Sheffer MH User Manual

MH SERIES
Medium-Duty Hydraulic Cylinders
Pressure Rating 800 - 2,000 PSI
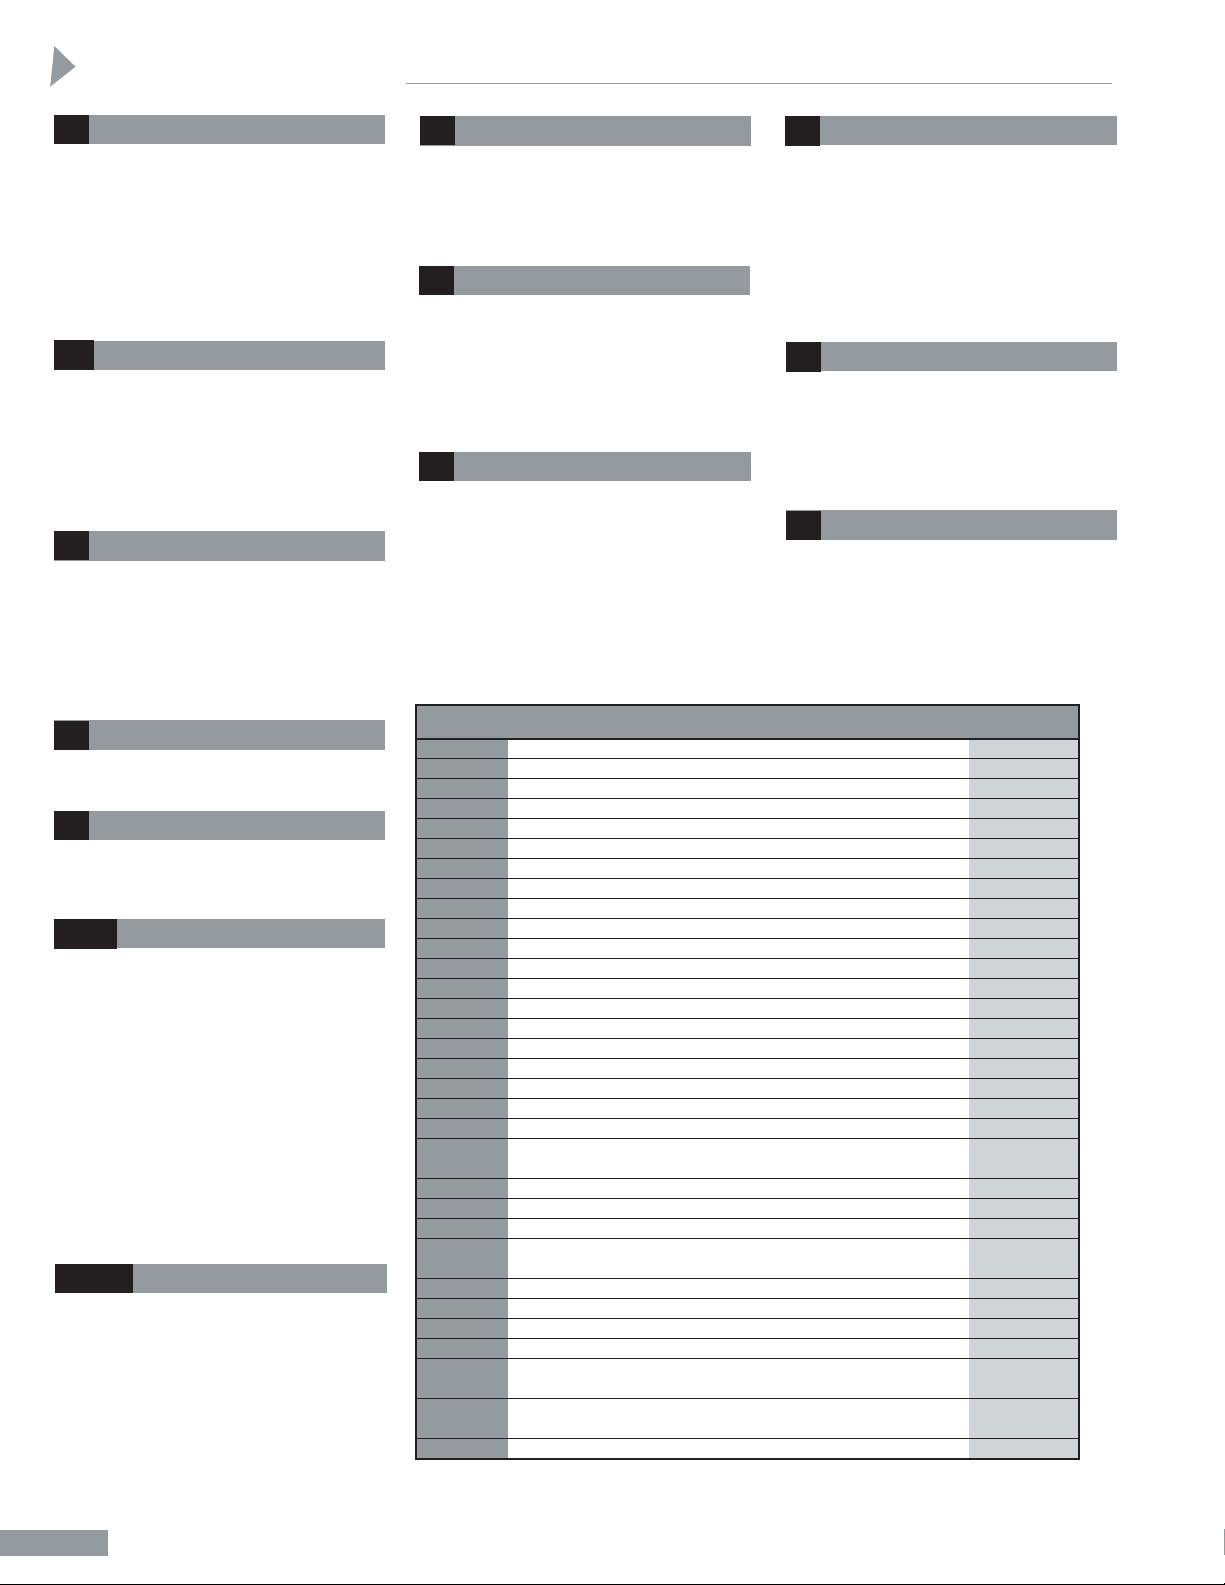
Piston rods through 4" diameter have a
minimum expected yield of 100,000 psi.
They are case hardened to 50 Rockwell C
to a depth of .030" for damage resistance.
They are then hard chrome plated for wear
and corrosion resistance. Larger diameter
rods have an expected minimum yield
of 50,000 to 60,000 psi depending on
diameter and are hard chrome plated.
Offers much longer fatigue life through
elimination of thread relief stress concentration point. Standard as Style 2 rod end on
all rod sizes through 2
1
/2" diameter. Studs
are pretorqued and locked in to prevent
loosening. They are machined from high
tensile steel and the threads rolled.
The steel tube is honed to an 8 to 16
microinch finish for low friction and long
seal and piston bearing life. Tube ends
are machined on the O. D. concentric with
the I. D. They are confined by the close
tolerance machining of the head and cap
which provides greater hoop strength.
Maximum strength is obtained through a
prestressed tie rod assembly.
Four wrench flats are provided as standard
for easy attachment. Spanner holes, in lieu
of flats, are standard on large diameter rods.
All pistons are machined from a fine grain
alloy cast iron. They are threaded directly
onto the piston rod, torqued, sealed and
locked in place with one or more set
screws.
The special piston seal is an endless
glass filled Teflon material with an O-ring
expander. One or more (depending on
bore size) bronze filled Teflon bearing
strips are also employed on this type piston
to eliminate metal-to-metal contact. This
type piston offers long life, low friction,
near zero leakage, and great tolerance for
side loading. It can be used successfully
on virtually any application.
Pressure activated O-ring seals are used
at rod gland and tube ends. Located to
eliminate extrusion and to provide positive
leak tight seal.
High load bearing bronze piloted into the
head. Located inboard of the seals to insure
a well lubricated bearing for the fastest
cycling applications. It need not be
removed for rod seal replacement.
The polyurethane wiper is designed to
wipe off abrasive dust and contaminants
on the retract stroke to insure long life for
packings, rod bearing, and piston rod.
Where the rod will be exposed to gummy
materials such as road tar, a metallic rod
scraper is available.
The polyurethane rod seal has a unique
design which incorporates the optimum
sealing properties of a U configuration with
the elastomeric properties of a compressiontype seal. The polyurethane material was
selected for toughness, abrasion resistance,
and the ability to resist extrusion under
rough service conditions.
Cushion pistons (29) are tapered to provide
gradual deceleration and eliminate shock
upon entrance. The Adjusting Screw
with fine threads (30, 40) provides a wide
range of adjustment. It is interchangeable
with the Ball Check (36, 46) permitting
field changes of position. Neither the
adjusting screw nor ball check plug project
beyond the head or cap surface.
When required, air bleeds are located
where they can be employed most
successfully – at the tube and head juncture.
The straight thread plugs are equipped
with metallic O-rings so they can be used
repeatedly with a good seal every time.
Easily removable for replacement of rod
seal and wiper. In most cases it is not
necessary to demount or disassemble the
cylinder. Easier to service since on removal
of the ductile iron gland, the piston rod
remains supported by the separate rod
bearing.
DIMENSIONALLY INTERCHANGEABLE TO MEET ANSI SPECIFICATIONS
Construction
ITEM QUANTITY
NUMBER
DESCRIPTION
REQUIRED
1 HEAD 1
2 CAP 1
3 PISTON ROD 1
3A STUD – STYLE II THREAD THRU 21/2" ROD DIA. 1
4 TUBE 1
5 TIE ROD 4
6 ROD GLAND RETAINER 1
6A ROD GLAND AND RETAINER – SINGLE PIECE 1
9 PISTON – SLIPPER SEAL TYPE 1
10 RETAINER SCREW ‡
13 TIE ROD NUT 4
16 † TUBE SEAL 2
18 † PISTON SEAL – SLIPPER SEAL TYPE 1
18 A† EXPANDER – FOR SLIPPER SEAL 1
21 † ROD BEARING 1
22 † ROD GLAND SEAL 1
24 † ROD WIPER 1
25 † ROD SEAL 1
29 CUSHION PISTON – FRONT **
30 CUSHION ADJ. SCREW – FRONT (CROSS SLOT) **
31 SEAL – CUSHION ADJUSTING AND CUSHION
CHECK – FRONT **
36 CUSHION CHECK BALL – FRONT **
38 CUSHION CHECK PLUG – FRONT **
40 CUSHION ADJ. SCREW – REAR (CROSS SLOT) **
41 SEAL – CUSHION ADJUSTING
AND CUSHION CHECK – REAR **
46 CUSHION CHECK BALL – REAR **
48 CUSHION CHECK PLUG – REAR **
57 PISTON BEARING STRIP 1
58 AIR BLEED PLUG **
66 A BACK-UP WASHER – CUSHION ADJUSTING
AND CHECK – FRONT **
66 B BACK-UP WASHER – CUSHION ADJUSTING
AND CHECK – REAR **
70 ROD GLAND 1
‡Retainer Screws required varies by bore and mount
†Recommended Spare Parts
**As required; specify if cushioned front, cushioned rear or cushioned both ends.
3
Piston Rod
4
Tube
5
Tie Rod Construction
7
Wrench Flats
9&18
Pistons & Piston Seals
21
Rod Bearing
24
Rod Wiper
25
Rod Seal
58
Air Bleeds (Optional)
70
Rod Gland
3A
Studded Rod End
Parts List
16, 22
Static Seals
29
Cushions
1
MH-1
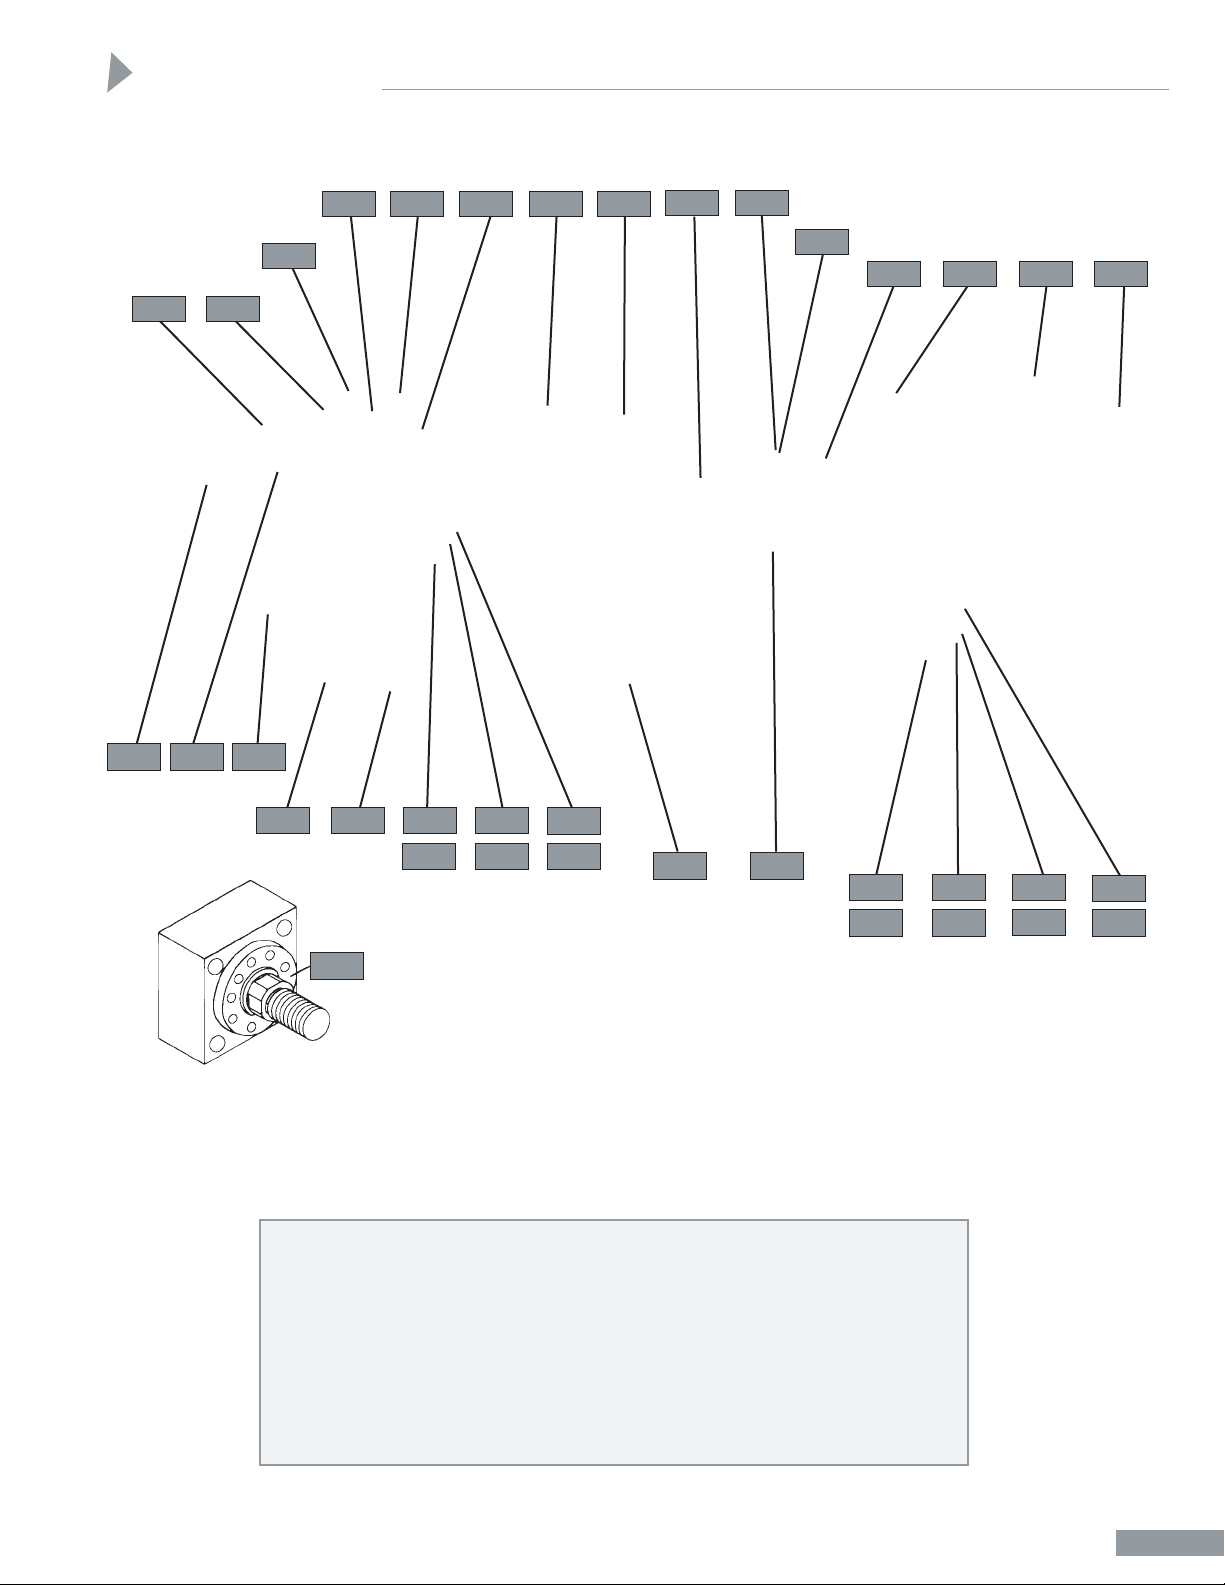
Round, single piece rod gland
and retainer used on all but some
of the smaller bore sizes. Consult
pages on specific mounts.
66A
31
1 1/2" THRU 8" BORE SIZES
Parts List
36
46
41
66B
38
48
95
31
41
66A
66B
30
40
16
1033A
7 24
70
25 22 21 16 4
29 18
18A
57 58 2 13
66AA
Ordering Information:
Also see separate ordering information. When ordering parts, the
Model No.and Serial No. must be
specified. Give item no., name and
quantity of part desired. The Model
No. and Serial No. will be found on
a metal plate that has been drivescrewed to either the head or the
cartridge retainer.
Please Note:
Complete replacement packing kits
are available. For purposes of economy
and less down-time, it is recommended
that replacement packing kits be
stocked. They are described and priced
in the current Sheffer Replacement
Parts Price List. Contact your distributor or the factory for these lists.
1
MH-2
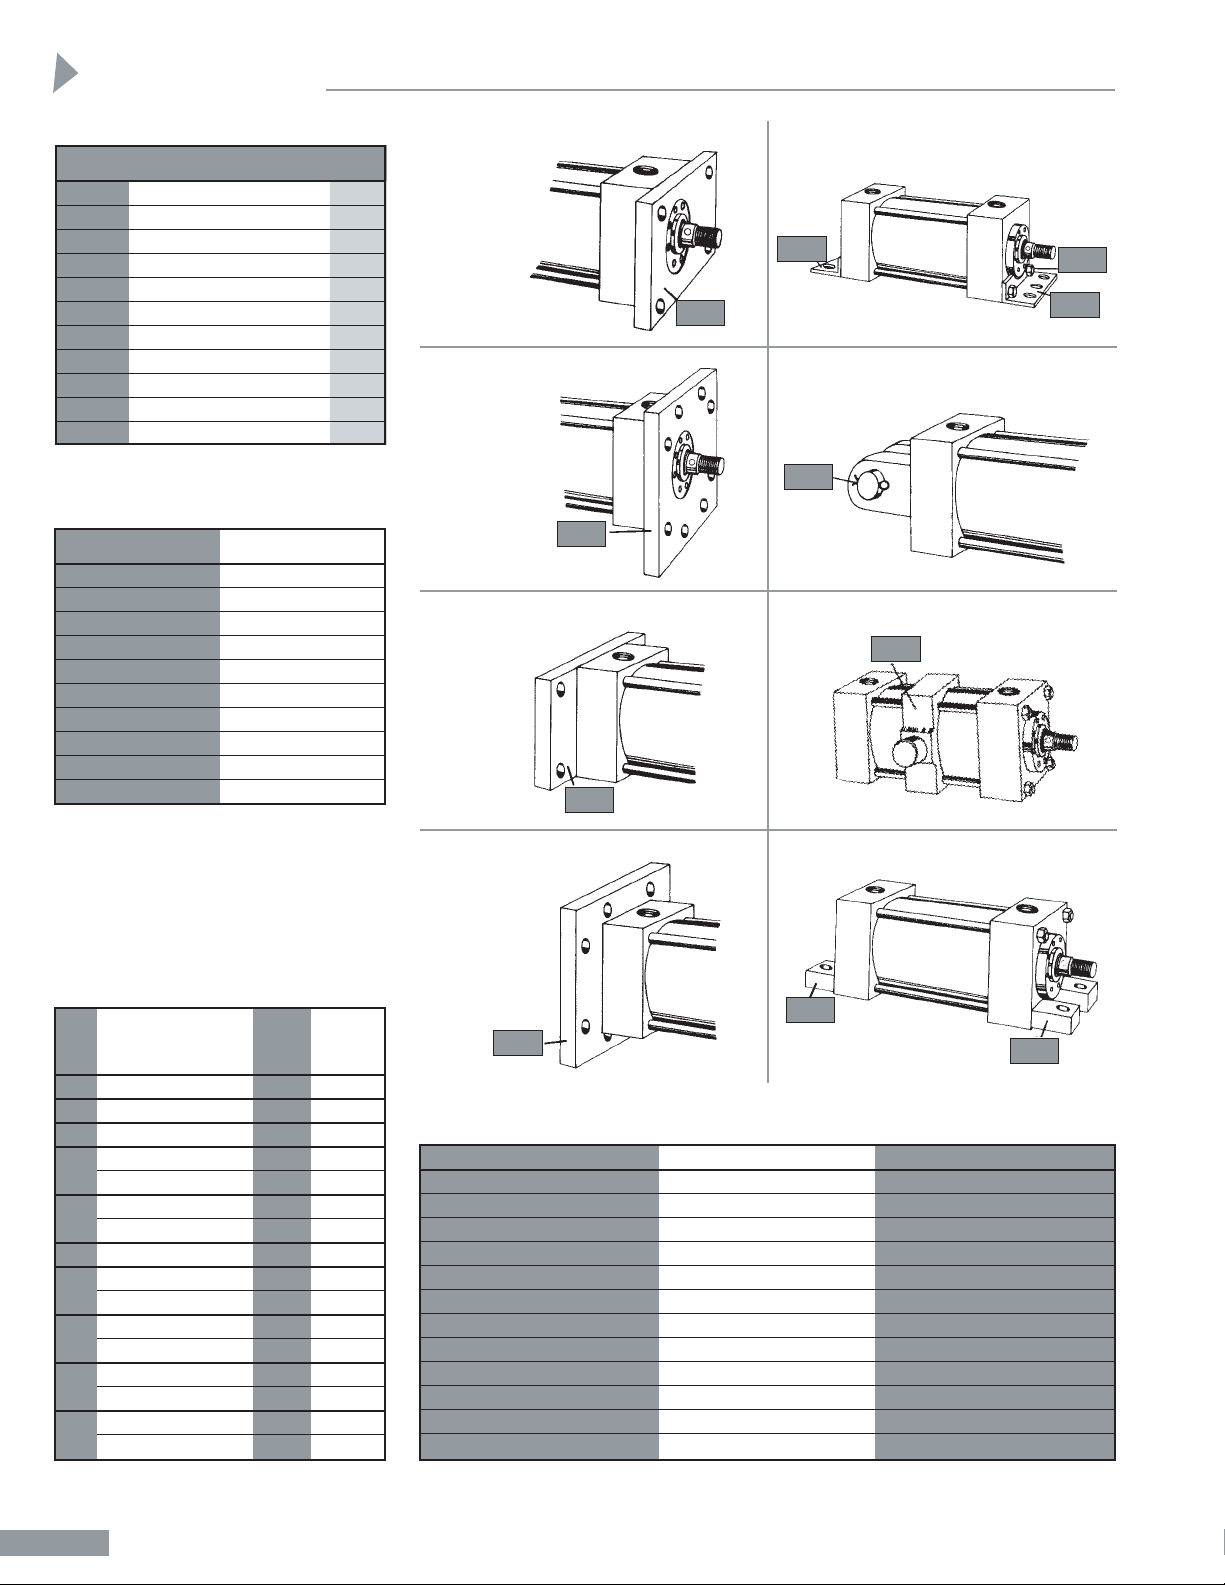
ITEM QTY.
NUMBER DESCRIPTION REQ'D
100 FRONT FLANGE 1
102 FRONT FLANGE EXTRA 1
103 REAR FLANGE 1
104 REAR FLANGE EXTRA 1
105 FOOT BRACKET – FRONT 1
106 FOOT BRACKET – SCREW 2
107 FOOT BRACKET – REAR 1
112 CLEVIS PIN 1
117 INTERMEDIATE TRUNNION 1
108 END LUG – FRONT 2
110 END LUG – REAR 2
BORE TORQUE
11/8 8
11/2 8
2 15
21/2 15
31/4 30
4 30
5 55
6 60
7 140
8 140
HEX SOCKET
PISTON HEAD HEAD
BORE ROD CAP CAP
SIZE DIAMETER SCREW SCREW
11/8
5
/8 7.7
11/2 ALL 4.0
2 ALL 7.5
5
/8, 1 4.5
13/8, 13/4 7.5
1, 13/8, 13/4 4.5
2 13.5
4 ALL 4.5
1, 13/8, 13/4, 2, 21/2 4.5
3, 31/2 8.0
13/8, 13/4, 2, 21/2 4.5
3, 31/2, 4 8.0
13/8, 13/4, 2, 21/2 4.5
3, 31/2, 4, 41/2, 5 8.0
13/8, 13/4, 2, 21/2 4.5
3, 31/2, 4, 41/2, 5, 51/2 8.0
2
1
/2
31/4
5
6
7
8
BORE SIZE ROD DIAMETER NUMBER
11/8, 11/2, 2, 21/2 ALL 4
31/4 1, 2 4
31/4 13/8, 13/4 8
4 1 4
4 13/8, 13/4, 2, 21/2 8
5 1 4
6 ALL 8
7 13/8, 13/4, 2, 21/2 8
7 3, 31/2, 4, 41/2 8
7 5 12
8 13/8 THRU 41/2 8
8 5, 51/2 12
FRONT FLANGE
MOUNT
STYLE FF
REAR FLANGE MOUNT
EXTRA SIZE
STYLE RFX
FRONT FLANGE MOUNT
EXTRA SIZE
STYLE FFX
FOOT BRACKET MOUNT
STYLE FB
INTERMEDIATE TRUNNION MOUNT
STYLE T
REAR FLANGE MOUNT
STYLE RF
CLEVIS MOUNT
STYLE C
END LUG MOUNT
STYLE
EL
Parts List
100
107
102
112
103
104
110
108
106
105
117
Parts List
Tie Rod Torque in Foot Pounds
Specifications Rod Gland
Retainer Screw Torque
Information
Screw Torque in Foot Pounds
Retainer Screw Chart
1
MH-3
Sheffer pioneered tapered cushions,
designed to provide gradual deceleration and eliminate shock upon entrance
of the cushion pistons, have now been
considerably improved. The tapered
cushion has been married with a fine
thread, wide range, adjusting screw.
This new combination offers a positive,
low-shock deceleration and a method
to adjust the cushioning effect for
speeds and loads.
The adjusting screw is identified by a
tag affixed to the head (or cap) and can
be further distinguished by a cross-slot
in the head of the screw. It does not
project beyond the surface of the head
(or cap) through its full range of
adjustment so no clearance need be
considered on close fit installations.
The adjusting screw and the cushion
check can be interchanged in the same
cylinder end. This flexibility can be
important if, after installation, it is
discovered that the adjusting screw is
inaccessible.
The cushion check, which does not
require adjustment, has a single slot in
its head. It does not project beyond
the surface of the head (or cap). The
cushion check plus the tapered cushion
piston provides rapid acceleration out
of cushioning. There is no spring in the
cushion check to fatigue, hence, no
worry of mechanical failure.
Cushioning is designed to properly
cushion the cylinder and is not intended
to cushion large inertia loads. Cushions
do not substitute for speed controls or
deceleration valves on most installations.
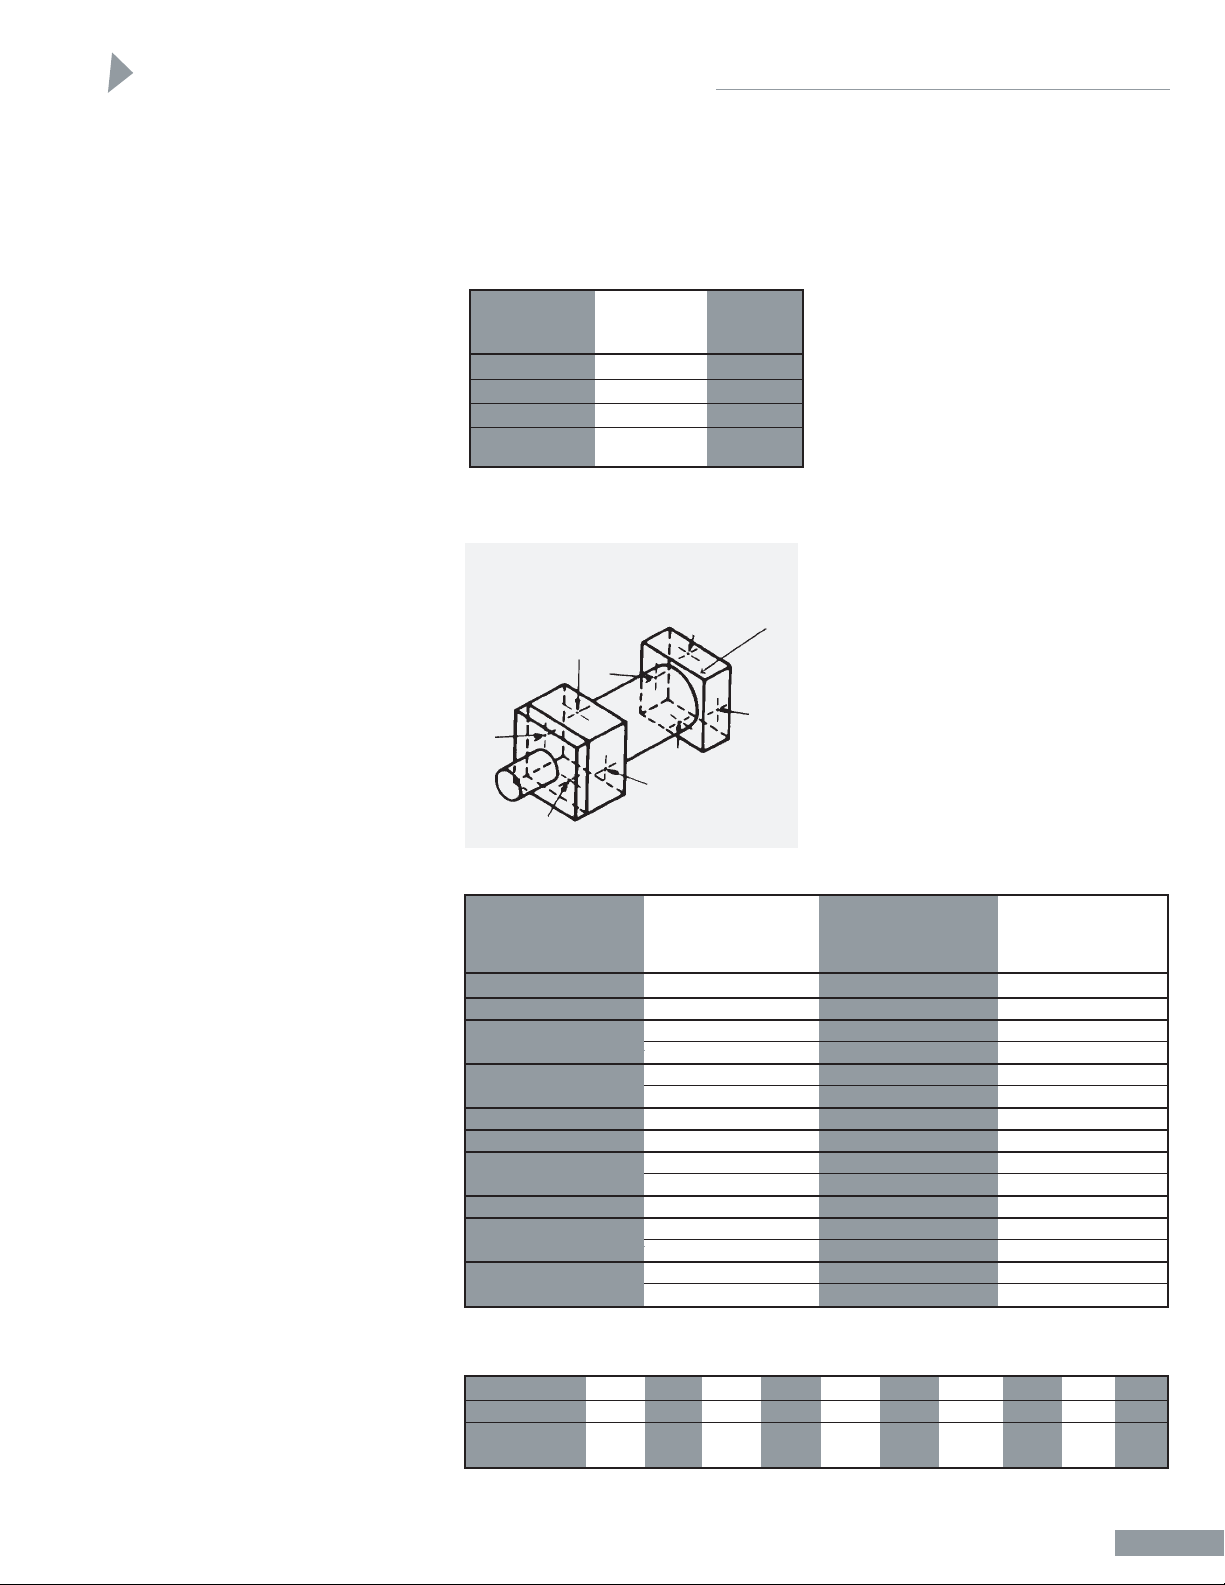
As indicated on page MA-6, the
standard positions for ports are 1 and 5.
Where possible, the standard positions
for cushion adjusting screws will be 2
and 6 and the standard positions for
cushion checks will be 4 and 8. With
some mounting styles, it is not possible
to so locate the adjusting screws and
checks. For example, a Trunnion Front
Mount has the trunnion pins located in
positions 2 and 4 on the head. With the
port in position 1, the only side
available for both adjusting screw and
check is position 3. Since both will then
be located on the same side, they will be
located off-center. This example would
hold true with the TR, CL, FHF and
RHF mounts. See Chart A for standard
positions that will be supplied unless
otherwise specified. When requested,
other positions can be supplied so long
as there is no interference with
mounting.
Where access to an adjusting screw
or check could be made difficult
because of proximity to a mount, the
locations of the screws will be slightly
off-center. An example of this would
be a small bore cylinder with a side lug
mount.
Because of space limitations, neither
cushion adjusting screws nor cushion
ball checks can be put into 11/2" and
2", 21/2" bore sizes for cushioned front
when they are specified with 2:1 rod
diameters.
The chart below shows the recommended
working pressures for MH Series cylinders
by bore and rod diameters. Note that the
column“Operating Pressure” is based on a
3:1 safety factor. It is felt that this is an
adequate safety factor for any well
designed hydraulic system where shock
conditions have been considered and
reduced to an acceptable level.
The “Max. Shock Service” column is
based on a 2:1 safety factor and SHOULD
NOT be used to determine operating
pressures.
All values on the adjacent chart are
based on the cylinder as a pressure
vessel. Use of the proper mounting style
to withstand the thrust generated must
be considered.
The following factors in shock loading
should be considered:
Relief valves in the circuit do not
protect the components from shock
because of the time lag.
Gauges do not necessarily register
shock conditions, either because of
their location in the circuit, or the
short duration of the shock.
The two general types of shock loading
to be considered are pressure rise
caused by quick stop of the flow in
the circuit and quick pressure drop.
Decompression shock is particularly
important in large bore cylinders and
can be as destructive as compression
shock.
Cushions
Pressure and Shock
OPERATING MAX. SHOCK
PRESSURE SERVICE
PISTON 3:1 SAFETY FACTOR 2:1 SAFETY FACTOR
BORE ROD BASED ON YIELD BASED ON YIELD
SIZE DIAMETER IN PSI IN PSI
11/8
5
/8 3,600 5,400
11/2 ALL 2,250 3,375
5
/8 1,400 2,100
1, 13/8 2,450 3,675
5
/8, 1 900 1,350
13/8, 13/4 1,550 2,325
31/4 ALL 1,400 2,100
4 ALL 925 1,390
1, 13/8, 13/4 675 1,000
BALANCE 1,075 1,600
6 ALL 800 1,200
13/8, 13/4 625 940
BALANCE 875 1,300
13/8, 13/4 475 700
BALANCE 675 1,000
8
7
5
2
1
/2
2
Cushions and Pressure
CUSHION
ADJUSTING CUSHION
MOUNT SCREW CHECK
TF AND FHF 3 and 6 3 and 8
CL 3 and 7 3 and 7
TR AND RHF 2 and 7 4 and 7
ALL OTHER
MOUNTS 2 and 6 4 and 8
Standard positions for cushion adjusting screws
and cushion checks in relation to port positions
by style of mounting.
Chart A
Position Diagram for Ports,
Air Bleeds, Cushion Adjusting
Screws and Cushion Checks
1
2
3
4
5
6
7
8
9
Maximum Pressure Ratings
Specifications
Cylinder Weight Chart
BORE 11/8 11/2 2 21/2 31/4 4 5 6 7 8
ZERO STROKE 3 6 8 11 22 30 45 70 85 100
ADD PER INCH
OF STROKE .25 .35 .6 .9 .9 1.2 1.7 2.5 3 4
NOTE: The above weights are based on an average value for cushioning, rod side, and the various types of
mountings for uncrated cylinders to establish approximate shipping weights. Add 10% of cylinder weight to
determine estimated weight of crated cylinder.
1
MH-4
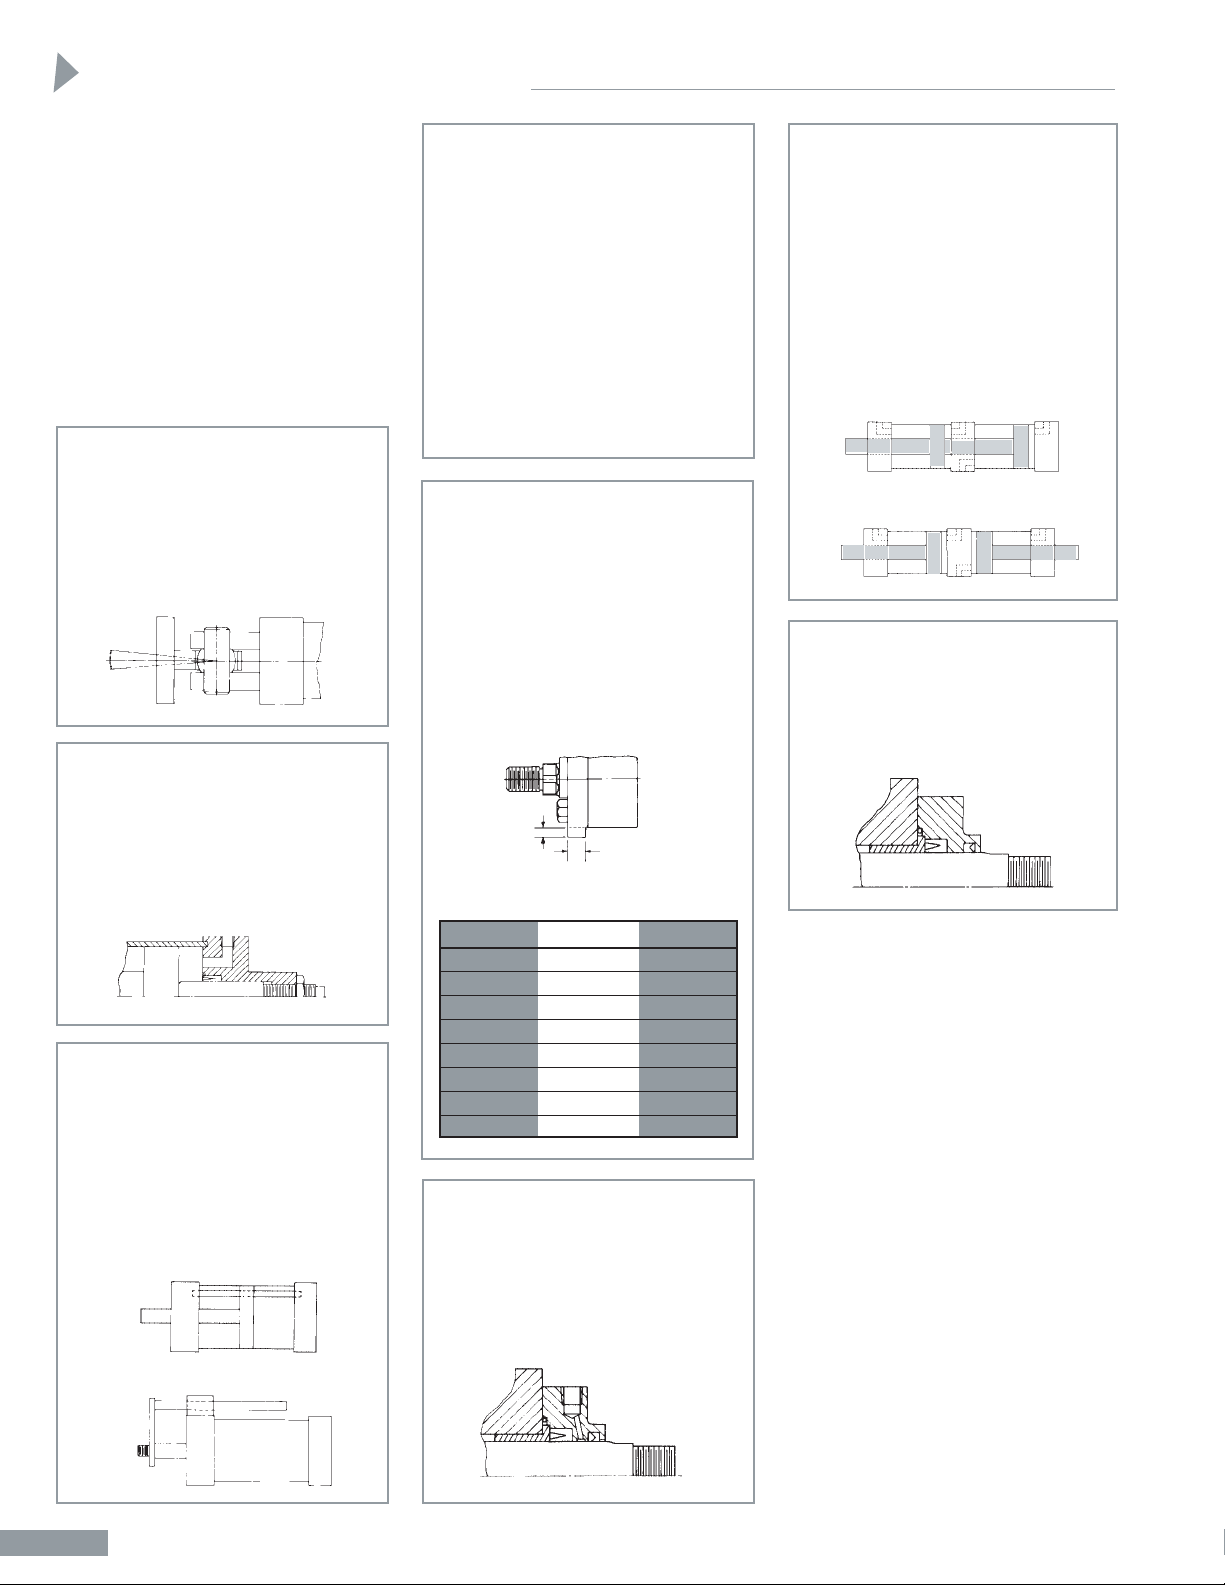
BORE FA FK
11/8 .3120
3
/16
11/2 .3120
3
/16
2 .3120
3
/16
21/2 .3120
3
/16
31/4 .5620
5
/16
4 .5620
5
/16
5 .5620
5
/16
6 .6870
1
/8
Thrust Key Bore Sizes
Tandem Cylinders and
Multi-stage Cylinders
The tandem cylinder (Figure A)
has two pistons connected to a
common rod, resulting in twice
the force output of a single
cylinder. Multi-stage cylinders
(Figure B) offer multiple, positive
strokes by pressurizing one
cylinder, the other, or both.
Contact the factory for other
variations.
Rod Gland Drain Back
When not even a drop of external
leakage can be tolerated, the rod
gland drain back provides a signal
that the rod seal set has worn to the
point of replacement – without the
danger of contamination from
leakage.
External Rod Seal
When a cylinder is to be operated
under water, provision is made to
prevent the water from being drawn
into the cylinder at the time of
valve shift or pressure differential.
Stainless Steel Piston Rods
Many applications, especially those
subjected to water spray, require
the use of stainless steel piston
rods. We stock AISI Type 304 hard
chrome plated, stainless steel and
will furnish that type unless
otherwise specified. Type 304 is
considered a good, corrosion
resistant type of stainless steel, but
the minimum expected yield is
approximately 35,000 psi and that
factor must be considered with
respect to operating pressure,
column loading, etc.
FIGURE B
FIGURE A
Adjustable Stroke
Shown is an integral stroke
adjustment (externally adjusted)
that is accomplished by the use
of a bump rod threaded into the
cylinder cap. Seals are incorporated
to prevent external leakage and a
lock nut is included.
Thrust Key
All side mounted cylinders (SF, FB,
EL and SL mounts) can be supplied
with thrust keys. Thrust keys are
available in bore sizes 1
1
/8" thru 6".
Extending the rod gland retainer,
as shown, provides a key which fits
into a milled slot in the mounting
surface of the machine member.
Combined with the mount this key
assures that cylinder will not shift
in severe service.
Spherical Bearings
Pivot mounting brackets and rod
eyes can be provided with spherical
bearings to compensate for misalignment on both ends of cylinders.
Consider also the use of the Sheffer
Uni-Lign described in separate
Accessories Brochure.
Non-Rotating Piston Rod
Two methods of providing nonrotating piston rods are employed.
The internal rod type
(Figure A)
is generally used since it requires
less space and is neater. The type
shown in Figure B must be used
on small bore cylinders where
internal space is limited.
FIGURE A
FIGURE B
The Sheffer Corporation manufactures
many cylinders with variations to meet
special customer needs. In addition to
those illustrated below, some of the
more popular variations are:
• Cylinders with Boots
• Combination Mount Cylinders
• Cylinders with Built-In Limit
Switch Actuators
• Locking Cylinders
• Precision Stroke Cylinders
• Precision Mount Cylinders
• Many More
FK
FA ± .0005
Special Variations
1
MH-5
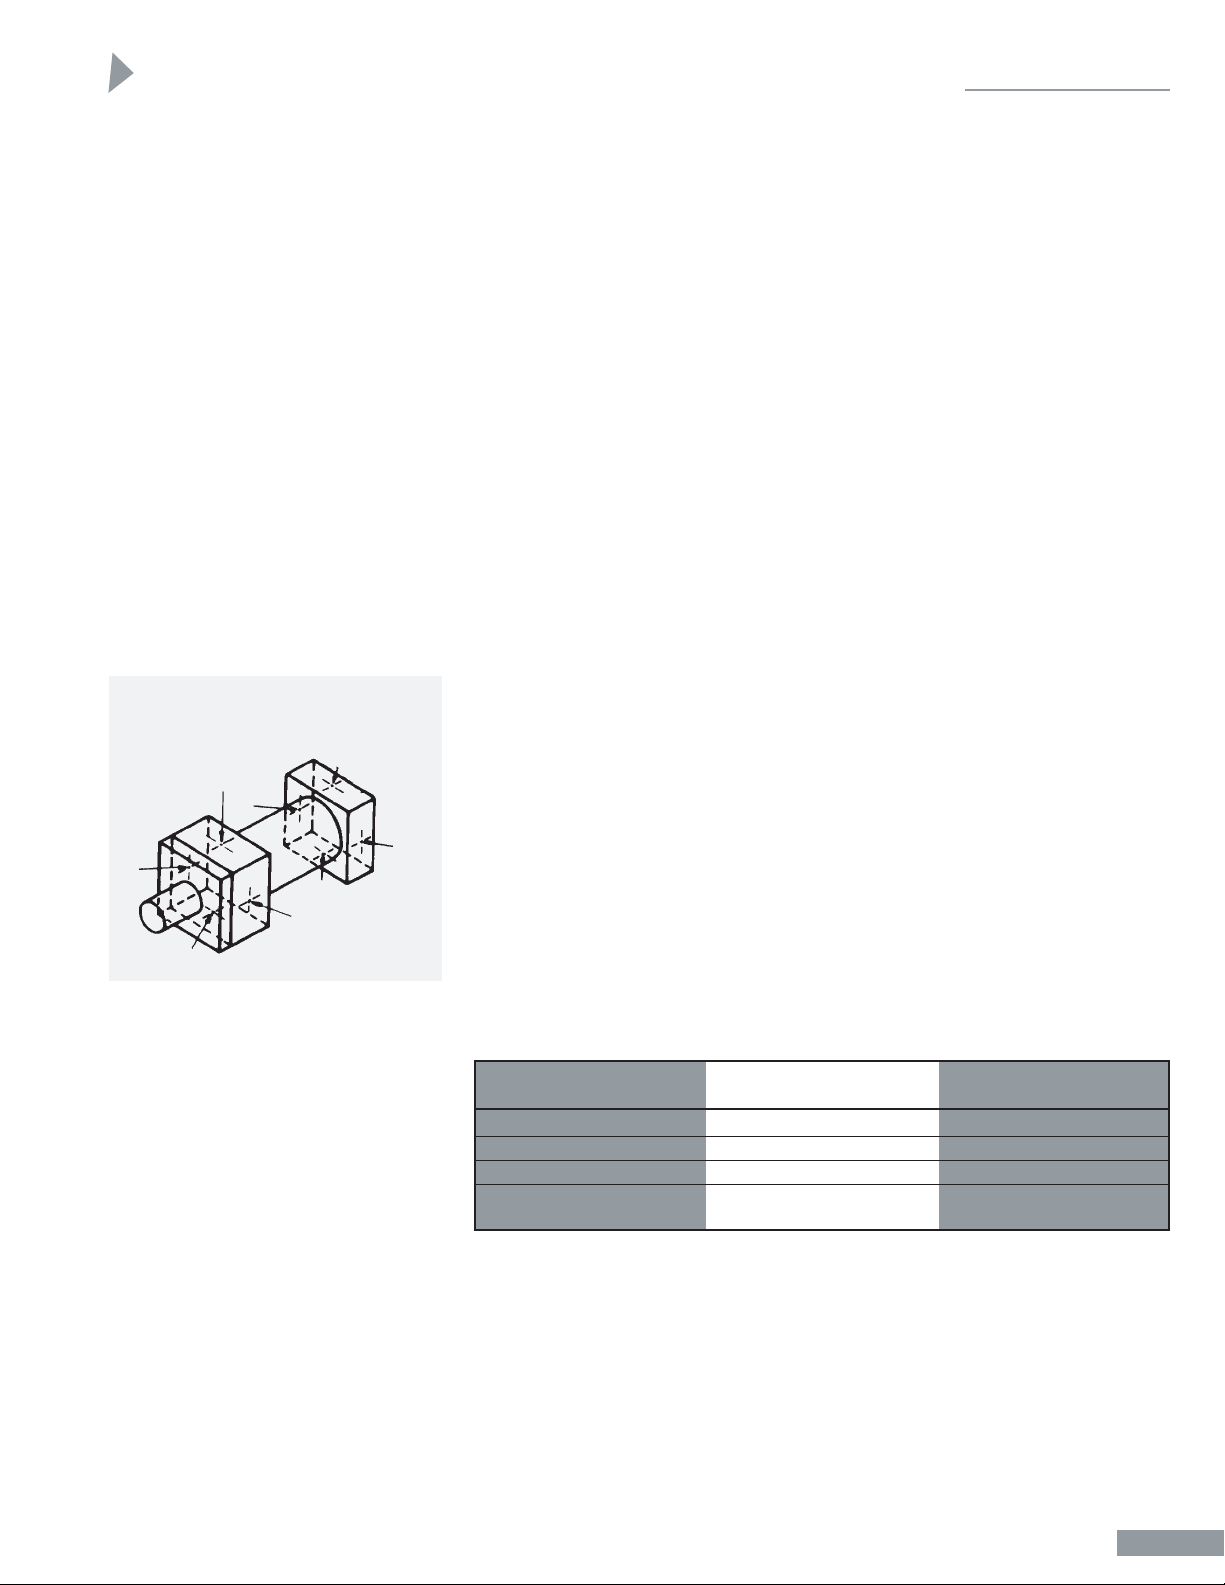
Air Bleeds
An air bleed may be ordered at either
or both ends of the cylinder as an
option. To provide for maximum
bleeding of air from the cylinder,
Sheffer places its air bleeds in the tube
to bleed air from the tube/head or
tube/cap juncture. The air is bled from
the cylinder by backing out the straight
thread metallic seal plug to allow air to
pass by the threads. When air bubbles
stop and oil starts to flow, retighten
plug. It is recommended that bleeding
be done with pressure on the opposite
end of the cylinder so that the bleed
plug is not subjected to pump pressure
when being backed out. Air bleeds
should always be positioned at the
highest point of the cylinder tube.
Please specify positions of air bleeds
by position number from the chart.
NOTE: Since Sheffer puts air bleeds in
the cylinder tube, position can be
changed by loosening the tie rods and
rotating the tube. Photos and Line
Drawings show ports in positions 1
and 5.
Porting
SAE straight thread Ports, located in
positions 1 and 5 (See above) are
standard and will be furnished unless
otherwise specified. Other types and
sizes of ports are available on request,
at slight additional cost.
Port Positions – Where mounting
clearances permit, the ports can be in
any of four positions in the head and in
the cap at no extra cost. Indicate both
port positions desired by position
number. If no preference is stated, ports
will be furnished in positions 1 and 5.
NOTE: The head and cap can be
rotated in relation to each other as
long as mounting and porting are
convenient for installation.
Strongly Recommended
S.A.E. Straight Thread Ports –
S.A.E. straight thread O-ring sealed
ports are standard. This type of port
offers positive seal with full thread
engagement. It also eliminates the
problem of faulty pipe threads since
sealing takes place independently of
the thread. No messy pipe dope to
bother with or to contaminate the
hydraulic system. No wedging,
distortion, or breakage due to overtightening. Alignment and full sealing
are both assured since the fittings can
be tightened after lining up. Straight
thread fittings may be reused,
indefinitely. NPT ports are available
at no extra cost.
Cushions – The standard positions
for ports are 1 and 5. Where possible,
the standard positions for cushion
adjusting screws will be 2 and 6 and the
standard positions for cushion checks
will be 4 and 8. With some mounting
styles, it is not possible to so locate the
adjusting screws and checks. For
example, a Trunnion Front Mount has
the trunnion pins located in positions 2
and 4 on the head. With the port in
position 1, the only side available for
both adjusting screw and check is
position 3. Since both will then be
located on the same side, they will be
located off-center. This example would
hold true with the TR, CL, FHF and
RHF mounts. See Chart A for standard
positions that will be supplied unless
otherwise specified. When requested,
other positions can be supplied so
long as there is no interference with
mounting.
Where access to an adjusting screw or
check could be made difficult because
of proximity to a mount, the locations
of the screws will be slightly off-center.
An example of this would be a small
bore cylinder with a side lug mount.
Because of space limitations, neither
cushion adjusting screws nor cushion
ball checks can be put into 1
1
/2", 2" and
21/2" bore sizes for cushioned front
when they are specified with 2:1 rod
diameters.
Special Variations
The Sheffer Corporation manufactures
many cylinders with variations to meet
customer special needs. Some of the
most popular variations are:
• Cylinders with Boots
• Combination Mount Cylinders
• Precision Stroke Cylinders
• Tandem and Multi-stage
Cylinders
• Adjustable Stroke Cylinders
• Non-rotating Rod Cylinders
• Cylinders with Stainless Steel
Piston Rods
• Cylinders for Underwater
Service
• Many More
Please request a quotation for any
special requirement.
Position Diagram for Ports,
Air Bleeds, Cushion Adjusting
Screws and Cushion Checks
1
2
3
4
5
6
7
8
Cushions, Porting and Air Bleeds
CUSHION
ADJUSTING CUSHION
MOUNT SCREW CHECK
TF AND FHF 3 AND 6 3 AND 8
CL 3 AND 7 3 AND 7
TR AND RHF 2 AND 7 4 AND 7
ALL OTHER
MOUNTS 2 AND 6 4 AND 8
Chart A
Standard Positions for Cushion Adjusting Screws and Cushion
Checks in Relation to Port Positions by Style of Mounting.
1
MH-6
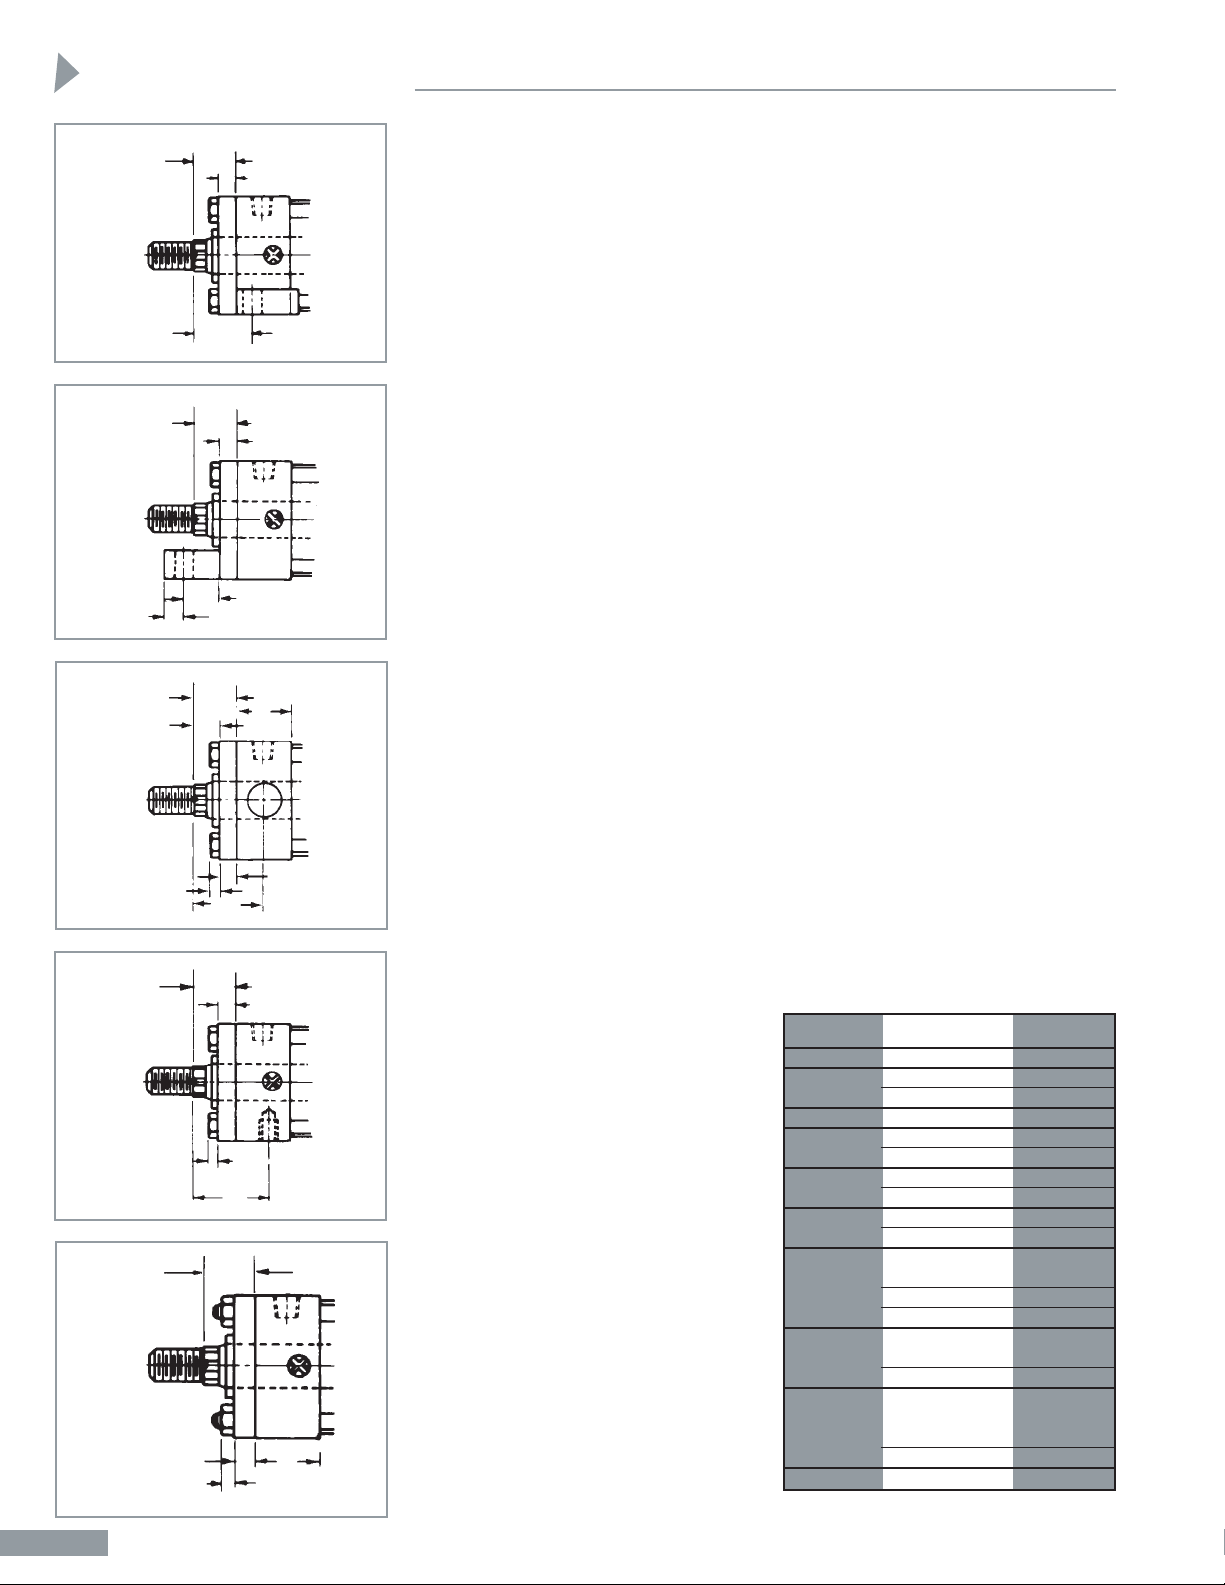
WF
FF
XS
WF
FF
EX
EO
WF
G
W
FF
XG
FF
K
XT
K
WF
FIGURE A
FIGURE B
FIGURE C
FIGURE D
WF
FF
K
G
FIGURE E
VARIANCES
Construction
Variances in Construction
There is a construction variance in the
11/8", 11/2", and 2" bore sizes, and the
21/2" bore with the 13/8" and 13/4" rod
diameters, and the 31/4" bore with a 2" rod
diameter. The round rod gland retainer
shown on the preceding pages is not
employed on these sizes. A square retainer,
the same square size as the head is used
instead.
Side Lug (SL) and Centerline Lug
(CL) Mounts – The retainer is held in
place with retainer screws that thread into
the head. The rod gland can be removed
without loosening the tie rods in all sizes.
See Fig. A.
End Lug (EL) Mount – The bottom two
tie rods utilize the lugs as nuts and the top
two tie rods have tie rod nuts. The rod
gland cannot be removed without
loosening the tie rods. See Fig. B.
Trunnion Front (TF) and Trunnion
Rear (TR) Mounts – The retainer is held
in place by retainer screws that thread
into the head and the rod gland can be
removed without loosening the tie rods
in all sizes. See Fig. C.
Intermediate Trunnion (T) Mount –
The retainer is held in place with tie
rod nuts and the rod gland cannot be
removed without loosening the tie rods
in these sizes. See Fig. C.
Clevis (C) Mount – The retainer is held
in place with tie rod nuts and the rod
gland cannot be removed without
loosening the tie rods in 1
1
/8" and 11/2"
bore sizes only.
Side Flush (SF) Mount – The retainer is
held in place by retainer screws that thread
into the head and the rod gland can be
removed without loosening the tie rods in
all sizes. See Fig. D.
Trunnion Mounts Note:
Pillow blocks of ample size and rigidity
should be provided and should be
mounted as close to the head or cap as
possible. Bearing should be provided for
the full length of the trunnion pin.
All trunnion cylinders need provision
on both ends for pivoting in one plane.
Alignment in the other direction is
essential to avoid excessive side loading.
Where two-direction pivoting is necessary,
consult with our distributor for specific
recommendations. Do not use spherical
bearing Pillow Blocks.
End Lug Note:
When specifying an End Lug mount,
carefully check the distance between the
rod end and the lug to determine sufficient clearance for the rod end attachment. It may be necessary to add extra
plain rod extension to move the threaded
rod end out beyond the lug.
Side Lug Note:
When specifying a Side Lug mount with
the ports on the side (port positions 2, 4,
6 or 8), be sure that there will be enough
clearance between the port fitting and the
lug to insert a bolt or cap screw into the
lug. In small bore sizes, it may be
necessary to employ a pipe nipple to
easily pipe the port.
Variances in Construction –
Flange Mount Cylinders
There is a construction variance in some
bore and rod size combinations where it
is not possible to utilize the round, cap
screwed, rod gland retainer. Affected
dimensions can be determined by Fig. E.
Front Flange (FF) and Front Flange
Extra (FFX) Mounts – On the bore and
rod combinations affected, the tie rods
thread into the flange and the flange serves
as the rod gland retainer. Tie Rod nuts are
employed on the cap end. The rod gland
cannot be removed without loosening the
tie rods in these sizes. See chart on page
MH-10 for combinations affected.
Front Head Flange (FHF) Mount –
On the bore and rod combinations
affected, the retainer is rectangular, the
same size as the head, and the tie rods
thread into it. Tie rod nuts are employed
on the cap end. The rod gland cannot be
removed without loosening the tie rods.
See chart on page MH-10 for combinations
affected. Mounting bolts should be sized
to clear through both the head (G dim.)
and the rectangular retainer thickness
(FF dim.).
Rear Flange (RF), Rear Flange Extra
(RFX) and Rear Head Flange (RHF)
Mounts – On the bore and rod combi-
nations affected, a square retainer, the
same square size as the head, is employed.
The retainer is cleared for the tie rods,
and tie rod nuts secure it. The rod gland
cannot be removed without loosening the
tie rods. The combinations affected are
shown in the chart on page MH-12.
THREAD
BORE ROD DIA. DEPTH
11/8
5
/8
3
/8
5
/8
3
/8
1
5
/16
2
5
/8, 1, 13/8
7
/16
5
/8, 1, 13/8
5
/8
13/4
7
/16
1, 13/8, 13/4
3
/4
2
1
/2
1, 13/8, 13/4, 2
3
/4
21/2
11
/16
1, 13/8, 13/4,
2, 21/2 11/4
3
15
/16
31/2
3
/4
13/8, 13/4, 2,
21/2, 3, 31/2 11/8
4 1
13/8, 13/4, 2,
21/2, 3, 31/2,
4, 41/2 11/8
5 1
8 ALL 11/8
NOTE: Side flush mounting is available with
usable thread depths shown above.
11/2
21/2
31/4
4
5
6
7
Side Flush Note:
Thread Depth and Slide Flush
Mounting Availability Chart
1
MH-7
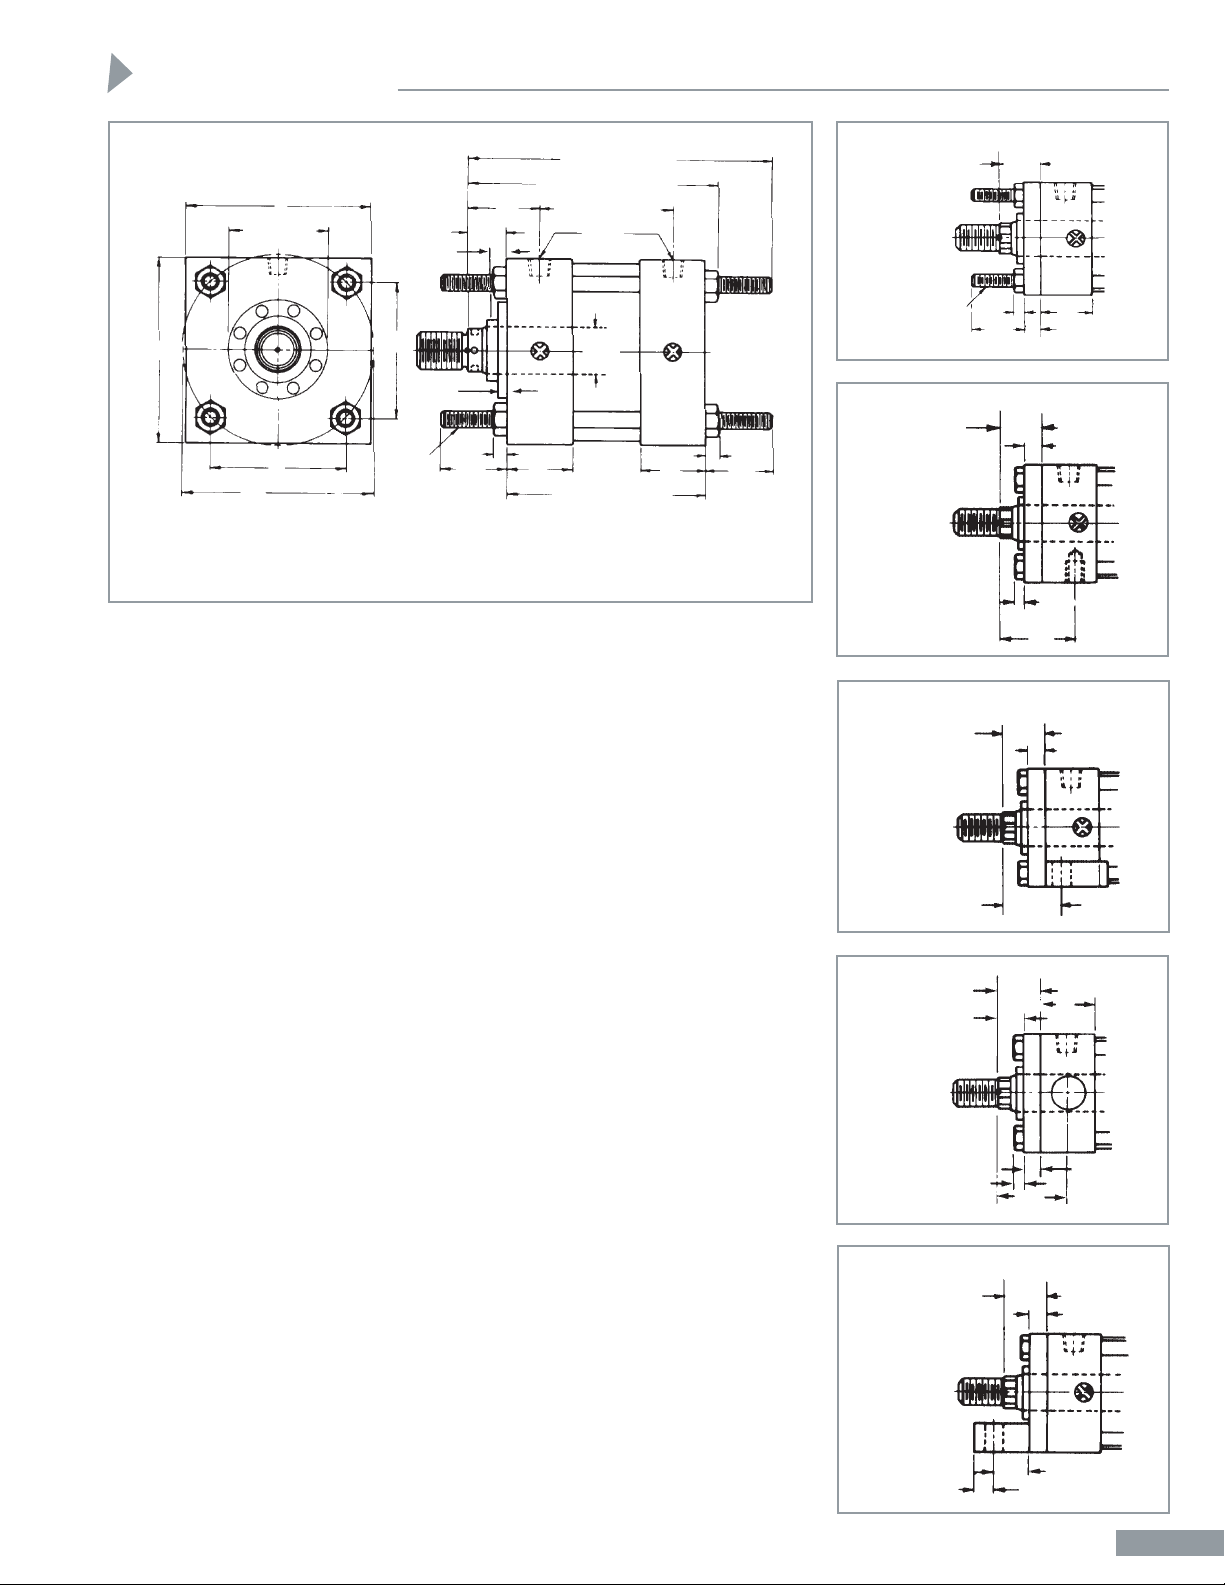
END LUG
(EL)
VARIANCE
TRUNNION
FRONT
(TF)
VARIANCE
SIDE LUG
(SL)
VARIANCE
SIDE FLUSH
(SF)
VARIANCE
FX AND BX
MOUNTS
Variances in Construction –
Tie Rods Extended Mounts
There is a construction variance in the
11/8", 11/2" and 2" bores, and the 21/2"
bore with a 13/8" and 13/4" diameter
rods, and the 31/4" bore with a 2"
diameter rod. The round rod gland
retainer is not employed on those sizes.
A square retainer, the same square size
as the head, is used.
On the FX and BX mounts, the retainer
is secured by tie rod nuts and the rod
gland cannot be removed without
loosening the tie rods.
On the RX and NX mounts, the retainer
is secured by retainer screws that thread
into the head and the rod gland can be
removed without loosening the tie rods.
Variances in Construction –
Double Rod End Cylinders
There is a construction variance in the
11/8", 11/2" and 2" bore sizes, and the
21/2" bore with 13/8" and 13/4" diameter
rods, and the 31/4" bore with a 2"
diameter rod. The round rod gland
retainers shown on the adjacent page
are not employed on these sizes. Square
retainers, the same square size as the
head, are used instead.
Side Flush (SF), Side Lug (SL),
Centerline Lug (CL), Trunnion
Front (TF), and Trunnion (T)
Mounts – The rod gland retainer on
one end is secured with retainer screws
that thread into the head. On that end,
the rod gland can be removed without
loosening the tie rods. On the opposite
end, the retainer is secured by tie rod
nuts and the rod gland on that end
cannot be removed without loosening
the tie rods in these sizes.
End Lug (EL) Mount – The lugs serve
as nuts on both ends on the bottom two
tie rods to secure the square rod gland
retainers and tie rod nuts are used on
both ends on the top two tie rods for
that purpose. The rod gland cannot be
removed without loosening the tie rods
in these sizes.
Front Head Flange (FHF) Mount –
A rectangular retainer, the same size as
the head, is employed on the mount end
and a square retainer, the same size as
the opposite end head, is used on the
other end. The tie rods thread into the
retainer on the mount end and tie rod
nuts are used on the opposite end.
Neither rod gland can be removed
without loosening the tie rods in these
sizes. Note that when mounting,
mounting bolts must be long enough
to clear through both the head (G dim.)
and the retainer (FF dim.).
Front Flange (FF) and Front
Flange Extra (FFX) Mounts –
In addition to the sizes mentioned
above, in these mounts the construction
variance also applies to the 4" bore with
a 21/2" diameter rod, and the 5" bore
with a 31/2" diameter rod. The tie rods
thread into the flange on the mount
end and the flange retains the rod gland.
On the opposite end, a square retainer,
the same square size as the head, is
employed. It is secured by the rod
nuts. Neither rod gland can be removed
without loosening the tie rods in these
sizes.
For Cylinder Dimensions, See Pages
MH-10 through MH-19.
E
R
AA
B.C. DIA.
E
R
BB
BB
DD
K
G
LB + STROKE
MM
ROD
DIA.
EE
WF
P + STROKE
ZT + STROKE
ZB + STROKE
Y
VB
FA
XT
K
WF
WF
FF
FF
XS
WF
WF
EX
EO
G
W
FF
XG
K
K
J
RD -.001
-.003
WF
DD
FF
FF
K
BB
G
TIE RODS
EXTENDED MOUNTS
EXTENDED FRONT MOUNT – STYLE FX (ANSI MX3)
EXTENDED REAR MOUNT – STYLE RX (ANSI MX2)
EXTENDED BOTH MOUNT – STYLE BX (ANSI MX1)
EXTENDED NEITHER MOUNT – STYLE NX (ANSI MX0)
TIE ROD EXTENDED MOUNT CYLINDERS
Mountings
1
MH-8
