

Page 1
SHARR
Page 2

Congratulations on purchasing the
Electronic
Organizer. Please read this operation manual carefully to familiarize
yourself with all the features of the Organizer and to ensure years of reliable
operation. Also, make it a point to keep this operation manual on hand
for reference.
Notes:
l
One of the models described in this manual may not be available in
some countries.
l
Unless otherwise specified, the text material applies to all three models.
NOTICE
SHARP strongly recommends that separate permanent written records be kept of
l
all important data. Data may be lost or altered in virtually any electronic memory
product under certain circumstances. Therefore, SHARP assumes no responsibility
for data lost or otherwise rendered unusable whether as a result of improper use,
repairs, defects, battery replacement, use after the specified battery life has expired,
or any other cause.
l
SHARP assumes no responsibility, directly or indirectly, for financial losses or claims
from third persons resulting from the use of this product and all of its functions, such
as stolen credit card numbers, the loss of or alteration of stored data, etc.
l
The information provided in this manual is subject to change without notice.
1
Page 3

Features of the Organizer
Clock function
Displays current date and time.
Calendar function
Contains a calendar, which extends from the year 1901 to 2099. Important dates
on your monthly calendar will be flagged, so you can check what has been scheduled
for any designated day.
PAGE 23
Schedule function
Allows you to store important dates and events. Important dates will also be flagged
on the calendar to remind you to check them. A schedule alarm can also be set.
PAGE 29
Anniversary function
Allows you to register wedding anniversaries, birthdays, etc. After registration, the
corresponding day is considered an anniversary for every year from 1901 to 2099.
PAGE 47
Telephone book function
Three telephone lists allow you to list business and private numbers separately.
Phone numbers can be recalled in alphabetical order using the sequential search
function, or directly Lecalled by entering.
19
PAGE 53
‘Memo function
Allows you to note important details, such as timetables and also store price lists,
etc.
PAGE 63
Calculator
Contains a lo-digit calculator with memory.
PAGE 71
Secret function
Protects personal information. A password is required to see the information you
mark as secret.
PAGE 75
Data transfer function
By using an optional cable, data can be transferred between two Organizers.
PAGE 89
3
Page 4
Contents
GETTING STARTED
Partnames
Display symbols
Contrast adjustment
Turning the “beep” on and off
............................................
BASIC ENTRY PROCEDURES
Entering characters
Making corrections
USING THE CLOCK
Displaying the time
Settingtheclock .....................................
USING THE CALENDAR FUNCTION
Displaying and changing the monthly calendar
Displaying the number of days and weeks between
January 1st or December 31 to a specified date
USING THE SCHEDULE FUNCTION
Entering data in the SCHEDULE mode
Recalling scheduled data
Editing scheduled data
Copyingscheduleddata
Deleting scheduled data
Using the schedule alarm
.................................
.......................................
....................................
............................
.........................
....................................
.....................................
...............................
....................................
...................
..............
.............
...................
....................
...............................
.................................
...............................
.................. .............
...............................
.
9
9
..4 1
USING THE ANNIVERSARY FUNCTION
Entering anniversaries
Recalling anniversaries
Checking anniversaries
Editing anniversaries
Deleting anniversaries
..................................
.................................
.................................
...................................
..................................
USING THE TELEPHONE DIRECTORY.
Designating the file names
..............................
................
...............
3
Page 5
Entering listings
Recalling listings
Editing listings
Deleting listings
.......................................
......................................
....................................... ..5
.......................................
8
USING THE MEMO FUNCTION
Entering memos
Recallingmemos.. ...................................
Deleting memos
.......................................
.......................................
USING THE ORGANIZER AS A CALCULATOR
Using the Organizer in the CALC mode
When the error message appears
USING THE SECRET FUNCTION
Registering a password
Coding data as secret data
Turning off the secret function
Turning on the secret function
Recalling secret data
Declassifying secret data by removing the secret code
Deleting and changing the password
What to do if you forget the password
.................................
...................................
USING THE MISCELLANEOUS FUNCTIONS
Checking the memory capacity
Setting the date format
................................. .86
........................63
..........
....................
.........................
......................
.............................. .76
............................ .78
............................
........ .80
......................
.....................
............ .85
........................... .85
..6 4
6
USING THE DATA TRANSFER FUNCTION . . . . . . . . . . . . . . .89
Transferring data between ZQ-2000 series Organizers . . . . . . . .
Transferring data with a ZQ-5000 series or IQ series Organizer .
Transferring data with an EL series Organizer (including
Auto Dialer) . . . . . . . . . . . . . . . . . . . . . . . . . . . . . . . . . . . . . . . . . .
APPENDIX .......................................
Caring for your Organizer
When trouble occurs
Replacing batteries
Specifications
........................................
............................... .97
...................................
.................................... .99
..9 7
5
Page 6
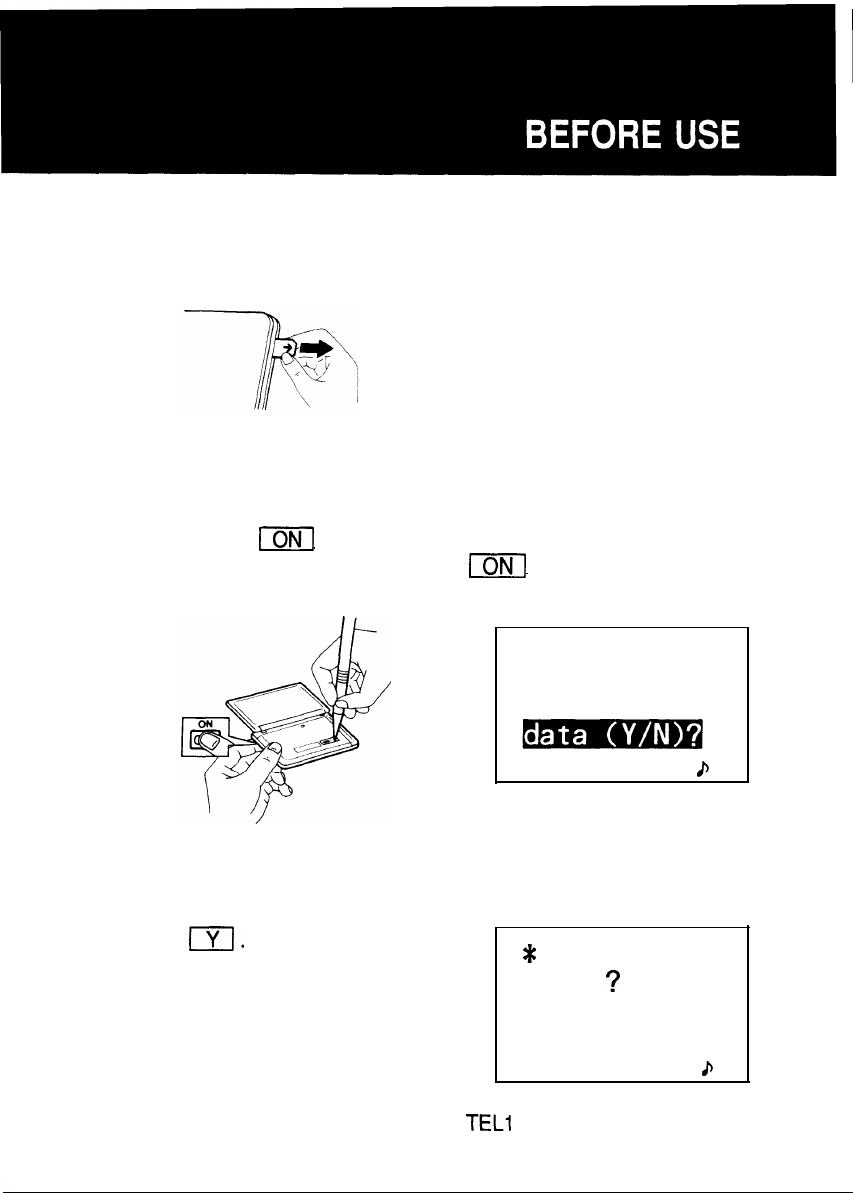
Be sure to perform the following procedures before using the Organizer
for the first time:
1. Remove the insulation sheet.
Note:
When you remove the insulation sheet, write down the date on
the label on the back of the Organizer (refer to page 101).
2. Initialize the Organizer.
While holding
the RESET switch and then release
will appear:
, press the RESET switch on the back. Release
. The following display
Data has
been broken!
Clear all
CAPS
Note:
Under certain conditions the message may appear as “DATA
ALL CLEAR OK (Y/N)?“. Proceed to the next step in either case.
Press
TEL 1 4
NAME
CAPS
The Organizer is initialized and then the TEL1 directory is displayed.
,
Page 7
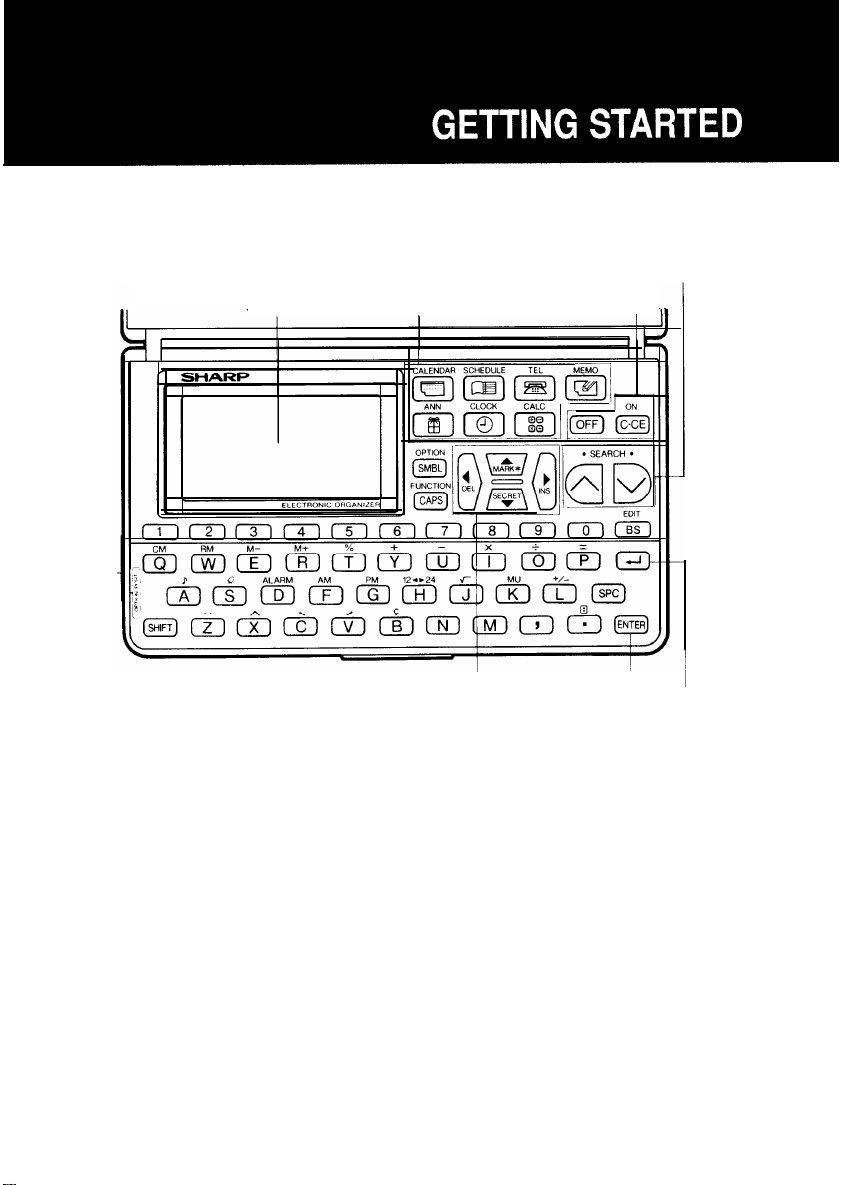
Part names
Display Command center Power on/off keys
Search keys
Option port
(4-pin option jack)
Cursor movement keys
Enter key
Return key
Page 8
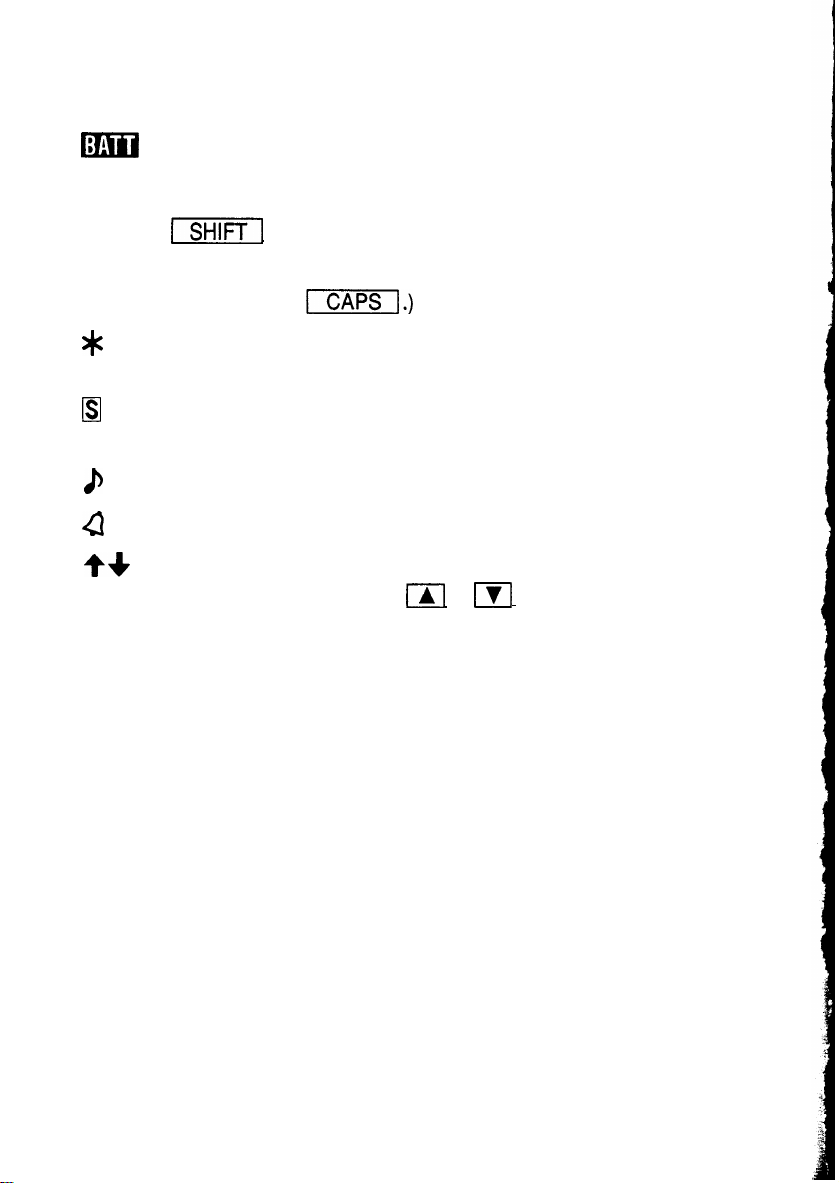
Display symbols
This symbol appears when the operating battery level is low.
EDIT
SHIFT
CAPS
Note:
The entry on the display may be edited.
has been pressed..
Capital letters will be entered. (To enter small letters, turn “CAPS”
off by pressing
The data appearing on the display is secret data accessible only
by password.
The secret function is in effect. (Secret data cannot be recalled
without the password.)
A “beep” will sound when a key is pressed.
The specified schedule alarm(s) will sound.
There is more data which is not on the display. The data can
be displayed by pressing
In this manual, only the symbols necessary for explanation will be
shown.
or
.
10
Page 9
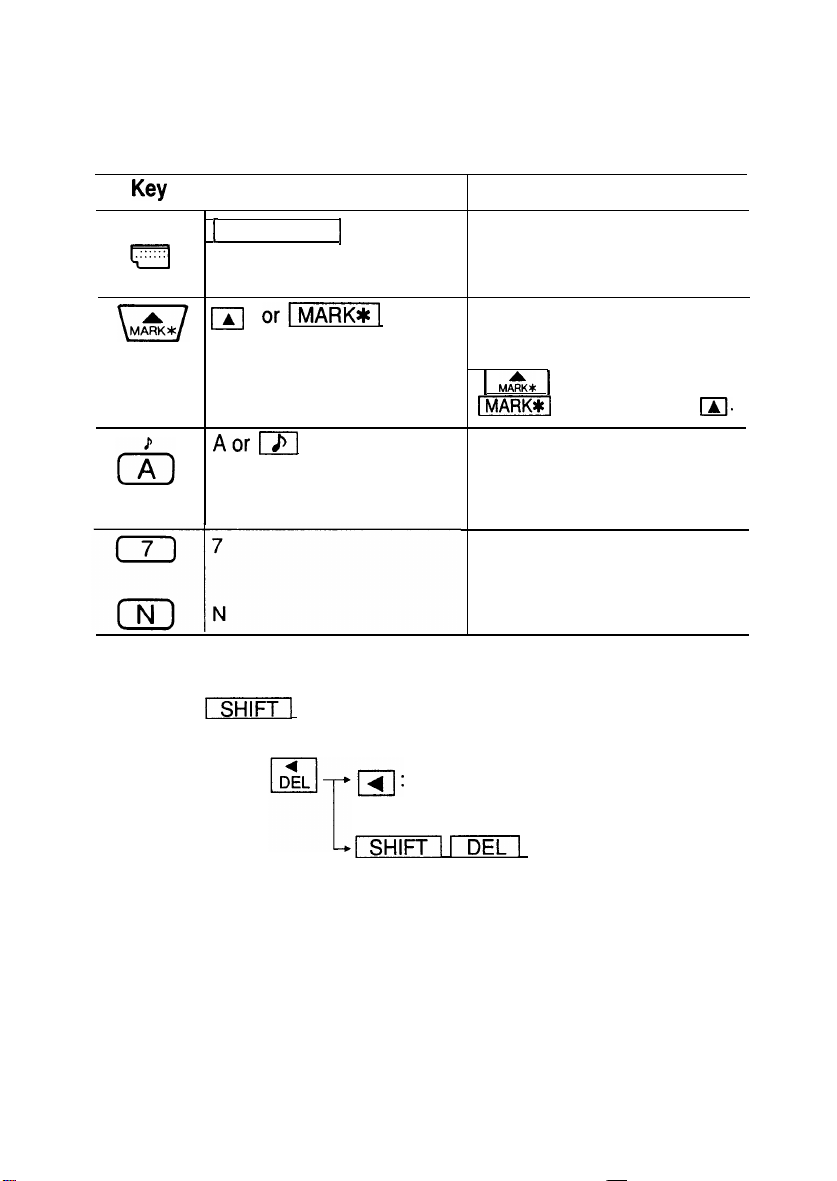
Key notations
This manual uses the following notations for key operations and functions.
CALENDAR
. . . . . .
. . .
0
I
Notation
CALENDAR
Keys with only one function always
appear in the manual with the function
enclosed in a box.
Keys with multiple functions appear in
the manual with only the contextually
appropriate function boxed; i.e.,
Alphabetical keys with multiple functions appear sometimes as unboxed
letters and sometimes as the boxed
function name, as per context.
Numerical keys and alphabetical keys
with single function are notated only
with unboxed numbers and letters.
Note
will sometimes appear as
and sometimes as
Note: The blue functions and symbols are operated by press-
ing
key.
(“SHIFT” will be displayed) and the appropriate
Example: Functions as a cursor movement
key.
: Function as a delete
key.
Distinguishing between “0” and “0”
Zero is indicated as “0” on the display and also in this manual when it may
be confused with the letter “0”.
11
Page 10
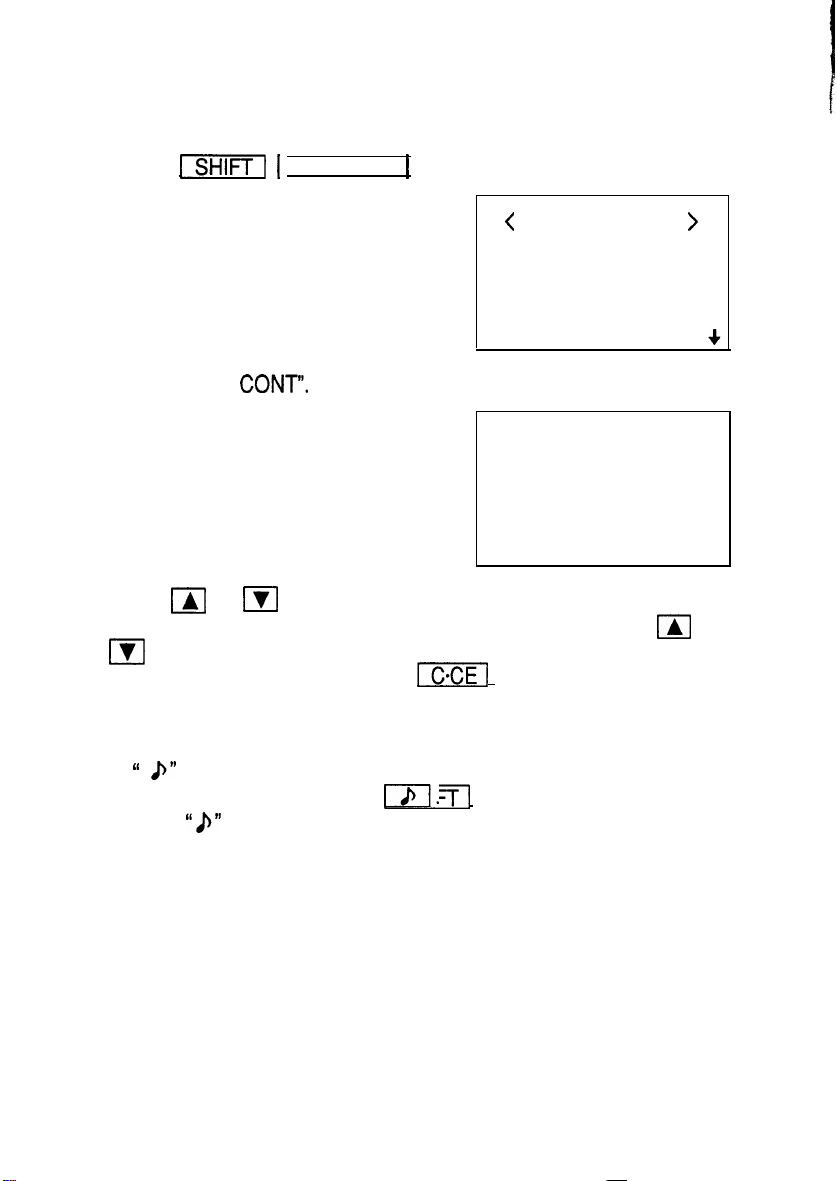
Contrast adjustment
Adjust the display contrast to make the display easier to read.
1. Press
2. Select “2 LCD
2
1 FUNCTION 1 .
FUNCTION
MEMORY CHK
LCD CONT
DATA DEL
I
LCD CONT
A-DARK
V-LIGHT
3. Press
The amount of contrast will change continuously when either
is held.
4. After adjusting the contrast, press
or
to darken or lighten the display as required.
.
Turning the “beep” on and off
While
is displayed, a “beep” will sound when a key is pressed. To
turn the “beep” on and off, press
sound after
12
goes off. To turn the “beep” back on, repeat the process.
The “beep” will not
or
Page 11
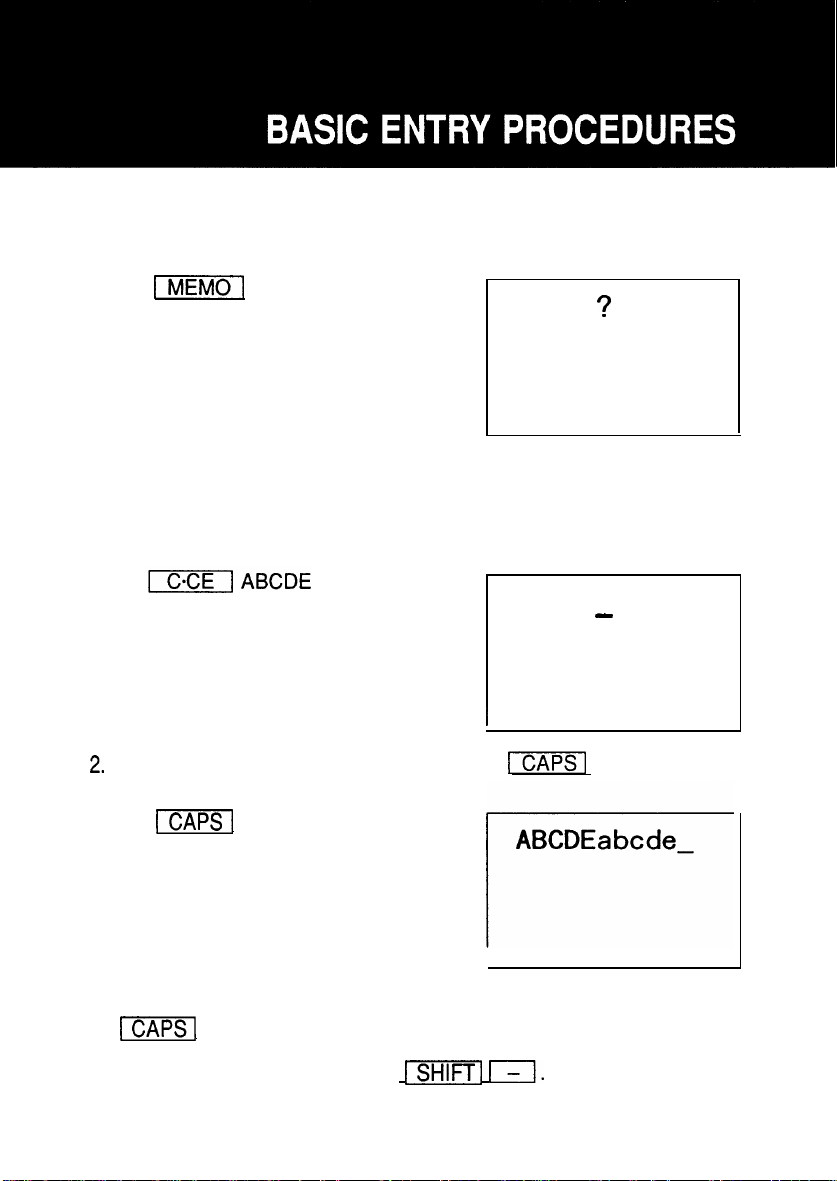
To practice entering characters and numbers, select the MEMO mode, for
example, and enter the characters as follows:
MEMO ?
The MEMO mode will be selected.
CAPS
Entering characters
Entering the letters
1. Enter “ABCDE” in capital letters, for example.
ABCDE
CAPS
To enter “abcde” in small letters, press
disappears, enter “abcde”.
ABCDE
To enter capital letters again, turn “CAPS” back on by pressing
again.
Note: To enter a hyphen, press
. After “CAPS”
13
Page 12
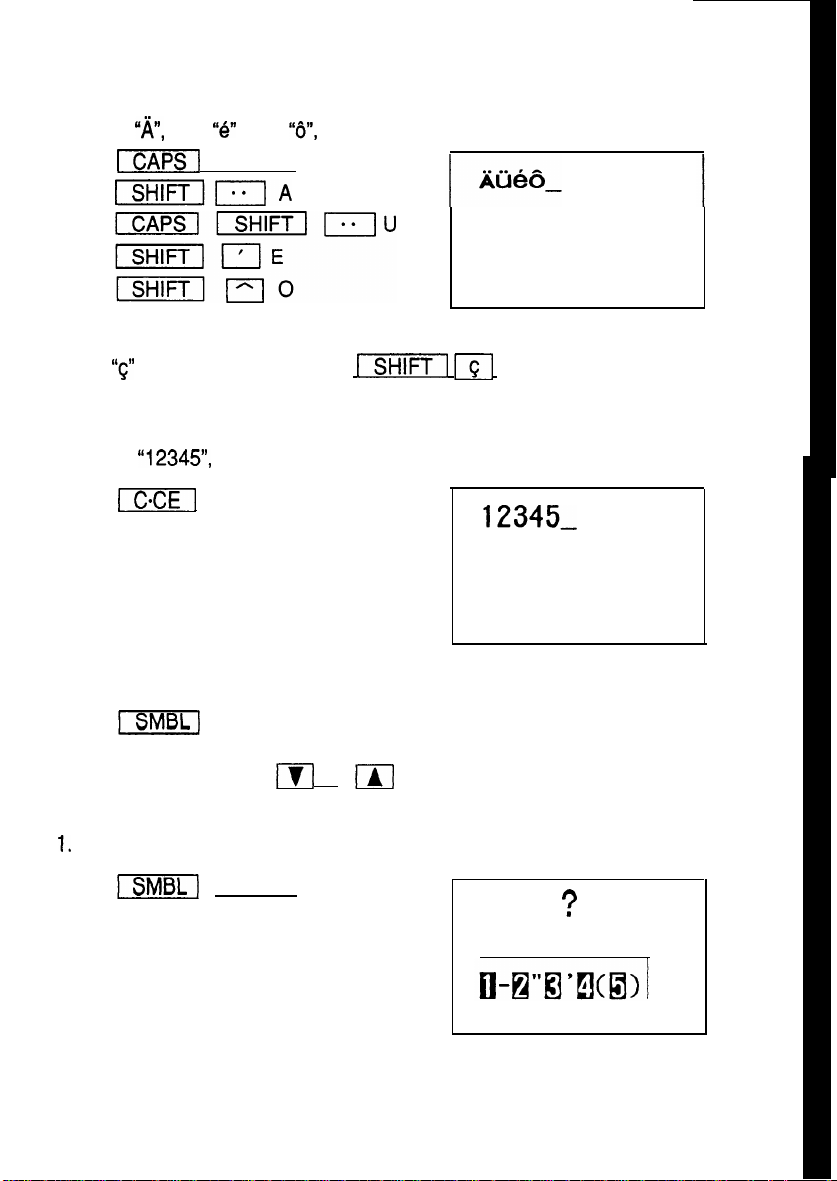
Entering non-English characters
Enter “A”, “ii”,
and
for example.
*
ters can also be entered as symbols.
. Non-English charac-
Entering numbers
Enter
Entering graphic symbols and special characters
Press
displays may be selected. To select the symbol display containing the
desired characters, press
for example.
12345
to select the symbol entry mode. A total of 33 symbol
or
. When
the desired
symbol or
character appears, press the number corresponding to its symbol position.
Enter the symbol entry mode.
MEMO ?
5 symbols will be displayed.
Page 13
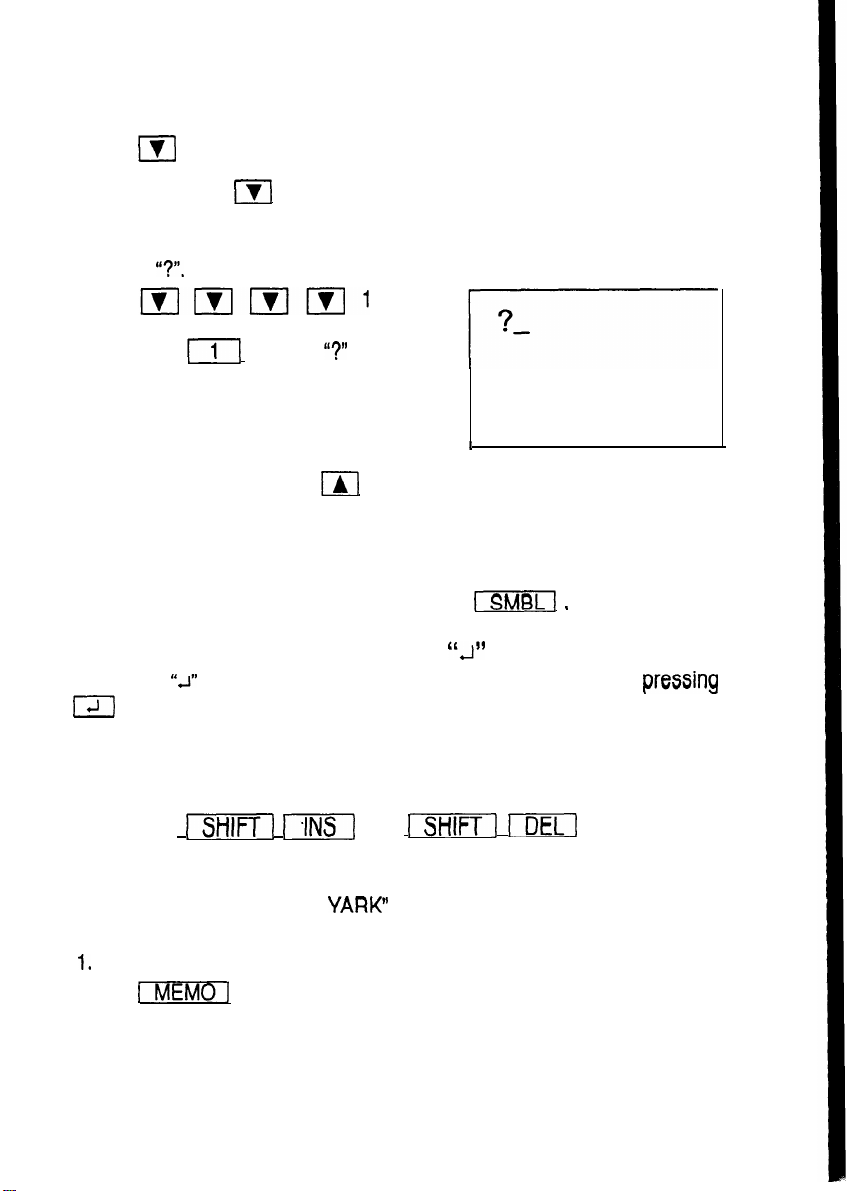
2. Switch to the next set of symbols.
Each time
sequence.
3. Enter
Press
next to the number one.
Note: When you press
is pressed, a new set of 5 symbols will appear in
when a ‘I?” appears
, the previous set of symbols reappears.
The initial symbol display is thus determined by your previous
choice. The 5 most recently used symbols and characters will
appear in the initial symbol display.
Nate:
To exit the symbol entry mode, press
Entering the new-line character
Enter the
character to continue entry on the next line by
, Then the cursor moves to the beginning of the next line.
Making corrections
Misspellings and incorrect entries can be corrected using
as well as
Correcting misspellings
If you have entered “NEW
may be corrected as follows:
Enter the incorrect spelling.
NEW YARK
and
for “NEW YORK”, for example, the entry
the cursor keys
as follows:
15
Page 14
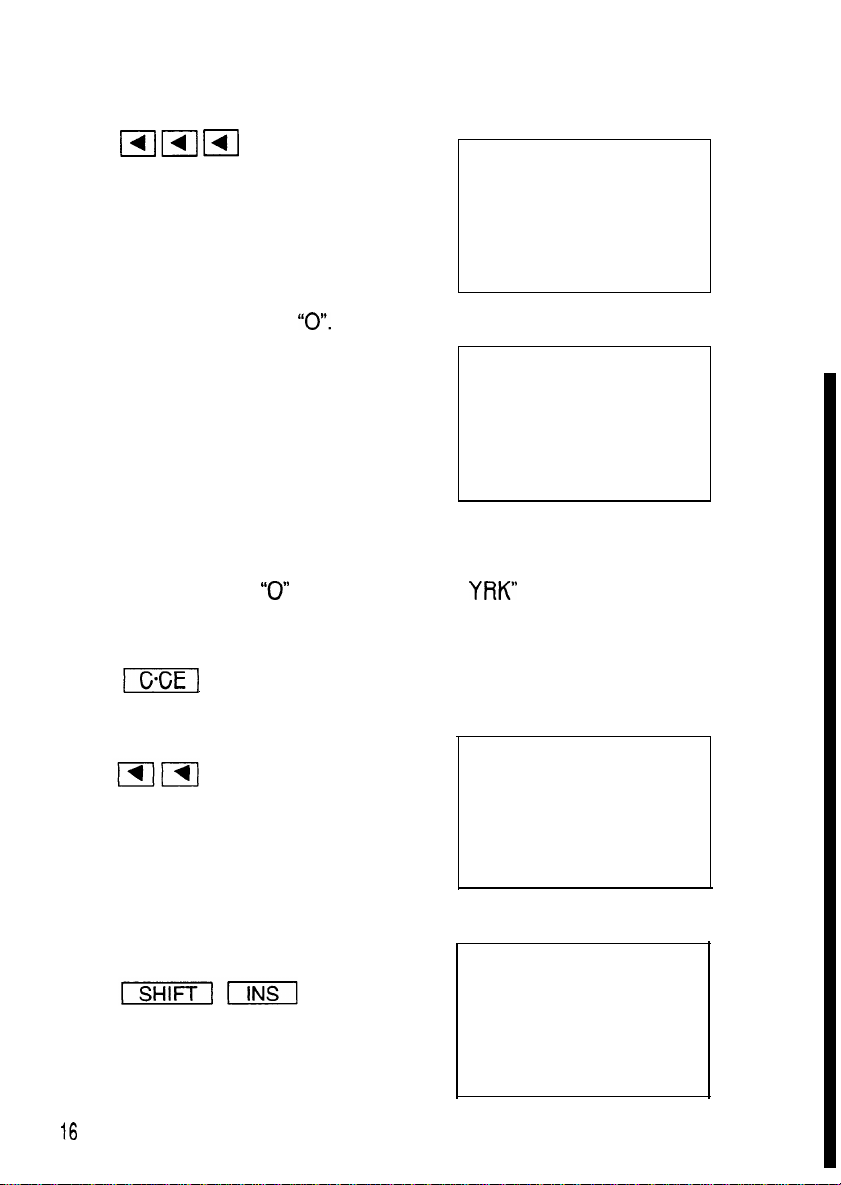
2. Now move the cursor to the incorrect letter “A”.
NEW YARK
3. Enter the correct letter “0”.
0
Inserting missing letters
To enter the missing
example:
1. Enter the incorrect spelling.
NEW YRK
2. Next move the cursor over the “R”.
3. Put the Organizer into insert mode.
and correct “NEW
NEW YORK
to “NEW YORK”, for
NEW YRK
NEW YRK
Page 15
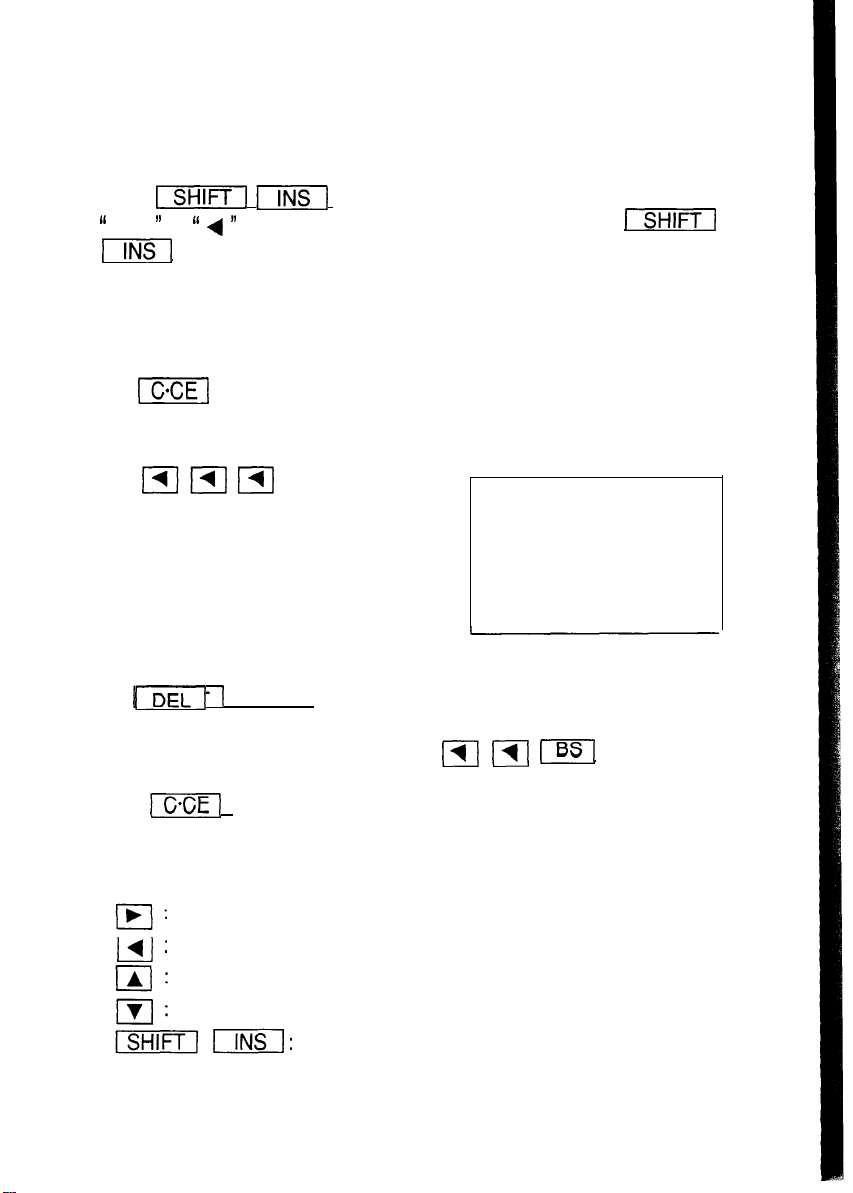
4. Insert the missing letter.
0
When
n
to
again to exit the insert mode.
indicating that the insert mode is set.
are pressed, the cursor mark changes from
Press
Deleting unwanted letters
To correct “NEW YOARK” to “NEW YORK”, for example:
1. Enter the incorrect spelling.
NEW YOARK
2. Move the cursor to the letter “A” to be deleted.
NEW YOARK
3.
Delete the letter “A”.
You can also delete “A” by pressing
Note; If
is pressed, the data currently being entered will be
deleted.
The following descriptions explain the functions.
Moves the cursor to the right.
Moves the cursor
Moves the cursor up to the previous line.
Moves the cursor down to the next line.
Puts the Organizer into insert mode. Pressing
these
keys again exits the insert mode.
to the left.
17
Page 16

Cursor:
designates the cursor.
the next letter, number, or symbol will be entered. When correcting an
entry, move the cursor to the position where a character is to be typed
over or deleted. The cursor changes to
the cursor changes to
Deletes the character at the cursor.
Deletes the character to the left of the cursor
(“backspace”).
Clears the data being entered.
The cursor is used to indicate the position where
m
When inserting characters,
18
Page 17
The Organizer features a built-in clock which allows the Organizer to do
the following:
1. To display the current monthly calendar in the CALENDAR mode.
2.
To keep track of the items scheduled on the agenda for the current day
in the SCHEDULE mode (automatic tracking).
3. To sound the schedule alarm.
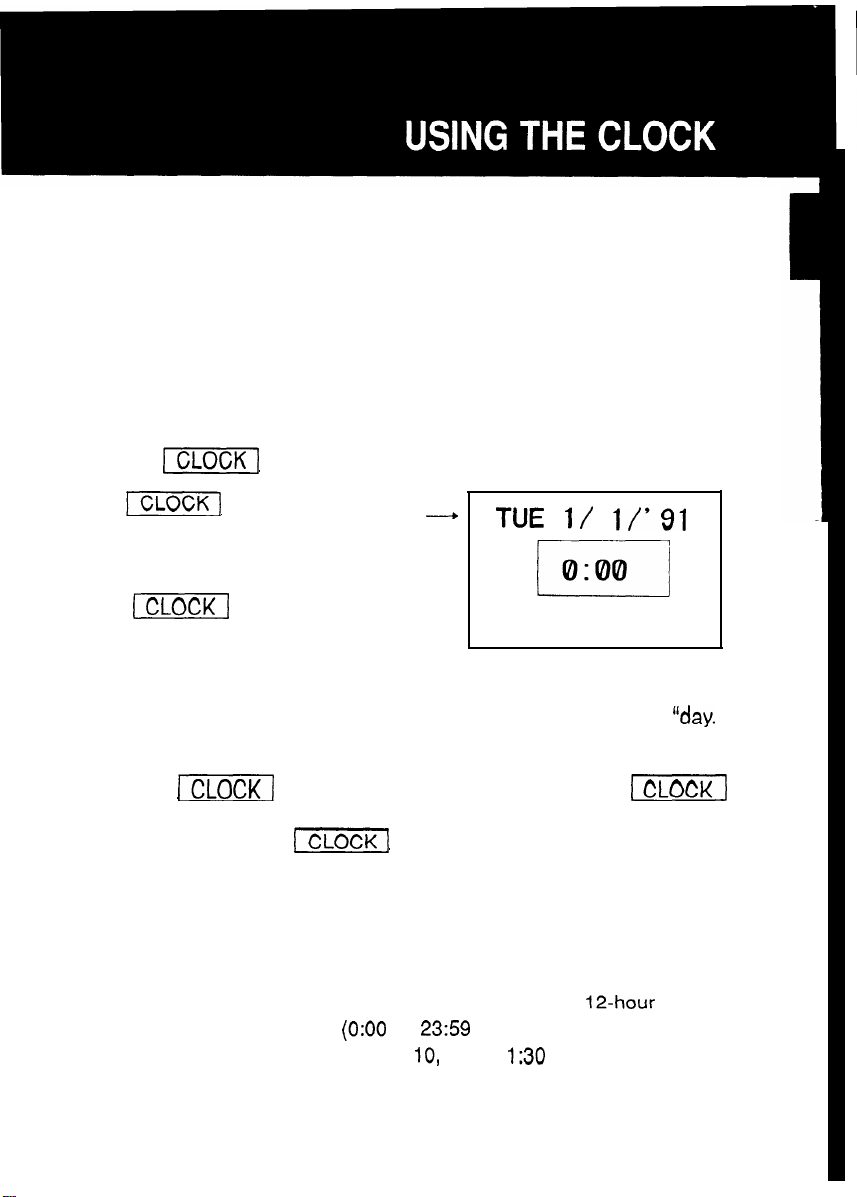
Displaying the time
Pressing
displays the current date and time.
Day of the week
month/day/year*
The display appears only while
is pressed.
* The display can be changed to show the date in the format of
month. year”. Refer to page 86.
Note:
If
was initially pressed is displayed. The internal clock continues
working while
change.
is pressed continuously, the time when
is pressed, but the display does not
Setting the clock
The time can be displayed using either the conventional
system or the 24-hour system
For example, set the clock to January IO, 1992, 1;30 PM.
to
hrs.).
AM/PM
19
Page 18
Setting the clock on a
AM/PM basis
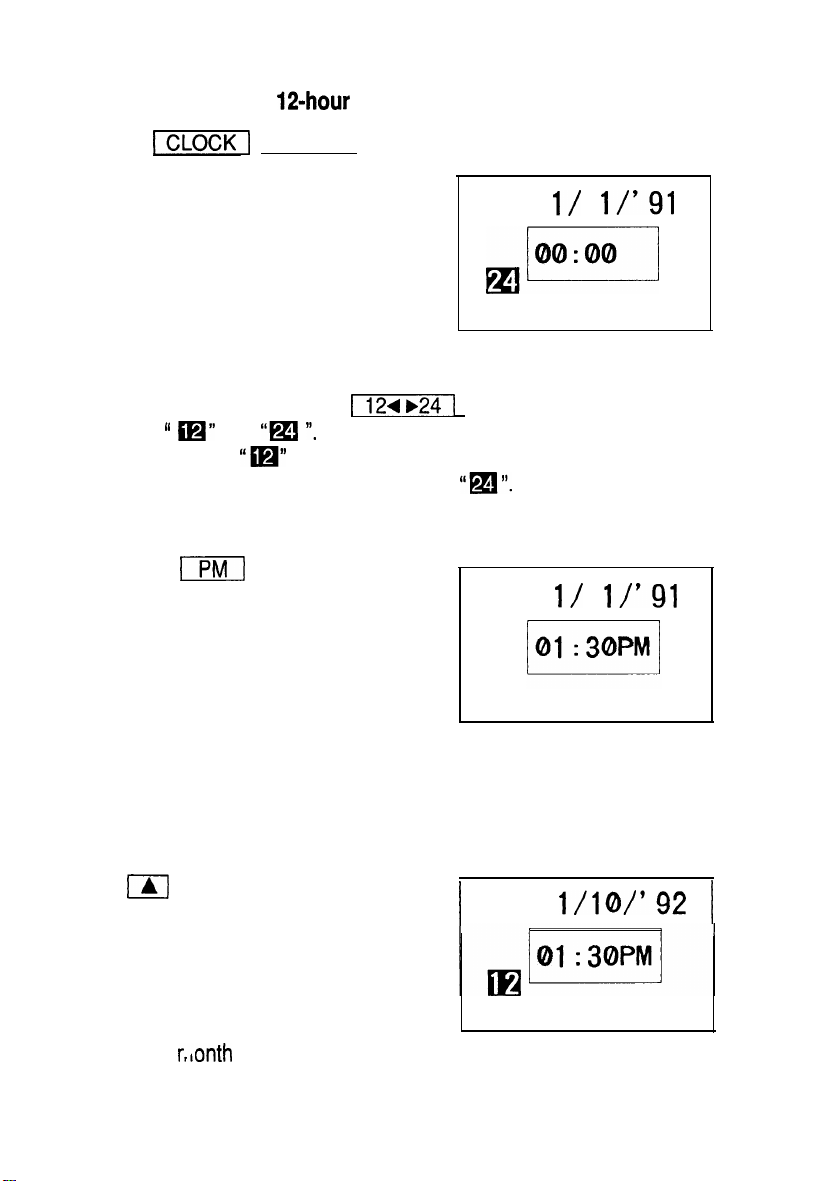
1. Press
2. Select the time system.
The number highlighted in the lower left corner of the screen indicates
the time system. Each time
between
In this example,
Note:
3. Set the time.
To set the 24-hour system, display
01 30
.
and
is displayed.
TUE
is pressed, this alternates
TUE
q
Note: The hours and minutes must be entered using two digits each.
4. Enter the date.
01 10 1992
FRI 1/10/'92
Enter the
single digit months or days, enter “0” before the single digit.
20
and day using 2 digits and the year using 4 digits. For
Page 19
5. Enter the correct starting time.
Notes:
l
Use the beep of the time announcements given on the radio, on
T.V., or by telephone time services.
l The clock starts from 0 seconds.
6. Check the set time on the display.
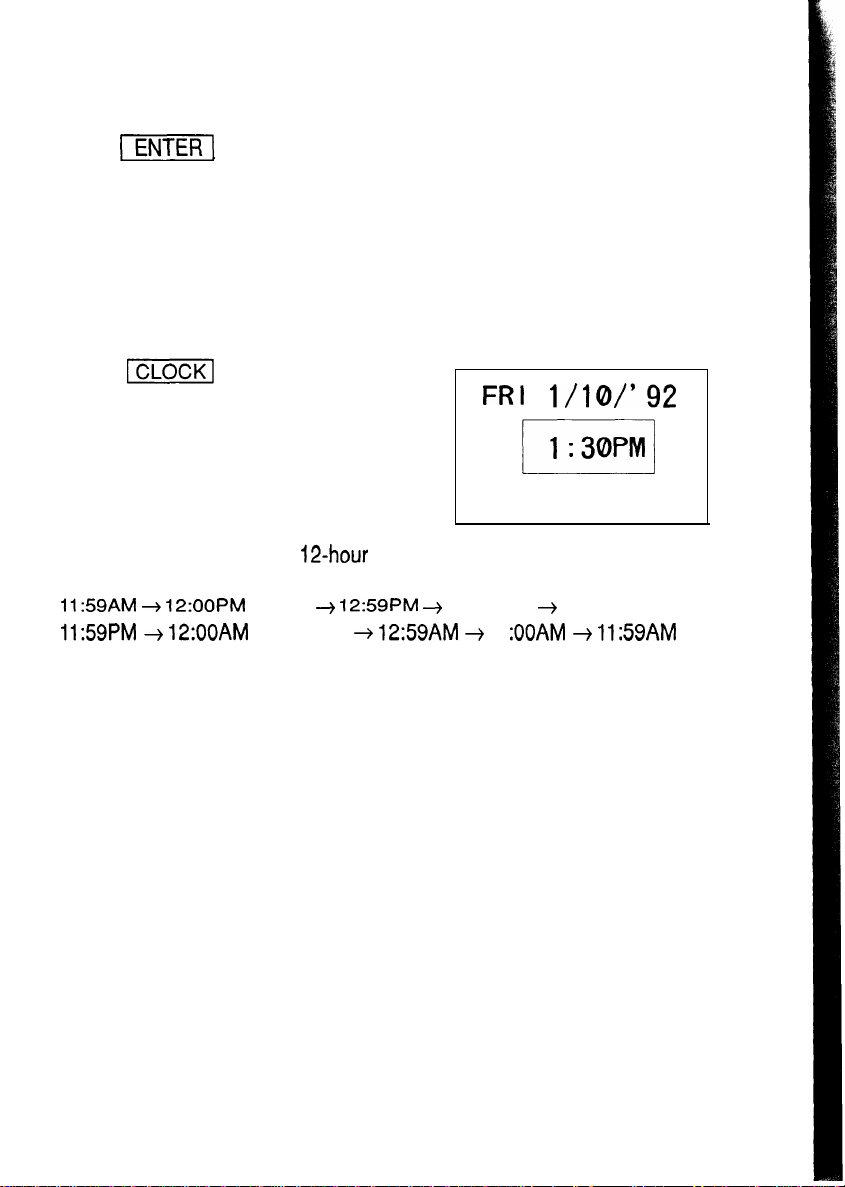
1/10/'92
When the time is set with
basis, noon and midnight changes are
displayed as below.
(noon) -+
(midnight)
-+ 1 :OOPM -+
12;59AM
1
Correcting the clock
To correct the time, reset the clock by following the procedure in ‘Setting
the clock”.
21
Page 20
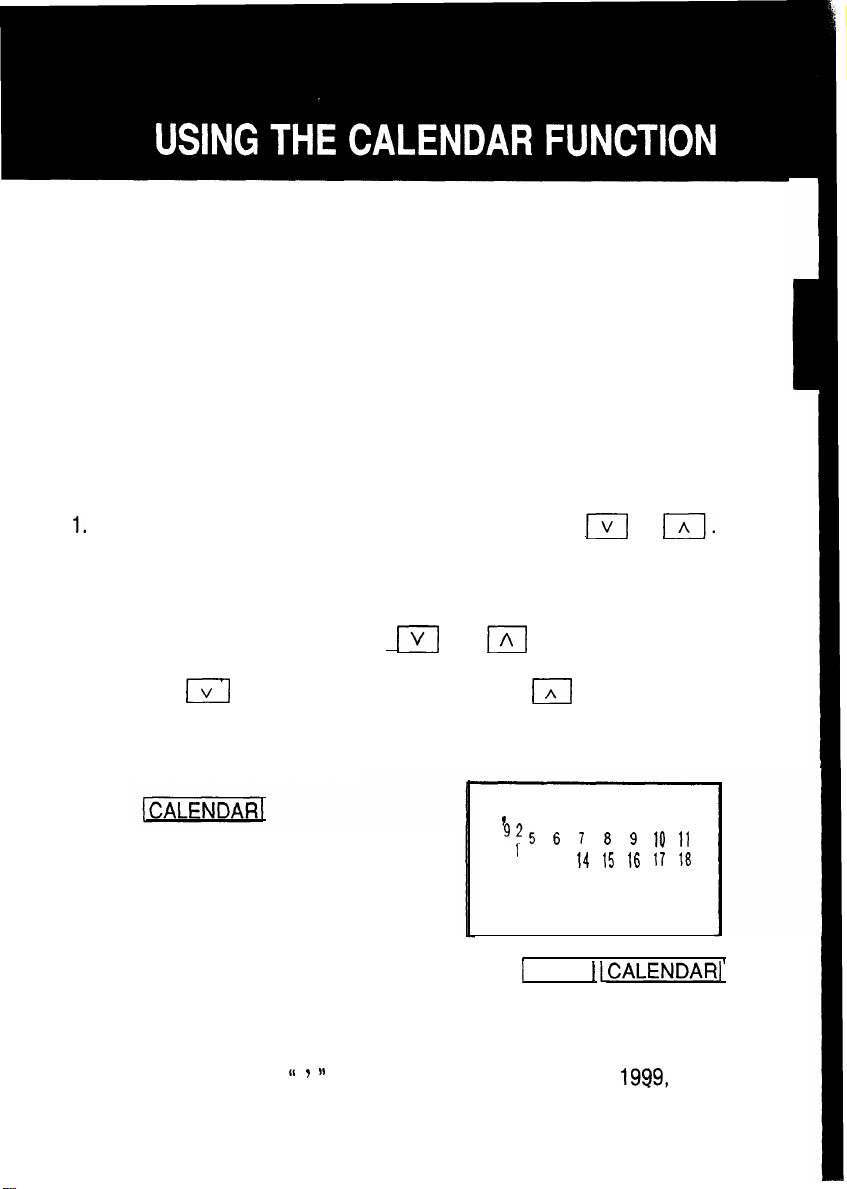
Monthly calendars covering the period from January, 1901 through December, 2099 can be displayed.
In addition, for a given day it is possible to determine the number of days
passed since January 1st of that year and the number of days remaining
until December 31st of the same year.
Displaying and changing the monthly
calendar
There are three methods of recalling dates and scanning the built-in
calendar.
Displaying the calendar and changing the month with
2. Specifying the desired date, past or future, with the numerical keys.
3. Designating the year and month on the monthly calendar.
or
Changing the month with
Once the CALENDAR mode has been selected, the month can be changed
by pressing
months) as follows:
1. Select the CALENDAR mode.
(to display upcoming months) or
or
(to display past
1
2 3
12 13 14 15 18 17
192021
26 27 28 29 30
22 23 24 25
4
31
Notes:
l
If the above display does not appear, press 1 SHIFT 1 ICALENDAR]
to display the current monthly calendar. In this instance, if you set the
Organizer’s built-in clock for January 10, the calendar for January 1992
will be displayed.
l
In the year display, a
no mark is attached to the years 2000 to 2099.
is attached to the years 1901 to
while
23
Page 21
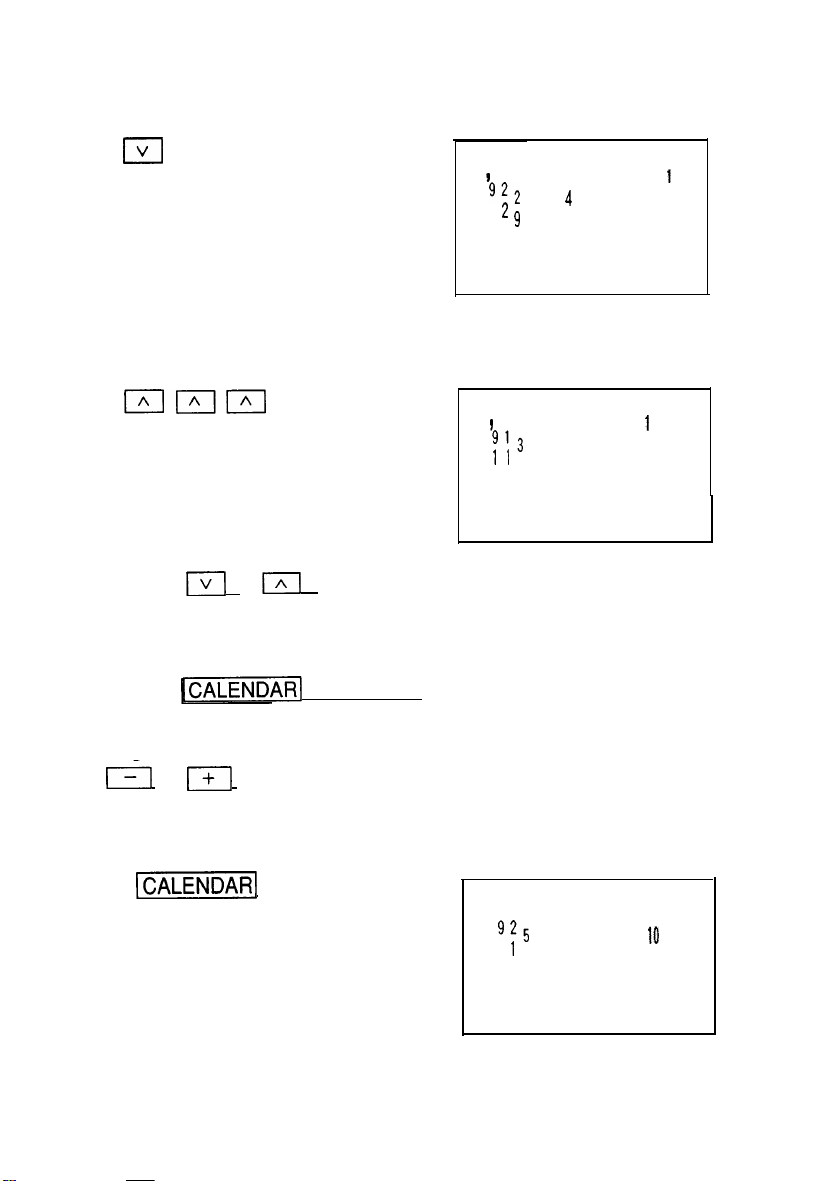
2. Display the calendar for the next month.
V
3
5 6 7 8
101112 131415
16 17 18 192021
23 24 25 26 27 28 29
22
3. Display the calendar for three months prior to the month presently on
the display.
2
4 5 6 7 8 9
101112 131415 16
17 18 192021
24 25 26 27 28 29 30
22 23
Note: When
or 1/\1 is pressed continuously, the calendar will
scroll forward or backward.
To return the calendar to the current date:
Press
.
Setting a date with the numerical keys
Use
past or future.
1. Select the CALENDAR mode.
or
to set a date that is a specified number of days in the
I
6 7 8 9
12 13 14 15 16 17 18
192021
26 27 28 29 30
1
2 3
4
11
22 23 24 25
31
Page 22
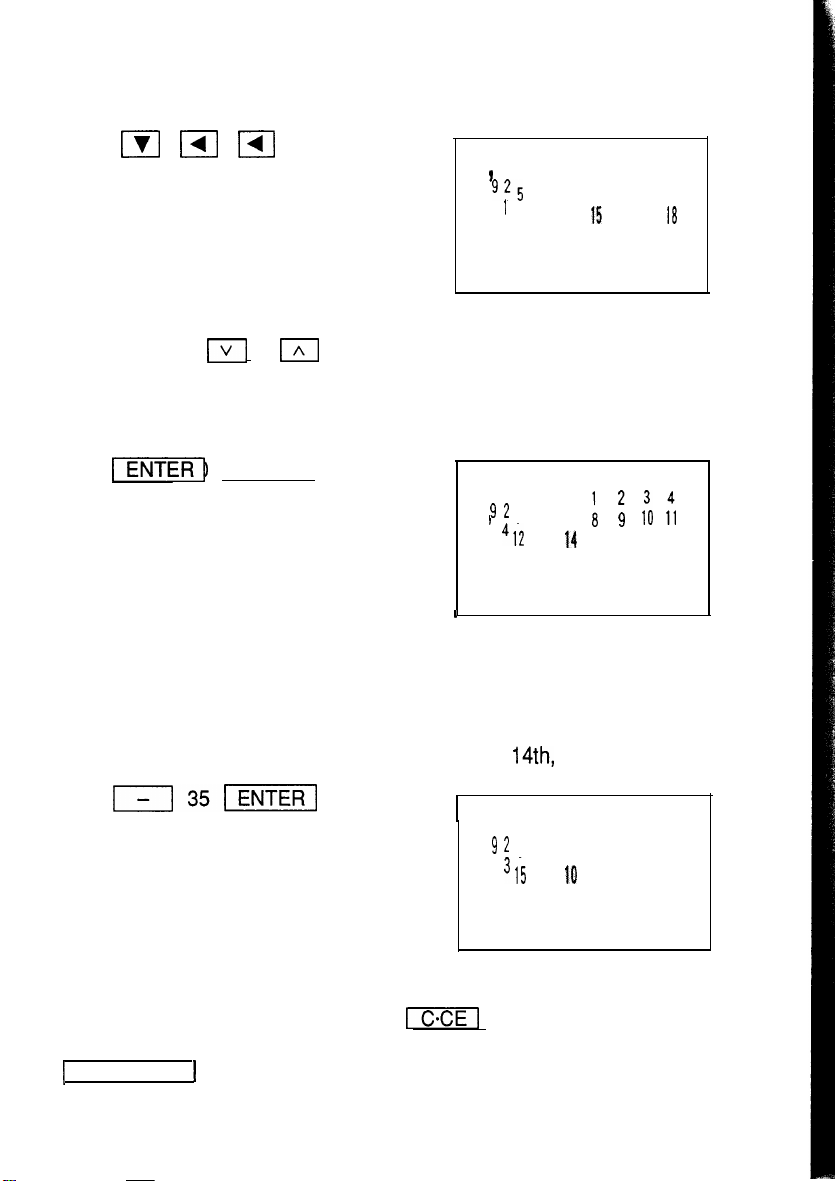
2. Set January 15 as the reference date.
1
2 3
4
6 7 8
12 13 14 15 16 17 18
192021
26 27 28 29 30
9 10
11
22 23 24 25
31
To set the reference date to a different month, display the new month
by pressing
or
and then flash the date with the cursor
movement key.
3. Set the date for the 90th day from today.
6 7 b
13 14 15 16 17 18
192021
26 27 28 29 30
22 23 24 25
The 90th day from today will flash on the display.
Note: The number of days specified can range from 9999 days in the
past to 9999 days in the future.
4. Set the date five weeks (35 days) before April 14th, 1992.
‘1234567
9
16 10
22 23 24 25 26 27 28
29 30
17 11 18
31
12 13 14
192021
Recalling a month by designating the date
You can also change the calendar with
you would like to display when the date prompt appears, and then pressing
again.
, entering the date which
25
Page 23
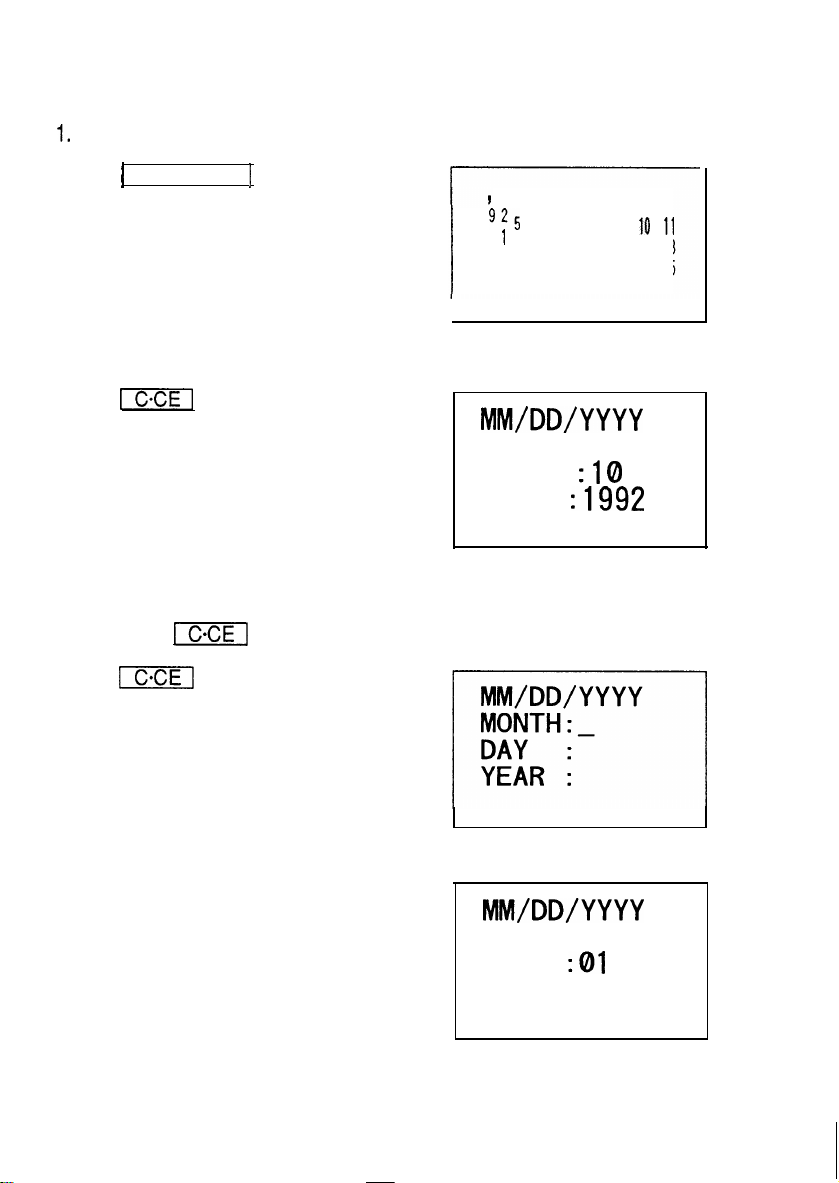
For example, to display the month of February, 1992:
Select the CALENDAR mode.
CALENDAR
1
2 3
4
6
7 8 9
12 131415 16 17 18
192021
26 27 28 29 30
2. Enter the date entry mode.
22 23 24 25
31
MONTH:01
DAY
YEAR
To make a correction, move the cursor with the cursor movement keys,
or press
to clear the displayed date.
3. Enter the date.
02 01 1992
MONTH:02
DAY
YEAR : 1992
Note: To enter a single-digit date or month, enter zero and the digit
(i.e., “06”).
26
Page 24
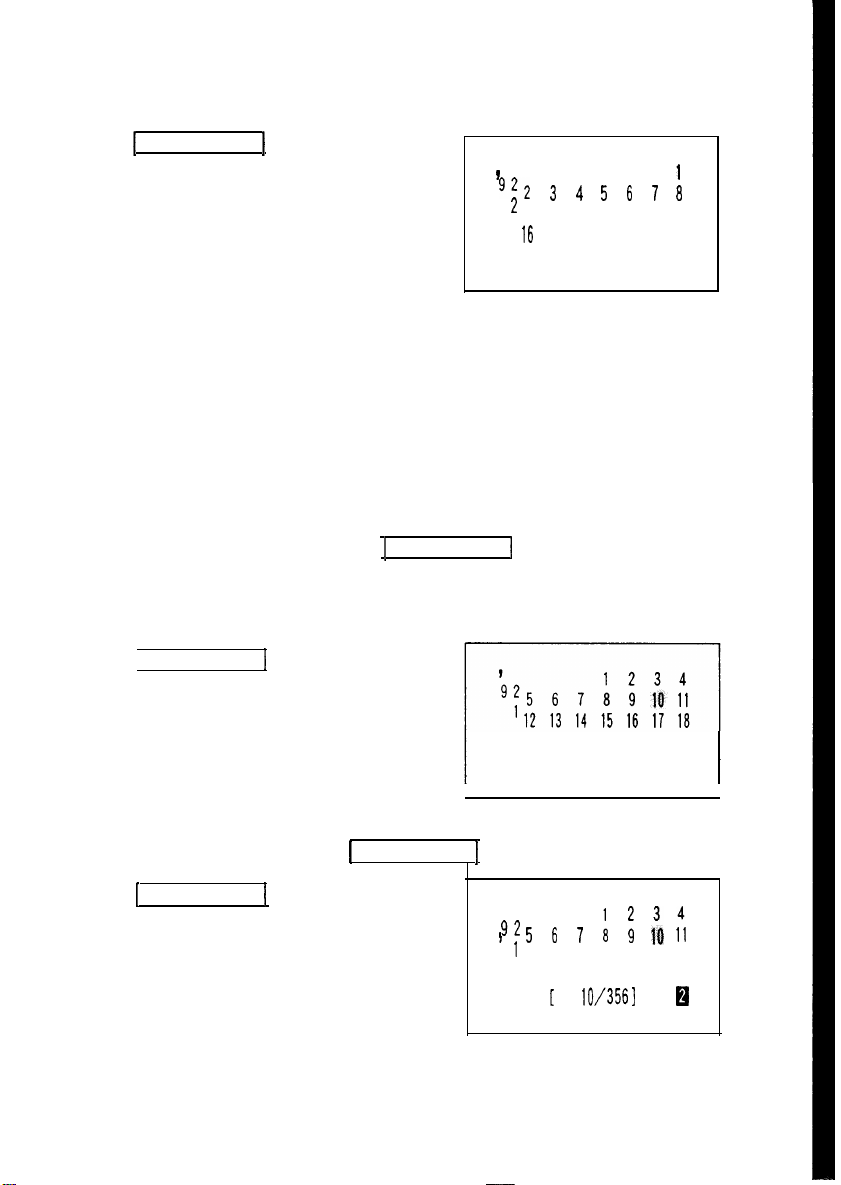
4. Recall the calendar.
The specified monthly calendar
will be displayed.
9
101112 131415
18 192021
23 24 25 26 27 28 29
22
Displaying the number of days and
weeks between January 1st or
December 31 to a specified date
It is possible to determine the number of days between January 1st and
a specified date, as well as the number of days between a specified date
and December 31. It is also possible to determine how many weeks have
passed since the beginning of the current year.
To determine these items, press 1 CALENDAR
displayed.
1. Select the CALENDAR mode.
while the calendar is
19 20 21 22 23 24 25
26 27 28 29 30 31
2. Determine the number of days passed/left, and number of weeks
passed in the year. Press
CALENDAR 1
CALENDAR
a second time.
12 13
14 15 16
192021 22 23
18
17
24 25
27
Page 25
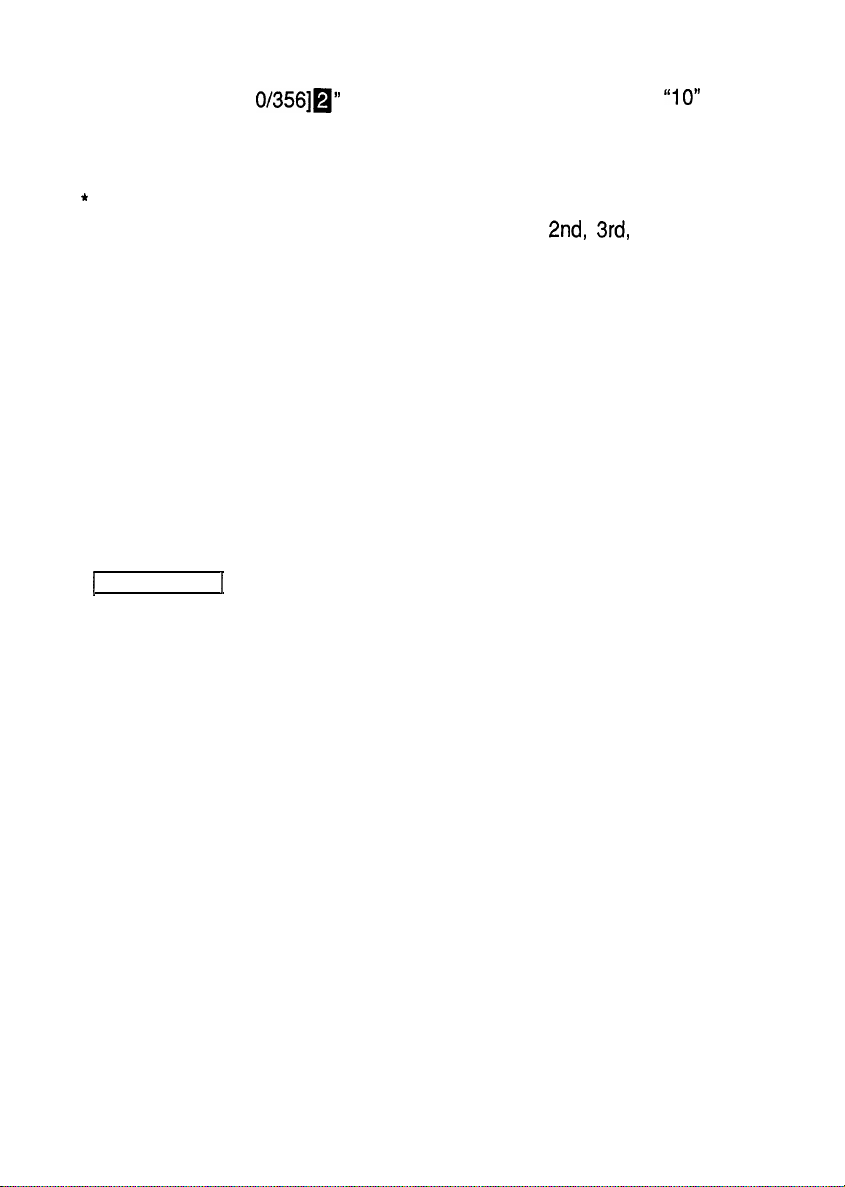
The numbers “[I
indicates that this is the
will appear at the end of the display.
10th
day of 1992, “356” indicates that there
are 356 days left in the year, and “2” indicates that this is the 2nd
week of the year.
The Organizer recognizes each Monday-to-Sunday interval as one
week. The number of the week in the year (1 st,
etc.) is
determined as follows:
If January 1st falls between Monday and Thursday, it begins the
1.
first week of the year.
2. If January 1st falls between Friday and Sunday, it begins the
final week of the previous year.
3.
If December 31 falls between Monday and Wednesday, it begins
the first week of the next year.
Note:
To display a date not shown, move the cursor with the cursor
movement keys.
3. Return to the original display.
28
Page 26
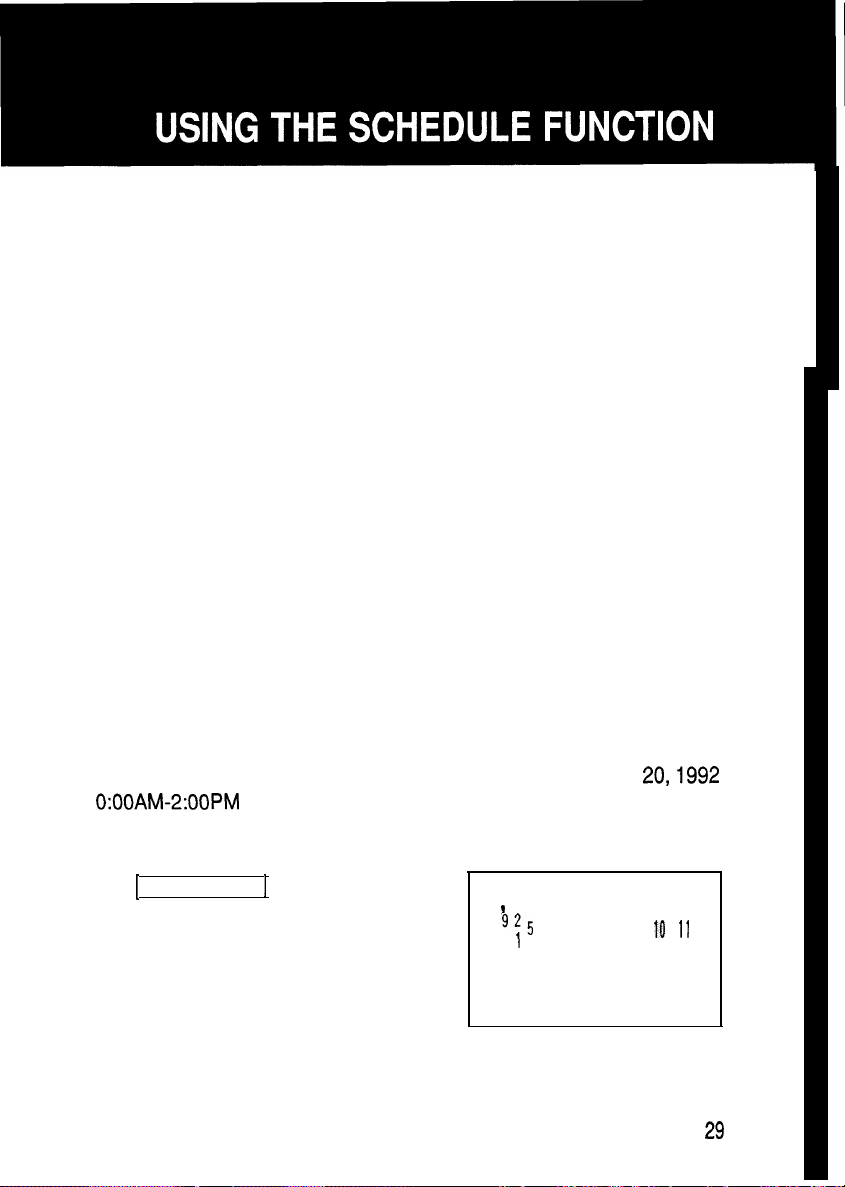
You can enter important future appointments as well as important dates
in the past into the Organizer’s schedule function. These dates are marked
with tags on the Organizer’s calendar display. In addition, you can set an
alarm to sound at the scheduled time as a reminder. (Refer to “Using the
schedule alarm,” page 45.)
Entering data in the SCHEDULE mode
The date of a schedule item can be selected using three different
methods.
1. By selecting the desired date in the CALENDAR mode.
2. By selecting the desired date in the SCHEDULE mode.
3. By recalling the desired date directly.
Once the date has been selected, actual entry of the schedule item is the
same for all three methods.
Note: Multiple items may be scheduled on the same date.
If other items have been previously scheduled for a given date,
simply enter the new appointment over the old one.
Organizer’s display will clear upon recognition of the new entry.
Entering items from the CALENDAR mode
To enter an item from the CALENDAR mode, such as, “February 20,1992
1
ABC Project meeting”
The
1. Select the CALENDAR mode.
1
6 7 8 9
12 13 14 15 16 17 18
19 20 21 22 23 24 25
26 27 28 29 30 31
2 3
4
Page 27
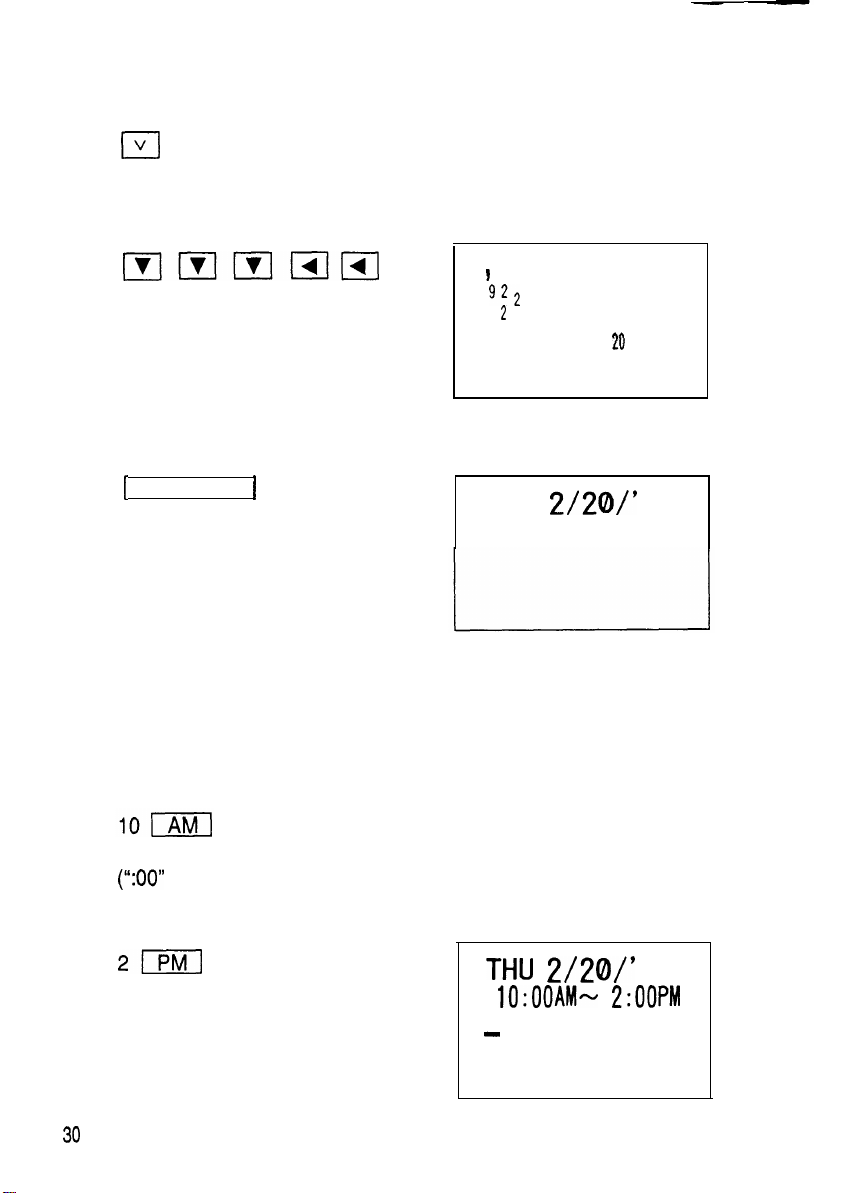
2. Change the calendar to February 1992.
V
3. Move the cursor to the 20th of February, using the cursor movement
keys.
1
3
4
5 6 7 8
9
101112 131415
16 17 18 19 20 21
23 24 25 26 27 28 29
4. Change to the SCHEDULE mode.
22
SCHEDULE 1
The date you have selected (February 20, 1992) will appear at the
top of the display. The bottom part of the display is for schedule
time and detail.
5. Enter the starting time.
will be entered automatically.)
6. Enter the finishing time.
THU
92
92
2:OOPM
Page 28
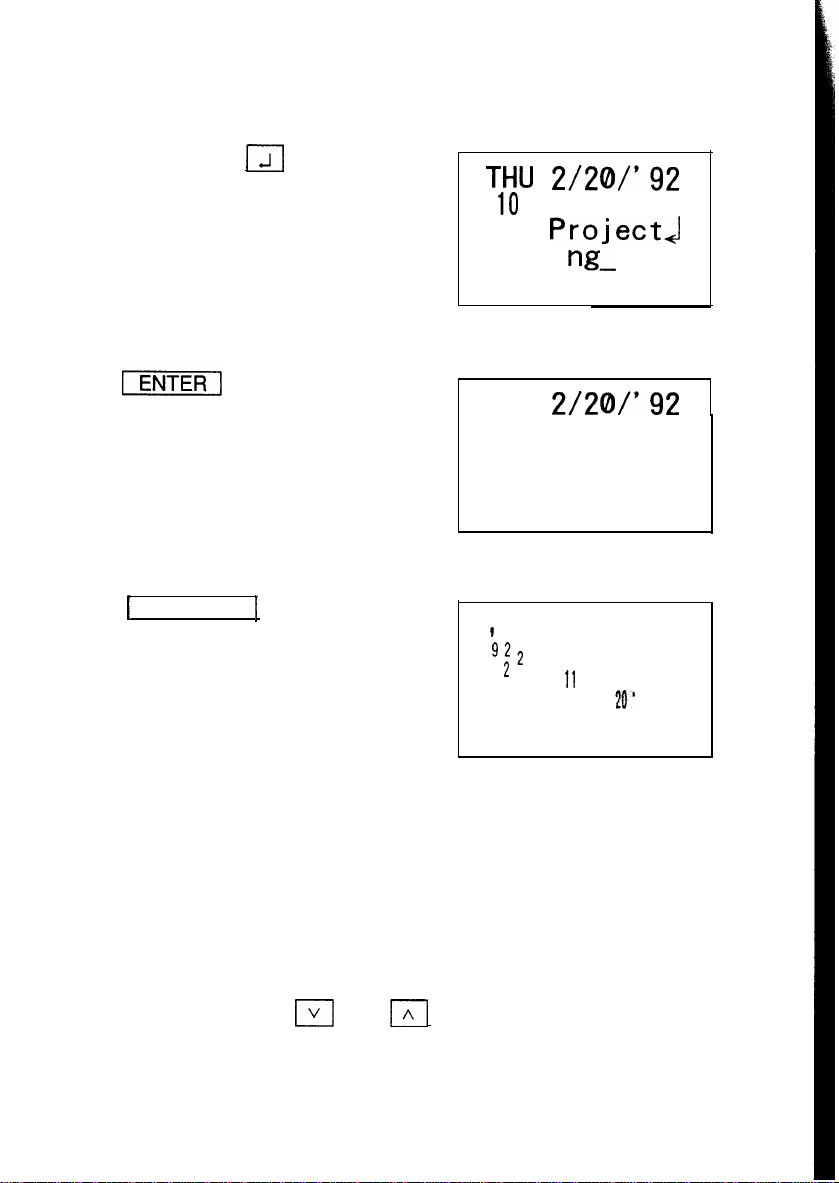
7. After both starting and finishing times are entered, enter the schedule
detail.
ABC Project
meeting
: OOAM-
ABC
meet i
8. Store the scheduled meeting in the memory.
THU
10
:
ABC Project
meeting
9. Now, check to see if the data was registered in the memory.
CALENDAR
3
9 10
16
17 18 19
23 24 25 26 27 28 29
OOAM-
4
5
2 : OOPM
2 : OOPM
1
6 7 8
15
21
22
Notice the tag ( n ) next to “February 20”. It indicates a scheduled item
for that date. (Items beginning in the morning result in a tag at the upper
right of the date, while those beginning after noon result in a tag
appearing at the lower right of the date.)
Entering items from the SCHEDULE mode
There are two methods of selecting the date depending on which is more
convenient.
Selecting the date with
This method is convenient for displaying a nearby date. It changes the
schedule display day by day until the desired date appears.
and
31
Page 29
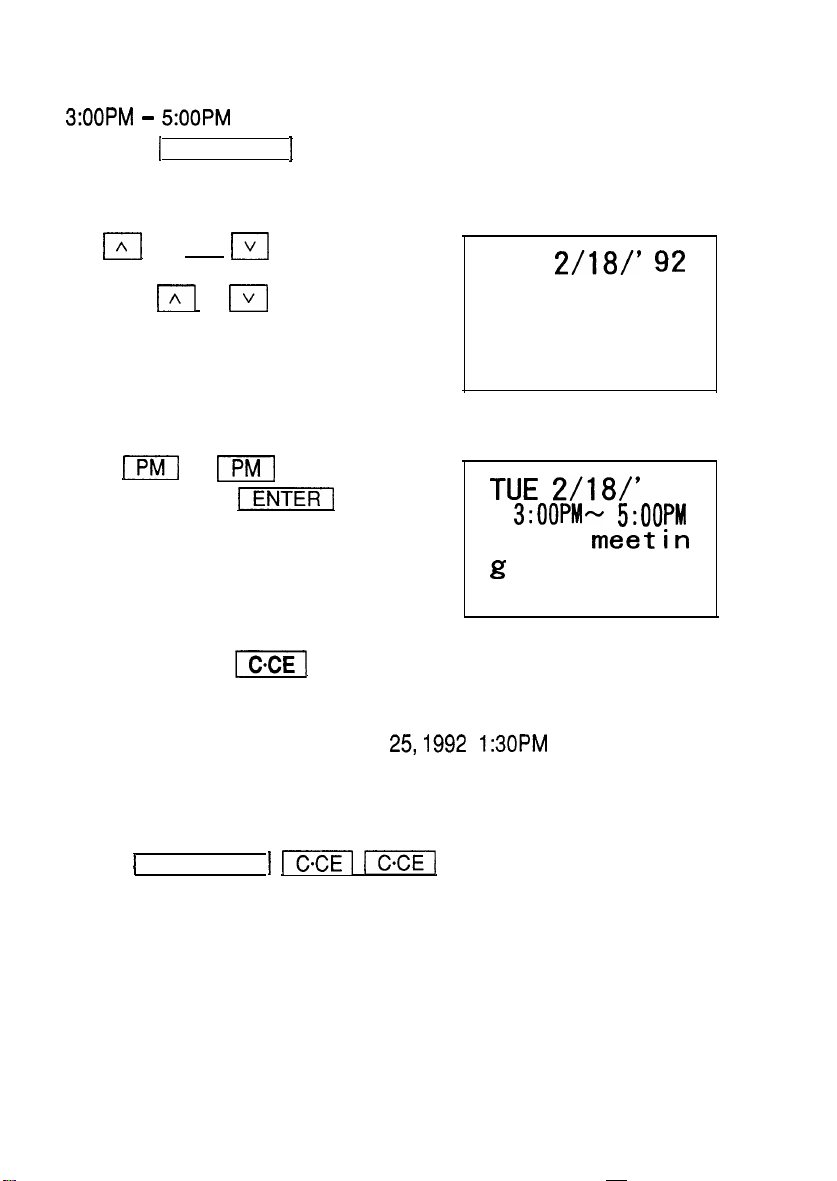
For example, if you wish to schedule an item such as, “February 18,
5:OOPM Sales meeting”
1. Press 1 SCHEDULE 1 .
2. Recall “February 18”.
or
Press
18” is recalled.
3. Enter the schedule time and detail.
or
until “February
TUE
3
Sales meeting
5
92
Sales
Scheduling with
When the date is not close to the displayed date, you may find it more
convenient to enter the schedule items with the numerical keys.
For example, to schedule, “February 25,1992 1:30PM DR. WILSON VISIT
AT GUEST ROOM”.
1. Enter the date entry mode.
2. Enter the scheduled date. (February 25, 1992)
02 25 1992
and the numerical keys
32
Page 30
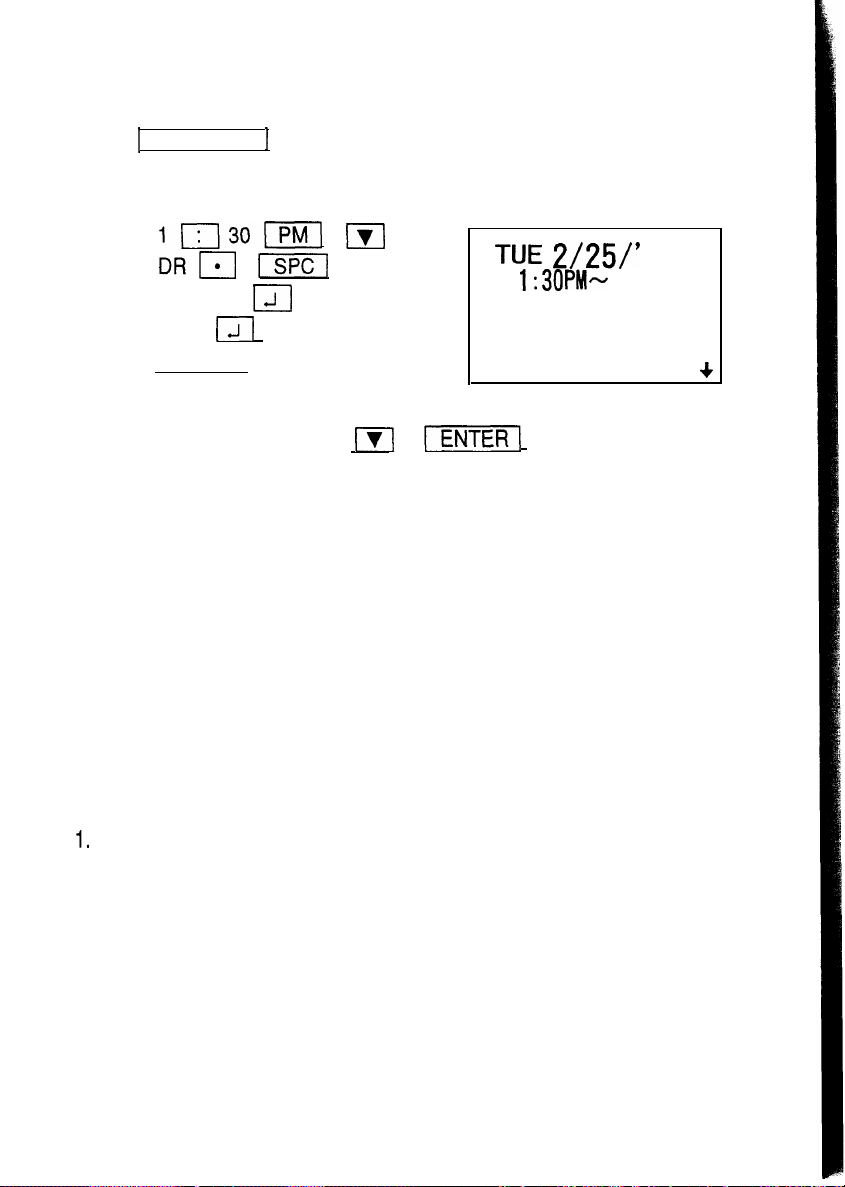
3. Select the SCHEDULE mode.
4. Enter the scheduled time and detail.
92
WILSON
VISIT
[ENTER]
Note: If you don’t know what time a scheduled item, such as a meeting,
will finish, press either
time, then enter the schedule item.
AT GUEST ROOM
or
DR. W I LSON
VISIT
following the starting
Scheduling items without times
After selecting the schedule date as outlined above, schedule items can
be entered directly without a specified time, except in instances when the
data begins with a number. Simply begin by entering the letters in the
item. (In this instance, the tag marking the scheduled item on the monthly
calendar will appear on the-upper right next to the date.)
Recalling scheduled data
The following 7 methods may be used to display previously scheduled
items.
Recalling today’s agenda.
2. Recalling scheduled items from the CALENDAR mode.
3. Recalling scheduled items from the SCHEDULE mode.
4. Recalling only scheduled dates (skip empty dates).
5.
Recalling scheduled items from the SCHEDULE mode by entering the
date numerically.
6. Recalling scheduled items by using the first letter(s) of the item.
7. Recalling scheduled items with a keyword search.
33
Page 31
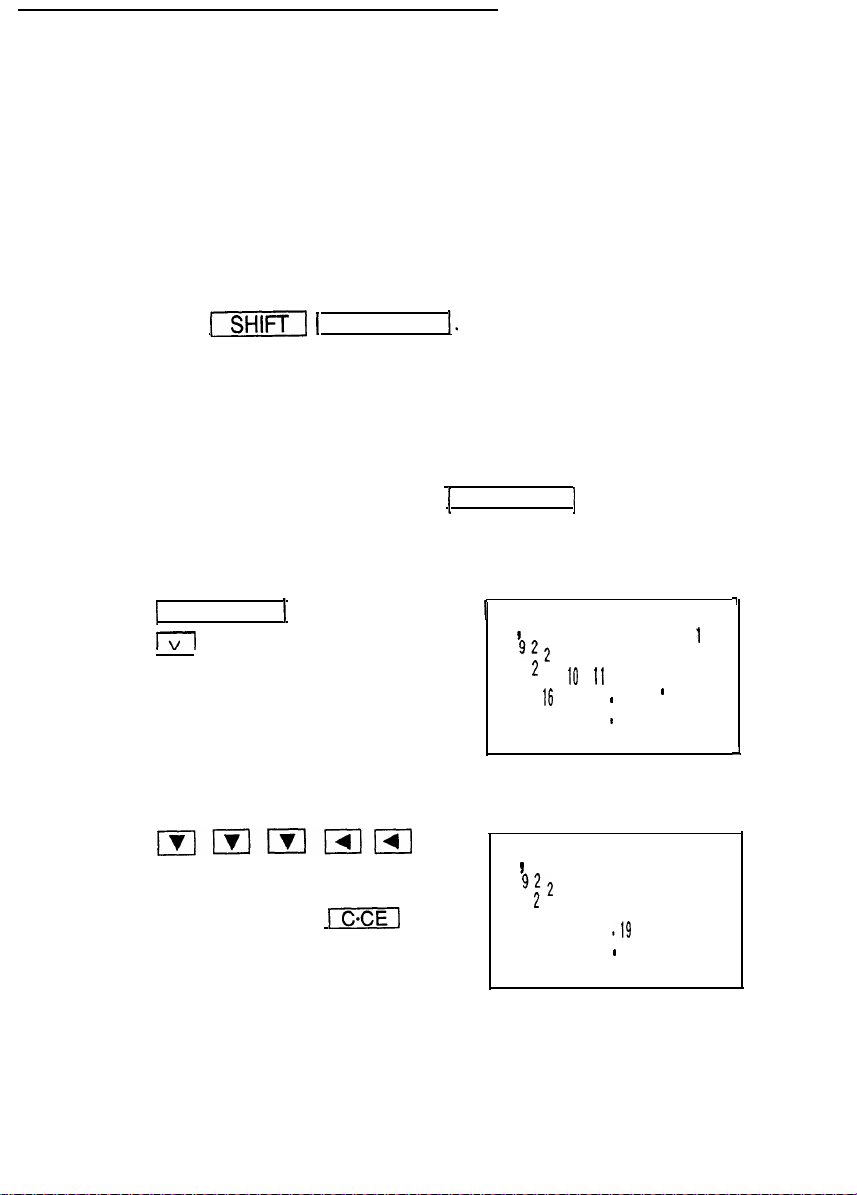
Note:
When several schedule items are entered for the same day, items
without a specified time are recalled first, followed by items with a
specified time in chronological order.
When there is more than one schedule item with the same starting
time, items with an earlier finishing time are recalled first.
Recalling today’s agenda
Press
1 SCHEDULE I.
If nothing has been entered for the day, only the date will be displayed.
Recalling scheduled items from the CALENDAR mode
When a daily schedule is recalled from the CALENDAR mode, first select
the CALENDAR mode and then press
For example, to recall the schedule for February 20, 1992:
1. Select the CALENDAR mode.
2. Select the 20th with the cursor keys.
Note: You may also recall February
20 by pressing
entering the date.
SCHEDULE
and
.
3
4
567
9
23 24 25 I 26 27 28 29
99
1616
2323
12 131415
3434 56 756 7
10 1110 11 12 13 1412 13 14
17 1817 18 119 20’21119 20’21
24 2524 25
26 27 28
26 27 28
8
20 ’’
21
22
11
88
1515
2222
2929
34
Page 32

3. Recall the schedule display.
[SCHEDULE 1
THU
92
ABC Project
meeting
Recalling scheduled items from the SCHEDULE mode
To recall the schedule directly from the SCHEDULE mode in forward or
reverse direction, first set the SCHEDULE mode and then press
recall the next day and future days) or
days) as required.
For example, to recall the schedule for January 10, 1992 (today):
1. Select the SCHEDULE mode and display the today’s schedule.
1 SCHEDULE 1
(to recall the last and previous
FRI
(to
2. Recall the schedule for the next day.
V
The agenda for the next day will be
displayed. If there are several items
scheduled on the same day,
use v
chronological order.
to recall them in
SAT
35
Page 33

Recalling only scheduled dates (skip empty dates)
Press
items on the agenda are searched for, starting with the day appearing on
the display.
1.
repeatedly so that the days on which there are
Search for all days containing agenda items.
Sales
2. Press
*
After the last agenda item has been found, “NOT FOUND!” is briefly
displayed and then the previous display reappears. Pressing
* Pressing 1 SCHEDULE
displays the oldest past agenda item. If you press
the most distant future agenda item is displayed.
to recall the next agenda items.
, references agenda items in reverse.
and
Recalling scheduled items from the SCHEDULE mode by
entering the date numerically
You can recall the date directly from the SCHEDULE mode by numerical
entry. Select the SCHEDULE mode, press
with the numerical keys in accordance with the prompts. This method is
handy for recalling scheduled items which are far away.
, then enter the date
For example, to recall the schedule for February 18, 1992:
1. Enter the date entry mode.
36
Page 34

2. Enter the date.
02
1992
MONTH:02
DAY
YEAR
3. Recall the agenda for that date.
Sales
Recalling scheduled items by using the first letter(s) of
the item
Enter the first letter(s) of the schedule item you would like to recall on the
display and then press
to recall it.
Note: Be sure to enter the first letter(s) exactly as they were entered. A
difference in capital or small letters will not search properly.
For example, to recall the “DR.‘‘-related items scheduled after January
1992 (today):
1. Select the SCHEDULE mode. Today’s schedule is displayed.
37
Page 35

2. Enter the first letter(s).
DR.
3. Begin the search.
V
FRI
DR.
TUE
92
DR. W I LSON
VISIT
Note: When
will begin for scheduled items beginning with the word “DR.“.
If
scheduled before the date presently appearing on the display.
is pressed, a forward search from the displayed date
is pressed, a reverse search will take place for items
Recalling scheduled items with a keyword search
Enter any word contained anywhere in the entry, and the Organizer will
find it with
Note: Be sure to enter the keyword exactly as it was entered. Adifference
in capital or small letters will not search properly.
To search for agenda items containing the word “meeting”, after January
1, 1992, for example:
1. Recall the schedule for January 1, 1992.
.
01 01 1992
SCHEDULE 1
Page 36

2. Enter the keyword for the search.
meeting
3. Begin the search.
WED
meet i
TUE
3:
OOPM-
5:
Sales
The first scheduled item containing the word “meeting” after January 1,
1992 will appear on the display.
Repeated search:
To search for additional items containing the word “meeting”, press
repeatedly. When no more items containing the word
“meeting” are scheduled, “NOT FOUND!” will appear on the display.
Reverse search:
To browse back through the list of entries containing the keyword,
press
1/\1 .
39
Page 37

Editing scheduled data
Previously scheduled data may be edited by pressing
. Once the edit mode is entered, the data may be edited directly
using
, etc.
For example, to change “GUEST ROOM” within a schedule item on
February 25, to “MEETING ROOM”:
Recall this item on the schedule for February 25.
,
and
2. Enter the edit mode.
02 25 1992 1 SCHEDULE
TUE
92
DR. W I
EDIT
3. Move the cursor to the section to be edited and correct it.
DR. W I
VISITS
AT MEETING R
t
4. Store the edited data.
EDIT
TUE
DR. W I LSON
VISIT
I
Page 38

Copying scheduled data
If you would like to enter a new item on a different date that has the same
or similar content to a previously scheduled item, you may save time by
copying the previous entry onto the new date using the copy function and
editing it later if required.
The copy function operates similarly to the edit mode, instead of pressing
to store the data,
the data is copied onto the new date, it also remains on the previous date
as it was originally entered.
For example, if the “ABC Project meeting” scheduled on February 20 is
also to be held at the same time on March 6, you may copy it onto the
new date as follows:
1. Recall the items scheduled for February 20 and enter the edit mode.
are pressed. After
[SCHEDULE
20
2. Change the date.
03 06
(You can also change the entire date by pressing
point and reentering the entire date.)
3. Copy the data.
1
2:OOPM
ABC
meeting
EDIT
FRI
:
ABC Project
meeting
2 : OOPM
1
at this
41
Page 39

(in this instance, the time and detail are stored in the memory as is
without correction. If the copied data requires additional editing, it may
be edited as described in “Editing scheduled data” above.)
Deleting scheduled data
Scheduled data can be deleted by the following three methods:
1. Deleting one agenda item at a time
2. Deleting the agenda for an entire month
3. Deleting all of the data in the schedule memory
Deleting one agenda item at a time
First recall the data you would like to delete on the display and delete it
with
For example, to delete the “ABC Project meeting” scheduled for March 6:
1. Recall the schedule for that day.
and
SCHEDULE
2. Press
3. The delete prompt appears.
Press
*
After deletion, the next agenda item for that day or that date alone will
be displayed.
. (To retain the data, press
03
1992 SCHEDULE
06
FRI
: OOAM-
2 : OOPM
92
42
Page 40

Deleting the agenda for an entire month
To delete the agenda for February, 1992, for example:
1. Select the CALENDAR mode and display the calendar for the month
you would like to delete.
CALENDAR 1
2.
Press
3. The delete prompt appears.
Press
After the agenda for the month has been deleted, the flags on scheduled
dates will disappear from the calendar.
. (To retain the data, press
02011992 CALENDAR
314 5 6 7
9 10
11 12 13 14 15
Deleting all the data in the schedule memory
All the data in the schedule memory can be deleted using the miscel-
laneous functions.
1. Recall the miscellaneous function menu.
FUNCTION 1
FUNCTION
MEMORY CHK
LCD CONT
DATA DEL
I
43
Page 41

2. Select “3 DATA DEL”.
3
3. Select “3 SCHEDULE”.
3
4. Select “1 SCHEDULE”.
1
DATA DEL
TEL
MEMO
SCHEDULE
SECRET DT.
DATA DEL
SCHEDULE
ANN
5. The delete prompt appears.
Press
Note: When the secret function is turned on, “SECRET ON!” will appear
. (To retain the data, press
on the display. In this instance, the secret function must be turned
off first before the data can be deleted. (Refer to “Turning off the
secret function,” page 78.)
Page 42

Using the schedule alarm
The Organizer schedule alarm sounds when the time for a scheduled
appointment or other item on the agenda arrives. To stop the alarm after
it starts beeping, simply press
alarm will stop automatically after approximately 20 seconds.
Setting the alarm to ring
The schedule alarm can be set for a scheduled appointment.
1) Select an agenda item and mark it for the alarm with
2) Activate the alarm for that item with
Once an agenda item has been selected for an alarm and the alarm has
been turned on, the alarm will sound automatically and the relevant item
will be displayed even if the Organizer has been turned off. The alarm
can also be set to sound for secret items without displaying the item.
If you do not wish to have the alarm sound at that time, you can turn the
alarm off.
Setting the schedule alarm
First display the schedule item for which you wish to set the alarm and
press
for the scheduled item on the display, to indicate that the alarm has been
set for that item. You can also set the alarm while you schedule an item
on the agenda by pressing
However, when you press
the alarm will be canceled and
For example, to set an alarm for a meeting scheduled on December 18
(“December 18, 1992, 10:00 AM-1 1:00 AM Meeting”) while entering the
schedule item:
.
. If
appears to the left of the starting time
while
will disappear from the display.
is not pressed, the
is displayed,
1. Enter the date, time, and schedule detail.
12 18 1992
10 [AM] 11
Meeting
SCHEDULE 1
Meet i ng
45
Page 43

2. Set the alarm.
Meeting
(Once the alarm has been set for the schedule item,
before the scheduled starting time.)
3. Store the item.
appears
Meeting
will appear.)
The alarm will sound at the starting time of the meeting.
*
Note: If the time of the schedule item for which you wish to set the alarm
appears or disappears each time
has already passed, the following message appears on the display.
I
are pressed.
After the alarm sounds, will disappear and the scheduled item will
remain in memory without
If
is turned off and the set alarm time has passed,
front of the scheduled item.
46
will remain in
Page 44

Anniversaries (date, label) can be stored in the Organizer. Once a date
is designated as an anniversary, the date will be an anniversary for every
year from 1901 to 2099. Thus, the anniversary function serves as a
mnemonic aid for these important personal dates.
Note: Anniversary data cannot be coded as secret data.
Entering anniversaries
To enter “NANCY’S BIRTHDAY” on February 12, for example,
described below.
1. Select the ANNIVERSARY mode.
2. Enter the date.
02 12
proceed as
M=MONTH
D=DAY
3. Enter the label.
NANCY’S
BIRTHDAY
NANCY’S
BIRTHDAY
47
Page 45

Recalling anniversaries
After selecting the ANNIVERSARY mode, anniversaries are recalled in
calendar sequence each time
1. Select the ANNIVERSARY mode.
2. Recall the anniversary.
V
is pressed.
NANCY’ S
BIRTHDAY
Note:
Each time
recalled in calendar sequence (forwards or backwards).
or
is pressed, the next entry will be
Checking anniversaries
After pressing
anniversaries in that month will be displayed while
Check whether there are any anniversaries in February.
1. Display the calendar.
02 01
(Valid for any year.)
2. Display the anniversaries.
(Displayed while pressed.)
[CALENDAR 1
in a monthly calendar display, the
is held.
12 13 14 15
161718 192021
23 24 25 26 27 28 29
12
i
22
48
Page 46

Note:
If there are no anniversaries in the specified month, the display
on the right will appear:
Editing anniversaries
To edit an anniversary entry, for example, such as changing “NANCY’S
BIRTHDAY” to “CATHY’S BIRTHDAY”:
1. Recall the entry, “February 12th, NANCY’S BIRTHDAY”.
(Press
appears.)
2. Enter the edit mode.
3. Move the cursor to the letter you wish to correct and correct it.
or
repeatedly until the “NANCY’S BIRTHDAY”
49
Page 47

To correct the date, first enter the edit mode, then press
date flashes, enter the correct date and press
until the
.
Note: If
the correction, data can be copied. (Refer to “Copying scheduled
data,” page 41)
are pressed instead of
Deleting anniversaries
Deleting one entry
To delete the “CATHY’S BIRTHDAY” entry, for example:
1. Recall the entry “CATHY’S BIRTHDAY”.
(Press
2. Press
repeatedly until “CATHY’S BIRTHDAY” appears.)
CATHY’ S
after
3. The delete prompt appears.
Press
. (To retain the data, press
Deleting all the entries
Recall the miscellaneous function menu.
1 FUNCTION
50
FUNCTION
MEMORY CHK
LCD CONT
DATA DEL
Page 48

2. Select “3 DATA DEL”.
3
3. Select “3 SCHEDULE”.
3
4. Select “2 ANN”.
2
DATA DEL
TEL u MEMO
SCHEDULE
SECRET DT.
I
DATA DEL
SCHEDULE
ANN
5. The delete prompt appears.
Press
Note: When the secret function is turned on, “SECRET ON!” will appear
. (To retain the data, press
on the display. In this instance, the secret function must be turned
off first before the data can be deleted. (Refer to “Turning off the
secret function,” page 78.)
51
Page 49

The telephone directory stores the names, telephone numbers, and addresses of business clients, companies, personal friends and so on.
The Organizer’s telephone directory is actually three different telephone
directories in one
and other listings separate.
TEL2, and TEL3) for keeping business, private,
Designating the file names
The file names for the different directories (business, private, etc.) can be
input from the miscellaneous function mode. Input directory file names of
10 letters or less as follows:
1. Recall the miscellaneous function menu.
TEL FILENAME
(The prompt for entering the direc-
tory file name will appear.)
I
2. Store the directory file names.
TEL
TEL
TEL
Business
Private
*
If you do not wish to assign a file name to a directory, skip this step by
pressing
*
To discontinue the entry of a directory file name, press
*
When “CAPS” appears on the display, capital letters are entered, and
.
twice.
53
Page 50

when not, small letters are entered. Pressing
between capital and small letters.
alternates
Entering listings
Telephone listings can be entered into any of the three directories.
Pressing
presses display the TEL2, TEL3, and again the TEL1 directories.
for the first time displays directory TEL 1. Subsequent
Press
TEL1
(Display the file name.)
Entering telephone listings into the TEL1 directory
To enter two sample listings into the TEL1 directory, follow steps 1 to 5
below:
EDWARDS BOB
DAVIS MIKE
1. Select the TEL mode.
214-456-7890
. TEL2
Press
Press
. TEL3
FAX 2651869 President,
Davis Assoc.
Co.
*Business
(Press
TEL1 directory name appears.)
2. Enter the name of the first party.
repeatedly until the
NAME ?
EDWARDS BOB
54
EDWARDS BOB
NUMBER ?
Page 51

3. Enter the party’s telephone number and fax number.
20 l-265-5600
FAX 2651869
EDWARDS BOB
ADDRESS ?
4. Enter the person’s position and company name, etc.
President
EDWARDS BOB
201-265-5600
FAX 265-1869
President
Notes:
l
To skip the party’s telephone number or company name and address,
simply press
l Check the listing for mistakes before pressing
are, correct them using the cursor keys (
. If you find any mistakes after you have already pressed
, then correct the listing using the editing function. (Refer
to “Editing listings,” page 58.)
at this point.
,
. If there
, and
and then press
5. Enter the next listing, “DAVIS MIKE”, in the same manner.
DAVIS MIKE
2 14-456-7890
Davis Assoc.
DAVIS MIKE
214-456-7890
Dav i s Assoc.
55
Page 52

Entering listings into the TEL2 directory:
JONES JACK 708-759-8555 Romeoville, Illinois
1. Display the TEL2 directory.
(Press
TEL2 directory name appears.)
2. Enter listings as for
JONES JACK
708-759-8555 1 ENTER 1
Romeoville
Illinois
repeatedly until the
ENTER 1
*Pr i vate
JONES JACK
Romeoville
II I inois
I
Recalling listings
The telephone listings are stored in the order described on page 61.
There are three methods of retrieving telephone listings.
1. Sequential search, which retrieves the listings in alphabetical order
2. Direct search using the first letter(s) of the party’s name
3. A keyword search for any word contained in the listing
Recalling a listing with a sequential search
1. Select the TEL1 directory.
(Press
56
TEL
repeatedly until the TEL1 directory name appears.)
Page 53

2. Recall the first listing.
V
(When
the listings begins in alphabetical
order.)
3. Recall subsequent listings.
is pressed, a search of
V
DAVIS MIKE
214-456-7890
Dav i s Assoc.
EDWARDS BOB
201-265-5600
FAX 265-1869
President
Note: Pressing
recalls the listings in reverse order.
Recalling a listing with a direct search
Press
originally entered.
, then enter the first letter(s) of the party’s name and press
. Capital and small letters must be entered exactly as they were
To recall a listing which starts with “E”, for example, in the TEL1
directory, first select the TEL mode.
EDWARDS BOB
201-265-5600
FAX 265-1869
President
*
Subsequent entries will be searched in sequential order, from the
listing displayed.
Page 54

Recalling a listing with a keyword search
To perform a keyword search, press
contained in the desired listing and press
Note: Capital and small letters must be entered exactly as they were
originally entered.
Recall listings containing the word “AbC Co.“, for example, in the TEL1
directory. First select the TEL mode.
, then enter any word
.
EDWARDS BOB
FAX
265-l 869
President
Each time
the word “AbC Co.” will be displayed.
are pressed, successive listings containing
Editing listings
To edit a listing, recall it, and then press
edit mode.
Use
you may type over the data. Or, press
cursor to
To add the name “SHARP CORP.” to the listing for “JONES JACK” in the
TEL2 directory, for example:
1. Select the TEL2 directory and recall the listing for “JONES JACK”.
(Press
and you may insert new data.
repeatedly until the listing appears.)
or
to delete data. With the cursor
to enter the
n
to change the
58
Page 55
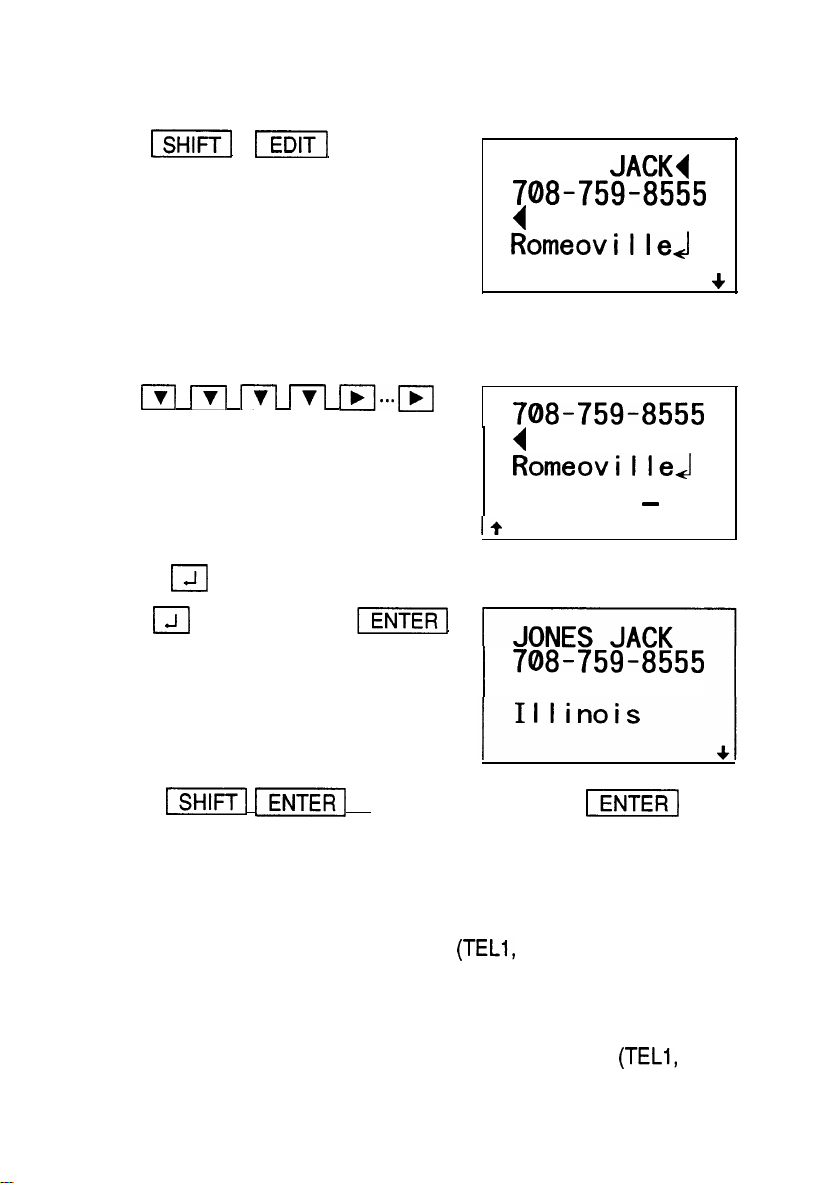
2. Enter the edit mode.
JONES
EDIT
3. Move the cursor to the end of the address to add the company name
using the cursor movement keys.
II I inois
EDIT
4. Press
and enter the company name.
SHARP CORP.
Romeoville
Note: If
the correction, data can be copied. (Refer to “Copying scheduled
data,” page 41)
are pressed instead of
Deleting listings
Either single listings or an entire directory
deleted as required.
Deleting single listings
1. Select the directory containing the listing to be deleted
or TEL3).
TEL2, or TEL3) can be
after
TEL2,
59
Page 56

2. Recall the listing to be deleted.
Press
several times until the listing is displayed.
3. Delete the entry with
4. The delete prompt appears.
Press
. (To retain the data, press
Deleting entire directories
Any one of these directories can be deleted separately by using the
miscellaneous function “DATA DEL”.
To delete TEL2, for example:
1. Recall the miscellaneous function menu.
1 FUNCTION 1
2. Select “3 DATA DEL”.
3
TEL2, or TEL3)
DATA DEL
TEL
MEMO
SCHEDULE
SECRET DT.
3. Select “1 TEL”.
4. Select “2
2
60
DATA DEL
TEL2
TEL3
TEL2
Page 57

5. The delete prompt appears.
Press
Note:
The characters are sorted in the following order:
When the secret function is turned on, “SECRET ON!” will appear
on the display.
off first before the data can be deleted (Refer to “Turning off the
secret function,” page 78.)
.(To retain the data, press
In this instance, the secret function must be turned
61
Page 58

The Organizer’s memo function conveniently stores odd bits of information
not appropriate for the schedule or other directories.
Entering memos
To enter the following two items, for example:
“X’mas presents, Jill sweater, Mother ring”
“ABC BANK Chicago Branch, Account No. 272-0011223”
1. Select the MEMO mode.
MEMO ?
2. Enter the data.
X’mas presents
Jill 1 SPC 1 sweater
Mother 1 SPC 1 ring
X’ mas presen
Jill sweater
Mother
Page 59

3. Store the entry.
X’ mas presen
Jill sweater
Mother ring
4. Store the second memo in the same manner.
ts
ABC
Chicago Branch
Account No.
BANK
272-0011223
ABC BANK
Chicago Bran
ch
Account No.
Recalling memos
The following three methods can be used to recall memos.
1. Sequential search in the order of entry:
Press
Press
2. A direct search for the first letter(s) of the entry:
Enter the first letter(s) of the memo entry. Press
forward. Press
Subsequent memos will be displayed in sequential order each time you
press
3. Keyword search for a key word contained in a memo:
Enter any word or part of a word contained in the memo and
press 1 SHIFT 1
a reverse search.
to display each memo in the order it was entered.
to reverse the order of display.
to search
to search backward.
or 1/\1 .
or
initiates a forward search.
1/\1 .
initiates
64
Page 60

Recalling memos with a sequential search
Each time
is
Select the MEMO mode and recall the data.
is Dressed. data is recalled in the order of entry. When
data is searched in reverse order.
X’ mas presen
ts
Jill sweater
Mother ring
Each time
*
If you press
appear on the display.
*
Reverse search works in the same manner.
is pressed, the next item is displayed.
after the last entry is displayed, “NOT FOUND!” will
Recalling memos with a direct search
The first letter(s) of the memo can be searched. To continue the search,
press
or reverse order of entry starting with the memo searched.
To search for a memo beginning with the letter “A”, for example:
Select the MEMO mode, then search for a memo entry starting with the
letter “A”.
or 1/\1 repeatedly. The data will be recalled in the forward
ABC BANK
Chicago Bran
ch
Account No.
65
Page 61

Recalling memos with a keyword search
With the keyword search function, the memos containing the key word are
searched out in sequence.
To perform a keyword search for memos containing the word “Act”, for
example:
Enter the keyword in the MEMO mode.
ABC BANK
Chicago Bran
ch
Account No.
(The first memo containing the word
l
Subsequent memos containing the same word can be recalled in
order each time you press
.
will be displayed.)
Editing memos
Memo editing capabilities are similar to those in the SCHEDULE and TEL
modes.
For example, to change “Chicago Branch” to “Boston Branch” in the memo
for ABC BANK:
1. Recall the memo containing “ABC BANK”.
2. Enter the edit mode.
ABC
Chicago Bran
Account No. $
EDIT
66
Page 62

3. Correct “Chicago” to “Boston”.
Boston
Boston Branc
Account No.
EDIT
4. Store the revised version.
ENTER
ABC BANK
Boston Branc
h
Account No.
Note: If
SHIFT I
the correction, data can be copied. (Refer to “Copying scheduled
data,” page 41)
ENTER
are pressed instead of [ENTER] after
Deleting memos
Either single memos or the entire memo list can be deleted as follows:
Deleting single memos
Recall the memo you wish to delete on the display and press [SHIFT]
The delete prompt appears. Press
press
For example, to delete the memo “X’mas presents”:
1. Select the MEMO mode and recall the data.
(Press
pears.)
repeatedly until the memo item “X’mas presents” ap-
(To retain the data,
67
Page 63

2. Press
X’mas presen
ts
Jill sweater
3. The delete prompt appears.
Press
* After the deletion, the next item will appear.
(To retain the data, press
Deleting entire memos
All the memos can be deleted at once using the miscellaneous function
mode as follows:
1. Recall the miscellaneous function menu.
2. Select “3 DATA DEL”.
3
3. Select
2
68
DATA DEL
TEL d MEMO
SCHEDULE
SECRET DT.
MEMO”.
Page 64

4. The delete prompt appears.
Press
in this instance, as we will need to save this data for future examples,
press
Note: When the secret function is turned on, “SECRET ON!” will appear
on the display. In this instance, the secret function must be turned
off before the data can be deleted. (Refer to “Turning off the secret
function,” page 78.)
(To retain the data, press
Page 65

The Organizer’s built-in calculator can perform the four arithmetic calculations with up to
digits.
To use the calculator function, simply press
CALCULATOR mode.
Using the Organizer in the
CALCULATOR mode
Before performing any calculation, press
display.
Example
12x3+5=
(-24)
34 + 57 =
45 + 57 =
48
23 =
68 x 25 =
=
35 + 14=
98
14=
What is 10% of
What percentage is 9 of
Operation
12
24
34
45
48
14
68
35
98
9
36
The addend becomes
a constant.
23
25
40
The
subtrahend
becomes a constant.
The multiplicand
a constant.
The divisor becomes
a constant.
to select the
twice to clear the
Display
(answer)
41.
-8.
91.
102.
25.
-9.
1700.
2720.
2.5
7.
20.
25.
71
Page 66

Example
What results from a 10%
increase of 200?
What is 500 after a 20%
discount?
Operation
Display
(answer)
220.
400.
4.
=
=
Calculate the percent
change between two
yearly sates figures,
$620,000 one year and
$500,000 the previous year.
Calculate the selling price
and the gross profit from a
cost of $8.16 on the basis
of a 15% profit on the
selling price.
Calculate the cost and the
gross profit from a selling
price of $100 on the basis
of a 25% profit on the cost.
(Summation)
25x5=
+) 68+17=
(Total) =
(Temporary memory)
(14
3 x 2) x
(52
35) =
620000
Clear the memory before performing any
calculations
500000
4096.
0.125
24.
9.6 (Selling
price)
1.44 (Gross
profit)
80. (Cost)
20. (Gross
profit)
-M-
125.
28. .
-M- 85.
182.
6.
136.
(Constant memory)
135 x (12 + 14) =
5=
*
Non-zero numbers in the memory cause ‘I-M-” to appear on the display.
-M- 26.
-M- 3510.
-M- 5.2
72
Page 67

When the error message appears
When any of the following occur, an error is registered and ‘I-E-” appears.
Press
input.
to cancel the error. The following are examples of error
Example
Example 2:
Example 3:
Example 4:
1: The integer section in the calculation result has a range of
4567890123
(208.2957896 x
A number is divided by 0.
exceeds 10 digits.
The integer section of the calculation result exceeds 20 digits.
11 to 20 digits (rough estimate).
456
The integer section in the numerical value of the memory
1000000000
208.2957896
=
0.000000001 r%-J
73
Page 68

The Secret function allows you to protect confidential data with a password
so that no unauthorized person can access it. You may mark certain
entries as private; displaying or modifying such data requires the
password. Data can also be classified from the SCHEDULE, TEL, and
MEMO modes.
Registering a password
Press
pear, then enter your password. Press
is now set to operate and
up to seven letters, numbers, spaces, or symbols (except To recall
the password successfully, you must enter it exactly as you entered it,
without, for example, changing capital letters to small or vice versa.
and the password entry prompt will ap-
. The secret function
q
will appear. The password can contain
important:
If you ever forget the password, you will have to erase all
your secret data.
never forget.
Make sure the password is one you will
To register “1234” as the password, for example:
Recall the password entry prompt.
PASSWORD SET
1
Note: If a password has been previously registered, “SECRET OFF” will
be displayed instead. If this occurs, refer to “What to do if you
forget the password” on page 82 and delete the previous password
and secret data.
75
Page 69

The Secret function allows you to protect confidential data with a password
so that no unauthorized person can access it. You may mark certain
entries as private; displaying or modifying such data requires the
password. Data can also be classified from the SCHEDULE, TEL, and
MEMO modes.
Registering a password
Press
pear, then enter your password. Press
is now set to operate and
up to seven letters, numbers, spaces, or symbols (except
the password successfully, you must enter it exactly as you entered it,
without, for example, changing capital letters to small or vice versa.
important: If you ever forget the password, you will have to erase all
To register “1234” as the password, for example:
Recall the password entry prompt.
and the password entry prompt will ap-
. The secret function
q
your secret data.
never forget.
will appear. The password can contain
Make sure the password is one you will
To recall
PASSWORD SET
1
Note: If a password has been previously registered, “SECRET OFF”
be displayed instead. If this occurs, refer to “What to do if you
forget the password” on page 82 and delete the previous password
and secret data.
will
75
Page 70

2.
Enter “1234” as the password.
1234
3. Store the password in the memory.
Make sure it is right!
This is the last time you will ever see
the password.
*
After the password is registered, the secret function is set to operate
and
.
will appear. After rechecking the password, press
Coding data as secret data
Any entry can be coded as secret data by pressing
so that
secret function is turned off by entering the password.
appears. Data coded with ‘W’ cannot be recalled until the
Coding previously stored data as secret data
Recall the item which you wish to encode, enter the edit mode and mark
that item with
To
convert the “ABC BANK” entry in the MEMO mode to secret data, for
example:
1. Recall “ABC BANK”.
ABC BANK
Boston
h
Account No.
76
Page 71

Page 72

Page 73

Page 74

Page 75

Page 76

Page 77

Page 78

Page 79

Page 80

Page 81

Page 82

Page 83

Page 84

Page 85

Page 86

Page 87

Page 88

Page 89

Page 90

Page 91

Page 92

Page 93

Page 94

Page 95
Page 96

Page 97

 Loading...