

Sharp XV-Z9000E User Manual
Using the Operation Buttons
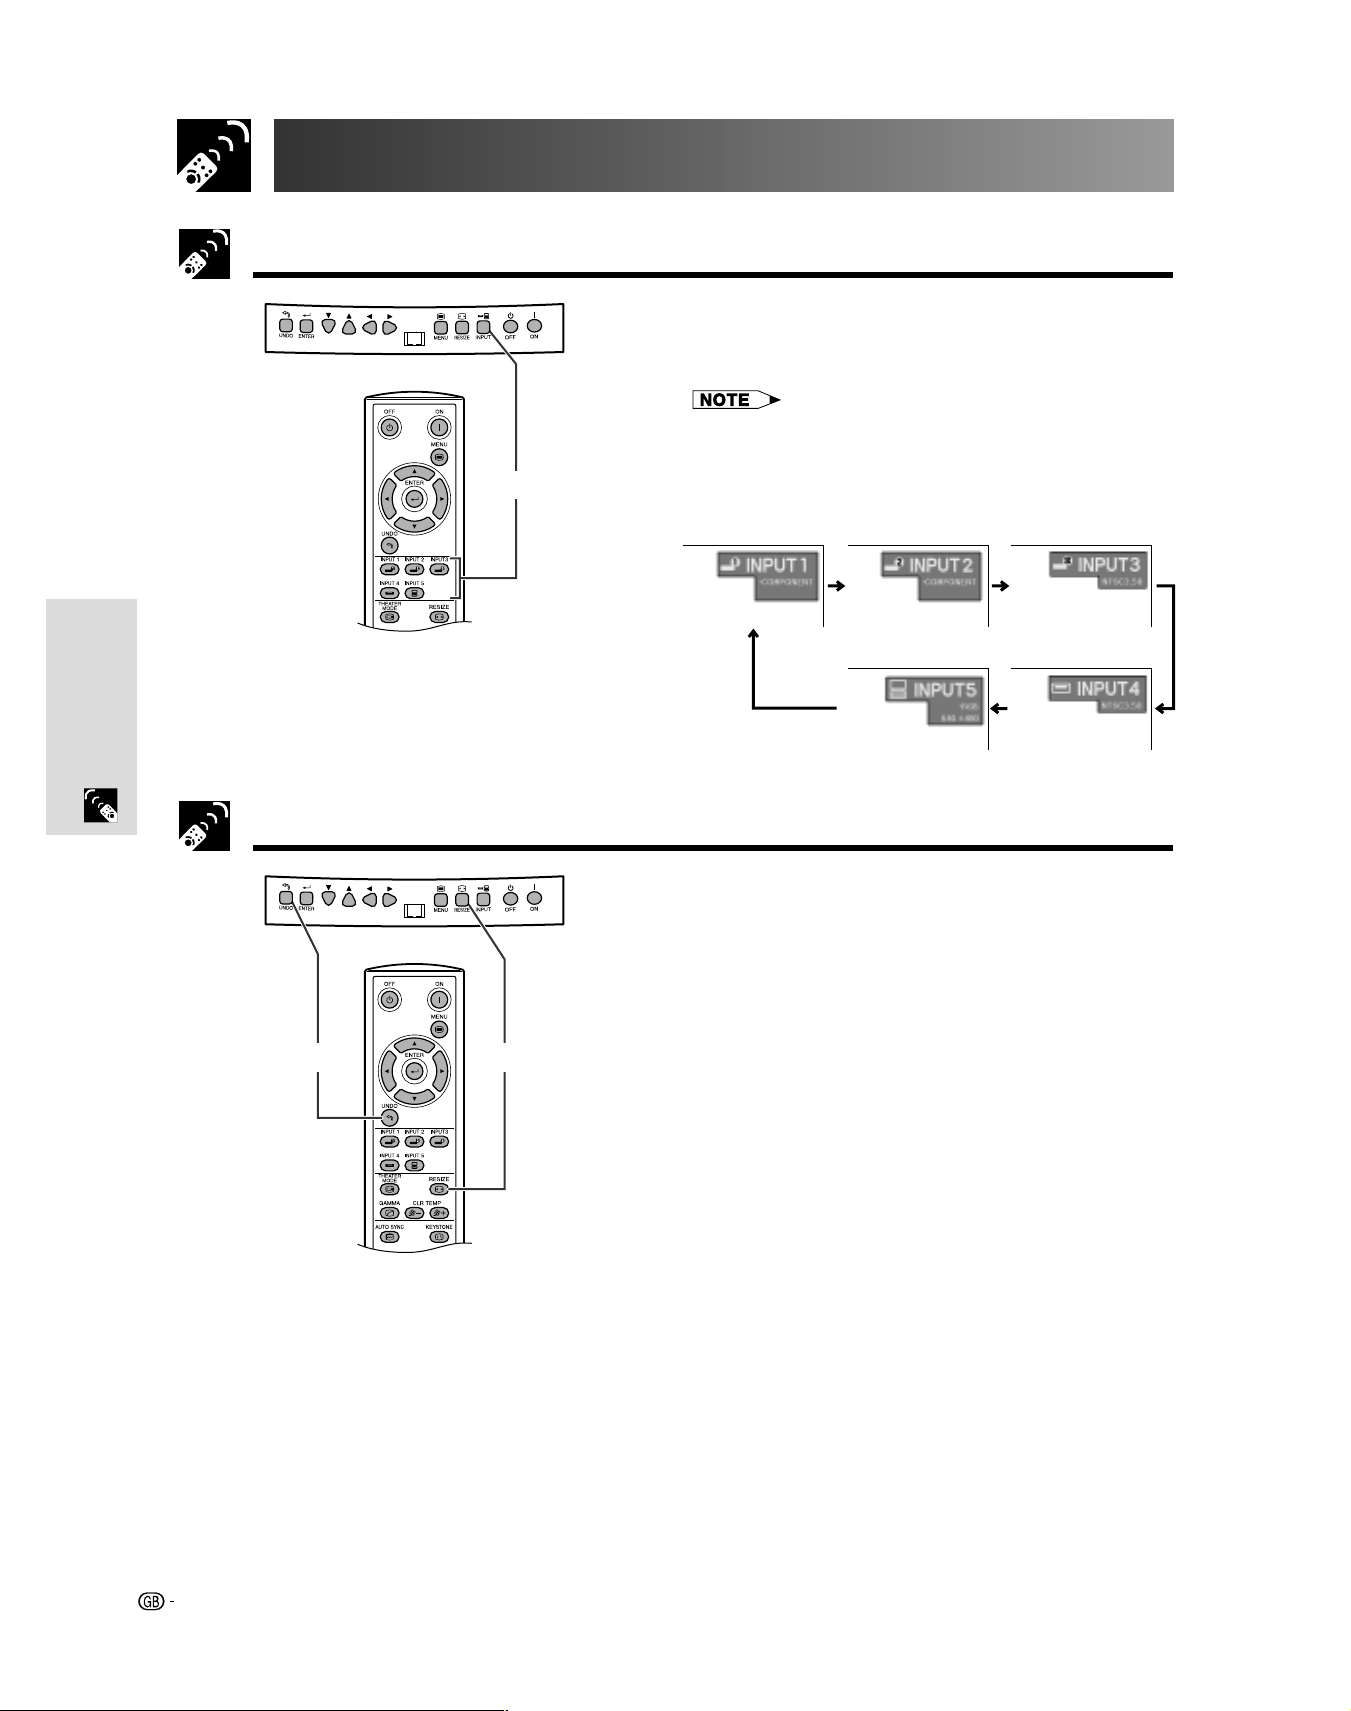
Selecting the Input Signal Source
Press INPUT on the projector, INPUT 1, INPUT 2,
INPUT 3, INPUT 4 or INPUT 5 on the remote control
to select the desired input mode.
• When no signal is received, “NO SIGNAL” will be displayed.
When a signal that the projector is not preset to receive is
received, “NOT REG.” will be displayed.
INPUT buttons
On-screen Display
INPUT 1 Mode INPUT 2 Mode
INPUT 3 Mode
Operation Buttons
INPUT 5 Mode
Adjusting the Picture Aspect Ratio
This function allows you to modify or customize the
picture display mode to enhance the input image.
Depending on the input signal, you can choose SIDE
BAR, SMART STRETCH, CINEMA ZOOM, STRETCH,
NORMAL, or DOT BY DOT image.
1 Press RESIZE. Each time RESIZE is pressed, the
picture mode changes as shown on the next page.
12
2 To return to the standard image, press UNDO
while “RESIZE” is displayed on the screen.
INPUT 4 Mode
23
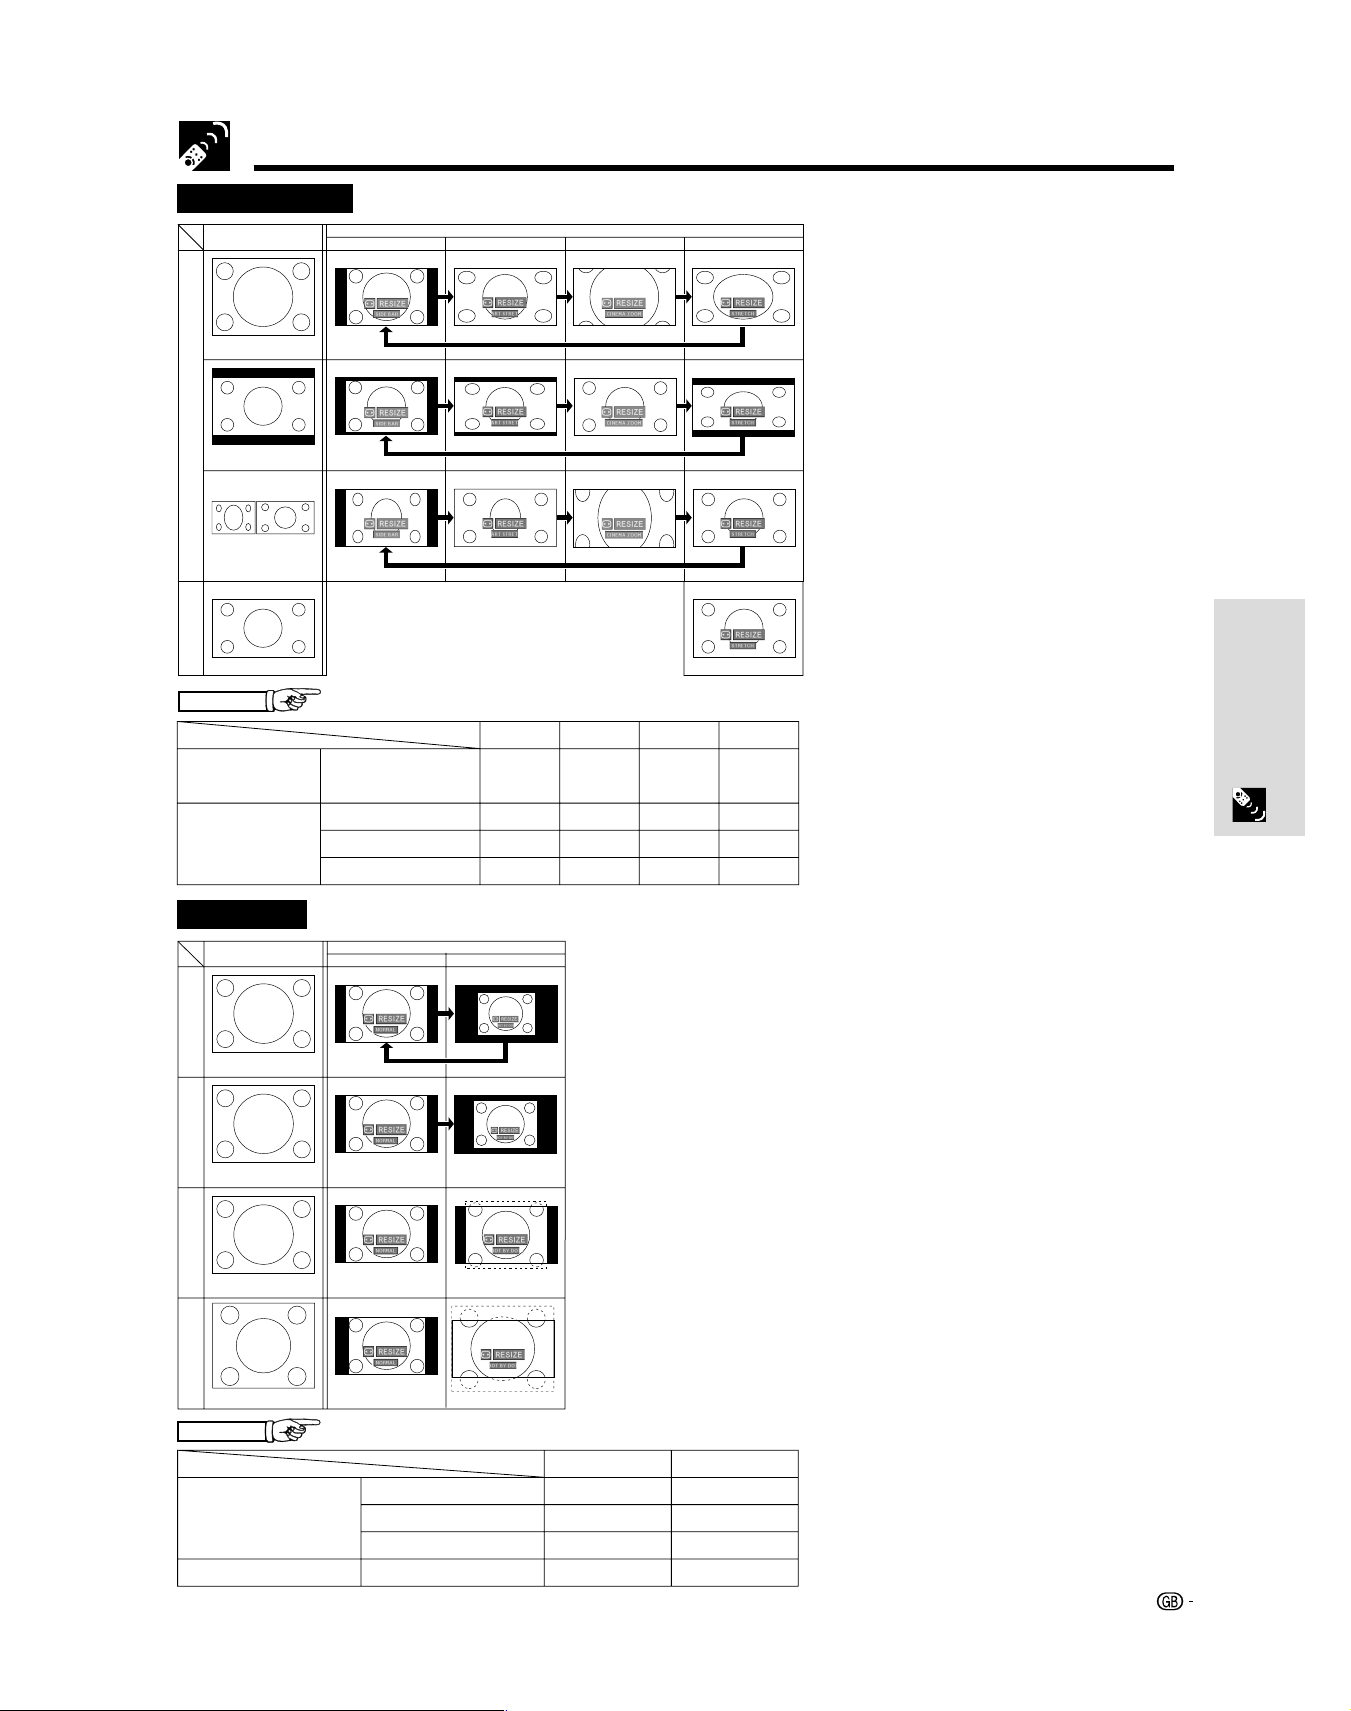
Adjusting the Picture Aspect Ratio
VIDEO/DVD/DTV
Input Signal
For 4:3 aspect ratio
480i
480P
NTSC
PAL
SECAM
Letter box image
With squeeze
SIDE BAR SMART STRETCH
Output screen image
STRETCHCINEMA ZOOM
720P
1080i
For 16:9 aspect ratio
EXAMPLE
For 4:3
aspect ratio
For 16:9
aspect ratio
COMPUTER
Input Signal
VGA
For 4:3 aspect ratio
(640 ⳯ 480)
SVGA
For 4:3 aspect ratio
(800 ⳯ 600)
480i
480P
NTSC
PAL
SECAM
Output screen image
NORMAL
SIDE BAR STRETCH
960 ⳯ 720 1280 ⳯ 720
960 ⳯ 720 1280 ⳯ 720480P
––720P
––
SMART
STRETCH
CINEMA
ZOOM
1280 ⳯ 720
1280 ⳯ 720
–
–
DOT BY DOT
Operation Buttons
1280 ⳯ 720
1280 ⳯ 720
1280 ⳯ 720
1280 ⳯ 7201080i
XGA
For 4:3 aspect ratio
(1024 ⳯ 768)
SXGA
For 5:4 aspect ratio
(1280 ⳯ 1024)
EXAMPLE
4:3 aspect ratio
For 4:3
aspect ratio
For without
NORMAL DOT BY DOT
960 ⳯ 720 800 ⳯ 600 SVGA (800 ⳯ 600)
960 ⳯ 720 1024 ⳯ 720XGA (1024 ⳯ 768)
960 ⳯ 720 1280 ⳯ 720SXGA (1280 ⳯ 960)
900 ⳯ 720 1280 ⳯ 720SXGA (1280 ⳯ 1024)
24
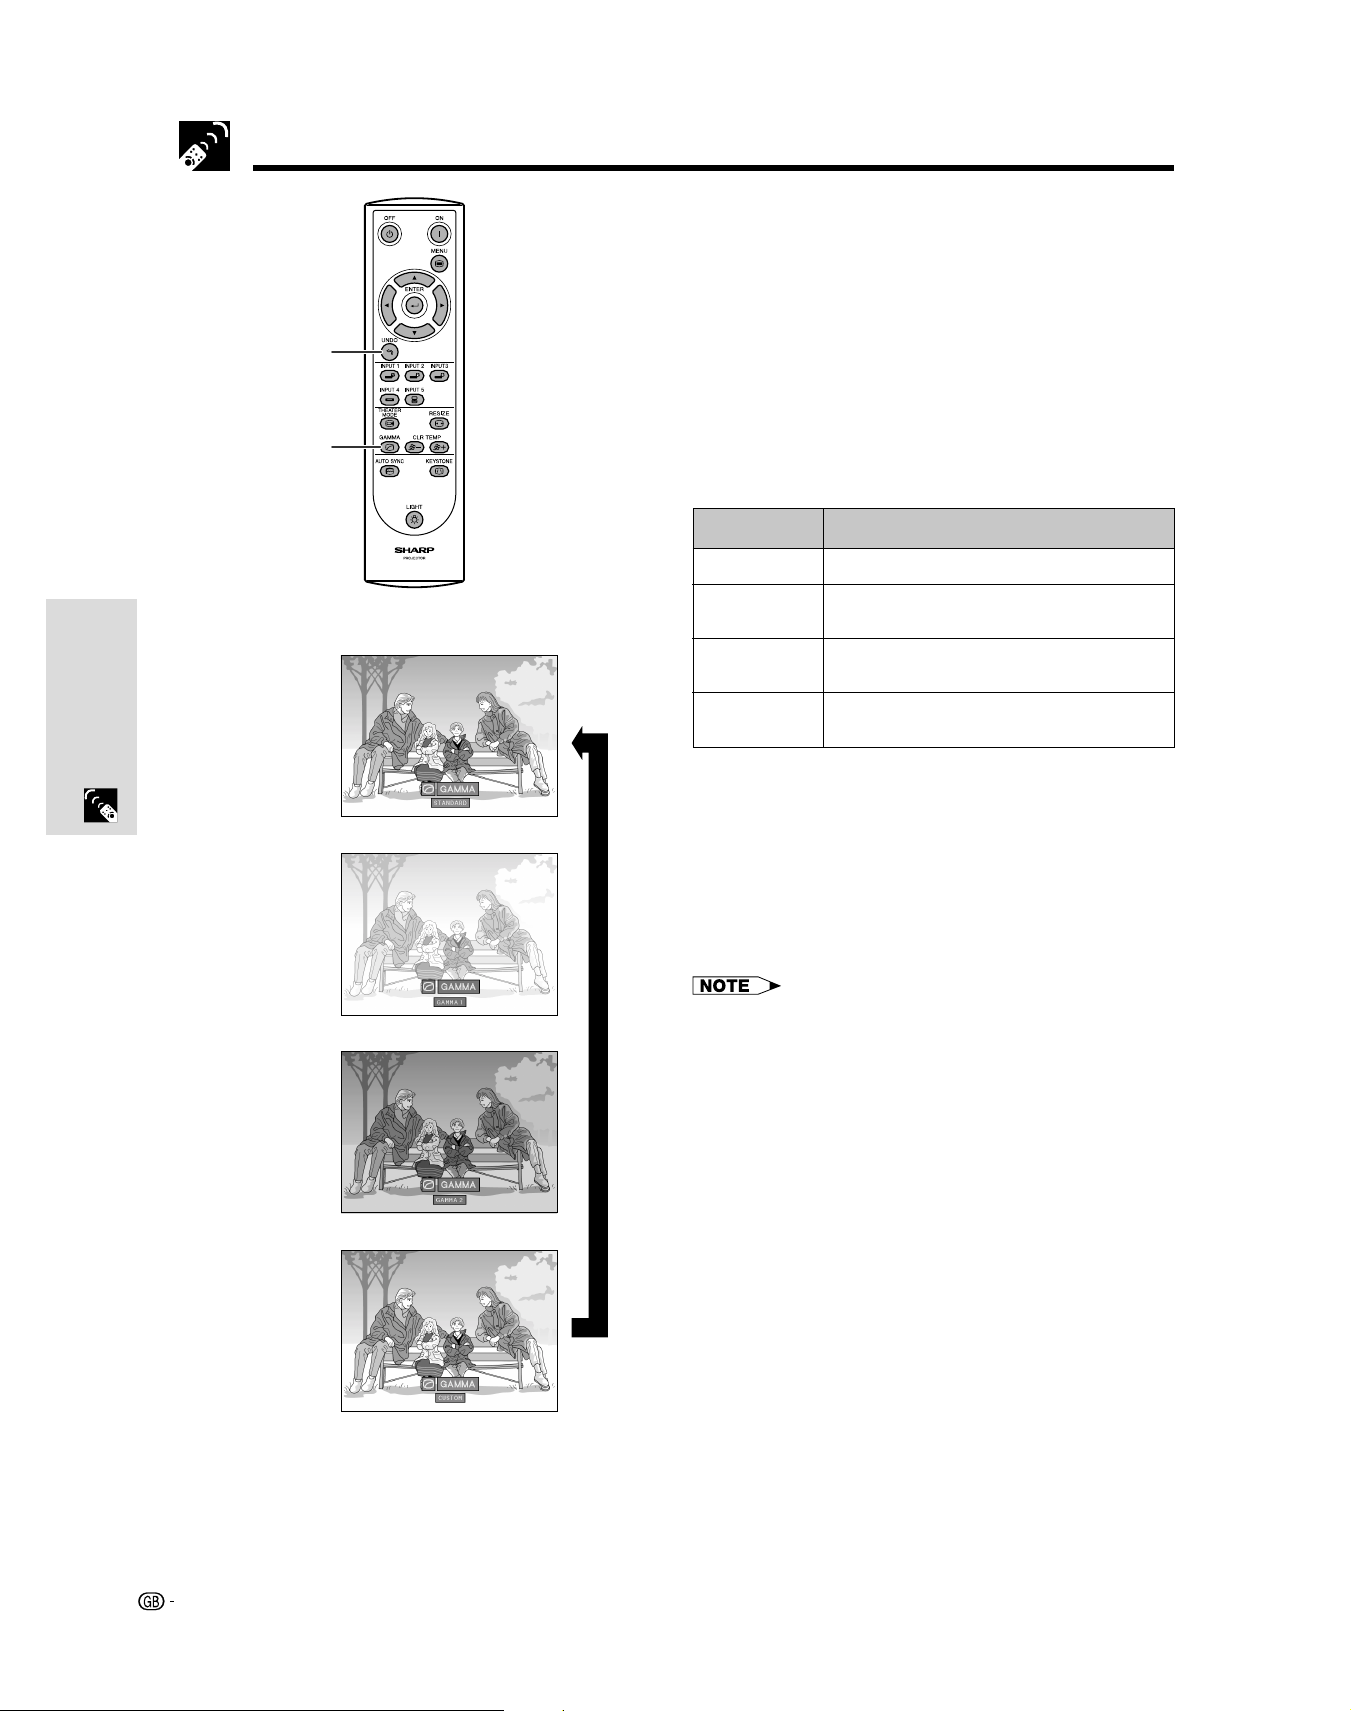
Gamma Correction Function
• Gamma is an image quality enhancement function
that offers a richer image by brightening the darker
portions of the image without altering the brightness
of the brighter portions.
• Four gamma settings are available to allow for
differences in the images displayed and in the
3
1,2
brightness of the room.
• When you are displaying images with frequent, dark
scenes, such as a film or concert, or when you are
displaying images in a bright room, this feature makes
the dark scenes easier to see and gives the
impression of greater depth in the image.
Gamma Modes
Gamma modeSelected Mode
STANDARD
Operation Buttons
GAMMA 1
GAMMA 2
CUSTOM
On-screen Display
sss
STANDARD
GAMMA 1
GAMMA 2
CUSTOM
Standard picture without gamma correction.
Brightens darker portions of images for more
enhanced presentations.
Gives greater depth to darker portions of
images for a more exciting theatre experience.
Allows you to adjust gamma value using
SharpVision Manager (supplied).
1 Press GAMMA to display “GAMMA”.
2 Then, the present Gamma mode is displayed.
Each time GAMMA is pressed, the gamma level
toggles as shown on the left.
3 To return to the standard image, press UNDO
while “GAMMA” is displayed on the screen.
• The CUSTOM setting of VIDEO mode optimizes the video
source to reproduce the image more beautifully. It darkens
bright portions of the image and gives greater depth to
darker portions of the image.
Select CUSTOM as your default setting if you prefer a
smooth textured image to a sharply contrasted one.
• STANDARD and GAMMA 2 settings of VIDEO mode (except
COMPONENT 480P/720P/1080i) incorporate a DYNAMIC
GAMMA function for optimizing GAMMA correction frame
by frame in real time, thus providing a more beautiful image.
• GAMMA 1 settings are the same for both RGB and VIDEO
modes.
25
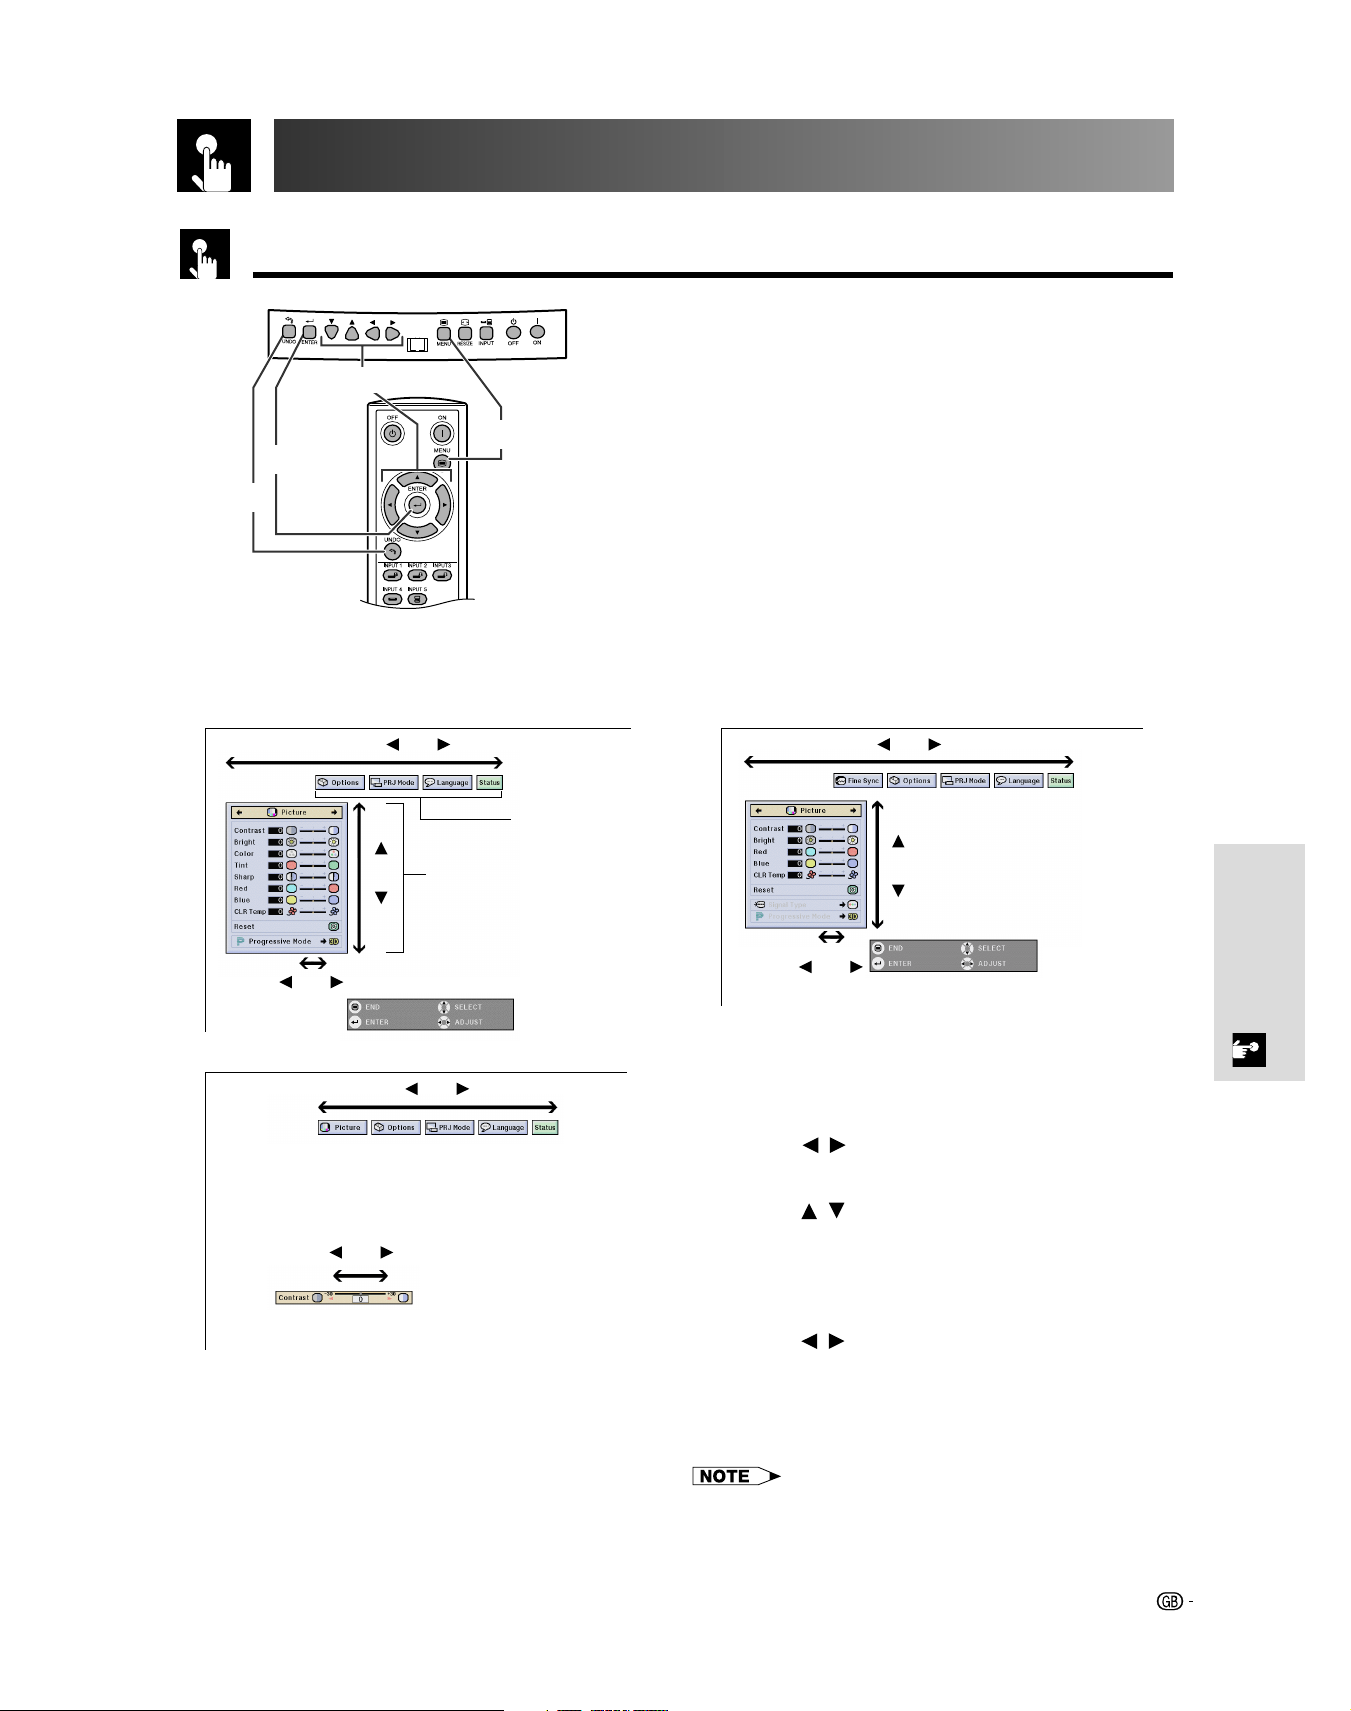
Using the GUI (Graphical User Interface) Menu Screen
Basic Operations
2,3,5
4
6
INPUT 3, 4 (VIDEO) mode
1
2
1,7
This projector has two sets of menu screens that allow
you to adjust the image and various projector settings.
These menu screens can be operated from the projector
or the remote control with the following procedure.
(GUI) On-screen Display
INPUT 1, 2 (COMPONENT) or 5 (RGB) mode
1
2
4
5
5
3
Sub menu
2
Main menu
3
5
1 Press MENU to display the INPUT 1, 2, 3, 4 or 5
mode menu bar.
2 Press / to select an adjustment main menu
on the menu bar.
3 Press / to select a specific adjustment item.
4 To display a single adjustment item, press ENTER
after selecting the item. Only the menu bar and
the selected adjustment item will appear.
5 Press / to adjust the item.
6 Press UNDO to return to the previous screen.
Basic Operation
7 To exit the GUI, press MENU.
• For details on items on the menu screen, see the tree charts
on pages 27 and 28.
26

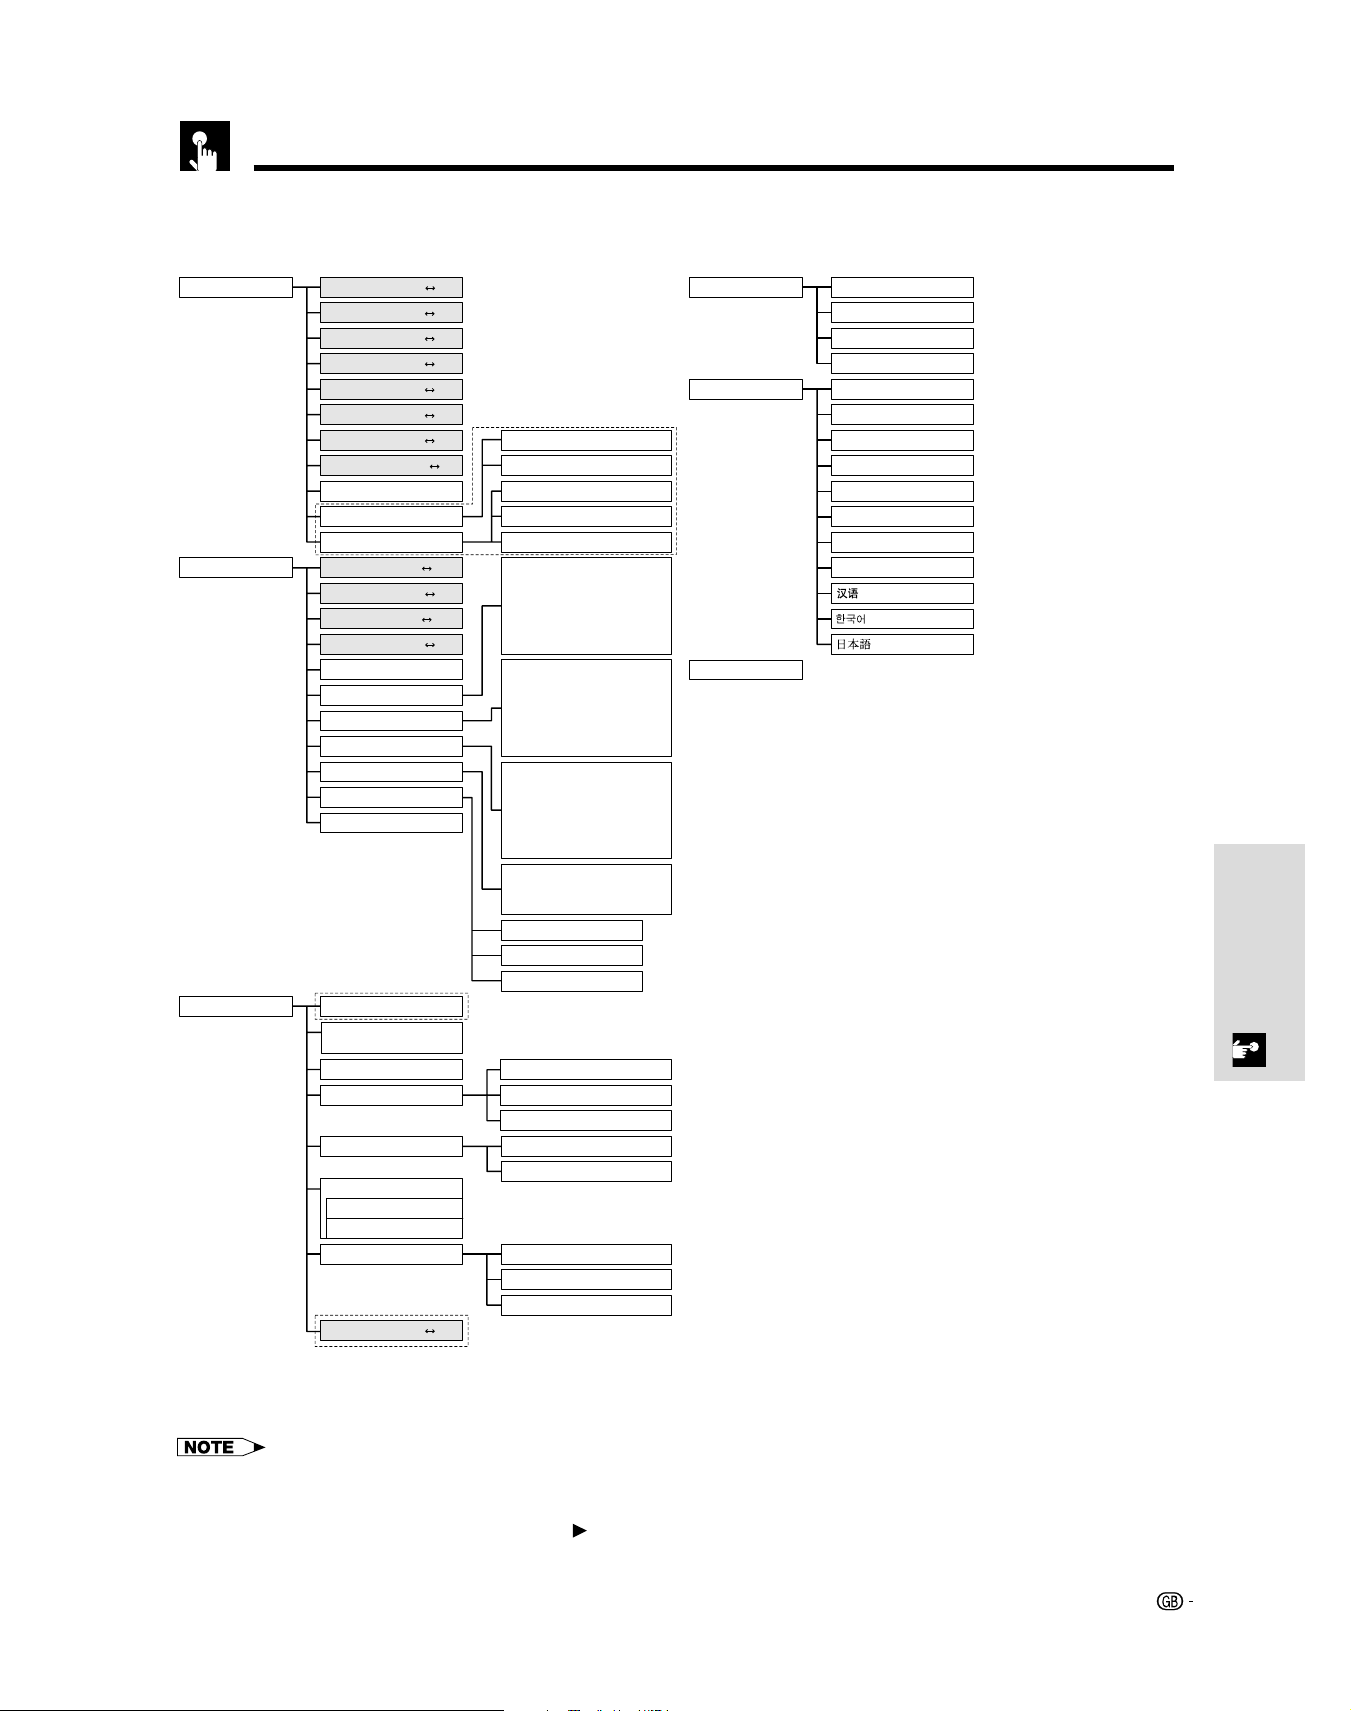
Menu Bars
Items on the INPUT 3 or 4 Mode Menu Bar
Main menu
Picture
Options
Basic Operation
Sub menu
Contrast Ⳮ30ⳮ30
Brightness Ⳮ30ⳮ30
Color Ⳮ30ⳮ30
Tint Ⳮ30ⳮ30
Sharp Ⳮ30ⳮ30
Red Ⳮ30ⳮ30
Blue
CLR Temp
Reset
Progressive Mode
3D DNR
Theater Mode
[NORMAL/BRIGHT]
Lamp Timer
OSD Display
Video System
Background
Economy Mode
RS232C Port
Auto Power Off
RS-232C
Subtitle Ⳮ30ⳮ30
Ⳮ30ⳮ30
Ⳮ3ⳮ3
[ON/OFF]
[ON/OFF]
[ON/OFF]
2D Progressive
3D Progressive
Film Mode
Normal
Level A
Level B
Auto
PAL (50/60Hz)
SECAM
NTSC4.43
NTSC3.58
PAL–M
PAL–N
Blue
None
9600bps
38400bps
115200bps
*
Main menu
PRJ Mode
Language
Status
Sub menu
Front
CeilingⳭFront
Rear
CeilingⳭRear
English
Deutsch
Español
Nederlands
Français
Italiano
Svenska
Português
* These values may be changed using the RESIZE mode.
• Only the items highlighted in the tree charts above can be adjusted.
• To adjust the items under the sub menu, press after selecting the sub menu.
27
Menu Bars
Items on the INPUT 1, 2 or 5 Mode Menu Bar
Main menu
Picture PRJ Mode
Fine Sync
Options
Sub menu
Contrast Ⳮ30ⳮ30
Brightness Ⳮ30ⳮ30
Color Ⳮ30ⳮ30
Tint Ⳮ30ⳮ30
Sharp Ⳮ30ⳮ30
Red Ⳮ30ⳮ30
Blue
CLR Temp
Reset
Signal Type
Progressive Mode
Clock Ⳮ150ⳮ150
Phase Ⳮ60ⳮ60
H-Pos
V-Pos
Reset
Save Setting
Select Setting
Special Modes
Signal Info
Auto Sync
Auto Sync Disp
DNR
Theater Mode
[NORMAL/BRIGHT]
Lamp Timer
OSD Display
Background
Economy Mode
RS232C Port
Auto Power Off
RS-232C
Subtitle Ⳮ30ⳮ 30
Ⳮ30ⳮ30
Ⳮ3ⳮ3
Ⳮ150ⳮ150
Ⳮ60ⳮ60
[ON/OFF]
[ON/OFF]
[ON/OFF]
[ON/OFF]
[ON/OFF]
*
*,**
RGB
Component
2D Progressive
3D Progressive
Film Mode
Resolution
800⳯600
1
640⳯480
2
•
•
7
Resolution
800⳯600
1
640⳯480
2
•
•
7
Resolution
640⳯480
1
720⳯480
2
•
•
7
Resolution
Hor Freq
Vert Freq
Off
Normal
High Speed
Normal
Level A
Level B
Blue
None
9600bps
38400bps
115200bps
Vert Freq
75 Hz
72 Hz
Vert Freq
75 Hz
72 Hz
640⳯480
37.5 kHz
72 Hz
Main menu
Language
*
Status
Sub menu
Front
CeilingⳭFront
Rear
CeilingⳭRear
English
Deutsch
Español
Nederlands
Français
Italiano
Svenska
Português
Basic Operation
* Not displayed in the INPUT 5 mode. The “3D” function is not available in INPUT 1, 2 or 5. (Therefore, “DNR” is displayed
on the On-screen Display of INPUT 1, 2 or 5.)
** These values may be changed using the RESIZE mode.
• The resolution, vertical frequency and horizontal frequency figures displayed above are for example purposes only.
•“Color”, “Tint”, and “Sharp” appear only when Component is selected in INPUT 1 or 2 mode.
• Only the items highlighted in the tree charts above can be adjusted.
• To adjust the items under the sub menu, press
after selecting the sub menu.
28
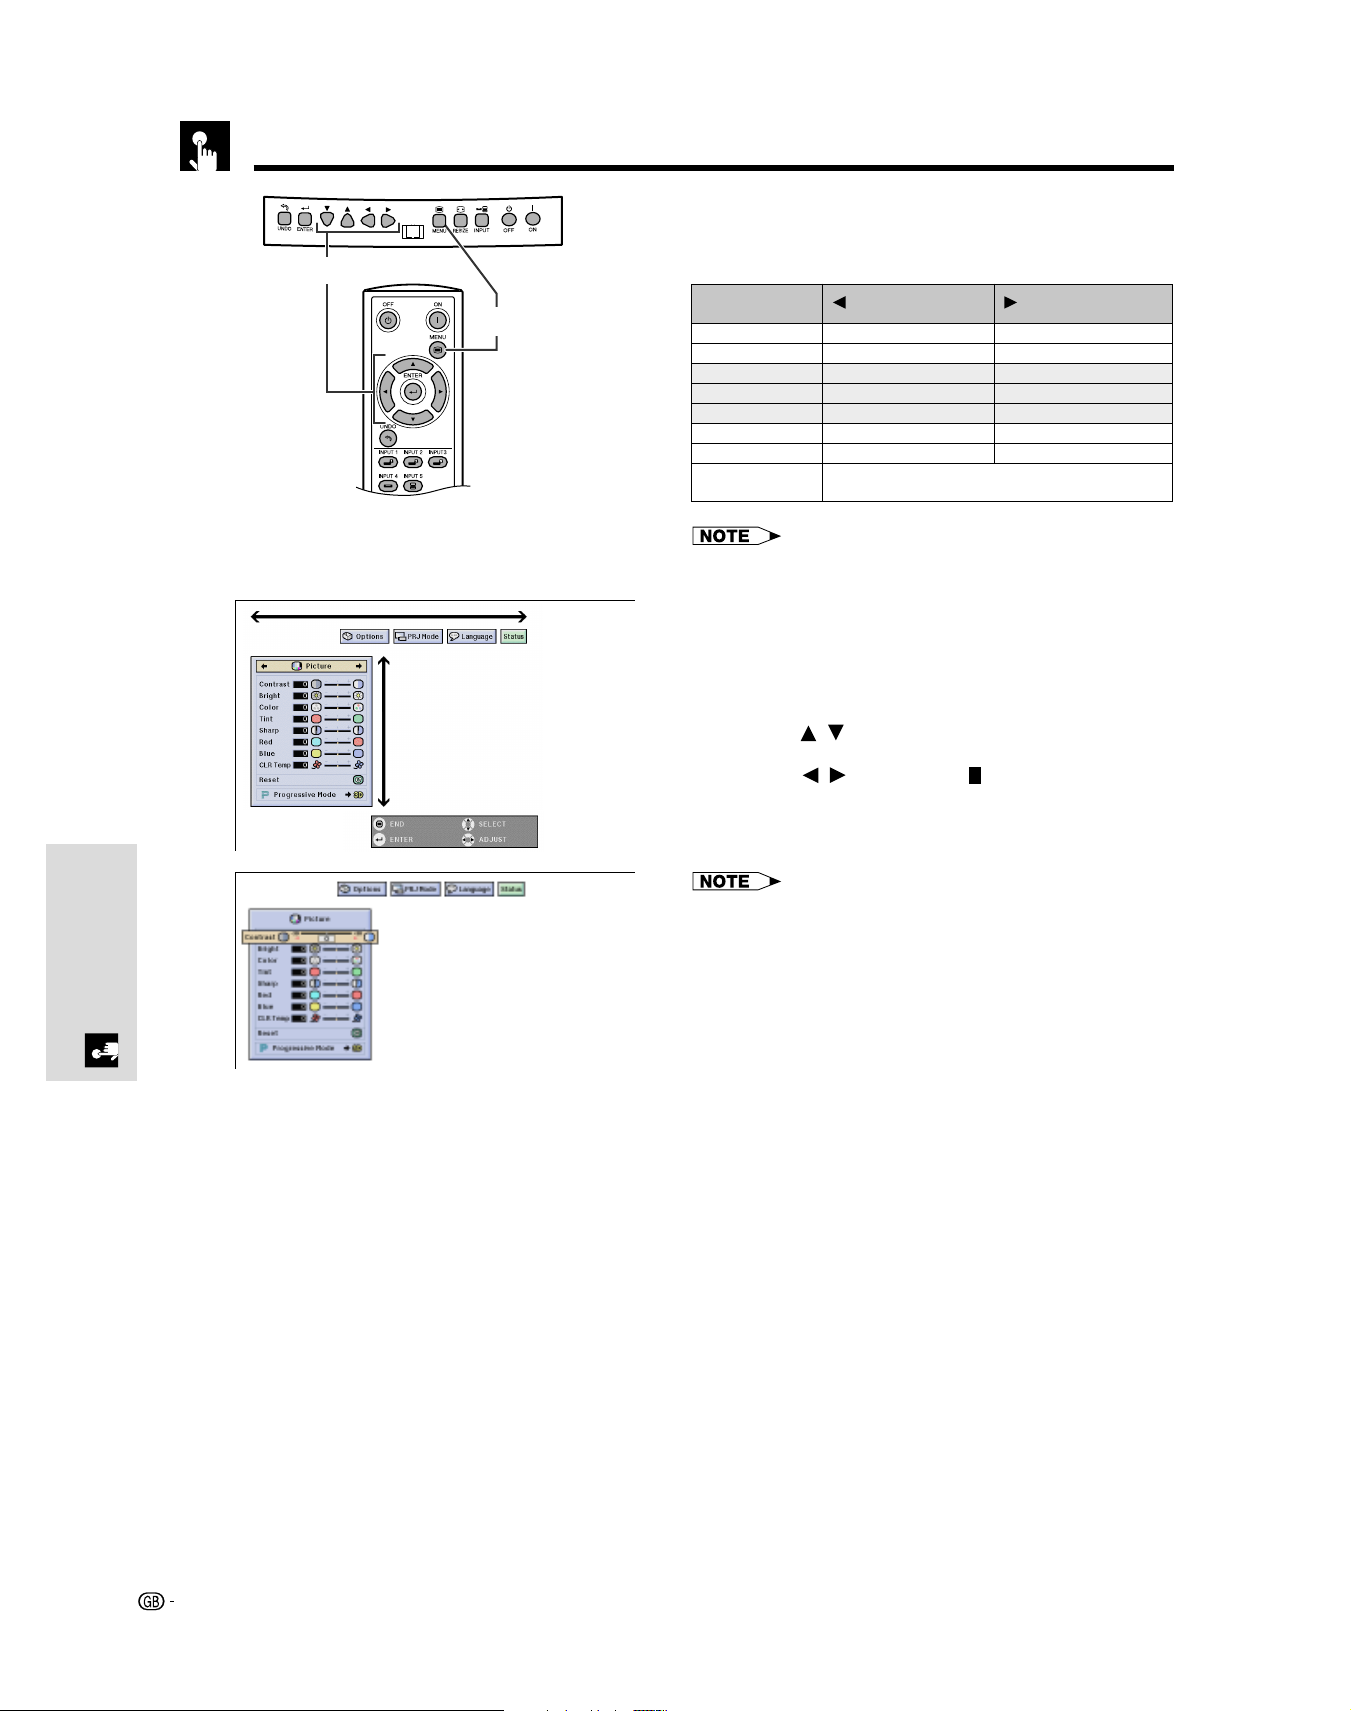
Adjusting the Picture
You can adjust the projector’s picture to your preferences with the following picture settings.
2,3
1,4
(GUI) On-screen Display
e. g. (VIDEO input in INPUT 3 or 4 mode)
1
Description of Adjustment Items
Selected item
Contrast
Brightness
Color
Tint
Sharp
Red
Blue
Reset
•“Color”, “Tint” and “Sharp” do not appear for RGB input in
INPUT 5 mode.
button
For less contrast
For less brightness
For less colour intensity
Skin tones become purplish
For less sharpness
For weaker red
For weaker blue
All image adjustment items are returned to the factory preset
settings.
1 Press MENU. Menu bar and “Picture” menu
screen appear. GUI operation guide is also
displayed.
2 Press
/ to select a specific adjustment item.
3 Press / to move the mark of the selected
adjustment item to the desired setting.
4 To exit the GUI, press MENU.
button
For more contrast
For more brightness
For more colour intensity
Skin tones become greenish
For more sharpness
For stronger red
For stronger blue
2
Basic Operation
• To reset all adjustment items, select “Reset” on the “Picture”
menu screen and press ENTER.
• The adjustments can be stored separately in the INPUT 1
to 5 modes.
29
Adjusting the Picture
On-screen Display
1,2
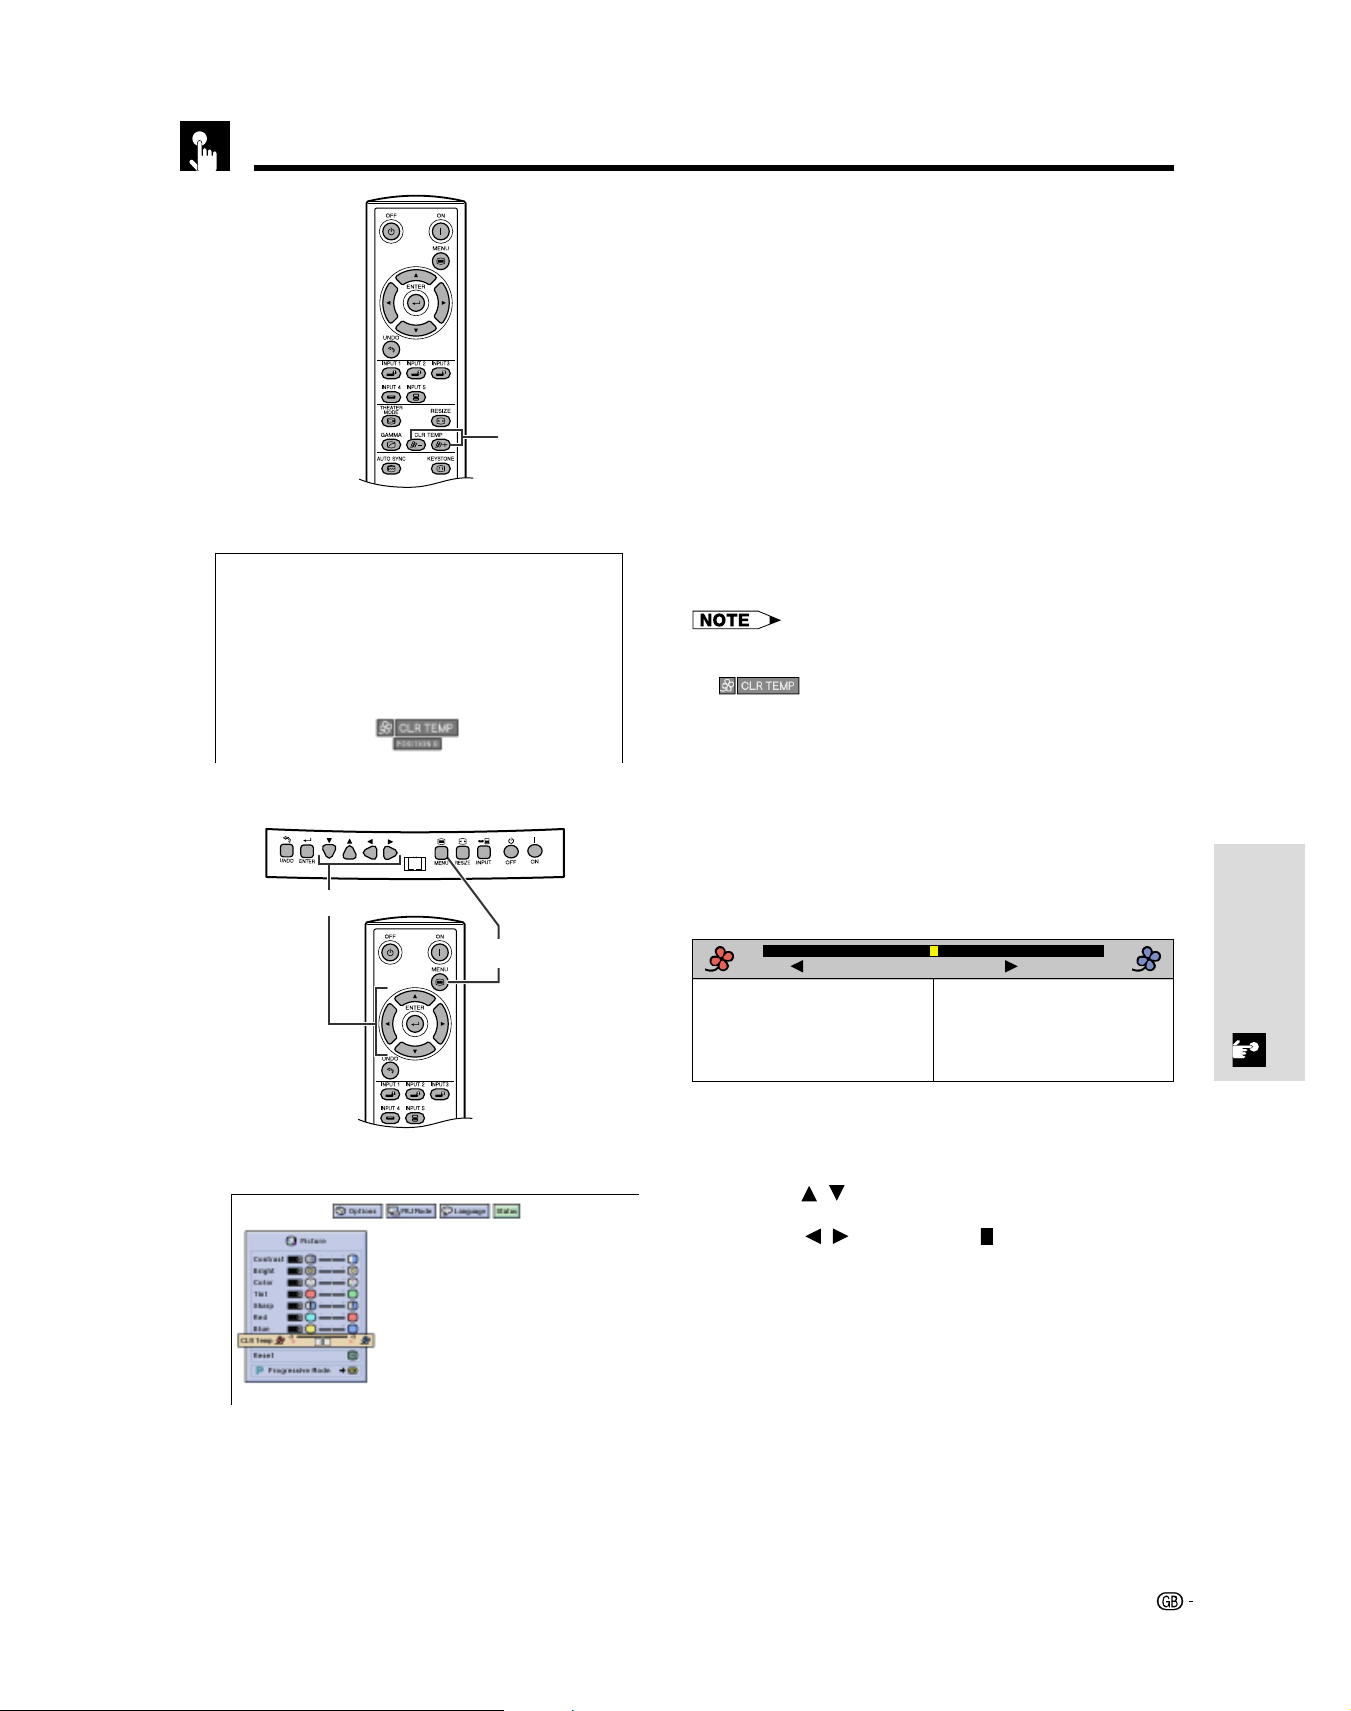
Adjusting the Colour Temperature
This function can be used to adjust the colour
temperature to suit the type of image input to the
projector (DVD, video, computer image, TV broadcast,
etc.).
This function can be operated using the CLR TEMP
buttons on the remote control, as well as the GUI menu
screen.
Adjusting the Colour Temperature with the
Remote Control
1 Press CLR TEMP (–/+) on the remote control.
Then, the present colour temperature level is
displayed.
2 Press CLR TEMP (–/+) to change the colour
temperature level.
• The descriptions of each of the button operations are
shown on the table below.
•“
operation.
” disappears after four-seconds of no-
2,3
1,4
(GUI) On-screen Display
Adjusting the Colour Temperature using the
GUI Menu Screen
Description of Colour Temperature
ⳮ3 Ⳮ3
(Red) button button (Blue)
Decreases colour temperature
for warmer, reddish,
incandescent-like images.
(Low colour temperature)
1 Press MENU. Menu bar and “Picture” menu
screen appear. GUI operation guide is also
displayed.
2 Press / to select “CLR Temp”.
3 Press / to move the mark of the colour
temperature setting to the desired setting.
4 To exit the GUI, press MENU.
Increases colour temperature for
cooler, bluish, florescent-like
images.
(High colour temperature)
Basic Operation
30
Adjusting the Picture
2,3
4
(GUI) On-screen Display
1,5
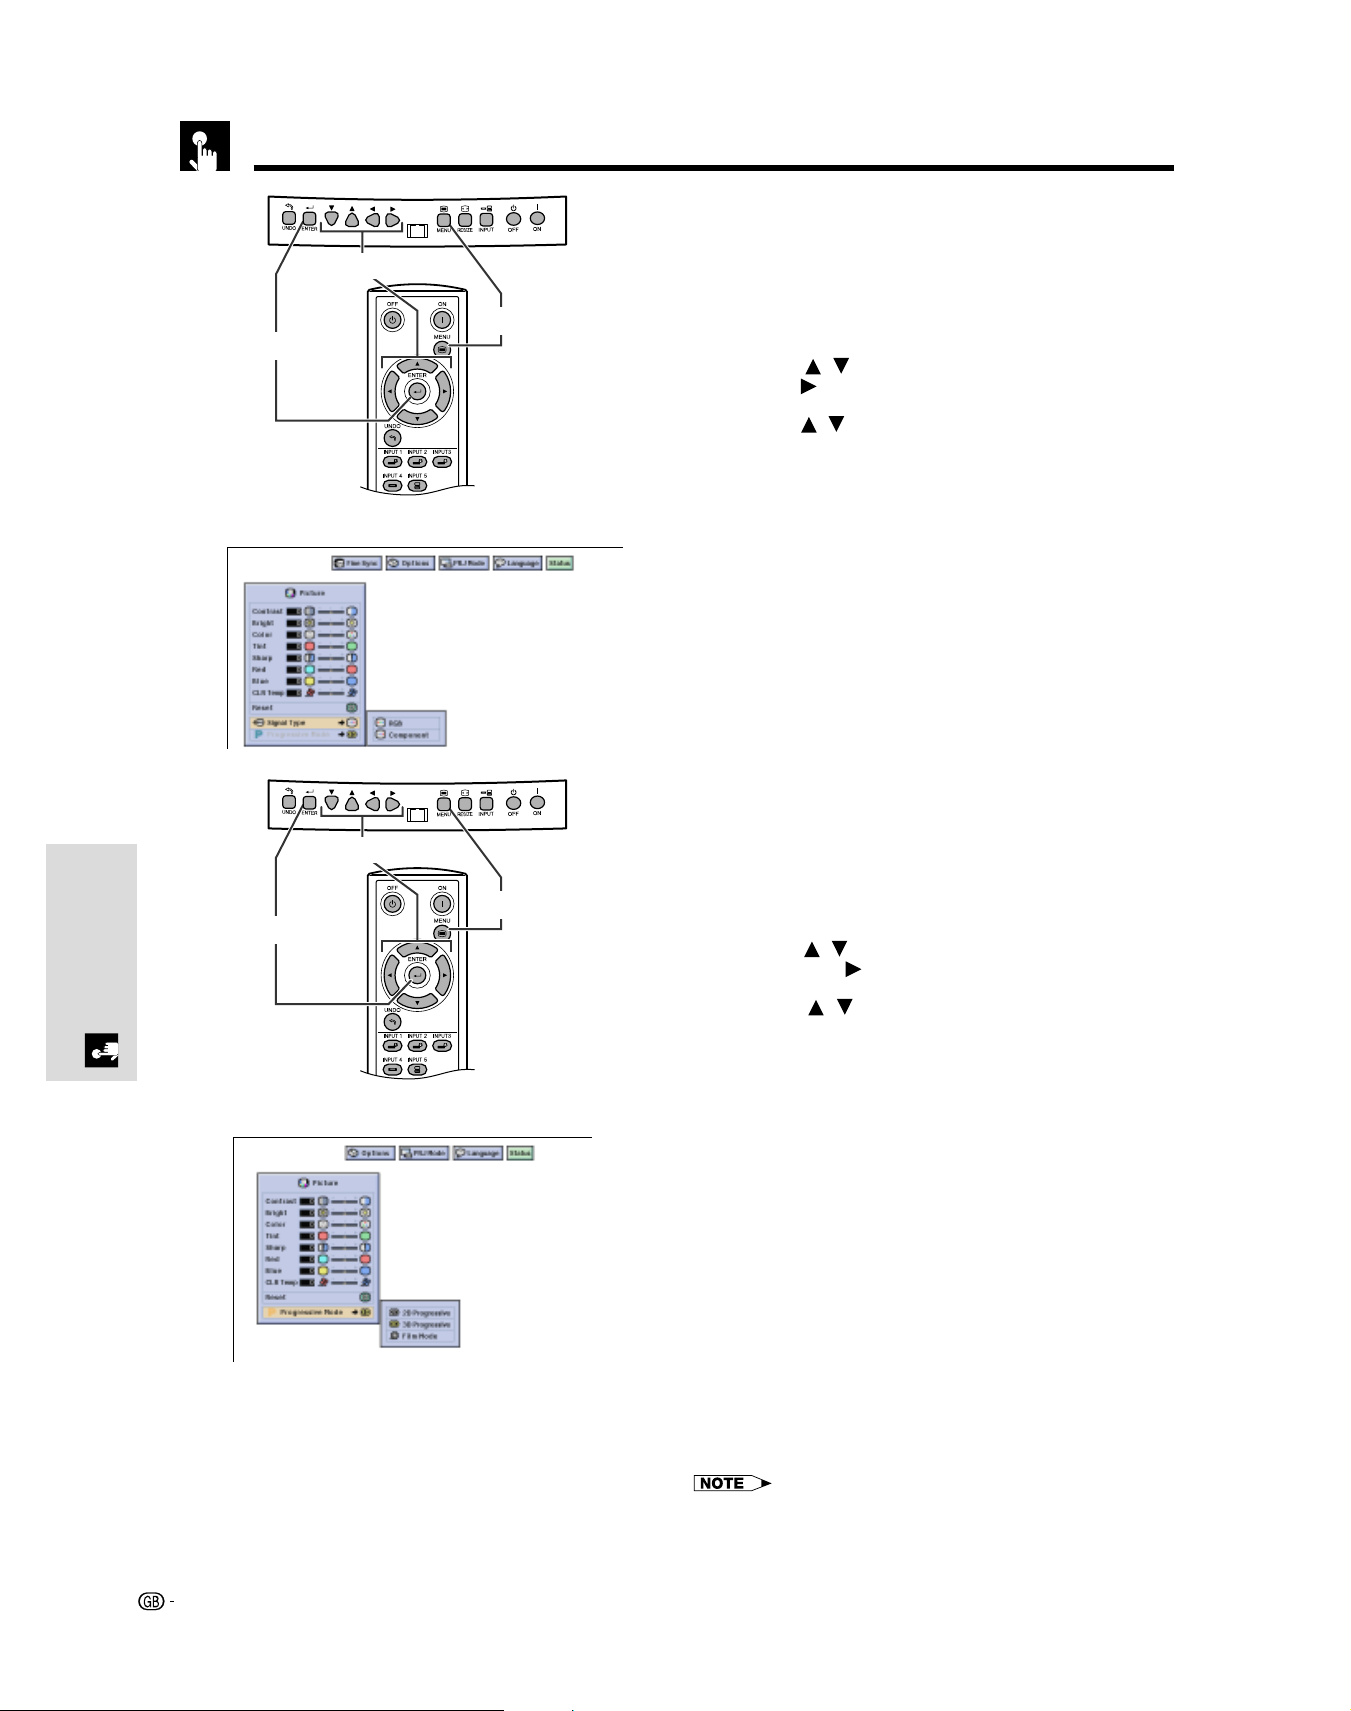
Selecting the Signal Type
This function allows you to select the input signal type
COMPONENT or RGB for INPUT 1 or 2.
1 Press MENU. Menu bar and “Picture” menu
screen appear. GUI operation guide is also
displayed.
2 Press
press
3 Press / to select “RGB” or “Component”.
4 Press ENTER to save the setting.
5 To exit the GUI, press MENU.
/ to select “Signal Type”, and then
.
Basic Operation
2,3
4
(GUI) On-screen Display
1,5
Progressive Mode
This function allows you to select the progressive display
of a video signal. The progressive display projects a
smoother video image.
1 Press MENU. Menu bar and “Picture” menu
screen appear. GUI operation guide is also
displayed.
2 Press / to select “Progressive Mode”, and
then press .
3 Press / to select “2D Progressive”, “3D
Progressive” or “Film Mode”.
4 Press ENTER to save the setting.
5 To exit the GUI, press MENU.
Selects the following progressive conversion mode.
2D Progressive
This function is useful to display fast-moving images such as
sports and action films. This mode optimizes the image in a
displayed frame.
3D Progressive
This function is useful to display relatively slow-moving images
such as drama and documentary more clearly. This mode
optimizes the image by estimating the movement of a number
of preceding and succeeding frames.
Film Mode
Reproduces the image of film software clearly. Displays the
optimized image of film transformed with three-two pull down
enhancement to progressive mode images.
31
• Film Mode cannot work with PAL 50 Hz.
• The film source is a digital video recording with the original
encoded as is at 24 frames/second. The projector can convert
this film source to progressive video at 60 frames/second to play
back a high-definition image.

2
Adjusting the Computer Images (RGB menu only)
When displaying computer patterns which are very
detailed (tiling, vertical stripes, etc.), interference may
occur between the DMD pixels, causing flickering,
2,3,4
1,5
(GUI) On-screen Display
vertical stripes, or contrast irregularities in portions of
the screen. Should this occur, adjust “Clock”, “Phase”,
“H-Pos” and “V-Pos” for the optimum computer image.
Description of Adjustment Items
DescriptionSelected item
Clock
Phase
H-Pos
V-Pos
Reset
• Computer image adjustments can be made easily by pressing
AUTO SYNC ( ) on the remote control. See page 35 for details.
(Select the desired computer input mode with INPUT 1
or 2.)
1 Press MENU.
Adjusts vertical noise.
Adjusts horizontal noise (similar to tracking on your VCR).
Centres the on-screen image by moving it to the left or right.
Centres the on-screen image by moving it up or down.
All computer image adjustment items are returned to the factory
preset settings.
3
2 Press / to select “Fine Sync”.
3 Press / to select a specific adjustment item.
4 Press / to move the mark of the selected
adjustment item to the desired setting.
5 To exit the GUI, press MENU.
• To reset all adjustment items, select “Reset” on the “Fine Sync”
menu screen and press ENTER.
• The adjustable area of each item may be changed using the input
signal.
Basic Operation
32
Adjusting the Computer Images (RGB menu only)
Saving and Selecting Adjustment Settings
This projector allows you to store up to seven adjustment
2,3,4
1,6
5
settings for use with various computers. Once these
settings are stored, they can be easily selected each
time you connect a computer to the projector.
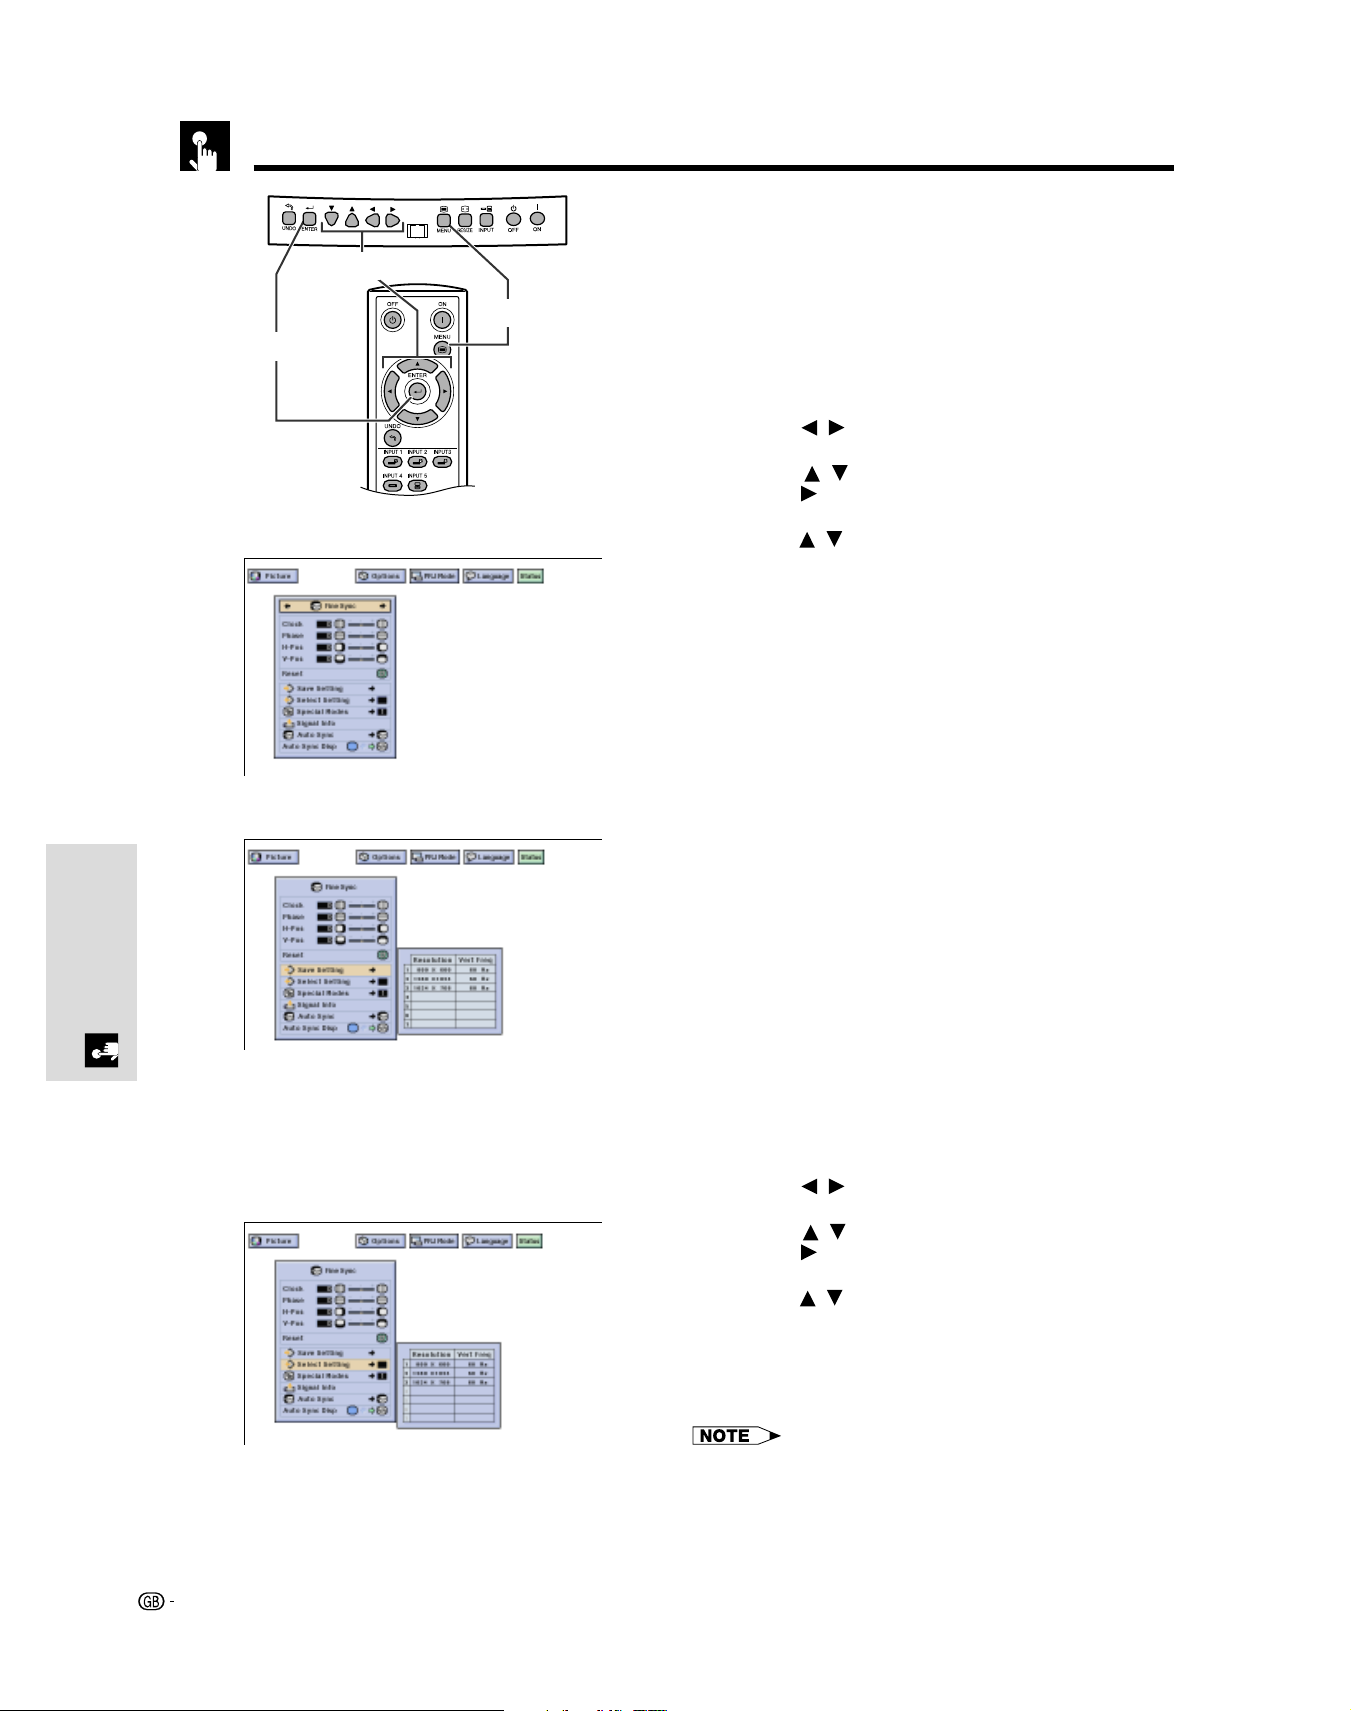
Saving the adjustment setting
1 Press MENU.
2
3
Basic Operation
(GUI) On-screen Display
2 Press
3 Press
press
4 Press
/ to select “Fine Sync”.
/ to select “Save Setting”, and then
.
/ to select the desired memory location
of the setting.
5 Press ENTER to save the setting.
6 To exit the GUI, press MENU.
33
3
Selecting a saved setting
1 Press MENU.
2 Press / to select “Fine Sync”.
3 Press / to select “Select Setting”, and then
press .
4 Press / to select the desired memory setting.
5 Press ENTER to select the setting.
6 To exit from the GUI, press MENU.
• If a memory position has not been set, the resolution and frequency
setting will not be displayed.
• When selecting the stored adjustment setting with “Select Setting”,
the computer system should match the stored setting.
Adjusting the Computer Images (RGB menu only)
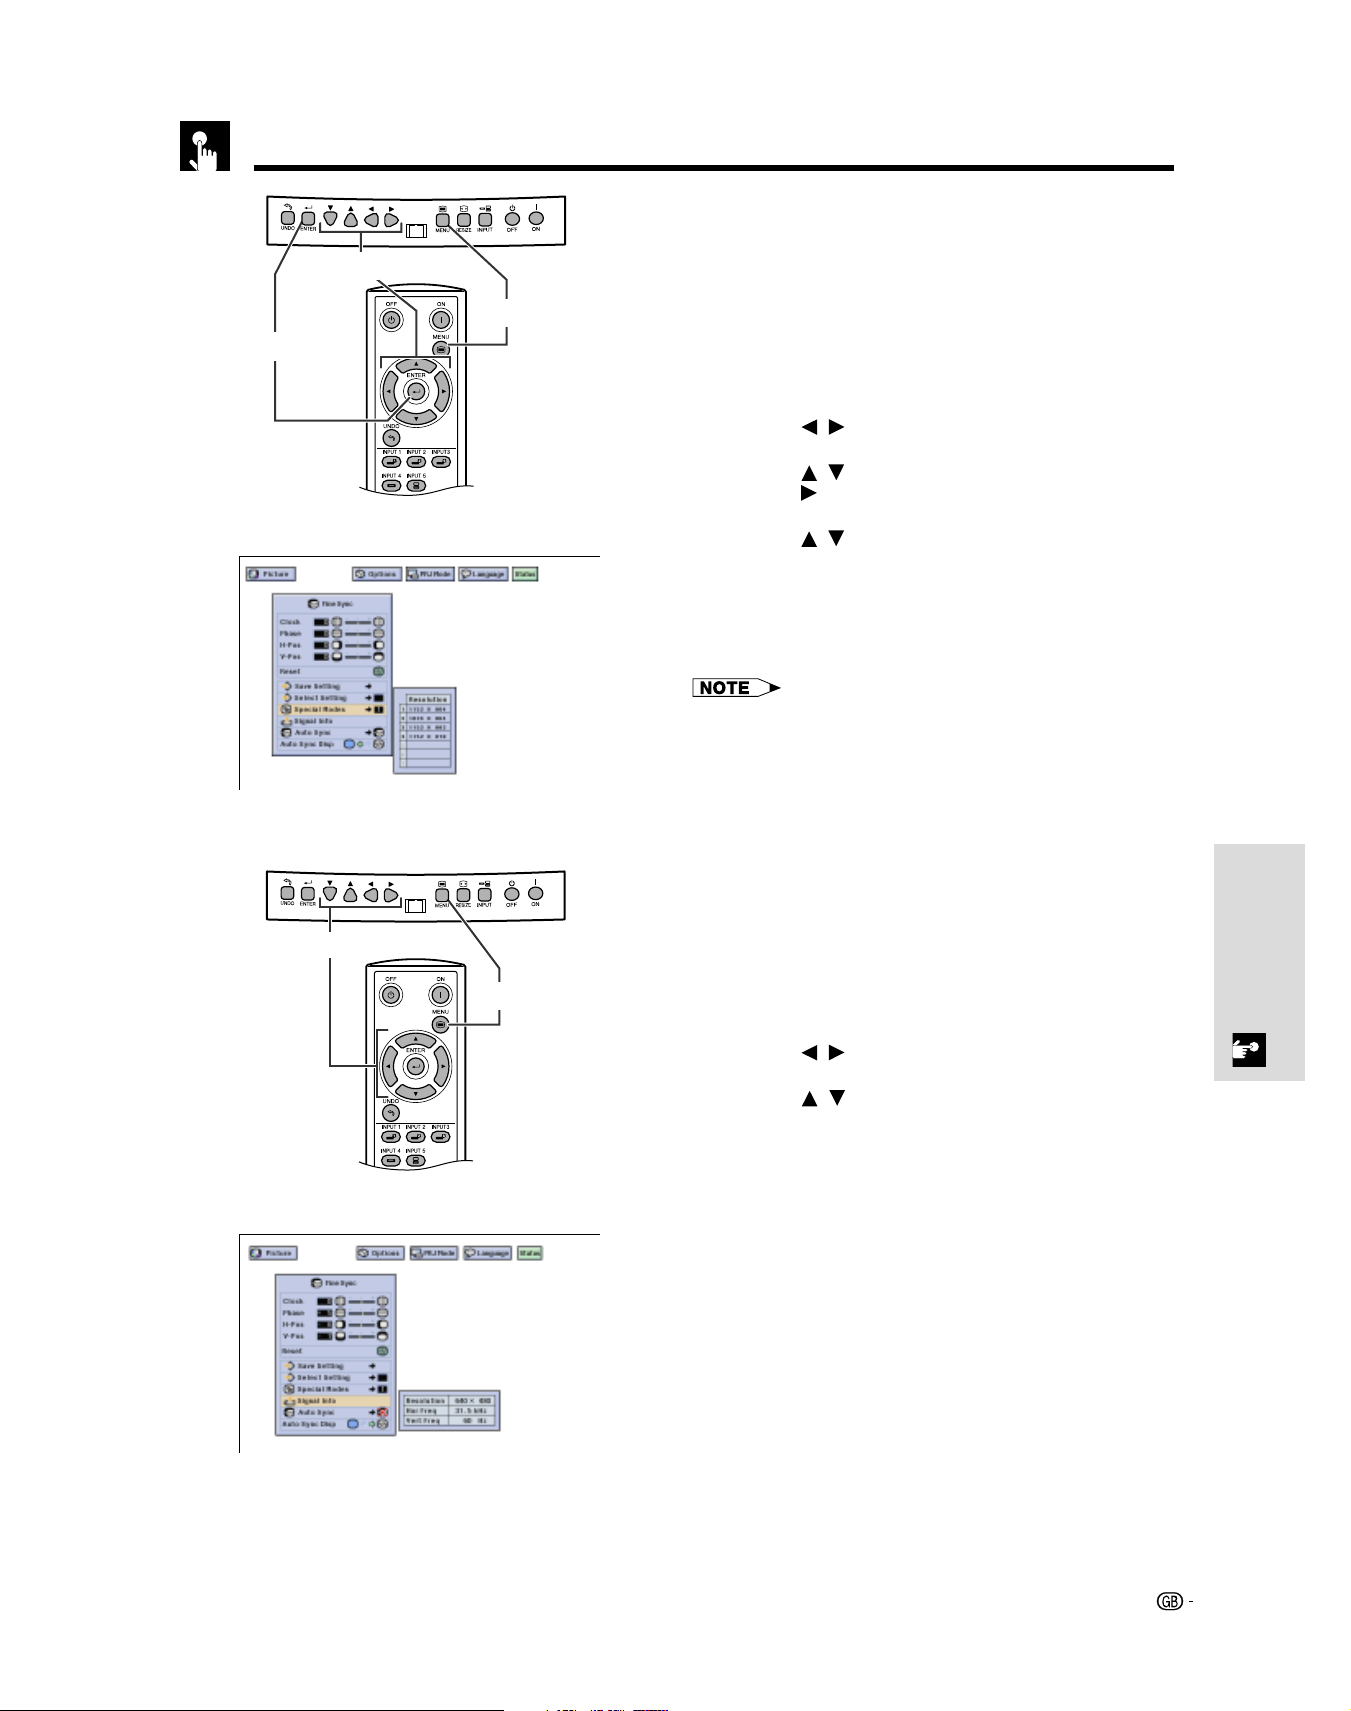
Special Mode Adjustment
Ordinarily, the type of input signal is detected and the
2,3,4
1,6
5
correct resolution mode is automatically selected.
However, for some signals, the optimal resolution mode
in “Special Modes” on the “Fine Sync” menu screen
may need to be selected to match the computer display
mode.
1 Press MENU.
2 Press / to select “Fine Sync”.
3 Press / to select “Special Modes”, and then
press .
(GUI) On-screen Display
2,3
1,4
4 Press / to select the optimal resolution.
5 Press ENTER to save the setting.
6 To exit the GUI, press MENU.
• Avoid displaying computer patterns which repeat every other line
(horizontal stripes). (Flickering may occur, making the image hard
to see.)
• When inputting DTV 1080i signal, select the corresponding type of
signal in step 4 above.
• When inputting 720P RGB signal, select the corresponding type of
signal in step 4.
Basic Operation
Checking the Input Signal
This function allows you to check the current input signal
information.
1 Press MENU.
2 Press / to select “Fine Sync”.
3 Press / to select “Signal Info” to display the
current input signal.
(GUI) On-screen Display
4 To exit the GUI, press MENU.
34
 Loading...