

Page 1

DVD-MIC RO-SYSTEM
MICRO-CHAÎNE DVD
CADENA MICRO CON DVD
DVD MIKRO SYSTEM
SISTEMA DVD MICRO
DVD MICRO-SYSTEEM
MICROSSISTEMA DVD
DVD MICRO SYSTEM
MODELL
MODÈLE
MODELO
MODELL
MODELLO
MODEL
MODELO
MODEL
XL-DV50H
BEDIENUNGSANLEITUNG
MODE D’EMPLOI
MANUAL DE MANEJO
BRUKSANVISNING
MANUALE DI ISTRUZIONI
GEBRUIKSAANWIJZING
MANUAL DE OPERAÇÃO
OPERATION MANUAL
!
DVD-Micro-System XL-DV50H besteht aus XL-DV50H (Haupt-
t), CP-DV50HF (Front-Lautsprecher) und CP-DV50HSW
gerä
(Subwoofer).
! Micro-chaîne DVD XL-DV50H composée de XL-DV50H (appareil
principal), CP-DV50HF (enceintes avant) et CP-DV50HSW
(woofer auxiliaire).
! Cadena micro con DVD XL-DV50H que consta de XL-DV50H
(aparato prinpal), CP-DV50HF (altavoces delanteros) y CPDV 50HSW (altavoz de subgraves).
! XL-DV50H DVD mikro system bestående av XL-DV50H
(huvudenhet), CP-DV50HF (främre högtalarna) och CPDV 50HSW (subwoofer).
! Sistema DVD micro XL-DV50H composto da XL-DV50H (appar-
ecchio principale), CP-DV50HF (diffusori anteriori) e CPDV 50HSW (subwoofer).
! XL-DV50H DVD micro-systeem bestaande uit XL-DV50H (hoofd-
toestel), CP-DV50HF (voorluidsprekers) en CP-DV50HSW
(subwoofer).
! Microssistema DVD XL-DV50H composto de XL-DV50H
(unidade principal), CP-DV50HF (caixas acústicas frontais) e
CP-DV50HSW (subwoofer).
XL-DV50H DVD Micro System consisting of XL-DV50H (main unit),
!
CP-DV50HF (front speakers) and CP-DV50HSW (subwoofer).
DEUTSCH
Siehe Seiten i
bis vi und D-1
bis D-56.
FRANÇAIS
Se reporter aux
pages i à vi et
F-1 à F-56.
ESPAÑOL
Consulte las
páginas i a vi y
S-1 a S-56.
SVENSKA
Hänvisa till
sidorna i till vi
och V-1 till V-56.
ITALIANO
Leggere le
pagine i a vi e
I-1 a I-56.
NEDERLANDS
Raadpleeg de
bladzijden i t/m
vi en N-1 t/m N-56.
PORTUGUÊS
Favor consultar
as páginas i a
vi e P-1 a P-56.
04/3/18
XL-DV50H(H)_FRONT.fm
ENGLISH
Please refer to
pages i to vi
and E-1 to E-56.
TINSZA007SJZZ
Page 2
XL-DV50H
i
BESONDERE ANMERKUNGEN
REMARQUES SPÉCIALES
NOTAS ESPECIALES
SÄRSKILDA ANMÄRKNINGAR
NOTE PARTICOLARI
BIJZONDERE OPMERKINGEN
NOTAS ESPECIAIS
SPECIAL NOTES
● Dieses Gerät entspricht den Anforderungen der EG-Richtlinien
89/336/EWG und 73/23/EWG mit Änderung 93/68/EWG.
● Ce matériel répond aux exigences contenues dans les direc-
tives 89/336/CEE et 73/23/CEE modifiées par la directive 93/
68/CEE.
● Este aparato satisface las exigencias de las Directivas
89/336/CEE y 73/23/CEE, modificadas por medio de la 93/
68/CEE.
● Denna utrustning uppfyller kraven enligt riktlinjerna 89/336/
EEC och 73/23/EEC så som kompletteras av 93/68/EEC.
● Quest’apparecchio è conforme ai requisiti delle direttive 89/
336/EEC e 73/23/EEC, come emendata dalla direttiva 93/68/
EEC.
● Dichiarazione di conformità
La società SHARP ELECTRONICS EUROPE GmbH dichiara
che il prodotto SHARP MINI SISTEMI CD-XP300H è costruito
in conformità alle prescrizioni del D.M.n˚548 del 28/8/95,
pubblicato sulla G.U.n˚301 del 28/12/95 ed in particolare è
conforme a quanto indicato nell’art. 2, comma 1 dello stesso
decreto.
● Dit apparaat voldoet aan de eisen van de richtlijnen 89/336/
EEG en 73/23/EEG, gewijzigd door 93/68/EEG.
● Este equipamento obedece às exigências das directivas 89/
336/CEE e 73/23/CEE, na sua versão corrigida pela directiva
93/68/CEE.
● This equipment complies with the requirements of Directives 89/336/EEC and 73/23/EEC as amended by 93/68/
EEC.
SISTEMA DVD MICRO
XL-DV50H
● Dette udstyr overholder kravene i direktiv nr. 89/336/EEC og
73/23/EEC med tillaeg nr. 93/68/EEC.
● Dette produktet oppfyller betingelsene i direktivene 89/336/
EEC og 73/23/EEC i endringen 93/68/EEC.
● Tämä laite täyttää direktiivien 89/336/EEC ja 73/23/EEC
vaatimukset, joita on muutettu direktiivillä 93/68/EEC.
●
● Bei Einstellung der ON/STAND-BY-Taste auf STAND-BY ist
die Netzspannung immer noch im Gerät vorhanden.
Wenn die ON/STAND-BY-Taste auf STAND-BY eingestellt
wird, kann das Gerät unter Verwendung der T imer-Betriebsart
oder Fernbedienung in Betrieb gesetzt werden.
Warnung:
In diesem Gerät sind keine vom Benutzer wartbaren Teile
vorhanden. Niemals Abdeckungen entfernen, außer wenn Sie
dafür qualifiziert sind. In diesem Gerät sind gefährliche
Spannungen vorhanden. Vor Ausführung von irgendwelchen
Kundendienstarbeiten oder bei längerer Nichtverwendung des
Gerätes stets den Netzstecker aus der Netzsteckdose ziehen.
● Lorsque la touche ON/STAND-BY est mise en STAND-BY,
l’appareil est toujours sous tension.
Lorsque la touche ON/STAND-BY se trouve sur la position
STAND-BY, l’appareil est prêt à fonctionner par la minuterie
ou la télécommande.
Avertissement:
Cet appareil contient des pièces non réparables par
l’utilisateur. Personne non qualifiée n’enlèvera jamais les
couvercles. L’appareil contenant des organes portés à haute
tension, débrancher l’appareil avant toute réparation ou en
période de non-utilisation.
0203
04/3/19 XL-DV50H(H)_common.fm
TINSZA007SJZZ
Page 3

1
TINSZA007SJZZ
● Cuando el botón ON/STAND-BY está puesto en la posición
STAND-BY, todavía hay tensión dentro del aparato.
Cuando el botón ON/STAND-BY está puesto en la posición
STAND-BY, el aparato puede ponerse en funcionamiento
utilizando el modo del temporizador o el controlador remoto.
Advertencia:
Tenga en cuenta que dentro de este aparato no hay piezas
que pueda reparar. No quite nunca las tapas a menos que se
esté cualificado para hacerlo. Este aparato tiene en su interior tensiones peligrosas.
Desenchufe siempre la clavija de la red del tomacorriente
antes de realizar cualquier servicio de mantenimiento y
cuando no se use el aparato durante un largo período de
tiempo.
● När ON/STAND-BY knappen är i läge STAND-BY, finns
nätspänning i apparaten.
Med ON/STAND-BY knappen i läge ST AND-BY kan apparaten
startas med timerfunktion eller fjärrkontrollen.
Varning:
Apparaten innehåller inga delar som kan åtgärdas av kunden.
Höljet får endast öppnas av kvalificerad personal. Apparaten
innehåller farliga spänningar.
Stickkontakten ska därför dras ut från nätuttaget före
reparationsarbeten och bör dras ut om apparaten inte ska
användas på mycket länge.
● Quando il tasto ON/STAND-BY si trova in posizione STANDBY, all’interno dell’apparecchio c’è ancora la corrente.
Se il tasto ON/STAND-BY si trova nella posizione STANDBY, l’unità può essere accesa con il modo timer o con il
telecomando.
Avvertenza:
L’apparecchio non contiene parti riparabili dall’utente.
Non togliere mai i coperchi, a meno di non essere qualificati
per farlo. All’interno dell’apparecchio ci sono tensioni
pericolose, per cui si deve sempre staccare la spina del cavo
d’alimentazione dalla presa di corrente prima di qualsiasi
intervento di manutenzione e quando non si usa l’apparecchio
per un lungo periodo di tempo.
● Wanneer de ON/STAND-BY toets in de STAND-BY stand
staat, loopt er nog steeds stroom (netspanning) in het toestel.
Wanneer de ON/STAND-BY toets in de STAND-BY stand
staat, kan het toestel ingeschakeld worden via de timerfunctie
of de afstandsbediening.
Waarschuwing:
Dit toestel bevat geen door de gebruiker te repareren
onderdelen. Verwijder de behuizing nooit tenzij u deskundig
bent op dit gebied. In het toestel loopt een gevaarlijke spanning; haal de stekker altijd uit het stopcontact alvorens
onderhoud uit te voeren of wanneer het toestel voor langere
tijd niet gebruikt wordt.
● Quando o botão ON/STAND-BY estiver ajustado na posição
STAND-BY, a voltagem de alimentação ainda se encontra
presente dentro do aparelho.
Quando o botão ON/STAND-BY estiver ajustado na posição
STAND-BY, o aparelho pode ser colocado em operação
através do modo de programação horária ou pelo controle
remoto.
Advertência:
Neste aparelho não há partes que podem ser consertadas
pelo usuário. Nunca retire a tampa, a menos que você tenha
qualificação para tal. Este aparelho contém voltagens
perigosas. Remova sempre o cabo de alimentação da tomada
antes de efetuar qualquer conserto ou quando deixar o
aparelho muito tempo fora de uso.
● When the ON/STAND-BY button is set at STAND-BY position, mains voltage is still present inside the unit.
When the ON/STAND-BY button is set at STAND-BY position, the unit may be brought into operation by the timer mode
or remote control.
Warning:
This unit contains no user serviceable parts. Never remove
covers unless qualified to do so. This unit contains dangerous voltages, always remove mains plug from the socket before any service operation and when not in use for a long
period.
XL-DV50H
0203
04/3/19 XL-DV50H(H)_common.fm
ii
TINSZA007SJZZ
Page 4
XL-DV50H
● Vorsicht:
Das Gerät weder Tropf- noch Spritzwasser aussetzen.
Ansonsten besteht die Gefahr eines Brandes oder
elektrischen Schlages. Es dürfen keine mit Flüssigkeiten
gefüllten Gegenstände wie Vasen auf dem Gerät abgestellt
werden.
● Attention:
Pour éviter un incendie ou une secousse électrique, mettre
l’appareil à l’abri de l’eau (éclaboussure, goutte). Ne pas poser
sur l’appareil un récipient contenant du liquide.
● Advertencia:
Para evitar incendios y descargas eléctricas, no exponga
el aparato a goteo o salpicadura de líquidos. No deberán
ponerse encima del aparato objetos que estén llenos de
líquido, como por ejemplo un florero.
● Varning:
Utsätt inte enheten för dropp eller stänk för att förhindra
brand eller elektriska stötar. Inga vätskefyllda föremål
såsom vaser får placeras på enheten.
● Attenzione:
Per prevenire incendi o scosse elettriche, non fare
gocciolare nessun liquido sull’apparecchio e non bagnarlo.
Non collocarvi sopra nessun oggetto riempito d’acqua,
come per esempio vasi.
● Waarschuwing:
Stel het toestel niet bloot aan druipend of spattend water
om brand en elektrische schokken te voorkomen. Met
vloeistoffen gevulde voorwerpen, zoals vazen, mogen niet
op het toestel geplaatst worden.
● Cuidado:
Para evitar incêndio ou choque elétrico, não exponha este
aparelho a gotejamento ou salpicamento de água. Não
coloque objetos com água como, por exemplo, um vaso de
flores, em cima do aparelho.
● Warning:
To prevent fire or shock hazard, do not expose this appliance to dripping or splashing. No objects filled with liquids,
such as vases, shall be placed on the apparatus.
iii
● Når ON/ST AND-BY-knappen er sat i STAND-BY positionen,
er der stadig netspaending til stede i apparatet.
Når ON/STAND-BY-knappen er sat i STAND-BY position,
kan apparatet startes v.hj.a. timer-funksionen eller
fjernbetjeningen.
Advarsel:
Apparatet indeholder ingen dele, der kan repareres af
brugeren selv. Fjern aldrig kabinettet med mindre De er
kvalificeret hertil. Apparatet indeholder farlig
strømspaending. Traek altid stikket ud af stikkontakten før
der foretages reparationer, eller hvis apparatet ikke er i
brug i laengere tid.
DENNA APPARAT ÄR ANSLUTEN TILL 230 V
VÄXELSTRÖM NÄR STICKPROPPEN ÄR INSKJUTEN I
VÄGGUTTAGET. FÖR ATT FULLSTÄNDIGT KOPPLA IFRÅN
APPARATEN, V.G. DRAG UT STICKPROPPEN.
04/3/19 XL-DV50H(H)_common.fm
TINSZA007SJZZ
Page 5
● Advarsel:
● Advarsel:
Til at forbygge ild og stød risiko, lad vaere med at undsaette
Til at forbygge ild og stød risiko, lad vaere med at undsaette
denne indretning for drypning eller overstaenkning. Der må
denne indretning for drypning eller overstaenkning. Der må
ikke anbringes nogen genstande fyldt med vand, som for
ikke anbringes nogen genstande fyldt med vand, som for
eksempel vaser, på dette apparat.
eksempel vaser, på dette apparat.
● Advarsel:
● Advarsel:
For å unngå brann eller kortslutning, utsett ikke produktet for
For å unngå brann eller kortslutning, utsett ikke produktet for
vann eller fuktighet. Gjenstander som inneholder vaeske, feks.
vann eller fuktighet. Gjenstander som inneholder vaeske, feks.
en blomstervase, må ikke plasseres oppå apparatet.
en blomstervase, må ikke plasseres oppå apparatet.
● Varoitus:
● Varoitus:
Älä vie laitetta sateeseen tai kosteisiin tiloihin. Jos laite on
Älä vie laitetta sateeseen tai kosteisiin tiloihin. Jos laite on
kostunut, anna sen kuivua ennen kuin käytät sitä
kostunut, anna sen kuivua ennen kuin käytät sitä
verkkovirralla. Nestettä sisältäviä astioita kuten esim.
verkkovirralla. Nestettä sisältäviä astioita kuten esim.
kukkamaljakoita ei saa asettaa laitteen päälle.
kukkamaljakoita ei saa asettaa laitteen päälle.
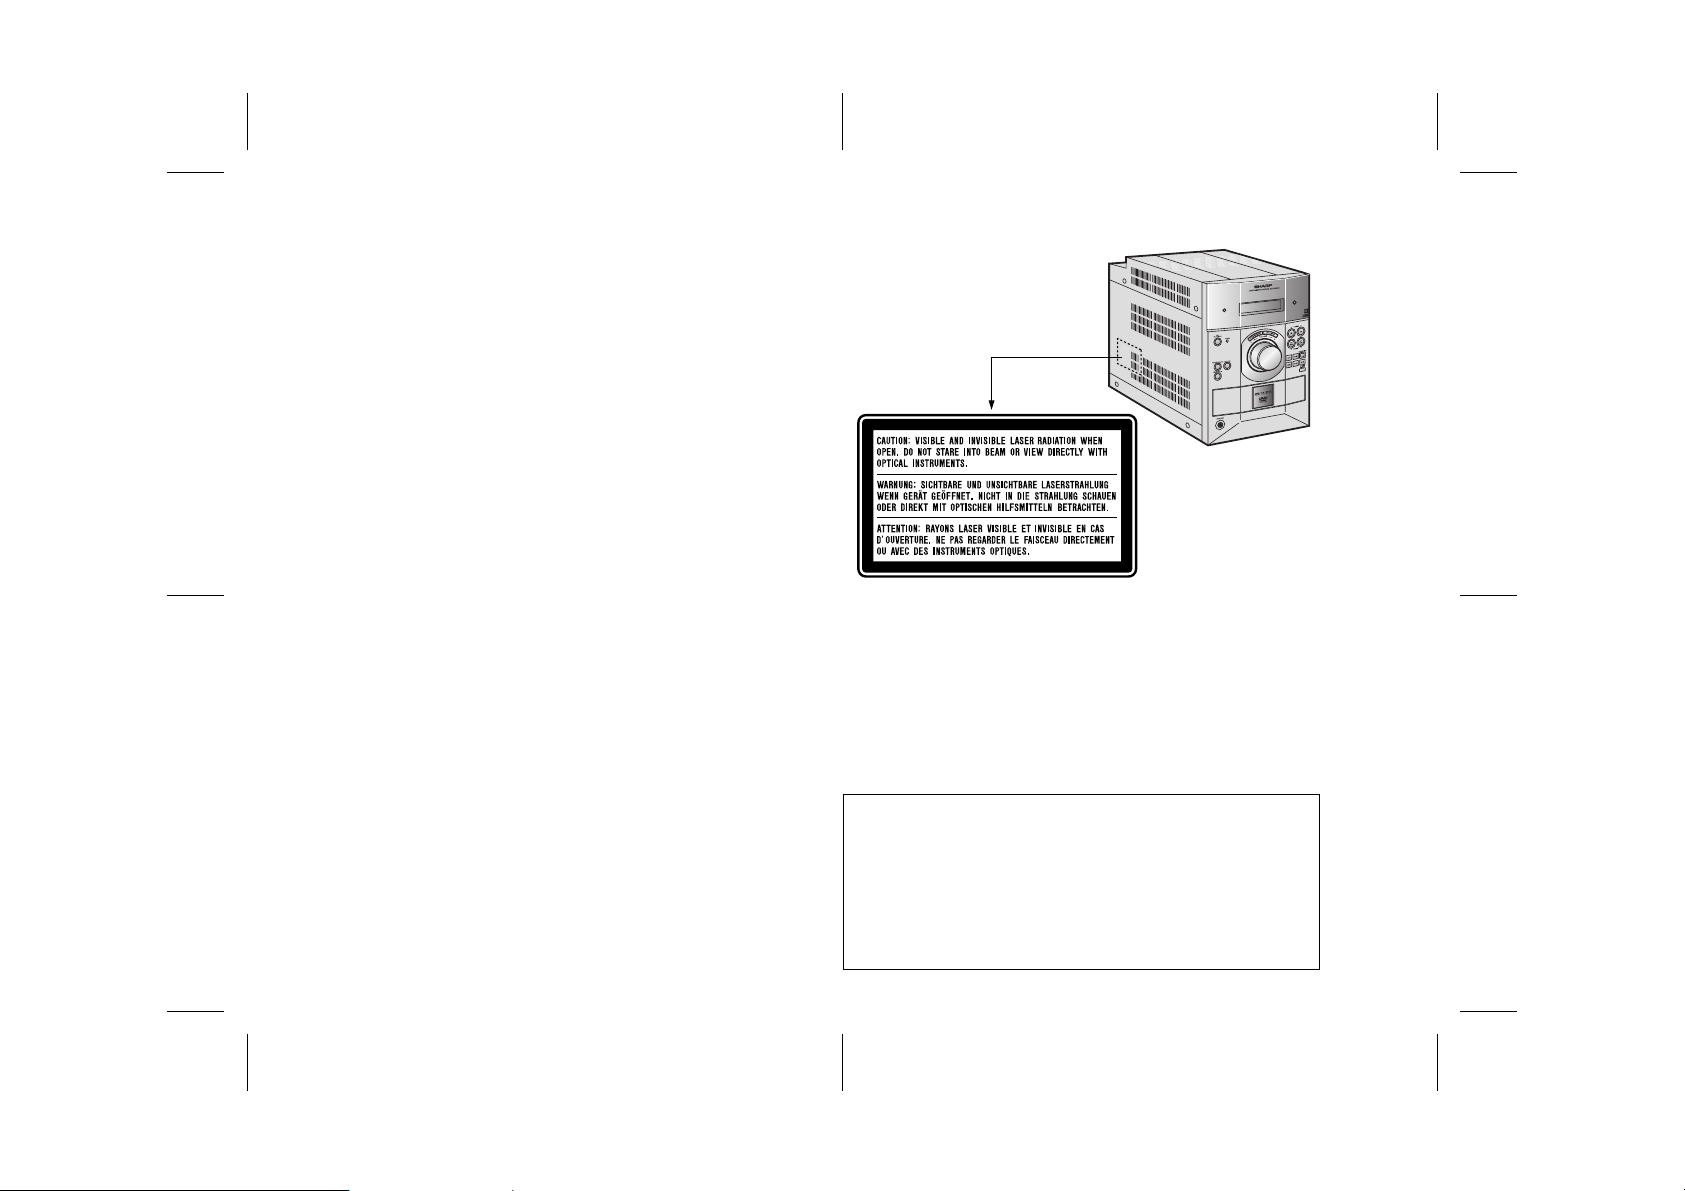
Dieses Produkt ist ein Laserprodukt der Klasse 1.
Ce produit est classifié comme étant un LASER DE CLASSE 1.
Este producto está clasificado como un PRODUCTO LÁSER DE
CLASE 1.
Denna produkt klassificeras som KLASS 1 LASERPRODUKT.
Questo prodotto è classificato come CLASS 1 LASER PRODUCT.
Dit product is geclassificeerd als een KLASSE 1 LASER PRODUCT.
Este produto é classificado como PRODUTO LASER DE CLASSE 1.
This product is classified as a CLASS 1 LASER PRODUCT.
Dette produktet er klassifisert som et KLASSE 1 LASERPRODUKT.
Dette produkt er klassificeret som et KLASSE 1 LASERPRODUKT.
Tämä laite on luokiteltu LUOKAN 1 LASERLAITTEEKSI.
Denna produkt klassificeras som KLASS 1 LASERAPPARAT.
0402_A5_2
XL-DV50H
04/3/19 XL-DV50H(H)_common.fm
iv
TINSZA007SJZZ
Page 6
XL-DV50H
● VORSICHT
Verwendung von Regelungen oder Einstellungen bzw.
Durchführung von anderen Verfahren als die hierin
angegebenen kann zum Aussetzen gefährlicher Strahlung
führen.
Da der in diesem Gerät verwendete Laserstrahl für die Augen
schädlich ist, ist das Gehäuse unter keinen Umständen zu
zerlegen. Wenden Sie sich für Wartungsarbeiten nur an
berechtigten Fachhändler.
● ATTENTION
Respecter les indications données relatives à la manipulation, au réglage et au fonctionnement. En cas de non-respect,
on s’exposera à une radiation dangereuse.
Éviter absolument de démonter l’appareil, qui utilise un rayon
laser nuisible aux yeux. Pour toute réparation, s’adresser à
une personne qualifiée.
● PRECAUCIÓN
El uso de los controles, ajustes o ejecución de procedimientos
distintos de los especificados podría causar la exposición a
radiación peligrosa.
No intente desmontar la caja ya que el haz de láser usado en
este aparato es perjudicial para los ojos. Para el servicio de
reparación, consulte a una persona cualificada.
● OBSERVERA
Användning av reglage eller justeringar eller handhavande
på annat sätt än som anges kan leda till farlig bestrålning.
Försök inte ta isär höljet eftersom enhetens laserstråle är
skadlig för ögonen. Överlåt service endast till kvalificerad
personal.
● ATTENZIONE
L’uso dei comandi e l’effettuazione di regolazioni e
procedimenti diversi da quelli specificati nel manuale possono
provocare una pericolosa esposizione alle radiazioni.
Poiché il raggio laser usato in questo apparecchio può
danneggiare gli occhi, non smontare l’apparecchio. Per le
riparazioni rivolgersi a personale specializzato.
● LET OP
Gebruik van regelaars, het maken van instellingen, gebruik
of handelingen anders dan in deze gebruiksaanwijzing
vermeld, kan gevaarlijke straling blootleggen.
De laserstraal in dit toestel kan de ogen beschadigen,
Probeer derhalve de ombouw niet te verwijderen. Laat
reparaties alleen over aan erkend onderhoudspersoneel.
● CUIDADO
O uso de controles, ajustes ou a execução de procedimentos
além daqueles especificados aqui pode resultar em perigosa
exposição à radiação.
Como os raios laser usados nesta unidade são perigosos para
os olhos, não tente desmontar o aparelho. Solicite o
conserto somente para pessoas especializadas.
● CAUTION
Use of controls, adjustments or performance of procedures
other than those specified herein may result in hazardous radiation exposure.
As the laser beam used in this unit is harmful to the eyes, do
not attempt to disassemble the cabinet. Refer servicing to
qualified personnel only.
0403
v
04/3/23 XL-DV50H(H)_common.fm
TINSZA007SJZZ
Page 7
Eigenschaften der Laserdiode
Material: AIGaAs/AIGaInP
Wellenlänge: 785 nm/650 nm
Emissionsdauer: kontinuierlich
Laser-Ausgang: max. 0,6 mW
Caractéristiques de la diode laser
Matière: AIGaAs/AIGaInP
Longueur d’onde: 785 nm/650 nm
Durée d’émission: ininterrompue
Puissance de sortie
laser maximale: 0,6 mW
Características del diodo láser
Material: AIGaAs/AIGaInP
Longitud de onda: 785 nm/650 nm
Duración de emisión : continua
Salida de láser: máx. 0,6 mW
Laserdiodens egenskaper
Material: AIGaAs/AIGaInP
Våglängd: 785 nm/650 nm
Utstrålningsvaraktighet: kontinuerlig
Lasereffekt: max. 0,6 mW
Proprietà del diodo laser
Materiale: AIGaAs/AIGaInP
Lunghezza d’onda: 785 nm/650 nm
Durata di emissione: continua
Uscita massima del laser: 0,6 mW
Laser diode specificaties
Materiaal: AIGaAs/AIGaInP
Golflengte: 785 nm/650 nm
Stralingsduur: doorlopend
Laseruitgang: max. 0,6 mW
Propriedades do diodo de laser
Material: AlGaAs/AlGaInP
Comprimento de onda: 785 nm/650 nm
Duração da emissão: contínua
Saída de laser: máx. 0,6 mW
Laser Diode Properties
Material: AIGaAs/AIGaInP
Wavelength: 785 nm/650 nm
Emission Duration: continuous
Laser Output: max. 0.6 mW
0403
ADVERSEL-SYNLIG OG USYNLIG LASERSTRÅLING VED ÅBNING.
SE IKKE IND I STRÅLEN-HELLER IKKE MED OPTISKE INSTRUMENTER.
VARO! AVATTAESSA OLET ALTTIINA NÄKYVÄLLE JA NÄKYMÄTTÖMÄLLE
LASERSÄTEILYLLE ÄLÄ TUIJOTA SÄTEESEEN ÄLÄKÄ KATSO SITÄ
OPTISEN LAITTEEN LÄPI.
VARNING-SYNLIG OCH OSYNLIG LASERSTRÅLNING NÄR DENNA
DEL ÄR ÖPPNAD. STIRRA EJ IN I STRÅLEN OCH BETRAKTA EJ
STRÅLEN GENOM OPTISKT INSTRUMENT.
VAROITUS! LAITTEEN KÄYTTÄMINEN MUULLA KUIN TÄSSÄ
KÄYTTÖOHJEESSA MAINITULLA TAVALLA SAATTAA
ALTISTAA KÄYTTÄJÄN TURVALLISUUSLUOKAN 1
YLITTÄVÄLLE NÄKYMÄTTÖMÄLLE LASERSÄTEILYLLE.
VARNING - OM APPARATEN ANVÄNDS PÅ ANNAT SÄTT ÄN
I DENNA BRUKSANVISNING SPECIFICERAS. KAN
ANVÄNDAREN UTSÄTTAS FÖR OSYNLIG LASERSTRÅLNING, SOM ÖVERSKRIDER GRÄNSEN FÖR
LASERKLASS 1.
0203
XL-DV50H
vi
04/3/19 XL-DV50H(H)_common.fm
TINSZA007SJZZ
Page 8

XL-DV50H
ENGLISH
Introduction
ENGLISH
Special notes
E-1
Thank you for purchasing this SHARP product. To obtain the
best performance from this product, please read this manual
carefully. It will guide you in operating your SHARP product.
Accessories
Please confirm that the following accessories are included.
Remote control 1 AM loop aerial 1
General Information
Note:
Only the above accessories are included.
FM aerial 1 SCART cable 1
AC power lead 1 "AA" size battery (UM/S UM- 3,
R6, HP-7 or similar) 2
"DTS" and "DTS Digital Out" are trademarks of Digital Theater Systems, Inc.
Manufactured under license from Dolby Laboratories. "Dolby" and
the double-D symbol are trademarks of Dolby Laboratories.
Copyright Information:
! Unauthorised copying, broadcast, public display, transmission,
public performance and rental (regardless of whether or not
such activities are for profit) of disc contents are prohibited by
law.
! This system is equipped with copy protection technology that
causes substantial degradation of images when the contents of
a disc are copied to a videotape.
Copy Protection:
This unit supports Macrovision copy protection.
On DVD discs that include a copy protection code, if the contents of
the D VD disc are copied using a VCR, the copy protection code prevents the videotape copy from playing normally.
Apparatus Claims of U.S.Patent Nos. 4,631,603, 4,577,216,
4,819,098 and 4,907,093 licensed for limited viewing uses only.
This product incorporates copyright protection technology that is
protected by method claims of certain U.S. patents and other
intellectual property rights owned by Macrovision Corporation
and other rights owners. Use of this copyright protection
technology must be authorized by Macrovision Corporation, and
is intended for home and other limited viewing uses only unless
otherwise authorized by Macrovision Corporation. Reverse
engineering or disassembly is prohibited.
04/3/19 XL-D V50H(H)_E.fm
TINSZA007SJZZ
Page 9
Contents
Page
" General Information
Types of pl ayable discs . . . . . . . . . . . . . . . . . . . . . . . . . . . . . . . . 3
Description of discs . . . . . . . . . . . . . . . . . . . . . . . . . . . . . . . . .4 - 6
Precautions . . . . . . . . . . . . . . . . . . . . . . . . . . . . . . . . . . . . . . . . . 7
Controls and indicators . . . . . . . . . . . . . . . . . . . . . . . . . . . . .8 - 10
" Preparation for Use
System con ne ctions . . . . . . . . . . . . . . . . . . . . . . . . . . . . . .11 - 15
Remote con t rol . . . . . . . . . . . . . . . . . . . . . . . . . . . . . . . . . . . . . . 16
General control . . . . . . . . . . . . . . . . . . . . . . . . . . . . . . . . . . . . . 17
Setting the clock . . . . . . . . . . . . . . . . . . . . . . . . . . . . . . . . . . . . 18
" DVD Operation
Playing a disc . . . . . . . . . . . . . . . . . . . . . . . . . . . . . . . . . . . .19 - 21
Basic operation
To locate the b e gi nning of a chapter/track (sk ip ) . . . . . . . . . . 22
Fast forward/F ast re verse (search) . . . . . . . . . . . . . . . . . . . . . . 22
To star t p layback from the desired point (direct play) . . . 23, 24
Still pictur e /Frame advance . . . . . . . . . . . . . . . . . . . . . . . . . . . 24
Slow-motion play . . . . . . . . . . . . . . . . . . . . . . . . . . . . . . . . . . . . 2 4
Useful features
To play repeatedly (repeat play) . . . . . . . . . . . . . . . . . . . . . 25, 26
To play the contents between the specified points
repeatedly ( A -B re peat) . . . . . . . . . . . . . . . . . . . . . . . . . . . . . . . 26
Various settings
To change the audio language (audio output) . . . . . . . . . . . . 27
To change the s u b t i t le language . . . . . . . . . . . . . . . . . . . . . . . 28
To change the a n g le . . . . . . . . . . . . . . . . . . . . . . . . . . . . . . . . . 28
To select a title, subtitle or audio language, etc.
from the top menu or m e nu of the disc . . . . . . . . . . . . . . . . . . 28
To zoom in on an image (zoom ) . . . . . . . . . . . . . . . . . . . . . . . . 29
To brighten an im a ge . . . . . . . . . . . . . . . . . . . . . . . . . . . . . . . . . 30
To improve the imag e qu a lity . . . . . . . . . . . . . . . . . . . . . . . . . . 30
To change the display on TV screen . . . . . . . . . . . . . . . . . . . . 31
" Video CD Operation
Playing a video CD
To play a video CD wi t h P. B. C. (pl ayba ck co ntrol) . . . . . . . . 32
" Audio CD Operation
Page
Playing an audio CD
To play in random order (random play) . . . . . . . . . . . . . . . . . . 33
To start playback from the desired point (direct play) . . . . . . 33
To play in the desir e d order (program m e d playback) . . . . . . . 34
" MP3 and JPEG Disc Operation
Playing an M P3 and JPEG disc . . . . . . . . . . . . . . . . . . . . . 35, 36
" Radio
Listening to the radio . . . . . . . . . . . . . . . . . . . . . . . . . . . . . 37, 38
Using the Radio Data System (RDS) . . . . . . . . . . . . . . . . .39 - 42
" Advanced Features
Changing the initial setting of DVD . . . . . . . . . . . . . . . . . .43 - 48
Timer and sleep operation . . . . . . . . . . . . . . . . . . . . . . . . . 49 - 51
Enhancing your system . . . . . . . . . . . . . . . . . . . . . . . . . . . . . . 52
" References
Troubleshooting chart . . . . . . . . . . . . . . . . . . . . . . . . . . . . . 53, 54
Error indicat ors a nd warnings . . . . . . . . . . . . . . . . . . . . . . . . . 54
Maintenance . . . . . . . . . . . . . . . . . . . . . . . . . . . . . . . . . . . . . . . . 55
Specifications . . . . . . . . . . . . . . . . . . . . . . . . . . . . . . . . . . . 55, 56
Icons used in this operation manual
Some functions may not be available depending on discs. The following icons indicate the discs that can be used in the section.
... Indicates DVDs.
... Indicates video CDs.
... Indicates audio CDs.
... Indicates CD-R/RW with MP3 recording.
... Indicates CD-R/RW with JPEG recording.
! Some operations may not be performed depending on discs
even if they are described in this manual.
! During operat ion, " " may be displayed on the screen. This
means that the operations described in this manual are prohibited by the disc.
XL-DV50H
ENGLISH
General Information
E-2
1
2
3
4
5
6
7
8
04/3/19 XL-D V50H(H)_E.fm
TINSZA007SJZZ
Page 10
XL-DV50H
ENGLISH
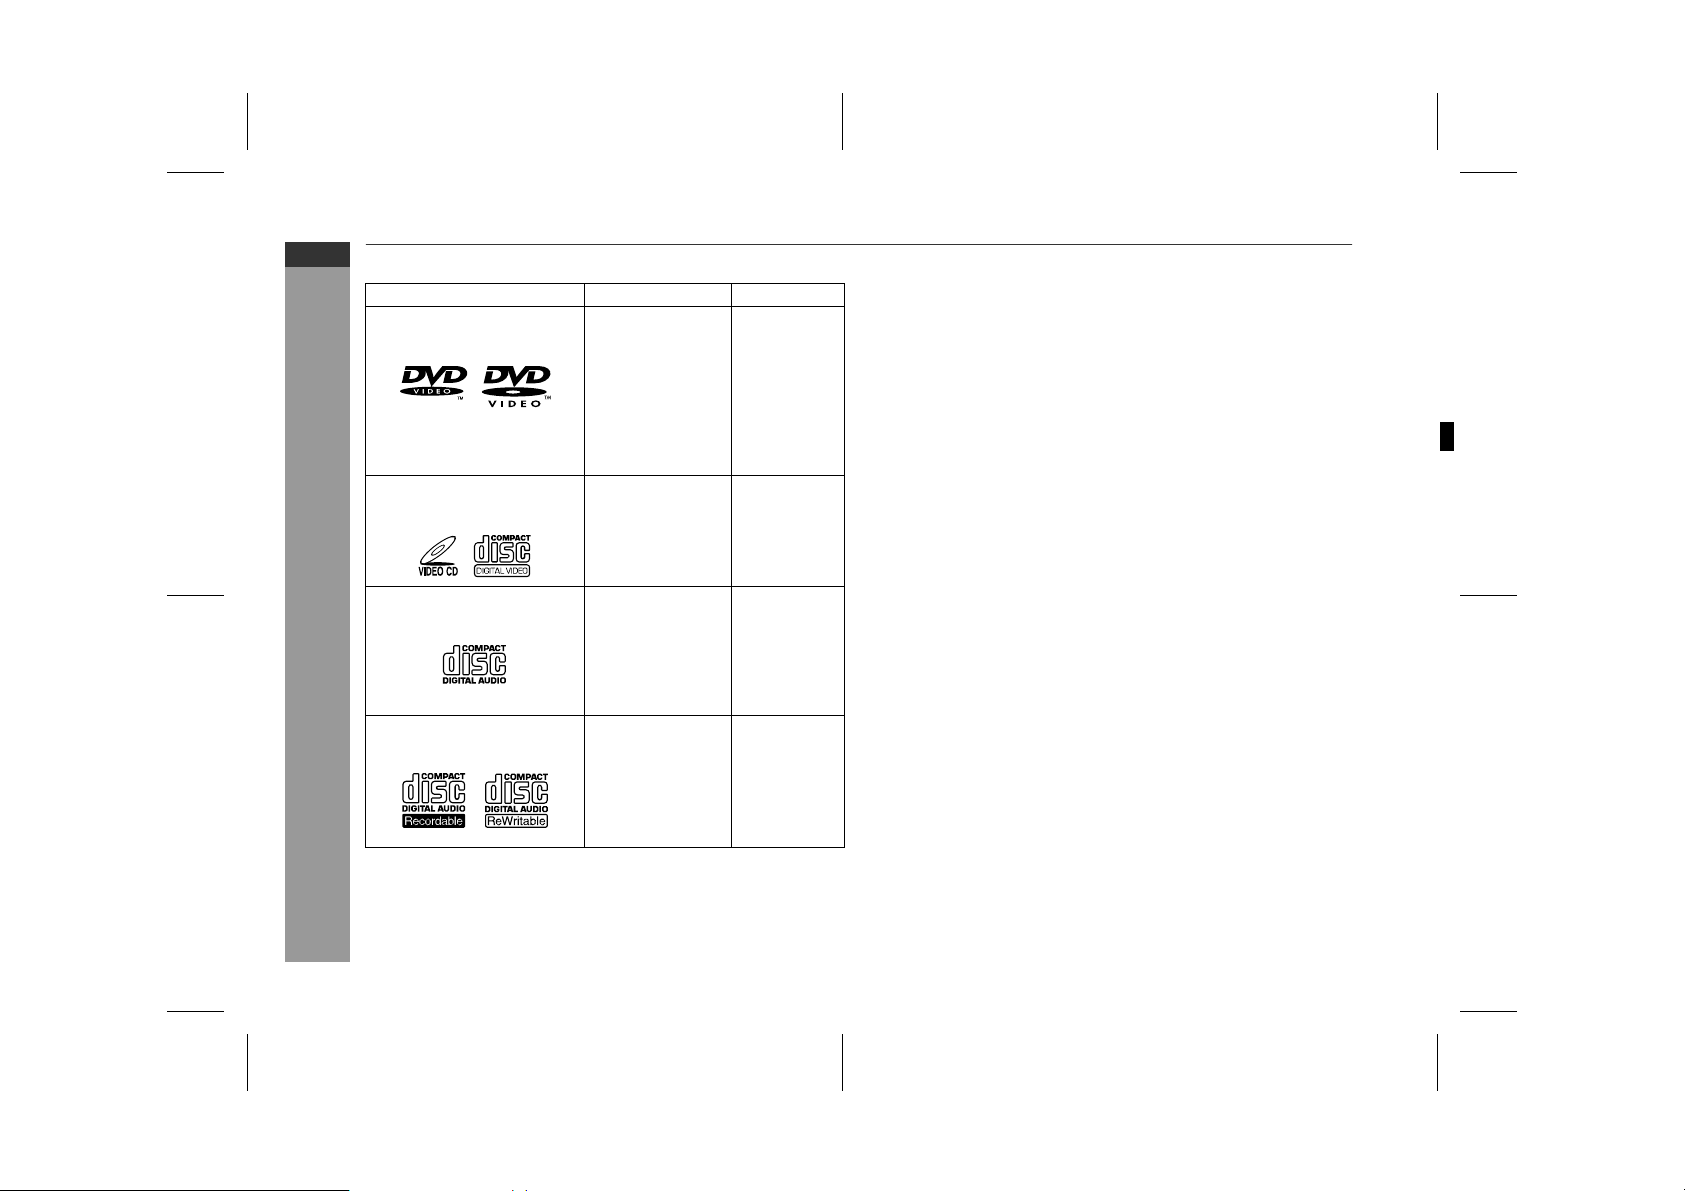
Types of playable discs
The unit can play back discs bearing any of the following marks:
Disc type Disc contents Disc size
DVD Video Disc Audio and video
(movies)
Or DVD-R/DVD-RW/DVD+R/
DVD+RW recorded in video
mode (*1)
Video CD Audio and video
(movies)
12 cm (5")
8 cm (3")
12 cm (5")
8 cm (3")
(*1): Discs including DVD-R/DVD-RW/DVD+R/DVD+RW may not be
played back due to properties and scratches on the disc, dirty
optical pickup lens, etc.
(*2): Only the audio on the CDV can be played.
(*3): The CD-R/CD-RW may not be played back properly depending
on the recording equipment or the disc.
(*4): If the sampling frequency is 44.1 or 48.1 kHz and the fixed bit
rate is 128 kbps or higher, MPEG 1 Audio Layer 3 (MP3) files
can be played. However, some of them may not be played de-
pending on their conditions or formats.
(*5): JPEG or JPG picture discs also play on this unit. However, pic-
tures may not be clear (depends on resolution and recording
method).
! For unplayable discs, see page 5.
5
E-3
Audio CD Audio 12 cm (5")
Or CDV (*2)
General Information
CD-R/CD-RW (*3) Audio and picture 12 cm (5")
CD-R/CD-RW recorded in MP3 format (*4), JPEG
format (*5)
8 cm (3")
8 cm (3")
04/3/19 XL-D V50H(H)_E.fm
TINSZA007SJZZ
TINSZA007SJZZ
Page 11
Description of discs
" Icons used on DVD discs
Check the icons on the DVD case before playing your discs.
XL-DV50H
ENGLISH
1
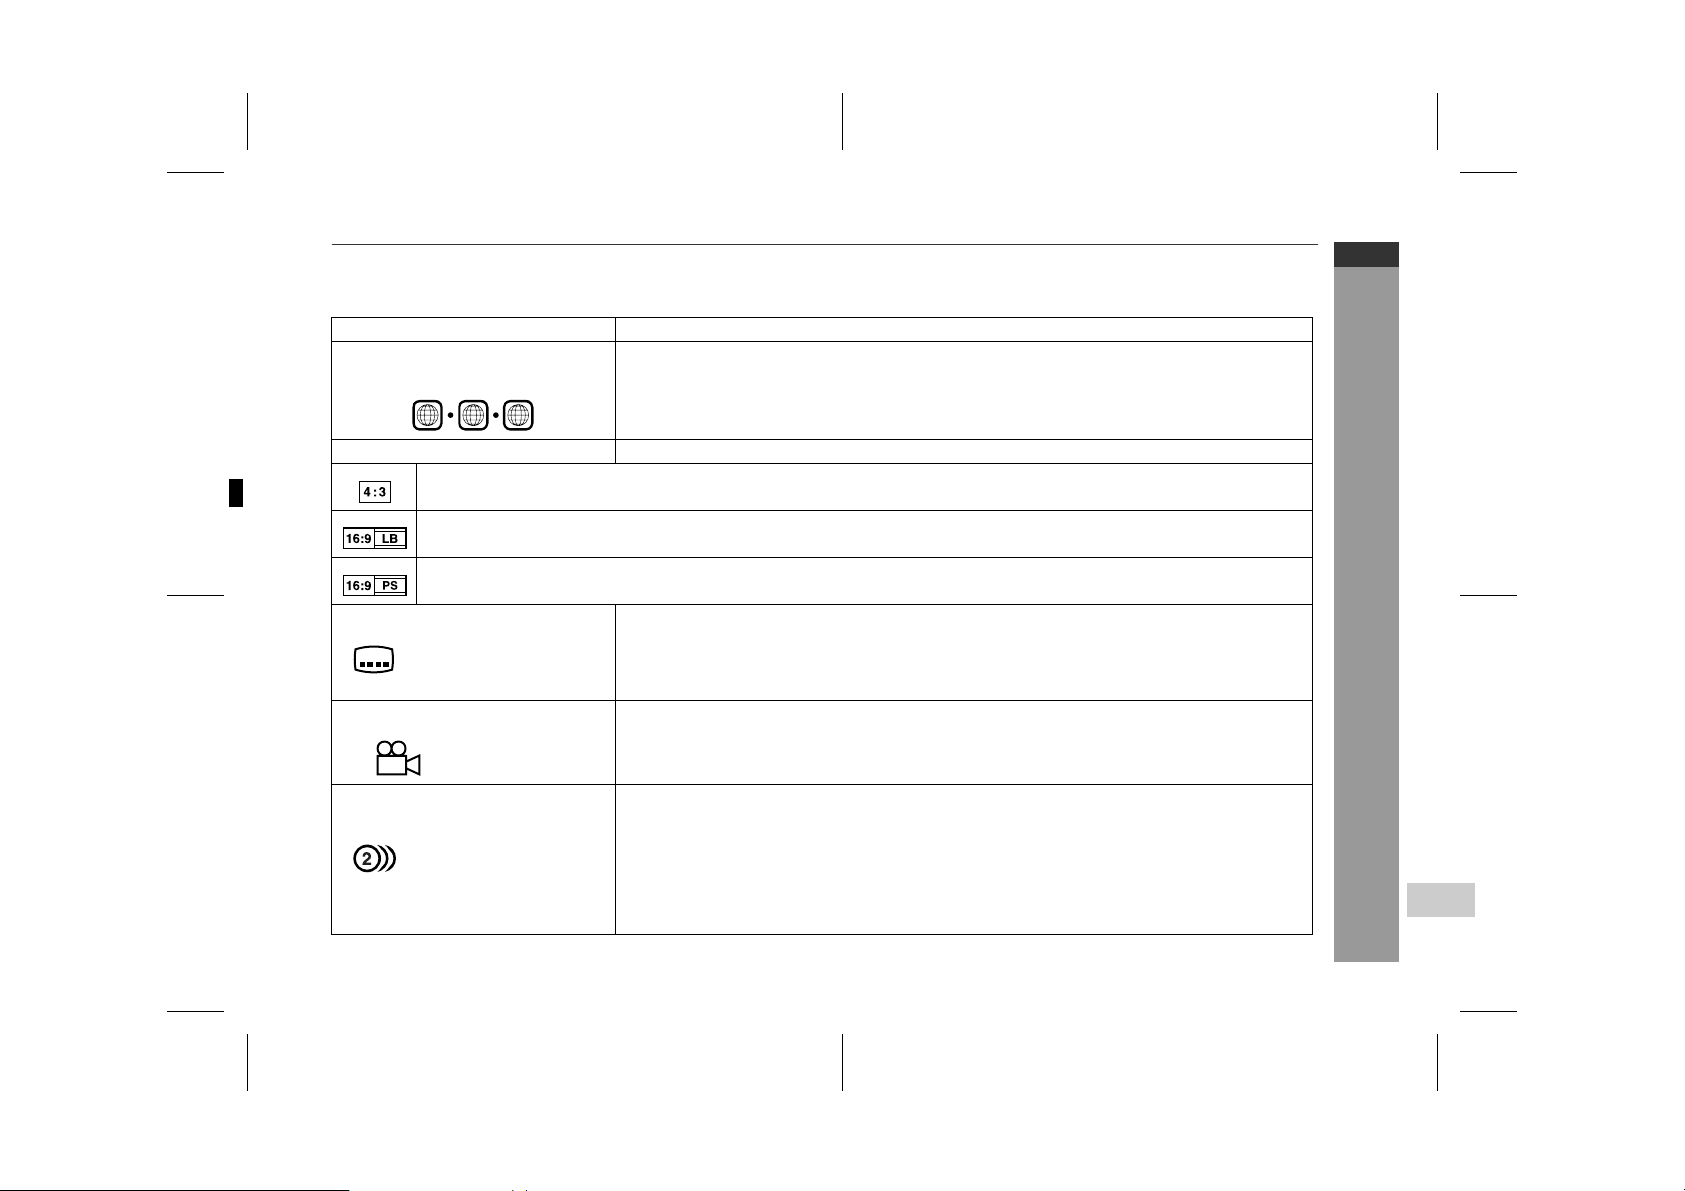
Display Description
Region number (playable area number)
1
2
2
Format recorded on the DVD To adopt the video format to the connected TVs ("wide-screen TV" or "4:3 size TV").
Recorded in 4:3.
6
Type of subtitles recorded Recorded subtitle languages.
Number of camera angles Number of angles recorded on the DVD.
TINSZA007SJZZ
Number of audio tracks and audio
recording systems
You can enjoy wide images on a wide-screen TV, and letterbox size images on the 4:3 size TV.
You can enjoy wide images on a wide-screen TV and 4:3 images with the side edges cut on the 4:3 size TV.
Example: Language can be selected with the SUB TITLE/SURROUND button.
2
1: English
2: French
2
Example: ! The audio recorded on the DVD can be switched by using the ZOOM/AUDIO button.
1: Original <English> (Dol-
by Digital 5.1 Surround)
2: English (Dolby Digital 2
Surround)
ALL
6
DVD discs are programmed with region numbers indicating countries in which they can be played.
This system can play discs with region number "2" or "ALL".
Angles can be selected with the ANGLE button.
The number of audio tracks and audio recording systems are indicated.
! The number of audio tracks and recording systems vary depending on the DVD. Check them in
the DVD's manual.
General Information
2
3
4
5
6
7
8
04/3/19 XL-D V50H(H)_E.fm
E-4
TINSZA007SJZZ
Page 12
XL-DV50H
ENGLISH
Description of discs (continued)
" Discs that cannot be played
! DVDs without the region num-
ber "2" or "ALL".
! DV Ds with SECAM system ! CD-ROM
! DV Ds with MP EG sound ! SACD
! DVD-ROM ! Discs recorded in special for-
! DVD-RAM
! T he discs above cannot be played at all, or no sound is heard
although images appear on the screen or vice versa.
! Faulty playback may damage the speakers and can have an
adverse effect on your hearing when played at high volume settings.
! You cannot play illegally produced discs.
Notes:
! A disc with s cratches or finger pr ints may not play properly. Refer
to "Care of discs (page 55)" and clean the disc.
! Do not play the discs of special shapes (heart or octagon
shaped) as they can be ejected whilst rotating and cause injury.
! DVD-Audio
! CDG
! Photo CD
mats, etc.
General Information
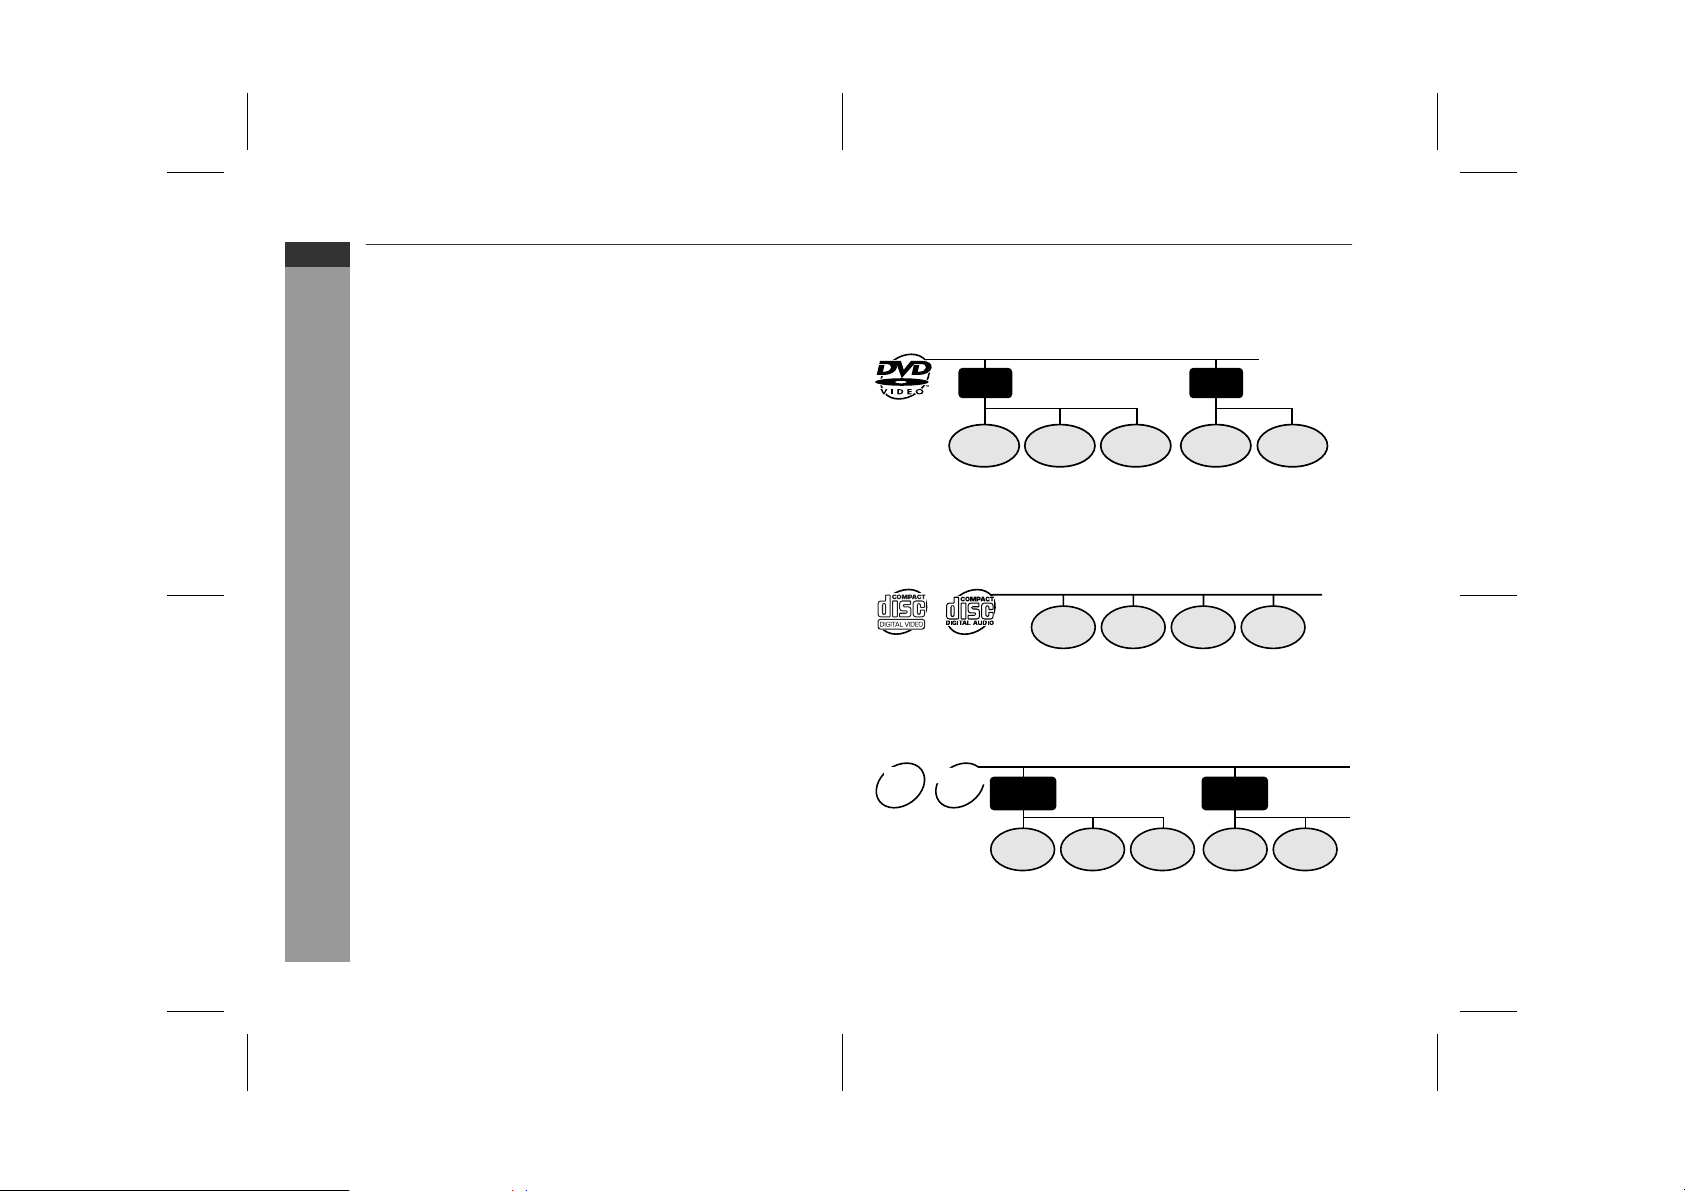
" Title, chapter and track
DV Ds are divided into "titles" and "chapters". If the disc has more
than one movie on it, each movie is a separate "title". "Chapters" are
subdivisions of titles.
Title 1 Title 2
Chapter 1
Video CD and audio CD are composed of "tracks". Tracks are equivalent to songs on a CD.
Note:
Title, chapter, or track numbers may not be recorded on some discs.
MP3, JPEG discs consist of "folders" and "tracks".
MP3
JPEG
disc
disc
Chapter 2 Chapter 3 Chapter 1 Chapter 2
Track 1 Track 2 Track 3 Track 4
Folder 1
Folder 2
E-5
Track 1
Track 2 Track 1
04/3/19 XL-D V50H(H)_E.fm
Track 2Track 3
TINSZA007SJZZ
Page 13

The list below shows the countries covered by region number 2.
XL-DV50H
ENGLISH
1
Common names Names of nations and areas
Albania Republic of Albania
Andorra Principality of Andorra
Austria Republic of Austria
Bahrain State of Bahrain
Belgium Kingdom of Belgium
Bosnia and Herzegovina Bosnia and Herzegovina
Bulgaria Republic of Bulgaria
Channel Islands *Channel Islands
Croatia Republic of Croatia
Cyprus Republic of Cyprus
Czech The Czech Republic
Denmark Kingdom of Denmark
Egypt Arab Republic of Egypt
Faeroe Islands *Faeroe Islands
Finland Republic of Finland
France French Republic
Germany Federal Republic of Germany
Gibraltar *Gibraltar
Greece Hellenic Republic
Greenland *Greenland
Hungary Republic of Hungary
Iceland Republic of Iceland
Iran Islamic Republic of Iran
Iraq Republic of Iraq
Ireland Ireland
Isle of Man *Isle of Man
Israel State of Israel
Italy Italian Republic
Japan Japan
Jordan Hashemite Kingdom of Jordan
Kuwait State of Kuwait
Common names Names of nations and areas
Lebanon Republic of Lebanon
Lesotho Kingdom of Lesotho
Liechtenstein Principality of Liechtenstein
Luxembourg Grand Duchy of Luxembourg
Macedonia Republic of Macedonia
Malta Republic of Malta
Monaco Principality of Monaco
Netherlands K ingdom of the Netherlands
Norway Kingdom of Norway
Oman Sultanate of Oman
Poland Republic of Poland
Portugal Portuguese Republic
Qatar State of Qatar
Romania Romania
San Marino Republic of San Marino
Saudi Arabia Kingdom of Saudi Arabia
Slovakia The Slovak Republic
Slovenia Republic of Slovenia
South Africa Republic of South Africa
Spain Kingdom of Spain
Svalbard and Jan Mayen Islands *Svalbard and Jan Mayen Is-
Swaziland Kingdom of Swaziland
Sweden Kingdom of Sweden
Switzerland Swiss Confederation
Syrian Arab Republic Syrian Arab Republic
Turkey Republic of Turkey
United Arab Emirates United Arab Emirates
United Kingdom United Kingdom of Great Britain
Vatican City State State of the City of Vatican
Yemen Republic of Yemen
Yugoslavia Federal Republic of Yugoslavia
lands
and Northern Ireland
* represents area name.
2
3
4
5
General Information
6
7
8
04/3/19 XL-D V50H(H)_E.fm
E-6
TINSZA007SJZZ
Page 14

XL-DV50H
ENGLISH
Precautions
" General
! P lease ensure that the equipment is positioned in a well venti-
lated area and ensure that there is at least 10 cm (4") of free
space along the sides, top and back of the equipment.
10 cm (4") 10 cm (4")
! Use the unit on a firm, level surface free from
vibration.
! Keep the unit away from direct sunlight,
strong magnetic fields, excessive dust,
humidity and electronic/electrical equipment (home computers, facsimiles, etc.)
which generate electrical noise.
! Do not place anything on top of the unit.
! Do not expose the unit to moisture, to temperatures higher than
General Information
60°C (140°F) or to extremely low temperatures.
! I f your system does not work properly, disconnect the AC power
lead from the wall socket. Plug the AC power lead back in, and
then turn on your system.
! In case of an electrical storm, unplug the
unit for safety.
10 cm (4")
10 cm (4")
! Do not remove the outer cover, as this
may result in electric shock. Refer internal service to your local SHARP service
facility.
! The ventilation should not be impeded by covering the ventilation
openings with items, such as newspapers, tablecloths, curtains,
etc.
! No naked flame sources, such as lighted candles, should be
placed on the apparatus.
! Attention should be drawn to the environmental aspects of bat-
tery disposal.
! The apparatus is designed for use in moderate climate.
! This unit should only be used within the range of 5°C - 35°C
(41°F - 95°F).
Warning:
The voltage used must be the same as that specified on this unit.
Using this product with a higher voltage other than that which is
specified is dangerous and may result in a fire or other type of accident causing damage. SHARP will not be held r esponsible for any
damage resulting from use of this unit with a voltage other than that
which is specified.
" Volume control
The sound level at a given volume setting depends on speaker efficiency, location, and various other factors. It is advisable to avoid
exposure to high volume levels. Do not tur n the volume on to full at
switch on and listen to music at moderate levels.
E-7
! Hold the AC power plug by the head when
removing it from the wall socket, as pulling
the lead can damage internal wires.
04/3/19 XL-D V50H(H)_E.fm
TINSZA007SJZZ
Page 15

Contr o ls an d in dic ators
1
2
3
4
5
6
7
8
9
321 4 5687 9 10
10
11
12
13
14
15
16
17
18
! Front panel
1.Equaliser Mode Select Button . . . . . . . . . . . . . . . . . . . . . . 17
2.Extra Bass/Demo Mode Button . . . . . . . . . . . . . . . . . . 15, 17
3.Timer Indicator . . . . . . . . . . . . . . . . . . . . . . . . . . . . . . . . . . . 50
4.On/Stand-by Button . . . . . . . . . . . . . . . . . . . . . . . . . . . . . . . 15
5.DVD/CD Button . . . . . . . . . . . . . . . . . . . . . . . . . . . . . . . . . . . 19
6.Tuner (Band) Button . . . . . . . . . . . . . . . . . . . . . . . . . . . . . . 37
7.Video/Auxiliary Button . . . . . . . . . . . . . . . . . . . . . . . . . . . . . 52
8.Disc Compartment . . . . . . . . . . . . . . . . . . . . . . . . . . . . . . . . 19
9.Headphone Socket . . . . . . . . . . . . . . . . . . . . . . . . . . . . . . . . 52
10.Remote Sensor . . . . . . . . . . . . . . . . . . . . . . . . . . . . . . . . . . . 16
11.Stop or Tuning Down Button . . . . . . . . . . . . . . . . . . . . . 20, 37
12. Play or Tuning Up Button . . . . . . . . . . . . . . . . . . . . . . . 20, 37
13. Chapte r (Track) Skip Down or Fas t Reve rs e,
Tuner Preset Down Button . . . . . . . . . . . . . . . . . . . . . . 22, 38
14.Chapter (Track) Skip Up or Fast Forward,
Tuner Preset Up Button . . . . . . . . . . . . . . . . . . . . . . . . . 22, 38
15.Memory/Set Button . . . . . . . . . . . . . . . . . . . . . . . . . . . . . . . 18
16.Disc Compartment Open/Close Button . . . . . . . . . . . . . . . 19
17. Disc Number Select B uttons . . . . . . . . . . . . . . . . . . . . . . . . 20
18.Volume Control . . . . . . . . . . . . . . . . . . . . . . . . . . . . . . . . . . . 17
Reference page
XL-DV50H
ENGLISH
1
2
3
4
5
! Display
1.Disc Number Indicators . . . . . . . . . . . . . . . . . . . . . . . . . . . . 20
2.Play Indicator . . . . . . . . . . . . . . . . . . . . . . . . . . . . . . . . . . . . 20
3.Pause Indicator . . . . . . . . . . . . . . . . . . . . . . . . . . . . . . . . . . 20
4.Repeat Play Indicators . . . . . . . . . . . . . . . . . . . . . . . . . . . . . 25
5.Disc Type Indicators . . . . . . . . . . . . . . . . . . . . . . . . . . . . . . 20
6.Extra Bass Indicator . . . . . . . . . . . . . . . . . . . . . . . . . . . . . . 17
7.Traffic Programme Indi c a t o r . . . . . . . . . . . . . . . . . . . . . . . . 39
8.RDS Indicator . . . . . . . . . . . . . . . . . . . . . . . . . . . . . . . . . . . . 41
9.Traffic Announceme nt Indicator . . . . . . . . . . . . . . . . . . . . . 39
10.Sound Mode Indicators . . . . . . . . . . . . . . . . . . . . . . . . . . . . 20
11.Memory Indicator . . . . . . . . . . . . . . . . . . . . . . . . . . . . . . 34, 38
12.Angle Indicator . . . . . . . . . . . . . . . . . . . . . . . . . . . . . . . . . . . 28
13.Surround Mode Indicator . . . . . . . . . . . . . . . . . . . . . . . . . . 17
14.Sleep Indicator . . . . . . . . . . . . . . . . . . . . . . . . . . . . . . . . . . . 51
1715 1611 12 1413
15. FM Stere o M o de Indicato r . . . . . . . . . . . . . . . . . . . . . . . . . . 37
16.FM Stereo Receiving Indicator . . . . . . . . . . . . . . . . . . . . . . 37
17.Timer Play Indicator . . . . . . . . . . . . . . . . . . . . . . . . . . . . . . . 50
Reference page
General Information
6
7
8
04/3/19 XL-D V50H(H)_E.fm
E-8
TINSZA007SJZZ
Page 16
XL-DV50H
ENGLISH
Controls and indicators (continued)
1
2
3
1
General Information
2
1
2
4
5
6
7
8
9
10
3
4
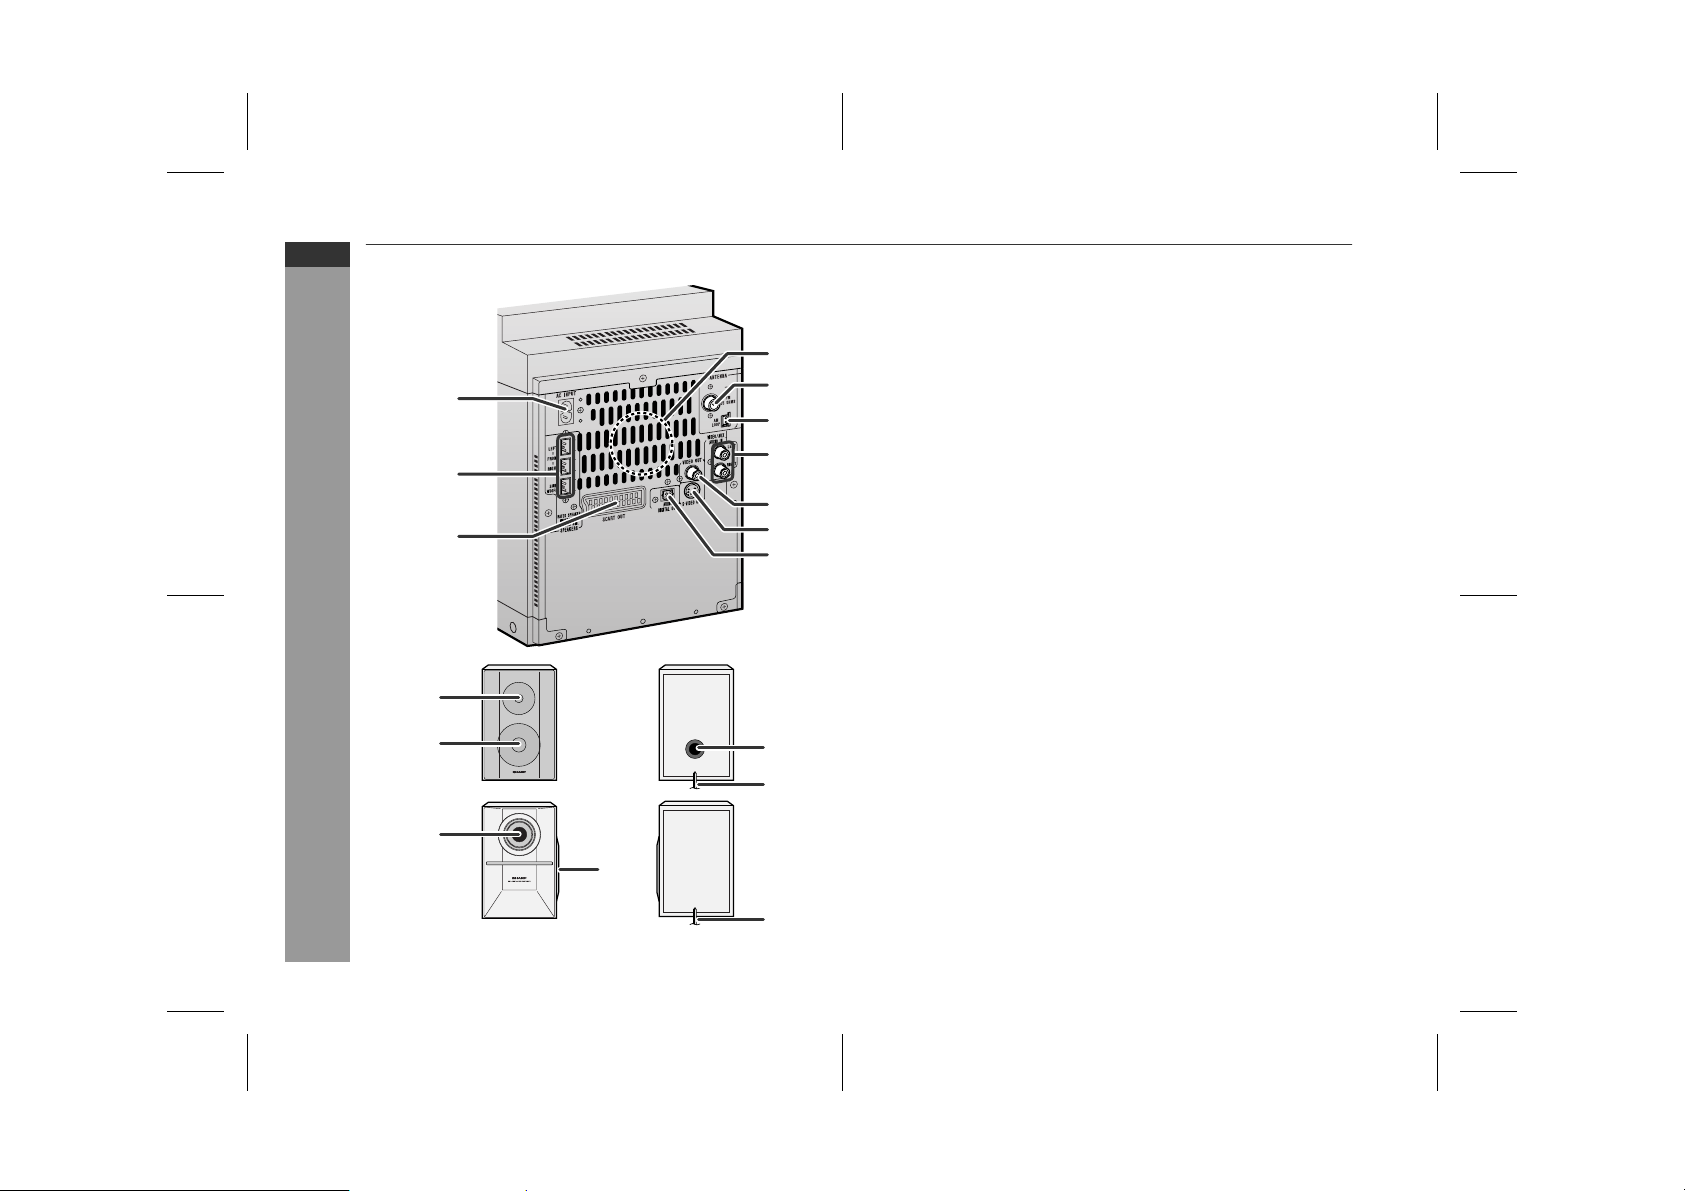
" Rear panel
Reference page
1.AC Power Input Socket . . . . . . . . . . . . . . . . . . . . . . . . . . . . 15
2.Speaker Terminals . . . . . . . . . . . . . . . . . . . . . . . . . . . . . . . . 12
3.SCART Outpu t Sock e t . . . . . . . . . . . . . . . . . . . . . . . . . . . . . 13
4.Cooling Fan . . . . . . . . . . . . . . . . . . . . . . . . . . . . . . . . . . . . . . 15
5.FM 75 Ohms A e r ia l S ocket . . . . . . . . . . . . . . . . . . . . . . . . . 12
6.AM Loop A e r ia l S ocke t . . . . . . . . . . . . . . . . . . . . . . . . . . . . 1 2
7.Video/Auxilia ry (Audio Signa l) Input Sockets . . . . . . . . . . 52
8.Video Output Socket . . . . . . . . . . . . . . . . . . . . . . . . . . . . . . 1 4
9.S-video Output Socket . . . . . . . . . . . . . . . . . . . . . . . . . . . . . 14
10.Optical Digital Audio Output Socket . . . . . . . . . . . . . . . . . . 52
" Front speaker
1.Tweeter
2.Woofer
3.Bass Reflex Duct
4.Speaker Wire
" Subwoofer
1.Sub Duct Pipe
2.Subwoofer
3.Speaker Wire
E-9
3
04/3/19 XL-D V50H(H)_E.fm
TINSZA007SJZZ
Page 17
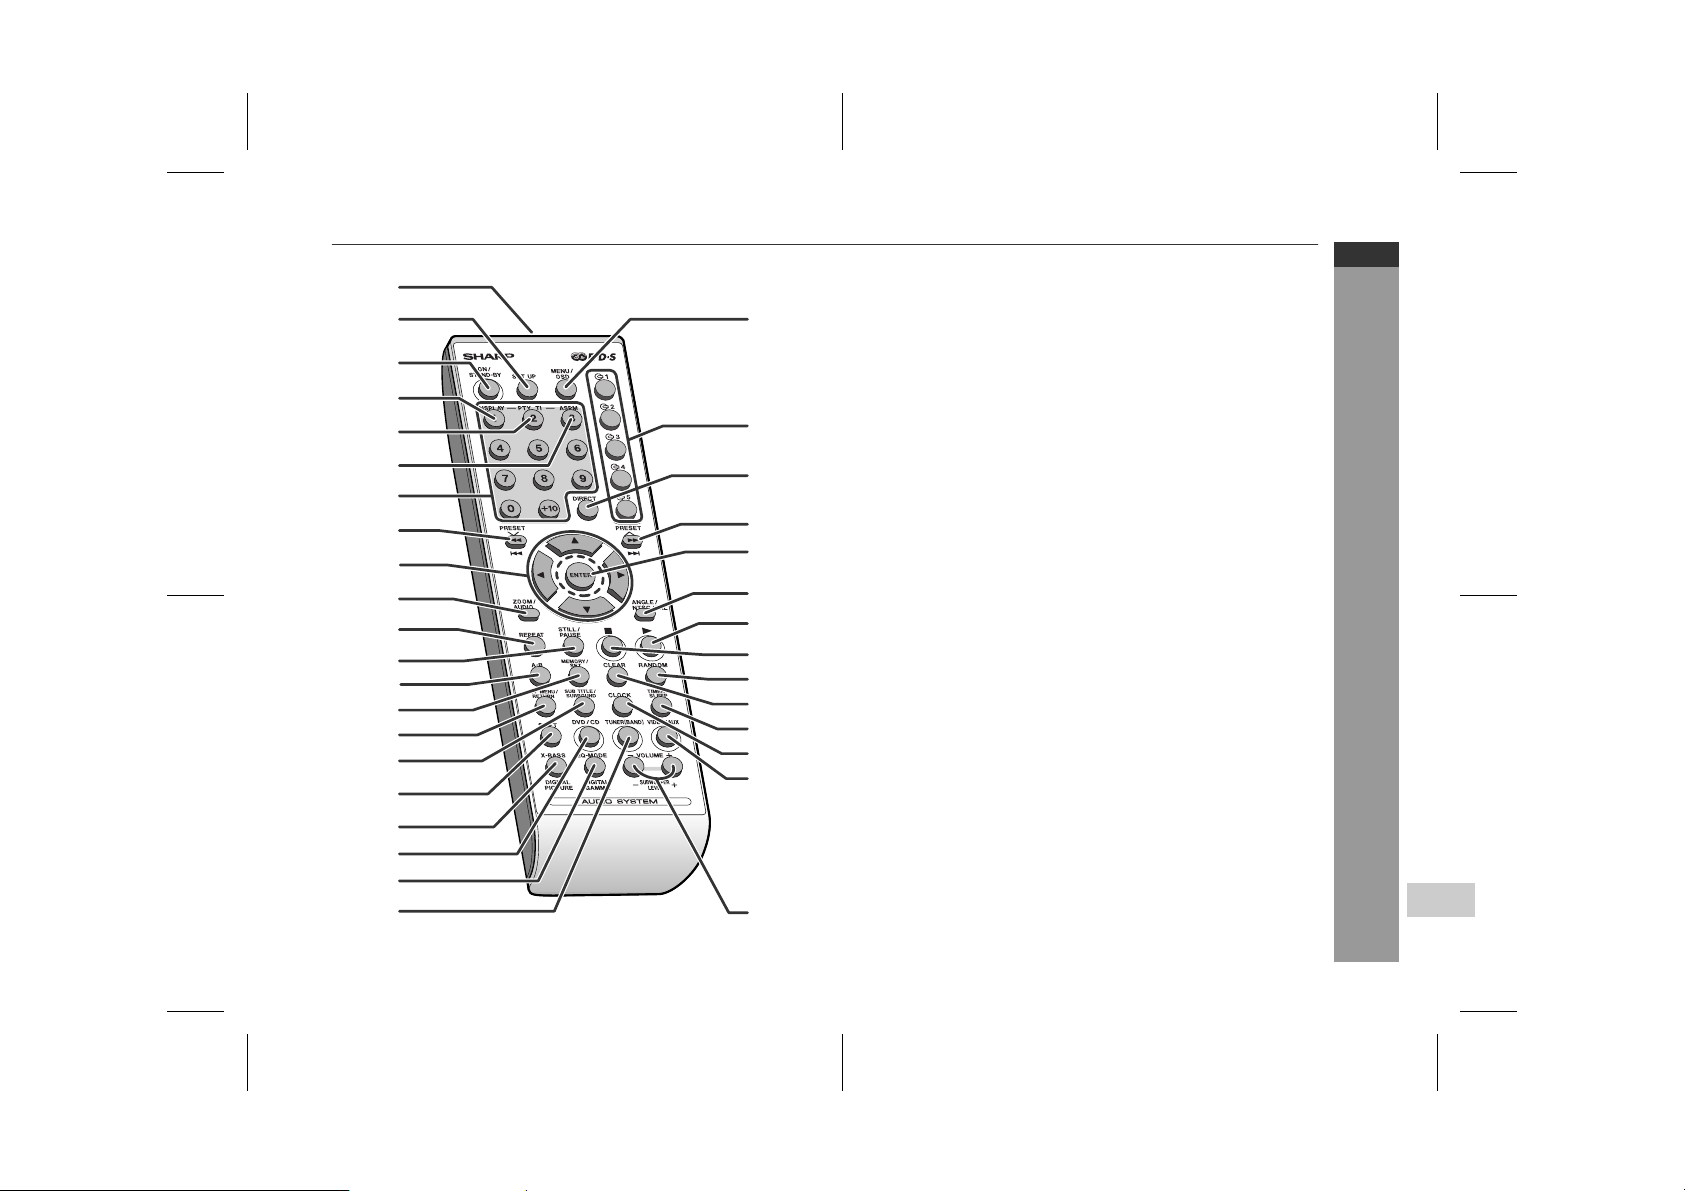
" Remote control
1.Remote Co ntrol Transmitter . . . . . . . . . . . . . . . . . . . . . . . . 16
2.DVD Setup Button . . . . . . . . . . . . . . . . . . . . . . . . . . . . . . . . 43
3.On/Stand-by Button . . . . . . . . . . . . . . . . . . . . . . . . . . . . . . . 16
4.RDS Display Mode Selec t Butt on . . . . . . . . . . . . . . . . . . . . 39
RDS Programme Typ e/Traffic Information Search Button
5.
6.RDS ASPM (Auto Station Programme Memory) Button . . 41
7.Direct Number Buttons . . . . . . . . . . . . . . . . . . . . . . . . . . . . 23
8.Chapter (Track) Skip Down or Fas t Reve rs e,
Tuner Preset Down, Time Down Button . . . . . . . . . 18, 22, 38
9.Cursor Buttons . . . . . . . . . . . . . . . . . . . . . . . . . . . . . . . . 20, 43
10.Zoom or Audio Select Button . . . . . . . . . . . . . . . . . 27, 29, 36
11.Repeat Play Button . . . . . . . . . . . . . . . . . . . . . . . . . . . . . . . 25
12.Frame Advance or Pause Button . . . . . . . . . . . . . . . . . 20, 24
13.A - B Repeat Button . . . . . . . . . . . . . . . . . . . . . . . . . . . . . . . 26
14.Memory/Set Button . . . . . . . . . . . . . . . . . . . . . . . . . 18, 34, 38
15. Top Menu or Return Button . . . . . . . . . . . . . . . . . . . . . . 28, 43
16.Subtitle or Surround Mode Select Button . . . . . . . . . . 17, 28
17.Shift Button . . . . . . . . . . . . . . . . . . . . . . . . . . . . . . . . . . . . . 17
18.Extra Bass or Digital Picture Select Button . . . . . . . . 17, 30
19.DVD/CD Button . . . . . . . . . . . . . . . . . . . . . . . . . . . . . . . . . . . 19
20.Equaliser Mode Select or Digital Gamma Button . . . . 17, 30
21.Tuner (Band) Butt on . . . . . . . . . . . . . . . . . . . . . . . . . . . . . . 37
22.Menu or On Screen Display Select Button . . . . . . . . . 28, 31
23. Disc Number Select B uttons . . . . . . . . . . . . . . . . . . . . . . . . 20
24.Direct Button . . . . . . . . . . . . . . . . . . . . . . . . . . . . . . . . . . . . 24
25.Chapter (Track) Skip Up or Fast Forward,
Tuner Preset Up, Time Up Button . . . . . . . . . . . . . . 18, 22, 38
26.Enter Button . . . . . . . . . . . . . . . . . . . . . . . . . . . . . . . . . . 20, 43
27.Angle or NTSC/PAL Sele c t Button . . . . . . . . . . . . . . . . 13, 28
28.Play Button . . . . . . . . . . . . . . . . . . . . . . . . . . . . . . . . . . . . . . 20
29.Stop Button . . . . . . . . . . . . . . . . . . . . . . . . . . . . . . . . . . . . . 20
30.Random Button . . . . . . . . . . . . . . . . . . . . . . . . . . . . . . . . . . 33
31.Clear Button . . . . . . . . . . . . . . . . . . . . . . . . . . . . . . . . . . . . . 34
32.Timer/Sleep Button . . . . . . . . . . . . . . . . . . . . . . . . . . . . 49, 51
33.Clock Button . . . . . . . . . . . . . . . . . . . . . . . . . . . . . . . . . . . . . 18
34.Video/Auxiliary Button . . . . . . . . . . . . . . . . . . . . . . . . . . . . . 52
35. Volume or Subwoofer Level Up a nd Down Butto ns . . . . . 17
Reference page
. . . 39
10
11
12
13
14
15
16
17
18
19
20
21
1
2
22
3
4
5
6
23
24
7
8
9
25
26
27
28
29
30
31
32
33
34
35
XL-DV50H
ENGLISH
General Information
1
2
3
4
5
6
7
8
E-10
04/3/19 XL-D V50H(H)_E.fm
TINSZA007SJZZ
Page 18
XL-DV50H
ENGLISH
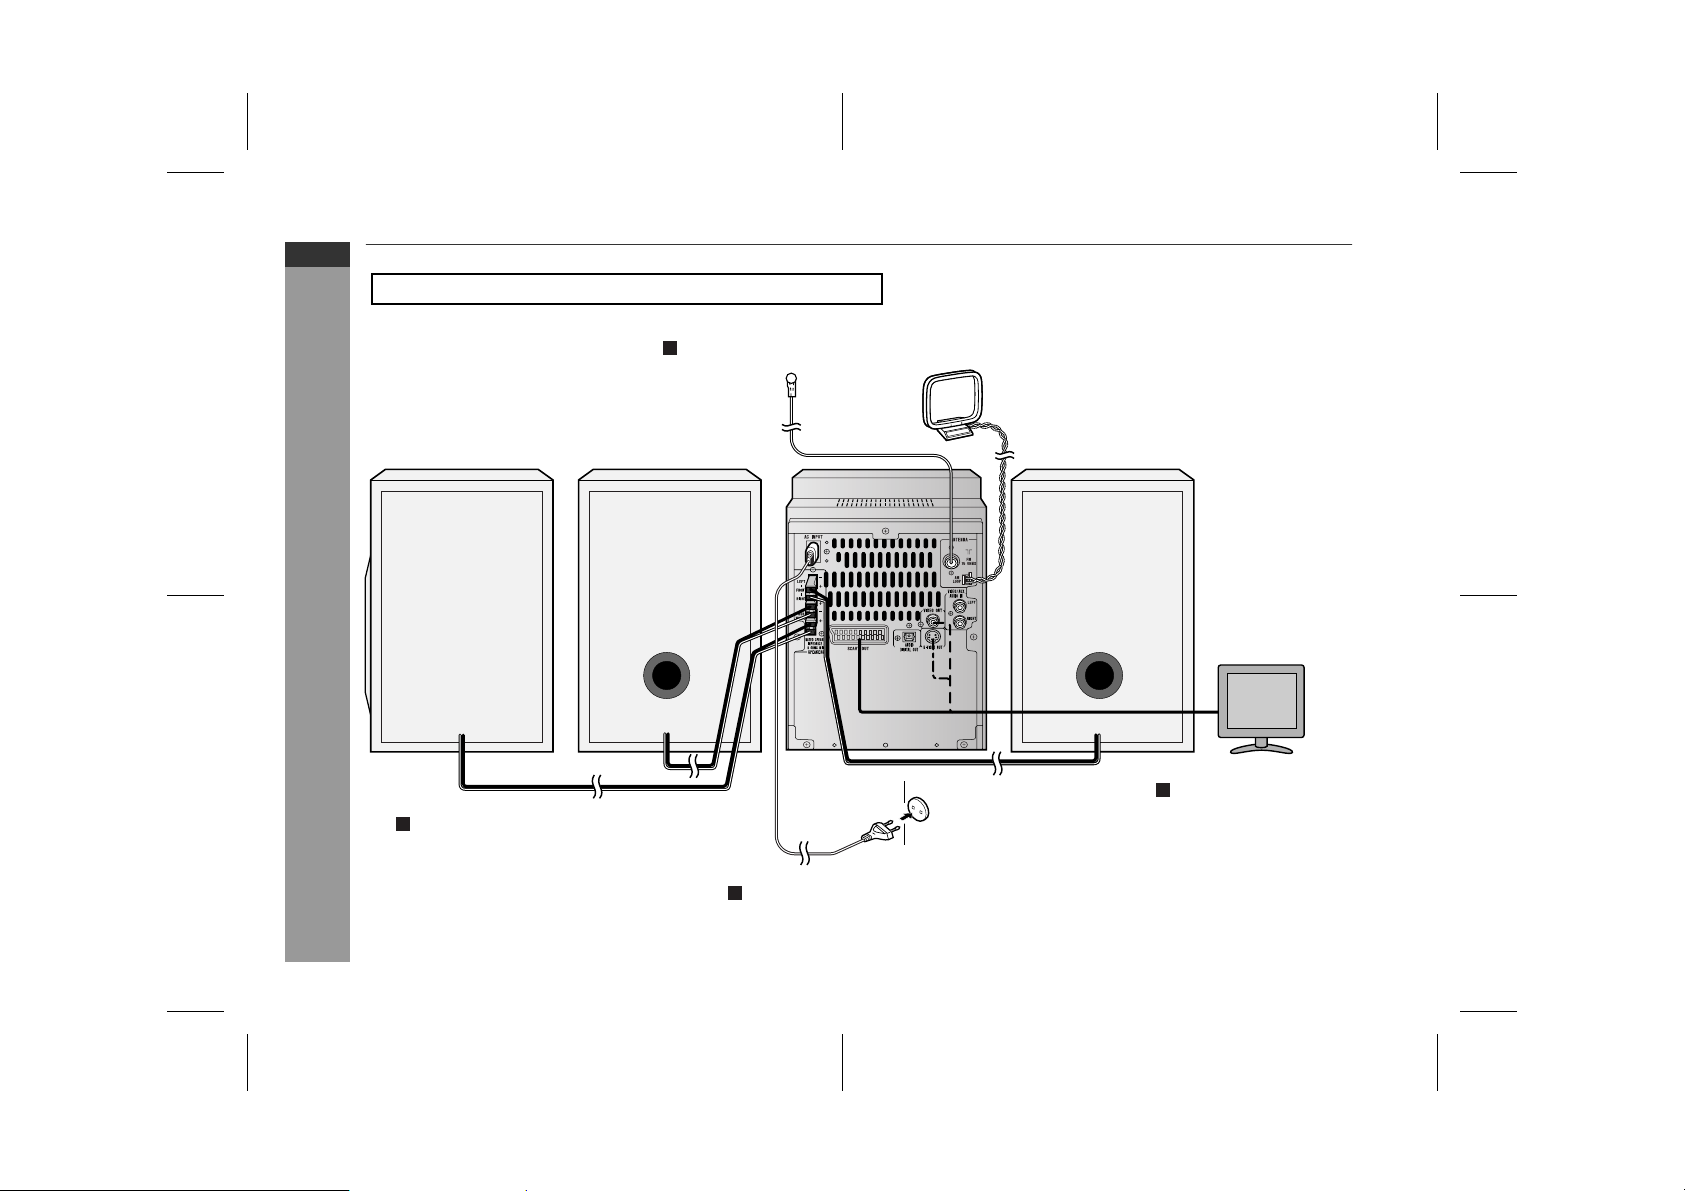
System connections
Make sure to unplug the AC power lead before any connections.
Aerial connection (see page 12)
FM aerial
AM loop aerial
Front speaker (left)Front speaker (right)Subwoofer
TV
Preparation for Use
TV connection
(see pages 13 - 14)
Speaker connection (see page 12)
Wall socket
(AC 230 V, 50 Hz)
Connecting the AC power lead (see page 15)
E-11
04/3/19 XL-D V50H(H)_E.fm
TINSZA007SJZZ
Page 19
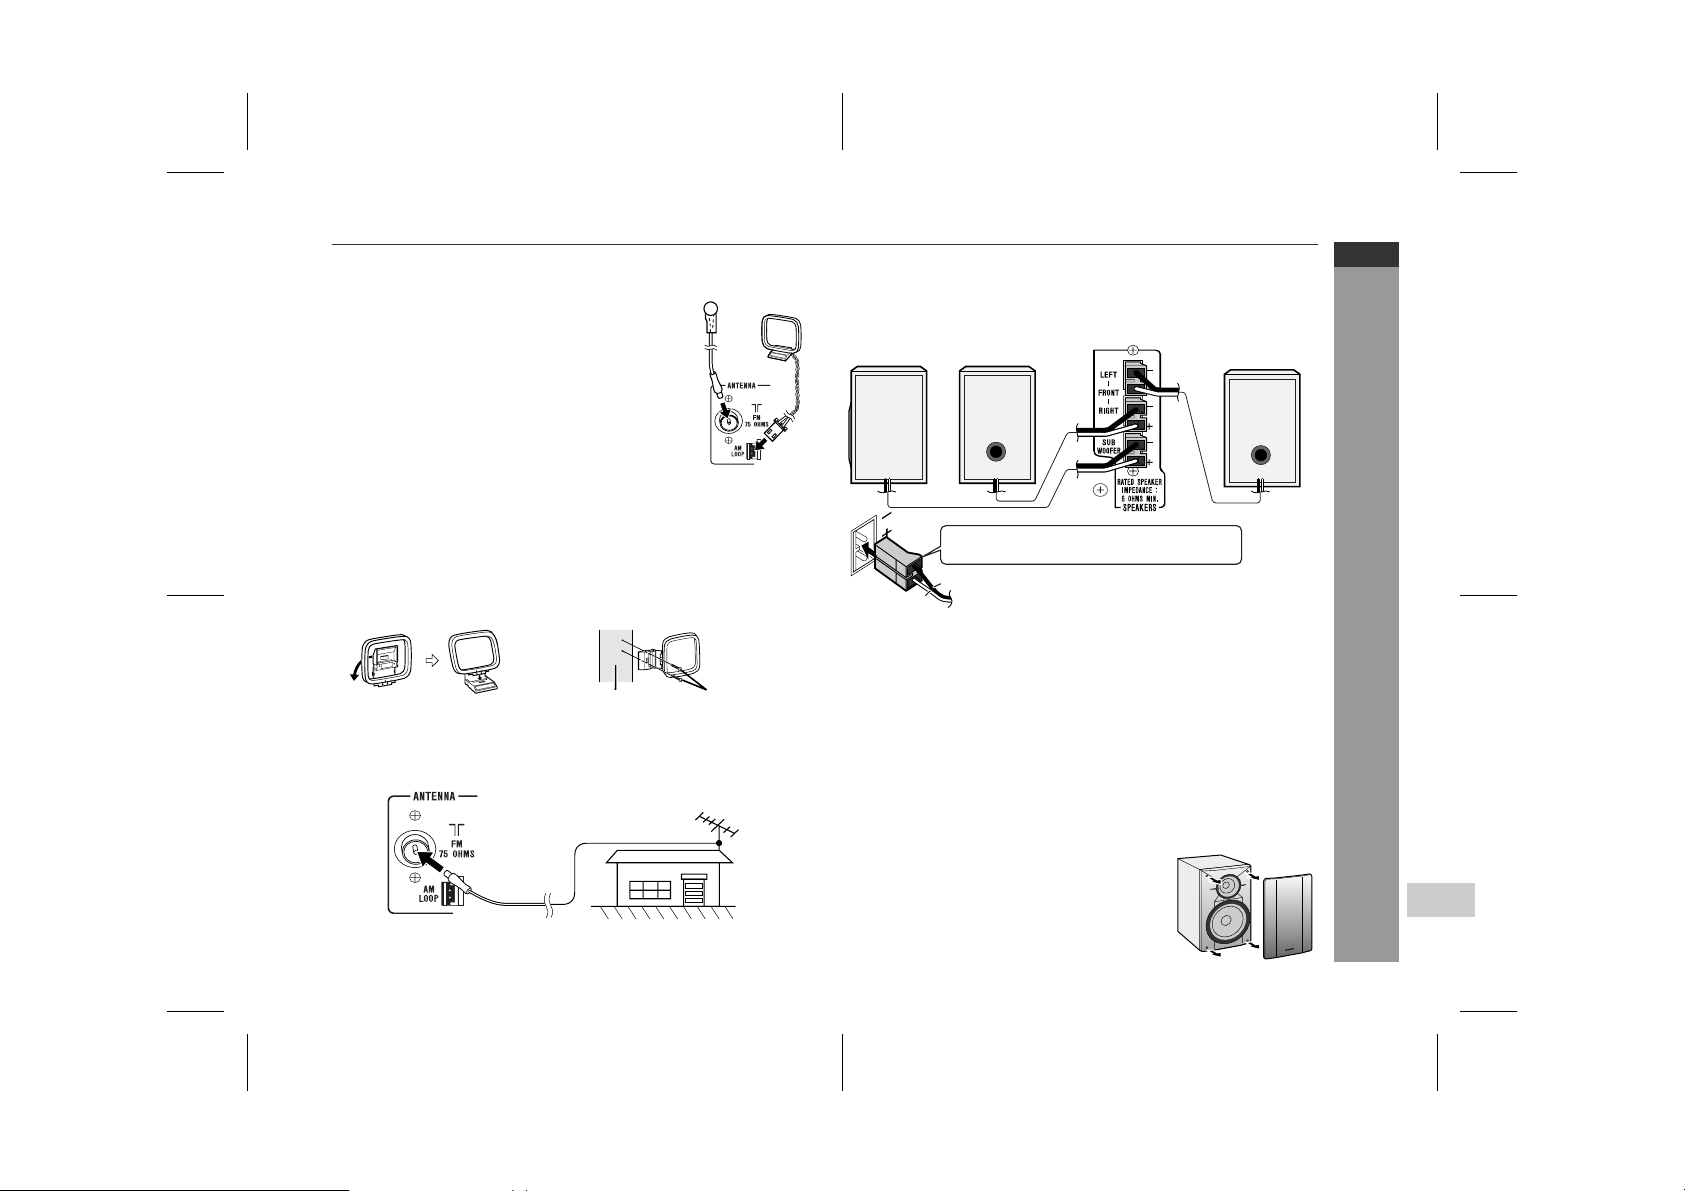
! Aerial connection
Supplied FM aerial:
Connect the FM aerial wire to the FM 75 OHMS
socket and position the FM aerial wire in the direction where the strongest signal can be received.
Supplied AM loop aerial:
Connect the AM loop aerial to the AM LOOP
socket. Position the AM loop aerial for optimum
reception. Place the AM loop aerial on a shelf,
etc., or attach it to a stand or a wall with screws
(not supplied).
Note:
Placing the aerial on the stereo system or near the AC power lead
may cause noise pickup. Place the aerial away from the stereo system for better reception.
Installing the AM loop aerial:
< Assembling > < Attaching to the wall >
Wall Screws (not supplied)
External FM aerial:
Use an external FM aerial if you require better reception. Consult
your dealer.
External FM aerial
! Speaker connection
Insert the front speaker plugs (black) into the FRONT terminals.
Insert the subwoofer plug (red) into the SUBWOOFER terminal.
Subwoofer
Caution:
The supplied speakers are exclusively for XL-DV50H. Do not
"
connect them to other equipment, and do not connect other
speakers to XL-DV50H. It may cause malfunction.
Use speakers with an impedance of 6 ohms or more, as lower im-
"
pedance speakers can damage the unit.
Do not mistake the right and the left channels. The right speaker
"
is the one on the right side when you face the unit.
Do not allow any objects to fall into or to be placed in the bass re-
"
flex ducts.
Do not stand or sit on the speakers. You may be injured.
"
Front speaker
(right)
Speaker or subwoofer plug in with the rising
side facing to the right.
Black
Red
Front speaker
(left)
! Front speaker grills are removable
Make sure nothing comes into contact with the
speaker diaphragm when you remove the
speaker grilles.
XL-DV50H
ENGLISH
Preparation for Use
1
2
3
4
5
6
7
8
04/3/19 XL-D V50H(H)_E.fm
E-12
TINSZA007SJZZ
Page 20

XL-DV50H
ENGLISH
System connections (continued)
! Placing the speaker system
Same distance
Front speaker
(left)
Notes:
Place the TV halfway between the front speakers.
"
The bass sound from the subwoofer is omni-directional, however,
"
it is recommended to place it as close as left and right speakers.
The subwoofer vibrates whilst reproducing bass. Place it on a
"
stable sturdy surface.
Keep the free space of at least 10 cm (4") along the right side of
"
the subwoofer .
Same distance
Front speaker
(right)
Subwoofer
! TV connection
Three types of sockets (SCART OUT, S-VIDEO OUT and VIDEO
OUT) are available for connection of a TV and this unit. Connect
according to your TV.
Connecting to a TV with SCART socket:
You can enjoy DVD images by connecting your TV and this unit with
the supplied SCART cable.
Set the video output mode to "SCART" (default setting). For the
procedure, refer to "Changing the initial setting of DVD" on pages
43, 45.
TV
E-13
! Magnetically shielded speakers
The speakers are magnetically shielded.
Therefore, they do not affect the display even you use them near the
TV. However, some colour variation may occur, depending on the
type of TV used.
Preparation for Use
If colour variation occurs...
Turn off the TV (from the power switch).
After 15 - 30 minutes, turn the TV on again.
If the colour variation is still present...
Move the speakers further away from the TV.
If any kind of magnet or an electromagnet is placed too close to the
TV and the system, irregular colours may appear on the TV screen.
To SCART input
socket
Video signal
SCART cable (supplied)
Change the input mode on the TV accordingly.
Press the SHIFT button and ANGLE/NTSC/PAL button on the remote control.
Each time these buttons are pressed, the mode will change in the
following order:
PAL
NTSC
04/3/19 XL-D V50H(H)_E.fm
Select this mode for the PAL TV.
Select this mode for the NTSC TV.
TINSZA007SJZZ
Page 21

Connecting to a TV with an S-video input socket:
If your TV is equipped with an S-video input socket, you can enjoy
higher quality images by connecting it with an S-video cable (not
supplied).
Set the video output mode to "S-Video". For the procedure, refer
to "Changing the initial setting of DVD" on pages 43, 45.
Connecting to a TV with a video input socket:
If your TV is equipped only with a video input socket (without
SCART), connect a video cable (not supplied) to enjoy images.
Set the video output mode to "S-Video". For the procedure, refer
to "Changing the initial setting of DVD" on pages 43, 45.
XL-DV50H
ENGLISH
1
2
3
Video signal
S-video cable
(commercially available)
TV
To S-video
input socket
Note:
When the video and S-video cables are both connected, the images
from the S-video input socket appears on your TV.
Video signal
Video cable
(commercially available)
TV
To video
input socket
Notes:
Change the TV input in accordance with the connected socket.
"
Do not connect other equipment (VCR, etc.) between the TV
"
and this unit. Pictures may be distorted.
Refer to the operation manual of the equipment to be connect-
"
ed.
Insert the plugs fully to avoid fuzzy pictures or noise.
"
E-14
4
5
Preparation for Use
6
7
8
04/3/19 XL-D V50H(H)_E.fm
TINSZA007SJZZ
Page 22

XL-DV50H
ENGLISH
System connections (continued)
! Connecting the AC power lead
After checking all the connections have been made correctly, connect the AC power lead to the AC power input socket, then plug the
AC power lead of this unit into the wall socket. If you plug in the unit
first, the unit will enter the demonstration mode.
Wall socket
(AC 230 V, 50 Hz)
Notes:
Never use a po wer lead other than the one supplied. Otherwise , a
"
malfunction or an accident may occur.
Unplug the AC power lead from the wall socket if the unit will not
"
be in use for a prolonged period of time.
Cooling fan:
A cooling fan is built into this unit for better heat radiation. Do no t
cover the opening in this section with any obstacles to avoid dam-
Preparation for Use
age to the unit.
! Demonstration mode
The first time the unit is plugged in, the
unit will enter the demonstration mode.
You will see words scroll.
To cancel the demonstration
mode:
When the unit is in the power standby mode (demonstration mode),
press the X-BASS/DEMO button.
The unit will enter the low power
consumption mode.
To return to the demonstration mode:
When the unit is in the power stand-by mode, press the X-BASS/
DEMO button again.
Note:
When the power is on, the X-BASS/DEMO button can be used to select the extra bass mode.
! To turn the power on
Press the ON/STAND-BY button to turn the power on.
E-15
After use:
Press the ON/STAND-BY button to enter the power stand-by
mode.
04/3/19 XL-D V50H(H)_E.fm
TINSZA007SJZZ
Page 23

Remote control
! Battery installation
1 Remove the battery cover.
2 Insert the supplied batteries according to the direction indi-
cated in the battery compartment.
When inserting or removing the batteries, push them towards the
battery terminals.
3 Replace the cover.
Precautions for battery use:
Replace all old batteries with new ones at the same time.
"
Do not mix old and new batteries.
"
Remove the batteries if the unit is not to be used for long periods
"
of time. This will prevent poten tial damage due to battery leakage.
Notes concerning use:
Replace the batteries if the operating distance is reduced or if the
"
operation becomes erratic. Purchase 2 "AA" size batteries (UM/
SUM-3, R6 , HP-7 or similar).
Periodically clean the transmitter on the remote control and the
"
sensor on the unit with a soft cloth.
Exposing the sensor on the unit to strong light may interfere with
"
operation. Change the lighting or the direction of the unit if this
occurs.
Keep the remote control away from moisture, heat, shock, and
"
vibrations.
! Test of the remote control
Check the remote control after checking all the connections (see
pages 11 - 15).
Point the remote control directly at the remote sensor on the unit.
The remote control can be used within the range shown below:
Press the ON/STAND-BY button. Does the power turn on? Now, you
can enjoy music.
Remote sensor
XL-DV50H
ENGLISH
Preparation for Use
1
2
3
4
5
6
Caution:
Do not use rechargeable batteries (nickel-cadmium battery, etc.).
"
Installing the batteries incorrectly may cause the unit to malfunc-
"
tion.
0.2 m - 6 m
(8" - 20')
04/3/19 XL-D V50H(H)_E.fm
7
8
E-16
TINSZA007SJZZ
Page 24

XL-DV50H
ENGLISH
General control
! Volume control
Main unit operation:
When the VOLUME control is turned
clockwise, the volume will increase.
When it is turned anti-clockwise, the
Preparation for Use
volume will decrease.
Remote control operation:
Press the VOLUME (+ or -) button to increase or decrease the volume.
! Subwoofer volume control
Press the SHIFT button on the remote control, and adjust the volume.
.....
.....
30 (MAXIMUM
290
30 (MAXIMUM
290
! Bass control (X-BASS)
When the power is first turned on,
the unit will enter the extra bass
mode which emphasises the bass
frequencies, and "X-BASS" will appear. To cancel the extra bass
mode, press the X-BASS/DEMO (XBASS) button.
! Equaliser
When the EQUALIZER (EQ-MODE) button is pressed, the current
mode setting will be displayed . To change to a different mode, press
the EQUALIZER (EQ-MODE) button repeatedly until the desired
sound mode appears.
FLAT
ROCK
CLASSIC
POPS
VOCAL
)
JAZZ
The sound is not modified.
Bass and treble are emphasised.
Treble is cut a little.
Bass and treble are slightly emphasised.
Vocals (midrange tones) are emphasised.
Treble is slightly emphasised.
! Surround
To enter the surround mode, press
the SHIFT button and SUB TITLE/
SURROUND button on the remote
control. Repeat this operation to exit.
Note:
When the input source is "TUNER" or "AUX", the surround mode is
)
not available.
E-17
04/3/19 XL-D V50H(H)_E.fm
TINSZA007SJZZ
Page 25

Setting the clock
In this example, the clock is set for the 24-hour (0:00) display.
1 Press the CLOCK button and within 8 seco nds, press the
MEMORY/SET button.
2 Within 30 seconds, press the PRESET ( or ) button to
select 24-hour or 12-hour display and then press the MEMORY/SET button.
"0:00" The 24-hour display will appear.
(0:00 - 23:59)
"AM 12:00" The 12-hour display will appear.
(AM 12:00 - PM 11:59)
3 Within 30 seconds, press the P RESET ( or ) button to
adjust the hour and then press the MEMORY/SET button.
Press the PRESET ( or ) button once to advance the time
by 1 hour. Hold it down to advance continuously.
4 Within 30 seconds, press the P RESET ( or ) button to
adjust the minutes and then press t he MEMORY/SET button.
Press the PRESET ( or ) button once to advance the time
by 1 minute. Hold it down to advance continuously.
To confirm the time display:
Press the CLOCK button.
The time display will appear for
about 8 seconds.
Note:
The "CLOCK" or time will flash at the push of the CLOCK button
when the AC power supply is restored after a power failure or
unplugging the unit.
Readjust the clock as follows.
To readju st the clock:
Perfor m "Setting the clock" from step 1. If the "CLOCK" is not flashing in step 1, step 2 (for selecting the 24-hour or 12-hour display) will
be skipped.
To change the 24-hour or 12-hour display:
1 Clear all the programmed contents. [Refer to "Clearing all the
memory (reset)" on page 54 for details.]
2 Perform "Setting the clock" from step 1.
XL-DV50H
ENGLISH
Preparation for Use
E-18
1
2
3
4
5
6
7
8
04/3/19 XL-D V50H(H)_E.fm
TINSZA007SJZZ
Page 26

XL-DV50H
ENGLISH
Playing a disc
Turn on the TV, and switch the input to the "VIDEO 1" or "VIDEO 2",
etc. accordingly .
DVD Operation
1 Press the ON/STAND-BY button to turn the power on.
2 Press the DVD/CD button.
3 Press the OPEN/CLOSE button
to open the disc compartment.
All trays open in tiers.
4 Place the disc on the disc tray 1, label side up.
Be sure to place 8 cm (3") discs in the middle of the disc trays.
12 cm (5") 8 cm (3")
5 To place discs in the trays 2 - 5
1. Slide in the tray with a disc toward the unit.
6
E-19
2. Place a disc in an empty tray.
04/3/19 XL-D V50H(H)_E.fm
TINSZA007SJZZ
TINSZA007SJZZ
Page 27

6 Press the OPEN/CLOSE button to close the disc compart-
ment.
Discs supporting auto start will start to play once you close the
disc tray even if you do not press the (play) button.
7 If playback does not start, press the (play) button.
Chapter or
track number
The sound mode in use appears during DVD playback.
When playing a DTS on this unit, s ound is not heard from the
7
"
speakers. To listen t o the sound, sel ect another aud io output i n
the "To change the audio la nguage (audi o output)" on page 27.
When the menu appears on the TV screen:
On DVD, select an item by using the cursor ( , , or ) button
and press the ENTER button.
On video CD, select an item by using the direct number buttons.
Play indicator Selected disc type Playing time
To play from a specified disc:
1. Press the 1 - 5 button.
2. Press the (play) button.
Selected disc number
Note:
If a disc tray with no disc is selected, playback will not start, and only
parentheses of the indicator "( )" disappear.
To exchange other discs whilst playing a disc:
Press the OPEN/CLOSE button. When trays open, exchange discs.
The tray in use does not open.
To remove the discs:
1. In the stop mode, press the OPEN/CLOSE
button.
All trays open in tiers.
2. Remove the disc in the tray 1.
3. Slide in the tray 1 toward the unit. In the
same way, remove discs in the trays 2 - 5.
4. After removing the discs, press th e OPEN/
CLOSE button again.
XL-DV50H
ENGLISH
DVD Operation
1
2
3
4
5
6
TINSZA007SJZZ
To interrupt playback:
Press the STILL/PAUSE button on the remote
control.
To resume playback from the same point, press
the (play) button.
To stop playback:
DVD:
Press the button twice.
VCD/CD/MP3/JPEG:
Press the button.
Pause indicator
Note:
DVD discs cannot be remov ed in t he resume play mode . Press the
button and then remove the disc.
04/3/19 XL-D V50H(H)_E.fm
TINSZA007SJZZ
7
8
E-20
Page 28

XL-DV50H
ENGLISH
Playing a disc (continued)
Caution:
! Do not place two discs in one disc tray.
! Do not play discs with special shapes (heart or octagon shaped)
as it may cause malfunctions.
! Do not push the disc compartment whilst it is moving.
! I f the power fails whilst the disc compartment is open, wait until
the power is restored.
! If the disc com partment is stopped with force, the unit will not
function. If this occurs, press the ON/STAND-BY button to enter
the power stand-by mode and then turn the power on again.
! If a disc is dam aged, dirty, or loaded upside down, the disc will
skip or not play.
! When attempting to play discs with scratches or of a different
region number, or unplayable or restricted (*1) d iscs, an error
message will appear on the TV display and the disc will not play.
(*1)Viewing is prohibited on some DVDs according to the audi-
ence age.
Notes:
! W hen the unit is turned on, no operation is possible for 10 sec-
onds as the unit is performing the initial setting.
! S top positions may be recorded on some discs. When you play
such a disc, playback stops there.
! Dur ing an operation, " " may appear indicating that the opera-
DVD Operation
tion is disabled by the disc.
" To resume playback after stopping
(resume play)
You can resume playback from the point playback is stopped.
1 Whilst the disc is playing, press
the button.
The system stores the point you stopped.
2 To restart play, press the
(play) button.
Playback resumes from the point you left off.
To cancel resume play:
Press the button again whilst " Pre-Stop" is lit.
Notes:
! The resume play feature is disabled on some discs.
! Depending on the disc, playback may resume slightly before the
position where it was stopped.
Pre-Stop
Play
Stop
E-21
04/3/19 XL-D V50H(H)_E.fm
TINSZA007SJZZ
Page 29

Basic operation
" Fast forward/Fast reverse (search)
You can search the desired point as you play t he disc.
1 Whilst a disc is playing, hold
down the or button for 2
seconds or more.
The scanning speed will change as follows at each press of the
button.
The speed changed as follows on DVD/video CD/audio CD:
Fast Forward 2x
XL-DV50H
ENGLISH
1
2
3
" T o locate the beginning of a chapter/track (skip)
You can skip the current chapter (track) to the next or previous.
Whilst a disc is playing, press the
or button.
! Press the button to skip to the next chapter (track).
! Press the button to skip to the beginning of the current
chapter (track). Press the button again to skip to the beginning of the previous chapter (track).
Notes:
! Some discs do not display the chapter (track) and the skip feature
is disabled.
! On a DVD, you cannot skip across titles.
! When operating video CD with the P.B.C. function, set t he P.B.C.
to off (see page 32).
Next
Fast Reverse 2x
Fast Reverse 8x
Fast Reverse 30x
Play
! T he speed cannot be changed on MP3 discs.
! The disc is forwarded by the button and reversed by the
button.
Fast Forward 2x
/
Fast Forward 8x
/
Fast Forward 30x
/
Play
/
2 Press the (play) button to return to the normal playback.
Notes:
! On some discs, the search function is disabled.
! On a DV D, search does not operate across titles.
! Whilst searching on a DVD or video CD, the sound is not heard
and the subtitles will not appear.
! When search is performed during the DVD playback, pictures
may not be forwarded or reversed in the search speed specified
in this manual, depending on the disc or the scene being played.
04/3/19 XL-D V50H(H)_E.fm
TINSZA007SJZZ
4
5
DVD Operation
6
7
8
E-22
Page 30

XL-DV50H
ENGLISH
Basic operation (continued)
DVD Operation
" To start playback from the desired point
(direct play)
To select and play the desired title and chapter:
1 Whilst in the stop or playback mode, press the DIRECT but-
ton.
2 Within 10 seconds, select the title or chapter by pressing
the cursor ( or ) button and enter the title or chapter
number by using the direct number buttons.
Title number Chapter number
1 / 0801 001 / 010 --:--:--
If the title or chapter number is 2 digits or more, press "+10" and
enter the number.
Example:
To select chapter 1, press "1".
To select chapter 12, press "+10" and "2".
To select chapter 22, press "+10", "+10" and "2".
3 Within 10 seconds, press the ENTER button.
Notes:
! Direct play feature is dis abled on some discs.
! Some discs may not display the chapter number.
! With DVDs, you can specify the desired point only in the current
title and not in another title.
E-23
04/3/19 XL-D V50H(H)_E.fm
TINSZA007SJZZ
Page 31

To play by specifying time (time search):
1 Whilst a disc is playing, press the DIRECT button.
2 Within 10 seconds, select the time by pressing the cursor (
or ) button and specify the time by using the direct number
buttons.
Time
1 01/ 08 001 / 010 --:--:--
" Slow-motion play
You can slow down the playback speed.
1 Whilst a disc is playing, press the STILL/PAUSE button.
2 Hold down the or button
for 2 seconds or more.
Slow Forward
Slow ForwardSlow Backward /
3 Press the (play) button to return to the normal playback.
XL-DV50H
ENGLISH
1
2
3
! To specify 1 hour 23 minutes and 40 seconds, enter
"012340".
! If you enter the wrong number, start over from step 1.
3 Within 10 seconds, press the ENTER button.
Notes:
! Some discs cannot play from the specified point.
! Time search feature is disabled on some discs.
" Still picture/Frame advance
You can freeze the image and advance frame by frame.
1 Whilst a disc is playing, press
the STILL/PAUSE button.
Each press of the STILL/PAUSE button advances the frame in
the still mode.
Pause
2 Press the (play) button to return to the normal playback.
Note:
Still picture and frame advance features are disabled on some discs.
Note:
On some discs, slow-motion play functions are disabled.
04/3/19 XL-D V50H(H)_E.fm
4
5
DVD Operation
6
7
8
E-24
TINSZA007SJZZ
Page 32

XL-DV50H
ENGLISH
E-25
Useful features
DVD Operation
" To play repeatedly (repeat play)
You can play a chapter (track ) or a title repeatedly by specifying it
during playback.
1 Whilst the disc is playing, press the REPEAT button.
TV screen Unit display
Chapter Repeat on
Each time the button is pressed, the repeat play mode changes
in the following order.
For DVD, the mode changes as follows:
Chapter Repeat on
Title Repeat on
Repeat off
For video CD/audio CD, the mode changes as follows:
Track Repeat on
Disc Repeat on
Repeat off
For MP3/JPEG discs, the mode changes as follows:
File Rep
Folder Rep
Disc Rep
Rep off
, CHAP
, TITLE
Disappear
1
Disappear
1
Disappear
Repeats the chapter
currently playing.
Repeats the title
currently playing.
The normal playback
Repeats the track
currently playing.
Repeats the disc
currently playing.
The normal playback
Repeats the file currently
playing. (Only for MP3)
Repeats the folder
(directory) currently playing.
Repeats the disc
currently playing.
The normal playback
04/3/19 XL-D V50H(H)_E.fm
TINSZA007SJZZ
Page 33

2 Select "Repeat off" by pressing the REPEAT button repeat-
edly to return to the normal playback.
Caution:
After performing repeat play, be sure t o press the button. Otherwise, the disc will play continuously.
Notes:
! Repeat play is not available on some discs.
! If you press another button during the repeat play, the playback
may be cancelled.
! Repeat play is not possible during random play.
! When operating video CD with the P.B.C. function, set t he P.B.C.
to off (see page 32).
" To play the contents between the specified
points repeatedly (A-B repeat)
You can play the desired portion repeatedly by specifying it during
playback.
1 Whilst the disc is playing, press the A-B button.
TV screen Unit display
A-B Set A
This registers the start point (A).
2 Press the A-B button again.
A-B Repeat on
A-B repeat plays from the start point (A) to the end point (B).
3 Press the A-B button to return to the normal playback.
Notes:
! A-B repeat play is disabled on some discs.
! Some scenes in DVD may not allow A-B repeat play.
! A-B repeat play for DVD is possible only within a title.
! A-B repeat play for video CD and audio CD are possible only
within a track.
XL-DV50H
ENGLISH
DVD Operation
1
2
3
4
5
6
04/3/19 XL-D V50H(H)_E.fm
7
8
E-26
TINSZA007SJZZ
Page 34

XL-DV50H
ENGLISH
Various settings
The subtitle language and the audio language you select during
playback are reset each time you set this unit to the stand-by mode
or change the disc. To keep your preferred languages, set them in
the initial setting screen (see page 43).
" To change the audio language (audio output)
During playback, you can change the audio language (audio output).
1 Whilst a disc is playing, press
the SHIFT button, and then
press the ZOOM/AUDIO button.
Audio language information
Audio 1/3: AC-3 5.1 English
2 Within 3 seconds, press the ZOOM/AUDIO button repeat-
edly to select the desired audio number.
When playing DVD, the language changes as follows:
E-27
DVD Operation
Audio 1/3: AC-3 5.1 English
Audio 2/3: AC-3 2 English
When playing video CD, audio CD and MP3, the sound changes as follows:
Mono Left
Mono Right
Stereo
Notes:
! The audio language on some DVDs m ay not be changed.
! For audio language and audio system, refer to the manual of the
disc.
! This unit does not play sound when playing D TS discs. Change
the audio language to listen to the sound through the speakers.
Only the 2.1 channel sound can be reproduced even if you select
other audio languages (Dolby Digital 5.1 channel or Dolby Digital
2 channel, etc.). Alternatively, connect to a DTS digital surround
amplifier, etc. to produce the sound from the speakers (see page
52).
04/3/19 XL-D V50H(H)_E.fm
1: Original <English>
(Dolby Digital 5.1
2: English
(Dolby Digital 2 ch Surround)
ch
Surround)
TINSZA007SJZZ
Page 35

" To change the subtitle language
You can change the subtitle language or hide subtitles during playback.
1 Whilst the disc is playing, press
the SUB TITLE/SURROUND button.
2 Within 3 seconds, press the
SUB TITLE/SURROUND button
repeatedly to select the desired
subtitle la n guage.
Notes:
! Some DVDs prohibit changing the subtitle language.
! If no subtitles are recorded on the disc, " " is displayed.
! It may take a little time to switch the subtitle language to the
selected one.
! The subtitle cannot be hidden on some DVDs.
" To change the angle
You can change the angle of view when playing a DVD video dis c
that contains scenes recorded from multiple angles.
When " " is displayed in the upper right corner of the TV
screen, press the ANGLE/NTSC/PAL button repeatedly to select the desired angle number.
TV screen Unit display
Subtitle 01/09: English
Subtitle 02/09: Spanish
" To select a title, subtitle or audio language, etc.
from the top menu or menu of the disc
You can select a title, subtitle or audio language on your DVD if it
has a disc menu.
1 Whilst the disc is stopped or
played, press the TOP MENU/
RETURN button to display the
top menu or press the MENU/
OSD button to display the menu.
Example
TOP MENU
1. Title
2. Subtitle
3. Audio language
2 Press the cursor ( , , or ) button to change the setting
and press the ENTER button.
You can also use the direct number buttons for some discs.
Notes:
! The procedure shown here provides only general steps. The
actual procedure for using the title menu depends on the disc you
are using. See the disc jacket for details.
! If the disc you are using does not have a title menu, nothing
appears on the screen.
XL-DV50H
ENGLISH
DVD Operation
1
2
3
4
5
6
7
1
Notes:
! Some DVDs prohibit changing the angle.
! Refer to the manual of the disc as the operation may vary
depending on the disc.
04/3/19 XL-D V50H(H)_E.fm
8
E-28
TINSZA007SJZZ
Page 36

XL-DV50H
ENGLISH
Various settings (continued)
DVD Operation
" To zoom in on an image (zoom)
You can magnify images during playback.
1 Whilst a disc is playing, press
the ZOOM/AUDIO button.
Each press of the ZOOM/AUDIO button cycles through the
zoom settings as follows:
Zoom x 1.5 Zoom x 2 Zoom x 3 Zoom off
Zoom x 1.5
2 To shift the view and display the desired part of a zoo med
image, press the cursor ( , , or ) button repeatedly.
Notes:
! An image may become distorted when zoomed.
! Subtitles cannot be zoomed.
! The position of the current part is indicated in the lower left of the
screen.
E-29
04/3/19 XL-D V50H(H)_E.fm
TINSZA007SJZZ
Page 37

" To brighten an image " To improve the image quality
1 During playback, press the
SHIFT button, and then press
the DIGITAL GAMMA button to
select "ON".
"ON" and "OFF" will be switched by each press of these buttons.
G
2 Within 10 seconds, press the
cursor ( or ) bu tton to set th e
level.
G
OFF
ON
1 During playback, press the
SHIFT button, and then press
the DIGITAL PICTURE button to
select "ON".
"ON" and "OFF" will be switched by each press of these buttons.
2 Within 10 seconds, press the
cursor ( or ) b utto n to set the
level.
XL-DV50H
ENGLISH
OFF
S
1
2
3
ON
S
3 To restore the original brightness, select "OFF" by press-
ing the SHIFT button, and then press the DIGITAL GAMMA
button.
Level Setting Level Settin g
OFF Normal image ON Brighter
ON Slightly brighter ON A lot brighter
3 To restore the original picture quality, select "OFF" by
pressing the SHIFT button, and then press the DIGITAL
PICTURE button.
Level Setting Level Setting
OFF Normal ON Clearer
ON Slightly clearer ON A lot clearer
04/3/19 XL-D V50H(H)_E.fm
TINSZA007SJZZ
4
5
DVD Operation
6
7
8
E-30
Page 38

XL-DV50H
ENGLISH
Various settings (continued)
" To change the display on TV screen
You can display or hide the operation indicators on the TV screen.
Whilst the disc is playing, press the SHIFT button, and then
press the MENU/OSD button. (The display is changed at each
operation of these two buttons.)
E-31
When playing D V D, the display changes as follows:
1 1 / 8 2 / 10 00:38:58
1 / 8 2 / 101 -01:09:50
1 / 8 2 / 101 00:07:43
DVD Operation
1
2
3
4
5
1 / 8 2 / 101 -00:02:38
DEF 1/9 DEF 1/3 1 / 3
Titles, 10 Chapters
DVD
VCD 2.0
CDDA
Data Disc
Data Disc
8
Tracks,
10
Tracks,
19
35 Files
23 Files
40:47
58:03
Title playing time
Total number of chapters
Current chapter number
Total number of titles
Current title number
Disc number
Disc type
Remaining playing time of
the current title
Chapter playing time
Remaining playing time of
the current chapter
Angle information
Repeat mode information
Audio language information
Subtitle information
When playing video CD and audio CD, the display changes as follows:
3 1 / 19 01:02
L
R
Track playing time
Repeat mode information
PBC information (VCD)
Audio information
3 1 / 19 -03:14
3 1 / 19 58:03
3 1 / 19 -40:37
DVD
1
VCD 2.0
2
CDDA
3
4
Data Disc
5
Data Disc
L
R
L
R
L
R
8
Titles, 10 Chapters
10
Tracks,
19
Tracks,
35 Files
23 Files
Remaining track playing time
Total playing time
Remaining total playing time
40:47
58:03
Note:
On video CD, total playing time or remaining total playing time
appears when P.B.C is off (see page 32).
04/3/19 XL-D V50H(H)_E.fm
TINSZA007SJZZ
Page 39

Playing a video CD
Page
Playing a disc . . . . . . . . . . . . . . . . . . . . . . . . . . . . . . . . . . . .19 - 21
To locate the b e gi nning of a chapter/track (sk ip ) . . . . . . . . . . 22
Fast forward/F ast re verse (search) . . . . . . . . . . . . . . . . . . . . . . 22
Still pictur e /Frame advance . . . . . . . . . . . . . . . . . . . . . . . . . . . 24
Slow-motion play . . . . . . . . . . . . . . . . . . . . . . . . . . . . . . . . . . . . 2 4
To play repeatedly (repeat play) . . . . . . . . . . . . . . . . . . . . . 25, 26
To play the contents between the specified points
repeatedly ( A -B re peat) . . . . . . . . . . . . . . . . . . . . . . . . . . . . . . . 26
To change the audio language (audio output) . . . . . . . . . . . . 27
To zoom in on an image (zoom ) . . . . . . . . . . . . . . . . . . . . . . . . 29
To brighten an im a ge . . . . . . . . . . . . . . . . . . . . . . . . . . . . . . . . . 30
To improve the imag e qu a lity . . . . . . . . . . . . . . . . . . . . . . . . . . 30
To change the display on TV screen . . . . . . . . . . . . . . . . . . . . 31
To play in random order (random play) . . . . . . . . . . . . . . . . . . 33
To start playba ck f rom t he d e s ir e d point (dire c t play) . . . . . . 33
To play in the desir e d order (programmed playback) . . . . . . . 34
" To play a video CD with P. B. C.
(playback control)
1
2
3
Example
1 Load a video CD with P.B.C. The
menu will appear on the TV and
playback will be paused.
2 Select the desired menu number by using the direct num-
ber buttons (1 - +10).
Example:
To select track 14, press "+10" and "4".
! Play back st arts .
! After playback stops, the menu will reappear, then select the
menu number you want to play.
To scroll the menu screen
(menu screen with more than 1 page):
Press the or button.
To stop playback:
Press the button.
To play without activating the playback control function:
You can play a video CD with P.B.C. without activating the playback
control function.
In this case, the menu screen will not appear, and the disc will play
in the same way as a video CD without P.B.C.
Whilst in the stop mode, press the
MENU/OSD button to cancel the
P.B.C. mode.
Playback starts.
Each time you press the button, the setting switches on and off.
Note:
Some video CDs with P.B.C. cannot be played back when the P.B.C.
mode is off.
PBC offPlay
XL-DV50H
ENGLISH
Video CD Operation
E-32
1
2
3
4
5
6
7
8
04/3/19 XL-D V50H(H)_E.fm
TINSZA007SJZZ
Page 40

XL-DV50H
ENGLISH
Playing an audio CD
Playing a disc . . . . . . . . . . . . . . . . . . . . . . . . . . . . . . . . . . . 19 - 21
To locate the beginning of a chapter/track (skip) . . . . . . . . . . 22
Fast forward/Fast reverse (search) . . . . . . . . . . . . . . . . . . . . . . 22
To play repeatedly (repeat play) . . . . . . . . . . . . . . . . . . . . . 25, 26
To p lay the contents between the specified points
repeated ly (A-B repeat) . . . . . . . . . . . . . . . . . . . . . . . . . . . . . . . 2 6
To change the audio language (audi o output) . . . . . . . . . . . . . 27
To change the display on TV s creen . . . . . . . . . . . . . . . . . . . . 31
" To play in random order (random play)
The tracks on the disc can be played in random order automatically.
Audio CD Operation
Whilst in the stop mode, press the RANDOM button.
TV screen Unit display
RandomPlay
Page
" To start playback from the desired point
(direct play)
To select and play the desired track:
Whilst in the stop or playback mode, press the
direct number buttons to select the track number.
TV screen Unit display
Select: 14
If the track number is 2 digits or more, press "+ 10" and enter the
number.
Example:
To select track 14, press "+10" and "4".
To select track 24, press "+10", "+10" and "4".
Notes:
! Direct play feature is dis abled on some discs.
! When operating video CD with the P.B.C. function, set the P.B.C.
to off (see page 32).
To play by specifying time (time search):
You can play tracks from the desired time point during playback.
1 Whilst the disc is playing, press the DIRECT button.
3 1 / 19 MAX [04:56]
--:--
Time
E-33
To cancel random play:
Press the button.
Notes:
! O n some discs, this function cannot be used.
! You cannot set the random play whilst in the playback or pause
mode.
! W hen operating video CD with the P.B.C. function, set the P.B.C.
to off (see page 32).
2 Specify the time with the direct number buttons.
! Enter minutes and seconds.
! To specify 1 hour 23 minutes and 40 seconds, enter "8340".
! If you enter the wrong number, start over from step 1.
3 Within 10 seconds, press the ENTER button.
Note:
Time search feature is disabled on some discs.
04/3/19 XL-D V50H(H)_E.fm
TINSZA007SJZZ
Page 41

" To play in the desired order
(programmed playback)
You can play back the desired tracks in the sequence you want.
Maximum of 40 tracks can be programmed.
1 Whilst in the stop mode, press the MEMORY/SET button.
Information on all loaded discs is read, and then the programming screen appears.
2 Press the cursor ( or ) button
to select "Add" and press the
ENTER butt o n.
3 Press the cursor ( or ) button
to select a disc number and
press the ENTER button.
4 Press the cursor ( or ) button
to select a track number and
press the ENTER button.
5 Repeat steps 3 - 4 for other
tracks. Up to 40 tracks can be
programmed.
If you make a mistake, the programmed tracks can be cleared by
pressing the CLEAR button.
PROGRAM LIST
No. INDEX
DISC No.
PROGRAM LIST
No. INDEX
DISC No.
1
PROGRAM LIST
No. INDEX
DISC No.
1 Disc-2
PROGRAM LIST
No. INDEX
DISC No.
1 Disc-2 Track2
2 Disc-3 Track12
3 Disc-4 Track8
4
Add
Insert
Modify
Delete
Clear All
Exit
Disc-1
Disc-2
Disc-3
Disc-4
Disc-5
Track1
Track2
Track3
Track4
Track5
Track6
Disc-1
Disc-2
Disc-3
Disc-4
Disc-5
6 Press the cursor ( ) button to
finish programming.
PROGRAM LIST
No. INDEX
DISC No.
1 Disc-2 Track2
2 Disc-3 Track12
3 Disc-4 Track8
7 Use the cursor ( or ) button to
select a track to start with, and
press the (play) button.
! Playback starts from the select-
ed track and ends after the last
track in the programme.
! "ME MOR Y" lights up on the
main unit during programmed
play.
! Programmed tracks are stored until a disc is removed or you
turn the power off.
To change the programmed contents:
1 Whilst stopped, press the MEMORY/SET button to show the pro-
gramming screen.
2 Use the cursor ( or ) button to select an item and then press the
cursor ( ) button.
3 Use the cursor ( or ) button to select the desired command and
then press the ENTER button.
"Add" Adds a track to the programme.
"Insert" Inserts a track between programmed tracks. The
track is inserted above (before) the selected track.
"Modify" Modifies the track.
"Delete" Deletes the selected track.
"Clear All" Deletes the programme.
"Exit" Turn off the programming screen.
Note:
On some discs, programmed play does not work.
PROGRAM LIST
No. INDEX
DISC No.
1 Disc-2 Track2
2 Disc-3 Track12
3 Disc-4 Track8
XL-DV50H
ENGLISH
Audio CD Operation
1
2
3
4
5
6
7
8
04/3/19 XL-D V50H(H)_E.fm
E-34
TINSZA007SJZZ
Page 42

XL-DV50H
ENGLISH
Playing an MP3 and JPEG disc
Page
Playing a disc . . . . . . . . . . . . . . . . . . . . . . . . . . . . . . . . . . . 19 - 21
To locate the beginning of a chapter/track (skip) . . . . . . . . . . 22
Fast forward/Fast reverse (search) . . . . . . . . . . . . . . . . . . . . . . 22
To play repeatedly (repeat play) . . . . . . . . . . . . . . . . . . . . . 25, 26
To change the audio language (audi o output) . . . . . . . . . . . . . 27
To play in random order (random play) . . . . . . . . . . . . . . . . . . 33
To start playback f rom the desired point (direct play) . . . . . . 33
You can play CD-R/RW recorded in the M P3 and JPE G formats.
Load a disc containing MP3 and
JPEG tracks.
A menu screen appears and playback
starts automatically.
Folder
MP3 T rack
JPEG T rack
Example of playback sequence
! Playback is performed in the
order of 1 to 11 in this example.
! Tracks on some discs cannot
be played in order.
When playing JPEG tracks
! Playback skips to the next track approx. every 5 seconds.
! To return to the menu screen, press the button.
ROOT
Playback
1 1/19 00:00:00Stereo
sequence
ROOT
ALBUM01
ALBUM02
ALBUM03
ALBUM04
ALBUM05
ALBUM06
ALBUM07
Folder
3
Track
4
5
1
6
2
7
8
9
10
11
7
E-35
Selecting a folder/track on the menu screen:
MP3 and JPEG Disc Operation
Whilst in the stop mode, press the cursor ( or ) button to select a
folder/track and press the ENTER button.
TINSZA007SJZZ
Caution:
If you convert MP3 data to "audio CD" data when recording on a
CD-R/RW, play it as an audio CD. The MP3 operation cannot be
performed.
Note:
Up to 20 characters can be displayed for a folder name and a track
name. Underlines, asterisks, and spaces may not be displayed.
04/3/19 XL-D V50H(H)_E.fm
TINSZA007SJZZ
Page 43

" Zoom function
1 During playback, press the
ZOOM/AUDIO button.
2 Hold down th e or button
for 2 seconds or more.
Zoom on
Zoom 150 Pct
" Rotating a picture
After pressing the STILL/PAUSE button, press the cursor ( ,
, or ) button.
The image rotates as shown below.
button: 90º rotation in a clockwise direction.
XL-DV50H
ENGLISH
1
2
Use the or button to switch the zoom setting as follows:
Zoom 025 Pct Zoom 050 Pct Zoom 100 Pct Zoom 150 Pct Zoom 200 Pct
3
3 To shift the view and display the desired part of a zoo med
image, press the cursor ( , , or ) button repeatedly.
8
Press the button.
Press the button.
button: 90º rotation in a anti-clockwise direction.
button: Vertical mirror image.
4
5
6
TINSZA007SJZZ
Press the button.
To return to normal view:
Press the ZOOM/AUDIO button again, "Zoom off" will show on the
screen.
Press the button.
button: Horizontal mirror image.
MP3 and JPEG Disc Operation
7
8
E-36
04/3/19 XL-D V50H(H)_E.fm
TINSZA007SJZZ
Page 44

XL-DV50H
ENGLISH
Listening to the radio
Radio
" Tuning
1 Press the ON/STAND-BY button to turn the power on.
2 Press the TUNER (BAND) button repeatedly to select the
desired frequency band (FM or AM).
3 Press the TUNING ( or ) button to tune in to the desired
station.
Manual tuning:
Press the TUNING button as many times as required to tune in
to the desired station.
Auto tuning:
When the TUNING button is pressed for more than 0.5 seconds, scanning will start automatically and the tuner will stop at
the first receivable broadcast station.
Notes:
! When radio interference occurs, auto scan tuning may stop auto-
matically at that point.
! Auto scan tuning will skip weak signal stations.
! To stop the auto tuning, press the TUNING button again.
! When an RDS (Radio Data System) station is tuned in, the fre-
quency will be displayed first, and then the RDS indicator will
light. Finally, the station name will appear.
! Full auto tuning can be achieved for RDS stations "ASPM", see
page 41.
To receive an FM stereo transmission:
Press the TUNER (BAND) button to display the "ST" indicator.
! " " will appear when an FM broadcast is in stereo.
! If the FM reception is weak, press the TUNER (BAND) button to
extinguish the "ST" indicator. The reception changes to monaural, and the sound becomes clearer.
E-37
04/3/19 XL-D V50H(H)_E.fm
FM stereo mode indicator
FM stereo receiving indicator
TINSZA007SJZZ
Page 45

" Memorising a station
You can store 40 AM and FM stations in memory and recall them at
the push of a button. (Preset tuning)
1 Perform steps 1 - 3 in "Tuning" on page 37.
2 Press the MEMORY/SET butto n t o en ter the preset tuning
saving mode.
" To recall a memorised station
Press the PRESET ( or ) button for less than 0.5 seconds to select the desired station.
" To scan the preset stations
The stations saved in memory can be scanned aut omatically. (Preset memory scan)
1 Press the PRESET ( or ) button for more than 0.5 seconds.
The preset number will flash and the programmed stations will be
tuned in sequentially, for 5 seconds each.
2 Press the PRESET ( or ) button again when the desired sta-
tion is located.
XL-DV50H
ENGLISH
1
2
3
3 Within 30 seconds, press the PR ESET ( or ) button to
select the preset channel number.
Store the stations in memory, in order, starting with preset
channel 1.
4 Within 30 seconds, press the MEMORY/SET button to store
that station in memory.
If the "MEMORY" and preset number indicators go out before
the station is memorised, repeat the operation from step 2.
5 Repeat steps 1 - 4 to set other stations, or to change a pre-
set station.
When a new station is stored in memory, the station previously
memorised will be erased.
Note:
The backup function protects the memorised stations for a few
hours should there be a power failure or the AC power lead get disconnected.
" To erase entire preset memory
1 Press the ON/STAND-BY button to enter the stand-by mode.
2 Whilst pressing down the TUNER(BAND) button and the 2 but-
ton, press the ON/STAND-BY button until "TUNER CL" appears.
04/3/19 XL-D V50H(H)_E.fm
TINSZA007SJZZ
4
5
Radio
6
7
8
E-38
Page 46

XL-DV50H
ENGLISH
Using the Radio Data System (RDS)
RDS is a broadcasting service which a growing number of FM
stations provide. These FM stations send additional signals
along with their regular programme signals. They send their
station names, and information about the type of programme
such as sport, music, etc.
When tuned to an RDS station, "RDS" and the station name will be
displayed.
"TP" (Traffic Programme) will appear on the display when the
received broadcast carries traffic information, and "TA" (Traffic
Announcement) will appear whilst a traffic information is on air.
You can control the RDS by using the remote control only.
" Information provided by RDS
Each time the DISPLAY button is pressed, the display will
switch as follows:
When you are tuning in to a station other than an RDS station or to
an RDS station which sends weak signal, the display will change in
the following order:
Station name (PS) Programme type (PTY)
Frequency
NO PS NO PTY
E-39
Radio
FM 98.80 MHz
04/3/19 XL-D V50H(H)_E.fm
TINSZA007SJZZ
Page 47

Descriptions of the PTY (Programme Type) codes, TP (Traffic
Programme) and TA (Traffic Announcement).
You can search for and receive the following PTY, T P and TA signals.
NEWS Short accounts of facts, events and publicly ex-
pressed views, reportage and actuality.
AFFAIRS Topical programme expanding or enlarging upon
the news, generally in different presentation style or
concept, including debate, or analysis.
INFO Programmes whose purpose is to impart advice in
the widest sense.
SPORT Programme concerned with any aspect of sport.
EDUCATE Programme intended primarily to educate, of which
the formal element is fundamental.
DRAMA All radio plays and serials.
CULTURE Programmes concerned with any aspect of national
or regional culture, including language, theatre, etc.
SCIENCE Progr ammes about the natural sciences and tech-
nology.
VARIED Used for mainly speech-based programmes usually
of light-entertainment nature, not covered by other
categories. Examples include: quizzes, panel
games, personality interviews.
POP M Commercial music, which would generally be con-
sidered to be of current popular appeal, often featuring in current or recent record sales charts.
ROCK M Contemporary modern music, usually written and
performed by young musicians.
EASY M Current contemporary music considered to be
"easy-listening", as opposed to Pop, Rock or Classical, or one of the specialised music styles, Jazz,
Folk or Country. Music in this category is often but
not always, vocal, and usually of short duration.
LIGHT M Classical music for general, rather than specialist
appreciation. Examples of music in this category
are instrumental music, and vocal or choral works.
CLASSICS Performances of major orchestral works, sympho-
nies, chamber music, etc., and including Grand Opera.
OTHER M Musical styles not fitting into any of the other cate-
gories. Particularly used for specialist music of
which Rhythm & Blues and Reggae are examples.
WEATHER Weather reports and forecasts and meteorological
information.
FINANCE Stock Market reports, commerce, trading, etc.
CHILDREN For programmes targeted at a young audience, pri-
marily for entertainment and interest, rather than
where the objective is to educate.
SOCIAL Programmes about people and things that influence
them individually or in groups. Includes: sociology,
history, geography, psychology and society.
RELIGION Any aspect of beliefs and faiths, involving a God or
Gods, the nature of existence and ethics.
PHONE IN Involving members of the public expressing their
views either by phone or at a public forum.
TRAVEL Features and programmes concerned with travel to
near and far destinations, package tours and travel
ideas and opportunities. Not for use for announcements about problems, delays, or roadworks affecting immediate travel where TP/TA should be used.
LEISURE Programmes concerned with recreational activities
in which the listener might participate. Examples include, Gardening, Fishing, Antique collecting,
Cooking, Food & Wine, etc.
JAZZ Polyphonic, syncopated music characterised by im-
provisation.
XL-DV50H
ENGLISH
Radio
1
2
3
4
5
6
7
8
04/3/19 XL-D V50H(H)_E.fm
E-40
TINSZA007SJZZ
Page 48

XL-DV50H
ENGLISH
Using the Radio Data System (RDS) (continued)
COUNTRY Songs which originate from, or continue the musical
NATION M Current Popular Music of the Nation or Region in
OLDIES Music from the so-called "golden age" of popular
FOLK M Music which has its roots in the musical culture of a
DOCUMENT Programme concerned with factual matters, pre-
TEST Broadcast when testing emergency broadcast
Radio
ALARM Emergency announcement made under exception-
TA Traffic announcements are being broadcast.
TP Broadcasts which carry traffic announcements.
tradition of the American Southern States. Characterised by a straightforward melody and narrative
story line.
that country's language, as opposed to International 'Pop' which is usually US or UK inspired and in
English.
music.
particular nation, usually played on acoustic instruments. The narrative or story may be based on historical events or people.
sented in an investigative style.
equipment or receivers.
al circumstances to give warning of events causing
danger of a general nature.
" Using the Auto Station Programme Memory
(ASPM)
Whilst in the ASPM operation mode, the tuner will automatically
search for new RDS stations. Up to 40 stations can be stored.
If you have already stored some stations in memory, the number of
new stations you can s tore will be less.
1 Press the TUNER (BAND) button
to select the FM band.
2 Press and hold down the A SPM
button for at least 3 seconds.
1 After "ASPM" has flashed for about 4 seconds, scanning will
start (87.50 - 108.00 MHz).
2 When an RDS station is found, "RDS" will appear first, and
then "MEMORY" and the preset channel number will flash for
2 seconds. Finally the station will be stored in memory.
E-41
3 After scanning, the number of stations stored in memory will
be displayed for 4 seconds, and then "END" will appear for 4
seconds.
04/3/19 XL-D V50H(H)_E.fm
TINSZA007SJZZ
Page 49

To stop the ASPM operation before it is complete:
Press the ASPM button whilst it is scanning for stations.
The stations which are already stored in memory will be kept there.
Notes:
! Any station which has the same frequency as one stored in mem-
ory will not be stored.
! If 40 stations have already been stored in memory, the scan will
be aborted. If you want to redo the ASPM operation, erase the
preset memory.
! If no stations have been stored in memory, "END" will appear for
about 4 seconds.
! If the RDS signals are very weak, station names may not be
stored in memory.
To erase all of the contents of preset memory:
1 Press the ON/STAND-BY button to enter the stand-by mode.
2 Whilst pressing down the TUNER (BAND) button and the 2 but-
ton, press the ON/STAND-BY button until "TUNER CL" appears.
! After performing this operation, all of the preset memory informa-
tion will be erased.
To store a station name again if the wrong name was stored in
memory:
It may be impossible to store station names in memory using the
ASPM function if there is lots of noise or if t he s ignal is too weak. In
this case, perform as follows.
1 Press the PRESET ( or ) button to check whether the names
are correct.
2 If you find a wrong name during receiving the station, wait until the
correct name will be displayed. And then press the MEMORY button.
3 Within 5 seconds, press the MEMORY button whilst the preset
channel number is flashing.
! The new station name has been stored in memory correctly.
Notes:
! The same station name can be stored in different channels.
! In a certain area or during certain time periods, the station names
may temporarily be different.
" Notes for RDS operation
If any of the following events occur, it does not mean that the
unit is faulty:
! "PS", "NO PS" and a station name appear alternately, and the
unit does not operate properly.
! If a particular station is not broadcasting properly or a station is
conducting tests, the RDS reception function may not work properly.
! When you receive an RDS station whose signal is too weak,
information like the station name may not be displayed.
! "NO PS" or "NO PTY" will flash for about 5 seconds, and then the
frequency will be displayed.
XL-DV50H
ENGLISH
Radio
1
2
3
4
5
6
7
04/3/19 XL-D V50H(H)_E.fm
8
E-42
TINSZA007SJZZ
Page 50

XL-DV50H
ENGLISH
Changing the initial setting of DVD
Advanced Features
1 After pressing the button, press the SET UP button.
2 Press the cursor ( or )
button to select the main
menu and press the ENTER
button.
3 Press the cursor ( or )
button to select the submenu and press the ENTER
button.
To return to the previous display, press the cursor ( ) button. Or press the SHIFT button
and then press the RETURN
button.
Language
Setup
Audio Setup
Video Setup
Display Setup
System Setup
Language Setup
OSD Language
Audio
Subtitle
Disc Menu
Submenu
English
English
English
English
Enter
4 Press the cursor ( or ) button to change the setting an d
press the ENTER button.
! To return to the previous display, press the cursor ( ) button.
Or press the SHIFT button and then press the RETURN button.
! To change other settings, begin from step 2.
5 Press the SET UP button.
The new setting is memorised.
Note:
Settings are retained even if the unit is set to the stand-by mode.
E-43
04/3/19 XL-D V50H(H)_E.fm
TINSZA007SJZZ
Page 51

Se t tin g Selec t able p aram e t ers
(* indicates initial settings.)
Language Setup OSD Language English*
Audio English*
Français
Español
Deutsch
Nederlands
Italiano
Svenska
French
Description Reference
page
Selects the initial or playback setting language. P. 47
Select a language to play. P. 47
XL-DV50H
ENGLISH
1
2
3
Subtitle English*
French
Disc menu English*
French
Audio Setup Digital output BitStream*
LPCM
LPCM output 48 kHz
96 kHz*
Analog output Surround
2.1Ch*
Compression On
Off*
Selects the subtitle displayed on the TV screen. P. 47
Selects the disc menu language. P. 47
Select a type of signal sent from the digital audio output
socket.
PCM sound signals recorded in 96 kHz are converted to 48
kHz.
Select a type of signal sent to the speaker.
Surround: 2 channel (video CD/audio CD) or 5.1 channel
(DVD) sound are converted to 2.1 channel
sound (virtual speaker surround sound).
2.1Ch: 2 channel (video CD/audio CD) or 5.1 channel
(DVD) sound are converted to 2.1 channel
sound (with the subwoofer sound increased).
Set to on to enjoy the realistic sound as recorded on the
disc.
On: Realistic sound is produced as recorded on
DVD/video CD/audio CD.
Off: The range of signal levels is reduced to moder-
ate sudden increase in playback volume.
04/3/19 XL-D V50H(H)_E.fm
P. 52
TINSZA007SJZZ
E-44
4
5
Advanced Features
6
7
8
Page 52

XL-DV50H
ENGLISH
Changing the initial setting of DVD (continued)
Se t tin g Se lect a ble p a ram e t ers
Video Setup TV screen 4:3 PS*
Advanced Features
(* indicates initial settings.)
4:3 LB
16:9
TV type PAL*
NTSC
AUTO
Video output SCART*
S-Video
Picture mode Auto
Film
Video
Smart*
The screen mode should be set according to the connected
TV type.
Selects the correct colour system (TV standard). P. 13
PAL: Select this mode for the PAL TV.
NTSC: Select this mode for the NTSC TV.
AUTO: Select this mode for the multi-system TV.
The video output mode should be set according to the connected TV type.
SCART: Select this when the unit is connected to a TV
S-Video: Select this when the unit is connected to a T V
Select a mode to optimise DVD or video CD images on a TV.
Auto: Images are automatically optimised according to
Film: Suitable for progressive video output. Select for
Video: Suitable for interlaced video output. Select for
Smart: Optimise special effects for progressive video
Description Reference
page
P. 47
P. 13, 14
with a SCART cable.
with an S-video or video cable.
the video source.
DVD movies, etc.
DVD karaoke, video CD, etc.
output.
E-45
04/3/19 XL-D V50H(H)_E.fm
TINSZA007SJZZ
Page 53

Se t tin g Selec t able p aram e t ers
(* indicates initial settings.)
Display Setup Angle mark On*
Screen saver On
System Setup Rating Level 1 G
Please enter a 4-digit
password.
(Default setting: 6629)
Password ---------- Password setting. P. 48
Restore Info ---------- This resets all settings, except for "Rating Level" and "Pass-
Off
Off*
2
3 PG
4 PG 13
5
6 PG-R
7 NC-17
8 Adult
No Limit*
Description Reference
page
Select whether to display " " (On) or not (Off). P. 28
Select whether to use a screen saver (On) or not (Off).
On: Press the button. After 5 minutes or more of inactiv-
ity, a screen saver appears.
To turn off the screen saver on the screen, press any
button on the main unit or remote control.
Off: Cancel the screen saver setting.
Sets a restriction level for DVD viewing. P. 48
P. 48
word", to the factory defaults.
XL-DV50H
ENGLISH
Advanced Features
1
2
3
4
5
6
04/3/19 XL-D V50H(H)_E.fm
7
8
E-46
TINSZA007SJZZ
Page 54

XL-DV50H
ENGLISH
Changing the initial setting of DVD (continued)
" Language " Video format
Indicator Setting
OSD Language
A language for screen display can be set, such as for
initial settings or messages.
English
Close
French
Fermer
Indicator Setting
4:3 LB When playing a wide image
(16:9) disc, black bands are
inserted at the top and bottom and you can enjoy full
wide images (16:9) on a 4:3
size TV.
E-47
Audio A language for audio can be set.
You can specify a language for conversation and narration.
English
Subtitle A language for subtitle can be set.
The subtitles are displayed in a specified language.
Advanced Features
Disc
Menu
A language for disc menus can be set.
Menu screens are displayed in a specified language.
English
Thank you
English
CAST
STAFF
Thank you
French
French
Merci
French
ACTEURS
PERSONNEL
Merci
A 4:3 disc is played in 4:3.
4:3 PS When playing a wide image
(16:9) disc, the left and right
sides of the image are cut
(pan scan) to display a natural-looking 4:3 size image.
A wide image disc without
pan scan is played back
in 4:3 letterbox.
A 4:3 disc is played in 4:3.
16:9 A wide image (16:9) is dis-
played when playing a wide
image (16:9) disc.
! W hen playing a 4:3 image disc, the image size de-
pends on the setting of the connected TV.
! I f you play back a wide image (16:9) disc with the
unit connected to a 4:3 TV, images appear
stretched vertically.
Note:
When playing the disc with a fixed video for mat, it will not change
even if the TV screen size is changed.
04/3/19 XL-D V50H(H)_E.fm
TINSZA007SJZZ
Page 55

" Rating level setting
Indicator Setting
1 G Only DVD software intended for children can be
2
3 PG
4 PG 13
5
6 PG-R
7 NC-17
8 Adult DVD software of any grade (adult/general/children)
No Limit Rating level control is cancelled.
Notes:
! To change the rating level, enter a 4-digit password. It is set to
6629 by default.
! Whilst playing a disc with parental lock, the display may appear
requesting a password in order to watch some restricted scenes.
In such a case, enter the password to temporarily change the
parental level.
played back.
Only DVD software intended for general use and
children can be played back.
can be played back.
" To change the password
1 After pressing the button, press the SET UP button.
2 Press the cursor ( or ) button to select "System Setup"
and press the ENTER button.
3 Press the cursor ( or ) button to select "Password" and
press the ENTER button.
4 Enter a 4-digit old password with the direct number but-
tons on the remote control.
(Default setting: 6629)
5 Enter a 4-digit new password with th e direct number but-
tons on the remote control.
6 Enter the new password again for confirmation.
7 Press the SET UP button.
When you forget your password
1 After pressing the button, press the SET UP button.
2 Press the cursor ( or ) button to select "System Setup" and
press the ENTER button.
3 Press the cursor ( or ) button to select "Restore Info" and press
the ENTER button.
4 Enter 2486 with the direct buttons and then press the ENTER but-
ton.
When reset is done according to this method, all settings, including the settings for password and rating level, will be reset to the
factory defaults.
XL-DV50H
ENGLISH
Advanced Features
1
2
3
4
5
6
7
04/3/19 XL-D V50H(H)_E.fm
8
E-48
TINSZA007SJZZ
Page 56

XL-DV50H
ENGLISH
Timer and sleep operation
Timer playback:
The unit turns on and plays the desired sour ce (DVD, video CD,
audio CD, MP3 disc, tuner) at the preset time.
Sleep operation:
You can set the system to the power stand-by mode at the specified
time.
Advanced Features
" Timer playback
Before setting timer:
1 Press the CLOCK button to check that the clock is set to the cor-
rect time. (Refer to page 18.)
2 Load the discs to be played.
1 Press the ON/STAND-BY button to turn the power on.
2 Press the DVD/CD or TUNER (BAND) button to select the
desired function.
When you select the TUNER (BAND), tune into the desired station.
3 Adjust the volume using the VOLUME but tons.
Do not turn the volume up too high.
4 Press the TIMER/SLEEP button rep eatedly un ti l " " is dis-
played and then within 8 seconds, press the MEMORY/SET
button.
5 Within 30 seconds, press the PR ESET ( or ) button to
specify the hour to start, then press the MEMORY/SET button.
E-49
04/3/19 XL-D V50H(H)_E.fm
TINSZA007SJZZ
Page 57

6 Within 30 seconds, press the PR ESET ( or ) button to
specify the minute to start, then press the MEMORY/SET
button.
! Settings are displayed in order and the unit will enter the tim-
er stand-by mode.
! Timer set indicator will light up.
To cancel the timer playback:
Press the ON/STAND-BY button to turn the power on.
7 When the preset time is reached, playback will start.
The volume will increase gradually until it reaches the volume
you were listening to before your system entered the timer
stand-by mode.
8 The unit will en ter the powe r st and-by mod e one h our afte r
the timer playback starts.
To reset or chang e the timer setting :
Perform "Timer playback" from the beginning.
Note:
When performing timer playback using another unit connected to the VIDEO/AUX
sockets, select "VIDEO/AUX" in step 2.
At this time, only this unit will be turned on or
enter the power stand-by mode automatically. It will enter the power stand-by mode 1
hour after the playback starts. However, the
other unit will not be turned on or off.
XL-DV50H
ENGLISH
Advanced Features
1
2
3
4
5
6
7
04/3/19 XL-D V50H(H)_E.fm
8
E-50
TINSZA007SJZZ
Page 58

XL-DV50H
ENGLISH
Timer and sleep operation (continued)
" Sleep operation
1 Play back the desired sound source.
2 Press the TIMER/SLEEP button repeatedly until "SLEEP" is
displayed and then within 8 seconds, press the MEMORY/
SET button.
" To use timer and sleep operation together
Example: To fall asleep and wake up to the same radio station
You can play back the same source only (the function cannot be
switched).
1 Set the sleep time (see left, steps 1 - 3).
2 Whilst the sleep timer is set, set the timer playback (steps
4 - 6, pages 49 - 50).
E-51
To change the sleep time:
Whilst the sleep time is displayed, press the PRESET ( or )
button.
(Maximum: 3 hours - Minimum: 5 minutes)
3:00 2:00 1:30 1:00
(cancel) 0:05 0:10 0:15 0:30
3 Within 30 seconds, press the MEMORY/SET button.
4 The unit will enter the power stand-by mode automatically
after the preset time has elapsed.
Advanced Features
The volume will turn down 30 seconds before the sleep operation finishes.
T o confirm the remaining sleep time:
Press the TIMER/SLEEP button whilst the sleep timer is set.
The remaining sleep time is displayed for about 8 seconds.
T o cancel the sleep operation:
Press the ON/STAND-BY button whilst the sleep timer is set.
Sleep timer setting Timer playback setting
5 minutes - 3 hours
Sleep operation will
automatically stop.
Timer playback
start time
8
TINSZA007SJZZ
04/3/19 XL-D V50H(H)_E.fm
TINSZA007SJZZ
Page 59

Enhancing your system
The connection lead is not included. Purchase a commercially available lead as shown below.
VCR, DVD, etc.
White
To the
line output
Red
White
Audio cable
(commercially available)
Dolby Digital/DTS amplifier or
Digital audio recorder, etc.
Optical digital cable
(commercially available)
sockets
Red
To the
optical line
input socket
" Listening to the playback sounds from VCR,
DVD, etc.
1 Use a connection lead to connect the VCR, DVD, etc. to the
VIDEO/AUX AUDIO IN sockets.
When using video equipment, connect the audio output to this
unit and the video output to a television.
2 Press the ON/STAND-BY button to turn the power on.
3 Press the VIDEO/AUX button.
4 Play the connected e quipment.
Note:
To prevent noise interference, place the unit away from the television.
" Digital connection to a surround amplifier or a
digital audio recorder, etc.
Selecting a sound sig na l type
When connecting other equipment to the digital audio output, adjust the audio output setting accordingly (see page 43).
Bitstream
Choose this when connecting the unit to a Dolby Digital/DTS
(5.1ch) surround amplifier. When playing a DVD recorded in Dolby Digital or DTS, bitstream output allows you to enjoy the 5.1ch
surround sound.
LPCM
Choose this for PCM output. When playing a DVD recorded in Dolby Digital, the output converts to 2 channel PCM. When a DVD recorded in DTS is played back, signals are sent in bitstream.
" Headphones
! Before plugging in or unplugging the headphones, reduce the vol-
ume.
! Be sure your headphones have a 3.5 mm (1/8") diameter plug
and are between 16 ohms and 50 ohms impedanc e. The recommended impedance is 32 ohms.
! Plugging in the headphones disconnects the speakers automati-
cally. Adjust the volume using the VOLUME control.
XL-DV50H
ENGLISH
Advanced Features
1
2
3
4
5
6
7
8
04/3/19 XL-D V50H(H)_E.fm
E-52
TINSZA007SJZZ
Page 60

XL-DV50H
ENGLISH
Troubleshooting chart
Many potential problems can be resolved by the owner without calling a service technician.
If something is wrong with this product, check the following before
calling your authorised SHARP dealer or service centre.
" General
Symptom Possible cause
The clock is not set
to the correct time.
When a button is
pressed, the unit
does not respond.
No sound is heard. ! Is the volume level set to "0"?
Noise is heard during playback.
The power is not
turned on.
References
" Remote control
Symptom Possible cause
The remote control
does not operate.
! Did a power failure occur? Reset the clock. (Re-
fer to page 18.)
! Set the unit to the power stand-by mode and
then turn it back on .
! If the unit still malfunctions, reset it. (Refer to
page 54.)
! Are the headphones connected?
! Are the speaker wires disconnected?
! Is the TV or amplifier volume level set to "0"?
! Move the unit away from any computers or mo-
bile phones.
! Is the unit unplugged?
! Is the AC power lead of the unit plugged in?
! Is the battery polarity correct?
! Are the batteries dead?
! Is the distance or angle incorrect?
! Does the remote control sensor receive strong
light?
" DVD player
Symptom Possible cause
No images are displayed.
Even though a disc
is loaded, "No
Disc" is displayed.
Playback sounds
are skipped.
The control bu ttons do not function. Music or
video playback is
interrupted.
Pictures and
sound are
skipped.
The unit does not
operate even if the
power is on.
Images cannot be
played back.
(Sound is not
heard.)
! Is TV turned on?
! Is the input of TV switched?
! Is the disc loaded upside down?
! Is the disc very dirty?
! Does the disc satisfy the standards?
! Is the unit located near excessive vibrations?
! Is condensation formed inside the unit?
! Is the disc very dirty?
! Does the disc satisfy the standards?
! Is the unit located near excessive vibrations?
! Is condensation formed inside the unit?
! Is the disc very dirty?
! Is the unit located near excessive vibrations?
! Is condensation formed inside the unit?
! Is a disc other than a DVD (region number 2 or
ALL), video CD, audio CD, CD-R or CD-RW
loaded?
! Is a disc other than a DVD (region number 2 or
ALL), video CD, audio CD, CD-R or CD-RW
loaded?
! Is the disc very dirty?
! Is the disc loaded upside down?
! Is the optical pickup dirty?
! Is the TV input set to "VIDEO 1/VIDEO 2", etc.?
! Is the unit turned on?
E-53
04/3/19 XL-D V50H(H)_E.fm
TINSZA007SJZZ
Page 61

" Tuner
Symptom Possible cause
The radio makes
unusual noises
continuously.
" Condensation
Sudden temperature changes, storage or operation in an extremely
humid environment may cause condensation inside the cabinet
(laser pickup, etc.) or on the transmitter on the remote control.
Condensation can cause the unit to malfunction. If this happens,
leave the power on with no disc in the unit until normal playback is
possible (about 1 hour). Wipe off any condensation on the transmitter with a soft cloth before operating the unit.
" If trouble occurs
When this product is subjected to strong external interference
(mechanical shock, excessive static electricity, abnormal supply
voltage due to lightning, etc.) or if it is operated incorrectly, it may
malfunction.
If such a problem occurs, do the following:
1 Set the unit to the stand-by mode and turn the power on again.
2 If the unit is not restored in the previous operation, unplug and
plug in the unit, and then turn the power on.
Note:
If neither operation above restores the unit, clear all the memory by
resetting it.
Is the unit placed near the TV or computer?
Is the FM aerial or AM loop aerial pl aced properly?
Move the aerial away f rom the AC powe r lead if it 's
located nearby.
" Clearing all the memory (reset)
1 Press the ON/STAND-BY button to enter the power stand-by
mode.
2 Whilst pressing down the DVD/CD button and the 2 button,
press the ON/STAND-BY button until "CLEAR" appears.
Caution:
When you reset, all data is deleted and the settings retur n to the
default. (DVD initial settings are retained.)
" Before transporting the unit
Remove all discs from the unit. Make sure there is no disc in the di sc
tray. Then, set the unit to the power stand-by mode. Carrying the
unit with discs left inside can damage the unit.
Error indicators and warnings
When you load an unplayab le disc or f ail to perform operations properly, the following messages are displayed on the T V scr een.
TV screen Meaning
The disc cannot be played with this
Disc Error
Wrong Region
system or it is loaded in an incorrect way.
The region number of the DVD is
neither "2" nor "ALL".
XL-DV50H
ENGLISH
References
1
2
3
4
5
6
7
The disc does not support the operation described in this operation
manual.
04/3/19 XL-D V50H(H)_E.fm
8
E-54
TINSZA007SJZZ
Page 62

XL-DV50H
ENGLISH
Maintenance
! Cleaning the cabinet
Periodically wipe the cabinet with a soft cloth and a diluted soap
solution, then with a dry cloth.
Caution:
Do not use chemicals for cleaning (petrol, paint thinner, etc.). It
"
may damage the cabinet finish.
Do not apply oil to the inside of the u nit. It may cause malfunc-
"
tions.
! Care of discs
Discs are fairly resistant to damage, however mistracking can occur
due to an accumulation of dirt on the disc surface. Follow the guidelines below for maximum enjoyment from your disc collect ion and
player.
Do not write on either side of the disc, particularly the non-label
"
side from which signals are read. Do not mark this surface.
Keep your discs away from direct sunlight, heat, and excessive
"
moisture.
Always hold the discs by the edges. Fingerprints, dirt, or water on
"
the discs can cause noise or mistracking. If a disc is dirty or does
not play properly, clean it with a soft, dry cloth, wiping straight out
from the centre, along the radius.
References
NO YES
Correct
Specifications
As part of our policy of continuous improvement, SHARP reser ves
the right to make design and specification changes for product
improvement without prior notice. The performance specification figures indicated are nominal values of production units. There may be
some deviations from these values in individual units.
! General
Power source AC 230 V, 50 Hz
Power consumption Power on: 98 W
Power stand-by: 0.6 W (*)
Dimensions Width: 160 mm (6-5/16")
Height: 240 mm (9-7/16")
Depth: 300 mm (11-13/16")
Weight 6.0 kg (13.2 lbs.)
(*) This power consumption value is obtained when the demonstra-
tion mode is cancelled in the power stand-by mode. Refer to page
15 to cancel the demonstration mode.
! Amplifier
Output power Front speaker s:
PMPO: 180 W
MPO: 90 W (45 W + 45 W) (DIN 45 324)
RMS: 60 W (30 W + 30 W) (DIN 45 324)
RMS: 45 W (22.5 W + 22.5 W) (DIN 45 500)
Subwoofer:
PMPO: 120 W
MPO: 60 W (DIN 45 324)
RMS: 40 W (DIN 45 324)
RMS: 30 W (DIN 45 500)
E-55
04/3/19 XL-D V50H(H)_E.fm
TINSZA007SJZZ
Page 63

Audio output
terminals
Audio input
terminals
Video output
terminals
" DVD player
Type 5-disc multi-play compact disc player
Signal readout PAL/NTSC colour
Supported disc
types
Video signal Horizontal resolution: 500 lines
Audio signal Frequency
Front speakers and subwoofer: 6 ohms
Headphones: 16 - 50 ohms
(recommended: 32 ohms)
Optical digital output: Square type 1
Video/Auxiliary (audio signal):
500 mV/47 k ohms
SCART output: SCART terminal 1
Video output: RCA type 1
S-video output: S-terminal 1
DVD (region number 2, ALL), video CD,
audio CD, CD-R, CD-RW
S/N ratio: 75 dB
characteristics
S/N ratio CD: 95 dB (1 kHz)
Dynamic
range
Total har-
monic distortion ratio
Linear PCM DVD:
30 Hz to 20 kHz
(sampling rate: 48 kHz)
30 Hz to 20 kHz
(sampling rate: 96 kHz)
CD: 30 Hz to 20 kHz
Linear PCM DVD: 92 dB
CD: 92 dB
0.14 %
" Tuner
Frequency range FM: 87.5 - 108 MHz
AM: 522 - 1,620 kHz
" Front speaker
Type 2-way type speaker system
Maximum input
power
Rated input power 30 W
Impedance 6 ohms
Dimensions Width: 165 mm (6-1/2")
Weight 2.5 kg (5.5 lbs.)/each
(magnetic shield)
4 cm (1.5") tweeter
10 cm (4") woofer
60 W
Height: 240 mm (9-7/16")
Depth: 265 mm (10-7/16")
" Subwoofer
Type 15 cm (6") subwoofer system
Maximum input
power
Rated input power 40 W
Impedance 6 ohms
Dimensions Width: 160 mm (6-5/16")
Weight 2.9 kg (6.4 lbs.)/each
(magnetic shield)
80 W
Height: 240 mm (9-7/16")
Depth: 270 mm (10-5/8")
XL-DV50H
ENGLISH
References
E-56
1
2
3
4
5
6
7
8
04/3/19 XL-D V50H(H)_E.fm
TINSZA007SJZZ
Page 64

SHARP CORPORATION
0401_A5
TINSZA007SJZZ
04C N HK 1
03/8/20 XL-DV50H(H)_BACK.fm
TINSZA007SJZZ
Page 65

U P
DOWN
XL-DV50H DVD MICRO SYSTEM
03/8/20 XL-DV50H(H)_SPINE.fm
TINSZA007SJZZ
 Loading...