

Page 1
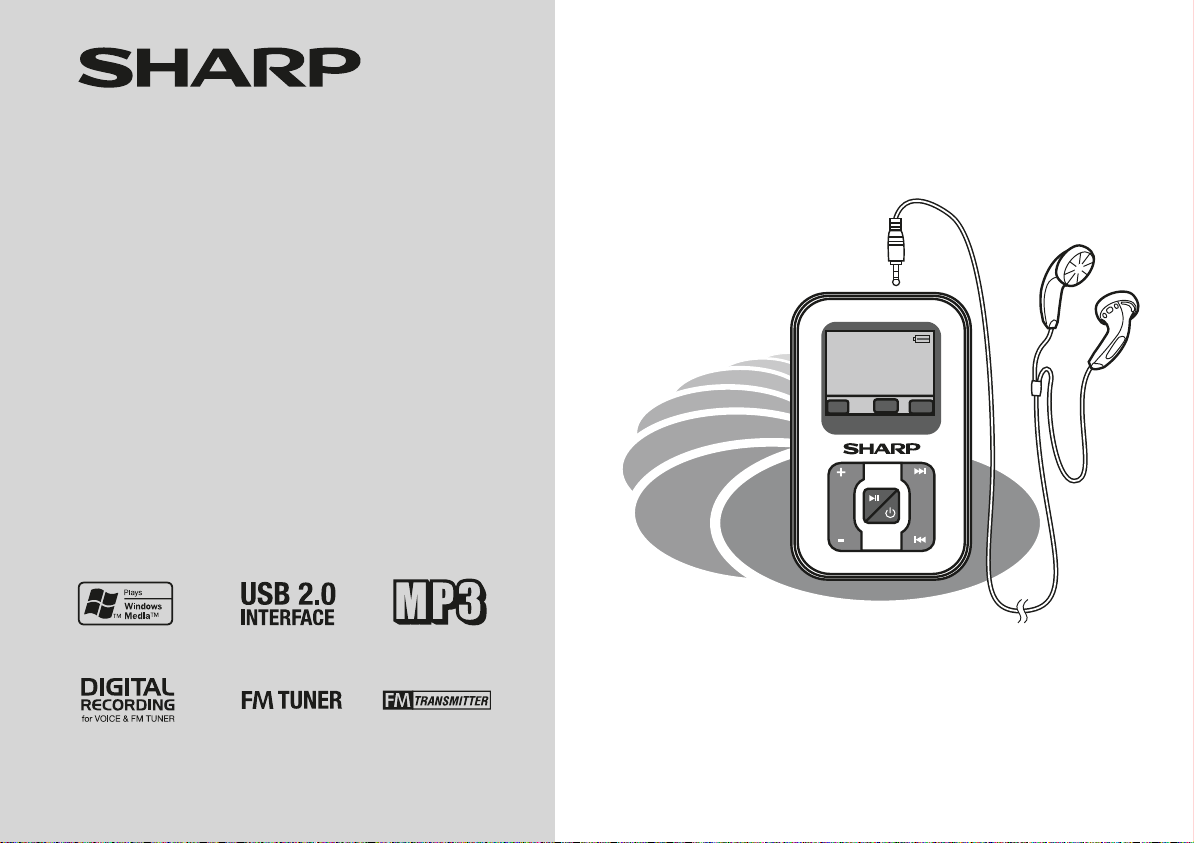
DIGITAL AUDIO PLAYER
MODEL
WA-TR30(BK)/(W)
WA-TR300(BK)/(W)
OPERATION MANUAL
kbps
mp3 kHz
DIGITAL AUDIO PLAYER
M
EQ
Page 2

WA-TR30(BK)/(W)
WA-TR300(BK)/(W)
Warning:
To prevent fire or shock hazard, do not expose this appliance
to dripping or splashing. No objects filled with liquids, such as
vases, shall be placed on the apparatus.
Information on Proper Disposal
A. Information on Disposal for Users (private
households)
1. In the European Union
Attention: If you want to dispose of this equipment,
please do not use the ordinary dustbin!
Used electrical and electronic equipment must be treated
separately and in accordance with legislation that
requires proper treatment, recovery and recycling of used
electrical and electronic equipment.
Following the implementation by member states, private
households within the EU states may return their used
Attention: Your product is marked with
this symbol. It
means that used
electrical and electronic products
should not be mixed
with general household waste. There is
a separate collection system for
these products.
electrical and electronic equipment to designated
collection facilities free of charge*. In some countries*
your local retailer may also take back your old product
free of charge if you purchase a similar new one.
*) Please contact your local authority for further details.
If your used electrical or electronic equipment has
batteries or accumulators, please dispose of these
separately beforehand according to local requirements.
By disposing of this product correctly you will help ensure
that the waste undergoes the necessary treatment,
recovery and recycling and thus prevent potential
negative effects on the environment and human health
which could otherwise arise due to inappropriate waste
handling.
2. In other Countries outside the EU
If you wish to discard this product, please contact your
local authorities and ask for the correct method of
disposal.
For Switzerland: Used electrical or electronic equipment
can be returned free of charge to the dealer, even if you
don't purchase a new product. Further collection facilities
are listed on the homepage of www.swico.ch or
www.sens.ch.
B. Information on Disposal for Business Users
1. In the European Union
If the product is used for business purposes and you
want to discard it:
Please contact your SHARP dealer who will inform you
about the take-back of the product. You might be charged
for the costs arising from take-back and recycling. Small
products (and small amounts) might be taken back by
your local collection facilities.
For Spain: Please contact the established collection
system or your local authority for take-back of your used
products.
2. In other Countries outside the EU
If you wish to discard of this product, please contact your
local authorities and ask for the correct method of
disposal.
i
Page 3

Introduction
Thank you for purchasing this SHARP product. For the best performance, read this manual carefully. It will guide you in operating your SHARP
product.
Special notes
■
Trademarks
●
IBM and PC/AT are registered trademarks of International
Business Machines Corporation.
●
Macintosh is a trademark of Apple Computer, Inc., registered in
the United States and other countries.
●
Microsoft Windows and Windows Media are registered
trademarks of Microsoft Corporation in the United States and/or
other countries.
●
All brand names and product names are trademarks or
registered trademarks of their respective owners.
■
Audio data
●
Back up your audio data stored on this product periodically in
case of accidental loss or alteration.
●
SHARP shall not be liable for any damages or loss of audio data
resulting from defects in this product or your computer.
■
Note
Supply of this product does not convey a license nor imply any right
to distribute content created with this product in revenue-generating
broadcast systems (terrestrial, satellite, cable and/or other
distribution channels), revenue-generating streaming applications
(via Internet, intranets and/or other networks), other revenuegenerating content distribution systems (pay-audio or audio-ondemand applications and the like) or on revenue-generating physical
media (compact discs, digital versatile discs, semiconductor chips,
hard drives, memory cards and the like). An independent license for
such use is required. For details, please visit http://mp3licensing.com
MPEG Layer-3 audio coding technology licensed from Fraunhofer IIS
and Thomson.
WA-TR30(BK)/(W)
WA-TR300(BK)/(W)
ENGLISH
General Information
E-1
Page 4
WA-TR30(BK)/(W)
WA-TR300(BK)/(W)
ENGLISH
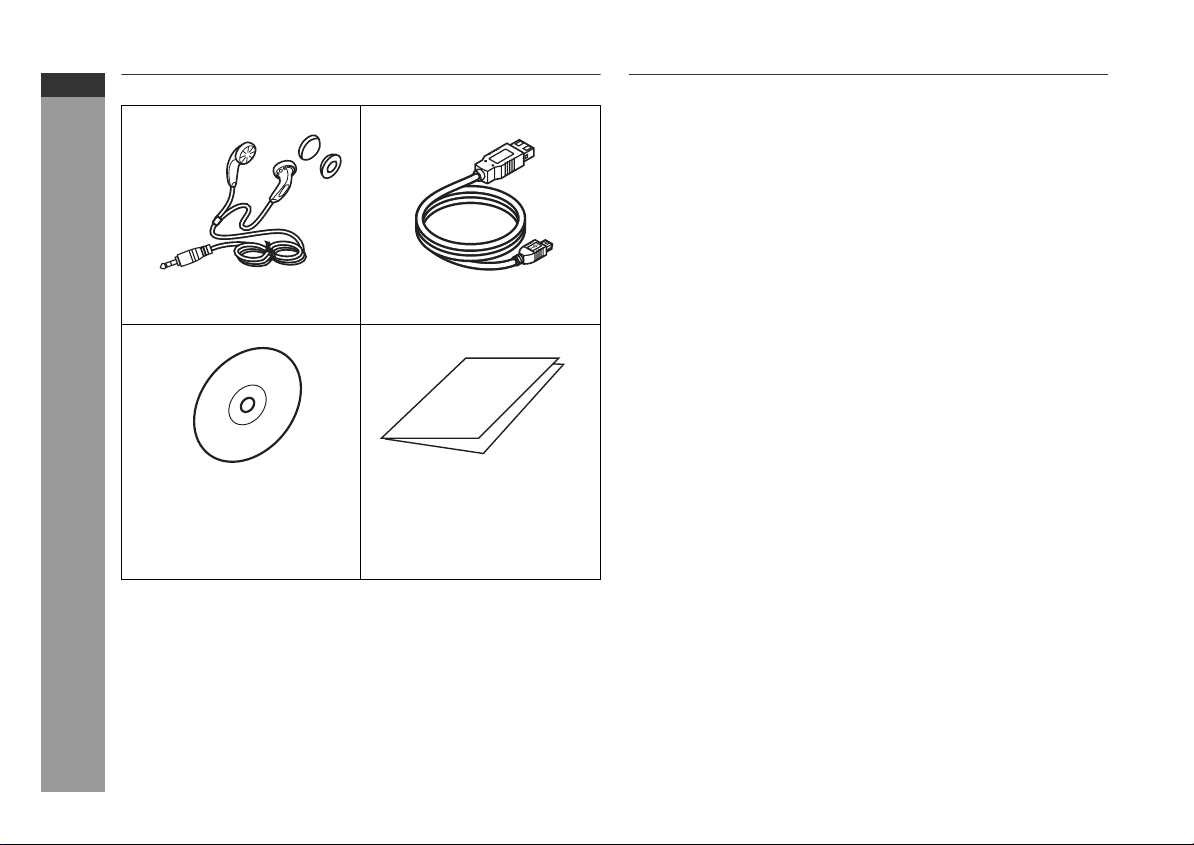
Accessories
Please confirm that only the following accessories are included.
General Information
Notes:
●
●
●
E-2
Earphones x 1
(with the ear pads)
CD-ROM x 1 Quick Guide x 1
●
If you use a PC running
Windows 98 Second Edition,
install a USB driver from this
supplied CD-ROM
(see page 8).
USB cable may differ from illustrations shown above.
Use the supplied earphones only.
Use the supplied USB cable only (1m).
USB Cable x 1
Contents
Page
■
General Information
Accessories . . . . . . . . . . . . . . . . . . . . . . . . . . . . . . . . . . . . . . . . . 2
Precautions . . . . . . . . . . . . . . . . . . . . . . . . . . . . . . . . . . . . . . . . . . 3
Controls and indicators . . . . . . . . . . . . . . . . . . . . . . . . . . . . . . . . 4
System requirements . . . . . . . . . . . . . . . . . . . . . . . . . . . . . . . . . . 5
■
Preparation for Use
Battery installation . . . . . . . . . . . . . . . . . . . . . . . . . . . . . . . . . . . . 5
SD/MMC card installation . . . . . . . . . . . . . . . . . . . . . . . . . . . . . . 6
Turning the unit on/off . . . . . . . . . . . . . . . . . . . . . . . . . . . . . . . . . 6
Hold function . . . . . . . . . . . . . . . . . . . . . . . . . . . . . . . . . . . . . . . . 7
Changing the display language . . . . . . . . . . . . . . . . . . . . . . . . . 7
Connecting the unit to a PC . . . . . . . . . . . . . . . . . . . . . . . . . . . . 8
■
Windows Media Player
Ripping tracks from audio CD to PC . . . . . . . . . . . . . . . . . 9 - 10
Transferring audio data from PC to the unit. . . . . . . . . . . 11 - 13
■
Playback
Disconnecting the unit . . . . . . . . . . . . . . . . . . . . . . . . . . . . . . . 13
Playing transferred audio data . . . . . . . . . . . . . . . . . . . . . . . . . 14
Advanced playback . . . . . . . . . . . . . . . . . . . . . . . . . . . . . . 14 - 15
Playing selected data . . . . . . . . . . . . . . . . . . . . . . . . . . . . . 15 - 16
■
FM Radio
FM transmitter function . . . . . . . . . . . . . . . . . . . . . . . . . . . . . . . 17
Listening to the FM radio . . . . . . . . . . . . . . . . . . . . . . . . . . . . . . 18
■
Recording
Recording with the built-in microphone . . . . . . . . . . . . . . . . . 19
Recording from the FM radio . . . . . . . . . . . . . . . . . . . . . . . . . . 20
■
Advanced Features
Deleting selected data . . . . . . . . . . . . . . . . . . . . . . . . . . . . . . . . 20
Changing default settings . . . . . . . . . . . . . . . . . . . . . . . . . 21 - 23
Checking memory status . . . . . . . . . . . . . . . . . . . . . . . . . . . . . 23
■
References
Firmware update . . . . . . . . . . . . . . . . . . . . . . . . . . . . . . . . . . . . 24
Troubleshooting . . . . . . . . . . . . . . . . . . . . . . . . . . . . . . . . . 24 - 25
Error messages . . . . . . . . . . . . . . . . . . . . . . . . . . . . . . . . . . . . . 25
Maintenance . . . . . . . . . . . . . . . . . . . . . . . . . . . . . . . . . . . . . . . . 25
Specifications . . . . . . . . . . . . . . . . . . . . . . . . . . . . . . . . . . . . . . . 26
Page 5

Precautions
■
Important
●
Do not wear your earphones when you are
crossing streets or near traffic.
●
Do not use earphones whilst driving a vehicle
since it may be illegal or create a traffic hazard.
Always follow safety regulations in your area.
●
Do not play the unit at a high volume. Hearing
experts advise against extended listening at
high volume levels.
●
Excessive sound pressure from earphones and headphones can
cause hearing loss.
●
If you experience ringing in your ears, reduce the volume or
discontinue use.
●
No naked flame sources, such as lighted candles, should be
placed on the apparatus.
●
Attention should be drawn to the environmental aspects of battery
disposal.
●
The apparatus is designed for use in moderate climate.
●
This unit should only be used within the range of 5°C - 40°C
(41°F - 104°F).
To avoid accidental electric shock or other possible problems,
observe the precautions listed below.
●
Do not disassemble or modify the unit.
●
Do not drop or subject the unit to shock.
●
Do not use the unit near open flames.
●
Do not spill liquid on the unit.
●
SHARP is not responsible for damage due to improper use. Refer
all servicing to a SHARP authorised service centre.
Caution:
●
When recording important selections, make a preliminary test to
ensure that the desired material is properly recorded.
●
SHARP is not liable for damage or loss of your recording arising
from malfunction of this unit.
■
Storing the unit
Avoid using or leaving the unit in the following places.
●
Places exposed to direct sunlight for many hours (especially in
cars with the doors and windows closed) or near heaters. (The
cabinet may deform, change colour or the unit may malfunction.)
●
Places exposed to excessive dust.
●
Places exposed to water.
●
Places where temperatures are excessively high or low.
●
Places (bathrooms) where the humidity is extremely high.
●
Places with strong magnetic fields such as TVs or loudspeakers.
●
Places exposed to vibration.
●
Places where sand can easily enter the inside of the unit (beaches
etc.).
●
If the unit is used near radio tuners or TVs, noise and/or picture
interference may result. If you experience these problems, move
the unit away from such devices.
It is not recommended to put this unit into a rear
pocket, as this may damage the product when
sitting.
Using this unit near mobile phones may cause
noise pickup. If it occurs, move it away from
them.
■
Copyright
Copyright laws protect sounds, images, computer programmes,
databases, other materials and copyright holders.
Duplicated material is limited to private use only. Use of materials
beyond this limit or without permission of copyright holders may
constitute copyright infringement, and be subject to criminal
punishment.
WA-TR30(BK)/(W)
WA-TR300(BK)/(W)
ENGLISH
General Information
E-3
Page 6
WA-TR30(BK)/(W)
WA-TR300(BK)/(W)
ENGLISH
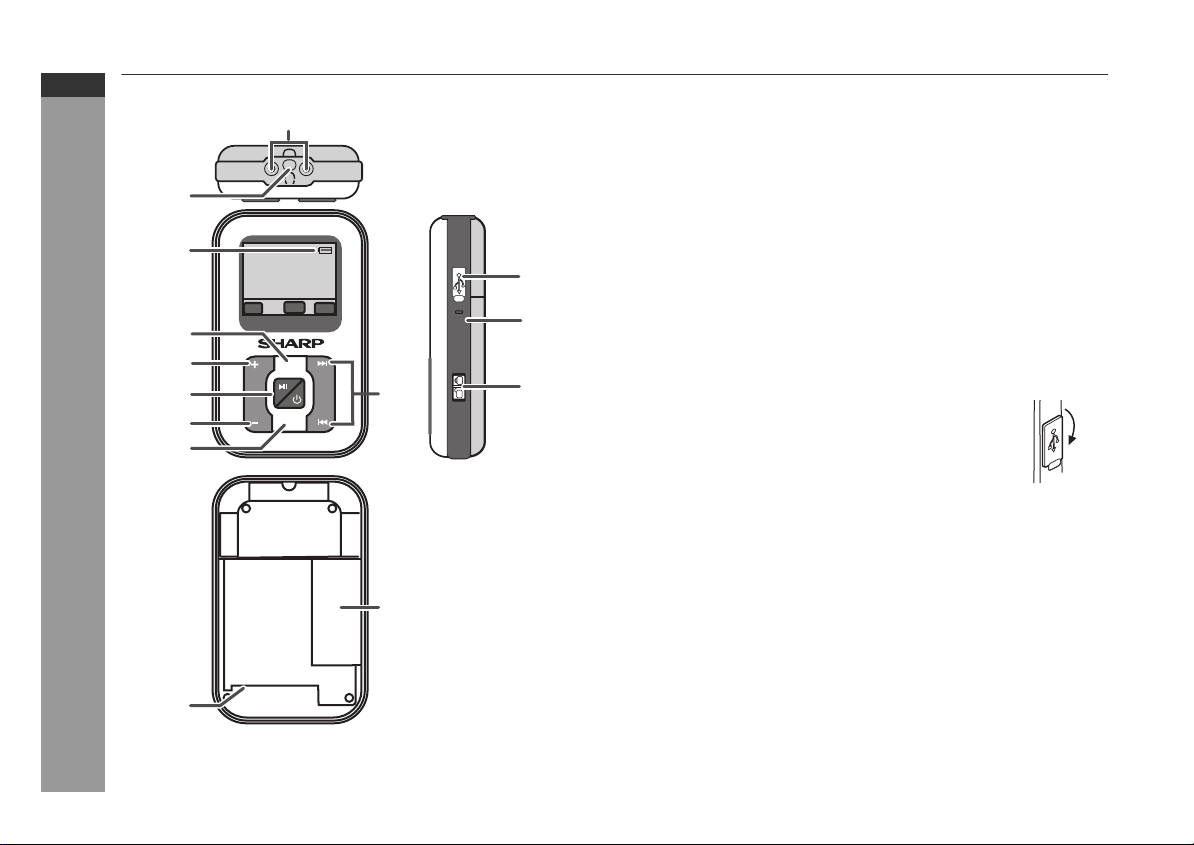
Controls and indicators
General Information
1
2
3
12
kbps
mp3 kHz
4
5
6
7
DIGITAL AUDIO PLAYER
M
10
EQ
MIC
13
14
1. Earphones Sockets . . . . . . . . . . . . . . . . . . . . . . 13, 17, 18, 20
2. Neck Strap Hole . . . . . . . . . . . . . . . . . . . . . . . . . . . . . . . . . . . 4
3. Battery Indicator . . . . . . . . . . . . . . . . . . . . . . . . . . . . . . . . . . . 6
4. Menu Button . . . . . . . . . . . . . . . . . . . . . . . . . . . . . . . 7, 14 - 23
5. Volume up/Back to Previous level/Screen . . . . . . . . . . . 6, 15
6. Power On/Off/Play/Pause Button . . . . . . . . . . . . . 6, 7, 13 - 21
7. Volume down Button. . . . . . . . . . . . . . . . . . . . . . . . . . . . . . . . 6
8. Equaliser Button . . . . . . . . . . . . . . . . . . . . . . . . . . . . . . . 16, 20
9. SD/MMC Card Terminal . . . . . . . . . . . . . . . . . . . . . . . . . . . 5, 6
10. Track Skip/Tuning Button . . . . . . . . . . . . . . . . . . . . 7, 13 - 23
11. Battery Compartment . . . . . . . . . . . . . . . . . . . . . . . . . . . . . . . 5
12. USB Port . . . . . . . . . . . . . . . . . . . . . . . . . . . . . . . . . . . . . . . . . 8
13. Microphone . . . . . . . . . . . . . . . . . . . . . . . . . . . . . . . . . . . . . . 19
14. Hold Switch . . . . . . . . . . . . . . . . . . . . . . . . . . . . . . . . . . . . . . . 7
Note:
To protect the USB port, cover it with the USB
cap when not in use.
Reference page
8
11
E-4
9
Page 7
System requirements
The following hardware and software are required to transfer audio
data from a PC to the unit.
Hardware and software requirements *1
Computer
OS
Software
Drive
Interface
*1 Operation is not guaranteed on all the compatible computers.
*2 Operation is not guaranteed on computers running upgraded OS
or multiple OS with dual-boot.
IBM PC/AT-compatible
®
Microsoft
Millennium Edition/2000 Professional/XP
Professional/XP Home Edition standard
installation *2, Mac OSX 10.2.6 above
Windows Media® Player 9 Series or 10
CD-ROM drive
Available USB port (USB 2.0/1.1)
Windows® 98 Second Edition/
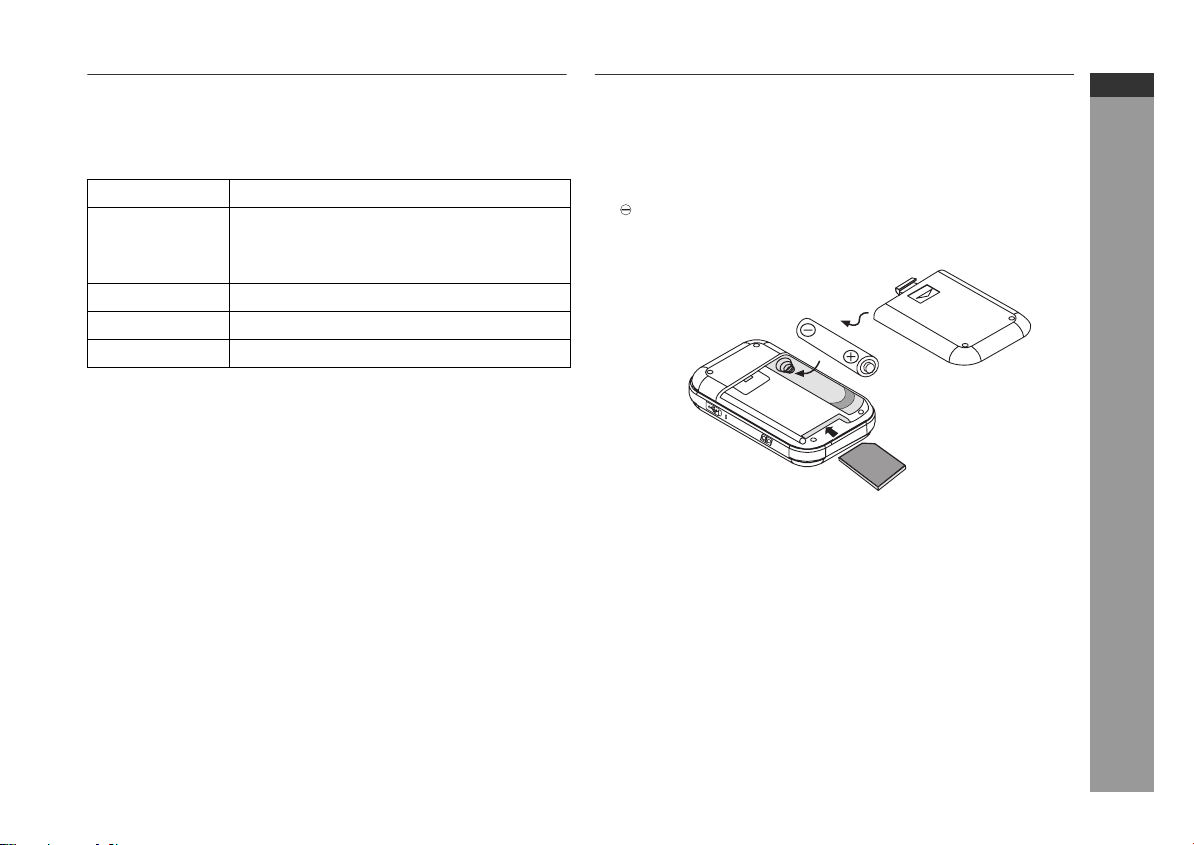
Battery installation
■
Storing the unit
1 Open the battery cover.
2 Insert the “AAA” battery according to the direction indicated
in the battery compartment.
When inserting or removing the battery, push them towards the
battery terminal.
3 Close the battery cover.
Battery Cover
Battery AAA
MIC
Notes:
●
Be sure to turn off the MP3 player before inserting or removing the
SD/MMC card.
If the set is on, removing or inserting the SD/MMC card can cause
some data to be lost or the set to freeze or become inoperative. If
this should be happen, please take out the battery for a whilst,
insert it and restart the MP3 player.
●
Installing the battery incorrectly may cause the unit to malfunction.
●
Remove the battery if the unit will not be used for long periods of
time. This will prevent potential damage due to battery leakage.
●
Replace the battery when it become weak and/or recording or
playback is impaired.
●
Do not use rechargeable battery (nickel-cadmium battery, etc.).
●
Batteries (battery pack or batteries installed) shall not be exposed
to excessive heat such as sunshine, fire or the like.
●
Battery is not included.
OPEN
SD
SD/MMC Card
WA-TR30(BK)/(W)
WA-TR300(BK)/(W)
ENGLISH
Preparation for Use
E-5
Page 8
WA-TR30(BK)/(W)
!
16
MAX39MIN
..........
WA-TR300(BK)/(W)
ENGLISH
SD/MMC card installation
SD/MMC card installation
1. Open the battery cover.
2. Insert the SD or MMC card.
3. Close the battery cover.
Notes:
●
●
●
●
●
●
●
●
■
The battery level is shown by the battery indicator during operation.
SHARP will not be held liable for the loss of data whilst the SD/
MMC memory device is connected to the audio system.
Files compressed in MP3 and/or WMA format can be played
back when connected to the SD terminal.
This SD/MMC memory’s format support FAT 16 or FAT 32.
SHARP cannot guarantee that all SD/MMC memory devices will
work on this audio system.
The SD terminal in this unit is not intended for a PC connection
but is used for music streaming with a SD/MMC memory device.
The larger the capacity of the SD/MMC storage device, the longer
it will take for the data to be read.
SD/MMC card are not included.
SD/MMC card cannot be operate if battery power is low.
Checking the remaining amount of battery level
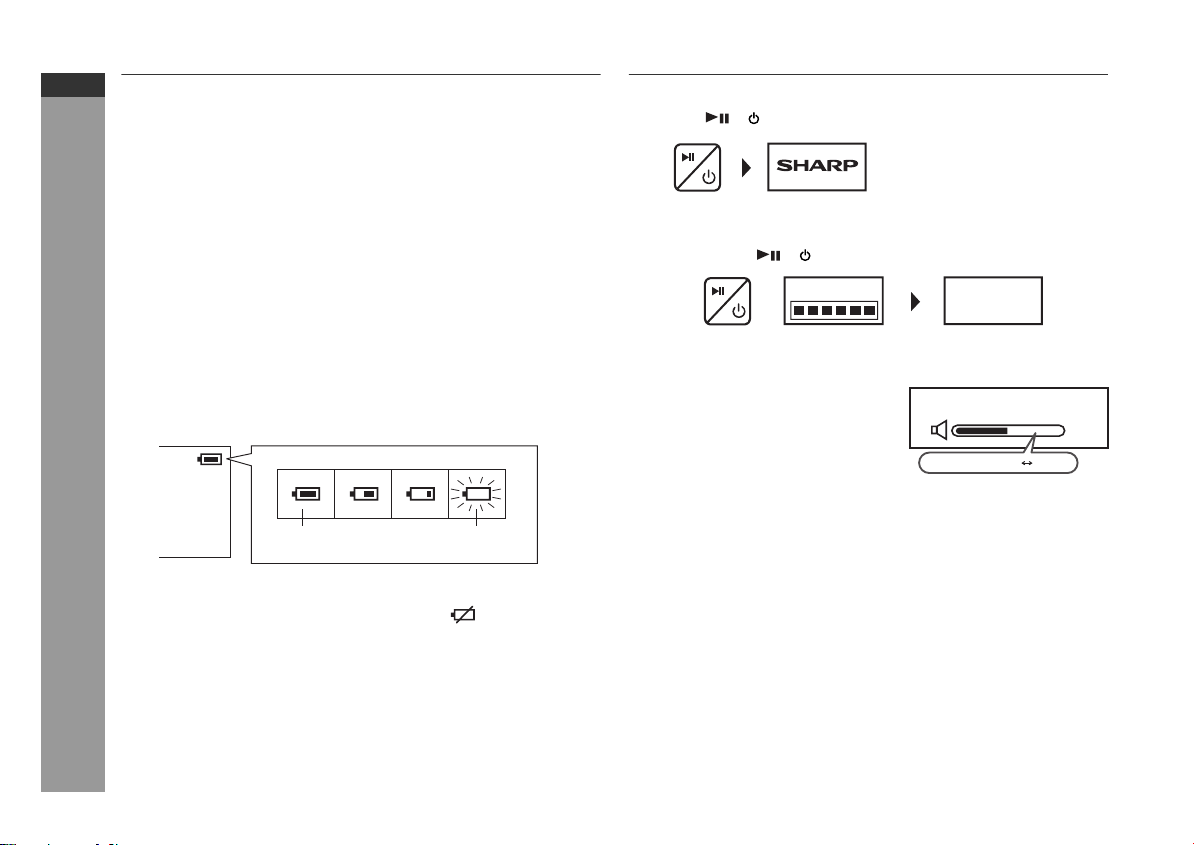
Turning the unit on/off
■
To turn on the unit
Press the / button.
■
To turn off the unit
In any mode
1. Hold down the / button for 3 seconds or more.
Continue Holding On
To Power Off
■
Volume control
Whilst play or stop mode, press
Volume (– or +) button to decrease or
increase the volume.
Good Bye
Preparation for Use
E-6
03
When the battery
level is high
●
When the battery level is very low, the battery indicator will flash.
Replace the alkaline battery with a new one.
●
When the battery has run out completely “ Shut down...” will
appear. Then, the power will be disconnected automatically.
Notes:
●
The battery indicator will not correctly display the remaining
capacity for approximately 10 seconds after the power has been
turned on.
●
The number of bars shown in the battery indicator may increase
or decrease, depending on the operation being performed. This
is normal.
●
The battery life and the operating time may be shortened by
usage conditions, long periods of disuse, etc.
Battery indicator
When the battery
level is very low
■
Volume auto set-in
●
If you turn off and on the main unit with volume set to 18 or higher,
the volume will start at 18.
●
If you turn the unit off then on again with the volume level set to
less than 17, it will turn on again at the level set.
■
Back to previous level/screen
Press Volume (+) button for return to previous level/screen.
Page 9
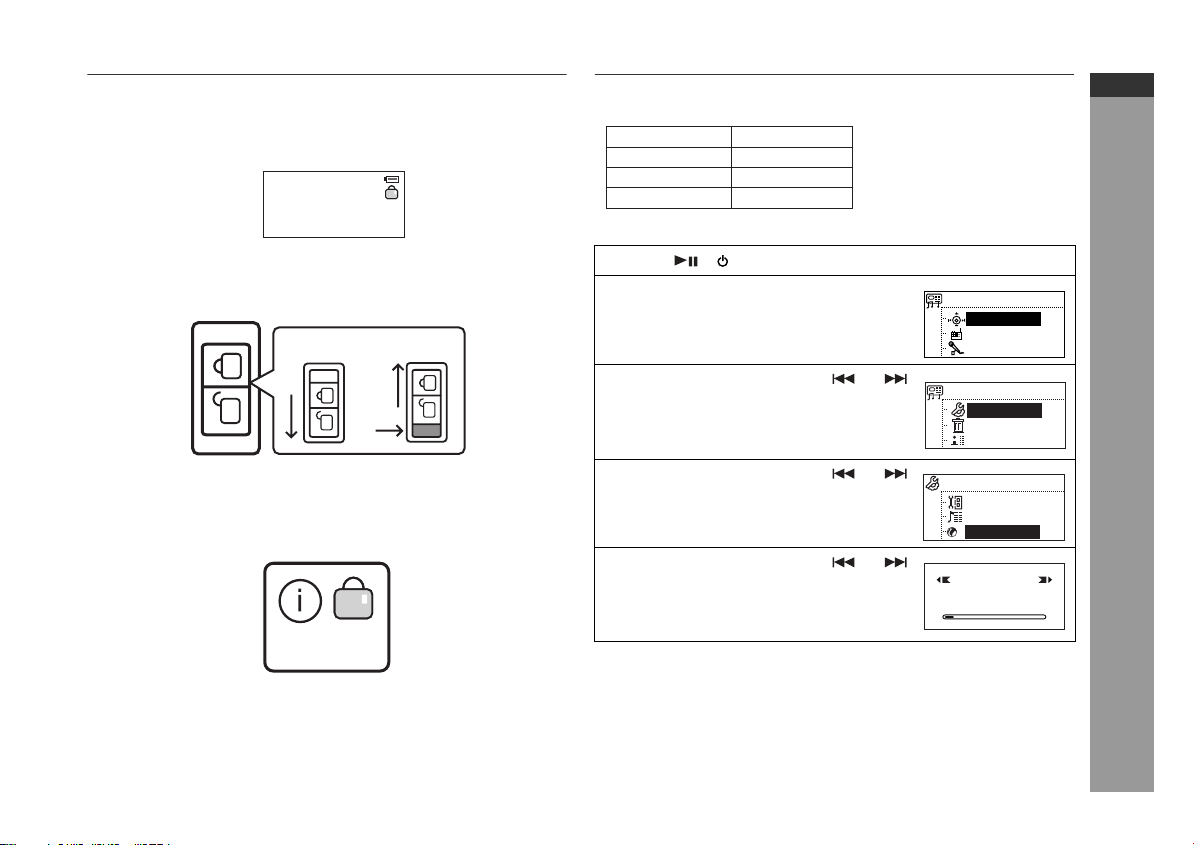
Hold function
When the hold function is turned on, all buttons on the unit will be
inactive. To make changes to the operation of the unit, switch the
HOLD off.
●
Whilst on mode, lock icon will appear if hold function is active.
Move the HOLD switch to the safety position (direction indicated by
the arrows).
Release
Red
mark
Note:
If the hold function is active when the unit is turned off, the unit cannot
be turned on by mistake and the battery will not be drained.
Hold
Changing the display language
You can see information in a selected language.
English (*)
Russian
German Chinese TRA
French
(*) indicates default setting
Press / button to turn the power on.
1
2
Hold down the Menu button for 1
second or more to enter the main
menu.
3
Within 20 seconds, press or
button to select “Settings” and press
Menu button.
4
Within 20 seconds, press or
button to select “Language” and
press Menu button.
5
Within 20 seconds, press or
button to select the desired language
and press Menu button.
Spanish
Italian
Portuguese
Main Menu
Navigator
FM Radio
Voice Record
Main Menu
Settings
Del Files
About
Settings
Rec Set
Lyric
A
B
Language
C
LANGUAGE
English
WA-TR30(BK)/(W)
WA-TR300(BK)/(W)
ENGLISH
Preparation for Use
Locked!
Note:
The display language setting is retained even after the unit is turned
off.
E-7
Page 10

WA-TR30(BK)/(W)
WA-TR300(BK)/(W)
ENGLISH
Connecting the unit to a PC
Preparation for Use
■
kbps
mp3 kHz
DIGITAL AUDIO PLAYER
M
EQ
PC
USB connection cable
To the USB port
MIC
Connect the unit to a PC to transfer audio data
Open the USB port cover, connect
the unit to a PC with a USB
connection cable.
Whilst the unit is connected to the PC,
the screen below appears.
Ver 875.833.XXX
FS
READY
Caution:
●
Do not disconnect the USB cable whilst transferring audio data
from a PC. Audio data on the unit may become corrupted.
●
Operation is not guaranteed if the PC is connected to two or more
USB devices.
●
Connect the USB cable to the PC’s USB port. If connected via a
USB hub, operation cannot be guaranteed.
●
We do not guarantee operation of the unit with self-built PCs or
PCs with modified motherboards.
●
Make sure to use the supplied USB cable. Use of other cables
(two-way cables, extension cables, etc.) degrades the quality of
connection and may cause a malfunction/radiation.
Note:
The operation buttons on the main unit do not work if it is connected
to a PC. Disconnect from the PC to operate on the unit.
■
Installing a USB driver
If you use a PC running Windows 98 Second Edition, install a USB
driver from the supplied CD-ROM.
●
The installation is not necessary for a PC running Windows
Millennium Edition, Windows 2000 Professional, Windows XP
Professional or Windows XP Home Edition.
Insert the supplied CD-ROM into your CD-ROM drive.
1
Connect the unit to a PC by USB cable.
2
The “The wizard searches for new drivers..” screen appears.
Click the “Next” button.
3
The “What you want Windows to do?” screen appears.
4 Select “Search for the best driver...” and click “Next”
button.
The “Windows will search for new drivers...” screen appears.
5 Select “CD-ROM drive” and click “Next” button.
The “Windows driver file search for the device” screen appears.
6 Click the “Next” button.
The “USB Mass Storage Device...” screen appears.
7 Click the “Finish” button.
E-8
Page 11

Ripping tracks from audio CD to PC
Using Windows Media Player, rip tracks from your favourite audio
CDs to a PC. Ripped tracks are stored on PC as audio data. You can
enjoy music on the unit by transferring audio data from the PC.
Windows Media Player 9
7
6
5
■ For Windows Media Player 9 Series
Notes:
● For details on Windows Media Player, refer to its Users Guide.
● If the PC is connected to the internet, information (artist or album
1 Launch Windows Media Player.
Example:
Start → All Programs → Windows Media Player
2 On the “Tools” menu, click “Options...” and then “Copy
Music” and select “Copy protect music”.
3 Click “OK”.
4 Insert an audio CD into the PC.
The audio CD may play automatically depending on settings on
the PC. In this case, stop playback.
5 Click “Copy from CD” on the taskbar to show tracks on the
audio CD.
6 Select the check boxes of tracks to rip.
7 Click “Copy Music” to start ripping.
name, title, genre, etc.) appears. Information may not be available
depending on the audio CD.
WA-TR30(BK)/(W)
WA-TR300(BK)/(W)
ENGLISH
Windows Media Player
2
E-9
Page 12

WA-TR30(BK)/(W)
555
5
5
WA-TR300(BK)/(W)
ENGLISH
Ripping tracks from audio CD to PC (continued)
Windows Media Player
■ For Windows Media Player 10
Windows Media Player 10
7
1 Launch Windows Media Player.
Example:
Start → All Programs → Windows Media Player
2 On the “Tools” menu, click “Options...” and then “Rip
Music” and select “Copy protect music”.
3 Click “OK”.
4 Insert an audio CD into the PC.
The audio CD may play automatically depending on settings on
the PC. In this case, stop playback.
5 Click “Rip” on the taskbar to show tracks on the audio CD.
6 Select the check boxes of tracks to rip.
7 Click “Rip Music” to start ripping.
Notes:
● For details on Windows Media Player, refer to its Users Guide.
● If the PC is connected to the internet, information (artist or album
name, title, genre, etc.) appears. Information may not be available
depending on the audio CD.
2
E-10
Page 13

Transferring audio data from PC to the unit
You can transfer audio data (MP3, WMA or WAV format) to the unit
or SD/MMC card.
1. Connect the unit to PC.
2. Open “My Computer” and copy or move the selected audio data to
the unit (TR30_300) or SD/MMC card (indicated as “Removable
Disc”).
■ Folders
When using Windows Media Player 9 series, select the
“MUSIC” folder to transfer the audio data.
Note:
You need to create Music Folder. Create them in the level indicated
in “About folder tree”.
When using Windows Media Player 10, subfolders with an
artist or album name are automatically created in the “MUSIC”
folder.
Note:
To create subfolders with an artist or album name automatically,
click ( ) to display properties and select “Create folder hierarchy
on device”.
Click this to display properties
WA-TR30(BK)/(W)
WA-TR300(BK)/(W)
ENGLISH
Notes:
● This unit can be used as a USB storage device.
● “FAV.TXT” is system created file in the unit.
■ About folder tree
Flash
VOICE
FM
MUSIC
Windows Media Player
Data recorded with microphone.
Recorded FM Radio programmes.
Music data copy from PC.
E-11
Page 14

WA-TR30(BK)/(W)
WA-TR300(BK)/(W)
ENGLISH
Transferring audio data from PC to the unit (continued)
You can enjoy music on the unit by transferring ripped audio files (protected) or licensed WMA files (DRM) from PC to the unit.
■ For Windows Media Player 9 Series ■ For Windows Media Player 10
Windows Media Player
68
4
5
3
1 Connect the unit to a PC (see page 8).
2 Launch Windows Media Player.
Example:
Start → All Programs → Windows Media Player
3 Click “Copy to CD or Device” on the taskbar.
4 From the drop-down list of “Items to Copy”, window shown
on the left, select a list with desired audio data.
5 Select the check boxes of audio data to transfer.
6 Set the unit as a destination.
7 Select the folder.
For folder, refer to page 15.
8 Click the “Copy” button to start transfer.
1 Connect the unit to a PC (see page 8).
2 Launch Windows Media Player.
Example:
Start → All Programs → Windows Media Player
3 Click “Sync” on the taskbar.
4 From the drop-down list of “Sync List”, window shown on
the left, select a list with desired audio data.
5 Select the check boxes of audio data to transfer.
6 Set the unit as a destination.
7 Click the “Start Sync” button to start transfer.
Caution:
● On Windows Media Player 10 to create subfolders with an artist or
album name automatically, click to display properties and
select “Create folder hierarchy on device”.
● Audio data on the unit is replaced by newly transferred audio data
if their file names are the same.
● Refer to “Connecting the unit to the PC” or “Disconnecting the unit”
when you connect/disconnect the unit to/from a PC.
● Do not disconnect the unit from the PC during transfer.
E-12
Page 15

Notes:
● Windows Media Player 9 & 10 installer are include in the supplied
CD-ROM.
● For details on Windows Media Player, refer to its User Guide.
● The drive letter for the unit may change depending on the
environment of the connected PC.
MP3 (MPEG-1 Audio Layer 3):
MPEG is an international standard developed by Moving Picture
Experts Group, a working group of ISO.
WMA (Windows Media Audio):
WMA is an audio compression format developed by Microsoft
Corporation.
About DRM (Digital Rights Management):
● This product supports Windows Media Digital Rights
Management 9 Series. Using Windows Media Player 9 Series or
10, you can transfer licensed WMA files to the unit for playback.
● Some WMA files may not be playable/transferable onto this
products due to their license agreements with copyright holders.
● Some audio data may not be playable on this products.
● When the SD/MMC card is installed the unit will not play DRM 10
protected music as mandated by Microsoft but DRM 9 or non DRM
protected music will play normally.
File format of transferred audio data:
● Depending on the setting of Windows Media Player, audio data
may be converted automatically for playback on portable devices.
● On Windows Media Player 10, you can change this setting and
transfer audio data without conversion. To do so, click and
select “Quality” to uncheck “Convert files as required by the device
(recommended)”.
● For details on Windows Media Player, refer to its User Guide.
Disconnecting the unit
For details, refer to the operation manual for the PC.
■ Windows 98 Second Edition
1. Click “Safely remove hardware” on the taskbar.
2. Click “Safely remove USB Mass Storage Device-Drives(*:)”.
3. “Safely remove hardware” appears. Click the “OK” button and
disconnect the USB cable from the PC.
■ Windows Millennium Edition
1. Click “Unplug or Eject Hardware” on the taskbar.
2. Click “Stop USB Disc-Drive(*:)”.
3. “Safe To Remove Hardware” appears. Click the “OK” button and
disconnect the USB cable from the PC.
■ Windows 2000 Professional
1. Click “Unplug or Eject Hardware” on the taskbar.
2. Click “Stop USB Disc-Drive(*:)”.
3. “Safe To Remove Hardware” appears. Click the “OK” button and
disconnect the USB cable from the PC.
■ Windows XP Home Edition/Professional
1. Click “Safely remove hardware” on the taskbar.
2. Click “Safely remove USB Mass Storage Device-Drives(*:)”.
3. “Safe To Remove Hardware” appears. Click the message and
disconnect the USB cable from the PC.
(*:) Drive letter of this unit.
Notes:
● After the above operation, the USB connection display still
remains on the unit (the display changes when you disconnect the
USB cable).
● If you cannot cancel the USB connection, try again or restart the
PC.
● For Windows 98 Second Edition
If the “Safely remove hardware” not appear on the taskbar, open
the “Windows 98SE Driver” folder and click “w98eject” in the
supplied CD-ROM.
WA-TR30(BK)/(W)
WA-TR300(BK)/(W)
ENGLISH
Playback
E-13
Page 16

WA-TR30(BK)/(W)
(Normal) (Repeat 1) (Repeat All) (Shuffle) (Preview)
1AS
WA-TR300(BK)/(W)
ENGLISH
Playing transferred audio data
Left
channel
L
Right
channel
R
Connect to either one of the
headphone sockets
kbps
mp3 kHz
DIGITAL AUDIO PLAYER
■ To locate the beginning of audio data
To move to the beginning of the next audio data:
Press the button.
To replay the current audio data:
Press the button.
Note:
To skip some data at one time, press the or button as many
times as required until the desired audio data appears.
■ To locate the desired portion
For fast forward:
Hold down the button.
For fast reverse:
Hold down the button.
Note:
Normal playback will resume when the or button is released.
■ Playback
1 Press / button to turn the power on.
Playback
2 Use the or button to select
an audio data and press /
button. Playback starts.
To interrupt playback:
Press the / button.
To resume playback, press the / button again.
To stop playback:
Hold down / button for 1 second.
Resume play:
When you turn off the unit and turn it back on, playback starts from
the beginning of the audio data which was stopped.
E-14
M
(Playback Window)
0 : 00 : 00
001
NOR
0 : 04 : 25
007
Track 01
Anna
128
mp3
kbps44kHz
Advanced playback
■ Repeat play or shuffle play or preview
Whilst in stop mode, press the Menu button repeatly until the desired
play mode appears.
or
1 Press / button to turn the power on.
2 Hold down the Menu button for 1
second or more.
3 Within 20 seconds, press or
button to select “Settings” and press
Menu button.
Main Menu
Navigator
FM Radio
Voice Record
Main Menu
Settings
Del Files
About
Page 17

4 Within 20 seconds, press or
button to select “Playmode” and
press Menu button.
5 Within 20 seconds, press or
button to select a play mode setting,
press Menu button.
(*)Normal
Repeat 1
Repeat All
Shuffle
Preview
● The setting is completed.
● The playback screen returns after 20 seconds.
(*) indicates default setting
Note:
The unit plays each data for 10 seconds when play with preview
mode.
■ Repeat A-B
You can play the desired portion repeatedly by specifying it during
playback.
:
Normal playback
:
Repeat one data
:
Repeat all data
:
Play all data at random
:
Play all data for a 10 seconds
Settings
Playmode
Eq
Contrast
PLAY MODE
Repeat All
Playing selected data
You can select and play the audio data transferred from PC or data
recorded with the unit.
1 Hold down Menu button for 1 second or more.
2 Within 20 seconds, press Menu button
to select “Navigator”.
3 Within 20 seconds, press or
button to select “Flash” or “Card”,
then press Menu button.
4 Within 20 seconds, select the data and
press / button, playback will
start.
or : Browser for folder or data.
Menu : Select a folder or data.
Volume (+) : Return to the previous level/screen.
■ About folder tree
Flash
VOICE
Data recorded with microphone.
Main Menu
Navigator
FM Radio
Voice Record
001/002
Flash:/
Card:/
001/004
FM:/
VOICE:/
File name 1
WA-TR30(BK)/(W)
WA-TR300(BK)/(W)
ENGLISH
Playback
1 Whilst playback, press Menu button. This registers the
start point (A).
2 Press the Menu button again to enter the end point (B).
This starts A-B repeat from the start point (A) to the end point
(B).
3 Press the Menu button again to return to the previous
playback mode.
Caution:
After perform repeat or preview play, be sure to press / button
to stop or pause the playback. Otherwise, it will playback
continuously.
FM
MUSIC
This product supports:
● Up to 140 folders (including the “VOICE” and “FM” folders).
● Up to 200 files (each folders).
● Up to 30 characters as a folder name.
● Up to 30 characters as a file name.
Recorded FM Radio programmes.
Music data copy from PC.
E-15
Page 18

WA-TR30(BK)/(W)
WA-TR300(BK)/(W)
ENGLISH
Playing selected data (continued)
■ Equaliser setting
Whilst stop or play mode, press the EQ button repeatly until the
desired sound mode appears.
Alternative method to change sound mode.
Playback
Note:
Distortion may occur depending on the equaliser setting.
In this case, change the type or turn down the volume.
E-16
(*) indicates default setting
NOR ROCK POP JAZZ
(Normal)
CUST
(Custom)
1 Press / button to turn the power on.
2 Hold down the Menu button for 1
second or more.
3 Within 20 seconds, press or
button to select “Settings” and press
Menu button.
4 Within 20 seconds, press or
button to select “Eq” and press Menu
button.
Main Menu
Navigator
FM Radio
Voice Record
Main Menu
Settings
Del Files
About
Settings
Playmode
Eq
Contrast
5 Within 20 seconds, press or
button to select an equaliser setting,
press Menu button.
(*)Normal : The sound is not modified
Rock : For rock music
Pop : For pop music
Jazz : For jazz
Custom : Sound quality can be customise (see page 16)
● The setting is completed.
● The playback screen returns after 20 seconds.
Rock
■ Customising sound quality
1 Perform step 1 - 4 on page 16.
2 Within 20 seconds, press or
button to select “Custom” and press
Menu button.
EQ
Custom
3 Within 20 seconds, press or button to select the
frequency and press button.
80Hz: Bass setting
250Hz:
Custom
1000Hz: Midrange setting
4000Hz:
12000Hz: Treble setting
4 Within 20 seconds, press Volume
(– or +) button to increase or
dB 0.0
Custom
1000Hz
decrease the gain level.
dB -6.5
1000Hz
5 Repeat steps 3 and 4 to adjust each frequency.
EQ
6 Within 20 seconds, press Menu button.
● The setting is completed.
● The playback screen returns after 20 seconds.
Note:
The “Custom” settings will remain in the memory even after you
switch to another equaliser mode.
Page 19

FM transmitter function
This unit can be use as
a FM transmitter
You can enjoys music
sound at FM receiver
by playback at the unit.
1 Press / button to turn the power on.
2 Hold down the Menu button for 1
second or more.
3 Within 20 seconds, press or
button to select “Settings” and press
Menu button.
4 Within 20 seconds, press or
button to select “Transmitter
Frequency” and press Menu button
to enter transmitter frequency setup.
5 Within 20 seconds, press or to
select the desired transmission
frequency then press Menu button.
kbps
mp3 kHz
DIGITAL AUDIO PLAYER
M
EQ
FM
FM receiver
Main Menu
Navigator
FM Radio
Voice Record
Main Menu
Settings
Del Files
About
Settings
Backlight
Transmitter Freq
Power
FM TRANSMITTER
OFF
6 Transmission icon and select
frequency (*) will appear on screen
(playback window) when transmitter
function is setting on.
● Tune the FM receiver frequency same as transmitter setting.
● The unit playback music can be listening at FM receiver unit.
About playing audio data, see page 14.
Notes:
● After unit is power off, the transmitter function will be off when the
unit is on back.
● The FM transmitter and FM receiver must be tune into the same
frequency.
● Adjust the channel if there is a signal interference.
Select any un-interfered channel from 88.1 to 89.3 MHz.
● Transmitter function will automatically off within 1 minute after in
the stop or interrupt mode of audio data.
● Keep the distance of the unit much close as possible to FM
receiver aerial for more sensitivity receiving.
● Select the frequency of FM transmitter which not near to FM
broadcasting station for reducing noise or signal interference.
● The transmitter function will regulate the volume and transmit to
FM receiver by this unit. If a big sound occur at FM receiver even
not adjust to maximum volume level, manually decrease the
volume level at this unit (FM transmitter).
● Earphones are not required to plug into the unit for FM
transmission. The FM transmitter aerial is built inside the unit.
WA-TR30(BK)/(W)
WA-TR300(BK)/(W)
ENGLISH
FM Radio
OFF 88.3Mhz 88.5Mhz88.1Mhz
89.3Mhz 89.1Mhz 88.9Mhz
88.7Mhz
E-17
Page 20

WA-TR30(BK)/(W)
WA-TR300(BK)/(W)
ENGLISH
Listening to the FM radio
■ Tuning
FM aerial:
The earphones lead works as an FM aerial. Keep
it as straight as possible.
■ Manual Tuning and memorising a station
FM Radio
kbps
mp3 kHz
DIGITAL AUDIO PLAYER
M
1 Press the / button to turn the power on.
2 Hold down the Menu button for 1 second or more. Press
button to select “FM Radio”, then press the Menu button.
Main Menu
Navigator
FM Radio
Voice Record
81
CH 02
FM Radio
89.8
91
108
Mono
1 Press / button to enter search mode.
FM Radio
89.8
81 91 108
02
CH
Mono
Search
89.8
81 91 108
Mono
2 Press or button as many times as required to tune
into the desired station. Press and hold down the Menu
button for more than 1 second to enter the preset tuning
saving mode.
Search
89.8
81 91 108
STEREO
Store
89.8
81 91 108
02
CH
STEREO
3 Press or button to select the preset channel
number. Press the Menu button to store that station in
memory.
Store
89.8
81 91 108
02
CH
Mono
Store
89.8
81 91 108
02
CH
Mono
■ Storing station automatically (auto scan)
With this function, the auto tuning memorises the received stations
automatically. The unit will stop after scanning the full range of
frequencies and storing stations.
1 Press / button to enter search mode. Hold down the
/ button for 1 second or more, auto scan will be
started.
Search
87.5
87 97 108
CH
Mono
● Scanning will start automatically and the tuner will stop at the
first receivable broadcast station.
● The unit receives and stores stations with strong signals.
● Press or button to select the desired preset station.
To exit Tuner mode:
Press Menu button.
Searching
100.0
87 97 108
CH 30
STEREO
FM Radio
88.2
87 97 108
CH 01
STEREO
E-18
Page 21

Recording with the built-in microphone
Check the memory status beforehand. If the memory is low, move
some data to a PC to make some room.
Note:
This microphone is monaural and omnidirectional. However, it is recommended to direct
it towards the source for better recording.
IC
1 Press / button to turn the power on.
2 Hold down the Menu button for 1 second or more.
3 Within 20 seconds, press or button to select “Voice
Record”, then press Menu button. Recording will be
started.
Main Menu
Navigator
FM Radio
Voice Record
To interrupt recording:
Press / button.
To resume recording, press the / button again.
To save recording:
Press the Menu button. Data will be saved.
NOR
/VOICE/V001. WAV
00 : 05 : 24 005 : 52 : 55
Note:
Data recorded with the built-in microphone are named automatically,
ie V001.WAV, V002.WAV... etc.
Newly saved files are numbered sequentially following the largest
number among the existing file names. It is recommended to delete
or move some files to PC.
For long recording time, “Saving....” indicator will appear after a few
seconds (Data saved).
■ Changing sound quality for microphone recording
1 Hold down the Menu button to enter main menu screen.
Within 20 seconds, press the or button to select
“Settings”, then press Menu button.
2 Within 20 seconds, press the or button to select
“Rec Set”, then press Menu button. Press the or
button to select at “Rate”, then press Menu button repeatly
to change the recording quality.
Settings
3 To exit record setting screen, press the or button to
select “Exit”, then press Menu button.
Rec Set
Lyric
A
B
Language
C
Main Menu
Settings
Del Files
About
Source : Mic
Rate : Middle
Exit
Settings
Playmode
Eq
Contrast
Mode Sampling (kHz)
Normal
Middle
High
8
11
16
WA-TR30(BK)/(W)
WA-TR300(BK)/(W)
ENGLISH
Recording
E-19
Page 22

WA-TR30(BK)/(W)
WA-TR300(BK)/(W)
ENGLISH
Recording from the FM radio
Check the memory status beforehand. If the memory is low, move
some data to a PC to make some room.
The earphones lead works as an FM aerial. Keep
it as straight as possible.
1 Tune in to the desired station.
2 Hold down EQ button for 1 second or
more. Recording will be started.
kbps
mp3 kHz
DIGITAL AUDIO PLAYER
M
Deleting selected data
1 Hold down Menu button for 1 second or more.
2 Within 20 seconds, press or
button to select “Del Files”, then
press Menu button.
3 Press or button to select
“Flash” or “Card”, then press Menu
button.
Main Menu
001/002
Flash:/
Card:/
Settings
Del Files
About
E-20
To interrupt recording:
Press the / button.
To resume recording, press the / button again.
To save recording:
Press the Menu button or EQ button.
Data will be saved.
Note:
Data recorded from the FM radio are named automatically, ie
F001.WAV, F002.WAV... etc.
Recording
Newly saved files are numbered sequentially following the largest
number among the existing file names. It is recommended to delete
or move some files to PC.
For long recording time, “Saving...” indicator will appear after a few
seconds (Data saved).
4 Press or button to select
“Folder” or “File”, then press Menu
button.
5 Delete (X) marking will display for
selected file(s).
● To cancel delete (X) marking, press
Menu button.
003/020
VOICE:/
File name 1
File name 2
003/020
VOICE/
File name 1
File name 2
6 Press the / button, a warning
note will displayed. Press or
button to select “Yes” or “No”. Select
“Yes” if confirmed to delete file(s),
then press Menu button.
Delete the files?
Yes No
7 File(s) deleted.
Files Deleted!
Caution:
Deleted data cannot be restored.
Note:
At “Del Files” mode, display will not able to automatically return to
playback screen.
Page 23

Changing default settings
t
r
r
You can change the default setting.
1. Press the / button to turn the power on.
2. Hold down the Menu button for 1 second or more.
3. Within 20 seconds, press or button to select “Settings”,
then press Menu button.
Setting
Menu
Playmode Normal*
Eq Normal*
Contrast 0/10
Backlight Off
Transmitter
frequency
Power Disable
Selectable parameter
(* indicates default settings)
Repeat one
Repeat all
Shuffle
Preview
Rock
Pop
Jazz
Custom
I
5/10*
I
10/10
5 secs
10 secs
30 secs*
Always
Off*
88.1
88.3
88.5
88.7
88.9
89.1
89.3
1 Min
2 Mins
5 Mins*
10 Mins
Description
Adjust of playback mode.
Adjust of playback sound quality.
To adjust display contrast level.
Set backlight lighting time.
Set the FM transmitter
frequency.
Set auto-power off time.
The unit turns off automatically
after a time period in the stop
mode.
Note: The auto-power off does
not work when listening to FM
radio.
Rec Set Source : Mic
Lyrics Always*
Language English*
Factory
Setting
Exit Exit setting mode.
Rate : Normal
Middle*
High
Off
Russian
German
French
Spanish
Italian
Chinese TRA (Traditional)
Portuguese
No*
Yes
Set the microphone recording
sound quality.
Display of lyrics when lyrics is
available.
Set the display language for the
unit.
Reset the unit to default setting
(*).
■ About auto-power off
When the auto power off is set, the unit turns off automatically after
a time period in the stop or pause mode. (The auto-power off does
not work when listening to the FM Radio.)
1 Press / button to turn the power on.
2 Hold down the Menu button for 1
second or more.
3 Within 20 seconds, press or
button to select “Settings” and press
Menu button.
4 Within 20 seconds, press or
button to select “Power” and press
Menu button.
Continued to the next page
Main Menu
Navigator
FM Radio
Voice Record
Main Menu
Settings
Del Files
About
Settings
ackligh
Transmitte
Powe
WA-TR30(BK)/(W)
WA-TR300(BK)/(W)
ENGLISH
Advanced Features
E-21
Page 24

WA-TR30(BK)/(W)
mp3
L
WA-TR300(BK)/(W)
ENGLISH
Changing default settings (continued)
5 Within 20 seconds, press or
button to select a time period,
press Menu button.
PWR SAVE
2 Mins
3 Within 20 seconds, press or
button to off or on the lyric display
and press Menu button.
LRC
Always
Disable : Autopower off does not work.
1-2-5-10
Minutes
: In the stop mode, the unit turns off automatically
after a set time period.
● The setting is completed.
● The playback screen returns after 20 seconds.
■ Changing the display contrast
You can change the display contrast.
1 Perform steps 2 to 3 on page 21.
2 Within 20 seconds, press or
button to select “Contrast” and
press Menu button.
3 Within 20 seconds, press or
button to adjust contrast and press
Menu button.
Advanced Features
● The setting is completed.
● The playback screen returns after 20 seconds.
■ Changing the Lyric display
You can off or on the lyric display (Audio Data with LRC only).
1 Perform steps 2 to 3 on page 21.
2 Within 20 seconds, press or
button to select “Lyric” and press
Menu button.
Settings
Playmode
Eq
Contrast
contrast
- +
Settings
Rec Set
Lyric
A
B
Language
C
5/10
Off : Lyric not display (off)
Always : Lyric display (on)
● The setting is completed.
● The playback screen returns after 20 seconds.
Note:
The name of lyric songs should keep in pace with the name of the
song data.
If the present song has the corresponding lyric file, “L” indicator will
appear at screen.
■ Changing the backlight lighting time
You can change the lighting time of the display backlight.
1 Perform steps 2 to 3 on page 21.
2 Within 20 seconds, press or
button to select “Backlight” and press
Menu button.
Settings
Backlight
Power
Rec Set
3 Within 20 seconds, press or
button to adjust the lighting time and
press Menu button.
Off : Backlight remains off.
5-10-30 seconds
: Backlight illuminates for a set time period.
Always : Backlight remains on.
● The setting is completed.
● The playback screen returns after 20 seconds.
LIGHT TIME
30 Secs
E-22
Page 25

■ Reset the factory setting
You can reset all function to the factory setting (default).
1 Hold down the Menu button for 1 second or more.
2 Within 20 seconds, press or button to select
“Settings” and press Menu button.
Main Menu
Navigator
FM Radio
Voice Record
3 Within 20 seconds, press or
button to select “Factory Setting”
and press Menu button.
Main Menu
Settings
Del Files
About
Settings
D
Factory Setting
Exit
4 Within 20 seconds, press or
button to select “Yes” and press
Menu button.
● Select “No” to cancel.
● The playback screen returns after 20 seconds.
Caution:
This function reset the following setting:
Language, volume, equaliser, repeat play, lyric, FM station, FM auto
scan, FM area, FM transmitter, record settings, auto-power off,
contrast, backlight.
Reset Factory Setting?
YesNo
Checking memory status
You can check the memory status before starting long hours of
recording, etc.
1 Hold down the Menu button for 1 second or more.
2 Within 20 seconds, press or button to select
“About”, then press Menu button.
Main Menu
Navigator
FM Radio
Voice Record
3 Firmware version, memory capacity and free space will
display. Press or button to display internal flash
memory or SD/MMC.
875. 833. XXX
Int Total : XXX MB
Int Free : XXX MB
Internal Memory
Note:
The playback screen returns after 20 seconds.
Main Menu
Settings
Del Files
About
Ext Total : XXX MB
Ext Free : XXX MB
External SD/MMC card memory
WA-TR30(BK)/(W)
WA-TR300(BK)/(W)
ENGLISH
Advanced Features
E-23
Page 26

WA-TR30(BK)/(W)
WA-TR300(BK)/(W)
ENGLISH
Firmware update
■ Installing the update tool
If you use a PC running Windows Millennium Edition, Windows 2000
Professional, Windows XP Professional or Windows XP Home
Edition, install the upgrade tool as follows.
References
■ Updating the firmware
If you have update firmware from website, follow below procedure.
E-24
1 Insert the supplied CD-ROM into your CD-ROM drive.
2 Select and click “FIRMWARE RECOVERY” on the screen
(AutoRun) or
Open the “Firmware Recovery” folder on the CD-ROM and
double-click “setup.exe”.
3 Click the “Next” button.
The “License Agreement” screen appears.
4 Click the “accept” and “Next” button.
The “Choose Destination Location” screen appears.
5 Click the “Next” button.
The “Select Program Folder” screen appears.
6 Click the “Next” button.
The “Ready to Install the Program” screen appears.
7 Click the “Install” button.
When the installation is completed, the “Install Shield Wizard
Complete” screen appears.
8 Click the “Finish” button.
1 Decompress the downloaded file.
2 Replace the file in “C:\Program Files\SHARP\WA-TR30_
300” with the decompressed file.
3 Connect the unit to a PC with the USB cable.
4 Start the update tool.
From the “Start” menu, click “All Programs”, “WA-TR30_300
MP3 Audio player” and then “Firmware Download”.
5 Click the “Start” button.
● Check the box of “Format Data Area”. All the data will be
deleted. Move important data to a PC before updating the
firmware.
● Update starts.
Troubleshooting
Many potential “problems” can be resolved by the owner without
calling a service technician. If something seems to be wrong with this
product, check the following before calling your authorised SHARP
dealer or service centre.
The unit does not turn on.
● Is the battery exhausted?
● Is the unit in the hold mode?
● Has condensation formed inside the unit?
● Is the unit being influenced by mechanical shock or by static
electricity?
No sound is heard from the earphones.
● Is the volume set too low?
● Are the earphones correctly plugged in?
When the buttons are pressed, the unit does not respond.
● Is there playable audio data on the unit?
● Is the unit in the hold mode?
● Is the battery exhausted?
● Is the unit connected to a PC with the USB cable?
Sound skipping or loss.
● Is the battery exhausted?
The operation is unstable whilst the PC and the unit are
connected.
● Are you using the USB cable that was purchased separately?
● Is the unit correctly connected to the PC?
The USB connection display does not appear.
● Is the unit correctly connected to the PC?
The FM radio makes unusual noises continuously.
● Is a TV or computer near the unit?
The display is difficult to see.
● Is the display contrast too low or too high?
Page 27

The FM transmitter does not work.
● Is the FM transmitter is setting on?
● Is the volume set too low?
● Are the frequency of FM transmitter & receiver tunning in same?
FM transmission noises.
● Is the unit bring it close to metal or put on a metal desk?
● Is there a thing intercepting an electric wave generator and an
electric wave interfering with an FM electric wave?
● Are you using the frequency that is near to the FM broadcasting
station?
● Is the distance of the unit much close to the FM receiver?
● Is there an obstacle intercepting an FM electric wave?
● Is the battery exhausted?
The FM transmission sound distort.
● Is the volume set too high?
■ Resetting the unit
If the unit does not work properly, reset it as follows.
The unit may work properly.
1. Disconnect the USB cable.
2. Remove the battery.
3. Leave the unit completely unpowered for approximately
30 seconds.
4. Insert the battery.
5. Operate the unit.
Error messages
ERROR MESSAGE MEANING
Shut down... The battery has run out
Insufficient power to
operate External Devices
Locked The HOLD switch is turned ON
(Replace the battery)
The battery level is low
(cannot operate SD/MMC card)
(Turn off the HOLD switch)
Maintenance
■ Cleaning
When the unit becomes dirty
Clean it with a soft cloth. When the unit is excessively dirty, use a soft
cloth dampened in water (external surfaces only).
Clean the plugs and the connecting sockets.
If the plugs or sockets are dirty, noise may be heard.
Cleaning will prevent noise.
WA-TR30(BK)/(W)
WA-TR300(BK)/(W)
ENGLISH
References
If the unit still does not work properly, do as follows:
1. Disconnect the USB cable.
2. Remove the battery.
3. Connect the unit to a PC.
4. Proceed to the firmware update procedure (see page 24).
5. Insert the battery.
6. Operate the unit.
Caution:
● Do not use chemicals for cleaning (petrol, paint thinner, etc.). It
may damage the cabinet finish.
● Do not apply oil to the inside of the unit. It may cause malfunctions.
E-25
Page 28

WA-TR30(BK)/(W)
WA-TR300(BK)/(W)
ENGLISH
Specifications
As part of our policy of continuous improvement, SHARP reserves
the right to make design and specification changes for product
improvement without prior notice. The performance specification
figures indicated are nominal values of production units. There may
be some deviations from these values in individual units.
References
Power source DC 1.5 V: AAA size, alkaline battery (LR03
Dimensions Width: 80 mm (3-3/16")
Weight 36 g (1.28 oz.) without battery and
Sockets Earphones (impedance: 32 ohms)
Frequency response 20 - 20,000 Hz
Output power 5 mW + 5 mW (earphones: 32 ohms)
Battery life
(Alkaline Battery)
Frequency range FM: 87.5 - 108 MHz
Storage media 1 GB Flash Memory (WA-TR30)
FM transmission
Frequency range
or similar) x 1
DC 5 V: USB bus power
Height: 48 mm (1-7/8")
Depth: 18 mm (11/16")
SD/MMC card
USB port (Normal type)
(maximum output level)
Continuous playback: Approx 6 hours
2 GB Flash Memory (WA-TR300)
88.1 MHz - 89.3 MHz
(0.2 MHz range)
Digital Right
Management
Playback format MP3 (MPEG-1/2 Audio Layer 3),
Recording format Voice recording,
PC interface Compatible with USB 2.0 and USB
System
requirements
Notes:
● A combination of sampling frequency and bit rate differs
depending on audio format.
● Actual battery life will vary with use.
● The values are the standard values when the unit is used at an
ambient temperature of 25°C (77°F).
● Continuous playback:
At 128 kbps in MP3 format (earphone output: 0.1mW + 0.1mW,
backlight: not set to “Always”, equaliser: set to “Normal”).
Windows Media DRM 9
bit rate: 12 - 320 kbps
WMA (Windows Media Audio),
bit rate: 64 - 192 kbps
WAV (PCM)
PCM (sampling frequency: 8 - 16 kHz)
FM recording
PCM (sampling frequency: 44 kHz)
1.1
Pentium 2 - 300 MHz or higher
CD-ROM drive
150 MB free hard disc space
Microsoft Windows 98 Second
Edition/Millennium Edition/2000
Professional/XP Professional/XP
Home Edition standard installation/
Mac OSX 10.2.6 above.
E-26
Page 29

 Loading...