

Sharp VL-Z500H Quick Guide
CAMCORDER QUICK START GUIDE
Please consult the supplied operation manual for further details on these and other functions of your camcorder.
12
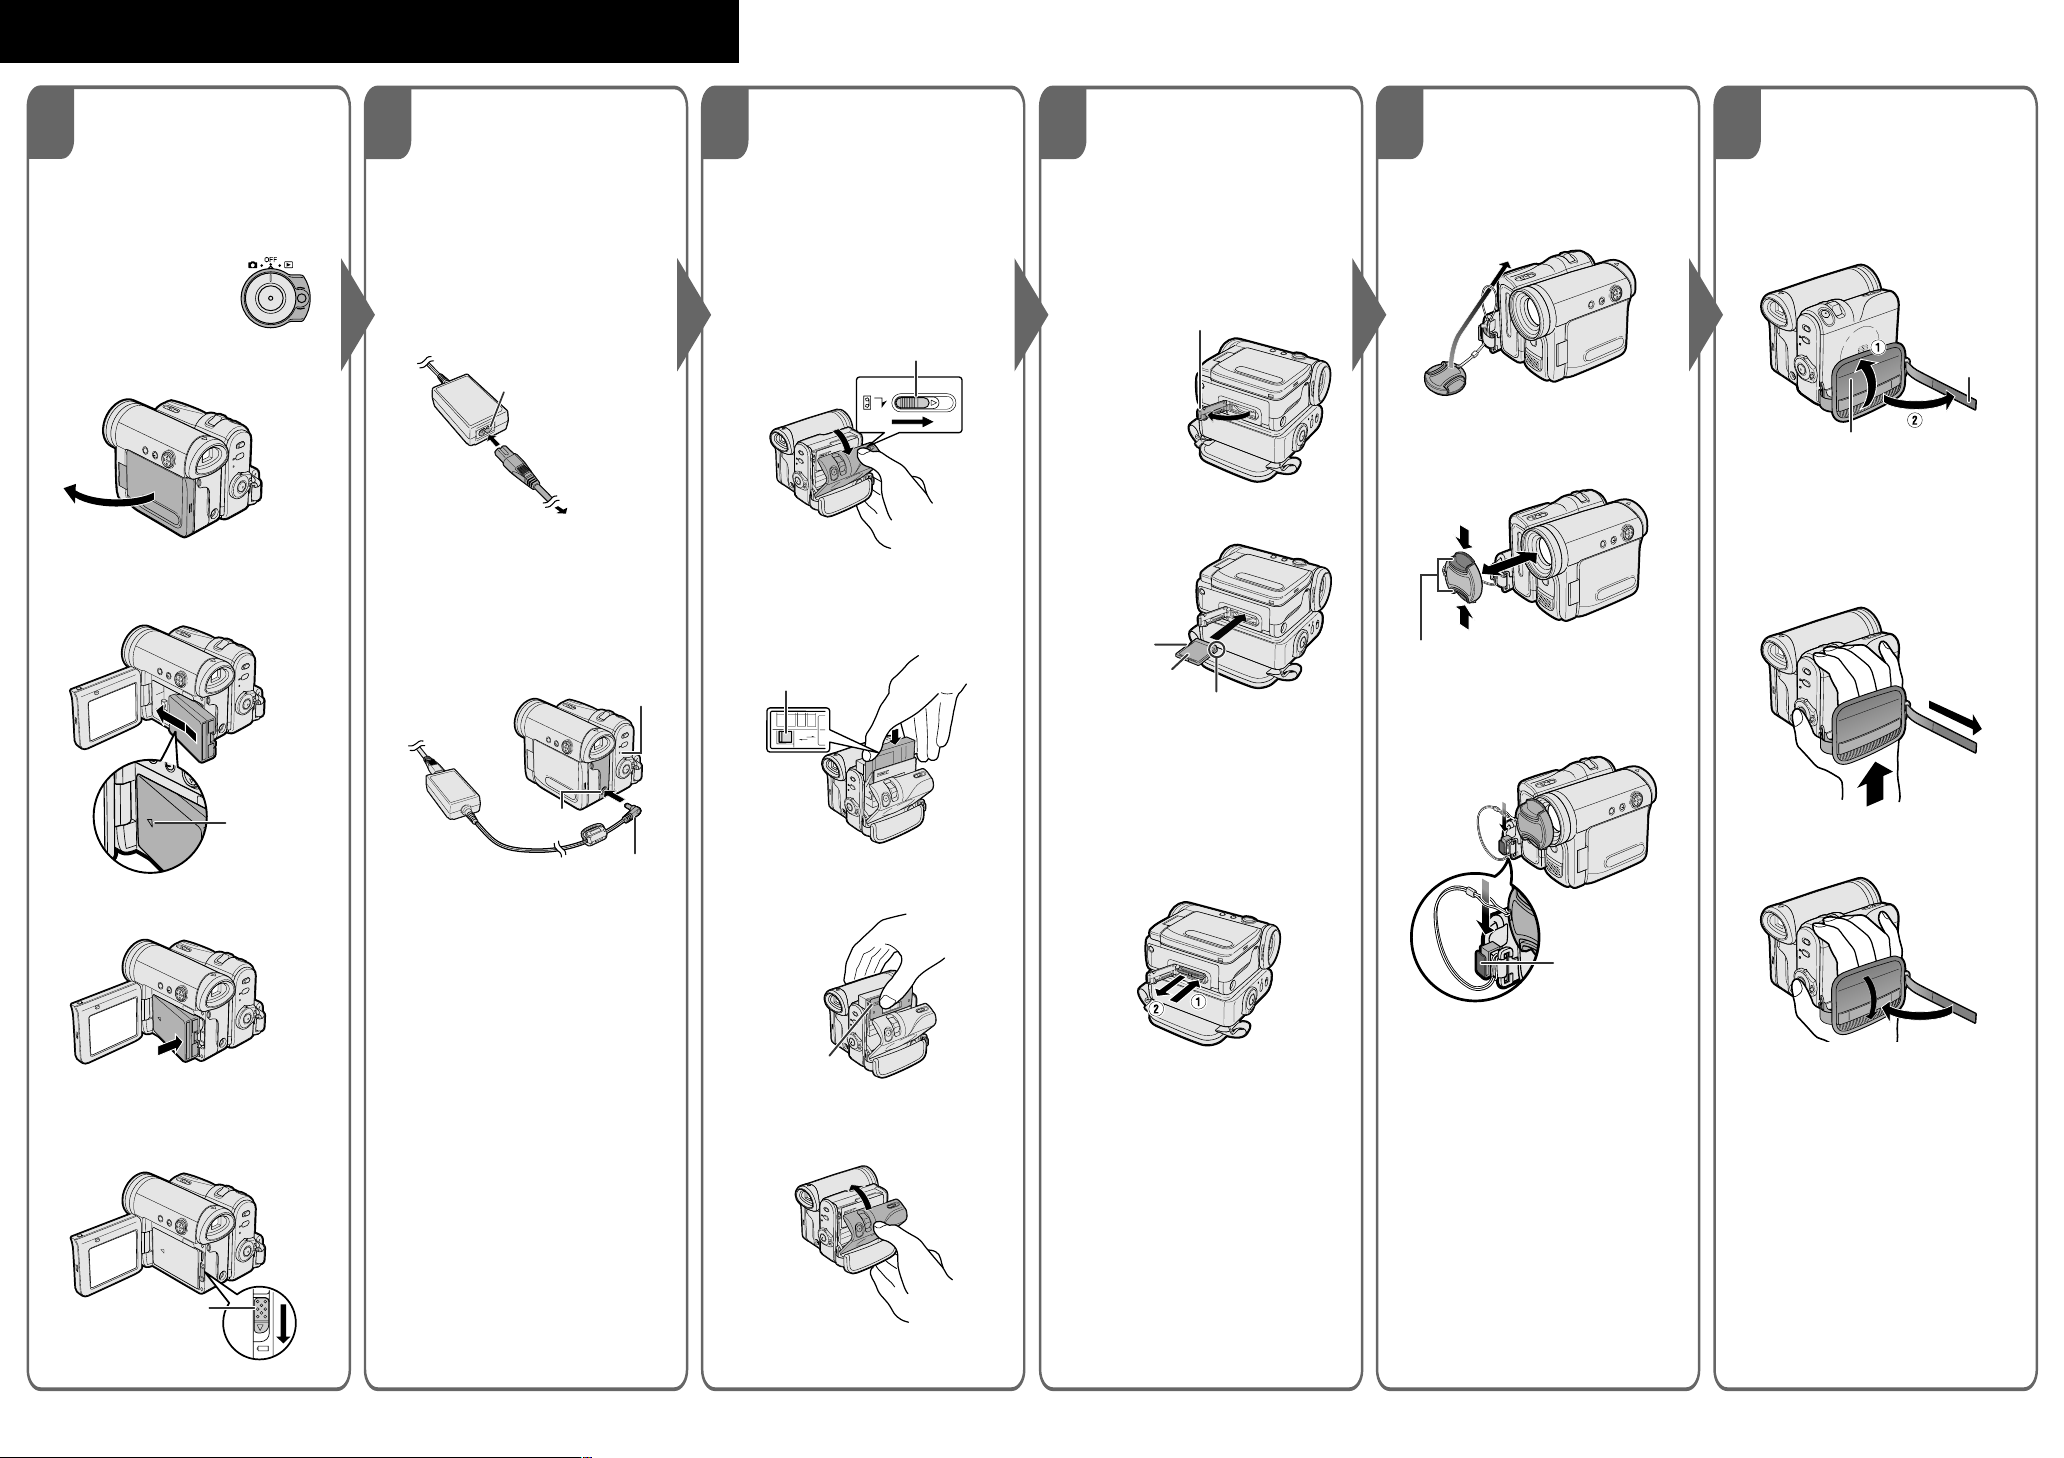
Attaching and
Removing the
Charging the
Battery Pack
Battery Pack
1 Attach the battery pack to the
Attaching
1 Make sure that the
Power switch is set to
OFF.
2 Open the LCD monitor to a 90°
angle to the camcorder body.
3 Slide the battery pack in the
direction of the arrow with the “m”
mark facing out.
camcorder, and make sure that the
Power switch is set to OFF.
2 Connect the supplied power cord to
the AC power socket on the AC
adapter, and insert the AC plug into
a power outlet.
AC power socket
To power
outlet
3 Insert the DC plug into the DC IN
jack of the camcorder.
• The POWER/CHARGE (RED)
indicator lights up red.
• The POWER/CHARGE (RED)
indicator turns off when the battery
is charged.
POWER/CHARGE (RED)
indicator
3
Inserting and
Removing a Cassette
Inserting
1 Attach the power source to the
camcorder, then slide and hold
the cassette compartment door
release as you open the cassette
compartment door.
Cassette compartment door release
2 Insert a commercially available
Mini DV cassette fully with the
window facing outwards, and
with the erasure protect tab
facing upwards.
Erasure protect tab
E
V
A
S
C
E
R
4
Inserting and
Removing a Card
Inserting
1 Make sure that the Power switch is
set to OFF.
2 Open the card slot cover.
Card slot cover
3 Insert a card into the slot as shown
below, and push it in fully.
Write-protect
switch
Label
Clipped corner
4 Close the card slot cover securely.
5
Using the Lens
Cap
Attach the strap of the lens cap to the
hand strap as shown below.
When attaching or removing the lens
cap, grasp the indents on both sides of
the cap.
Indents
When recording, remove the lens cap
and attach the lens cap cord to the
fastener so that the cap will not get in
the way.
6 Adjusting the
Hand Strap
Open the hand strap flap (1) and
1
grip strap (2).
Grip strap
Hand strap flap
2 Loosen the grip strap, pass your
right hand through the hand strap,
and put your thumb close to the
Record Start/Stop button and your
index finger on the Power Zoom
control. Then, pull the grip strap
tight until it fits snugly.
“m” mark
4 Push the battery pack in the
direction of the arrow until it clicks.
Removing
Slide the battery release in the direction
of the arrow, and then take the battery
pack out.
Battery release
DC IN jack
DC plug
3 Press the “PUSH” mark gently
until the cassette holder clicks
into place.
“PUSH” mark
4 Wait for the cassette holder to
fully retract. Close the compartment door by pressing the centre
until it clicks into place.
Removing
Perform step 1 above, then take out the
cassette.
Removing
Perform steps 1 and 2 above, push the
card and release slowly (1). Then pull
the card straight out (2) as shown
below.
Fastener
3 Seal the Velcro
grip strap and the hand strap flap.
®
fasteners of the
Web-site: www.sharp.co.uk/customersupport Help Line UK:08705 274277, Ireland:(01) 676 0648
TINSEA080WJN1
04P03-M-G
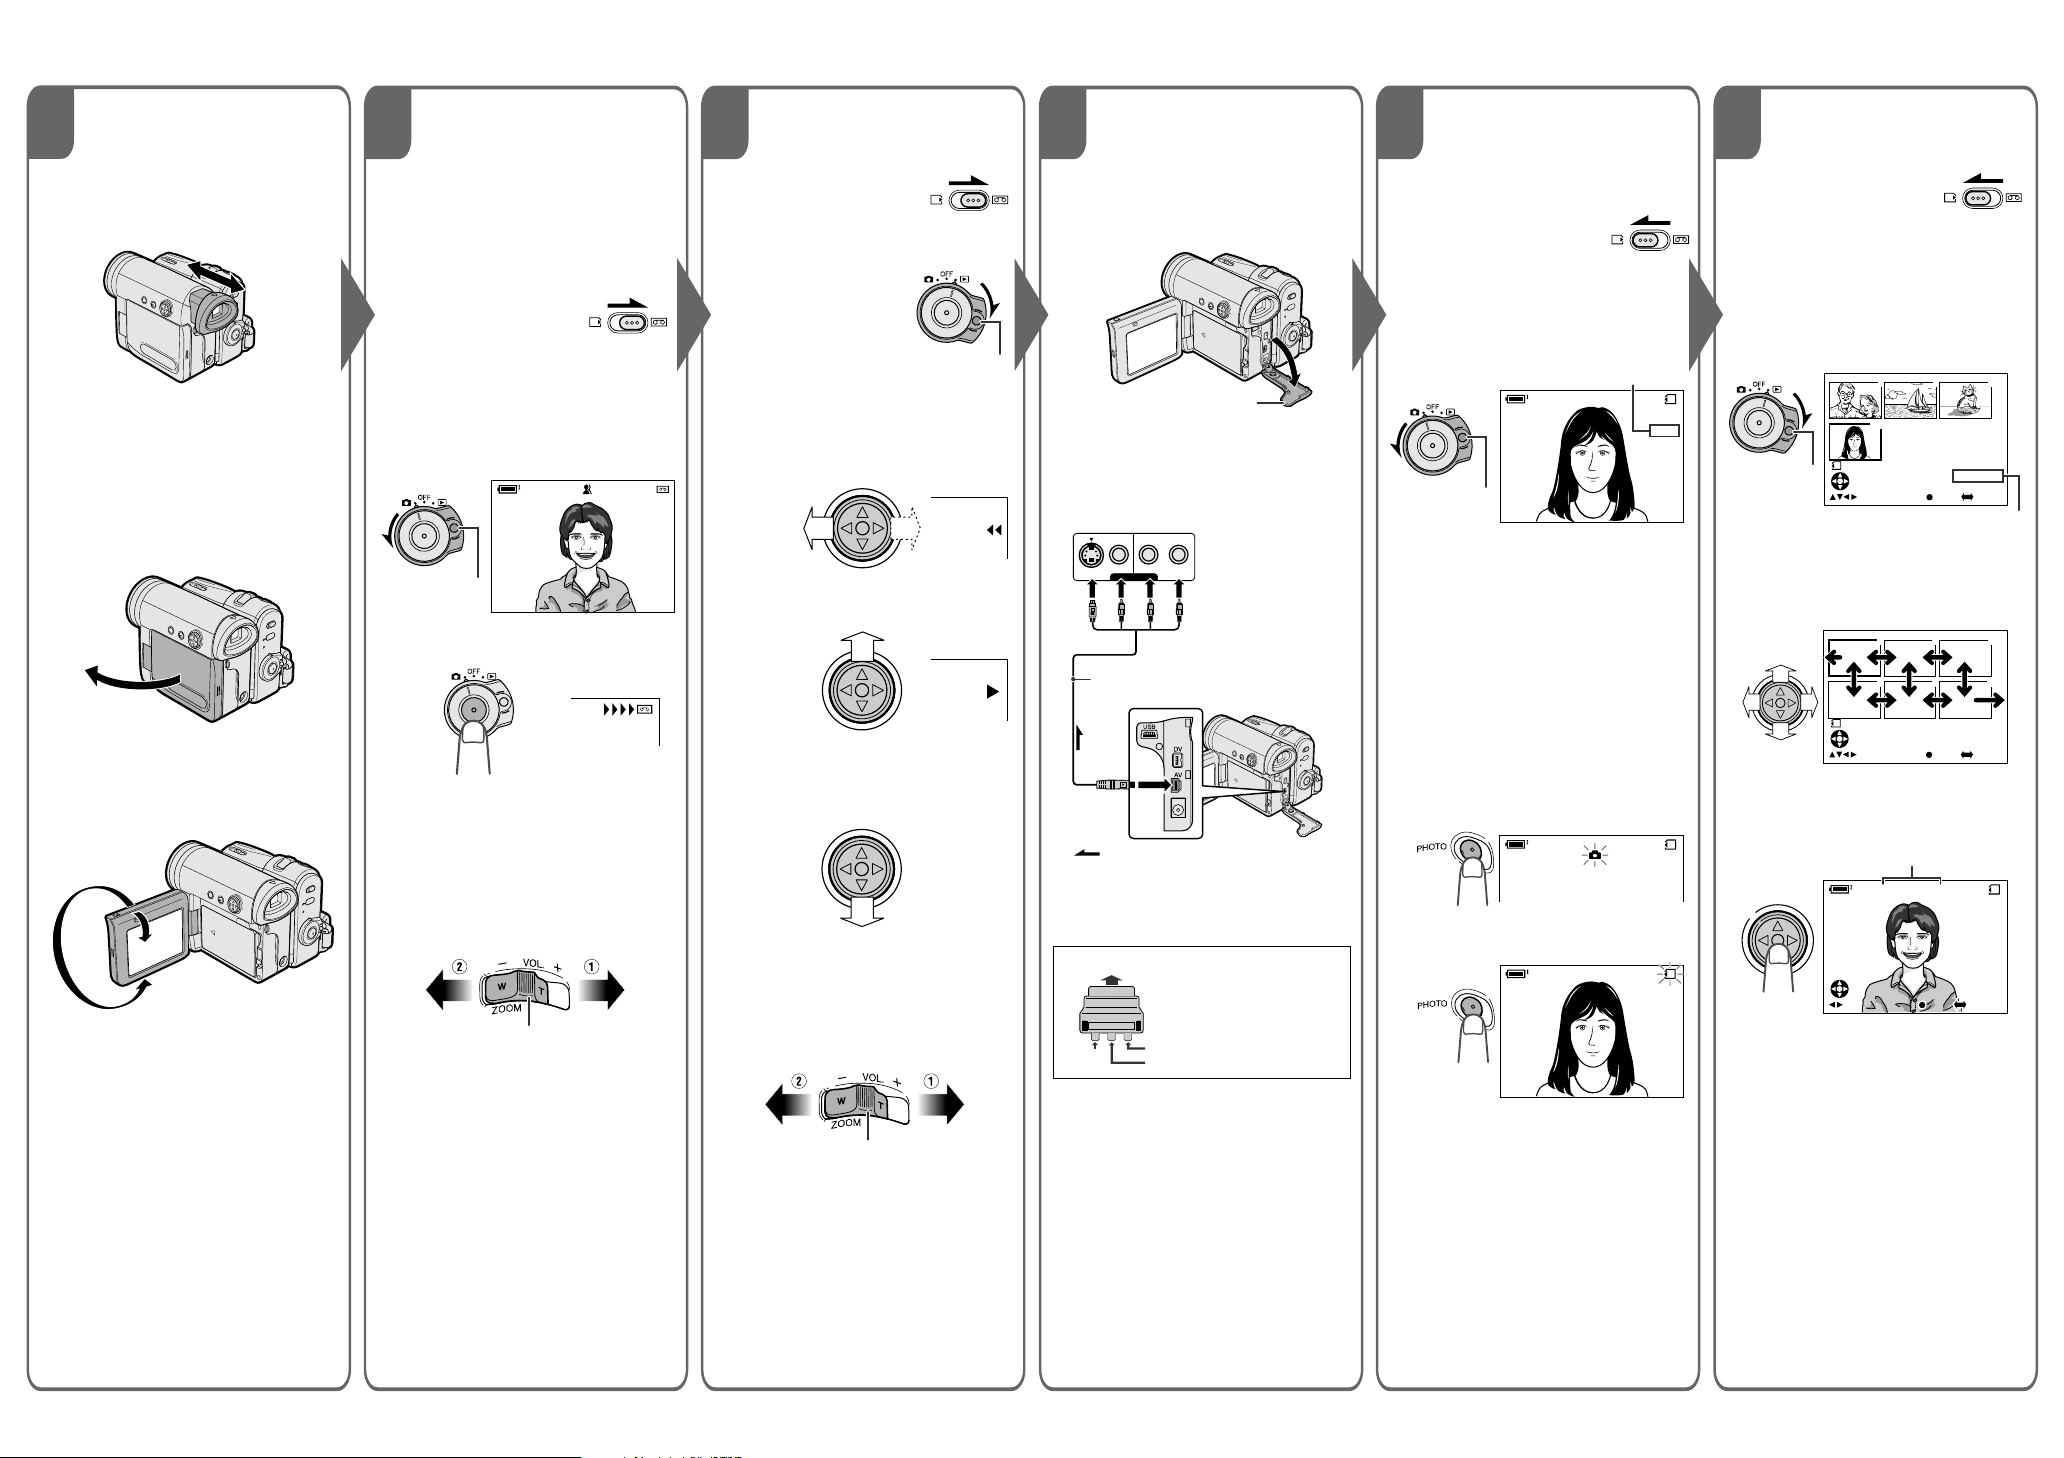
BASIC OPERATIONS
0
VIDEO AUDIO
(L/MONO)
AUDIO
(R)
7 8 10 12
Using the
Viewfinder
Easy Camera
Recording on
Tape
Pull out or push in the viewfinder
completely.
1 Insert a cassette into the
camcorder.
2 Set the Media
Selection switch to
V.
3 Hold down the Lock button and
set the Power switch to v.
• The picture from the lens now
Using the LCD
Monitor
displays.
PAUSE
1 Open the LCD monitor to a 90°
angle to the camcorder body.
Lock button
AU T OAUTO
4 Press the Record Start/Stop
button to begin recording.
REC
2 Adjust the LCD monitor to an angle
that allow easy viewing of the onscreen picture.
• The LCD monitor rotates 270°
vertically.
To pause recording
Press the Record Start/Stop button
again.
Zooming
Push the Power Zoom control to T (1)
(telephoto) or W (2) (wide angle) side.
911
Tape Playback
Watching
Card Recording
Playback on a TV
1 Set the Media
Selection switch to
V.
2 Hold down the Lock
button and set the
Power switch to w.
Lock button
3 Press j (or k) on the Opera-
tion button to rewind (or fast
forward) the tape to the desired
point.
4 Press m to begin playback.
To stop playback
Press l.
1 Open the terminal cover on the
camcorder.
Terminal cover
2 Connect the camcorder to your
TV (or VCR) with the supplied
audio/video/S-video cable, as
shown.
TV or VCR
VIDEO
L-AUDIO-R
(MONO)
S-VIDEO
AV-IN
Audio/video/S-video cable (supplied)
To AV
terminal
:
The arrow shows the signal flow.
• If your TV or VCR has a 21-pin EuroSCART connector, use a commercially
available RCA/21-pin Euro-SCART
conversion connector.
21-pin Euro-SCART on TV or VCR
Black: To S-video input socket
Yellow: To video input jack
White: To audio input (L) jack
Red: To audio input (R) jack
1 Insert a card into the camcorder.
2 Set the Media
Selection switch to
u.
3 Hold down the Lock button and
set the Power switch to v.
• The picture from the lens now
displays.
Number of shots taken/remaining
/981
NORMAL
Lock button
AUTO
4 Adjust the Power Zoom control
to frame the subject as you
desire.
5 Press the PHOTO button half-
way down to focus on the
subject.
• The camcorder automatically
focuses on the subject. When it
is set, you will hear a sound and
see T mark with green light,
then the camcorder locks the
focus.
• When camcorder locks out of
focus, T mark lights up yellow.
/981
NORMAL
6 Press the PHOTO button fully to
begin recording.
1 Set the Media
2 Hold down the Lock button and
Lock button
3 Press j, k, l or m on the
4 Press the centre of the Opera-
Volume Control
Power Zoom control
Push the Volume control to the L or +
side to increase (1) or decrease (2)
the volume.
Video
RCA/21-pin Euro-SCART
conversion connector
Audio R
Audio L
AUTO
/981
NORMAL
3 Turn on the TV and set it to the
Volume control
“AV” or “VIDEO” channel. (See
the operation manual of your TV.)
• When connecting to a TV via a
VCR, turn on the VCR and set it
to the “AV” or “LINE” input
channel. Operate the TV as you
normally do to view the signal
from the VCR. (See the operation
manuals of your TV and VCR.)
• The S indicator flashes red
while data is being recorded on
the card, and returns to white
when recording completes.
Card Playback
Selection switch to
u.
set the Power switch to w.
• The images recorded on the
card are displayed in a
thumbnail format.
7
89
01
1
NORMA L
FULLSELECT IMG MULTI
Page number/total thumbnail pages
Operation button to move the
selection frame to the desired
image.
1
2
4
5
1
NORMA L
FULLSELECT IMG MULTI
tion button.
• The selected image displays in
full-screen.
Image file name
0-0 0 1001
0-001001
NO RMAL
NORMAL
F ULLS E LE C T I MG MULT I
FULLSELECT IMG MULT I
0100-00
2/2PAGE
3
6
1000-00
2/1PAGE
1 0/1
10/1
4 Set the Power switch on the
camcorder to w, and begin
playback.
Web-site: www.sharp.co.uk/customersupport Help Line UK:08705 274277, Ireland:(01) 676 0648
 Loading...