

Page 1
Digital Still Camera Features
Digital Still Camera Features
Camera Recording
Camera Recording
Card Recording
Available mode:
Card Camera
You can take a still picture in the same way
as you do with a standard camera and
record that image on the card.
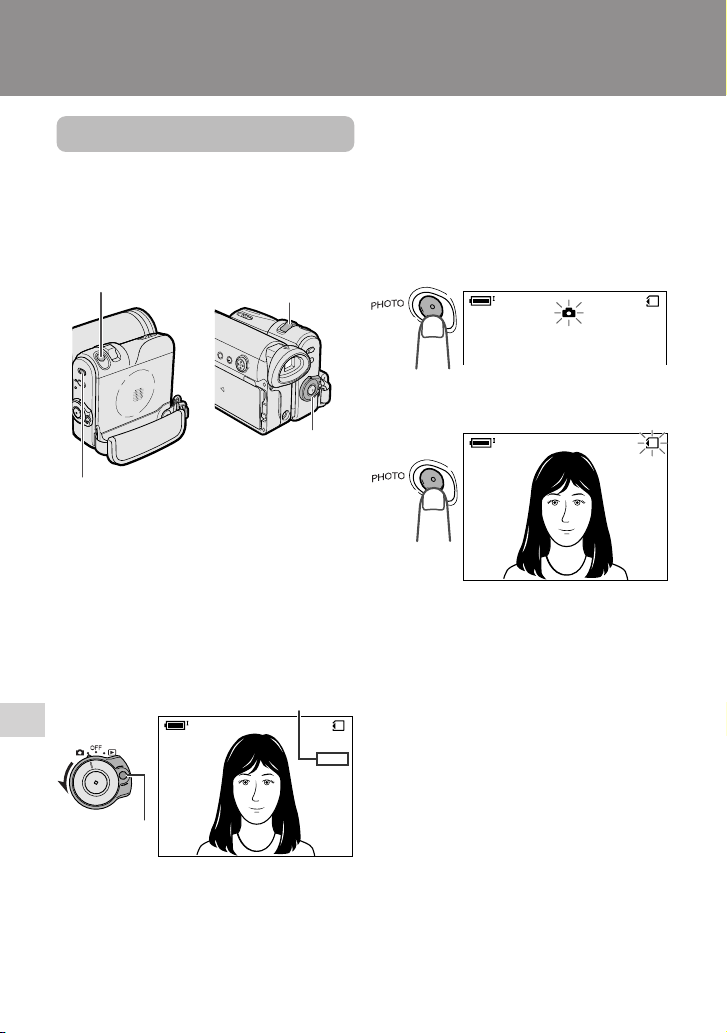
PHOTO button
Media Selection switch
Power Zoom control
1 Insert a card into the camcorder (see
page 11).
2 Remove the lens cap.
3 Set the Media Selection switch to u.
4 Hold down the Lock button and set
the Power switch to v.
• The picture from the lens now
displays.
Number of shots taken/remaining
Lock button
AUTO
5 Adjust the Power Zoom control to
frame the subject as you desire.
Digital Still Camera Features
70
Power switch
/981
NORMAL
6 Press the PHOTO button half-way
down to focus on the subject.
• The camcorder automatically focuses
on the subject. When it is set, you will
hear a sound and see T mark with
green light, then the camcorder locks
the focus.
• When camcorder locks out of focus,
T mark lights up yellow.
NORMAL
7 Press the PHOTO button fully to
begin recording.
NORMAL
AUTO
• The S indicator flashes red while
data is being recorded on the card,
and returns to white when recording
completes.
• To record another image, release the
PHOTO button and make sure the
picture is not frozen in the monitor,
then perform steps 6 and 7.
Notes:
• Recording under insufficient lighting may
result in blurred images. It is recommended
that you use a tripod to record insufficiently
illuminated subjects.
• Recording under the light of a fluorescent,
mercury, or sodium lamp may cause
flickering in the image and, depending on the
timing of the shot, may result in changes to
colour hue in the image.
• Set the BEEP menu item to “OFF” to turn off
the focus locking sound.
• Do not turn the power off or remove the
card while the S indicator is flashing in
step 7.
/981
/981
Page 2
Selecting the Picture
REC MODE
ECONOMY
Quality
Available mode:
Card Camera
The picture quality of still images recorded
on the card depends on the picture quality
setting. Select the appropriate setting to
match your recording objectives.
Types
NORMAL: Records images with
standard picture quality.
ECONOMY: Allows you to take more
shots than in NORMAL mode but with
lower quality.
FINE: Records images with higher
quality than in NORMAL mode but
with lower number of recordable
images.
Approximate number of recordable images with 8 MB SD memory
card
Picture quality
setting
NORMAL
ECONOMY
FINE
Note:
• The number of recordable images differs
depending on the combination of picture
quality settings used and the images shot.
Approx. number of
images
90
160
50
1 Set the Media Selection switch to u,
then hold down the Lock button and
set the Power switch to v.
Lock button
2 In Card Camera mode, press the
MENU button to display the menu
screen.
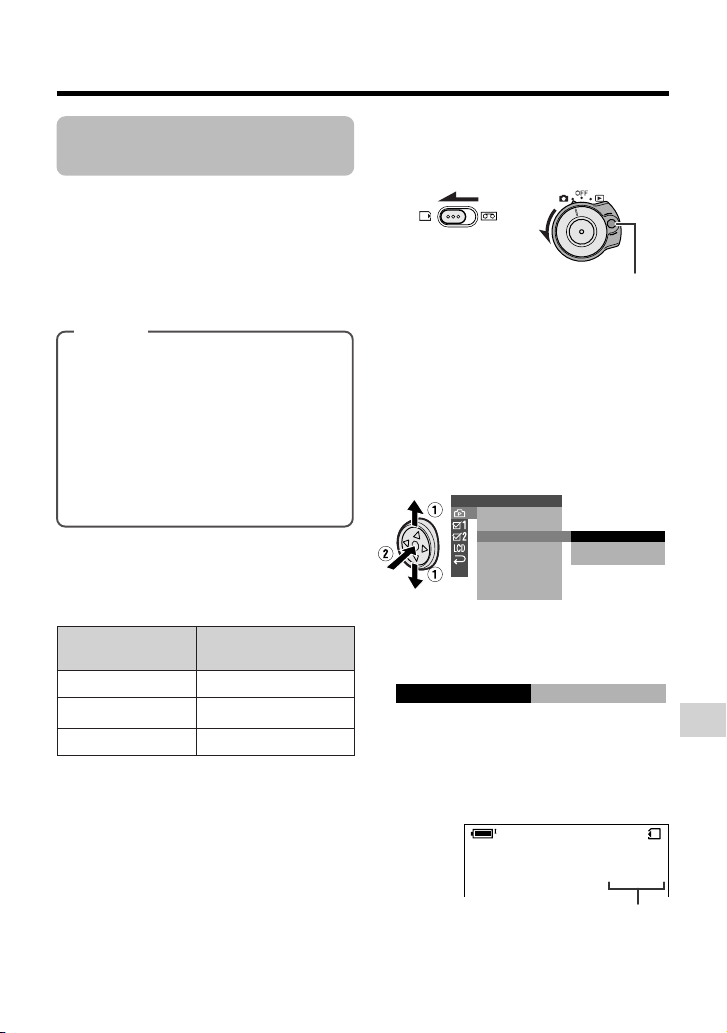
3 Press l or m on the Operation
button to select Y, then press the
centre of the Operation button.
4 Press l or m to select “REC
MODE”, then press the centre of the
Operation button.
SETT ING
FILE
NO.
SELF T IMER
REC
MOD E
RETURN
NORMAL
ECONOMY
FINE
5 Press l or m to select the desired
setting, then press the centre of the
Operation button.
6 Press the MENU button to turn off the
menu screen.
• The selected picture quality indicator
only appears when the on-screen
indicators are turned on.
Digital Still Camera Features
/090
EC ONOMY
Picture quality indicator
71
Page 3

Digital Still Camera Features
Camera Recording
Recording with the
Self-timer
Available mode:
Card Camera
The self-timer function allows you to record
images after a time lag. This is convenient
when you want to record an image of you
and your friends together.
Selecting the time-lag
When you hold the PHOTO button half-way
down in 2 SEC mode, the camcorder will
lock the focus. This will prevent the camera
movement. But it will not lock the focus in 10
SEC mode.
1 In Card Camera mode, press the
MENU button to display the menu
screen.
2 Press l or m on the Operation
button to select Y, then press the
centre of the Operation button.
3 Press l or m to select “SELF
TIMER”, then press the centre of the
Operation button.
SETT ING
FILE
NO.
SELF T IMER
REC
MOD E
RETURN
10 SEC
2 SEC
4 Press l or m to select the desired
time-lag, then press the centre of the
Operation button.
SEL F T IMER
SEC10
5 Press the MENU button to turn off the
menu screen.
Digital Still Camera Features
72
Page 4
Recording
1 Select the desired time lag.
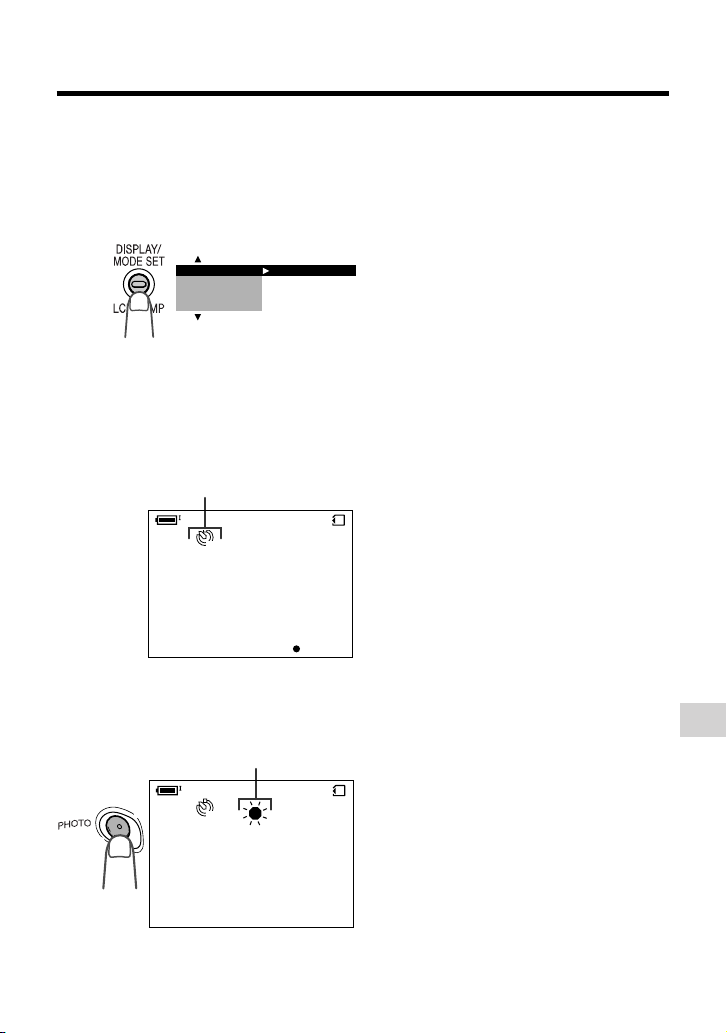
2 Press the DISPLAY/MODE SET
button until the mode screen appears.
EXECUTE
ANUAL
SET
M
FOCUS
AUTO FOCUS
BLC/GAIN
3 Press l or m on the Operation
button to select “SELF TIMER”, then
press the centre of the Operation
button.
• The self timer mode indicator, U
(10 SEC mode) or T (2 SEC
mode), appears.
Self timer mode indicator
To cancel the countdown
Press the PHOTO button in step 4.
To cancel the self-timer
Press the centre of the Operation button
again in step 3.
Notes:
• When recording with the self-timer, stabilize
the camcorder in the horizontal plane by
attaching it to a tripod, etc.
• Self-timer mode cancels after recording one
image. Repeat steps 1 to 4 to record another
image with the self-timer.
• Do not turn the power off or remove the card
once the self-timer operating indicator begins
flashing.
10
NORMAL
AUTO
CANCEL
4 Press the PHOTO button to start the
self-timer.
• The self-timer operating indicator
flashes while the timer counts down.
Self-timer operating indicator
10
NORMAL
AUTO
• The shutter automatically releases
after the time lag you selected, and a
still image of the subject is recorded.
81/9
Digital Still Camera Features
81/9
73
Page 5
Digital Still Camera Features
OTHERS 2
RETURN
PO
W
ER SAVE
EXECUTEFORMAT
SETT ING
DAT E D I SP.
12H 24H/
SELECT SET
62005.2.
10 30:00:
OFF
24H
DAT E+TIME
FORMAT
ALL DATA WI LL
BE
NO
YES
ERASED.
Camera Recording
Formatting a Card
Available modes:
Card Camera, Card Playback
Before using a commercially available card
with this camcorder, you must first have it
formatted. Also, if any of the following
warning indicators displays, you will need to
format your card.
• “FORMAT MEMORY CARD”
• “MEMORY CARD ERROR”
• “MEMORY CARD READ ERROR”
• “CANNOT STORE DATA”
Notes:
• Formatting a card erases all stored images,
including delete-protected images. Be sure
to backup important data on your computer
or other media before formatting the card
(see pages 83–88).
• Do not remove the power source during
formatting, as this may cause damage to the
camcorder or card. It is recommended that
you use the AC outlet for the power supply.
• The example screens shown are for Card
Camera mode.
1 In Card Camera or Card Playback
mode, press the MENU button to
display the menu screen.
2 Press l or m on the Operation
button to select ~, then press the
centre of the Operation button.
3 Press l or m to select “FORMAT”,
then press the centre of the Operation
button.
• To cancel formatting, press l or m
to select “RETURN”, then press the
centre of the Operation button.
4 Press l or m to select “YES”, then
press the centre of the Operation
button to begin formatting.
• The menu screen displays when
formatting finishes.
5 Press the MENU button to turn off the
menu screen.
Notes:
• The supplied card is preformatted for
immediate use.
• Use this camcorder to format a card. The
camcorder may not recognize the images
on a card formatted by a computer or other
equipment.
Digital Still Camera Features
74
Page 6

Setting the File
Numbering Method
Available mode:
Card Camera
The camcorder automatically assigns file
numbers to captured images. You can
select two different methods of file numbering.
Types
SERIAL: Defines file numbers by
incrementing up from the last image
captured when inserting a new card.
RESET: Defines a new set of file
numbers when inserting a new card.
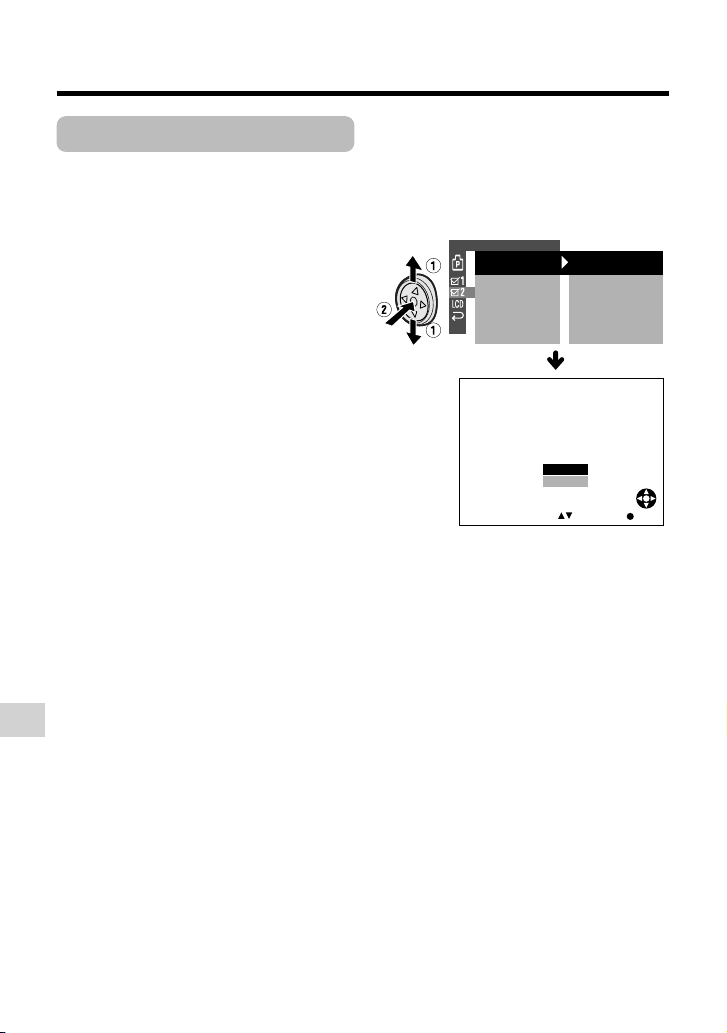
1 In Card Camera mode, press the
MENU button to display the menu
screen.
2 Press l or m on the Operation
button to select Y, then press the
centre of the Operation button.
3 Press l or m to select “FILE NO.”,
then press the centre of the Operation
button.
SETTING
FILE
SELF TIMER
REC MODE
RETURN
NO.
SERIAL
RESET
4 Press l or m to select “SERIAL” or
“RESET”, then press the centre of the
Operation button.
RESETFILE NO.
5 Press the MENU button to turn off the
menu screen.
Note:
• When a warning indicator “MAXIMUM FILE
NUMBER” appears on the screen, set FILE
NO. menu item to “RESET”, then format the
card (see page 74) or replace the card with a
new one (see page 11).
Digital Still Camera Features
75
Page 7

Digital Still Camera Features
MA
UL
Digital Still Camera Features
Playback
Playback
Card Playback
Available mode:
Card Playback
You can play back and view still images
recorded on a card on the LCD monitor.
Media Selection switch
Power switch
Operation button
1 Set the Media Selection switch to u.
2 Hold down the Lock button and set
the Power switch to w.
• The images recorded on the card are
displayed in a thumbnail format.
7
89
01
Lock button
Page number/total thumbnail pages
FULLSELECT IMG MULTI
3 Press j, k, l or m on the Opera-
tion button to move the selection
frame to the desired image.
• Each time you press j, k, l or m,
the selection frame moves as shown
below.
1
4
Digital Still Camera Features
76
0100-00
1
2/2PAGE
NORMAL
2
5
FULLSELECT IMG MULTI
3
6
1
NORMA L
Note:
• Holding down j or k increases the
speed of motion of the selection frame.
4 Press the centre of the Operation
button.
• The selected image displays in fullscreen.
Image file name
0-0 0 1001
0-001001
F UL
FULLSELECT IMG MULT I
Playback image number/
number of recordings
Available Operations during
Full-screen Display
• You can display the full-screen picture of the
previous or next image by pressing j or k.
• When holding down j or k, you can search
through the images on the card. The search can
be very fast, so it is recommended that the onscreen indicators turns on to display the image
number.
• To return to a thumbnail of the images, press
the centre of the Operation button again.
Notes:
• You can also set in the mode screen to display
the images in full screen or thumbnails.
• Depending on the amount of image data
recorded by a camera other than this camcorder,
the picture quality indicator displayed during
playback may not match the picture quality
setting used during recording.
• The images bigger than 640K480, e.g. images
recorded on other equipment, display as
thumbnails, not full screen.
• Do not play back any card storing a defective
image (with noise and distortion) created on
other equipment. If you mistakenly play back
data on such a card, set the Power switch to
OFF, remove, and never use it with this
camcorder.
1000-00
2/1PAGE
Picture quality
NO RMA
NORMAL
LS E L E CT I MG MULULT I
indicator
1 0/1
10/1
L
Page 8

Delete Protection
3000-00
2/1PAGE
NORMA L
1
PROTECT
SET DISPLAY CANCEL:
][
1
4
2
5
3
6
3000-00
2/1PAGE
NORMA L
1
PROTECT
SET DISPLAY CANCEL:
][
1
4
2
5
3
6
Available mode:
Card Playback
You can prevent your important images
recorded on the card from accidental
erasure.
1 In Card Playback mode, press the
DISPLAY/MODE SET button until the
mode screen appears.
2 Press l or m on the Operation
button to select “PROTECT”, then
press the centre of the Operation
button.
• The PROTECT indicator appears.
DELETE ONE
DELETE ALL
DI RECT PR I
PROTE CT
PROTECT
SET DISPLAY CANCEL:
PROTECT indicator
1
4
EX ECUTE
2
5
1
][
NORMA L
3 Press j, k, l or m to select the
image for delete protection.
1
4
PROTECT
SET DISPLAY CANCEL:
2
5
1
NORMA L
][
4 Press the centre of the Operation
button to set delete protection.
• The R indicator appears.
Delete protection indicator
• If you want to protect another image,
repeat steps 3 to 4.
5 Press the DISPLAY/MODE SET
button to finish the setting.
To cancel the protection
setting
1 Select the image for delete protection
3
6
1000-00
2/1PAGE
3
cancellation in step 3 above.
2 Press the centre of the Operation
button to cancel the protection.
• The R indicator disappears.
3 Press the DISPLAY/MODE SET
6
3000-00
2/1PAGE
button to finish the setting.
Note:
• Formatting a card erases all stored images,
including delete-protected images.
Digital Still Camera Features
77
Page 9

Digital Still Camera Features
3000-00
2/1PAGE
NORMA L
1
DELE TE
SET DISPLAY CANCEL:
][
1
4
2
5
3
6
3000-00
NORMA L
1
1
4
2
5
3
6
DELETE?
NO
YES
SETSELECT
4000-001
DELE TE
1
4
2
5
3
6
Playback
Deleting Stored
Images
Available mode:
Card Playback
Deleting One Stored Image
You can delete unwanted images to free up
memory of a card for new images.
Note:
• Deleted images cannot be restored. Check
whether or not you want the images before
performing the procedure below.
1 In Card Playback mode, press the
DISPLAY/MODE SET button until the
mode screen appears.
2 Press l or m on the Operation
button to select “DELETE ONE”, then
press the centre of the Operation
button.
• The DELETE indicator appears.
FULL MULTI
PIC. EFFECT
DELETE ALL
EX ECUTEDELETE ONE
1
2
3
3 Press j, k, l or m to select the
image to be deleted.
4 Press the centre of the Operation
button to set the image.
5 Press l or m to select “YES”, then
press the centre of the Operation
button to delete the image.
DELE TE
SET DISPLAY CANCEL:
DELETE indicator
Digital Still Camera Features
78
4
5
][
1
NORMA L
6
1000-00
2/1PAGE
• To cancel the setting, select “NO”.
• If you want to delete another image,
repeat steps 3 to 5.
6 Press the DISPLAY/MODE SET
button to finish the setting.
Notes:
• The protected images cannot be deleted.
Cancel the protection setting to delete the
image (see page 77).
• Do not turn the power off while deleting an
image.
Page 10

Deleting All Stored Images
You can delete all stored images on a card
in one operation.
Notes:
• Deleted images cannot be restored. Check
whether or not you want the images before
performing the procedure below.
• If you want to keep some images on the card,
first delete-protect them (see page 77), and
then perform the procedure below.
1 In Card Playback mode, press the
DISPLAY/MODE SET button until the
mode screen appears.
2 Press l or m on the Operation
button to select “DELETE ALL”, then
press the centre of the Operation
button.
• The DELETE ALL? indicator appears.
FULL MULTI
PIC. EFFECT
DELETE ONE
DELETE ALL
EX ECUTE
3 Press l or m to select “YES”, then
press the centre of the Operation
button.
• To cancel the setting, select “NO”.
4 Press the DISPLAY/MODE SET
button to finish the setting.
Notes:
• The protected images cannot be deleted.
Cancel the protection setting to delete the
image (see page 77).
• If a print order is assigned to deleteprotected images and you perform the
procedure above, the print order will cancel
(the protection setting will not cancel).
• It may take several seconds to delete all
images from the card.
• Do not turn the power off while deleting
images.
1
4
DELETE
NO
YES
DELETE ALL? indicator
2
5
ALL?
SETSELECT
1
3
6
1000-00
NORMA L
Digital Still Camera Features
79
Page 11

Digital Still Camera Features
1000-00
2/1PAGE
NORMAL
1
PRI NT
SET DI SPLAY CANCEL:
][
1
4
2
5
3
6
3000-00
2/1PAGE
NORMAL
11
PRI NT
1
4
2
5
3
6
SETPR INT NUMBER
P
3000-00
2/1PAGE
NORMAL
1
PRI NT
SET DI SPLAY CANCEL:
][
1
4
2
5
3
6
Playback
Print Order
Available mode:
Card Playback
The print order function allows you to add
print information called DPOF to still images
recorded on a card.
About DPOF
DPOF (Digital Printing Order Format)
defines the print information for the specific
images and number of each image on
memory cards. In the near future you will be
able to easily make prints on a DPOFcompatible printer or order copies at your
local print shop.
Note:
• You can print an image even if no print order
has been assigned.
Assigning Print Order to an
Image
1 In Card Playback mode, press the
MENU button to display the menu
screen.
2 Press l or m on the Operation
button to select S, then press the
centre of the Operation button.
3 Press l or m to select “PRI.
ORDER”, then press the centre of the
Operation button.
PLAYBACK SET
SL IDE SHO
PR I. ORDER
RETURN
W
PRI.SELECT
PRI. ALL
PR I. NONE
RETURN
4 Press l or m to select “PRI.
SELECT”, then press the centre of
the Operation button.
• The PRINT indicator appears.
PRINT indicator
5 Press j, k, l or m to select the
image to which you want to assign a
print order.
6 Press the centre of the Operation
button, then press l or m to select
the number of printouts.
• 1 through 99 can be set for the
number of printouts.
Number of printouts
7 Press the centre of the Operation
button to set the print order.
• The M indicator appears.
M indicator
Digital Still Camera Features
80
• If you want to assign another print
order, repeat steps 5 to 7.
8 Press the MENU button to finish the
setting.
Page 12

To cancel the print order for an image
PLAYBACK SET
PRI.SELECT
PRI . ALL
PR I. NONE
RETURN
SL IDE SHO
W
PRI . ORDER
1000-00
NORMA L
1
456
NONE ?
NO
YES
PRI NT
P P P
RETURN
SETSELECT
1 Select the image for cancelling out of
print order in step 5 above, then press
the centre of the Operation button.
2 Press l to select “0”, then press the
centre of the Operation button.
• The M indicator disappears.
M indicator
1
2
3
P
4
5
6
PRI NT
1
4
10
NORMA L
SETPR INT NUMBER
2
3
5
6
Note:
• A warning indicator appears when the
print order is set to more than 999
images. To turn off the warning
indicator, press the Operation button.
3 Press l or m to select “YES”, then
press the centre of the Operation
button.
• The M indicators appear, and each
image is set to 1 print out.
• To cancel the setting, select “NO”.
To cancel the print order for all
images
3000-00
2/1PAGE
1 Perform steps 1 to 3 in “Assigning
Print Order to an Image”.
2 Press l or m to select “PRI. NONE”,
then press the centre of the Operation
button to cancel the print order for all
images.
PRI NT
3 Press the MENU button to finish the
setting.
Assigning Print Order to All
Images
1 Perform steps 1 to 3 in “Assigning
Print Order to an Image”.
2 Press l or m to select “PRI. ALL”,
then press the centre of the Operation
button.
PLAYBACK SET
SL IDE SHO
PR I. ORDER
RETURN
PRI NT
W
PRI.SELECT
PRI . ALL
PR I. NONE
RETURN
456
NO
YES
ALL?
1
NORMAL
SETSELECT
3000-001
Digital Still Camera Features
3 Press l or m to select “YES”, then
press the centre of the Operation
button.
• The M indicators are turned off.
• To cancel the setting, select “NO”.
1000-00
81
Page 13

Digital Still Camera Features
Playback
Direct Print
Available modes:
Card Playback
When you connect the camcorder to a
Seiko Epson’s Direct Print compatible
printer, you can print out the recorded still
image directly from the printer without
computer.
Preparation
Turn on the printer.
1 Make sure that the Power switch is
set to OFF.
2 Connect the camcorder to the printer
with the supplied USB cable.
3 Set the Media Selection switch to u,
then hold down the Lock button and
set the Power switch to w.
4 In Card Playback mode, press the
DISPLAY/MODE SET button until the
mode screen appears.
5 Press l or m on the Operation
button to select “DIRECT PRI”, then
press the centre of the Operation
button.
6 Press m to select the number of
printouts, then press the centre of the
Operation button.
DI RECT PRI NT
CHECK THE PR I NTER
SETT INGS.
START?
NO
YES
SELECT RETURN
SET
7 Press l or m to select “YES”, then
press the centre of the Operation
button.
• Printing begins.
• To cancel the setting, select “NO”.
Notes:
• “INK ERROR” appears when the ink of the
printer connected to the camcorder is low.
Check the remaining of the printing ink.
• The top and bottom of an image may be
cropped depending on the paper size. In this
case, set the crop setting of the printer to off.
See the printer's operation manual for the
details.
• When connecting the camcorder to a printer,
“CHECK THE PRINTER SETTINGS.” may
appear. In this case, disconnect and connect
the USB cable before or after printing. If the
message still appears, turn off and on the
printer.
PIC. EFFECT
DELETE ONE
DELETE ALL
DI RECT PR I
Digital Still Camera Features
82
EX ECUTE
DIRECT PRINT
SET NO . 1
SEL ECT RETURN
About PRINT Image Matching L
This product supports PRINT Image
Matching K. When used in combination,
PRINT Image Matching K enabled digital
still cameras, printers and software, help
photographers to produce images more
faithful to their intentions.
PRINT Image Matching is a trademark of
Seiko Epson Corporation.
SET
Page 14

Transferring Data on Card to Computer
To transfer data from the card, first install the software from the supplied CD-ROM.
The CD-ROM includes “USB Driver”, “PixLab Media Browser” and other related files.
• “USB Driver” is the software that transfers images from the camcorder when connecting to the
PC with the supplied USB cable.
• “PixLab Media Browser” is the software that can copy image files to the computer or can
display the files like the way you do with Windows Explorer.
System Requirements
• Operating systems
— Microsoftb Windowsb XP Home Edition/Professional
— Microsoftb Windowsb 2000 Professional
— Microsoftb Windowsb Me
— Microsoftb Windowsb 98 Second Edition
• 266 MHz or higher MMX Pentium-compatible CPU*
mended)
(When using Windowsb XP: Pentiumb K 300 MHz or higher)
• 64 MB or more of RAM*
128 MB or more of RAM*
• USB terminal
• CD-ROM drive (for installation)
1
(128 MB or more recommended) for Windowsb 98 or Windowsb Me
1
(256 MB or more recommended) for Windowsb 2000 or Windowsb XP
• Mouse or other pointing device
• 800K600 pixels or more resolution and 16,777,216 colours (24 bit) or more screen display
(recommended)
• DirectXb 8 or later-compatible video card*
• SoundBlaster or SoundBlaster-compatible sound card*1, compatible with DirectXb 8 or later
required*
2
• Software: Microsoftb Internet Explorer 5.5 or 6.0 (typical or full install)
• Approx. 70 MB or more hard disk for installing USB Driver, PixLab Media Browser, Microsoftb
DirectXb 8.1, Microsoftb Windows Media/ Format 7.1
*
Microsoftb Windows Media/ Format 7.1/DirectXb 8.1*
1
Depending on the computer’s performance and capacity, this software may not provide the
expected performance (for example, operation may be extremely slow).
*2Contact your computer’s manufacturer to find out if your video card is compatible with
DirectXb 8 or later.
*3It will be installed if needed during the installation.
Note:
• The USB driver is not compatible with Macintosh operating systems.
Trademarks
• Microsoft, Windows and Windows Media are either registered trademarks or
trademarks of Microsoft Corporation in the United States and/or other countries.
• Adobe, Acrobat, Acrobat Reader and Adobe Reader are trademarks or registered
trademarks of Adobe Systems Incorporated.
• DirectX is a trademark of Microsoft Corporation of the United States and is copyrighted.
1
(Pentiumb K 266 MHz or higher recom-
2
3
Digital Still Camera Features
83
Page 15

Digital Still Camera Features
Playback
Installing the USB Driver
For installing the USB driver in Windows XP or Windows 2000, you need to log in as the
system administrator.
1 Turn on the computer.
• Do not connect the camcorder to the computer with the USB cable at this point.
2 Insert the supplied CD-ROM containing the USB driver into the CD-ROM drive.
• The License Agreement/Install Key screen will display automatically.
Note:
• When the License Agreement/Install Key screen does not appear,
1 select “Run...” in Windows “start” menu, then
2 type “R:\SETUP.EXE”, and then click on the “OK” button.
• In the example above the CD-ROM drive letter is taken as “R:”. Select the correct drive
letter according to your operating environment.
3 After reading the License Agreement, enter the Install Key, mentioned on the cover
page, and then click the “Yes” button.
• The Setup screen will display automatically.
• The example screen shown is for Windows XP.
4 Click the “USB Driver” button.
• Welcome screen appears.
5 Click the “Next” button.
• Information screen appears. Read information.
6 Click the “Next” button.
• Installation begins.
7 Confirm the message on the screen, and then click the “Finish” button to complete
the installation.
Note:
• If your computer gives you the option to restart, you may do so.
Digital Still Camera Features
84
Page 16

8 Insert a card that contains recorded still images into camcorder.
9 Connect the camcorder to the computer with the supplied USB cable as shown
below.
• It is recommended to use the AC adapter as a power source for extended periods of
use.
• Connect the USB cable directly to the USB terminal of computer.
• To prevent malfunction, turn off the camcorder when you connect to the computer.
To USB terminal
USB cable (supplied)
To USB terminal
10
Set the Media Selection switch to u.
11
Hold down the Lock button and set the Power switch to w.
• Computer will recognize the camcorder automatically.
Note:
• If you restart computer after installing the USB driver, remove the CD-ROM and insert it again or
click the icon of the CD-ROM on computer’s screen.
12
Click the “PixLab Media Browser” button on the Setup screen, and then follow the
instructions as they appear on the screen until the installation is completed.
Digital Still Camera Features
85
Page 17

Digital Still Camera Features
Playback
Using the PDF Manual
Use of the installed “PixLab Media Browser” is explained in the PDF Operation Manual.
Installing Adobe Reader
Adobe Reader 6.0 (or Adobe Acrobat Reader 4.0 or later) is required for viewing the PDF
manual. If it is not installed on your PC, perform steps below to access Adobe homepage
and download it.
1 Insert the supplied CD-ROM.
2 Click the “Open Readme file” button in the Setup screen.
3 Read the section “(3-8) Operation Manual” in “(3) Cautions on using PixLab”, then
click “To download the Reader follow the link on the next page”.
4 Click “Adobe Reader homepage” (or “Adobe Systems Website”) in “Adobe Reader”
to access the homepage, then download Adobe Reader.
Opening the PDF Manual
Click on the Windows “start” button and click after moving the pointer to “All Programs”,
“PixLab Media Browser Ver4” and “PixLab Media Browser LE Operation Manual”.
• Adobe Reader 6.0 (or Adobe Acrobat Reader 4.0 or later) starts up and the PDF manual opens.
Note:
• If the PDF file does not open, Adobe Reader 6.0 (or Adobe Acrobat Reader 4.0 or later) may not
be properly installed. Refer to the steps of “Installing Adobe Reader” to check the installation
procedure.
Printing the PDF Manual
Print out the PDF manual so that you can consult it whenever necessary.
1 Open the PDF manual.
2 Select “Print“ in the “File” menu.
3 Select your print settings, then click “OK”.
Digital Still Camera Features
86
Page 18

Transferring the data on
Card to Computer
Connecting the camcorder to the
computer
Connect the camcorder to the computer
with the supplied USB cable (see page
85).
Transferring data
1 Turn on the computer, then connect
the camcorder with the supplied USB
cable.
2 Set the Media Selection switch to u,
then hold down the Lock button and
set the Power switch to w.
3 Double click the shortcut icon of
PixLab Browser Ver4.
• PixLab Media Browser will start up.
4 Transfer data with PixLab Media
Browser.
• For details about PixLab Media
Browser, refer to the online manual
and help.
Caution on transferring data
While transferring data, the transfer
indicator moves. Do not execute the
operations below.
• Disconnecting the USB cable
• Switching the power on/off
• Turning off the PC or setting it to Standby
• Removing the card
Transfer indicator
Disconnecting the USB
cable
Windows Me/2000/XP
1 Close PixLab Media Browser.
2 Click the “Safely Remove Hardware”
(or “Unplug or Eject Hardware”) icon
that appears on the task bar, and
choose an applicable hard drive to
stop.
3 After the message “Safe To Remove
Hardware” appears, disconnect the
USB cable.
Note:
• See Windows Help for the procedure
of disconnecting USB cable in detail.
Windows 98
When data is not being transferred (the
indicator on LCD display stays still), rightclick on the disk drive icon, which appears
on explorer window, to eject the disk. After
that, disconnect the USB cable.
Digital Still Camera Features
USB
TRANSMI TT ING
Note:
• In case of data transfer error, disconnect the
USB cable, then connect it again, or set the
Power switch to OFF, then set it to w again.
87
Page 19

Digital Still Camera Features
Playback
Image Folders and File
Names
Double-click the My Computer icon on the
PC and find a new drive called “Removable
Disk (F:)” (or other drive letter, depending
on your PC configuration). Still images
recorded using the camcorder are stored in
files and on a card as shown below.
••••••
DCIM
Folder of still image files
100SHARP
DVC00001.JPG
DVC00002.JPG
Note:
• If you copy any data incompatible with this
camcorder to the card, the camcorder will not
be able to recognize it.
Sub-folder of still
images
Serial number
(100 to 999)
Digital Still Camera Features
88
Still
image
Page 20

Slide Show Playback
PLAYBACK SET
EXECUTESL IDE SHO
W
PRI.
RETURN
EXECUTE
ORDER
SL I D E S HOWSL IDE SHOW
S TOP
STOP
Available mode:
Card Playback
You can automatically play back consecutive still images recorded on a card at
intervals of 5 seconds. This is useful when
confirming the data recorded on a card.
1 Set the camcorder to Card Playback
mode.
2 Press j, k, l or m on the
Operation button to select the image
from which you want to begin slide
show playback.
1
2
4 Press l or m to select S, then
press the centre of the Operation
button.
5 Press l or m to select “SLIDE
SHOW”, then press the centre of the
Operation button.
• Beginning from the image selected in
step 2, the recorded images will
display in full-screen one after
another in order of recording.
3
4
5
1
NORMA L
FULLSELECT IMG MULTI
F ULLSE L E C T I MG M ULT I
6
3 Press the MENU button to display the
menu screen.
3000-00
2/1PAGE
• After playing back all the images on
the card once, slide show playback
automatically stops.
To stop slide show playback
During slide show playback, press the
centre of the Operation button.
Digital Still Camera Features
89
 Loading...