

References
Useful Information
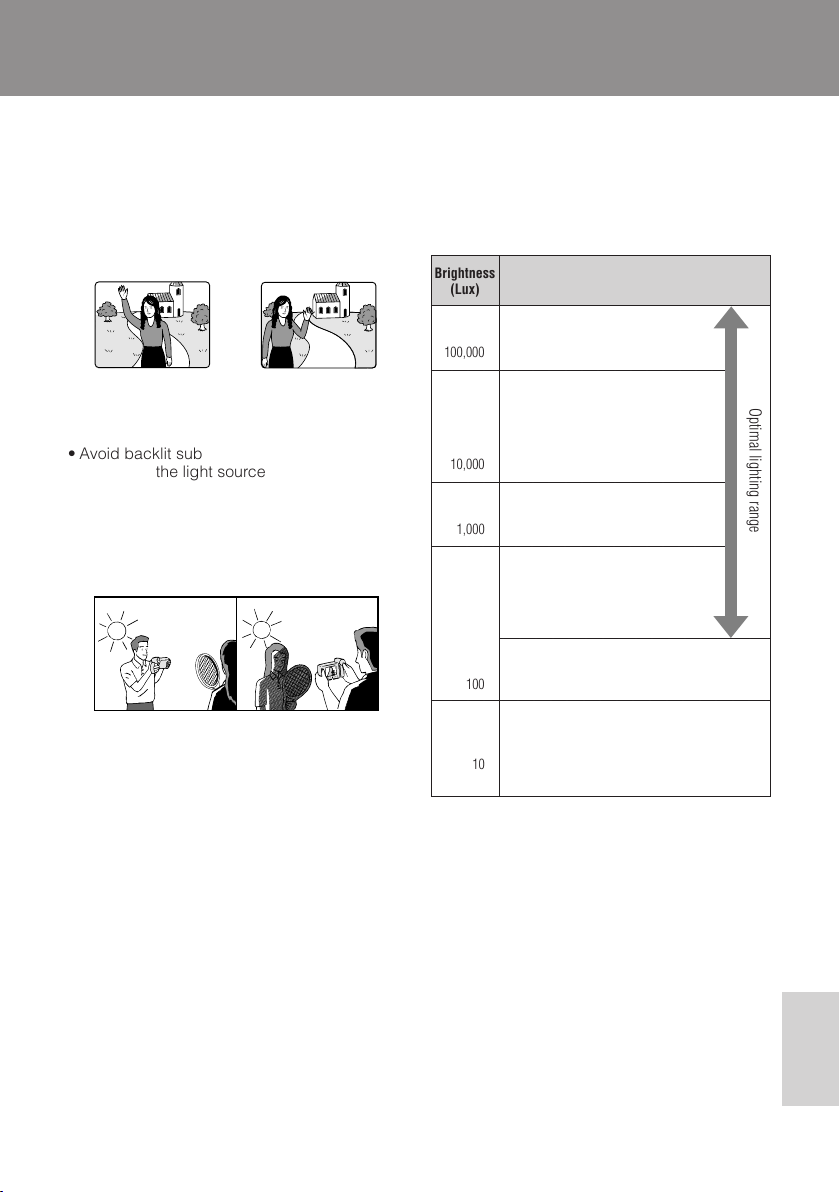
Hints for Better Shooting
• Position the subject in the centre of the
screen. When you are using auto focus,
whatever is in the centre of the screen is kept
in focus.
Position the subject in
the centre.
• Avoid backlit subjects. For the best picture,
shoot with the light source behind you.
When the background is brighter than the
subject, the subject often becomes too dark.
If you have to record with this lighting, use the
Gamma Brightness Compensation or correct
the exposure level to improve the picture (see
pages 28 and 44).
Light from behind Backlighting
• Before zooming, think about how to best
frame the shot. Frequent zooming produces
unattractive pictures. It also increases the
battery power consumption.
• When image shakes are noticeable during
zoomed-in telephoto shooting, use a tripod,
or push the Power Zoom control to the W side
to zoom out.
• Horizontal panning (lateral movement) and
tilting (vertical movement) should be done
slowly to emphasize the wide expanse of a
scene or the height of a building, and to
make scenes easy to watch during playback.
• Use a wide-angle setting for fast-moving
subjects.
Note:
• It may take longer to focus when zooming and
panning are used frequently.
Focus manually when
you need to position
the subject off centre
(see page 42).
Lighting
For clear, good-quality recording, 500 to
100,000 lux is needed. Recording is possible
with less light, but the picture quality may
suffer. Adequate lighting is also essential for
correct white balance.
Brightness
(Lux)
Blue sky
100,000
○ ○ ○ ○ ○ ○ ○ ○ ○ ○ ○ ○ ○ ○ ○ ○ ○ ○ ○
○ ○ ○ ○ ○ ○ ○ ○ ○ ○ ○ ○ ○ ○ ○ ○ ○ ○ ○
○ ○ ○ ○ ○ ○ ○ ○ ○ ○ ○ ○ ○ ○ ○ ○ ○ ○ ○
○ ○ ○ ○ ○ ○ ○ ○ ○ ○ ○ ○ ○ ○ ○ ○ ○ ○ ○ ○ ○
Note: The figures in the chart are approximations.
Clear day at noon (100,000)
Clear day at 10 am (65,000)
Clear day at 3 pm (35,000)
Cloudy day at noon (32,000)
Cloudy day at 10 am (25,000)
10,000
Cloudy day, one hour after sunrise (2,000)
Clear day, one hour before sunset (1,000)
1,000
Fluorescent light near window (1,000)
Factory floor (700–800)
Sales counter in department store (500–700)
Bowling alley (500)
Library (400–500)
Office with fluorescent lighting (400–500)
○ ○ ○ ○ ○ ○ ○ ○ ○ ○ ○ ○ ○ ○ ○ ○ ○
Fluorescent desk lamp (400)
Flashlight at 1 m (250)
100
Shop stairway (100)
During intermission at movie theatre (15–35)
Cigarette lighter at 30 cm (15–20)
Candles on birthday cake at 20 cm (10–15)
10
Candlelight
Tips on Good Lighting
In most outdoor, daytime scenes, natural
lighting is adequate for home videos. Indoors,
however, artificial lighting is usually required.
Video lights with halogen lamps provide the
most natural artificial light over a long operating
life.
Situation (Lux)
Optimal lighting range
References
48
References
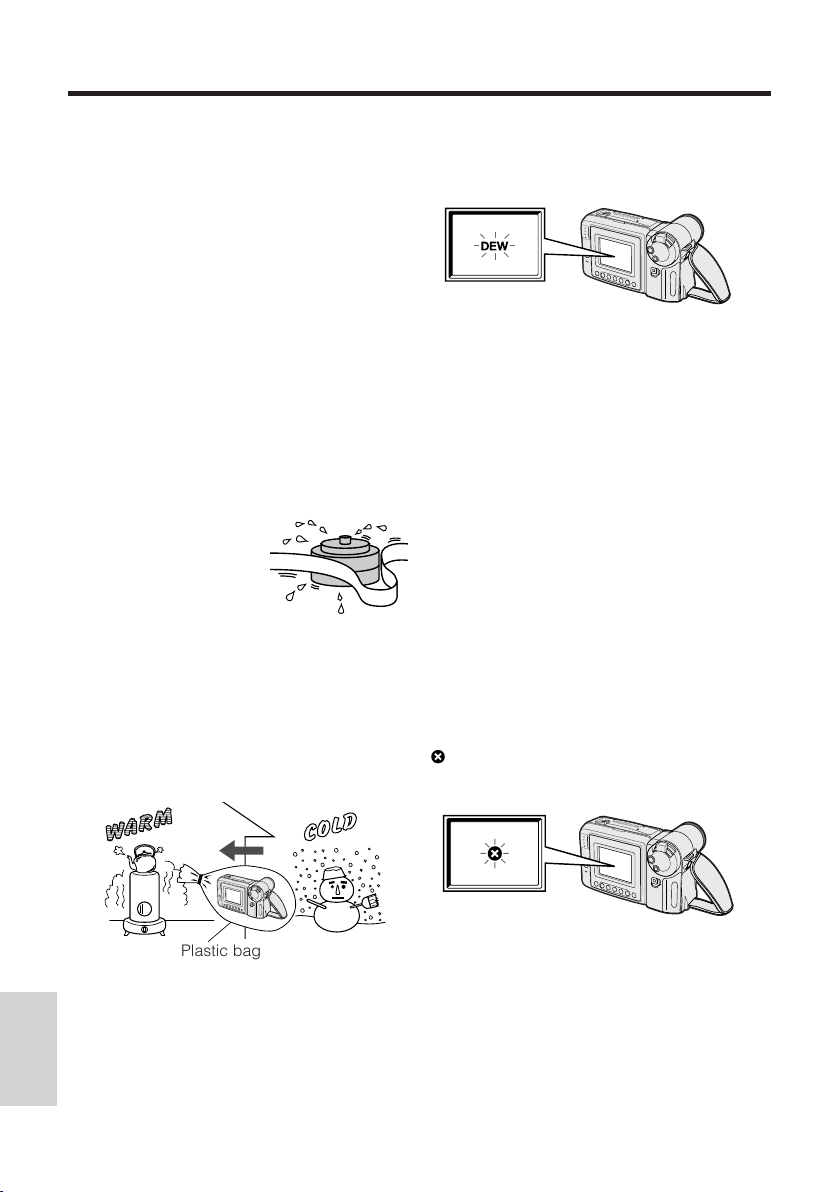
Dew Formation
• What is “dew formation”?
When cold water is poured into a glass, dew
drops form on the glass. This clinging of
water drops is called dew formation.
• When dew forms in your VIEWCAM.
Dew will gradually form on the head drum of
your VIEWCAM and make the video tape stick
to the head. This causes damage both to the
head and the tape. When dew formation
occurs, recording and playback may not
function properly.
Dew is likely to form in the following circumstances:
• When moving the VIEWCAM from a cold
place to a warm place.
• When placing the VIEWCAM in a cold room
which is then heated rapidly.
• When moving the VIEWCAM outdoors from
an air conditioned room.
• When placing the
VIEWCAM in the direct
path of air blowing from
an air conditioner.
• When placing the
VIEWCAM in a humid
room.
• How to prevent trouble due to dew
formation.
When using the VIEWCAM in a place where
dew formation is likely to occur, allow the
VIEWCAM and the video tape to acclimatise
to the surroundings for about one hour.
For example, when bringing the VIEWCAM
indoors after skiing, place it in a plastic bag.
• “Dew” warning feature
If dew forms, the word “DEW” flashes on the
LCD monitor, and the power will automatically
turn off in approximately 10 seconds.
Q If “DEW” flashes on the LCD monitor,
remove the cassette, leave the cassette
compartment open, and wait for a few hours
to allow the VIEWCAM to acclimatise to the
surrounding temperature.
W To use the VIEWCAM again, turn on the
power after waiting for a few hours. Be sure
that “DEW” has disappeared from the
monitor.
E Do not insert a cassette while “DEW” is
flashing; this may result in damage to the
tape.
R Since dew forms gradually, it may take 10 to
15 minutes before the dew warning feature
engages.
Dirty Video Heads
Using the VIEWCAM when the video tape is
dirty may cause the heads to clog, producing
noise on the recorded image or preventing the
image from being recorded at all.
If the video heads become clogged, the
indicator appears on the screen. Contact
your SHARP dealer for further advice or refer to
page 53 “Before Requesting Service”.
Plastic bag
Q Be sure to tightly seal the plastic bag
containing the VIEWCAM.
W Remove the bag when the air temperature
inside it reaches the temperature of the
room.
References
49
Note:
• Video head cleaning can be done by using a
commercially-available cleaning tape. However,
excessive use of the cleaning tape may also
cause damage to the video heads. Please read
the instructions accompanying the cleaning tape
carefully, before using it.
Replacing the Fluorescent Lamp
CHARGE
This VIEWCAM uses a fluorescent lamp to
backlight the LCD monitor. If the monitor
becomes dark or difficult to view, the
fluorescent lamp may need to be replaced.
Contact the nearest SHARP service centre or
your dealer for further advice.
Battery Pack
Battery pack consumption
• Recording with many starts and stops,
frequent zooming, and recording in low
temperatures will shorten actual recording
times. Accordingly, be sure to turn off the
power when not recording. Use of an auxiliary
battery pack is recommended to prevent
undesirable interruptions in your recording.
• Do not use an insufficiently charged or weak
battery pack. Use of such battery packs may
cause the power to automatically stop during
VIEWCAM operation to protect both the
battery pack and the unit.
Note:
• This VIEWCAM uses a Ni-MH (nickel-metal
hydride) type battery pack. Use only the
SHARP BT-H22 or BT-H32 battery packs.
They are designed specifically for use with
this VIEWCAM.
Battery pack life
The battery pack has a limited service life. If
the period of use becomes noticeably
shorter with a normal charge, the battery
pack is at the end of its service life. Replace
it with a new battery pack.
Extending battery pack life
• It is recommended that you use the battery
pack until its charge is fully drained and the
VIEWCAM is inoperable before recharging
the pack.
• Recharge the battery pack right before
recording. A battery pack stored for an
extended time will naturally wear down,
resulting in decreased recording time.
• Do not try to recharge a fully charged battery
pack before it has been discharged, as this
will cause deterioration of the battery’s
capacity.
• Store the battery pack in a dry, cool place.
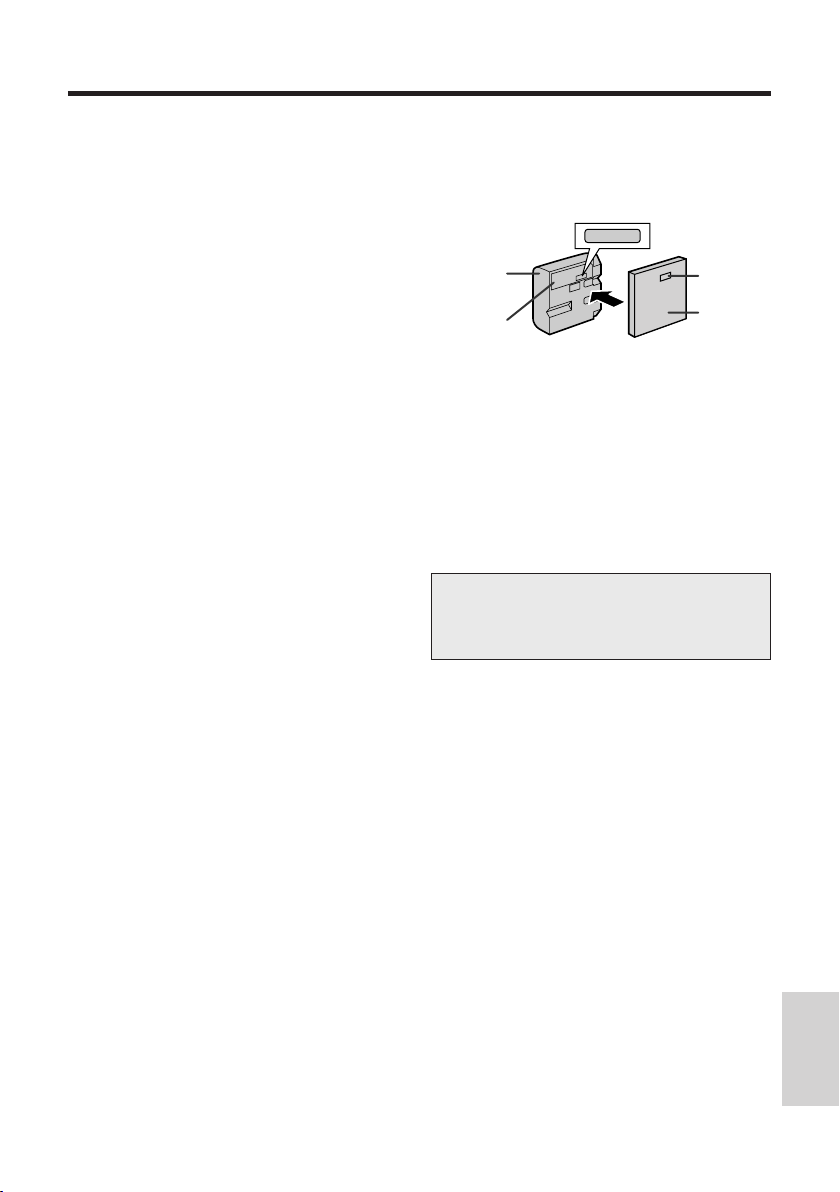
How to use the battery pack cover
• When storing a fully charged battery pack,
put the cover on it so that the “CHARGE”
mark printed on the label is seen through the
window, as shown.
Battery
pack
Label
• When storing a battery pack that is not fully
charged, put the cover upside down so that
only the battery pack casing is seen through
the window.
Caution:
• For safety reasons, put the cover on the
battery pack when it is not being used. If the
metal parts of the battery pack come in
contact with other metal items, there is a
danger that a short circuit may occur.
Battery power is consumed even when the
VIEWCAM’s power is turned off. If you are not
going to use your VIEWCAM immediately,
remove the battery pack (see page 8).
Window
Cover
Temperature during charging
• The Ni-MH (nickel-metal hydride) type BT-H22
and BT-H32 battery packs can be charged at
a temperature of 15°C to 30°C.
References
50

References
Video Cassette Tapes
Use only tapes with the mark with this
VIEWCAM.
To protect recordings against erasure
When a previously recorded cassette is used
again for recording, the previously recorded
material is erased. To protect a recording
against accidental erasure, slide the tab on the
cassette to cover the opening. (A red mark will
be exposed.) To record, slide the tab to open
the opening.
Notes:
• Do not insert anything into the erasure-protection
opening in the cassette.
• Do not put anything into the holes on the bottom
of the cassette.
• Do not store or place your video tapes in direct
sunlight, near heaters, or in places with
excessive moisture or dust.
• Do not keep video tapes near magnetic objects
as they may erase the recording.
• Do not drop or subject the tapes to excessive
shocks.
• Uneven tape winding will damage the tape. If the
tape is not properly wound, reinsert it in the
VIEWCAM and rewind the tape.
• Store the cassettes in their cases and stand
them upright.
Using Your VIEWCAM Abroad
Television signal standards and electrical
voltages and frequencies vary substantially
from country to country. When you are abroad,
check the sections below before using the AC
adapter or connecting the VIEWCAM to a TV.
AC Adapter (Supplied Accessory)
The supplied AC adapter is compatible with
50 Hz and 60 Hz electrical systems in the
range of 110 V to 240 V AC.
Television Signal Standards
In any country, you can always watch the video
picture by using the LCD monitor screen.
However, if you want to watch the picture on a
TV screen, the TV must be PAL system
compatible. PAL is used in the following
countries:
Germany, Great Britain, Sweden, Denmark,
Austria, Belgium, Switzerland, Italy, Spain,
Holland, Finland, Portugal, Norway,
Hong Kong, Thailand, Australia, New Zealand,
Singapore, Kuwait, China, etc.
References
51

Demonstration Mode
Cancelling Demo Mode
You can watch a brief demonstration of the
special VIEWCAM features in Demo mode.
If the demonstration appears on the screen
when you turn on the VIEWCAM for the first
time, cancel the Demo mode to use your
VIEWCAM.
Power switch
MENU button
Operation buttons
Watching the Demonstration
1 Make sure that there is no video
cassette in the VIEWCAM.
• If a cassette is in the VIEWCAM, Demo
mode does not work. Perform the
procedure on page 11 to remove it.
2 Hold down the Lock
button and slide the
Power switch to
CAMERA.
Lock button
1 During the demonstration, perform step
3 above.
2 Press or button (Q) to select
“DEMO MODE”, then press the SET
button (B) (W) to select “OFF”.
MENU
SET
FADE
REMOTE
DEMO MODE OF F
1
NORMAL
ON
3 Press the DISPLAY button to turn off the
menu screen.
Note:
• The demonstration will stop if you press the
MENU button. If you leave it for 60 seconds, or
turn the power off temporarily and then set the
Power switch to CAMERA, the demonstration will
begin again.
3 Press the MENU button until
appears.
• If MENU 2 appears on the screen,
press the PAGE button ( ) to display
MENU 1.
4 Press or (C or D) button (Q) to
select “DEMO MODE”, then press the
SET button (B) (W) to select “ON”.
• The demonstration begins.
MENU
SET
FADE
REMOTE
DEMO MODE ON
1
NORMAL
ON
References
52

References
Before Requesting Service
The following conditions do not always denote trouble. Therefore, perform the checks described below
before calling for service. If the problem cannot be corrected by the use of this guide, remove the mains
plugs from the wall socket, and contact the dealer or supplier from whom the unit was purchased in
order to obtain service. Where this is not possible, please visit our web-site www.sharp.co.uk/support.
Customers without Internet access may telephone 08705 274277 during office hours (or (01)676 0648 if
telephoning from Ireland).
Certain replacement parts and accessories may be obtained from our main parts distributor, who can be
contacted on the following numbers:
WILLOW VALE ELECTRONICS LTD.: 0121 766 5414
In the unlikely event of this equipment requiring repair during the guarantee period, you will need to
provide proof of the date of purchase to the repairing company. Please keep your invoice or receipt,
which is supplied at the time of purchase.
Symptom
No power.
Power
REC START/STOP button does
not work.
Power suddenly turns off.
Auto focus does not work.
Bright subject produces wide
vertical lines.
CAMERA mode
Automatically zooms out without
operating Zoom control.
Display automatically changes
in Camera mode.
Possible cause
Power source is not properly connected.
Battery pack is not charged.
Dew in VIEWCAM.
Safety function is in effect.
Erasure-protect tab on video cassette is closed.
VIEWCAM left in Recording Standby mode for 5
minutes.
Manual Focus mode is engaged.
Zoom used on close subject.
Subject has little contrast in brightness, or is full
of horizontal or vertical stripes.
Occurs when shooting subject with strong
contrast to the background. Does not indicate a
malfunction.
VIEWCAM is unable to focus when zooming in
on subject within 1.5 m, and automatically
zooms out until it focuses on subject.
No subject in the field of view.
VIEWCAM is in Demo mode.
Suggested solution
Connect power source properly (pp. 8, 10).
Charge battery pack sufficiently (p. 9).
Wait until dew dries (p. 49).
Set Power switch to OFF and remove battery
pack; wait for 2 seconds, then reinstall battery
pack and turn on power (p. 8).
Open tab or use a new cassette (p. 51).
Set Power switch to OFF and then back to
CAMERA.
Set to Auto Focus mode (p. 42).
Zoom out from subject (p. 17).
Focus manually (p. 42).
——
——
Direct lens to some subject, or set zoom to
widest angle before shooting (p. 17).
Set DEMO MODE menu item to “OFF” (p. 52).
References
53

Symptom
Tape stops during rewind or fast
forward.
No image appears on connected
TV screen.
VCR mode
Cannot play back, rewind or fast
forward tape.
Video noise in image.
Cassette will not eject.
No image on monitor.
Monitor picture is hard to see.
General
CHARGE indicator flashes in red
when charging battery pack.
Cannot edit to connected VCR.
Lens makes rattling sound when
VIEWCAM is moved in VCR
mode or with power off.
Possible cause
Counter is in memory mode.
Video input channel on TV or TV channel is not
selected properly.
Audio/video cable is not properly connected.
Position at beginning or end of tape.
Dirty video heads.
Old or worn tape.
Power source is not properly connected.
Battery pack is not charged.
VIEWCAM is recording.
Backlight has been turned off.
Fluorescent lamp is burned out.
Inappropriate picture adjustments.
AC adapter or battery pack may have
malfunctioned.
Audio/video cable is not properly connected.
Does not indicate a malfunction.
Suggested solution
Disengage the memory mode (p. 36).
Select video input channel or TV channel
properly (p. 20).
Connect audio/video cable properly (p. 20).
Rewind or fast forward tape to desired point
(p. 19).
Call for service (p. 53).
Use a new cassette.
Connect power source properly (pp. 8, 10).
Charge battery pack sufficiently (p. 9).
Stop tape and try again (p. 16).
Turn on backlight (p. 46).
Call for service (p. 53).
Adjust picture (p. 45).
Call for service (p. 53).
Connect audio/video cable properly (p. 47).
——
Notes:
• This unit is equipped with a microprocessor. Its performance could be adversely affected by external electrical
noise or interference. If this should happen, turn off the power and disconnect the unit from any power sources,
including the lithium battery, etc. Then reconnect the power sources to resume operation.
• If the characters displayed on the monitor screen appear to malfunction, disconnect the power source and
remove the lithium battery, then reconnect the power source, insert the lithium battery, and turn the power on
again. The characters on the monitor should be normal. Set the date and time, then resume operation.
References
54

References
Specifications
VIEWCAM
Signal System: PAL standard
Recording System: 2 rotary heads, helical scanning system
Recording/Playback Time: 120 minutes (P5-120)
Lens Filter Diameter: 46 mm
Colour Temperature Compensation: Auto white balance with white balance lock
Minimum Illumination: 0.8 lux* (with gain-up, F1.4)
Video Output Level: 1.0 Vp-p 75-ohm unbalanced
Audio Output Level: ⳮ8 dBs, impedance less than 2.2 kohms
Power Requirement: DC 3.6 V (with battery pack)
Power Consumption: 4.9 W (during camera recording in full auto mode with zoom
Operating Temperature: 0⬚C to Ⳮ40⬚C
Operating Humidity: 30% to 80%
Storage Temperature: ⳮ20⬚C to Ⳮ60⬚C
Dimensions (approx.): 183 mm (W) ⳯ 109 mm (H) ⳯ 99 mm (D)
Cassette: 8 mm video tape, MP type
Tape Speed: 20.051 mm/second
Pickup Device:1⁄4 ⬙ (6.4 mm, effective size: 4.5 mm) CCD image sensor (with
approx. 320,000 pixels including optical black)
Lens: 16⳯ power zoom lens (F1.4, f⳱4.0–64.0 mm), and full-range
auto focus
Monitor: 3⬙ (7.5 cm) full-colour LCD screen (TFT active matrix)
Microphone: Electret monaural microphone
Speaker Output: 200 mW
DC 7.0 V (with AC adapter)
motor off and backlight in normal mode)
Weight (approx.): 710 g (without battery pack, lithium battery, video cassette, and
lens cap)
AC Adapter (UADP-0313TAZZ)
Power Requirement: AC 110–240 V, 50/60 Hz
Power Consumption: 15 W
Dimensions (approx.): 68 mm (W) ⳯ 37 mm (H) ⳯ 130 mm (D)
Specifications are subject to change without notice.
*Minimum illumination: Since there is no widely accepted testing procedure for determining minimum
DC Output: 7.0 V
Weight (approx.): 233 g
illumination capability, lux ratings are comparable only between models from the
same manufacturer.
References
55

LIQUID CRYSTAL DISPLAY CAMCORDER
OPERATION MANUAL
SHARP CORPORATION
PAL
Please read this operation manual
carefully before using the VIEWCAM.
If you require any advice or assistance
regarding your Sharp product, please
visit our web-site www.sharp.co.uk/
support. Customers without Internet
access may telephone 08705 274277
during office hours (or (01)676 0648
if telephoning from Ireland) .
SHARP ELECTRONICS (U.K.) LTD.
Sharp House, Thorp Road, Newton Heath
Manchester M40 5BE
Printed in Malaysia
TINSE0440TAZZ
02P01-M-G
 Loading...