

Page 1

ADVANCED OPERATION
AUDIO AND YOUR VCR
HI-FI STEREO SOUND
Stereo sound is possible from this VCR if you have a stereo TV connected to the VCR with a
scart lead, or audio equipment connected with audio phono leads. The VCR is normally set
so that stereo sound is possible. The sound output from the VCR is controlled by the
AUDIO OUT button on the remote control. If you wish to change the sound output you can
use the
AUDIO OUT button as follows:
• Press
• Press
• Press
• Pressing
AUDIO OUT once. The LEFT audio channel will be sent to BOTH speakers. L will
appear on the VCR display.
AUDIO OUT twice. The RIGHT audio channel will be sent to BOTH speakers. R will
appear on the VCR display.
AUDIO OUT three times. The MONO track will be sent to BOTH speakers. L and R
will disappear from the VCR display.
AUDIO OUT a fourth time, normal Hi-Fi stereo sound will be heard. L and R will
appear on the VCR display.
NICAM Hi-Fi STEREO SOUND
Your VCR can receive and record programmes broadcast in NICAM sound (the factory preset condition for NICAM is AUTO). NICAM sound may not be stereo, this depends on the
programme being received.
Audio is automatically recorded in two different ways:
(i) Hi-Fi: Using specialised rotary heads, two audio signals are recorded on to the tape. These
will be stereo, mono or bilingual depending on the sound being received.
(ii) Normal: A mono recording is also made on the conventional analogue audio track.
4. Press MENU to display the main menu on the
screen.
5. Press [ / ] to select MODE.
➝NICAM AUTO OFF
COLOUR AUTO PAL
6. Press SET. NICAM will be selected.
7. Press [ / ] to select OFF.
8. Press SET, to return to the menu screen.
9. Press MENU, to exit to normal screen.
NOTES:
• If the tape being played back does not carry sound recorded on Hi-Fi tracks, L and R
will not appear on the display.
• lf the sound contains ‘crackling’ or ‘popping’ noises the sound quality may be
improved by adjusting the tracking using CHANNEL / .
• If the poor quality is for a long period the VCR will automatically select the mono track
and the sound will be in mono.
• Not all TV transmitters provide NICAM sound. In this case the VCR automatically
switches to receive the mono signal.
• NICAM sound may not be stereo.
If problems persist contact the SHARP Helpline on tel: 08705-274277 (office hours)
or www.sharp.co.uk/support
20
Page 2
ADVANCED OPERATION
AUDIO AND YOUR VCR
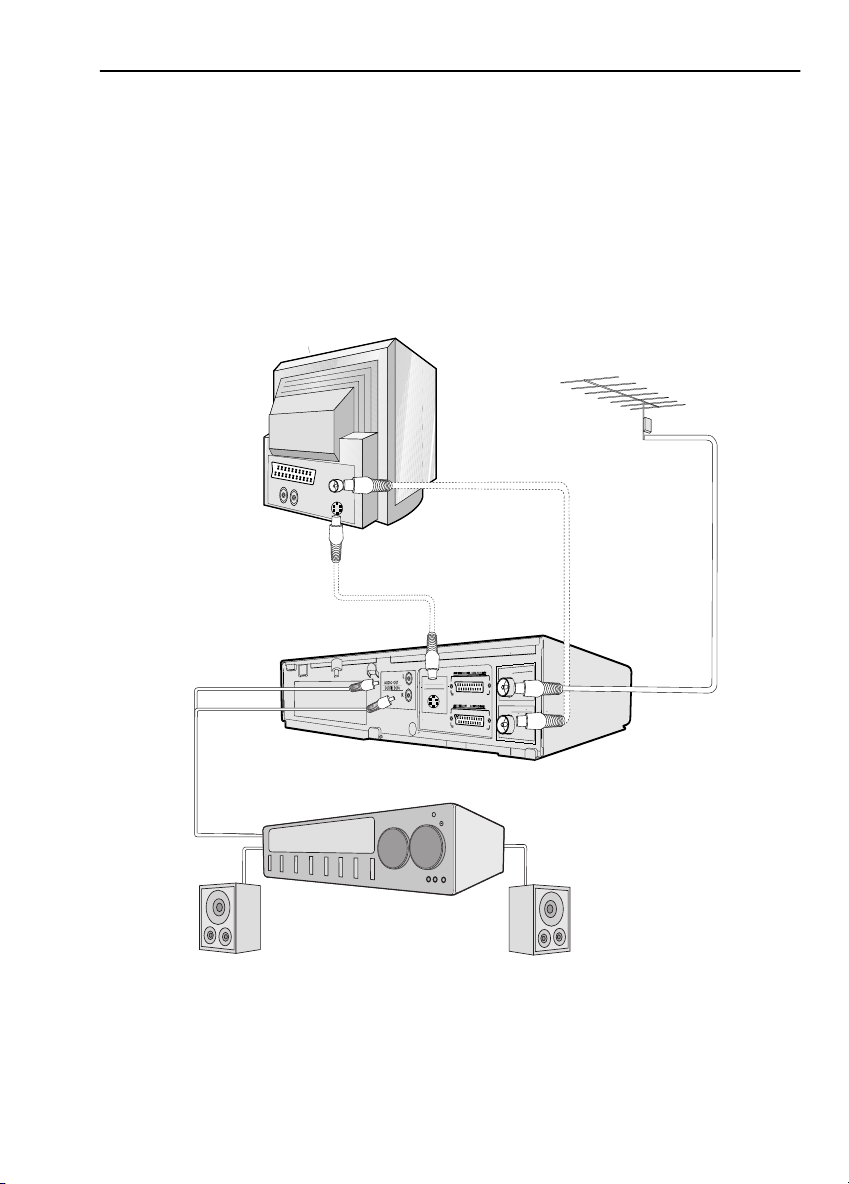
CONNECTING TO AUDIO EQUIPMENT
The diagram below shows how to connect your VCR to audio equipment. When connected
in this way stereo sound is possible from the speakers.
EXISTING AERIAL
CABLE
BACK OF
TELEVISION
AUDIO OUT
L and R
AUDIO PHONO LEADS
(NOT SUPPLIED)
S-VIDEO CABLE
S-VIDEO OUT
G
SORTIE SON S-VIDEO
D
+
AMPLIFIER
RF CONNECTION CABLE
ANTENNA IN
ENTREE ANTENNE
RF OUT
SORTIE ANTENNE
RF-OUT
AERIAL IN
If problems persist contact the SHARP Helpline on tel: 08705-274277 (office hours)
or www.sharp.co.uk/support
21
Page 3
ADVANCED OPERATION
AUDIO DUBBING
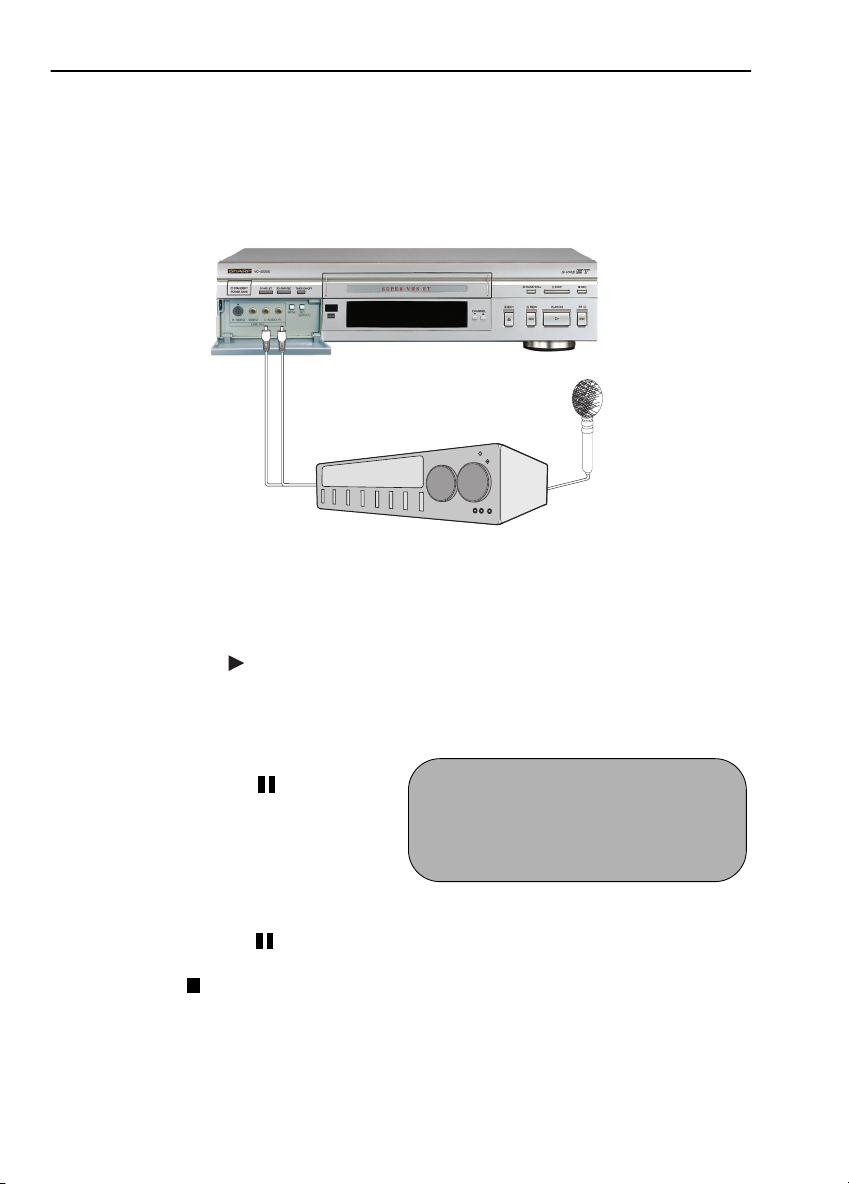
RECORDING SOUND ON TO A VIDEO TAPE (AUDIO DUBBING)
This feature enables you to add narration or background music to a pre-recorded tape.
• The audio signal will be recorded on the mono track. The Hi-Fi track will remain
unchanged..
Connect your
audio equipment
to AUDIO IN L-R
terminals on the
front of your VCR.
If a microphone is to be used,
connect it to your audio
equipment
1. Connect the audio source to the AUDIO
IN L-R terminals on the front of the VCR as
shown above.
2. Insert the pre-recorded tape into the
VCR.
3. Press PLAY/X2 ( ) to view the
recording.
4. If you wish to listen to the original Hi-Fi
track while you are recording the new
dubbed audio track you will need to set
AUDIO MIX to ON in the mode menu.
5. Press PAUSE/STILL ( ) when you
reach the point on the tape where you
want audio dubbing to start.
6. Press A.DUB (A.DUB will be shown on
your TV)
NOTE: The input source will be
automatically changed to L3 (Front
phono jacks)
7. Press PAUSE/STILL ( ) , to start audio
dubbing.
8. Press STOP ( ) , to finish audio dubbing
(
A.DUB will disappear from your TV)
+
AUDIO SOURCE
II A. DUB L3
SP
If problems persist contact the SHARP Helpline on tel: 08705-274277 (office hours)
or www.sharp.co.uk/support
22
Page 4
ADVANCED OPERATION
AUDIO DUBBING
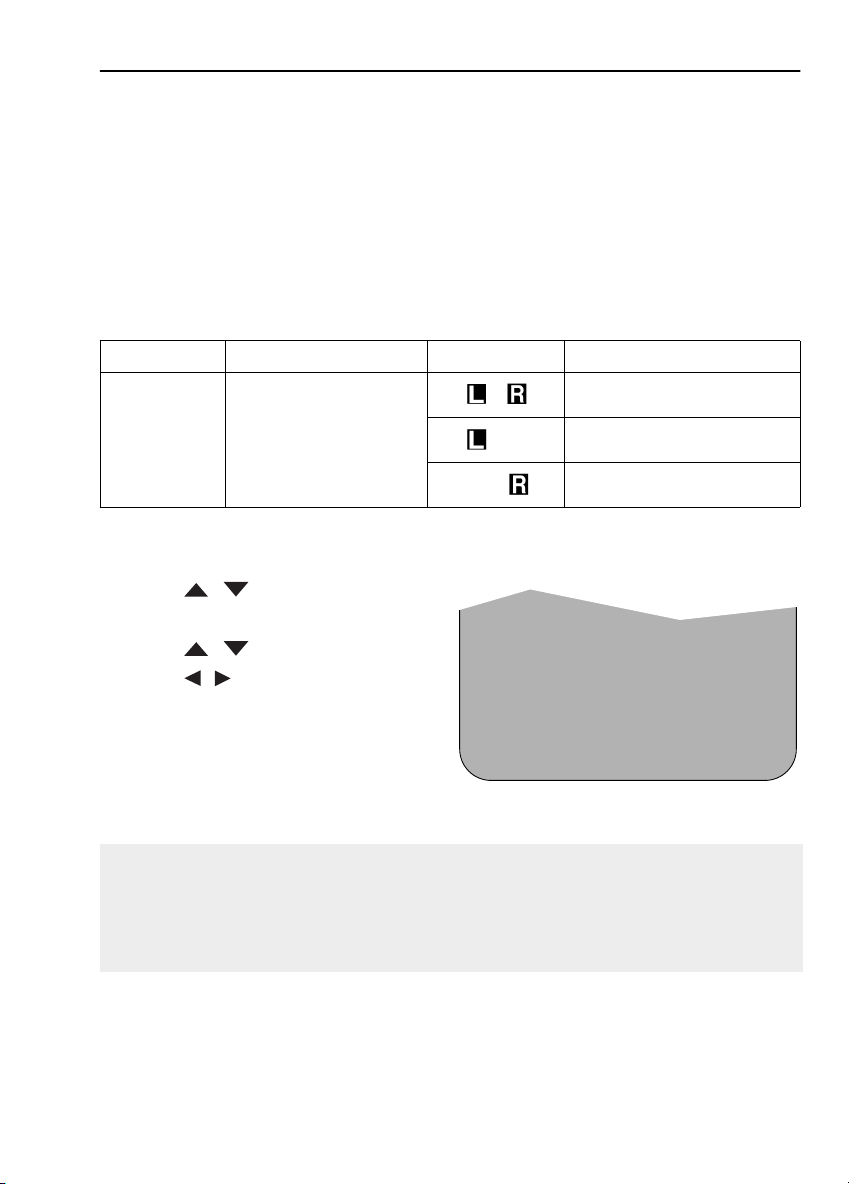
PLAYING BACK AN AUDIO DUBBED TAPE
• If you want to listen to the original and the new dubbed audio signal simultaneously, you will
need to set AUDIO MIX to ON.
• You can change the audio output by pressing the AUDIO OUT button on the remote
control. Refer to the table below.
AUDIO MIX AUDIO OUT MODE VCR DISPLAY RESULT
Original Hi-Fi audio (L&R
channels) and dubbed audio
ON
Hi-Fi and Mono audio
1. Press MENU, to display the main menu
on the screen.
2. Press [ / to select MODE.
3. Press SET.
4. Press [ / ] to select AUDIO MIX.
5. Press [ / ] to select ON.
6. Press SET, to return to the menu screen.
7. Press MENU, to exit to the normal screen.
AUDIO MIX ON OF F
➞
16: 9 AUTO OF F
POWERSAVE ON OF F
▲▼ :SELECT :CHANGE
SET :ENTER MENU :EXIT
Original Hi-Fi audio (L channel)
plus dubbed audio
Original Hi-Fi audio (R channel)
plus dubbed audio
MODE MENU SCREEN
▲▲
2/ 2
▲▲
▲
▲
NOTES: .
• Do not start audio dubbing until AUTO or MANUAL tracking has been completed as the
audio signal will not be recorded correctly.
• Because the audio signal is recorded onto the mono track any previous recording on
this track will be erased.
• If AUDIO MIX in the mode menu is set to OFF, no sound will be heard during audio
dubbing.
If problems persist contact the SHARP Helpline on tel: 08705-274277 (office hours)
or www.sharp.co.uk/support
23
Page 5

ADVANCED OPERATION
PR
DIGITAL DISPLAY
TIME OF DAY
Shows current time of day, if the clock is set. Press
DISPLAY until the time of day appears. For example,
21:20 appears:
Operation Mode
Shows status of tape. Press DISPLAY until the display
appears, for example:
TAPE COUNTER AND ZERO BACK
Tape counter measures the current position of the video tape in real time. ZERO BACK uses the
tape counter to determine a specific point on a tape you may wish to return to.
PR
PR
1. Press DISPLAY until tape counter appears, for
example:
2. To identify the current position on a video tape
press
CLEAR on the remote control or COUNTER
RESET on the VCR’s control
panel and the tape counter will appear:
When you wish to return to this position on the video tape, press
rewind/advance to this point.
ZERO BACK The tape will
NOTE:
• The tape counter will only operate on recorded sections of tape.
If problems persist contact the SHARP Helpline on tel: 08705-274277 (office hours)
or www.sharp.co.uk/support
24
PR
PR
Page 6

ADVANCED OPERATION
SPSPAM PM
LP
VPS PD
VCR
DEC
AV
PR
STO P
PLAYBACK OF A VIDEO TAPE
CHECKING THE AMOUNT OF TAPE REMAINING
When you load a video tape into the VCR it can calculate approximately the amount of
video tape remaining in hours and minutes. This is useful in determining whether or not there is
sufficient tape left to make a recording.
When a video tape is playing, the amount of tape remaining is calculated for you
automatically.
To display the amount of video tape remaining:
1. Load the video tape into the VCR
2. Press DISPLAY on the remote control as many times as necessary until “R” appears on
the VCR display. The tape will wind forward and then return to its original position. The
tape remaining will be shown on the VCR display in hours and minutes.
By pressing the
change between long play and standard play
For example, if 1 hour 23 minutes is left on the tape
In long play 2 hour 46 minutes is left on the tape:
NOTES:
• Do not interrupt the tape remaining calculation.
• If less than 5 minutes of tape remains the display will flash.
TAPE SPEED button on the remote control the remaining time will
PR
PLAYING BACK A VIDEO TAPE REPEATEDLY
You can set your VCR to automatically rewind at the end of playing a video tape and replay
the entire tape again. REPEAT will appear on the on-screen display when selected.
To use this feature:
1. Press MENU to display the main menu on the
screen.
MODE MENU SCREEN
2. Press [ / ] to select MODE.
3. Press SET.
4. Press [ / ] to select REPEAT.
5. Press [ / ] to select ON.
6. Press SET.
7. Press MENU to return to normal screen.
If problems persist contact the SHARP Helpline on tel: 08705-274277 (office hours)
or www.sharp.co.uk/support
25
BLUE MUTE AUTO OFF
➝REPEAT ON OFF
AUD IO MI X ON OFF
16.9 AUTO OFF
POWERSAVE ON OFF
2/2
:SELECT : CHANGE
S E T : EN T ER M E N U : E X I T
Page 7

ADVANCED OPERATION
PLAYBACK OF A VIDEO TAPE
PLAYING BACK AN NTSC TAPE
NTSC (National Television Standards Committee) is a different TV standard to PAL and is used
in some Non-European Countries. Your VCR can playback pre-recorded NTSC tapes onto a
PAL system TV, but cannot record an NTSC signal onto a video tape.
Note that..
• You cannot record NTSC signals or dub NTSC tapes onto other VCR’s from this VCR.
• You cannot use Slow speed, Still frame, Double Speed, Frame Advance or Tape
Remaining with a pre-recorded NTSC tape.
• On some televisions, the picture may appear in black and white or there may be no
picture. This does not indicate a fault with your VCR.
• On some televisions, the picture may shrink vertically causing black bands to appear at
the top and bottom of your screen.
• On some televisions, the played-back picture may roll vertically, this does not indicate a
fault with your VCR.
SUPER-VHS (S-VHS)
Your VCR is capable of recording and playing back on an S-VHS cassette. This standard of
video cassette will give you increased picture quality. You will only be able to record S-VHS if
S-VHS in the Mode Menu is selected to AUTO.
If problems persist contact the SHARP Helpline on tel: 08705-274277 (office hours)
or www.sharp.co.uk/support
26
Page 8

ADVANCED OPERATION
MODE SELECTION
1.
MENU
V I DEOP L US
TIMER
MOD E
SET UP
: SELECT
SET :ENTER MENU: EXI T
2.
NICAM AUTO OF F
→
COLOUR AUTO PAL
BLUE MUTE AUTO OF F
REPEAT ON OFF
AUD IO MI X ON OFF
16:9 AUTO OFF
POWERSAVE AUTO OFF
SET :ENTER MENU: EX I T
2/2
: SELECT
: CHANGE
Press MENU to display the main menu on the
screen. The main menu has four options
including MODE.
1. To access the mode menu highlight MODE
using the [ / ] buttons, then press
SET.
2. Highlight the option to be changed using
the [ / ] buttons. Press [ / ] to
select AUTO, ON or OFF as appropriate,
SET then MENU to return to the
press
normal screen.
NICAM. Selecting OFF will disable the
NICAM sound reception.
COLOUR. If the VCR is playing a poor quality
recording, the picture may turn black and
white. Selecting PAL may reduce this
(depending on the recording), although
coloured speckles will appear on black and
white recordings.
BLUE MUTE. This enables the blue background colour. That is, the TV screen will be blue if
a TV channel with no signal is selected, an unrecorded section of tape is played or the quality
of the recording on the tape is poor. Select OFF to disable this feature.
REPEAT. If you want to playback repeatedly an entire video tape, this feature will
automatically rewind at the end of the tape and replay. This function enables or disables this
feature.
AUDIO MIX. When this function is switched ON the VCR will playback both Hi-Fi and Mono
audio tracks.
If problems persist contact the SHARP Helpline on tel: 08705-274277 (office hours)
or www.sharp.co.uk/support
27
Page 9

ADVANCED OPERATION
MODE SELECTION
16:9 PLAYBACK AND RECORDING.
This feature allows the PLAYBACK and RECORDING of wide screen format signals (16.9) which
should automatically change the picture size setting on a wide screen TV. To allow the
operation of this feature, ensure 16:9 mode is set to AUTO in the MODE menu.
A scart connection must be used between the VCR (SOCKET L1) and the TV.
During PLAYBACK of a 16:9 encoded tape the TV should switch to (Widescreen) 16:9 mode.
NOTES:
• Not all pre recorded tapes are compatible with 16:9 playback.
• This feature must be supported by TV’s equipped with 16:9 switching.
• 16:9 format recording can only be made from L2 scart input.
POWERSAVE. This feature allows the VCR power consumption to be ≤1.5 Watt in
POWERSAVE mode. Auto POWERSAVE mode will engage if the VCR is not operated for 3
hours.
S - VHS AUTO OF F
L1 OUT COMP . Y/C
L2 IN COMP. Y/C
: SELECT
SET :ENTER MENU : EX I T
2/2
: CHANGE
S-VHS. Selecting Auto will enable your VCR to
record in Super-VHS format provided an S-VHS
cassette is being used, or in the S-VHS ET
(Expansion Technology) format when using a
VHS cassette and the S-VHS ET button on the VCR
front panel is pressed (S-VHS ET will only work in SP
mode).
L1 OUT. You can select the output of L1 to be either a composite signal where one path is
used for the video information or a Y/C signal, where the luminance (Y) and the colour (C)
information are separated and two paths are used for the video information. This will enhance
picture quality.
L2 IN. The input of L2 can be changed between composite input or Y/C input. Y/C input will
enhance the picture quality.
If problems persist contact the SHARP Helpline on tel: 08705-274277 (office hours)
or www.sharp.co.uk/support
28
Page 10

ADVANCED OPERATION
SEARCHING THE VIDEO TAPE
SKIP SEARCHING THE VIDEO TAPE
You can search the tape in 30 second time intervals. To do this follow the procedure below:
1. Press PLAY/X2 ( ) to start the video tape playing.
2. Press SKIP SEARCH on the remote control.
The number of times you press
determines the forward search time.
• After searching, normal playback
will resume automatically.
SKIP SEARCH
DIGITAL PROGRAMME SEARCH SYSTEM (DPSS)
Your VCR records a marker signal on the tape at the start of each recording. These signals can
be used later to locate the starting point of a recording.
DPSS to locate a previous programme or the next programme.
Press
For example,
/
1. Load the video tape into the VCR.
2. Press DPSS three times. The number 3 will appear on the on-screen display, and the
VCR will fast forward to locate the third recording after the current one.
3. Press DPSS once. A -1 will appear on the on-screen display and the VCR will rewind
to locate the beginning of the current recording.
1 press = 30 seconds
2 presses = 1 minute
3 presses = 1 minute 30 seconds
4 presses = 2 minutes
DPSS
Number
DPSS Signals
RECORDING 1
RECORDING 2
-1
Current tape position
RECORDING 3
+1
RECORDING 4
+2
+3
Fast ForwardRewind
RECORDING 5
4. To cancel the search before it has finished, press STOP ( ) or PLAY/X2 ( ) .
NOTES:
• Recordings must be longer than 3 minutes..
• The starting point of playback may vary.
• This feature will only work with video tapes recorded on a VCR with the DPSS feature.
If problems persist contact the SHARP Helpline on tel: 08705-274277 (office hours)
or www.sharp.co.uk/support
29
Page 11

ADVANCED OPERATION
REMOTE CONTROL OPERATION OF TV
In addition to operating the VCR the remote control will also operate basic functions on TVs,
including brands other than SHARP.
SETTING UP THE VCR REMOTE
CONTROL TO OPERATE THE TV
1.
Switch on the TV. Open the door on the
remote control and point the unit at the TV.
Hold down
2.
remote control and the appropriate
button for the TV from the list shown, for 2
seconds. For example for a SHARP TV, press
TV BRAND SET
3.
The TV will enter standby mode to confirm
the correct code has been entered.
To turn the TV on from standby mode hold
4.
TV BRAND SET
about 2 seconds.
TV BRAND SET
and
and
on the VCR
1
.
(Sharp TV) for
1
CONTROLLING THE TV WITH THE VCR REMOTE CONTROL
•
TV OPERATE
•
TV INPUT SELECT
TV CH
•
•
TV VOL
• Certain models of TV do not use standard codes for their brand. In this case hold down
TV BRAND SET
mode (You will need to reset when remote control batteries are replaced).
• SHARP cannot guarantee the VCR remote control will operate your TV.
Switches the TV to and from Standby Mode.
Determines which input to the TV is to be displayed on the
screen.
/ Increases or decreases the volume.
/
Changes the TV channels.
+
, then press each of the buttons in the list until the TV enters stand-by
TV BRAND BUTTON TV BRAND BUTTON
SHARP 1 TOSHIBA 9
PHILIPS 2 PANASONIC 0 or
THOMSON 3 or 4 HITACHI INPUT SELECT
GRUNDIG 5 SANYO MODE OSD
FERGUSON 6 JVC DISPLAY
ITT NOKIA 7 MITSUBISHI AUDIO OUT
SONY 8
If problems persist contact the SHARP Helpline on tel: 08705-274277 (office hours)
or www.sharp.co.uk/support
30
Page 12

ADVANCED OPERATION
R
SORTIE
S-VIDEO OUT
SORTIE SON S-VIDEO
RECORDING FROM OTHER EQUIPMENT
You can record video and audio signals from various sources, for example a camcorder, onto
a video tape using your VCR.
For example, recording from a camcorder connected to LINE 2 IN/DECODER on your VCR:
Mono/Stereo Camcorder
1.
Connect your signal source (e.g. Camcorder, Digital Camera, etc.) to the desired scart
socket on he back of the VCR using the manufacturers recommended cable (not
supplied).
Ensure that the tape on which you
2.
wish to record is inserted into the VCR..
Press
3.
4.
5.
6.
INPUT SELECT
control until the VCR display shows
L2
.
If you wish to record from a source
connected to LINE 1 IN/OUT, select
If you wish to record from a source
connected with audio phono leads to
the sockets on the front of the VCR
and S-VIDEO connection lead, select
L3
.
Press
to start the recording.
REC
Optional SCART connection (not supplied).
(R)
(L/MONO)
VIDEO
AUDIO
AUDIO
ANTENNA IN
ENTREE ANTENNE
RF OUT
SORTIE ANTENNE
INPUT SELECT
78
on the remote
G
S-VIDEO OUT
SORTIE SON S-VIDEO
D
0
L1
.
OW
9
INPUT SELECT
DPSS
AUDIO OUTAM/PM
ZERO BACK
L - AUDIO - R
VIDEO
S-VIDEO
LINE IN 3
NOTES:
• There are many different ways of connecting external equipment to your VCR. Please
refer to your equipment operation manuals for further information.
• S-Video connection has priority over the Video connection when both are connected
to the L3 input.
• To Record/Playback audio when connected via the S-Video input you must also
connect the audio phono leads (L3).
If problems persist contact the SHARP Helpline on tel: 08705-274277 (office hours)
or www.sharp.co.uk/support
31
Page 13

ADVANCED OPERATION
DECODER SWITCHING OPERATION
If you connect a separate decoder to the VCR connected to L2 as previously shown, you will
need to set the decoder function to ON in order to record the descrambled signal and/or
watch it on your TV. Now, when the VCR receives a scrambled signal it is output via LINE 2
terminal to the decoder. The decoder then outputs the descrambled signal back to LINE 2
terminal and the signal can be recorded. The VCR outputs the descrambled signal to your TV
through the LINE1 terminal and you can watch the descrambled picture.
When making recordings using a separate decoder connected as shown remember to leave
the decoder function ON.
If you connect a decoder unit to the VCR, the decoder unit provides a switching signal which
will automatically allow your TV to display the descrambled signal routed through the VCR. To
use this feature make sure that the VCR is connected to both TV and decoder unit by SCART
leads. Then:
• Press
• Press
If you switch the decoder function ON when connected to a decoder unit as shown you will
NOT be able to watch the descrambled picture in TV mode or in VCR mode.
STANDBY
[TV/VCR]
appear on the display.
If problems persist contact the SHARP Helpline on tel: 08705-274277 (office hours)
to place the VCR in Stand-by mode, OR
on the remote control to place the VCR in ‘VCR mode’. ‘VCR’ will
or www.sharp.co.uk/support
32
 Loading...