

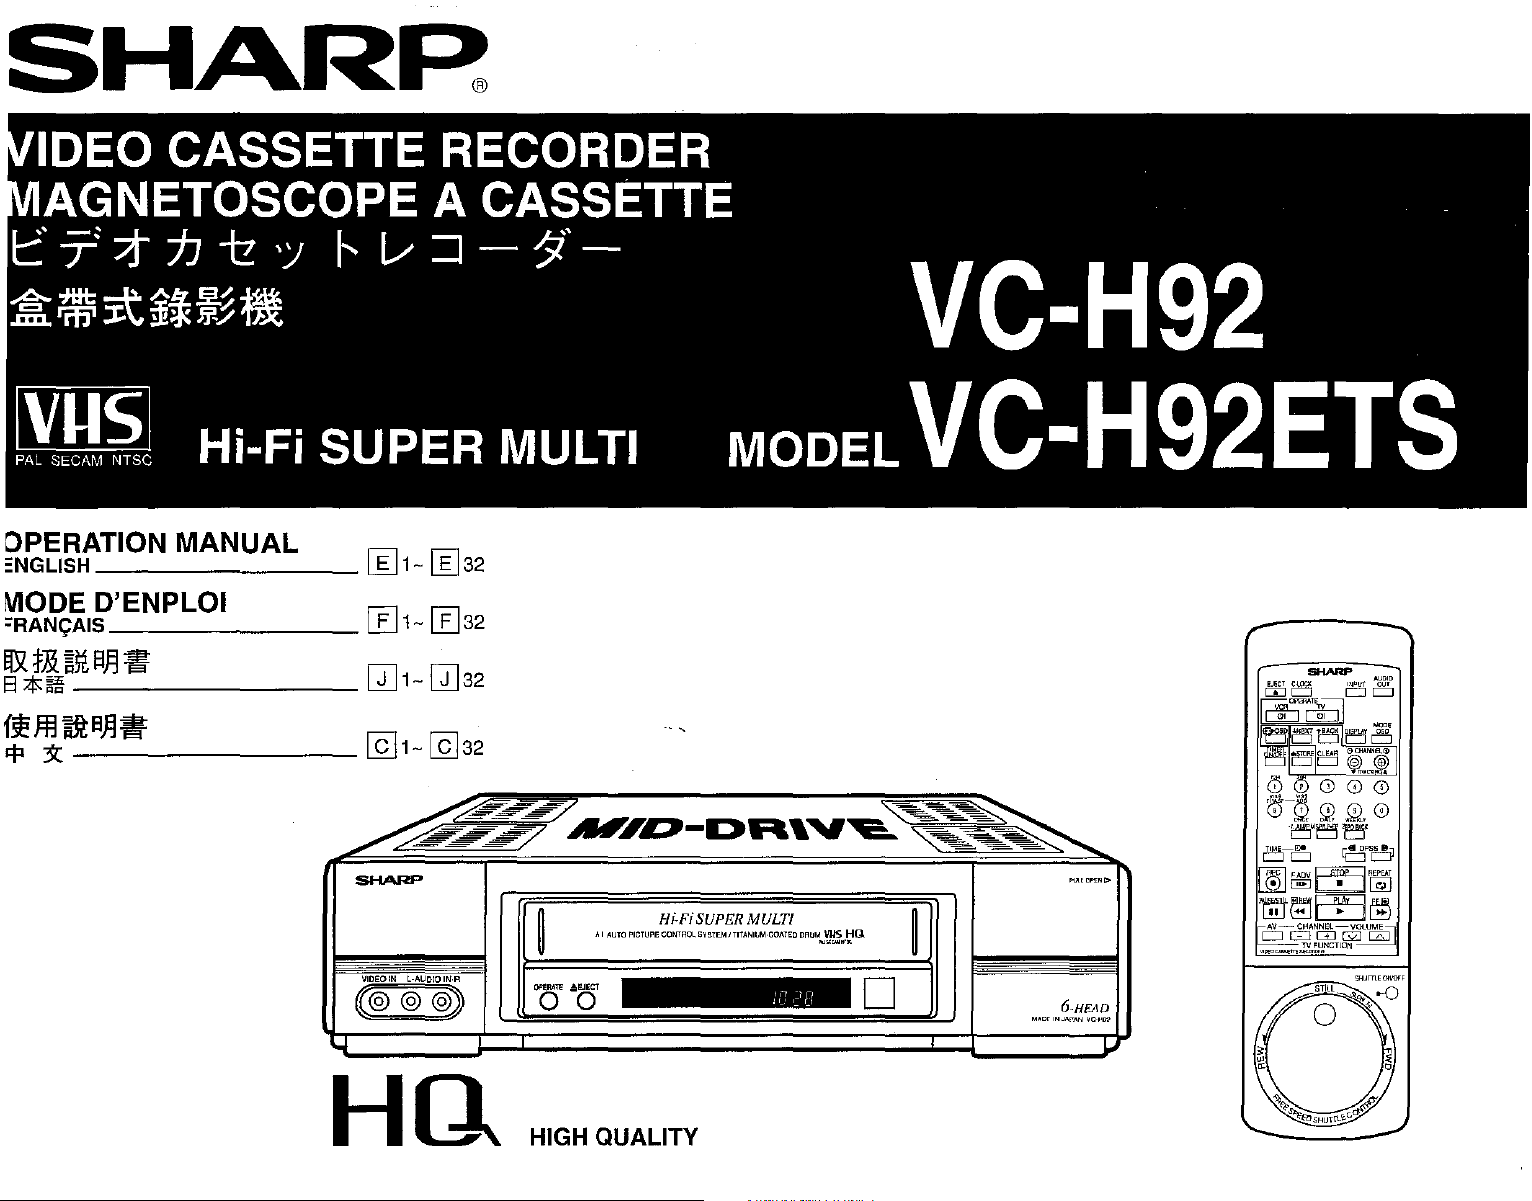
Page 1
CI~~HS
13
All
~..L
,rl
=wo
"'9'
~
V!!
HSI1~N=
30011\I
SIIf:)Nlfl:l=
'IlBYt
~*
03CI
'!
1:,
ZI-
Cl-
¥
~
~
'\'3:
t5f:IL\]
NOI.L"t:l3dC
:iUfl::l
ii37iv
~l!!
*'!l
101dN3,0
~
!:f-!H
l"nN"1I\I
---------
3113SSV~
V
3dO~S013N~"
-
l;
-1
l..=.J
~
f3l
-
L.iJ
~
I.:il
-
~
L..G
Ii'l
- C
1::13dnS
L.=J
<:8
i3l -
L.iJ
<:81.:il
<:t:[~J
Illnw
1::13C1::I0~31::1
3113SSV~
13COW
~6H-OA
S13~6H-OA
~~n.Lolo
Olnv
I V
'OH
HmH
N:FldflS
/.1:111
10~iNQ~
xinvno
J.L7f1W
aalVOO'l'inINVJJ111'I31o'S
i'<n~a
'OH stli\
D
aV3H"9
"""-0"
NV~vr
NI
Jam
Page 2
FEATURES
CONTENTS
• VHS l-li-Fl stereo sound
•
PAL(B/G,I,D/K)/SECAM
4.43/NTSC 3.58(M) multi system
• Able to play back NTSC tapes
(B/G,
D/K·
K1)
onto
a PAL system
MESECAM(B/G,D/K'K1)NTSC
TV
(see notes on page
19.)
• Equipped with a titanium coated
• Camcorder input terminal
• A.1.(artificial intelligence) auto picture control system
• Auto head cleaning system ]
• Auto tracking system
[
• Auto picture control system
• OSD(On Screen Display)/OSP(On Screen Programme) functions
Choice of four languages (English, Chinese, French, and Spanish)
• VISS signal writing and erasing
• Remote control with shuttle dial
• Full loading
• DPSS (Digita Programme Search System)
•
Two-way child-lock system
• Full automatic playbackfunction
• 11
0-240V 50/60Hz automatic voltage supply selector
• Timer recording of up to 8 programmes over a
(Every day or every
5-digit linear tape counter
•
• 48-position automatic voltage synthesized tuner
• Simple Recording Timer only needs setting of the recording start time and
end time.
• Random Repeat playback
Voltage
The
voltage supply of this VCR is AC110-240V, 50/60Hz.
Cassette tape:
This
VCR
tapes marked with
srstem
Supply:
uses
with instantaneous playback
week
IVIISI
method
IV!!.~
and
drum
timer recording for a programme is possible.)
standard
IVllsl
are usable with this VCR.
365-day period.
video
signals.
Only
video
cassette
BEFORE
• IMPORTANTSAFEGUARDSAND PRECAUTIONS.............................................. 2
• BROADCAST SYSTEMSIBEFOREUSINGYOUR VCR........................................ 3
• MAJOR COMPONENTS OF YOURVCR 5
PREPARATIONS
• CONNECTIONS....................................................................................................... 6
• ADJUSTING THE VIDEOCHANNEL 7
• REMOTECONTROL............................................................................................... 8
• INITIAL SETTINGOF OSD(ON SCREEN DISPLAy) 9
• OSD SETTINGSSCREEN 11
• SETTINGTHECHANNELS 13
• MODEOSD(ONSCREEN DISPLAY) 16
BASIC
• PLAYBACK 17
• FULL AUTO PLAY
• HOW TO USEVISSAND VISS ERASE FUNCTIONS 20
• RECORDING A TV PROGRAMME 21
TIMER RECORDING
• TIMER RECORDING (OSP: ON SCREENPROGRAMME) 23
• CONFIRMING TIMER PROGRAMMES 25
• CANCELLING TIMER PROGRAMMES 25
• SIMPLE RECORDING TIMER 26
SPECIAL
• ZERO-BACK
• DPSS(DIGITALPROGRAMMESEARCH SYSTEM) 27
• RANDOM REPEAT 28
• TWO-WAYCHILD-LOCKSYSTEM 28
• MULTI-FUNCTION DiSPLAy . 29
• USING YOURVCR WITHA VIDEO CAMERA 30
• EDITING FROMOTHERVIDEO EQUIPMENT 30
HELPFUL
• BEFORECALLING FOR SERVICE 31
• SPECIFICATIONS 32
USING YOUR VCR
OPERATIONS
FUNCTION
FUNCTIONS
FUNCTION
HINTS
19
27
ACCESSORIES
Makesurethefollowingaccessories were suppliedwithyourVCR. If any aremissing, pleasecontact your nearestshop.
Coaxialcable(75ohm)
Wireless remotecontrol
with SHUTTLEDial
~
~
TwoAAbatteries
(UM/SUM-3
R6
orAA)
~
~
Audiocable Videocable
1Il1
Page 3
IMPORTANT SAFEGUARDS AND PRECAUTIONS
Caution
BEFORE OPERATING YOUR NEW VCR, PLEASE CAREFULLY READ THIS
OPERATION MANUAL AND THEN SAVE IT FOR FUTURE REFERENCE,
AS IT WILL BE
YOUR VCR IN THE FUTURE.
Location and Handling
1. Air vents are provided in the VCR cabinet to
prevent excessive temperatures inside the
unit.
spaces,
vents.
2. Do not place the VCR in direct sunlight, or
near heat sources.
3. Keep the VCR and tapes away from strong
magnetic objects.
4. Do not insert or drop anything into the VCR
through
compartment as this could cause serious
damage, possibly resulting in fire.
-----------------
USEFULIF'YGUHAVEANY
Do
not
place
cover
it, or otherwise block the
the
air
your
VCRinclosed
vents
or
-----------
cassette
PR@BlEMSOPERATING·
8
"
'
'
•.
r?'
. .
f7~
..
'"
BC
-
~
~.
ll'!-~>~
..
[~
""",
-,
7.
G<!..
C]
§1
c''''1'!'i
.~g":~
"
"
~
f!j
··~···.7ihA
.
!..J':Z
~.
~
@1i:J
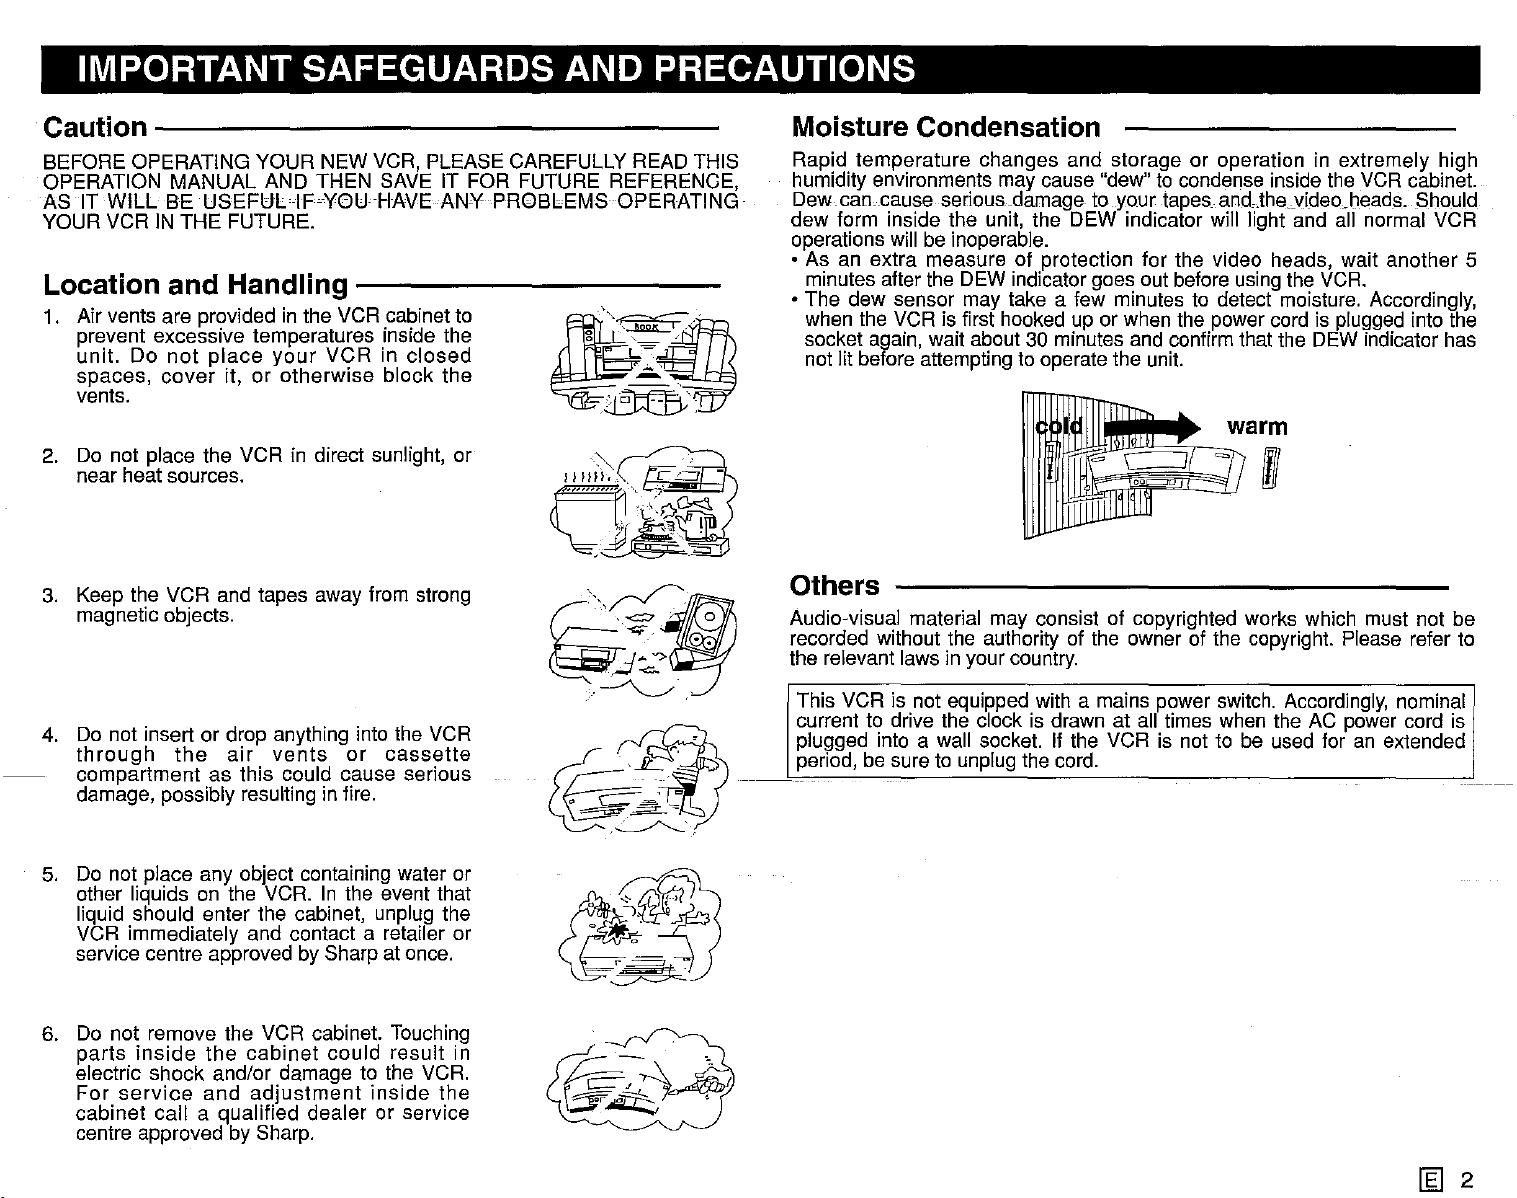
Moisture Condensation
Rapid temperature changes and storage or operation in extremely high
humidity environments may cause "dew" to condense inside the VCR cabinet.
Dew can.cause serious damage to your tapes and..thevideo.heads..Should
dew form inside the unit, the DEW indicator will light and all normal VCR
operations will be Inoperable.
• As an extra measure of protection for the video heads, wait another 5
minutes after the DEW indicator goes out before using the VCR.
• The dew sensor may take a few minutes to detect moisture. Accordingly,
when the VCR is first hooked up or when the power cord is plugged into the
socket again, wait about 30 minutes and confirm that the DEW indicator has
not lit before attemptingto operate the unit.
I
Others
Audio-visual material may consist of copyrighted works which must not be
recorded without the authority of the owner of the copyright. Please refer to
the relevant laws in your country.
This VCR Is not equipped with a mains power switch. Accordingly, nominal
current to drive the clock is drawn at all times when the AC power cord is
plugged into a wall socket. If the VCR is not to be used for an extended
period, be sure to unplugthe cord.
5. Do not place any object containing water or
other liquids on the VCR. In the event that
liquid should enter the cabinet, unplug the
VCR Immediately and contact a retailer or
service centre approved by Sharp at once.
6. Do not remove the VCR cabinet. Touching
parts
inside
electric shock and/or damage to the VCR.
For
service
cabinet call a qualified dealer or service
centre approved by Sharp.
the
and
cabinet
could result in
adjustment
Inside
the
\~q;;
o*,~
~)
~
~
2
Page 4
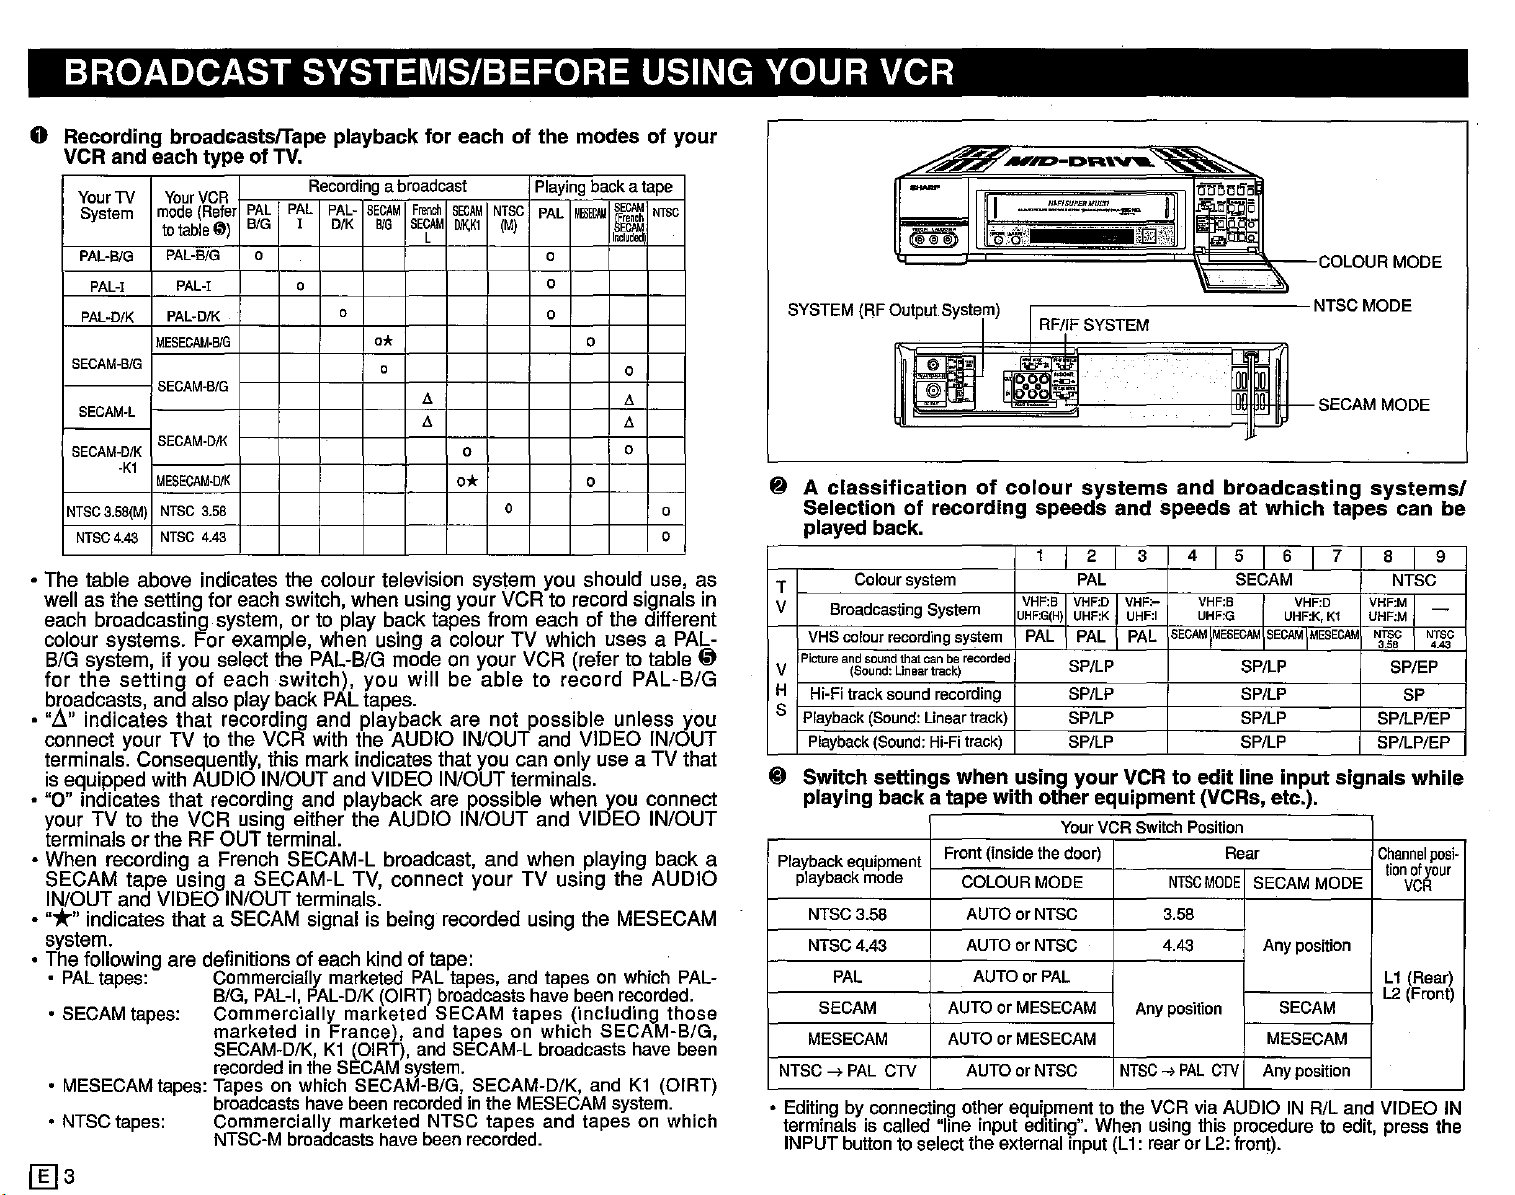
BROADCAST SYSTEMS/BEFORE USING YOUR VCR
o
Recording
VCR
YourTV
System
PAL-B/G
PAL-I
PAL-D/K
SECAM-B/G
SECAM·L
BECAM-D/K
NTSC
3.58(M)
NTSC
• The table above indicates the colour television system you should use, as
well as the setting for each switch, when using your VCR to record signals in
each broadcasting system, or to play back tapes from each of the different
colour systems.
B/G system, if you select the PAL-B/G mode on your VCR (refer to table
for
the
broadcasts, and also play back PAL tapes.
•
"~"
indicates
connect your TV to the VCR with the AUDIO IN/OUT and VIDEO IN/OUT
terminals. Consequently, this mark indicates that you can only use a TV that
is equipped with AUDIO IN/OUT and VIDEO IN/OUT terminals.
• "0" indicates that recording and playback are possible when you connect
your TV to the
terminals or the RF OUT terminal.
• When recording a French SECAM-L broadcast, and when playing back a
SECAM
IN/OUT and VIDEO IN/OUT terminals.
·
"*"
indicates that a SECAM signal is being recorded using the MESECAM
system.
• The following are definitions of each kind of tape:
• PALtapes: Commercially marketed PALtapes, and tapes on which PAL-
•
SECAM
•
MESECAM
• NTSCtapes: Commercially marketed NTSC tapes and tapes on which
[Ijs
broadcastsfTape
and
each
Your
mode
to
table@)
PAL-BIG
PAL-I
PAL-D/K
MESECAM·B!G
BECAM-B/G
BECAM-DIK
-Kt
MESECAM·D/K
NTSC
NTSC
4.43
setting
that
VCR
tape
usingaSECAM-L
typeofTV.
VCR
PAL
(Reter
BIG
0
3.58
4.43
For
example, when using a colour
of
each
recording and
using either the AUDIO IN/OUT and VIDEO IN/OUT
B/G,
PAL-I,
playback
Recording
PAL
PAL-
I
D/K
0
switch),
PAL-D/K
abroadcast
SECAM
BIG
0
0*
0
you
playback
TV,
(DIRT)
for
eachofthe
French
SECAM
SECAM
L
l!.
l!.
will
connect
NTSC
(M)
IlJ1\Kl
0
0*
0
be
abletorecord
are
not
your
broadcasts have been
modesofyour
Playing
backatape
SECAM
M_
PAL
I~~m
0
0
0
0
0
l!.
l!.
0
0
TV
which uses a PAL-
possible
TV using
unless
the
recorded.
NTSC
0
0
PAL-B/G
AUDIO
tapes: Commercially marketed SECAM tapes (including those
marketed in France), and tapes on which SECAM-B/G,
SECAM-D/K,K1(DIRT),
recorded
inthe
SECAM
andSECAM-Lbroadcasts have been
system.
tapes: Tapes on which SECAM-B/G, SECAM-D/K, andK1(DIRT)
broadcasts
NTSC-M
havebeen
recorded
Inthe
MESECAM
broadcasts havebeenrecorded.
system.
~
you
SYSTEM
@ A
(RF
classification
Selection
played
T
V
V
H
S
@
Coloursystem
Broadcasting System
VHS colour recording system
Pictureandsoundthatcan be
(Sound:
Hi-Fitracksound recording
Playback
Playback
Switch
playing
Playback
equipment
playback
NTSC3.58
NTSC4.43
PAL
SECAM
MESECAM
NTSC
....
PAL
• Editingby connecting other equipmentto the VCR viaAUDIO INRlL and VIDEO IN
terminals is called "line input editing". When usingthis procedure to edit, press the
INPUTbuttonto selectthe externalinput(L1: rearor L2:front).
I
I"
iiii
--
"~I
11
t~1l~0\.
Output
of
recording
back.
Lineartrack)
(Sound:
Linear
(Sound:
Hi-Fi
settings
backatape
mode
CTV
System)
,-------~~~.
RF/iF
:OOO::I~
of
colour
speeds
1 I 2 I
VHF:B
VHF:D VHF:- VHF:B
UHF:G(H
)
UHF:K
PAL
recorded
SP/LP
SP/LP SP/LP
track)
track)
when
Front
(inside
COLOUR
with
SP/LP
SP/LP
using
your
other
YourVCRSwitch Position
the
door)
MODE
AUTOorNTSC
AUTOorNTSC
AUTOorPAL
AUTOorMESECAM
AUTOorMESECAM
AUTOorNTSC
SYSTEM
systems
and
3
PAL
UHF:I UHF:G
PAL
PAL
VCRtoedit
equipment
Anyposition
NTSC
==:-":b~NTSC
and
broadcasting
speedsatwhich
4
I
SECAM
!MESECAM
(VCRs,
Rear
NTSC
MODE
3.58
4.43
...PAL
CTV
5
SECAM
SECAM
SP/LP
gP/LP
SP/LP
line
input
etc.),
SECAM
Any position
SECAM
MESECAM
Anyposition
COLOUR
SECAM
6
"1
VHF:D
UHF:K,K1
TMESECAM
MODE
MODE
systemsl
tapes
7
VHF:M
UHF:M
NTSC
3.58
SP/LP/EP
SP/LP/EP
signals
Channel
MODE
MODE
can
8 9
NTSC
NTSC
'AS
SP/EP
SP
while
posi-
tionofyour
VCR
L1
(Rear)
L2
(Front)
be
-
Page 5
BROADCAST SYSTEMS/BEFORE USING YOUR VCR
o
The
relationship
positions,
Tape
tobe
Connection
played
back
your
and
NTSC
-------
-------
NTSC
------- -------
NTSC
PAL
colour
your
RF
AV
RF
AV
RF
AV
RF
AV
and
VCR
of
TV
--------
--------
between
the
colourTVyou
Front
(inside
the
door)
COLOUR
MODE
AUTO
or
NTSC
AUTO
or
NTSC
AUTO
or
NTSC
AUTO
or
PAL
tapes
YourVCR Switch
NTSCMOOE
3.58
--------
4.43
--------
NTSC-tPAL
CTV
RF
SECAM
MESECAM
AV
RF
AV
AUTO
MESECAM
po~Hron
or
• When you play back an NTSC tape on
VCR
tothe
NTSC
-->
PAL
rearof the
• When
system
playing
back an NTSC
TV.
A picturecan be
tape,
obtained
CTV
connect
points:
The
•
a
playback
problem
with
image
either
wiil
shrink
somewhat
theTVorthe
VCR.
to be played
are
using.
Position
Rear
SECAM
MODE
Any
position
-------
Any
position
-------
Any
position
Any
position
SECAM
MESECAM
PAL
TV,
position.
your
usinga
PAL
atthetop
back,
SYSTEM
Output System)
Anyposition
-I~
BIGorDjK
toyour
colour
Anyposition
------------
1,
BIGorD/K
toyourcolourTV)
Anyposition
I,
BIG
orD/K
10
your
colour
Anyposition
BIG
orD/K
(Match
your
colour
Any position
BIG
orD/K
(Match
your
colour
Any position
setthe
VCR
TV,
and
NTSC
to eitheran
but
bottom.
your
VCR
Thecolour TV
systemto which
(RF
the
VCR
connected
NTSC
--------------
(Matc-h
TV)
(Match
(Match
TV)
TV) or K1
TV)
NTSC
--------------
PAL-I,B/GorD/K
All pAL
systems
PAL-M
SECAM-B/G,D/K
to
All
SECAM
SECAM-L
to
SECAM·B/G,
All
SECAM
SECAM-L
MODE
switch
NTSC
please
notethe
This
does
switch
can
3.58(M)
4.43
PAL
and
PAL-N
including
or
K1
including
or a
foilowing
not
indicate
be
except
O/K
on the
multi-
• If the
television
makingitunviewable.
possible
is
is not
tostopthe
equipped
However,
withaV-HOLD
if the TV is
rollingbyadjusting
equipped
the
knob,
control
knob,
withaV-HOLD
making
the
the
picture
picture
may
knob,
thenit
viewable
roil,
.
• RF indicates that the TV is connected to the VCR using the RF OUT terminal.
AV indicatesthatthe TV is connected to the VCR usingthe AUDIO IN/OUTand
VIDEO IN/OUTterminals.
• When you play back a pooriy recorded tape, set the COLOUR MODE switch to
"PAL",
"NTSC",
set it to "AUTO"). Inthecaseof a
~
Switch
Region
~
Broadcasting
system
PAL-BIG
~
!mml
PAL-D/K
SECAM
I~
SECAM
--
E I
NTSC
or "SECAM"depending on the coioursystemofthe tape (do not
positions
PAL-!
-BIG
-D/K
-K1
for
recording
Recording
system
PAL
recording
MESECAM
recordina
SECAM
recordina
MESECAM
recordina
SECAM
recordina
NTSC
recording
MESECAM
TV
Front (inside
the
door)
COLOUR
MODE
AUTOorPAL
AUTOorPAL
AUTOorPAL
AUTO
or
MESECAM
AUTDor
NTSC
tape, setitto
broadcast
NTSCMODE
Any position Any position BIG
Any position Any position
Any position Any position
Any position
signals
SECAM
MESECAM
---------
"SECAM".
withr
Rear
MODE
SECAM
MESECAM
Any position
3.58
---------
SECAM
Any position Any position
your
RF/IF
VCR.
SYSTEM
I
D/K
BIG
D/K
-
Using
Recording
o Set the NTSC MODE switch on the rear of the VCR either to "3.58", "4.43"
lj
NOTE:
If you make a mistake in setting the position of the SECAM MODE switch, the
tape which you recorded will not play back in colour when you play it back using
anotherSECAMonly or MESECAMonly
@ After completing 0 and
your
VCR Auto System during Playback and
or "NTSC-7PAL CTV" to match the TVbeing used.
When a broadcast system is SECAM, set the SECAM MODE switch on
the rear of the VCR to SECAM if you want to record it in the SECAM
system. If you want to record in the MESECAM system, set to MESECAM.
Also, set the SECAM MODE switch to MESECAM if the tape being played
back is recorded in MESECAM. Set the SECAM MODE switch to SECAM
if the tape being played back is recorded in the SECAM system.
system
.
lj,
set the COLOUR MODE switch to the AUTO
position, and the VCR will automatically discriminate between "PAL",
"NTSC" and "SECAM".
[Ij4
Page 6
MAJOR COMPONENTS OF YOUR VCR BEFORE USING YOUR VCR
Remote Control
CD(J)Q)@C9
m-/!j
I::i
.m,
o
t""i'El'l""'l'
D~Cl
[/ID
rnl'~E51~
~-~~~~
."""",J!mNC1l0N
!El
5
~Dl'SSc!J1
Il1'i
ffil1':J
OPERATE button (turns VCR on/off)
Clock display will work regardless of this button.
Front
VIDEO
(@@@:»
ON or OFF: Set to this position in normal VCR
Rear
RF convertor
·Channel
J37/C22-C2
,
Cassette compartment
(See PLAYBACK/RECORDING)
EJECT button
11 .
L·AUOIO
IN.fl
EDIT: Set to this position when
operation.
Set to "D/K", "I", or "B/G," to match the TV you are using.
TEST SIG ON/OFF switch
Connection termin,als(see CONNECTIONS)
~
l'l~
.
~
,
1~P1
, ,
r.
editin~
Iw'~
©O('jj
©"db
._,
W
fi
-
output channel adjustor
E39/US26-US38/J25-
30-
E
6
SECAM MODE switch
Photoreceptor window
n
,---
_..
'"
I
, ,
I
~
_.~
I'
~
]
-
Fluorescent display
11
~~
~~
e""..,)
IIwExREC
Setting confirmation display
It flashes for a few seconds when a button on the
VCR is pressed or when signals are received from
the Remote Control.
~-
::-.~=
--'---.
TIIIIER
=
,_,
~
- [Q§] srrr If{.
HI
~ ~
©1ru
C
PRO.S
SPlPEP
',;:
SEU,i/
S~i\W
PAL
CSf'
i-!TSC
_ CH
:J
111
171
/.Er
/jf/ ·nl /If
,JII m
1,1
Opened door
Channel tuning buttons (see SETTING THE
CHANNELS)
Tracking buttons (see PLAYBACK)
Operating
RECORDING A TV PROGRAMME)
GHA
NNEL up/down buttons (select channels
for vi
ewing)
Set in accordance with the broadcast signal
received.
Audio Attenuator switch
(AUDIO
See
EQUIPMENT"
NTSC Mode Switch
buttons
An.
ON/OFF)
"EDITING
(see
FROM
PLAYBACK/
OTHER
VIDEO
SIl'.~UL
,-,
~:__
Fi·:Ll
/jf/y
,-
_0
Page 7
CONNECTIONS PREPARATIONS
Connecting Aerial Cable to VCR
Disconnecting·TV Cable
Disconnect the aerial cable from the
back of your TV set.
1
Connected to outdoor or indoor
antennaorcable
Connecting Antenna Cable to VCR
Connect the antenna cable to the TV
ANTENNA IN terminal of your VCR.
/ TV back panel
1
ANTENNA IN
VCR rear
Connecting to a Stereo TV
1-
_
-
~
r-
q
::
~
From
RFOUT
From VIDEO OUT
From VIDEO IN
I~
~
_m.
..
-<0-
~u;
--
Imt
~
I--
From From
AUDIO IN RlL AUDIO OUT RlL
..
Connecting VCR to TV
Connect the supplied coaxial cable to
the RF
Plug the
ANTENNA IN terminal.
NOTE:
When the connection is made using
the
bilingual sound will not be output.
RF
OUT
terminalofthe VCR.
other
end
into
OUT
terminal,
your
stereo
TV's
or
.. I I
TV ANTENNA IN
ANTENNA IN
TV back panel
•
t
ToAUDIO OUT R/L
-I···
To VIDEO
ToVIDEO IN
ToANTENNA IN
NOTES:
• Audio recorded in the EP mode in the NTSC system is not recorded on the
Hi-Fi track, but on the linear track.
• If you simultaneously switch both the TV and the VCR to the AV mode after
connecting as in the diagram above, the audio and video may be distorted.
Accordingly, do not switch both to the AV mode simultaneously.
otrr
-
,
ToAUDIO IN RlL
--
- - - -_...-
[§]
6
Page 8

PREPARATIONS
ADJUSTING THE VIDEO CHANNEL
Connecting to TV and Audio Equipment
From AUDIO OUT R/L
From AUDIO IN R/L
FM tuner
Amplifier
I,
"I
I I
Ittol
•
'''''''''''iO
q
I
ToAUDIO OUT RlL
Rear of the VCR
TEST SIG ON/OFF
~~
~
RF convertor output channel adjustor (CHANNEL)
(can be set to E30-E39/US26-US38/J25-J37/C22-C26).
To view the output of your VCR on the television screen, you must select an
unused channel on your TV and tune it to the output of your VCR (The UHF
tuner on the VC-H92 is set to channels E36'US34'J33 and between C24 and
C25. The VC-H92ETS is set to channels E39'US38'J37 and C26).
switc.h
iti!
~o
.
~IOO
o Select an unused channel on your TV and
press the OPERATE button on the VCR to
turn on the power.
~
Set the TEST SIG switch to ON.
i}
Adjust the tuning of the selected TV channel
until
the
test
appears on the screen.
pattern
E) Set the TEST SIG
(two verttcal bars)
switc.h
to OFF.
ToAUDIO
!.":;;.i'y,-'
'_0i:_""'_'«"_.';'
ToANTENNA IN
NOTES:
• Connect the power plug of the VCR last, after having first made sure that the
connections are as shown in the diagram above.
• If the audio output from the audio equipment is mono, connect it to the
UMONO terminal. Then, audio will be output from both the AUDIO OUT R
and L terminals.
Ii=l
7
IN R/L
NOTE:
If interferenc.e of a beat pattern appears when
the
test
patternisdisplayed,
sc.rewdriver to turn the RF
channel adjustor to
channel, and then retune your TV as above.
c.hange
useasmall
convertor
the
VCR output
output
e
I~
OFF~Til~TI
ONri.b!.I
~-E)
Page 9
REMOTE CONTROL PREPARATIONS
The remote control lets you operate your VCR at a distance. Just aim the top
of the remote control at the photoreceptor window situated on the frontpanel
of your VCR, then press buttons or rotate the shuttle dial.
Inserting the Batteries
The
Battery
Cover
remote control
(UM/SUM-3,
(included). If the remote controi does not
AA)
operates
1.5
volt
on two R6
batteries
operate or fails to function normally, use new
batteries,
which
can
be
purchased
at
electronics or camera stores.
o Open the battery cover. (Remove any
old batteries that may be in the remote
control.)
~
Insert
polarities
inside the remote control.
~ Replace the cover.
• You can set the clock or timer recordings by using the remote control.
Clock setting: See
Timer recording: See
Setting the CLOCK (page 12).
TIMER RECORDING (page 23).
NOTES:
• Do not subject the remote control to shock, water or excessive humidity.
• The remote control may not function if the VCR sensor is in direct sunlight or
any other strong light. If so, move the VCR or alter the lighting.
• Incorrect use of batteries may cause them to leak or burst.
• Do not mix old and new batteries, or mix brands in use.
• Batteries are available in rechargeable and disposable configurations. Read
the battery warnings and use the batteries properly.
• Remove the batteries if
the remote control wiil not be operated for an
extended period of time.
new
batteries,
(+ and
-)
to
matching
the
markings
their
(@~@=@)
C-LOCK (child lock) button
EJECT button
TV OPERATE button
VCR OPERATE button 0
OSD buttons
(Seepage9)
TIMER ON/OFF button
CLEAR button
E'Je
button
TIME button
DIGIT SELECT button
• Useto
select
either
digitordouble-digit
channel
number
selected
using
buttons.
AM/PMSELECT
button
(page10).
single-
entry
whenitis
the0-9
"""~-DR'V'-~
I
.,,",,,,..,,.'!!:.!:!,s.!!,;!:~MUL~,
, .
.~IQ
~~
-J-IF:E~~h
I I F"l
REO
~ETTE
RECORDER
ofa
~
............
n1lJ:
Photoreceptor
INPUT button
AUDIO OUT button
- I I DISPLAYbutton
~MODE
O"U'''.'~I
"" (Seepage16)
(See page29)
CHANNEL UP/DOWN and
TRACKING buttons
Channel
TV FUNCTION buttons
(Canbe
11
_.~E2.
OSD button
selector
used
window
with
SharpTVs.)
buttons
,{j
SHUTTLE ON/OFF button
SHUTTLE ON Indicator light
I-SHUTTLE
DIAL
[g] 8
Page 10
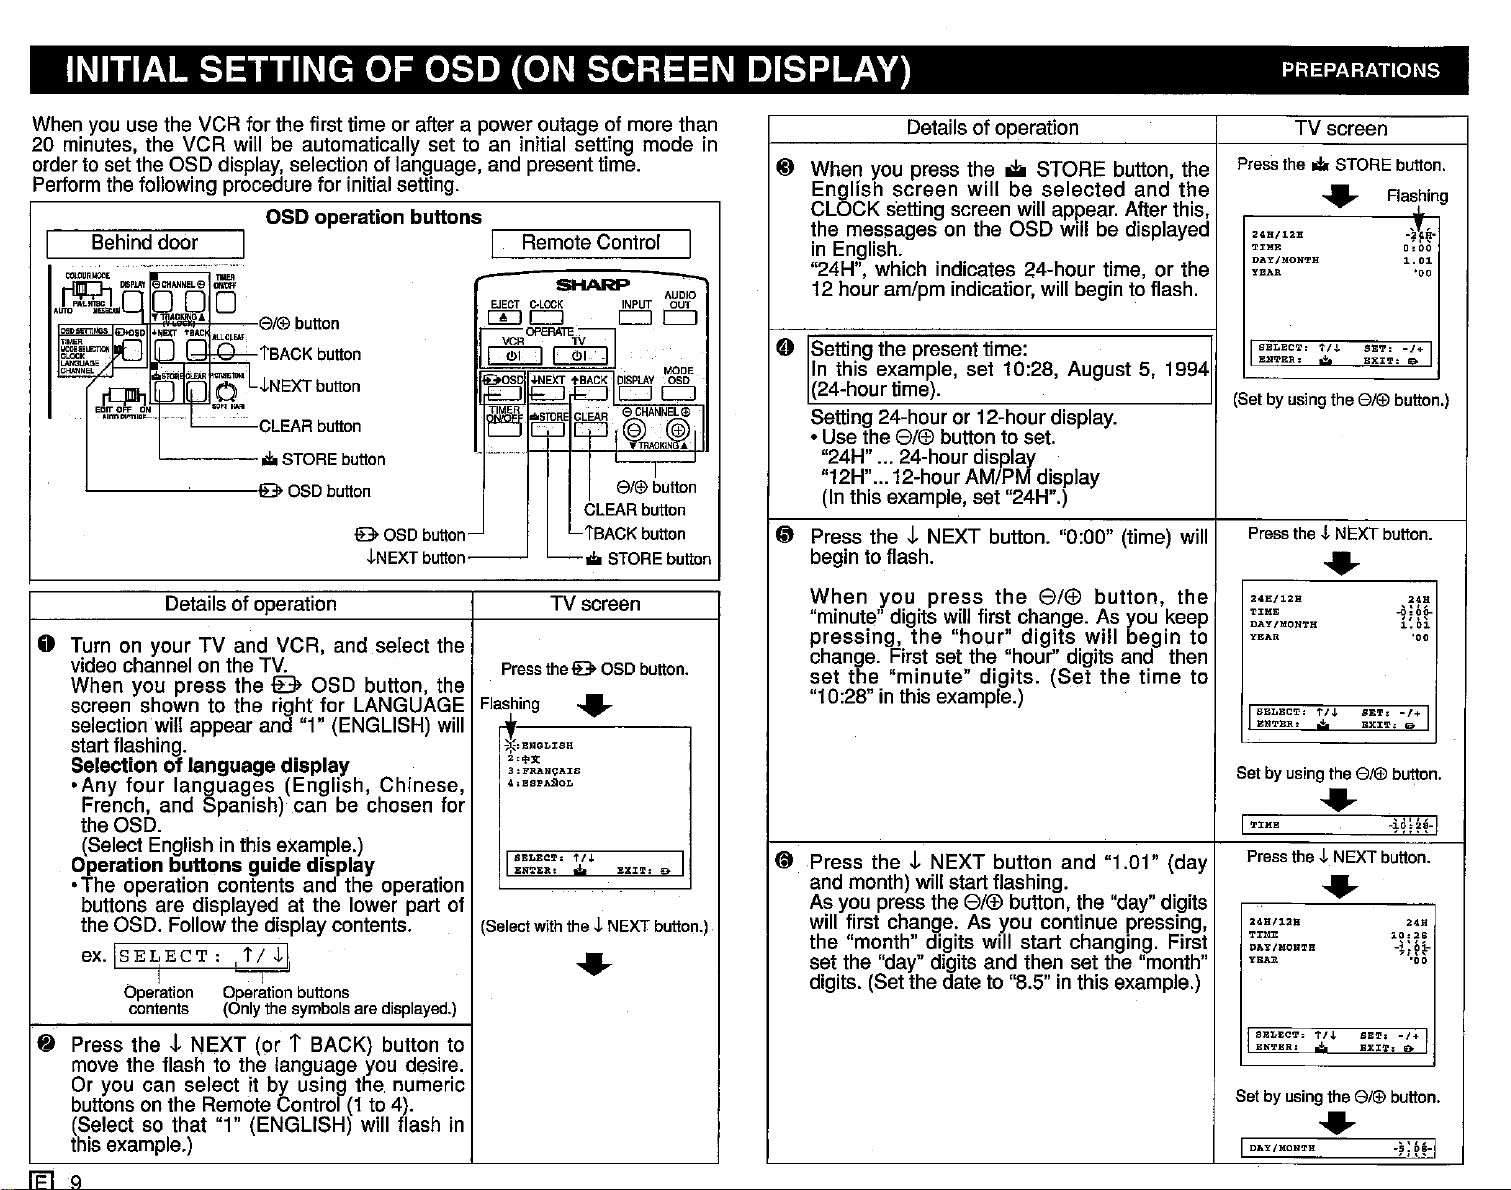
INITIAL SETTING OF OSD (ON SCREEN DISPLAY) PREPARATIONS
When you use the VCR for the first time or after a power outage of more than
20 minutes, the VCR will be automatically set to an initial setting mode in
orderto set the OSD display,selection of language, and present time.
Performthe following procedure for initial setting.
Behinddoor
EJECT
8/@ button
,IfL.J,~]§R~::,
I
iSACK
button
~NEXT
button
CLEAR button
...
STORE button
[I)
~OPERATEbJ
l<J>:1
~
~~EXT
J~~F
c:::::J
I"~_,,..
I e OSO button
e OSO
Details of operation
button-
~NEXT
button-------l
C-LOC~PUT
c:::::J
QC]
~BACK'
_STORE
CLEAReCHANNEla;l
CLEAR button
L
tSACK
...
TV screen
AgBf
c:::::J
c:::::J
MODE
0
CS
@@I
"'TRACKlN~
--r-
8/@button
button
STORE button
o Turn on your TV and VCR, and seiect the
video channel on the TV.
When you press the {B> OSD button, the
screen shown to the right for LANGUAGE
selectionwill appear and "1" (ENGLISH) will
start flashing.
Selectionoflanguage
•Any
four
languages (English, Chinese,
display
French, and Spanish) can be chosen for
the OSD.
(Select English in this example.)
Operation
buttons
guide
display
•The operation contents and the operation
buttons are displayed at the lower part of
the OSD. Follow the display contents.
ex.
Is
~
ELECT
Operation
contents (Only the symbols are displayed.)
Press
the!
: ! t /
~I,
I I
Operation
buttons
NEXT (or T BACK) button to
move the flash to the language you desire.
Or you can select it by using the. numeric
buttonsonthe Remote Control(1to 4).
(Select so that "1" (ENGLISH) will flash in
this example.)
IFlQ
Press thee OSO button.
Flashing
~:ENGL:tSH
:L't':t
3:FRANl;:ArS
4.BSPAgOL
I
SBLECT:
BN'l'BR..
(Select with the~NEXT button.)
....
t /J. I
EXIT:
0>
....
Details of operation TV screen
~
When you press the oii STORE button, the
English screen
will
be
selected
CLOCK setting screen will appear. After this,
the messages on the OSD will be displayed
in English.
"24H", which indicates 24-hour time, or the
12 hour am/pm indicatior, will begin to flash.
0 Setting the present time:
In this example, set 10:28, August 5, 1994
(24-hour time).
Setting 24-hour or 12-hour display.
• Use the 8/(f) button to set.
"24H" ... 24-hour
"12H"...12-hour AM/P display
(In this example, set "24H".)
f3 Press
the!
begin to flash.
When
you
"minute" digits will first change. As you keep
pressing,
the
change. First set the "hour" digits and then
set
the
"minute"
"10:28" in this example.)
~ Press
the!
and month) will start flashing.
As you press the 8/(f) button, the "day" digits
will first change. As you continue pressing,
the "month" digits will start changing. First
set the "day" digits and then set the "month"
digits. (Set the date to "8.5" in this example.)
displ~
NEXT button. "0:00" (time) will
press
the
"hour"
digits.
8/(f)
digits
(Set
button,
will
the
NEXT button and "1.01" (day
and the
begin
time
the
to
to
Press the
I
(Set by using the
Press the~NEXT button.
248/12:&
'l':J:HH
DAY/HON'l'H
YEAR
SELECT.
ENTER,
...
STORE button.
....
t/.J.
SET:
.:!;o
EXIT:
8/@
Flasthin
....
248/128
TIME
DAY/MON'l'H
YEAR
I
SELECT'
t/J,
ENTER.
Set by using the
BET:
.;,
EXIT,
8/@
....
I'I':J:HB
Press the~NEXT button.
-HH~-I
....
24H/12H
TIME
OAY/MONTH
YBAR
I
SELECT:
1"/J,
BNTBR:
Set by using the
BBT:
.;.
EXIT:
8/@
....
I
OAY/MONTH
g
-~,~.
0:00
1.
01
'eo
-r;
I
So
button.)
,~H
-0:
DO-
i:
b1
."
-/+
I
&
button.
".
10:
2S
-1:
01-
"'00
_1+
I
B-
button.
-~;
~!-I
Page 11

PREPARATIONS
Details of operation TV screen
Press
fI
Press
__
digits "00" wiil startflashlnq.,
Press the
(Set the year to "94" in this example.)
theJ-NEXT
8/®
button to set the "year" digits.
button
and
the
_.
"year"
theJ,NEXT
..
24H/12H
TrME
DA'l/gON'I'H
YEAR
I
SELECT:
IUI'l'I!:R,
Set with the8ft£) buttons.
t/.L
.t..
SET:
EXIT,
button.
10,28
""
5.08
.':'..0:'*
~/"I
0
..
I
YEAR
Press
the
Make
~
month,
checking
Press
SETIINGS
is compieted.)
NOTE: As soon as you press the
button, the clock will begin to operate. To set
the
button at the TV or ra io time signal.
(;)
Press the
screen.
'
..
Notes:
• The OSD
than t minute.
Setting the NTSC
• Selectthe outputsystemfor the OSD
NTSC
NTSCMODESwitch
NTSC
• The OSD will automatically select the appropriate system for the broadcast or
playback
sure
and
the
time
The
screen
MODE
Positioning
3.58
4.43
-->
PAL
signal.
that
the
present
day
are
the
entire
".to
screen will appear. (Initial setting
accurately,
"8
OSD" button to clear the OSD
initial setting is compieted.
will be automatically
MODE switch
switch. N
CTV
ail
clock
STORE"
gress
ColourSystemOutput
NTSCSystem
PALSystem
PAL
time,
correctly
setting
button
the
cleared
Menu
System
.to
.to
year,
set
screen.
and
the
STORE
STORE
when
screen
by
Press
The asoscreenis cleared.
I I
no button is
and Blue Back
otes:
• When changing from a
receiving PAL System to a
channei
(including external input "L1"and
"L2"). or when performing the
reverse operation, the
characters
become skewed for a few
seconds.
a malfunction.
... STORE
..
SELECT'
BNT!UI.:
thee OSD
SETTINGS
SBLECTION
t n.
.;.
*.,TIMBR
:I,HODE
3.CLOCR
',LANGOAGB
5:CHANNllL
I
..
pressed
screen,
receiving NTSC
on the OSD will
This does not inclidate
button.
EXIT,
button.
for more
usingthe
channel
'~{·I
Iil> I
System
IKey
• For settings that require operation of the
-
procedure Control
.-----1-
to
easy setting I
8/®
button as mentioned earlier in
StepsE)to
,1--)
buttons on the remote control.
Setting Details of operation Buttons on the Remote
E) Setting of either "24H" or "12H"
Step
Steps
@ Inputting numerals
to
fI
Step
@ Setting the 12-hourdisplay mode
fI,
you
can.sat.themmora
Example: 12-hour AM/PM dispiay
24-hour display
Example:
Example: Set the date to August 5th.
Note:
month (Step
only one digit, put a
number when you input it.
Example: Set the year to '94.
Example: Set
1)When you press the
button, the displays of "-:--AM" and
"-:--PM"
(Set -:--PM in this example.)
2)
Input
above
(Input "1", "1", "0", and "8" in this I
Set
10:28
When
@),
will
numerais
numeric
the
present
the
minute
or year (Step fj) has
0 in front of the
11
:08 p.m.
alternately
according
input
easily
time
(Step
(il),
/.._ (AM/PM)
appear.
to the
procedure.
example.)
byusingtOe10,liedQJp9,
--7
1 (12H) button
--72 (24H) button
to
--7
"1", "0", "2", and "8"
--7
"5", "0", and "8"
--7
"9", "4"
~~:~12H
DAY
/.ONTH
YNAR
SELECT:
ENTER;':'
Press
TIME
1 ' " " 1
Pressbuttons"1","1", "0"
TIME
1
the
1'/,l.
•
(1._
AM/PM)
•
and
SET:
EXIT:
"8".
-12"
b~}::'
• ,
1.'0\
-/+
button.
--:--PM-
'J
~J.l:0BPM-
, , , , ,
'''''I
[El
'00
I
9
, "
10
Page 12
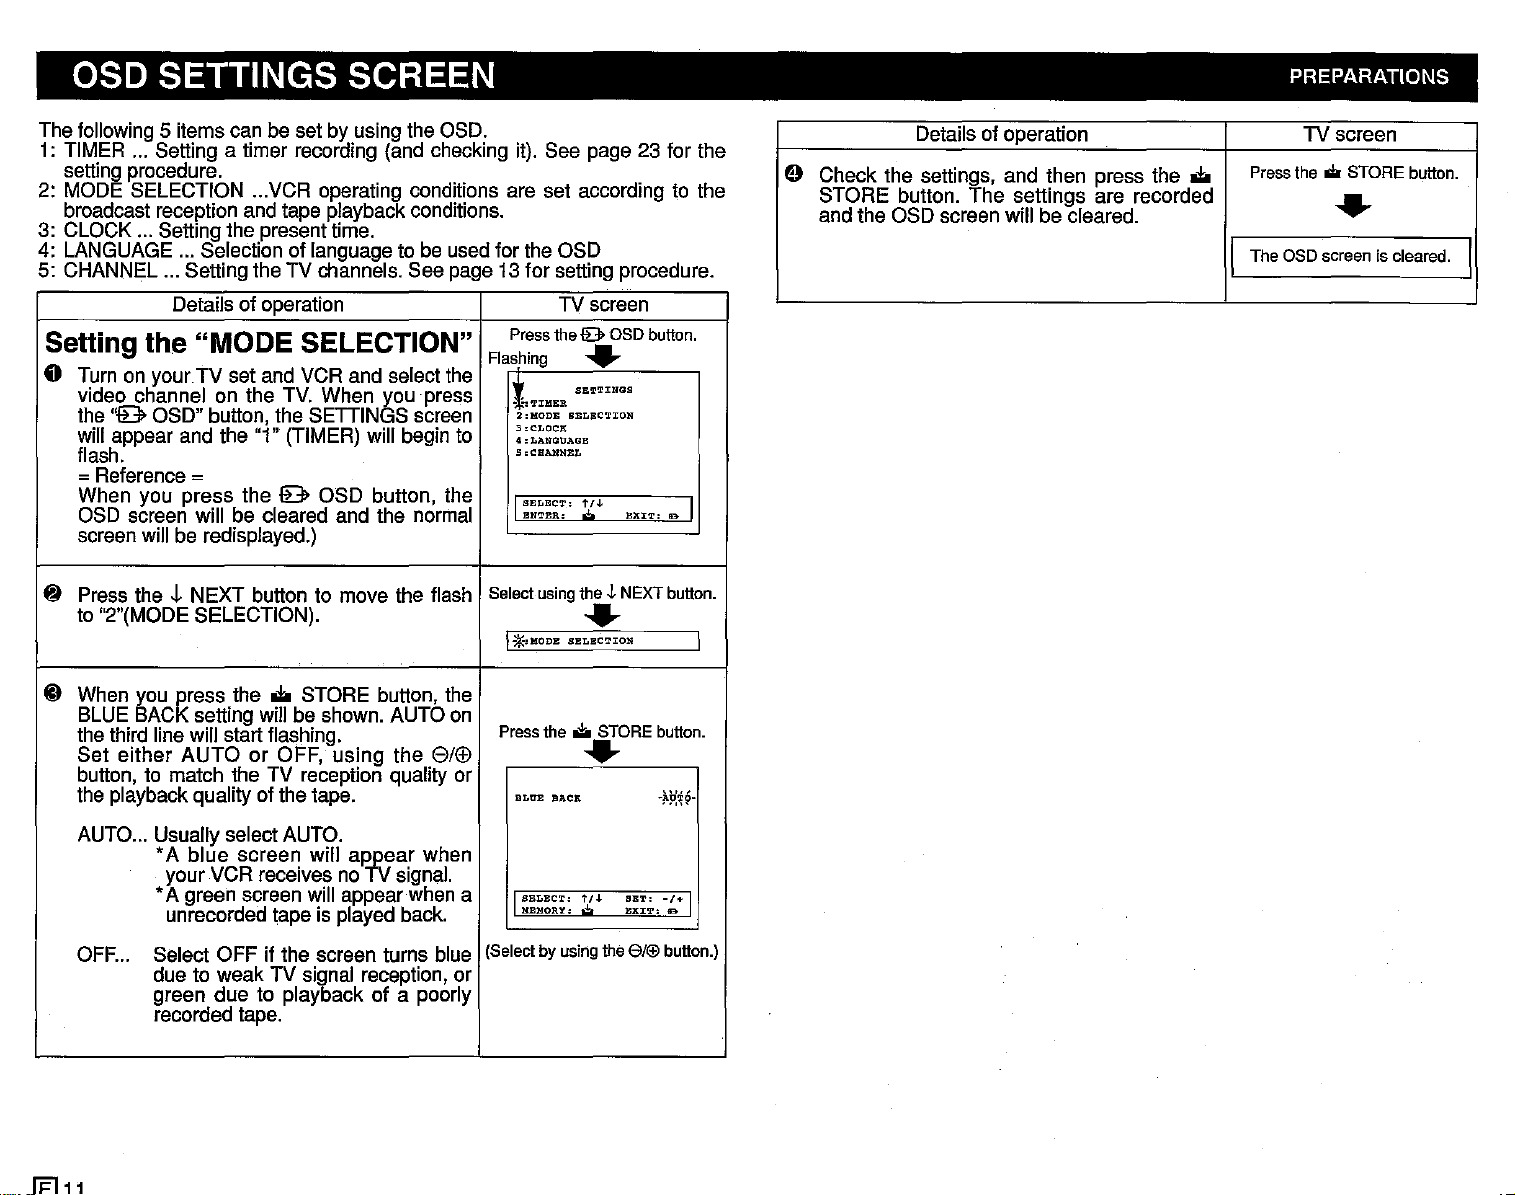
oso SETTINGS SCREEN PREPARATIONS
The following 5 items can be set by using the OSD.
1: TIMER ... Setting a timer recording (and checking it). See page 23 for the
setting procedure.
2: MODE SELECTION ...VCR operating conditions are set according to the
broadcast reception and tape playback conditions.
3: CLOCK ... Setting the present time.
4: LANGUAGE ... Selection of language to be used for the OSD
5: CHANNEL ... Setting the TV channels. See page 13 for setting procedure.
Details of operation TV screen
Setting the "MODE SELECTION"
o Turn on
video channel on the TV. When you press
the
will appear and the "1" (TIMER) will begin to
flash.
your
TV set and VCR and select the
"9
OSD" button, the SETIINGS screen
Press the
Flashing
It
·;'l':tI!lRR
2:HODE
3,CLOCP:
4,LANQOAGE
5
lB>
OSD button.
..
SE~TINGS
SELBC'l'XO»
,CHANNEL
=Reference =
When you press the 9 OSD button, the
OSD screen will be cleared and the normal
screen will be redisplayed.)
8 Press the .j, NEXT button to move the flash
to "2"(MODE SELECTION).
@ When you
BLUE BAC setting will be shown. AUTO on
the third line will start flashing.
Set either
button, to match the TV reception quality or
the playback quality of the tape.
~ess
the
AUTO
IIIi
STORE button, the
or OFF, using the
8/(f)
I
SELECT.:
t/J.
ENTER:
,,;,
BXI'l'.
lB I
Select using the J.NEXT button.
..
I
*'
MODE
Press the
SELBC'l'ION
i:!o
STORE button.
I
..
BLtrE
BACK
~~?:t~·
Details of operation
e Check the settings, and then press the
STORE button. The settings are recorded
and the OSD screen will be cleared.
TV screen
Press the ilr STORE button.
IIIi
..
IThe aSD screen is cleared.
I
AUTO... Usually select AUTO.
•A blue screen will
your VCR receives no signal.
•A green screen will appear when a
unrecorded tape is played back.
OFF... Select OFF if the screen turns blue
due to weak TV signal reception, or
green due to playback of a poorly
recorded tape.
~11
aJ¥(7ar when
I
SELECT-,
t/+
SB!!.':
-/+
KEBORY,
.;,
EXJ:'l':
(Select by using the 6/Efj button.)
I
le
Page 13
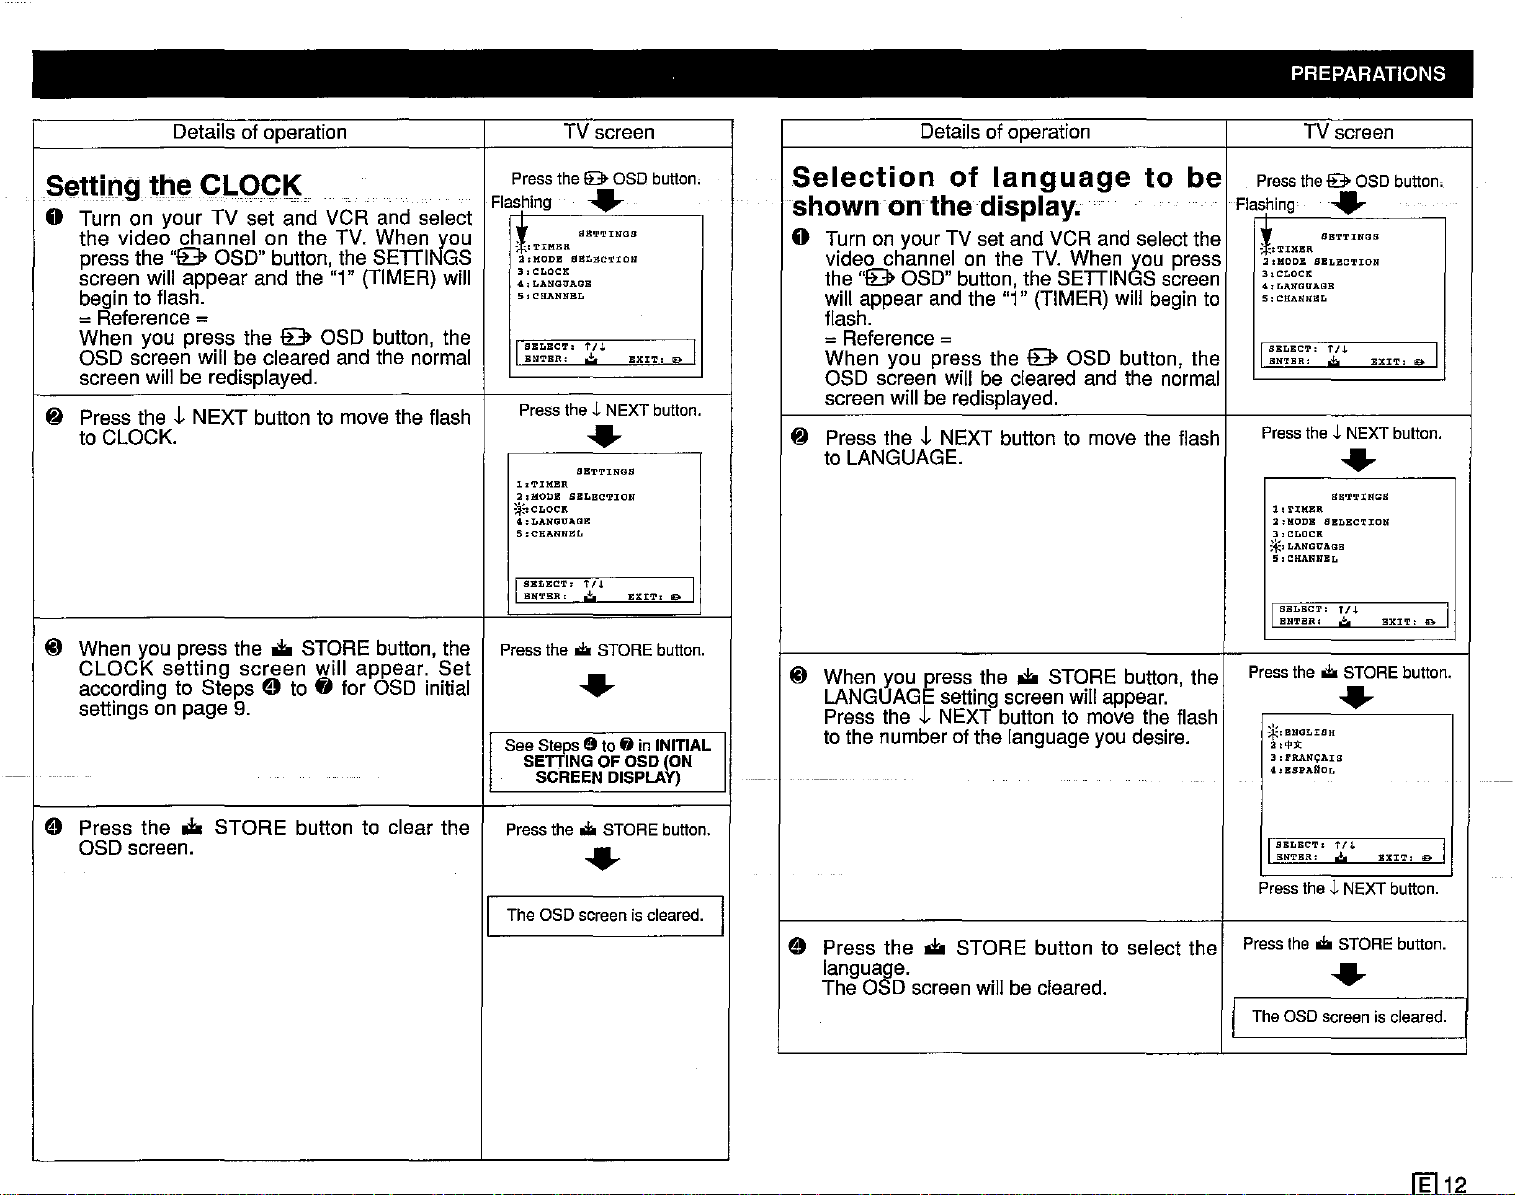
PREPARATIONS
Details of operation TV screen
Setting
-_
.......
tM
__... - - _._.
CLQCK
----
.....-.....
_.-
-----
o Turn on your TV set and VCR and select
the
video
press the
screen will
begin to flash.
= Reference =
When you
OSD screen will be cleared and the normal
screen will be redisplayed.
Press the t
~
to CLOCK.
@ When you press the
CLOCK
according to
settings on page
channel
"9
OSD" button, the
appear
press
the 9 OSD button, the
NEXT
setting
screen
Steps
9.
on
the
TV.
When
J<0u
SEDI
and the "1" (TIMER) will
button to move the flash
.to
STORE button, the
will
appear.
e to
fj
for OSD initial
GS
Set
Press
the9
Flashing
I
*~
: -,
'l'IM1'a\
a,HODB
3 I
CLOCK
4,LANGUAGB
5,CHANNBL
I
SELECT'
ENTER:
Press
theJ.NEXT
1,TIMBR
a,HODB
;:j~CLOCIt
4.LANGOAllE
5:CHAll"ffEL
I
SBLECT,
BNTBR
I
Press
the...
See
s~s
SE .
INGOFOSD
SCREEN
OSD
.-
SBTTINGS
SELECTION
1'/.1.
.:!:.
.-
SETTINGS
SBLECTION
fn
.:!:.
STORE
.-
19
tofjin
DISPLAY)
EXIT:
EXIT,
button.
19 I
button.
11)0 I
button.
INITIAL
(ON
Details of operation TV screen
Selection
of
language
to
be
shown on thedisplay.
o Turn on your TV set and VCR and select the
video channel on the TV. When you press
the
"9
will appear and the "1" (TIMER) will begin to
flash.
OSD" button, the
=Reference =
When
OSD screen will be cleared and the normal
screen will be redisplayed.
~
Press the t NEXT button to move the flash
to LANGUAGE.
@ When you press the
LANGUAGE setting screen will appear.
Press the t NEXT button to move the flash
to the number of the language you desire.
you press the 9 OSD button, the
SEDINGS
.to
STORE button, the
screen
Press
Flashing
~::
:
-:TIMBR
2,HOOB
3,CLOCK
<I.,
LII,IWItAGB
5:
CHANNBL
I
SBLBCT:
ENTER:
Press
l,T:UUU\
2:HODB SBLBCTION
3,
CLOCK
;~I
LANGUAGE
5,
CHANNEL
I
SELECT:
ENTER:
Press
the
.'.
*,BNGLIBH
2,'!'Jl:
3:
rRANO;:AIS
4:BSPARoI,
the9OSD
.-
SBTTINGS
SELBCTION
1'/.1.
.;.
EXIT,
theJ.NEXT
.-
SB'l'TUIGS
fI.j.
.:!;o
...
STORE
.-
button.
button
BXIT:
button.
a I
.
D I
Press the
e
OSD screen.
.to
STORE
button to clear the
Press
the
...
STORE
.-
The OSDscreen iscleared.
I
button.
I
SBI,BCT.
Press
I
e
Press
languaae.
The 0 D screen will be cleared.
the
.to
STORE button to select the
Press
BNTBR.
theJ.NEXT
the
...
tf.l.
,,±,
STORE
.-
BXIT,
button.
button.
0 I
I Theaso screenis cleared.
1El12
Page 14
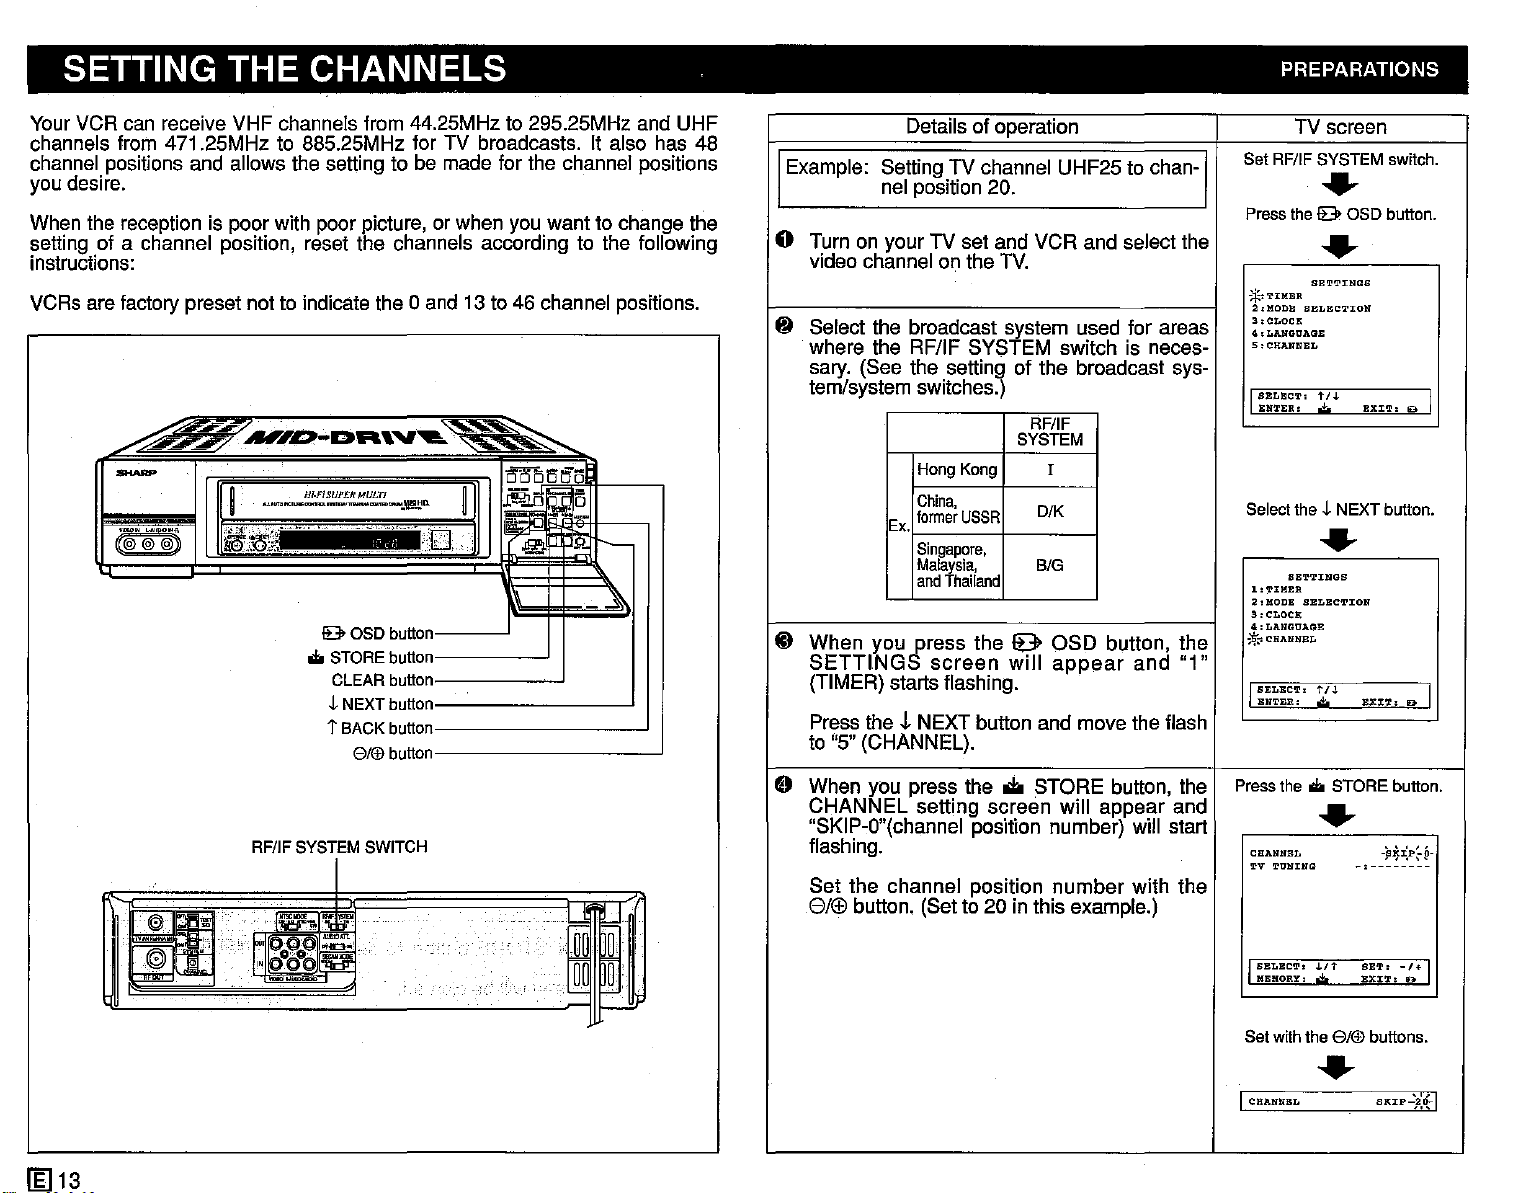
SETTING THE CHANNELS PREPARATIONS
YourVCR can receive VHF channels from 44.25MHz to 295.25MHz and UHF
channels from 471.25MHz to 885.25MHz for TV broadcasts. It also has 48
channel positions and allows the setting to be made for the channel positions
you desire.
When the reception is poor with poor picture, or when you want to change the
setting of a channel position, reset the channels according to the following
instructions:
VCRs are factory preset not to indicate the 0 and 13 to 46 channel positions.
.4
--
(if@'11)
~..,;y.'4:l!'.E:n:nv
H~FISUP£R
....
""'
__
......
,_,
~':~!!i~!~
...
;.:,;
..••
«lO~".lj~,
;;-",,-
__
,,_,.
!B>
OSD button I
...
STOREbutton I
CLEARbutton I
""NEXTbutton I
1"
BACKbutton I
8/®
RF/IFSYSTEMSWITCH
....
~
TI'/ffi
MULTI
••"
...
_~~(J.
D I
1i!'iij
-
''''''liS
;;;:l~:~:lf~",-
~I
....I
P.J1---
~
button I
Details of operation
Example: Setting TV channel UHF25 to chan-
nel position 20.
G Turn on your TV set and VCR and select the
video channel on the TV.
~
Select the broadcast system used for areas
where the RF/IF SYSTEM switch is neces-
sary. (See the setting of the broadcast sys-
tem/system switches.)
RF/IF
SYSTEM
will
I
DiK
BIG
appear
number
and
"1"
with the
HongKong
China,
former
Ex.
~ When you press the e OSD button, the
SETTINGS
(TIMER) starts flashing.
Press the
to "5" (CHANNEL).
e
When you press the • STORE button, the
CHANNEL setting screen will appear and
"SKIP-O"(channel position number) will start
flashing.
Set the channel position
8/r:FJ
,J.
button. (Set to 20 in this example.)
USSR
Singapore,
Malaysia,
and
Thailand
screen
NEXT button and move the flash
TVscreen
Set RF/IFSYSTEM switch.
,CHANNEL
SETTINGS
''l'IMER
LANGUAGE
CHANNEL
TUBING
•
!B>
OSD button.
•
SETT:rNGS
SELECTION
t/J.
EX:!:'!',
,,;!;,
•
SELECTION
t/.J.
EX:rT.
,;,
...
STORE button.
•
-,--------
-¥JP=.p,P-
Pressthe
*''l'IMER
2,MODB
3:CLOCK
4.LANGtJAGE
5
I
SELECT'
ENTER.
Selectths L NEXT button.
1
2,MODE
3'CLOCll;
4:
*.:
...
I
SELECT,
ENTER'
Pressthe
CHANNEL
TV
D I
Do I
£El
13
~
[1!:1
I-~
I A
~IWI
I
SELECT
RERORY,
Set withthe
I
CHANNEL
•
.LIt
.;.
8/®
•
SET.
-/+
EX:tT:
19>
buttons.
SKrP-):lf-1
I
Page 15

PREPARATIONS
Details of operation
~ As you press the J, NEXT button, the flash
will
move
iridlcaHon6n
settings.
r
Tuning band
• If you hold down the
seconds, the SKIP display will disappear,
the •
flash,
automatically done.
As the indicator reaches the right
the
LOW),
H(VHF-HIGH) and U(UHF).
l
Continue this operation until the broadcast
channel you desire appears. (Set channel
25.)
Reference: 1) Press the
to
-:--------
the rignt shows the following
"-
\ I 1 /
-L:.-------
/1[\"-
I"
Low High
frequency frequency
Tuning indicator
part
of the indicator will begin to
and
channel
tuning
band
changes
and
then
fine tuning.
2) A press of the
ton stops automatic chan-
nel selection.
TV
El)
button for a
selection
in
turn
8 or
TUNING.
-
~I
will
to
L(VHF/
changes
El)
button for
8 or
The
end,]
El)
few
be
to
but-
TV screen
Pressthe t NEXTbutton.
I
CHANNEL
TV
SELECT'
MEMORY'
Holddown the@ buttonfor afew
TONING
.....
~,-I-:~~:~~~~~-
1'I.L
SBT,
EXIT'
-1+
D
,j.
seconds
.....
I TV
TONING
The TV picturewillappear
underthe OSO.
CHANNEL
TV
TU"~'G
J
SELBCT,
HBHOR1::.
L~)jf
.,
'U'~_'::~'
'l'
-2
tlJ.
SBT,
1+ I
BXl'.I':
!Do
Details of operation TV screen
CD
When you press the
contents of the settings are memorized and
. the' OSD'sCreerf
oJ:io
STORE button, the
iscleared;"
...•••••
Pressthe
I.·
...
I The
If you wish to continue channel position setting, press the J, NEXT button after
step
~
above and move the flash to CHANNEL on the first line to set the
desired channel position. Afterwards, follow steps
Et
to~for further setting.
...
STOREbutton.
c
.~.............
aSD
screenis cleared. I
.
I
1
.
When you wish to check whether channel
UHF25
channel you desire, select channel 25 with
your
programmes.
tuned
TV
tu
in on
ner
and
your
compare
VCRisthe
the
[g]14
Page 16
PREPARATIONS
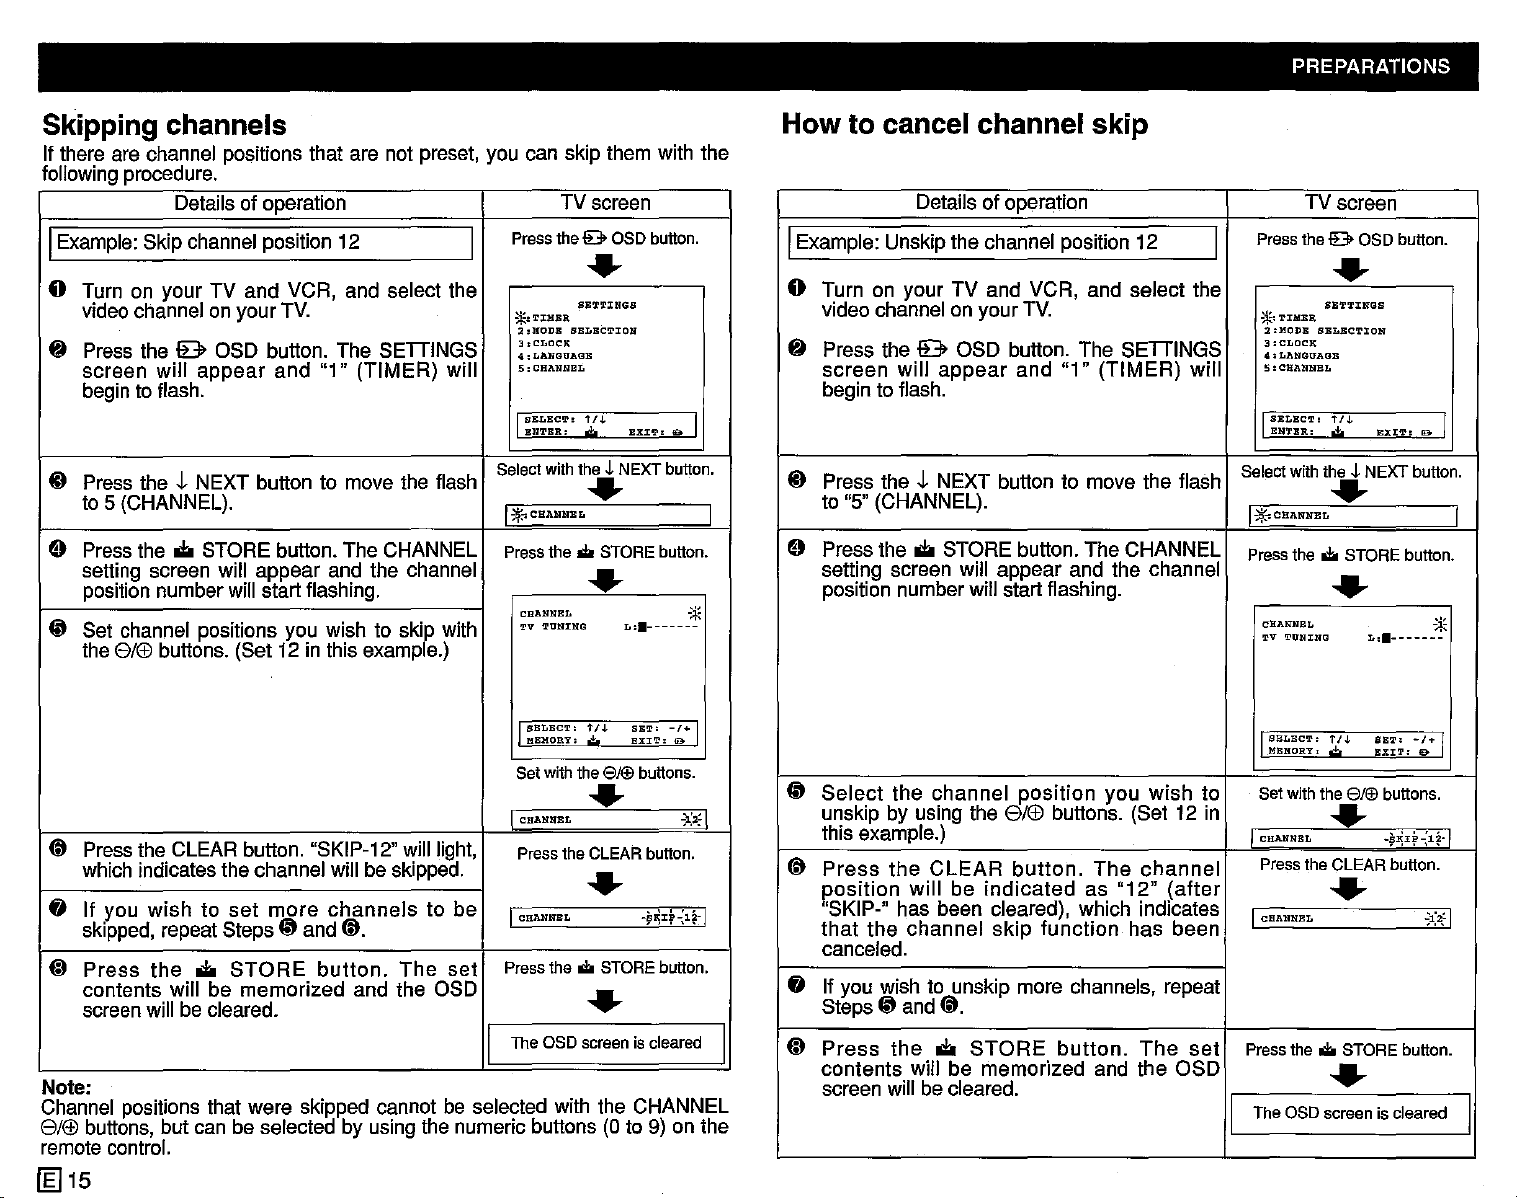
Skipping channels
If there are channel positions that are not preset, you can skip them with the
followingprocedure.
Details of operation
IExample:Skip channel position 12
o Turn on your TV and VCR, and select the
videochannel on your TV.
{t
Press the 9 OSD button. The SETIINGS
screen will
beginto flash.
ID
Press the t NEXT button to move the flash
to 5 (CHANNEL).
9 Pressthe
setting screen will appear and the channel
positionnumberwill start flashing.
CP
Set channel positions you wish to
the elf£!buttons. (Set 12 in this exampe.)
appear
ol:i
STORE button. The CHANNEL Press the
and
"1" (TIMER) will
skiPe
with
I
Select with the~NEXT button.
TV screen
Press the9 OSD button.
.....
3.CLOCK
ENTER.
SETTINGS
SELECTION
t/J.
,,;,
SKI'!"
*.'1'J:HBR
2:HODB
4,LAN"GUAGB
5:CHANNBL
IBBLBC!l.':
.....
I.;r.-:CHANNBL
.to
STORE button.
.....
CHANNEL
'l'V '1'UNl:NG
L••-------
& I
"*
How to cancel channel skip
Details of operation
IExample: Unskip the channel position 12
I
o Turn on your TV and VCR, and select the
video channel on your TV.
fj
Press the 9 OSD button. The SETIINGS
screen will
begin to flash.
ID
Press the t NEXT button to move the flash
I
to "5" (CHANNEL).
9 Press the
setting screen will appear and the channel
position numberwill start flashing.
appear
ol:i
STORE button. The CHANNEL
and "1" (TIMER) will
Select with the~NEXT button.
TV screen
Press the 9 OSD button.
.....
2.HODB
SELECTION
3:CLOClt
4.LANGUAGB
SELEC'r:
ENTER:
SB'l",I'J:NGS
t/J.
,,;,
li:XIT:
*''1'IIlIBR
5:CBANNEL
I
.....
I~~CBANNEL
Press the
.to
STORE button.
.....
CHANNEL
'J,'V
TtlNING
L••_______
lBo I
I
"*
I
SELECT:
l\BHORY:
Set with the
t/J.
.;,
8/®
SB'1"
EXIT:
buttons.
-1+
I
0
.....
@
Pressthe CLEAR button. "SKIP-12" will light,
which indicates the channel will be skipped.
CHANNEL
Press the CLEAR button.
.
~.;,:
.....
fj
If you
skipped,repeatStepsCPand @.
(D
Press
contents will be memorized and the OSD
screenwill be cleared.
Note:
Channel positions that were skipped cannot be selected with the CHANNEL
elf£!buttons,but can be selected by using the numeric buttons (0 to 9) on the
remotecontrol.
[gJ15
wishtoset
the
ol:i
STORE
more
channels
button.
The
to be
set
I
CHANNEL
Press the
TheaSD
I
-~~J:f~l~~
.to
STORE button.
.....
screeniscleared
ISELBC'1"
lIBRORY,
CP
Select
I
I
I
unskip by using the elf£! buttons. (Set 12 in
this example.)
@
Press
position
"SKIP-" has been cleared), which indicates
that
canceled.
fj
If you wish to unskip more channels, repeat
StepsCPand@.
(D
Press
contents will be memorized and the OSD
screen will be cleared.
the channel
the
CLEAR
will
be
the channel
the
ol:i
position
button.
indicated
skip
STORE
you wish to
The
channel
as
"12"
(after
function has been
button.
The
set
Set with the
I CHANNEL
Press the CLEAR button.
I
CHANNEL
Press the
TheaSD
I
t I J.
SE'l"
EXIT:
buttons.
-/+
9
,;,
8/®
.....
-¥~J:f-:l~·1
.....
.to
STORE button.
.....
screeniscleared
I
';1:~1
I
Page 17
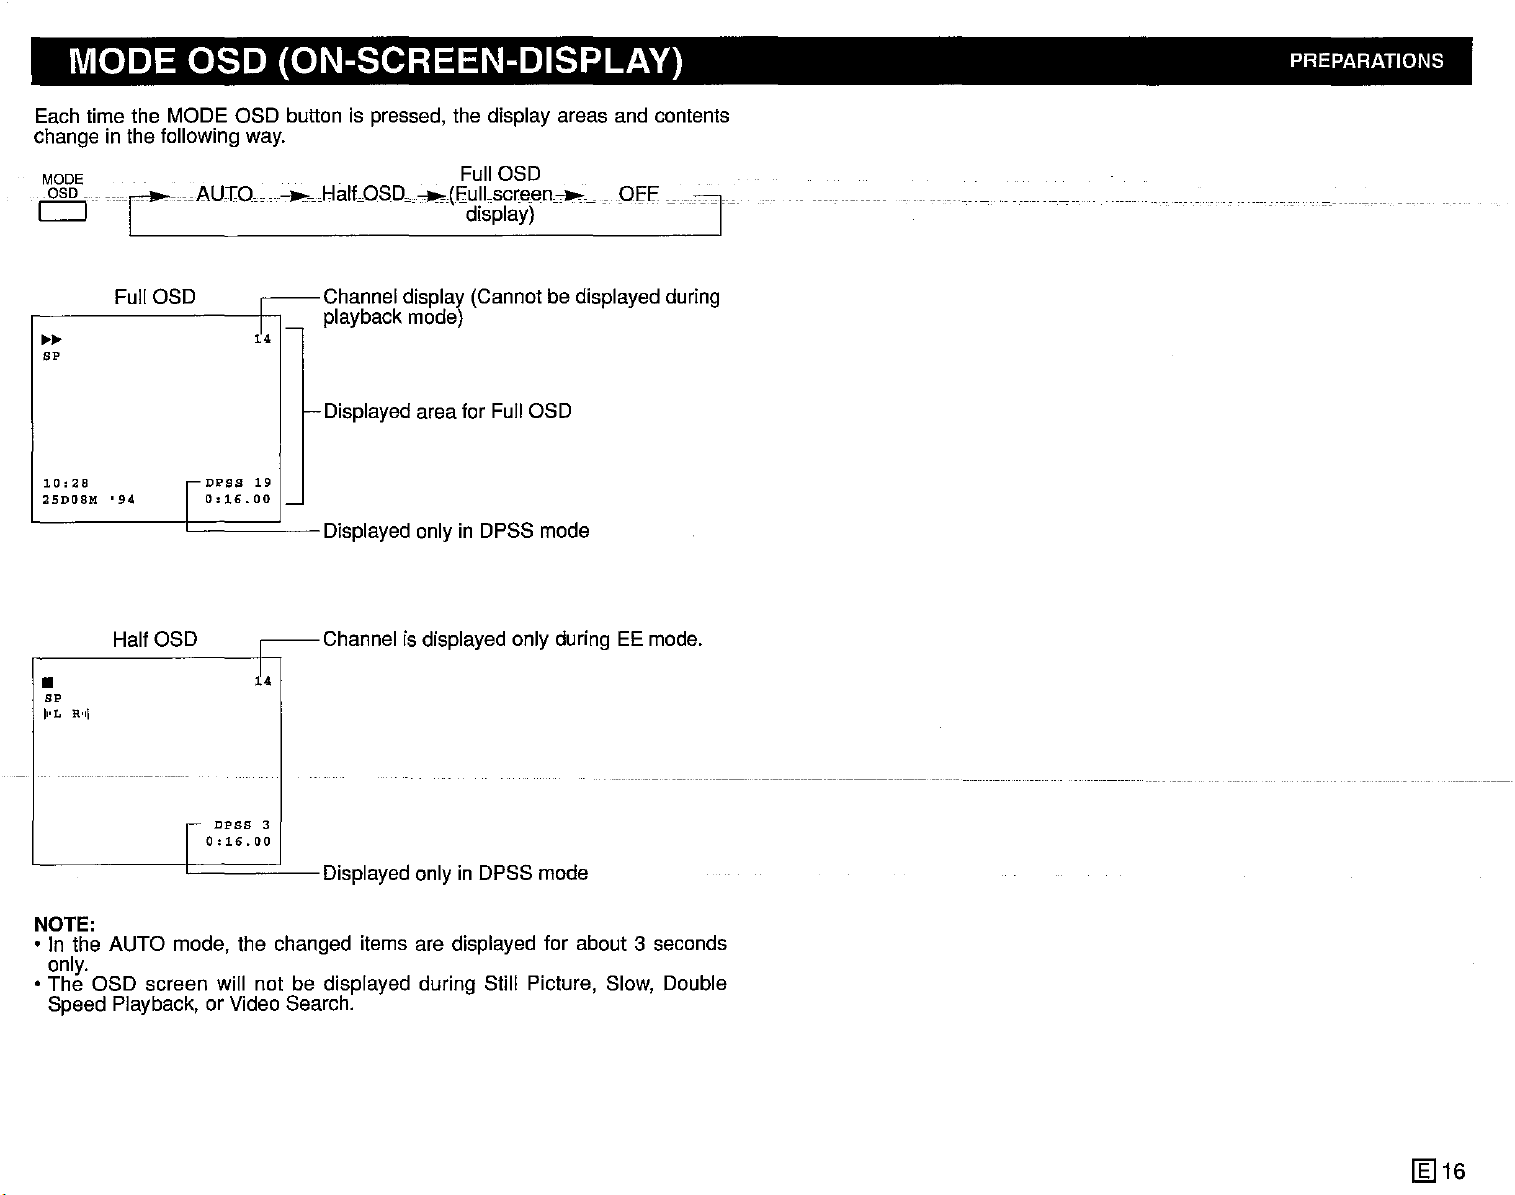
MODE OSD (ON-SCREEN-DISPLAY) PREPARATIONS
Each time the MODE OSD button is pressed, the display areas and contents
change in the following way.
MODE . Full OSD
10SD
iCcAu:r:O----HaltoSDo-(Cdli~~~)en~~
OH'
]
Full OSD
~~
BP
e-Displayedarea for Full OSD
10:28
25D08M•94
I
DPSS
I
0:16.001_
19
HalfOSD
DPSS
0:16.00
i4
3
•
BP
11'x.,
R'11
I I I Displayedonly in DPSS mode
NOTE:
• In the AUTO mode, the changed items are displayed for about 3 seconds
only.
• The OSD screen will not be displayed during Still Picture, Slow, Double
Speed Piayback, or Video Search.
[gJ
16
Page 18
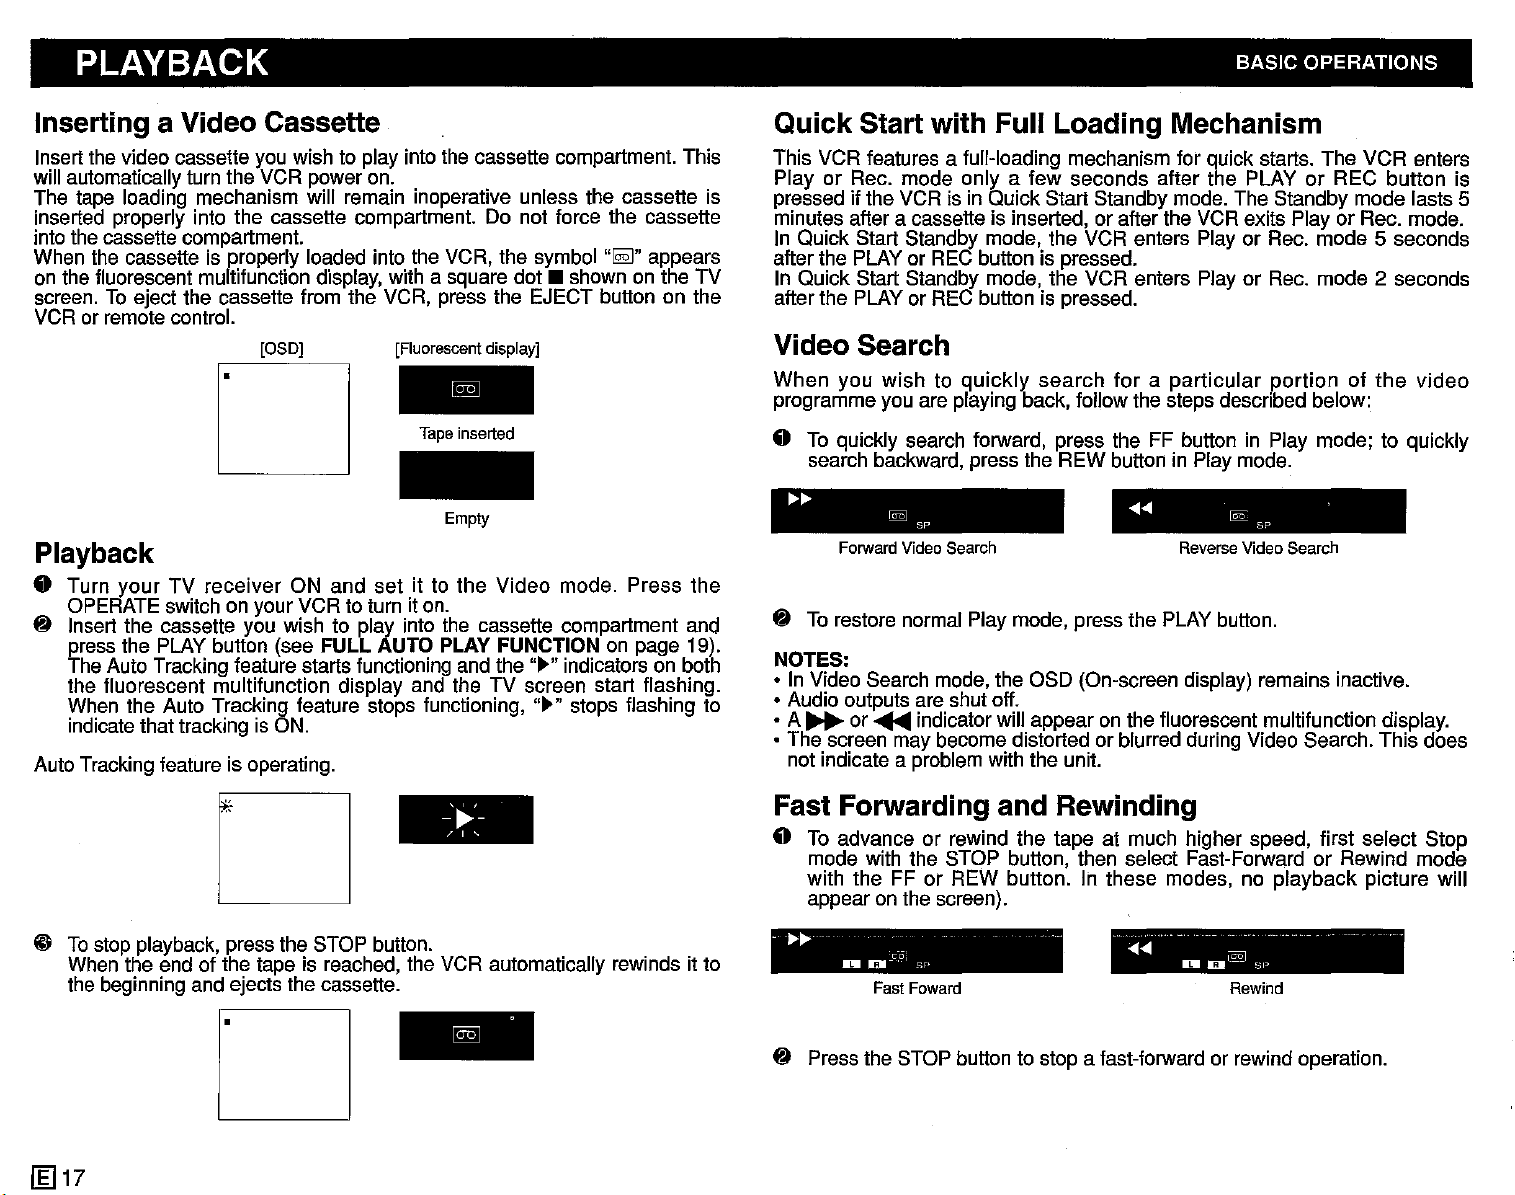
PLAYBACK BASIC OPERATIONS
Inserting a Video Cassette
Insert the video cassette you wish to play into the cassette compartment. This
will automatically turn the VCR power on.
The tape loading mechanism will remain inoperative unless the cassette is
inserted properly into the cassette compartment. Do not force the cassette
into the cassette compartment.
When the cassette is properly loaded into the VCR. the symbol
on the fluorescent multifunction display, with a square
screen. To eject the cassette from the VCR, press the EJECT button on the
VCR or remote control.
[OSD]
[Fluorescent display]
Tape
dot.
inserted
..~..
appears
shown on the TV
r
Empty
Playback
• Turn
~
Auto Tracking feature is operating.
your
TV
receiver
OPERATE switch on your VCR to turn it on.
Insert the cassette you wish to play into the cassette compartment and
press the PLAY button (see
The Auto Tracking feature starts functioning and the
the fluorescent multifunction display and the TV screen start flashing.
When the Auto Tracking feature stops functioning,
indicatethat tracking is ON.
ON and
set
it to the
FULL AUTO PLAY FUNCTION on page 19).
Video
mode. Press
..~..indicators on both
..~.. stops flashing to
the
Quick Start with Full Loading Mechanism
This VCR features a full-loading mechanism for quick starts. The VCR enters
Play or Rec. mode only a few seconds after the PLAY or REC button is
pressed if the VCR is in Quick Start Standby mode. The Standby mode lasts 5
minutes after a cassette is inserted, or after the VCR exits Play or Rec. mode.
In Quick Start Standby mode. the VCR enters Play or Rec. mode
after the PLAY or REC button is pressed.
In Quick Start Standby mode. the VCR enters Play or Rec. mode
after the PLAY or REC button is pressed.
5 seconds
2 seconds
Video Search
When
programme you are playing back, follow the steps described below:
• To quickly search forward. press the FF button in Play mode; to quickly
~
NOTES:
• In Video Search mode, the OSD (On-screen display) remains inactive.
• Audio outputs are shut off.
• A
• The screen may become distorted or blurred during Video Search. This does
you
wishtoquickly
search backward, press the REW button in Play mode.
.......
To restore normal Play mode, press the PLAY button.
~
not indicate a problem with the unit.
Forward
or
~
@§J
Sp
Video
Search
indicator will appear on the fluorescent multifunction display.
search
foraparticular
....... @2:
Reverse
portionofthe
SP
Video
Search
video
-'~'-
, , ,
o
@ Tostop playback, press the STOP button.
When the end of the tape is reached, the VCR automatically rewinds it to
the beginning and ejects the cassette.
D
[g]17
Fast Forwarding and Rewinding
• To advance or rewind the tape at much higher speed, first select Stop
mode with the STOP button, then select Fast-Forward or Rewind mode
with the FF
appear on the screen).
..
~~
_0
~
Press the STOP button to stop a fast-forward or rewind operation.
or REW button. In these modes, no playback picture will
Fast
c-oj
Foward
SF'
.......
DI
D~
Rewind
Sl~
- ,,,_
..
Page 19
BASIC OPERATIONS
Still Picture and Frame Advance
o To freeze a particular scene in the video programme you are watching,
press the PAUSE/STILL button in Play mode. The VCR will automatically
.return-lothe normal Play mode in about five minutes to prevent damage to
the tape.
11
~
If the still picture Is disturbed by a noise bar, clear it by activating the
~
SP
Shuttle mode with the SHUTTLE ON/OFF button, setting the shuttle dial to
the SLOW position, and then pressing the TRACKING ... or
....
button.
When the noise bar has disappeared, press the SHUTTLE ON/OFF
button again to deactivate Shuttle mode, and then press the PAUSE/
STILL button again.
4D
If the still picture is disturbed by jittering, press the TRACKING ... or
....
button until the picture stops shaking.
o If you wish to view frame-advance pictures, press the F.ADV button on the
remote control while the still picture is on the screen.
(it
Press the PAUSE/STILL or PLAY button to return to normal Play mode.
NOTES:
• Still Picture and Shuttle Mode are not displayed on the OSD.
• No audio output will come out during Still Picture playback.
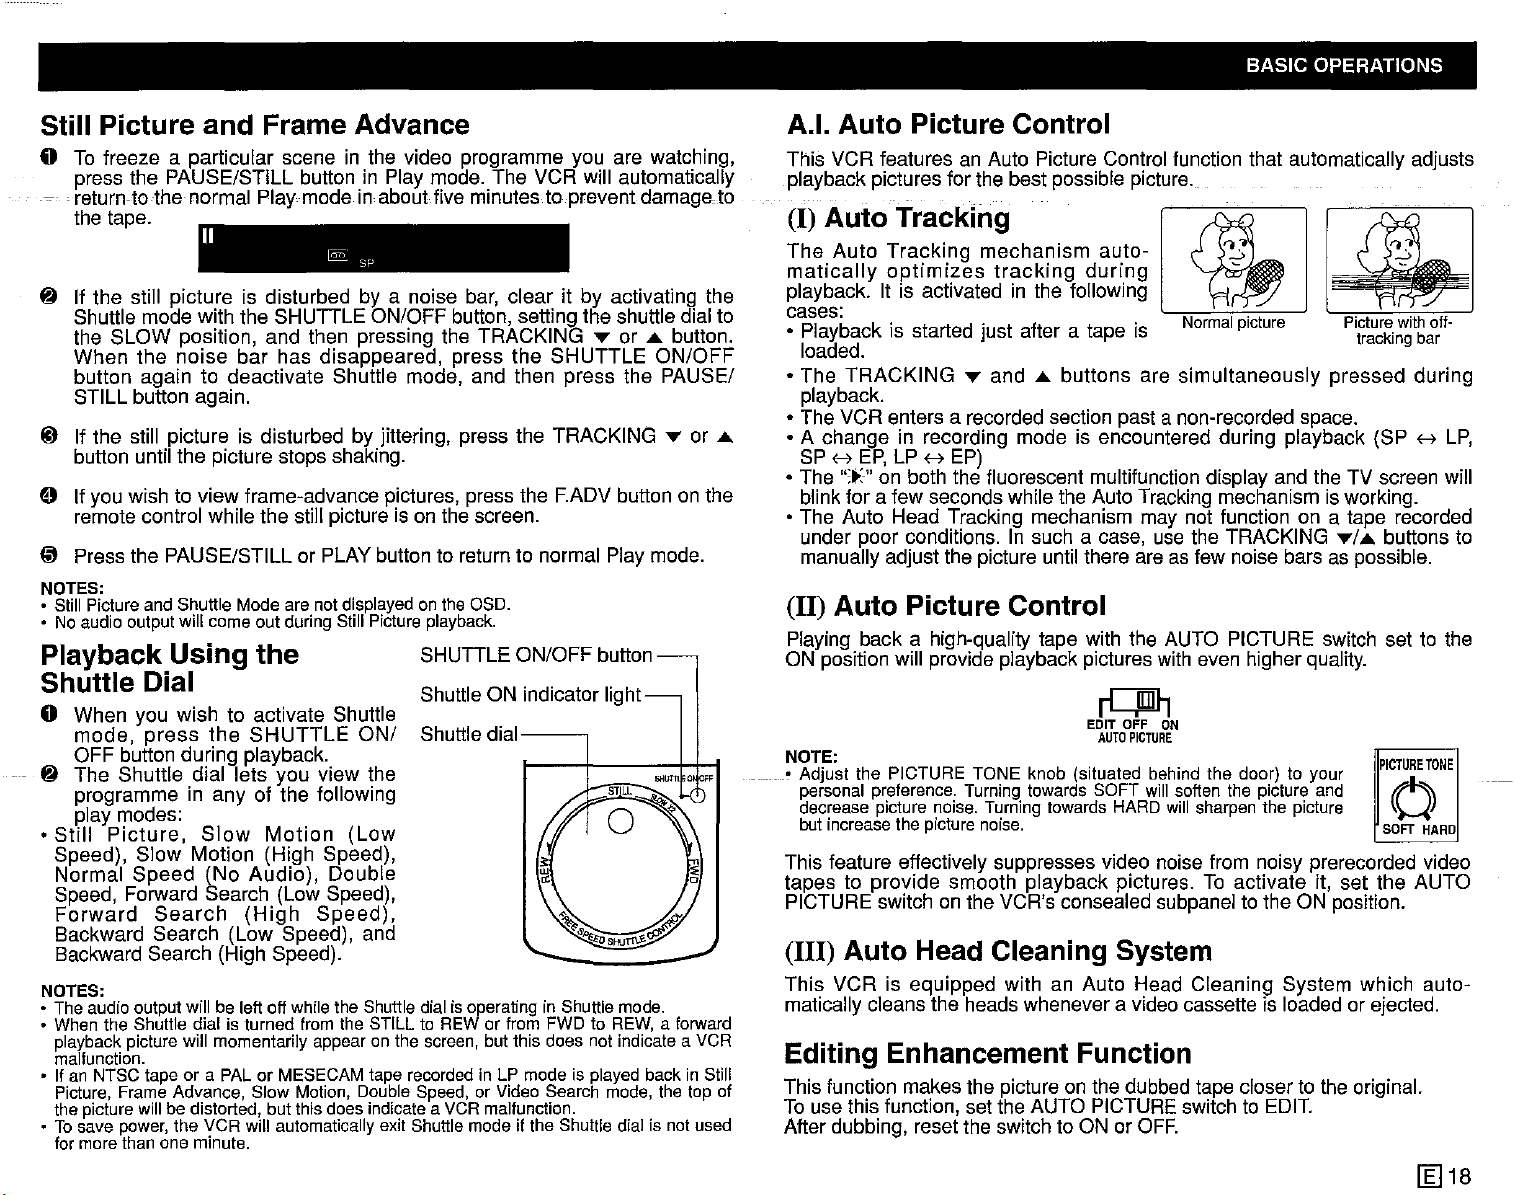
Playback Using the
Shuttle Dial
o When you wish to activate Shuttle
mode,
press
OFF button during playback.
~
The Shuttle dial lets you view the
programme in any of the following
piay modes:
•
Still
Picture,
Speed), Slow Motion (High Speed),
Normal Speed (No Audio), Double
Speed, Forward Search (Low Speed),
Forward
Backward Search (Low Speed), and
Backward Search (High Speed).
NOTES:
• The audio output will be left off while the Shuttle dial is operating in Shuttle mode.
• When the Shuttle dial is turned from the STILL to REW or from FWD to REW, a forward
playback
malfunction.
• If an NTSC tape or a PAL or MESECAM tape recorded in LP mode is played back in Still
Picture, Frame Advance, Slow Motion, Double Speed, or Video Search mode, the top of
the picture will be distorted, but this does indicate a VCR malfunction.
• To save power, the VCR will automatically exit Shuttle mode if the Shuttle dial is not used
for
more
picture
than
Siow
Search
will
one
minute.
the
SHUTTLE
Motion
(High
momentarily
ON/
(Low
Speed),
appearonthe
SHUTTLE ON/OFF button
Shuttle ON indicator light
Shuttle
screen,
dial--,
butthisdoes not
indicate
a VCR
A.I. Auto Picture Control
This VCR features an Auto Picture Control function that automatically adjusts
playback pictures for the best possible picture.
(I)
Auto
The
Auto Tracking mechanism auto-
matically
Tracking 1
optimizes
tracking
during
~
'S
~
11
~
~
~
playback. It is activated in the following
cases:
• Playback is started just after a tape is
loaded.
• The TRACKING
... and
....
buttons are simultaneously pressed during
u • -,->.._-
I\lUlllldl
IJlljlUIt:
Picture
tracking
with
off-
bar
playback.
• The VCR enters a recorded section past a non-recorded space.
• A change in recording mode is encountered during playback (SP
SP H
EP,
LP H EP)
• The
":t:" on both the fluorescent multifunction display and the TV screen will
H
blink for a few seconds while the Auto Tracking mechanism is working.
• The Auto Head Tracking mechanism may not function on a tape recorded
under poor conditions. In such a case, use the TRACKING
.../
....
buttons to
manually adjust the picture until there are as few noise bars as possible.
(11) Auto Picture Control
Playing back a high-quality tape with the AUTO PICTURE switch set to the
ON position will provide playback pictures with even higher quality.
~
EDIT OFF ON
AUTO
PICTURE
NOTE:
_.
Adjust the PICTURE TONE knob (situated behind the door) to your
personal
decrease
but
preference.
increase
picture
the
noise.
picture
Turning
Turning
noise.
towards
towards
SOFT
HARD
will
soften
will
the
sharpen
picture
the
and
picture
This feature effectively suppresses video noise from noisy prerecorded video
tapes to provide smooth playback pictures. To activate it, set the AUTO
PICTURE switch on the VCR's consealed subpanel to the ON position.
(Ill)
Auto Head Cleaning System
This VCR is equipped with an Auto Head Cleaning System which automatically cleans the heads whenever a video cassette is loaded or ejected.
IPICTURE
o
SOFT
HARD
TONE
Editing Enhancement Function
This function makes the picture on the dubbed tape closer to the original.
Touse this function, set the AUTO PICTURE switch to
After dubbing, reset the switch to ON or
OFF.
EDIT.
LP,
1Il18
Page 20
Playing Back an NTSC Tape (NTSC
This VCR allows you to view
receiver, as well as on an NTSC-compatible or multi-standard TV set.
NOTES:
It is advisable that this VCR be used, as a rule,
with an NTSC-compatible TV set or with a multistandard
compatibility. While the VCR is usable with a
PAL-compatible TV
note the following restrictions:
• The vertical raster size is slightly smaller than normal. This is not a machine
malfunction.
• If the PAL TV
programmes because the vertical synchronization will remain "out." If your
PAL
the vertical sync. with the V-HOLD knob.
• Horizontal lines may appear on the screen when using special playback
functions (Video Search, Stiil Screen, Slow Shuttle). Also, these horizontal
lines may be accompanied by a loss of colour, depending on their position.
Should this occur, colour can be restored by pressing the TRACKING
... button while in Video Search or Slow mode.
• You cannot dub an NTSC video from this VCR onto another PAL-compatible
VCR. If a
compatible VCR, no picture wiil be displayed.
TV
receiver
receiver
lacksaV-HOLD
TV
has a V-HOLD control, you can enjoy NTSC videos by stabilizing
tape
createdinthis
NTSC~format
with
NTSC
as well, please
control,
matter
tapes on your PAL-compatible TV
3.58/4.43
you
is played
~
PAL)
tGl
•
cannot
back
view
on
NTSC
another
video
.....
PAL-
Playing Back a Tape with Hi-Fi Audio Tracks
This VCR can play back tapes with Hi-Fl audio tracks recorded in different TV
standards and at different tape speeds.
Hi-Fi
audio
compatibility
Tape
speed
I~
PAL
MESECAM
SECAM
NTSC
SP LP EP
0 0
0
0
0 0 0
0 -
0
NOTE:
Stereo and bilingual audio are available only at the AUDIO OUT jacks. The
RF OUT jack yields only monaural audio.
o This VCR automatically discriminates
between tapes recorded in different
modes (SP, LP, EP).
o
For
the switch
maintain
recorded in different TV standards,
see pages 3 and 4 of this manual.
settings
compatibility
required
with
tapes
to
or
BASIC OPERATIONS
The
audio outputs at
several different modes.
used to make a selection from these modes in a cyclic sequence.
the
AUDIO
The
OUT
AUDIO
R/L-MONO
OUT button on the remote control is
jacks
are
available
1)Normally the VCR should be placed in Hi-Fi mode, in which the indicators
IT]
and
[}[]
are lit up on the fluorescent display and the OSD, and
"I"
is displayed for some time on the TV screen.
In Hi-Fi mode the VCR can play tapes with stereo or bilingual audio (main
channel from the left, and sub channel from the right).
2) Pressing the AUDIO
audio to both the AUDIO
OUT
button the first time sends only the left-channel
OUT
Rand
L-MONO jacks.
"I"
L R
3) Pressing the button a second time sends only the right-channel audio to
both the AUDIO OUT
4) Pressing it a third time sends the mono audio recorded on the linear track
to both AUDIO OUT
Pressing the AUDIO
audio modes described above in a cyclic sequence.
NOTE:
• The VCR will automatically switch into mono mode from the linear audio track if
the quality of the Hi-Fi audio tracks is too poor,or if the tracking is "out".
Rand
L-MONO jacks.
Rand
L-MONO jacks.
OUT
button on the remote control selects one of four
Adjusting Hi-Fi Audio Tracking
o Normally you can obtain the optimal sound automatically by using the auto
tracking function.
o If the Hi-Fi audio is unstable (frequent dropouts, etc.) with a pre-recorded
video or a tape recorded on another VCR or in
normal tracking while playing backthe tape as described below:
o Simultaneously press the TRACKING
~
Press the TRACKING
the
IT]
and
[}[]
OSD
"I"
L R "I" indicators disappear.
ID
Press the TRACKING ... button in the same manner while counting the
number of presses until
reappear, and then disappear again.
e
Press
number of times counted in stepIDabove to obtain optimal tracking.
the
TRACKING
.....
indicators disappear from the fluorescent display and the
button repeatedly at short, equal intervals until
IT]
and
.....
button
.....
and
[}[]
and the OSD
againinthe
...
buttons.
NT$C
same
SP mode, restore
"I"
L R "I" indicators
manner
half
the
FULL AUTO PLAY FUNCTION
The convenient auto play feature lets you save some manual operation steps
in tape playback.
When a cassette with its erasure prevention tab removed is loaded into the
VCR, the deck automatically turns itself on and starts playback. When the end
of
the
tape
beginning and ejects it.
is reached,
the
VCR
automatically
rewinds
the
tapetothe
in
Audio Mode Selection
[§]
19
AUDIO
OUT
c:::::::J
NOTE:
• Whenyouwishto playa tapewith its
but
covered
pressthe
upwith
PLAY
tape),
button.
loadthe
erasure
cassette
prevention
(theVCRwillautomatically turn on), and
tabunremoved (or
removed
Page 21

HOW TO USE VISS AND VISS ERASE FUNCTION BASIC OPERATIONS
How
How
to Use VISS ADD
o Play back the tape, watch the picture and listen to the sound until you
locate the place where you wish to add the VISS signal, then press the
PAUSE/STILL button.
frpYifsstf1e~~REWoutforn6peifdrrn--
aHelierseVidetrSearchfdraobtJt-1
second (approx. 3 to 4 seconds of playing time), then immediately press
the PAUSE/STILL button to freeze the picture.
~ Press the 0 VISS ADD button on the remote control.
(The VCR will automatically exit the Still mode and begin piayback.)
About 2 seconds after playback commences, "VISS ADD" will begin flashing on the OSO. At this point, the VISS index signal is being registered.
o When "VISS ADD" disappears from the OSO, registration of the VISS
signal is complete.
P~L
L!U-~-L!U-0
NOTE:
o Each time the VISS ADD button is pressed, an index signal is added.
Accordingly, press the button once only at each position.
o The VISS ADD function can not be used on cassettes which have the
erasure prevention tab broken off, or on unrecorded portions of a tape.
o There will be no sound while the ADD function is operating. This does not
indicate a malfunction.
o Do not press any other buttons while the ADD function is operating.
~
PA~L
X'&8
" " ,
-,!1,9B,
tDp-
--0
to Use VISS ERASE
o Find the iocation of the VISS signal you want to erase by using the OPSS
function (see page 27).
~
Atthetape
freeze-the picture. -
~ Press the
position located in Step0,press the PAUSE/STILL button to
~
FF button to carry out Forward Video Search for about 1
------
--
---.---
second (approx. 5 seconds of playing time), then immediately press the
PAUSE/STILL button to freeze the picture.
o Press the (D VISS ERASE button on the remote control.
The VCR will automatically change to Reverse Video Search mode and
search for the VISS signal. (Approx. 7 seconds of playing time.)
At this time, VISS ERASE will light up on the OSO.
Then, the VCR will automatically enter playback mode, and, after 4 to 5
seconds of playback, it will take about 10 seconds to erase the VISS
signal. (During this time, VISS ERASE will flash on the OSD.)
o VISS ERASE will disappear from the OSD when VISS ERASE has been
completed.
PA~L
L!U-
NOTE:
o Do not use the VISS ADD or ERASE functions in tape locations where there
is a speed change (SP
;::'
NTSC, PAL;::' MESECAM, NTSC
of the tape, as this may cause a disturbance in the playback picture.
There will be no sound while the ERASE function is operating. This does not
indicate a malfunction.
o Do not press any other buttons while the ERASE function is operating.
o The picture may be distorted during the VISS ADD or ERASE operation.
This does not indicate a malfunction.
(F!ffi)
~-L!U-~
;::'
LP,LP;::'
P~L
E~E
EP) or a recording format change (PAL
;::'
MESECAM, etc.) or at the beginning
-VlB,B
,BR~B,B·
--
[g]20
Page 22

RECORDING A TV PROGRAMME BASIC OPERATIONS
Cassette Erase Protection
A
IV!!~
or
IVJ.lsl
cassette
has a
removable
tab
ERASURE
PROTECTION TAB
to
prevent accidental erasure of recorded material.
Removing the tab prevents recording. To record on a
video cassette with the tab removed, place adhesive
tape over the tab opening.
~
Recording a TV Programme
o Turn on your TV and select the video channel.
8 Press the OPERATEbutton on the VCR to turn on the power.
ID Select one of the recording speeds: SP (standard play), LP (long play;
does not work when the NTSC system is used) or EP (extended play;
works only only when the NTSC system is used) by using the SP/Lp·EP
button on the remote control. ("SP", "LP", or "EP" lights on the display.)
Longest Recording Timesby RecordingSpeedsandTypesof Cassette
PAL,
111-.I....
SECAMand MESECAMlapes
RecordingSpeed
Tape
E-240
E-180 180min. 360min.
E-120 120min. 240min.
E-60
E-30
\."••II\oIllv
Recording Speed
TapeColour
System
PAL
MESECAM
SECAM 0 0
NTSC
SP
240min. 480min.
SDmin.
SOmin.
...
VIUIII~
lP
120min.
6Dmin.
........
t'
....,•••
'J
UJIl......
SP
0
0 0
0
RecordingSpeed
..,IUIl.~
lP
0
Tape
T-160 160min. 480min.
T-120
T-60
.............u............
NTSClapes
SP
120min.
SDmin.
1'...
o Select the programme position you wish to record using the CHANNEL
Up/down
(0-9) on the remote control.
~
Insert the cassette, making sure the erasure protection hole is covered.
Press the REC button. (If the erasure protection hole is uncovered, the
cassette
PAUSE/STILL button. To resume recording, press the PAUSE/STILL
button again. (The pause/still mode disengages automatically after about
five minutes.)
buttons on the VCR or the remote control, or the numeric buttons
will
be
ejected.)
To
pause
while
recording,
..,
................
EP
Tapes
EP
360min.
180min.
y~
press
..
"""
••
the
To Watch
After steps
Another
TV Programme While Recording
0 through~have been completed, select the TV programme you
wish to view by using the television tuner.
At the end of the tape, your VCR will automatically stop recording, rewind the
tape, and eject it.
RECbutton
button-
~!i;;;;."""
~~
"-
mrni52'~
~EPm:5
~
is.:..;-~
CJj.
p/downbuttons
=
.JJ;l",.Q1C
U
~o'b
p.
~
.....
~..-..-.i'/
-
..
~-"'
..
((@@@.J)
OPERATE
Numericbuttons
SP/lp.EP button I I
PAUSE/STill
"
button
RECbutton~
button~
..,.I~-DR'~
H;"FISUPERMUC!"f
.,"""-
__
~
,.........,...."
j~tff':
11
1~~~~~t----CHANNElu~down
L, buttons
..
'='
c:;::
PI\USE/STlll
....
~~"tID.
NOTES:
• When you record from other equipment by using the video input terminal
(VIDEO IN) and audio input terminal (AUDIO IN R/L-MONO) on the rear or
the front of your VCR, select the external input position located between
programme positions 47 and 0 by using the CHANNEL button on the remote
control or inside the door of the VCR.
(When you select the external input position, "L1" (rear) or "L2" (front) will
appear onthe program position display.)
/El
21
NOTE:
• TV signals vary in different areas around the world.
correctly by referring to pages 3 and 4.
Set
up your VCR
Page 23
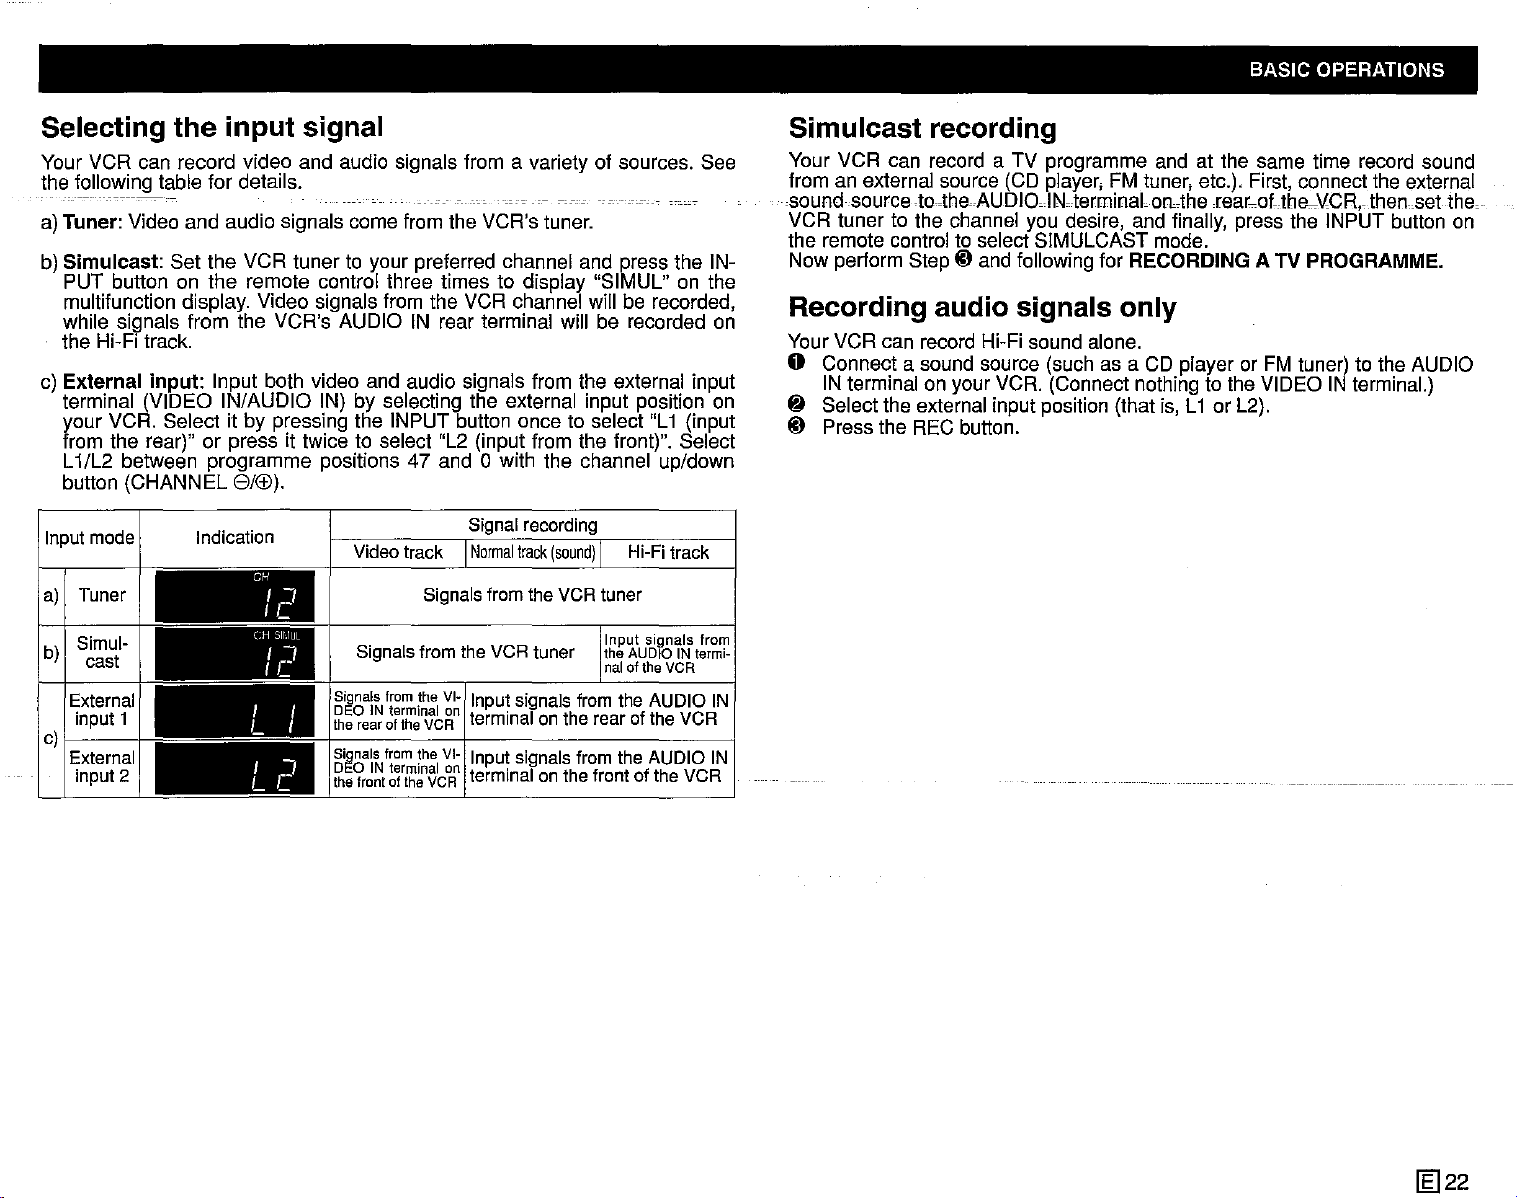
BASIC OPERATIONS
Selecting the input signal
Your VCR can record video and audio signals from a variety of sources. See
the following table for details.
-
---
------_.-
a) Tuner: Video and audio signals come from the VCR's tuner.
Simulcast:
b)
PUT button on the remote control three times to display "SIMUL" on the
multifunction display. Video signals from the VCR channel will be recorded,
while signals from the VCR's AUDIO IN rear terminal will be recorded on
the Hi-Fi track.
c)
External
terminal (VIDEO IN/AUDIO IN) by selecting the external input position on
your VCR. Select it by pressing the INPUT button once to select "L1 (input
from the rear)" or press it twice to select "L2 (input from the front)". Select
L1/L2 between programme positions 47 and 0 with the channel up/down
button (CHANNEL
Inputmode
a) Tuner
Simul-
b)
cast
External
input1
c)I
External
input2
-
Set the VCR tuner to your preferred channel and press the IN-
input:
Input both video and audio signals from the external input
GAB).
Signal
Indication
CH
(H
I I
L I
I I
Le
Ir
Ir
Video
track I
J
SIIIUL
J
Signals
Signals
DEO IN terminal on npu signaS romthe
therearoftheVCR
Signals
DEO IN terminal on
the front of the VCR
Signals
fromthe VCRtuner
from
the
VI~
1
from
the
VI-I
recording
Normal
track
(sound)IHi-Fi
fromthe VCRtuner
t si I f
I
terminal
I t sl I
npu,
terminal
onthe
rear
signaS fromthe
onthefrontofthe VCR
track
Input signals from
the AUDIO IN
naloftheVCR
AUDIO
ofthe VCR
AUDIO
termi-
IN
IN
Simulcast recording
Your VCR can record a TV programme and at the same time record sound
from an external source (CD player, FM tuner, etc.), First, connect the external
sound source to-the
AUDIOolNoterminaLonAherear_oUh8--\,lCR, then
set
theo
VCR tuner to the channel you desire, and finally, press the INPUT button on
the remote control to select SIMULCAST mode.
Now perform SteptDand following for RECORDING A TV PROGRAMME.
Recording audio signals only
Your VCR can record Hi-Fi sound alone.
o Connect a sound source (such as a CD player or FM tuner) to the AUDIO
IN terminal on your VCR. (Connect nothing to the VIDEO IN terminal.)
~
Select the external input position (that is, L1 or L2).
tD
Press the REC button.
1m22
Page 24
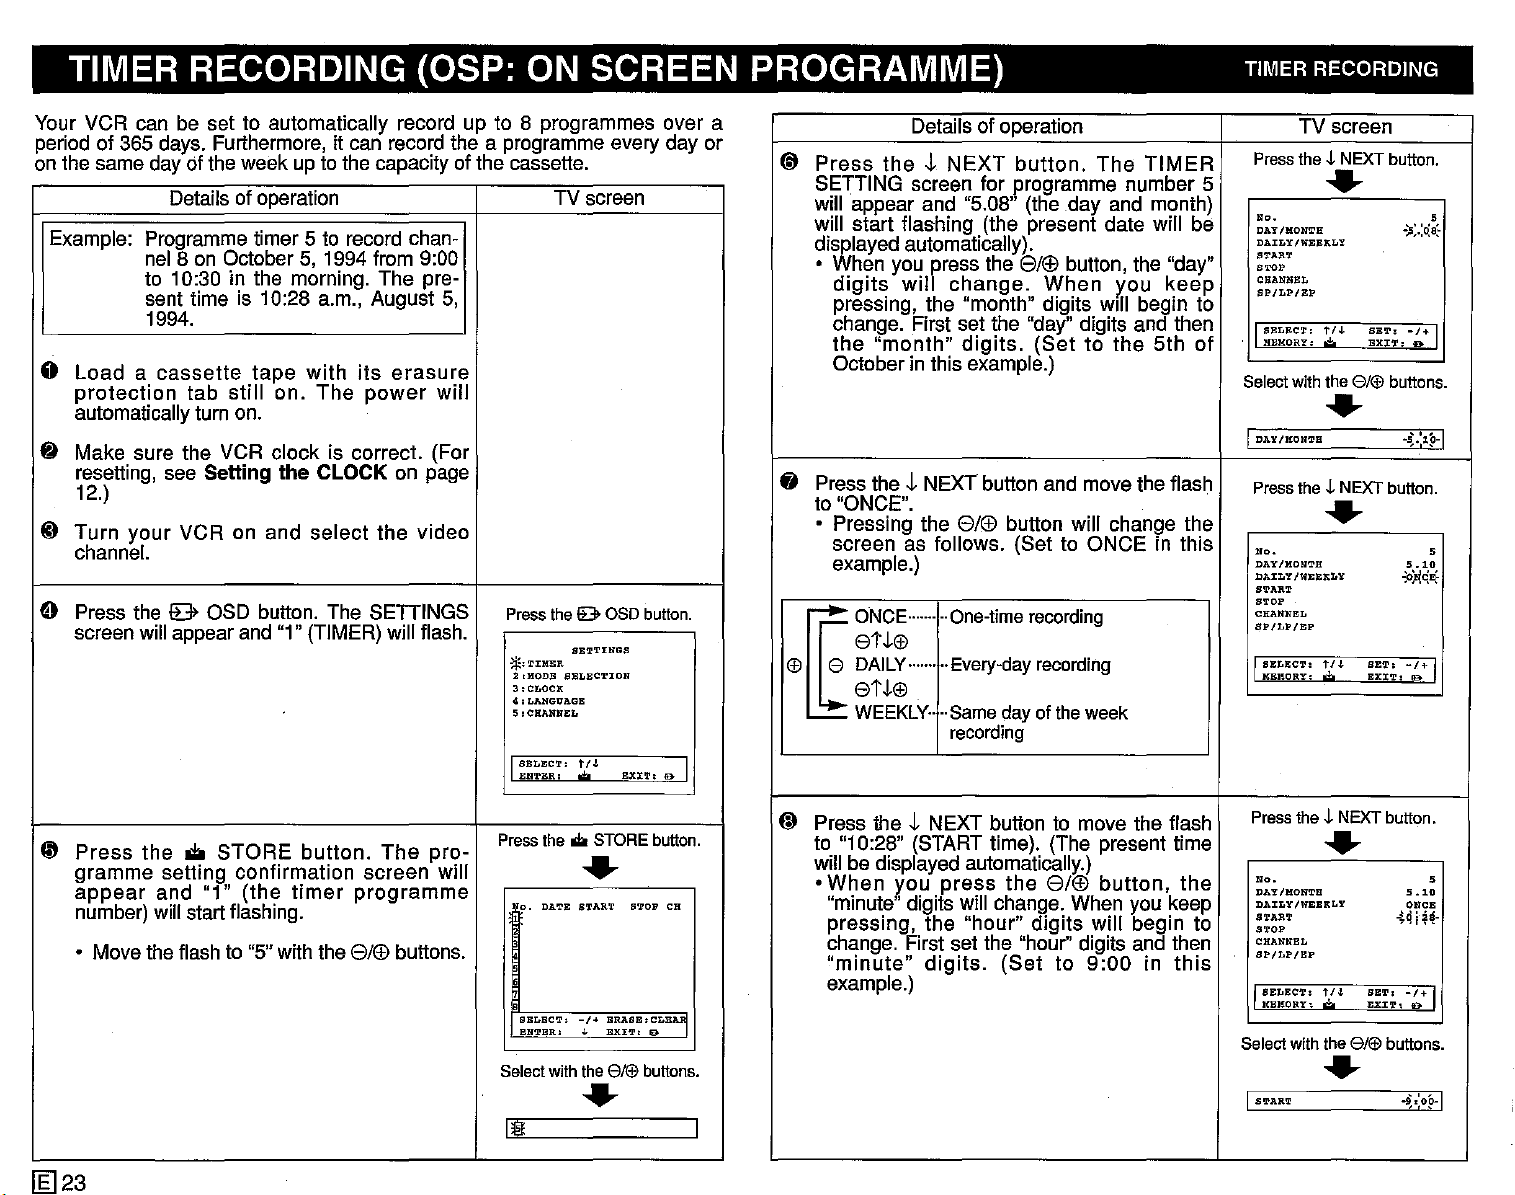
TIMER RECORDING (OSP: ON SCREEN PROGRAMME) TIMER RECORDING
Your VCR can be set to automatically record up to 8 programmes over a
period of 365 days. Furthermore, it can record the a programme every day or
on the same day of the week up to the capacity of the cassette.
Details of operation TV screen
Example: Programme timer 5 to record chan-
nel 8 on October 5, 1994 from 9:00
to 10:30 in the morning. The present time is 10:28 a.m., August 5,
1994.
0
Loadacassette
protection
automatically turn on.
~ Make sure the
resetting, see Setting
12.)
..
Turn
channel.
e Press the
screen will appear and "1" (TIMER) will flash.
your
VCR on and
lE>
tab
tape
with
still
on.
The
VCR
clock is correct. (For
the
CLOCK on page
select
OSD button. The
its
erasure
power
the
video
SETIINGS
will
Press
the
IB>
*'i'IHER
I
SB'1'T!NGS
2,HODB SELBCTION
3.CLOCK
4:LANGUAGB
5:CHANNE:L
SBLECT.
t/.l.
EnTER:
e
OSD
EX:CT. 10> I
button.
Details of operation TV screen
@
Press
SETTING screen for programme number 5
will appear and "5.08" (the day and month)
will start flashing (the present date will be
displayed automatically).
• When you press the
fj
Press theJ.NEXT button and move the flash
to "ONCE".
• Pressing the
~ooc,-
G'!
EDAILy
theJ.NEXT
digits
pressing, the "month" digits
change. First set the "day" digits and then
the
October in this example.)
screen as follows. (Set to ONCE in this
example.)
will
"month"
change.
..
One-time
button.
8/®
button, the "day"
When
digits.
8/®
(Settothe
button will change the
recording
The
y.ou
Will
etJ.G'!
..
....
·..
Every-day
recording
etJ.G'!
WEEKLY
..
Same
..
recording
dayoftheweek
TIMER
keep
begin to
5th
of
Press
the~NEXT
No.
DAY/HONTH
DAILY!WElElKLY
START
'TOP
CHANNEL
BP/LP/EP
I
SELECT:
HEMORY:
Select
with
I
DAY/KON'l'H
Press
the
N".
DAY/HONTH
DAILY
IW:EBKLY
S'l'AR'l'
STOP
CHAN'N"BL
SP/LP/BP
I
SELECT.
HEllORT•.;.
..
t/J.
BET:
BXJ:'J'.
'*'
the
8/1ifJ
..
-l-
NEXT
..
t/J.
BE'!'.
BXJ:'l':
button.
s
-)i;.:~8:
-/+
I
a
buttons.
.~.:lp-1
button.
s
5.10
-P!lG*
-/+
I
!El>
~
Press
gramme
appear
number) will start flashing.
• Move the flash to "5" with the
the.
setting
and
STORE
confirmation
"1"
[g]23
(the
button.
timer
The
screen
programme
8/®
pro-
buttons.
will
Press
o.
e
BELEe'!'.
BN'1'BR.
Select
Ill!
the
DA'1'E
with
.do
STORE
..
START
-/+
BRASE.CLE~
,
EXI'1':
the
8/1ifJ
..
button.
S'l'OP CH
lE)
buttons
Press
@
Press theJ.NEXT button to move the flash
to "10:28" (START time). (The present time
will be displayed automatically.)
When
•
"minute" digits will change. When you keep
pressing, the
change. First set the "hour" digits and then
"minute"
example.)
.
you
press
"hour"
digits.
the
(Set
8/®
digits
to
button,
will
9:00
the
begin to
in
this
the~NEXT
No.
DAY/HON'l'1I
DAILY/WEEKLY
START
STOP
CHANNEL
BP/LP/EP
IBELEC''1', 1'/.1.
HBKORY,
Select
with
I
S!L'AR'1'
..
'*'
the
..
BE'1',
EXJ:'1', D
8/1ifJ
button.
s
5.10
ONCE
-!4
i~~-
-/+
buttons
~,:oH
I
.
I
Page 25
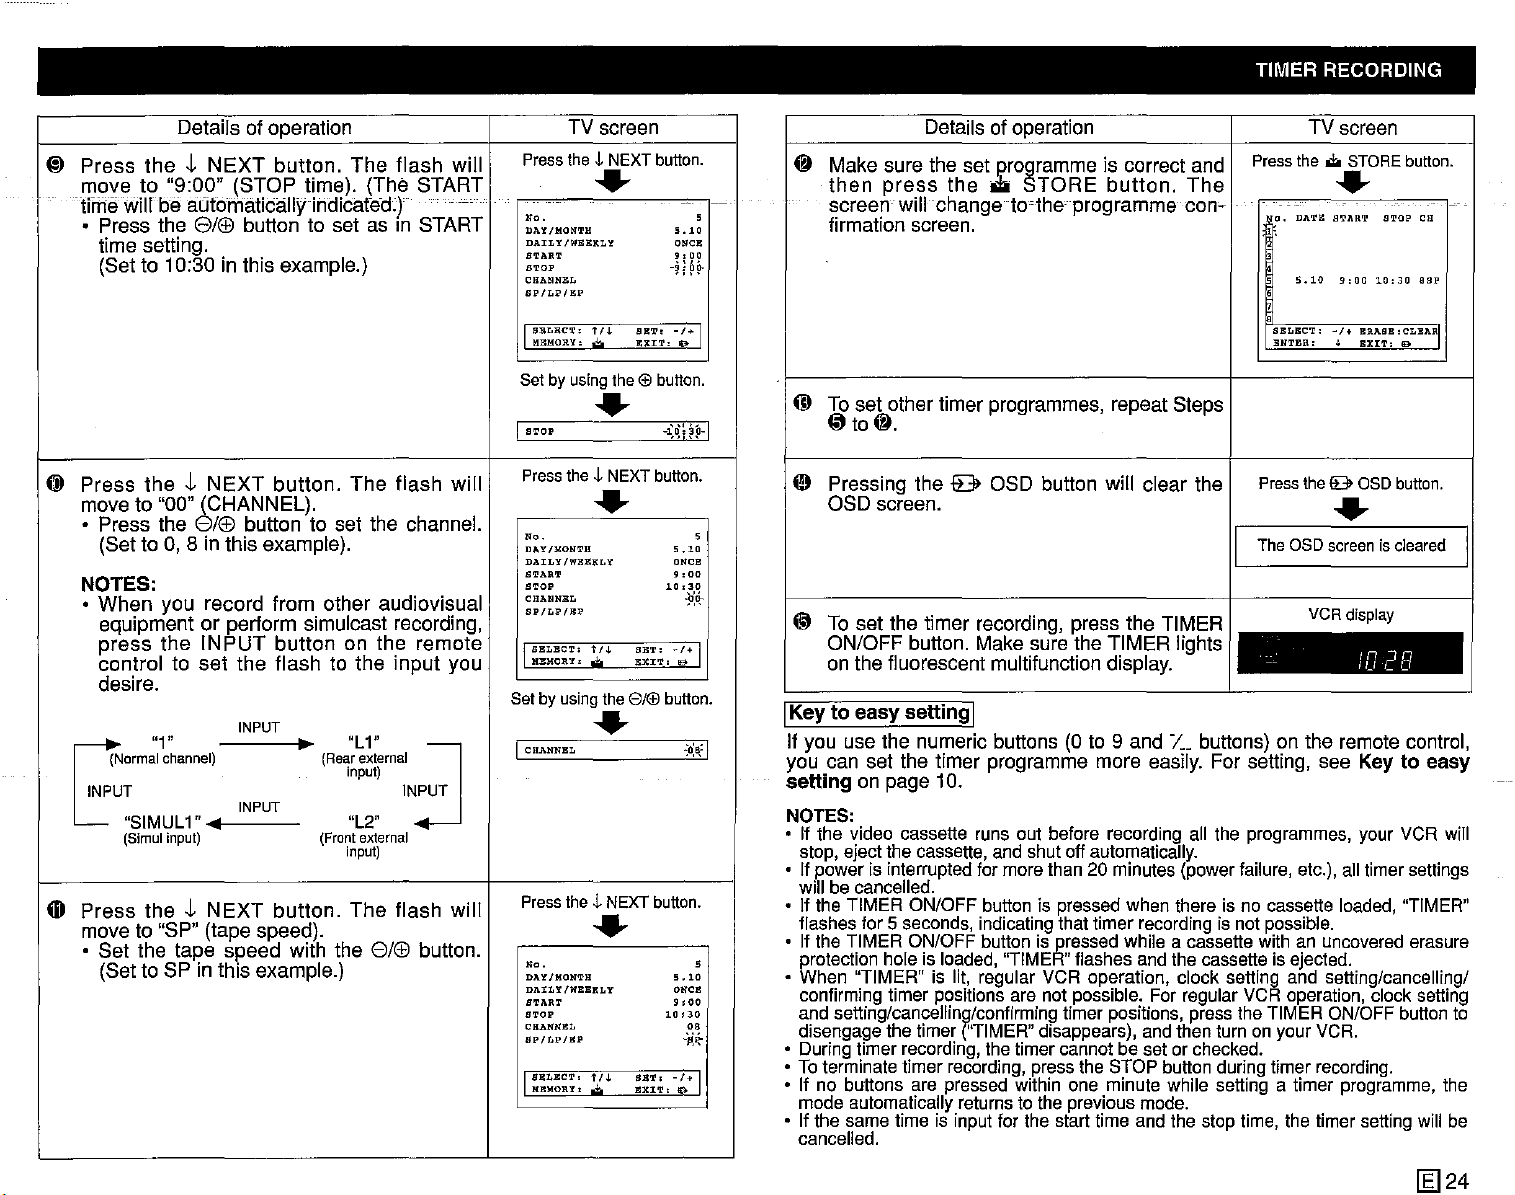
TIMER RECORDING
Details
Press
~
move
I
lime
theJ,NEXT
to
"9:00"
Will be
of operation
button.
(STOP
automatically
The
time).
(The
lndlcated.)"
• Press the e/(£) button to set as in START
time setting.
(Set to 10:30 in this example.)
@
Press
move to "00"
•
theJ,NEXT
Press
(Set
to 0, 8 in
button.
The
(CHANNEL).
the e/(£) button to set the channel.
this
example).
NOTES:
•
When
equipmentorperform
press
controltoset
you
the
record
INPUT
the
from
other
simulcast recording,
button
on
flashtothe
desire.
G"1"
INPUT
Press
Gl
INPUT
(Normalchannel)
"SIMUL1"
(Simulinput) (Frontexternal
theJ,NEXT
INPUT
OIl
button.
•
"L1"
(Rear
input)
"L2"
input)
external
The
move to "SP" (tape speed).
•
Set
the
tape
(Set
to SP in
speed
this
with the e/(£) button.
example.)
flash
will
START
....
flash
will
audiovisual
the
remote
input
you
~
INPUT
flash
will
C
TV screen
Press
the
-l-
NEXT
button.
......
ae . s
DAY/MONTH S
D./l.ILY/WEElKLY
START
STOP
CHANNEl.
BP/LP/Ell'
I
SEL1W'T,
1/.1.
Ml'lMORY, Jr.
Set by using
BRT.
E::l!:I'l" U
the@
button.
......
I
STOP
Press
the
-l-
NEXT
button.
......
ae
. s
DAY/MONTH
DAILY/Wgl:':ltLY ONCS
START
STOP
CHANNEL
SP/LPIJU~
I
BBLBCT,
t/"-
MEMORY'
Setby
using
.;.
the8/(fJ
SET'
RXJ:'l',
......
I
CHANNBL
Press
the
.l.
NEXT
button.
......
ne . s
DAY/MONTH
DAILY/WEEKLY ONCE
START 9 I
STOP
CHANNeL
BP/LP/BP
IISBUCTI
MEMORY'
~J.
:~i~,
~
-
.10
aRCIl
9,00
-~i~~
-'+1
CD
-l:o:\~p-I
o Pressing the 0 OSD button will
5.10
9.00
10,30
.:O:cl;
@ To
~/+
I
!it
button.
-:o:a:1
5.10
00
10,30
ea
-}J:~
-/+
I
I
Keytoeasy
If you use the numeric buttons (0 to 9 and
you can set the
setting
NOTES:
• If the video cassette runs out before recording all the programmes, your VCR will
stop, ejectthe cassette,andshut off automatically.
• If power is interruptedfor morethan 20 minutes (powerfailure,etc.), alltimersettings
will be cancelled.
• If the TIMER ON/OFF button is pressedwhen there is no cassette
flashes for 5 seconds, indicatingthat timer recording is not possible.
• If the TIMER ON/OFFbuttonis pressed while a cassette with an
protectionhole is
• When "TIMER" is lit, regular VCR operation, clock setting and setting/cancelling/
confirmingtimer positionsare not possible. For regular VCR operation, clock setting
and setting/cancelling/confirming timer positions,press the TIMERON/OFFbuttonto
disengagethe timer
• During timerrecording, the timercannot be set or checked.
• Toterminatetimer recording, pressthe STOP buttonduringtimer
• If no buttons are pressed within one minute while setting a timer programme, the
mode automaticallyreturns tothepreviousmode.
• If the same time is inputfor the start time and the stop time, the timer settingwill be
cancelled.
Details of operation
Make sure the set programme is correct and
then
press
screen
the
oiIli
STORE
button.
willchangeto·theprogramme
The
con-
firmation screen.
To
set
(i'
OSD
ON/OFF
other timer programmes, repeat Steps
to~.
screen.
set
the
timer
recording, press the TIMER
button. Make sure the
TIMER
clear
the
iights
on the fluorescent multifunction display.
setting
I
/.._
timer
programme more easily. For setting, see Key to
on page 10.
loaded,
"TIMER"flashes and the cassetteis ejected.
("TIMER"
disappears), andthenturnon your VCR.
TV screen
Press
the...
STORE
button.
......
o.
DATE START STOP CH
5.10
9,00
10:30
asp
SELBCT,
-I
+
BRAaB,
BNTER'
Press the 9 aso button.
~
BXIT:
CLBARI
0
......
The aso screen is cleared
VCR
display
In
-
buttons) on the remote control,
uncovered
recording.
IU
loaded,
10
C [J
"TIMER"
erasure
easy
[g]24
Page 26
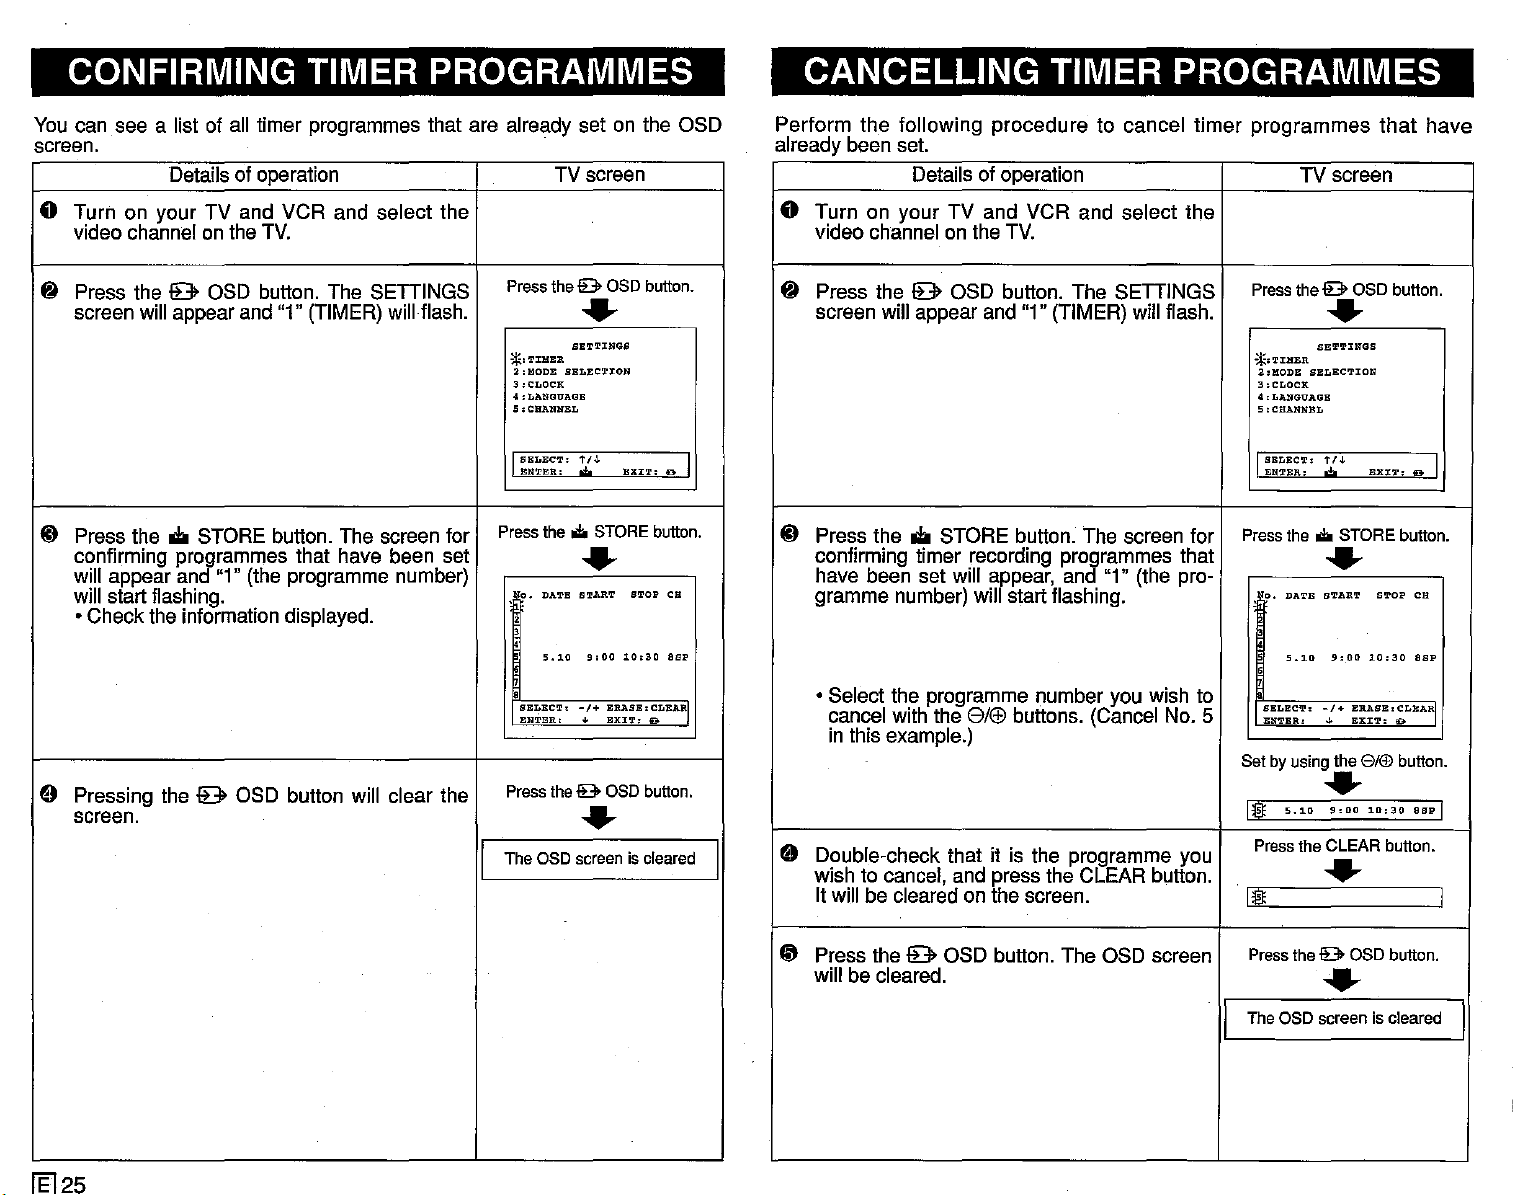
CONFIRMING TIMER PROGRAMMES
CANCELLING TIMER PROGRAMMES
You can see a list of all timer programmes that are already set on the OSD
screen.
Details of operation
TV screen
o Turn on your TV and VCR and select the
video channel on the TV.
8 Press the 9 OSD button. The SETTINGS
screen will appear and "1" (TIMER) will flash.
~ Press the
confirming programmes that have been set
will appear and "1" (the programme number)
will start flashing.
• Check the information displayed.
9 Pressing the 9 OSD button will clear the
screen.
oIi
STORE button. The screen for
Pressthe
*.TIHER
2,MODE SELECTION
3,CLOCK
;!"LANGUAGE
5:CHANNEL
J
Press
Pressthe
Theaso
I
lB>
OSD button.
..
SETTINGS
SELEC'r:
t/J.
ENTER.
the.
EXIT.
'*'
STORE button.
..
o.
DATE START STOP CH
g:OO
5.10
::~=~~'
10:30
-j+
:~~~~':RARI
lB>
OSD button.
..
screeniscleared
D I
asp
Perform the following procedure to cancel timer programmes
already been set.
o Turn on your TV and VCR and select the
8 Press the 9 OSD button. The SETTINGS
~
9
I
Details of operation
video channel on the TV.
screen will appear and "1" (TIMER) will flash.
Press the
confirming timer recording programmes that
have been set will appear, and "1" (the programme number) will start flashing.
• Select the programme number you wish to
cancel with the
in this example.)
Double-check that it is the programme you
wish to cancel, and press the CLEAR button.
It will be cleared on the screen.
oIi
STORE button. The screen for
SI(£)
buttons. (Cancel No. 5
that
have
TV screen
Pressthe lB>OSD button.
..
2:HODE
SELECTION
3,CLOCK
4 ,LANGUAGE
5:CHANNBL
SELECT:
ENTER:
the.
SET!L'INGS
t/J.
EXX':l', D I
W
STORE button.
*.TJ:HER
I
Press
..
e ,
DATE
START
S!L'OP
CB
5.10
9,00
10:30
s
::~:~~:
-:+
:~:~'~BA~
Set by using the 8/!IJ button.
asp
..
!hOO
10:30
5.10
1I
Pressthe CLEAR button.
asp I
..
1I I
fEl25
~
Press the 9 OSD button. The OSD screen
will be cleared.
Pressthe lB>OSD button.
......
Theaso
I
screeniscleared
I
Page 27
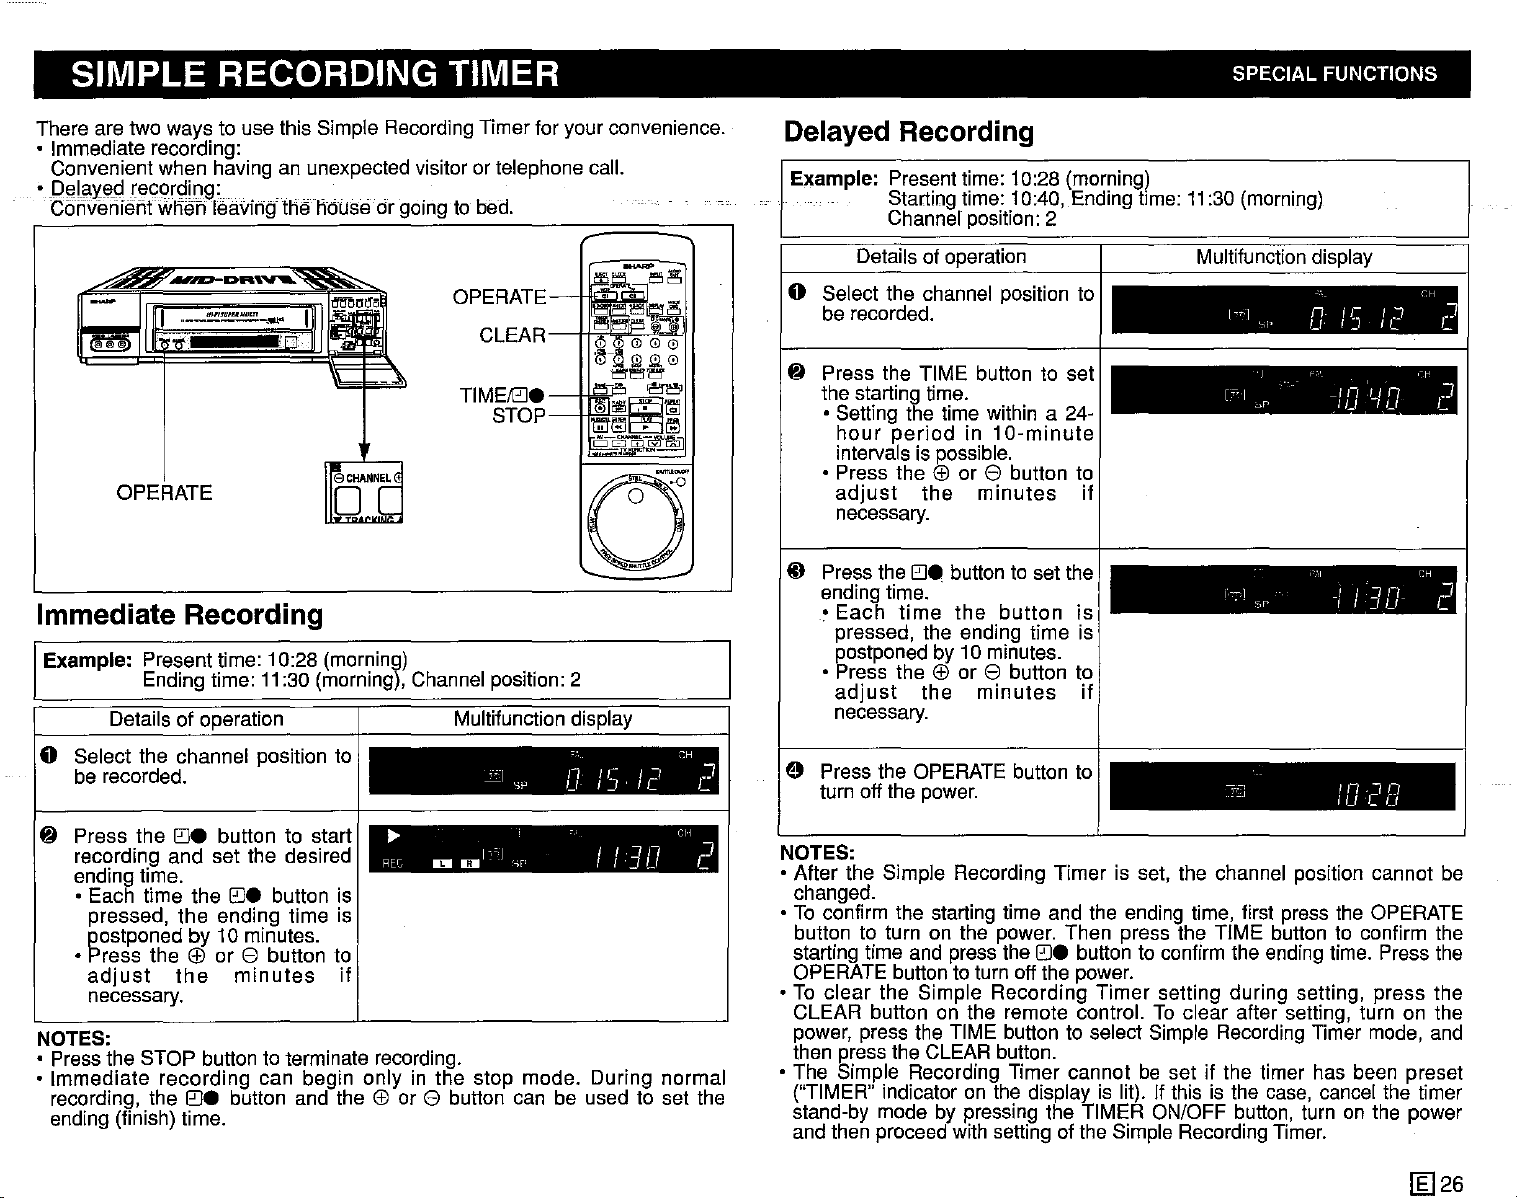
SIMPLE RECORDING TIMER SPECIAL FUNCTIONS
There are two ways to use this Simple Recording Timer for your convenience.
• Immediate recording:
Convenient when having an unexpected visitor or telephone call.
la,Yf3.
•
De
d
recording: . . .
Oonvenientwhen leaVingthe house or going to bed.
OPERATE
~
CLEAR~\ii"'''''''
~-~
w
l:l.
'"
~15l""r
l]::J
~
~~
~ffi~
~&:l~-~~
~
OPERATE
TIMEl0e
STOP
~CHANNEL
o
V
Immediate Recording
Example: Present time: 10:28 (morning)
Ending time:
Details of operation
o Select the channel position to
be recorded.
11
:30 (morning), Channel position: 2
Multifunction display
~
- SP U
If
Ir
IJ'
/'
I~
CH
,
C
Delayed Recording
Example: Present time: 10:28 (morning)
Starting time: 10:40, Ending time:
Channel position: 2
Details of operation
I Multifunctiondisplay
o Select the channel position to
be recorded.
lj
Press the TIME button to set
the starting time.
• Setting the time within a 24hour
period
in
10-minute
intervals is possible.
• Press the
adjust
EEl
or e button to
the
minutes
if
necessary.
~
Press the
ending time.
•
Each
e:Je
button to set the
.
time
the
button
is
pressed, the ending time is
postponed by 10 minutes.
• Press the
adjust
EEl
or e button to
the
minutes
if
necessary.
o Press the OPERATE button to
turn off the power.
11
:30 (morning)
1-,,--1
Si'
[:;-"1
::'1'
r,-,,,l
.
SI'
,',-'
,,,.I I U C (J
n. ,r I
Lt i J
":',',
_I
If
)UIU
,'.',1
J
1"If
-,
/':tu'
11I·'1l
CH
~
le
'-r'
11 n J
r:H
,
C
C
,
C
lj
Press the
e:Je
button to start
recording and set the desired
ending time.
• Each time the
e:Je
button is
..
REC
I'
II!II 0 - '-;,' I
c
,]
/
/.:JI/
I'~U
CH
J
c..
pressed, the ending time is
postponed by 10 minutes.
EEl
• Press the
adjust
or e button to
the
minutes
if
necessary.
NOTES:
• Press the STOP button to terminate recording.
• Immediate recording can begin only in the stop mode. During normal
recording, the
button and the
EEl
or e button can be used to set the
e:Je
ending (finish) time.
NOTES:
• After the Simple Recording Timer is set, the channel position cannot be
changed.
• To confirm the starting time and the ending time, first press the OPERATE
button to turn on the power. Then press the TIME button to confirm the
starting time and press the
e:Je
button to confirm the ending time. Press the
OPERATE button to turn off the power.
• To clear the Simple Recording Timer setting during setting, press the
CLEAR button on the remote control. To clear after setting, turn on the
power, press the TIME button to select Simple Recording Timer mode, and
then press the CLEAR button.
• The Simple Recording Timer cannot be set if the timer has been preset
("TIMER" indicator on the display is lit). If this is the case, cancei the timer
stand-by mode by pressing the TIMER ON/OFF button, turn on the power
and then proceed with setting of the Simple Recording Timer.
[§]26
Page 28
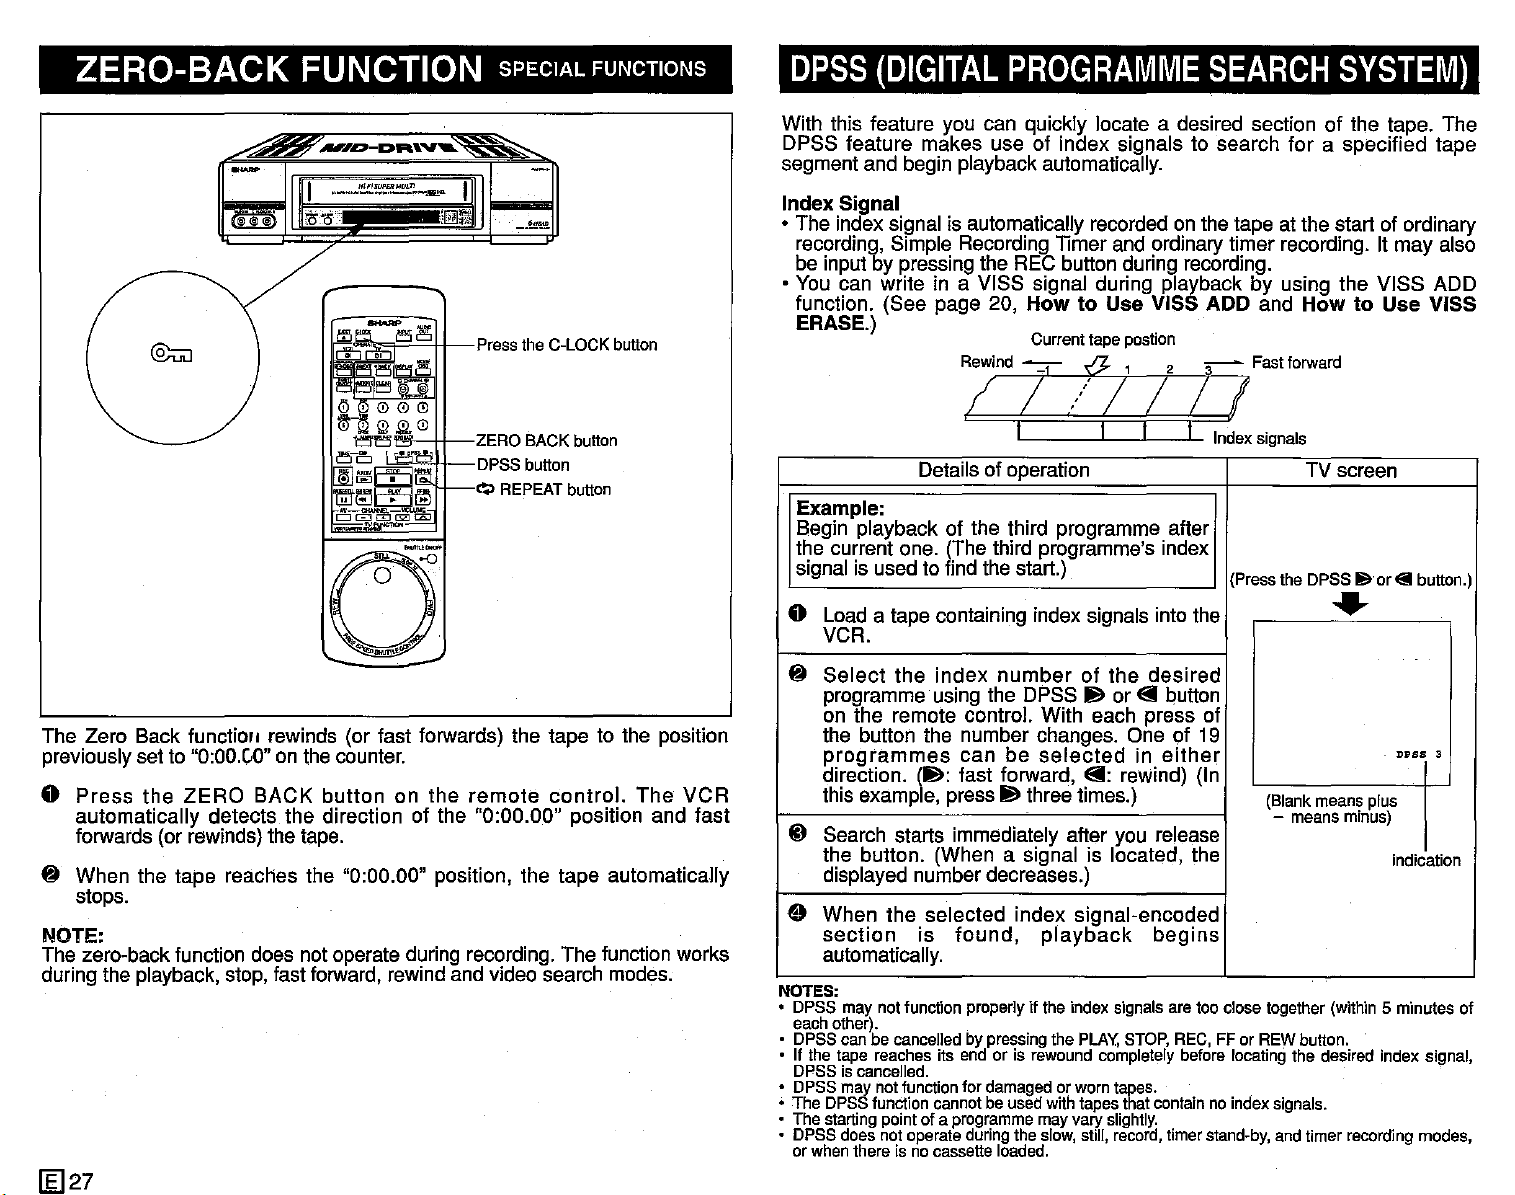
ZERO-BACK FUNCTION SPECIAL FUNCTIONS
~
,L.J
@;:;;]
L....III
Pressthe C-LOCKbutton
DPSS
With this feature you can quickly locate a desired section of the tape. The
DPSS feature makes use of index signals to search for a specified tape
segment and begin playback automatically.
Index Signal
• The index signal is automatically recorded on the tape at the start of ordinary
recording, Simple RecordingTimer and ordinarytimer recording. It may also
be input by pressing the REC button during recording.
• You can write in a VISS signal during playback by using the VISS ADD
function. (See page 20,
ERASE.)
(DIGITAL
PROGRAMME
HowtoUse VISS ADD and
SEARCH
SYSTEM)
HowtoUse VISS
:-
~
:!:I_-
ZERO BACK button
DPSS button
~
REPEAT button
Cl
The Zero Back function rewinds (or fast forwards) the tape to the position
previouslysetto
Press
•
automatically detects the direction of the "0:00.00" position and fast
forwards (or rewinds)the tape.
~
When the taps reaches the "0:00.00" position, the tape automatically
stops.
NOTE:
The zero-back function does not operate during recording. The function works
during the playback, stop, fast forward,rewindandvideosearch modes.
"0:00."0" on the counter.
the
ZERO
BACK button on the
remote
control.
The
VCR
I I
Detailsof operation
Example:
Begin playback of the third programme after
the current one. (The third programme's index
signal is used to find the start.)
• Load a tape containing index signals into the
VCR.
~
Select
programme using the DPSS
on the remote control. With each press of
the button the number changes. One of 19
programmes
direction.
this example, press
ID Search starts immediately after you release
the button. (When a signal is located, the
displayed number decreases.)
the index
can be
(Ill:
fast forward,
number
III
of the desired
selectedineither
three times.)
I
III
or 8 button
8:
reWind)
n
......."....~..........
(Press the DPSS
(In
TV screen
8·orElbutton.)
•
(Blank means plus
- means minus)
DPBS
3
indication
e When the selected index signal-encoded
section
automatically.
NOTES:
• DPSS
• DPSS can be cancelled by pressing the PLAY, STOP, REC, FF or REW button.
• If the tape reaches its end or is rewound completely before locating the desired index signal,
• DPSS may notfunetion for damaged or worn tapes.
• The DPSSfunctioncannotbe usedwith tapesthatcontainnoindexsignals.
• The startingpointof a programmemay vary
• DPSS doesnot operateduringthe slow,still, record,timerstand-by, andtimer recordingmodes,
may notfunction properly if the index signals are too close together (within 5 minutes of
each other).
DPSS is cancelled.
or whenthere isno cassetteloaded.
is
found,
playback
slightly.
begins
lliJ
27
Page 29
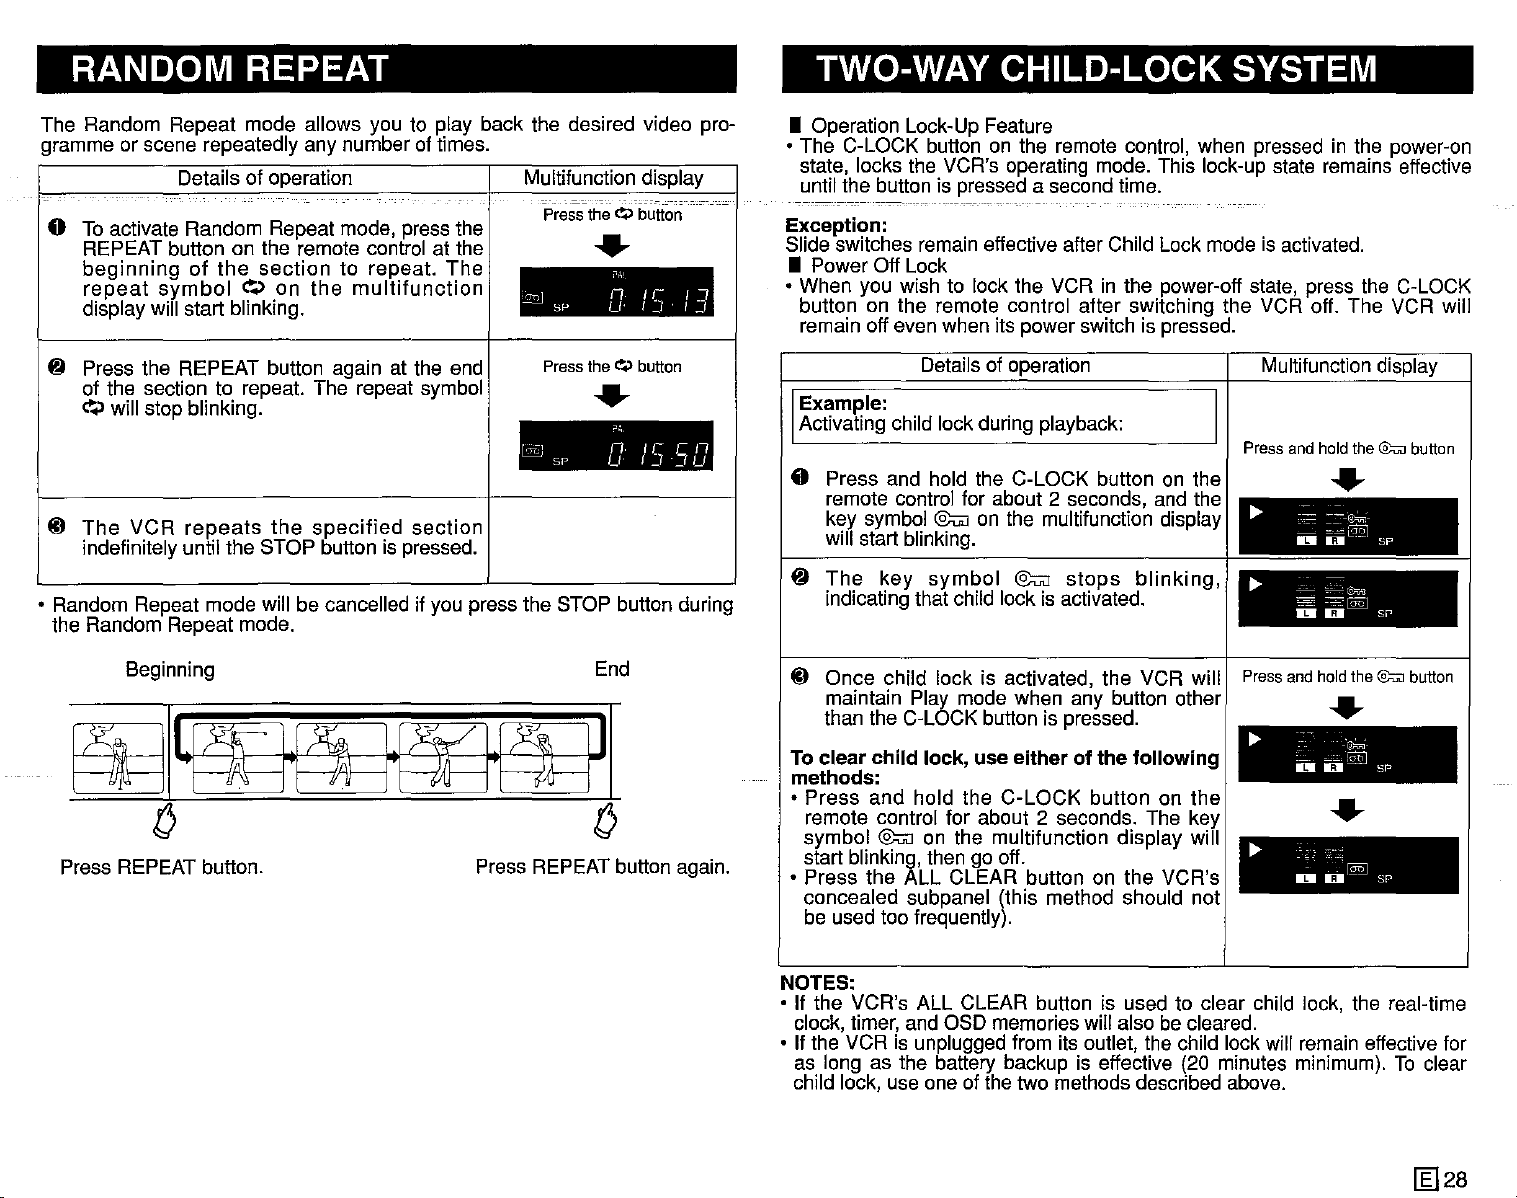
RANDOM REPEAT TWO-WAY CHILD-LOCK SYSTEM
The Random Repeat mode allows you to play back the desired video programme or scene repeatedly any number of times.
Details of operation I Multifunction display
Press
sr- u
Press
SP
the~button
..
,
n/l-"
IJ
theQ
button
..
.,
nu-en
u
f~13U
End
I.~J
o Toactivate Random Repeat mode, press the
REPEAT button on the remote control at the
beginning
repeat
display will start blinking.
~ Press the REPEAT button again at the end
of the section to repeat. The repeat symbol
~.>
will stop blinking.
lil
The
VCR
indefinitely until the STOP button is pressed.
• Random Repeat mode will be cancelled if you press the STOP button during
the Random Repeat mode.
Beginning
of
symbol
repeats
the
section
~.>
on
the
to repeat.
the
multifunction
specified
The
~
l©
section
~I~J
o
Press REPEAT button.
Press REPEATbutton again.
• Operation Lock-Up Feature
• The C-LOCK button on the remote control, when pressed in the power-on
state, locks the VCR's operating mode. This lock-up state remains effective
until the button is pressed a second time.
------------------._----
Exception:
Slide switches remain effective after Child Lock mode is activated.
• Power Off Lock
• When you wish to lock the VCR in the power-off state, press the C-LOCK
button on the remote control after switching the VCR off. The VCR will
remain off even when its power switch is pressed.
Details of operation
Example:
Activating child lock during playback:
o Press and hold the C-LOCK button on the
remote controi for about 2 seconds, and the
key symbol @u;] on the multifunction display
will start blinking.
~
The
key
indicating that child lock is activated.
symbol
lil Once child lock is activated, the VCR will I Pressandhold
maintain Play mode when any button other ___
than the C-LOCK button is pressed.
To clear child lock, use either of the following
methods:
• Press and hold the C-LOCK button on the I •
remote control for about 2 seconds. The key ......
symbol @u;] on the multifunction display will
start blinking, then go off.
• Press the ALL CLEAR button on the VCR's
concealed subpanel (this method should not
be used too frequently).
@u;]
stops
blinking,
Multifunction display
Press
and
hold
the
@;;:n]
..
...
=~
~=:-'~
IDIU--sP
...
~
~~~
DD
~
-
IDI
~
o
SI'
the@:uJ
......
.'~.
~:";:.I:§Q]
IIiJI
SP
@"I
1iII-
sr-
button
button
NOTES:
• If the VCR's ALL CLEAR button is used to clear child lock, the real-time
clock, timer, and OSD memories will also becleared.
• If the VCR is unplugged from its outlet, the child lock will remain effective for
as long as the battery backup is effective (20 minutes minimum). To clear
child lock, use one of the two methods described above.
~28
Page 30
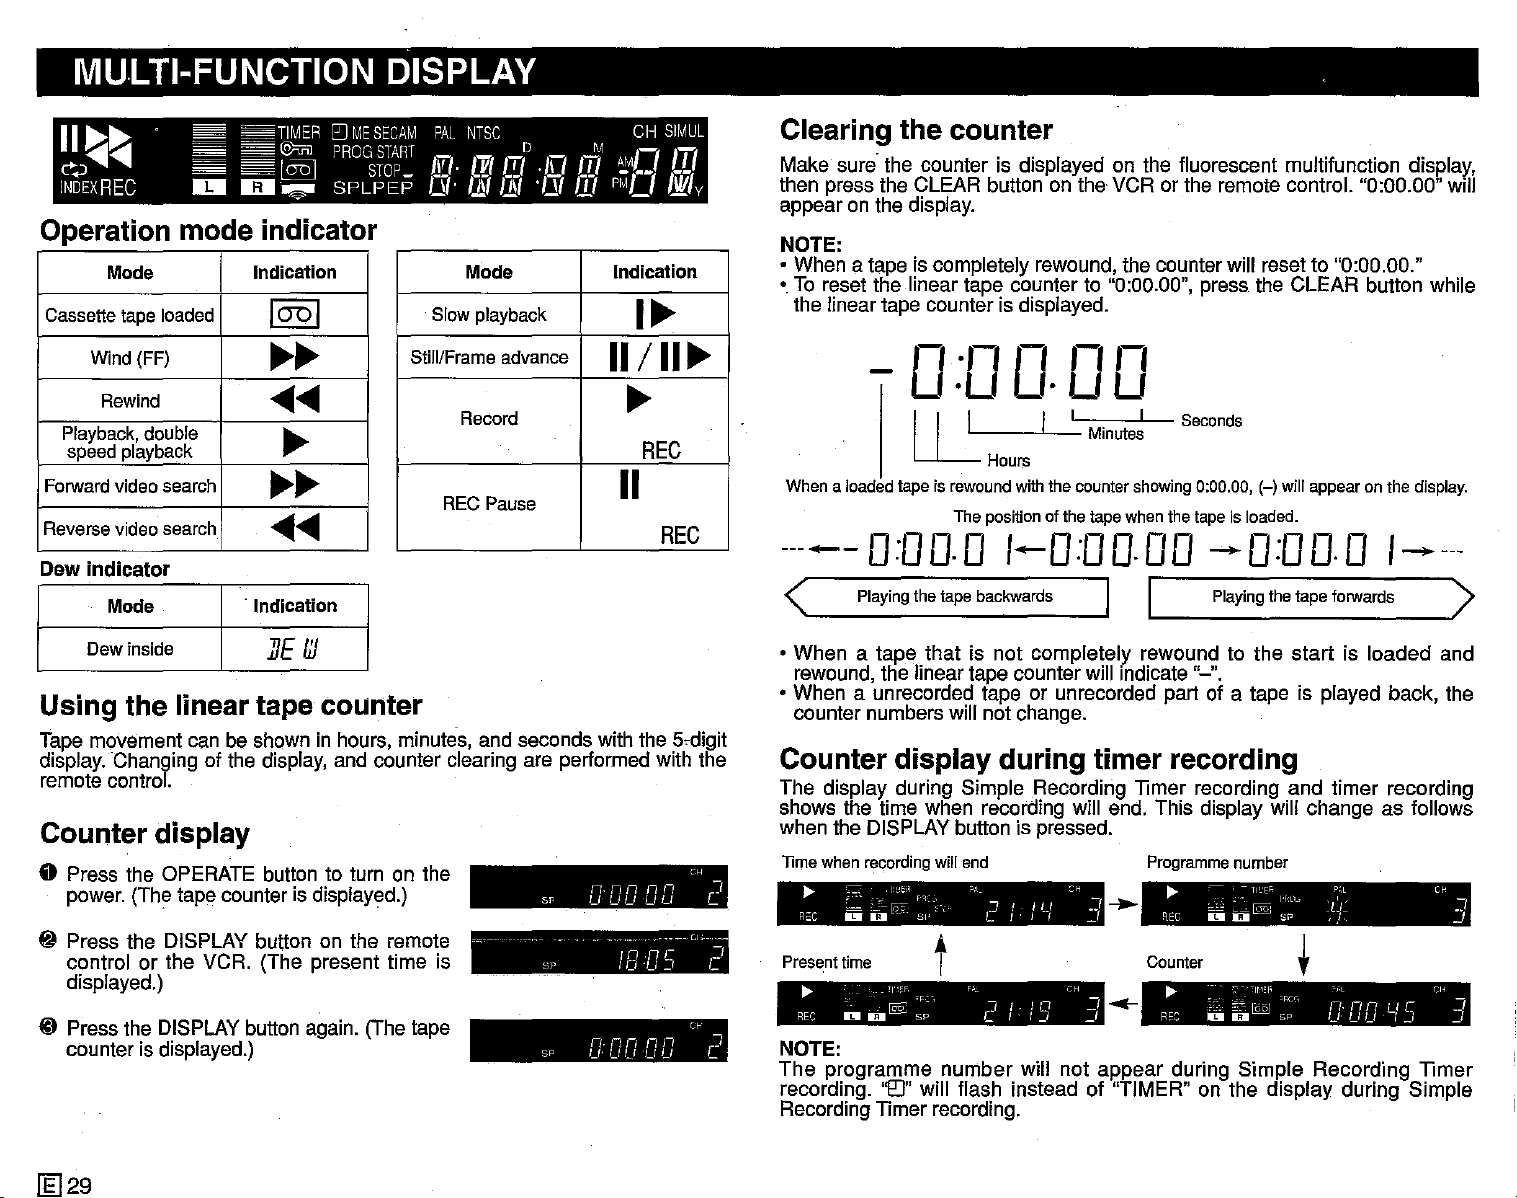
MULTI-FUNCTION DISPLAY
~~
11
~~
c>~..........
INDEXREC
II!II
TIMER
[JJMESECAM
@mJPROGSTARTDM
l@
1IiII~
STOP
SPLPEP
PAL
In
is.
NTSC
[vttT/
I.!ft
11/
·1\1
'/11
m
m
CH
-7'-7
I
~'
••
PI'Ll
SIMUL
.L
Nil
v
Operation mode indicator
Mode
Cassette tape loaded
Wind (FF)
Rewind
Playback, double
speed playback
Forward video search
Reverse video search
Dew
indicator
Mode
Dew inside I
Indication
1001
~~
......
~
~~
......
.
Indication
IJE
III
Mode
Slow playback
Still/Frame advance
Record
REC Pause
Indication
I~
11/
II~
~
REC
11
REC
Using the linear tape counter
Tape movement can be shown in hours, minutes, and seconds with the
display. Changing of the display, and counter clearing are performed with the
remote control.
5~digit
Counter display
o Press the OPERATE button to turn on the
power. (The tape counter is displayed.)
~
Press the DISPLAY button on the remote
control or the VCR. (The present time is
displayed.)
ID Press the DISPLAYbutton again. (The tape
counter is displayed.)
nnnnn
Sp
uuuuu
- - - Cl
SI'
SI'
IB
nnnnn
uuuuu
C~
C/5
Cc
"]
L
Cl
I
C
Clearing the
Make sure the counter is displayed on the fluorescent rnultifunction display',
then press the CLEAR button on the VCR or the remote control. "0:00.00"
appear on the display.
NOTE:
• When
• To reset the linear tape counter to "0:00.00", press the CLEAR button while
Whena loadedtape is rewoundwiththe countershowing0:00.00,(-) will appear on the display.
a tape is completely rewound, the counter will reset to "0:00.00."
the linear tape counter is displayed.
counter
,-,
.,-,
0
rm
U·U
I I L I
U-
The positionofthe tape whenthe tapeis loaded.
Hours
·UU
Minutes
I
Seconds
-----0:00.0 1-0:00.00 --0:00.0
<
• When
rewound, the linear tape counter will Indicate "-".
• When a unrecorded tape or unrecorded part of a tape is played back, the
counter numbers will not change.
Counter
The display during Simple Recording TImer recording and timer recording
shows the time when recording will end. This display will change as follows
when the DISPLAY button is pressed.
lime
R"C D D - SI' L I
~
Presenttime
REC
NOTE:
The
recording.
Recording
Playing
thetape
a tape that is not completely rewound to the start is loaded and
display
when recording will end
~
c:
L~
~~~
F'C;.;
~
programme number will not appear during Simple Recording TImer
lI'.:'F, P" CH
@§:
II!IIU
'F,:~,
SP C
'0"
TImer recording.
backwards
during
"1_:1
I i U
!,
t
"l
I.
I n _J
I-I.J
will flash instead of "TIMER" on the display during Simple
I I
Playing
timer recording
Programme
~
~H
w]
_I
_,
-..
Counter
.-
REC
~
REC
~
ceJ
~.~
II!IIO
~".,
"''i'.
D
o[QQJ
thetape
number
ll'-'EF;..
@
If-H.
SP
forwards
P;,L
:L:'~
,}.
t
-~I.,~~_"
'RC" o,·L Cl' I
Sp
Cl:
DD
Will
1-----
>
C~
.J
_I
~15
~
[l;]29
Page 31

USING
You can also use your VCR with a video camera. The connection diagram
below is only a quidallne, Refer to your video camera operation manual for
precise connection information
YOUR
VCR
WITH
A
VIDEO
CAMERA
EDITING
Other video equipment (for example, a laser disc player)
FROM
OTHER
VIDEO
EQUIPMENT
_I
Video camera
~
.
.
0
To AUDIO IN R/UMONO terminals
the
• If
camera
UMONO terminal.
audio
is
output
mono,
from
connect
.
To VIDEO IN
"""'-'
"""~-D""''V'"
~
Cl
~
1'fMi"it'ii'i
~
lit"
w
the
~~
~~
_.
-
it to
~
~
.
..
video
the
From VIDEO OUT
AUDIO
Match to the audio output level of the
video equipment you are using. (The
recording level of Hi-Fi sound changes.)
ToVIDEO IN ToAUDIO IN R/L-MONO
'Jil""~
(C@'@,'i;j
Make sure that the external input
position indicator is being displayed.
0'0
AD.
switch
'--I~-D""''V'-
H~FISU~ERMULTI
"""","=",=-"",",'--""',,"~W[l
Select the external input
From AUDIO OUT R/L
ml~
~
1'fMi"it'ii'i1
I~i
o
ii"
~
position--------'
Select the external input position
--"
Example: A laser disc player
Switches Position
NTSC MODE (rear)
COLOUR MODE (behind door) AUTO or NTSC
3.58
[g]30
Page 32

BEFORE CALLING FOR SERVICE HELPFUL HINTS
The following problems do not always denote a broken VCR.
Therefore, perform the checks described below before calling for service.
Problem
• No power. LED indicator
does not light.
• Tapecannot be ejected.
• VCR
• VCR does not record.
• Cassette is automatically
• No colour or poor TV plc-
• Snowy picture appears on
does
not
even if LED indicatoris lit. out.
ejected
REC,
OFF button.
ture during normal view- nected.
ing.
TV during playback.
when
0.
operate
pressi7Jj
or TIMER 0 /
• Make
plugged into the wall socket and the AC power
cordsocketon the rear of the VCR.
• ChecktheAC outlet, fuse or circuit breaker.
• Turn on
• Press the TIMER ON/OFF button to disengage
thetimer.
• Dew inside. Wait until the DEW indicator goes
• Pressthe EJECTbuttonseveral times.
• Safety device in VCR is functioning. Unplug
VCRand plugin again after about one minute.
Cassette
•
removed. Use a different cassette or place adhesivetape overthe tab opening.
• Check if a cassetteisloaded.
Cassette
•
removed. Use a different cassette or place
adhesivetape overthe tab opening.
• Make sure all the cables are correctly con-
• Make sure the VCR power cord is properly
pluggedin.
Set
•
SECAM MODEand SYSTEM switches to match
the broadcastsystem and TV. (Refer to pages 3
and4.)
• Press the TRACKING buttons or try a different
cassette.
• The heads may be contaminated with condensed moisture or magnetic coating from the
videotape. (Ifthisis the case, the heads needto
be cleaned. Ask the retailer or a Sharp approved
servicecentre.)
This VCR has a built-in full auto head cleaning
mechanism, however, there are some environments in which head cleaning can not be
carried outcompletely.
Suggested Solution
sure
the AC
power.
erasure
erasure
the COLOUR MODE, NTSC MODE,
power
protection
protection
cord is
properly
tab
has been
tab has been
Problem Suggested Solution
• No
picture
colour is not correct dur- the VCR radio frequency converter output chaning playback. nel adjuster (CHANNEL).
• Cassette cannot be loaded. • Make sure the cassette is correctly positioned
• Picture does not change
even though CHANNEL clock setting mode.
up/down
pressed.
• The multifunction display
does not operate properly. again. Set the timer again if necessary.
• No operation when any
button is pressed. engaged.
• Selected programme position does not appear. Cancel the skip settingforthat channel.
• No coiour appears during
video search andthe like. SECAM or MESECAM system, the picture is
• Picture is skewed.
appears
buttons
or • Make sure the TV is set to the same channel as
• Check all connectingcables.
• Set the COLOUR MODE, NTSC MODE,SECAM
MODE and SYSTEM switches to match the tape
and TV.(Referto pages3 and 4.)
• Makesurethere is no other cassette inside.
andthen reinsert.
• Make sure the VCR is not in the timer setting or
are
• Press the ALL CLEAR button and set the clock
sure
that
the
• Make
• The channel may have been set to be skipped.
• When a tape is recorded in the LP mode in the
discoloured during video search, still and similar
modes.
malfunction.
• If a tape is recorded in the LP mode (regardless
of whether it is a SECAM, MESECAM or PAL
tape), the picture is skewed during video search.
However,
However,
this does not indicatea malfunction.
Child-Proof
this
does
not
Lock
indicate
is not
a
• Notape movement.
1El31
• Makesurethe VCR is not in pause/stillmode.
• Make sure the tape has not reached the beginningor end.
Page 33

SPECIFICATIONS
HELPFUL
HINTS
Video recording system: Two rotary head helical scan system, VHS, Hi-Fi
Format: VHS PAUSECAM/NTSC standard
Video signal:
PAL: PAL
PAL: PAL System-I
System-BIG (Playback/Recording)
(Playback/Recording)~c_~c~~_~_~
PAL: PAL System-D/K (Playback/Recording)
SECAM: SECAM/MESECAM System
BIG, D/K·K1
(Playback/Recording)
NTSC: NTSC4.43 (Playback/Recording)
NTSC: NTSC System M (NTSC 3.58) (Playback/Recording)
Recording/playing time: 480 minutes max. with E-240 tape (PAU MESECAM)
480 minutes max. with T-160 tape (NTSC)
Tape width: 12.7mm
Tape speed: PAUSECAM/MESECAM
23.39mm/sec (SP) 11.70mm/sec (LP)
NTSC
33.35mm/sec (SP) 16.68mm/sec (LP: Playback
only),
11.12mm/sec (EP: Playback only for Hi-Fi)
Receiving channel:
Antenna:
75 ohm unbalanced
VHF: E2-E12 UHF: E21-E69
European CATV:S1-S20
VHF: US2-US13 UHF: US14-US83
CATV: A-5 to A-1, A-W
VHF: J1-J12 UHF: J13-J62
VHF: C1-C12 UHF: C13-C57
VHF-Band:
44.25MHz-295.25MHz (44.25-111MHz when
V-LO is displayed/111-295.25MHz when V-HI is
displayed)
RF convertor output signal:
UHF-Band:
471.25MHz-885.25MHz
E30-E39 (adjustable). VC-H92: Preset to channel E36 (VC-H92ETS: Preset to E39).
US26-US38(adjustable). VC-H92: Preset to channel US34 (VC-H92ETS: Preset to US38).
J25-J37 (adjustable). VC-H92: Preset to channel J33 (VC-H92ETS: Preset to J37).
C22-C26 (adjustable). VC-H92: Preset between C24-C25 (VC-H92ETS: Preset to C26).
Power requirement:
_ Power consumption:
Operating temperature:
Storage temperature:
Weight:
Dimensions:
Video input:
Video output:
Audio input:
AC110-240V,
50/60Hz
Approx.22W
5°C to 40°C
-20°C
to 60°C
4.5kg
380mm(W) x 320.7mm(D) x 89.8mm(H)
1.0Vp-p, 750hm
1.0Vp-p, 750hm
Phonojack: -8dBs/-4dBs (approx.), switchable, 47
kohm
Supplied accessories:
Audio output:
Phonojack: -8dBs, 1kohm
75 ohm coaxial cable, operation manual, remote
control unit, R6 (AA, UM/SUM-3) battery x2, audio
cable x1, video cable x1
__
Design
and
specifications
are
subjecttochange
without
notice.
ffi)32
Page 34

PARTICULARITES
TABLE DES MATIERES
• Sten§ophonie
•
Magnetoscope
MESECAM
• Posslbillte de lecture de cassettes enrepistrees en
systems PAL (voir remarques en page 19)
Dote d'un tambour arevetement en titane
•
• Prise d'entree camescope
• Systeme automatique d'image par intelligence artificielle (A.I.)
• Nettoyage automatique des
• Alignement automatique
[
• Controle automalique de I'image
•
Fonction
selection de .quatre langues: anqlals, chlnols, fr!lngais et espagnol.
• Fonction d'ajout et d'effacement des slgnaux d'lndex
• Telecommande
• Dispositif de chargement entlerernent automatique avec lecture instantanee
• DPSS (Systsme de recherche nurnsrlque des programmes)
• Deux verrouillages possibles
• Fonction de lecture entlsrernent automatique
• Selecteur automatique d'alimentation 110-240 V, 50-60 Hz
Programmateur
•
quotidiennes et hebdomadaires) sur une periode de 365 jours.
• Compteur de bande lineairs
• Syntoniseur asynthetiseur de tension automatique, 48 canaux
Minuteur
•
enregistrement en indiquant simplement I'heure du
du programme.
Repetition de la lecture
•
Alimentation:
VHS
Hi-fi
multistandard
(BIG, D/K.K1), NTSC 4.43/NTSC 3.58 (M)
d'affichage
avec
sur
reglage de vitesse de defilement
pour8enregistrements
PAL (BIG, I, D/K),
tetes ]
scranetde
programmation
(y
a5 chiffres _
d'enregistrement
imrnedlat
permettant
SECAM
NTSC
VISS
compris
de
debut
(BIG, D/K.K1),
sur
un televiseur
sur
ecran
les
programmer
et I'heure de la fin
avec
emissions
un
Latension d'alimentation de ce maqnetoscops est 110-240 V CA, 50-60 Hz.
Cassettes:
IV
...
sl.
Ce rnaqnetoscops est ooncu pour les signaux
cassettes portant le sigle
IV!:I~
ou Iv
...
SI.
N'utilisez que
des
ACCESSOIRES
Assurez-vous
que [esaccessoires
presentes
ci-dessous
sont
contenus
dans
I'emballagedumagnetoscope.
AVANT
• RECOMMANDATIONS ET PRECAUTIONS IMPORTANTES 2
• STANDARDS D'EMISSIONS/AVANT D'UTILISER LE MAGNETOSCOPE........... 3
• VUE D'ENSEMBLE 5
PREPARATIFS
• BRANCHEMENTS................................................................................................... 6
• REGLAGE DU
• TELECOMMANDE 8
• REGLAGE INITIAL DE L'AFFICHAGE SUR ECRAN 9
• REGLAGES SUR
• REGLAGE DES
• MODE D'AFFICHAGE SUR ECRAN OSD 16
OPERATIONS
• LECTURE 17
• FONCTION DE LECTURE ENTIEREMENT AUTOMATlQUE 19
• UTILISATION DE LA FONCTION D'
SIGNAUX D'INDEX VISS 20
• ENREGISTREMENT D'UNE EMISSION TELEVISEE 21
ENREGISTREMENT
• ENREGISTREMENTAVEC PROGRAMMATEUR
(PROGRAMMATION SUR ECRAN) 23
• VERIFICATION D'UNE PROGRAMMATION 25
• ANNULATION D'UNE PROGRAMMATION 25
• MINUTEUR D'ENREGISTREMENT 26
FONCTIONS
• FONCTION DE RETOUR A ZERO 27
• SYSTEME DE RECHERCHE NUMERIQUE DES PROGRAMMES 27
• REPETITION DE
• DEUX VERROUILLAGES POSSIBLES 28
• AFFICHAGE MULTIFONCTIONS 29
• UTILISATION DU MAGNETOSCOPE AVEC UN CAMESCOPE 30
• COPIE A PARTIR
CONSEILS
• AVANT DE FAIRE
• FICHE TECHNIQUE 32
D'UTILlSER
CANAL
CANAUX
FONDAMENTALES
SPECIALES
LA
PRATIQUES
Dans[ecas
LE
MAGNETOSCOPE
VIDEO 7
L'ECRAN
AJOUT
COMMANDE
LECTURE 28
D'UN
AUTRE
APPEL
contra/re,
APPAREIL VIDEO 30
A UN TECHNICIEN 31
prenez
ET D'EFFACEMENT
PARLEPROGRAMMATEUR
contact
avecvotrerevendeur le plusproche.
DES
13
11
Cablecoaxial(75 ohms) I
1Il1
elecommande sansfil avec
T
reglage
devitessede
defilement
~
G
Deuxpiles R6
(UM/SUM-3 DU AA)
~
~
Cableaudio Cablevideo
Page 35

RECOMMANDATIONS ET PRECAUTIONS IMPORTANTES
Attention
AVANT
ATTENTIVEMENT
SGlIGNEUSEMENTAFIN DE POUVOIR VOUS Y REPORTER EN CAS DE
BESOIN.
Installation et manipulation
-----------------
D'UTILlSER
CE
LE
MODE
MAGNETOSCOPE,
D'EMPLOI
QUE
---------
VOUS
VEUILLEZ
CONSERVEREZ
LIRE
1. Le coffret du maqnetoscops comporte des
cures
temperatures
I'apparei!.
toujours degagees afin que la ventilation de
I'appareil puisse s'effectuer normalement.
2. N'exposez pas le rnaqnetoscope au soleil et
ne le
chaleur.
3. Eloignez le rnaqnetoscope et les cassettes
des
intense.
d'aeration
placez
objets
pour
excesslves
Assurez-vous
pas
pres
ayant
un
champ
evlter
11
l'Interleur de
qu'ellss
d'une
rnaqnetlqua
soient
source
les
de
Condensation de l'hurnldlte
Les variations de temperature ainsi que le stockage et le fonctionnement dans
un environnement charge d'hurnidite peuvent provoquer de la condensation
1'.interieur
endommager les cassettes et lestetes, En cas de form-alien de condensation,
le ternoln DEW apparait et toutes les fonctions du maqnetoscope deviennent
sans effet.
• Par
minutes apres I'extinction du temoin et avant d'employer I'apparell.
• La detection de la condensation n'est pas instantanee. En consequence,
apres le branchement du rnaqnetoscope vous devez attendre environ
minutes puis vous assurez que le ternoln n'est pas eclalre avant d'employer
le
rnaqnetoscope,
..
durnaqnetoscope
mesure
de precaution supplernentalre,
..
_Catte.
---------
condensaJloD
attendez
peulserleusement
encore environ 5
30
I
Divers
Les oeuvres audlovisuelles peuvent atre protegees par des droits d'auteur et
iI peut atre interdlt de les enregistrer sans I'autorisation du detenteur des
droits ou celle de ses ayants droit. Veuillez vous conformer11la legislation en
vigueur dans votre pays.
11
4.
N'introduisez
maqnetoscops,
d'aaration
cassette.1Ipourrait
circuit,
rnaqnetoscope
incendle.
5. Ne
liguide sur le rnaqnetoscope. Dans le cas
ou un
rnaqnetoscope, debranchez-Ie et portez-Ie
imrnedlatement
centre de service agree Sharp.
6. N'ouvrez pas le coffret du rnaqnetoscope,
Vous
psut-etre
tentiez
renferme. Pour la reparation et le reglage
des circuits, adressez-vous
ou11un centre de service agree Sharp.
vous
placez
liquide
pourriez
endommager
de
aucun
quecesoit
ou
par
pourriez
ou rnerne
aucun
chez
subir
toucher
objet
le
compartiment
en
resulter
endommager
recipient
penetrerait
un revendeur ou un
une electrocution et
I'appareil
les
composants
dans
par
les cutes
un court-
provoquer
contenant
dans
si vous
11
un revendeur
un
un
qu'il
le
11
le
le
Ce maqnetoscops n'est pas pourvu d'un interrupteur principal. Une faible
puissance est consornrnee en permanence pour I'alimentation de I'horloge
des lors que la fiche du cordon est branches sur une prise secteur. Si vous
n'envisagez pas d'utlllser ce rnaqnetoscope pendant une psrlode prolonqee,
prenez soin de dsbrancher la fiche.
[£]2
Page 36

STANDARDS D'EMISSION/AVANT D'UTILlSER LE MAGNETOSCOPE
o
Enregistrement
enregistrement dans un des modes de votre magnetoscope et pour
chaque type de televiseur.
Standards
de
television
PAL·B/G
PAL·!
PAL-DII<
SECAM·BJG
SECAM-L
SECAM·D/K
NTSC
3.58(M)
NTSC
4.43
• Le tableau ci-dessus indique les standards de television cauleur pour lesquels votre
rnaqnetoscopa est prevu ainsi que les positions correspondantes
dolvent
etre places les selecteurs prevus acet ellet, lorsque le rnaqnetoscope est
utilise pour enregistrer des signaux provenant de ces standards ou pour la lecture de
bande enregistrees dans I'un des dillerents systemss couleur. A titre d'exemple, si
vous utilisez un
mode PAL B/G sur le rnaqnetoscope (voir le tableau
selacteun, vous pourrez non seulement enregistrer des emissions en PAL-B/G mais
egalement proceder
• Le triangle
televiseur ou le maqnetoscops sont relies
IN/OUT et VIDEO IN/OUT. Cela suppose que le
AUDIO IN/OUT, et VIDEO IN/OUT.
o Le cercle
televiseur et le maqnetoscope sont relies
IN/OUT et VIDEO IN/OUT ou de la prise RF OUT.
o
Pour
I'enregistrement
enregistrement SECAM au moyen d'un televiseur SECAM-L, le televiseur et le
rnaqnetoscope dolvent
VIDEO IN/OUT.
o L'etoile
MESECAM.
•
Differents
"*'''
•
Cassettes
• CassettesSECAM: Cassettes SECAM,
•
Cassettes
•
Cassettes
Mod'do
fonclionnemenl
magnetoscoi
(Voirlableau
PAL-BIG
PAL~I
PAL·D/K
MESECAM·BIG
SECAM-B/G
SECAM·D/K
·K'
MESECAM-DIK
NTSC
NTSC
televiseur couleur de standard PAL-B/G et que vous selectlonnez le
"8" indique que I'enregistrement ou la lecture ne sont possibles que si le
"0"
indique que I'enregistrement ou la lecture sont possibles lorsque le
indique que I'enregistrement est realise en SECAM grace au standard
typesdecassettes:
PAL
MESECAM:
NTSC:
(£]3
d'une
Enregistrement
du
PAL PAL PAL·
BIG [ D/K
)
0
3.58
4.43
emission
0
0
d'une
emission
SECAM SECAM
BIG
France
0*
0
televisee
te!levisee
SECAM
NTSC
OM,Kl
l
A
A
0
0*
(i)
ou
lecture
Lecture
d'un
enregistrement
PAL
MESECAM
(M)
0
0
0
0
SECAM
CO~ris
F_J
0
0
A
A
0
0
sur
lesquelles
pour le reglage de chaque
ala lecture de bandes enregistrees en PAL.
par
I'intermediaire
televiseur soit pourvu des prises
par
l'lntermedlalre
d'une
emission
SECAM-L
(France)
etre relies par l'intermedlaire des prises AUDIO IN/OUT et
Cassettes
I'enregistrement
venduesenFrance)etcassettes
d'une
Cassettes portant I'en'registrement MESECAM d'une emission
SECAM-B/G,
Cassettes
I'enregistrement
PAL,
emission
NTSC,
disponibles
d'une
danslecommerceetcassettes
emission
dlsponloles
SECAM-B/G,
SECAM-D/K,1<1
disponibles
d'une
emission
PAL-BIG,
dans le commerce (y
portant
SECAM-D/K,K1(OIRn ouSECAM-L
(OIRn
danslecommerceetcassettes
NTSC-M.
des
prises AUDIO
des
prises AUDIO
ou la
lecture
PAL-Iou
PAL-D/K
['enregistrement
compris
d'un
NTSC
0
0
d'un
portant
(OIRn.
celles
SECAM
portant
I'!i\"@li;
111118'1',8',11
STANDARD
~
Vitesses d'enregistrement ou de lecture en fonction des standards
(Standard
desortie
RF)
,
STANDARD
RF/IF
couleur et des standards d'emission
1 2
T
V
V
H
S
fD
Standards
Standard
Standard
d'enregistrement
Enregistremenlduson
lineaire;
EnregistrementdusonenHi-FI
lecturedeI'imageetdu
Lecture
de
Position des selecteurs lorsque votre magnetoscope est utilise pour
couleur
d'emlsslon
couleur
surla
son
(piste
etduson
piste
Iineaire)
(Hi-R)
enregislremenldeI'image
l'imape
VHS
PAL
VHF:B
VHF:D
UHF:K
PAL
VHF:
UHF:I
PAL
UHF:G(H)
PAL
SP/LP SP/LP
SP/LP SPILP
SP/LP
SP/LP SP/LP
copier un enregistrement que porte une cassette placee dans un
autre appareil
Position
desselecteursdu rnaqnetoscope
Modede
fonctionnement
I'appareildelecture
NTSC3.58
NTSC4.43 AUTOou
PAL
SECAM
MESECAM
NTSC
-->
PAL
CTV
• Dans ce mode
l'operatlon de copie d'un enregistrement realisee en reliant le rnagnetcscope et un
autre appareil audiovisuel par l'mtermedlalre des prises AUDIO IN AIL et VIDEO IN.
Si vous utilisez
selectlonnsr I'entree extarieure (L1: arrlere ou L2: avant),
Derrierelevolet
de
COLOUR
AUTOou
AUTOou
AUTOouMESECAM
AUTOouMESECAM
AUTOou
d'emploi,
celle
procedure pour copier, appuyez sur la touche
avant
MODE
NTSC
NTSC
PAL
NTSC
I'expression
Position
NTSC
"copie
3
SECAM
NTSC
3.58
4.43
indifferente
"'?
~<
\\ .
4
I 5 I 6 I 7
SECAM
VHF:B
UHF:G
IMESECAM
SP/LP
NTSCMODE
MODE
PAL
par
SECAMMODE
Position
CTV
Position
l'entres
MODE
COULEUR
3\
MODENTSC
MODESECAM
8
VHF:D VHF:M
UHF:K,
K1
UHF:M
SECAMIMESECAM
NTSC
a.se
SP/LP/EP
SP/LP/EP
magnetoscope
indifferente
L1 (arrlere)
SECAM
L2(avant)
MESECAM
indifferente
Iigne"serapporte
INPUT
NTSC
SP/EP
SP
Canal
pour
9
-
NTSC
'-',
du
a
Page 37

e
Position
standard
Type
de
cassette
NTSC
-------
NTSC
-------
NTSC
PAL
SECAM
MESECAM
• Pour la lecture d'une cassette NTSC sur un televissur PAL, placez le NTSC MODE
l'arriere du rnaqnetoscope sur la position NTSC - PAL CTV.
•
Pourlalecture
televiseur NTSC ou multistandards. L'image peut etre oblenue sur le televiseur PAL,
mais les points suivants sont
o L'image lue sera legerement retrecie en haut et en bas. Ceci n'indique pas un
problems de lonctionnement du televlseur ni du rnaqnetoscope.
des
de
I'enregistrement
Connexion
televlseur
couleur
et
maqne'osoope
RF
AV
-------
RF
AV
-------
RF
AV
RF
AV
RF
AV
RF
AV
selecteurs
Positiondes selecteurs du magnetascope
Derriere le
valet avant
COLOUR
MODE
AUTOou
NTSC
--------
AUTOou
NTSC
--------
AUTOou
NTSC
AUTOou
PAL
AUTOou
MESECAM
d'une
cassette
de
etduteleviseur
NTSC
MODE
3.58
--------
4.43
--------
NTSC...,PAL
CTV
Position
tndlfferenta
NTSC,
a.
noter:
votre
Amere
SECAM
MODE
Position
indifferente
-------
Position
indifferenle
-------
Position
indifh~rente
Position
indifferante
SECAM
MESECAM
branchez
magnetoscope
couleur
SYSTEM
(standard
de
sortie
Position
lndlfferente
-1,-
BiG
ou
oil<
le
televtseur
Position
indifferente
------------
I,8/Gou
011<
le
televlseur
Position
indifferente
I,
BIG
ouD/K
le
televlseur
couleur)
Position
indiffBrente
BIG
ouD/K
le
televlseur
Position
indifferente
BIG
ouD/K
indifferente
votre
(selon
couleur)
televiseur
Position
en
fonction
utilise
Typede televtseur
couleur
maqnetoscope
RF)
(seiOfi
couleun
(selon
couleur)
(selon
(selon
couleur)
rnaqnetoscope
peutetre retia
NTSC
--------------
NTSC
--------------
PAL-I,BIGouD/K
Taus
les
sauf
PAL·MelPAL-N
SECAM-B/G,D/K
Teus
res
lehlviseurs
compris
le
SECAM-BIG,
Tous
les
televiseurs
y
compris
auquelle
3.58(M)
4.43
PAL
televlseurs
ou
K1
SECAM,
SECAM·L
ou
K1
SECAM,
SECAM·L
sur
DIK
du
PAL,
un
AVANT
• Si le televiseur n'est pas dote d'une commande V-HOLD, I'image peut defiler et
elre impossibleElregarder. Si le televlssur est pourvu d'une commande V-HOLD,
vous pourrez arrster le defilement en reglant la commande pour stabiliser I'image.
• RF indique que le
--
__
~prise
o Pour la lecture de bandes de quallte mediocre, placez le selscteur COLOUR MODE
6)
.m
Imml
-
h~l
-
Utilisation de la fonction de selection automatlque
RF
Position
Standard
d'emissicn
PAL-BIG
PAL-DIK
SECAM
SECAM
NTSC
OUT.
PAL-!
prises AUDIO IN/OUT et VIDEO IN/OUT.
en position NTSC, PAL ou SECAM en lonction du standard dans lequel la bande a
ete enregistree (ne placez pas sur AUTO). Dans le cas d'une bande MESECAM,
placez le seleoteur sur "SECAM".
televisee
Region
~
televiseur est branche au rnaqnetcscope par l'intermedlaire de la
AV~indique
des
selecteurs
d'enregistre
Enregistrement
Enregistrement
-B/G
Enre~strement
Enregistrement
-D/K
Enregistrement
-K1
Enregistrement
que le televiseur est branche au rnaqnetoscope
Standard
ment
PAL
MESECAM
S
CAM
MESECAM
SECAM
NTSC
Derriere le
valet
COLOUR
AUTOou
AUTOou
AUTOou
AUTOou
MESECAM
AUTOouNTSC
D'UTILlSER
pour
I'enregistrement
avant
MODE
PAL
PAL
PAL
NTSCMODE
Position
indifferenle
Position
indifferenle
Position
indifferenle
Position
inditrerenle
Pos~ion
indifferenle
3.58
LE
MAGNETOSCOPE
d'une
Arrlere
SECAM
Posillon
indifferenle
Position
indifferente
Position
indifferente
MESECAM
---------
SECAM
MESECAM
---------
SECAM
Position Position
lndlfferenta indifferente
MOOE
emission
RF/IFSYSTEM
par
BIG
I
D/K
BIG
D/K
les
du standard pour la lecture et I'enregistrement
•
PlacezleNTSC
4.43 ou
~
Lorsqu'un
SECAM
desirez
systerne
selectsur
MESECAM.
y
El
enrsqlstreeenstandard
Remarque:
Si
vous
I'enregistrement ne donnera pas une image couleur lorsque vous procsdereza.sa
lecture au moyen d'un appareil prevu uniquement pour les emegistrements SECAM
ou MESECAM.
ID
Aprss
COLOUR
puisse
NTSC
MODEal'arriare
I'emegistrerenstandard
MESECAM,
SECAM MODE
commettez
avoir
MODE
choisir
MODEal'arriaredurnaqnetoscope
-> PAL
programme
Placezlememe
realise
automatiquementlestandard
CTV
selon
est
du
placez-Ie
sur
SECAM.
une
erreur
les
operations.
surlaposition
le type de
en
standard
televiseur
SECAM.Sivous
sur
MESECAM
surlaposition
MESECAM.
selectsur
et~,
AUTOdemanlere
televiseur
SECAM,
surlaposition
si la
bandeaete
sur
SECAM
du
placezleselectourdestandard
PAL,
surlaposition
utilise.
placez
deslrez
Placez
selecteur
quelernaqnetoscope
NTSCouSECAM.
le
SECAMsivous
I'emegistrer
egalement
enraqistree
si la
bandeaete
SECAM
3.58,
salecteur
MODE,
en
le
en
[£]4
Page 38

VUE D'ENSEMBLE AVANT D'UTILlSER LE
MAGNETOSCOPE
Teh~commande
C!J<:;)000
~~~.
t.:1,ill,0.
'C"rl""i'l""j'
0-8
laID
~t:!iJ
tl1\
EEl~
!~~EEl~
~"""'cbfWl~-~c:2b]
;,;;0;;;;;;;:,
TV
~!lNCTlON
Arriere
!:e
0,
~
Selecteur de canal de
Ce
canal
•
US26 et US38, J25 e
peut
!EIs
Interrupteur de fonctionnement OPERATE (permet de
meltre le rnaqnetoscope sous tension ou hors tension)
L'heure est indiquee quelie que soit la position de cet
interrupteur.
Compartiment
(reportez-vous
LECTURElENREGISTREMENT)
Capteur de telecommande
I, ou BIG selon le televiseur que vous
(reportsz-vous aRACCORDEMENTS)
IA~
I~'~
ae
I;;~
©)~Bl'b
-
Selecteurde mode SECAM
Avant
VI EOIN .1.....UDIOIN·A
ON ou
stre
Touche
d'ejection
EJECT
EDIT:
OFF:
i
sortie du convertisseur RF
I J37 et C22 et C26.
placez
placez
fonctionnement normal du rnaqnetoscope,
Prises de
Ir~1::l
cholsi
sur
celte position pour le montage.
sur
celte position pendant le
Placez sur
utiJisez.
Interrupteur de signal d'essai
raccord~ment
,.
.
b-
=
entre
"
E30
et E39,
1:,
D/K,
II©.
._"
acasselte
a
TEST
SIG ON/OFF
,.---
-~
,
~
Afficheur multifonction
11
~~
~~
17..)
Ii'D~XREC
Affichage de confirmation des reglages
Cet
lorsqu'une touche du rnaqnetoscope
ou lorsque la teleconimande envoie un signal.
:~::..::;;
=:,-,::::TI\':=R
-
::=::::=@F.roP"OGS:,\.RT__
;;:=
II!II
IiII
affichage clignote pendant quelques
[Q§]
~
[S:..!ESECM.I
srce
SPL-PEP
PAL
l·jTSC
IVf·(VI
CS/-
lil/II
_[
II1 .JII J11
"fIt
est
Volet ouvert
Touches de selection des canaux (reportez-vous a
REGLAGE DES CANAUX)
Touches de reglage de I'alignement (reportezvous
aLECTURE)
mandes de fonctionnement (reportez-vous
Corn
LEC'
~
&
MI~~~~~~~lr~l~)EMENT
EMI~
hes de selection des canaux
Touc
ant/decroissant (selection des
crois
sion)
telev
Placez selon le signal d'ernlssion recu,
Interrupteur de
ATLON/OFF
(reportez-vous a"MON1;AGE AVEC UN
AUTRE APPAREIL VIDEO")
I'attenuateur audio
D'UNE
dans
canaux
J
f-.-..!
Selecteur de mode NTSC
CH
~1
,-,
'~"._
[[I
"·:LI
secondes
enfoncee
I'ordre
de
AUDIO
SII''':L'L
/-,
~L
I1LJ
a
y
Page 39

BRANCHEMENTS PREPARATIFS
Branchement
Debranchement·
Dabranchezlecable
l'arriere du televiseur.
du
cable du televiseur
du
cable
d'antenne
du
leleviseur
11
./
1
Panneau
du
televiseur
Entree antenna
ANTENNA IN
arrlsre
1
Branche sur I'antenna exterieure ou
interieure oua.la prise du reseeu de
television par cable
Branchement du cable d'antenne au rnaqnetoscope
Branchez le
d'entrea d'antenne ANTENNA
prise
IN du rnaqnetoscope.
cable d'antenne sur la
Arriere du maqnetoscopa
Raccordement aun televiseur stereo
-
-
~
«
1[;:
'Ill
~I:~'
~Ir
De
RFOUT
De VIDEO OUT
De VIDEO IN
.
~
-<0-
0
•
De AUDIO IN R/L De AUDIO OUT R/L
m'II
~
-
Entree d'antenne ANTENNA IN
Branchement du maqnetoscope au televiseur
Connectez le cable coaxial tourni11la
prise
RF
OUT
du
maqnetcscope.
Branchez I'autre extrernite11la prise
ANTENNA IN du televlseur,
Remarque:
Lorsque le branchement est effectue
11
I'aide de la prise RF OUT, le son
stereo ou bilingue ne peut atre emis.
Panneau
Entreed'antenne
ANTENNA IN
arrleredu
tetevtseur
•
t
Vers AUDIO OUT R/L
Vers VIDEO
Vers VIDEO IN
Vers ANTENNA IN
Remarques:
• Le son enregistre en mode EP dans le standard NTSC n'est pas enregistre
sur piste Hi-Fi, maissur piste llnealre,
• Si vous choisissez en memo temps le mode AV sur le
maqnetoscope apres avoir
son peuvent
rnernetemps sur les deux appareils.
atre deformss. En consequence, ne choisissez pas ce mode en
otlT
Vers AUDIO IN R/L
-
televiseur et sur le
realise les branchements cl-dessus, I'image et le
l:El
6
Page 40

PREPARATIFS
REGLAGE DU CANAL VIDEO
Raccordementitun televiseur etitune chaine audio
De AUDIO OUT R/L
-----.cJj
11
1(IlI
cm::
ue
HF OUT
Syntoniseur FM
Amplificateur
1
~
De AUDIO IN RlL
I I I L I I I
o
ImF.
I
"'D""O"
0 0
~:~
0I I
VersAUDIO
OUTRlL
VersAUDIO IN RlL
Panneau arrlere du magnetoscope
Interrupteurdusignal
®J
II:~'
ED'
d'essai
TESTSIG
ON/OFF
I®
SelecteurducanaldesortieduconvertisseurRF(CHANNEL)
(vous
pouvez
et
US38,
Pour que I'image d'un enregistrement video apparaisse sur le televiseur, ce
dernier doit
une station de
du convertisseur du rnaqnetoscope (le syntoniseur UHF du VC-H92
preregle en usine sur les canaux E36, US34, J33 et entre C24 et C25. Le
maqnetoscops est
o
Sur
lnernploye puis mettez le rnaqnstoscope
sous
OPERATE.
f9 Placez I'interrupteur de signal d'essai TEST
SIG sur la position ON.
choisiruncanal
J25etJ37etC22 et C26
etre regie sur une frequence qUi n'est pas utlllsae par ailleurs par
television et qui correspond ala frequence du canal de sortie
regie sur les canaux E39, US38, J37 et C26.
le televiseur,
tensionaI'aide
compris
selectlonnez
de
l'interrupteur
entre
E30etE39,
un canal
US26
est
o Aglssez sur le reglage du canal choisi sur le
televiseur de rnanlers
bandes
apparaisse
possible sur I'ecran.
verticales)
de rnanlere
que
la mire (deux
duo
rnaqnstoscops
aussi
netts
que
~~~~s
e
Cela
fait, placez
d'essai TEST SIG sur la position OFF.
I'interrupteur
de signal
Sous tension (ON)
Remarques:
• Branchez la fiche du cordon d'alimentation en tout dernier lieu, apres vous
etre assure que les raccordements sont conformes au schema ci-dessus.
• Si la sortie de la chalne audio est monophonique, realisez le raccorderrient
en ulilisant la prise L/MONO. Le signal sonore est alors present sur les
prises AUDIO OUT R et
[E]
7
L.
Remarque:
Si des brouillages pertubent la mire, changez la
frequence du canal de sortie du convertisseur
RF au moyen d'un petit tournevis et reprenez la
syntonisation du televiseur en procedant de la
rnaniere indlquee ci-dessus. .
;@
.....
[!JI
DFF~h§I~TI
ONr1.b!.I
f9-8
Page 41

TELECOMMANDE PREPARATIFS
Vous
telecommande. Pour cela, dirigez le haut de la telecornmands vers le capteur
place
tournez la commande de vitesse de defilement.
Mise en place
• La mise
pouvez
sur
Couvercle
regler
le panneau avant du rnaqnetoscope et appuyez sur les touches ou
le
maqnetoscopo
des
piles
a
distance
La tslecornmande
piles R6 de 1.5 volts (UM/SUM-3, AA). Vous
pouvez vous en procurer dans la plupart des
magasins
photographiques.
fonctionne
tout), remplacez les piles.
o
Ouvrezlecouvercle
retirez les piles usaqees,
fj
Placez
logement en respectant les polarites
et -) indiqueesdans le logement.
@ Remettez le couvercle du logement en
place.
d'appareils
pas
est
Si la
correctement
les
piles
aI'heure de I'horloge et le reglage du programmateur peuvent stre
realises
Horloge: reportez-vous aReglage de I'horloge (page 12).
Programmateur:
programmateur (page 23).
au moyen de ia telecomrnande.
reportez-vous
a
Enregistrement
au
moyen
alimentee par
electronlquas
telecommande
neuves
du
logement
(ou
dans
commands
de
pas
par
la
deux
ou
ne
du
et
le
(+
le
-
@'@"'@)
Touchedeverrouil1age
Touched'ejectlon EJECT
ToucheEJe
ToucheTIME I I
C-LOCK
_'.D-DR'~~
(51:'(')
I I Touched'affichageDISPLAY
•
"~RElcLEAR
y J
IL.J
El
14J
eCHANNELG:l
~o.~
_
..
~~
Capteurdetelecommande
Touched'entree INPUT
Touchedesortie
(voirpage 29)
audio
AUDIO
OUT
Remarques:
• Ne soumettez la telecommande ni ades chocs, ni aune temperature ou une
humidite excessive.
• La
telecommande
rnaqnetoscope
dsptacez le rnaqnetoscope ou modifiez l'eclairaqe,
• Prenez soin
• N'employez pas sirnultanernent une pile usaqee et une pile neuve, ou deux
piles de marques differentes.
• Les piles sont de deux types: jetables ou rechargeables. Employez les piles
contormement aux indications fournies par le fabricant.
•
Retirez
pendant une longue periode.
des
les
pilessivous
peut ne
est
expose au soleil ou aune lurniere vive. Dans ce cas,
piles afin d'eviter qu'elies ne fuient.
pas
fonctionner correctement si le capteur du
envisagez
de ne pas
utiliser
la telecommande
Touchede selectiondes
chiffres DIGIT SELECT
•
Utilises pour selectlcnner les
canaux
aun ou deuxchiffres
a['aide destouches
numeriquesde
de selectionAM/PM (page
10)
0
El.
9. Touche
iSE:TT£REOORDER
~
SHUrTLEONlOFF'
7~/
Touchesde fonetionsdu
televiseur(peuventetre utilisees
avec les televlseursSharp)
Touchede mise en servicede la
commandsde vltessede
defilement(SHUTILE ON/OFF)
remain de la commands de
vltesse
I Commands de vilesse de
defilement
m8
Page 42

REGLAGE INITIAL DE L'AFFICHAGE SUR ECRAN
PREPARATIFS
Lorsque
panne
automatiquement
selection de la
reglage initial
I Derriere le
o Mettez le televiseur et le maqnetoscope sous
vous
utiJisez le
de
courant
Touchesdefonctionnement
au
langue
volet
~~"
~:;m",jiii;~p;~~:I:::-:::;"""TOUChe
~~%p:~t:J~~~~TOUChe
L=---=::'Touche
I •
I 9
Details des operations
tension
et
selactlonnez
televlseur,
Lorsque vous appuyez sur la touche d'affichage
sur ecran OSD, l'ecran lndique cl-contra apparait
pour la selection de la langue et le "1" (pour
I'anglais)commence aclignoter.
Selection de I'affichage de la langue
• Vous pouvez choisir I'une des quatre langues
sulvantes:
espagnol,pour I'affichage sur ecran.
(L'anplals est selectlonns dans cet exemple)
Guideaffiche destouches defonctlonnement
• Les operations aeffectuer et les touches de
fonctionnement
J'affichage
donness
ex.
SELECT:
anglais,
sur
aI'ecran. .
maqnstoscops
de
plus
mode
et
de
de
reglage
l'heure, Procedez de la rnaniere
pourlapremiere
20
minutes,
initial
de
pour
I'affichaesur
I
...
e et
1$1
de
retourt BACK
Touched'avance
d'annulationCLEAR
Touche
Touche
e Touche d'affichage sur ecran
le
chinols,
sont
ecran. Suivez les instructions
i I
afficMes
.L
J..
NEXT
de
memorisation
d'affichage
J-
Touched'avance NEXT
canal
STORE
sur
ecran
video
francals
en
bas
OSD
OSD-
du
ou
de
fois
ou
le
maqnetoscope
I'affichage
Telecommande
EJECT
G-LOCK
IIJCJ
VCR,
~~ERATEb]
sur
suivante
acran
SHARP
CJ·CJ
,,'lV
~I~
'050
"'NEXT 1'6 OK
=:J
~
d1rJrF
oW>TOAE
CJ
4J
~
Clignolemenl
L
Ecran du teleVlseur
Appuyez sur la touche
d'affichagesur ecranOSD
~'BNGt-ISH
2'""X
J'FJlANi;:AIS
4.ESPADoL
!
SBL.,~--r
ENT.,
(Selectionnez ala touche
d'avance
DISPLAY
CJ CJ
CLEAReCHANNEL@
QI~",,~I
ToucheGet®
Touche
CLEAR
L Tlcuchede
BACK
11:1
TouchedememoriSation
•
SOJlT,
.j.NEXT)
•
~ Appuyez sur la touche d'avance
retour i BACK pour deplacsr le clignotement sur
la langue que vous deslrez utiliser. Vous pouvez
egalement
numsnques de la telecommande (1 a4). (Pour
cet example, selecnonnsz de tacon ace que "1"
(I'anglais)clignote.)
choisir
a
I'aide
.L
NEXT ou de
des
touches
apres
revient
ecran, la
pour
ALlolO
INPuT OUT
MODE
oso
d'annulaton
retour
a
une
le
STORE
Details des operations
~
Lorsque
memorisation
selectionne et I'ecran de reglage de I'horloge
apparatt, Apres
messages de I'affichage apparaltront en anglais.
L'indication 24H qui indique un regla2e sur 24
heures, ou I'indication sur 12 heures M/PM se
met alors aclignoter.
Et
Reglagede I'heure:
Dans cet exemple, reglez 10 h 28, le 5 aoGt1994
(reglage sur 24 heures)
Reglagesur 24 ou sur 12 heures
•
Utilisezlatouche
reglage.
vous
appuAez
.to
STO E, j'ecran en anqlals est
avoir
e/(£)
sur
regie
pour
la
touche
I'horloge,
effectuer
24H .... affichage sur 24 heures
12H .... affichage sur 12 heures AM/PM
(dans eet exemple, reglez sur 24 H.)
til
Appuyez
L'indication
commence aclignoter.
Le
chiffre
lorsque vous appuyez sur la touche
continuez aappuyer, les chiffres des heures sont
modifies. Reglez
I'heure et ensuite ceux des minutes. (Reglez
I'heure sur 10:28 dans cet exemple).
e
Appuyez
L'indication 1.01 correspondant au jour et au mois
commence aclignoter.
Le chiffre des jours change tout d'abord lorsque
vous
continuez aappuyer, les chiffres des mois sont
modifies. Reglez tout d'abord les chiffres du jour
et ensuite ceux du mois. (Reglez la date sur 8.5
dans eet exemple).
surlatouche
0:00,
des
surlatouche
appuyez
d'avance
correspondantaI'heure
minutes
change
tout
el(£),
tout
d'abord les chiffres de
d'avance.LNEXT.
surlatouche
et(£). Si
.L
NEXT.
d'abord
Sivous
vous
de
les
(ReglageaI'aide
le
Appuyez
Reglage
I
Appuyez
ReglageaI'aide
I
Ecran du televiseur
Appuyez sur la touche de
memorisation.
240ft/12ft
HEURE
JOUR/MOXS
ANNEB -oo
(SEL.,t/./.
ENT.,
,;,
surla
touche
24ft/12ft
1IEURE
JOUR/KOIS
ANNEE
jS:tL.'t!./.
ENT.'
,;,
a
I'aide
DEBUT
surlatouche
24111122
2EURE
JOUR/KOIS
ANNEB
I
SEL.'t!./.
BNT.,';'
JOUR/MOiS
•
•
•
•
•
VALID.,
SORT,o
dela
davance!
VALID.,-/+
SORT,
dela
d'avance
.
VAL:tD.
SORT,
dela
STORE.
touche
touche
touche
clig~~te
-".-
0,
1.
-/+
>OH
10,28
5.08
a
;oi~8-1
242
10,28
-;
."
,-/+
0
~.;o:o-I
GO
01
I
8fEil)
NEXT
":0:6..-
I
8fEil.
.I
NEXT
.:0:1-
I
8/E1J.
1£]9
Page 43

PREPARATIFS
Detail
des
operations
fi
Appuyez
.
l'lndicatlcn
l'annee
Appuyez
chiffres de
dans
@
Verlflez si I'heure, l'annee, le rnols et ie
sont
reglage de l'horloqe, AppuAez sur la touche
de
reglages
initial est tsrrnine).
Remarque:
memorisation
I'horloge
mise
touche de memorisation .a
sonore de la radio ou de la television.
e>
~uyez
Le reglage initial
Remarque:
•
L'ecran
pendantplus d'une minute.
• Selectionnezle systems de sortie pour l'ecran de menu OSD et I'ecrande fond bleu
au moyendu selscteur NTSC MODE
Remarques:
Lorsque vous passez d'un canal recevant le systems PAL
systems NTSC (y compris l'entres externe "L1" et "L2"), ou lorsquevous procedez
l'oparatloninverse, ies caractsres de i'affichagesurecrandeviennenttroublespendant
quelques secondes. Ce phenomena ne traduit pas un mauvais fonctionnement de
I'apparei!.
surlatouche
correspond
commenceEtc1ignoter.·
surlatouche
l'annee.
cet
exemple.)
correctement
memorisation
SETTINGS
Des
.a S
commenceEt/onctionner. Pour une
Et
I'heure tres precise,
sur la
OSD
de I'affichage est automatiquement annule si aucune touche n'est sntoncee
touche
pour
annuier
est
Positionnementdu
sslecteur
NTSC
d'avance t
ant
aWL
SI(£)
pour
(Reglez
antres
ioiIi
STO
l'annee
sur
E et l'ecran
apparalt.
~ue
ia
ORE
d'affichage sur ecran
I'affichage sur ecran.
terrnine.
NTSC
3.58
4.43
--.
PAL
touche
est
appuyez
STOREautop
MODE
GTV
NEXT
cbiflr.esde
reqler les
l'ecran
(Le
entoncee,
Sortiede standard couleur
sur
94
jour
de
des
reglage
de
sur la
Standard
Standard
Standard
et
Ecran du televisaur
Appuyez
surlatouche
.
24.H/12a
HEORE
JOURIMOIB
ANUSB
I
sal..
,
BNT.'
ReglageaI'aidedela
I
ANNElB
Appuyezsur latouche de
memorisation
*,PROG
:I,SBLBCTION
3,RORLOGB
4,LANGOB
5
:Cll.NAUX
I
SEL.
, 'tI.l.
BNT.:
,;,
Appuyezsur latouche d'affichage
sur seran
11
L'ecrand'affichageest annuls.
NTSC
PAL
PAL
a un canal recevant ie
t/.l.
.;.
RBGLAGE
d'avance
....
•
VALID·'-'+I
SORT'
•
..a
•
HODE
SORT,
-9
•
:uu
10,211
5.08
~:o:~-
9
touche
STORE.
9
aSD
.l.
NEXT
e/®.
',:..1
I
I Reglage facile avec les touches numeriques I
• Pour les reglages avec la touche
Et
fi,
vous
.
nurneriques de 0Et9 de la telecommande.
Procedure
de reglage
Etape
E)
Etapes
e
Etfi
Etape
Cil
pouvez
Detaii des operations
Reglage de 24H ou 12H.
Exemple: Affichage 12 heures AMIPM
Affichage 24 heures
Entree des chiffres
Exemple:
Exemple: pour
Remarque: Lorsque les minutes (atape
@),
le mois(etape@)ou l'annee (etape8)
ne comportent qu'un seul chiffre, piacez
zerodevant lechiffre.
un
Exemple: pour regler l'annee sur 1994.
Reglage
heures
Exemple: pour regler sur 11 h 08 PM
1)
Lorsque
touche
-:-alternativement.
dans cet exemple).
2) Entrez les chiffres contorrnernent it
la
(Entrez
exemple.)
pour
heures 28
du
(23 heures 08)
-1
AMet-:--
procedure
proceder
reqler
regler
mode
vous
__
(AM/PM), les affichages
indiquee
1, 1, 0,
SI(£)
rnentlonnes ci-dessus aux stapes E)
plus
simplementEtI'aide
I'heure
ladatesur le5
d'affichage
appuyez
PM aPFearaissent
(Reg ez -:-- PM
et8dans
sur 10
aoOt
12
sur
ci-dessus.
cet
la
des
touches
Touches de la
telecommande
-->
Touche 1 (12 H)
-->
Touche 2 (24 H)
~
"1", "0", "2", et "8"
---7u5", "0", et
---7
"9",
24H/12H
HEURE
JOUR/MOlS
ANNEE
I
SEL.:tn
EN'!'.=.;.
Appuyez
I
HEURE
Appuyezsur lestouches"1","1",
I
HEURE
114"
surla
•
AM/PM)
•
"0"et"8".
118"
VALID.:
SORT:
touche
-;2>
.
-1;1,=
24.
90:A~
1.
'
00
-/+
ID
(1
__
-'--PMI
~8r!1-
"'''I
01
I
a
[El
10
Page 44

REGLAGES SUR L'ECRAN PREPARATIFS
Les 5 rubriquessuivantes peuvent atre reglees au moyen de I'affichage sur
ecran.
1: PROG. (Programmateur) ... Reglage (et verification) d'un
avec le programmateur. Reportez-vous page 23 pour la procedureasuivre.
2: SELECTION MODE.. Les conditions de fonetionnement du rnaqnetoscope
sont reglees selon la reception de I'emission
la bande.
3: HORLOGE .... Reglage de I'heure.
4: LANGUE Selection de la langue choisie pour I'affichage sur ecran.
5: CANAUX Reglage des canaux de
pour la procedure de reglage.
Detail des operations
Reglage de la selection de mode
o
Mellezleteleviseur
sous tension et selecnonnez le canal video
du
televiseur.
d'affichage sur ecran . OSD. L'ecran des
reglages apparait et le chiffre 1 commence a
clignoter.
et le rnaqnetoscope
APP~Z
sur
la
etles
conditions de lecture de
television. Reportez-vous page 13
Ecrandu
Appuyez
d'affichage
Clign10te
touche
11
~'PROG
2:SELBCTIOH HODR
3 :
EORLOGB
4:LANGOB
5,CANAOX
enreQistrement
televiseur
surlatouche
surecran
•
ltBGLAGE
aSD
=Reference =
Lors~e
d'affic age 9 0 D, l'eoran est annule et
I'image revient ala normale.
~
Appuyez sur la touche d'avance .j, NEXT
pour
(SELECTION MODE) .
vous
deplacer
aJjPuyez
le
clignotement
sur
la
touche
sur
ISEL
..
BN'l'.'.
SeleclionnezaI'aicledela
2
1
*'
SELECTION
tlJ.
•
SOR'l':
e
touche
d'avance!NEXT,
MODE I
I
Detail des operations Ecran du telsvlseur
e Verlfiez ces reglages et
la touche de memorisation STORE. Les
reglages sont enraqlstres et I'affichage sur
scran disparall.
app~ez
ensuite sur
Appuyez
memorisation
11
L'affichage
surla
•
sur
touche
.t. STORE.
ecran
disparait.
de
~
Appuyez sur la touche d'avance L NEXT. Le
reglage de fond bleu apparatt, L'indication
AUTO sur la trolsleme Iigne commence a
clignoter.
Choisissez AUTO ou HORS
touche
reception
d'enregistrement de la bande.
AUTO...
HORS...
8/tf)
en
fonction
du
televiseur
Selectionnez
'Un
maqnetosccpe
signal televise.
'Un
ecran
bande
enregistrement est lue.
Selectionnez
devient bleu en raison d'une faible
reception
raison
d'enregistrement de la bande
ecran
ne
de la
AUTOenregie
bleu
vert
comportant
du
aI'aide de la
de la
DU
apparait
ne
recoit
apparait
HORS
signal,
mauvaise
la
DU
(f]11
quallte
qualite
generale.
aucun
si
aucun
si
I'ecran
vert
quallte
de
si le
une
en
Appuyez
surlatouche
FOND BLBD
I
BEL.ottJ.
stH.:
(Selectionnez
d'avance!NEXT
•
VALID.:-f+
.;.
SORT'
aI'aidede la
touche8/Eil).)
~u:'l'p.
I
e
Page 45

PREPARATIFS
Detaildes operations Ecrandu televiseur
R~glage
de I'horloge
0 Mettez le televiseur et le rnaqnetoscope
sous tension et selectionnez le canal video
du
televiseur.
d'aflichage
reglage
apparait
commencea clignoter.
= Reference =
Lorsque
vous
d'aflichage
I'imagerevient ala normale.
Appuyez sur la touche d'avance.1NEXT
~
pour
deplacer
HORLOGE.
~
Le reglage de I'horioge apparait lorsque
vous
appuyez
memorisation
contormsment aux stapes 9 a
rl3glages
initiaux de I'affichage sur ecran en
page9.
Appuyez
sur
ecran OSD. L'ecran de
surlatouche
et le chiffre 1 (PROG)
appuyez
surlatouche
OSD, l'ecran est annuls et
le
clignotement
sur
la
touche
oil STORE.
fj
su r
de
Reglez
pour les
Appuyez
Clign10te
surla
sur
ecran
I!
*,PROG
2'SS:loaCTION
3,HORLOGl':
'i,LANGUE
5,CANAUX
)
stL.,t/~
ENT.
:
a:!;
Appuyez
d'avance~NEXT
l,PROG
2,BBLBCTION
~~B;ORLOGB
4.,LANQUB
5:CAtl'AUX
I
BEL.:ff
ENT.:';'
Appuyez
memorisation
Voir
les etapes Et a
f891age
initialdeI'affichage
touche
9 aSD
...
RBG:lol\GB
HOOE
SORT,
surla
...
REPLAGE
HODB
..
SORT,
surla
touche
diI
...
ecran.
d'affichage
D
touche
a
de
STORE.
fj
du
I
I
sur
Detailsdesoperations
Selection
a
I'ecran
0
Mettez le televiseur et le rnaqnetoscope
dela
langue
apparaissant
sous tension et selectionnez le canal video
du
televiseur.
App~z
sur la touche
d'affichage sur scran OSD. L'ecran de
reglage apparait et le chiflre 1 (PROG)
commencea clignoter.
=Reference =
Lorsque
d'affichage
('image
~
Appuyez sur la touche d'avance.1NEXT
pourdeplacarle
~
Le reglage de la langue apparait lorsque
vous
memorisation oil
Appuyez sur la touche d'avance.1NEXT
pour deplacer le clignotement sur le
de la langueque vous souhaitez utiliser.
vous a£puyez
fB>
0 0, l'ecran est annule et
revientala
normale.
c1ignotement
appuyez sur la
STORE.
sur
sur
touche
la touche
LANGUE.
de
nurnsro
Ecran
Appuyez
d'affichage
Clign10te
I
_"
*,PROG
2'SBr.I'lCTION
3,HORLOGE
;\,LANGUE
5,
CANAUX
ISEL.,.,/'"
ENT.:';'
Appuyez
d'avance~NEXT
1,PROG
2:
SELECTION
3
:HORLOGE
.;4~
LANGUB
5,
CANAUX
I
sih.:tn
EN'I'.:
Appuyez
memorisation
*'
gNGLISH
~,
"'::le
3:
f:RAN~AIS
;\:ESPARoL
du televiseur
surla
touche
sur
ecran
{£}
...
REG:loAGE
MODI!;
SORT,
0
surla
touche
...
REGLAGE
HODB
SORT,
touche
.I.
STORE.
0
.t..
surla
...
aSD
I
I
de
Appuyez sur la touche de memorisation oil
9
STOREpour annuler I'affichage sur ecran.
Appuyez
memorisation
surla
...
L'affichage
sur
annuls.
touche
..a
STORE.
ecran
est
de
IsilL.:
t/'"
SORT:
touche
.I.
STORE.
ecran
0
I
d'avance
de
est
BNT.:
.t..
Appuyez
9
I
A!fcu~ez
S 0 E
sur la touche de memorisation oil
pour
selectlcnnerlalangue
it
utiliser.
L'affichage sur scran est annuls.
r
surla
~NEXT
Appuyez
memorisation
sur[a
...
L'affichage
annuls.
touche
sur
If] 12
Page 46

REGLAGE DES CANAUX PREPARATIFS
Ce mapnstoscops peut recevoir les emissions dlftusees sur ies canaux VHF
entre 44.25 MHz et 295.25 MHz et sur les canauxUHF entre 471.25 MHz et
885.25 MHz.
11
est dote de 48 canaux et un canal quelconque peut etre
sy,ntonise de rnanlere arecevoir parfaitement l'ernlsslon d'une station de
television..
Dans le cas ou la reception n'est pas nette ou si vous
dsstrez
modifier la
syntonisationd'un canal, procedez de la rnanierelndlqueeci-apres.
Les maqnetoscopes sont
canal 0 ainsi que lescanaux 13
preregles en usine de facon a ne pas indiquer le
a46.
~'9-DFU~~
"Ii'\'ffi
5mB
1~E!Irai5
[@~@@)
Touche
Touche
d'affichage
de
memorisation
Touche
Touche
Touche
sur
l'ecran9 aSD I
at.
STORE I
d'annulation CLEAR I
d'avance~NEXT I
deretou1"BACK I
Touche
6/fJ! I
-mijJ.p.Q
Detailsdes operations
Exemple:
Reglage
du
syntoniseur
canal
sur
UHF
la frequence du
25 du
canal de television 20.
e
Mettez
le
televiseur
sous
tension
et
choisissez le canal video du televiseur.
~ Selectionnez le standard d'emlssion utilise
dans les regions pour lesquelles le sstecteur
RF/IF SYSTEM doit €lire
vous
aux
positions
regll3.
des
(Reportez-
selecteurs
de
standard et d'ernlssion.)
RF/IF
SYSTEM
ID
Lors~e
d'affic age
HongKong
Chine,
URss
Ex.
Singapour,
Malaisie
Thallande
vous
lE>
ex-
et
appurez
OSD, 'ecran des reglages
I
DIK
BIG
sur
la
touche
est afflche et le chiffre 1 (PROG) commence
aclignoter.
Appuyez sur la touche d'avance t NEXT et
deplacez le clignotementsur 5 (CANAUX).
Sur I'ecran du
Reglezle selecteurRF/IF
televiseur
SYSTEM.
.....
Appuyez
d'affichagesur ecran0 OSD
surla
touche
.....
,*,PROG
Isih.. :
Selectionnezlatouche
REGLAGE
2,SELJ!:CTIO»
3,BORLOGE
4.LANGtJE
5.CANAtrX
1/J.
ENT••.;.
~NEXT.
HODE
SORT,
&
d'avance
.....
REGLAGE
1:
PROG
2.SBLECTION
3:
RORLOGE
1,'LANGtrB
~",CANAOX
I
BEL.of/'"
ENT
MODE
••
.t.
SORT.
18>
I
I
[El
13
Selecteur
SYSTEM
RF/IF
11$
e
Quand
vous
appuyez
surlatouche.
STORE, l'ecran des reglages apparalt et
SAUT·O (nurnero du canal) commence a
clignoter.
Reglez le numsro de position du canal a
I'aide de la touche el(£). (Reglez sur 20 en
I'occurrence.)
Appuyez
surlatouche
de
memorisation
.....
~Hi~~~:~L.
!SBL
..
tlJ.
HBH.,.
Reglez
aI'aldede latouche6/fJ!.
.....
IIiUH.PRBSBL.
surla
touche
...
STORE.
..,
,,,,,
_:_=~~3:~~-
VALID
.•
-/+
SORT,o
I
SAUT-);~-I
Page 47

PREPARATIFS
ITetail des operanons
@ Si vous appuyez sur la touche d'avance t
~NEXT,
ies reglages suivants.
syntonisation
• Si vous maintenez la toucheGJenfoncee
le clignotement se deplace sur -:,------
TV ACCORD. L'lndication de drolte indique
".\1//
r -
Bandede
pendant
SAUT
I'indication
selection
automatiquement.
(Lorsque I'indication est cornpletement
la droite, la bande de syntonisation passe
~:·/--I--\--:
I"
8a5SB
frequence frequence
'remctn
disparait
de syntonisation
quelques
commenceaclignoter.
du
secondes, I'affichage
et la
canal
est
alors
~I
Hauts
partie
-
• de
effectuee
su]
La
aL (VHF/LOW) et passe ensuite aH(VHF-
HIGH) et U(UI-IF).)
l
Continuez cetta operation jusqu'a ce que le
canal
(Reglez le canal 25 en I'occurrence.)
Reference: 1) Appuyez sur la touche 8 ou
d'ernlssion
2) Unepression sur la touche
souhalts
GJ
pour I'accord fin.
ouGJarreteautomatiquement
la selection du
apparaisse.
canal.
Ecran du
Appuyezsur la touche
d'avanee 1 NEXT
televiseur
..
NOM.PRBSBL.
TV
ACCORIl
/SBL.'t/./.
HEld.,,,;!;,
Maintenezla touche
pendantquelquessecondes.
"
-,-
VALID.:-I+/
BORT,B'
..
I
TV
ACCORD
L'imagetelevises apparattsous
J'affichage
Il"OK.PRBBEL.
'v
A"O~O'~--:-:
I
BEL.'
!\Ilhl.,';"
8
-~,.----~_:
sur ecran.
",
~
t/,).
VALID
90aT,o
9.f.UT,:lP
'!I-~~-,~-.:-
EEl
sntoncee
I
,2P
••
-/+
I
Details des operations
(;}
SI
vous
memorisation
memorises et l'affichageSu(ecrandisparait.
Si vousdeslrez continuer le reglage de la position des canaux, appuyez sur la
touche d'avance
c1ignotement sur CANAUX
canal desires. Suivez ensuite les etapes
suivants.
appuyez
oio
J.
NEXT apres I'etape @ ci-dessus et deplacez le
sur
la
STORE, les reglages sont
touche
ala premiere
l19ne
de
I;!our
et et (;J pour procsder aux reglages
Ecran du televissur
Appuyezsurlatouchede
memorisation.
STORE.
..
L'affichage surecrandisparait.1
regler sur la position de
,
Si vous souhaitez verifier si le canal UHF
25 syntonlse sur le maqnatoscope est bien
le canal souhalte, selectionnez le canal 25
avec
comparez les programmes.
le
syntoniseur
du
televiseur
et
[£]14
Page 48

PREPARATIFS
Omission des canaux
Vous
avezla
du
maqnetoscops,
possfbilite,
Details des operations Ecran du televiseur
si vous nedesirezpas reglertous les
d'indiquer au
rnaqnetoscope
IExemple: pour ignorer le canal 12
0
Mettezletelevlseur
sous tension et choisissez le canal video du
televiseur.
~
~uyez
chiffre 1 (PROG) commence aclignoter.
~
Appuyez
pour deplacer le clignotement sur CANAUX.
E) Appuyez sur la touche de memorisation
STORE.
apparatt et le nurnero de canal commence a
clignoter.
e
Reglez les canaux que vous deslrez omettre
sur la touche d'affichage sur ecran
OSD. L'ecran des reglages appara1t et le
surlatouche
L'ecran
aI'aide de la touche
I'occurrence.)
et le
maqnetoscope
d'avance!NEXT
de
reglage
8/(f).
(Reglez 12 en
des
canaux
les
canaux
Appuyezsur latouched'affichage
I
Selectionnez
o:Ii
canaux
qu'i1
sur
*'P:ROG
2,SBLBCTXON
3.HORLOQB
4:LANGUE
S:CANADX
ISBL.:t/J.
ENT.
I
;$~
CANAOX
Appuyezsurlatouchede
memorisation.
NUM.
TV ACCORD
dusyntoniseur
doit
ignorer.
ecrane oso
•
REGLAGB
HODE
:';'
SORT,li»
aveclatouche
•
•
PRBSEL.
L:.-~----"*
d'avance!
STORE.
I
NEXT,
I
Pour
rendre
possible
le
precedemment ignore
Details des operations
Exemple: pour que le reglage du canal 12 soit
0
Mettezleteleviseur
sous tension et choisissez le canal video du
televiseur.
~
~uyez
chiffre 1 (PROG) commence aclignoter.
~
Appuyez
pour
(CANAUX).
E)
A~u~ez
S 0 E.
apparatt et le nurnero de canal commence a
clignoter.
a nouveau possible
etlemaqnatoscope
sur la touche d'affichage sur ecran
OSD. L'ecran des reglages apparatt et le
surlatouche
deplacer
sur la touche de memorisation
L'acran
le
d'avance!NEXT
clignotement
de
reglage
des
canaux
reglage
Appuyez
Seleclionnez
sur
5
o:Ii
d'un
Ecran du televiseur
surla
sur seran B OSD
•
*,PROI]
S,CANAtJX
I
I
;~~
Appuyezsur la touche de
memorisation"
NUM.
TV ACCORD
REGLAGE
2:SELEC~ION
3,KORLOGE
4.LANGIJ'B
BBL.:
t/J.
BNT.
:';'
aveclatouche
CANAl.TX I
•
•
PRESEL.
canal
touche
d'affichage
MODE
BOR'1'.9
d'avance!
STORE.
L:.------"¥
I
NEXT,
I
SEL.,
1"I.j.
VALID
••
HEM.,.
Regleza I'aidedestouches
I
CANADX
(i}
Appuyez sur la touche d'annulation CLEAR.
L'lndlcatlon
ainsi que le canal sera omis.
fj
Si vous
procedez de nouveau aux etapes (;, et (i}.
@ Appuyez sur la touche de memorisation
STORE. Les reglages sont alors memorises
et I'affichage sur ecran disparalt,
Remarque:
Les canaux que vous avez omis ne peuvent pas
touches
effectuer ce choix avec les touches nurneriques (0 a9) de la telecommande.
If]
de
15
SAUT
deslrsz
selection
12
s'allurneetindique
omettre
des
d'autres
canaux
canaux,
o:Ii
CHANNEL
I
NOM.
Appuyezsurlatouchede
memorisation
L'affichage sur
stre selectionnes aI'aide des
8/(f),
•
Appuyezsurlatouche
d'annulation
PRBSBL.
•
•
ecran
mais
vous
-/+
SORT:
Eo
-)',~l
CLEAR.
-~~Dt~l~1
• STORE.
disparait.
pourrez
I
e/~.
(;,
Reglez les canaux qui ne doivent plus stre
omis a J'aide de la touche 8/(f). (Reglez 12
en I'occurrence.) I
(i}
Appuyez sur la touche d'annulation CLEAR.
La position du canal sera indiquee
(apres annulation de SAUT) et indique ainsi
quelatonctlon
annulee.
fj
Si vous deslrez remettre d'autres canaux
se~ce,
et
@
Appuyez sur la touche de memorisation
STORE. Les reglages sont alors memorises
et I'affichage sur ecran dlsparait,
procedsz de nouveau aux etapes
•.
de
saut
du
par
canal
IBBL'ft/./.
HEM.
ReglezEtI'aide des touches
ND'II!.PREBI!.L.
Appuyezsur la touche
12
a
ete
d'annulation CLEAR.
\
NUM.PRESEL.
VALJ;D.:-!+
I';'
8011.'1'.0
-9~ut~1l-1
•
•
SAD'l'-12
I
S/EB.
I
lB
o:Ii
Appuyez
memorisation• STORE.
IL'affichagesur ecren disparait. I
surla
•
touchede
Page 49

MODE AFFICHAGE SUR ECRAN OSD PREPARATIFS
A chaque pression sur la touche d'affichage sur ecran, les zones affichees et
le contenu changent de la
rnanlere suivante.
MODE
-050--
-e
c==J
Affichagetotal
~~
10:28
25J08M
Demi-affichage sur
•
BP
IIIL R"l
'94
AUTO-..-
I
DPSS
I
0:16.00
ecra~
14
Demi- Affichage
aftichaqe
sur ecran ecran
I-
Zone de I'affichagesur ecrantotal
19
Le canal est affiche uniquementen mode EE.
I
-..to,tal
sur
-..
HORES
-
J
I
DPSS
I
Remarque:
• En mode AUTO, les modifications sont afficheas pendant 3 secondes
uniquement.
• L'affichage sur
lecture au ralenti, de lecture en double vitesse ou de recherchevideo.
ecran ne peut pas apparaitre en mode d'arret sur image, de
3
0:16.00
1EI16
Page 50

LECTURE OPERATIONS FONDAMENTALES
Mise en place d'une cassette video
Introduisez une cassette video dans le compartiment. Le maqnetoscope se
met automatiquement sous tension.
Si vous introduisez incorrectement la cassette, le dispositit de chargement ne
fonctionne pas. Ne torcez pas sur la cassette.
Lorsque la cassette est en place, le pictogramme
multitonctions, et un
cassette, appuyez sur la touche
telecommande.
carre • apparalt sur l'ecrandu televlseur, Pour retirer la
d'ejectlonEJECT du maqnetoscope ou de la
[Affichage
sur
ecran]
[Afficheur
Cassetteenplace
"[Q2]"
apparalt sur I'afficheur
multifonctions]
C
Vide
Lecture
o Mettez le televiseur sous tension et choisissez le mode video. Appuyez
sur la touche OPERATE du
~
Introduisez la cassette dans le compartiment et appuyez sur la touche de
lecture PLAY (Reportez-vous
19). La tonction d'alignement automatique est actlvee et les indications
"~"
sur I'afficheur multitonctions et sur l'ecran du televiseur se mettent a
clignoter. Lorsque I'alignement automatique est achsve, les indications
"~"
s'arrstent de clignoter pour indiquer que I'alignement est au point.
Fonction d'alignement automatique actives.
maqnstosoope pour le mettre sous tension.
aLecture sntlerement automatique, page
Dernarraqe rapide avec dispositif de
chargement
entlerement automatique
Ce rnaqnetoscope
automatique pour darnarraqss rapides. En mode d'attente avec dernarraqe
rapide,iJprecede
seulement aprss avoir appuye sur les touches correspondantes. Ce mode
d'attente
cassette ou la sortie des modes de lecture ou d'enregistrement.
En mode d'attente avec dernarraqe rapide, le rnaqnetoscope precede
lecture et
ou REC.
En mode d'attente avec dernarraqe rapide, le rnaqnetoscope precede
lecture et
ou REC.
reste active
aI'enregistrement 5 secondes aprss la pression sur la touche PLAY
aI'enregistrement2 secondes
est
pourvu d'un dispositit de
chargement
ala lecture ou aI'enregistrement
pendant
les 5 minutes
apres
suivant
la pression sur la touche PLAY
entlerernent
quelques
I'introduction
secondes
d'une
a la
a la
Recherche video
Les operations ci-dessous
scene.
vous
permettent de retrouver
rapidement
une
o Pour effectuer une recherche rapide vers l'avant, appuyez sur la touche
d'avance rapide FF en mode de lecture; pour une recherche vers l'arrlere,
appuyez sur la touche de rembobinage REW en mode de lecture.
~~
~
Pour
lecture PLAY.
"""~,
---
SP
Recherche
video
avant
revenir au mode de lecture normale, appuyez
......
@[
Recherche
SI"
video
arrtsre
surlatouche
de
-'~-
, , .
D
~
Appuyez sur la touche d'arret STOP pour terminer la lecture. Si la tin de la
bande
rnaqnetoscope precede automatiquement au rembobinage de la bande et
est
atteinte
avant
que
vous
n'agissiez
sur
cette
touche,
aI'ejection de la cassette.
c
!Ell?
Remarques:
• L'affichage sur ecran n'est pas operatlonnel en mode de recherche video.
• Le son est
• Les indications
• L'image peut
pas un defaut de tonctionnement de I'apparei!.
coupe pendant une recherche.
~
ou
~
apparaissent sur I'afficheur multitonctions.
etre deforrnee pendantune recherche video. Cecl ne constitue
Avance rapide et rembobinage
le
e Pour avancer rapidement ou rembobiner la bande aplus grande vitesse,
appuyez tout d'abord sur la touche d'arret STOP puis, selon le cas,
touch!' d'avance raplds FF ou de rembobinage REW. Aucune image n'est
tournie dans ce mode de tonctionnement.
~~
~
Appuyez sur la touche d'arrst STOP pour interrompre I'avance rapide ou
le rembobinage de la bande.
.:!II
~c7'
0
Avance
Sf'
rapide
....
"'IIlII
:'T'
II!II
0--'
Rembobinage
SP
sur
la
Page 51

OPERATIONS FONDAMENTALES
Arret
sur
image et avance image par image
o Pour figer I'image sur le televlseur, appuyez sur la touche de pause/arret sur
image PAUSE/STILL. Pour eviter que ia bande ne soit endornmaqee, ia
lecture reprend normalement apres environ cinq minutes d'arrat sur image.
11
fj
Si des barres de bruit apparaissent, eliminez-IesaI'aide de la touche de mise
en
service de la commande de vitesse de defilement SHUTTLE ON/OFF.
Placez la commande sur la position lente SLOW et appuyez sur les touches
....ou....
nouveau sur la touche de mise en service de la commande de vltesse
SHUTILE
sur image PAUSE/STILL.
~
Si I'image est animea de tremblements verticaux, appuyez sur les touches de
reglage de I'alignement TRACKING
d'alignement TRACKING. Lorsque les barres ont disparu, appuyez de
ON/OFF et appuyez une nouvelle fois sur la touche de pause/arret
Et Pendant un arret sur image, appuyez sur la touche d'avance image par image
F.ADVde la telecommande pour obtenir une successiond'lmages fixes.
~
Appuyez
reprendre la lecture normaie.
Remarques:
• Le mode d'arret sur image et de vitesse de defilement n'apparalssent pas sur I'affichage
sur
seran.
• Le son est interrompu au caurs d'un arret sur image DU d'une avance image par image.
Emplo
surlatouche
". de la commande
de vitesse de defi lement
o Pendant la lecture, appuyez sur la
touche
commande de
SHUTILE ON/OFF pour vous mettre
en mode de vitesse de defilement.
fj
La
defilement
les programmes dans les dlftsrents
modes de lecture suivants.
• Arret sur image, ralentl (1ere vitesse), ralenti
(zemevitesse), lecture a vitesse
interruption
recherche ralenfle vers le debut DU la fin de la
bands et recherche acceleres vers le
la fin de la
Remarques:
• Le son est interrompu des que vous employez la commande de vitesse de defilement.
• Lorsque vous tournez la commande de vitesse de
position REW, ou de la position FWD vers la position REW, les images defllant dans le sens de
la lecture vers I'avant sur recran mais ceci ne traduit pas une anomalie de fonctionnement de
I'apparei!.
• Lorsqu'une bande NTSC ou une bande PAL ou MESACAM enreqistree en mode LP est lue en
mode d'arret sur image, d'avance image par image, de ralenti, de vitesse acceleree ou de
recherche video, le haut de I'image peut etre
fonctionnemant de I'appareil.
• Pour economiser de I'energie, le maqnetoscope sort automatiquement du mode de vitesse de
defilement si la commande n'est pas utllisee pendant plus d'une minute.
de
mise
en
vitesse de defilement
commande
vous permet de visionner
du
bands.
son).
de
lecture
I"
""
de pause arret
service
vitesse
normale
acceler
debut DU
de la
~avec
....et....
de
ee,
deforms mais ceci ne tradult pas una anomalie de
jusqu'a stabllisation de I'image.
sur
image PAUSE/STILL
Touchedemiseenservice
commandsdevitessededefilement
Ternoln
dela
commandedevitesse
Commandedevitessededefilement
defilement de la position STILL vers la
dela
pour
Controle
Ce mapnstoscope est pourvu
I'image qui vous procure la meliieure quallte d'image possible.
automatiquedeI'image
d'une
fonction de contrete automatique de
par
intelligence
artificielle
(I) Alignement automatique
Le dispositif d'alignement automatique
vous procure le meilleur alignement de
I'image pendant la lecture. II est active
dans les cas suivants:
• La
lrnrneciaternent apres avoir charge la
cassette.
•
Les
slmultanernent pendant la lecture.
• Le rnaqnstoscope passe
espace
• Le mode d'enregistrement a ete rnodifie pendant la lecture (SP en
EP ou LP en EP).
• Le pictogramme
clignote pendant quelques
automatique fonctlonne.
• Le dispositif d'alignement automatique des
la qualita d'enregistrement de la bande est mediocre. Dans ce cas, utilisez
les touches d'alignement
jusqu'a ce qu'elle soit le plus nette possible.
(11)
Pour obtenir des Images de qualite supsrtsure, procsdez a la lecture d'une
bande de bonne qualite
Remarque:
•
Utllisezlatouchedetonalitedel'lmage
le valet)
direction
direction
les parasites.
Celte
preenreqistrees afin d'ameliorer la qualite de I'image. Pour I'activer, placez le
selscteur
position ON.
(Ill)
Ce maqnetoscope est dote d'un dispositif de nettoyage automatique des tetes
qui nettoie les tetes
lecture
touches
est
d'alignement
commences
....
et
aune portion enreqistrae de la bande aprss un
vierge.
,ct:" sur I'affichage multifonctions et sur l'ecran du televiseur
secondes
....
1
....
TRACKING pour regler manuellement I'image
contrele
pour
SOFT
HARD
fonction
AUTO PICTURE, situe derriere le volet du rnaqnetoscope, en
Dispositif de nettoyage automatique des tetes
automatique de I'image
avec le selectsur AUTO PICTURE en position ON.
rC;tIIlh
EDIT
OFF
AUTO
PICTURE
regler les tonalltes seton
pour
attenusr
pour
mieux definir I'image
permet
des qu'une cassette est chargee ou ejectee.
I'image et
de
PICTURE
vos
preferences. Tournez
diminuer
mais
supprimer
~~
Image norrnare
....
TRACKING
lorsque le dispositif d'alignement
teHes
peut ne pas fonctionner si
ON
TONE
(situee
les parasites et
augmenter, en revanche,
les
parasites
sont
derriere
dans
dans
sur
enfoncees
PICTURE
la
la
,""0,",
les
LP,
SP en
TONE
bandes
Fonction d'arnelloratlon de la copie
Cette fonction permetd'amsllorerI'image d'une bande coples et de la
prochede I'original.
Pourutiliser cette
Apreslacople,
fonetion,
remettez
placezleselscteur
leselectsursur laposition ON ou
AUTO
PICTURE
sur la
OFF.
rendre
position
plus
EDIT.
[fJ18
Page 52

OPERATIONS FONDAMENTALES
Lecture d'une bande NTSC (NTSC en PAL)
Ce rnaqnstoscope vous permet de visionner des bandes de standard NTSC
sur un
televiseur compatible PAL, compatible NTSC ou multistandards.
Remarques:
Nous vous recommandons d'utiliser en principe le
rnaqnetoscope avec un
NTSC ou
compatible
rnaqnetoscope peut
compatible PAL, les restrictions suivantes devront
stre prises en compte:
• Le format vertical de la mire est
ne constitue pas un detaut de fonctionnement de I'appareil.
• Si le
pourrez pas visionner les programmes
synchronisation verticale. Si le
HOLD,
synchronisation verticale au moyen de cette commands.
• Des lignes horizontales peuvent apparaltre
certaines fonctions (recherche video, arret sur image, vitesse de defilement
lente). Ces Iignes peuvent egalement
couleur, enfonction de leur position. Dans ce cas, vous pouvez restaurer la
couleur en appuyant sur la touche d'alignement
mode de recherche
• Vous ne pourrez pas copier une cassette NTSC de ce rnaqnetoscope sur un
autre rnapnetoscope compatible PAL. Si une bande enreqlstres de cette
rnanlere est lue sur un autre maqnetoscope compatible PAL, aucune image
n'apparalt.
avec
un
NTSC
televiseur PAL ne possede pas de
vous
pourrez
televiseur compatible
televiseur
3.58/4.43.
stre utilise avec un televiseur
multistandards
televiseur PAL est dote d'une commande V-
regarder
Msme
legerement plus petit que la normale. Ceci
si le
commande
video NTSC car il n'y aura pas de
les
cassettes
aI'ecran lors de I'utilisation de
stre accornpaqnees d'une perte de
video ou de lecture auralenti.
i
tGl
•
V-HOLD,
NTSC
.....ou....
en
stabilisant
TRACKING en
vous
Lecture d'un enregistrement Hi-Fi
Ce maqnetoscope est prevu
dans differents standards de
Oompatlbillte
Vitesse
-.
PAL
M
ESECAM
SECAM
NTSC
Remarque:
Les sons
prise de sortie RF OUT ne correspond qu'a la monophonie.
SP LP
0 0 -
0
0 0
0 0 0
stereo et bilingues ne sortent
pour
la lecture Hi-Fi de bandes enregistrees
television et avec differentes vitesses de lecture.
dela
0
Hl-Fl
bande
EP
-
• Le
• Pour les differehts types de
rnapnatoscope
automatiquement la vitesse (SP, LP
ou EP) a
I'enregistrement.
les
positions
selectsurs, reportez-vous aux pages
3et4.
g,ue
laquelle
correspondantes
sur les homes AUDIO OUT. La
a
reconna1t
ete
realise
bands et
des
Selection du mode audio
AUOIO
OUT
c::::J
If]
19
ne
Les sorties audio par les prises AUDIO OUT RlL"MONO peuvent stre obtenues
en differents modes. La touche AUDIO OUT de la telecommande est utllisea pour
effectuer la selectioncyclique de ces modes.
t)
En temps normal, le
mode, les indications
I'affichagesur ecran et I'indication
En mode Hi-Fl, le maqnstoscope peut lire des bandes
(canal principal
2) Si vous appuyez une fois sur la touche de sortie audio AUDIO OUT, le son de
lavoie gauche est presentsur les prises AUDIO OUT R et L-MONO.
3) Si vous appuyez une dauxisme fois sur la touche de sortie audio AUDIO OUT,
le son de la voie droite est present sur les prises AUDIO OUT R et L-MONO.
4) Si vous appuyez une trolsisme fois sur la touche de sortie audio AUDIO OUT,
seul le son de la piste Iineaire est present sur les prises AUDIO OUT R et
MONO.
Appuyez sur la touche AUDIO OUT de la telecommande pour selaotlonner par
cycle, un des quatre modes audio presentss ci-dessus.
la
Remarque:
• Si le niveau de sortie Hi-Fl est de faible amplitude ou si I'alignement n'est pas
effectue,lemaqnetoscope
m~netoscope
[J;J
et
[B]
doit stre regie en mode Hl-Fl, Dans ce
s'allument sur I'afficheur multifonctions et
,,,
L R
,[I
appara1t
agauche et canal auxiliaireadroite).
choisit
automatiquement
la pistellnealrsmonophonique.
quelque temps aI'ecran.
stereo ou bilingues
L-
Reglage optimal du son Hi-Fi
• En principe, vous obtiendrez le meilleur son possible en utilisant la fonction
d'alignement automatique.
• Procedez aux reglages suivants si I'enregistrementsonore Hi-Fi d'une cassette
preenreqtstrse, enregistree
ala vitesse normale
SP,
o Appuyez slmultanernentsur les touchesd'aliqnernent... et
~ Appuyez d'une tacon repetee et reguliere
TRACKING ...
I'afficheur multifonctions et que I'indication
disparaisse.
~ Appuyez d'une tacon repetee et reguliere sur la touche d'alignement
TRACKING, sans omettre de compter le nombre de fois ou vous pressez sur
cette touche,
multifonctions
reapparaissentpuis disparaissentanouveau.
jusqu'a
jusqu'a
et
avec un autre magnetoscope ou en standard NTSC
est mediocre.
....
et
et
[B]
[B]
TRACKING.
d'alignement
s'effacent
de
ce que les indications
ce que les indications
que
I'indication
1['
1['
L R "I de
sur
L R
la touche
[J;J
'[1
de l'affichage sur ecran
[J;J
I'affichage
de
....
I'afficheur
sur
ecran
e Appuyer sur la touche d'alignement TRACKING ... comme il a ete dit cl-
dessus un nombre de fois
reglageest alorsoptimal.
egal ala rnoitledu nombre compte al'stape
···~·rt)Nei10N·IJEtECiURt·tNiltRtM£NTAUTOMATlaIJE·-
Cette fonction tres pratique vous permet d'omettre certalnes operations pour la
lectured'une bande.
Si vous introduisez une languette dernunls de la ianguette de protection contre
l'sffacement, le maqnetoscops se met automatiquement en fonctionnementet
commence la lecture. Lorsque la fin de
rembobine labandeet ejectelacassette.
Remarque:
cassette
• Si la
languette
touchedelecture
est
est pas
recouvert
PLAY
pourvue
d'un
apreslamisesous
de sa
morceauderuban
.Iabande est atteinte, le rnagnetoscope
languette
ou si le trou cree par I'absencede
adheslt,
tension
vous devez
automatiquedurnaqnetoscope.
appuyer
~.
Le
sur la
Page 53

UTILISATION
DE
LA
FONCTION
D'AJOUT
ET
D'EFFACEMENT
DES
SIGNAUX
D'INDEX
VI
SS
OPERATIONS
FONDAMENTALES
Utilisation de la
fonctlon
VISS ADD
o Procedez a [a lecture de la bande jusqu'a ce que vous locallsiez le point
ou vous dsslrez ajouter le slqnal VISS et appuyez ensuite sur [a touche de
,.'
pause/arret sur image PAUSE/STILL.
~
Appuyez
recherche video arriere pendant une seconde (environ 3 ou 4 secondes
de
PAUSE/STILL pour geler I'image.
ID
Appuyez
rnaqnetoscope
commence la lecture.)
Environ 2 secondes apres le
clignote
enregistre.
9 Lorsque I'indication VISS ADD disparait de l'ecran, I'enregistrement du
signal est terrntns.
P~l
L!!J - ... - [!!] -
Remarque:
• A chaque pression sur la touche VISS ADD, un signal d'index est aloute,
N'appuyez
position.
•
La
fonction
depourvues
portions vierges de la bande.
• Le son est interrompu lorsque la fonction ADD est actlvse. Ceci n'indique
pas une anomalie de l'appareil.
• N'appuyez sur aucune autre touche lorsque la fonction ADD est
sur
lecture),
sur
par
la touche de rernbobiriaqe REW
puis
sur
la
sort
I'affichage
0
REI
consequent
VISS
de
languette
appuyez
touche
automatiquement
ADD
surlatouche
fj
VISS
debut de la lecture, I'indication VISS ADD
sur
ecran,
PAUS8STIll
qu'une
ne
peut
de protection contre
pas
ADD
Le
seule
etre
~
pour
procetJer
de
pause/arret
de[atelecommande.
du
mode
signal
d'arret
d'index
VISS
~
fois
surlatoucheachaque
utlllsee
avec
I'effacement
des
sur
sur
image
est
cassettes
ou
actrves.
it una
image
-'hss'
"
sur
(Le
alors
ADD.
'"
des
et
Utilisation de VISS ERASE
o Localisez l'ernplacernent du signal VISS que vous dsslrez effacer a I'aide
de la fonction de recherche de programme DPSS jvoir page 27).
~ A I'endroit de la bande localise a l'etape precedente, appuyez sur la
touche de pause/arret sur image PAUSE/STILL pour geler I'image.
ID Appuyez sur la touche FF~pour proceder a une recherche video avant
pendant environ 1 seconde (environ 5 secondes de lecture) puis appuyez
sur la touche de pause/arret sur image PAUSE/STILL pour geler I'image.
9
Appuyez
rnaqnetoscope passe
arriere
lecture.
A ce moment-la, ['indication VISS ERASE s'allurne sur I'affichage sur
ecran.
Le rnaqnetoscope entre ensuite automatiquement en mode de lecture et
apres 4 ou 5 secondes de lecture, le signal sera efface en environ 10
secondes. (L'indication VISS ERASE clignote sur I'affichage sur scran
ce moment-la.
• Lorsque I'indication VISS ERASE disparalt de i'affichage, I'effacement du
signal est terrnine,
PAUS8STIll
[!!] -
Remarques:
• N'utilisez pas les fonctions d'ajout et d'effacement de signal d'index sur des
portions de la bande ou la vitesse a ete rnodlfise (de SP en LP ou I'inverse),
sur
des
MESECAM, NTSC c' MESECAM, etc.) ou au debut de la bande car cela
pourrait
• Le son est interrompu lorsque [a fonction d'effacement est activee. Ceci ne
constitue pas un detaut de fonctionnement de l'appareil.
• N'appuyez pas sur une autre touche lorsque la fonction d'effacement est
actlvee,
• L'image peut
signaux
fonctionnement de I'apparei!.
suriatouche
et recherche le signal
I
ff
j
~
enregistrements dans differents formats (PAL c' NTSC, PAL c'
gener la lecture.
etre detorrnse lorsque la fonction d'ajout ou d'effacement des
d'index
est
(i)
automatiquement
VISS
VISS
PAUS8STIll
- [!!] -
actlvae.
Ceci
ERASE
de la
au mode de recherche video
pendant
telecommanoe.
environ 7
secondes
mE
n'indique
pas
une
anomalie
_V}B,5
,"'R~B,B·
Le
de
de
a
lII20
Page 54

ENREGISTREMENT D'UNE EMISSION TELEVISEE
Pour
Protection contre I'effacement
Les casselles
detachable dont I'absence protege les emegistrements
contre un effacement involontaire. Si cette languelle est
otee, I'enregistrement est impossible. Si vous deslrez
rnalqre tout
une
emission,
adhesif le trou cree par I'absence de languelle.
IV!:,.~
ou IVllsl posssdent une languette
employer
cette cassette
recouvrez
d'un
pour
morceau
emegistrer
de
ruban
Languelle de protection
contre I'effacement
~
regarder
Apres
telE~viseur,
Lorsque
automatiquementaurembobinagedela
Enregistrement d'une emission televisee
o Mellez le televiseur sous tension et choisissez le canal video.
e.I
Mettez
OPERATE prevu it cet effel.
@ Choislssez une des vitesses d'enregistrement: standard (SP), lente (LP, sauf
dans le cas d'un enregistrement NTSC), ou tres lente (EP, uniquement dans
le cas d'un emegistrement NTSC) au moyen du selscteur prevu it cet effet sur
la telecommande (SP/LP.EP). (L'indication SP, LP ou EP s'eclaire.)
le maqnetoscope en
fonctionnement
au
moyen
de
I'interrupteur
avoir
precede
le
canal
la
-
($N@@).
OPERATIONS
une
autre
fin
emission
aux
operations
sur
lequel
de
la
bande
Touchedepause/arret
~.-
est
pendant
0 it @
recue l'ernlsslon
est
atteinte,
Touched'enregistrementREC
I'enregistrement
ci-dessus,
le
bande
sur
et it I'ejectiondela
image
que
PAUSE/STILL
~,.~"""'.D-DR'~"
Hf.FiSUPER
Al_""'
..........
uuut
""omD<._""""._~~.t'11
FONDAMENTALES
choisissez,
vous
desirez regarde!'.
rnaqnetoscope
,'"
o
~
~
J:1.
sur
precede
cassette.
le
EP
vites
de
:e
I'
se
sur
de
UIW
...
lI'u
............
"'1.I1,",,",i;lIIIIQAIIIIAI~'"'W11I1W~lilIllS;;llll;;ln
Cassettes
Vilesse
Possibilite
Vilesse
Standardcouleur
MESECAM
ll'
Au me
ou
telecomrnande, choisissez le canal du syntoniseur du rnaqnetoscope
lequel est recue l'ernission it enregistrer.
@ Introduisez une casselle dont la languelle de protection contre I'effacement
n'a
languelle a ete otee et si le trou n'est pas recouvert d'un morceau de ruban
adhesll, la casselle est ejectee.) Pour interrompre I'emegistrement, appuyez
surlatouche
I'enregistrement, appuyez une nouvelle fois sur celle touche. (La pause cesse
automatiquement aprss une periode de cinq minutes environ.)
Remarques:
• Pour emegistrer les signaux provenant d'une source exterlaura rellee aux prises
d'entree video (VIDEO IN) et d'entree audio (AUDIO IN R/L-MONO), it l'arrlere ou it
I'avant
programmes 47 et 0 au moyen de la touche de selection des canaux (CHANNEL)
sur la telecommande ou derriere le voletdu maqnetoscope,
(Lorsque vous avez selectionne la position d'antree sxterleure, I'indication L1
(arrtere)
PAL,
d'enregislremenl
Type
E·240
E·180
E·120
E·60
E·30
d'enregislrement
PAL
SECAM
NTSC
de
pas
SECAMetMESECAM
SP
240min.
180min. 360min.
120min.
60min.
30min. 60min.
d'e
reoistrement sonore Hi-Fi en fonction du standard et de la
'yen des touches de selection des canaux t;HANNI::L dU magnetoscope
la
telecornmande,
ete
otee.
de
du mapnetoscope,
ou L2 (avant) apparait sur I'affichage des positions de programmes.)
480min.
240min.
120min.
SP
0
0
0
0
Appuyez
pause/arret
nction
'l;iJI.""
LP
ou
des
surlatouche
sur
choisissez
Vilesse
LP
0
0
0
touches
image
le canal
"'11"'";;11""..I
Cassettes NTSC
denregislremenl
Type
T·160
T·120
T·60
160min.
120min. 360min.
60min.
nurneriques
d'enregistrement
PAUSE/STILL.
place
entre
SP
....
I
Pour
les
.........V..........
480min.
180min.
EP
(0 it 9)
REC. (Si la
reprendre
positions
1F121
Interrupteurde fonctionnemenfOPERATE
'~~~13~l---Touches
II
t
,,,.,,
Touches
Touchedevitesse
la
Touche
Touche
image
Remarque:
• Les standards utilises par les stations de television different d'un pays it I'autre.
Veillez it regler le maqnetosccpe contormernsnt aux indications donnsss aux pages
numeriques
SP/Lp·EP
d'enregistrement
de pause/arret
PAUSE/STILL
REC~
sur~
t;?9
Touche
deselectiondes canaux CHANNEL
eanaux
de selectiondes
CHANNEL
3 et 4.
Page 55

OPERATIONS FONDAMENTALES
Selection du signal d'entree
Ce maqnetoscops peut enregistrer les signaux video et audio it partir d'une
grande
a)
variete d'appareils. Consultez le tableau ci-dessous pour les details.
Syntoniseur:
Les signaux audio et video proviennent du syntoniseur du
maqnetoscope,
b)
Enregistrement
prefere
et
telecornrnande
stmultane:
appuyez
pour
trois
faire
Regiez le rnaqnetoscope
fois
surlatouche
apparaitre
i'indication
d'entree
SIMUL
sur
INPUT
sur
votre
canai
de
I'afficheur
la
multifonctions. Les signaux video provenant du canai du maqnetoscops
sont enrsqlstres, alors
que
ies signaux provenant de la prise AUDIO IN it
l'arrlere du rnaqnetoscope seront enreqlstres sur la piste Hi-Fi,
c)
Entree
externe:
pour
entrer les signaux video et audio it partir de ia prise
externe (VIDEO IN/AUDIO IN) en selectlonnant la position d'antree externe
sur
le rnaqnetoscope.
Appuyez
une
fois
surlatouche
INPUT
pour
selectionner L1 (entree it partir de l'arriere) ou deux fois pour selectionner
L2 (entree it partir de I'avant). Selectionnez L1 ou L2 entre les positions 47
et
Mode
d'entree
a) I
Byntoni,.ur
0 it i'aide
des
touches de selection des canaux CHANNEL 8/(!).
Indication
CH
/,
Piste
Signauxdusyntoniseur
Enregistrementdusignal
video
I
Piste
sonore
normale
dumaqnstoscope
I Plste
Hi-Fi
le
b)
ISimulcast
externe1
externa
Entree
Entree
CH51IUL
1,-7
L I
• - I
2
L2
Signauxdusyntoniseur
maqnetoscops
Signaux
dela
dela
prise
l'arrlere
prise
VIDEO IN a
du maqnetoscope
Signaux
VIDEOINal'avant IN
du
rnecnetoscooe
du
!Signaux
IN
ISignaux
d'entreede la priseAUDIO
Et
l'arrleredu maonetoscope
d'entree de la prise AUDIO
Et
l'avant du rnaqnetoscope
Signaux
d'entree de
[apriseAUDIOINdu
maqnetosocpe
Enregistrement slmultane
Ce rnaqnetoscopa peut enregistrer sirnultanernent une emission televisee et
le son
it partir d'un appareil exteneur (Iecteur de CD, tuner FM ou autre). Pour
cela,
branchez
I'appareil
exterieur
surlaprise
AUDIO
IN it
I'arriere
du
rnaqnetoscope et accordez le syntoniseur sur le canal que vous souhaitez
enregistrer. Appuyez sur la touche d'entree INPUT de la
selectlonner le mode d'enregistrement slmultans SIMULCAST.
Procedez
ensuiteitI'etape
~ et
aux
etapes
suivantes
Enregistrement d'une emission televisee.
telecommande pour
lndiquees
dans
Enregistrement des signaux audio uniquement
Le maqnetoscope peut enregistrer uniquement ie son
Hi-Fi,
o Branchez I'appareil exterieur (Lecteur de CD ou tuner FM) sur la prise
AUDIO IN du
~ Selectlormsz la position d'entree externe (L1 ou L2).
~
Appuyez sur la touche d'enregistrement REC.
rnaqnetoscope. (Ne branchez rien sur la prise VIDEO IN).
[E]22
Page 56

.
ENREGISTREMENT
Le
rnaqnetoscope
I'enregistrement de hult emissions sur une periode de
informations peuvent correspondre
hebdomadaires. Dans ce cas, I'enregistrement a lieu jusqu'a la fin de la
bande.
Detailsdes operations Ecrandu
Exemple: Enregistrement sur le numsro de
programme
diffusee sur le canal 8, le 5 octobre
AVEC
peut
5
PROGRAMMATEUR
memo
riser
les
informations
(PROGRAMMATION
ades emissions
d'une
emission
relatives
365
jours. Ces
quotidiennes
televiseur
ou
1994, de 9 heures a10 heures 30.
11
est actuellement 10 heures 28, le
saout 1994.
0
Introduisez une cassette apres vous atre
assure qu'elle est munie de la languette de
protection.
automatiquementsous tension.
~
Assurez-vous
I'horloge du maqnetoscope est correcte.
(Pour remettre I'horloge
Le
maqnetoscope
que
I'heure
se
met
affichee
par
aI'heure, reportez-
vous aReglagede I'horloge en page 12).
ID
Mettez le maqnstoscope sous tension et
selectlonnez le canal video.
e
~uYez
OSD. L'ecran des reglages apparalt et 1
(PROG.) clignote.
sur la touche d'affichage sur ecran
Appuyez sur la touche d'affichage
surecran9 08D.
*'
PROG
REGLAGE
2,BELECTION
3,HORLOGB
4:LANGtlE
5:CAllAUX
HODE
a
SUR
ECRANl
@ Appuyez sur la touche d'avance .j. NEXT.
L'ecran des reglages
programme 5 appara1t. L'indication
correspondant au jour et au mois, clignote.
(La
automatiquernent).
• Une
permet de modifier le chiffre des jours. Si
ENREGISTREMENT
Details des operations Ecran du televiseur
pour
date
pression
actuelle
surlatouche
COMMANDE
le nurnsro de
est
attlchee
8/®
vous maintenez cette touche enfoncee, le
chiffre des mois commence
Reglez tout d'abord les chiffres du jour,
puis
ceux
du
reglezsur le 5 octobre.)
fj
Appuyez sur la touche d'avance .j. NEXT et
dsplacez le clignotement sur ISOLE.
• Appuyez sur la touche
I'ecran de la rnanlere suivante. (Reglez sur
ISOLE,en I'occurrence.)
eH(jJ
~'=-
(jJ
E
QUOT
....
mois.
..Un
seul
..
Enregistrement
·..
(En
8/®
enregistrement
achanger.
I'occurrence,
pour modifier
quotidien
eH(jJ
HEBDO
..
..
Enregistrement
la
rnerne
hebdomadaire
heure.
5.08,
vous
it
PAR
PROGRAMMATEUR
A~uyez
sur latouche
'avanee
.j.
....
N.
JOUR/MOIS
QUOT.
/HEEDO.
DEBUT
S'1'OP
NOH.PRESEL.
S'R/LP/EP
I
BEL.:tlJ.
HEM.,,,;,
Seleetionnez
avec
VALID.,-/+
BOR'l':9
les
....
I
JOUR/MOIS
Appuyezsur latouche
d'avanee
.j.
....
N. s
JOUR/HOIS
QOOT./E&5DO.
DBBU'1'
S'l:'OP
HUM.PRBSEL.
BP/LP/BP
I
sEL.
, 't1J.
MEM.:';'
VALJ:D.
SORT,li»
NEXT.
, . ,
P.
-.~
.,Oll~
I
touches
S/ffi.
~·;~o-I
NEXT.
5.10
~.xP9~Jt
:-/+
I
~
APpu~ez
--STO E.
programmation appara1t et le nurnero de
programme
• Deplacez le clignotementsur 5 aI'aidedes
touches
sur la touche de memorisation
L'ecran
de
verification
1 commence aclignoter.
8/®.
[E]23
IlIir
de la
I
BELdtH
ENT.:.
Appuyezsurla touchede
rnemortsanon
BORT:
•
....
• DATE DEBUT
SBL
••
EN'l'.:
Selectionnez
t/J.
.ir
avec
FIN
EFFAC.:eLBAj
SOR'J':O
les
....
II
9
STORE.
,
..
touches
I
8/1$1,
I
(;)
Appuyez sur la touche d'avance .j. NEXT
pour deplacer le clignotement sur 10:28,
heure
automatiquementaffichse.)
• Une
de
debut.
pression
permet de modifier le chiffre des minutes.
Si
vous maintenez cette touche entoncee,
le chiffre des heures commence
Regleztout d'abord les chiffres des heures,
puis ceux des minutes. (En I'occurrence,
reglezsur
9:00.)
(L'heure
surlatouche
actuelle
8/®
achanger.
est
vous
Appuyezsurlatouche
d'avanceLNEXT.
....
I
HEORB
Seleetionnez
avec
....
I
DEBUT
Jes
-H1H-1
touches
-9;,;0:0-1
et@.
Page 57

ENREGISTREMENT COMMANDE PAR PROGRAMMATEUR
Details des operations
4i) Appuyez sur la touche d'avance NEXT. Le
chgnotement se deplacs sur 9:00,
C
d'enreqistrernent.
d'enregistrementest
• Appuyez sur les touches
la
meme
debut de I'enregistrement.
(Reglez sur 10:30, en I'occurrence.)
@
Appuyez sur la touche d'avance J, NEXT. Le
clignotement se deplace sur 00 (CANAUX).
• Appuyez sur les touches
le canal. (Reglez sur 0, 8 en I'occurrence.)
Remarques:
• Si
vous
appareil audiovisuel ou si vous procsdsz a
un enregistrement slrnultane, LRPuyez sur
ia
telecommande pour placer le clignotement
sur l'entree desires.
~canal
INPUT
"SIMUL1" .. "L2"
slmultanee)
Appuyez sur la touche d'avance J, NEXT. Le
ID
cllgnotement se deplace sur la vitesse de la
bande SP.
• Reglez la vltesse de la bande aI'aide des
touches
I'occurrence.)
rnanlere
enreglstrezapartir
touche
"1"
normal)
(entree
8/(f;.
(L'heure
indlquse
que
d'entrea
INPUT
•
INPUT
(Reglez
I'heure
de debut
automatiquement.)
8/(f;
et reglez de
pour
I'heure
8/(f;
pour reqler
d'un
INP
T de la
"l1"
(entree
externe
sur
::J
INPUT
SP en
arrlere)
(entree externa
avant)
de fin
de
autre
Ecran du
Appuyez
surlatouche
televiseur
d'avance!
..
N.
JOUR/MOlS
OUOT./liEBDO.
DEllU'l;'
STOP
ffUM.PRESBL.
SP/LP/Bi'
I
slh.,
t/.\.
,,,;!;,
VALID.:
BORT:
0
HEM.
Reglez a l'alde de la touche
..
I
STOP
Appuyez
surla
touche
d'avanceJ,NEXT.
..
N.
JODR/HOIS
QUOT./IlEBDO.
DBBUT
STOP
NUM.Ii'RSSBL.
BP/LP/BP
I
BEL.:
1'1.\.
VALID.:
SORT.
HBM.
'e
Rsg
lez aI'aide de la touche
0
..
I
NUH.PRIHlIilL.
Appuyez
surla
touche
d'avanceJ,NEXT.
..
N.
JOUR/MOlS
QOO'l'./HBBDO.
DEaltT
STOP
NUll.PRBSBL.
BP/LP/BP
I
BBL.,t/.\.
11811.
VALID.,
,,,;,
BORT,
9
NEXT.
s
5.10
lBOLE
s ,
00
~9;':O:(
-/+
I
<H.
-;qiH-1
s
5.10
IBOLB
9:
00
10I30
-P:~·
-/+
I
<H.
.:,:;-1
s
5.10
ISOLE
9,00
10,00
,
-pJ
~/+
I
Details des operations
~
Verltlez
sont
touche
L'affichage passeEtl'ecran de verification de
programmation.
CD
Pour procedez a une autre programmation,
procedez de nouveau aux etapes
49
~puyez
~
si les
correctesetappuyez
OSD pour annuler I'affichage.
informations
de
memorisation
sur la touche d'afflchage sur ecran I
proqrarnrnees
ensuite
ooIlr
~)a~.
STORE.
sur la
iEcran
Appuyezsurlalouchedememorisalion"STORE.
I
~.
Appuyez
du televlseur
..
DA'l'E
DBBlt~
FIN
5.10
9,00
10,30
SEL.:l'I.\.
BNT.,.:!:.
sur
EFPAC.,CLBA
SOR'l'
, 9
sU,rlatouche
ecran8>OSD.
pr.
OBP
d'affichage
..
L'affichagesur scran est annule
Cl
Pour
programmateur, appuyez
programmateur TIMER ON/OFF. Verifiez si
I'indication PROG. s'allume sur I'afficheur
multlfonctions.
I
Pour
Utilisez
plus facilement. Pour le reglage, reportez-vous it
numeriques,
Remarques:
• Si la tin de la bande est atteinte avant la tin de taus les enregistrements, le maqnetoscopa
ejecte la cassette et se metde lul-rneme horsfonctionnement.
• Si I'alimentation du maqnetosoopa est interrompue pendant plus de 20 minutes en cas de
panne de courant par exemple, les programmations sontannulees,
• Si vous appuyez sur la touche de commande du programmateur TIMER ON/OFF alors
qu'aucune cassette n'ast placee dans le rnaqnetoscope, I'indication TIMER
secondes, vous signalant alnsl queI'enregistrement estimpossible.
• Si vous appuyez sur la touche de commande du programmateur TIMER ON/OFF et si la
cassette que vous avez placae dans le maqnetoscope est protegee contre I'effacement,
I'indication TIMERclignote et la cassette est ejectee.
• La
lecture
programmation ne sont pas possibles lorsque I'indication TIMER est eclalree. Pour que ces
operations deviennent reallsablas, vous devez appuyer sur la touche de commande du
programmateur TIMER ON/OFF pour mettre le programmateur hors service puis mattre le
maqnetoscope enfonctionnement (I'indication TIMER s'etelnt).
• Le programmateur ne paut pas etre regie ou verifie pendant un enregistramentcommands par
le programmateur.
• Pour arreter un enregistrement commende par le programmateur, vous devez appuyer sur la
touche d'arret STOP.
• Si, au caurs d'une programmatian, vous n'enfoncez aucune touche pendant una minute,
I'afficheur reprand son aspectinitial.
• Si vous indiquez la rnerne heure paur la debut et la fin d'un enregistrement, la programmation
est armulee.
regler
effectuer
les
touches
page10.
d'un
I'enreglstrement
sur
la touche de
facilementlaprogrammation
nurnenques
enregistrement,ler8glageduprogrammateuretI'annulation
(0 it 9 et -/-) de la
avec
I
telecommande
Reglage
Affichage maanetoscope
,
facile avec les touches
fO
pour
c1ignote
1~8
programmer
pendant 5
d'une
1I124
Page 58

VERIFICATION
D'UNE
PROGRAMMATION
ANNULATION
D'UNE
PROGRAMMATION
Vous pourrez verlflez sur une liste toutes les emissions que vous avez
programmees sur I'affichagesur ecran
Detailsdesoperations
Ecrandu televlssur
0 Mettez le televiseur et le rnaqnstoscope
sous tension et selectlonnez le canal
du televiseur.
~
~uyez
(PROG)
~
Appuyez
STORE.
emissions proqramrnses apparalt et 1 (le
nurnero
•Verifiezles informationsaffichess.
El
~uyez
sur la touche d'affichage sur ecran
OSD,
L'ecrandes reglagesapparaltet 1
clignote.
sur la touche de memorisation
L'ecran
deprogramme)clignote.
sur la touche d'affichage sur ecran
08D
pour annuler l'ecran.
de
confirmation
video
o:l:i
des
Appuyez
sur
~;PROG
2:SBloBC~ION
3,XORLOGE
4
:LANGOE
S:CANAI1X
I
SEL.:
ENT.,
Appuyez
memorisation
. DATE DEBUT
5.10
•
BilL
EH'l'.,
Appuyez
surecran
surla
touche
ecren
'tIJ.
,;,
••
tlJ.
..
surla
•
RBGloAGB
surla
•
9:0010:30
d'affichage
9-
08D.
HODE
SORT,
touche
.t. STORE.
FIR
:~=~~~CLEAi
touche
d'affichage
lB>
OSO
....
I
de
..
,
BSP
Procedez de la manlsre suivante pour annuler la programmation qui a ete
effectuee.
Detailsdes operations
0
Mettez le televlsaur et le maqnetoscope
sous tension et seleotionnez le canal
du televiseur. -
~
~uyez
PROGclignote.
~
Appuyez sur la touche de memorisation
STORE.
emissions proqrarnmees apparalt et 1 (le
nurnerode programme) clignote.
• Selectionnez le
vous dssirez annuler
8/(f).
I'occurrence.)
sur la touche d'affichage sur ecran
08D.
L'ecran des reglages apparalt et 1
L'ecran
de
nurnero
confirmation
du programmeque
aI'aide des touches
(Annulez
le
nurnero
-
video
5
o:l:i
des
en
Ecrandu
Appuyez
Reglez
surla
surecranlB>OSO,
*'FROG
2.BELBCTION
3:HORLOGE
4:LANGUE
5:CANAtJX
ISEL.:t/J.
ENT••,;,
Appuyez
memorisation
. DATE DEBUT
5.10
SEL.,tlJ,
ENT.:
aj'aidede latouche
II
5.10
•
REGLAGE
surla
•
9.00
4,
9:00
•
touche
televiseur
d'affichage
HODE
SORT,
lE>
touche
...
STORE.
FIN
...
10.30
SSP
EPFAC"CLEAItj
SOR'1':O
10:30
881'
I
de
8/<ifJ.
I
[E]25
L'affichage
•
Sur
ecranestannule,
El
Verlfiaz
programme que vous desirez annuler et
appuyez sur la touche d'annulation CLEAR,
Le nurnero de
J'ecran.
~
~uyez
auparavant
programme
sur la touche d'affichage sur ecran
OSDpourannulerI'ecran.
s'il
s'agit
est
efface a
bien du
.
~puyez
'annulation
1I
Appuyez
sur
L'affichage
surla
touche
CLEAR.
•
surla
touche
ecran-908D.
•
sur
ecran
1
d'affichage
est
annuls.
Page 59

MINUTEUR D'ENREGISTREMENT
peut
Le minuteur
• Un enregistrement
etre employe pour raaliser:
lmrnediat
C'est le cas lorsque se presents un visiteur inattendu ou que vous devez
quitter le salon de television pour repondra it un appel telaphonique.
• Un enregistrement differe .
C'est le cas lorsque vous devez quittervotre domicile ou que vous souhaitez
vous coucher.
che de reqlaqe
de
I'heure
TIMElEle
lnterrupteur de
fonctionnement OPERATE
Touched'arret STOP
eCHANNEL
o
u
Enregistrement lmrnedlat
Exemple:
o
Choisissez
syntoniseur du maqnatoscops
sur iequel est racue l'emlssfcn
que
~
Appuyez sur la
commencer i'enregistrement et
indiquer i'heure
se terminer.
• A chaque pression sur cette
• Le cas echaant, precisez les
Remarques:
• La touched'arretSTOPpermetd'interrompre
• L'enregistrement irnrnediat ne peut
le rnaqnetoscope est en coursd'enregistrement, la touche
permettentde preclserI'heurede la fin deI'enregistrement.
Heure actuelle: 10 heures 28
Heure de la fin de I'enregistrement:
2
canal:
Details des operatIOns
le
canai
du
vous dssiraz enregistrer.
rouche~.
pour
it laquelle iI doit
touche,
I'enregistrement augmente de
10 minutes.
minutes
touches 8 et
I'heure de la fin de
au
moyen
des
EEl.
-,
...
REC
commencer
11
heures 30, nurnero du
Afficheur multifonctions
SP u·
~l
,r
I~
I~
le
/-,11
,- n
_~
- Iv,1 I
0 IiJI SP I '":tu (
l'enreQistrement.
qu'a partir de l'arret de la
0.
et lestouches(f) et 8
bande.
CH
CH
C
ENREGISTREMENTCOMMANDE
PAR LE PROGRAMMATEUR
Enregistrement differe
Exemple:
o
Choisissez
syntoniseur du rnaqnetoscope
sur lequel est racus I'emission
que
~
Appuyez
reglage de I'heure TIME pour
indiquer I'heure
commencer
• Catte heure peut atre quelconque
• Le
~
Appuyez sur la touche
indiquer
I'enregistrement.
• A
• Le
~
Heure actuelle: 10 heures 28
Heure du
debut de I'enregistrement: 10 heures 40
Heure de la fin de I'enregistrement:
Nurnsro du canal: 2
Details des operaflons
le
canal
-I
du
vous deslrez enregistrer.
sur
la
touche
de
it laquelle dolt
I'enre~istrement.
au
cours
suivent
cette
l'enregistrement augments de 10
minutes.
cas
minutes au moyen des touches Et)
et
8.
des 24
A chaque pression sur
touche,
echaant,
I'heure
chaque
pression
touche, I'heure de la fin de
I'enregistrement
minutes.
cas
minutes au moyen des touches
et
echeant,
8.
heures
l'heure du
precisez
de la fin de
augmente
precisez
debut
~.
sur
qui
de
les
pour
cette
de 10
les
EB
11
--Afficheur
B.
~J
heures 30
muitifonctions
WO!
n· t r
'-;p
UI";:iIC
Si-' f0 Lt
'';1' I I :J U C
//111
I'"
Cl
CH
J
C
(:.:-1
1
1:
C-H
~/
o Meltez le rnaqnetoscopa hors
fonctionnement
I'interrupteur OPERATE prevu
cet ellet.
J
Si
Remarques:
•11n'est pas possible de changer le numero du canal du syntoniseur apres le reglage du
minuteur.
• Pour verifier I'heure du
en fonctlonnement au moyen de I'interrupteur OPERATE puis appuyez sur la touche de reglage
de I'heure TIME pour afficher I'heure du
pour
confirmer
fonctionnement au moyen de I'interrupteur OPERATE.
• Pour annuler la programmation au cours du reglage du minuteur, appuyez sur la touche
d'annulation CLEAR sur la
minuteur, mettez le mapnetoscope sous tension et appuyez sur la touche de reglage de I'heure
TIME pour
CLEAR.
• Le minuteur ne peut pas etra regie si le programmateur est en service (l'indication aseoclee,
TIMER, est eclalree). Pour regler le minuteur, appuyez sur la touche de commande du
programmateur
macnetosccpe en fonctionnement au moyen de I'interrupteur OPERATE,
selectformer I'enregistrement lrnmedlat et appuyez sur la touche d'annulation
au moyen de
it
debut et I'heure de la fin de I'enregistrement, mettez le maqnetoscope
l'heure
de fin de I'enregistrement. Enfin, mettez le rnaqnetoscope hors
telecommande. Pour annuler la programmation apres le reglage du
TIMER ON/OFF pour mettre le programmateur hors service puis mettez le
debut de I'enregistrement. Appuyez sur la touche
;":;';1
In
,
IU
.111
C Cl
0.
ICl
L.E.J
26
Page 60

FONCTION
@:uu
DE
REMISEAZERO
Il'FiSVpER"'JID I
..
_---,,---
'
dt:J.., .
~
I~
~
''''
_
~~
~
FONCTIONS SPECIALES
....
"'"
_.~
O
.....
""
Appuyez
verrouillage
Touchederemise
Touchederecherche
des
surla
C-LOCK
programmes
Touchederepetition
touche
a
zero
DPSS
de
ZERO
numerlque
REPEAT
BACK
~.
V
La fonction de remise azero permet de rembobiner ou d'avancer rapidement
la bande jusqu'a la position precedemrnent choisie pour "0:00:00" sur le
cornptsur,
o
Appuyez
telecommande. Le maqnetoscope deteote automatiquement la position
0:00:00 et avance ou rembobine la bande.
~
Lorsque la bande a atteint le zero, elle s'arrete automatiquement.
sur
la
touche
de
....;;
remiseazero
ZERO
BACK
de
la
SYSTEME
11
est
possible
recherche de programme qui lui
DE
RECHERCHE
de
localiser
rapidement
NUMERIQUE
est
une
assocla. Cela fait, le magnetoscope
DES
portion
PROGRAMMES
de la
bandepar
commence automatiquement la lecture de la bande.
Signaux
d'index
• Un index est automatiquement enregistre au debut de tout enregistrement,
qu'i1
soit commande par la touche d'enregistrement REC, le programmateur
ou le minuteur.
• Vous pouvez ajouter un signal VISS pendant la lecture
aI'aide de la fonction
d'ajout VISS. (Reportez-vous page 20, Utilisation de la fonction d'ajout et
d'effacement des signaux d'index VISS).
Position
actueJle
de la
bande
Rembobinage
~
.
{}-
1
17,//
I f
Details des operations
EXEMPLE:
Commencer la lecture il
partir
du trolslerne
enregistrement suivant. (Le maqnetoscope
rechercheletroisierne
0 Introduisez une
sachant
signaux
~
PrecisezlenurnerodeI'index
au moyen des touches DPSS
telecommande. Le nurnsro de !'index
quelabandedecelle cassette portedes
d'index.
signald'index).
cassette
dans le
maqnetoscope,
de I'enreglstrement
1& et
E!I
augmente
d'une unite chaque fois que vous appuyez sur
I'unedeces
celle
rnanisre
touches.
Vous
undes dix-neuf
pouvez rschercher de
programmes
les deux sens de defilement de la bande.
pour une recherche vers la fin de la
bande;
pour une recherche vers le debut de la
(Dans
cet
ID
La
recherche
exemple,
appuyez
commence
troisfois sur
des que vous reliichez
la touche. (Le nombre afficM dacrott lorsqu'un
signalestlocalise.)
"":::r"~~~"'''''''''''''
(AppU
de la
dans
(1&:
E!I:
bande)
(Un
1&).
Ecran TV
surla
6ez
PSS8ou8.)
..
espace
vide
flluS
-
signiiemains)
touche
DPSS
signifie
indicateur
3
la
Remarque:
La
fonction
de
remise
a
zero
n'est
pas.
operatlonnelle
pendant
I'enregistrement. Elle peut etre activee durant la lecture, l'arret, I'avance
rapide, le rembobinage et la recherche
video
..
[E]27
e La
ete
Remarques:
• La
recherche
trop
rapproches.
• La
recherche
PLAY,
arret
• Si la
fin
la
recherche
• La
recherche
• La
recherche
• Le
commencement
• La
recherche
une
attente
cassette
lecture
commence
localise.
d'un
prowamme
c'est-a-dlresi
d'un
programme
STOP,
(oule
n'aete
enregistrement
debut)
estannalee.
d'un
programme
est
impossible
est
impossible
d'enregistrement
introduite
peut nepas
['intervalledetemps
peutetre annuleeen
de labande est
peut etre
sila
dela
lecture
pendant
(le
dans
des que le signald'indexa
vous
donner
entlere
qulles
sepere
REC,
avance
atteinte
impossible
bandenecomporte
peut
varier
unelecture.au
programmateur
lemapneioscope.
appuyant
rapide
avantque le
sila
legerement
est en
FF,
bande
pas
d'index.
d'une
ralenn.
service);
rembobinage
signal
un
recherchea.I'autre.
satisfaction
estlnterieura
surl'unedes
est
arret
REW.
d'index
usagee
sur
image,unenregistrement
c'eet
egarement
siles
signaux
cinq
touches
recherche
ouendcmmapee.
d'index
minutes.
suivantes:
n'alt ete
le cas si
sont
lecture
localise,
ou
aucune
Page 61

REPETITION DE LA LECTURE
DEUX VERROUILLAGES POSSIBLES
Graceacette
enregistrement ou d'une scene.
..
Pour activer la fonction de repetition de la/ Appuyez surla
lecture, appuyez sur la touche de repetition _
REPEAT de la telecommande au debut de la ......
scene dont vous deslrez repeter la lecture.
Le pictogramme Q clignote sur I'afficheur
multifonctions.
f,l
Appuyez une nouvelle fois sur cette touche a
la fin de la scene. Le pictogramme s'arrets
de
c1ignoter.
~
La portion de bande comprise entre les deux
pressions sur la touche de repetition est lue
et relue sans interruption jusqu'a ce que la
touche d'arret STOP soit entoncee.
• La touche d'arret STOP permet de mettre fin ala repetition.
fonction,
Details des operations
il
est
possible
de
repetar
iAffichage
-ne]
Appuyezsur latouche
la
multifonctions
n
Sf"' _ _ _
..
['"TIJ
-5('
Debut Fin
lecture
touche~.
".
If
UI:"7:JU
FJll~J
()
Appuyez sur la touche de repetition
Appuyez une nouvelle fois
sur la touche de repetition
,'l]
11- r
d'un
J J,
~.
11
• Verrouillage du fonctionnement choisi
• Si vous appuyez sur la touche de verrouillage C-LOCK de la telecommande
lorsque
fonctionnement ne peut plus etre rnodltle aussi longtemps que vous
n'appuyez pas une nouvelle fois sur la touche,
Exception:
Les selecteursrestentoperationnelslorsque le modedeverrouillage est active.
• Interdictionde mise en fonctionnement
• Si vous appuyez sur la touche de verrouillage C-LOCK de la telecommande
alors que le rnaqnetoscope n'est pas en fonctionnement, le rnaqnetoscope
ne pourra pas atre mis sous tension mame si I'interrupteur est actlcnns.
Exemple:
verrouillage de la lecture
..
Appuyez pendant environ 2 secondes sur la
touche
telecommande.
commence
multifonctions.
f,l
Le pictogramme
indique que le mode de fonctionnement
actuel du rnaqnetoscopeest verrouille,
~
A
commandes de fonctionnement sont sans main
effet et le rnaqnetoscope poursuit la lecture,
par exemple.
Le verrouillage peut atre annuls en utilisant
I'une des deux methodes suivantes:
• En appuyant pendant 2 secondes environ sur I
la
telecommande. Le pictogramme
sur I'afficheur multifonctions,puiss'etein!.
• En appuyant sur la touche d'effacement total
ALL
rnaqnetoscope, (N'utilisez pas cette methods
trap frequernrnent.)
partir
touche
CLEAR
le
rnaqnetoscopa
Detailsdes operations' - I Afficheur muitifoncfions
de
verrouillage
Le
a
clignoter
@;;:;;J
de ce
moment,
est
en
fonctionnement,
C-LOCK
pictogramme
sur
cesse de clignoter et
de la
I'afficheur
toutes
@;;:;;J
les Appuyezsurlatcuche Ora at
ce
mode
Appuyezsurla touche@:w et
mainrenez-lasntoncee
..
~
"'-"'
.~~
~
~
DO
:;
-~'
I!II
renez-la
.0-
:'~~~:'@j
_
""'@c
-:=~
eIl
0 SI"
entoncee
..
-',&cl
I:iII
Sp
SP
..
de
verrouillage
derriere
C-LOCK
@;;:;;J
le
valet
de la
clignote
du
~
I:!II
~f.29.
SP
de
Remarques:
• Si vous llbererez le verrouillage en appuyant sur latouche d'effacement total
ALL CLEAR, vous devez remettre I'horloge aI'heure et recommencer la
programmation de l'affichaQe sur ecran.
• Si le rnaqnetoscope est debranchS, le verrouillage reste effectif jusqu'a ce
que la batterie de secours soit epulsea (20 minutes minimum). Pour annular
le verrouillage, utilisez une des deux mefhodes indiqueesci-dessus.
[Ej28
Page 62

AFFICHAGE MULTIFONCTIONS
........
11
'riiJ!'i(
c-+J
"""lIl
INDEXREC
_
IIiII
TIMER
@m
[Q§J
""!l!!"
[']MESECAM
PROG
START
STOP
SPLPEP
PAL
_
m.
CSI'
NTSC
~
_0
[V/
1'1
119/1/
-
2'
'/\I
/11
'/}I m
CH
SIMUl
'/-
~'_J
PI'U
-,
Lt
/111"
Indication de mode de fonctionnement
Mode
Cassette
Avance
Lecture,
Recherche
Recherche
Indica.tion de
chargee
rapide
Rembobinage
iecture
acceleree
video
video
Presence
condensation
IndiCation
FF
avanl
arrlere
condensation
IndicationMode
de
1001
~~
........
~
~~
........
liE
Cl
Mode
Lecture
Arret
Image
Enregistrement
d'enregistrement
lente
sur
imag.e/avance
par
Pause
Image
Indication
I~
11/
II~
~
REC
11
REC
Utilisation du compteur de bande
Utilisation du compteur de bande
Le defilement de la bande est indique en heures, minutes et secondes sur
I'afficheur
compteur sont eftsctuees aI'aide de la telecommande.
Affichagedela
o
Appuyez
fonctionnement OPERATE pour mettre le
rnaqnstoscops sous tension. (La valeur du
compteur s'affiche.)
ft
Appuyez
DISPLAY
mapnstoscops. (L'heure actuelle s'affiche.)
@
Appuyez
DISPLAY.
aff/che.)
acinq chiffres. La modification de I'afficheur et I'annulation du
valeur
sur
sur
la
delatelecommande
sur
la
(Le
compteur
du
compteur
I'interrupteur
touche
touche
d'affichage
d'affichaqe
de
bande
de
ou du
est
_ •
,~
ririrt
U
uu
~
In
nnlll,n
LILt
rt n J
U u L
_Set
ne
c~
_I U t:
SP
_,
_
s» ICl U _I t:
Sp U
Remise it zero du compteur
Assurez-vous que I'indication affichee represents effectivement la valeur du
compteur puis appuyez sur la touche d'annulation CLEAR du rnaqnetoscope
ou de la telecommande.
Remarque:
• Le
compteur
complet de la bande.
•
Pour
remeltrelecompteur
CLEAR lorsque le compteur est affiche.
est
rirt
Lt
"0:00:00" apparalt sur I'afficheur.
automatiquement
azero,
n
nn
·Lt Lt· Lt
I I
-L.-:
remis a
appuyez
Lt
Minutes
zero
surlatouche
Secondes
lors
du
rembobinage
d'annulation
~Heures
Lesigna mains(-) apparattlorsquela bande est
Valeurdu compteurlorsque lacassetteest introduite.
-----
OD
0.
0 I-OD
<Lectureversle debutde labands I I Lectureversla finde la
• Si la bande de la cassette que vous avez introduite n'est pas sntierement
rernboblnee, le signe moins (-)
commence la lecture vers le debut de la bande.
• La valeur du compteur ne change pas pendant la lecture d'une bande vierge
DU d'une portion de bande qui ne comporte pas d'enregistrement.
Affichageducompteur
L'affichage pendant I'enregistrement imrnediat DU avec programmateur
indique I'heure alaquelle I'enregistrement prend fin. L'a.ffichage change de la
rnanlere suivante lorsque la touche DISPLAY est entoncee,
Heurede find'enregistrement Numerode
.,.
t=
~~::~
REG
ap··
,
J
J
Heureactuelle
.,.
'",'
,,":.0,
REC
IDIP-sp
Remarque:
Le nurnero de prQ9ramme n'apparalt pas pendant I'enregistrement lrnrnedlat
mais I'indication
p,c,\._ ;L J I I Cl
0;\'
t
~._,
@§J
PRC'G
''E'J''
pendant
C.
I
I!
'I,.
:J 1 1 n :J
(1'1_1_1
clignote ala place de PROG sur I'affichage.
rembobinee
O·
00 -
precede la valeur du
alorsque lecompteur afflehezero.
I'enregistrement
-..
.-
.,.
R~C.
Compteur
.,.
R~C
101
~
- ',,,,,, Im)',
IDIIJI-
CH_)
Cl,
_!
OD
avec
programm.e
"I,LR
~
!01;' P,'c:,
0-
Sf>
t
'11.'oCR
PF'~·~;
se U
0.
0
1----
bandS>
compteur
des
que
programmateur
P,\L CH
~I):
,-,I,
ri',1
n, n
LILt
1'1
'-11
~,,-'
C :J
.-1
_)
_I
_I
If]
29
Page 63

UTILISATION
Vous
pouvez
raccordement
reportez-vous au manuel qui vous a
DU
employer
ci-dessous
MAGNETOSCOPE
ce rnaqnetoscope avec un carnescope. Le schema de
n'est donne qu'a titre indicatif. Pour plus de details,
ete
remis
AVEC
avec
le carnescope.
UN
CAMESCOPE
COPIEAPARTIR
Autre appareil video (par exemple un lecteur de disque video)
D'UN
AUTRE
APPAREIL
VIDEO
Camascope
Vers les prises AUDIO IN
• Si la sortie son du
monophonie,
UMONO.
Vers VIDEO IN
came
reliez-Ia
•
R/UMONO
scope
est en
a
la
prise
~IOOII
De VIDEO
Attenuatour AUDIO
A regler en fonction du niveau de sortie
audiofrequence de i'appareil utilise. (Le
niveau d'enregistrement Hi-Fi n'est pas
le rnerne.)
Vers VIDEO IN
'A"~-DF"'~~
OUT
An.
Vers AUDIO IN R/L-MONO
~
H?FiSUPERMULTI
""'''''"'"'"--'''''_''_J.!!LHO
De AUDIO
~IOO
TImlEllJol
t.,li;ii.i
OUT
H~FISUPERMULT1
••
""O."""""',"",
.."••".........
'IO
.......
lI!f.!;l1l
~
=""
o
L1 (Arrier,
L2 (Avant)
Choisissez le canal d'entree externe I
-~
(@;@"@5
Assurez-vous que I'indication de
position d'entres externe est
Exemple:
COLOUR MODE (derriere le volet)
00
Choisissez le canal d'entree externe I
un lecteur de disques video
Selecteurs
NTSC MODE (arriere)
affichee.
Position
3.58
AUTOou
NTSC
[f]so
Page 64

AVANT DE FAIRE APPEL A UN TECHNICIEN
Les
conditions
fonctionnementdurnaqnetoscope,Enconsequence,
verifications
suivantes
indiquees
Symptomes
ne
avant
traduisent
de
faire
pas
necessalrernentundefaut
procedez
appel
aux
services
Remedes
d'un
de
aux
technicien
Symptomes
CONSEILS
Remedes
PRATlQUES
• Absence d'alimentation. Le • Assurez-vous que le
ternoln ne s'eclaire pas.
cassette
• La
etre ejectee. •
maqnetoscopa
• Le
lonctionne
lorsque
allurne,
•
L'enregistrement
impossible. languette a
• La
automatiquement
lorsque vous appuyez sur recouvrez ie trou d'un morceau de ruban adhesil.
touches
les
TIMER ON/OFF.
• Les
medlocres ou absentes. corrects.
• De la "neige" apparait
i'image pendant la lecture.
ne peut
pas
le
ternoln
cassette
REC,
couleurs
rnerne maqnetoscope, Attendez environ trois heures que
ejectee
0.
sont
branche
rnaqnetosoope.
pas
Veritiez
disjoncteur.
• Mettez le maqnetoscopa sous tension.
• Appuyez sur la touche TIMER ON/OFF pour mettre
hors service le programmateur.
• De la condensation
ne
est
le temoln DEW s'eteigne.
• Appuyez plusieurs
EJECT.
• Le
tonctionne.
attendez
rebrancher.
est
• La cassette est protegee contre I'effacement (la
Employez une autre cassette ou recouvrez le trou.
• Assurez-vous que ie maqnetoscope contient une
cassette.
• La ianguette de protection a ete otee et le trou est
est
adaoouvert.
ou
• Assurez-vous que
• Branchez le cordon d'alimentation.
Placez
•
MODE,
positions epproprlses (reportez-vous aux pages 3
et 4).
sur
• Appuyez sur les touches d'alignement TRACKING
ou
• Les tetes sont peut-etre recouvertes d'hurnidite
condenses
provenant
eventualite,ifconvient
Adressez-vous avotre revendeur ou au centre
d'entretien
Ce magnetoscope
nettoyage automatique des tetes.
certains cas
ne peut etre rnenee abien compietsment.
surlaprise
la
dispositil
les setecteurs
SECAM
essayez
agree Sharp le pius proche.)
prise
de
Debranchezlemaqnstoscopeet
environ
ete otee et le trou est adecouvert).
Employez
avecune
ou de
delabande
OU
cordon
secteur
secteur,
s'est
tols
securlte
une
tous
MODEetSYSTEM
autre
reveternent
est
l'operatlon de nettoyage des tetes
d'alimentation
et a
l'arrtere
les
lusibles
torrnee a l'lntarlaur du
sur la touche d'ejectlon
du
maqnetoscope
minute
une
les raccordements
COLOUR
autre
avant
cassette
MODE,
sur
cassette.
video.
de
dote d'un rnecanlsrne de
rnaqnetlque
(Dans
nettoyer
11
existe toutelois
les
est
du
ou le
de le
ou
sont
NTSC
les
cette
tetes.
• La bande ne defile pas.
• Absence d'image pendant
la
lecture
incorrectes.
ou
couleurs
•
Veriliez
pause/arret sur image.
• Verifiez que la bande n'est ni au debut, ni
Assurez-vous
•
merne canal que le selecteur CHANNEL du canal
de sortie du convertisseur radiofrequencs.
• Verifiez tous ies cables de raccordements.
Placez
•
MODE,
positions appropriees (reportez-vous aux pages 3 et
quelemagnetoscope
les
selscteurs
SECAM
que ie
televiseur
MODE
COLOUR
et
n'est
est
regie
MODE,
SYSTEM
pas
ala lin
sur
NTSC
sur
en
le
les
4).
• La
cassette
a
etre introduite.
•
L'image
rnerne
appuyez
CHANNEL.
• L'afficheur multllonctions ne
lonctionne
correctement.
•
Aucun
quelle
utilisee.
•
11
est impossible d'afficher
numero
le
syntoniseur.
•
Absence
pendant la recherche
• L'image est deformea. • Si I'enregistrement a
ne peut
ne
change
lorsque
sur
les
touches
lonctionnement
que
soitlatouche
du
canal
de
couleurs
pas
• Assurez-vous que le maqnetoscops ne contient pas
une autre cassette.
Assurez-vous
•
presentee.
pas
• Assurez-vous que I'horloge ou le programmateur ne
vous
sont pas en cours de reglage.
• Appuyez sur la touche ALL CLEAR et procedez
pas
une remise aI'heure. Le cas echeant,
programmateur.
•
Assurez-vous
que la
queleverrouiliage
cassette
est
service.
• Ce canal est ignore. Procedez
du
• Les couleurs sont absentes pendant une recherche
video
video
enregistrement MESECAM ou SECAM en mode LP.
Cela ne traduit pas un delaut de lonctionnement.
que soit le standard, SECAM, MESECAM
I'image est detormee pendant une recherche. Cela
ne traduit pas un delaut de lonctionnement.
(un
arret
sur
ete realise en mode LP (quel
ason rappel.
image,
correctement
reglez
n'est
pas
etc.)
sur
DU PAL),
a
le
en
un
lE]
31
Page 65

FICHE TECHNIQUE
CONSEILS
PRATIQUES
Dispositif
d'enregistrement
Duree
d'enregistrementllecture:
Largeur de la bande:
Vitesse de defilement de la
Canaux
Signal de sortie
radiofrequencs:
Format:
video:
Signal video:
PAL:
PAL:
SECAM:
NTSC:
NTSC:
maximals
bande:
Antenne:
de reception:
Bande VHF:
Bande UHF:
Alimentation:
Consommation:
Temperature ambiante de
Temperature ambiante de
fonctionnement:
stockage:
Poids:
Dimensions:
Entree video:
Sortie video:
Entree audio:
Accessoires
Sortie audio:
tournis:
Standards VHS
Deux tetes rotatives, balayage hellcofdal, VHS, HI-FI
PAL: PAL-BIG (Iecturelenregistrement)
PAL-i (iecturelenregistrement)
PAL-D/K (Iecturelenregistrement)
SECAM/MESECAM-B/G,
(Iecturelenregistrement)
NTSC
4.43 (Iecturelenregistrement)
NTSC
M (NTSC 3.58 (Ieeturelenregistrement)
480 minutes maximum avec une cassette E-240
(PAUMESECAM)
480 minutes maximum avec une cassette T-160 (NTSC)
12,7 mm
PAUSECAM/MESECAM
23,39
mm/s (SP), 11,70 mm/s (LP)
NTSC
33,35 rnrn/s(SP),
11,12
mm/s (EP): lecture
75 Ohms, asymsntque
VHF:E2
Cable europeen: S1 aS20
VHF: US2 a US13 UHF:
Cable europeen: A-5 aA-1, A-W
VHF: J1
VHF: C1 aC12 UHF:
44,25 MHz a295,25
LO est affiche et
affichee)
471,25
E30
US26
J25
C22aC26
110
Environ 22 Watts
5°C
-20°C
4,5 Kg
380 (L) x 320,7 (P) x 89,8 (H) mm
1,0 Vc-c, 75 Ohms
1,0 Vc-c, 75 Ohms
Prise: -8 dBs/-4 dBs (environ), commutable, 47 kohms
Prise: -8 dBs, 1 kohm
Cable coaxial de 75 Ohms,
telecommande, deux piles R6 (AA,UM/SUM-3), un
audio, un cable video
aE12, UHF:E21-E69
aJ2 UHF:
MHz
aE39 (rsqlabte). VC-H92: Reglage usine E36 (VC-H92ETS: Reglage usine E39).
aUS38 (reglable). VC-H92: Reglage usine US34 (VC-H92ETS: Reglage usine US38).
a
J37
a240 V, 50/60 Hz
a40°C
a60° C
PAUSECAM/NTSC
D/K, K1
16,68
rnrn/s(LP:lecture seule),
pour
Hi-Fi uniquement
US14
aUS83
J13aJ62
C13aC57
MHz
111
(44,25 MHz a111 MHz si V-
Mhz a295,25
MHz
si V-HI est
a885,25 MHz
(reglable). VC-H92: Re\llage usine J33 (VC-H92ETS: Reglage usine J37).
(reglable). VC-H92: Reglage usine entre C24 et C25 (VC-H92ETS: Reglage usine C26).
mode
d'emploi,
cable
La
conceptionetles
caracteristiques
sont
modifiables
sans
preavis.
[E]32
Page 66

OOf
z
iji?!l>~
[(W~F,q:
8'lAlnSflIIln)91:1]
£
m-
Z E••••..•••••...•.••.••••..••......••••••.•......••••••••..•.••••.•••.......••.•.••..•.....•.••••.•..•........•.• \fIj:ff·
LE '"
o E...••••.••..••.••........•••••••••••••..••••••.•...•...••.•••.••...••
o
E·····················································
6
z··················
B
z·····················································
B
z·····················································
L
z······················································
L Z
('1-£cr-::.f,--A-'1f,.l/tJt:1r~",-£c)
¥!#:'ll~(I)).'1E1i$H~ifilfJfiliilcoljff'
~$!:I:r'l
'1-£cr-::4r.·t:U1rJ--4-.f,COI,w.z·
~
c.~,?
c.,',?f,.,:q:-I:£;:l.
2." c..:1
""~~*lll~~ifiI~
'l'!l!-I-.'1
I :!'t,qlllll1l'
mIDI
1,'1.~--:f,·
~~ifil4
SSdO'
r.,}rtJ.'I_·
aml_
9 Z
S Z
'f!#:'l
S Z •
E Z •
('1f,ktJt:--:-I,4r--:-I:)
LZ
oZ 2."c..:I*fiif%11fSSIA/-It''a<llil%11fSS1A·
6 L
L L ·
9 l ·
E L
L L •
6
2."c..:I!!l!!!i!(5NI.Ll3S)I3l:fl:;P:~CO
(:;p:~CO+~jll'?~~~~)
8·····················································
L iliir.C01r*--:
9···
..··..··· ..····· ····· ..···· ..·..·..· ··..·..··..··..···
S
E ,
Z
2."c..:1
:;p:~ftllIl«CO
!!i!~-"-J--~k--:
fiif(,
lIIlCO'1
f,.4
:lI;-'1f,.4tJt:-"-J--~CO-lt'~:;P:~·
dSO)
J.-,-£c-C-11rt:--:-::·
tJt:-"-
J--
~CO-lt'~:;P:~
o,l,q'lCO!!i!~-"-J--~'
!!i!~COlf$*;:J
-1
-£c
'I!lifil-l--I:1rL'
~,q'lCO'l'!l!·
(J---1t:rJ.-,-£c--:-I,4r--:-I:)
o,l"''lCO:;P:~1r*--:4-.f,·
(J---1t:rJ.-~--:-I,4r--:-I:)
(.Ht:r
J.-,-£c--:-I,
:-
OS0300VV'
4r--:-I:)
4-
OSO'
OSO'
.....;:C3:-(J·
.f,-I:~.'1
ifiI"I'
!).\!~COilll3,HI'I·
:;p:~CO.f,r.,
J--r'1-£cr-::/':ii!#'1i',flf.·
<!>'ff::?
co:rEli$f
ij
ij
.
•
•
"-
COISNAI:Il-
ni'
IsliAI
!)
!p
'" if'['2. '1
'-f-,.,
U '1
- z,
J--
(~~I!!,qr,HCOiliff!!
:H.
:r
E1i$!~
%11I-l:,-£c
'-f-J.
~
k
--:
J.-
,-£c-C-11rt:--:
-.,<:
-r-
.f,.r
'8f!!
('1-£cr-::.f,--A-'1f,.?tJt:1r~",-£c)
~
$!~'I;'It:
.=1jli
..I¥#:ISNAlfl'll'I.\i'!Z :
zH09/OS
J---A-ZI-
'-It'CO@]
-~4 -1
'1-£cr-::
-
-£c
-I
r.,
ZI-q:-I:,-£C;:l:;l,
'AOVG'O
L
L:JII~I~~CO'll'I.\i'!Z
'l'!l!-I
-::
~~l;!,:;p:~n~jll1.~:Il-l'l!l4~!!i!~
--:
"'"
- -£c1r*-I
-~--:"q:t:--£c-d:=I,!!IS
L)
-"-J--~"*±lf$*B
Zl-llff!l>/lii
'1-£cr-::l/&tJ~1rJ--4-.f,CO~w.z·
--1:--:
1;1
ZH09/0S
~~ifiI'l'!l!-I
t:
- of
-.'1
I,'1,$--: f, •
E -::,,#8v.
AOvG'O
,c..co
-I
'8
--I:1r
r..
ZI-
:
l!1!!I>
S9S·
LL.
4-
q:
•
•
L .
SSdO·
k
--:
J.-~- tJ11L
CO~~ifiI'l'!l!"'lIl:m
•
--:C'IoI,:;l"#C0114J--,$11-14--:: •
'<l
(<lj>f~~ifilMIli!
~~ifiI
('1f,.l/tJt:--:-I,4r--:-I:)
j>f~~ifiI*fii!%11ISSIA/-It'~<llil%1!.LSSJA
(~--:
J--lvr/~r--:f,L/~Jj;]"'/~ll<)
dSO/
(J---1t:rJ.-,-£c--:-I,l/r--:-I:)
~ooq:
•
v)
OSO'
'1-£cr-::11-tJ-I--:C-4-.f,4.'1-l--I:J
•
(
~~r~k<~~'~~-~
'1-£cr-::k--:=-I,
4.-1
r.'''-I_-I:
-4-.f,4.'1-l--I:
~~r~
1(-O~<C
(~~tI¥IY)
'I'll.
±1lf-Cf.Y-,$-C'1q:.
i1i'O'l'1
f,
~
.1/
--:
J.-
-£c-C
--:
~.f,
•
~~l;!,'l'!i!J..'1
-1
-£CCO
llld~t:
--£c~
~if~e~J.
'1-£cr-::
:JS.LN
•
'1-£cr-::.f,11
•
z,
(VV)8S·S:JS.LN/Sv·v:JS.LN(
L>f.>f/0'5/S)VVII:J3S3VV/(
L>f
. >f/0'5/S)VVII:J3S/(>f/OHl/slllld •
~
--:,,-A--I:-1-£cr
!~'!HSHA'
Page 67

Jrt:;
R=l
l;)Cm
...t
(J)
-.'"
'-
).:1:-'&,
=z:.
s!Jel.'t:fJ.:@ilJjt:
'4--
;:r.,1ll.
jJi
~
<
sl'iI,,
iI1>
'f\
'to
to
I,
vtc
; :/
-\'
c.
L.
O)JI](:I:!tiill.~Jjt!H
t
t:;f,tt~n:
~~iil~jiJU:::
1.
'!;:!:
~RO)••~~ifm(~!/).
M
~to
t
L.
J: <
s~.i\<
<
'o)C'.
't
0)
t
~0)to!/)t~f*#
J&t&\,\-------------
~-\'I::*~"~••Rffil1>~l.ij:!:'o
'5
t~i!l'I"to~),
:lJJ~-if
'0
2.
ii[l,t
3.
BJ't;O)~
I:::'j";;t
~j'
to.Q
I,l!pJi~AAilH'O)l!I
-:1if
,§ll,
'm:IJ
if:t;¥_:o
-:11:: Tot:IJi! 'yI_l/::J-~-if
to
~
I,
'0
~l&1l!!ffl
fJ>tt
to
f)
<
t~i!l'b'
to¥iJf$o)l!I
q,
t~r"'lIIifJf~
i.r
SI,'
r <
~t.H'C'
IJ1,'C'<
<
<
to
to
t~i!ifJ>1J
to
~
~
1,'0
~
I,
'0
1,'C'<
I,
'0
to
L.
••
s1l!!1,
-:J
to
f
b
~
I,
'0
_
,t~
IJ.Q
t
;;n~
~
I::Totif8
jz1itf
0:11.:!:
AA
-:J
6.
I::Toto)~-\'I::*'y
~1&1l!0)rn!1iSI': IJ~)
1:::'"
i! / 51-t:;:'f;j(JIfj <
"?
IW"?
~
(D EW)
~,.IJ••'ll:f~fJf;E
'.Qt,
A,'y
(DEW)
.
. ~
~-\'I::*~I_~R~r~.Jff~<L.tffil1>ij:!:,o~.~j'-7'~I::Tot
"'O)~*lJtll~O)rn!liSItlJ.QL.tfJf.~J:!:'o
fJf
R.i1tJ~,I::
coTotA"y
11'
0 5 ?H'i ->, <
19>
1:!Il(lJi;HtiO
-:>19>ll<;r-(DEW)
I'Hi"ii1-;iOtoIl.>O)!I<l~IJmli!!Cc
-tz
/-If
-I~
_:0
19>
U;'
I1'JiiiiT
H;J:I;J:i'~IJI,'C'<
:!:,
0
~RO)R.i~s
to
~
I,
'0
to~I,'o
J:
-----------
[;
to
~J,
Tot
to
~
HlHB-;
j;,
C'0
iO
i"JnfJ<~:tJ!/)
0),
'"
l
O).ijI;j/j!~gbff~l1::
iO
0)
1:l&?l'I1>
C
'I~
7"7 ,;I'
>!t!li:ill<'-'?-
iJr ,'1Jc';:
Cc
l~I,'
vc
t'T;f>!t1l!?ilIil:_:oI9>ll<;r-(DEW)
11>
iOt:Cc
'y
H:~
>!tll!,~
t,
,11'
~llBO)llB.ll.t:=F-H~:I1..QtFo\i1l!:
V'iillJiflt;J::/
t
-\'
-
7'~llOJO)PJl~r.s~-Ij-
L.
'5 C'
I:::'Tot
iff*~,
~llBt~~.bf~<z,~."'ii'
L '" , 0
fieffl
L
tiil',,-,
11'
j;, l}
,,-;
0 L
to
11'
->
"
co
Tot
H"W
iJu,;[;
Cc;>;
1:'.1(,9",
S
co
Tot
>!t1l!?
30?l';\j;~
J:?
I:
i.r
<
to'i5
Udl!,
C'0
to
f)
4
.••
fL~:IJ
i! 'y
I_I'IiAD
~
I,
'0
~*lJtllfjHsi~~L.
5.
1:::'
TotO)~t~*,
'y
I_~Rt~J:mf$fJfA_:o~I,l!-&I;J:,
~OJO)llIii~r.sfJHt-
fJ'0
~llBt~¥iJ
,OJ~gi1bfil1>~),
't
O)fl!lO)J:mf$O)A
1:::'"
i! /
51-'~
oM.o~
~
if
A:I1.
-:J
tog~
~)l,.i\<7'77if::J/i!/
toto'!;
t~
>
s
.
d;;J
......
.•.
"".>
~~;
•
-
to
~J,
)i
t
~)l,lvto~)
*~0)rn!1iSI
if
i!ifJ'
1J1,'
t'tIJ
C'l'~I,
I_fJ'0:f.j;I,'l:/-\'-7'
;:')I;jj!, <
to
~
I,
'0
t.IJ1,'C'<
~J:!:,
0
'0 JJ
-~
I
to.
-\'
1:::'
*
'f0)1m
tJl.llimJl:mf$t:
:!:'os
L.0)I::
'y
if:E>lt'lro'fie:tJ
-------------
I;J:,
'Il'f'F:jlpJi1i'i!l't:
••
O)OOO)~.$.ls~"'<~~I,~
Tott:
t;J::E~ill<"
H:~
~)l,Iv1'
IJ,
'l;\\-&t:
il\\IDi
C'~iiffi,
1"
'y
Tbf~C'
•
.Q
t
~
t;J:ijI;t:Ri'i~t
,;J:,
1I!:;w.7'7:!'
n'
Hbb>-;
~'l1il'~
'" 'it
Iv
to
I::J
/i!/I_b'0:f.j;"lSI,'
IJI,''Il'f'F:jlO)
iJ
to
ff->l,1I!:iW,7'7
o
!/)O)!i)tb
fiJIE:I1.
n'
iI1>
.Q
,"'90
l <
f'F.ll.b
'11
to'Tot
to
~"o
f
'-'-7
iI1>
Q]2
lJ
Page 68

1i9:~1J'i\,/)t
O*~s~~~fflT~TVe~~~~-"~~*~~https://manualmachine.com/7-/~~~
fi!!IlI"
~:IJ
7vl::0)1J~
PAL-B/G
PAL-I PAL-I
PAL-D/K
SECAM-B/G
SECAM-L
SECAM-D/K-K1
NTSC3.58(M)
NTSC4.43
•
J:0)3l<1~,
/"jlj::'E:t
..
c flIJitli,
gt
(~;;(1'JTO)OltlEl:?L\ll~,
PALB/G
·
"S'
I~,
?
l7'
V l:: t l::
-s
r.
lifI"AI:Il:t.Jiili'l' (AUDIO
L\lL\IJ:L
·
"0"
l~,
?l,7'vl::tl::7'*"~IiliL.lt,RFOUTiili'l'''fil!?l~liliL.lt~i!ii·jlj:~~"l'
~7.>;:t"ff,I>;I;T,
• 7 '7 /
;;(O)SECAM-L0)1DI:*
7'-:1"jlj:~"7.>ijli';I~,
(VIDEO
·
"*"
·~~~~7'-:1O)lE~"ff,L.;I;",
• PAL
•
*llI1'itltT<>:O;IC
'7-
(lilOJ,H'
"!IIll-
<
t.:~I.\)
PAL-B/G
PAL-D/K
MESECAM-B/G
SECAM-B/G
SECAM-D/K
MESECAM-D/K
NTSC3.58
NTSC4.43
~"fi!!?
7.>
I;\}i';1:fil!IlI"'"
PAL-B/G1J~
0)1DI:*"~i@"
l~1DI:*1J~O)f".jH'2~il(t
liffl"AI:Il:t.Jiili'l'
7'*
,,~Iili
\7'
V
l::1~fi!!llI"l'
liffl"AI:Il:t.Jiili'l'
IN/OUT)
I~,
"fil!?
SECAMf""'~fMESECAM
7'-/
SECAM
7'-:1
A T.b.A
T PAL- PAL PAL SECAM
BIG
I D/K BIG L 1(1
l'
'Y
7-
:6j"l<~ii!iOJ\l!*
~:c~
S~M
NTSC
0
0 0
0 0
0*
0
'"
'"
0
0*
7.>1;\}i';,
~:IJ
7
-7'
v
l::O)1J~t,
O):IJ'7-7'Vl::"fi!!llIl>,
filOJ3l<H~lffi),
7.>;:
t
il"l'
~,
(AUDIO
L.IJ:
IN/OUT)
IHl.l;l'·,
IN/OUT)
~
t.n\;:
t"
(AUDIO
,,~i!iiT
IN/OUT)
7.>1;\}i';,
PALO)7'-
~i@"
sd:V'i!iiftAI:Il:IJiili'l'
ff,
L.l
:1"jlj:~"
tOOiftAI:Il:t.Jiili'l' (VIDEO
jlj:~~f"l'
L\;I;
T,
ti!iiftAI:Il:t.Jiili'l' (VIDEO
:t; d:
~SECAM-L1J~O)7'vl::"l'SECAM~
liffl"AI:Il:t.Jiili'l' (AUDIO IN/OUT)
l 7' V
l:::'I:~1ili
:
'iPi!ii",nn\7.>PAL7'-/,
PAL-D/K(OIRT)
:
'iPJlIi",nn\7.>SECAM7'~:1
L\7.>tO)t'@;{;),
K1
I>
l <
to'"
L
1J~"l'02~
'"
n7.>;:
0)1DI:*
;l;7.>L"~SECAM-B/G,
(OIRT),
SECAM-L0)1DI:*"SECAM1J~"l',2~
;I;
td~~:IJ'7-1J~0)7'~
~;;(
1 'J
*~"l'PAL-B/Go)~-
~;:t~fl:llJla
~
IJ:L\;:t"ff,
\,
t
"ff,
S~~PAL-B/G,
,,~i!ii
L.
On~~
T
:1jIj!E
PAL
MESE·
~~~
(M)
CAM
U,tl
NTSC
0
0
0
'"
'"
0
0
..
c
c
L.
PAL-I,
0
0
1>;1;
Hi!!
to
O)?
"fil!
L.
~f
to
0
To)~lEfJi~{tjF
"1:~lE"
IN/OUT)
I>
;1;
..
(VIDEO
IN/OUT)
IN/OUT)
ti!iiftAI:Il:t.Jiili'l'
1>;1;
T,
to7'-:1,
(7'7/;("l'mJlli",nl
SECAM-D/K,
RF/IF
SYSTEM COLOUR
(RFtl:I1J:"x
~:IJ7-1J~t1Dl:*1J~~~HllU,W~~;(
1::'-
"~m.~~j'iJ~g;(
1 I 2 I 3 4 I 5 I 6 I 7 8 I 9
T
V
:lJ5--n;JC
:611:l11-n;JC
VHS:lJ7-,an"ATL.
V
'EJfmt.f:Ui§i'
H
iiJn.tfJli:!E
S
iiJn.tfJli:!E (iO'i":
~~~~~(l::7'*~)
~;(1'JT~~~
j!j:!ET>';lil!iliIOJ
'1'-
NTSC3.58
NTSC
PAL
SECAM
MESECAM
NTSC-PAL
ji<'E'
iiIfmt.f:Hi-Hi
(iO'i":
0
4.43
CTV
(-if~:
I)
t--
7 ':I
7i§-~G:~
1)'::7' 1-7~7)
Hi-Hi
"l'T-/"~~L.,*~"~?l71/A1J~~"..~t~
lWi!ii
(07'1*1)
COLOUR
AUT01Hd1NTSC
AUTO"
fd:INTSC
AUTO"fd1PAL
AUTOllo
td'MESECAM
AUTO:<
fd1MESECAM
AUTO"
tdmTSC
7'1-5·/7)
1-7~7) S
*lil!OJA
MODE
SECAM
PAL
VHF:~,I:HF:D
UHF:G(H)
VHF:-
UHF:K
UHF:IVHF:G
PALIPAL
S
P/L
SP/LP
S
P/L
P/L
l'
'J
7'OJfJ'LiIi:
NTSC
MODE
3.58
4.43
1!:ll:OJfJ'LJ!!
NTSC-PAL CTV
7-:1
[;)]3
•
MESECAM
•
NTSC7'-:1
7'-:1
: SECAM-B/G, SECAM-DIK,
MESECAM1J~"l"2~
:
mJlli",nn\7.>NTSC7'-:1;l;7.>L"~NTSC-MO)1&~"'2~
L.to
K1(OIRT)0)1DI:~"
7'-
:1,
I>to7'-:1,
'lih~~~Uffl"A1Jiili-T-
l::7'*i:j;,ifCij
'J
~
(INPUT)
L\o
L.~~"1T?;:
;j{
51
/
"jIjI
(AUDIO IN R/Ll
t
"',
71
L., 9HlBA1J (L1:
J.,t~~jtA1Jiili'l'
/A1J~~t\'\L\;I;'t
{l!i@51J;l:L2
S1~L\(:7';t{,jJrjt:
7.6.)
MODE
1nj
III
NTSC
NODE
SECAM
1::'-
~'i:?L\(
SECAM
SECAMIMESw.M
PAL
VHF:B
VHF:D
UHF:K.K1
SECAMI
P SP/LP SP/EP
SP/LP
P
P
l~i!iijIH-jJl
SP/LP
SP/LP
SECAM
MODE
ff~Q)'fiLif[
SECAM
MESECAM
1!~OJfJ'Ll!!'
(VIDEO IN) ilIEI3"l'
0
;:~m,-&l',
: iWiljj)
,,~A,
""""
NTSC
VHF:M
-
VHF:M
NTSC
NTse
3.58 4.43
SP
SP/LP/EP
SP/LP/EP
*Il!OJ
:r'\'
:"-,*J(;
L
1(1l!i!ii)
L2
(1~i!ii)
1//
C'<fU5
Page 69

gM~'~T-/,*~~;>:1~7~~S~~~ffl,~n7-Tv~t~M~
*tIJl~
j!j~i"Q
7--;1
NTSC
- - -
NTSC
- - -
NTSC
PAL
SECAM
MESECAM
•
PAL1J;t~T
;>:
•
NTSC~T-/"M~'
ji:;li1i
TL.d::C:
:>!<1II!1::1Jl
lflIC1J$
RF
AV
------
--
RF
AV
------
--
RF
AV
RF
AV
RF
AV
RF
AV
1 ':J
7"
NTSC~PAL
L,"( < t:'.!'!,'0
(
COLOUR
MODE
AUTO
:<fel;l:
NTSC
-------
AUTO
:<fel;l:
NTSC
-------
AUTO
:<fel;l:
NTSC
AUTO
:<fel;l:
AUTO
*t,l;I:
MESECAM
v~l.'NTSC~T-/"M~'
,'J
l!ii
FJ'P'J)
SELECT
NTSCMODE
3,58
-------
4.43
-------
NTSCPAL
CTV
PAL
f:f;t;0)
iiLiIll
CTVI:~li:lE:
~t~
PAL1J;t~T
L,"( <
1;1:,
*tIJl"NTSC1J;t,
V
t'l.'
A 1 ':J T
i,l!l!iimM-rJ&
SECAM
f:E:i:1Jl
Utfi
- - -
i'UllJl
{JiJO;'
- - -
f:E:lO;1Jl
UtI!
f:EJilIJl
1ftfl'
SECAM
MESECAM
t:'.!'!
t
iiIDf~l;l:l'1
~{iLiil1
SYSTEM
<Bn;"A7A)
f-f~O)'UtIi
--
-----------
I,GBJGHdW/K
-n7-TVl:::~;:*bi±g)
1±~V')U'Lii:
--
I,G-siGiiiElioIK
ir7-j'vt"l:.g.bi±g)
!'EJilIJl1ftii1
1,8JG:tfdJ:OfK
:lJ5-TVtl:.g.tli:l:g)
f:EJilIJl1fti<i
81G
tHtDlK
7J5-jvI:::l:f;tJtt
!'E:i:IJl1ftlli
BIG
:tt~tj;D/K
'fJ7-TI.-t"l:f;b1:t{i)
!'EJilIJl1ft~
~t~
1;1:,
(RF
(lijitQ
~iiti
(liMitg
(:Il~tg
(llSlt{i
t'7';fi,l!l!ii~NTSC
",
*tc1;1:,
Gn *
,il",
IJ;1;l"t",g
iJ'5'-:rL.-t:
1Jl1J'it
NTSC3,58(M)
-------------
NTSC4.43
-------------
PAL-I,B/G
PAL-M
s
W';Ol';',
SECAM-B/G,D/K,
{i)
"t,liK1
SECAM-L€"~t;
';',IJlSECAM
SECAM-B/G,D/K,
"'fdiK1
SECAM-L
';',IJlSECAM
)v71J;t~T
:t<:~#.\I:
t:'.!'!",
PAL
"'fdiD/K
J::
'{fPAL·N
IJlPAL1J'it
€"
~
t'
MODE
t-
t'l:
~)1:i;
<
•
M~iiIDf~il"J,j,'J:
•
V-HOLD~llIlfl'Y,
IJ~;:
t b"i!;
iJifn'l:.lI:""l~i:<
• RFI;I:,
t;l:,
li1iL,l"~;:
•
ja~:I;l;rm~iI!\"T-/"M~'~
COLOUR
!'!",
1:~:lE:
(i)
llllil
BI
BI
g
RFOUT;l;1H"iie-:J"(Tv~l:t'7';f"ji:;li1iL,n'~;:
"'fl'Al±l
MODE;>:
("AUTO"
L,"( <
*~l.'T
vt'~M:l2Sf§~Ha~,~I:~~;>:1
ll:*1J>t ,a"1J'it
PAL-BIG
PAL-I
PAL-D/K
SEGAM-B/G
-
SEGAM-D/K-K1
BI
NTSC
1'1:,jj!lJ.:I:
"~-::>,,"(,,
1):1:"
,il",
;:
nl;l:
T t-
IJ,
'T
V
t'
C'M~'
V-HOLD~llIlfl'Y,,,
il<-::>,'"(,'~J;ll-g-I;I:,
t:'.!'!",
:lJJiIii-r(AUDIO IN/OUT)
t
"if,L,:I:"
1 ':J
7"
"NTSC",
1:I;I:~:lE:L,IJ"l.'<
tiiID1~AI:B:lJmM-r(VIDEO
t i'!
1;1:,
T-/~n7-1J;tI:-g-p-tt"(,
"PAL" :I:t,l;I: "SECAM"
t:'.!'!",
t:'.!'!",
WIi!ii(
!,:ppg)
PAL,a
..
MESEGAM,a
SEGAM,a
MESEGAM,ail
SEGAM,a
NTSG,a
..
..
..
..
COLOUR
MODE
AUTO
*td;l:PAl
AUTO
;l;tdj:PAL
AUTO
;I:t.: (;I:PAL
AUTO:<tdi
MESECAM
AUTO":l:1.'=\j;
NTSC
NTSC
iUllJlUi:iO!
iI:i:lJlUi:iI!
iI:i:lJlUi:lIl
ff;;:O)w:~
iIJilJli;lil
-
*_0:>
o
"3,58",
~M:l2S1J;tilfSECAM~J;ll-g-,
SECAM
MESECAMA,jlili!lL,"( <
"(,
,'~J;ll-g-I:I;I:,
Z:a~:
SECAM
MESECAM1J;tWffl~~7';f
~
"PAL",
~
t!J;;
AT A
{ieffl,
~
TV
t'
~1J;tI:
"4.43 ":I:to1;1:
MODE;>:
'~J;ll-g-I:
MODE;>:
0,
~H~7L,td,l!l.'COLOUR
"NTSC",
1 ':J 7 "SECAMA"
1;1:,
SECAM
SECAMA,~li:lE:L,"«
1 ':J
7~ID\:lE'I:~I'h
"SECAM"
(M1:..t3
-g-p-t!'"(, e;'7';fiJ1l!iiI:i!;-sNTSC MODEA 1 'Y
"NTSC~PALCTV"
SECAM1J;tl.'~aiiA
t2'!'!
",
:I:to,
MODE;>:
l.'M~
,,~!OJJ,¥Ij~IJ
.t(J~iOOt:'?(,
1:~:lE:L,:I:"
MESECAM:tJ'itl.'ja~
M~'
~T-
1 ':J T 'I:MESECAMA,,
t:'.!'!""
l~a~!'!
L,"(
MODE;>:"
ttt,T-
tg.,il'-::>~:I:-t!'
':J
L,:I:
-;,
SfJl!l
q:;J:
g
AA
I:
~
-'\"
t'
7';f~i\:II:llll.'l;I:
~
z ,
iiIDf~il"iJifn"(
)MESECAMT-/~a;¥I;I:,
':J
7~fF
lfi!ii~Tj)ji
MOOE
SECAM
MODE
iI:lllJl1ftil
ff~O)1ftfl:
ff;;:Q)1iLtI
MESECAM
-~----------
SEGAM
MESECAM
------------
SEGAM
3,58
iI:lllJlUi:lIl
i!; I) :I:
J! G
'y,,,
"gllllfl
t"if,L,:I:,o
IN/OUT)
"iie
1:~li:lE:
L,"( <
SECAM
RF/IF
SYSTEM
B/G
D/K
B/G
D/K
ff;;;O)tL~
-t!'
lv,
nlJ
L,"(,
AV
-:J"(ji:;
t:'.
I
<
'"C)
7"
L,
h'
t
~
I:
1;1:
t'
7';fi,l!ilii~
L,
t",
I::
~
I:
1;1:
/il'MESECAM1J;tC'ja~!'!
SECAM1J;tC'~a~!'!
/1;1:, fl!lo)SECAM, *
lv,
7 "AUTOI:ID\::;E,.Q
t,
nT
to
1;1:
t'7';fI;l:
[;)]4
n
Page 70

f*11=gBO)~
AA
SiiEl\
{:td
i\fj(:
T-/~AD
(1:j!Ij:!EO)
L,
I'J'
to/
T
t-
1:::'*~J1O)~ii!iiJ
iWim
~--~
--
[@~
@AUD@}
"I!:~(OPERATE)
•
;1Js:lI!lO)"I!:;IH
'.fi=~O);j{11;...t~.~<~.~~",-;o
*9;'"
A/t/.H:l;JJf)lix",
I)
t::J;""
-;
0
~
~ml)
~
T-7'IIJ('JillL
(EJECT)
;f-'51/
1''7''
• 7i';...;j:.;!d:'.:J.
•
~7'J'\';"''i*11;'"
•
ll\Oi'F*
EDIT
ON3I:liOFF :
~m.ltt
11;...
t.::~~
-=;...'i},\Oi'F*
(I:j!1j:!EO)
(l:j!Ij:i:!oO)L,tJ'toJ
L,
~*~~~T~A/~-
~~
11
~~
C>-..:J
U\='~XRECn~
I)
~::J
;...~*Jlil
o"e
Ei
1'5
ff5i
'~'Bi,-o
.....
-
:
IIIlIO"'IT?t;;f;;:OJ1'lil!l'I:vr,~,'o
lm~OJVCR
llli~OJ
t
1'!
;:OJ1'lil!!I:
.Jlil'l.
'5
-00'"1
ci
vr,~,
~
=:-'
=-
===®viJ PROG $F,RT
~
::-:
'0
TIIo,·\ER
0 r
-~
@§J ST;'
~
SPLPEP
..
iE
-~~---------'
11;'"
I'J'
to/
(17i';...;j:.;L-liji:iE:O)L,l'J'ttJ
~ml)
T t-
t::~HJlO)~ii!iiJ
~ml)
~ml)
SEeN:;
m
r~TS~
1fI·
LlI
JTI
Ij/-
l.B
III '/1/ /If
~i'F~{;t
(t~~
vCR;1Js:i1f;:o);j{11
l;t, I)
~::J
L,
tdI~"
. CH
D,~
./n
/
i/&:fj.>r.9$\;.Il/
--
m
"1.;/
I
p~Cl
/:a'jljl
I'J'
€>
O)i~~B"i~
SI:,iJL
111
~/y
L,"'-;
L,Hif)(
0
G!]5
o-~
C)
~
~""""
-
TA
~im
RF::J
;"'/~-
9 - i±l:iJ7
• E30-E39/US26-US38/J25-J37/C22-C26
~m-;
Q T t- t::
H~~l;JJliA
INI$O~.~I~~flSJ8I
NTSC'E-
i'
;"';j:.;~j7
l:i;
P -ttT "D/K".
l'
'Y 7 (TEST SIG)
~'A1'
'Y7
~
i'
A11- (CHANNEL)
O)ilBll!I
"I",
"BIG"
~mIDIT
I
C'IDi:iE:;;Y~E
0)
\,\
'f
t1.
m:l;JJf)li
X t <
to
~P"~;Rl;JJliA1'
I~O)~~lI!l~:a'~mL,tO)~~h~J~ml
SECAM'E-I"A1'
~
L
'0
'Y 7 (AUDIOATT.ON/OFF)
'YT
Page 71

ti
tVe
IT
V7/TT(J)ii~1
TV
I:::"T-
¥~e~.~~Sy~~~~~~f~*
'i)v~
'i1'"t
IIM1'i\IJ
AT
v~
917'T
.
~~Ii~
./
iJ!~/,*lv
- -
-
vI:::"
t
(J)ii~
0)
i.1!
1il1l
t;::
-::>
l , l
-
'0
7/TT~~eT~~ii~'
y~¥~~~e~*~WY~¥~A
:IJ;lffil-1'-(W
ANTENNA IN)I:ll'iIi1i~*,
0
P/TTilffii-r
(ANTENNA IN)
'm;>}
*
tol;l:~i*J~y
1;I:-7-7')vl:ll'j,j1;
I 1 I
~¥~*
i.r
,
'*'
rvy~¥~
(W
ANTENNA IN)
t'
~*~iJ!i!ii
to
0
A:IJ;lffil-1'-
RF
OUT;lffil-1'-!.J>
S
r
..
~,
It!-
I
iOOf~l!:l
:IJ
'iH
(VIDEO
OUT)
!.J>S
iOOf~A:IJ
~T
(VIDEO IN)
"-
"10-
~
iOOf~A:IJ;lffil-1'-
(VIDEO IN) (R-AUDIO·
fJ)i::;
iOOf~
l!:l:IJ;lffil'f
(VIDEO OUT)
"-
W1'ii~1
,tl~'
•
fl'
A:IJ;lffil-1'-
UMONO)!.J>S
Jiifl'l!:l:IJ;lffil'f
(AUDIO OUT RlL)
F"
"-
""
Jiifl'l!:l:IJ;lffil'f
(R-AUDIO-UMONO)
tJH':J
Jiifl'A:IJ;lffil'f
(AUDIO IN
f;,
""
-
k
='
~~
J
J.
J
f--
R/L)"-
y~T~A:IJ
(ANTENNA IN)
"-
I:::"T~
f;t~~l"JiIiII-7-
-1'-(RF
t>
e~y
t:f(§:
Z::5i:~
RF
l!:l:IJ;lffil-1'-
.*~~=i~.~l!:l:IJ~~*~~o
t T V
OUT) t:ll'iIi1i
~~~
~0J.;
*,
:
~
1:::"(J)ii~
:;I')v
~
e~*~RFl!:l:IJ;lffil
~,
t?
-
:1J~;lffil
A:IJ;lffil-1'-(ANTENNA IN)
0
,EIj
l \
to
ll'j,j1;a"
1;1:,
7.¥ t- *
~
¥
¥~e~iJ!~H*)v
•
t
y~¥~;lffil-1'
(ANTENNA IN)
t:
;::t:a
•
NTSCYAT
,ai><
~
•
.!:OaOJ
tl<i
L: I:
:
hOJEP'E-
tl
-r c'
~
.,.0
J:? l:lllliIi
~;'"'J~.,.
1"<:',aiU
Lddlll:"t'7:;-1:
0
fiE-=>
-r1i'J1lij;1:AV'E- I"1:.,.
tltdiJ"Ij;,
T
t-
t'
Hi-Fi1-7 'Y
It
i'!<1:AV'E
{,;:I:It,
- I"I:
71:
<:'It:(;: <I) =.J7 1-7 'Y
l.do!,ll-&l',
l!ilt-r
iilii!li:&V'fijli~'liL
<
t!~
c
71:
'0
[;!] 6
Page 72

TV
1::::'
t :;f
-
-7
If'
l'
:;f~~
t
O)mit:%
MHFjjfj())i1"1i11i(::'?~
\"(
1::::"
1::::'
7;f
7;f
T
l'
/'
'*
)vo)~JU~
(J)fiffii
RF:::J
;"Jt-$I-mlJ7'
(E30-E39IUS26-US38/J25-J37/C22-C260)l'B1l!I1:ID\::;EC'
l'
;"~U~7':;
l'
t~Htjjfj())i1"ifnH::
A $I-(CHANNEL)
~".
,?p"(
0 )
RFOUT
'ffIi'-iJ>
S
~fl'~lJ'ffIf-(R-AUDIO-
1§-
'ffIi'(AUDIO
OUT
RlL)
•
UMONO)iJ>
flS
1:ltt.J
iJ>
S
El~
i"'!~:
'
S
~fl'AlJ'ffIi'-(R-AUDIO-UMONO)'"
o
~©
'"
__
~
I"~
.
I
11 I II'I I I " I ,
_0
--
0
~fl'Al.J'ffIi'-
(AUDIO
INRIL)'"
0 0 0
'00
='
'=
J
J
,@
!
f--
I~~rlll
";0
0
0
0
I
FM7'.:l-1"-
7'//
0
00'
T A
H~~i;I]Jl!A
TV
c:ii!liimC'
7':t0)~1J1:.g-
;,.;j(
J~o)E36
VC-H92ETSIWHF7'1'
J37 • C267'
OT
v C:C'T
c:'7':tO)~iJjj!(OPERATE)
li:At1.".o
4')T
A
I:
[,"'0
8}ii!liiml:TA
~;;t1.,Q"C',iliA,~Tvl::7'1';";j(~li:~!'l
c:'7':t~lJ
5 J: 5
I:;~!'l
• US34 •
l'
;";j(J~I:ID\::;E;;
i-
H~~i;I]Jl!(TEST
~J~$I-;"
J33"
1::)}j(~0)t.i:"
l'
':J7'(TEST SIG)
li:
Jl.,QI:l;t,
[,,,.
tol;tC24
;";j(J~o)E39'
t1.
\7'
;]<$I;,.li:jIjl [,
SIG)A
(2*0)~j!![J(-)
T t-
C:)}j(~O)t.i:"
0
(I~mf,jl'Jl:I!l!H:
I:::
C250)/l<,0)7'
US38'
l~\".
l'
-r
0
;";j(J~
li:iliV',
l~iJjj!
':J7' li:
"ON"
iJf~
71""
\7'
l'
;";j(J~
li:iliA,
ao
StJ' [; ItJVC-H921;tUHF7'
1';"
;j(M:ID\::;E;;
hi
t1.""\".
III
i
~)JHAt1.,Q
Ii/)
.0,8)
C'-t
"I
t1.li:
c:'
l'
0
Z:)i:~
Q]7
:
• 1::7';f0)!i;w.:1-5
~\,\o
•
;f-7',.
JiIi'T(AUDIO
;fllJ!~O)lf)l<ii'E
OUT)
0 0
•
~11,
O)R
I:L
-
7'
""""
/T1"
Il
0
0
Al.J'ffIi'-(ANTENNA
+
J:;aO)Ii1I0)~l;:mliW§l;7
/ -5
J"O)I&*,
iil!inlJ>
UMoNOJili'Ttmil1;;[,cl';;
Sl±IiJ;;tt
t.,
Vc
IJ>
S
>1l<lli
I:
0
:::J;"-tz;..
"'0
0
IN)'"
H:mil1;;[,cl'
If)l<11,
If)l<l±IiJ
[,
".
0
970A
J~7':;1';($I-(CHANNEL)
&70
H~~i;I]Jl!(TEST
I:
[,"'0
.:'i;E:!f.
:
TA
~J~$I-;"li:~~[,t~I:::~,
$1-;"
tl-
1J7'1';";j(~li:.il#SJ:~0)1:::~ij~t5
([,,,tJ:5)
[;"
b L
li:~-:J
t-
c:'li:;~!'l
[,
SIG)A
-r
'~7'
li:
"OFF"
'fi!J;'(Oc:-
WaoSbt1.,Q~.g-,~;;t.i:
lRF:::l
t.i:~
;")('--$<
[,
".
-mlJ7'l';,.;j(
li:1EI["
0
1::7':tO)m
~H
OFF~.TEST
ON
SIG
..
....
,~
Page 73

I)
-=E
::::J
/'
I)
'E:::J:--
O'ill!?
I::
~'7':t
i$lEiIiiI:ilO:;,
~
\.,
'0
UIltl.to~pJitJ>
I) 'E
:::J
.>'l;'J'tllB"-ioHt, ;f- 9
Gliiifn.'~:I:;
~~5i!!0)3t~
I)
'E:::J
:--
*1iij/JJIJ!~llBO):!ll:,l(
to
2*
to
I)
0'3l:~
OJ!l,l(to
~~fi
r <
li*
(1i~,lI,)
li 1.))' '7
'E:::J
/iJ
i.r
J2'i
f1i!t.I';J:1,
<
HilI,'
L,I,
'*~il!lUi1~llBO)+,
to'.~I,'o
0 I)
'E:::J
:--O)ili'lllBO'
:--
'\!'
:/
l'
I-)~:$I
-(-\'
)~O)liiil'F
3 R 6
(UM/SUM·3,AA)1.5*)~
1.'lIJ!\,
'cl,':I:;
1.'
iIJ\
A1.'~:I:
,tJ>lE'lliI:,f;\I!~E
to'.~
1,'0
.''is'1,
'*~il!l
0 *1ii!!JI;I:,
; 0
L,;J:I,
'~-&;,
UIUJ WL,:I:;0
-O)~7FCS~H:Atl.
J:::7';;t*
Hr
-:J
c <
to'.
I-O)*lli:ij/J
~j«J2'i:l:
*~il!l
SHARP
~@@)
l' :</':J
7-i"1')vf-:'o':J')*11/
-~1i:,.lIllr~")
1-*9/
(28~
""'D-E:n:UV,,"
m.n
SUPER
..
t""rn""'"
.. <O<'I\OL
....'...
,m.,.u
MULTI
..
<""""OR""
~
..
~ll
~~
;t-j'
si51':
\,
It:
Jj:
:Q
Jlfj
t:
-,,~~
~7t$
1
;t~1J!)]l!J!'F
9/
I
-,
·U'E:::J/0'.-:Jc.~S~~91v-~~0'.~;:;'~I::W1.'~:I:;0
a~r.,O).~:
91v-~~:
;::'):!a
:
·
1)'E:::J/~l1';,f;\I!I:liiti.O'-9-:t;J:I,'1.'<
I,'m1:il:tJ>;J:I,'1.' <
•
*f$I)
'E:::J
t:
I::
tJfilO
*~ij/Jli~!h
•
·~L,
I,'*~ij/J
•
*1Il:ij/Jl:li3'C~~1::
<sill!I,, <
• I) 'E
:::J
/ 0'
I,
'0
rCLOCK
r91v-~~0)L,tJ>td
to
/'l;'J'tllBI:
') :1:;0
-1:
o)~-&;I:li~'7';;t
toll!!l,
'JJ
1::t;'1,
'*1Il:il!l,
to'.
~
I,
'0
~llJjr.'il!!;I:J
l~ll>l(toO'tl::cs'H:M[;:I:;o
(a~lJt)
~
I,
oo:M
0' L,:I:;
-1:?
1.';J:I,'to)iJfilO~):I:;
;J:
I,
O).~JJ$J
'0
El
J't'\!'llll,
I::~t tl.0'S t:
;j)l!0lll0))l?
,~-&;
l;l*~ij/J
0)J¥l~ffi1
0)J¥l~ffi1
to~I,'o
'ffi1~JjtJf!!3
H~lIJ!;:;'
tc
L,
*~ij/JO'ilF.tfclI!!FIl
0
0' I) 'E
:::J
(12-'"
-:;
O'~ffi1T
(23",,-:;;'0'~ffi1T~I,')
:l:to, 7l<t:lbG
-:J
cl,':;'
tr•
ffi1~JjO'1!':t:;,
to
~)
Witl.
*1iil!lO)il;ll~7FO'
/~i1';,f;\I!tJ>
L,to')
1::,I)'E:::J
-:J;:;'
t:
L,;J:I,
'1.' <
G
JIIU)
~
I,
,
~llJlO);%\
:--tfjjhtJ>;J:1,'
tJ>
L,
r <
to'.
I::
tJfilO
') :1:;0
to'.
~
I,
'0
~
<5l.clE
1;1:9"
L,
c <
,)
~
to'.
I,
'0
L,
~
nu"I-JlJU:!:lL.;f.5z/
~m!(VCR)O)'I!iIl:r.;,
7" t- I::
O)'ltiJ!j!:;f,?t
oso
,,;,
\,'0)
;,1'?-
')1)]7-*9/
7'-7";(~'-1'4iJ1ll,,;,/
:y/'1'J
,,;,
a~-~~lt/~lt~,,;,/
7'
• 7'~/
/
"1i: 1
1i:llI1R1'
• AM/PM 4iJ1ll,,;,/
/
J>./4iJ
v
v
::J
/
i*00i;f-9/
::J'l'*t)¥j~:E;F:$l
i/OlJi!l,,,;,/
7'''lOm!n!,,;,/
7'0)7'''
lO<,i<;"
~
/'l-Mfi!l'illlIR,,;, /
'l-Jv~
(0-9)
~Q)7-i"/*/IAlJ:l~
!fiI:1'~t'.
~,,;,
/
===/::
./
(9"'-V'j1l1llr~
*;'/
- T' 1 / ?
• R C
:$l
,
/ C'OSEITE
(:/~
'"
l'
0)
1
"'7
e4iJ1ll,,;,
21l":1'~t'
/<'1'
0
1'1
1' 'l' -
i;:;1
2. •
"."-~
F.ADV
.,.,_,
_0_
I~.
c:iJ!
b.~~i
...
~~
_.
F~TI()N
I I -.
~T1.A./l/-#9/
REPfAT
Q
"""
'-'=J
I
.~
~
1i:t<llin'~c'ol
MODOOSD;f-5!:/
o;lllI"f~
C
'01
=f-{r :'-*JL-J1";7'
1-5"y~/1';fi9/
Ii1i1;f,:9/,71"/*Jl-5'1'L.-o
'7
HII.,,,;,
itO/'i':J7;j{9/
IIllr~c'o)
DPSS;f./,J.:;'-
~I,,'o)
(29""=-;;
(16~-:::;~
/~rJ
/,
/
(27A:-:/'_
(27A::-:J#OO-r
1l'lt,,;,/
<
')JI&\'jlj~,,;,/
j1l1llr~
"01
'i'Ji!'),,;,/
jlj~,,;,/
:/~
rJvJ>./4iJ";'/
::"'1'
r)v~-
:Yi"
1-)\;~1'i'J\;
(28"'-~
1'"~jf-;7/:1
8
Page 74

OS
0 (:;f
/.A?
I)
-
/7
-r
.A7° 1/
1')
o)~JJ!t,ij~~~
!*1'FilfjO)i1"iFmt:-::>L'l
*#J!I;J:>ifJJI:sfle~
~"
O)ll!!RI:JJi'l±O)
WJ!Il~:lE";-
To
OSD~1'F*
1\1""
i"7i*i1
I""LJ
•
STORE;f-'9::.-
'I:
t,;:.;o
"P'!'1(U"
i"1;J:,
9
;.,
UII
I~'
~.LLCLEAA
I~
P,\XI;J:,
W~t,;:
O)~:lEHT?
j)11'0),'foJIIli1'1T?
11
6/(;)j(:$</
fSACK;f-9,/
I
NEXTj(:$<
CLEARj(:$<
/ I
1:20~j)..t.l:~~
fo/1)t:,
"[l'~
~'o
I'H:::J:"-
/
90S0
NEXTj(:$<
'foP'!'t:, "oso
~!!JJa9t:WJ!Il~:lE";-
I
j(:$</
/
lif'FJ1<Jlg
OTv~I:VCRO)~~«An"[,TV~«~T
:t7"\':..-*)~t:i;JJf)~!i."[1'~~'o
5<
:"-UllT
~t>n,
1::50)~t,;:
ij~No.O)
LANGUAGE"ll!:lRii!iij!jjii
"1"
(ENGLISH)
lB>OSO
iir,';.iJiJG
M!/1)*To
i!l
~~~0)1I:IR
lif'F*
5<
:"-~r*l~iJ'
~OSOii!iij!jjo)l'l:lif'Fr*llg
n*
TO)l'~iJ'r*lgl:ljh
1?IJ:
LE CT
T
lif'Fr*lg lif'F*5<:"-
~
I
NEXT
OO-pH~!!JJ
~~'o
X,
l'
t ll!:lRI:!HUTo
(z:;:
l'
I;J:,
t,
*T
0)
1JJ9
: 4
~'I:
(:;;;;'1:,
QtP7J
I;J::;;;;,H
I:
1
6
L: t
lif'F*5<:..-
~)
H,<;r-"t.Q
O)~Jl'
"[lif'F
'tr::
{XI;J:tBACK)
["
'
-70)h~iJ'['*T)
*5<
<:":'ffi-!;/!O)
ij~No.l:%t>-tt"[l'
'J";:::J:..-J:O)iiIi:'¥'*5<:"-
"ll:~0)
No " 1 "
iJ<
~iJiJGT
<l'[!I'I:,
Z:-;ffi-~o)~~C:OSD
ii~*".,
llilR[,".,
[,"[
f/,'I:, iffi
0 (L:
0)
iJf~iJ'
<
fo
~
~
(;.,:,,-*)~y
:..-«~
[,"[~iJiJG
(1-4)
.;0
J: ?
ll!:IR
lB>OSD
"':$I
*
7.7
t.
~
'0
';1~';/;;
)"
*:ENGLZSH
2;
$11:
3;!1'RAN';AI:S
4:ESPANOL
I
SELECT:
•
ENTER:
(I
NEXT"':l<
\"'0)
S/G};J{51/
CLEAR;f.~
I
BACKj(:$<
..
STOREj(:$</
TVii!Jj!jj
;.-'!':jljl [,
....
t/J.
.;.
EXIT:
;'-l'llilR [,
~iJ'''
"ij
i"t:t,;: f) *
AUDIO
::"
/
cl'I'
"0
0 I
cl'I'
lif'Fr*lg
n
*
,,"STORE
24H/12B
Tl"1!I1l
DAY/I!IOIll!l.'H
Y;SAR
I
SELEC'l',
BNT:ER.
(S/ffi"':$I
I
NEXT"':$I;'-
~.STORE*5<:"-«~TI:,"ll:~ii!iij!jj~ll!:IR
~
n ,
CLOCK
(P.l~OSO
*
To)
iJ'O)~:lE:lXIi.~«
~:lEii!iij!jj"i;JJ
~iJ'ij~I;J:,
ii!Jj!jjJ:
l'
1;J:24P'!'r.'~iJ'xl;J:
iJ'T
"24H"
f)
~t>
~"["ll:~1'~t>
iJf~iJiJG«
fa
To
~
12P'!'r..,~
M!/1)
To
JJi'l±P,!,1(UO)~:lE
~
;:Q)19Ul'l;J:,
(24P,!,r.,~;'R)
24P'!'r.,~'l'X
*5<:..-
«fY!?
"24H"
"12H"
(;:;:
"·"'24P'!'r.,~;'R
·"·"12P'!'r.'AM/PM~;'R
1'1;J:
:
1994~
I;J:
"[~:<E
"24H"
8,E1
5
810P'!'28~
I:
"":lEt, * T
12Il€fr.'~'l'0)~:lE
[,"[1'
~
~
I;J:,
8/$
'0
1:%t>-tt*To)
TVii!iij!jj
"':$I
:,,-,!,:jljl[,
....
t/J.
SB'l',
EXIT.
*
;'-l'0Ji:iE[,cl'
'!':jljl [, c"FI" '0
cl'I'"
77';;'//7
~
-~1~-
0100
1.
01
'00
-/+
I
Do
I'
....
fill
NEXT*
iJ<~iJiJG«M!/1)*To
8/$*
;fjjiJflll'ft[, * T iJf,
lll'1t[,I;J:[;/1)*To
't
O)f~~O);jfr
(;:;:1'1;1:,
~
I
NEXT>l'5<:..-«
iJ<
~ilH
5<:..-
«~T
5<:"-«~
V::>-:5It.,; l:>itm;J:
~
>iWt:
« %:b-tt
"10:
28"
~T
M!
/1)*To
I:
ll€f1(iJ«iJ'T
[,~
It.,; I: "P'!'''
"p'!''' O);jfr«%t>-tt,
"[1'
~
~
'0
1:%t>-tt*To)
I: 8 I:
,El
«;'RT"1,01"
"0
"~"
O);jfriJf
: 00"
0)
24l'1/12H
TIHB
DAY/MONTH
YBAR
I
SBLECT.
ENTER,
S/ffi"':$I
I
'rIME
I
NEXT"':$I;'-
t/J.
*
;.-
l'0Ji:iEt,c"FI'
....
'!':jljl [,
c"FI'
SBT.
EXIT.
".
-0:06-
1.
01
'00
-/+
Do
"
,,'
-1.0;28:
~
~
'0
....
8/$*5<
;jfriJ<lll'1t
lll'1t[,M!/1)*To
't
Q)1~
(;::;:1'1;J:
:..-«~
t.* TiJ",
",El"
O);jfr«
"8.5"
V:>-:5IHi
:Il!l
[,il.iHj".;o
>it]t:
%t>
"8"
-tt"[l'
l:%t>-tt*T,)
I:>iWI;J:
I: ",El"
O);jfr«%t>-tt,
~
~
'0
"8"
O);jfriJf
0)
24H/12H
TIHE
DAY/HONTH
YEAR
I
SBLECT.
S/ffi>Ji:$l
I
DAY/MONTH
t/J.
ENTER,
*
;'-l'OJilEi.cl'
....
SET.
EXI'1',
".
10.29
-i;H-
'00
-1+
Do
I'
"0
-5.08-
""
~
"0)
I
, ! , ,
I
I , ,
'"
I
Page 75

1*'f"Fi'jIjO)i1!!Jl
(:
-::>
l , l
lilH"Fl*J~
j
.1
NEXT*'o$l
/"l~,tif-,,'l"
'''00''
iJ<g~
NEXT>J"5<;-
· i,;':i$1ib:\',0
8/i±J*,o$l/"jijlL,l
(z t:
<.'
(;I:,
"'94"(:-Sp -It:\' , 0)
"if-"
"J-.7JL,:\,'0
24H/12H
TIME
DAY/MONTH
YEAR
I
SELECT,
ENTER:
e/Et>*5<;- t'lj)'lEL,
I
YEAR
~~.H!tjEii!iiilii:i:j;HJ!.l,
El
iJ<JE
L,
l
'$
Ht~:g
"oliSTORE"
(SETTINGS)
*,o$l/"jijl,t,
ii!iiilii
(:;(j:la'0
7L,:\,,)
;ei!;@;
: oliSTORE
~~~~~L,:\,'O)<.',
~~~I:-SP-ltl
JElfI;(j:
~~u
" "fB>OSD"
2'
MIJI!~~lE~'fu7
Z::j:t1\
OSDii!iiiliiO)3l<~~,
:
NTSC-=E
*NTSC MODE
OSD;( =.:L-ii!iiilii,
~7J
~
A 7
.t.iJ<~lE
C");E~
•
:
•
PAL~
A
7.t.
iv
(9HlllJ-.7J0) "L1" "L2" ,,1l"t;)
OSD~0):l<:''fW!liJ(I'J>r.9tlli7
~i~ii!iiilii/jij!tii!iii!UI:3l<~,
:\',
0
"oliSTORE"
iJ<3l<'l'<.'~:\',
>]\'o$l
/
19~W~~~L,;(j:#~~.-S~~~~f!1IlI*2'~:\"0
-
I"
A
A1
'Y TO)iJIiiU:J:
:;fiv-i\'J
2'
,,~i§
:fJl1±~~[j;\W'if-,
L,
cl'
2'c'0
~lEJl'l13
(1'IJllJj~lEiJ''fu
*'
o$l
/"
jijlL,toIIi:Ir.9
7V~~7V~;(j:CO)
>J'
o$l
iJ''"
/"
jijl,
0
"jijl,
tOSD
ii!iiii!iiiJ<f!1Il1*
L,:\',
0
l'
'/
To)~~~JJ*I:"?\'
I),
~:\',
0
?ii!iiilii,
0)
NTSC-PAL
L,
cC'{,
T
l'
v,
{,;::
{,OSDI:
/;j<iviJ'
"'NTSC~
1:t;JjI)I!I!ii.~,
t
iJ<
i!i.>
I) :\'
'::n' C
J'L
oliSTORE
*,TIMER
2,MODE
3,CLOCK
4 ,LANGUAGE
~
t
5.CHANNEL
I
SELECT:
ENTER:
fB>OSD
I
*5<;-
OSD
'"t
NTSCMODE
A -( ';I
7fjtll
3.58
4.43
CTV
A
7.t.
,,~i§
X,
{O)I.il:MO)~fF"
,iJ',
t:
~
1;l:1li:~<.'
(;I:
~~~I:ii!iiiliiO)
TVii!iiilii
itjljl
VCf~'
...
t/J.
,;,
...
*5<
;-itjljlL,
...
SETTINGS
SELECTION
t/J.
.;.
itjljl
...
ii!iiii!iif!1ll1*
lli
t.J
jr7-:/
NTSC
PAL
PAL
L,cc,{,
1;1:
~
A 7
'0
'OH
10:28
5.08
~O:o:
SET:
-/+
EXIT:
I
Do
TT~"
'?:fl
T~"o
EXIT:
a I
L,
TT~
"0
I
A T 1>
1i'i'C
1i'i'C
1i'i'C
T
l'
/;j<
L,Hi¥I:,
i!i.>
I):\'-It
""0
.t.1:~lE
2'
1J:.¥t.I:~~JJ*
.
iW&!AT'J
't:Cl
~*:\"o
~!St~:Jm~
A7'J7'0
A 7 'J
A7,y7'li)
7'
/0)10'\'-
7'
li)
\
•
0-
~JEI*J~
"24H"
!&iiJ-.7JO)1Ji!
'::'5::£1\
~lEl*J~0)9
(A7
O)!&iiil' 1
N~tc
12ai¥r.93l<~0).-S0)~lilE1Ji!
I
.0)'!"<.'8/i±J,jro$l
(0-
9,
-I--o)#.o$l
XI£
"12H~~:;E
1?~
:
12aM.9AM/PM
24ai¥r.93l<~
1?tl
:
:fJl1±~~~1
1?~:
El
ii
:
'J
7'~)
J-.7JL,cT2'
1?~
: '94
1?~
: 11 :
1 )
-1--
"t
0 :
8
FJ
(A7'Y7'li)),
if-(A7 ,y
'lli0).-S
.fF.O)~jE
08PMO)~lE
(AM/PM)
t"
- :
280)~lE
5
El
(;I:,
C'o
--AM"
PM" iJ'3i:1H:t;JjI)
'0
(;::;::
<.'1;1:,
-:
L,:\',
0)
2)
~~a!&iiJ-.7JO)1J;~~:lJEc'
!&iiHJ-.7JL,cl'
(L.L.-cti,
"0",
l.'o)
~
"1",
"8"
:a::A1JL,,'CF~
/H/!"?c~lE,{,Jl'lI3I;1:,
/)
H/!?;::
3l<~
O)~lE
t <.',
l!!l:1ili!jj.I:~lE'{';::
ii!!lll,
{, I) 't:
-1
(12H)
-2
(24H)
_
"1"
-
"5",
"0",
"On,
PJTO)iI)
Cl
/
~
#.o$l/
#.9/
"2",
"8"
0)#.
o$l
"8
FJ
7'
8)
AA
I:
0 "
J -
"g
".
"4"
>]\'
o$l
/ "jijl
t U
~
:
--
iJ'p
I) :\'
--PM~:~lE
24H/12H
TIME
DAY/MONTH
YEAR
!
SELECT:
ENTER: 4i
Tt./.
-12':
, ,
SE'l':
EXIT:
6o'AM-
i.'O'l
-/+
9
2'C'0
"1",
-1--
AM/PM#.
...
o$l
/
'.f:jijlL,cT2'
C'o
, :.:I:@'"-
[ TIME
-:--PM-
" ,
...
" 1
ll
... "1
II
"0"
...
" 8"
(J);j'f
o$l/"jijlL,cT2'c'o
-ll:OBPM-
[
TIME
'~'"
" , ...
I)
tiJ'
/
JJ
12.
'00
I
...
[;)]10
Page 76

OSD
z
O)VCR
1 : TIMER..,
2 : MODE
3 : CLOCK
4 : LANGUAGE"'OSD
5 :
"MODE SELECTION"
(;t/
(;j:, OSD
SELECTION···mci!0)'l1:1~:lX1i.~'i"T-:t0)jlj:~:lX1i.~(::i;:bit,
CHANNEL
A?
i!IDi'!ii'!:fle
91
?
'!:~mrf~
,··l3l.:tEn:!'!!YO)IDi:iE
"'TV:r"\'
!i1'1'pg~
I) -
-:>
-~i!ID7if,(JO)IDi:iEJ.kV'~i!IDpg~O)lit~~IDi:iE1Ji*
,'0
1'1'5HJ:
3l<5F
i!l
;"';juJ,O)IDi:iE~IDi:iE1Ji*(;j:13-"'-:;
/7'
"t<x0) 5
~O),iUR
'!:
IDi:iEIJ".,
Ji'l13
l'
A7°1/1)
'!:IDi:iE.,e z
0
O)~~
1J~i
OTVI::VCRO)~iW.'!:.AtL"t,
*"JH::i;Jjf)m3t
"90SD"
i!IDi'!ii1i3l<:btL,
"t1'~,'o
*'9
;...'!:jljI.,l::, "SETTINGS"
TIMER
llilIV".,0
=~~=
90SD
tL;m~j§ji'!ii(::~
~
~
SELECTION'!:5F.,
*'9
NEXT*' 9
;...'!:jljIitl;!'- OSD
f)
".,
;...
'!:jljIIJr ,
"2"
TV'!:e::7';f:r"\';'"
'!:5F.,"1"
j§ji'!ii1if!1Fll*~
0
JIii.)'iUijpJi'!:
,,-f,l;iIJ
1h;\(~'!:
MODE
IJ
"t1'
~
,'0
l::ii~±BI"".,
'!:~l!irf~,
TVi!IDi'!ii
90SD
77'y:,,'//f
;f51/,!,jlj!L,
,
*~'l'IMER
2:MODE
3:CLOCK
4,:LANGUAGE
5:CHANNEL
I
SELECT:
ENTER:
j NEXT;f
1
*:MODE
SETTINGS
SELECTION
tI
.;.
51
:>"l."ltill L,"Cl'"
SELECTION
O)~~~Jj[§
0
(;j:23-'"
-:;
VCR
iIJ
(SmINGS)
~,;loSTORE*,
:iEJ*l~
IV
T V
itG/®>J'
'!:IDi:iE
AUTO···;m~(;j:,
OFF ... T
"CFo!'
'0
~'o
•
e3l<5FJ*l~1Jf:iE
"t,
J,
...
EXl:'l':
o!'
9'
I
~
'0
I
J*l~
iOOmH::~~
!i1'1'*,
9;'"
9;'"
'!:jljI.,l::,
'!:5F." 2IT
""0
e::0)'l1:1~:lXtm'i"T
9;'"
IJ"t1'
l'
~"o
•
Tvl::'f;g~'!:'l1:ffiIJn't,j:,'1Iii'7
JJ,-j§ji'!ii(::t,j: f)
•
X,
1
7
)
i-
e::'l1:1~1~~1JflJlJ
(::Jilh
O)lll~'T-:t,!:jlj:~IJt.::n:!"
;"'i§ii'!ii(::i;J:
:iE
IJ
"t1'~,
",;loSTORE"
Ha~
IJ"tOSD
130)"AUTO"
'!:fle-:>"t "AUTO" 5m
~"o
;:0)
"AUTO" (::IDi:iEIJ"t
1!l\~i§iT-:t,!:jlj:~
-;"'j§ji'!ii(::t,j:
"tIJ"
?~i;,
~~i;(;j:,
'0
IJ<
IDi:iE~tLn
*,9;"',!:jljIIJ"t1'~Po
BLUEBACK
-
:to)jlj:~:lXtm(::
".,
0
f)".,
<,
X(;j:~a~:lX1i.~
"OFF"
i§ii'!ii1Jff!1Fll*~
,"(
1h;\(i~
IJH:!'(;j:
0
:iJJ,-i§ii'!ii
71)(::IDi
'~$
'!:lit~~
tL""
O)IDi
Hi!
i;:b
"OFF"
IJ
0
IJIHtWiO)$1il1!(::-:n'C"
,;loSTORE;f
BLUE BACK
I
SELECT;
MEMORY:
(8/Eil"l.'ilil.R
,;loSTORE;f51
51:>
Vr1'
IOSD
TVi§ii'!ii
•
'I'IJ.
.;.
•
:>,!,jlj!L,"t1'o!'
i§ii'!iif!1F1l*
,!,jlj!Ve1'o!'
SE'l':
EXIT;
o!'
~
'0)
I
~
'0
-~P,tp-
/+
I
0
~'o
G!]11
Page 77

t\H'Fr*J%l!
I
CLOCK(Il~hiT)0)5~~Jj"5!
OTVeVCRO)"Ii:iJ.!!'!::An"(,
;.-;j<Jvt:tiT.i')jjI;5i.
"lB>OSD"
iiliiiilii;/)"""'pn, TIMER ,!::;f-T
tIiliJIJ
'"
T,
=~;g=
lB>OSD
nJm.:li\'iiIDffii\:~I)
~
I NEXT;Jf 51;'-'!::jlj!
"CLOCK"
>I'
"(T~
>I'
51
;.-,!::jlj!T z ,
51
;.-
,!::jlj!t':tl,
,"To
t::,g-pt':"(T~
L,'C
.
TV'!::I:::7';;f"T1'
'\,
"SETIINGS"
OSD
F.:iilUil'l;;1i'!::
\'\,
I
"1"
;/)fF.:iilU'!::
iiliiiID;/)fM~~
lB>OSD;J{:$I;'- "jljl
77-17/'/'1
1
,
*:'I'IMER
2:MODE
3:CLOCK
4:LANGUAGE
S:CHANNEL
I
SELECT:
ENTER:
j
NEXT;J{
TViiliiiID
"-
SE'I''l'INGS
SELECTION
tt.!.
.;.
:$I
;..
1.'iIIIR
"-
SELECT:
ENTER:
SETTINGS
t n,
.;.
"jljlVCf"",
~o!lISTORE
t/.Jf)jjl;pIaT,
'y 7'
8-
>I'
.(::f,t
51
;.-,!::jlj!T
9]'[
O)OSD
-:J
"(~:lE
eCLOCK
L,"(T~\,',
~~iiIDiIDt::
:fnltJl~:lEO)
;;>;7'
l:TIMER
2:MODE SELECTION
~;:CLOCK
4:LANGUAGE
5:CHANNEL
I
o!lISTORE
"-
OSD
:fnltJl~jtlE:O)AT'Y
.'!::~ml
VCf"
EXIT:
VCf"
EXIT:
IB I
7'
",
0 I
8-
, "
jjI;
11'
r*J
%l!
LANGUAGE(OSD~~C1
~)O)
MlR
OTV
eVCR
;.-;j<JH::t/.JI) jjl;5i.
"lB>OSD"
iiIDiID;/)f3lipn, TIMER
tIiliJIJ
=~;g=
lB>OSD
nJm.:li\'iiliiffiit::~I)
~
I NEXT>I'51;'-'!::jIjl
"LANGUAGE"
~o!lISTORE
iID
t::
I NEXT,j;'
~~No.,~.g-b-tt
'"
t/.J
To
f) jjI;
O)!I!:iJ.!!€An
>1'51;"
>I'
51
;.-
HIlt':\l,
t::,g-pt':"(T~
>I'51;.-'!::jIjlT
pI)'"To
51
;.-€ jlj! L,
r.
"(T~\,I,
€jlj!T
€;f-T
:\:T,
L,"(,
eLANGUAGE~lEiilii
"(,
-eT
e:
\"
\0
TV'!::t:'7';;f" T
e,
"SETIINGS"
"1"
IlF.:iilU'!::
OSD
iiIDiID;/)fM~~
F.:iilUil'l;;1i'!::
\,1,
F.:iilUflMPJi
'!::
zc'ffi're.O)
IlM'FiJfi
lB>OSD
~~'Y:/;'-~
l'
*:TIMER
J
j
o!lISTORE
>J':$I
,
2:MODE
3:CLOCK
4:LANGUAGE
5:CHANNEL
SELEC'!'ION
SELECT:
ENTER:
NEXT>J':$I
1
:TIMER
2:90DB
3:
CLOCK
;fS:
LANGUAGE
5:CHANNEL
I
SELECT:
ENTER:
*.ENGLISH
2."';t
3'FRAN9
4,BSPA&OL
O)~fli\'
TViiliiiID
;.."jljl
Vel'''
"-
SETTINGS
t/J.
.;.
;'-1."iUR
"-
SETTINGS
SELECTION
t /.I.
.;.
"jljlV,T",',
"-
AI S
t:
-::>,
",
EXIT:
9 I
vel'"",
EXJ:'l': So I
\"(
TV
8o!l1STORE
n,"To
>I'
51
;.-,!::jlj!T
eOSDiiliiiID;/)fM~~
o!lISTORE
I
"jljl
VCf"
",
"-
OSDiiliiiIDM~
I
8o!l1STORE '!::jIjlT z ,
JR
~
n.,
OSD
ii!iiiIDl;l:M~i!
I
SELBCT,
ENTBR.
j
NEXT;J{
'::'ffi're.O)§j~iiliiffiilJ'lli
n,"
T,
o!lISTORE
t/.1.
.;.
aX:IT:
ID> I
9;"
1.'liiJR
L,
,1'"
",
"jljlL,,T"",
,.
OSDiiliiiIDM~
I
I
[;!]12
Page 78

7-
-v
/'
*)v~~~O)
;:
O)VCR
471.25MHz;/»
4800'pJiO)
~,
ii!iiiljj;/)f~:/1.,
l!!
t'iol,
L.'LL''''o
1;1:
T L--1::1ij(*0)44.25MHz
;;'885.25MHz"C'O)UHF 7
7
i'
;...;jt}v>F:;~
.Q
'JWC'~" , 0
'I:i!il!;;,
I,..
t:L,n;fl;l:,
II;\i;tf:lf,in;fI;l:, 0
- I
,;::O);tml:
~.17
"''''~~7
a
;...
~},f?
>d:L'
t
~,
iIO.Q
7i';...;jt}vHll':lE:
.1JHJ'13;/)'
-
;;'467
""'~-DFn'V~
[@'N@"@]
RF
/IF
SYSTEM"1 .,
'1-----,
G
iJ}
;/»
0295.25MHz"
-'r
;...;jt}vif~f;§:i:lHla,
'L:B
I),
O'I;l:m:(,EO)7
I,..
ill:
i';'"
;jt}v>F:;~=i
90S0,,1':-,
~NEXT;f-51'/
t: tl,Hti\IIO)$ir.!t:-:J\,'l
C'O)VHF7-'r
:B~~.tJ.0)7
-'r;....:jt
I,..
'L1'
i'
;"'':~:,;v>F:;~
}v>FV'~=i;"'O)~:lE:pq~lia~
~
L'0
;...
';l:~;r-
·~~I
~~~
•
.aSTORE;f-51:"'-
;...;jt
}H:
0
"t~;:o)VCR
=i
I,..
>d:L
'J:
?
8/(±);f-~/
I;l:
;"'1:~:lE:
OTL--l::tI::T~O)~~~A:/1.,TL--I::~I::T
1:~:lE:
I
BACK
>1'1':-
~VCR
~OSD
11?~:
7i';....:jt}vO)UHF25
~
t1!!~O)1ij(*~"
(1ij(*https://manualmachine.com/~"T.4A1'~70)~:lE:€~~
T~L'o)
;/)f~:/1.,
'0
1C2!=J~~~
.J:'lf.S:Lol51llo
j
~I'''''
r=-
s:i
""
\~
'I 1 cs
CLEAR;J{51
__
/
NEXTm
..
EhloSTORE
ii!iiiljjl:i;JJ
~;r-,
Ii{'i'pq~
7i';....:jt}v>FV·~=i;'"
7i';...;jt
}vl:i;JJI)
lil!iljjo)RF/IF SYSTEM"
T.4
....
ill.
<!>1l!l./B:Jll!
)i/jtlj;'-JI,.,
1'v-n',
>F
$I;'"
~jJjl,
"5"
TIMER
$I;'"
"j;;iIIJ
I)~:b
"SKIP-a"
~;r-,
'!:jlj!
L,
e,
L,er'""'0
>F
$I
;"'~jJjl,t,CHANNEL~:lE:
I).
"20"
"TL--I::1ij(~1
Hll':lE:'
~;{
1:.g-:b'it'LT~
11
.Q~.g-o
'LT~L'0 B>OSDm
l'
'Y 7
~
;:'1ieffl
0'0
RF/IF
SYSTEM
/
nl.
BIG
e. "SETTINGS" ii!iiiljj
","
;/)f#.(j'Hail'J"
#.~il!!PJT'!:CHANNEL
7
i'
;...;jt}v>F:;~
;/)<
....
j.l\iHIlil'J,,'o
=i
'!:;'f;
;"'No
RF//F
"F~
\,,'.;,
*:TIHER
2:MODE
3:CLOCK
4:LANGUAGE
5 :
I
j
NEXTm
1:TIMBR
2:MODE SELECTION
3:CLOCK
4:LANGOAGB
.'$;:
J
SELBCT:
Iii!oSTORE
CHANNEL
TV
TVii!iiiljj
SYSTEM"
-r
....
$I;'"
,!:jlj!
....
SETTINGS
SELECTION
CHANNEL
SELECT.
ENTER:
C
ENTER:
t/,J.
.;.
$I
;"'"('ll!~R
....
SETTINGS
BANNS
L
t/./..
•
m$l
;...'!:jlj!
....
TUNING
'Y7
HfilE
L,
er""
EXIT:
L,er'"
EXIT:
l8> I
L,er'""'0
-~t$~P~
-:--------
9 I
L,
'0
"0
p-
e
[;!]13
fiDHID
00
lID
e/EfJ;Ji
$I;'"
~~:lE:
, 0)
~{ib
I,..
'LT~L'0
'L7
i'
;...;jtJV;r-:;~
(;:
0)1?IJC'
=i;"'No.
1;l:20':~:lE:
e/(i)m$I;"'"('OlilE
I,..
"
I
CHANNEL
I
SELECT:
MEMORY:
./..1
r
•
....
L,
er""
SET:
EXIT:
SKIP-20-
-/+
0
'0
"'I
, "
I
Page 79

!iMtMQ)11'iJ11n:-:n
'c
l*{'i'r*J'J!l!
/i'jNEXT*'
TUNINGO)- :
O).~~*O).~.*~.t~G*
7'-~-.=/7/1/1'
7'-~-'=/71/Y'T-"-
(E);j("/ "iI&fJ>r.9j1jl' I:
,,-(J)
(1
I'
iiL(VHF/LOW)
[
HIGH),U(UHF)IOIllt>
<::
'lfffl!(J)t&Jl'7'-
T
i<'
<::~4f:1)1J&iiil\l'7'-~-'=/7",~I;I:,
VCR"('?'- a:
Hi!,~,
-I;')'JIl!'"-
l'
/ '!:
¥!l
G
-rT
"',
'0
r.\\i.l\\oo-pJTliTV
--------"
......-..L·!-------'
I .
"I"
Jlil?J-iiii\\j"Hilll.>,
/Y'T-"-ii;l;",,"('1T<
t'
'0
(;:;:"('
*"/"
2)
13!IJJl!i""~II.>~".~,83<~(I)*"/
"
1I9ljljl["Ti<,'0
-.=
/ 7' [, toUHF25
~
101;1:,TVt:(J)7'-~-1"-(J)257'-
,,,~.g-['UirFi<"o
-?
"f,;!W
''\\lll~
~
~
i!!;,'lliJijj(iI&
1):"
SKIPJl<;f,ih1l
13!IJJl!i"[''''o
1:7'-~-'=/7/1/]
10-1;')
'JIIIt>
'J,
~..!~IIIlJ!!'
'a,
0
/ *' Iviiiiilliilot±1
1;1:257'-
t'
/*'Jvlojjl::if:
119l<::l:lojljl["Ti<"0
iiEla~(J)t&Jl'v'
G",",
..
,
.1
;O;;"lliJijj(iI&
,"-1/
10
H(VHF-
~
"
"('110
'J)!&
[,,,,
83<1;1:(1)
t'
/*Jv"
;l;llil
'/'T-
0)
C?
NEXT;j(" /
CHANNEL
TV TUNING
I
(I);j(
[, ,
\TVTUNING
OSD (J)TIOTViiilliiliJl<t>n",0
CHANNEL
TV
v'
TViOOilii
"j~
SELECT:
MEMORY:';'
" /
"iI&fJ>r.9j1jl
VCfi<,
1'/J,
'0
skIP-2o
) , , I I , ,
~~-}-,--,-,--;,--,~
SET:
-/+
EXIT:
19
[,
,T
i<
, '0
..
L;,f------
TUNI~NG
~ui~-'-~:~-
'l'
-;>
" ,
I
I
~oiISTORE
:hOSD
1'8l,
iI,m-r
'!:jljlG
-r,
:;,
3
/No,
~~Jj('.lE
;J'1'
/ '!:¥!l9 z ,
iOOiliitJfWf~
7'-
-\'
/+lv*':J:;'
r.\\j.l\\OO-PJT
'!:e/(E);J'
G
-rT
'"
.lEr*J'J!l!lna'~",
'" :h",
9,
3/
HJl:lE9."I,lj-&I;I:,
'!:
111'
§
o)CHANNEL"~
l'
/
'!:{ieCl-r.lEG-rT'"",
"0
G
-rT
I
SELECT:
MEMORY:';'
oil
STORE
J::,a
"',
'0
f
O){t!JJiO§
t/J.
*"/
..
I OSD
iiilliiMIlJj\
/i'ij!jO)fit, j
;:CO/ff,/1(J)
1;1:
A T 'J 7'
7'-
SET:
EXIT:
"jIjl
NEXT>F'
-\'
[,
/.:j;
0-
,Ti<
I
-/+
9
l'
lv#V
/i'0)
I
"0
/
Q] 14
Page 80

7-
-\7
;..-
.:?-
JV
Cl)
1!«V'it!!
*i\fn:
7'
l'
/*JL-~:;E:
:/1,e,HiliV'i!!!<,
l19tl
: 7'
l'
/*JL-'.!':;~,.
OTv~t~T~O)~~~A:/1"Tv~~~T
~7'
l'
/*JL-l:i;Jj
f)lB>OSD
iJf~t.>tL,
*'0
..
j NEXT*:lz/
~ii',
""'STORE
imt:i;Jj~Jmt.>
F.i\~Hi'iil')*'
filS/EEl*:lz /
'.!':;~,./~~:;E:L,(T~
~:;E:
;ji:lz
TIMER
"5"
;ji:lz
L,*,0)
L,n'IJl
<:
t:
ii1'
~
*,
l*{'Fpq~
/12HiliV'i!!!<'~.g.
~Jm~(T~
/
~jIjl,
C,
~ii',
~
jIjl
L,
r
F.i\iJllfj![pJi
"ij\;~L,(T~l'o
/
~jIjl,
cCHANNEl
f),
7'1'
/*JL-'.!':;~,.
0
~1le",
(iiliV'~
!J
1i
'7'l'/*
0
l'o
"SETTINGS"
",
"
iJfF.i\~Hi'iil')
L,
tol
l '0 (<:<:1'1;J:12t:
JL-'.!':;~,.
~
CHANNEL
~:;E:iiID
/No.iJ
'7'l';"-*JL-
lB>OSD*9:'-O'/I!l
I
iiIDim
NEXT*9/<:'i!UR[,Tf
I,$C:
"'STORE#9:'-O'/IIl
f
/t.fao
;tITIME:R.
2lMODE
3.CLOCK
4 I
LANGUAGE
5:CliANNBI.
CHANNEL
CHANNEL
TV TUNING
.Q~.g.,
)))TO)l*{'F1't
TViiIDim
VCf~
....
SETTINGS
SELECTION
EXIT:
....
VCf~
....
L:.------~
IB ]
"0
~
l '0
"0
!*{'Fil!i0)i1!'fJ11j
7-
-\7
;..-
':?-Jv1!«V'it!!
l*{'Fpq~
!f9JJ:
7'1'/"'JL-'.!':;~,./1aiiliijM'~%
OTV~C~T~O)~~~A:/1"Tv~~eT
~7'1'
/*JL-t:-I;iJIJm~
j;)8>0
..
I
""'STORE
S D*:lz
iJf~t.>:/1"
*'0
j
NEXT;ji:lz
~ii',
"5"
imt:-I;iJfJmt.>fJ, 7'l'/*
F.i\i~Hi'iil')
/~jIjl,
TIMER
;ji:lz/~jIjl,cCHANNEL
*,
~ii',
/~jIjl
L,
"1'$~L,(T~po
0
!J~~Cl)l&
(T~
l'o
c "SETTINGS"
",
"
iJfF.i\iJIIHi'iil')
r
F.i\iJllfj![pJi
JL-'.!'V'
~
CHANNEL
~:;E:iiID
~,.
iiIDim
/No.iJ
~J
tt
!J
iJ)
t~
8>0
S D
I
j NEXT*9
I~,:
"'STORE*9/O'/I!l[,
f
#9
*:'1'J:MER
2
:HODE
3,CLOCK
4:LANGttAGE
5,CBANNEL
I
CRANNBr.
TV TUNING
SELECTION
SELECT,
ENTER:
CHANNEL
SE'l"l'INGS
:'-<:'i!!lR
TViiIDim
:.-Hll
....
11,1.
"*'
....
....
[,
EXIT:
[,
L:.--
I;:"?l
TT~
TT~
TT~
_____
'L
"0
9 I
"0
I
"0
,1<
CHANNEL
Ifo'ClEAR *:lz /
:;~,./O)~ii'iJf
JL-iJfiiliV'~
fire\1
({i!l0)
tol,~.g.I;J:AT';/
~"'STORE*:lz/~jIjl't,~:;E:pq~~~~
~
ttOSD
,-"5:3:~
iiliV'~
~tt*-ttft,iJf,
G!]15
:
L,JIl\~
~jIjl
L,
(T~Po
"SKIP-12"
~
:/1,
toz c
~
ii'L,*,
7'
l'/'"
JL-'.!':;~-,. /~iilim",
7"filt
fo'Hi
imimiJfM&;~:/1,
~
:/1,to7'
l'
/*
r)'E:::J/O)il&{~*:lz/
*,
JL-*:;
7'
l'
/'"
tIJIJ7'1'/'"
0
fJ1!&L,
(T~
0
~,.
(0-9)
JL-'.!'
L,
l'o
/ t;J:CHANNElS/EEl;ji:lz /O){i!!ffl1'
CLEAR*9:'-
O'/IIl
+
[
CHANNEL
"'STORE *
~1le?C~ii'~-tt.Q*iJf1'~*'o
I
OSD
9:'-
....
ii!iiiliiA¥Jlj\
[,
TT~,
-SKIP-12-
O'/IIl
," I
-12-
'0
'EE1E"
[,
TT~
,
"0
, , ., ,
I
t;J:~ii'
fils/(j);ji:lz
JL-'.!'V'
l:aot.>-tt*,
fo'ClEAR;ji:lz
;fi':;'~
iJ'
e,
iJfM&;
fjret1
~M&;L,tol,~.g.t;J:~.
l'o
~"'STORE
~
:/1,
/ Hi!!'"
~,./~
3
ilU
~
({i!l0)
0 S D
ao
t.>-tt(T~l '0 (<:
0) \
/~jIjlL,(T~
/(J)~jj;.1Jf
*
,)
t IJ
:/1,
tot: c
~
7'
l'
/;~UL-'.!'V·~,.
;jf:lz
/
~jIjl,
iIDim
iJfl!¥&;~:/1,
(iiliV'~
"12"
fJ
ii'L,*,
L,
tol
l'o
("SKIP-" 1JfiijiiJ
7'
l'
/*JL-O)iili'(f~
0
/O)iiliV'~
fo'HtIJ1!&L,(T~
z ,
~:;E:pq~iJf~a'~
* , 0
7'1'
'7'
l'/'"
<:
l'
/*)L-
1
SELECT:
MEMORY:
e/EiJ*9
1;J:
12
CHANNEL
CLEAR
L,
I
CHANNEL
L,
"'STORE*9/O'/I!l[,
t/J.
SET:
.;,
EXIT:
:'-<:'Olili':
[,TT<'"
....
-~IliI.¥-\lt-
*9:'-O'/I!l[,TT~
....
TT~
....
I
OSD
OOiiliiA¥R:it
-/+
"'''I
"0
I
0
I
'0
",I
-12-
" ,
"0
Page 81

MODE
OSD
(?t:.--
A
'7
I) -
;...-
T'
l'
A 7°
[...-1)
t:
~
~
\"(
1*1'FilfJO)11'ii(:::-:J,
'l
• I) '!'::J
rl--------~
'I
t-o:
"MODE OSD"
a
7)"080
~~
SP
IIlL
ROIl
10:28
25D08M
--------h
•
SP
IIIL RII]
'94
1\-7080
CAUTO-'I'-70
"'
$I /
",jljl,
Iln:;Xf})~I:3l<iFI
8 D
-.
71v08
r7'1'/;'/.lv3l<iF
I) 7' I: r1'J'S'IJ''lNJ'J
D
(31:im3\<iF)
(jlj:~,!,-
t'niflJ:3l<;j<~n:<ttA.o)
_
14
7
)"080
.---
DPSS
19
0:16.001_
L------OP88l!1JfF~0)i/j.
17'1'
14
/;'/.)v3l<iFIH E
C'O)3l<ii'I I)
'!'-
1'f})11!;t"
-.
7'
It3l<iF
:<,
°F F
~
n:<,0
0
J
(,1) AUTO'!' - t'f})niflJ:,
• ftlI.l!:im,
AQ-,
2il?i,*jlj:~,
DPSS
3
0:16.00
'll'il;
-j-
L.-toJ>lIH
l:'7'of-lj--7'IlifI:IJ:O 8
OP88l!1Jl'F~0)i/j.
iI'J
3f'J>rollt"
It3l<iF
L,:<,
0
DiiiiimlJ:3l<iF~n:<ttA.o
[;!] 16
Page 82

dS
~'lPidliH!il!~:!i!f',2..-1-;Hj):2)
IS')I<M3
o
~
~fH'It-:IS')I<""
'10
-:
IS')I<M
~'1"'}~\
DD
@.Q]
'''(:fl-'ItI,
3~fl
1i'1t::lmr-,t-COi!7-
'"
fl,2.~lfll1!,CJ~
:I.,G--&-f',,f;:l
~~
'~'lt1
(,"11§!~\OI
'",CJ2.1ill1'1o-:IS')I<dO.LS
'It(, '"
etll!~
~
I'
'~'lt1~,U
',,(:fl-'ltll
'fl::l
f!;/f?W!
~
iI
,~'It11:I
''10
-:
>
E!i~
et
:H!l!!!i!!~:!i!CL>[;!Oi!=1
IS')I<"
~
!!l1'iI'M
'11"C.~,2.if~'Iot:--,f2.1ill1'1o-:
'fl:I~:fl-"g*,2.if~I':f'lot:--,fO
"111'1
I' " c.
',,(:fl-'ltrnR~.~
"~lI1'a
,;;
-"*.f<~;:l
dS
@.l5]
Hl:I.,G--&-f',,f;:l
'/!f
('''(:fl- 'It
1~~~
.<CJIjJlflilif!!il!.,G--&
_/_flol'l~lI1'*l!j'
SOfl.:l-3,.,G--&-f',,f;:l •
~
,2.,~
=1
:2
(1*i§"
-f',,f;:l •
•
.,G--&-f'~;:l·
:$~f~
~illI'Io
-:
IS'
)l<A\Ildl!l
~#:!lI11
~~
'~'lt1ill1
f!;/f?lillf
':'.~:!i!O
'::H;U
'"\12.
!f
~
!!l1!!il!~:!!!:
'I
'11§!
~\OI,2.
'It
!IP,!fCL>(ft~Ht:-
, I /
-,f
:lii<l'lli!i!fl
-~-
'~'It
1 'ill1''Io*',11
'~'lt1l!l!W.,~"'CL>a
2.1
illI'Io-:IS')I<
s 0
''''~~l!j
3.L\l1:I3dOCL>
~
o1\ 0
•
'~'lt1rn~II'Io-l
~
o1\
'=1
~
~1:,2.
'ItI'
'ilJt:-
-,f.,CJt:-
'"
"""-2.1 illI
L,,",~:fl-'i~k-:~
'1'1li3,h~'7,fr"1'-C1-1-:ck<~r.·~-1-1--f'
("1"",,-2.1lli!$'Io
~'It
1
:11'",-:
'10
-:
IS'
)f<dO.LSfl:l
.1iI~~~r<'k<~~~-I-I-¥
r..
~-1=1~'i~:I.L(,W,CJl!l!W
r~~IIlH
--f'1'<:::J
'~'lt1ill1'1o-:IS'*A\Ild2.1.j:Y'Io-l~'!-'Il!I
4-.,GW:/ii:-f',,!';:l2.lIY
~
~
CL>,(,-:V6~)
'~'ltllY'Io""!I>
HI!
~JU,l1
iT.
'10
!I>
CL>;:l
CO
=t?M
r..'!-
-,f
~:!i!@
'1,fO
Jm!~::'ll'<<1H
:!!!:"'!!il!~,,2.<f4
11
"'!ilIi;IjM/~¥J(IflI'~CO-l
'"
Y::l.~-±'!>:!!!:"'!!il!~,2.IiI~~\
'l'F/1
YiH
o
~
~
$
,2.JCJ::?
~2.1I1U<~
s
~2.1
iIII~-:~
-~r t;.
-Ir:'l-
q:.f<~;:l
:'
"'~::l.~
••
.4<;"
)[!Altld..,<
)[!Altld..,<~)[!03l:lfl
~)[!03l:l
r..}-t;.::?
1E!i~f!,2.
'(,
SI'
-±,!>:!!!:
0{I(,1-[$
2.\
1.f>hCJ
'!!il!~
9
,.:f-tJ1(
'fl,2.~¥J(IflI'~,H
,2.~"ij¥J('!ilIi;!JoI
"'~l1i!IU:rh1-[$
s 9
,CJ
2..fl-
"l!/llflI'k< !-
,f,l.~
-
±1T~f,2."'}rIi\
L . '!
~
-
-&
¥
,.:f
o~~(, Y::l.'1 -±'!>:!!!:..,
-~r t;. r: }-t;.
s '"
"1T~~
~-
t:J1rL:"
-~
o~~(, Y::l.'1
-~r t;. r: )- t;.
,CJ2.'1
o~~~,2..,CJ::?:'
'!>:!!!:"'!!il!~;D.R
1E!i~fll:l
'C
_±'!>
o~~
:1.:-1
-±1T~
fll:l'J/\
'J /\
41:,;'4
.;:J
CO:'
CO:'
~<~)[!103r3co<c±(,ml
.,CJ.::!!!l1!!il!
r<'Y!Ilf
a S 0
'::?,1:171Y!Ilf>13!~-I
'1
.Q:'ilJG'~:l
"'~~*lllCO"'f*
•
(a
SO)
0~~'1i111
'#*1:1
0~~~Y!1i111'vDY!Ilf-l~'l-q:~-I~'l-q:¥£;:l
'J/\fl::l~FFl(,llU-l
'::?'"11"y!Ilf
0\1"
",,-,2.\1:17~Y!1
r.''l-q:
O~~('YJf,llOlf~::l&err1Oij
*~
It:y
~
CO
r..'}q:
iIII
'v.
::liliEilU -I r: 'l- q:
o,,/.fl-
'!
1:,
0~~1.Q:'iI
>
'13!P
-I r; 'l- q:
~1~ijlfll'.,G'~
'fl#*1:I
4-
Cl-
¥
,.:f
-s
'J/\
,;:J
Page 83

D
ltOOi
fl}1=.
~*ljMFO)
t
=1
X
i2S
~
J
¥f1=.
A.
I.
(.A.I~nFm)
:;f-
H::
'7
T
-\7
-.ti~
L,
ir]:
Ojljjoq,
I~PAUSE/STILL
,to'J:
71~,~tdl)l~,
;J(51/ '!'
VCR
I'!'[,:<,
l;l:iIjlJ!:OOiit
0 ;: nI~J: -0
'!'~
5
cMlJ!:OOitJ'1Jlt>n:<
>tr.91i'OIt
>.>
l::ii:%O)jljjol~I.>UJ
'0
11
RI
IiII
[Q§J
Sp
f)t
['MJ!:OOiI~
I::[":/;>
'!'I'!'[,c/1A'I\-'!',J!i
I::["jij:V'PAUSE/STILL;J(51
81
t [,
MlJ!:OOi
69cT!!
0:::"'*.'1
li!PAUSE/STILL
;::';:£~
'1i!IJ!:(lii.
'MJ!:ilii, ::J'*.'IOOi(lii1.'IHti"'l;l:tJj"-tth.
~
-\7
Ojij:jo'E-I'q,I~SHUTTLE
I'!'[,c:/;>
:tv'#.\rr""l~)
f):/;>t-)[,.:$I1-\')[,.'!'@['c~&J;.0)'E-I'1.'
~M"T!!
'MlJ!:iliijij:jo, A
10
(~lf),
jo,il!i~~~T.~-~
T.~-~
(ifl:lf),
-
I'v'*
.::'il~
':/;>t-)[,.ON'E-I'1.':/;>t-)[,.:$I1-\')[,.'!'.~['c
, '~ai¥
,
:/;>
t-)[,.:$I
O)~~,,@,v',
"REW"
.il!i~~O)jljjoilii.Yll!t>n:<'Y.
R
0)1&1\ll:1.'
. PAL.
10, ziJillfjljjo,
-tth.
o
,
SHUTTLE
1~I3!1M~I~SHUTTLE
/ 1
A'/~-V'mt>nto
t-)[,.:$I
1-\'
)[,.
'!'
['Tf!!
I~/N,U
J;.
>d:ilii(liijilln
"0
ilii(lii
HH
I~I;I:,
;J(51/ '!'jij:ill:I'!',
:
::J
,*.
'J 'E-
1'1;1:
"}v(i
~~~I::'T.~-~
:
IHt
O)~~Ao@,I::,
MESECAM0)L P
l'
-\7
}v~fl?
t-)[,.o
N'E-I'I::
"0
Cl-jljjo
ii:%AI::'-1'
(~lf),~~~~T.~-~
L
J;.,'
tot."
It:<,
i'"
1;1:
tJj
:<-tth.0
1-\')[,. '!' "STILL"
:<tol;l:
I;I:;J;
'J :<-tt;"o
I::'T.~-~Hr»:71::,
ON'E-
1'1: Lc
OFF
G,
SHUTTLE
SLOWO)1:itilll:
"0
/'!'I'!'[,cT!!
v'll! t>n to
MlJ!:iliijljjoq,l~
v'PLAY;J(51/ '!'
0 S D""ii'!!
[, c
't(})1~SHUTTLE
I) 'E::J
n:<
o
-c
ON/OFF>F5I/'!'
[,:<'0
(i!\;lf), A
(Jit!!!\[,), ziJiljlj
(.If),il!i~~~
(~lf)
0
"FWD"
:$I1-\')[,.t,<i'FI~Jj(Vrlll\l
,aUT
~"c
'E-
(7/
Cl-jIj
O)~'E
O)1:itililti'
1'1:»: 'J
G "REW"
O)~[ii]v'G
;:n~Vc
- :11>ZV'NTscO),aUT- :t1.'MlJ!:ilii.
t 1 >tr.9P1J::/;>
:<'0
ON/OFF;J(51/ '!'I'!'
SLOW'E-1'1::
"0
",
t-7 '" '" /
;-O)F,ADV
I'!',
-tth.
o
[" t-
ON/OFF;J(51/'!'1'!'
7"
;J(51/ '!'I'!'[,
1::,
ii
:%jljjoilii(liiI~)jPJ
[,:/;>
ch
'"/
7'''V'A;J(51/
[,SHUTTLE
V'A;J(51/ '!'j~[, clill n '!'J!:
cT!!'
0)¥f1=.
SHUTTLE
SHUTTLEON7/1,
:/;> t-)[,.:$I1-\,)[,.
OOiOOJ:SBv'-:!J~1~2J;.:<,v'I&I\ll:1.'I;I:;J;'a
t-)[,.:$I
1-\'
ON/OFF;J(51/
::J
,*.
)[,.'!'MIll [, »:,'1::,
t-)[,.O
:<,
T - :tV"",,"
:<,
0
N'E- I'
OFF
'0
0
'J,
ACl-jij:
""~O)~
'::O)VCRI;!:,
ijt.
d:ij.<.L,~~d:7~,l'E
O)";Ht1i~~Htltn';!:,
(I)
::tl1!li1i
'::o)VCR~,jij!t.0)t-7~'f/~>fr13
~1.'••~'~1i.1."o::t-t-t-7https://manualmachine.com/~1ii1i~,*0)~~~~~[,;!:;0
,n~7t-T-:1'!'~A[,'jljjo,!,~~[,~.0
,
jij:joai¥,
,jljjoq"
, jljjoq" ,aU'>";O)T
(SP~LP,
,
:of
- t-
"aU""lt~v'jjlj"T-:1O)J&~,
I,.»:J&~I;I:.
T~I,,\o
un
::t- t- t:''77-1' - ::I
~.Il.'iIi'1.'~a~!!
-1i!!~tH
z./-(
d:
'HU\h'i]!jjl~t
0)
"EDIT/OFF/ON" A -(
~"4-.::o:.
e-
Jl':
'y,
SOFTO)nAo[ij],1::,
HARDO):!JAo@,I::, iliiitv'< -o!! 'J [,,,,v'. .J 1
(ill)
;:o)VCR~,
I3~B~I:"'Y
• EDIT OFF ON
ix.m. .
I:~~TJ;.I~
~
1.'OOi~O)lIlJf/'v'tJj*",
7}),::t-
jij!ti]!jjl~>frd:')<",;!!
0
t-
t-7·~'f;...~t'::I;'"
&;fi;O)ii:F,i1.'TRACKING"
!!!\,aUSB>t
-:t
SP~EP,
t-7
'" '" /
'1'::J
TRACKING"xl;l:A;J(51/
:h.t:7'-7'>fr "AUTO PICTURE-ON"
'Jlil?t;!: 1.'g M
A'O)J"
'~a~)1jT
;~iI;!!
H:I-}),
'!'l!l~c,
/ f-Cl-)[,. '!'
jljV',au,>,,;1lIl>t0)jij:jol~A
AI::'- I'v'j!£t>-0
LP;:EP)
:of-
;...
t-0-}),l1!li1i
'I:jij!t
'~7-
1.';!!;!:'
-7'O)jij!t
>fr
L,;!:,
>fr
"ON"
:iJ~
.tt.1l\'iiIDOO
I::
A;J(
51
/O)jIij:!J'!'
to.
o
;l;:1*q"
0
!tll't""ii'~
l-
t-7'""'/7mljjW10Jv'»:"J&~v';J;'J:<,0
Hih
r / 1
0
Hr7J
711\f,
;:O)1i~~>frl'F~~
>1'
V':.-
I::
A'/~-
z
O)1i~W
3
/1:L,ll'~"0
t-7'"~/7v'
*?ll,,\t.i'I,,\i§jil
""ai¥I~1'!'
>1'V-:'-
[, Hi¥o
-0 Hi¥o
0 S D
O)'f--v'l&fpr.9#.\';'<L:<,
UH!#.\I~lIlJ'!'l
3/1:L,ljij!t,
/-rA'>fri.\t1-'~-IH
tt~
1:1;1:,
VC
[,c.;ei,,1ll
R*f*
;:0)
~
t
eJ7f!J
0
•
~
AUTO
PICTURE
~
b
-tt"
MOO
I'Yf'JO)iOO~j~ll!'
0
iOO~v''I'>b
~"'.~
1"'71)-:::;"'7'l1!l~~
~~7t-T-7'>fr.~L,k.,~lj~~~t-T-7'>fr.ij~['k.~
F>frm,*L,;!:,o
GV'< »:
'J,
(PICTURE
/1
A'V''}'»:<
TONE)
>d:
A'V'~<
>d:'1
'J",
:<'0
PICTURE
TONE
0
o
SOFTHARD
Iil~Mti~
J:'J!!n"»:AA{t"liii!lli,>.>to69O)m~"1."o.-
~
'!'
EDITI~~lE
[,r <
e«
"0
Iilliv'iIl!t> -0toG.
rl::'?~;>-
ONx
I;I:QFFI~~lE
(AUTO
[,r <
PICTURE)
to!!
"0
A1'"
[;!J
18
Page 84

£:>$:
lliH'F
(J) L, tJ'
t~
NTSC~~T-7·0)~1:.
NTSC~A
c":.;:t~
:I5*/;/),'td.:,'toV
:tL>'>~.~~,N~Co)5'L--I::'&~<=VI~~O)5'L--
1::"
v
1~~5'
0)5'
?~
Hi-Fi
::.0)
• ':OlV eR
• l'l'!E",,;
~'j:t~
•
:;(7'v:t,
f-~'SOl~1J
G!]19
5'.k
('~a~<'!
(NTSC3,58/NTSC4,430),
L--I::'')
'::M:'i!il:
L--I::'
'::M:'i!il:
~
~i'~l"<'!
".
•
l'l'!EiOOiliil;l:Ii1IOlJ:
VCR
::lHJ'7'
• V-HOLD'y""
iliiilii~fi*n
t~U
*
..
c
• !I'i?!l'l'!E
>.lib
n,,;
':Ol;fl!;(;:n;fl:
-1~~...:I:~J:ij.AI~...:l:if1:'~*
•
NTSC,aii7'-7"1
OUT) lJ'"iliiifltll1JililfIfflliliit,r 'b, NTSCOl7'-7"'!'
;fl!t;:1Jtlil~
~-;:-~
VCR
IHH!I>5'
I;l:SP/L
7'-7"OliIIlilIl:*~Oli'l-lI:;(
="ii!ii'ifi"I;I:,
1;1:'1'
:tLt~5'-:1,.,
C R
~::lNTSCo)5'-:1"'jlj:~<,!
'T:tLiJ'tif'h'
t.r
~Jil"
l &
ii!iif~HiJ!JI!lJ
':H~.t"fI~:l'iTliliiJi.*"~f,
[.-I::'OlI&II;1:'
~
Olj'h'cc';(;:c'7'[.-I::'I~~c'n;l:,
ciliiifU'.!l.";1jj:I;l:1:'~
["t.I&*I;l:V-HOLD'y""
(1::'7':t-tj--r'
t: I:
~'iIi>
IJ *
..
1;1:
1::'7':t-tj--r*
PA
cj'FJiI<
["
t.7'-
nt;;T-7·0)~1:.
-:1'"
Hi-Fi'litF'
/
5Iv1:''',
P/ EP
Ol,lH-
i'ifi"~1Jililf-
(NTSC
PAL
<,!,'.fJ:15
;j;
-;iJfl"~aO)R.i:t::
1;1:
iIi>
I) *
*
~
Olm'i!'I~J:
iIlIl1::iOO'
, * tc , -t
1::
1;1::;(Q-'1'-
LOl7'[.-I::'I~cl'l'!E["n',,;"ift~,
(VIDEO
OUT)
~I::'
7"'!'
PAL
<.'jlj:~
PAL
MESECAM
SECAM
NTSC
J<'!'
1Si1J",m1j[,,*..,
1",
rOlOll::iEI;I:3.4
(AUDIO
......
P A L
0)5'
L--I::'('jlj:~-;
j I
l"
>.>
PAL
-=E-
>.>;:
I:
f;')
ti<.'
Gl
t
..
it
I.,
it
I.,
toft
t., V-HOLD'y""
IJ,
i*n'!'l1::11J
:;(Q-'
OlmliliiOl1lti!!'I~
H.,m
/7"";':
1:J'<tOl
T
>.>
::.I:
:nl!!'J)
...
VCR
iJf<.'~;j;
SP
"i¥!~I;I:.
J:IJ
1!Stf)j!j
J<1:'TRACKING
t.,
~ljOl
I:
1;1:1:'~*it
1:'l'l'!E["c
Hi-Fi'lit
7-:1AI::'-
0
0
0
0
"<-::;
OUT)
~'SOlJi.~1J<'!n*
~
Olj\j-c't.7'
ciliiifH.!l.";1jj:~'1:'
nifkiOOiliil~mi\.~~f
3t,,;t:
Cbf
...xl;l:
....
i'ifi"~1Jililf-
PAL
1:J'<tOlV
I.,
*
tdlh
'bi!Jl!iflll;l:i!JI!
T,
Jl'jlj:~
F
LP EP
0
0
0
-
-
-
0 0
I~llll
["c"f<'! C',
..,RFOUTilil
,Hi
iIi>
;J{~/ '!' 2
CR
IJ *
-;.
L--I::'
~
1);1:
..
(AUDIO
I:*~
c':Ol
it
I.,
-;:-
ps
I:B
'litF't±l1J;lffil'T-
0)'litF't±l1J (AUDIOOUT)
1)
ll~li,
(:;:J'C3!<7i'~.
Hi-R
iJf;t;iJ'S
2) ')'E::J/O)AUDIOOUT
le
'>.>'litJl'if):;;-l§-li'litJl'it±l1J;lffilT
3) I) 'E::J/O)AUDIO OUT
CL
'>.>'litJl'ii):;;-l§-iJ
4) I) 'E::J/O)AUDIO OUT
~
'>.>
'E/
')'E::J/O)AUDIO
c
i;JJ~p
c::'$:t~
•
Hi-Fi
OlUi'if'iXfiMfJi,H1J'1:'
n~U=7i-5",7Ol'E/5~'E-J<~.~bij*",
Hi-Fi"
•
;mm~;I::t-
•
Hi-Fi
'/7
7'-7"1:'Hi-Fi
Hi-Fi
i-5'Y'\</71*bitc"f<'!,'o
OTRACKING"'I:"'Oliilii1:JOl;J{:$l
fUTRACKING
OS
DOl
fi)TRACKiNG
"ibl" I:
HOl:;(
;'-7Olii;d"iiO:l~%bit*"
7 jL-;t - I,
ffjfUfJ71~:t-
jiJl:l<B:O.I!:fIj
13!IW1l91::
:1li
13
!lWil9t::~~
.::::'i.t:i:
•
;j!j*~l1::fIjOl7i:~<
8~H~A?tdi!.
1]
-=E
- ".
i:ID~
X
,::
? \,
\"'(
AUDIO
OUT
c=J
(AUDIO OUT R/L-MONO) iJ'SO)'litF't±l:iJ'E-
>F~/<.'1TfJc';j;T.
1)'E=I/O)'litF't±l1J (AUDIO
0) "lbI" I: '18)"
'E-
J<<.'li.
t±l1J)
:71~'litiJf'litF't±l1J;lffil'T-
I) ;j;
T.
'7
i-
i-5'"'\<
i-7'-7"'(Ojt!l~'!'f';ffl["iii'if["1::Hi-Fi
i'ifif~.ntc
...
"I"L R"I"
....
"~",
7"Y
7"1:'!il:3t
A5'v:t;j;tdi=i§i~'litF't±l1J
iJf<.'
~
;j;
f'litJl'it±l1J;lffil'T-
OUT
t.i:
'Y::f
/?'O)~t>it1J
/
7~~EI~
;J{~;'-I>F/,y,/I:*!f-<,
~f;j!j3t.gi'Ji*1:'~["iillt*
;J{~/
If';c
OS
DOl
"H
to'FjfOl!il:tt
,
iJfR.i:i:T,
T.
>F~/"'-JijljlTI:.
(AUDIO
>F~/ ,.,& ?
(AUDIOIN RlL-MONO) jilij1JiJ' S
>F~
/,.,&?-JijljlTI:
(AUDIOINRlL-MONO) jilij1JiJ' S
>F~/<tjljlT~I:'::
c'I&*::!ill'i-:; 'y
J:'J
1Sl!8~H~Jll<.Fl,Oli'ifi:~'i!'
IJ'I''il<:iEOlllli*I;I:.Hi-Fi
/ I
[ilJn;fI~jJjl
,,y,
/>F/I:*!f-
R"i"
~'lli'iF<'!n.
It.
OUT)
OSDO)
OUT
-JijljlTI:
'\<
/
["*
lRJ-r.'i\iil1:'jJjl["c:;:*lli'iF~Ol
..
<.
TRACKING"';J{~/
>F~/Hleflj~l.
""LR"I"
(~-'litJl'iiJf:ti:iJ'S.
Hi-Fi
5'-:1O):ti:fJlJj~:7,y~71::~a~<'!:tL
RIL,MONO)
Hi-Fi
I)
=']7-
•.
uaO))IlI<.'4i!'l!lilO)t±l1J'E- FiJ
7~'
A'L--cc''';1&*1;1:. .:OlVCRItIS
7'-7',
c
-tOlji!l'l'lI';j!j3t";i'Ji*1:'~["iillt*"o
::!ill'NTSCOlS
,aii7'-7"jlj:~<FI:,
..
0
[ilJ-r.'i\iil1:'~
~lm
~.fiIlW,
O)'Y
;(
UIU
~;JlliJ<
A
I).
<'!
,I.
PLAY;J{:$l/'!'jJjl["c"f<,!C'.
jlj:~"'~~i::
Ht
~
l,
jlj:~iJf1TJd:
:tLl.1J
<'!
~f?
cc',,;"if
i!,y~iJfJllUJ
~;j;-;.
1Ji!'Y~5' - :1,.,
P:tL;I:
T.
:iJi!
t±l
<'!
(;j!j*~J!:fIjOl
VCR"
'Y
~
5'-
:tL
;j;
T.
'Y;I.
~'j\j-c'
FO)~?}W:.
iJfR.i:i:TI::~l:l5~;j;T.
jilij1JiJ'St±i1J
O);t;fRU~:7'y ?'I::
~:7'Y
<'!n*..
1.t,aO)~OIl1:'~
:1iJfJlij£';j; <.'C'<1:,
[".
A:/1.
cc''';
c
P'E-
~ ["td!,l[
>.>
1:.
"if)I~1;1:.
I)'E=I/
Hi-Fi
'E-
~='litJl'i
<'!:tL;j;T.
~a~
<'!
t±l1J
<'!:tL;j;
T.
?'t::~a~<'!:tL
t±l1J
<'!:/1.;j;
-;.
i1J
J<1:',au["t.
;XOl;fl!t;:1Ji2i1:'
"ibl" I:
::.
"~",
HUt;:if'"
["c
i-5,y
0)
VCR
li
5'-
~;lliiJflSllJ
F
:tL
l
f
'\<
Page 85

VISS
(VISS
ADDhi.!)
Or-7',!:jiIj:!EL,-r,
(J)
"PAUSE/STILL"
~
"~R
r.,)
,<"1:
1
lD
i:::J
)
1:.7\
f);I:,
jiIj:!ElllJllIH~~
iJf1!f~~;l:tt;l:,o
00
S D
ADD~~~
iOOilii
t'lil'Hil~
*':$I/'!:jIjlL,;I:,o
EW"
*:$I/'!:jIjlL"
"PAUSE/STILL" *:$1 / '!:jIjl vriljl.tl:iOOl:
/(J)
"fjVISS
0)
(J)
"VISS ADD"
2
ADD" '!:jIjl
'f'J>1'0SDI:
iJfiJU
...
VISS
ERASE~~~0)1f~
'11
'::'i1!!::
f.j:iJ<0
Vlssf~-lH.~~J;.to"iWl'
~1
'f'J>~t'T:t't-7<'iin
L,;I:,0(iz'y
"VISS ADD"
toniJiJ>\iISSf~~1!f~i2.J;.~7(J)nil1."
HHHiM91:STILL
iJf#.\i,:mI!.~l'3l<ptt;l:'
(jiIj:!Enilr.'1'3~4fJ>
L,;I:,
0
,
I) i:::J /
'!:WI~
L,jiIj:!E
0 <:(J)nWlss
0
•
7-7";(~-
(p
A L i'NTSC,
111'VISSO)
•
ERASE
tii'!''!'
,
ERASE
!!hi'!''!'"li!lOJ},\!i'!'*;' / f I'l'" "'C'
•
VISS
ADD/ERASE
ADD,
£*I\\H'FO)GfJ>to
cO)'JlOlt:,<>{;IJii(SPi'L
PAL
i'MESECAM,NTSCi'MESECAM
ERASE
I~HI"1J'ili"
Jhi,!,,!,OOOO1i~j>@n<>;;;1i<l1>')
IHT;;;'t>;;;','1'<
-t!;"1J'INIIl1'
P, L
IU
'a
1'1'"
tt"
Pi'E
p),
,ai><1i;l:1J''JlOlt:,<>{;IiI'
etc.)
:sz.1~,
",
j1j!EOOiI!!O)i!\.n<>rn;"'I~"")'"
-t!
;"0
C
'0
",1J<,
1N,*,1'
1"<11>')
7
-7"OJ:lHJ.JO)I!B
"-t!;,,o
0
TSE/ST
~
PAUSE/STILL
~
1I~~~C!!J~\2)
"
I'
-VISS
, I I , ,
~i1:tl
,
• ORjj!j*IWl!:';I;< O)jli'nto:1J't!'y
•
•
:
VISS
AOO*;';"
I~,
*;'/I~-@ttltl'l'L"<:1'"c'o
ADD
Jhi'!''!'
ADD
"hi'!''!'
fl'l',toV",-(/7',y
"HI"liili"
l~ii!lOJli<i'!'*;'
-t!
f"lilNllf1'
/
?;(i"-%lillF>11m"n,,,OJ1',
1-"
to
IMIl\,ai><~B111'o)A
I~
<11>
1~1'l'"
;;;,C'1'1'"
') ,,-t!
1'ClOJ*,~~3
0 0
1~1'
>11"
-ttl"o
;"0
C
'0
(VISS ERASEhJt<)
Oil!l:*
L,
to,
,vISSi~~iJ<'j!j'
'!:f~
'Cl
-rl*L,t±l
~
01'jlj(
L,
lD"~FF"*:$I;",!:jIjlL,,~18~t'T:t~-7<'i-t!<:
('I:
"PAUSE/STILL" *:$1 /'!:jIjlL,-rMl.tl:iOOl:
1
0
i:::J;"(J)
)
-71:~ITL"VISSf~~~t±lI:.7\'Ja:'
"VISS ERASE"
t
(J)1~§
~'!:)I!l:*L,;I:,o
• 0 S
DO)
"VISS
L,;I:,
to{;I~l'
"~VISS
iJ<
ibB91:jiIj:!Ei:-
(<:(J)r.,OS
ERASE"
{, nil
I;!:
, t (J)vISS(J){;Iill"!:DPSS
0
"PAUSE/STILL"
ERASE"
*:$1;"
#.\1JL,;I:, 0
1"1:);)(;
'),
D(J)
1J'iIJ*L"<:,
(27"<-
*:$1;"
'!:jIjlL,-rMl.tl:iOO
'!:
t±l
~!E.~1'58~)'
L,;I:,o
'!:jIjl
L,;I:,0iz'y
0
(jiIj:!E.r.,l'~
4 - 5
'f'J>r.'jiIj:!El~,
"VISSERASE"
VISS
ERASE1J''JB7
I-
IHI!l!M91:~I::"T:t~
78r.,)
~10'f'J>r.'iJ>iJ>
iJf#.\j,L,;I:,o)
L"
toll'
filllt>
~i5ffll)
L,;I:,
<:(J).O
L"
"'0
, I
ADO-
/1'
jIjl~g
0
S 0
'"
-rVlSSi~
P~L
(Fj
P~L
~E
L!.!J~~~L!.!J~\.,6)
\ \ I "
-V}S,S
IER~S,E-
G!l20
Page 86

T
L.-1:::'~*Jl.0)~00i
~*j~HFo)L,fJ't~
~~5~*~JJ
Ivusl;&ViVusI
-fo-'Y:I- HIf?>
to
~'I:
~
T V
1:::'.tdlo)~OOi
OT~eO)~~~~~.
~eT~*f.$O)~~
0
*"9
ID
S P
OJ~e).EP(!Iif~IJ~Pifr.'~ji!jj:
O)~'9"~iJ'O)~ji!jj~F,t~
(S P.
T-7'O)~~I:~ji!jj~F,tI::
PAL,SECAM,MESECAM
'7--7'
~
E-240
E-180
E-120
E-60
E-30
~ji!jj~F,t
T~
7J7-;"'A7'-.b..
PAL
MESECAM
SECAM
NTSC
geT~*f.$iJ")
~/
fi'~)i1l$;~1i.Itffl
"f;
~'o
~'t.i:
~,
.It
(PAUSE/STILL)
~ji!jj'!'MIll'J"9?>'::';l:.
*"9
0
~'j~~:
•
t"T;;j-,l!ilii/iiUiliil:iI;<iii!iil~A1JJiIO'T-
MONO)
(CHANNEL)
m
L,,,"
<1l!ilii)."L2"
G!J21
.LI:.
-
;n::';l:~ji!jj
T
1:~ji!jjH1i
,::I;l:.
:IJi."
to
':J
(OPi=RATE)
(j~i1'~ji!jj).
LP.
(0-9)
~ji!jj
1:, T - ;1
(-~~.It/i\li.ItI;l:iMJ
He"::'-'JlfllBj;'j!;ll}tJ'~~ii!ii.,<iI:li.
0 (JlHlilA1J;1(O/';'
L P
E
PO)3l>~iJfJ!il:tJ~*"9o)
S P
240?J180?J-
120?J-
60?J30?J-
I:
T-7'O)j;
1O:::J
/O)~.
'!'~."t~ji!jj~to~'7'J:l1"'7A*V"Y3/'!'~V'*"90
0)'Y
j.
O)'AiJ<,S.
(R EC)
iJf
9H:::±l
-J(5</'!'1ii;?
(iiUilii)
~to
to)~~."
c:
I:
iJfl'~*"90
:I-
O)ll!Iplf'::
eT~~./*)~~~V'*"9o
12
w,
-ni1l$;
~
':J:I-
~:lIf."
/T-7'H~
tJ:~,to/1)O)'Y
*,~/~:IIi'~t~)JH~~
(:~Pifr.'~ji!jj:
I)
1O:::J
J:
?>~~~ji!jjPifr.'3l>
'7-
-7'(J)!&{!;
'7-
y;;<.
S P
0 0
0
0
0
/*)~
"f;
iJ<
*"~
/'!':IIi'~*"9
t~*"9
*~/'!':IIi'~*"9o
t
'j-It.
5
~H~'::
T7'l:l1'
3/
HHR.,<iz,
ti'!il<;r-"f;
It".,
NTSC
Y;;<'
T A
NTSCY;;<'TAl'O)?;.OJ~e)
/0)
S P/
LP'
E
p;;f-~
LP
480?J360?J-
240?J120?J-
60?J-
TA'::
'7--7'
~'"
J:
?>Hi-Fi
T-160
T-120
T-60
i¥i"'O)~i¥iOJfle*,lI.,g-it3l>
LP
0
0
- -
(CHANNEL)
."
n'?>
t: I:
0
(OIl)i1l$;~.Itfflo)'Y:I-
0)
~ji!jj'"
-Pif~.It/i\li.It
i1li1JB~H::mll*"f;
(VIDEO
7.1>
>Y-O/';'
0)
IN)
')'E:::J/J/.liVC
3
7'l:l1'7
*'
'!'liiJ'
/1)
,::
-Pif~.It"9
(PAUSE/STILL)
~
:&tr""'A1JJiIO'T-
/471:
0 t (J)r,'(J)JlfllBA1J;1(Y ,;,3 / '!'1Ii
.1>;1(0/';' 3 /(J)!il<;r-l,iH:"L1..
j.
iJf-:n'"n,*
toT-7"::,S.tdoV'~ji!jj
f)
*"90
~)i1l$;~1ilJ:jljO)'Y:I-
~-L
l'
';l:1'
/
'!'fih
t~:I~
t. *"90
NTSC
'7-
-7'(J)!&{!;
~
/*
t
*"90)
S P
160?J120?J-
60?J-
tol;l:
I)
iJ'
ST
-7'
O)'AiJ<-s,"f;iJ'."
?>
,::I;l:.
(AUDIOINR/L-
R*l*t'7'I*i.
EP
480?J360?J180?J-
E P
1O:::J
/O)'I&f~;;f
'!'~
~
-pif~.It/i\li
*~
/'!':IIi'
7-\,/:j'.}1,
r <
~00i~':~0TVe.tdl~~~':~
OiJ'
Sfi'*
1'0);';
T '/
~
7'~§i;7
~V'*"90
j;12~~T-7''!'~~:IIi'~:±l~*"9o
SHARP
T-7'iJ'~t.>?>
4https://manualmachine.com/
~....,.~'7
"""I'~-Dft'"v""
~
t
iJ'
S, T t-
1:.
i::'T~';l:i1li1JB~H::~ji!jj,!,~.Itv.
Hi-Fi
"-'.<UTO~ofuAE",,",-oml!IollnfANl
SUPER
i::'O)~:J.
MULTI
....
-eomO,,"UM
..
--j--
-nill;<.tI:./Oll.tI:.#
\IllS
HQ,
_.~
'!'fih
t
jito~
T-7',!,~~»i;~,
5<
/
~ji!jj*
~
"IU,lI'!'
~
/
[@"@'@)
-"-:~
~iJl(;j(5</
~iJl(>Y-5</
~ml
.=11
~t'5~I~;f"J
JlIi:lli-J(5</
'7--7';U:'~
-nM~.tI:./ilj;.tI:.>Y-
t'WI!i!-J(5<
~ii!ii-J(:$l/
/
5<
/ , ,
II~,
lit
';;'4-0
t"-
t
~
LJ
~'"-~
~'$:!~
•
:
'7-vt"~;lIH;j:i!!
...
*ti!l"t'J'<t.;:'a."
3~.
4~'!'*lffiL,TiEL,<~lEL,T<t""f;L'0
~./*)~7"y7'/
;f"J/#~/
~./*WJ7'/7'/
/'H
/
Page 87

A:1Jf~~O)tJJ~xf*fF
*l1l!I;l:, fMU:{;lU%;m\
'!i:
*~(1
<
tU!
"0
~7~-T-:~~t-J:fi"'~-l§-'!i:VCRO)T~-T-~"'~~'~h$
~~1v~~~~~:VCRo)T~-T-'!i:§~o)T~~*}~~.~I-,
INPUT
0)7
c)j~llIl)":1J
;>HlIl)":!J;lii;l~
)..:!J)
*51
~
~
~*}~O)
'"
O){~-l§-iJ"U-J:f;';
: *l1l!HHlB)..:!J
1)~~~0)INPUT*51~'!i:11El!ijlVC
'!i:~,l'iJ>,
O)r.90)L1/L2'!i:~1v
;A.7J'E- I'
iJ>
'"
O)~{~{~-l§-,
'!i:3lEljijl,
t:!ll:l\';"'~'!!fl:
'bo)iJfU@;';:tt, Hi-Fi
:tt
'"'
0
>r-v':/
[VIDEO
IN/AUDIO
-J:fi"'{~-l§-
~
3
~I:,
IN]
!J>"'{#~'~h$o
HauC'~'"'
"SIMUL"
ch
7
~
L:t
iJf"'~;';:tt
I:
1;1:
VCR
I:
J:
fJ,
iiltilDO)AUDiO
~{~,
;>~l!B)":!J;J<~:/3
"L1" (ij!ilD)..:!J), 21El!ijl1-C' "L2" (MilD
XI;l:T-\'~*}~7'y7"5f'1~*51~
-Cf;';
,'0
~5F
~1~
1-7
'Y?1/-7}v
(CHANNEL8/Gl)
i§~~au
1-7'Y?
0 *I- <
'"'
1;1:
Ha
0)'"
U~~~O)
0
~{~I;I:
VCR
IN;lii;l~iJ>
-J:fi"'O)iiljj~-l§-
t 'b
~I;I:,
C'47tO
("",)
IHi-Fi
1-7
'Y?
li*j;'!dloO)
if
l'
~
}(;:f
L:O)VC
eto. )
~-T-'!i:§a~o)T-\'~*}~".~l-c!J>"',
7}~~-\,~
iilt'!i:;l<;1Jiiil-cr;';,'o
RI;I:~{~'!i:TVI:::>iIHJl!J>"'U@I-,
U-J:fC'~'"'0VCR
~prt':'tt
*mll;l:Hi-Fi
O-J:f;m\
~;>}l!B)":!J*:/:/3
8t~aU
(C
l1l!O)AUDIO
tl'.;';
"0)
(R E C)
1'.A l-
V:::::J
-
5"
O)iiltilDAUDIO
~~-
t"'!i:~IvC'r;';,'o
-fO)iilt, rTv!:::'jIHJlO)UOOiJ O)AT,y/,8W..l
O)~~
-J:fi'"
to
It
HaUC'~'"'
D/'v--\'-'\!>v-'if-7'1
IN;lii;l~"M:;i\jC
~"1;JJmx~o
*51
~
'!i:!ijl,o
t.r
0
<
to;';
(L1XI;l:L2)
,'0
l'
'/
/j'
-J:fi"'H~l!B!J>'"
IN;lii;l~";>}l!B-J:f;m\
I)~~~O)
A7/'v--\'-'\!>FMT~-T-t.i:C)
(VIDEO
IN;lii;l~"I;I:{ti]'bM:;li\:
(C D,
'!i:M:;li\:
"INPUT"
0
irt:
FMT~-T
1-,
VCR
O)T
,jf~/l',
-It1
'!i:*
1-t.i:,'C'<
,all
T~--j--
bll
"t17}v'l'tA
~fg3;A.7J
~fg3;A.7J
'"
/2
'"
I-
1
I
2
s
/2
I I
L I
L2
vc
VCR
OlViDEO
lNll!ilii",'fIJ>G
O)fB~
I
VCR
OlVIDEO
lNiWilii",'fIJ' G
(J)m:~
vc
RT-l-T-fJ)&O)f~~
RT~-T-j])60)ig~
VCR
Olll!ilii
AUD10IN",'T
IJ'
G
OlA:!:Ji'~
VCROJM"fm
AUD10IN",'T
OlA:!:J1'~
IJ'G
VCR
Olll!ilii
AUDiOiNJlii'f
fJI
60)i§05
[;[]
22
Page 88

91
~-~miOOO)
G;/»t.:
(0
s P:;;t
/.A?
I) -
/7
00
1'7
A)
5Z-17(-~~iOO{:"?l\l
*miO):$I1"'7-~j§jr;l:,
I:,
liilEl
iJO
~~\l;l:liil~O)FIiJ
s z I:
IFi'iJft~C',
jjlJ:
1994~10F.l5
Ti':"-;j:.)(,€:11:175kNo,51:S
:$11
"'7
-~j§j,
El
"FOO1
0P:¥28~.
O~j§jJlJJ
~t::
~Tvt::O)~~€A:tL-r,
I
~OSD~
J1:
';I
;(
:1€
1:::'7':tI:A:tL
AI)
a;
'0
T:to)P:\,~lJfiE
(jl}~~,~~'ftl;l:,
0)1'i'iJi.
)(,I:tllJil,'i
j§jjij'j
a;,
fill<f.>
IJ
0
[12~
-rTt5L'0
:tL, TIMER €
365 Elr.9r:8
[;IIIo1El,
0
!;\!f'Fi*I%!
El,
"FOO9P:\'-10P:\'30~,
s ,
m1'±p:¥i'iU
:11:175ka;C''ff.J~j§jt.fIDt'EC'~a;,o
i:U
r;l:
1994~
-:ddIH.!l
P'E-
€
T-
:1O)iJO
~
II!!
I)
Tyj§jjij'j
8
cC'
8
F.I
5
-
IJ<:IITG:tL
- V'] €
:"-€jIjl[,-rTt5~'o
-r
~
'>d:
-rTt5
Po
[,
P;:
I:
Hi~
CLOCK (P:\'m
~lffiTt5~
t::7':tWfflTi':"-;j:.
7.i"
~
':IJ
12
'"
"T-
~iIl!lJf~~a~r:
[,
-rTt5
~
'0
O)~~
\.)
90
S
SETTINGS
"1 " IJf
Ji;.iIli
[,
*:T:rMBl!.
2lMODE SELECTiON
3:
Cr.OCR
4:LANGl1AGE:
5:CHANNBL
!
SELECT:
ENTER,
D;J{:$1
...
SET'rINGS
t/J.
4
:..-€jIjl[,
~
"'C;,~~'t
~lii~,
, "1 " IJf
8/G);f-:$I:"-C'Ji;.~1l!lffl€"5",,~~[,-rT
~
I"
\0
:..-€jIjl t.
j§jjij'jlJfill<:b:tL, :11:177
Ji;.iWi
Ha
is')
-rH
a;, 0
~'o
:11:17'5
kNo,
€7.i'
"'STORE;J{:$1:"-
...
o.
DATE START STOP CH
a
SELECT:
ENTER:
8/G);J{:$1
~/+
:..-
C',IUIl
+
...
1¥iI
G!l23
llilOli
t.
-r~j§j,
-eT;;
EX]:'!,
€jIjl [,
-eT;;
BRASElCLBAj
EXIT:
D
[,-eT;; L'0
0 I
t5
L'o
L'.
G
4'~Tk:$l
TI R SETTING j§j jij'jI:i;IJ
DAY/MONTH
El
f-t €
ilI<7.i'
8/G)>fi':$I:..-€jIjl
;fjjlJf:Jl:fct.
llilJf:Jl:1c
:bit,
(;:;:C'I;l:10F.l5El(:%:bita;,.)
[,M/is')
'to)fl!
lifFi*I%!
I
NEXT,f-:$1:"-
:..-€jIjl,
jf7.i'9t~~~a~r:m1'±0)
[, a;,.)IJf
if,
1:,
:11:175kNo.
I) ;If!:b I) ,
Ji;.iWi
HiM
a;, 0
['-:>':Ht~
IJf, jIjl [,
a;,
0
"F.I"
O);fjj€'ft:bit-rTt5~'o
l:~f)JI;l:
'?":5lt
~
~f)JI:
"El"
"El"
I:. ,;
F.I"
O);fjj€'ft
5
0)
0)
0)
No,
DAY/MON'l'B
DAl:LY/WEEKLY
START
S'I'OP
CHANNEL
SP/LP/EP
SELECT:
MEMORY,
T yj§jjij'j
€jIjl [,
...
t/./.
.,j,
-eT;;
~:.:~(-
SET:
-/+
EXiTl
L'0
s
I
0
...
fj
I
NEXT>J':$I
DAILYIWEEKLY~~€7.i"
[,-rTt5~\
8/G)>fi':$I
a;,
0
[OO~
(j)
8
(z
z C'
8t!(j)
DAILY
:..-
€ jIjl[,
r.
Ji;.iWi1l!lp!T€
"ONCE"
e
:..-
€jIjl,
1:1'..11'0)
(;l:ONCEr:~:<E
___ 1
-
-
- -- liil
J: ? I:i;IJ1);If!:bf)
[,
1EIil\i!ii
, ,
Sil\i!ii
8t!(j)
WEEKLY
~
I
NEXT>J':$I
ft:\'F.lJ€7.i"
7.i't.a;,
8/G)>J':$I:"-€jIjl[,-:>":51H
f:Jl:1cIJa;,lJ
llilJ
f:Jl:1c[,M/is')a;,o
llilJ
:bit'tO)fl!
(;:;:C',;I:,
---lij~""
:..-
€ jIjl t.r ,
"10:28"
0)
,,~~
t.
f,
"~"
O)lli€%:bit-rft5
9:001:~~[,a;,o)
[;IIl<S€il\i!ii
Ji;.iWi1l!lpJi
(~~a~(:m1'±p:\'i'iU€ilI<
-rT
t5
~
'0
l:~fJ.H;I:
jIjl[,-:>":5,t~
~fBl:
,,~~
a;,
0)
€START
"~"
0)
I: "P:\'''
"p:¥" O)lli€'ft
0)
~'.
8/G);J{:$1
I DAY/MONTH
!
No.
DAY/MONTH
DAiLY/WEEKLY
START
STOP
CHANNEL
SP/LP/EP
1
!
NEXT,f-:$1:"-
No.
DAY/HONTH
DAILY/WEEKLY
START
STOP
CHANNEL
SP/LP/EP
ISELECT l
8/G);f-:$1
:..-
C'illlR
NEXT;J{:$1:"-
...
SELECT:
MEMORY'
HEMORYl
t/J-
.;.
tI
J-
i!;e
:..-
C'~lE
€jIjl t,
€jIjl[,
[,
-eT;;L'.
~)p-I
-eT;;
5.1.0
~oXc:i*
SETl
-/+
EXiT,
0
-eT;;L'.
...
5.10
ONCE
-lqil~-
SETl
-/+
EXIT:
9
[,
-eT;;
L'0
L'0
S
I
s
I
...
I
I START
."
I
-9~l,0P-
Page 89

$I
-1
?-~@jt::
..
:J\,
\"(
~fF!*J@
V)
~NEXT*5I/o::j!jlVCF~~\,
STOPfl"r.H:7i'9
r.'li3l<7i'
8/(1)*
~~~:iE
(;::;::
~:It
51
/
Lr
-eT
"(;I:,
"9:00" (l3iiJJatH:START fl;f
*
9,)
"f>ltJ
o::j!jlL,lSTART
i5
l,
'0
10:30
':~ll:~L,*9,)
Ji:\;JUWp!ili
L,*9,
fl"r.,
I::
I'iiJ
j NEXT*9 ;""j!j1
15~~1l
@;F?
TVi1!iijlij
No.
DAY/MONTH
DA,ILY!WBBKLY
8'l'ART
STOP
CHAI1NBL
SptM'/IlP
SBLECT,
t/~
KBHOIl.Y, ,j,
/""f~)E
.....
L.
-er
VCf'"
SST,
eXIT,
~
5.10
ONCE
~,
-~;
_/+
£>
I..
.....
I
STOP
j
llil
~
NEXT*
CHANNEL 0::7i'9
8/(1)*
l'~
;:'i:t~
·1t!lOJAV.\Jl~i1>"OJilIii!i'l',.,t-('}H·-\'A
.,!;!;;'!';
~~xEL.-Cr~t.\o
51
/
0::
j!jlL,ll'
"00"
51
/
o::j!jlL,lCHANNEL
~
\,
(;::;::"
1;1:,
0,8
~
~',
"f>ltJ
,:~~
Ji:\;JUWp!ili
L,*9,
o::~~
L,
L,*9,)
l
:
H~ii!i9
1:1:
I)
'E:::J
;"OJINPUT
* 9 ;.."j!j1VC",j"l!!P!f
INPUT
.. ' ..
-.,.
INPUT
C
..
,,"'"
SIMUL1
(-If1?
J,J,IJ)
Q)
~
NEXT*5I
-
/A
8/(1)*5I/0::j!jlL,lT-/AI:::"-~0::~~L,
ll'~~\,
/O::j!jl
1:::"-
H'7i'9
(;::;::"(;1:, S
..
Ll"
l""~
.--"L
INPUT
L,
ll'~
"s
2"
lilUim9H13J,IJI
~',
Ji:\;JUWp!iliT
P"
"f>ltJ
L,*9,
P':~~L,*9,)
INPUT
NEXT*9;"
'0.
DAY/MOUTH
DAILY/Iill:SKLY
START
STOP
CIlANNBL
SP!LP/RP
I
SELllCT.
HEMORY, .;..
8/(1)*9
j
CHANNEL
j
NEXT*9;"
'0.
DAy/aONTIl
DAILY!WR1UtLY
STAR'!'
9TOP
CRANNIlL
BP/LP/SP
::~~~~:
"j!j1
.....
T/~
;"1'Oli:iE
.....
"j!j1
.....
~L~
-~q;
V(l''''''
5.10
ONCE
s , DC
10
SET,
-/+
IlXIT.
V(l''''''
L,
,1''''''
5.10
ONCS
9,
10,30
:~~;,
~~+l
"0
s
00
~t
\
~H
s
1.3.~
-P,t!""
I
0
,0;'.'
I
s
QC
ee
.~:*"
DATE
TVi1!iijlij
"j!j1L,,T""
.....
START
STOP
lJid'F!*J@
@/t:I'}'7J,.!*J@iJ'jIL,
H(;~:g
L,
l.t.STORE
i1!iijlij
iJ',
/t:l7'7
J,.
<
~ll:~~:It
*
51
/
o::j!jl
!*J\ii!1i'ii;1li1!iijlij
H\':5;::
L,
ll'~
,:~
fa
I::
~',
t,
.t.STORE*9;"
o.
i
5.10
9:0010:30
SELECT:
ENTER:
4&lil,Ht
l1l!l0)
51
-(,
-
/t:l7'7
AT'Y
/
Cil-@HT-:J
~OSD*5I/0::j!jl91::0SDi1!iijlijYM~~
J,.
ll'~
0::9':51;\l-@;-1;I:
~',
90
:It*9,
4951-( , -
ON/OFF*51/0::
TIMER
ill
00i
0::
iz·y
I- 9
':5,:,;I:
j!jlL,*
9,
;llJ't3l<7i'~llllt:
O):lZ"i"iJ'Ji:\~
L,
l~\
':5
;::
I::
o::1i'iiJ'
T I
MER
Ib *
9,
11:.
'f
fJ:iI~:iE:;Ij~
')'E:::l/0)10,\,
$1;1:,
1
Oi"lO)J:'F;j:~~1J$
~;i:~
·
•
•
• 'Y;!'OJt.;-,':hi!·y Ioh'A":>n,.,;;;;,!,;, TIMERONIOFF*9/"j!j1,I::, !llJ\';j!;jf,'lI'Il6t.:
•
• 9 -(
· 9 -(
•
·OO.I::.7''~~••~i!7109al::,
:
:$1-(,
-0li:iEL,toillOOiIJ',""5B79.,
:hi!'Y l-iJfIoB"'ntdll,
~!li:t..:
I: 1'iI!),l;OJt'Jnto:t\:Ui1'20?l'P1J:lih'
90
I::'
7'-t
I::h
llIH:TIMER
TIMEROJ:l'I:'i"iJ'''').!IL"
TIMER
jl<5i'h'",:tJL,n'
:iE.Wlii*•11I!1lll:l:
j!j1L"9 -(
,-UOOi'!',
,-Uii!i'!'I:Uii!i"
9-(,-:1C11'7J,."0li:iEL,n,.,I::/;,
l:ilfjOJ'E-
I
(0-9,
'ijjj(A-(
i!.y
10
h'.Iv:>n
OJ:lCl'h'5l1>r.''''j''
:hi!'Y
M.'
<.'
/; "-It;,,o ;: n
,-Uilii"Wlii*
9 -(
i"':~')
L,
,-Uii!iOli:iE'I"Oli:iE:t\:iltOJl1I!llll:l:
'l"1b
"'0
-/--0)*51/)
o::~OOl'~~',
il;jt:
eT
'Y TIJ'J1jj!J(r,JI:t'Jn" 9
to!;!;;'!';
't..:,
'OJ
':TIMER
L"
9 -(,-ilIOOiOJ i!'Y
ON/OFF*
1oi1'J1jIl1J(r,JI:tII"'n"90
1:1:,
lm.:'ltOJll\lfl',
"OJlm.
:'ii'llkfl'OJ
toJ:
1',
!IIj!l:A-( 'Y
t.:c'
I::
/; I:l:STOP*9/
1?l'P1P"J1:,'TnOJ*9;..tjljl"'t..:,'I::,
9-(,-~0li:iE"'n,,-It;,,0
o::1\e;U;ril'J:flljlIH:~ll:~tl:Bla;,
-
:1iJ't..:
<
t..:
'Oddi;'!';l:
o
I:
1:1:,
9 -(,-0li:iE1:I:9
9 ;.."j!j1
10
h'<.'/;
aHUOli:iE.
T"
toIb
An
"jljl
to!
I:
,t,
,T'""0
<.'
/; "-It;,,o
L,,,90
J:V'9 -(
TIMER
-/+
ERASE:CLEARI
.t,.
EX!T:
SD
*9;"
"j!j1
L,
,T'"
.....
OSDii!iiliiWl~
VCR!llJ\';jl<5i''lI'
=:=1
L,
to;;;;'!';':
t..:,,;:
1:1:,
I::
,ON/OFF
ID!~B
ilIii!i
1:I:~.rJ:.
'"
,Wlii*'" n"
1:1:,
!llJ\';jl<5i''l!<
U!';!;
L,,,9°
-r-;;,:..-
3
;"OJOli
* 9
;.."
'0
CH
asp
19
"0
~ll:~1J
L"
j!j:Jll'
J1jj!J(r,J
[;!]24
Page 90

g~~i*J;,t(J))z
17
-7'D
1'5'
.b.-J[
$11'
';'"-*~@t::":nll
~~~i*J;,t
0)
511"
-iD
l''7A
O)!lil.il1!
G1Ji!
$11
';'"
-*~OOH::
-:J~'
l
'Jl!(:~~I1);
OTv~t~T~~~~~An,TV~«~T
~Wfill7-
~O
iOOiliiif~;bn,
""0
8holi
STORE
t!n
:11:177.L.No«ii"
$11'
~OSD;J'$1;"-«jLjl.tiOOiliiifM~e'>n""o
-(
<,-:to
i'
;..-;jt
S
D;J'$1
;"-«jLjlL."[Te'>
;J'$1;..-
n'Q:11:1
,-'fif(,JP"lg
.
~'7
MJJ!q'll''!'0 S DiIDiIDl:'-'!i-;
9;:
/::1/l:';o;;I:-;,
jif'FP"lg
)~t:::i;JJ:/i
TIMER
77
't
Tf
e'>
I,
I,
1,1,
SETIINGS
«ii"
"1"
Il#.(iii\l
«jLjl
L.
"[1'
e'>1,',
l;l!1£'ff.J
.L.P"lgii~iOOiliiii~;bn,
"1"
iJ<#.(iiillHill1J""
«ii~
L.
"[Tt!
I, '
0
90S
L.
oo!iSTORE
0
90
D>J{;:--'!'jIjl
*.TIMER
2:MOD8
3
:CLOCK
4 ,LANGUAGE
5:CHANNEL
I
SELECT:
ENTER:
o.
DA'l'E
"
2
5
5.10
,
SELECT:
ENTER:
S
D;jf;:--
TViOOilii
...
SETTINGS
SELECTION
1'/J.
.;.
>J{;:--'!'jIjl
...
START
9:00
-/+
ERASE:
,j. EXJ:T: f!3o
-
'!'jIjl
['TFe'>
EXIT:
V,T"
STOP
:r.O:30
VCF"
e I
CH
asp
CLEAR!
\",
\",
\",
Jl!t:::~iijj1fl1);
-r<' -
:to?
7 A 11)
J!q'll'
jif'FP"lg
OTv~t~T~~~~«An,TV~«~T
~Wfill7-
~
iOOiliiiJ<~;bn,
""0
8l00!iSTORE
t! n n
:11:177.L.No.«ii"
G/(Ei'Jf
:11:1
t~,
9:11:177.L.P"lg
L."[Tt!l,l
i'
:--;jtM:::i;JJ:/i't
0 S D;J'$1;..-
«jLjl
TIMER
;J'$1;..-
«jLjl
'Q:11:1
77
No.5
77
$1
;..-
«jLjlL."[
.L.NoJ:::~;bit"[Te'>
HlU)iil'~~o)
«iii;g~J:CLEAR
"[Tt!
L.
"[1'
t!
\,'0SETIINGS
«ii" "1 "
L.
"[1'
e'>
.L.P"lgii~iOOiliiiJ<~;bn,
"1"
iJ<#.(iiillHill1J"",
#.()Ji\\il!JPJi
HlU)
1,1
o
:11:177.L.P"lgiJ'llIDiliiiJ>e,iil*t!
'!'
1&
')
;i!l-;lill;%
I, '
0
iJ<#'(iiill
\,'0l;l!1£'ff.J
iil
L.
f.:\, I
(;:~1W('
0
;J':$?
:--
Hll
n"" 0
11;XI1)l!>",
L.
1Ji*
90
S D>J{;:--,!,jIjl
*:TIMER
2:MODE
3,CLOCK
4:LANGUAGE
5:CHANNEL
\
SELECT:
ENTER:
STORE
...
e ,
,
SELECT;
ENTER:
G/(Ei>J{;
5.10
Itt
CLEAR
Ill!
l:'rr'"
TViOOilii
...
SETTINGS
SELECTION
t/J.
.;.
>J{;:--'!'jIjl[,
...
DATE
START
5.10
9:0010:30
-/+
•
:--
l:'iIUR
...
9:00
>J{;:--'!'jIjl
...
\";1:
-;
c
V,T"
EXIT:
9·\
,1""
STOP
ERASE:CLEAR
EXIT:
f!3o
[,
,1""
10~30
[,TF"
·CH
asp
\,
asp \
\"0
\",
\",
'0
I
Q]25
...
OS
1
DiIDiIDf¥lRiil
I
~OSD*$1:--«jLjl.t~ilii~M~t!n",
'0
90
S D>J{;:--'!'jIjl[,
"l"F"
1,',
...
OS
I
DiIDiIDf¥lRiil
I
Page 91

~
:.--
7°}v[...
-::)-
T 1
:.--
l'
~
17
-~~iOO
51'
?-nnmr:-::>\,vr
;::~.g-,:
•
.g-tJitl 2;m f)
'<·I:jj\@l.,t~c'c;1;:
i£'I'C"H!
I.,
f.j:
C'*'i!l',!,~"j"iIi>
0):/:--
7'
J~
-o
to
v:J
c;1;
•iJ!C'jj\@l.,h,c;1; :
s ,!"
"No
I±IIJ'
It0)c
;1;I:fl!fUC', 0
~im!;J{
9:--
"9
<":~iOOL,t~t-\t~
19U
: m'i±IIMU: 10:28 ('F'M)
il!711ii'~IJ:
'.~iiIDT
~
.Q
,.,
I) 'E :J :--
~M~••~'.QiI!7••"'Bm~,.
7 -t':--
0
O)~;J{
11:30 ('F'M)
1*1'FP':i~
1<
Mt.'
V:/
9
:--
'"
jIjI,
7-t':--1<J~;J'V:/,":--2
'" .>'"
I::
~iiID
~
'0
·
~;J{
9:-- '"
jIjI,
t~
U'1:iI!7.~UfJ<1
9'-::>liA-
·
'Jb~r:lt
a~",~,.To
~'5:1Al
.~Jl:
·
[,<'I:i«@,-ill.li2<J
*9;..'it.ml.,l!!j
1'"'
~,.,
0
[; l<B/8;J{9:-- ",jIjI L
l1J'
:
(STOP) ;J<'9;..'itl'l'I."jj\00i'itl!!jl.,,,,o
11~Jl:'E-I'O)cUoltiijlmC',o
••
'it~.C';1;"'o
-7'
1:fl!fIJC',0
U'
'"
01J'
'"
1
:--791?
91lo,;J{9:--
~;J{9
A
~
~
-nr:
_..-
-~iiIDO)1.i;!j"
ilO
f)
1n~~2\
-~
E,l~
'i!i:im!;J'9:--
7
')),-
,+r~i'H1'1
~?
:--
'y 7';J{9:--
o
'"':l't~~~~'l'
"-\1
no
le
';1'
U
tc,'1
"~I
',I'
"tdm:'i'ii«OOi'l'I:11.
1:1
'_1'
u: t:
!
1·--'
!
I'~U
~cEEii8
r1 "']
,.,
0
fi"n~iOO
19U
:
m'i±IIii'~IJ
IlIlMIIUJ: 10:40
•
~iiID
~1R
~
I) 'E :J :--0) "TIME"
~M.~IJ
•
24.r.'l'JP':i0).~IJ
L,
t~
10:28 ('F'M)
1*1'FP':i~
L,t~"
'7
~,.,
-t'
0
'"
Bm~,. , 0
t-
\ t
~
il!711ii'~U:
:--
1<
J~;J'V:/
;J{9:--
'"1
o1J'Il.'~1'Bm
'" :--'"
'"jIjI~l
11:30
7-t':--1<J~;J'V:/,":--2
'"':l't~~~~'l'
n·
";1'
'il'
le
U'
I _, . I C L
to
I
~
:'--ID
"H
:J
2
m1'~"'o
·
1i'~I:lt
1J'
.,
I) 'E :J :--
.~IJ"'Bm
•
~;J{9
1
01J'9'-::>lifv
·
1i'~I:ffi
"'a~'"
0~im!
~i~
,",-I
:I
C
;:")3;~
· ";..:1J!.-v:J
. lllJiIlllil"!cl!!jnHa
'0
~;Jl!
· ;'-;..:1J!.-v:J-j"{ ;..1'917-/t'tO)iililE'I'I:JI)UJiJ!f'>:11.
Ti!!"'o
;"0)
"CLEAR"
·
917-/t*MI:lli:<EI.,'iIi>-ill,\!~
:1J!.-V:J-T{
ON/OFF)
{;"'1917-/t-l!'~
[;l<B/8;J{9:-- ",jIjI
'"
a~'"
~
,. , 0
O)~;J{
:--"'jIjI,t~U'I:iI!7.~W
[;
~,.,
(OPERATE)
HIP);!:,
9
~,.,
0
1'"'
~,.,
l(!)/8;J{
0
0
:--
'"jIjI t.r iI!7
9:-- ",jIjIV(1J'
;J{9
V(
0
:--",jIjIV(
:
-T
{ ;..
>.)(nIF.9
(OPERATE)
;.-;..:1J!.-V:J-T{
"TIME"
*9;..'itl'l'I.,";..:1J!.-V:J-T{
*9
* 9 ;../tl'l'
'1917-
Ulliill,-iI
(TIME) *
*9;../tl'l'I.,'~"'HIJ'a,o
;"/tl'l'I.,'Ti!!c'o
;"1'917-/tlli.'-iI<::cI11';1;"ttA,0
I.,,917
1-1.,"'0
'itiili.
I.,
toiJ!l:
1:11.
"t''iI!iliil (OPERATE)
9;"
'itl'l'
I.,
,illJiIlnilliU
;..'1917-lli.l!!jiJ!i:JIIU)iJ!f9l:11.
(jIlJl:J!!;f,~Li:
-ffl1ll!:t<Il.H
I
I.
',f'
!
1-:;
f n :J
ICh?B
117'
i"';"*
)!.-*;;"
'itilllJ'IIJ~/tl'l'
;"'1917-'E-I'!:1J:JjjU
"TIMER" 1J'Ji:(:tJl.,cc,,,,). ;.-;"
<::O)I,\!~.
WI~
I.,
,fJ'
0.
3 ;..
Ul'JI!l';1;"
*9;..'itl'l'I.,'!I!lHAn"
L,
'l!!jn"liIJ'itilllJ'IIJ",
"CLEAR"
*9;../tl'l'L"
~;Iiil/tAn.
r , ;j(I:
!IIila
A
917-
n;.-
;..:1
(TIMER
J!.-
U L
tt fv
I)'E:J
v:J - T
G!J
o
0
26
Page 92

ttCI/\
';J
?~t4~
"""D-DI'nV,,"
~~
~~~
*'t9!Mm~E
u.o".~~~.e.
DPSS
2:
(7)JlI!ftll~~?
2:(7)DPSSlt,
lh891:M~
iiifjl±llJf§~
•
ilIll±l
ii!!i~flll'Jlit~tL.gI:~I:,
.;~ljIjlT~I:~J:?YA:lJT.g~I:'b1'~*To
, jlj;j;!f.f,"VISS
ERASEilJlfll<(/)ji;"1JI*~~
(T'~
~
(VISSf§~)
[,j"i'}l~,
9 )v7°0:7''7A-Ij
1:, 'ffi'lllT'Q
iilHlllJm~
IllIllalJ:l:
lm:'il(/)~ii!!isJ:V'~
ADDilJlfll<l:
l.l!:;:'E(/)T-:1(/)1'itili'
..
-7
'/
AT A)
'T-
:1lSB:SHl'1:1''1''
(vlssm~)
l'
0
T-:1I:5i!I!J891:l!t~u.*tL*To
J:I)
t;
~
[,
rF~'
1
/:1/~
u.
t;
t: I:
'0)
HI!?
v::J
~fl±l*
<
J!.?
l~l1i:lE
-7'
1/:7;
* To (20"< -
milT;:
lJ
to'T-
-r
<-~ii!!it.;:
*to,
3
~!f9*1IJl~E
I: iJf1'
~:l:
l'
0
:1(7)Ji!!pJi
~ii!!i,*,I:~ii!!i
~(/)VISS
~
~
~
S
V'I:;
(R EC)
ADDilJlfll<,
iJft.
l'
<-~
ll3
VISS
@;:;;]
""'-l":JlIt"!..
1[IillCl1l
~~
D~N[Ij~-GZJ
~N
•
~
Q.
..
A··.
11
c)
~""'""'"
iiJ:l/{'y7Jl1!ftElt, :lJiz·y
to "0:00.00" I:l!:/Il')
OO'}
'E::J
/L(7)ZERO BACK
(7)1.i'Lll!'C7)l5(O]Hj!~lJl,
@'T-'1iJ'
;::'E;~
iiJ:l/{·y7Jl1!ftElt~ji!jj*I:lt,
~~
Q]27
t..
"0:00.00"
:
:lW,
I::T:;fij--7''E-
~'T-:1~.!f'-~I)
'QJlI!ftlll'To
*,:$1
/~jIjllJ
'T-:1~.!f'-~I)
l:iilJf.:S,
'T-:1ltl3lh891:f'i'l!:lJ:l:To
f'l'lhlJ:l:-tih.o2:(7)JlI!ftElt,
o(7)1:
~1:jf1J~
(~~lJ)
-Cf~
OZ.lt,
,'0
:l:To
t.r.
VCR
~~lJ)
C-LOCK
ZERO
REPEAT*':$I /
.
DPSSB.;F
iW'b?l~:lElJl:tW
Itl3!llM91:
lJ:l:To
M~*,
*,:$1
/
BACK*,:$I
.
~l!:,
51
"0:00.00"
.!f'-~I),
/
:.-
I
,
fflJ
:
lJ.1±(7)~IHJl.C7)l~':
IllIllalJ:l:
(3'11l'§C7)'IIl'~C7)iiifjl±llJm~~~?l~C7)lllIlla
Ji!!pJi
~;Z;?
Oiiifjl±llJ
I l'JDPSSI&I:
~*,:$I/~~~TI:T~ij--7'~lllIllalJ:l:To
e~l1i:lE
.~
e.-
·
m,
~fil;I)*To
· jlj;j;
~ljIjlTI:,
•
ilIll±l
DPSSI~Jll(l)
·
T-:1~fj'Hl>
•
DPSSI~,
·ilIll±l['~lll'JlitT.g1'it~Y~[,T:It.gjj!*Yil;~*To
·
AJ:l-jlj;j;,
1§~
:;f,:fijjJ,. t.
1jW'iM!Tl§~l1Ii:
1';::I:
':l1Ii:~iJf~t.>
1'ilUI'
l'
(1&:
.!f'-~
~~J!.?
lJtoiiifjl±llJl"~lSB;t';;:*to
~lla!t>",To
........
-
j:!~
.
,r.,1ii\
(to
(PLAY),
[,j"i'}
~:It
n't.;:L'R;\'I~,
7
f
l'
0
It:!:1')0
(VISS1§~)
ll"
~
"0
El*'
:$I
/
UUI'
iH
l'
0
I)
15(0]
It'Q
I:l1Ii:~iJf~?
5
jJ-PJfliI)
~lt
DPSS~fl¥llll<~tL*To
I""?
It.g
;j!j~:It
* To
[,
y"to
ilIll±l
[,j"i'}(/)A
MltiiIDjlj;j;,
DPSS,"ilJlflH,*'ltlv
/~Z
lif'l'p\;J~
iI5
'Q3'1IHl
~f~ffllJ
lJ",
I),
El:
1'ilIll±l
(STOP),
""I:
T-
I),
T
c,n'~,
~ii!i,
(7)'IIl'~Jl.C7)M~
(7)
J,.?
t6
-:1
~
J!.to'
'Ji!!iiii:l:
l'
0
*,:$1/It1IEIj1jl
jiljjl5(o]~I:,r.*191,","'
~~
lJ
15(0])
l,'~:l:
[,mi'}~<;l;~u.*
~ii!!i
:1~'>1f<ili*
'HJJ:It
l'
0)
0I3lh89I:M~
(R E C), .!f-il!I) (F F)
1'.!f-il!')
y,'to
I) T.g
'T
-:11'
1~ji;ffl1'
;1'<-H:ltV':$l1'<-~ii!i,*"
o
~l
ilIll±l
[,1=;;;-
TVii!iiji!jj
~
'C
T
1'(7)
(w
tL
n'.g
~
tLto
I:DPSS~'1i!~>~'
~
DPssl&/EI.;~1
jIjl[,YT~
"0
...
(:17AI~77~?)
<1'TAI~-
~,
:it:
t, <
ilIll±l
*tol~~jj;1[,
I).
'Jl:~I:~jj;1
* 'It
s;
[,
'jj!*~'il;
il;.g'\{~T-:1~fj;jiA
DPSS
,3
J
ii!!i;r-
[,
l'
~
t.;:"~I:
(R
EW)
~
tLto ') T.g I: ,
I)
*T
0
.;
Page 93

7
'../
1/
J."
I)
l::"
-
I"
M
~
*'i¥*tiilil~
2ii
f)
(1)"f-
-t'
-1
)v
'"
0
"j
?
~
A T
J."
~;'j¥*tiilil~
~~m.~~~~.~~~*.:<~~.~I~~.~~~~~~tij~I:<~.
O~~,*"
'E::J
5i'~~
.~~
;"-~REPEAT;F
''(0..:>''
m{'!'J*i~
~.~~fJlJIIl1lll~~
l'
;..-
IjIjl~
th\i:j1!lG
~:<
~.
t
>a:J't3l<
I)
>a:J't3l<5i''!HI<'l''
c:-..:>
;F";'-ijljlL,-C"fl"'.
...
1'-·0/5/1
c:-..:>
~~!lE.~~
::J
;"-O)REPEAT;F
~
~
~REPEAT*,1'
t1!lr.\i:t
~llB~iJfilil;f).
, '7;'-'!J].,.')
~.1?;0)~:b
''(0..:>''
iJfr.\i:in::t£:b
2!lE§
t:jIjl
1;:'-
O'F>I:STOP;F,,;'-
l'
;..-
;"-1~1'm:jIjl
~toT-/t1!lr.\i:tO)r.9
~~~~
l)llB~~
IjIjl,t>a:J't3l<5i'
la,
n:<
I)'E
•
~tOT-/
~.
ijljlT
I: .)
1;:'-
01'i''E'E- I'Il'JIl(')
;F,,;'-ijljlVCfl','.
...
n
rr
~'I
U
iJ!j
I:!:JU
I' n:<
r J7
OOIll
l~]I~
()
REPEAT*'
l'
;..-
IJIII~.
REPEAT;F:$I
;..-
I
tJ?
T.
l)
s:b
-!lEjIjl~.
.''''~o)},\O{'!''E-
,
VCR
ili/li'F4't: ')
1 )v I'Q
;::j:£~
.~;J!i
,~.;F";'-ljIjlL,T
~;F";'-ljIjlL,TB~~~Aij:<.Iv.
Iff~
0')
~
iJf~:;E
~~n"'~IJ~m{'!''E-
tJ,
~7IWI~
:
;("51
HI]
~
:
~~'*'I:;:'-\,1')v
'E::J
;"-O)C-LOCK;F:$I
JIII
~~tt
~
iJfr.\i:i1!lG~:<'.
"fu"
to:<:<
iJf
t:
1j:'):<,.)
~
nto
~~I~tt:<'.
t'niJ'~;:'-\'1')vt'O'y711!!1~,~
t:
tiJf~I:<'.
• 1)'E
::J
;..-
o)C-LOCK;F
JIII~:<~.
>a:J't3l<5i'~0)
I::t£:b
I),
~.
.
VCR
*{:$
IJIII~:<~.
c't:1j:
61j:c'~1'~c'.)
1"10
'Y 7
'E::J
;'-OJC,LOCK;F,,;'- ijljlT1:, toI: UIJOJli/li'F;F,,;'- IjIjlL,T BT1'
L,
fJ'
'Il' iP)..-to)li/li'F'E- I'Il'iltlil L,",
1";(1'Y;:'1;1:;:'
to:l*l!.~I:{*ffl
..
~~iW?~.~U'E::J;'-OJC~OCK;F";'-ljIjlL,TQ~7TII:,~
},\O{'!'
J*i
l1i!
1"0 'Y 7 I
z ,
>a:J't3l<5i'~0)
r.\i:i1!lG
I
w.1l:
;:. -\'
t: t 13l<fJ
t';F:$I;..-t:Jl'Jln
j).1l'~:tJ$O)c'
;..-1if.'J
t.:<
~.
l'
~:<~.
-\'
1)v
1"0 'Y
iJ'tt~.1
2
f'J>r.9
"fu"
(r.\i::tT
t.
)v I"0 'Y 7
~
I C-LOCK;F";'- H'J
I
:$I
;..-Iif.'J
2
f'Jir.9
"fu"
~f~t:
1"J7J*io)ALL
(~~:tJ$t;l:,
t;l:r.\i::tTiJ'
"fu"
CLEAR
6r.\i:j1!lG
l;l:j~:tT
;F:$I;"-
Jl;l!fl!t:s{i!!
I
~:<
T.
7~0'Y7,~jIH;I:~1
>a:J't3l<5i'~3l<'l"
C-LOCK;F";'-
U'J
:<1tIv.
2l'pr.9j1jlL,TTI"
...
~
I!I
D~:
'-if'
~
~
~
I:!I
UD
II!I
x.
U"1,,
,.
I:lJI ;,-- '-if'
'_I'
2l'PllIIjIjlL,TTI'
...
Cl'
...
'0
"0
':::'j:£:iK
.
VCR
*f$I'1'I"lO)ALLCLEAR;F,,;'- IjIjl
1""
-0);;' 'E')
•
~.)\
'Y
71''Y7'Il'flh"n,
~th'TtT1'1)v
WI~L,TTI'
"0
-,OSD0)0ll;;.
I I: s,
I'Q 'Y
71~J!!I~<.'i1:<.1v.
L,
TT1'1)v
'E')
-1~l'i'lltJt
(ftlli<.'20>l-r.9)
L,ill
1:'00) 2
I'Q 'y 7
L, L,
~,
IWI~
L,tol£\ic,
l;ntnlifJ
~I:;t~.::J
~O)h$O),,-;,'nll><.',
'1:<
.lvo
-
I'I::J;'-;'
P".t,
Q,y 7 I
"
/ oil'
Q]28
Page 94

~1fJlHt~m::7t~/J'~
~~
11
~!:iIlI
C-.:>
""'l @§]
INDEXREC
~f'F'E-
1"1":"-;/?--9
:!J'b
jlj:!ct
UI}
Jm~I}
n
'E-
1"
~T-:1
'i'-i!f)
~~~
21'{f~jlj:!:E
tj';j"ij--f
tj';j"ij--f
TIMER
©mJ
0.
~7F
I22J
~~
......
~
~~
......
t:
~
e::JMESECAM
PROGSTART
STOP
SPLPEP
iilll1:.ii/:]""~
.
~OOH~lU
-:J
f9>
I -:J
{,
\
-C
PAL
NTSC
NI·
[v//'I
fSt·
/JfI
AI:l-flj:!:t
~j[Ijj
1\1"
~
~7F
f9>1\1"
~
iliI
I)
D
__
./\/
'/JI
/11~,__
/j]
I~
11/11
~
Re,
11
Re,
llE
CH
M
1-'1-'
PMU
~
IlJ
SIMUL
.L
IVll
v
_
n·n
L
U
-----0:00-0 1-0:00·00
<
•
A$<-
H;j:l!i'I:"<:'~~~n''"'''7'-:1~Att';:;:1.J>&~~~~t,,li\!~,
tJ"J/9-1~
•
~i!ii~
-OJl&1ii
91"'-~li!iIl#(7)tJ"J:"-9-ll<;j;
Y :..-:1)"
"90
;:(7)ll<;j;lt7'-(A:1v-
tt"
It>l'P I)
v:J
[-J
''"''
-7'
"O:OO.OD"1.J'&7'-:1~~~~I:"9QI::
T~:1~,","91::
~ll<;j;~""90
'7'-:110
"it;,.o
-(
/7'
$<
n
'U
uu
['jt
H"F.'
Q'
'1~7'-
1"
,-~i!ii"
(DISPLAY)
nn
u
!
if'!>
7'-:1~Attt:I::~OJ7'-:1OJj;t~
-0:00-0
I I
:1(7)~i!ii~
t<:l~,
;jf9:"-~jljl"9I::PXF(7)J;51:>l'P')""90
tt"
$<
1"
,-~i!ii"'(7)ll<;j;I~~i!ii~7H"i'<U~;j;
T-:1~ll!/t)QI::
',",'
'lliljt~M~
(-)
ll<ii'1.J'll!ptt""9
~
!/M!~fj~
o
1----
>
!)=7'7'-:1
t"li\!~,
tJ"J:"-9
~"
I)
=
7T-7''j]
5lliOJ1,1(,~OJll<;j;
$<
-OJI!iI~lt
I: J; I) 7'-
I) 'E:J
rj
/;-O)'fil.
:1OJJ£l'T1.J
/~f'F<:'
~""9
fH"F.',
0
'j]rj/;-~7J'
O!ii;J;!
(OPERATE)
(7'-:171
l1)1) 'E:J
lil'b5-)ll'.
/"
(ll!1'EIl#i'<U1.J'll<ii'~tt""9
"J:"-
9
-ifll<ii'~tt""9
'j]rj/;-O)ff.l~
1J':O't3l<ii'~I:71
t:It I) 'E:J /OJ)i!l$; (CLEAR)
Z:j:£~
•
7'-:1~'lB~I:~~~
• I) =
7'7'-:171
I:ll<tt
n,QF.'I:,
14]29
*,$<:"-~jljl~,,
"J/
t:It*f*OJ7'
7'-(A:1v-
fll<ii'
$<
-1.J
-(;(
0)
"J
/9
-tfll<;j;~
Lt"
"J/$< -
~"O:OO.Oo
CLEAR*'9 /
~
0)
(DISPLAY)
I::
tt""9
:1v-
tt
n'Q;:
*'
9 /
~,
71
..
"t·>
~jljl~l"F~
0)
~jljl
"J
t:7':j"OJII!';J;!Vdl.""9o
(DISPLAY) ;)<9/
;)<$</~jljl~""9o
/9
(~i!ii~7H"i'<U)
\"'}j
jt,
~j;t<:'ll!0li
I::
~ll!1.J>/t),1.J'
L , <
to
~
-1.t"O:OO.OO"I:.l,td"lfOli'5E~
1-"9
QI: It I) z:
"0
<:'~""9.
~jljl
~""9
(7'-:171
ll<;j;OJ>l'lI!,
rcrinri
uuuuu
0
.uu:
&*f*OJ)i!l$; (CLEAR)*'$<
"0
"O:DO.OO"1.J'll<;j;~tt""9
it
7'7'-:1tJ
"J
/9
jJ'')
/
Cc
n
r-:'
_
Cc
IS
D5
QQ,,~
0
""9
0
-1.J'1J':""ll<;j;~
2
Cc
2
/"
(ll!1'EH"i'<U)
c::'ji:~
s->
j'Iij,
;j;
....
REC".:iII
~
RE::
7")10
~;...
..
0
~~~-
~;;
~
~;"
DD
v::J
-7'
7")10
v::J
,,"c_~..
"ALII.
SP
Ct'l"l
I11
t
Pc['G
SP
-r
-7'
;...
PALJI.
7
l'
/ n
[1'/:::1_1
~
1"y
-~j!jj'"
;...'7
~1"y-~j!jj'"
CH.
CH_)
J
_I
(:1CJ77J.No.)
...
-
1-
1;1:
REC
(tJ"J:"-$<-)
~
RE::
7"0
75
J. No.
WTIMER"3!<7i'o)iJ>;IJ
'--~
•
-;'
DU
t.::
r~;
0 U SI'
iJf3!<*
?RJG
2;~
sr-
,,I,
t
P,"OG
~~
n n I r CH
U'
lILt·Lj:J
"':It
"it
Iv
I)t:'EJ"iJf#.(;tJ L,
C~
~I
_1
.-J
_,
o
Page 95

(::'
T
:t
1:::'
T':>t
'I'
1:::'
~"!;'t:
-;
<f;<
to
~
"0
tJ;I.
T':>t1J" '7
it
fL
lEM!>d:li~(:1JII
o
"7
t l.\ J G
!:*.llJ;.,@;pit'ill!'5
L
J;
et;l:,
t:
i~
?
t;
tin'
1:::7':>t1J" '7
*HjMIJl~E
~;<
-;
0
~:'(TO)li~illil
O)JIl(t!l~~}j'l!f
(;I:
'I'
~llll
V' 1:-:>0)
t.-,
<
i1f!.O)a!R:i~~~
~i~Jf.I
G
"'(
Oni~1J~*
*¥¥*!l!l~E
~
t!!1
~
1:::'
T':>t1J" '7
Ti!ifl'iAtJ'iiliF'f (AUDIO IN RlUMONO) "
,
1:::'T':>t1J"
tl:l1J-;.Q
I:li~
I£\'@;I;I:,
t.-
,T
'7iJ''E./
~
"0
UMONO'IMT
'"
i!!iiifl<A1J'lMT (VIDEO IN) "
'7
)vTi!ifl'i'l'
~IW
i!!iiifl<tl:l1J'lMT
(VIDEO
AUDIO
An,
~ilemo)PMfI<.\\\!~O)Ti!ifl'itl:l1J
<
to
~"
(Hi-Fi
Ti!i!"0)
i§iifl<A1JiiH
(VIDEO IN) "
9IilBA1J*,VY3
n'.QO)'I'!igi!lt.-;<'o
OUT)
A-r'YT ,
ga~
iJ'
G
v"'C')vt:
t-
"'C')v
iJ''Jl:ftt. ;<, 0)
L
-.J
;"'iJ'~iJ''''n
I
'@;pit,
Ti!i!"
A 1J'lMT
(AUDIO IN R/L-MONO) c-;
9IilBA1J*,VY3;...UHRt.-;<,o
Ti!ifl'itl:l1J'lMT
(AUDIO OUT
R/L)
iJ'
G
~IW
"4tJI'"?~'
[@'@U<'Q@)
.......
1~-D~n'V
Hf.F!SUPf:RMULTI
".""''''"''''''''''''''
00
L 1
(~iIii)
L 2
(1i1JiIii)
9IilBA1J*'V
Jl~Fr
SUPER
....
..'.m".'
.....
'_'''''.'m
MULTI!
......
_,tl..u..~.!;'11
@"@@)
......
·,.
.....
<'''",,_YlISHa
,--
~
D
~
~
=
D
1?~
:
Y 3
I
;...
UHR
t.-;<'
A
NTSC MODE
COLOUR MODE
v--<j"-7'
-r
,y T
1 A
70)1£\'@;
(~iIii)
(1i1Ji§i
eT
i*J)
iIT1!\'
3,58
AUTO x
1;1:
NTSC
[;!]30
Page 96

'"
,2.
"!m~<
.<::.*1'*<4--oG!<'
!=~'('#if:YWHof
'if2.'1
'fFl'1
~~t,Cl1'*<
eltm~<!=~
'''!
,2.
lllIl\!i!
fl 'If
"2
'.<CI~
*
fl
£;1
'fl
(t:
-~CO
'fH
*V'J'V03S)
fl'lf"2
~!ii!!'fT!W'-oG--I+-I::£;1
~d
CA'
- s:
~ +¥~
'.,CI~*(1'if.<CI~ll'+"'4<'ClC..<ClQjl
1
''1
~iH~.ft:
-.~,1- >2.'1
'"~?I > 2.
'ClW~
J.-1$
"2.C.'4<:I.:-1-~~~+~~UfH*.:-I-~-~J.-1$
CA'
,ClW'CI','4<"
=?
"2,'
'4<,
2.
~
Q'1:1~9f-.~?I
'2.
'1IlH<1$)f!
(L<ClIIIl.,ClilJl!ii!!:1
2.~CO
1'Vd,aN
t:-~:;,£'4
V'J'V03S3V'J
, 2.'If
-.
~!ii!!~,2..~
'''!
+l-
* (1 'iffl
'flt:~~:;'£'1!ii!!~,2..:-I-
'fl:;'£ *
'f;lI!i\j~
~~~'1
2.'4
~
.,CI~~'1W¥,a~
~
~~lI4r:tJ.~
~?I
> 2.'1
"'~?I>2.
~~:Jlj'-
>
2.+l-CI'
(l:I\f310 11\f)
'"~?I > 2.
CA'
'ClW~
~.oI...
4--oG1I1!l- •
+l-
;1:(1
'if
~:;,£
tP-oG--1+-1::
V1JV03S3V'J
-~
d 1 •
,2.lllIl\!i!
'fl:1~UCO
V'J\f03S
11
•
W¥,a~
•
J.-4--oG
•
~'"~
!it~:\:tCO~-oG--I+-I::£;1'
~,(,#'1~?tJt:CO~~'
1fI"'2.'1IlH<1$*CO;:? ,
'if:Jlj'-~'"
*f;jf!!l1~'
>10:"
'4<
-~t:r;'£~~~*al'
,CI~ll\fII
• (13NN\fHO) 11*<4--oG'
l'
ijI
{f[~:1
-,
'4<
,Cl
'~
=?',
',,'4< dllfI>
'"2.'1IlH<1$)f!
" ,
~?I>2.'If"!I-~"'2.'1:1~r!1h''13!~~
~
,1- > 2.
Q\',ClW~
=?
"2,'
'4<"
2.c.Y
>CI~".'!-
,'~i¥
>CA"CI!ii!!SI'~"2"2
".,!-4"
" ,
4'COf/g
•
"''4<~Y>CI~
~=?;t;<"!"2
~~]iv
,oN
qq
,(,,(11*<
'4Cfg:l~~.,CI.4<:::-
-1fl:lifll* '"
c ,
'4<
m.,CI~ll\fII
if:
YlIl1iof
•
'!<'
.<CllllhCl~I!ii!!
C..,ClQjl:l~'I>
'4<::vm.<CI<
0\
•
!=
'l.:!fd;l
'13!.<CI
',,'4<~CI';(ll
".,!-4"
,£:-
~.~
;-l
cor,g,CI
~:72'
~
('"
rV'J3lSAS,o~3aOl'J
;j(f:H
#;-l-CC02.lo'-1-rl;t;<;-l-c~l\fII'~~""~+L<,(.
!IB'£:
COf/g
I'H'£:-:«>:
COflg
ii*2.'
'"
*
- "'-.),-15;2.
)v!IIB~!fji;ijj!lIlIl§Jfl"'?'ifX-"::jfH*~
Ci\l,CllJ,M
('"
ii'.oI...2.
']i&)
'"
.,.01...2.
'1
~~
~
-oG
r:.
3aoV'J
V'J\f03S
'2.'il-Cf~:l;1~~!<'~~!I!t
'"
3aoV'J
ii';;1
>2.lo'IIH11t:
OSlN '3aoV'J
.l-
',£:-,f!<'~~!I!t.
-""l!j!~CO
"'ii';;1>2.
,Cl
iiJ,M
!<"'2. '4
* (1
SI'
2.'
4-"
,CI!j'I",Nilfl
r: 'V
r.·'V:lqq,/-COk-<
'?
-1-'ii~~
,;t;<,
ii'
4-,Gif:R1I5;-v<c
~~:111*-<
(,4
'f'hCll>llifllk
~;;1
<:::
>11't<st:l-l5;<'I-r;:J
>'1~'-1-
'~ll'+CO"2)
c
-1-*(dj"CI=?2
;',f-c~!l!!CO,£:-,f""~i!!f"~'
"''';;1>2.~21'.h~~,£:-,f
-<
15;*
(8NIKI\fl:ll) k-<'" r; L
4-,G-[gj
~~CO-l::,,f.::j.,CI;:J~,f
('
-1-*(1'if'"=?2"'4<
'fl2.
- (,
4.:-1
* (1
'if,Clilli'!f-!<'
-,
U '1
~:1~9\1CO(lHHI:;'£
c.:r
:1lli'll±~!I!t.,CI
r:
'V~
,?,'
ii'
i" >2.
*lil~.,CI,£:
'".,;;1
=?
2,';t;<,
U c.
;t;<:l;-l
-±c'fT!!l!/'fT,j,)~U-.,CI-I::;L;:J
ii'.oI...2.
'1
!lil~~]iv']i&)
ClnOlOO
'2.:ffCf~:I;:J~,f'?-1-~N~¥flS¥·
-<'I--<c~k~,£:if'l!;j(fCO;-l-r:J!1f~CO-l::£;:J'
'"
ii';;1
>2.qq'Clll'!,CI
-,f<\ftJ
'I-:I9\1Cl[f,lCO
'''I'il-*''2.,'C.,CI'"
"'~;;1>2.lo'~'CI'?"2.C.Y,CI~
'"
ii'.oI...2
'1
l'JIf03S
'3aoV'J
'?',
'"r;
r..CO~'fTmF$f;!f~CO'£:-,f·
~~,G
0SlN
-,
ii';;1
2.'4
ii'
'"
',HiH'£:-,f
'1!lil
rV'J31SAS
ClnOlOO
2.lo'~•
=?
-15;r 4-
•
-
-1::11
-*coI!!~
>2.
£:
-1-~~f
2.
'4~.,CI
~
qq
'Clll'!
-,f
qq,CI!ii!!
•
•
r..
.l-
' 3aOl'J
>J."I'l!'1
l!j!~
>'13!
ii'
;;1
>2.c.
.,CI,£:
:;,l*<I5;lf!
r..'l-4"
:1',<
m.dI
Qjl
:1',<,
, 'If
,Cl
'4<9l\fII.,ClilJliliil:ltP'I>!it
'!<,'4<:1
.
-]ff1!!i
(1
'1IlI~,ClilJll\fIItP'I>!it
e ,
:I',<
'1
,"Hf.'CIt:-,f
~l\fII:l"'4~
'4<m.,CI~CO~ll\fIICO.;:I
'!<'>
-,f
(~~O
),-15;
fl"!<' 'if<
2.R1~I~alll~
'=?
-1-IlH-<15;
INO
Cl3V'l11)
(JH)
'"
~
(1
01-
c.
~:rCO
0\
'\::!7
'(l:;,£C.,CI
~,f
*
-"'-.
15;
If!eG3fl
!ml~'
"'ii';;1>2.C.
'''I'il-*'u,
\/tJ
'"
'¥I~.w~,£:
ii'
;;1
>2.
'11!1!1§J~~
!<'1'!i!f.'CI
"M3
'11!1!;ii<<15;
,?,'2.
'4
'I-:1
9\1
Cl
[f,I
'C.,~
ii';;1
'-1-
a ..
CO
'"r;
>J."I'l!'1
*'
U,
-<
15;
If!
>l!~~C.<6lC.
'"
If!
(~~O/NO
ii'l!j!~:"
"
~;;1
>
Q\'
',CI~!I!t~,£:-,f
'"
r:
COW'fTmJ*f;!f~CO'£:
;j(fll-
'lhCll!l~~1i'iCO.J':"f;:J
(lJ3r3)
~,,[,2.
'1
'"
ii';;1
'~C.<6lc.co9\1f¥1·
'1
f;!f(,~~~~
Cl3l'J1l)
'"
ii';;1>2'4Y
-<
'1-<c,Clk
'CI!ii!!SI'~"2 "2
_L
•
c:
'"
lI.'l~
l
•
R1~'£:
-,f
>2.
~"'-..l-I5;.
"'~;;1
•
c.~J.
~J!1f~
•
>2.
<'I--<C·
'"ii',,[,2.
G,£:
~'l!;j(f.
'ClIfI:1
(31\fl:l3dO)
(31\fCl3dO)
',,'4<
~J.!ii!!~.
CO!<",
2.'1
U.W,CI
~~!Ii~~.
0\
'\
:t+
il.Jf.
t:-
" ,
'4<,
, 2.'1
U.W
~~!Iif~
'"
'4<
9"
fL<CI!Iif~
~=?'4<"!2
0\
-
'\.:l7
-!:
_,Cl
•
•
•
•
•
•
'4<
:).1·1
C.'1$
SI'~r.;:I
--I+lIi'f~1
'J.
CO~
* (1 'if
_,Cl=?"2,'
'"
ii'?I >
'4<fl;l.lllIl\li!fl
lo'~ff:~
=?
"2CO~:lW!<'
~!lf;t;<
~:rCO~
Page 97

f±~~
-r0){t!l
1sellJi::'7'oJ"7'--;I :
i::'7'oJ"ilIj!jj"A7'A:
l::'T';tfa~
PAL:
PAL:
PAL:
SECAM :
NTSC:
NTSC:
ilIj!jjj!j:!1J!;r.9 :
7'--;l!li:
7'--;l",1l!':
Y/TT)..,1J:
~i~T1'/*}'"
NICAM1J>'C
VH
FJ(/
UHF/I/o:
R F
::J/JI-51~tJ~~:
;J!ljf!l[tJ :
;;".;lOll!' :
1*~j1ffi.~
9Hf<1-.tji<
1>t~~
~ots
J:V'1±jjOl"'f*'"
VHS
2
PAL/SECAM/mSC~.
-:J0)t:!-
51
I)
-A,.y
oA, I) ;/JJ"jEJ[1J>'C,
:
PAL
:tJ>'C
B/ G
(j!j:l'./,aill)
PAL
:tJ>'CI(j!j:l'./,aill)
PAL
:tJ>'C
D/ K
(j!j:l'./,aill)
SECAM/MESECAM:tJ>'C B/
NTSC4,43
NTSC
,T,',:k480* (E-240
ft:k
M:tJ>'C
480*
(j!j:l'./,aill)
(NTSC3.58)
7'--;1:
(T-160
*7'--;1:
12.7mm
(PAL/ SECAM/
(L
p)
(NTSC)33.35mm/sec (S
11.12mm/sec (E P :
MESECAM)
p)
Hi-Fi\>f""i"j!j:l'.OJl<OJ'.)
75 0 'f'liiJiti
VHF:
:
,,-
VHF:
(CATV
VHF
VHF
NICAM-I
:
1-':
44.25MHz-295_25MHz (V-LO:
E2-E12
t:! 'y HCATV:
US2-US13
: A-5
-A-1
: J1-J12
: C1-C12
UHF:
Sl-S20
, A
UHF
UHF
E21-E69
UHF:
-W)
: J13
: C13
295.25MHz)
471.25MHz-885.25MHz
E30-E3901:!fI!OJI..II,IHlifilja!; VC-H92:E36
US26-US38
J25-J37
C22-C26
iI!:;Jl!
:
AC110-240V • 50/60Hz
'~fI!OJ'.
'~fI!OJ'.
OI:!fI!OJ'.
II,IHlifilja!;
II§;~filjll!;
II§;~filjll!;
.l'i22w
5
'C-40'C
-20'C-60'C
:
11[.:
4_5kg
:
ilJl!1t:
~tJ:
""'_
.
..
F.
1Ili380mm
AtJ
1.0Vp-p,
AtJ:
XJlfii!320.7mm
: 1.0Vp-p ,
750
7ot/'.J,,'Y?
750
:-8dBs (t-J-4dBs)
I±ItJ:7ot/'.J,,·y?:·8dBs,lkO
:
75 oIOlJlili-r-:1'J".
1)1:::1:"-
Jl!3IR6
lAA,UM/SUM-311~lI!:;tl;X2.
l&llll~~
i::'7"oJ"-r- :1'J"X1
<
'i£'l'!
i!!
n
{,
L. I:
YiJi>'J
'" -; 0
VHS-HI-Fi
G,
D/ K • K 1
(j!j:l'./,aill)
PAUMESECAM)
NTSC)
23.39mm/sec (S
16.68mm/sec (L P :
US14-US83
-J62
-C57
44.25-111MHz/V-HI:
1:~lE,
VC-H92:
VC-H92:
VC-H92:
X~i!!89.8mm
••
""
US341:~lE,
J33
1:~lE.
C24 I:C25 OJr.9OJr"
OJ1jJ~ii.OJ'.,
I-J"~-(-\'J"W717'vA
oJ"-7'1oJ"-r-:1'J"Xl.
(j!j:l'./,aill)
p)
11.70mm/sec
j!j:l'.OJl<OJI..)
111 -
VC-H92ETS:E391:~lE
VC-H92ETS:US381:~lE
VC-H92ETS:J37i:~lE
/*J"I:~lE.
47kO
VC-H92ETS:C261:~lE
G!J
32
Page 98

*:t~~~lf!.1:i
°
;ll;1Fmt.llill.it.ll~A!t;liT.
°
VHs1]tcliii1l'liii',:rLIlt'il'.
° f?mU,,;ll!i1l':PAL(BIG,I,DIK1ISECAM(BIG,
K Kt ) INTSC4.43I
°
"f1'EPALfI>lJtc8'JiIU"lt.llLliU.ifflNTSCmIJtc',7<'ii18'J'UMll'.
°
lJl1ffli"U,lii'iltil<
°A L
(1I1~ttltqlJl;;j!l[)
NTSC3.58
i'ld;'t
(M)
[0
13
tbiltJlllilliJti!<l;'t]
°13li!Jilt~iiIlJ'il'i!<1;'t
°
13li!J1I1~t§;fI>lJi!<1;'t
°OSD(*!IfHJl5f-)/OSP(*II'Uliff):willi,
jj!~:w,g
°
VISSOI\!IJ!Jli::ff:/VISSlitlJiUl1fJl#<:willi
°
"1Fm~li!J0I\I
°
""'iJitr,jJ<gli!J8'J~
41!1i1~"
('lIf~/Wi~/i.!<~/i"if1EJf~)
fI!'il'
8'1
jj;t§;
..
13
tb'lli'lll'i!<1;'t
°DPSS(1!t"¥:tctJijt;lii!<I;'t)
°
iil'ifl
w''!'fJillJHJ\:>iO
i!<1;'t
°~13li!J!i\(1I3:w,g
°110fi<-240J!(:,
°365x,
° 5
fiLlIJ[/.l!1<EilttJi:
°
"ffli>i04811!1!fJlit8'Jlt~il-,t;li;iiIlJlll'''
°
Ill!
~'U3>iO~""fffl*fIi>iO'U.iIllJ/lIifD,j5*8'J~r,jJ
50/60,",l3tbt~jj!~'"
811!1tff"l}j(1lIi8'Jflijj!>iO~"("'iJj;
B
/iJj;iI!!8'Jl¥.~r1Ji\g)
..
°ff'!'£IJ!!i\(lIb
lItilili:
2js:t.Ilft
ffl
8'JlItililill;
~>I:~lIb'lll':
2js:t.Il,*ffl
1V11511J!11f'~~litlJt.
3l:iJ,EjUlO-
240J!(:,
50/60llF.
I>lt~,
.Jz.!Jl:1tffl'lO'1f
DIK'KllIMESECAM(BIG,
IV!l.~
J;IG
IVtl511J!"8'J~".n3'1O'.
DI
EH~
~
°ftfflH'JiEJl!:..····..···..·
°
ilIi1llimljtc~J.&~1I3t.1l1'E1tfflmor8'JiiIlJ'il'
°
W'3t.1l8'J±~~1l,t;li;/l~?)-
~
° jJ;jj:; 6
°
'U.ili1'it8'JiiIlJ'il'
°
i!<t§;
°
OSD<
* !IfHJl'f:)
OSD(*Ji'l.HJ\5f-)8'JJlJt>iOllW
°
°
li1'it8'JJlJt>iO
°
mm1Y>:*!lfLIffi5f-8'J1]"
£*~fF17;1;;
°
!i\(1I.i8'J1]i.!<
°
~
13
JiJ:w,g
°
~m1Y>:
VISSOI\lJi!Jli::ff:!VISSlitlJi!il1fJl#<
°
ltff"lfl!
~
~
°
°
°
°
mmmJJ
°
°
°
°
°
°
°
flIi1!I
°
°
E18'J~~
>iO~.,7<~8'J1]i.!«OSP(*Ji'l.LIi1'l!.J)
>iO
alH~
JlJt>iOJ"J
:§:-'ill:;;1<
>iO~
..
JlJt>iOJ"J:§:8'JJjj(il1f
1lI!£~~>iOa<i'a
IID~Jj],g
DPSS(tJi:'f:1'l!.J!:lI'1;lii!<I;'t)
ff;;:1Il;1J!!i\(1I.i···
iil'iflW,:i:{JillMJl>iOi!<I;'t
}:w,g*j\';~Jl5f-
"U3#11F'Jt.lIiilkt.ll8Mjiffl
il£;I(:'EiID<li1'JlJtfFm.H~;iEIi~
Oli'AI${lifzJi1j8'J'f<JJ$lJl1t
'!I1.ti}$l!!: ., ., 32
······
············
········
..· ·3
, 8
8'Jf<JJ/lIiJlJt>iO
(1ffi5f-8'J~,,!'!
~ti:8'JJlJt>iO
) 9
, ,· ··..··· ···
·..
····
..·· ···..·..··..··..··
·····
· ·· ···..· ·..· ····..
··· ·..···..· ·
··· ··
,·····
·· ···
·····
···· ····
·
·
·., - 27
·..·
····
..·..
····
··..
·······
.,
······
·····
··
..··..
····
···· ····
·· ····
·····
..··· ·· ·· ···..28
········
, 2
·················
········..·····..···19
·······..·····..···21
·····
..···..
········
····
·..
····..···········27
····
··········
· · '..29
5
7
·11
·13
·16
17
·20
23
..·35
·25
26
···28
·30
30
31
~f.H4:
1t~Ii-
T
2js:ffl\J;,'"l!fffli
~
F'Ji¥lIlll[!Il
191
(75
.
~~~
Iltl1ilc)
~
JXF
I
f~
8'1
.
Ilfj'jlf.
~~_
~~_.~_._"~~._~.__~"_.___
~p
"'mM!,
Oli'!'!
e:
~
jj\\~i!<~"
)[
~jf&M~
_._"._.
__~~·,__
.",'··c__
"'illi~ji
*.
c
(
ffir,JR6(UM/SUM-3
J;IGoIl'
AA)
'iltitll
--
-,."
~---.-.._~
..•
_---"..--.
-_._~--
- "."--,,,,-,.,-""-
--.-
~
1I
ff"lli1'
-ll'-!fJl'iltm
ltl!Jt
Page 99

°!mf;lti!!¥0eJU~I~.
il1\11~
y
~IlW0el'!i'j!UI;l1~
f:¥I0e
WjI-jl,'iiHii:fi!l/,\
",,~¥1o'.cj;f~1l0ef:¥lWjlr&\lill'l
*~~°lIMll''iitlllft
'~flS1\11~»~-!HI1~ll
1\11
liilll.
[I;I
~
o~i40ellt~'liHYti:fi±
.9
"!IHnJ~1fI,
~f(t!lt
fi'l4
..
UrfI;l1l#:
'liHliJ'I0H!lilYW
iiii~
1;11
"lIni
'1l~'iiHII±fJll~*~~
1l~!J.lI!iJ!1fI,.J.
~
rtr
10'.
J,1W%
~lltIJlfMiill**~1f
"ii'Ii¥J:0e~:~H!I:tl]iHllj:1¥!1fI,$N~0eD
':HT
~
"lllIfMl
§']
'WQ'JJlf
----------------
lil4''M'I"i:!lt±(M3a)
.J1\11[t/iI\I¥'f{*Il~lliHl:
°1l~nnllil\l!lllfMl:!lt
lll~iM'lfl*
f:¥I
~WjI:lt
·~WliJl'lfl*~f:¥Ill.J.
3',l:WjI~'iit
lll~m'lfl*m~llHr"iJl'S""~o£'*
'~1f§,]
".f5'*\IHiH1~~¥.t:iJ'J~0e~liIi:fi!l/,\~¥1o'.
'lil4'~g
°[t/"'f~e~laI
iI\I~
~l
~il*(M3a)
:ltMJi~±~l~¥f(;r0ij~.y9Wj1~iI'iiHII
°lmlll~'iit[Jj<*~'iiUllff!I!B
[t/
i1\11\11
JjfI
:!tq,
lll~m'lfl*3',l:~~
lfIl!J
0e
I\\'
ifi
JJI1I13',l:'l,,1'qfii
!iJ!1fI,
li'f.!Hi11l~f'iit!j!
Mi'l
'!i!fHHsHfIJ1UIi
"1l~'iiHII
~
'~:r'llmW!iJ~lII..J.fJt
·ll~lll~'/jtl!,!;H~·
[g]
';I.f'i'"I""~
..
'lfl*
~
"tI$.IllI~0e
'tjIJ.~
iI\IElH'It
!IlI[MJ:!lt
~\j!Ijjl*f*
"'lfl*'I'¥'~1l
Will
~
JJ1'1m
••~..
(M3
a)
*
•
-------
-------------------
e[t/~
'!llf4
>l)!
i>i~4-'~~0e
[fd~
[t/
iI\I:t:
~H_
°¥fjlk"N~»ill~1\11!mf;lH~0eJlf~I~.illvfiW
~1fI,0elillfll',/;U1l'IUij]J~
°:rlill~ll''/jt3',l:JjfI§j!*4ellllJ!4.:lt1\1!*~>W1%\l~rtr
11'
Brl;I~lillfll''iitil\l~f,t~~
f:¥IWjlfl1f\I(~4H~i4lill~ll''iitWI§j!*f!!}'ij%\li:fi±
o~jj;j:rl;I~1t'ill~",,~
liUro
4-J,Hf1\11
°1\\''if,nf:¥llllTf(~,,1
Mr:
WQ'J
-
W11ill'iMllli'tf¥!;!!!
'IIiJ'J
••
'F~~TU:f~¥r.:1.:w~:w.
f1;I
lilfll:t:[t/
'f:¥IlltY~IlIlJ!~-W
°N¥alqr,~U.!!"iJl'lllft0e
§']
'*~11
iI\I~!('
4.:ltEfl
~4e
[f.j.ff3',l:Jjfllill~'iit%\l
'1t'ill~~:r~i4llt~ll''/,'t
i1\13',l:
i!f:lt:¥: °~*>is'%\l1llf
'!J!14'lill~ll"iit,l/!0e
'll~W
Jlrt1\1!Y
1\1!
'>is'ii¥
~
>l)i
[t/
i1\13',l:
'9
~
'
~
rtr
'[
,,1
:!t
.'F~
Page 100

jl)'jiffiUit/1I
•
*~~j;j\fB%1!I!(flU;;J:&
lItill!llI!~U>i:
PAL-B/ G
PAL-I
PAL-D/ K
SECAM-B/G
SECAM-L
SECAM-DIK.KI
NTSC3.58(M)
NTSC4.43 NTSC4.43
•
f~ilJt)iie"m..t~aa9';fiI!~@.lI[il(flU;;J:.
%fiI!iM
j91J~O
PAL-BIG:15JJ:
ii!!lIl±\.
• ",,"
-'f~lI[ii!!j;j\W~~j;j\fEIj!JH~,
*ll!ll'jl\\""~U
>i:
(;~lOr.lJl!I
HO
PAL-B
PAL-DiK
!'1ESECAM-B / (
SECAM-B
SECAM-D/K
MESECAM-D
NTSC3.58
JJ:fBlIl±\
:
~o~iie"ma9~~-~
jgilJD51~PAL
~a~~ii'1'~gjfMT~!MOD51~.
f~m
ili~H'!~*mz"Wi
';fiI!milj;j\Jl!ll\jH¥J~~~OD51~
~!l!l!\1till!JJ!li1i
PAL PAL I PAL
B/G
I G 0
PAL-I
/0
/ K
W'\illi,
]jIG~JY-
0
%fiI!l'I&J
PAL-B
(~iI'~lllI*eJ1l
lIiUJJ:a9~~'I1J',
[1lIJ1ilJ1JlJ~:iE:)
?lTt).
SECAM
D/K
B/G
0
0*
0
Mz~IlI1~~JEij'.
a9~
@.(flUJJ:*1iJ$,
I G
(flUJJ:fB~@.milj;j\.
I\MFJm~j1flJl'{I\fjA/ilful±\&ffl!lJl'{I\j'jA/I\j'jI±\'IiI
mj@~~~ii'7'~giie"m
inl
IOOIL
L:.
L:.
) •
NTSC
SECAM
(M)
D,K,KI
0
0*
~PilJmm~*~~j;j\*~\l!l!
~orJY-~T
-~'i\'Hjj1flJl'{&ii!!lJl'{I\j'jA
1iI1~lI!IiMI#
SEC.t\lll!
PAL
0
0
0
0
7''ll!1±*~~j;j\..tjl!~
PAL-B
Mllllll1Y1
~BECAM
SECAlo!)
0
0
L:.
L:.
0
0
I G
lIiUJJ:fBlI[
NTSC
0
0
/1\fj1±\'IiI-'fa9l1[ii!!j;j\,
•
"0"
~a~~ii'1il'l!'lmffl!j;j\W~~j;j\a9j1flJl'{,
JlJ'lIf&.
•
1il'~~i*""
SECAM
•
•
t)
•
•
•
•
~porjfm~~~fjj(~,
SECAM-L
a9~~'I1J'~.
"*"
~a~~ii'~t)
T~%lii'!~~'I1J'a9iie"miIBlII
PAL
~'I1J':
SECAM~~'I1J':m~..tmt!ffB
MESECAM
NTSC~~1;l\':m~..tmt!ffB
~~'I1J':
lIi~;;J:fBlIl±\~~~.
~JlJ'lImii!!llJIa9lJl'{I\j'jA/I\j'jI±\:&ii!!lJl'{I\j'jA/I\j'jl:±J'IiI-'f,
MESECAM
ij;IJJJ:~\l!l!a9
:
m~..t!!fl't!fa9
PAL-D
I K
(OIRT
~o
SECAM-B
ij;IJ;;J:.lI~t)
orm:
tJ
MESECAM
fB~~,
I G •
SECAM-B
[93
ii!!lJl'{a9I\j'jA/!f@jI±\'IiI]jIG~.tlJl'{I\j'jI±\'IiI*1'I
t)&m
SECAM
PAL
~~I;l\'.
($:
SECAM
SECAM-D
SECAM
I G.
:15JJ:~,
NTSC
~~'I1J'.
SECAM-L
~~,
ilJmm:PAL-B
""lI1'.lImii!!M)
~~'I1J'
:15JJ:~~,
(-E1,!\5fE$""!!fl't!fa9)•orm:
I K • Kl (OIRT) :&
SECAM-DIK:&
ormm:fffi'J
(flUJJ:a9mii!!j;j\D51~
I G •
PAL-I.
)
lIiUJJ:.lIfB~
SECAM-L
KI (OIRT)
lIiUJJ:.lI~
NTSC-M
lIiUJJ:.lI
NTSC
Hi(
~
e
~@'lIiUJJ:~o.1I11iUJJ:a9Jl!ljjU/~~i!!Jmjl!~~~~'I1J'fBfjj(~jjjjJJt
2
3
I I
!lJi;;.*l;l PAL
T
V
ll'ili1i*l;l
VHS
!lJi;;.lI!l.>*l;l
"I_J&I'f<Jll"lI1i!W!l!l'f
V
~~l(I\j)
H Jl:1il'ill'M"Willfjil'gU
S
1iI11.>
(l'll'lFol.<lttll'mil'J)
(!l!ffJt~11'ff
IvHP:B
UHF
a(H)
PAL
1iI11.>(§ll'lFo1l:lI!!'il'll'mil'J)
eiie"m*~~j;j\*~~~ilfuA~~wm~~fB~.(~~j;j\~)fjj(~~~'I1J'~~OOU~
~
JEoo
1iI11.>lli'fl<il'J
1iI11.>1J>i:
NTSC3.58
NTSC4.43
PAL
SECAM
MESECAM
NTSC-PAL
•
jj~'l'flJl'{l\j'jA
jfm~~a9:15$f1Il1i~
mt)jl!l$~1lIl!/i,,"iA
CTV
(~i!.l11.t~)
AUDIO
(Ll:
('N~J"J)
**i;;.1:i"
131iJJl<
NTSC
131iJJl<
NTSC 4.43
131iJJl<
PAL
131iJJl<
MESECAM
131iJJl<
MESECAM
131iJJl<
NTSC
IN R I L
~Offil!lJl'{I\fjA
"~I\j'jA~~"
1\'iID.
]jIG
VHF:-
~D
UHF-I
:K
PAL
PAL
SP
/LP
SP/LP
SP/LP
SP/LP
*lI!!~«Ilil'Jllllll!lf1l.lI!!
e
iie"mmflfB:15$jif.f~~~.
L2:
il1filij) c
4 I 5 6 I 7 8 I 9
VHF:B
UHF:G
SECAM
lI!!IlJ!NTSC1:i"
3.58
ifi'Jl1l.fIi<
NTSC-PAL
(~f911ij!)
VIDEO
IN 'IiI-'f.
~~SECAM1:iA:
SECAM
iMESECAM
SP/LP
SP/LP
SP/LP
SP/LP
1\'00
CTV
jjjjJ'll~~fB~.~~~j;j\
VHF:D
UHF:K.Kl
SECAM
[MESECAM
SECAM1:i"
lfii'J
f1l.1l!'
SECAM
MESECAM
1f1'J
l1l.fIi<
~T
NTSC
VHF:M
UHF:M
NTSC
358
SP/EP
SP
SP/LP/EP
SP/LP/EP
*jj\1.>
«Ilil'J!lli
JiH1l.1l!'
Lt
(WOO)
L2 (JEOO)
INPUT
-
NTSC
4A3
~
 Loading...