

Page 1

Page 2
l G-code* for Instant Video Programme System
l MID-DRIVE (New Center Mount Mechanism)
l Built-in Shuttle Control System
l 2-Head Long play/Double Length Recording
l HQ (High Quality) Circuitry
l 48-Channel Preset PLL Frequency Synthesized Tuner
l Auto Channel Tuning System
l Quick Start with Full Loading Mechanism
l On screen Display (7 item, 5 languages)
l 365-Day, 8-Programme Timer (Daily/Weekly
Programmable)
l Simple Recording Timer for Programming Beginning
and Ending Times of Recordings
l Intelligent Recording
This VCR can automatically change to the
mode when
the tape is expected to run out halfway during timer
recording.
l Programmable Remote Control with Multi-brand TV
control
l Auto Head Cleaning System
l 5-Digit Linear Tape Counter with Auto Zero Back
l Tape Remaining Display
Computes the amount of tape remaining.
l Auto Rental Mode
This VCR will automatically find a location recorded
and play back with this function.
l Clean Picture
Makes badly recorded tapes look better.
l Digital Auto Tracking Control System
l Instant Replay
Performs a reverse video search for a fixed interval,
and then plays back again.
l
Programme Search System
l Auto Repeat
Plays back the entire tape repeatedly.
l Skip Search
Performs a forward video search for a fixed interval,
and then plays back again.
l Child-Proof Lock
Any selected mode can be locked-in to prevent
accidental change.
POWER SUPPLY:
The voltage supply of this VCR is AC 240 V 50 Hz.
CASSETTE TAPE:
This VCR uses
standard video signals. Use only
video cassette tapes that carry the
mark.
G-code is a trademark applied for by
Development
Corp. The G-code System is manufactured under license from
Development Corporation.
GENERAL INFORMATION
l
IMPORTANT SAFEGUARDS AND
PRECAUTIONS . . . . . . . . . . . . . . . . . . . . . . . . . . . . . . . . . . . . . . . . . . . . . .
2
COMPONENTS OF YOUR VCR
4
l
REMOTE CONTROL
. . . . . . ..*...*.........................
5
SETTING UP
THE REMOTE CONTROL FOR TV
OPERATION
. . . . . . . . . . . . . . . . . . . . . . . . . . . . . . . . . . . . . . . . . . . . . . . . . .
6
. . . . . . . . . . . . . . . . . . . . . . . . . . . . . . . . . . . . . . . . . . . . .
7
@ADJUSTING THE VIDEO CHANNEL
. . . . . . ...*...
7
THE LANGUAGE
. . . ..*...........*.........
8
THE CLOCK
. . . . . . . . . . . . . . . . . . . ..*.............
9
SETTING
. . . . . . . . . . . . . . . . . . . . . ..*..............
SKIP/CANCELLING SKIP
. . . . . . . . . . . .
12
l MENU SCREEN
. . . . . . . . . . . . . . . . . . . . . . . . . . . . . . . . . . . . . . . . . . . . .
13
SCREEN DISPLAY
. . . . . . . . . . . . . . . . . . . . ..a............
13
l MODE SELECTION
. . . . . . . . . . . . . . . . . . . . . . . . . . . . . . . . . ...*...
BASIC OPERATIONS
*PLAYBACK
. . . . . . . . . . . . . . . . . . . . . . . . . . . . . . . . . . . . . . . . . . . . . . . . . . . .
15
Auto Rental Mode . . . . . . . . . . . . . . . . . . . . . . . . . . . . . . . . . . . . . . . .
17
*RECORDING A TV PROGRAMME
. . . . . . . . . . . . . . . . .
18
TIMER RECORDING
RECORDING TIMER
. . . . . . . . . . . . . . . . . . . . . . . .
19
20
@PROGRAMMING THE TIMER
WITHOUT G-CODE
. . . . . . . . . . . . . . . . . . . . . . . . . . . . . . .
22
*CONFIRMING TIMER PROGRAMMES
24
. . . . . . . . . .
@CANCELLING TIMER PROGRAMMES
. . . . . . . . . .
24
SPECIAL FUNCTIONS
l
INTELLIGENT TIMER RECORDING
. . . . . . . . . . . . . .
25
@ZERO-BACK FUNCTION
26
l
DPSS (DIGITAL PROGRAMME SEARCH SYSTEM) . . . 26
REPEAT
. . . . . . . . . . . . . . . . . . . . . . . . . . . . . . . . . . . . . . . . . . . . . . .
26
SEARCH
. . . . . . . . . . . . . . . . . . . . . . . . . . . . ..*.................
27
l
INSTANT REPLAY . . . . . . . . . . . . . . . . . . . . . . . . . . . . . . . . . . . . . . . . . .
27
@CHILD-PROOF LOCK
. . . . . . . . . . . . . . . . . . . . . . . . . . . . . . . . . . . .
27
. . . . . . . . . . ..a..............................
28
REMAINING DISPLAY
. . . . . . . . . . . . . . . . . . . . . . . . .
28
HELPFUL HINTS
FROM A CAMCORDER TO
YOUR VCR . . . . . . . . . . . . . . . . . . . . . . . . . . . . . . . . . . . . . . . . . . . . . . . . . . . . .
29
@SPECIFICATIONS
. . . . . . . . . . . . . . . . . . . . . . . . . . . . . . . . . . . . . . . . . .
29
CALLING FOR SERVICE
. . . . . . . . . . . . . . . .
30
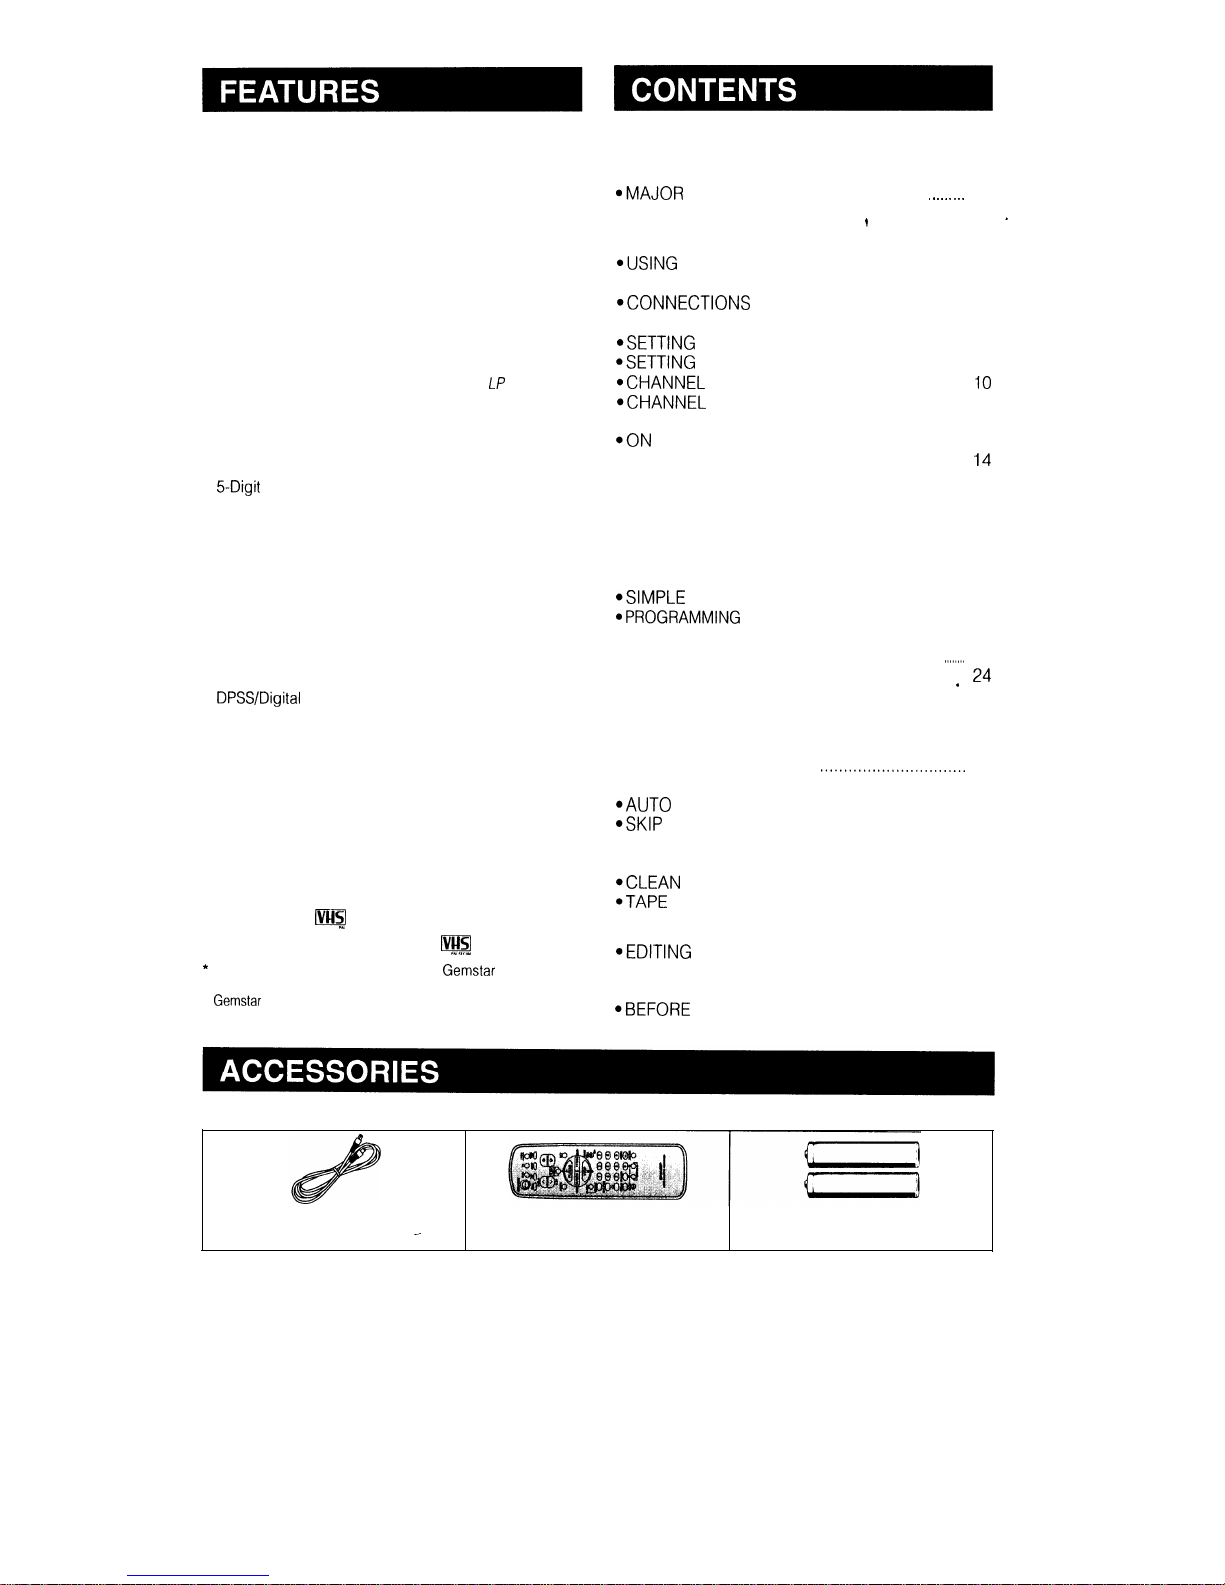
Be sure that the following accessories are all included with your VCR.
Coaxial cable (TV-VCR cable)
Remote control unit
Two (R6 UM/SUM-3 or AA) batteries for
the remote control unit
1
Page 3
CAUTION
BEFORE OPERATING YOUR NEW VCR, PLEASE CAREFULLY READ THIS OPERATION MANUAL AND
THEN SAVE IT FOR FUTURE REFERENCE AS IT WILL BE USEFUL IF YOU HAVE ANY PROBLEMS
OPERATING YOUR VCR IN THE FUTURE.
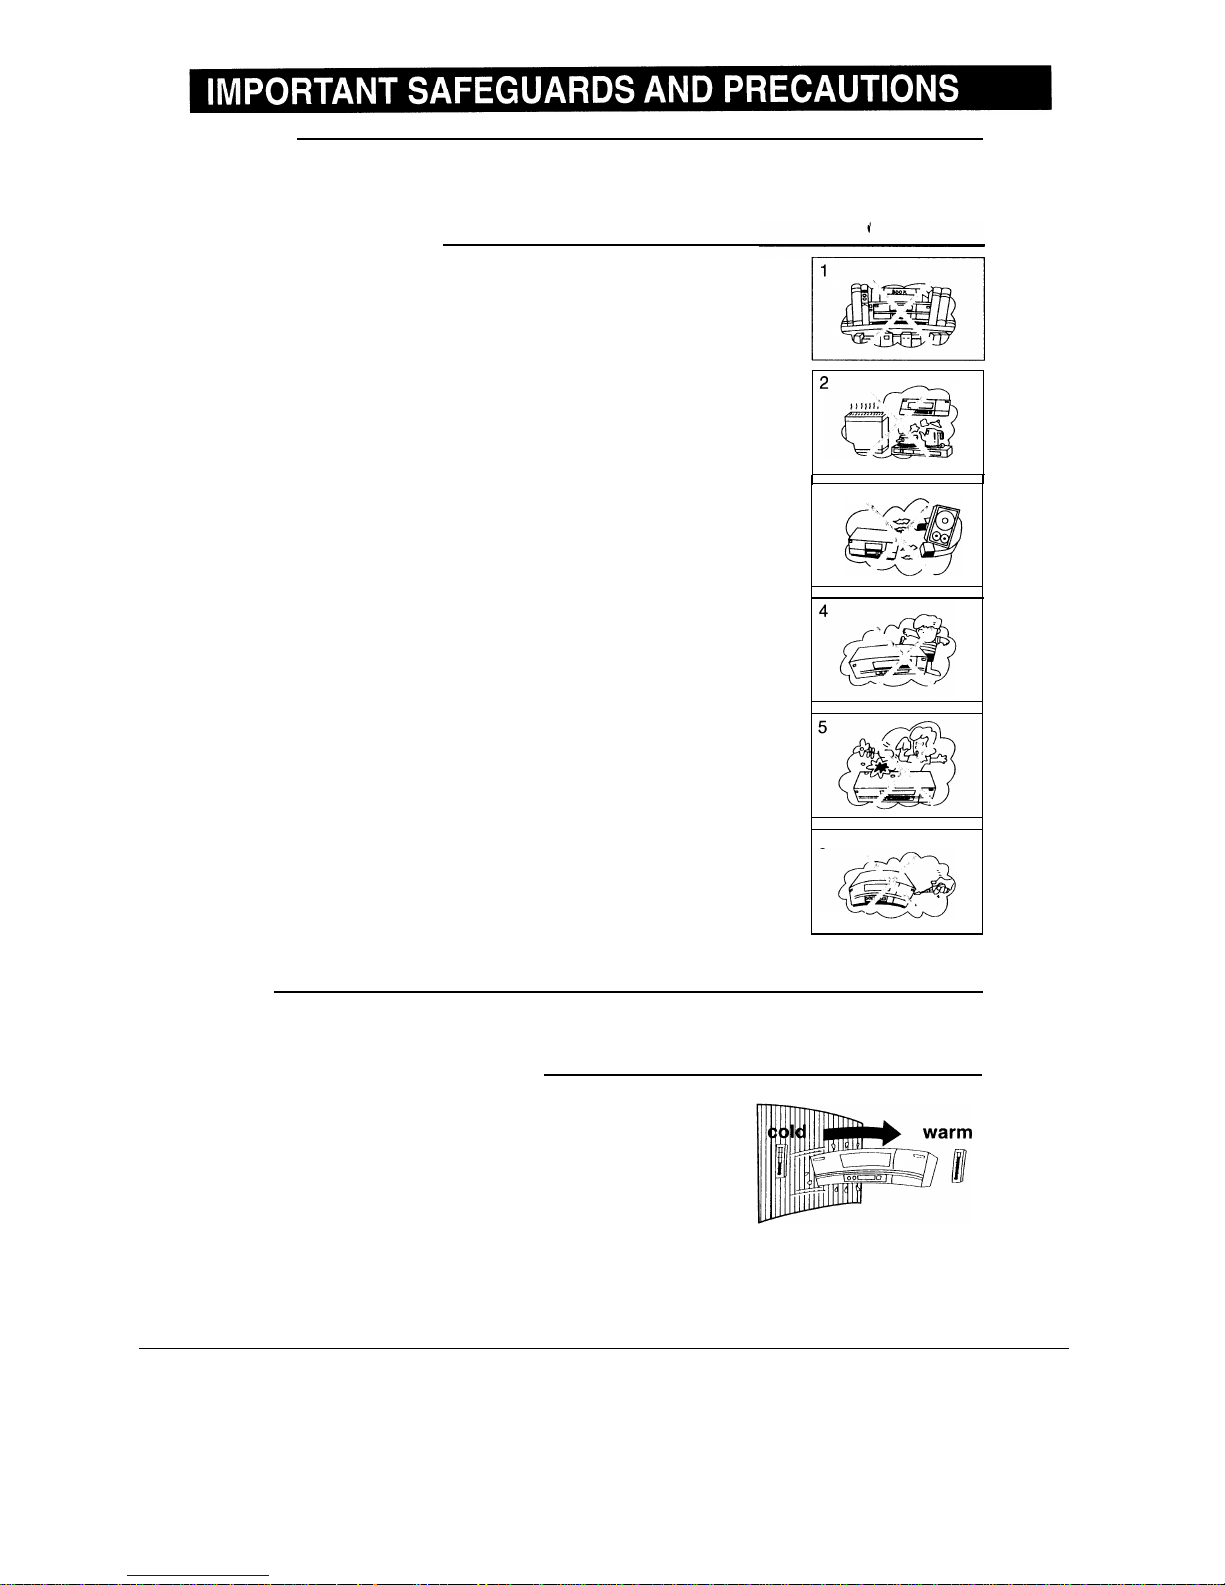
Location and Handling
1. Air vents are provided in the VCR cabinet to prevent excessive
temperatures inside the unit. Do not place your VCR in closed spaces,
cover it, or otherwise block the vents.
2.
Do not place the VCR in direct sunlight, or near heat sources.
3.
Keep the VCR and tapes away from strong magnetic objects.
4.
Do not insert or drop anything into the VCR through the air vents or
cassette compartment as this could cause serious damage, possibly
resulting in fire.
5.
Do not place any object containing water or other liquids on the VCR. In
the event that liquid should enter the cabinet, unplug the VCR immediately
and contact the retailer or a service centre approved by Sharp
immediately.
6.
Do not remove the VCR cabinet. Touching parts inside the cabinet could
result in electric shock and/or damage to the VCR. For service and
adjustment inside the cabinet, call a qualified dealer or service centre
approved by Sharp.
7.
The use of head cleaning tapes is not recommended as they may cause
damage to your machine.
3
6
Service
Do not attempt to service this VCR yourself. Please carry out the user checks on page 30. If you still
experience a problem, contact your dealer or nearest Sharp service facility.
Caution-Prevent Condensation
When moving the VCR from a cold place to a warm one,
condensation (dew) is likely to form on the VCR drum and heads.
If you try to play back or record in these circumstances, the
videotape and VCR may be damaged.
To prevent this, turn the power switch on and wait for a few hours for
the VCR to warm up and dry before attempting playback or
recording.
This is particularly important before loading a cassette for the first
time after purchasing the VCR.
2
Page 4

Others
Copyright may exist on material you wish to record. Copying such material without permission of the
relevant licensees or owners of the copyright is prohibited by law. Sharp is not in a position to authorize
the recording of copyrighted works and nothing in this operation manual should be read or implied as
giving that authority.
This VCR is not equipped with a mains power switch. Accordingly, nominal current to drive the
clock is drawn at all times when the AC power cord is plugged into a wall socket. If the VCR is not
to be used for an extended period, be sure to unplug the cord.
3
Page 5

Front
OPERATE button (turns VCR on/off)
Clock display will work regardless of this button.
Basic function
Cassette compartment (see
PLAYBACK/RECORDING)
I
controls (see
PLAYBACK/
RECORDING)
When pressed;
l Stops the tape during Playback, FF,
REW or REC.
l Tape is ejected during STOP mode.
VCR Display (explained throughout the operation instructions)
NOTE:
l When the VCR is ON, this indicator (where a channel
position number is usually displayed) will light up.
When the power is OFF, this part will not be lit.
Cassette-In
Slow
TIMER
Timer standby
Indicator
mode
Play/Double speed
playback
Frame Advance
Child-proof lock
Search Rewind
Record
Auto Repeat
REC
II
Search Forward
Pause
REC
.
REM
Tape Remaining
When AC power cord
is first plugged in.
Simple recording
Rear
Connection terminals (see
CONNECTIONS)
RF converter output channel (CHANNEL) (UHF channel 31 to
TEST SIG ON/OFF switch
4
Page 6
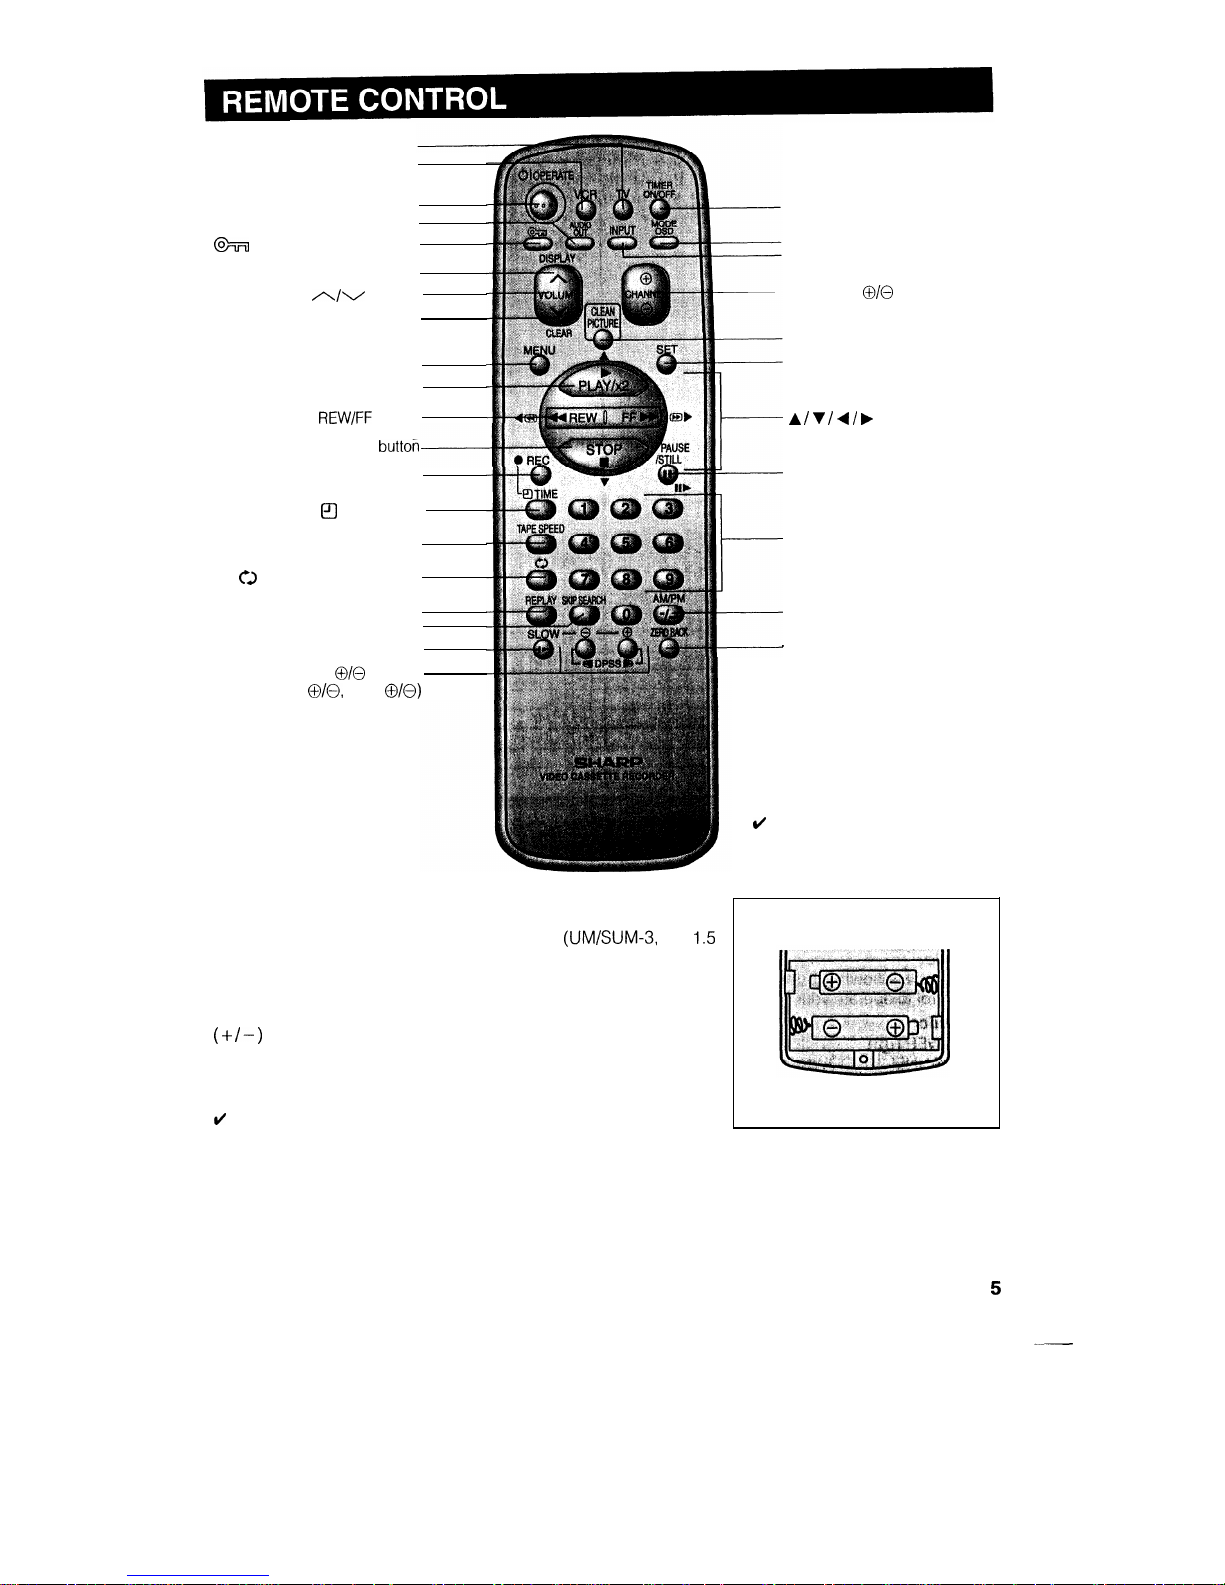
TV button
VCR button
OPERATE button
*AUDIO OUT button
button (Child-proof lock)
DISPLAY button
VOLUME
buttons
CLEAR button
MENU button
PLAY/x 2 button
button
STOP
REC button
TIME button
TAPE SPEED button
button (AUTO REPEAT)
REPLAY button
SKIP SEARCH button
SLOW button
buttons
(Slow
DPSS
Inserting the Batteries
First, install the batteries properly. Fit two R6
AA)
volt batteries (included) or equivalent. If the remote control stops
working, insert new batteries.
Ensure the batteries are inserted correctly, matching the polarities
indicated in the remote control.
TIMER ON/OFF button
MODE OSD button
INPUT button
CHANNEL
buttons
CLEAN PICTURE button
SET button
/
I
buttons
PAUSE/STILL button
Numeric buttons
AM/PM button
ZERO BACK button
NOTE:
* AUDIO OUT button does not work
with this model.
NOTES:
l Do not subject the remote control to shock, water or excessive humidity.
l The remote control may not function if the VCR sensor is in direct sunlight or any other strong light.
l Incorrect use of batteries may cause them to leak or burst. Read the battery warnings and use the batteries
properly.
l Do not mix old and new batteries, or mix brands in use.
l Remove the batteries if you will not use the remote control for an extended period of time.
Page 7

The provided remote control can operate the basic functions of your television. In addition to Sharp
televisions other manufacturers’ televisions listed below can also be controlled by setting the remote
control to
corresponding TV brand. The remote control’s default brand is “SHARP”, which enables
control of most Sharp televisions. When you replace the batteries in the Remote Control, the control’s
TV
brand setting will ‘be reset to SHARP.
Setting the TV Brand
Turn on your TV.
Press the TV button and the button
simultaneously which corresponds to the
brand of your TV. Hold the button down for
about one second.
Refer to the table of brands below.
When setting is complete, the remote control
will send a “power off” signal (01) to the TV,
and it should turn off.
(For example)
TV brand: SHARP
(Corresponding
button is
Press these
buttons
simultaneously
and hold for more
than
second.
NOTE:
l If the TV does not turn off in step
repeat the step
setting procedure and select the button for a different
brand.
TV BRAND NAME
Corresponding button
TV BRAND NAME
Corresponding button
SHARP
GRAETZ
7
PHILIPS
2
LUXOR
7
THOMSON
3
or
4
SALORA
7
TELEFUNKEN
3
or
4
SELECO
7
NORDMEND
3
or
4
SONY
8
BRANDT
3
or
4
TOSHIBA
9
SABA
3
or
4
PANASONIC
0 or
3
or
4
SANYO
Vol.
5
HITACHI
CHANNEL
BLAUPUNKT
5
MITSUBISHI
CHANNEL
FERGUSON
6
ITT
7
TV Functions to be Controlled
Switch to TV control mode.
Return to VCR control mode.
l Press the TV button to select the TV control mode.
l Press the VCR button to select the VCR control mode.
TV
function control
Press the TV button to select the TV control
mode.
Use the following buttons on your remote
control to operate your TV set.
function
TV
POWER
CHANNEL UP/DOWN
VOLUME UP/DOWN
l
INPUT button (TV-AV selector)
l
O-9: Numbered buttons
DIGIT SELECT button
Press the VCR button to return to the VCR
control mode.
NOTE:
l When you replace the batteries in the remote control,
if your television is not a Sharp model you must reset
the TV brand.
6
IMPORTANT NOTE:
Although the provided remote control unit is compatible
with SHARP televisions, as well as many TV models
manufactured by others, it is possible that the provided
remote control will not work with your TV, or will control
only some of the functions.
If the button listed in the table does not work with your
TV set, you may want to try another; occasionally,
models vary within a brand.
Consequently, Sharp’s warranty does not cover all of
the models under the brands listed in the table.
Page 8
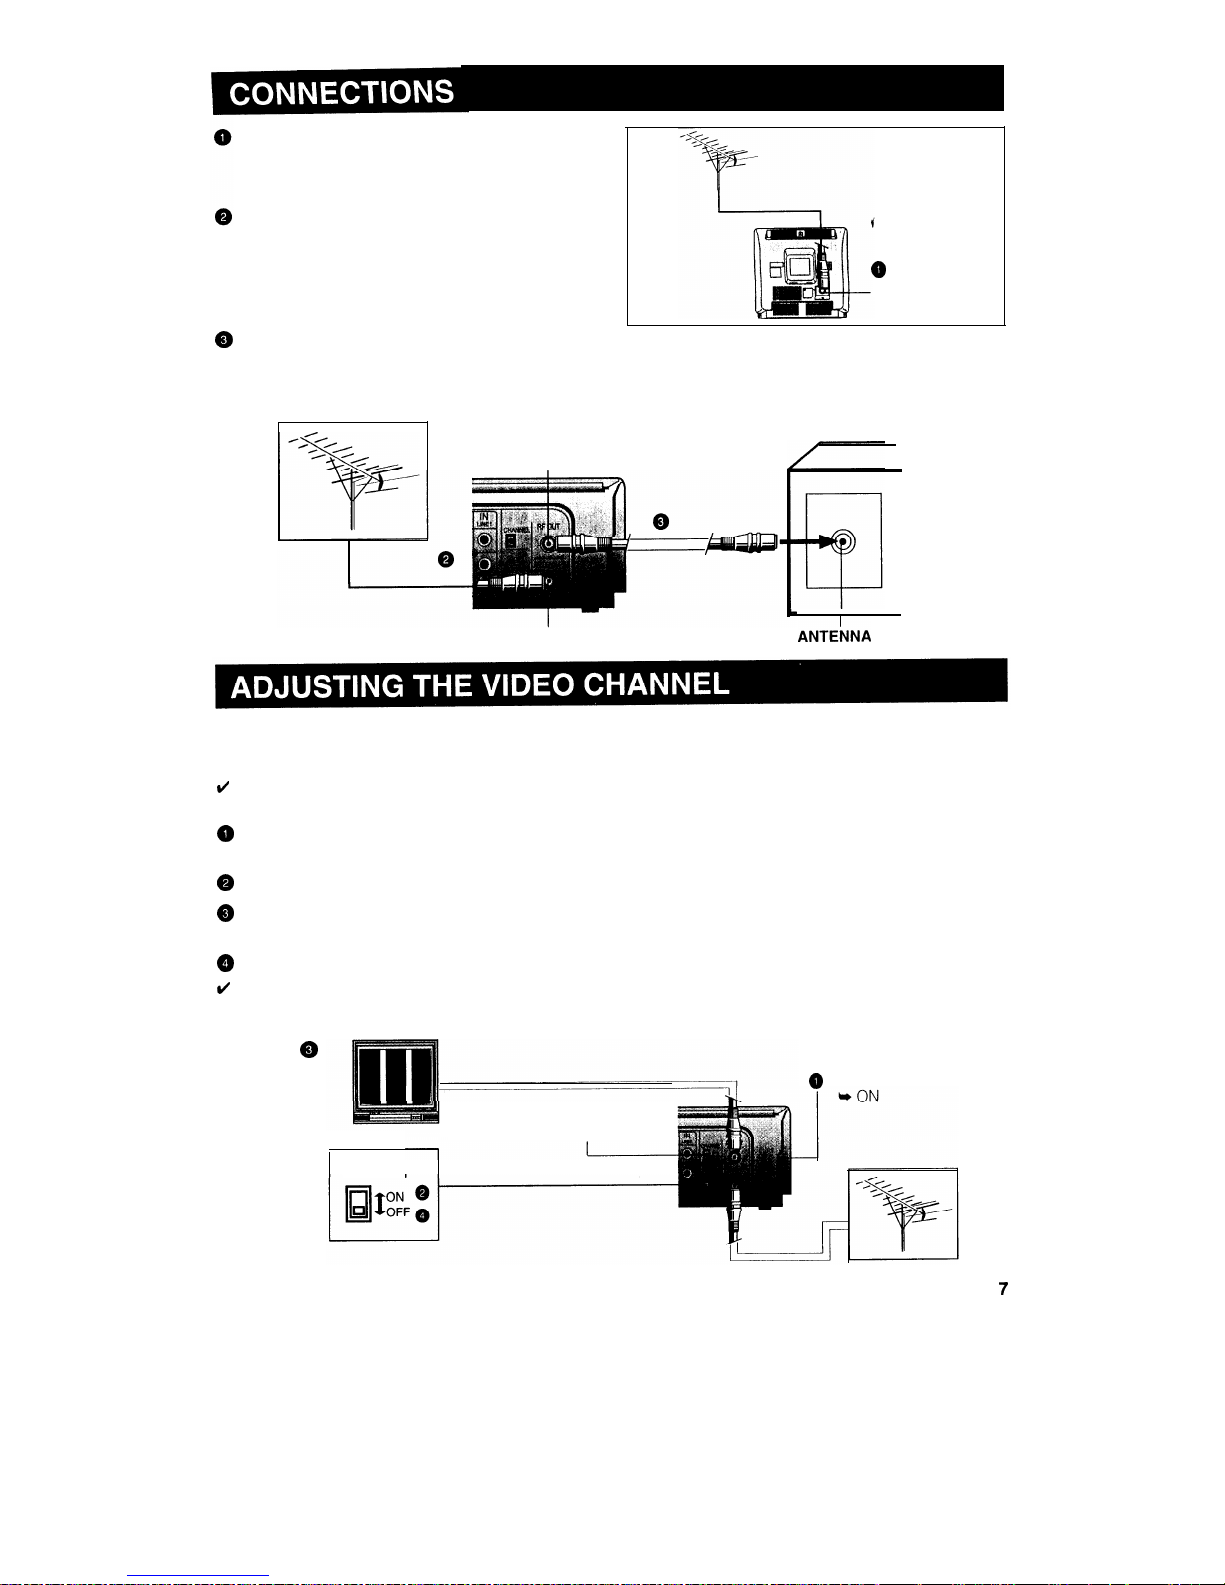
Disconnecting TV Cable
Disconnect the aerial cable from the back of
your TV set.
Connecting Aerial Cable to VCR
Connect the aerial cable to the ANTENNA IN
terminal of your
VCR.
ANTENNA IN
Connecting VCR to TV
Connect the supplied coaxial cable to the RF OUT terminal of
the VCR. Plug the other end into your
TV’s
ANTENNA IN
terminal.
RF OUT
ANTENNA
IN
TV back panel
To view the output of your VCR on the television screen, you must select an unused channel on your TV
and tune it to the output of your VCR (factory preset to
UHF
channel 37).
NOTE:
l TUNE THE TV, NOT THE VCR.
Select an unused channel on your TV and press the OPERATE button on the VCR to turn on the
power.
Set the
TEST SIG
switch to ON.
Adjust the tuning of the selected TV channel until the test pattern (two vertical bars) appears on the
screen.
Set the
TEST SIG
switch to OFF.
NOTE:
l If interference or a beat pattern is received when the test pattern is tuned in, use a small screwdriver to turn the RF
converter output channel adjuster to change the VCR output channel, and then retune your TV
as
above.
RF converter output channel
(channel) (UHF channel 31 to 40)
TEST SIG
OPERATE
Page 9

When you use the VCR for the first time or after a power failure
of more than 60 seconds the language will be reset. Apply
power to the unit to switch it on and press the MENU button.
Then perform the following procedure.
NOTE:
l If the remote control is not available the PLAY/x2 button can also be
used to select the language.
MENU
A
MENU
0’
ITALIAN0
SELECT
V
EXIT
SET
0
OPERATE
SET
Numeric
buttons
Press the MENU button.
Select the language with the
buttons and
press the SET button.
Ex.: ENGLISH
l If the language has already been set previously and you want to change it, follow the steps below.
TIMER
PRESET
ITALIAN0
SELECT
ENTER *SET EXIT
Press the MENU button.
Select item “LANGUAGE” with
buttons and
press the SET button.
Select the language with the
buttons and
press the SET button.
Ex.: ENGLISH
Page 10
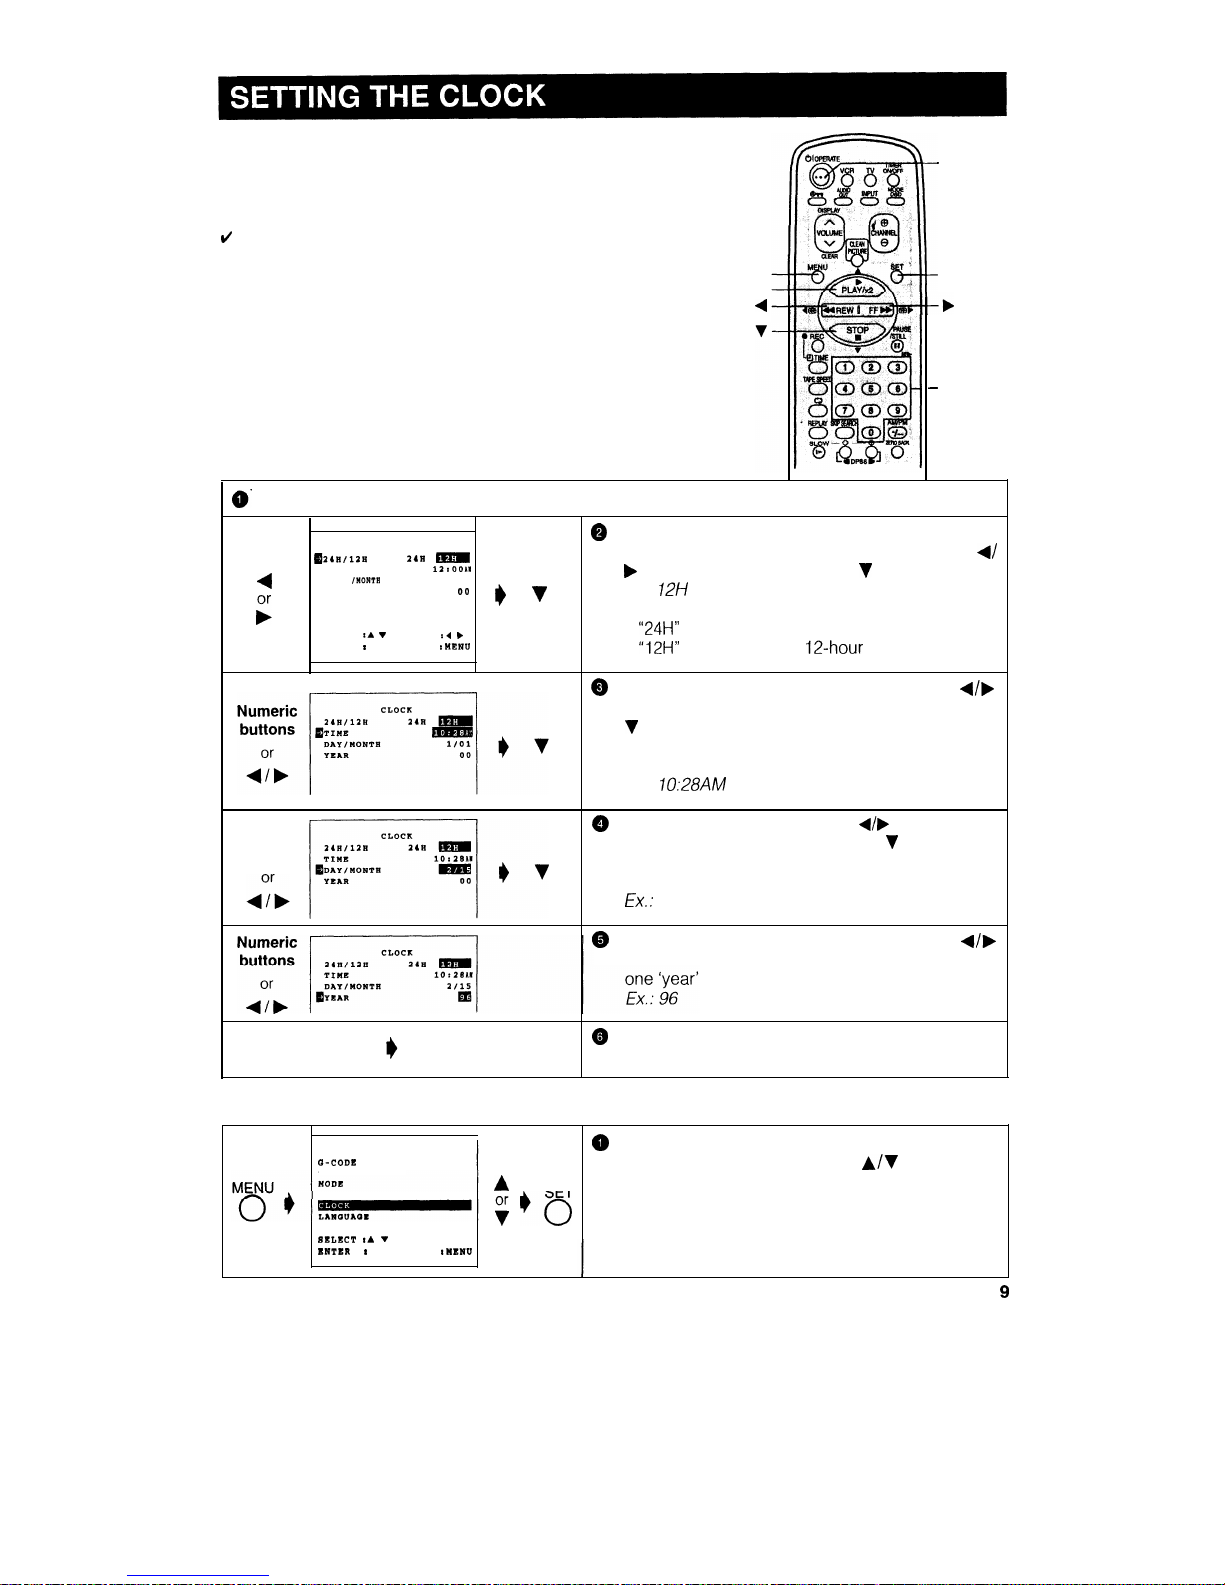
When you use the VCR for the first time or after a power failure
of more than 60 seconds the language will be reset. Apply
power to the unit to switch it on and press the MENU button.
Then perform the following procedure.
NOTE:
. If the remote control is not available the PLAY/x2 button can also be
used to select the language.
MENU
A
OPERATE
SET
Numeric
buttons
First set the language (Refer to page 8). Then press the SET button.
Select whether the clock should show 12-hour
CLOCK
AM/PM time or 24-hour time by pressing the
TIME
DAY
1101
buttons, and then press the
button.
YEAR
Ex.:
NOTE:
SELECT
DATA
l
. . . . . . . . . . . . . . . . . . . . . . . .
24-hour display.
ENTER
SET
EXIT
l
. . . . . . . . . . . . . . . . . . . . . . . .
AM/PM display.
Set the present time with the numeric or
buttons on the remote control and then press the
button. (First set the ‘hour’ digits and then the
‘minute’. If there is only one ‘hour’ or one ‘minute’
digit, enter a 0 first.)
Ex.:
Numeric
buttons
Set the date with the numeric or
buttons on the
remote control, and then press the
button. (First
set the ‘day’ digits and then the ‘month’. If there is
only one ‘day’ or one ‘month’ digit, enter a 0 first.)
Feb. 15
buttons on the remote control. (If there is only
digit, enter a 0 first.)
SET
0
Normal
Screen
To exit the MENU screen, press the SET button.
l If the clock has already been set previously and you want to change it, select “clock” from the MENU, and then
follow the procedures above.
NENU
TIMER
CHANNEL PRESET
SET
EXIT
Press the MENU button.
Select item ‘CLOCK” with the
buttons and
SET
press the SET button.
Page 11

your VCR can receive VHF channels 0 to 12, and UHF channels
to
has
programmable channel positions, each of which can be set to any of the above broadcast channels.
The channel positions have been preset at the factory as
shown below.
NOTES:
l Use the
I
I
the remote
control to set the OSD.
l Channel position numbers
3, 4, 8, 11 to 27, and
29 to 46 have been factory set to be skipped when
the channel
or
button is used.
l If the picture is not clear, if you want a different
channel from the one preset or if you wish to reset a
skipped channel, reset the channel as follows.
AUTO TUNING
PREPARATION
the video channel on your TV. Press the OPERATE button to turn on the VCR.
Press the MENU button.
MENU
Q-CODE
Select item “CHANNEL PRESET” with the
TIMER
MENU
SET
buttons, and press the
SET
button.
0
CLOCK
0
SELECT
7
EXIT
CHANNEL PRESET
. .
MANUAL
SET
0
SELECT
V
ENTER tSCT EXIT
Select item “AUTO” with the
buttons and
press the SET button.
The channel display on the TV screen will
1
continue through all of the channels and when
AUTOMATIC TUNINQ.
PLEASE WAIT.
Normal
finished, the TV screen will return to normal
Screen
screen.
EXIT
10
Page 12

MANUAL TUNING
PREPARATION
the video channel on your TV. Press
the OPERATE button to turn on the
VCR.
Example:
Tuning Channel Position 3 to Broadcast TV Channel 7
MENU
Q-CODE
Press the MENU button.
Select item ‘CHANNEL PRESET” with the
TIMER
MODE
SET
buttons and press the SET button.
0
CLOCK
SELECT
V
ENTER rSET EXIT
: MENU
CHANNEL PRESET
Select item “MANUAL” with the
or
buttons
AUTO
and press the
SET
button.
SET
SELECT
ENTER rSET EXIT
[Preset CH]
CS
q
the numeric or
buttons, and then press
CHANNEL 01
Numeric
the
button.
buttons
SKIP ON
SELECT
DATA
ENTER
EXIT
[Broadcast CH]
Hold down the numeric or
buttons until
PRESET CR
Numeric
you see the desired broadcast channel on your
TV, and then press the
button.
FINE
buttons
SKIP ON
SELECT
DATA
ENTER
[Fine tuning]
For fine tuning, press the
or
button until the
PRESET CR
3
broadcast channel comes in clearly on your TV.
CHANNEL
TUNINQ
SKIP
SELECT
DATA
ENTER
EXIT
SET
Normal
Press the SET button.
Screen
The TV screen will return to normal screen,
l Numeric buttons on the remote control can also be used to select channel numbers, press the
button to switch
between one and two digit numbers.
Page 13

Channel skip
If there are channel positions that are not preset, you can skip them with the following procedure.
PREPARATION
on your TV and VCR, and select the video channel on your TV.
Example: Skip channel position 12.
MENU
Press the MENU button. The MENU screen will
Q-CODE
TIMER
appear.
NODE
SET
Select item “CHANNEL PRESET” with the
0
buttons and press the SET button.
SELECT :A
ENTER
EXIT
Select item “MANUAL” with
buttons and
press the SET button.
Set channel positions you wish to skip with the
numeric or
buttons.
Ex.: 12
Select SKIP setting mode with the
or
ON
button.
Press the
or
button to select SKIP ON.
If you wish to set more channels to be skipped,
press the
button and repeat steps
through
SET
0’
Normal
Screen
Cancelling channel skip
Press the SET button to return to the normal
screen.
PREPARATION
on your TV and
VCR,
and select the video channel on your TV.
Example: Reset channel position 12.
the same procedure
in Channel skip, and then the procedure
below.
Select the channel position you wish to unskip
with the numeric
buttons.
Select SKIP setting mode by pressing the
or
button.
Press the
or
button to select SKIP OFF.
ON
If you wish to unskip more channels, press the
button and repeat steps
through
12
SET
0’
Normal
Press the SET button to return to the normal
Screen
screen.
Page 14

Turn on your TV and select the video channel.
Press the OPERATE button to turn on the VCR, and then press the
MENU button to display the MENU screen.
Select the item you want by pressing the
or
button on the
remote control. Refer to the pages listed below for details on each
item.
MENU
TIMER
MODE
CHANNEL PRESET
CLOCK
LANGUAGE
The following 6 items can be set by using the On Screen Display (OSD).
G-CODE . . . . . . . . . . . . . . . . . . . . . . .
Setting a G-CODE timer recording. (See page
20.)
SELECT :A V
ENTER
:SET
EXIT :MENU
2: TIMER
. . . . . . . . . . . . . . . . . . . . . . . . . . .
Setting a timer recording (and checking it). (See page 22 for the setting
procedure.)
3:
MODE . . . . . . . . . . . . . . . ..a.........
VCR operating conditions are set according to the broadcast reception and
tape playback conditions. (See page 14.)
4: CHANNEL PRESET . . . . . .
Setting the channels. (See page
5: CLOCK . . . . . . . . . . . . . . . . . . . . . . . . .
Setting the present time. (See page 9.)
6: LANGUAGE
. . . . . . . . . . . . . . . . .
Selection of language to be used for the On Screen Display. (See page 8.)
Press the SET button. The screen changes to the item which you have selected.
To cancel the MENU screen, press the MENU button.
The tape counter and VCR mode can be shown on the screen while you are playing back a tape or
watching a broadcast on the video channel.
Display example
Operating mode
2
Programme channel position
Tape Speed
STOP
Simple Recording timer
Clock display
Calendar display
( REM
Tape remaining (or DPSS)
Real time counter
NOTE:
l If the clock is not set, the time and date will not be displayed.
How to display indicators
Turn on your TV and select the video channel.
Press the OPERATE button to turn on the VCR. Mode indicators are displayed in the AUTO display
screen.
AUTO Display
FULL Display
COUNTER Display
Display off
AUTO Display
When an operation button, numbered button, or CH
button is pressed, the current mode or the
number of the channel will be displayed in the upper section of the TV screen for about 3 seconds.
NOTES:
l When the VCR power is turned off, the mode indicators will return to the AUTO display.
l When you record a video signal output from this VCR on another VCR, press the MODE OSD button to select
Display Off. (If the mode indicator is displayed on the screen, it is also recorded on the tape.)
13
Page 15

You can set the basic functions listed in the table below on the MODE selection screen.
PREPARATION
on your TV and select the video channel. Press the OPERATE button to turn on the VCR.
Press the MENU button.
MENU l ’
0
CLOCK
Select the MODE selection mode with the
buttons and then press the SET button.
Select the COLOUR mode by pressing the
buttons, and then press the
button.
BLUE BACK
(For details, see
Colour Mode.)
AUTO
Usually select AUTO mode.
PAL
Strict PAL colour mode.
:A
ENTER
EXIT
Select the BLUE BACK mode by pressing the
[Blue back]
buttons and then press the
button.
AUTO
. . . . . . . . . . . . . Usually select AUTO.
COLOUR
BACK
A blue screen will appear when
your VCR receives no TV signal or
an unrecorded tape is played
back.
OFF
Select OFF if the screen turns
SKLECT :A
DATA 14
ENTER
EXIT
blue due to weak TV signal
reception, or playback of a poorly
recorded tape.
Press the SET button to return to the normal
SET
Normal
screen.
0
Screen
14
Page 16

Inserting a Video Cassette
Gently insert the video cassette into the cassette compartment. The VCR turns on automatically. If the
cassette is inserted incorrectly, the loading system will not function. Do not force the cassette into the
VCR. When the cassette has been properly loaded,
appears on the VCR display.
To remove the cassette, press the EJECT button during stop mode.
Playback
Insert a cassette.
PREPARATION
on your TV and select the video channel.
OPERATE
PLAY/x 2
OPERATE
STOP/EJECT
Press the OPERATE button to turn on the VCR
Insert a cassette.
L
STOP
Press the PLAY/X2 button. (The auto tracking control system engages and flashes on the
VCR display for a few seconds.)
To stop playback, press the STOP button. (If the tape reaches its end, the VCR will automatically
rewind the tape to the beginning, eject the cassette, and turn off the power.)
Video Search (with the remote control)
Use the following procedure to quickly find the section you want, while viewing the picture.
During playback, press the FF button for forward video search, or the REW button for reverse
search.
There are 2 search speeds in each direction. The VCR switches between them each time the
button is pressed.
Press the PLAY/X2 button to resume normal playback.
NOTE:
l During video search of a tape recorded in the LP mode, the upper part of the picture may be skewed to one side.
Fast Forwarding and Rewinding (with the remote control)
To move through the cassette faster, press the STOP button and then press the FF or REW button
to fast forward or rewind the cassette. (The picture cannot be viewed in this mode.)
Press the STOP button to stop fast forward or rewind.
NOTE:
l If you use other than E-90-E-180 cassettes, fast forward and rewind may take somewhat longer.
15
Page 17

Shuttle System
The shuttle system lets you control all the basic playback functions using just the shuttle ring.
DURING STOP MODE
Fast Forward and Rewind
Turn the ring either to the right or the left and release
(The shuttle
ring will return to centre.)
Press the STOP button to stop fast forward or rewind.
DURING PLAY MODE
Video Search
the ring to the left or the right during playback to enter VSF (Video
Search Forward), or VSR (Video Search Reverse) mode. Select from
two speeds by turning the ring. Release the ring (the shuttle ring returns
to centre) to return to playback.
*During playback, turning the ring all the way to the left or right locks the
VCR in VSF (Video Search Forward), or VSR (Video Search Reverse)
mode. Press the PLAY/X2 button to return to regular playback.
D URING STILL MODE
Variable Slow Motion
still mode, turn the ring to the right for slow-motion playback.
(VSR
II
Select from two speeds by turning the ring more or less. Release the
ring (the shuttle ring returns to centre) to return to still.
Turning the ring all the way to the right locks the VCR in SLOW. Press
the PLAY/X2 or PAUSE/STILL button to return to regular playback or
n
still.
EJECT
(Slow
playback
the ring is turned to the left while in still, the VCR enters VSR, and
hold)
returns to still when the ring is released. Turning the ring all the way to
the left locks the VCR in VSR; however, the search speed does not
change.
NOTE:
l The shuttle ring does not rotate 360”.
TAPE SPEED
SLOW
x3
x7
Slow Motion Playback (with the
remote control)
Press the SLOW button on the remote control during playback.
Press the SLOW
or
button (to the right
of the SLOW button) to vary the slow motion
playback speed between
and
of the
normal playback speed.
Press the PLAY/X2 button to resume normal
playback.
16
Page 18

Still Picture and Frame Advance
Auto Tracking Control System
Press the PAUSE/STILL button during play-
back. This will freeze the picture on your TV.
If noise bars appear on the screen during still
picture, set your VCR to the slow mode and
press the CHANNEL
buttons to make
the noise disappear. Then press the PAUSE/
STILL button again.
Press the PAUSE/STILL button during still
mode for frame advance.
Press the PLAY/X2 button again to resume
normal playback.
This function automatically adjusts the tracking to
match the recorded tape. Auto tracking engages
in the following cases:
you insert the cassettq and begin play-
back.
you press the CHANNEL
and
buttons at the same time.
the VCR has been playing back an unrecorded section of tape, and then reaches a
recorded tape segment.
When auto tracking engages, on the TV
screen flashes for a few seconds.
Double Speed Playback
Press the PLAY/X2 button during playback.
The tape will be played back at twice the
normal speed.
Press the PLAY/X2 button to resume normal
playback.
NOTES:
l Sound is muted during video search, slow motion, still
picture, frame advance, and double speed playback.
avoid damage to the tape, your VCR will resume
normal playback after about 5 minutes of slow motion
playback and still picture.
l During slow motion, still, frame advance and double speed
playback with a tape recorded in the LP mode, the upper
part of the picture may be skewed to one side.
Poor Tracking
Normal tracking
l When a poorly recorded tape is
back, auto
NOTE:
tracking may not operate normally. In this event, manually
adjust the tracking with the CHANNEL
buttons to
make any noise disappear.
Colour mode
If a colour recording’s quality is poor, the picture
may turn black and white. In this event, set the
COLOUR mode on the MODE selection screen to
PAL (strict PAL colour mode). Normally, the
colour mode should be set to “AUTO” mode.
(See MODE SELECTION.)
Auto Head Cleaning System
When the tape is inserted or ejected, this system
automatically cleans the drum and heads with a
special roller before recording or playback
begins, protecting the heads and drum from dirt
and preserving beautiful picture quality.
Quick Start with Full Loading
Mechanism
Your VCR has a standby function (Full Loading
Mechanism) to allow immediate recording and
playback.
After pressing the REC or PLAY/X2 button, it
takes about 2 seconds until recording or
playback is engaged when in the standby mode.
Auto Rental Mode
q
COLOUR
BLUE BACK
SELECT :A
DATA
ENTER :SET EXIT
PAL colour mode
(Select with
or
button.)
Then press SET button.
NOTE:
l When the colour mode is set to fixed colour mode while
the VCR is playing back a black and white tape or is
receiving a black and white broadcast, the picture may
be coloured. In this event, set the COLOUR mode on the
MODE selection screen to “AUTO” mode.
The convenient auto rental mode lets you enjoy
playback with ease. When you insert a cassette
with the erasure protection tab removed (rental
videos, etc.), your VCR automatically turns on the
power, winds the tape forward to find the
recorded section, and plays back the tape. When
the tape reaches the end of recorded section, the
VCR automatically rewinds the tape, ejects it and
turns off the power.
NOTES:
l If there is more than a
second unrecorded section
between recorded sections, the tape will automatically
stop and rewind. To watch the next recorded section,
press the STOP button, fast forward to that section and
play the tape.
l If the erasure protection hole is covered, press the PLAY/
x 2 button after the power turns on automatically. (Auto
Rental Mode does not work.)
17
Page 19

Cassette Erase Protection
ERASURE PROTECTION TAB
A
cassette has a removable tab to prevent accidental
erasure of recorded material. Removing the tab prevents
recording. To record on a video cassette with the tab removed,
place adhesive tape over the tab opening.
Recording a TV Programme
Insert a cassette.
CHANNEL
LL
OPERATE
REC
STOP
DISPLAY
-OPERATE
t--INPUT
-CHANNEL
REC
.-PAUSE/
TAPE
SPEED
PREPARATION
on your TV and select the video channel.
PROCEDURE
Press the OPERATE button to turn on the VCR.
Insert the cassette, making sure the erasure protection hole is covered.
Select the channel position you wish to record with the CHANNEL
buttons.
Select the SP (Standard Play) or LP (Long Play) recording speed with the TAPE SPEED button on
the remote control
or “LP” will light up on the VCR display). SP (Standard Play) gives the best
picture quality, LP (Long Play) gives the longest recording time.
Press the REC button. (If the erasure protection hole is uncovered, the cassette will be ejected.) To
pause during recording, press the PAUSE/STILL button. To resume recording, press the PAUSE/
STILL button again.
To stop recording, press the STOP button.
NOTES:
l The pause mode disengages automatically after about 5 minutes, and the VCR enters stop mode.
record audio and video from an external source through the AUDIO/VIDEO terminal on the rear of the VCR,
press the INPUT button on the remote control or press the CHANNEL
buttons to select the AV channel
position situated between the last channel and first channel. (When the AV position is selected, “AV” is displayed
where a channel position number is usually displayed.)
l If the TV signals are weak and the picture changes to monochrome, set the strict colour mode on the MODE
selection screen. (See
Colour mode.) Normally, the colour mode should be set to “AUTO”.
Watch Another TV Programme While
Recording
After steps
to
have been completed, select the programme you wish to view using the
your VCR will automatically stop recording, eject it and turn off
power.
18
Page 20

There are two ways to use this Simple Recording Timer for your convenience.
l lrnmediate recording:
Convenient when having an unexpected visitor or telephone call.
l Delayed recording:
Convenient when leaving the house or going to bed.
Immediate Recording
l
REC
2
SP
STOP
REM 2:oo
96
NOTE:
l
Press the STOP button to terminate recording
Delayed Recording
0
n
CHANNEL
TIME
0
n
2
STOP
-9;:
pressing the CHANNEL
buttons.
(Ex.
Channel position: 2)
recording mode. Then, press the REC button
repeatedly to set the desired ending time.
(Ex.: Ending time: 9:30)
NOTES:
l Each press of the REC button increases the stop time by
minutes.
l If necessary, press the CHANNEL
buttons to change the
minutes setting.
pressing the CHANNEL
buttons.
(Ex.
Channel position: 2)
Set the starting time by pressing the
button.
Starting time:
NOTES:
l Setting the time within a 24-hour period in IO-minute intervals
is possible.
l Press the O/O buttons to adjust the minutes if necessary.
Set the ending time by pressing the REC button.
(Ex.: Ending time: 9:30)
NOTES:
l Each press of the REC button increases the stop time by 10 minutes.
l If necessary, press the CHANNEL O/O buttons to change the
minutes setting.
(Ex.: Present time:
NOTES:
l After the Simple Recording Timer is set, the channel position cannot be changed.
l To confirm the starting time and the ending time, first press the OPERATE button to turn on the power. Then press
the DTIME button to confirm the starting and ending time. Press the OPERATE button to turn off the power.
l To clear the Simple Recording Timer setting during setting, press the CLEAR button on the remote control. To clear
after setting, turn on the power, press the
button to select Simple Recording Timer mode, and then press
the CLEAR button.
l The Simple Recording Timer cannot be set if the timer has been preset (“TIMER” indicator on the display is lit). If
this is the case, cancel the timer standby mode by pressing the TIMER ON/OFF button, turn on the power and then
proceed with setting of the Simple Recording Timer.
l Select the SP (Standard Play) or LP (Long Play) recording speed with the TAPE SPEED button on the remote
control
or “LP” will light up on the VCR display). SP (Standard Play) gives the best picture quality, LP (Long
Play) gives the longest recording time.
Page 21

This
has the G-CODE Programming System. By simply inputting the G-CODE number
numeric buttons, you can programme your VCR for timer recording.
The G-CODE numbers are listed in most newspaper, TV guide, and local cable TV listings.
The timer can be set for automatic recording of up to 8 events over a 365 day period. In addition, each
of the events can be set to be recorded on a daily or weekly basis up to the limit of the ta
PREPARATION:
l Load the cassette, ensuring the erasure protection hole is covered. The VCR power will automatically
turn on.
that the clock is displaying the correct time.
ENU
3
DAILY/WEEKLY
D W
SELECT
DATA
ENTER
EXIT
ONCE/DAILY/WEEKLY]
Q-CODE
123
DAILY/WEEKLY
D
ELECT :A
NTER
BET
SELECT :A
DATA :4 b
ENTER
EXIT
DAY/MONTH
D W
START
STOP
TAPE SPEED
LP
NOTE:
l AUTO: Intelligent Timer Recording
l
SP: Standard Play
l
LP: Long Play
20
[MENU]
TIMER
MODE
CHANNEL
CLOCK
SELECT
ENTER
EXIT
SET
[G-CODE]
DATA
EXIT
[Channel]
[Once]
SET
[Daily/Weekly]
[Tape Speed
Numeric
buttons
PR 47
BP LP
Press the MENU button.
Select G-CODE setting mode and then press the
SET button.
Set the G-CODE number with the numeric (0 to
9) buttons.
NOTE:
l For the G-CODE number, refer to your newspaper or TV
guide.
If you want to record only once, press the SET
button and go to step
Otherwise, press the
or
button to select daily/weekly setting mode,
and then select
(DAILY)” or
(WEEKLY)” by
pressing the
/
buttons. And then press the
SET button.
NOTE:
“ONCE”: To record only once.
(DAILY)“: To record every day at the same time.
(WEEKLY)“: To record every week at the same time.
If you are going to record a programme from a
station which does not have the PR number
programmed, (“PR is displayed)set that
number to be the same as the PR number to
which your broadcasting channel is set into. (See
Note on the next page.) Use numeric
buttons. Then press the
button.
Ex.: 47
Select the tape speed with the
or
button.
(See INTELLIGENT TIMER RECORDING.)
Page 22

[Timer Review]
NOTE:
To programme additional timer settings, press
the
SET
button and repeat
through
MENU
0
Pressing the MENU button will clear the screen.
Normal Screen
TIMER
press the TIMER ON/OFF button and ensure the
ON/OFF
0
“TIMER” indication lights on the VCR display.
NOTE:
l Please be sure to check that the start and end times of two different programmes do not overlap, as the remote
control has been designed to accept the basic individual G-CODE number only. If the recording periods of two
programmes overlap, the beginning of the second programme will not be recorded.
Setting the Program Number In Step 5
When using G-CODE for the first time the Program number (Pr) on the screen shows two dashes and is
highlighted white. Set it to be the same as the Pr number to which your broadcasting channel is set
into.
For instance if you can view CH 7 on program (Pr) 7, set the On screen Pr number to 7.
l
You need to set this only once.
l
If the channels are retuned you need to set the Pr numbers again.
I
Input program No. here.
V DATA
?
EXIT
21
Page 23

The timer can be set manually for automatic recording of up to 8 events over a 365 day period.
PREPARATION
the cassette, ensuring the erasure protection hole is covered. The VCR power will automatically
turn on.
that the clock is displaying the correct time.
PROCEDURE
Example: Recording channel position 47 in SP mode from 1
to
December 15, 1996, if
the present time is
(morning), December 14, 1996.
[Menu]
Press the MENU button.
Select the TIMER-setting mode and press the
MENU
SET
SET button.
.
[Timer position]
Select the timer position number with the
buttons and press the SET button.
SET
3
6
‘0
[Date]
Set the date for timer recording with the numeric
buttons and then press the
button.
START
Numeric
STOP
buttons
SPEED
LP
SELECT
DATA
ENTER
SET
EXIT
-----
[Once]
If you want to record only once, press the
button and go to step
Otherwise, select
(DAILY)” to record at the same time each day or
(WEEKLY)” to record at the same time each
week by pressing the
or
button, and then
pressing the
button.
[Start]
Numeric
DAILY/WEEKLY
D W
buttons
buttons and press the
button.
STOP
Set the stop time in AM or PM with the numeric
Numeric
buttons and press the
button.
START
buttons
CHANNEL
or
NOTES:
l
/
buttons can also be used to set the date and time instead of the numeric buttons.
l Press 0 first if day, month or the time is a single digit.
22
Page 24

[Channel]
Set the channel number using the numeric or
Numeric
buttons and then press the
button.
STOP 12:30!1
buttons
TAPE SPEED
SP LP
NOTE:
l To record audio and video from an external source through an AUDIO/VIDEO terminal on the VCR, press the
buttons to select an AV channel. (When an AV position is selected,
is displayed where a channel
position number is usually displayed.)
[Tape
speed]
CHANNEL PR 17
LP
NOTE:
l AUTO: Intelligent Timer Recording
l
SP: Standard Play
l LP: Long Play
Select the tape speed with the
or
button.
(See INTELLIGENT TIMER RECORDING.)
[Timer review]
DATE START STOP PR
additional timer settings, repeat steps
1
through
SET
3
0
5
6
7
ENTER
EXIT rMENIJ
MENU
0
Pressing the MENU button will clear the screen.
Normal Screen
TIMER
To set the VCR for automatic timer recording,
ON/OFF
press the TIMER ON/OFF button and ensure
0
the “TIMER” indication lights on the VCR
display.
NOTES:
l In step
the displayed timer position number is the lowest one which has not been pre-programmed. If all the
timer positions have already been set, timer position number
is displayed. The old timer settings in position
are
cancelled.
l If the video cassette runs out before recording all the programmes, your VCR will stop, eject the cassette, and shut
off automatically.
l If power is interrupted for more than 1 minute (power failure, etc.), all timer settings will be cancelled.
l If the TIMER ON/OFF button is pressed when there is no cassette loaded, “TIMER” flashes for 5 seconds,
indicating that timer recording is not possible.
l If the TIMER ON/OFF button is pressed while a cassette with an uncovered erasure protection hole is loaded,
“TIMER” flashes and the cassette is ejected.
l When “TIMER” is lit, regular VCR operation, clock setting and setting/cancelling/confirming timer positions are not
possible. For regular VCR operation, clock setting and setting/cancelling/confirming timer positions, press the
TIMER ON/OFF button to disengage the timer (“TIMER” disappears), and then turn on your VCR.
l During timer recording, the timer cannot be set or checked.
l To terminate timer recording, press the STOP button during timer recording.
l If no buttons are pressed within one minute while setting a timer programme position, the mode automatically
returns to the previous mode.
l If the same time is input for the start time and the stop time, the timer setting will be cancelled.
23
Page 25

can see on the On Screen Display a list of all timer programmes that are already set.
PREPARATION
on your TV and VCR and select the video channel on the TV.
Press the MENU button.
SET
buttons and then press the SET button.
T
The screen for confirming programmes that have
been set will appear.
4
the information displayed.
and
you want to correct the data, select the
programme to be changed with the
buttons and then press the SET button. Correct
SET
TAPE SPEED
0
the setting as described on pages 22 and 23.
no indicator
DAILY;
“AT”: AUTO (Intelligent
is displayed.
Timer Recording)
WEEKLY:
is displayed.
“SP”: Standard Play
“LP”: Long Play
MENU
0
Pressing the MENU button will clear the screen.
Normal Screen
checking or correcting the programme
contents, press the TIMER ON/OFF button to
enter the Timer Standby mode.
Perform the following procedure to cancel timer programmes that have already been set.
PREPARATION
on your TV and VCR and select the video channel on the TV.
Press the MENU button.
Select the TIMER-setting mode with the
buttons and then press the
SET
button.
The screen for confirming timer recording pro-
grammes that have been set will appear.
the programme number you wish to
cancel with the
buttons.
Double-check that it is the program you wish to
cancel, and press the CLEAR button. It will be
cleared on the screen.
NOTE:
l Ensure the remote control is in VCR mode. Press the VCR
button.
Normal Screen
Pressing the MENU button will clear the screen.
there are still some programmes set, press
the TIMER ON/OFF button to enter the Timer
Standby mode.
Page 26

When the tape is expected to run out halfway during timer recording in the SP (standard play) mode,
the mode will automatically change to the LP (long play) mode to prevent termination of recording.
For example:
l When a 120-minute programme is timer-recorded with a
tape while the automatic switch is
on (AT is displayed on OSD.):
About 60 minutes
r-- About 30 minutes
SP (standard play) mode
LP
(long play) mode
r
Total: 120 minutes
NOTES:
l This function may not properly work for video tapes other than
El 80, and
l This tape may not be completely used up.
l When more than one programme is set on the timer, the automatic recording function will work for the length of
each timer-set programme, but not for the total length of all programmes.
l When the LP mode is initially used for timer-recording a programme, if the tape is not long enough to record the
entire length of the programme, the programme will not be entirely recorded.
25
__
Page 27

The zero-back function makes the cassette fast forward (or rewind) to the previously set
point
and stop there.
0
Make sure the counter is displayed, then press the CLEAR button on
the remote control at the point you wish to return to later.
is
displayed.
Press the ZERO BACK button on the remote
The VCR
automatically detects the direction of the
position and fast
forwards (or rewinds) the tape.
When the tape reaches the
position, the tape automatically
stops.
NOTE:
l The zero-back function does not operate during recording. The function works during the playback, stop, fast
forward, rewind and video search modes.
With this feature you can quickly locate a desired section of the tape. The DPSS feature makes use of
index signals to search for a specified tape segment and begin playback automatically.
lndex Signal
An index signal is automatically recorded on the
tape at the start of ordinary recording, simple
recording timer and timer recording.
Index signals
Load a tape containing index signals into the VCR.
Select the index number of the desired programme using the DPSS
or
button on the remote control.
Search starts immediately after you release the button. (When a signal
is located, the displayed number decreases.)
When the selected index signal-encoded section is found, playback
begins automatically.
NOTES:
l DPSS may not function properly if the index signals are too close together (within 3 minutes of each other).
l DPSS can be cancelled by pressing the
or STOP button.
l If the tape reaches its end or is rewound completely before locating the desired index signal, DPSS is cancelled.
l DPSS may not function for damaged or worn tapes.
l The DPSS function cannot be used with tapes that contain no index signals.
l The starting point of a programme may vary slightly.
l DPSS does not operate during the slow, still, record, timer standby, and timer recording modes, or when there is
no cassette loaded.
With this feature, the entire tape is played back repeatedly.
0
Press the
button on the remote control,
lights and the AUTO REPEAT is
engaged.
When the video cassette reaches its end, the VCR will stop playback, rewind the
tape, and automatically play it back again.
NOTE:
l Pressing the
button during auto repeat cancels it.
disappears, and the AUTO REPEAJ is disengaged.
26
Page 28

SEARCH button on the remote control is pressed during playback
mode, the VCR will perform a forward video search for a fixed interval of playback
time before resuming playback. Depending on how many times the button is pressed,
it is possible to set the forward video search time to approx.
or
seconds of recorded material.
Number of Times Pressed
Forward Video Search Time
(on the TV screen)
time
Approx. 30 sec.
(of playback time)
2 times
Approx. 60 sec.
(of playback time)
3 times
Approx. 90 sec.
(of playback time)
4 times
Approx. 120 sec.
(of playback time)
During skip search, the interval of the video search will flash on the display.
When the REPLAY button on the remote control is pressed during playback, the VCR
will perform a reverse video search for a fixed interval of playback time before
resuming playback. Depending on how many times the button is pressed, it is
possible to set the reverse video search time to approx. 20, 40, 60, or 80 seconds of
recorded material.
Any selected mode on the VCR can be locked-in to prevent accidental change to
another mode by simply pressing the
button on the remote control.
All modes remain locked (including power-off) until the Child-proof lock is disengaged (except when the VCR is in the full auto function mode).
Example: Engaging Child-proof lock during playback
0
Press the
button on the remote control for about 2
seconds.
stops flashing (remains lit), and the Child-proof lock is
engaged.
Now regardless of what other operating buttons are touched,
the VCR will continue to play the tape.
The Child-proof lock can be disengaged by the following method:
Press the
button on the remote control for about 2
seconds.
starts flashing.
disappears, and the Child-proof lock is disengaged.
NOTE:
l If
power is interrupted for more than
minute (power failure, etc.), the Child-proof lock may disengage. The clock
and the timer memories must be reset.
27
Page 29

CLEAN
PICTURE
When the CLEAN PICTURE button is pressed during playback of a tape with high
residual interference from dubbing, the picture quality will be enhanced, making it
easier to view. The CLEAN PICTURE indicator will light during operation. Pressing the
CLEAN PICTURE button again will turn off this function.
l Turn off the CLEAN PICTURE function when using the
VCR as a dubbing source.
The CLEAN PICTURE indicator
will light during operation.
On Screen Display
VCR Display
FULL or COUNTER display mode by
l Press the DISPLAY button on the remote
pressing the MODE OSD button on the remote
control.
control.
REM 2:oo
96
o:oo.oo
NOTES:
l When you insert the tape and the VCR is in the stop mode, the tape remaining cannot be computed. The following
indicator is shown when the tape remaining has not yet been computed or cannot be computed.
10:OOAM
REM
96
o:oo.oo
l When you start recording or playback, the VCR will begin the computation. However, this may take some time.
When computation is completed, tape remaining will be shown on the OSD and VCR display for 5 seconds.
l If the “REM.” mode is selected with the MODE OSD or DISPLAY button and the VCR is in stop mode, the tape will
automatically fast forward or rewind for a few seconds and then the VCR will begin computing the amount of tape
remaining.
l During computation, the REC button will not function, and pressing the STOP,
or other buttons will
interrupt the computation.
Setting the DPSS or ZERO-BACK function during computation may cancel it.
l The indicated length of tape remaining is only an approximate guide.
l This function may not work properly when you use a video tape other than
E240, or E180.
l The length of tape remaining during fast forward or rewind may be indicated as greater than it actually is.
l When
and
tapes are used with a cassette adapter, the indication may not be correct.
Warning for the length of tape remaining
When the tape reaches the point where only about five minutes of recording time is left, the remaining
length of tape will be automatically displayed, as a warning.
NOTE:
l No warning, however, will be shown during timer recording or Simple Recording Timer recording.
Page 30

Editing from your Camcorder is extremely easy using your VCR with a linear tape counter, etc. The
connection diagram below is for a guideline only. Refer to your Camcorder operation manual for
precise connection information.
(VIEWCAM)
/VIDEO IN
Select
position AV
AV
Format:
Video recording system:
Video signal system:
Maximum playing time:
Tape width:
Tape speed:
Antenna:
Reception channels:
RF output signal:
Power requirement:
Power consumption:
Operating temperature:
Storage temperature:
Video input:
output:
Audio input: (phono type)
output: (phono type)
Dimensions:
Weight:
Supplied accessories:
Design and specifications are subject to change without notice.
VHS PAL standard
Two rotary heads, helical scan
PAL colour or monochrome signals: 625 lines
480 min. with E-240 video cassette in LP mode
12.7 mm
23.39 mm/set. SP; 11.70
LP
75 Ohm unbalanced
VHF channel 0 to 12, UHF channel 28 to 69
UHF channel 31 to 40 (preset to 37)
AC 240 V, 50 Hz
16W (approx.)
5°C to 40°C
20°C to 60°C
1 .O Vp-p, 75 Ohm
1 .O Vp-p, 75 Ohm
Line:
47 kohm
Line:
1 kohm
380 (W) x 290.3 (D) x 91.8 (H) mm
3.6 kg (approx.)
control unit, R6 (AA, UM/SUM-3) battery x 2
Page 31

Check this list before calling for service.
Problem
MISCELLANEOUS PROBLEMS
l No power.
OPERATE button will not function.
l Cassette cannot be ejected.
Possible Cause/Solutions
l Make sure the power cord is plugged in.
l Check the outlet, fuse or circuit breaker.
Press the TIMER ON/OFF button and disengage the timer.
l
VCR display does not operate
l Make sure that the Child-Proof Lock is not engaged.
properly.
l Safety device in VCR is functioning.
Unplug VCR and plug in again after around 30 minutes and set the
operation when any button is
clock again. Set the timer again if necessary.
pressed.
l VCR does not record.
*Cassette’s erasure protection tab has been removed. Use a
different cassette or place adhesive tape over the tab opening.
l Check if a cassette is loaded.
l Cassette is automatically ejected when
*Cassette’s erasure protection tab has been removed. Use a
pressing REC, or TIMER ON/OFF
different cassette or place adhesive tape over the tab opening.
button.
l No tape movement.
l Make sure VCR is not in pause/still mode.
l Make sure tape has not reached the beginning or end.
l Cassette cannot be loaded.
l Make sure there is no other cassette inside.
l Make sure the cassette is properly positioned and reinsert.
does not change even though
l Make sure the VCR is not in the timer setting or clock setting mode.
CHANNEL
buttons are pressed.
l Make sure the VCR is not in the channel setting mode.
*Desired channel position cannot be
channel has been set to be skipped. Cancel the skip mode for
selected.
that channel.
NO COLOUR OR POOR PICTURE
l No colour or poor TV picture on normal
l Make sure all the cables are connected properly.
viewing.
l Make sure the VCR power cord is properly plugged in.
picture appears on TV during
l Adjust the CHANNEL
buttons or try a different cassette.
playback.
l The heads may be dirty from condensed moisture or the magnetic
coating of the video tape. (If this is the case, the heads need to be
cleaned. Ask the retailer or Sharp approved service centre.)
l No picture appears or colour is not
*Make sure the TV is set to the same channel as the VCR RF
correct during playback.
converter output channel adjuster.
l Check all connecting cables.
REMOTE CONTROL PROBLEM
VCR cannot be operated by the
l The remote control unit is too far away from the main unit.
remote control.
remote control unit is not pointed correctly at the
photoreceptor window.
l The batteries are exhausted.
l The batteries have not been inserted in the correct direction
polarity).
_
Page 32

SHARP CORPORATION
Osaka, Japan
SHARP CORPORATION
OF AUSTRALIA PTY. LIMITED
A.C.N. 003 039 405
1 Huntingwood Drive, Huntingwood,
Blacktown, N.S.W. 2148
Printed in Malaysia
TINS-2549AJZZ
 Loading...