

Page 1

MOBILE TERMINAL
MOBILES TERMINAL
TERMINAL MOBILE
TERMINAL PORTATIL
MODEL
MODELL
MODELE
MODELO
UP-X200
HARDWARE OPERATION MANUAL
TECHNISCHE BEDIENUNGSANLEITUNG
MANUEL D'UTILISATION
MANUAL TECNICO
UPX200_Cover1_4 04.7.15, 3:03 PM1
Page 2
In the U.S.A.
WARNING
FCC Regulations state that any unauthorized changes or modifications to
this equipment not expressly approved by the manufacturer could void
the user’s authority to operate this equipment.
Note: This equipment has been tested and found to comply with the
limits for a Class A digital device, pursuant to Part 15 of the FCC Rules.
These limits are designed to provide reasonable protection against harmful interference when the equipment is operated in a commercial environment.
This equipment generates, uses, and can radiate radio frequency energy
and, if not installed and used in accordance with the instruction manual,
may cause harmful interference to radio communications. Operation of
this equipment in a residential area is likely to cause harmful interference,
in which case the user will be required to correct the interference at
their own expense.
In Canada
This class A digital apparatus complies with Canadian ICES-003.
Cet appareil numerique de la classeA est conforme a la norme NMB-003 du
Canada.
In France
Contact the qualified dealer for correct frequency setting.
Veuillez contacter le commerçant autorisé pour l’installation de la fréquence
adéquate.
FOR YOUR RECORDS
Please record below the model number and serial number for easy
reference in case of loss or theft. These numbers are located on the
bottom of the unit. Space is provided for further pertinent data.
Model Number
Serial Number
Date of Purchase
Place of Purchase
UPX200_Cover2_3 04.7.15, 2:43 PM2
Page 3
INTRODUCTION
English
Thank you very much for your purchase of the SHARP model UP-X200 Mobile Terminal.
Please read this manual carefully before operating your Mobile Terminal. Please keep this manual for
future reference.
IMPORTANT
• Keep this terminal away from extreme heat. Do not leave it on the dashboard of a car or near a
heater. Do not leave it in any place that is extremely damp or dusty.
The use of such locations could cause damage to the cabinet and the electronic components.
• Avoid dropping this terminal or subjecting it to extreme shocks.
The terminal complies with a tested drop resistance specification (drop from 1m to concrete floor), we
however recommend not to drop or expose the terminal to any strong shock.
Especially, several drops from the tested height or the drop onto any projecting objects may cause
damage to the terminal and it’s electronic components.
• Do not apply excessive pressure to the LCD display. Do not use a sharp-pointed object on the
display.
This may cause damage to the LCD display.
• When cleaning this terminal, use a clean, dry, soft cloth. Never use solvents, such as benzine or
thinner.
The use of such chemicals will lead to discoloration or deterioration of the cabinet.
• Use this terminal only with SHARP model EA-BL08 batteries.
The use of other batteries could cause the terminal to malfunction.
• If the terminal malfunctions, call your local authorized dealer for service. Do not try to repair the
terminal yourself.
When handling the batteries, please observe the following guidelines:
• Do not dispose of the batteries in a fire. Also keep the battery away from open flames.
• Never attempt to disassemble the battery pack.
• Do not short-circuit the UP-X200 battery terminals as they will become very hot and will damage the
battery.
• Do not drop or subject the battery to shock.
• After storing the battery for a long period of time, be sure to charge the battery completely prior to use.
• Charge the battery properly, according to the details described in this manual.
• If fluid from a leaking battery accidentally entering an eye could result in serious injury. Should this occur,
wash with clean water and immediately consult a doctor.
• Should fluid from a leaking battery come into contact with your skin or clothes, immediately wash with
clean water.
• For battery disposal, follow the corresponding law in your country.
In the U.S.A., Canada only
“BATTERY DISPOSAL”
CONTAINS LITHIUM-ION BATTERY. MUST BE DISPOSED OF PROPERLY. CONTACT LOCAL
AGENCIES FOR INFORMATION ON RECYCLING AND DISPOSAL PLANS IN YOUR AREA.
In the USA
This product utilizes tin-lead solder, and fluorescent lamps containing a small amount of mercury.
Disposal of these materials may be regulated due to environmental considerations.
For disposal or recycling information, please contact your local authorities or the Electronics
Industries Alliance: www.eiae.org
UPX200_main(E) 04.7.15, 3:00 PM1
1
Page 4
TABLE OF CONTENTS
INTRODUCTION........................................................................................................................................... 1
IMPORTANT ................................................................................................................................................. 1
TABLE OF CONTENTS ............................................................................................................................... 2
PHYSICAL CHARACTERISTICS................................................................................................................. 3
CHARGING THE BATTERY ........................................................................................................................ 4
Charging the battery using the cradle charger
Charging using the battery charger
REPLACING THE BATTERIES ................................................................................................................... 6
BEFORE CALLING FOR SERVICE ............................................................................................................. 8
LIST OF OPTIONS ....................................................................................................................................... 8
SPECIFICATIONS ........................................................................................................................................ 9
CAUTION:
The LCD module built in this mobile terminal is manufactured with highly precise technology.
However bright pixels or blank pixels may appear. Occasionally, an irregular color or uneven
brightness may occur depending on the display settings or the view angle. Please note that this type
of phenomena is common for LCDs and may not be a malfunction of the system.
Copyright
© 2004 SHARP Corporation
This document contains or refers to proprietary information which is protected by copyright.
All rights are reserved. Copying or other reproduction of this document is prohibited without
the prior written permission of SHARP Corporation.
2
UPX200_main(E) 04.7.15, 3:00 PM2
Page 5
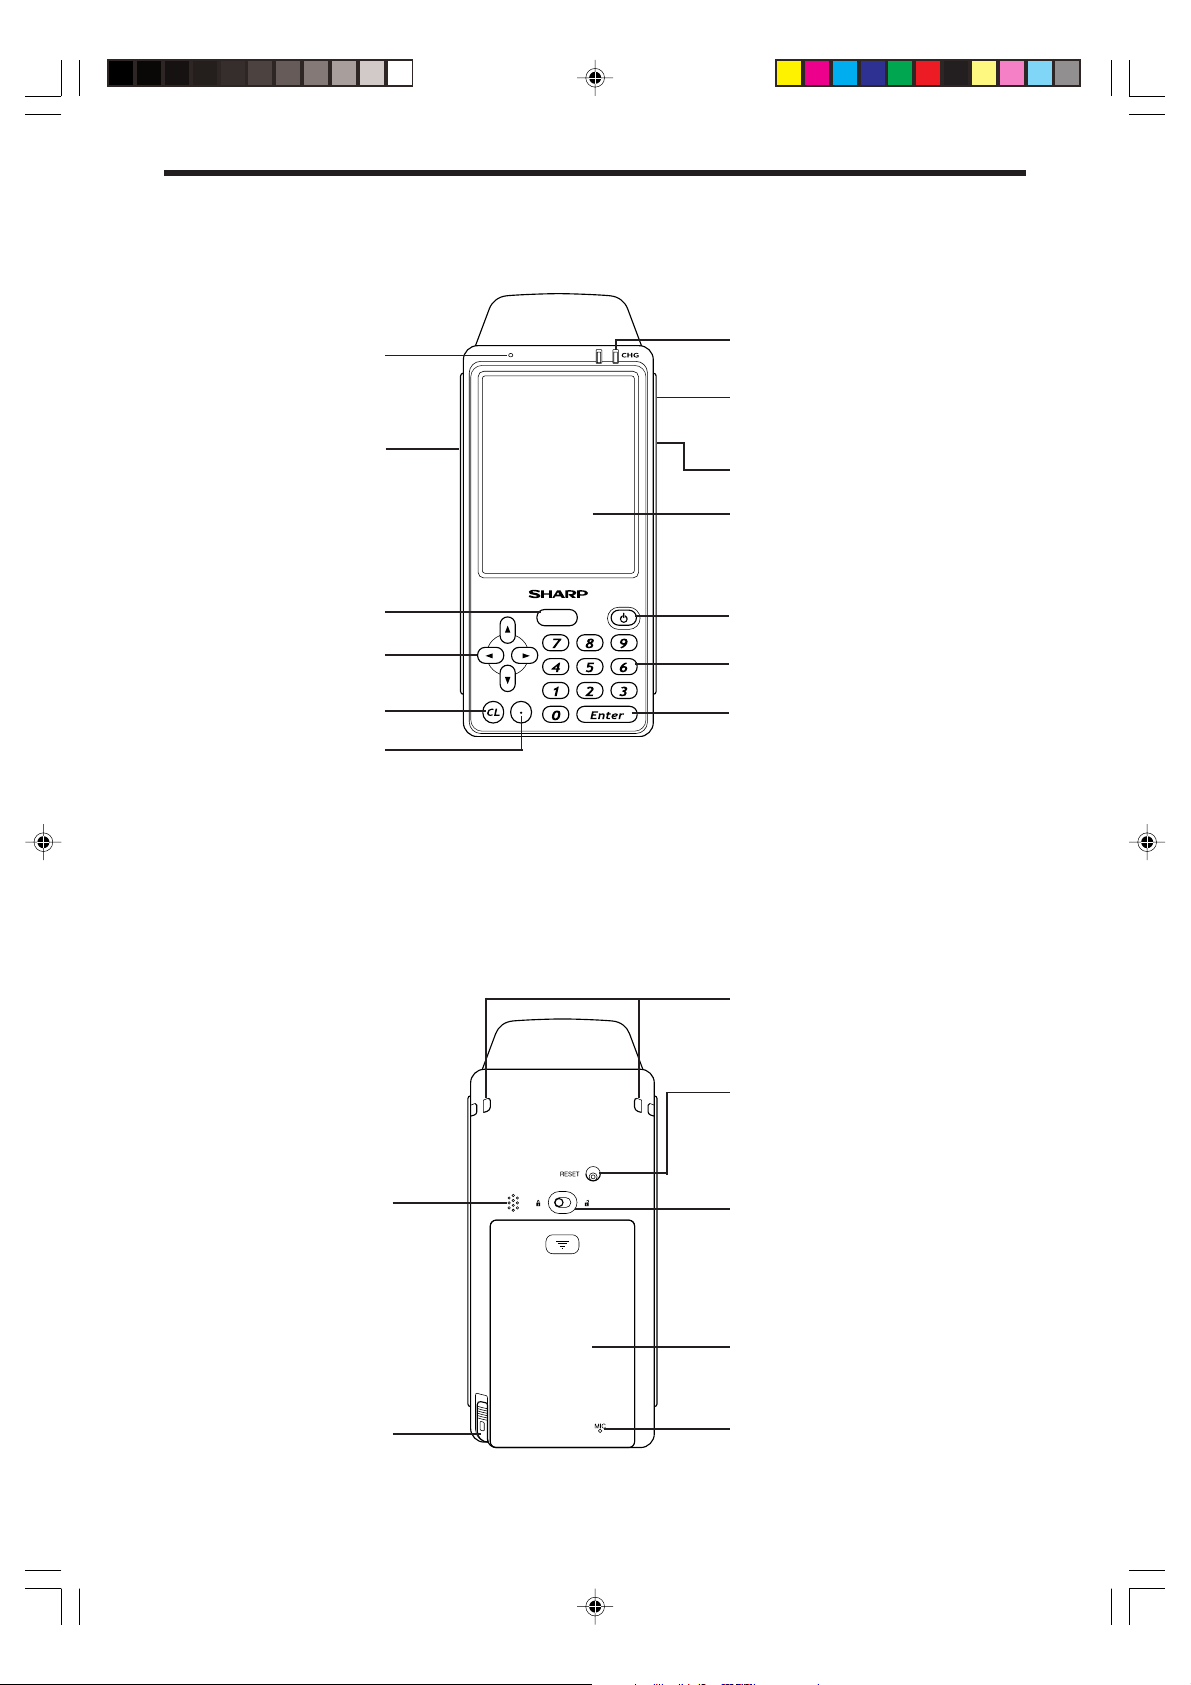
PHYSICAL CHARACTERISTICS
Front view
Buzzer
Side trigger key
Center trigger key
Cursor keys
(right/left/up/down arrow)
Clear key
Decimal point key
Charge indicator
USB 1.1 port
(provides a connection with external
peripherals.)
Earphone/microphone jack
Display (touch panel)
Power on/off key
Numeric keys (0 - 9)
Enter key
Note: The application software will determine the usage and availability of the USB port and the
keypad keys.
Rear view
Speaker
Stylus
Eyelets for connecting a strap
RESET Switch
DO NOT insert any objects unless
instructed to do.
Depression of the RESET Switch may
damage or delete data.
Lock for the battery compartment lid
Battery compartment lid
Microphone
3
UPX200_main(E) 04.7.15, 3:00 PM3
Page 6
CHARGING THE BATTERY
You can use the cradle charger or the battery charger for charging the battery.
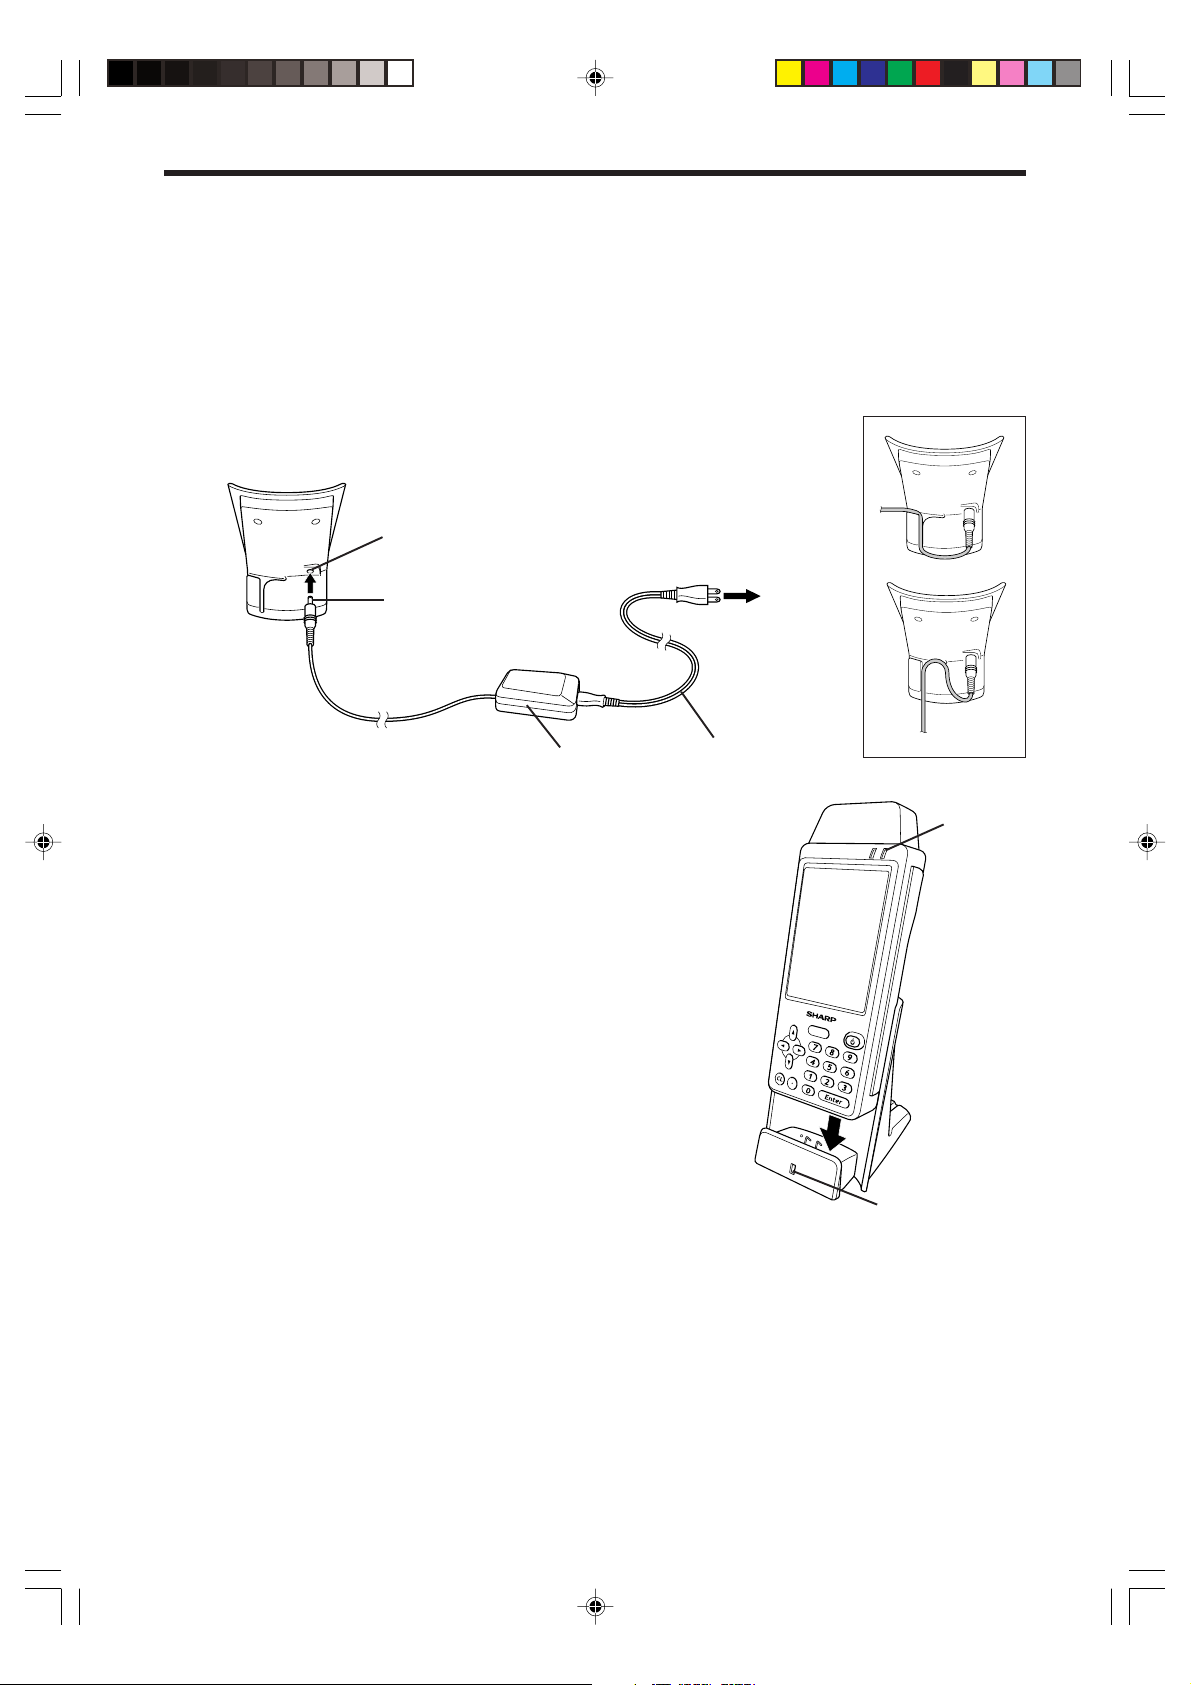
Charging the battery using the cradle charger
When you use the optional cradle charger (UP-B01CH) for charging battery, follow the procedure shown
below.
1.
Connect the AC power cord to the AC adapter.
2.
Plug the AC adapter connector into the cradle charger.
3.
Plug the AC power cord into an AC outlet.
AC adapter jack
AC adapter connector
Cradle charger
AC adapter
4.
Place the mobile terminal in the cradle charger by sliding as shown
at the right. Make sure that the terminal is fully inserted into the
cradle charger. The charge indicator on the terminal will illuminate
orange when charging begins.
Note: Please make sure that the power indicator turns green when
the mobile terminal is placed in the cradle.
If the terminal is not placed correctly, the power indicator will not
light.
Routing the AC adapter cable
To AC outlet
AC power cord
Charge
indicator
Charging time:
When the mobile terminal is OFF : approx. 3 hours
When the mobile terminal is ON : approx. 4.5 hours
(this varies depending on the ambient temperature and operating
conditions.)
5.
When charging has been completed, the charge indicator will turn
off. Upon completion, lift the mobile terminal from the cradle
charger.
6.
Unplug the AC power cord from the AC outlet and unplug the AC
adapter connector from the cradle charger.
Note:
• The AC power cord plug may differ in some countries.
• Do not use the AC adapter for other equipment. This adapter is specifically designed for the UP-X200.
• Do not use voltages beyond the indicated power supply voltage range.
• When the cradle charger is not in use, disconnect the AC power cord and the AC adapter from the wall
outlet for safety purposes.
• Do not connect or disconnect the AC adapter with wet hands.
• The AC plug must comply with the AC outlet configuration.
4
UPX200_main(E) 04.7.15, 3:00 PM4
Power indicator
Page 7
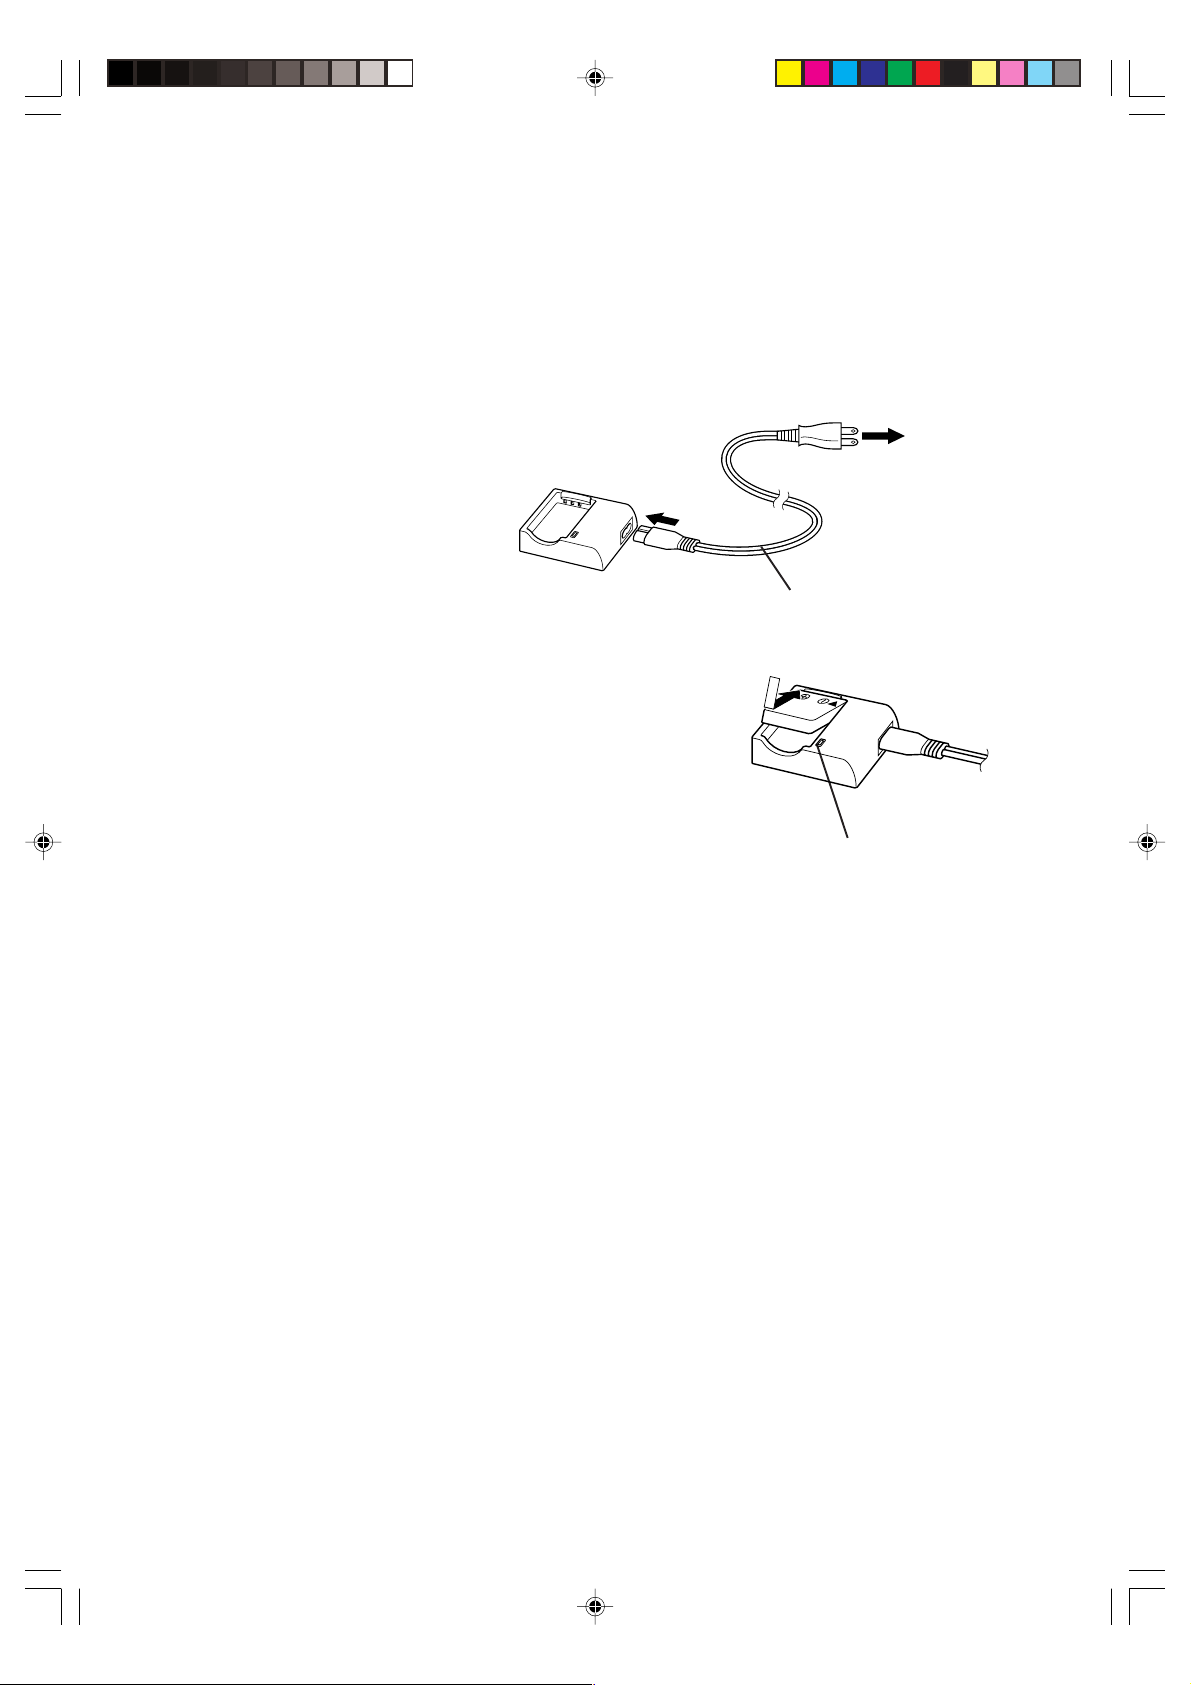
Charging using the battery charger
When using the optional battery charger (UP-P01CH) for charging the battery, follow the procedure shown
below.
You must remove the batteries from the mobile terminal for charging. To remove and install the batteries,
please refer to the next page.
Note: Only use the SHARP model EA-BL08 rechargeable battery.
1.
Connect the AC power cord to the battery charger and plug the other end into an AC outlet.
To AC outlet
Battery charger
2.
Insert the battery into the battery charger.
Make sure that the triangle (▲), plus (+), and minus (-) marks on
the battery are aligned correctly with those indicated on the
battery charger.
The charge indicator on the battery charger will illuminate red
when charging begins.
The charging time is approximately 3 hours, and may vary
depending on the ambient temperature and operating conditions.
3.
When the charging has been completed, the charge indicator will turn off. Upon completion, remove the
battery from the battery charger.
4.
Unplug the AC power cord from the AC outlet and from the battery charger.
Note:
• The AC power cord plug may differ in some countries.
• Do not use voltages beyond the indicated power supply voltage range.
• When not in use, disconnect the AC power cord from the wall outlet for safety.
• The AC plug must be appropriate for AC outlet configuration.
AC power cord
Charge indicator
UPX200_main(E) 04.7.15, 3:00 PM5
5
Page 8
REPLACING THE BATTERIES
Caution: Be sure to follow the procedures listed below when you replace the batteries. Otherwise data and
settings may be lost.
• Turn off the mobile terminal before replacing the batteries.
• When you replace the batteries, install spare batteries within 10 minutes under the condition the
back-up battery is fully charged.
• Only use the SHARP model EA-BL08 rechargeable battery.
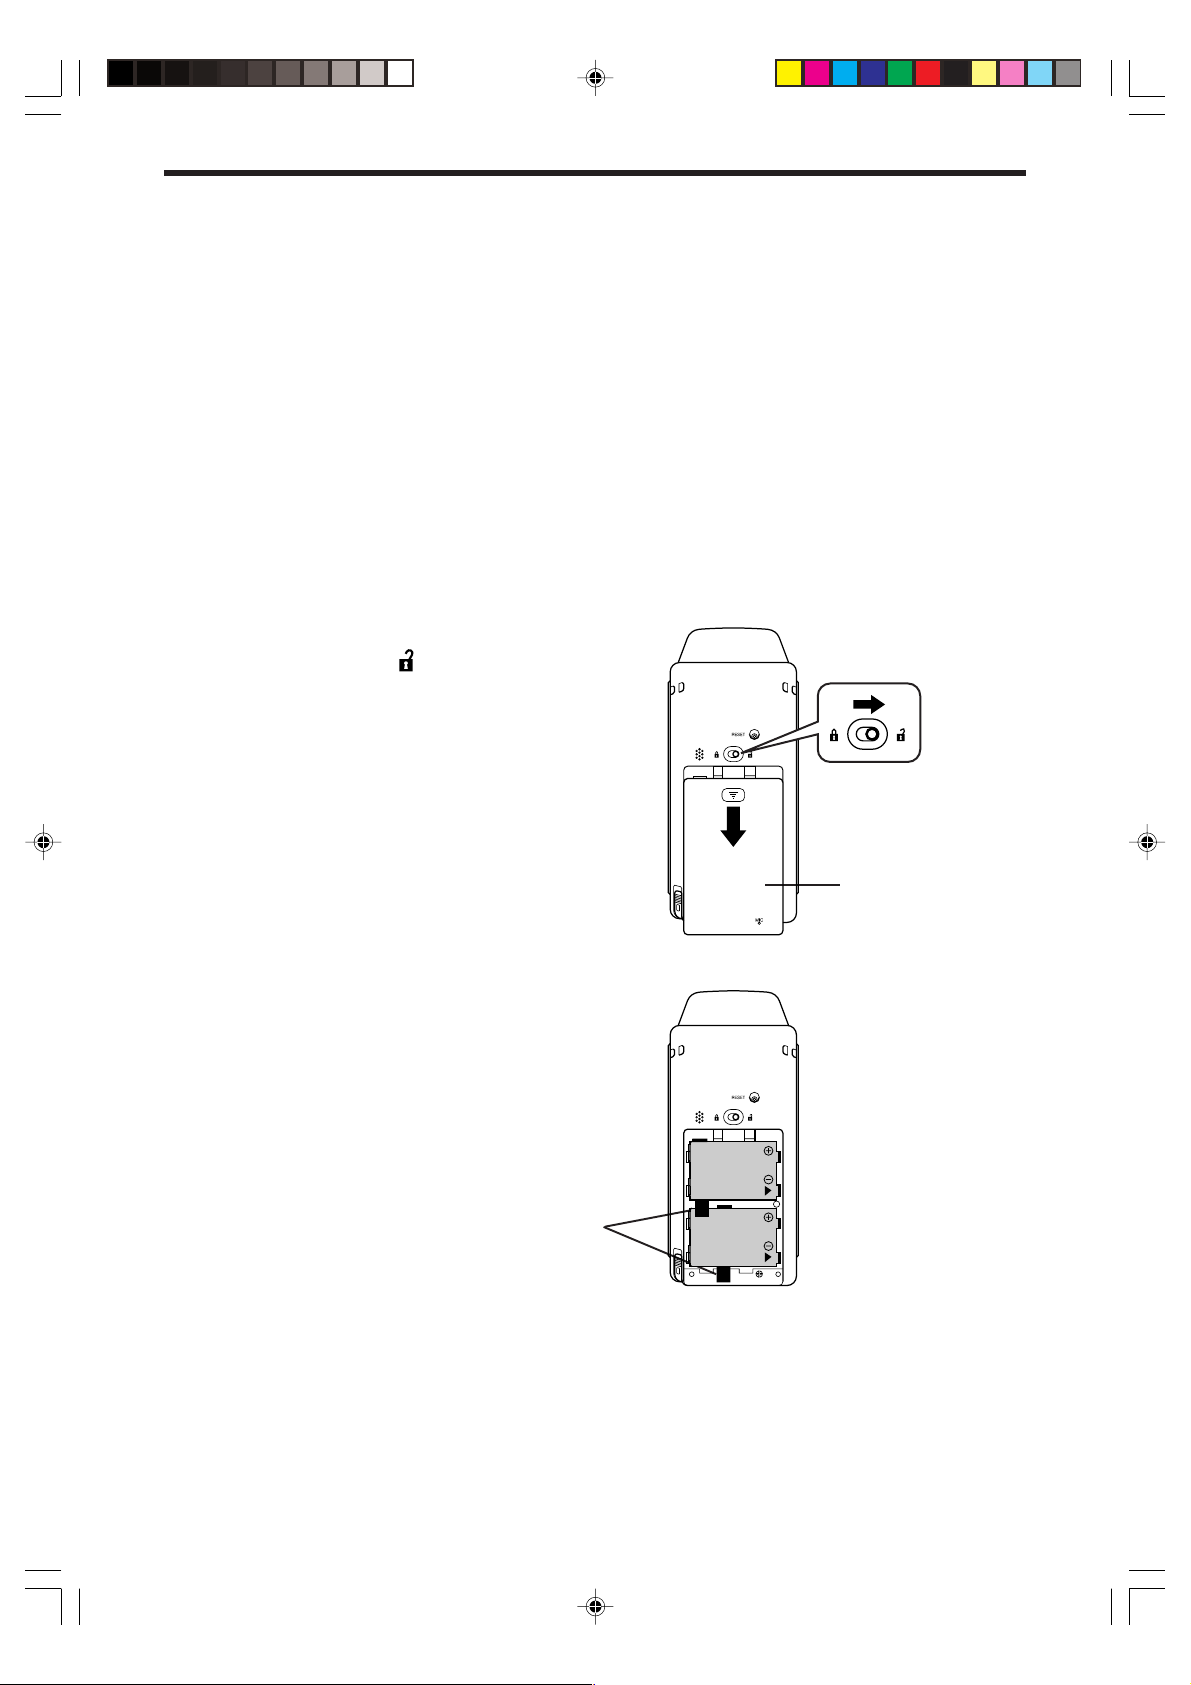
To remove the batteries
1.
Turn the mobile terminal off by depressing the power on/off key.
2.
Slide the lock for the battery compartment lid on the rear
side of the terminal to the
3.
Open the battery compartment lid and gently pull it off.
position.
Lock for the battery
compartment lid
4.
Pull the ribbon tabs to remove the batteries.
Battery
compartment lid
Ribbon tabs
6
UPX200_main(E) 04.7.15, 3:00 PM6
Page 9

To install the batteries
5.
Insert the full-charged batteries, making sure that the
triangle (▲), plus (+), and minus (-) marks on the battery
are aligned correctly with those printed inside the battery
compartment.
Also make sure each ribbon tab is placed under the
battery as shown in the diagram to the right.
Ribbon tabs
6.
Replace the battery compartment lid with the ribbon tabs
inside.
Caution: Be sure to replace the battery compartment lid
after inserting the battery. If the cover is not on securely,
the battery may not keep a proper connection and you
may lose the data which is stored in the terminal.
Lock for the battery
compartment lid
7.
Slide the lock for the battery compartment lid to the
position.
Battery
compartment lid
About the back-up battery
The UP-X200 has a specified built-in rechargeable back-up battery which prevents the memory contents
from being erased when you replace the batteries.
• The rechargeable back-up battery will be charged to its full capacity in approximately 24 hours using a
fully charged “EA-BL08” operating battery.
• The rechargeable back-up battery (when fully charged) keeps data stored in the UP-X200 for
approximately 10 minutes when the operating battery is not inserted.
UPX200_main(E) 04.7.15, 3:00 PM7
7
Page 10

BEFORE CALLING FOR SERVICE
The malfunctions shown in the left-hand column below, labeled “Condition,” does not necessarily indicate
functional faults of the terminal. The condition listed is only meant to be a reference for the items shown in
the “Possible Cause and Remedies” column at the right before calling for service.
Condition Possible Cause and Remedies
• The mobile terminal turns off by itself.
• The mobile terminal does not turn on
by pressing the power on/off key.
• The screen is lit but characters, etc.
are not displayed.
• The batteries may be exhausted. Charge the batteries
using the cradle charger or the battery charger.
• Remove and reinsert the batteries. Make sure that the
battery compartment lid is securely mounted on the mobile
terminal.
LIST OF OPTIONS
The following SHARP options are available for your UP-X200 mobile terminal:
For further details about options listed below, please contact your SHARP dealer.
1. Cradle charger model UP-B01CH
2. Battery charger model UP-P01CH
3. Rechargeable battery model EA-BL08
8
UPX200_main(E) 04.7.15, 3:00 PM8
Page 11
SPECIFICATIONS
Mobile terminal UP-X200
Dimensions: Approximately 77(W) x 187(D) x 25(H) mm
Approximately 3.0(W) x 7.4(D) x 0.98(H) in.
Weight: Approximately 340 g / 12.0 oz.
Power source: Operating battery: “EA-BL08” 3.7 V (DC) lithium-ion batteries
Memory back-up battery: 3.0 V
Power consumption: Operating: 2.6 W
Battery life: Approximately 9 hours*
*When you operate the 1 transaction per minutes. Transaction means 5 item
registration, finalization, data transmission.
Working temperature: 5 to 35 °C / 41 to 95 °F
Display: 4" Semi-transparent CGS color LCD with backlighting
480 x 640/240 x 320 dots (selectable)
Accessories: Rechargeable battery (EA-BL08) (2 pieces)
Stylus (inserted in the mobile terminal)
Hand strap (1 piece)
Hardware operation manual (1 copy)
(DC) (Built-in)
• Specifications and appearance subject to change for improvement without notice.
Cradle charger UP-B01CH
Dimensions: Approximately 83(W) x 106(D) x 106(H) mm
Approximately 3.3(W) x 4.2(D) x 4.2(H) in.
Weight: Approximately 157 g / 5.5 oz.
Battery charger UP-P01CH
Dimensions: Approximately 65(W) x 80(D) x 26.5(H) mm
Approximately 2.6(W) x 3.1(D) x 1.0(H) in.
Weight: Approximately 75 g / 2.6 oz.
UPX200_main(E) 04.7.15, 3:00 PM9
9
Page 12

UPX200_main(E) 04.7.15, 3:00 PM10
Page 13

EINLEITUNG
Deutsch
Wir danken Ihnen, daß Sie sich für das Mobile Terminal von SHARP entschieden haben.
Bitte lesen Sie, vor der Inbetriebnahme des Gerätes, diese Bedienungsanleitung sorgfältig durch und
bewahren Sie diese Anleitung zu Referenz-Zwecken gut auf.
WICHTIG
• Halten Sie das Gerät von extremer Hitze fern. Lassen Sie es nicht auf dem Armaturenbrett Ihres
Fahrzeugs oder in der Nähe einer Heizung liegen. Bewahren Sie es nicht an Orten auf, wo extreme
Dampf- oder Staubentwicklung vorherrscht.
Das Gehäuse und die elektronischen Bauteile können dabei beschädigt werden.
• Vermeiden Sie es, das Gerät fallen zu lassen oder dieses extremen Stößen auszusetzen.
Das Gerät wurde einem Falltest unterzogen (Freier Fall aus 1m Höhe auf einen Betonfußboden).
Trotzdem empfehlen wir Ihnen, das Gerät nicht fallen zu lassen oder es starken Stößen auszusetzen.
Insbesondere, mehrfaches Fallenlassen aus der angegebenen Höhe oder das Aufschlagen auf
hervorstehenden Objekten, kann zur Beschädigung des Gerätes und dessen elektronischen Bauteilen
führen.
• Üben Sie keinen übermäßigen Druck auf das Display aus. Berühren Sie das Display nicht mit
scharfkantigen Gegenständen.
Die LCD-Anzeige kann dabei beschädigt werden.
• Zum Reinigen dieses Geräts ist ein weiches, trockenes Tuch zu verwenden. Benutzen Sie niemals
Lösungsmittel wie z.B. Benzin oder Verdünner.
Die Verwendung solcher Chemikalien verursacht die Verfärbung oder Beschädigung des Gehäuses.
• Betreiben Sie das Gerät ausschließlich mit “EA-BL08”-Akkus.
Die Verwendung anderer Akkus kann zu Gerätestörungen führen.
• Wenn Gerätestörungen auftreten, sprechen Sie bitte mit Ihrem Händler zwecks Reparatur.
Versuchen Sie niemals das Gerät selbst zu reparieren.
Beim Umgang mit den Akkus sind die folgenden Punkte unbedingt zu beachten:
• Werfen Sie die Akkus niemals ins Feuer. Halten Sie die Akkus ebenfalls von offenem Feuer entfernt.
• Versuchen Sie niemals, den Akku zu zerlegen.
• Verursachen Sie keinen Kurzschluß an den Anschlüssen, da diese dabei sehr heiß werden und den Akku
beschädigen können.
• Der Akku darf nicht fallengelassen und auch sonst keinen Erschütterungen ausgesetzt werden.
• Nachdem der Akku für längere Zeit nicht verwendet wurde, muß dieser vor der Wiederverwendung
vollständig geladen werden.
• Laden Sie den Akku gemäß den in dieser Anleitung aufgeführten Details auf.
• Falls Akku-Säure zufällig austreten sollte und in die Augen gelangt, kann dies zu ernsthaften Verletzungen
führen. Sollte dieser Fall eintreten, müssen die Augen sofort mit reichlich sauberem Wasser ausgespült
werden. Danach ist unverzüglich ein Arzt aufzusuchen.
• Wenn Akku-Säure auf Ihre Haut oder Kleidung gelangt, ist diese sofort mit reichlich Wasser abzuwaschen.
• Beachten Sie die entsprechenden Gesetze hinsichtlich der Entsorgung der Akkus.
UPX200_main(D) 04.7.15, 2:43 PM11
11
Page 14

INHALTSVERZEICHNIS
EINLEITUNG .............................................................................................................................................. 11
WICHTIG..................................................................................................................................................... 11
INHALTSVERZEICHNIS ............................................................................................................................ 12
ANORDNUNG UND BESCHREIBUNG DER BEDIENUNGSELEMENTE ................................................ 13
LADEN DES AKKUS.................................................................................................................................. 14
Laden mit der Akku-Ladestation
Laden mit dem Akku-Ladegerät
AUSWECHSELN DER AKKUS.................................................................................................................. 16
BEVOR SIE DEN KUNDENDIENSTTECHNIKER ANFORDERN ............................................................. 18
SONDERZUBEHÖR ................................................................................................................................... 18
TECHNISCHE DATEN ............................................................................................................................... 19
VORSICHT:
Die in das Mobile Terminal eingebaute LCD ist ein hochtechnologisches Design. Es kann jedoch
vorkommen, daß helle Bildpunkte im Display erscheinen. Unregelmäßige Farbtöne oder
schwankende Helligkeitsstufen können ebenfalls bei bestimmten Displayeinstellungen oder
unterschiedlichen Blickwinkeln auftreten. Bitte nehmen Sie zur Kenntnis, daß diese Erscheinungen
bei LCD’s normal sind und keine Störung im Gerät bedeuten.
Copyright
© 2004 SHARP Corporation
Dieses Dokument ist urheberrechtlich geschützt und durch das Copyright geschützt. Alle
Rechte vorbehalten. Das Kopieren oder der Nachdruck dieses Dokuments ist ohne vorherige
schriftliche Genehmigung der SHARP Corporation verboten.
12
UPX200_main(D) 04.7.15, 2:43 PM12
Page 15

ANORDNUNG UND BESCHREIBUNG
DER BEDIENUNGSELEMENTE
Frontansicht
Summer
Seitliche Triggertaste
Mittlere Triggertaste
Cursortasten
(Pfeil für rechts/links/auf/ab)
Löschtaste
Dezimaltaste
Hinweis: Die Anwendersoftware bestimmt die Anwendung und die Verfügbarkeit des USB-Port
sowie des Tastenfeldes.
Ladeanzeige
USB 1.1 Port
(zum Anschluß externer Geräte)
Ohrhörer-/Mikrofonbuchse
Anzeige (Berührungssensitive Anzeige)
Ein-/Ausschalter
Zehner-Tastatur (0 – 9)
Eingabetaste
Rückansicht
Lautsprecher
Bedienungsstift
Ösen für den Halteriemen
Rückstellungsschalter
Keine Gegenstände einführen, außer
wenn es ausdrücklich angewiesen
wird.
Andernfalls können die Daten beschädigt
oder gelöscht werden.
Sperre für die Akku-Abdeckung
Akku-Abdeckung
Mikrofon
13
UPX200_main(D) 04.7.15, 2:43 PM13
Page 16

LADEN DES AKKUS
Für das Aufladen des Akkus kann die Akku-Ladestation oder das Akku-Ladegerät benutzt werden.
Laden mit der Akku-Ladestation
Mit der als Sonderzubehör erhältlichen Akku-Ladestation (UP-B01CH) ist wie nachfolgend beschrieben
vorzugehen:
1.
Schließen Sie das Netzkabel am Netzadapter an.
2.
Stecken Sie den Stecker des Netzadapters in die Akku-Ladestation.
3.
Schließen Sie das Netzkabel an eine Netzsteckdose an.
Anschlußbuchse
des Netzadapters
Stecker des
Akku-Ladestation
4.
Stellen Sie das Mobile Terminal in die Akku-Ladestation. Stellen
Sie sicher, daß das Gerät vollständig in der Akku-Ladestation
eingerastet ist. Die Ladeanzeige schaltet auf orange um, wenn
der Ladevorgang beginnt.
Hinweis:
Bitte stellen Sie sicher, daß die Stromversorgungsanzeige grün
aufleuchtet, wenn das Mobile Terminal in die Akku-Ladestation
eingesetzt wird.
Wenn das Gerät nicht richtig eingesetzt wird, leuchtet die
Stromversorgungsanzeige nicht auf.
Ladezeit:
Beim ausgeschalteten Mobilen Terminal: ca. 3 Stunden
Beim eingeschalteten Mobilen Terminal: ca. 4,5 Stunden
(Anmerkung: Die Ladezeit wird durch die Umgebungstemperatur
und den Betriebsbedingungen beeinflußt.)
5.
Ist der Ladevorgang abgeschlossen ist, erlischt die Ladeanzeige.
Danach ist das Mobile Terminal aus der Akku-Ladestation zu
entfernen.
6.
Nun das Netzkabel aus der Netzsteckdose und den Stecker des
Netzadapters aus der Akku-Ladestation ziehen.
Hinweis:
• Der abgebildete Netzstecker entspricht nicht den jeweils genutzten Stecker in den einzelnen Ländern.
• Benutzen Sie nie den Netzadapter für andere Geräte. Dieses kann zur Beschädigung der Geräte führen.
• Verwenden Sie keine Versorgungsspannungen, die von der spezifizierten Spannung abweicht.
• Wird das Gerät nicht benutzt, ziehen Sie sicherheitshalber das Netzkabel aus der Netzsteckdose und den
Stecker des Netzadapters aus der Akku-Ladestation ab.
• Achten Sie darauf, daß Sie beim Anschließen oder Abziehen des Netzadapters keine nassen Hände
haben.
• Der Netzstecker und die Netzsteckdose müssen kompatibel sein.
Netzadapters
Netzadapter
zur Netzsteckdose
Netzkabel
Kabelführung
Ladeanzeige
Stromversorgungsanzeige
14
UPX200_main(D) 04.7.15, 2:43 PM14
Page 17

Laden mit dem Akku-Ladegerät
Mit dem als Sonderzubehör erhältlichen Akku-Ladegerät (UP-P01CH) ist wie nachfolgend beschrieben
vorzugehen.
Um die Akkus zu laden, müssen sie zuerst aus dem Mobile Terminal entfernt werden. Für das Entfernen der
Akkus ist auf den Abschnitt “AUSWECHSELN DER AKKUS” Bezug zu nehmen.
Hinweis: Benutzen Sie nur Akkus des Typs EA-BL08.
1.
Schließen Sie ein Ende des Netzkabels an das Akku-Ladegerät an, und stecken Sie das andere Ende in
eine Netzsteckdose.
zur Netzsteckdose
Akku-Ladegerät
2.
Setzen Sie die Akkus in das Akku-Ladegerät ein.
Stellen Sie beim Einsetzen sicher, daß die Dreieck-Markierung
(▲) auf dem Akku auf der gegenüberliegenden Seite der
Ladeanzeige des Akku-Ladegerätes ist.
Die Ladeanzeige leuchtet rot auf, wenn der Ladevorgang
beginnt.
Die Ladezeit beträgt ca. 3 Stunden und hängt von der
Umgebungstemperatur und den Betriebsbedingungen ab.
3.
Wenn der Ladevorgang abgeschlossen ist, erlischt die Ladeanzeige. Danach ist der Akku aus dem AkkuLadegerät zu entfernen.
4.
Nun das Netzkabel aus der Netzsteckdose und dem Akku-Ladegerät abziehen.
Hinweis:
• Der abgebildete Netzstecker entspricht nicht den jeweils genutzten Stecker in den einzelnen Ländern.
• Verwenden Sie keine Versorgungsspannungen, die von der spezifizierten Spannung abweicht.
• Wird das Gerät nicht benutzt, ziehen Sie sicherheitshalber das Netzkabel aus der Netzsteckdose.
• Der Netzstecker und die Netzsteckdose müssen kompatibel sein.
Netzkabel
Ladeanzeige
UPX200_main(D) 04.7.15, 2:43 PM15
15
Page 18

AUSWECHSELN DER AKKUS
Vorsicht: Beim Auswechseln der Akkus ist das folgende Verfahren zu beachten. Andernfalls können die
Daten im Terminal beschädigt oder gelöscht werden.
• Schalten Sie das Mobile Terminal vor dem Auswechseln der Akkus aus.
• Die Ersatzakkus müssen innerhalb von 10 Minuten ausgewechselt werden. Dabei wird davon
ausgegangen, daß die Ersatzakkus vollständig geladen sind.
• Benutzen Sie nur Akkus des Typs EA-BL08.
Entfernen der Akkus
1.
Schalten Sie das Mobile Terminal aus.
2.
Schieben Sie die Sperre für die Akku-Abdeckung auf der
Geräterückseite in die Position
3.
Öffnen Sie die Akku-Abdeckung und ziehen Sie sie
vorsichtig ab.
.
Sperre für die AkkuAbdeckung
4.
Ziehen Sie an den Bandenden, um die Akkus zu
entfernen.
Bandenden
Akku-Abdeckung
16
UPX200_main(D) 04.7.15, 2:44 PM16
Page 19

Einsetzen der Akkus
5.
Setzen Sie die vollständig geladenen Akkus ein und
stellen Sie sicher, daß das Dreieck-Symbol (▲), sowie
die Markierungen für Plus (+) und Minus (-), mit den
Markierungen im Akku-Fach richtig ausgerichtet sind.
Achten Sie auch darauf daß die Bänder unter den Akkus
durchgeführt werden (siehe rechte Abbildung).
Bandenden
6.
Setzen Sie die Akku-Abdeckung wieder auf und stellen
Sie sicher, daß die Bandenden nicht herausragen.
Vorsicht:
Achten Sie unbedingt darauf, daß die Akku-Abdeckung
nach dem Einsetzen der Akkus ordnungsgemäß
verriegelt wird. Wenn die Abdeckung nicht richtig
aufgesetzt ist, können sich die Akkus lockern und die im
Gerät gespeicherten Daten verlorengehen.
Sperre für die AkkuAbdeckung
7.
Schieben Sie die Sperre für die Akku-Abdeckung auf der
Geräterückseite in die Position .
Speicherschutz-Akku
Das Mobile Terminal UP-X200 besitzt einen integrierten Speicherschutz-Akku. Er verhindert, daß beim
Auswechseln der Akkus der Speicherinhalt verlorengeht.
• Beim eingesetzten und voll geladenen “EA-BL08”-Akku benötigt der Speicherschutz-Akku eine Ladezeit
von 24 Stunden.
• Wenn der Betriebsakku entfernt ist, sichert der Speicherschutz-Akku bei voller Ladung die im Gerät
gespeicherten Daten für ca. 10 Minuten.
Akku-Abdeckung
UPX200_main(D) 04.7.15, 2:44 PM17
17
Page 20

BEVOR SIE DEN KUNDENDIENSTTECHNIKER ANFORDERN
Störungen in der linken Spalte “Zustand” weisen nicht unbedingt auf funktionelle Probleme des Mobile
Terminal hin. Der aufgeführte Zustand ist lediglich als Referenz für die rechts aufgeführte Spalte
“Überprüfung” zu betrachten. Überprüfen Sie bitte diese Details, bevor Sie sich an den Kundendienst
wenden.
Zustand Überprüfung
• Das Mobile Terminal schaltet sich von
selbst aus.
• Das Mobile Terminal schaltet sich
nicht ein, wenn die Gerätetaste (ein/
aus) betätigt wird.
• Das Display ist erleuchtet, es werden
jedoch keine Zeichen angezeigt.
• Die Akkus sind eventuell erschöpft. Laden Sie die Akkus
mit der Akku-Ladestation oder dem Akku-Ladegerät auf.
• Entfernen Sie die Akkus und setzen Sie diese wieder ein.
Stellen Sie sicher, daß die Akku-Abdeckung
ordnungsgemäß angebracht ist.
SONDERZUBEHÖR
Folgendes SHARP-Sonderzubehör ist für Ihr Mobiles Terminal erhältlich:
Einzelheiten der nachfolgend aufgeführten Sonderzubehörteile erfahren Sie bei Ihrem SHARP-Fachhändler.
1. Akku-Ladestation Modell UP-B01CH
2. Akku-Ladegerät Modell UP-P01CH
3. Akku Modell EA-BL08
18
UPX200_main(D) 04.7.15, 2:44 PM18
Page 21

TECHNISCHE DATEN
Mobiles Terminal UP-X200
Abmessungen: ca. 77(B) x 187(T) x 25(H) mm
Gewicht: ca. 340 g
Stromversorgung: Betriebsakku: “EA-BL08” 3,7 V (Gleichspannung) LithiumIon-Akkus
Speicherschutz-Akku: 3,0 V
Stromaufnahme: Betrieb: 2,6 W
Akku-Betriebsdauer: ca. 9 Stunden*
* Bei einer Transaktion pro Minute. (Eine Transaktion entspricht:
5 Posten-Registrierungen, ein Abschluß und die Datenübertragung.)
Betriebstemperatur: 5 bis 35°C
Display: Halbtransparente CGS-Farb-LCD mit Hintergrundbeleuchtung (4 Zoll)
480 x 640/240 x 320 Pixel (wählbar)
Zubehör: 2 Akkus (EA-BL08)
Bedienungsstift (im Mobile Terminal eingesteckt)
1 Halteriemen
1 Technische Bedienungsanleitung
(Gleichspannung) (integriert)
• Die Spezifikationen und das äußere Aussehen unterliegen Änderungen ohne vorherige Benachrichtigung.
Akku-Ladestation UP-B01CH
Abmessungen: ca. 83(B) x 106(T) x 106(H) mm
Gewicht: ca. 157 g
Akku-Ladegerät UP-P01CH
Abmessungen: ca. 65(B) x 80(T) x 26,5(H) mm
Gewicht: ca. 75 g
UPX200_main(D) 04.7.15, 2:44 PM19
19
Page 22

20
UPX200_main(D) 04.7.15, 2:44 PM20
Page 23

INTRODUCTION
Français
Nous vous remercions beaucoup pour votre achat du Terminal Mobile SHARP.
Veuillez lire attentivement ce Manuel d’Utilisation avant d’utiliser votre Terminal Mobile. Veuillez conserver
ce Manuel pour une référence ultérieure.
IMPORTANT
• Eloigner ce terminal d’une chaleur extrême. Ne pas le laisser sur le tableau de bord d’une voiture
ou à proximité d’un appareil de chauffage. Ne pas le laisser dans un endroit extrêmement humide
ou poussiéreux.
Une utilisation dans de pareils endroits risquerait d’endommager le boîtier et les composants
électroniques.
• Eviter de faire tomber ce Terminal de Point de Vente ou lui faire subir n’importe quelle extrême
secousse.
Ce terminal satisfait à la spécification testée de la résistance à une chute (chute de 1 m sur un sol en
béton). Nous recommandons toutefois de ne pas faire tomber ou exposer ce terminal à une secousse trop
forte.
Particulièrement, plusieurs chutes à partir d’une hauteur testée ou une chute sur des objets saillants
risquent d’endommager le terminal et ses composants électroniques.
• Ne pas appliquer une pression excessive sur l’affichage. Ne pas utiliser un objet avec une pointe
effilée sur l’affichage.
Cela risque d’endommager l’écran de l’affichage à cristaux liquides.
• Lorsqu’on nettoie ce terminal, utiliser un tissu sec et doux. Ne jamais utiliser de dissolvants, tels
que de la benzine ou un diluant.
L’utilisation de pareils produits chimiques entraînerait la décoloration ou la détérioration du boîtier.
• Utiliser ce terminal avec des batteries “EA-BL08”.
L’utilisation d’autres batteries pourrait provoquer un fonctionnement défectueux du terminal.
• Si le terminal ne fonctionne pas bien, faites appel à votre revendeur local agrée pour vous
dépanner. N’essayez pas de réparer vous-même le terminal.
Lors de la manipulation des batteries, ne jamais oublier d’observer les points suivants:
• Ne pas jeter les batteries dans un feu. Tenir toujours les batteries éloignées d’une flamme nue.
• Ne jamais tenter de démonter la batterie.
• Ne pas court-circuiter les bornes, car elles deviendraient très chaudes et endommageraient la batterie.
• Ne pas faire tomber ou soumettre la batterie à des chocs.
• Après avoir remisé la batterie pendant une période de temps prolongée, s’assurer de la recharger
complètement avant de l’utiliser.
• Charger correctement la batterie, selon les détails décrits dans ce manuel.
• Le liquide provenant de la fuite d’une batterie et pénétrant accidentellement dans l’œil risque de provoquer
une grave blessure. Si cela devait survenir, laver avec de l’eau pure et consulter immédiatement un
médecin.
• Si le liquide provenant de la fuite d’une batterie entrait en contact avec votre peau ou vos vêtements, laver
immédiatement avec de l’eau pure.
• Pour la mise au rebut de la batterie, observez les règlements en vigueur dans votre pays.
UPX200_main(F) 04.7.15, 2:44 PM21
21
Page 24

TABLE DES MATIERES
INTRODUCTION......................................................................................................................................... 21
IMPORTANT ............................................................................................................................................... 21
TABLE DES MATIERES ............................................................................................................................ 22
CARACTERISTIQUES PHYSIQUES ......................................................................................................... 23
CHARGE DE LA BATTERIE ...................................................................................................................... 24
Charge en utilisant le chargeur-support
Charge en utilisant le chargeur de batterie
REMPLACEMENT DES BATTERIES ........................................................................................................ 26
AVANT D’APPELER POUR UN DEPANNAGE......................................................................................... 28
LISTE DES OPTIONS ................................................................................................................................ 28
DONNEES TECHNIQUES .......................................................................................................................... 29
AVERTISSEMENT:
Le module de l’affichage à cristaux liquides incorporé dans ce terminal mobile est fabriqué avec une
technologie d’une très grande précision. Cependant, des points lumineux ou des points espacés
risquent d’apparaître. Occasionnellement, une couleur anormale ou une luminosité inégale peut se
produire selon les réglages de l’affichage ou l’angle de visualisation. Veuillez noter que ce type de
phénomène est courant pour des affichages à cristaux liquides et ne signifient pas automatiquement
un fonctionnement défectueux du système.
Copyright
© 2004 SHARP Corporation
Ce document contient ou se réfère à des informations sur le droit de propriété qui est protégé
par les droits de reproduction. Tous les droits sont réservés. Toute copie ou autre reproduction
de ce document est interdite sans l’autorisation écrite préalable de SHARP Corporation.
22
UPX200_main(F) 04.7.15, 2:44 PM22
Page 25

CARACTERISTIQUES PHYSIQUES
Vue frontale
Avertisseur sonore
Touche de déclenchement
latérale
Touche de déclenchement
centrale
Touches du curseur
(flèches de droite/gauche/
haut/bas)
Touche d’effacement
Touche du point de
décimalisation
Indicateur de charge
Port 1.1 USB
(prend en charge le raccordement avec
des périphériques externes)
Jack d’écouteur/microphone
Affichage (panneau à effleurement)
Touche de mise en circuit/hors circuit
d’énergie
Touches numériques (0 ~ 9)
Touche d’entrée
Nota: Le logiciel d’application déterminera l’utilisation et la disponibilité du port USB et du clavier.
Vue arrière
Haut-parleur
Stylet
Œillets pour la dragonne
Commutateur de REMISE A ZERO
NE PAS introduire n’importe quel
objet, à moins que cela ne soit
spécifié.
En le faisant on risque d’endommager
ou d’annuler les données.
Verrouillage pour le couvercle du
compartiment de la batterie
Couvercle du compartiment de la
batterie
Microphone
23
UPX200_main(F) 04.7.15, 2:44 PM23
Page 26

CHARGE DE LA BATTERIE
Vous pouvez utiliser le chargeur-support ou le chargeur de batterie pour charger la batterie.
Charge en utilisant le chargeur-support
Lorsqu’on utilise le chargeur-support (UP-B01CH) en option pour charger la batterie, suivre la procédure
indiquée ci-dessous.
1.
Raccorder le câble d’alimentation C.A. à l’adaptateur C.A.
2.
Enficher le connecteur de l’adaptateur C.A. dans le chargeur-support.
3.
Enficher le câble d’alimentation dans une prise de courant secteur.
Comment acheminer le
câble de l’adaptateur C.A.
Jack de
l’adaptateur C.A.
Connecteur de
Chargeur-support
4.
Placer le terminal mobile dans le chargeur-support en l’y faisant
coulisser. S’assurer que le terminal est complètement inséré dans le
chargeur-support. L’indicateur de charge sur le terminal s’éclairera
en orange lorsque la charge commence.
Nota:
S’assurer que l’indicateur d’énergie s’éclaire en vert lorsque le
terminal mobile est installé sur le support.
Si le terminal n’est pas correctement installé, l’indicateur d’énergie
ne s’éclairera pas.
Durée de la charge:
Lorsque le terminal mobile est hors circuit: environ 3 heures
Lorsque le terminal mobile est sous tension: environ 4,5 heures
(Nota: La durée de charge varie selon la température ambiante et
les conditions du fonctionnement.)
l’adaptateur C.A.
Adaptateur C.A.
A la prise de
courant C.A.
Câble
d’alimentation C.A.
Indicateur
de charge
5.
Lorsque la charge est terminée, l’indicateur de charge sera mis hors
circuit. A ce moment, soulever le terminal mobile du chargeursupport.
6.
Débrancher la câble d’alimentation C.A. de la prise de courant C.A.
et retirer le connecteur de l’adaptateur C.A. du chargeur-support.
Nota:
• La fiche du câble d’alimentation C.A. montrée dans l’illustration ci-dessus peut ne pas correspondre aux
fiches utilisées dans certains pays.
• Ne pas utiliser l’adaptateur C.A. pour un autre équipement. L’équipement risquerait d’être détruit.
• Ne pas utiliser n’importe quelle tension d’alimentation au-delà de la plage de tension spécifiée.
• Lorsqu’il n’est pas utilisé, débrancher par mesure de sécurité le câble d’alimentation C.A. et l’adaptateur
C.A. de la prise de courant murale et du chargeur-support.
• Ne pas raccorder ou débrancher l’adaptateur C.A. avec des mains humides.
• La fiche C.A. doit être appropriée pour une configuration de prise de courant C.A.
24
UPX200_main(F) 04.7.15, 2:44 PM24
Indicateur
d’énergie
Page 27

Charge en utilisant le chargeur de batterie
Lorsqu’on utilise le chargeur de batterie (UP-P01CH) en option pour charger la batterie, suivre la procédure
indiquée ci-dessous.
Pour la charge, il est nécessaire de retirer les batteries du terminal mobile. Pour enlever et installer les
batteries, se référer à la page suivante.
Nota: N’utiliser seulement que des batteries rechargeables EA-BL08.
1.
Raccorder une extrémité du câble d’alimentation C.A. au chargeur de batterie et enficher l’autre extrémité
dans une prise de courant secteur.
A la prise de
courant secteur
Chargeur de
batterie
2.
Insérer la batterie dans le chargeur de batterie.
S’assurer que les repères du triangle (▲), de positif (+) et de
négatif (-) indiqués soient correctement alignés avec ceux indiqués
sur le chargeur de batterie.
L’indicateur de charge sur le chargeur de batterie deviendra rouge
lorsque la charge commence.
La durée de charge est d’approximativement 3 heures, mais elle
peut varier selon la température ambiante et les conditions du
fonctionnement.
3.
Lorsque la charge est terminée, l’indicateur de charge sera mis hors circuit. A ce moment, retirer la
batterie du chargeur de batterie.
4.
Débrancher la câble d’alimentation C.A. de la prise de courant C.A. et du chargeur de batterie.
Nota:
• La fiche du câble d’alimentation C.A. montrée dans l’illustration ci-dessus peut ne pas correspondre aux
fiches utilisées dans certains pays.
• Ne pas utiliser n’importe quelle tension d’alimentation au-delà de la plage de tension spécifiée.
• Lorsqu’il n’est pas utilisé, débrancher par mesure de sécurité le câble d’alimentation C.A. de la prise de
courant murale.
• La fiche C.A. doit être appropriée pour une configuration de prise de courant C.A.
Câble d’alimentation
secteur
Indicateur de charge
UPX200_main(F) 04.7.15, 2:44 PM25
25
Page 28

REMPLACEMENT DES BATTERIES
Avertissement: S’assurer d’observer les procédures suivantes lors du remplacement des batteries.
Autrement, toutes les données et les réglages mémorisés dans le terminal mobile seront
perdus.
• Mettre hors circuit le terminal mobile avant de remplacer les batteries.
• Lors du remplacement des batteries, installer les batteries de réserve en deçà de 10
minutes sous la condition que la batterie de réserve soit complètement chargée.
• N’utiliser seulement que des batteries rechargeables EA-BL08.
Pour retirer les batteries
1.
Mettre hors circuit le terminal mobile.
2.
Faire glisser le verrouillage du couvercle du compartiment
de la batterie sur le côté arrière du terminal à la position
.
3.
Ouvrir le couvercle du compartiment de la batterie et le
retirer doucement.
Verrouillage du couvercle
du compartiment de la
batterie
4.
Tirer sur les attaches des rubans pour retirer les
batteries.
Attaches des rubans
Couvercle du
compartiment de la
batterie
26
UPX200_main(F) 04.7.15, 2:44 PM26
Page 29

Pour installer les batteries
5.
Insérer les batteries complètement chargées en
s’assurant que les repères du triangle (▲), de positif (+)
et de négatif (-) soient correctement alignés avec ceux
imprimés à l’intérieur du compartiment de la batterie.
S’assurer aussi que chaque attache de ruban soit placée
sous la batterie, comme il est montré sur l’illustration de
droite.
Attaches des rubans
6.
Remettre en place le couvercle du compartiment de la
batterie avec les attaches des rubans à l’intérieur.
Avertissement:
S’assurer de remettre en place le couvercle du
compartiment de la batterie après insertion de la batterie.
Si le couvercle n’est pas fixé de façon sûre, la batterie
risque d’être desserrée et les données mémorisées dans
le terminal risquent d’être perdues.
Verrouillage du couvercle
du compartiment de la
batterie
7.
Faire glisser le couvercle du compartiment de la batterie
sur la position .
Couvercle du
compartiment de la
batterie
A propos de la batterie de sauvegarde de la mémoire
Le UP-X200 a une batterie de sauvegarde de la mémoire incorporée qui empêche les contenus de la
mémoire d’être effacés lors du remplacement des batteries.
• La batterie de sauvegarde de la mémoire devra être chargée en 24 heures à sa capacité totale en utilisant
une batterie de fonctionnement complètement chargée “EA-BL08”.
• La batterie de sauvegarde de la mémoire (lorsqu’elle est complètement chargée) conserve les données
mémorisées dans le UP-X200 pendant approximativement 10 minutes lorsque la batterie de
fonctionnement est retirée.
UPX200_main(F) 04.7.15, 2:44 PM27
27
Page 30

AVANT D’APPELER POUR UN
DEPANNAGE
La défaillance de la machine montrée dans la colonne de gauche ci-dessous, sous le titre de “Condition”,
n’indique pas nécessairement un défaut fonctionnel du terminal. Les conditions énumérées ne servent
qu’en tant que références pour les articles montrés à droite dans la colonne “Vérification”, ceci avant de
faire appel à un service de dépannage.
Condition Vérification
• Le terminal mobile se met de luimême hors circuit.
• Le terminal mobile ne se met pas sous
tension en appuyant sur la touche
d’énergie de mise en circuit/hors
circuit.
• L’écran s’allume, mais les caractères,
etc., ne sont pas affichés.
• Les batteries sont peut-être épuisées. Charger les batteries
en utilisant le chargeur-support ou le chargeur de batterie.
• Retirer et réinsérer les batteries. S’assurer que le couvercle
du compartiment des batteries est fixé de façon sûre sur le
terminal mobile.
LISTE DES OPTIONS
Les options SHARP suivantes sont disponibles pour votre terminal mobile.
Pour plus de détails au sujet des options, consultez votre revendeur SHARP.
1. Chargeur-support Modèle UP-B01CH
2. Chargeur de batterie Modèle UP-P01CH
3. Batterie rechargeable Modèle EA-BL08
28
UPX200_main(F) 04.7.15, 2:44 PM28
Page 31

DONNEES TECHNIQUES
Terminal mobile UP-X200
Dimensions: Approximativement 77 (L) x 187 (P) x 25 (H) mm
Poids: Approximativement 340 g
Source d’énergie:
Consommation: Fonctionnement: 2,6 W
Durée de la batterie: Approximativement 9 heures*
Température de 5 à 35°C
fonctionnement:
Affichage:
Accessoires: Batterie rechargeable (EA-BL08) (2 pièces)
• Les données techniques et l’apparence peuvent être l’objet de modifications en vue d’une amélioration,
ceci sans avertissement préalable.
Batterie de fonctionnement: Batteries ion-lithium “EA-BL08” de 3,7 V
Batterie de sauvegarde de la mémoire: 3,0 V (C.C.) (Incorporée)
* Lorsqu’on opère une transaction par minute. Une transaction signifie
l’enregistrement de 5 articles, un achèvement, une transmission de
données.
Affichage à cristaux liquides couleur CGS de 4" semi-transparent avec éclairage arrière
480 x 640/240 x 320 pixels (sélectionnable)
Stylet (inséré dans le terminal mobile)
Dragonne (1 pièce)
Manuel d’utilisation (1 exemplaire)
(C.C.)
Chargeur-support UP-B01CH
Dimensions: Approximativement 83 (L) x 106 (P) x 106 (H) mm
Poids: Approximativement 157 g
Chargeur de batterie UP-P01CH
Dimensions: Approximativement 65 (L) x 80 (P) x 26,5 (H) mm
Poids: Approximativement 75 g
UPX200_main(F) 04.7.15, 2:44 PM29
29
Page 32

30
UPX200_main(F) 04.7.15, 2:44 PM30
Page 33

INTRODUCCION
Español
Muchas gracias por la adquisición del Terminal Portátil SHARP.
Lea atentamente este manual antes de poner en funcionamiento el terminal portátil. Guarde este manual
para poderlo consultar en el futuro.
IMPORTANTE
• Mantenga este terminal apartado de calor excesivo. No lo deje sobre el tablero de instrumentos de
un automóvil ni cerca de la calefacción. No lo deje en ningún lugar que esté extremadamente
húmedo o polvoriento.
El empleo en cualquier lugar similar puede causar daños en el exterior y en los componentes
electrónicos.
• Procure que este terminal no se caiga al suelo y que no reciba golpes fuertes.
Este terminal conforma una especificación de resistencia a caídas probada (caída de 1 m al piso de
hormigón). Sin embargo, no le recomendamos que deje caer ni que exponga el terminal a golpes fuertes.
En particular, varias caídas desde la altura probada o la caída sobre algún objecto saliente podrían
causar daños en el terminal o en sus componentes electrónicos.
• No aplique presión excesiva en el visualizador. No emplee objetos puntiagudos sobre el
visualizador.
Podría causar daños en el visualizador LCD.
• Cuando limpie este terminal, emplee un paño seco y suave. No emplee nunca solventes, como por
ejemplo bencina o disolvente.
El empleo de tales agentes químicos producirá decoloración o deterioro del exterior.
• Emplee este terminal sólo con baterías “EA-BL08”.
El empleo de otras baterías puede causar mal funcionamiento del terminal.
• Si el terminal funciona mal, solicite el servicio técnico a su distribuidor autorizado local. No intente
reparar el terminal usted mismo.
Cuando manipule las baterías, no se olvide nunca de observar lo siguiente:
• No tire las baterías al fuego. Mantenga las baterías apartadas del fuego.
• No intente nunca desmontar las baterías.
• No cortocircuite los terminales ya que se calentarían y dañarían las baterías.
• No permita que las baterías se caigan al suelo ni que reciban golpes fuertes.
• Después de haber tenido guardadas las baterías durante mucho tiempo, asegúrese de cargar
completamente las baterías antes de emplearlas.
• Cargue correctamente las baterías, de acuerdo con los detalles descritos en este manual.
• Si el líquido que sale de una batería le entra en los ojos, puede causarle heridas serias. En este caso,
límpiese los ojos con agua limpia y vaya inmediatamente al médico.
• Si el líquido que sale de una batería se pone en contacto con la piel o con la ropa, límpielas
inmediatamente con agua limpia.
• Para deshacerse de las baterías, siga las leyes vigentes en su país.
UPX200_main(S) 04.7.15, 2:44 PM31
31
Page 34

INDICE
INTRODUCCION ........................................................................................................................................ 31
IMPORTANTE ............................................................................................................................................ 31
INDICE ........................................................................................................................................................ 32
CARACTERISTICAS FISICAS................................................................................................................... 33
CARGA DE LAS BATERIAS ..................................................................................................................... 34
Carga de las baterías empleando la base de recarga
Carga de las baterías empleando el cargador de baterías
REEMPLAZO DE LAS BATERIAS ............................................................................................................ 36
ANTES DE SOLICITAR EL SERVICIO TECNICO..................................................................................... 38
LISTA DE OPCIONES ................................................................................................................................ 38
ESPECIFICACIONES ................................................................................................................................. 39
PRECAUCION:
El módulo LCD incorporado en este terminal portátil está fabricado con tecnología de alta precisión.
Sin embargo, pueden aparecer píxeles brillantes o píxeles en blanco. De vez en cuando, puede
aparecer un color y brillo irregulares dependiendo de los ajustes del visualizador o del ángulo de
visión. Tenga presente que este tipo de fenómenos es común en los LCD y no se trata de un mal
funcionamiento del sistema.
Copyright
© 2004 SHARP Corporation
Este documento contiene o se refiere a información de propiedad que está protegida por
derechos de autor. Todos los derechos reservados. La copia o reproducción por cualquier
medio de este documento está prohibida sin el permiso por escrito de SHARP Corporation.
32
UPX200_main(S) 04.7.15, 2:44 PM32
Page 35

CARACTERISTICAS FISICAS
Vista frontal
Zumbador
Tecla del activador lateral
Tecla del activador central
Teclas del cursor
(flecha hacia la derecha/
izquierda/arriba/abajo)
Tecla de borrado
Tecla del punto decimal
Indicador de carga
Puerto USB 1.1
(compatible con conexión de
dispositivos periféricos externos.)
Toma de auriculares/micrófono
Visualizador (panel sensible al tacto)
Tecla de conexión/desconexión de la
alimentación
Teclas numéricas (0 – 9)
Tecla de introducción
Nota: El software de aplicación determinará la utilización y disponibilidad del puerto USB y del
teclado.
Vista posterior
Altavoz
Estilo
Ojales para la correa
Interruptor RESET (reposición)
NO inserte ningún objeto a menos
que se le indique lo contrario.
De lo contrario, se podrían dañar o
borrar los datos.
Cierre de la tapa del compartimiento
de las baterías
Tapa del compartimiento de las
baterías
Micrófono
33
UPX200_main(S) 04.7.15, 2:44 PM33
Page 36

CARGA DE LAS BATERIAS
Para cargar las baterías podrá emplear la base de recarga o el cargador de baterías.
Carga de las baterías empleando la base de recarga
Cuando emplee la base de recarga opcional (UP-B01CH) para cargar las baterías, siga el procedimiento
mostrado a continuación.
1.
Conecte el cable de alimentación de CA al adaptador de CA.
2.
Enchufe el conector del adaptador de CA a la base de recarga.
3.
Enchufe el cable de alimentación de CA a una toma de corriente de CA.
Cómo guiar el cable
del adaptador de CA
Toma del
adaptador de CA
Conector del
Base de recarga
4.
Ponga el terminal portátil en la base de recarga deslizándolo a la
base.
Asegúrese de que el terminal esté insertado completamente en la
base de recarga. Cuando se inicie la carga, el indicador de carga del
terminal se encenderá en color naranja.
Nota:
Asegúrese de que el indicador de la alimentación se encienda en
verde cuando se ponga el terminal portátil en la base.
Si no se pone correctamente el terminal, no se encenderá el
indicador de la alimentación.
Tiempo de carga:
Cuando la alimentación del terminal portátil está desconectada
(OFF): aprox. 3 horas
Cuando la alimentación del terminal portátil está conectada (ON):
aprox. 4,5 horas
(Nota: El tiempo de carga varía según la temperatura ambiente y las
condiciones de funcionamiento.)
5.
Cuando se haya completado la carga, se apagará el indicador de
carga. Una vez completada la carga, levante el terminal portátil de la
base de recarga.
6.
Desenchufe el cable de alimentación de CA de la toma de corriente
de CA y desenchufe el conector del adaptador de CA de la base de recarga.
Nota:
• Es posible que la clavija del cable de alimentación de CA mostrada en la ilustración de arriba no
corresponda a las clavijas usadas en algunos países.
• No emplee el adaptador de CA para otros equipos. Podría averiarse el equipo.
• No emplee ninguna tensión de alimentación que esté fuera de la gama de tensiones especificada.
• Cuando no se proponga utilizarlo, desconecte el cable de alimentación de CA y el adaptador de CA de la
toma de corriente y de la base de recarga por razones de seguridad.
• No conecte ni desconecte el adaptador de CA con las manos mojadas.
• La clavija de CA se debe ser apropiada para la configuración de la toma de corriente de CA.
adaptador de CA
Adaptador de CA
A una toma de
corriente de CA
Cable de
alimentación de CA
Indicador de la
alimentación
34
Indicador
de carga
UPX200_main(S) 04.7.15, 2:44 PM34
Page 37

Carga de las baterías empleando el cargador de baterías
Cuando emplee el cargador de baterías opcional (UP-P01CH) para cargar las baterías, siga el
procedimiento mostrado a continuación.
Debe extraer las baterías del terminal portátil para cargarlas. Para extraer e instalar las baterías, consulte la
página siguiente.
Nota: Emplee sólo baterías recargables EA-BL08.
1.
Conecte un extremo del cable de alimentación de CA al cargador de baterías y enchufe el otro extremo a
una toma de corriente de CA.
A una toma de
corriente de CA
Cargador de
baterías
2.
Inserte la batería en el cargador de baterías.
Asegúrese de que las marcas triangular (▲), positiva (+), y
negativa (-) de la batería estén alineadas correctamente con las del
cargador de baterías.
Cuando se inicie la carga, el indicador de carga del cargador de
baterías se encenderá en rojo.
El tiempo de carga es aproximadamente 3 horas, pero varía
dependiendo de la temperatura ambiente y de las condiciones de
funcionamiento.
3.
Cuando se haya completado la carga, se apagará el indicador de carga. Una vez completada la carga,
extraiga la batería del cargador de baterías.
4.
Desenchufe el cable de alimentación de CA de la toma de corriente de CA y del cargador de baterías.
Nota:
• Es posible que la clavija del cable de alimentación de CA mostrada en la ilustración de arriba no
corresponda a las clavijas usadas en algunos países.
• No emplee ninguna tensión de alimentación que esté fuera de la gama de tensiones especificada.
• Cuando no se proponga utilizarlo, desconecte el cable de alimentación de CA de la toma de corriente por
razones de seguridad.
• La clavija de CA se debe ser apropiada para la configuración de la toma de corriente de CA.
Cable de
alimentación de CA
Indicador de carga
UPX200_main(S) 04.7.15, 2:44 PM35
35
Page 38

REEMPLAZO DE LAS BATERIAS
Precaución: Asegúrese de llevar a cabo el procedimiento siguiente antes de reemplazar las baterías. De
lo contrario, es posible que se pierdan todos los datos y ajustes almacenados en el terminal
portátil.
• Desconecte la alimentación del terminal portátil antes de reemplazar las baterías.
• Cuando reemplace las baterías, instale las baterías de reemplazo antes de 10 minutos con
la condición de que la batería de respaldo esté completamente cargada.
• Emplee sólo baterías recargables EA-BL08.
Para extraer las baterías
1.
Desconecte la alimentación del terminal portátil.
2.
Deslice el cierre de la tapa del compartimiento de las
baterías, situado en el lado posterior del terminal, a la
posición
3.
Abra la tapa del compartimiento de las baterías y quítela
suavemente.
.
Cierre de la tapa del
compartimiento de las
baterías
4.
Tire de las lengüetas de cinta para quitar las baterías.
Lengüetas de cinta
Tapa del compartimiento
de las baterías
36
UPX200_main(S) 04.7.15, 2:44 PM36
Page 39

Para instalar las baterías
5.
Inserte las baterías completamente cargadas,
asegurándose de que las marcas triangular (▲), positiva
(+), y negativa (-) de cada batería estén alineadas
correctamente con las que hay impresas en el interior del
compartimiento de las baterías.
También asegúrese de que cada lengüeta de cinta esté
debajo de la batería como se muestra en la ilustración de
la derecha.
Lengüetas de cinta
6.
Vuelva a colocar la tapa del compartimiento de las
baterías con las lengüetas de cinta dentro.
Precaución:
Asegúrese de volver a colocar la tapa del compartimiento
de las baterías después de haber insertado las baterías.
Si la cubierta no está fijada con seguridad, es posible que
se aflojen las baterías y que se pierdan los datos
almacenados en el terminal.
Cierre de la tapa del
compartimiento de las
baterías
7.
Deslice el cierre de la tapa del compartimiento de las
baterías hasta la posición .
Tapa del compartimiento
de las baterías
Observaciones sobre la batería de respaldo
El UP-X200 tiene una batería recargable de respaldo incorporada especificada que evita que se borre el
contenido de la memoria cuando se reemplazan las baterías.
• La batería recargable de respaldo se cargará a su capacidad total en 24 horas empleando una batería de
alimentación “EA-BL08” cargada por completo.
• La batería recargable de respaldo (cuando está completamente cargada) conserva los datos
almacenados en el UP-X200 durante aproximadamente 10 minutos cuando se han extraído las baterías
de alimentación.
UPX200_main(S) 04.7.15, 2:44 PM37
37
Page 40

ANTES DE SOLICITAR EL
SERVICIO TECNICO
El mal funcionamiento que se muestra en la columna de la izquierda de la tabla de abajo, bajo el título de
“Condición” no indica necesariamente que haya ocurrido una falla en el funcionamiento del terminal. La
condición listada sólo indica una referencia para los elementos mostrados en la columna “Comprobación”
de la derecha antes de solicitar el servicio técnico.
Condición Comprobación
• Se desconecta la alimentación del
terminal portátil por sí misma.
• No se conecta la alimentación del
terminal portátil pulsando la tecla de
conexión/desconexión de la
alimentación.
• Se enciende la pantalla, pero no se
visualizan caracteres, etc.
• Es posible que las baterías estén descargadas. Cargue las
baterías empleando la base de recarga o el cargador de
baterías.
• Extraiga y vuelva a insertar las baterías. Asegúrese de que
la tapa del compartimiento de las baterías esté colocada
con seguridad en el terminal portátil.
LISTA DE OPCIONES
Las opciones Sharp siguientes están disponibles para su terminal portátil:
Para más detalles sobre las opciones listadas a continuación, póngase en contacto con su distribuidor
SHARP.
1. Base de recarga modelo UP-B01CH
2. Cargador de baterías modelo UP-P01CH
3. Batería recargable modelo EA-BL08
38
UPX200_main(S) 04.7.15, 2:44 PM38
Page 41

ESPECIFICACIONES
Terminal portátil UP-X200
Dimensiones: Aproximadamente 77 (An) x 187 (Prf) x 25 (Al) mm
Peso: Aproximadamente 340 g
Alimentación: Batería de alimentación: “EA-BL08” 3,7 V (CC) baterías de litio-ion
Batería para protección de la memoria: 3,0 V
Consumo de energía: Operación: 2,6 W
Duración de la batería: Aproximadamente 9 horas*
* Cuando efectúa una transacción por minuto. Una transacción significa un
registro de 5 artículos, finalización y transmisión de datos.
Temperatura de operación: 5 a 35°C
Visualizador: LCD de color CGS semitransparente de 4 pulgadas con luz de fondo
480 x 640/240 x 320 píxeles (seleccionable)
Accesorios: Batería recargable (EA-BL08) (2 piezas)
Estilo (insertado en el terminal portátil)
Correa (1 pieza)
Manual técnico (1 ejemplar)
(CC) (incorporada)
• Especificaciones y aspecto exterior sujetos a cambios sin previo aviso por motivos de mejora del
producto.
Base de recarga UP-B01CH
Dimensiones: Aproximadamente 83 (An) x 106 (Prf) x 106 (Al) mm
Peso: Aproximadamente 157 g
Cargador de baterías UP-P01CH
Dimensiones: Aproximadamente 65 (An) x 80 (Prf) x 26,5 (Al) mm
Peso: Aproximadamente 75 g
UPX200_main(S) 04.7.15, 2:44 PM39
39
Page 42

40
UPX200_main(S) 04.7.15, 2:44 PM40
Page 43

This product contains an approved Radio LAN card of Regulations. Type:LA-4137.
The Regulation of Radio LAN card Type:LA-4137 is as the following.
Applying the Regulatory Country Stamp
A regulatory label is applied to signify the device is approved for use in the following countries:
United States, Canada, Australia, New Zealand, Japan & Europe.
Note: Europe includes, Austria, Belgium, Croatia, Denmark, Estonia, Finland, France, Germany,
Greece, Iceland, Ireland, Italy, Liechtenstein, Luxembourg, Netherlands, Norway, Portugal, Spain,
Sweden, Switzerland, United Kingdom.
In addition to the list above other countries may require a regulatory stamp to be affixed to the product.
Please refer to www.symbol.com/ for the list of countries where mandatory stamps are required.
For countries that require regulatory label, a sheet of stamps may be enclosed within the package.
If the appropriate stamp is not provided, please contact your supplier.
To apply the country stamp:
1. Peel the stamp appropriate to the country where this device is to be used.
2. Apply the country stamp in the space provided on the wireless card regulatory label.
Operation of the device without a regulatory label or the correct country Stamp is illegal.
Regulatory Compliance
Symbol RF products are designed to be compliant with the rules and regulations in the locations into
which they are sold and will be labeled as required. The majority of Symbol RF devices are type
approved and do not require the user to obtain license or authorization before using the equipment. Any
changes or modifications to Symbol Technologies equipment not expressly approved by Symbol
Technologies could void the user authority to operate the equipment.
Radio Frequency Interference Requirements
This device has been tested and found to comply with the limits for a Class B digital device pursuant to
Part 15 of the Federal Communications Commissions (FCC) Rules and Regulation. These limits are
designed to provide reasonable protection against harmful interference when the equipment is operated
in a commercial environment. This equipment generates, uses and can radiate radio frequency energy
and, if not installed and used in accordance with the instruction manual, may cause harmful interference
to radio communications. Operation of this equipment in a residential area is likely to cause harmful
interference in which case the user will be required to correct the interference at his own expense.
However, there is no guarantee that interference will not occur in a particular installation.
If the equipment does cause harmful interference to radio or television reception, which can be
determined by turning the equipment off and on, the user is encouraged to try to correct the interference
by one or more of the following measures:
• Reorient or relocate the receiving antenna.
• Increase the separation between the equipment and receiver.
• Connect the equipment into an outlet on a circuit different from that which the receiver is connected.
The Regulation of this Radio LAN card is as the following.
This device complies with Part 15 of the FCC Rules. Operation is subject to the following two conditions :
(1) this device may not cause harmful interference, and (2) this device must accept any interference
received, including interference that may cause undesired operation.
UPX200_ENDpage 04.7.15, 2:45 PM41
41
Page 44

The Regulation of Radio LAN card Type:LA-4137 is as the following.
Radio Frequency Interference Requirements - Canada
This Class B digital apparatus meets the requirements of the Canadian Interference-Causing
Equipment Regulations. Cet appareil numérique de la Classe B respecte toutes les exigences du
Reglement sur le Matériel Brouilleur du Canada.
Warning
• The WLAN card has been tested and found to comply with the Federal Communications
Commission(FCC) guidelines on radio frequency energy (RF) exposures.
• This transmitter must not be co-located or operating in conjunction with any other antenna or
transmitter.
European Economic Area (EEA)
RLAN's (2.4GHz) for use through the EEA have the following restrictions:
• Maximum radiated transmit power of 100 mW EIRP in the frequency range 2.400 - 2.4835 GHz
• France outside, the equipment is to be restricted to power of less than 10mW, about 2.454 - 2.4835
GHz frequency range.
• Belgium outside, the equipment is not restricted to 2.460 - 2.4835 GHz frequency range.
• Italy requires a user license for outside usage.
Statement of Compliance
Symbol Technologies, Inc., hereby, declares that the radio card is in compliance with the
essential requirements and other relevant provisions of Directive 1999/5/EC. A Declaration of
Conformity may be obtained from http://www2.symbol.com/doc/
Declaration of Conformity
We, Symbol Technologies Inc. of One Symbol Plaza, Holtsville, NY 11742-1300, USA declare under
our sole responsibility that the product
Spectrum24HR, LA-4137, 11 Mbps Type I Radio Card
To which this product relates, is in conformity with the following standards and/or other normative
documents.
EN 300 328 v1.1.1 (2000-07) Radio; 2.4GHz Spread Spectrum
EN 301 489-1 v1.2.1 (7-2000) Part 1: EMC, Common technical requirement
EN 301 489-17 v1.1.1 (9-2000) Part 17: Specific conditions for wide-band data
EN 60950: 1992 Uncl. 1-4, 11: Safety of information Technology Equipment
We hereby declare that all essential radio test suites have been carried out and that the above named
product is in conformity to all essential requirements of Directive 1999/5/EC.
The conformity assessment procedure referred to in Article 10(5) and detailed in Annex IV of Directive
1999/5/EC has been followed with the involvement of the following Notified Body (ies):
BABT, Claremont House, 34 Molesey Road, Walton-on-Thames, KT12 4RQ.
Identification Mark: 0168
The equipment also carries the Class 2 equipment identifier
The technical documentation relevant to the above equipment can be made available
for inspection on application to:
Symbol Technologies EMEA, Symbol Place, Winnersh Triangle, Berkshire, RG 41 5TP, UK
Alan Parrish Senior Director, Regulatory 6 August 2001
(name) (title) (signature of authorised person) (date)
42
UPX200_ENDpage 04.7.15, 2:45 PM42
Page 45

CAUTION
Risk of explosion if battery is replaced by an incorrect type.
Dispose of used batteries according to the instructions.
VORSICHT
Explosionsgefahr, wenn der Original-Akku gegen einen Akku des
falschen Typs ausgewechselt wird.
Gebrauchte Akkus sind gemäß den vorliegenden Richtlinien zu
entsorgen.
ATTENTION
Risque d’explosion si la batterie est remplacée par un type incorrect.
Mette au rebut les batteries usées selon les instructions données.
Riesgo de explosión si se reemplaza la batería por una del tipo
Tire las baterías usadas de acuerdo con las instrucciones.
UPX200_ENDpage 04.7.15, 2:45 PM43
AVISO
incorrecto.
43
Page 46

CAUTION
Please do not connect cables longer than 3 m to the USB port
and earphone/microphone jack.
VORSICHT
Bitte schließen Sie keine Kabel an den USB-Port und
die Ohrhörer-/Mikrofonbuchse an, die länger als 3 m sind.
ATTENTION
Veuillez ne pas raccorder des câbles plus long que 3 mètres
au port USB et au jack de l’écouteur/microphone.
No conecte cables de más de 3 m al puerto USB
44
UPX200_ENDpage 04.7.15, 2:45 PM44
AVISO
ni a la toma de auriculares/micrófono.
Page 47

In the U.S.A.
NOTICE
BE SURE TO ASK YOUR AUTHORIZED SHARP DEALER ABOUT THE WARRANTY THAT IS
EXTENDED TO YOU UPON PURCHASE. In order to assure you, the end-user, of warranty
protection, Sharp extends a limited warranty to each of its authorized dealers, and in turn requires
each of its authorized dealers to extend its own warranty to you on terms that are no less favorable
than those given to the dealer by Sharp. Please be advised that Sharp itself does not extend any
warranties, either express or implied, directly to you, the end-user, and no one is authorized to
make any representations or warranties on behalf of Sharp. Specifically, SHARP DOES NOT
EXTEND TO YOU, THE END-USER, ANY EXPRESS WARRANTY OR ANY IMPLIED WARRANTY
OF MERCHANTABILITY, FITNESS FOR USE OR FITNESS FOR ANY PARTICULAR PURPOSE IN
CONNECTION WITH THE HARDWARE, SOFTWARE, OR FIRMWARE EMBODIED IN OR USED IN
CONJUNCTION WITH THIS PRODUCT. Sharp is not responsible for any damages or loss, either
direct, incidental or consequential, which you, the end-user, may experience as a result of your
purchase or use of the hardware, software or firmware embodied in or used in conjunction with this
product. Your sole remedy in the event that you encounter any difficulties with the product is against
the authorized dealer from which you purchased the product. In the event that this authorized dealer
does not honor its warranty commitments, please contact the Point of Sale Division, ISG, Sharp
Electronics Corporation, Sharp Plaza, P.O. Box 650, Mahwah, NJ 07430-2135 so that Sharp can try
to help you to assure complete satisfaction of all the warranty rights to which you are entitled from
the authorized dealer.
In Europe:
UPX200_Cover2_3 04.7.15, 2:43 PM3
Page 48

SHARP CORPORATION
UPX200_Cover1_4 04.7.15, 3:03 PM2
Printed in Korea / Gedruckt in Korea / Imprimé en Corée / Impreso en Corea
(TINSM2531BHZZ)
➀
 Loading...