

Page 1
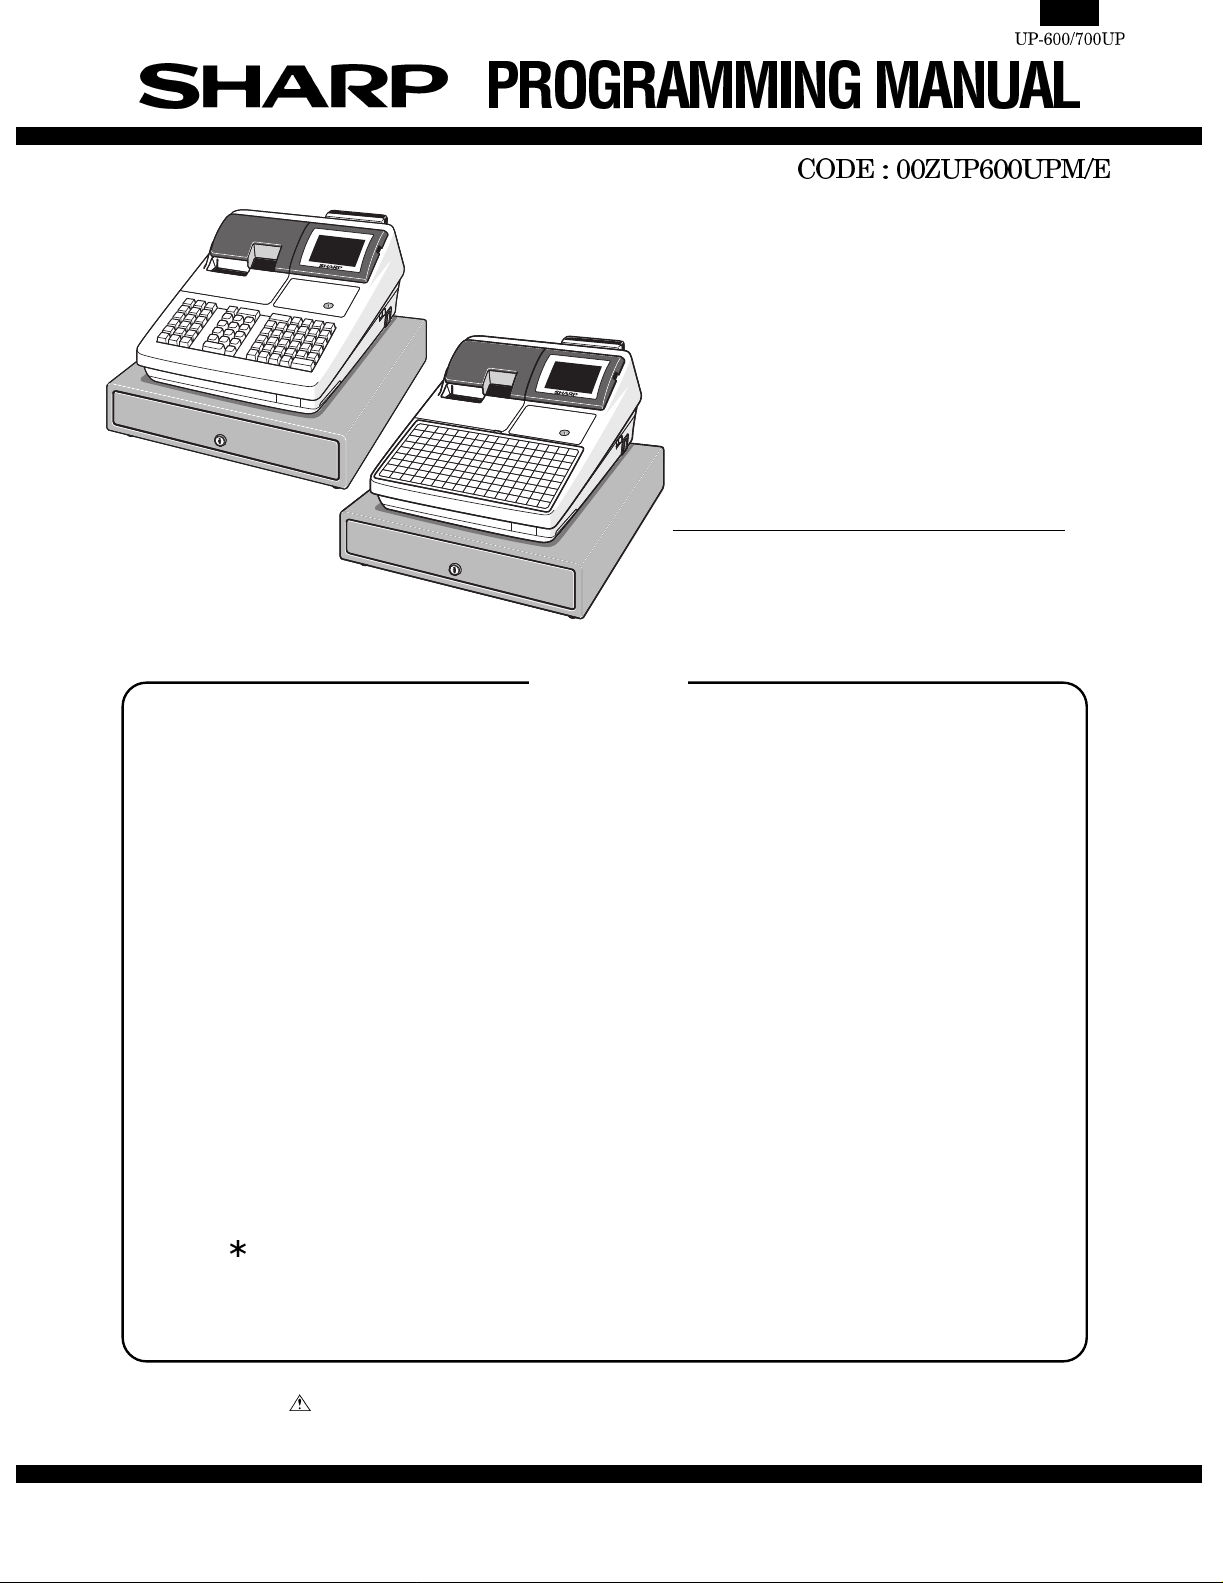
UP-600
UP-600
MODEL
(For "U" & "A" version)
UP-700
CONTENTS
CHAPTER 1. SRV. RESET AND MASTER RESET ........................................2
CHAPTER 2. READING OF THE SRV MODE PROGRAM .............................3
CHAPTER 3. SRV MODE PROGRAMMING ("2 SETTING").........................10
CHAPTER 4. SRV MODE PROGRAMMING ("3 IRC SETTING")..................45
UP-700
CHAPTER 5. SRV MODE PROGRAMMING ("4 DOWN LOAD")..................48
CHAPTER 6. SRV MODE PROGRAMMING ("5 DIAGNOSTICS")................49
For settings in PGM1 or PGM2 mode, please refer to the Operation Manual.
Parts marked with " " are important for maintaining the safety of the set. Be sure to replace these parts with specified
ones for maintaining the safety and performance of the set.
This document has been published to be used
SHARP CORPORATION
for after sales service only.
The contents are subject to change without notice.
Page 2
Symbol/PartsCod)
- - - - - - - - - - - - - - - - - - - - - - - - - - - - - - - - - - - - - - - - - - - - - - - - - - - - - - -
Major keys used in the SRV mode
The following major keys are used in the SRV mode.
FUNCTION KEY DESCRIPTION
CURSOR UP
CURSOR DOWN
CURSOR RIGHT
CURSOR LEFT
PAGE UP PAGE UP Moves page up (1page)
PAGE DOWN PAGE DOWN Moves page up (1page)
CLEAR CL Clear numeric entry or error message
CANCEL CANCEL Operation cancel & back to previous menu.
ENTER ENTER Data entry
ALL ENTER CA/AT All entries terminate.
TOGGLE SELECT
SELECTABLE VALUE LIST ST Show selectable value
Moves cursor up (1character)
Moves cursor down (1character)
Moves cursor right (1character)
Moves cursor left (1character)
Toggles between selections
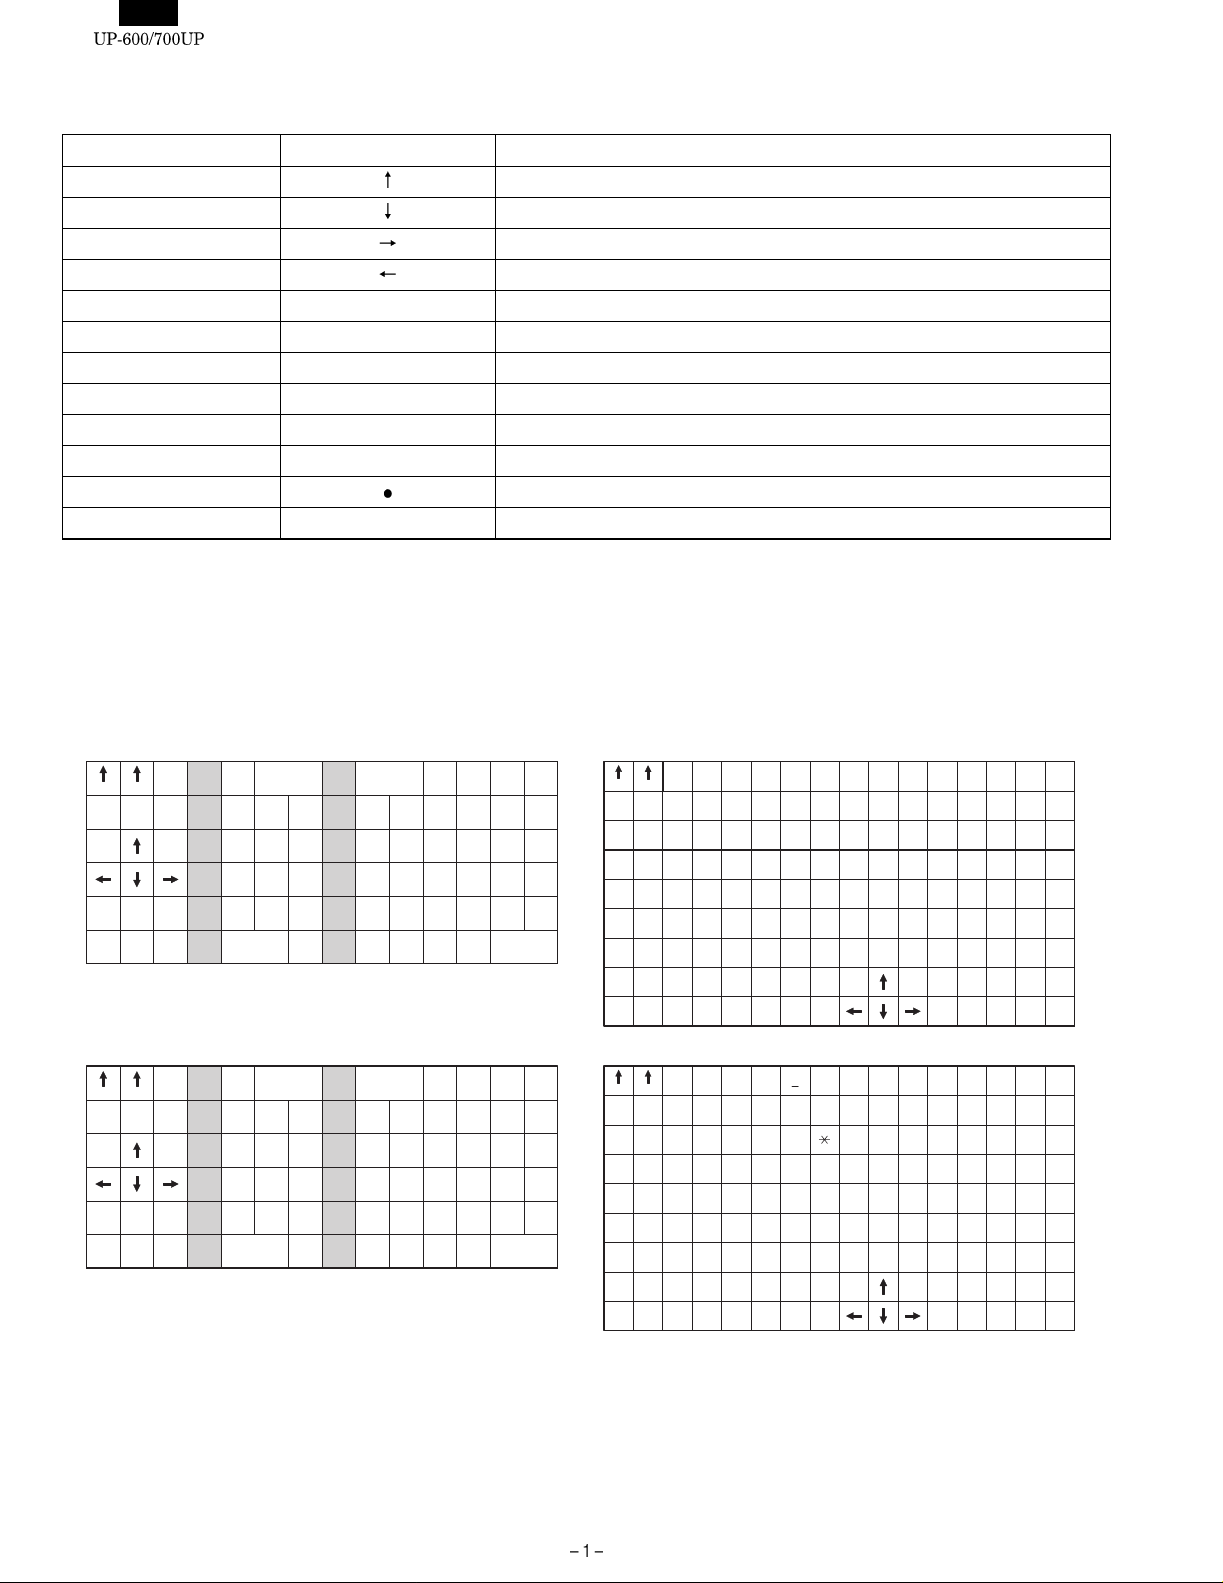
Keyboard LAYOUT
UP-600:
Key type
Number of keys
Key pitch
<Standard Key layout>
JOURNAL
CANCEL
TAX
SHIFT
VOID
RCPT
PAGE
PAGE
DOWN
ENTER
#/TM
RECEIPT
MISC
FUNC
CONV#
TAX
RFND
<Text Preset Key layout>
RECEIPT
JOURNAL
(PAGE
(CANCEL)
(PAGE
( )
DOWN)
( ) ( )
( )
(ENTER)
(SPACE)
(SHIFT)
CASH#
@/FOR
UP
(RECALL)
@/FOR
UP)
: Normal type
: STD 68key
: MAX 84key
: 19mm(w) x 19mm(h)
PLU/UPC
•CL
789
456
123
00
0
(DC)
CL
•
7
4
1
9
8
6
5
3
2
00
0
PRICE
CHANGE
5
4 9 14 19
3
2 7 12 17
1
BG
CH
DI
E
F
AMT
10 15 20
81318
61116
A
J
K
UP-700:
Key type
Number of keys
: Flat type
: STD 144key (16 x 9)
: MAX 144key
Key pitch
AUTO
FS
INQ
SHIFT
FS
TEND
NS
CHK#
MDSE
SBTL
1
AUTO
2
NEXT$
CH#
SBTL
CA/AT
(INS)
L
M
N
O
P
Q
X
Y
Z
(PREV
RECORD)
(UPDATE)
CA/AT
(DEL)
(BACK
SPACE)
(NEXT
RECORD)
SBTL
R
S
T
U
V
W
RECEIPT
JOURNAL
87
73
72
71
60
59
58
50
49
48
40
39
38
30
29
28
20
19
18
11
10
9
3
2
1
<Text Preset Key layout>
RECEIPT
JOURNAL
!
@
#
W
Q
A
(Shift)
E
S
D
(Space)
: 18mm(w) x 15mm(h)
89
88
90
75
74
76
62
61
63
52
51
53
42
41
43
32
31
33
22
21
23
13
12
14
5
4
6
Ñ¿
]
^
%
$
R
G
F
(Space) (Space) (Space)(Space)
&
UJY
T
H
100
99
988497
96
95
94
93
92
91
86
85
83
82
81
80
79
78
77
70
69
68
67
66
65
64
RCPT VOID
SERV#
PAGE
UP
PAGE
DOWN
ENTER
=
(PAGE
UP)
(PAGE
DOWN)
( )
/
@/FOR
:
RFND
@/
•
For
7
8
5
4
1
2
0
00
}[{
><
•CL
7
89
456
1
23
00 000
0
57
56
55
53
47
46
45
44
37
36
35
34
27
26
25
24
17
16
15
8
7
-
+
?
’”
)
(
P
OLI
;
K
MNBVCXZ
.,
(DC)
(ENTER)
( )
( )
( )
MISC
FUNC
CANCEL
CL
9
6
3
000
(CANCEL)
AUTO
1
Level
#
P-SHIFT
#
PLU/
SUB
CHK#
CR#
SBTL
(Ins)
(Recall)
AUTO
2
CONV
#
TAX
SHIFT
GLU
SRVC
FINAL
CA/AT
(Del)
(BACK
SPACE)
(PREV.
RECORD)
(NEXT
RECORD)
(UPDATE)
CA/ATSBTL
*1
*1: NC Key replaces Auto 2 from August production.
Page 3
CHAPTER 1. SRV. RESET AND MASTER RESET
The SRV key is used for operating in the SRV mode.
1. SRV. RESET (Program Loop Reset)
Procedure
• Method 1
1) Turn off the AC switch.
2) Set the mode switch to (SRV’) position.
3) Turn on the AC switch.
4) Turn to (SRV) position from (SRV’) position.
• Method 2
1) Set the mode switch to PGM2 position.
2) Turn off the AC switch.
3) While holding down the JOURNAL FEED key and RECEIPT
FEED keys, turn on the AC switch.
Note: When disassembling and reassembling always power up us-
ing method 1 only. Method 2 will not reset the CKDC9.
Note: SRV programming job#926-B must be set to "4" to allow the
PGM program loop reset.
PRG. RESET
MRS-2 (Master resetting 2)
Used to clear all memory and keyboard contents.
This reset returns all programming back to defaults (Except t he key-
board). The keyboard must be entered by hand.
This reset is used if an application needs a different keyboard layout
than that supplied by a normal MRS-1.
Procedure
1) Turn off the AC switch.
2) Set the MODE switch to the (SRV’) position.
3) Turn on the AC switch.
4) While holding down the JOURNAL FEED key and RECEIPT
FEED keys, turn to the (SRV) position from the (SRV’) position.
5) Key position assignment:
After the execution of the MRS-2, only the RECEIPT FEED and
JOURNAL FEED keys remain effective on the key assignment.
Any key can be assigned to any key position on the main keyboard.
[key setup procedure]
0
Disable
*2
Free key setup
complete.
*1
MRS-2 executed Key position set Free key
0
2. MASTER RESET (All memory clear)
There are three possible methods to perform a master reset.
MRS-1 (Master resetting 1)
Used to clear all memory contents and return the machine back to its
initial settings including the default keyboard layout.
Procedure
1) Turn off the AC switch.
2) Set the MODE switch to the (SRV’) position.
3) Turn on the AC switch.
4) While holding down the JOURNAL FEED key, turn to the
(SRV) position from the (SRV’) position.
MASTER RESET
NOTES:
*1: When the 0 key is pressed, the key of the key number dis-
played is disabled.
*2: Push the key on the keyboard t o be assigned. With this, the
function key of the key number displayed is assigned to that
key position.
*3: When relocating t he keyboard, the PGM 1/2 mode uses the
standard key layout.
Key
No.
001
002 012 022
003 013 023
004 014
005 015
006 016
007 017
008 018
009 019
010 020
Key
name
Key
No.
011 021
Key
name
Key
No.
Key
name
Page 4
Symbol/PartsCod)
- - - - - - - - - - - - - - - - - - - - - - - - - - - - - - - - - - - - - - - - - - - - - - - - - - - - - - -
MRS-3 (Master resetting 3)
Master resetting 3 requires the entry of Seri al No. data in addition to
Master resetting 2.
After completion of the MRS-3, the following operations and programming will be inhibited.
1. GT programming.
2. All memory download via RS-232.
3. GT resets with t ransaction Z report. (This report can be made, but
the GT will not be reset.)
Procedure
1) Turn off the AC switch.
2) Set the mode key to the "SRV" position.
3) Turn on the AC switch.
4) While holding down the JOURNAL FEED key and MRS-3 key,
turn to the (SRV) position from the (SRV’) position.
MRS-3 key : UP-600=[CANCEL] key
UP-700=[PLU72] key
5) The product serial No. input window is displayed as shown
below.
DISPLAY:
SERIAL No. 00000000
Enter the product serial No. of this POS and depress the
[CA/AT] key.
6) Key position assignment:
After the execution of the MRS-3, only the RECEIPT FEED and
JOURNAL FEED keys remain effective on the key assignment.
Any key can be assigned to any key position on the main keyboard.
[key setup procedure]
0
Disable
*2
Free key setup
complete.
*1
MRS-3 executed Key position set Free key
0
MASTER RESET
NOTES:
*1: When the 0 key is pressed, the key of the key number dis-
played is disabled.
*2: Push the key on the keyboard t o be assigned. With this, the
function key of the key number displayed is assigned to that
key position.
*3: When relocating the keyboard, the PGM 1/2 mode use the
standard key layout.
Key
No.
001
002 012 022
003 013 023
004 014
005 015
006 016
007 017
008 018
009 019
010 020
Key
name
Key
No.
Key
name
Key
No.
011 021
Key
name
Page 5
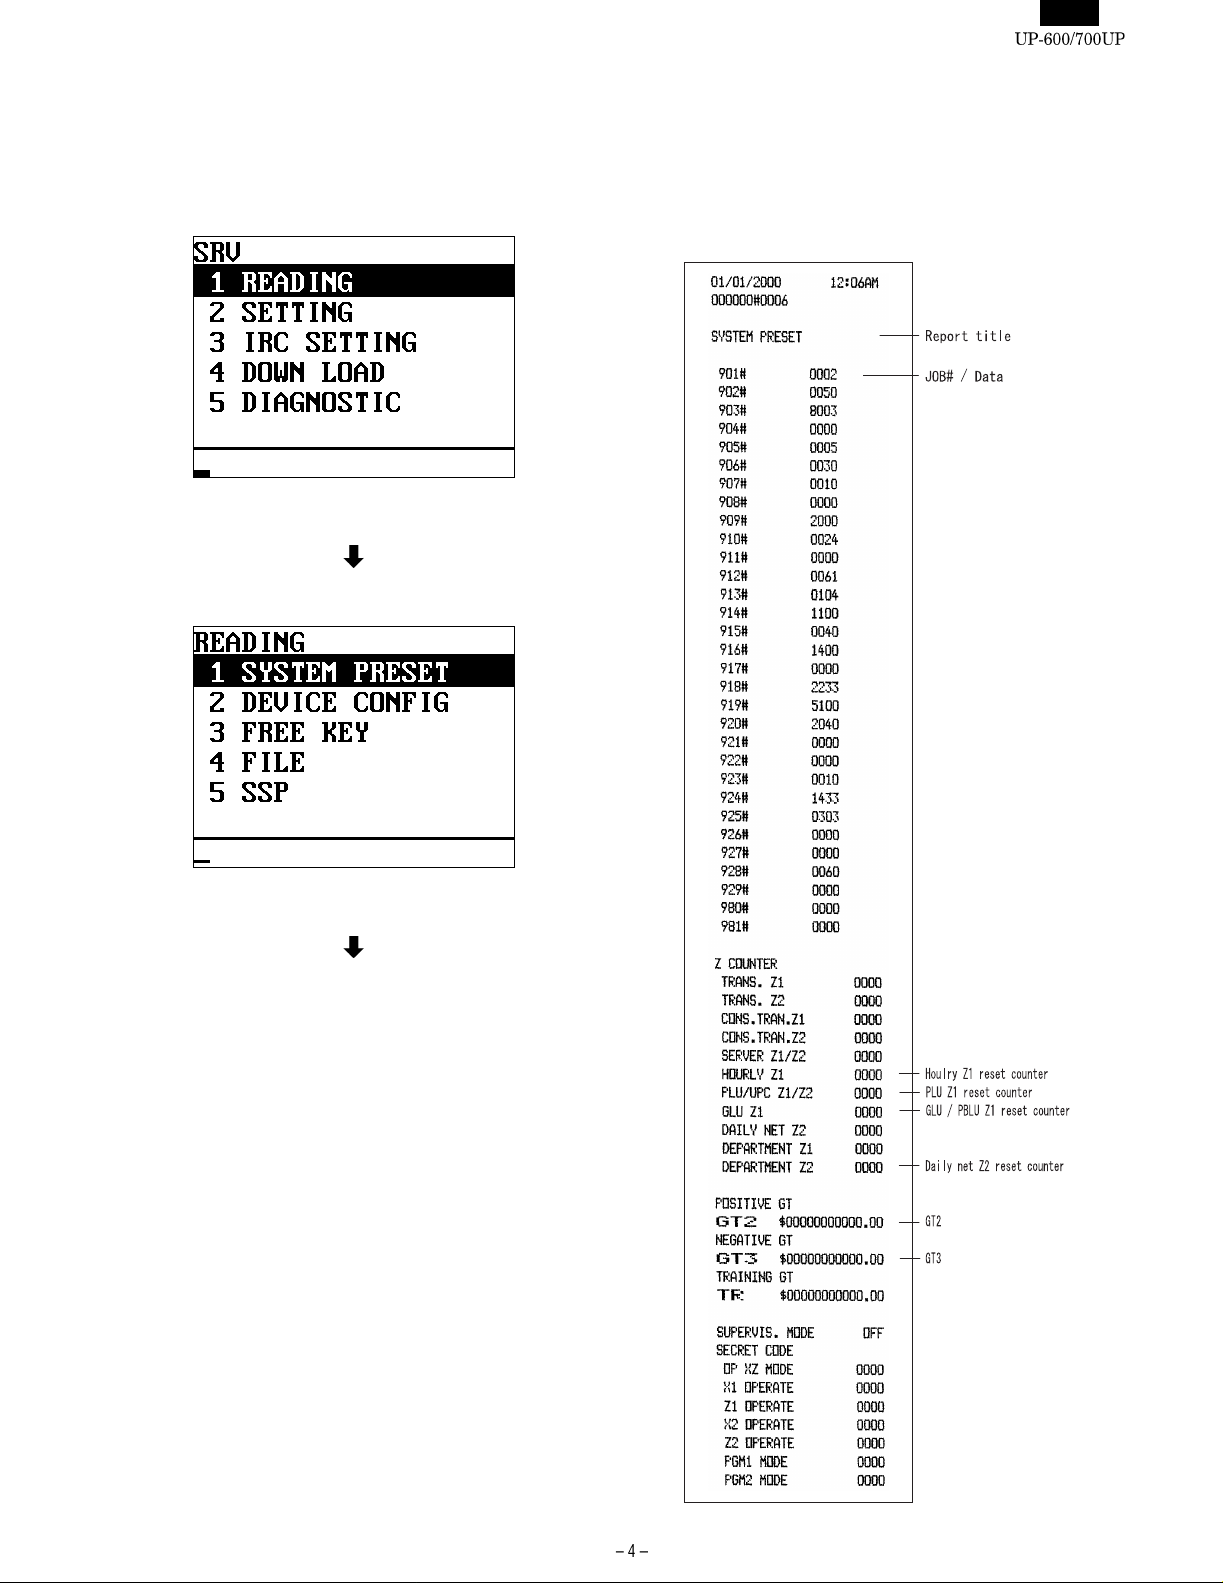
CHAPTER 2. READING OF THE SRV MODE PROGRAM
The setting contents of the SRV mode can be checked with the
printer
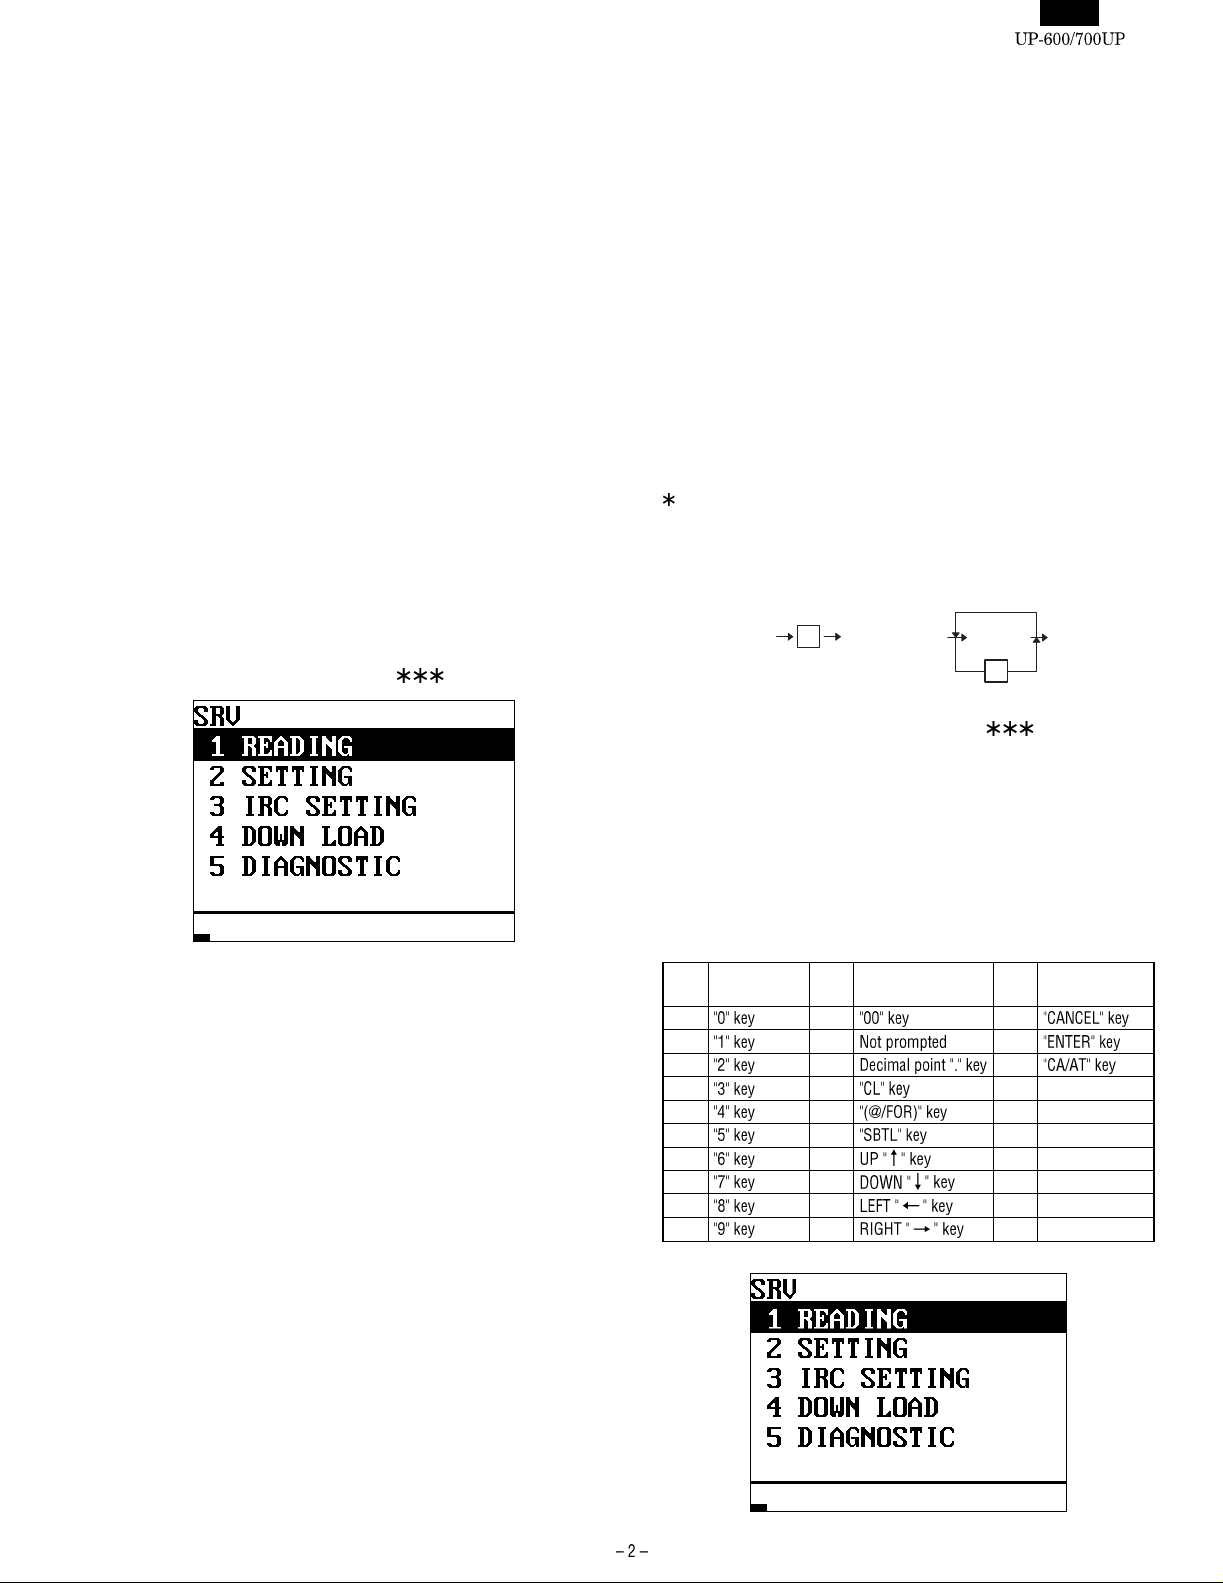
DISPLAY: SRV mode screen
Select "1 READING " and press the Enter key.
DISPLAY: READING item selection screen
Sample of program reports
1. [1 SYSTEM PRESET]
•
UP-600
Select the desired item, press the Enter key.
The setting content is printed.
Page 6
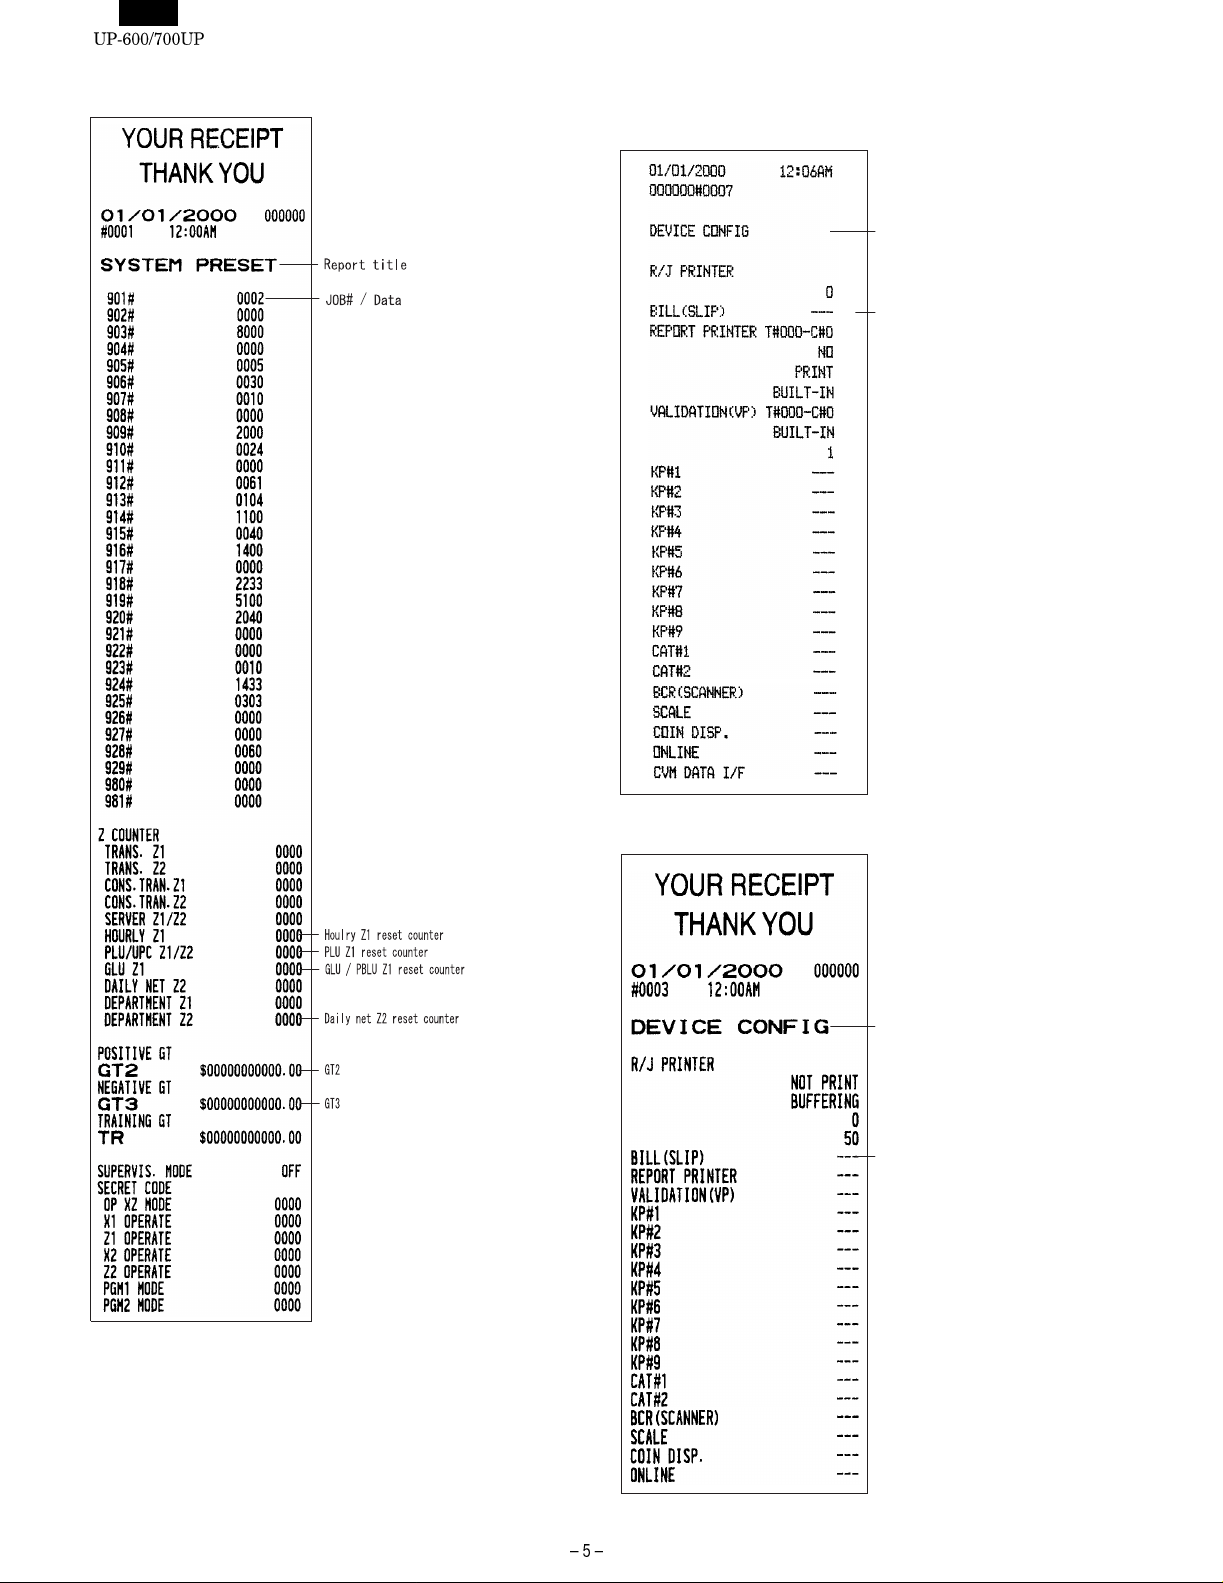
• UP-700
2. [2 DEVICE CONFIG]
•
UP-600
Report title
Device name / Not assigned
• UP-700
Report title
Device name / Not assigned
Page 7
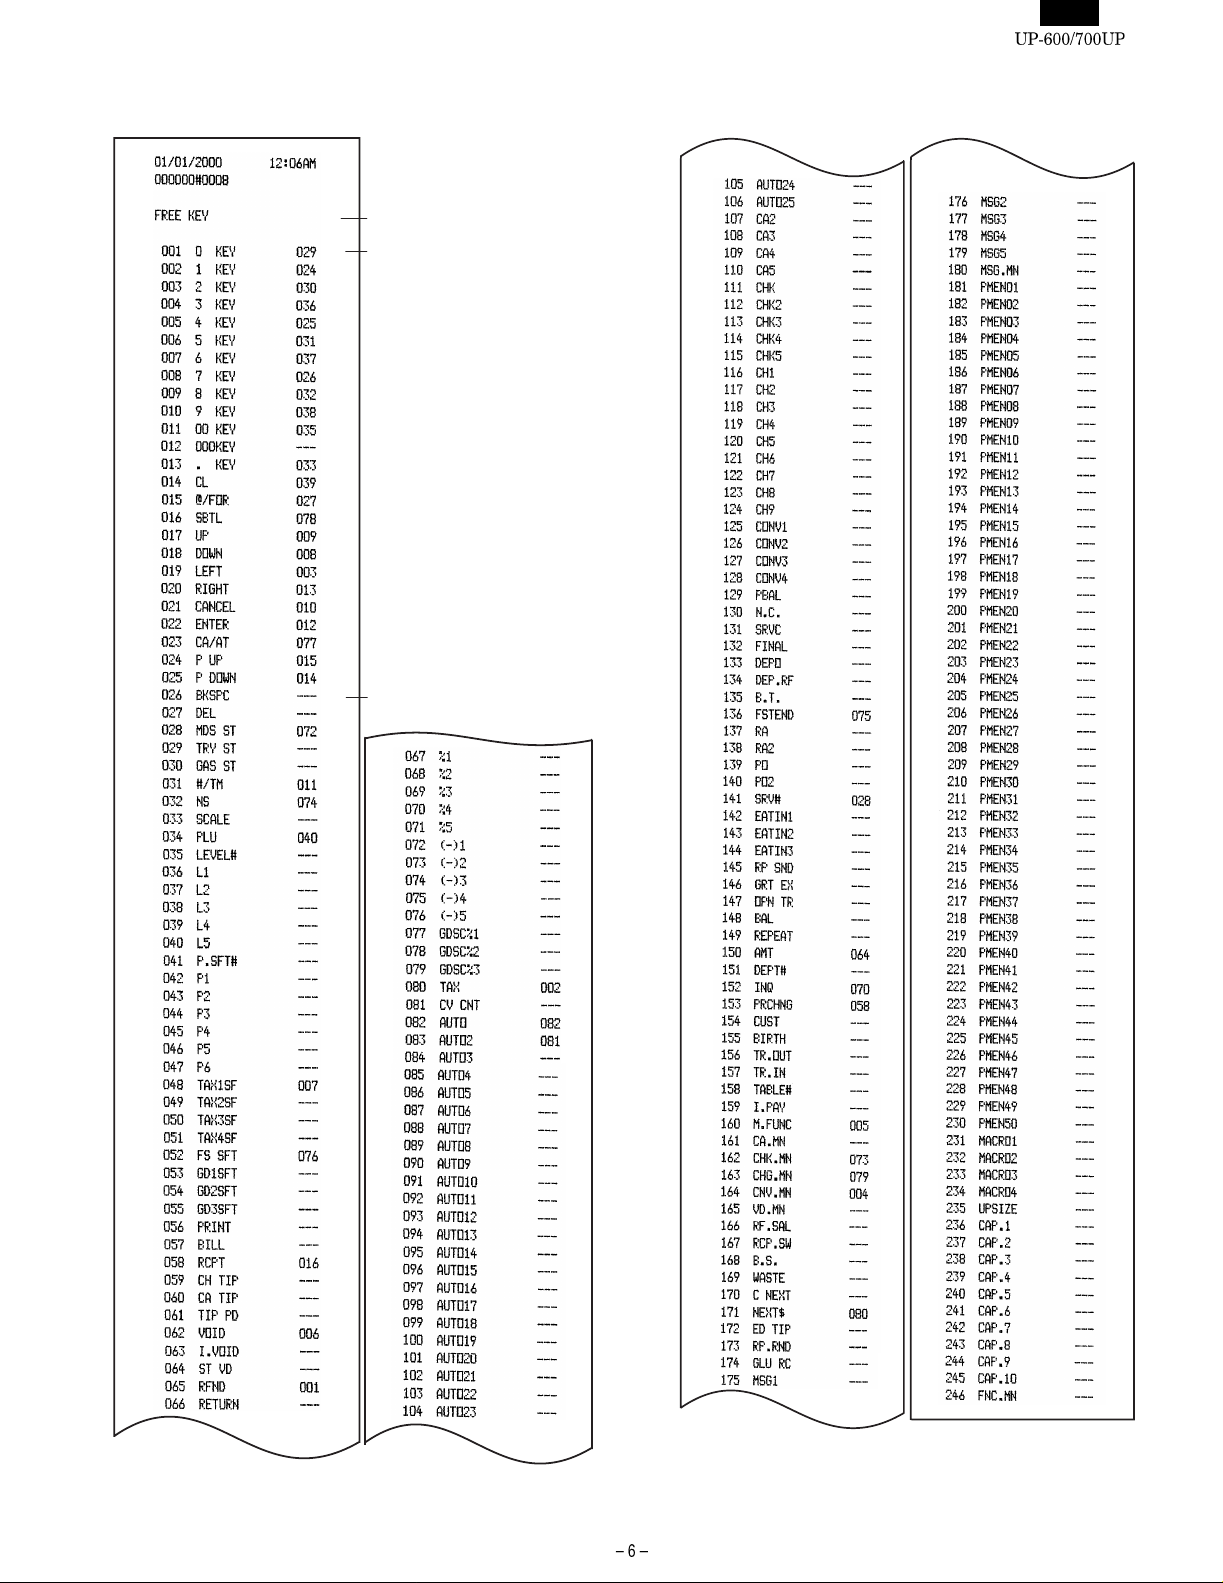
3. [3 FREE KEY]
•
UP-600
Report title
Key No. / Key text /
Key position code
Key No. / Key text /
Not assigned
Page 8
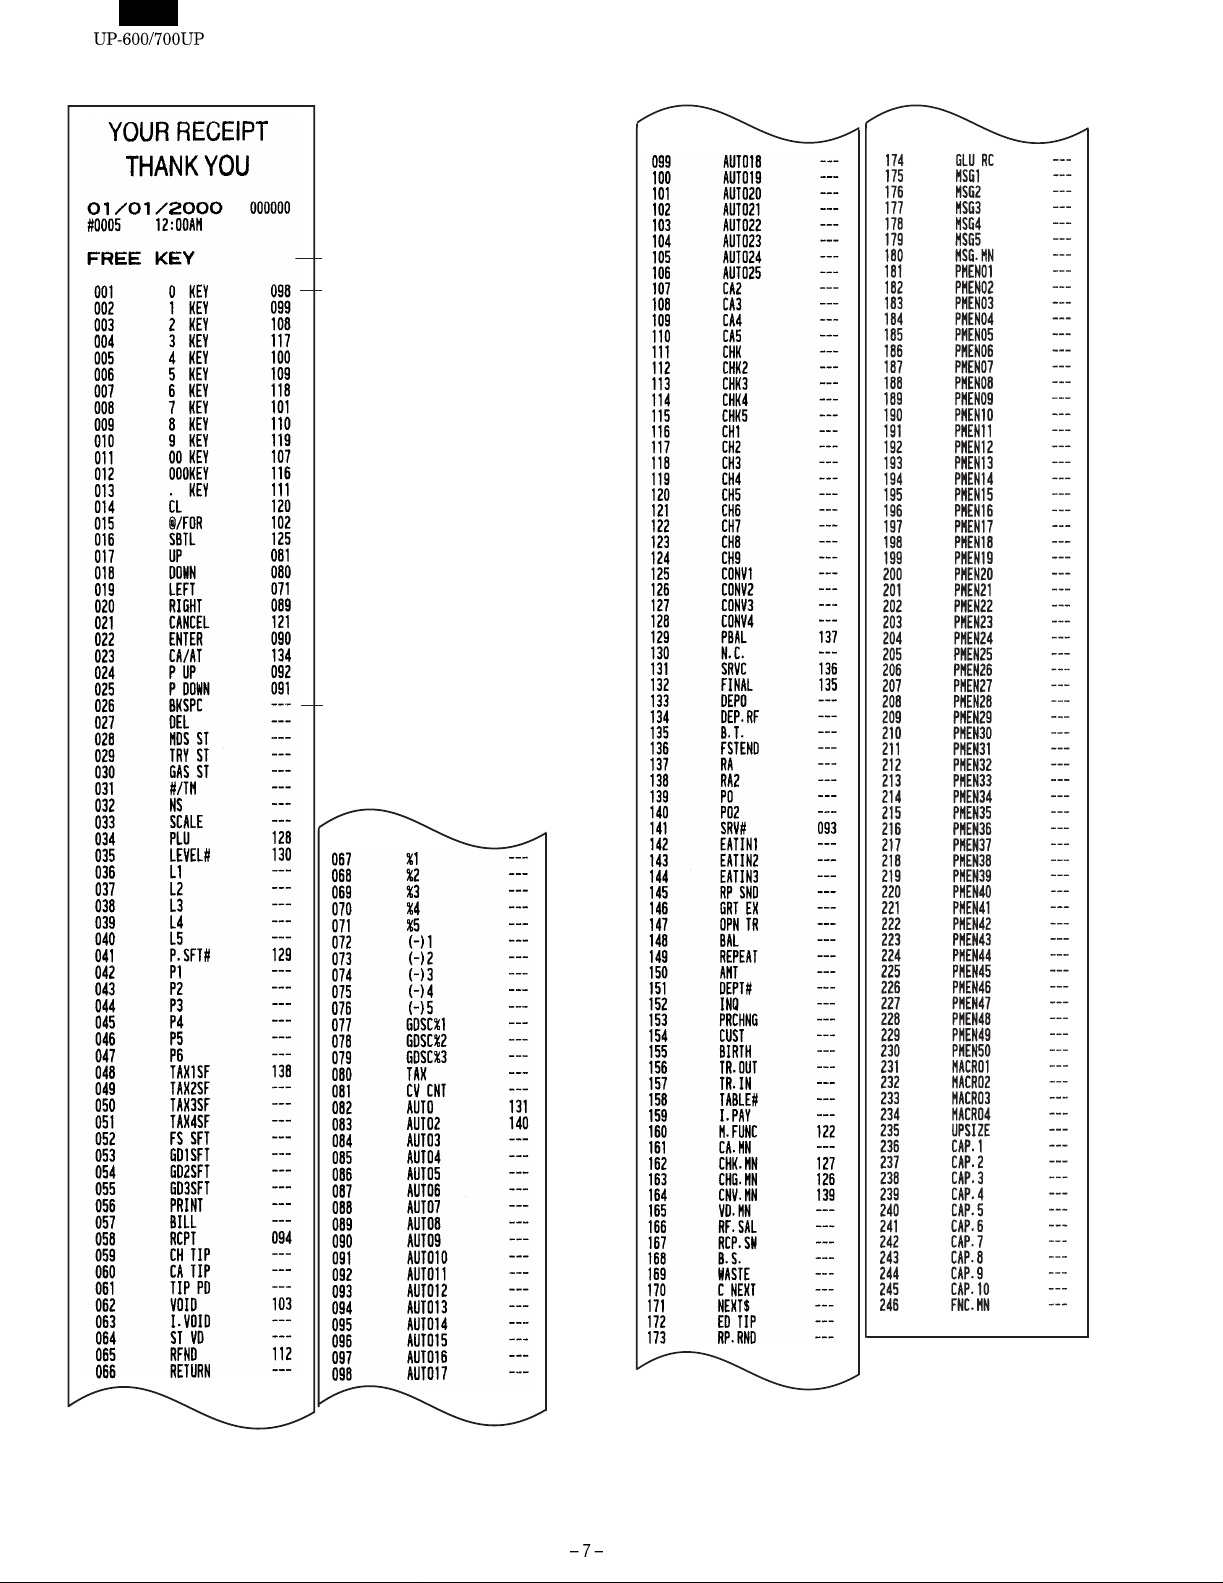
• UP-700
Report title
Key No. / Key text /
Key position code
Key No. / Key text /
Not assigned
Page 9
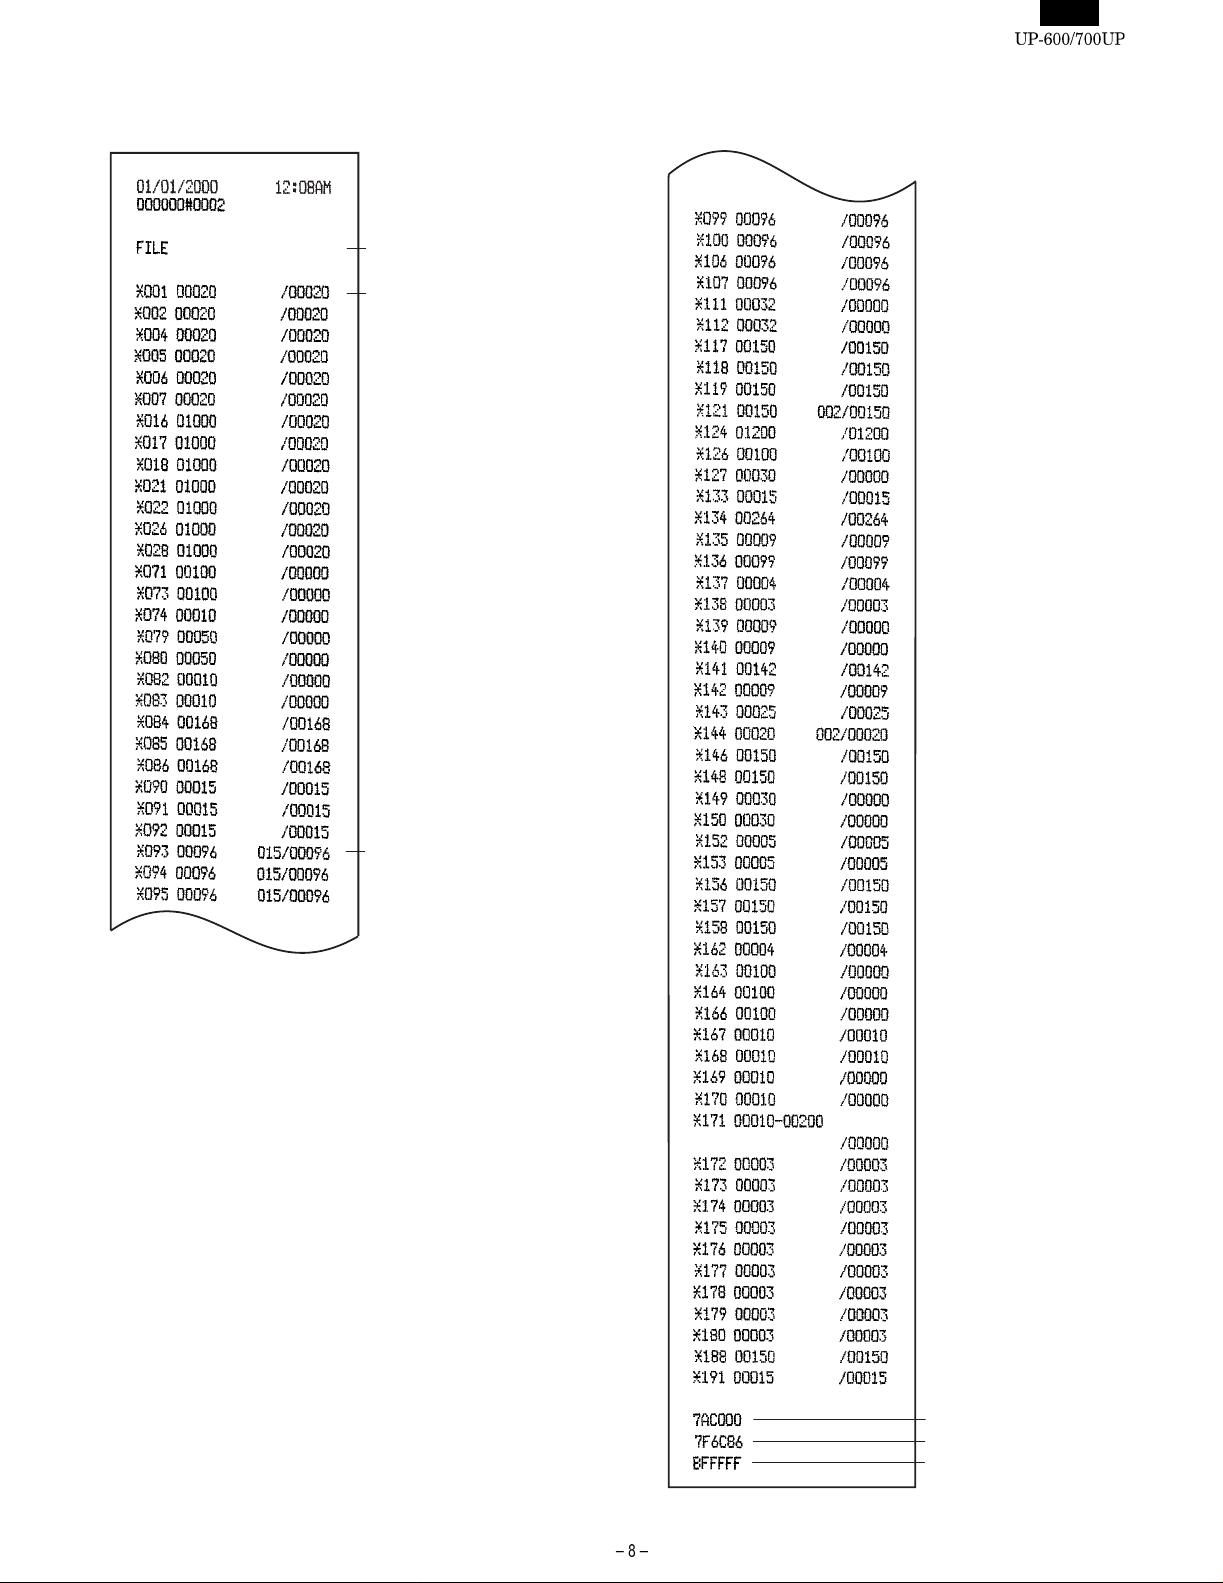
4. [4 FILE]
•
UP-600
Report title
File table No. / No. of records/
No. of used records
File table No. / No. of records /
No. of blocks / No. of used
records
File memory start address
Empty memory start address
Memory end address
Page 10
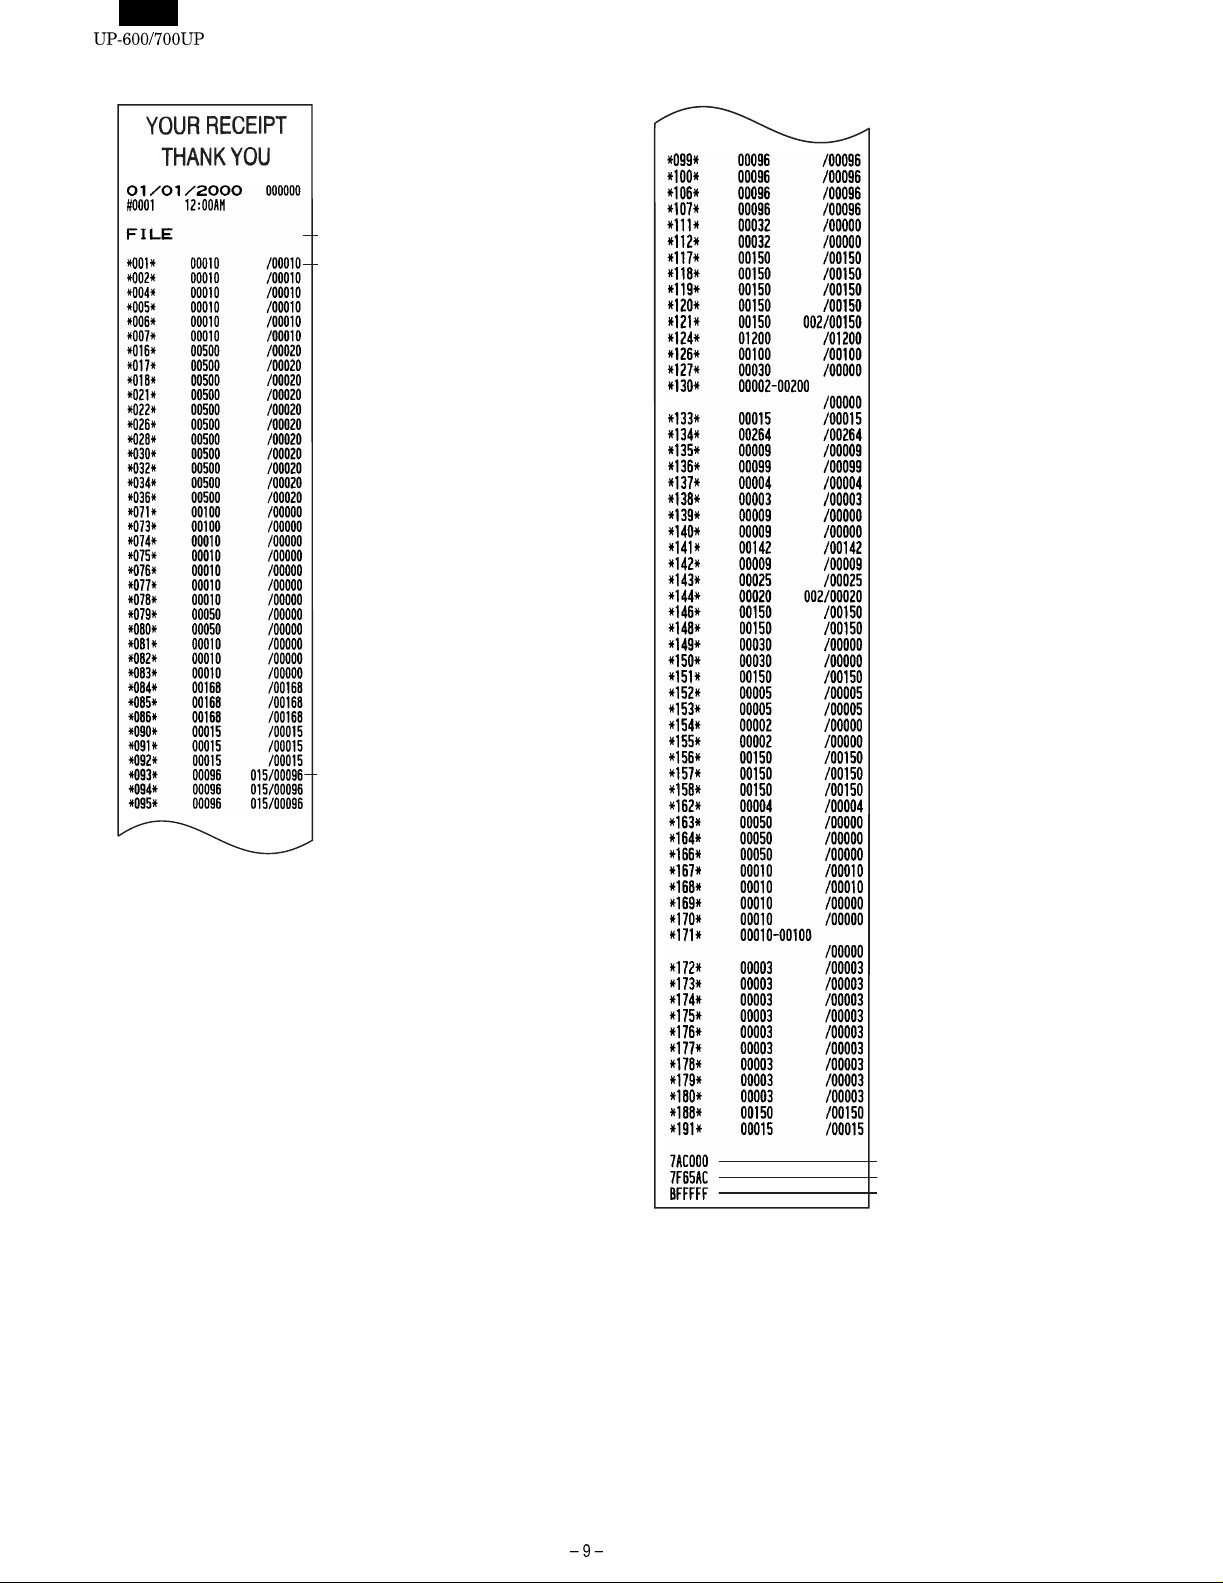
• UP-700
Report title
File table No. / No. of records/
No. of used records
File table No. / No. of records /
No. of blocks / No. of used
records
File memory start address
Empty memory start address
Memory end address
Page 11
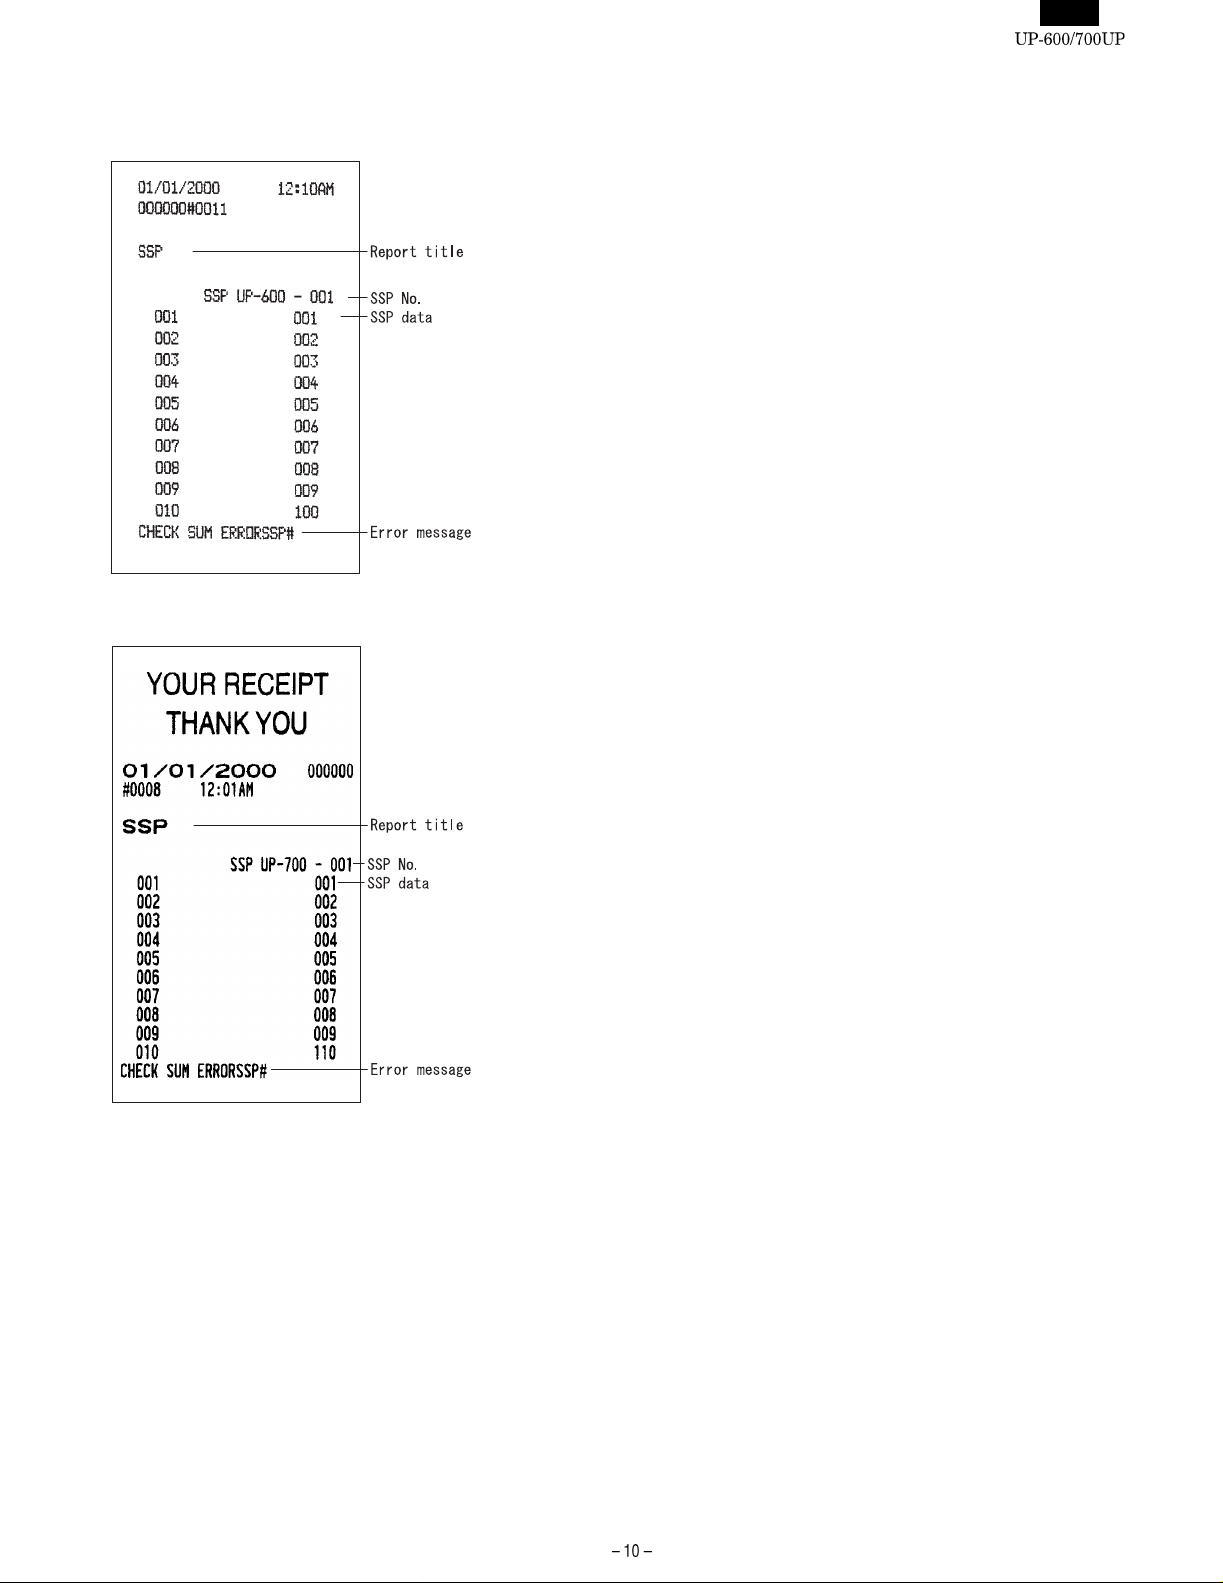
5. [5 SSP]
•
UP-600
• UP-700
Page 12
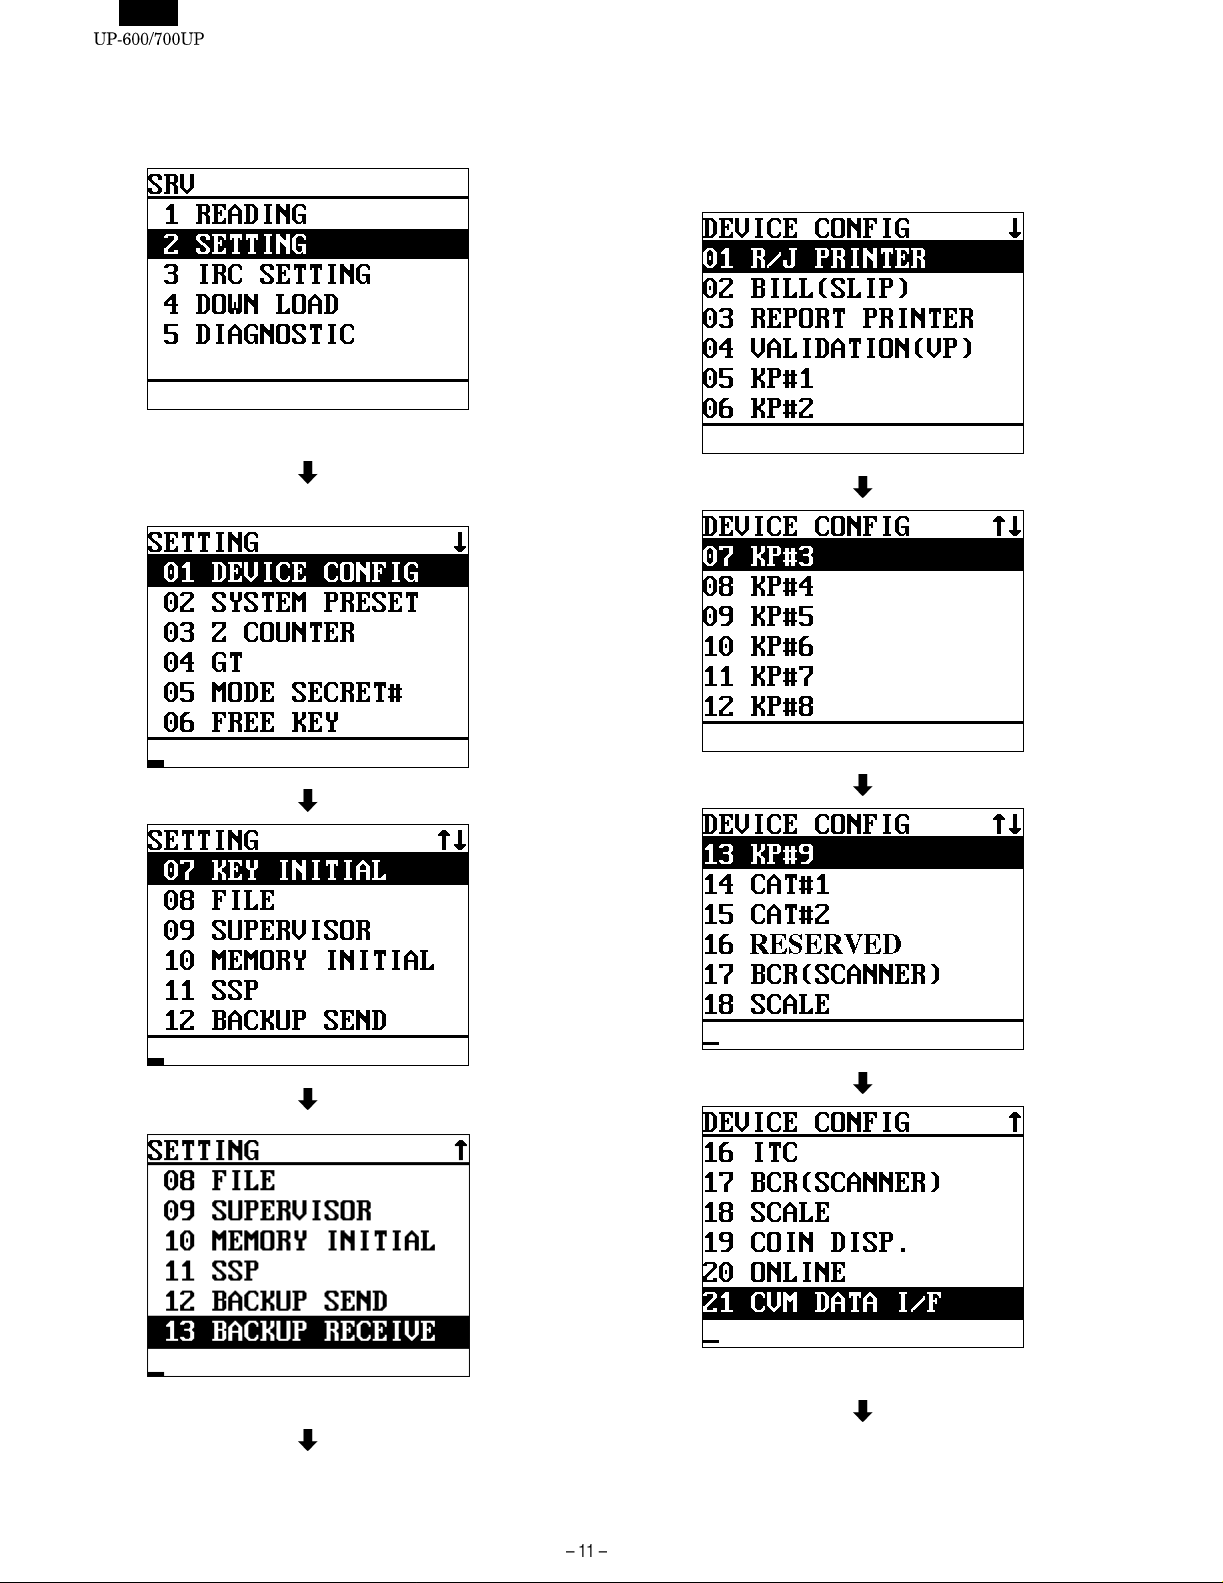
CHAPTER 3. SRV MODE PROGRAMMING ( "2 SETTING")
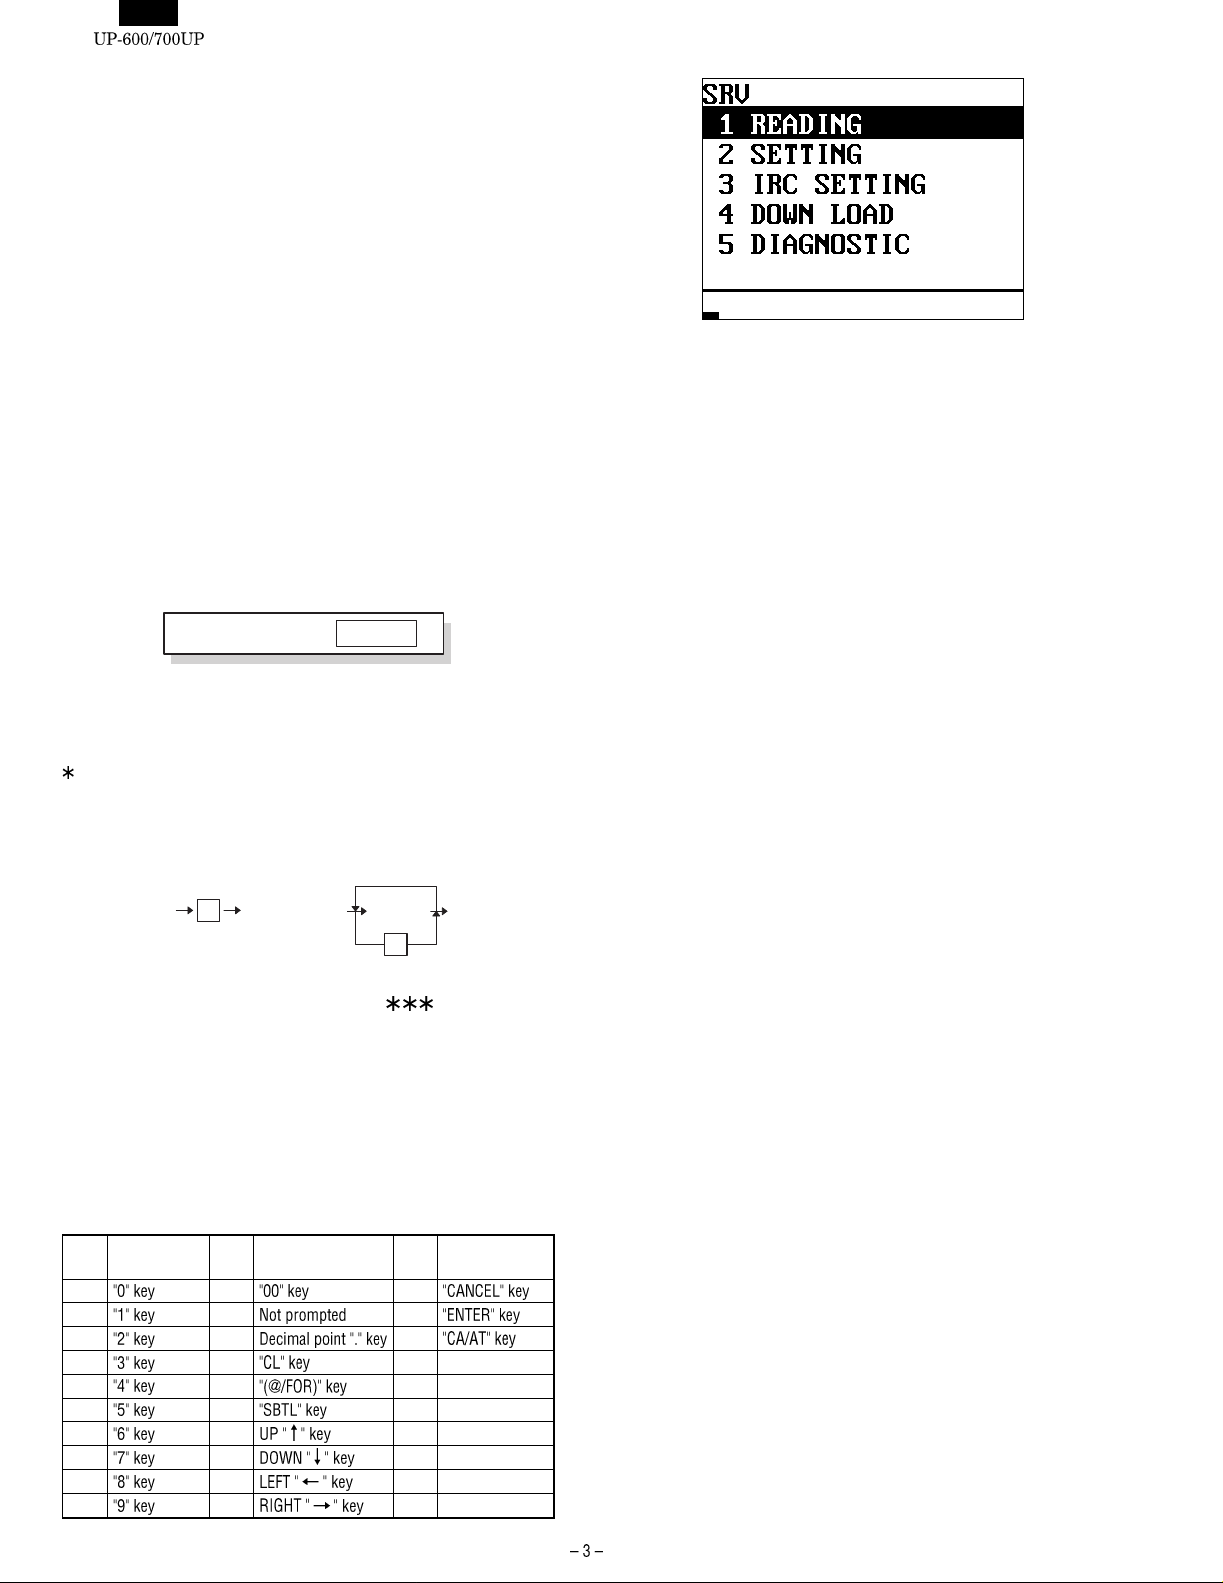
DISPLAY: SRV mode screen
Select " 2 SETTING " and press the Enter key.
DISPLAY: SETTING item selection screen
1. [01 DEVICE CONFIG]
DISPLAY: DEVICE CONFIG select screen
Select the desired item, press the Enter key.
The item setting input screen is displayed.
Select the item to be changed and press the ENTER key.
The setting input screen is displayed.
Page 13
Symbol/PartsCod)
- - - - - - - - - - - - - - - - - - - - - - - - - - - - - - - - - - - - - - - - - - - - - - - - - - - - - - -
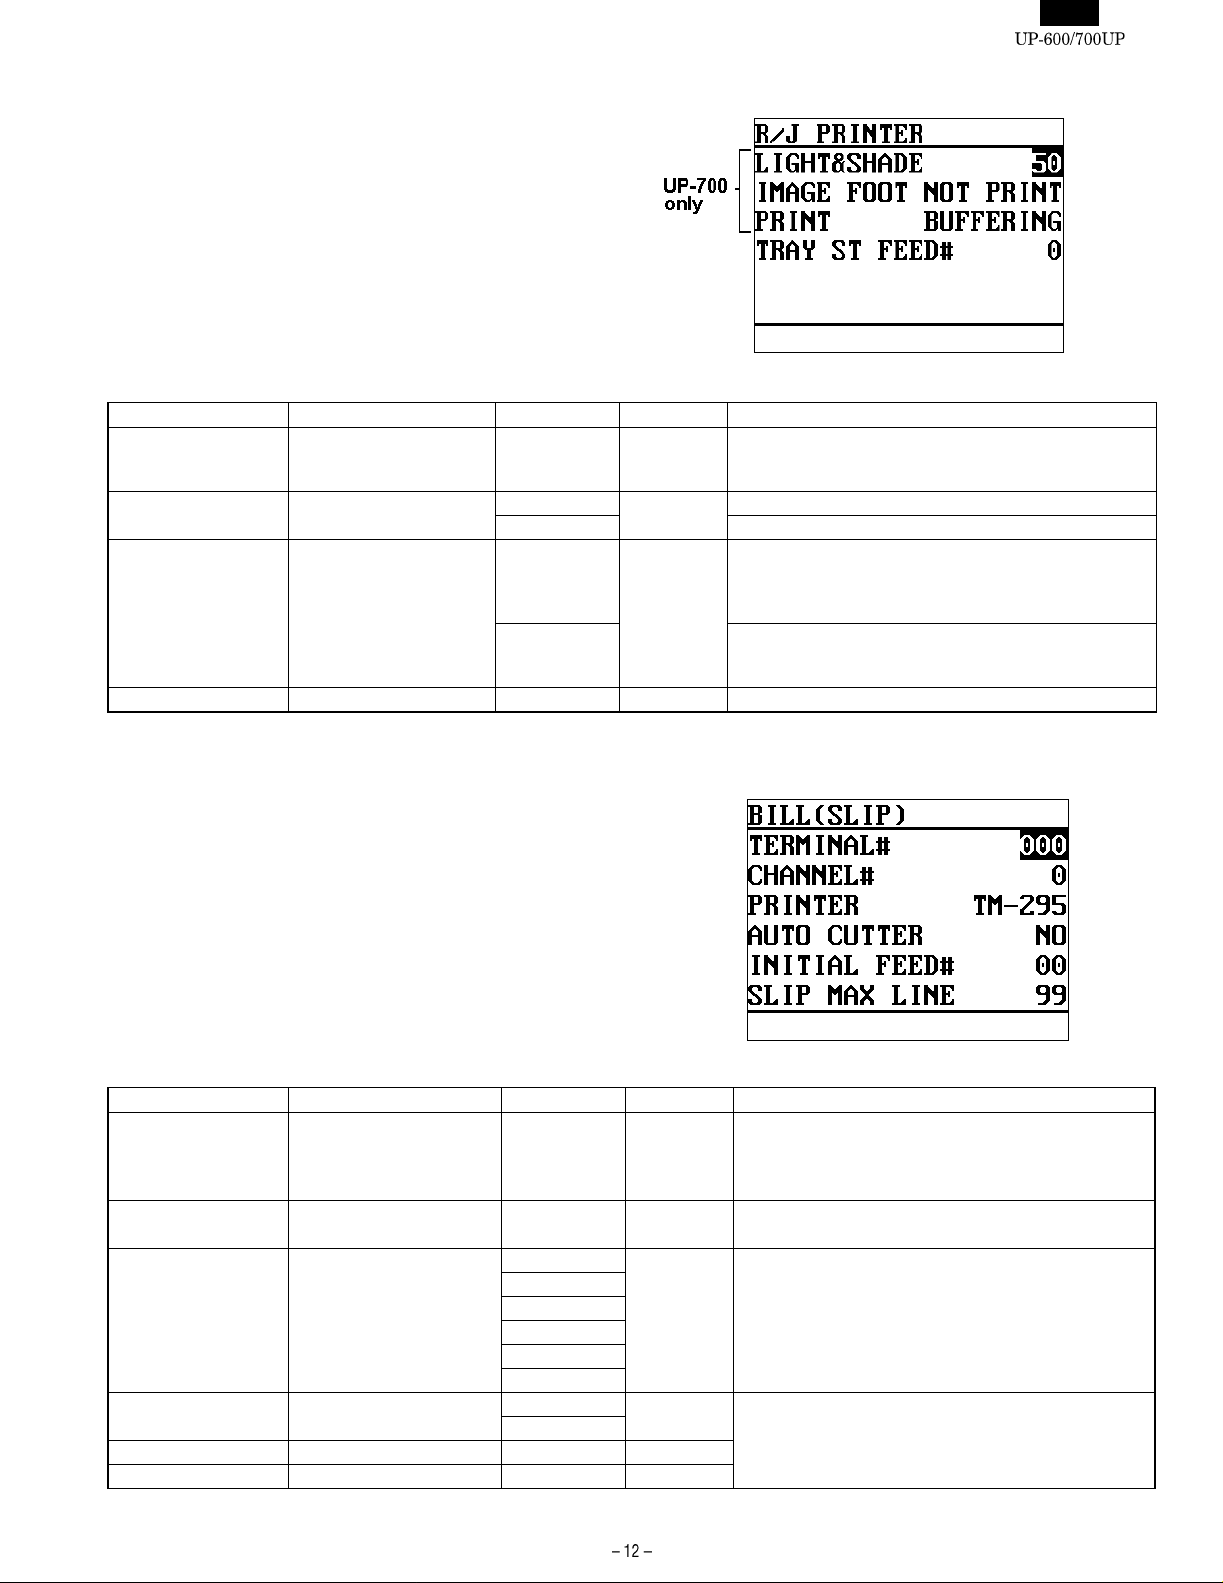
[01 DEVICE CONFIG] - [01 R/J PRINTER] DISPLAY: Setting screen
[R/J PRINTER] (Built-in printer programming)
DISPLAY CONTENTS SELECT ITEM MRS NOTE
LIGHT&SHADE
(UP-700 only)
IMAGE FOOTER
(UP-700 only)
PRINT
(UP-700 only)
TRAY ST FEED# Tray ST feed line 0-9 0 Only applies to the receipt printer
Light & shade of printing 00-99 50 00= 75% for standard
50= 100% <Standard>
99= 125% for standard
Footer Graphic LOGO print NOT PRINT NOT PRINT
PRINT
Buffering print BUFFERING BUFFERING BUFFERING :
The receipt prints the recapitulated data at the finalization
of the transaction. The journal prints the non-recapitulated
data at the finalization of transaction.
REAL TIME REAL TIME :
Both receipt and journal prints each data at same time
during registration.
[01 DEVICE CONFIG] - [02 BILL (SLIP)] DISPLAY: Setting screen
[BILL (SLIP)]
DISPLAY CONTENTS SELECT ITEM MRS NOTE
TERMINAL# Terminal No. 000-254 000 000 : Self terminal No.
CHANNEL# Channel No. 0-7 0 0: No RS232 channel is assigned.
PRINTER Connected printer name TM-295 TM-295
TM-T88/85
TM-U210
TM-T80
TM-T88 (2)
TM-300
AUTO CUTTER Auto cutter function No No This item is not valid for the TM-295.
Yes
INITIAL FEED# Initial SLIP feed line number 00-64 00
SLIP MAX LINE Slip print maximum line No. 00-99 99
This means local device.
1-254: Except self terminal No.
This means re-routed device.
1-7: RS232 channel is assigned.
Page 14
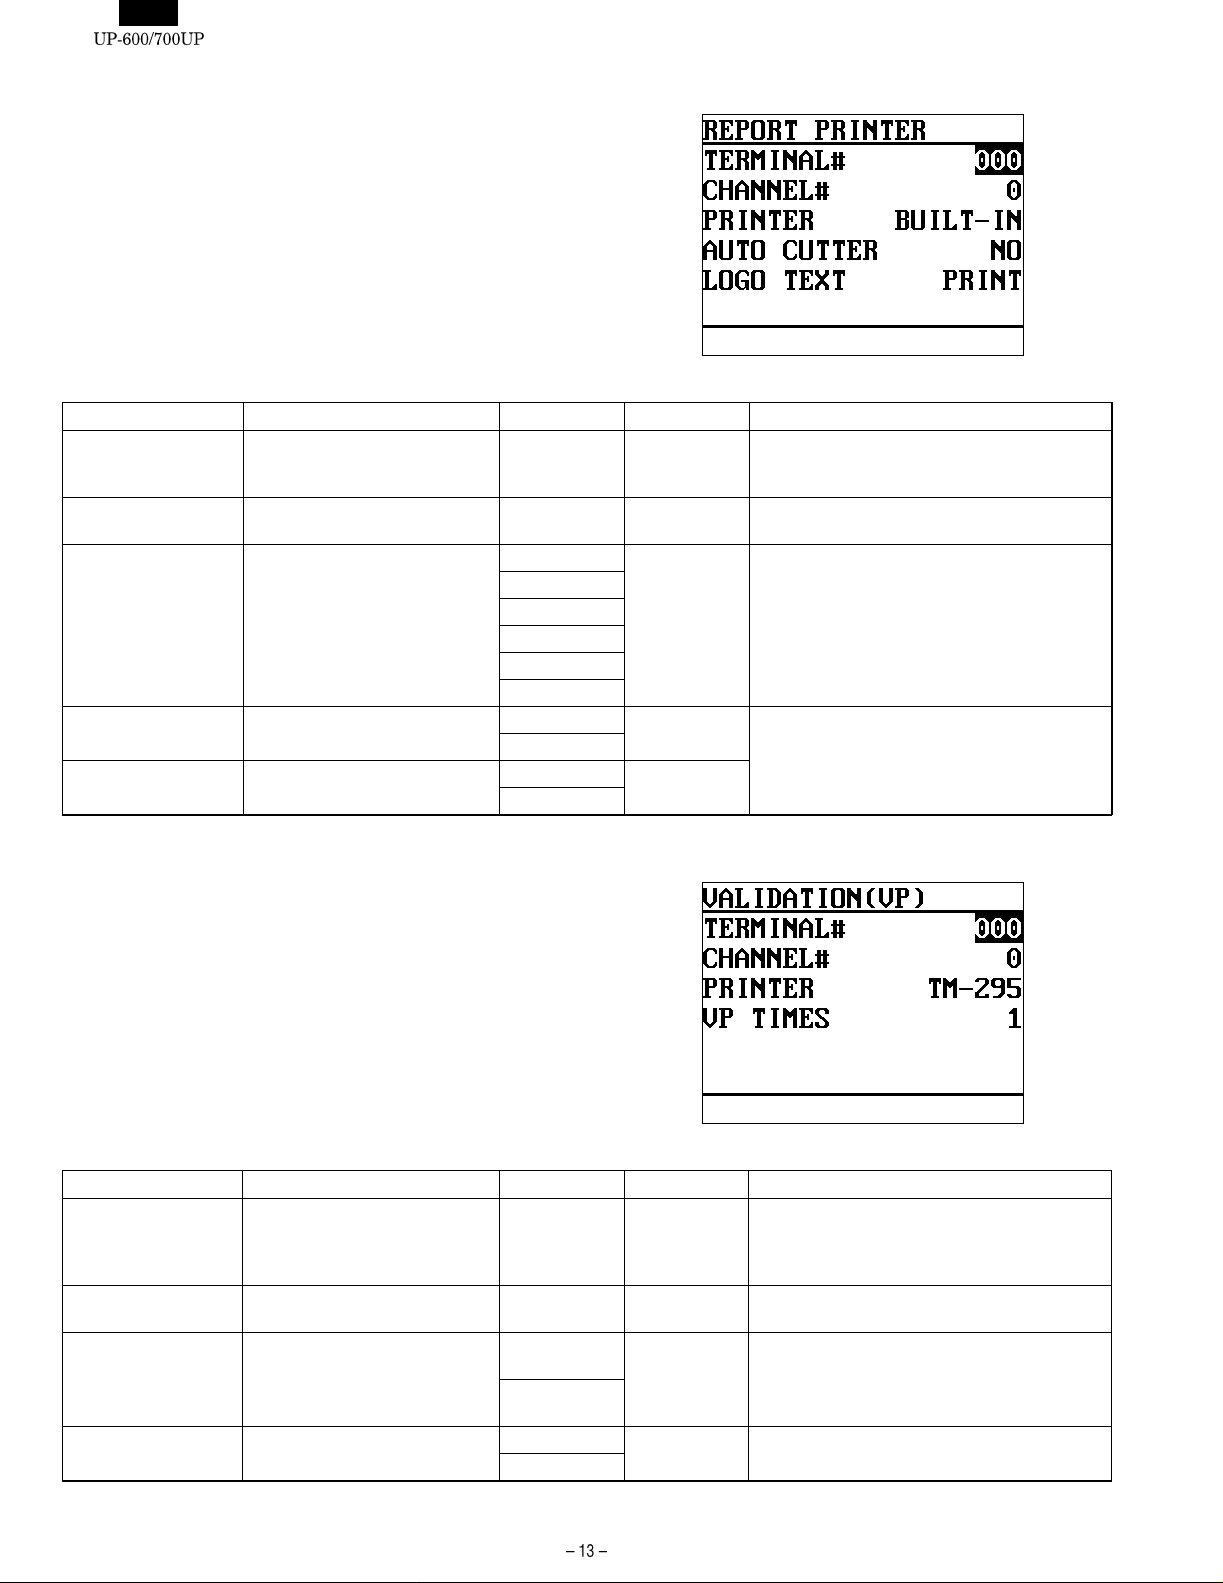
[01 DEVICE CONFIG] - [03 REPORT PRINTER] DISPLAY: Setting screen
[REPORT PRINTER]
DISPLAY CONTENTS SELECT ITEM MRS NOTE
TERMINAL# Terminal No. 000-254 000 000 : Self terminal No. This means local device.
CHANNEL# Channel No. 0-7 0 0 : No RS232 channel is assigned.
PRINTER Connected printer name BUILT-IN BUILT-IN In case of "BUILT-IN":
TM-T80
TM-T88/85
TM-300
TM-U210
TM-T88 (2)
AUTO CUTTER Auto cutter function NO NO (AUTO CUTTER and LOGO are used the
YES
LOGO TEXT Logo text print PRINT PRINT
NOT PRINT
1-254 : Except self terminal No. This means
re-routed device.
1-7 : RS232 channel is assigned.
The printing method is according to the "R/J
PRINTER" programming.
programming data of "REPORT PRINTER)
[01 DEVICE CONFIG] - [04 VALIDATION (VP)] DISPLAY: Setting screen
[VALIDATION (VP)]
DISPLAY CONTENTS SELECT ITEM MRS NOTE
TERMINAL# Terminal No. 000-254 000 000 : Self terminal No. This means local device.
1-254 : Except self terminal No. This means
re-routed device.
Re-routing programming is only valid for printer.
CHANNEL# Channel No. 0-7 0 0 : No RS232 channel is assigned.
PRINTER Connected printer name BUILT-IN BUILT-IN
(UP-600)
TM-295 TM-295
(UP-700)
VP TIMES No. of times of VP 0-9 1
YES
1-7 : RS232 channel is assigned.
"Built-in" can not be selected for the UP-700.
(Fixed at "TM-295)
Page 15
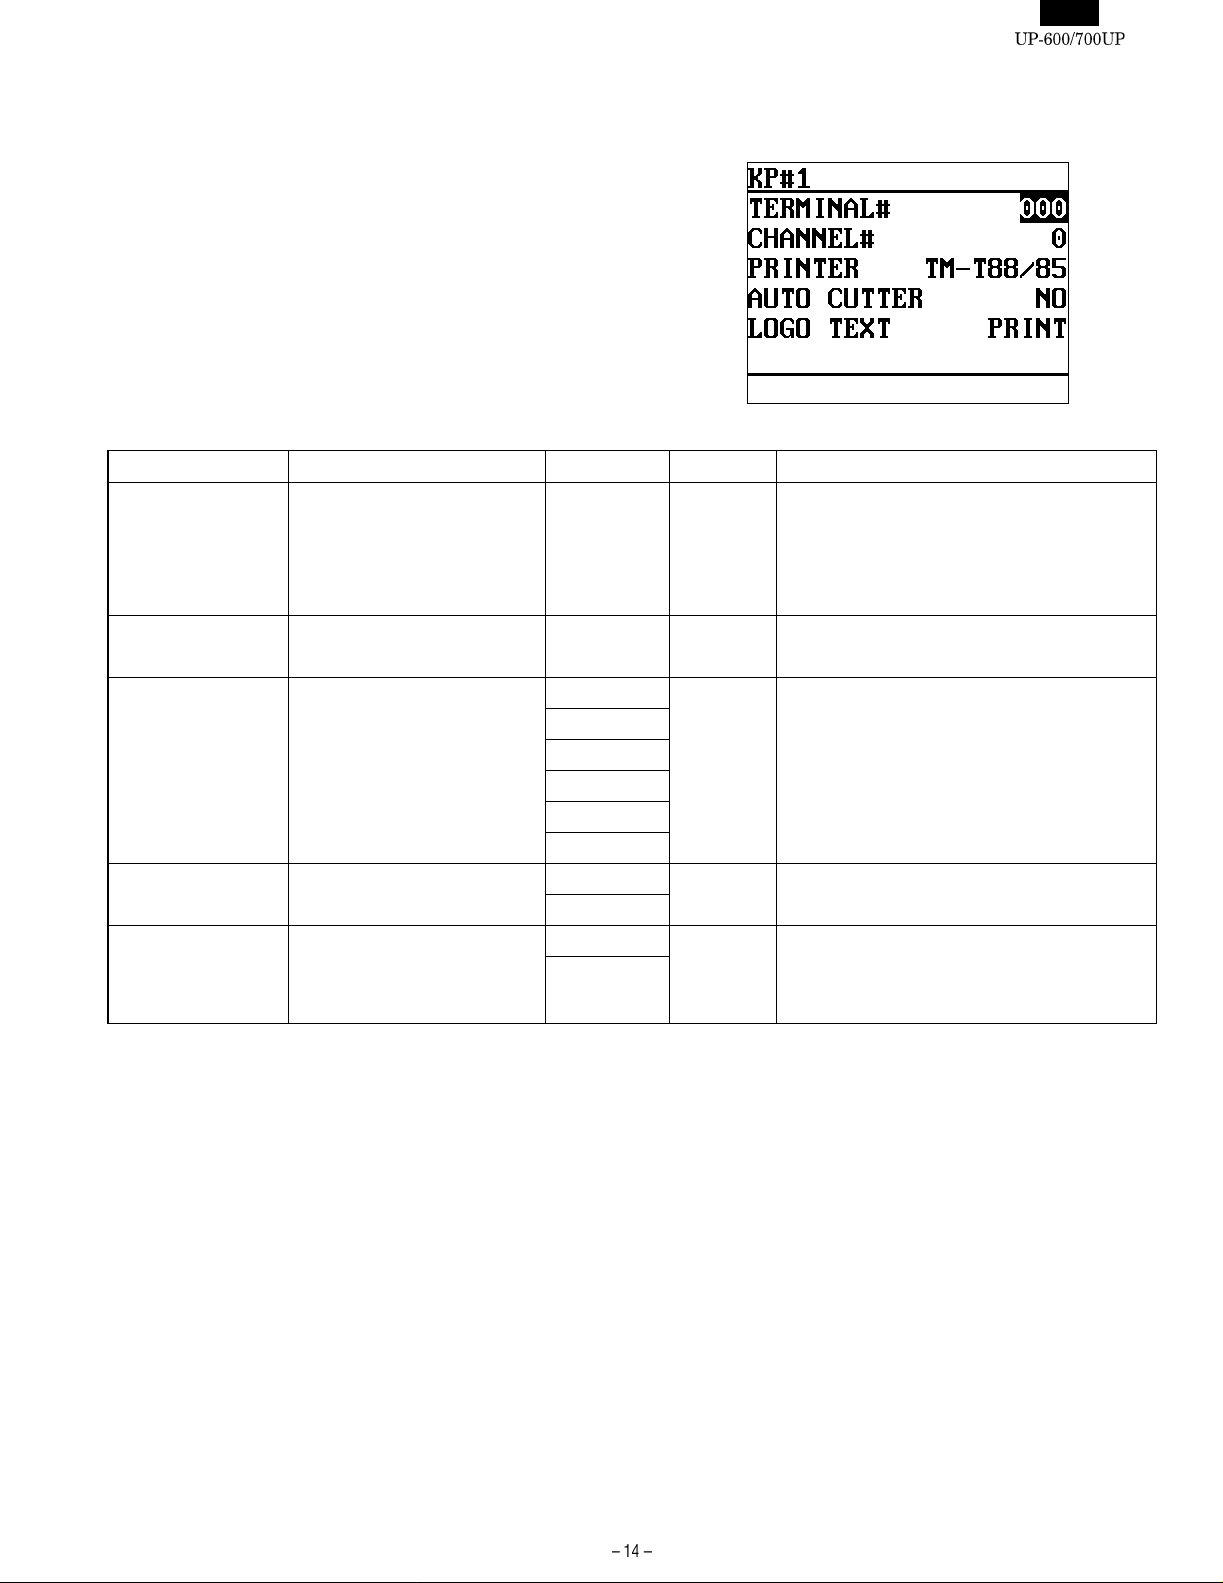
[01 DEVICE CONFIG] - [05 KP#1] / [06 KP#2] / [07 KP#3]
DISPLAY: Setting screen
[08 KP#4] / [09 KP#5] / [10 KP#6]
[11 KP#7] / [12 KP#8] / [13 KP#9]
[KITCHEN PRINTER] KP#1-KP#9
DISPLAY CONTENTS SELECT ITEM MRS NOTE
TERMINAL# Terminal No. 000-254 000 000 : Self terminal No.
CHANNEL# Channel No. 0-7 0 0: No RS232 channel is assigned.
PRINTER Connected printer name TM-T88/85 TM-T88/85 In case of "BUILT-IN" :
TM-300
TM-U210
TM-T88 (2)
BUILT-IN
TM-T80
AUTO CUTTER Auto cutter function NO NO
YES
LOGO TEXT Logo text print PRINT PRINT Logo text and its format is the same as the Receipt.
NOT PRINT
This means local device.
1-254: Except self terminal No.
This means re-routed device.
The built-in printer cannot be re-routed.
1-7: RS232 channel is assigned.
The printing method is according to the "R/J
PRINTER" programming.
If a printer is set as "TM-T88 (2) ", its STAMP can
be printed.
Page 16
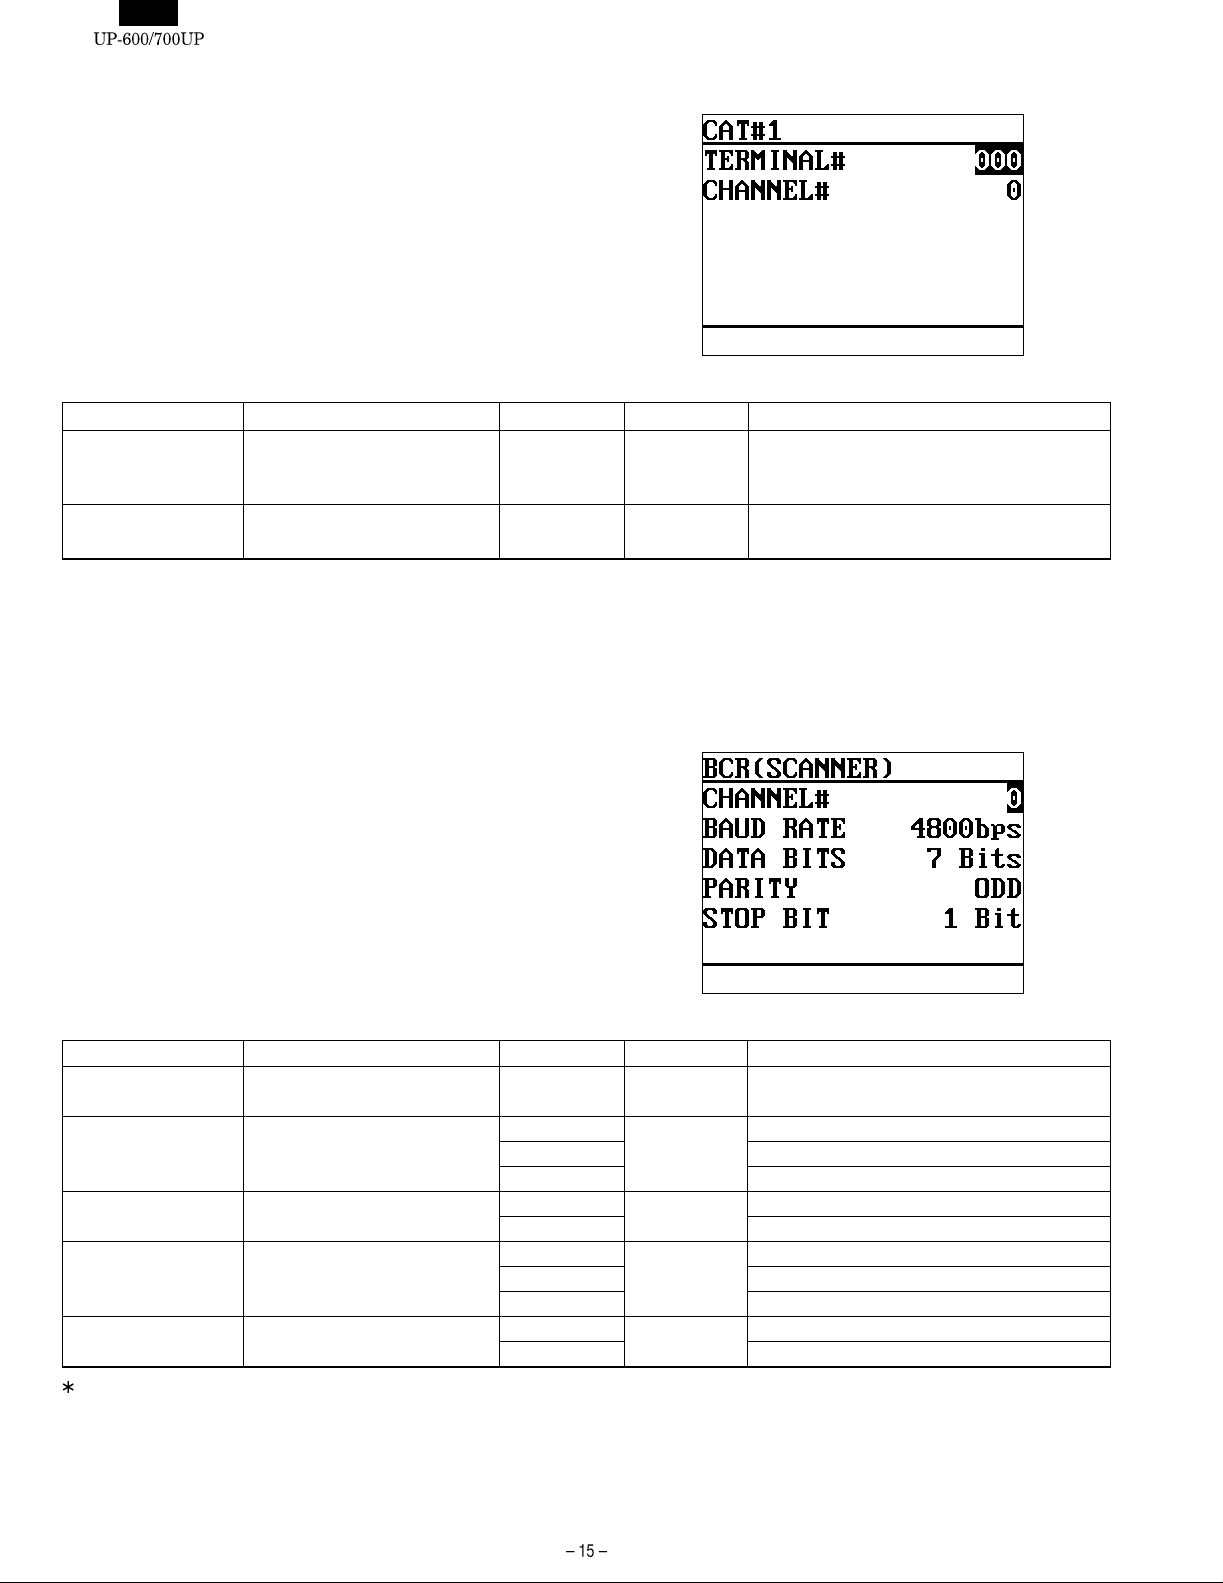
[01 DEVICE CONFIG] - [14 CAT#1] DISPLAY: Setting screen
[CAT#1]
DISPLAY CONTENTS SELECT ITEM MRS NOTE
TERMINAL# Terminal No. 000-254 000 000 :Self terminal No.
CHANNEL# Channel No. 0-7 0 0 : No RS232 channel is assigned.
This means local device.
1-254 : Except self terminal No.
1-7 : RS232 channel is assigned.
[01 DEVICE CONFIG] - [15 CAT#2]
RESERVED
[01 DEVICE CONFIG] - [16 RESERVED]
[01 DEVICE CONFIG] - [17 BCR(SCANNER)]
[BCR (SCANNER)]
DISPLAY CONTENTS SELECT ITEM MRS NOTE
CHANNEL# Channel No. 0-7 0 0: No RS232 channel is assigned.
BAUD RATE Transmission speed 4800 bps 4800 bps
9600 bps
19200 bps
DATA BITS Data bit 7 Bits 7 Bits
8 Bits
PARITY Parity bit ODD ODD
EVEN
NON
STOP BIT Stop bit 1 Bits 1 Bit
2 Bit
ER-A6HS1 setting : "BAUD RATE = 4800 bps" , "DATA BITS = 7Bits", "PARITY = ODD", "STOP BIT = 1Bit"
NOTE: 1. Set the channel No. so that it does not conflict with other devices that are to be connected. If this occurs, the unit will not operate properly.
2. Do not use channel No. 2 for the ER-A6HS1. Use other channel Nos.
3. If you want to change the channel No. of the BCR (Scanner), set a channel No. that is other than 0 and does not conflict with other
devices.
DISPLAY: Setting screen
1-7: RS232 channel is assigned.
Page 17

[01 DEVICE CONFIG] - [18 SCALE] DISPLAY: Setting screen
[SCALE]
DISPLAY CONTENTS SELECT ITEM MRS NOTE
CHANNEL# Channel No. 0-7 0 0: No RS232 channel is assigned.
NOTE: 1. Set the channel No. so that it does not conflict with other devices that are to be connected. If this occurs, the unit will not operate properly.
1-7: RS232 channel is assigned.
[01 DEVICE CONFIG] - [19 COIN DISP.] DISPLAY: Setting screen
[COIN DISPENSER]
DISPLAY CONTENTS SELECT ITEM MRS NOTE
CHANNEL# Channel No. 0-7 0 0 : No RS232 channel is assigned.
1-7 : RS232 channel is assigned.
NOTE: 1. Set the channel No. so that it does not conflict with other devices that are to be connected. If this occurs, the unit will not operate properly.
Page 18

[01 DEVICE CONFIG] - [20 ONLINE] DISPLAY: Setting screen
[ONLINE]
DISPLAY CONTENTS SELECT ITEM MRS NOTE
CHANNEL# Channel No. 0-7 0 0: No RS232 channel is assigned.
NOTE: 1. Set the channel No. so that it does not conflict with other devices that are to be connected. If this occurs, the unit will not operate properly.
2. Do not use channel No. 2 when there is a modem.
1-7: RS232 channel is assigned.
[01 DEVICE CONFIG] - [21 CVM DATA I/F] DISPLAY: Setting screen
[CVM DATA I/F]
DISPLAY CONTENTS SELECT ITEM MRS NOTE
TERMINAL# Terminal No. 000-254 000 000 : Self terminal No.
This means local device.
1-254 : Except self terminal No.
CHANNEL# Channel No. 0-7 0 0 : No RS232 channel is assigned.
NOTE: 1. Set the Channel No. so that it does not conflict with other devices that are to be connected. If this occurs, the unit will not operate properly.
1-7 : RS232 channel is assigned.
Page 19

2. [02 SYSTEM PRESET]
DISPLAY: Setting item select screen
Select "02 SYSTEM PRESET" and press the ENTER key.
DISPLAY: SYSTEM PRESET screen
Select the JOB# to be changed and enter the value.
The content of each JOB# is described below.
Page 20

[JOB#901] : UP-600/700 MRS=0002
Note : ★ ... MRS for UP-600
✩ ... MRS for UP-700
901-A: Not used (Fixed at "0")
901-B: 1. Tax system
1. Tax system 901-B
Auto tax 1-4 & Manual tax 0
CANADIAN TAX (Type1 to Type 10) 6
CANADIAN TAX (Type 11) 7
901-C: 1.Rounding system
1.Rounding system 901-C
Normal 0
Singapore 8
901-D: 1.TAB setting
1.TAB setting 901-D
0 0
0.0 1
0.00 2
0.000 3
[JOB#902] : UP-600 MRS=0050
UP-700 MRS=0000
902-A: 1.In-line system
1.In-line system 902-A
No 0
Yes 1
902-B: Not used (Fixed at "0")
902-C: 1. Display format for the operator display (LCD).
1. Display format for the operator display (LCD). 902-C
GLU mode 0
CHECK OUT mode 5
902-D: Not used (Fixed at "0")
★✩
★✩
★✩
★✩
✩
★
[JOB#903] : UP-600 MRS=8003
UP-700 MRS=8000
903-A: 1. POS SIO data copy baud rate
1. Baud rate 903-A
2400 2
4800 3
9600 4
19200 5
38400 6
57600 7
115200 8
903-B: 1. Symbol of scale entry
1. Symbol of scale entry 903-B
"LB" 0
"KG" 2
903-C: 1. Entry of tare
2. Unit of weight for the scale
1. Entry of tare
Disallowed
Allowed
903-D: 1. Food stamp
Tax not payable in Food stamps 1
Tax payable in Food stamps 2
Food stamp forgiveness 3
2. Unit of weight for the
scale
2id(3id)+2dd 0
1id(2id)+3dd 1
2id(3id)+2dd 2
1id(2id)+3dd 3
1. Food stamp 903-D
No Food stamps 0
[JOB#904] : UP-600/700 MRS=0000
904-A: 1. Printing of date
2. Fraction treatment at gasoline (OIL) q’ty calculation
1. Printing of date
Yes
No
2. Fraction treatment at
gasoline (OIL) q’ty
calculation
Round off 0
Round up 1
Round down 2
Round off 4
Round up 5
Round down 6
★✩
★✩
903-C
★✩
✩
★
904-A
★✩
Note : ★
...
MRS for UP-600 /
...
✩
MRS for UP-700
904-B: 1. Printing of the consecutive No.
2. Decimal point position of gasoline (OIL) q’ty
1. Printing of the
consecutive No.
Yes
No
2. Decimal point position of
gasoline (OIL) q’ty
0 0
0.0 1
0.00 2
0.000 3
0 4
0.0 5
0.00 6
0.000 7
904-B
★✩
Page 21

904-C: 1. Fraction treatment at gasoline discount
1. Fraction treatment at gasoline discount 904-C
Round off 0
Round up 1
Round down 2
904-D: 1. TAB for the gasoline unit price
2. Gasoline function
1. TAB for gasoline unit
price
0.00
0.000
2. Gasoline function 904-D
Disable 0
Enable 1
Disable 2
Enable 3
★✩
★✩
905-D: 1. TAX METHOD (CANADIAN TAX)
GST PST
Tax on Tax 0
Tax on Base 1
Tax on Tax 2
Tax on Base 3
Tax on Tax 4
Tax on Base 5
Tax on Tax 6
Tax on Base 7
Tax on Tax 8
Tax on Base 9
905-D
★✩
[JOB#905] : UP-600/700 MRS=0005
905-A: 1. Taxable 4 subtotal print on X/Z report
2. Gross Tax 4 and refund Tax 4 total print on X/Z report
3. Net Tax 4 total print on X/Z report
1. Taxable 4
subtotal
Print
Skip
905-B: 1. Tax printing when taxable subtotal is zero.
2. Tax printing when GST is VAT.
3. Tax printing when tax is zero.
1. Taxable
subtotal is
zero
Skip
Print
905-C: 1. GST EXPT print on X/Z report
2. Gross Tax 4
and refund
Tax 4 total
Print
Skip
Print
Skip
2. GST is VAT 3. Tax is zero
Print
Skip
Print
Skip
1. GST EXPT 905-C
Print 0
Skip 4
3. Net Tax 4
total
Print 0
Skip 1
Print 2
Skip 3
Print 4
Skip 5
Print 6
Skip 7
Print 0
Skip 1
Print 2
Skip 3
Print 4
Skip 5
Print 6
Skip 7
905-A
905-B
★✩
★✩
★✩
[JOB#906] : UP-600/700 MRS=0030
906-A: 1. Printing of Dept. and PLU code
2. Entry which makes the PLU stock counter negative
1. Printing of Dept.
and PLU code
No
Yes
906-B: 1. Bottle return function
2. Hash department setting
1. Bottle return function
Disable
Enable
906-C: 1. Split pricing counting
2. Multiplication entry
1. Split pricing
counting
Quantity
Package
2. Entry which makes the
PLU stock counter negative
Allowed unconditionally 0
Operation allowed despite
error message
Entry inhibited 2
Allowed unconditionally 4
Operation allowed despite
error message
Entry inhibited 6
2. Hash department
setting
Disable 0
Enable 2
Disable 4
Enable 6
2. Multiplication entry 906-C
Multiplication 0
Successive multiplication 1
Split pricin g 2
FFx (FF sequence + Split pricing) 3
Multiplication 4
Successive multiplication 5
Split pricin g 6
FFx (FF sequence + Split pricing) 7
906-A
★✩
1
5
906-B
★✩
★✩
Note : ★
...
MRS for UP-600 /
...
✩
MRS for UP-700
Page 22

906-D: 1. UPC/PLU price look up at refund entry
2. Presetting of consecutive No.
3. Fractional quantity
1. UPC/PLU
price look
up at refund
entry
Yes
No
2. Presetting of
consecutive
No.
Yes
No
Yes
No
3. Fractional
quantity
No 0
Yes (3 digit
decimal place)
No 2
Yes (3 digit
decimal place)
No 4
Yes (3 digit
decimal place)
No 6
Yes (3 digit
decimal place)
[JOB#907] : UP-600/700 MRS=0010
907-A: Not used (Fixe at "0")
907-B: 1. UPC code printing on journal
2. UPC code printing on receipt
1. UPC code printing
on journal
Yes
No
907-C: 1. Minus Dept./PLU/UPC
1. Minus Dept./PLU/UPC 907-C
907-D: Not used (Fixed at "0")
2. UPC code printing
on receipt
Yes 0
No 1
Yes 2
No 3
Disable 0
Enable 1
906-D
1
3
5
7
907-B
★✩
★✩
★✩
[JOB#908] : UP-600/700 MRS=0000
908-A: GT print on Z report
1. GT1 (NET) 2. GT2 (+) 3. GT3 (–) 908-A
Print
Print
Skip
Print
Skip
Skip
908-B: GT print on X report
1. GT1 (NET) 2. GT2 (+) 3. GT3 (–) 908-B
Skip
Skip
Print
Skip
Print
Print
908-C: 1. Add void -mode transaction data to hourly total report
2. Resetting of consecutive number in Z1 resetting
1. Add void -mode
transaction data to
hourly total report
No
Yes
908-D: 1. Printing of X/Z report
(Excepting the individual server report)
2. Z1 resetting that resets GT
1. Printing of X/Z report 2. Z1 resetting that
Receipt & Journal
Journal only
2. Resetting of
consecutive number
in Z1 resetting
resets GT
Print 0
Skip 1
Print 2
Skip 3
Print 4
Skip 5
Print 6
Skip 7
Skip 0
Print 1
Skip 2
Print 3
Skip 4
Print 5
Skip 6
Print 7
No 0
Yes 1
No 4
Yes 5
Disable 0
Enable 1
Disable 4
Enable 5
★✩
★✩
908-C
★✩
908-D
★✩
Note : ★
...
MRS for UP-600 /
...
✩
MRS for UP-700
Page 23

[JOB#909] : UP-600/700 MRS=2000
909-A: 1. Printing of training GT on the X report
2. Printing of training GT on the Z report
1. Printing of training
GT on the X report
Skip
Print
909-B: 1 . Printing of data on the PLU/UPC resetting report
1. Printing of data on PLU/UPC resetting report 909-B
909-C: 1. Printing of VOID mode totalizer and MGR VOID totalizer
on the Z2 report
2. Printing of VOID mode totalizer and MGR VOID totalizer
on the Z1 report
1. Printing of VOID
mode totalizer and
MGR VOID
totalizer on the Z2
report
Print
Skip
909-D: Not used (Fixed at "0")
2. Printing of training
GT on the Z report
Print 0
Skip 1
Print 2
Skip 3
Print 0
Skip 4
2. Printing of VOID
mode totalizer and
MGR VOID totalizer
on the Z1 report
Print 0
Skip 2
Print 4
Skip 6
909-A
908-C
★✩
★
★✩
911-D: 1. RECEIPT/SLIP header format
1. RECEIPT/SLIP header format 911-D
Format 1 0
Format 2 2
Format 3 4
HEADER FORMAT for order receipt (Receipt/Journal/Bill)
FORMAT1 FORMAT2
FORMAT3
★✩
[JOB#910] : UP-600/700 MRS=0024
910-A: 1. Drawer open at server sign ON/OFF
1. Drawer open at server sign ON/OFF 910-A
No 0
Yes 2
Note: For stay down server# entry system.
910-B: Not used (Fixed at "0")
910-C: 1. Server # entry system
2. Server # entry system 910-C
Stay down 0
Auto sign off 2
910-D: Not used (Fixed at "4")
[JOB#911] : UP-600/700 MRS=0000
911-A: 1. Fraction treatment
1. Fraction treatment 911-A
Round off 0
Round up 1
Round down 2
911-B: 1. C/D check of UPC
1. C/D check of UPC 911-B
No 0
Yes 4
HEADER FORMAT for GLU receipt (Receipt/Journal)
★✩
FORMAT1 FORMAT2
★✩
FORMAT3
★✩
★✩
911-C: Not used (Fixed at "0")
Note : ★
...
MRS for UP-600 /
...
✩
MRS for UP-700
Page 24

[JOB#912] : UP-600/700 MRS=0061
912-A: 1. Data print format
1. Data print format 912-A
Month / Day / Year 0
Day / Month / Year 1
Year / Month / Day 2
912-B: 1. Time system
1. Time system 912-B
12 H 0
24 H 1
912-C: 1. After transaction receipt
2. Copy receipt function
3. Footer print control (SRV JOB 912-D=2)
1. After
transaction
receipt
Total only
Detail
912-D: 1. STAMP LOGO message control
1. STAMP LOGO message control 912-D
3-line header instead of a STAMP LOGO 0
STAMP LOGO only 1
STAMP LOGO and 3-line footer 2
3-line header instead of a STAMP LOGO 3
3-line header instead of a STAMP LOGO and
3-line footer
(STAMP LOGO message format)
012
2. Copy
receipt
function
No
Yes
No
Yes
3. Footrer print control
912-C
All receipts 0
On selected function
key at the time of
finalization
All receipts 2
On selected function
key at the time of
finalization
All receipts 4
On selected function
key at the time of
finalization
All receipts 6
On selected function
key at the time of
finalization
3
[JOB#913] : UP-600/700 MRS=0104
913-A: 1. Content of total VP amount
1. Content of total VP amount 911-B
★✩
The UP-700 uses the TM-295 for validation.
913-B: 1. Printing of SBTL
2. Printing of MDSE SBTL
★✩
1
3
5
Note: Escape sequence is [CANCEL]
913-C: 1. Lock error buzzer keeps sounding
3. Escape compulsory validation print or bill print operation
1.Printing of
SBTL
No
Yes
2. Buffered keyboard
1. Lock error buzzer
keeps sounding
For 2 sec.
★✩
7
913-D: 1. Drawer closing compulsory
★✩
5
5
Constant
2. Error system
3. Key touch sound
1. Drawer closing
compulsory
Non-compulsory
Compulsory
Total amount 0
Tendered amount 1
2.Printing of
MDSE SBTL
No
Yes
No
Yes
2. Error system 3. Key touch
All lock error
Misoperation
(One shot error)
All lock error
Misoperation
(One shot error)
3.Escape
compulsory
bill print
Disable 0
Enable 1
Disable 2
Enable 3
Disable 4
Enable 5
Disable 6
Enable 7
[BILL]
2. Buffered keyboard
Yes 0
No 1
Yes 2
No 3
sound
Yes 0
No 1
Yes 2
No 3
Yes 4
No 5
Yes 6
No 7
913-B
913-C
913-D
★
★✩
★✩
★✩
Note: STAMP LOGO refers to the graphic logo function of the UP-
700 only.
Note : ★
...
MRS for UP-600 /
...
✩
MRS for UP-700
Page 25

[JOB#914] : UP-600/700 MRS=1100
914-A: 1. Receipt issuing at no-sale
2. No-sale key separation f rom the CA/AT key for no-sale
function
3. Tax delete
1. Receipt
issuing at
no-sale
Yes
No
914-B: 1. No-sale after non-add code entry
914-C: 1. Action to be taken when the machine is locked by the
1. Action to be taken
when the machine
is locked by the
receipt/journal paper
near end check
Unlocked by CL key
Enforces paper roll
replacement
914-D: 1. Manual TAX
1.Manual TAX 2.Check/Cashing 3.Non-add
Enable
Disable
2. No-sale key is
separate from
the CA/AT key
for the no-sale
function
Yes
No
Yes
No
1.No-sale after non-add code entry 914-B
Disable 0
Enable 1
receipt/journal paper near end check (Only for UP-600)
2. Void mode
3. Non-add code entry at the beginning of a t ransaction operation
2. Void
mode
Enable
Disable
Enable
Disable
2. Check/Cashing
3. Non-add code entry
Disable
Enable
Disable
Enable
3. Tax delete
914-A
Inhibit 0
Enable 1
Inhibit 2
Enable 3
Inhibit 4
Enable 5
Inhibit 6
Enable 7
3. Non-add code
entry at the
beginning of a
transaction
operation
Non compulsory 0
Compulsory 1
Non compulsory 2
Compulsory 3
Non compulsory 4
Compulsory 5
Non compulsory
Compulsory
code entry
Enable 0
Disable 1
Enable 2
Disable 3
Enable 4
Disable 5
Enable 6
Disable 7
914-C
914-D
★✩
★✩
★✩
★✩
[JOB#915] : UP-600/700 MRS=0040
915-A: 1. Amount symbol
1.Amount symbol 915-A
"$" 0
" "1
"(Space)" 2
915-B: 1. PO system
1.PO system 915-B
Mixed entry 0
Cash only entry 1
915-C: 1. Paper near end check (Only for UP-600)
2. No. of times of ST(–) or ST(%) entry within one transaction
3. RA system
1.Paper
near
end
check
Yes
No
915-D: Not used (Fixed at "0")
2.No. of times of
ST(–) or ST(%)
entry within
one transaction
Any No. of time s
Only once
Any No. of time s
Only once
3.RA system
Mixed entry 0
Cash only entry 1
Mixed entry 2
Cash only entry 3
Mixed entry 4
Cash only entry 5
Mixed entry 6
Cash only entry 7
915-C
★✩
★✩
★✩
[JOB#916] : UP-600/700 MRS=1400
916-A: 1. Action to be taken when the text and amount over lap
each other in a REG mode entry
1.Action to be taken when text and amount over
lap each other in a REG mode entry
Truncate text 0
2-line print 1
916-B: 1. Finalization by charge when ST <= 0
2. Food stamp subtotal entry before food stamp tender
1. Finalization by
charge when ST <= 0
Inhibit
Always
2. Food stamp subtotal
entry before food
stamp tender
Non compulsory 0
Compulsory 1
Non compulsory 4
Compulsory 5
916-A
★✩
916-B
★✩
Note : ★
...
MRS for UP-600 /
...
✩
MRS for UP-700
Page 26

916-C: 1. Negative merchandise subtotal
2. Subtotal entry before tender
3. Subtotal entry before direct non-tendering finalization
1.Negative
merchandise
subtotal
916-D: 1. Coupon PLU printing on X/Z report
2. Net sales subtotal(NET1) printing on X/Z report
3. Check change total printing on X/Z report
1. Coupon
PLU
Print
Skip
2.Subtotal entry
before tender
2. Net sales
subtotal(NET1)
Print
Skip
Print
Skip
3.Subtotal
entry before
direct
non-tendering
finalization
3. Check
change total 916-D
Print 0
Skip 1
Print 2
Skip 3
Print 4
Skip 5
Print 6
Skip 7
[JOB#917] : UP-600/700 MRS=0000
917-A: 1. Printing of Taxable 1 subtotal on X/Z report
2. Printing of Gross Tax 1 and Refund Tax 1 totals on X/Z
report
3. Printing of Net Tax 1 total on X/Z report
1. Taxable 1
subtotal
Print
Skip
2. Gross Tax 1
and Refund
Tax 1 totals
Print
Skip
Print
Skip
3. Net Tax 1
total 917-A
Print 0
Skip 1
Print 2
Skip 3
Print 4
Skip 5
Print 6
Skip 7
916-C
0
1
2
3
4
5
6
7
★✩
★✩
★✩
917-B: 1. Printing of Taxable 2 subtotal on X/Z report
2. Printing of Gross Tax 2 and Refund Tax 2 totals on X/Z
report
3. Printing of Net Tax 2 total on X/Z report
1. Taxable 2
subtotal
Print
Skip
917-C: 1. Printing of Taxable 3 subtotal on X/Z report
2. Printing of Gross Tax 3 and Refund Tax 3 totals on X/Z
3. Printing of Net Tax 3 total on X/Z report
1. Taxable 3
subtotal
Print
Skip
917-D: 1. Printing of Total Tax on X/Z report
2. Printing of Gross manual Tax and Refund manual Tax on
3. Printing of Net manual Tax total on X/Z report
1. Total Tax 2. Gross
Print
Skip
2. Gross Tax 2
report
2. Gross Tax 3
X/Z report
and Refund
Tax 2 totals
Print
Skip
Print
Skip
and Refund
Tax 3 totals
Print
Skip
Print
Skip
manual Tax
and Refund
manual Tax
Print
Skip
Print
Skip
3. Net Tax 2
total
Print 0
Skip 1
Print 2
Skip 3
Print 4
Skip 5
Print 6
Skip 7
3. Net Tax 3
total 917-C
Print 0
Skip 1
Print 2
Skip 3
Print 4
Skip 5
Print 6
Skip 7
3. Net manual
Tax total
Print 0
Skip 1
Print 2
Skip 3
Print 4
Skip 5
Print 6
Skip 7
917-B
★✩
★✩
917-D
★✩
Note : ★
...
MRS for UP-600 /
...
✩
MRS for UP-700
Page 27

[JOB#918] : UP-600/700 MRS=2233
918-A: 1. Printing of text for associated PLUs in COMBO MEAL.
2. Direct non-tendering finalization after previous tender entry.
3. Output of COMBO MEAL to KP.
1. Printing of
text for
associated
PLUs in
COMBO
MEAL.
Print
Skip
918-B: 1. Red color printing on KP when the PLU’s unit price is
2. Fractional entries for non-scalable UPC/PLU/DEPT.
1. Red color printing
on KP when the
PLU’s unit price is
zero
918-C: 1. Kitchen printer recapitulation
2. Printing the UPC/DEPT./PLU text on KP in double size
1. Kitchen
printer
recapitulation
Yes
No
2. Direct
non-tendering
finalization
after previous
tender entry.
Disable
Enable
Disable
Enable
zero
2. Fractional entries for
No
Yes
character
2. Printing the
UPC/DEPT./PLU text on
KP in double size character
3. Output of
COMBO
MEAL to KP.
By associated
PLU
COMBO
MEAL’s KP
By associated
PLU
COMBO
MEAL’s KP
By associated
PLU
COMBO
MEAL’s KP
By associated
PLU
COMBO
MEAL’s KP
non-scalable
UPC/PLU/DEPT.
Enable 0
Disable 1
Enable 2
Disable 3
Normal size 0
Double size 1
Normal size 2
Double size 3
918-A
0
1
2
3
4
5
6
7
918-B
918-C
★✩
★✩
★✩
918-D: 1. Tip paid includes cash tip
2. Clearing of tip totalizer at server Z1 report
3. Printing of tip totalizer on the server report
1.Tip paid
includes
cash tip
Yes
No
2.Clearing of tip
totalizer at
server Z1
report
No
Yes
No
Yes
3.Printing of
tip totalizer
on the
server report
No 0
Yes 1
No 2
Yes 3
No 4
Yes 5
No 6
Yes 7
918-D
[JOB#919] : UP-600/700 MRS=5100
919-A: 1 . GLU/PBLU system
2. GLU/PBLU code entry at re-order (When #919:B-1 is 0 "
Auto generation ")
1. GLU/PBLU system 2. GLU/PBLU code
PB Look-Up system
Guest Look-Up system
919-B: 1. Checking of server# for guest check entries when a
re-order is made
2. Guest check No. system
1. Checking of server# for
guest check entries
when a re-order is made
Yes
No
919-C: 1. PB entry
2. Amount printing when PLU unit price is $0.00
1. PB entry
Non-compulsory
Compulsory
919-D: 1. Conversion SBTL printing of native SBTL
2. Foreign currency format
1. Conversion SBTL
printing of native
SBTL
Yes
No
entry at re-order
Non-compulsory 2
Compulsory 3
Non-compulsory 4
Compulsory 5
2. Guest check
No. system
Auto generation 0
Manual 1
Auto generation 4
Manual 5
2. Amount printing when
PLU unit price is $0.00
No 0
Yes 1
No 2
Yes 3
2. Foreign currency format 919-D
Decimal digits are printed 0
Omit digits lower than tab
position
Decimal digits are printed 4
Omit digits lower than tab
position
919-A
919-B
919-C
1
5
★✩
★✩
★✩
★✩
★✩
Note : ★
...
MRS for UP-600 /
...
✩
MRS for UP-700
Page 28

[JOB#920] : UP-600/700 MRS=2040 : INLINE
PROGRAMMING AREA
920-A: 1. Back-up master function.
1. Back-up master function. 920-A
Not 2
Exist 3
920-B: 1. System reports and down-load jobs are enabled in the
back-up master
1. System reports and down-load jobs are
enabled in the back-up master
Disable 0
Enable 4
920-C: 1. Automatic download to all machines in an inline system
(UPC)
2. PGM mode programming at the satellite machine
1. Automatic download to
all machines in an
inline system (UPC)
Yes
No
920-D: 1. The register is
1. The register is 920-D
Standard alone machine 0
Back up master 3
2. PGM mode
programming at the
satellite machine
Disable 0
Enable 1
Disable 4
Enable 5
Satellite 1
Master 2
920-B
920-C
★✩
★✩
★✩
★✩
[JOB#921] : UP-600/700 MRS=0000
921-A: 1. Convert UPC-E code to UPC-A code
1. Convert UPC-E code to UPC-A code 921-A
No 0
Yes 4
921-B: 1. GLU system
1. GLU system 921-B
Centralized 0
Individual 4
921-C: 1. Bill printing method
1. Bill printing method 921-C
The item data is deleted. 0
The item data is not deleted. 1
921-D: 1. Tip paid is automatically executed when a tip-in remains
at individual server resetting.
1. Tip paid is automatically executed a tip-in
remains at individual server resetting.
Yes 0
No 4
921-D
★✩
★✩
★✩
★✩
[JOB#922] : UP-600/700 MRS=0000 : INLINE
PROGRAMMING AREA
922-A : Not used (Fixed at "0")
922-B : 1. Uses the new Coin Dispenser which can issue $1 Coin.
1. Uses the new Coin Dispenser which can issue
$1 Coin.
No 0
Yes 1
922-C,D: Not used (Fixed at "00")
922-B
★✩
[JOB#923] : UP-600/700 MRS=0010 : INLINE
PROGRAMMING AREA
923-A,B: 1. The record number for REQUEST of T-LOG POLLING
(x100)
1. The record number for REQUEST
of T-LOG POLLING (x100)
0000 ~ 9900 00-99 00 00
Ex: 923-AB=10
When the T-LOG record exceeds 1000 records, the satellite will
request T-LOG polling to master.
923-C: 1. T-log function.
1. T-log function. 923-C
No 0
Yes 1
923-D: 1. Polling cycle (second)
1. Polling cycle (second) 923-D
0 ~ 9 Sec. 0 ~ 9 0 0
Ex: 923-D=5
After the master waits 5 seconds, the master starts T-LOG polling to next machine.
923-AB
★✩
[JOB#924] : UP-600/700 MRS=1433 : INLINE
PROGRAMMING AREA
924-A,B,C: Not used (Fixed at "143")
924-D: Programming whether or not to lock REG-mode entries after
individual periodic total resetting
1. Locking after Daily Net resetting
2. Locking after Transaction resetting
1. Locking after Daily
Net resetting
Yes
No
2. Locking after
Transaction resetting
Yes 0
No 1
Yes 2
No 3
924-A
★✩
Note : ★
...
MRS for UP-600 /
...
✩
MRS for UP-700
Page 29

[JOB#925] : UP-600/700 MRS=0303 : INLINE
PROGRAMMING AREA
925-A: Not used (Fixed at "0")
925-B: 1. Various individual resetting
1. Various individual resetting 925-B
Disable 2
Enable 3
The master only can be made capable of resetting by selecting
"Disable".
925-C: 1. Report printing when consolidation daily and periodic
transaction reading or resetting is taken
1. Report printing when consolidation daily and
periodic transaction reading or resetting is
taken
Printing of both i.e. reports on individual
machines and consolidation report on the entire
system
Printing of consolidation report on the entire
system
Printing of report on individual register 2
The following three types are available:
a) Printing of the X/Z reports on individual machines only
b) Printing of the consolidation X/Z report only
c) Printing of the X/Z reports on individual machines, followed by
the printing of a consolidation X/Z report.
925-D: 1. Resetting is allowed when the server is signed on
2. Resetting in the open store state
1. Resetting is allowed
when the server is
signed on
No
Yes
2. Resetting in the
open store state 925-D
Disable 0
Enable 1
Disable 2
Enable 3
925-C
★✩
0
★✩
1
★✩
[JOB#926] : UP-600/700 MRS=0000
926-A: 1. Printing "LAST VOID DATA" on KP.
2. Printing "PAST VOID DATA" on KP.
1. Printing "LAST
VOID DATA" on KP.
Both are printed
Both LAST VOID
DATA and voided
items aren’t printed
926-B: 1. Program reset in PGM2 mode
2. Sending "REFUND DATA" on KP
1. Program reset in
PGM2 mode
Disable
Enable
2. Printing "PAST
VOID DATA" on KP.
Both are printed 0
Both PAST VOID
DATA and voided
items aren’t printed
Both are printed 2
Both PAST VOID
DATA and voided
items aren’t printed
2. Sending "REFUND
DATA" on KP
Yes 0
No 2
Yes 4
No 6
926-A
★✩
1
3
926-B
★✩
2. Send AT command string with OPEN STORE
3. Send AT command string with CLOSE STORE
1. Open store /
Close store :
stand alone
POS with
on-line
No
Yes
926-D: 1. Reverse ONLINE channel in closed store.
1. Reverse ONLINE channel in closed store. 926-D
2. Send AT
command
string at
CLOSE
STORE
No
Yes
No
Yes
No 0
Yes 4
3. Send AT
command
string at
OPEN
STORE
No 0
Yes 1
No 2
Yes 3
No 4
Yes 5
No 6
Yes 7
926-C
[JOB#927] : UP-600/700 NOT USED MRS=0000
[JOB#928] : UP-600/700 MRS=1060
928-A: 1. Printing of SLIP logo text
1. Printing of SLIP logo text 928-A
No 0
Yes 1
928-B: 1. VP message printing on SLIP
2. Header line on slip paper is printed upon reorder
1. VP message
printing on SLIP
No
Yes
928-C: 1. Printing of PLU text on bill when the price is 0.00
2. Printing of t ext for associated PLU in COMBO MEAL on
the bill.
1. Printing of PLU
text on bill when
the price is 0.00
Yes
No
2. Header line on slip
paper is printed upon
reorder
Printed 0
Not 1
Printed
Not
2. Printing of text for
associated PLU in
COMBO MEAL on the
bill.
Yes 0
No 2
Yes 4
No 6
928-B
928-C
★✩
★✩
★✩
★✩
★✩
926-C: 1. Open store / Close store : stand alone POS with on-line
Note : ★
...
MRS for UP-600 /
...
✩
MRS for UP-700
Page 30

928-D: 1. Printing of PB/SERVICE on SLIP at reorder
2. Compulsory bill print system
1. Printing of
PB/SERVICE on
SLIP at reorder
Yes
No
2. Compulsory bill print
system 928-D
According to each media’s
preset
(The bill printing at
SERVICE and FINAL
media’s preset)
Compulsory for every entry 1
Compulsory for PB 2
According to each mediafs
preset
(The bill printing at
SERVICE and FINAL in
GLU system acts on each
media’s preset)
Compulsory for every entry 5
Compulsory for PB 6
0
★✩
4
[JOB#929] : UP-600/700 MRS=0000
929-A: 1. KP print format when finalizing (Expeditor)
1. KP print format when finalizing 929-A
Simple 0
Detail 1
NOTE: Based on each media’s preset.
929-B: 1. Server, Transaction resetting allowed with open GLU.
1. Server, Transaction resetting allowed with open
GLU.
No 0
Yes 1
929-B
★✩
★✩
3. [03 Z COUNTER]
DISPLAY: Setting item selection screen
Select "03 Z COUNTER" and press the ENTER key.
DISPLAY: Z COUNTER screen
929-C: 1. When closed file is full
1. When closed file is full 929-C
Inhibit registration 0
Registration is continued 1
929-D: 1. Selection o f TA X c o nt en t s in bi ll printing
2. Taxable status of PLU/UPC that is set at "Non-taxable" by PGM
1. Selection of TAX
contents in bill
printing
The total of tax
amount is printed
The tax amount of
every TAX is printed in
detail
2. Taxable status of
PLU/UPC that is set
at "Non-taxable" by
PGM
According to its
associated DEPT.
Non-taxable 1
According to its
associated DEPT.
Non-taxable 4
929-D
0
2
[JOB#980] : UP-600/700 MRS=0000
980-A: Not used (Fixed at "0")
980-B: 1. Hash department entries effect Hourly sales total.
1. Hash department entries effect Hourly sales
total.
No 0
Yes 1
980-C,D: Not used (Fixed at "00")
980-B
[JOB#981] : UP-600/700 NOT USED MRS=0000
★✩
★✩
★✩
Select the report to be changed and enter the desired value.
The content limits of the displayed reports are listed in the table
below.
DISPLAY TEXT CONT ENTS MRS
TRANS. Z1 Transaction Z1 report counter 0000
CONS.TRAN.Z1 Consolidation transaction Z1 report
counter
SERVER Z1/Z2 Server Z1/Z2 report counter 0000
HOURLY Z1 Hourly Z1 report counter 0000
PLU/UPC Z1/Z2 PLU/UPC Z1/Z2 report counter 0000
GLU Z1 GLU Z1 report counter 0000
TRANS. Z2 Transaction Z2 report counter 0000
CONS.TRAN.Z2 Consolidation transaction Z2 report
counter
DAILY NET Z2 Daily net Z2 report counter 0000
DEPARTMENT Z1 Department Z1 report counter 0000
DEPARTMENT Z2 Department Z2 report counter 0000
0000
0000
Note : ★
...
MRS for UP-600 /
...
✩
MRS for UP-700
Page 31

4. [04 GT]
5. [05 MODE SECRET# ]
DISPLAY: Setting item selection screen
Select "04 GT" and press the ENTER key.
DISPLAY: GT COUNTER screen
DISPLAY: Setting item selection screen
Select "05 MODE SECRET#" and press the ENTER key.
DISPLAY: MODE SECRET# screen
Select the GT counter to be changed and enter the desired value.
The content limits of the displayed GT counter are listed in the table
below.
DISPLAY TEXT CONTENTS MRS
POSIT GT2 (Positive GT) : Max.13 digits 0.00
NEGA GT3 (Negative GT) : Max.13 digits 0.00
TRAIN Training GT : Max.13 digits
GT1 is obtained by the following.
EQUATION: GT1 = GT2 - GT3
Select the MODE to be changed and enter the desired value.
The content limits of the displayed MODE SECRET# are listed in the
table below.
DISPLAY TEXT CONTENTS MRS
OP XZ MODE OP X/Z mode secret code : 4 digits 0000
X1 OPERATE X1 operation secret code : 4 digits *1 0000
Z1 OPERATE Z1 operation secret code : 4 digits *2 0000
X2 OPERATE X2 operation secret code : 4 digits *1 0000
Z2 OPERATE Z2 operation secret code : 4 digits *2 0000
PGM1 MODE PGM1 mode secret code : 4 digits
PGM2 MODE PGM1 mode secret code : 4 digits
If "0000" is entered "compulsory secret code entry" is canceled.
*1 : " X1,X2 operation secret code" is used when an operater selects
the "READING" menu in X/Z modes.
*2 : " Z1,Z2 operation secret code" is used when an operater selects
the "RESETTING" menu in X/Z modes.
Page 32

6. [06 FREE KEY]
DISPLAY: Setting item selection screen
Select "06 FREE KEY" and press the ENTER key.
DISPLAY: FREE KEY LAYOUT screen
To shift the screen, use the cursor key, or enter the Key No. and
press the ENTER key.
The initial screen starts from key No. 2-24.
When placing keys: Select the key to be placed with the cursor and
press the key on the keyboard.
With the cursor key,
the key No. is retrieved and
specified.
With the " " key and " "keys,
move the cursor to the desired
function key.
Press the key on
the Key board
Retrieve and specify by
directly entering the Key No.
XXX ENTER
Key No.
With the above operation, the
screen is selected and the key No.
Position code
(MRS)
Key No. Function name Key text
UP-600 UP-700
999 INHIBIT
1 0 KEY 0 KEY 029 098
2 1 KEY 1 KEY 024 099
3 2 KEY 2 KEY 030 108
4 3 KEY 3 KEY 036 117
5 4 KEY 4 KEY 025 100
6 5 KEY 5 KEY 031 109
7 6 KEY 6 KEY 037 118
8 7 KEY 7 KEY 026 101
9 8 KEY 8 KEY 032 110
10 9 KEY 9 KEY 038 119
11 00 KEY 00 KEY 025 107
12 000KEY 000KEY --- 116
13 Decimal point key . KEY 033 111
14 Clear key CL 039 120
15 Multiplication key @/FOR 027 102
16 Subtotal key SBTL 078 125
17 Cursor UP UP 009 081
18 Cursor DOWN DOWN 008 080
19 Cursor LEFT LEFT 003 071
20 Corsor RIGHT RIGHT 013 089
21 Cancel key CANCEL 010 121
22 Enter key ENTER 012 090
23 CA/AT key CA/AT 077 134
24 Page up key P UP 015 092
25 Page down key P DOWN 014 091
26 Back space key BKSPC --- --27 Delete key DEL --- --28 Merchandise subtotal key MDS ST 072 --29 Tray subtotal key TRY ST --- --30 Gasoline sales subtotal key GAS ST --- --31 Non-add code/Time key #/TM 011 --32 No sale key NS 074 --33 Scale key SCALE --- --34 PLU/UPC key PLU 040 128
35 Level shift # key LEVEL# --- 130
36 Level 1 key L1 --- --37 Level 2 key L2 --- --38 Level 3 key L3 --- --39 Level 4 key L4 --- --40 Level 5 key L5 --- --41 Price shift # key P.SHT# --- 129
42 Price 1 key P1 --- --43 Price 2 key P2 --- --44 Price 3 key P3 --- --45 Price 4 key P4 --- --46 Price 5 key P5 --- --47 Price 6 key P6 --- --48 Tax 1 shift key TAX1SF 007 138
49 Tax 2 shift key TAX2SF --- --50 Tax 3 shift key TAX3SF --- --51 Tax 4 shift key TAX4SF --- --52 Food stamp shift key FS SFT 076 --53 Group discount 1 shift key GD1SFT --- --54 Group discount 2 shift key GD2SFT --- ---
Page 33

Position code
(MRS)
Key No. Function name Key text
UP-600 UP-700
55 Group discount 3 shift key GD3SFT --- --56 Validation print key PRINT --- --57 Bill key BILL --- --58 Copy/After transaction
RCPT 016 094
receipt key
59 Charge tip key CH TIP --- --60 Cash tip key CA TIP --- --61 Tip paid key TIP PD --- --62 Last void key VOID 001 103
63 Indirect void key I.VOID --- --64 Subtotal void key ST VD --- --65 Refund key RFND --- 112
66 Return key RETURN --- --67 %1 key 1% --- --68 %2 key 2% --- --69 %3 key 3% --- --70 %4 key 4% --- --71 %5 key 5% --- --72 (-) 1 key (-) 1 --- --73 (-) 2 key (-) 2 --- --74 (-) 3 key (-) 3 --- --75 (-) 4 key (-) 4 --- --76 (-) 5 key (-) 5 --- --77 Group discount %1 key GDSC%1 --- --78 Group discount %2 key GDSC%2 --- --79 Group discount %3 key GDSC%3 --- --80 Tax key TAX 002 --81 Cover count key CV CNT --- --82 Auto key AUTO 082 131
83 Auto2 key AUTO2 081 140
84 Auto3 key AUTO3 --- --85 Auto4 key AUTO4 --- --86 Auto5 key AUTO5 --- --87 Auto6 key AUTO6 --- --88 Auto7 key AUTO7 --- --89 Auto8 key AUTO8 --- --90 Auto9 key AUTO9 --- --91 Auto10 key AUTO10 --- --92 Auto11 key AUTO11 --- --93 Auto12 key AUTO12 --- --94 Auto13 key AUTO13 --- --95 Auto14 key AUTO14 --- --96 Auto15 key AUTO15 --- --97 Auto16 key AUTO16 --- --98 Auto17 key AUTO17 --- --99 Auto18 key AUTO18 --- ---
100 Auto19 key AUTO19 --- --101 Auto20 key AUTO20 --- --102 Auto21 key AUTO21 --- --103 Auto22 key AUTO22 --- --104 Auto23 key AUTO23 --- --105 Auto24 key AUTO24 --- --106 Auto25 key AUTO25 --- --107 Cash2 key CA2 --- --108 Cash3 key CA3 --- --109 Cash4 key CA4 --- ---
Position code
(MRS)
Key No. Function name Key text
UP-600 UP-700
110 Cash5 key CA5 --- --111 Check key CHK --- --112 Check2 key CHK2 --- --113 Check3 key CHK3 --- --114 Check4 key CHK4 --- --115 Check5 key CHK5 --- --116 Charge1 key CH1 --- --117 Charge2 key CH2 --- --118 Charge3 key CH3 --- --119 Charge4 key CH4 --- --120 Charge5 key CH5 --- --121 Charge6 key CH6 --- --122 Charge7 key CH7 --- --123 Charge8 key CH8 --- --124 Charge9 key CH9 --- --125 Currency conversion 1 key CONV1 --- --126 Currency conversion 2 key CONV2 --- --127 Currency conversion 3 key CONV3 --- --128 Currency conversion 4 key CONV4 --- --129 GLU/PBLU key PBAL --- 137
130 New check key N.C. --- --131 Service key SRVC --- 136
132 Final key FINAL --- 135
133 Deposit key DEPO --- --134 Deposit refund key DEP.RF --- --135 Bill transfer key B.T. --- --136 FS tender key FSTEND 075 --137 Received on account key RA --- --138 Received on account2 key RA2 --- --139 Paid out PO --- --140 Paid out2 key PO2 --- --141 Server number entry key SRV# 028 093
142 Eat in 1 key EATIN1 --- --143 Eat in 2 key EATIN2 --- --144 Eat in 3 key EATIN3 --- --145 Remote printer send key RP SND --- --146 Gratuity exempt key GRT EX --- --147 Open tare key OPN TR --- --148 Balance key BAL --- --149 Repeat key REPEAT --- --150 Amount key AMT 064 --151 Dept number entry key DEPT# --- --152 Inquire key INQ 070 --153 Price change key PRCHNG 058 --154 Customer key CUST --- --155 Birthday key BIRTH --- --156 Trans out key TR.OUT --- --157 Trans in key TR.IN --- --158 Table/Seat # key TABLE# --- --159 Individual payment key I.PAY --- --160 MISC menu key M.FUNC 005 122
161 Cash menu key CA.MN --- --162 Check menu key CHK.MN 073 127
163 Charge menu key CHG.MN 079 126
164 Conversion menu key CNV.MN 004 139
Page 34

Position code
(MRS)
Key No. Function name Key text
UP-600 UP-700
165 Void menu key VD.MN --- --166 Refund type of sales key RF.SAL --- --167 Receipt ON/OFF switch key RCP.SW --- --168 Bill separate key B.S. --- --169 Waste mode key WASTE --- --170 Condiment next key C NEXT --- --171 Next $ key NEXT$ 080 --172 Edit tip key ED TIP --- --173 Repeat round key RP.RND --- --174 GLU recall key GLU RC --- --175 Message 1 key MSG1 --- --176 Message 2 key MSG2 --- --177 Message 3 key MSG3 --- --178 Message 4 key MSG4 --- --179 Message 5 key MSG5 --- --180 Message menu key MSG.MN --- --181 PLU menu 1 key PMEN01 --- --182 PLU menu 2 key PMEN02 --- --183 PLU menu 3 key PMEN03 --- --184 PLU menu 4 key PMEN04 --- --185 PLU menu 5 key PMEN05 --- --186 PLU menu 6 key PMEN06 --- --187 PLU menu 7 key PMEN07 --- --188 PLU menu 8 key PMEN08 --- --189 PLU menu 9 key PMEN09 --- --190 PLU menu 10 key PMEN10 --- --191 PLU menu 11 key PMEN11 --- --192 PLU menu 12 key PMEN12 --- --193 PLU menu 13 key PMEN13 --- --194 PLU menu 14 key PMEN14 --- --195 PLU menu 15 key PMEN15 --- --196 PLU menu 16 key PMEN16 --- --197 PLU menu 17 key PMEN17 --- --198 PLU menu 18 key PMEN18 --- --199 PLU menu 19 key PMEN19 --- --200 PLU menu 20 key PMEN20 --- --201 PLU menu 21 key PMEN21 --- --202 PLU menu 22 key PMEN22 --- --203 PLU menu 23 key PMEN23 --- --204 PLU menu 24 key PMEN24 --- --205 PLU menu 25 key PMEN25 --- --206 PLU menu 26 key PMEN26 --- --207 PLU menu 27 key PMEN27 --- --208 PLU menu 28 key PMEN28 --- --209 PLU menu 29 key PMEN29 --- --210 PLU menu 30 key PMEN30 --- --211 PLU menu 31 key PMEN31 --- --212 PLU menu 32 key PMEN32 --- --213 PLU menu 33 key PMEN33 --- --214 PLU menu 34 key PMEN34 --- --215 PLU menu 35 key PMEN35 --- --216 PLU menu 36 key PMEN36 --- --217 PLU menu 37 key PMEN37 --- --218 PLU menu 38 key PMEN38 --- --219 PLU menu 39 key PMEN39 --- ---
Position code
Key No. Function name Key text
UP-600 UP-700
220 PLU menu 40 key PMEN40 --- --221 PLU menu 41 key PMEN41 --- --222 PLU menu 42 key PMEN42 --- --223 PLU menu 43 key PMEN43 --- --224 PLU menu 44 key PMEN44 --- --225 PLU menu 45 key PMEN45 --- --226 PLU menu 46 key PMEN46 --- --227 PLU menu 47 key PMEN47 --- --228 PLU menu 48 key PMEN48 --- --229 PLU menu 49 key PMEN49 --- --230 PLU menu 50 key PMEN50 --- --231 Macro function 1 key MACR01 --- --232 Macro function 2 key MACR02 --- --233 Macro function 3 key MACR03 --- --234 Macro function 4 key MACR04 --- --235 Up size key UPSIZE --- --236 Capture 1 key CAP.1 --- --237 Capture 2 key CAP.2 --- --238 Capture 3 key CAP.3 --- --239 Capture 4 key CAP.4 --- --240 Capture 5 key CAP.5 --- --241 Capture 6 key CAP.6 --- --242 Capture 7 key CAP.7 --- --243 Capture 8 key CAP.8 --- --244 Capture 9 key CAP.9 --- --245 Capture 10 key CAP.10 --- --246 Function menu key FNC.MN --- ---
KEY POSITION CODES
[UP-600]
58
64
52
46
40
34
28
22
16
J
R
51
45
39
33
27
21
15
10
5
44
38
32
26
20
14
9
4
43
37
31
25
19
13
8
3
42
36
30
24
18
12
7
2
41
35
29
23
17
11
6
1
57
50
56
49
55
48
54
47
53
70
63
69
62
68
61
67
60
66
59
65
[UP-700]
43
34
25
J
R
42
33
24
16
8
41
32
23
15
7
40
31
22
14
6
39
30
21
13
5
38
29
20
12
4
37
28
19
11
3
36
27
18
10
2
35
26
17
9
1
70
61
52
69
60
51
68
59
50
67
58
49
66
57
48
65
56
47
64
55
46
63
54
45
62
53
44
97
88
79
96
87
78
95
86
77
94
85
76
93
84
75
92
83
74
91
82
73
90
81
72
89
80
71
106
105
104
103
102
101
100
99
98
115
114
113
112
111
110
109
108
107
124
123
122
121
120
119
118
117
116
(MRS)
76
75
74
73
72
71
133
132
131
130
129
128
127
126
125
82
81
80
79
78
77
142
141
140
139
138
137
136
135
134
Page 35

7. [07 KEY INITIAL]
08. [08 FILE]
DISPLAY: Setting item selection screen
Select "07 KEY INITIAL" and press the ENTER key.
DISPLAY: Setting item selection screen
Select "08 FILE" and press the ENTER key.
The keyboard layout is reset to the MRS-1 default key layout.
Page 36

Page 37

DISPLAY: File group Type 2 input screen
Select the file name to be changed and depress the ENTER key.
The content limits of the different file to pes are listed below.
DISPLAY: File group Type 0 input screen
DISPlAY TEXT SELECT ITEM NOTE
RECORD CREATE Select and press the CA/AT
ERASE
Select the file to be changed and enter the number of records.
DISPLAY: File group Type 1 input screen
key
Enter the number of blocks.
DISPLAY: File group Type 3 input screen
Enter the number of index records and data records.
DISPLAY : File group Type 4 input screen
Enter the number of records.
When an item of Type 2 is selected, the following display is shown.
Enter the number of records.
Page 38

FILE TABLE
GROUP
NO.
1 DEPT. 1 01, 02, 03, 05, 06
2 DEPT. TEXT (8) 0 03
3 DEPT. TEXT (16) 0 04
4 DEPT. Mark Down 0 11/12, 13, 14, 15
5 PLU/UPC 1 16, 17, 18, 20, 26, 28, 30, 32, 34, 36
6 PLU/UPC PRICE 1 0 18, 28, 30, 32, 34, 36/29, 31, 33, 35, 37
7 PLU/UPC PRICE 1-6 0 19, 38, 40, 42, 44, 46/39, 41, 43, 45, 47
8 PLU/UPC TEXT1 (8) 0 20
9 PLU/UPC TEXT1 (16) 0 21
10 PLU/UPC KP TEXT1 (12) 0 22
11 PLU/UPC TEXT1-6 (8) 0 23
12 PLU/UPC TEXT1-6 (16) 0 24
13 PLU/UPC KP TEXT1-6 (12) 0 25
14 PLU stock 0 27
15 DYNAMIC UPC 1 48, 49, 50, 53, 54, 58, 59, 61, 63, 193
16 DYNAMIC PLU PRICE 1 0 50, 59, 61, 63, 193/60, 62, 64, 194
17 DYNAMIC PLU PRICE 1-6 0 51, 65, 67, 69, 195/66, 68, 70, 196
18 DYNAMIC PLU TEXT1 (8) 0 52
19 DYNAMIC PLU TEXT1 (16) 0 53
20 DYNAMIC PLU KP TEXT1 (12) 0 54
21 DYNAMIC PLU TEXT1-6 (8) 0 55
22 DYNAMIC PLU TEXT1-6 (16) 0 56
23 DYNAMIC PLU KP TEXT1-6 (12) 0 57
24 UPC PGM PICK UP 1 71
25 DYNAMIC UPC PGM PICK UP 1 72
26 UPC X/Z PICK UP 1 73
27 Link PLU 1 74
28 Combo Meal 1 75, 76, 78
29 Combo Meal KP TEXT 0 77
30 Condiment table 1 81, 151
31 Mix & Match Table 1 82, 83
32 Server 1 90, 91, 92, 93, 94/95, 96, 97, 98, 101
33 Sign off Clerk (IRC) 2 104, 105
34 Hourly 1 106, 107
35 Daily net 1 111, 112/113, 115
36 Reg buffer 1 117, 118, 119, 120, 146, 148, 156, 157/122, 123, 125, 128, 129 , 145, 151, 121, 158
37 KP buffer 0 121, 158
38 GLU/PBLU (Preset + buffer) 3 130, 154, 155
39 Closed GLU 1 131, 197
40 AUTO GLU Generate code 1 132
41 GLU/PBLU Rcv buffer (IRC) 2 122
42 KP PRESET (IRC) 1 139, 140
43 CUSTOMER (PRESET) 1 159, 160
44 CUSTOMER (SALES) 3 161
45 T-LOG buffer 1 124
46 Journal Log buffer 1 126
47 Receipt Window buffer 1 127
48 Individual Payment buffer 0 128, 129, 145, 147
49 Term Dept 0 7, 12
50 Term PLU/UPC 0 29, 31, 33, 35, 37
51 Term Transaction 0 86
52 Term Server 0 95
53 All of term file 0 7, 12, 29, 31, 33, 35, 37, 60, 62, 64, 86, 95, 194
54 GLU/PBLU (Preset Only) 3 130, 154, 155
55 B.T buffer (buffer Only) 0 120
FILE NAME TYPE
File table No. (Create, Erase)
[(Fixed files)/(Related files)]
Page 39

GROUP
NO.
56 Message text (KP) 0 152, 153
57 Repeat round buffer 0 157
58 Positive# 1 163
59 Charge Positing (Positive# Sales) 1 164
60 Negative# 1 166
61 Capture job 1 169, 170
62 Capture job (sales) 3 171
63 RJE Command buffer 1 172, 173, 174, 175, 176, 177, 178, 179, 180/181, 182, 183, 184, 185, 186, 187
64 RJE Scheduler buffer 0 181, 182, 183, 184, 185, 186, 187
65 ONLINE PRINT buffer 1 188
66 MSG Spool (Machine) 1 189
67 MSG Spool (Server) 4 190
68 Term DYNAMIC PLU 0 60, 62, 64, 194
69 DYNAMIC UPC X/Z PICK UP 1 192
70 PLU ENH. SALES 0 30, 31, 32, 33, 34, 35, 36, 37, 61, 62, 63, 64, 193, 194
71 RECEIVE CHARGE POSTING 1 165
Type 0 Create / Erase only
Type 1 Create / Erase and Increase / Decrease the number of records.
Type 2 Create / Erase and Increase / Decrease the number of blocks.
Type 3 Create / Erase and Increase / Decrease the number of records
for label and data individually.
Type 4 Create / Erase and Increase / Decrease the number of records.
(corresponding with the number of blocks)
FILE NAME TYPE
File table No. (Create, Erase)
[(Fixed files)/(Related files)]
* : The files which are created or erased by the entry of the group
No.
** : For individual erase
Page 40

FILE CONTENTS
File name
1 DEPT PRESET 20 10 99 1 1 1 1 15
2 PRICE 20 10 99 (1) 1 1 1 0 3
3 TEXT (8 chara) 0 0 99 (1) 0 0 1 0 8
4 TEXT (16 chara) 20 10 99 (1) 1 1 1 0 16
5 CVM CHARACTOR 20 10 99 (1) 1 1 1 0 1
6 DAILY 20 10 99 (1) 1 1 1 0 13
7 TERM 20 10 99 (1) 1 1 1 0 13
8 SAVE DAILY 0 0 99 (1) 0 0 1 0 13
9 CONSOLI. 0 0 99 (1) 0 0 1 0 13
10 RECEIVE 0 0 99 (1) 0 0 1 0 13
11 DAILY (Markdown) 0 0 99 (1) 0 0 10 0 8
12 TERM (Markdown) 0 0 99 (1) 0 0 10 0 8
13 SAVE DAILY (Markdown) 0 0 99 (1) 0 0 10 0 8
14 CONSOL. (Markdown) 0 0 99 (1) 0 0 10 0 8
15 RECEIVE (Markdown) 0 0 99 (1) 0 0 10 0 8
16 PLU PRESET 1000 500 **** 1 1 1 9 43
17 FLAG 1000 500 **** (16) 1 1 1 0 2
18 PRICE1 1000 500 **** (16) 1 1 1 0 3
19 PRICE1-6 0 0 **** (16) 0 0 1 0 18
20 TEXT1 (8 chara) 0 0 **** (16) 0 0 1 0 8
21 TEXT1 (16 chara) 1000 500 **** (16) 1 1 1 0 16
22 KP TEXT1 1000 500 **** (16) 1 1 1 0 12
23 TEXT1-6 (8 chara) 0 0 **** (16) 0 0 1 0 48
24 TEXT1-6 (16 chara) 0 0 **** (16) 0 0 1 0 96
25 KP TEXT1-6 0 0 **** (16) 0 0 1 0 72
26 CVM CHARACTOR 1000 500 **** (16) 1 1 1 0 1
27 STOCK 0 0 **** (16) 0 0 1 0 8
28 DAILY (Price1) 1000 500 **** (16) 1 1 1 0 9
29 TERM (Price1) 0 0 **** (16) 0 0 1 0 9
30 COMBO DAILY (Price1) 0 500 **** (16) 0 0 1 0 9
31 COMBO TERM (Price1) 0 0 **** (16) 0 0 1 0 9
32 WASTE DAILY (Price1) 0 500 **** (16) 0 0 0 0 9
33 WASTE TERM (Price1) 0 0 **** (16) 0 0 1 0 9
34 REFUND DAILY (Price1) 0 500 **** (16) 0 0 1 0 9
35 REFUND TERM (Price1) 0 0 **** (16) 0 0 1 0 9
36 COUPON DAILY (Price1) 0 500 **** (16) 0 0 1 0 9
37 COUPON TERM (Price1) 0 0 **** (16) 0 0 1 0 9
38 DAILY (Price1-6) 0 0 **** (16) 0 0 6 0 9
39 TERM (Price1-6) 0 0 **** (16) 0 0 6 0 9
40 COMBO DAILY (Price1-6) 0 0 **** (16) 0 0 6 0 9
41 COMBO TERM (Price1-6) 0 0 **** (16) 0 0 6 0 9
42 WASTE DAILY (Price1-6) 0 0 **** (16) 0 0 6 0 9
43 WASTE TERM (Price1-6) 0 0 **** (16) 0 0 6 0 9
44 REFUND DAILY (Price1-6) 0 0 **** (16) 0 0 6 0 9
45 REFUND TERM (Price1-6) 0 0 **** (16) 0 0 6 0 9
46 COUPON DAILY (Price1-6) 0 0 **** (16) 0 0 6 0 9
47 COUPON TERM (Price1-6) 0 0 **** (16) 0 0 6 0 9
48 DYNAMIC UPC PRESET 0 0 **** 0 0 1 9 43
49 FLAG 0 0 **** (48) 0 0 1 0 2
50 PRICE1 0 0 **** (48) 0 0 1 0 3
51 PRICE1-6 0 0 **** (48) 0 0 1 0 18
52 TEXT1 (8 chara) 0 0 **** (48) 0 0 1 0 8
53 TEXT1 (16 chara) 0 0 **** (48) 0 0 1 0 16
RECORD BLOCK
MAX
Label
size
Data
size
Page 41

File name
RECORD BLOCK
MAX
Label
size
Data
size
54 KP TEXT1 0 0 **** (48) 0 0 1 0 12
55 TEXT1-6 (8 chara) 0 0 **** (48) 0 0 1 0 48
56 TEXT1-6 (16 chara) 0 0 **** (48) 0 0 1 0 96
57 KP TEXT1-6 0 0 **** (48) 0 0 1 0 72
58 CVM CHARACTOR 0 0 **** (48) 0 0 1 0 1
59 DAILY (Price1) 0 0 **** (48) 0 0 1 0 9
60 TERM (Price1) 0 0 **** (48) 0 0 1 0 9
61 WASTE DAILY (Price1) 0 0 **** (48) 0 0 1 0 9
62 WASTE TERM (Price1) 0 0 **** (48) 0 0 1 0 9
63 REFUND DAILY (Price1) 0 0 **** (48) 0 0 1 0 9
64 REFUND TERM (Price1) 0 0 **** (48) 0 0 1 0 9
65 DAILY (Price1-6) 0 0 **** (48) 0 0 6 0 9
66 TERM (Price1-6) 0 0 **** (48) 0 0 6 0 9
67 WASTE DAILY (Price1-6) 0 0 **** (48) 0 0 6 0 9
68 WASTE TERM (Price1-6) 0 0 **** (48) 0 0 6 0 9
69 REFUND DAILY (Price1-6) 0 0 **** (48) 0 0 6 0 9
70 REFUND TERM (Price1-6) 0 0 **** (48) 0 0 6 0 9
71 EAN PGM PICK UP 100 100 **** 1 1 1 9 0
72 DYNAMIC EAN PGM PICK UP 0 0 **** 0 0 1 9 0
73 EAN X/Z PICK UP 100 100 **** 1 1 1 9 0
74 LINK PLU 10 10 99 1 1 1 1 35
75 COMBO MEAL 0 10 20 0 0 1 1 124
76 TEXT 0 10 20 (75) 0 0 1 0 16
77 KP TEXT 0 10 20 (75) 0 0 1 0 12
78 CVM CHARACTOR 0 10 20 (75) 0 0 1 0 1
79 PLU MENU KEY 50 50 50 1 1 1 1 105
80 PLU MENU KEY TEXT 50 50 50 (79) 1 1 1 0 16
81 Condiment Table 0 10 99 0 0 1 1 107
82 MIX & MATCH TABLE 10 10 99 1 1 1 1 5
83 MIX & MATCH SOLD 10 10 99 (82) 1 1 1 0 5
84 TRANSACTION LABEL 168 168 168 1 1 1 2 0
85 DAILY 168 168 168 (84) 1 1 1 0 9
86 TERM 168 168 168 (84) 1 1 1 0 9
87 SAVE DAILY 0 0 168 (84) 0 0 1 0 9
88 CONSOL. 0 0 168 (84) 0 0 1 0 9
89 RECEIVE 0 0 168 (84) 0 0 1 0 9
90 SERVER PRESET 15 15 99 1 1 1 2 115
91 FLAG 15 15 99 (90) 1 1 1 0 3
92 TEXT 15 15 99 (90) 1 1 1 0 8
93 SERVER TRNSACTION LABEL 96 96 96 15 15 15 (90) 2 0
94 DAILY 96 96 96 (93) 15 15 15 (90) 0 9
95 TERM 96 96 96 (93) 15 15 15 (90) 0 9
96 SAVE DAILY 0 0 96 (93) 0 0 15 (90) 0 9
97 CONSOL. 0 0 96 (93) 0 0 15 (90) 0 9
98 RECEIVE 0 0 96 (93) 0 0 15 (90) 0 9
99 TOTAL SERVER (BUFFER) LABEL 96 96 96 (93) 1 1 1 2 0
100 TOTAL 96 96 96 (93) 1 1 1 0 9
101 RECEIVE SERVER PRESET 0 0 99 (90) 0 0 1 2 115
102 FLAG 0 0 99 (90) 0 0 1 0 3
103 TEXT 0 0 99 (90) 0 0 1 0 8
104 SIGN OFF SERVER TRNS. LABEL 0 0 96 (93) 0 0 1 2 0
105 RECEIVE 0 0 96 (93) 0 0 1 0 9
106 HOURLY LABEL 96 96 96 1 1 1 1 0
107 DAILY 96 96 96 (106) 1 1 1 0 11
Page 42

File name
RECORD BLOCK
MAX
Label
size
Data
size
108 SAVE DAILY 0 0 96 (106) 0 0 1 0 11
109 CONSOL. 0 0 96 (106) 0 0 1 0 11
110 RECEIVE 0 0 96 (106) 0 0 1 0 11
111 DAILY NET LABEL 32 32 32 1 1 1 3 0
112 TOTAL 32 32 32 (111) 1 1 1 0 8
113 DAILY NET CONSOL. LABEL 0 0 32 (111) 0 0 1 3 0
114 CONSOL. 0 0 32 (111) 0 0 1 0 8
115 DAILY NET RCV. LABEL 0 0 32 (111) 0 0 1 3 0
116 RECEIVE 0 0 32 (111) 0 0 1 0 8
117 Reg buffer 150 150 **** 1 1 1 0 62
118 Reg Edit buffer 150 150 **** (117) 1 1 1 0 62
119 GLU/PBLU buffer 150 150 **** (117) 1 1 1 0 62
120 B.T. buffer 0 150 **** (117) 0 0 1 0 62
121 KP buffer 150 150 **** (117) 2 2 2 0 52
122 GLU/PBLU Rcv buffer 0 0 **** (117) 0 0 1 0 62
123 GLU/PBLU Save buffer 0 0 **** (117) 0 0 1 0 62
124 T-LOG buffer 1200 1200 **** 1 1 1 0 33
125 T-LOG RECEIVE buffer 0 0 **** (117) 0 0 1 0 33
126 Journal Log Buffer 100 100 **** 1 1 1 0 50
127 Receipt Window buffer 30 30 **** 1 1 1 5 20
128 Ind. PAY Reg Edit Buffer 0 0 * *** (117) 0 0 1 0 62
129 Ind. PAY GLU/PBLU Buffer 0 0 **** (117) 0 0 1 0 62
130 GLU/PBLU 0-0 2-200 ****-**** 0 0 1 7 57
131 Closed GLU 0 0 **** 0 0 1 4 144
132 AUTO GLU Generate Code 0 0 **** 0 0 1 0 11
133 Logo Text 15 15 15 1 1 1 1 30
134 Function TEXT 264 264 264 1 1 1 2 8
135 Dept Group Text 9 9 9 1 1 1 1 8
136 PLU Group Text 99 99 99 1 1 1 1 8
137 Currency descriptor text 4 4 4 1 1 1 1 4
138 VP TEXT 3 3 3 1 1 1 1 30
139 KP PRESET 9 9 9 1 1 1 1 4
140 KP TEXT 9 9 9 (139) 1 1 1 0 12
141 Direct Key Table 142 142 142 1 1 1 1 35
142 Scale Table 9 9 9 1 1 1 1 2
143 Auto Key Table 25 25 25 1 1 1 2 100
144 Stacked report Table 20 20 20 2 2 2 1 16
145 Ind. Pay Reg buffer 0 0 **** (117) 0 0 1 0 62
146 Bill buffer 150 150 **** (117) 1 1 1 0 62
147 Ind. Pay Itemizer buffer 0 0 **** 0 0 1 1 450
148 Copy buffer 150 150 **** (117) 1 1 1 0 62
149 BS DESTINATION BUFFER 30 30 **** 1 1 1 5 20
150 BS SOURCE BUFFER 30 30 **** 1 1 1 5 20
151 CONDIMENT EDIT buffer 0 150 **** (117) 0 0 1 0 62
152 Message Preset 5 5 5 1 1 1 1 2
153 Message Text 5 5 5 (152) 1 1 1 0 16
154 OPEN GLU BUFFER 0 150 **** (130) 0 0 1 4 16
155 DISP OPEN GLU BUFFER 0 150 **** (130) 0 0 1 2 18
156 Receipt Window Display BUFFER 150 150 **** (117) 1 1 1 0 62
157 REPEAT ROUND BUFFER 150 150 **** (117) 1 1 1 0 32
158 Reg buffer FOR KP 150 150 **** (117) 1 1 1 0 62
159 CUSTOMER PRESET 0 0 **** 0 0 1 7 8
160 TEXT 0 0 **** (159) 0 0 1 0 56
161 CUSTOMER SALES 0-0 0-0 ****-**** (159) 0 0 1 12 18
162 MACRO TABLE 4 4 4 1 1 1 1 30
Page 43
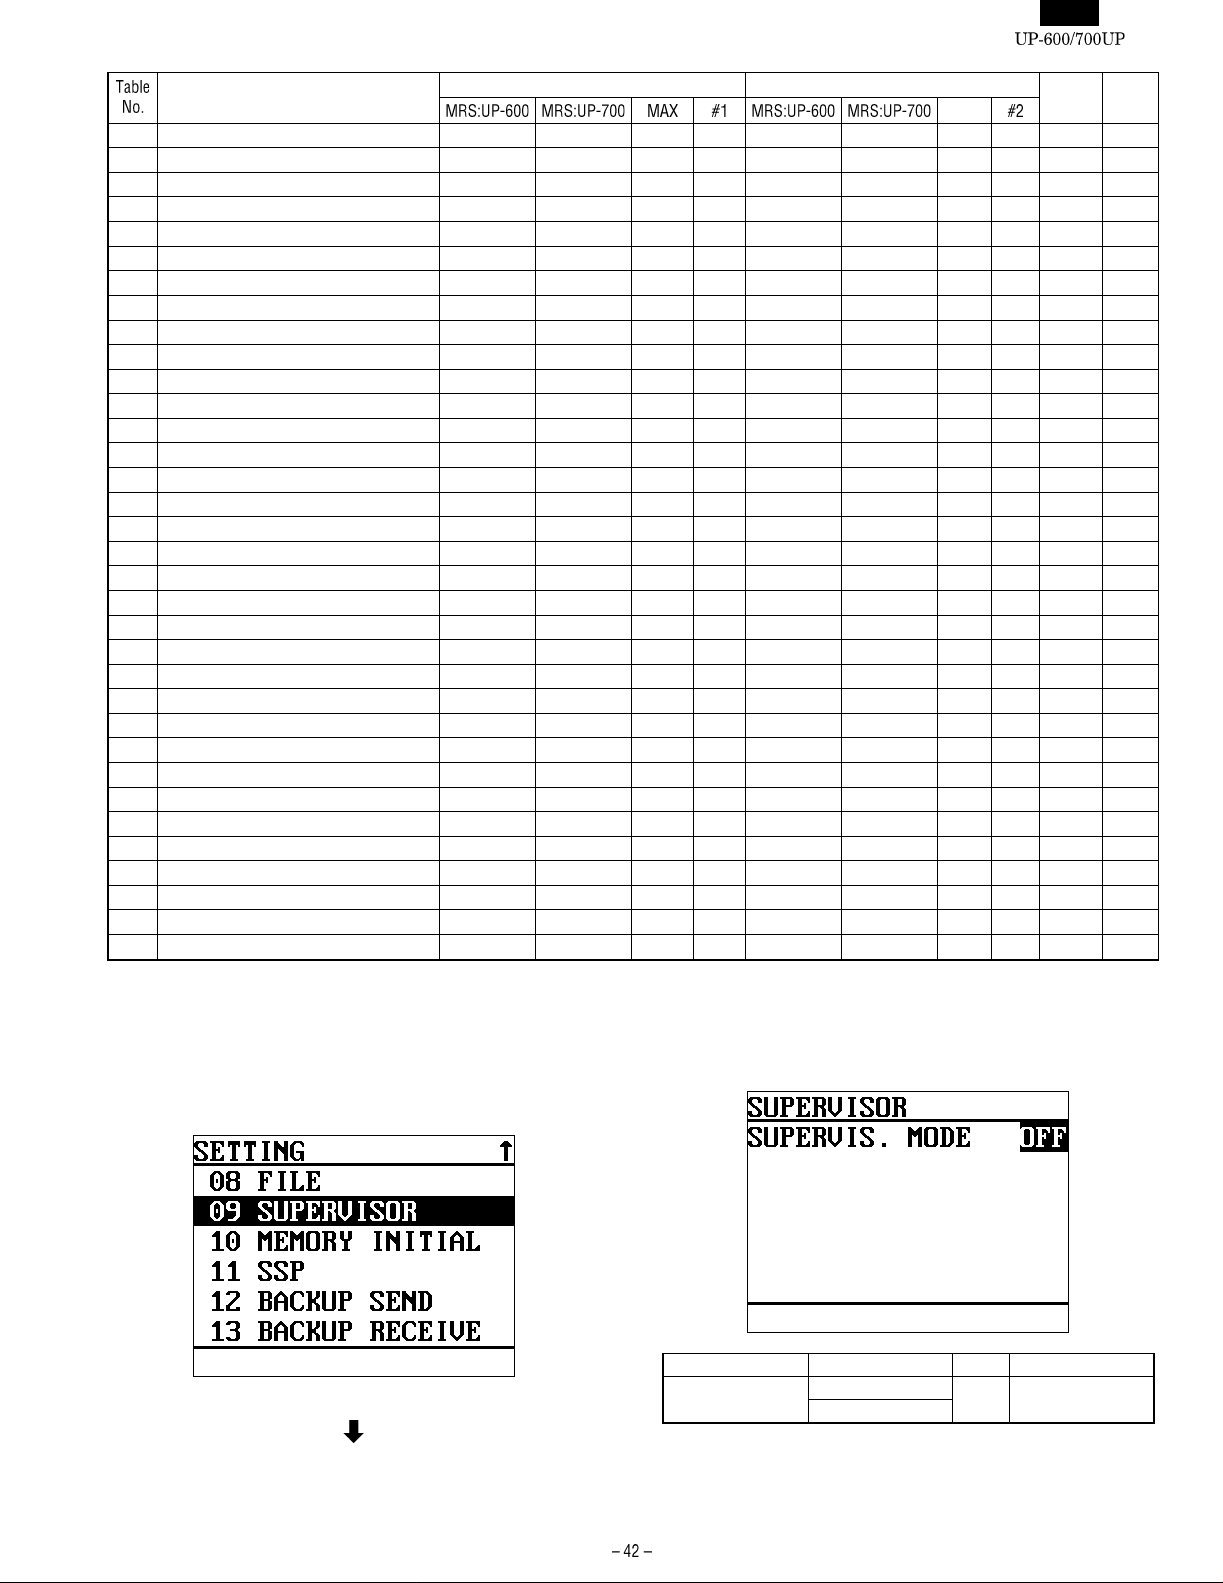
File name
163 POSITIVE# 100 50 **** 1 1 1 8 0
164 CHARGE POSTING (POSITIVE# SALES) 100 50 **** 1 1 1 2 14
165 CHARGE POSTING FOR IRC RCV 0 0 **** (164) 0 0 1 2 14
166 NEGATIVE# 100 50 **** 1 1 1 8 1
167 CAPTURE KEY PRESET 10 10 10 1 1 1 1 2
168 CAPTURE KEY TEXT 10 10 10 (167) 1 1 1 0 12
169 CAPTURE JOB PRESET 10 10 99 1 1 1 1 12
170 CAPTURE JOB TEXT 10 10 99 (169) 1 1 1 0 52
171 CAPTURE SALES 10-200 10-100 99-**** (169) 1 1 1 1 29
172 RJE BUFFER 3 3 **** 1 1 1 0 6
173 COMMNAD BUFFER 3 3 **** (172) 1 1 1 0 7
174 PFLD1 BUFFER 3 3 **** (172) 1 1 1 0 5
175 PFLD2 BUFFER 3 3 **** (172) 1 1 1 0 255
176 PFLD3 BUFFER 3 3 **** (172) 1 1 1 0 255
177 PFLD4 BUFFER 3 3 **** (172) 1 1 1 0 255
178 PFLD5 BUFFER 3 3 **** (172) 1 1 1 0 3
179 STATUS ONLINE BUFF 3 3 **** (172) 1 1 1 0 4
180 STATUS INLINE BUFFER 3 3 **** (172) 1 1 1 0 254
181 RJE SCHEDULE BUFFER 0 0 **** (172) 0 0 1 1 6
182 SCHEDULE COMMNAD BUFFER 0 0 **** (172) 0 0 1 0 7
183 SCHEDULE PFLD1 BUFFER 0 0 **** (172) 0 0 1 0 5
184 SCHEDULE PFLD2 BUFFER 0 0 **** (172) 0 0 1 0 150
185 SCHEDULE PFLD3 BUFFER 0 0 **** (172) 0 0 1 0 150
186 SCHEDULE PFLD4 BUFFER 0 0 **** (172) 0 0 1 0 150
187 SCHEDULE PFLD5 BUFFER 0 0 **** (172) 0 0 1 0 3
188 ONLINE PRINT SPOOL 150 150 **** 1 1 1 0 20
189 MACHINE MESSAGE SPOOL FILE 0 0 **** 0 0 1 0 20
190 SERVER MESSAGE SPOOL FILE 0 0 **** 0 0 15 (90) 0 20
191 FUNC MENU KEY 15 15 15 1 1 1 3 3
192 DYNAMIC EAN X/Z PICK UP 0 0 **** 0 0 1 9 0
193 D-EAN COUPON DAILY(Price1) 0 0 **** (48) 0 0 1 0 9
194 D-EAN COUPON TERM(Price1) 0 0 **** (48) 0 0 1 0 9
195 D-EAN COUPON DAILY(Price1-6) 0 0 **** (48) 0 0 6 0 9
196 D-EAN COUPON TERM(Price1-6) 0 0 **** (48) 0 0 6 0 9
#1: Same as the number of record of table no. N.
#2: The number of table is same as the number of record of table No. N.
****-**** : (Number of index record) - (Number of data record)
RECORD BLOCK
MAX
Label
size
Data
size
9. [09 SUPERVISOR]
DISPLAY: Setting item selection screen
Select "09 SUPERVISOR" and press the ENTER key.
DISPLAY: Supervisor ON/OFF screen
DISPLAY TEXT SELECT ITEM MRS NOTE
SUPERVIS.
MODE
Select the item and press the CA/AT key.
NOTE : Secret code for all modes are ignored when supervisor mode
is "ON".
OFF OFF Select and press
ON
the CA/AT key
Page 44

10. [10 MEMORY INITIAL]
1 1 . [11 SSP]
DISPLAY: Setting item selection screen
Select "10 MEMORY INITIAL" and press the ENTER key.
DISPLAY: The following display is shown.
DISPLAY: Setting item selection screen
Select "11 SSP " and press the ENTER key.
DISPLAY: SSP screen
Select the desired choice and press the ENTER key.
Select the item and press the ENTER key.
The contents of each item are shown in the table below.
DISPLAY TEXT CONTENTS
SSP INPUT U sed for SSP data input.
SSP EDIT Used for edit of entered SSP data .
SSP ALL CLEAR Used to erase all the entered SSP data.
SSP IND.CLEAR Used to erase entered SSP data individually.
SSP REACTIV. Used to restore erased SSP data.
Page 45

12. [12 BACKUP SEND]
13. [13 BACKUP RECEIVE]
DISPLAY: Setting item selection screen
Select "12 BACKUP SEND" and press the ENTER key.
DISPLAY: BACKUP SEND screen
DISPLAY: Setting item selection screen
Select "13 BACKUP RECEIVE" and press the ENTER key.
DISPLAY: BACKUP RECEIVE screen
Select the item and press the ENTER key.
The contents of each item are shown in the table below.
DISPLAY CONTENT S SELECT ITEM MRS
SEND DATA Send content
type
SPEED Communication
speed setting
Only channel 2 is available. For connection, a modular to D-sub
conversion cable is required.
For the modular-D-sub conversion cable, see the Service Manual.
ALL RAM ALL RAM
SSP
PROGRAMMED PROGRAMMED
115,200 bps
57,600 bps
38,400 bps
19,200 bps
9,600 bps
4,800 bps
2,400 bps
Select the item and press the ENTER key.
The contents of each item are shown in the table below.
DISPLAY CONTENTS SELECT ITEM MRS
SPEED Communication
speed setting
Only channel 2 is available. For connection, a modular to D-sub
conversion cable is required.
For the modular-D-sub conversion cable, see the Service Manual.
PROGRAMMED PROGRAMMED
115,200 bps
57,600 bps
38,400 bps
19,200 bps
9,600 bps
4,800 bps
2,400 bps
Page 46

CHAPTER 4. SRV MODE PROGRAMMING ("3 IRC SETTING")
Before trying to perform inline setup, make sure to create (or delete)
all files required by the system using the following procedure: [SRV
MODE] - [2 SETTING] - [08 FILE] allocate memory. Then perform the
inline setup.
DISPLAY: SRV mode screen
Select "3 IRC SETTING" and press the ENTER key.
DISPLAY: IRC SETTING item selection screen
[1 SATELLITE]
DISPLAY: Setting screen
Select the desired item and press the ENTER key.
The item setting input screen is displayed.
1. [1 TERMINAL SETTING]
DISPLAY: Setting item selection screen
Select the desired item to be changed and press the ENTER key
when complete.
The setting content is described below.
DISPLAY
TEXT
IP ADDRESS 1 192
IP ADDRESS 2 168
IP ADDRESS 3 000
IP ADDRESS 4 Terminal No. 001-254 000
GLU GLU system CENTRALIZED CENTRALIZED
POSITIVE Positive #
NEGATIVE Negative #
BACKUP
MASTER
Regarding IP address 1-3, use the same address for all machines
(master, back-up master, and satellites) on the inline system.
For IP address 4, enter the machine’s own terminal No. on the
inline system.
When all the machine are set, press the [CA/AT] key.
The [IRC SETTING] screen appears and the setup starts automatically.
DISPLAY:
CONTENTS SELECT ITEM MRS
INDIVIDUAL
CENTRALIZED CENTRALIZED
system
system
Backup
master function
INDIVIDUAL
CENTRALIZED CENTRALIZED
INDIVIDUAL
EXIST NOT
NOT
Select the desired item to be changed and press the ENTER key.
The contents of setting are shown in the table next page.
SRV
IRC SETUP
1: SAVE NON DELETE
2: OTHER DELETE
3: SAVE CREATE
4: OTHER CREATE
Page 47

[2 MASTER]
Symbol/PartsCod)
- - - - - - - - - - - - - - - - - - - - - - - - - - - - - - - - - - - - - - - - - - - - - - - - - - - - - - -
DISPLAY: Setting screen
When all the master’s selections are set, press the [CA/AT] key.
Set the IP address 4 for the master list and press the ENTER key
Select the desired item to be changed, make the setting and press
the ENTER.
The setting content is described below.
DISPLAY TEXT CONTENTS SELECT ITEM MRS
IP ADDRESS 1 192
IP ADDRESS 2 168
IP ADDRESS 3 000
IP ADDRESS 4 Termi nal No. 001-254 000
GLU GLU system CENTRALIZED CENTRALIZED
INDIVIDUAL
POSITIVE Positive #
system
NEGATIVE Negative #
system
BACKUP
MASTER
Backup master
function
CENTRALIZED CENTRALIZED
INDIVIDUAL
CENTRALIZED CENTRALIZED
INDIVIDUAL
EXIST NOT
NOT
Regarding IP address 1-3, use the same address for all machines
(master, back-up master, and satellites) on the inline system.
For IP address 4, enter the machine’s own terminal No. on the
inline system.
Set the Machine No. for the master list and press the ENTER key
Repeat the setting for IP address and the machine No. for every
machine on the inline system. When all machines have been set,
press the [CA/AT] key.
The [IRC SETTING] screen appears and the setup starts automatically.
DISPLAY:
SRV
IRC SETUP
1: SAVE NON DELETE
2: OTHER DELETE
3: SAVE CREATE
4: OTHER CREATE
Page 48

[3 BACKUP MASTER]
DISPLAY: Setting screen
[4 STD. WITH IRC]
DISPLAY: Setting screen
Select the desired item to be changed and press the ENTER key.
The setting content is described below.
DISPLAY TEXT CONTENTS SELECT ITEM MRS
IP ADDRESS 1 192
IP ADDRESS 2 168
IP ADDRESS 3 000
IP ADDRESS 4 Terminal No. 001-254 000
Select the desired item to be changed and press the ENTER key.
The setting content is described below.
DISPLAY TEXT CONTENTS SELECT ITEM MRS
IP ADDRESS 1 192
IP ADDRESS 2 168
IP ADDRESS 3 000
IP ADDRESS 4 Terminal No. 001-254 000
GLU GLU system CENTRALIZED CENTRALIZED
INDIVIDUAL
POSITIVE Positive #
system
NEGATIVE Negative #
system
Regarding IP address 1-3, use the same address for all machines
(master, back-up master, and satellites) on the inline system.
For IP address 4, enter the machine’s own terminal No. on the
inline system.
When you have completed your selections, press the [CA/AT] key.
The [IRC SETTING] screen appears and the setup starts automat-
ically.
DISPLAY:
CENTRALIZED CENTRALIZED
INDIVIDUAL
CENTRALIZED CENTRALIZED
INDIVIDUAL
[5 STAND ALONE]
Used to restore to a stand alone machine.
2. [2 IRC RESET]
This operation clears only the working memory for inline operations.
The program memory for inline operations remains unchanged even
after the resetting is performed.
Inline communications can also be achieved.
SRV
IRC SETUP
1: SAVE NON DELETE
2: OTHER DELETE
3: SAVE CREATE
4: OTHER CREATE
Page 49

CHAPTER 5. SRV MODE PROGRAMMING ("4 DOWN LOAD")
After the IRC SETUP has been completed, using this setting procedure, you can download SRV mode presets setting data from the
master.
DISPLAY: SRV mode screen
Select the "4 DOWN LOAD" and press the ENTER key.
DISPLAY: DOWN LOAD item selection screen
[1 ALL]
Download data to all the machines included in the master list.
[2 MACHINE SELECT]
Select the machine among the master list from which you want to
download data.
DISPLAY: MACHINE SELECT screen
Select the machine and press the ENTER key.
The downloading of data is started, once the [CA/AT] key is pressed.
Select the desired item and press the ENTER key.
DISPLAY: DOWN LOAD METHOD item selection screen
Select the desired item and press the ENTER key.
Page 50

CHAPTER 6. SRV MODE PROGRAMMING ("5 DIAGNOSTICS")
Execute the Diag. test program.
For more information, please refer to the Service Manual.
DISPLAY: SRV mode screen
Page 51

COPYRIGHT 2001 BY SHARP CORPORATION
All rights reserved.
Printed in Ja pan.
No part of this public ation may be reproduced,
stored in a retrieval system, or transmitted.
In any form or by any means ,
electronic, mechanical, photocop ying, recording, or oth erwise,
without prior written permission of the publisher.
SHARP CORPORATION
Digital Document Systems Group
Quality & Reliability Control Center
Yamatokoriyama, Nara 639-1186, Japan
2001 July Printed in Japan
 Loading...