


POS TERMINAL
MODEL
UP-3515
INTER-REGISTER
COMMUNICATION SYSTEM
INSTRUCTION
MANUAL

TABLE OF CONTENTS
Introduction ·············································································································································3
Inline Operation ·······································································································································4
1
1. Message display·····································································································································4
(1) Message displayed during inline communication··············································································4
(2) Error messages·································································································································5
2. Open store operation (OPXZ mode) – master and satellite ···································································6
3. Close store operation (OPXZ mode) – master and satellite ···································································6
4. Clerk system···········································································································································7
(1) Centralized clerk file system ·············································································································7
(2) Individual clerk file system ················································································································8
5. Sign-on operation (clerk assignment) (REG mode/MGR mode) ····························································9
6. Clerk sign-on report ······························································································································10
7. Sign-off operation (cancellation of clerk assignment) (REG mode/MGR mode) ··································11
8. Downloading the contents of the programming to satellites – master ··················································12
(1) Initial downloading···························································································································12
(2) Maintenance downloading ··············································································································12
9. Look-up and updating of the GLU file···································································································15
(1) Centralized GLU file system············································································································15
(2) Individual GLU file system···············································································································15
10. PLU/EAN stock control ·························································································································16
11. T-LOG polling ·······································································································································17
12. PLU/EAN data control ··························································································································18
13. Price change function ···························································································································20
14. Customer data control ··························································································································21
15. Communication with a remote printer (option)······················································································21
16. Rerouting print data ······························································································································22
Consolidated and Individual Reports··································································································23
2
1. Operating modes ··································································································································23
2. Consolidated reports – master/back-up master····················································································24
(1) Report generation procedure ··········································································································24
(2) List of consolidated reports (SYSTEM READING/RESETTING) ····················································25
3. Individual reports – master/back-up master/satellite ············································································27
(1) Report generation procedure ··········································································································27
(2) List of individual reports (READING/RESETTING) ·········································································28
4. Resetting reports in a system with no save file ····················································································30
5. Clerk report···········································································································································31
(1) Centralized clerk file system ···········································································································31
(2) Individual clerk file system ··············································································································32
6. Cashier report·······································································································································33
7. Reports that can be generated when the Compulsory Cash/Check Declaration (CCD) function is
enabled·················································································································································34
8. Reset clear operation (X1/Z1 and X2/Z2 modes) – master ··································································35
1

IRC Programming··································································································································36
3
1. Setting the machine numbers – master and satellite············································································36
2. Setting the terminal numbers (IRC machine numbers) for satellites ····················································37
3. Initial setting for the master and master list creating/updating ·····························································38
(1) Setting the terminal number for the master and creating the master list·········································38
(2) Deleting a machine from the master list··························································································39
4. Specifying the terminal to serve as a back-up master – master···························································40
5. Specifying whether to enable or disable the system retry function when a transmission error occurs –
master and satellite ······························································································································41
6. Choosing whether to search the master or satellite first for the PLU/EAN code – satellite ··················41
7. Reading the contents of the IRC programming – master and satellite ·················································42
8. Programming for the remote printer ·····································································································43
(1) Basic programming for the remote printer – master and satellite ···················································43
(2) Optional programming for the remote printer – master and satellite···············································45
9. Programming for the Manager Work Station (MWS) – master and satellite·········································46
(1) Programming of the MWS terminal number····················································································46
(2) Programming of the time-out time···································································································47
(3) Programming of the gateway number ·····························································································47
10. Reading the contents of the Manager Work Station (MWS) programming – master and satellite ·······48
System Back-Up ····································································································································49
4
1. How the IRC back-up system works·····································································································49
2. Master declaration ································································································································50
(1) When the master breaks down – Master declaration at the back-up master ··································50
(2) When the back-up master breaks down – Master declaration at the master ··································51
3. Recovery declaration····························································································································52
(1) When the master recovers from a breakdown – Recovery declaration at the back-up master·······52
(2) When the back-up master recovers from a breakdown – Recovery declaration at the master·······53
Error Recovery ······································································································································54
5
1. Manual clear operation ·························································································································54
(1) Manual clearing procedure··············································································································54
(2) List of manual clearing items···········································································································54
2. System retry function····························································································································55
(1) When the system retry function is disabled·····················································································55
(2) When the system retry function is enabled ·····················································································56
BASIC SPECIFICATIONS for LAN········································································································57
6
2
Introduction
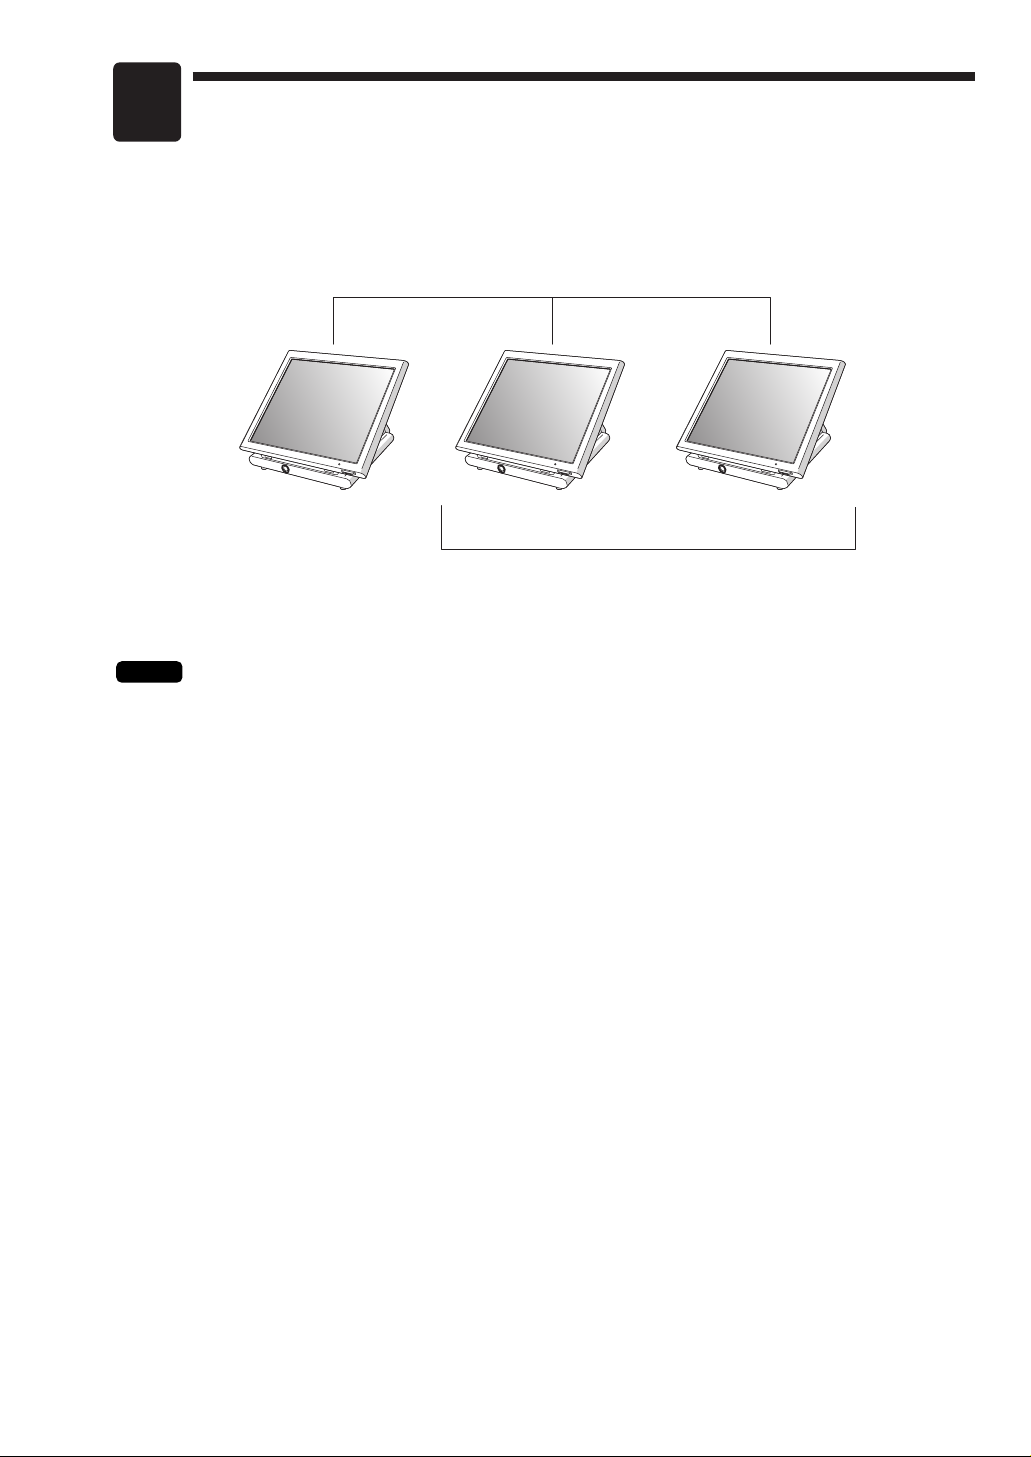
The UP-3515 inter-register communication (IRC) system consists of one master machine and up to 31
satellite machines which are all interconnected by the local area network (LAN) to provide data transmission
among them. This system allows the manager to exercise centralized control over the satellites through the
master.
LAN
Master Satellite
Max. 31 satellites (with batch processing)
Max. 15 satellites (with real-time processing)
• One of the satellites may be used as a back-up master.
NOTE
The additional RAM board, UP-S04MB2/UP-S08MB, must be installed in the master and,
if possible, in each satellite.
Satellite
3
1
Inline Operation
1. Message display
(1) Message displayed during inline communication
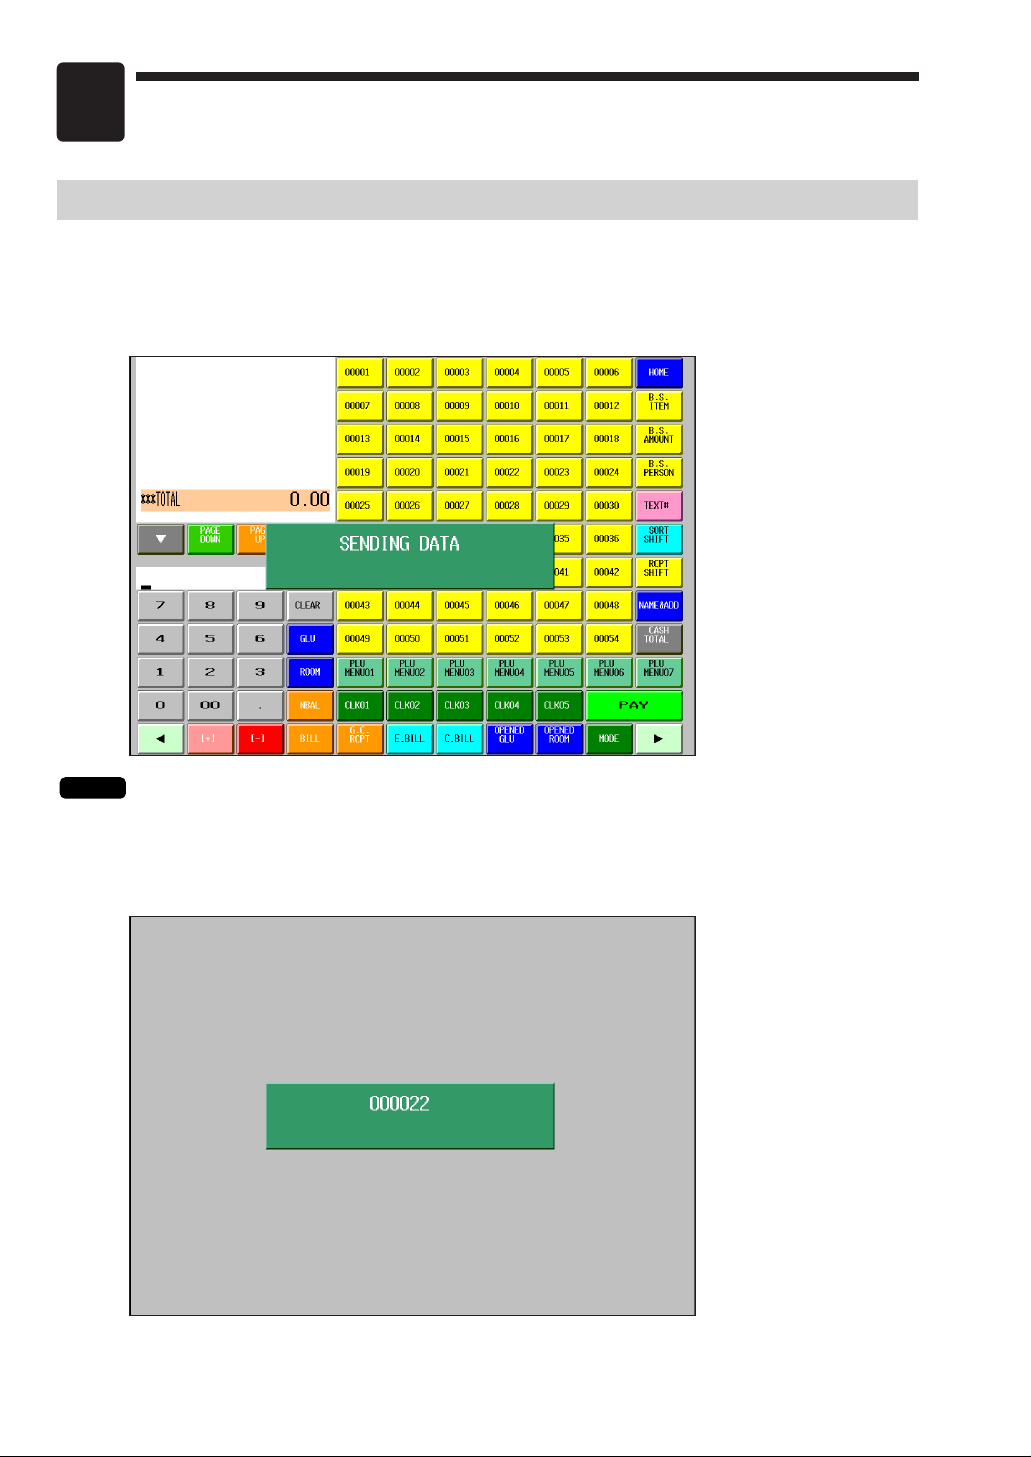
1)The message as shown below is displayed at the master which is engaged in IRC transmission.
ex.:
NOTE
In this case, the machine number of the satellite is “000022.”
The above message is also displayed at the satellite which is engaged in transmission for
system resetting.
2)The machine number of the satellite communicating with the master is displayed at the master after
the start of IRC transmission.
ex.:
4

(2) Error messages
Error messages (Default) Description
• This message prompts you to retry communication with the machine which you
have failed to communicate.
• The target machine is busy.
• The specified clerk has signed on at another machine.
• The entered GLU code is in use.
• The GLU code or related file memory is not enough.
• Transmission error
• The clerk who entered a GLU code are not authorized.
• IRC initial downloading before resetting
• The back-up master doesn't reply to the request.
• The master doesn't reply to the request.
• Remote printer or external printer off-line error
• The target machine is turned off.
• T-LOG buffer is full.
• The file in the master and that in the satellite are not of the same type.
• The specified clerk code is not present in the master list.
• The entered code is not listed.
• The entry made is not valid.
RETRY
BUSY
CODE NOT FREE
LACKING MEMORY
LINE ERROR
NO AUTHORITY
NON RESET
BACKUP DOWN?
MASTER DOWN?
CHECK CONNECT
POWER OFF
T-LOG FULL
TYPE ERROR
UNDEFINED CODE
ENTRY ERROR
If an error occurs, a corresponding error message is displayed.
To clear an error message, touch the [CLEAR] key.
Some of the error messages are listed below as examples.
List of sample error messages
5

NOTE
NOTE
2.
Open store operation (OPXZ mode) – master and satellite
When the open store operation is performed at the master, the IRC system is opened. POS can send AT
command by this job. This function controls a modem, but doesn't have control over registration and T-LOG.
The procedure for the open store operation is as follows.
Open store procedure
Select “7 OPEN STORE” from the displayed menu in the OPXZ mode window.
• You can also perform the open store operation at each satellite.
• The open store operation cannot be performed at any machines whose terminal numbers have
not been programmed.
• When a transmission error occurs while the open store operation is being performed, the open
store operation is regarded as normally terminated if the system retry function* has been
disabled by programming. When the master has been programmed to enable the system retry
function, it displays the machine number of the satellite that has encountered the error.
Selecting the displayed machine number will display a prompt to retry the open store operation.
* For the system retry function, see pages 55–56.
3.
Close store operation (OPXZ mode) – master and satellite
When the close store operation is performed at the master, the IRC system is closed. POS can send AT
command by this job. This function controls a modem, but doesn’t have control over registration and T-LOG.
The procedure for the close store operation is as follows.
Close store procedure
Select “8 CLOSE STORE” from the displayed menu in the OPXZ mode window.
• You can also perform the close store operation at each satellite.
• When the close store operation is performed, the data remaining in the T-LOG buffers of all the
satellites is collected by the master.
• When a transmission error occurs during the close store operation, the operation is regarded
as normally terminated if the system retry function* has been disabled by programming. When
the master has been programmed to enable the system retry function, it displays the machine
number of the satellite that has encountered the error. Selecting the displayed machine
number will display a prompt to retry the close store operation.
* For the system retry function, see pages 55–56.
6

NOTE
4. Clerk system
In the IRC system, the following two types of clerk file systems are available: a centralized system and an
individual system. In the centralized clerk file system, the master manages transaction data on clerks within
the IRC system. In the individual clerk file system, each machine manages its clerk transaction data.
In choosing the type of clerk system, consult your authorized SHARP dealer.
(1) Centralized clerk file system
Centralized clerk file system – without the overlapped clerk function
In this system, each clerk file is under the centralized control of the master and programming for clerks has
to be done only at the master. When a clerk signs on at a satellite, a communication between the satellite
and the master will begin.
Centralized clerk file system
– with the overlapped clerk function and without overlapped clerk save files
In this system, each overlapped clerk file is under the centralized control of the master and programming for
clerks has to be done only at the master. When a clerk signs on at a satellite, a communication between the
satellite and the master will begin.
When the clerk signs off, the overlapped clerk data is transferred to the master and saved in its overlapped
clerk file.
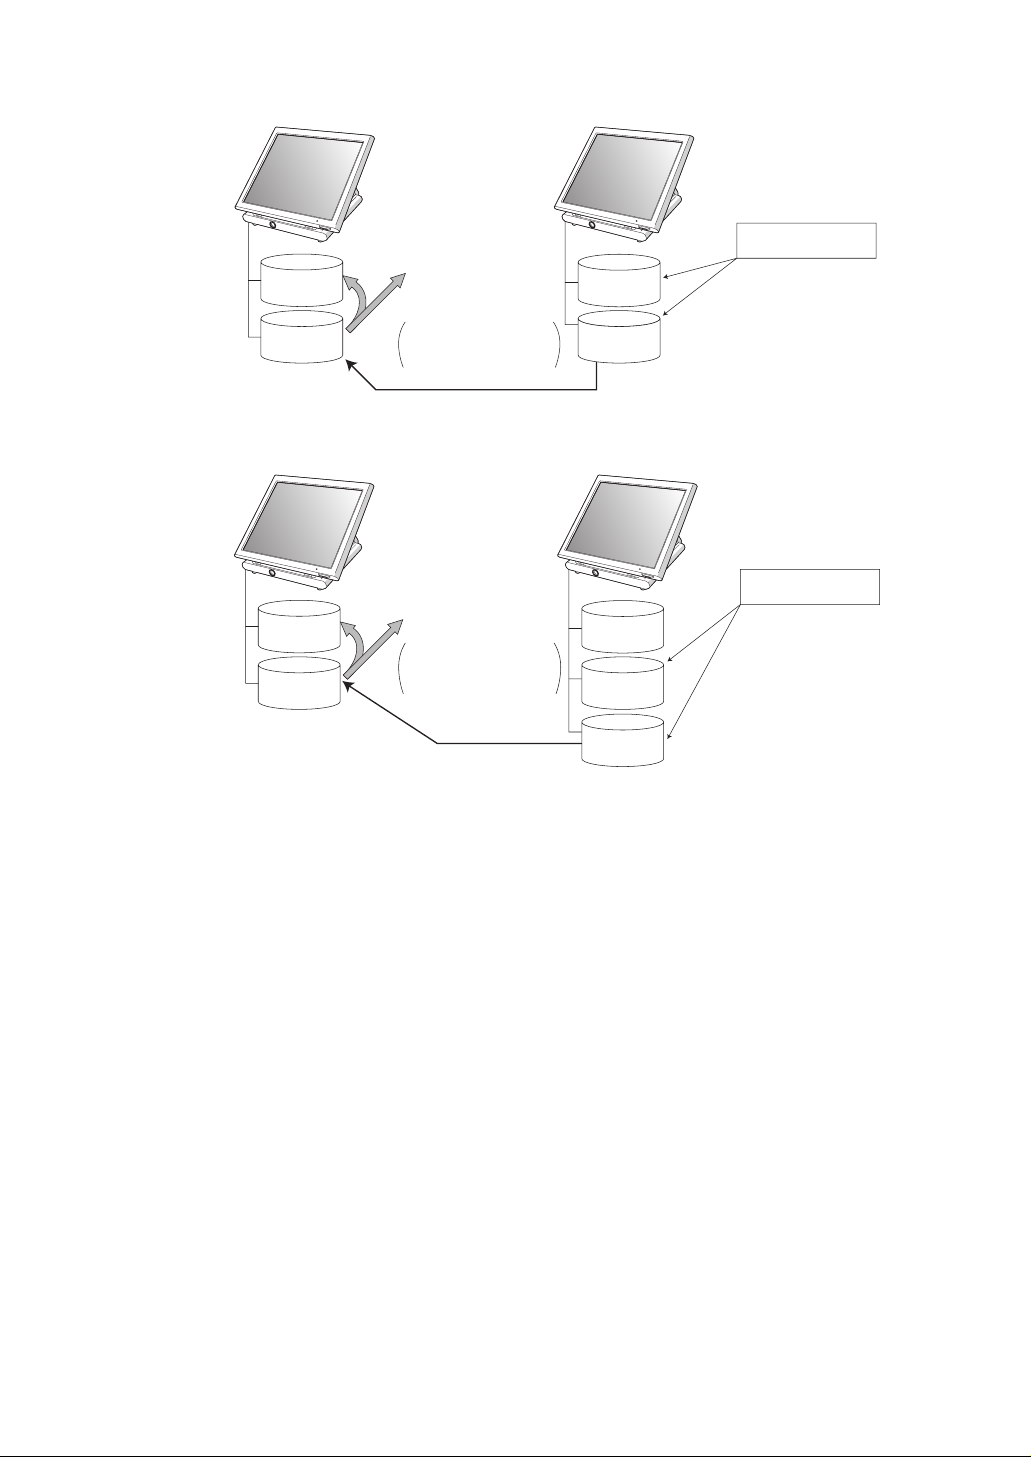
Centralized clerk file system
– with the overlapped clerk function and overlapped clerk save files
In this system, each overlapped clerk file is under the centralized control of the master and programming for
clerks has to be done only at the master. The way data flows differs depending on whether or not the clerk
signs on at the same satellite as the one used in his or her previous operation. (The data which flows in the
system includes not only clerk data but also GLU data. In the figure on the next page, the GLU/ROOM GLU
data flows are omitted.)
At the master, you can generate a report listing clerks who are currently in sign-on state at the
machines in the IRC system. (For further details on the clerk sign-on report, see page 10.)
7

1) When the clerk signs on at a machine other than the one used in his or her previous operation:
NOTE
Overlapped
clerk file
Overlapped
clerk save file
Overlapped
clerk file
1)
2)
Master
Satellite
Satellite
Overlapped
clerk file
Overlapped
clerk save file
Overlapped
clerk file
In this case, the overlapped clerk data is sent from the master to the satellite (transfer of overlapped clerk
data).
2) When the clerk signs on at the same satellite as the one used in his or her previous operation:
In this case, no data transfer occurs between the master and the satellite but the data stored in the save file
of the satellite is called back. This permits quicker data look-up than above in 1).
In both cases, the overlapped clerk data is saved in the
master's overlapped clerk file as well as the satellite's
overlapped clerk data save file upon sign-off operation.
Whether the centralized clerk file system is used with or
without an overlapped clerk save file, the master's
overlapped clerk file can be accessed from any machine
in the IRC system.
• For selecting whether your system should have the overlapped clerk function or not, and whether
it should have overlapped clerk save files or not, consult your authorized SHARP dealer.
• To use the overlapped clerk function in the IRC system, the overlapped clerk function must be
enabled for all the master and satellite machines.
(2) Individual clerk file system
In this system, each clerk file is under the control of a satellite and you have to do programming for
clerks at each satellite. Even if a programmed clerk signs on at a satellite, a communication with the
master will not begin.
The overlapped clerk file in a satellite can only be accessed by the satellite itself. The data in the clerk
files at all satellites will be collected by the master each time a consolidated report is issued.
8

NOTE
NOTE
5.
Sign-on operation (clerk assignment) (REG mode/MGR mode)
The sign-on operation is intended to assign a clerk to a machine (satellite/master) and enable him or her to
make registrations at the machine.
If a clerk successfully signs on at a machine, his or her clerk code appears on the LCD of the machine.
Sign-on procedure
(This procedure is the same as for clerk assignment at a standalone machine.)
Clerk assignment
• For the contactless clerk key system:
Set a corresponding clerk key to the clerk switch.
* The contactless clerk key is optional.
• For the clerk entry key system:
Touch a corresponding clerk entry key on the screen.
• For the WMF clerk key system (option):
Insert a corresponding WMF clerk key into the WMF clerk switch.
* The WMF clerk key is not a SHARP product.
• For the code entry system:
Enter a corresponding clerk code and touch the [CLK#] key.
• For the magnetic card reading system (option):
Swipe a corresponding clerk card through the magnetic card reader.
* The magnetic clerk card is optional.
If a secret code is programmed, the secret code entry window will pop up. Enter the secret code and touch
the [ENTER] key.
• The sign-on operation can be made only for one clerk at a time.
• Every clerk that is programmed for the system can sign on at any satellite. (Centralized clerk file system)
• A clerk, who has signed on at a machine using a contactless clerk key, can not sign on at any other
machine in the system until he or she signs off at the original machine. (Centralized clerk file system)
• If a clerk, who has signed on at a machine in the system using the clerk entry key system or
the code entry system, signs on at any other machine in the system, he or she is automatically
signed off at the original machine. (Centralized clerk file system)
• In case of trouble, the sign-on state can be cleared at the master. (Please consult your
authorized SHARP dealer for further details.)
Your POS terminal can provide the clerk + cashier system instead of current system (clerk only
system). If you want to change the system, please consult your authorized SHARP dealer.
Cashier assignment (Clerk + cashier system)
• For the cashier entry key system:
Touch a corresponding cashier key on the screen.
• For the code entry system:
Enter a corresponding cashier code and touch the [CSR#] key.
If a secret code is programmed, the secret code entry window will pop up. Enter the secret
code and touch the [ENTER] key.
9
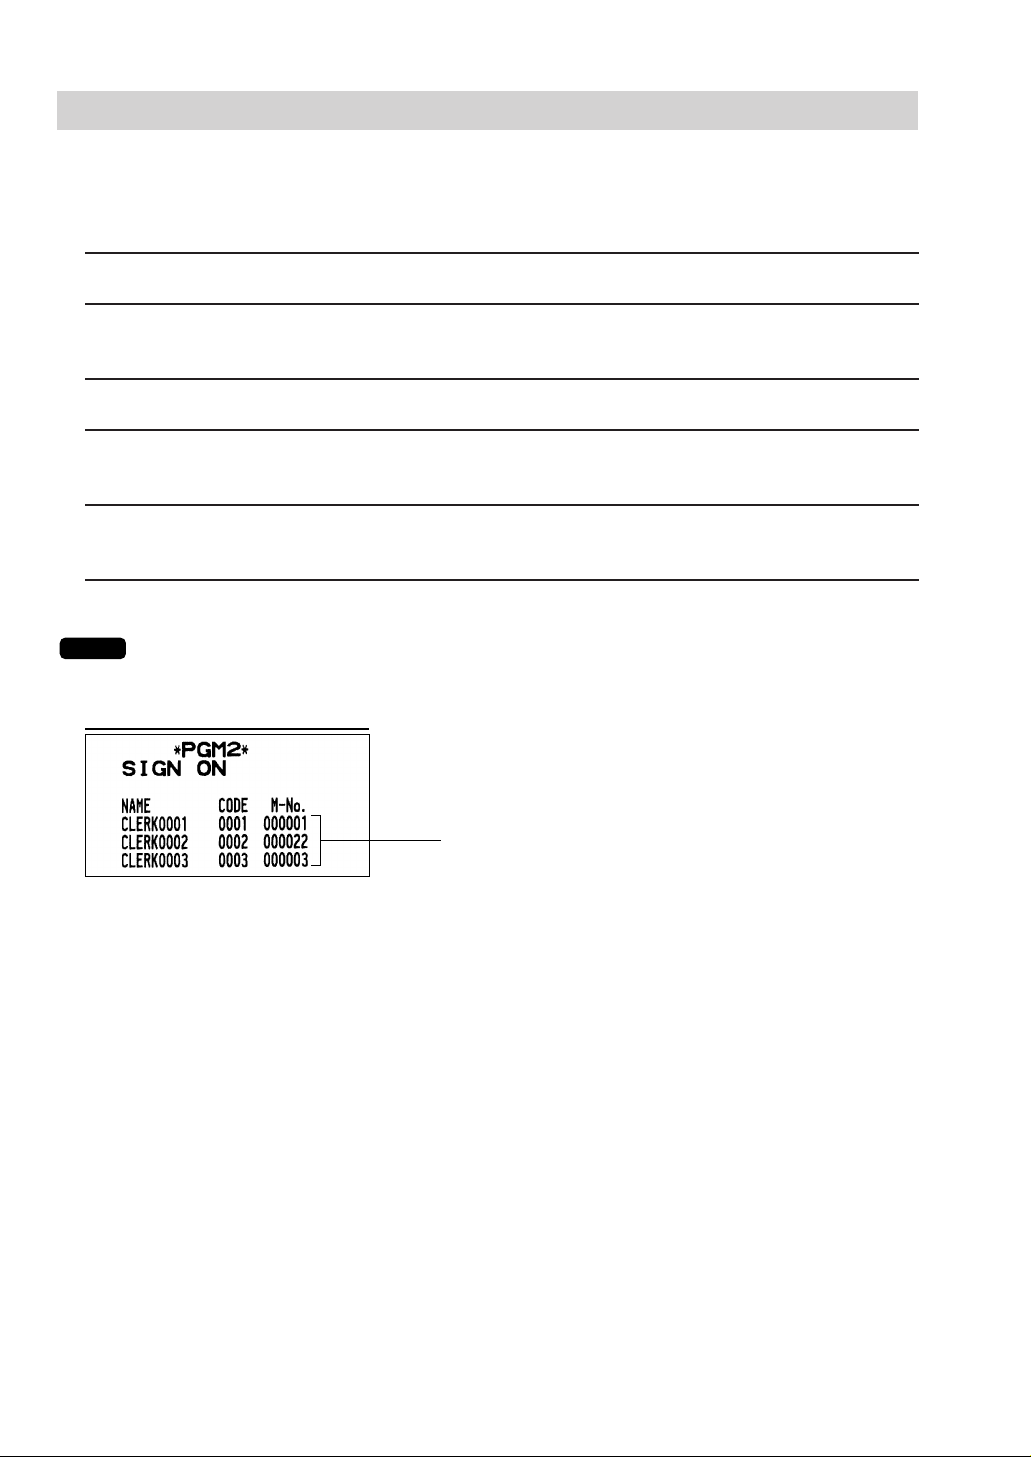
Clerk names, clerk codes and machine numbers of
the machines at which the clerks are in sign-on state
Sample Print (master)
NOTE
6. Clerk sign-on report
A clerk sign-on report can be generated at the master. This report is used to know which clerks are currently
in sign-on state at which machines.
Report generation procedure
1. Enter the PGM2 mode from the mode selection window.
2. Select “1 READING” from the displayed menu.
The READING window will appear.
3. Touch the right-pointing arrow key down on the screen to display the rest of the menu for reading.
4. Select “45 INLINE CONFIG” from the displayed menu.
The INLINE READING window will appear.
5. Select “2 SIGN ON CLERK” from the displayed menu.
The PLEASE SELECT OUTPUT DEVICE. dialogue will appear.
6. Touch “1.DISPLAY” or “2.PRINT.”
• If a receipt/report printer is not set up for the master, “1.DISPLAY” is the only valid choice.
10

NOTE
NOTE
7. Sign-off operation
(cancellation of clerk assignment) (REG mode/MGR mode)
The sign-off operation is intended to cancel the assignment of a clerk to a machine and terminate his or her
registration operation.
The sign-off operation at a machine (master or satellite) can be done only for the clerk who is in sign-on
state at the machine and not in the middle of a registration entry.
Sign-off procedure
• For the contactless clerk key system:
Remove the contactless clerk key.
* The contactless clerk key is optional.
• For the clerk entry key system:
Touch the same clerk entry key that you used to sign on.
• For the WMF clerk key system (option):
Pull out the WMF clerk key.
* The WMF clerk key is not a SHARP product.
• For the code entry system:
Touch the [CLK#] key.
• The sign-off operation can be made only for one clerk at a time.
• If a clerk signs on at a machine while another clerk has already signed on there using the clerk
entry key system or the code entry system, the preexisting clerk is automatically signed off
unless he or she is halfway through an item entry.
• If the sign-off operation for the contactless clerk key system is done while the corresponding
clerk is still in the middle of a registration entry, the transaction is finalized automatically.
Your POS terminal can provide the clerk + cashier system instead of current system (clerk only
system). If you want to change the system, please consult your authorized SHARP dealer.
Cashier sign-off procedure
• For the cashier entry key system:
Touch the same cashier entry key that you used to sign on.
• For the code entry system:
Touch the [CSR#] key.
11

NOTE
8.
Downloading the contents of the programming to satellites – master
When you have completed the programming at the master, you can distribute the preset data from the
master to all or desired satellites in the IRC system.
(1) Initial downloading
For initial setup of the IRC system, follow the downloading procedure below. When the preset data in
the master is downloaded to each satellite, existing preset data in the satellite, if any, is cleared.
1. Enter the PGM2 mode from the mode selection window.
2. Select “5 INITIAL D/L” from the displayed menu.
The INITIAL D/L window will appear.
3. If you wish to distribute all preset data files in the master to satellites, select “29 ALL PGM.” (To display
the hidden menu for the initial downloading, scroll the screen to the right or left using the right-pointing or
left-pointing arrow key down on the screen.)
If you wish to distribute an individual preset data file, select the corresponding data item.
Enter an appropriate code range or specify an appropriate code(s) if needed.
The MACHINE No. window will appear.
4. If you wish to download the preset data to all satellites, select “1 ALL.” If you wish to download the data
to certain satellite(s), select “2 MACHINE SELECT.” In this case, the MACHINE SELECT window will
appear.
Touch a desired machine number(s) line and select “YES,” and then touch the [CONTINUE] key.
Check the contents of the programming of all the satellites in the IRC system that have received
the preset data from the master.
(2) Maintenance downloading
To update the preset data for the IRC system, follow the downloading procedure below. The preset
data in the master is downloaded to each satellite without clearing its existing preset data.
1. Enter the PGM2 mode from the mode selection window.
2. Select “6 MAINTENANCE D/L” from the displayed menu.
The MAINTENANCE D/L window will appear.
3. Select a preset data item for maintenance from the displayed menu.
Enter an appropriate code range or specify an appropriate code(s) if needed.
The MACHINE No. window will appear.
4. If you wish to download the preset data to all satellites, select “1 ALL.” If you wish to download the data
to certain satellite(s), select “2 MACHINE SELECT.” In this case, the MACHINE SELECT window will
appear.
Touch a desired machine number(s) line and select “YES,” and then touch the [CONTINUE] key.
12

List of downloading jobs (PGM2 mode)
Downloading Jobs Description
Department preset data
Dept./PLU key preset data for direct depts./PLUs
PLU/EAN, link PLU table, condiment table, promotion table, combo,
PLU convert, crate table and PLU information text preset data
PLU menu key preset data
Link PLU table preset data
Condiment PLU table preset data
EAN/ITF PLU convert preset data
Crate PLU table preset data
Promotion table preset data
Combo meal preset data
EAN non-PLU code format data
EAN press code format data
PLU information text preset data
Transaction preset data
Training text and training clerk/cashier No. preset data
Clerk preset and contactless clerk key preset data
Cashier preset data (Only for the clerk + cashier system)
Manager preset data
Date, time
Other preset data
Text preset data
Function/Function menu key preset data
Device configuration preset data
Tax preset data
Customer preset data
Name & address preset data
Online preset data
Inline preset data
All PGM mode preset data excluding Online and Device
Config preset data
Department preset data
Department price preset data
PLU/EAN, link PLU table, condiment table, promotion table, combo,
PLU convert, crate table and PLU information text preset data
PLU/EAN price preset data
Link PLU table preset data
Condiment PLU table preset data
Crate PLU table preset data
Promotion table preset data
Combo meal preset data
PLU information text preset data
Transaction preset data
INITIAL D/L
(Preset data copying with
existing data clearing)
MAINTENANCE D/L
(Preset data copying only)
Item
DEPARTMENT
DIRECT KEY
PLU/EAN
PLU MENU KEY
LINK PLU TABLE
CONDIMENT TABLE
PLU CONVERT
CRATE TABLE
PROMOTION TABLE
COMBO MEAL
EAN NON-PLU
PRESS CODE
PLU INFORMATION
TRANSACTION
TRAINING TEXT/CLK
CLERK
CASHIER
MANAGER
DATE/TIME
OPTION
MESSAGE
FUNCTION KEY
DEVICE CONFIG
TAX
CUSTOMER
NAME & ADDRESS
ONLINE PRESET
INLINE PRESET
ALL PGM
DEPARTMENT
DEPT PRICE
PLU/EAN
PLU/EAN PRICE
LINK PLU TABLE
CONDIMENT TABLE
CRATE TABLE
PROMOTION TABLE
COMBO MEAL
PLU INFORMATION
TRANSACTION
13

• The PLU/EAN file (INITIAL D/L and MAINTENANCE D/L) does not include stock data.
NOTE
• The OPTION file includes the following data:
Optional feature preset, EAN deletion term, scale preset, happy hour, zero skip, general report
format, trans. report format, clerk report format, hourly report, DEPT. report format, stacked
report, drawer alarm, screen save time, customer control program, bonus point, bonus point
redemption table and auto key preset data.
• The MESSAGE file includes the following data:
Logo text, dept. group text, PLU group text, currency descriptor, VP text, bill text, bill footer,
payee name, Entertainment bill message, PLU hourly group text, scrolling message for pole
display, scrolling message for main display, working time shift text and free text.
• The DEVICE CONFIG file includes the following data:
Journal printer, receipt/report printer, bill printer and kitchen printer#1-#9.
• The PLU/EAN file (INITIAL D/L and MAINTENANCE D/L) includes LINK PLU preset data.
• Initial downloading of all preset data (ALL PGM) should not be performed when totals exist in
the system. (The totalizers of the receiving satellite are cleared.)
• Performing individual initial D/L jobs will result in a non-reset error when sales data exists in the
satellite.
14

9. Look-up and updating of the GLU file
In the IRC system, the following two types of GLU file allocation system are available: a centralized system
and an individual system.
In choosing the type of GLU file system, please consult your authorized SHARP dealer.
(1) Centralized GLU file system
In this system, only the master has control over GLU data stored in its GLU file. All satellites in the IRC
system can access the GLU file in the master for registration.
The GLU file is accessed by satellites for the following purposes:
• New order or reorder
• Payment entry or temporary finalization
• Bill printing
• Bill transfer/bill totalizing
• Bill separating
• Customer ordering
• Hotel transfer (Transaction transfer to ROOM GLU)
There are two types of GLU data transmission.
1) The GLU data is transmitted from the master to a satellite for GLU file look up (in case of a new
order/reorder). In this case, the GLU reserve counter* is retained at the master.
* The reserve counter reserves some records of GLU files to prevent a “LACKING MEMORY” error
in finalization.
2) The GLU data is transmitted from a satellite to the master upon finalization of a transaction (in case
of payment entry or temporary finalization).
The data transmitted from the satellite is once saved in the temporary GLU data receiving file and
then updated in the GLU file of the master. In this case, the GLU reserve counter is cleared at the
master.
If a satellite looks up the GLU file in the master or asks the master to update the file, the backup master
performs the same process as the master.
(2) Individual GLU file system
In this system, the master and each satellite individually control their own GLU data stored in their GLU files
and look up them for registration. Therefore, no inline communications are made regarding GLU data.
15

NOTE
10. PLU/EAN stock control
In the IRC system, the following two systems for PLU/EAN stock control are available: a centralized system
and an individual system.
In choosing the type of PLU/EAN stock control system, please consult your authorized SHARP dealer.
Centralized system
Preset stock data is stored only in the master. Stock data in each satellite must be zero before a PLU/EAN
entry is made.
When a consolidated report is generated, stock data in respective satellites is consolidated into the stock file
in the master and calculated there.
The stock data calculated at the master is displayed or printed out and the stock data in each satellite is
reset to zero at the same time.
Individual system
The master and satellites store their own preset stock data. When a consolidated report is generated, the
stock data in the master and satellites is consolidated and displayed or printed out.
In the individual system, the consolidation does not affect the stock data in the master.
16
11. T-LOG polling
All REG-mode transaction data in each satellite is saved in its T-LOG buffer. T-LOG polling is a data
collecting system in which the master collects data from the T-LOG buffers in satellites.
A request for T-LOG polling is issued from the satellite to the master when the number of data records in its
T-LOG buffer exceeds a predetermined number.
As the master detects such a request, it starts collecting T-LOG buffer data. After collecting data from one
satellite, the master waits for a preset time and starts collecting data from another satellite. In T-LOG polling,
the data transmitted to the master is stored in the corresponding file.
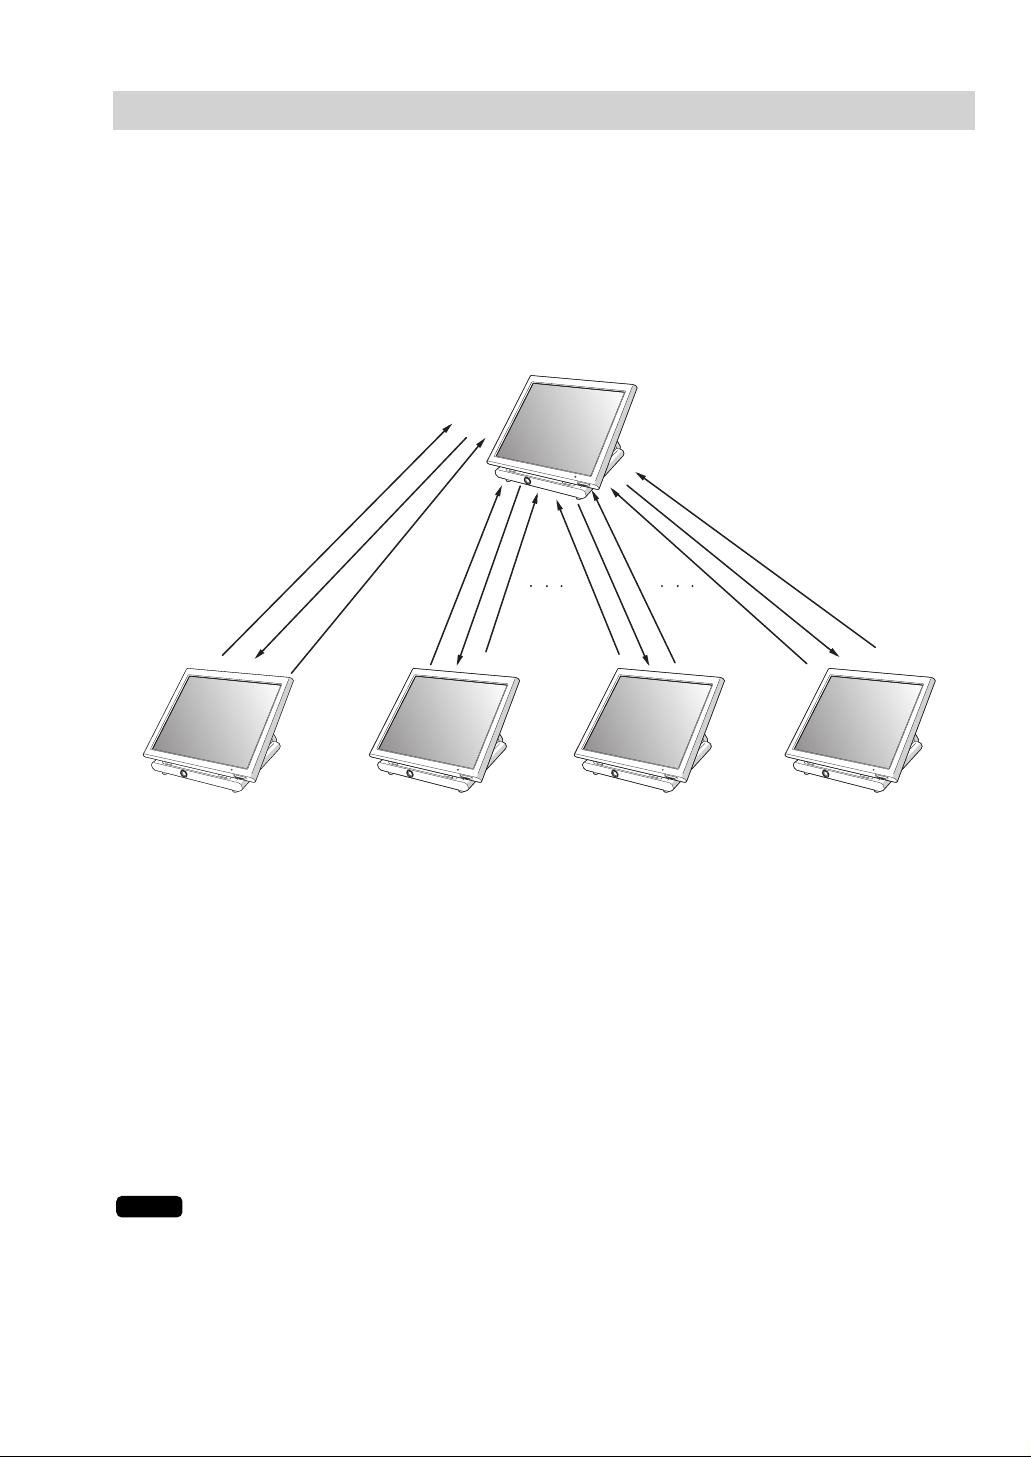
The data flow in T-LOG polling is shown below.
Master
(4)
(1) (5)
(2) (3)
Satellite A Satellite B Satellite C Satellite D
Polling sequence (see the figure above.)
(1) Satellite A makes a request for polling.
(2) The master detects the request and starts collecting T-LOG data from satellite A.
(3) The T-LOG data is sent to the master.
(4) After receiving T-LOG data from satellite A, the master waits for a preset time.
(5) The master detects a request from another satellite (B, C or D) and starts polling for it.
You can specify in the PGM2 mode whether the entry function of a satellite is disabled (LOCK) or enabled
(CONTINUE) when the T-LOG buffer is full.
If it is disabled, an error message “T-LOG FULL” will be displayed and you are not allowed to make any
entry in the REG/MGR mode at the satellite until the error message is cleared.
If it is enabled, you can continue entries but cannot save the entered data. Even if data is entered after the
T-LOG buffer becomes full, the previous data saved in the file will not be erased.
NOTE
• Depending on a remaining capacity of T-LOG buffer, T-LOG full indicator “T” appears on the
top right of the screen in a colored square: green for less than 20 percent remaining, yellow for
less than 10 percent remaining and red for less than 5 percent remaining.
• For the programming whether or not to lock a registration entry when the T-LOG file is full, see
the UP-3515 Instruction Manual.
• For the T-LOG polling between the master and MWS, please consult your authorized SHARP
dealer.
17

12. PLU/EAN data control
In the IRC system, the following two systems for PLU/EAN data control are available: a centralized system
and an individual system.
In choosing the type of PLU/EAN data control system, please consult your authorized SHARP dealer.
Centralized system
PLU/EAN sales data is centrally controlled by the master. PLU/EAN sales data which is temporarily stored
in the T-LOG buffer of a satellite is sent to the master by T-LOG polling.
Individual system
The master and satellites control their own PLU/EAN sales data. PLU/EAN sales reports can be individually
generated at each machine. Consolidation of PLU/EAN sales data can be achieved by generating the
consolidated PLU/EAN report at the master.
NOTE
The learning function enables the operator at a satellite to set the unit price, associated
department and auto-deletion/non-deletion choice for an item whose code is undefined in the
PLU/EAN file, and to register the transaction. (For further information on the learning function,
see the UP-3515 Instruction Manual.)
If the satellite has no dynamic EAN file, the data on the EAN item which has been set using the
learning function is stored in the PLU/EAN main file to update the file.
If the satellite has a dynamic EAN file, the data is stored in the dynamic EAN file to update the file.
The data which has been set using the learning function in the training mode at a satellite is also
stored in its T-LOG buffer.
For the data flow, see the following figures.
(1) In case that the master and satellites have no dynamic EAN files:
Master Satellite
PLU/EAN
main file
T-LOG polling/updating
PLU/EAN
main file
T-LOG
buffer
Updating
Saving
Registration by the
learning function
18
(2) In case that the master has a dynamic EAN file and satellites don't:
Master Satellite
PLU/EAN
main file
Dynamic
EAN file
Updating
Updating the
PLU/EAN main
files of satellites
At this time,
the dynamic EAN file of
the master is cleared.
T-LOG polling
PLU/EAN
main file
T-LOG
buffer
(3) In case that both the master and satellites have dynamic EAN files:
Master Satellite
PLU/EAN
main file
Dynamic
EAN file
Updating
Updating the PLU/EAN
main files of satellites
At this time, all dynamic
EAN files in the IRC
system are cleared.
PLU/EAN
main file
Dynamic
EAN file
Updating
Saving
Updating
Saving
Registration by the
learning function
Registration by the
learning function
T-LOG polling
T-LOG
buffer
19

13. Price change function
When a preset data (unit price and associated department) of an EAN item is changed at a satellite or the
master using the price change function, its PLU/EAN main file or dynamic EAN file is updated with the new
data. Immediately after this, the new data is automatically distributed to all other machines to update their
PLU/EAN main files or dynamic EAN files which contain the same EAN code. The updated file varies
depending on dynamic file setting for the IRC system.
The EAN data changed at a satellite is also stored in its T-LOG buffer and collected through T-LOG polling
by the master to update its PLU/EAN main file or dynamic EAN file in case the updated EAN data at the
satellite is not automatically distributed to the master due to dynamic file setting for the IRC system.
For further information on the price change function, see the UP-3515 instruction manual.
For the data flow, see the following figures.
• In case that the price is changed at the master:
Master Satellite
Updated EAN data
(unit price and associated
department) through the
price change function
PLU/EAN
main file
Dynamic
EAN file
• In case that the price is changed at a satellite:
Automatic distribution of
updating data to the master
and all other satellites
T-LOG polling and
updating
NOTE
PLU/EAN
main file
Dynamic
EAN file
If a transmission error occurs during automatic distribution of updated data to other machines after a
price is changed using the price change function at a machine, the machine number of the terminal
which causes the error and the type of error are printed out at the sending machine. In this case, the
system retry function can be used if it is enabled. (For the system retry function, see pages 55–56.)
Automatic distribution of
updating data to all satellites
etilletaSretsaM
PLU/EAN
main file
Dynamic
EAN file
T-LOG
buffer
Updating
Saving
PLU/EAN
main file
Dynamic
EAN file
T-LOG
buffer
Updated EAN data
(unit price and associated
department) through the
price change function
20

NOTE
14. Customer data control
In the IRC system, customer data is centrally controlled by the master. Customer data which is temporarily
stored in the T-LOG buffer of a satellite is sent to the master by T-LOG polling and controlled by the master.
(For further information on T-LOG polling, see page 17.)
15. Communication with a remote printer (option)
When a remote printer is included in the inline system, order data is output to the remote printer according
to the remote printer assignment.
The remote printer, also called a kitchen printer, is used to print all or part of the data entered at a machine.
Although kitchen may be one of the typical settings for the convenient use of the remote printer, it can also
be used at any location.
If a remote printer is assigned to a department or PLU, the information on the department or PLU is output
to the remote printer when the [NBAL] or [FINAL] key is touched or the transaction is finalized at a terminal.
The data which can be output to a remote printer is as follows:
1) Item text
2) Quantity*
3) Unit price*/Price*
4) Amount*
5) PLU/department code*
6) Free text*
7) Number of guests*
* Whether to print or not is selectable.
Second (back-up) remote printer
A second remote printer can be assigned to each remote printer for automatic back-up.
If an error occurs during data output to a remote printer, the data is output to the second remote printer
assigned to it.
When an error occurs during data output to the second remote printer, the data is output to the receipt
printer if there is one set up for the terminal.
Up to two remote printers can be preset to print data on each item (PLU or department).
If two printers are preset to print data on each item, the data is simultaneously output to both printers.
If either of these printers encounters an error, the data is output to its backup printer.
If the backup printer encounters an error, the data is output to the receipt printer if there is one set up for the
terminal.
• For the programming of remote printers (KP#1-KP#9), see pages 43–45.
• Crate entry is not output to a remote printer.
21

16. Rerouting print data
In restaurants or the like, every terminal does not need an external printer (a receipt/report printer, journal
printer, bill printer or kitchen printer).
One external printer connected by an RS-232 cable can be shared by two or more UP-3515 machines.
Print data rerouting chart
Rerouting data flow
Print data (1)
UP-3515
External printer
Print data (1)
UP-3515
UP-3515
Ordinary data flow
Print data (2)
External printer
via LAN
via RS-232 cable
22

2
The system can generate two types of sales reports: consolidated reports (reports on all or specified
machines in the system) and individual reports (reports on individual machines). At the master, you can
generate consolidated reports on all or specified machines in the system. Certain consolidated reports can
also be generated at the back-up master under certain conditions. Individual reports can be generated at
any machine in the IRC system: each satellite, the master and the back-up master.
Consolidated and Individual Reports
1. Operating modes
X1/Z1 mode: Daily sales reading (X1) and resetting (Z1) reports
X2/Z2 mode: Periodic consolidated sales reading (X2) and resetting (Z2) reports
OPXZ mode: Individual clerk/cashier daily sales reading (X) and resetting (Z) reports
23

NOTE
2. Consolidated reports – master/back-up master
(1) Report generation procedure
To generate various reports, use the following procedure, referring to the list of consolidated reports
on the following pages.
1. Enter the required operating mode (OPXZ, X1/Z1 or X2/Z2) from the mode selection window.
2. Select “SYSTEM READING” or “SYSTEM RESETTING” from the displayed menu depending on your
need.
3. Select the type of report you wish to generate from the displayed menu.
(If your desired type of report menu is not shown on the displayed screen, you can scroll the screen to
the right or left to display the rest of the report menu using the right-pointing or left-pointing arrow key
down on the screen.)
4. Enter data required to generate a desired report if needed.
The MACHINE No. window will appear. (If the PLEASE SELECT OUTPUT DEVICE. dialogue is
appeared at this point, skip the step 5 and proceed to step 6.)
5. If you wish to generate a report on all the machines in the system, select “1 ALL.” If you wish to generate
a report on specific machines, select “2 MACHINE SELECT.” In this case, the MACHINE SELECT
window will appear.
Touch a desired machine number(s) line and select “YES,” and then touch the [CONTINUE] key.
The PLEASE SELECT OUTPUT DEVICE. dialogue will appear.
6. Select “1.DISPLAY” or “2.PRINT.”
If a receipt/report printer is not set up for the master or back-up master, “1.DISPLAY” is the only
valid choice.
24

(2) List of consolidated reports (SYSTEM READING/RESETTING)
OPXZ X1/Z1 X2/Z2
Report type Description
Operating modes
Required data/Remarks
General report
Department by group report
Individual department group report
Department group total report
PLU/EAN sales report by
specified range
PLU/EAN pickup report
Combo sales report
Combo sales pickup report
PLU/EAN report by associated dept.
PLU/EAN individual group report
PLU/EAN group total report
PLU/EAN stock report
PLU/EAN stock pickup report
PLU/EAN top 20 sales report by
sales amount
PLU/EAN top 20 sales report by
sales quantity
PLU/EAN zero sales report
PLU/EAN zero sales report by
associated dept.
PLU/EAN minimum stock report
PLU/EAN sales report by price
category
PLU/EAN hourly group report
Promotion PLU/EAN report
Transaction report
Total-in-drawer report
Commission sales report
Tax report
Chief report
Department code
(Specify range by start and end codes.)
Department group no. (1 to 17)
PLU/EAN code
(Specify range by start and end codes.)
PLU/EAN code pickup
PLU code
(Specify range by start and end codes.)
PLU/EAN code pickup
Department code
PLU/EAN group no.
PLU/EAN code
(Specify range by start and end codes.)
PLU/EAN code pickup
Department code
PLU/EAN code
(Specify range by start and end codes.)
PLU/EAN price category
Time range
Promotion table no.
(Specify range by start and end
number.)
-
-
-
-
-
-
-
-
-
-
-
-
-
-
-
-
-
-
-
-
-
-
-
-
-
-
X1,Z1
X1
X1
X1
X1,Z1
X1,Z1
X1
X1
X1,Z1
X1
X1
X1
X1
X1
X1
X1
X1
X1
X1
X1,Z1
X1,Z1
X1
X1
X1
X1
X1
X2,Z2
X2
X2
X2
X2,Z2
X2,Z2
X2
X2
X2,Z2
X2
X2
-
-
X2
X2
X2
X2
-
X2
-
-
X2
X2
X2
X2
-
GENERAL
<DEPARTMENT>
DEPT. /GROUP
DEPT. IND. GROUP
DEPT. GROUP TOTAL
<PLU>
PLU
PLU PICK UP
COMBO SALES
COMBO PICK UP
PLU BY DEPT.
PLU IND. GROUP
PLU GROUP TOTAL
PLU STOCK
PLU STOCK PICK UP
PLU TOP 20
PLU ZERO SALES
PLU MINIMUM STOCK
PLU PRICE CATEGORY
PLU HOURLY GROUP
PROMOTION PLU
<TRANSACTION>
TRANSACTION
TL-ID
COMMISSION SALES
TAX
CHIEF
*2
*2
*2
*2
*2
*2
*2
*2
*2
*2
*2
*2
*2
*2
*2
*2
*2
*2
*2
*2
*2
*2
*2
*2
25

OPXZ X1/Z1 X2/Z2
Report type Description
Operating modes
Required data/Remarks
All clerk report
Individual clerk report
All cashier report
Individual cashier report
Employee report
Employee time adjustment report
Employee active status report
Employee over time report
Hourly report (by specified range)
Hourly report (all)
Daily net report
Labor cost % report
GLU report
GLU report by clerk
ROOM GLU report
ROOM GLU report by clerk
Balance report
Bill report
Customer sales report
Customer sales report 1
(Only charge details)
Customer sales report 2
(Charge amount & details)
Customer sales report by
specified sales range
Customer charge account report
(Customer no payment report)
Customer ordering report by
code range
Customer ordering report by date range
Stacked report 1
Stacked report 2
Only for the clerk + cashier system
Only for the clerk + cashier system
Employee code
(Specify range by start and end codes.)
Employee code
(Specify range by start and end codes.)
Employee code
(Specify range by start and end codes.)
Employee code
(Specify range by start and end codes.)
Time range
GLU code
(Specify range by start and end codes.)
Only for the centralized GLU file system
Only for the centralized GLU file system
ROOM GLU code
(Specify range by start and end codes.)
Only for the centralized GLU file system
Only for the centralized GLU file system
Customer code
(Specify range by start and end codes.)
Customer code
(Specify range by start and end codes.)
Customer code
(Specify range by start and end codes.)
Customer sales range
Customer ordering code
(Specify range by start and end codes.)
Date range
-
X,Z
-
X,Z
-
-
-
-
-
-
-
-
-
-
-
-
-
-
-
-
-
-
-
-
-
X1,Z1
X1,Z1
X1,Z1
X1,Z1
-
-
-
-
X1
X1,Z1
-
X1
X1,Z1
X1,Z1
X1,Z1
X1,Z1
X1
X1,Z1
-
-
-
-
-
-
-
X1,Z1
X2,Z2
X2,Z2
X2,Z2
X2,Z2
X2,Z2
X2
X2
X2,Z2
-
-
X2,Z2
-
-
-
-
-
X2
-
X2
Z2
Z2
X2
X2
X2,Z2
X2,Z2
X2,Z2
<PERSONNEL>
ALL CLERK
IND. CLERK
ALL CASHIER
IND. CASHIER
EMPLOYEE
EMP. ADJUSTMENT
EMP. ACTIVE STATUS
EMP. OVER TIME
<OTHERS>
HOURLY
DAILY NET
LABOR COST%
GLU
GLU BY CLERK
ROOM GLU
ROOM GLU BY CLERK
BALANCE
BILL
CUSTOMER SALES
CUSTOMER SALES 1
CUSTOMER SALES 2
CUSTOMER BY AMT
CHARGE ACCOUNT
CUSTOMER
ORDERING
STACKED REPORT
*1 (Centralized) *2 (Individual)
*1 (Centralized) *2 (Individual)
*2
*2
*1
*1
*1
*1
*2
*2
*2
*1 (Centralized) *3 (Individual)
*1 (Centralized) *3 (Individual)
*1 (Centralized) *3 (Individual)
*1 (Centralized) *3 (Individual)
*2
*1
*3
*3
*3
*3
*3
*1 (Centralized) *3 (Individual)
*1: Corresponding reports can be generated at the back-up master after master declaration.
*2: Corresponding reports can be generated at the back-up master after master declaration under certain condition.
(Please consult your authorized SHARP dealer for the required condition setting.)
*3: Corresponding reports can not be generated at the back-up master.
26

NOTE
3. Individual reports – master/back-up master/satellite
(1) Report generation procedure
To generate various reports, use the following procedure, referring to the list of individual reports on
the following pages.
1. Enter the required operating mode (OPXZ, X1/Z1 or X2/Z2) from the mode selection window.
2. Select “READING” or “RESETTING” from the displayed menu depending on your need.
3. Select the type of report you wish to generate from the displayed menu.
(If your desired type of report menu is not shown on the displayed screen, you can scroll the screen to
the right or left to display the rest of the report menu using the right-pointing or left-pointing arrow key
down on the screen.)
4. Enter data required to generate a desired report if needed.
The PLEASE SELECT OUTPUT DEVICE. dialogue will appear.
5. Select “1.DISPLAY” or “2.PRINT.”
• If a receipt/report printer is not set up for the terminal, “1.DISPLAY” is the only valid choice.
• Depending on your IRC settings for the items (clerk file system, etc) requiring the selection of
centralized or individual, issuable report types vary. For further detail, consult your authorized
SHARP dealer.
27

(2) List of individual reports (READING/RESETTING)
OPXZ X1/Z1 X2/Z2
Report type Description
Operating modes
Required data/Remarks
General report
Department by group report
Individual department group report
Department group total report
PLU/EAN sales report by
specified range
PLU/EAN pickup report
Combo sales report
Combo sales pickup report
PLU/EAN report by associated dept.
PLU/EAN individual group report
PLU/EAN group total report
PLU/EAN stock report
PLU/EAN stock pickup report
PLU/EAN top 20 sales report by
sales amount
PLU/EAN top 20 sales report by
sales quantity
PLU/EAN zero sales report
PLU/EAN zero sales report by
associated dept.
PLU/EAN minimum stock report
PLU/EAN sales report by price
category
PLU/EAN hourly group report
Promotion PLU/EAN report
Transaction report
Total-in-drawer report
Commission sales report
Tax report
Chief report
Department code
(Specify range by start and end codes.)
Department group no. (1 to 17)
PLU/EAN code
(Specify range by start and end codes.)
PLU/EAN code pickup
PLU code
(Specify range by start and end codes.)
PLU/EAN code pickup
Department code
PLU/EAN group no.
PLU/EAN code
(Specify range by start and end codes.)
Only for the individual PLU/EAN
stock file system
PLU/EAN code pickup
Only for the individual PLU/EAN
stock file system
Department code
PLU/EAN code
(Specify range by start and end codes.)
Only for the individual PLU/EAN
stock file system
PLU/EAN price category
Time range
Promotion table no.
(Specify range by start and end
number.)
-
-
-
-
-
-
-
-
-
-
-
-
-
-
-
-
-
-
-
-
-
-
-
-
-
-
X1,Z1
X1
X1
X1
X1,Z1
X1,Z1
X1
X1
X1,Z1
X1
X1
X1
X1
X1
X1
X1
X1
X1
X1
X1,Z1
X1,Z1
X1
X1
X1
X1
X1
X2,Z2
X2
X2
X2
X2,Z2
X2,Z2
X2
X2
X2,Z2
X2
X2
-
-
X2
X2
X2
X2
-
X2
-
-
X2
X2
X2
X2
-
GENERAL
<DEPARTMENT>
DEPT. /GROUP
DEPT. IND. GROUP
DEPT. GROUP TOTAL
<PLU> (Only when the individual PLU/EAN totalizer system is applied)
PLU
PLU PICK UP
COMBO SALES
COMBO PICK UP
PLU BY DEPT.
PLU IND. GROUP
PLU GROUP TOTAL
PLU STOCK
PLU STOCK PICK UP
PLU TOP 20
PLU ZERO SALES
PLU MINIMUM STOCK
PLU PRICE CATEGORY
PLU HOURLY GROUP
PROMOTION PLU
<TRANSACTION>
TRANSACTION
TL-ID
COMMISSION SALES
TAX
CHIEF
28

OPXZ X1/Z1 X2/Z2
Report type Description
Operating modes
Required data/Remarks
All clerk report
Individual clerk report
All cashier report
Individual cashier report
Hourly report (by specified range)
Hourly report (all)
Daily net report
GLU report
GLU report by clerk
ROOM GLU report
ROOM GLU report by clerk
Balance report
Customer ordering report by
code range
Customer ordering report by date range
Stacked report 1
Stacked report 2
Electronic journal
Only for the individual clerk file system
Only for the individual clerk file system
Only for the clerk + cashier system
Only for the clerk + cashier system
Time range
GLU code
(Specify range by start and end codes.)
Only for the individual GLU file system
Only for the individual GLU file system
ROOM GLU code
(Specify range by start and end codes.)
Only for the individual GLU file system
Only for the individual GLU file system
Customer ordering code
(Specify range by start and end codes.)
Date range
Consecutive number range, Date
range, time range and clerk code
for X and X1 reports
-
X,Z
-
X,Z
-
-
-
-
-
-
-
-
-
-
-
X,Z
X1,Z1
X1,Z1
X1,Z1
X1,Z1
X1
X1,Z1
-
X1,Z1
X1,Z1
X1,Z1
X1,Z1
X1
-
-
X1,Z1
X1,Z1
X2,Z2
X2,Z2
X2,Z2
X2,Z2
-
-
X2,Z2
-
-
-
-
X2
X2,Z2
X2,Z2
X2,Z2
-
<PERSONNEL>
ALL CLERK
IND. CLERK
ALL CASHIER
IND. CASHIER
<OTHERS>
HOURLY
DAILY NET
GLU
GLU BY CLERK
ROOM GLU
ROOM GLU BY CLERK
BALANCE
CUSTOMER
ORDERING
STACKED REPORT
E. JOURNAL
29

NOTE
4. Resetting reports in a system with no save file
In a system which has no save file and has been programmed so as to automatically lock satellites after
resetting when general resetting, hourly resetting, cashier resetting, clerk resetting (only the case of
individual clerk file system) or daily net resetting report is taken, the data in the satellites concerned is not
cleared. In this case, the satellites will be locked after resetting, and any entry will not be allowed in the
REG/MGR mode there.
Generation of the same resetting report in the locked state will print a copy symbol on the report.
The satellites can be unlocked by generating a corresponding consolidated resetting report at the master, or
by manual clearing of corresponding sales memories of the satellites.
Your dealer can program whether or not to have save files, and whether or not to lock the
satellites. For details, consult your authorized SHARP dealer.
30

5. Clerk report
As stated earlier (see pages 7-8), there are two systems for collecting clerk sales data: a centralized system
and an individual system.
(1) Centralized clerk file system
In this system, the transaction data on a clerk in each satellite will be transmitted to the master each
time the clerk signs off. Individual reports on both individual clerk and full clerk are not available at any
machine in the IRC system. At the master, you can generate consolidated full clerk and individual clerk
reports.
At each satellite, you can generate consolidated individual clerk reports.
If a consolidated individual clerk report is taken at a satellite while a clerk is in sign-on state at the
machine, the data on transactions being handled by the clerk or cashier is also added and printed out.
If a consolidated full clerk Z report is taken at the master while a clerk signs on at a satellite, that
clerk’s sales data are excluded from the report and resetting operation for the clerk can not be made.
In this case, the message “IS SIGNED ON” and a machine number of the satellite is printed on the
report as shown below.
Full clerk report sample in the centralized clerk file system (master)
Machine no.
Consecutive no.
Date
NOTE
Time
Report mode
Report type
Clerk code
Clerk name
Data on clerk #0001
Clerk sign-on state message and the signed on machine #
(This message is printed right above the clerk who is in sign-on state.)
Data on clerk #0003
For detailed information on report items, see the UP-3515 Instruction Manual.
31

(2) Individual clerk file system
NOTE
Symbol of copy
Symbol of copy
In this system, you can generate consolidated reports on full clerk or individual clerk at the master
only. At each machine, you can generate an individual X or Z report on transactions made by an
individual clerk or all clerks assigned to the machine.
If the system has no save file, the clerk for whom an individual Z report has been generated is not
allowed to make registrations in the REG mode. This condition, in which registrations by the clerk are
disallowed, is canceled when his or her sales data is consolidated and reset at the master or when the
sales data is manually cleared. (For the manual clearing operation, see page 54.)
When an X or Z report for the locked clerk is generated again, the COPY mark will be printed in the
report as shown below. (This COPY mark will not appear when the system has a save file.)
Full clerk report sample in the individual clerk file system (master)
32
• For selecting whether your system should have a save file or not, consult your authorized
SHARP dealer.
• For the setting of the individual resetting data clear at the time of consolidation general
resetting, please consult your authorized SHARP dealer.

NOTE
6. Cashier report
The cashier file management method in the IRC system employs individual system. A cashier who is
assigned to a machine can carry out registrations and other operations at that machine. In this system, you
can generate consolidated reports on full cashier or individual cashier at the master only. At each machine,
you can generate an individual X or Z report on transactions made by an individual cashier or all cashiers
assigned to the machine.
If the system has no save file, the cashier for whom an individual Z report has been generated is not allowed
to make registrations in the REG mode. This condition, in which registrations by the cashier are disallowed,
is canceled when his or her sales data is consolidated and reset at the master or when the sales data is
manually cleared. (For the manual clearing operation, see page 54.)
When an X or Z report for the locked cashier is generated again, the COPY mark will be printed in the
report. (This COPY mark will not appear when the system has a save file.)
When the system has a save file, the data in the save file and that in the sales file are summed up for
consolidation.
• The above explanation applies when the cashier system is used in addition to the clerk system.
For the selection and settings of the clerk + cashier system or clerk only system, please consult
your authorized SHARP dealer.
• For the setting of the individual resetting data clear at the time of consolidation general
resetting, please consult your authorized SHARP dealer.
33

NOTE
: Report generation is not allowed.
: Report generation is allowed.
* : CCD entries at the generation of corresponding individual reports at the master and all the satellites must have
been done beforehand except when taking a consolidated individual or all clerk Z1 report under centralized clerk
file system.
*
*
*
Type of report
CCD entry programming
Clerk/Cashier General report Other reports
Individual clerk/
cashier report
All clerk/
cashier report
Non-compulsory
By clerk/cashier
By terminal (per shift)
By all clerk/cashier
XZXZXZXZ
7. Reports that can be generated when the Compulsory
Cash/Check Declaration (CCD) function is enabled
Each machine can be programmed to enable the Compulsory Cash/Check Declaration (CCD) function. This
function compels the operator to enter the cash/check amount in the drawer just before an individual
clerk/cashier Z/Z1 report, all clerk/cashier Z1 report, or a general Z1 report is issued. Unless CCD entries
compelled by the CCD function have been made, all the reports can not be generated.
To take a consolidated general Z1 report in case of compulsory CCD function (by terminal), the following
two conditions are applied.
1) If the CCD DATA is not entered in the master and the master is included in appointment of machine
number, a consolidated general Z1 report can not be generated.
2) If the CCD DATA is not entered in the satellite, a consolidated general Z1 report can not be generated.
In the case of taking a consolidated individual clerk Z1 report and a consolidated all clerk Z1 report under
centralized clerk file system, CCD entry is required only at the master just before the report generation.
In all other cases under compulsory CCD function, you can not generate a consolidated Z1 reports
(individual clerk, individual cashier, all clerk, all cashier and general report) at the master unless CCD
entries have been made at all the machines in the IRC system to generate the corresponding individual
Z1(Z) report at each machine beforehand.
You can not generate some types of reports depending on a selected CCD entry type as shown in the table
below.
List of consolidated reports (at the master)
For choosing a type of compulsory cash/check declaration, please consult your authorized
SHARP dealer.
34

8. Reset clear operation (X1/Z1 and X2/Z2 modes) – master
Even when a machine has been programmed to disallow entries after individual general resetting or has not
been programmed to allow automatic clearing operation of the individual resetting memory at the time of
consolidation general resetting, you can unlock the machine through reset clear operation in order to restart
entries.
1. Enter the X1/Z1 or X2/Z2 mode from the mode selection window.
2. Select “RESET CLEAR” from the displayed menu.
The MACHINE No. window will appear.
3. If you wish to unlock all the locked machines in the system, select “1 ALL.” If you wish to unlock specific
machines, select “2 MACHINE SELECT.” In this case, the MACHINE SELECT window will appear.
Touch a desired machine number(s) line and select “YES,” and then touch the [CONTINUE] key.
35

3
NOTE
To start IRC programming, first, turn on the machines in the IRC system and put them in the PGM2 mode.
The programming procedures for both the master and satellites will be explained below.
For the setup of your IRC system, please be sure to consult your authorized SHARP dealer.
IRC Programming
1. Setting the machine numbers – master and satellite
It is necessary to assign machine numbers to the master and satellites before programming.
1. Enter the PGM2 mode from the mode selection window.
2. Select “2 SETTING” from the displayed menu.
The SETTING window will appear.
3. Select “8 TERMINAL” from the displayed menu.
The TERMINAL window will appear.
4. Touch the “MACHINE#” line from the displayed items.
Enter a desired number for the machine, and touch the [Exit] key.
Machine number: up to 6 digits (0–999999)
The DATA NOT SAVED SAVE IT? dialogue will appear.
5. Select “1.SAVE.”
6. Repeat steps 1 to 5 for all machines in the IRC system.
• In an IRC network, each machine number must be unique. Do not use the same number for
two or more machines.
• Be sure to set up satellites first to allow the downloading of inline preset from the master to
satellites.
36

NOTE
2.
Setting the terminal numbers (IRC machine numbers) for satellites
For the setup of your IRC system, please be sure to consult your authorized SHARP dealer.
It is assumed that your IRC terminals have been set for inline operations.
1. Enter the PGM2 mode from the mode selection window.
2. Select “2 SETTING” from the displayed menu.
The SETTING window will appear.
3. Select “21 INLINE CONFIG” from the displayed menu.
The INLINE CONFIG window will appear.
4. Touch the “IP ADDRESS 4” line from the displayed items.
Enter a desired terminal number (1-254) for the machine, and touch the [CONTINUE] key.
(For programming for the SYSTEM RETRY function and the LOOKUP ORDER, see page 41.)
5. Repeat steps 1 to 4 for all machines in the IRC system.
• Terminal numbers must be assigned to the master and each satellite in the IRC system.
(For setting the master’s terminal number, see the next paragraph.)
• If an IRC network contains two or more machines with the same terminal number, IRC
communications will not be achieved correctly. Each terminal number must be unique.
• The terminal number should be in the range from 1 to 254.
• If the terminal number “000” is programmed for a machine, it is put in the OFF LINE mode and
cannot take part in IRC communications.
37

NOTE
3.
Initial setting for the master and master list creating/updating
For the setup of your IRC system, please be sure to consult your authorized SHARP dealer.
(1) Setting the terminal number for the master and creating the master list
A master list can only be created on the pre-designated master.
1. Enter the PGM2 mode from the mode selection window.
2. Select “2 SETTING” from the displayed menu.
The SETTING window will appear.
3. Select “21 INLINE CONFIG” from the displayed menu.
The INLINE CONFIG window will appear.
4. Enter a terminal number (1–254) for the master in the “IP ADDRESS 4” line and carry out the
programming for BMA MACHINE NO.*, the SYSTEM RETRY function*, and LOOKUP ORDER*, and
then touch the [CONTINUE] key.
The MASTER LIST window will appear.
(*For programming for BMA MACHINE NO., the SYSTEM RETRY function and LOOKUP ORDER, see
pages 40–41.)
5. Enter a terminal number (1–254) for a machine in the IRC system in the “IP ADDRESS 4” line, and then
touch the [ENTER] key.
The “MACHINE No.” line will be selected for entry.
6. Enter the machine number (1–999999) of the machine and touch the [ENTER] key.
7. Repeat steps 5 to 6 for all machines in the IRC system.
Touch the [CONTINUE] to complete the master list.
• The terminal numbers and machine numbers of the master and satellites must be entered into
the master list for IRC communications.
• The terminal numbers and machine numbers of up to 32 machines (one master and 31
satellites) can be entered into the master list.
• The terminal number should be in the range from 1 to 254 and the machine number from 1 to
999999.
• No satellite can perform inline communications unless its terminal and machine numbers are
present in the master list.
• If a machine number which already exists in the master list is entered, an entry error will occur
even when the corresponding terminal number does not exist in the list.
• Even if a set of terminal and machine numbers that exists in the master list is entered, no error
will occur (the list will remain unchanged.)
38

(2) Deleting a machine from the master list
NOTE
To delete a terminal number from the master list, proceed as follows:
1. Enter the PGM2 mode from the mode selection window.
2. Select “2 SETTING” from the displayed menu.
The SETTING window will appear.
3. Select “21 INLINE CONFIG” from the displayed menu.
The INLINE CONFIG window will appear.
4. Touch the [CONTINUE] key.
The MASTER LIST window will appear.
5. Enter a terminal number in the “IP ADDRESS 4” line and a corresponding machine number in the
“MACHINE No.” line of a machine to be deleted , and then touch the []key.
RECORD
DELETE
6. The machine will ask you as follows: “ARE YOU SURE?”
If you are sure to delete it, select “1.YES.” If not, select “2.NO.”
7. Repeat steps 5 to 6 for all machines to be deleted.
8. Touch the [CONTINUE] key to complete the master list.
• You can delete any of the terminal numbers that are in the master list.
• Deleting the master from the master list will inhibit all requests of the satellites from being sent.
39

NOTE
4.
Specifying the terminal to serve as a back-up master – master
You can assign one satellite to the function of a back-up master. If the master fails during guest check
operation, the assigned terminal will perform the master’s function.
A machine number from 1 to 999999 can be entered.
If zero is entered, there will be no back-up master in the IRC system.
This assignment can be done in the INLINE CONFIG window of the master.
For determining whether your IRC system should have a back-up master or not, please consult your
authorized SHARP dealer.
1. Enter the PGM2 mode from the mode selection window.
2. Select “2 SETTING” from the displayed menu.
The SETTING window will appear.
3. Select “21 INLINE CONFIG” from the displayed menu.
The INLINE CONFIG window will appear.
4. Touch the “BMA MACHINE NO.” line and enter the machine number of the terminal to serve as a
backup master, and then touch the [CONTINUE] key.
The MASTER LIST window will appear.
5. Touch the [CONTINUE] key again to close the MASTER LIST window.
• For determining which satellite should be selected for BMA MACHINE NO., please consult your
authorized SHARP dealer.
The master declaration function enables the back-up master or the master to declare to serve as
the master when the master or back-up master breaks down, and the recovery declaration
function enables the back-up master or the master to inform satellites of its recovery.
If the master and back-up master communicate with each other without any problems, a “master
declaration” should not be done at the master or back-up master. Otherwise the communication
between them stops.
For details of these functions, see “Master declaration” and “Recovery declaration” on pages
50–53.
40

NOTE
5.
Specifying whether to enable or disable the system retry function
when a transmission error occurs – master and satellite
You can specify whether to enable or disable the system retry function if a communication between
machines does not end successfully.
This function can be specified in the INLINE CONFIG window of the master and each satellite in the IRC system.
1. Enter the PGM2 mode from the mode selection window.
2. Select “2 SETTING” from the displayed menu.
The SETTING window will appear.
3. Select “21 INLINE CONFIG” from the displayed menu.
The INLINE CONFIG window will appear.
4. Touch the “SYSTEM RETRY” line and select “ENABLE” or “DISABLE”, and then touch the [CONTINUE]
key to complete the setting. (The following is applied only in the case of the setting at the master.)
The MASTER LIST window will appear.
5. Touch the [CONTINUE] key again to close the MASTER LIST window.
• If the system retry function is enabled, a transmission job with which an error has occurred is
not finalized immediately, but the master waits for selection of one of the three commands
(RETRY, ABORT and IGNORE). Then the master retries access to the satellite that has
caused the transmission error or terminates the access as a successful or unsuccessful
transmission depending on the selection made.
• If the function is disabled, the job is terminated immediately.
• For further information, see the “System retry function” section on pages 55–56.
• The default setting is “ENABLE.”
6. Choosing whether to search the master or satellite
first for the PLU/EAN code – satellite
At a satellite, you can choose which machine, either the master or the satellite, should be searched first for
the PLU/EAN code. If you specify that the master should be searched first and enter the PLU/EAN code, the
master is first searched and then the satellite is searched, and vice versa.
However, either choice of search order made at the master is invalid. In other words, even if you specify at
the master that the satellite should be first searched, the master will be first searched.
1. Enter the PGM2 mode from the mode selection window.
2. Select “2 SETTING” from the displayed menu.
The SETTING window will appear.
3. Select “21 INLINE CONFIG” from the displayed menu.
The INLINE CONFIG window will appear.
4. Touch the “LOOKUP ORDER” line and select “MA” or “SA”, and then touch the [CONTINUE] key.
41

Sample Print (master)
Sample Print (satellite)
Terminal number of the master
MWS port no.
Terminal number of the satellite
MWS port no.
System retry function (enable/disable)
List of the machines involved in the IRC system
(terminal no. and machine no.)
Back-up master (terminal no. and machine no.)
The machine from which the PLU/EAN code is searched first
The machine from which the
PLU/EAN code is searched first
System retry function (enable/disable)
NOTE
7.
Reading the contents of the IRC programming – master and satellite
1. Enter the PGM2 mode from the mode selection window.
2. Select “1 READING” from the displayed menu.
The READING window will appear.
3. Select “45 INLINE CONFIG” from the displayed menu.
(To display the hidden menu for reading, scroll the screen to the right or left using the right-pointing or
left-pointing arrow key down on the screen.)
The INLINE READING window will appear.
4. Select “1 INLINE PRESET” from the displayed menu.
The PLEASE SELECT OUTPUT DEVICE. dialogue will appear.
5. Select “1.DISPLAY” or “2.PRINT.”
If a receipt/report printer is not set up for the terminal, “1.DISPLAY” is the only valid choice.
42

8. Programming for the remote printer
For connection of a remote printer to a terminal(s) in the IRC system, be sure to consult your authorized
SHARP dealer.
(1) Basic programming for the remote printer – master and satellite
With the following procedure, you can do basic programming for the remote printer(s) included in the
IRC system.
For initial setup of the remote printer, please consult your authorized SHARP dealer.
1. Enter the PGM2 mode from the mode selection window.
2. Select “2 SETTING” from the displayed menu.
The SETTING window will appear.
3. Select “14 DEVICE CONFIG” from the displayed menu.
The DEVICE CONFIG window will appear.
4. Select a remote printer (KP#1-KP#9) to be programmed from the displayed menu.
A corresponding setting window for the remote printer will appear.
5. Carry out the programming for the remote printer.
(See the next page for programming for individual remote printer items.)
• Be sure to consult your authorized SHARP dealer for the correct settings.
6. After completion of settings for desired programming items, touch the [EXIT] key.
The DATA NOT SAVED SAVE IT? dialogue will appear.
7. Select “1.SAVE.”
43

Items to be programmed
NOTE
TERMINAL#
Enter the terminal number (1-254, 0).
CHANNEL#
Enter the channel number (0-5).
PRINTER
Select the model of the remote printer.
ER-01PU (SHARP)
TM-T90 (EPSON)
TM-H6000R (EPSON)
TM-T88(3)/T88(4) (EPSON)
TM-U220/230 (EPSON)
AUTO CUTTER
Choose whether to disable or enable the auto cutter function.
NO: Disables the auto cutter function.
YES: Enables the auto cutter function.
PRINT TYPE
Select the receipt type.
ADDITION: Addition receipt type
S/D: Single/double receipt type
ADD.+S: Addition + single receipt type
D ADD.: Double addition receipt type
D ADD+S: Double (addition + single) receipt type
SECOND KP
Enter the second remote (kitchen) printer number (1-9, 0).
NAME
Enter the name of the remote printer (max.12 characters).
INITIAL FEED#
Enter the initial line feed for the remote printer (0 to 64 lines).
SORT RCPT. CUTTING
Choose whether to disable or enable the partial cut between each sort group.
NO: Disables the partial cut function.
YES: Enables the partial cut function.
SEQUENTIAL PRINT
Choose whether to disable or enable the sequential print function.
NO: Disables the sequential print function.
YES: Enables the sequential print function.
Please consult your authorized SHARP dealer for appropriate settings of each item.
44

(2) Optional programming for the remote printer – master and satellite
With the following procedure, you can specify what items to be printed on the remote printer.
1. Enter the PGM2 mode from the mode selection window.
2. Select “2 SETTING” from the displayed menu.
The SETTING window will appear.
3. Select “10 OPTIONAL” from the displayed menu.
The OPTIONAL window will appear.
4. Select “5 PRINT SELECT2” from the displayed menu.
The PRINT SELECT2 window will appear.
5. Make appropriate settings for items to be printed on the remote printer and touch the [EXIT] key.
(See below for programming of individual items.)
The DATA NOT SAVED SAVE IT? dialogue will appear.
6. Select “1.SAVE.”
Items to be programmed
SEPARATOR LINE
NO: Does not print the separator line on the remote printer.
YES: Prints the separator line on the remote printer.
FREE TEXT ON KP
NO: Does not print the free text on the remote printer.
YES: Prints the free text on the remote printer.
ITEM CODE ON KP
NO: Does not print the PLU/department code on the remote printer.
YES: Prints the PLU/department code on the remote printer.
PRICE ON KP
NO: Does not print the price on the remote printer.
YES: Prints the price on the remote printer.
AMOUNT ON KP
NO: Does not print the amount on the remote printer.
YES: Prints the amount on the remote printer.
GUEST# ON KP
NO: Does not print the number of guests on the remote printer.
YES: Prints the number of guests on the remote printer.
QTY=1 ON KP
NO: Does not print quantity data on the remote printer when the quantity is “1.”
YES: Prints quantity data on the remote printer even though the quantity is “1.”
UNIT PRICE PRINT
NO: Does not print the unit price on the bill printer.
YES: Prints the unit price on the bill printer.
NOTE
For settings of the rest of the programming items for PRINT SELECT2, see the UP-3515
Instruction Manual.
45

9. Programming for the Manager Work Station (MWS)
– master and satellite
Manager Work Station (MWS) is the system that enables inline data communication between UP-3515 POS
terminals in the IRC system and a host P.C. via LAN interface.
For the setup of the Manager Work Station, please be sure to consult your authorized SHARP dealer.
The function of Manager Work Station:
1) Downloading of POS terminal data
2) Uploading of POS terminal data [Terminal PC]
3) Remote Job Entry (RJE) function [Terminal PC]
4) T-LOG function [Terminal PC]
5) MAIL MESSAGE function [Terminal PC]
6) Uploading of SD card data [Terminal PC]
(1) Programming of the MWS terminal number
The terminal number of MWS can be specified by the following procedure:
1. Enter the PGM2 mode from the mode selection window.
2. Select “2 SETTING” from the displayed menu.
The SETTING window will appear.
3. Select “22 MWS CONFIG” from the displayed menu.
The MWS CONFIG window will appear.
[Terminal PC]
4. Touch the “IP ADDRESS 4” line and enter a terminal number (1-254) for a MWS terminal, and then
touch the [EXIT] key.
The DATA NOT SAVED SAVE IT? dialogue will appear.
• Entering a terminal number of the machine itself results in “ENTRY ERROR.”
5. Select “1.SAVE.”
NOTE
A terminal number for a machine in MWS must be different from its terminal number for the IRC
system.
46

(2) Programming of the time-out time
The time-out value for receiving the data can be specified by the following procedure:
1. Enter the PGM2 mode from the mode selection window.
2. Select “2 SETTING” from the displayed menu.
The SETTING window will appear.
3. Select “22 MWS CONFIG” from the displayed menu.
The MWS CONFIG window will appear.
4. Touch the “TIME OUT” line and enter a number (1-255 (sec)) for the time-out time, and then touch the
[EXIT] key.
The DATA NOT SAVED SAVE IT? dialogue will appear.
• This value (time-out value) will depend upon the application. Please consult your authorized SHARP
dealer.
5. Select “1.SAVE.”
(3) Programming of the gateway number
The gateway number can be specified by the following procedure:
1. Enter the PGM2 mode from the mode selection window.
2. Select “2 SETTING” from the displayed menu.
The SETTING window will appear.
3. Select “22 MWS CONFIG” from the displayed menu.
The MWS CONFIG window will appear.
4. Touch the “G.W. ADDR. 4” line and enter a number (1-254) for gateway IP address 4, and then touch
the [ENTER] key.
• Entering a terminal number of the machine itself results in “ENTRY ERROR.”
• A number pre-entered in the “IP ADDRESS 4” line is not available for the gateway IP address 4.
47

Terminal No.
Time-out time (20 sec)
GATEWAY No.
Sample Print (master)
NOTE
10. Reading the contents of the Manager Work Station
(MWS) programming – master and satellite
1. Enter the PGM2 mode from the mode selection window.
2. Select “1 READING” from the displayed menu.
The READING window will appear.
3. Select “46 MWS CONFIG” from the displayed menu.
(To display the hidden menu for reading, scroll the screen to the right or left using the right-pointing or
left-pointing arrow key down on the screen.)
The PLEASE SELECT OUTPUT DEVICE. dialogue will appear.
4. Select “1.DISPLAY” or “2.PRINT.”
If a receipt/report printer is not set up for the terminal, “1.DISPLAY” is the only valid choice.
48

4
1) Updated data 3) Updated data
2)
Acknowledgment signal
4)
Acknowledgment signal
Satellite
Back-up master
Master
System Back-Up
1. How the IRC back-up system works
The IRC system incorporates a back-up system.
One of the satellites can be designated to serve as a back-up master.
For the setup of a back-up master in your IRC system, please consult your authorized SHARP dealer.
When both the master and back-up master are in order, the system works in the following sequence:
1) Each satellite sends updated GLU data (and clerk data*) to the master.
2) The master receives the data and sends back an acknowledgment signal to the satellite.
3) The satellite sends the updated data to the back-up master.
4) The back-up master receives the data and sends back an acknowledgment signal to the satellite.
*Only for the centralized clerk file system
If the master breaks down, the back-up master serves as the master after a master declaration is made at
the back-up master. If the back-up master breaks down, updated data transmission to it can be stopped by
a master declaration at the master. When the master or back-up master recovers from the breakdown, it
resumes its function as the master or back-up master by the recovery declaring operation.
49

NOTE
1) Detection of a breakdown
3) Updated data
Satellite
4)
Acknowledgment signal
(Transmission stops.)
Master declaration
Back-up master
Master
2) Master
declaration
operation
2. Master declaration
When the master or back-up master breaks down, the master declaration procedure should be taken to
inform satellites of the breakdown.
(1) When the master breaks down – Master declaration at the back-up master
Flow of a master declaration at the back-up master
1) A satellite detects a breakdown of the master through the system retry function when sending
updated GLU data (and clerk data*) to the master. At this point, the message “MASTER DOWN”
appears in the pop-up window of the display of the satellite.
(For the system retry function, see pages 55–56.)
2) The master declaration operation must be done at the back-up master. This operation informs all
the satellites that the master has broken down and the back-up master will serve as the master
hereafter. (During this process, any other operation cannot be done at each satellite.)
3) Each satellite in the IRC system starts sending updated GLU data (and clerk data*) only to the
back-up master.
4) The back-up master receives the data and sends back an acknowledgment signal to the satellites.
*Only for the centralized clerk file system
The master declaration procedure is as follows:
1. Enter the PGM2 mode from the mode selection window.
2. Select “7 DECLARE & RECOVERY MA/BMA” from the displayed menu.
3. Select “1 DECLARE MASTER&STOP DB UPDATE.”
The DECLARE & RECOVERY MA/BMA window will appear.
While the master is down, the back-up master performs T-LOG polling as well.
50

(2) When the back-up master breaks down – Master declaration at the master
1) Detection of a back-up master breakdown
3) Updated data
Satellite
4) Acknowledgment signal
(Transmission stops.)
Back-up master
Master
2) Master declaration
Flow of a master declaration at the master
1) A satellite detects a breakdown of the back-up master through the system retry function when
sending updated GLU data (and clerk data*) to both the master and back-up master. At this point,
the message “BACKUP DOWN” appears in the pop-up window of the display of the satellite.
2) The master declaration operation must be done at the master. This operation informs all the
satellites of the breakdown of the back-up master.
3) Each satellite in the IRC system starts sending updated GLU data (and clerk data*) only to the
master.
4) The master receives the data and sends back an acknowledgment signal to the satellites.
*Only for the centralized clerk file system
The master declaration procedure is the same as “(1) When the master breaks down.”
51

3) Updated data file
Satellite
4) Master
recovery
information
2)
Transmission stops temporarily.
Recovery declaration
1) Recovery
declaration
operation
Back-up master
Master
5) Restart of updated
data transmission
3. Recovery declaration
When the master or back-up master recovers from a breakdown, the recovery declaration operation should
be taken to inform satellites of the recovery.
(1) When the master recovers from a breakdown – Recovery declaration
at the back-up master
Flow of a recovery declaration at the back-up master
1) The recovery declaration operation is done at the back-up master.
2) Each satellite stops sending updated GLU data (and clerk data*) to the back-up master
temporarily.
3) The back-up master sends the updated GLU data (and clerk data*) files to the master.
4) The back-up master informs all satellites of the master's recovery.
5) The satellites restart sending updated GLU data (and clerk data*) to the master and the IRC
system returns to the normal state.
*Only for the centralized clerk file system
The recovery declaration procedure is as follows:
1. Enter the PGM2 mode from the mode selection window.
2. Select “7 DECLARE & RECOVERY MA/BMA” from the displayed menu.
The DECLARE & RECOVERY MA/BMA window will appear.
3. Select “2 SYNCHRONIZE DB MA/BMA.”
52

(2) When the back-up master recovers from a breakdown – Recovery
2) Transmission stops
temporarily.
3) Updated data file
Satellite
4) Back-up master
recovery information
Back-up master
Master
1) Recovery declaration
5) Restart of updated data transmission
declaration at the master
Flow of a recovery declaration at the master
1) The recovery declaration operation is done at the master.
2) Each satellite stops sending updated GLU data (and clerk data*) to the master temporarily.
3) The master sends the updated GLU data (and clerk data*) files to the back-up master.
4) The master informs all satellites of the back-up master's recovery.
5) The satellites restart sending updated GLU data (and clerk data*) to the back-up master and the
IRC system returns to the normal state.
*Only for the centralized clerk file system
The recovery declaration procedure is the same as “(1) When the master recovers from a breakdown.”
53
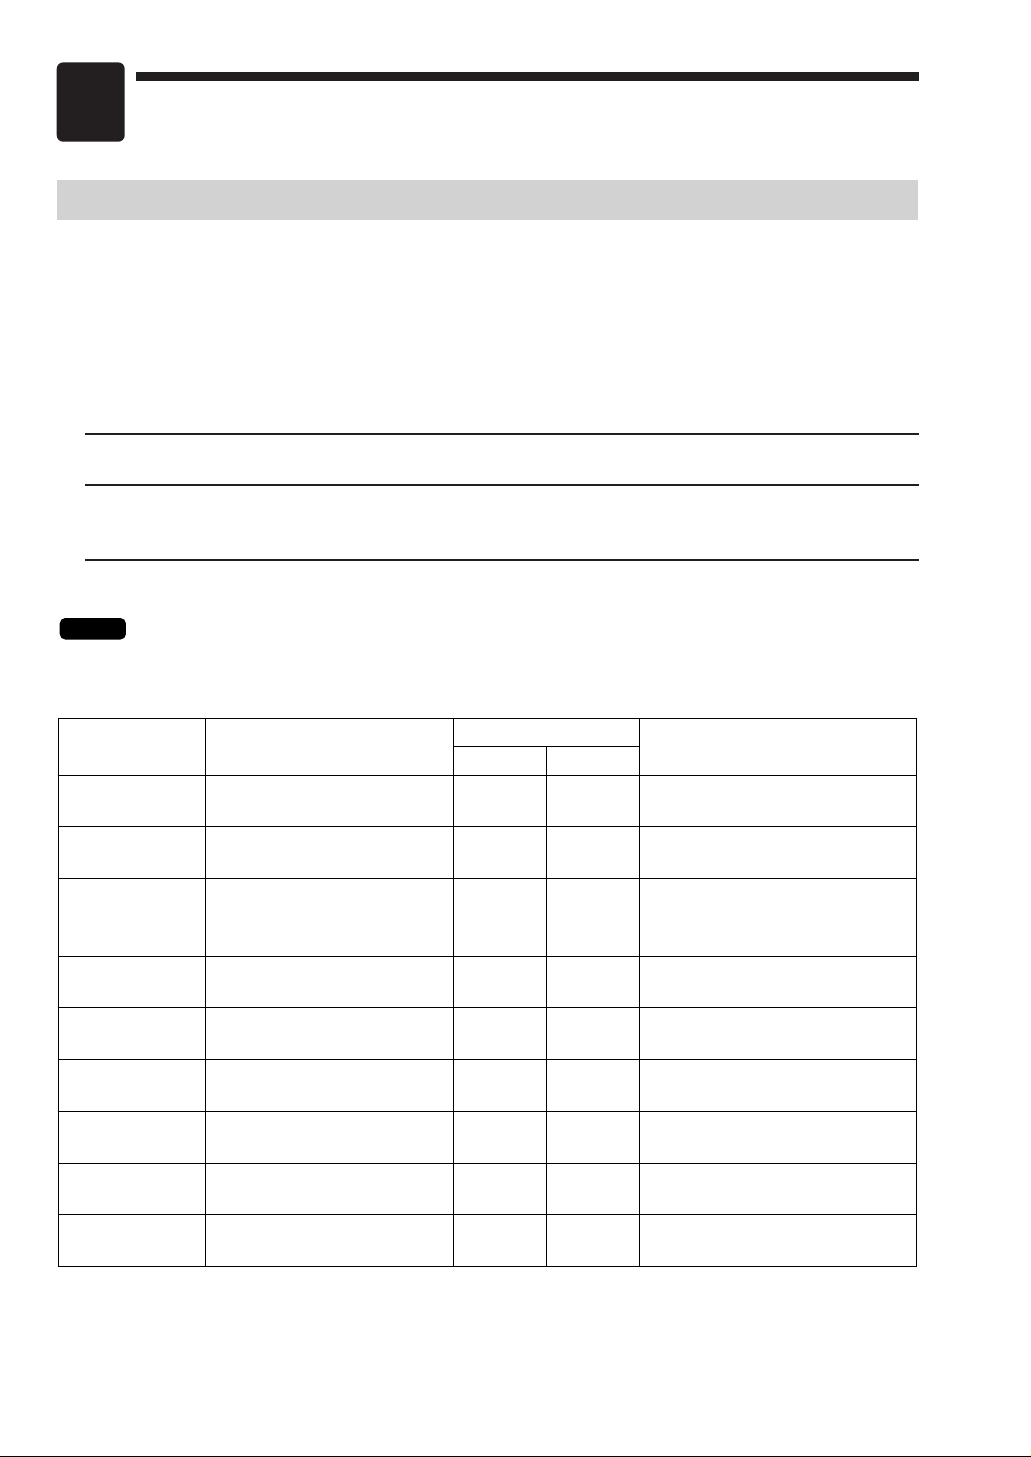
5
Manual clearing of the clerk
sign-on state
Manual clearing of the ‘GLU
data in use’ state
Manual clearing of the
GENERAL (dept. and
transaction) data memory
Manual clearing of the hourly
sales data memory
Manual clearing of the clerk
sales data memory
Manual clearing of the cashier
sales data memory
Manual clearing of the daily net
sales data memory
Manual clearing of the T-LOG
buffer
Manual clearing of the electronic
journal data
M
M
M
M
M
M
M
M
M
-
-
S
S
S
S
S
S
S
Effective only for clerks who is in the
sign-on state at the master. (*2)
This operation clears all GLU data
that is currently in use.
Only for the clerk + cashier system.
For T-LOG polling, see page 17.
SIGN ON FLAG
GLU USED FLAG
TRANSACTION
HOURLY
CLERK
CASHIER
DAILY NET
T-LOG
E. JOURNAL
Master(M)
Satellite(S)
Item Description
Terminal*1
Remarks
*
1
‘M’ denotes manual clearing functions available at the master while ‘S’ denotes manual clearing functions available at
satellites.
*
2
Clerk sales data for each satellite at which a clerk signs on is not collected by manual clearing of the sign-on state.
Clerk sales data is collected only when sign-off operation is done correctly at satellites.
NOTE
Error Recovery
1. Manual clear operation
In case of trouble, you can forcibly clear a specific item memory causing the trouble using the manual clear
operation to restore the system. This operation should be done only when the master or system breaks
down.
(1) Manual clearing procedure
With the following procedure, you can specify and clear an item memory causing trouble.
Clearing procedure
1. Enter the PGM2 mode from the mode selection window.
2. Select “4 DATA CLEAR” from the displayed menu.
The DATA CLEAR window will appear.
3. Referring to the list below, select an appropriate item memory to be cleared to restore the system.
The above-mentioned manual clearing jobs should be performed at the advice of your
authorized SHARP dealer.
(2) List of manual clearing items
54

2. System retry function
If a transmission job from the master to a satellite is not performed successfully, the master either
terminates the job immediately or enters command entry awaiting state depending on whether the system
retry function has been disabled or enabled. When the system retry function has been enabled, the master
awaits entry of a command and retries access depending on the commands as explained on the following
page.
System retry function is also available at satellites depending on a type of transmission error.
This function is used in the following cases:
• The master has failed to download preset or updated data to all or some of the satellites.
• The master has failed to collect sales report data from all or some of the satellites.
• The satellite has failed to download data to other machines.
• A clerk has failed to sign off at a satellite.*
Whether the system retry function is enabled or disabled when a transmission error occurs is
programmed both at the master and a satellite. (See “5. Specifying whether to enable or disable the
system retry function when a transmission error occurs” on page 41.)
*When a clerk has failed to sign off at a satellite for some reason (e.g. the master is busy), the RETRY
and ABORT commands are available but the IGNORE command is not.
(1) When the system retry function is disabled
The master terminates the transmission job immediately in the following two ways.
If none of the satellites have successfully transmitted data, the transmission is regarded as having
ended with an error, which is equivalent to ABORT as discussed on the following page.
If there is any satellite which has successfully transmitted data, the transmission is regarded as either
successful or unsuccessful depending on the type of transmission job. In this case, the transmission
regarded as successful and the one regarded as unsuccessful are equivalent to IGNORE and ABORT,
respectively, both of which are explained on the following page.
55

(2) When the system retry function is enabled
If a transmission error relating to a satellite occurs, the relevant window will appear on the display of
the master and the master awaits entry of one of the following commands:
A) RETRY command (selection from the menu)
B) ABORT command (selection from the menu)
C) IGNORE command (selection from the menu)
A) RETRY command:
When RETRY is selected, the master retries to access the satellite; however, depending on the
type of error (command error, etc.), it is obvious that the master would fail to access it again. If this
type of error occurs during transmission, the master may not retry.
B) ABORT command:
When ABORT is selected, the master terminates access to the satellite and regards the
transmission as having unsuccessfully ended. However, in the case of program data downloading,
the ABORT command may be issued only when all the satellites accessed are in the error state.
C) IGNORE command:
When IGNORE is selected, the master terminates access to the satellite and regards the
transmission as having successfully ended, and then prints only transmitted data.
If no satellite has successfully transmitted data, the IGNORE command may be issued to the
master in the case of sales data inquiry (X report), though the result is not printed.
[Retry during sales data inquiry]
During resetting, the ABORT command may be given only when every accessed satellite is in the
error state. The IGNORE and RETRY commands are available unconditionally.
56

6
Transmission system: 10Base-T/100Base-T
Transmission speed: 10 Mbits/sec / 100Mbits/sec
Transmission distance: Segment length max. 100m
Transmission cable: Twisted pair cable
No. of connectable machines: Master: 1
BASIC SPECIFICATIONS for LAN
Satellites: max. 31
*Up to 31 machines are operable with batch processing.
Up to 15 machines are operable with real-time processing.
57

UP3515V_2IE10
 Loading...