

Page 1
Page 2

PREFACE
The UP-3300 Flash ROM program version RAD1F/RAE1F contains enhancements for the
Employee Over Time reports. The enhancements allow the UP-3300 to be setup for tracking
standard hours for a period of time (ex: 2 weeks) while also allowing the overtime to tracked in
a separate period (ex: 1 week).
The contents of this manual were developed to assist you with the setup and reporting
procedures for using the enhanced Employee Time function of the UP-3300.
Therefore, if your UP-3300 terminal has a previous version Flash ROM object, the enclosed
descriptions do not apply.
1
Page 3

CONTENTS
INTRODUCTION ...............................................................
IMPORTANT .....................................................................
1. Programming Overview ................................................
- programming sequence
- some hints
2. SRV Mode Settings ......................................................
- Free key
- File allocation
3. PGM2-Mode Settings ...................................................
- Employee settings
- Job locations
4. Employee Time Reports ...............................................
- Report table
- Key sequence
- Report schedule table
- Example of report procedure
pg. 2
pg. 2
pg. 3
pg. 4
pg. 8
pg. 11
5. Week-1 Report Sequence ............................................
6. Week-2 Report Sequence ............................................
7. Sample Reports ...........................................................
pg. 13
pg. 17
pg. 19
1
Page 4

INTRODUCTION
This manual is designed to supplement existing SHARP documentation and assist the
Authorized Sharp Dealer with the program settings necessary to implement the enclosed
enhancements. Please read this manually carefully in order to decrease setup time and
confusion.
IMPORTANT
The basic UP-3300 software application system consists primarily of two modes for which the
dealer may select and/or change parameter settings. The two modes hereafter will be referred
to as "SRV-mode" (service) and "PGM-mode" (programming).
1. When Entering SRV Mode:
Please insure that the AC power switch is placed to the "OFF" position prior to placing
the SRV-Reset switch to the "Reset" position.
*** Note:
Please refer to the applicable Service Manual for SRV Mode programming of the
UP-3300. (SHARP Part No. SM-UP3300.)
2. Description of Installation:
The steps outlined in this manual have been developed from the UP-3300 starting from
the Default Settings which are activated upon successful completion of a Master Reset
"MRS".
2
Page 5

UP-3300 PROGRAMMING OVERVIEW
1. Programming Sequence:
The approach recommended for program settings that are to be set for the UP-3300 follow
the traditional scheme used in previous SHARP models.
As with previous models, it is highly recommended that the you set all necessary settings
1st) in SRV mode then 2nd) in PGM mode.
EDOM.oNBOJNOITPIRCSEDSTNEMMOC
B-219metsySemiTmetsySruoH-21/metsySruoH-42
059tuoyaLyeKeerF761#dna661#,561#noitcnuF
edomVRS
079
4132noitpircseDtxeTnoitcnuF.xam.rahc8
noitacollAeliFyromeM
).oNpuorGeliFyb(
eeyolpmE:62.oN
emiTgnikroWeeyolpmE:82.oN
0552steserpeeyolpmE)552~1(
edoM2MGP
5552snoitacoLboJ)99~1(
0362sedoCterceSboj/edomhcaeyB
*** Important:
When the UP-3300 is placed in a 24-hour operation, it is necessary to select the 24-Hour
Time system in SRV job 912-B.
*** Note:
The examples used in this manual will emphasize the use of the employee TIME-IN,
TIME-OUT and BREAK function keys which are placed directly on the keyboard.
2. Some UP-3300 PGM Mode Hints:
The UP-3300 provides some function keys designed specifically for PGM Mode entries
which will assist you in making certain preset field entries during your setup.
LIST
: will display all available selections in PGM mode for the preset field that has
been highlighted by the cursor.
.
: will "toggle" through all available selections in PGM mode for the preset field
that has been highlighted by the cursor.
3
Page 6
UP-3300 SRV-MODE SETTINGS
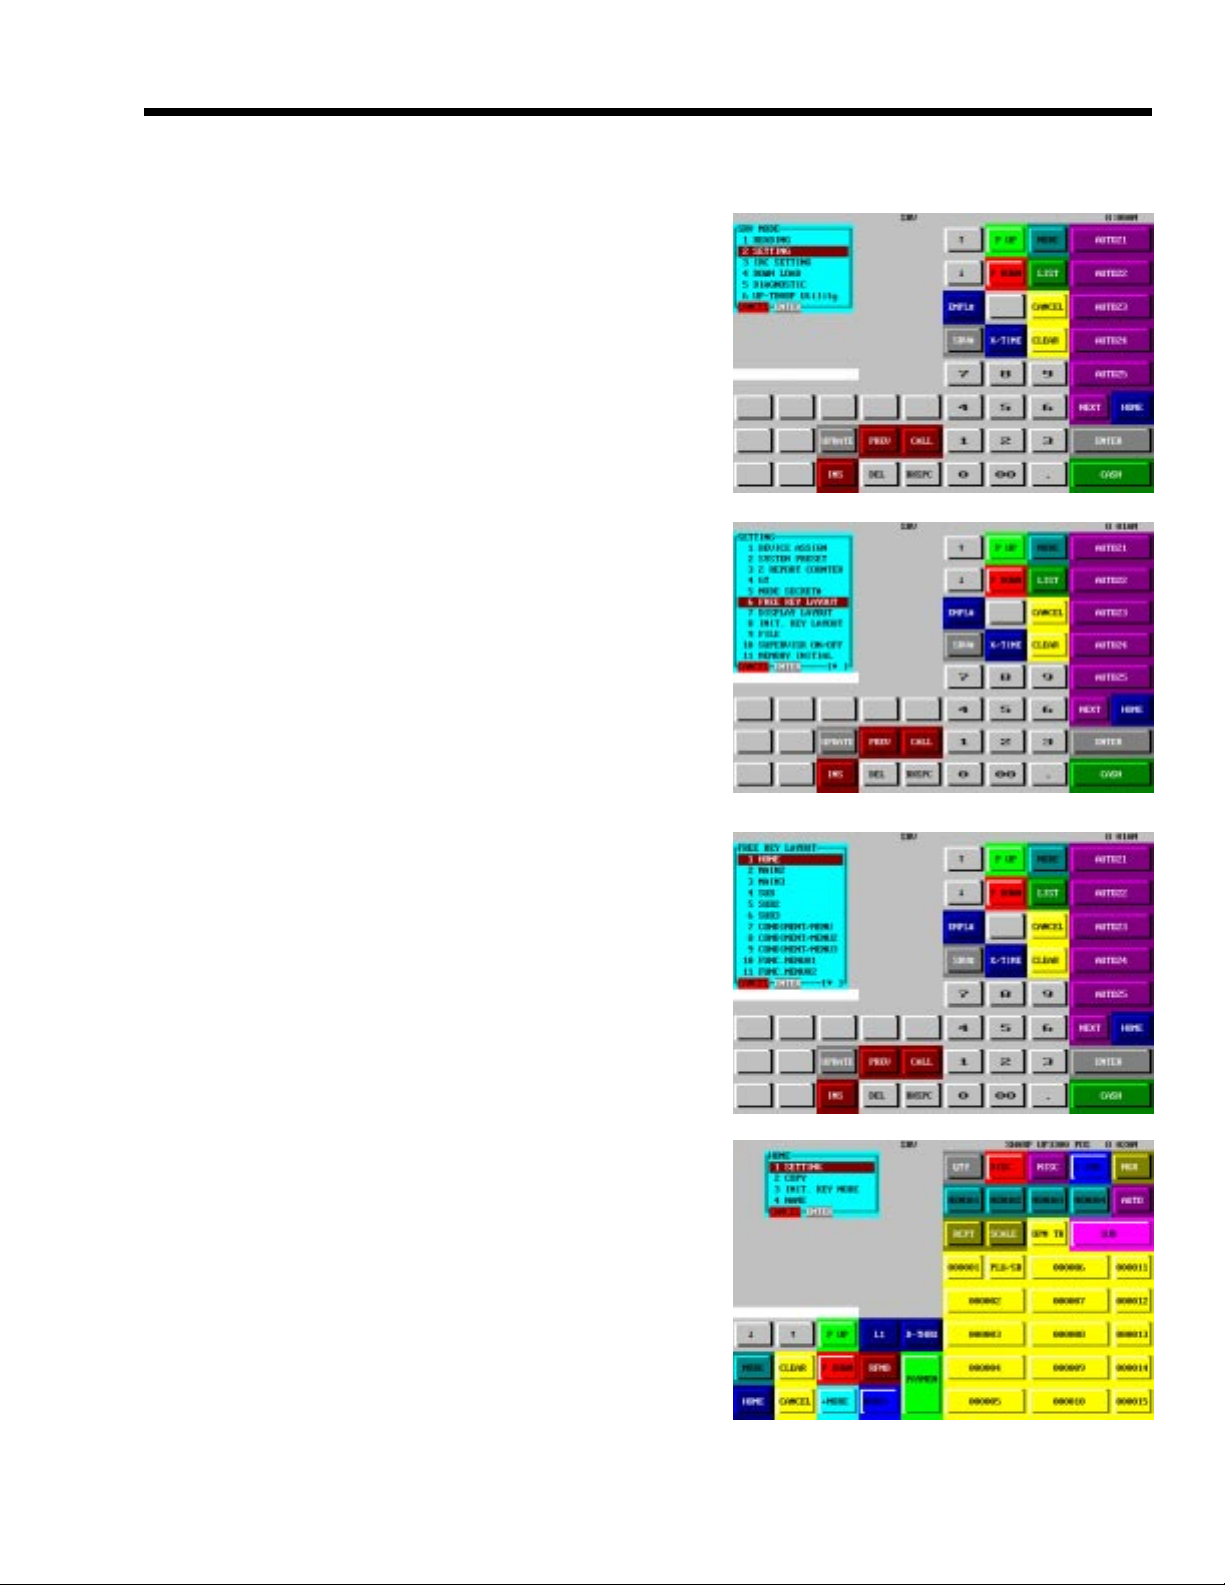
1. UP-3300 Free Key Assignment:
1) From the SRV-Mode Main Menu select menu
option "2. SETTING" by simply touching the
menu option as shown in Fig. 2-1.
2) From the SRV-Mode Sub-Menu #1, select
"6. FREE KEY LAYOUT" simply by touching
the menu option as shown in Fig. 2-2.
The UP-3300 will proceed to the different
keyboard menu options as shown in Fig. 2-3.
FIG. 2-1
3) From the desired keyboard menu, proceed by
touching "1. SETTING" to begin placement of
the related employee time function keys as
shown in Fig. 2-4.
FIG. 2-2
FIG. 2-3
FIG. 2-4
4
Page 7
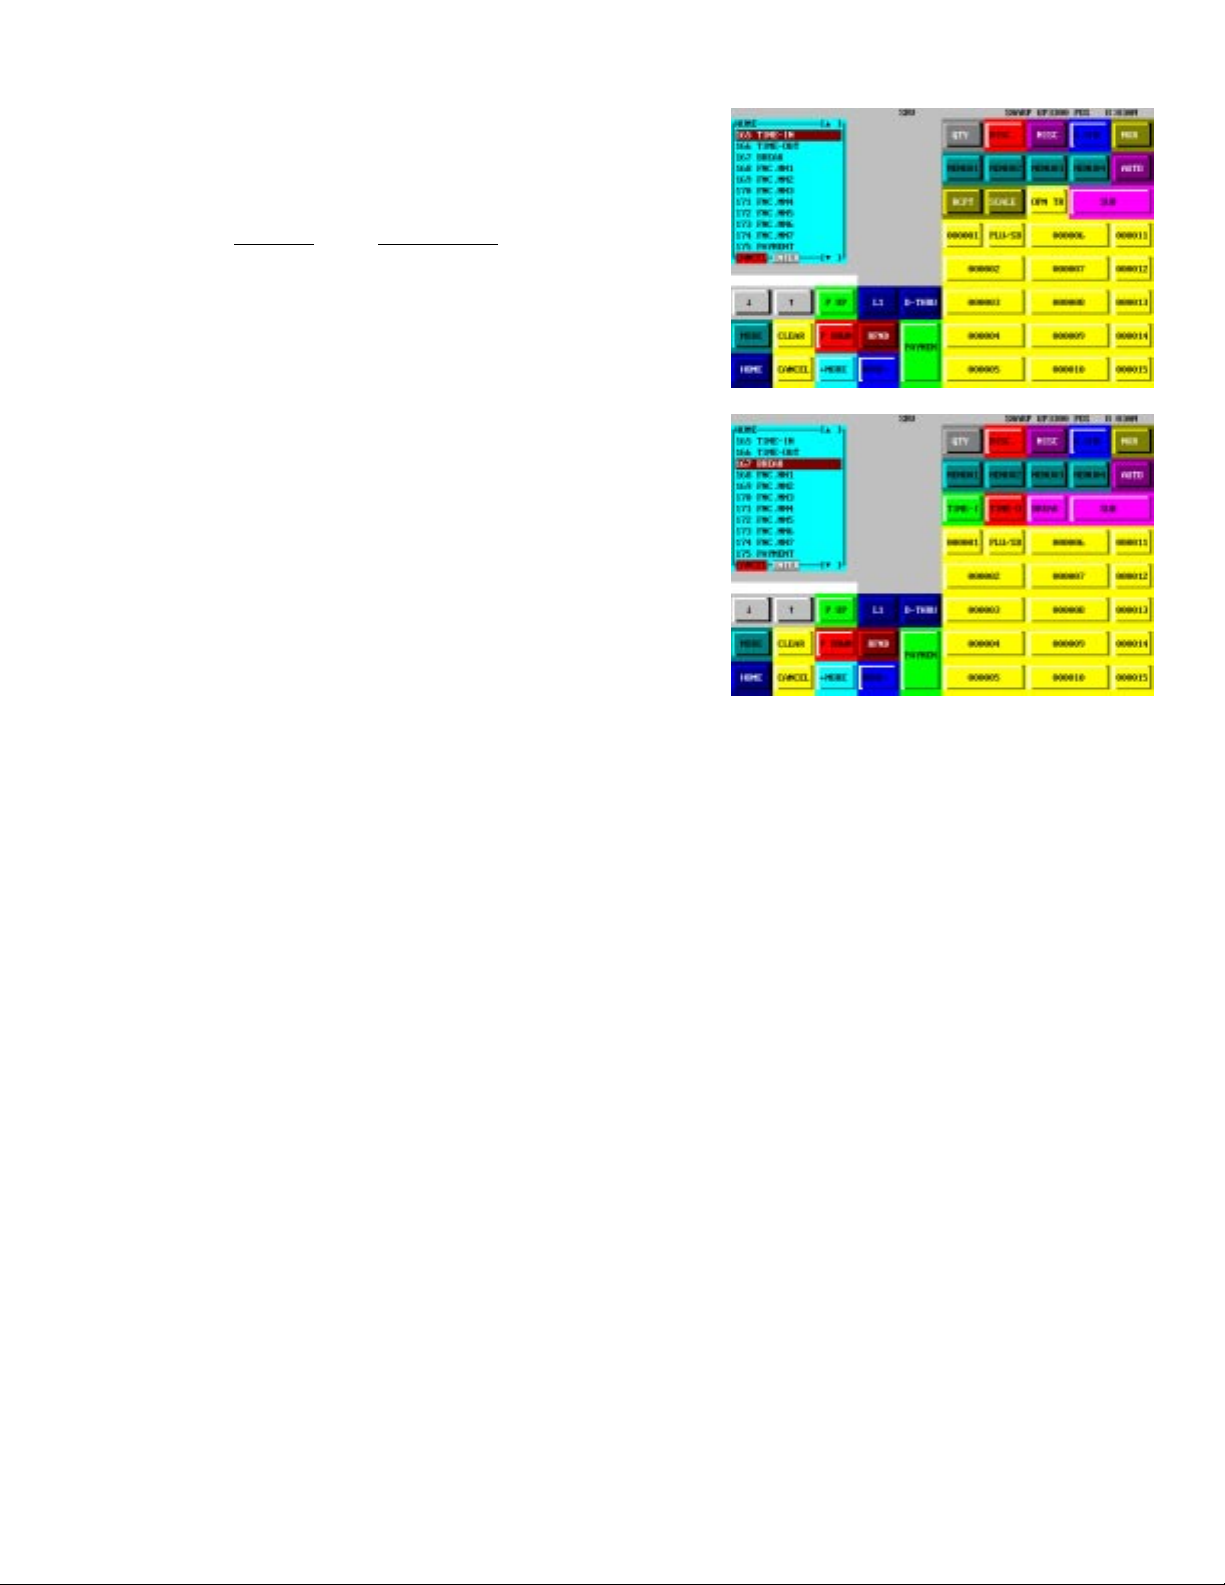
4) From the function list, place the following SRV
950 function keys on the desired keyboard as
shown in Fig. 2-5 and 2-6:
Func. # Description
165 TIME-IN
166 TIME-OUT
167 BREAK
FIG. 2-5
*** Note:
Once you have placed the related function keys on the keyboard, you may exit the SRV
job by depressing the ENTER button at the lower border of the RECEIPT WINDOW
followed by depressions of the CANCEL key until you have returned to the HOME
keyboard.
FIG. 2-6
5
Page 8

2. UP-3300 Memory File Allocation:
1) From the SRV-Mode Main Menu select menu
option "2. SETTING" by simply touching the
menu option as shown in Fig. 2-7.
2) From the SRV-Mode Sub-Menu #1, select
"8. FILE" by simply touching the menu option
as shown in Fig. 2-8.
FIG. 2-7
3) Using the UP and DOWN arrow keys, scroll to
File Group No. 26 and select it by depressing
the ENTER key as shown in Fig. 2-9.
4) Using the Ten-key pad, enter the desired
number of employees followed by depressing
the ENTER key as shown in Fig. 2-10.
FIG. 2-8
FIG. 2-9
*** Note:
Once the UP-3300 has completed "processing" the allocation, it will return to the
File Group listing automatically.
FIG. 2-10
6
Page 9

5) Next, from the File Group listing, select
"28. EMPLOYEE TIME" by simply touching
the menu option as shown in Fig. 2-11.
6) The employee's working memory should be
allocated as follows:
Index:
No. of employees
Records:
Is the max. number of Time-In/Out,
Break-In/Out records for all employees to be
stored within the period (+1)
General Equation:
FIG. 2-11
FIG. 2-12
where x =number of employees
example:
*** Note:
Once the UP-3300 has completed "processing" the allocation, it will return to the
File Group listing automatically.
To exit the SRV mode, depress the CANCEL key until the UP-3300 returns to the
HOME keyboard.
x * (y * z) + 1
y =number of records per employee per day
z =number of days in period
Employees (20) x ((5 per day x 7 days or 35)) + (1) = 701 records
7
Page 10

UP-3300 PGM2-MODE SETTINGS
1. UP-3300 Employee Settings:
1) From the HOME keyboard, depress the
MODE key to place the UP-3300 at the Mode
Main Menu and select "9. PGM2 MODE" as
shown in Fig. 3-1.
2) From the PGM2-Mode Sub-Menu #1, select
"2. SETTING" simply by touching the menu
option as shown in Fig. 3-2.
FIG. 3-1
3) From the PGM2-SETTING Sub-menu, select
"7. PERSONNEL" simply by touching the
menu option as shown in Fig. 3-3.
4) From the PGM2-PERSONNEL Sub-Menu,
select "3. EMPLOYEE" simply by
touching the menu option as shown in
Fig. 3-4.
FIG. 3-2
FIG. 3-3
FIG. 3-4
8
Page 11

5) From the PGM2-EMPLOYEE settings, the
following preset options are available:
a) Secret Code : employee's own
b) Name : 16 char. max.
c) Server Code : 4 digits max.
d) Std. Hours : 40 hrs ****
e) Job Locations : 7 locations max.
f) HALO : Employee sales limit
FIG. 3-5
*** Note:
Once you have completed the last field entry for the specified employee, the UP-3300 will
return to the employee listing automatically.
FIG. 3-6
Once you have completed presetting all employee data, you can exit the PGM2 sub
menus by depressing the CANCEL until the UP-3300 returns to the HOME keyboard.
9
Page 12

2. Job Location Settings:
1) From the PGM2-PERSONNEL Sub-menu,
select "4. JOB LOCATE TBL" as shown in
Fig. 3-7.
2) From the PGM2-JOB LOCATE TBL settings, the
following preset options are available:
a) Text : 8 char. max.
b) Salary Amount : pay rate per hour
c) Over-Time Rate : Percent rate to calculate overtime (ex: 1.50 is time-and-a-half)
FIG. 3-7
FIG. 3-8
*** Note:
Once you have completed the last field entry for the specified job location, the UP-3300
will return to the location listing automatically.
Once you have completed presetting all job location data, you can exit the PGM2 sub
menus by depressing the CANCEL until the UP-3300 returns to the HOME keyboard.
10
Page 13

UP-3300 EMPLOYEE TIME REPORTS
Overview:
The following reporting information is based on a 40 hour standard workweek and:
a. Employee detail information being reset every week (Z2/255).
b. Employee summary information being reset every two weeks (Z2/265)
1. Report Table
TROPER
EDOM.ONBOJ
1X1Z2X2ZyliaD
)deliateD(eeyolpmEx------551.ytivitcaeeyolpmedeliateds'yadotswohS
emiTrevOx------261
)deliateD(eeyolpmE----xx 552
)yrammuS(emiTrevO----xx 262
)yrammuS(eeyolpmE----xx 562
2. Key Sequence for Running Reports
3. X1
EGASU
dradnatsehtecnoemitrevos'yadotswohS
.dedeecxeneebsahsruoh
ehtfosliateddetalumuccaehtswohS
.seitivitcas'eeyolpme
yadhcaeybemitrevodetalumuccaehtswohS
.dedeecxeneebsahsruohdradnatsehtecno
emitrevodnathgiartsdetalumuccaehtwohS
yrammus.doirepehtrof
20. EMPLOYEE
24. OVER TIME
MODE
5. X2
6. Z2
16. EMPLOYEE
19. OVER TIME
20. EMPLOYEE
SUMMARY
7. EMPLOYEE
10. OVER TIME
11. EMPLOYEE
SUMMARY
11
Page 14

3. Schedule Table for Running Reports
.oNboJ/tropeRyliaDylkeeWylkeeWiBdedeeNsAnoitcA
551/eeyolpmE1Xx------x liateDyliaDstnirP
261/emitrevO1Xx------x emitrevOyliaDstnirP
552/eeyolpmE2X * ---x---x liateDdetalumuccAstnirP
262/emitrevO2X * ---x---x emitrevOdetalumuccAstnirP
eeyolpmE2X
562/yrammuS *
262/eeyolpmE2Z---x------
262/emitrevO2Z---x-----
yrammuSeeyolpmE2Z
562/
* These reports will continue to accumulate data until they are cleared by running the equivalent Z2 reports.
---------x
------x---
emitrevO
&liateDeeyolpmEsetadpU
yrammuS
emitrevO
yrammuS
foyrammuSstnirP
&thgiartSdetalumuccA
4. Example of Reporting Procedure:
Week 1 - X2/255 - reads the employee(s) details for the period
X2/262 - reads the employee(s) overtime for the period
{ Perform edits if necessary }
Z2/255 - resets the employee(s) details & overtime for the period
updates Employee Summary
X2/265 - reads the Employee Summary data thus far
Week 2 - X2/255 - period detail
X2/262 - period overtime
{ Perform edits if necessary }
Z2/255 - clears period detail & overtime; updates Employee Summary
Z2/265 - clears Employee Summary
detalumuccAsraelC&stnirP
detalumuccAsraelC&stnirP
eeyolpmEsraelC&stnirP
*** Important:
Accidental execution of the Over Time (262) Z2 Report prior to the Employee (255) X2/Z2
will reset the detailed employee data for that period without printing the contents.
*** Note:
The above example allows the UP-3300 to a) capture detailed activity per employee on
a weekly basis and b) reset employee detail information on a weekly basis thereby
preventing the accumulation of overtime into the new week.
12
Page 15

WEEK - 1 REPORT SEQUENCE
1) From the Mode Main menu select the
"5. X2 MODE" simply by touching this option
as shown in Fig. 4-1.
2) From the X2-Mode Sub-Menu #1, select
"16. EMPLOYEE" by simply depressing
the report menu item as shown in Fig. 4-2.
FIG. 4-1
3) Enter the desired employee code or range of
employee code(s) by using the ten key pad
followed by depression of the [ENTER]
function key as shown in Fig. 4-3..
4) Select "1. DISPLAY" to display the contents at
the UP-3300 receipt window or "2. REPORT
PRINTER to print the contents at the
designated report printer as shown in Fig. 4-4.
FIG. 4-2
FIG. 4-3
13
FIG. 4-4
Page 16

*** Note:
Once the UP-3300 has successfully displayed/printed the report, it will return to the X2
mode automatically.
5) From the X2-Mode Sub-Menu #1, select
"19. OVER TIME" by simply depressing
the report menu item as shown in Fig. 4-5.
FIG. 4-5
6) Enter the desired employee code or range of
employee code(s) by using the ten key pad
followed by depression of the ENTER
function key as shown in Fig. 4-6.
FIG. 4-6
7) Select "1. DISPLAY" to display the contents at
the UP-3300 receipt window or "2. REPORT
PRINTER to print the contents at the
designated report printer as shown in Fig. 4-7.
FIG. 4-7
*** Note:
Once the UP-3300 has successfully displayed/printed the report, it will return to the X2
mode automatically.
14
Page 17

8) From the Mode Main Menu select the
"6. Z2 MODE" simply by touching this option
as shown in Fig. 4-8.
9) From the Z2-Mode Sub-Menu #1, select
"7. EMPLOYEE" by simply depressing
the report menu item as shown in Fig. 4-9.
FIG. 4-8
10)Enter the desired employee code or range of
employee code(s) by using the ten key pad
followed by depression of the [ENTER]
function key as shown in Fig. 4-10.
11)Select "1. DISPLAY" to display the contents at
the UP-3300 receipt window or "2. REPORT
PRINTER to print the contents at the
designated report printer as shown in
Fig. 4-11.
FIG. 4-9
FIG. 4-10
15
FIG. 4-11
Page 18

12)Once you have selected the display/printer
option, the UP-3300 will prompt:
"ARE YOU SURE ?"
as shown in Fig. 4-12.
FIG. 4-12
*** Important:
Please insure that the connected report printer is functioning properly prior to this selection.
*** Note:
Once the UP-3300 has successfully displayed/printed the report, it will return to the Z2
mode automatically.
16
Page 19

WEEK - 2 REPORT SEQUENCE
*** Important:
Repeat the steps ( 1~ 13 ) from the WEEK - 1 procedures to produce the following reports:
a) X2 : 255 Employee (reading)
b) X2 : 262 Over Time(reading)
c) Z2 : 255 Employee (resetting)
1) From the Mode Main Menu select the
"6. Z2 MODE" simply by touching this option
as shown in Fig. 5-1.
2) From the Z2 MODE Sub-Menu #1, select
"11. EMPLOYEE SUMMARY " by simply
depressing the report menu item as shown in
Fig. 5-2.
3) Enter the desired employee code or range of
employee code(s) by using the ten key pad
followed by depression of the [ENTER]
function key as shown in Fig. 5-3.
FIG. 5-1
FIG. 5-2
17
FIG. 5-3
Page 20

4) Select "1. DISPLAY" to display the contents at
the UP-3300 receipt window or "2. REPORT
PRINTER" to print the contents at the
designated report printer as shown in Fig. 5-4.
5) Once you have selected the display/printer
option, the UP-3300 will prompt:
"ARE YOU SURE ?"
as shown in Fig. 5-5.
FIG. 5-4
FIG. 5-5
*** Important:
Please insure that the connected report printer is functioning properly prior to this selection.
*** Note:
Once the UP-3300 has successfully displayed/printed the report, it will return to the Z2
mode automatically.
18
Page 21

SAMPLE REPORTS
155 Employee Details for this day 162 Employee Overtime for this day
*** Note:
The daily reports are available only during the current day and are automatically cleared
after 12:00 a.m. (12-hour system) or 24:00 (24 hour system).
19
Page 22

255 Employee Details for the Period
262 Overtime Summary for the Period
Note:
Z2 reports are identical in format to their
X2 counter parts, the difference being
that Z2 reports performs a reset and
update function when they are executed.
20
Page 23

265 Employee Summary for the Period
End of Week One
Note:
This report is updated when the Z2
Employee report (262) is executed.
End of Week Two
Note:
The Z2 equivalent of this report will
permanently clear all accumulated data
from memory.
21
 Loading...