

Page 1

Handset Parts................................. 1-2
Parts & Functions ............................ 1-2
Charging Battery............................ 1-4
Charging Battery (AC Charger) ....... 1-4
Charging Battery (In-Car Charger)....
Power On/Off .................................. 1-6
Handset Power On/Off..................... 1-6
Display & Indicators....................... 1-7
Display............................................. 1-7
Indicators......................................... 1-8
Accessing Functions................... 1-11
Shortcuts Menu & Key Shortcut .... 1-13
Toggling Active Functions (Multi Job)
....................................................... 1-14
Standby Shortcuts ......................... 1-15
Using Simplified Menus (Simple Menu)
....................................................... 1-16
Cycloid Position Setup................... 1-17
1-5
TOUCH CRUISER......................... 1-18
Using TOUCH CRUISER ...............1-18
Motion Control ............................. 1-19
Mobile Manners............................ 1-21
Security Codes ............................ 1-22
Basic Tools................................... 1-23
My Details & Basic Tools................1-23
Double Number ............................ 1-25
Using Double Number....................1-25
Modes.............................................1-26
Additional Functions ................... 1-28
Troubleshooting........................... 1-31
1
Getting Started
1-1
Page 2
Getting Started
1
Handset Parts
7
9
a
8
6
l
i
g
h
k
j
f
e
c
d
5
1
4
2
3
b
Parts & Functions
1-2
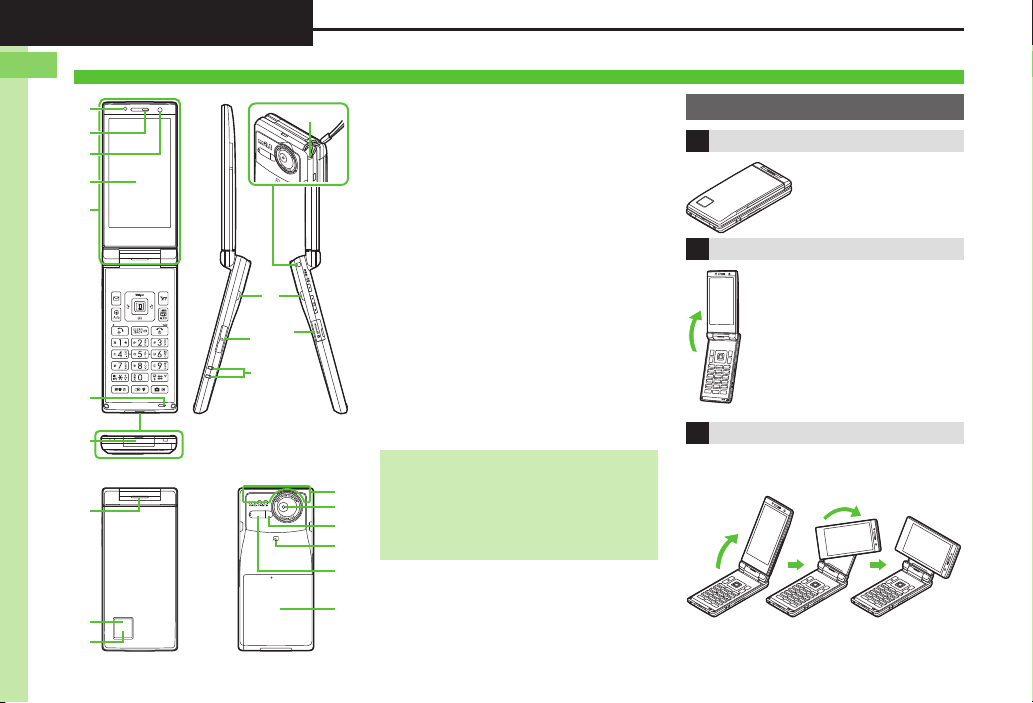
1 Light Sensor
2 Earpiece
3 Internal Camera
4 Display
5 TV Antenna Location
6 Microphone
7 External Device Port (with Port Cover)
8 Center Speaker
9 Small Light
a External Display
b Strap Eyelet
c Stereo Speakers
d Memory Card Slot (with Slot Cover)
e Headphone Port (with Port Cover)
f Charging Terminals
g Internal Antenna Location
h External Camera (lens cover)
i Mobile Light
j m Logo
k Infrared Port
l Battery Cover
. Do not cover or place stickers, etc. over
Light Sensor or Internal Antenna area.
. Replace Port/Slot Cover after Port/Slot
use.
. Avoid metallic straps; Antenna sensitivity
may be affected.
Display Positions
Closed Position
Keep handset closed
when not in use.
Portrait Position
Open handset to place or
answer calls, enter text, etc.
Cycloid Position
Open handset and rotate Display
90 degrees clockwise.
Do not forcefully rotate Display; damage
may result.
Page 3

Getting Started
1
Press a or b e
Press c or d f
Press a, b, c or d g
Press E or F L
Handset Keys
Keys are indicated in this guide as shown.
1
2
3
4
5
6
7
8
9
a
b
c
1 Multi Selector (right) d
Open Received Calls. Long Press to
activate/cancel infrared.
2 Multi Selector (up) a
Open Mobile Widget window. Long Press
to open PC Site Browser menu.
3 Center Key % & TOUCH CRUISER
Open Main Menu. Long Press to activate/
cancel Keypad Lock.
4 Multi Selector (left) c
Open Dialed Numbers. Long Press to
activate/cancel Bluetooth
d
e
f
g
h
i
Handset Parts
5 Mail Key B
Open Messaging menu. Long Press to
open S! Mail Composition window.
6 Shortcuts & A/a Key '
Open Shortcuts menu. Long Press to
show active indicators (Status Icon List).
7 Clear/Back Key $
Play Answer Phone messages. Long
Press to activate/cancel Answer Phone.
8 Start Key !
Open All Calls. Long Press to open
Double Number Mode menu.
9 Keypad 0 - 9
Enter numbers to place calls or access
functions (Quick Operations). Long Press
j
k
l
®
.
to open Phone Book.
a n Key (
n
, +, P, ? and -. Long Press to open
Enter
S! Friend's Status member list.
b Dictionary Key ~
Open Dictionary. Long Press to activate
VeilView.
c Multi Job & Manner Key )
Select handset mode. Long Press to
activate/cancel Manner mode.
d Yahoo! Keitai Key A
Open Yahoo! Keitai portal. Long Press to
activate Familink Remote.
e TV & Text Key &
Activate TV. Long Press to open Change
Menu window.
f Multi Selector (down) b
Open Phone Book. Long Press to create
new Phone Book entries.
g Power On/Off Key "
Toggle Standby display. Long Press to
turn handset power off.
h # Key #
Enter #. Long Press to activate/cancel
Manner mode.
i Camera Key |
Activate mobile camera. Long press to
activate Review.
Side Keys
j S! Circle Talk & Pedometer Key I
Portrait: Open S! Circle Talk member list.
Long Press to open Pedometer menu.
Closed: Toggle Clock view. Long Press to
illuminate Mobile Light.
k Volume Up Key E
Closed: Scroll External Display indicators.
Long Press to check e-money balance.
l Volume Down Key F
Long Press to start Simulated Call.
Closed: Scroll External Display indicators.
Multi Selector & Side Keys
. In this guide, Multi Selector and Side Key
operations are indicated as follows:
1-3
Page 4
Getting Started
1
Charging Battery
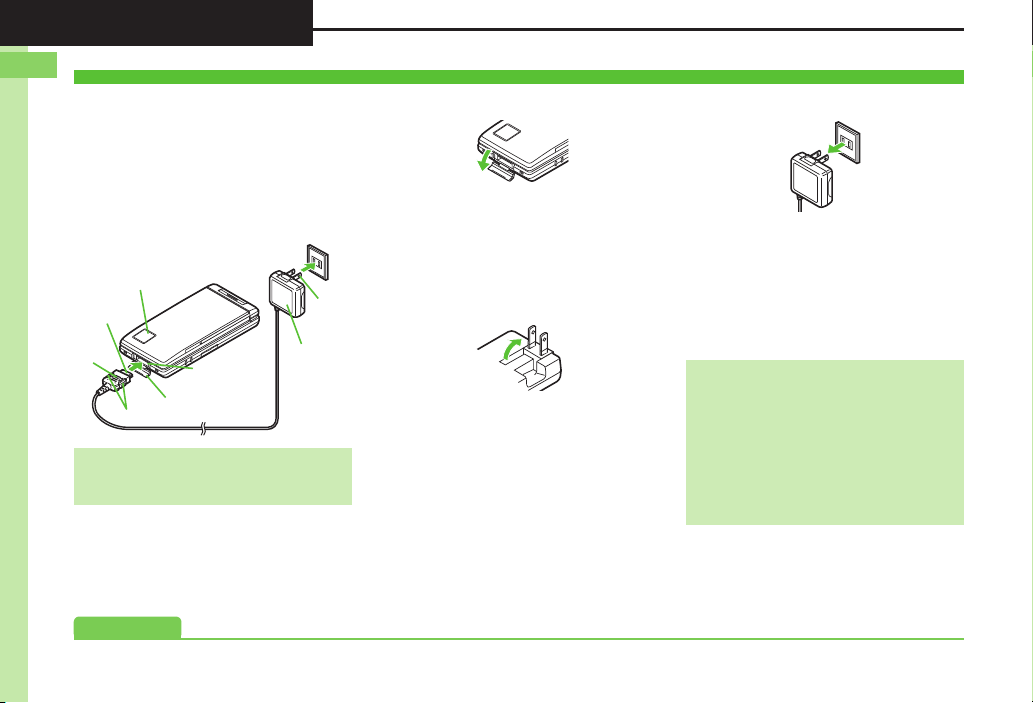
AC 100V Outlet
Blades
AC Charger
Small Light
Charger
Connector
Release Tabs
Port Cover
External Device
Por t
Arrows
Advanced
Charging Battery (AC Charger)
Battery must be inserted in handset to
charge it.
. Use specified AC Charger ZTDAA1 (sold
separately) only. In this guide, ZTDAA1 is
referred to as "AC Charger."
. Handset and AC Charger may warm during
charging.
Important AC Charger Usage Note
. Fold back blades after charging. Do not
pull, bend or twist the cord.
1Open Port Cover as shown
2Connect AC Charger
. With arrows up, insert connector until
it clicks.
3Extend blades and plug AC
Charger into AC outlet
. Small Light illuminates red while
charging.
. Small Light goes out when battery is
full.
4Unplug AC Charger
. Pull AC Charger straight out.
5Disconnect handset
. Squeeze release tabs to remove
connector.
6Fold back blades and
replace Port Cover
When Small Light Flashes
.
Battery is unchargeable; may be defective
or simply at the end of its life; replace it.
USB Charge
. Connect handset (with power on) to PC
via USB Cable to charge battery.
Charging Battery Overseas
. SoftBank is not liable for problems
resulting from charging battery abroad.
1-4
0(Disabling USB Charge (P.1-28)
Page 5
Getting Started
1
Charging Battery
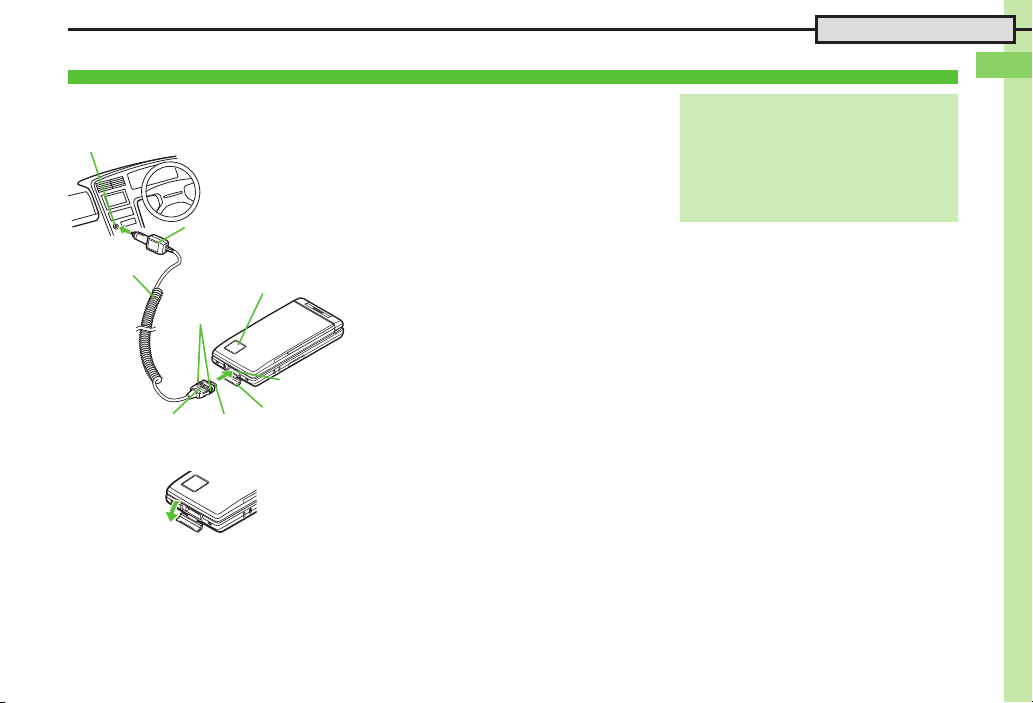
Cigarette Lighter Socket
Plug
In-Car Charger
Small Light
Release Tabs
Arrows
External
Device Port
Port Cover
Charger Connector
Charging Battery (In-Car Charger)
In-Car Charger may be purchased
separately.
1Open Port Cover as shown
2Connect In-Car Charger
. With arrows up, insert connector until
it clicks.
3Plug Charger into cigarette
lighter socket
4Start car engine
. Small Light illuminates red while
charging.
. Small Light goes out when battery is
full.
5Unplug Charger
6Disconnect handset
. Squeeze release tabs to remove
connector.
7Replace Port Cover
Important In-Car Charger Usage Notes
.
Disconnect Charger before leaving vehicle
to prevent charging with engine off.
. Do not use In-Car Charger with Desktop
Holder.
. Avoid charging battery inside extremely
hot vehicles.
1-5
Page 6

Getting Started
1
Power On/Off
Handset Power On/Off
Power On
Follow these steps when powering on
932SH for the first time:
1" (Long)
. After Power On Graphic, follow the
steps below.
. " S " S % S b S % S
設定
S % S Language S % S
English S % S " (Long) S "
(Long) S Change Menu window
opens
2Select option S %
Guide descriptions are based on
Standard Menu.
. My Details setup star ts.
3Enter last name S % S
Enter first name S %
. Change Menu display option
confirmation appears.
4Yes or No S %
Standby
. Choose No to enter Standby
immediately after powering on.
When USIM Card is Not Installed
. Insert USIM Card appears; insert the
card to use handset.
Retrieving Network Information
Handset initiates Network Information
retrieval when B, % or A is pressed for
the first time.
Follow these steps to retrieve Network
Information to use Network-related
services and TV; retrieval automatically
sets Clock:
1Yes S % S Retrieval starts
2%
Power Off
1" (Long)
. After Power Off Graphic, handset
shuts down.
1-6
Page 7
Getting Started
1
Display & Indicators
B%A
Advanced
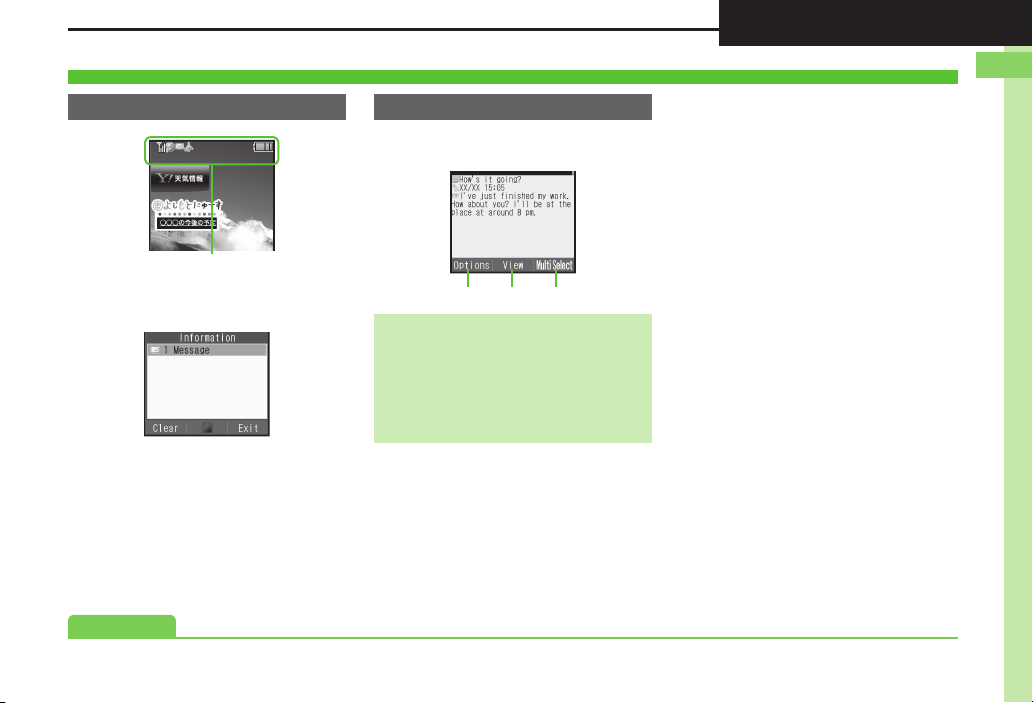
Display
Standby Softkeys
Functions/operations assigned to B, %
and A appear at the bottom.
. Indicators (signal strength, battery
strength, etc.) appear.
. Information window opens at the bottom for
Missed Calls, new mail, etc.
, Information label (e.g., Message, etc.)
Information Window
and count appear in Information window.
Select an item and press % to open it.
Display Saving
. Display goes dark after Display Saving
time elapses. Press any key to activate it.
Backlight
. Backlight turns off after Time Out time
elapses. Press 0 - 9 to illuminate it
(key press may affect active function).
0(Handling Information list (P.1-28)
1-7
Page 8
Getting Started
1
4
5
1
3
2
3
4
1
5
2
5
6
1
7
8
3
4
2
31
2
1-8
Display & Indicators
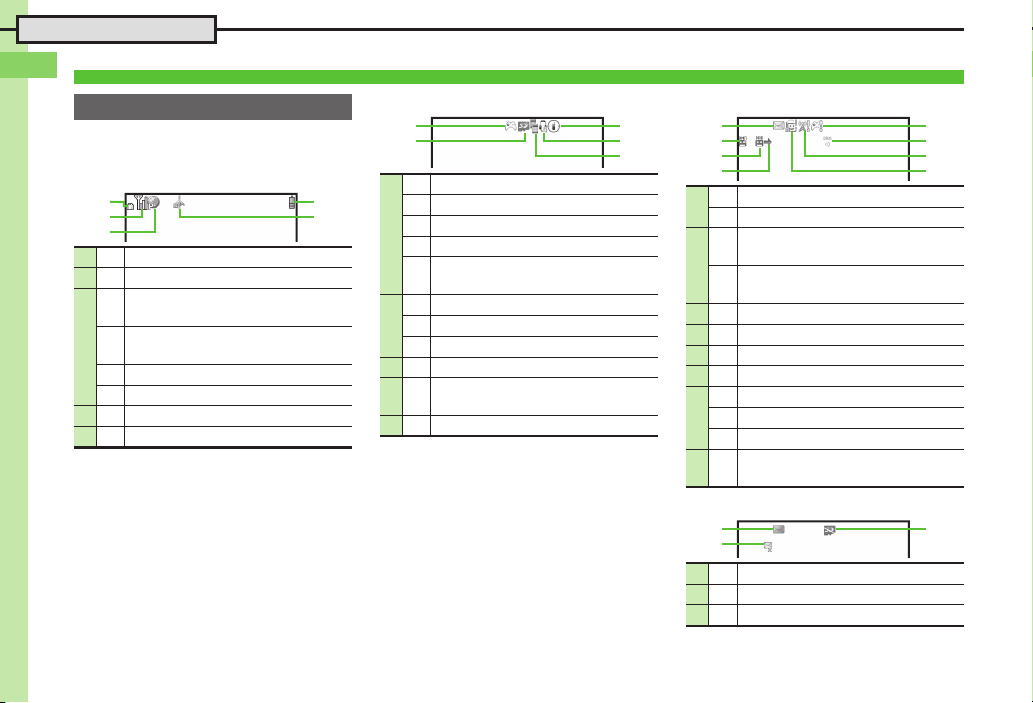
Indicators
Display Indicators
k, l and j indicate line type in Dual
Mode (P.1-25).
[ Basic Status
1 o International roaming in progress
2 ! Signal strength
Packet transmission protocol
B
ready (3G)
Packet transmission protocol
i
3
ready (GSM)
" Packet transmission available (3G)
h
Packet transmission available (GSM)
4 0
Battery strength (%2 appears in turn)
5 q IP Service enabled
1
The more bars the better.
2
Battery strength % is an approximation.
3
Appears when Decoration Call, S! Appli
communication or Mobile Widget is enabled.
B accompanies q even if packet
transmission is not in progress. Both
indicators disappear when Decoration
Call, S! Appli Notification Setting and
Mobile Widget Notification Setting are Off.
1
3
[ Function Status [ Notifications
F Active S! Application
< Paused S! Application
g Music playback in progress
1
a TV recording in progress (handset)
TV recording in progress (Memory
b
Card)
@ Memory Card in use
2
n Memory Card formatting
m TV Timer/TV Recording Timer set
3 n Compass Indicator
Music playback in progress (via
4 r
5 7
®
Bluetooth
Multiple functions (Multi Job) active
)
C Unread mail
1
B Unread Delivery Report
Answer Phone active & message
:
recorded
2
Answer Phone canceled &
l
message recorded
3 N New Voicemail
4 m
Missed Call or new mail on idle line
5 , S! Appli/Mobile Widget Notification
6 S Contents Key received
x
Unread S! Information Channel info
7
9 Software Update result
5 Unread S! Quick News info
Unread S! Friend's Status notification
8 d
or unanswered registration request
[ Warnings
1 k Mail memory low
2 O Message delivery failure
3 ;
Memory Card unusable/misinserted
Page 9
Getting Started
1
Display & Indicators
6
7
1
8
3
4
5
2
7
8
1
9
b
a
3
5
4
6
2
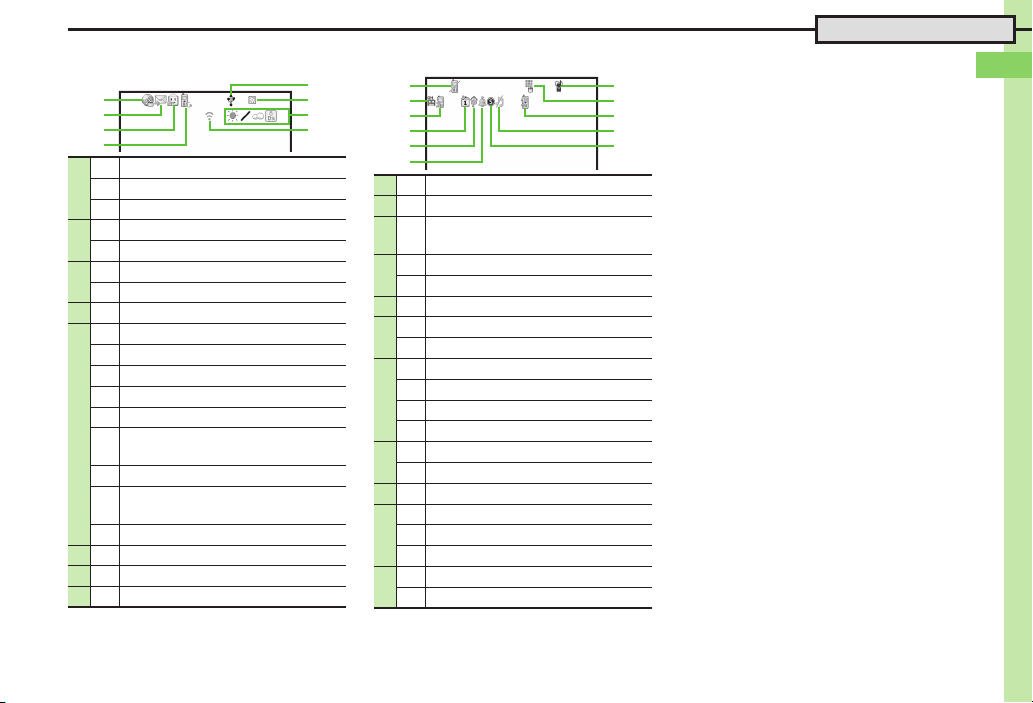
[ Transmissions
[ Settings
l SSL browsing in progress
1
A Waiting packet transmission (3G)
b
Waiting packet transmission (GSM)
C Receiving mail
2
D Sending mail
c S! Friend's Status online
3
0 Positioning in progress
4 8 Software Update in progress
I USB Cable connected
: USB transmission in progress
f Infrared transmission in progress
- Infrared file transfer in progress
g Bluetooth
5
h
®
transmission ready
Bluetooth® transmission in progress
(
e
appears for multiple connections)
h Bluetooth® talk in progress
S! Addressbook Back-up
9
transmission in progress
C PC Site Browser in use
6 0 RSS-compatible site
7 i Weather Indicator
8 % Infrared transmission ready
1
Hidden while Mobile Widget is in use.
2
Flashes while positioning.
1
1 [ Offline Mode active
2 L Answer Phone active
Call Forwarding or Voicemail active
3 M
(forwarding condition:
s Schedule/Task (Alarm set)
4
2
t Schedule/Task (Alarm unset)
Always
*
)
5 I Hour Minder active
P Alarm set
6
E Wakeup TV set
J Manner mode active
# Drive mode active
7
] Original mode active
o VeilView active
` Keypad Lock active
8
H IC Card Lock active
9 b
Auto Answer or Remote Monitor active
R Ringtone (Silent)
a
a Ringtone (Increasing Volume)
c Vibration active
Q Show Secret Data active
b
$ Function Lock active
*
Indicator does not appear when Call
Forwarding is set to Video Calls only, with
Voicemail unset.
1-9
Page 10
Getting Started
1
Display & Indicators
12
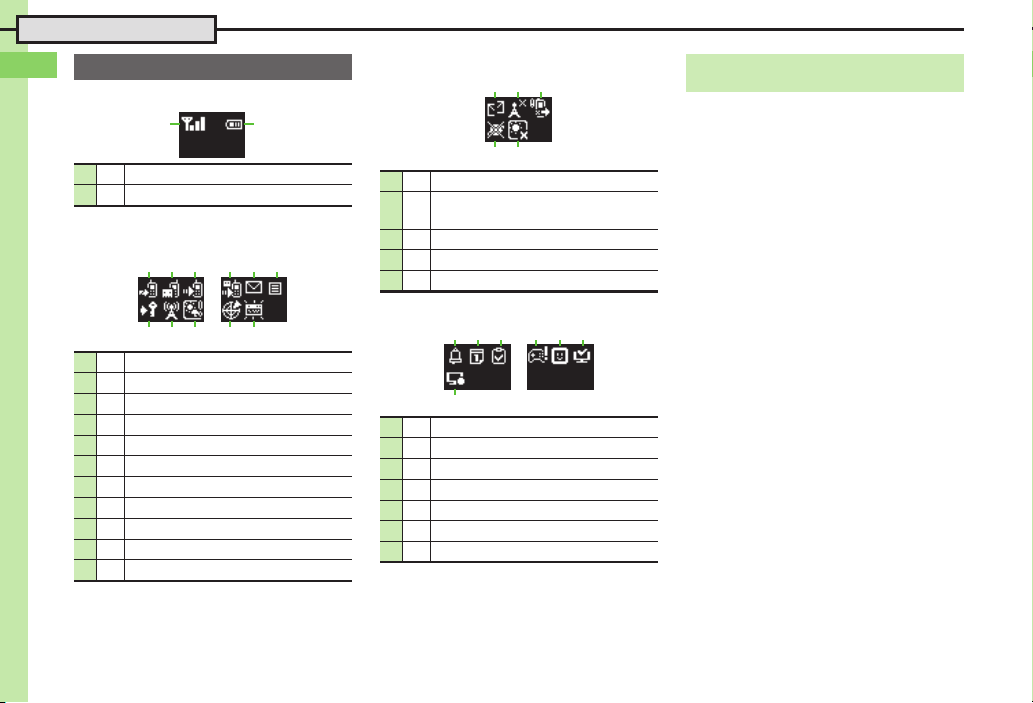
External Display Indicators
[ Basic Status
[ Warnings
1 2 3
External Display Date & Time
. Press I to toggle Clock view.
1 a Signal strength
2 b Battery strength
*
The more bars the better.
[ Notifications
1 2 3
789
1 c Missed Calls
2 d Answer Phone message recorded
3 e Missed Call Notification
4 f New Voicemail
5 V New mail
6 h New Delivery Report
7 i Contents Key received
8 j
Unread S! Information Channel info
9 B Weather Indicator update
a C Location Info request
b A Pedometer target achieved
1-10
*
4 56
ab
45
1 W Message delivery failure
S! Information Channel info
2 m
reception failure
3 E
Decoration Call transmission failure
4 F IP Service connection failure
5 D Weather Indicator update failure
[ Handset Status
1 2 374 5 6
1 n Alarm
2 o Schedule Alarm
3 p Task A l a r m
4 f S! Appli/Mobile Widget Notification
5 +
Unread S! Friend's Status notification
6 m TV Alarm (watch)
7 H TV Alarm (record)
Page 11

Getting Started
1
Accessing Functions
Accessing Functions
Use the following methods as needed.
Main Menu
Main Menu
Repeat menu item selection.
Select menu
items
Use shortcuts
Quick Operations
Enter numbers
Enter numbers to access functions.
To activate functions, press the
corresponding key.
■Quick Shortcut■Shortcuts ■Standby Shortcuts
Access assigned functions
(changeable).
Save functions to Standby.
Shake handset to access assigned
functions. (Complete setup beforehand.)
Access a function in Shortcuts menu while another is active, then toggle function windows as needed.
1-11
Page 12

Getting Started
1
Accessing Functions
Ta b
Main Menu
1%
. Main Menu opens.
2Use g to select menu item
S %
. Menu/window opens.
. If Sub Menu opens, use e to select
an item and press %.
Tab s
. Menus/lists in a single window appear in
separate tabs; use f to toggle tabs.
Reverse Navigation
. Press $. If a confirmation appears,
follow onscreen prompts.
Returning to Standby
. Press ". If a confirmation appears,
follow onscreen prompts.
Simple Menu
. Simplify menus and enlarge fonts; ideal
for users who use only basic handset
functions.
Main Menu Items
Messaging
Yahoo! Keitai
S! Appli
TV Watch/record TV programs
Camera
Entertainment
Too ls
Data Folder
Media Player
Communication
Phone
Settings
Open/create messages, etc.
Browse the Internet
Use S! Applications
including games
Capture images or record
video
Read e-Books, receive
news updates, etc.
Manage schedules, set
Alarm, scan QR Codes, etc.
Open files saved on
handset/Memory Card
Play/download media files
Communicate with other
users in various ways
Search contacts, add
entries, etc.
Customize handset
interface, sounds, etc.
1-12
Page 13

Getting Started
1
Accessing Functions
Advanced
Shortcuts Menu & Key Shortcut
Shortcuts Menu
Access assigned functions via Shor tcuts
menu.
1'
Shortcuts Menu
2Select function S %
. Menu/window opens.
Changing Default Shortcuts
In 2, select numbered function S B
S Assign Function S % S Select
menu item S % S Select new item
S %
, To assign menu items, select one and
press B.
Assigning Files & Folders
In 2, select numbered function S B
S Assign Data S % S Select file/
folder S %
, For folders, select Set this folder and
press %.
Key Shortcut
Long Press B, A or g to access
assigned functions.
B Open S! Mail Composition window
A Activate Familink Remote
a Open PC Site Browser menu
b Create new Phone Book entries
c Activate/cancel Bluetooth
d Activate/cancel Infrared
Changing Assigned Functions
Follow these steps to assign Calculator to a.
1% S Settings S %
2In Phone menu, Set Key
Shortcut S %
Key Shor tcut M enu
3Long press| S %
4From Appli S %
®
5Too ls S % S In PIM/Life
menu, Calculator S %
Bookmark
In 4, From Bookmark S % S
Select title S % S Yes S %
Bluetooth
Canceling Assigned Function
®
or Infrared On/Off
In 4, From Other S % S Select
item S %
In 4, Off S %
0(Changing item order (Restoring default shortcuts (P. 1- 2 8 )
1-13
Page 14

Getting Started
1
Accessing Functions
While browsing the Internet
Jot down information
Toggle windows
Open Scratch Pad
①
②
S
Toggling Active Functions (Multi Job)
Multi Job Feature
Access a function in Shor tcuts menu
while another is active.
Multi Job may not activate from some
menus/windows (e.g., ringtone/ringvideo
1-14
selection, etc.). Multi Job is disabled while
< (gold) appears.
Using Multi Job
1In a function window, '
In text entry/dial windows, Long Press '.
2Select function S %
. Menu/window opens.
3
To toggle active windows,
)
s
4" S Multi Job ends
. If a confirmation appears, follow
onscreen prompts.
)
Page 15

Getting Started
1
Accessing Functions
↓A (Long)
Advanced
Standby Shortcuts
Paste shortcuts to functions, files, folders,
etc. to Standby for easy access.
Saving Shortcuts to Standby
1a
. Point er (X) appears.
2Use A to select # (OPEN)
S %
. Press A to toggle selection.
. Alternatively, use g to point to #
(OPEN) and press %.
3f !
5Use g to specify target
location S %
Saving from Menu/Window
. In Options menu, select Set as
StbyShortcut (may not appear for some
items); select sheet as needed.
Removing Shortcuts from Standby
a S Use A to select icon S B S
Operation S % S Remove S % S
Yes S %
Moving Icons
a
S Use A to select icon S B S
Operation
% S
Moving Icons to Front/Back
a S Use A to select icon S B S
Operation S % S To Front or To
Back S %
Using Shortcuts
S % S
Specify target location S
Change Layout S
%
Toggling Sheets
Toggle sheets to use Standby shortcuts
and widgets pasted on each sheet.
1a S A (Long)
. To toggle further, Long Press A or
press ) repeatedly.
. Sheet name appears at the top, then
disappears.
. Save Standby shortcuts as needed;
corresponding icons appear on the
current sheet.
Using Locked Sheets
a S Select 1 S % S Enter
Handset Code S %
1a S Use A to select icon
4Select item S %
. Corresponding icon appears in
Standby.
. >> appears when more items are
available.
S %
. Menu/window opens or command is
executed.
0(Reversing icon selection order with A (Editing sheet names (Locking sheets (P.1-28)
1-15
Page 16

Getting Started
1
Accessing Functions
Using Simplified Menus (Simple Menu)
Simple Menu Features
Activate Simple Menu to reduce available
handset functions and simplify menus.
. Fonts are enlarged and appear in bold.
. Clock is enlarged (Calendar is hidden).
. Motion Control and TOUCH CRUISER are
unavailable.
[ Menu Items
Messaging
Phone
Camera
Convenient
Tool
Data
Folder
TV -
Key assignments are largely the same as
in Standard Menu.
Received Msg., Create Msg.,
Drafts, Templates, Sent
Messages, Unsent Msg.,
Create SMS
Phone Book, Add New Entry,
Play Messages, Answer
Phone, Call VM, My Details,
Speed Dial/Mail
Photo Camera, Video
Camera, Scan Barcode,
Scan Card, Scan Text,
Review, Camera Settings,
Video Settings,
SetCameraKey
Calendar, Alarms, Calculator,
Assignment, Dictionary,
Notepad, S! GPS Navi,
Pedometer, Compass,
S! Friend's Status, S! Circle
Talk, Double Number,
Change Menu
-
Activating Simple Menu
1& (Long)
2Simple Menu S %
3
Select Talk Mode S % S
%
4Select Voice Clear option S
% S %
While Using an Incompatible Function
. End the function before activating Simple
Menu.
Canceling Simple Menu
& (Long) S Standard Menu S %
Talk Mode & Voice Clear
Improve Earpiece sound quality.
[ Talk Mode
Slow Talk
Noise
Reduction
[ Voice Clear
Boost high frequencies to improve the
audibility of other party's voice.
Reduce Earpiece noise and
improve voice audibility
Reduce Earpiece noise
1-16
Page 17

Getting Started
1
Accessing Functions
Advanced
Cycloid Position Setup
Set handset to automatically execute one
of these actions upon Display rotation:
Activate
Digital TV
Show TV Menu
Show AV Menu
Show Internet
Menu
Show Main
Menu
Launch Appli Access assigned function
Connect
Bookmark
Off(Standby) Keep Standby
Upon first rotation, setup menu opens.
Activate TV
Access TV functions
Activate mobile camera or
access S! Applications,
images and media files
Open Bookmarks/
received messages or
activate PC Site Browser/
Document Viewer
Open Main Menu
Access saved URL
1Rotate Display (first time)
Landscape Menu
2Select item S %
. Setting is applied and Landscape
setup option confirmation appears.
3Yes or No S %
. Selection appears.
Launch Appli or Connect Bookmark
. Handset accesses the assigned function
or URL; change function/URL as needed.
Changing Applied Setting
When SetRotation Softkey appears in
Cycloid Position menus, etc., press B to
change setting.
1B
. Landscape menu opens.
2Select item S %
From Standby
% S Settings S % S In Phone
menu, Display Rotation S % S
Rotate 90o to S % S Rotate 90o to
S % S Select item S %
0(Changing function assigned to Launch Appli in landscape menu (Changing URL assigned to Connect Bookmark in landscape menu (P. 1 -2 8 )
1-17
Page 18

Getting Started
1
TOUCH CRUISER
Sensor Area
TOUCH CRUISER
Advanced
Using TOUCH CRUISER
Slide finger over Center Key to move
cursor, pointer, etc. (Not available for
Calculator or some other functions.)
Activating TOUCH CRUISER
Touch Center Key until cursor, pointer, etc.
moves. (TOUCH CRUISER activates.)
When finger is released, TOUCH CRUISER
deactivates after a period of inactivity.
Selection & Execution
Cursor, pointer, etc. moves multi-directionally
according to finger movement; select item.
Press Center Key to execute selection.
Important TOUCH CRUISER Usage Notes
. Do not use a pen or other sharp object.
. Do not use with gloved fingers.
.
Do not place stickers, etc. over Center Key.
. Clean with a dry, soft cloth.
. Performance may be affected by direct
sunlight; use Multi Selector.
0(Disabling TOUCH CRUISER (Changing activation timing/method (Changing inactivity time limit (Changing cursor speed (P. 1- 2 9 )
1-18
Page 19

Getting Started
1
Motion Control
Quick Shortcut
Shake handset left and right
approximately three times in Standby
to access assigned functions.
Activate Camera
Portrait
Position
Activate TV
Cycloid
Position
Change assigned functions as needed.
.
Shake to the left to navigate back, or right to
navigate forward.
ChannelsTVImages
Data Folder
(Pictures)
Pages
Document
Viewer
Music
Music Player
Navigate Functions Multi Job
Shake to the left or right
to toggle active windows
Toggle Windows
Multi Job
Turn Over Shake Left/Right
Activate Quick Silent
Turn handset over to instantly mute
ringer and stop vibration.
Ringer
Incoming Calls,
Alarms, etc.
Vibration
Incoming Calls,
Alarms, etc.
Some tones may not be silenced.
.
Motion Control
Sensor detects handset orientation or movement. Move handset to navigate pages, access functions, etc.
. Cancel Keypad Lock and activate Display first.
. Adjust Motion Control sensor (P.1-29) before using Motion Control for the first time.
. Activate Motion Control by function beforehand.
1-19
Page 20

Getting Started
1
Motion Control
Shake Forward or Backward
Zoom In/Zoom Out
Shake forward to enlarge, or backward
to reduce.
Fonts
Yahoo! Keitai
Message Window
Zoom Image
Data Folder
(Pictures)
Zoom Page
PC Site Browser
Document Viewer
Advanced
0(Changing Quick Shortcut items (Practicing Motion Control actions (Adjusting Motion Control sensor (P. 1- 2 9 )
1-20
Toggling Motion Control On/Off
1% S Settings S %
2In Phone menu, Motion
Control S %
Motion Control Menu
3Action Settings S %
4Select function S %
5On or Off S %
Enabling Quick Shortcut
1In Motion Control menu,
Quick Shortcut S %
2Switch On/Off S %
3On S %
Activating Show Secret Data Temporarily
Enter Handset Code S Shake
handset left or right
, Close handset in Standby to cancel
Show Secret Data.
Important Motion Control Usage Notes
. Hold/shake handset correctly to avoid
unintended results.
. Motion Control may be unavailable while
handset is ringing/vibrating.
. Confirm there is ample space for Motion
Control use; hold handset firmly and
shake it gently to avoid injury/breakage.
Do not shake handset roughly; handset
may slip, resulting in injury or damage.
Page 21

Getting Started
1
Mobile Manners
Advanced
Mobile Manners
Please use your handset responsibly. Use
these basic tips as a guide. Inappropriate
handset use can be both dangerous and
bothersome. Please take care not to
disturb others when using your handset.
Adjust handset use according to your
surroundings.
. Turn it off in theaters, museums and other
places where silence is the norm.
. Refrain from using it in restaurants, hotel
lobbies, elevators, etc.
. Observe signs and instructions regarding
handset use aboard trains, etc.
. Refrain from use that interrupts the flow of
pedestrian or vehicle traffic.
Manner Mode
Mutes most handset function sounds.
1) (Long)
. Manner mode is set.
When Manner Mode is Active
. Ringtones and other sounds are muted.
. 932SH vibrates for transmissions/alerts.
. Shutter click still sounds at fixed volume.
Canceling Manner Mode
) (Long)
Offline Mode
Temporarily suspends all transmissions.
1% S Settings S % S f
Network
2Offline Mode S %
3On S %
. Offline Mode is set.
Canceling Offline Mode
In 3, Off S %
0(Changing handset modes (Creating a custom mode (Resetting Mode Settings (P.1-29)
1-21
Page 22

Getting Started
1
Security Codes
Security Codes
These codes are required for handset use.
. Write down Security Codes.
. Do not reveal Security Codes. SoftBank is
not liable for misuse or damages.
Handset
Code
Center
Access
Code
Network
Password
*
Change as needed.
Incorrect Code Entry
. Handset code is incorrect! appears; try
again.
. If Network Password is incorrectly
entered three times consecutively, Call
Barring settings are locked. To resolve,
Network Password and Center Access
Code must be changed.
9999 by default; use or
change some functions
4-digit code selected at
contract; access Optional
Services via landlines or
change contract details
4-digit code selected at
contract; restrict incoming/
*
outgoing calls (Call Barring)
Changing Handset Code
Enter four to eight digits for new Handset
Code.
1% S Settings S %
Phone Menu
2Locks S %
3Chg. Handset Code S %
4Enter current Handset Code
S %
5
Enter new Handset Code S
%
6Re-enter new Handset Code
S %
1-22
Page 23

Getting Started
1
Basic Tools
Advanced
My Details & Basic Tools
My Number
1% S 0
. Handset phone number and the
name entered at initial setup appear.
Editing My Details
After 1, f (select tab) S Select item
S A S
Select item S % S Edit S
VeilView
Activate VeilView to prevent peeking.
A
1~ (Long)
Canceling VeilView
~ (Long)
Keypad Lock
Lock handset keys and prevent accidental
operation/function activation.
1% (Long)
. Keypad Lock activates.
. " does not turn off handset power.
Incoming Calls while Keypad Lock is
Active
. Keypad Lock is temporarily canceled;
press ! to answer calls. Keypad Lock
reactivates after the call.
Canceling Keypad Lock
% (Long)
Pen Light
1
In closed position, I (Long)
. Mobile Light illuminates.
2I
Important Pen Light Usage Note
. Do not point Pen Light at people or look
S Mobile Light goes out
at it directly.
Battery Meter
1% S Tools S % S f
Clock/Gauge
2Battery Meter S %
.
Approximate battery strength appears.
Changing Battery Strength Indicator
Pattern
After 2, B S Select pattern S %
, Remaining time is approximated for
current handset usage pattern.
Phone Help
Access this handy guide to handset
settings and key functions/shortcuts.
1% S Tools S % S f
Doc./Rec.
2Phone Help S %
3Select item S %
. For Indicators, select category and
press %.
0(Clearing My Details (Toggling My Details in Dual Mode (Changing battery strength indicator pattern (Changing VeilView pattern/density (P.1-30)
1-23
Page 24

Getting Started
1
Basic Tools
Indicator Descriptions S! Town (Japanese)
Check active indicators and their
descriptions. (Status Icon List)
1' (Long)
Select an avatar to enter this 3D virtual
town, where you can play games and
meet other users.
.
To use S! Town, agree to the terms of
service then complete free user registration.
. Internet connection is required; may incur
high charges.
1% S Communication S %
. Active indicators are enlarged;
description for selected indicator
appears.
. Use g to select indicators to view
their descriptions.
. Press % to open menu/window
(e.g., Battery Meter window from
battery strength indicator). May be
unavailable for some indicators.
2S! Town S %
. S! Town (S! Application) starts.
. Refer to the S! Town help menu for
operational instructions.
.
If an upgrade notice appears, follow
onscreen instructions to upgrade.
S! Town Library
. Downloaded S! Town-compatible
S! Applications are saved to S! Town
Library. To start an application in S! Town
Library, follow these steps:
% S Communication S % S
S! Town S B S Select application
S %
S! Loop (Japanese)
S! Loop is an online communication
service. Share your diary, join BBS, etc.
Internet connection is required; may incur
high charges.
1% S Communication S %
2S! Loop S %
. Refer to the S! Loop help menu for
operational instructions.
1-24
Page 25

Getting Started
1
Double Number
Phone Book
Entries
Phone Number
090392XXXX8
Mail Address
△△△@softbank.ne.jp
B
B
Phone Number
090392XXXX7
Mail Address
○○○@softbank.ne.jp
A
A
Two Phone Numbers & Two Mail Addresses
Line BLine A
Modes
Select from three usage modes:
A Mode
(Line A* only)
Dual Mode
(both accounts)
B Mode
(Line B* only)
Account Memory Management
While one line is active, call/messaging
records for the other do not appear.
Messaging
Folders
Call Log
Records
Customize Wallpaper, incoming call
graphic, ringtone, vibration, etc. by account.
.
Callers to the other line hear a busy tone;
messages are received without alerts.
*
Using Double Number
Manage two accounts (Line A and Line B, with separate phone numbers and mail addresses) on one handset.
. Double Number requires a separate contract and basic monthly fee.
. While abroad, any Line B messaging charges are applied to Line A.
. For more information, see SOFTBANK MOBILE Corp. Website (P.1 5 - 2 3).
Activating Double Number
Make sure signal is stable.
1% S Settings S %
2In Phone menu, Double
Number S %
3Switch On/Off S %
4On S %
5Enter Handset Code S %
S Yes S %
Canceling Double Number
In 4, Off S % S 5
. When Double Number is canceled:
, Line B calls and SMS messages are
redirected to Line A Phone Number.
, Initial portion of Line B S! Mail is
redirected to Line A. (Full messages
are irretrievable.)
, Double Number account is not affected.
1-25
Page 26

Getting Started
1
Double Number
A Mode
Receive Calls to Line A Only
.
Place calls or send messages via Line A.
A Mode & B Mode Precautions
.
.
Line indicators do not appear in Phone Book entries, message
lists, Call Log records, etc.
When an operation affects information on the other line, a
confirmation appears. Follow onscreen prompt(s).
B Mode
Receive Calls to Line B Only
.
Place calls or send messages via Line B.
B Mode Restrictions
.
.
Handset connects to the Internet via Line A. (During Internet
connections, place/receive calls via Line B.)
S! Friend's Status, S! Circle Talk and Decoration Call are
unavailable.
Advanced
Modes
Activate A Mode to use Line A only, B Mode to use Line B only, or Dual Mode to use both accounts.
1-26
0(Omitting Handset Code entry when switching modes (Renaming Double Number modes (Showing indicator for calls missed or new mail on idle line
(Hiding Internet connection confirmation (P.1-30)
Page 27

Getting Started
1
Double Number
Dual
Mode
Receive Calls to Both Accounts
.
Place calls or send messages via Line A (or the account of record for Phone
Book entries or Call Log records) by default; toggle accounts as required.
.
k, l and j indicate line type in Phone Book entries, message lists, Call Log records, etc.
Phone Book Entries
Specify A, B or Dual.
Calling
Select Line A or Line B.
Caller ID changes
accordingly.
Messaging
Select Line A or Line B.
Sender Address changes
accordingly.
Advanced
0(Rejecting calls to either line in Dual Mode (Setting main line for Dual Mode (P. 1 - 30 )
Switching Modes
1! (Long)
2Enter Handset Code S %
3Select mode S %
. For B Mode confirmation appears.
4Yes S %
Saving Modes to Phone Book Entries
1% S Phone S % S Add
New Entry S %
2Mode: S % S Select mode
S %
Entries Saved with Double Number Off
. Dual is set automatically.
1-27
Page 28

Getting Started
1
Additional Functions
USB Charge
Disabling USB
Charge
Information
Handling
Information list
Shortcuts
Changing item
order
Restoring default
shortcuts
Standby Shortcut (Sheets)
Reversing icon
selection order
with A
Editing sheet
names
% S Settings S % S f Connectivity S USB
Charge S % S Disable S %
7% S Phone S % S See below
Opening List Manually
Information S %
Clearing List
Information S % S B S Yes S %
' S Select numbered function S B S Move
S % S Select target location S %
' S Select numbered function S B S Set to
Default S % S Yes S %
a S B S Move Focus(Reverse) S %
. To cancel, select Move Focus(Order).
7a S B S Sheet Settings S % S
Change Sheet Name S % S See below
Renaming
Select sheet S % S Enter name S %
Resetting All Sheet Names
B S Yes S %
Locking sheets
Cycloid Position
Changing function
assigned to
Launch Appli in
landscape menu
Changing URL
assigned to
Connect Bookmark
in landscape menu
7a S B S Sheet Settings S % S Set
Sheet Lock S % S Enter Handset Code S %
S See below
Activating Lock
Select sheet S % S On S %
Changing Method for Temporary Access
Unlock Method S % S No Password S %
. Press a, then select 1 and press % to unlock
sheet temporarily.
% S Settings S % S In Phone menu, Display
Rotation S % S Rotate 90o to S % S Set
Appli S % S Select menu item S % S
Select new item S %
% S Settings S % S In Phone menu, Display
Rotation S % S Rotate 90o to S % S Set
Bookmark S % S Select Bookmark entry S
% S Yes S %
1-28
Page 29

Getting Started
1
Additional Functions
TOUCH CRUISER
Disabling TOUCH
CRUISER
Changing activation
timing/method
Changing
inactivity time limit
Changing cursor
speed
% S Settings S % S In Phone menu, TOUCH
CRUISER S % S Switch On/Off S % S Off
S %
% S Settings S % S In Phone menu, TOUCH
CRUISER S % S Cursor Trigger S % S
Select option S %
% S Settings S % S In Phone menu, TOUCH
CRUISER S % S Cursor Sustained S % S
Select time S %
% S Settings S % S In Phone menu, TOUCH
CRUISER S % S Cursor Speed S % S
Select speed S %
Adjusting Motion
Control sensor
Mode
Changing handset
modes
Motion Control
Creating a custom
mode
Resetting Mode
Settings
Changing Quick
Shortcut items
Practicing Motion
Control actions
% S Settings S % S In Phone menu, Motion
Control S % S Quick Shortcut S % S
Shortcut Entry S % S Open Position or
Cycloid Position S % S Select menu item S
% S Select new item S %
% S Settings S % S In Phone menu, Motion
Control S % S Action Test S % S Select
item S %
% S Settings S % S In Phone menu, Motion
Control S % S Adjust Sensor S %
. Follow onscreen instructions.
. Avoid adjusting sensor near metal/magnetic objects
or aboard trains or in vehicles.
7% S Settings S % S In Phone menu,
Mode Settings S % S See below
Selecting a Handset Mode
Select mode S %
Customizing Handset Modes
Select mode S B S Select item S % S
Adjust settings
. Not available for Normal mode.
% S Settings S % S In Phone menu, Mode
Settings S % S Original S B S Select item
S % S Adjust settings
% S Settings S % S In Phone menu, Mode
Settings S % S Select mode S A S Enter
Handset Code S % S Yes S %
. Follow onscreen instructions.
1-29
Page 30

Getting Started
1
Additional Functions
My Details
Clearing My Details
Toggling My Details
in Dual Mode
Battery Meter
Changing battery
strength indicator
pattern
VeilView
Changing VeilView
pattern/density
% S 0 S B S Reset My Details S % S
Yes S %
% S 0 S B S Switch to B or Switch to A
S %
% S
Settings S % S In Phone menu, Display S
% S
Mini Battery S % S Select pattern S
. For patterns other than Clock & Battery, indicators
appear in turn. To change interval, press B.
. For Battery level (or Level), approximate battery
strength appears as a percentage.
. Remaining time is approximated for current
handset usage pattern.
, Remaining time is hidden while charging.
%
7% S Settings S % S In Phone menu,
Display S % S VeilView S % S See below
Pattern
Pattern Setting S % S Select pattern S % S
Select scale or Animation S %
Density
Density Setting S % S Select density S %
Double Number
[ All Modes
Omitting Handset
Code entry when
switching modes
Renaming Double
Number modes
[ A Mode & B Mode
Showing indicator
for calls missed or
new mail on idle line
Hiding Internet
connection
confirmation
[ Dual Mode
Rejecting calls to
either line in Dual
Mode
Setting main line
for Dual Mode
% S Settings S % S In Phone menu, Double
Number S % S Password Entry S % S Off
S % S Enter Handset Code S %
% S Settings S % S In Phone menu, Double
Number S % S Mode Name S % S Select
mode S % S Enter name S % S Select icon
S %
% S
Settings S % S In Phone menu, Double
S % S
Number
% S Settings S % S In Phone menu, Double
Number S % S Packet Warning S % S Off
S %
. Available for B Mode.
% S Settings S % S In Phone menu, Double
Number S % S Reject By Line S % S Select
line S % S On S %
% S Settings S % S In Phone menu, Double
Number S % S Send Priority S % S Select
option S %
Show Missed S % S On S
%
1-30
Page 31

Getting Started
1
Troubleshooting
Battery Meter
--- appears
3
. Calculating time; not a malfunction.
100% does not appear
3
. This is by design; not a malfunction.
Battery runs out faster
3
. A low ambient temperature reduces
battery time.
. An older battery may run out faster.
Remaining time changes suddenly
3
. Time estimated by handset status;
estimate may take time to appear.
TOUCH CRUISER
TOUCH CRUISER does not
3
activate (or activates too quickly)
. Adjust activation response; see P.1-29
"Changing activation timing/method."
TOUCH CRUISER deactivates too
3
quickly or too slowly
. Adjust active time; see P.1-29
"Changing inactivity time limit."
Cursor moves too fast or too slowly
3
. Adjust cursor response; see P. 1- 2 9
"Changing cursor speed."
1-31
 Loading...