

Page 1
SHARF?
lVlicrowave
Drawer
:
SMDZ470AS
INSTATTATIOII
MANUAT
INSTALLATION
AND
SERVICE
IVTUST
BE
PERFORMED
BY
A
OUALIFIED
INSTALLER"
IMPORTANT:
SAVE
IhiS
INSIAIIAIION
MANUAI
FOR
I-()CAL
ELECTRICAL
INSPECTOR'S
USE"
READ
AND
SAVE
THESE
INSTRUCTIONS
FOR
FUTURE
REFERENCE
For
SAFETY
C0NSIDERATI0NS
do
not install
drawer
in
any combustible
cabinetry,
which
is
not
in
accord
with
the
stated
clearances
and
dimensions
on
page
2.
See Figure
1,
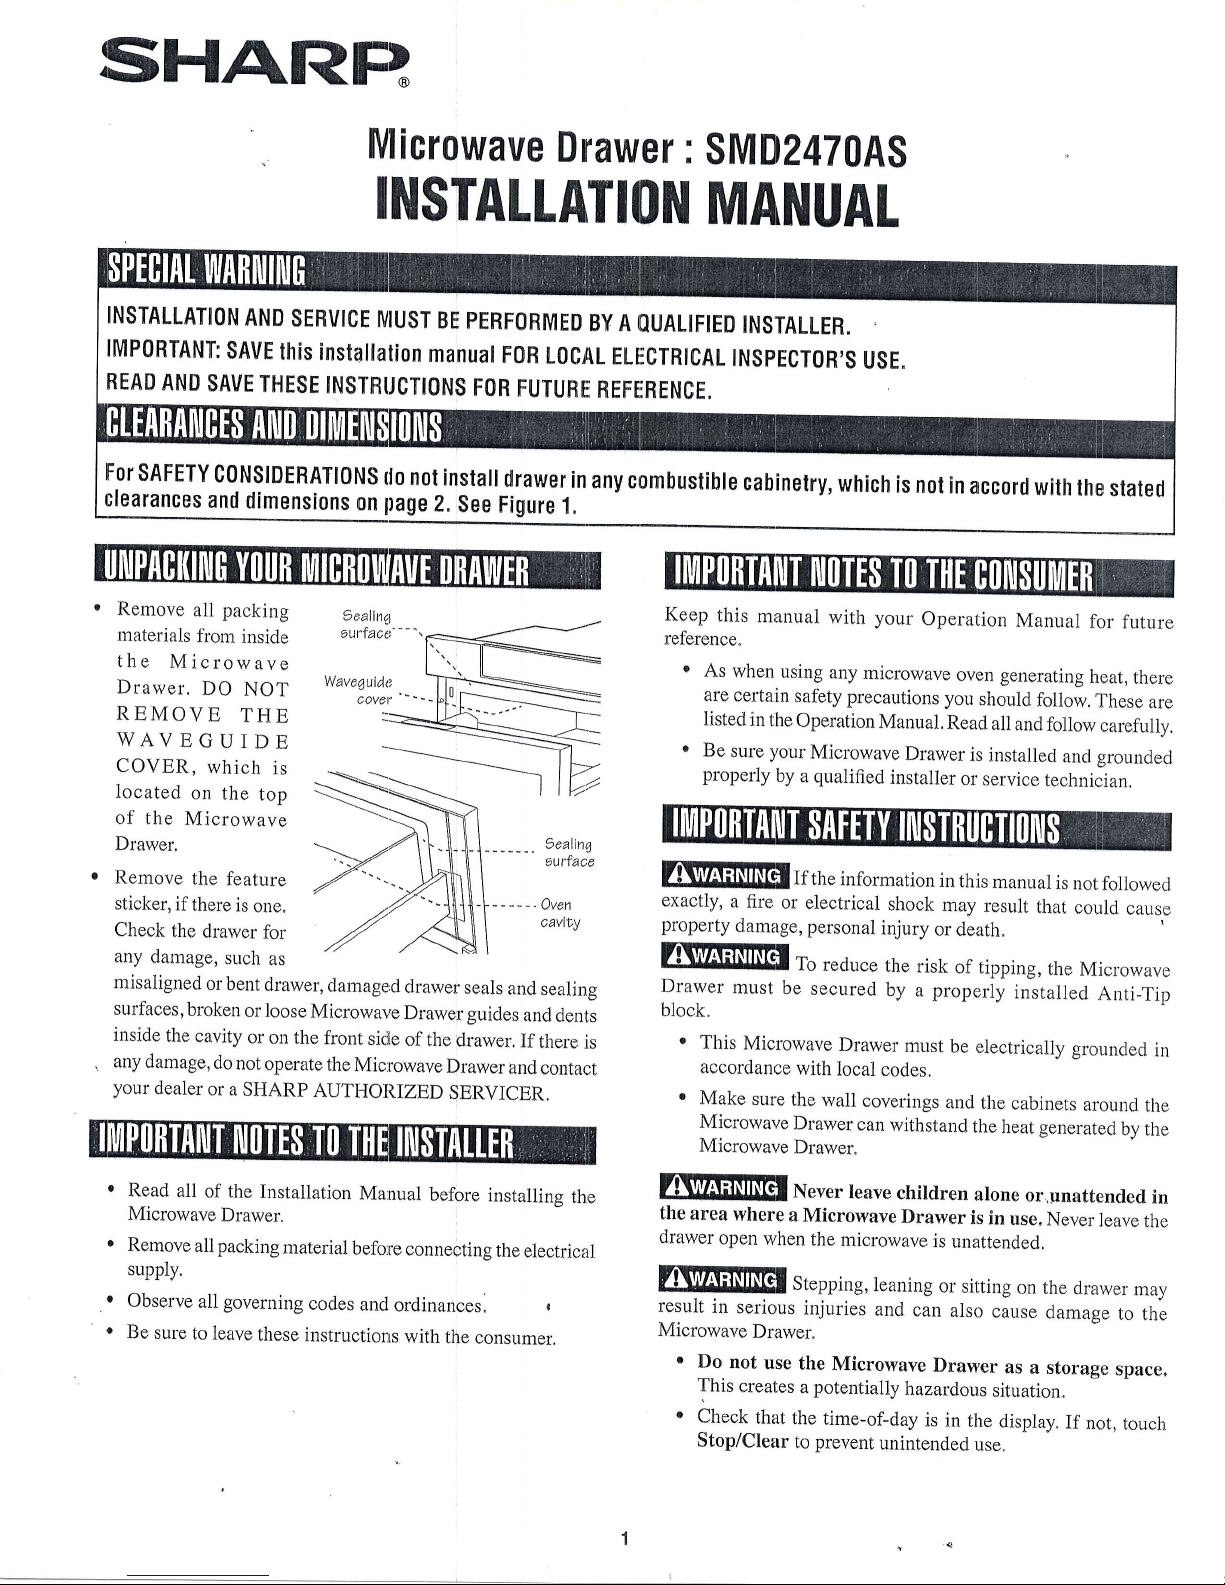
Remove
all
packing
materials
from
inside
the
Microwave
Drawer,
DO
NOT
REMOVE
THE
WAVEGUIDE
COVER,
which
is
located
on
the
top
of the
Microwave
Drawer,
Remove
the
feature
sticker,
ifthere
is
one.
Check
the
drawer
for
any
damage,
such
as
misaligned
or
bent
drawer,
damaged
drawer
seals
and
sealing
surfaces,
broken
or loose
Microwave
Drawer
guides
and
dents
inside
the ca.vity
or on
the
front
side
of the
drawer.
If
there
is
any
damage,
do
not
operate
the
Microwave
Drawer
and
contact
your
dealer
or a
SHARP
AUTIIORIZED
SERVICER,
.
Read
all
of the
Installation
Ma:nual
before
installins
the
Microwave
Drawer"
.
Remove
all
packing
material
trefore
connecting
the
electrical
supply.
Observe
all
governing
codes
and
ordinances.
I
Be
sure
to
leave
these
instructions
with
the consumer,
Keep
this
manual
with your
Operation
Manual
for
future
reference.
.
As
when
using
any
microwave
oven gengrating
treat,
there
are
certa:in
safety precautions
you
should
foliow.
These
are
Iisted
in
the
Operation
Manual,
Read
all and
follow
carefuily.
.
Be
sure your
Microwave
Drawer
is
installed
and
srounded
properly
by
a
qualified
installer
or service
technician.
tT\Mllft{T\Gf
If
rhe
information
in
rh is
manuar
is
not followed
exactiy,
a fire
or electrical
shock
may
result
tirat
could
cause
property
damage,
personal
injury
or
death.
tt\flIl.;fiflq
To reduce
rhe
risk
of tipping,
rhe
Microwave
Drawer
must be
secured
by
a
properly
installed
Anti_Tip
block.
r
This
Microwave
Drawer
must
be
electricaily
grounded
in
accordance
with
local
codes,
r
Make
sure
the
wall
coverings
and
the cabinets
around
the
Microwave
Drawer
can
withstand
the
]ieat
generated
bv the
Microwave
Drawer.
7!\fiff;Ntfil
Never
teaye
chitdren
atone
or,unaftended
in
the
area
where
a Microwaye
Drawer
is
in
use"
Never
leave
the
drawer
open
when
the
microwave
is
unattended
ry.T.ilTry
Stepping,
ieaning
or
siting
on
rhe
drawer
may
resuit
in
serious
injuries
and
can
also
cause
damage
to
the
Microwave
Drawer"
Do
not
use the
Microwave
Drawer
as
a storage
space.
This
creat.es
a
potentially
hazardous
situation.
Check
that the
time-of-day
is
in
the
display.
If
not,
touch
Stop/Clear
to
prevent
unintended
use"
9aalln(l
eurfaoo
Wave6uido
oover
_--__.9aaling
aurfaoe
-----.)ven
aavity
t
a
Page 2

'
Dimensions
that
are
shown
in
Figure
1 must
be
used.
Given
dimensions
provide
minimum
clearance,
Locate
electrical
outlet
in
the
shaded
area
in
the
upper
left_hand
corner
of the
cutout.
See
Figure
5.
.
Contact
surface
must
be solirJ
and level,
pay
special
attention
to the
floor
on
which
the
Microwave
prawer
will
sit,
T,he
floor
ofthe
opening
shouid
be
constructed
ofplywood
strong
enough
to support
the
weight
ofthe
oven
(about
100
pounclsi.
Check
location
where
the
Microwave
Drawer
will
be
installed
for proper
electrical
supply.
Your
oven
can
be
built
into
a
cabinet
or wail
by
itself
or
under
a
gas
or electric
wall
oven.
Be sure
that the
clearance
ofthe
floor
between
the
wall
oven
and
the
rnicrowave
drawer
is
a minimum
of
2_inches"
9uqgealeA
electrlcal
ouf,lel
locallon'
Conlrol
p.anel
6n0wn
tn
open
po1iilon
Figure
1
Floor
muel
1uppoft0A
b6,
Cutout
Dimension
22rll"
x 15
th6"
1419,52'
This
drawing
represents
a typical
standard
cabinet.
lfinstallecl
in
custom
cabinets
with
extended
counter
tops,
take
into
account
visibiiity
and
access
to controls,
See
Figure
3,
Figure
3
'
Figures
1
and
2
contain
many
Microwave
Drawer
measurements
for
reference
when
planning
the
drawer's
location.
This
Microwave
Drawer
can
be
installed
below
any
electric
or
gas
wall
oven"
*
Can
also
be
installed
using
an
electrical
outlet
in
an
adjacent
cabinet
within
the
area
wiere
the provided
elesl7i6o7
cord
can
reach,
Power
cord
access
hole
in iabinet
should
be
a rninimum
I
I
/2"
diameter
hole
and
deburred
of
a.ll
sharp
edges
.
,t!ry
Atuays
allow
sfficient
power
cord
length
to the
electrical
outlet
to
prevent
tension.
Always
check
electrical
codes
for
requirements,
Move
oven
localion
downward,
for
oxtended
aounlertopa
411h6'
Page 3

NORMAL
INSTALLATION
STEPS
ANTI.TIP
BLOCK
INSTALLATION
INSTRUCTIONS
To
reduce
the
risk
of
tipping
of the
drawer,
the
AntitTip
btock
must
be properly
installed
located
14
13lrc-inches
above
the
florlr
on
which
the
Microwave
Drawer
will
sit,
The
6_inch
Anti_Tip
block
must
be provided
by
the
installer.
See
Figures
1 and
4,
f!9.
a1li+in
biock
prevenrs
serious
injury
that
might
resulr
frorn
spilled
hot
liquids,
If
the
Micrnwave
Drawer
is
evermoved
to a
different
location,
the
Anti-Tip
block
must
also
be
movecl
a'<I
instailed,
When
installerj
to
the
wall,
make
sure
that
the,
screws
c<lmpletely
penetrate
the
dry
wall
and
are secured
in
wood
or
metal
so
that
it " Uto"t
is
totaliy
stable.
When
fastening,
be
sure
that
the
screws
do
not penetrate
electrical
wiring
or
plumbing,
AnLi-Tip
block
Figure
4
The
electrical
requirements
are
a 1i)0
volt
60
Hz,
AC
only,
15
amp,
or
more protected
electrical
supply.
It
is
recommended
that
a
separate
circuit
serving
only
this
*pptiun""
be providecl,
The
drawer
is
equipped
with
a
3-pron;g
grounding
plug,
It
must
be plugged
into
a wall
receptacle
that
is properly
installed
ancl
grounded.
Should
you
only
have
a Z-prc,ng
outlet,
have
a
qualifiecl
electrician
install
a
correct
wall
reciptacle,
Note:
If you
have
any questions
about
the grounding
or electrical
instructions,
consult
a
qualified
electri,;iai
o, ,".ut"
person.
*
can
also
be
instailecr
using
an
erectricar
outret
in
an
acrjacent
cabinet
witldn
the
area
wlrcre
the
providecl
electrical
cotrd
cqn
reach.
Always
check
electrical
codes
for
requirements.
9u6qeehed
eleatrloal
outleL
looaNlon*
I
r--- ---
I5"
Figure
5
This
applianca
must
be grounded,
The
Microwave
Drawer
is
equipped
with
a cord
having
a
grounding
wire
with
a
grounding
piug,_Ij
must
be plugged
into
a waLl
receptacle
that
is properl!
installed
and grounded
in
accorda'ci
with
the
National
Electrical
Code
and
local
codes
and
ordinances,
In
the
event
of
an electrical
short
circuit, grounding
reduces
risk
of electric
shock
by
providing
an escape
wire
for
the
eler:tric
current.
4EEEI[E|
.
I]nrglel
use
of the groundi'g
prug
can
rpsurr
in
a risk
of electric
shock,
Do not
use
an
extension
cord.
Ii
the
power
supply
cord
is
too
short,
have
a
qualified
electrician
or
serviceman
install
an outlet
near
the
appliance.
3-7ronq
plua
I'
AR
\-lb-o
Groundinq
pin
',1-Pron7
reoeplaale
r-ll
twil
lctl
l('u,) ll
,yru l
.7=,
Orounded
reae?tacle
box
Page 4

1.
5,
Place
the
drawer
adjacent
to
the wall
or
cabinet
opening.
Plug
the power
supply
cord
into
the
electrical
outlet"
Carefully
guide
the
drawer
into
the
prepared
opening,
Avoid
pinching
the
cord
between
the
oven
and
the
vlall.
The
name
plate
includes
moclel
an<I
seriai
nunber.
Open
the
Microwave
Drawer
fully"
The
label
is
beyond
the
back
wail
of
the
microwave
cavity
facing
up from
the
flat surfacer"
Read
the
BEFORE
YOU
CALL
and
operating
instruction
sections
in your
Operation
Manual.
It may
save
you
time
and
expense.
The
list
includes
common
occurrences
that
are
not
the
result
of
defective
wortmanship
or
materials
in
this range.
Refer
to
the;
warranty
in your
Operation
Manual
for
Sharp,s
toll-free
service
number
and
address.
please
call
or
write
if you
have
inquiries
about
your
microwave
product
and/or
need
to
order parts,
7a*a
oupplle,)
BBgR
EEFF
4
9crew6
Figure
6B
2.
3.
4.
Slide
the
drawer
all
the way
until
the
mounting
flange
is flr.rsh
with
the
face
of the
cabinet,
See
Figure
6,4'.
Open
the
drawer.
Using
the 4
holes
on the
drawer
as a
template.
pre
drill
the
cabinet
using
a
1/ro,'
bit.
See
Figure
6A,
Secure
the
drawer
with
the 4
screws
supplied,
See
Figure
68.
SF4A,.FRFq
SHARP
ELECTRONICS
CORPORATION
1
Sharp
Plaza,
Suite
1
.
Mahwah,
New
Jersey
074gS_1j23
1
-800-8
E-SH
ARP
(237 -427
7
)
Refer
to
the
Operation
Manual
for
cleaning
instructions.
IINSEBs3TMRRO
JUN
20,2014
 Loading...