


 Loading...
ELECTRIC REFRIGERATOR OPERATION MANUAL
Thank you very much for buying this SHARP product. Before using your SHARP refrigerator, please read this operation manual to ensure that you gain the maximum benefit from it.
SJ-P600M SJ-600M
SJ-P560M SJ-560M SJ-P520M SJ-520M
DESCRIPTION
|
1 |
18 |
|
|
|
7 |
2 |
19 |
|
3 |
28 |
|
4 |
|
|
20 |
|
|
|
|
|
5 |
21 |
|
6 |
22 |
|
5 |
|
|
7 |
23 |
|
8 |
|
Plasmacluster |
13 |
rail |
9 |
|
10 |
|
|
|
11
12
13
14
15
16
17
1.Freezer fan
2.Freezer shelf
3.Ice cube maker
4.Ice cube box
5.Deodorizing unit
6.Freezer temp. control knob
7.Fresh case
The cover of Fresh case opens as the case is pulled.
8.Refrigerator fan
Refrigerator compartment is equipped with a special fan, that quickly and evenly cools the inside of the cabinet should the inside temperature increase when opening the door or for other reasons.
9.Refrigerator temp. control knob
10.Refrigerator shelf
(600 type 3 shelves, 560/520 type 2 shelves)
11.Light
12.Shelf
13.Vegetable crisper
24
25
26
22
27
14.Separator plate
15.Evaporating pan & cover
16.Casters
17.Adjustable feet
18.Fan switch for freezer
19.Fan & light switch for refrigerator
20.Freezer pocket
21.Water supply cup
22.Magnetic door seal
23.Utility case
24.Egg holder
25.Free pocket
(600 type 2 pockets, 560/520 type 1 pocket)
26.Bottle pocket
27.Bottle guard
Prevents bottles,etc. from falling. Stick-type food products can also be stored inside.
28. Plasmacluster panel
(Only for SJ-P600M, SJ-P560M, SJ-P520M)
Put in the Vegetable crisper under the rail.
1
INSTALLATION OPERATION
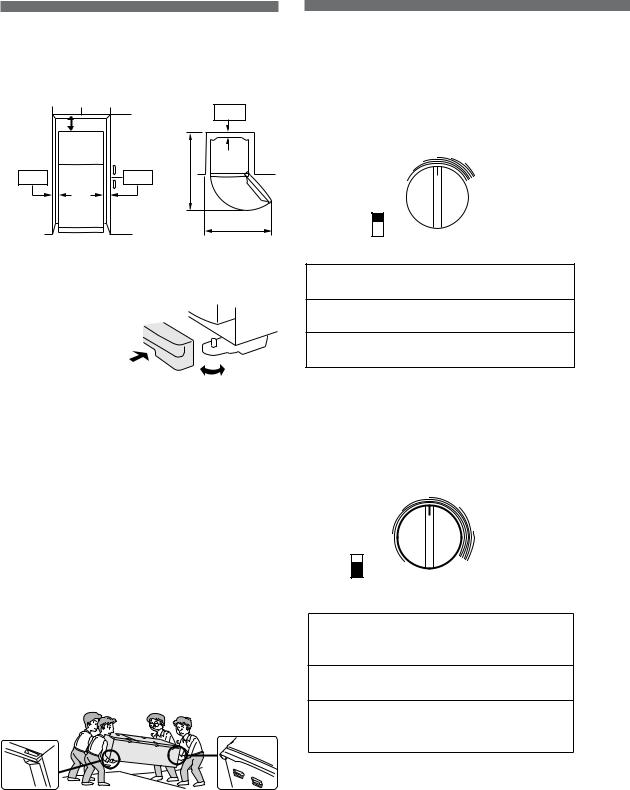
1.To ensure adequate ventilation for your refrigerator, it is recommended to provide space of 6cm on both sides and at the back, and space of 9cm above the refrigerator. Insufficient spacing will decrease the cooling efficiency, resulting in unnecessary consumption of electricity.
|
9cm |
6cm |
|
|
|
||
6cm |
6cm |
cm |
|
148 |
|||
|
|
||
|
|
135 cm |
2.Using the two front Adjustable feet, ensure that the refrigerator is positioned firmly and level on the floor.
3.Clip Evaporating pan cover (supplied inside the refrigerator com-
partment) in position
in front of the two Ad- 
 justable feet.


Evaporating pan |
Adjustable |
cover |
foot |
4.Connect the power plug to a 230/240 volt.
10 amp. power point.
NOTE:
•Position your refrigerator so that the plug is accessible.
•Keep your refrigerator out of direct sunlight.
•Do not place next to heat generating appliance.
•Do not place directly on the ground. Provide a clean, level, firm floor surface such as concrete or timber.
When transporting
Carry the refrigerator by holding the handles located on the rear and bottom.
Before using your refrigerator
Clean the inside parts with a cloth soaked in warm water. If soapy water is used, wipe it off thoroughly.
CONTROLLING
TEMPERATURES
The refrigerator controls its temperature automatically. However, if needed, adjust the temperature as follows.
Freezer compartment
|
MED |
|
|
3 |
4 |
5 |
6 |
|
|
||
2 |
|
|
7 |
1 |
|
|
|
MIN |
|
|
MAX |
|
|
|
Coldest |
FREEZER TEMP. CONTROL
7(MAX)
For making ice rapidly or fast freezing.
4(MED)
For normal freezing.
1(MIN)
When frozen food or ice cream is not stored.
•If the refrigerator is operated for a long time with FREEZER TEMP. CONTROL set at 7(MAX), foods stored in the refrigerator compartment may also freeze.
Refrigerator compartment
|
MED |
|
4 |
3 |
5 |
|
|
2 |
6 |
MIN 1 |
MAX |
7 Coldest |
REFRIGERATOR TEMP. CONTROL
7(MAX)
For keeping foods fresher tasting. When the refrigerator does not provide sufficient cooling.
4(MED)
For normal operation.
1(MIN)
When the refrigerator provides excessive cooling.
•If the refrigerator is operated for a long time with REFRIGERATOR TEMP. CONTROL set at 7 (MAX), foods stored in the refrigerator compartment may also freeze.
•Low ambient temperature may cause placed foods to freeze even if REFRIGERATOR TEMP. CONTROL is set to 1 (MIN).
2

HINTS WHEN MAKING ICE
1. The included Water supply cup can be used to measure the amount of water to pour into Ice cube trays. Pouring too much water into the tray will result in the ice cubes connecting to each other when frozen.
2. When the ice cubes are made, turn the lever clockwise to empty the ice into Ice cube box.
NOTE:
To prevent damage to the Ice cube box, do not make ice in the Ice cube box or pour oil into it.
Amount for both Ice cube trays
Amount for one Ice cube tray
Lever
Ice cube box
PLASMACLUSTER (Only for SJ-P600M, SJ-P560M, SJ-P520M)
The plasmacluster automatically starts operating when the refrigerator is powered on.
1.Press “PLASMACLUSTER(ON/OFF) button”, and the PLASMACLUSTER lamp goes out and the plasmacluster turns off.
2.Press “PLASMACLUSTER(ON/OFF) button” again, and the PLASMACLUSTER lamp lights up. The plasmacluster turns on.
Plasmacluster |
PLASMACLUSTER(ON/OFF) button
Notes about PLASMACLUSTER operation
The ionizer inside your refrigerator releases clusters of ions, which are collective masses of positive and negative ions, into the freezer and refrigerator compartment.
These ion clusters reduce airborne mold fungus.
mold  fungus
•There may be a slight odors in the refrigerator. This is the smell of ozone generated by the ionizer. The amount of ozone is minimal, and quickly decomposes in the refrigerator.
DEODORIZING UNIT
A built-in unit which requires no manual operation because it automatically starts operating when the refrigerator is powered on.
DEFROSTING
Defrosting is fully automatic due to a unique energy saving system. Whereby the defrost cycle start time is proportional to the running time of your refrigerator compressor, i. e., the less time the refrigerator compressor operates (during the winter season or you’re away on holidays), the longer the time between each defrost cycle.
3
Loading...