

Page 1

®
TM
DOUBLE GRILL CONVECTION
MICROWAVE OVEN
OPERATION MANUAL
J
MODEL R-880B
Info Display
Page 2

INTRODUCTION
®
INFO DISPLAY COOKING SYSTEM
Thank you for buying a Sharp Microwave Oven.
Your new oven has an "Information Display System"
which offers you step-by-step instructions to easily guide
you through each feature.
Your oven also has a HELP key for instructions on using
Auto Start, Information Guide On / Off, Demonstration
Mode, Child Lock, Info on pads and Help.
After gaining experience and confidence using your oven,
the information display can be turned off.
We strongly recommend however that you read this
operation manual thoroughly before operating your oven,
paying particular attention to the Important Safety Instructions.
The manual is divided into two sections:
1. OPERATION (P2~P27)
This section describes your oven and teaches you how to
use all the features.
2. COOKING GUIDE
This section is at the back of the manual, it contains the
more commonly used information such as how to prepare
food, which cooking utensil to use, standing time.
It also contains recipes for automatic cooking.
Please take some time to read your operation manual carefully, the automatic cooking menus programmed into your new
oven have been carefully developed to give optimum results
when the step-by-step instructions are followed.
When selecting another home appliance, please again consider our full range of Sharp products.
CONTENTS Page
Introduction 1
Important Safety Instructions 2
Installation Instructions 4
Oven Diagram 4
Connecting Plug 5
Operation of Touch Control Panel 6
Control Panel Display 6
Touch Control Panel Layout 6
Before Operating 7
Getting Started 7
Clock Setting 7
Stop/Clear 7
To Cancel Program 7
Microwave Cooking 8
Microwave Time Cooking 8
Sequence Cooking 9
Instant Cook 9
Heating without Food 10
Convection Cooking 10
To Cook by Convection 10
To Preheat and Cook by Convection
Convection and Microwave Cooking 12
Preheating 13
Grill Cooking 14
Mix Cooking 15
Automatic Operations 16
Notes for Automatic Operations 16
Sensor Instant Action 16
Reheat Sensor 17
Convenience/Pizza 18
Multi Cook 19
Easy Defrost 20
Other Convenient Features 21
Help 21
Less/More Setting 24
Increasing/Decreasing Time 25
Alarm 25
Care and Cleaning 26
Service Call Check 27
Specifications 27
Guarantee 28
Cooking Guides 1 –
11
39
1
Page 3

IMPORTANT SAFETY INSTRUCTIONS
Warning
To avoid the danger of fire
1. The microwave oven should not be left unattended
during operation. Power levels that are too high or
cooking times that are too long may overheat foods
resulting in a fire.
2. This oven is not designed to be built-in to a wall or
cabinet.
3. The electrical outlet must be readily accessible so
that the unit can be unplugged easily in an emergency.
4. The
5. It is recommended that a separate circuit serving
6. Do not place the oven in areas where heat is
7. Do not install the oven in an area of high humidity
8. Do not store or use the oven outdoors.
9. If food being heated in the oven begins to smoke,
10. Use only microwave-safe
11.
12.
13. Do not place flammable materials near the oven or
14. Do not block the ventilation openings.
15. Remove all metallic seals, wire twists, etc., from
16. Do not use the microwave oven to fry with oil or heat
17. To make
18. Do not store food or any other items inside
19. Check the settings after you start the oven to
20. To avoid overheating and fire, special care must be
AC power supply must be 220V, 50Hz.
only this appliance be provided.
generated. For example, close to a conventional
oven.
or where moisture may collect.
DO NOT OPEN THE DOOR. Turn off and unplug
the oven and wait until the food has stopped
smoking. Opening the door while food is smoking
may cause a fire.
containers and utensils.
Do not leave the oven unattended when
using disposable plastic, paper or other combustible food containers.
Clean the waveguide cover, the oven cavity, the
turntable and roller stay after use. These must be
dry and free from grease. Built-up grease may
overheat and begin to smoke or catch fire.
ventilation openings.
food and food packages. Arcing on
metallic surfaces may cause a fire.
oil for deep frying. The temperature can not be
controlled and the oil may catch fire.
popcorn, use only special microwave
makers.
the oven.
ensure the oven is operating as desired.
taken when cooking or reheating foods with a high
sugar or fat content, for example, Sausage rolls,
Pies or christmas pudding.
To avoid the possibility of injury
Do not operate the oven if it is damaged or
1.
malfunctioning. Check the following before use.
(1) The door (not warped)
(2) The hinges and safety door latches
(not broken or loose)
(3) The door seals and sealing surfaces
(4) The oven cavity (not dented)
(5) The power supply cord or plug
Do not try to adjust or repair the oven yourself.
2.
The oven must be adjusted or repaired
by a qualified service technician trained by
SHARP.
Do not operate the oven with the door open
3.
or alter the safety door latches in any way.
Do not operate the oven if there is an object
4.
between the door seals and sealing surfaces.
Do not allow grease or dirt to build up on
5.
the door seals and sealing surfaces.
6. Individuals with
with their doctor or the manufacturer of the pacemaker for precautions regarding microwave
ovens.
PACEMAKERS should check
To avoid the possibility of electric shock
1. Under no circumstances should you remove the
outer cabinet.
2. Never spill or insert any objects into the door lock
openings or ventilation openings. In the event of
a spill, turn off and unplug the oven immediately,
and call a SHARP service agent.
3. Do not immerse the power supply cord or plug in
water or any other liquid.
4. Do not let the power supply cord hang over the
edge of a table or counter.
5. Keep the power supply cord away from heated
surfaces.
6. If the oven lamp fails, consult your dealer or a
qualified service technician trained by SHARP.
7. Should the power supply cord become damaged,
it must be replaced with a special cord supplied
by a SERVICE CENTRE APPROVED BY
SHARP. And it must be replaced by a qualified
service technician trained by SHARP.
2
Page 4

To avoid the possibility of explosion
and sudden boiling
1. Never use sealed containers. Remove seals and
lids before use. Sealed containers can explode
due to a build up of pressure even after the oven
has been turned off.
When boiling water or other liquids, use a wide-
2.
mouthed container to allow bubbles to escape. It
is advisable to insert a glass rod or other similar
utensil to prevent sudden boiling (resulting in
splashing or burning).
Do not cook eggs in their shells. They may
3.
explode. The explosion may damage the oven or
injure yourself. To cook or reheat eggs which
have not been scrambled or mixed, pierce the
yolks and whites, or the eggs may explode. Shell
and slice hard boiled eggs before reheating them
in the microwave oven.
Pierce the skin on such foods as potatoes,
4.
sausages and fruit before cooking, or they may
explode.
To avoid the possibility of burns
1. Do not touch the cavity around the oven lamp
after cooking. This part will become hot when the
oven lamp is on.
Whenever the top heater, bottom heater or convection symbols are displayed the turntable, turntable support, racks, oven door, outer cabinet,
oven cavity and especially bottom heater will
become very hot. To prevent yourself from getting burnt use thick oven mittens.
2. Always
cooking bags, etc., away from the face and hands
to avoid steam burns.
3. Always
when opening it to avoid burns from
escaping steam and heat.
Slice stuffed baked foods after heating to
4.
release steam and avoid burns.
Stir the food and the contents of cooking contain-
5.
ers, and
giving them to infants, young children or elderly
people to avoid internal burns.
6. Do not catch the utensil, your clothes or accessories on the door safety latches when you take out
the food from the oven.
open containers, popcorn makers, oven
stand back from the oven door
test their actual temperature before
To avoid misuse by children
1. Only allow children to use the oven without supervision when adequate instructions have been
given so that the child is able to use the oven in
a safe way and understands the hazards or
improper use.
2. Children should use ovens only under the
vision of adults.
Do not lean or swing on the oven door. Do not
3.
play with the oven or use it as a toy. Young
children should be supervised to ensure that they
do not play with the oven.
super-
4. Children should be taught all important safety
instructions : use of potholders, careful removal
of food coverings; pay special attention to packaging (e.g. self-heating materials) designed to
make food crisp because they may be extra hot.
Other warnings
1. Never modify the oven in any way.
Do not move the oven while it is in operation.
2.
3. This oven is for
not suitable for commercial or laboratory use.
4. This appliance is not intended for use by young
children or infirm persons without supervision.
Caution
1. Never operate the oven empty except the directed case in the operation manual. Doing so may
damage the oven.
2. When using a browning dish or self-heating material, always place a heat-resistant insulator
such as a porcelain plate under it to prevent
damage to the turntable and roller stay due to
heat stress. The preheating time specified in the
dish’s instructions must not be exceeded.
3. Do not use metal utensils for MICROWAVE cooking, which reflect microwaves and may cause
electrical arcing. Do not put cans in the oven.
4. Use small pieces of aluminium foil to shield food
to prevent over cooking. Keep foil at least 2 cm
from the oven walls.
5. Use only the turntable and the roller stay designed for this oven.
6. Do not use plastic containers for microwaving if
the oven is still hot from using the CONVECTION,
GRILL, MIX, PREHEAT, MULTI COOK or CONVENIENCE/PIZZA mode. Because they may melt.
Plastic containers must not be used during above
mode unless the container manufacturer says
they are suitable.
7. Do not place anything on the outer cabinet during
operation.
home food preparation only. It is
- To prevent trouble with the
oven or damage.
Note
1. If you are not sure how to connect your oven,
please consult a qualified electrician.
2. Neither the manufacturer nor the dealer can
accept any liability for damage to the oven or
personal injury resulting from failure to observe
the correct electrical connection procedure.
3. Water vapour or drops may occasionally form on
the oven walls or around the door seals and
sealing surfaces. This is a normal occurrence and
is not an indication of leaking of microwaves or a
malfunction.
4. The cooking times given in the cook book are just
for your guidance, and will vary because of altitude, food structure of food size.
3
Page 5

INSTALLATION INSTRUCTIONS
1. Remove all packing materials from the oven cavity. Check the unit for any damage, such as a misaligned door,
damaged door seals around the door or dents inside the oven cavity or on the door. If there is any damage,
please do not operate the oven until it has been checked by a SERVICE CENTRE APPROVED BY SHARP
and repaired, if necessary.
2. Accessories provided
1) Turntable tray
2) Roller stay
3) Low rack
3. Since the door may become hot during cooking, you should place or mount the oven so that the bottom of
the oven is 80 cm or more above floor. You should also keep children away from the door to prevent them
burning themselves.
4. Ensure that the bottom heater is in the lowest position as shown in the OVEN DIAGRAM below (never touch
or move the bottom heater while it is hot). Then fit the turntable support to the turntable motor shaft on the
floor of the oven cavity. And place the turntable on the turntalbe support. Make sure the turntable and turntable
support are centrally located and locked together. NEVER operate the oven without the turntable support and
turntable.
5. The oven should not be installed in any area where excessive heat and steam are generated, for example,
next to a conventional oven unit.
The oven should be installed so as not to block ventillation openings.
Allow at least 40 cm on the top of the oven for free air space.
6. Neither the manufacturer nor the distributors can accept any liability for damage to the machine or personal
injury for failure to observe the correct electrical connecting procedure.
The A.C. voltage must be single phase 220V, 50Hz.
7. Before using top or bottom heater for the first time, operate the oven without food for 20 minutes using both
heaters. This will allow the oil that is used for rust protection to be burned off.
4) High rack
5) Combined operation manual and cookbook
OVEN DIAGRAM
13
4
5
9
6780
1.Oven lamp
(It will light during the cooking.)
2.Top grill heater
(top heater)
3.See through door
4.Door hinges
5.Door safety latches
6.Door seals and sealing surfaces
7.Bottom grill heater
(bottom heater)
8.Oven cavity
Warning:
The accessories will become very hot whenever the top heater, bottom heater or convection symbols are lighted
in the display and use thick oven gloves when inserting/removing the food or turntable from the oven to
PREVENT BURNS.
q
2
5
r
e
w
u
i
9.Turntable motor shaft
10.Ventilation openings
11.Waveguide cover
12.Door open button
13.Control panel
14.Digital readout
15.Power supply cord
16.Outer cabinet
17.Turntable
18.Turntable support
19.Ventilation slit
t
0
Metal racks——High and low
The racks are for Grill, Mix,
Convection and recommended
automatic operations.
o
y
4
Page 6

CONNECTING PLUG
You must connect a 3 pin plug to the power supply cord.
WARNING - THIS APPLIANCE MUST BE EARTHED.
If you are unsure how to do this get help from an electrician.
IMPORTANT - The wires in the mains cable are colour coded as follows:
green and yellow stripes = earth
blue = neutral
brown = live
The wire terminals or screws in your plug may not be marked in the same way as the wires, so to be quite sure
you have wired the plug properly you should connect the wires as follows:
green and yellow striped wire to the terminal marked
Eor
or
coloured green or
coloured green and yellow
blue wire to the terminal marked
Nor
coloured black or
coloured blue
brown wire to the terminal marked
Lor
coloured red or
coloured brown
Make sure the terminal screws are properly tirhtened and the power supply cord is held tightly by the cable grip
where it enters the plug.
Link most appliances in your house, your oven must be connected to a single phase 220 volt, 50 Hz alternating
current supply. If you have any doubts about your electrical supply ask a qualified electrician.
If you do not make the proper electrical connections you might damage your microwave oven or injure yourself.
Neither SHARP nor the supplier will be liable if this happens.
5
Page 7
OPERATION OF TOUCH CONTROL PANEL
The operation of the oven is controlled by pressing the appropriate pads arranged on the surface of the control
panel.
An entry signal tone should be heard each time you press the control panel to make a correct entry.
In addition the oven will beep for approximately 2 seconds at the end of the cooking cycle, or 4 times when a
cooking procedure is required.
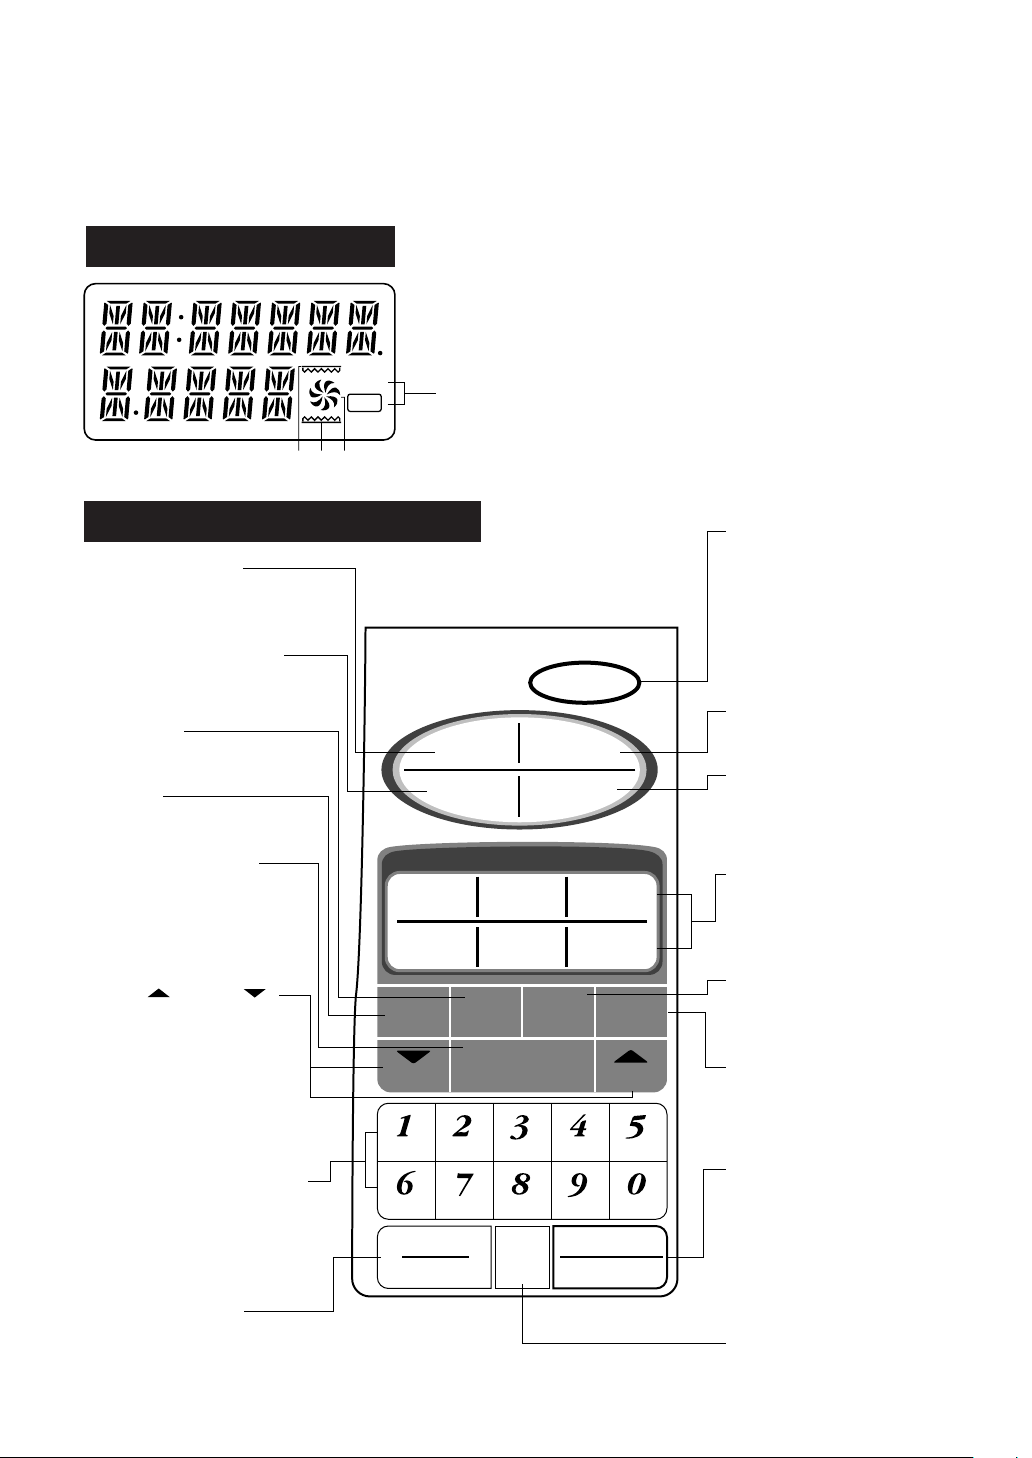
Control Panel Display
1. TOP HEATER SYMBOL
The symbol will light when the top heater is in use.
2. BOTTOM HEATER SYMBOL
The symbol will light when the bottom heater is in use.
COOK
HELP
123
Control Panel Display
Touch Control Panel Layout
MULTI COOK PAD
Press to select Multi Cook
mode.
REHEAT SENSOR PAD
Info Display
Press to select 3 popular
Reheat menus.
GRILL PAD
Press to select grill cooking.
MIX PAD
Press to select mix cooking.
Indicator
MULTI
COOK
REHEAT
SENSOR
3. CONVECTION SYMBOL
The symbol will light during convection cooking.
HELP PAD
Press to select auto start,
information guide on/off,
child lock, demonstration
modes or info on pads.
Press to obtain cooking information.
HELP
CONVENIENCE/PIZZA PAD
CONVENIENCE
/PIZZA
EASY
DEFROST
Press to select 6 popular
menus.
EASY DEFROST PAD
Press to defrost meat by entering weight.
POWER LEVEL PAD
Press to select microwave
power setting.
If not pressed, HIGH is automatically selected.
MORE( ), LESS( )
PADS
Press to adjust the doneness
of food in one minute increments during cooking or to
increase/decrease the time
whilst programming the
automatic opertions.
NUMBER AND TEMPERATURE PADS
Press to enter cooking times,
clock time, convection
temperature, weight or
quantity of food.
STOP/CLEAR PAD
Press to clear during programming.
Press once to stop operation of
oven during cooking; press twice
to cancel cooking programme.
SENSOR INSTANT ACTION
Fresh
Vegetables
Frozen
Vegetables
MIX GRILL CONVEC PREHEAT
LESS
40°C
180°C
STOP
CLEAR
70°C
200°C
Reheat Pie
Rice
POWER
LEVEL
130°C
220°C
CLOCK
6
Jacket
Potato
Pasta
MORE
150°C
160°C
230°C
250°C
INSTANT COOK
START
SENSOR INSTANT ACTION PADS
Press once to cook or reheat 6 popular menus.
CONVEC PAD
Press to select convection
cooking.
PREHEAT PAD
Press to preheat the oven
prior to cooking.
INSTANT COOK/START PAD
Press once to cook for 1
minute on HIGH or increase
by 1 minute multiples each
time this pad is pressed during
manual cooking.
Press to start oven after
setting programs.
CLOCK PAD
Press to set clock time.
Page 8

BEFORE OPERATING
* This oven is preset with the INFORMATION GUIDE ON.
To assist you in operating your oven useful information will appear on the display.
In this manual, the display of information guide is abbreviated.
* When you become familiar with your oven, the information guide can be turned off. Check page 22.
Getting Started
Step
Plug the oven into a power point and switch
on the power.
1
Ensure the oven door is closed.
Press the STOP/CLEAR pad so that the
oven beeps.
Procedure Pad Order Display
2
Clock Setting
* To enter the present time of day 11:34 (AM or PM).
Step
Press the CLOCK pad.
Procedure Pad Order Display
1
Enter the correct time of day by pressing the numbers in sequence.
2
SHARP, MICRO-WAVE,
OVEN will be displayed repeatedly.
STOP
CLEAR
Only the dots will remain.
CLOCK
(operation guide off: )
The dots (:) will flash on and
off.
Press the CLOCK pad again.
3
This is a 12 hour clock. If you attempt to enter an incorrect clock time (Eg. 13:45) ERROR will appear in the
display. Press the STOP/CLEAR pad and re-enter the time of day (Eg. 1:45).
If you wish to know the time of day during the cooking or timer mode, press the CLOCK pad. As long as your
finger is pressed the CLOCK pad, the time of day will be displayed.
CLOCK
Stop/Clear
Press the STOP/CLEAR pad once to:
1.Stop the oven temporarily during cooking.
2.Clear if you make a mistake during programming.
3.Clear the message on the display after cooking.
To Cancel a Programme During Cooking
Press the STOP/CLEAR pad twice.
7
Page 9

MICROWAVE COOKING
Microwave Time Cooking
This is a manual cooking feature, first enter the cooking time then the power level.
You can programme up to 99 minutes, 99 seconds.
There are five different power levels.
Power level
Approximate percentage of
microwave power
Examples of foods typically cooked on different microwave power levels
This variable cooking control allows you to select the rate of microwave cooking.
If a power level is not selected, then HIGH power is automatically used.
*Suppose you want to cook for 10 minutes on HIGH power.
Step
Enter desired cooking time.
Procedure
–
–
LOW HIGHMEDIUM
–
–
–
–
–
–
10% 70% 100%
Keeping food
warm
–
–
M•LOW M•HIGH
–
–
–
–
–
–
30%
Defrosting
Softening
butter
–
–
–
–
–
–
–
–
50%
–
–
Casseroles
–
–
–
–
–
–
Pad Order Display
–
–
–
–
–
–
–
–
–
–
–
–
–
–
–
Seafood
–
Cakes
Muffins
Slices
–
–
–
–
–
–
–
–
–
Fruit
–
–
Vegetables
–
–
Rice/Pasta
–
–
–
–
–
–
–
1
Press the INSTANT COOK/START pad.
2
To lower the power press the POWER LEVEL pad once. Note the display will indicate “HIGH”. To lower to
“M•HIGH” press the POWER LEVEL pad again. Repeat as necessary to select “MEDIUM”, “M•LOW” or “LOW”
power levels.
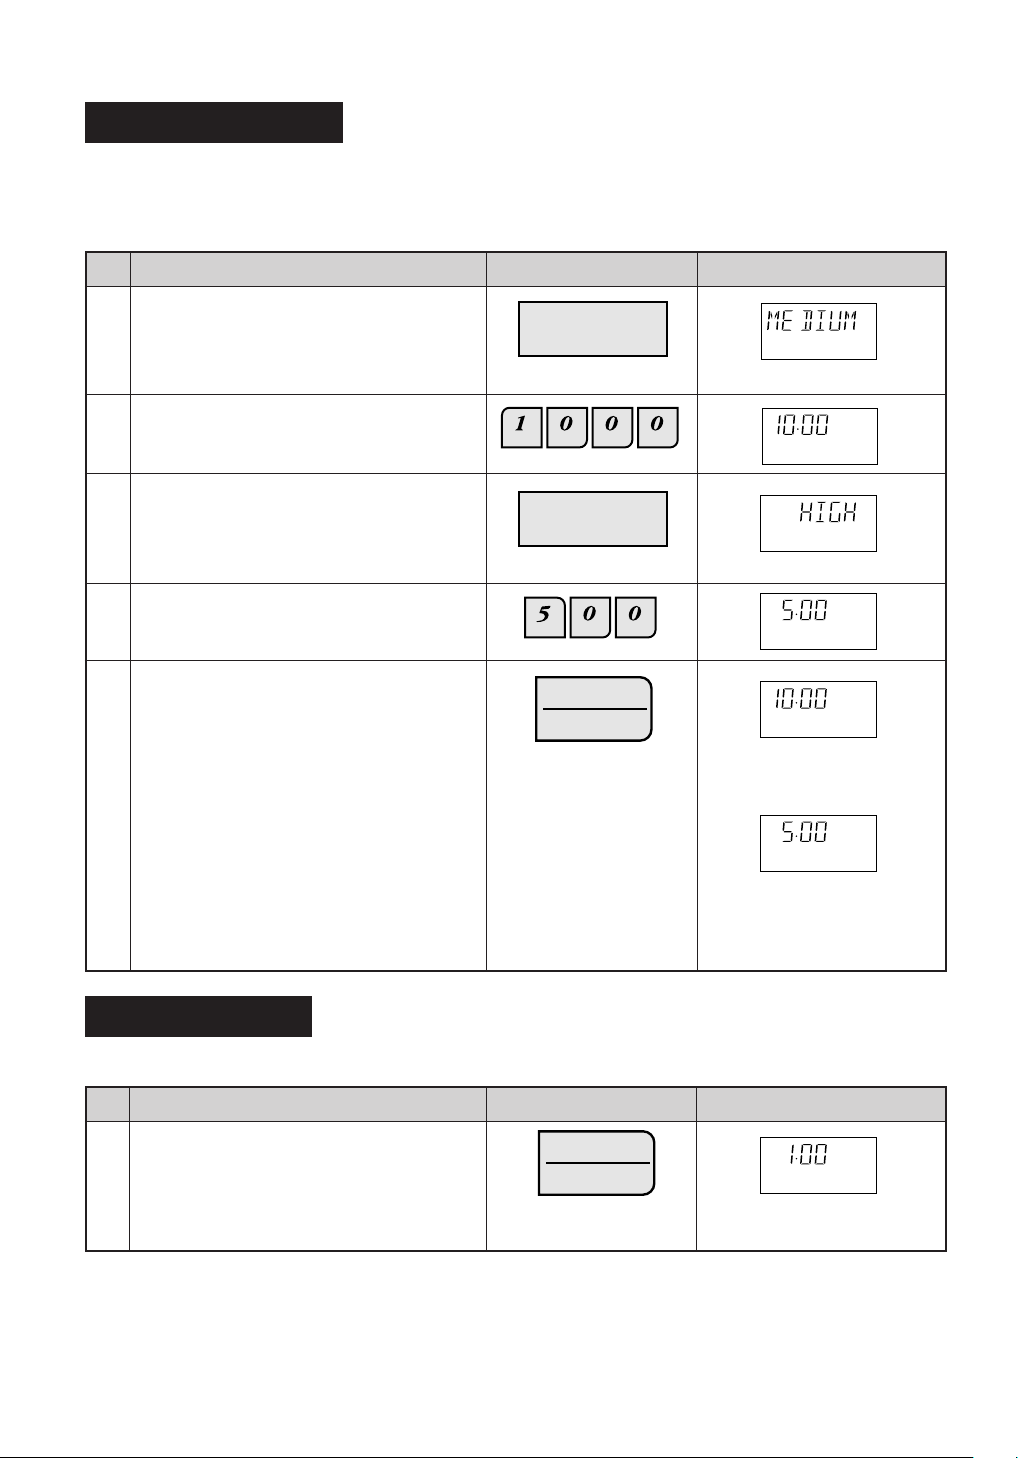
* Suppose you want to cook Fish Fillets for 10 minutes on MEDIUM power.
Step
Procedure Pad Order Display
INSTANT COOK
START
COOK
The timer begins to count
down.
Enter desired cooking time.
1
Select power level by pressing the POWER
LEVEL pad as required (for MEDIUM press
2
three times).
Press the INSTANT COOK/START pad.
3
If the door is opened during the cooking process, the cooking time in the display automatically stops. The cooking
time starts to count down again when the door is closed and the INSTANT COOK/START pad is pressed.
If you want to check the power level during the cooking, press POWER LEVEL pad.
As long as your finger is pressing the POWER LEVEL pad, the power level will be displayed.
POWER
LEVEL
INSTANT COOK
START
8
x 3
COOK
The timer begins to count
down.
Page 10
Sequence Cooking
Your oven can be programmed up to 4 automatic cooking sequences, switching from one variable power setting
to another automatically.
Note that POWER LEVEL must be entered first when programming sequence cooking.
* Suppose you want to cook for 10 minutes on MEDIUM followed by 5 minutes on HIGH.
Step
Procedure Display
Pad Order
Select microwave cooking and desired power
level by pressing the POWER LEVEL pad (for
1
MEDIUM press three times).
Enter desired cooking time.
2
For second sequence, select microwave
cooking and power level (for HIGH press
3
the POWER LEVEL pad once)
Enter desired cooking time for the second
4
sequence.
Press the INSTANT COOK/START pad.
5
POWER
LEVEL
x 3
POWER
LEVEL
INSTANT COOK
START
COOK
The timer begins to count
down to zero. When it reaches zero,
COOK
the second sequence will appear and the timer will begin
counting down to zero again.
Instant Cook™
For your convenience Sharp’s Instant Cook allows you to easily cook for one minute on HIGH power.
Step
Press the INSTANT COOK/START pad.
Procedure Display
Pad Order
INSTANT COOK
START
COOK
1
Within one minute of closing the door.
Press the INSTANT COOK/ START pad until desired time is displayed.
Each time the pad is pressed, the cooking time is increased by 1 minute.
9
The timer begins to count
down.
Page 11
HEATING WITHOUT FOOD
Before the first use and after cleaning the top and bottom heaters must be conditioned. The procedure involves
heating the heaters for a period of 20 minutes. You may notice some smoke and odour during this process, the
oven is not out of order. Follow the procedure below.
Step
Ensure that no food is in the
oven.
1
Press the GRILL pad three
times.
Enter the heating time (20
2
min.).
Press the INSTANT COOK/
START pad.
IMPORTANT: During this operation, some smoke and odour
3
will occur. Therefore open the
windows or run the ventillation
fan in the room.
Open the door to cool the oven cavity. The cooling fan will remain on until the oven cavity has cooled.
WARNING: The oven door, outer cabinet, turntable and oven cavity will be hot to PREVENT BURNS
4
allow the oven to cool.
Procedure
Pad Order
GRILL
X3
INSTANT COOK
START
The timer begins to count down to zero. When
timer reaches zero, all indicators will go out
and the oven will "beep". END will appear on
the display.
Display
COOK
CONVECTION COOKING
Please consult your Convection Microwave Cookbook for more specific cooking instructions and procedures.
To Cook by Convection
Your Convection Microwave Oven can be programmed for ten different convection cooking temperatures up
to 99 minutes, 99 seconds.
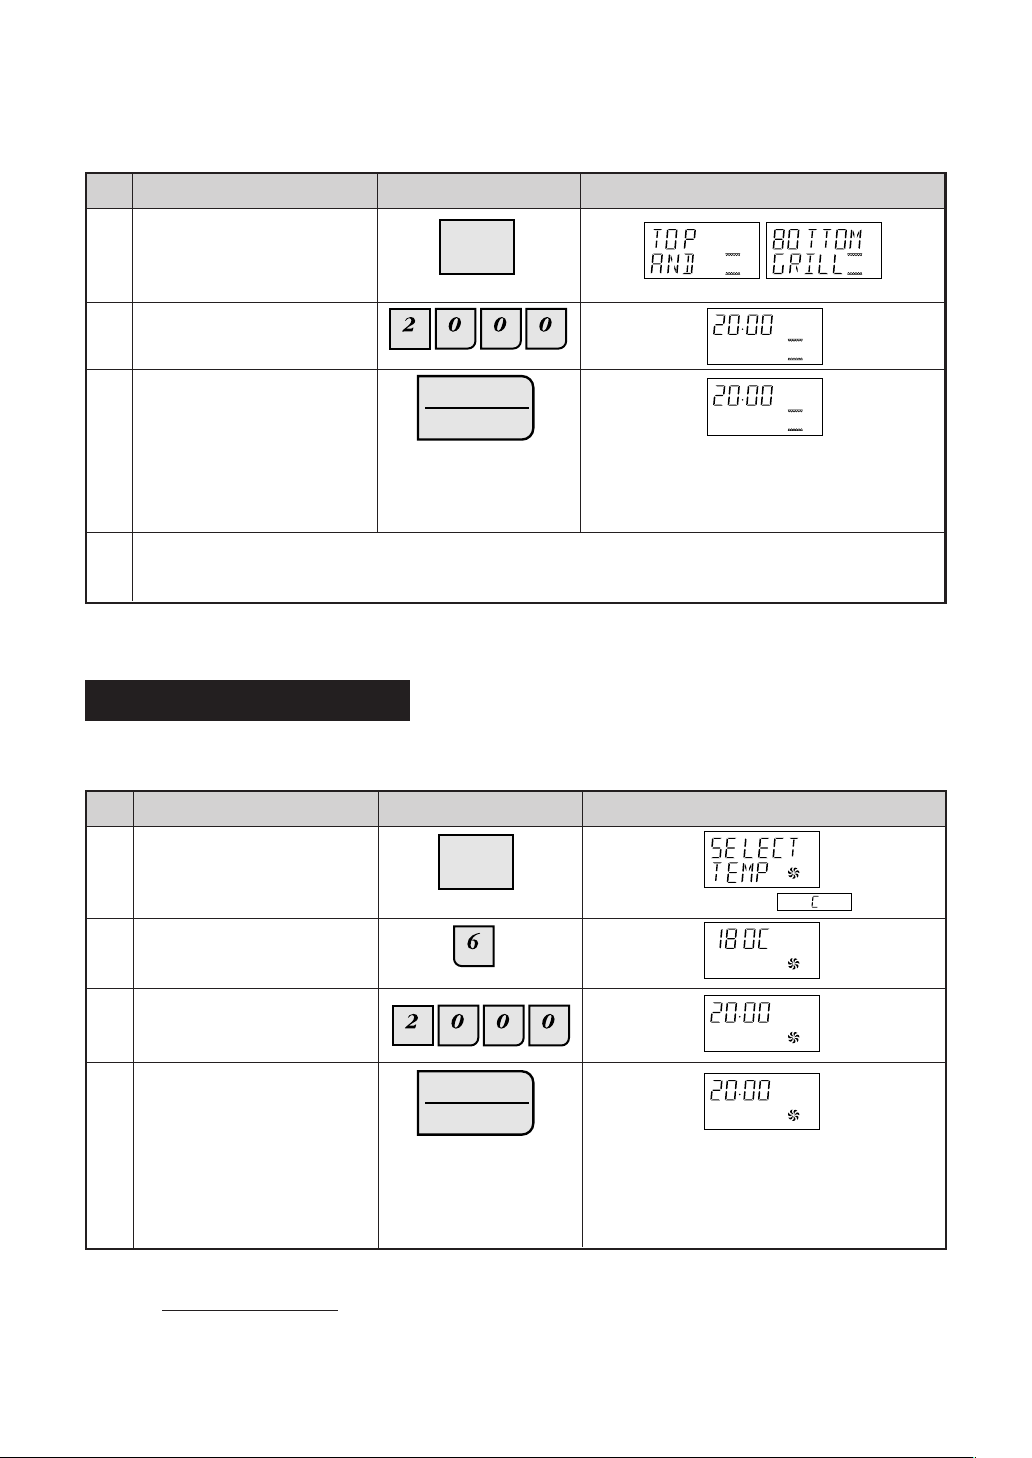
* Suppose you want to cook for 20 minutes at 180°C.
Step
Place turntable in the oven.
Press the CONVEC pad.
1
Enter desired temperature.
2
Enter desired cooking time.
Procedure
Pad Order
CONVEC
180°C
Display
(Operation guide off :
)
3
Press the INSTANT COOK/
START pad.
4
Warning:
The oven cavity, door, turntable, turntable support, racks, dishes and especially the bottom heater will become
very hot, use thick oven gloves when inserting/removing the food or turntable from the oven to PREVENT
BURNS.
Helpful Hints:
If you are cooking and wish to check the temperature you have programmed, simply press the CONVEC pad.
The programmed temperature will be displayed as long as CONVEC pad is pressed.
INSTANT COOK
START
10
COOK
The timer begins to count down to zero.
When timer reaches zero, all indicators will
go out and the oven will "beep". END will
appear on the display. The cooling fan will
remain on until the oven cavity has cooled.
Page 12

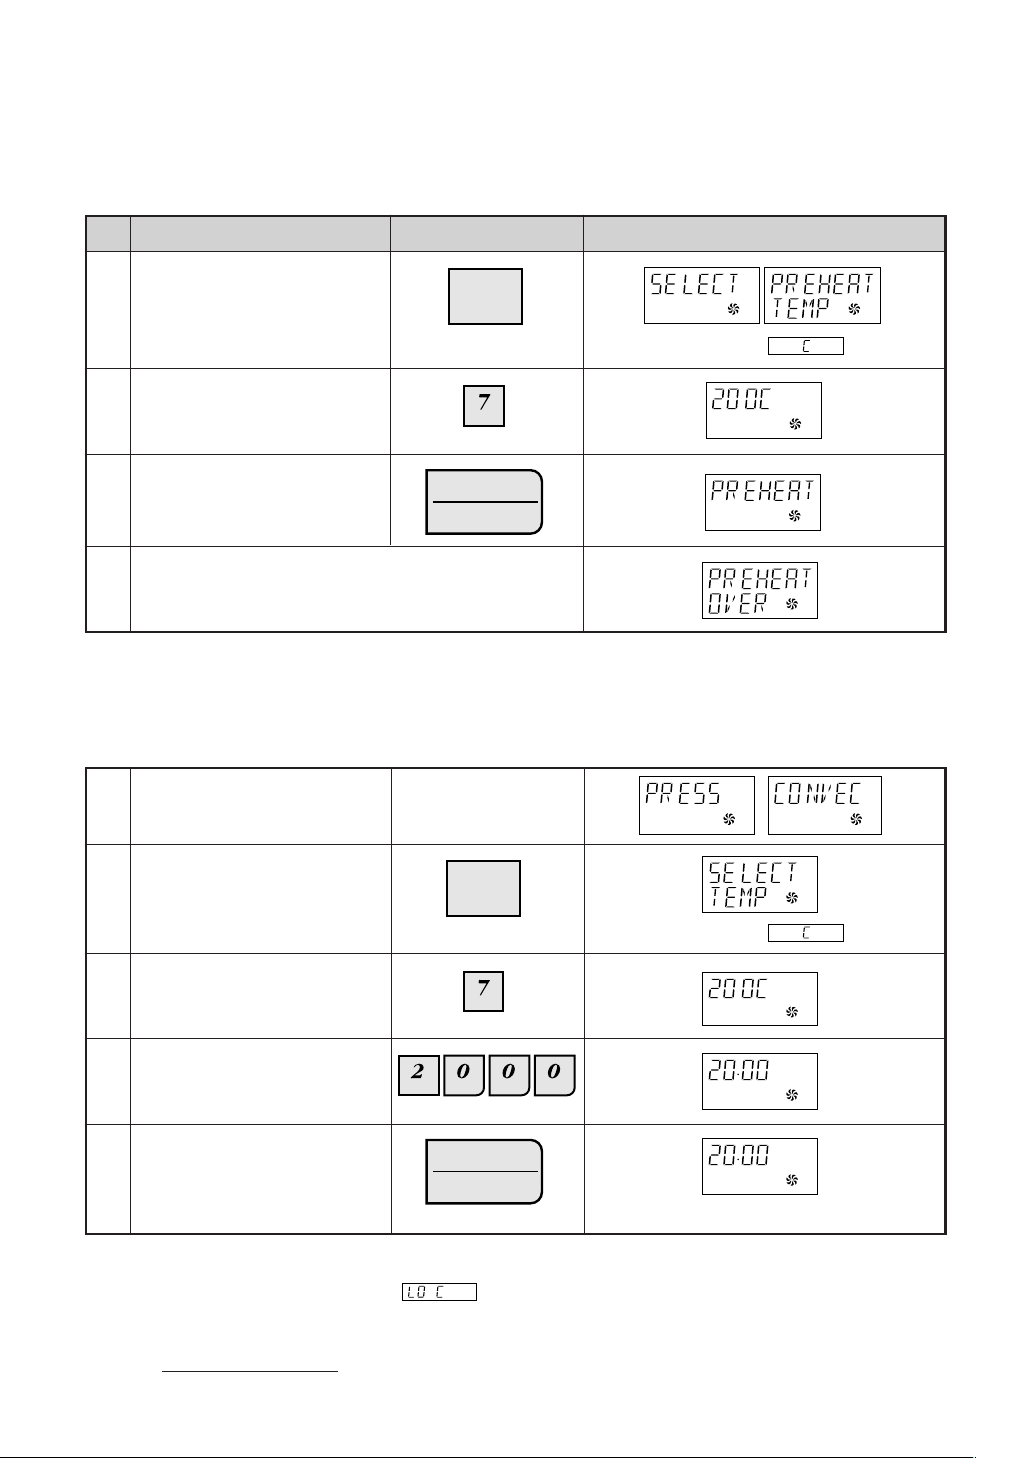
To Preheat and Cook by Convection
* Suppose you want to preheat the oven to 200°C then cook for 20 minutes at 200°C.
Step
Press the PREHEAT pad.
Procedure Display
1
Press desired preheat temperature
pad.
2
Press the CONVEC pad.
3
Press desired cooking temperature
pad.
4
Enter desired cooking time.
5
Pad Order
PREHEAT
200°C
CONVEC
200°C
(Operation guide off : )
(Operation guide off :
PREHEAT COOKING
)
Press the INSTANT COOK/START
pad.
When "ADD FOOD" is displayed, the
6
oven is preheated. If the oven door is
not opened, the oven will automatically hold at the preheat temperature
for 30 minutes.
Open the door. Place food in oven.
7
Close the door.
Press the INSTANT COOK/START
pad.
8
Warning:
The oven cavity, door, turntable, turntable support, racks, dishes and especially the bottom heater will become
very hot,
BURNS.
use thick oven gloves when inserting/removing the food or turntable from the oven to PREVENT
INSTANT COOK
START
INSTANT COOK
START
COOK
will be displayed repeatedly.
When preheat is over, the oven will
"beep" 4 times and ADD FOOD will be
displayed.
PRESS START will be displayed.
COOK
The timer begins to count down to
zero.
11
Page 13

Convection and Microwave Cooking
Your oven can be programmed to combine convection and microwave cooking operations.
* Suppose you want to roast chicken pieces for 15 minutes at 180°C and then cook at 8 minutes on MEDIUM.
Step
Press the CONVEC pad.
Procedure Pad Order Display
1
Enter desired convection temperature.
2
Enter desired convection cooking
time.
3
Select microwave cooking and
power level by pressing the
4
POWER LEVEL pad as required
(for MEDIUM press three times.)
Enter desired microwave cooking
time.
5
Press the INSTANT COOK/START
pad.
6
CONVEC
180°C
POWER
LEVEL
x 3
INSTANT COOK
START
(Operation guide off: )
COOK
The timer begins to count down to
zero. When it reaches zero,
COOK
The timer begins to count down to
zero.
Do not use plastic (non-heat proof) cookware if combining Convection and Microwave mode.
Warning:
The oven cavity, door, turntable, turntable support, racks, dishes and especially the bottom heater will become
very hot, use thick oven gloves when inserting/removing the food or turntable from the oven to PREVENT
BURNS.
12
Page 14
PREHEATING
For best results, preheat to the required temperature with the turntable in the oven. Add food after preheating.
* To preheat the oven to 200°C
Step
Press the PREHEAT pad.
Procedure Display
Pad Order
PREHEAT
1
(Operation guide off: )
Select preheating temperature.
2
Press the INSTANT COOK/
START pad.
3
Preheat is over. If the oven door is not opened, the oven
will automatically hold at the preheat temperature for 30
4
minutes.
After preheating, Suppose you want to cook profiteroles for 20 minutes on convection 200°C.
Open the door and place food.
Close the door.
5
200°C
INSTANT COOK
START
COOK
COOK
Press the CONVEC pad.
6
Enter desired temperature.
7
Enter desired cooking time.
CONVEC
(Operation guide off: )
200°C
8
Press the INSTANT COOK/
START pad.
9
If you are in the process of preheating and wish to check the actual oven temperature, simply press the CONVEC
pad. The actual oven temperature will be displayed as long as the CONVEC pad is pressed. If the oven
temperature is below 40°C at this time,
Warning:
The oven cavity, door, turntable, turntable support, racks, dishes and especially the bottom heater will become
very hot, use thick oven gloves when inserting/removing the food or turntable from the oven to PREVENT
BURNS.
INSTANT COOK
START
will be displayed.
13
COOK
The timer begins to count down.
Page 15
GRILL COOKING
Your oven has three grill cooking modes. Select the desired grill mode by pressing the GRILL pad.
For the top heater mode, press the GRILL pad once.
For the bottom heater mode, press the GRILL pad twice.
For the top and bottom heaters mode, press the GRILL pad three times.
It is not necessary to preheat for grill cooking.
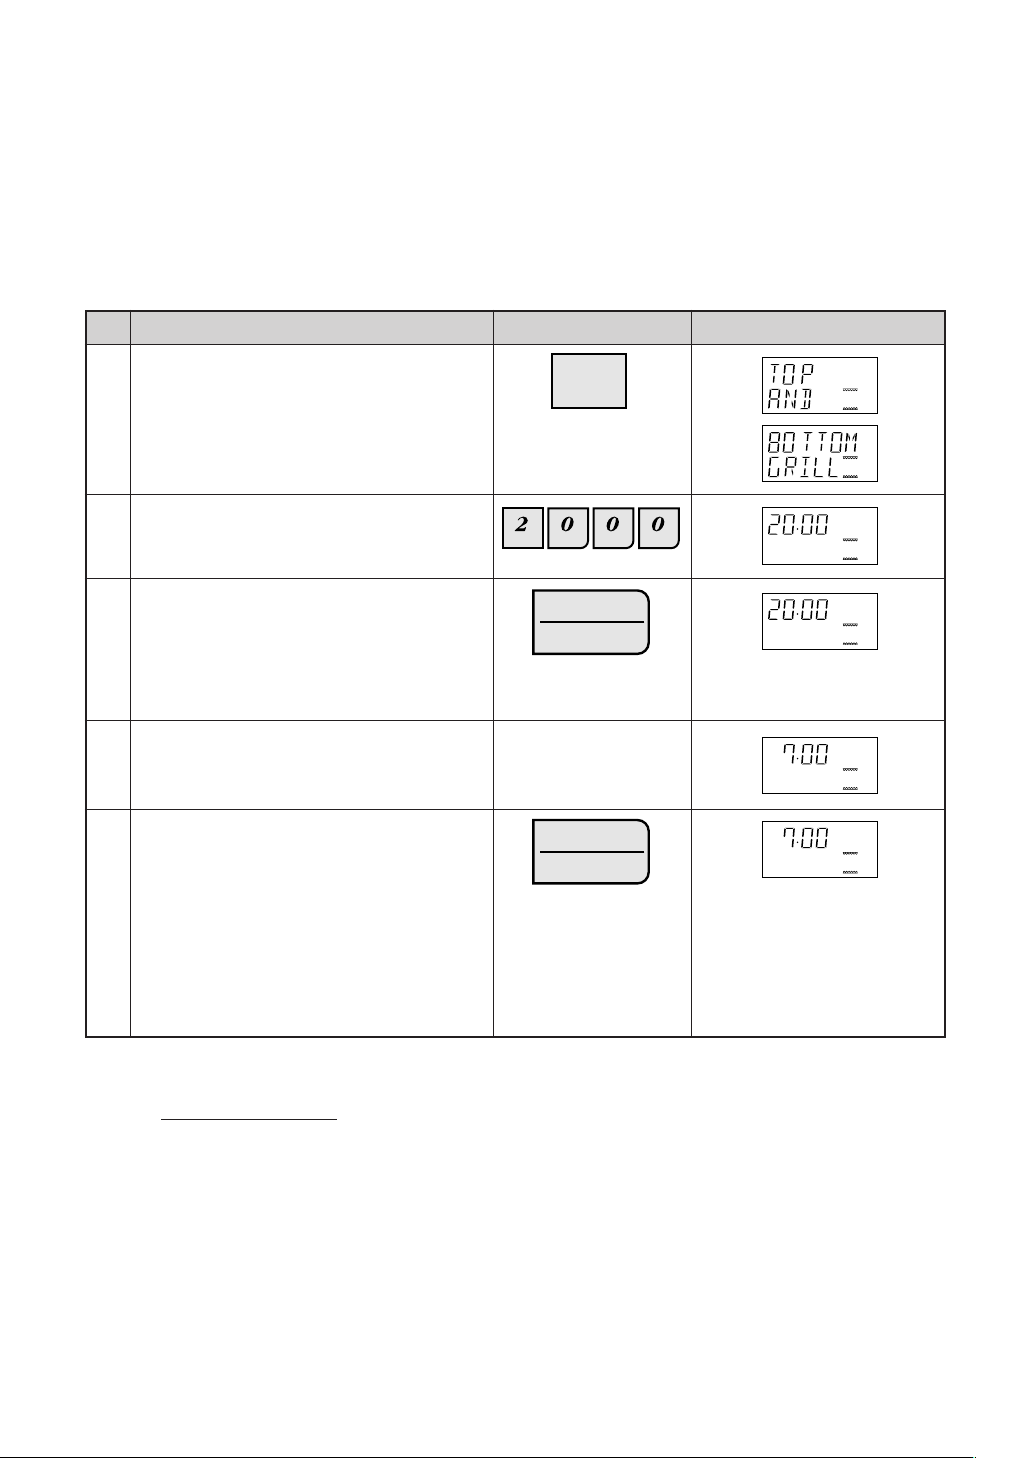
* Suppose you want to cook for 20 minutes using the top and bottom heaters.
Step
Press the GRILL pad three times.
Procedure Pad Order Display
1
Enter desired cooking time.
2
Press the INSTANT COOK/START pad.
3
When the timer reaches about 2/3 of the way
through the cooking time, open the door and
4
turn over the steak. And then close the door.
Press the INSTANT COOK/START pad.
5
GRILL
x 3
INSTANT COOK
START
INSTANT COOK
START
COOK
The timer begins to count
down.
COOK
The timer begins to count
down again. When it reaches
zero, all indicators will go off
and the oven will "beep". The
cooling fan will remain on until the oven cavity has cooled.
Warning:
The oven cavity, door, turntable, turntable support, racks, dishes and especially the bottom heater will become
very hot,
BURNS.
use thick oven gloves when inserting/removing the food or turntable from the oven to PREVENT
14
Page 16
MIX COOKING
Your oven has four preprogrammed settings that make it easy to cook with both grill heaters and microwave.
Select the desired mix setting by pressing the MIX pad. It is not necessary to preheat for the mix cooking.
The times
Setting
HIGH MIX TOP GRILL
LOW MIX TOP GRILL
HIGH MIX BOTTOM GRILL
LOW MIX BOTTOM GRILL
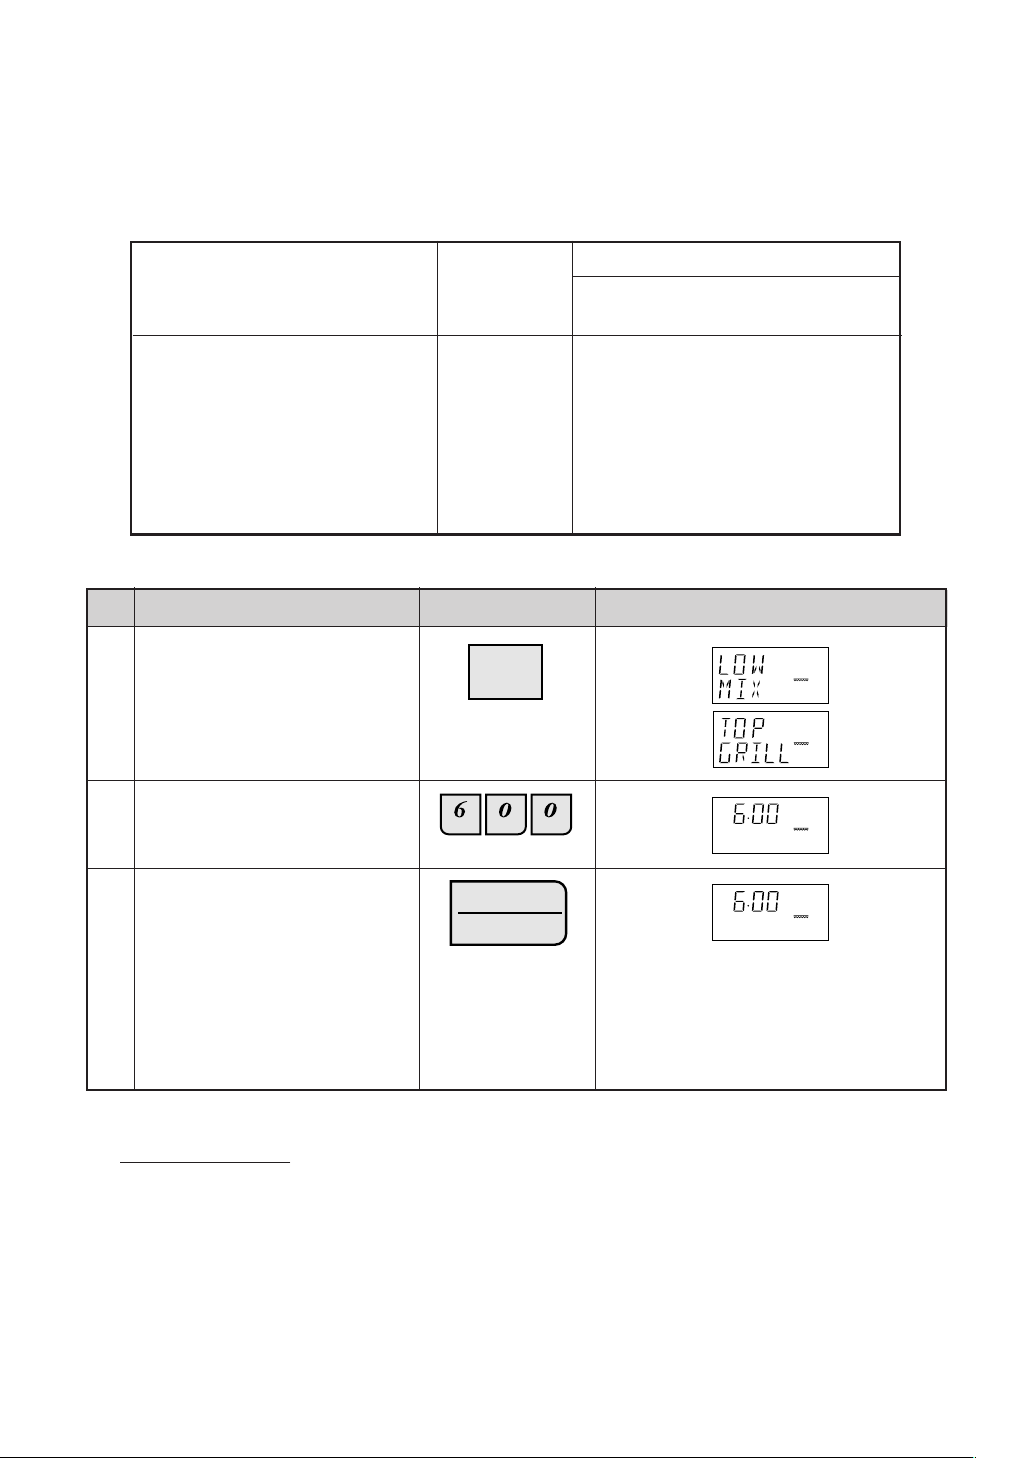
* Suppose you want to for 6 minutes on LOW MIX TOP GRILL.
Step
Press the MIX pad twice.
Procedure
1
Enter desired cooking time.
pressing
MIX pad
Once
Twice
three times
four times
Pad Order Display
MIX
x 2
2
Preset programme
Microwave
power
70%
50%
50%
10%
Grill heater
Top heater
Top heater
Bottom heater
Bottom heater
Press the INSTANT COOK/START
pad.
3
Warning:
The oven cavity, door, turntable, turntable support, racks, dishes and especially bottom heater will become very
use thick oven gloves when inserting/removing the food or turntable from the oven to PREVENT BURNS.
hot,
INSTANT COOK
START
15
COOK
The timer begins to count down.
When it reaches zero, all indicators will go
off and the oven will "beep". END will
appear on the display.
The cooling fan will remain on until the
oven cavity has cooled.
Page 17

AUTOMATIC OPERATIONS
Notes for Automatic Operations
1. Wipe off any moisture from the outside of cooking containers and the interior of the oven with a dry cloth or
paper towel prior to cooking on SENSOR INSTANT ACTION or REHEAT SENSOR.
2. After oven is plugged in, wait 2 minutes before using SENSOR INSTANT ACTION or REHEAT SENSOR.
3. ERROR will be displayed if:
(a) more or less than the quantity or weight of foods suggested in the MULTI COOK, CONVENIENCE/PIZZA
or EASY DEFROST MENU GUIDE are programmed when the START pad is pressed.
To clear, press the STOP/CLEAR pad and reprogramme.
(b) the door is opened or the STOP/CLEAR pad is pressed until the cooking time is displayed. To clear, press
the STOP/CLEAR pad and cook manually. Refer to manual cooking charts in RECIPES section.
4. When using the automatic features (SENSOR INSTANT ACTION, REHEAT SENSOR, MULTI COOK,
CONVENIENCE/PIZZA, EASY DEFROST), carefully follow the details provided in each MENU GUIDE to
achieve the best result.
If the details are not followed carefully, the food may be overcooked or undercooked or ERROR may be
displayed.
5. When cooking small quantities of food on SENSOR INSTANT ACTION or REHEAT SENSOR, the food may
be cooked without displaying any remaining cooking time.
6. Food weighing more or less than the quantity or weight listed in each MENU GUIDE, cook manually. Refer
to manual cooking charts in RECIPES section.
7. When entering the weight of the food, round off the weight to the nearest 0.1kg(100g). For example, 1.65kg
would become 1.7kg.
8. To change the final cooking or defrosting result from the standard setting, press the MORE(
pad prior to pressing the each automatic operation pad. See page 24.
9. The fianl cooking result will vary according to the food condition (e.g. initial temperature, shape, quality).
Check the food after cooking and if necessary continue cooking manually.
Sensor Instant Action
) or LESS( )
Fresh
Vegetables
Frozen
Vegetables
Reheat Pie
Rice
Jacket
Potato
Pasta
Press once to cook 6 popular menus. Follow the details provided in
SENSOR INSTANT ACTION MENU GUIDE on page 4 - 5 in the
cooking guides.
* Suppose you want to cook 1.0 kg Fresh Vegetables.
Step
Procedure
Press the SENSOR INSTANT
ACTION pad for Fresh Vegeta-
Pad Order
Fresh
Vegetables
Display
COOK
COOK
bles (within 1 minute of closing
the door).
COOK COOK
1
*When the sensor detects the
vapour from the food, the remaining cooking time will appear.
(eg. remaining cooking time
is approximately. 1 min.42
sec.)
The timer begins to count down. When the
cooking time reaches zero, STAND,
COVERED, 1-5MIN, STIR, ENJOY YOUR,
VEGETABLES will be displayed.
NOTE:
You can get a cooking hint by pressing the HELP pad before pressing the desired SENSOR INSTANT ACTION
pad. See page 24.
COOK
16
Page 18
Reheat Sensor
REHEAT
SENSOR
1.Dinner Plate
2.Reheat Pizza
3.Casseroles/Canned Food
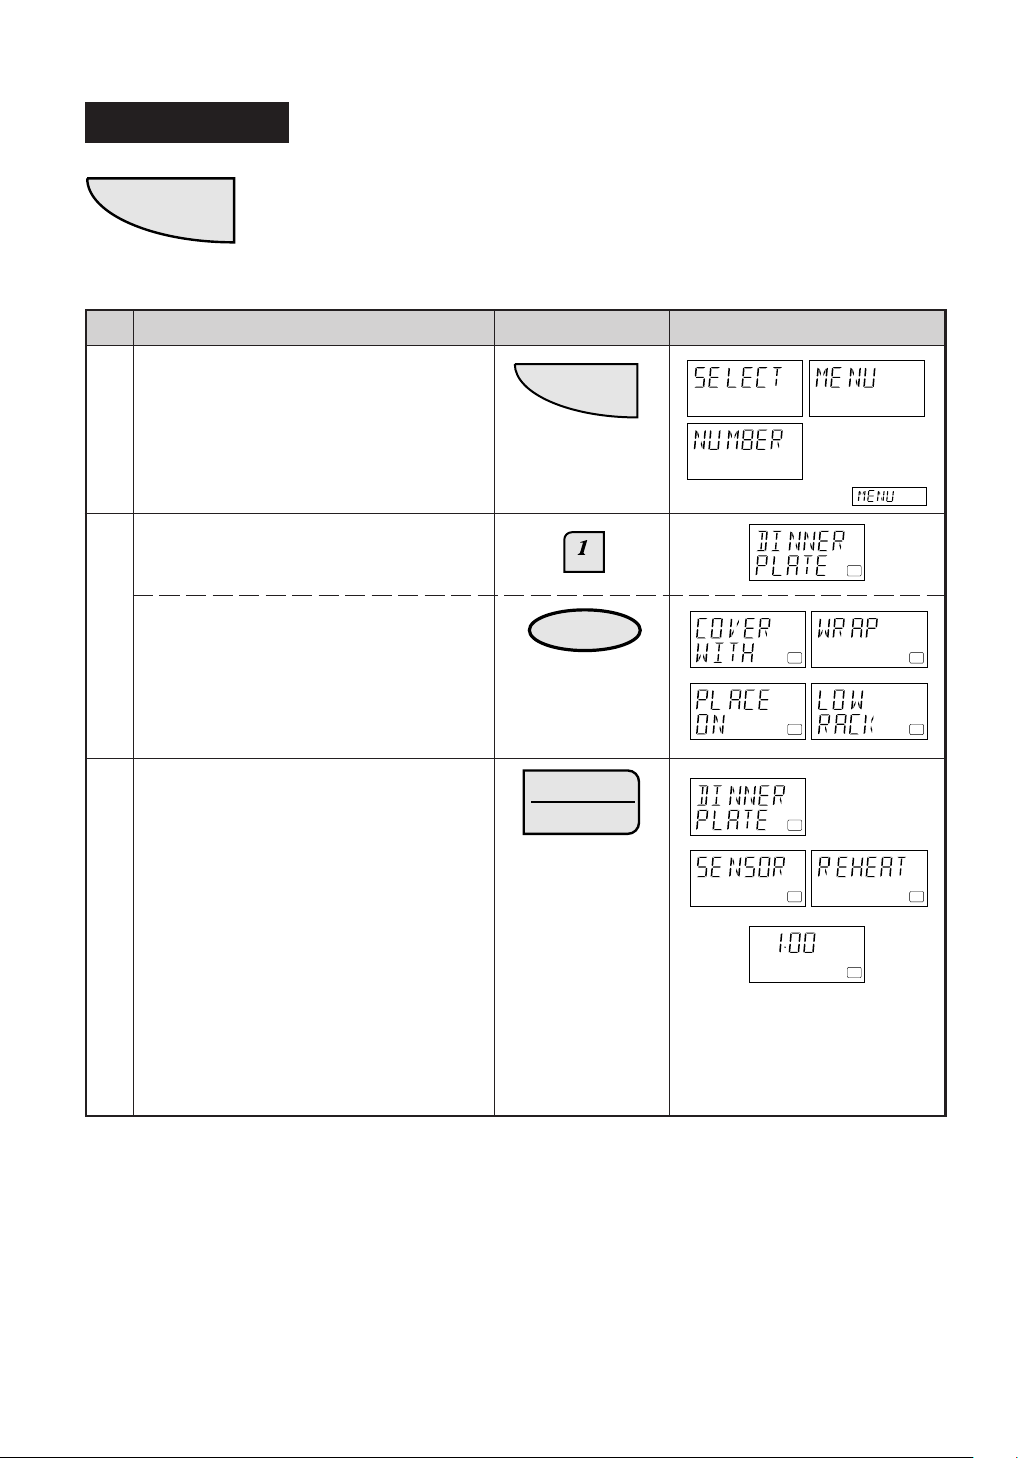
* Suppose you want to reheat 1 serve of Dinner plate.
Step
Procedure Pad Order Display
Press the REHEAT SENSOR pad.
1
Select food category for Reheat Sensor.
Press 1 to reheat Dinner Plate.
If you require a cooking hint, press the HELP
2
pad.
Press to select 3 popular reheat menus.
Follow the details provided in REHEAT
SENSOR MENU GUIDE on page 6 in the
cooking guides.
REHEAT
SENSOR
(Operation guide off:
HELP
HELP
HELP HELP
HELP HELP
)
Press the INSTANT COOK/START pad.
3
* When the sensor detects the vapour from
INSTANT COOK
START
the food, the remaining reheating time will
appear.
(eg. remaining reheating time is approximately 1 min.)
NOTE:
You can get a cooking hint whenever HELP is lit in the display. See page 24.
COOK
HELP
COOK
HELP
COOK
HELP
COOK
HELP
The timer begins to count down.
When the cooking time reaches
zero, STAND, COVERED 2MIN,
ENJOY YOUR, DINNER will be
displayed.
17
Page 19
Convenience / Pizza
1.Frozen Pizza
CONVENIENCE
/PIZZA
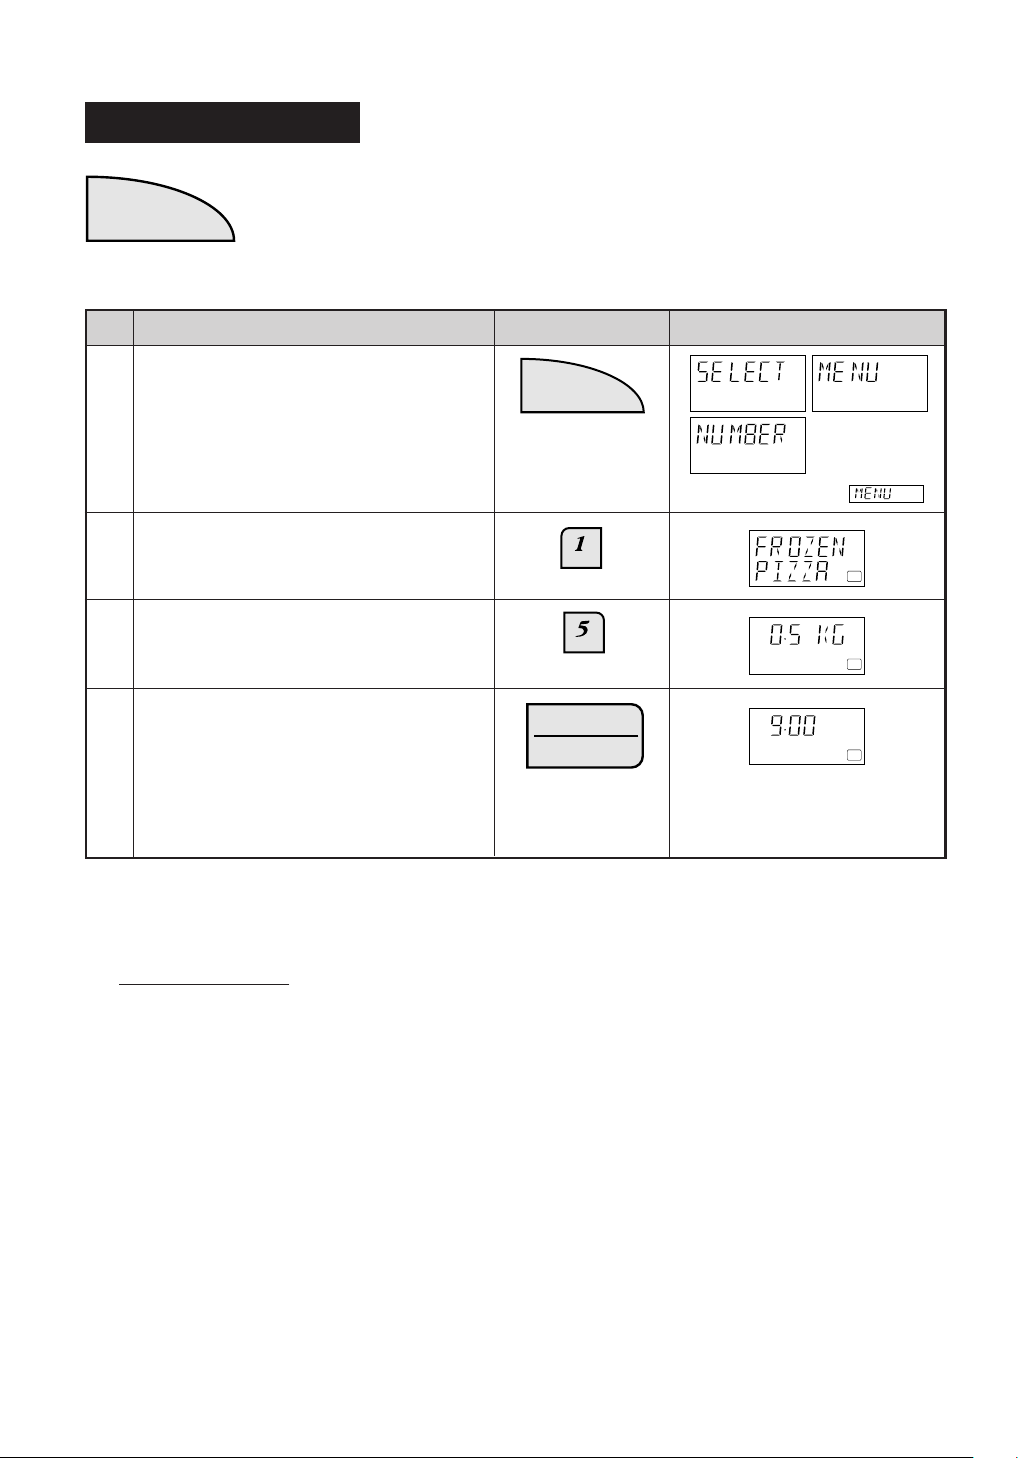
* Suppose you want to cook 0.5 kg Frozen Pizza.
Step
Press the CONVENIENCE / PIZZA pad.
2.Fresh Pizza
3.Fries
Procedure Pad Order Display
4.Frozen Pasta
5.Crumbed Fish
6.Finger Food
1
Select food category for
Convenience / Pizza.
2
Press 1 to cook Frozen Pizza.
Enter the weight.
3
Press the INSTANT COOK/START pad.
4
Press to select 6 popular menus.
Follow the details provided in CONVENIENCE
/ PIZZA MENU GUIDE on page 7 in the
cooking guides.
CONVENIENCE
/PIZZA
(Operation guide off: )
INSTANT COOK
START
The timer begins to count down.
When the cooking time reaches
zero, ENJOY YOUR, PIZZA will
be displayed repeatedly.
HELP
HELP
COOK
HELP
NOTE:
You can get a cooking hint whenever HELP is lit in the display. See page 24.
Warning:
The oven cavity, door, turntable, turntable support, racks, dishes and especially bottom heater will become very
hot,
use thick oven gloves when inserting/removing the food or turntable from the oven to PREVENT BURNS.
18
Page 20
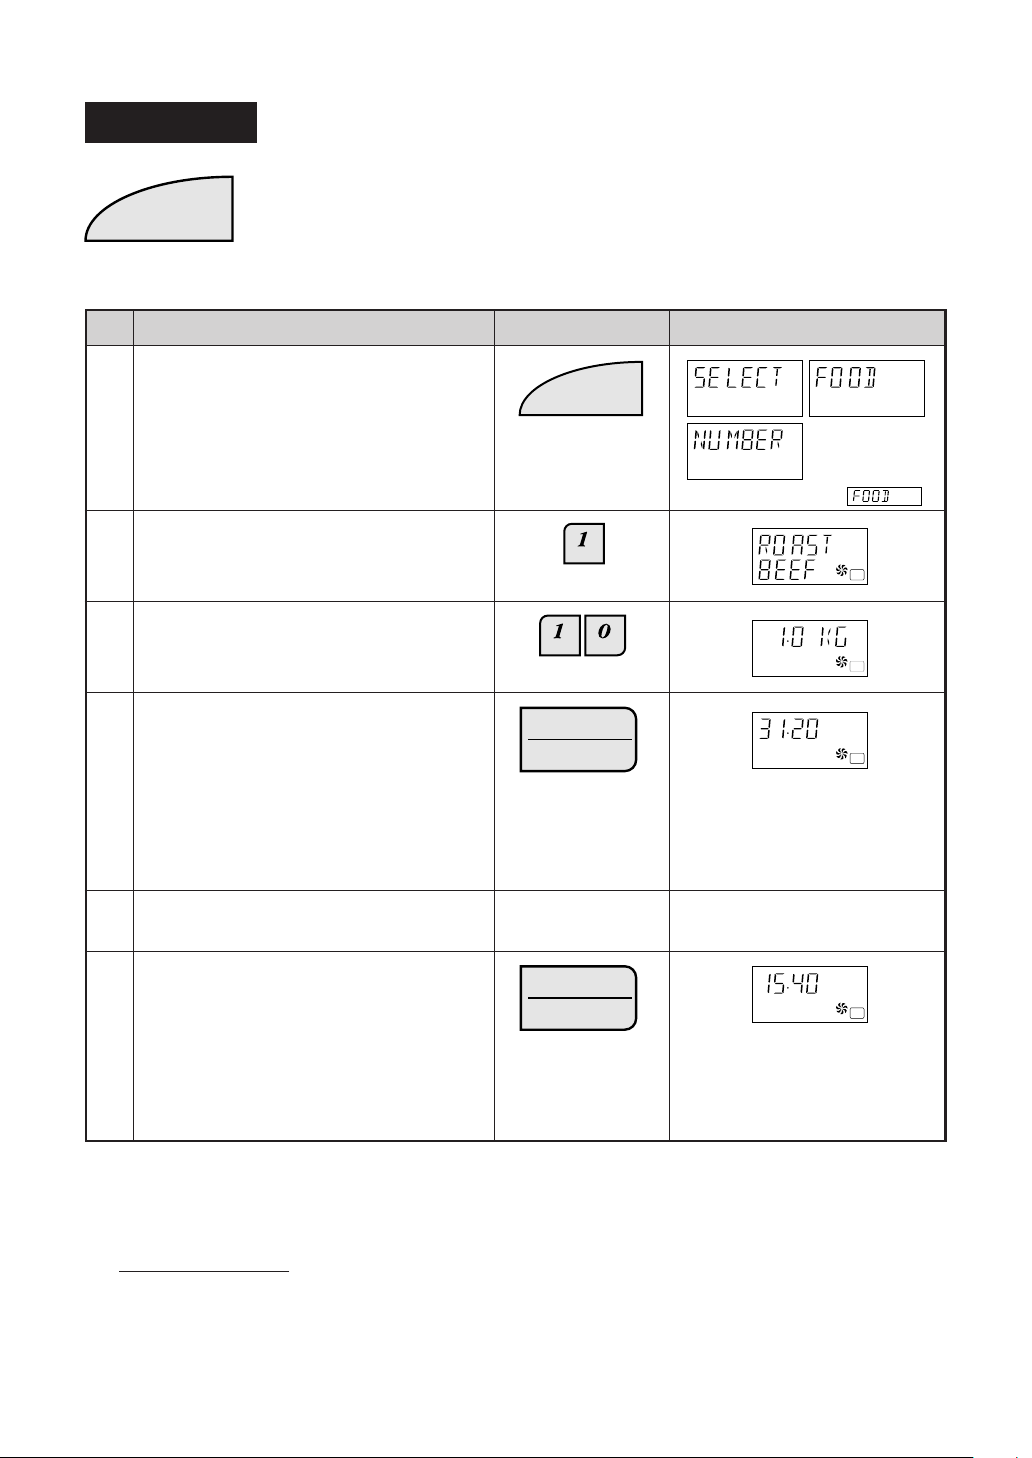
Multi Cook
1.Roast Beef
MULTI
COOK
* Suppose you want to cook 1.0 kg Roast Beef (Medium).
Step
Press the MULTI COOK pad.
2.Roast Lamb
3.Roast Chicken
Procedure Pad Order Display
4.Roast Pork
5.Grilled Steak/Chops
6.Grilled Chicken Pieces
1
Select food category for Multi Cook.
Press 1 to cook Roast Beef.
2
Enter the weight.
3
Press the INSTANT COOK/START pad.
INSTANT COOK
4
Press to select 6 popular Grill and Mix cooking
menus.
Follow the details provided in MULTI COOK
MENU GUIDE on page 8 - 9 in the cooking
guides.
MULTI
COOK
(Operation guide off:
HELP
HELP
START
The timer begins to count down.
The oven will "beep" 4 times and
will stop.
TURN BEEF, OVER will be displayed repeatedly.
COOK
HELP
)
Open the door. Turn over the meat. Close
5
the door.
Press the INSTANT COOK/START pad.
INSTANT COOK
START
6
NOTE:
You can get a cooking hint whenever HELP is lit in the display. See page 24.
Warning:
The oven cavity, door, turntable, turntable support, racks, dishes and especially bottom heater will become very
hot,
use thick oven gloves when inserting/removing the food or turntable from the oven to PREVENT BURNS.
19
PRESS START will be displayed repeatedly.
COOK
HELP
When the cooking time reaches
zero, STAND, COVERED, 515MIN, FOIL, ENJOY YOUR,
BEEF will be displayed repeatedly.
Page 21

Easy Defrost
EASY
DEFROST
The Easy Defrost feature allows you to defrost meats by entering weight.
Follow the details provided in EASY DEFROST MENU GUIDE on page 0 in the cooking
guides.
* Suppose you want to defrost 2.0 kg of Poultry.
Step
Procedure Pad Order Display
Press the EASY DEFROST pad.
1
Press number pads to enter weight.
2
Press the INSTANT COOK/START pad.
3
EASY
DEFROST
INSTANT COOK
START
HELP HELP
(Operation guide off: )
HELP
COOK
HELP
COOK
HELP
The cooking time will begin
counting down. The oven will
“beep” 4 times and will stop.
REMOVE, DEF-, ROSTED,
PORTION, TURN FOOD,
OVER, SHIELD EDGES, OR,
WARM, PORTION will be
displayed repeatedly.
Open the door. Turn over meat.
4
Close the door.
Press the INSTANT COOK/START pad.
INSTANT COOK
START
5
NOTE:
You can get a cooking hint whenever HELP is lit in the display. See page 24.
PRESS START will be displayed
repeatedly.
COOK
HELP
COOK
HELP
The cooking time will begin counting to zero, when it reaches zero,
the oven will “beep”.
STAND, COVERED, 5-50MIN,
FOIL will be displayed repeatedly.
20
Page 22

OTHER CONVENIENT FEATURES
Help Feature
HELP
The HELP feature has 6 different programs.
Auto Start
The Auto Start feature allows you to set your oven to start automatically.
* Suppose you want to start cooking a casserole for 20 minutes on MEDIUM at 4:30 in the afternoon.
(Check that the correct time of day is displayed.)
Step
Press the HELP pad.
Procedure
Pad Order
Display
HELP
1
Press the number 1 pad.
2
Enter the desired start time.
3
The dots (:) will flash on and off.
Press the CLOCK pad.
4
CLOCK
Set the desired cooking mode.
(for microwave cooking on MEDIUM,
5
press the POWER LEVEL pad 3
times)
Enter the desired cooking time.
POWER
LEVEL
x3
6
Press the INSTANT COOK/START
pad.
7
To check the current time, simply press the CLOCK pad, the time will be displayed.
If the door is opened after step 7, close the door and press the START pad to continue with Auto Start.
Press the STOP/CLEAR pad to cancel Auto Start.
The correct time of day must be set before using Auto Start, see clock setting on page 7.
INSTANT COOK
START
The oven will start cooking at 4:30 P.M.
COOK
The timer begins to count down. When
the timer reaches zero, all indicators
will go off and the oven will "beep".
END will appear in the display.
21
Page 23

Information Guide On/Off
This oven is preset with the Information Guide On.
As you get more familiar with your oven, the Information Guide can be turned off.
* To turn off the Information Guide.
After step 1 for Auto Start.
Step
Press the number 2 pad.
Procedure
2
Press the STOP/CLEAR pad.
3
* To restore the Information Guide.
After step 2 above.
Step
Press the INSTANT COOK/START
pad.
Procedure
3
Child Lock
Pad Order
STOP
CLEAR
Pad Order
INSTANT COOK
START
Display
The time of day will appear in the display.
Display
The time of day will appear in the display.
If the oven is accidentally started with no food or liquid in the cavity, the life of the oven can be reduced.
To prevent accidents like this, your oven has a "Child Lock" feature that you can set when the oven is not in use.
* To set the Child Lock.
After step 1 for Auto Start.
Step
Press the number 3 pad.
Procedure
Pad Order
Display
2
Press the INSTANT COOK/START
pad.
3
The control panel is now locked, each time a pad is pressed, the display will show "LOCK".
INSTANT COOK
START
The time of day will appear in the display.
22
Page 24

* To unlock the control panel.
After step 2 for Child Lock.
Step
Press the STOP/CLEAR pad.
3
Procedure Pad Order Display
STOP
CLEAR
The time of day will appear in the
display. The oven is ready to use.
Demonstration Mode
This feature is mainly for use by retail outlets, and also allows you to practice key operations.
* To demonstrate.
After step 1 for Auto start.
Step
Press the number 4 pad.
Procedure Pad Order Display
2
Press the INSTANT COOK/START
pad.
3
Cooking operations can now be demonstrated with no power in the oven.
INSTANT COOK
START
Then DEMO,SHARP, MICROWAVE,
OVEN will appear repeatedly.
* Suppose you demonstrate Instant Cook.
Step
Press the INSTANT COOK/START
pad.
Procedure Pad Order Display
1
* To cancel the Demonstration Mode.
After step 2 above.
Step
Press the STOP/CLEAR pad.
Procedure Pad Order Display
3
INSTANT COOK
START
STOP
CLEAR
COOK
The cooking time will begin counting
down to zero at ten times the speed.
When the timer reaches zero,
END will appear in the display.
The time of day will appear in the display.
23
Page 25

Info on Pads
Each pad carries useful guide.
* To get the guide for MULTI COOK pad. After step 1 for Auto Start.
Step
Procedure Pad Order Display
Press the MULTI COOK pad.
MULTI
COOK
2
The guide message will be repeated twice, and then the display will show the time of day.
If you want to cancel the guide, press the STOP/CLEAR pad.
Help
Each setting of Automatic Operations has a cooking hint.
If you wish to check, press the HELP pad whenever HELP is lit in the display.
NOTE : For SENSOR INSTANT ACTION, HELP is not lit in the display, so press the HELP pad before pressing
the desired SENSOR INSTANT ACTION pad.
Less/More Setting
The cooking times programmed into the automatic menus are tailored to the most
LESS
The LESS/MORE pads can be used to adjust the cooking time of the following features
– SENSOR INSTANT ACTION – REHEAT SENSOR – MULTI COOK
– CONVENIENCE / PIZZA – EASY DEFROST
MORE
popular tastes. To adjust the cooking time to your individual preference use the
“more” or “less” feature to either add (more) or reduce (less) cooking time.
To adjust cooking time, press the LESS or MORE pad at the beginning of the procedure.
* Suppose you want to cook 1.0 kg Fresh Vegetables for less time than the standard setting.
Step
Press the LESS pad.
1
Press the SENSOR INSTANT
ACTION pad for Fresh Vegetables
(Within 1 minute of closing the door).
Procedure Pad Order Display
LESS
Fresh
Vegetables
COOK
2
COOK
24
COOK
COOK
Page 26

Increasing or Decreasing Time During A Cooking Programme
Microwave, Convection, Grilling or Mix time can be added or decreased during a cooking programme using the
“MORE” or “LESS” pads.
* Suppose you want to increase cooking time by 2 minutes during 5 minutes on MEDIUM cooking.
Step
Select microwave cooking and power level
by pressing the POWER LEVEL pad as
1
required.
(for MEDIUM press three times)
Enter desired cooking time.
Procedure Pad Order Display
2
Press the INSTANT COOK/START pad.
3
Press the MORE pad twice to increase time
by two minutes.
4
POWER
LEVEL
x3
INSTANT COOK
START
MORE
x2
COOK
The timer starts to count down.
COOK
COOK
Alarm
Your oven has an alarm function. If you leave food in the oven after cooking, the oven will "beep" 3 times and
REMOVE FOOD will be appeared in the display after 2 minutes.
If you do not remove the food at that time, the oven will "beep" 3 times after 4 minutes and 6 minutes.
25
Page 27

CARE AND CLEANING
IMPORTANT:
Do not touch the cavity around the oven lamp after cooking.
This part will become hot when the oven lamp is on.
Use thick cloth for cleaning the oven to avoid burns.
Before cleaning ensure oven cavity is cool.
Exterior:
The outside may be cleaned with mild soap and warm water, wipe clean with a damp cloth. Avoid the use of
harsh abrasive cleaners.
Door:
Wipe the door and window on both sides and the door seals frequently with a damp cloth to remove any spills
or spatters. Do not use abrasive cleaner.
Touch Control Panel:
Care should be taken in cleaning the touch control panel. Open the oven door before cleaning to inactivate the
control panel. Wipe the panel with a cloth dampened slightly with water only.
Do not scrub or use any sort of chemical cleaners. Avoid the use of excess water.
Interior walls:
Wipe spatters and spills with a little dish washing liquid on a soft damp cloth. For heavier stains inside the oven
cavity only, use a mild stainless steel cleaner applied with a soft damp cloth. Do not apply to the inside of the
door. Wipe clean ensuring all cleaner is removed.
After use wipe the waveguide cover in the oven with a soft damp cloth to remove any food splashes. Built-up
splashes may overheat and begin to smoke or catch fire. Do not remove the waveguide cover. You can hold
the bottom heater up by hand for cleaning only. After cleaning, sit the bottom heater down in the lowest position
(see page 4 and Figure 1).
DO NOT USE CAUSTIC CLEANERS, ABRASIVE OR HARSH CLEANSERS OR SCOURING PADS ON
YOUR OVEN. NEVER SPRAY OVEN CLEANERS DIRECTLY ONTO ANY PART OF YOUR OVEN.
Note:
At regular intervals, heat the oven referring to "Heating
without Food" on page 10. Because, the splashed dirt or
food oil remained around the top and bottom heaters and
oven walls may cause the smoke and odour.
Turntable/Turntable Support/Racks:
Wash with mild soapy water and dry thoroughly.
26
Bottom heater
Figure 1
Page 28

SERVICE CALL CHECK
Check the following before calling service:
1. Does the display light? Yes
2. Place one cup of water (approx. 250 ml) in a glass measure in the oven and close the door securely.
Press the INSTANT COOK / START.
A. Does the oven lamp light? Yes No
B. Does the cooling fan work? Yes No
(Put your hand over the rear ventilation openings.)
C. Does the turntable rotate? Yes
(The turntable can rotate clockwise or counterclockwise. This is quite normal.)
D. Does the COOK indicator light? Yes No
E. After one minute, did an audible signal sound? Yes No
F. Is the water inside the oven hot? Yes No
3. Remove water from the oven and programme the oven for 3 minutes on GRILL mode using top and bottom
heaters.
A. Do the top and bottom heater symbols and COOK indicator light? Yes No
B. After 3 minutes, do the both heaters become red? (Pay special attention to prevent burns when checking
the bottom heater) Yes
If "NO" is the answer to any of the above questions, please check your wall socket and the fuse in your meter
box.
If both the wall socket and the fuse are functioning properly, CONTACT YOUR NEAREST SERVICE CENTRE
APPROVED BY SHARP.
NOTE: 1.If time in the display is counting down very rapidly, check Demonstration Mode.
(Please see page 23 for detail.)
2.The following thing is not trouble;
Each cooking mode has a maximum cooking time. If you operate the oven longer than the maximum
time, the power will automatically be reduced. The table below shows the maximum time for each
cooking mode.
No
No
No
Cooking mode
Microwave 100% cooking
Grill cooking
Top heater
Bottom heater
Top and bottom
heaters
Maximum cooking time
20 min.
30 min.
15 min.
Top heater 10 min.
Bottom heater 10 min.
SPECIFICATIONS
AC Line Voltage : Single phase 220V, 50Hz.
AC Power Required :
Microwave 1.6 kW
Grill 2.1kW
Output Power :
Microwave 900W* (IEC)
Grill Heater 1200W (Top heater)
Microwave Frequency : 2450 MHz (Class B/Group 2)**
Outside Dimensions : 520mm(W) x 309mm(H) x 502mm(D)
Cavity Dimensions : 352mm(W) x 207mm(H) x 368mm(D)***
Oven Capacity : 27 Litre***
Cooking Uniformity : Turntable (325mm in diameter) system
Weight : Approx. 20kg
* This measurement is based on the International Electrotechnical Commission's standardised method for
measuring out power.
** This is the classification of ISM (Industrial, Scientific and Medical) equipment described in the International
Standard CISPR11.
*** Internal capacity is calculated by measuring maximum width, depth and height. Actual capacity for
holding food is less.
800W (Bottom heater)
2000W (Top and bottom heater)
27
Page 29

GUARANTEE
SHARP ELECTRONICS DIVISION OF SEARTEC GROUP TRADING (PTY) LTD (“the Company”) guarantees to the
original purchaser that the product sold with this certificate is free of defects in material or workmanship under normal
use and service for a period of 2 (two) years from the date of purchase thereof, subject to the following conditions:
1. The guarantee shall apply to the product, provided the product is still owned by the original purchaser and provided
further that it was purchased in and is retained for use in the Republic of South Africa, Swaziland, Lesotho,
Botswana, South West Africa (Namibia) and all territories formerly falling within the boundaries of the Republic of
South Africa (as constituted on 31 May 1961).
2. At any time within 2 (two) years from the date of invoice issued to the original purchaser, the Company shall, at its
election, repair or replace, entirely free of charge as its own branch or authorised service dealer, any part in the
product found to be defective by such Company branch or authorised service dealer. If the original purchaser
resides in an area situated beyond a 50 kilometer radius from the nearest Company branch or authorised service
dealer, all travelling expenses incurred by the Company in connection with repair or replacement of the product shall
be for the original purchaser’s account.
3. It is a condition of this guarantee that the Company shall not be responsible for any transportation, labour, material
or any other costs not specified in the clauses contained herein.
4. Installation, operation, maintenance and servicing of the product must be carried out in accordance with the
Company instructions as contained in this booklet or in the product packaging, and any failure to do so will render
the guarantee null and void.
5. The Company shall not be responsible for damage to the product resulting from: incorrect voltages or faults in the
electrical power supply system; general misuse or abuse of the product; failure to use the product for the purpose
for which it was designed; fire, flood, war, civil disturbances, strikes, lookouts, acts of God, acts of Government or
quasi-Government, or any other cause beyond the reasonable control of the Comapny.
6. The Company shall not accept any responsibility or liability for any loss suffered by or damage of any kind caused
to the original purchaser or any other person by or due to failure of operation or malfunction of the product or for
consequential damage of whatsoever nature, whether such loss, damage or consequential damage was suffered
by the original purchaser or any other person.
7. Should the product be worked on by anyone other than a Company branch or authorised service dealer or be found
to contain any component parts or accessories other than product component parts or accessories, this guarantee
will become null and void.
8. The defacement or removal of the nameplate and/or serial number from the product will render the guarantee null
and void.
9. The guarantee does not apply to light bulbs or fuses nor to vitreous enamelware or other similar finishes nor to
external cables and plugs where the length of life depends on the amount of use and care given.
10. Save as set out in this guarantee, no terms, conditions, provisions, representations or statements (whether express
or implied) shall be of any force or effect whether made prior to, on, or subsequent to the date of original purchase,
unless the same shall have been confirmed in writing by the Company.
11. Failure to submit the guarantee Registration Certificate (contained herein or in the product packaging) within a
period 30 (thirty) days of date of original purchase, or to produce documentary proof of ownership and date of original
purchase prior to guarantee repair and/or replacement of any defective part being carried out by the Company, will
render the customer liable for all costs incurred by the Company inclusive of parts, repairs, labour, travelling and
transportation even if the product still falls within the period of guarantee cover. The same condition will apply in
respect of service calls where the product is found to be free from defects in material or workmanship.
12. This undertaking is given in lieu of any liability of the Company at common low, whether in respect of patent and/
or latent defects, express and/or implied representations or guarantees and/or in contract and/or in delict and/or
otherwise, and any such liability is hereby expressly excluded.
Microwave Special Conditions
Failure to observe the following conditions will forthwith render the guarantee null and void:
(i) Metal or tinfoil objects must not be placed in the oven.
(ii) The oven must not be operated if the oven is empty.
(iii) No object must be placed on top of the oven.
(iv) Abrasive and harsh cleaners must not be used. Hot water and mild detergent are sufficient.
(v) This product is not suitable for commercial or laboratory use.
(vi) In the unlikely event of failure please route your service call through your service dealer. Alternatively contact one
of the Company branches.
(vii) In the event of repair or replacement of defective parts being necessary, the product should be delivered to the
nearest service dealer.
* THIS GUARANTEE IS APPLIED ONLY IN THE REPUBLIC OF SOUTH AFRICA, SWAZILAND, LESOTHO,
BOTSWANA, SOUTH WEST AFRICA (NAMIBIA) AND ALL TERRITORIES FORMERLY FALLING WITHIN THE
BOUNDARIES OF THE REPUBLIC OF SOUTH AFRICA (AS CONSTITUTED ON 31 MAY 1961).
28
Page 30

HELPFUL HINTS
CONTENTS COOKING GUIDE
1
UTENSIL GUIDE
COOKWARE
AND
3
SENSOR INSTANT
ACTION
MENU GUIDE
4
REHEAT SENSOR
MENU GUIDE
COOKING GUIDES
6
CONVENIENCE/PIZZA
MENU GUIDE
7
MENU GUIDE
MULTI COOK
8
EASY DEFROST
MENU GUIDE
10
RECIPES
11 -
39
Page 31

7. STIRRING
Stir foods from the outside to the centre of the dish, once or twice during cooking
if possible.
Eg. Casseroles and Sauces.
6. STANDING TIME
Standing time is important. After cooking or defrosting ensure adequate
standing time. This allows the food to continue cooking or heating. Refer to
cooking guides for each menu or according to manufacturers instructions.
5. SHIELDING
Shield using small pieces of aluminium foil to shield thin areas of meat, fish and
poultry or edges of cakes to prevent overcooking.
4. PIERCING
Cover foods in the microwave if you would normally cover the food in your
ordinary oven, or to retain moisture. Cover foods such as Vegetables, Casse-
roles, or when Reheating.
Pierce potatoes, eggs, oysters, tomatoes or any foods with a skin or membrane
to allow steam to escape.
Use to cover foods:
3. COVERING
2. TURNING
Foods such as poultry and joints of meat should be turned over after half the
cooking time.
in the centre, Medium Vegetables in-between.
1. ARRANGEMENT
Arrange foods carefully. Place thickest areas toward outside of dish.
Eg. Arrange vegetables in a shallow dish in the following way:
Hard Vegetables around the outside, Soft Vegetables
FISH CHICKEN
STIR
TOMATO EGG
PAPER TOWELLID PLASTIC WRAP
HELPFUL HINTS
MICROWAVE COOKING
1
13. CONDENSATION
chicken cooks rapidly. When the energy is divided among several items,
cooking takes more time.
Condensation is a normal part of microwave cooking. The humidity and
moisture in food will influence the amount of condensation in the oven.
Generally, covered foods will not cause as much condensation as uncovered
foods. Ensure that the ventilation openings are not blocked.
12. QUANTITY
rooms, refrigerators and freezers differ in temperature, check for doneness at
Microwave cooking times are directly related to the amount of food in the oven.
Because energy is absorbed by the food itself, one potato or a single piece of
the minimum time.
11. STARTING TEMPERATURE
of meat conducts heat to the areas next to it.
Frozen or refrigerated food takes longer to heat than food at room temperature.
Cooking times in this book are based on normal storage temperatures. Since
10. FAT AND BONE
Marbling within meat, or a thin, even layer of fat on a roast, speeds cooking.
Large fatty areas or excess drippings in dish attract energy away from meat,
and slows cooking. Centre bones do not affect cooking, but bone on the side
9. DENSITY
The depth to which microwaves penetrate food varies depending on the food's
density. Porous foods like minced beef or mashed potatoes microwave faster
than dense ones like steak or whole potatoes.
8. SIZE
Small pieces cook faster than large ones. To speed cooking, cut pieces
smaller than 5 cm so microwaves can penetrate to the centre from all sides.
For even cooking, make all the pieces the same size.
Page 32

3. Metal cookware can be used.
During mix cooking some metal uten-
sils may cause arcing when they
come in contact with oven walls or
accessory racks. To prevent arcing
when using a metal tin, place a heat
resistant dish (Pyrex pie plate,
dinner plate) between the tin and the
rack.
2. Use thick oven gloves when removing the food or turntable from the oven to
PREVENT BURNS. Because the oven cavity, door, turntable, turntable
support, racks, dishes and especially bottom heater will become very hot.
1. There are four automatic, preprogrammed mix settings.
a) High mix top grill - Top browner with 70% microwave power.
b) Low mix top grill - Top browner with 50% microwave power.
c) High mix bottom grill - Bottom browner with 50% microwave power.
d) Low mix bottom grill - Bottom browner with 10% microwave power.
2. Foods may be cooked either directly on turntable, or using the high or low racks.
1. Use thick oven gloves when removing the food or turntable from the oven to
PREVENT BURNS. Because the oven cavity, door, turntable, turntable
support, racks, dishes and especially bottom heater will become very hot.
MIX COOKING
CAKE TIN
HIGH RACKLOW RACK
PIZZA TRAY
GRILL COOKING
HELPFUL HINTS
2
2. For best results, preheat to required temperature with the turntable in the oven.
5. Do not cook 2 layers of eg. biscuits at the same time.
4. If you are cooking and wish to check the temperature you have programmed,
simply press the CONVEC pad. The programmed temperature will be displayed
as long as CONVEC pad is pressed.
CAKE TIN SQUARE DISH PIZZA TRAY
3. Metal cookware can be used. Round pizza trays are excellent cooking utensils
Add food after preheating.
for cooking.
1. Use thick oven gloves when removing the food or turntable from the oven to
PREVENT BURNS. Because the oven cavity, door, turntable, turntable
support, racks, dishes and especially bottom heater will become very hot.
CONVECTION COOKING
Page 33

;;;;;;;;
;;;;;;;;
;;;;;;
;;;;;;
*1 When using metal utensil, place a heat resistant dish between the metal utensil and the rack (refer to page 2).
*2 For cooking food with high fat contents, do not bring the wrap in contact with the food as it may melt.
*3 Some microwave safe plastic cookware are not suitable for cooking foods with high fat and sugar content.
OVENPROOF GLASS
DEFROST RACK
RING CENTRE DISH SQUARE DISH
PAPER TOWEL
CAKE TIN
PIZZA TRAY
FOIL
METAL RACKS
COOKWARE & UTENSIL GUIDE
METAL RACKS
GLASSWARE/CERAMIC
(HEAT RESISTANT)
METAL COOKWARE
OVEN BAGS
ALUMINIUM FOIL
NON-STICK PAPER
GREASE-PROOF PAPER
BROWNING DISH
DEFROST RACK
THERMOMETERS
MICROWAVE SAFE
CONVENTIONAL
PAPER TOWEL
PLASTIC COOKWARE
MICROWAVE SAFE
PLASTIC WRAP
3
(microwave safe
wrap only)
YES
NO
YES
Defrost Only
YES
*3
YES
WAXED PAPER
*2
YES
YES
YES
YES
For Shielding
YES
NO
YES
(LOW RACK
ONLY)
YES
MICROWAVE
NO
NO
NO
NO
NO
NO
NO
NO
NO
NO
NO
NO
NO
NO
NO
NO
NO
NO
NO
NO
NO
NO
NO
NO
NO
NO
NO
NO
NO
NO
YES
NO
For Shielding
NO
YES
NO
YES
*1
YES
YES
YES
YES
YES
YES
YES
YES
GRILL
COOKING
MIX
CONVECTION
Page 34

Beans
Brussels Sprouts
Broccoli
Cauliflower
Corn
Green Peas
Mixed Vegetables
soft vegetables
medium vegetables
Frozen Vegetables
Carrots
hard vegetables
Jacket Potato
Potato (whole)
Reheat Pie
meat
Zucchini
Spinach
Cabbage
Squash
soft vegetables
Carrots
Potato
Beans
Brussels Sprouts
Broccoli
Cauliflower
hard vegetables
medium vegetables
Fresh Vegetables
Menu
SENSOR INSTANT ACTION MENU GUIDE
0.1-1.0 kg –18°C
(1 piece, approx. 150g)
1-10 pieces
(1 piece, approx. 180g)
1-4 pieces
0.1-1.0 kg
Weight
Range
Room temperature
Frozen
+20°C
Refrigerated
+3°C
Refrigerated
Top/bottom
4
• Cover with a glass lid or plastic wrap.
• After cooking, stand covered and stir.
Micro
• After cooking, stand, covered with aluminium foil.
• Before cooking, separate vegetables eg. broccoli as much as possible.
• Arrange the vegetables in a shallow dish in the following way : hard
vegetables around the outside, soft vegetables in the centre, medium
vegetables in-between.
potatoes and continue cooking.
Micro
• Use washed new potatoes.
• Pierce twice with fork on each side.
• Place on outside of turntable.
• When oven stops and TURN, POTATO OVER is displayed, turn over
Micro
grill
• Remove from package.
• Place directly onto turntable.
• After cooking, stand.
• After cooking, stand coverd and stir.
• Pierce skin of squash with folk.
• Arrange the vegetables in a shallow dish in the following way : hard
• Cover with a glass lid or plastic wrap.
vegetables around the outside, soft vegetables in the centre, medium
vegetables in-between.
Temperature
(approx.)
+3°C
Micro
Initial
Cooking
Method
Vegetables
• Wash the vegetables.
Frozen
Rice
Pasta
Vegetables
Fresh
Reheat Pie
Potato
Jacket
1-5
3-10
1-3
1-5
Procedure
(minutes)
Standing
Time
Page 35

Pasta
Rice
Menu
1
2 cups
3 cups
4 cups
5 cups
6 cups
1
/2 cups
3 cups
4 cups
1
1 cup
/2 cup
2 cups
2 cups
Pasta
(1cup = 250ml)
Hot tap water
1/2 - 4 cups Micro
Hot tap water
+60°C
5
3 cups
4 cups
4
6 cups
1
/2 cups
1
2 cups
1
/2 cups
2 cups
4 cups
1
1 cup
/2 cup
Rice
Soup stock or Hot tap
water (1cup = 250ml)
1
1
1 cup
/2 cups
1/2 - 4 cups Micro
Hot tap water or
soup stock
+60°C
Weight
Range
Temperature
(approx.)
Initial
Cooking
Method
• After cooking, stand and stir.
®
bowl and cover with hot tap water.
• Cook uncovered.
• When oven stops and STIR is displayed, stir and continue cooking.
• After cooking, stand and stir.
• Wash rice until water runs clear.
• Place into a Pyrex
water.
®
bowl and cover with hot soup stock or with hot tap
• Place into a Pyrex
• Cook uncovered.
• When oven stops and STIR is displayed, stir and continue cooking.
Procedure
(minutes)
Standing
1-5
1-5
Time
Page 36

3
2
1
No.
REHEAT SENSOR MENU GUIDE
Canned Food
Springtime Lamb
Apricot Chicken
Baked Beans
Spaghetti
Room temperature
+20°C
Casseroles
Beef Stroganoff
1-4 cups (1 cup, 250 ml)
Refrigerated
+3°C
Reheat Pizza
(1 pieces, approx. 90 g)
1-4 pieces
Refrigerated
+3°C
Beef, Lamb sliced 2 varieties
Chicken, T-Bone eg. sliced Carrot,Zucchini
175-180g 125g 100g
MEAT POTATO VEGETABLES
Broccoli
Refrigerated
Dinner Plate
SENSOR
Menu
3. Casseroles/Canned Food
1 serve (approx. 400 g)
Weight
Range
number pad of the menu.
Temperature
(approx.)
+3°C
Initial
REHEAT
1. Dinner Plate
2. Reheat Pizza
When you reheat the following menus with REHEAT
SENSOR, press the REHEAT SENSOR pad and the
Cooking
6
Micro
• Place into a casserole dish, and cover with lid.
• After cooking, stir and stand covered.
Micro
• Place pizza on the low rack.
• After cooking, stand covered.
• Place on the low rack.
Method
Micro
• Cover with plastic wrap.
Procedure
1-5
2
(minutes)
Standing
Time
Page 37

6
5
4
3
2
1
No.
CONVENIENCE/PIZZA MENU GUIDE
Finger Food 0.2 - 0.8kg -18 °C Micro • Remove from package.
Includes: Frozen Top/bottom • Place directly onto turntable.
Party pies temperature grill
Party sausage rolls Top grill
Cocktail spring rolls
Mini chicken drum sticks
Sea shantys
Chicken chippees, Calamari
Includes: Frozen Top/bottom • Place directly onto turntable.
Fish fingers temperature grill
Battered Fish Top grill
Frozen Pasta 0.3 - 1.0kg -18 °C Micro • Remove the pasta from foil tray and place in a heat - resistant ceramic dish.
Crumbed Fish 0.1 - 0.5kg -18 °C Micro • Remove from package.
Includes: Frozen Mix • Place on the low rack.
Lasagne temperature • Do not cover.
Cannelloni • After cooking, stand
Wedges temperature grill continue cooking.
Crinkle cut Top grill
Shoe string
Fresh pizza 1 pizza + 3 °C Top/bottom • Add paste and toppings of your choice to fresh pizza base.
Fries 0.1 - 0.5kg -18 °C Micro • Place directly onto turntable.
Includes: Frozen Top/bottom • When oven stops and TURN FRIES, OVER is displayed, turn over fries and
Olives
Capsicum
Mushrooms
Peperoni
Cabanossi
Pineapple
Topping include: (500 - 700g) Refrigerated grill • Place directly onto turntable.
Ham Top grill
Cheese
Onion
temperature
Frozen
Top/bottom • Place directly onto turntable.
grill
Frozen pizza 0.2 - 0.5 kg -18 °C Micro • Remove from package.
Menu
Weight
Range
Temperature
(approx.)
Initial
Cooking
Method
CONVENIENCE
/PIZZA
1. Frozen Pizza 4. Frozen Pasta
2. Fresh Pizza 5. Crumbed Fish
3. Fries 6. Finger Food
To cook the following CONVENIENCE/PIZZA menus.
Press the CONVENIENCE/PIZZA pad and the number pad of the menu.
7
Procedure
(minutes)
Standing
2-5
Time
Page 38

3
2
1
No.
MULTI COOK MENU GUIDE
Roast Chicken
Preparation before cooking
• Remove neck and excess fat from chicken.
• Wash and dry chicken.
• Tie legs together.
STD - Medium
1.0-2.0 kg
Refrigerated
+3°C
Mix
Roast Lamb
* You can select desired
cooking result.
MORE - Well done
LESS - Rare
0.5-2.5 kg
Refrigerated
+3°C
Mix
STD - Medium
Roast Beef
* You can select desired
cooking result.
MORE - Well done
Menu
0.5-3.0 kg
Weight
Range
+3°C
Mix
Temperature
(approx.)
Method
Refrigerated
Initial
Cooking
MULTI
COOK
1. Roast Beef 4. Roast Pork
2. Roast Lamb 5. Grilled Steak/Chops
3. Roast Chicken 6. Grilled Chicken Pieces
When you cook the following menus with MULTI COOK, press the MULTI COOK pad and the number
pad of the menu.
8
• Place fat side down on the low rack.
• When oven stops and TURN LAMB, OVER is displayed, turn lamb over.
• Place breast side down on the low rack.
• When oven stops and TURN, CHICKEN OVER is displayed, turn chicken
• After cooking, stand covered with aluminium foil.
over.
5-15
• After cooking, stand covered with aluminium foil.
5-15
• Tie meat with string.
• Place fat side down on the low rack.
• When oven stops and TURN BEEF, OVER is displayed, turn beef over.
• After cooking, stand covered with aluminium foil.
Procedure
(minutes)
Standing
Time
5-15
Page 39

6
5
4
No.
Grilled Chicken Pieces 0.3 - 1.0 kg +3°C Mix
Refrigerated Top grill
Includes:
T-bone Steak
Rump Steak
Pork Chops
Lamb Chump Chops
Lamb Ioin Chops
Refrigerated grill • When oven stops and DRAIN, JUICES, TURN, STEAK CHOPS,
Grilled Steak/Chops 0.3 - 1.0 kg +3°C Top/bottom • Place directly onto turntable.
Roast Pork 0.5 - 3.0 kg +3°C Mix
Refrigerated
Menu
Weight
Range
Temperature
(approx.)
Initial
Cooking
Method
9
• Tie meat with string (loins only).
• Brush rind lightly with oil and season with salt.
• Place rind side down on the low rack.
• When oven stops and TURN PORK, OVER is displayed, turn pork
• Place chicken skin side down on the high rack and season.
• When oven stops and TURN, CHICKEN, PIECES, OVER is dis-
• After cooking, stand covered with aluminium foil.
played, turn chicken over and season.
OVER is displayed, DRAIN FAT JUICES and
turn meat over.
• After cooking, stand covered with aluminium foil.
over.
Procedure
(minutes)
5
5-15
Standing
Time
Page 40

Foods not listed in the Guide can be defrosted using M•LOW setting.
NOTE: When freezing minced meat, shape it into flat even sizes.
Roast Meat
Beef/Lamb/Pork
For chicken pieces, steaks and chops, freeze separately in single flat layers and if necessary interleave with freezer plastic to separate layers.
This will ensure even defrosting.
It is also a good idea to label the packs with the correct weights.
0.5-3.0
Poultry
1.0-3.0
Chicken Pieces
0.1-3.0
Steak/Chops
0.1-3.0
Minced Meat
Beef
min-max
0.1-3.0
(kg's)
EASY DEFROST MENU GUIDE
Menu
Quantity
10
• Shield the bone and the edge with foil strips about 2.5cm wide.
• Place joint with lean side face upwards (if possible) on a defrost rack.
• When the oven has stopped, turn over and shield the warm portions.
• After defrost time, stand covered with aluminium foil.
• When the oven has stopped, turn over and shield the warm portions.
• After defrost time, stand covered with aluminium foil.
N.B. After standing run under cold water to remove giblets if necessary.
• See NOTE below.
• Remove from original wrapper. Shield wing and leg tips with foil.
• Place breast side down on a defrost rack.
portions of remaining pieces.
• After defrost time, stand covered with aluminium foil.
• See NOTE below.
portions of remaining pieces.
• Shield thin end of chops or steaks with foil.
• Position the food with thinner parts in the centre in a single layer on a defrost rack.
• When the oven has stopped, remove defrosted pieces, turn over and shield the warm
If pieces are stuck together, try to separate as soon as possible.
• Shield the exposed bone with foil.
• Place chicken pieces on a defrost rack.
• When the oven has stopped, remove any defrosted pieces, turn over and shield the warm
• After defrost time, stand covered with aluminium foil.
• Place shielded frozen minced meat on a defrost rack.
• When the oven has stopped, remove defrosted portions of mince, turn over and shield
• After defrost time, stand covered with aluminium foil.
• See NOTE below.
edges with foil strips.
Procedure
15-50
15-50
5-15
10-15
10-15
(minutes)
Standing
Time
Page 41

CHICKEN CACCIATORE s
CHICKEN AND MACARONI BAKE a
VEAL AND PINEAPPLE t
POULTRY
APRICOT CHICKEN
CHEESE AND HERB CHICKEN LEGS a
CHICKEN AND APRICOT SALAD o
VEAL À LA MEDALLION t
TROPICAL CURRY LAMB y
SPRINGTIME LAMB CASSEROLE r
SPINACH LOIN OF LAMB u
SHEPHERD'S PIE e
PORK RIBS WITH CHILLI PLUM SAUCE i
MIXED GRILL i
MINTED PICNIC LOAF y
LASAGNE e
ITALIAN SPAGHETTI SAUCE t
HONEY ROAST LAMB u
HERBED LOIN OF LAMB t
HAMBURGER i
GRILLED KEBABS i
FILLET MIGNON u
CURRIED SAUSAGES r
CRUSTY ROSEMARY LAMB e
CORNED BEEF r
CHILLI CON CARNE y
INDEX
APPETISERS
GARLIC AND HERB FOCACCIA
QUICK NACHOS w
VEGETABLE FRITTATA w
MEAT
APRICOT AND ALMOND CRUSTY LAMB
BEEF MADEIRA y
BEEF STROGANOFF r
11
a
SESAME PRAWNS g
SQUID IN TOMATO AND WINE SAUCE h
STEAMED SCALLOPS IN f
BLACK BEAN SAUCE
TAGLIATELLE AND CRAB SALAD f
VEGETABLES
CAULIFLOWER AU GRATIN
CAULIFLOWER POLONAISE
CHOKOS WITH SOUR CREAM AND BACON l
GRILLED TOMATOES
EASY HOME-MADE RICE RISOTTO k
k
CHARTS
DEFROSTING CHARTS
FRESH VEGETABLE CHART
FROZEN VEGETABLE CHART
GRILLING CHART
GUIDE TO COOKING EGGS
REHEATING CONVENIENCE
RICE AND PASTA COOKING CHART
DEFROSTING CONVENIENCE-FOOD CHART
SEAFOOD
BOMBAY AVOCADO SCALLOPS
BOUILLABAISSE h
CHEESY SALMON ROLLS d
CRAB MORNAY g
CRISPY MARINATED CRAB STICKS f
GARLIC MUSSELS g
GARLIC PRAWNS d
OYSTERS KILPATRICK j
PAELLA d
PRAWN CUTLETS j
PRAWN CREOLE f
SEAFOOD LASAGNE g
h
DESSERTS
APRICOT WHEATGERM CRUNCHIES
AUSTRALIAN FRUIT CAKE
BAKED APPLES
BREAD AND BUTTER PUDDING
CALIFORNIAN APPLE CRUNCH
CARAMEL RICE PUDDING
CHOCOLATE MOUSSE
CHOCOLATE CAKE
CHOCOLATE CHIP COOKIES
CHOCOLATE SELF-SAUCING PUDDING
MUESLI CUSTARD DELIGHT
WHOLEMEAL CHICKEN p
VEGETABLE PLATTER k
TANDOORI CHICKEN p
SUNSHINE BRUSSELS SPROUTS ;
u
CRUNCHY CAMEMBERT CHICKEN s
HONEY CHICKEN LEGS a
ROAST CHICKEN s
STUFFED BAKED POTATOES l
LEEK SEASONING
PUMPKIN SALAD
SCALLOPED POTATOES
SQUASH WITH YOGHURT ;
w
CHICKEN IN A POT o
CHICKEN PROVENCALE p
CHICKEN TERRINE p
CHICKEN WITH BACON AND o
HOT CURRIED SLAW ;
MINESTRONE l
POTATOES PIZZAIOLA
POTATO, AVOCADO AND ONION SALAD l
POULTRY continued
CHICKEN FILLET BURGERS
CHICKEN FRICASSEE o
RECIPES
s
VEGETABLES continued
HONEY CARROTS
HONEY GINGERED VEGETABLES ;
k
k
Page 42

5. Cut into strips and serve hot.
2 cloves garlic, crushed
1 teaspoon mixed herbs
1. Carefully cut bread in half.
2. Mix margarine, garlic and herbs together in a small bowl.
3. Spread evenly over focaccia. Place onto the high rack side by side.
4. Cook for 4-5 minutes on TOP GRILL.
GARLIC AND HERB FOCACCIA
1 focaccia (rectangular)
100 g margarine
6. Serve immediately with guacamole.
5. Place on the high rack and cook for 4
1
/2 minutes on TOP GRILL.
1. Place corn chips in base of a flan dish.
2. Mix salsa and sour cream together in a small bowl.Pour over corn chips.
3. Spread tomato paste over the top of salsa.
4. Sprinkle with cheese.
2 tablespoons tomato paste
1
/4 cup grated tasty cheese
1
/2 cup sour cream
QUICK NACHOS
200 g packet corn chips
250 g jar of salsa
APPETISERS
Serves 4
12
7. Cut into wedges.
Pour over remaining egg mixture. Sprinkle with cheese.
minutes on TOP GRILL.
5 eggs
450 mL sour cream
340 g can asparagus spears, drained
1
2 zucchinis, cut into strips
2 tablespoons parmesan cheese
/2 red capsicum, cut into strips
VEGETABLE FRITTATA
2 large potatoes, peeled and thinly sliced
1 onion,thinly sliced
1. Arrange potatoes and onion over base of greased 23 cm pie plate.
2. Combine eggs and sour cream. Pour half the mixture over potatoes.
3. Cook for 10-12 minutes on 70% on the low rack.
4. Arrange asparagus, capsicum and zucchinis in a circle over potato.
5. Cook on the low rack for 10-12 minutes on HIGH MIX TOP GRILL, and 4
6. Stand covered with foil for 5 minutes.
Serves 4
Page 43

8. Allow to stand coverd with foil for 10 minutes before serving.
tender. Drain.
70%, stirring every 2 minutes. Drain juices from meat.
GRILL.
parsley. Mix well.
1 onion, chopped
tablespoons water; cover and cook for 12-14 minutes on 100% or until
1 egg, beaten
1 tablespoon milk
salt and pepper
1 kg minced beef
1 tablespoon Worcestershire sauce
1 tomato, chopped
2 tablespoons parsley
1. Peel and cut potatoes into 2.5 cm cubes. Place in a large bowl. Add 2
2. Mash potatoes; add butter, milk, salt and pepper.
3. In a large bowl, combine mince and onion and cook for 10-12 minutes on
4. Add gravy powder, tomato sauce, Worcestershire sauce, tomato and
5. Spoon mixture into a 25 cm x 20 cm rectangular dish.
6. Spread mashed potato evenly over top of mixture. Brush with beaten egg.
7. Cook for 23-25 minutes on HIGH MIX TOP GRILL and 6 minutes on TOP
SHEPHERD'S PIE
4 large potatoes (approx.1 kg)
1 tablespoon butter
2
1 tablespoon gravy powder
/3 cup tomato sauce
4. Allow to stand 10 minutes covered with foil before carving.
combined ingredients over leg of lamb. Cook for a further 16 minutes on
HIGH MIX TOP GRILL and 3 minutes on TOP GRILL (for well done).
1. Combine brown sugar, mustard, lemon juice and rosemary in a small bowl.
2. Place fat side down on the low rack.
3. Cook for 14 minutes on HIGH MIX TOP GRILL and 3
for 16 minutes on HIGH MIX TOP GRILL and 3 minutes on TOP GRILL.
GRILL. Turn over, shielding shank with foil to prevent overcooking. Spread
combined ingredients over leg of lamb. Cook for a further 14 minutes on
HIGH MIX TOP GRILL and 3
Turn over, shielding shank with foil to prevent overcooking. Spread
minutes on TOP GRILL (for medium). Or cook
minutes on TOP
1 tablespoon lemon juice
2 tablespoons chopped fresh rosemary
1.5 kg leg lamb
CRUSTY ROSEMARY LAMB
1
2 tablespoons seeded mustard
/4 cup brown sugar
13
2. Gradually stir in milk. Cook for 4-6 minutes on 100%, stirring every minute.
3. Stir in tasty cheese.
TO COMBINE
1. Use a 20 x 20 cm deep casserole dish.
2. Dip lasagne sheets in hot water, then cover base of dish.
3. Spoon over sheets one-third of meat sauce. Cover with one-third of cheese
4. Repeat the process 3 times, ending with the cheese sauce.
5. Sprinkle with mozzarella cheese.
6. Cook for 24-26 minutes on HIGH MIX TOP GRILL and 4 minutes on TOP
7. Allow to stand 10 minutes before serving.
8. Serve with a fresh garden salad and bread.
GRILL.
sauce.
Serves 6-8
1. Melt butter for 50-60 seconds on 100%. Stir in flour; cook for further 1
minute on 100%.
minutes. Drain excess fat.
125 g tasty cheese, grated
200 g packet instant lasagne sheets
100 g mozzarella cheese, grated
1
3
/4 cups milk
MEAT SAUCE METHOD
1. Place butter and onion in a Pyrex bowl. Cook for 2-3 minutes on 100%.
2. Stir in mince. Cook, uncovered, for 12-14 minutes on 70%, stirring every 2
3. Stir in tomato paste, bolognese sauce, champignons and garlic.
CHEESE SAUCE METHOD
CHEESE SAUCE INGREDIENTS
90 g butter
1
/3 cup flour
1 clove garlic, crushed (optional)
1
240 g jar bolognese sauce
200 g can champignons, drained
/4 cup tomato paste
30 g butter
1 onion, chopped
1 kg topside mince
Serves 4-6
MEAT
MEAT SAUCE INGREDIENTS
LASAGNE
Serves 4-6
Page 44

7. Cover and cook for an extra 6-7 minutes on 50%. Serve with boiled rice or
sausages into thirds.
sultanas; mix well. Cover and cook for 4-6 minutes on 100%.
once.
noodles.
peeled and finely chopped
/4 cup flour
2 tablespoons butter
2 onions, chopped
1 small Granny Smith apple,
1 beef stock cube
1
1
/4 cup sultanas
1
/2 cups water
CURRIED SAUSAGES
1 kg sausages
3 teaspoons curry powder
1
1. Pierce sausages with a fork twice. Arrange sausages on the low rack.
2. Cook for 14-16 minutes on 50%, turning halfway through cooking. Cut
3. In a 2-3-litre casserole dish, place butter, onions, apple, curry powder and
4. Dissolve stock cube in water.
5. Mix in flour and stock, cover and cook for 4-5 minutes on 100%, stirring
6. Add sausages and stir.
5. Cook a further 16-18 minutes on 50%.
the lamb in flour mixture, coating thoroughly.
1. Combine French onion soup mix and flour in a 2-3-litre casserole dish. Toss
2. Add onions and carrots, stir in chicken stock and mix well.
3. Cover and cook for 22-24 minutes on 50%, stirring during cooking.
4. Add corn, celery and sour cream. Mix well.
300 mL carton sour cream
/4 cup plain flour
1 packet (30 g) French onion soup
SPRINGTIME LAMB CASSEROLE
1
750 g lamb, cubed
4 spring onions, quartered
2 carrots, thinly sliced
1 cup chicken stock
310 g can corn kernels, drained
2 sticks celery, finely chopped
14
Serves 4-6
1. Toss steak with flour, salt and pepper in a freezer bag until evenly coated.
2. Place steak, left-over flour, onion, tomato purée, beef stock and red wine in a
3. Cook, covered, for 35 minutes on 50%, stirring twice during cooking.
4. Stir in mushrooms and sour cream. Cook for a further 4-5 minutes on 50%.
4. Serve with white sauce.
cooking. Allow to stand covered with foil for 10 minutes before serving.
2 tablespoons malt vinegar
3 cups hot water
1.5 kg corned beef
CORNED BEEF
2 tablespoons brown sugar
1. Place in a casserole dish just large enough to contain it.
2. Add brown sugar, malt vinegar and hot water.
3. Cover with lid and cook for 70 minutes on 50%, turning over halfway through
5. Serve with boiled rice.
3-litre casserole dish.
100 g mushrooms, thinly sliced
300 mL sour cream
salt and pepper
1 onion, finely chopped
2 tablespoons tomato purée
1
1
/4 cup red wine
1
/2 cups beef stock
Serves 4
1 kg rump steak, cut into strips
BEEF STROGANOFF
1
/2 cup plain flour
Serves 6-8
Serves 6
Page 45

4. Sprinkle with parsley and serve with rice.
1 cup tomato sauce
2 tablespoons chopped parsley
4 rashers bacon, chopped
3 shallots, chopped
440 g can pineapple pieces, drained
1 teaspoon chicken stock powder
black pepper
750 g veal, diced
1. Mix first 4 ingredients together in a large casserole dish.
2. Add the veal; toss to coat in the seasonings. Stir in bacon, shallots, pineap-
3. Cover and cook for 35 minutes on 50%, stirring 2-3 times during cooking.
ple pieces and tomato sauce.
VEAL AND PINEAPPLE
2 tablespoons flour
2 teaspoons mixed herbs
2. Cover and cook for 40 minutes on 50%, stirring 2-3 times during cooking.
3. Stir in mushrooms and sour cream.
4. Cover and cook a further 5-7 minutes on 50%.
5. Sprinkle with chives.
1. Toss veal in flour. Place in a 3 litre casserole dish. Stir in salt, pepper, water,
shallots, carrots, lemon rind and bacon.
2 carrots, thinly sliced
1 tablespoon chopped chives
/2 cup plain flour
/4 cup water
1
2 rashers bacon, chopped
250 g fresh mushrooms, sliced
300 mL carton sour cream
/2 teaspoon grated lemon rind
VEAL À LA MEDALLION
1 kg veal, cubed
1
salt and pepper
3
1 cup finely chopped shallots
15
2. Stir in canned tomatoes, tomato paste, mushrooms, parsley, salt, oregano
3. Cook a further 8-11 minutes on 70%. Stir halfway through cooking.
4. Serve over hot spaghetti.
and basil.
Serves 4-6
1. Mix mince, onion and garlic together in a large bowl. Cook for 8-10 minutes
1 teaspoon salt
1
1
/2 teaspoon dried oregano leaves
/2 teaspoon dried basil leaves
1
100 g mushrooms, sliced
1 tablespoon chopped parsley
1 clove garlic, crushed
410 g can whole tomatoes
/2 cup tomato paste
ITALIAN SPAGHETTI SAUCE
500 g topside mince
1 onion, chopped
on 70%, stirring every 2 minutes. Drain well.
5. Allow to stand 10 minutes covered with foil before carving.
Turn meat over and cook for a further 14-16 minutes on HIGH MIX TOP GRILL
and 3 minutes on TOP GRILL (for well done).
4. Place on the low rack.Cook for 10-12 minutes on HIGH MIX TOP GRILL and 3
minutes on TOP GRILL. Turn meat over and cook for a further 10-12 minutes
on HIGH MIX TOP GRILL and 3 minutes on TOP GRILL. (for medium). Or cook
for 14-16 minutes on HIGH MIX TOP GRILL and 3 minutes on TOP GRILL.
1. Mix all ingredients except lamb together to form a marinade in a small bowl.
2. Place loin of lamb in a large shallow dish and pour over marinade; leave
3. Remove loin of lamb from marinade and roll loin tightly, securing with string.
overnight.
Serves 4-6
HERBED LOIN OF LAMB
1
1
3 cloves garlic, crushed
freshly ground black pepper
1 teaspoon rosemary spikes
1 kg loin of lamb
/2 cup white wine
/4 cup oil
Serves 4-6
Serves 8
Page 46

4. Cook, covered, for 20-22 minutes on 50%, stirring 2-3 times during cooking.
7. Serve with boiled rice.
casserole dish and cover.
litre casserole dish.
1
/2 cup of liquid.
1 kg lamb, trimmed and cubed
1 cup chicken stock
1 teaspoon chicken stock powder, extra
3 teaspoons curry powder
825 g can apricot halves, drained, reserving
2 tablespoons arrowroot
1
/2 cup syrup
TROPICAL CURRY LAMB
1 onion, thinly sliced
1. Place onion, lamb, chicken stock, stock powder and curry powder into a 3-
2. Cover and cook for 28-30 minutes on 50%; stir twice during cooking.
3. Drain lamb and reserve
4. Combine liquid, apricot syrup and arrowroot. Cook for 1-2 minutes on 100%.
5. Combine lamb, apricots and stock mixture and liquid, together in a 3-litre
6. Heat through for 12-14 minutes on 50%.
5. Add beans and capsicum. Cover and cook a further 24-26 minutes on 50%,
Pour over beef.
stirring twice during cooking.
1. In a 3-litre casserole dish, combine meat and flour; mix well.
2. Add onions and carrots.
3. In a jug, combine garlic, beef stock, madeira or sherry, and paprika; stir well.
1 large onion, sliced
2 carrots, thinly sliced
1 clove garlic, crushed
1
350 g beans, washed and sliced
1 green capsicum, sliced
/2 teaspoon paprika
BEEF MADEIRA
750 g blade or round steak, cubed
1
/4 cup plain flour
1
1
/2 cup beef stock
/2 cup madeira or sherry
16
Serves 4-6
1. Combine breadcrumbs and milk in medium bowl; stand for 5 minutes.
2. Add potato, mince, tomato sauce and mint to breadcumb mixture; mix well.
3. Press mixture into an 11 cm x 25 cm loaf dish lined with paper towels.
4. Place on low rack. Cook for 24-26 minutes on 50%.
5. Drain excess liquid from loaf dish.
1. Combine topping ingredients and press evenly over loaf. Cook for a further
4. Serve with boiled rice.
70%, stirring every 2 minutes.
and kidney beans.
salt and pepper
1-2 teaspoons chilli powder
425 g can red kidney beans, drained
1 large onion, finely chopped
825 g can peeled tomatoes
1 teaspoon sugar
375 g jar tomato paste
CHILLI CON CARNE
1 kg mince
1 tablespoon vinegar
1. Mix mince and onion together in a large bowl. Cook for 10-12 minutes on
2. Stir in tomatoes, salt and pepper, chilli powder, vinegar, sugar, tomato paste
3. Cook for 20-22 minutes on 70%, stirring twice during cooking.
2. Allow to stand 10 minutes before turning out. Serve hot or cold.
TOPPING
3-4 minutes on TOP GRILL.
Serves 4-6
MINTED PICNIC LOAF
2 cups stale breadcrumbs
1
1 large potato, grated
500 g sausage mince
TOPPING
1 cup grated fresh parmesan cheese
1 cup stale breadcrumbs
1 tablespoon chopped fresh mint
/2 cup milk
500 g minced beef
1
2 tablespoons chopped fresh mint
/2 cup tomato sauce
Serves 4-6
Serves 6-8
Page 47

6. Remove toothpick before serving.
7. Serve with mushroom sauce.
5. Turn over and drain juices, cook for a further 6
BOTTOM GRILL.
1
/2 minutes on TOP and
1. Remove rind of bacon.
2. Wrap 1 rasher of bacon around each fillet, secure with a toothpick.
3. Place directly onto turntable.
4. Cook for 10
minutes on TOP and BOTTOM GRILL.
4 rashers bacon
FILLET MIGNON
4x scotch fillet steaks, approx 2.5 cm thick
4. Place on the low rack. Cook for 22-24 minutes on 50% and 3 minutes on
TOP GRILL. Allow to stand 10 minutes covered with foil before carving.
rosemary and egg.
1 tablespoon apricot jam
2 teaspoons dried rosemary
1 egg, lightly beaten
1 rack of lamb (approx. 8 chops)
200 g dried apricots, finely chopped
1 cup fresh breadcrumbs
1
/2 cup ground almonds
APRICOT AND ALMOND CRUSTY LAMB
1. Mix together in a small bowl, apricots, breadcrumbs, ground almonds,
2. Brush lamb with apricot jam.
3. Place apricot crust on top of lamb.
17
Serves 4
6. Place on the low rack, fat-side down, cook for 14-16 minutes on 70% and 3
minutes on TOP GRILL. Turn over and cook for a further 14-16 minutes on
70% and 5 minutes on TOP GRILL (for medium). Or cook for 17-19 minutes
on 70% and 5 minutes on TOP GRILL. Turn over and cook for a further 17-19
minutes on 70% and 3 minutes on TOP GRILL (for well done).
Sprinkle over spinach.
1 large onion, chopped
salt and pepper
1.0 kg loin of lamb
1 large spinach leaf, shredded
1 tablespoon butter
1. Butterfly loin of lamb and flatten slightly with a meat mallet.
2. Spread with shredded spinach.
3. Place butter and onion in a Pyrex bowl. Cook for 3 minutes on 100%.
4. Season with salt and pepper.
5. Roll up loin and secure with string.
4. Allow to stand 10 minutes covered with foil before carving.
SPINACH LOIN OF LAMB
shield shank with foil to prevent over cooking.
Cook for a further 14 minutes on HIGH MIX TOP GRILL and 3
TOP GRILL (for medium).
Or cook for 16-18 minutes on HIGH MIX TOP GRILL and 3
GRILL.Turn meat over, brush combined
ingredients over leg of lamb, and shield shank with foil to prevent overcook-
ing.
Cook for a further 16-18 minutes on HIGH MIX TOP GRILL and 3 minutes
on TOP GRILL (for well done).
Serves 4
1. Combine honey and Dijon mustard in a small bowl.
2. Place fat-side down on the low rack.
3. Cook for 14 minutes on HIGH MIX TOP GRILL and 3
GRILL. Turn meat over, brush combined ingredients over leg of lamb, and
minutes on TOP
1 tablespoon Dijon mustard
HONEY ROAST LAMB
1.5 kg leg lamb
3 tablespoons honey
Serves 4-6
minutes on TOP
minutes on
Serves 4-6
Page 48

5. Serve on a bed of rice.
1 green capsicum, coarsely chopped
GRILLED KEBABS
500 g chicken breasts
1 large onion, coarsely chopped
3. Drain juices, turn patties over and cook for a further 9-10 minutes on TOP
4. Serve on hambuger bun with lettuce and tomato.
and BOTTOM GRILL.
1. In a large bowl, combine mince, onion, egg, tomato sauce, mixed herbs and
2. Shape into 6 equal patties. Place directly onto turntable. Cook for 9-10
seasoned pepper.
minutes on TOP and BOTTOM GRILL.
1 teaspoon seasoned pepper
3
/4 cup breadcrumbs
1 onion, chopped
1 egg
1 tablespoon tomato sauce
1 teaspoon mixed herbs
1. Cut chicken into cubes.
2. Thread capsicum, onion and chicken onto 8 skewers.
3. Place on the high rack and cook for 10-15 minutes on TOP GRILL.
4. Turn over and cook for a further 10-15 minutes on TOP GRILL.
HAMBURGER
500 g mince
18
3. Cook for 6 minutes on TOP and BOTTOM GRILL.
Add egg.
1 rasher bacon
turntable. Cook for 10 minutes on TOP and BOTTOM GRILL.
1. Place steak, chop, sausage (pierced 3 times ) and bacon directly onto
2. Turn steak, chop, and sausage over, and pierce 3 times again. Drain juices.
MIXED GRILL
1 steak
1 chump chop
1 thick sausage
1 egg
5. Turn ribs over, brush each side with chilli plum sauce. Cook for a further
6. Serve with remaining sauce.
11 minutes on TOP and BOTTOM GRILL until golden brown.
4. Dip each rib into black bean mixture. Cook for 11 minutes on TOP and
sauce, five spice powder, pepper and salt.
BOTTOM GRILL.
Serves 4
Sauce Method
1. Add oil, crushed garlic, ginger, chopped shallots. Cook for 1-2 minutes on
2. Add plum and chilli sauce, stir until combined.
3. Combine water, stock cube, soy sauce and cornflour. Add to mixture. Cook
Method
1. Remove excess fat from ribs.
2. Cover black beans with water, leave soak for 15 minutes, drain mash with
3. In a large bowl combine oyster sauce, sherry, soy sauce, black beans
100%.
fork.
for a further 2 minutes on 100%, until mixture begins to thicken.
2 teaspoons soy sauce
2 teaspoons cornflour
1
1
/2 teaspoon pepper
/4 teaspoon salt
1
1
1 chicken stock cube
/2 teaspoon chilli sauce
/3 cup water
1 tablespoon soy sauce
3 teaspoons black beans sauce
1
1
/2 teaspoons five spice powder
2 shallots
170 mL bottle plum sauce
1
/2 teaspoon grated green ginger
750 g pork ribs
1 tablespoon oyster sauce
2 tablespoons dry sherry
CHILLI PLUM SAUCE
2 teaspoons oil
1 clove garlic
Serves 6
PORK RIBS WITH
CHILLI PLUM SAUCE
Serves 1
Serves 4
Page 49

7. Sprinkle with parsley.
40 seconds.
halfway through cooking.
Stir well.
70%.
1
/2-litre casserole dish. Cover and cook for 4-6 minutes on 70%.
2 cups chicken stock
1 egg yolk
4 slices processed cheese
chopped parsley
1 large cooked chicken
60 g butter
3 tablespoons flour
400 g can artichoke hearts, halved
CHICKEN FRICASSEE
1
1
/4 cup cream
/4 teaspoon nutmeg
5. Pour into a 1
6. Lay cheese slices across middle of dish.Cook a further 12-14 minutes on
2. Combine all ingredients, except mushrooms, in a 3 litre casserole dish.
3. Cover and cook on low rack for 30 minutes on 70%. Stir 2-3 times during
4. Add mushrooms. Cook, uncovered, a further 5-7 minutes on 70%.
cooking.
1. Remove meat from chicken and chop into cubes.
2. Melt butter for 40-50 seconds on 100% in a jug. Stir in flour; cook a further
3. Gradually stir in chicken stock. Cook for 5-6 minutes on 100%, stirring
4. Stir in chopped chicken, egg yolk, cream, nutmeg and artichokes.
1. Toss chicken thighs in flour.
425 g can peeled tomatoes
2 rashers bacon, finely chopped
1 green capsicum, diced
1 onion, finely chopped
200 g mushrooms, sliced
/4 cup plain flour
1 tablespoon soy sauce
salt and pepper
CHICKEN IN A POT
1.5 kg chicken thighs
1
2 tablespoons tomato paste
2 chicken stock cubes
19
Serves 4
1. Melt butter for 20 seconds on 100%, brush chicken with butter. Cook on the
2. Turn over, brush chicken with butter, and cook for a further 12-14 minutes
3. Remove chicken flesh from the bone.
4. Combine mayonnaise, sour cream and lemon juice. Stir in apricots, chicken,
5. To serve, line a salad bowl with lettuce leaves. Spoon in salad.
NOTE: Leftover turkey may be substituted for chicken.
low rack for 12-14 minutes on HIGH MIX TOP GRILL and 7 minutes on TOP
GRILL.
on HIGH MIX TOP GRILL and 7 minutes on TOP GRILL. Cool.
celery and tarragon until coated. Chill for 1-2 hours.
/4 teaspoon dried tarragon
1 tablespoon lemon juice
6 ripe fresh apricots, cut into wedges
2 sticks celery, thinly sliced
1
/4 cup sour cream
No.15 chicken
20 g butter
1
1
/2 cup mayonnaise
CHICKEN AND APRICOT SALAD
Serves 4-6
1. Combine butter, leek and bacon in a bowl. Cook for 1-2 minutes on 100%.
2. Stir in breadcrumbs, egg yolk and seasonings. Mix well.
3. Fill cavity of chicken with stuffing and secure with a toothpick.
4. Place chicken on the low rack, breast-side down, cook for 12-14 minutes on
5. Turn over, cook a further 12-14 minutes on HIGH MIX TOP GRILL and 7
6. Stand covered with foil for 10 minutes before carving.
HIGH MIX TOP GRILL and 7 minutes on TOP GRILL.
minutes on TOP GRILL.
2 rashers bacon, chopped
No.15 chicken
60 g butter, melted
1 leek, finely chopped
1 egg yolk
salt and pepper
AND LEEK SEASONING Serves 4
1
1
/2 cups wholemeal breadcrumbs
POULTRY
CHICKEN WITH BACON
Serves 6
Page 50

10. Turn out and slice. Serve with Melba toast.
7. Cover with paper towel and cook for 3-5 minutes on 100%.
8. Remove top layer of paper towel.
9. Pour in chicken mixture. Refrigerate overnight.
5. Dissolve gelatine in water. Cook for 40 seconds -1 minute on 100%; add
6. Line 25 cm x 11 cm loaf dish with paper towel and place bacon across
peppercorns.
to chicken mixture.
paper towel.
2. Gradually stir in stock and milk. Cook for 4-5 minutes on 100%, stirring
3. Stir in tabasco sauce and pepper.
4. Beat cream cheese. Gradually stir in the sauce. Add chicken and
minute on 100%.
every 2 minutes.
pepper
1. Melt butter for 40 seconds on 100%. Add shallots and flour. Cook for 1
1 cup chicken stock
1 cup milk
1
/4 teaspoon tabasco sauce
3 teaspoons gelatine
1
6 rashers bacon
/2 cup water
CHICKEN TERRINE
60 g butter
6 shallots, chopped
1
/2 cup flour
2 teaspoons green peppercorns, chopped
250 g cream cheese, softened
1 cooked chicken, chopped
4. Sprinkle with parsley.
powder. Mix well.
cook for 26-28 minutes on 70%. Stir once during cooking.
minutes on 70%.
1 apple, peeled and chopped
1
/2 cup black olives
chopped parsley
1. In a large jug combine wine, tomatoes, onion, apple, olives and curry
2. Arrange chicken pieces in a casserole dish. Pour over sauce. Cover and
3. When oven stops, stir in mushrooms. Cover and cook for a further 4-6
CHICKEN PROVENCALE
1
425 g can peeled tomatoes
1 large onion, chopped
/2 cup white wine
1 teaspoon curry powder
1.25 kg chicken pieces (or 4 marylands)
250 g button mushrooms
20
Serves 6-8
8. Serve with boiled rice.
leaf and cloves.
stirring occasionally.
9 minutes on TOP GRILL.
and paprika in a small bowl.
1
3 teaspoons ground coriander
2 whole cloves
/2 teaspoon black pepper
1 tablespoon vinegar
200 g low-fat yoghurt
2 teaspoons crushed ginger
2 tablespoons lemon juice
2 teaspoons ground cumin
2 teaspoons paprika
6 chicken thighs, skin removed
/2 teaspoon nutmeg
2 fresh red chillies, seeded
1 onion
2 cloves garlic, crushed
1
1
1
1 bay leaf
/4 teaspoon cinnamon
/2 teaspoon turmeric
1. Pure´e chillies, onion, garlic, ginger and lemon juice until smooth.
2. Mix cumin, pepper, coriander, cloves, cinnamon, bay leaf, turmeric, nutmeg
3. Cook for 1 minute on 100%, stirring halfway through cooking. Remove bay
4. Combine chilli mixture and spices together. Spread over chicken.
5. Sprinkle with vinegar and pour over yoghurt. Cover and marinate overnight,
6. Place on the low rack, cook for 20-22 minutes on HIGH MIX TOP GRILL and
7. Turn over and cook for 10 minutes on TOP GRILL.
4. Turn over and cook for a further 8-9 minutes on TOP GRILL.
TANDOORI CHICKEN
5-6 minutes on TOP GRILL.
Serves 4
1. Dip chicken thighs in butter.
2. Coat with combined cheese, flour and parsley.
3. Place on the low rack. Cook for 14 minutes on HIGH MIX TOP GRILL and
1 cup wholemeal flour
1 tablespoon chopped parsley
1 kg chicken thighs
100 g butter, melted
1
/4 cup finely grated parmesan cheese
WHOLEMEAL CHICKEN
Serves 4-6
Serves 4
Page 51

6. Serve hot with pasta.
825g can apricot halves, drained
4 chicken thighs
1 packet French onion soup
2 tablespoons plain flour
125 mL apricot nectar
7. Serve immediately with a tossed salad.
APRICOT CHICKEN
4. Mix together plain flour, sour cream and chicken stock.
5. Combine chicken, macaroni and sauce mixture. Sprinkle with cheese and
6. Sprinkle with parsley.
cook for 10-12 minutes on 70% and 4-5 minutes on TOP GRILL.
1. Toss chicken in combined French onion soup and plain flour.
2. Place in a 3 litre casserole dish and put on low rack.
3. Cook chicken for 13-15 minutes on 70%. Turn chicken over.
4. Pour over apricot nectar and apricots.
5. Cook, covered, for 13-15 minutes on 70%.
2. Place macaroni in a large bowl. Cover with hot water. Cook for 22-25
3. Remove flesh from chicken.
minutes on 100% or until pasta is tender. Drain.
1. Melt butter for 20 seconds on 100%. Brush chicken with butter. Place on the
low rack. Cook for 12-14 minutes on HIGH MIX TOP GRILL and 5 minutes
on TOP GRILL. Turn over. Cook for 12-14 minutes on HIGH MIX TOP
GRILL and 5 minutes on TOP GRILL.
1 cup chicken stock
1 cup grated cheese
1 tablespoon chopped parsley
2 cups macaroni
1
300 mL sour cream
/4 cup plain flour
CHICKEN AND MACARONI BAKE
No. 15 chicken
20 g butter, melted
Serves 4
21
5. Place on the low rack, cook for 16-18 minutes on HIGH MIX TOP GRILL and
6. Turn over and cook for a futher 6 minutes on TOP GRILL.
4. Sprinkle with sesame seeds.
bowl. Pour over chicken and marinate for 2-3 hours.
TOP GRILL and 10 minutes on TOP GRILL.
8 large chicken legs
sesame seeds
1 clove garlic, crushed
1
2 tablespoons oil
/2 teaspoon freshly grated ginger
250 mL soy sauce
4 tablespoons honey
1 tablespoon lemon juice
HONEY CHICKEN LEGS
1. Combine soy sauce, honey, lemon juice, garlic, ginger and oil in a small
2. Arrange chicken legs on the low rack. Cook for 18-20 minutes on HIGH MIX
3. Turn chicken over and cook for a further 10 minutes onTOP GRILL.
7. Allow to stand for 5-10 minutes before serving.
4-5 minutes on TOP GRILL.
Serves 4-6
1. Mix parsley, basil, tarragon, dill, mustard powder, paprika, salt and pepper,
2. Using a sharp knife, lift skin back from the chicken drumsticks.
3. Spread a teaspoon of herb mixture between skin and chicken.
4. Brush chicken with remaining butter, coat with biscuit crumbs.
sesame seeds and one-third of butter together in a small bowl.
8 large chicken drumsticks
125 g country cheese biscuits, crushed
salt and pepper
1 teaspoon sesame seeds
90 g butter, melted
2 teaspoons dill
2 teaspoons mustard powder
1 teaspoon paprika
2 tablespoons chopped parsley
1 teaspoon basil
2 teaspoons tarragon
CHEESE AND HERB CHICKEN LEGS
Serves 4
Serves 4
Page 52

6. Allow to stand covered with foil for 10 minutes before serving.
small bowl.
legs together.
MIX TOP GRILL.
Cook for a further 12-14 minutes on HIGH MIX TOP GRILL.
2 tablespoons honey
1
2 tablespoons seeded mustard
No.15 chicken
/2 cup toasted, slivered almonds
CRUNCHY CAMEMBERT CHICKEN
125 g camembert cheese, finely chopped
2 rashers bacon, finely chopped
5. Garnish with black olives.
minutes on 70%.
1. Mix camembert, bacon, almonds and 1 tablespoon mustard together in a
2. Press camembert mixture between skin and flesh of chicken. Tie chicken
3. Mix remaining mustard and honey. Brush over chicken.
4. Place breast side down on the low rack, cook for 12-14 minutes on HIGH
5. Turn chicken over and brush with remaining mixture.
4. Add capsicum and chopped tomatoes. Cover and cook a further 10-12
is coated.
juice from tomatoes, stock cubes and white wine in a 5 litre casserole dish.
1 onion, sliced
30 g butter
1 clove garlic, crushed
1 green capsicum, thinly sliced
6 black olives, sliced
/2 cup white wine
6 chicken thighs
CHICKEN CACCIATORE
1
1 tablespoon Season All salt
/4 cup flour
1
2 tablespoons tomato paste
440 g can peeled tomatoes
2 chicken stock cubes
1. Place chicken, flour and season all salt into a freezer bag.Toss until chicken
2. Combine chicken thighs, remaining flour, onion, butter, garlic, tomato paste,
3. Cover and cook for 26-28 minutes on 70%. Stir 2-3 times during cooking.
22
Serves 6
1. Wash and dry chicken well.
2. Tie legs of chicken together with string.
3. Place breast-side down on the low rack.
4. Baste with butter and sprinkle with Season All salt.
5. Cook for 12-14 minutes on HIGH MIX TOP GRILL and 7 minutes on TOP
6. Turn chicken over. Baste with butter and sprinkle with Season All salt.
7. Cook a further 12-14 minutes on HIGH MIX TOP GRILL and 7 minutes on
8. Allow to stand covered with foil for 10 minutes before serving.
GRILL.
TOP GRILL.
No.15 chicken
30 g butter, melted
Season All salt
ROAST CHICKEN
1. Place chicken, flour and paprika into a freezer bag. Toss until chicken is
2. Place chicken fillets on the low rack.
3. Cook for 8-10 minutes on 70%, turning over halfway through cooking.
4. Place ham and pineapple slices on top of each chicken piece.
5. Top with cheese.
6. Cook for 10 minutes on TOP GRILL.
7. Serve on a hamburger bun with lettuce and tomato.
coated.
Serves 6
4 chicken breast fillets (approx. 500 g)
2 tablespoons flour
1 teaspoon paprika
2 slices ham, sliced in half
2 slices pineapple, sliced in half
4 slices processed cheese
CHICKEN FILLET BURGERS
Serves 4
Serves 4
Page 53

10. Serve with French bread.
7. Place mussels in remaining white wine. Cook for 3-5 minutes on 70%, until
8. Gently fold seafood into rice mixture.
9. Cover and reheat Paella for 14-16 minutes on 50%.
mussels open.
5. In a large bowl, heat white wine for 4-5 minutes on 100%. Add fish fillets.
6. Stir in prawns and calamari. Cover and cook a further 8-10 minutes on 50%
Cover and cook for 4-6 minutes on 50%. Remove fish.
until prawns turn pink. Remove from wine.
3. Stir in tomatoes and tomato paste. Cover and cook for 3-5 minutes on
4. Stir in peas, capsicums, turmeric and paprika. Cook for 5-6 minutes on
100%, stirring halfway through cooking.
100%, stir in cooked rice.
1. Combine rice and chicken stock together in a large casserole dish.
2. Combine oil, garlic and onion together in a small bowl. Cook for 2-3
Cook for 45-50 minutes on 100%, until tender.
minutes on 100%.
1 red capsicum, diced
1 green capsicum, diced
3 cups brown rice
6 cups chicken stock
1 tablespoon olive oil
2 cloves garlic, crushed
1 onion, chopped
4 ripe tomatoes, chopped
1
1 cup frozen peas
/4 cup tomato paste
PAELLA
23
2. Combine ricotta cheese, cheddar cheese, salt and pepper, eggs, salmon
1. Combine cornflour with 2 tablespoons of tomato purée to form a
5. Serve in individual dishes with garlic bread.
parsley.
GARLIC PRAWNS
24 green king prawns
2 tablespoons butter
3 cloves garlic, crushed
1. Peel and devein prawns, leaving tails intact.
2. Combine butter and garlic. Cook for 1
3. Stir in oil and prawns.
4. Cook for 4-6 minutes on 50%, tossing every 2 minutes. Spinkle with
2. Pour tomato purée over salmon rolls and cook for 18-20 minutes on
smooth paste. Stir in remaining purée and parsley.
70% or until noodles are tender.
3. Place a spoonful of salmon mixture into each lasagne sheet. Roll up tightly.
SAUCE
and lemon juice; mix well.
Place in a single layer in a shallow heat-proof dish, seam-side down.
24 green prawns, peeled with
2 calamari tubes, sliced into
6 mussels
rings
1 kg fish fillets, cubed
tails intact and deveined
1
paprika
2 cups white wine
/2 teaspoon turmeric
Serves 8
SEAFOOD
12 lasagne noodles (200 g packet)
250 g ricotta cheese
90 g cheddar cheese, grated
salt and pepper to taste
2 eggs, lightly beaten
210 g can red salmon, drained
2 teaspoons lemon juice
1. Soak noodles (4 at a time) in a large bowl of boiling water, till noodles are
pliable to roll.
CHEESY SALMON ROLLS
ROLLS
1
/2-2 minutes on 100%.
1
1 tablespoon chopped
/3 cup olive oil
parsley
Serves 4
1 tablespoon cornflour
415 g can tomato purée
2 tablespoons parsley, chopped
SAUCE
Serves 4-6
Page 54

7. Cook for 1
well.
with a toothpick.
1
/2 minutes on TOP GRILL.
removed
2 teaspoons grated ginger
8 rashers bacon, rind
12 crab sticks
2 tablespoons lemon juice
1 clove garlic, crushed
1 tablespoon soy sauce
/4 cup oil
CRISPY MARINATED CRAB STICKS
1 teaspoon sugar
1
1. Cut crab sticks in half.
2. Place lemon juice, garlic, ginger, sugar, oil and soy sauce in a bowl. Mix
3. Place crab sticks in marinade and allow to stand 2 hours. Drain.
4. Cut bacon into 3 pieces. Wrap each piece around each crab stick; secure
5. Place on the low rack.
6. Cook for 14-16 minutes on LOW MIX TOP GRILL.
1. In a large bowl combine oil, onions and chilli; cook for 1 minutes on 100%.
2. Stir in cornflour, sugar, soy sauce and black bean sauce.
3. Add scallops; stir well.
4. Cook for 10-12 minutes on 50%, stirring twice during cooking.
1 tablespoon cornflour
500 g scallops
sauce
1 tablespoon oil
2 spring onions, finely sliced
1 chilli, seeded and finely chopped
2 tablespoons black bean
2 teaspoons sugar
1 tablespoon soy sauce
STEAMED SCALLOPS IN BLACK BEAN
SAUCE
24
Makes 24
1. In a large bowl, combine butter, onion, capsicum and celery. Cook for
2. Stir in flour, tomatoes, tomato paste, chicken stock, parsley, sugar, salt and
3. Cook, uncovered, for 5 minutes on 100%, stirring once.
4. Add prawns and cook for 18-20 minutes on 50%, stirring twice. Serve with
4-5 minutes on 100%.
chilli powder; mix well.
rice.
1
2 tablespoons flour
425 g can whole tomatoes
/2 cup tomato paste
500 g green prawns, peeled and deveined
/2 teaspoon chilli powder
1 medium onion, chopped
1 capsicum, chopped
1 stick celery, sliced
2 teaspoons sugar
1
1
/2 teaspoon salt
PRAWN CREOLE
1 tablespoon butter
pasta. Toss well.
1 cup chicken stock
1 tablespoon parsley
1. Place tagliatelle into a large bowl. Cover with hot tap water. Cook for 14-16
2. Toss sliced crab sticks, pine nuts and shallots through pasta.
3. Mix French dressing and cream. Season with salt and pepper. Pour over
minutes on 100%, until tender. Drain well.
12 crab sticks, sliced
1
6 shallots, chopped
/2 cup toasted pine nuts
300 mL cream
salt and pepper
Serves 4
500 g tagliatelle pasta
TAGLIATELLE AND CRAB SALAD
1
/2 cup French dressing
Serves 4
Serves 6-8
Page 55

5. Serve with satay sauce and rice.
Marinate for 1-2 hours.
Turn over halfway.
6 bamboo skewers
3 shallots, finely chopped
lemon pepper to taste
1
/2 cup toasted sesame seeds
/4 cup chopped parsley
1
1
/4 cup oil
SESAME PRAWNS
24 green king prawns (approx. 1 kg)
1
/4 cup port
8. Cook for 16-19 minutes on HIGH MIX TOP GRILL and 3 minutes on TOP
9. Allow to stand for 10 minutes before serving.
GRILL.
6. Layer noodles over base of a 2-litre rectanglar casserole dish.
7. Cover noodles with
Repeat process, ending with marinara sauce and cheese.
1
/3 marinara sauce and
1
/2 cup cheese.
1. Peel prawns, leaving tails intact, and devein. Place in a shallow dish.
2. Combine port, oil, parsley, shallots and lemon pepper. Pour over prawns.
3. Thread 3-4 prawns onto each bamboo skewer. Coat in sesame seeds.
4. Place skewers on the high rack. Cook for 15-17 minutes on TOP GRILL.
5. Dip noodles individually into a large bowl of boiling water.
1 teaspoon dry mustard
4 cups milk
Stir every 2 minutes.
1 packet precooked lasagne
1
1
1
/2 cups grated tasty cheese
/2 minutes on 100%.
noodles
SEAFOOD LASAGNE
125 g butter
1
1
/2 cups plain flour
500 g seafood marinara
1. Melt butter for 1-2 minutes on 100% in a large bowl.
2. Stir in flour and dry mustard. Cook for 1
3. Gradually stir in milk. Cook for 6-8 minutes on 100% or until sauce is thick.
4. Stir in marinara. Cook for 4-6 minutes on 50%.
25
Serves 4
2. Gradually stir in milk. Cook for 4-5 minutes on 100%, stirring every 2
1. Wash mussels under running water; remove all traces of mud, seaweed and
1. Melt butter in jug for 30 seconds on 100%, add oil, garlic and pepper.
2. Arrange mussels in serving bowl and pour remaining sauce over mussels.
GARLIC BUTTER
Pour
1
/2 garlic sauce over mussels; toss well.
2. In a large bowl, cover mussels with wine, water and garlic. Cook for
barnacles with brush or knife; remove beards. Discard cracked, broken or
open mussel shells.
16-18 minutes on 50% or until open, removing from liquid as they open.
Discard unopened mussels.
1 clove garlic, crushed
2 cloves garlic, crushed
pepper
500 g mussels
1 cup wine
2 cups water
2 tablespoons butter
2 tablespoons olive oil
GARLIC MUSSELS
GARLIC BUTTER
6. Serve with fresh garden salad.
3. Stir in onion, crab meat, eggs, salt and pepper and
4. Place into a 1-litre serving dish. Sprinkle with cornflake crumbs and remain-
5. Cook for 13-15 minutes on LOW MIX TOP GRILL.
mustard. Cook for a further 1 minute on 100%.
minutes.
ing cheese.
1
/4 cup cheese.
Serves 4 as entree
Serves 6-8
1. In a large bowl, melt butter for 1-1
1
/2 minutes on 100%. Stir in flour and
1
2 cups milk
1 onion, finely chopped
/2 teaspoon dry mustard
1
2 tablespoons cornflake crumbs
2 hard-boiled eggs, sliced
salt and pepper
/2 cup finely grated cheese
CRAB MORNAY
60 g butter
1
/3 cup plain flour
2 x 170 g cans crab meat, drained
Serves 6
Page 56

7. Garnish with fresh basil.
8 minutes on 100%, stirring halfway through cooking.
until mussels open. Discard any which stay closed.
cook for 5-6 minutes on 70%.
on 70% or until fish flakes.
750 g scallops
500 g green prawns,
peeled and deveined
500 g firm fish fillets,
cut into bite-size pieces
5 crab sticks, sliced
6 oysters
1 tablespoon olive oil
1 onion, finely chopped
1
1
1
/4 cup chopped fresh basil
1
grated rind of 1 lemon
salt and pepper
/4 teaspoon turmeric
425 g can tomatoes, pure´ed
2 tablespoons tomato paste
/2 cup white wine
/2 cups fish stock
BOUILLABAISSE
6 mussels
1 clove garlic, crushed
1
1. Wash and clean seafood.
2. Cook oil, onion and garlic in a large casserole dish for 1-2 minutes on 100%.
3. Stir in fish stock, tomatoes, white wine and tomato paste. Cover and cook for
4. Place mussels into hot stock, cover and simmer for 8-10 minutes on 70% or
5. Stir in scallops, prawns, turmeric, lemon rind, salt and pepper. Cover and
6. Stir in fish fillets, crab sticks and oysters. Cover and cook for 14-16 minutes
6. Serve with French bread and tossed salad.
5. Sprinkle with fresh basil.
cornflour. Refrigerate for 30 minutes.
100%.
squid is firm.
1 spring onion, chopped
1 tablespoon chopped fresh basil
1 tablespoon cornflour
1 tablespoon olive oil
1
2 tablespoons tomato paste
/4 cup dry white wine
SQUID IN TOMATO AND WINE SAUCE
500 g squid tubes
1
/2 teaspoon meat tenderiser
1 clove garlic, crushed
410 g can tomato, drained and chopped
1. Cut squid tubes into rings. Sprinkle with combined meat tenderiser and
2. Combine oil, onion and garlic. Cook for 1 minute on 100%.
3. Stir in tomatoes, white wine and tomato paste. Cook for 5-6 minutes on
4. Stir in squid. Cook for 10-12 minutes on 50%, tossing every minute until
26
Serves 8
1. Remove flesh from avocado, leaving shell intact. Either scoop out with a
2. In a large bowl, combine butter, onion, apple, cumin, coriander and turmeric.
3. Add flour and cook, uncovered, a further 1 minute on 100%.
4. Stir in cream, blend well.
5. Add the scallop and avocado mixture.
6. Cook for 18-20 minutes on 50%. Stir during cooking and after cooking.
7. Scoop mixture evenly back into the avocado shells. Serve hot.
teaspoon or by making horizontal and vertical cuts in flesh, easing out with a
round-bladed knife. Mix halved scallops with the avocado flesh.
Cover and cook for 5-6 minutes on 100%.
1 tablespoon flour
1
/2 cup cream
1
1
1
/2 teaspoon cumin
/2 teaspoon coriander
/2 teaspoon turmeric
2 tablespoons butter
1 onion, finely chopped
1 Granny Smith apple, chopped
Serves 6
BOMBAY AVOCADO SCALLOPS
4 avocados, halved
500 g scallops, halved
Serves 4
Page 57

1. Place bacon in a small bowl, cover and cook for 3 minutes on 100%.
2. Sprinkle bacon over top of oysters, and add sauce. Place on the high rack
and cook for 8-10 minutes on TOP GRILL.
3 rashers bacon, chopped
1 dozen oysters in the half shell
2 tablespoons worcestershire sauce
OYSTERS KILPATRICK
Serves 1-2
27
7. Serve with tartare sauce.
BOTTOM GRILL.
2 tablespoons olive oil
1 cup breadcrumbs
1
1 egg (lightly beaten)
/2 cup plain flour
PRAWN CUTLETS
16 green king prawns
1. Peel prawns, leaving tails intact and devein.
2. Cut prawn down the back, flatten slightly with hand to form a cutlet shape.
3. Dust prawns lightly with flour, dip into egg, and coat with breadcrumbs.
4. Spray turntable with non-stick spray.
5. Place directly onto turntable, cook for 7 minutes on BOTTOM GRILL.
6. Turn over and lightly brush each side with oil, cook for a further 7 minutes on
Serves 4
Page 58

4. Leave to stand for 5 minutes and stir with a fork before serving.
on 100%. Stir well.
ingredients. Cover with a lid and cook for 16-18 minutes on 100%. Do not
stir while cooking.
e.g. carrots, zucchinis, mushrooms
2 cups boiling water
1 cup long-grain rice, well washed
1 cup assorted finely chopped vegetables,
4 rashers bacon, diced
(or 1 cup cooked chicken or ham)
3 chicken or beef stock cubes
EASY HOME-MADE RICE RISOTTO
1 onion, diced
60 g butter
Serves 6-8
5. Stir in cheese until melted.
6. Pour over cauliflower. Sprinkle with paprika.
7. Cook for 6-8 minutes on TOP GRILL.
4. Gradually stir in milk and mustard. Cook for 2-2
every minute.
/2 minutes on 100%, stirring
1. Place onion, butter and bacon in large casserole dish. Cook for 3-4 minutes
2. Dissolve stock cubes in boiling water; add to onion and bacon. Add all other
3. At the end of this time, all the liquid will have been absorbed.
1. Place cauliflower in a pie dish. Cover and cook on the low rack for 4-6
2. Melt butter in a Pyrex jug for 40-50 seconds on 100%.
3. Stir in flour. Cook for 1 minute on 100%.
minutes on 100%, until tender. Drain.
1
paprika
1 cup milk
1 teaspoon mustard
1
/2 cup grated cheese
500 g cauliflower florets
30 g butter
2 tablespoons flour
CAULIFLOWER AU GRATIN
VEGETABLES
Serves 4-6
28
4. Stand covered for 3 minutes before serving.
1. Arrange vegetables in a shallow dish with the harder vegetables positioned
2. Cover with a lid or plastic wrap.
3. Cook for 4
around the outside and the softer vegetables in the centre.
1
/2-5
1
/2 minutes on 100%.
200 g broccoli, cut into florets
100 g zucchinis, sliced
VEGETABLE PLATTER
200 g carrots, sliced
Serves 4
1. Combine all ingredients in a casserole dish.
2. Cover and cook for 6-8 minutes on 100%.
3. Stand covered for 3 minutes before serving.
60 g butter
1 tablespoon honey
HONEY CARROTS
500 g carrots, sliced lengthwise
Serves 4
5. Cook uncovered, 6 minutes on HIGH MIX TOP GRILL and 8-10 minutes on
TOP GRILL.
2. Drain off water.
3. Arrange sliced onion over potatoes.
4. Combine sour cream and egg. Mix well and pour over potatoes. Sprinkle
with cheese and a little paprika if desired.
1. Place potatoes in a round or oval shallow dish, add water, cover, and cook
paprika
for 6-8 minutes on 100% on the low rack.
200 g carton light sour cream
1 egg
90 g cheddar cheese, finely grated
3 large potatoes (approx. 500 g), peeled and sliced thinly
SCALLOPED POTATOES
1
1 large onion, sliced
/4 cup water
Serves 4-6
Page 59

3. Combine mayonnaise, sour cream and black pepper. Pour over potatoes.
4. Toss in onions and avocado; sprinkle with chives.
5. Cook for 2-3 minutes on 100%.
paper.
or until tender.
6 shallots, chopped
1
1
1
/4 teaspoon dried basil leaves
/4 teaspoon dried oregano leaves
/2 cup grated tasty cheese
2 rashers bacon, chopped
3 medium chokos (500 g), peeled, cored and thinly sliced
150 mL sour cream
CHOKOS WITH
SOUR CREAM AND BACON
1. Cook bacon in a large bowl for 2-3 minutes on 100%. Drain on absorbent
2. Add chokos to bacon fat in bowl; cover and cook for 8-10 minutes on 100%
3. Combine sour cream, basil, oregano, cheese and shallots with chokos.
4. Sprinkle with bacon.
5. Chill serve.
minutes on 100%, stirring twice.
1. Cut unpeeled potatoes in half. Place in a large dish and cover with water.
2. Place onion rings, caster sugar and butter in a Pyrex dish. Cook for 8-10
Cook, covered with a lid, for 16-18 minutes on 100% (potatoes should be
tender but holding their shape). Drain.
chives
150 mL sour cream
black pepper
1 large avocado, cubed
1 tablespoon caster sugar
1 tablespoon butter
1
/2 cup mayonnaise
POTATO, AVOCADO AND ONION SALAD
1 kg small new potatoes
1 large onion, sliced into rings
29
Serves 4-6
1. Combine oil, butter and onion in a large casserole dish. Cook for 2-3 minutes
2. Add carrots and potato. Cover and cook for 5 minutes on 100%.
3. Add celery, zucchini and cabbage. Cover and cook for 3 minutes on 100%.
5. Sprinkle with remaining cheese and paprika. Cook for 2-3 minutes on 100%
spoon, leaving a thin shell.
well until no lumps remain.
and 8 minutes on TOP GRILL.
paprika
100%. Stand in foil for 5 minutes.
30 g butter
2 teaspoons dried parsley flakes
1
/4 teaspoon dry mustard
/2 cup grated cheddar cheese
4 large potatoes
1
1
1
/4 cup milk
/4 cup cream
1. Pierce potatos with a fork; place on turntable. Cook for 10-12 minutes on
2. Cut a thin slice from top of each potato; scoop out cooked potato with a
3. Stir milk, cream, half the cheese, butter, parsley, mustard and potato. Mix
4. Spoon mixture into each potato shell. Place on the low rack.
4. Serve hot, topped with parmesan cheese.
STUFFED BAKED POTATOES
on 100%.
Add stock, undrained tomatoes, salt and pepper. Cook, covered, for 20-25
minutes on 100%, stirring occasionally.
Serves 6
MINESTRONE
1
60 g butter
2 onions, peeled and chopped
3 carrots, finely chopped
1 potato, peeled and chopped
3 sticks celery, chopped
2 x 400 g cans peeled tomatoes
salt and pepper
parmesan cheese
/2 cup oil
1
3 cups beef stock
2 zucchinis, chopped
/4 cabbage, shredded
Serves 4
Serves 6
Page 60

4. Serve hot.
prior to adding yoghurt.
ground black pepper
500 g squash
200 g carton natural yoghurt
2 teaspoons seeded mustard
1. Wash and trim squash. Slice thinly, place in a pyrex pie plate.
2. Cover and cook for 4-6 minutes on 100%, or until just tender. Drain juice
3. Combine yoghurt, mustard and pepper and gently fold through the squash.
SQUASH WITH YOGHURT
6. Serve hot.
leaves, salt and pepper in a large casserole dish. Cover and cook for 10-12
minutes on 100%, stirring halfway through cooking.
Cook for 40 seconds on 100%.
crumbs and dot with extra butter.
minutes on TOP GRILL.
4 whole cloves
2 cloves garlic
2 bay leaves
3
1
2 teaspoons butter, extra
/4 cup cream
/4 cup dry breadcrumbs
1. Place cabbage, carrot, stock, onion halves with cloves pressed in, garlic, bay
2. Remove onion and bay leaves.
3. Melt butter for 40 seconds on 100% in a jug. Stir in flour and curry powder.
4. Gradually stir in cream. Pour over slaw, then toss. Sprinkle with bread-
5. Cook covered for 8-10 minutes on 100%. Then cook uncovered for 3
1 onion, peeled and halved
1 tablespoon curry powder
/2 large cabbage, finely shredded
/2 cup chicken stock
salt and pepper
60 g butter
2 tablespoons plain flour
HOT CURRIED SLAW
1
1 large carrot, grated
1
30
Serves 4-6
1. In a large bowl,heat dressing, ginger, honey, soy sauce and lemon juice for
2. Add pumpkin and cook covered 4-6 minutes on 100%, until just tender.
3. Stir in beans and zucchinis, cook covered a further 6-7 minutes on 100%.
5. Pour over brussels sprouts. Heat for 2-3 minutes on 50%.
minutes on 50% until thick, stirring every minute.
4 egg yolks, lightly beaten (ensure all yolks have broken.)
2 tablespoons lemon juice
salt and pepper
30 g butter
1 small onion, finely chopped
1
/2 cup milk
SUNSHINE BRUSSELS SPROUTS
500 g brussels sprouts
1. Place brussels sprouts into a pie plate with 1 tablespoon water.
2. Cover and cook for 5-6 minutes on 100%.
3. Combine butter and onion in a jug. Cook for 2-3 minutes on 100%.
4. Blend remaining ingredients into onion and butter mixture. Cook for 5-6
4. Spoon onto a serving plate. Sprinkle with pecans.
3-4 minutes on 100%.
1 tablespoon soy sauce
2 tablespoons lemon juice
500 g butternut pumpkin, peeled and thinly sliced
1 cup frozen beans
2 zucchinis, sliced
1
/2 cup pecans
Serves 6-8
HONEY GINGERED VEGETABLES
1
2 teaspoons grated ginger
2 tablespoons honey
/2 cup salad dressing
Serves 4
Serves 6
Page 61

1. Cut tomatoes in half.
2. Place directly onto turntable.
3. Cook for 5 minutes on TOP and BOTTOM GRILL.
4. Turn over, cook for 5 minutes on TOP and BOTTOM GRILL.
GRILLED TOMATOES
2 tomatoes
3. Combine oregano and pepper to garlic mixture.
4. Add tomatoes and garlic mixture to potatoes, ensuring potatoes are well
5. Cook, uncovered, for 10 minutes on 100%, stirring halfway through cooking.
100%.
coated.
1. Peel and dice potatoes into 1.5 cm cubes, rinse and place in a large bowl
2. In a small bowl, combine butter and garlic and cook for 50 seconds on
with 2 tablespoons of water, cover and cook for 8 minutes on 100%, stirring
halfway through cooking. Drain.
2 teaspoons fresh (or
ground black pepper
425 g can tomatoes, roughly chopped
1
/
2
teaspoon dried) oregano
POTATOES PIZZAIOLA
4 large potatoes
1 tablespoon butter
1 clove garlic, crushed
31
Serves 4
1. Trim cauliflower and break into florets.
2. Place cauliflower in a 20 cm pie plate. Cover and cook for 4-6 minutes on
3. Heat peanut butter and honey in a large jug for 40 seconds on 100%.
4. Add yoghurt to the mixture, stir well.
5. Pour over cooked cauliflower. Combine parsley, eggs and breadcrumbs and
6. Cook for 4-5 minutes on 100% or until hot.
4. Fold mayonnaise mixture gently into the pumpkin. Serve chilled.
12-14 minutes on 100% or until pumpkin is just cooked, but still firm.
1
ground black pepper
1 cup mayonnaise
/4 cup finely chopped parsley
/2 teaspoon nutmeg
1 kg pumpkin, peeled and cubed
PUMPKIN SALAD
3
6 shallots, chopped
1
/4 cup walnuts
1. Place pumpkin in large bowl, add 2 tablespoons of water, cover and cook for
2. Refresh by running cold water over pumpkin. Drain and chill.
3. Mix walnuts, shallots, parsley, nutmeg and pepper with mayonnaise.
7. Serve hot.
sprinkle over peanut butter sauce.
100%.
Serves 4-6
500g cauliflower
1 cup peanut butter
2 tablespoons honey
200 mL carton natural yoghurt
1 tablespoon parsley
2 hard-boiled eggs, finely chopped (optional)
1
/2 cup wholemeal breadcrumbs
CAULIFLOWER POLONAISE
Serves 6-8
Serves 4-6
Page 62

8. Pour over extra brandy. Decorate with extra glacé fruits if desired.
of cooking time. (This will prevent the outside from overcooking before the
centre is cooked.)
on 100%, stirring once. Allow to cool slightly.
2 tablespoons brandy
4 eggs, lightly beaten
2 teaspoons parisienne essence
1 teaspoon cinnamon
2 tablespoons brandy, extra
/2 teaspoon nutmeg
1 kg mixed fruit
1 cup brown sugar
250 g butter, chopped
1 teaspoon baking powder
salt
1
AUSTRALIAN FRUIT CAKE
1 cup plain flour, sifted
6. Serve warm with whipped cream.
4. Combine last 4 ingredients and sprinkle over sliced butter.
5. Cook on the low rack for 6 minutes on 100% and 3
GRILL.
1
/2 minutes on TOP
1. Preheat oven to 130°C.
2. Combine the first 4 ingredients in a large bowl. Cover and cook for 5 minutes
3. Stir in eggs and parisienne essence, followed by dry ingredients.
4. Pour into a greased 20cm square cake tin.
5. Cook for 45-50 minutes on CONVECTION 130°C.
6. Using a 3 cm foil strip, place around the outside of cake container at halfway
7. Stand 5-10 minutes before turning out.
1. Place pie apple in a shallow casserole dish.
2. Sprinkle evenly with dry cake mix.
3. Layer sliced butter over cake mix, covering completely.
1 teaspoon cinnamon
3 tablespoons brown sugar
3 tablespoons coconut
2 tablespoons crushed nuts
800 g can pie apple
1
125 g hard butter, cut into thin slices
CALIFORNIAN APPLE CRUNCH
1
/2 cups White Wings buttercake mix
32
1. Melt chocolate and coffee for 1-2 minutes on 100%.
2. Add sour cream and beat well.
ICING
4. Mix well, pour into a greased microwave safe gugelhopf container.
5. Cook for 11 minutes on 50% followed by 11 minutes on CONVECTION
6. Allow to cool before icing.
130°C. Allow to stand 10 minutes before turning out.
1. Place chocolate and butter in a large bowl. Melt for 1-1
2. Add sour cream and water. Cook a further 1 minute on 100%. Mix well.
3. Stir in eggs, flour, sugar and baking powder.
stirring during cooking.
50 mL sour cream
ICING
250 g chocolate
2 tablespoons black coffee
1
1
/4 cups warm water
1
/2 teaspoon baking powder
Serves 4-6
CHOCOLATE CAKE
175 g Nestlé Milk Choc Melts
100 g butter
125 mL (
1
/2 cup) sour cream
1 cup brown sugar
2 eggs, lightly beaten
2
1
/2 cups self-raising flour, sifted
6. Serve with whipped cream.
4. Place in base of a 20 cm pie plate. Fill centre of apples with any remaining
5. Cook for 4-6 minutes on 100% and 6-8 minutes on TOP GRILL.
walnut mixture.
Allow to stand for 5 minutes.
Serves 6-8
DESSERTS
1. Place walnuts, sugar and mixed spice in a blender or food processor,
2. Peel and core apples, brush with lemon juice.
3. Brush apples with butter. Toss in walnut mixture until evenly coated.
process until nuts are finely chopped.
2 teaspoons mixed spice
30 g butter, melted
BAKED APPLES
3
1
/4 cup walnuts
/4 cup brown sugar
4 large apples
2 tablespoons lemon juice
1
/2 minutes on 100%,
Serves 4
Page 63

6. Allow to stand for 5 minutes before serving.
4 eggs, lightly beaten
3 tablespoons brown sugar
1
/4 teaspoon nutmeg
into eggs, then pour over bread mixture.
1
2
1
/2 teaspoon vanilla essence
/2 cups milk
butter
3 tablespoons caster sugar
/4 cup sultanas
1
1. Spread bread with butter and cut into 2 cm cubes.
2. Place bread, sugar and sultanas in a 1.25-litre pudding bowl.
3. Heat milk and vanilla in a small bowl for 3 minutes on 100%. Gradually whisk
4. Sprinkle with brown sugar and nutmeg.
5. Cook on low rack for 25-28 minutes on 30%.
BREAD AND BUTTER PUDDING
4 slices multigrain bread, crusts removed
2 cups boiling water
1 teaspoon vanilla essence
1 cup brown sugar
1
/3 cup cocoa powder, extra
/4 cup milk
1. Place butter in a large Pyrex pudding bowl; melt for 40 seconds on 100%.
2. Stir in flour, sugar, cocoa, milk and vanilla. Beat until smooth.
3. Combine brown sugar and extra cocoa. Sprinkle over pudding mixture.
4. Pour boiling water over the mixture.
5. Cook for 12 minutes on 50% and 3 minutes on TOP GRILL. Allow to stand
6. Serve hot with ice-cream.
for 5 minutes before serving.
1
1
3
1
/2 cup caster sugar
/4 cup cocoa powder
/2 cups self-raising flour
SELF-SAUCING PUDDING
60 g butter
1
CHOCOLATE
33
Serves 4-6
1. Place rice and water in a large Pyrex bowl. Cook for 12-15 minutes on
2. Mix condensed milk and butter together. Cook for 4-6 minutes on 100%,
3. Stir cooked rice, lemon juice, egg yolks and vanilla essence into caramel.
4. Beat egg whites until stiff, gradually beat in sugar. Spoon over rice pudding.
5. Sprinkle with cinnamon sugar. Cook for 3-5 minutes on 50% and 3 minutes
6. Serve decorated with cream and chocolate shavings.
into chocolate mixture.
seconds-1 minute on 100%. Stir in sugar.
2 tablespoons water
2 tablespoons rum
1
/4 cup caster sugar
300 mL carton thickened cream
extra cream for decoration
30 g chocolate, grated
CHOCOLATE MOUSSE
200 g cooking chocolate
3 egg whites
1. Place chocolate, water and rum in a large heatproof bowl. Melt for 30
2. Allow mixture to cool, then whip until aerated.
3. Beat egg whites until stiff peaks form.
4. Whip the cream until thick but not stiff. Fold cream and beaten egg whites
5. Divide mixture evenly between four dessert glasses. Refrigerate until set.
6. Stand 5 minutes before serving.
100%, or until tender. Stir at halfway. Drain.
stirring every 20 seconds. (Caramel will boil over if not stirred.)
Pour into a 2-litre pudding bowl.
on TOP GRILL.
Serves 4-6
1 cup rice
3 cups water
400 g can condensed milk
1 tablespoon butter
1 tablespoon lemon juice
2 tablespoons caster sugar
cinnamon sugar
CARAMEL RICE PUDDING
3 eggs, separated
1 tablespoon vanilla essence
Serves 4
Serves 4-6
Page 64

5. Place on the low rack. Bake for 12-14 minutes on CONVECTION 160°C.
125 g choc bits
60 g walnut pieces
tray: press down slightly, allowing room for spreading.
1 egg
1
1
/2 teaspoon salt
3
/4 cups self-raising flour, sifted
1
1
1
/2 cup caster sugar
/2 cup brown sugar, lightly packed
/2 teaspoon vanilla essence
1. Preheat oven to 160°C.
2. Cream butter, sugars and vanilla until light and fluffy. Beat in egg.
3. Mix in flour, salt, choc bits and walnut pieces.
4. Shape tablespoonfuls of mixture into balls. Place on a lightly greased pizza
CHOCOLATE CHIP COOKIES
125 g butter
1. Preheat oven to 160°C.
2. Cream butter and sugar together until light and fluffy. Add vanilla and egg.
3. Mix in flour, wheatgerm, coconut, rolled oats, apricots and cornflakes.
4. Shape tablespoonfuls of mixture into balls.
5. Place on a greased pizza tray: flatten slightly with a fork.
6. Place on the low rack. Bake for 10-12 minutes on CONVECTION 160°C.
Beat well.
1
125 g dried apricots, chopped
1
/2 cups cornflakes
/3 cup coconut
/3 cup rolled oats
1
1 egg
/4 cup brown sugar, lightly packed
/2 teaspoon vanilla essence
/2 cup self-raising flour, sifted
/4 cup wheatgerm
125 g butter
3
1
1
3
1
APRICOT WHEATGERM
CRUNCHIES
34
Makes24
Makes18
1. Spread sour cream evenly over base of a 20 cm pie plate. Sprinkle with
2. Combine butter cake mix, muesli, coconut and butter in a small bowl. Mix
3. Spread muesli mixture over peaches.
4. Cook on the low rack for 6 minutes on 100% and 4 minutes on TOP GRILL.
5. Stand 5 minutes before serving.
well.
175 g butter, melted
1
2 cups toasted muesli
/2 cup coconut
drained peaches.
1 cup butter cake mix
3 x 425 g can, sliced peaches, drained
MUESLI CUSTARD DELIGHT
300 g carton, sour cream
Serves 6-8
Page 65

Chops
POULTRY
Turkey Pieces
Chicken (Whole)
Pieces
Duck
8-10 minutes/500 g
10-12 minutes/500 g
8-12 minutes/500 g
10-12 minutes/500 g
10-15 minutes
10-15 minutes
9-11 minutes
8-10 minutes
8-10 minutes/500 g
7-9 minutes
Chops
Ribs
Minced Pork
LAMB (Roast)
Shoulder
6-8 minutes/500 g
8-10 minutes/500 g
10 minutes/500 g
10-12 minutes/500 g
8-10 minutes/500 g
10-15 minutes
10-15 minutes
5-10 minutes
5-10 minutes
7-9 minutes
BEEF (Roast)
Steaks
Minced Beef
PORK (Roast)
CUT
10-12 minutes/500 g
8-9 minutes/500 g
10-12 minutes/500 g
7-9 minutes/500 g
10-15 minutes
5-10 minutes
MICROWAVE TIME
10-15 minutes
5-10 minutes
1. Remove wrapping from meat.
2. Place frozen meat on a defrost rack. Shield.
3. Defrost using MEDIUM LOW/DEFROST power level (30%).
4. Halfway through defrosting, remove any defrosted portions, e.g. steak,mince.
Turn over and shield. Continue defrosting.
DEFROSTING TIMES AND TECHNIQUES
FOR MEAT AND POULTRY
STANDING TIME
DEFROSTING FROZEN FOODS
Procedure:
CHARTS
35
2 slices
4 slices
Individual
Whole
4-5 minutes
8-10 minutes
Place between paper towel
on a rack. Allow to stand
5 minutes before reheating.
Bread Rolls
PIES
30 seconds
50 seconds
30 seconds per roll
MICROWAVE TIME
Place between paper towel
directly on turntable.
PROCEDURES
Prawns
BREAD
4-6 minutes/500 g
MICROWAVE TIME
2-3 minutes
PROCEDURES
possible.
Separate as soon as
Scallops
6-8 minutes/500 g
2-3 minutes
Separate and
rearrange halfway
through defrosting.
possible.
Separate as soon as
Whole Fish
SEAFOOD MICROWAVE TIME STANDING TIME PROCEDURES
DEFROSTING TIMES AND TECHNIQUES
FOR SEAFOOD, BREAD AND PIES
4-6 minutes/500 g
5 minutes
Shield head and tail
with foil.
Page 66

Eggplant
Chokos
Corn (on cob)
Cauliflower
Carrots
sprouts
Cabbage
Brussels
Broccoli
Beans
Asparagus
VEGETABLE
36
Vegetables
(canned)
500 g (2)
500 g
4-5 minutes
Cut into 2 cm cubes. Place in a dish with 2
tablespoons water. Cook covered. Allow to stand
3 minutes before serving.
Zucchini
1 kg (4)
15-17 minutes
Arrange in a dish with
covered. Turn over during cooking. Allow to
stand 5 minutes before serving.
/3 cup water. Cook
Tomatoes
7-8 minutes
Arrange in a dish with
covered. Turn over during cooking. Allow to
stand 3 minutes before serving.
1
/4 cup water. Cook
Sweet Potato
500 g (2)
5-6 minutes
Cut into quarters. Place in a 20 cm pie plate with
1 tablespoon of water. Cook covered. Allow to
stand 3 minutes before serving.
1
Squash
500 g
5-6 minutes
Cut into uniform florets. Arrange with flower
towards centre, with 1 tablespoon water. Cook
covered. Allow to stand 3 minutes before
serving.
Spinach
500 g
500 g
4-6 minutes
Allow to stand 3 minutes before serving.
Pumpkin
500 g
7-8 minutes
Shred and cook in a dish with 2 tablespoons
water. Cook covered. Allow to stand 3 minutes
before serving.
Peel and slice. Arrange in a dish. Cook covered.
(baked)
500 g
3-4 minutes
Arrange in a 23 cm flan dish. Arrange with stalk
towards outside. Cook covered. Allow to stand 3
minutes before serving.
Potatoes
500 g
5-5
3-3
1
1
/2 minutes
/2 minutes
Cut into 4 cm pieces. Place in a dish with 1
tablespoon water. Cook covered. Allow to stand
3 minutes before serving.
Cut into uniform florets. Arrange with flower
towards centre. Cook covered. Allow to stand 3
minutes before serving.
Peas - Green
AMOUNT
500 g
MICROWAVE TIME
AT HIGH (100%)
3-3
1
/2 minutes
Wash and place in a freezer bag. Allow to stand
3 minutes before serving.
COOKING PROCEDURE
FRESH VEGETABLE CHART
Mushrooms
500 g
500 g
2-4 minutes
with 1 tablespoon covered water and 1
tablespoon butter. Cook covered. Allow to
stand 3 minutes before serving.
vegetables and reserved liquid in a dish and
cook covered. Allow to stand 3 minutes
before serving.
Drain, reserving 2 tablespoons liquid. Place
500 g
1 kg
2
12-14 minutes
1
4-5 minutes
Cut into uniform-size pieces. Place in a dish
/2-3
1
/2 minutes
a dish with
minutes before serving.
and cook covered. Allow to stand 3 minutes
before serving.
Cut into quarters. Place in a dish. Season
1
/2 cup water. Allow to stand 3-5
500 g
500 g
4-5 minutes
5-6 minutes
squash with a fork. Cook covered. Allow to
stand 3 minutes before serving.
Peel and quarter potatoes. Cook, covered, in
500 g
5-6 minutes
with 2 tablespoons water. Allow to stand 3
minutes before serving.
Wash and place in a dish. Pierce whole
500 g
9-10 minutes
in a dish and cook covered. Allow to stand 1-
5 minutes before serving.
Peel and cut into serving-size pieces. Place
Wash and shred. Cook, covered, in a dish
5-6 minutes
stand 3 minutes before serving.
Turn over halfway through cooking. Allow to
stand wrapped in foil 3 minutes.
with 1/3 cup water. Cook covered. Allow to
Peel and quarter potatoes. Cook in a dish
2 medium
4 small
4 small
(jacket)
2 medium
5-5
/2 minutes
Pierce skin with a fork. Place on turntable.
- Snow
AMOUNTVEGETABLE
500 g
500 g
4-5 minutes
3-4 minutes
1
tablespoon water. Cook covered. Allow to
stand 1-5 minutes before serving.
1 tablespoon water. Cook covered. Allow to
stand 3 minutes before serving.
Cook in a dish with 1 teaspoon sugar and 1
Remove string from pod. Cook in a dish with
500 g
MICROWAVE TIME
AT HIGH (100%)
4-5 minutes
teaspoons butter. Cook covered Allow to
stand 3 minutes before serving.
Sliced or whole. Place in a dish with 2
COOKING PROCEDURE
Page 67

(kernel)
Peas (green)
Spinach
Mixed Vegetables
Cauliflower
Corn (on cob)
Brussels sprouts
Carrots (whole)
(sliced)
Asparagus
Beans (green, cut)
Broccoli
1. Place vegetables in a dish. Cover with a lid.
2. Allow to stand 1-3 minutes before serving.
37
500 g
500 g
250 g
500 g
9-10 minutes
possible.
Break apart as soon as
possible.
8-9 minutes
8-9 minutes
5-6 minutes
Break apart as soon as
Add 1 teaspoon of butter.
4 pieces
(500 g)
7
1
/2-8
1
/2 minutes
possible.Arrange with flower
towards the centre.
500 g
500 g
500 g
500 g
8-10 minutes
7
/2-8
7-8 minutes
8-9 minutes
/2 minutes
Break apart as soon as
500 g
8-8
1
1
/2 minutes
1
Break apart as soon as
possible. Arrange with flower
towards the centre.
WEIGHTVEGETABLE
500 g
500 g
MICROWAVE TIME
AT HIGH (100%)
7-8 minutes
8-9 minutes
SPECIAL PROCEDURES
FROZEN VEGETABLE CHART
3
4
2
2 tsp.
1
/2 tsp.
1 tbsp.
1
/3 cup
3
/4 min.
4 min.
3
1
2
1
1
/2 tsp.
3 tsp.
3 tsp.
2
1
1
/4 min.
/4 min.
Egg(s)
1 tsp.
Butter
Milk
HIGH (70%)
3
through cooking.
MEDIUM
Cook
in. Cook uncovered, stirring halfway
GUIDE TO COOKING EGGS
SCRAMBLED EGG GUIDE
Place butter, eggs, and milk in a small
bowl.
Beat with a fork until well combined
and yolks of eggs are completely stirred
during cooking. Allow to stand 2 minutes.
Procedure:
Place rice/pasta/oats in a large bowl with water. Cook uncovered, stirring twice
oats
oats
1 cup quick-cooking
250 g spaghetti
1 cup brown rice
1 cup macaroni
250 g fettuccine
1
/3 cup quick-cooking
1 cup white rice
RICE AND PASTA COOKING CHART
FOOD
4 cups boiling water
4 cups boiling water
4 cups boiling water
3
2
/4 cup water/milk
1
/4 cups water/milk
9-11 minutes on HIGH
1-2 minutes on HIGH
5
on HIGH
1
/2-6
1
/2 minutes minutes
9-11 minutes on HIGH
2 cups hot water
2 cups hot water
OTHER INGREDIENTS
12-13 minutes on HIGH
23-25 minutes on HIGH
11-13 minutes on HIGH
COOKING TIME
Page 68

NOTE: Room Temperature +20°C
(frozen)
Refrigerator Temperature +3°C
Frozen Temperature -18°C
GRILL
Fruit Pie individual (frozen)
135 g each
Danish Pastry whole
400 g
1
2
followed by 2 minutes on TOP/BOTTOM GRILL
1
followed by 4 minutes on TOP/BOTTOM GRILL
4
1
1
/2 minutes on 50%
/2 minutes on 70% followed by 5 minutes on TOP
Croissants (frozen)
Fruit Pie whole (frozen)
600 g
1
2
40 sec-1 minute on 30%
1
10 minutes on LOW MIX TOP GRILL
1
/4-1
1
/2 minutes on 30%
350 g-400 g per serve
Casserole (refrigerated)
250 g per serve
2 seves
1 serve
6-7 minutes on 50%
11-12 minutes on 50%
Pizza (refrigerated)
100 g per slice
Dinner Plate (refrigerated)
2 slices
1 serve
1 slice
and 3-5 minutes on TOP/BOTTOM GRILL
1-2 minutes on 70%
1
6
1
1
/2-2
/2-7 minutes on 50%
1
/2 minutes on 70%
Frozen Pasta Dinners
(e.g. Lasagne)
300-500 g
500-750 g
TOP/BOTTOM GRILL
5-7 minutes on 100% followed by 4-6 minutes on 50%,
and 3-4 minutes on TOP/BOTTOM GRILL
7-9 minutes on 100% followed by 6-8 minutes on 50%,
Meat Pie (refrigerated)
Individual 180 g each
4 pies
1 pie
2-2
TOP/BOTTOM GRILL
6-6
1
/2 minutes on 50% followed by 4-4
/2 minutes on 50% followed by 6-6
(e.g. Spaghetti, Baked Beans)
Canned Soup (room temp.)
250 mL per cup
2 cups
2 cups
1 cup
10 minutes on 50%
2-2
5 minutes on 100%
1
1
/2 minutes 100%
Beverage (room temp.)
250 mL per cup
Canned Food (room temp.)
FOOD
WEIGHT STANDING TIME
2 cups
1 cup
1 cup
2 minutes on 100%
4 minutes on 100%
5-5
1
/2 minutes on 50%
COOKING TIME AND POWER LEVEL
REHEATING CONVENIENCE
DEFROSTING CONVENIENCE
38
Remove from foil container. Place on dinner plate. Allow
to stand.
turntable. Allow to stand.
turntable.
Keep in foil container. Place on turntable. Allow to stand.
Remove from foil container. Place directly on the
Place on paper towel. Place directly on turntable. Allow to
stand.
Slice potato. Cover plate with plastic wrap. Place directly
on turntable. Allow to stand.
Place in a bowl, cover with plastic wrap. Place directly on
turntable. Stir halfway. Allow to stand, then stir.
Place between paper towels. Place directly on the
Remove from foil container. Place in a dish same size.
Allow to stand.
1
1
/2 minutes on
/2 minutes on
Stir after heating.
Place food in bowl. Cover plastic wrap or lid.
Stir halfway.
Stir halfway through cooking. Stir after heating.
Place directly on turntable, face side down. When oven
stops, turn pie over and continue cooking.
– FOOD CHART
SPECIAL INSTRUCTIONS
1-2 minutes
2-3 minutes
2-3 minutes
—
1-2 minutes
2 minutes
—
1-2 minutes
—
2-3 minutes
1-3 minutes
—
Page 69

Toasted
Sandwiches
OpenToasted
Sandwiches
1-2 (whole)
1-2 (open)
(filling: cheese, ham, tomato)
(filling: cheese, ham, tomato)
5 minutes on TOP and BOTTOM GRILL
5 minutes on TOP and BOTTOM GRILL
Grill
per/1serve
includes: 1 steak, 1chop, 1 sausage
1 rasher bacon and 1 egg
1.
2.
10 minutes on TOP and BOTTOM GRILL
6 minutes on TOP and BOTTOM GRILL
per/4 tomatoes halved
1.
2.
5 minutes on TOP and BOTTOM GRILL
5 minutes on TOP and BOTTOM GRILL
Grilled
Tomato
Mixed
Chicken Breasts
per/500g
1-2 breasts
1.
2.
per/500g
1.
2.
FOOD
2 rashers
4 rashers
Bacon
Sausages
(thick, thin)
Steak/Chops
GRILLING CHART
6 minutes on TOP and BOTTOM GRILL
8 minutes on TOP and BOTTOM GRILL
10 minutes on TOP and BOTTOM GRILL
6 minutes on TOP and BOTTOM GRILL
14-15 minutes on TOP and BOTTOM GRILL
8 minutes on TOP and BOTTOM GRILL
8 minutes on TOP and BOTTOM GRILL
39
Turn over after stage 1, continue cooking.
Place directly onto turntable.
Turn over after stage 1. Drain juices. Add egg,
and continue cooking.
Place directly onto turntable.
Place directly onto turntable.
COOKING TIME AND POWER LEVEL
Place directly onto turntable
Place directly onto turntable, pierce 3 times.
Turn over after stage 1, drain juices, and
pierce skin again 3 times. Continue cooking.
Place directly onto turntable.
Place directly onto turntable.
Turn over after stage 1. continue cooking.
Place directly onto turntable. Spray with non-
stick cooking spray.
INSTRUCTIONSAMOUNT STAGE
Page 70

QUICK REFERENCE GUIDE
FEATURE
Sensor Instant Action
Reheat Sensor
Convenience/Pizza
Multi Cook
Easy Defrost
Variable Cooking
Control
Preheat
Manual Convection
Cooking
Grill Cooking
Mix Cooking
QUICK OPERATION GUIDE
Jacket
Potato
REHEAT
SENSOR
PRESS
Once to automatically cook 1 to 10 potatoes.
Menu
Number
INSTANT COOK
START
eg. Dinner Plate
MULTI
COOK
EASY
DEFROST
Menu
Number
eg. Roast Beef
Weight
Weight
INSTANT COOK
eg. 1.0kg
INSTANT COOK
START
eg. 1.0kg
To soften Cream Cheese or Butter for 40 seconds on M•LOW.
Cooking Time
eg. 40 seconds
PREHEAT
Temp
160°C
POWER
LEVEL
INSTANT COOK
START
INSTANT COOK
START
x 4
eg. 160°C
Cooking Time
eg. 15 minutes
INSTANT COOK
START
INSTANT COOK
CONVEC
Grill Mode
GRILL
eg. TOP heater
Mix Setting
x 1
MIX
x 1
eg. High mix top grill
Temp
180°C
eg. 180°C
Cooking Time
eg. 15 minutes
Cooking Time
eg. 15 minutes
START
INSTANT COOK
START
START
®
SHARP CORPORATION OSAKA, JAPAN
TINSEA779 WRR0 - M32
PRINTED IN THAILAND
 Loading...