

Page 1
10
HOW TO OPERATE THE OVEN
Website: http://www.sharp.co.uk/support Help Line: 08705 274277 (office hours)
Opening and closing the door:
To open the oven door for R-884M, pull the door opening handle, for R-84STM
and R-874M press the door opening button. The oven lamp will come on while
the door is open. Close the door firmly and the oven lamp will go out.
Starting the oven:
Prepare and place food in a suitable container onto the turntable or
directly onto the turntable. Close the door and press the START/AUTO
MINUTE key.
Stopping the oven:
If you wish to stop the oven during cooking press the STOP/CLEAR key
once or open the oven door. If you wish to cancel the cooking programme,
press the STOP/CLEAR key twice.
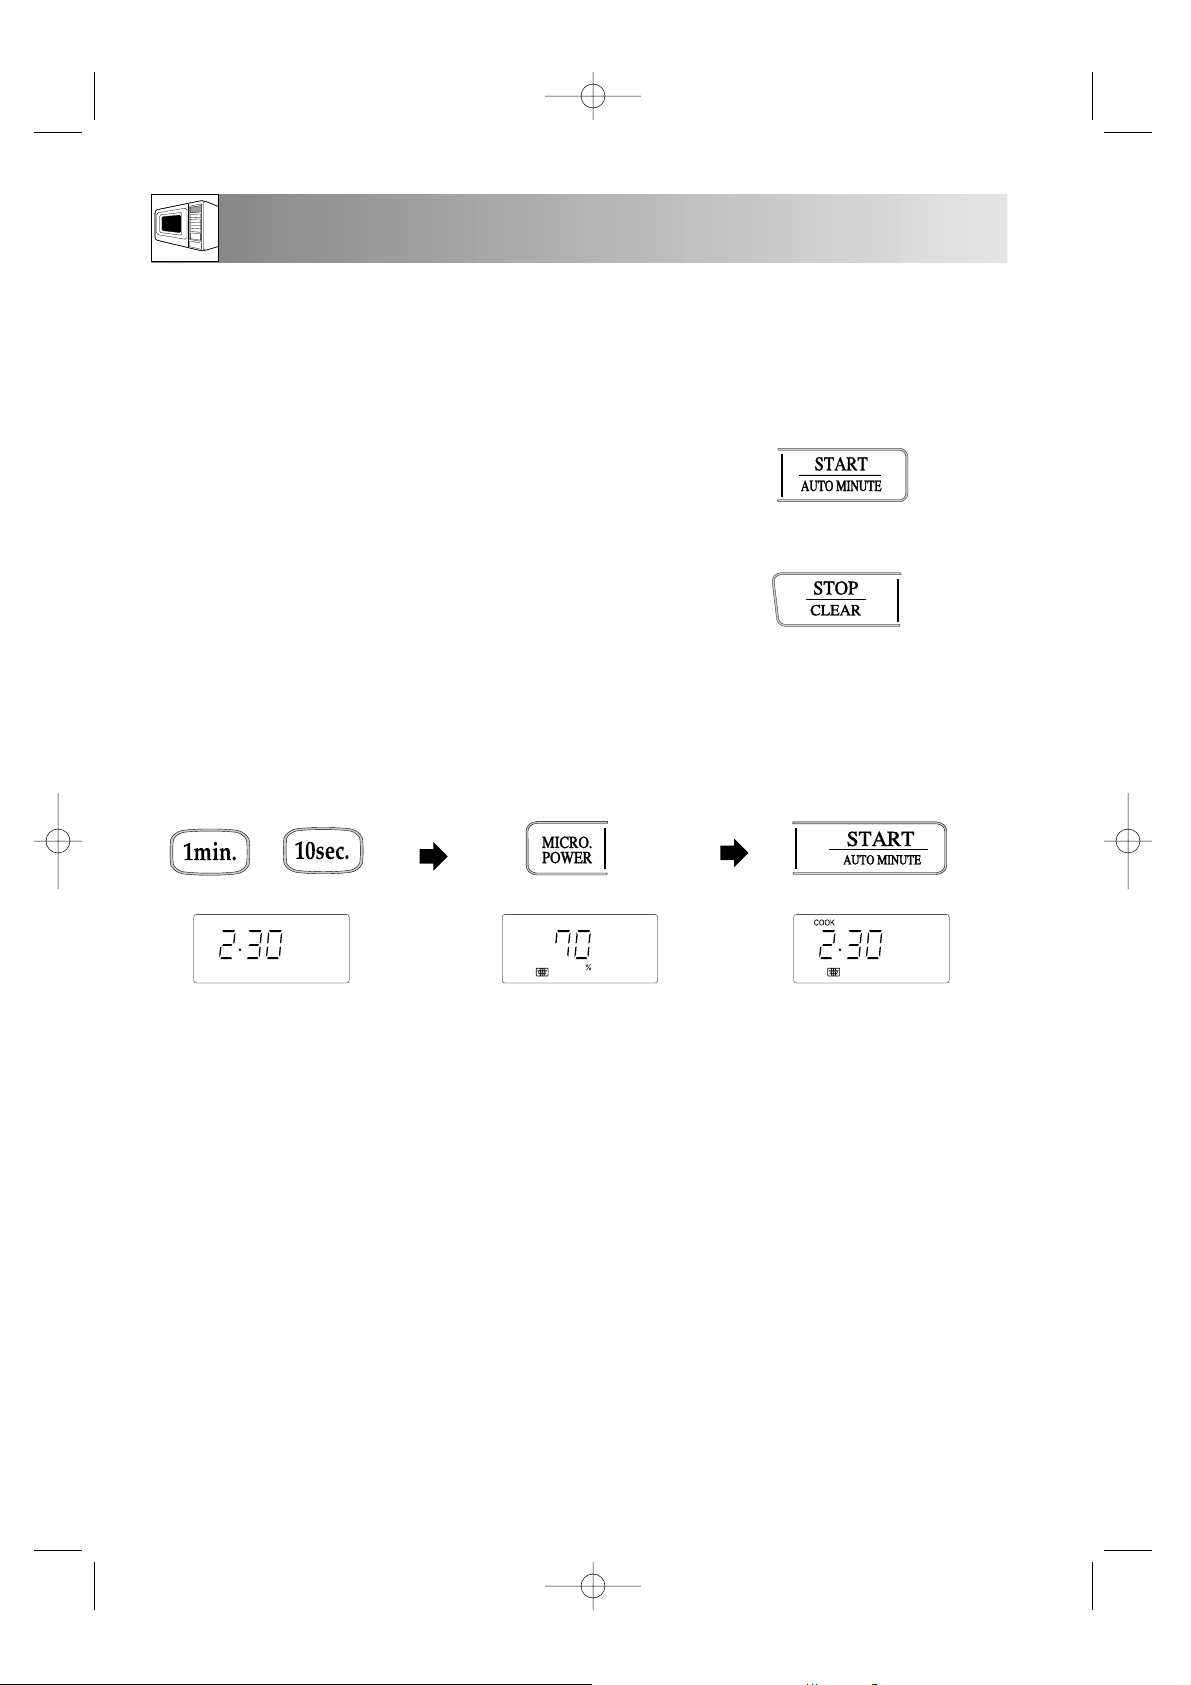
1. To enter the cooking time,
press the 1 MIN key
twice then the 10 SEC
key three times.
2. To input the power level press
the MICRO. POWER key
twice for 70%.
3. Press the START/AUTO
MINUTE key once to
start cooking.
The display will count down
through the cooking time.
Example:
To cook for 2 minutes and 30 seconds on 70% microwave power .
x1
x2
NOTES:
•
Your oven can be programmed up to 99 minutes, 90 seconds (99.90)
.
• When the door is opened during cooking, the cooking time on the display stops automatically. The cooking
time starts to count down again when the door is closed and the START/AUTO MINUTE key is pressed.
• When oven operation is finished, the time of day will reappear on the display, if the clock has been set.
• If you wish to know the power level during cooking, press the MICRO. POWER key. As long as your
finger is touching the key the power level will be displayed.
x2
x3
R-874M/R-84STM Op Man/Ck Bk 28/3/01 8:41 am Page 10
Page 2
EXAMPLE:
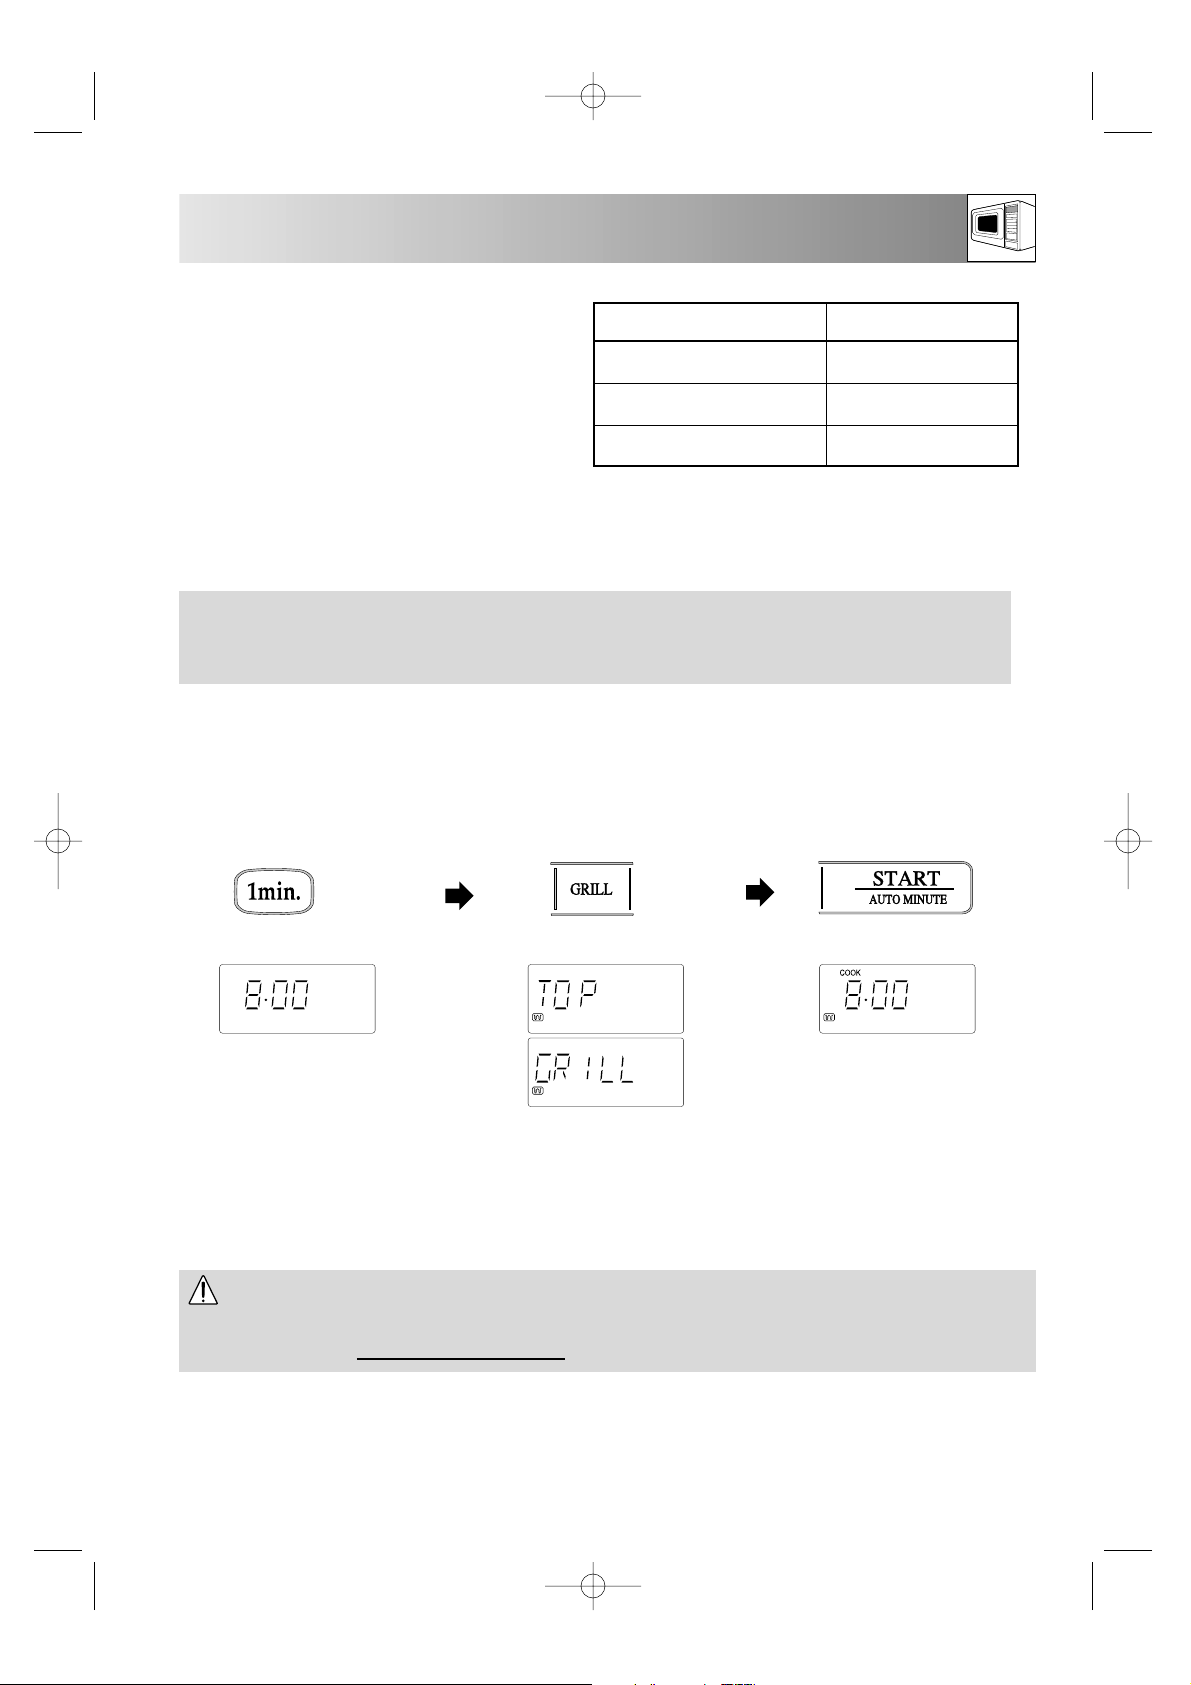
To grill for 8 minutes using GRILL - 1.
NOTES:
• When browning or crisping foods in a casserole dish, place directly onto the turntable or low rack.
• After cooking the display may show “NOW COOLING”.
• Follow recommended GRILL times and procedures given in the charts on page 38.
The oven has top and bottom grills which can be
operated independently or combined.
• First enter the cooking time by using the TIME
keys.
• Then press the GRILL key to select the heating
element(s) required (top, bottom or combined).
See table opposite for selection details.
• Press the START/AUTO MINUTE key.
The oven cavity, door, outer cabinet, turntable, racks, dishes and especially bottom grill heater will become very
hot. To prevent burns, always use thick oven gloves
when removing the food or turntable from the oven.
WARNING:
11
GRILLING
Website: http://www.sharp.co.uk/support Help Line: 08705 274277 (office hours)
1. To enter the grilling time,
press the 1 MIN key 8
times.
2. To select the GRILL - 1 press
the GRILL key once.
3. Press the START/AUTO
MINUTE key once to
start grilling.
The display will count down
through the grilling time.
x1
x1
x8
NOTE:
When first using the grill heating elements, smoke and odour will be given off. To avoid this happening
when food is being cooked, heat the top and bottom grills without food for approximately 20 minutes.
COOKING MODE
GRILL - 1 (Top Grill)
GRILL - 2 (Bottom Grill)
GRILL - 3 (Top & Bottom Grills)
PRESS GRILL KEY
Once
Twice
3 Times
The turntable rotates to ensure even browning during grilling. Use the grill mode for bacon, fish fingers and
tea cakes or for making cheese on toast. It is also ideal for browning and crisping food which has been
microwaved.
R-874M/R-84STM Op Man/Ck Bk 28/3/01 8:41 am Page 11
Page 3
12
PREHEATING THE OVEN
Website: http://www.sharp.co.uk/support Help Line: 08705 274277 (office hours)
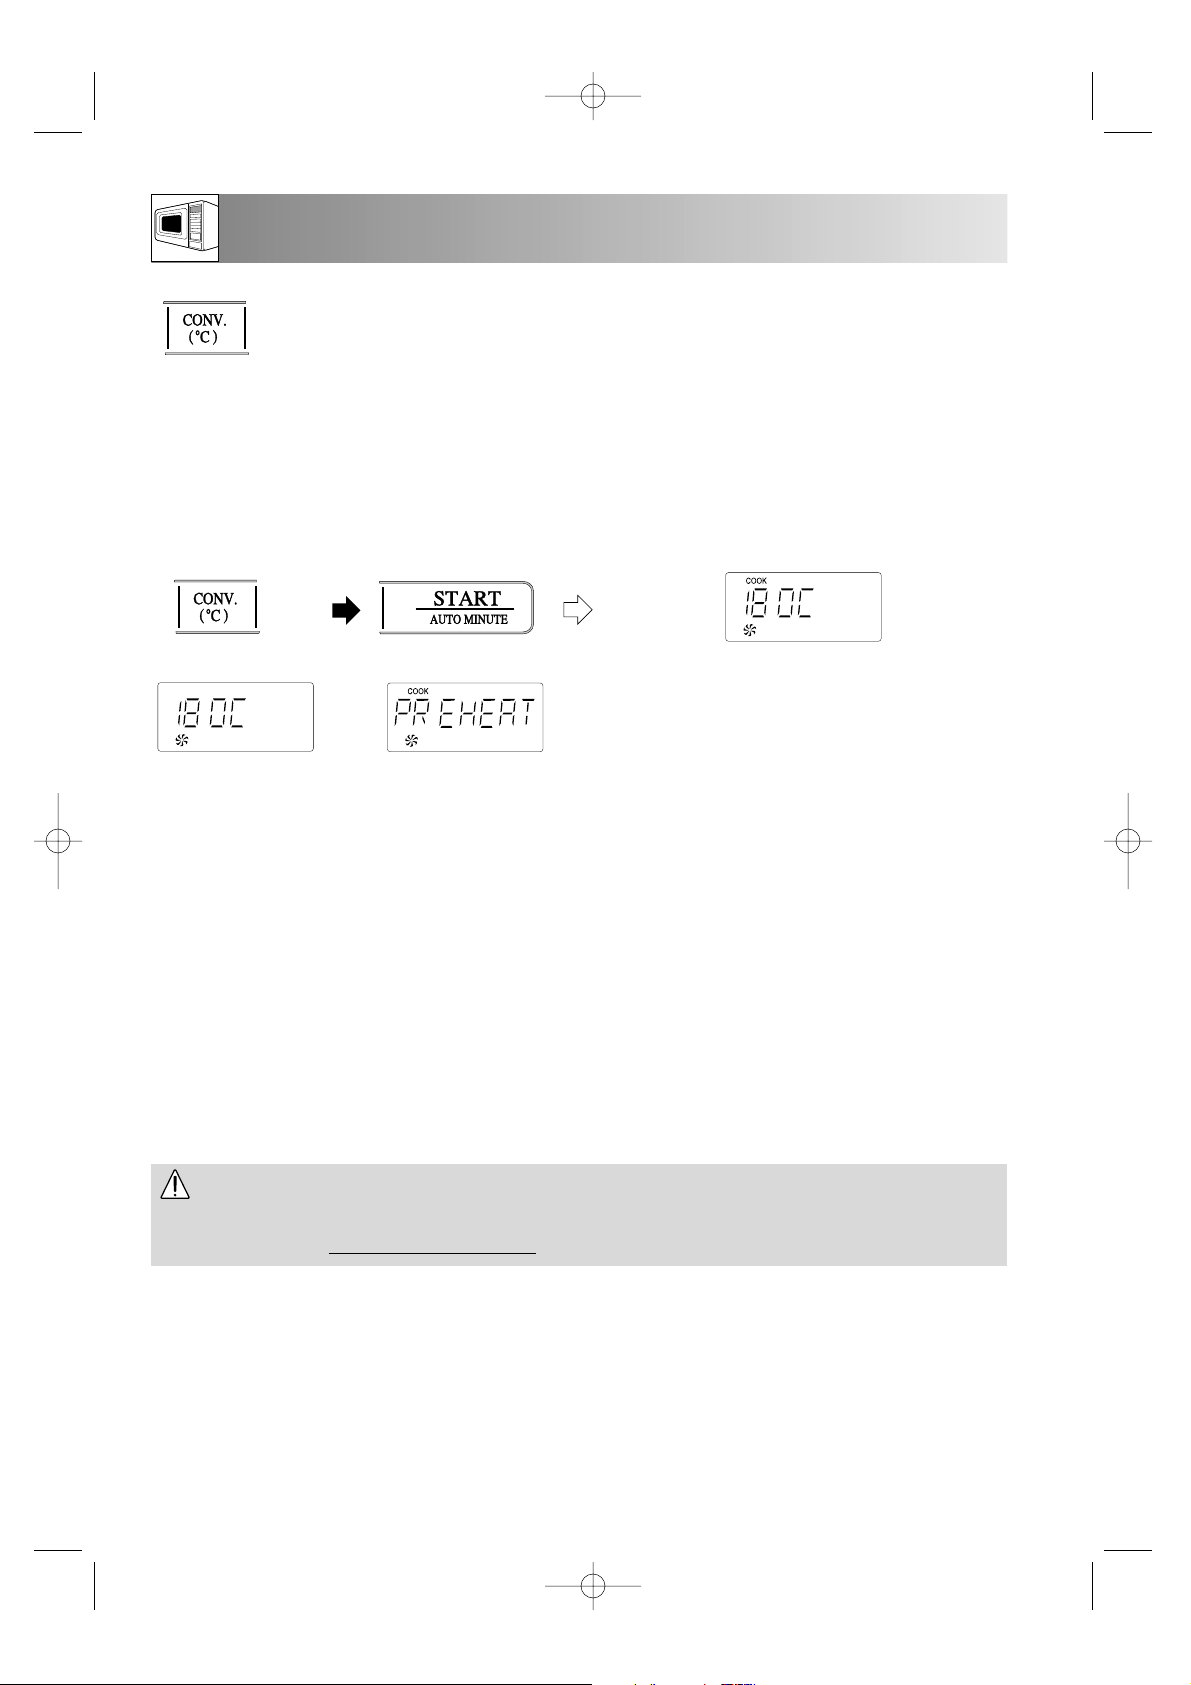
EXAMPLE:
To preheat the oven to 180°C.
NOTES:
• During preheating and convection cooking, you will hear the cooling fan cycling on and off. This is
completely normal and will not affect the cooking.
• When the oven reaches the desired temperature, the audible signal will sound and display the temperature in
°C. Do not press the STOP/CLEAR key after opening and closing the door, as this will
cancel the CONVECTION MODE.
• If you prefer not to preheat the oven where recommended in the cookbook section, allow extra cooking time.
• The preheated temperature will be maintained for approximately 30 minutes before automatically turning
itself off and returning to the time of day, if the clock has been previously set.
• If you wish to preheat the oven, then cook at a different temperature, enter the cooking time then press the
CONV. (°C) key until the desired temperature is displayed.
• You can check the actual temperature during preheating by pressing the CONV. (°C) key. The temperature
will appear on the display. This will not affect the oven operation.
1. To enter the desired
temperature press
the CONV. (°C)
key 5 times.
2. Press the
START/AUTO
MINUTE key to
begin preheating.
3. When the oven reaches 180°C, the audible
signal will sound and the oven will display
180°C. Place food in the oven, enter the desired
cooking time and temperature before pressing the
START/AUTO MINUTE key.
x5
x1
The oven cavity, door, outer cabinet, turntable, racks, dishes and especially bottom grill heater will become very
hot. To prevent burns, always use thick oven gloves
when removing the food or turntable from the oven.
WARNING:
Your oven can be preheated to a desired temperature prior to oven cooking.
R-874M/R-84STM Op Man/Ck Bk 28/3/01 8:41 am Page 12
Page 4
13
CONVECTION COOKING
Website: http://www.sharp.co.uk/support Help Line: 08705 274277 (office hours)
The oven cavity, door, outer cabinet, turntable, racks, dishes and especially bottom grill heater will become very
hot. To prevent burns, always use thick oven gloves
when removing the food or turntable from the oven.
WARNING:
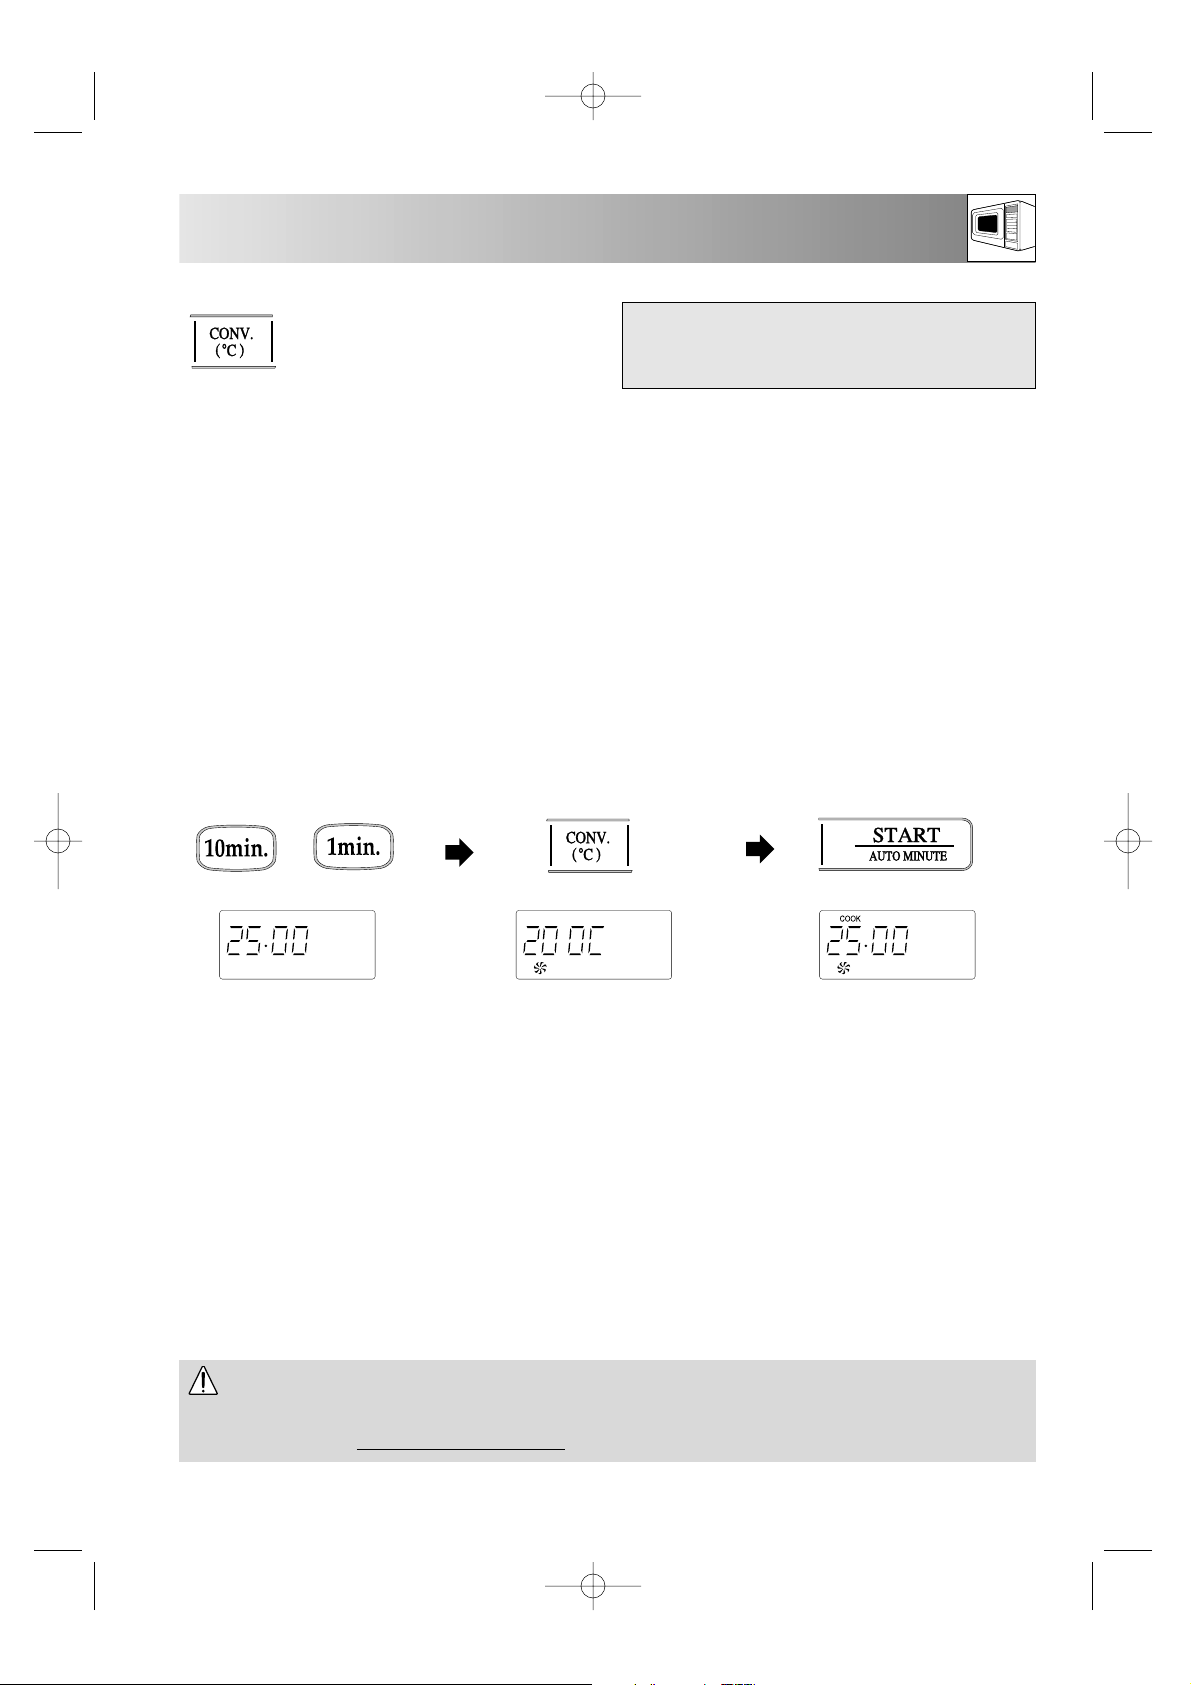
EXAMPLE:
To bake for 25 minutes at 200°C convection.
NOTES:
• Once the oven has started you can find out the temperature you have programmed by pressing the
CONV. (°C) key. The temperature will appear on the display. This will not affect the programme or
cooking time.
• After cooking is complete the cooling fan will continue working for a short time to lower the temperature
of the electrical and mechanical components. The display may show “NOW COOLING”.
• Recipes requiring a browned or crispy underside (ie; pies, pizza and bread), should be placed directly
on the turntable, unless instructions in the cookbook section state otherwise.
• Joints of meat/poultry should be cooked on the low rack, on the turntable.
• Small food items such as pastries or biscuits should be cooked on the low rack so as to avoid browning
too quickly.
The temperatures available in degrees Centigrade are:
250°C, 230°C, 220°C, 200°C, 180°C,
160°C, 130°C, 100°C, 70°C, 40°C
Your oven can be programmed to cook
with ten different temperatures by
combining the top and bottom grills with
the convection fan.
NOTES:
• CONVECTION cooking is ideal for cooking buns, biscuits and scones.
• When using the CONVECTION facility, all metal cookware can be used. See SUITABLE COOKWARE
pages 27 - 28.
• Temperature measurements taken whilst the oven is in convection mode will differ slightly from the
displayed level. This is due to the grill elements turning on and off in order to regulate the oven
temperature. This will not affect the cooking results as long as the operation manual and cook book are
followed correctly.
1. To enter the baking time,
press the 10 MIN key
twice then the 1 MIN
key 5 times.
2. To enter the temperature
press the CONV. (°C) key
4 times.
3. Press the START/AUTO
MINUTE key once to
start cooking.
The display will count down
through the baking time.
x1
x4
x2
x5
R-874M/R-84STM Op Man/Ck Bk 28/3/01 8:41 am Page 13
Page 5
There are three DUAL COOKING modes:
1. DUAL-1- Convection and Microwave
2. DUAL-2 - Top Grill and Microwave
3. DUAL-3 - Bottom Grill and Microwave
• First enter cooking time.
• Then select the DUAL COOKING mode by
pressing the DUAL CONV./GRILL key until
the desired setting appears on the display. See
table opposite.
• Press the START/AUTO MINUTE key.
The combination of microwaves with the grill or
the convection reduces cooking time and
provides a crisp, brown finish, giving you the
convenience of fast cooking with a traditional
appetising appearance.
DUAL COOKING combines
the power of microwave with
convection or the grill modes.
14
DUAL COOKING
Website: http://www.sharp.co.uk/support Help Line: 08705 274277 (office hours)
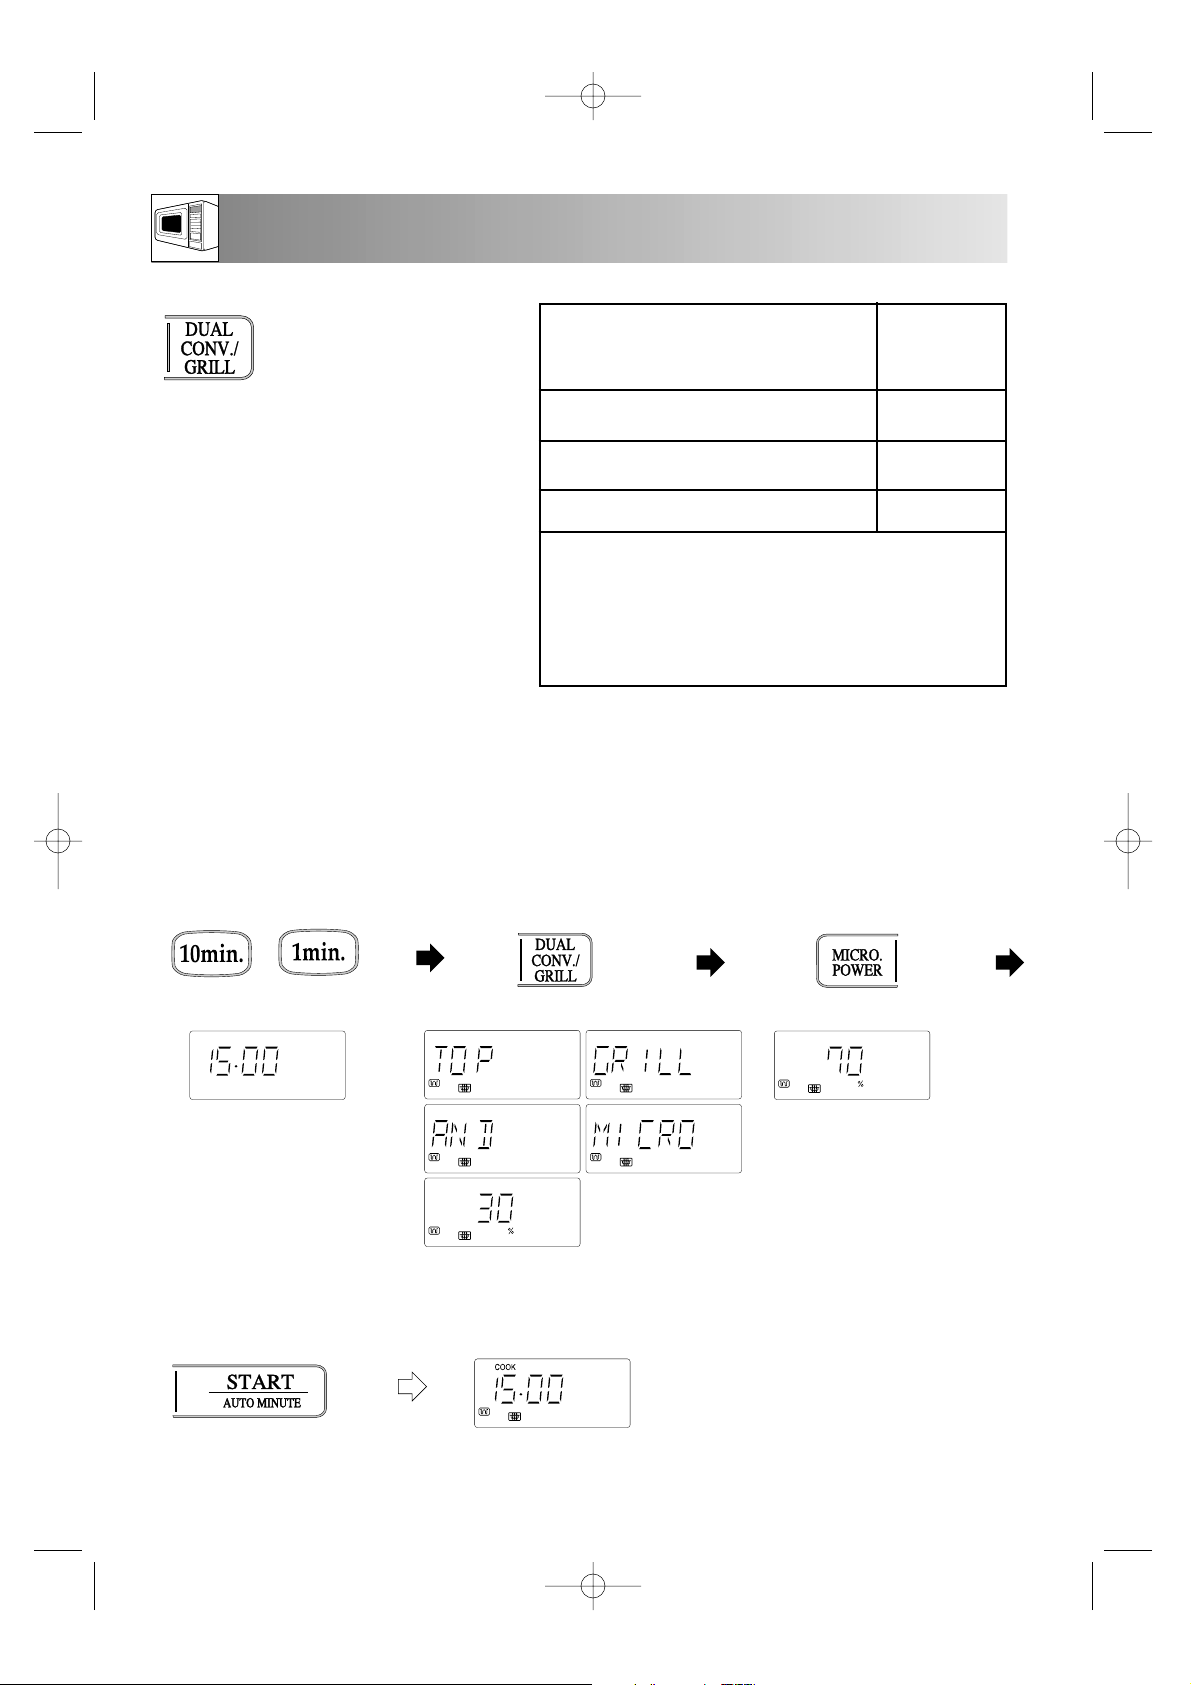
1. To enter the grilling time, press
the 10 MIN key once then the
1 MIN key 5 times.
2. Press the
DUAL CONV./
GRILL
key twice.
4. Press the START/AUTO
MINUTE key once to
start cooking.
The display will count down
through the cooking time.
Example 1:
To cook for 15 minutes using DUAL - 2, combining 70% microwave power with the top grill.
x1
x2
x1
x5
3. To change the power level press
the MICRO. POWER key 3
times for 70%.
x3
COOKING MODE
Dual Grill - 1 (Convection + Microwave*)
Dual Grill - 2 (Top Grill + Microwave*)
Dual Grill - 3 (Bottom Grill + Microwave*)
PRESS DUAL
CONV./GRILL
KEY
Once
Twice
3 times
NOTE:
* To adjust the microwave power level, press the
MICRO. POWER key.
* You can select power levels 10% to 100% for
DUAL - 2/DUAL - 3, and power levels 10% to 50%
for DUAL - 1.
R-874M/R-84STM Op Man/Ck Bk 28/3/01 8:41 am Page 14
Page 6
NOTES:
• Follow recommended DUAL COOKING times and procedures given in the chart on pages 39 - 41.
• After cooking, the display will show “NOW COOLING”.
The oven cavity, door, outer cabinet, turntable, racks, dishes and especially bottom grill heater will become very
hot. To prevent burns, always use thick oven gloves
when removing the food or turntable from the oven.
WARNING:
15
DUAL COOKING
Website: http://www.sharp.co.uk/support Help Line: 08705 274277 (office hours)
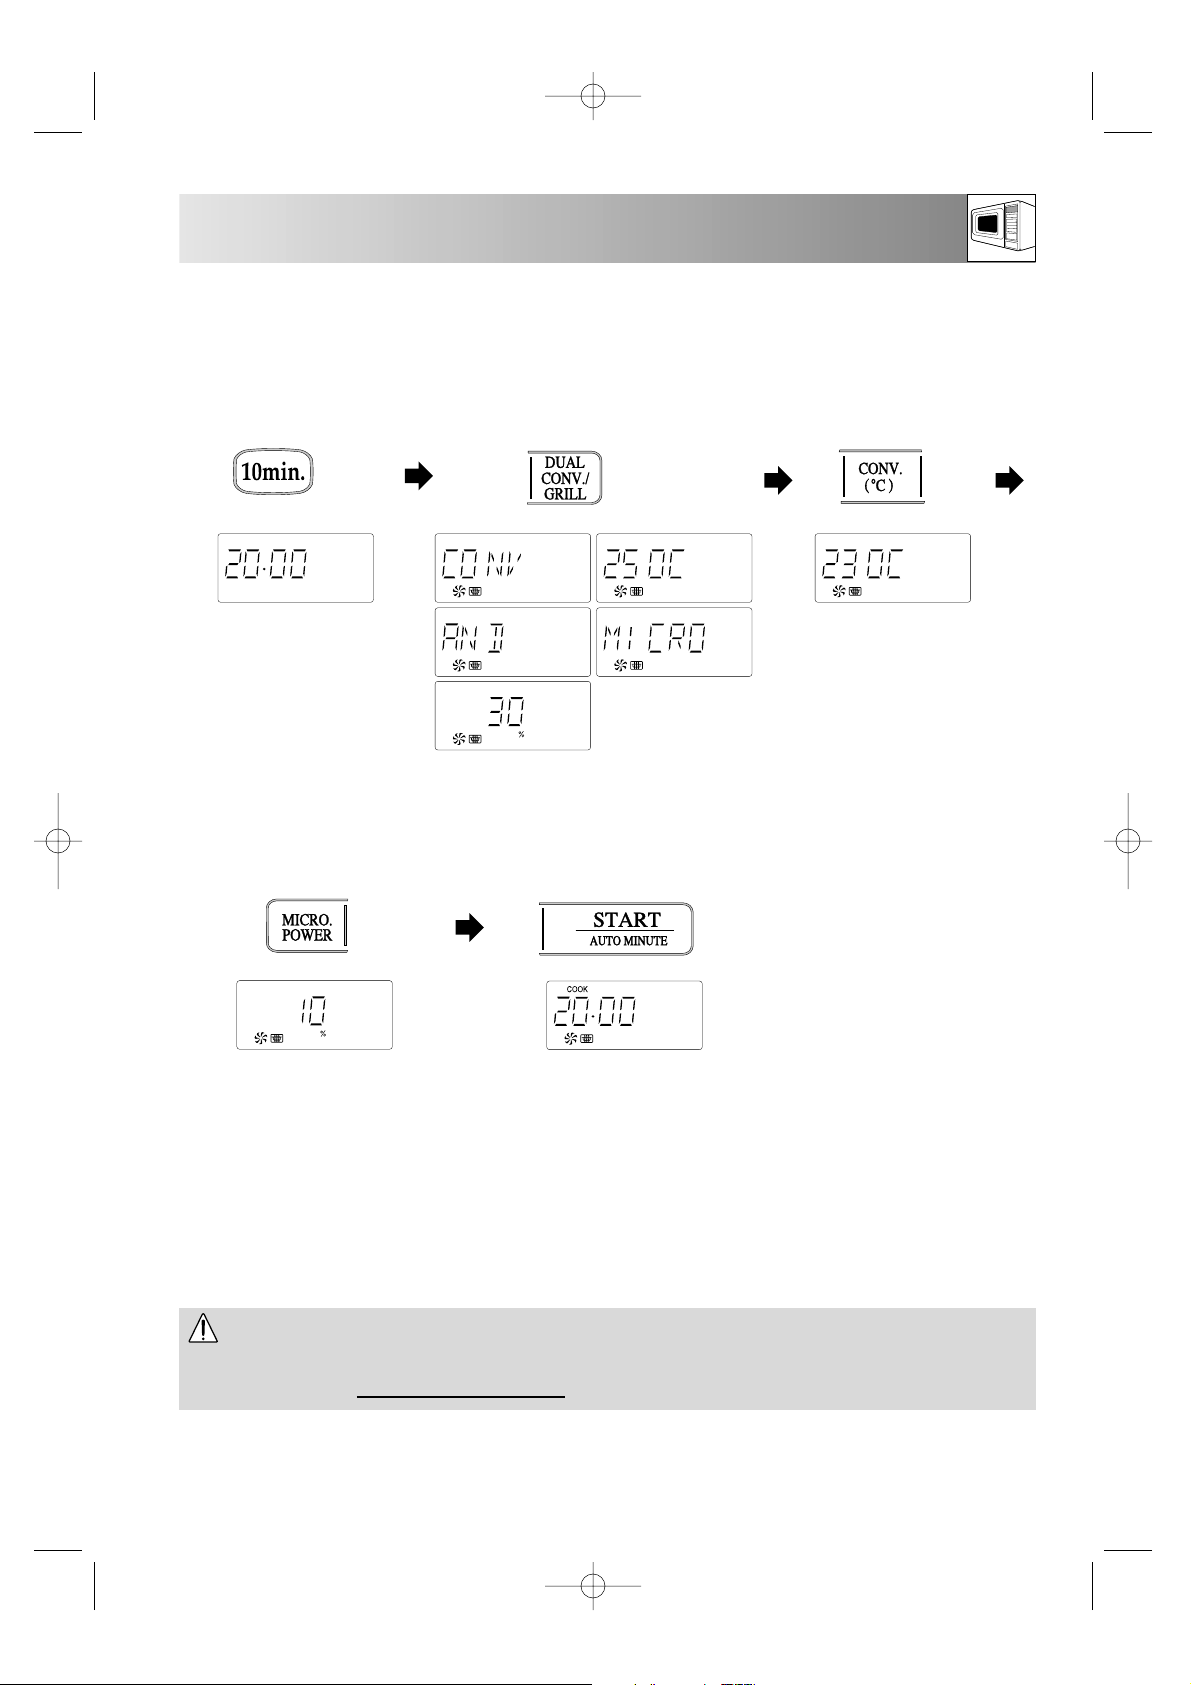
1. To enter the cooking time,
press the 10 MIN key
twice.
2. Press the
DUAL
CONV./GRILL
key
once.
5. Press the START/AUTO
MINUTE key once to
start cooking.
Example 2:
To cook for 20 minutes using DUAL-1, 230°C, combined with 10% microwave power.
x1
x1
x2
3. To change the temperature
press the CONV. (°C) key
once.
x1
COOKING HINT: For DUAL - 1 and DUAL - 2
Use the low rack for browning food in larger dishes such as Lasagne.
4. To change the power level
press the MICRO. POWER
key once for 10%.
x1
The display will count down
through the cooking time.
R-874M/R-84STM Op Man/Ck Bk 28/3/01 8:41 am Page 15
Page 7
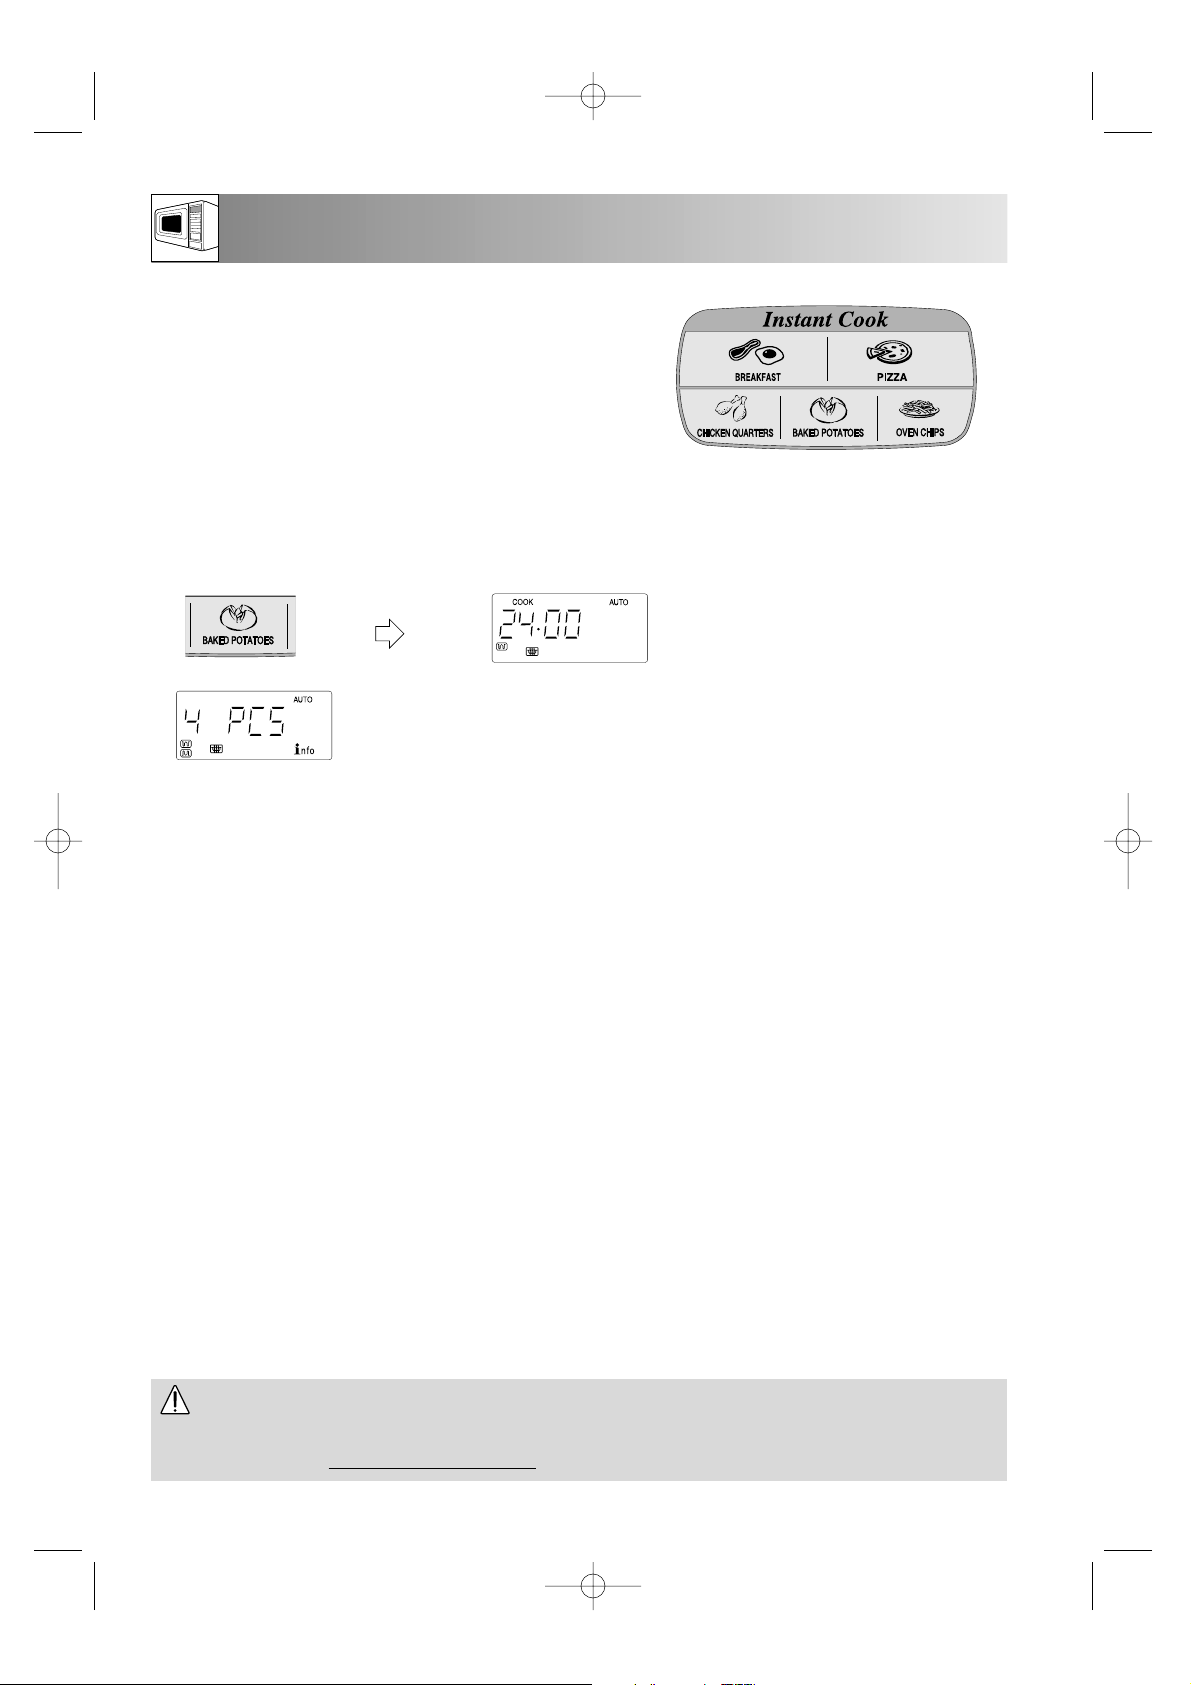
INSTANT COOK enables you to cook the foods listed on the
control panel and on the chart on page 17.
Follow the example below for details on how to operate this
function.
1. Press the BAKED
POTATOES key
four times.
2. The oven will automatically
start cooking after 2 seconds.
x4
The oven cavity, door, outer cabinet, turntable, racks, dishes and especially bottom grill heater will become very
hot. To prevent burns, always use thick oven gloves
when removing the food or turntable from the oven.
WARNING:
EXAMPLE: To cook 4 baked potatoes.
16
INSTANT COOK
Website: http://www.sharp.co.uk/support Help Line: 08705 274277 (office hours)
WEIGHT RANGE:
• Food weight should be rounded up to the nearest 0.1kg, for example, 0.65kg to 0.7kg.
• You are restricted to enter a weight within the range given (see the chart on page 17).
• To cook weights below or above that range or foods not included in the chart on page17, refer to the
charts in the cookbook section.
NOTES:
• The INSTANT COOK function can only be input within 3 minutes after cooking completion, closing the
door or pressing the STOP/CLEAR key.
• You can enter the weight by holding down the desired INSTANT COOK key, as well as by pressing, until
the desired weight appears.
• You can use the LESS/MORE keys, see page 23. Press the MORE or LESS keys before pressing the
START/AUTO MINUTE key where recommended in the chart on page 17.
• When action is required (example, to turn food over), the oven stops and indicates instructions on the
display. To continue cooking, press the START/AUTO MINUTE key.
• The final temperature will vary according to the initial food temperature. Check food is piping hot after
cooking. If necessary, you can extend the cooking manually.
• You can enter the weight in Lb/oz or Kg/g. To convert to either weight range press the WEIGHT
CONVERSION key once before pressing desired INSTANT COOK key. See page 26.
• All menus on INSTANT COOK use a combination of microwave power and grill/convection during the
cooking programme to provide a brown, crisp traditional looking and tasting result.
• If you use the AUTO MINUTE function during INSTANT COOK operation, the food may be overcooked.
R-874M/R-84STM Op Man/Ck Bk 28/3/01 8:41 am Page 16
Page 8

PIZZA 0.1 - 0.9kg • Remove from packaging and place on the turntable.
(Thin & crispy or • After cooking, remove from the tuntable and put on a plate for serving.
Deep pan type) NOTE: For FROZEN pizza use the MORE key.
CHICKEN 1 - 4 pieces • Place chicken quarters on the low rack (best side down).
QUARTERS (1 piece = • Turn over when oven indicates.
300g/leg • Stand for 4 - 5 minutes wrapped in aluminium foil after cooking.
400g/breast) NOTE: Use the MORE key for breast and wing quarters.
It is not possible to use LESS key for chicken quarters.
BAKED 1 - 4 pieces • Pierce each potato in several places, place towards the edge of
POTATOES (1 piece = 250g) the turntable.
• After cooking, leave potatoes to stand for 2 - 3 minutes.
OVEN CHIPS 0.1 - 0.4kg • Spread the chips evenly on the turntable.
• After cooking, remove from the turntable.
NOTE: Use LESS for thin chips and MORE for thick chips.
For converting to lb/oz please see the conversion chart on page 32.
17
INSTANT COOK CHART
Website: http://www.sharp.co.uk/support Help Line: 08705 274277 (office hours)
BREAKFAST 1 - 3 servings • Grease the turntable with 5 - 10ml of oil.
• Place bacon and/or sausages on the turntable. (Pierce sausages).
• When oven indicates, turn bacon/sausages over and add eggs (not
beaten).
• After cooking, leave to stand for 2 - 3 minutes.
NOTE: See the table below. Use MORE or LESS as indicated.
NOTE: It is not necessary to pierce eggs as this programme uses only the grill, after the eggs have been added.
MENU WEIGHT COOKING PROCEDURE
RANGE
Bacon & eggs LESS Bacon (approx 30g/Slice, approx 0.25cm thick) 2 rashers 4 rashers 6 rashers
Egg (medium) 1 2 3
Thin sausage & eggs STD Thin sausage (approx 25g each) 4 8 12
Egg (medium) 1 2 3
Bacon, thin sausage STD Bacon (approx 30g/ slice, approx 0.25cm thick) 2 rashers 4 rashers 6 rashers
& eggs Thin sausage (approx 25g each) 2 4 6
Egg (medium) 1 2 3
Thick sausages & eggs MORE Thick sausage (approx 50g each) 3 6 9
Egg (Medium) 1 2 3
Less/
Menu
More
Ingredient 1Serving 2 Servings 3 Servings
R-874M/R-84STM Op Man/Ck Bk 28/3/01 8:41 am Page 17
Page 9

18
EXPRESS COOK/EXPRESS DEFROST
Website: http://www.sharp.co.uk/support Help Line: 08705 274277 (office hours)
2. Enter the weight by pressing
the WEIGHT keys until the
desired weight is displayed.
1. Press the ROAST BEEF/
LAMB key once to select
cooking from frozen.
Example 1: To cook medium Roast Beef weighing 0.6kg from frozen, using EXPRESS COOK.
x1
x1
OR
x13
3. Press the START/AUTO
MINUTE key to start
cooking.
x1
NOTE:
If the DOWN ( ▼ ) weight key is pressed the display will count down from the highest weight range, each
time the key is pressed. If the UP ( ▲ ) weight key is pressed the display will count up from the lowest weight
range, each time the key is pressed.
You can enter the weight by holding down the WEIGHT keys, as well as by pressing, until the desired
weight appears.
EXPRESS COOK enables you to cook the 3 popular menus, from frozen or
chilled, listed on the control panel and the chart on page 19.
EXPRESS DEFROST enables you to defrost the 3 menus listed on the control
panel and the chart on page 20.
Follow the example below for details on how to operate these functions.
The display will count down
through the cooking time.
2. Enter the weight by pressing
the WEIGHT keys until the
desired weight is displayed.
1. Select the menu required by
pressing the MEAT JOINT
key once.
Example 2: To defrost a Meat Joint weighing 1.8kg, using EXPRESS DEFROST.
x1
3. Press the START/AUTO
MINUTE key to start defrosting.
x1
The display will count down
through the defrosting time.
x13
OR
x1
The oven cavity, door, outer cabinet, turntable, racks, dishes and especially bottom grill heater will become very
hot. To prevent burns, always use thick oven gloves when removing the food or turntable from the oven.
WARNING:
R-874M/R-84STM Op Man/Ck Bk 28/3/01 8:41 am Page 18
Page 10

19
EXPRESS COOK/EXPRESS DEFROST CHARTS
Website: http://www.sharp.co.uk/support Help Line: 08705 274277 (office hours)
MENU WEIGHT RANGE COOKING PROCEDURE
Roast Beef/Lamb 0.6kg - 1.8kg • Place meat in a flan dish on the low rack.
• Turn meat over when the audible signal sounds.
• After cooking, leave meat to stand wrapped in aluminium
foil for 10 minutes.
x1: Frozen NOTE: Select MORE key for well done.
x2: Chilled It is not possible to use the LESS key for beef/lamb.
Roast Pork 0.6kg - 1.8kg • Place meat in a flan dish on the low rack.
• Turn meat over when the audible signal sounds.
• After cooking, leave meat to stand wrapped in aluminium
foil for 10 minutes.
x1: Frozen NOTE: It is not possible to use the LESS key for pork.
x2: Chilled
Roast Poultry 1.2kg - 1.8kg • Pierce skin (chilled only) a few times and place poultry
breast side down in a flan dish on the low rack.
• Turn poultry over when the audible signal sounds. When
cooking frozen poultry with giblets, remove the giblets
x1: Frozen at first or second turn over.
x2: Chilled • After cooking, leave poultry to stand wrapped in
aluminium foil for 10 minutes.
NOTE: It is not possible to use the LESS key for poultry.
This menu is only suitable for cooking whole poultry.
EXPRESS COOK
WEIGHT RANGE:
• Food weight should be rounded up to the nearest 0.1kg or 1oz, for example, 0.65kg to 0.7kg and
12.5oz to 13oz.
• You are restricted to enter a weight within the range (see the following charts).
• To cook/defrost weights above or below that range or foods not included in the charts below, refer to the
charts in the cookbook section.
NOTES:
• Press the MORE or LESS keys before pressing the START/AUTO MINUTE key where recommended in
the charts below.
• When action is required (example, to turn food over), the oven stops and indicates instructions on the
display. To continue cooking, press the START/AUTO MINUTE key.
• The final temperature will vary according to the initial food temperature. Check food is piping hot after
cooking. If necessary, you can extend the cooking manually.
• You can enter the weight in Lb/oz or Kg/g. To convert to either weight range press the WEIGHT
CONVERSION key once before entering the weight. See page 26.
• When freezing foods for EXPRESS COOK, ensure food is fresh and of good quality.
• All menus on EXPRESS COOK use a combination of microwave power and convection during the cooking
programme to provide a brown, crisp traditional looking and tasting result.
• If you use the AUTO MINUTE function during EXPRESS COOK/EXPRESS DEFROST operation, the food
may be overcooked.
R-874M/R-84STM Op Man/Ck Bk 28/3/01 8:41 am Page 19
Page 11

20
EXPRESS COOK/EXPRESS DEFROST CHARTS
Website: http://www.sharp.co.uk/support Help Line: 08705 274277 (office hours)
For converting to Lb/oz see the conversion chart on page 32.
Weigh all meat and poultry prior to defrosting and cooking, as the labelled weight is only approximate.
Defrost: If necessary, shield small areas of meat or poultry with flat pieces of aluminium foil. This will
prevent the areas from becoming warm during defrosting. Ensure the foil does not touch the
oven walls. Do not cook the meat or poultry until thoroughly defrosted.
EXPRESS DEFROST
MENU WEIGHT RANGE COOKING PROCEDURE
Meat joint: 0.6kg - 1.8kg • Place meat in a flan dish on the turntable.
Beef/Lamb/Pork • Turn over when audible signal sounds.
• Stand, wrapped in foil, for 60-90 minutes until
defrosted.
Whole Poultry 1.2kg - 1.8kg • Place poultry breast side up in a flan dish on the
turntable.
• Turn over when audible signal sounds.
• Stand, wrapped in foil, for 60-90 minutes until evenly
defrosted.
Chicken Quarters 0.3kg - 1.2kg • Place quarters best side up in a flan dish on the
turntable.
• Turn over and rearrange when audible signal sounds.
• Stand, wrapped in foil, for 15-30 minutes until evenly
defrosted.
R-874M/R-84STM Op Man/Ck Bk 28/3/01 8:41 am Page 20
Page 12

21
MEAL IN ONE
Website: http://www.sharp.co.uk/support Help Line: 08705 274277 (office hours)
MEAL IN ONE enables you to cook 3 popular menus at the touch
of a key (see chart below). Always refer to the MEAL IN ONE
chart and the recipes on pages 42 - 44 in the Cookbook section
before operating this function. Press the selected key once and the
programmes will automatically start to cook after 2 seconds.
x1
EXAMPLE: To cook Pasta Bolognese using PASTA DISH.
1. Select the menu required by pressing
the PASTA DISH key once.
After 2 seconds the oven will start
cooking automatically.
MENU WEIGHT COOKING PROCEDURE
Pasta Dish:- includes approx. See recipes for pasta dish on page 42 in the cookbook
Pasta bolognese, 2.0kg* section.
Pasta ‘Quorn’ bolognese * Total weight of all ingredients.
Risotto:- includes approx. See recipes for risotto on page 43 in the cookbook section.
Beef risotto, Chicken risotto, 1.7kg*
Fish risotto, Vegetable risotto * Total weight of all ingredients.
Gratin:- includes approx. See recipes for gratin on page 44 in the cookbook section.
Spinach gratin, Fish gratin, 2.0kg*
Chicken gratin * Total weight of all ingredients.
NOTES:
• The MEAL IN ONE function can only be input within 3 minutes after cooking completion, closing the door
or pressing the STOP/CLEAR key.
• When action is required (for example, to stir food) the oven stops and the audible signals sound, the
remaining cooking time and any indicator will flash on the display. To continue cooking press the
START/AUTO MINUTE key.
• You can use the LESS/MORE keys, see page 23.
• The final temperature will vary according to the initial food temperature. Check the food is piping hot after
cooking. If necessary you can extend the cooking time manually.
• To cook menus or weights not included in the chart below, cook manually.
• If you use the AUTO MINUTE function during MEAL IN ONE operation, the food may be overcooked.
• Gratin uses a combination of microwave power and grill during the cooking programme to provide a
brown, crisp traditional looking and tasting result.
The oven cavity, door, outer cabinet, turntable, racks, dishes and especially bottom grill heater will become very
hot. To prevent burns, always use thick oven gloves
when removing the food or turntable from the oven.
WARNING:
R-874M/R-84STM Op Man/Ck Bk 28/3/01 8:41 am Page 21
Page 13

CONVENIENT FUNCTIONS
22
Website: http://www.sharp.co.uk/support Help Line: 08705 274277 (office hours)
A sequence of 4 stages (maximum) can be programmed using combinations of MICROWAVE, GRILL,
CONVECTION and DUAL COOKING.
1. MULTIPLE SEQUENCE COOKING:
Example:
To cook for: 5 minutes on 100% microwave power (Stage 1)
16 minutes on 30% microwave power (Stage 2)
x1 x6
2. To input the power level
press the MICRO. POWER
key once.
STAGE 1
1. To input the time, press
the 1 MIN key 5
times.
STAGE 2
3. To input the time press the 10
MIN key once and then press
the 1 MIN key 6 times.
x1
x5
The oven will begin to cook for 5 minutes on 100% and then for 16 minutes on 30%.
x1x4
5. Press the START/AUTO
MINUTE key once to start.
4. To input the power level press
the MICRO. POWER key
four times.
NOTE: If 100% is selected as the final power level, it is not necessary to input the power level.
AUTO MINUTE enables you:
• To cook on 100% microwave power in multiples of 1 minute.
• To extend cooking time in multiples of 1 minute.
Example:
To cook on 100% for 2 minutes, press the START/AUTO MINUTE key twice.
NOTES:
• The AUTO MINUTE function for direct start, can only be input within 3 minutes after cooking completion,
closing the door or pressing the STOP/CLEAR key.
• The cooking time may be extended to a maximum of 99 minutes.
2. AUTO MINUTE:
x2
Example:
R-874M/R-84STM Op Man/Ck Bk 28/3/01 8:41 am Page 22
Page 14

CONVENIENT FUNCTIONS
23
Website: http://www.sharp.co.uk/support Help Line: 08705 274277 (office hours)
3. LESS ( ▼ ) and MORE ( ▲ ):
The LESS ( ▼ ) and MORE ( ▲ ) keys allow you to cook/defrost food for more or less time than the preset
programmes.
For Example: If you prefer Baked Potatoes which are cooked but still firm, use the LESS ( ▼ ) key.
Alternatively, if you prefer Baked Potatoes softer, use the MORE ( ▲ ) key.
• To use LESS and MORE with EXPRESS COOK / EXPRESS DEFROST
Press the LESS ( ▼ ) / MORE ( ▲ ) key before pressing the START/AUTO MINUTE key.
• To use LESS and MORE with INSTANT COOK / MEAL IN ONE
Press the LESS ( ▼ ) / MORE ( ▲ ) key within 2 seconds after pressing the desired INSTANT COOK or
MEAL IN ONE key.
If you select MORE, the display will show ( ▲ ). Alternatively, if you select LESS, the display will show ( ▼ ).
Some menus cannot use the LESS function. If you select LESS for them, will appear when
the START/AUTO MINUTE key is pressed.
NOTE: To cancel LESS ( ▼ ) / MORE ( ▲ ), simply press the same key again.
To change MORE to LESS simply press the LESS ( ▼ ) key.
To change LESS to MORE simply press the MORE ( ▲ ) key.
• To use LESS and MORE with manual cooking
Press the LESS ( ▼ ) or MORE ( ▲ ) key to decrease or increase the cooking or defrosting time in
multiples of 1 minute whilst the oven is in use. The overall cooking time can be increased to a maximum of
99 minutes.
Example: To cook on 50% for 10 minutes and then decrease the cooking time by 2 minutes:
NOTE: If you use this function for INSTANT COOK, EXPRESS COOK, EXPRESS DEFROST and MEAL IN
ONE, the food may be over or under cooked.
1. To input the time press
the 10 MIN key once.
x1
2. To input the power press the
MICRO. POWER key three
times.
x3
3. Press the START/AUTO MINUTE
key once to start cooking.
x1
4. To reduce the time by 2 minutes
press the LESS key twice.
x2
Cooking time is reduced by two minutes
and continues to count down, for example:
R-874M/R-84STM Op Man/Ck Bk 28/3/01 8:41 am Page 23
Page 15

CONVENIENT FUNCTIONS
The INFO key provides a step-by-step information guide to the keys on the oven.
This will enable you to determine:
• The next action on the way to completing any programme (manual or automatic).
• Weight ranges for automatic programmes.
• Action required during or after cooking, e.g. when to stir or turn food, whether to leave the food to
stand at the end of cooking.
When you plug the oven in, the auto setting for the information display is ON.
There are three options when you use the INFO key:
1. Guide of Keys allows you to press a key to display information about it. The information will be
displayed twice.
EXAMPLE:
To check the information for EXPRESS COOK Frozen Roast Pork.
1. Press the INFO key once. Info
will appear in the display.
2. Press the ROAST PORK key once
to select Frozen Roast Pork.
The display will flash a series of messages.
The message will be repeated twice, and then the display will show the time of day, if set. If you want to
cancel the guide, press the STOP/CLEAR key.
x1
x1
4. INFORMATION DISPLAY
24
Website: http://www.sharp.co.uk/support Help Line: 08705 274277 (office hours)
R-874M/R-84STM Op Man/Ck Bk 28/3/01 8:41 am Page 24
Page 16

25
CONVENIENT FUNCTIONS
Website: http://www.sharp.co.uk/support Help Line: 08705 274277 (office hours)
2. Guide on/off allows you to turn the guide on or off.
1. Press the INFO key once.
The display will flash a series of messages.
2. Press the INFO key again.
3. Press the STOP/CLEAR
key to turn off.
The display will return to the
time of day, if set.
Press the START/AUTO
MINUTE key to turn on.
x1
x1
x1
x1
The display will return to the
time of day, if set.
OR
3. The INSTANT COOK, EXPRESS COOK, EXPRESS DEFROST, and MEAL IN ONE menus can provide a
helpful cooking hint.
If you wish to check, press the INFO key whenever is lit on the display.
R-874M/R-84STM Op Man/Ck Bk 28/3/01 8:41 am Page 25
Page 17

26
CONVENIENT FUNCTIONS
Website: http://www.sharp.co.uk/support Help Line: 08705 274277 (office hours)
5. KITCHEN TIMER:
You can use the KITCHEN TIMER for timing where microwave cooking is not involved. For example, to
time a boiled egg cooked on a conventional hob, to monitor the standing time for microwaved food or to
remind you of the time when making a phone call.
Example: To set the timer for 5 minutes:
x5
x1
You can enter any time up to 99 minutes, 90 seconds. To cancel the KITCHEN TIMER whilst counting
down, simply press the STOP/CLEAR key and the display will return to the time of day, if set.
NOTE: The KITCHEN TIMER function cannot be used whilst cooking.
x1
3. Press the START/
AUTO MINUTE
key once.
2. Enter the desired
time by pressing the
1 MIN key 5 times.
1. Press the
KITCHEN TIMER
key once.
The display will count down.
When the display reaches zero,
the audible signal will sound.
6. WEIGHT CONVERSION:
Your oven comes set for kg (Kilograms).
You can use the WEIGHT CONVERSION function to convert kg to lbs or vice-versa. The oven memorises
the weight unit of the last operation, until you change it. To change from kg to lbs press the WEIGHT
CONVERSION key when the display shows the time of day or before entering the weight.
Example: To change from kg to lbs when using EXPRESS DEFROST “Whole Poultry” (3lb 15oz).
1. Press the
WHOLE
POULTRY key.
2. Press the WEIGHT
CONVERSION key once
to change from kg to lbs.
3. Enter the weight by
pressing the
WEIGHT keys.
4. Press the START/AUTO
MINUTE key once to
begin defrosting.
x1
x1
x1
OR
x22
x1
NOTE: For INSTANT COOK press the WEIGHT
CONVERSION key before pressing the
desired INSTANT COOK key.
or will appear on the display.
R-874M/R-84STM Op Man/Ck Bk 28/3/01 8:41 am Page 26
Page 18

27
Website: http://www.sharp.co.uk/support Help Line: 08705 274277 (office hours)
SUITABLE COOKWARE
SUITABLE FOR MICROWAVING GRILL
CONVEC- DUAL
TION COOKING
YES
YES
YES
Microwave cling film and bags must be
vented for steam to escape, pierce in 4 - 5
places. Do not use plastic or metal ties as they
may melt or catch fire due to ‘arcing’.
YES
Except for dishes with metallic decoration.
YES
Always attend the oven closely. Look at the
oven from time to time when heating food
in plastic or paper containers, keep an
eye on the oven due to the possibility of
ignition.
YES
Always attend the oven closely. Only use
to absorb fat and moisture when warming
food. Pay special attention as overheating may cause a fire in your oven.
YES
Always place on an up-turned plate on the
turntable to prevent heat stress. Follow
manufacturer's instructions. Be careful as
these become very hot. Popcorn: Only use
microwave popcorn within recommended
packaging (follow popcorn manufacturer's
instructions). Never use oil unless the
manufacturer recommends and never cook
for longer than instructed.
NO
COOKWARE
Heat resistant glass,
(e.g. Pyrex®,
Fire King®,
Corning Ware ®).
Microwave-safe
plastic cookware.
Microwave cling
film, microwave
roasting bags.
Heat-resistant china
and ceramics.
Disposable
containers:
Thin plastic, paper,
straw and wooden
containers.
Kitchen paper.
Browning dishes
& self-heating
packages.
Metal cookware.
For microwaving, use only those utensils suitable for microwave cookery as indicated below.
A variety of cookware can be used for microwaving. Round/oval dishes rather than square/oblong ones are
recommended, as food in the corners tends to overcook.
YES YES YES
NO NO NO
NO NO NO
NO YES YES
Except for
dishes with
metallic
decoration.
NO NO NO
NO NO NO
NO NO NO
YES YES NO
If desired,
metal trays
may be
used.
R-874M/R-84STM Op Man/Ck Bk 28/3/01 8:41 am Page 27
Page 19

28
Website: http://www.sharp.co.uk/support Help Line: 08705 274277 (office hours)
SUITABLE COOKWARE
FOOD HANDLING & PREPARATION
SUITABLE FOR MICROWAVING GRILL
CONVEC- DUAL
TION COOKING
YES YES YES/NO
Use aluminium
foil for shielding
only.
YES YES YES
COOKWARE
YES/NO
Use small pieces of aluminium foil to shield food
from overheating. Keep foil at least 2cm from the
oven walls. Foil containers are not recommended
unless specified by the manufacturer, eg.
MicroFoil ®, follow instructions carefully.
YES
The metal racks supplied have been specially
designed for all cooking modes and will not
damage the oven.
Aluminium
foil & foil
containers,
made from
"Micro Foil®".
High rack
& low rack.
Stir, turn &
stand
Initial and final
temperature of
food
Composition
& quality
Face & Hands: Always use oven gloves to remove food or cookware from the oven. Stand back
when opening the oven door to allow heat or steam to disperse. When removing covers (such as cling
film), opening roasting bags or popcorn packaging, direct steam away from face and hands.
For even cooking stir, turn or rearrange food during
cooking. Where recommended, leave food to stand after
cooking or defrosting.
The initial temperature of food affects the amount of
cooking time needed, eg. chilled food requires more
cooking than food at room temperature.
The temperature of the container is not a true indication
of the temperature of the food or drink. Cut into foods
with fillings, for example, jam doughnuts, to release heat
or steam.
Food high in fat or sugar (Christmas pudding or mince
pies) requires less heating time and should be watched,
over-heating can lead to fire.
Good quality ingredients should be used for
microwaving. Economical cuts of meat are recommended
for casserole.
Check the temperature of food and drink and stir before serving. Take special care when
serving babies, children or the elderly. The contents of feeding bottles and baby food jars are to
be stirred or shaken and the temperature is to be checked before consumption to avoid burns.
R-874M/R-84STM Op Man/Ck Bk 28/3/01 8:41 am Page 28
Page 20

29
Website: http://www.sharp.co.uk/support Help Line: 08705 274277 (office hours)
FOOD HANDLING & PREPARATION
ADVICE FOR COOKING
Piercing
Arrangement
Covering
Size & shape
Density &
quantity
Hygiene
Food with skin (such as potatoes, apples, fish,
chicken), or with membrane (such as the white and
yolk of eggs, including boiled eggs), must be pierced
in several places before cooking or reheating. If not,
steam will build up and may cause food to explode.
Note: Eggs in their shells and whole hard boiled
eggs should not be heated in the microwave
ovens since they may explode even after
microwaving has ended.
Place thickest parts of food on the outside of the dish, for
example, the meaty ends of chicken drumsticks should be
placed on the outside of the dish.
Fish, vegetables and certain other foods benefit from being
covered during microwave cookery, follow
recommendations where given and use vented microwave
cling film or a suitable lid.
Food size and shape affect the amount of cooking time
needed. When cooking more than one portion of the same
food ensure they are of a similar size and shape.
Food density and quantity affect the amount of cooking
time needed, for example, potatoes require more cooking
than peas; four potatoes will take longer to cook than two.
Food hygiene standards (storage, handling and
preparation) apply to microwaving. Always store
convenience foods as recommended by the food
manufacturer and keep no longer than the "Use By" date.
WARNING - Always attend the oven when in use.
Carefully follow the SHARP Operation Manual at all times. If you exceed recommended
cooking times and/or use power levels that are too high, food may overheat, burn, and
in extreme circumstances, catch fire and damage the oven.
The microwave power level will default to 100% unless you press the MICROWAVE POWER LEVEL key to reach
the desired setting. Take care when heating foods with high sugar or fat content, for example, Christmas pudding,
mince pies and fruit cakes (see reheating chart in the cookbook section for guidance). Before use, the user
should check that utensils are suitable for use in microwave ovens.
Lids: Always remove lids from food jars and containers before you use them in the oven. If you do not, steam and
pressure will build up inside and the container may explode.
Do not place hot foods/utensils on a cold turntable, or cold foods/utensils on a hot turntable.
WARNING: Liquids and other foods must not be heated in sealed containers since they are liable to explode.
R-874M/R-84STM Op Man/Ck Bk 28/3/01 8:41 am Page 29
Page 21

30
Website: http://www.sharp.co.uk/support Help Line: 08705 274277 (office hours)
ADVICE FOR DEFROSTING
Meat joints
Poultry
Steak, Chops
& Chicken
Portions
Cubed &
Minced Meat
Whole Fish
& Fillets
Prepacked
Frozen Foods
Place in a flan dish, turn over at least 4 - 5 times
during defrosting, shield any warm areas with small,
flat pieces of foil. After defrosting, wrap in foil and
allow meat to stand for 60 - 90 minutes, until
thoroughly defrosted.
Place in a flan dish, turn over at least 3 - 4 times
during defrosting, shield any warm areas with small,
pieces of foil. After defrosting, wrap in foil and
allow poultry to stand for 60 - 90 minutes, until
thoroughly defrosted.
NOTE: Do not defrost poultry with giblets.
Place in a flan dish, separate during defrosting and
turn over at least 2 - 3 times. Shield if necessary.
Place in a bowl, stir or turn over at least 3 - 4 times
during defrosting, remove defrosted parts each time.
Please refer to the defrost chart on page 33.
Place in a flan dish, separate during defrosting and
turn over at least twice. Shield if necessary.
Remove packaging, including any foil and place in
a suitable dish.
NOTES:
• To defrost food, use either 30% or 10% microwave power.
• Shield warm areas with small pieces of foil if necessary.
• It is important to turn food over, separate (where appropriate) and rearrange to ensure even
defrosting.
• Standing time is necessary to ensure thorough defrosting.
• Ensure food is defrosted thoroughly before use.
R-874M/R-84STM Op Man/Ck Bk 28/3/01 8:41 am Page 30
Page 22

31
Website: http://www.sharp.co.uk/support Help Line: 08705 274277 (office hours)
ADVICE FOR REHEATING
WARNINGS:
Oil & Fat: Never heat oil or fat for deep frying as this may lead to overheating and fire. Stand back
when opening the oven door to allow heat or steam to disperse. When removing covers (such as
cling film), opening roasting bags or popcorn packaging, direct steam away from face and hands.
Never heat liquids in narrow-necked containers, as this could result in the
contents erupting from the container and may cause burns.
• Remove food from foil or metal containers before reheating.
• Reheating times will be affected by the shape, depth, quantity and temperature of food together
with the size, shape and material of the container.
• To avoid overheating and fire, special care must be taken when reheating foods with a high
sugar or fat content, for example, mince pies, Christmas pudding.
• Canned potatoes should not be heated in the microwave oven, follow the manufacturers’
instructions on the can.
Plated meals
Casseroles
Poultry portions
Sliced meat
Pies
Vegetables
Remove any poultry or meat portions, reheat
these separately, see below. Place smaller items of
food to the centre of the plate, larger and thicker foods
to the edge. Cover with vented microwave cling film
and reheat on 50%, stir/rearrange halfway through
reheating. Ensure food is thoroughly reheated before
serving.
Cover with vented microwave cling film or suitable lid,
reheat on 50%. Stir frequently to ensure even
reheating.
Place thickest parts of the portions on the outside of the
dish, cover with vented microwave cling film and
reheat on 70%. Turn over halfway through. NOTE:
Ensure poultry is thoroughly reheated, before
serving.
Cover with vented microwave cling film and reheat on
50%. Rearrange at least once to ensure even
reheating. NOTE: Ensure meat is thoroughly reheated
before serving.
Place pies in a flan dish. Reheat meat pies on 70%
and fruit pies on 50%.
Cover with vented microwave cling film or suitable lid
and reheat on 50%. Stir at least once during
reheating.
R-874M/R-84STM Op Man/Ck Bk 28/3/01 8:41 am Page 31
 Loading...