

Sharp R-842IN User Manual [ro]
Important
Ważne
Σημαντικό
Pomembno
Důležité
Dôležité
Fontos
Svarīgi
Svarbu
Tähelepanu
Важно
Important
ENGLISH
ČESKYSLOVENSKYMAGYARLIETUVIŠKAI LATVISKIEESTIБЪЛГАРСКИROMÂNĂ SLOVENŠČINA ΕΛΛΗΝΙΚΑ POLSKI
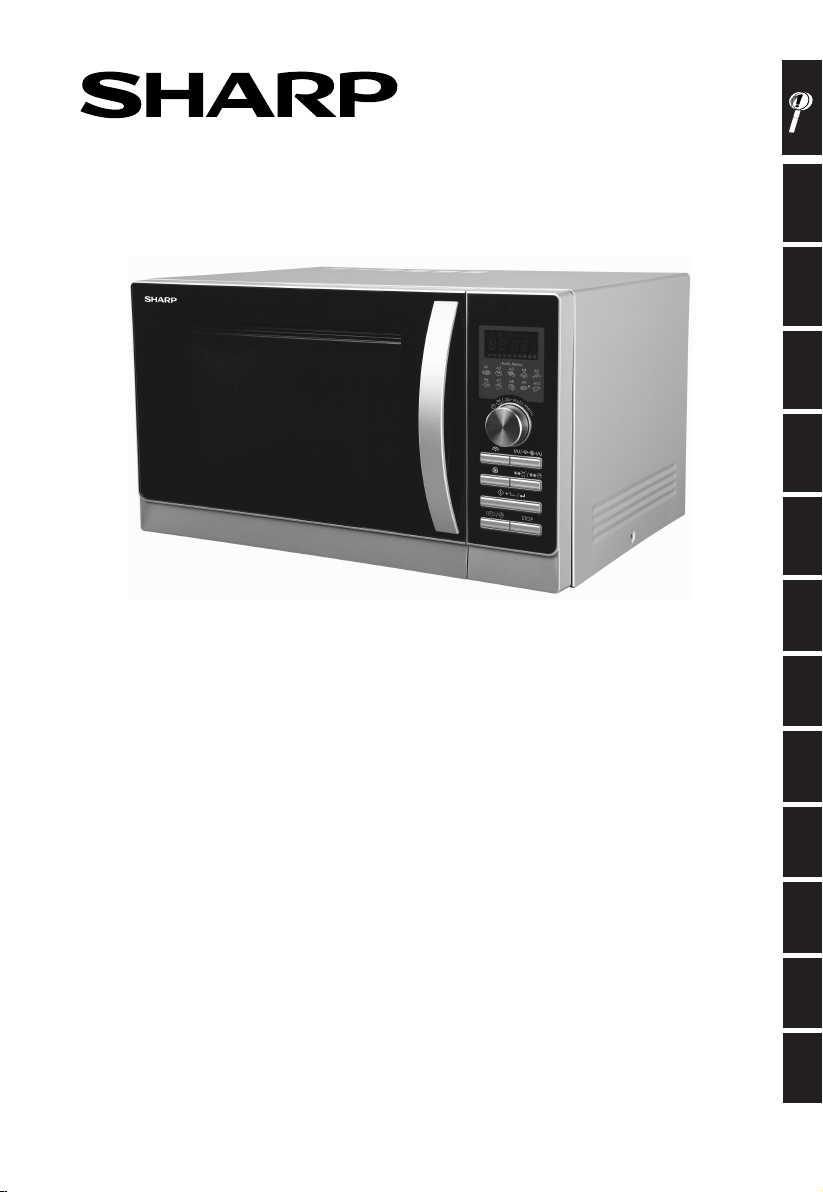
R-842IN
MICROWAVE OVEN WITH TOP AND BOTTOM GRILL AND CONVECTION - OPERATION MANUAL
KUCHENKA MIKROFALOWA Z GÓRNYM I DOLNYM GRILLEM ORAZ TERMOOBIEGIEM - INSTUKCJA OBSŁUGI
ΦΟΥΡΝΟΣ ΜΙΚΡΟΚΥΜΑΤΩΝ ΜΕ ΑΝΩ ΚΑΙ ΚΑΤΩ ΣΤΟΙΧΕΙΟ ΓΚΡΙΛΛ ΚΑΙ ΕΠΑΓΩΓΙΚΗ ΛΕΙΤΟΥΡΓΙΑ - ΕΓΧΕΙΡΙΔΙΟ ΛΕΙΤΟΥΡΓΙΑΣ
MIKROVALOVNA PEČICA Z ZGORNJIM IN SPODNJIM ŽAROM TER KONVEKCIJO - NAVODILA ZA UPORABO
MIKROVLNNÁ TROUBA S HORNÍM A SPODNÍM GRILEM A KONVEKCÍ - NÁVOD K OBSLUZE
MIKROVLNNÁ RÚRA S HORNÝM A DOLNÝM GRILOM A HORÚCIM VZDUCHOM - NÁVOD NA POUŽITIE
LÉGKEVERÉSES MIKROHULLÁMÚ SÜTŐ ALSÓ ÉS FELSŐ GRILL FŰTŐSZÁLLAL - KEZELÉSI ÚTMUTATÓ
MIKROVIĻŅU KRĀSNS AR AUGŠĒJO UN APAKŠĒJO GRILU UN KONVEKCIJU - LIETOŠANAS INSTRUKCIJA
MIKROBANGŲ KROSNELĖ, KARŠTO ORO PŪTIMO SU KEPIMO IŠ VIRŠAUS IR APAČIOS FUNKCIJA - VALDYMO VADOVAS
ÜLEMISE JA ALUMISE GRILLI NING KONVEKTSIOONIGA MIKROLAINEAHI - KASUTUSJUHEND
МИКРОВЪЛНОВА ФУРНА С ГОРЕН И ДОЛЕН ГРИЛ И КОНВЕКЦИЯ - РЪКОВОДСТВО ЗА УПОТРЕБА
CUPTOR CU MICROUNDE CU GRILL SUPERIOR ŞI INFERIOR ŞI CU CONVECŢIE - MANUAL DE UTILIZARE
900 W (IEC 60705)

GB
This operation manual contains important information which you should read carefully before using your microwave oven.
Important: There may be a serious risk to health if this operation manual is not followed or if the oven is modi ed so that it operates with the
door open.
PL
Niniejsza instrukcja zawiera ważne informacje, z którymi należy się zapoznać przed przystąpieniem do korzystania z kuchenki.
Ważne: Nieprzestrzeganie informacji zawartych w niniejszej instrukcji lub doprowadzenie do uruchomienia kuchenki przy otwartych
drzwiczkach może być przyczyną niebezpieczeństwa dla życia i zdrowia.
GR
Αυτό το εγχειρίδιο λειτουργίας περιέχει σημαντικές πληροφορίες, τις οποίες θα πρέπει να διαβάσετε προσεκτικά πριν τη χρήση του φούρνου
μικροκυμάτων.
Σημαντικό: Ενδέχεται να υπάρξει σοβαρός κίνδυνος για την υγεία, αν δεν ακολουθήσετε αυτό το εγχειρίδιο λειτουργίας, ή αν τροποποιηθεί ο
φούρνος έτσι ώστε να λειτουργεί με την πόρτα ανοικτή.
SI
V teh navodilih za uporabo najdete pomembne informacije, ki jih pred uporabo pečice pozorno preberite.
Pomembno: Če teh navodil za uporabo ne upoštevate ali pečico predelate tako, da deluje z odprtimi vrati, lahko to resno škoduje vašemu
zdravju.
Tento návod k obsluze obsahuje důležité informace, které byste si měli pozorně přečíst před použitím této mikrovlnné trouby.
Důležité: Pokud se nebude postupovat podle tohoto návodu k obsluze nebo se mikrovlnná trouba upraví tak, že bude moci pracovat s otevřenými
dveřmi, může dojít k vážnému ohrožení zdraví.
Tento návod na obsluhu obsahuje dôležité informácie, ktoré by ste si mali pred použitím mikrovlnnej rúry pozorne prečítať.
Dôležité: Nedodržanie pokynov uvedených v tomto návode na použitie, ako aj akýkoľvek zásah, ktorý dovoľuje prevádzkovanie rúry s otvorenými
dvierkami, môže viesť k závažnému poškodeniu zdravia osôb.
Fontos: A jelen kezelési útmutató előírásainak be nem tartásával, illetve a mikrohullámú sütő nyitott ajtajú működését lehetővé tevő módosításával
A kezelési útmutató fontos információkat tartalmaz. Olvassa végig gyelmesen a mikrohullámú sütő használata előtt!
súlyos egészségkárosodási kockázatot vállal!
Šī lietošanas instrukcija ietver svarīgu informāciju, kuru pirms mikroviļņu krāsns lietošanas jums vajadzētu uzmanīgi izlasīt.
Svarīgi: Šīs lietošanas instrukcijas neievērošana vai krāsns pārveidošana tā, lai tā darbotos ar atvērtām durvīm, var nopietni apdraudēt veselību.
Šiame valdymo vadove rasite svarbią informaciją, kurią, prieš naudodamiesi mikrobangų krosnele, turite atidžiai perskaityti.
Svarbu: Jūsų sveikatai gali kilti rimtas pavojus, jei nesivadovausite šiuo valdymo vadovu ar krosnelė veiks su atidarytomis durelėmis.
Käesolev juhend sisaldab olulist teawvet, mis tuleks teil enne oma mikrolaineahju kasutamist tähelepanelikult läbi lugeda.
Tähtis: käesoleva juhendi eiramine või ahju muutmine selliselt, et see töötab ka avatud ukse korral, võib kujutada tervisele tõsist ohtu.
Това ръководство за употреба съдържа информация, която трябва да прочетете внимателно, преди да започнете да използвате Вашата
микровълнова фурна.
Важно: може да има сериозен риск за здравето, ако не се спазва настоящата инструкция или фурната е преправена така, че да работи и
при отворена врата.
Acest manual de utilizare conţine informaţii importante, care trebuie citite cu atenţie înainte de utilizarea cuptorului cu microunde.
Important: Nerespectarea instrucţiunilor descrise în acest manual sau modi carea cuptorului pentru a funcţiona cu uşa deschisă poate duce la
rănirea utilizatorului.

GB
ENGLISH
GB-1
CONTENTS
Operation manual
INFORMATION ON PROPER DISPOSAL ......................................................................................................................................1
CONTENTS ........................................................................................................................................................................................... 2
SPECIFICATIONS ................................................................................................................................................................................ 2
OVEN AND ACCESSORIES ..............................................................................................................................................................3
CONTROL PANEL ............................................................................................................................................................................... 4
IMPORTANT SAFETY INSTRUCTIONS .....................................................................................................................................5-7
INSTALLATION .................................................................................................................................................................................... 7
BEFORE OPERATION ........................................................................................................................................................................8
SETTING THE CLOCK .........................................................................................................................................................................8
MICROWAVE POWER LEVELS ........................................................................................................................................................8
MANUAL OPERATION ...................................................................................................................................................................... 9
MICROWAVE COOKING ................................................................................................................................................................... 9
GRILL COOKING/ COMBI COOKING .................................................................................................................................... 10-11
CONVECTION COOKING .........................................................................................................................................................11-12
OTHER CONVENIENT FUNCTIONS ............................................................................................................................................13
WEIGHT DEFROST AND TIME DEFROST OPERATION ..........................................................................................................14
AUTO MENU OPERATION .............................................................................................................................................................14
AUTO MENU CHART .......................................................................................................................................................................15
SUITABLE OVENWARE ....................................................................................................................................................................16
CARE AND CLEANING ....................................................................................................................................................................17
SPECIFICATIONS
Model name: R-842
AC Line Voltage : 230 V, 50 Hz single phase
Distribution line fuse/circuit breaker : 16 A
AC Power required: Microwave : 1450 W
Output power: Microwave : 900 W (IEC 60705)
Top Grill (Quartz / Infrared) : 1200 / 1100 W
Bottom Grill (Infrared) : 500 W
Convection : 2300 W
O Mode (Energy Save Mode) : less than 1,0 W
Microwave Frequency : 2450 MHz*(Group 2/Class B)
Outside Dimensions (W) x (H) x (D) mm : 513,0 x 306,0 x 430,0 mm
Cavity Dimensions (W) x (H) x (D)** mm : 330,0 x 208,0 x 368,0 mm
Oven Capacity : 25 litres**
Turntable (metal) : ø 301 mm
Weight : approx. 15,8 kg
Oven lamp : 25 W / 240 V
* This Product ful ls the requirement of the European standard EN55011.
In conformity with this standard, this product is classi ed as group 2 class B equipment.
Group 2 means that the equipment intentionally generates radio-frequency energy in the form of electromagnetic
radiation for the heat treatment of food.
Class B equipment means that the equipment is suitable to be used in domestic establishments.
** Internal capacity is calculated by measuring maximum width, depth and height. Actual capacity for holding food is
less.
AS PART OF A POLICY OF CONTINUOUS IMPROVEMENT, WE RESERVE THE RIGHT TO ALTER DESIGN AND SPECIFICATIONS
WITHOUT NOTICE.
GB-2
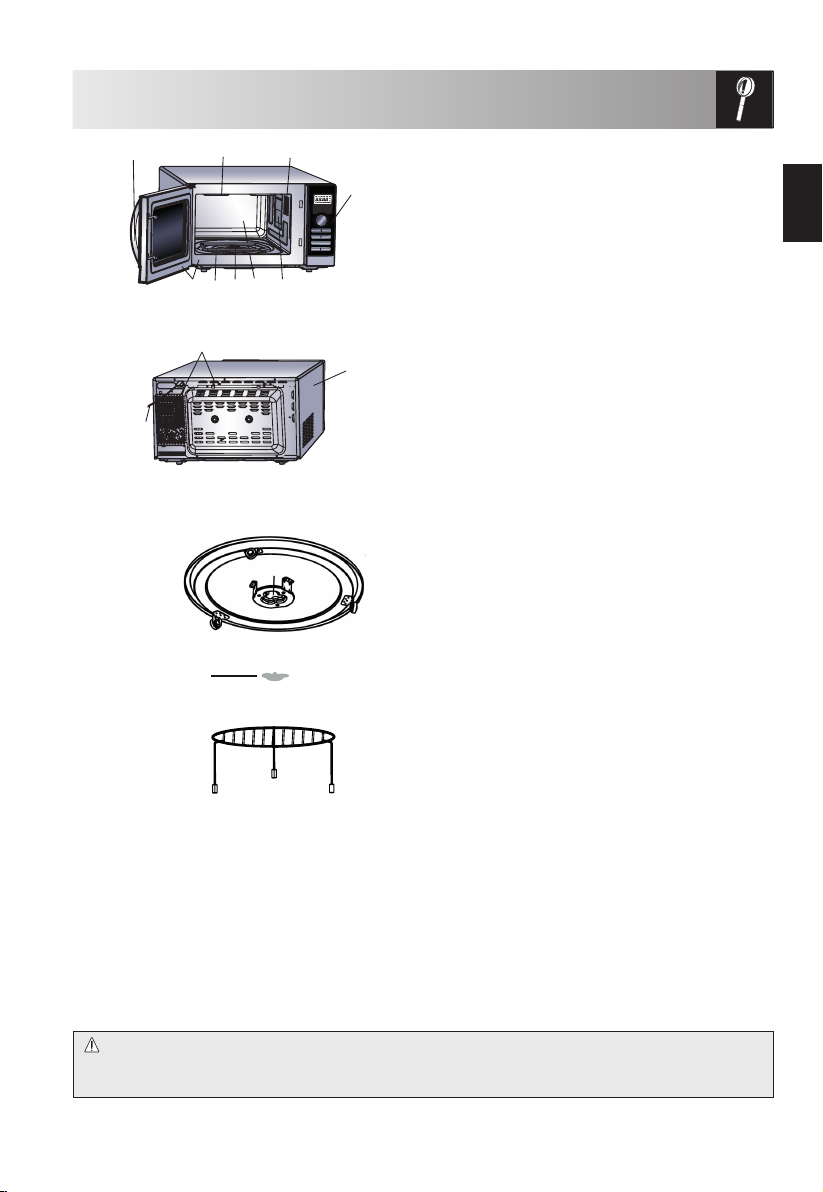
OVEN AND ACCESSORIES
4
11
13. Turntable
(metal)
14. Coupling
1
2
OVEN
1. Grill heating element (top grill)
3
2. Oven lamp
3. Control panel
4. Door handle
ENGLISH
5. Waveguide cover (DO NOT REMOVE)
6. Oven cavity
5
6
7
10
8
7. Turntable motor shaft
8. Grill heating element (bottom grill)
9. Ventilation openings
10. Door seals and sealing surfaces
9
12
11. Power cord
12. Outer cabinet
ACCESSORIES:
Check to make sure the following accessories are
provided:
(13) Turntable (14) Coupling (15) Rack
• Place the coupling into the turntable motor shaft.
Then place the turntable on to the turntable motor
shaft; ensuring it is located firmly.
• To avoid turntable damage, ensure dishes and
containers are lifted clear of the turntable rim when
removing them from the oven.
• For use of the rack, refer to the grilling sections on
pages GB-11.
Never touch the grill when it is hot.
NOTE: When you order accessories, please mention
two items: part name and model name to your
dealer or SHARP authorised service agent.
15. Rack
NOTES:
• The waveguide cover is fragile. Care should be taken when cleaning inside the oven to ensure that it is not
damaged.
• After cooking fatty foods without a cover, always clean the cavity and especially the grill heating element
thoroughly, these must be dry and free from grease. Built-up grease may overheat and begin to smoke or
catch fire.
• Always operate the oven with the turntable and turntable support fitted correctly. This promotes thorough,
even cooking. A badly fitted turntable may rattle, may not rotate properly and could cause damage to the
oven.
• All food and containers of food are always placed on the turntable for cooking.
• The turntable rotates clockwise or anti-clockwise. The rotary direction may change each time you start the
oven. This does not affect cooking performance.
WARNING:
The door, outer cabinet, oven cavity, accessories and dishes will become very hot during operation.
To prevent burns, always use thick oven gloves.
GB-3
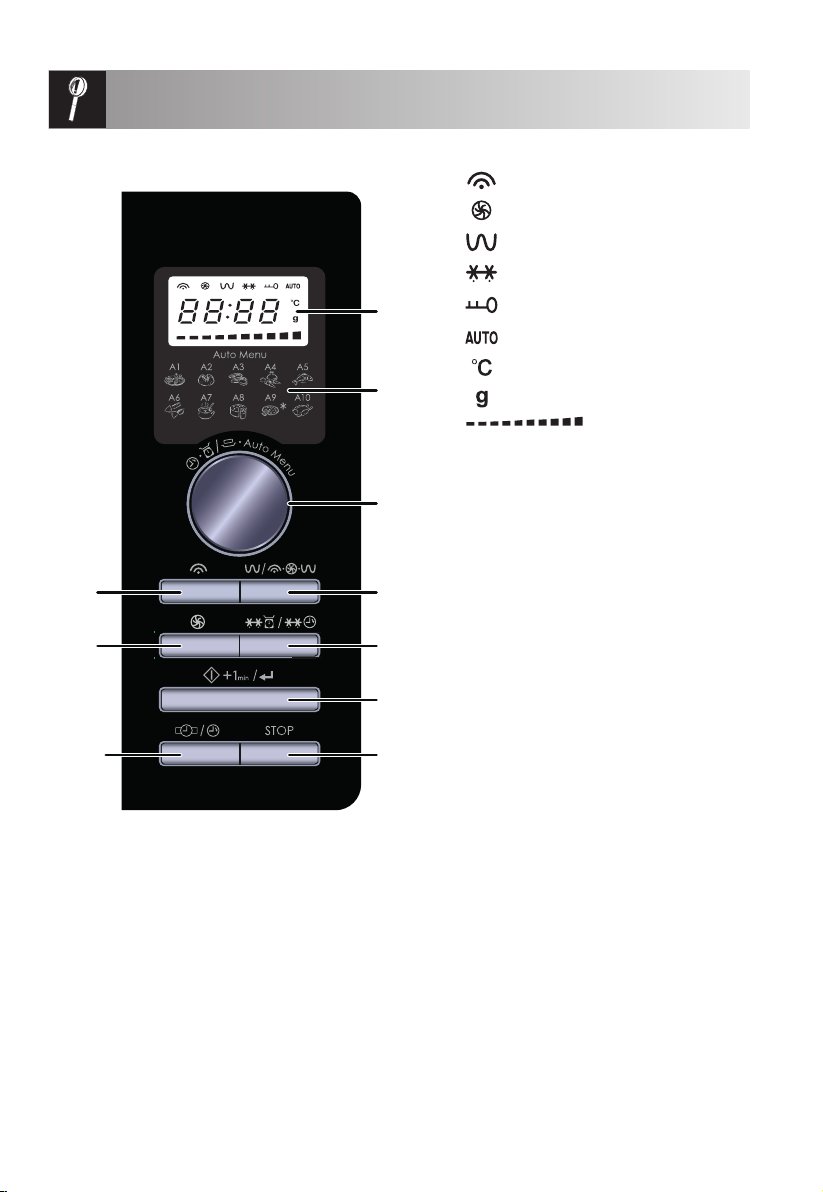
CONTROL PANEL
8
9
10
1. DIGITAL DISPLAY and INDICATORS
CONVECTION indicator
1
2
2. Auto Menu options:
A1: Reheat menu
A2: Jacket potato
A3: Meat
3
A4: Fresh vegetables
A5: Fish
A6: Pasta
A7: Soup
4
A8: Sponge cake
A9: Frozen Pizza
A10: Chicken
5
3. ENTRY dial
Rotate to enter the cooking time, time,
6
4. GRILL MODE/ COMBI MODE button
1 PRESS (G-1) = TOP QUARTZ GRILL
2 PRESSES ( G-2) = TOP QUARTZ GRILL &
7
3 PRESSES (G-3) = BOTTOM GRILL
4 PRESSES (C-1) = MICROWAVE & TOP
5 PRESSES (C-2) =
6 PRESSES (C-3) =
5. WEIGHT/ TIME DEFROST button
6. START/ +1min/ CONFIRM button
7. STOP button
8. MICROWAVE POWER LEVEL button:
Press to select microwave power level.
9. CONVECTION button
10. CLOCK SET/ KITCHEN TIMER button
MICROWAVE indicator
GRILL indicator
DEFROST indicator
CHILD LOCK indicator
AUTO MENU indicator
TEMPERATURE indicator
WEIGHT indicator
power level, temperature, weight, portion
and select auto menu.
Index for the temperature
BOTTOM GRILL TOGETHER
QUARTZ GRILL & BOTTOM
GRILL
MICROWAVE (73%) & TOP
GRILL & CONVECTION (27%)
MICROWAVE (52%) & TOP
GRILL & CONVECTION (48%)
GB-4

IMPORTANT SAFETY INSTRUCTIONS
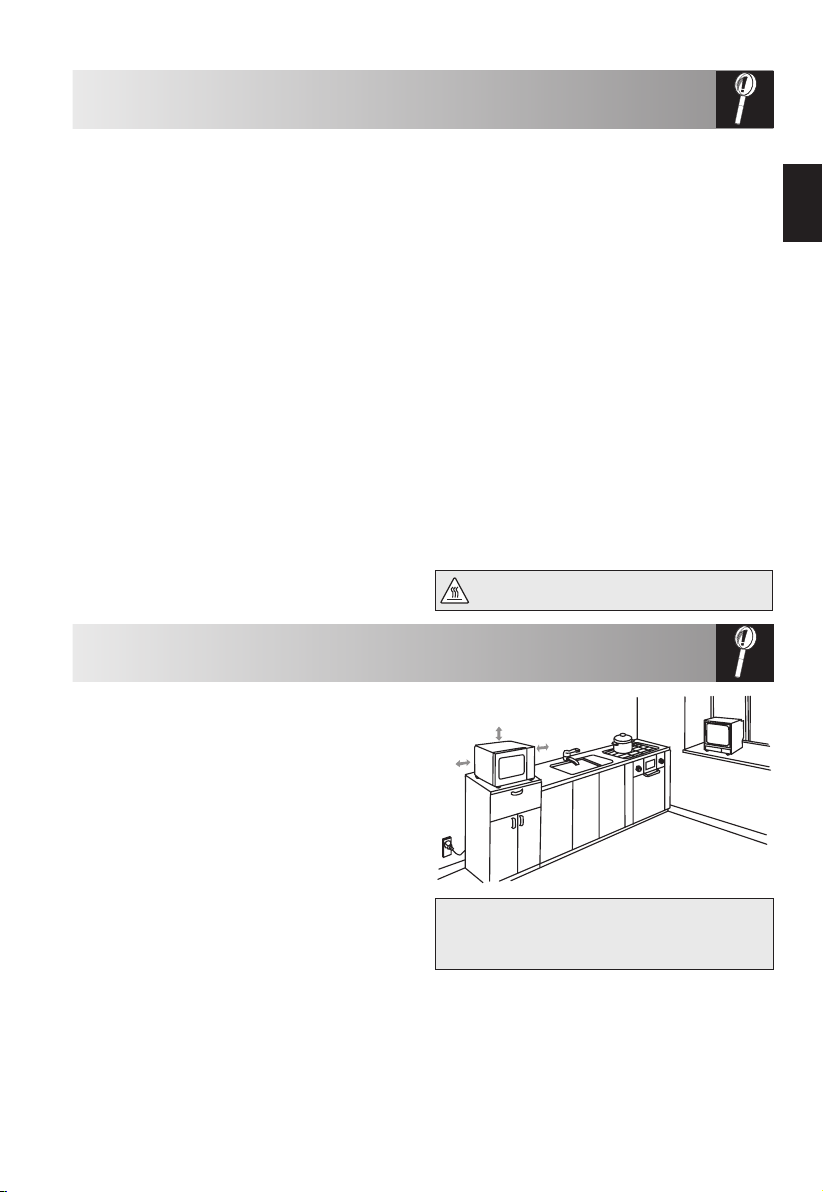
1. This oven is designed to be used on a countertop
only. It is not designed to be built into a kitchen
unit. Do not place the oven in a cabinet.
2. The oven door may become hot during cooking.
Place or mount the oven so that the bottom of
the oven is 85 cm or more above the floor. Keep
children away from the door to prevent them
burning themselves.
3. Ensure there is a minimum of free space above
the oven of 30 cm.
4. This appliance is not intended for use by
persons (including children) with reduced
physical, sensory or mental capabilities, or lack
of experience and knowledge, unless they have
been given supervision or instruction concerning
use of the appliance by a person responsible for
their safety.
5. Children should be supervised to ensure that
they do not play with the appliance.
6. WARNING: Only allow children to use the oven
without supervision when adequate instructions
have been given so that the child is able to use
the oven in a safe way and understands the
hazards of improper use.
7. WARNING: When the appliance is operated in the
GRILL/COMBI and CONVECTION modes, children
should only use the oven under adult supervision
due to the temperature generated.
8. WARNING: Accessible parts may become hot
during use. Young children should be kept away.
9. WARNING: If the door or door seals are damaged,
the oven must not be operated until it has been
repaired by a competent person.
10. WARNING: Never adjust, repair or modify the
oven yourself. It is hazardous for anyone other
than a competent person to carry out any service
or repair operation which involves the removal of
a cover which gives protection against exposure
to microwave energy.
11. If the power supply cord of this appliance is
damaged, it must be replaced with a special cord.
The exchange must be made by an authorised
SHARP service agent.
12. WARNING: Liquids and other foods must not be
heated in sealed containers since they are liable
to explode.
13. Microwave heating of beverages can result in
delayed eruptive boiling, therefore care must be
taken when handling the container.
14. Do not cook eggs in their shells, and whole hard
boiled eggs should not be heated in microwave
ovens since they may explode even after
microwave cooking has ended. To cook or reheat
eggs which have not been scrambled or mixed,
pierce the yolks and the whites, or the eggs may
explode. Shell and slice hard boiled eggs before
reheating them in the microwave oven.
15. Utensils should be checked to ensure that they
are suitable for use in the oven. See Page GB-16.
Use only microwave safe containers and utensils
on microwave modes.
16. The contents of feeding bottles and baby
food jars must be stirred or shaken and the
temperature checked before consumption, in
order to avoid burns.
17. The door, outer cabinet, oven cavity, dishes,
accessories and especially the grill heating
elements will become very hot during operation.
18. Care should be taken to avoid touching these
areas. To prevent burns, always use thick oven
gloves. Before cleaning make sure they are
not hot. When heating food in plastic or paper
containers, keep an eye on the oven due to the
possibility of ignition.
19. If smoke is observed, switch off or unplug the
oven and keep the door closed in order to stifle
any flames.
20. Clean the oven at regular intervals and remove
any food deposits.
21. Failure to maintain the oven in a clean condition
could lead to deterioration of the surface that
could adversely affect the life of the appliance
and possibly result in a hazardous situation.
22. Do not use harsh abrasive cleaners or sharp
metal scrapers to clean the oven door glass since
they can scratch the surface, which may result in
shattering of the glass.
23. Steam cleaner is not to be used.
24. See instructions for cleaning door seals, cavities
and adjacent parts on page GB-17.
GB-5
ENGLISH

IMPORTANT SAFETY INSTRUCTIONS
To avoid the danger of re.
1. The microwave oven should not be left
unattended during operation. Power levels
that are too high, or cooking times that are too
long, may overheat foods resulting in a re.
2. The electrical outlet must be readily accessible
so that the unit can be unplugged easily in an
emergency.
3. The AC power supply must be 230V, 50Hz,
with a minimum 16A distribution line fuse, or a
minimum 16A distribution circuit breaker.
4. A separate circuit serving only this appliance
should be provided.
5. Do not place the oven in areas where heat is
generated. For example, close to a conventional
oven.
6. Do not install the oven in an area of high
humidity or where moisture may collect.
7. Do not store or use the oven outdoors.
8. Clean the waveguide cover, the oven cavity, the
turntable and turntable support after use. These
must be dry and free from grease. Built-up grease
may overheat and begin to smoke or catch re.
9. Do not place ammable materials near the oven
or ventilation openings.
10. Do not block the ventilation openings.
11. Remove all metallic seals, wire twists, etc., from
food and food packages. Arcing on metallic
surfaces may cause a re.
12. Do not use the microwave oven to heat oil
for deep frying. The temperature cannot be
controlled and the oil may catch re.
13. To make popcorn, use only special microwave
popcorn makers.
14. Do not store food or any other items inside the
oven.
15. Check the settings after you start the oven to
ensure the oven is operating as desired.
16. To avoid overheating and re, special care must
be taken when cooking or reheating foods with
a high sugar or fat content, for example, Sausage
rolls, Pies or Christmas pudding.
17. See the corresponding hints in operation manual.
To avoid the possibility of injury
1. WARNING:
Do not operate the oven if it is damaged or
malfunctioning. Check the following before use:
a) The door; make sure the door closes properly
and ensure it is not misaligned or warped.
b) The hinges and safety door latches; check to
make sure they are not broken or loose.
c) The door seals and sealing surfaces; ensure
that they have not been damaged.
d) Inside the oven cavity or on the door; make
sure there are no dents.
e) The power supply cord and plug; ensure that
they are not damaged.
2. Do not operate the oven with the door open or
alter the door safety latches in any way.
3. Do not operate the oven if there is an object
between the door seals and sealing surfaces.
4. Do not allow grease or dirt to build up on the
door seals and adjacent parts. Clean the oven at
regular intervals and remove any food deposits.
Follow the instructions for ''Care and Cleaning''
on page GB-17.
5. Individuals with PACEMAKERS should check
with their doctor or the manufacturer of the
pacemaker for precautions regarding microwave
ovens.
To avoid the possibility of electric shock
1. Under no circumstances should you remove the
outer cabinet.
2. Never spill or insert any objects into the door lock
openings or ventilation openings. In the event of
a spill, turn o and unplug the oven immediately,
and call an authorised SHARP service agent.
3. Do not immerse the power supply cord or plug in
water or any other liquid.
4. Do not let the power supply cord hang over the
edge of a table or work surface.
5. Keep the power supply cord away from heated
surfaces, including the rear of the oven.
6. Do not attempt to replace the oven lamp
yourself or allow anyone who is not an electrician
authorised by SHARP to do so. If the oven lamp
fails, please consult your dealer or an authorised
SHARP service agent.
To avoid the possibility of explosion and sudden boiling:
1. Never use sealed containers. Remove seals and
lids before use. Sealed containers can explode
due to a build up of pressure even after the oven
has been turned o .
2.
Take care when microwaving liquids. Use a
widemouthed container to allow bubbles to escape.
Never heat liquids in narrow necked
containers such as baby bottles, as this may
result in the contents erupting from the
container when heated and cause burns.
To prevent sudden eruption of boiling liquid and
possible scalding:
1. Do not use excessive amount of time
2. Stir liquid prior to heating/reheating.
3.
It is advisable to insert a glass rod or similar
utensil (not metal) into the liquid whilst
reheating.
4. Let liquid stand for at least 20 seconds in the
oven at the end of cooking time to prevent
delayed eruptive boiling.
3. Pierce the skin of such foods as potatoes,
sausages and fruit before cooking, or they may
explode.
GB-6
IMPORTANT SAFETY INSTRUCTIONS
To avoid the possibility of burns
1. Use pot holders or oven gloves when removing
food from the oven to prevent burns.
2. Always open containers, popcorn makers, oven
cooking bags, etc., away from the face and hands
to avoid steam burns and eruption of boiling.
3. To avoid burns, always test food temperature
and stir before serving and pay special
attention to the temperature of food and drink
given to babies, children or the elderly.
Temperature of the container is not a true
indication of the temperature of the food or drink;
always check the food temperature.
Always stand back from the oven door when opening
4.
it to avoid burns from escaping steam and heat.
5. Slice stu ed baked foods after heating to release
steam and avoid burns.
To avoid misuse by children
1. Do not lean or swing on the oven door.
2. Children should be taught all important safety
instructions: use of pot holders, careful removal
of food coverings; paying special attention to
packaging (e.g. self-heating materials) designed
to make food crisp, as they may be extra hot.
Other warnings
1. Never modify the oven in any way.
2. Do not move the oven while it is in operation.
3. This oven is for home food preparation only
and may only be used for cooking food. It is not
suitable for commercial or laboratory use.
To promote troublefree use of your oven and
avoid damage.
1. Never operate the oven when it is empty except
where recommended in the operation manual.
Doing so may damage the oven.
2. When using a browning dish or self-heating
material, always place a heat-resistant insulator
such as a porcelain plate under it to prevent
damage to the turntable and turntable support
due to heat stress. The preheating time speci ed
in the dish’s instructions must not be exceeded.
Do not use metal utensils, which re ect microwaves
3.
and may cause electrical arcing. Use only the
turntable and the turntable support designed for this
oven. Do not operate the oven without the turntable.
4. Do not place anything on the outer cabinet
during operation.
NOTE:
If you are unsure how to connect your oven, please
consult an authorised, qualified electrician. Neither
the manufacturer nor the dealer can accept any
liability for damage to the oven or personal injury
resulting from failure to observe the correct electrical
connection procedure. Water vapour or drops may
occasionally form on the oven walls or around the
door seals and sealing surfaces. This is a normal
occurrence and is not an indication of microwave
leakage or a malfunction.
This symbol means that the surfaces are liable
to get hot during use.
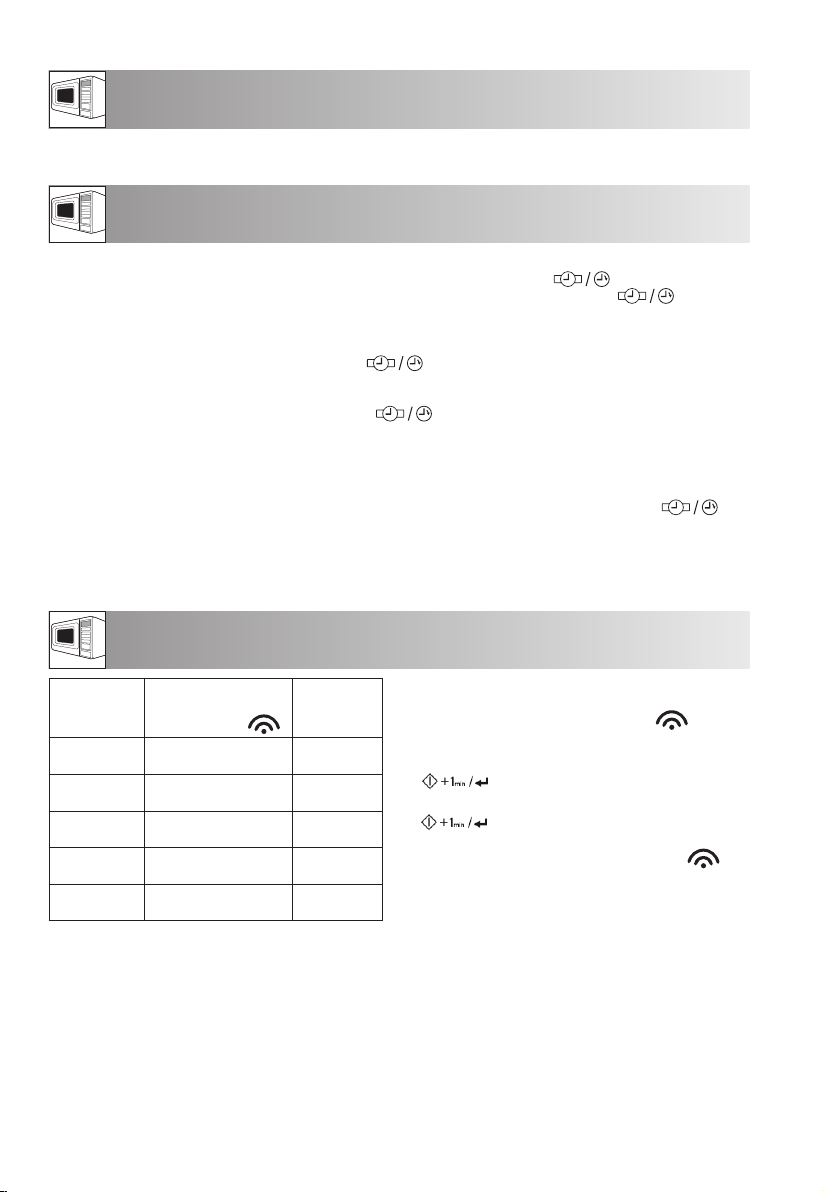
INSTALLATION
1. Remove all packing materials from the inside of
the oven cavity and remove any protective film
found on the microwave oven cabinet surface.
Check the oven carefully for any signs of damage.
2. Place the oven on a secure, level surface, strong
enough to take the oven weight, plus the heaviest
item likely to be cooked in the oven. Do not place
the oven in a cabinet.
3. Select a level surface that provides enough open
space for the intake and/or outlet vents. The rear
surface of appliance shall be placed against a wall.
• A minimum space of 20 cm is required between
the oven and any adjacent walls. One side must
be open.
• Leave a minimum space of 30 cm above the oven.
• Do not remove the feet from the bottom of the
oven.
• Blocking the intake and/or outlet openings can
damage the oven.
• Place the oven as far away from radios and TV
as possible. Operation of microwave oven may
cause interference to your radio or TV reception.
30 cm
20 cm
20 cm
4.
The oven door may become hot during cooking. Place
or mount the oven so that the bottom of the oven is
85 cm or more above the floor. Keep children away
from the door to prevent them burning themselves.
5. Securely connect the plug of the oven to a standard
earthed (grounded) household electrical outlet.
WARNING: Do not place the oven where heat, moisture
or high humidity are generated, (for example, near
or above a conventional oven) or near combustible
materials (for example, curtains).
Do not block or obstruct air vent openings.
Do not place objects on top of the oven.
ENGLISH
GB-7
BEFORE OPERATION
Plug in the oven. The oven display will display: “0:00”, an audible signal will sound once.
This model has a clock function and the oven uses less than 1,0 W in stand by mode. To set the clock, see below.
SETTING THE CLOCK
There are two setting modes: 12 hour clock and a 24 hour clock.
1. To set the 24 hour clock, press the CLOCK SET/ KITCHEN TIMER button once (
in the display. To set the 12 hour clock, press the CLOCK SET/ KITCHEN TIMER button (
and “12H” will appear in the display.
2. Rotate the ENTRY dial until the correct hour is displayed, the input time should be within 0-23 (24-hour
clock) or 1 -12 (12-hour clock).
3. Press the CLOCK SET/ KITCHEN TIMER button (
4. Set the minutes. Rotate the ENTRY dial until the correct minutes are displayed, the input time should be
within 0-59.
5. Press the CLOCK SET/ KITCHEN TIMER button (
time will be ashing on the display.
NOTES:
• If the clock is set, when cooking is complete, the display will show the correct time of day. If the clock has not
been set, the display will show “0:00”.
• To check the time of day during a cooking process, press CLOCK SET/ KITCHEN TIMER button (
the LED will display the time of day for 2-3 seconds. This does not a ect the cooking process.
In the process of clock setting, if the STOP button is pressed, the oven will go back to the former setting.
•
•
If the electrical power supply to your microwave oven is interrupted, the display will intermittently show “0:00” after the
power is reinstated. If this occurs during cooking, the programme will be erased. The time of day will also be erased.
), the minute gure will ash.
) once to start the clock. The icon “:” of the digital
) and “24H” will appear
) once more
) and
MICROWAVE POWER LEVELS
Power Level Press the
HIGH x1 P100
MEDIUM
HIGH
MEDIUM x3 P50
MEDIUM LOW
(DEFROST)
LOW x5 P10
Generally the following recommendations apply:
P100 - (HIGH output = 900W) used for fast cooking or re-
heating e.g. for casseroles, hot beverages, vegetables etc.
P80 - (MEDIUM HIGH output = 720W) used for longer
cooking of dense foods such as roast joints, meat loaf
and plated meals, also for sensitive dishes such as
sponge cakes. At this reduced setting, the food will
cook evenly without over cooking at the sides.
P50 - (MEDIUM output = 450W) for dense foods which
require a long cooking time when cooked conventionally, e.g. beef casserole, it is advisable to use this power
setting to ensure the meat will be tender.
MICROWAVE POWER
LEVEL button
x2 P80
x4 P30
Display
(Percentage)
(100%)
(80%)
(50%)
(30%)
(10%)
• Your oven has 5 power levels, as shown.
• To change the power level for cooking, press the
MICROWAVE POWER LEVEL button
the ENTRY dial until the display indicates the desired
level. Press the START/+1min/CONFIRM button
(
and then press the START/+1min/CONFIRM button
(
• To check the power level during cooking, press
the MICROWAVE POWER LEVEL button
current power level will be displayed for 2-3 seconds.
The oven continues to count down although the
display will show the power level.
P30 - (MEDIUM LOW output = 270 W) Defrost setting)
to defrost, select this power setting, to ensure that the
dish defrosts evenly. This setting is also ideal for simmering rice, pasta, dumplings and cooking egg custard.
P10 - (LOW output = 90 W) For gentle defrosting, e.g.
cream gateaux or pastry.
) to confirm, enter the cooking time
) to start the oven.
or rotate
GB-8
, the
MANUAL OPERATION
Opening the door:
To open the oven door, pull the door opening handle.
Starting the oven:
Prepare and place food in a suitable container onto the turntable or place directly onto the turntable.
Close the door and press the START/+1min/CONFIRM button after selecting the desired cooking mode.
Once the cooking programme has been set and the START/+1min/CONFIRM button is not pressed in
5 minutes, the setting will be cancelled.
The START/+1min/CONFIRM button must be pressed to continue cooking if the door is opened during
cooking. The audible signal sounds once by e cient press, ine cient press will be no response.
Use the STOP button to:
1. Erase a mistake during programming.
2. Stop the oven temporarily during cooking.
3. Cancel a programme during cooking, press the STOP button twice.
4. To set and to cancel the child lock (refer to page GB-13).
MICROWAVE COOKING
Your oven can be programmed for up to 95 minutes (95.00).
The input unit of cooking (defrosting) time varies from 5
seconds to 5 minutes. It depends on the total length of the
cooking (defrosting) time as shown on the table.
MANUAL COOKING/ MANUAL DEFROSTING
• Enter the cooking time and use microwave power levels P100 to P10 to cook or defrost (see example below).
• Stir or turn the food, where possible, 2 - 3 times during cooking.
• After cooking, cover the food and leave to stand, where recommended.
• After defrosting, cover the food in foil and leave to stand until thoroughly defrosted.
Example:
To cook 2 minutes and 30 seconds on P80 (80%) microwave power.
1. Input the power
level by pressing the
MICROWAVE POWER
LEVEL button twice
for P80 or turn the
ENTRY dial to select
the microwave power
to P80.
x2 or
NOTE:
• When the oven starts, the oven lamp will light and the turntable will rotate clockwise or anticlockwise. If the door
is opened during cooking/defrosting to stir or turn over food, the cooking time on the display stops automatically. The cooking/ defrosting time starts to count down again when the door is closed and the START/+1min/
CONFIRM button (
• When cooking/ defrosting is complete, open the door or press STOP button and the time of day will reappear on
the display, if the clock has been set.
• If you wish to know the power level during cooking, press the MICROWAVE POWER LEVEL button
current power level will be displayed for 2-3 seconds.
IMPORTANT:
• Close the door after cooking / defrosting. Please note that the light will remain on for 10 minutes when the door
is open, this is for safety reason to remind you to close the door.
2. Press the START/
+1min/CONFIRM
button to con rm the
selected power level.
At the same time the
microwave indicator will
light up on the display.
) is pressed.
3. Enter desired cooking
Cooking Time
0-1 minutes
1-5 minutes
5-10 minutes
10-30 minutes
30-95 minutes
time by rotating the
ENTRY dial.
Increasing Unit
5 seconds
10 seconds
30 seconds
1 minute
5 minutes
4. Press the START/+1min/
CONFIRM button to
start the timer.
(The display will count
down through the set
cooking time.)
. The
ENGLISH
GB-9

GRILL COOKING/ COMBI COOKING
1. GRILL ONLY COOKING
The oven has top and bottom grills which can be used separately or combined. These have one power setting
only. The grill is assisted by the turntable which rotates simultaneously to ensure even browning. Input the desired
grill mode by pressing the GRILL MODE/COMBI MODE button as indicated below.
Press GRILL MODE/ COMBI MODE button Display Grill heating element in use
Example:
Suppose you want to cook for 20 minutes using the TOP GRILL only.
1. Choose TOP GRILL
function by pressing
GRILL MODE/COMBI
MODE button once. G-1
and the grill indicator will
light up on the display.
NOTE:
After half of grilling time the audible signal sounds twice and will remind you to turn the food over to ensure even
browning. Please be aware that the oven will not stop automatically during grilling. For a better grill effect the food
should be turned over after halfway through cooking time. After the food has been turned over halfway through cooking,
re-closed the door grill result, close the door and then press the START/ +1min / CONFIRM button to continue grilling.
2. COMBI COOKING
The COMBI COOKING feature enables a combination microwave power with grill or convection COMBI means to cook
by microwave power and grill power or convection power alternately. The combination cooking reduces cooking time
and provides a crisp, brown nish giving you the convenience of fast cooking with a traditional appetising appearance.
There are 3 choices for the combination as shown in the chart below:
Press GRILL MODE/COMBI
MODE button
x1 G-1 Top quartz grill only
x2 G-2 Top quartz grill and bottom grill together
x3 G-3 Bottom grill only
2. Press the START/ +1min/
CONFIRM button to
con rm the cooking
mode.
Display Microwave/
x4 C-1 • / 24% • / 76% • / 76% x5 C-2 • / 73% • / 27% - • / 27%
x6 C-3 • / 52% • / 48% - • / 48%
3. Use the ENTRY dial to
input the grilling time
duty cycle
Top grill/ duty
cycle
4. Press the START/+1min/
CONFIRM button to start the
grilling.
( The display will count down
through the set grilling time.)
Bottom grill/
duty cycle
Convection/
duty cycle
Follow the example on the next page for details on how to operate the combi cooking function.
WARNING:
The door, outer cabinet, oven cavity and accessories will become very hot during operation. To prevent
burns, always use thick oven gloves.
GB-10
GRILL COOKING/ COMBI COOKING
Example for Microwave and Convection:
Suppose you want to cook for 30 minutes using the combination of microwave and convection (C-2).
1. Press GRILL
MODE/ COMBI
MODE button
once. G-1 will light
up on the display
NOTES for GRILL and COMBI COOKING:
• It is not necessary to preheat the grill.
• When browning food place it either on rack or in a deep container on the turntable. Use the rack for grilling
small items of food such as bacon, gammon and teacakes.
• You may detect smoke or a burning smell when using the grill for the first time. This is normal and not a
sign that the oven is not operating correctly. To avoid this problem, when rst using the oven, heat the oven
without food for 20 minutes on grill.
IMPORTANT: During operation, to allow smoke or smells to disperse open a window or switch the kitchen ventilation on.
2.
Select C-2 by pressing
the button repeatedly (4
times) or turn the ENTRY
dial until the display will
show C-2.
At the same time
the microwave and
convection indicator light
up on the display.
3. Press the
START/ +1min/
CONFIRM button
to con rm the
cooking mode
4. Use the
ENTRY dial
to input the
grilling time
5. Press the START/ +1min/
CONFIRM button to start
the cooking. (The display
will count down through
the set cooking time.)
CONVECTION COOKING
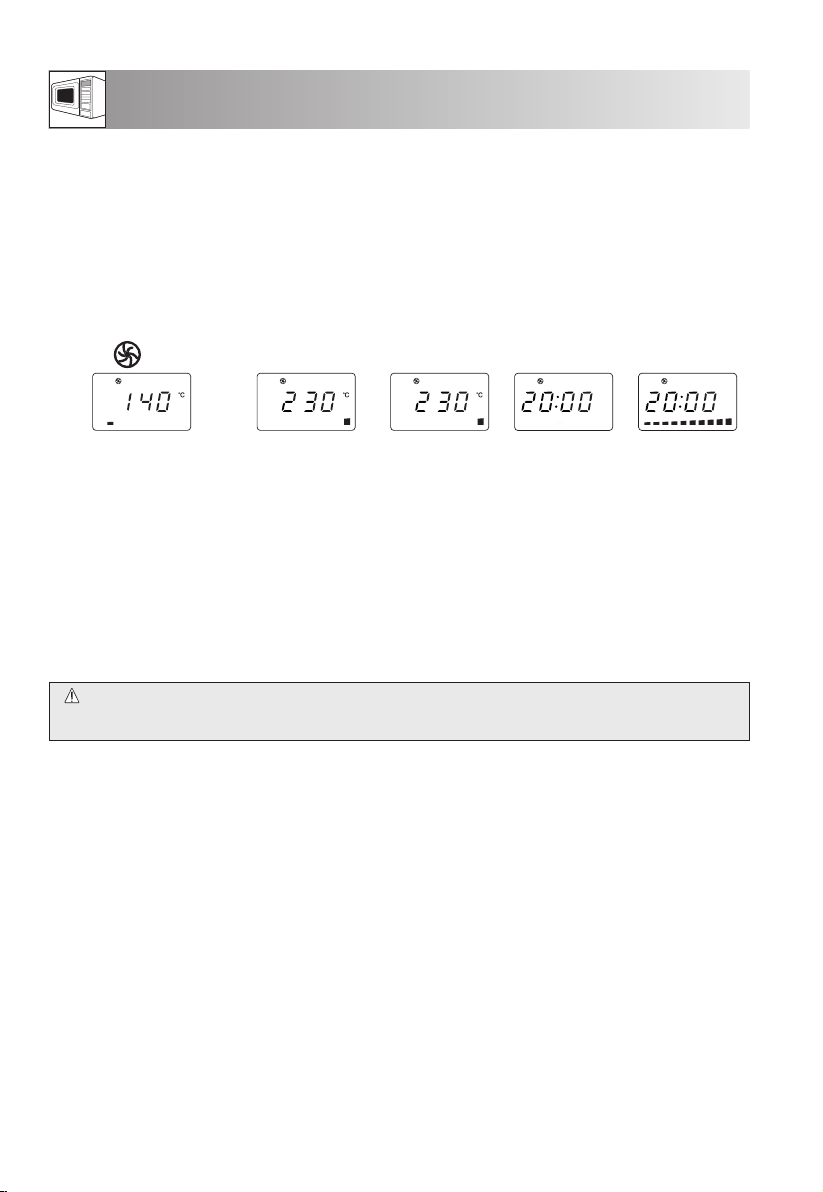
Your oven can be used as a conventional oven using the convection facility and 10 pre-set oven temperatures. Preheating is recommended for better results. The temperature can be chosen from 140°C to 230°C in 10°C increments.
Press CONVECTION button 1 2 3 4 5 6 7 8 9 10
Oven Temp (°C) 140 150 160 170 180 190 200 210 220 230
For each settable temperature there is an index for the temperature in the display e.g. 170°C = fourth bar. During
preheating this display will be ashing and the increasing bars on the display will be indicating the preheating process.
Example 1: To cook with preheating
Suppose you want to preheat to 200°C and cook for 25 minutes at 200°C.
1. Press the CONVECTION button once
and the temperature indicator will
ash on the display. Additionally the
convection indicator will light up.
x1
2. Enter the desired preheat
temperature by pressing the
CONVECTION button (6 times) or
turn the ENTRY dial until the display
shows 200.
3. Press the START/ +1min/ CONFIRM
button to con rm the temperature.
ENGLISH
4. Press the START/ +1min/ CONFIRM
button once more to start preheating.
When the preheated temperature
has been reached the audible signal
will sound twice to remind you to put
the food into the oven. The current
temperature will ash in the display.
5. Open the door, place the food inside
the oven and close the door. Use the
ENTRY dial to input the cooking time
(25 minutes).
GB-11
6. Press the START/ +1min/ CONFIRM
button to start cooking. The display will
count down through the set cooking
time. The convection indicator will
ash.
CONVECTION COOKING
Example 2: To cook without preheating
Suppose you want to cook at 230°C for 20 minutes.
1. Open the door, place
the food inside the oven
and close the door.
Press the CONVECTION
button once and the
temperature indicator
will ash on the display.
Additionally the
convection indicator will
light up.
x1
NOTES:
1. The cooking time cannot be input until the preheating temperature arrives. If the temperature arrives, door
must be opened to input the cooking time.
2. The convection heater will stop automatically; if there is no input for the cooking time within 5 minutes. The
audible signal will sound ve times to remind you and the LED will display the time of day, if the clock has
been set. If the clock has not been set, the display will only show “0:00”.
3. When the oven is preheating, the turntable should be in the oven. During preheating and convection cook-
ing, you will hear the cooling fan cycling on and o . This is completely normal and will not a ect the cooking.
4. Food manufacturers instructions are only a guideline, so cooking times may need to be adjusted.
5. After cooking is complete the cooling fan will continue working for a short time to lower the temperature of
the electrical and mechanical parts.
6. You may detect smoke or a burning smell when using convection for the rst time. This is normal and is not
a sign that the oven is not working correctly. To avoid this problem, when rst using the oven, heat the oven
without food for 20 minutes on grill and then at convection 230
IMPORTANT: During operation, to allow smoke or smells to disperse open a window or switch the kitchen ventilation on. Make sure there is no food in the oven.
WARNING:
The door, outer cabinet, oven cavity and accessories will become very hot during operation. To prevent
burns, always use thick oven gloves.
2. Enter the desired
temperature
by pressing the
CONVECTION
button (9 times)
or turn the ENTRY
dial until the
display shows 230.
3. Press the
START/
+1min/
CONFIRM
button to
con rm the
temperature.
4. Use the ENTRY
dial to input
the cooking
time (20
minutes).
°
C.
5. Press the
START/ +1min/
CONFIRM
button to start
cooking.
GB-12
OTHER CONVENIENT FUNCTIONS
1. SEQUENCE COOKING
This function allows you to cook using up to 3 di erent stages which can include manual cooking time and
mode and/or time defrost as well as weight defrost function. Once programmed there is no need to interfere
with the cooking operation as the oven will automatically move onto the next stage. The audible signal will
sound once after the rst stage. If one stage is defrosting, it should be in the rst stage.
NOTE: Auto menu cannot be set as one of the multiple sequences.
Example : If you want to defrost the food for 5 minutes, then cook with P80 microwave power for 7 min-
utes. The steps are as follows:
- 1. Press the WEIGHT/TIME DEFROST button twice, in the LED display will appear dEF2.
- 2. Enter the defrosting time by rotating ENTRY dial until the display show “5:00” minutes.
- 3. Press the MICROWAVE POWER LEVEL button
- 4. Input the power level by pressing the MICROWAVE POWER LEVEL button once more for P80 or turn
the ENTRY dial to select the microwave power to P80.
- 5. Press the START/+1min/CONFIRM button (
- 6. Enter the cooking time by rotating the ENTRY dial until the display show “7:00” minutes.
- 7. Press the START/+1min/CONFIRM button (
2. +1min FUNCTION (Auto minute)
The START/+1min/CONFIRM button (
a. Direct start
You can directly start cooking on P100 microwave power level for 1 minute by pressing the START/+1min/
CONFIRM button (
this will increase the cooking time by 1 minute.
b. Extend the cooking time
You can extend the cooking time during manual, grill, convection and combi cooking in multiples of 1 minutes if the START/+1min/CONFIRM button (
weight defrost, auto menu function and sequence cooking, the cooking time cannot be increased by pressing
START/+1min/CONFIRM button (
NOTE: The cooking time may be extended to a maximum of 95 minutes.
3. KITCHEN TIMER FUNCTION
You can use the kitchen timer for timing where microwave cooking is not involved for example to time boiled
eggs cooked on conventional hob or to monitor the standing time for cooked/defrosted food.
Example:
To set the timer for 5 minutes.
1. Press the CLOCK
SET/ KITCHEN TIMER
button twice.
When the timer time arrives, the audible signal will sound 5 times and the LED will display then time of day.
You can enter any time up to 95 minutes. To cancel the KITCHEN TIMER whilst counting down,
simply press the STOP button.
NOTE: The KITCHEN TIMER function cannot be used whilst cooking.
4. CHILD LOCK:
Use to prevent unsupervised operation of the oven by children.
a. To set the CHILD LOCK:
Press and hold the STOP button for 3 seconds until a long a beep sound. The display will light the lock indicator:
x 2
). The cooking process will start immediately and each time the button is pressed
2. Enter the desired time
by rotating the ENTRY
dial until the correct
minutes are displayed.
once.
) to con rm the setting.
) to start cooking.
) allows you to operate the two following functions:
) is pressed while the oven is in operation. During the
).
3. Press the START/
+1min/CONFIRM
button to start the
timer.
4. Check the display.
(The display will count
down through the set
time.)
ENGLISH
b. To cancel the CHILD LOCK:
Press and hold the STOP button for 3 seconds until a long beep sound. The lock indicator will disappear.
GB-13
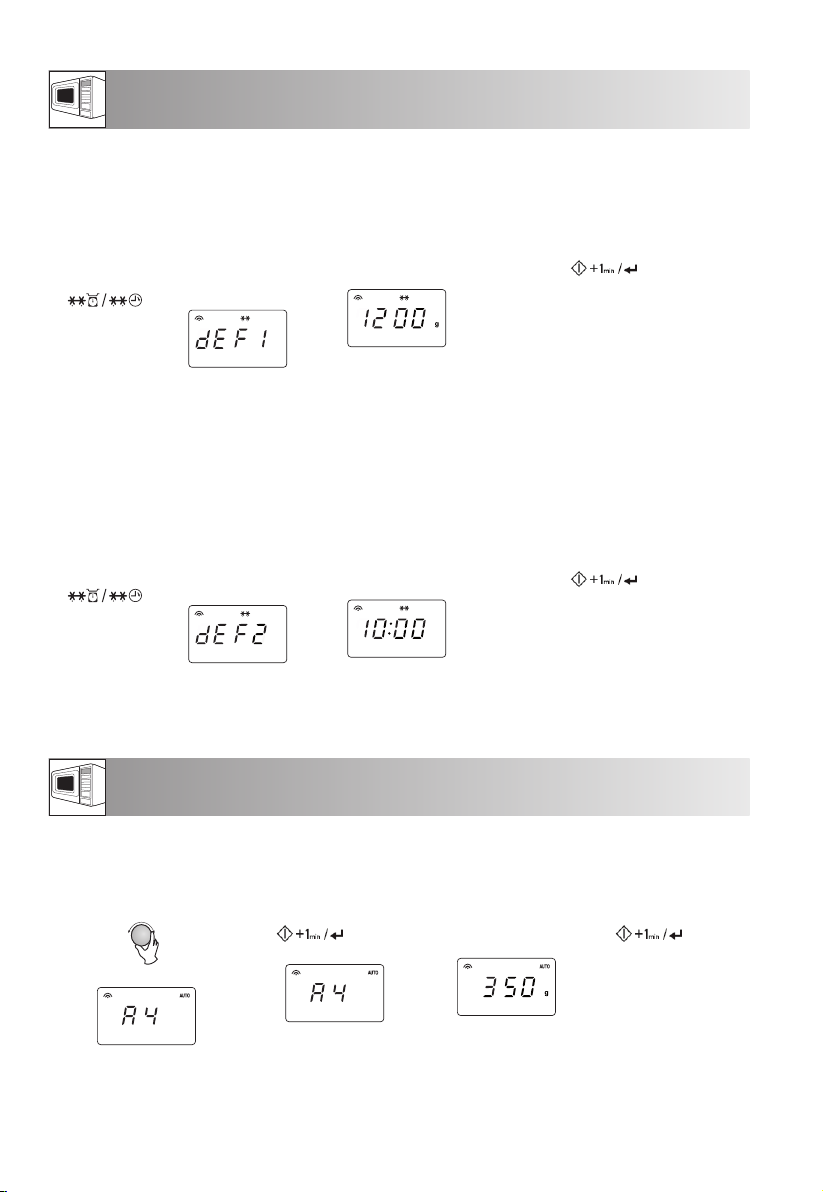
WEIGHT DEFROST AND TIME DEFROST OPERATION
1. WEIGHT DEFROST
The microwave oven is pre-programmed with a time and power level so that the following food is defrosted easily: Pork, beef
and chicken. The weight range for this food is from 100g – 2000g in 100g steps. The frozen foods are defrosted from -18°C.
Follow the example below for details on how to operate these functions.
Example: To defrost a meat joint weighing 1,2 kg using WEIGHT DEFROST.
Place the meat in a an dish or microwave oven defrost rack on the turntable.
1. Select the menu required by pressing
the WEIGHT/ TIME DEFROST button
once.
the display will show:
NOTES for WEIGHT DEFROST:
• Before freezing foods, ensure food is fresh and of good quality.
• Place food with a weight less than 200 g at the edge of the turntable and do not place it to the centre of the turntable.
• Food weight should be rounded up to the nearest 100 g, for example, 650 g to 700 g.
• If necessary, shield small areas of meat or poultry with at pieces of aluminium foil. This will prevent the areas from becoming
warm during defrosting. Ensure the foil does not touch the oven walls.
2. TIME DEFROST
This function quickly defrosts food while enabling you to choose a suitable defrost period, depending on the food type. Follow
the example below for details on how to operate this function. The time range is 0:05 – 95:00.
Example: To defrost the food for 10 minutes.
1.
Select the menu required by pressing the
WEIGHT/ TIME DEFROST button twice.
x2,
the display will show:
NOTES for TIME DEFROST:
• After cooking the audible signal will sound ve times and the LED will then display time of day, if the clock has been set. If the
clock has not been set, the display will only show “0:00
• The preset microwave power level is P30 and can not be changed.
x1,
2. Enter the desired weight by
rotating the ENTRY dial until the
display shows:
At the same time “g” indicator
will light on the display.
2. Enter the desired cooking time
by rotating the ENTRY dial until
the display shows 10:00
”
when cooking is complete.
3. Press the START/+1min/CONFIRM
button (
The time and defrost indicators will
light and “g” indicator will disappear.
(The display will count down through
defrosting time).
3. Press the START/+1min/CONFIRM
button (
The time and defrost indicators will light.
) to start defrosting.
) to start defrosting.
AUTO MENU OPERATION
The AUTO MENU programmes automatically work out the correct cooking mode and cooking of the foods (details on page
GB-15). Follow the example below for details on how to operate this function.
Example: To cook 350 g carrots by using the AUTO MENU function for fresh vegetables.
1. Rotate the ENTRY dial and
select the desired auto menu.
The display will show:
NOTES:
• The weight or quantity of the food can be input by rotating the ENTRY dial until the desired weight/ quantity is displayed.
Enter the weight of the food only. Do not include the weight of the container.
•
For food weighing more or less than the weights/quantities given in the AUTO MENU chart on page GB-15 cook by manual operation.
2. Press the START/+1min/
CONFIRM button
(
the setting.
) to con rm
GB-14
3. Enter the desired weight
by rotating the ENTRY
dial until the display
shows:
4. Press the START/+1min/
CONFIRM button
(
cooking. (The display
will count down through
cooking time.)
) to start
AUTO MENU CHART
Auto Menu Display Cooking
Reheat
Dinner Plate
(pre-cooked food
e.g. meat, vegetable
and garnishes)
Jacket Potato A2 100% Micro 1, 2, 3 potatoes (pieces)
Meat
(boneless meat e.g.
beef, lamb, pork or
poultry)
Fresh vegetables e.g.
Cauli ower, carrots,
broccoli, fennel, leek,
pepper, courgettes
etc.
Fish
(Only sh llet is
recommended for
this programme)
Pasta
(dried pasta e.g.
Fussili, Farfalle,
Rigatoni)
Soup A7 100% Micro 200g, 400g, 600g
Sponge Cake*
Ingredients:
4 eggs
110 g sugar
100 g our
10 g corn starch
60 g water
60 g vegetable oil
Frozen Pizza (Oven
Ready Pizza Æ
prebaked)
Roast Chicken A10 C-1 500g, 750g, 1000g, 1200g
* Preparation of the sponge cake (A8):
1. Separate the eggs.
2. Cream the egg yolk, oil and water with a handheld blender (low speed) until light and u y.
3. Add the our and mix well.
4.
In a separate dish, beat the egg white, sugar and cornstarch with a handheld blender (high speed) until sti . Carefully fold into the cake mixture.
5. Spoon in the mixture into the greased spring form and smooth the surface.
6. After preheating place the spring form on the rack.
NOTES:
• The nal temperature will vary according to the initial food temperature. Check food is piping hot after cooking. If necessary,
you can extend the cooking manually.
•
The results when using auto cook depend on variances such as the shape and size of the food and your personal preference as regards
cooking results. If you are not satis ed with the programmed result, please adjust the cooking time to match your requirement.
method
A1 100% Micro 150g, 250g, 350g, 450g, 600g
A3 100% Micro 150g, 300g, 450g, 600g
A4 100% Micro 150g, 350g, 500g
A5 80% Micro 150g, 250g, 350g, 450g, 650g
A6 80% Micro Pasta Water
A8 Preheat at
160°C
A9 C-1 200g, 300g, 400g
WEIGHT/ PORTION / UTENSILS Procedure
(initial temp. 5°C)
Plate and vented microwave
cling lm or suitable lid
1 potato = approx. 230g
(initial temp. 20°C)
(initial temp 5°C)
Flan dish and vented microwave
cling lm or suitable lid
(initial temp 20°C)
Bowl and lid
(initial temp. temp 20°C)
Flan dish and vented microwave
cling lm or suitable lid
50 g 450 ml
100 g 800 ml
150 g 1200 ml
(initial temp. for the water: 20°C)
Big and wide bowl
(initial temp. 5°C)
Cups (200 g per cup)
475g
(initial temp. 20°C)
Spring form
(about 26 cm diameter)
Rack
(initial temp. -18°C)
Rack
(initial temp. 20°C)
Rack
Put the pre-cooked food on a plate. Use vented
microwave cling lm or a suitable lid to cover the
plate. Place the plate in the centre of the turntable.
Stir after cooking.
Please use potatoes with a similar size of approx.
230g. Pierce each potato in several places and place
towards the edge of the turntable. Turn over and rearrange halfway through cooking. Stand for 3 - 5
minutes before serving.
Cut the meat into small stripes and place it in a an
dish. Use vented microwave cling lm or a suitable
lid to cover the an dish. Place the an dish in the
centre of the turntable.
Cut, chop or slice fresh vegetables into even sized
pieces. Place fresh vegetables in a suitable container.
Place on the turntable. Add the required amount of
water (1 tbsp per 100 g). Cover with a lid. Sir after
cooking and let the food stand for approx. 2 minutes.
Place in a single layer in a an dish. Use vented
microwave cling lm or a suitable lid to cover.
Place pasta in an appropriate sized bowl and add the
water. Do not cover. Place the bowl in the centre of
the turntable.
After cooking, stir well and stand for 2 minutes
before draining.
Place the cups on the turntable and stir after cooking.
The oven will preheat to 160°C. When the
temperature is reached, open the door and place
the cake on the rack inside. Press the START/+1min/
CONFIRM button (
Remove packaging and place directly on the rack. No
standing time is required.
If desired, season with salt, pepper and paprika.
Pierce the skin of the chicken a few times. Place the
chicken, breast side up, onto the rack.
) to start the baking.
GB-15
ENGLISH
SUITABLE OVENWARE
To cook/defrost food in a microwave oven, the microwave energy must be able to pass through the container to
penetrate the food. Therefore it is important to choose suitable cookware.
Round/oval dishes are preferable to square/oblong ones, as the food in the corners tends to overcook. A variety
of cookware can be used as listed below.
Cookware Microwave
Aluminium foil
Foil Containers
Browning dishes
China and ceramics
Glassware e.g. Pyrex ®
Metal
Plastic/Polystyrene e.g.
fast food containers
Cling lm
Freezer/Roasting bags
Paper - Plates, cups and
kitchen paper
Straw and wooden
Containers
Recycled paper and
newspaper
Rack
Safe
/
✔
✔✘✘✘
/
✔
✔✔✔✔
✘✔✔✘
✔✘✔
✔✘✘✘
✔✘
✔✘✘✘
✔✘✘✘
✘✘✘✘
✔✔✔✔
Grill Convection Mix Cook Comments
✔✔
✘
✘✔✔
✘
✔
Mix Conv.
/
✘
✔
✔
Small pieces of aluminium foil can be used
/
✘
to shield food from overheating. Keep foil
at least 2cm from the oven walls, as arcing
may occur.
Foil containers are not recommended unless specified by the manufacturer, e.g.
Microfoil®, follow instructions carefully.
Always follow the manufacturers instructions. Do not exceed heating times given.
Be very careful as these dishes become very
hot.
Porcelain, pottery, glazed earthenware and
bone china are usually suitable, except for
only
those with metallic decoration.
Care should be taken if using ne glassware
as it can break or crack if heated suddenly.
It is not recommended to use metal cookware as it will arc, which can lead to re.
/
Care must be taken as some containers
✘
warp, melt or discolour at high temperatures.
It should not touch the food and must be
pierced to let the steam escape.
✘
Must be pierced to let steam escape. Ensure
bags are suitable for microwave use. Do not
use plastic or metal ties, as they may melt or
catch re due to the metal ‘arcing’.
Only use for warming or to absorb moisture.
Care must be taken as overheating may
cause re.
Always attend the oven when using these
materials as overheating may cause re.
May contain extracts of metal which will
cause ‘arcing’ and may lead to re.
The metal rack supplied have been specially
designed for all cooking modes and will not
damage the oven.
WARNING:
When heating food in plastic or paper containers, monitor the oven due to the possibility of ignition.
GB-16
CARE AND CLEANING
CAUTION: DO NOT USE COMMERCIAL OVEN
CLEANERS, STEAM CLEANERS, ABRASIVE, HARSH
CLEANERS, ANY THAT CONTAIN SODIUM HYDROXIDE OR SCOURING PADS ON ANY PART OF YOUR
MICROWAVE OVEN.
Before cleaning, make sure the oven cavity, door,
oven cabinet and accessories are completely cool.
CLEAN THE OVEN AT REGULAR INTERVALS AND
REMOVE ANY FOOD DEPOSITS – Keep the oven
clean, or the oven could lead to a deterioration of
the surface. This could adversely a ect the life of
the appliance and possibly result in a hazardous
situation.
Oven exterior
The outside of your oven can be cleaned easily with
mild soap and water. Make sure the soap is wiped o
with a moist cloth, and dry the exterior with a soft
towel.
Oven controls
Open the door before cleaning to de-activate the
oven controls. Care should be taken when cleaning
the oven control. Using a cloth dampened with water
only, gently wipe the panel until it becomes clean.
Avoid using excessive amounts of water. Do not use
any sort of chemical or abrasive cleaner.
Oven Interior
1. For cleaning, wipe any splatters or spills with a soft
damp cloth or sponge after each use while the oven
is still warm. For heavier spills, use a mild soap and
wipe several times with a damp cloth until all residues are removed. Built-up splashes may overheat
and begin to smoke or catch re, and cause arcing.
Do not remove the waveguide cover.
2. Make sure that mild soap or water does not penetrate the small vents in the walls which may cause
damage to the oven.
3. Do not use spray type cleaners on the oven interior.
4. Heat up your oven regularly by using the convection
and grill. Remaining food or fat can cause smoke or a
bad smell.
5. Food will release steam during cooking and cause
condensation inside the oven and door. It is important to wipe the oven dry. A build up of condensation will eventually lead to rust forming on the oven
interior.
SPECIAL NOTE for WAVEGUIDE COVER: Keep the
waveguide cover clean at all times. The waveguide
cover is constructed from a fragile material and should
be cleaned with care (follow the cleaning instructions
above).
Excessive soaking may cause disintegration of the
waveguide cover. The waveguide cover is a consumable part and without regular cleaning, will need to
be replaced.
Accessories
The accessories like turntable and rack should be
washed in a mild washing up liquid solution and
dried. They are dishwasher safe.
Door
To remove all traces of dirt, regularly clean both sides
of the door, the door seals and adjacent parts with a
soft, damp cloth. Do not use harsh abrasive cleaners
or sharp metal scrapers to clean the glass oven door
since they can scratch the surface, which may result in
shattering of the glass.
NOTE: A steam cleaner should not be used.
ENGLISH
Cleaning tip - For easier cleaning of your oven:
Place half a lemon in a bowl, add 300ml (1/2 pint) water and heat on 100% for 10 -12 minutes.
Wipe the oven clean using a soft, dry cloth.
IMPORTANT:
• If you cook food for more than the standard time (see chart below) using the same cooking mode, the oven's safety
mechanisms automatically activate. The microwave power level will be reduced or the grill heating element will
turn on and o .
Cooking Mode Standard time
Microwave P100 30 minutes
Grill/ Convection/ Combi cooking mode Intermittent operation, temperature and time
controlled
GB-17

GB-18
PL
Uwaga:
Państwa produkt
jest oznaczony
tym symbolem.
Oznacza on,
że zużytych
urządzeń elek-
trycznych i elek-
tronicznych nie
można łączyć ze
zwykłymi odpada-
mi z gospodarstw
domowych. Dla
tych produktów
istnieje oddzielny
system zbiórki
odpadów.
A. Informacje dla użytkowników
(prywatnych gospodarstw domowych) dotyczące
usuwania odpadów
1. W krajach Unii Europejskiej
Uwaga: Jeśli chcą Państwo usunąć to urządzenie, prosimy nie używać zwykłych
pojemników na śmieci!
Zużyty sprzęt elektryczny i elektroniczny należy usuwać oddzielnie, zgodnie
z wymogami prawa dotyczącymi odpowiedniego przetwarzania, odzysku i
recyklingu zużytego sprzętu elektrycznego i elektronicznego.
Po wdrożeniu przepisów unijnych w Państwach Członkowskich prywatne
gospodarstwa domowe na terenie krajów UE mogą bezpłatnie* zwracać zużyty
sprzęt elektryczny i elektroniczny do wyznaczonych punktów zbiórki odpadów.
W niektórych krajach* można bezpłatnie zwrócić stary produkt do lokalnych punktów
sprzedaży detalicznej pod warunkiem, że zakupią Państwo podobny nowy produkt.
*) W celu uzyskania dalszych informacji na ten temat należy skontaktować się
z lokalnymi władzami.
Jeśli zużyty sprzęt elektryczny i elektroniczny jest wyposażony w baterie lub akumulatory, należy je usunąć oddzielnie, zgodnie z wymogami lokalnych przepisów.
Jeśli ten produkt zostanie usunięty we właściwy sposób, pomogą Państwo
zapewnić, że odpady zostaną poddane przetworzeniu, odzyskowi i recyklingowi, a tym samym zapobiec potencjalnym negatywnym skutkom dla środowiska
naturalnego i zdrowia ludzkiego, które w przeciwnym razie mogłyby mieć miejsce na skutek niewłaściwej obróbki odpadów.
2. Kraje pozaunijne
W celu uzyskania szczegółowych informacji na temat prawidłowej metody
pozbycia się zużytego urządzenia, prosimy o kontakt z władzami lokalnymi.
W Szwajcarii: Zużyte urządzenia elektryczne lub elektroniczne można bezpłatnie zwracać do sprzedawcy, nawet jeśli nie zostanie zakupiony nowy produkt.
Szczegóły na temat punktów zbiórki odpadów są wymienione na stronie:
www.swico.ch lub www.sens.ch.
POLSKI
B. Informacje dla użytkowników biznesowych dotyczące
usuwania odpadów
1. W krajach Unii Europejskiej
W przypadku gdy produkt używany jest do celów biznesowych i zamierzają go
Państwo usunąć:
Należy skontaktować się z dealerem firmy SHARP, który poinformuje o możliwości zwrotu wyrobu. Być może będą Państwo musieli ponieść koszty zwrotu
i recyklingu produktu. Produkty niewielkich rozmiarów (i w małych ilościach)
można zwrócić do lokalnych punktów zbiórki odpadów.
W Hiszpanii: W celu usunięcia zużytego produktu prosimy o skontaktowanie się
wyznaczonym punktem systemu zbiórki odpadów lub władzami lokalnymi.
2. Kraje pozaunijne
W celu uzyskania szczegółowych informacji na temat prawidłowej metody
pozbycia się zużytego urządzenia, prosimy o kontakt z władzami lokalnymi.
PL-1

SPIS TREŚCI
Instrukcja obsługi
INFORMACJE DOTYCZĄCE POSTĘPOWANIA ZE ZUŻYTYMI URZĄDZENIAMI ............................................................1
SPIS TREŚCI .........................................................................................................................................................................................2
DANE TECHNICZNE .......................................................................................................................................................................... 2
KUCHENKA I JEJ WYPOSAŻENIE ..................................................................................................................................................3
PANEL STEROWANIA .......................................................................................................................................................................4
WAŻNE INFORMACJE DOTYCZĄCE BEZPIECZEŃSTWA ..................................................................................................5-7
INSTALACJA ........................................................................................................................................................................................ 7
PRZED PRZYSTĄPIENIEM DO PRACY .........................................................................................................................................8
USTAWIENIE ZEGARA ....................................................................................................................................................................... 8
POZIOMY MOCY MIKROFAL .........................................................................................................................................................8
STEROWANIE RĘCZNE ..................................................................................................................................................................... 9
TRYB PRACY Z MIKROFALAMI ......................................................................................................................................................9
TRYB PRACY Z GRILLEM/TRYB PRACY KOMBINOWANEJ Z GRILLEM .....................................................................10-11
TRYB PRACY Z TERMOOBIEGIEM ........................................................................................................................................11-12
INNE UŻYTECZNE FUNKCJE ........................................................................................................................................................13
PROGRAMY ROZMRAŻANIA WEDŁUG WAGI I WEDŁUG CZASU ROZMRAŻANIA ....................................................14
PROGRAMY AUTOMATYCZNEGO GOTOWANIA .................................................................................................................14
TABELA PROGRAMÓW AUTOMATYCZNEGO GOTOWANIA .............................................................................................15
PRZYDATNE NACZYNIA ................................................................................................................................................................16
CZYSZCZENIE I KONSERWACJA ..................................................................................................................................................17
ADRESY AUTORYZOWANYCH PUNKTÓW SERWISOWYCH .............................................................................................17
DANE TECHNICZNE
Typ kuchenki: R-842
Napięcie zasilające : 230 V / 50 Hz, prąd zmienny jednofazowy
Bezpiecznik/wyłącznik automatyczny : 16 A
Wymagana moc wejściowa: Mikrofale : 1450 W
Moc wyjściowa: Mikrofale : 900 W (IEC 60705)
Grill górny (kwarcowy/na podczerwień) : 1200/1100 W
Grill dolny (na podczerwień) : 500 W
Termoobieg : 2300 W
Tryb wyłączenia (oszczędzania energii) : mniej niż 1,0 W
Częstotliwość mikrofal : 2450 MHz* (grupa 2/klasa B)
Wymiary zewnętrzne (szer.) x (wys.) x (gł.) : 513,0 x 306,0 x 430,0 mm
Wymiary komory operacyjnej (szer.) x (wys.) x (gł.)** : 330,0 x 208,0 x 369,0 mm
Pojemność kuchenki : 25 litrów**
Talerz obrotowy (metalowy) : ø 301 mm
Ciężar : ok. 15,8 kg
Lampka oświetleniowa : 25 W/240 V
* Opisywane urządzenie spełnia wymagania europejskiego standardu EN55011.
Zgodnie z tym standardem urządzenie zostało sklasy kowane jako sprzęt należący do grupy 2 i klasy B.
Przynależność do grupy 2 oznacza, że urządzenie w sposób zamierzony generuje fale radiowe służące do podgrze-
wania jedzenia.
Przynależność do klasy B oznacza, że urządzenie może pracować w gospodarstwach domowych.
** Pojemność kuchenki jest obliczana poprzez pomnożenie maksymalnej szerokości, głębokości i wysokości komory
operacyjnej. Rzeczywista pojemność przeznaczona na potrawy jest mniejsza.
STAWIAJĄC SOBIE ZA CEL CIĄGŁE DOSKONALENIE SWOICH PRODUKTÓW FIRMA SHARP ZASTRZEGA SOBIE PRAWO
DO ZMIANY WYGLĄDU I DANYCH TECHNICZNYCH URZĄDZENIA BEZ UPRZEDZENIA.
PL-2

KUCHENKA I JEJ WYPOSAŻENIE
4
1
2
3
KUCHENKA
1. Górny element grzejny grilla
2. Lampka oświetleniowa
3. Panel sterowania
4. Uchwyt drzwiczek
5. Osłona źródła mikrofal (NIE USUWAJ)
6. Komora operacyjna
5
6
7
10
8
7. Gniazdo napędu talerza obrotowego
8. Dolny element grzejny grilla
9. Otwory wentylacyjne
10. Uszczelki drzwiczek i powierzchnie
9
12
11
uszczelniające
11. Kabel zasilający
12. Obudowa
WYPOSAŻENIE:
Należy upewnić się, że wraz z kuchenką dostarczone
zostały następujące akcesoria:
(13) Talerz obrotowy (14) Gniazdo napędowe (15) Ruszt
• Sprzęgło należy zamocować w gnieździe napędu
13. Talerz
obrotowy
(metalowy)
talerza obrotowego, a następnie dokładnie zamocować na nim talerz obrotowy.
• Podczas wyjmowania z kuchenki naczyń lub
pojemników należy ostrożnie unosić je nad krawędzią talerza obrotowego, żeby zapobiec uszkodzeniu talerza.
• Porady na temat wykorzystania rusztu znajdziesz
14. Gniazdo
napędowe
w części dotyczącej obsługi funkcji grillowania na
stronie PL-11.
Nigdy nie dotykaj nagrzanego rusztu.
UWAGA: W celu zamówienia wyposażenia dodat-
kowego należy skontaktować się z lokalnym sprzedawcą produktów firmy SHARP. Prosimy podać typ
15. Ruszt
kuchenki oraz nazwę części.
UWAGI:
• Osłona źródła mikrofal jest wrażliwa na uszkodzenia. Należy zachować szczególną ostrożność w trakcie czyszczenia wnętrza kuchenki.
• Po gotowaniu tłustych potraw bez użycia osłony zawsze dokładnie wyczyść komorę operacyjną, w szczególności element grzejny grilla - musi być on suchy i wolny od tłuszczu. Nagromadzony tłuszcz może spowodować przegrzanie, dymienie, a nawet pożar.
• Zawsze używaj kuchenki z poprawnie zamontowanym talerzem obrotowym i jego podstawą. Pomaga to w
równomiernym gotowaniu potraw. Źle zamontowany talerz obrotowy może się kołysać, obracać nieprawidłowo, a nawet spowodować uszkodzenie kuchenki.
•
Wszelkie przeznaczone do gotowania produkty i naczynia z potrawami należy zawsze ustawiać na talerzu obrotowym.
• Talerz obraca się w prawo lub w lewo. Kierunek obrotu może być inny przy każdym uruchomieniu kuchenki.
Nie wpływa to na efektywność gotowania.
POLSKI
OSTRZEŻENIE:
Drzwiczki, obudowa, komora operacyjna, elementy wyposażenia i naczynia bardzo silnie się
nagrzewają podczas pracy kuchenki. Wyjmując naczynia i talerz obrotowy z kuchenki należy chwytać
je przez grube rękawice, żeby zapobiec poparzeniom.
PL-3

PANEL STEROWANIA
8
9
10
1. WYŚWIETLACZ CYFROWY i WSKAŹNIKI:
Wskaźnik TERMOOBIEGU
1
Wskaźnik TEMPERATURY
2
2. Opcje funkcji automatycznego gotowania:
A1: Podgrzanie
A2: Ziemniaki w mundurkach
A3: Mięso
3
A4: Świeże warzywa
A5: Ryba
A6: Makaron
A7: Zupa
A8: Biszkopt
4
A9: Zamrożona pizza
A10: Kurczak
3. Pokrętło WYBORU
5
Przekręć, żeby wybrać czas gotowania,
6
4. Przycisk TRYB PRACY Z GRILLEM/PRACY
1 NACIŚNIĘCIE (G-1) = GÓRNY GRILL
7
2 NACIŚNIĘCIA ( G-2) = GÓRNY GRILL
3 NACIŚNIĘCIA ( G-3) = DOLNY GRILL
4 NACIŚNIĘCIA ( C-1) = MIKROFALE, GÓRNY
5 NACIŚNIĘĆ ( C-2) =
6 NACIŚNIĘĆ ( C-3) =
5. Przycisk ROZMRAŻANIE WEDŁUG WAGI/
6. Przycisk START/+1min/ZATWIERDŹ
7. Przycisk STOP
8. Przycisk POZIOM MOCY MIKROFAL:
Naciśnij, żeby wybrać poziom mocy mikrofal.
9. Przycisk TERMOOBIEG
10. Przycisk USTAWIANIE ZEGARA/TIMER
Wskaźnik MIKROFAL
Wskaźnik GRILLA
Wskaźnik ROZMRAŻANIA
Wskaźnik BLOKADY RODZICIELSKIEJ
Wskaźnik AUTOMATYCZNEGO GOTOWANIA
Wskaźnik WAGI
godzinę, poziom mocy, temperaturę, wagę,
ilość porcji i program automatycznego
gotowania.
KOMBINOWANEJ
ROZMRAŻANIE WEDŁUG CZASU
KUCHENNY
Wskaźnik temperatury
KWARCOWY
KWARCOWY
I DOLNY GRILL
RÓWNOCZEŚNIE
GRILL KWARCOWY
I DOLNY GRILL
MIKROFALE (73%),
GÓRNY GRILL
I TERMOOBIEG (27%)
MIKROFALE (52%),
GÓRNY GRILL
I TERMOOBIEG (48%)
PL-4

WAŻNE INFORMACJE DOTYCZĄCE BEZPIECZEŃSTWA
1. Opisywana kuchenka została zaprojektowana do
instalacji na blacie szafki. Nie jest przeznaczona
do instalacji w zabudowie. Nie wolno umieszczać
kuchenki wewnątrz szafki.
2. Podczas pracy kuchenki jej drzwiczki bardzo się
nagrzewają, dlatego kuchenkę należy ustawić
przynajmniej 85 cm nad poziomem podłogi. Nie
wolno pozwalać dzieciom, żeby zbliżały się do
drzwiczek podczas pracy kuchenki, ponieważ
mogłyby się poparzyć.
3. Nad kuchenką należy pozostawić co najmniej 30
cm wolnej przestrzeni.
4. Urządzenie to nie może być obsługiwane przez
osoby (włącznie z dziećmi) z obniżonymi zdolnoś-
ciami fizycznymi, zmysłowymi bądź umysłowymi,
a także przez osoby bez doświadczenia i wiedzy
na temat obsługi, chyba że dostały pozwolenie,
bądź udzielono im instrukcji obsługi urządzenia
przez osobę odpowiedzialną za ich bezpieczeń-
stwo.
5. Dzieci powinny pozostawać pod opieką, aby nie
bawiły się urządzeniem.
6. OSTRZEŻENIE: Dzieci mogą korzystać z kuchenki
bez nadzoru tylko wtedy, jeśli zostały szczegó-
łowo poinstruowane o sposobie bezpiecznego
używania urządzenia i rozumieją zagrożenia
związane z niewłaściwym użyciem.
7. OSTRZEŻENIE: Dzieci powinny używać kuchenki
wyłącznie pod nadzorem dorosłych, gdy urządze-
nie pracuje w trybach GRILLA/PRACY KOMBINO-
WANEJ Z GRILLEM i trybie z TERMOOBIEGIEM ze
względu na generowanie wysokiej temperatury
8. OSTRZEŻENIE: Nie wolno dopuścić, żeby do ku-
chenki zbliżały się dzieci, ponieważ niektóre jej
elementy bardzo się nagrzewają.
9. OSTRZEŻENIE: Nie używaj kuchenki, jeśli
drzwiczki lub uszczelki drzwi są uszkodzone.
Naprawę należy powierzyć wykwalifikowanym
pracownikom serwisu.
10. OSTRZEŻENIE: Nigdy nie próbuj samodzielnie
regulować, naprawiać ani modyfikować urzą-
dzenia. Wszelkie naprawy, zwłaszcza wiążące się
z otwarciem obudowy, mogą być przeprowadzo-
ne wyłącznie przez wykwalifikowanych pracowni-
ków serwisu firmy SHARP.
11. Jeśli ulegnie uszkodzeniu przewód zasilający, na-
leży zainstalować nowy kabel tego samego typu.
Wymianę musi przeprowadzić upoważniony pra-
cownik serwisu firmy SHARP.
12. OSTRZEŻENIE: Płynów i innych pokarmów nie
wolno podgrzewać w zamkniętych pojemnikach,
ponieważ mogą one eksplodować.
13. Podczas przenoszenia pojemnika z płynem pod-
grzanym w kuchence należy zachować szczegól-
ną ostrożność, ponieważ może nastąpić opóźnio-
ne wykipienie cieczy.
14. Nie należy używać kuchenki do gotowania jajek
w skorupkach ani do podgrzewania jajek gotowanych na twardo. Mogą one eksplodować nawet
po zakończeniu procesu gotowania. Przed gotowaniem lub podgrzewaniem jajek nie roztrzepanych czy rozmieszanych należy przekłuć żółtko
i białko, gdyż w przeciwnym razie jajka mogą
eksplodować. Jajka ugotowane na twardo należy
przed podgrzewaniem w kuchence mikrofalowej
obrać i pokroić w plasterki.
15. Stosuj wyłącznie pojemniki i naczynia przezna-
czone do kuchenek mikrofalowych (patrz strona
PL-16).
16. W celu uniknięcia poparzeń należy zawsze spraw-
dzać temperaturę pokarmów dla niemowląt
i mieszać zawartość butelek i naczyń przed podaniem.
17. Drzwiczki, zewnętrzna obudowa, komora opera-
cyjna kuchenki, wyposażenie, naczynia, a szczególnie elementy grzejne grilla bardzo się nagrzewają.
18. Otwierając drzwiczki i wyjmując naczynia z ku-
chenki należy używać grubych rękawic, żeby
zapobiec poparzeniom. Przed przystąpieniem do
czyszczenia poczekaj na wystygnięcie urządzenia,
akcesoriów i naczyń. Korzystając z plastykowych,
papierowych lub innych łatwopalnych pojemników na żywność nigdy nie pozostawiaj urządzenia bez nadzoru.
19. Jeśli podgrzewane produkty zaczną dymić, wy-
łącz kuchenkę lub odłącz wtyczkę i odczekaj, aż
podgrzewane produkty przestaną dymić.
20. Kuchenkę należy regularnie czyścić i usuwać z niej
wszystkie pozostałości jedzenia.
21. Dopuszczenie do nadmiernego zanieczyszczenia
kuchenki może spowodować zniszczenie jej ścianek, doprowadzić do jej przedwczesnego zużycia
oraz może wywołać sytuacje niebezpieczne.
22. Nie należy stosować środków do szorowania lub
innych środków powodujących zadrapania, które
mogłyby uszkodzić szklaną powierzchnię drzwiczek.
23. Do czyszczenia żadnego elementu kuchenki nie
należy używać odkurzaczy parowych.
24. Instrukcje dotyczące czyszczenia uszczelek drzwi-
czek, komory operacyjnej i sąsiednich elementów
znajdziesz na stronie PL-17.
POLSKI
PL-5

WAŻNE INFORMACJE DOTYCZĄCE BEZPIECZEŃSTWA
2.
Żeby uniknąć niebezpieczeństwa pożaru:
1. Nie powinno się pozostawiać pracującej kuchenki bez nadzoru. Ustawienie zbyt wysokiego poziomu mocy lub zbyt długiego czasu
gotowania może doprowadzić do przegrzania
potrawy i spowodować pożar.
Gniazdko elektryczne, do którego podłączana jest
2.
kuchenka, musi być stale dostępne, żeby w razie konieczności można było po prostu wyciągnąć wtyczkę.
3. Napięcie sieci musi wynosić 230 V (prąd zmienny,
50 Hz), instalacja elektryczna powinna być wyposażona w bezpiecznik/wyłącznik automatyczny o
dopuszczalnym prądzie 16 A lub większym.
4. Zaleca się podłączenie urządzenia do niezależnego obwodu prądu.
5. Nie należy stawiać urządzenia w pobliżu źródeł
ciepła, np. w pobliżu zwykłego piecyka.
6.
Nie należy instalować kuchenki w miejscach o dużej
wilgotności lub tam, gdzie może się skraplać para.
7. Nie należy przechowywać ani użytkować urządzenia na wolnym powietrzu.
8. Osłonę źródła mikrofal, komorę operacyjną, talerz obrotowy i jego podstawę należy oczyścić po
użyciu. Części te powinny być suche i bez tłuszczu. Nagromadzony tłuszcz może się przegrzać,
zacząć dymić lub zapalić się.
9. W pobliżu urządzenia lub jego otworów wentylacyjnych nie wolno przechowywać materiałów
łatwopalnych.
10. Nigdy nie blokuj otworów wentylacyjnych.
11. Usuwaj z produktów i opakowań wszystkie me-
talowe zamknięcia, druty itp. Powstawanie łuku
elektrycznego na powierzchniach metalu może
doprowadzić do pożaru.
12. Nie używaj kuchni mikrofalowej do smażenia
potraw w głębokim oleju. Temperatury oleju nie
można kontrolować i tłuszcz może się zapalić.
13. Do prażenia kukurydzy powinny być używane
wyłącznie do tego przeznaczone naczynia.
14. Nie przechowuj w urządzeniu żadnej żywności
ani innych przedmiotów.
15.
Po uruchomieniu kuchenki sprawdź ustawienia, żeby
upewnić się, że pracuje ona zgodnie z życzeniem.
16.
Żeby uniknąć przegrzania lub pożaru, należy zachować szczególną ostrożność podczas gotowania i podgrzewania potraw zawierających duże ilości cukru lub
tłuszczu, np. krokietów z mięsem lub budyniu.
17.
Niniejszej instrukcji obsługi należy używać razem z podanymi dalej wskazówkami dotyczącymi gotowania.
Żeby uniknąć obrażeń ciała:
1. OSTRZEŻENIE:
Nie używaj kuchenki, jeżeli jest uszkodzona lub
wykazuje wadliwe funkcjonowanie. Przed użyciem sprawdź następujące punkty:
a) Drzwiczki: muszą się zamykać prawidłowo i nie
mogą być skrzywione lub scentrowane.
b) Zawiasy oraz zatrzaski bezpieczeństwa: należy
się upewnić, że nie są złamane ani luźne.
c) Uszczelki drzwiczek i ich powierzchnie: nie
mogą być uszkodzone.
d)
Wewnątrz urządzenia i na drzwiczkach: nie może
być żadnych wgnieceń ani innych uszkodzeń.
e) Przewód zasilający oraz wtyczka: nie mogą być
uszkodzone.
Nie używaj kuchenki przy otwartych drzwiczkach
lub zamknięciu przerobionym w jakikolwiek sposób.
3. Nie używaj kuchenki, jeśli pomiędzy uszczelkami
drzwiczek a powierzchniami uszczelniającymi
znajdują się jakieś przedmioty.
4. Nie dopuszczaj do gromadzenia się tłuszczu i
zabrudzeń na uszczelkach drzwiczek i sąsiednich
elementach. Stosuj się do wskazówek z rozdziału
„Czyszczenie i konserwacja” na stronie PL-17.
5. Osoby mające ROZRUSZNIK SERCA powinny za-
pytać swojego lekarza lub producenta rozrusznika o środki ostrożności podczas posługiwania się
kuchenkami mikrofalowymi.
Żeby uniknąć porażenia prądem elektrycznym:
1. W żadnym wypadku nie wolno zdejmować ze-
wnętrznej obudowy kuchenki.
2. Nie należy wprowadzać żadnych przedmiotów
ani płynów w otwory zatrzasków bezpieczeństwa
drzwiczek ani w otwory wentylacyjne. Jeśli jakiś
płyn rozleje się wewnątrz kuchenki, urządzenie
należy natychmiast wyłączyć, wyjąć wtyczkę
przewodu zasilającego z gniazda i zwrócić się do
serwisu rmy SHARP.
3. Przewodu zasilającego ani wtyczki nie wolno za-
nurzać w wodzie ani jakiejkolwiek innej cieczy.
4. Przewód nie powinien być zawieszony na krawę-
dzi stołu lub blatu kuchennego.
5. Przewód zasilający należy prowadzić z dala od
powierzchni nagrzewających się, włącznie z tylną
ścianką kuchenki.
6. Nie wolno samodzielnie wymieniać lampki
oświetleniowej w kuchence ani też pozwalać, by
wymieniał ją ktokolwiek, niebędący elektrykiem
upoważnionym przez rmę SHARP.
Żeby uniknąć eksplozji i wykipienia:
1. Nigdy nie wolno używać szczelnie zamkniętych
pojemników. Przed użyciem należy zdjąć pokrywki i wieczka. Szczelnie zamknięte pojemniki mogą
wybuchnąć wskutek wzrostu ciśnienia, nawet po
wyłączeniu kuchenki.
2.
Przy podgrzewaniu płynów w kuchence należy
zachować szczególną ostrożność. Stosuj naczynia
o szerokim wylocie, aby pęcherzyki pary mogły
swobodnie uchodzić.
Nigdy nie należy ogrzewać płynów w pojemni-
kach o wąskich szyjkach, takich jak butelki dla
niemowląt, ponieważ gorący płyn może z nich
gwałtownie wytrysnąć, powodując oparzenia.
Żeby uniknąć gwałtownego wytryśnięcia wrzącej
cieczy i oparzeń:
1. Nie należy przekraczać zalecanych czasów
podgrzewania.
2. Płyn należy przed podgrzaniem zamieszać.
Wskazane jest włożenie do naczynia szklanej
3.
pałeczki lub podobnego przedmiotu na czas
ogrzewania.
4. Po zakończeniu ogrzewania płyn należy pozostawić co najmniej 20 sekund w kuchence, aby
zapobiec opóźnionemu wykipieniu.
3. Przed gotowaniem należy przekłuć skórkę takich
produktów jak ziemniaki, parówki i owoce –
w przeciwnym razie mogą eksplodować.
PL-6
WAŻNE INFORMACJE DOTYCZĄCE BEZPIECZEŃSTWA
Żeby uniknąć poparzeń:
1. Podczas wyjmowania potraw z kuchenki należy używać
uchwytów do garnków lub rękawic kuchennych.
2. Pojemniki, naczynia do prażenia kukurydzy, woreczki do
pieczenia itp. należy otwierać w taki sposób, by para nie
wydobywała się z nich na twarz i ręce.
W celu uniknięcia poparzeń należy zawsze sprawdzać
3.
temperaturę pokarmów i mieszać je przed podaniem;
szczególną ostrożność należy zachować w przypadku
temperatury pokarmów i napojów przeznaczonych
dla niemowląt, małych dzieci oraz osób starszych.
Temperatura naczynia nie jest miarodajnym wskaźni-
kiem temperatury pokarmu czy napoju; zawsze należy
sprawdzać temperaturę samego pokarmu.
4. Przy otwieraniu drzwiczek kuchenki należy zachować
ostrożność, by nie ulec poparzeniu wydobywającą się
z wnętrza parą i falą gorąca.
5. Pieczone potrawy z nadzieniem należy po przyrządzeniu pokrajać w plastry, by para mogła ujść.
Żeby zapobiec niewłaściwemu użyciu przez dzieci:
1.
Nie wolno opierać się ani huśtać na drzwiczkach kuchenki.
2.
Dzieciom należy wpoić zasady bezpieczeństwa: używanie rękawic
kuchennych, ostrożne zdejmowanie pokrywek, zachowanie szczególnej ostrożności co do opakowań (np. materiałów samonagrzewających się), gdyż opakowania te mogą być bardzo gorące.
Inne ostrzeżenia:
1. Nie wolno w żaden sposób samodzielnie dokonywać
mody kacji kuchenki.
2. Nie wolno poruszać kuchenką podczas jej pracy.
3. Kuchenka ta służy wyłącznie do przygotowywania po-
traw w warunkach domowych i można jej używać tylko
do takich celów. Nie jest ona przeznaczona do użytku
przemysłowego ani laboratoryjnego.
Żeby zapewnić niezawodną pracę kuchenki i uniknąć
uszkodzeń:
1.
Nigdy nie należy włączać pustej kuchenki, o ile nie jest to
wyraźnie zalecone w instrukcji obsługi. Uruchomienie pustego urządzenia może spowodować jego uszkodzenie.
2. Używając naczynia powodującego rumienienie potraw
lub materiałów samonagrzewających się, zawsze należy pod nimi umieścić izolację termiczną, na przykład
porcelanowy talerz, żeby zapobiec uszkodzeniu talerza
obrotowego i podstawy talerza na skutek nadmiernego
wzrostu temperatury. Niedopuszczalne jest przekraczanie czasu podgrzewania, podanego w przepisach.
3.
Nie wolno używać naczyń metalowych odbijających mikrofale i mogących spowodować powstawanie łuków elektrycznych. Należy używać wyłącznie talerza obrotowego i
jego podstawy przeznaczonych dla tego typu kuchenki. Nie
używaj kuchenki, jeśli został wyjęty z niej talerz obrotowy.
4. Podczas pracy urządzenia nie należy na jego obudowie
stawiać jakichkolwiek przedmiotów.
UWAGA:
W przypadku wątpliwości co do sposobu przyłączenia kuchenki
należy skontaktować się z upoważnionym, wykwalifikowanym
elektrykiem. Producent ani sprzedawca nie ponoszą żadnej odpowiedzialności za uszkodzenie kuchenki lub obrażenia ciała powstałe wskutek zaniedbań w przeprowadzeniu poprawnych połączeń elektrycznych. Na ściankach kuchenki lub wokół uszczelki
drzwiczek może czasami pojawiać się para wodna lub krople
wody. Jest to zjawisko normalne i nie świadczy o wydobywaniu
się mikrofal na zewnątrz ani o wadliwym działaniu kuchenki.
Ten symbol oznacza, że ścianki kuchenki bardzo się
nagrzewają.
INSTALACJA
POLSKI
1. Wyjmij ze środka kuchenki wszystkie elementy opakowa-
nia i zdejmij warstwę ochronną znajdującą się na obudowie urządzenia. Sprawdź uważnie, czy na kuchence nie
ma śladów uszkodzeń.
2. Ustaw kuchenkę na równym i płaskim podłożu, dostatecz-
nie wytrzymałym, by mogło unieść ciężar kuchenki wraz
z przyrządzaną w niej żywnością. Nie wolno umieszczać
kuchenki wewnątrz szafki.
3. Wybierz miejsce, które zapewni dostateczną ilość wolnej
przestrzeni dla prawidłowego działania otworów wlotowych i/lub wylotowych powietrza. Tylna ścianka kuchenki
może opierać się o ścianę.
• Pomiędzy kuchenką a sąsiadującymi ścianami należy
pozostawić przynajmniej 20 cm wolnej przestrzeni. Jedna ścianka urządzenia musi pozostać odsłonięta.
• Nad kuchenką należy pozostawić co najmniej 30 cm
wolnej przestrzeni.
• Nie należy demontować nóżek znajdujących się na spo-
dzie kuchenki.
• Zablokowanie otworów wlotowych i/lub wylotowych
powietrza może spowodować uszkodzenie kuchenki.
• Kuchenkę należy ustawić w możliwie największej od-
ległości od odbiorników radiowych i telewizyjnych.
Korzystanie z kuchenki mikrofalowej może powodować
zakłócenia odbiorników radiowych i telewizyjnych.
PL-7
30 cm
20 cm
20 cm
4. Podczas pracy kuchenki jej drzwiczki bardzo się nagrze-
wają, dlatego kuchenkę należy ustawić przynajmniej
85 cm nad poziomem podłogi. Nie wolno pozwalać
dzieciom, żeby zbliżały się do drzwiczek podczas pracy
kuchenki, ponieważ mogłyby się poparzyć.
5. Podłącz wtyczkę kuchenki do standardowego uziemio-
nego gniazdka elektrycznego.
OSTRZEŻENIE: Nie należy stawiać urządzenia w pobliżu źródeł
ciepła, w miejscach o dużej wilgotności (np. w pobliżu zwykłego piekarnika) lub w pobliżu palnych materiałów (np. zasłon).
Nie należy blokować ani zasłaniać otworów wentylacyjnych.
Nie należy ustawiać żadnych przedmiotów na obudowie urządzenia.
PRZED PRZYSTĄPIENIEM DO PRACY
Podłącz kuchenkę do sieci elektrycznej. Na wyświetlaczu pojawi się: „0:00” i zostanie wyemitowany jeden raz sygnał dźwiękowy.
Opisywany model wyposażony jest w zegar. W trybie czuwania kuchenka zużywa poniżej 1,0 W. Żeby ustawić zegar, postępuj
według poniższego opisu.
USTAWIENIE ZEGARA
Zegar może pracować w jednym z dwóch trybów wyświetlania czasu: 12- lub 24-godzinnym.
1.
Żeby uruchomić zegar w trybie 24-godzinnym, jeden raz naciśnij przycisk USTAWIANIE ZEGARA/TIMER KUCHENNY (
cze raz przycisk USTAWIANIE ZEGARA/TIMER KUCHENNY (
2. Obróć pokrętło WYBORU, aż wyświetli się poprawna godzina. Czas powinien mieścić się w zakresie 0-23 (ze-
gar 24-godzinny) lub 1-12 (zegar 12-godzinny).
3. Naciśnij przycisk USTAWIANIE ZEGARA/TIMER KUCHENNY (
4. Ustaw minuty. Obróć pokrętło WYBORU do momentu wyświetlenia poprawnej wartości minut. Wprowadza-
na wartość mieści się w zakresie 0-59.
5. Naciśnij jeden raz przycisk USTAWIANIE ZEGARA/TIMER KUCHENNY (
Symbol „:” cyfrowego zegara zacznie pulsować na wyświetlaczu.
UWAGI:
•
Jeśli zegar został ustawiony, po zakończeniu gotowania na wyświetlaczu pojawi się aktualna godzina. Jeśli zegar nie został
ustawiony, na wyświetlaczu pojawi się wskazanie „0:00”.
•
Żeby sprawdzić wskazania zegara podczas gotowania, naciśnij przycisk USTAWIANIE ZEGARA/TIMER KUCHENNY
(
•
Jeśli podczas ustawiania zegara zostanie naciśnięty przycisk STOP, kuchenka powróci do poprzedniego ustawienia.
•
Jeśli wystąpi przerwa w zasilaniu kuchenki, po przywróceniu zasilania na wyświetlaczu co pewien czas będzie pojawiać się
wskazanie „0:00”. Jeśli przerwa w zasilaniu wystąpi podczas pracy kuchenki, program zostanie skasowany. Ustawienie czasu
zostanie również skasowane.
) - na wyświetlaczu pojawi się napis „24H”. Żeby uruchomić zegar w trybie 12-godzinnym, naciśnij jesz-
) - na wyświetlaczu pojawi się napis „12H”.
). Minuty zaczną pulsować.
), żeby uruchomić zegar.
). Na wyświetlaczu przez 2-3 sekundy widoczne będzie wskazanie zegara. Nie wpływa to na proces gotowania.
POZIOMY MOCY MIKROFAL
Poziom mocy Naciśnij przycisk
WYSOKI x1 P100
ŚREDNIO
WYSOKI
ŚREDNI x3 P50
ŚREDNIO NISKI
(ROZMRAŻANIE)
NISKI x5 P10
W ogólnym przypadku należy stosować poniższe zalecenia:
Poziom P100
szybkiego gotowania lub podgrzewania potraw, np. duszonego
mięsa, puszkowanych produktów, gorących płynów, warzyw itp.
Poziom P80
podczas dłuższego gotowania gęstych potraw (np. pieczeni,
klopsów i potraw w panierce) oraz delikatnych dań, na przykład
pulchnego ciasta. Przy tym poziomie mocy mikrofal potrawa będzie gotowana równomiernie bez przypalenia po jednej stronie.
Poziom P50 (ŚREDNIA moc = 450 W) należy stosować do
gęstych potraw, które wymagają długiego czasu gotowania
POZIOM MOCY
MIKROFAL
x2 P80
x4 P30
(WYSOKA moc = 900 W) należy stosować podczas
(ŚREDNIO WYSOKA moc = 720 W) należy stosować
Wyświetlany
poziom (w
procentach)
(100%)
(80%)
(50%)
(30%)
(10%)
• Opisywana kuchenka posiada 5 poziomów mocy, któ-
re opisano w tabelce obok.
•
Żeby zmienić poziom mocy dla gotowania, naciśnij
przycisk POZIOM MOCY MIKROFAL
pokrętło WYBORU, dopóki nie wyświetli się żądany
poziom mocy mikrofal. Naciśnij przycisk START/+1min/
ZATWIERDŹ (
wadź czas gotowania, a następnie przyciskiem START/
+1min/ZATWIERDŹ (
• W celu sprawdzenia poziomu mocy mikrofal w trakcie
gotowania należy nacisnąć przycisk POZIOM MOCY
MIKROFAL
wyświetlane przez 2-3 sekundy. Podczas wyświetlania
poziomu mocy mikrofal kuchenka nie przerywa pomiaru czasu gotowania.
w przypadku gotowania tradycyjnego, na przykład dań z wołowiny. Użycie tego poziomu mocy mikrofal jest wskazane,
żeby mięso było miękkie.
Poziom P30 (ŚREDNIO NISKA moc = ustawienie rozmrażania
z mocą 270 W) służy do rozmrażania. Wybierz to ustawienie,
żeby zapewnić równomierne rozmrożenie dania. Jest ono również idealne w przypadku gotowanego ryżu, makaronu, knedli
i słodkiego sosu z gotowanych jajek z dodatkiem mąki.
Poziom P10 (NISKA moc = 90 W) służy do łagodnego rozmrażania, na przykład tortu lub ciasta z kremem.
PL-8
lub obróć
), żeby zatwierdzić, wpro-
) uruchom kuchenkę.
. Bieżące ustawienie mocy będzie
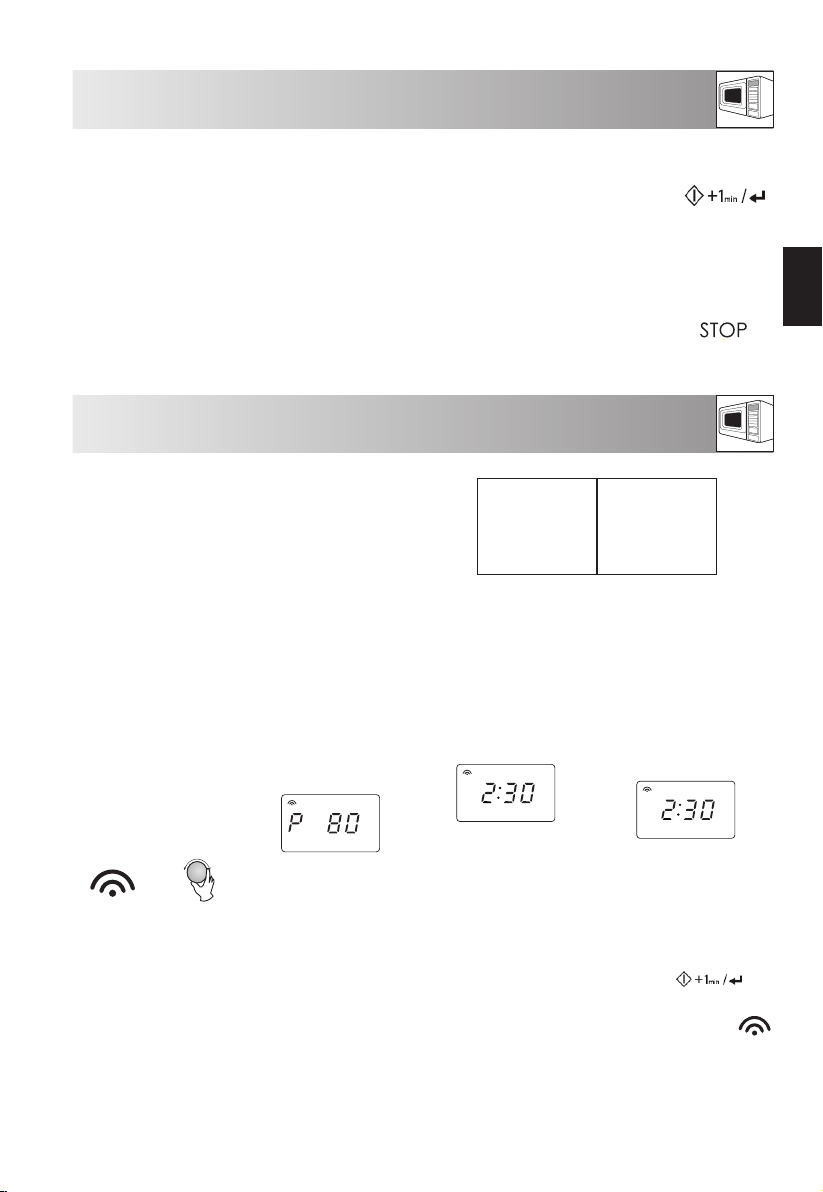
STEROWANIE RĘCZNE
Otwieranie drzwiczek:
Pociągnij za uchwyt, żeby otworzyć drzwiczki.
Uruchamianie kuchenki:
Przygotuj i włóż potrawę do odpowiedniego naczynia. Umieść naczynie na talerzu obrotowym lub
umieść potrawę bezpośrednio na talerzu obrotowym. Zamknij drzwiczki i po wybraniu żądanego trybu
pracy naciśnij przycisk START/+1min/ZATWIERDŹ.
Jeśli nie naciśniesz przycisku START/+1min/ZATWIERDŹ po upływie 5 minut po wyborze programu gotowania, program zostanie anulowany.
Jeśli podczas gotowania otwarte zostaną drzwiczki, należy nacisnąć przycisk START/+1min/ZATWIERDŹ,
żeby kontynuować proces. Prawidłowe naciśnięcie potwierdzane jest sygnałem dźwiękowym, nieskuteczne
naciśnięcie nie spowoduje wyemitowania sygnału.
Używaj przycisku STOP do:
1. Anulowania błędów podczas programowania.
2. Tymczasowego przerwania pracy kuchenki.
3. Anulowania programu w trakcie pracy (naciśnij przycisk STOP dwa razy).
4. Włączanie i wyłączanie zabezpieczenia przed dziećmi (patrz strona PL-13).
TRYB PRACY Z MIKROFALAMI
Czas pracy kuchenki można zaprogramować do 95 minut (95.00).
Jednostkę czasu gotowania (rozmrażania) można ustawić w
zakresie od 5 sekund do 5 minut, w zależności od łącznego
czasu gotowania (rozmrażania) potrawy (patrz tabela obok).
GOTOWANIE RĘCZNE/RĘCZNE ROZMRAŻANIE
• Wprowadź czas gotowania lub rozmrażania i ustaw moc mikrofal na poziomie od P100 do P10, żeby uruchomić gotowanie lub rozmrażanie (patrz przykład poniżej).
• Jeśli to możliwe, zamieszaj lub obróć potrawę 2-3 razy podczas gotowania.
• Po gotowaniu przykryj jedzenie i odstaw przed podaniem, jeśli jest to zalecane.
• Po rozmrożeniu przykryj jedzenie folią aluminiową i pozostaw do całkowitego rozmrożenia.
Przykład:
Gotowanie przez 2 minuty i 30 sekund z mocą mikrofal P80 (80%).
Wprowadź poziom
1.
mocy mikrofal
naciskając dwa razy
przycisk POZIOM
MOCY MIKROFAL dla
uzyskania wartości P80
lub pokrętłem WYBORU
wybierz poziom mocy
mikrofal P80.
x2 lub
UWAGA:
• Po uruchomieniu kuchenki lampka oświetleniowa zaświeci się a talerz zacznie się obracać w lewo lub w prawo. Jeśli podczas gotowania/rozmrażania otwarte zostaną drzwiczki w celu zamieszania lub obrócenia potrawy, odliczanie czasu gotowania na wyświetlaczu zostanie automatycznie wstrzymane. Odliczanie czasu zosta-
nie wznowione po zamknięciu drzwiczek i naciśnięciu przycisku START/+1min/ZATWIERDŹ (
• Po zakończeniu gotowania/rozmrażania otwórz drzwiczki lub naciśnij przycisk STOP. Na wyświetlaczu pojawi
się aktualny czas, jeśli zegar został wcześniej ustawiony.
•
Żeby podczas gotowania sprawdzić poziom mocy mikrofal, należy nacisnąć przycisk POZIOM MOCY MIKROFAL .
Przez 2-3 sekundy będzie wyświetlany bieżący poziom mocy.
WAŻNE:
• Po zakończeniu gotowania lub rozmrażania należy zamknąć drzwiczki kuchenki. Należy pamiętać, że oświetlenie wnętrza kuchenki pozostaje włączone przez 10 minut, gdy drzwiczki są otwarte. Wynika to ze względów
bezpieczeństwa, żeby przypomnieć o konieczności zamknięcia drzwiczek.
2. Naciśnij przycisk
START/+1min/
ZATWIERDŹ, żeby
zaakceptować wybrany
poziom mocy.
Na wyświetlaczu zaświeci
się wskaźnik mikrofal.
3. Wprowadź żądany czas
PL-9
Czas gotowania
0-1 minut
1-5 minut
5-10 minut
10-30 minut
30-95 minut
gotowania obracając
pokrętło WYBORU.
Jednostka czasu
5 sekund
10 sekund
30 sekund
1 minuta
5 minut
4. Naciśnij przycisk START/
+1min/ZATWIERDŹ,
żeby uruchomić timer
kuchenny.
(Na wyświetlaczu
rozpocznie się odliczanie
czasu gotowania.)
).
POLSKI
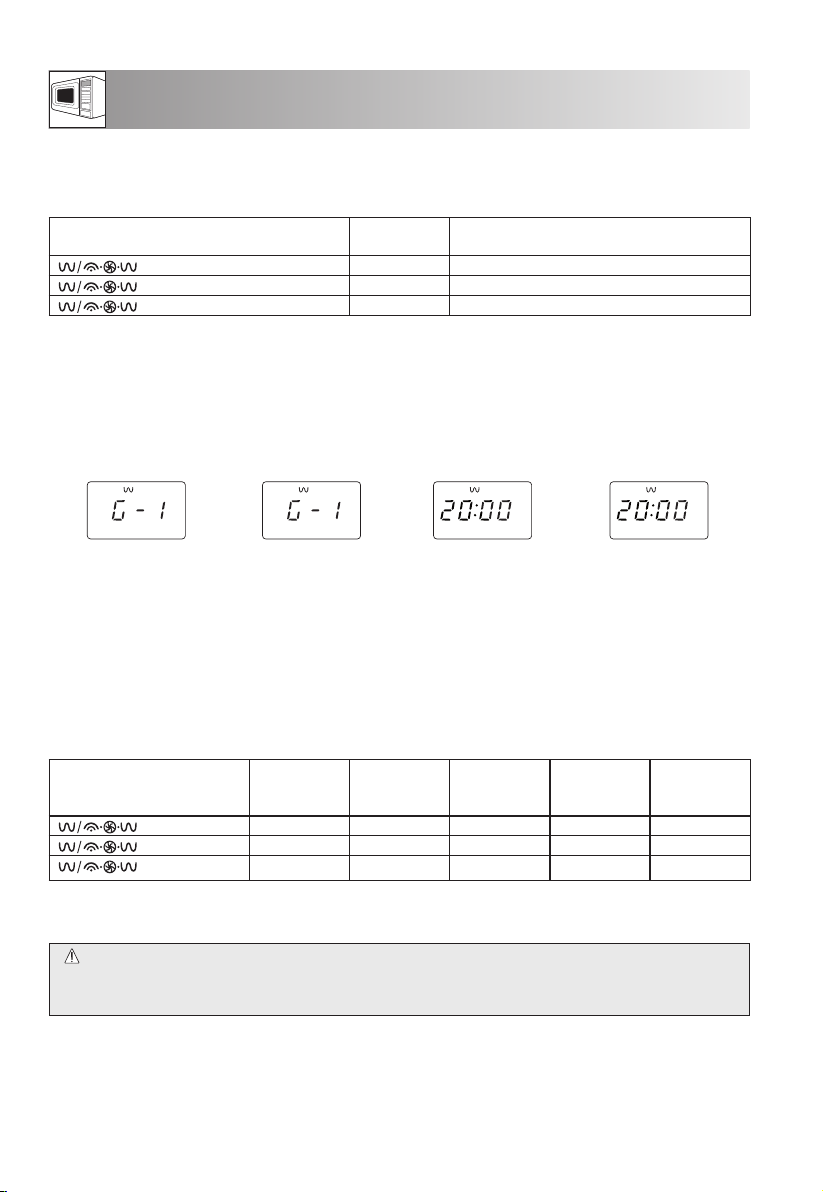
TRYB PRACY Z GRILLEM/TRYB PRACY KOMBINOWANEJ Z GRILLEM
1. Tryb pracy tylko z wykorzystaniem GRILLA
Kuchenka posiada górny i dolny grill, których można używać osobno lub równocześnie. Grill ma tylko jedno
ustawienie mocy. Obrotowy talerz wspomaga pracę grilla zapewniając równe opiekanie potraw. Należy ustawić
odpowiedni tryb pracy przy pomocy przycisku TRYB PRACY Z GRILLEM/PRACY KOMBINOWANEJ:
Naciśnij przycisk TRYB PRACY Z GRILLEM/
PRACY KOMBINOWANEJ
Przykład:
Gotowanie przez 20 minut przy pomocy tylko GÓRNEGO GRILLA.
1. Wybierz funkcję TOP
GRILL naciskając jeden
raz przycisk TRYB PRACY
Z GRILLEM/PRACY
KOMBINOWANEJ. Na
panelu zaświecą się
wskaźniki G-1 i grilla.
UWAGA:
W połowie procesu grillowania wyemitowany zostanie dwa razy sygnał dźwiękowy przypominający o konieczności
przewrócenia potrawy na drugą stronę, żeby zapewnić jej równe opiekanie. Należy pamiętać, że kuchenka nie wyłączy
się automatycznie podczas pracy z grillem. W celu uzyskania lepszego efektu grillowania potrawę należy obrócić
w połowie czasu gotowania. Po obróceniu potrawy zamknij drzwiczki kuchenki i naciśnij przycisk START/+1min/
ZATWIERDŹ, żeby wznowić grillowanie.
2. TRYB PRACY KOMBINOWANEJ
Funkcja trybu PRACY KOMBINOWANEJ umożliwia połączenie mocy mikrofal z grillem lub funkcją termoobiegu. Na
przemian stosowane jest promieniowanie mikrofalowe i opiekanie przy pomocy grilla. Tryb kombinowany pozwala
na zmniejszenie czasu gotowania oraz uzyskanie chrupiących i zarumienionych potraw. Przy wygodzie szybkiego
gotowania uzyskiwany jest tradycyjny, apetyczny wygląd potraw.
Dostępne są trzy kombinacje przedstawione w poniższej tabeli:
Naciśnij przycisk TRYB PRACY Z GRILLEM/PRACY KOMBINOWANEJ
x1 G-1 Tylko górny grill kwarcowy
x2 G-2
x3 G-3 Tylko dolny grill
2. Naciśnij przyciskSTART/
+1min/ZATWIERDŹ,
żeby zaakceptować
wybrany tryb gotowania.
Wyświetlacz Mikrofale /
x4 C-1 • / 24% • / 76% • / 76% x5 C-2 • / 73% • / 27% - • / 27%
x6 C-3 • / 52% • / 48% - • / 48%
Wyświetlacz Pracujący element grzejny
Górny grill kwarcowy i dolny grill równocześnie
3. Przy pomocy pokrętła
WYBORU wprowadź
czas grillowania.
wykorzysty-
wana moc
Grill górny /
wykorzysty-
wana moc
4. Naciśnij przycisk START/
+1min/ZATWIERDŹ, żeby
rozpocząć proces grillowania.
(Na wyświetlaczu rozpocznie
się odliczanie czasu
grillowania.)
Grill dolny /
wykorzysty-
wana moc
Termoobieg
/ wykorzysty-
wana moc
Zapoznaj się z instrukcjami w przykładzie podanym na następnej stronie, żeby uzyskać szczegółowe
informacje na temat obsługi trybu pracy kombinowanej z grillem.
OSTRZEŻENIE:
Drzwiczki, obudowa, komora operacyjna i elementy wyposażenia bardzo silnie się nagrzewają
podczas pracy kuchenki. Wyjmując naczynia i talerz obrotowy z kuchenki należy chwytać je przez
grube rękawice, żeby zapobiec poparzeniom.
PL-10
 Loading...