

Page 1
VBRHJDJKZJDFY GTXM C DTHÜZBV B
ZBÖZBV UHBKTV
MICROW A VE OVEN WITH TOP & BOTTOM GRILLS
HR
MODEL
Herjdjlcndj gj ärcgkefnfwbb b htwtgns
OPERATION MANUAL
R-770B
Page 2

CJLTHÖFZBT
BZAJHVFWBY J CTHNBABRFWBB GHJLERWBB
VTHS GHTLJCNJHJÖZJCNB ......................................... 1
JCJ>ST ERFPFZBY .......................................................... 2
BZCNHERWBY GJ ECNFZJDRT ...................................... 3
J>OBQ DBL GTXB ............................................................. 3
HF>JNF C CTZCJHZJQ GFZTKM* EGHFDKTZBY .......
Lbcgktq gfztkb eghfdktzby ............................................ 4
Ctzcjhzfy gfztkm eghfdktzby ......................................... 5
Ghbvths bzlbrfwbb heccrbü <erd ................................ 6
Ghbvths bzlbrfwbb heccrbü ckjd ................................ 6
Gthtl hf<jnjq ..................................................................... 7
Zfxfkj hf<jns .................................................................... 7
Cnjg/C<hjc ........................................................................... 7
Lky jnvtzs ghjuhfvvs dj dhtvy ghbujnjdktzby ......7
Zfuhtd gtxb <tp ghjlernjd d ztq .................................. 7
Ecnfzjdrf xfcjd .................................................................. 8
JCJ>ST ERFPFZBY ...............................................................
Gjktpzst cjdtns ................................................................ 9
Ghbujnjdktzbt ghb gjvjob nfqvthf ...........................10
Ghbujnjdktzbt gentv pflfzby gjcktljdfntkmzjcntq .....
>scnhjt ghbujnjdktzbt ................................................... 11
Vtlktzzjt ghbujnjdktzbt .............................................. 12
Gtxm jczfotzf nhtvy htöbvfvb ”UHBKM“ ................13
Ghbujnjdktzbt c bcgjkmpjdfzbtv aezrwbb
”UHBKM+CDX“ ................................................................... 14
FDNJVFNBXTCRBT JGTHFWBB .................................. 15
Pfvtxfzby jnzjcbntkmzj fdnjvfnbxtcrbü jgthfwbq .....
Gbwwf .................................................................................. 16
Ühecnyofy pfrecrf ........................................................... 18
Fdnj-uhbkm .......................................................................... 20
Hfpjuhtd .............................................................................. 22
Ghbujnjdktzbt hbcf ......................................................... 23
>k+lf zf gfhe ................................................................... 25
Fdnjvfnbxtcrjt ghbujnjdktzbt .................................... 28
Ghjcnfy hfpvjhjprf ......................................................... 30
LHEUBT ELJ>ZST AEZRWBB ...................................... 32
Aezrwby ”cghfdrf“ ........................................................... 32
Cbuzfkbpfwby .................................................................... 34
Aezrwby ”vtzmit-<jkmit“ ............................................ 35
Htuekbhjdfzbt dhtvtzb d üjlt ghbujnjdktzby .......... 35
EÜJL PF GTXM* ............................................................... 36
GTHTL NTV RFR DSPDFNM VFCNTHF .......................37
NTÜZBXTCRBT ÜFHFRNTHBCNBRB ........................... 37
11
15
CONTENTS
Warning ........................................................................ E-1
Special Notes ............................................................... E-2
Installation Instructions ............................................... E-3
Oven Diagram .............................................................. E-3
4
9
Operation of Touch Control Panel ..............................E-4
Control Panel Display .............................................. E-4
Touch Control Panel Layout.....................................E-5
Before Operating...................................................... E-6
Getting Started ......................................................... E-6
Stop/Clear ................................................................. E-6
To Cancel a Programme During Cooking ...............E-6
Heating without Food .............................................. E-6
Clock Setting............................................................. E-7
Manual Operations ...................................................... E-8
Microwave Cooking Techniques .............................E-8
Microwave Time Cooking ........................................E-9
Sequence Cooking ................................................. E-10
Instant Cook............................................................ E-10
Slow Cook............................................................... E-11
Grill Cooking........................................................... E-12
Grill Mix Cooking ................................................... E-13
Automatic Operations ............................................... E-14
Notes for Automatic Operations ........................... E-14
Pizza......................................................................... E-15
Crispy Snack ........................................................... E-17
Auto Grill................................................................. E-19
Reheat ..................................................................... E-21
Rice Cook ................................................................ E-22
Steam Menu ........................................................... E-24
Auto Cook ............................................................... E-27
Easy Defrost............................................................ E-29
Other Convenient Features ....................................... E-31
Help Feature ........................................................... E-31
Alarm....................................................................... E-33
Less/More Setting .................................................. E-34
Adjust Time During Cooking..................................E-34
Care and Cleaning...................................................... E-35
Service Call Check...................................................... E-36
Specifications ............................................................. E-36
Page 3

BZAJHVFWBY J CTHNBABRFWBB GHJLERWBB
VBRHJDJKZJDFY GTXM C UHBKTV
VJLTKM R-770B IFHG
cthnbabwbhjdfzf Rjvgfzbtq UJCN-FPBY,
jabwbfkmzsv ghtlcnfdbntktv UJCCNFZLFHNF Hjccbb
(Htubcnhfwbjzzsq zjvth d Ujchttcnht — HJCC SG.0001.11.BZ02)
VJLTKM R-770B IFHG
cjjndtncndetn nht<jdfzbyv
zjhvfnbdzsü ljrevtznjd:
Dj bcgjkztzbt Cnfnmb 5 Pfrjzf Hjccbqcrjq Atlthfwbb ≤J pfobnt ghfd gjnht<bntktq≥, f nfröt Erfpf
Ghfdbntkmcndf Hjccbqcrjq Atlthfwbb @ 720 jn 16 b+zy 1997 u. ecnfzfdkbdftncy chjr ckeö<s lfzzjq
vjltkb 7 ktn c vjvtznf ghjbpdjlcndf ghb eckjdbb bcgjkmpjdfzby d cnhjujv cjjndtncndbb c
bzcnherwbtq gj ärcgkefnfwbb b ghbvtzytvsvb ntüzbxtcrbvb cnfzlfhnfvb.
Cnhfzf-bpujnjdbntkm: Ghjbpdtltzj d Nfqkfzlt
Abhvf-bpujnjdbntkm: IFHG Rjhgjhtqiz
*hblbxtcrbq flhtc bpujnjdbntky:
22-22 Zfufqrt-xj, F<tzj-re, Jcfrf 545-8522, Ygjzby
gj <tpjgfczjcnb — UJCN 27570.14-88
/ VÄR 335-2-6-1986, UJCN H VÄR
335-2-25-1994 / VÄR 335-2-25-1988
gj ÄVC — UJCN 23450-83, zjhvs
URHX 5>-80
In accordance with Article 5 of the Russian Consumer Rights Protection Law and the Russian Federation Government
Decree @ 720 dated June 16, 1997, the lifetime for this product is established as 7 years from the date of production,
provided this product is used in full conformity with its instruction manual and the applicable technical standards.
Name of the Manufacturing country: Produced in Thailand
Name of the Manufacturing firm: Sharp Corporation
Legal address of the manufacture:
22-22, Nagaike-cho, Abeno-ku, Osaka 545-8522, Japan
Page 4

VTHS GHTLJCNJHJÖZJCNB
Jpzfrjvmntcm cj dctvb erfpfzbyvb lj zfxfkf bcgjkmpjdfzby ghb<jhf.
1. Chfpe gjckt ghbujnjdktzby zt ljnhfubdfqntcm lj gtxb d j<kfcnb kfvgs.
Rjulf kfvgf ujhbn, änb xfcnb zfuhtdf+ncy.
2. Ghb bcgjkmpjdfzbb aezrwbq ”UHBKM“, ”UHBKM+CDX“, ”GBWWF’, ”ÜHECNYOFY PFRECRF“ b ”FDNJUHBKM“ gjdjhjnzsq cnjkbr, gjlcnfdrf, ldthwf, dztizbq rjhgec b ëvrjcnm gtxb zfuhtdf+ncy. Dj bp<töfzbt
jöjuf gjkmpeqntcm herfdbwfvb.
3. Lky evtzmitzby dthjynzjcnb djpujhfzby d gtxb:
f. zt gthtuhtdfqnt ghjlerns;
<. elfkbnt egfrjdjxze+ ghjdjkjre c <evfözsü bkb gkfcnbrjdsü gfrtnjd lj njuj, rfr gjvtcnbnm bü d
gtxm;
d. zt gthtöfhbdfqnt vfckj bkb öbh; ntvgthfnehe vfckf rjznhjkbhjdfnm ztdjpvjözj;
u. tckb ghjlerns bkb gjcelf, zfüjlyobtcy d gtxb, hfcrfkbkbcm bkb cnfkb lsvbnm, jnrhjqnt ldthwe gtxb,
dsrk+xbnt gtxm, jnrk+xbnt ctntdjq izeh bkb j<tcnjxmnt ctnm, dsdthzed ghj<rb bkb jnrk+xbd
he<bkmzbr;
l. ghb bcgjkmpjdfzbb hfpjdsü tvrjcntq bp gkfcnvfccs, <evfub bkb lheubü ujh+xbü vfnthbfkjd
gthbjlbxtcrb cvjnhbnt, xnj ghjbcüjlbn d gtxb.
4. Lky evtzmitzby dthjynzjcnb dphsdf bkb htprjuj pfrbgfzby:
f. zt gjvtofqnt d gtxm uthvtnbxzst tvrjcnb; <enskjxrb c ltncrbv gbnfzbtv, pfrhsnst dbznjdsvb
rhsirfvb bkb cjcrfvb, ydky+ncy nfrbvb uthvtnbxzsvb cjcelfvb;
<. lky rbgyobü öblrjcntq bcgjkmpeqnt tvrjcnb c ibhjrbv ujhksirjv, f rhjvt njuj, lfqnt jncnjynmcy
öblrjcnb 20 ctrezl gjckt ghbujnjdktzby — ntv cfvsv ds lflbnt djpvjözjcnm pfrjzxbnmcy ghjwtcce
frnbdzjuj rbgtzby öblrjcnb.
5. Änf gtxm ljközf bcgjkmpjdfnmcy njkmrj lky ghbujnjdktzby gbob d ljvfizbü eckjdbyü b zt ghbujlzf lky
rjvvthxtcrjuj bcgjkmpjdfzby, f nfröt lky bcgjkmpjdfzby d kf<jhfnjhbb.
6. Zbrjulf zt ujnjdmnt d gtxb, tckb vtöle ldthm+ b rjhgecjv gtxb pföfn rfrjq-zb<elm ghtlvtn.
7. Zt ghj<eqnt jnhtuekbhjdfnm bkb gjxbzbnm gtxm cfvjcnjyntkmzj. Gtxm ljközf htuekbhjdfnmcy bkb
htvjznbhjdfnmcy rdfkbabwbhjdfzzsv ntüzbrjv gj j<ckeöbdfzb+, gjlujnjdktzzsv abhvjq ”Ifhg“.
8. Zbrjulf zt gjkmpeqntcm gtxm+, tckb jzf zt hf<jnftn ljközsv j<hfpjv bkb ckjvfzf lj ntü gjh, gjrf jzf
zt <eltn gjxbztzf rdfkbabwbhjdfzzsv cgtwbfkbcnjv, gjlujnjdktzzsv abhvjq ”Ifhg“. Jcj<tzzj dfözj,
xnj<s ldthwf gtxb pfrhsdfkfcm gkjnzj b zt bvtkf gjdhtöltzbq. F bvtzzj:
(1) ldthwf zt ljközf <snm gjrjhj<ktzf; (2) gtnkb b pfotkrb zt ljközs <snm ckjvfzs bkb ifnfnmcy; (3)
ghjrkflrf b gjdthüzjcnm rjznfrnf c ghjrkflrjq zt ljközs bvtnm gjdhtöltzbq.
9. Ghb bpdktxtzbb ghjlernjd bp gtxb <elmnt dzbvfntkmzs, xnj<s zt pfwtgbnm ghtljühfzbntkmzst pfotkrb
ldthws gjceljq, jltöljq bkb ghbzflktözjcnyvb.
10. Cktlbnt pf ntv, xnj<s ctntdjq izeh zt bvtk gjdhtöltzbq, zt ghjüjlbk gjl gtxm+, f nfröt gj
ujhyxbv b jcnhsv gjdthüzjcnyv.
11. Zt rkflbnt ctntdjq izeh zf dztizbq rjhgec gtxb ghb bcgjkmpjdfzbb aezrwbq ”UHBKM“, ”UHBKM±CDX“,
”GBWWF“, ”ÜHECNYOFY PFRECRF“ b ”FDNJ-UHBKM“.
12.
Ghb gjdhtöltzbb ctntdjuj izehf ztj<üjlbvj tuj pfvtzbnm zf zjdsq cgtwbfkmzsq izeh, ghtljcnfdkytvsq
wtznhjv ntüzbxtcrjuj j<ckeöbdfzby abhvs ”Ifhg“.
Izeh gjlktöbn pfvtzt rdfkbabwbhjdfzzsv ntüzbrjv gj j<ckeöbdfzb+, gjlujnjdktzzsv abhvjq
”Ifhg“.
13. D ckexft dsüjlf bp cnhjy kfvgs j<hfnbntcm r cdjtve futzne bkb dspjdbnt rdfkbabwbhjdfzzjuj cgtwbfkbcnf,
gjlujnjdktzzjuj abhvjq ”Ifhg“.
14. Bp<tufqnt ghyvjuj gjgflfzby gfhf zf kbwj b herb.
Vtlktzzj gjlzbvfqnt lfkmz++ jn dfc xfcnm rhsirb gjcels bkb gktzrb lky vbrhjdjkzjdjuj
ghbujnjdktzby. Jcnjhjözj jnrhsdfqnt djpleize+ rerehepe b gjcele lky vbrhjdjkzjdjuj ghbujnjdktzby.
Ghb änjv lthöbnt bü gjlfkmit jn kbwf.
15. Zt ghbrfcfqntcm r dtznbkywbjzzsv jndthcnbyv, gjcrjkmre jzb vjuen <snm cbkmzj zfuhtns.
16. Zt cnfdmnt zbrfrbü ghtlvtnjd zf dztizbq rjhgec gtxb.
17. C extnjv djpvjözjcnb zfuhtdf ldthws dj dhtvy ghbujnjdktzby b dj bp<töfzbt ckexfqzjuj tt rfcfzby
dphjcksvb b ltnmvb, gtxm cktletn hfcgjkjöbnm nfrbv j<hfpjv, xnj<s jzf zfüjlbkfcm zf dscjnt zt vtztt
80 cv jn gjkf.
18. Gtxm ljközf <snm pfptvktzf.
1
Page 5
JCJ>ST ERFPFZBY
Xnj ztj<üjlbvj ltkfnm
Yqwf, cjcbcrb,
jhtüb, ctvtzf,
jdjob,
aherns b
ecnhbws
Djpleizfy
rerehepf
Ltncrjt
gbnfzbt
J<obt
erfpfzby
Rjzcthdbhjdfzzst
ghjlerns
Cjcbcrb, hektn,
gbhju,
hjöltcndtzcrbq
gelbzu
Vycj
Ghjrfksdfnm ötknrb b <tkrb ybw, f nfröt
hfrjdbzs ecnhbw gthtl ghbujnjdktzbtv. Ntv
cfvsv ds bp<töbnt ”dphsdf“.
Ghjnsrfnm rjöehe rfhnjatky, y<kjr,
rf<fxrjd, üjn-ljujd, cjcbcjr b ecnhbw lky
dsüjlf gfhf zfheöe.
Bcgjkmpjdfnm cgtwbfkmze+ gjcele lky
ghbujnjdktzby djpleizjq rereheps d
vbrhjdjkzjdjq gtxb.
Gjljölbnt lj ntü gjh, gjrf otkxrb jn
djpleizjq rereheps <elen hfplfdfnmcy c
bznthdfkjv 1—2 ctrezls.
Gthtkjöbnt ltncrjt gbnfzbt d vfktzmre+
gjcele b jcnjhjözj zfuhtdfqnt, xfcnj
gjvtibdfy. E<tlbntcm d ljcnbötzbb
ztj<üjlbvjq ntvgthfnehs.
Elfkbnt dbznjde+ rhsire bkb cjcre lj
zfuhtdfzby <enskjxrb. Gjckt zfuhtdfzby
e<tlbntcm d ljcnbötzbb ztj<üjlbvjq
ntvgthfnehs.
Ghjlerns c zfgjkzbntktv ljközs <snm
zflhtpfzs gjckt zfuhtdf. Änj ztj<üjlbvj
lky njuj, xnj<s jzb dsgecnbkb gfh, xnj
ghtljühfzbn dfc jn jöjujd.
Bzntzcbdzj gjvtibdfqnt öblrjcnb lj b
gjckt ghbujnjdktzby d wtkyü hfdzjvthzjuj
zfuhtdf.
Bcgjkmpjdfnm uke<jre+ gjcele ghb
ghbujnjdktzbb öblrbü ghjlernjd bkb rfi.
Änj bcrk+xftn dsrbgfzbt.
Ghb rbgyxtzbb b ghbujnjdktzbb öblrjcntq
gjvzbnt j vthfü ghtljcnjhjözjcnb,
erfpfzzsü zf cnh. H-1.
Elfkbnm ghjlern bp <fzrb.
Änb ghjlerns cjlthöfn <jkmijt rjkbxtcndj
cfüfhf b (bkb) öbhf.
Ujnjdmnt d ntxtzbt htrjvtzletvjuj dhtvtzb.
Bcgjkmpjdfnm ecnjqxbde+ r ltqcndb+
vbrhjdjkz gjlcnfdre lky öfhrb lky c<jhf
cntrf+otuj cjrf.
gjlcnfdrf lky öfhrb:
Xtuj ltkfnm ztkmpy
Dfhbnm yqwf d crjhkegt.
Änj ghtljndhfoftn ”dphsd“,
rjnjhsq vjötn gjdhtlbnm gtxm
bkb zfztcnb nhfdve.
Hfpjuhtdfnm yqwf wtkbrjv.
Gthtuhtdfnm ecnhbws.
Ceibnm jhtüb d crjhkegt b
ctvtzf d itkeüt.
Ujnjdbnm djpleize+ rerehepe d
j<sxzjq afhajhjdjq bkb
cntrkyzzjq gjcelt.
Ghtdsifnm vfrcbvfkmzjt
dhtvy ghbujnjdktzby d gjcelt
lky djpleizjq rereheps.
Zfuhtdfnm jlzjhfpjdst
<enskjxrb.
Gthtuhtdfnm <enskjxrb.
Ljgecrfqnt njkmrj bü zfuhtd.
Zfuhtdfnm <enskjxrb c cjcrjq.
Zfuhtdfnm <enskjxrb d
jhbubzfkmzjq egfrjdrt.
Zfuhtdfnm bkb ujnjdbnm d
pfrhsnsü cntrkyzzsü <fzrfü
bkb uthvtnbxzj pfrhsnsü
tvrjcnyü.
Gthtöfhbdfnm öbh.
Ceibnm lthtdj, nhfds, vjrhe+
<evfue.
Drk+xfnm gecne+ gtxm, rhjvt
ckexftd erfpfzzsü d
bzcnherwbb gj ärcgkefnfwbb.
Zfuhtdfnm bkb ujnjdbnm ghjlern
d <fzrt.
Tckb dhtvy ghbujnjdktzby
<eltn ghtdsitzj, djpvjözj
djpzbrzjdtzbt juzy.
Gjvtofnm vycj lky
ghbujnjdktzby ztgjchtlcndtzzj
zf gjdjhjnzsq cnjkbr.
Gjcelf
Fk+vbzbtdfy
ajkmuf
>k+lj lky
gjlhevyzbdfzby
E<tlbntcm d ghbujlzjcnb gjcels lj tt
bcgjkmpjdfzby lky vbrhjdjkzjdjuj
ghbujnjdktzby.
Ghbvtzytncy lky j<jhfxbdfzby ghjlernf dj
bp<töfzbt tuj gthtuhtdf.
Cktlbnt pf ntv, xnj<s zt <skj
äktrnhbxtcrjuj hfphylf. Bcgjkmpeqnt
vtzmitt rjkbxtcndj ajkmub; zt ljgecrfqnt
tt cjghbrfcfzby cj cntzrfvb rfvths.
Vtöle gjdjhjnzsv cnjkbrjv b <k+ljv lky
gjlhevyzbdfzby gjvtcnbnt gjlüjlyobq
bpjkbhe+obq ghtlvtn nbgf öfhjghjxzjq
nfhtkrb bp vfnthbfkf, hfccxbnfzzjuj zf
CDX-bpkextzbt.
2
Bcgjkmpjdfnm vtnfkkbxtcre+
gjcele lky vbrhjdjkzjdjuj
ghbujnjdktzby. Vtnfkk
jnhföftn vbrhjdjkzjde+
äzthub+ b vjötn dspdfnm
äktrnhbxtcrbq hfphyl (leue).
Bcgjkmpjdfnm vzjuj ajkmub.
J<jhfxbdfnm ghjlern nfr, xnj<s
ajkmuf zfüjlbkfcm d<kbpb
cntzjr rfvths. Äktrnhbxtcrbq
hfphyl vjötn dspdfnm
gjdhtöltzbt gtxb.
Ghjdjlbnm zfuhtd ljkmit, xtv
htrjvtzletncy bpujnjdbntktv. D
htpekmnfnt xhtpvthzjuj zfuhtdf
cntrkj cnjkbrf vjötn nhtczenm,
djpvjözj nfröt gjdhtöltzbt
dzenhtzzbü xfcntq gtxb.
Page 6
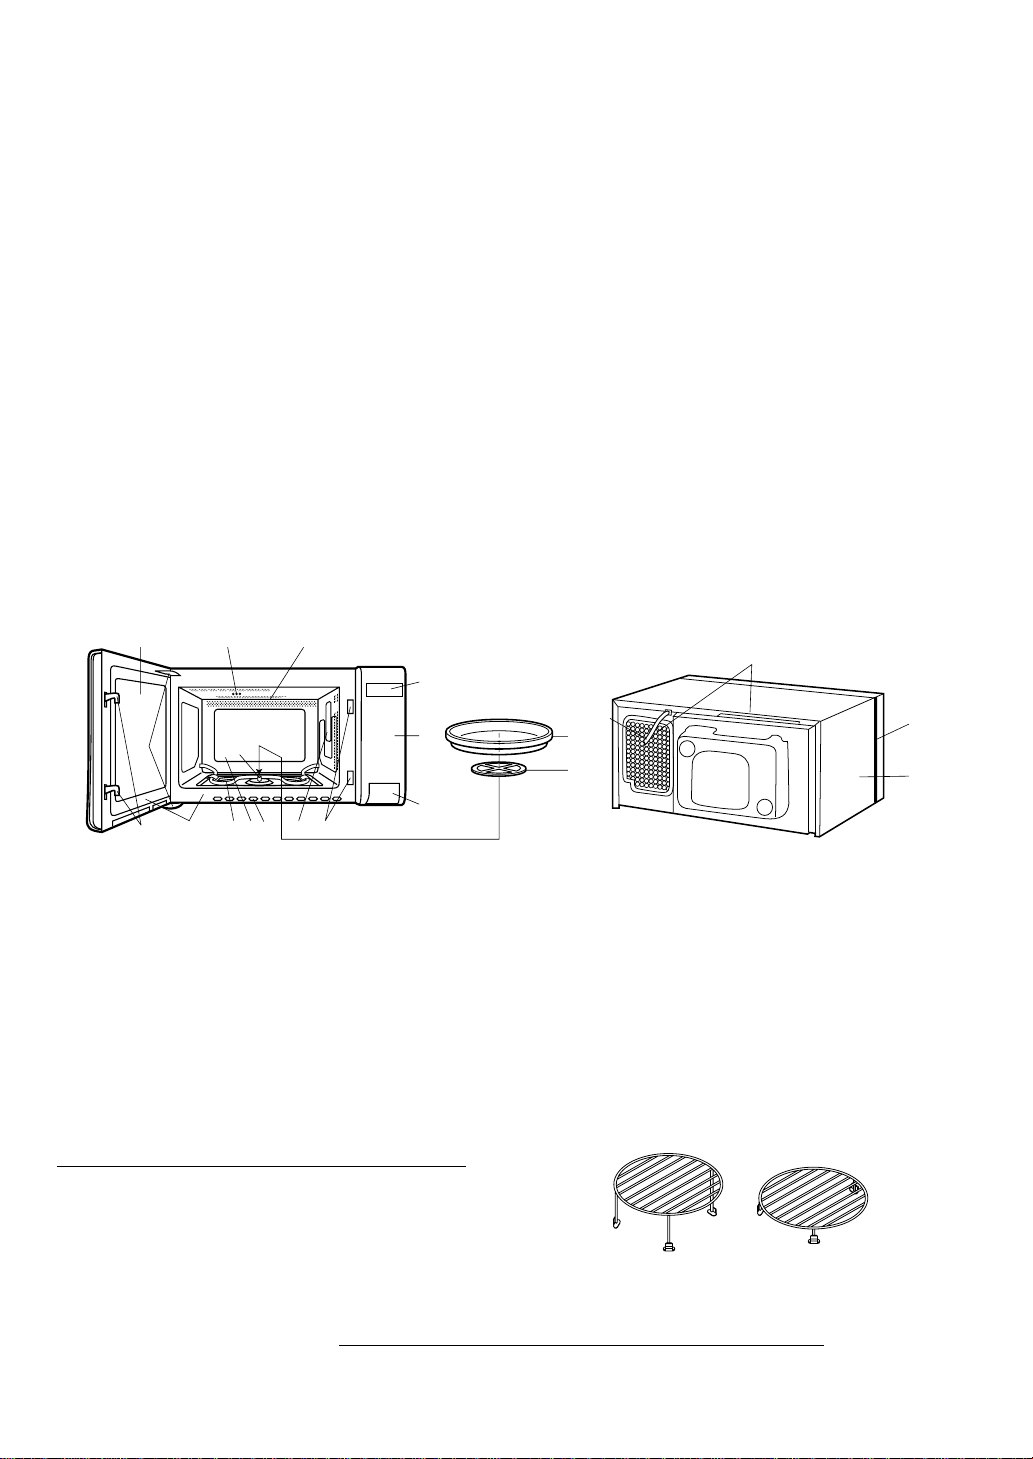
BZCNHERWBY GJ ECNFZJDRT
1. Elfkbnt dct egfrjdjxzst vfnthbfks bp gtxb. E<tlbntcm d njv, xnj gtxm zt bvttn gjdhtöltzbq, f bvtzzj:
ldthwf zt gthtrjitzf, ghjrkflrf zf ldthwt zt bvttn gjdhtöltzbq, f zf dzenhtzzbü gjdthüzjcnyü gtxb
b zf ldthwt jncencnde+n dvynbzs. Tckb Ds j<zfheöbkb jlzj bp änbü gjdhtöltzbq, zt gjkmpeqntcm gtxm+
lj ntü gjh, gjrf jzf zt <eltn ghjdthtzf d WTZNHT NTÜZBXTCRJUJ J>CKEÖBDFZBY abhvs IFHG
b jnhtvjznbhjdfzf, tckb änj ztj<üjlbvj.
2. R gtxb ghbkfuf+ncy:
1) gjdjhjnzsq cnjkbr 4) dscjrfy gjlcnfdrf 7) bzcnherwby gj ärcgkefnfwbb
2) gjlcnfdrf gjl gjdjhjnzsq cnjkbr 5) gjdfhtzzfy rzbuf (zf fzukbqcrjv ypsrt)
3) zbprfy gjlcnfdrf 6) gjdfhtzzfy rzbuf (zf heccrjv ypsrt)
3. E<tlbntcm d njv, xnj zbözbq zfuhtdfntkmzsq äktvtzn zfüjlbncy d cfvjv zböztv gjkjötzbb, rfr
gjrfpfzj zf bkk+cnhfwbb ”J<obq dbl gtxb“ zf cnh. H-3 (zt nhjufnm b zt ldbufnm zbözbq zfuhtdfntkmzsq
äktvtzn, rjulf jz cbkmzj zfuhtn). Ghbkflmnt gjlcnfdre gjl gjdjhjnzsq cnjkbr r dfke äktrnhjldbufntky
gjdjhjnzjuj cnjkbrf, hfcgjkjötzzjuj zf zböztq gjdthüzjcnb ëvrjcnb gtxb. Ecnfzjdbnt gjdjhjnzsq
cnjkbr zf gjlcnfdre. E<tlbntcm d njv, xnj gjdjhjnzsq cnjkbr b gjlcnfdrf hfcgjkjötzs gj wtznhe b
cwtgktzs lheu c lheujv. ZB D RJTV CKEXFT zt ljgecrftncy hf<jnf gtxb <tp gjdjhjnzjuj cnjkbrf
b gjlcnfdrb.
4. Gtxm zt ljközf zfüjlbnmcy d<kbpb bcnjxzbrjd ntgkf b gfhf, zfghbvth, jrjkj j<sxzjq gkbns. Gtxm
ljközf <snm ecnfzjdktzf nfr, xnj<s zt gthtrhsdfkbcm dtznbkywbjzzst jndthcnby.
Zfl gtxm+ ljközj bvtnmcy zt vtztt 40 cv cdj<jlzjuj ghjcnhfzcndf.
5. Ghjbpdjlbntkb b lbcnhb<m+nths zt ztcen jndtncndtzzjcnb pf gjdhtöltzby gtxb b nhfdvs gjnht<bntky,
dspdfzzst ztghfdbkmzsv gjlrk+xtzbtv gtxb r ctnb.
Gtxm gbnftncy jn jlzjafpzjq ctnb gthtvtzzjuj njrf c zfghyötzbtv 220 D b xfcnjnjq 50 Uw.
J>OBQ DBL GTXB
13
4
6780A
5
9
2
D
E
C
B
5
G
H
0
I
F
1. Kfvgjxrf gjlcdtnrb gtxb
(Kfvgjxrf ujhbn dj dhtvy ghbujnjdktzby
bkb ghb jnrhsnjq ldthwt.)
2. Dthüzbq zfuhtdfntkmzsq äktvtzn
(uhbky)
3. Ghjphfxzjt jrzj
4. Gtnkb ldthws
5. Ghtljühfzbntkmzst pfotkrb ldthb
6. Bpjkywby ldthws b
bpjkbhe+obt gjdthüzjcnb
7. Zbözbq zfuhtdfntkmzsq äktvtzn
(uhbky)
8. Ëvrjcnm gtxb
9. Dfk äktrnhjldbufntky
gjdjhjnzjuj cnjkbrf
10.Dtznbkywbjzzst jndthcnby
11.Rhsirf djkzjdjlf
12.Rzjgrf jnrhsnby ldthws
13.Ctzcjhzfy gfztkm eghfdktzby
14.Wbahjdjq lbcgktq
15.Ctntdjq izeh
16.Dztizbq rjhgec
17.Gjdjhjnzsq cnjkbr
18.Gjlcnfdrf gjl gjdjhjnzsq
cnjkbr
19.Dtznbkywbjzzfy otkm
Vtnfkkbxtcrbt gjlcnfdrb — dscjrfy b zbprfy
Gjlcnfdrb ghtlzfpzfxtzs lky bcgjkmpjdfzby aezrwbq ”UHBKM“,
”UHBKM+CDX“, ”GBWWF“, ”ÜHECNYOFY PFRECRF“ b ”FDNJUHBKM“.
JCNJHJÖZJ:
Ghb bcgjkmpjdfzbb aezrwbq ”UHBKM“, “UHBKM+CDX“, ”GBWWF“, ”ÜHECNYOFY PFRECRF“ b ”FDNJUHBKM“ ghbzflktözjcnb gtxb cbkmzj zfuhtdf+ncy. DJ BP>TÖFZBT JÖJUF ghb bpdktxtzbb ghjlernjd
b gjdjhjnzjuj cnjkbrf bp gtxb
gjkmpeqntcm njkcnsvb herfdbwfvb lky hf<jns c gtxm+.
3
Page 7
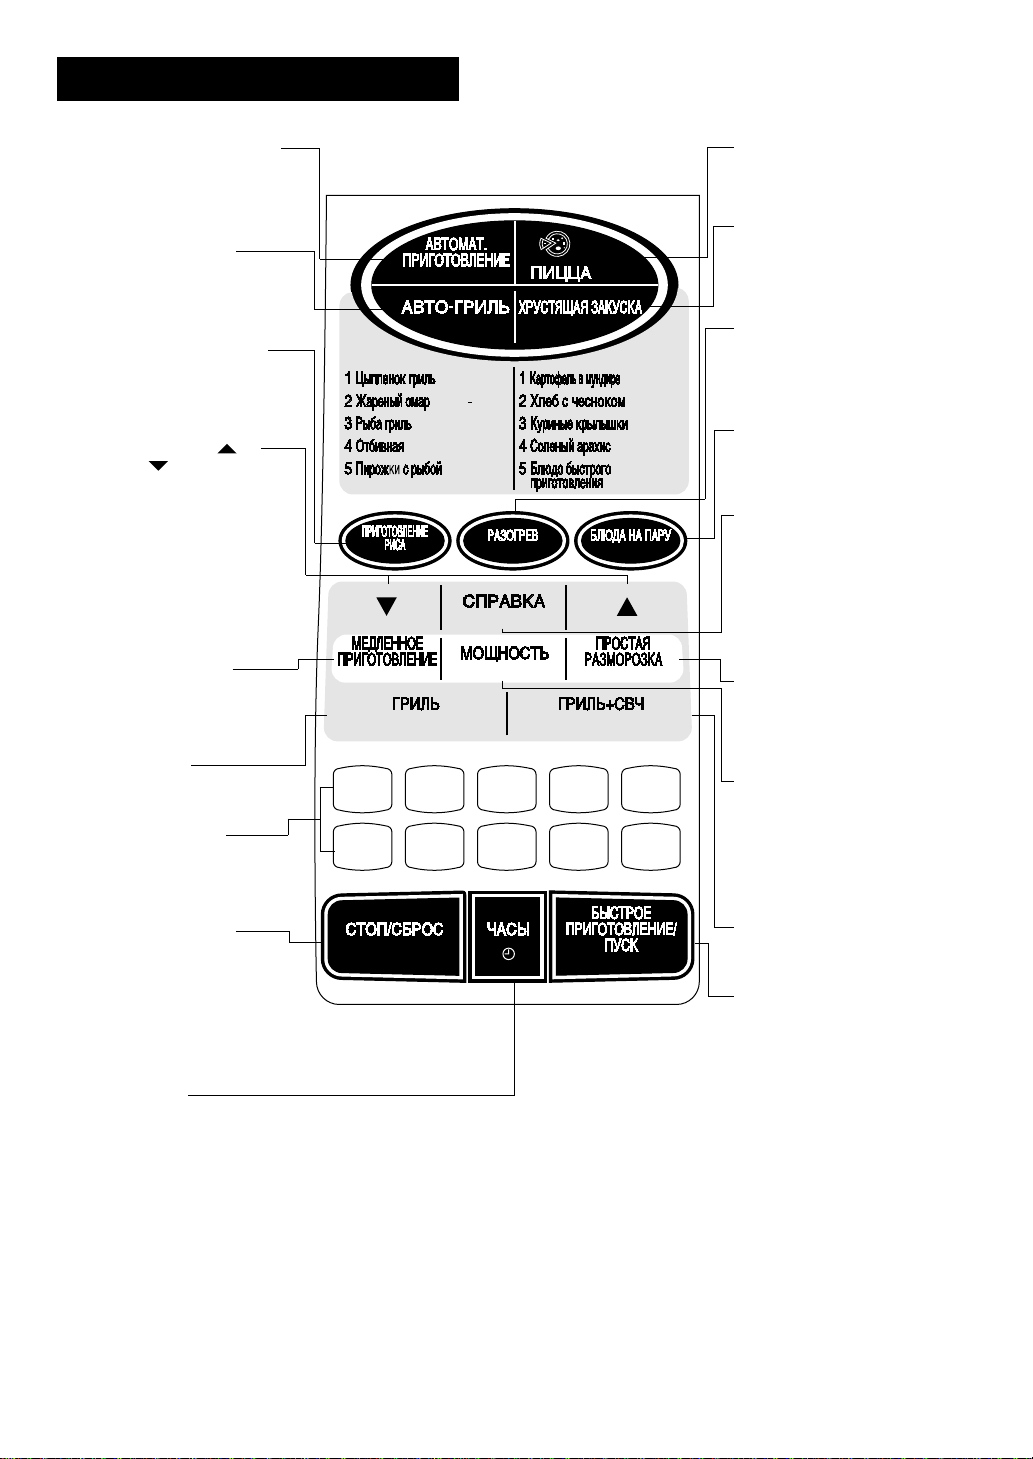
HF>JNF C CTZCJHZJQ GFZTKM* EGHFDKTZBY
: GTHTDTHZENM
: LJ>FDBNM
: ZFRHSNM
: GTHTVTIFNM
: HFPVJHJPRF
: GJVJOM
Hf<jnf c ctzcjhzjq gfztkm+ eghfdktzby jceotcndkytncy zföfnbtv cjjndtncnde+otq rzjgrb, hfcgjkjötzzjq
zf gfztkb eghfdktzby.
Pderjdjq cbuzfk ghb zföfnbb zf rzjgre cdbltntkmcndetn j <tpjib<jxzjv ddjlt. Pderjdjq cbuzfk
lkbntkmzjcnm+ ghb<kbpbntkmzj 2 ctrezls hfplftncy nfröt d rjzwt wbrkf ghbujnjdktzby. Rhjvt njuj, rjulf
nht<etncy dsgjkztzbt cktle+otuj ifuf ghbujnjdktzby, pdexbn 4-rhfnzsq pderjdjq cbuzfk.
Lbcgktq gfztkb eghfdktzby
JCN
FDBNM
TURNOVER ADDSTAND
1
2
3
1. Bzlbrfnjh dthüztuj zfuhtdfntkmzjuj äktvtznf
Ujhbn ghb bcgjkmpjdfzbb dthüztuj zfuhtdfntkmzjuj äktvtznf.
2.
Bzlbrfnjh zböztuj zfuhtdfntkmzjuj äktvtznf
Ujhbn ghb bcgjkmpjdfzbb zböztuj zfuhtdfntkmzjuj äktvtznf.
3.
Bzlbrfnjh vbrhjdjkzjdjuj htöbvf
Ujhbn ghb bcgjkmpjdfzbb vbrhjdjkzjdjuj htöbvf.
COVER STIRDEFROST HELP
KG PCS%AUTO
ru in. fdnj
bzlbrfnjh
COOK
ghbujnjd
4
Page 8
Ctzcjhzfy gfztkm eghfdktzby
/
RZJGRF ”FDNJVFNBXTCRJT
GHBUJNJDKTZBT“
Zföfnbtv zf äne rzjgre
jceotcndkytncy ds<jh vtz+ bp 4
hfcghjcnhfztzzsü <k+l.
RZJGRF ”FDNJ-UHBKM“
Zföfnbtv zf äne rzjgre
jceotcndkytncy ds<jh vtz+ bp 5
hfcghjcnhfztzzsü öfhtzsü
<k+l.
RZJGRF ”GHBUJNJDKTZBT
HBCF“
Zföfnbt zf äne rzjgre
bcgjkmpetncy lky ghbujnjdktzby
hbcf, hbcjdjuj jndfhf b rfib.
RZJGRB ”>JKMIT“ ( ) b
”VTZMIT“ ( )
Zföfnbt zf änb rzjgrb
bcgjkmpetncy lky htuekbhjdfzby
htpekmnfnf ghbujnjdktzby gentv
bpvtztzby tuj dhtvtzb c ifujv d
jlze vbzene d üjlt ghbujnjdktzby,
f nfröt lky edtkbxtzby b
evtzmitzby dhtvtzb
ghbujnjdktzby ghb ddjlt
ghjuhfvvs lky dsgjkztzby
fdnjvfnbxtcrbü jgthfwbq.
RZJGRF ”VTLKTZZJT
GHBUJNJDKTZBT“
Zföfnbtv zf äne rzjgre
j<tcgtxbdftncy vtlktzzjt b <jktt
lkbntkmzjt ghbujnjdktzbt.
RZJGRF ”UHBKM“
Bcgjkmpetncy lky ds<jhf
vtz+ ”UHBKM“.
RZJGRB C WBAHFVB
Zföfnbtv zf änb rzjgrb
j<tcgtxbdftncy ddjl dhtvtzb
ghbujnjdktzby, ecnfzjdrf xfcjd,
ddjl dtcf b rjkbxtcndf ghjlernjd.
RZJGRF ”CNJG/C>HJC“
Zföfnbtv lfzzjq rzjgrb
jceotcndkytncy jxbcnrf dj dhtvy
ghjuhfvvbhjdfzby.
Jlzjrhfnzsv zföfnbtv gtxm
jcnfzfdkbdftncy dj dhtvy
ghbujnjdktzby, lderhfnzjt zföfnbt
jnvtzytn ghjuhfvve
ghbujnjdktzby.
RZJGRF ”XFCS“
Zföfnbtv änjq rzjgrb ljcnbuftncy
ecnfzjdrf dhtvtzb zf xfcfü.
AUTO COOK
AUTO GRILL
RICE COOK
SLOW COOK
GRILL
CRISPY SNACK
Grilled Chicken
Grilled Lobster
Grilled Fish
Steak
Fish Cake
REHEAT STEAM MENU
HELP
POWER LEVEL EASY DEFROST
PIZZA
Convenient Food
GRILL MIX
Potato Skin
Garlic Bread
Chicken
Wings
Salty Peanuts
12345
67890
STOP/
CLEAR
INSTANT COOK//START
RZJGRF ”GBWWF“
Zföfnbtv zf äne rzjgre
j<tcgtxbdftncy ds<jh vtz+ bp 3
dfhbfznjd gbwws.
RZJGRF ӆHECNYOFY
PFRECRF“
Zföfnbtv zf äne rzjgre
j<tcgtxbdftncy ds<jh vtz+ bp 5
hfcghjcnhfztzzsü kturbü pfrecjr.
RZJGRF ”HFPJUHTD“
Zföfnbtv zf äne rzjgre
j<tcgtxbdftncy hfpjuhtd vyczsü b
n. g. <k+l, cegjd, zfgbnrjd b
ükt<f.
RZJGRF ”>K*LF ZF GFHE“
Zföfnbt zf äne rzjgre
bcgjkmpetncy lky ghbujnjdktzby zf
gfhe hs<s, vycf b rkëwtr.
RZJGRF ”CGHFDRF“
Zföfnbtv zf äne rzjgre
ljcnbuftncy ds<jh cktle+obü
aezrwbq: fdnjgecr, pfobnf jn
ltntq, ltvjzcnhfwbjzzsq b
ypsrjdjq htöbvs.
Zföfnbt zf äne rzjgre gjpdjkytn
gjkexbnm bzajhvfwb+ j
ghbujnjdktzbb.
RZJGRF ”GHJCNFY
HFPVJHJPRF“
Zföfnbtv zf äne rzjgre
j<tcgtxbdftncy hfpvjhjprf vycf
gjckt ddjlf dtcf.
RZJGRF ”VJOZJCNM“
Zföfnbtv zf äne rzjgre
j<tcgtxbdftncy ds<jh ehjdzy
vjozjcnb vbrhjdjkzjdjuj
bpkextzby.
Tckb rzjgrf zt zföfnf,
ghjbcüjlbn fdnjvfnbxtcrbq ds<jh
DSCJRJUJ ehjdzy vjozjcnb.
RZJGRF ”UHBKM+CDX“
Bcgjkmpetncy lky ds<jhf vtz+
”UHBKM+CDX“.
RZJGRF ”>SCNHJT
GHBUJNJDKTZBT/GECR“
Jlzjrhfnzjt zföfnbt gjpdjkytn
ujnjdbnm <k+lj 1 vbzene ghb
dscjrjv ehjdzt vjozjcnb, f
nfröt edtkbxbdfnm dhtvy
ghbujnjdktzby zf 1 vbzene ghb
rföljv tt zföfnbb dj dhtvy
ghbujnjdktzby.
Zföfnbt zf äne rzjgre
j<tcgtxbdftn nfröt gecr ddtltzzjq
ghjuhfvvs.
5
Page 9
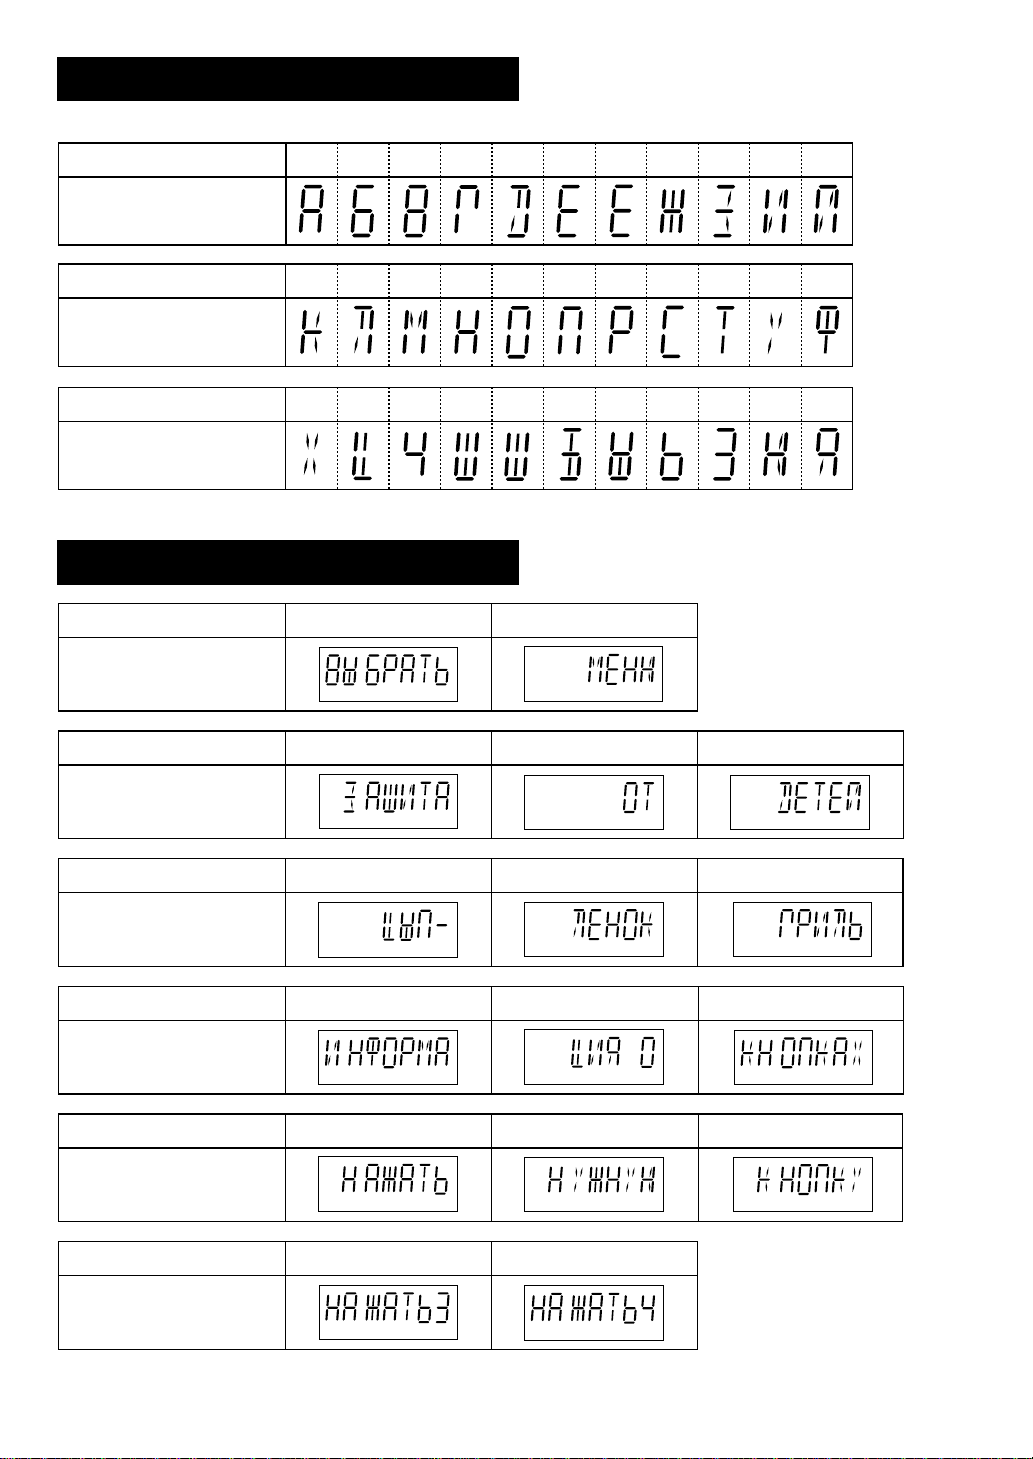
Ghbvths bzlbrfwbb heccrbü <erd
>erdf
F>DU LTËÖPBQ
Bzlbrfwby
>erdf
RKVZJGH CN EA
Bzlbrfwby
>erdf
ÜWXIO?SMÄ*Y
Bzlbrfwby
Ghbvths bzlbrfwbb heccrbü ckjd
Ckjdj
Bzlbrfwby
DS>HFNM VTZ*
Ckjdj
Bzlbrfwby
Ckjdj
Bzlbrfwby
Ckjdj
Bzlbrfwby
Ckjdj
Bzlbrfwby
Ckjdj
Bzlbrfwby
PFOBNF JN LTNTQ
WSG- KTZJR
BZAJHVF WBY J
ZFÖFNM ZEÖZE*
ZFÖFNM4ZFÖFNM3
UHBKM
RZJGRFÜ
RZJGRE
6
Page 10
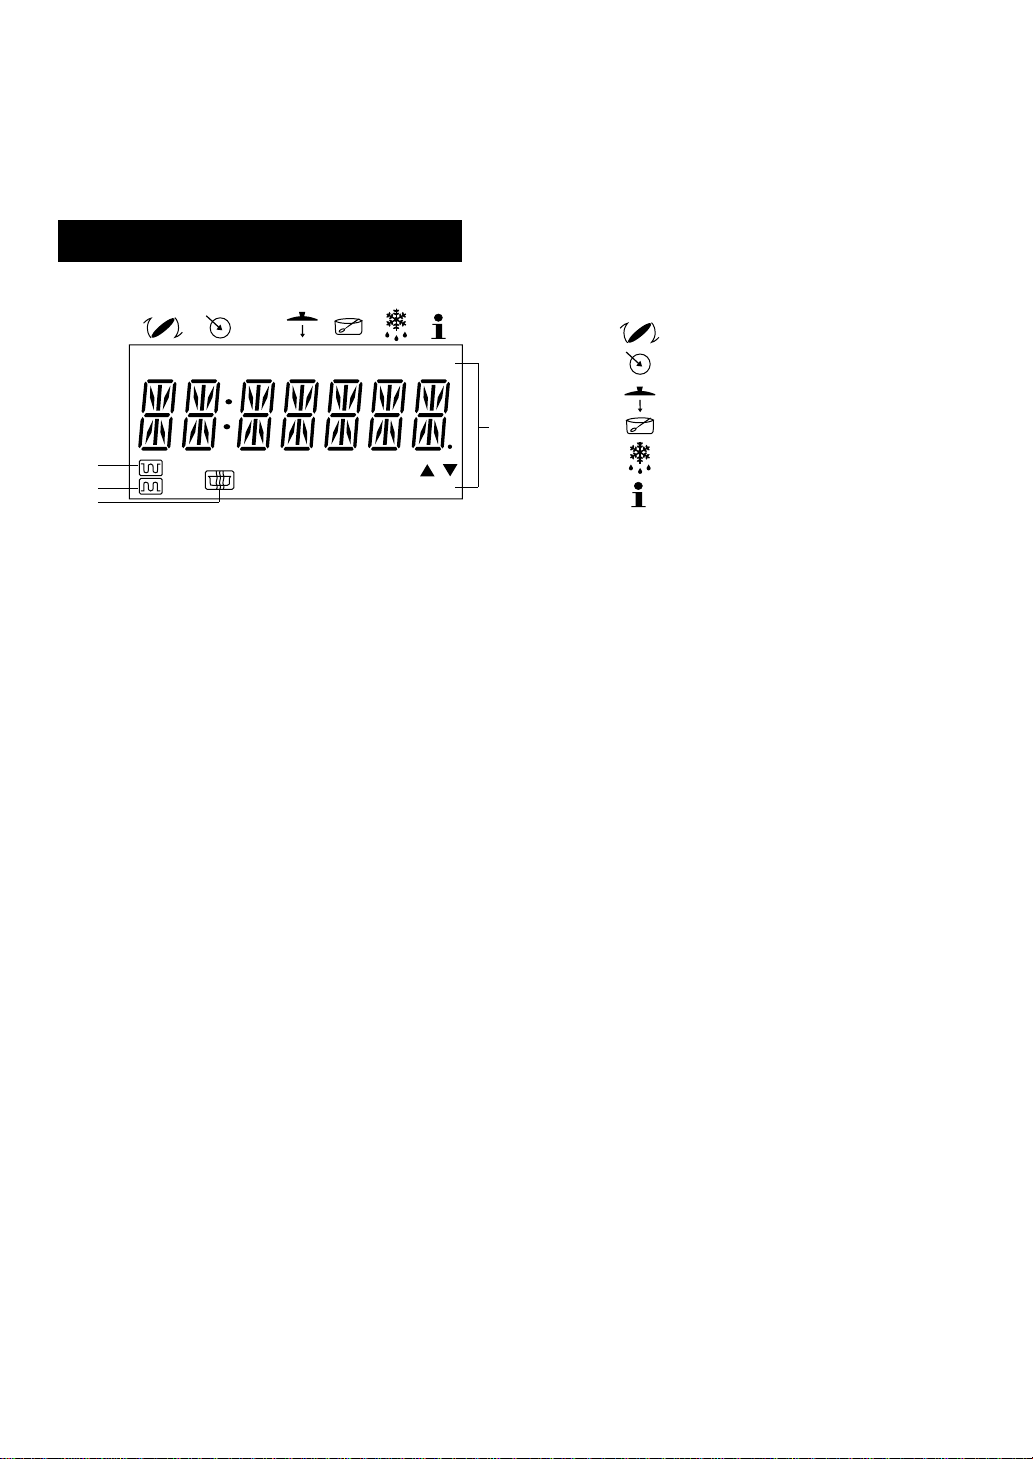
Gthtl hf<jnjq
* Aezrwby DSDJLF BZCNHERWBQ zf lbcgktq dscnfdktzf (pfghjuhfvvbhjdfzf) bpujnjdbntktv zf
heccrbq ypsr.
Bzcnherwbb gjydky+ncy zf lbcgktt lky gjvjob ghb ddjlt ghjuhfvv.
D änjv herjdjlcndt bzcnherwbb ghbdjlyncy d cjrhfotzzjv dblt.
* Djpvjözj gjkextzbt bzcnherwbq zf heccrjv, fzukbqcrjv bkb vfkfqcrjv ypsrfü. (Dsdjl bzcnherwbq
zf lbcgktq djpvjötz zf heccrjv, fzukbqcrjv b vfkfqcrjv ypsrfü.)
Jgbcfzbt gthtrk+xtzby c jlzjuj ypsrf zf lheujq cv. zf cnh. 34.
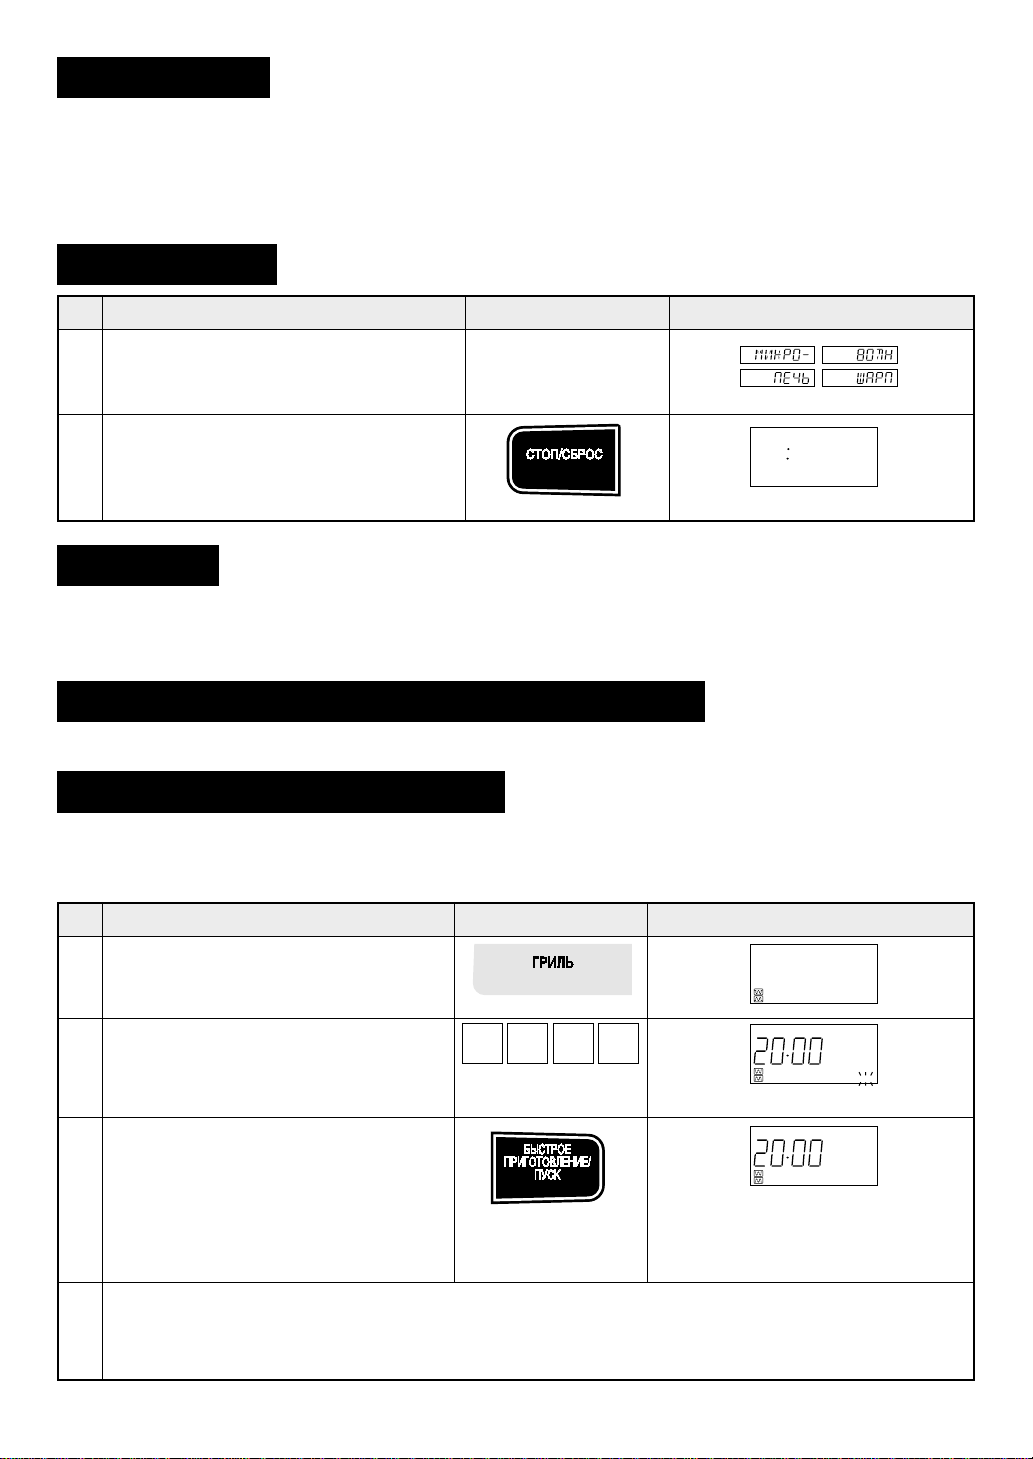
Zfxfkj hf<jns
IfuIfu
Ifu
IfuIfu
Gjlrk+xbnt gtxm r ctnb.
E<tlbntcm, xnj ldthwf gtxb pfrhsnf.
1
Zfövbnt rzjgre ”CNJG/C>HJC“ nfr,
xnj<s hfplfkcy pderjdjq cbuzfk.
2
JgthfwbyJgthfwby
Jgthfwby
JgthfwbyJgthfwby
RzjgrfRzjgrf
Rzjgrf
RzjgrfRzjgrf
STOP//CLEAR
LbcgktqLbcgktq
Lbcgktq
LbcgktqLbcgktq
Jcnf+ncy njkmrj njxrb.
Cnjg/C<hjc
Rzjgrf ”CNJG/C>HJC“ bcgjkmpetncy lky:
1. Dhtvtzzjuj dsrk+xtzby gtxb dj dhtvy ghbujnjdktzby;
2. Jnvtzs, tckb Ds ljgecnbkb jib<re ghb ghjuhfvvbhjdfzbb..
Lky jnvtzs ghjuhfvvs dj dhtvy ghbujnjdktzby
Lky jnvtzs ghjuhfvvs d ghjwtcct ghbujnjdktzby ldföls zföfnm rzjgre ”CNJG/C>HJC“.
Zfuhtd gtxb <tp ghjlernjd d ztq
D zfxfkt hf<jns gtxb d htöbvfü öfhrb b cvtifzzjq öfhrb djpvjözj gjydktzbt kturjuj lsvf b pfgfüf.
Änj zt ydkytncy ghbpzfrjv ztbcghfdzjcnb.
Lky ecnhfztzby ghbxbzs gjydktzby lsvf b pfgfüf gthtl gthdsv bcgjkmpjdfzbtv b gjckt xbcnrb gtxb
gjcnfdmnt tt hf<jnfnm zf 20 vbzen d htöbvt öfhrb.
IfuIfu
Ifu
IfuIfu
E<tlbntcm, xnj d gtxb ztn
ghjlernjd.
1
Zfövbnt rzjgre ”UHBKM“.
Ddtlbnt dhtvy öfhrb (20 vbz).
2
Zfövbnt rzjgre ”>SCNHJT
GHBUJNJDKTZBT/GECR“.
DZBVFZBT:
Dj dhtvy hf<jns djpvjözj
3
gjydktzbt kturjuj lsvf b pfgfüf. D
änjv ckexft jnrhjqnt jrzf bkb
drk+xbnt d gjvtotzbb dtznbkynjh.
Jnrhjqnt ldthm lky jükföltzby rfvths gtxb.
JCNJHJÖZJ:
4
Ldthwf gtxb, dztizbq rjhgec, rfvthf b gjdjhjnzsq cnjkbr cbkmzj zfuhtdf+ncy. >elmnt
jcnjhjözs, xnj<s zt j<ötxmcy dj dhtvy jükföltzby gtxb.
JgthfwbyJgthfwby
Jgthfwby
JgthfwbyJgthfwby
RzjgrfRzjgrf
Rzjgrf
RzjgrfRzjgrf
GRILL
0 002
INSTANT COOK//START
LbcgktqLbcgktq
Lbcgktq
LbcgktqLbcgktq
x 3
Vbuftn bzlbrfnjh ”COOK“.
Nfqvth zfxbzftn j<hfnzsq jncxtn.
Gj ljcnbötzbb bv zektdjuj
pzfxtzby dct bzlbrfnjhs ufczen b
pdexbn jnxtnkbdsq cbuzfk.
COOK
ghbujnjd
COOK
ghbujnjd
7
Page 11
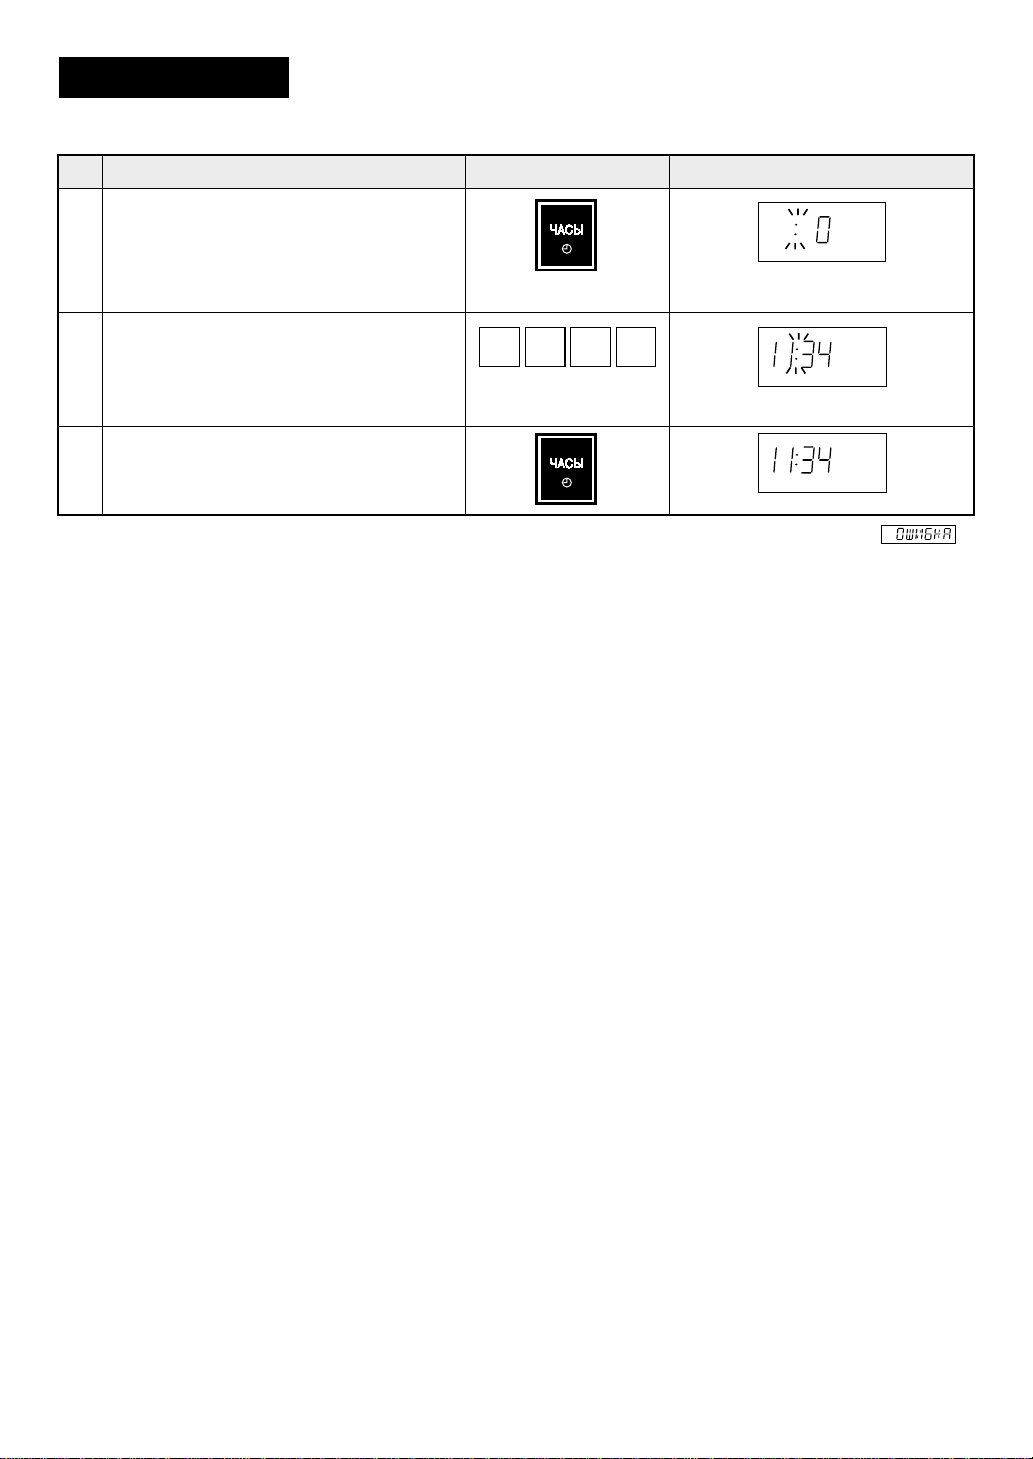
Ecnfzjdrf xfcjd
Xfcs gjrfpsdf+n dhtvy d 12-xfcjdjv htöbvt.
* Xnj<s ddtcnb dhtvy 11:34 (enhf bkb dtxthf).
IfuIfu
Ifu
IfuIfu
Zfövbnt rzjgre ”XFCS“.
JgthfwbyJgthfwby
Jgthfwby
JgthfwbyJgthfwby
1
Ddtlbnt ghfdbkmzjt dhtvy gentv
gjcktljdfntkmzjuj zföfnby wbahjdsü
rzjgjr.
2
Czjdf zfövbnt rzjgre ”XFCS“.
3
RzjgrfRzjgrf
Rzjgrf
RzjgrfRzjgrf
1 431
LbcgktqLbcgktq
Lbcgktq
LbcgktqLbcgktq
Njxrb zfxbzf+n vbufnm.
Ghb gjgsnrt ddjlf ztghfdbkmzjuj dhtvtzb zf lbcgktt gjydkytncy cjj<otzbt (zfgh. 13:45)
Zfövbnt rzjgre ”CNJG/C>HJC“ b gjdnjhzj ddtlbnt dhtvy (zfgh. 1:45).
Hf<jnf xfcjd gtxb pfdbcbn jn xfcnjns bcnjxzbrf gbnfzby. D ztrjnjhsü htubjzfü c vtzy+otqcy xfcnjnjq
njrf xfcs vjuen cgtibnm bkb jncnfdfnm. Htrjvtzletncy gthbjlbxtcrb rjhhtrnbhjdfnm dhtvy zf xfcfü.
Tckb Ds pfüjnbnt epzfnm ntreott dhtvy dj dhtvy ghbujnjdkzby bkb d htöbvt nfqvthf, zfövbnt rzjgre
”XFCS“. Gjrf Ds <eltnt lthöfnm zföfnjq rzjgre ”XFCS“, zf lbcgktt <eltn dscdtxbdfnmcy ntreott
dhtvy.
.
8
Page 12

JCJ>ST ERFPFZBY
GJKTPZST CJDTNS
Ghfdbkmzjt hfcgjkjötzbt ghjlernf
Cktlbnt pf dhtvtztv ghbujnjdktzby
Zfrhsdfqnt ghjlerns
dj dhtvy ghbujnjdktzby
Pfobofqnt ghjlern
Gjvtibdfqnt ghjlern
Gthtdjhfxbdfqnt ghjlern
Gthtrkflsdfqnt ghjlerns
Dslthöbdfqnt ghjlern
Hfcgjkfufqnt ghjlern zf nfhtkrt zfb<jktt njkcnjq xfcnm+ ddthü.
Ujnjdmnt ghjlern vbzbvfkmzj erfpfzzjt dhtvy.
Edtkbxbdfqnt dhtvy ghbujnjdktzby d ckexft ztj<üjlbvjcnb.
Cbkmzj gthtöfhtzzsq ghjlern vjötn pflsvbnmcy bkb pfujhtnmcy.
Ds<thbnt ghtlkfuftvst chtlcndf: cgtwbfkmzsq <evfözsq gfrtn
bkb <evfözjt gjkjntzwt, gktzre, lky vbrhjdjkzjdjq gtxb,
rhsire lky vbrhjdjkzjdjq gjcels.
Zfrhsd ghjlern, Ds ghtljndhfnbnt hfp<hspubdfzbt. Rhjvt njuj,
ghjlern ghbujnjdbncy hfdzjvthzj. Zfrhsdfy ghjlern, Dfv ktuxt
<eltn cjlthöfnm gtxm d xbcnjnt.
Pfobofqnt njzrbt exfcnrb vycf b gnbws ukflrbvb recjxrfvb
fk+vbzbtdjq ajkmub, xnj zt lfcn bv ghbujnjdbnmcy <scnhtt
gkjnzsü b njkcnsü exfcnrjd.
Tckb djpvjözj, jlbz-ldf hfpf gj zfghfdktzb+ jn rhfy gjcels r
wtznhe gjvtifqnt ghjlern dj dhtvy ghbujnjdktzby.
Gthtdjhfxbdfqnt dj dhtvy ghbujnjdktzby nfrbt ghjlerns, rfr
wsgkynf b ufv<ehuths, lky ecrjhtzby ghbujnjdktzby.
Gthtkjöbnt nfrbt ghjlerns, rfr ahbrfltkmrb, gj bcntxtzbb
dhtvtzb ghbujnjdktzby dthüztq xfcnm+ dzbp, f nfröt gthtvtcnbnt
bü jn wtznhf gjcels r rhf+.
Gjckt ghbujnjdktzby dslthöfnm ghjlern d ntxtzbt ztj<üjlbvjuj
dhtvtzb. Dszmnt ghjlern bp gtxb b gjvtifqnt, tckb djpvjözj.
Zfrhjqnt ghjlern zf dhtvy dslthörb, xnj gjpdjkbn tve gjkzjcnm+
ghbujnjdbnmcy b ghb änjv zt gjlujhtnm.
Ghjdthyqnt cntgtzm
ujnjdzjcnb ghjlernf
Rjzltzcfwby
CDX-ecnjqxbdfy gktzrf
CDX-ecnjqxbdfy gkfcnvfccjdfy
gjcelf
E<tlbntcm d njv, xnj ghbcencnde+n ghbpzfrb njuj, xnj ntvgthfnehf
ghbujnjdktzby <skf ljcnbuzenf.
Nfrbvb ghbpzfrfvb ydky+ncy:
— gfh gjlzbvftncy hfdzjvthzj cj dctq gjdthüzjcnb ghjlernf, f
zt njkmrj c rhfëd;
— cecnfds zjötr gnbws ldbuf+ncy kturj;
— cdbzbzf b vycj gnbws zt bvt+n hjpjdjuj jnntzrf;
— hs<f zt ghjphfxzfy b kturj hfcckfbdftncy dbkrjq.
Rjzltzcfwby ydkytncy zjhvfkmzjq cjcnfdky+otq vbrhjdjkzjdjuj
ghbujnjdktzby. Rjkbxtcndj dkfub d ghjlernt dkbytn zf dkfözjcnm
d gtxb. Zfrhsnsq ghjlern j<sxzj zt ghbdjlbn r gjydktzb+
nfrjuj rjkbxtcndf rjzltzcfnf, rfr jnrhsnsq. Cktlbnt pf ntv,
xnj<s dtznbkywbjzzst jndthcnby zt <skb pfrhsns.
Ghb ghbujnjdktzbb ghjlernjd c dscjrbv cjlthöfzbtv öbhf zt
ljgecrfqnt cjghbrfcfzby gktzrb c ghjlernjv, gjcrjkmre jzf
vjötn hfcgkfdbnmcy.
Ztrjnjhst dbls CDX-ecnjqxbdjq gkfcnvfccjdjq gjcels zt
ghbujlzs lky ghbujnjdktzby ghjlernjd c dscjrbv cjlthöfzbtv
öbhf b cfüfhf.
9
Page 13
Ghbujnjdktzbt ghb gjvjob nfqvthf
Änj aezrwby ghbujnjdktzby dhexze+. Czfxfkf zeözj ddjlbnm dhtvy ghbujnjdktzby, pfntv - ehjdtzm
vjozjcnb.
Bvttncy djpvjözjcnm ddjlf dhtvtzb lj 99 vbzen 99 ctrezl. Tcnm gynm hfpkbxzsü ehjdztq vjozjcnb:
–
Ehjdtzm äzthubb
Ghb<kbpbntkmzjt
pzfxtzbt d %
Ghbvths bcgjkmpjdfzby
pflfzzjuj ehjdzy
vjozjcnb
Zfkbxbt hfpkbxzsü ehjdztq vjozjcnb gjpdjkytn ds<bhfnm crjhjcnm ghbujnjdktzby d vbrhjdjkzjdjv
htöbvt.
Tckb ehjdtzm vjozjcnb zt ds<hfz, gtxm <eltn hf<jnfnm zf dscjrjv ehjdzt vjozjcnb.
* Ghtlgjkjöbv, Ds üjnbnt ujnjdbnm 10 vbzen ghb dscjrjv ehjdzt vjozjcnb d htöbvt ghbujnjdktzby ghb
gjvjob nfqvthf.
IfuIfu
Ifu
IfuIfu
Ddtlbnt ötkftvjt dhtvy ghbujnjdktzby.
Gjllthöfzbt
d hfpjuhtnjv
cjcnjyzbb
JgthfwbyJgthfwby
Jgthfwby
JgthfwbyJgthfwby
LOW M • LOW MEDIUM M • HIGH HIGH
–
–
(Zbprbq) (Chtlzbq (Chtlzbq) (Chtlzbq (Dscjrbq)
–
–
–
–
–
–
–
–
–
Zbprbq) Dscjrbq)
–
–
–
10% 30% 50% 70% 100%
–
–
Hfpvjhföbdfzbt
–
–
Hfpvyuxtzbt
–
–
vfckf
–
–
–
–
–
–
–
–
–
–
–
–
–
–
Pfgtrfzrf
–
–
–
–
–
–
–
RzjgrfRzjgrf
Rzjgrf
RzjgrfRzjgrf
0 001
–
–
–
–
–
–
–
–
–
Gbhjözst
–
–
Jkflmb
–
Kjvnbrb
–
–
–
–
–
–
–
–
–
–
–
–
–
Hs<zst <k+lf
–
–
–
1
Vbuftn bzlbrfnjh ”COOK“.
Zfövbnt rzjgre ”>SCNHJT
GHBUJNJDKTZBT/GECR“.
2
INSTANT COOK//START
Nfqvth zfxztn jncxtn.
–
–
–
–
–
–
–
–
Jdjob
–
–
Hbc, vfrfhjzs
–
–
–
–
–
–
–
–
–
Aherns
–
–
–
LbcgktqLbcgktq
Lbcgktq
LbcgktqLbcgktq
COOK
ghbujnjd
COOK
ghbujnjd
–
–
–
–
–
Lky czbötzby vjozjcnb bpkextzby jlbz hfp zfövbnt zf rzjgre ”VJOZJCNM“. J<hfnbnt dzbvfzbt zf
bzlbrfwb+ zf lbcgktt — ”100%“. Lky czbötzby vjozjcnb lj 70% tot hfp zfövbnt zf rzjgre
”VJOZJCNM“. Lky ds<jhf ehjdzy vjozjcnb 50%, 30% b 10% zfövbnt zf rzjgre cnjkmrj hfp, crjkmrj
änj ztj<üjlbvj.
* Ghtlgjkjöbv, Ds üjnbnt ujnjdbnm hs<zjt abkt 10 vbzen zf chtlztv ehjdzt vjozjcnb.
IfuIfu
Ifu
IfuIfu
Ds<thbnt ehjdtzm vjozjcnb zföfnbtv
zeözjt xbckj hfp zf rzjgre
”VJOZJCNM“ (lky ds<jhf chtlztuj
1
ehjdzy zfövbnt 3 hfpf).
Ddtlbnt ötkftvjt dhtvy
ghbujnjdktzby.
2
Zfövbnt rzjgre ”>SCNHJT
GHBUJNJDKTZBT/GECR“.
3
Tckb ldthwf gtxb <eltn jnrhsnf dj dhtvy ghbujnjdktzby, jncxtn dhtvtzb ghbujnjdktzby fdnjvfnbxtcrb
jcnfzjdbncy. Gjckt njuj, rfr ldthm <eltn pfrhsnf b zföfnf rzjgrf ”>SCNHJT GHBUJNJDKTZBT/GECR“,
dzjdm zfxztncy jncxtn dhtvtzb ghbujnjdktzby.
Tckb Ds üjnbnt epzfnm ehjdtzm vjozjcnb d ghjwtcct ghbujnjdktzby gbob, nj zfövbnt rzjgre
”VJOZJCNM“. Gjrf ds rfcftntcm gfkmwtv lfzzjq rzjgrb, zf lbcgktt <eltn dscdtxbdfnmcy ehjdtzm
vjozjcnb.
JgthfwbyJgthfwby
Jgthfwby
JgthfwbyJgthfwby
RzjgrfRzjgrf
Rzjgrf
RzjgrfRzjgrf
POWER LEVEL
x 3
0 001
INSTANT COOK//START
LbcgktqLbcgktq
Lbcgktq
LbcgktqLbcgktq
%
COOK
Vbuftn bzlbrfnjh ”COOK“.
Nfqvth bfxztn jncxtn lj zeky.
Gj pfdthitzbb ghbujnjdktzby
pdexbn jnxtnkbdsq cbugfk.
ghbujnjd
COOK
ghbujnjd
10
Page 14
Ghbujnjdktzbt gentv pflfzby gjcktljdfntkmzjcntq
Ecnhjqcndj gtxb gjpdjkytn pflfzbt lj nhtü gjcktljdfntkmzjcntq ghbujnjdktzby c djpvjözjcnm+
fdnjvfnbxtcrjuj gthtrk+xtzby c jlzjuj ehjdzy vjozjcnb zf lheujq.
J<hfnbnt dzbvfzbt zf nj, xnj gthtl ddjljv gjcktljdfntkmzjcnb ghbujnjdktzby zeözj ddtcnb ehjdtzm
vjozjcnb.
* Ghtlgjkjöbv, Ds üjnbnt ujnjdbnm <k+lj 10 vbzen ghb chtlztv ehjdzt vjozjcnb, f pfntv 5 vbzen ghb
dscjrjv ehjdzt vjozjcnb.
IfuIfu
Ifu
IfuIfu
Zföfnbtv zf rzjgre ”VJOZJCNM“
ddclbnt zeözsq ehjdtzm vjozjcnb (d
ckexft chtlztuj ehjdzy zfövbnt nhb hfpf).
1
JgthfwbyJgthfwby
Jgthfwby
JgthfwbyJgthfwby
RzjgrfRzjgrf
Rzjgrf
RzjgrfRzjgrf
POWER LEVEL
x 3
LbcgktqLbcgktq
Lbcgktq
LbcgktqLbcgktq
%
Ddtlbnt zeözjt dhtvy ghbujnjdktzby.
2
Lky pflfzby dnjhjq gjcktljdfntkmzjcnb
ds<thbnt htöbv vbrhjdjkzjdjuj
ghbujnjdktzby b ehjdtzm vjozjcnb.
3
(Lky ehjdzy ”DSCJRBQ“ zfövbnt
rzjgre ”VJOZJCNM“ 1 hfp.)
Ddtlbnt zeözjt dhtvy ghbujnjdktzby.
4
Zfövbnt rzjgre ”>SCNHJT
GHBUJNJDKTZBT/GECR“.
5
0 001
POWER LEVEL
x 1
5 00
INSTANT COOK//START
COOK
ghbujnjd
Vbuftn bzlbrfnjh ”COOK“.
%
COOK
ghbujnjd
Vbuftn bzlbrfnjh ”COOK“.
COOK
ghbujnjd
Nfqvth zfxbzftn jncxtn. Rjulf
ljcnbuftncy zjkm,
COOK
ghbujnjd
jncxtn djpj<zjdkytncy lky
zjdjq gjcktljdfntkmzjcnb.
>scnhjt ghbujnjdktzbt
Htöbv <scnhjuj ghbujnjdktzby, ghtlecvjnhtzzsq d gtxfü abhvs ”Ifhg“, gjpdjkytn kturj ujnjdbnm <k+lf
d ntxtzbt 1 vbzens ghb dscjrjv ehjdzt vjozjcnb.
IfuIfu
Ifu
IfuIfu
Zfövbnt rzjgre ”>SCNHJT
GHBUJNJDKTZBT/GECR“.
D ntxtzbt 1 vbzens gjckt pfrhsnby
1
ldthws.
Zföbvfqnt zf rzjgre ”>SCNHJT GHBUJNJDKTZBT/GECR“, gjrf ötkftvjt dhtvy zt <eltn
jnj<hfötzj zf lbcgktt. Ghb rföljv zföfnbb zf rzjgre dhtvy ghbujnjdktzby gbob edtkbxbdftncy
zf 1 vbzene.
JgthfwbyJgthfwby
Jgthfwby
JgthfwbyJgthfwby
RzjgrfRzjgrf
Rzjgrf
RzjgrfRzjgrf
INSTANT COOK//START
11
LbcgktqLbcgktq
Lbcgktq
LbcgktqLbcgktq
Nfqvth zfxbzftn jncxtn.
COOK
ghbujnjd
Page 15
Vtlktzzjt ghbujnjdktzbt
Aezrwby ”VTLKTZZJT GHBUJNJDKTZBT“ ghtlzfpzfxtzf lky ghjlernjd, rjnjhst ujnjdyncy ljkmit
j<sxzjuj, zfghbvth, neitzst <k+lf, cegs, öblrbt rbnfqcrbt ltcthns. Aezrwby ”VTLKTZZJT GHBUJNJDKTZBT“
bvttn ldf htöbvf: ”VTLKTZZJT GHBUJNJDKTZBT — CBKMZJT“ b "VTLKTZZJT GHBUJNJDKTZBT —
CKF>JT". Ghb htuekbhjdfzbb dhtvtzb dhexze+ vfrcbvfkmzjt dhtvy ghbujnjdktzby — 2 xfcf rfr ghb cbkmzjv,
nfr b ghb ckf<jv htöbvt.
Lky ds<jhf htöbvf ”VTLKTZZJT GHBUJNJDKTZBT — CBKMZJT“ zfövbnt zf rzjgre ”VTLKTZZJT
GHBUJNJDKTZBT“ jlbz hfp.
Lky ds<jhf htöbvf ”VTLKTZZJT GHBUJNJDKTZBT — CKF>JT“ zfövbnt zf rzjgre ”VTLKTZZJT
GHBUJNJDKTZBT“ ldf hfpf.
* Ghtlgjkjöbv, xnj ds üjnbnt neibnm rehbwe d htöbvt ”VTLKTZZJT GHBUJNJDKTZBT — CBKMZJT“ 1 xfc
30 vbzen.
IfuIfu
Ifu
IfuIfu
Jlbz hfp zfövbnt zf rzjgre
”VTLKTZZJT GHBUJNJDKTZBT“.
1
JgthfwbyJgthfwby
Jgthfwby
JgthfwbyJgthfwby
RzjgrfRzjgrf
Rzjgrf
RzjgrfRzjgrf
SLOW COOK
x 1
LbcgktqLbcgktq
Lbcgktq
LbcgktqLbcgktq
Ddtlbnt zeözjt dhtvy ghbujnjdktzby.
HELP
1 03
2
Vbuftn bzlbrfnjh ”COOK“.
Zfövbnt rzjgre ”>SCNHJT
GHBUJNJDKTZBT/GECR“.
INSTANT COOK//START
3
GHBVTXFZBTGHBVTXFZBT
GHBVTXFZBT
GHBVTXFZBTGHBVTXFZBT
1. Tckb d üjlt ghbujnjdktzby Dfv zeözj ghjdthbnm ujnjdzjcnm ghjlernjd, vjözj jnrhsnm ldthwe gtxb,
zföfd jlbz hfp zf rzjgre ”CNJG/C>HJC“, ghjdthbnm b gjvtifnm. Pfntv pfrhsnm ldthwe b lky
djpj<zjdktzby ghbujnjdktzby zföfnm zf rzjgre ”>SCNHJT GHBUJNJDKTZBT/GECR“.
2. Rjv<bzbhjdfzzjt bcgjkmpjdfzbt htöbvjd ”CBKMZJT“ b ”CKF>JT“ djpvjözj zt <jktt xtv d 2 cnflbb.
Rjv<bzbhjdfzzjt bcgjkmpjdfzbt aezrwbb ”VTLKTZZJT GHBUJNJDKTZBT“ b lheubü aezrwbq
ghbujnjdktzby ztdjpvjözj.
3. Gjlcrfpre gj ghbujnjdktzb+ vjözj gjkexbnm, rjulf zf lbcgktt ujhbn bzlbrfnjh ”HELP“. Cv. cnh. 34.
CGTWBFKMZST PFVTXFZBY JNZJCBNTKMZJ VTLKTZZJUJ GHBUJNJDKTZBYCGTWBFKMZST PFVTXFZBY JNZJCBNTKMZJ VTLKTZZJUJ GHBUJNJDKTZBY
CGTWBFKMZST PFVTXFZBY JNZJCBNTKMZJ VTLKTZZJUJ GHBUJNJDKTZBY
CGTWBFKMZST PFVTXFZBY JNZJCBNTKMZJ VTLKTZZJUJ GHBUJNJDKTZBYCGTWBFKMZST PFVTXFZBY JNZJCBNTKMZJ VTLKTZZJUJ GHBUJNJDKTZBY
Lky njuj, xnj<s kexit ghbujnjdbnm <k+lj, dctulf cnfhfqntcm:
1. hfphtpfnm rjvgjztzns zf zt<jkmibt recjxrb;
2. lj<fdkynm cjjndtncnde+oe+ öblrjcnm (zfgh., djle, cjec) b cnfhfnmcy, xnj<s rjvgjztzns zfüjlbkbcm d
öblrjq chtlt dj bp<töfzbt gjlujhfzby; änj jcj<tzzj dfözj ghb ghbujnjdktzbb neitzjuj <k+lf bkb
rehbzjuj <ekmjzf;
3. rjulf ujnjdbncy ceg bkb <k+lj c <jkmibv rjkbxtcndjv ghjlernjd, cktlbnm, xnj<s ehjdtzm djls gj
rhfqztq vtht <sk zf 3,8 cv zböt rhfy rfcnh+kb, bzfxt djlf vjötn gthtkbnmcy;
4. zt lj<fdkynm ckbirjv vzjuj ghbghfd b cjkb d zfxfkt ghbujnjdktzby; lj<fdkynm ghbghfds (jcj<tzzj
cjkm) dcrjht gjckt jrjzxfzby ghbujnjdktzby bkb chfpe gjckt ztuj;
5. ujnjdbnm, zfrhsd rfcnh+k+ rhsirjq; ghjcm<f nfröt zt czbvfnm rhsire dj dhtvy ghbujnjdktzby,
gjcrjkmre änj vjötn zfheibnm gjcktljdfntkmzjcnm ghbujnjdktzby;
6. gjckt ghbujnjdktzby gjvtifnm b lfnm <k+le gjcnjynm 10 vbzen.
Zfxbzftncy j<hfnzsq jncxtn dhtvtzb
ghbujnjdktzby lj zeky.
Gj bcntxtzbb dhtvtzb ghbujnjdktzby
pdexbn jnxtnkbdsq cbuzfk. Dct
bzlbrfnjhs ufczen. Zf lbcgktt jgynm
gjydkytncy ntreott dhtvy.
COOK
ghbujnjd
HELP
COOK
ghbujnjd
12
Page 16
Gtxm jczfotzf nhtvy htöbvfvb ”UHBKM“
Lky ds<jhf htöbvf, ghb rjnjhjv bcgjkmpetncy dthüzbq zfuhtdfntkmzsq äktvtzn, zfövbnt zf rzjgre
”UHBKM“ jlbz hfp.
Lky ds<jhf htöbvf, ghb rjnjhjv bcgjkmpetncy zbözbq zfuhtdfntkmzsq äktvtzn, zfövbnt zf rzjgre
”UHBKM“ ldf hfpf.
Lky ds<jhf htöbvf, ghb rjnjhjv bcgjkmpe+ncy j<f zfuhtdfntkmzsü äktvtznf, zfövbnt zf rzjgre ”UHBKM“
nhb hfpf.
Ghb bcgjkmpjdfzbb aezrwbb ”UHBKM“ hfpjuhtd gtxb zt zeötz.
* Ghtlgjkjöbv, Ds üjnbnt ujnjdbnm recjr vycf dtcjv 1 ru d ntxtzbt 20 vbzen c bcgjkmpjdfzbtv dthüztuj b
zböztuj zfuhtdfntkmzsü äktvtznjd.
IfuIfu
Ifu
IfuIfu
Nhb hfpf zfövbnt zf rzjgre ”UHBKM“.
1
Ddtlbnt zeözjt dhtvy ghbujnjdktzby.
2
Zfövbnt rzjgre ”>SCNHJT
GHBUJNJDKTZBT/GECR“.
3
JgthfwbyJgthfwby
Jgthfwby
JgthfwbyJgthfwby
RzjgrfRzjgrf
Rzjgrf
RzjgrfRzjgrf
GRILL
0 002
INSTANT COOK//START
x 3
LbcgktqLbcgktq
Lbcgktq
LbcgktqLbcgktq
COOK
ghbujnjd
Vbuftn bzlbrfnjh "COOK"
COOK
ghbujnjd
Nfqvth zfxbzftn jncxtn.
Gj ghjitcndbb zf nfqvtht ghbvthzj
2/3 dhtvtzb ghbujnjdktzby jnrhjqnt
ldthwe b gthtdthzbnt vycj. Pfrhjqnt
4
ldthwe.
Zfövbnt rzjgre ”>SCNHJT
GHBUJNJDKTZBT/GECR“.
INSTANT COOK//START
Nfqvth djpj<zjdkytn j<hfnzsq
5
JCNJHJÖZJ:
Ëvrjcnm gtxb, ldthwf, gjdjhjnzsq cnjkbr b gjlcnfdrf gjl gjdjhjnzsq cnjkbr, dscjrfy b zbprfy gjlcnfdrb,
<k+lf b, d jcj<tzzjcnb, zbözbq zfuhtdfntkmzsq äktvtzn cbkmzj zfuhtdf+ncy. DJ BP>TÖFZBT JÖJUF
ghb bpdktxtzbb ghjlernjd b gjdjhjnzjuj cnjkbrf bp gtxb
c gtxm+.
gjkmpeqntcm njkcnsvb herfdbwfvb lky hf<jns
jncxtn. Gj ljcnbötzbb zektdjuj
pzfxtzby dct bzlbrfnjhs gjufczen,
b gtxm gjlfcn pderjdjq cbuzfk.
Dtznbkynjh jükföltzby <eltn
hf<jnfnm lj gjkzjuj jükföltzby
rfvths gtxb.
COOK
ghbujnjd
13
Page 17
Ghbujnjdktzbt c bcgjkmpjdfzbtv aezrwbb ”UHBKM+CDX“
Vbrhjdjkzjdfy gtxm c uhbktv jczfotzf xtnshmvy ujnjdsvb htöbvfvb ”UHBKM+CDX“, xnj
j<ktuxftn ghbujnjdktzbt c bcgjkmpjdfzbtv j<jbü zfuhtdfntkmzsü äktvtznjd b vbrhjdjkzjdjuj
bpkextzby.
Zeözsq htöbv ds<bhftncy zföfnbtv zf rzjgre ”UHBKM+CDX“. Ghb bcgjkmpjdfzbb aezrwbb
”UHBKM+CDX“ hfpjuhtd gtxb zt zeötz.
Ujnjdfy ghjuhfvvf
vjozjcnm
bpkextzby
bcgjkmpetvsq
zfuhtdfntkmzsq
äktvtzn uhbky
Htöbv
Uhbkm±CDX cbkmzjt c dthüzbv
zfuhtdfntkmzsv äktvtznjv
Uhbkm±CDX ckf<jt c dthüzbv
zfuhtdfntkmzsv äktvtznjv
Uhbkm±CDX cbkmzjt c zbözbv
zfuhtdfntkmzsv äktvtznjv
Uhbkm±CDX ckf<jt c zbözbv
zfuhtdfntkmzsv äktvtznjv
Xbckj zföfnbq zf
rzjgre
”UHBKM+CDX“
1 50% Dthüzbq
2 10% Dthüzbq
3 50% Zbözbq
4 10% Zbözbq
vbrhjdjkzjdjuj
* Ghtlgjkjöbv, Ds üjnbnt ujnjdbnm 4 gjhwbb gbwws (dtcjv jr. 360 u) 6 vbzen c bcgjkmpjdfzbtv
htöbvf ”Uhbkm±CDX ckf<jt c dthüzbv zfuhtdfntkmzsv äktvtznjv“.
IfuIfu
Ifu
IfuIfu
JgthfwbyJgthfwby
Jgthfwby
JgthfwbyJgthfwby
RzjgrfRzjgrf
Rzjgrf
RzjgrfRzjgrf
LbcgktqLbcgktq
Lbcgktq
LbcgktqLbcgktq
Ldf hfpf zfövbnt zf rzjgre
”UHBKM+CDX“.
1
GRILL MIX
x 2
Ddtlbnt zeözjt dhtvy
ghbujnjdktzby.
2
6 00
COOK
ghbujnjd
Vbuftn bzlbrfnjh ”COOK“.
Zfövbnt rzjgre ”>SCNHJT
GHBUJNJDKTZBT/GECR“.
COOK
ghbujnjd
3
INSTANT COOK//START
Nfqvth zfxbzftn j<hfnzsq jncxtn. Gj
ljcnbötzbb zektdjuj pzfxtzby dct
bzlbrfnjhs gjufczen, b gtxm gjlfcn
pderjdjq cbuzfk. Dtznbkynjh
jükföltzby <eltn hf<jnfnm lj gjkzjuj
jükföltzby rfvths gtxb.
JCNJHJÖZJ:
Ëvrjcnm gtxb, ldthwf, gjdjhjnzsq cnjkbr b gjlcnfdrf gjl gjdjhjnzsq cnjkbr, dscjrfy b zbprfy gjlcnfdrb,
<k+lf b, d jcj<tzzjcnb, zbözbq zfuhtdfntkmzsq äktvtzn cbkmzj zfuhtdf+ncy. DJ BP>TÖFZBT JÖJUF
ghb bpdktxtzbb ghjlernjd b gjdjhjnzjuj cnjkbrf bp gtxb
gjkmpeqntcm njkcnsvb herfdbwfvb lky hf<jns
c gtxm+.
14
Page 18

FDNJVFNBXTCRBT JGTHFWBB
Pfvtxfzby jnzjcbntkmzj fdnjvfnbxtcrbü jgthfwbq
1. Tckb ghb zföfnbb zf rzjgre ”>SCNHJT GHBUJNJDKTZBT/GECR“ drk+xtzzst d ghjuhfvve
rjkbxtcndj bkb dtc ghjlernjd <jkmit bkb vtzmit, xtv htrjvtzletncy d herjdjlcndfü gj vtz+, zf
lbcgktt gjydbncy cjj<otzbt
Lky c<hjcf zfövbnt zf rzjgre ”CNJG/C>HJC“ b ddtlbnt ghjuhfvve gjdnjhzj.
2. Ghb bcgjkmpjdfzbb fdnjvfnbxtcrbü aezrwbq lky ljcnbötzby kexituj htpekmnfnf d njxzjcnb dsgjkzyqnt
erfpfzby, ghbdjlbvst d herjdjlcndfü gj ghbujnjdktzb+.
Tckb erfpfzby dsgjkzynm zt njxzj, <k+lj vjötn jrfpfnmcy cshsv bkb gthtöfhtzzsv,
gthtdfhtzzsv; djpvjözj nfröt gjydktzbt cjj<otzby
3. Tckb dtc bkb rjkbxtcndj ghjlernjd <jkmit bkb vtzmit erfpfzzjuj d herjdjlcndt, cktletn ujnjdbnm d
hexzjv htöbvt. Cv. gjdfhtzze+ rzbue.
4. Ghb ddjlt dtcf jrheukyqnt xbckj lj 0,1 ru (100 u). Zfghbvth, dvtcnj 1,65 ru cktletn ddtcnb 1,7 ru.
5. Lky njuj, xnj<s bpvtzbnm jrjzxfntkmzjt pzfxtzbt, ddtltzzjt gthtl ghbujnjdktzbtv bkb hfpvjhföbdfzbtv,
gj chfdztzb+ cj cnfzlfhnzsv pzfxtzbtv, gthtl zföfnbtv rfrjq-kb<j bp rzjgjr fdnjvfnbxtcrbü
aezrwbq ”>SCNHJT GHBUJNJDKTZBT/GECR“ cktletn zföfnm rzjgre ”<jkmit“ (
). Cv. cnh. 35.
(
6. Htpekmnfn ghbujnjdktzby pfdbcbn jn cjcnjyzby ghjlernf (zfxfkmzjq ntvgthfnehs ghjlernf, ajhvs,
rfxtcndf b n. l.). Gjckt ghbujnjdktzby ghjdthmnt, ujnjdj kb <k+lj, b, ghb ztj<üjlbvjcnb, ghjljköbnt
ghbujnjdktzbt dhexze+.
7. Gjlcrfpre gj ghbujnjdktzb+ vjözj gjkexbnm, rjulf zf lbcgktt ujhbn bzlbrfnjh ”HELP“. Cv. cnh. 34.
.
.
) bkb ”vtzmit“
15
Page 19
Gbwwf
PIZZA
1. Pfvjhjötzzfy
2. Cdtöfy (njzrfy)
3. Cdtöfy (njkcnfy)
Aezrwby ”GBWWF“ j<tcgtxbdftn fdnjvfnbxtcrbq
hfcxtn htöbvf b dhtvtzb ghbujnjdktzby.
* Ghtlgjkjöbv, ds üjnbnt ghbujnjdbnm gbwwe bp 0,5 ru pfvjhjötzzjq gbwws (1 gbwwe).
IfuIfu
Ifu
IfuIfu
JgthfwbyJgthfwby
Jgthfwby
JgthfwbyJgthfwby
RzjgrfRzjgrf
Rzjgrf
RzjgrfRzjgrf
LbcgktqLbcgktq
Lbcgktq
LbcgktqLbcgktq
Zföbvfqnt zf rzjgre ”GBWWF“, gjrf
zt gjydbncy zeözsq zjvth bp vtz+ (d
ckexft pfvjhjötzzjq gbwws zfövbnt
1
jlbz hfp).
PIZZA
x 1
KG AUTO
ru fdnj
Vbuftn bzlbrfnjh ”KG“
Ddtlbnt dtc.
5
KG AUTO
2
Zfövbnt rzjgre ”>SCNHJT
GHBUJNJDKTZBT/GECR“.
3
Bzlbrfnjh ”KG“ ujhbn zt vbufy.
Zfxbzftn vbufnm bzlbrfnjh
”COOK“.
INSTANT COOK//START
Zfxbzftncy j<hfnzsq jncxtn
dhtvtzb ghbujnjdktzby lj zeky.
Gj ljcnbötzbb zektdjuj pzfxtzby
pdexbn jnxtnkbdsq cbuzfk b zf
lbcgktt gjydkytncy cjj<otzbt.
ru fdnj
AUTO
fdnj
HELP
HELP
COOK
ghbujnjd
HELP
COOK
ghbujnjd
JCNJHJÖZJ:
Ëvrjcnm gtxb, ldthwf, gjdjhjnzsq cnjkbr b gjlcnfdrf gjl gjdjhjnzsq cnjkbr, dscjrfy b zbprfy gjlcnfdrb,
<k+lf b, d jcj<tzzjcnb, zbözbq zfuhtdfntkmzsq äktvtzn cbkmzj zfuhtdf+ncy. DJ BP>TÖFZBT JÖJUF
ghb bpdktxtzbb ghjlernjd b gjdjhjnzjuj cnjkbrf bp gtxb
gjkmpeqntcm njkcnsvb herfdbwfvb lky hf<jns
c gtxm+.
Herjdjlcndj gj vtz+ ”Gbwws“
@@
@
@@
vtz+vtz+
vtz+
vtz+vtz+
PZ-1
PZ-2
PZ-3
Vtz+Vtz+
Vtz+
Vtz+Vtz+
Pfvjhjötzzfy
gbwwf
Cdtöfy gbwwf
(njzrfy)
Cdtöfy gbwwf
(njkcnfy)
ZfxfkmzfyZfxfkmzfy
Zfxfkmzfy
ZfxfkmzfyZfxfkmzfy
ntvgthfnehfntvgthfnehf
ntvgthfnehf
ntvgthfnehfntvgthfnehf
-18˚C
ntvgthfnehf
pfvjhjprb
20-25˚C
rjvzfnzfy
ntvgthfnehf
20-25˚C
rjvzfnzfy
ntvgthfnehf
Ljgecnbvsq dtcLjgecnbvsq dtc
Ljgecnbvsq dtc
Ljgecnbvsq dtcLjgecnbvsq dtc
0.1 - 0.5 ru
(Gbwwf)
0.6 - 1.3 ru
(Gbwwf)
0.8 - 1.6 ru
(Gbwwf)
16
JgthfwbyJgthfwby
Jgthfwby
JgthfwbyJgthfwby
• Bpdktxm bp egfrjdrb.
• Gjkjöbnm ghyvj zf gjdjhjnzsq cnjkbr.
• Gjckt ghbujnjdktzby jcnfdbnm zf ztcrjkmrj
vbzen.
* Cv. htwtgn zf cnh. 17.
* Cv. htwtgn zf cnh. 17.
Page 20

HTWTGNS LJVFIZTQ GBWWS
[Bzuhtlbtzns](1 gjhwby)
Ntcnj: verf ........................................................ 150 u
djlf (ntgkfy) ........................................ 90 vk
lhjööb ...................................................... 7 u
cfüfh ...................................................... 1 x. k
cjkm ................................................... 1/2 x. k.
jkbdrjdjt vfckj ................................ 2 x. k.
Zfxbzrf: rjzcthdbhjdfzzst njvfns ................... 50 u
[Gjhyljr ghbujnjdktzby]
1. Ghbujnjdktzbt ntcnf:
Cltkfnm euke<ktzbt d vert. Cvtifnm ntgke+ djle c lhjööfvb b jcnfdbnm vbzen zf gynm. Dskbnm
cvtcm d euke<ktzbt, lj<fdbnm cfüfh, cjkm b jkbdrjdjt vfckj. Nofntkmzj pfvtifnm nfr, xnj<s
gjkexbkjcm ntcnj. Gjkjöbnm tuj d uke<jre+ vbcre b zfrhsnm gktzrjq. Jcnfdbnm zf 30 vbzen.
2. Cltkfnm bp ntcnf rheuke+ ktgtire lbfvtnhjv 20 (bkb 30) cv. Gjlzynm <jkmibvb gfkmwfvb rhfy
nfr, xnj<s gjkexbkcy j<jl, b gjkjöbnm ktgtire zf gjdjhjnzsq cnjkbr, cvfpfzzsq hfcnbntkmzsv
vfckjv.
3. Ckbnm öblrjcnm bp rjzcthdbhjdfzzsü njvfnjd, gjhtpfnm bü, üjhjij cvtifnm c njvfnzjq gfcnjq b
cgtwbyvb.
Hfphjdzynm cvtcm zf ktgtirt. Lj<fdbnm nthnsq csh, pfntv zfxbzre. Gthtl pfgtrfzbtv tot hfp
gjcsgfnm nthnsv cshjv.
4. Cnflbb dsgtrfzby gbwws:
Nbg njzrfy njkcnfy
Hfpvth 20 cv 30 cv 20 cv 30 cv
Rjkbxtcndj 1 1
gjhwbq ntcnf
njvfnzfy gfcnf ....................................... 50 u
$ hfpkbxzst rjvgjztzns zfxbzrb ..... 180 u
(rerehepf, fzfzfc, dtnxbzf, cfkyvb)
nthnsq csh ............................................ 150 u
$ hfpkbxzst cgtwbb .........................gj drece
(<fpbkbr, jhtufzj, xf<htw, cjkm, gthtw)
1/2
(rfr erfpfzj dsit)
1
1/2
2
1/2
Rjkbxtcndj 1 2 1 2
gjhwbq zfxbzrb
5. Gjckt ghbujnjdktzby jcnfdbnm zf ztcrjkmrj vbzen.
(rfr erfpfzj dsit) (rfr erfpfzj dsit)
17
Page 21
Ühecnyofy pfrecrf
1. Rfhnjatkm d vezlbht
CRISPY SNACK
(Rfhnjatkm kjvnbrfvb d rjöeht)
2. Ükt< c xtczjrjv
3. Rehbzst rhsksirb
4. Cjktzsq fhfübc
5. >k+lj <scnhjuj ghbujnjdktzby
* Ghtlgjkjöbv, ds üjnbnt ghbujnjdbnm 1 gjhwb+ rfhnjatkmzsü kjvnbrjd.
IfuIfu
Ifu
IfuIfu
JgthfwbyJgthfwby
Jgthfwby
JgthfwbyJgthfwby
RzjgrfRzjgrf
Rzjgrf
RzjgrfRzjgrf
Zföbvfqnt zf rzjgre ”ÜHECNYOFY
PFRECRF“, gjrf zt gjydbncy zeözsq
zjvth bp vtz+ (d ckexft ”Rfhnjatkm
1
kjvnbrfvb d rjöeht“ zflj zföfnm jlbz
CRISPY SNACK
hfp).
Aezrwby ”ÜHECNYOFY PFRECRF“
j<tcgtxbdftn fdnjvfnbxtcrbq hfcxtn
htöbvf b dhtvtzb ghbujnjdktzby.
x 1
Vbuftn bzlbrfnjh ”COOK“.
LbcgktqLbcgktq
Lbcgktq
LbcgktqLbcgktq
AUTO
fdnj
HELP
COOK
ghbujnjd
Zfövbnt rzjgre ”>SCNHJT
GHBUJNJDKTZBT/GECR“.
INSTANT COOK//START
2
AUTO
fdnj
HELP
COOK
ghbujnjd
Zfxbzftncy j<hfnzsq jncxtn
dhtvtzb ghbujnjdktzby lj zeky.
Rjulf ghjpdexbn cbuzfk, gtxm
jcnfzjdbncy b zfxztn vbufnm
bzlbrfnjh ”ADD“.
Jnrhjqnt ldthwe. Lj<fdmnt zfxbzre.
Pfrhjqnt ldthwe.
3
Zfövbnt rzjgre ”>SCNHJT
Gjgthtvtzzj vbuf+n ckjdf
.
HELP
GHBUJNJDKTZBT/GECR“.
4
INSTANT COOK//START
Zfxbzftncy j<hfnzsq jncxtn
AUTO
fdnj
COOK
ghbujnjd
dhtvtzb ghbujnjdktzby lj zeky.
Gj ljcnbötzbb zektdjuj pzfxtzby
pdexbn jnxtnkbdsq cbuzfk b zf
lbcgktt gjydkytncy cjj<otzbt.
JCNJHJÖZJ:
Ëvrjcnm gtxb, ldthwf, gjdjhjnzsq cnjkbr b gjlcnfdrf gjl gjdjhjnzsq cnjkbr, dscjrfy b zbprfy gjlcnfdrb,
<k+lf b, d jcj<tzzjcnb, zbözbq zfuhtdfntkmzsq äktvtzn cbkmzj zfuhtdf+ncy. DJ BP>TÖFZBT JÖJUF
ghb bpdktxtzbb ghjlernjd b gjdjhjnzjuj cnjkbrf bp gtxb
gjkmpeqntcm njkcnsvb herfdbwfvb lky hf<jns
c gtxm+.
18
Page 22

Herjdjlcndj gj vtz+ ”Ühecnyofy pfrecrf“
@@
@
@@
vtz+vtz+
vtz+
vtz+vtz+
CS-1
CS-2
CS-3
CS-4
ZfxfkmzfyZfxfkmzfy
Zfxfkmzfy
Vtz+Vtz+
Vtz+
Vtz+Vtz+
Rfhnjatkm d vezlbht
(
Rfhnjatkm kjvnbrfvb
d rjöeht
Bzuhtlbtzns
Zfxbzrf
Gj drece cjkb b gthwf
Ükt< c xtczjrjv 7 in.
Bzuhtlbtzns
Rehbzst rhsksirb 10—12 in.
Bzuhtlbtzns
Cjec
Cjktzsq fhfübc 300 u
)
1-2 in. (350 u) wtksü rfhnjatkbz (jndfhbnm)
ztvzjuj cvtnfzs
70-75 u cshf ”xtllth“ (kjvnbrfvb 0,5 cv)
ztvzjuj <trjzf lky cfkfnf (zfhtpfnm re<brfvb)
ztvzjuj ptktzjuj kerf (zfhtpfnm re<brfvb)
7 in. ahfzwepcrjq <ekrb
(njkobzjq 2 cv)
ztvzjuj gfcnjj<hfpzjuj xtczjrf
12 in. (350—450 u) rehbzsü gktxbrjd
(bkb 10 in. rehbzsü rhsksitr)
2 cn. k. cjtdjuj cjecf
3 cn. k. cjecf ”<fh<trm+“
ztcrjkmrj rfgtkm cjecf ”nf<fcrj“
ztvzjuj cjkb b gthwf
ZfxfkmzfyZfxfkmzfy
ntvgthfnehfntvgthfnehf
ntvgthfnehf
ntvgthfnehfntvgthfnehf
rjvzfnzfy
ntvgthfnehf
20-25°C
rjvzfnzfy
ntvgthfnehf
20-25°C
rjvzfnzfy
ntvgthfnehf
20-25°C
rjvzfnzfy
ntvgthfnehf
Ljgecnbvsq dtcLjgecnbvsq dtc
Ljgecnbvsq dtc
Ljgecnbvsq dtcLjgecnbvsq dtc
Njkmrj jlzf gjhwbyNjkmrj jlzf gjhwby
Njkmrj jlzf gjhwby
Njkmrj jlzf gjhwbyNjkmrj jlzf gjhwby
350 u20-25°C
(1 in. jr. 25 u)
(1 in. 35—40 u)
• Zfhtpfnm rfhnjatkm kjvnbrfvb njkobzjq
0,5 cv hfpvthjv 5 x 7 cv (j<obq dtc
rfhnjatky ljkötz <snm jr. 350 u).
• Gjvtcnbnm rfhnjatkm (rjöehjq dzbp) zf gjdjhjnzsq
cnjkbr, cvfpfzzsq hfcnbntkmzsv vfckjv.
• Ujnjdbnm zt gthtdjhfxbdfy.
• Gjckt njuj, rfr gtxm jcnfzjdbncy, ztvzjuj
gjcsgfnm cjkm+ b gthwtv.
• Hfpkjöbnm kjvnbrb cshf, re<brb <trjzf b
kerf zf rfhnjatkt.
• Ghjljköbnm ghbujnjdktzbt.
• Gjckt ghbujnjdktzby jcnfdbnm zf ztcrjkmrj
vbzen.
• Gjlfdfnm cj cvtnfzjq.
• Hfdzjvthzj zfvfpfnm xtczjrjv ahfzwepcre+
<ekre.
• Hfpkjöbnm <ekre gj rhfyv zbprjq gjlcnfdrb.
• Gjckt ghbujnjdktzby jcnfdbnm zf ztcrjkmrj
vbzen.
• Dsvsnm rehbzst gktxbrb, ghjnrzenm irehre,
c<hspzenm djljq b pfvfhbzjdfnm d cvtifzzjv
cject. (D ckexft rehbzsü rhsksitr hfpltkbnm
bü zf 3 xfcnb rföljt b ds<hjcbnm rjzxbrb.)
• Hfpkjöbnm gktxbrb zf zbprjq gjlcnfdrt.
• Gjckt ghbujnjdktzby jcnfdbnm zf ztcrjkmrj
vbzen.
• Hfpkjöbnm fhfübc zf gjdjhjnzjv cnjkbrt.
• Gjckt njuj, rfr gtxm jcnfzjdbncy, gthtvtifnm
b ghjljköbnm ghbujnjdktzbt.
• Gjckt njuj, rfr gtxm jcnfzjdbncy tot hfp,
gthtvtifnm.
F pfntv ghjljköbnm ghbujnjdktzbt.
• Gjckt njuj, rfr gtxm jcnfzjdbncy tot hfp,
ljcnfnm fhfübc, cvtifnm tuj c zt<jkmibv
rjkbxtcndjv hfcnbntkmzjuj vfckf b cjkb b
jgynm hfdzjvthzj hfpkjöbnm fhfübc zf
gjdjhjnzjv cnjkbrt.
• Ghjljköbnm ghbujnjdktzbt.
• Gjckt ghbujnjdktzby gthtvtifnm b jcnfdbnm
zf ztcrjkmrj vbzen.
JgthfwbyJgthfwby
Jgthfwby
JgthfwbyJgthfwby
CS-5
>k+lj <scnhjuj
ghbujnjdktzby
ghbv.:
-Hs<zst gfkjxrb
-Öfhtzst rhtdtnrb
—18°C
pfvjhjötzzfy
280 - 330 u
19
• Bpdktxm bp egfrjdrb.
• Gjkjöbnm zf gjdjhjnzsq cnjkbr zf ajkmue,
cvfpfzze+ hfcnbntkmzsv vfckjv.
• Gjckt njuj, rfr gtxm jcnfzjdbncy,
gthtdthzenm.
F pfntv ghjljköbnm ghbujnjdktzbt.
• Gjckt njuj, rfr gtxm jcnfzjdbncy tot hfp,
gthtdthzenm b cvfpfnm hfcnbntkmzsv vfckjv
ajkmue zf gjdjhjnzjv cnjkbrt, ult zeözj.
• Ghjljköbnm ghbujnjdktzbt.
• Gjckt ghbujnjdktzby jcnfdbnm zf ztcrjkmrj
vbzen.
Page 23
Fdnj-uhbkm
1. Wsgktzjr uhbkm
AUTO GRILL
2. Öfhtzsq jvfh
3. Hs<f uhbkm
4. Jn<bdzfy
5. Gbhjörb c hs<jq
Aezrwby ”FDNJ-UHBKM“ j<tcgtxbdftn fdnjvfnbxtcrbq
hfcxtn htöbvf b dhtvtzb ghbujnjdktzby.
Cj<k+lfqnt gjlhj<zst erfpfzby Herjdjlcndf gj vtz+
”FDNJ-UHBKM“.
(Hs<zst gfkjxrb)
* Ghtlgjkjöbv, ds üjnbnt ghbujnjdbnm öfhtze+ rehbwe dtcjv 1,0 ru (dtc gjlktöbn jrheuktzb+ lj 0,1 ru).
IfuIfu
Ifu
IfuIfu
Zföbvfqnt zf rzjgre ”FDNJ-UHBKM“,
gjrf zt gjydbncy zeözsq zjvth bp
JgthfwbyJgthfwby
Jgthfwby
JgthfwbyJgthfwby
RzjgrfRzjgrf
Rzjgrf
RzjgrfRzjgrf
AUTO GRILL
LbcgktqLbcgktq
Lbcgktq
LbcgktqLbcgktq
HELP
vtz+ (d ckexft öfhtzjq rehbws zfövbnt
1
jlbz hfp).
x 1
KG AUTO
ru fdnj
Vbuftn bzlbrfnjh "KG".
C gjvjom+ rkfdbi c wbahfvb ddtlbnt
dtc.
2
01
KG AUTO
ru fdnj
HELP
COOK
ghbujnjd
Bzlbrfnjh ”KG“ ujhbn zt vbufy.
Zfxbzftn vbufnm bzlbrfnjh
”COOK“.
Zfövbnt rzjgre ”>SCNHJT
HELP
GHBUJNJDKTZBT/GECR“.
3
INSTANT COOK//START
Zfxbzftncy j<hfnzsq jncxtn
AUTO
fdnj
COOK
ghbujnjd
dhtvtzb ghbujnjdktzby. Rjulf
ghjpdexbn jnxtnkbdsq cbuzfk, gtxm
jcnfzjdbncy b zfxztn vbufnm
bzlbrfwby ”GTHTDTHZENM“.
Jnrhjqnt ldthwe. Gthtdthzbnt vycj.
Pfrhjqnt ldthwe.
4
Zfövbnt rzjgre ”>SCNHJT
Gjgthtvtzzj vbuf+n ckjdf
.
HELP
GHBUJNJDKTZBT/GECR“.
5
INSTANT COOK//START
Zfxbzftncy j<hfnzsq jncxtn
AUTO
fdnj
COOK
ghbujnjd
dhtvtzb ghbujnjdktzby lj zeky.
Gj ljcnbötzbb zektdjuj pzfxtzby
pdexbn jnxtnkbdsq cbuzfk b zf
lbcgktt gjydkytncy cjj<otzbt.
JCNJHJÖZJ:
Ëvrjcnm gtxb, ldthwf, gjdjhjnzsq cnjkbr b gjlcnfdrf gjl gjdjhjnzsq cnjkbr, dscjrfy b zbprfy gjlcnfdrb,
<k+lf b, d jcj<tzzjcnb, zbözbq zfuhtdfntkmzsq äktvtzn cbkmzj zfuhtdf+ncy. DJ BP>TÖFZBT JÖJUF
ghb bpdktxtzbb ghjlernjd b gjdjhjnzjuj cnjkbrf bp gtxb
gjkmpeqntcm njkcnsvb herfdbwfvb lky hf<jns
c gtxm+.
20
Page 24

Herjdjlcndj gj vtz+ ”FDNJ-UHBKM“
@@
@
@@
vtz+vtz+
vtz+
vtz+vtz+
Wsgktzjr uhbkm
AG-1
Vtz+Vtz+
Vtz+
Vtz+Vtz+
ZfxfkmzfyZfxfkmzfy
Zfxfkmzfy
ZfxfkmzfyZfxfkmzfy
ntvgthfnehfntvgthfnehf
ntvgthfnehf
ntvgthfnehfntvgthfnehf
8-12°C
Ljgecnbvsq dtcLjgecnbvsq dtc
Ljgecnbvsq dtc
Ljgecnbvsq dtcLjgecnbvsq dtc
1.0-1.6ru
• Dsvsnm rehbwe, elfkbnm öbh b c<hspzenm djljq.
• Ghbghfdbnm gj ötkfzb+ b jcnfdbnm zt vtztt xtv zf 30
vbzen.
• Gjkjöbnm zf zbpre+ gjlcnfdre, zj zt j<jhfxbdfnm.
• Rjulf gtxm jcnfzjdbncy, j<thzenm njzrbt xfcnb b
rjzxbrb zjötr ajkmujq. (Ghb ztj<üjlbvjcnb — ckbnm
kbiztt vfckj c gjdjhjnzjuj cnjkbrf.) Gthtdthzenm
rehbwe b ghjljköbnm ghbujnjdktzbt.
(Ghbvtxfzbt: zt ljgecrfnm cjghbrfcfzby recrjd ajkmub
lheu c lheujv b cj cntzrfvb gtxb.)
• Gjckt ghbujnjdktzby jcnfdbnm zf 5—10 vbz.
JgthfwbyJgthfwby
Jgthfwby
JgthfwbyJgthfwby
Öfhtzsq jvfh
Ghbvtxfzbt.
AG-2
Hs<f uhbkm
zfghbvth: ütr
AG-3
Jn<bdzfy
(>baintrc)
AG-4
10-14°C
•Üdjcns jvfhjd dj bp<töfzbt jöjuf cktletn
hfcgk+obnm, zfcrjkmrj änj djpvjözj.
•Jvfhs ljközs <snm cdtöbvb, bzfxt dj dhtvy b
gjckt ghbujnjdktzby bp zbü <eltn dsltkynmcy
vzjuj cjrf.
•Gjckt ghbujnjdktzby jvfhjd cktletn gthtkjöbnm d
lheue+ nfhtkre, gjcrjkmre d ghjnbdzjv ckexft
csh vjötn hfcgkfdbnmcy b hfcntxmcy gj nfhtkrt b
ntv cfvsv bcgjhnbnm dtcm dbl <k+lf ghb tuj
gjlfxt zf cnjk.
8-12°C
jrezm
b lh.
0.1-0.6ru
1 jvfh, chtlzbq
360 u dtc 600 u
vfktzmrbq
(”VTZMIT“)
240 u dtc 360 u
0.1-0.4ru
0.2-0.6ru8-12°C
• Hfphtpfnm jvfhf zf gjkjdbzrb.
• Dsvsnm gjkjdbzrb b elfkbnm dct, xnj zfüjlbncy e jvfhf
d ujkjdt.
• Gjcsgfnm gjdthüzjcnm jvfhf zt<jkmibv rjkbxtcndjv
rerehepzjq verb.
• Gjhtpfnm csh zf kjvnbrb njkobzjq ghbvthzj 1 cv b
gjkjöbnm bü zf jvfhf.
• Gjkjöbnm jvfhf zf rthfvbxtcre+ nfhtkre b gjcnfdbnm
tt zf dscjre+ gjlcnfdre.
• Ujnjdbnm zt zfrhsdfy.
• Rfölsq hfp vjözj ujnjdbnm 1/2 (1 gjhwb+) bkb 1 (2
gjhwbb) jvfhf. Jlzfrj d ckexft ghbujnjdktzby jvfhf
vfkjuj hfpvthf e<tlbntcm, xnj<s <skf zföfnf rzjgrf
(VTZMIT) lky gjkextzby zfbkexibü htpekmnfnjd.
• Nofntkmzj dsvsnm hs<e b elfkbnm xtie+.
• Cltkfnm ztcrjkmrj zflhtpjd zf ntkt hs<s, ghjrjkjnm
ukfpf.
• Ckturf c<hspzenm djljq b j<vfpfnm hfcnbntkmzsv
vfckjv.
• Gjvtcnbnm zf dscjre+ gjlcnfdre (cvfpfzze+ zt<jkmibv
rjkbxtcndjv hfcnbntkmzjuj vfckf) b zt zfrhsdfnm.
• Rjulf gtxm jcnfzjdbncy, gthtdthzenm b ghjljköbnm
ghbujnjdktzbt.
• Rjulf gtxm jcnfzjdbncy, jgynm gthtdthzenm.
• Xnj<s <baintrc üjhjij gjkexbkcy, htrjvtzletncy,
xnj<s jz <sk njkobzjq jr. 1,5 cv.
• Ghbghfdbnm gj ötkfzb+.
• Gjvtcnbnm zf dscjre+ gjlcnfdre.
• Rjulf gtxm jcnfzjdbncy, <baintrc gthtdthzenm.
• Gjckt ghbujnjdktzby lfnm gjcnjynm.
• Ghb ztj<üjlbvjcnb — gjlfdfnm c ujhyxbv cjecjv.
Gbhjörb c hs<jq
(Hs<bst gfkjxrb)
Bzuhtlbtzns:
AG-5
20-25°C
260 u rfhgf (vycf)
ztvzjuj ptktzjuj kerf
(zfhtpfnm re<brfvb)
ztvzjuj cjkb b gthwf
njkmrj 1 gjhwby
(4 in. 1 in.
jr. 70 u)
21
• Cvtifnm dct bzuhtlbtzns, hfpltkbnm bü zf 4 xfcnb b
cltkfnm bp zbü gfkjxrb hfpvthjv 8 x 9 cv, njkobzjq 0.5
cv.
• Gjkjöbnm hs<zst gfkjxrb ztgjchtlcndtzzj zf
gjdjhjnzsq cnjkbr, cvfpfzzsq hfcnbntkmzsv vfckjv.
• Ujnjdbnm <tp rhsirb.DTC DDJLBNM ZT ZEÖZJ.
• Rjulf gtxm jcnfzjdbncy, gthtdthzenm.
• Rjulf gtxm jcnfzjdbncy, gfkjxrb gthtdthzenm.
Page 25

Hfpjuhtd
1. >k+lj
2. Ceg
REHEAT
3. Zfgbnjr
4. Ükt<
* Ghtlgjkjöbv, ds üjnbnt hfpjuhtnm 2 xfirb cegf:
JgthfwbyJgthfwby
Jgthfwby
IfuIfu
Ifu
IfuIfu
JgthfwbyJgthfwby
Zföbvfqnt zf rzjgre ”HFPJUHTD“,
gjrf zt gjydbncy zeözsq zjvth bp
vtz+ (d ckexft cegf zfövbnt ldf hfpf).
1
C gjvjom+ rkfdbi c wbahfvb ddtlbnt
rjkbxtcndj.
2
Zfövbnt rzjgre fi>SCNHJT
GHBUJNJDKTZBT/GECRfl.
3
Zföfnbtv zf äne rzjgre j<tcgtxbdftncy hfpjuhtd
vyczsü b n. g. <k+l, cegjd, zfgbnrjd b ükt<f.
Gjlhj<zjcnb cvjnhbnt d ”Herjdjlcndt gj vtz+
hfpjuhtdf“.
RzjgrfRzjgrf
Rzjgrf
RzjgrfRzjgrf
REHEAT
x 2
LbcgktqLbcgktq
Lbcgktq
LbcgktqLbcgktq
PCS
in
AUTO
fdnj
HELP
Vbuftn bzlbrfnjh ”PCS“.
PCS AUTO
in fdnj
HELP
COOK
ghbujnjd
2
Vbuftn bzlbrfnjh ”COOK“.
HELP
AUTO
INSTANT COOK//START
fdnj
COOK
ghbujnjd
Zf lbcgktt gjydkytncy dhtvy
ghbujnjdktzby b zfxbzftncy tuj
j<hfnzsq jncxtn lj zeky.
Gj pfdthitzbb ghbujnjdktzby
pdexbn jnxtnkbdsq cbuzfk.
Gjydkytncy cjj<otzbt.
Herjdjlcndj gj vtz+ hfpjuhtdf
ZfxfkmzfyZfxfkmzfy
Zfxfkmzfy
@@
@
@@
vtz+vtz+
vtz+
vtz+vtz+
RH-1
Vtz+Vtz+
Vtz+
Vtz+Vtz+
>k+lj
hfpjuhtd pfdnhfrf
bkb j<tlf (zf nfhtkrt)
vyczjt <k+lj
öfhtzfy kfgif
hfpjuhtd hbcf(zf nfhtkrt)
Ceg
ZfxfkmzfyZfxfkmzfy
ntvgthfnehfntvgthfnehf
ntvgthfnehf
ntvgthfnehfntvgthfnehf
(ghbvthzj)(ghbvthzj)
(ghbvthzj)
(ghbvthzj)(ghbvthzj)
4-12°C
bp üjkjlbkmzbrf
4-12°C
bp üjkjlbkmzbrf
RH-2
Zfgbnjr
RH-3
Ükt<
RH-4
20-25°C
rjvzfnzfy
ntvgthfnehf
20-25°C
rjvzfnzfy
ntvgthfnehf
LjgecnbvsqLjgecnbvsq
Ljgecnbvsq
LjgecnbvsqLjgecnbvsq
1 gjhwby
jr. 400 u
1—4 xfirb
1 xfirf
(
jr. 250 vk
1—4 xfirb
1 xfirf
(
jr. 250 vk
1–4 in
1 in.
(
jr. 50 u
JgthfwbyJgthfwby
Jgthfwby
JgthfwbyJgthfwby
• Ljcnfnm nfhtkre bp üjkjlbkmzbrf.
• Zfrhsnm gktzrjq lky vbrhjdjkzjdjq gtxb bkb
cntrkyzzjq rhsirjq.
• Gjckt hfpjuhtdf gjvtifnm b jcnfdbnm gjl gktzrjq
zf 1 vbzene.
• Zt zfrhsdfnm.
• Gjcnfdbnm d wtznh gjdjhjnzjuj cnjkbrf (1 xfirf).
)
(D ckexft hfpjuhtdf 2—4 xfirb hfccnfdbnm bü gj
rhf+ cnjkbrf.)
• Gjckt hfpjuhtdf gjvtifnm.
• Zt zfrhsdfnm.
• Gjcnfdbnm d wtznh gjdjhjnzjuj cnjkbrf (1 xfirf).
)
(D ckexft hfpjuhtdf 2—4 xfirb hfccnfdbnm bü gj
rhf+ cnjkbrf.)
• Gjckt hfpjuhtdf gjvtifnm.
• D ckexft hfpjuhtdf 1—2 kjvnbrjd gjkjöbnm bü zf
jlzj <evfözjt gjkjntzwt b zfrhsnm lheubv.
• D ckexft hfpjuhtdf 3—4 kjvnbrjd gjkjöbnm <evfözjt
)
gjkjntzwt zf nfhtkre, zf ztuj gjkjöbnm ükt< b
zfrhsnm lheubv <evfözsv gjkjntzwtv. (D ckexft
hfpjuhtdf 1 kjvnbrf zt rkfcnm tuj d wtznh.)
GHBVTXFZBTGHBVTXFZBT
GHBVTXFZBT
GHBVTXFZBTGHBVTXFZBT
Rfölfy bp ghbdtltzzsü dsit tlbzbw rjkbxtcndf (zfghbvth: gjhwby, xfirf bkb recjr) ljközf <snm
ddtltzf d eckjdzsü tlbzbwfü PCS, rfr gjrfpfzj zf lbcgktt.
22
Page 26

Ghbujnjdktzbt hbcf
1. Hbc
RICE COOK
2. Hbcjdsq jndfh
3. Rfif
* Ghtlgjkjöbv, ds üjnbnt ghbujnjdbnm 2 gjhwbb hbcf.
JgthfwbyJgthfwby
Jgthfwby
IfuIfu
Ifu
IfuIfu
JgthfwbyJgthfwby
Zföbvfqnt zf rzjgre ”VTZ* >K*L
BP HBCF“, gjrf zt gjydbncy zeözsq
zjvth bp vtz+ (d ckexft hbcf zfövbnt
1
jlbz hfp).
C gjvjom+ rkfdbi c wbahfvb ddtlbnt
xbckj gjhwbq.
2
Zfövbnt rzjgre ”>SCNHJT
GHBUJNJDKTZBT/GECR“.
INSTANT COOK//START
3
Zföfnbt zf äne rzjgre bcgjkmpetncy lky
ghbujnjdktzby 3 hfcghjcnhfztzzsü <k+l bp hbcf.
Gjlhj<zjcnb cvjnhbnt d ”Herjdjlcndt gj
ghbujnjdktzb+ ghbujnjdktzbt hbcf“.
RzjgrfRzjgrf
Rzjgrf
RzjgrfRzjgrf
RICE COOK
x 1
LbcgktqLbcgktq
Lbcgktq
LbcgktqLbcgktq
COVER
AUTO
PCS
fdnj
in
HELP
Vbuftn bzlbrfnjh ”PCS“ b
”COVER“.
2
COVER HELP
AUTO
PCS
COOK
fdnj
ghbujnjd
in
Vbuftn bzlbrfnjh ”COOK“.
HELP
AUTO
COOK
fdnj
ghbujnjd
Zfxbzftncy j<hfnzsq jncxtn
dhtvtzb ghbujnjdktzby lj zeky.
Gj ljcnbötzbb zektdjuj pzfxtzby
gtxm gjlftn pderjdjq cbuzfk. Zf
lbcgktt gjydky+ncy cjj<otzby
[JCNFDBNM], [ZFRHSNM],
[GJVTIFNM].
GHBVTXFZBTGHBVTXFZBT
GHBVTXFZBT
GHBVTXFZBTGHBVTXFZBT
1. Lky änjq aezrwbb lfzs erfpfzby gj ghbujnjdktzb+ hbcjdjuj jndfhf b rfib <tp ljgjkzbntkmzsü
bzuhtlbtznjd. Bzajhvfwb+ j nfrbü bzuhtlbtznfü, bü rjkbxtcndt b gjhylrt ghbujnjdktzby cv. d
”Herjdjlcndj gj ghbujnjdktzb+ hbcf“ zf cnh. 24.
2. Hbcjdsq jndfh vjözj ghbujnjdbnm rfr uecnjq, nfr b cegjj<hfpzsq. Rfie vjözj ghbujnjdbnm rfr
gjöböt, nfr b gjueot.
3. Äne aezrwb+ vjözj bcgjkmpjdfnm dvtcnt c aezrwbtq ”Fdnjgecr“. Cv. cnh. 32.
23
Page 27

Herjdjlcndj gj ghbujnjdktzb+ hbcf
@@
@
@@
vtz+vtz+
vtz+
vtz+vtz+
R-1
R-2
R-3
Vtz+Vtz+
Vtz+
Vtz+Vtz+
HbcHbc
Hbc
HbcHbc
Rjkbxtcndj gjhwbq Hbc Djlf
1 (zf 1—2 xtkjdtrf) 150 u 250 vk
2 (zf 3—5 xtkjdtr) 300 u 480 vk
•Zeöze+ cntgtzm ujnjdzjcnb vjözj ds<hfnm
zföfnbtv rkfdbi ”>JKMIT“bkb ”VTZMIT“.
(Cv. cnh. 35)
Hbcjdsq jndfhHbcjdsq jndfh
Hbcjdsq jndfh
Hbcjdsq jndfhHbcjdsq jndfh
Rjkbxtcndj gjhwbq Hbc Djlf
1 (zf 1—2 xtkjdtrf) 50 u 750 vk
2 (zf 3—5 xtkjdtr) 80 u 1400 vk
• Zeöze+ cntgtzm ujnjdzjcnb vjözj ds<hfnm
zföfnbtv rkfdbi ”>JKMIT“ bkb ”VTZMIT“.
(Cv. cnh. 35)
Dfhbfzns vtz+
Ghbvths
RfifRfif
Rfif
RfifRfif
Rjkbxtcndj gjhwbq Hbc Djlf
1 (zf 1—2 xtkjdtrf) 100 u 700 vk
2 (zf 3—5 xtkjdtr) 140 u 1400 vk
★
Hbcjdsq jndfh c vbznftv b fhfübcjv
Bzuhtlbtzns: 100 u vbznfy (gjöfhbnm, gjhtpfnm)
(zf 3—5 xtkjdtr) 50 u fhfübcf
GHBVTXFZBT
★
Hbcjdsq jndfh c cjktzjq cdbzbzjq b rjzcthdbhjdfzzsvb enbzsvb yqwfvb
Bzuhtlbtzns: jr. 230 u. gjcnzjq cdbzbzs (gjhtpfnm)
(zf 3—5 xtkjdtr) 2 rjzcthdbhjdfzzsü enbzsü yqwf (gjhtpfnm re<brfvb)
GHBVTXFZBT
• Zeöze+ cntgtzm ujnjdzjcnb vjözj ds<hfnm
zföfnbtv zf rzjgrb ”>JKMIT“ bkb
”VTZMIT“.(Cv. cnh. 35)
Dfhbfzns vtz+
Vjözj dztcnb hfpzjj<hfpbt d vtz+, lj<fdkyy ztrjnjhst bzuhtlbtzns d rfie chfpe gjckt
ghbujnjdktzby bkb pf 10 vbzen lj tuj jrjzxfzby.
Ghbvths
★
★
LjgecnbvsqLjgecnbvsq
Ljgecnbvsq
LjgecnbvsqLjgecnbvsq
1 kjvnbr cjktzjq htgs (gjhtpfnm)
3 gthf ptktzjuj kerf (gjhtpfnm)
Bzuhtlbtzns vjözj lj<fdkynm njkmrj chfpe gjckt ghbujnjdktzby,
ghbxtv cjktzfy htgf b ptktzsq ker <elen dscnegfnm d hjkb ufhzbhf,
gjcsgftvjuj cdthüe.
Bzuhtlbtzns vjözj lj<fdkynm pf 10 vbz. lj jrjzxfzby ghbujnjdktzby.
Rfif c rehbwtq: 200 u rehbws (vtkrj gjhtpfnm, ghbujnjdbnm pfhfztt)
(zf 3—5 xtkjdtr) ptktzsq ker (gjhtpfnm zf xfcnb lkbzjq 3 cv)
Rfif c hs<jq: 250 u hs<s (ghbujnjdbnm pfhfztt)
(zf 3—5 xtkjdtr) 2 kjvnbrf bv<bhy (gjhtpfnm gjkjcrfvb)
JgthfwbyJgthfwby
Jgthfwby
JgthfwbyJgthfwby
• Ghjvsdfnm hbc, gjrf djlf zt cnfztn
xbcnjq.
• Gjvtcnbnm hbc c djljq d uke<jre+
rfcnh+k+ (ghbvthzj 2-kbnhjde+) b
jcnfdbnm të zf 30 vbzen.
• Gjvtifnm, zfrhsnm rhsirjq b
gjcnfdbnm dfhbnmcy.
• Gjckt ghbujnjdktzby ckturf gjvtifnm
b jcnfdbnm gjl gktzrjq zf 5 vbzen.
• Ghjvsdfnm hbc, gjrf djlf zt cnfztn
xbcnjq.
• Gjvtcnbnm hbc c djljq d uke<jre+
rfcnh+k+ (ghbvthzj 2-kbnhjde+) b
jcnfdbnm të zf 30 vbzen.
• Gjvtifnm b gjcnfdbnm dfhbnmcy <tp
rhsirb.
• Gjckt ghbujnjdktzby gjvtifnm b
jcnfdbnm zf ztcrjkmrj vbzen.
• Ghjvsdfnm hbc, gjrf djlf zt cnfztn
xbcnjq.
• Gjvtcnbnm hbc c djljq d uke<jre+
rfcnh+k+ (2-kbnhjde+ lky 1 gjhwbb,
3-kbnhjde+ lky 2 gjhwbq) b jcnfdbnm
të zf 15 vbzen.
• Gjvtifnm b gjcnfdbnm dfhbnmcy <tp
rhsirb.
• Gjckt ghbujnjdktzby gjvtifnm b
jcnfdbnm zf ztcrjkmrj vbzen.
GHBVTXFZBTGHBVTXFZBT
GHBVTXFZBT
GHBVTXFZBTGHBVTXFZBT
1. D zfxfkt ghbujnjdktzby ntvgthfnehf djls ljközf <snm jrjkj 20°C.
2. Ghbdtltzzfy dsit gjhwby ljközf <snm ddtltzf d eckjdzsü tlbzbwfü PCS, rfr gjrfpfzj zf lbcgktt.
24
Page 28

>k+lf zf gfhe
Zföfnbt zf äne rzjgre bcgjkmpetncy lky
ghbujnjdktzby 3 hfcghjcnhfztzzsü <k+l zf gfhe.
Gjlhj<zjcnb cvjnhbnt d ”Herjdjlcndj gj
STEAM MENU
1. Hs<f
2. Vycj
3. Rkëwrb
ghbujnjdktzb+ <k+l zf gfhe“.
* Ghtlgjkjöbv, ds üjnbnt ghbujnjdbnm 3 gjhwbb hs<s.
RzjgrfRzjgrf
IfuIfu
Ifu
IfuIfu
JgthfwbyJgthfwby
Jgthfwby
JgthfwbyJgthfwby
Rzjgrf
RzjgrfRzjgrf
Zföbvfqnt zf rzjgre ”>K*LF ZF
GFHE“, gjrf zt gjydbncy zeözsq zjvth
bp vtz+ (d ckexft hs<s zfövbnt jlbz
1
hfp).
STEAM MENU
C gjvjom+ rkfdbi c wbahfvb ddtlbnt
rjkbxtcndj.
2
Zfövbnt rzjgre ”>SCNHJT
GHBUJNJDKTZBT/GECR“.
INSTANT COOK//START
3
LbcgktqLbcgktq
Lbcgktq
LbcgktqLbcgktq
HELP
COVER
x 1
PCS
AUTO
fdnj
in
Vbuftn bzlbrfnjh ”PCS“ b
”COVER“.
3
COVER HELP
AUTO
PCS
COOK
fdnj
ghbujnjd
in
Bzlbrfnjh ”PCS“ gthtcnfztn
vbufnm b <eltn dscdtxbdfnmcy zf
lbcgktt.
Vbuftn bzlbrfnjh ”COOK“ b
”COVER“.
HELP
AUTO
COOK
fdnj
ghbujnjd
Zfxbzftncy j<hfnzsq jncxtn
dhtvtzb ghbujnjdktzby. Gj
ljcnbötzbb zektdjuj pzfxtzby gtxm
gjlftn pderjdjq cbuzfk.
Zf lbcgktt gjydky+ncy cjj<otzby
[JCNFDBNM], [ZFRHSNM].
25
Page 29

Herjdjlcndj gj ghbujnjdktzb+ <k+lf zf gfhe
ZfxfkmzfyZfxfkmzfy
Zfxfkmzfy
@@
@
@@
vtz+vtz+
vtz+
vtz+vtz+
S-1
Vtz+Vtz+
Vtz+
Vtz+Vtz+
Hs<f
zfghbvth:
vjhcrjq jrezm
vjhcrjq kto
rfhg
rfv<fkf
b lh.
ZfxfkmzfyZfxfkmzfy
ntvgthfnehfntvgthfnehf
ntvgthfnehf
ntvgthfnehfntvgthfnehf
8-12°C
Rjkbxtcndj gjhwbq
1
2
3
Ljgecnbvsq dtcLjgecnbvsq dtc
Ljgecnbvsq dtc
Ljgecnbvsq dtcLjgecnbvsq dtc
1—3 gjhwbb
wtkfy hs<f
bkb hs<zjt
abkt
Hs<f
130 - 199u
200 - 300u
301 - 420u
• Nofntkmzj dsvsnm hs<e b elfkbnm xtie+.
• Cltkfnm ztcrjkmrj zflhtpjd zf ntkt hs<s,
ghjrjkjnm ukfpf.
• Gjkjöbnm zf vtkre+ nfhtkre, lbfvtnh
rjnjhjq 22—28 cv.
• Ckturf c<hspzenm djljq, gjcsgfnm cjkm+ b
cvfpfnm vfckjv.
• Cdthüe gjkjöbnm ptktzsq ker b kjvnbrb
bv<bhy.
• Zfrhsnm gktzrjq lky vbrhjdjkzjdsü gtxtq.
• Gjckt ghbujnjdktzby jcnfdbnm gjl gktzrjq
zf 3—5 vbzen.
JgthfwbyJgthfwby
Jgthfwby
JgthfwbyJgthfwby
Vycj
zfghbvth:
S-2
$ Htwtgns cv. zf cnh. 27.
Rkëwrb
Ujnjdfy tlf
S-3
GHBVTXFZBTGHBVTXFZBT
GHBVTXFZBT
GHBVTXFZBTGHBVTXFZBT
8-12°C
vtlfkmjzs bp ujdylbzs
recjxrb rehbws
c uhb<fvb
Rjkbxtcndj gjhwbq
8-12°C
Rjkbxtcndj gjhwbq
1—3 gjhwbb
Vycj
1
2
3
1
2
180 - 249u
250 - 400u
401 - 520u
1—2 gjhwbb
Rkëwrb
100 - 199u
200 - 370u
• Pfvfhbzjdfnm ujdyöbq afhi bkb recjxrb
rehbws (zfhtpfzzst zf njzrbt kjvnbrb).
• Gjvtcnbnm zf vtkre+ nfhtkre lbfvtnhjv
22—28 cv.
• Zfrhsnm gktzrjq lky vbrhjdjkzjdjq gtxb.
• Gjckt ghbujnjdktzby jcnfdbnm gjl gktzrjq
zf 3—5 vbzen.
• Hfpkjöbnm rkëwrb zf nfhtkrt d zfghfdktzbb
jn të dztiztuj rhfy r të wtznhe.
• Zfrhsnm gktzrjq lky vbrhjdjkzjdjq gtxb.
• Gjcnfdbnm zf zbpre+ gjlcnfdre.
• Gjckt ghbujnjdktzby jcnfdbnm gjl gktzrjq
zf 1 vbzene.
Ghbdtltzzfy dsit gjhwby ljközf <snm ddtltzf d eckjdzsü tlbzbwfü PCS, rfr gjrfpfzj zf lbcgktt.
26
Page 30

HTWTGNS LKY >K*L ZF GFHE HTWTGNS LKY >K*L ZF GFHE
HTWTGNS LKY >K*L ZF GFHE
HTWTGNS LKY >K*L ZF GFHE HTWTGNS LKY >K*L ZF GFHE
Vtlfkmjzs bp ujdylbzs
[ Bzuhtlbtzns ]
330 u ujdyömtuj afhif
50 u rjzcthdbhjdfbzsq jdjotq
1 cjktzsq ybxzsq ötknjr
[ Ghbghfdf ]
1 x. k. cjkb
1 x. k. cfüfhf
2 x. k. rerehepzjuj rhfüvfkf
2 x. k. hfcnbntkmzjuj vfckf
1,5 x. k. cjtdjuj cjecf
[ Cgjcj< ghbujnjdktzby ]
1. Pfvfhbzjdfnm ujdyöbq afhi c rjzcthdbhjdfzzsvb jdjofvb
b ghbghfdjq b üjhjij gthtvtifnm. Gjkjöbnm d ajhve lky
gbhjuf.
2. Gjhtpfnm cjktzsq ybxzsq ötknjr kjvnbrfvb b gjkjöbnm
zf <k+lj lky erhfitzby.
3. Zfrhsnm gktzrjq lky vbrhjdjkzjdjq gtxb b ldf hfpf
zföfnm zf rzjgre ”>K*LF ZF GFHE“ (vycj).
Recjxrb rehbws c uhb<fvb
(Vycj)
[ Bzuhtlbtzns ]
280 u recjxrjd rehbws
40 u ceitzsü uhb<jd (dsvjxbnm)
kjvnbrb bv<bhy
kjvnbrb ptktzjuj kerf
[ Ghbghfdf ]
1
/2 x. k. cjkb
1
/2 x. k. cfüfhf
1,5 x. k. cjtdjuj cjecf
1
/2 x. k. rerehepzjuj rhfüvfkf
1,5 x. k. rezöenzjuj vfckf
[ Cgjcj< ghbujnjdktzby ]
1. Pfvfhbzjdfnm recjxrb rehbws c dsvjxtzzsvb uhb<fvb b
ghbghfdjq. Cvtifnm c kjvnbrfvb bv<bhy b ptktzjuj kerf.
2. Zfrhsnm gktzrjq lky vbrhjdjkzjdjq gtxb b ldf hfpf
zföfnm zf rzjgre ”>K*LF ZF GFHE“ (vycj).
27
Page 31

Fdnjvfnbxtcrjt ghbujnjdktzbt
Aezrwby ”FDNJVFNBXTCRJT GHBUJNJDKTZBT“
j<tcgtxbdftn fdnjvfnbxtcrbq hfcxtn ehjdzy vjozjcnb
b dhtvtzb ghbujnjdktzby. Änf aezrwby bvttn vtz+
bp 4 dbljd <k+l. Lky ds<jhf dblf zeözj zföbvfnm
zf rzjgre ”FDNJVFN. GHBUJNJDKTZBT“, gjrf zf
AUTO COOK
1. Cdtöbt jdjob
2. Pfvjhjötzzst jdjob
3. Rfhnjatkm d vezlbht
4. Kfgif
lbcgktt zt gjydbncy zeözsq zjvth bp vtz+.
* Ghtlgjkjöbv, ds üjnbnt djcgjkmpjdfnmcy aezrwbtq ”FDNJVFNBXTCRJT GHBUJNJDKTZBT“
lky ghbujnjdktzby ldeü rfhnjatkbz d vezlbht.
JgthfwbyJgthfwby
Jgthfwby
IfuIfu
Ifu
IfuIfu
JgthfwbyJgthfwby
Lky ghbujnjdktzby rfhnjatky d vezlbht
3 hfpf zföfnm zf rzjgre ”FDNJVFN.
GHBUJNJDKTZBT“.
1
JgthfwbyJgthfwby
Jgthfwby
JgthfwbyJgthfwby
AUTO COOK
x 3
LbcgktqLbcgktq
Lbcgktq
LbcgktqLbcgktq
PCS AUTO
in fdnj
HELP
Vbuftn bzlbrfnjh ”PCS“.
C gjvjom+ rkfdbi c wbahfvb ddtlbnt
rjkbxtcndj.
2
2
Bzlbrfnjh ”PCS“ ujhbn zt vbufy.
PCS AUTO
in fdnj
HELP
COOK
ghbujnjd
zfxbzftn vbufnm bzlbrfnjh
”COOK“.
Zfövbnt rzjgre ”>SCNHJT
GHBUJNJDKTZBT/GECR“.
HELP
3
Jnrhjqnt ldthwe. Gthtdthzbnt
rfhnjatkm. Pfrhjqnt ldthwe.
4
Zfövbnt rzjgre ”>SCNHJT
GHBUJNJDKTZBT/GECR“.
5
INSTANT COOK//START
INSTANT COOK//START
AUTO
COOK
fdnj
ghbujnjd
Zfxbzftncy j<hfnzsq jncxtn
dhtvtzb ghbujnjdktzby. Gtxm
gjlftn pderjdjq cbuzfk b
jcnfzfdkbdftncy. Zfxbzftn vbufnm
bzlbrfwby ”GTHTDTHZENM“.
Gjgthtvtzzj vbuf+n ckjdf
.
HELP
AUTO
COOK
fdnj
ghbujnjd
Zfxbzftncy j<hfnzsq jncxtn
dhtvtzb ghbujnjdktzby lj
zeky. Gj ljcnbötzbb
nfqvthjv zektdjuj pzfxtzby
gtxm gjlftn pderjdjq cbuzfk.
Zf lbcgktt gjgthtvtzzj
gjydky+ncy ckjdf
.
28
Page 32

Herjdjlcndj gj vtz+ fdnjvfnbxtcrjuj ghbujnjdktzby
@@
@
@@
vtz+vtz+
vtz+
vtz+vtz+
Cdtöbt jdjob
<hjrrjkb (wdtnrb)
cfkfn-kfner (recjxrb)
cgfhöf, rhegzfy (gjkjcrb 5 cv)
rbnfqcrfy rfgecnf (wtkbrjv bkb gjkjdbzrb)
rfgecnf-ctkmlthtq (recjxrb)
igbzfn (gjkjdbzrb)
AC-1
AC-2
ker (recjxrb)
rerehepf d gjxfnrfü (wtkbrjv bkb gjkjdbzrb)
ptktzsq gthtw (gjkjcrb)
Vjhjötzst jdjob
<hjrrjkb (wdtnrb)
wdtnzfy rfgecnf(wdtnrb)
cgfhöf (gjkjcrb)
rerehepf d gjxfnrfü (wtkbrjv bkb gjkjdbzrb)
<j<s ptktzst
Rfhnjatkm d vezlbht
wtkfl
rfhnjatkbzf
AC-3
Kfgif
1. Cdtöfy, vyurfy
Zfghbvth:
AC-4
2. Ceüfy, gkjnzfy
Zfghbvth:
GHBVTXFZBT Dcy kfgif ljközf zfüjlbnmcy d djlt.
Vtz+Vtz+
Vtz+
Vtz+Vtz+
GHBVTXFZBTGHBVTXFZBT
GHBVTXFZBT
GHBVTXFZBTGHBVTXFZBT
1. Lky njuj, xnj<s kexit ghbujnjdbnm ötcnrbt jdjob, cktletn djcgjkmpjdfnmcy aezrwbtq ”<jkmit“ (cv. cnh.
35) b gjckt ghbujnjdktzby lfnm bv ztrjnjhjt dhtvy gjcnjynm.
2. Ghb bcgjkmpjdfzbb vtztt rhegzjq b vtkrjq cgfhöb lky gjkextzby kexituj htpekmnfnf gjkmpeqntcm
aezrwbtq ”vtzmit“ (cv. cnh. 35).
3. Lky <jktt hfdzjvthzjuj ghbujnjdktzby gthtvtifnm gj ghjitcndbb gjkjdbzs dhtvtzb ghbujnjdktzby.
4. Jdjob, gj rjnjhsv htrjvtzlfwbb pltcm zt ghbdtltzs, ghjcm<f ujnjdbnm dhexze+.
(ghbujnjdktzzfy)
dthvbitkm kfgif
kfgif c
rhtdtnrfvb
ybxzfy kfgif
dthvbitkm
kfgif lky <scnhjuj
ghbujnjdktzby
ZfxfkmzfyZfxfkmzfy
Zfxfkmzfy
ZfxfkmzfyZfxfkmzfy
ntvgthfnehfntvgthfnehf
ntvgthfnehf
ntvgthfnehfntvgthfnehf
20-25°C
rjvzfnzfy
ntvgthfnehf
-18°C
ntvgthfnehf
pfvjhjprb
20-25°C
rjvzfnzfy
ntvgthfnehf
20-25°C
rjvzfnzfy
ntvgthfnehf
20-25°C
rjvzfnzfy
ntvgthfnehf
Ljgecnbvsq dtcLjgecnbvsq dtc
Ljgecnbvsq dtc
Ljgecnbvsq dtcLjgecnbvsq dtc
0.1 - 1.0 ru
0.1 - 1.0 ru
1—6 in.
1 in.
jr. 220 u
1—2 gjhwbb
1 gjhwby
jr. 200 u
1—2 gjhwbb
1 gjhwby
jr. 50 u.
bkb 100 u d ckexft
kfgib lky
<scnhjuj
ghbujnjdktzby
• Dsvsnm jdjob b ckbnm kbiz++ djle.
• Gjhtpfnm jdjob zf wdtnrb, recjxrb bkb gjkjcrb.
• Gjkjöbnm zf rthfvbxtcre+ nfhtkre (lbfvtnhjv
28—31 cv), gjcsgfnm zt<jkmibv rjkbxtcndjv
cjkb b c<hspzenm zt<jkmibv rjkbxtcndjv
hfcnbntkmzjuj vfckf.
• Ghbrhsnm gktzrjq lky vbrhjdjkzjdjq gtxb b
ghbcnegbnm r ghbujnjdktzb+.
• Gjckt ghbujnjdktzby gjvtifnm.
• Gthtl ghbujnjdktzbtv gj djpvjözjcnb hfpltkbnm
jdjob, zfghbvth, <hjrrjkb.
• Gjkjöbnm zf gkjcre+ rthfvbxtcre+ nfhtkre
(lbfvtnhjv 28-31 cv), lj<fdbnm djls 2-3 cnjkjdst
kjörb (tckb zeözj).
• Ghbrhsnm gktzrjq lky vbrhjdjkzjdjq gtxb b
ghbcnegbnm r ghbujnjdktzb+.
• Gjckt ghbujnjdktzby gjvtifnm.
• Dpynm vsnsq vjkjljq rfhnjatkm.
• Ldföls ghjnrzenm dbkrjq c rföljq cnjhjzs.
• Hfpkjöbnm gj rhf+ gjdjhjnzjuj cnjkbrf.
• Tckb rfhnjatkbzf jlzf, gjkjöbnm tt d wtznh.
• Pdexbn cbuzfk, gtxm dsrk+xftncy, b zfxbzftn
vbufnm bzlbrfwby ”GTHTDTHZENM“.
Gthtdthzenm rfhnjatkm b zföfnm rzjgre ”CNFHN“
lky djpj<zjdktzby ghbujnjdktzby.
• Gjckt ghbujnjdktzby zfrhsnm fk+vbzbtdjq
ajkmujq b jcnfdbnm zf 3—10 vbzen.
• Gjkjöbnm kfgie d vbcre:
1 gjhwb+ — d kbnhjde+;
2 gjhwbb — d 2-kbnhjde+.
• Lj<fdbnm djls (20-25°C):
zf 1 gjhwb+ — 500 vk;
zf 2 gjhwbb — 800 vk.
• Zfrhsnm gktzrjq lky vbrhjdjkzjdjq gtxb bkb
cntrkyzzjq rhsirjq.
• Gjckt ghbujnjdktzby gjvtifnm b jcnfdbnm zf 1
vbzene.
• Gjkjöbnm kfgie d vbcre:
1 gjhwb+ — d 750-vbkkbkbnhjde+;
2 gjhwbb — d 1,5—2-kbnhjde+.
• Lj<fdbnm djls (20-25°C)
zf 1 gjhwb+ — 500 vk;
zf 2 gjhwbb — 800 vk.
• Zfrhsnm gktzrjq lky vbrhjdjkzjdjq gtxb bkb
cntrkyzzjq rhsirjq.
• Gjckt ghbujnjdktzby gjvtifnm b jcnfdbnm zf 5
vbzen.
JgthfwbyJgthfwby
Jgthfwby
JgthfwbyJgthfwby
29
Page 33

Ghjcnfy hfpvjhjprf
Htöbv ”GHJCNFY HFPVJHJPRF“ gjpdjkbn Dfv hfpvjhjpbnm vycj, ddtly tuj
EASY DEFROST
* Ghtlgjkjöbv, ds üjnbnt hfpvjhjpbnm recjxrb wsgktzrf dtcjv 1,0 ru. (Dtc gjlktöbn jrheuktzb+ lj 0,1
ru.)
IfuIfu
Ifu
IfuIfu
Zfövbnt rzjgre ”GHJCNFY
HFPVJHJPRF“.
1
dtc.
JgthfwbyJgthfwby
Jgthfwby
JgthfwbyJgthfwby
JgthfwbyJgthfwby
Jgthfwby
JgthfwbyJgthfwby
EASY DEFROST
LbcgktqLbcgktq
Lbcgktq
LbcgktqLbcgktq
DEFROST HELP
KG AUTO
ru fdnj
Vbuftn bzlbrfnjh ”KG“.
C gjvjom+ rkfdbi c wbahfvb ddtlbnt
dtc.
2
Zfövbnt rzjgre ”>SCNHJT
GHBUJNJDKTZBT/GECR“.
3
Jnrhjqnt ldthm. Gthtdthzbnt recjxrb
wsgktzrf b pfrhjqnt ldthm.
4
Zfövbnt rzjgre ”>SCNHJT
GHBUJNJDKTZBT/GECR“.
5
01
INSTANT COOK//START
INSTANT COOK//START
DEFROST HELP
KG AUTO
ru fdnj
COOK
ghbujnjd
Bzlbrfnjh ”KG“ ujhbn zt vbufy.
Zfxbzftn vbufnm bzlbrfnjh
”COOK“.
DEFROST HELP
AUTO
COOK
fdnj
ghnujnjd
Gj ghjitcndbb ghbvthzj 2/3
dhtvtzb hfpvjhjprb gtxm gjlfcn
pderjdjq cbuzfk b jcnfzjdbncy.
Zfxztn vbufnm bzlbrfwby
”GTHTDTHZENM“.
Gjgthtvtzzj vbuf+n ckjdf
.
DEFROST HELP
AUTO
COOK
fdnj
ghbujnjd
Gj ljcnbötzbb nfqvthjv
zektdjuj pzfxtzby pdexbn
jnxtnkbdsq cbuzfk b zf lbcgktt
gjgthtvtzzj gjydky+ncy ckjdf
.
30
Page 34

Herjdjlcndj gj ghjcnjq hfpvjhjprt
Ghjlern
Recjr vycf
jn<bdzfy
Ujdyöbq afhi
Cdbzbzf/ujdylbzf
Gnbwf
Cdbzbzf/ujdylbzf/<fhfzbzf
Ljgecnbzsq Dtc
0.1 - 2.0 ru
0.1 - 2.0 ru
0.5 - 2.0 ru
Gjhyljr ltqcndbq
• Pfrhsnm njzrbt rjzws jn<bdzjq bkb recrf vycf ajkmujq.
• Hfpkjöbnm ghjlern zf gjlcnfdrt lky hfpvjhföbdfzby d
jlbz ckjq njzrjq xfcnm+ r wtznhe. Gjgsnfnmcy, rfr
vjözj crjhtt, hfpltkbnm cvëhpibtcy recrb.
Gjckt jcnfzjdrb gtxb dszenm hfpvjhjötzzst recrb, jcnfkmzst
•
gthtdthzenm b j<thzenm ajkmujq bü ntgkst xfcnb.
•
Lky ghjljkötzby hfpvjhföbdfzby zföfnm zf rzjgre ”GECR“.
• Gj bcntxtzbb dctuj dhtvtzb hfpvjhföbdfzby jcnfdbnm
ghjlern gjcnjynm gjl fk+vbzbtdjq ajkmujq zf 5—30
vbzen.
• Gjkjöbnm pfvjhjötzzsq ujdyöbq afhi zf gjlcnfdre
lky hfpvjhföbdfzby.
• Gjckt jcnfzjdrb gtxb dszenm hfpvjhjötzzst xfcnb, jcnfkmzst
gthtdthzenm b j<thzenm bü rhfy gjkjcrfvb ajkmub.
• Lky ghjljkötzby hfpvjhföbdfzby zföfnm zf rzjgre ”GECR“.
Pfrhsnm rhfy.
• Gj bcntxtzbb dctuj dhtvtzb hfpvjhföbdfzby jcnfdbnm
ghjlern gjcnjynm gjl fk+vbzbtdjq ajkmujq zf 5—30
vbzen.
• Pfrhsnm rhfy gjkjcrfvb ajkmub ibhbzjq jr. 2,5 cv.
• Gjkjöbnm recjr vycf zf gjlcnfdre lky hfpvjhföbdfzby
gjcnzjq xfcnm+ ddthü (gj djpvjözjcnb).
• Gjckt jcnfzjdrb gtxb gthtdthzenm b j<thzenm ajkmujq
ntgkst xfcnb.
• Lky ghjljkötzby hfpvjhföbdfzby zföfnm zf rzjgre ”GECR“.
• Gj bcntxtzbb dctuj dhtvtzb hfpvjhföbdfzby jcnfdbnm
ghjlern gjcnjynm gjl fk+vbzbtdjq ajkmujq zf 10—30
vbzen.
Gnbwf
1.0 - 2.0 ru
• Dszenm ghjlern bp egfrjdrb. Pfrhsnm rjzxbrb rhskmtd
b zjötr ajkmujq.
• Gjkjöbnm gnbwe uhelzjq xfcnm+ zf gjlcnfdre lky
hfpvjhföbdfzby.
• Gjckt jcnfzjdrb gtxb gthtdthzenm b j<thzenm ajkmujq
ntgkst xfcnb.
• Lky ghjljkötzby hfpvjhföbdfzby zföfnm zf rzjgre
”GECR“.
• Gj bcntxtzbb dctuj dhtvtzb hfpvjhföbdfzby jcnfdbnm
ghjlern gjcnjynm gjl fk+vbzbtdjq ajkmujq zf 15—60
vbzen.
GHBVTXFZBTGHBVTXFZBT
GHBVTXFZBT
GHBVTXFZBTGHBVTXFZBT
Gjckt njuj, rfr ghjlern gjcnjbn, ghb
ztj<üjlbvjcnb ghjvsnm tuj d üjkjlzjq djlt lky
elfktzby gjnhjüjd.
Recjxrb
wsgktzrf
0.1 - 2.0 ru
• Pfrhsnm jnrhsnst rjcnjxrb ajkmujq.
• Gjkjöbnm recjxrb wsgktzrf zf gjlcnfdre lky hfpvjhföbdfzby.
• Gjckt jcnfzjdrb gtxb dszenm hfpvjhjötzzst recrb, jcnfkmzst
gthtdthzenm b j<thzenm ajkmujq bü ntgkst xfcnb.
• Lky ghjljkötzby hfpvjhföbdfzby zföfnm zf rzjgre
”GECR“.
• Gj bcntxtzbb dctuj dhtvtzb hfpvjhföbdfzby jcnfdbnm
ghjlern gjcnjynm gjl fk+vbzbtdjq ajkmujq zf 5—30
vbzen.
Ghjlerns, zt erfpfzzst d lfzzjq nf<kbwt, vjuen hfpvjhföbdfnmcy d htöbvt ”CHTLZBQ ZBPRBQ“.
Ghbvtxfzbt: 1.Ghb hfpvjhföbdfzbb afhif hfpltkbnm tuj zf gkjcrbt jlbzfrjdst gj hfpvthe recrb.
2.Recjxrb wsgktzrf, vycf b jn<bdzst pfvjhföbdfnm jnltkmzj lheu jn lheuf d jlbz ckjq. Tckb
ztj<üjlbvj, bcgjkmpeqnt gkfcnbrjdst ghjrkflrb lky hfpltktzby ckjtd. Änj ufhfznbhetn
hfdzjvthzjt hfpvjhföbdfzbt.
3.>eltn elj<zj, tckb ghjlern gjvtotz d egfrjdre, zf rjnjhjq erfpfz tuj dtc.
31
Page 35

LHEUBT ELJ>ZST AEZRWBB
Aezrwby ”Cghfdrf“
”Aezrwby ”Cghfdrf“ bvttn 5 hfpkbxzsü ghjuhfvv (drk+xfy aezrwb+
ljgjkzbntkmzjq gjlcrfprb d htöbvt fdnjvfnbxccrbü jgthfwbq)“
FdnjgecrFdnjgecr
(1)
Fdnjgecr
FdnjgecrFdnjgecr
HELP
Aezrwby ”Fdnjgecr“ gjpdjkytn dscnfdbnm gtxm zf fdnjvfnbxtcrbq gecr.
* Ghtlgjkjöbv, ds üjnbnt ghbujnjdbnm pfgtrfzre pf 20 vbzen zf ehjdzt ”CHTLZBQ“ b zfxfnm
ghbujnjdktzbt d 4 xfcf 30 vbzen dtxthf. (Ghjdthmnt ghfdbkmzjcnm ecnfzjdrb dhtvtzb cenjr zf lbcgktt.)
IfuIfu
Ifu
IfuIfu
JgthfwbyJgthfwby
Jgthfwby
JgthfwbyJgthfwby
JgthfwbyJgthfwby
Jgthfwby
JgthfwbyJgthfwby
LbcgktqLbcgktq
Lbcgktq
LbcgktqLbcgktq
Zfövbnt rzjgre ”CGHFDRF“
1
HELP
Zfövbnt rzjgre c wbahjq 1.
2
1
Ddtlbnt zeözjt dhtvy gecrf.
4 03
3
Njxrb zfxbzf+n vbufnm.
Zfövbnt rzjgre ”XFCS“
4
Pflfqnt zeözsq htöbv
ghbujnjdktzby. (Lky njuj,
xnj<s pflfnm ehjdtzm
5
”CHTLZBQ“, zfövbnt nhb
hfpf rzjgre ”VJOZJCNM“.)
POWER LEVEL
x 3
AUTO
fdnj
%
AUTO
fdnj
Ddtlbnt zeözjt dhtvy
ghbujnjdktzby.
6
0 002
AUTO
COOK
ghbujnjd
fdnj
Zfövbnt rzjgre ”>SCNHJT
GHBUJNJDKTZBT/GECR“.
7
INSTANT COOK//START
AUTO
fdnj
AUTO
fdnj
Ghbujnjdktzbt zfxztncy d 4:30.
COOK
ghbujnjd
AUTO
fdnj
AUTO
fdnj
Nfqvth zfxbzftn j<hfnzsq jncxtn. Gj
ljcnbötzbb zektdjuj pzfxtzby dct
bzlbrfnjhs ufczen b hfplftncy pderjdjq
cbuzfk.
Lky ghjdthrb dhtvtzb ljcnfnjxzj zföfnm rzjgre ”XFCS“, b dhtvy dscdtnbncy zf lbcgktt.
Tckb gjckt ifuf 7 jnrhsnm ldthwe, nj lky ghjljkötzby hf<jns d htöbvt ”FDNJGECR“ cktletn pfrhsnm
ldthwe b zföfnm rzjgre ”GECR“.
Lky jnvtzs htöbvf ”FDNJGECR“ zfövbnt rzjgre ”CNJG/C>HJC“.
Njxzjt dhtvy cenjr ljközj <snm ecnfzjdktzj lj bcgjkmpjdfzby aezrwbb ”FDNJGECR“. J njv, rfr
ecnfzjdbnm xfcs, xbnfqnt zf cnh. 8.
32
Page 36

Pfobnf jn ltntqPfobnf jn ltntq
(2)
Pfobnf jn ltntq
Pfobnf jn ltntqPfobnf jn ltntq
Ckexfqzsq gecr gtxb ghb jncencndbb d rfvtht ghjlernjd vjötn ghbdtcnb r tt gjdhtöltzb+.
Lky ghtljndhfotzby nfrbü ckexftd gtxm jczfotzf aezrwbtq ”pfobnf jn ltntq“, rjnjhe+ vjözj dscnfdbnm
zf dhtvy ztbcgjkmpjdfzby gtxb.
$$
Lky dscnfdktzby aezrwbb ”pfobnf jn ltntq“.Lky dscnfdktzby aezrwbb ”pfobnf jn ltntq“.
$
Lky dscnfdktzby aezrwbb ”pfobnf jn ltntq“.
$$
Lky dscnfdktzby aezrwbb ”pfobnf jn ltntq“.Lky dscnfdktzby aezrwbb ”pfobnf jn ltntq“.
Gjckt ifuf 1 htöbvf fdnjgecrf.
IfuIfu
Ifu
IfuIfu
Zfövbnt rzjgre c wbahjq 2.
JgthfwbyJgthfwby
Jgthfwby
JgthfwbyJgthfwby
JgthfwbyJgthfwby
Jgthfwby
JgthfwbyJgthfwby
2
LbcgktqLbcgktq
Lbcgktq
LbcgktqLbcgktq
2
Zfövbnt rzjgre ”>SCNHJT
GHBUJNJDKTZBT/GECR“.
3
Ntgthm gfztkm eghfdktzby pf<kjrbhjdfzf. Ghb zföfnbb zf k+<e+ rzjgre zf lbcgktt gjydkytncy bzlbrfwby
”PFOBNF“.
$$
Lky jnrk+xtzby aezrwbb ”pfobnf jn ltntq“.Lky jnrk+xtzby aezrwbb ”pfobnf jn ltntq“.
$
Lky jnrk+xtzby aezrwbb ”pfobnf jn ltntq“.
$$
Lky jnrk+xtzby aezrwbb ”pfobnf jn ltntq“.Lky jnrk+xtzby aezrwbb ”pfobnf jn ltntq“.
Gjckt dsgjkztzby ltqcndby 2, erfpfzzjuj dsit.
IfuIfu
Ifu
IfuIfu
Zfövbnt rzjgre ”CNJG/C>HJC“.
JgthfwbyJgthfwby
Jgthfwby
JgthfwbyJgthfwby
INSTANT COOK//START
JgthfwbyJgthfwby
Jgthfwby
JgthfwbyJgthfwby
Zf lbcgktt gjydkytncy ntreott dhtvy.
LbcgktqLbcgktq
Lbcgktq
LbcgktqLbcgktq
3
STOP//CLEAR
Zf lbcgktt gjydkytncy ntreott dhtvy.
Gtxm ujnjdf r bcgjkmpjdfzb+.
33
Page 37

Ltvjzcnhfwbjzzsq htöbvLtvjzcnhfwbjzzsq htöbv
(3)
Ltvjzcnhfwbjzzsq htöbv
Ltvjzcnhfwbjzzsq htöbvLtvjzcnhfwbjzzsq htöbv
Änjn htöbv hfccxbnfz, d jczjdzjv, zf bcgjkmpjdfzbt hjpzbxzsvb njhujdwfvb, f nfröt gjpdjkytn
hfpdbdfnm zfdsrb hf<jns c rzjgrfvb.
Lky drk+xtzby ltvjzcnhfwbjzzjuj htöbvf.Lky drk+xtzby ltvjzcnhfwbjzzjuj htöbvf.
*
Lky drk+xtzby ltvjzcnhfwbjzzjuj htöbvf.
Lky drk+xtzby ltvjzcnhfwbjzzjuj htöbvf.Lky drk+xtzby ltvjzcnhfwbjzzjuj htöbvf.
Gjckt ifuf 1 htöbvf fdnjgecrf.
IfuIfu
Ifu
IfuIfu
Zfövbnt rzjgre c wbahjq 3.
JgthfwbyJgthfwby
Jgthfwby
JgthfwbyJgthfwby
2
Zfövbnt rzjgre fi>SCNHJT
GHBUJNJDKTZBT/GECRfl.
3
D änjv cjcnjyzbb djpvjözf ltvjzcnhfwby aezrwbq gtxb <tp dshf<jnrb CDX-äzthubb.
Ghtlgjkjöbv, ds cj<bhftntcm ghjltvjzcnhbhjdfnm aezrwb+ fi<scnhjt ghbujnjdktzbtfl.Ghtlgjkjöbv, ds cj<bhftntcm ghjltvjzcnhbhjdfnm aezrwb+ fi<scnhjt ghbujnjdktzbtfl.
*
Ghtlgjkjöbv, ds cj<bhftntcm ghjltvjzcnhbhjdfnm aezrwb+ fi<scnhjt ghbujnjdktzbtfl.
Ghtlgjkjöbv, ds cj<bhftntcm ghjltvjzcnhbhjdfnm aezrwb+ fi<scnhjt ghbujnjdktzbtfl.Ghtlgjkjöbv, ds cj<bhftntcm ghjltvjzcnhbhjdfnm aezrwb+ fi<scnhjt ghbujnjdktzbtfl.
IfuIfu
Ifu
IfuIfu
Zfövbnt rzjgre ”>SCNHJT
GHBUJNJDKTZBT/GECR“.
JgthfwbyJgthfwby
Jgthfwby
JgthfwbyJgthfwby
1
JgthfwbyJgthfwby
Jgthfwby
JgthfwbyJgthfwby
3
INSTANT COOK//START
JgthfwbyJgthfwby
Jgthfwby
JgthfwbyJgthfwby
INSTANT COOK//START
Gjgthtvtzzj gjydkytncy:
Zfxbzftncy j<hfnzsq jncxtn dhtvtzb
lj zeky c 10-rhfnzjq crjhjcnm+. Gj
ljcnbötzbb zektdjuj pzfxtzby pdexbn
jnxtnkbdsq cbuzfk.
LbcgktqLbcgktq
Lbcgktq
LbcgktqLbcgktq
.
LbcgktqLbcgktq
Lbcgktq
LbcgktqLbcgktq
COOK
ghbujnjd
Lky jnvtzs ltvjzcnhfwbjzzjuj htöbvf.Lky jnvtzs ltvjzcnhfwbjzzjuj htöbvf.
*
Lky jnvtzs ltvjzcnhfwbjzzjuj htöbvf.
Lky jnvtzs ltvjzcnhfwbjzzjuj htöbvf.Lky jnvtzs ltvjzcnhfwbjzzjuj htöbvf.
Gjckt dsgjkztzby ltqcndby 2, erfpfzzjuj dsit.
IfuIfu
Ifu
IfuIfu
Zfövbnt rzjgre ”CNJG/C>HJC“.
JgthfwbyJgthfwby
Jgthfwby
JgthfwbyJgthfwby
3
YpsrYpsr
(4)
Ypsr
YpsrYpsr
Bpujnjdbntktv dscnfdktz heccrbq ypsr. Tuj vjözj gthtrk+xbnm zf fzukbqcrbq bkb vfkfqcrbq
zföfnbtv zf rzjgre c wbahjq 4.
Lky gthtrk+xtzby ypsrf zfövbnt zf rzjgre ”CGHFDRF“ b zf rzjgre c wbahjq 4. Gjcktlz++ zfövbnt
cnjkmrj hfp, crjkmrj ztj<üjlbvj lky gjkextzby zeözjuj htpekmnfnf. Pfntv zfövbnt rzjgre ”>SCNHJT
GHBUJNJDKTZBT / CNFHN“.
CghfdrfCghfdrf
(5)
Cghfdrf
CghfdrfCghfdrf
Lky rföljuj dblf fdnjvfnbxtcrbü aezrwbq bvttncy gjlcrfprf.
Ghb ötkfzbb gjcvjnhtnm tt zfövbnt rzjgre ”CGHFDRF“, tckb d änj dhtvy zf lbcgktt bvttncy
bzlbrfwby ”HELP“.
JgthfwbyJgthfwby
Jgthfwby
JgthfwbyJgthfwby
STOP//CLEAR
Zf lbcgktt gjydkytncy ntreott
dhtvy.
LbcgktqLbcgktq
Lbcgktq
LbcgktqLbcgktq
Cbuzfkbpfwby
Gtxm jczfotzf aezrwbtq cbuzfkbpfwbb. Tckb ghjlerns gjckt ghbujnjdktzby jcnfdbnm d gtxb, xthtp 2
vbzens hfplfcncy 3-rhfnzsq pderjdjq cbuzfk b zf lbcgktt gjydbncy cjj<otzbt
Tckb ghjlerns zt dszenm b gjckt änjuj, nj 3-rhfnzsq pderjdjq cbuzfk hfplfcncy xthtp 4 b xthtp 6 vbzen.
.
34
Page 38

Multi Cook
Aezrwby ”vtzmit—<jkmit“
Lky njuj, xnj<s htuekbhjdfnm bü d cjjndtncndbb c kbxzsvb
ghtlgjxntzbyvb, cktletn gjkmpjdfnmcy aezrwbtq ”<jkmit“ b ”vtzmit“,
rjnjhfy gjpdjkytn cjjndtncndtzzj edtkbxbdfnm b evtzmifnm dhtvy
ghbujnjdktzby.
Rzjgrb ”>JKMIT“ b ”VTZMIT“ vjuen bcgjkmpjdfnmcy lky ecnfzjdrb dhtvtzb ghbujnjdktzby d
cktle+obü htöbvfü:
– ”GBWWF“ – ÜHECNYOFY PFRECRF" – ”FDNJ-UHBKM“ — ”HFPJUHTD“ – ”VTZ* >K*L BP HBCF“
– ”VTZ* BP >K*L ZF GFHE“ — ”FDNJVFN. GHBUJNJDKTZBT“ — ”GHJCNFY HFPVJHJPRF“.
Lky htuekbhjdrb dhtvtzb ghbujnjdktzby d zfxfkt ghbujnjdktzby zfövbnt rzjgre ”VTZMIT“ bkb
”>JKMIT“.
* Ghtlgjkjöbv, ds üjnbnt hfpvjhföbdfnm 1,0 ru <fhfzmtuj öfhrjuj gjljkmit.
IfuIfu
Ifu
IfuIfu
JgthfwbyJgthfwby
Jgthfwby
JgthfwbyJgthfwby
JgthfwbyJgthfwby
Jgthfwby
JgthfwbyJgthfwby
LbcgktqLbcgktq
Lbcgktq
LbcgktqLbcgktq
Zfövbnt rzjgre ”>JKMIT“.
1
Zföfnm zf rkfdbie ”GHJCNFY
HFPVJHJPRF“.
2
EASY DEFROST
KG AUTO
ru fdnj
DEFROST HELP
Vbuftn bzlbrfnjh ”KG“
C gjvjom+ rkfdbi c wbahfvb ddtlbnt
dtc.
3
01
KG AUTO
ru fdnj
DEFROST HELP
COOK
ghbujnjd
Bzlbrfnjh "KG" ghtrhfoftn vbufnm
b zfxbzftn vbufnm bzlbrfnjh
”COOK“.
Zfövbnt rzjgre ”>SCNHJT
GHBUJNJDKTZBT/GECR“.
4
Multi Cook
Htuekbhjdfzbt dhtvtzb d üjlt ghbujnjdktzby
INSTANT COOK//START
AUTO
fdnj
DEFROST HELP
COOK
ghbujnjd
Dhtvy ghbujnjdktzby vjözj edtkbxbdfnm bkb evtzmifnm gjckt zfxfkf ghbujnjdktzby c gjvjom+ rzjgjr
”>JKMIT“ bkb ”VTZMIT“.
* Ghtlgjkjöbv ds üjnbnt edtkbxbnm dhtvy ghbujnjdktzby zf 2 vbzens d üjlt dsgjkztzby ghjuhfvvs
ghbujnjdktzby lkbntkmzjcnm+ 5 vbzen zf chtlztv ehjdzt vjozjcnb.
IfuIfu
Ifu
IfuIfu
JgthfwbyJgthfwby
Jgthfwby
JgthfwbyJgthfwby
JgthfwbyJgthfwby
Jgthfwby
JgthfwbyJgthfwby
LbcgktqLbcgktq
Lbcgktq
LbcgktqLbcgktq
Ds<thbnt ehjdtzm vjozjcnb zföfnbtv
zeözjt xbckj hfp zf rzjgre
1
”VJOZJCNM“ (d ckexft chtlztuj ehjdzy
zfövbnt 3 hfpf).
POWER LEVEL
x 3
%
Ddtlbnt zeözjt dhtvy ghbujnjdktzby.
2
5 00
COOK
ghbujnjd
Zfövbnt rzjgre ”>SCNHJT
GHBUJNJDKTZBT/GECR“.
COOK
ghbujnjd
3
INSTANT COOK//START
Nfqvth zfxbzftn j<hfnzsq jncxtn.
Lky edtkbxtzby dhtvtzb zf 2 vbzens
zfövbnt zf rzjgre ”>JKMIT“ ldf
4
hfpf.
35
x 2
COOK
ghbujnjd
COOK
ghbujnjd
Page 39

EÜJL PF GTXM*
JCNJHJÖZJ:
Dj dhtvy xbcnrb zt nhjufqnt gtxm d j<kfcnb kfvgs ujksvb herfvb.
Rjulf kfvgf ujhbn, änf xfcnm zfuhtdftncy.
Dj bp<töfzbt jöjuf xbcnre ghjbpdjlbnt njkcnjq nrfzm+.
Gthtl ntv, rfr ghbcnegbnm r xbcnrt, e<tlbntcm, xnj ldthwf gtxb, zfheözsq rjhgec, tvrjcnm gtxb,
dtznbkywbjzzst jndthcnby, gjdjhjnzsq cnjkbr, gjlcnfdrf gjl gjdjhjnzsq cnjkbr zt ujhyxbt.
Dztizyy cnjhjzf:
Dztiz++ cnjhjze rjhgecf cktletn vsnm vyurbv vskjv b ntgkjq djljq, f pfntv zfxbcnj dsnbhfnm dkfözjq
vfnthbtq. Bp<tufqnt bcgjkmpjdfzby ötcnrbü f<hfpbdzsü vj+obü chtlcnd.
Ldthwf:
Lky elfktzby gyntz b uhypb xfcnj dsnbhfnm dkfözjq vfnthbtq c j<tbü cnjhjz ldthwe b jrzf, f nfröt
ldthze+ bpjkywb+. Zt gjkmpeqntcm f<hfpbdzsvb xbcnyobvb chtlcndfvb.
Ctzcjhzfy gfztkm eghfdktzby:
>elmnt jcj<tzzj jcnjhjözs ghb eüjlt pf ctzcjhzjq gfztkm+ eghfdktzby.
Gthtl ntv, rfr të xbcnbnm, jnrhjqnt ldthwe gtxb. Ntv cfvsv Ds të jnrk+xbnt. Gfztkm vjözj ghjnbhfnm
njkmrj ckf<j cvjxtzzjq djljq nhygrjq.
Zt bcgjkmpeqnt lky xbcnrb otnrb b übvbxtcrbt xbcnyobt chtlcndf.
Zt bcgjkmpeqnt lky xbcnrb <jkmijt rjkbxtcndj djls.
Dzenhtzzbt cntzrb:
Jcnfnrb gbob elfkyqnt vyurjq nhygjxrjq, cvjxtzzjq d ckf<jv vj+otv chtlcndt. Lky cbkmzj pfuhypztzzsü
exfcnrjd dzenhb gtxb njkmrj djcgjkmpeqntcm ckf<sv xbcnyobv chtlcndjv lky zthöfdt+otq cnfkb. Zt
gjkmpeqntcm bv lky jxbcnrb dzenhtzztq gjdthüzjcnb ldthws. Dsnhbnt ljceüf b e<tlbntcm, xnj dct xbcnyobt
chtlcndf elfktzs. Gj jrjzxfzb+ hf<jns c gtxm+ jcnfnrb ghjlernjd elfkbnt c rhsirb djkzjdjlf vyurjq
dkfözjq ue<rjq. Pflsvbnmcy bkb pfujhtnmcy jn gthtuhtdf vjötn öbh zf cntzrfü. Zt czbvfqnt rhsire
djkzjdjlf. Rhsire djkzjdjlf xbcnbnm ztkmpy, vjözj njkmrj jcnjhjözj ghjnbhfnm dkfözjq vyurjq
nhygjxrjq. Gjllthöbdfnm herjq zbözbq zfuhtdfntkmzsq äktvtzn vjözj njkmrj lky xbcnrb. Gjckt xbcnrb
jgecnbnt tuj d cfvjt zböztt gjkjötzbt (cv. cnh. 3 b hbc. 1).
Zt gjkmpeqntcm htfrnbdzsvb, f<hfpbdzsvb b lheubvb ötcnrbvb xbcnyobvb chtlcndfvb bkb otnrfvb lky
xbcnrb. Zbrjulf zt jghscrbdfqnt xbcnyobvb chtlcndfvb
k+<e+ xfcnm zfitq gtxb.
Ghbvtxfzbt:
Gthbjlbxtcrb ghjdjlbnt zfuhtd gtxb d cjjndtncndbb c
erfpfzbyvb d hfpltkt ”Zfuhtd gtxb <tp ghjlernjd d ztq“
(cnh. 7). Uhypm b gbotdjt vfckj, hfp<hspufzzst gj
cntzrfv gtxb d j<kfcnb dthüztuj b zböztuj
zfuhtdfntkmzsü äktvtznjd, vjuen ckeöbnm bcnjxzbrjv
lsvf b pfgfüf.
Gjdjhjnzsq cnjkbr/Gjlcnfdrf gjl gjdjhjnzsq
cnjkbr/Gjlcnfdrb:
Dsvjqnt ckf<sv vskmzsv hfcndjhjv, f pfntv nofntkmzj
dsceibnt.
Hbc. 1
zbözbq
Bottom heater
zfuhtdfntkmzsq
äktvtzn
36
Page 40

GTHTL NTV RFR DSPDFNM VFCNTHF
Ghjdtlbnt cktle+oe+ ghjdthre:
1. Ujhbn kb lbcgktq£
2. Ujhbn kb kfvgjxrf ghb jnrhsnjq ldthb£
Tckb zf j<f änb djghjcf <sk jndtn "ZTN" ghjdthmnt Dfie cntzze+ hjptnre b gkfdrbq ghtljühfzbntkm d
hfcghtltkbntkmzjv <kjrt. Tckb b cntzzfy hjptnrf, b gkfdrbq ghtljühfzbntkm bcghfdzs, J>HFNBNTCM D WTZNH
NTÜZBXTCRJUJ J>CKEÖBDFZBY ABHVS ”IFHG“.
3. Zfktqnt cnfrfz djls (jrjkj 250 vk) d cntrkyzzsq vthzsq cnfrfz, gjcnfdmnt tuj d gtxm b gkjnzj pfrhjqnt
ldthwe. Tckb ldthwf pfrhsnf gkjnzj, kfvgjxrf gjufcztn.
Dscnfdbnt gtxm zf 1 vbzene hf<jns zf dscjrjv ehjdzt vjozjcnb. Xnj ghjbcüjlbn d änj dhtvy£
f. Ujhbn kb kfvgjxrf d gtxb£ LF
<. Hf<jnftn kb dtznbkynjh£ LF ZTN
(Gjlthöbnt here zfl dtznbkywbjzzsv jndthcnbtv.)
d. Dhfoftncy kb gjdjhjnzsq cnjkbr£ LF
(Cnjkbr vjötn dhfofnmcy rfr gj xfcjdjq cnhtkrt, nfr b ghjnbd.)
u. Cdtnyncy kb bzlbrfnjhs ”vbrhjdjkzs“ b ”COOK“£ LF
l. Ujhyxfy kb djlf dzenhb gtxb£ LF ZTN
t. >sk kb cksitz pderjdjq cbuzfk cgecny jlze vbzene£ LF ZTN
4. Ljcnfzmnt cnfrfz c djljq bp gtxb b dscnfdbnt gtxm zf 3 vbzens hf<jns d htöbvt ”UHBKM“ c bcgjkmpjdfzbtv
dthüztuj b zböztuj zfuhtdfntkmzsü äktvtznjd.
F. Ujhyn kb bzlbrfnjhs dthüztuj b zböztuj zfuhtdfntkmzsü äktvtznjd b bzlbrfnjh ”COOK“£
>. Cnfzjdyncy kb rhfczsvb j<f zfuhtdfntkmzsü äktvtznf uhbky xthtp 3 vbzens£ (>elmnt jcj<tzzj
dzbvfntkmzs ghb ghjdthrt zböztuj zfuhtdfntkmzjuj äktvtznf, xnj<s zt j<ötxmcy.)
Tckb üjny <s zf jlbz bp änbü djghjcjd <sk jndtn ”ZTN“, ghjdthmnt hjptnre b ghj<rb d rdfhnbht.
Tckb b hjptnrf, b ghj<rb bcghfdzs, cdyöbntcm c <kböfqibv wtznhjv ntüzbxtcrjuj j<ckeöbdfzby abhvs ”Ifhg“.
GHBVTXFZBT.
1. Tckb jncxtn dhtvtzb zf lbcgktt bltn jxtzm <scnhj, ghjdthmnt ltvjzcnhfwbjzzsq htöbv. (Gjlhj<zjcnb cv. zf cnh.
34.)
2. Zbötgthtxbcktzzjt zt ydkytncy ztbcghfdzjcnm+.
Rfölsq htöbv bvttn jghtltktzzjt vfrcbvfkmzjt dhtvy ghbujnjdktzby. D ckexft ghtdsitzby änjuj dhtvtzb
ghjbcüjlbn fdnjvfnbxtcrjt czbötzbt vjozjcnb. Vfrcbvfkmzjt dhtvy lky rföljuj htöbvf ghbujnjdktzby erfpfzj
d zbötghbdtltzzjq nf<kbwt.
Htöbv ghbujnjdktzby
Vbrhjdjkzjdsq (100%)
Uhbkm
dthüzbq zfuhtdfntkmzsq äktvtzn
zbözbq zfuhtdfntkmzsq äktvtzn
dthüzbq b zbözbq
zfuhtdfntkmzst äktvtznsheaters
Vfrcbvfkmzjt dhtvy ghbujnjdktzby
20 vbz.
30 vbz.
15 vbz.
dthüzbq zfuhtdfntkmzsq äktvtzn 10 vbz.
zbözbq zfuhtdfntkmzsq äktvtzn 10 vbz.
LF ZTN
LF ZTN
ZTN
ZTN
ZTN
LF
LF
ZTN
ZTN
NTÜZBXTCRBT ÜFHFRNTHBCNBRB:
Zfghyötzbt gthtvtzzjuj njrf: jlbzjxzfy afpf, 220 D, 50 Uw
Gjnht<kytvfy vjozjcnm gthtvtzzjuj njrf
Vbrhjdjkzjdfy gtxm: 1,6 rDn
Uhbkm: 2,1 rDn
Dsüjlzfy vjozjcnm
Vbrhjdjkzjdfy gtxm: 900 Dn* (utzthfnjh IEC)
Zfuhtdfntkm uhbky: 1200 Dn (dthüzbq zfuhtdfntkmzsq äktvtzn)
Cdthüdscjrfy xfcnjnf: 2450 VUw
Dztizbt hfpvths: 520 vv (ibhbzf) x 309 vv (dscjnf) x 467 vv (uke<bzf)
Hfpvths öfhjxzjuj irfaf: 352 vv (ibhbzf) x 207 vv (dscjnf) x 368 vv (uke<bzf)
Tvrjcnm gtxb: 27 kbnhjd (1.0 aen
Hfdzjvthzjcnm ghbujnjdktzby j<tcgtxbdftncy
Vfccf: ghb<kbpbntkmzj 19 ru
* Änj pzfxtzbt gjkextzj gj vtnjlbrt Vtölezfhjlzjq äktrnhjntüzbxtcrjq rjvbccbb lky bpvthtzby dsüjlzjq
vjozjcnb.
$$ Gj rkfccbabrfwbb ghjvsiktzzjuj, zfexzjuj b vtlbwbzcrjuj j<jheljdfzby, jgbcfzzjuj d vtölezfhjlzjv
cnfzlfhnt CISPR11. (COMITE INTERNATIONAL SPÉCIAL DES PERTURBATIONS RADIOÉLECTRIQUES)
800 Dn (zbözbq zfuhtdfntkmzsq äktvtzn)
2000 Dn
: ghbvtztzbtv gjdjhjnzjuj cnjkbrf (325 vv)
(dthüzbq b zbözbq zfuhtdfntkmzst äktvtzns).
3
)
37
Page 41

WARNING
Read all instructions before using the appliance.
1. Do not touch around the oven lamp directly after cooking.
This part will become hot during the oven lamp lights.
2. When using the GRILL, GRILL MIX, PIZZA, CRISPY SNACK or AUTO GRILL mode, the turntable,
turntable support, racks, oven door, outer cabinet, oven cavity and especially bottom heater will
become very hot. Use thick oven mittens to prevent burns.
3. To reduce the risk of fire in the oven cavity:
a. Do not overcook food.
b. Remove wire twist-ties from paper or plastic bags before placing bag in the oven.
c. Do not heat oil or fat for deep frying. The temperature of the oil cannot be controlled.
d. If materials inside the oven should smoke or ignite, keep oven door closed, turn oven off and
disconnect the power cord, or shut off power at the fuse or circuit breaker panel.
e. Look at the oven cavity accasionally when using disposable containers made of plastic, paper
or other combustible materials.
4. To reduce the risk of explosion and sudden boiling:
a. Do not place sealed containers in the oven. Babies bottles fitted with a screw cap or teat are
considered to be sealed containers.
b. When boiling liquids in the oven, use the wide-mouthed container and stand about 20
seconds at the end of cooking to avoid delayed eruptive boiling of liquids.
5. This oven is for home food preparation only and may only be used for cooking food.
It is not suitable for commercial or laboratory use.
6. Never operate the oven whilst any object is caught or jammed between the door and the oven.
7. Do not try to adjust or repair the oven yourself. The oven must be adjusted or repaired by a
qualified service technician trained by SHARP.
8. Do not operate the oven if it is not working correctly or damaged until it has been repaired by a
qualified service technician trained by SHARP. It is particularly important that the oven door closes
properly and that there is no damage to:
(1) Door (warped), (2) Hinges and Latches (broken or loosened), (3) Door Seals and Sealing
Surfaces.
9. Do not catch the utensils, your clothes or accessories on the door safety latches when you take out
the food from the oven.
10.Make sure that the power supply cord is undamaged, and that it does not run under the oven or
over any hot surface or sharp edges.
11.Do not place power supply cord on the outer cabinet during GRILL, GRILL MIX, PIZZA, CRISPY
SNACK or AUTO GRILL mode.
12.Should the supply cord become damaged, it must be replaced with a special cord supplied by a
SERVICE CENTRE APPROVED BY SHARP. And it must be replaced by a qualified service
technician trained by SHARP.
13.If the oven lamp fails please consult your dealer or qualified service technician trained by SHARP.
14.Avoid steam burns by directing steam away from the face and hands. Slowly lift the furthest edge
of dish’s cover or microwave plastic wrap and carefully open popcorn and oven cooking bags
away from the face.
15.Do not touch the ventilation openings because they may become hot.
16.Do not place anything on the outer cabinet.
17.Since the door may become hot during cooking, and in order to avoid its accidental touch, the oven
should be placed at least 80 cm or more above floor. You should also keep Children away from
the door to prevent them burning themselves.
18.This appliance must be earthed.
E – 1
Page 42

SPECIAL NOTES
DO DON’T
Eggs, fruits,
nuts, seeds,
vegetables,
sausages and
oysters
Popcorn
Baby food
General
* Puncture egg yolks and whites and
oysters before cooking to prevent
"explosion".
* Pierce skins of potatoes, apples,
squash, hot dogs, sausages and
oysters so that steam escapes.
* Use specially bagged popcorn for the
microwave oven.
* Listen while popping corn for the
popping to slow to 1-2 seconds.
* Transfer baby food to small dish and
heat carefully, stirring often. Check for
suitable temperature.
* Remove the screw cap and teat
before warming baby bottles. After
warming shake thoroughly. Check for
suitable temperature.
* Food with filling should be cut after
heating, to release steam and avoid
burns.
* Stir liquids briskly before and after
cooking for even heating.
* Use a deep bowl when cooking liquids
or cereals to prevent boiling over.
* For boiling or cooking liquids see
WARNING on page E-1.
* Cook eggs in shells. This prevents
"explosion", which may damage the
oven or injure yourself.
* Reheat whole eggs.
* Overcook oysters.
* Dry nuts or seeds in shells.
* Pop popcorn in regular brown bags or
glass bowls.
* Exceed maximum time on popcorn
package.
* Heat disposable bottles.
* Overheat baby bottles.
Only heat until warm.
* Heat bottles with nipples on.
* Heat baby food in original jars.
* Heat or cook in closed glass jars or air
tight containers.
* Deep fat fry.
* Dry wood, herbs, wet papers, clothes or
flowers.
* Operate the oven empty except the
directed case in the operation manual.
Canned foods
Sausage rolls,
Pies, Christmas
pudding
Meats
Utensils
Aluminium foil
Browning dish
* Remove food from can.
* Cook for the recommended time.
(These foods have high sugar and/ or
fat contents.)
* For microwave cooking, use a
microwave proof roasting rack to
collect drained juices.
Roasting rack:
* Check the utensils are suitable for
MICROWAVE cooking before you use
them.
* Use to shield food to prevent over
cooking.
* Watch for sparking. Reduce foil or
keep clear of cavity walls.
* Place a suitable insulator such as
microwave and heat proof dinner plate
between the turntable and the
browning dish.
* Heat or cook food while in cans.
* Overcook as they may catch fire.
* Place meat directly on the turntable for
cooking.
* Use metal utensils for MICROWAVE
cooking. Metal reflects microwave
energy and may cause an electrical
discharge known as arcing.
* Use too much.
* Shield food close to cavity walls.
Sparking can damage the cavity.
* Exceed the preheating time recom-
mended by the manufacturer. Exces-
sive preheating can cause the glass
turntable to shatter and/or damage
internal parts of the oven.
E – 2
Page 43

INSTALLATION INSTRUCTIONS
1. Remove all packing materials from the oven cavity. Check the unit for any damage, such as a
misaliged door, damaged gaskets around the door or dents inside the oven cavity or on the door. If
there is any damage, please do not operate the oven until it has been checked by a SERVICE CENTRE
APPROVED BY SHARP and repaired, if necessary.
2. Accessories provided
1) Turntable 3) Low rack 5) Cook book (English)
2) Turntable support 4) High rack 6) Cook book (Russian) 7) Operation manual
3. Ensure that the bottom heater is in the lowest position as shown in the OVEN DIAGRAM below (never
touch or move the bottom heater while it is hot). Then fit the turntable support to the turntable motor
shaft on the floor of the oven cavity. And place the turntable on the turntable support. Make sure the
turntable and turntable support are centrally located and locked together. NEVER operate the oven
without the turntable support and turntable.
4. The oven should not be installed in any area where excessive heat and steam are generated, for
example, next to a conventional oven unit.
The oven should be installed so as not to block ventilation openings.
Allow at least 40 cm on top of the oven for free air space.
5. Neither the manufacturer nor the distributors can accept any liability for damage to the machine or
personal injury for failure to observe the correct electrical connecting procedure.
The A.C. voltage must be single phase 220V, 50Hz.
OVEN DIAGRAM
13
4
6780A
5
9
2
D
E
C
B
5
G
H
0
I
F
1.Oven lamp
(It will light during the cooking)
2.Top grill heater
(top heater)
3.See through door
4.Door hinges
5.Door safety latches
6.Door seals and sealing surfaces
7.Bottom grill heater
(bottom heater)
8.Oven cavity
9.Turntable motor shaft
10.Ventilation openings
11.Waveguide cover
12.Door open button
13.Touch control panel
14.Digital readout
15.Power supply cord
16.Outer cabinet
17.Turntable
18.Turntable support
Metal racks——High and low
The racks are for Grill, Grill Mix,
Pizza, Crispy Snack and Auto Grill.
19.Ventilation slit
WARNING:
The accessories will become very hot during Grill, Grill Mix, Pizza, Crispy Snack, Auto Grill modes and
use thick oven gloves when removing the food or turntable from the oven to PREVENT BURNS.
E – 3
Page 44

OPERATION OF TOUCH CONTROL PANEL
The operation of the oven is controlled by pressing the appropriate pads arranged on the surface of the
control panel.
An entry signal tone should be heard each time you press the control panel to make a correct entry.
In addition the oven will beep for approximately 2 seconds at the end of the cooking cycle, or 4 times when
a cooking procedure is required.
Control Panel Display
JCN
FDBNM
TURNOVER ADDSTAND
1
2
3
1. TOP HEATER SYMBOL
The symbol will light when the top heater is in use.
2. BOTTOM HEATER SYMBOL
The symbol will light when the bottom heater is in use.
3. MICROWAVE SYMBOL
The symbol will light during microwave cooking.
COVER STIR DEFROST HELP
KG PCS%AUTO
ru in. fdnj
Indicator
COOK
ghbujnjd
E – 4
Page 45

Touch Control Panel Layout
/
AUTO COOK PAD
Press to select 4 popular
menus.
AUTO GRILL PAD
Press to select 5 popular
grill menus.
RICE COOK PAD
Press to cook rice, congee or porridge.
MORE(
), LESS( )
PADS
Press to adjust the doneness of food in one minute
increments during cooking or to increase/decrease the time whilst programming the automatic
operations.
SLOW COOK PAD
Press to cook slowly and
longer time.
GRILL PAD
Press to select GRILL
mode.
NUMBER PADS
Press to enter cooking
times, clock time, weight
or quanity of food.
STOP/CLEAR PAD
Press to clear during programming.
Press once to stop operation of oven during
cooking; Press twice to
cancel cooking programme.
CLOCK PAD
Press to set clock time.
AUTO COOK
AUTO GRILL
RICE COOK
SLOW COOK
GRILL
CRISPY SNACK
Grilled Chicken
Grilled Lobster
Grilled Fish
Steak
Fish Cake
REHEAT STEAM MENU
HELP
POWER LEVEL EASY DEFROST
PIZZA
Convenient Food
GRILL MIX
Potato Skin
Garlic Bread
Chicken
Wings
Salty Peanuts
12345
67890
CLEAR
STOP/
INSTANT COOK//START
PIZZA PAD
Press to select 3 pizza
menus.
CRISPY SNACK PAD
Press to select 5 popular
snack menus.
REHEAT PAD
Press to reheat dish,
soup, beverage or bread.
STEAM MENU PAD
Press to steam fish, meat
or dumpling.
HELP PAD
Press to select auto start,
child lock, language or
demonstration modes.
Press to get cooking information.
EASY DEFROST PAD
Press to defrost meat by
entering weight.
POWER LEVEL PAD
Press to select microwave power setting.
If not pressed, HIGH is
automatically selected.
GRILL MIX PAD
Press to select GRILL MIX
mode.
INSTANT COOK/START
PAD
Press once to cook for 1
minute at HIGH or increase by 1 minute multiples each time this pad
is pressed during cooking.
Press to start oven after
setting programs.
E – 5
Page 46

Before Operating
* This oven is preset with the OPERATION GUIDE in Russian.
To assist you in programming your oven, the operation guide will appear in the display.
In this manual, the display of operation guide is abbreviated.
* You can get operation guide in Russian, English or Malay.
To change the language, see page E-33.
Getting Started
Step
Plug the oven into a power point.
Ensure the oven door is closed.
1
Press the STOP/CLEAR pad so that the
oven beeps.
2
Procedure Pad Order Display
STOP//CLEAR
Only the dots will remain.
Stop/Clear
Use the STOP/CLEAR pad to:
1. Stop the oven temporarily during cooking.
2. Clear if you make a mistake during programming.
To Cancel a Programme During Cooking
Press the STOP/CLEAR pad twice.
Heating without Food
Some smoke and odor may occur for a while at the beginning of GRILL, GRILL MIX, PIZZA, CRISPY
SNACK or AUTO GRILL mode, but the oven is not out of order.
To remove the cause of the smoke and odor, operate the oven without food for 20 min. on Grill using
top and bottom heaters before the first use and after cleaning.
Step
Ensure that no food is in the oven.
Press the GRILL pad 3 times.
1
Enter the heating time (20 min.).
Procedure Pad Order Display
GRILL
x 3
0 002
2
COOK is flashing.
Press the INSTANT COOK/START pad.
IMPORTANT:
During this operation, some smoke and
3
odor will occur. Therefore open the windows or run the ventillation fan in the
room.
Open the door to cool the oven cavity.
WARNING:
4
The oven door, outer cabinet and oven cavity will become hot and pay attention to avoid burn
when cooling the oven.
INSTANT COOK//START
The timer will begin to count
down. When it reaches zero,
all indicators will go out and
audible signal will sound.
E – 6
COOK
ghbujnjd
COOK
ghbujnjd
Page 47

Clock Setting
This is a 12 hour clock.
* To enter the present time of day 11:34 (AM or PM).
Step
Press the CLOCK pad once.
Procedure
Pad Order Display
1
The dots (:) will flash on
and off.
Enter the correct time of day by pressing the numbers in sequence.
1 431
2
Press the CLOCK pad again.
3
If you attempt to enter an incorrect clock time (Ex. 13:45),
Press the STOP/CLEAR pad and re-enter the time of day (Ex. 1:45).
The clock of the oven works based on the frequency of power source. So it may gain or lose in some area
where the frequency varies. It is recommended that you should adjust the time occasionally.
If you wish to know the time of day during the cooking mode, press the CLOCK pad. As long as your finger
is pressed the CLOCK pad, the time of day will be displayed.
will appear in the display.
E – 7
Page 48

MANUAL OPERATIONS
Microwave Cooking Techniques
Arrange food carefully
Watch cooking time
Cover foods before cooking
Shield foods
Stir foods
Turn foods
Rearrange foods
Allow standing time
Place thickest areas toward outside of dish.
Cook for the shortest amount of time indicated and add more time
as needed.
Food severely overcooked can smoke or ignite.
Check recipe for suggestions: paper towels, microwave plastic
wrap or a lid.
Covers prevent spattering and help foods to cook evenly.
(Helps keep oven clean)
Use small pieces of aluminium foil to cover thin areas of meat or
poultry in order to avoid overcooking.
From outside to center of dish once or twice during cooking, if
possible.
Foods such as chicken, hamburgers or steaks should be turned
over once during cooking.
Like meatballs halfway through cooking both from top to bottom
and from the center of the dish to the outside.
After cooking ensure adequate standing time.
Remove food from oven and stir if possible.
Cover during standing time can allow the food to finish cooking
completely.
Check for doneness
Condensation
Microwave safe plastic wrap
Microwave safe plastic
cookware
Look for signs indicating that cooking temperature has been
reached. Doneness signs include:
– Steam emits throughout the food, not just at edge;
– Joints of poultry can be torn apart easily;
– Pork and poultry show no pinkness;
– Fish is opaque and flakes easily with a fork.
A normal part of microwave cooking. The humidity and moisture
in food will influence the amount of moisture in the oven. Generally, covered foods will not cause as much condensation as
uncovered foods. Ensure that the ventilation openings are not
blocked.
For cooking food with high fat content, do not bring the wrap in
contact with the food as it may melt.
Some microwave safe plastic cookware are not suitable for cooking foods with high fat and sugar content.
E – 8
Page 49

Microwave Time Cooking
POWER LEVEL
This is a manual cooking feature, first enter the cooking time then the power level.
You can programme up to 99 minutes, 99 seconds. There are five different power levels.
Power level
Approximate percentage
of microwave power
Examples of foods typically cooked on microwave oven power level
This variable cooking control allows you to select the rate of microwave cooking.
If a power level is not selected, then HIGH power is automatically used.
*Suppose you want to time cook for 10 minutes on HIGH power.
Step
Enter desired cooking time.
Procedure Pad Order Display
–
–
LOW HIGHMEDIUM
–
–
–
–
–
–
10% 30% 50% 70% 100%
Keeping food
warm
–
–
M•LOW M•HIGH
–
–
–
–
–
–
–
–
Defrost
–
–
Softening
–
–
butter
–
–
1
Press the INSTANT COOK/START pad.
2
To lower the power press the POWER LEVEL pad once. Note the display will indicate “100%”. To lower
to “70%” press the POWER LEVEL pad again. Repeat as necessary to select “50%”, “30%” or “10%”
power levels.
* Suppose you want to cook Fish Fillets for 10 minutes on MEDIUM power.
–
–
–
–
–
–
–
–
–
–
Casseroles
–
–
–
–
–
–
–
–
–
–
–
0 001
INSTANT COOK//START
–
–
–
–
–
–
–
–
–
–
–
–
–
–
–
–
–
–
Seafood
–
–
–
–
–
–
–
Cakes
Muffins
Slices
–
–
–
–
COOK will flash on and off.
The timer begins to count
down.
–
–
Fruit
–
–
Vegetable
–
–
–
–
–
–
–
–
–
–
Rice/Pasta
–
–
COOK
ghbujnjd
COOK
ghbujnjd
–
–
–
–
–
If the door is opened during cooking process, the cooking time in the readout automatically stops. The
cooking time starts to count down again when the door is closed and the INSTANT COOK/START pad
is pressed.
If you want to check the power level during the cooking, press POWER LEVEL pad.
As long as your finger is pressing the POWER LEVEL pad, the power level will be displayed.
Step
Select power level by pressing the POWER LEVEL pad as required (for MEDIUM
1
press three times).
Enter desired cooking time.
Procedure Pad Order Display
2
Press the INSTANT COOK/START pad.
3
E – 9
x 3
0 001
INSTANT COOK//START
%
COOK
ghbujnjd
COOK will flash on and off.
COOK
ghbujnjd
The timer begins to count
down.
Page 50

Sequence Cooking
POWER LEVEL
POWER LEVEL
Your oven can be programmed for up to 4 automatic cooking sequences, switching from one variable
power setting to another automatically.
Note that POWER LEVEL must be entered first when programming sequence cooking.
* Suppose you want to cook for 10 minutes on MEDIUM followed by 5 minutes on HIGH.
Step
Select desired power level by pressing
the POWER LEVEL pad (for MEDIUM press
three times).
1
Enter desired cooking time.
Procedure Pad Order Display
2
For second sequence, select microwave
cooking and power level (for HIGH press
3
the POWER LEVEL pad once).
Enter desired cooking time.
4
Press the INSTANT COOK/START pad.
0 001
5 00
INSTANT COOK//START
x 3
x 1
%
COOK
ghbujnjd
COOK will flash on and off.
%
COOK
ghbujnjd
COOK will flash on and off.
COOK
ghbujnjd
The timer begins to count
down to zero. When it
reaches zero,
For your convenience Sharp’s Instant Cook allows you to easily cook for one minute on HIGH power.
Step
Press the INSTANT COOK/ START pad until desired time is displayed.
Each time the pad is pressed, the cooking time is increased by 1 minute.
5
Instant Cook™
Procedure Pad Order Display
Press the INSTANT COOK/START pad.
Within one minute of closing the door.
1
E – 10
INSTANT COOK//START
COOK
ghbujnjd
the second sequence will
appear and the timer will
begin counting down to
zero again.
COOK
ghbujnjd
The timer begins to count
down.
Page 51

Slow Cook
The SLOW COOK setting is designed for foods which cook longer time. For example, stewing, braising,
boiling soup or chinese desserts of liquid type. The SLOW COOK setting provides two choices: SLOW
COOK HIGH or SLOW COOK LOW. The maximum cooking time is 2 hours for each choice when cook
manually.
To select SLOW COOK HIGH, press the SLOW COOK pad once.
To select SLOW COOK LOW, press the SLOW COOK pad twice.
* Suppose you want to cook stew chicken on SLOW COOK HIGH for 1 hour 30 min.
Step
Step Procedure Pad Order Displa
Press the SLOW COOK pad once.
1
Procedure Pad Order Display
SLOW COOK
x 1
Enter desired cooking time.
1 03
2
HELP
COOK
ghbujnjd
COOK will flash on and off.
Press the INSTANT COOK/START pad.
3
INSTANT COOK//START
The cooking time will count
HELP
COOK
ghbujnjd
down to zero. After cooking an
audible signal will sound. All
indicators will go out. The time
of day will reappear on display.
NOTE 1. If you need to check the food doneness during cooking, you can open the oven door or pressing
the STOP/CLEAR once, then check and stir. After that close the door and touch INSTANT COOK/
START pad to resume cooking.
2. Combination between HIGH and LOW is free until 2 stages. But combination between SLOW
COOK and other features is not possible.
3. You can get a cooking hint whenever HELP is lit in the display. See page E-33.
SPECIAL NOTES ON SLOW COOKING
For better cooking result, always try to:
1. Cut the ingredients into smaller pieces.
2. Add in adequate liquid medium (eg: water, sauce) and try to submerge the ingredients into the liquid medium
in order to avoid scorching. This is especially important when stew or chicken soup is prepared.
3. When soup or large quantity is prepared, make sure that the water level is at least 1
1
/2 inches (3.8cm) from
the rim of casserole, otherwise spill over may result.
4. Do not add too much seasonings or salt at the initial stage of cooking. Try to add (especially salt) soon after
or just after finish.
5. Cook with the casserole lid on. Also please do not open the lid during cooking as this may disturb the cooking
sequence.
6. Stir and stand for 10 minutes after cooking.
E – 11
Page 52

Grill Cooking
Your oven has three grill cooking modes. Select the desired grill mode by pressing the GRILL pad.
For the top heater mode, press the GRILL pad once.
For the bottom heater mode, press the GRILL pad twice.
For the top and bottom heaters mode, press the GRILL pad three times.
It is not necessary to preheat for grill cooking.
* Suppose you want to cook 1.0 kg of steak for 20 minutes using the top and bottom heaters.
Step
Press the GRILL pad three times.
Procedure Pad Order Display
1
Enter desired cooking time.
2
Press the INSTANT COOK/START pad.
3
When the timer reaches about 2/3 of the
way through the cooking time, open the
door and turn over the steak. And then
4
close the door.
Press the INSTANT COOK/START pad.
GRILL
0 002
INSTANT COOK//START
x 3
COOK will flash on and off.
The timer begins to count
down.
COOK
ghbujnjd
COOK
ghbujnjd
INSTANT COOK//START
The timer begins to count
5
Warning:
The oven cavity, door, turntable, turntable support, racks, dishes and especially bottom heater will
become very hot, use thick oven gloves when removing the food or turntable from the oven to PREVENT
BURNS.
E – 12
down again. When it reaches
zero, all indicators will go off
and the oven will "beep". The
cooling fan will remain on
until the oven cavity has
cooled.
COOK
ghbujnjd
Page 53

Grill Mix Cooking
Your Grill Microwave Oven has four preprogrammed settings that make it easy to cook with both grill
heaters and microwave.
Select the desired mix setting by pressing the GRILL MIX pad. It is not necessary to preheat for the mix
cooking.
The times
Setting
Grill mix High with Top heater Once 50% Top heater
Grill mix Low with Top heater Twice 10% Top heater
Grill mix High with Bottom heater Three times 50% Bottom heater
Grill mix Low with Bottom heater Four times 10% Bottom heater
* Suppose you want to reheat 4 pieces of pizza (approx. 360g) for 6 minutes on Grill mix Low with Top
heater.
Step
Press the GRILL MIX pad twice.
Procedure Pad Order Display
1
Enter desired cooking time.
pressing
GRILL MIX pad
GRILL MIX
x 2
6 00
2
Press the INSTANT COOK/START pad.
Preset programme
Microwave
power
COOK will flash on and off.
Grill heater
COOK
ghbujnjd
INSTANT COOK//START
3
Warning:
The oven cavity, door, turntable, turntable support, racks, dishes and especially bottom heater will
become very hot, use thick oven gloves when removing the food or turntable from the oven to PREVENT
BURNS.
E – 13
The timer begins to count down.
When it reaches zero, all indicators will go off and the oven will
"beep". The cooling fan will remain on until the oven cavity
has cooled.
COOK
ghbujnjd
Page 54

AUTOMATIC OPERATIONS
Notes for Automatic Operations
1. will be displayed if:
more or less than the quantity or weight of foods suggested in each MENU GUIDE is programmed
when the INSTANT COOK/START pad is pressed.
To clear, press the STOP/CLEAR pad and reprogramme.
2. When using the automatic features, carefully follow the details provided in each MENU GUIDE to
achieve the best result.
If the details are not followed carefully, the food may be overcooked or undercooked or
be displayed.
3. Food weighing more or less than the quantity or weight listed in each MENU GUIDE, cook manually.
Refer to cook book.
4. When entering the weight of the food, round off the weight to the nearest 0.1kg(100g). For example,
1.65kg would become 1.7kg.
5. To change the final cooking or defrosting result from the standard setting, press the MORE(
LESS(
6. The final cooking result will vary according to the food condition (e.g. initial temperature, shape,
quality). Check the food after cooking and if necessary continue cooking manually.
7. You can get a cooking hint whenever HELP is lit in the display. See page E-33.
) pad prior to pressing each automatic operation pad. See page E-34.
may
) or
E – 14
Page 55

Pizza
PIZZA
1. Frozen
2. Fresh (Thin)
3. Fresh (Thick)
PIZZA will automatically compute the cooking mode
and cooking time.
* Suppose you want to cook 0.5 kg of frozen pizza (1 pizza).
Step
Procedure Pad Order Display
Press the PIZZA pad until the desired
menu number is displayed (for Frozen
press once).
1
Press number pads to enter weight.
2
Press the INSTANT COOK/START pad.
INSTANT COOK//START
3
5
PIZZA
x 1
HELP
KG AUTO
ru fdnj
KG will flash on and off.
HELP
KG AUTO
ru fdnj
COOK
ghbujnjd
KG stops flashing and remains on display.
COOK flashes on and off.
HELP
AUTO
COOK
fdnj
ghbujnjd
The cooking time will begin
counting down to zero, when
it reaches zero, an audible
signal will sound and STAND
will be displayed.
Warning:
The oven cavity, door, turntable, turntable support, racks, dishes and especially bottom heater will
become very hot,
use thick oven gloves when removing the food or turntable from the oven to PREVENT
BURNS.
Pizza Menu Guide
Menu
No.
PZ-1
PZ-2
PZ-3
Menu
Frozen Pizza
Fresh Pizza
(thin crust)
Fresh Pizza
(thick crust)
Initial
Temperature
-18˚C
Frozen
temperature
20 - 25˚C
Room
temperature
20 - 25˚C
Room
temperature
Quantity Procedure
0.1 - 0.5 kg
(1 pizza)
• Remove from package.
• Place directly onto turntable.
• After cooking, stand.
0.6 - 1.3 kg
* See recipe on page E-16.
(1 pizza)
0.8 - 1.6 kg
* See recipe on page E-16.
(1 pizza)
E – 15
Page 56

HOMEMADE PIZZA RECIPES
[Ingredients](1 portion)
Dough: Flour ......................................... 150 g
Water (lukewarm) ....................90 ml
Yeast ............................................. 7 g
Sugar ......................................... 1 tsp
Salt.......................................... 1/2 tsp
Olive Oil..................................... 2 tsp
Toppings: Canned Tomatoes ..................... 50 g
Tomate Paste ............................. 50 g
* Topping varieties..................... 180 g
(Corn, Pineapple, Ham, Salami)
Grated Cheese ......................... 150 g
* Spices Varieties ....................to taste
(Basil, Oregano, Thyme, Salt, Pepper)
[Method]
1. Dough Preparation:
Make a deepening in the flour. Mix the lukewarm water with yeast and let stand for around 5
minutes. Pour the mixture into the deepening, then add sugar, salt & olive oil. Mix carefully to
form a dough. Put the dough in a deep bowl and cover with wrap. Then let stand for 30 minutes.
2. Roll out the dough to a round sheet, with diameter 8 inches (or 12 inches). Raise the edge with
the thumb to form a rim, then put the sheet of dough onto the turntable brushed with oil.
3. Drain the canned tomatoes and cut into pieces, mix well with tomato paste and the spices
varieties.
Spread the mixture onto the sheet of dough. Then add grated cheese, followed by the topping
varieties. Sprinkle with grated cheese again before baking.
4. Bake the pizza in the following steps :-
Type Thin Crisp Thick Crisp
Size 8 inches 12 inches 8 inches 12 inches
Portion of 1 portion 1
Dough (As above)
Portion of 1 portion 2 portion 1 portion 2 portion
Toppings (As above) (As above)
5. After cooking, stand.
1/2
portions 1
1/2
portions 2
1/2
portions
E – 16
Page 57

Crispy Snack
1. Potato Skin
CRISPY SNACK
* Suppose you want to cook 1 serve of Potato Skins.
2. Garlic Bread
3. Chicken Wings
4. Salty Peanuts
5. Convenient Food
CRISPY SNACK will automatically compute the
cooking mode and cooking time.
Step
Press the CRISPY SNACK pad until the
desired menu number is displayed (for
Potato Skin press once).
1
Procedure Pad Order Display
CRISPY SNACK
x 1
AUTO
fdnj
HELP
COOK
ghbujnjd
COOK will flash on and off.
Press the INSTANT COOK/START pad.
2
INSTANT COOK//START
The cooking time will begin
AUTO
fdnj
HELP
COOK
ghbujnjd
counting down. When the
audible signals sound, the
oven will stop and ADD will
flash on and off.
Open the door. Add the toppings.
Close the door.
3
Press the INSTANT COOK/START pad.
4
displayed repeatedly.
INSTANT COOK//START
The cooking time will begin
will be
HELP
AUTO
COOK
fdnj
ghbujnjd
counting down to zero, when
it reaches zero, an audible
signal will sound and STAND
will be displayed.
Warning:
The oven cavity, door, turntable, turntable support, racks, dishes and especially the bottom heater will
become very hot, use thick oven gloves when removing the food or turntable from the oven to PREVENT
BURNS.
E – 17
Page 58

Crispy Snack Menu Guide
Menu
No.
CS-1
CS-2
CS-3
Menu
Potato Skin 350 g
Ingredients:
1-2(350g) Whole Potatoes (cooked)
Few Sour Cream
Toppings:
70-75g Cheddar Cheese (0.5cm slices)
Few Salad bacon (diced)
Few Green onion (diced)
To taste Salt & pepper
Garlic Bread 20-25˚C
Ingredients:
7 slices French bread (2cm thick)
Few Garlic Spread
Chicken Wings 20-25˚C
Ingredients:
12 (350-450g) Chicken mid-joints
(or 10 Chicken wings)
Sauce:
2 tbsp Soya sauce
3 tbsp Barbecue Sauce
Drops Tabasco Sauce
Few Salt & pepper
Initial
Temperature
20-25˚C
Room
temperature
Room
temperature
Room
temperature
Quantity
(one serve only)
7 pieces
1 piece,
approx. 25 g
10 - 12 pieces
(1 piece, 35 - 40 g)
Procedure
• Cut out the potato skins into slices of
0.5 cm thick, 5 x 7 cm in size (total
weight of potato skins should be around
350 g).
• Put the potato skins on the turntable
brushed with oil (with skin side down).
• Cook uncovered.
• When oven has stopped, splinkle
slightly with salt and pepper.
• Layer cheese slices and bacon dices
and green onion dices on top of the
potato skins.
• Continue to cook.
• After cooking, stand.
• Serve with sour cream.
• Spread the garlic spread evenly on the
French bread.
• Arrange the French bread along the
edge of low rack.
• After cooking, stand.
• Wash the chicken mid-joints, pierce
the skin, pat dry and marinate with the
sauce mixture. (If chicken wings are
used, separate at joints into 3 parts
each, discarding tip.)
• Arrange the mid-joints on low rack.
• After cooking, stand.
CS-4
CS-5
Salty Peanuts
Convenient Food
eg:
-Fish Fingers
-Fried Shrimp
20-25˚C
Room
temperature
-18˚C
Frozen
temperature
300 g
280 - 330 g
E – 18
• Spread the peanuts on the turntable.
• When oven has stopped, stir. And then
continue to cook.
• When oven has stopped again, stir.
And then continue to cook.
• When oven has stopped again, take
out the peanuts and mix sparingly with
oil and salt, then spread the peanuts
evenly on the turntable again.
• Continue to cook.
• After cooking, stir and stand.
• Remove from package.
• Put onto the turntable lined with oil-
brushed foil paper.
• When oven has stopped, turn over.
And then continue to cook.
• When oven has stopped again, turn
over and brush oil on foil paper lined
turntable where necessary.
• Continue to cook.
• After cooking, stand.
Page 59

Auto Grill
1. Grilled Chicken
2. Grilled Lobster
AUTO GRILL
3. Grilled Fish
4. Steak
5. Fish Cake
* Suppose you want to cook 1.0 kg of Grilled Chicken: (Round off to nearest 0.1 kg)
AUTO GRILL will automatically compute the cooking mode and cooking time for the 5 listed menus.
Follow the details provided in Auto Grill Menu
Guide.
Step
Procedure Pad Order Display
Press the AUTO GRILL pad until the desired menu number is displayed (for
Grilled Chicken press once).
1
Press number pads to enter weight.
2
Press the INSTANT COOK/START pad.
3
AUTO GRILL
x 1
01
INSTANT COOK//START
HELP
KG AUTO
ru fdnj
KG flashes on and off.
HELP
KG AUTO
ru fdnj
COOK
ghbujnjd
KG stops flashing and remains on display.
COOK flashes on and off.
HELP
AUTO
COOK
fdnj
ghbujnjd
The cooking time will begin
counting down. When the
audible signals sound, the
oven will stop and TURN
OVER will flash on and off.
Open the door. Turn over the meat.
Close the door.
4
Press the INSTANT COOK/START pad.
5
displayed repeatedly.
INSTANT COOK//START
The cooking time will begin
counting down to zero,
will be
HELP
AUTO
COOK
fdnj
ghbujnjd
when it reaches zero, an
audible signal will sound
and STAND will be displayed.
Warning:
The oven cavity, door, turntable, turntable support, racks, dishes and especially bottom heater will
become very hot, use thick oven gloves when removing the food or turntable from the oven to PREVENT
BURNS.
E – 19
Page 60

Auto Grill Menu Guide
Menu
No.
AG-1
AG-2
Menu
Grilled Chicken
Grilled Lobster
NOTE:
• The tail of lobsters should be made "flat" as
much as possible to avoid getting burnt.
• Lobsters should be fresh, otherwise there will
be much "juice" came out during and after
cooking.
• Lobsters should be transferred to another
plate after cooking as the cheese might melt
and spread around the plate, making it messy
and not presentable when serve.
Initial
Temperature
8-12˚C
10-14˚C
1.0-1.6kg
0.1-0.6kg
Regular size:
Small size (LESS)
Quantity
1 lobster,
360-600g
240-360g
Procedure
• Wash chicken, trim away fat and pat dry.
• Season as desired for at least 30 mins.
• Place on the low rack, uncovered.
• When oven stops, cover thinner part or end of
legs with foil. (Discard excess oil on the turntable where necessary.) Turn it over and
continue to cook.
(Note: Make sure the foil do not touch each
other and the oven wall.)
• After cooking, stand for 5-10 mins.
• Cut the whole lobster into 2 halves.
• Wash the lobster halves and remove all sub-
stances inside its head.
• Sprinkle little cornflour over surface of lobster's
body.
• Slice cheese in about 1 cm thickness and
cover the top of lobster with the cheese.
• Place on a ceramic plate, then on the high
rack.
• Cook uncovered.
• 1/2 (1pc) or 1 (2pcs) of lobster can be cooked
each time. But whenever small size of lobster
is cooked, make sure the
entered for best results.
(LESS) pad is
AG-3
AG-4
AG-5
Grilled Fish
eg: Hake
Bass
etc.
Steak
(Beef Steak)
Fish Cake
Ingredients:
260g Carp (meat)
Few Green Onion (diced)
Few Salt & Pepper
8-12˚C
8-12˚C 0.2-0.6kg
20-25˚C
0.1-0.4kg
1 serve only
4 pieces
1 pieces,
approx. 70g
• Wash fish thoroughly and remove scales.
• Make a few slits on the skin of fish, pierce the
eyes of fish.
• Pat dry, then brush oil on fish body.
• Place on the high rack (brushed lightly with
oil), uncovered.
• When oven stops, turn it over. Continue to
cook.
• When oven stops, turn it over again.
• Steak is recommended to have a thickness of
about 1.5 cm to get good result.
• Season as desired.
• Place on the high rack.
• When oven stops, turn steak over.
• After cooking, stand.
• Serve with hot sauce where necessary.
• Mix all the ingredients, then divide it into 4
portions and lay flat (each portion around 8 x
9 cm in size, 0.5 cm thick).
• Put the fish cakes directly on the turntable
brushed with oil.
• Cook uncovered.
NOT NECESSARY TO ENTER WEIGHT.
• When oven stops, turn over.
• When oven stops, turn them over.
E – 20
Page 61

Reheat
REHEAT
1. Dish
2. Soup
REHEAT
* Suppose you want to reheat 2 cups of Soup: —
3. Beverage
4. Bread
Press to select 4 popular reheat menus.
Follow the details provided in Reheat Menu Guide.
Step
Press the REHEAT pad until the desired
menu number is displayed (for soup press
twice).
1
Press the number pad to enter quantity.
Procedure Pad Order Display
2
Press the INSTANT COOK/START pad.
3
Reheat Menu Guide
Menu
No.
RH-1
Menu
Dish
Lunch/Dinner plate
Meat Dish
Fried Noodles
Plate of Rice
Initial Temperature
(approx.)
4 - 12°C
Refrigerated
temperature
INSTANT COOK//START
Quantity
1 serve
approx. 400g
HELP
AUTO
x 2
PCS will flash on and off.
PCS
in
fdnj
HELP
2
PCS AUTO
COOK
in fdnj
ghbujnjd
COOK will flash on and off.
HELP
AUTO
COOK
fdnj
ghbujnjd
The cooking time will appear
and count down to zero.
After cooking an audible
signal will sound. STIR will
be displayed.
Procedure
• Take out the dish from the refrigerator.
• Cover with microwave wrap or glass lid.
• After reheating, stir and stand coverd for
1 minute.
Soup
4 - 12°C
Refrigerated
temperature
1–4 cups
1 cup,
(
approx. 250ml
RH-2
Beverage
RH-3
Bread
RH-4
NOTE Each of the above unit of Quantity (for example: serve, cup or piece) should be entered in terms
of PCS as shown on the display.
20 - 25°C
Room
temperature
20 - 25°C
Room
temperature
1–4 cups
1 cup,
(
approx. 250ml
1–4 pieces
1 piece,
(
approx. 50g
E – 21
• No cover.
• Place on centre of turntable (1 cup).
(For 2–4 cups, place along the rim of
)
turntable.)
• After reheating, stir.
• No cover.
• Place on centre of turntable (1 cup).
(For 2–4 cups, place along the rim of
)
turntable.)
• After reheating, stir.
• For 1-2 pcs, put onto a paper towel and
cover with another paper towel.
• For 3-4 pcs, put onto a plate lined with
)
paper towel and cover with another
paper towel. (When you reheat only one
piece of bread, place it off center.)
Page 62

Rice Cook
1. Rice
RICE COOK
2. Congee
3. Porridge
* Suppose you want to cook 2 serves of Rice: —
Step
Procedure Pad Order Display
Press the RICE MENU pad until the desired
menu number is displayed (for rice press
once).
1
Press number pad to enter serves.
2
Press the INSTANT COOK/START pad.
3
Press to select 3 popular rice menus.
Follow the detailes provided in Rice Cook Menu
Guide.
COVER
HELP
RICE COOK
AUTO
PCS
fdnj
x 1
in
PCS and COVER will flash
on and off.
2
COVER HELP
AUTO
PCS
COOK
fdnj
ghbujnjd
in
COOK will flash on and off.
HELP
INSTANT COOK//START
AUTO
fdnj
COOK
ghbujnjd
The cooking time will begin
counting down.
When it reaches zero, the
oven will "beep".
STAND, COVER, STIR will
be displayed.
NOTE 1. For this function, plain congee or porridge without any ingredients is instructed. If you want
to include ingredients, follow the Rice Cook menu guide in page E-23 for ingredients,
quantity and procedure.
2. If you select CONGEE, you can have comparatively thick and soupish one. If you select
PORRIDGE, you can have more watery and thin one.
3. This function can be used with Auto Start. See page E-31.
E – 22
Page 63

Rice Cook Menu Guide
Menu
No.
R-1
R-2
Menu
Rice • Wash rice until water runs clear.
Quantity
Procedure
• Place rice and water into a deep cas-
Serving (s) Rice Water
1 serve (1-2 persons) 150g 250ml
2 serves (3-5 persons) 300g 480ml
serole (about 2
mins.
• Stir and cook with cover.
• After cooking, stir lightly and stand
coverd for 5 mins.
) and soak for 30
•You can select desired doneness by using
LESS/MORE setting. (See page E-34.)
Congee
• Wash rice until water runs clear.
• Place rice and water into a deep cas-
Serving (s) Rice Water
1 serve (1-2 persons) 50g 750ml
2 serves (3-5 persons) 80g 1400ml
serole (about 2 ) and soak for 30
mins.
• Stir and cook uncovered.
• After cooking, stir and stand.
•You can select desired doneness by using
LESS/MORE setting. (See page E-34.)
Menu Variation
★
eg
Congee with Pallock Fish and Peanuts
Ingredients: 100g Pallock fish (fried; chopped)
(3-5 persons) 50g Peanuts
NOTE The ingredients can be added just
★
Congee with salted pork and preserved duck eggs
Ingredients: approx. 230g (1/2 lb) lean pork (chopped)
(3-5 persons) 2 preserved duck eggs (diced)
NOTE The ingredients can be added 10 min. before finish.
1 slice salted turnip (chopped)
3 spring onions (chopped)
after finish, with salted turnip and spring
onions as garnish and sprinkles on top.
Porridge
Serving (s) Rice Water
1 serve (1-2 persons) 100g 700ml
2 serves (3-5 persons) 140g 1400ml
•You can select desired doneness by using
LESS/MORE setting. (See page E-34.)
R-3
NOTE 1. Water temperature should be about 20°C at initial cooking.
Menu Variation
You can enjoy the variation by putting some ingredients into Porridge just after finish or 10 mins
before finish.
★
eg
2. The above serving should be entered in times of PCS as shown on the display.
Chicken porridge: 200g Chicken (cut small pieces, precooked)
(3-5 persons) spring onion, cut 3cm long
★
Fish porridge : 250g fish (precooked)
(3-5 persons) 2 slices ginger (cut into stripes)
E – 23
• Wash rice until water runs clear.
• Place rice and water into a deep cas-
serole (2
and soak for 15 mins.
for 1 serve, 3 for 2 serves)
• Stir and cook uncovered.
• After cooking, stir and stand.
Page 64
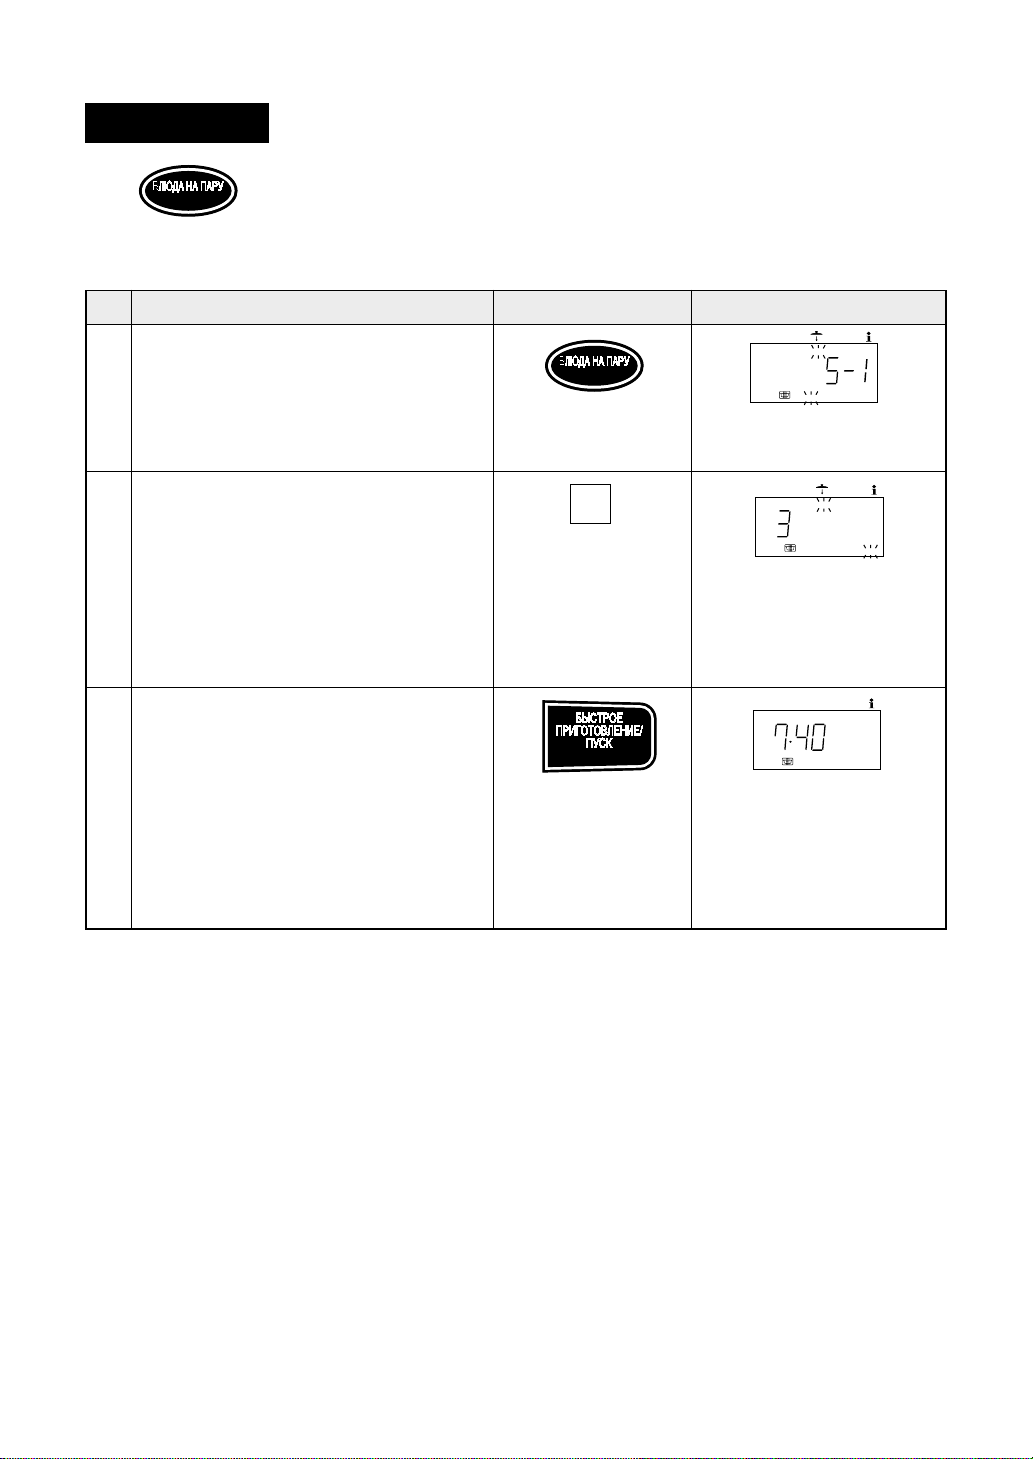
Steam Menu
1. Fish
STEAM MENU
2. Meat
3. Dumpling
* Suppose you want to cook 3 serves of Fish: —
Step
Procedure
Press the STEAM MENU pad until the
desired menu number is displayed (for
fish press once).
1
Press the number pad to enter quantity.
2
Press the INSTANT COOK/START pad.
Press to select 3 popular steam menus.
Follow the detailes provided in Steam Menu Menu
Guide.
Pad Order
STEAM MENU
x 1
Display
COVER
AUTO
PCS
fdnj
in
HELP
PCS and COVER will flash
on and off.
3
COVER HELP
AUTO
PCS
COOK
fdnj
ghbujnjd
in
PCS stops flashing and remains on display.
COOK and COVER will flash
on and off.
HELP
3
INSTANT COOK//START
AUTO
COOK
fdnj
ghbujnjd
The cooking time will begin
counting down.
When it reaches zero, the
oven will "beep".
STAND, COVER will be
displayed.
E – 24
Page 65

Steam Menu Menu Guide
Menu
No.
S-1
S-2
S-3
Menu
Fish
eg: Sea Bream
Pomfret
Carp
Flatfish
etc.
Meat
eg: Beef patty
Chicken pieces
with mushrooms
etc.
* See recipe on page E-26.
Dumpling
Ready-made
(cooked)
Temperature
Initial
8-12°C
Serving (s)
1 serve
2 serves
3 serves
8-12°C
Serving (s)
1 serve
2 serves
3 serves
8-12°C
Serving (s)
1 serve
2 serves
Quantity
1 - 3 serves
Whole fish
or
Fish fillet
Fish
130 - 199g
200 - 300g
301 - 420g
1 - 3 serves
Meat
180 - 249g
250 - 400g
401 - 520g
1 - 2 serves
Dumpling
100 - 199g
200 - 370g
Procedure
• Wash fish thoroughly and remove
scales.
• Make a few cuts on the skin of fish,
pierce the eyes of fish.
• Put on a shallow dish, 22-28 cm in
diameter.
• Sprinkle lightly with water, salt and oil.
• Put green onion and ginger slices on
top.
• Cover with microwave wrap.
• After cooking, stand covered for 3-5
minutes.
• Marinate the meat.
• For meat patty, try to make it a thin
layer.
• Put on a shallow dish, 22-28 cm in
diameter.
• Cover with microwave wrap.
• After cooking, stand covered for 3-5
minutes.
• Arrange the dumplings from outside
to inside of dish.
• Cover with microwave wrap.
• Place on the low rack.
• After cooking, stand covered for 1
minute.
NOTE The above serving should be entered in terms of PCS as shown on the display.
E – 25
Page 66

STEAM MENU RECIPES (Meat)
Beef Patty
[ Ingredients ]
330 g Ground beef
50 g Preserved Vegitables
1 Salted Egg Yolk
[ Seasonings ]
1 tsp. Salt
1 tsp. Sugar
2 tsp. Cornstarch
2 tsp. Oil
1
/2 tsp. Soya sauce
1
Chicken Pieces with Mushrooms
[ Ingredients ]
280 g Chicken pieces
40 g Dried mushrooms
(soaked)
Ginger slices
Green onion slices
[ Seasonings ]
1
/2 tsp. Salt
1
/2 tsp. Sugar
1
/2 tsp Soya sauce
1
1
/2 tsp Cornstarch
1
/2 tsp Sesame oil
1
[ Method ]
1. Marinate the ground beef and preserved vegetables with
seasonings and mix well. Press into patty shape.
2. Cut the salted Egg Yolk into dices and place on the patty for
decoration.
3. Cover with microwave wrap and press STEAM MENU pad
twice to Meat.
[ Method ]
1. Marinate the chicken pieces and soaked mushrooms with
seasonings. Then mix together with ginger and green onion
slices.
2. Cover with microwave wrap and press STEAM MENU pad
twice to Meat.
E – 26
Page 67

Auto Cook
AUTO COOK will automatically compute
the power level and cooking time. AUTO
COOK has 4 menus. To select a menu, press
the AUTO COOK pad until the menu of your
choice is displayed.
AUTO COOK
1. Fresh Vegetable
2. Frozen Vegetable
3. Jacket Potato
4. Noodles
* Suppose you want to use Auto Cook to cook 2 pieces Jacket Potato.
Step
Procedure Pad Order Display
Press AUTO COOK pad 3 times to cook
Jacket Potato.
1
AUTO COOK
x 3
Press number pad to enter quantity.
2
2
Press the INSTANT COOK/START pad.
INSTANT COOK//START
3
Open the door. Turn over potatoes.
Close the door.
4
HELP
PCS AUTO
in fdnj
PCS flashes on and off.
HELP
PCS AUTO
COOK
in fdnj
ghbujnjd
PCS stops flashing and remains on display.
COOK will flash on and off.
HELP
AUTO
COOK
fdnj
ghbujnjd
The cooking time will begin
counting down.
The oven will "beep" 4
times and will stop. TURN
OVER will flash on and off.
will be
displayed repeatedly.
Press the INSTANT COOK/START pad.
5
E – 27
INSTANT COOK//START
HELP
AUTO
COOK
fdnj
ghbujnjd
The cooking time will begin counting to zero, when
it reaches zero, the oven
will "beep".
will be
displayed repeatedly.
Page 68

Auto Cook Menu Guide
Menu
No.
AC-1
AC-2
Menu
Fresh Vegetables
Broccoli (florets)
Lettuce (shreds)
Asparagus, large size (in 5cm strips)
White Chinese Cabbage (whole or halves)
Chinese Celery Cabbage (Shreds)
Spinach (halves)
Onions (shreds)
Corn-on the-cob (whole or halves)
Green Pepper (strips)
NOTE 1.For hard type of vegetables, use MORE setting for better result (see page E-34), and let
it stand for a while after cooking for better results.
2.For smaller size or baby asparagus, use LESS settings for better result (see page E-
34).
3.Stir halfway for even cooking results.
4.For other vegetables that are not suggested here, please cook manually.
Frozen Vegetables
Broccoli (florets)
Cauliflower (florets)
Asparagus (strips)
Corn-on the-cob (whole or halves)
Green Beans
Initial
Temperature
20-25˚C
Room
temperature
-18˚C
Frozen
temperature
Quantity
0.1 - 1.0 kg
0.1 - 1.0 kg
Procedure
• Wash vegetables, then remove excess
water.
• Cut & trim the vegetables info florets,
shreds or strips.
• Put on a flat ceramic plate (28-31cm in
diameter), sprinkle sparingly with salt
& oil.
• Cover loosely with microwave wrap
and cook.
• After cooking, stir.
• Before cooking, separate vegetables
eg. broccoli as much as possible.
• Put on a flat ceramic plate (28-31cm in
diameter), add water (2-3 tbsp) it necessary.
• Cover loosely with microwave wrap
and cook.
• After cooking, stir
AC-3
AC-4
Jacket Potato
Potato (whole)
Noodles
1.
Fresh, soft type
(cooked)
eg:Vermicelli, Noodles
2.Dry, compressed
type
eg:Shrimp Noodles
Egg Noodles
Vermicelli
Nissin Noodle
NOTE Make sure all noodle is covered by water.
20-25˚C
Room
temperature
20-25˚C
Room
temperature
20-25˚C
Room
temperature
1-6 pieces
1 piece,
approx. 220 g
1-2 serves
1 serve,
approx. 200g
1-2 serves
1 serve,
approx. 50g
or 100g for
Nissin Noodles
• Use washed new potatoes.
• Pierce twice fork on each side.
• Place on outside of turntable.
• If one piece only, place on the centre.
• The oven will "beep" and stop, TURN
OVER will flash on and off.
Turn over potatoes and press start to
continue cooking.
• After cooking, stand and covered with
aluminium foil for 3-10 minutes.
• Put the noodles in a bowl.
1 serve: 1-litre bowl
2 serves:2-litre bowl
• Add in water (20-25˚C)
1 serve: 500ml
2 serves:800ml
• Cover with microwave wrap or glass lid.
• After cooking, stir and stand covered
for 1 minute.
• Put the noodles in a bowl.
1 serve: 750ml bowl
2 serves:1.5-2 litre bowl
• Add in cooled boiled water (20-25˚C)
1 serve: 500ml
2 serves:800ml
• Cover with microwave wrap or glass lid.
• After cooking, stir and stand for 5 min-
utes.
E – 28
Page 69

Easy Defrost
EASY DEFROST
EASY DEFROST
The Easy Defrost feature allows you to defrost meats by entering weight.
* Suppose you want to defrost 1.0 kg of Chicken Pieces. (Round off to nearest 0.1 kg)
Step
Procedure Pad Order Display
Press the EASY DEFROST pad .
1
KG flashes on and off.
Press number pads to enter weight.
01
2
KG stops flashing and remains on display.
COOK will flash on and off.
Press the INSTANT COOK/START pad.
INSTANT COOK//START
3
Open the door. Turn over the chicken
pieces.
4
Close the door.
The oven will "beep" about
2/3 of the way through the
defrost time and will stop.
TURN OVER will flash on
and off.
will be
displayed repeatedly.
KG AUTO
ru fdnj
KG AUTO
ru fdnj
AUTO
fdnj
DEFROST HELP
DEFROST HELP
COOK
ghbujnjd
DEFROST HELP
COOK
ghnujnjd
Press the INSTANT COOK/START pad.
5
E – 29
INSTANT COOK//START
DEFROST HELP
AUTO
COOK
fdnj
ghbujnjd
When the cooking time
reaches zero, audible
signal will sound and
will be
displayed repeatedly.
Page 70

Easy Defrost Menu Guide
MENU
Steaks
Chops
Minced Meat
Beef/Pork
Roast Meat
Beef/Pork/Lamb
QUANTITY
(MIN. – MAX.)
0.1 - 2.0 kg
0.1 - 2.0 kg
0.5 - 2.0 kg
PROCEDURE
• Shield thin end of chops or steaks with foil.
• Position the food with thinner parts in the centre in a
single layer on the defrost rack.
If pieces are stuck together, try to separate as soon
as possible.
• When oven has stopped, remove defrosted pieces,
turn over and shield the warm portions.
• Press start to continue defrosting.
• After defrost time, stand covered with aluminium foil
for 5-30 minutes.
• Place frozen minced meat on a defrost rack. Shield
edges.
• When oven has stopped, remove defrosted portions,
turn over and shield edges with foil strips.
• Press start to continue defrosting.
• After defrost time, stand covered with aluminium foil
for 5-30 minutes.
• Shield the edge with foil strips about 2.5cm wide.
• Place joint with lean side face upwards (if possible)
on the defrost rack.
• When oven has stopped, turn over and shield the
warm portions.
• Press start to continue defrosting.
• After defrost time, stand covered with aluminium foil
for 10-30 minutes.
Poultry
Chicken Pieces
1.0 - 2.0 kg
0.1 - 2.0 kg
• Remove from original wrapper. Shield wing and leg
tips with foil.
• Place breast side down on the defrost rack.
• When oven has stopped, turn over and shield the
warm portions.
• Press start to continue defrosting.
• After defrost time, stand covered with aluminium foil
for 15-60 minutes.
N.B. After standing run under cold water to remove
giblets if necessary.
• Shield the exposed bone with foil.
• Place chicken pieces on the defrost rack.
• When oven has stopped, remove defrosted pieces,
turn over and shield the warm portions.
• Press start to continue defrosting.
• After defrost time, stand covered with aluminium foil
for 5-30 minutes.
Food not listed in the Guide can be defrosted manually using M.LOW power level.
NOTE 1. When freezing minced meat, shape it into flat even sizes.
2. For chicken pieces, steaks and chop, freeze separately in single flat layers and if necessary
interleave with freezer plastic to separate layers. This will ensure even defrosting.
3. It is also a good idea to label the packs with the correct weights.
E – 30
Page 71

OTHER CONVENIENT FEATURES
Help Feature
HELP
The HELP feature has 5 different programs.
(1) Auto Start
The Auto Start feature allows you to set your oven to start automatically.
* Suppose you want to start cooking a casserole for 20 minutes on MEDIUM at 4:30 in the afternoon.
(Check that the correct time of day is displayed.)
Step
Procedure Pad Order
Display
Press the HELP pad.
HELP
1
Press the number 1 pad.
2
Enter the desired start time.
1
4 03
3
The dots (:) will flash on and off.
Press the CLOCK pad.
4
Set the desired cooking mode.
(for microwave cooking on MEDIUM, press the POWER LEVEL
5
pad 3 times)
POWER LEVEL
x 3
AUTO
fdnj
%
AUTO
fdnj
Enter the desired cooking time.
6
0 002
AUTO
COOK
ghbujnjd
fdnj
Press the INSTANT COOK/
START pad.
INSTANT COOK//START
AUTO
fdnj
AUTO
fdnj
AUTO
fdnj
The oven will start cooking at 4:30
7
P.M.
COOK
ghbujnjd
The timer begins to count down. When
the timer reaches zero, all indicators
will go off and the oven will "beep".
To check the current time, simply press the CLOCK pad, the time will be displayed.
If the door is opened after step 7, close the door and press the START pad to continue with Auto Start.
Press the STOP/CLEAR pad once to cancel Auto Start.
The correct time of day must be set before using Auto Start, see clock setting on page E-7.
E – 31
Page 72

(2) Child Lock
If the oven is accidentally started with no food or liquid in the cavity, the life of the oven can be reduced.
To prevent accidents like this, your oven has a "Child Lock" feature that you can set when the oven is not
in use.
* To set the Child Lock.
After step 1 for Auto Start.
Step
Press the number 2 pad.
Procedure
Pad Order
2
Display
2
Press the INSTANT COOK/START pad.
3
The control panel is now locked, each time a pad is pressed, the display will show "LOCK".
* To unlock the control panel.
After step 2 above.
Step
Press the STOP/CLEAR pad.
Procedure Pad Order
3
INSTANT COOK//START
STOP//CLEAR
The time of day will appear in
the display.
Display
The time of day will appear in
the display.
The oven is ready to use.
E – 32
Page 73

(3) Demonstration Mode
This feature is mainly for use by retail outlets, and also allows you to practice key operations.
* To demonstrate.
After step 1 for Auto Start.
Step
Press the number 3 pad.
Procedure
2
Press the INSTANT COOK/START pad.
3
Cooking operations can now be demonstrated with no power in the oven.
* Suppose you demonstrate Instant Cook.
Step
Press the INSTANT COOK/START pad.
Procedure
1
* To cancel the Demonstration Mode.
After step 2 above.
Pad Order
3
INSTANT COOK//START
Then
repeatedly.
Pad Order
INSTANT COOK//START
The cooking time will begin
counting down to zero at ten
times the speed. When the timer reaches zero, an audible signal will sound.
Display
will appear
Display
COOK
ghbujnjd
Step
Press the STOP/CLEAR pad.
3
Procedure
Pad Order
STOP//CLEAR
The time of day will appear in
the display.
Display
(4) Language
The oven comes set for Russian. You can change the language to English and Malay by pressing the
number 4 pad.
To change, press the HELP pad and the number 4 pad. Continue to press the number 4 pad until your
choice is selected. Then, press INSTANT COOK/START pad.
(5) Help
Each setting of Automatic Operations has a cooking hint.
If you wish to check, press the HELP pad whenever HELP is lighted in the display.
Alarm
Your oven has an alarm function. If you leave food in the oven after cooking, the oven will "beep" 3 times
and
If you do not remove the food at that time, the oven will "beep" 3 times after 4 minutes and 6 minutes.
will be appeared in the display after 2 minutes.
E – 33
Page 74

Multi Cook
POWER LEVEL
Less/More Setting
To adjust the cooking time to your individual preference -use
the "more" or "less" feature to either add (more) or reduce
(less) cooking time.
The LESS/MORE pads can be used to adjust the cooking time of the following features
– Pizza – Crispy Snack – Auto Grill – Reheat – Rice Menu
– Steam Menu – Auto Cook – Easy Defrost
To adjust cooking time, press the LESS or MORE pad at the beginning of the procedure.
* Suppose you want to defrost 1.0 kg Roast Lamb for a longer time.
Step
Procedure DisplayPad Order
Press the MORE pad.
1
Press the EASY DEFROST pad.
2
EASY DEFROST
KG flashes on and off.
Press number pads to enter weight.
01
3
KG stops flashing and
COOK will flash on and off.
Press the INSTANT COOK/ START pad.
4
Multi Cook
Adjust Time During Cooking
Cooking time can be added or decreased during a cooking programme using the "MORE" or "LESS"
pads.
* Suppose you want to increase cooking time by 2 minutes during 5 minutes on MEDIUM cooking.
INSTANT COOK//START
KG AUTO
ru fdnj
KG AUTO
ru fdnj
AUTO
fdnj
DEFROST HELP
DEFROST HELP
COOK
ghbujnjd
DEFROST HELP
COOK
ghbujnjd
Step
Procedure DisplayPad Order
Select power leve by pressing the POWER LEVEL pad as required.
1
(for MEDIUM press three times)
Enter desired cooking time.
2
Press the INSTANT COOK/ START pad.
3
Press the MORE pad twice to increase
time by two minutes.
4
E – 34
x 3
5 00
INSTANT COOK//START
x 2
%
COOK
ghbujnjd
COOK
The timer starts to count
ghbujnjd
down.
COOK
ghbujnjd
COOK
ghbujnjd
Page 75

CARE AND CLEANING
IMPORTANT:
Do not touch around the oven lamp directly when cleaning.
This part will become hot during the oven lamp lights.
Use the thick cloth for cleaning the oven to avoid burns.
Before cleaning, make sure the oven door, outer cabinet, oven cavity, air vent openings, turntable,
turntable support racks and bottom heater are not hot.
Exterior:
The outside may be cleaned with mild soap and warm water. After rinsing, wipe with a soft dry cloth.
Avoid the use of harsh abrasive cleaners.
Door:
Wipe the door (including both sides of the door window and the door seals surface) frequently with a
damp cloth to remove any spills or spatters. Do not use abrasive cleaner.
Touch Control Panel:
Care should be taken in cleaning the control panel. Open the oven door before cleaning to inactivate the
control panel. Wipe the panel with a cloth dampened slightly with water only. Do not scrub or use any
sort of chemical cleaners. Avoid the use of excess water.
Interior walls:
Wipe spatters and spills with a little dishwashing liquid on a soft damp cloth. For heavier stains inside
the oven cavity only, use a mild stainless steel cleaner applied with a soft damp cloth. Do not apply to
the inside of the door. Wipe clean ensuring all cleaner is removed. After use wipe the waveguide cover
in the oven with a soft damp cloth to remove any food splashes. Built-up splashes may overheat and
begin to smoke or catch fire. Do not remove the waveguide cover. You can hold the bottom heater up
by hand for cleaning only. After cleaning, sit the bottom heater down in the lowest position (see P.E-3
and Figure 1).
DO NOT USE CAUSTIC CLEANERS, ABRASIVE OR HARSH CLEANSERS OR SCOURING PADS ON
YOUR OVEN. NEVER SPRAY OVEN CLEANERS
DIRECTLY ONTO ANY PART OF YOUR OVEN.
Note:
At regular intervals, heat the oven referring to "Heating
without Food" on page E-6. Because, the splashed dirt
or food oil remained around the top and bottom heaters
oven walls may cause the smoke and odour.
Turntable/Turntable Support/Racks:
Wash with mild soapy water and dry thoroughly.
Figure 1
Bottom heater
E – 35
Page 76

SERVICE CALL CHECK
Check the following before calling service:
1. Does the display light? Yes
When the door is opened, does the oven lamp light? Yes No
If "NO" is the answer for both, check your wall socket and the fuse in your meter box. If both the wall
socket and fuse are functioning properly, CONTACT THE SHARP SERVICE CENTRE.
2. Place one cup of water (approx. 250 ml) in a glass measuring cup in the oven and close the door
securely. Oven lamp should go off if door is closed properly.
Programme the oven for one minute on HIGH. At this moment:
A. Does the oven lamp light? Yes
B. Does the cooling fan work? Yes No
(Put your hand over the rear ventilation openings.)
C. Does the turntable rotate? Yes
(The turntable can rotate clockwise or counterclockwise. This is quite normal.)
D. Do the microwave symbol and COOK indicator light? Yes
E. After one minute, did an audible signal sound? Yes No
F. Is the water inside the oven hot? Yes No
3. Remove water from the oven and programme the oven for 3 minutes on GRILL mode using top and
bottom heaters.
A. Do the top and bottom heater symbols and COOK indicator light? Yes
B. After 3 minutes, do the both heaters become red? (Pay special attention to prevent burns when
checking the bottom heater) Yes
If "NO" is the answer to any of the above questions, please check your wall socket and the fuse in your
meter box.
If both the wall socket and the fuse are functioning properly, CONTACT YOUR NEAREST SERVICE
CENTER APPROVED BY SHARP.
NOTE: 1.If time in the display is counting down rapidly, check Demonstration Mode.
(Please see E-33 for detail.)
2.The following thing is not trouble;
Each cooking mode has a maximum cooking time. If you operate the oven longer than the
maximum time, the power will automatically be reduced. The table below shows the
maximum time for each cooking mode.
No
No
No
No
No
No
Cooking mode
Microwave 100% cooking
Grill cooking
Top heater
Bottom heater
Top and bottom
heaters
Maximum cooking time
20 min.
30 min.
15 min.
Top heater 10 min.
Bottom heater 10 min.
SPECIFICATIONS
AC Line Voltage : Single phase 220V, 50Hz
AC Power Required :
Microwave 1.6 kW
Grill 2.1kW
Output Power :
Microwave 900W* (IEC)
Grill Heater 1200W (Top heater)
Microwave Frequency : 2450 MHz
Outside Dimensions : 520mm(W) x 309mm(H) x 467mm(D)
Cavity Dimensions : 352mm(W) x 207mm(H) x 368mm(D)
Oven Capacity : 27 liters (1.0 cu.ft)
Cooking Uniformity : Turntable (325mm tray) system
Weight : Approx. 19kg
* This measurement is based on the International Electrotechnical Commission's standardised method
for measuring output power.
** This is the classification of ISM (Industrial, Scientific and Medical) equipment described in the
International Standard CISPR11. (COMITE INTERNATIONAL SPÉCIAL DES PERTURBATIONS
RADIOÉLECTRIQUES)
800W (Bottom heater)
2000W (Top and bottom heater)
SHARP CORPORATION OSAKA, JAPAN
TINSEA780WRR0-HR81
E – 36
 Loading...