

Page 1
ENGLISHSVENSKA SUOMI DEUTSCH
Important
Achtung
Tärkeää
Viktig
This operation manual contains important information which you should read carefully before using your microwave oven.
IMPORTANT: There may be a serious risk to health if this operation manual is not followed or if the oven is modified
so that it operates with the door open.
Diese Bedienungsanleitung enthält wichtige Informationen, welche Sie vor Inbetriebnahme des Gerätes unbedingt
sorgfältig durchlesen sollten.
Achtung: Die Nichtbeachtung der Gebrauchs- und Serviceanweisungen sowie jeglicher Eingriff, der das Betreiben des
Gerätes in geöffnetem Zustand (z.B. geöffnetes Gehäuse) erlaubt, führt zu erheblichen Gesundheitsschäden.
Kädessäsi oleva käyttöohjekirjanen sisältää tärkeitä tietoja, joihin sinun tulee tutustua ennen kuin ryhdyt käyttämään
siinä kuvattua mikroaaltouunia.
TÄRKEÄÄ: Käyttöohjeiden laiminlyönnistä voi käyttäjälle aiheutua terveydellisiä haittoja; näin voi käydä myös silloin,
jos uuniin tehdään muutoksia, jotka mahdollistavat uunin toiminnan sen oven ollessa auki.
Denna driftshandledning innehåller viktig information som du skall läsa noga innan du använder mikrovågsugnen.
VIKTIGT! Det kan innebära en allvarlig hälsorisk om du inte följer denna driftshandledning eller om du modifierar
ugnen så att den kan arbeta när luckan är öppen.
GB
FIN
S
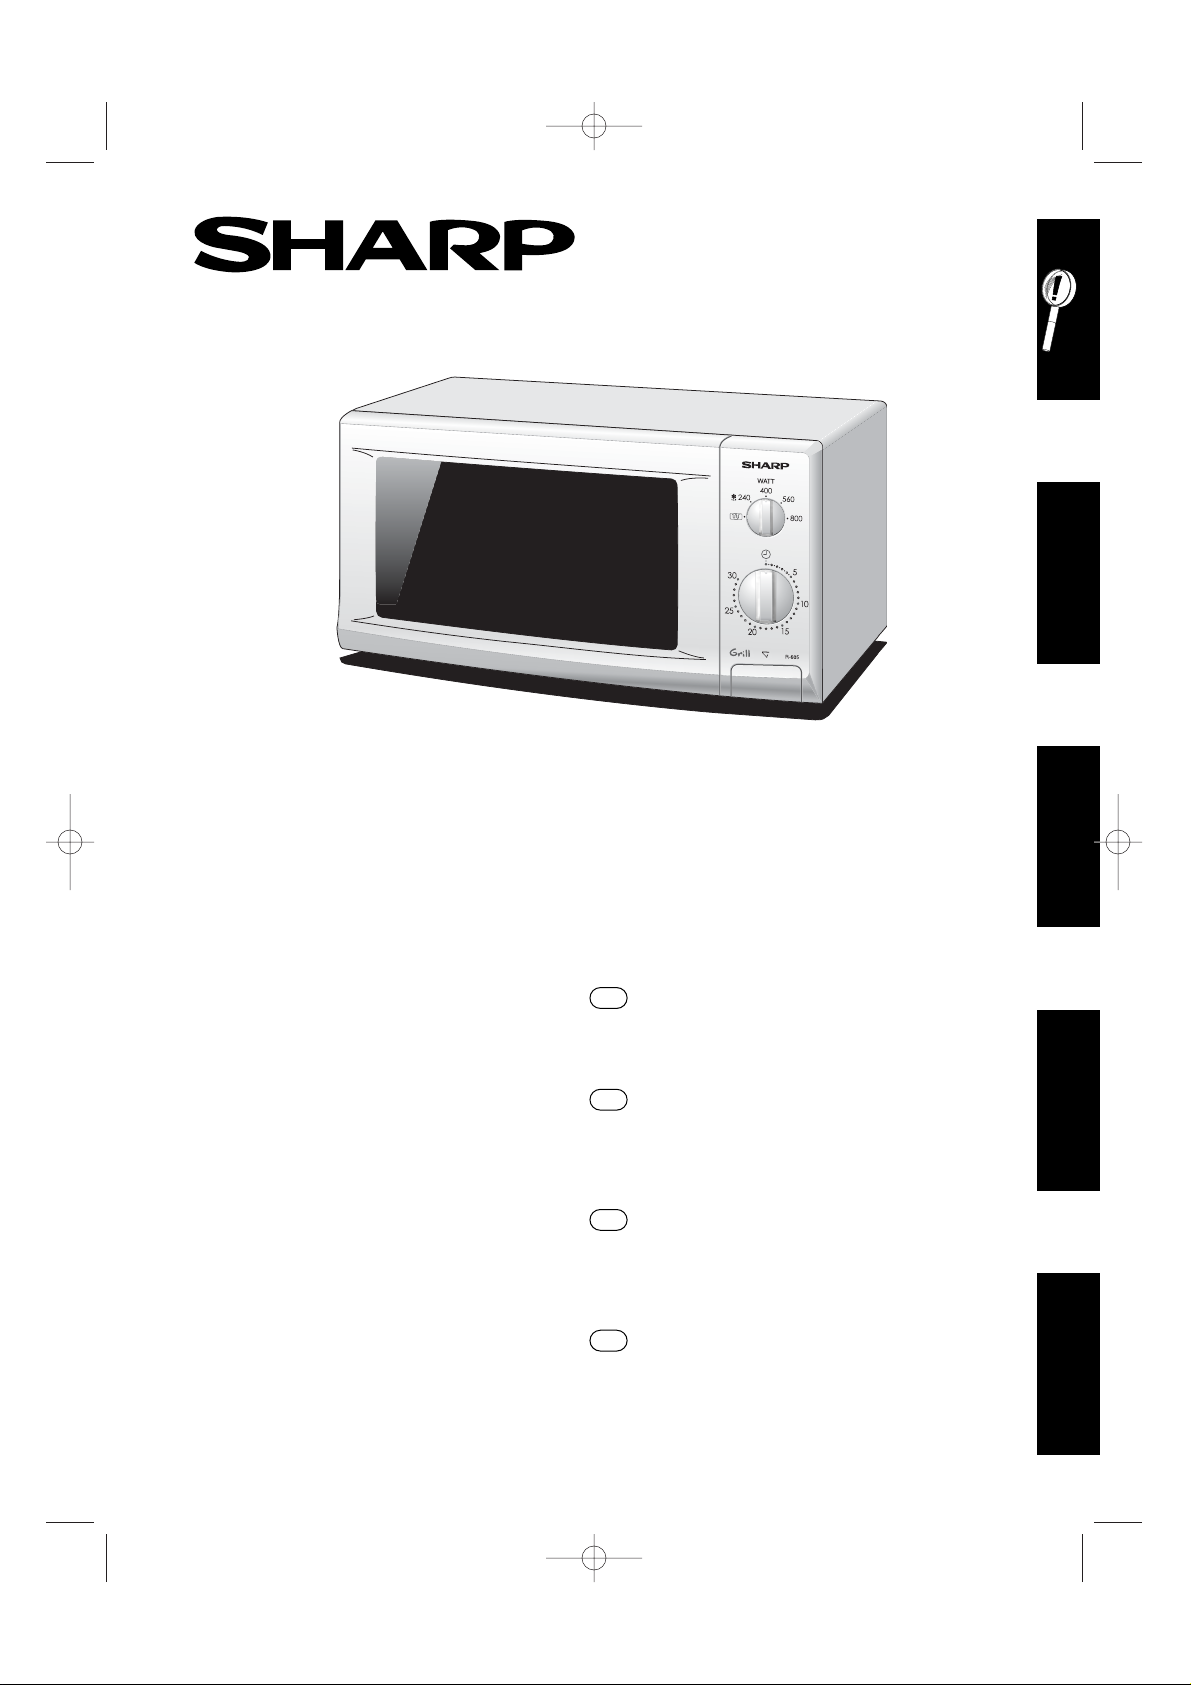
800 W (IEC 60705)
R-605N
MICROWAVE OVEN WITH GRILL - OPERATION MANUAL WITH COOKBOOK
MIKROWELLENGERÄT MIT GRILL - BEDIENUNGSANLEITUNG MIT KOCHBUCH
MIKROAALTOUUNI JA GRILLI - KÄYTTÖOHJE JA RUUANLAITTOKIRJA
MIKROBØLGEOVN MED GRILL - BRUKSANVISNING MED KOKEBOK
D
1. R-605N Introduction 16/05/2003 11:11 Page 1
Page 2
Wir gratulieren lhnen zu lhrem neuen
Mikrowellengerät mit Grill, das Ihnen ab jetzt die
Arbeit im Haushalt wesentlich erleichtern wird.
Es kombiniert alle Vorteile der schnellen Mikrowelle
mit denen des Grills, der mit seiner Hitze für eine
knusprige Bräune sorgt.
Sie werden angenehm überrascht sein, was man mit
der Mikrowelle alles machen kann. Sie können nicht
nur schnell auftauen und erhitzen, sondern auch
ganze Menüs zubereiten.
Unser Mikrowellen-Team hat für Sie in unserem
Kochstudio die leckersten internationalen Rezepte
zusammengestellt, die Sie leicht und schnell
zubereiten können.
Lassen Sie sich von den angegebenen Rezepten
anregen und bereiten Sie auch eigene und bewährte
Rezepte in ihrem Grill-Mikrowellengerät zu.
Die Mikrowelle bietet Ihnen viele Vorteile, die Sie
begeistern werden:
• Sie können bis zu 80% Zeit und Energie
einsparen.
• Die Lebensmittel können direkt im Serviergeschirr
zubereitet werden, so dass wenig Abwasch anfällt.
• Kurze Garzeiten, wenig Wasser und wenig Fett
sorgen dafür, dass viele Vitamine, Mineralstoffe
und der Eigengeschmack erhalten bleiben.
Wir empfehlen lhnen, den Kochbuch-Ratgeber und die
Bedienungsanleitung genau durchzulesen. So wird Ihnen
die Bedienung ihres Gerätes leicht von der Hand gehen.
Sehr geehrter Kunde,
Viel Spass beim Umgang mit Ihrem neuen Grill-Mikr owellengerät und beim Ausprobieren der leckeren Rezepte.
Ihr Mikrowellen-Team
Dear Customer,
Congratulations on acquiring your new microwave
oven with grill, which from now on will make your
kitchen chores considerably easier.
You will be pleasantly surprised by the kinds of things
you can do with a microwave. Not only can you use it
for rapid defrosting or heating up of food, you can
also prepare whole meals.
In our test kitchen our microwave team has gathered
together a selection of the most delicious international
recipes which are quick and simple to prepare.
Be inspired by the recipes we have included and
prepare your own favourite dishes in your microwave
oven.
There are so many advantages to having a microwave
oven which we are sure you will find exciting:
• Food can be prepared directly in the serving dishes,
leaving less to wash up.
• Shorter cooking times and the use of little water and
fat ensure that many vitamins, minerals and
characteristic flavours are preserved.
We advise you to read the cookery book guide and
operating instructions carefully.
You will then easily understand how to use your oven.
Enjoy using your microwave oven and trying out the delicious recipes.
SERVICE VORGEHENSWEISE - GILT NUR FÜR DEUTSCHLAND
Lieber SHARP-Kunde,
SHARP - Geräte sind Markenartikel, die mit Präzision und
Sorgfalt nach modernen Fertigungsmethoden hergestellt
werden. Bei sachgemässer Handhabung und unter
Beachtung der Bedienungsanleitung wird Ihnen Ihr Gerät
lange Zeit gute Dienste leisten.
Das Auftreten von Fehlern ist aber nie auszuschliessen.
Sollte Ihr Gerät während der Gewährleistungsfrist einen
gewährleistungspflichtigen Mangel aufweisen, so wenden
Sie sich bitte an den Handelsbetrieb, bei dem Sie dieses
Gerät erworben haben, denn dieser ist Ihr alleiniger
Ansprechpartner für jegliche Gewährleistungsansprüche.
Als Nachweis im Gewährleistungsfall dient Ihr
Kaufbeleg.
Sollte sich nach Ablauf der Gewährleistungsfrist ein Fehler
des Gerätes zeigen, so können Sie dieses wahlweise auch
direkt an eine von SHARP autorisierte Vertragswerkstatt zur
Fehlerbeseitigung geben. Eine Aufstellung aller SHARP
Vertragswerkstätten in Deutschland entnehmen Sie bitte der
Kundendienstübersicht.
SHARP ELECTRONICS (EUROPE) GmbH Parts &
Technical Services.
D
GB
1. R-605N Introduction 16/05/2003 11:11 Page 2
Page 3
3
Onnittelumme uuden grillillä varustetun mikrouunin
hankinnastanne, joka tulee helpottamaan huomattavasti
ruoanlaittoanne.
On yllättävää, kuinka monella tavalla mikrouunia voidaan
käyttää hyväksi. Sitä voidaan käyttää pakasteiden nopeaa
sulatusta tai aterian kuumennusta varten ja myös aterioiden
valmistukseen.
Mikrouunitiimimme on koonnut testikeittiössämme
kansainvälisten herkullisten ruokien reseptejä, joiden avulla
niiden valmistus käy helposti ja yksinkertaisesti.
Toivomme, että nämä reseptit innostavat teitä kokeiluun ja
myös valmistamaan omia mieliruokianne uudessa
mikrouunissanne.
Toivomme, että mikrouuninne käytöstä ja herkullisten ruokien reseptien kokeilusta on suurta iloa ja nautintoa.
Mikrouuni tarjoaa monia erittäin arvokkaita etuja:
•
Ruoka voidaan valmistaa suoraan tarjoiluastioissa,
mikä vähentää astianpesua.
•Lyhyemmät ruoanvalmistusajat ja pienempi vedentarve
varmistavat, että tarjolla on enemmän vitamiineja,
mineraaleja, ja ruoan maku säilyy aidompana.
Mikrouunin käyttö selviää helposti lukemalla huolella
keittokirjaopas ja käyttöohjeet
Hyvä asiakas,
FIN
Gratulerar till köpet av din nya mikrovågsugn med grill,
som från och med nu kommer att göra ditt köksarbete
betydligt enklare.
Du kommer att bli glatt överraskad över allt du kan göra
med en mikrovågsugn. Inte nog med att du kan använda
den för snabbt tina eller värma upp mat, dessutom kan du
tillreda hela måltider.
I vårt provkök har vårt mikrovågsteam samlat ett urval av
de mest välsmakande internationella recepten som är
snabba och lätta att laga.
Låt dig inspireras av recepten vi har valt ut och tillred dina
egna favoriträtter i din mikrovågsugn.
Vi hoppas du får glädje av din mikrovågsugn och de läckra recepten.
Fördelarna med att ha en mikrovågsugn är många, och vi
övertygade om att du kommer att se hur spännande det är:
• Mat kan tillredas direkt på tallriken, så du får mindre
disk.
• Kortare koktider och den lilla mängden vatten och fett
som behövs gör att många vitaminer, mineraler och
karakteristiska smaker bevaras.
Vi rekommenderar att du läser matlagningsguiden och
bruksanvisningen noga. Då kommer du lätt att förstå hur
ugnen fungerar.
Kära kund,
S
1. R-605N Introduction 16/05/2003 11:11 Page 3
Page 4

4
OVEN AND ACCESSORIES . . . . . . . . . . . . . . . . . . . . . .5-6
CONTROL PANEL . . . . . . . . . . . . . . . . . . . . . . . . . . . . . . .7
IMPORTANT SAFETY INSTRUCTIONS . . . . . . . . . . . . . .8-10
INSTALLATION . . . . . . . . . . . . . . . . . . . . . . . . . . . . . . . .10
MICROWAVE POWER LEVELS . . . . . . . . . . . . . . . . . . . . .10
MICROWAVE/GRILL COOKING . . . . . . . . . . . . . . . . . . .11
CARE AND CLEANING . . . . . . . . . . . . . . . . . . . . . . . . . .12
SERVICE CALL CHECK . . . . . . . . . . . . . . . . . . . . . . . . . .12
SERVICE ADDRESSES . . . . . . . . . . . . . . . . . . . . . . . . .72-77
SPECIFICATIONS . . . . . . . . . . . . . . . . . . . . . . . . . . . . . .78
COOKBOOK
WHAT ARE MICROWAVES? . . . . . . . . . . . . . . . . . . . .13
SUITABLE OVENWARE . . . . . . . . . . . . . . . . . . . . . . . .13
TIPS AND ADVICE . . . . . . . . . . . . . . . . . . . . . . . .14-16
TABLES . . . . . . . . . . . . . . . . . . . . . . . . . . . . . . . .17-19
RECIPES . . . . . . . . . . . . . . . . . . . . . . . . . . . . . . . .20-23
CONTENTS
GERÄT UND ZUBEHÖR . . . . . . . . . . . . . . . . . . . . . . . . .5-6
BEDIENFELD . . . . . . . . . . . . . . . . . . . . . . . . . . . . . . . . . . .7
WICHTIGE SICHERHEITSHINWEISE . . . . . . . . . . . . . . .24-26
AUFSTELLANWEISUNGEN . . . . . . . . . . . . . . . . . . . . . . .26
MIKROWELLENLEISTUNG . . . . . . . . . . . . . . . . . . . . . . . .26
GAREN MIT MIKROWELLE & GRILLBETRIEB . . . . . . . . . . . .27
REINIGUNG UND PFLEGE . . . . . . . . . . . . . . . . . . . . . . .28
FUNKTIONSPRÜFUNG . . . . . . . . . . . . . . . . . . . . . . . . . .28
SERVICE-NIEDERLASSUNGEN . . . . . . . . . . . . . . . . . . .72-77
TECHNISCHE DATEN . . . . . . . . . . . . . . . . . . . . . . . . . . .78
KOCHBUCH
WAS SIND MIKROWELLEN? . . . . . . . . . . . . . . . . . . .29
DAS GEEIGNETE GESCHIRR . . . . . . . . . . . . . . . . . . .29
TIPS UND TECHNIKEN . . . . . . . . . . . . . . . . . . . . .30-32
TABELLEN . . . . . . . . . . . . . . . . . . . . . . . . . . . . . .33-35
REZEPTE . . . . . . . . . . . . . . . . . . . . . . . . . . . . . . .36-39
INHALTSVERZEICHNIS
UUNI/LISÄVARUSTEET . . . . . . . . . . . . . . . . . . . . . . . . . .5-6
SÄÄTÖTAULU . . . . . . . . . . . . . . . . . . . . . . . . . . . . . . . . .7
TÄRKEITÄ KÄYTTÖTURVALLISUUSOHJEITA . . . . . . . . . . . . .40-42
ASENNUS . . . . . . . . . . . . . . . . . . . . . . . . . . . . . . . . . . .42
MIKROAALTOTEHON TASO . . . . . . . . . . . . . . . . . . . . . .42
MIKROAALTO/GRILLAUS KYPSENNYS . . . . . . . . . . . . . . .43
HOITO JA PUHDISTUS . . . . . . . . . . . . . . . . . . . . . . . . . .44
ENNEN HUOLTOON SOITTAMISTA TARKISTETTAVAT ASIAT
. .44
HUOLTOLIIKKEIDEN OSOITTEITA . . . . . . . . . . . . . . . . .72-77
TEKNISET TIEDOT . . . . . . . . . . . . . . . . . . . . . . . . . . . . . .79
KEITTOKIRJA
MITÄ MIKROAALLOT OVAT? . . . . . . . . . . . . . . . . . . .45
KÄYTETTÄVÄKSI SOPIVAT MATERIAALIT . . . . . . . . . . .45
VINKKEJÄ JA OHJEITA . . . . . . . . . . . . . . . . . . . . .46-48
TAULUKKO . . . . . . . . . . . . . . . . . . . . . . . . . . . . .49-51
RESEPTI . . . . . . . . . . . . . . . . . . . . . . . . . . . . . . . .52-55
SISÄLTÖ
UGN/TILLBEHÖR . . . . . . . . . . . . . . . . . . . . . . . . . . . . . .5-6
KONTROLLPANEL . . . . . . . . . . . . . . . . . . . . . . . . . . . . . . .7
VIKTIGA SÄKERHETSFÖRESKRIFTER . . . . . . . . . . . . . . .56-58
INSTALLATION . . . . . . . . . . . . . . . . . . . . . . . . . . . . . . . .58
MIKROVÅGSEFFEKT . . . . . . . . . . . . . . . . . . . . . . . . . . . .58
TILLAGNING MED GRILL/MIKROVÅG . . . . . . . . . . . . . . . . .59
VÅRD OCH RENGÖRING . . . . . . . . . . . . . . . . . . . . . . . .60
FELSÖKNING . . . . . . . . . . . . . . . . . . . . . . . . . . . . . . . .60
SERVICESTÄLLEN . . . . . . . . . . . . . . . . . . . . . . . . . . . .72-77
SPECIFIKATIONER . . . . . . . . . . . . . . . . . . . . . . . . . . . . .79
KOKBOK
VAD ÄR MIKROVÅGOR? . . . . . . . . . . . . . . . . . . . . . .61
LÄMPLIGA TILLAGNINGSKÄRL . . . . . . . . . . . . . . . . . .61
TIPS OCH RÅD . . . . . . . . . . . . . . . . . . . . . . . . . . .62-64
TABELL . . . . . . . . . . . . . . . . . . . . . . . . . . . . . . . . .65-67
RECEPT . . . . . . . . . . . . . . . . . . . . . . . . . . . . . . . .68-71
INNEHÅLL
GB
D
FIN
S
1. R-605N Introduction 16/05/2003 11:11 Page 4
Page 5
5
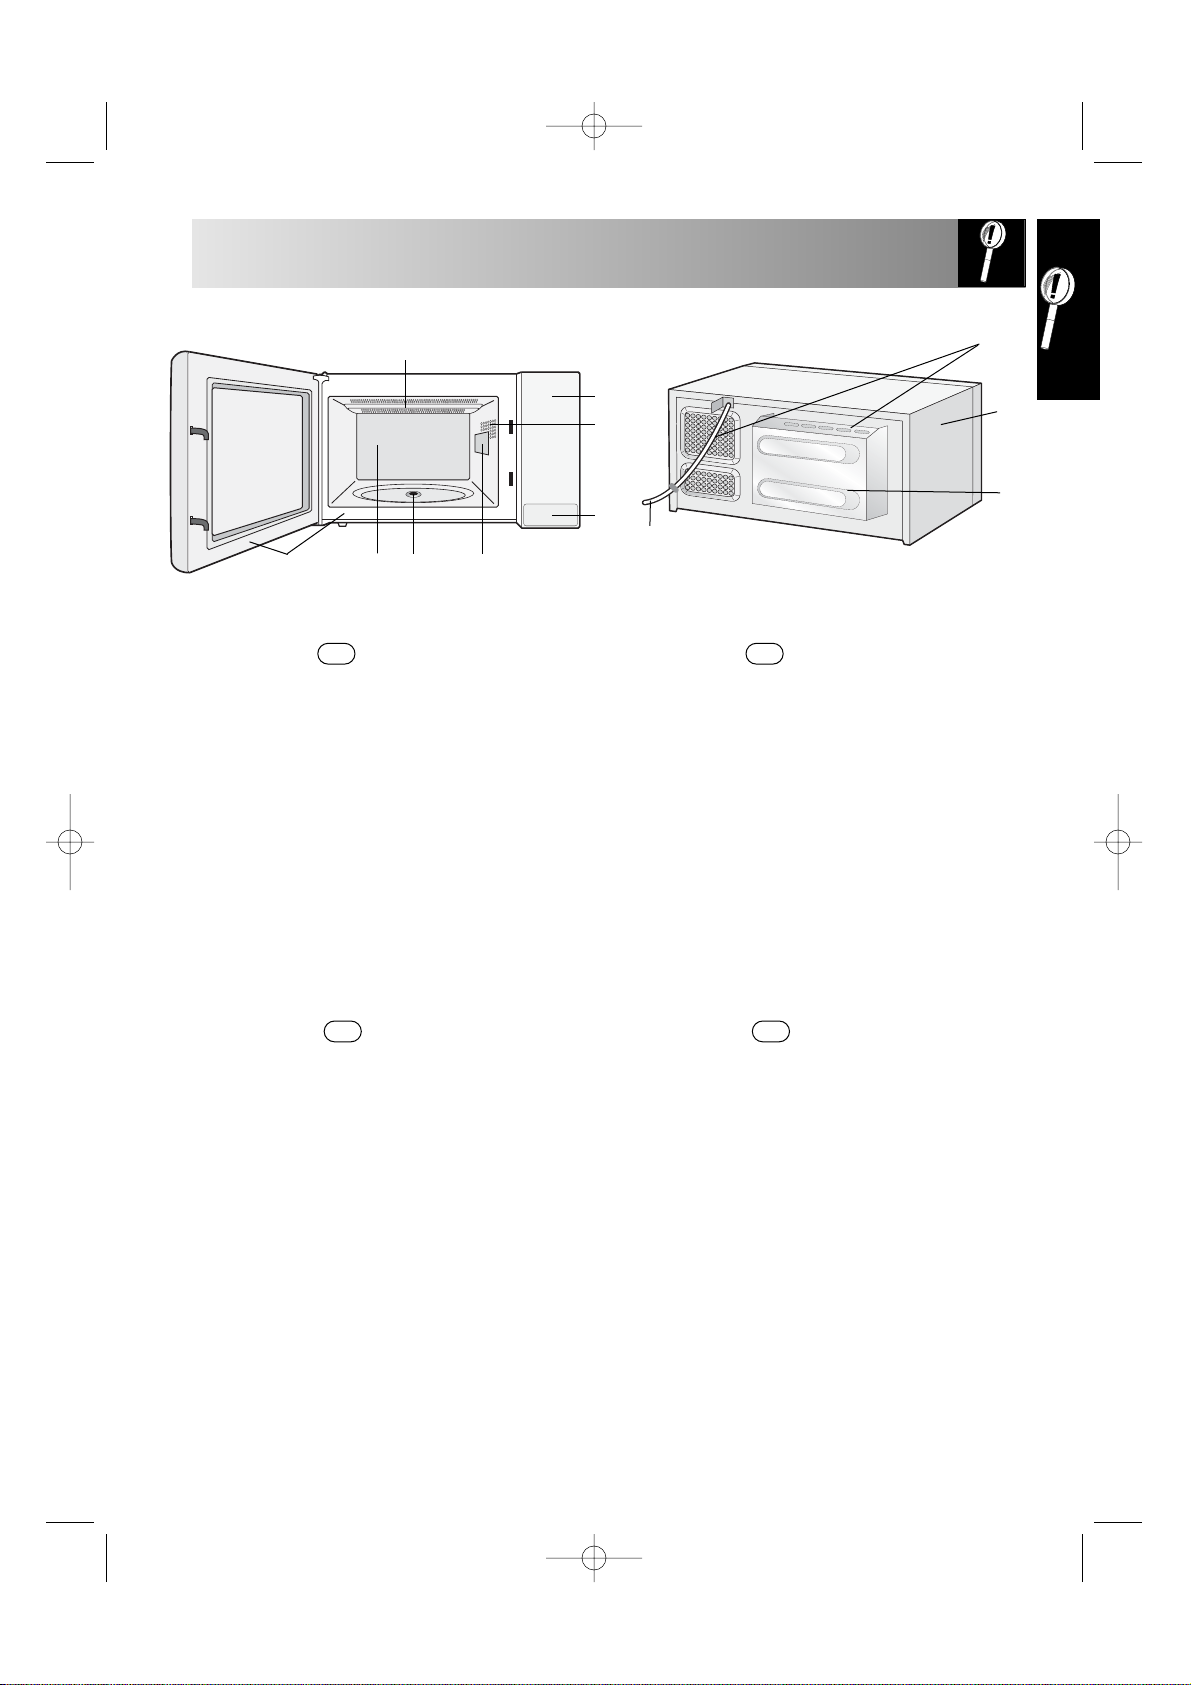
OVEN/GERÄT/UUNI/UGN
1 Grillivastus
2 Säätötaulu
3 Uunin lamppu
4 Ovenavauspainike
5 Mikroaalto-ohjainkansi
6 Tiiviste
7 Uunin sisätila
8 Oven tiivisteet ja tiivistepinnat
9 Tuuletusaukot
10 Ulkokuori
11 Verkkojohto
12 Takakotelointi
UUNI
1 Grill heating element
2 Control panel
3 Oven lamp
4 Door opening button
5 Waveguide cover
6 Seal packing
7 Oven cavity
8 Door seals and sealing surfaces
9 Ventilation openings
10 Outer cabinet
11 Power supply cord
12 Rear cabinet
OVEN
1 Grill-Heizelement
2 Bedienfeld
3 Garraumlampe
4 Türöffner
5 Spritzschutz für den Hohlleiter
6 Antriebswelle
7 Garraum
8 Türdichtungen und Dichtungsoberflächen
9 Lüftungsöffnungen
10 Aussenseite
11 Netzkabel
12 Geräterückseite
GERÄT
1 Grillelement
2 Kontrollpanel
3 Ugnslampa
4 Lucköppnare
5 Vågledarskydd
6 Tätningslist
7 Ugnsutrymme
8 Tätningslist på luckan och kontaktyta
9 Ventilöppningar
10 Ytterhölje
11 Nätsladd
12 Bakre hölje
UGN
GB D
FIN S
1
2
3
567
9
11
10
4
8
12
1. R-605N Introduction 16/05/2003 11:11 Page 5
Page 6
6
ACCESSORIES/ZUBEHÖR/LISÄVARUSTEET/TILLBEHÖR
13
14
15
16
ZUBEHÖR:
Überprüfen Sie, dass folgende Zubehörteile
mitgeliefert wurden:
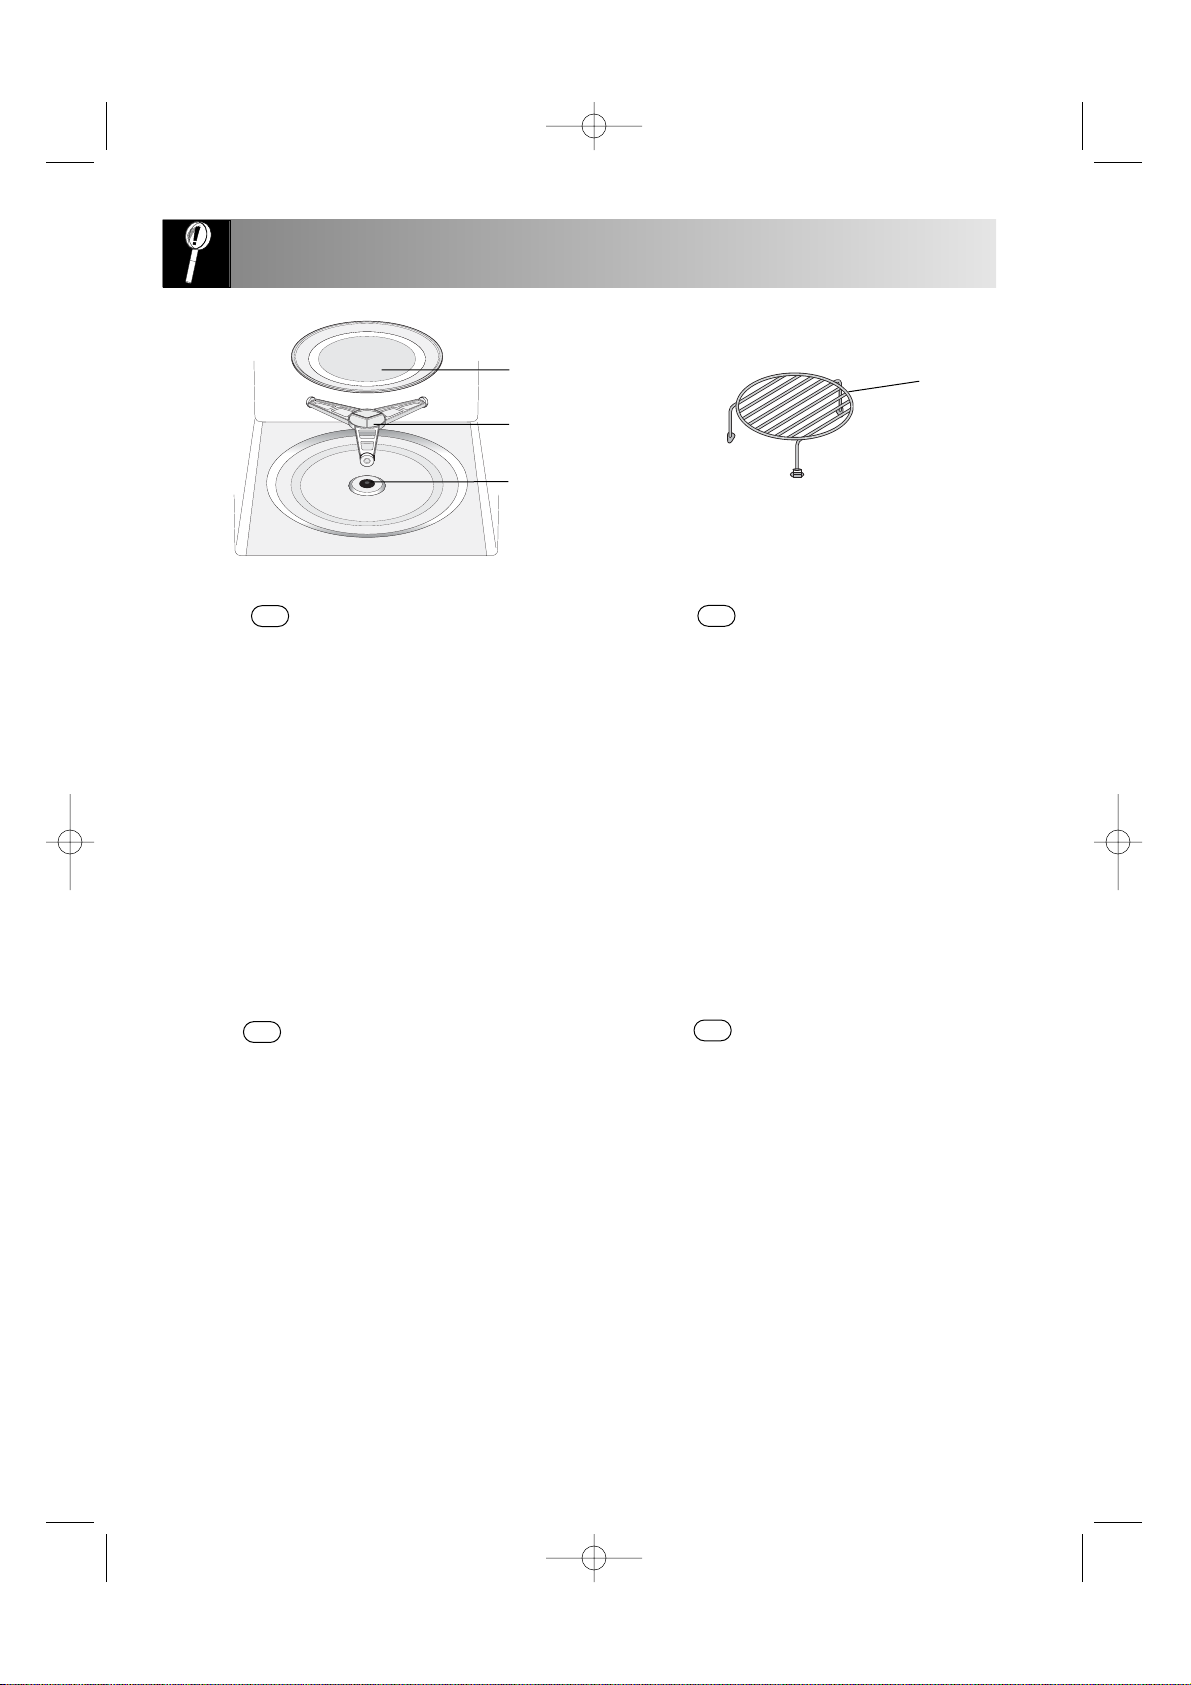
(13) Drehteller (14) Drehteller-Träger
(15) Antriebswelle (16) Rost
Den Drehteller-Träger in die Antriebswelle am
Garraumboden einsetzen.
Dann den Drehteller darauf legen.
Um Schäden am Drehteller zu vermeiden, ist
darauf zu achten, dass Geschirr und Behälter bei
der Entnahme nicht den Rand des Drehtellers
berühren.
HINWEIS: Bei der Bestellung von Zubehör,
teilen Sie Ihrem Händler oder dem SHARPKundendienst bitte folgende Angaben mit: Name
des Zubehörteils und Bezeichnung des Modells.
ACCESSORIES:
Check to make sure the following accessories are
provided:
(13) Turntable (14) Roller stay (15) Seal packing
(16) Rack
Place the roller stay in the seal packing on the floor
of the cavity.
Then place the turntable on the roller stay.
To avoid turntable damage, ensure dishes or
containers are lifted clear of the turntable rim when
removing them from the oven.
NOTE: When you order accessories, please
mention two items: part name and model name to
your dealer or SHARP authorised service agent.
TILLBEHÖR:
Kontrollera att följande tillbehör medföljer:
(13) Tallrik (14) Valsstöd (15) Tätningslist
(16) Galler
Placera valsstöden i tätningslisten på ugnsgolvet.
Placera därefter tallriken på valsstöden.
Lyft upp fat och behållare ordentligt när du tar ut
dem ur ugnen så att de inte stöter till och skadar
kanten på tallriken.
OBS! Du måste ange artikelnummer och
modellnamn när du beställer tillbehör från din
återförsäljare eller av SHARP auktoriserad
serviceperson.
LISÄVARUSTEET:
Tarkista, että olet saanut seuraavassa mainitut
lisävarusteet:
(13) Pyörivä alusta (14) Rullakehikko (15) Tiiviste
(16) Ritilä
Aseta rullakehikko uunin sisätilan pohjalle olevaan
tiivisteeseen.
Sijoita pyörivä alusta rullakehikon varaan.
Jotta pyörivä alusta ei aiheuttaisi vahinkoa, kun sen
päällä lepäävä astia poistetaan uunista, nosta
astiaa sen verran, että se ei osu alustan reunaan.
HUOM: Jälkitilattaessa lisävarusteita on mainittava
kaksi seikkaa: osan nimike ja uunin malli, ja nämä
tiedot edelleen kodinkoneliikkeeseen tai
valtuutettuun SHARP-huoltoliikkeeseen.
GB
D
FIN
S
1. R-605N Introduction 16/05/2003 11:11 Page 6
Page 7
7
CONTROL PANEL BEDIENFELD/
SÄÄTÖTAULU/KONTROLLPANEL
GB
D
FIN
S
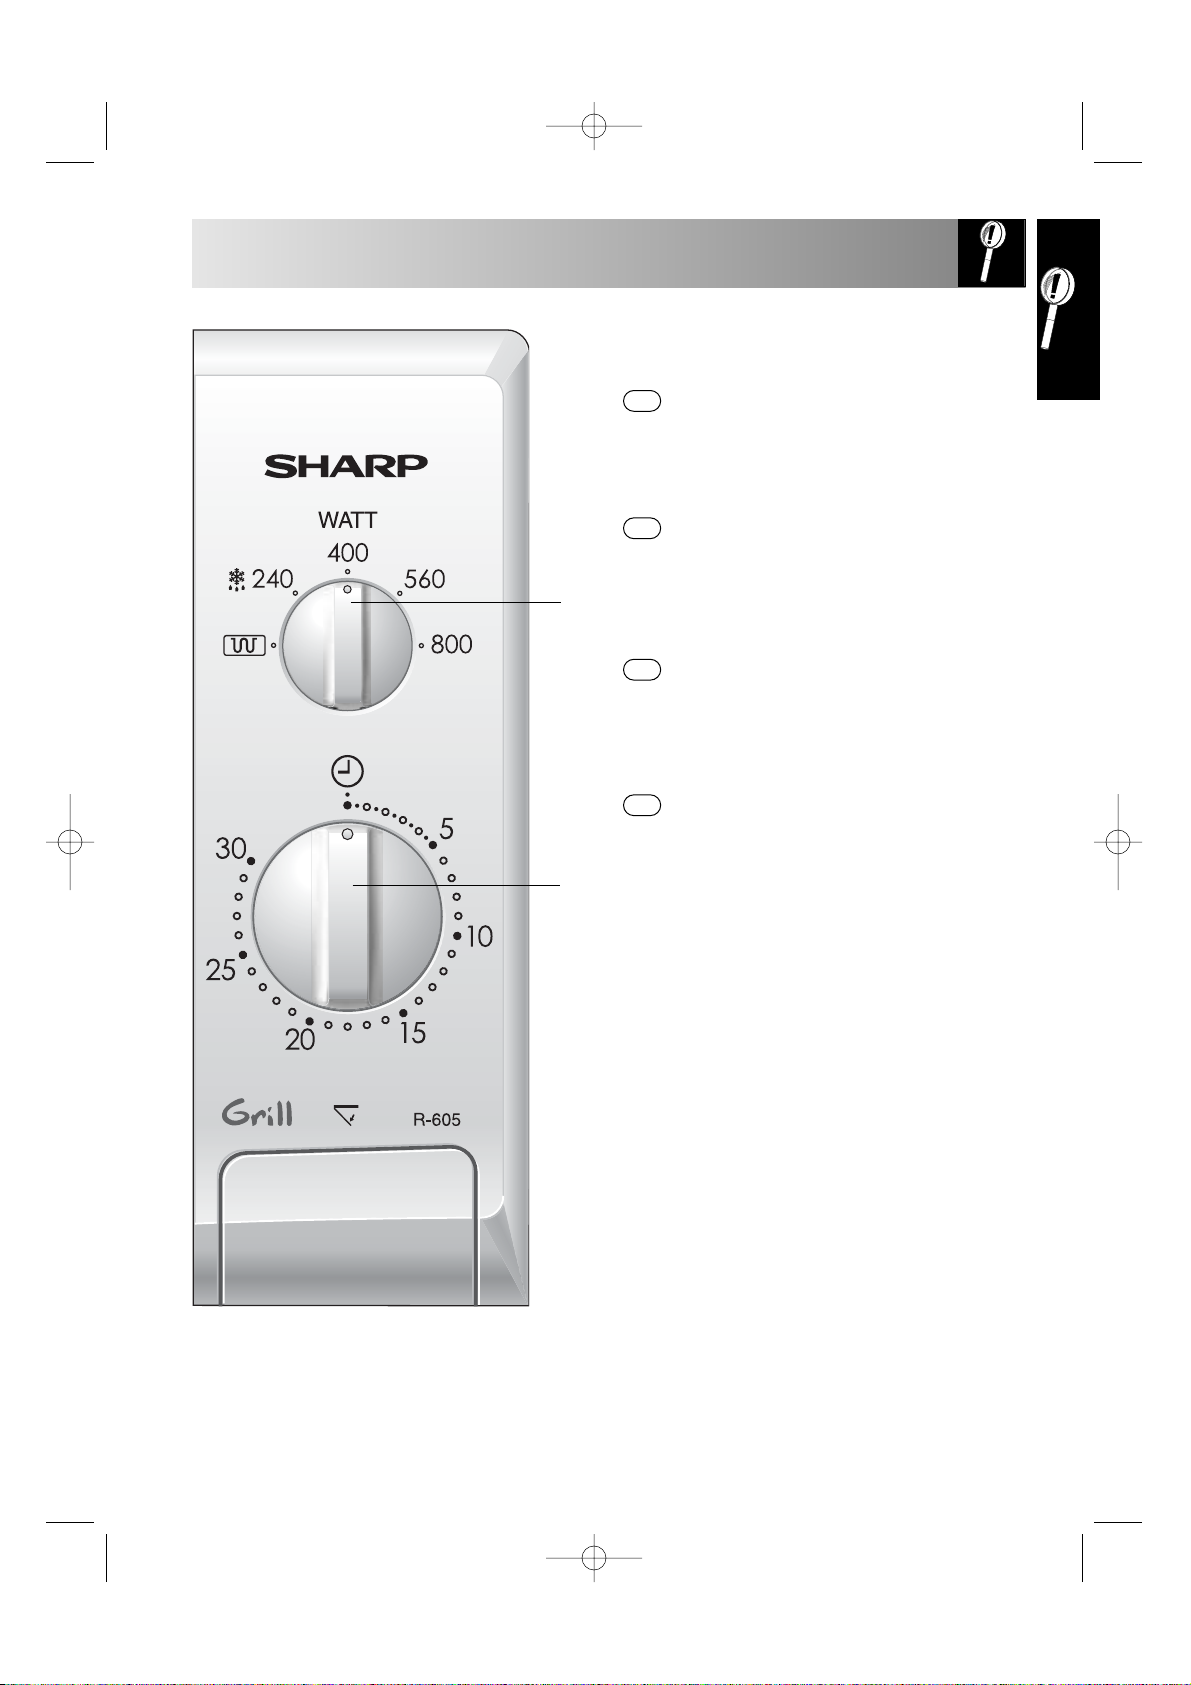
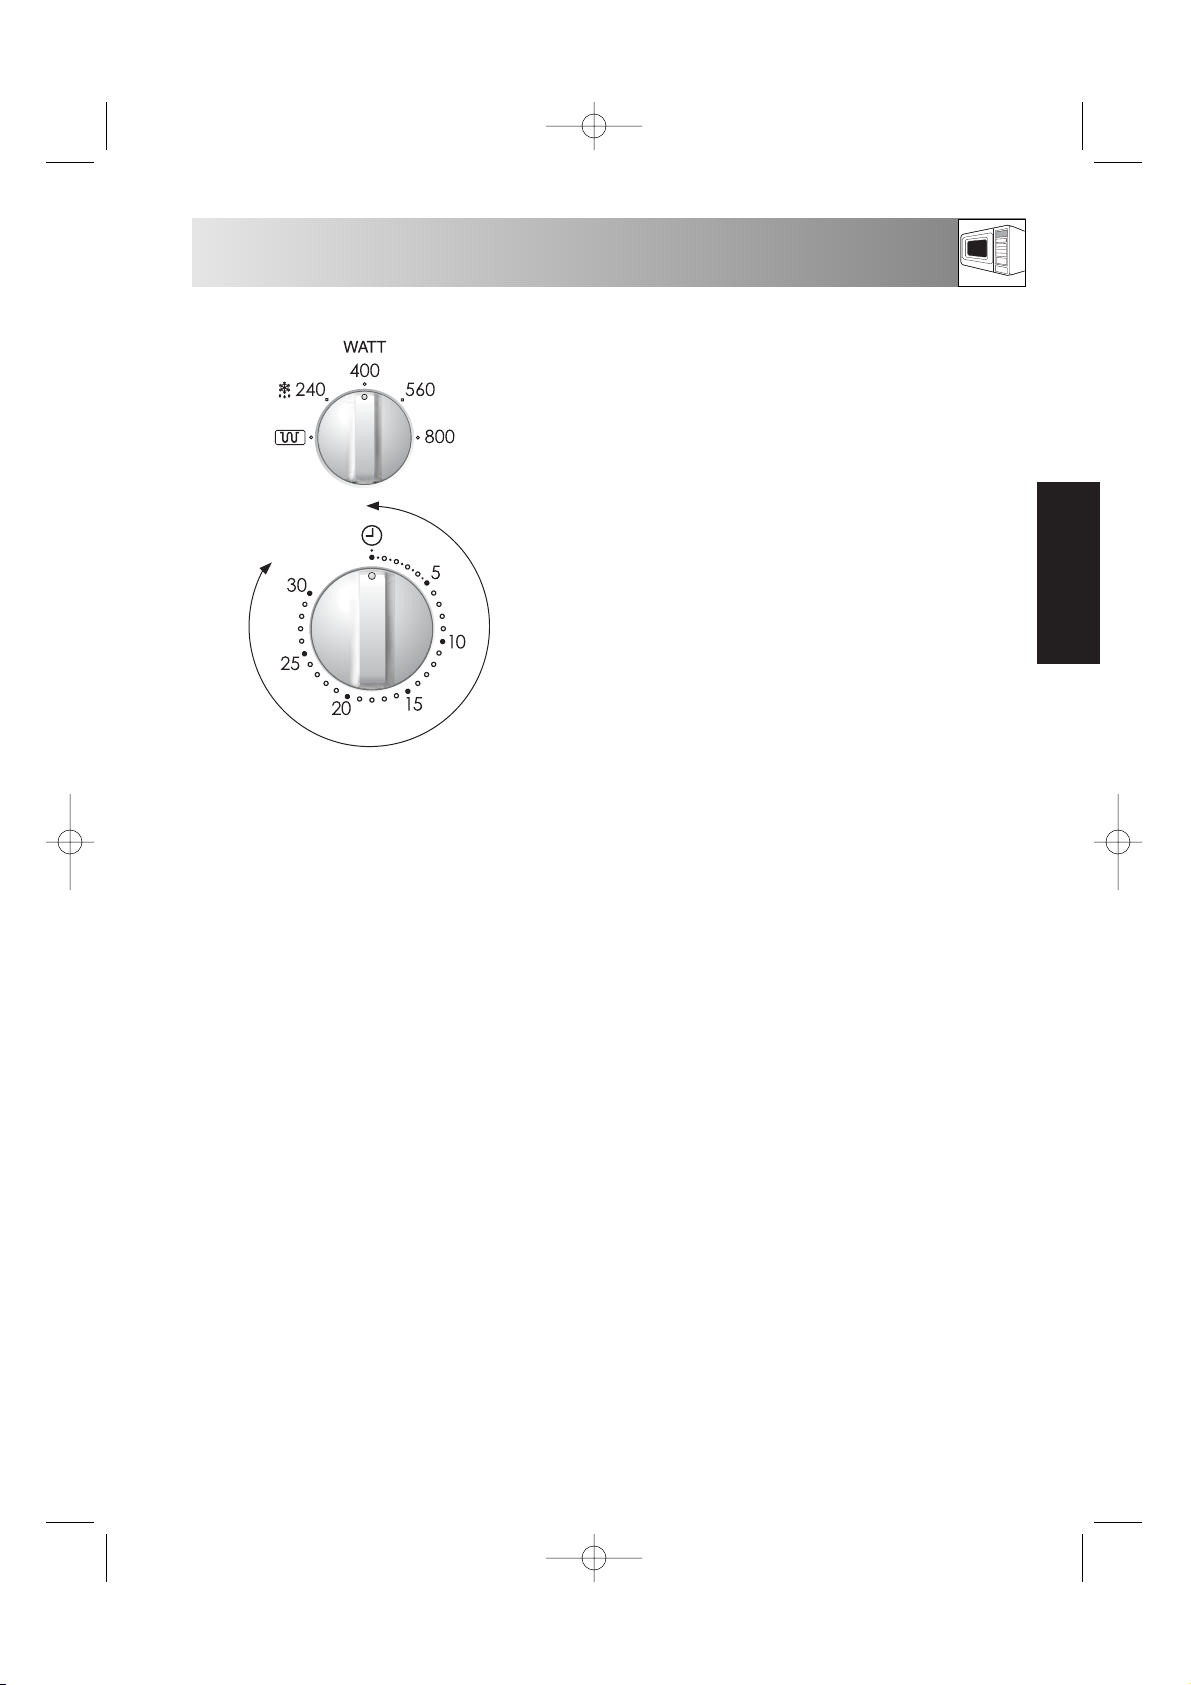
1. MICROWAVE POWER/GRILL CONTROL knob
2. TIMER knob (0 - 30 Min.)
1. MIKROWELLEN-LEISTUNGS/GRILL -Drehknopf
2. ZEITSCHALTUHR-Drehknopf (0-30 Min)
1. MIKROAALTOTEHON/GRILLAUS-nuppia
2. AJASTIN--nuppia (0-30 Min)
1. MIKROVÅGSEFFEKT/GRILL-ratten
2. TIMER-ratten (0-30 Min)
1
2
1. R-605N Introduction 16/05/2003 11:11 Page 7
Page 8

8
IMPORTANT SAFETY INSTRUCTIONS
To avoid the danger of fire
The microwave oven should not be left
unattended during operation. Power levels
that are too high or cooking times that are
too long may overheat foods resulting in a
fire.
This oven is not designed to be built in to a kitchen
unit.
The electrical outlet must be readily accessible so that
the unit can be unplugged easily in an emergency.
The AC power supply must be 230V, 50Hz, with a
minimum 10 A distribution line fuse, or a minimum 10
A distribution circuit breaker.
It is recommended that a separate circuit serving only
this appliance be provided.
Do not place the oven in areas where heat is
generated. For example, close to a conventional
oven.
Do not install the oven in an area of high humidity or
where moisture may collect.
Do not store or use the oven outdoors.
If food being heated begins to smoke, DO
NOT OPEN THE DOOR. Turn off and unplug
the oven and wait until the food has
stopped smoking. Opening the door while
food is smoking may cause a fire.
Use only microwave-safe containers and
utensils. See Page 13.
Do not leave the oven unattended when
using disposable plastic, paper or other
combustible food containers.
Clean the waveguide cover, the oven
cavity, the turntable and roller stay after
use. These must be dry and free from
grease. Built-up grease may overheat and
begin to smoke or catch fire.
Do not place flammable materials near the oven or
ventilation openings. Do not block the ventilation
openings.
Remove all metallic seals, wire twists, etc., from food
and food packages. Arcing on metallic surfaces may
cause a fire.
Do not use the microwave oven to heat oil for deep
frying. The temperature cannot be controlled and the
oil may catch fire.
To make popcorn, use only special microwave
popcorn makers.
Do not store food or any other items inside the oven.
Check the settings after you start the oven to ensure
the oven is operating as desired.
See the corresponding hints in this operation manual
and the cookery book section.
To avoid the possibility of injury
WARNING:
Do not operate the oven if it is damaged or
malfunctioning. Check the following before use:
a)The door; make sure the door closes properly and
ensure it is not misaligned or warped.
b)The hinges and safety door latches; check to make
sure they are not broken or loose.
c) The door seals and sealing surfaces; ensure that
they have not been damaged.
d)Inside the oven cavity or on the door; make sure
there are no dents.
e)The power supply cord and plug; ensure that they
are not damaged.
Never adjust , repair or modify the oven
yourself. It is hazardous for anyone other
than a competent person to carry out any
service or repair operation which involves
the removal of a cover which gives
protection against exposure to microwave
energy.
Do not operate the oven with the door open or alter
the door safety latches in any way.
Do not operate the oven if there is an object between
the door seals and sealing surfaces.
Do not allow grease or dirt to build up on the
door seals and adjacent parts. Follow
instructions for “Care and Cleaning”, Page 12.
Individuals with PACEMAKERS should check with their
doctor or the manufacturer of the pacemaker for
precautions regarding microwave ovens.
To avoid the possibility of electric shock
Under no circumstances should you remove the outer
cabinet.
Never spill or insert any objects into the door lock
openings or ventilation openings. In the event of a
spill, turn off and unplug the oven immediately, and
call an authorised SHARP service agent.
Do not immerse the power supply cord or plug in
water or any other liquid.
Do not let the power supply cord hang over the edge
of a table or work surface.
Keep the power supply cord away from heated
surfaces, including the rear of the oven.
Do not attempt to replace the oven lamp yourself or
allow anyone who is not an electrician authorised by
SHARP to do so. If the oven lamp fails, please consult
your dealer or an authorised SHARP service agent.
If the power supply cord of this appliance is
damaged, it must be replaced by an authorised
SHARP service agent.
IMPORTANT SAFETY INSTRUCTIONS: READ CAREFULLY AND KEEP FOR FUTURE REFERENCE
2. R-605N English Op man 16/05/2003 11:10 Page 8
Page 9
ENGLISH
9
IMPORTANT SAFETY INSTRUCTIONS
Do not touch the oven door, outer cabinet, rear
cabinet, oven cavity, ventilation openings, accessories
and dishes during GRILL mode operation as they will
become hot. Before cleaning make sure they are not
hot.
To avoid misuse by children
WARNING: Only allow children to use the
oven without supervision when adequate
instructions have been given so that the
child is able to use the oven in a safe way
and understands the hazards of improper
use.
Do not lean or swing on the oven door. Do not play
with the oven or use it as a toy.
Children should be taught all important safety
instructions: use of pot holders, careful removal of
food coverings; paying special attention to packaging
(e.g. self-heating materials) designed to make food
crisp, as they may be extra hot.
Other warnings
Never modify the oven in any way.
Do not move the oven while it is in operation.
This oven is for home food preparation only and may
only be used for cooking food. It is not suitable for
commercial or laboratory use.
To promote trouble-free use of your oven
and avoid damage.
Never operate the oven when it is empty except
where recommended in the operation manual, see
Page 11. Doing so may damage the oven.
When using a browning dish or self-heating material,
always place a heat-resistant insulator such as a
porcelain plate under it to prevent damage to the
turntable and roller stay due to heat stress. The
preheating time specified in the dish’s instructions must
not be exceeded.
Do not use metal utensils, which reflect microwaves
and may cause electrical arcing. Do not put cans in
the oven.
Use only the turntable and the roller stay designed for
this oven.
To prevent the turntable from breaking:
(a) Before cleaning the turntable with water, leave the
turntable to cool.
(b) Do not put hot foods or hot utensils on a cold
turntable.
(c) Do not put cold foods or cold utensils on a hot
turntable.
Do not place anything on the outer cabinet during
operation.
Do not use plastic containers for microwaving if the
oven is still hot from using the GRILL mode operation,
because they may melt. Plastic containers must not be
used during above modes unless the container
manufacturer says they are suitable.
To avoid the possibility of explosion and
sudden boiling:
WARNING: Liquids and other foods must
not be heated in sealed containers since
they are liable to explode.
Never use sealed containers. Remove seals and lids
before use. Sealed containers can explode due to a
build up of pressure even after the oven has been
turned off.
Take care when microwaving liquids. Use a widemouthed container to allow bubbles to escape.
Microwave heating of beverages can result
in delayed eruptive boiling, therefore care
has to be taken when handling the
container.
To prevent sudden eruption of boiling liquid and
possible scalding:
1. Stir liquid prior to heating/reheating.
2. It is advisable to insert a glass rod or similar utensil
into the liquid whilst reheating.
3. Let liquid stand for at least 20 seconds in the oven
at the end of cooking time to prevent delayed
eruptive boiling.
Do not cook eggs in their shells, and whole
hard boiled eggs should not be heated in
microwave ovens since they may explode
even after microwave cooking has ended.
To cook or reheat eggs which have not
been scrambled or mixed, pierce the yolks
and the whites, or the eggs may explode.
Shell and slice hard boiled eggs before
reheating them in the microwave oven.
Pierce the skin of such foods as potatoes, sausages
and fruit before cooking, or they may explode.
To avoid the possibility of burns
Use pot holders or oven gloves when removing food
from the oven to prevent burns.
Always open containers, popcorn makers, oven
cooking bags, etc., away from the face and hands to
avoid steam burns.
To avoid burns, always test food
temperature and stir before serving and
pay special attention to the temperature of
food and drink given to babies, children or
the elderly.
Temperature of the container is not a true indication of
the temperature of the food or drink; always check the
food temperature.
Always stand back from the oven door when opening
to avoid burns from escaping steam and heat.
Slice stuffed baked foods after heating to release
steam and avoid burns.
Keep children away from the door to prevent them
burning themselves.
2. R-605N English Op man 16/05/2003 11:10 Page 9
Page 10
MICROWAVE POWER LEVELS
10
IMPORTANT SAFETY INSTRUCTIONS
INSTALLATION
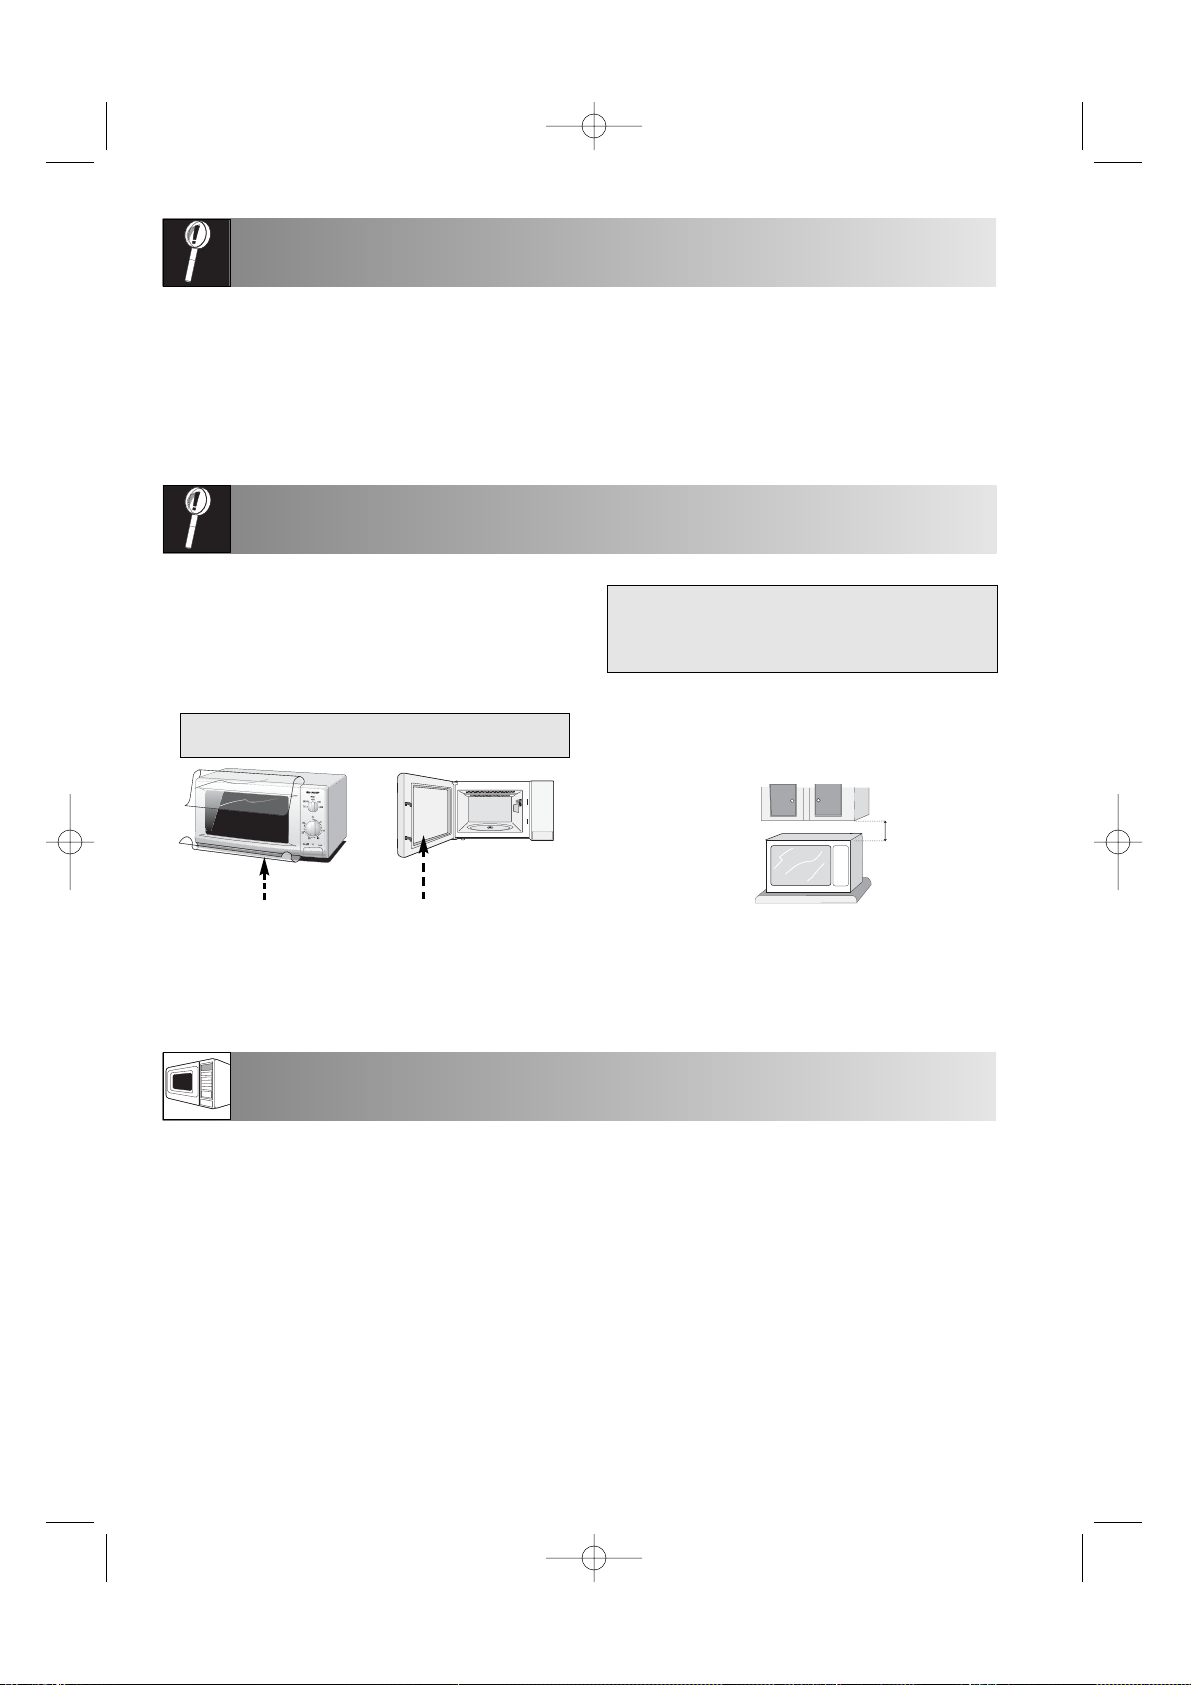
The door may become hot during
cooking, place or mount the oven so
that the bottom of the oven is 85cm or
more above the floor.
4. Do not allow the power supply cord to
run over any hot or sharp surfaces,
such as the hot air vent area at the top
rear of the oven.
5. Ensure there is a minimum free space above the
oven of 21 cm.
6. Make sure the TIMER knob is set in the
“●”
(off) position.
7. Securely connect the plug of the oven to a
standard earthed (grounded) household
electrical outlet.
1. Remove all packing materials from the inside of
the oven cavity. Discard the loose polythene
sheet from between the door and cavity.
Remove the feature sticker, if attached, from the
outside of the oven door.
Do not remove the protective film attached to
the inside of the door
2. Check the oven carefully for any signs of
damage.
3. Place the oven on a flat, level surface strong
enough to support the oven’s weight plus the
heaviest item likely to be cooked.
✓
✗
Water vapour or drops may occasionally form on the
oven walls or around the door seals and sealing
surfaces. This is a normal occurrence and is not an
indication of microwave leakage or a malfunction.
NOTE:
If you are unsure how to connect your oven, please
consult an authorised, qualified electrician.
Neither the manufacturer nor the dealer can accept
any liability for damage to the oven or personal injury
resulting from failure to observe the correct electrical
connection procedure.
Your oven has 4 power levels. To choose the power
level for cooking, follow the advice given in the
recipe section. Generally the following
recommendations apply:
800 W - used for fast cooking or reheating e.g.
soup, casseroles, canned food, hot beverages,
vegetables, fish, etc.
560 W - used for longer cooking of dense foods
such as roast joints, meat loaf and plated meals,
also for sensitive dishes such as cheese sauce and
sponge cakes. At this reduced setting, the sauce
will not boil over and food will cook evenly without
over cooking at the sides.
400 W - for dense foods which require a long
cooking time when cooked conventionally, eg. beef
dishes, it is advisable to use this power setting to
ensure the meat will be tender.
240 W Defrost setting - to defrost, select this
power setting, to ensure that the dish defrosts
evenly. This setting is also ideal for simmering rice,
pasta, dumplings and cooking egg custard.
W=WATT
2. R-605N English Op man 16/05/2003 11:10 Page 10
21cm
Page 11
ENGLISH
11
MICROWAVE/GRILL COOKING
You may detect smoke or a burning smell when using the grill for the first time, this is normal and not a
sign that the oven is out of order.
To avoid this problem, when first using the oven operate the grill without food for 20 minutes.
IMPORTANT: During grill operation, to allow smoke or smells to disperse, open a window or switch the
kitchen ventilation on.
HEATING WITHOUT FOOD
COOKING HINTS:
In the cookbook section, you will find detailed instructions for recipe preparation, only basic cooking hints
are given here.
1. Push the door opening button and the door will open, then place the food on the turntable.
2. Whenever setting the TIMER to less than 2 minutes, turn the TIMER knob past the 5 minute mark, and
then back to the desired setting.
3. If you wish to stop cooking before the cooking time has elapsed, turn the TIMER knob back to “●”
(off), or open the oven door. The oven door may be opened at any time during cooking. To continue
cooking, close the door. If you wish to change the cooking time during cooking, simply turn the TIMER
knob to the desired new setting.
WARNING:
Be sure to turn the TIMER knob back to “●” (off) position when the oven is not in use, or the
oven will start when the oven door is closed.
1. Set the MICROWAVE POWER/GRILL
CONTROL knob to the desired setting,
microwave or grill.
2. Set the TIMER knob to the desired cooking
time.
The oven starts cooking.
✳ When cooking has finished, the TIMER knob
will return to “●” (off), the signal will sound,
and the oven and oven lamp will turn off
automatically.
1.
2.
2. R-605N English Op man 16/05/2003 11:10 Page 11
Page 12
12
CARE AND CLEANING
SERVICE CALL CHECK
Please check the following before calling for service.
1. Power Supply
Check the power plug is properly connected to a suitable wall outlet.
Check the line fuse/circuit breaker is functioning properly.
2. Place a cup of water (approx. 150 ml) in the oven and close the door securely.
Programme the oven for one minute on 800 W power and start the oven.
Does the oven lamp come on? YES NO
Does the turntable rotate? YES NO
NOTE: The turntable turns in either direction.
Does the ventilation work? YES NO
(Place your hand over the ventilation openings and check for air flow.)
After 1 minute does the signal sound? YES NO
Is the water warm after the above operation? YES NO
3. Set the MICROWAVE POWER/GRILL CONTROL knob to GRILL
cooking for 3 minutes.
After 3 minutes does the GRILL heating element become red? YES NO
If you answer “No” to any of the above questions, call a Service Technician appointed by SHARP and report the
results of your check. See inside back cover for details of address.
CAUTION: DO NOT USE COMMERCIAL OVEN
CLEANERS, ABRASIVE, HARSH CLEANERS OR
SCOURING PADS ON ANY PART OF YOUR
MICROWAVE OVEN.
Oven exterior
The outside of your oven can be cleaned easily with
mild soap and water. Make sure the soap is wiped off
with a moist cloth, and dry the exterior with a soft
towel.
Oven controls
Open the door before cleaning to de-activate the oven
controls. Care should be taken when cleaning the
oven controls. Using a cloth dampened with water
only, gently wipe the panel until it becomes clean.
Avoid using excessive amounts of water.
Do not use any sort of chemical or abrasive cleaner.
CAUTION:
Take care not to move the TIMER knob from “●” (off)
position during cleaning, or the oven will start as soon
as you close the door.
Oven Interior
1. For cleaning, wipe any splatters or spills with a soft
damp cloth or sponge after each use while the
oven is still warm. For heavier spills, use a mild
soap and wipe several times with a damp cloth
until all residues are removed. Do not remove the
waveguide cover.
2. Make sure that mild soap or water does not
penetrate the small vents in the walls which may
cause damage to the oven.
3. Do not use spray type cleaners on the oven
interior.
4. At regular intervals, heat the grill, see page 11,
because the splashed dirt or oil around the grill
heating element and oven walls may cause smoke
and odour
Turntable and Roller stay
Remove the turntable and roller stay from the oven.
Wash the turntable and roller stay in mild soapy
water. Dry with a soft cloth. Both the turntable and
the roller stay are dishwasher safe.
Rack
The rack should be washed in mild washing up liquid
solution and dried. The rack is dishwasher safe.
Door
To remove all trace of dirt, regularly clean both sides
of the door, the door seals and sealing surfaces with a
soft, damp cloth.
NOTE: If you cook the food over the standard time
with the same cooking mode, the power of the oven
will lower automatically to avoid overheating.
(The microwave power level will be reduced).
Cooking Mode
Microwave 800 W
Standard time
20 minutes
2. R-605N English Op man 16/05/2003 11:10 Page 12
Page 13
ENGLISH
13
WHAT ARE MICROWAVES?
SUITABLE OVENWARE
Microwaves are generated in the microwave oven
by a magnetron and cause the water molecules in
the food to oscillate.
Heat is generated by the friction which is caused,
with the result that the food is thawed, heated or
cooked.
GLASS AND CERAMIC GLASS
Heat-resistant glass utensils are very
suitable. The cooking process can be
observed from all sides. They must
not, however, contain any metal (e.g.
lead crystal), nor have a metallic overlay (e.g. gold
edge, cobalt blue finish).
CERAMICS
Generally very suitable. Ceramics must be glazed,
since with unglazed ceramics moisture can get into
the ceramic. Moisture causes the material to heat up
and may make it shatter. If you are not certain
whether your utensil is suitable for the microwave,
carry out the utensil suitability test.
PORCELAIN
Very suitable. Ensure that the porcelain does not have
a gold or silver overlay and that it does not contain
any metal.
PLASTIC AND PAPER UTENSILS
Heat resistant plastic utensils which are suitable for
use in the microwave can be used to thaw, heat and
cook food. Follow the manufacturer's
recommendations.
Heat-resistant paper made for use in a microwave
oven is also suitable. Follow the manufacturer's
recommendations.
MICROWAVE FOIL
This, or heat-resistant foil, is very suitable for covering
or wrapping. Please follow the manufacturer's
recommendations.
ROASTING BAGS
Can be used in a microwave oven. Metal clips are
not suitable for fastening them since the roasting bag
foil might melt. Fasten the roasting bag with string and
pierce it several times with a fork. Non heat-resistant
food wraps are not recommended for use in a
microwave oven.
BROWNING DISH
A special microwave dish made from ceramic glass with
a metal alloy base, which allows food to be browned.
When using the browning dish a suitable insulator,
e.g. a porcelain plate, must be placed between the
turntable and the browning dish. Be careful to adhere
exactly to the pre-heating time given in the
manufacturer's instructions. Excessive pre-heating can
damage the turntable and the turntable stand or can
trigger the safety-device which will switch off the oven.
METAL
Generally speaking, metal should not be used, since
microwaves do not pass through metal and therefore
cannot reach the food. There are, however,
exceptions: small strips of aluminium foil may be used
to cover certain parts of the food, so that these do not
thaw too quickly or begin to cook (e.g. chicken
wings).Small metal skewers and aluminium containers
(e.g. of ready- cooked meals) can be used. They must,
however, be small in relation to the food, e.g.
aluminium containers must be at least
2/
3
to
3/
4
filled
with food. It is recommended that you transfer the
food into a dish suitable for use in the microwave.
When using aluminium containers or other metal
utensils there must be a gap of approx. 2 cms between
them and the walls of the cooking area, otherwise the
walls could be damaged by possible arcing.
NO UTENSIL SHOULD HAVE A METAL
OVERLAY
metal parts such as screws, bands or handles.
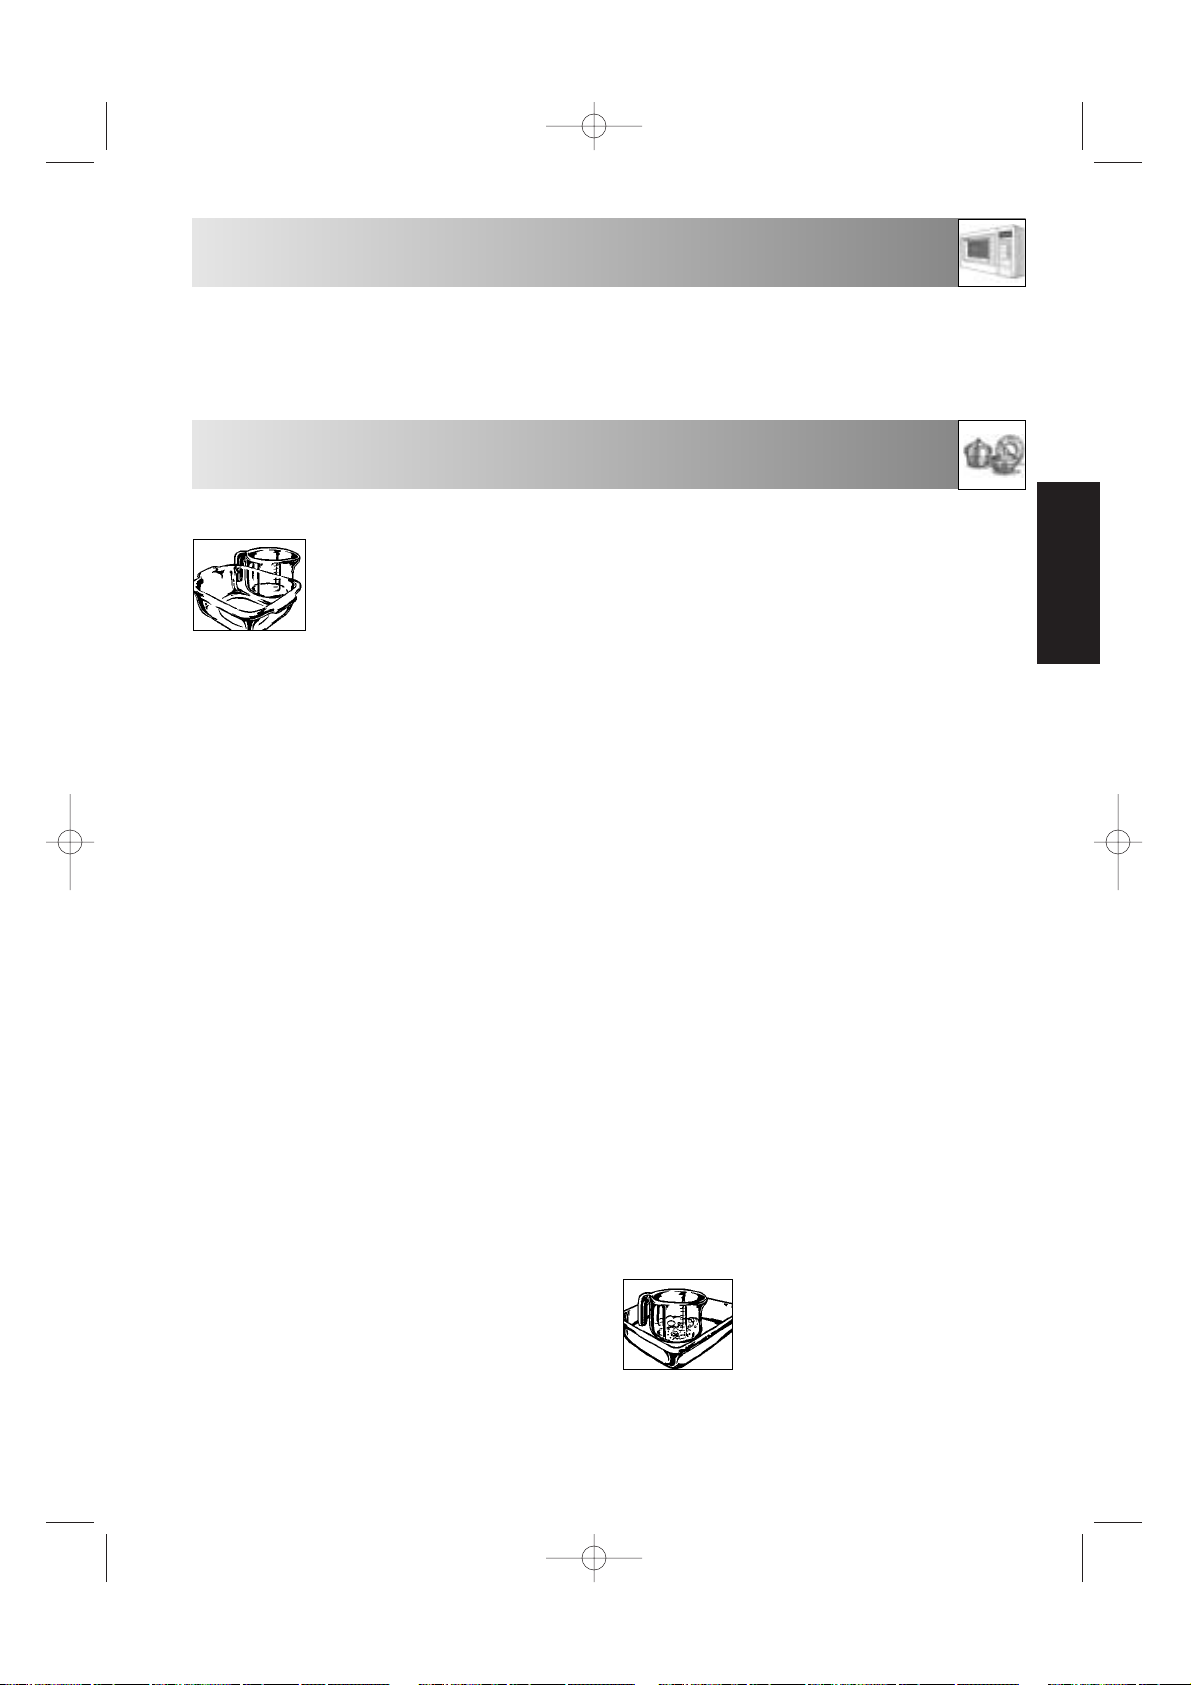
UTENSIL SUITABILITY TEST
If you are not sure whether your utensil is suitable for
use in your microwave oven, carry
out the following test: Place the utensil
into the oven. Place a glass container
filled with 150 ml of water on or next
to the utensil. Switch on the oven at 800 W power
for 1 to 2 minutes. If the utensil stays cool or just
warm to the touch, it is suitable. Do not use this test
on a plastic utensil. It could melt.
3. R-605N English Ckbk 16/05/2003 11:10 Page 13
Page 14

14
TIPS AND ADVICE
TIME SETTINGS
In general the thawing, heating and cooking times are
significantly shorter than when using a conventional
oven. For this reason you should adhere to the
recommended times given in this cookery book. It is
better to set the times too short, rather than too long. Test
the food after it has been cooked. It is better to have to
cook something for a little longer than to overcook it.
INITIAL TEMPERATURES
Thawing, heating and cooking times are dependent
upon the initial temperature of the food. Deep-frozen
food and food stored in a refrigerator, for example,
requires longer than food which has been stored at
room temperature. For heating and cooking, normal
storage temperatures are assumed (refrigerator
temperature approx. 5° C, room temperature approx.
20° C). For thawing the temperature of the deep
freeze is assumed to be -18° C.
COOKING TIMES
All the times given in this cookery book are
guidelines, which can be varied according to the
initial temperature, weight and condition of the
food (water or fat content etc.).
SALT, SPICES AND HERBS
Food cooked in your microwave retains its individual
flavour better than it does when conventional
preparation methods are used. For this reason you
should use salt sparingly and normally add it only after
cooking. Salt absorbs liquid and dries out the outer
layer of food. Herbs and spices can be used as normal.
ADDITION OF WATER
Vegetables and other foods with a high water
content can be cooked in their own juice or with
the addition of a little water. This ensures that many
vitamins and minerals are preserved.
FOOD IN SKINS OR SHELLS
Foods such as sausages, chickens, chicken legs,
baked potatoes, tomatoes, apples, egg yolks or such
like should be pricked or pierced with a fork or small
wooden skewer. This will enable the steam which
forms to dissipate without splitting the skin or shell.
FATTY FOODS
Fatty meat and layers of fat cook better than lean
portions of meat. Before cooking, cover the fatty
portions with a piece of aluminium foil or place the
food with the fat side down.
LARGE AND SMALL QUANTITIES
Microwave times are directly dependent upon the
amount of food which you would like to thaw, heat
or cook. This means that small portions cook more
quickly than larger ones. As a rule of thumb:
TWICE THE AMOUNT = ALMOST TWICE THE TIME
HALF THE AMOUNT = HALF THE TIME
DEEP AND SHALLOW CONTAINERS
Both containers have the same capacity, but the
cooking time is longer for the deeper one. You
should therefore choose as flat a container as
possible with a large surface area. Only use deep
containers for dishes where there is a danger of
overcooking, e.g. for noodles, rice, milk etc..
ROUND AND OVAL CONTAINERS
Food cooks more evenly in round or oval
containers than in containers with corners, since
the microwave energy concentrates in the corners
and the food in these areas could become
overcooked.
COVERING
Covering the food retains the moisture within it and
shortens the cooking time. Use a lid, microwave
foil or a cover. Foods which are to be crispy, e.g.
roasts or chickens, should not be covered. As a
general rule, whatever would be covered in a
conventional oven should also be covered in a
microwave oven. Whatever would be uncovered
in an ordinary oven can also be left uncovered in
a microwave oven.
IRREGULAR SHAPED FOOD
Place the thicker, more compacted end of the food
pointing towards the outside. Place vegetables
(such as broccoli) with the stalks pointing outward.
STIRRING
Stirring the food is necessary, since the
microwaves begin by heating the outer areas. The
temperature is thereby equalised and the food
heats up evenly.
ARRANGEMENT OF FOOD
Place a number of individual portions, such as
small pudding moulds, cups or potatoes in their
jackets, in a circle on the turntable. Keep the
portions at a distance from each other so that
the microwave energy can reach the food from
all sides.
3. R-605N English Ckbk 16/05/2003 11:10 Page 14
Page 15
ENGLISH
15
TIPS AND ADVICE
TURNING
Medium-sized items, such as hamburgers and
steaks, should be turned over once during cooking,
in order to shorten the cooking process. Large
items, such as roasts and chickens, must be turned,
since the upper side receives more microwave
energy and could dry out if not turned.
STANDING TIME
Keeping to the standing time is one of the most
important rules with microwaves. Almost all foods,
which are thawed, heated or cooked in the
microwave, require a certain amount of time to stand,
during which temperature equalisation takes place
and the moisture in the food is evenly distributed.
BROWNING AGENTS
After more than 15 minutes' cooking time food acquires
a brownness, although this is not comparable to the
deep brownness and crispness obtained through
conventional cooking. In order to obtain an appetising
brown colour you can use browning agents. For the
most part they simultaneously act as seasoning agents.
In the following table you will find some suggestions
for substances you might use for browning and some
of the uses to which you might put them.
BROWNING AGENT
Melted butter and dried paprika
Dried paprika
Soya sauce
Barbecue and Worcestershire sauce, Gravy
Rendered down bacon fat or dried onions
Cocoa, chocolate flakes, brown icing,
honey and marmalade
Poultry
Oven baked dishes"Cheese
toasties"
Meat and poultry
Roasts, Rissoles, Small roasted
items
Oven baked dishes, toasted
items, soups, stews
Cakes and desserts
Coat the poultry with the
butter/paprika mixture
Dust with paprika
Coat with the sauce
Coat with the sauce
Sprinkle pieces of bacon or
dried onions on top
Sprinkle pieces on top of cakes
and desserts or use to glaze
DISH
METHOD
HEATING
● Ready-prepared meals in aluminium containers
should be removed from the aluminium
container and heated on a plate or in a dish.
● Remove the lids from firmly closed containers.
● Food should be covered with microwave foil, a
plate or cover (obtainable from stores), so that
the surface does not dry out. Drinks need not be
covered.
● When boiling liquids such as water, coffee, tea
or milk, place a glass stirrer in the container.
● If possible, stir large quantities from time to time,
to ensure that the temperature is evenly
distributed.
● The times are for food at a room temperature of
20° C. The heating time for food stored in a
refrigerator should be increased slightly.
● After heating allow the food to stand for 1-2
minutes, so that the temperature inside the food
can be evenly distributed (standing time).
● The times given are guidelines which can be
varied according to the initial temperature,
weight, water content, fat content or the result
which you wish to achieve.
DEFROSTING
Your microwave is ideal for thawing. Thawing times
are usually considerably shorter than in traditional
methods. Here are a few tips. Take the frozen item out
of its packaging and place on a plate for thawing.
Boxes and Containers
Boxes and containers suitable for microwaves are
particularly good for thawing and heating food, since
they can withstand temperatures in a deep freeze
(down to approx. –40° C) as well as being heatresistant (up to approx. 220° C). You can therefore use
the same container to freeze, thaw, heat and even
cook the food, without having to transfer it.
Covering
Cover thin parts with small strips of aluminium foil before
thawing. Thawed or warm parts should likewise be covered
with aluminium strips during thawing. This stops the thin parts
becoming too hot while thicker parts are still frozen.
Correct setting
It is better to choose a setting which is too low rather
than one which is too high. By so doing you will
ensure that the food thaws evenly. If the microwave
setting is too high, the surface of the food will already
have begun to cook while the inside is still frozen.
3. R-605N English Ckbk 16/05/2003 11:10 Page 15
Page 16

16
TIPS AND ADVICE
Tu r ning/stirring
Almost all foods have to be turned or stirred from time
to time. As early as possible, separate parts which are
stuck together and rearrange them.
Small amounts
Thaw more quickly and evenly than larger ones. We
recommend that you freeze portions which are as
small as possible. By so doing you will be able to
prepare whole menus quickly and easily.
Foods requiring careful handling
Foods such as gateaux, cream, cheese and bread
should only be partially thawed and then left to thaw
completely at room temperature. By so doing you will
avoid the outer areas becoming too hot while the
inside is still frozen.
Standing time
This is particularly important after thawing food, as the
thawing process continues during this period. In the
thawing table you will find the standing times for
various foods. Thick, dense foods require a longer
standing time than thinner foods or food of a porous
nature. If the food has not thawed sufficiently, you may
continue thawing it in the microwave oven or lengthen
the standing time accordingly. At the end of the
standing time you should process the food as soon as
possible and not re-freeze it.
COOKING FRESH VEGETABLES
● When buying vegetables try to ensure that, as far
as possible, they are of similar size. This is
particularly important when you want to cook the
vegetables whole (e.g. boiled potatoes).
● Wash the vegetables before preparing them, clean
them and only then weigh the required quantity for
the recipe and chop them up.
● Season them as you would normally, but as a rule
only add salt after cooking.
● Add about 5 tbsps of water for 500 g of
vegetables. Vegetables which are high in fibre
require a little more water. You will find information
about this in the table.
● Vegetables are usually cooked in a dish with a lid.
Those with a high moisture content, e.g. onions or
boiled potatoes, can be cooked in microwave foil
without adding water.
● After half the cooking time has elapsed vegetables
should be stirred or turned over.
● After cooking allow the vegetables to stand for
approx. 2 minutes, so that the temperature
disperses evenly (standing time).
● The cooking times given are guidelines and depend
upon the weight, initial temperature and condition
of the type of vegetable in question. The fresher the
vegetables, the shorter the cooking times.
COOKING MEAT, FISH AND POULTRY
● When buying food items, try to ensure that, as far
as possible, they are of similar size. This will ensure
that they are cooked properly.
● Before preparation wash meat, fish and poultry
thoroughly under cold running water and pat them
dry with kitchen paper. Then continue as normal.
● Beef should be well hung and have little gristle.
● Even though the pieces may be of a similar size,
cooking results may vary. This is due, amongst
other things, to the kind of food, variations in the fat
and moisture content as well as the temperature
before cooking.
● After the food has been cooking for 15 minutes it
acquires a natural brownness, which may be
enhanced by the use of a browning agent. If, in
addition, you would like the surface to be crisp you
should either use the browning dish or sear the food
on your cooker and finish cooking it in your
microwave. By doing this you will simultaneously
obtain a brown base for making a sauce.
● Turn large pieces of meat, fish or poultry half way
through the cooking time, so that they are cooked
evenly from all sides.
● After cooking cover roasts with aluminium foil and
allow them to stand for approx. 10 minutes (standing
time). During this period the roast carries on cooking
and the liquid is evenly distributed, so that when it is
carved a minimum amount of juice is lost.
DEFROSTING AND COOKING
Deep-frozen dishes can be thawed and cooked at the
same time in one process in your microwave. You will
find some examples in the table. Do take note,
however, of the general advice given on "heating" and
"thawing" food. Please refer to the manufacturer's
instructions on the packaging when preparing deepfrozen dishes. These usually contain precise cooking
times and offer advice on preparation.
3. R-605N English Ckbk 16/05/2003 11:10 Page 16
Page 17
ENGLISH
17
TABLES
Drinks, 1 cup 150 800 W ca. 1 do not cover
Platters 400 800 W 3-6 sprinkle some water onto the sauce, cover
(Vegetables, meat and trimmings) stir half way through the heating time
Stew, Soup 200 800 W 2-3 cover, stir after heating
Garnishes 200 800 W 1-3 sprinkle some water on them, cover
stir from time to time
Meat, 1 slice
1
200 800 W 3-4 thinly spread some sauce on it, cover
2 Sausages 180 400 W 2-21/
2
pierce the skin several times
Baby food, 1 glass 190 400 W ca. 1 remove the lid, after heating stir well and test the
temperature
Melting butter or margarine
1
50 800 W
1
/2-1
Melting chocolate 100 400 W 2-3 stir from time to time
Dissolving six sheets of gelatin 10 400 W
1
/
2
dip into water, squeeze thoroughly and place in
a soup bowl, stir from time to time
Food / Drink Quantity Watt Time Hints
-
g/ml- -Min-
TABLE: HEATING FOOD AND DRINK
From refrigerator temperature
1
The recommended times are average and may need to be changed according to the, shape, composition,
weight and temperature (i.e. frozen, refrigerated or at room temperature) of the food.
TABLE: DEFROSTING AND COOKING
Food Quantity Watt Cooking time Added water Hints Standing time
(frozen) -g- -Min- -
tbsps
/ml- -Min-
Fish fillet 300 800 W 10-11 - cover 1-2
Plated meal 400 800 W 8-10 - cover, turn after 6 minutes 2
Frozen vegetables 300 800 W 7-9 3-5
tbsps
cover, stir once or twice during cooking 2
e.g. Spinach,
brocolli, Peas
Frozen mixed veg. 500 800 W 12-14 3-5
tbsps
cover, stir halfway through cooking time 2
Fresh vegetables, 500 800 W 9-11 5 tbsps Prepare in the common way, cover and 2
(e.g. Potatoes, stir halfway through cooking
peas, leek, carrots) 300 800 W 6-8 3 tbsps Prepare in the common way, cover and 2
stir halfway through cooking
ABBREVIATIONS USED
tbsp = tablespoon
tsp = teaspoon
l.p. = large pinch
s.p. = small pinch
Cup = cupful
Sach. = sachet
kg = kilogram
g = gram
l = litre
ml = millilitre
cm = centimetre
DFC = dry fat content
DF = deep frozen
MW = microwave
MWO = microwave oven
min = minutes
sec = seconds
dm = diameter
ca = circa
3. R-605N English Ckbk 16/05/2003 11:10 Page 17
Page 18
18
TABLES
TABLE: DEFROSTING
Food Quantity Watt Defrosting time Hints Standing time
-g- -Min- -Min-
The times given in the table are average and may require adjustment depending on the frozen temperature, condition
and weight of food.
Vegetable Weight Power Time Hints Added Water
-g- -Level- -Min- -tbsps/ml-
Artichokes 300 800 W 6-8 remove the stalk, cover 3-4 tbsp
Leaf Spinach 300 800 W 5-7 wash, dry well, cover, stir once or twice during cooking Cauliflower 800 800 W 15-17 1 whole head, cover, divide into florets 5-6 tbsp
500 800 W 10-12 stir during cooking 4-5 tbsp
Broccoli 500 800 W 9-11 divide into florets, cover, stir occasionally during cooking 4-5 tbsp
Mushrooms 500 800 W 8-10 whole heads, cover, stir occasionally during cooking Chinese leaves 300 800 W 9-11 cut into strips, cover, stir occasionally during cooking 4-5 tbsp
Peas 500 800 W 9-11 cover, stir occasionally during cooking 4-5 tbsp
Fennel 500 800 W 9-11 cut into quarters, cover, stir occasionally during cooking 4-5 tbsp
Onions 250 800 W 5-7 whole, cook in microwave foil Kohlrabi 500 800 W 10-12 dice, cover, stir occasionally during cooking 50 ml
Carrots 500 800 W 10-12 cut into rings, cover, stir occasionally during cooking 4-5 tbsp
Green peppers 500 800 W 9-11 cut into strips, stir once or twice during cooking 4-5 tbsp
Jacket potatoes 500 800 W 9-11 cover, stir occasionally during cooking 4-5 tbsp
Leeks 500 800 W 9-11 cut into rings, cover, stir occasionally during cooking 4-5 tbsp
Red cabbage 500 800 W 15-17 cut into strips, stir once or twice during cooking 50 ml
Brussels sprouts 500 800 W 9-11 whole sprouts, cover, stir occasionally during cooking 50 ml
Boiled potatoes (salted) 500 800 W 9-11 cut into large pieces of a similar size, add a little salt, 150 ml
cover, stir occasionally during cooking
Celery 500 800 W 9-11 dice finely, cover, stir occasionally during cooking 50 ml
White cabbage 500 800 W 15-17 cut into strips, cover, stir occasionally during cooking 50 ml
Courgettes 500 800 W 9-11 slice, cover, stir occasionally during cooking 4-5 tbsp
TABLE : COOKING FRESH VEGETABLES
Roast meat (e.g. pork, beef, 500 240 W 7-8 place on an upturned plate, 30
lamb, veal) during cooking turn 1-2 times
Steaks, Pork chops, Goulash, 200 240 W 4-5 turn halfway through defrosting time 10-15
Chicken legs
Sausages 300 240 W 4-5 place next to each other, 5-10
turn halfway through defrosting time
Duck, turkey 1500 240 W 20-22 place upon an upturned plate, 30-90
during cooking turn over 1-2 times
Chicken 1200 240 W 15-17 place upon an upturned plate, 30-90
during cooking turn over 1-2 times
Whole fish 800 240 W 9-12 turn halfway through defrosting time 10-15
Fish fillet 400 240 W 7-10 turn halfway through defrosting time 5-10
Crab 300 240 W 6-8 turn halfway through defrosting time 5
Rolls, 2 80 240 W ca. 1 only partially defrost Bread sliced, 250 240 W 2-4 place slices next to each other, 5
only partially defrost
Whole loaf 500 240 W 7-10 turn halfway through defrosting 15
(centre still frozen)
Cakes, per piece 150 240 W ca. 2 place on a plate 5
Whole gateau, diameter/width 25 cm 240 W 9-91/
2
after defrosting, cut into pieces 60
and leave space between each slice
Butter 250 240 W 2-4 only partially defrost 15
Fruit such as strawberries 250 240 W 4-5 spread them out evenly 5
raspberries, cherries, plums turn halfway through defrosting time
3. R-605N English Ckbk 20/05/2003 11:36 Page 18
Page 19
ENGLISH
19
TABLES
Roast meat
(Pork, Lamb & Veal)
Roastbeef (medium)
Chicken
Chicken legs
Gratin e.g. Soufflés
Cheese on toast
1 piece
Season to taste, place in a gratin dish and then on
the turntable, after * turn over
Season to taste, place with the fatty side downward
in a flat gratin dish, put on turntable, after * turn over
Season to taste, place with the breast facing
downwards in a flat gratin dish, put on the turntable,
after * turn over
Season to taste, place the skin side downwards on
the rack, after * turn over
Place gratin dish on the rack
Toast the bread, spread with butter, place 1 slice of
cooked ham, a slice of pinapple and a slice of
processed cheese on each slice, and grill on the rack.
10
10
3
3
10
1
TABLE : COOKING, GRILLING AND GRATIN DISH
7-8
3-5*
6-8
3-5
15-17
7-9*
9-11
3-4
19-21
6-8
6-7*
16-18
4-6
10-12
7-8*
7-9
4-5
11-13
8-10*
11-13
3-5
12-14
7-8*
12-14
4-5
2-3
5-7*
5-7
3-4
1
/
2
4-5
500
1000
1500
1000
1500
1200
200
800 W
800 W
800 W
800 W
800 W
560 W
800 W
560 W
560 W
560 W
560 W
800 W
800 W
800 W
400 W
Food Weight Setting Power Time Hints Standing Time
-g- -Level- -Min- -Min-
3. R-605N English Ckbk 16/05/2003 11:10 Page 19
Page 20
20
RECIPES
Germany
CAMEMBERT TOAST
Total cooking time: approx. 1-2 minutes
Utensil:
Ingredients
4 slices of bread for toasting (80 g)
2 tbsp butter or margarine (20 g)
150 g Camembert
4 tsp Cranberry jelly (40 g)
Cayenne pepper
1. Toast the bread and spread with butter.
2. Cut the Camembert into slices and arrange on
top of the toast. Put the Cranberry jelly in the
middle of the cheese and sprinkle with Cayenne
pepper.
3. Place the toast on a plate and heat for
1-2 min. 800 W
Tip:You can vary this recipe according to your
taste. For example, you can use fresh
mushrooms and grated cheese or cooked ham,
asparagus and Emmental cheese.
Holland
MUSHROOM SOUP
Total cooking time: approx. 9-13 minutes
Utensil: bowl with lid (2 litre capacity)
Ingredients
200 g mushrooms, sliced
1 onion (50 g), finely chopped
300 ml meat stock
300 ml cream
2
1
/
2
tbsp flour (25 g)
2
1
/
2
tbsp butter or margarine (25 g)
salt and pepper
150 g crème fraîche
1. Place the vegetables and the stock in the bowl,
cover and cook.
6-8 min. 800 W
2. Blend all the ingredients in the mixer, add the
cream.
3. Mix the flour and butter to a dough, and smooth
into the soup. Season with salt and pepper, cover
and cook. Stir after cooking.
3-5 min. 800 W
4. After cooking gradually stir the crème fraîche into
the soup.
Germany
SPICY TURKEY FRICASSEE
2 servings
Total cooking time: approx. 23-27 minutes
Utensil: flat, oval dish with a lid (about 26 cm long)
Ingredients
1 cup of long grain rice, parboiled (120 g)
a little saffron (containing the whole
stigma)
1 tsp butter or margarine to grease the dish
1 onion (50 g), sliced
1 red pepper (100 g), cut into strips
1 small leek (100 g), cut into strips
300 g turkey breast, diced
pepper
paprika pepper
2 tbsps butter or margarine (20 g)
300 ml meat stock
1. Mix the rice with the saffron and place in the
greased dish. Mix in the onion, pepper and leek
with the diced turkey breast and season. Stack
the mixture on top of the rice. Dot with butter.
2. Pour the stock over the dish, cover and cook.
1. 5-7 min. 800 W
2. 18-20 min. 240 W
Allow the turkey fricassee to stand for about 2-3
minutes after cooking.
3. R-605N English Ckbk 16/05/2003 11:10 Page 20
Page 21

ENGLISH
21
RECIPES
Austria
ROAST CHICKEN WITH STUFFING
Total cooking time 36-42 minutes
Utensils: Quiche form, kitchen twine
Ingredients
1 Chicken (weighing 1 kg)
salt
marjoram, rosemary
1 stale bread roll (white bread 40 g)
1 bunch of parsley, chopped finely (10 g)
pinch nutmeg
2 tbsps butter or margarine (20 g)
1 yolk of egg
3 tbsps butter or margarine (30 g)
1 tbsp paprika pepper
salt
1 tsp butter or margarine to grease dish
1. Wash the chicken, dry with kitchen towel. Season
with salt, rosemary and marjoram.
2. To make the stuffing, soak the bread roll for about
10 minutes in cold water, then press the water
out. Mix in the salt, parsley, nutmeg, butter and
the egg yolk and stuff the chicken with the
mixture. Tie up the opening with ties or with
butcher’s twine.
3. Heat the butter
approx 1 min. 800 W
Stir the paprika pepper and the salt into the
butter, and drizzle the mixture over the chicken.
4. Place the chicken breast down in the greased flan
dish and cook without covering.
1. 13-15 min. 800 W
2. 5-6 min.
Turn over
3. 13-15 min. 800 W
4. 4-5 min.
Allow the chicken to stand for approximately 3
minutes after cooking.
Switzerland
FILLET OF FISH WITH CHEESE SAUCE
Total cooking time 24-27 minutes
Utensils: Bowl with a lid (1 l capacity)
Flan dish (approx 25 cm diameter)
Ingredients
3 fillets of fish (approx. 800 g)(e.g. plaice
or cod)
2 tbsps lemon juice
1 tbsp butter or margarine
1 onion (50 g), finely chopped
2 tbsps flour
100 ml white wine
1 tsp vegetable oil to grease the dish
100 g grated Emmental cheese
2 tbsps chopped parsley
1. Wash the fillets, dry with kitchen towel. Drizzle
with the lemon juice. Allow to stand for about 15
minutes, then dry again and salt.
2. Spread the butter over the base of the bowl. Add
the chopped onion, cover and cook.
approx. 2 min. 800 W
3. Sprinkle the flour over the onions and stir. Pour the
white wine over and mix.
4. Grease the flan dish and place the fillets inside.
Pour the sauce over the fillets, sprinkle with
cheese and cook on the turntable.
1. 18-20 min. 560 W
2. 4-5 min.
Allow the fish to stand for approximately 2
minutes after cooking. Garnish with chopped
parsley and serve.
3. R-605N English Ckbk 16/05/2003 11:10 Page 21
Page 22

22
RECIPES
Germany
COLOURED MEAT KEBABS
Total cooking time 20-28 minutes
Utensils: Rack
Three wooden skewers (20-25 cm long)
Ingredients
300 g escalope of pork
75 g bacon
1-2 onions (75 g) cut into quarters
3 tomatoes (250 g) cut into quarters
1
/
2
green pepper (75 g), cut into nine pieces
3 tbsps oil
4 tsps paprika
salt
1 tsp Cayenne pepper
1 tsp Worcester sauce
1. Cut the meat and bacon into 2-3 cm cubes.
2. Thread the meat and the vegetables alternately
onto the three skewers.
3. Stir the seasoning into the oil and spread over the
kebabs. Place the kebabs on the rack and grill.
1. 7-10 min.
2. 3-4 min. 800 W
Turn over the kebabs
3. 7-10 min.
4. 3-4 min. 800 W
Spain
STUFFED HAM
Total cooking time 19-22 minutes
Utensils: Bowl with lid (2 l capacity)
Wooden skewers
Flat oval soufflé dish with lid or
cling film (approx 27 cm long)
Ingredients
125 g leaf spinach, with stalks removed
125 g Fromage frais 20 % fat content
40 g grated Emmental cheese
pepper
paprika
6 slices of cooked ham (300 g)
125 ml water
125 ml cream
2 tbsp flour (20 g)
2 tbsp butter or margarine (20 g)
1 tsp butter or margarine to grease the dish
1. Chop the spinach into small pieces, mix with the
fromage frais and the cheese and season with
pepper and paprika to taste.
2. Place a tablespoon of the filling on top of each
slice of cooked ham, and roll up. Spear the ham
with a wooden skewer to fasten it.
3. Make a béchamel sauce; to do this pour the
water and cream into the bowl, cover and heat.
3-4 min. 800 W
Mix the flour and butter to make a roux, add to
the liquid and whisk until dissolved. Cover, bring
to the boil and allow to thicken.
1 min. 800 W
Stir and taste.
4. Place the sauce into the greased dish, position
the filled rolls of ham onto the sauce. Cover with
microwave foil.
11-13 min. 800 W
5. Remove the microwave foil and continue grilling
on rack.
approx. 4 min.
Allow the rolls of ham to stand for about 2
minutes after cooking.
Tip:
You can buy ready-made béchamel sauce and
use it for this recipe.
3. R-605N English Ckbk 16/05/2003 11:10 Page 22
Page 23
ENGLISH
23
RECIPES
Spain
MUSHROOMS WITH ROSEMARY
STUFFING
Total cooking time 15-22 minutes
Utensils: Bowl with lid (1 l capacity)
Flat round bowl with lid (approx
22 cm diameter)
Ingredients
8 large mushrooms (approx 225 g) whole
2 tbsps butter or margarine (20 g)
1 onion (50 g), chopped finely
50 g diced ham
black milled pepper
rubbed rosemary
125 ml dry white wine
125 ml cream
2 tbsps flour (20 g)
1. Remove the mushroom stalks and cut them up into
small pieces.
2. Put the butter in the bowl and spread on the
base. Add the onion, diced ham and the
chopped mushroom stalks, season with the
pepper and rosemary, cover and cook.
4-5 min. 800 W
Allow to cool.
3. Place 100 ml of the wine and the cream in the
round bowl. Cover and heat.
2-3 min. 800 W
4. Blend the flour into the remainder of the wine and
stir into the hot liquid. Cover and cook. Stir twice
during cooking.
1-2 min. 800 W
5. Fill the mushrooms with the ham and onion
mixture and place into the sauce. Place the bowl
on the rack and cook.
1. 4-6 min. 800 W
2. 4-5 min.
Allow the mushrooms to stand for about 2 minutes
after they have cooked.
Germany
COURGETTES - NOODLES - GRATIN
Total cooking time 46-55 minutes
Utensils: Bowl with lid (2 l capacity)
Soufflé dish (approx 26 cm long)
Ingredients
500 ml water
1
/
2
tsp oil
salt
80 g macaroni
400 g tinned tomatoes, chopped
3 onions (150 g), finely chopped
basil
thyme
salt and pepper
1 tbsp oil to grease the dish
450 g courgettes, sliced
150 g soured cream
2 eggs
100 g grated Cheddar cheese
1. Place the water, oil and salt into the bowl, cover
and bring to the boil.
3-4 min. 800 W
2. If you have the sort of macaroni that is is sold in
long strips, break it up into small pieces, add to
the boiling water, stir and cook.
8-10 min. 240 W
Drain the past and allow to cool.
3. Mix the tomatoes and the onions and season
well. Grease the dish. Place the macaroni into the
dish and pour the tomato sauce on top. Place the
slices of courgette on the top of that.
4. Beat the soured cream with the eggs and pour
over the dish. Sprinkle the grated cheese on top.
1. 30-35 min. 800 W
2. 5-6 min.
Allow the dish to stand for 5-10 minutes after
cooking.
3. R-605N English Ckbk 16/05/2003 11:10 Page 23
Page 24

24
WICHTIGE SICHERHEITSHINWEISE
Die Einstellungen nach dem Starten des Gerätes
überprüfen um sicherzustellen, daß das Gerät wie
gewünscht arbeitet. Diese Bedienungsanleitung und den
Kochbuch-Ratgeber zusammen verwenden.
Zur Vermeidung von Verletzungen
WARNUNGSHINWEIS:
Das Gerät nicht betreiben, wenn es beschädigt ist oder
Fehlfunktionen aufweist. Überprüfen Sie vor dem Betrieb
die folgenden Punkte:
a) Die Tür muß einwandfrei schließen und darf nicht
schlecht ausgerichtet oder verzogen sein.
b) Die Scharniere und Türsicherheitsverriegelungen
dürfen nicht gebrochen oder lose sein.
c) Die Türdichtungen und Dichtungsoberflächen dürfen
nicht beschädigt sein.
d) Im Garraum und an der Tür dürfen keine Dellen oder
andere Beschädigungen vorhanden sein.
e) Das Netzkabel und der Netzstecker dürfen nicht
beschädigt sein.
Nehmen Sie unter keinen Umständen
Reparaturen oder Änderungen an Ihrem
Mikrowellengerät selbst vor. Reparaturen,
insbesondere solche, bei denen die Abdeckung
des Geräts entfernt werden muß, dürfen
ausschließlich von entsprechend qualifizierten
Technikern vorgenommen werden.
Das Gerät nicht bei geöffneter Tür oder mit auf irgendeine
Weise veränderter Türsicherheitsverriegelung betreiben.
Niemals das Gerät betreiben, wenn sich Gegenstände
zwischen den Türdichtungen und den abdichtenden
Oberflächen befinden.
Vermeiden Sie die Ansammlung von Fett oder
Verschmutzungen auf der Türdichtung und
angrenzenden Teilen. Bitte folgen Sie den Hinweisen
im Kapitel Reinigung und Pflege auf Seite 28.
Personen mit HERZSCHRITTMACHERN sollten ihren Arzt
oder den Hersteller des Herzschrittmachers nach
Vorsichtsmaßnahmen beim Umgang mit
Mikrowellengeräten befragen.
Zur Vermeidung von elektrischem Schlag
Unter keinen Umständen sollte das äußere Gehäuse
entfernt werden.
Niemals Flüssigkeiten in die Öffnungen der
Türsicherheitsverriegelung oder Lüftungsöffnungen kommen
lassen oder Gegenstände in diese Öffnungen stecken.
Wenn größere Mengen Flüssigkeiten verschüttet werden,
müssen Sie sofort das Gerät ausschalten, den Netzstecker
ziehen und den SHARP-Kundendienst anfordern.
Niemals das Netzkabel bzw. den Netzstecker in Wasser
oder andere Flüssigkeiten legen.
Das Netzkabel nicht über die scharfe Kante eines Tisches
oder einer Arbeitsplatte führen.
Das Netzkabel von erwärmten Oberflächen fernhalten,
einschließlich Geräterückseite.
Auf keinen Fall versuchen, die Garraumlampe selbst
auszuwechseln, sondern nur von einem von SHARP
autorisierten Elektriker auswechseln lassen!
Zur Vermeidung von Feuer
Mikrowellengeräte sollten während des
Betriebs nicht unbeaufsichtigt gelassen
werden. Zu hohe Leistungsstufen oder zu lange
Garzeiten können das Gargut überhitzen und
Feuer verursachen.
Dieses Gerät ist nicht für den Einbau in einer Wand oder
Einbauschrank vorgesehen.
Die Steckdose muß ständig zugänglich sein, so daß der
Netzstecker im Notfall einfach abgezogen werden kann.
Die Netzspannung muß 230 V Wechselstrom, 50 Hz betragen
und sollte mit einer Sicherung von mindestens
10 A oder einem Sicherungsautomaten von mindestens
10 A ausgestattet sein.
Es wird empfohlen das Gerät an einen separaten Stromkreis
anzuschließen.
Das Gerät nicht an Orten aufstellen, an denen Wärme
erzeugt wird, z.B. in der Nähe eines konventionellen
Herdes.
Das Gerät nicht an Orten aufstellen, an denen eine hohe
Luftfeuchtigkeit vorhanden ist oder sich Kondenswasser
bilden kann.
Das Gerät nicht im Freien lagern oder aufstellen.
NIEMALS DIE TÜR ÖFFNEN, wenn im Gerät erwärmte
Lebensmittel zu rauchen beginnen. Das Gerät
ausschalten, den Netzstecker ziehen und warten, bis
die Lebensmittel nicht mehr rauchen. Öffnen der Tür
während der Rauchentwicklung kann Feuer
verursachen.
Nur für Mikrowellengeräte vorgesehene Behälter
und Geschirr verwenden. Siehe die entsprechenden
Hinweise im nachfolgenden Kochbuch-Ratgeber
(Seite 29).
Niemals das Gerät unbeaufsichtigt lassen, wenn
Kunststoff-, Papier- oder andere brennbare
Lebensmittelbehälter verwendet werden.
Den Spritzschutz für den Hohlleiter, den Garraum,
den Drehteller und den Drehteller-Träger nach der
Ver wendung des Gerätes reinigen. Diese Bauteile
sollten trocken und fettfrei sein. Zurückbleibende
Fettspritzer können überhitzen, zu rauchen beginnen
oder sich entzünden.
Keine brennbaren Materialien in der Nähe des Gerätes
oder den Lüftungsöffnungen lagern.
Niemals die Lüftungsöffnungen blockieren.
Alle Metallverschlüsse, Drähte usw. von Lebensmitteln und
Verpackungen entfernen. Funkenbildung auf
Metalloberflächen kann zu Feuer führen.
Das Mikrowellengerät nicht zum Frittieren von
Lebensmitteln in Öl oder Fett verwenden. Temperaturen
können nicht kontrolliert werden und das Fett kann sich
entzünden.
Zum Herstellen von Popcorn sollte nur für
Mikrowellengeräte vorgesehenes Popcorn-Geschirr
verwendet werden.
Keine Lebensmittel oder andere Gegenstände im Gerät lagern.
WICHTIG FÜR IHRE SICHERHEIT: LESEN SIE DIE FOLGENDEN HINWEISE AUFMERKSAM
DURCH, UND BEWAHREN SIE DIE BEDIENUNGSANLEITUNG AUF.
4. R-605N German Op man 16/05/2003 11:11 Page 24
Page 25
25
WICHTIGE SICHERHEITSHINWEISE
DEUTSCH
Halten Sie beim Öffnen der Gerätetür ausreichenden
Abstand, um Verbrennungen durch austretende Hitze oder
Dampf zu vermeiden.
Schneiden Sie gefüllte, gebackene Speisen nach dem Garen
in Scheiben, um den Dampf entweichen zu lassen und
Verbrennungen zu vermeiden.
Kinder vom Türglas fernhalten, um Verbrennungen zu
vermeiden.
Die Gerätetür, die Geräteaußenflächen, die Geräterückseite,
der Geräteinnenraum, Lüftungsöffnungen, Zubehörteile und
das Geschirr im GRILL-Betriebsart nicht berühren, da sie heiß
werden. Vor der Reinigung sicherstellen, daß alle Geräteteile
abgekühlt sind.
Zur Vermeidung von Fehlbedienung durch Kinder
WARNUNG: Kinder dürfen das Gerät nur unter
Aufsicht benutzen oder wenn sie ausreichende
Anweisungen zur sicheren Benutzung erhalten
haben und die Gefahren eines unsachgemäßen
Gebrauchs verstehen.
Nicht an die Gerätetür lehnen oder an der Tür hängend
schwingen. Das Mikrowellengerät ist kein Spielzeug!
Kinder sollten mit allen wichtigen Sicherheitshinweisen
vertraut gemacht werden: z.B. Verwendung von
Topflappen und vorsichtiges Abnehmen von Deckeln.
Beachten Sie besonders Verpackungen, die Lebensmittel
knusprig machen (z.B. selbstbräunende Materialien),
indem sie besonders heiß werden.
Sonstige Hinweise
Niemals das Gerät auf irgendeine Weise verändern.
Das Gerät während des Betriebs nicht bewegen.
Dieses Gerät ist nur für den Hausgebrauch vorgesehen und
darf nur zum Garen von Lebensmitteln verwendet werden.
Es eignet sich nicht für gewerbliche Zwecke oder den
Gebrauch in einem Labor.
Zur Vermeidung von Fehlfunktionen und
Beschädigungen dieses Gerätes
Das Gerät niemals leer in Betrieb nehmen, es sei denn, dies
wird in der Bedienungsanleitung ausdrücklich empfohlen
(siehe Seite 27). Durch Inbetriebnahme des Gerätes ohne
Gargut kann das Gerät beschädigt werden.
Bei der Verwendung von Bräunungsgeschirr oder
selbsterwärmenden Materialien muß eine wärmefeste
Isolierung (z.B. ein Porzellanteller) zwischen Geschirr und
Drehteller gestellt werden. Dadurch werden
Beschädigungen des Drehtellers und des Drehteller-Trägers
durch Wärme vermieden. Die angegebene Aufheizzeit für
das Geschirr sollte nicht überschritten werden.
Kein Metallgeschirr verwenden, da Mikrowellen reflektiert
werden und dies zu Funkenbildung führt. Keine Konserven
in das Gerät stellen.
Nur den für dieses Gerät vorgesehenen Drehteller und den
Drehteller-Träger verwenden.
Um das Zerspringen des Drehtellers zu vermeiden:
(a) Vor dem Reinigen, den Drehteller abkühlen lassen.
(b) Kein heißes Gargut oder heißes Geschirr auf den
kalten Drehteller stellen.
(c) Keine kalten Lebensmittel oder kaltes Geschirr auf den
heißen Drehteller stellen.
Während das Gerät arbeitet, keine Gegenstände auf das
äußere Gehäuse stellen.
Wenn die Garraumlampe ausfallen sollte, wenden Sie sich
bitte an Ihren Elektrohändler oder eine von SHARP
autorisierte Kundendienststelle!
Wenn das Netzkabel beschädigt ist, muß es durch ein
SHARP autorisierten Kundendienst ersetzt werden.
Zur Vermeidung von Explosionen und
plötzlichem Sieden:
WARNUNG: Speisen in flüssiger und anderer
Form dürfen nicht in verschlossenen Gefäßen
erhitzt werden, da sie explodieren könnten.
Niemals verschlossene Behälter verwenden. Verschlüsse
und Abdeckungen entfernen. Verschlossene Behälter
können durch den Druckanstieg selbst nach dem
Ausschalten des Gerätes noch explodieren.
Beim Erhitzen von Flüssigkeiten vorsichtig sein. Behälter mit
großer Öffnung verwenden, damit entstehende Blasen
entweichen können.
Beim Erhitzen von Flüssigkeiten in
Mikrowellengeräten beim Entnehmen des
Behälters vorsichtig sein, da es zu einem
verspätetem Aufwallen durch Siedeverzug
kommen kann.
Um Verbrennungen durch plötzliches Überkochen
(Siedeverzug) zu vermeiden:
1. Die Flüssigkeiten vor dem Kochen/Erhitzen umrühren.
2. Es wird empfohlen, während des Erhitzens einen
Glasstab oder ähnlichen Gegenstand in den Behälter
zu stecken.
3. Nach dem Erhitzen die Flüssigkeit noch kurze Zeit im
Gerät stehen lassen für mindestens 20 Sekunden, um
verspätetes Aufwallen durch Siedeverzug zu verhindern.
Eier nicht in der Schale kochen. Hartgekochte
Eier dürfen nicht in Mikrowellengeräten
erwärmt werden, da sie selbst nach der
Erwärmung explodieren können. Zum Kochen
oder Aufwärmen von Eiern, die nicht verquirlt
oder verrührt wurden, das Eigelb und Eiweiß
anstechen, damit es nicht explodiert. Vor dem
Aufwärmen im Mikrowellengerät die Schale
von gekochten Eiern entfernen und die Eier in
Scheiben schneiden.
Die Schale von Lebensmitteln, z.B. Kartoffeln, Würstchen
oder Obst, vor dem Garen anstechen, damit der Dampf
entweichen kann.
Zur Vermeidung von Verbrennungen
Beim Entnehmen von Gargut aus dem Garraum sollten
Topflappen o.ä. verwendet werden.
Behälter, Popcorngeschirr, Kochbeutel, usw. immer vom
Gesicht und den Händen abgewandt öffnen, um
Verbrennungen durch Dampf zu vermeiden.
Um Verbrennungen zu vermeiden, immer die
Lebensmitteltemperatur prüfen und umrühren,
bevor Sie das Gargut servieren. Besondere
Vorsicht ist geboten, wenn die Lebensmittel
oder Getränke an Babys, Kinder oder ältere
Personen weitergereicht werden.
Die Temperatur des Behälters ist kein echter Hinweis auf die
tatsächliche Temperatur des Lebensmittels oder Getränks;
immer die Temperatur prüfen.
4. R-605N German Op man 16/05/2003 11:11 Page 25
Page 26
MIKROWELLENLEISTUNG
26
WICHTIGE SICHERHEITSHINWEISE
AUFSTELLANWEISUNGEN
Da das Türglas während des Garens heiß
werden kann, das Gerät in einer Höhe von
mindestens 85 cm über dem Fußboden
aufstellen. Kinder vom Türglas fernhalten,
um Verbrennungen zu vermeiden.
4. Das Netzkabel darf nicht über heiße oder
scharfe Oberflächen geführt werden, wie
zum Beispiel über den heißen
Lüftungsöffnugen an der oberen
Rückwand des Gerätes.
5. Stellen Sie sicher, daß
über dem Gerät ein
Freiraum von mindestens
21 cm vorhanden ist.
6. Sicherstellen, daß der ZEITSCHALTUHR-Drehknopf
auf “
●” (aus) Stellung eingestellt ist.
7. Den Netzstecker des Mikrowellengerätes mit einer
normalen, geerdeten Steckdose verbinden.
1. Sämtliches Verpackungsmaterial aus dem
Geräteinnenraum entnehmen. Die
Polyethylenschicht zwischen Tür und Innenraum
entfernen. Den Aufkleber (falls vorhanden) von der
Aussenseite der Tür abziehen.
Die Schutzfolie an der Innenseite der Tür
nicht entfernen.
2. Das Gerät nicht betreiben, wenn es beschädigt ist.
3. Das Mikrowellengerät auf einer flachen, geraden
Oberfläche aufstellen, die stabil genug ist, das
Gewicht des Gerätes und der darin zubereiteten
Lebensmittel zu tragen.
Keine Kunststoffbehälter für den Mikrowellenbetrieb
verwenden, wenn das Gerät nach dem Gebrauch der
GRILL-Betriebsart noch heiß ist, da diese sonst schmelzen
könnten. In diesen Betriebsarten dürfen keine
Kunststoffbehälter verwendet werden, es sei denn, der
Hersteller weist auf deren Eignung zu diesem Zweck hin.
HINWEISE:
Bei Fragen zum Anschluß des Gerätes wenden Sie sich
bitte an einen autorisierten Elektrofachmann.
Sowohl der Hersteller als auch der Händler können keine
Verantwortung für Beschädigungen des Gerätes oder
Verletzungen von Personen übernehmen, die als Folge
eines falschen elektrischen Anschlusses entstehen.
Wasserdampf und Tropfen können sich auf den Wänden
im Innenraum bzw. um die Türdichtungen und
Dichtungsoberflächen bilden. Dies ist normal und ist kein
Anzeichen für den Austritt von Mikrowellen oder einer
sonstigen Fehlfunktion.
Für den manuellen Betrieb stehen 4 verschiedene
Leistungsstufen zur Auswahl. Zur Wahl der
Mikrowellenleistung sollten Sie sich an den Angaben
in dem nachfolgenden Kochbuch-Ratgeber orientieren.
Generell gelten folgende Empfehlungen:
800 W für schnelles Kochen oder Aufwärmen, z.B.
für Suppen, Eintöpfe, Dosengerichte, heiße Getränke,
Gemüse, Fisch usw.
560 W zum längeren Garen von kompakteren
Speisen wie Braten, Hackbraten und Tellergerichten,
auch für empfindliche Gerichte wie Käsesossen oder
Rührkuchen. Mit dieser niedrigeren Einstellung kochen
Sossen nicht über und die Speisen garen gleichmässig,
ohne am Rand hart zu werden oder überzulaufen.
400 W für kompaktere Speisen, die beim Kochen
mit herkömmlichen Methoden eine lange Garzeit
erfordern, z.B. Rindfleischgerichte, wird diese
Leistungsstufe empfohlen, damit das Fleisch zart bleibt.
240 W (Auftau-Einstellung) wählen Sie diese Stufe
zum Auftauen, damit Speisen gleichmäßig auftauen.
Diese Stufe ist auch bestens geeignet, um Reis, Nudeln
und Klöße zu köcheln und gebackenen Eierpudding
zu kochen.
W = WATT
21cm
✓
✗
4. R-605N German Op man 16/05/2003 11:11 Page 26
Page 27
27
GAREN MIT MIKROWELLE & GRILLBETRIEB
DEUTSCH
HEIZEN OHNE SPEISEN
Bei der ersten Benutzung des Grills kann es zu Rauchentwicklung oder Brandgeruch kommen. Das ist
normal und kein Anzeichen dafür, daß das Gerät funktionsuntüchtig ist. Um dieses Problem beim
erstmaligen Gebrauch des Gerätes zu vermeiden, betreiben Sie den Grill 20 Minuten lang ohne Speisen.
WICHTIG: Damit während des Grillbetrieb entstehender Rauch oder Gerüche abziehen können, öffnen
Sie ein Fenster oder schalten Sie die Abzugshaube/den Ventilator ein. Vergewissern Sie sich,
dass sich keine Speisen im Gerät befinden.
1. Den MIKROWELLEN-LEISTUNGS-/GRILL
REGLER
-Drehknopf wie gewünscht einstellen.
2. Den ZEITSCHALTUHR-Drehknopf auf die
gewünschte Garzeit einstellen. Der Garvorgang
beginnt.
✳ Bei Ablauf der Garzeit kehrt der ZEITSCHALTUHR-
Drehknopf zurück zu “
●” (aus), dann ertönt ein
Signalton und das Gerät und die Garraumlampe
werden automatisch ausgeschaltet.
1.
2.
BEDIENUNGSHINWEISE:
Im Kochbuchteil finden Sie ausführliche Anleitungen für jedes Rezept, hier werden nur grundlegende Hinweise
zur Bedienung aufgeführt.
1. Drücken Sie die Taste für den Türöffner und die Tür öffnet sich, dann stellen Sie die Speise auf den Drehteller.
2. Wenn die ZEITSCHALTUHR auf weniger als zwei Minuten eingestellt werden soll, den ZEITSCHALTUHR-
Drehknopf zuerst über die Zwei-Minuten-Markierung und dann zurück auf die gewünschte Zeit drehen.
3. Wenn der Garvorgang vor Ablauf der eingestellten Garzeit beendet werden soll, den ZEITSCHALTUHR-
Drehknopf zurück auf “
●” (aus) drehen oder die Gerätetür öffnen. Die Gerätetür kann jederzeit während des
Garvorgangs geöffnet werden. Zum Fortsetzen des Garvorgangs die Gerätetür schließen. Während des
Garvorgangs kann die Garzeit geändert werden, indem die ZEITSCHALTUHR auf eine neue Garzeit
eingestellt wird.
WARNHINWEIS:
Wenn das Mikrowellengerät nicht im Einsatz ist, muß der ZEITSCHALTUHR-Drehknopf auf “
●” (aus) stehen.
Andernfalls startet das Gerät, sobald die Tür geschlossen wird.
4. R-605N German Op man 16/05/2003 11:11 Page 27
Page 28

28
REINIGUNG UND PFLEGE
FUNKTIONSPRÜFUNG
VORSICHT! KEINE HANDELSÜBLICHEN
OFENREINIGER, SCHEUERNDE ODER SCHARFE
REINIGUNGSMITTEL ODER METALLWOLLEREINIGER AM MIKROWELLENGERÄT
VERWENDEN.
Gerätegehäuse: Die Außenseite des Gerätes mit
einer milden Seifenlauge reinigen. Die Seifenlauge
gründlich mit einem feuchten Tuch abwischen und mit
einem Handtuch nachtrocknen.
Bedienfeld: Vor dem Reinigen die Tür öffnen, um
das Bedienfeld zu inaktivieren. Das Bedienfeld
vorsichtig mit einem feuchten Tuch reinigen. Niemals
zuviel Wasser und keine chemischen oder
scheuernden Reiniger verwenden, da das Bedienfeld
dadurch beschädigt werden kann.
VORSICHT: Während des Reinigens darf der
ZEITSCHALTUHR-Drehknopf nicht aus der Position
“
●” (aus) gedreht werden. Andernfalls schaltet sich
das Gerät nach dem Schließen der Tür ein.
Geräteinnenraum:
1. Nach jedem Gebrauch das noch warme Gerät zur
Reinigung mit einem weichen, feuchten Tuch oder
Schwamm abwischen, um leichte Verschmutzungen
zu entfernen. Für starke Verschmutzungen eine
milde Seifenlauge verwenden und mehrmals mit
einem weichen, feuchten Tuch oder Schwamm
gründlich nachwischen, bis alle Rückstände
vollständig entfernt sind. Entfernen Sie nicht den
Spritzschutz für den Hohlleiter.
2. Sicherstellen, daß weder Seifenlauge noch Wasser
durch die kleinen Öffnungen an der Wand
eindringen, da dies das Gerät beschädigen kann.
3. Verwenden Sie keine Sprühreiniger im Garraum.
4. Das Gerät nach dem Reinigen in regelmäßigen
Abständen im Grillbetrieb betreiben, vgl. “Heizen
ohne Speisen“ auf der Seite 27. Speisereste oder spritzer im Ofen können Rauch und Gerüche
erzeugen.
Drehteller und Drehteller-Träger: Entfernen Sie
zuerst den Drehteller und den Drehteller-Träger aus
dem Garraum. Den Drehteller und den Träger mit
einer milden Seifenlauge reinigen und mit einem
weichen Tuch trocknen. Beide Teile sind
spülmaschinenfest.
Rost: Diesen Rost mit einem milden Spülmittel
reinigen und nachtrocknen. Der Rost ist
spülmaschinengeeignet.
Gerätetür: Die Tür auf beiden Seiten, die
Türdichtung und die Dichtungsoberflächen des öfteren
mit einem feuchten Tuch abwischen, um
Verschmutzungen zu entfernen.
Bitte prüfen Sie die folgenden Punkte, bevor Sie den Kundendienst rufen.
1. Stromversorgung:
Überprüfen Sie, ob der Netzstecker richtig an eine spannungsführende Netzsteckdose angeschlossen ist.
Vergewissern Sie sich, dass die Netzsicherung und der Sicherungsautomat in Ordnung sind.
2. Stellen Sie einen Messbecher mit etwa 150 ml Wasser in das Gerät und schliessen Sie die Tür.
Programmieren Sie das Gerät auf 1 Minute bei 800 W Leistung und starten Sie es.
Leuchtet die Lampe? JA NEIN
Dreht sich der Drehteller? JA NEIN
HINWEIS: Der Drehteller dreht sich in beide Richtungen.
Arbeitet die Lüftung? JA NEIN
(Legen Sie Ihre Hand über die Lüftungsöffnungen und prüfen Sie, ob Luft herauskommt.)
Ertönt der Signalton nach einer Minute? JA NEIN
Ist das Wasser im Messbecher nach dem gerade
durchgeführten Betrieb heiss? JA NEIN
3. Den MIKROWELLEN-LEISTUNGS-/GRILL-Drehknopf auf GRILL stellen.
Den ZEITSCHALTUHR-Drehknopf auf drei Minuten einstellen.
Wird nach drei Minuten das Grill-Heizelement rot? JA NEIN
Wenn die Antwort auf eine der obigen Fragen “NEIN” lautet, wenden Sie sich an Ihren Fachhändler oder den
SHARP-Kundendienst und teilen Sie diesen die Ergebnisse Ihrer Überprüfung mit.
Betriebsart
Mikrowelle 800 W
Standardzeit
20 Minuten
HINWEIS: Wenn Sie die Speisen in der Standardgarzeit in
nur einer Betriebsart garen, wird die Leistung des Gerätes
automatisch reduziert, um eine Überhitzung zu vermeiden.
(Die Mikrowellenleistung wird vermindert.)
4. R-605N German Op man 16/05/2003 11:11 Page 28
Page 29
DEUTSCH
29
WAS SIND MIKROWELLEN?
DAS GEEIGNETE GESCHIRR
die Speise gebräunt wird. Bei Verwendung von
Bräunungsgeschirr muß ein geeigneter Isolator, z.B. ein
Porzellanteller, zwischen Drehteller und Bräunungsschale
gelegt werden. Beachten Sie genau die Vorheizzeit
gemäß Herstelleranweisung. Bei Überschreitung kann es
zur Beschädigung des Drehtellers und Drehteller-Trägers
kommen bzw. die Schutzsicherung des Gerätes auslösen
und das Gerät ausschalten.
METALL
sollte in der Regel nicht verwendet werden, da
Mikrowellen Metall nicht durchdringen und so nicht an
die Speisen gelangen können. Es gibt jedoch
Ausnahmen: Schmale Streifen aus Aluminiumfolie
können zum Abdecken von Teilen verwendet werden,
damit diese nicht zu schnell auftauen oder garen (z.B.
die Flügel beim Hähnchen). Kleine Metallspieße und
Aluminiumschalen (z.B. bei Fertiggerichten) können
benutzt werden. Sie müssen aber im Verhältnis zur
Speise klein sein, z.B. müssen Aluminiumschalen
mindestens
2/
3
bis
3/
4
mit Speise gefüllt sein.
Empfehlenswert ist, die Speise in mikrowellengeeignetes
Geschirr umzufüllen. Bei Verwendung von
Aluminiumschalen oder anderem Metallgeschirr muß ein
Mindestabstand von ca. 2,0 cm zu den Garraumwänden
eingehalten werden, da diese sonst durch mögliche
Funkenbildung beschädigt werden können.
Kein Geschirr mit Metallauflage,
Metallteilen oder Metalleinschlüssen, wie z.B. mit
Schrauben, Bändern oder Griffen verwenden.
GESCHIRR-EIGNUNGSTEST
Wenn Sie nicht sicher sind, ob Ihr
Geschirr mikrowellengeeignet ist, führen
Sie folgenden Test durch: Das Geschirr in
das Gerät stellen. Ein Glasgefäß mit 150 ml
Wasser gefüllt auf oder neben das Geschirr stellen.
Das Gerät 1 bis 2 Minuten bei 800 W Leistung
betreiben. Wenn das Geschirr kühl oder handwarm
bleibt, ist es geeignet. Diesen Test nicht für
Kunststoffgeschirr durchführen. Es könnte schmelzen.
Mikrowellen werden im Mikrowellengerät vom
Magnetron erzeugt und versetzen die
Wassermoleküle im Lebensmittel in Schwingungen.
Durch die verursachte Reibung entsteht Wärme, die
dafür sorgt, daß die Speisen aufgetaut, erhitzt oder
gegart werden.
GLAS UND GLAS-KERAMIK
Hitzebeständiges Glasgeschirr ist sehr gut
geeignet. Der Garvorgang kann von allen
Seiten beobachtet werden. Es darf jedoch
nicht metallhaltig (Bleikristall) oder mit einer
Metallauflage versehen sein (z.B. Goldrand, Kobaltblau).
KERAMIK
ist im allgemeinen gut geeignet. Keramik muß glasiert
sein, da bei unglasierter Keramik Feuchtigkeit in das
Geschirr eindringen kann. Feuchtigkeit erhitzt das
Material und kann es zum Zerspringen bringen. Falls
Sie nicht sicher sind, ob Ihr Geschirr für die Mikrowelle
geeignet ist, führen Sie den Geschirr-Eignungstest durch.
PORZELLAN
ist sehr gut geeignet. Achten Sie darauf, daß das
Porzellan keine Gold- oder Silberauflage hat bzw. nicht
metallhaltig ist.
KUNSTSTOFF UND PAPIER-GESCHIRR
Hitzebeständiges, mikrowellengeeignetes
Kunststoffgeschirr ist zum Auftauen, Erhitzen und Garen
geeignet. Beachten Sie bitte die Angaben des Herstellers.
Hitzebeständiges, mikrowellengeeignetes Papiergeschirr
ist ebenfalls geeignet. Beachten Sie bitte die Angaben
des Herstellers.
MIKROWELLENFOLIE
oder hitzebeständige Folie ist zum Abdecken oder
Umwickeln gut geeignet. Beachten Sie bitte die
Angaben des Herstellers.
BRATBEUTEL
können im Mikrowellengerät verwendet werden.
Metallclipse sind jedoch zum Verschließen ungeeignet,
da die Bratbeutelfolie schmelzen kann. Nehmen Sie
Bindfaden zum Verschließen und stechen Sie den
Bratbeutel mehrmals mit einer Gabel ein. Nicht
hitzebeständige Folie, wie z.B. Frischhaltefolie, ist für die
Benutzung im Mikrowellengerät nicht empfehlenswert.
BRÄUNUNGSGESCHIRR
ist spezielles Mikrowellenbratgeschirr aus Glaskeramik
mit einer Metallegierung am Boden, die dafür sorgt, daß
5. R-605N German Ckbk 16/05/2003 11:11 Page 29
Page 30

30
TIPS UND TECHNIKEN
EINSTELLUNG DER ZEITEN
Die Auftau-, Erhitzungs- und Garzeiten sind im
allgemeinen erheblich kürzer als in einem
konventionellen Herd oder Backofen. Halten Sie sich
deshalb an die in diesem Kochbuch empfohlenen
Zeiten. Stellen Sie die Zeiten eher kürzer als länger
ein. Machen Sie nach dem Garen eine Garprobe.
Lieber kurz nachgaren als etwas übergaren lassen.
AUSGANGSTEMPERATUR
Die Auftau-, Erhitzungs- und Garzeiten sind von der
Ausgangstemperatur der Lebensmittel abhängig.
Tiefgefrorene und kühlschranktemperierte Lebensmittel
benötigen beispielsweise länger als raumtemperierte.
Für das Erhitzen und Garen von Lebensmitteln
werden normale Lagertemperaturen vorausgesetzt
(Kühlschranktemperatur ca. 5o C, Raumtemperatur
ca. 20o C). Für das Auftauen von Lebensmitteln wird
von -18o C Tiefkühltemperatur ausgegangen.
ALLE ANGEGEBENEN ZEITEN . . . .
in diesem Kochbuch sind Richtwerte, die je nach
Ausgangstemperatur, Gewicht und Beschaffenheit
(Wasser-, Fettgehalt etc.) der Lebensmittel variieren können.
SALZ, GEWÜRZE UND KRÄUTER
In der Mikrowelle gegarte Speisen erhalten ihren
Eigengeschmack besser als bei konventionellen
Zubereitungsarten. Verwenden Sie deshalb Salz sehr
sparsam und salzen Sie in der Regel erst nach dem
Garen. Salz bindet Flüssigkeit und trocknet die
Oberfläche aus. Gewürze und Kräuter können wie
gewohnt verwendet werden.
WASSERZUGABE
Gemüse und andere sehr wasserhaltige Lebensmittel
können im eigenen Saft oder mit wenig
Wasserzugabe gegart werden. Dadurch bleiben viele
Vitamine und Mineralstoffe im Lebensmittel erhalten.
FETTE SPEISEN
Mit Fett durchwachsenes Fleisch und Fettschichten
garen schneller als magere Teile. Decken Sie
deshalb diese Teile beim Garen mit etwas
Aluminiumfolie ab oder legen Sie die Lebensmittel
mit der fetten Seite nach unten.
LEBENSMITTEL MIT HAUT ODER SCHALE
wie Würstchen, Hähnchen, Hähnchenschenkel,
Pellkartoffeln, Tomaten, Äpfel, Eigelb oder ähnliches,
mit einer Gabel oder einem Holzstäbchen einstechen.
Dadurch kann der sich bildende Dampf entweichen,
ohne daß die Haut oder Schale platzt.
KLEINE UND GROSSE MENGEN
Die Mikrowellenzeiten sind direkt abhängig von der
Menge des Lebensmittels, das Sie auftauen, erhitzen
oder garen möchten. Das bedeutet, kleine Portionen
garen schneller als große. Als Faustregel gilt:
DOPPELTE MENGE=FAST DOPPELTE ZEIT
HALBE MENGE=HALBE ZEIT
HOHE UND FLACHE GEFÄSSE
Beide Gefäße haben das gleiche Fassungsvermögen,
aber in der hohen Form ist die Garzeit länger als in
der flachen. Bevorzugen Sie deshalb möglichst flache
Gefäße mit großer Oberfläche. Hohe Gefäße nur für
Gerichte verwenden, bei denen die Gefahr des
Überkochens besteht, z.B. für Nudeln, Reis, Milch etc.
RUNDE UND OVALE GEFÄSSE
In runden und ovalen Formen garen Speisen
gleichmäßiger als in eckigen, da sich in Ecken
Mikrowellenenergie konzentriert und die Speise an
diesen Stellen übergaren könnte.
ABDECKEN
Durch Abdecken bleibt die Feuchtigkeit im Lebensmittel
erhalten und die Garzeit verkürzt sich. Zum Abdecken
einen Deckel, Mikrowellenfolie oder eine
Abdeckhaube verwenden. Speisen, die eine Kruste
erhalten sollen, z.B. Braten oder Hähnchen, nicht
abdecken. Es gilt die Regel, was im konventionellen
Herd abgedeckt wird, sollte auch im Mikrowellengerät
abgedeckt werden. Was im Herd offen gegart wird,
kann auch im Mikrowellengerät offen gegart werden.
UNREGELMÄSSIGE TEILE
mit der dickeren bzw. kompakten Seite nach außen
plazieren. Gemüse (z.B. Broccoli) mit den Stielen nach
außen legen. Dickere Teile benötigen eine längere
Garzeit und erhalten an den Außenseiten mehr
Mikrowellenenergie, so daß die Lebensmittel
gleichmäßig garen.
UMRÜHREN
Das Umrühren der Speisen ist notwendig, da die
Mikrowellen zuerst die äußeren Bereiche erhitzen.
Dadurch wird die Temperatur ausgeglichen und die
Speise gleichmäßig erhitzt.
ANORDNUNG
Mehrere Einzelportionen, z.B. Puddingförmchen, Tassen
oder Pellkartoffeln, ringförmig auf dem Drehteller
anordnen. Zwischen den Portionen Platz lassen, so daß
die Mikrowellenenergie von allen Seiten eindringen kann.
5. R-605N German Ckbk 16/05/2003 11:11 Page 30
Page 31
31
TIPS UND TECHNIKEN
DEUTSCH
Zerlassene Butter und Paprikapulver
Paprikapulver
Sojasauce
Barbecue- und Worcestershire Sauce, Bratensauce
Ausgelassene Speckwürfel oder Trockenzwiebeln
Kakao, Schokostreusel, braune Glasuren, Honig
und Marmelade
Geflügel
Aufläufe, Käsetoasts
Fleisch und Geflügel
Braten, Frikadellen, Kurzgebratenes
Aufläufe, Toasts, Suppen, Eintöpfe
Kuchen und Desserts
Das Geflügel mit der Butter/
Paprikamischung bestreichen
Mit Paprikapulver bestäuben
Mit der Sauce bestreichen
Mit der Sauce bestreichen
Mit den Speckwürfeln oder
Trockenzwiebeln bestreuen
Kuchen und Desserts damit
bestreuen oder glasieren
BRÄUNUNGSMITTEL
GERICHTE
VERFAHREN
WENDEN
Mittelgroße Teile, wie Hamburger und Steaks,
während des Garvorgangs einmal wenden, um die
Garzeit zu verkürzen. Große Teile, wie Braten und
Hähnchen, müssen gewendet werden, da die nach
oben gerichtete Seite mehr Mikrowellenenergie erhält
und austrocken könnte, falls nicht gewendet wird.
STANDZEIT
Die Einhaltung der Standzeit ist eine der wichtigsten
Mikrowellen-Regeln. Fast alle Speisen, die in der
Mikrowelle aufgetaut, erhitzt oder gegart werden,
benötigen eine kurze oder längere Standzeit, in der
ein Temperaturausgleich stattfindet und sich die
Flüssigkeit in der Speise gleichmäßig verteilen kann.
BRÄUNUNGSMITTEL
Lebensmittel erhalten nach mehr als 15 Minuten
Garzeit eine Bräune, die jedoch nicht mit der
intensiven Bräune und Kruste beim konventionellen
Garen zu vergleichen ist. Um eine appetitliche
braune Farbe zu erhalten, können Bräunungsmittel
eingesetzt werden. Sie dienen meist gleichzeitig als
Würzmittel. Nachfolgend finden Sie einige
Empfehlungen für Bräunungsmittel und
Anwendungsmöglichkeiten:
ERHITZEN
● Fertiggerichte in Aluminiumbehältern sollten
herausgenommen und auf einem Teller oder in
einer Schüssel erhitzt werden.
● Speisen mit Mikrowellenfolie, Teller oder
Abdeckhaube (im Handel erhältlich) abdecken,
damit die Oberfläche nicht austrocknet. Getränke
müssen nicht abgedeckt werden.
● Bei fest verschlossenen Gefäßen die Deckel entfernen.
● Beim Kochen von Flüssigkeiten wie Wasser, Kaffee,
Tee oder Milch, einen Glasstab in das Gefäß stellen.
● Größere Mengen, wenn möglich, zwischendurch
umrühren, so daß sich die Temperatur gleichmäßig
verteilt.
● Die Zeiten sind für Lebensmittel bei einer
Zimmertemperatur von 20o C angegeben. Bei
kühlschranktemperierten Lebensmitteln erhöht sich
die Erhitzungszeit geringfügig.
● Lassen Sie die Speisen nach dem Erhitzen 1-2
Minuten stehen, so daß sich die Temperatur
gleichmäßig innerhalb der Speise verteilt (Standzeit).
● Die angegebenen Zeiten sind Richtwerte, die je
nach Ausgangstemperatur, Gewicht, Wassergehalt,
Fettgehalt und gewünschtem Endzustand etc.
variieren können.
AUFTAUEN
Die Mikrowelle ist ideal zum Auftauen von Lebensmitteln.
Die Auftauzeiten sind in der Regel erheblich kürzer als beim
Auftauen auf herkömmliche Weise. Nachfolgend einige
Tips. Nehmen Sie das Gefriergut aus der Verpackung
und legen Sie es zum Auftauen auf einen Teller.
Verpackungen und Behälter
Gut geeignet zum Auftauen und Erhitzen von Speisen
sind mikrowellengeeignete Verpackungen und Behälter,
die sowohl tiefkühlgeeignet (bis ca. -40o C) als auch
hitzebeständig (bis ca. 220o C) sind. So können Sie im
gleichen Geschirr auftauen, erhitzen und sogar garen,
ohne die Speise zwischendurch umfüllen zu müssen.
Abdecken
Dünnere Teile vor dem Auftauen mit kleinen
Aluminiumstreifen abdecken. Angetaute oder warme Teile
während des Auftauens ebenfalls mit Aluminiumstreifen
abdecken. Dies verhindert, daß dünnere Teile bereits zu
heiß werden, während dickere Teile noch gefroren sind.
Die Mikrowellenleistung
eher niedriger als zu hoch wählen. So erzielen Sie ein
gleichmäßiges Auftauergebnis. Ist die Mikrowellenleistung
zu hoch, gart die Speisenoberfläche bereits an, während
das Innere noch gefroren ist.
5. R-605N German Ckbk 16/05/2003 11:11 Page 31
Page 32

32
TIPS UND TECHNIKEN
Wenden/Umrühren
Fast alle Lebensmittel müssen zwischendurch einmal
gewendet oder umgerührt werden. Teile, die
aneinanderhaften, so bald wie möglich voneinander
trennen und umordnen.
Kleinere Mengen
tauen gleichmäßiger und schneller auf als große. Wir
empfehlen deshalb, möglichst kleine Portionen
einzufrieren. So können Sie sich schnell und einfach
ganze Menüs zusammenstellen.
Empfindliche Lebensmittel,
wie Torte, Sahne, Käse und Brot, nicht vollständig
auftauen, sondern nur antauen und bei
Raumtemperatur fertig auftauen. Dadurch wird
vermieden, daß die äußeren Bereiche bereits zu heiß
werden, während die inneren noch gefroren sind.
Die Standzeit
nach dem Auftauen von Lebensmitteln ist besonders
wichtig, da der Auftauvorgang während dieser Zeit
fortgesetzt wird. In der Auftautabelle finden Sie die
Standzeiten für verschiedene Lebensmittel. Dicke,
kompakte Lebensmittel benötigen eine längere
Standzeit als flache oder Lebensmittel mit poröser
Struktur. Sollte das Lebensmittel nicht ausreichend
aufgetaut sein, können Sie es weiter im Mikrowellengerät
auftauen oder die Standzeit entsprechend verlängern.
Die Lebensmittel nach der Standzeit möglichst sofort
weiterverarbeiten und nicht wieder einfrieren.
GAREN VON FRISCHEM GEMÜSE
● Achten Sie beim Kauf von Gemüse darauf, daß
die Stücke möglichst gleichmäßig sind. Dies ist vor
allem dann wichtig, wenn Sie das Gemüse im
Stück garen möchten (z.B. Pellkartoffeln).
● Gemüse vor der Zubereitung waschen, putzen und
dann erst die erforderliche Menge für das Rezept
abwiegen und zerkleinern.
● Würzen Sie wie gewohnt, aber salzen Sie in der
Regel erst nach dem Garen.
● Pro 500 g Gemüse ca. 5 EL Wasser zugeben.
Faserreiches Gemüse benötigt etwas mehr
Wasserzugabe. Angaben hierzu finden Sie in der Tabelle
(Siehe Seite 15).
● Gemüse wird in der Regel in einer Schüssel mit Deckel
gegart. Flüssigkeitsreiche Gemüsesorten, wie z.B.
Gemüsezwiebeln oder Pellkartoffeln, können ohne
Wasserzugabe in Mikrowellenfolie gegart werden.
● Gemüse nach der Hälfte der Garzeit umrühren
oder wenden.
● Nach dem Garen das Gemüse ca. 2 Minuten
stehenlassen, damit sich die Temperatur
gleichmäßig verteilt (Standzeit).
● Die angegebenen Garzeiten sind Richtwerte und
hängen vom Gewicht, der Ausgangstemperatur und
der Beschaffenheit der Gemüsesorte ab. Je frischer
das Gemüse ist, desto kürzer sind die Garzeiten.
GAREN VON FLEISCH, FISCH & GEFLÜGEL
● Achten Sie beim Einkauf darauf, daß die Stücke
möglichst gleichmäßig sind. So erhalten Sie ein
gutes Garergebnis.
● Fleisch, Fisch und Geflügel vor der Zubereitung
gründlich unter fließend kaltem Wasser abwaschen
und mit Küchenpapier trockentupfen. Danach wie
gewohnt weiterverarbeiten.
● Rindfleisch sollte gut abgehangen und sehnenarm sein.
● Trotz gleicher Größe der Stücke kann das
Garergebnis unterschiedlich ausfallen. Dies liegt
u.a. an der Art des Lebensmittels, am
unterschiedlichen Fett- und Flüssigkeitsgehalt als
auch an der Temperatur vor dem Garen.
● Ab 15 Minuten Garzeit erhält man eine natürliche
Bräunung, die durch die Verwendung von
Bräunungsmitteln noch verstärkt werden kann. Um
außerdem eine knusprige Oberfläche zu erhalten, sollten
Sie Bräunungsgeschirr verwenden oder das Lebensmittel
auf dem Herd anbraten und in der Mikrowelle fertig
garen. Auf diese Weise erhalten Sie gleichzeitig einen
braunen Fond für die Zubereitung einer Sauce.
● Größere Fleisch-, Fisch- und Geflügelstücke nach
der halben Garzeit wenden, so daß sie von allen
Seiten gleichmäßig gegart werden.
● Decken Sie Braten nach dem Garen mit Aluminiumfolie
ab und lassen ihn ca. 10 Minuten ruhen (Standzeit).
Während dieser Zeit gart der Braten nach, und die
Flüssigkeit verteilt sich gleichmäßig, so daß beim
Anschneiden weniger Fleischsaft verlorengeht.
AUFTAUEN UND GAREN
Tiefkühl-Gerichte können in der Mikrowelle in einem
Arbeitsgang aufgetaut und gleichzeitig gegart werden. In
der Tabelle finden Sie hierzu einige Beispiele. Beachten Sie
außerdem die allgemeinen Hinweise zu “Erhitzen” und
“Auftauen” von Lebensmitteln. Für die Zubereitung von
handelsüblichen Tiefkühl-Fertiggerichten richten Sie sich
bitte nach den Herstellerangaben auf der Verpackung. In
der Regel werden genaue Garzeiten und Hinweise für die
Zubereitung im Mikrowellengerät gegeben.
5. R-605N German Ckbk 16/05/2003 11:11 Page 32
Page 33

33
TABELLEN
DEUTSCH
Fischfilet 300 800 W 10-11 - abdecken 1-2
Tellergericht 400 800 W 8-10 - abdecken, nach ca. 6 Minuten umrühren 2
Gemüse, z.B. 300 800 W 7-9 3-5 EL abdecken, ein- bis zweimal zwischendurch umrühren 2
Spinat, Brokkoli,
Erbsen
Mischgemüse 500 800 W 12-14 3-5 EL abdecken, nach der halben Zeit umrühren 2
Frisches Gemüse, 500 800 W 9-11 5 EL wie üblich vorbereiten, abdecken, zwischendurch 2
(z.B Kartoffeln, umrühren
Erbsen, Porree, 300 800 W 6-8 3 EL wie üblich vorbereiten, abdecken, zwischendurch 2
Karotten) umrühren
Lebensmittel Menge Watt Garzeit Wasserzugabe Verfahrenshinweise Standzeit
(tiefgefroren) -g- -Min- -EL- -Min-
TABELLE : AUFTAUEN UND GAREN
Getränk/Speise Menge Watt Zeit Verfahrenshinweise
-g/ml- -Min-
TABELLE : ERHITZEN VON GETRÄNKEN UND SPEISEN
1
ab Kühlschranktemperatur.
Getränke, 1 Tasse 150 800 W ca.1 nicht abdecken
Tellergericht 400 800 W 3-6 Sauce mit Wasser beträufeln, abdecken,
(Gemüse, Fleisch und Beilagen) zwischendurch umrühren
Eintopf, Suppe 200 800 W 2-3 abdecken, nach dem Erhitzen umrühren
Beilagen 200 800 W 1-3 mit etwas Wasser beträufeln, abdecken,
zwischendurch umrühren
Fleisch, 1 Scheibe
1
200 800 W 3-4 mit etwas Sauce beträufeln, abdecken
Würstchen, 2 Stück 180 400 W 2-21/2die Haut mehrmals einstechen
Babynahrung, 1 Glas 190 400 W ca.1 Deckel entfernen, nach dem Erhitzen gut umrühren
und die Temperatur prüfen
Margarine oder Butter schmelzen
1
50 800 W1/2 -1
Schokolade schmelzen 100 400 W 2-3 zwischendurch umrühren
6 Blatt Gelatine auflösen 10 400 W1/
2
in Wasser einweichen, gut ausdrücken und in eine
Suppentasse geben; zwischendurch umrühren
VERWENDETE ABKÜRZUNGEN
EL = Eßlöffel kg = Kilogramm TK = Tiefkühlprodukt
TL = Teelöffel g = Gramm Msp = Messerspitze
Pr = Prise l = Liter Pck = Päckchen
Ta = Tasse ml = Milliliter MW = Mikrowellen
Min = Minuten cm = Zentimeter Sec = Sekunden
MWG = Mikrowellengerät Durchm = Durchmesser F.i.Tr. = Fett in der Trockenmasse
ca = circa
5. R-605N German Ckbk 16/05/2003 11:11 Page 33
Page 34

34
TABELLEN
TABELLE : AUFTAUEN
Lebensmittel Menge Watt Auftauzeit Verfahrenshinweise Standzeit
-g- -Min- -Min-
Bratenfleisch (z.B. Schwein, Rind, 500 240 W 7-8 auf einen umgedrehten Teller legen, 30
Lamm, Kalb) zwischendurch 1-2 mal wenden
Steaks, Koteletts, Gulasch, 200 240 W 4-5 nach der halben Auftauzeit wenden 10-15
Hähnchenschenkel
Würstchen 300 240 W 4-5 nebeneinander legen, nach der halben 5-10
Auftauzeit wenden
Ente/Pute 1500 240 W 20-22 auf einen umgedrehten Teller legen, 30-90
zwischendurch 1-2 mal wenden
Hähnchen 1200 240 W 15-17 auf einen umgedrehten Teller legen, 30-90
zwischendurch 1-2 mal wenden
Fisch im Stück 800 240 W 9-12 nach der halben Auftauzeit wenden 10-15
Fischfilet 400 240 W 7-10 nach der halben Auftauzeit wenden 5-10
Krabben 300 240 W 6-8 nach der halben Auftauzeit wenden 5
und aufgetaute Teile abnehmen
Brötchen, 2 Stück 80 240 W ca. 1 nur antauen Brot in Scheiben 250 240 W 2-4 Scheiben nebeneinander legen, nur antauen 5
Brot, ganz 500 240 W 7-10 Scheiben nebeneinander legen, nur antauen 15
Kuchen, 1 Stück 150 240 W ca. 2 auf einen Teller legen 5
Torte ganz, Ø 25cm 240 W 9-91/2auf einen Teller legen, nach der halben 60
Auftauzeit zwischen den einzelnen Stücken
etwas Zwischenraum lassen.
Butter 250 240 W 2-4 nur antauen 15
Obst wie Erdbeeren 250 240 W 4-5 gleichmäßig nebeneinander legen 5
Himbeeren, Kirschen, Pflaumen nach der halben Auftauzeit wenden
Gemüse Menge Leistung Zeit Verfahrenshinweise Wasserzugabe
-g- -Stufe- -Min- -EL/ml-
Artischocken 300 800 W 6-8 den Stiel entfernen, abdecken 3-4 EL
Blattspinat 300 800 W 5-7 nach dem Waschen gut abtropfen lassen, -
abdecken, zwischendurch ein- bis zweimal umrühren
Blumenkohl 800 800 W 15-17 1 ganzer Kopf, abdecken in Röschen teilen, 5-6 EL
500 800 W 10-12 zwischendurch umrühren 4-5 EL
Brokkoli 500 800 W 9-11 in Röschen teilen, abdecken, zwischendurch umrühren 4-5 EL
Champignons 500 800 W 8-10 ganze Köpfe, abdecken, zwischendurch umrühren Chinakohl 300 800 W 9-11 in Streifen schneiden, abdecken, zwischendurch umrühren 4-5 EL
Erbsen 500 800 W 9-11 abdecken, zwischendurch umrühren 4-5 EL
Fenchel 500 800 W 9-11 in Viertel schneiden, abdecken, zwischendurch umrühren 4-5 EL
Gemüsezwiebel 250 800 W 5-7 ganz, in Mikrowellenfolie garen Kohlrabi 500 800 W 10-12 in Würfel schneiden, abdecken, zwischendurch umrühren 50 ml
Möhren 500 800 W 10-12 in Scheiben schneiden,abdecken, zwischendurch umrühren 4-5 EL
Paprikaschote 500 800 W 9-11 in Würfel schneiden, abdecken, zwischendurch umrühren 4-5 EL
Pellkartoffeln 500 800 W 9-11 abdecken, zwischendurch umrühren 4-5 EL
Porree/Lauch 500 800 W 9-11 in Ringe schneiden, abdecken, zwischendurch umrühren 4-5 EL
Rotkohl 500 800 W 15-17 in Streifen schneiden,abdecken, zwischendurch ein- bis 50 ml
zweimal umrühren
Rosenkohl 500 800 W 9-11 ganze Köpfe, abdecken, zwischendurch umrühren 50 ml
Salzkartoffeln 500 800 W 9-11 in gleich große Stücke schneiden, etwas salzen, 150 ml
abdecken, zwischendurch umrühren
Sellerie 500 800 W 9-11 in feine Würfel schneiden, abdecken, zwischendurch umrühren 50 ml
Weißkohl 500 800 W 15-17 in Streifen schneiden, abdecken, zwischendurch umrühren 50 ml
Zucchini 500 800 W 9-11 in Scheiben schneiden,abdecken, zwischendurch umrühren 4-5 EL
TABELLE : GAREN VON FRISCHEM GEMÜSE
5. R-605N German Ckbk 20/05/2003 11:37 Page 34
Page 35

35
TABELLEN
DEUTSCH
Braten
(Schwein,
Kalb, Lamm)
Roastbeef (medium)
Hähnchen
Hähnchenschenkel
Gratinieren von
Aufläufen u.a.
Käsetoast
1 Stück
Nach Geschmack würzen, in eine flache Auflaufform
legen, auf den Drehteller stellen, nach * wenden
Nach Geschmack würzen, mit der fetten Seite nach
unten in eine flache Auflaufform legen, auf den
Drehteller stellen, nach * wenden
Nach Geschmack würzen, mit der Brustseite nach
unten in eine flache Auflaufform legen, auf den
Drehteller stellen, nach * wenden
Nach Geschmack würzen, mit der Hautseite nach
unten auf den Rost legen, nach * wenden
Auflaufform auf den Rost stellen
Toastbrot toasten, mit Butter bestreichen, mit einer
Scheibe gekochten Schinken, einer Scheibe Ananas
und einer Scheibe Schmelzkäse belegen, auf dem
Rost grillen
10
10
3
3
10
1
TABELLE : GAREN, GRILLEN UND GRATINIEREN
500
1000
1500
1000
1500
1200
200
800 W
800 W
800 W
800 W
800 W
560 W
800 W
560 W
560 W
560 W
560 W
800 W
800 W
800 W
400 W
Lebensmittel Menge Leistung Garzeit Verfahrenshinweise Standzeit
-g- -Stufe- -Min- -Min-
Ein-
stellung
7-8
3-5
6-8
3-5
15-17
7-9
9-11
3-4
19-21
6-8
6-7
16-18
4-6
10-12
7-8
7-9
4-5
11-13
8-10
11-13
3-5
12-14
7-8
12-14
4-5
2-3
5-7
5-7
3-4
1
/
2
4-5
(*)
(*)
(*)
(*)
(*)
(*)
(*)
(*)
5. R-605N German Ckbk 16/05/2003 11:11 Page 35
Page 36

36
REZEPTE
Deutschland
CAMEMBERTTOAST
Gesamtgarzeit: 1-2 Minuten
Geschirr: Flacher Teller
Zutaten
4Scheiben Toastbrot (80 g)
2 EL Butter oder Margarine (20 g)
150 g Camembert
4 TL Preiselbeerkonfitüre (40 g)
Cayennepfeffer
1. Die Brotscheiben toasten und mit Butter bestreichen.
2. Den Camembert in Scheiben schneiden und diese mit
der Schnittfläche nach oben auf die Toastscheiben
legen. Die Preiselbeeren in die Mitte des Käses
geben, und die Toasts mit Cayennepfeffer bestreuen.
3. Die Toasts auf einen Teller legen und erhitzen.
1-2 Min. 800 W
Tip:
Sie können die Toasts nach Belieben variieren, z.B.
mit frischen Champignons und geraspeltem Käse
oder gekochtem Schinken, Spargel und Emmentaler.
Niederlande
CHAMPIGNONSUPPE
Gesamtgarzeit: 9-13 Minuten
Geschirr: Schüssel mit Deckel (2 I Inhalt)
Zutaten
200 g Champignons, in Scheiben
1 Zwiebel (50 g), fein gehackt
300 ml Fleischbrühe
300 ml Sahne
2
1/2 EL Mehl (25 g)
2
1/2
EL Butter oder Margarine (25 g)
Salz
Pfeffer
150 g Rahm (Crème fraîche)
1. Das Gemüse mit der Fleischbrühe in die
Schüssel geben und abgedeckt garen.
6-8 Min. 800 W
2. Mit einem Mixer alle Zutaten pürieren. Die
Sahne zufügen.
3. Das Mehl und die Butter zu einem Teig
verkneten und in der Champignonsuppe
glattrühren. Mit Salz und Pfeffer würzen,
abdecken und garen.
3-5 Min. 800 W
4. Nach dem Garen den Rahm unterrühren.
Deutschland
PIKANTE PUTENPFANNE (für 2 Portionen)
Gesamtgarzeit: 23-27 Minuten
Geschirr: Schüssel mit Deckel (2 I Inhalt)
Zutaten
1Tasse Langkornreis, parboiled (120 g)
etwas Safran
1 TL Butter oder Margarine
zum Einfetten der Form
1Zwiebel (50 g), in Scheiben
1 rote Paprikaschote (100 g), in Streifen
1 kleine Porreestange (100 g), in Streifen
300 g Putenbrust, gewürfelt
Pfeffer & Paprikapulver
2 EL Butter oder Margarine (20 g)
300 ml Fleischbrühe, heiß
1. Den Reis mit Safran mischen und in die gefettete
Schüssel geben.
Die Zwiebelscheiben, die Paprika und
Porreestreifen und die Putenbrustwürfel mischen
und würzen. Auf den Reis schichten. Die Butter in
Flöckchen darauf verteilen.
2. Die Fleischbrühe darübergießen, abdecken und
garen.
1. 5-7 Min. 800 W
2. 18-20 Min. 240 W
Die Putenpfanne nach dem Garen ca. 2-3
Minuten stehen lassen.
5. R-605N German Ckbk 16/05/2003 11:11 Page 36
Page 37

37
REZEPTE
DEUTSCH
Österreich
GEFÜLLTES BRATHÄHNCHEN
Gefülltes Brathendl für 2 Portionen
Gesamtgarzeit: ca. 36-42 Minuten
Geschirr: Flache runde Auflaufform, Zwirnsfaden
Zutaten
1 Hähnchen (1000 g)
Salz
Rosmarin, gekerbelt
Majoran, gekerbelt
1 altbackenes Brötchen (Semmel, 40 g)
1 Bund Petersilie, fein gehackt (10 g)
1 Pr. Muskatnuß
3 EL Butter oder Margarine (30 g)
1Eigelb
1 EL Paprika, edelsüß
1 TL Butter/Margarine zum Einfetten der Form
1. Das Hähnchen waschen, trockentupfen und innen
mit Salz, Rosmarin und Majoran würzen.
2. Für die Füllung das Brötchen ca. 10 Minuten in
kaltem Wasser einweichen, danach ausdrücken.
Mit Salz, Petersilie, Muskatnuß, Butter (20 g) und
Eigelb mischen und das Hähnchen damit füllen.
Die Öffnung mit Bindfaden oder
Fleischerrollfaden zunähen.
3. Die Butter erhitzen.
ca. 1 Min. 800 W
Paprika und Salz unter die Butter rühren und das
Hähnchen damit bestreichen.
4. Das Hähnchen in der gefetteten Auflaufform offen garen.
1. 13-15 Min. 800 W
2. 5-6 Min.
Das Hähnchen wenden
1. 13-15 Min. 800 W
2. 4-5 Min.
Das gefüllte Brathähnchen nach dem Garen ca.
3 Minuten stehen lassen.
Schweiz
FISCHFILET MIT KÄSESAUCE
Gesamtgarzeit: ca. 24-27 Minuten
Geschirr: Schüssel mit Deckel (1 l Inhalt)
Flache runde Auflaufform
(ca. 27 cm Durchm.)
Zutaten
3 Fischfilets (ca. 600 g)
(z.B. Egli, Flunder oder Kabeljau)
2 EL Zitronensaft
Salz
1 EL Butter oder Margarine
1 Zwiebel (50 g), fein gehackt
2 EL Mehl (20 g)
100 ml Weißwein
1 TL Pflanzenöl zum Einfetten der Form
100 g geriebener Emmentaler Käse
2 EL gehackte Petersilie
1. Die Filets waschen, trockentupfen und mit
Zitronensaft beträufeln. Etwa 15 Min.
stehenlassen, nochmals trockentupfen und salzen.
2. Die Butter auf dem Boden der Schüssel verteilen.
Die Zwiebelwürfel hineingeben und abgedeckt
andünsten.
ca. 2 Min. 800 W
3. Das Mehl über die Zwiebeln streuen und
verrühren. Den Weißwein dazugießen und
mischen.
4. Die Auflaufform einfetten und die Filets hineinlegen.
Die Sauce über die Filets gießen und mit Käse
bestreuen. Auf den Drehteller stellen und garen.
1. 18-20 Min. 560 W
2. 4-5 Min.
Die Fischfilets nach dem Garen ca. 2 Minuten
stehen lassen. Mit gehackter Petersilie garniert
servieren.
5. R-605N German Ckbk 16/05/2003 11:11 Page 37
Page 38

38
REZEPTE
Deutschland
BUNTE FLEISCHSPIESSE
Gesamtgarzeit: 20-28 Minuten
Geschirr: Rost
3 Holzspieße (ca. 20-25 cm lang)
Zutaten
300 g Schweineschnitzel
75 g Schinkenspeck
1-2 Zwiebeln (75 g) geviertelt
3 Tomaten (250 g) geviertelt
1
/
2
grüne Paprikaschote (75 g), geachtelt
3 EL Öl
4 TL Paprika, edelsüß
Salz
1 TL Cayennepfeffer
1 TL Worcestersauce
1. Das Schnitzelfleisch und den Schinkenspeck in
etwa 2-3 cm große Würfel schneiden.
2. Das Fleisch und das Gemüse abwechselnd auf
drei Holzspieße stecken.
3. Das Öl mit den Gewürzen verrühren und die
Spieße damit bestreichen. Die Spieße auf den
hohen Rost legen und grillen.
1. 7-10 Min.
2. 3-4 Min. 800 W
Die Spieße wenden.
3. 7-10 Min.
4. 3-4 Min. 800 W
Spanien
GEFÜLLTER SCHINKEN
Jamón relleno
Gesamtgarzeit: ca. 19-22 Minuten
Geschirr: Schüssel mit Deckel (2 I Inhalt)
Flache ovale Auflaufform mit Deckel
(ca. 27 cm lang)
Zutaten
125 g Blattspinat, entstielt
125 g Speisequark, 20 % F.i.Tr.
40 g geriebener Emmentaler Käse
Pfeffer
Paprika, edelsüß
6 Scheiben gekochter Schinken (300 g)
125 ml Wasser
125 ml Sahne
2 EL Mehl (20 g)
2 EL Butter / Margarine (20 g)
1 TL Butter / Margarine zum Einfetten der Form
Tip:
Sie können auch fertige Béchamelsauce aus
dem Handel verwenden.
1. Den Spinat fein schneiden, mit dem Quark und
dem Käse verrühren und nach Geschmack
würzen.
2. Auf jede Scheibe des gekochten Schinkens einen
Eßlöffel der Füllung geben und aufrollen. Mit einem
Holzspieß den Schinken feststecken.
3. Eine Béchamelsauce herstellen. Dafür die
Flüssigkeit in die Schüssel geben, abdecken und
erhitzen.
3-4 Min. 800 W
Die Butter mit dem Mehl verkneten, in die
Flüssigkeit geben und mit dem Schneebesen
glattrühren, bis sie sich gelöst hat. Abdecken,
aufkochen und binden lassen.
1 Min. 800 W
Umrühren und abschmecken.
4. Die Sauce in die gefettete Auflaufform geben, die
Röllchen hineinsetzen und auf dem Rost garen.
Mit Mikrowellenfolie abdecken.
11-13 Min. 800 W
5. Entfernen Sie die Mikrowellenfolie und fahren Sie
fort zu grillen auf den Rost.
ca. 4 Min.
Die Schinkenröllchen nach dem Garen ca. 2
Minuten stehen lassen.
5. R-605N German Ckbk 16/05/2003 11:11 Page 38
Page 39
39
REZEPTE
DEUTSCH
Deutschland
ZUCCHINI-NUDEL-AUFLAUF
Gesamtgarzeit: ca. 46-55 Minuten
Geschirr: Schüssel mit Deckel (2 l Inhalt)
Auflaufform (ca. 26 cm lang)
Zutaten
500 ml Wasser
1/2 TL Öl
80 g Makkaroni
400 g Tomaten, aus der Dose, zerkleinert
3 Zwiebeln (150 g), fein gehackt
Basilikum, Thymian, Salz, Pfeffer
1 EL Öl zum Einfetten der Form
450 g Zucchini, in Scheiben
150 g Sauerrahm
2 Eier
100 g geriebener Cheddar
1. Das Wasser, das Öl und das Salz in die Schüssel
geben und abgedeckt zum Kochen bringen.
3-4 Min. 800 W
2. Die Makkaroni in Stücke brechen, zugeben,
umrühren und quellen lassen.
8-10 Min. 240 W
Die Nudeln abtropfen und abkühlen lassen.
3. Die Tomaten mit den Zwiebeln verrühren und gut
würzen. Die Makkaroni hineingeben und mit der
Tomatensauce begießen. Die Zucchinischeiben
darauf verteilen.
4. Den Sauerrahm mit den Eiern verschlagen und
über den Auflauf gießen. Den geriebenen Käse
darüberstreuen.
1. 30-35 Min. 800 W
2. 5-6 Min.
Den Auflauf nach dem Garen etwa 5-10 Minuten
stehen lassen.
Spanien
CHAMPIGNONS MIT ROSMARIN
Champiñones rellenos al romero
Gesamtgarzeit: ca. 15-21 Minuten
Geschirr: Schüssel mit Deckel (1 l Inhalt)
Flache runde Schüssel mit Deckel
(Durchm. ca 22 cm)
Zutaten
8 große Champignons (ca. 225 g), ganz
2 EL Butter oder Margarine (20 g)
1 Zwiebel (50 g), fein gehackt
50 g Schinken, fein gewürfelt
schwarzer Pfeffer, gemahlen, Rosmarin,
gekerbelt
125 ml Weißwein, trocken
125 ml Sahne
2 EL Mehl (20 g)
1. Die Stiele aus den Champignons herausschneiden
und die Stiele kleinschneiden.
2. Die Butter in die Schüssel geben und auf dem
Boden verstreichen. Die Zwiebel und
Schinkenwürfel und die Champignonstiele
zufügen, mit Pfeffer und Rosmarin würzen,
abdecken und garen.
4-5 Min. 800 W
Abkühlen lassen.
3. In der zweiten Schüssel 100 ml Wein und die
Sahne abgedeckt erhitzen.
2-3 Min. 800 W
4. Mit dem restlichen Wein das Mehl anrühren, in
die heiße Flüssigkeit einrühren und abgedeckt
garen. Zwischendurch einmal umrühren.
1-2 Min. 800 W
5. Die Champignons mit der Schinkenmischung
füllen, in die Sauce setzen und auf dem Rost
garen.
1. 4-6 Min. 800 W
2. 4-5 Min.
Die Champignons nach dem Garen ca. 2
Minuten stehen lassen.
5. R-605N German Ckbk 16/05/2003 11:11 Page 39
Page 40

40
TÄRKEITÄ KÄYTTÖTURVALLISUUSOHJEITA
Välttääksesi loukkaantumisilta
VAROITUS:
Älä käytä uunia, jos se on vaurioitunut tai siinä
esiintyy toimintahäiriöitä. Suorita seuraavat
tarkistukset ennen käyttöä:
a)Ovi; varmista, että ovi sulkeutuu kunnolla ja ettei
se ole millään tavoin pois linjasta tai kierossa.
b)Saranat ja turvalukitushakaset; varmista, että
nämä eivät ole rikkoutuneet tai löystyneet.
c) Oven tiivisteet ja tiivistepinnat; varmista, että
nämä eivät ole rikkoutuneet.
d)Uunin sisätila ja oven sisäpinta; varmista, ettei
näissä ole kolhuja.
e)Verkkojohto ja pistoke; varmista, että nämä eivät
ole rikkoutuneet.
Älä missään tapauksessa ryhdy itse
korjaamaan uunia tai tekemään siihen
muutoksia. Ammattitaidoton henkilö
asettaa itsensä vaaroille alttiiksi, jos hän
ryhtyy suorittamaan uunin ulkokuoren
poistamisen edellyttämiä huolto- tai
korjaustoimenpiteitä, sillä kuori estää
mikroaaltosäteilyn pääsyn ympäristöön.
Älä käytä uunia sen oven ollessa auki, äläkä
myöskään tee muutoksia oven turvahakasiin.
Älä käytä uunia mikäli oven tiivisteiden ja
tiivistepintojen väliin on jäänyt jokin esine.
Estä rasvan ja lian kertyminen oven
tiivisteisiin ja niihin yhteydessä oleviin
osiin. Seuraa s. N-5, kohdassa “Hoito ja
puhdistus”, annettuja ohjeita.
Henkilöiden, jotka käyttävät SYDÄMENTAHDISTAJAA,
on syytä olla yhteydessä lääkäriinsä liittyen
varotoimenteisiin mikroaaltouunien käyttämisessä.
Välttyäksesi sähköiskuilta
Älä koskaan poista uunin ulkokuorta.
Älä koskaan kaada tai työnnä mitään uunin oven
lukon aukkoihin tai tuuletusaukkoihin. Mikäli sellaista
pääsee tapahtumaan, kytke laite pois päältä, irrota se
verkosta, ja ota yhteys lähimpään valtuutettuun
SHARP-huoltoliikkeeseen.
Laitteen virtajohtoa tai pistoketta ei saa upottaa veteen
tai muuhunkaan nesteeseen.
Vältä tilanteita, joissa laitteen virtajohto roikkuisi
pöydän tai työtason reunan yli.
Pidä virtajohto loitolla kuumista pinnoista, myös uunin
takaosasta.
Älä ryhdy itse vaihtamaan äläkä anna kenenkään
muunkaan kuin SHARPin valtuuttaman sähköasentajan
vaihtaa uunin lamppua. Jos uunin lamppu lakkaa
toimimasta, ota yhteys laitteen myyneeseen liikkeeseen
tai lähimpään valtuutettuun SHARP-huoltoliikkeeseen.
Jos laitteen virtajohto on vaurioitunut, se on korvattava
erityisjohdolla. Johdon vaihto on teetettävä
valtuutetussa SHARP-huoltoliikkeessä.
TÄRKEITÄ KÄYTTÖTURVALLISUUSOHJEITA: LUE HUOLELLA JA PISTA TALTEEN VASTAISEN VARALLE.
Välttääksesi tulipalon vaaran
Mikroaaltouunia ei pidä jättää toimimaan
ilman valvontaa. Ylisuuri tehotaso tai liian
pitkä kypsennysaika voi aiheuttaa ruuan
ylikuumenemisen, joka vuorostaan voi
aiheuttaa sen syttymisen.
Tämä uunimalli ei ole tarkoitettu keittiökalusteisiin
upotettavaksi.
Pistorasian tulee olla helposti saatavilla, jotta uuni
voidaan hätätilanteessa vaivatta irrottaa verkosta.
Vaihtovirtasyötön tulee olla 230V, 50Hz, ja
jakelulinjalla vähintään 10A sulake tai vähintään 10A
sulakkeella varustettu jakeluvirrankatkaisija.
Suosittelemme, että tälle laitteelle järjestetään erillinen
virtapiiri.
Uunia ei tule asentaa tiloihin, joissa kehittyy lämpöä.
Esimerkiksi tavanomaisen uunin läheisyyteen tätä
mikroaaltouunia ei pidä asentaa.
Uunia ei pidä myöskään sijoittaa tiloihin, joissa ilman
suhteellinen kosteus on suuri tai johon saattaa kertyä
kosteutta.
Älä varastoi tai käytä uunia ulkona.
Jos uunissa oleva ruoka-annos alkaa
savuta, ÄLÄ AVAA UUNIN OVEA. Kytke laite
pois päältä ja irrota verkkojohto, ja odota
kunnes sen sisältö ei enää savua. Uunin
oven avaaminen savunmuodostuksen
aikana voi aiheuttaa tulipalon.
Käytä ainoastaan mikroaaltouunikäyttöön
hyväksyttyjä astioita ja välineitä. Ks. s. N-6.
Älä jätä poistu uunin ääreltä käyttäessäsi
uunissa muovisia, paperisia tai muista palavista
materiaaleista valmistettuja kertakäyttöastioita.
Puhdista mikroaalto-ohjaimen kansi, uunin
sisätila, pyörivä alusta sekä rullakehikko
käytön jälkeen. Näiden pintojen tulee olla
kuivia ja rasvattomia. Niille mahdollisesti
kerääntynyt rasva voi ylikuumentua, alkaa
savuta ja mahdollisesti syttyä palamaan.
Älä sijoita tulenarkoja materiaaleja lähelle uunia tai
sen tuuletusaukkoja. Älä tuki tuuletusaukkoja.
Poista kaikki metalliset esineet (sulkimet yms.) uuniin
laitettavista ruokapakkauksista. Kipinöinti
metallipinnoilta voi aiheuttaa tulipalon.
Mikroaaltouunia ei pidä käyttää paistoöljyn
kuumentamiseen, sillä lämpötilan säätö ei ole
mahdollista ja niinpä öljy voi syttyä palamaan.
Jos haluat valmistaa popkornia, käytä erityisiä,
mikroaaltouunikäyttöön tarkoitettuja tuotteita.
Uuni ei ole tarkoitettu ruuan tai minkään muunkaan
säilytykseen.
Tarkista uunin asetukset käynnistämisen jälkeen
voidaksesi todeta, että uuni toimii haluamallasi tavalla.
Ks. vastaavia tässä ohjekirjassa ja sen ruuanlaittoosuudessa annettuja neuvoja.
6. R-605N Finnish Op man 16/05/2003 11:12 Page 40
Page 41
41
TÄRKEITÄ KÄYTTÖTURVALLISUUSOHJEITA
SUOMI
pääsee purkautumaaan aiheuttamatta vahinkoja.
Sijoita uuni siten, että lapset eivät ylety avaamaan sen
ovea ja siten mahdollisesti polttamaan itseään.
Uunin ovea, ulkokuorta, takakotelointia, uunin sisätilaa,
tuuletusaukkoja, lisävarusteita ja siinä olevia astioita ei saa
koskettaa uunin ollessa GRILL (grillaus) -tilassa sillä kyseiset
osat ovat tuolloin kuumia. Ennen kuin ryhdyt puhdistamaan
näitä osia, varmista etteivät ne ole enää kuumia.
Uunin väärinkäytön estäminen lasten taholta
VAROITUS: Lapsille ei pidä sallia käyttää
uunia ilman vanhemman henkilön
valvontaa, ellei heille ole annettu riittävää
opastusta uunin turvallisesta käytöstä sekä
sen väärinkäyttöön liittyvistä vaaroista.
Uunin oveen ei saa nojata eikä siinä saa roikkua.
Uuni ei ole leikkikalu.
Lapsille tulee neuvoa tärkeimmät turvallisuuteen vaikuttavat
seikat: astianottimien ja suojakäsineiden käyttö, varovaisuus
ruokien kääreiden poistamisessa, ruuan rapeaksi tekevien
pakkauksien ominaisuuksien huomioiminen (esim. itselämpiävät materiaalit), sillä ne voivat olla erityisen kuumia.
Muita varoituksen sanoja:
Älä koskaan ryhdy tekemään minkäänlaisia muutoksia
uuniin. Uunia ei saa liikutella silloin kun se on toiminnassa.
Tämä uuni on tarkoitettu kotioloissa tapahtuvaan ruuanlaittoon,
eikä sitä saa käyttää muuhun kuin ruuan valmistamiseen.
Uuni ei sovellu ammattimaiseen tai laboratoriokäyttöön.
Seuraavassa neuvoja, joita noudattamalla
voit edistää uunin häiriötöntä toimintaa ja
välttyä vahingoilta.
Älä käytä uunia tyhjänä; poikkeuksena tähän
ohjeeseen on käyttöohjeen suositukset, ks. s.43.
Tyhjänä käyttäminen voi vaurioittaa uunia.
Kun käytät ruskistusastiaa tai itse-kuumenevaa tuotetta,
aseta sen alle kuumuutta kestävä eristävä esine (esim.
posliinilautanen) estämään pyörivän alustan ja rullakehikon
kuumenemisesta johtuva vaurioituminen. Älä ylitä astian
mukana tulleissa ohjeissa mainittua esilämmitysaikaa.
Älä laitta metallisia välineitä uuniin, sillä nämä
heijastavat mikroaaltoja ja voivat aiheuttaa kipinöintiä.
Uuniin ei saa laittaa metallisia säilykepurkkeja.
Älä käytä muuta tälle uunille tarkoitettua pyörivää
alustaa ja rullakehikkoa.
Noudata seuraavia ohjeita välttääksesi pyörivän
alustan rikkoutumisen:
(a) Anna pyörivän alustan jäähtyä ennen kuin ryhdyt
puhdistamaan sitä vedellä.
(b) Älä laita kuumia ruokia tai kuumia välineitä
kylmälle pyörivälle alustalle.
(c) Älä laita kylmiä ruokia tai kylmiä välineitä
kuumalle pyörivälle alustalle.
Älä laita mitään uunin ulkokuoren päälle uunin ollessa
toiminnassa.
Älä laita muovisia mikroaaltouuniastioita uuniin, jos uuni
on vielä kuuma GRILL-(grillaus) -käytön jäljiltä, sillä ne
saattavat tuolloin sulaa. Muovisia astioita ei siis saa
käyttää em. käyttötapojen yhteydessä paitsi jos astian
valmistaja ilmoittaa sen soveltuvan ko. käyttötapaan.
Välttyäksesi uunin räjähtämiseltä tai sen
sisällön äkilliseltä kiehumiselta:
VAROITUS: Nesteitä ja muita ruokia ei saa
kuumentaa suljetuissa astioissa sillä ne
saattavat räjähtää.
Älä koskaan laita suljettua astiaa uuniin. Poista astian
kansi ennen käyttöä. Suljetut astiat saattavat räjähtää
paineen muodostumisen johdosta senkin jälkeen, kun
uuni on kytkeytynyt pois päältä.
Nesteiden kuumentamisessa on oltava huolellinen.
Käytä laajasuista astiaa, jolloin ilmakuplat pääsevät
poistumaan esteettä.
Microwave lämmitys -lta juoma kanisteri
lopputulos kotona hidastaa ihottuma
keittää, sen tähden haluta has jotta olla
varattu jahka hoitava astia.
Välttyäksesi äkillisiltä kiehuvan nesteen purkautumisilta
ja palovammoilta:
1. Hämmennä nestettä ennen sen kuumentamista.
2. Suosittelemme lasisauvan tai vastaavan
sijoittamista nesteeseen kuumentamisen ajaksi.
3. Anna nesteen viipyä uunissa kuumennuksen
päätyttyä, jotta viiveellä tapahtuvaa äkillistä
kiehumista ei pääsisi tapahtumaan.
Älä kypsennä munia kuorineen; älä
myöskään lämmitä kovaksikeitettyjä munia
kuorineen mikroaaltouunissa, sillä ne voivat
räjähtää kuumennuksen päätyttyäkin. Kun
haluat kypsentää tai uudelleen lämmittää
munia, joita ei ole tehty kokkeliksi tai muuten
sekoitettu, puhkaise niiden keltuainen ja
valkuainen, sillä muussa tapauksessa ne
saattavat räjähtää. Kuori ja viipaloi
kovaksikeitetyt munat ennen kuin ryhdyt
lämmittämään niitä mikroaaltouunissa.
Tee esimerkiksi perunoihin, makkaroihin ja hedelmiin
reikiä ennen kuin ryhdyt kypsentämään niitä, sillä
muussa tapauksessa ne saattavat räjähtää.
Välttääksesi palovammoja
Käytä astianottimia tai suojakäsineitä ottaessasi
kuumennettuja ruokia ulos uunista; näin vältyt palovammoilta.
Kun avaat astioita, popkornin valmistuspusseja,
uunipaistopusseja, yms., tee se niin, että kasvosi ja
kätesi eivät ole alttiina mahdollisille höyrynpurkauksille.
Vältä palovammoja selvittämällä lämmitetyn
ruuan lämpötila, ja hämmennä sitä ennen
tarjoilua; kiinnitä erityistä huomiota
vauvoille, lapsille ja vanhuksille tarjottujen
ruokien ja juomien lämpötilaan.
Astian lämpötila ei ole osoitus sen sisältämän ruuan tai juoman
todellisesta lämpötilasta; nämä on syytä aina todeta erikseen.
Säilytä riittävä etäisyys uuniin nähden aina kun avaat
sen oven; näin vältyt uunista mahdollisesti purkautuvilta
kuumien höyryjen ja kuumuuden vaikutuksilta.
Täytetyt paistoruuat on hyvä viipaloida
kuumentamisen jälkeen, jotta niiden sisältämä höyry
6. R-605N Finnish Op man 16/05/2003 11:12 Page 41
Page 42
MIKROAALTOTEHON TASOT
42
TÄRKEITÄ KÄYTTÖTURVALLISUUSOHJEITA
ASENNUS
Uunin ovi kuumenee, kun uunia
käytetään; siksi uuni tulee sijoittaa
siten, että uunin pohja on vähintään
85 cm lattiatason yläpuolella.
4. Ajaa ei antaa eksponentti hankinta johto
jotta ajelu aikana jokin helteinen eli
kimakka pinta, moinen koska helteinen
kuivata purkaa kohta aikaa ylin
häntäpää -lta leivinuuni.
5. Uunin yläpuolella tulee olla vähintään 21 cm
tyhjää tilaa.
6. Varmista, että TIMER-ajastinnuppi on
asennossa “
●
” (pois päältä).
7. Kytke uunin virtajohdon pistoke tavanomaiseen
maadoitettuun kodin sähköpistorasiaan.
Vesihöyryä tai vesipisaroita saattaa joskus muodostua
uunin seinämille tai oven tiivisteisiin ja tiivistepintoihin.
Tämä on aivan normaalia, eikä se ole merkki mistään
mikroaaltojen vuodosta tai uunin muusta
toimintahäiriöstä.
HUOM:
Ellet ole aivan varma kuinka uuni tulee kytkeä
verkkoon, ota yhteys sähköasentajaan.
Uunin valmistaja ja sen myynyt liike eivät vastaa
virheellisestä sähkökytkennästä mahdollisesti
aiheutuneista henkilö- tai aineellisista vahingoista.
Uunissa on 4 tehotasoa. Noudata ruuanlaitto-osuudessa
olevia neuvoja, kun valitset ruuanlaitossa käytettävää
tehotasoa. Seuraavat suositukset ovat yleensä paikallaan:
800 W
Tämä tehotaso on tarkoitettu nopeaan kypsennykseen
tai uudelleen lämmittämiseen, esim. lautasella olevat
ruoka-annokset, kuumat juomat, vihannekset, kala, yms.
560 W
Pitkäaikaisempaan tiheiden ruokien kuten paahtopaistin
kypsennykseen. Arkoja ruokalajeja valmistettaessa,
esim. juustokastike, on syytä valita pienempi
teholukema. Kun teho on pienempi, annokset eivät kiehu
yli ja liha kypsyy tasaisesti (ei ylikypsymistä reunoilta).
400 W
Tämä on tarkoitettu tiheille ruokalajeille, joita on
kypsennettävä pitkään tavanomaisesti valmistettaessa,
esim. paistit; tehotasoa on alennettava ja kypsennysaikaa
lisättävä. Näin menetellen, liharuuasta tulee mureampi.
240 W
(Defrost -sulatusasetus.) Valitse alhainen tehotaso
pakasteen sulattamiseen. Näin varmistat, että sulaminen
on tasaista. Tämä asetusarvo sopii myös riisin, pastan
ja keitettyjen kokkareiden hauduttamiseen.
W = Wattimäärä
1. Poista uunin sisätilassa oleva pakkausmateriaali.
Poista uunin oven ja sen sisätilan välissä oleva
irtonainen muovikalvo. Poista oven
ulkopintaan mahdollisesti kiinnitetty tarra.
Älä poista uunin oven sisäpintaan kiinnitettyä
suojakalvoa.
2. Tutki uuni huolella mahdollisten vaurioiden osalta.
3. Sijoita uuni tasaiselle vaakatasossa olevalle
pinnalle, joka on riittävän tukeva kantamaan
uunin ja siinä valmistettavan painavimman
yksittäisen ruokamäärän yhteispainon.
21cm
✓
✗
6. R-605N Finnish Op man 16/05/2003 11:12 Page 42
Page 43
43
MIKROAALTO/GRILLAUS -KYPSENNYS
SUOMI
1. Aseta MIKROAALTOTEHON/GRILLAUS-nuppia
haluamaasi arvoon, mikroaaltotehon tai grillaus.
2. Aseta AJASTIN-nuppi haluamallesi kypsennysajalle.
Uuni käynnistyy ja sen valonäyttö osoittaa ajan
kulumisen.
Kun kypsennys on päättynyt, AJASTIN-nuppi palaa
asentoon “
●”, kuulet äänimerkin, ja uuni ja sen
sisätilassa oleva lamppu kytkeytyvät pois päältä
automaattisesti.
1.
2.
RUUANLAITTOVINKKEJÄ:
Ruuanlaitto-osuudessa on yksityiskohtaiset ohjeet ruuan valmistamisesta; tässä annamme joitakin
perusvinkkejä.
1. Push the door opening button and the door will open, then place the food on the turntable.
2. Kun AJASTIN-nuppi säädetään kahta minuuttia lyhyemmäksi ajaksi, käännä ensin AJASTIN-nuppi
säätönuppi kahden minuutin merkin ohi ja sen jälkeen takaisin haluamaasi aika-asetukseen.
3. Jos haluat lopettaa kypsentämisen ennen kuin valitsemasi ohjelma päättyy, käännä AJASTIN-nuppi
taksiin asentoon “
●” (pois päältä) tai avaa uunin ovi. Voit avata uunin oven milloin tahansa uunin
ollessa käynnissä. Kun haluat jatkaa kypsentämistä, sulje uunin ovi. Jos haluat muuttaa ohjelma-asetusta
tai kypsennysaikaa, käännä AJASTIN-nuppi osoittamaan haluamaasi asetusarvoon.
VAROITUS: Huolehdi siitä, että AJASTIN-nuppi on käännetty takaisin asentoon “
●” (pois päältä) silloin
kun uuni ei ole käytössä; ellei näin ole, uuni käynnistyy kun sen ovi suljetaan.
Saatat havaita jonkin verran savua tai palaneen käryä grillin ensimmäisen käyttökerran yhteydessä; tämä
on aivan normaalia eikä siis ole merkki mistään vikaisuudesta.
Voit välttää tämän grillin ensikäyttöön liittyvän ongelman käyttämällä grilliä ensin 20 minuuttia laittamatta
mitään sen sisälle.
TÄRKEÄÄ: Kun grillaustoiminto on käytössä, on syytä avata ikkuna tai kytkeä keittiön imuri päälle,
jotta savu ja mahdolliset hajut poistuisivat.
KUUMENTAMINEN ILMAN RUOKAA
6. R-605N Finnish Op man 16/05/2003 11:12 Page 43
Page 44

44
HOITO JA PUHDISTUS
ENNEN HUOLTOON SOITTAMISTA
TARKISTETTAVAT ASIAT
Ole hyvä ja tarkista seuraavat asiat ennen huoltoon soittamista.
1. Virransyöttö
Tarkista, että pistoke on kunnolla kytketty sille tarkoitettuun pistorasiaan.
Tarkista sulakkeen/virrankatkaisimen toimivuus.
2. Laita kupillinen vettä (n. 1
1/
2
dl) uuniin ja sulje uunin ovi.
Ohjelmoi uuni toimimaan yhden minuutin ajan 800 W teholla ja käynnistä uuni.
Syttyykö uunin lamppu? KYLLÄ EI
Alkaako pyörivä alusta pyöriä? KYLLÄ EI
HUOM: Alusta voi pyöriä molempiin suuntaan.
Toimiiko tuuletus? KYLLÄ EI
(Pistä kätesi tuuletusaukkojen päälle ja tunnustele virtaako ilma.)
Lämpenikö kupillinen vettä toimenpiteen jälkeen? KYLLÄ EI
3. Aseta MIKROAALTOTEHON/GRILLAUS-nuppia
valintaan GRILL-kypsennys 3 minuutin jaksolle.
Onko grillin vastus punainen 3 minuutin kuluttua? KYLLÄ EI
Mikäli vastauksesi johonkin em. kysymyksistä on “EI”, ota yhteys SHARPin valtuuttamaan huoltoasentajaan
ja ilmoita hänelle tarkistustoimenpiteittesi tulokset. Osoitetiedot löydät tämän kirjasen takakannesta.
VAROITUS: ÄLÄ KÄYTÄ KAUPALLISIA
UUNINPUHDISTUSAINEITA TAI KARKEITA
HANKAAVIA PUHDISTUSVÄLINEITÄ
TÄMÄN MIKROAALTOUUNIN PINTOJEN
PUHDISTAMISEEN.
Uunin ulkopinta
Ulkopinnan voit puhdistaa kätevästi miedolla
saippualla ja vedellä. Käytä kosteaa liinaa, ja
pyyhi saippua pois huolellisesti ja kuivaa
pehmeällä pyyheliinalla.
Uunin säätötaulu
Avaa uunin ovi ennen kuin ryhdyt puhdistamaan,
sillä oven avaaminen kytkee uunin säätötaulun pois
päältä. Uunin säätötaulun puhdistamisessa on
oltava erityisen huolellinen. Käytä pelkällä vedellä
kostutettua liinaa säätötaulun puhdistamiseen. Vältä
liiallista veden käyttöä. Älä käytä kemikaaleihin tai
hankaukseen perustuvia puhdistusmenetelmiä.
VAROITUS:
Varo kiertämästä AJASTIN-nuppia “
●” (pois
päältä) asennostaan puhdistuksen aikana; muussa
asennossa se aiheuttaa uunin käynnistymisen kun
uunin ovi suljetaan.
Uunin sisätila
1. Poista tahrat pyyhkimällä kostealla liinalla tai
sienellä jokaisen käyttökerran jälkeen, kun uuni
on vielä lämmin. Vaikeampien tahrojen
poistamisessa on syytä käyttää mietoa saippuaa
ja pyyhkiä toistuvasti kostealla liinalla. Älä
poista mikroaalto-ohjaimen kantta.
2. Huolehdi siitä, että saippua ja vesi eivät pääse
vaurioittamaan uunin sisärakenteita seinämien
pienten tuuletusaukkojen kautta.
3. Älä käytä suihkepuhdistusaineita uunin sisätilan
puhdistamisessa.
4. Uunin grilliosaa on kuumennettava säännöllisin
välein (ks. ss. 43), sillä roiskeet grillivastuksen
pinnalla ja uunin seinämillä saattavat tuottaa
savua ja hajuja.
Pyörivä alusta ja rullakehikko
Poista pyörivä alusta ja rullakehikko uunista. Pese
ne miedolla saippuaisella vedellä. Kuivaa
pehmeällä liinalla. Sekä pyörivä alusta että
rullakehikko kestävät konepesua.
Ritilä
Ritilä tulee pestä miedossa pesuaineliuoksessa ja
lopuksi kuivata. Ritilä kestää konepesua.
Ovi
Poista likatahrat ovesta pyyhkimällä oven
molemmat puolet säännöllisesti, samoin oven
tiivisteet, pehmeällä kostealla liinalla.
HUOM: Jos kypsennät ruokaa yli vakioajan 800 W
teholla, uunin teho laskee automaattisesti
ylikuumenemisen välttämiseksi. (Mikroaaltojen teho
alenee).
Kypsennystila
Mikroaaltoteho 800 W
Vakioaika
20 minuuttia
6. R-605N Finnish Op man 16/05/2003 11:12 Page 44
Page 45

45
MITÄ MIKROAALLOT OVAT?
KÄYTETTÄVÄKSI SOPIVAT MATERIAALIT
SUOMI
pohjaosa. Kulho on tarkoitettu ruuan ruskistamiseen.
Ruskistuskulhoa käytettäessä on pyörivän alustan ja
kulhon väliin asetettava sopiva eriste, esimerkiksi
posliinilautanen. On varmistettava, että valmistajan
ohjeissa mainittua esikuumennusaikaa noudatetaan.
Liiallinen esikuumennus voi vahingoittaa pyörivää
alustaa ja sen kehystä, tai se voi laukaista uunin
jännitteen katkaisevan turvalaitteen.
METALLI
Metallia ei yleensä tulisi käyttää, sillä mikroaallot
eivät läpäise sitä eivätkä näin ollen voi lämmittää
ruokaa. Poikkeuksena voidaan kuitenkin käyttää
pieniä alumiinikalvosuikaleita peittämään tiettyjä osia
ruuasta niin, että ne eivät sula tai ala kypsyä liian
nopeasti (esim. broilerin siivet). Pieniä metallivartaita
tai alumiinisia säilytysastioita (esim.
valmisruokavuokia) voidaan käyttää. Niiden tulee
kuitenkin olla kooltaan pieniä ruuan määrään
nähden, esim. alumiinisessa astiassa tulee olla ruokaa
vähintään
2/
3
tai
3/
4
sen tilavuudesta. On suositeltavaa
siirtää ruoka mikroaaltokäyttöön sopivaan astiaan.
Jos käytetään alumiinisia säilytysvuokia tai muita
metallisia käyttötarvikkeita, on niiden ja uunin
sisäseinämän väliin jätettävä vapaata tilaa noin 2
cm. Muussa tapauksessa voi seinämä vahingoittua
mahdollisen valokaaren vaikutuksesta.
Käyttöesineissä ei saa olla metallipinnoitetta
eikä myöskään metalliosia, kuten ruuveja, sulkimia
tai kädensijoja.
KÄYTTÖLAITTEIDEN SOVELTUVUUSTESTI
Jos et ole varma onko jokin
käyttöesine mikroaaltokäyttöön
sopiva, voit suorittaa seuraavan
kokeen: Laita esine uuniin ja esineen
viereen vesiastia, jossa on 1
1/
2
dl vettä. Kytke uuni
800 W teholla päälle 1-2 minuutiksi. Jos esine
pysyy viileänä tai kosketuslämpöisenä, voit käyttää
sitä. Tätä koetta ei tule tehdä muovisille
käyttöesineille, koska ne voivat sulaa.
Mikroaallot syntyvät mikroaaltouunissa
magnetronin avulla, ja ne saavat ruuassa olevat
vesimolekyylit värähtelemään.
Syntynyt kitka muodostaa lämpöä, minkä
vaikutuksesta ruoka sulaa, kuumenee tai kypsyy.
LASI JA KERAAMINEN LASI
Kuumuutta kestävät lasiastiat sopivat
erittäin hyvin. Kypsymistä voidaan
seurata eri suunnilta. Astioissa ei saa
olla metallia (esim. lyijylasi), eikä
niissä saa olla metallista koristelua (kultakoristelu,
sininen kobolttilasipinnoite).
KERAAMISET ASTIAT
Sopivat yleensä erittäin hyvin. Keramiikan tulee olla
lasitettua, koska lasittamattomassa keramiikassa
saattaa olla kosteutta, joka saa materiaalin
kuumenemaan ja voi aiheuttaa sen rikkoutumisen. Jos
et ole varma soveltuvatko välineet mikroaaltokäyttöön,
voit tehdä niille soveltuvuuskokeen.
POSLIINI
Erittäin sopivaa. On varmistettava, ettei posliinissa ole
kulta- tai hopeakoristeluja, ja ettei se sisällä metallia.
MUOVISET JA PAPERISET KÄYTTÖASTIAT
Mikroaaltokäyttöön soveltuvia kuumuutta kestäviä
muovisia välineitä, voidaan käyttää ruuan
sulattamiseen, kuumentamiseen ja kypsyttämiseen.
Valmistajan suosituksia tulee noudattaa.
Mikroaaltokäyttöön tarkoitettu kuumuutta kestävä
paperi soveltuu myös. Valmistajan antamia ohjeita
on noudatettava.
MIKROAALTOKELMU
Mikroaaltokelmu, tai muu kuumuutta kestävä kelmu,
sopii erittäin hyvin peittämiseen tai käärimiseen.
Käyttö valmistajan suosituksien mukaan.
PAAHTOPUSSIT
Sopivat mikroaaltouunikäyttöön. Metalliset sulkimet
eivät sovellu käytettäväksi, sillä paahtopussi voi
sulaa. Sido paahtopussi narulla ja tee siihen
haarukalla runsaasti reikiä. Kuumuutta
kestämättömät ruokatavaroiden suojakelmut eivät
sovellu mikroaaltokäyttöön.
RUSKISTUSKULHO
Kyseessä on erityinen keraamisesta lasista valmistettu
mikroaaltokulho, jossa on metalliseoksesta valmistettu
7. R-605N Finnish Ckbk 16/05/2003 11:12 Page 45
Page 46

46
VINKKEJÄ JA OHJEITA
KÄYTTÖAJAN ASETUKSET
Mikroaaltouunin sulatus- ja kypsennysajat ovat
yleensä huomattavasti lyhyempiä kuin tavallisilla
uuneilla. Tästä syystä on tässä keittokirjassa
annettuja suositusaikoja noudatettava. On parempi
asettaa aika liian lyhyeksi kuin liian pitkäksi.
Kypsymisaste tarkistetaan valmistumisen jälkeen.
On parempi, jos ruokaa joudutaan kypsyttämään
vielä lisää, kuin kypsyttää sitä liikaa.
LÄHTÖLÄMPÖTILA
Sulattamis-, kuumennus- ja kypsennysajat riippuvat
ruuan alkulämpötilasta. Esimerkiksi pakastimessa
tai jääkapissa säilytetty ruoka vaatii enemmän
aikaa kuin huoneenlämpöinen ruoka.
Kuumennettaessa ja kypsennettäessä oletetaan
lämpötilojen olevan normaaleja säilytyslämpötiloja
(jääkaapin lämpötila on noin 5° C, huoneen
lämpötila noin 20° C). Sulatusta ajatellen
oletetaan pakastimen lämpötilaksi –18° C.
KYPSENNYSAJAT
Kaikki tässä keittokirjassa annetut ajat ovat
ohjeaikoja, jotka voivat vaihdella ruuan
alkulämpötilasta, painosta ja muista tekijöistä (vesitai rasvapitoisuus, jne.) riippuen.
SUOLA, MAUSTEET JA YRTIT
Mikroaaltouunissa kypsytetty ruoka säilyttää
luontaisen makunsa paremmin kuin tavanomaisia
valmistusmenetelmiä käytettäessä. Tästä syystä olisi
suolaa käytettävä varovasti, ja sitä tulisi yleensä
lisätä vasta kypsennyksen jälkeen. Suola imee
itseensä nestettä ja kuivattaa ruuan ulkopintaa.
Yrttejä ja mausteita voit käyttää tavalliseen tapaan.
VEDEN LISÄÄMINEN
Vihannekset ja muut runsaasti vettä sisältävät ruokaaineet voit kypsentää niiden omassa mehussa, tai
lisäämällä hieman vettä. Näin varmistat monien
vitamiinien ja hivenaineiden säilymisen.
RUOKA-AINEET, JOISSA ON NAHKA TAI
KUORI
Sellaiset ruoka-aineet, kuten makkarat, broilerit,
kanankoivet, keitetyt perunat, tomaatit,
munankeltuainen, tulisi rei'ittää haarukalla tai
pienellä puutikulla. Tällöin kuumennettaessa
muodostuva höyry pääsee vapaasti poistumaan
halkaisematta nahkaa tai kuorta.
RASVAISET RUUAT
Rasvapitoinen liha ja rasvasuikaleet kypsyvät
paremmin kuin vähärasvainen liha. Ennen kypsennystä
kannattaa suojata rasvaiset osat alumiinifoliolla,
tai sijoittaa ruoka rasvainen puoli alaspäin
.
SUURET JA PIENET ANNOKSET
Mikroaaltouunin käyttöajat riippuvat suoraan siitä,
kuinka suuria määriä ruokaa sulatetaan,
kuumennetaan tai kypsennetään. Pienet annokset
kypsyvät nopeammin kuin suuret. Yleissääntö on:
KAKSINKERTAINEN MÄÄRÄ = MELKEIN
KAKSINKERTAINEN AIKA
PUOLET PIENEMPI MÄÄRÄ = PUOLET PIENEMPI AIKA
SYVÄT JA MATALAT VALMISTUSASTIAT
Jos molempien astioiden tilavuus on sama, on
syvempää astiaa käytettäessä kypsennysaika pitempi.
Tästä syystä on parempi valita mahdollisimman laaja
astia, jonka pinta-ala on suuri. Syviä valmistusastioita
kannattaa käyttää vain silloin, kun on pelko ruuan
ylikypsymisestä. Tällaisia ruoka-aineita ovat
esimerkiksi nauhamakaroni, riisi, maito, jne.
PUÖREÄT JA SOIKEAT VALMISTUSASTIAT
Ruoka kypsyy paremmin pyöreissä ja soikeissa
valmistusastioissa kuin kulmikkaissa, koska
mikroaaltoenergia keräytyy kulmiin, jolloin näissä
kohdissa oleva ruoka kypsyy liikaa.
ANNOSTEN SIJOITTAMINEN
Yksittäiset annokset, kuten pienet vanukasmuotit,
kupit tai yksittäiset perunat kypsennyskupeissaan
sijoitetaan pyörivän alustan kehälle. Annokset
asetetaan jonkin matkan päähän toisistaan, jolloin
mikroaaltoenergia pääsee vaikuttamaan ruokaan
joka puolelta.
SUOJAAMINEN
Ruokien suojaaminen säilyttää kosteutta ja
lyhentää kypsymisaikaa. Peittämiseen voi käyttää
kantta, mikroaaltofoliota tai suojusta. Rapeaksi
tarkoitetut ruoka-aineet, kuten paahtokyljet tai
broilerit, tulisi valmistaa peittämättä. Yleissääntönä
voidaan sanoa, että mikä tulisi peittää tavallisessa
uunissa, tulisi peittää myös mikroaaltouunissa.
KÄÄNTÄMINEN
Keskikokoiset annokset, kuten hampurilaiset ja
pihvit, tulisi kypsentämisen aikana kääntää kerran.
Tämä lyhentää valmistusaikaa. Suurikokoiset
kappaleet, kuten paistit ja broilerit, tulee kääntää,
sillä jos kääntämistä ei tehdä, saa yläpuoli
enemmän mikroaaltoenergiaa ja pyrkii kuivumaan.
SEKOITTAMINEN
Ruuan sekoittaminen on välttämätöntä, sillä
mikroaallot lämmittävät aluksi vain ulkopuolta.
Sekoittaminen tasoittaa lämpöä ruuassa, jolloin
lämpeneminen tapahtuu kauttaaltaan tasaisesti.
7. R-605N Finnish Ckbk 16/05/2003 11:12 Page 46
Page 47
47
VINKKEJÄ JA OHJEITA
SUOMI
TASAANTUMISAIKA
Tasaantumisajan noudattaminen on yksi
mikroaaltouunin tärkeimpiä sääntöjä. Lähes kaikki
mikroaaltouunissa sulatettavat, kuumennettavat tai
kypsennettävät ruoka-aineet vaativat jonkin verran
tasaantumisaikaa, jolloin valmistetussa ruuassa
tapahtuu lämpötilan tasaantuminen ja kosteuden
tasoittuminen.
RUSKISTUSAINEET
Yli 15 minuutin kypsentämisen jälkeen tulee ruokaan
ruskea pintaväri, vaikkakaan väriä ei voida verrata
tavanomaisilla kypsennystavoilla syntyvään
rapeuteen ja syvään ruskeaan väriin. Ruokahalua
lisäävän ruskean värin aikaansaamiseksi voidaan
käyttää ruskistamisaineita. Useassa tapauksessa ne
toimivat samanaikaisesti myös makuaineina.
Seuraavassa taulukossa on esitetty joitakin
ehdotuksia ruskistamiseen soveltuvista menetelmistä,
sekä niille sopivista mahdollisista käyttökohteista:
Voisula ja kuivattu paprika
Kuivattu paprika
Soijakastike
Grillikastike ja Worcestershire-kastike, kastike
Pekonin kuumentamisesta saatu rasva tai kuivattu
sipuli
Kaakao, suklaahiutaleet, ruskea sokerikuorrutus,
hunaja ja marmeladi
Linnunliha
Uunissa paistetut välipalat, juustoleivät
Liha ja siipikarja
Paistit, risollit, pienet paahdetut annokset
Uunissa valmistetut ruuat,
paahtoleivät, keitot, muhennokset
Kakut ja jälkiruuat
Lintu sivellään voi-/
paprikaseoksella
Päälle ripotellaan paprikaa
Sivellään kastikkeella
Sivellään kastikkeella
Päälle ripotellaan pekoninpaloja
tai kuvattua sipulia
Kakun päälle sirotellaan
paloja
RUSKISTUSAINE
RUOKAVALMISTE
VALMISTUSMENETELMÄ
KUUMENTAMINEN
● Alumiinivuokiin pakatut valmisruuat tulisi
poistaa pakkauksestaan ja kuumentaa
lautasella tai kulhossa.
● Tiukasti suljetuista astioista tulisi irrottaa kansi.
● Ruoka tulisi suojata mikroaaltokalvolla,
lautasella tai suojakuvulla (saatavissa alan
liikkeistä), jolloin pinta ei kuivu. Juomia ei
tarvitse peittää.
● Keitettäessä nesteitä kuten vettä, kahvia, teetä
tai maitoa, on astiaan sijoitettava sekoitin.
● Jos nestettä on paljon, tulee sitä mahdollisuuksien
mukaan aika ajoin sekoittaa. Näin varmistetaan
lämmön tasainen jakautuminen.
● Esitetyt ajat koskevat huoneen lämpötilassa, 20° C,
olevia ruoka-aineita. Jääkaapissa säilytettävien
ruoka-aineiden kohdalla tulee aikaa hieman lisätä.
● Kuumennuksen jälkeen annetaan ruuan seistä
1-2 minuuttia niin, että lämpötila ruuan sisällä
jakautuu tasaisesti (tasoittumisaika).
● Annetut ajat ovat ohjeaikoja, jotka voivat muuttua
lähtölämpötilan, painon, vesipitoisuuden,
rasvapitoisuuden tai halutun lopputuloksen
mukaan.
SULATTAMINEN
Mikroaaltouuni on ihanteellinen väline sulattamiseen.
Sulatusajat ovat yleensä huomattavasti lyhyempiä
kuin tavanomaisilla menetelmillä. Ohessa on esitetty
joitakin vihjeitä. Kylmä valmiste otetaan pois
pakkauksestaan ja sijoitetaan lautaselle sulamaan.
Kotelot ja pakkaukset
Mikroaaltokäyttöön tarkoitetut laatikot ja pakkaukset
ovat erityisen hyviä ruuan sulattamiseen ja
kuumentamiseen, koska ne kestävät sekä pakastamista
(alaraja noin –40° C ) sekä kuumennusta (noin 220° C
tasoon). Tällöin voidaan käyttää samaa pakkausta
ruuan pakastamiseen, sulattamiseen ja myös
kypsentämiseen ilman valmistusastian vaihtotarvetta.
Suojaaminen
Ennen sulattamista suojataan ohuet kohdat pienillä
alumiinikalvosuikaleilla. Sulatetut tai lämpimät osat
tulisi sulatuksen aikana suojata samalla tavoin
alumiinisuikaleilla. Näin vältetään ohuiden osien
liika kuumeneminen silloin, kun paksummat osat
ovat vielä kylmiä.
Oikeat asetusarvot
On parempi valita liian pieni kuin liian suuri
asetusarvo. Näin voidaan varmistaa, että ruoka
sulaa tasaisesti. Jos mikroaaltouunin asetusarvo on
liian korkea, alkaa ruuan pintakerros kypsyä,
vaikka sisäkerrokset eivät ole vielä sulaneet.
7. R-605N Finnish Ckbk 16/05/2003 11:12 Page 47
Page 48

48
VINKKEJÄ JA OHJEITA
Kääntäminen/sekoittaminen
Lähes kaikkia ruokia on ajoittain käännettävä tai
sekoitettava. Toisiinsa kiinni tarttuneet osat tulee
irrottaa ja asetella uudelleen mahdollisimman
aikaisessa vaiheessa.
Pienet määrät
Sulavat nopeammin ja tasaisemmin kuin suuret.
Suosittelemme mahdollisimman pienien annosten
pakastamista. Tällä tavoin voit rakentaa
monipuolisia ruokalistoja nopeasti ja helposti.
Huolellista käsittelyä vaativat ruoka-aineet
Jotkut ruoka-aineet, kuten kakut, kerma, juusto ja leipä
tulisi sulattaa vain osittain ja jättää sitten huoneen
lämpötilaan lopullista sulamista varten. Näin vältät
ulompien kerrosten liiallisen kuumenemisen silloin,
kun sisäosat eivät vielä ole sulaneet.
Tasaantumisaika
Tämä on erityisen tärkeätä ruuan sulattamisen
jälkeen, koska sulaminen jatkuu tämän vaiheen
aikana. Sulatustaulukossa on ilmoitettu eri ruokaaineille tarkoitetut tasaantumisajat. Raskaat ruuat
vaativat pitemmän seisotusajan kuin kevyet tai
kuohkeat. Jos ruoka ei ole kunnolla sulanut, voit
jatkaa sen sulatusta mikroaaltouunissa tai pidentää
sen seisonta-aikaa. Odotusajan päätyttyä tulee
ruoka valmistaa mahdollisimman pian, eikä ruokaa
saa pakastaa uudelleen.
TUOREIDENVIHANNESTEN
KYPSENTÄMINEN
● Hankittaessa tuoreita vihanneksia, tulisi
varmistaa että ne ovat mahdollisuuksien mukaan
samankokoisia. Tämä pitää paikkansa erityisesti
silloin, kun vihannekset valmistetaan
kokonaisina (esim. perunat).
● Ennen käyttöä vihannekset pestään ja
puhdistetaan, ja tämän jälkeen punnitaan ja
pilkotaan ruokalajiin tarvittava määrä.
● Maustetaan tavalliseen tapaan, mutta periaatteessa
suola tulisi lisätä vasta kypsentämisen jälkeen.
● Vettä lisätään noin 5 rkl jokaista 500 g
vihannesmäärää kohti. Runsaasti kuitua sisältävät
vihannekset tarvitsevat hieman enemmän vettä.
Tätä koskevat tiedot on esitetty taulukossa.
● Vihannekset keitetään yleensä kannellisessa
kattilassa. Vihannekset, joiden vesipitoisuus on
suuri, kuten sipulit ja keitetyt perunat, voidaan
kypsentää mikroaaltouunissa vettä lisäämättä.
● Kun puolet kypsennysajasta on kulunut, tulisi
vihanneksia sekoittaa tai ne tulisi kääntää.
● Kypsentämisen jälkeen annetaan vihannesten
seistä noin 2 minuuttia, jolloin niiden lämpö
jakautuu tasaisesti (odotusaika).
● Annetut valmistusajat ovat ohjeellisia aikoja, ja
ne riippuvat painosta, aloituslämpötilasta sekä
kyseessä olevan vihanneslajin tyypistä ja
olosuhteista. Mitä tuoreempia vihannekset ovat,
sitä lyhyempi on valmistusaika.
LIHAN, KALAN JA LINNUNLIHAN
KYPSENTÄMINEN
● Ruokatarvikkeita ostettaessa tulisi varmistaa,
että ne ovat likimain samankokoisia. Näin
varmistat kunnollisen kypsyminen.
● Ennen valmistusta tulee liha, kala ja linnunliha
pestä huolellisesti kylmässä, juoksevassa vedessä,
sekä taputetaan kuivaksi talouspaperilla. Tämän
jälkeen jatketaan tavalliseen tapaan.
● Pihvilihan tulisi olla hyvin riippunutta eikä siinä
saisi olla paljon rustoa.
● Vaikka palaset olisivatkin yhtä suuria, voi
kypsennystulos vaihdella. Tämä johtuu muun muassa
ruuan laadusta, rasvapitoisuuden ja vesimäärä
vaihteluista, sekä lämpötilasta ennen kypsennystä.
● Kun ruoka on kypsynyt noin 15 minuuttia, siihen
tulee luonnollinen ruskeus, jota voi parantaa
ruskistusmenetelmien avulla. Jos lisäksi haluat
rapean pinnan, käytä ruskistamisastiaa tai ruskista
ruoka ensin tavanomaisessa uunissa ja viimeistele
kypsennys mikroaaltouunissa. Näin menetellen
tuloksena on samalla ruskea kastikepohja.
● Suuria lihan, kalan tai linnun kappaleita on
käännettävä kypsennyksen puolivälissä, jolloin
ne kypsyvät tasaisesti joka puolelta.
● Kypsennyksen jälkeen peitä paahdetut valmisteet
alumiinifoliolla ja anna niiden seistä noin 10
minuuttia (odotusaika). Tänä aikana paistettu
valmiste jatkaa vielä kypsymistään ja sen nesteet
jakautuvat tasaisesti, jolloin leikattaessa
menetetään nestettä mahdollisimman vähän.
SULATTAMINEN JA KYPSENTÄMINEN
Pakastetut ruoka-aineet voit sulattaa ja kypsentää
mikroaaltouunissa samanaikaisesti yhtenä
työvaiheena. Taulukossa on esitetty joitakin
esimerkkejä. Yleiset ohjeet ruuan “kuumentamisesta”
ja “sulattamisesta” tulee kuitenkin ottaa huomioon.
Valmistajan antamia ohjeita pakkauksissa tulee
pakasteruokia valmistettaessa noudattaa. Näissä
ohjeissa on yleensä annettu tarkat kypsennysajat
sekä tietoja valmistamisesta.
7. R-605N Finnish Ckbk 16/05/2003 11:12 Page 48
Page 49

49
TAULUKKO
SUOMI
Juomat/Ruoat Märä Wattiluku Aika Vinkkejä
-
Grammoissa-
-Min.-
TAULUKKO: JUOMIEN JA RUOKIEN KUUMENTAMINEN
1
Lähtölämpöptilana jääkaapin lämpötila.
Juomat, 1 kupillinen 150 800 W noin 1 Älä peitä.
Valmis ateria 400 800 W 3-6 Ripottele vedellä ja peitä.
(vihannekset, liha ja lisukkeet) Sekoita ajoittain.
Pataruoka ja kastike 200 800 W 2-3 Peitä ja sekoita kuumennuksen jälkeen.
Lisukkeet 200 800 W 1-3 Ripottele vedellä ja peitä.
Sekoita ajoittain.
Liha, Viipale
1
200 800 W 3-4 Ripottele vedellä ja peitä.
Makkara, 2 kpl 180 400 W 2-21/
2
Tee kuoreen runsaasti reikiä.
Lastenruoka, 1 purkki 190 400 W noin 1 Poista kansi. Sekoita hyvin kuumentamisen
jälkeen ja tarkista ruoan lämpötila.
Margariinin tai voin sulattaminen 150 800 W
1
/2 -1
Suklaan sulattaminen 100 400 W 2-3 Sekoita ajoittain.
6 hyytelökuution liuottaminen 10 400 W
1
/
2
Pehmitä vedessä, puserra kunnolla ja aseta
keittolautaselle. Sekoita ajoittain.
KÄYTETYT LYHENTEET
rkl = ruokalusikallinen tl = teelusikallinen min = minuuttia
mikro = mikroaaltouuni kg = kilogramma g = gramma
l = litra ml = millilitra cm - senttimetri
halk. = halkaisija MW = mikroaallot s = sekunti
DF = pakaste/jääkaappituote v = veitsenkärki h = hiven
p = pussi k = kupillinen K. r = Kuivasekoituksen rasvapitoisuus
Kalafilee 300 800 W 10-11 - Peitä. 1-2
Valmis ateria 400 800 W 8-10 - Peitä ja sekoita n. 6 minuutin jälkeen. 2
Vihannekset, 300 800 W 7-9 3-5 rkl Peitä ja sekoita pari kertaa 2
esim.pinaatti, kypsymisen aikana.
parsakaali ja herneet
Sekavihannekset 500 800 W 12-14 3-5 rkl Peitä ja sekoita kypsymisen puolivälissä. 2
Vihannekset 500 800 W 9-11 5 rkl valmista tavalliseen tapaan, peitä 2
(esim. perunat, herneet, ja sekoita kypsymisen aikana
purjo ja porkkanat) 300 800 W 6-8 3 rkl valmista tavalliseen tapaan, peitä ja 2
sekoita kypsymisen aikana
Liha ja Määrä Wattiluku Kypsentä- Veden Vinkkejä Tasaantumisaika
siipikarja -grammoissa- minen lisääminen -min.-
-rkl-
TAULUKKO: SULATUS JA KYPSENNYS
7. R-605N Finnish Ckbk 16/05/2003 11:12 Page 49
Page 50

50
TAULUKKO
TAULUKKO: SULATTAMINEN
Liha ja siipikarja Määrä Wattiluku Sulattamisaika Vinkkejä Tasaantumisaika
-grammoissa- -min.- -min.-
Paahdettu liha, (esim. 500 240 W 7-8 Aseta ylösalaisin olevalle lautaselle. Käännä 30-90
sian-, naudan-, lampaan- pari kertaa sulamisen aikana.
ja vasikanliha)
Pihvit, kyljykset ja gulassi 200 240 W 4-5 Käännä sulamisen puolivälissä. 10-15
Kanankoivet ja 300 240 W 4-5 Aseta vierekkäin, käännä ylösalaisin ja 5-10
makkarat 180 astetta sulamisen puolivälissä.
Ankka / kalkkuna 1500 240 W 20-22 Aseta ylösalaisin olevalle lautaselle ja 30-90
käännä pari kertaa sulamisen aikana.
Broileri 1200 240 W 15-17 Aseta ylösalaisin olevalle lautaselle ja 30-90
käännä pari kertaa sulamisen aikana.
Kala (kokonainen) 800 240 W 9-12 Käännä sulamisen puolivälissä. 10-15
Kalafilee 400 240 W 7-10 Käännä sulamisen puolivälissä. 5-10
Katkaravut 300 240 W 6-8 Käännä sulamisen puolivälissä ja ota pois 5
sulaneet palat.
Sämpylät, 2 kpl 80 240 W noin 1 Sulata vain vähän. Viipaloitu leipä 250 240 W 2-4 Aseta viipaleet vierekkäin ja sulata vain vähän. 5
Kokonainen viipaloitu leipä 500 240 W 7-10 Käännä sulamisen puolivälissä. 15
Leivonnainen, 1 kpl 150 240 W noin 2 Aseta lautaselle. 5
Kokonainen kakku, 240 W 9-9
1
/2Aseta lautaselle ja erota palat toisistaan 60
halkaisija 25 cm sulamisen puolivälissä.
Voi 250 240 W 2-4 Sulata vain vähän. 15
Marjat ja hedelmät, esim. 250 240 W 4-5 Levitä tasaisesti, älä laita limittäin. 5
mansikat, vadelmat, Käännä sulamisen puolivälissä.
kirsikat ja luumut
Artisokat 300 800 W 6-8 poistetaan varsi, peitetään kannella 3-4 rkl
Pinaatin lehdet 300 800 W 5-7 kuivataan hyvin pesun jälkeen, peitetään kannella, -
sekoitetaan kerran tai kaksi kypsennettäessä
Kukkakaali 800 800 W 15-17 jaetaan paloihin, peitetään kannella, sekoitetaan ajoittain 5-6 rkl
500 800 W 10-12 sekoitetaan ajoittain 4-5 rkl
Parsakaali 500 800 W 9-11 jaetaan paloihin, peitetään kannella, sekoitetaan ajoittain 4-5 rkl
Sienet 500 800 W 8-10 kokonaisina, peitetään kannella, sekoitetaan ajoittain Kiinankaali 300 800 W 9-11 raastetaan, peitetään kannella, sekoitetaan ajoittain 4-5 rkl
Herneet 500 800 W 9-11 peitetään kannella, sekoitetaan ajoittain 4-5 rkl
Fenkoli 500 800 W 9-11 leikataan neliöiksi, peitetään kannella, sekoitetaan ajoittain 4-5 rkl
Sipulit 250 800 W 5-7 kokonaisina, kypsytetään mikroaaltokalvossa Kyssäkaali 500 800 W 10-12 kuutioidaan, peitetään kannella, sekoitetaan aika ajoin 50 ml
Porkkanat 500 800 W 10-12 viipaloidaan, peitetään kannella, sekoitetaan aika ajoin 4-5 rkl
Pippuri 500 800 W 9-11 kuutiointi, peitetään kannella, sekoitetaan ajoittain 4-5 rkl
Perunat kuorineen 500 800 W 9-11 peitetään kannella, sekoitetaan ajoittain 4-5 rkl
Purjosipuli 500 800 W 9-11 leikataan renkaiksi, peitetään kannella, sekoitetaan ajoittain 4-5 rkl
Punakaali 500 800 W 15-17 raastetaan, peitetään kannella, sekoitetaan kypsennyksen 50 ml
kypsennyksen aikana kerran tai kahdesti
Ruusukaali 500 800 W 9-11 kokonainen, peitetään kannella, sekoitetaan ajoittain 50 ml
Keitetyt perunat 500 800 W 9-11 leikataan yhtä suuriksi paloiksi, lisätään hieman suolaa, 150 ml
peitetään kannella, sekoitetaan ajoittain
Juuriselleri 500 800 W 9-11 leikataan pieniksi kuutioiksi, peitetään kannella, sekoitetaan ajoittain 50 ml
Valkokaali 500 800 W 15-17 raastetaan, peitetään kannella, sekoitetaan ajoittain 50 ml
Kesäkurpitsa 500 800 W 9-11 raastetaan, peitetään kannella, sekoitetaan ajoittain 4-5 rkl
vihannekset Määrä Wattiluku Aika Vinkkejä Veden lisäys
-g- -Taso- -min- -rkl/ml-
TAULUKKO: TEKEILLÄ HEHKEÄ VIHANNEKSET
7. R-605N Finnish Ckbk 20/05/2003 11:37 Page 50
Page 51

51
TAULUKKO
SUOMI
Paahdetut lihatuotteet
(porsas, vasikanliha,
lammas)
Paahtopaisti
(keskikypsä)
Broileri
Kanankoivet
Kohokkaiden jne.
ruskistaminen grillissä
Juusto paahtoleivällä
1 viipale
Maustetaan tarpeen mukaan, asetetaan laakealle
paistovadille, asetetaan pyörivälle alustalle,
käännetään * minuutin kulattua
Maustetaan tarpeen mukaan, asetetaan rasvainen
puoli alaspäin laakealle paistovadille, asetetaan
pyörivälle alustalle, käännetään * minuutin kulattua
Maustetaan tarpeen mukaan, asetetaan rintapuoli
alaspäin laakealle paistovadille, asetetaan pyörivälle
alustalle, käännetään * minuutin kulattua
Maustetaan tarpeen mukaan, asetetaan ritilälle
nahkapuoli alaspäin, käännetään * minuutin kulattua
Leivontavuoka asetetaan ritilälle
Paahtoleipä, päälle levitetään voita ja asetetaan
lisäksi viipale kypsytettyä kinkkua, ananasviipale ja
viipale sulatejuustoa. Grillataan ritilällä
10
10
3
3
10
1
TAULUKKO : KYPSENTÄMINEN, GRILLAAMINEN JA RUSKISTAMINEN GRILLITOIMINNOLLA
500
1000
1500
1000
1500
1200
200
7-8
3-5
*
6-8
3-5
15-17
7-9
*
9-11
3-4
19-21
6-8
6-7
*
16-18
4-6
10-12
7-8
*
7-9
4-5
11-13
8-10
*
11-13
3-5
12-14
7-8
*
12-14
4-5
2-3
5-7
*
5-7
3-4
1
/
2
4-5
800 W
800 W
800 W
800 W
800 W
560 W
800 W
560 W
560 W
560 W
560 W
800 W
800 W
800 W
400 W
Ruoka Määrä Asetus Teho Kypsennysaika Vinkkejä Seisotusaika
-g- -Taso- -Min- -Min-
7. R-605N Finnish Ckbk 16/05/2003 11:12 Page 51
Page 52

52
RESEPTI
Saksa
CAMEMBERT-LEIPÄ
Kypsennysaika: 1-2 minuuttia
Työvälineet: Matala lautanen
Ainekset:
4 viipaletta leipää (80 g)
2 rkl voita tai margariinia (20 g)
150 g Camembert-juustoa
4 tl karpalo- tai mustikkahilloa (40 g)
cayennepippuria
1. Paahda leivänviipaleet ja levitä niille voi.
2. Leikkaa Camembert siivuiksi ja aseta siivut leikattu
puoli ylöspäin leiville. Laita hillo keskelle juustoa
ja ripottele kevyesti cayennepippuria.
3. Aseta leivät lautaselle ja grillaa ne.
1-2 min. 800 W
Ehdotus:
Päästä mielikuvituksesi valloilleen! Käytä tuoreita
sieniä ja juustoraastetta tai keittokinkkua, parsaa
ja emmental-juustoa.
Alankomaat
KERMAINEN SIENIKEITTO
Kypsennysaika: 9-13 minuuttia
Työvälineet: Kannellinen kulho (tilavuus 2 litraa)
Ainekset:
200 g sieniä siivuina
1 hienoksi hakattu sipuli (50 g)
3 dl lihalientä
3 dl kermaa (tavallista tai kuohukermaa)
2
1/
2
rkl vehnäjauhoa (25 g)
2
1/
2
rkl voita tai margariinia (25 g)
suolaa ja
mustapippuria
150 g ranskankermaa
1. Laita vihannekset ja lihaliemi kulhoon, peitä se
ja kypsennä.
6-8 min. 800 W
2. Soseuta ainekset tehosekoittimella. Lisää kerma.
3. Yhdistä voi ja vehnäjauhot tahnaksi, lisää se
keittoon ja sekoita tasaiseksi. Mausta suolalla ja
mustapippurilla, peitä kannella ja kypsennä.
3-5 min. 800 W
4. Lisää ranskankerma valmiiseen keittoon.
Saksa
MAUSTEINEN KALKKUNAPATA
Pikante Putenpfanne
(kahdelle 2) Kypsennysaika: noin 23-27 minuuttia
Työvälineet: Laakea, soikea, kannellinen
kohokasvuoka (26 cm)
Ainekset
1 Kupillinen pitkäjyväistät riisiä,
puolikypsää ( 120 g)
1 Hyppysellinen kokonaista sahramia
1 tl Voita tai margariinia vuoan voiteluun
1 Sipuli (50g ), viipaleina
1 Punainen paprika (100 g), suikaleina
1 Pieni purjosipuli (100 g), suikaleina
300 g Kalkkunan rintapalaa, paloiteltuna
Pippuria ja paprikamaustetta
2 rkl Voita tai margariinia (20 g)
3 dl Kupillista lihalientä
Valmistaminen
1. Sekoita riisi ja sahrami keskenään ja aseta
voideltuun kohokasvuokaan. Sekoita viipaloitu
sipuli, paprikasuikaleet ja purjo kalkkunaan ja
lisää sitten pippuria ja suolaa maun mukaan.
Aseta riisin päälle, ja laita lopuksi
lihavihannessekoituksen päälle voinokareita.
2. Kaada päälle lihaliemi, peitä kannella ja
kypsennä.
1. 5-7 min. 800 W
2. 18-20 min. 240 W
Anna seistä noin viiden minuutin ajan ennen
tajoilua.
7. R-605N Finnish Ckbk 16/05/2003 11:12 Page 52
Page 53

53
RESEPTI
SUOMI
Itävalta
TÄYTETTY BROILERI (2 annosta)
Gefülltes Brathendl
Kypsennysaika: 36-42 minuuttia
Työvälineet: piirakkavuoka, lankaa
Ainekset:
1 broileri (1000 g)
suolaa
kuivattua rosmariinia ja meiramia
1 päivän vanha sämpylä (40 g)
1 nippu persiljaa hienoksi hakattuna (10 g)
1 hyppysellinen muskottipähkinää
3 rkl voita tai margariinia (30 g)
1 munankeltuainen
1 rkl paprikaa
suolaa
1 tl voita tai margariinia vuokaan
1. Huuhdo broileri, kuivaa se talouspaperilla ja
mausta sisältä suolalla, rosmariinilla ja meiramilla.
2. Täyte: Liota sämpylää kylmässä vedessä n. 10
minuuttia, ja purista se sitten kuivaksi. Lisää suola,
persilja, muskottipähkinä, voi (20 g) ja
munankeltuainen. Sekoita hyvin ja täytä broileri
seoksella.
Sulje aukko langalla tai cocktailtikulla.
3. Kuumenna loppu voi
noin 1 min. 800 W
Lisää paprika ja suola voihin ja voitele broileri.
4. Kypsennä broileri voidellussa astiassa. Älä peitä.
1. 13-15 min. 800 W
2. 5-6 min.
Käännä broileri.
1. 13-15 min. 800 W
2. 4-5 min.
Anna kypsän broilerin tasaantua n. 3 minuutin ajan.
Sveitsi
KALAFILEETÄ JA JUUSTOKASTIKETTA
Kypsennysaika: 24-27 minuuttia
Työvälineet: Kannellinen kulho (tilavuus 1 litraa)
Matala, pyöreä vuoka (n. 25 cm pitkä)
Ainekset:
4 kalafileetä (n. 800 g), esim. turskaa
tai kampelaa
2 rkl sitruunan mehua
1 rkl voita tai margariinia
1 hienoksi hakattu sipuli (50 g)
2 rkl vehnäjauhoja
1 dl valkoviiniä
1 tl ruokaöljyä (vuoan voiteluun)
100 g emmentaljuustoa raastettuna
2 rkl hienonnettua persiljaa
1. Huuhdo kalafileet, kuivaa talouspaperilla ja
pirskota päälle sitruunan mehua. Laita
jääkaappiin n. 15 minuutiksi, taputtele fileet
kuiviksi ja suolaa.
2. Levitä voi kulhon pohjalle. Lisää hienoksi hakattu
sipuli, peitä ja kypsennä.
noin 2 min. 800 W
3. Ripota vehnäjauhoja sipulille ja sekoita. Lisää
valkoviini ja sekoita.
4. Laita fileet voideltuun valmistusastiaan. Kaada
kastike fileiden päälle ja ripota juustoa päälle.
Laita grilliin ja kypsytä.
1. 18-20 min. 560 W
2. 4-5 min.
Anna kypsän ruoan tasaantua n. 2 minuutin ajan.
Koristele persiljasilpulla ennen tarjoilua.
7. R-605N Finnish Ckbk 16/05/2003 11:12 Page 53
Page 54

54
RESEPTI
Saksa
VÄRIKKÄÄT LIHAVARTAAT
Kypsennysaika: 20-28 minuuttia
Työvälineet: Ritilä
3 puuvarrasta (n. 20-25 cm pitkä)
Ainekset:
300 g porsaanleikettä
75 g lihaista savupekonia
1-2 sipulia (75 g) lohkoina
3 tomaattia (200 g) lohkoina
1/
2
vihreä paprika (75 g) kahdeksaan osaan
lohkottuna
3 rkl öljyä
4 tl paprikaa
suolaa
1 tl cayennepippuria
1 tl Worcester-kastiketta
1. Paloittele porsaanleikkeet ja pekoni 2-3 cm
paloiksi.
2. Pujota vuorotellen lihaa ja vihanneksia vartaisiin.
3. Sekoita mausteet öljyyn ja sivele grillivartaat
öljyllä. Aseta vartaat yläritilälle ja grillaa.
1. 7-10 min.
2. 3-4 min. 800 W
Käännä grillivartaat.
3. 7-10 min.
4. 3-4 min. 800 W
Espanja
KINKKURULLAT
Jamón relleno
Kypsennysaika: 19-22 minuuttia
Työvälineet: Kannellinen kulho (tilavuus 2 litraa)
Matala, soikea vuoka (n. 26 cm pitkä)
Ainekset:
125 g pinaatinlehtiä, joista kannat on poistettu
125 g raejuustoa (rasvapitoisuus 20 %)
40 g emmentaljuustoa raastettuna
mustapippuria
paprikaa
6 siivua keittokinkkua (300 g)
1
1/
4
dl vettä
1
1/
4
dl kermaa (tavallista tai kuohukermaa)
2 rkl voita tai margariinia (20 g)
2 rkl vehnäjauhoa (20 g)
1 tl voita tai margariinia vuokaan
Ehdotus:
Voit myös käyttää valmista béchamel-kastiketta.
1. Hakaa pinaatti hienoksi, sekoita siihen raejuusto
ja juustoraaste, mausta.
2. Aseta ruokalusikallinen seosta jokaiselle kinkun
siivulle ja rullaa se. Kiinnitä cocktailtikulla.
3. Valmista béchamel-kastike. Kaada neste kulhoon,
peitä se ja kuumenna.
3-4 min. 800 W
Nypi voi jauhoihin, lisää neste ja sekoita
tasaiseksi seokseksi vispilällä. Peitä, anna
kiehahtaa ja saostua.
1 min. 800 W
Sekoita ja mausta maun mukaan.
4. Laita kastike voideltuun valmistusastiaan, lisää
pienet sämpylät ja kypsennä grillissä.
10-13 min. 800 W
5. Aseta yläritilälle ja grillaa
noin 4 min.
Anna kinkkusämpylöiden seistä n. 5 minuuttia
kypsentämisen jälkeen.
7. R-605N Finnish Ckbk 16/05/2003 11:12 Page 54
Page 55

55
RESEPTI
SUOMI
Saksa
KESÄKURPITSAPASTAPAISTOS
Kypsennysaika: 46-55 minuuttia
Työvälineet: Kannellinen kulho (2 l)
Uunivuoka (n. 26 cm pitkä)
Ainekset:
5 dl kuumaa vettä
1/
2
tl öljyä
80 g makaronia
400 g säilyketomaattimurskaa
3 hienoksi hakattua sipulia (150 g)
asilikaa, timjamia, suolaa ja
mustapippuria
1 rkl öljyä astian rasvaamiseen
450 g kesäkurpitsaa, siivuina
150 g hapankermaa
2 kananmunaa
100 g raastettua Cheddar-juustoa
1. Laita vesi, öljy ja suola kulhoon, peitä ja
kuumenna kiehuvaksi.
3-4 min. 800 W
2. Katko makaroni paloiksi (tai käytä lyhyttä
makaronia). Laita se kiehuvaan veteen, sekoita ja
kypsennä.
8-10 min. 240 W
Valuta pasta ja anna sen jäähtyä.
3. Sekoita keskenään tomaatit ja sipulit ja mausta
hyvin. Lisää makaronit ja kaada tomaattikastike
niiden päälle. Levitä kesäkurpitsaviipaleet seoksen
päälle.
4. Vatkaa kananmunat smetanaan ja kaada
kohokkaan päälle. Ripottele päälle raastettua
juustoa.
1. 30-35 min. 800 W
2. 5-6 min.
Anna kypsän paistoksen tasaantua n. 5-10
minuutin ajan.
Espanja
ROSMARIINIHERKKUSIENET
Champiñones rellenos al romero
Kypsennysaika: 15-21 minuuttia
Työvälineet: Kannellinen kulho (tilavuus 1 litraa)
matala, pyöreä kannellinen vuoka
(noin Ø 22 cm)
Ainekset:
8 suurta (viljeltyä) herkkusientä
(n. 225 g yhteensä), kokonaisina
2 rkl voita tai margariinia (20 g)
1 hienoksi hakattu sipuli (50 g)
50 g hienoksi kuutioitua kinkkua
rouhittua mustapippuria
kuivattua rosmariinia
1
1/
4
dl kuivaa valkoviiniä
1
1/
4
dl kermaa (tavallista tai kuohukermaa)
2 rkl vehnäjauhoa (20 g)
1. Irrota sienistä jalat ja paloittele ne.
2. Levitä voi kulhon pohjalle. Lisää hienoksi hakattu
sipuli ja kuutioitu kinkku, mausta pippurilla ja
rosmariinilla. Peitä ja kypsennä.
4-5 min. 800 W Anna jäähtyä.
3. Kaada 1 dl viiniä ja kerma vuokaan, peitä vuoka
ja lämmitä seos.
2-3 min. 800 W
4. Sekoita loppu viini jauhoihin, lisää kuuma neste
hyvin sekoittaen, peitä ja kypsytä. Sekoita kerran
kypsymisen puolivälissä.
1-2 min. 800 W
5. Täytä sienet kinkkuseoksella, laita kastikkeeseen,
peitä ja kypsytä. Ota kansi pois ja grillaa
grillissä.
1. 4-6 min. 800 W
2. 4-5 min.
Anna sienien seistä n. 2 minuuttia kypsentämisen
jälkeen.
7. R-605N Finnish Ckbk 16/05/2003 11:12 Page 55
Page 56

56
VIKTIGA SÄKERHETSFÖRESKRIFTER
Minska eldfaran!
Mikrovågsugnen får inte lämnas utan
uppsikt under drift. För hög styrka eller för
lång matlagningstid leder till att maten
överhettas och kan fatta eld.
Denna ugn är inte avsedd att inneslutas i en köksenhet.
Det elektriska uttaget måste vara lättåtkomligt så att enheten
enkelt kan kopplas bort från nätuttaget i en nödsituation.
Nätanslutningen måste vara 230 V, 50 Hz, med minst
en 10 A säkring på distributionsledningen eller minst
ett 10 A distributionsrelä.
Vi rekommenderar att utrustningen ansluts till ett
separat uttag.
Placera inte ugnen nära platser med hög värme, t ex
vid en vanlig ugn.
Installera inte ugnen på en plats med hög fuktighet
eller där fukt lätt kan bildas.
Ugnen får inte förvaras eller användas utomhus.
ÖPPNA INTE LUCKAN om maten överhettas
och börjar ryka. Stäng av ugnen, koppla
bort den från vägguttaget och vänta tills
maten har slutat ryka. Öppna inte luckan
medan maten fortfarande ryker. Detta kan
orsaka eldsvåda.
Använd endast mikrovågssäkra behållare
och material. Se sidan 61.
Lämna inte ugnen utan uppsikt om du
använder engångsmaterial, papper eller
andra lättantändliga matförpackningar.
Rengör vågledarskyddet, ugnsutrymmet,
tallriken och valsstöden efter varje
användning. Dessa delar måste vara torra
och fria från fett. Ansamlat fett kan
överhettas och börja ryka eller fatta eld.
Placera inte lättantändligt material nära ugnen eller
ventilöppningarna. Blockera inte ventilöppningarna.
Avlägsna alla förseglingar, påsklämmor, m.m. av
metall från maten och matförpackningarna. Metall kan
skapa elektriska bågar som kan orsaka eldsvåda.
Värm inte frityrolja i mikrovågsugnen. Temperaturen
kan inte kontrolleras och oljan kan fatta eld.
Poppa endast popcorn i förpackning som är speciellt
avsedd för mikrovåg.
Förvara inte mat eller andra föremål inuti ugnen.
Kontrollera inställningarna när du slår på ugnen, så
att den genomför önskat program.
Se tipsen i denna handledning och i receptavsnittet.
Minska skaderisken!
VARNING!
Använd inte ugnen om den är skadad eller inte fungerar
ordentligt. Kontrollera följande detaljer före drift:
a)Luckan: Kontrollera att luckan stängs ordentligt
och inte är ur läge eller skev.
b)Gångjärn och säkerhetsspärrar: Kontrollera att de
inte har skadats eller lossnat.
c) Luckans tätningslister och kontaktytor: Kontrollera
att de är oskadade.
d)I ugnsutrymmet eller på luckan: Kontrollera att det
inte finns några hack.
e)Nätsladden och stickproppen: Kontrollera att de
är oskadade.
Du får aldrig själv justera, reparera eller
modifiera ugnen. Det kan utgöra en risk
om ej utbildad personal avlägsnar hölje
eller skydd mot mikrovågsenergi i avsikt
att serva eller reparera utrustningen.
Använd inte ugnen om luckan är öppen. Du får inte
heller påverka säkerhetsspärren på något sätt.
Använd inte ugnen om det finns något föremål mellan
luckans tätningslister och kontaktytorna.
Låt inte fett och smuts ansamlas på luckans
tätningslister och intilliggande delar. Följ
instruktionerna i “Vård och rengöring”,
sidan 60.
Personer med PACEMAKER skall rådfråga läkare eller
tillverkaren av pacemakern för säkerhetsföreskrifter
avseende mikrovågsugnar.
Undvik elektriska stötar!
Du får under inga omständigheter avlägsna ytterhöljet.
Du får aldrig spilla eller sticka in föremål i luckans
låsöppningar eller i ventilöppningarna. Om du skulle
spilla något, skall du omedelbart slå av ugnen och
koppla bort den från vägguttaget. Ring därefter till en
av SHARP auktoriserad serviceperson.
Sänk inte ned nätsladden eller stickproppen i vatten
eller annan vätska.
Låt inte nätsladden hänga ned över kanten på ett bord
eller arbetsbänk.
Låt inte nätsladden komma i kontakt med varma ytor, t
ex ugnens baksida.
Försök inte byta ugnslampa. Endast en av SHARP
auktoriserad elektriker får byta lampa. Om
ugnslampan skulle gå sönder, skall du kontakta din
återförsäljare eller en av SHARP auktoriserad
serviceperson.
Om utrustningens nätsladd skulle skadas, måste den
ersättas med en speciell sladd. Endast en av SHARP
auktoriserad serviceperson får utföra bytet.
VIRTIGA SÄKERHETSFÖRESKRIFTER: LÄS IGENOM DESSA NOGA OCH SPARA DEM FÖR FRAMTIDA BRUK.
8. R-605N Swedish Op man 16/05/2003 11:09 Page 56
Page 57

57
VIKTIGA SÄKERHETSFÖRESKRIFTER
SVENSKA
Vidrör inte ugnsluckan, ytterhöljet, det bakre höljet,
ugnsutrymmet, ventilöppningarna, tillbehör eller
kokutrustning i driftsläget GRILL, eftersom de är heta.
Kontrollera att de har svalnat före rengöring.
Låt inte barn missbruka utrustningen
VARNING! Låt inte barnen använda ugnen
utan uppsikt innan de har fått ordentliga
instruktioner och själva kan använda ugnen
och inse farorna med felaktig användning.
Luta dig inte mot och gunga inte på ugnsluckan.
Använd inte ugnen som leksak.
Barn måste lära sig alla viktiga säkerhetsföreskrifter: att
använda grytlappar, att avlägsna alla tillslutningar
fullständigt, att vara extra försiktig med förpackningar (t
ex självuppvärmande material) som är avsedda att göra
maten knaprig, eftersom dessa kan vara extra heta.
Andra varningsföreskrifter:
Modifiera aldrig ugnen på något sätt.
Flytta inte ugnen under drift.
Denna ugn är endast avsedd för matlagning i hemmet
och får bara användas vid uppvärmning av livsmedel.
Den är inte lämplig att användas i kommersiella syften
eller i laboratoriemiljö.
Undvik driftsproblem och skador på din ugn!
Använd aldrig ugnen när den är tom, utom om detta
speciellt rekommenderas i driftshandledningen (se
sidan 59). Detta kan skada ugnen.
Om du använder brynfat eller självuppvärmande
material, undviker du skador av den kraftiga värmen
på den roterande tallriken och valsstöden genom att
alltid placera värmetålig isolering under fatet, t ex en
porslinstallrik. Överskrid inte de uppvärmningstider
som anges på köksutrustningen.
Använd inte metallredskap som reflekterar mikrovågor
och orsakar elektriska bågar. Placera inte
konservburkar i ugnen.
Använd endast roterande tallrik och valsstöd som är
avsedd för denna ugn.
Undvik att krossa tallriken:
(a) Låt tallriken svalna innan du rengör den med
vatten.
(b) Placera inte het mat eller het utrustning på en kall
tallrik.
(c) Placera inte kall mat eller kall utrustning på en het
tallrik.
Do not place anything on the outer cabinet during
operation.
Placera ingenting på ytterhöljet under drift.
Använd inte plastbehållare vid mikrovågstillagning om
ugnen fortfarande är varm från driftsläget GRILL,
eftersom dessa kan smälta. Plastbehållare får endast
användas i ovanstående driftsläge om tillverkaren
speciellt har angivit att de kan användas till detta.
Undvik explosion och plötslig överkokning
VARNING! Vätskor och andra livsmedel får
inte värmas i slutna behållare eftersom de
kan explodera.
Använd aldrig slutna behållare. Avlägsna tillslutningar och
lock före tillagning. Förseglade behållare kan explodera av
övertrycket även efter det att ugnen har stängts av.
Var försiktig vid mikrovågsuppvärmning av vätskor.
Värm vätskan i en behållare med stor öppning så att
bubblor kan tränga ut.
Microwave upphettning av dryck kanna
resultera inne fördröj utbrotten kokning ,
därför bekymmer har till vara tog när
handlingen behållaren.
Förebygg att kokande vätska sprutar ut och eventuellt
orsakar skållning!
1. Vispa vätskan före uppvärmning/återuppvärmning
2. Det är tillämpligt att placera en glasstav eller
liknande föremål i vätskan under uppvärmningen.
3. Låt vätskan stå kvar i ugnen efter uppvärmningen
för att förebygga eventuella fördröjda eruptioner.
Värm inte upp ägg med skal eller hela
hårdkokta ägg i en mikrovågsugn,
eftersom de kan explodera även efter det
att uppvärmningen har avslutats. Om
äggen inte har vispats eller blandats upp,
skall du sticka håll på gulan och vitan före
uppvärmningen/återuppvärmningen så att
äggen inte exploderar. Skala och skiva
hårdkokta ägg före återuppvärmning i
mikrovågsugn.
Stick hål på matvaror typ potatis, korv och frukt före
uppvärmningen, så att de inte exploderar.
Undvik brännskador!
Undvik brännskador genom att använda grytlappar
eller ugnsvantar då du lyfter ut maten ur ugnen.
Undvik brännskador från het ånga genom att alltid
rikta behållare, påsar med popcorn, tillagningspåsar
etc. bort från ansiktet då du öppnar dem.
Undvik brännskador genom att alltid
kontrollera matens temperatur och röra om i
maten före serveringen. Var speciellt försiktig
med temperaturen på mat och dryck till
spädbarn, små barn och äldre personer.
Behållarens temperatur är inte identisk med
temperaturen på maten eller drycken inuti behållaren.
Kontrollera alltid matens och dryckens temperatur.
Stå alltid på avstånd från ugnsluckan då du öppnar
den för att undvika brännskador från ångan och
hettan inuti ugnsutrymmet.
Skiva alltid fyllda maträtter efter uppvärmningen för
att släppa ut ånga och undvika brännskador.
Undvik brännskador på barn. Låt dem inte komma i
kontakt med ugnsluckan.
8. R-605N Swedish Op man 16/05/2003 11:09 Page 57
Page 58
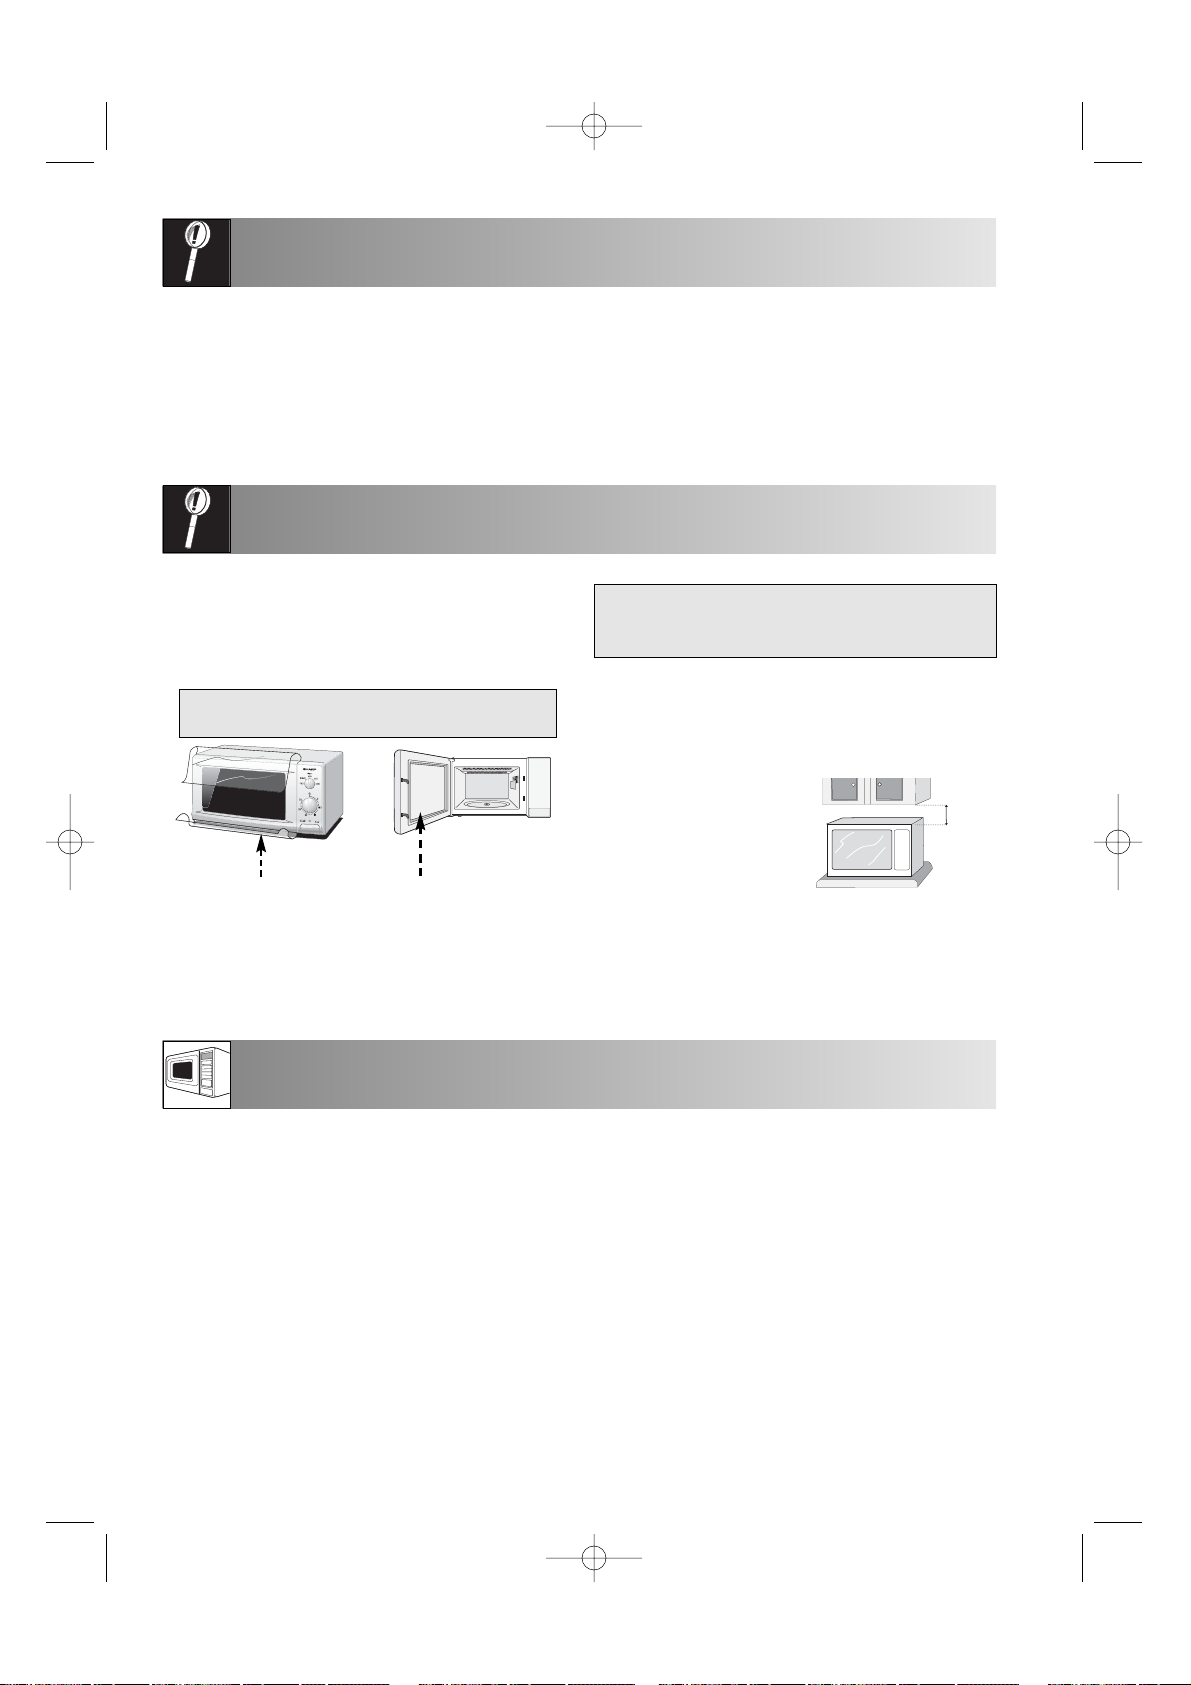
58
VIKTIGA SKYDDSFÖRESKRIFTER
INSTALLATION
MIKROVÅGSEFFEKT
Ugnsluckan kan bli het under tillagningen.
Placera ugnen så att dess undersida
befinner sig minst 85 cm över golvet.
4. Tillåtande inte makten tillförsel snore till
springa över någon het eller skarp
utsidorna, sådan som den het luft lufthål
areal på den topp föda upp om ugn.
5. Kontrollera att det finns minst 21 cm fritt
utrymme ovanför ugnen.
6. Kontrollera att TIMER-ratten är ställd till ”
●
” (av).
7. Anslut stickproppen ordentligt till ett vanligt
jordat uttag för hushållsbruk.
1. Avlägsna allt förpackningsmaterial från
ugnsutrymmet. Kasta det lösa bladet av etenplast,
som sitter mellan dörren och ugnsutrymmet.
Avlägsna eventuella dekaler från luckans utsida.
Avlägsna inte den skyddande filmen från
luckans insida.
2. Kontrollera ugnen noga för tecken på
eventuella skador
3. Placera ugnen på ett plant och vågrätt underlag
som är tillräckligt kraftigt för att kunna bära
ugnens vikt tillsammans med de tyngsta
matvarorna som du räknar med att tillaga.
Imma eller droppar kan ibland bildas på ugnens
väggar eller runt luckans tätningslister och kontaktytor.
Detta är helt normalt och är inte ett tecken på
mikrovågsläckage eller felaktig funktion.
OBS!
Kontakta en auktoriserad och kvalificerad elektriker
om du är osäker hur ugnen skall anslutas.
Varken tillverkaren eller återförsäljaren bär ansvaret
för skador på material eller person, som har orsakats
av felaktig elektrisk anslutning.
Din ugn har fyra effektnivåer. Följ råden i receptavsnittet
när du väljer effektnivå för tillagningen. Nedanstående
generella rekommendationer gäller dock.
800 W
För snabb tillagning eller återuppvärmning, t ex
färdiga måltider, varma drycker, grönsaker, fisk etc.
560 W
För längre tillagning av fasta maträtter, t ex rostbiff.
Minska effektnivån för känsliga maträtter, t ex ostsås.
Vid lägre nivåer kommer maten inte att koka över
samtidigt som köttet blir jämt tillagat utan att bli
överkokt på sidorna.
400 W
Det är tillämpligt att minska effektnivån och förlänga
tillagningstiden för fasta maträtter som kräver lång
tillagningstid vid vanlig tillagning, t ex nötkött.
Därmed blir köttet mörare.
240 W
(Upptining.) Välj en låg effektnivå vid upptining.
Därmed blir maträtten jämt upptinad. Detta läge är
dessutom perfekt för att sjuda ris, pasta el. dyl.
W = WATT
21cm
✓
✗
8. R-605N Swedish Op man 16/05/2003 11:09 Page 58
Page 59
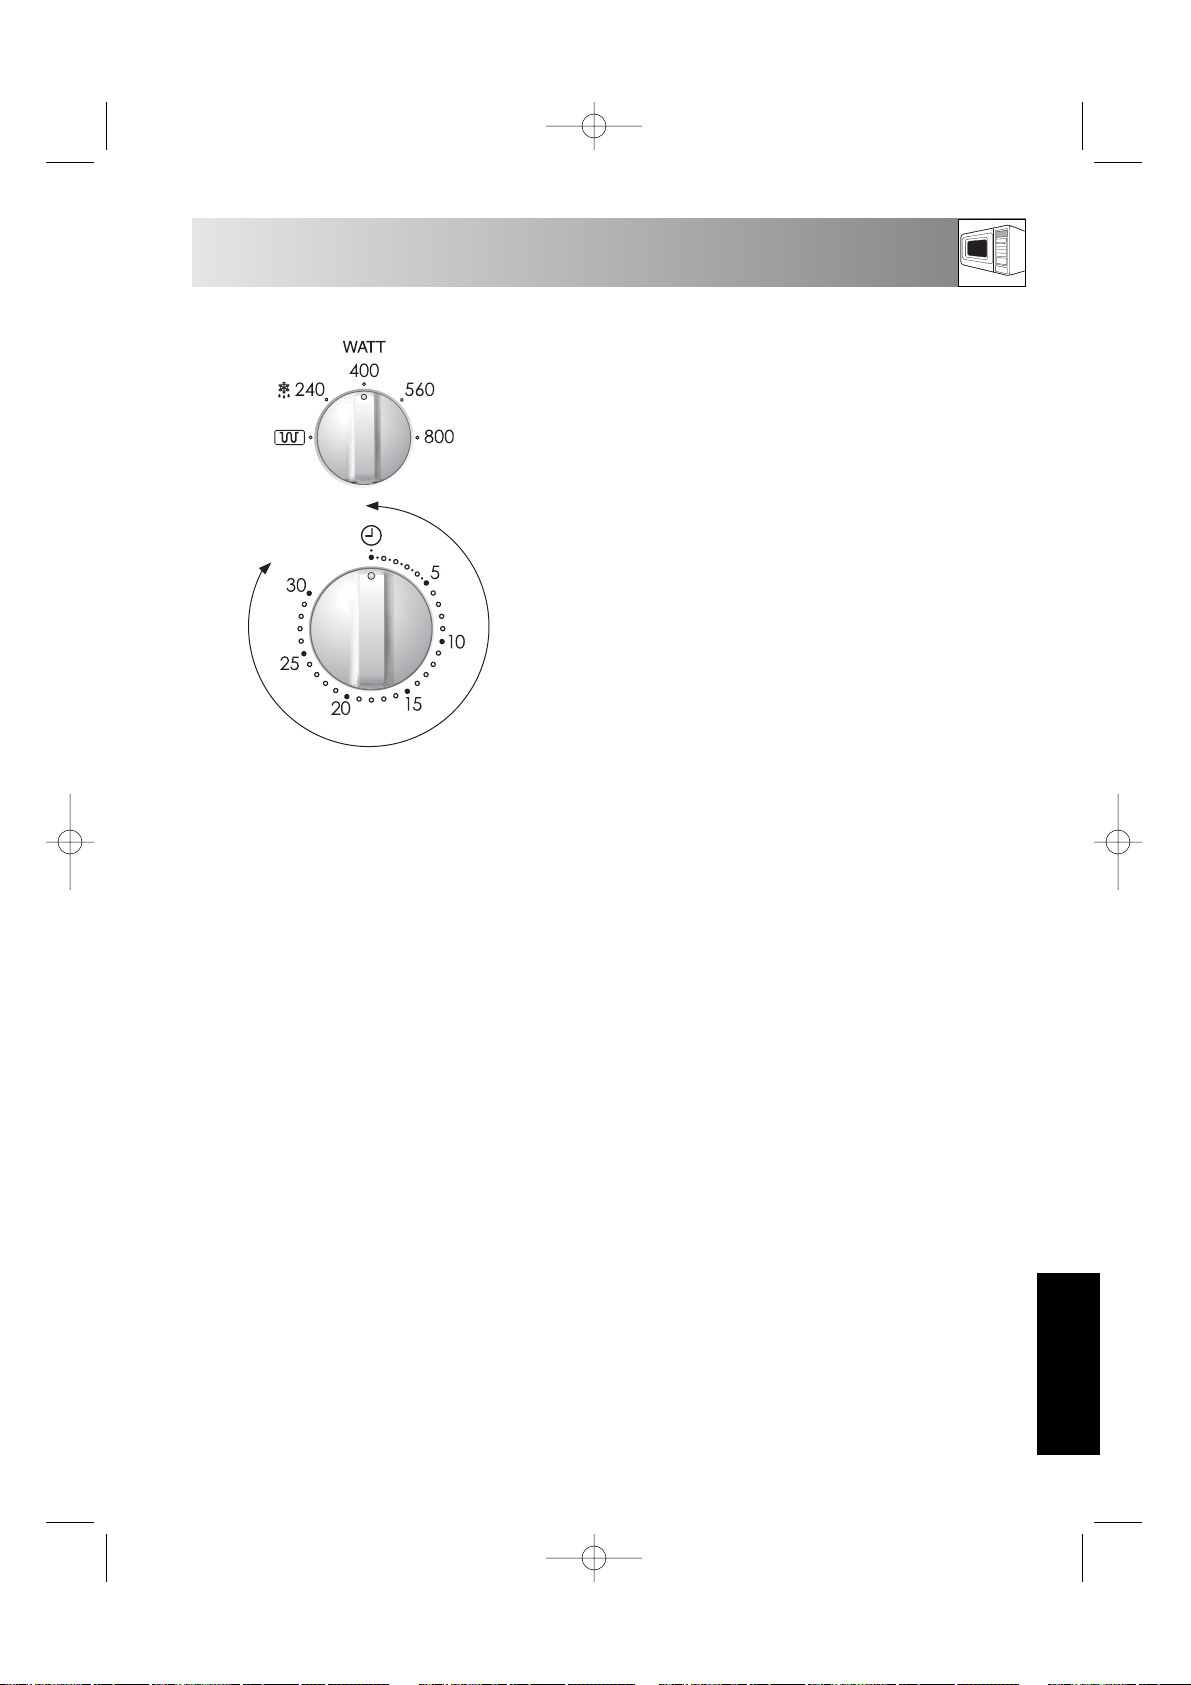
59
TILLAGNING MED GRILL/MIKROVÅG
SVENSKA
Det kan kännas en rökdoft eller vidbränd lukt när du använder grillen första gången. Detta är helt normalt
och innebär inte att ugnen är trasig.
För att undvika detta, kan du vid första användningen först sätta på grillen utan matvaror under 20 minuter.
VIKTIGT: Öppna ett fönster eller slå på köksfläkten, för att släppa ut rök och os ur köket vid grillning.
UPPVÄRMNING UTAN MAT
MATLAGNINGSTIPS:
I kokboken hittar du detaljerade anvisningar för olika recept. I detta avsnitt ges endast grundläggande
matlagningstips.
1. Dra i handtaget för att öppna luckan, och placera maten på den roterande tallriken.
2. När TIMER skall ställas in på tider under två minuter skall TIMER-ratten först vridas förbi 2-
minutersmarkeringen ett stycke och sedan vridas tillbaka till önskad tidsinställning.
3. Om du vill avbryta tillagningen innan den inställda tiden har gått ut, kan du vrida TIMER-ratten till ”●”
(av), eller öppna luckan. Luckan kan öppnas när som helst under tillagningen. Stäng dörren, för att
fortsätta tillagningen. Om du vill ändra inställningen eller tiden under tillagningen, skall du vrida på
TIMER-ratten.
VARNING: Var noga med att vrida ratten till “●” (av) när ugnen inte används. Annars kommer ugnen
att startas så snart luckan stängs
1. Ställ in MIKROVÅGSEFFEKT/GRILL-ratten på
önskad nivå, mikrovågseffekten eller grillen.
2. Ställ in TIMER-ratten på önskad tillagningstid.
Tillagningen startar.
✳ TIMERN kommer att återgå till “
●” när
tillagningen är klar och en signal hörs. Ugnen
stannar och ugnslampan släcks automatiskt.
1.
2.
8. R-605N Swedish Op man 16/05/2003 11:09 Page 59
Page 60

60
VÅRD OCH RENGÖRING
FELSÖKNING
Kontrollera följande detaljer innan du ringer efter service.
1. Strömtillförsel
Kontrollera att stickproppen är ansluten till ett lämpligt vägguttag.
Kontrollera att säkringen/överspänningsskyddet fungerar ordentligt.
2. Ställ en kopp vatten (cirka 150 ml) i ugnen och stäng luckan ordentligt.
Programmera ugnen för en minut med 800 W effekt. Starta ugnen
Tänds ugnslampan? JA NEJ
Roterar tallriken? JA NEJ
OBS! Tallriken kan rotera i endera riktningen.
Fungerar ventilationen? JA NEJ
(Placera din hand över ventilöppningarna och kontrollera om
du känner ett luftflöde.)
Är vattnet i koppen varmt efter ovanstående åtgärder? JA NEJ
3. Ställ in MIKROVÅGSEFFEKT/GRILL-ratten till GRILL
under 3 minuter.
Har grillelementen blivit röda efter 3 minuter? JA NEJ
Om du har svarat “NEJ” på någon av ovanstående frågor, skall du kontakta din återförsäljare eller en av
SHARP auktoriserad serviceperson och meddela resultatet av dina kontroller. Adresser till serviceställen
finns på insidan av det bakre omslaget till denna broschyr.
VAR FÖRSIKTIG: ANVÄND INTE
KOMMERSIELLA UGNSRENGÖRINGSMEDEL,
KRAFTIGA RENGÖRINGSMEDEL MED
SLIPVERKAN ELLER SKURSVAMPAR PÅ
NÅGON DEL AV DIN MIKROVÅGSUGN.
Ugnens utsida
Utsidan på din ugn kan rengöras enkelt med mild
tvål och vatten. Var noga med att torka av all tvål
med en fuktig trasa. Torka torrt med en mjuk trasa.
Kontrollpanelen
Avaktivera kontrollpanelen före rengöring genom att
öppna ugnsluckan. Var försiktig när du rengör
kontrollpanelen. Använd endast en trasa fuktad i
vatten. Torka panelen försiktigt tills den är ren. Undvik
stora mängder vatten. Använd aldrig någon sorts
kemikalier eller rengöringsmedel med slipverkan.
VAR FÖRSIKTIG:
Var noga med att inte flytta TIMER-ratten från ”
●”
(av) vid rengöringen. Annars kommer ugnen att
starta så snart luckan stängs.
Ugnens insida
1. Rengör ugnens insida genom att torka bort stänk
och spill med en fuktig trasa efter varje
användning medan ugnen fortfarande är varm.
Använd en mild tvål för större spill och torka
efter flera gånger med en fuktig trasa, tills alla
matrester har försvunnit.
2. Se till att den milda tvålen och vattnet inte
tränger in i de små ventilöppningarna i
väggarna eftersom detta kan skada ugnen.
3. Spruta inte rengöringsmedel på ugnens insida.
4. Värm upp ugnen regelbundet med grillen. Se
sid. 59, eftersom mat- eller fettrester kan orsaka
rök och dålig lukt.
Tallrik och valsstöd
Ta bort tallriken och valsstöden från ugnen. Tvätta
tallriken och valsstöden med milt tvålvatten. Torka
med en mjuk trasa. Både tallriken och valsstöden
kan diskas i diskmaskin.
Galler
Gallret skall tvättas med ett milt diskmedel och
torkas. Gallret kan diskas i diskmaskin.
Lucka
Ta bort alla smutsrester genom att regelbundet
rengöra båda sidorna av luckan, luckans
tätningslister och kontaktytor med en mjuk och
fuktig trasa
OBS: Om du tillagar mat över standardtid med
endast 800 W, kommer ugnens effekt automatiskt att
sänkas för att undvika överhettning. (Mikrovågsugnens
effektläge sänks.)
Tillagningsläge
Mikrovåg 800 W
Standardtid
20 minuter
8. R-605N Swedish Op man 16/05/2003 11:09 Page 60
Page 61

61
VAD ÄR MIKROVÅGOR?
LÄMPLIGA TILLAGNINGSKÄRL
SVENSKA
När detta fat används måste en lämplig isolering,
t.ex. ett porslinsfat, placeras mellan den roterande
skivan och stekfatet. Var noga med att exakt följa
den föruppvärmningstid som anges i tillverkarens
anvisningar. Alltför lång föruppvärmning kan skada
den roterande skivan och dess ställ eller utlösa den
säkerhetsmekanism som stänger av ugnen.
METALL
Metall bör i allmänhet inte användas eftersom
mikrovågor inte kan passera genom metall och
därför inte kommer in i maten. Det finns emellertid
undantag: små remsor av aluminiumfolie kan
användas för att täcka vissa delar av maten så att
dessa inte tinar för snabbt eller börjar tillagas
(t.ex. kycklingvingar). Små steknålar av metall och
aluminiumkärl (t.ex. för färdiglagad mat) kan
användas. De måste dock vara små i förhållande
till maten, aluminiumkärl måste t.ex. fyllas minst till
2/
3
eller
3/
4
. Det bästa är att lägga över maten i ett
kärl som är lämpligt för mikrovågsugnen. När
aluminiumkärl eller andra metallkärl används
måste det finnas ett mellanrum på ca 2 cm mellan
kärlet och ugnens insida, i annat fall kan insidan
skadas av eventuell ljusbågsbildning.
Kärlen får inte ha metallöverdrag eller
metalldelar som skruvar, band eller handtag.
TESTA KÄRLETS LÄMPLIGHET
Är man osäker på om ett kärl kan användas i
mikrovågsugnen kan man göra följande test: Sätt
kärlet i ugnen. Placera ett glas med 150 ml vatten
på eller bredvid kärlet. Sätt på ugnen
på 800 W i 1 till 2 minuter. Om
kärlet förblir kallt eller bara känns
handvarmt, kan det användas. Testa
aldrig ett plastkärl, eftersom det kan smälta.
Mikrovågor alstras av en magnetron i
mikrovågsugnen och sätter vattenmolekylerna i
maten i rörelse.
Friktionen som uppstår alstrar värme, som gör att
maten tinas, värms eller tillagas.
GLAS OCH KERAMISKT GLAS
Värmetåliga glaskärl är mycket
lämpliga, eftersom man kan iaktta
tillagningen från alla håll. Kärlen får
emellertid inte innehålla metall (t.ex.
blykristall) eller ha metalldekor (t.ex. guldkant,
koboltblå yta).
KERAMIK
Passar i allmänhet bra. Keramikformar måste vara
glaserade, eftersom fukt kan tränga in i oglaserad
keramik. Fukten får materialet att hettas upp och kan
göra att det spricker. Är man osäker på om ett kärl
passar för mikrovågsugnen kan man göra ett test.
PORSLIN
Går bra, men se till att porslinet inte har en dekor
av guld eller silver och att det inte innehåller
metall.
PLAST OCH PAPPERSKÄRL
Värmetåliga plastkärl lämpliga för mikrovågsugn
kan användas till att tina, värma och tillaga mat.
Följ tillverkarens anvisningar.
Värmetåligt papper som tillverkats för användning
i mikrovågsugn passar också. Följ tillverkarens
anvisningar.
MIKROVÅGSFOLIE
Denna folie, eller värmetålig folie, används för att
täcka över eller svepa in mat. Följ tillverkarens
anvisningar.
STEKPÅSAR
Kan användas i mikrovågsugn. Metallklämmor bör
inte användas för tillslutning eftersom folien i
stekpåsen kan smälta. Tillslut stekpåsen med snöre
och stick några hål i den med en gaffel.
Matemballage som inte är värmetåliga bör inte
användas i mikrovågsugnen.
STEKFAT
Ett speciellt mikrovågsfat av keramiskt glas med en
metallegering i botten som gör att maten blir brynt.
9. R-605N Swedish Ckbk 16/05/2003 11:12 Page 61
Page 62

62
TIPS OCH RÅD
TIDSINSTÄLLNINGAR
Generellt sett är tiden för tining, upphettning och
tillagning betydligt kortare än då man använder
en vanlig ugn. Följ därför de tider som anges i
den här kokboken. Det är bättre att ställa in för
kort tid än för lång. Pröva maten efter tillagningen.
Det är bättre att lägga till tid i efterhand än att låta
maten tillagas för länge.
GRUNDTEMPERATUR
Upptining, värmning och tillagningstider är
beroende av vilken temperatur maten har från
början. Djupfryst mat och mat som förvarats i
kylskåp kräver t.ex. längre tid än mat som
förvarats i rumstemperatur. För uppvärmning och
tillagning förutsätts normala förvaringstemperaturer
(kylskåpstemperatur ca 5° C, rumstemperatur ca
20° C). För upptining förutsätts en frystemperatur
på -18° C.
TILLAGNINGSTIDER
Alla tider som anges i kokboken är riktlinjer som
kan varieras beroende på matens grundtemperatur,
vikt och tillstånd (vatten- eller fetthalt osv.).
SALT OCH KRYDDOR
Mat som tillagas i mikrovågsugn behåller sin
individuella smak bättre än vid konventionell
tillagning. Därför bör salt användas sparsamt och
normalt tillsättas efter tillagningen. Salt absorberar
vätska och torkar ut matens yttre skikt. Kryddor
kan användas på vanligt sätt.
TILLSATS AV VATTEN
Grönsaker och annan föda med hög vattenhalt
kan tillagas i sin egen vätska eller med tillsats av
litet vatten. Detta garanterar att många vitaminer
och mineraler bevaras.
MAT MED SKINN ELLER SKAL
Mat som korv, kyckling, kycklinglår, bakad potatis,
tomater, äpplen, äggulor eller liknande bör prickas
eller genomborras med en gaffel eller liten trästicka.
Detta gör att den ånga som bildas kan försvinna
utan att spränga sönder skinnet eller skalet.
FET MAT
Fett kött tillagas snabbare än magert kött. Före
tillagningen bör man täcka de feta delarna med
en bit aluminiumfolie eller placera maten med den
feta sidan neråt
.
STORA OCH SMÅ MÄNGDER
Mikrovågstider är direkt beroende av den mängd
mat som ska tinas upp, värmas eller tillagas. Det
innebär att små portioner tillagas snabbare än
stora. Tumregeln är:
DUBBLA MÄNGDEN = NÄSTAN DUBBLA TIDEN
HALVA MÄNGDEN = HALVA TIDEN
DJUPA OCH FLATA KÄRL
Båda typerna av kärl har samma kapacitet, men
tillagningstiden är längre för de djupa. Därför bör
man välja så flata kärl som möjligt med en stor yta.
Använd djupa kärl bara för rätter där det finns risk
för överkokning, t.ex. för nudlar, ris, mjölk osv.
RUNDA OCH OVALA KÄRL
Tillagningen blir jämnare i runda eller ovala kärl
än i kärl med hörn, eftersom mikrovågsenergin
koncentreras i hörnen och gör att maten i dessa
områden kan tillagas för länge.
PLACERING AV MAT
Placera ett antal enskilda portioner, t.ex. små
puddingformar, koppar eller potatisar med skal, i
en cirkel på den roterande skivan. Sätt dem på
avstånd från varandra så att mikrovågsenergin
kan nå maten från alla håll.
ÖVERTÄCKNING
Övertäckning av maten håller kvar fukten och
förkortar tillagningstiden. Använd lock eller
mikrovågsfolie. Mat som ska vara knaprig, t.ex. stek
eller kyckling, bör inte täckas över. Den allmänna
regeln är att det som täcks över i en vanlig ugn bör
också täckas över i en mikrovågsugn. Det som inte
skulle täckas över i en vanlig ugn kan också lämnas
utan övertäckning i mikrovågsugnen.
VÄNDNING
Medelstora köttbitar som hamburgare och biffar
bör vändas en gång under tillagningen så att
tillagningstiden förkortas. Stora köttbitar som stek
och kyckling måste vändas, eftersom överdelen får
ta emot mer mikrovågsenergi och kan torka ut om
man inte vänder köttet.
OMRÖRNING
Maten måste röras om, eftersom mikrovågorna
börjar med att värma upp de yttre delarna.
Därigenom jämnas temperaturen ut och maten
värms upp jämnt.
9. R-605N Swedish Ckbk 16/05/2003 11:12 Page 62
Page 63
63
TIPS OCH RÅD
SVENSKA
UTJÄMNINGSTID
Att låta maten få en utjämningstid är en av de
viktigaste reglerna för mikrovågstillagning. Nästan
all mat som tinas, värms eller tillags i
mikrovågsugnen kräver en viss tid för utjämning,
under vilken temperaturen och vätskan i maten
fördelas jämnt.
FÄRGSÄTTNING
Efter mer än 15 minuters tillagning får maten färg,
även om denna inte kan jämföras med den djupa
färg och knaprighet som man får i konventionell
matlagning. För att få en aptitretande färg kan
man använda färgsättningsmedel. För det mesta
ger de samtidigt smak. I följande tabell finns några
förslag på ämnen som kan användas för att ge
färg och tips om hur man kan använda dem:
Smält smör och paprikapulver
Paprikapulver
Soja
Grillsås och Worcestershire-sås, buljong
Smält baconfett eller torkad lök
Kakao, chokladspån, brun glasyr, honung och
marmelad
Fågel
Ugnsbakade rätter “Varma mackor“
Kött och fågel
Stekar, kroketter, kött stekt i mindre bitar
Ugnsbakade rätter, rostade rätter,
soppor, stuvningar
Kakor och desserter
Täck fågeln med smör/
paprikablandningen
Strö över paprika
Täck med såsen
Täck med såsen
Strö över baconbitar eller
torkad lök
Strö pieces på kakor
FÄRGSÄTTNINGSMEDEL
MATRÄTTER
TILLVÄGAGÅNGSSÄTT
UPPVÄRMNING
● Färdiglagade rätter i aluminiumformar bör tas
ut ur aluminiumformen och värmas på en tallrik
eller i en skål.
● Ta av locket på tätt tillslutna kärl.
● Mat bör täckas över med mikrovågsfolie, en
tallrik eller lock (finns att köpa), så att inte ytan
torkar ut. Drycker behöver inte täckas över.
● När man kokar vätskor som vatten, kaffe, te
eller mjölk, placeras en glassked i kärlet.
● Om möjligt bör stora mängder röras om då och
då så att temperaturen fördelas jämnt.
● Tiderna gäller för mat med rumstemperatur på
20° C. Uppvärmningstiden för mat som
förvarats i kylskåp bör ökas något.
● Efter uppvärmning bör maten få stå i 1-2
minuter, så att temperaturen inne i maten kan
fördelas jämnt (utjämningstid).
● Angivna tider är riktlinjer som kan variera
beroende på matens grundtemperatur, vikt,
vattenhalt, fetthalt eller det resultat man vill
uppnå.
UPPTINING
Mikrovågsugnen är idealisk för upptining.
Upptiningstiderna är vanligen betydligt kortare än
vid traditionella metoder. Här är några tips. Ta ut
den frysta enheten ur sin förpackning och lägg
den på en tallrik för upptining.
Burkar och kärl
Burkar och kärl som passar för mikrovågsugnen är
särskilt bra för upptining och uppvärmning av mat,
eftersom de tål temperaturer i frysen (ner till ca –40° C)
samtidigt som de tål värme (upp till ca 220° C). Man
kan därför använda samma kärl att frysa, tina, värma
och t.o.m. tillaga maten i, utan att behöva byta.
Övertäckning
Täck över tunna delar med små remsor
aluminiumfolie före upptining. Tinade eller varma
delar bör också täckas med aluminiumremsor under
upptining. Detta hindrar de tunna delarna att bli för
varma medan tjockare delar fortfarande är frusna.
Korrekt inställning
Det är bättre att välja en för låg inställning än en
för hög. På det sättet kan man se till att maten
tinas jämnt. Om mikrovågsinställningen är för hög
kommer ytan på maten att redan ha börjat tillagas
medan insidan fortfarande är frusen.
9. R-605N Swedish Ckbk 16/05/2003 11:12 Page 63
Page 64

64
TIPS OCH RÅD
Vändning/omrörning
Nästan all mat måste vändas eller röras om då och
då. Så snart som möjligt bör man sära delar som
sitter ihop och flytta om dem.
Små mängder
Tinar snabbare och jämnare än större mängder. Vi
rekommenderar att man fryser in så små portioner
som möjligt. På det sättet kan man snabbt och lätt
laga till hela menyer.
Mat som kräver försiktig hantering
Mat som tårtor, grädde, ost och bröd bör man
bara halvtina och därefter låta dem tina helt i
rumstemperatur. På så sätt undviker man att de
yttre delarna blir alltför varma medan insidan
fortfarande är frusen.
Utjämningstid
Detta är särskilt viktigt efter upptining av mat,
eftersom tiningsprocessen fortsätter under denna
period. I upptiningstabellen anges utjämningstider
för olika mattyper. Tjock, kompakt mat kräver en
längre utjämningstid än mat i mindre delar eller
med porös konsistens. Om maten inte tinat
tillräckligt, kan man fortsätta tina den i
mikrovågsugnen eller förlänga utjämningstiden efter
behov. Efter utjämningstiden bör maten tillagas så
snabbt som möjligt och den bör inte frysas om.
TILLAGNING AV FÄRSKA GRÖNSAKER
● När man köper grönsaker bör man försöka se
till att de är ungefär lika stora. Detta är särskilt
viktigt när man tänker tillaga grönskaerna hela
(t.ex. kokt potatis).
● Tvätta grönsakerna innan de tillagas, rensa dem
och väg först därefter upp den mängd som
behövs enligt receptet och dela dem.
● Krydda dem som vanligt, men ta som regel att
inte salta förrän efter tillagningen.
● Tillsätt 5 msk vatten till 500 g grönsaker.
Fiberrika grönsaker kräver litet mera vatten.
Information om detta finns i tabellen.
● Grönsaker tillagas vanligen i en skål med lock.
De med hög vattenhalt, t.ex. lök eller kokt
potatis kan tillagas i mikrovågsfolie utan tillsats
av vatten.
● Efter halva tillagningstiden bör grönsakerna
röras om eller vändas.
● Efter tillagningen låter man grönsakerna stå i ca
2 minuter, så att temperaturen fördelas jämnt
(utjämningstid).
● Tillagningstiden som anges är riktlinjer och
beror på vikt, grundtemperatur och tillstånd hos
den aktuella grönsakssorten. Ju färskare
grönsak, desto kortare tillagningstid.
TILLAGNING AV KÖTT, FISK OCH FÅGEL
● Vid matinköp bör man försöka se till att de olika
delarna så långt möjligt är av samma storlek.
Detta gör att de tillagas på rätt sätt.
● Innan beredningen sköljs kött, fisk och fågel
noga under kallt rinnande vatten och klappas
torra med hushållspapper. Fortsätt därefter som
vanligt.
● Kött bör vara välhängt och broskfritt.
● Även om bitarna är av samma storlek kan
tillagningsresultatet variera. Detta beror bland
annat på vilken typ av mat det gäller,
variationer i fett- och vätskehalt liksom på
temperaturen före tillagningen.
● När maten tillagats i 15 minuter börjar den få
färg naturligt, och detta kan förhöjas ytterligare
med hjälp av färgsättningsmedel. För att
dessutom få en knaprig yta, bör du använda
speciella mikrovågskärl eller börja med att
bryna maten på spisen och avsluta tillagningen
i mikron. På det sättet får du samtidigt en sky att
göra sås av.
● Vänd stora bitar av kött, fisk eller fågel efter
halva tillagningstiden, så att de tillagas jämnt
från alla sidor.
● Efter tillagningen täcks stekar med
aluminiumfolie och får vila i ca 10 minuter
(utjämningstid). Under tiden fortsätter steken att
tillagas och vätskan fördelas jämnt, så att
minimalt med köttsaft går till spillo vid
uppskärningen.
UPPTINING OCH TILLAGNING
Djupfrysta rätter kan tinas och tillagas samtidigt i
en enda process i mikrovågsugnen. Det finns
några exempel i tabellen. Observera de allmänna
råd som ges om “uppvärmning“ och “upptining“
av mat. Följ alltid tillverkarens anvisningar på
förpackningen vid beredning av djupfrysta rätter.
Dessa brukar innehålla exakta tillagningstider och
råd om beredning.
9. R-605N Swedish Ckbk 16/05/2003 11:12 Page 64
Page 65

65
TABELL
SVENSKA
Dryck/mat Mängd Watt Tid Tips
-g- -min-
TABELL : VÄRMA DRYCKER OCH MAT
1
maten har kylskåpstemperatur vid starten.
Drycker, 1 kopp 150 800 W ca 1 Täck inte över
Färdigmat 400 800 W 3-6 Stänk med vatten, täck sedan över, rör om ibland
(Grönsaker, kött och tillbehör)
Stuvning och sås 200 800 W 2-3 Täck över; rör om efter tillagningen
Tillbehör 200 800 W 1-3 Stänk över lite vatten, täck över och rör om ibland
Kött,1 skiva
1
200 800 W 3-4 Stänk över lite vatten och täck över
Korv, 2 st 180 560 W 2-21/
2
Pricka skinnet några gånger
Barnmat, 1 burk 190 400 W ca 1 Ta av locket; rör om noga efter uppvärmningen
och kontrollera temperaturen
Smälta margarin eller smör
1
50 800 W1/2 -1
Smälta choklad 100 400 W 2-3 Rör om ibland
Lösa upp gelatin 10 400 W1/
2
Mjuka upp i vatten, krama ur och (Tidsangivelsen kan
lägg i en skål; rör om ibland variera beroende på
om gelatinblad eller pulver används)
FÖRKORTNINGAR SOM ANVÄNDS
msk = matsked kg = kilogram dp = djupfryst produkt
tsk = tesked g = gram krm = kryddmått
n = nypa l = liter pp = portionspåse
k = kopp (2,5 dl) ml = milliliter mv = mikrovågsugn
min = minuter cm = centimeter sek = sekunder
mvg = mikrovågsutrustning d = diameter fett = matfett
ca = cirka
Fiskfilé 300 800 W 10-11 - Täck över 1-2
Färdigmat 400 800 W 8-10 - Täck över; rör om efter ca 6 min. 2
Grönsaker, t.ex. 300 800 W 7-9 3-5 msk Täck över; rör om ett par ggr 2
spenat, broccoli,
ärtor
Grönsaksblandning 500 800 W 12-14 3-5 msk Täck över; rör om efter halva tiden 2
Grönsaker 500 800 W 9-11 5 msk förbered som vanligt, täck över och rör om 2
(t. ex. potatis, ärtor, ibland under kokningen
purjolök och morötter) 300 800 W 6-8 3 msk förbered som vanligt, täck över och rör om 2
ibland under kokningen
Mat Mängd Watt Tillagning Tillsats av Tips Utjämningstid
-g- -min- vatten -msk- -min-
TABELL : UPPTINING OCH TILLAGNING
9. R-605N Swedish Ckbk 16/05/2003 11:12 Page 65
Page 66

66
TABELL
TABELL : UPPTINING
Mat Mängd Watt Upptiningstid Tips Utjämningstid
-g- -min- -min-
Helt kött (t.ex. gris, nöt, 500 240 W 7-8 Lägg på ett uppochnervänt fat, 30
lamm och kalv) Vänd en eller två ggr under tining
Skivat kött, kotletter, 200 240 W 4-5 Vänd efter halva tiden 10-15
gulasch, kycklinglår
Korv 300 240 W 4-5 Lägg bredvid varandra; vänd efter 5-10
halva tiden
Anka/kalkon 1500 240 W 20-22 Lägg på ett uppochnervänt fat; 30-90
Vänd en eller två ggr under tining
Kyckling 1200 240 W 15-17 Lägg på ett uppochnervänt fat, 30-90
Vänd en eller två ggr under tining
Fisk (hel) 800 240 W 9-12 Vänd efter halva tiden 10-15
Fiskfilé 400 240 W 7-10 Vänd efter halva tiden 5-10
Räkor 300 240 W 6-8 Vänd efter halva tiden och ta bort de som tinat 5
Bullar, 2 st 80 240 W ca 1 Tina endast lätt Skivat bröd 250 240 W 2-4 Lägg skivor bredvid varandra; tina endast lätt 5
Helt skivat bröd 500 240 W 7-10 Lägg skivor bredvid varandra; tina endast lätt 15
Sockerkaka, 1 st 150 240 W ca. 2 Lägg på ett fat 5
Hel sockerkaka, 240 W 9-9
1
/2Lägg på ett fat; dela bitarna efter 60
25 cm i diameter halva tiden
Smör 250 240 W 2-4 Tina endast lätt 15
Frukt; jordgubbar, 250 240 W 4-5 Sprid ut jämnt i ett enda lager 5
hallon, körsbär, plommon Vänd efter halva tiden
Kronärtskocka 300 800 W 6-8 tag bort stjälken, täck över 3-4 msk
Bladspenat 300 800 W 5-7 torka väl efter sköljning, -
täck, rör om en eller två gånger under tillagning
Blomkål 800 800 W 15-17 hela huvudet, dela i buketter, täck, 5-6 msk
500 800 W 10-12 rör om ibland 4-5 msk
Broccoli 500 800 W 9-11 dela i buketter, täck, rör om ibland 4-5 msk
Svamp 500 800 W 8-10 hela, täck, rör om ibland Kinesisk kål 300 800 W 9-11 strimla, täck, rör om ibland 4-5 msk
Ärtor 500 800 W 9-11 täck, rör om ibland 4-5 msk
Fänkål 500 800 W 9-11 skär i fjärdedelar, täck, rör om ibland 4-5 msk
Lök 250 800 W 5-7 hela, tillaga i plastfilm för mikrovågsbruk Kålrabbi 500 800 W 10-12 skär i tärningar, täck, rör om ibland 50 ml
Morötter 500 800 W 10-12 skiva, täck, rör om ibland 4-5 msk
Paprika 500 800 W 9-11 skär i tärningar, täck, rör om ibland 4-5 msk
Oskalad potatis 500 800 W 9-11 täck, rör om ibland 4-5 msk
Purjolök 500 800 W 9-11 skär i ringar, täck, rör om ibland 4-5 msk
Rödkål 500 800 W 15-17 strimla, täck, rör om en eller två gånger under tillagning 50 ml
Brysselkål 500 800 W 9-11 hel, täck, rör om ibland 50 ml
Kokt potatis 500 800 W 9-11 skär i jämnstora bitar, tillsätt lite salt, täck, rör om ibland 150 ml
Rotselleri 500 800 W 9-11 skär i små tärningar, täck, rör om ibland 50 ml
Vitkål 500 800 W 15-17 strimla, täck, rör om ibland 50 ml
Squash 500 800 W 9-11 skiva, täck, rör om ibland 4-5 msk
Grönsak Mängd Effekt Tid Noteringar om tillvägagångssätt Vattentillsats
-g- -Nivå- -Min- -msk/ml-
TABELL: TILLAGNING AV FÄRSKA GRÖNSAKER
9. R-605N Swedish Ckbk 20/05/2003 11:36 Page 66
Page 67

67
TABELL
SVENSKA
500
1000
1500
1000
1500
1200
200
Helt kött
(gris, kalv
och lamm)
Rostbiff (medium)
Kyckling
Kycklingbitar
Färgsättning av
suffléer ingår.
Smält ost
1 skiva
Krydda efter smak, lägg i en låg ugnsform, placera
på den roterande skivan och vänd efter (*).
Krydda efter smak och lägg i en låg ugnsform med
den feta sidan neråt. Placera på den roterande
skivan och vänd efter (*).
Krydda efter smak och lägg i en låg ugnsform med
(kyckling-) bröstet neråt. Placera på den roterande
skivan och vänd efter (*).
Krydda efter smak och lägg på grillstället med
skinnet neråt. Vänd efter (*).
Sätt ugnsformen under grillen.
Rosta brödet, smöra, täck med en skiva kokt skinka,
en skiva ananas och en skiva smält ost, samt tillaga
under grillen.
10
10
3
3
10
1
TABELL : TILLAGNING, GRILLNING OCH FÄRGSÄTTNING
Kött, fisk
och fågel
Mängd
-g-
Effekt
-inställning-
Tid
-min-
Tips
Utjämningstid
-min-
Inställ-
ning
7-8
3-5*
6-8
3-5
15-17
7-9*
9-11
3-4
19-21
6-8
6-7*
16-18
4-6
10-12
7-8*
7-9
4-5
11-13
8-10*
11-13
3-5
12-14
7-8*
12-14
4-5
2-3
5-7*
5-7
3-4
1
/
2
4-5
800 W
800 W
800 W
800 W
800 W
560 W
800 W
560 W
560 W
560 W
560 W
800 W
800 W
800 W
400 W
9. R-605N Swedish Ckbk 16/05/2003 11:12 Page 67
Page 68

68
RECEPT
Tyskland
CAMEMBERTTOAST
Total koktid: 1-2 minuter
Redskap: Platt tallrik
Ingredienser:
4 skivor bröd (80 g)
2 msk smör eller margarin (20 g)
150 g Camembert
4 tsk tranbärs- eller blåbärssylt (40 g)
Cayennepeppar
1. Rosta brödet och bred på smör.
2. Skiva camembertosten och lägg dem med den
skurna sidan uppåt på det rostade brödet. Lägg
sylt i mitten på osten och strö över cayennepeppar.
3. Placera brödet på en tallrik och grilla.
1-2 Min. 800 W
Förslag:
Låt fantasin flöda! Prova t.ex. färska
champinjoner och riven ost eller kokt skinka,
sparris och emmentalost.
Nederländerna
CHAMPINJONSOPPA
Total koktid: 9-13 minuter
Redskap: Form med lock (2 l kapacitet)
Ingredienser:
200 g champinjoner, skivade
1 lök (50 g), finhackad
300 ml buljong
300 ml grädde, visp- eller kaffegrädde
2
1
/
2
msk mjöl (25 g)
2
1
/
2
msk smör eller margarin (25 g)
Salt och peppar
150 g crème fraîche
1. Placera grönsakerna och buljongen i formen, täck
över och koka.
6-8 Min. 800 W
2. Använd en blandare och gör en puré av
ingredienserna. Tillsätt grädden.
3. Knåda mjölet och smöret till en massa, lägg i den
i soppan och vispa tills den är jämn. Krydda efter
behag med salt och peppar, täck över och koka.
Tillsätt crème fraîche efter kokningen.
3-5 Min. 800 W
Tyskland
KRYDDIG KALKONRÄTT (2 personer)
Total tillagningstid: ca. 23-27 minuter
Kärl: låg oval form med lock (26 cm)
Ingredienser:
1 kopp förkokt ris (120 g)
1 nypa saffran
1 tsk smör eller margarin till formen
1 skivad lök (50 g)
1 röd paprika i skivor (100 g)
1 liten purjolök i skivor (100 g)
300g tärnat kalkonbröst
peppar & paprikapulver
2 msk smör eller margarin (20 g)
2 koppar köttbullong (300 ml)
1. Blanda ris med saffran och placera dem i smord
form. Blanda skivad lök, röd paprika och purjolök
med kalkontärningarna och peppra och salta
efter smak. Lägg ovanpå riset. Klicka smör på
köttblandningen.
2. Häll köttbuljong på rätten, lägg på locket och
tillaga.
1. 5-7 Min. 800 W
2. 18-20 Min. 240 W
Låt stå i 2-3 minuter före servering.
9. R-605N Swedish Ckbk 16/05/2003 11:12 Page 68
Page 69

69
RECEPT
SVENSKA
Österrike
FYLLD GRILLAD KYCKLING
Gefülltes Brathendl (2 portioner)
Total koktid: ca. 36-42 minuter
Redskap: Quicheform, snöre
Ingredienser:
1 kyckling (för grillning) (1000 g)
Salt
orkad rosmarin och mejram
1 dagsgammalt franskbröd (40 g)
1 knippe persilja, finhackad (10 g)
1 nypa muskotnöt
3 msk smör eller margarin (30 g)
1 äggula
1 msk paprikapulver
1 tsk smör eller margarin för formen
1. Tvätta kycklingen, torka med hushållspapper och
krydda insidan med salt, rosmarin och mejram.
2. Till fyllningen: Blötlägg franskbrödet i kallt vatten i
ca. 10 minuter och krama sedan torrt. Tillsätt salt,
persilja, muskotnöt, smör (20 g) och äggula.
Blanda ordentligt och fyll kycklingen.
Använd snöre eller tandpetare för att stänga
öppningen.
3. Värm upp det återstående smöret.
ca. 1 Min. 800 W
Tillsätt paprikapulver och salt i smöret och smörj in
kycklingen.
4. Tillaga kycklingen utan lock i en smord form.
1. 12-15 Min. 800 W
2. 5-6 Min.
Vänd kycklingen.
1. 13-15 Min. 800 W
2. 4-5 Min.
Låt den grillade kycklingen stå i ca. 3 minuter
efter tillagning.
Schweiz
FISKFILÉ MED OSTSÅS
Total koktid: ca. 24-27 minuter
Redskap: Form med lock (1 l kapacitet)
Låg rund form (ca. 25 cm lång)
Ingredienser:
3 fiskfiléer (ca. 800 g), t.ex. torsk, flundra
2 msk citronsaft
Salt
1 msk smör eller margarin
1 lök (50 g), finhackad
2 msk mjöl (20 g)
100 ml vitt vin
1 tsk grönsaksolja (för att smörja formen)
100 g riven emmentalost
2 msk hackad persilja
1. Tvätta fiskfiléerna, torka med hushållspapper och
droppa över citronsaften. Låt stå i kylen i ca. 15
minuter, torka dem torra igen och salta.
2. Bred ut smöret i botten på formen. Lägg i den
hackade löken, täck över och koka.
ca. 2 Min. 800 W
3. Strö mjölet över löken och rör om. Tillsätt vitt vin
och rör om.
4. Lägg filéerna i en smord ugnsform. Häll över
såsen och strö över ost. Sätt under grillen och
tillaga.
1. 18-20 Min. 560 W
och därefter
2. 4-5 Min.
Låt stå i ca. 2 minuter efter tillagning. Dekorera
med hackad persilja innan servering.
9. R-605N Swedish Ckbk 16/05/2003 11:12 Page 69
Page 70

70
RECEPT
Tyskland
FÄRGRIKA GRILLSPETT
Total koktid: 20-28 minuter
Redskap: Galler
3 grillspett av trä (ca. 20-25 cm långa)
Ingredienser:
300 g fläskschnitzel
75 g rökt bacon
1-2 lökar (75 g), delade i fyra delar
3 tomater (200 g), delade i fyra delar
1
/
2
grön paprika (75 g), delad i åtta delar
3 msk olja
4 tsk paprikapulver
Salt
1 tsk cayennepeppar
1 tsk Worcestersås
1. Skär fläsk och bacon i 2-3 cm bitar.
2. Trä omväxlande på köttet och grönsakerna på
grillspetten.
3. Rör ner kryddorna i oljan och pensla kebaberna
med den. Lägg kebaberna på översta hyllan och
grilla.
1. 7-10 Min.
2. 3-4 Min. 800 W
Vänd kebaberna.
3. 7-10 Min.
4. 3-4 Min. 800 W
Spanien
FYLLDA SKINKRULLAR
Total koktid: ca. 19-22 minuter
Redskap: Form med lock (2 l kapacitet)
Låg oval form (ca. 26 cm lång)
Ingredienser:
150 g bladspenat med stjälkarna borttagna
150 g keso, 20% fett (se snabbköpets
mejeriavdelning)
50 g riven emmentalost
Peppar
Paprikapulver
8 skivor kokt skinka (400 g)
125 ml vatten
125 ml grädde (kaffegrädde eller vispgrädde)
2 msk smör eller margarin (20 g)
2 msk mjöl (20 g)
1 tsk smör eller margarin för formen
Förslag:
Du kan också använda färdiglagad
béchamelsås som finns att köpa i snabbköpet.
1. Finhacka spenaten, blanda med keson och osten
och krydda efter behag.
2. Placera en matsked av blandningen på varje
skinkskiva och rulla ihop till en rulle. Fäst med en
tandpetare.
3. Gör i ordning en béchamelsås. Häll vätskan i en
skål, täck över och värm upp.
3-4 Min. 800 W
Knåda ihop smör och mjöl, tillsätt vätskan och
vispa till en slät smet. Täck över, koka upp och låt
smeten tjockna.
1 Min. 800 W
Rör om och krydda efter smak.
4. Häll såsen i en smord ugnsform, lägg ner de små
rulladerna. Täck över och tillaga.
11-13 Min. 800 W
5. Ta därefter av locket och tillaga under grillen.
ca. 4 Min.
Låt skinkrulladerna vila ca 5 minuter efter
tillagningen.
9. R-605N Swedish Ckbk 16/05/2003 11:12 Page 70
Page 71

71
RECEPT
SVENSKA
Tyskland
ZUCCHINI OCH PASTAGRATÄNG
Total koktid: ca. 46-55 minuter
Redskap: Form med lock (2 l kapacitet)
Ugnsform (ca. 26 cm lång)
Ingredienser:
500 ml hett vatten
1
/
2
tsk olja
80 g makaroner
400 g tomater på burk, hackade
3 lökar (150 g), finhackade
Basilika, timjan, salt och peppar
1 msk En matsked olja att smörja formen
450 g zucchini, skivade
150 g gräddfil
2 ägg
100 g riven cheddarost
1. Placera vattnet, oljan och saltet i skålen, täck över
och koka upp.
3-4 Min. 800 W
2. Bryt makaronerna i bitar (om du inte använder
korta makaroner). Lägg dem i vattnet, rör om och
koka.
8-10 Min. 240 W
Häll av pastan och låt den svalna.
3. Rör om tomater och lök och krydda väl. Tillsätt
makaroner och häll över tomatsåsen. Strö över
zucciniskivor.
4. Vispa ner äggen i creme fraiche och häll det över
sufflén. Strö över riven ost.
1. 30-35 Min. 800 W
2. 5-6 Min.
Låt den tillagade rätten stå i ca. 5-10 minuter.
Spanien
ROSMARINFYLLDA CHAMPINJONER
Total koktid: ca. 15-22 minuter
Redskap: Form med lock (1 l kapacitet)
Låg rund form med lock
(ca. 22 cm diameter)
Ingredienser:
8 stora champinjoner (ca. 225 g), hela
2 msk smör eller margarin (20 g)
1 lök (50 g), finhackad
50 g skinka i små tärningar
Mald svartpeppar
Torkad rosmarin
125 ml torrt vitt vin
125 ml grädde (kaffegrädde eller vispgrädde)
2 msk mjöl (20 g)
1. Ta bort skaften på champinjonerna och hacka
dem.
2. Smöra formens botten. Lägg i den hackade löken,
champinjonskaften, tärnade skinkan och krydda
med peppar och rosmarin. Täck över och koka.
4-5 Min. 800 W Låt svalna.
3. Häll i 100 ml av vinet och grädden i den andra
formen, täck över och värm upp.
2-3 Min. 800 W
4. Rör ner det återstående vinet i mjölet, rör ner i
den heta vätskan, täck över och tillaga. Rör om
efter halva tiden.
1-2 Min. 800 W
5. Fyll champinjonerna med skinkblandningen, lägg
dem i såsen och tillaga under grillen.
1. 4-6 Min. 800 W
2. 4-5 Min.
Låt champinjonerna vila ca 2 minuter efter
tillagningen.
9. R-605N Swedish Ckbk 16/05/2003 11:12 Page 71
Page 72

72
ÖSTERREICH
Bei einer Reklamation Ihrer SHARP Mikrowelle wenden Sie sich bitte an Ihren Fachhändler oder an eine der
nachfolgend aufgeführten SHARP SERVICE Niederlassungen.
Manfred Mayer GmbH, Stipcakgasse 6, 1234 Wien, Phone: 01-6093120, Fax: 01-6993629 / MCL-Service ‘GmbH, Deutschstr. 19,
1232 Wien, Phone: 01-6168800, Fax: 01-6168800-15 / Karl Rother, Simmeringer Hauptstr. 11, 1110 Wien, Phone: 01-7498432, Fax:
01-7498432-12 / Roland Göschl, Bayerhamerstr. 12c, 5020 Salzburg, Phone: 662-882307, Fax: 662-881926 / Franz Schuhmann,
Gablonzerweg 18, 4030 Linz, Phone: 732-382280, Fax: 732-382280-8 / Arnold Moser, An der Heufurt 28, 6900 Bregenz, Phone: 557475777, Fax: 5574-75777 / Anton Reitmeir, Leopoldstr. 57, 6020 Innsbruck, Phone: 512-562277, Fax: 512-562277 / Scheuermann,
Rennsteinerstr. 8, 9500 Villach, Phone: 4242-21174, Fax: 4242-21174 / Pichler, Am Wagrain 342, 8055 Graz, Phone: 316-291292, Fax:
316-291292 / Audio Video Service, Sonnengasse 13, 9020 Klagenfurt, Phone: 463-43114, Fax: 463-43113
BELGIUM
En cas d´une réclamation concernant une four a micro-onde SHARP, nous vous prions de vous adresser à votre
spècialiste ou à une adresse des SHARP Services suivantes.
Indien uw magnetron problemen geeft kunt u zich wenden tot uw dealer of een van de onderstaande Sharp service
centra.
SHARP ELECTRONICS, Phone: 0900-10158, Web: http://www.sharp.be
AVTC, Kleine Winkellaan 54,1853 Strombeek-Bever, Phone:02/2674019, Fax:2679670,
ETS HENROTTE, Rue Du Campinaire 154, 6240 Farciennes, Phone: 071/396290, Fax:391237
Nouvelle Central Radio (N.C.R), Rue des Joncs 15 L-1818 HOWALD Phone: 00352404078, Fax. 402085
Service Center Deinze, Kapellestraat, 95, 9800 DEINZE Phone:09-386.76.67, Fax: 09-386.97.95
NEDERLAND
Indien uw magnetron problemen geeft kunt u zich wenden tot uw dealer of naar onderstaand Sharp Service Centrum.
SHARP ELECTRONICS BENELUX BV,- Helpdesk -,Postbus 900,3990 DW Houten, Telefoon: 0900-7427723,
Web: http://www.sharp.nl
DEUTSCHLAND
Bei einer Reklamation Ihrer SHARP Mikrowelle wenden Sie sich bitte an Ihren Fachhändler oder an eine der
nachfolgend aufgeführten SHARP SERVICE Niederlassungen.
03058 Groß Garglow, Cottbuser Str.129, Bernd Mindach, Tel: 0355-539987, Fax: 0355-5265685 / 04159 Leipzig, Max-Liebermann-
Straße 4 a, Rudi Franz, Tel: 0341-9112525, Fax: 0341-9112526 / 04600 Altenburg, Wallstr. 35, Mechanik Altenburg E.G., Tel: 03447311102, Fax: 03447-315253 / 06217 Merseburg, Gotthardstraße 30, Looke & May GmbH, Tel: 03461-214121, Fax: 03461-216891 /
06295 Eisleben, Hallesche Straße 36, Hausger. Kundend. Eisleben, Tel: 03475-603079, Fax: 03475-747262 / 06618 Naumburg,
Wenzelstraße 15, Hausgeräte & Service GmbH, Tel: 03445-202016, Fax: 03445-202016 / 06844 Dessau, Albrechtstraße 116-118,
Dessau-Electric GmbH, Tel: 0340-261270, Fax: 0340-213332 / 07407 Rudolstadt, Emil Hartmann Straße 2, Elektro Ernst Granowski, Tel:
03672-352123, Fax: 03672-357097 / 07987 Kahmer, Dorfstraße 25, Elektro Riederer Haushaltgeräte, Tel: 03661-430142, Fax: 03661482422 / 08280 Aue, Juri-Gagarin-Ring 12a, EHS Hausgeräte GmbH, Tel: 03771-552222, Fax: 03771-552255 / 08523 Plauen,
Weststraße 63, Elektrotechnik Plauen GmbH, Tel: 03741-2120, Fax: 03741-212259 / 09221 Neukirchen, Hauptstraße 74, Walther Elektro,
Tel: 0371-217096, Fax: 0371-217090 / 09246 Pleißa, Zeppelinstraße 8 a, Hans Krempl Haustechnik GmbH, Tel: 03722-73780, Fax:
03722-737822 / 09328 Lunzenau, Schulstraße 6, Peter Welsch GmbH, Tel: 037383-6434, Fax: 037383-6448 / 09376 Oelsnitz,
Bahnhofstraße 43, Elektrotechnik Oelsnitz-GmbH, Tel: 037298-2677, Fax: 037298-2678 / 12157 Berlin, Cranachstraße 2, Elektro-Kittler, Tel:
030-85602602, Fax: 030-85602603 / 16866 Kyritz, Hamburgerstr. 31, Schumacher Haustechnik GmbH, Tel: 033971-54137, Fax:
033971-54137 / 17235 Neustrelitz, Glambecker Nebenstr. 10, Dieter Kroppen, Tel: 03981-204661, Fax: 03981-204667 / 18055
Rostock, Timmermannstrat 5, Hetec, Tel: 0381-36231, Fax: 0381-36231 / 18435 Stralsund, Kedingshäger Straße 78, RDS
Haushaltsgeräte GmbH, Tel: 03831-391426, Fax: 03831-390121 / 20357 Hamburg, Schulterblatt 132, Dieter Möller, Tel: 040-435332,
Fax: 040-4302120 / 20537 Hamburg, Eiffestraße 398, Deubel+Höfermann Elektronic GmbH, Tel: 040-41365200, Fax: 040-41365299 /
22459 Hamburg, Seesrein 35, Dieter A. Volbrecht VDI Klima und Kälte Service, Tel: 040 - 5517331, Fax: 040 - 5519996 / 23562
Lübeck, Helmholtzstraße 12, Lutz H. Boenisch, Tel: 0451-51929, Fax: 0451-56787 / 24116 Kiel, Eckernförder Straße 93, Jürgen Skop
GmbH, Tel: 0431-13038, Fax: 0431-13811 / 24357 Fleckeby, Südring 14, Kaack Elektro-Haushaltgeräte Service GmbH, Tel: 04354-700,
Fax: 04354-1311 / 24975 Husby, Flensburger Straße 41, Günter Josten, Tel: 04634-422, Fax: 04634-723 / 25770 Hemmingstedt,
Koesliner Straße 18, Dirk Stübner Dithmarscher Hausgeräte Service, Tel: 0481-64943, Fax: 0481-64764 / 26655 Westerstede, Südring
37, Gerhard Ahrenholtz GmbH, Tel: 04488-84770, Fax: 04488-847711 / 27404 Heeslingen, Kirchstraße 9-11, Helmut Willenbrock
Elektro-Kälte-Radio, Tel: 04281-1031, Fax: 04281-6467 / 27472 Cuxhaven, Abschnede 198-200, Oskar Wieandt & Sohn OHG, Tel:
04721-568811, Fax: 04721-568850 / 28207 Bremen, Neidenburger Straße 20, Hansa Haushaltsgeräte Service GmbH, Tel: 0421492526, Fax: 0421-440932 / 29439 Lüchow, Güldenboden 25, Elektro-Kittler, Tel: 05841-709779, Fax: 05841-709780 / 30926
Seelze, Lange-Feld-Straße 122, Strickling Werkskundendienst, Tel: 0511-400399-9, Fax: 0511-40039920 / 34123 Kassel, Heinrich-HertzStraße 9, Kältedienst v. Rappard, Tel: 0561-5809545, Fax: 0561-5809570 / 34128 Kassel, Ahnatalstraße 84, Elektro Mohrhenne, Tel:
0561-61727, Fax: 0561-65470 / 35037 Marburg, Wilhelmstraße 16, Hans-Georg Fuchs, Tel: 06421-22424, Fax: 06421-27549 /
35415 Pohlheim, Ludwigstraße 13-15, Jung KDZ, Tel: 06403-61131, Fax: 06403-62151 / 36088 Hünfeld, Hauptstr. 22, Elektro Vogt,
Tel: 06652-2215, Fax: 06652-5782 / 37671 Höxter, Krämerstraße 8, Elektro Nonn, Tel: 05271-7959, Fax: 05271-35053 / 39171
Altenwedding, Friedensstr.25, Spiske IEM Installation-Elektronik-Montage, Tel: 039205-21279, Fax: 039205-80288 / 40476 Düsseldorf,
Rather Straße 21, Horst Leven, Tel: 0211-486025, Fax: 0211-443399 / 41065 Mönchengladbach, Gutenbergstraße 28, Horst Hommers
Kundendienst-Center, Tel: 02161-603256u.57, Fax: 02161-651951 / 42781 Haan, Talstraße 8 b, Horst Kerkühn Elektro-Haustechnik, Tel:
02129-4466+53550, Fax: 02129-34037 / 45219 Essen, Corneliusstraße 39, R. Drengenburg, Tel: 02054-84114, Fax: 02054-15238 /
46045 Oberhausen, Feldmannstraße 76, Dieter Kroppen, Tel: 0208-871711, Fax: 0208-876652 / 48165 Münster-Hiltrup,
Rohrkampstraße 23, Günter Pfeifer Großküchentechnik, Tel: 02501-3033, Fax: 02501-24277 / 51598 Friesenhagen, Mühlenhof 6, Hans
Krempl Haustechnik GmbH, Tel: 02734-7377, Fax: 02734-40618 / 52146 Würselen, De Gasperistraße 6+10, Hubert Hamacher, Tel:
02405-9600+9609, Fax: 02405-2704 / 55130 Mainz, Nur telefonische Annahmestelle, Norbert Schwamb GmbH, Tel: 06131-881070 /
55543 Bad Kreuznach, Industriestraße, Hans Krempl Haustechnik GmbH, Tel: 0671-794335, Fax: 0671-794369 / 56070 Koblenz,
August-Horch-Straße 14, Hans Krempl Haustechnik GmbH, Tel: 0261-8909173, Fax: 0261-8909199 / 57080 Siegen, Gosenbacher Hütte
44, Hans Krempl Haustechnik GmbH, Tel: 0271-354114, Fax: 0271-351408 / 59457 Werl, Westdahler Weg 2, MAYER Electro, Tel: 029223541, Fax: 02922-85382 / 63739 Aschaffenburg, Maximilianstraße 8, Radio-Fernseh Reis, Tel: 06021-15177, Fax: 06021-15199 /
65239 Hochheim, Eltviller Straße 14, Norbert Schwamb GmbH, Tel: 06146-4085, Fax: 06146-4088 / 65627 Elbtal-
SERVICE ADDRESSES. SERVICE NIEDERLASSUNGEN . SERVICEADRESSER . SERVICESTÄLLEN
10. R-605N Specifications 16/05/2003 11:11 Page 72
Page 73

73
Hangenmeilingen, Am Ohlenrod 10, Rudi Wagner, Tel: 06436-3444, Fax: 06436-941387 / 65931 Frankfurt, Nur telefonische
Annahmestelle, Norbert Schwamb GmbH, Tel: 069-371525 / 66115 Saarbrücken, Ludwigstr. 55-57, Edgar Reinert, Tel: 0681-9487070,
Fax: 0681-9487060 / 67434 Neustadt, Saarlandstraße 55, Hans Krempl Haustechnik GmbH, Tel: 06321-83077, Fax: 06321-83077 /
68309 Mannheim, Heppenheimerstraße 23, Hans Krempl Haustechnik GmbH, Tel: 0621-7184611, Fax: 0621-7184618 / 68526
Ladenburg, Am Sägewerk 2, Elektro Service Salinger, Tel: 06203-3341, Fax: 06203-16919 / 70186 Stuttgart, Klippeneck Straße 1,
Elektro Herterich Techn. Kundendienst, Tel: 0711-4687023, Fax: 0711-4687024 / 75236 Kämpfelbach, Goethestraße 19, Horst Frei, Tel:
07232-1518, Fax: 07232-5238 / 76185 Karlsruhe, Lotzbeckstraße 9, Electronic Service Franke, Tel: 0721-5700720-23, Fax: 07215700736 / 76872 Winden, Hauptstraße 103, Hans Krempl Haustechnik GmbH, Tel: 06349-8571, Fax: 06349-3390 / 78462
Konstanz, Nur telef. Annahmestelle, Elektro Herterich, Tel: 07531-27923 / 78737 Fluorn-Winzeln, Schafbaumstraße 9, Edmund
Schneider, Tel: 07402-482, Fax: 07402-8014 / 79650 Schopfheim, Feldbergstraße 21, R. Grossmann, Tel: 07622-674510, Fax: 0762261900 / 80339 München, Schwanthalerstraße 110, Kesel & Schnitt, Tel: 089-505802, Fax: 089-5021596 / 85095 Denkendorf-
Zandt, Michlstraße 3, Elektro Pfeiffer, Tel: 08466-1319, Fax: 08466-1319 / 85609 München-Aschheim, Waldweg 9a, Dieter Beise, Tel:
089-9034005, Fax: 089-9044859 / 86157 Augsburg, Stadtberger Straße 67, J. Haslinger Elektro-Geräte Kundendienst, Tel: 0821523125, Fax: 0821-526664 / 87439 Kempten, Heiligkreuzer Straße 17, Radio Hartmann, Tel: 0831-594646, Fax: 0831-594648 /
89231 Neu-Ulm, Gartenstraße 4, Elektrotechnik Schneider, Tel: 0731-85897, Fax: 0731-74681 / 91522 Ansbach, Am Ring 17, Elektro
Merk GmbH, Tel: 0981-89574, Fax: 0981-86715 / 90537 Feucht/Nürnberg, Friedrich-Ebert-Straße 21, Herbert Geissler GmbH, Tel:
09128-7076-0, Fax: 09128-707636 / 93102 Pfatter, Regensburger Straße 60, Franz Bernhard, Tel: 09481-90060, Fax: 09481-90061 /
94130 Obernzell, Hameter Straße 31, Elektro Service Schurig, Tel: 08591-2400, Fax: 08591-1285 / 96052 Bamberg, Aronstraße 2 a,
Bernhard Jackl, Tel: 0951-9370245, Fax: 0951-9370247 / 97070 Würzburg, Untere Johannitergasse 16, Radio Wels City Service GmbH,
Tel: 0931-3557119, Fax: 0931-14151 / 98724 Neuhaus, Eisfelder Straße 32, DLC Haustechnik GmbH, Tel: 03679-79060, Fax: 03679790620 / 99096 Erfurt, Goethestraße 14, Ernst Grüsser, Tel: 0361-3465719, Fax: 0361-3465719 / 99817 Eisenach, Bahnhofstraße
17, Blitz Elektro-Elektronik GmbH, Tel: 03691-292930, Fax: 03691-292915
FRANCE
En cas de réclamation pour les fours micro-ondes SHARP, nous vous prions de vous adresser à votre spécialiste ou à
l’une des stations techniques agréées SHARP suivantes :
A.A.V.I., 1, rue du Mont de Terre - 59818 Lesquin Cedex, Tél : 03.20.62.18.98 - Fax : 03.20.86.20.60 / A.A.V.I. (Point d'Accueil), 9-11,
rue Léon Trulin - 59000 Lille, Tél : 03.20.14.96.20 - Fax : 03.20.14.96.26 / ATELIER ROUSSEL, 12, Bld Flandre Dunkerque - 56100 Lorient,
Tél : 02.97.83.07.41 - Fax : 02.97.87.02.36 / BASTIA TELE VIDEO, Immeuble Le Béarn - Av. de la libération - 20600 Bastia, Tel :
04.95.30.81.29 - Fax 04.95.30.85.23 / C.M.T.S., 38, rue des Ormeaux - 75020 Paris, Tél : 01.43.70.20.00 - Fax : 01.43.70.36.46 /
ELECTRONIC SERVICE PLUS, 5, bd LOUIS XI - ZI le Menneton - 37000 Tours, Tél : 02.47.77.90.90 - Fax : 02.47.77.90.91 / ELECTRO
SERVICE, 21, rue de Mulhouse - B.P 122 - 68313 Illzach, Tél : 03.89.62.50.00 - Fax : 03.89.50.80.14 / M.R.T., 74, Rue Albert Einstein -
72021 Le Mans Cedex, Tél : 02.43.28.52.20 - Fax : 02.43.24.93.81 / ROSSIGNOL, ZI du Brezet Est - 6 rue P.Boulanger - 63100 Clermont
Ferrand, Tél : 04.73.98.64.64 - Fax : 04.73.92.28.79 / S.T.E., 3, chemin de l'Industrie - 06110 Le Cannet Rocheville, Tél : 04.93.46.05.00 -
Fax : 04.93.46.51.18 / S.T.R. AQUITAINE, 111, rue Bouthier - B.P 27 - 33015 Bordeaux, Tél : 05.57.80.78.07 - Fax : 05.57.80.78.08 /
S.T.V.S., 1, rue de la Presse - 42000 Saint Etienne, Tel : 0825.898.903 - Fax : 04.77.79.48.70 / S.T.V.S., 10, chemin Saint Gobin - 69 190
Saint fons, Tél : 04.72.89.06.89 - Fax : 04.72.89.06.99 / S.T.V.S. (point d'accueil), 143 av Maréchal de Saxe - Entrée : 54 rue Villeroy -
69003 Lyon, Tél : 04.78.62.07.05 - Fax : 04.78.62.13.65 / TECH SERVICE, 15 rue du château de ribaute - ZA ribaute 2 - 31130 Quint
Fonsegrives, Tel : 05.62.57.63.90 - Fax : 05.62.57.63.99 / TIMO VIDEO, 131 chemin des bassins- Zone Europarc - Hameau D - 94000
Creteil, Tél : 01.43.39.08.18 - Fax : 01.43.39.08.07 / U.N.T.D., 1, rue des Lourdines - 76000 Rouen, Tél : 02.35.72.28.04 - Fax :
02.35.73.18.32 / VIDEO TECHNOLOGY, 8, Allée de la Fontaine des Tournelles - Z.I. - 77230 Saint-Mard, Tel : 01.60.54.99.44 - Fax :
01.60.54.99.45
ITALIA
NEL CASO SI VERIFICASSERO PROBLEMI ALLA VOSTRA APPARECCHIATURA POTRETE RIVOLGERVI PRESSO UN NOSTRO
CENTRO DI ASSISTENZA AUTORIZZATO SHARP
C.A.T. Di Bellone, Via Dell’areoporto, 76, 64100, Teramo, Tel: 0861415745, Fax: 0861212117 / C.R. Elettronica, Via Amiternum 38,
67100, L’aquila, Tel: 0862-321442, Fax: 0862-314323 / Elettrovideo Snc, Via Tiburtina V. 64, 65124,Pescara, Tel: 08552020, Fax: 08552020 / Riccardi Cosimo, Via S.Stefano 51, 75100, Matera, Tel: 0835-333671, Fax: 0835-333671 / Ld Service Di Lavano E De
Biasi, Via Viviani 2, 85100, Potenza, Tel: 0971-472578, Fax: 0971-472578 / Cozzupoli & Crupi, Via R. Campi Primo Tronco 103,
89126, Reggio Calabria, Tel: 0965-24022, Fax: 0965-310778 / Ater Snc, Via Naz.Pentimele 159/A-B, 89100, Reggio Calabria, Tel:
0965-47051, Fax: 0965-47855 / Audiovideo Snc, Via A. De Gasperi 44, 88018, Vibo Valentia, Tel: 0963-45571, Fax: 0963-45572 /
Battaglia Saverio, Via C. Colombo 85, 88063, Catanzaro, Tel: 0961-33824, Fax: 0961-737337 / Ciano Giuseppe, Via
Circonvallaz.Sud, 89029, Taurianova Rc, Tel: 0966-643483, Fax: 0966-614946 / Lab. Tv Dei F.Lli Aiello Snc, Via Torino 121/123,
88074, Crotone Cz, Tel: 0962-20889, Fax: 0962-24254 / Mea Giuseppe, Via L. Einaudi Trav.I 16, 88048, Lamezia T. (Cz), Tel: 0968437520, Fax: 0968-437520 / Medaglia Giolindo, Via Torrazzo 60/62, 88063, Catanzaro Lido, Tel: 0961-31626, Fax: 0961-31626 /
S.A.T.E Di Dodaro, Via Degli Stadi 28/F, 87100, Cosenza, Tel: 0984-482337, Fax: 0984-482337 / Se.Ri.El.Co, V.Delle Medaglie
D’oro163, 87100, Cosenza, Tel: 0984-33152, Fax: 0984-33152 / Satep (Casoria NA), Via Nazionale Delle Puglie, 176, 80026, Casoria
(NA), Tel: 081-7590706, Fax: 081-7590706 / Audio Service Snc, Via Cattaneo 4/6, 81100, Caserta, Tel: 0823-329099, Fax: 0823353686 / Drf Elettr. Di Rubbo, Via M.Pacifico 118, 82100, Benevento, Tel: 0824-62416, Fax: 0824-62416 / Elettronica D`Argenio, Via
Nazion. Torrette,195, 83013, Mercogliano (Av), Tel: 0825-681590, Fax: 0825-681590 / Elettronica Service, Viale Europa, 15, 80053,
Castell. Stabia, Tel: 081-8728280, Fax: 081-8728280 / Errediesse Service, Via P. Mascagni 74/76, 80128, Napoli, Tel: 081-5794825,
Fax: 081-5791899 / M.C. Elettronica Snc, Via Dei Mille 138, 84100, Salerno (Sa), Tel: 089-330591, Fax: 089-336836 / Menna
Elettronica Srl, Via Nazionale Delle Puglie 294, 80026, Casoria (Na), Tel: 081-5840726, Fax: 081-7594277 / Satec Di Correra Snc,
Via Liberta’ 307, 81024, Maddaloni (Ce), Tel: 0823-341088, Fax: 0823-343011 / Video Elett. 2 Di Nasti, Via Ant.Pio 74/76, 80126,
Napoli, Tel: 081-7676300, Fax: 081-7284347 / Audio Video Center Snc, Via F. Vandelli 23/29, 41100, Modena, Tel: 059-235219,
Fax: 059-210265 / Ass.Electron Di Fogli, Via F.Lli Aventi 19, 44100, Ferrara, Tel: 0532-903250, Fax: 0532-903250 / Ma.Pi. Snc, Via
T.Azzolini 3, 40132, Bologna, Tel: 051-6414115, Fax: 051-406848 / Masini Service, Via Mediterraneo 24, 47041, Bellaria (Fo), Tel:
0541-347714, Fax: 0541-324413 / Nuova Tecnocoop, Via Armellini 28/30/32,47037, Bellariva Rimini, Tel: 0541-370812, Fax: 0541370812 / Parmaservice Sas, Via Benedetta 47/A, 43100, Parma, Tel: 0521-271666, Fax: 0521-271666 / Rimpelli Nelusco Snc, Via
Marchelli 7/C, 42100, Reggio Emilia, Tel: 0522-323740, Fax: 0522-376967 / Rip.Elettr.Ravenna, Via Reale, 27/C 48010, Camerlona
(Ra), Tel: 0544-521500, Fax: 0544-521100 / Rte Di I. Catellani & C., Via Premuda 38/V, 42100, Reggio Emilia (Re), Tel: 0522-381277,
Fax: 0522-381788 / Stema Snc, V.Le Bologna, 92/A 47100, Forli’, Tel: 0543-704475, Fax: 0543-702742 / Technolab Snc, Via Romea
36, 48100, Ravenna, Tel: 0544-64008, Fax: 0544-476497 / Tecnoservice.Com, Via Longhi 16/A/B, 40128, Bologna, Tel: 051-360986,
SERVICE ADDRESSES. SERVICE NIEDERLASSUNGEN . SERVICEADRESSER . SERVICESTÄLLEN
10. R-605N Specifications 16/05/2003 11:11 Page 73
Page 74

74
Fax: 051-366863 / A.V.R. Sas Di Di Renzo, Via Colonna 20/8, 33170, Pordenone, Tel: 0434-27669, Fax: 0434-523661 / Astec
S.N.C. Di Zoccarato, Via Pecenco 4, 34127, Trieste, Tel: 040-574745, Fax: 040-577923 / Cm Elettronica Snc, Via G.Galilei 2, 33010,
Tavagnacco (Ud), Tel: 0432-572172, Fax: 0432-573788 / Contr.El., Via Rossetti 51/C, 34141, Trieste, Tel: 040-368387, Fax: 040-638117
/ Tecnofly Snc, Via Cappuccini 11/2, 34170, Gorizia, Tel: 0481-32732, Fax: 0481-546740 / A.P. Rip. Arduini Piero, Via Licinio Refice
192, 03100, Frosinone, Tel: 0775-291267, Fax: 0775-291267 / Centro E.L.Va. Snc, Via Attilio Mori 19/21, 00176, Roma, Tel: 062148641, Fax: 06-2753048 / El.S.A.R., Via S.Sotero 36, 00165, Roma, Tel: 06-6380516, Fax: 06-6380973 / Elettronica 81, Via Ezio
56/58, 04100, Latina, Tel: 0773-694608, Fax: 0773-663511 / Italreg Di Abano, Parco Belvedere Conca 74, 04024, Gaeta, Tel: 0771470851, Fax: 0771-470851 / Palmieri F., Via S.Polledrara 219, 03100, Frosinone, Tel: 0775-291485, Fax: 0775-291485 / S.A.R.E.
S.R.L., Via Barbana 35/37, 00142, Roma, Tel: 06-5406796, Fax: 06-5412736 / Video Serv. Sas Di Calabrese, Str Teverina Km 2, 400
L. Pantanese, 01100, Viterbo (Vt), Tel: 0761-251557, Fax: 0761-251558 / Caudullo Salvatore, Via Cavour 11/R, 17100, Savona, Tel:
019-8386251, Fax: 019-829654 / Centro Assistenza Tecn., Via Metella 3, 18039, Ventimiglia (Im), Tel: 0184-239011, Fax: 0184239015 / G.A.T.E. Snc, Passo P.Carrega 24/A, 16141, Genova, Tel: 010-8361543, Fax: 010-8364571 / Gse S.R.L., Via Rimassa 183 R,
16122, Genova (Ge), Tel: 010-5536076, Fax: 010-5536113 / Rapisarda G., Via Argine Destro 299, 18100, Imperia, Tel: 0183-710771,
Fax: 0183-710771 / Rien Snc, Via Valle 17/19, 19124, La Spezia, Tel: 0187-21925, Fax: 0187-21925 / Tognetti Snc, Via Lunigiana
589, 19100, La Spezia, Tel: 0187-507656, Fax: 0187-507656 / A.E. Snc, V.Acerbi 28, 20161, Milano, Tel: 02-66220906, Fax: 026466930 / A.T. Electronics, Via G. Da Cermenate 76, 20141, Milano, Tel: 02-89501602, Fax: 02-89502937 / C.A.T. Bm, Via Per Desio
22, 20030, Bovisio Masciago Mi, Tel: 0362-558421, Fax: 0362-558887 / Cat Electronic Snc, Via Togliatti 8, 20077, Melegnano(Mi), Tel:
02-9834498, Fax: 02-9837559 / Crel S.N.C.,Via Carducci, 23100, Sondrio, Tel: 0342-216538, Fax: 0342-216538 / Electronic’s
Center, Via G.Giulini 9, 22100, Como, Tel: 031-279820, Fax: 031-261791 / Elettronica Cappi, Via Gorizia, 14/B, 23100, Sondrio, Tel:
0342-210459, Fax: 0342-210459 / Elettrotecnica Di Ronchi, Via Milano 74/B, 25126, Brescia, Tel: 030-317673, Fax: 030-3735252 /
Microcentro, Via Falloppio 11, 20110, Milano, Tel: 02-26827306, Fax: 02-2826711 / Morini Daniele, Via Maiocchi, 10, 27058,
Voghera (Pv), Tel: 0383-368740, Fax: 0383-368740 / Prada Cesare M.Antonio, Via Riviera 142, 27100, Pavia, Tel: 0382-525920, Fax:
0382-525920 / S.A.R.E.L. Snc Di Giglia Mario, Carso 30, 27029, Vigevano (Pv), Tel: 0381-344088, Fax: 0381-344088 / S.T.A.R.T.
Video Hi-Fi, Via Orti Romani 16/A, 26100, Cremona, Tel: 0372-38731, Fax: 0372-38731 / Salvadori Claudio, Via Del Bosco 44,
21052, Busto Arsizio (Va), Tel: 0331-329973, Fax: 0331-628727 / Service Tva Snc, Via Vergnano 59 , 25127, Brescia, Tel: 030-349885,
Fax: 030-349885 / Tecnovideo Snc, P.Zza De Gasperi 28, 46100, Mantova, Tel: 0376-321554, Fax: 0376-321554 / Teletecnica
2000, Via Torino 21, 21013, Gallarate (Va), Tel: 0331-775519, Fax: 0331-775519 / Test Tv Snc, Via S. Altamura 10, 20148, Milano, Tel:
02-4035408, Fax: 02-48704889 / Video Service Snc, Via Locatelli 2, 24068, Seriate (Bg), Tel: 035-296883, Fax: 035-300076 / C.A.T.
Snc, Via A. Cecchi 25, 61100, Pesaro, Tel: 0721-25608, Fax: 0721-25608 / Digitecnica Di Moroni R. Snc, Via Zuccarini, 1-
Z.Baraccola, 60131, Candia (An), Tel: 071-2866067, Fax: 071-8046398 / Marconi Lanfranco, Via M.Bianco 10-Porto D’ascoli, 63039,
S.Bened. D/Tronto, Tel: 0735-659230, Fax: 0735-751155 / Pluritecnica Di Campitelli, Via C. Ulpiani 5, 63100, Ascoli Piceno, Tel: 0736342635, Fax: 0736-346405 / S.A.T. Radio Tv, Via D. Rossi 32-34, 62100, Macerata, Tel: 0733-231304, Fax: 0733-231304 / Vitali
Claudio, Via Marconi 89, 60035, Jesi (An), Tel: 0731-59290, Fax: 0731-59290 / Pesce Luigi, Via Tiberio 74, 86100, Campobasso, Tel:
0874-63717 / Alpilab Di Giordano, Via S. Grandis 11, 12100, Cuneo, Tel: 0171-690384, Fax: 0171-648063 / Arte E Tecnica Snc,
Via Falletti 22, 13900, Biella, Tel: 015-8496250, Fax: 015-8496250 / Elektro Di Fiore F., Via Tripoli 91, 13100, Vercelli, Tel: 0161250071, Fax: 0161-255843 / F.G. Elettronica,Via Sagra S.Michele 46,10141, Torino, Tel: 011-796423, Fax: 011-796423
Guida Di Guida Alessio, Via Roggiolo 5, 28069, Trecate (No), Tel: 0321-71608, Fax: 0321-777003 / Mantoan Dario, Via Matteotti
69, 28062, Cameri (No), Tel: 0321-519078, Fax: 0321-519078 / Siragusa E Roagna Sdf, C.So Matteotti 41, 14100, Asti, Tel: 0141531131, Fax: 0141-531131 / Videotext, P.Zza D.Alp.Cuneense 24, 12043, Canale (Cn), Tel: 0173-95878, Fax: 0173-979638 / A.V.S.
Snc, Via N.Pompilio 61, 72100, Brindisi, Tel: 0831-560165, Fax: 0831-560165 / Arnesano Faustino, Via M.Moscardino 10, 73100,
Lecce, Tel: 0832-318277, Fax: 0832-318277 / C.Ass.Tec. Di Columella, Via Mazzini 30, 71016, San Severo (Fg), Tel: 0882-226295,
Fax: 0882-226295 / Elettr.Serv. Di Marcuccio, C.So Annibale 15/17, 74100, Taranto, Tel: 099-7721933, Fax: 099-7721933 / Eltec
Service Di Pepe G., Viale Ofanto 149-151, 71100, Foggia, Tel: 0881-685013, Fax: 0881-687041 / Ingrosso Fernando, Via Biasco
15, 73100, Lecce, Tel: 0832-396466, Fax: 0832-392014 / Marinelli Benedetto, Via Dei Salici 14, 70051, Barletta (Ba), Tel: 0883514054, Fax: 0883-527128 / Massariello Agostino, Via Numa Pompilio 65, 72100, Brindisi, Tel: 0831-521821 / Stear Snc Di Pici,
Via E.Perrone 16, 71100, Foggia, Tel: 0881-778483, Fax: 0881-778483 / Video Serv. Marcantonio, Via G.M. Giovene 47, 70124,
Bari, Tel: 080-5618029, Fax: 080-5618029 / Zetaclima Di Zumpano, Via Molfetta 69, 70054, Giovinazzo (Ba), Tel: 080-3947952, Fax:
080-3947952 / Sat Di Partipilo, Via Borsellino E Falcone 17 Bis,70100, Bari, Tel: 080-5022999, Fax: 080-5022992 / Base Elettronica,
Via G. Curreli, S.N., 09170, Oristano, Tel: 0783-310049, Fax: 0783-212081 / Chip Elettronica S.R.L., Via Salvator Rosa 26, 09100,
Cagliari, Tel: 070-521338, Fax: 070-506074 / Co.Ri.Fr.El. 2 Snc, Via Del Castagno Settore D, 07026, Olbia - Zona Cerasarda /
Co.Ri.Fr.El. Snc, Via Monastir 112, 09122, Cagliari, Tel: 0789-562104, Fax: 0789-9562105 / Floris Sergio, Via Mazzini 56, 09010,
Gonnesa (Ca), Tel: 0781-45436, Fax: 0781-469198 / G.S. Elettronica Di Porcu, Via Della Resistenza 5, 08100, Nuoro, Tel: 0784203084, Fax: 0784-203084 / Hi-Fi Center, Via Lucania 15, 07026, Olbia (Ss), Tel: 0789-22164, Fax: 0789-200366 / Matta Paolo, Via
Risorgimento 166/A, 09134, Cagliari-Pirri, Tel: 070-520856, Fax: 070-524148 / Videoelettronica Snc, Via Torino 18, 07100, Sassari,
Tel: 079-276616, Fax: 079-273239 / A.T.El. Di G.Amico, L.Go Scarlatti 30, 93100, Caltanissetta, Tel: 0934-591955, Fax: 0934-552999
/ A.V.S., Via Sassari, 2/C, 95100, Catania, Tel: 095-446696, Fax: 095-434337 / Alamia Service, C.So Pisani, 310/312, 90129,
Palermo, Tel: 091-6570502, Fax: 091-6575761 / Euroservice 2000, Via Degli Atleti, 61/C, 91025, Marsala (Tp), Tel: 0923-956475, Fax:
0923-956475 / Arte Tv E C. Snc, Via G.Centorbi 17, 91026, Mazara Del Vallo, Tel: 0923-908160, Fax: 0923-670035 / Centro Ass.
Tec. Di Bacchi I., P.Za A. Giglia 40, 92026, Favara (Ag), Tel: 0922-420311, Fax: 0922-421545 / Cuppari Electr., Via S.Agostino Is 265,
98100, Messina, Tel: 090-672064, Fax: 090-672065 / Di Fonzo F.E Figli Snc, Via Ruggero Loria 4/6, 90100, Palermo, Tel: 091-363578,
Fax: 091-362853 / Elettronica Di Tullio, Via Carlentini 40/A, 96100, Siracusa, Tel: 0931-758602, Fax: 0931-758602 / Tecnica Sud
S.N.C., V,Le Regina Elena 225/227, 98100, Messina, Tel: 090-40037, Fax: 090-52831 / Tecnico Siracusana, V.P.Novelli 71, 96100,
Siracusa, Tel: 0931-39440, Fax: 0931-36294 / Torrisi Michele, Via Novara 45, 95128, Catania, Tel: 095-445561, Fax: 095-448628 /
Vullo Michele, Via Gorizia 16, 93100, Caltanissetta, Tel: 0934-551367, Fax: 0934-551367 / A.T.E.S. Di Zappia L., Via Torino 3/A,
57124, Livorno, Tel: 0586-859566, Fax: 0587-859565 / Belcari Nolberto, Via J. Gagarin 70, 56012, Pisa, Tel: 0587-420273, Fax:
0587-420273 / Centi Franco, Via Dosio 83, 50142, Firenze, Tel: 055-710388, Fax: 055-710388 / Cre Carradori Snc, Via Dei Macelli
1, 51100, Pistoia, Tel: 0573-28284, Fax: 0573-32413 / D’amicis Gennaro, Via P.Pisana 71, 57100, Livorno, Tel: 0586-400564, Fax:
0586-409724 / Elettronica Rnp, Via Romana 731, 55100, Lucca, Tel: 0583-956225, Fax: 0583-956225 / Goti Arcangelo, Via
Magellano 42/A, 52100, Arezzo, Tel: 0575-900819, Fax: 0575-900819 / Lab.Riparaz. Falchi M., Via A. Garibaldi 22-D, 57025,
Piombino (Li), Tel: 0565-49400, Fax: 0565-227161 / Lab.Tv Arrighi, Via F.Lli Cervi 26/28, 50057, P.A Elsa Empoli(Fi), Tel: 0571-931327,
Fax: 571931327 / M2 Elettronica, Via Danimarca 3, 58100, Grosseto, Tel: 0564-454571, Fax: 0564-454571 / Na.To.Ma Snc, Via Del
Sabotino 13, 58100, Grosseto, Tel: 0564-456229, Fax: 0564-456229 / Pa.Ri.El.S., Via B. Tolomei 9, 53100, Siena, Tel: 0577-51159, Fax:
0577-589454 / Saec Di Coppa, Via Degli Artigiani 36, 54100, Massa, Tel: 0585-251724, Fax: 585791177 / Tele Service Di
Benvenuti, Via F. Busoni 3/B, 50018, Scandicci, Tel: 055-753974, Fax: 055-7350267 / Videoservice Di Genuardi, Via Borgaccio 72,
SERVICE ADDRESSES. SERVICE NIEDERLASSUNGEN . SERVICEADRESSER . SERVICESTÄLLEN
10. R-605N Specifications 16/05/2003 11:11 Page 74
Page 75

75
53036, Poggibonsi (Si), Tel: 0577-983181, Fax: 0577-996382 / Bardazzi Paolo, Via Forlanini 8dr, 500127, Firenze, Tel: 055-4376776,
Fax: 055-431956 / Dal Pozzo Enzo, Via Barletta 8, 39100, Bolzano, Tel: 0471-913290, Fax: 0471-913290 / Melone Giuseppe, Via
Zara 44, 38100, Trento, Tel: 0461-235166, Fax: 0461-267210 / Sighel Mauro, Via A. Volta 92, 38100, Trento, Tel: 0461-935919, Fax:
0461-935919 / Tecnoservice Snc, Via San Vigilio 64/B-C-D-, 39100, Bolzano, Tel: 0471-289062, Fax: 0471-261559 / Quondam, Via
Del Rivo 33, 05100, Terni, Tel: 0744-301512, Fax: 0744-301512 / Tecnoconsult Elettronica, Via Madonna Alta 185, 06100, Perugia,
Tel: 075-5003089, Fax: 075-5003089 / C.A.T. Di D’isanto, C.So Ivrea 82/A, 11100, Aosta, Tel: 0165-364056, Fax: 0165-235910 /
Ass.Elettr.Campi Snc, Via E.Reginato 87, 31100, Treviso, Tel: 0422-436245, Fax: 0422-435996 / D.D. Assistenza Tecnica, Via
Mondin 11, 32100, Belluno, Tel: 0437-30240, Fax: 0437-939916 / Dl Service Di Dal Lago, Via Giaretta 33, 36100, Vicenza, Tel: 0444566662, Fax: 0444-966239 / G.F.L. S.R.L., Via D. De Massari 10, 37045, Legnago, Tel: 0442-602020, Fax: 0442-602021 /
L’elettronica Piu’ Snc, Via Gaspare Campo18, 45100, Rovigo, Tel: 0425-33221, Fax: 0425-33221 / Pieffe Di Premier F., Via
Zermanese 6/B, 31100, Treviso, Tel: 0422-321054, Fax: 0422-321054 / Pierezza Carlo, Via Barroccio Dal Borgo 4, 35100, Padova, Tel:
049-8643266, Fax: 049-8643266 / Sat Di Galber E C. Snc, Via Catarinetti 1/E, 37136, Verona, Tel: 045-509609, Fax: 045-509699 /
Speedy Service, Viale Europa 42/B, 36016, Thiene Vi, Tel: 0445-368235, Fax: 0445-379028 / Tecno Futura Di Rossi, Via Delfinato 8
(Laboratorio), 35127, Camin (Pd), Tel: 049-9129469, Fax: 049-9126147 / Video Service, Via Vitruvio 11, 37100, Verona, Tel: 045566299, Fax: 045-573865 / Video Tv 17323, Via S. Marco 1818, 30019, Sttomarina ( Ve), Tel: 041-5541675, Fax: 041-5541675 /
Vignando Luigino, Via Dell’industria 18, 30020, Gruaro (Ve), Tel: 0421-74472, Fax: 0421-72923 / Zaffalon Urbano, Cas.Calle
Corraz. 3849, 30122, Venezia, Tel: 041-2750670, Fax: 041-2757273 / Ecoservice Srl, Via Buffolara 68/A, 43100, Parma, Tel:
0521/987402, Fax: 0521/987402 / Novatecnica Snc, Via Giovanale, 78/A - Viserba Di Rimini, 47037, Rimini / Reat Srl, Via Giardini
Nord 8, 41043, Formigine (MO), Tel: 059-557168, Fax: 059-573517 / Tecnoservice.Com, Via Serenari, 28/C, 40100 Castelmaggiore
(BO), Tel: 051-6321343, Fax: 051-6320781 / Radiotecnica 96 Di Fattorini, Via A. Cantore, 14, 33040 Povoletto (UD), Tel: 0432666797, Fax: 02-700425181 / Panaservice, Via S.Sotero, 36, 00165 Roma, Tel: 06-6380516, Fax: 06-6380973 / Michelis Sandro,
Via Giannetti, 8/10, 18100 Imperia, Tel: 0183-275891, Fax: 0183-275891 / Reat Di Frisina, C.So Unione Sovietica, 584, 10135 Torino,
Tel: 011-3979817, Fax: 011-3979817 / Video Tecnica Di Rotulo, Via Dante, 87/89, 92100 Agrigento, Tel: 0922-25183, Fax: 092220117 / DBS Elettronica Di Aldovardi, Via Simon Musico, 2/C, 54100 Massa, Tel: 0585-489893, Fax: 0585-886122
ESPANA
En caso de una reclamación con vuestra SHARP Microwave, preguntan por favor la casa dónde han comprado su
máquina o infórmanse en una de las SHARP Service casas siguientes.
Lavison, C.B., 972/ 23.01.22, Cl Montseny 35, Girona, Girona / Videocolor, 93/ 454.99.08, Cl Villarroel 44, Barcelona, Barcelona
Argi Giltz, 94/ 443.77.93, Cl Autonomia 15, Bilbao, Vizcaya / Estarlich Pradas Vicente, 93/ 766.22.33, Cl Industria 131, Calella,
Barcelona / Sabe Electronica, 964/ 21.52.65, Cl Joaquin Costa 46, Castellon, Castellon / Teknibat Electronica, 943/ 70.24.37, Cl
Zezenbide 4, Eibar, Guipuzcoa / Electronica Gomez, 96/ 546.75.81, Cl Baltasar Tristany 100, Elche, Alicante / Ramon Villaret De
Gea, 93/ 798.02.48, Cl Moli De Vent 21, Mataro, Barcelona / Irtesa Electronica, 971/ 20.47.02, Cl Jaume Ferran 72 Bjos, Palma De
Mallorca, Baleares (Mallorca) / A. T. Pamplona, 948/ 24.19.50, Cl Julian Gayarre 1, Pamplona, Navarra / Ce.Va.Sat, 93/ 710.76.13,
Ps Rubio I Ors 105, Sabadell, Barcelona / Servicios Electronicos, 96/ 340.20.34, Cl Doctor Oloriz 3, Valencia, Valencia
Laurea S.A.T, 93/ 889.02.48, Cl Guilleries Bis 20, Vic, Barcelona / Merino Nicolas Jose A., 945/ 25.18.92, Av Judizmendi 24, VitoriaGasteiz, Alava / Ce. Va. Sat, S.C., 93/ 785.51.11, Cr Matadepera 87, Terrassa, Barcelona / Unitec, 948/ 82.74.34, Cl Fuente
Canonigos 5, Tudela, Navarra / Euro Tecnics Electronica, 977/ 32.24.89, Cl Lepanto 16-18, Reus, Tarragona / Servitele, 94/
444.89.02, Cl Autonomia 24 Galerias, Bilbao, Vizcaya / Satel, 972/ 26.55.19, Ps De Barcelona 12, Olot, Girona / Ielsa, C.B., 973/
24.71.27, Cl Tarragona 40, Lleida, Lleida / Estudios 3, C.B., 943/ 45.37.97, Pz De Los Estudios 3, San Sebastian, Guipuzcoa / Monje
Ureña Manuel, 972/ 70.25.52, Cl Sant Quinti 33, Ribes De Freser, Girona / Cristel, 973/ 27.08.26, Cl Vallcalent 32, Lleida, Lleida /
Teleservic, 974/ 31.34.44, Cl Estadilla 6, Barbastro, Huesca / Insat, Cb, 971/ 36.53.18, Cl Pintor Calbo 30, Mahon, Baleares (Menorca)
/ Electronica S. Torres, 977/ 21.21.48, Cl Ernest Vilches 4-B L-2, Tarragona, Tarragona / Asiste, S.L., 964/ 21.57.69, Av De Valencia
Nave 19, Castellon, Castellon / Sonovision, C.B., 978/ 60.11.74, Cl Abadia 5, Teruel, Teruel / Buira Tecnic's, 977/ 66.04.37, Cl San
Javier 55, El Vendrell, Tarragona / Tecnik's, S.C.P., 93/ 630.11.20, Cl Joan Bardina 32, Sant Boi De Ll., Barcelona / Elde, 93/ 872.85.42,
Cl Bruch 55, Manresa, Barcelona / Teleservicio, 974/ 22.01.39, Cl Tenerias 20, Huesca, Huesca / Servinters, S.C.C.L., 93/ 389.44.60,
Pz Casagemes 20, Badalona, Barcelona / Elec.Safont Montraveta,Sc, 93/ 821.30.03, Cl Gral. Manso Sola 31, Berga, Barcelona /
Tecno Hogar, 96/ 286.53.35, Cl Dos De Mayo 41, Gandia, Valencia / Reparaciones Ortega, 971/ 39.01.55, Cl Via Punica 33, Ibiza,
Baleares (Ibiza) / Telesonic, 974/ 36.32.97, Cl Teruel 6, Jaca, Huesca / Antonio Monleon, S.L., 96/ 334.55.87, Av De La Plata 91,
Valencia, Valencia / Electronica Las Heras, 96/ 238.11.14, Cl Jose Iranzo 6, Ontinyent, Valencia / Telecom Electronica, 96/
539.50.21, Cl Hernan Cortes 8, Elda, Alicante / Audio Imagen, 971/ 31.46.59, Cl Jose Riquer Llobet 8, Ibiza, Baleares (Ibiza) / 4 En 1
Reparaciones, 93/ 430.97.26, Cl Taquigrafo Marti 19, Barcelona, Barcelona / Sac-2, S.C.P., 93/ 331.77.54, Cl Riera Blanca 113,
Barcelona, Barcelona / Martorell Altes Francisco, 977/ 75.32.41, Cl Roseta Mauri 10, Reus, Tarragona / Cinca Monterde Antonio,
976/ 31.69.65, Cl Via Universitas 52, Zaragoza, Zaragoza / Electronica Josep, 977/ 88.04.41, Ctra. Igualada 29 Bjos, Sta. Coloma
Queralt, Tarragona / Fermo, 93/ 465.22.00, Av Morera 5, Badalona, Barcelona / Negredo Martin Daniel, 94/ 411.22.82, Cl Padre
Pernet 8, Bilbao, Vizcaya / Collantes Martin Onofre, 94/ 483.21.22, Cl Ortuño De Alango 7, Portugalete, Vizcaya / Riera Daviu,
972/ 50.32.64, Cl Torras Y Bages 19, Figueres, Girona / Envisa Electronic, S.L., 96/ 241.24.87, Cl General Espartero 9, Alzira, Valencia
/ F.Carceller-F.Cervera,C.B, 964/ 45.44.65, Cl Carrero 29, Vinaros, Castellon / Eurosat, S.L., 96/ 525.80.40, Cl Montero Rios 33,
Alicante, Alicante / Teelco, 93/ 805.11.90, Av Balmes 90, Igualada, Barcelona / Audiovision, 93/ 385.78.08, Cl Mare Deu Montserrat
22, Sta.Coloma Gramanet, Barcelona / Tele-Color, 96/ 585.24.60, Cl Del Vent 9, Benidorm, Alicante / Tecno Serveis Mora, 977/
40.08.83, Cl Pau Picasso 1, Mora D'ebre, Tarragona / Electronica Moncho, 96/ 287.23.29, Cl Pare Pascual Catala 5, Gandia, Valencia /
Electronica Mateos, 93/ 849.28.77, Cr De Caldas (Bajos) 76, Granollers, Barcelona / Electron. Pons Gomila Sa, 971/ 37.22.76, Cr
Nueva 162, Alayor, Baleares (Menorca) / Antonio Robles Sanchez, 93/ 872.55.41, Cl Sant Bartomeu 42, Manresa, Barcelona / Top
Electronica, 93/ 890.35.91, Cl Misser Rufet 4 Bjos, Vilafranca Penedes, Barcelona / Totvisio Electronica S.L., 93/ 873.88.81, Pj Ferrer
14, Manresa, Barcelona / Satef, 973/ 50.08.48, Av Raval Del Carme 12, Tarrega, Lerida / Fix Servicio Tecnico, 93/ 675.59.02, Cl
Valles 88, Sant Cugat Valles, Barcelona / Selecco S.L., 977/ 70.00.12, Cl Calderon De La Barca 11, Amposta, Tarragona / Instalaciones
Maes, S.L., 971/ 27.49.47, Cl Son Nadal 63, Palma De Mallorca, Baleares (Mallorca) / Sertecs, S.C., 977/ 22.18.51, Cl Caputxins
(Bajos) 22, Tarragona, Tarragona / Sonitev Electronica, C.B., 93/ 815.74.44, Cl Aigua 143, Vilanova I Geltru, Barcelona / Aragon
Televideo, S.C., 976/ 32.97.12, Cl Batalla Clavijo 18, Zaragoza, Zaragoza / Jose Marques Anglada,S.L., 971/ 38.54.54, Cl Lepanto
19, Ciudadela, Baleares (Menorca) / Electronica Alcañiz S.L., 979/ 87.07.94, Cl Carmen 21, Alcañiz, Teruel / Teleservicio Bajo
Aragon, 978/ 87.08.10, Cl Romualdo Soler 4, Alcañiz, Teruel / Reparaciones Urruti S.L., 943/ 45.84.10, Ps Aintzieta 32, San
Sebastian, Guipuzcoa / Reparaciones Pilsa S.C., 972/ 20.66.96, Cl J. Pascual I Prats 8, Gerona, Gerona / Electro Servei C.B., 977/
51.04.42, Ps Moreira 10, Tortosa, Tarragona / Electronica Santa Pola, 96/ 571.25.58, Cl Orihuela 43, Torrevieja, Alicante /
Electronica Loguard, 977/ 32.38.04, Cl Vapor Vell 17, Reus, Tarragona / A.B.R. Electronica S.L., 977/ 50.21.20, Cl Calderon La
SERVICE ADDRESSES. SERVICE NIEDERLASSUNGEN . SERVICEADRESSER . SERVICESTÄLLEN
10. R-605N Specifications 16/05/2003 11:11 Page 75
Page 76

76
SERVICE ADDRESSES. SERVICE NIEDERLASSUNGEN . SERVICEADRESSER . SERVICESTÄLLEN
Barca 3, Roquetas, Tarragona / La Clinica Del Electrod., 93/ 236.44.11, Cl Balmes 160, Barcelona, Barcelona / Angel Avellan Puig,
965/ 21.32.55, Cl Poeta Quintana 13, Alicante, Alicante / Pulgar I Edo S.L., 93/ 436.44.11, Cl Castillejos 333, Barcelona, Barcelona /
A.E. De Consumo, 96/ 552.32.35, Cl Peru 42, Alcoy, Alicante / Unisat, 96/ 674.11.94, Cl Duque De Tamames 9, Orihuela, Alicante /
Electro-Sat, 971/ 32.27.62, Cl Eivissa 12-16, S. Francesc De Formentera, Baleares (Formentera) / Garman C.B., 91/380.33.49, Cl
Carlos Sole 38 Local, Madrid, Madrid / Electronica Bote, 924/ 22.17.40, Pz Portugal 2, Badajoz, Badajoz / Ruiz Garcia Jose, 927/
22.48.86, Cl Ecuador 5-B, Caceres, Caceres / Electronica Edimar, S.A, 98/ 535.34.51, Cl Cangas De Onis 4, Gijon, Asturias / Servicio
Tecnico, 956/ 87.07.05, Cl Divina Pastora E-1 L-4, Jerez La Frontera, Cadiz / Electronica Torres, S.C., 941/ 24.76.15, Av Navarra 14,
Logroño, La Rioja / Cañedo S.T., 98/ 522.29.68, Cl Otero, S/N C. Cial, Oviedo, Asturias / Electronica Javier, 979/ 75.03.74, Av
Castilla 77, Palencia, Palencia / Teleservicios, 983/ 30.92.61, Cl Esgueva 6, Valladolid, Valladolid / Central De Servicios, 986/
37.47.45, Cl Asturias (Bajo) 10, Vigo, Pontevedra / Dueñas Ca|As Teodoro, 957/ 26.35.06, Cl Hermano Juan Fdez 15, Cordoba,
Cordoba / Telejara, 959/ 22.60.74, Pol. Polirrosa Cl-A Nave-27, Huelva, Huelva / Alejandro Hernandez, 978/ 60.85.51, Rb San Julian
59, Teruel, Teruel / Caro Porlan Raimundo, 968/ 46.18.11, Cl Jose Mouliaa 45, Lorca, Murcia / Daniel Serran0 Labrado, 920/
37.15.16, Cl Jose Gochicoa 16, Arenas De S.Pedro, Avila / Electronica Fouces, 982/ 40.24.38, Cl Benito Vicetto 34, Monforte De Lemos,
Lugo / Televideo, 950/ 40.18.63, Cl Velazquez 7 Local-A, Adra, Almeria / Reg., C.B., 968/ 51.00.06, Cl Ramon Y Cajal 27, Cartagena,
Murcia / Electronica Rivas, 925/ 80.55.46, Cl Barrio San Juan 1, Talavera La Reina, Toledo / Antonio Cazorla Luque, 952/ 36.16.02,
Cl Ciudad De Andujar 2, Malaga, Malaga / Telson, 987/ 21.25.18, Cl Batalla Clavijo 2, Leon, Leon / Alvarez Olivar Casilda, 98/
522.37.39, Cl San Jose 12, Oviedo, Asturias / Electronica Jumar, 953/ 26.17.08, Cl Goya (Las Flores) 1, Jaen, Jaen / Video Taller,
S.C., 952/ 54.23.95, Edif. La Noria B Bjos-5, Torre Del Mar, Malaga / Top Service, 941/ 13.50.35, Cl Achutegui De Blas 17, Calahorra, La
Rioja / Electroservicios Seba,C.B, 968/ 29.85.93, Cl Isaac Albeniz 4 Bjos, Murcia, Murcia / Garcia Quintela Arturo, 981/ 70.21.07,
Cl Xoane, Carballo, La Coruña / Tv Video Jimenez, S.L., 967/ 34.04.43, Cl Juan Xxiii 38, Almansa, Albacete / Electronica Mas, 947/
31.49.94, Cl Alfonso Vi 6, Miranda De Ebro, Burgos / Manuel Mato Señaris, 981/ 53.71.14, Cl Silvouta-Pedra Da, Santiago Compostela,
La Coruña / Electronica Gredos, 920/ 22.48.39, Cl Eduardo Marquina 24, Avila, Avila / Jimenez Almohalla Miguel, 920/ 25.08.76,
Cl Jacinto Benavente 1, Avila, Avila / Jielsa, 96/ 546.14.27, Cl Doctor Ferran 97, Elche, Alicante / New Meresa, 972/ 30.44.54, Cl
Surera Bertran 23, Palafrugell, Girona / Arsenio Sanchez, C.B., 927/ 41.11.21, Cl Tornavacas 9, Plasencia, Caceres / Electronica
Barajas, 91/ 305.48.90, Pz Del Jubilado 8, Barajas, Madrid / Gallardo Alonso Miguel, 958/ 67.64.81, Cl Carmen 104, Benalua De
Guadix, Granada / Aguado Gil Roberto, 941/ 25.25.53, Av Viana 10, Logroño, La Rioja / Zener Electronica, 981/ 22.07.00, Cl
Ronda De Monte Alto 15, La Coruña, La Coruña / Electronica Garman, C.B., 91/ 368.01.79, Cl Mandarina 15, Madrid, Madrid / Jose
Borja Y Jose Arana, 956/ 66.60.53, Cl San Antonio 31, Algeciras, Cadiz / Servisuel, Edif. La Union, 952/ 46.90.28, Cm De Las
Cañadas Lc 2, Fuengirola, Malaga / S.T. Mendez, 981/ 27.52.52, Cl Gil Vicente 13, La Coruña, La Coruña / Electronica Triana, 95/
433.83.03, Cl Evangelista 69-71 L-25, Sevilla, Sevilla / Electronica Ansar, 91/ 460.47.45, Cl Tomasa Ruiz 4, Madrid, Madrid /
Electronica Castilla, 981/ 32.14.09, Cr Castilla 377-Bis Bjos, Ferrol, La Coruña / Tec-Norte, 91/851.63.47, Cl Santiago Apostol 5,
Collado Villalba, Madrid / Electronica Arellano, 926/ 54.78.95, Cl Lorenzo Rivas 14, Alcazar De San Juan, Ciudad Real / Fernandez
Gonzalez Jose, 988/ 23.48.53, Av Buenos Aires 75 Bjos, Orense, Orense / Visatel, 968/24.16.47, Cl Torre Alvarez S/N, Murcia,
Murcia / Electronica Fe-Car, S.L., 925/ 21.21.45, Av Santa Barbara 30, Toledo, Toledo / Salvador Rodriguez, C.B., 987/ 40.36.02,
Cl Ortega Y Gasset 24, Ponferrada, Leon / Juan Gomez Orellana, 956/ 46.25.01, Cl Fco.Fdez.Ordo|Ez 5 L-D, Ubrique, Cadiz / Abril
Sanchez Valentin, 959/ 10.60.41, Cl Cadiz 2, Cala, Huelva / Vilchez Vilchez Rafael, 958/ 60.06.50, Cl Amadeo Vives 9, Motril,
Granada / Electro Servicios Plaza, 968/ 28.45.67, Cl Gomez Cortina 10, Murcia, Murcia / Telepal, 95/ 464.95.80, Cl Julio Verne 49,
Sevilla, Sevilla / Auvitel, S.L., 95/ 427.57.07, Cl Virgen De Africa 20, Sevilla, Sevilla / Electronica Wenceslao, 958/ 81.16.16, Cl
Fontiveros 42, Granada, Granada / Zabala Vazquez Jose, 927/ 57.06.13, Cl Del Agua 39, Losar De La Vera, Caceres / Santiago
Valderrey, 98/ 563.18.61, Cl Dr. Venancio Mtez. 7, Navia, Asturias / Variosat, S.L., 91/ 662.04.68, Cl Isla De Corcega 24,
Alcobendas, Madrid / Teco, 975/ 22.61.25, Cl Antolin De Soria 10, Soria, Soria / Imason, 986/ 84.16.36, Cl Loureiro Crespo 43,
Pontevedra, Pontevedra / Telesonid Huelva, S.C.A., 959/ 24.38.60, Cl Fco.Vazquez Limon 4, Huelva, Huelva / Guijo S.T., 921/
42.94.18, Cl Teofilo Ayuso 2 Local, Segovia, Segovia / Almat Electronica, 923/ 22.45.08, Cl Galileo 21, Salamanca, Salamanca /
Electronica Seyma, 942/ 23.69.19, Cl Del Monte 69 C Bjos, Santander, Cantabria / Asist. Tecnica Marcos, 983/ 29.78.66, Cl Pio Del
Rio Hortega 2-4, Valladolid, Valladolid / Tecnicas Marvi S.L., 949/ 23.27.63, Pz Capitan Boixareu 51, Guadalajara, Guadalajara /
Bandin Audio, 981/ 86.60.23, Cl Rua Arcos Moldes 2 B-3, Rianxo, La Coruña / Televexo S.L., 982/58.18.57, Cl Nosa Sra. Do Carmen
82, Burela, Lugo / Digimat Electronica, 958/ 70-04-52, Av Jose De Mora 16, Baza, Granada / Serpriego S.L., 957/ 54.15.11, Cl San
Luis 4 Bjo. Izda., Priego De Cordoba, Cordoba / Instalacion Martin, 669/ 85.98.80, Cl Alicante 11 (1º - C), Getafe, Madrid / Servirap,
950/ 27.40.67, Cl Angel Ochotonera 11, Almeria, Almeria / Tecnihogar, 956/ 28.10.82, Cl Tolosa Latour 19, Cadiz, Cadiz / Cayro,
957/ 26.35.06, Cl Hermano Juan Fdez. 15, Cordoba, Cordoba / Microm Electronica, 957/ 23.02.22, Av Aeropuerto 2, Cordoba,
Cordoba / Fermasa, 958/ 25.64.77, Cl Azorin 7, Granada, Granada / Servigon, 958/ 20.52.81, Cl Hospital De La Virgen 22,
Granada, Granada / Relegra S.L., 958/ 27.24.50, Cl Dr.Gomez Roman 5, Granada, Granada / Servicosta, 958/ 63.11.43, Pz Dr.
Alvarez Riosol 1, Almuñecar, Granada / Airsext Huelva, 959/ 22.88.13, Ps De La Glorieta 6, Huelva, Huelva / Electro Sur, 959/
29.06.15, Cl Alonso De Ercilla 23, Huelva, Huelva / Climaire Plus, 95/ 234.50.36, Cl Guaro 4, Malaga, Malaga / Covitel, 95/
231.62.50, Cl Ceramistas 8, Malaga, Malaga / Luis Rivas Caldas, 95/ 451.73.55, Cl Febo 16, Sevilla, Sevilla / Intersat Sevilla, 95/
443.02.26, Cl Beethoven 5, Sevilla, Sevilla / Frilar, 95/ 492.14.44, Pol. Indust. Navisa C/A 47, Sevilla, Sevilla / Pedro L. Villagrasa,
976/ 37.10.20, Cl Augusto Borderas 3-5 L-Izq., Zaragoza, Zaragoza / G.A.M.I.F.E.L, 98/ 528.43.60, Cl Ricardo Montes 6, Oviedo,
Asturias / Amsa, 971/ 27.27.57, Cl Isidoro Antillon 97, Palma De Mallorca, Baleares / Teclurami Menorca, 971/ 35.28.02, Cl Pintor
Calbo 57, Mahon, Baleares / David Torregrosa Jorda, 965/ 33.43.06, Cl Terrassa 6, Alcoy, Alicante / Electronica Bersabe, 95/
483.33.93, Pasaje Merinos 62 A, Ecija, Sevilla / Novomam-Sat, 956/ 40.12.09, Pol. Urbisur, Jorge Juan 4, Chiclana De La Frontera, Cadiz
/ Video Service Electronic, 91/ 880.27.87, Cl Era Honda 9, Alcala De Henares, Madrid / Servei Tecnic Ferrer, 93/ 710.51.38, Cl
Sarda 37, Sabadell, Barcelona / Fred Vilafranca, 93/ 890.48.52, Cl Progres 42, Vilafranca Del Penedes, Barcelona / Domca, 973/
24.74.46, Cl Tarragona 29, Lerida, Lerida / Mañe Grifolls, 977/ 69.04.39, Cl Jesus 21, Calafell, Tarragona / Ramsat, 981/ 74.74.61,
Av Finisterre 117-B, Cee, La Coruña / Victor Perez Quintela, 981/ 58.43.92, Cl Entrerios 35, Santiago De Compostela, La Coruña /
Antonio Rodriguez Alvarez, 988/ 22.40.98, Cl Cabeza De Manzaneda 7, Orense, Orense / Ugenasa, 91/ 611.52.51, Cl La Canaleja
4, Alcorcon, Madrid / Javier Acevedo, 91/ 843.01.58, Pz Mayor 5, Torrelaguna, Madrid / Tecniblan, 968/ 29.39.99, Cl Jose Javier 1,
Murcia, Murcia / Angel Lopez Alcaraz, 968/ 29.39.10, Cl Sierra Del Espartal 6 (Edif. Ana), Murcia, Murcia / Elbeservi, S.A., 91/
386.27.11, Cl Dr.R. Castroviejo 19, Madrid, Madrid / Televideo Nervion, 95/ 458.10.66, Cl Juan Curiel 22, Sevilla, Sevilla / Servicio
Tecnico Ponce, 950/ 13.28.37, Plg Ps Maritimo E- Europa 1, Garrucha, Almeria / Marcial Lagoa Gonzalez, 924/ 49.03.33, Cl Ramon
Y Cajal 7, Olivenza, Badajoz / Electronica Gonzalez, 953/ 50.33.82, Corredera San Bartolome 11, Andujar, Jaen / Sat Tv Video
Vazquez, 926/ 42.09.93, Cl Aduana 3, Puertollano, Ciudad Real / C.E. Vilanovense C.B., 924/ 84.59.92, Cl Camino Magacela 4
Local-5, Villanueva Serena, Badajoz / Electronica Sales, 957/ 66.09.04, Cl Andalucia 11, Aguilar Frontera, Cordoba / Astusetel S.L.,
98/ 539.10.11, Cl Cea Bermudez 9, Gijon, Asturias / niservic Electronica, 953/ 75.14.19, Cl Goya 1 Bjos, Ubeda, Jaen / Radio
Sanchez C.B., 927/ 32.06.88, Av De Miajadas S/N, Trujillo, Caceres / Asturservice, 98/ 556.83.87, Cl Sanchez Calvo 6 Bjos.,
10. R-605N Specifications 16/05/2003 11:11 Page 76
Page 77

77
SERVICE ADDRESSES. SERVICE NIEDERLASSUNGEN . SERVICEADRESSER . SERVICESTÄLLEN
Aviles, Asturias / Electrodiaz S.L., 926/ 32.23.24, Cl Buensuceso 10, Valdepeñas, Ciudad Real / Tele-Nueva, 926/ 50.59.96, Cl Campo
56, Tomelloso, Ciudad Real / Juan Morillon Del Corro, 98/ 567.40.24, Av De Gijon 19, La Felguera/Langreo, Asturias / Electronica
Centeno S.L., 924/ 57.53.08, Av Del Zafra 1, Puebla Sancho Perez, Badajoz / Electronica Penelo, 982/ 21.47.43, Cl Serra Gañidoira
63, Lugo, Lugo / Galan Sat S.L., 956/ 20.14.17, Cl Cruz Roja Española 11, Cadiz, Cadiz / Galan Sat S.L., 956/ 83.35.35, Cl
Factoria Matagorda 52, Puerto Real, Cadiz / Servitec Burgos S.L., 947/ 22.41.68, Cl Lavaderos 7-9, Burgos, Burgos / Electronica
Garcia, 969/ 22.24.83, Cl Ramon Y Cajal 17, Cuenca, Cuenca / Indalecio Amaya Sanchez, 924/ 66.47.01, Cl Carreras 11,
Almendralejo, Badajoz / Lavison Electronica S.L., 957/ 75.01.75, Cm De La Barca 3, Cordoba, Cordoba / Antonio Gonzalez
Esquinas, 957/ 57.10.50, Cl Gral Primo Rivera 61, Peñarroya, Cordoba / Electronica Jopal S.L., 925/ 25.04.42, Av Santa Barbara
S/N, Toledo, Toledo / Juman, 967/ 22.40.78, Cl Ejercito 1, Albacete, Albacete / Anuma, 953/ 69.70.41, Cl Paredon 24, Linares, Jaen /
Electro 93 S.L., 95/ 472.37.16, Cl Melliza 1, Dos Hermanas, Sevilla / Sonivitel S.L., 950/ 22.97.55, Cl Poeta Paco Aquino 51, Almeria,
Almeria / Sial-Alvimo S.L., 986/ 29.93.01, C/ C.Torrecedeira 92 Bjos, Vigo, Pontevedra / Patricio Electronica, 924/ 33.04.13, Cl
Reyes Huertas 7, Merida, Badajoz / Electronica Cambados, 986/ 50.83.27, Cl Camilo Jose Cela 13, Vilagarcia Arousa, Pontevedra /
Electronica Vitelson, 983/ 80.43.56, Pz Del Mercado 9, Medina Del Campo, Valladolid / Megatecnica Extremera, 958/ 26.06.01,
C/.Mozart L-2 Ed.Granate, Granada, Granada / R.T.V. Blanco, 980/ 51.14.41, Cl Eduardo Julian Perez 9, Zamora, Zamora / Rafael
Gomez Yelo, 968/ 26.14.67, Ps Corbera 17, Murcia, Murcia / Prosat, 987/ 20.34.10, Pz Doce Martires 5, Leon, Leon / Electro Anaya,
925/ 48.09.81, Cl Vertedera Alta 14, Consuegra, Toledo / S.A.T. Juan-Manuel, 98/ 581.22.48, Cl Uria 60, Cangas De Narcea, Asturias
/ Manuel Alea Villa, 98/ 592.26.40, Cl Llano Morgolles S/N, Cangas De Onis, Asturias / Electro Himega, S.A., 953/ 24.22.56, Cl
Adarves Bajos 4-C, Jaen, Jaen / Electrogan, 956/ 87.07.05, Cl Pagador 31, Pto. Sta. Maria, Cadiz / Servitel, 956/ 33.76.55, Cl Porvenir
11 Local, Jerez La Frontera, Cadiz / Lara Technitel, 926/ 21.17.87, Cl De La Jara 1, Ciudad Real, Ciudad Real / Parreño, 967/
22.62.49, Cl Santiago Rusiñol 50, Albacete, Albacete / Victor Quiles Parra, 926/ 32.54.38, Cl Jose Ramon Osorio 57, Valdepeñas,
Ciudad Real / S.T.C., 696/ 20.14.08, Cl Nord 24, Palafrugell, Girona / Ferreteria Toledano, 949/ 23.02.61, Cl Ejercito 17 A,
Guadalajara, Guadalajara / Satelec, 926/ 22.01.55, Cl Libertad 13 L-1, Ciudad Real, Ciudad Real / Reparaciones San Segundo, 920/
22.33.21, Cl Soria 6, Avila, Avila / Tecnyser Electro, 987/ 22.77.87, Cl Relojero Losada 25, Leon, Leon / Multiservicio Palencia, 979/
74.53.80, Cl Cardenal Cisneros 20, Palencia, Palencia / J. Daniel Martinez, 923/ 19.16.10, Cl Abraham Lacut 11-15, Salamanca,
Salamanca / Jesus Alburquerque, 983/ 24.62.26, Cl Vinos Ribera Del Duero 10, Valladolid, Valladolid / Domotica, 93/ 408.66.22, Av
Diagonal 296, Barcelona, Barcelona / Salja & Mat, 93/ 668.13.61, Cl La Raseta 15 L-3, Molins De Rey, Barcelona / Alameda Barcelo
46, 952/ 32.00.77, Av Velazquez 5, Malaga, Malaga / Fermafrio, 956/ 28.10.82, Pz España 1, Cadiz, Cadiz / Elotronic, 968/
46.16.22, Pz Don Juan Moreno 8, Lorca, Murcia / Electro Reparaciones 2000, 948/ 26.79.12, Cl Monasterio Fitero 26, Pamplona,
Pamplona / Telnor, 94/ 417.04.97, Pz Juanene 5 Tras., Erandio, Bilbao / Instalacant, 96/ 525.93.55, Cl Daya Vieja S/N Local 7,
Alicante, Alicante / Airnet, 96/ 533.17.53, Cl Oliver 35, Alcoy, Alicante / Arcadio Martinez, 96/ 585.49.17, Cl Almudena 6, Benidorm,
Alicante / Joaquin A. Lon Jaen, 96/ 578.67.50, Cl Patricio Ferrandiz 66, Denia, Alicante / Trinitario Gea, 96/ 545.56.25, Cl Jaime
Pomares Javaloyes 47, Elche, Alicante / Jose A. Patiño Villena, 96/ 571.74.29, Cr De Bigastro 1, Orihuela, Alicante / Electroservicios
Plaza, 96/ 828.45.67, Pz Santiago 5, Orihuela, Alicante / E.Electrosax, 96/ 547.42.32, Cl Rio Turia 1, Sax, Alicante / Vensat
Reparaciones, 964/ 20.57.12, Cl Pintor Lopez 43, Castellon, Castellon / Electronica Bg, 952/ 78.50.09, Cl Andalucia 2, San Pedro
De Alcantara, Malaga / Servimart, 964/ 51.32.05, Av Corts Valencianes 8, Burriana, Castellon / Tefrival, 96/ 333.19.00, Av Ausias
March 6, Valencia, Valencia / Mª Jesus Fernandez Pinilla, 96/ 329.67.29, Cl Castellon De Rugat 8-S, Valencia, Valencia / Angel
Rodero Bellow, 926/ 51.52.76, Cl Asturias 26, Tomelloso, Ciudad Real / Climatec, 652/ 79.03.60, Cl Pozo 3 4º A, Puertollano,
Ciudad Real / Antonio Jover Torregrosa, 607/ 61.77.99, Cl Espronceda 12 Entlo. Izqda., Alicante, Alicante / Feliu Canalias, 972/
73.01.72, Cl Major 26, Campdevanol, Girona / A.T. Tv. Video, 965/ 80.02.31, Av De La Constitucion 185 D, Villena, Alicante /
Servicio Tecnico Pasfer, 696/17.86.458, Av Arcadio Pardiñas 77, Burela, Lugo
SWITZERLAND
Sharp Electronics AG, Langwiesenstrasse 7, 8108 Dällikon, Tel: +41 1 846 61 11.
SWEDEN
Vid förfrågningar angående din mikrovågsugn var vänlig kontakta din återförsäljare eller nägon av Sharps
representanter Centralservice Umeå, Formvägen 8, 90621 Umeå, Phone: 090-125001, Fax: 090-131135 / MN Elektronikservice
AB, Flygplatsinfarten 10A, 161 11 Bromma, Phone: 08-6275900, Fax:08-6275160 / Jönköpings Antenn & TV Service, Fridhemsvägen
20, 553 02 Jönköping, Phone: 036-161690, Fax: 036-160211 / Ratronik Radio & TV Service, Nordlandergatan 15, 931 32 Skellefteå,
Phone: 0910-17305, Fax: 0910-16844 / Tomi Elektronik AB, Bäckvägen 90, 126 47 Hägersten, Phone: 08-186170, Fax: 08-186175 /
Tretronik, Östermovägen 33, 854 62 Sundsvall, Phone: 060-155925, Fax: 060-173690 / TV-Trim Service AB, S:T Pauligatan 37, 416 60
Göteborg, Phone: 031-847200, Fax: 031-847500
NORWAY
Finn Clausen AS, Postbox 274, No-0511 Oslo, Phone: 47-22635000, Fax: 47-22646655
Norsk Elektronik senter, Postbox 13, No-2007 Kjeller, Phone: +47-63804500, Fax: +47-63804501
ICELAND
Braedurnir Ormsson Ltd, PO box 8790, IS-128 Reykjavik, Phone: +354-5332800, Fax: +354-5332810
Hjolmtaekni Ehf, Skeifar, IS-108 Reykjavik, Phone: +354-5332150, Fax: +354-5332151
DENMARK
Sö Höyem AS, Büllowsvej 3, DK-1870 Fredriksberg C, Phone: 45-31224434, Fax: 45-31224127
Almstock Radio & Tv service, Sallingsvej 61, DK-2720 Vanlöse, Phone: 45-38740021, Fax:45-38740031
SUOMI
Oy Perkko, PL 40 Rälssintie 6, SF-00721 Helsinki, Phone: +35-8947805000, Fax: +35-8947805480
Theho Video Oy, Niittyläntie 3, SF-0620 Helsinki, SUOMI Phone: +35-891461500, Fax: +35-891461767
10. R-605N Specifications 16/05/2003 11:11 Page 77
Page 78

78
SPECIFICATIONS
GB GB
AC Line Voltage
Distribution line fuse/circuit breaker
AC Power required: Microwave
Grill
Output power: Microwave
Grill heating elements
Microwave Frequency
Outside Dimensions
Cavity Dimensions
Oven Capacity
Turntable
Weight
Oven lamp
: 230 V, 50 Hz, single phase
: Minimum 10 A
: 1,25 kW
: 1,15 kW
: 800 W (IEC 60705)
: 1000 W
: 2450 MHz
: 449 mm(W) x 282 mm(H) x 372 mm(D)
: 290 mm(W) x 194 mm(H) x 313 mm(D) *
: 18 litres *
: ø 272 mm
: approx. 14 kg
: 25 W/240-250 V
This equipment complies with the requirements of directives 89/336/EEC and 73/23/EEC
as amended by 93/68/EEC.
As part of a policy of continuous improvement, we reserve the right to alter design and
specifications without notice.
TECHNISCHE DATEN
D D
Stromversorgung
Sicherung/Sicherungsautomat
Leistungsaufnahme: Mikrowelle
Grill
Leistungsabgabe: Mikrowelle
Grill
Mikrowellenfrequenz
Außenabmessungen
Garraumabmessungen
Garrauminhalt
Drehteller
Gewicht
Garraumlampe
: 230 V, 50 Hz, Einphasenstrom
: Mindestens 10 A
: 1,25 kW
: 1,15 kW
: 800 W (IEC 60705)
: 1000 W
: 2450 MHz
: 449 mm (B) x 282 mm (H) x 372 mm (T)
: 290 mm (B) x 194 mm (H) x 313 mm (T) *
: 18 Liter *
: ø 272 mm
: ca. 14 kg
: 25 W/240-250 V
Dieses Gerät entspricht den Anforderungen der EG-Richtlinien 89/336/EEC und 73/23/EEC
mit Änderung 93/68/EEC.
DIE TECHNISCHEN DATEN KÖNNEN JEDERZEIT OHNE ANGABE VON GRÜNDEN
GEÄNDERT WERDEN, UM DEM TECHNISCHEN FORTSCHRITT RECHNUNG ZU TRAGEN.
* Internal capacity is calculated by measuring maximum width, depth and height.
Actual capacity for holding food is less.
* Der Garrauminhalt wird aus der max. gemessenen Breite, Tiefe und Höhe errechnet.
Die tatsächliche Aufnahmekapazität von Lebensmitteln ist jedoch geringer.
10. R-605N Specifications 18/07/2003 12:06 Page 78
Page 79

79
TEKNISET TIEDOT
FIN FIN
Vaihtovirtajännite
Virranjakolinjan sulake/virrankatkaisin
Vaihtovirtaa tarvitaan: Mikroaalto-käyttöön
Grillaamiseen
Lähtöteho: Mikroaalto-käyttö
Grillausvastukset
Mikroaaltotaajuus
Ulkomitat
Sisätilan mitat
Uunin teho
Pyörivä alusta
Paino
Uunin lamppu
: 230 V, 50 Hz, 1-vaihe
: Vähintään 10 A
: 1,25 kW
: 1,15 kW
: 800 W (IEC 60705)
: 1000 W
: 2450 MHz
: 449 mm (L) x 282 mm (K) x 372 mm (S)
: 290 mm (L) x 194 mm (K) x 313 mm (S) *
: 18 litraa *
: ø 272 mm
: n. 14 kg
: 25 W/240-250 V
Tämä laite täyttää direktiivien 89/336/EEC ja 73/23/EEC asettamat vaatimukset
siten kuin niitä on direktiivissä 93/68/EEC muutettu.
Jatkuvan kehittämispyrkimyksemme mukaisesti pidätämme oikeuden tehdä laitteen suunnitteluun ja teknisiin
ominaisuuksiin liittyviä muutoksia ilman ennakkoilmoitusta.
SPESIFIKASJONER
S S
Växelström
Säkring/överspänningsskydd för elledningen
Erforderlig spänning: Mikrovåg
Grill
Uteffekt: Mikrovåg
Grillelementen
Mikrovågsfrekvens
Yttre mått
Inre mått
Ugnskapacitet
Tallrik
Vikt
Ugnslampa
: 230 V, 50 Hz, enfas
: Minimum 10 A
: 1,25 kW
: 1,15 kW
: 800 W (IEC 60705)
: 1000 W
: 2450 MHz
: 449 mm(br) x 282 mm (h) x 372 mm (dj)
: 290 mm(br) x 194 mm (h) x 313 mm (dj) *
: 18 liter *
: ø 272 mm
: cirka 14 kg
: 25 W/240-250 V
Denna utrustning uppfyller kraven i direktiv 89/336/EEC och 73/23/EEC med tillägg 93/68/EEC.
Som en del av vår strävan att alltid förbättra våra produkter, förbehåller vi oss rätten att ändra
utformning och specifikationer utan föregående varning.
* Jäsentenvälinen asema on arvioida luona mittaileva enimmäis- avaruus , syvyys ja huippu.
Reaalinen asema ajaksi arvopaperit elintarvikkeet on l;sitellä.
* Inre utrymme är beräknat vid mättande maximum bredd , djup och höjd.
Faktisk utrymme för holdingen näring er mindre.
10. R-605N Specifications 18/07/2003 12:06 Page 79
Page 80

SHARP ELECTRONICS (EUROPE) GMBH.
Sonninstrasse 3
20097 Hamburg
Germany
TINS-A303URR0
is a member of:
ist ein Mitglied von:
on alkio -lta
är en medlem av
SHARP MANUFACTURING
Printed in United Kingdom
Gedruckt in Grossbritannien
Tryckt i Storbritannien
Trykket i Storbritannia
10. R-605N Specifications 18/07/2003 12:06 Page 80
Der Zellstoff zur
100% of the pulp
used in making this
paper comes from
sustainable forests
Herstellung dieses
Papiers kommt zu
100 % aus nachhaltig
bewirtschafteten
Wäldern
100 % tähän
käyttöohjeeseen
käytetystä
puuhiokkeesta tulee
hoidetaan ekologisesti
kestävällä tavalla
2
metsistä, joita
100 % av
pappersmassen i
detta papper
kommer från skogar
som brukas med
hållbart skogsbruk
Page 81
SHARP ELECTRONICS (EUROPE) GMBH.
Sonninstrasse 3
20097 Hamburg
Germany
TINS-A303URR0
is a member of:
ist ein Mitglied von:
on alkio -lta
är en medlem av
SHARP MANUFACTURING
Printed in United Kingdom
Gedruckt in Grossbritannien
Tryckt i Storbritannien
Trykket i Storbritannia
10. R-605N Specifications 18/07/2003 12:06 Page 81
The paper of this
operation manual is
made of 100%
recycled paper
Das Papier dieser
Bedienungsanleitung
besteht zu 100 %
aus Altpapier
Paperi tämän
käsikirjan on
tehty 100 %tä
kierrätettyn paperin
2
Papperet av denna
återanvänt papper
bruksanvisning
göras av 100 %
 Loading...