

Page 1

LCD Monitor Management Software
OPERATION MANUAL
PN-SS21
Page 2

Contents
Introduction 6
Points to note before using e-Signage S ................................................................................................ 6
Trademarks ................................................................................................................................................ 6
How to read this manual ........................................................................................................................... 7
Notation ................................................................................................................................................................. 7
Denitions .................................................................................................................................................. 8
Workow through display of distribution data ....................................................................................... 9
Distribution using SDSS Launcher ...................................................................................................................... 10
System operation precautions ............................................................................................................... 11
Points to note when creating content and programs ........................................................................................... 11
e-Signage S Player A1 limitations ....................................................................................................................... 13
Installation 14
System requirements .............................................................................................................................. 14
Installing e-Signage S ............................................................................................................................. 16
Settings after installation ..................................................................................................................................... 17
Conguring player device settings ...................................................................................................................... 17
Uninstalling e-Signage S ........................................................................................................................ 22
Server Settings 23
WEB Server Settings (Initial Setup Wizard) .......................................................................................... 23
WEB Server Settings ............................................................................................................................... 26
Setting the automatic logout time ........................................................................................................................ 27
Distribution Scheduler ......................................................................................................................................... 27
Logging in
Logging In 29
Logging in to WEB Server ...................................................................................................................... 29
Description of the screen ....................................................................................................................... 30
Toolbar ................................................................................................................................................................ 30
Dashboard........................................................................................................................................................... 30
E
2
Page 3
Contents
Content
Content Folder Management 32
Main window ............................................................................................................................................ 32
Managing content folder groups ............................................................................................................ 33
Content folder group management area ............................................................................................................. 33
Creating a content folder group........................................................................................................................... 34
Managing content folders ....................................................................................................................... 35
Content folder management area ....................................................................................................................... 35
Creating content folders 36
Basic ow for creating a content folder ................................................................................................ 36
Creating a content folder ........................................................................................................................ 36
Editing a content le in a content folder ............................................................................................... 38
Edit Content File window..................................................................................................................................... 38
Files that can be saved in content folders ........................................................................................................... 40
Uploading content les ........................................................................................................................... 41
Uploading les to the “Media” folder ................................................................................................................... 41
Creating a scroll message ...................................................................................................................... 45
Uploading les to the “Scroll Message” folder or “Audio” folder .......................................................................... 48
Downloading content les ...................................................................................................................... 49
Playback Condition Setting 50
Setting playback conditions ................................................................................................................... 50
Program
Program Management 53
Main window ............................................................................................................................................ 53
Managing program groups ..................................................................................................................... 54
Program group management area ...................................................................................................................... 54
Creating a Program Group .................................................................................................................................. 55
Managing programs ................................................................................................................................ 56
Program Management area ................................................................................................................................ 56
E
3
Page 4
Contents
Creating a Program 57
Main window ............................................................................................................................................ 57
Creating programs .................................................................................................................................. 58
Setting the layout ................................................................................................................................................ 58
Assigning content folders .................................................................................................................................... 60
Setting the PIP frame .......................................................................................................................................... 61
Setting the position of the screen ........................................................................................................................ 62
Setting the screen size ........................................................................................................................................ 62
Schedule
Schedule Management 64
Main window ............................................................................................................................................ 64
Managing schedule groups .................................................................................................................... 65
Schedule group management area ..................................................................................................................... 65
Creating schedule groups ................................................................................................................................... 66
Managing schedules ............................................................................................................................... 67
Schedule management area ............................................................................................................................... 67
Creating Schedules 68
Main window ............................................................................................................................................ 68
Schedule creation area ....................................................................................................................................... 69
Creating a schedule ................................................................................................................................ 70
Adjusting an assigned content folder, program, or panel control command ....................................................... 71
Saving a timetable for synchronization ............................................................................................................... 71
Synchronize Timetable ........................................................................................................................................ 72
Panel control commands..................................................................................................................................... 72
Distribution
Distribution 74
Main window ............................................................................................................................................ 74
Distribution data selection area ........................................................................................................................... 74
Panel area ........................................................................................................................................................... 75
Distributing / Scheduling distribution ................................................................................................... 78
Distribution Status .................................................................................................................................. 80
USB Memory / SD Card Distribution 81
E
4
Page 5

Contents
System Log
Viewing the System Log 83
Main window ............................................................................................................................................ 83
Viewing a system log .............................................................................................................................. 84
Outputting a system log (TXT format / CSV format) ........................................................................................... 85
Player
Receiving Schedules and Displaying Programs 87
Client Scheduler ...................................................................................................................................... 87
Launching Client Scheduler ................................................................................................................................ 87
Client Scheduler menu ........................................................................................................................................ 87
Program Viewer ....................................................................................................................................... 95
e-Signage S Player A1 settings .............................................................................................................. 95
e-Signage S Player A1 settings window..............................................................................................................95
Key/Mouse Linkup 98
Key/Mouse Linkup Tool window ............................................................................................................ 98
Launching Key/Mouse Linkup Tool ..................................................................................................................... 98
Key/Mouse Linkup Tool menu ............................................................................................................................. 98
SDSS
SDSS Launcher 103
Appendix
License information for this product 105
Software components ........................................................................................................................... 105
E
5
Page 6

Introduction
Thank you for purchasing LCD Monitor Management Software (e-Signage S).
Points to note before using e-Signage S
• This product has undergone exacting quality control processes prior to shipment. In the unlikely event that a
failure or malfunction occurs, contact your retailer.
• Please understand that SHARP CORPORATION bears no responsibility for errors made during use by the
customer or a third party, nor for any other malfunctions or damage to this product arising during use, except
where indemnity liability is recognized under law.
•
Under copyright law, the use of this product to duplicate, edit or otherwise alter copyrighted material is only
permitted in cases where such duplicated or edited material is for individual or home use.
If material is duplicated and/or edited beyond this scope, and if such duplicated or edited material is used
(except in cases where the user themselves holds the copyright for the object of the duplicated material or
where the user has received permission from the copyright holder), this will constitute a violation of copyright
law and may lead to the copyright holder or other parties claiming compensation for damages. Such use
should therefore be strictly avoided.
When using photo image data, DVD images, TV broadcasts or similar material with this product, the above
uses that constitute copyright violation must be strictly avoided. Using, modifying, or otherwise altering
images of other people without permission constitutes a violation of portrait rights, and must also be strictly
avoided.
• To show TV, DVDs, or similar copyrighted programs and/or material, you must obtain the permission of the
copyright holder or copyright holders.
• Transcribing or duplicating part or all of this manual and/or this software without permission from our
company is not permitted.
•
As a part of our policy of continuous improvement, SHARP reserves the right to make design and
specification changes for product improvement without prior notice.
Trademarks
• Microsoft, Microsoft Edge, Windows, Windows Media, Windows Server, PowerPoint, and Internet Explorer
are either registered trademarks or trademarks of Microsoft Corporation in the United States and/or other
countries.
• Adobe and Flash are either registered trademarks or trademarks of Adobe Systems Incorporated in the
United States and/or other countries.
• Google, Android, and Google Chrome are trademarks of Google LLC.
Names of products and other proper nouns are the registered trademarks or trademarks of their respective
copyright holders.
E
6
Page 7

Introduction
How to read this manual
Notation
• Keyboard keys are indicated with square brackets.
Example: [Shift], [Ctrl]
• Menus, windows, dialog boxes, buttons, and tabs are indicated with square brackets.
Example:
• Items, checkboxes, and option buttons are indicated with quotation marks.
Example: “Coordinate-X”, “Preset Screen Size” option button
• This manual assumes that e-Signage S has been installed in the following folder.
If you have installed the software in a different folder, substitute the other folder as necessary.
C:\Program Files (x86)\SHARP\e-Signage (default)
• The screens and procedures in this manual are examples.
These may vary depending on your monitor, screen settings, operating system, browser, and browser
version.
The content les and fonts in this manual are examples. Not all of these are included with the software.
• This manual does not contain instructions for basic use of Windows or Android.
Click [Save changes].
4
Return to the [Power Options] dialog box.
E
7
Page 8

Introduction
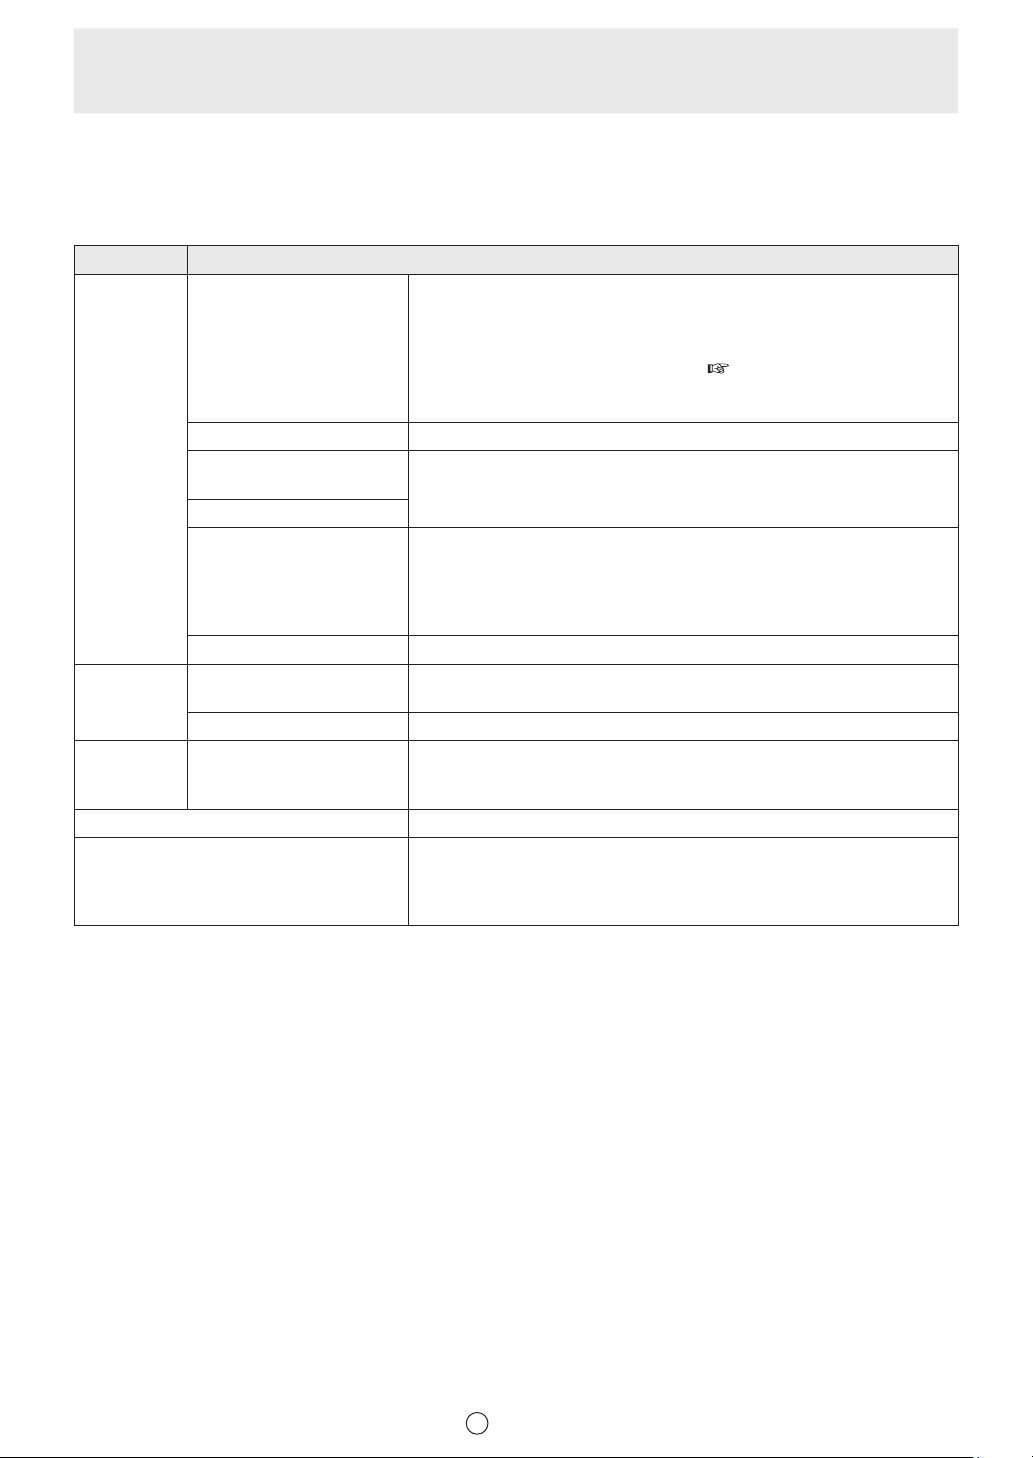
Definitions
This chart provides definitions of terms used in this manual.
Term Definition
Management PC
Player device This is a device that plays content according to the distributed schedule.
Server software Software that is installed on the management PC.
Player software Software that is installed on a player device.
Content (files)
Content folders Folders that contain content files. Panels, programs, and schedules can be assigned.
Playlist
Frame The screen can be divided into multiple sub-screens, each of which is called a frame.
Program
Timetable
Schedule This assigns content folders and programs to the date each is to be played.
Panel Display (LCD monitor on which content data is displayed)
Scroll message
Attached files
Assigning Specifying which files (schedules, etc.) are to be distributed to each panel.
Distribution
Distribution data Content data that is distributed to player devices.
Tenant This is a group by which users, panels, schedules, and programs are managed.
This is used to set the overall screen layout and order of playback of content, and to
create and distribute playback schedules.
Files such as videos, still images, and audio that are played.
These are usually prepared by the user.
A list of content files to be played.
Programs consists of a frame layout and the content folder information assigned to
each frame.
This assigns content folders and programs to the time period each is to be played
during one day.
A message that scrolls on the screen.
Up to two scrolling messages can be displayed with this software.
A collective term for image and other files that are required when displaying files such
as HTML files.
Sending content data created on a management PC to player devices. In the SHARP
e-Signage S Standalone Edition, the management PC and the player device are
same.
E
8
Page 9
Introduction
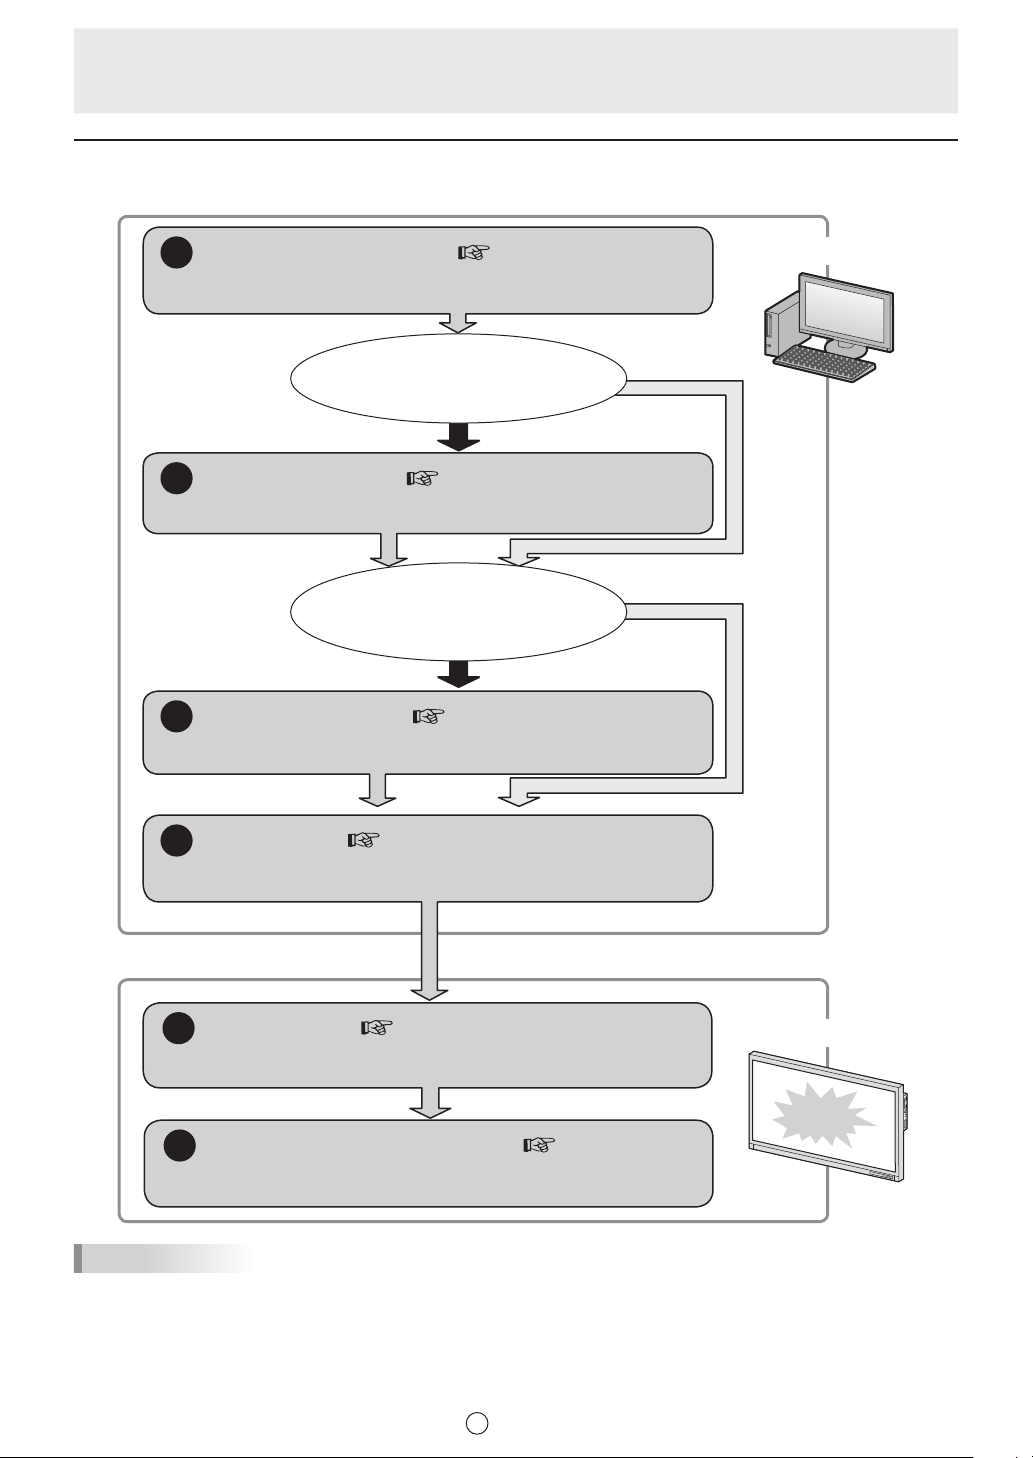
Workflow through display of distribution data
This chart indicates the workflow from selection of content to be displayed through display of the content on player devices.
Create content folders ( page 32)
1
Create folders and save prepared content in the folders.
Create a layout for
multiple content files and display the
content in the layout
Yes
Create a program ( page 53)
2
Create a screen layout and assign content folders to each frame.
Display on a specified day at a
specified time
Yes
Create a schedule ( page 64)
3
Set the date and time when each content folder or program will play.
Management PC*
No (full-screen display)
No (display all day)
1
Distribution ( page 74)
4
Distribute the data for distribution that you created to player devices.
Receive data ( page 87)
5
Deliver received distribution data to the e-Signage Client Scheduler.
Display the distribution data ( page 95)
6
Display the data that was distributed.
TIPS
Client Scheduler manages program viewers so that received distribution data are played at the scheduled time.
*1 In the SHARP e-Signage S Standalone Edition, the management PC and the player device are same.
Player device*
Distribution data
displayed
1
E
9
Page 10
Introduction
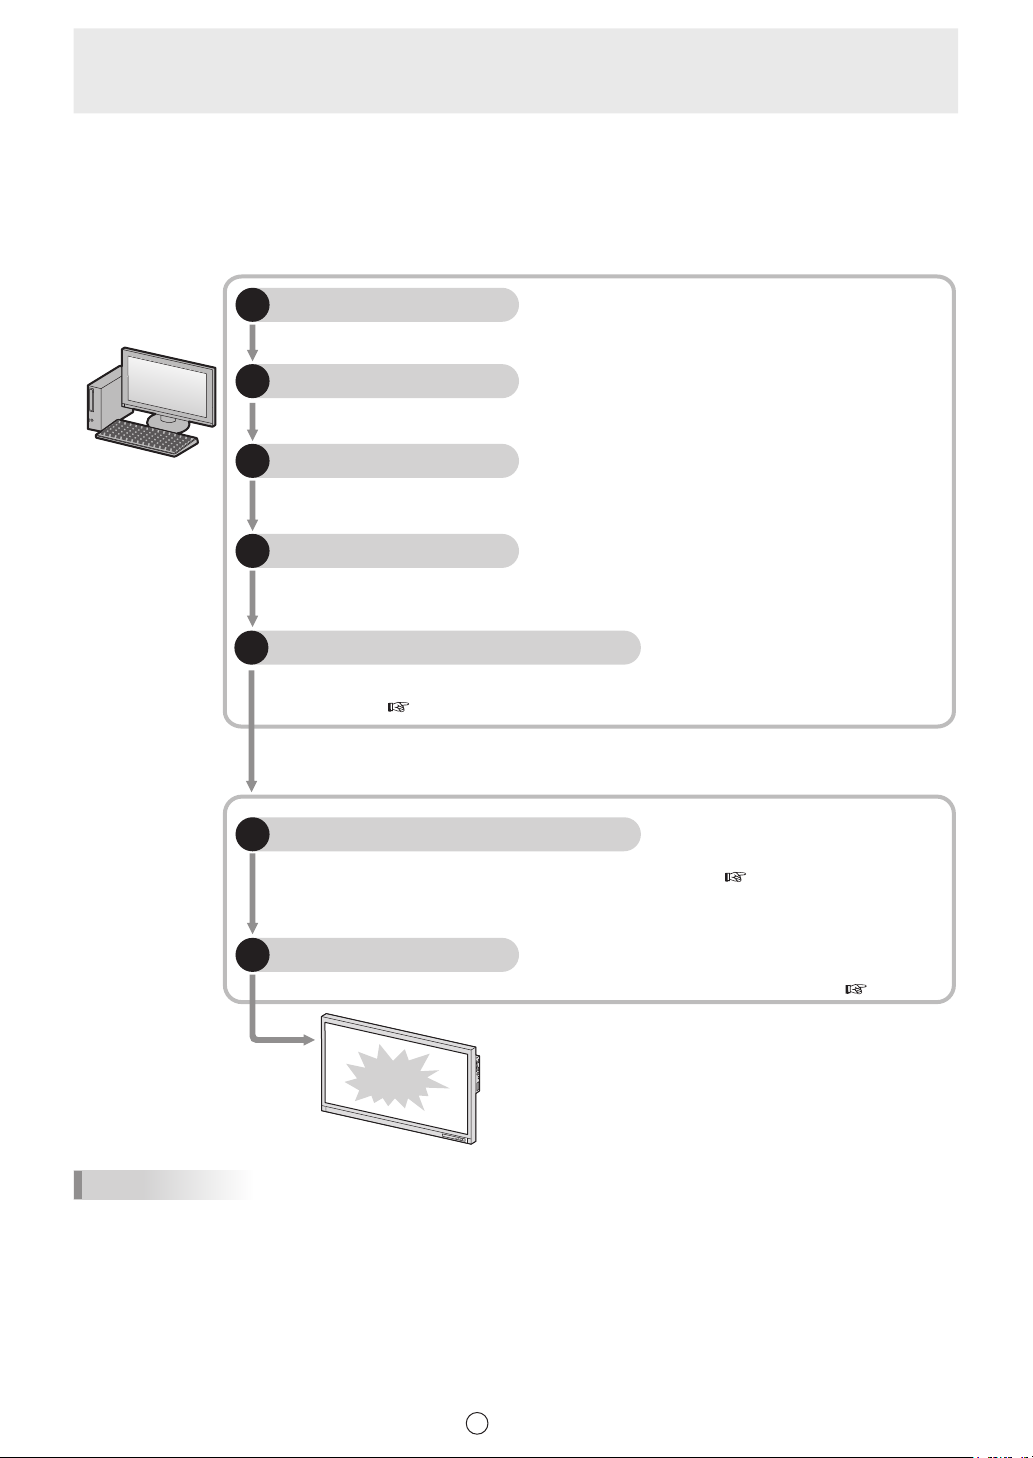
Distribution using SDSS Launcher
The sequence of steps from program creation to display of programs on a panel is indicated below.
For information on SDSS Launcher, see page 103.
Create program
1
Lay out content prepared in Program Editor and create a program.
Create timetable
2
Assign the hour of the day when a program created in Timetable Editor will be displayed.
Create schedule
3
Management PC*
1
Assign the dates when daily timetables you have created in Schedule Editor will be displayed.
Upload
4
Upload schedules that you have created to e-Signage S on the management PC.
Distribution Schedule
5
Log in to the management PC using your browser, and schedule distribution of uploaded data to
player devices. ( Page 74)
Receive data
6
Deliver received schedules to the e-Signage Client Scheduler. ( Page 87)
Program displayed
7
Program Viewer displays programs when instructed to do so by Client Scheduler. ( Page 95)
Program
displayed
Player device*
TIPS
Client Scheduler manages program viewers so that received schedules are played at the scheduled time.
1
*1 In the SHARP e-Signage S Standalone Edition, the management PC and the player device are same.
E
10
Page 11

Introduction
System operation precautions
Points to note when creating content and programs
Before operating the system, run a test using the actual content to be displayed on the panel. If the computer
does not have sufficient processing power, content may not be play correctly.
• Playing videos
Playing multiple videos simultaneously is not recommended.
Windows Media Player generally places a heavier load on the CPU than Flash Player (although this
depends on the content).
TIPS
• For some content, it may be necessary to install a codec or player software. For codecs and software that
are not indicated as being operable on the installed operating system, test operation prior to introduction.
• Flash content
Take care when playing content that makes frequent use of image transparency processing (image fade-in/
fade-out), as this may place an extremely heavy load on the CPU.
• Enlarging/reducing still images and video
As image size and display size increase, so does the load placed on the CPU. CPU load also increases
when images are displayed at an enlarged or reduced size. Keep the size of the content display area (frame
size) as small as possible. Content should be created using the same image size as the display size.
• Still image slideshow
Using slideshow for still images will increase the load on the CPU. Effects depend on the performance of the
video card.
• Scroll messages content
Displaying scroll messages requires signicant CPU processing power. When using scroll messages,
programs should be tested by actually displaying them before operation.
• Making the background color transparent will increase the load.
• Scroll messages with a larger display area place a larger load on the computer. Do not make the scroll
message display area unnecessarily large.
• If there are many characters in a scroll message line, the display may become distorted. In this event,
start a new line. (Up to 100 characters per line is recommended.)
• PowerPoint
To display PowerPoint content, e-Signage S requires PowerPoint Viewer. Even if Microsoft PowerPoint is
installed on your computer, PowerPoint Viewer must be installed separately. If the 64-bit version of Ofce is
installed on your computer, you will not be able to install PowerPoint Viewer.
Set the PowerPoint le to play repeatedly, and use automatic slideshow.
PowerPoint Viewer is not able to display multiple les at the same time. Do not assign PowerPoint les to
multiple frames in the same program.
When PowerPoint content is displayed, you cannot use a mouse or other tool to click other display frames.
It takes time for PowerPoint Viewer 2010 to start playback. Time is especially required to start the rst
playback after the computer is started. Be sure to allow time for startup in the overall playback time.
Although it is possible to play les with a .pptx or .ppsx extension using PowerPoint Viewer 2007, it will take
time to start playback. It is recommended that les with a .ppt or .pps extension be used for playback on
PowerPoint Viewer 2007.
E
11
Page 12

Introduction
Operation in a browser
Do not use the [Back] key of your browser. This may cause the browser to stop operating normally.
Do not select the “Prevent this page from creating additional dialogs” checkbox that appears in the browser.
Confirmation screens may not appear, and some actions such as deleting may not be possible. If this is
inadvertently selected and messages do not appear, restart your browser.
Continuous operation of player device
Player devices are not designed for continuous 24-hour-a-day operation. Be sure to shut down and restart
player devices every day. (Refer to [Power Control] tab on page 90 )
Continuous operation of management PC
The management PC should be operated continuously no more than one week.
Computer internal clock
The software executes schedules based on the computer’s internal clock. You should ensure that your
computer’s internal clock is always accurate by such means as synchronizing it with an internet time server.
Accuracy of program display time
Program display is controlled by a timer that starts at 0 seconds every minute. Programs can only be switched
on the minute.
Note that there may be a delay before content is actually displayed. This depends on the time taken to launch
applications that display content and the time taken to load content files.
Backup
e-Signage S does not have a data backup function. Regularly back up the tenant data folder (under C:\
ProgramData\SHARP\e-Signage\GroupData\) according to the data update frequency during operation.
Daisy chain configuration
e-Signage S cannot send different panel control commands (panel power ON/OFF and panel input source
selection commands) to LCD Monitors (PN Series) connected in a daisy chain.
Still images
Displaying a still image in the background or in a frame in the same position for a long time may leave a
residual image on the monitor. When creating programs, change still images and layouts at set intervals or take
other measures to avoid this problem.
E
12
Page 13
Introduction
e-Signage S Player A1 limitations
The following limitations apply to e-Signage S Player A1 (for Android player devices). Note these limitations
before using this player.
Function e-Signage S Player A1 limitations
Content File types that cannot be
Distribution Storage required for
Player device
settings
Key/Mouse Linkup Tool Not supported.
Client Scheduler Not included.
used
Screen size Maximum 1920 × 1080 or 1080 × 1920
Specification of player
device path
Screen division by PIP
Still image slideshow
(Transition Direction)
Playing videos
distribution (player device)
Player device power ON/OFF
Default FTP port number 2121
The following file types cannot be used on e-Signage S Player A1.
• PowerPoint
• Flash
• Executable file
• Video files in unsupported formats (
• Signage widget content file
• Conditional content file
Cannot be used.
Usable slideshow effects are different on e-Signage S Player and
e-Signage S Player A1.
On e-Signage S Player A1, the following slideshow effects can be used.
[Wipe / Expand / Slide / Fade / Round / Perspective / Pulse / Rotate /
Transform / Random]
You cannot play multiple videos simultaneously.
(Size of distributed file) x 3 + 200 MB
Cannot be used.
If changed from the default setting, the port number must be set within
the range 1024 to 32000.
The Client Scheduler functions “View the Log”, “Pause to View
Program”, “Delete Schedule Information”, and “Get data from
management PC” cannot be used.
page 40)
• After mounting or unmounting a USB memory (USB flash drive) or SD memory card, restart e-Signage S
Player A1 before distributing data. Data distribution may fail if attempted without restarting.
• Only one USB memory or SD memory card can be used at a time.
• If you uninstall e-Signage S Player A1 from the player device, all settings and distributed data will be lost.
• e-Signage S recognizes content types by the file extension. Even if a content type is indicated as being
usable, it may not play correctly due to an unsupported codec or other reason. Verify that video and audio
files play correctly in advance.
•
Scrolling messages may not scroll smoothly in some instances. Check operation before placing signage in operation.
• The screen may flicker when changing programs or adjusting the clock on a player device.
• If a large amount of data has been distributed, it may take time to change programs.
• Changing of played data will occur when the time on the player device reaches 12:00 AM. Even if the same
data will be played, playback will restart from the beginning of the data at 12:00 AM.
E
13
Page 14
Installation
This chapter explains the system requirements and procedures for installing e-Signage S. Be sure to read this
chapter before using the software.
1
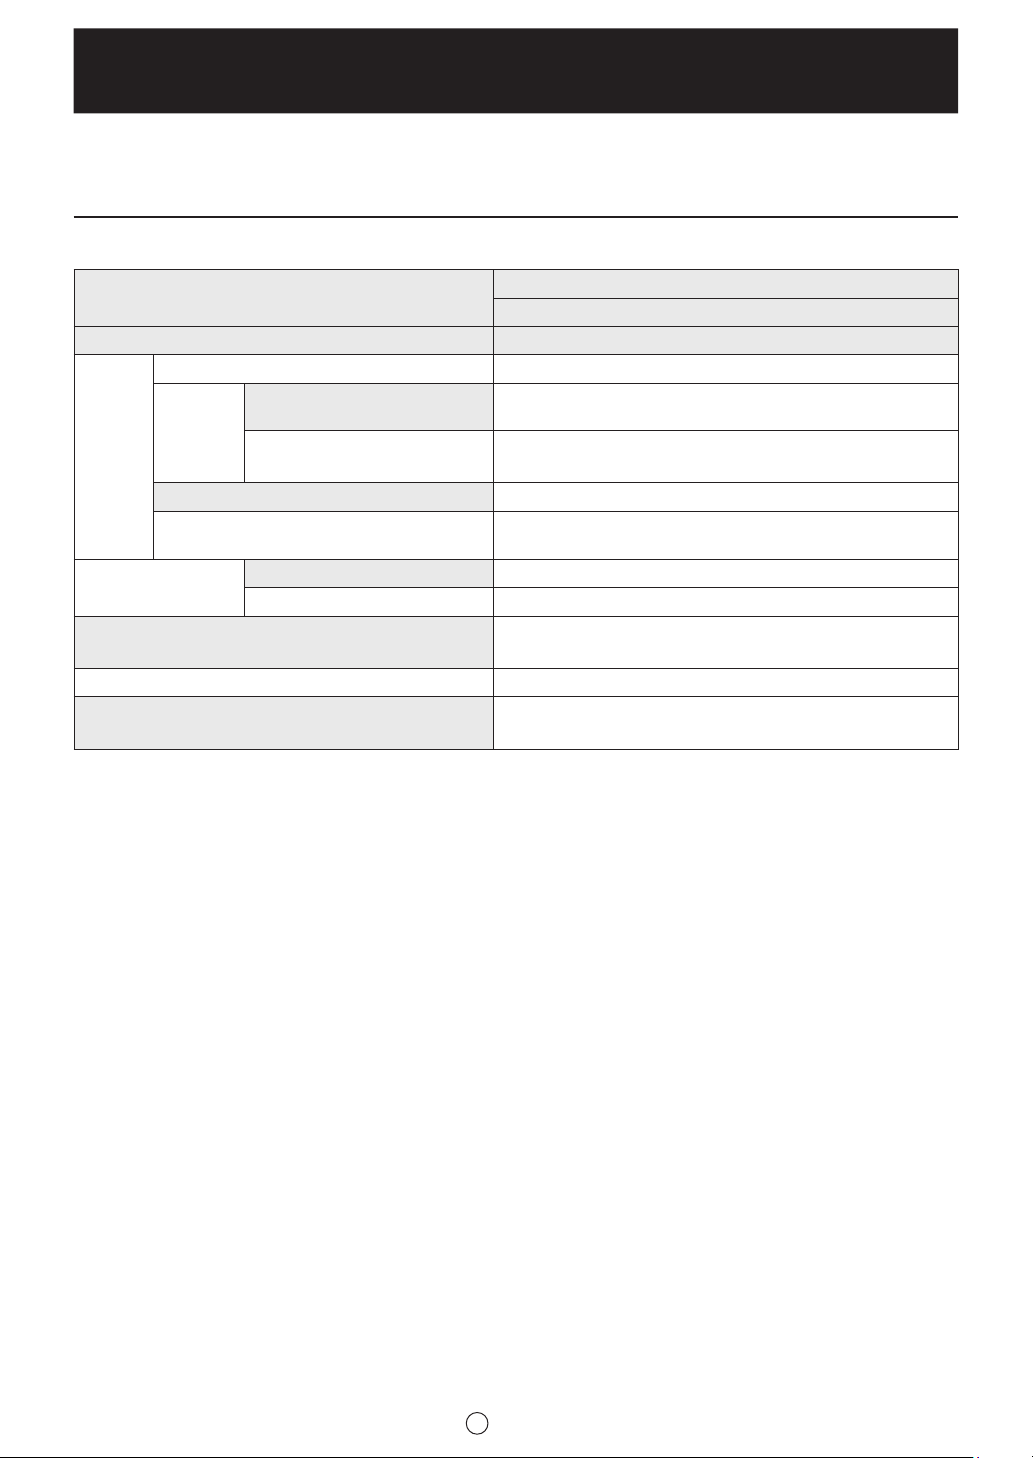
System requirements
*
Name
Installed computer Management PC / Player device
CPU 1.6 GHz or higher
Operating
Computer
Monitor
(for management)*
Compatible browsers (operation window)
Panel (for player device) *
Other software
system *
Memory 2 GB or higher
Hard disk
Microsoft Windows 7/8.1/10*
2
Microsoft Windows Server 2008 /
2008 R2 / 2012 / 2012 R2 / 2016
Resolution 1280 × 1024 dots or higher
4
Number of colors Full color
5
3
500 MB or more of free space
(additional space required to save data)
Microsoft Internet Explorer 11 / Microsoft Edge /
Google Chrome
LCD Monitor (PN Series)
Microsoft Internet Explorer / Microsoft PowerPoint Viewer /
Microsoft Windows Media Player*
Turn off user account control on the player device. *
*1 The minimum requirements for the operating system to operate must also be met. Some content may require
performance greater than that indicated to play correctly.
*2 Applicable versions are the 32-bit version and 64-bit version.
*3 Use Windows 10 in desktop mode.
*4 The monitor of the computer used to create/edit programs and schedules.
*5 The player device can control the panel. To control the panel, the player device and the panel must be connected with an
RS-232 cable, or the panel must be connected to the LAN.
For the specifications of the panel and procedures for connection and settings, see the panel’s operation manual.
*6 Some content may require installation of a codec or player software. For codecs and software that are not indicated as
being operable on the installed operating system, test operation prior to introduction.
*7 How to turn off user account control on the player device.
In Windows 7
(1) Select “User Accounts and Family Safety” in Control Panel.
(2) Select “User Accounts”.
(3) Select “Change User Account Control settings”.
(4) Move the slider to the bottom.
In Windows 8.1/10
(Caution)
Note that when this setting is selected, the Windows Store application will not run.
After you install e-Signage S Player, you can turn off user account control from Client Scheduler.
(1) Right-click the e-Signage Client Scheduler icon, and click [Setting] in the pop-up menu to display the [Setting of Client
Scheduler] dialog box.
(2) Click the [UAC Settings] tab and click [Turn off User Account Control].
(3) A confirmation message will appear. Click [OK].
(4) The [User Account Control] dialog box will appear. Click [Yes].
(5)
A message indicating that the user account control has been disabled will appear. Click [OK] to restart the computer.
SHARP e-Signage S Standalone Edition
PN-SS21
○
○
6
/ Adobe Flash Player
7
E
14
Page 15

Installation
TIPS
• Flash Player, Windows Media Player and PowerPoint Viewer must be installed on player device.
•
If a message prompting you to install a program appears because the program is not installed or the wrong
version is installed, download and install the program from an appropriate website.
• For some content, it may be necessary to install a codec or player software. For codecs and software whose
operation has not been demonstrated on the installed operating system, check operation prior to installation.
E
15
Page 16

Installation
Installing e-Signage S
• You must log in as an administrator to install the software.
Start your computer.
1
Exit all applications.
2
Launch the e-Signage S setup program (Setup.exe).
3
• Double-click Setup.exe to launch the setup program.
• If a security warning (“The publisher could not be verified.”) appears during the installation, click [Run].
If the [User Account Control] window appears, click “Yes”.
In the [Welcome to the InstallShield wizard...] window, click [Next].
4
The software license agreement will appear.
5
Read the entire software license agreement.
If you agree to the terms of the agreement, select the “I accept the terms of the license
6
agreement” option button, and click [Next].
Follow the instructions on the screen to complete the installation.
7
If a dialog box prompting you to restart appears after installation is nished, click [Yes].
8
E
16
Page 17

Installation
Settings after installation
Double-click the e-Signage S shortcut icon on the desktop. The server settings window appears. ( Page 23)
Configuring player device settings
Once the installation is complete, change the settings of the player device before using e-Signage S.
Auto login settings
If the player device is to be used without an operator, enable Windows auto login.
From the Windows Taskbar, click [Start] - [All Programs] - [Accessories] - [Command Prompt].
1
In Windows 8.1 or 10, press the [Windows] key and [X] key at the same time, and click
[Command Prompt] in the context menu.
The [Command Prompt] window will appear.
Type in “control userpasswords2” (without the quotation marks) and press the [Enter] key.
2
If the [User Account Control] window appears, click [Continue].
3
The [User Accounts] dialog box will appear.
Clear the “Users must enter a user name and password to use this computer.” checkbox.
4
Click [OK].
5
In the [Automatically Log On] window, enter the “User Name” and “Password”, and click [OK].
6
Type in “exit” and press the [Enter] key.
7
E
17
Page 18

Installation
Screen saver settings
Disable the screen saver so that it does not appear on the panel when distributed content is played.
• In Windows 7 or 8.1
Right-click on an empty area of the desktop, and select [Personalize] - [Screen Saver] from the
1
menu that appears.
The [Screen Saver Settings] dialog box will appear.
Select “(None)” from the “Screen saver” list.
2
Click [OK].
3
• In Windows 10
Right-click on an empty area of the desktop, and select [Personalize] - [Lock screen] - [Screen
1
Saver] from the menu that appears.
The [Screen Saver Settings] dialog box will appear.
Select “(None)” from the “Screen saver” list.
2
Click [OK].
3
E
18
Page 19

Installation
Power Management
Adjust settings so that the panel and hard disk do not turn off or enter system standby while distributed content
is playing.
• In Windows 7
From the Windows taskbar, select [Start] - [Control Panel] - [System and Security] - [Power
1
Options].
The [Power Options] dialog box will appear.
Click “Show additional plans”, select “High performance”, and click [Change plan settings].
2
Select “Never” from the “Turn off the display” and “Put the computer to sleep” pull-down
3
menus.
Click [Save changes].
4
Return to the [Power Options] dialog box.
Close the [Power Options] dialog box by clicking the button in the upper right corner
5
of the window.
• In Windows 8.1
Press the [Windows] key and [C] key at the same time, and click [Settings] - [Control Panel] -
1
[System and Security] - [Power Options].
The [Power Options] dialog box will appear.
Select “High performance” and click [Change plan settings].
2
Select “Never” from the “Turn off the display” and “Put the computer to sleep” pull-down
3
menus.
Click [Save changes].
4
Return to the [Power Options] dialog box.
Close the [Power Options] dialog box by clicking the button in the upper right corner
5
of the window.
• In Windows 10
Press the [Windows] key and [X] key at the same time, and then select [Control Panel] - [System
1
and Security] - [Power Options] from the context menu.
The [Power Options] dialog box will appear.
Click “Show additional plans”, select “High performance”, and click [Change plan settings].
2
Select “Never” from the “Turn off the display” and “Put the computer to sleep” pull-down menus.
3
Click [Save changes].
4
Return to the [Power Options] dialog box.
Close the [Power Options] dialog box by clicking the button in the upper right corner of the
5
window.
E
19
Page 20
Installation
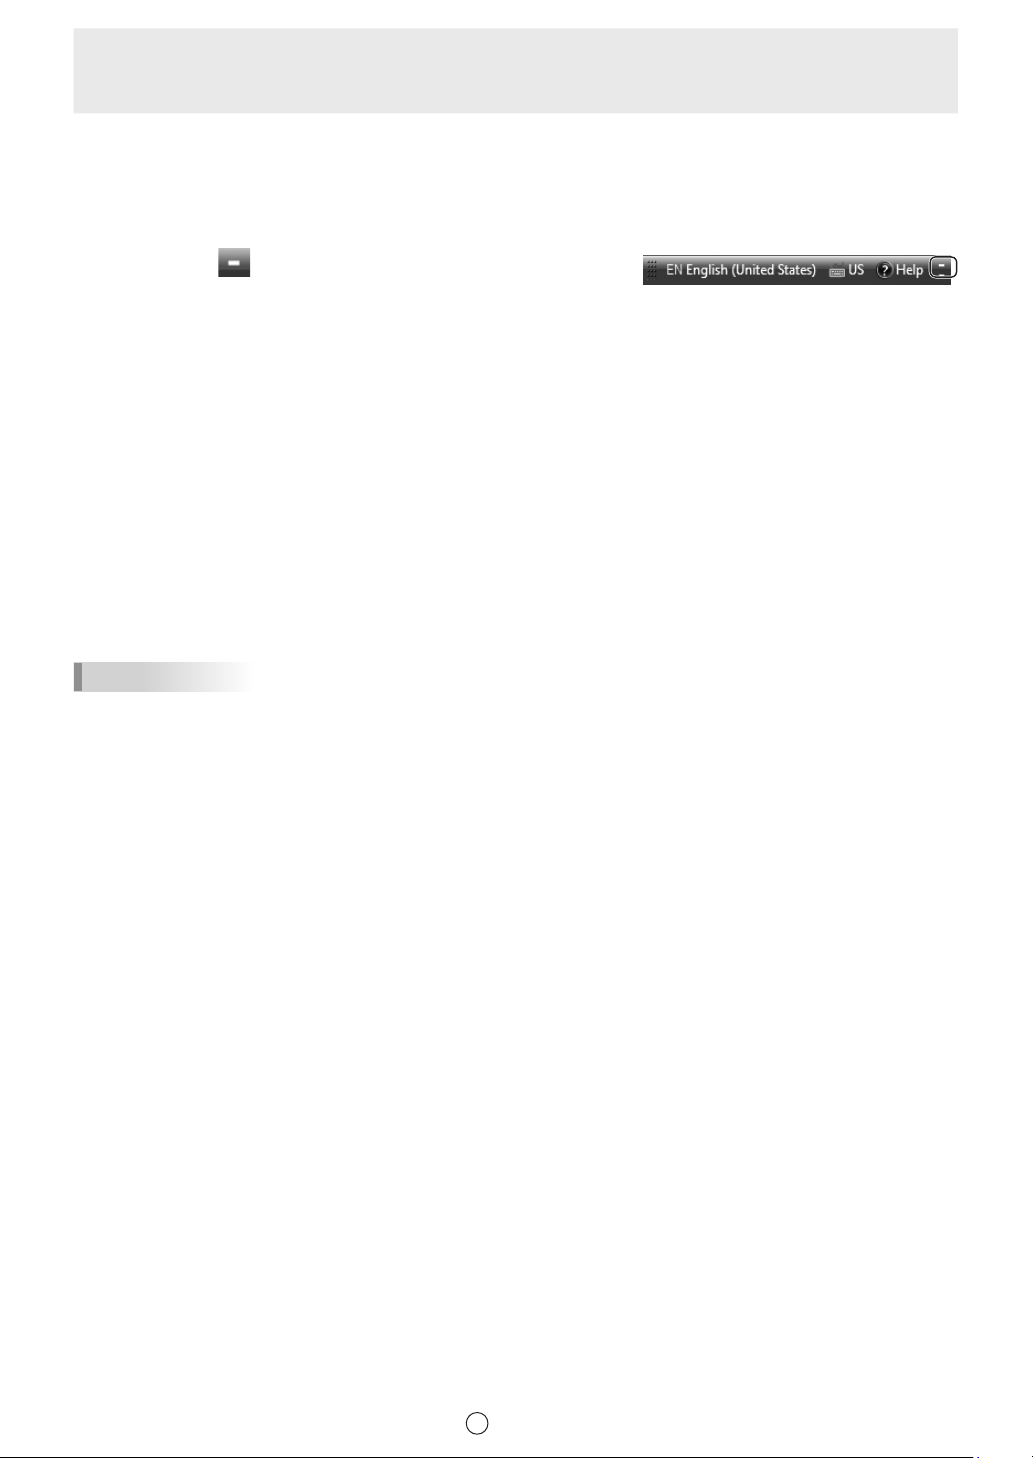
IME toolbar settings
Move the IME toolbar into the taskbar so that it does not appear when distributed content is being played.
Right-click on the IME toolbar and click [Minimize] in the menu that appears.
1
Or click
Notification settings (Windows 10 only)
Adjust the settings so that notifications from applications are not displayed when distributed content is being
played.
Press the [Windows] key and [A] key at the same time, and enable “Quiet hours” in ACTION
1
CENTER.
Windows Update settings
Set Windows Update so that it does not update automatically and display popup messages (dialog boxes, etc.)
while distributed content is being played.
.
TIPS
If you have disabled automatic updates, be sure to check the Windows Update website (http://windowsupdate.
microsoft.com/) regularly and download and install updates manually. Not installing the latest updates is a
security risk and may also lead to performance related issues.
• In Windows 7 / 8.1
Windows 7: From the Windows Taskbar, click [Start] - [Control Panel] - [System and Security] -
1
[Turn automatic updating on or off].
Windows 8.1: Press the [Windows] key and [C] key at the same time, and click [Settings] -
[Control Panel] - [System and Security] - [Turn automatic updating on or off].
The [Change settings] dialog box will appear.
Select “Never check for updates (not recommended)” from the “Important updates” menu.
2
Click [OK].
3
If the [User Account Control] window appears, click “Yes”.
4
The [Change settings] dialog box will close.
E
20
Page 21

• In Windows 10
Press the [Windows] key and [X] key at the same time, and click [Command Prompt] in the
1
context menu.
Type in “gpedit.msc” and press [Enter].
2
If the [User Account Control] window appears, click [Continue].
3
In the tree on the left side of the [Local Group Policy Editor], click [Computer Conguration] -
4
[Administrative Templates] - [Windows Components] - [Windows Update].
Double-click [Congure Automatic Updates] on the right side of the [Local Group Policy
5
Editor].
The [Configure Automatic Updates] dialog box will appear.
Select the “Disabled” option button and click [OK].
6
Installation
Click the button in the upper right corner to close the [Local Group Policy Editor] dialog
7
box.
Type “gpupdate” at the [Command Prompt] and press the [Enter] key.
8
Make sure that the messages “User Policy update has completed successfully.” and “Computer
9
Policy update has completed successfully.” appear, and then click the
right corner to close the [Command Prompt] dialog box.
TIPS
In Windows 10 Home Edition, Windows Update cannot be disabled.
Resident application settings
Adjust the settings of resident applications so that they do not display popup messages (dialog boxes, etc.)
while programs are playing.
button in the upper
E
21
Page 22

Installation
Uninstalling e-Signage S
• Uninstalling the server software will not delete any tenants or users that have been created or data that was
uploaded to the server. After you reinstall the server software, you will be able to use the data again.
Start your computer.
1
Exit all applications.
2
Launch the e-Signage S setup program (Setup.exe).
3
• Double-click Setup.exe to launch the setup program.
• If a security warning (“The publisher could not be verified.”) appears during the installation, click [Run].
If the [User Account Control] window appears, click “Yes”.
Select the “Remove” option button and click [Next].
4
Click [Yes].
5
Uninstallation will start.
TIPS
If Distribution Scheduler, Client Scheduler, or HTTP Server is already running, a message will appear.
In this case, click [Yes]. Distribution Scheduler, Client Scheduler, or HTTP Server will be forcibly
terminated and uninstallation will continue.
Click [Finish].
6
This completes uninstallation.
E
22
Page 23
Server Settings
After installing e-Signage S, configure the server settings. The settings that must configured depend on the
software you installed.
WEB Server Settings (Initial Setup Wizard)
Double-click the e-Signage S shortcut icon on Desktop.
1
Configuration Tool will launch. When launching the tool for the first time, follow the instructions in the
setup wizard to configure the WEB server.
From the taskbar, click [Start] - [All Programs] - [SHARP e-Signage S] - [Server Management Tool].
TIPS
•
After initial setup has been completed, the dashboard screen ( page 30) will appear when you
click the e-Signage S shortcut icon.
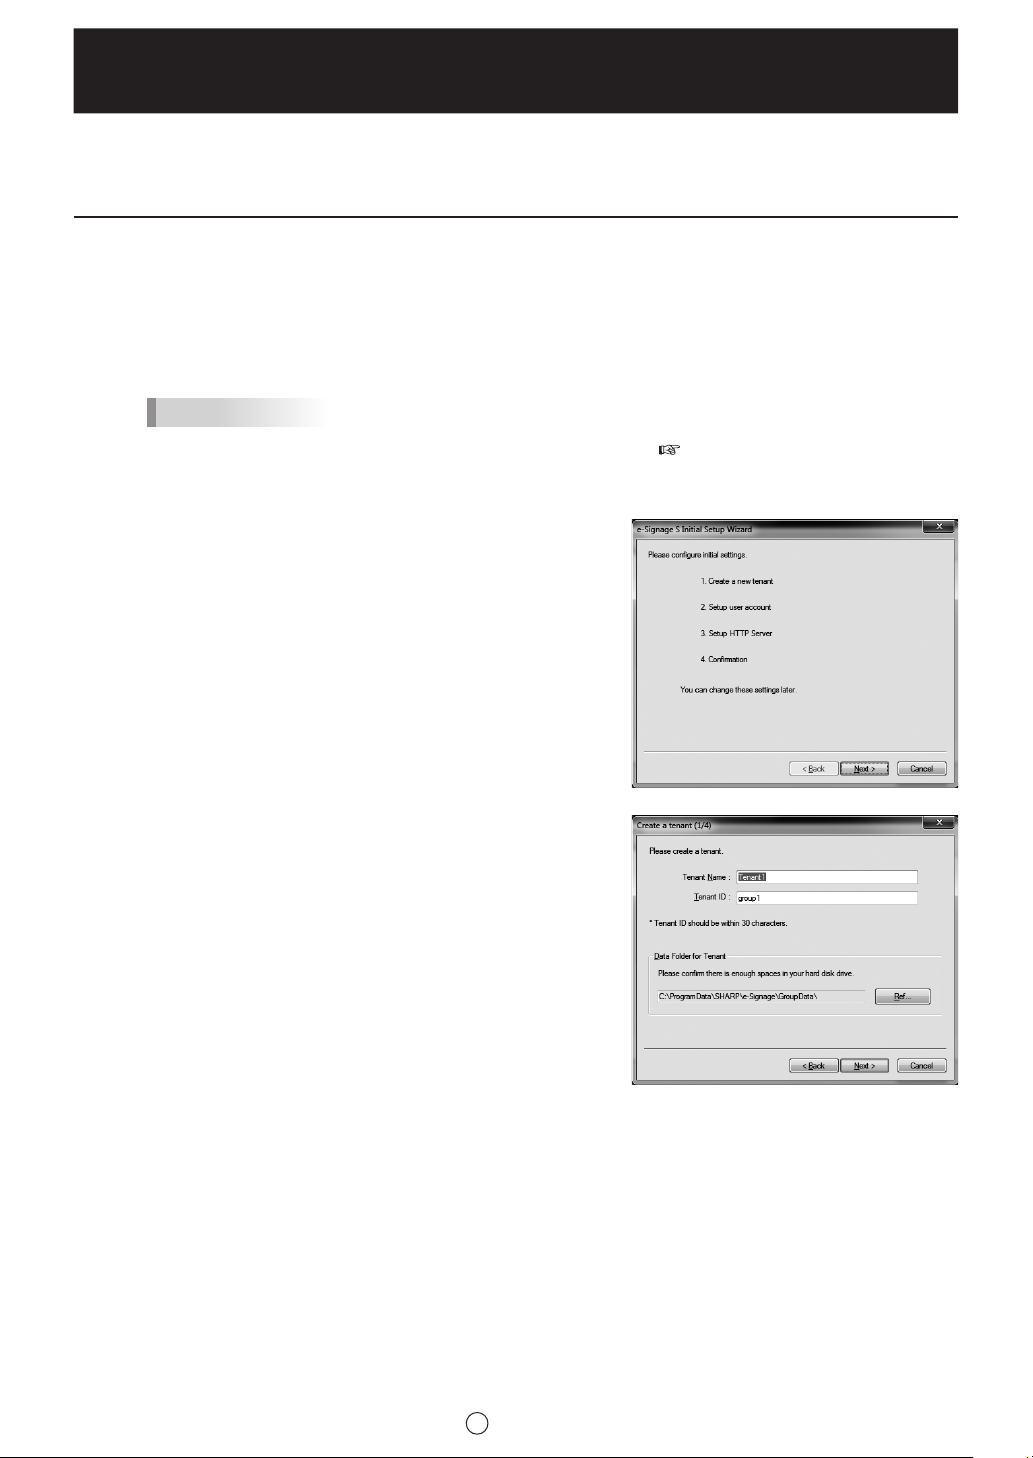
Click [Next].
2
Create a tenant.
3
Create a tenant that will be used to manage users,
panels and schedule data. Enter a tenant name and
tenant ID (up to 30 alphanumeric characters).
“Data Folder for Tenant”
This folder contains the user, panel and schedule data.
To use a different folder, click [Ref] and specify the folder.
When you have finished entering, click [Next].
E
23
Page 24
Server Settings
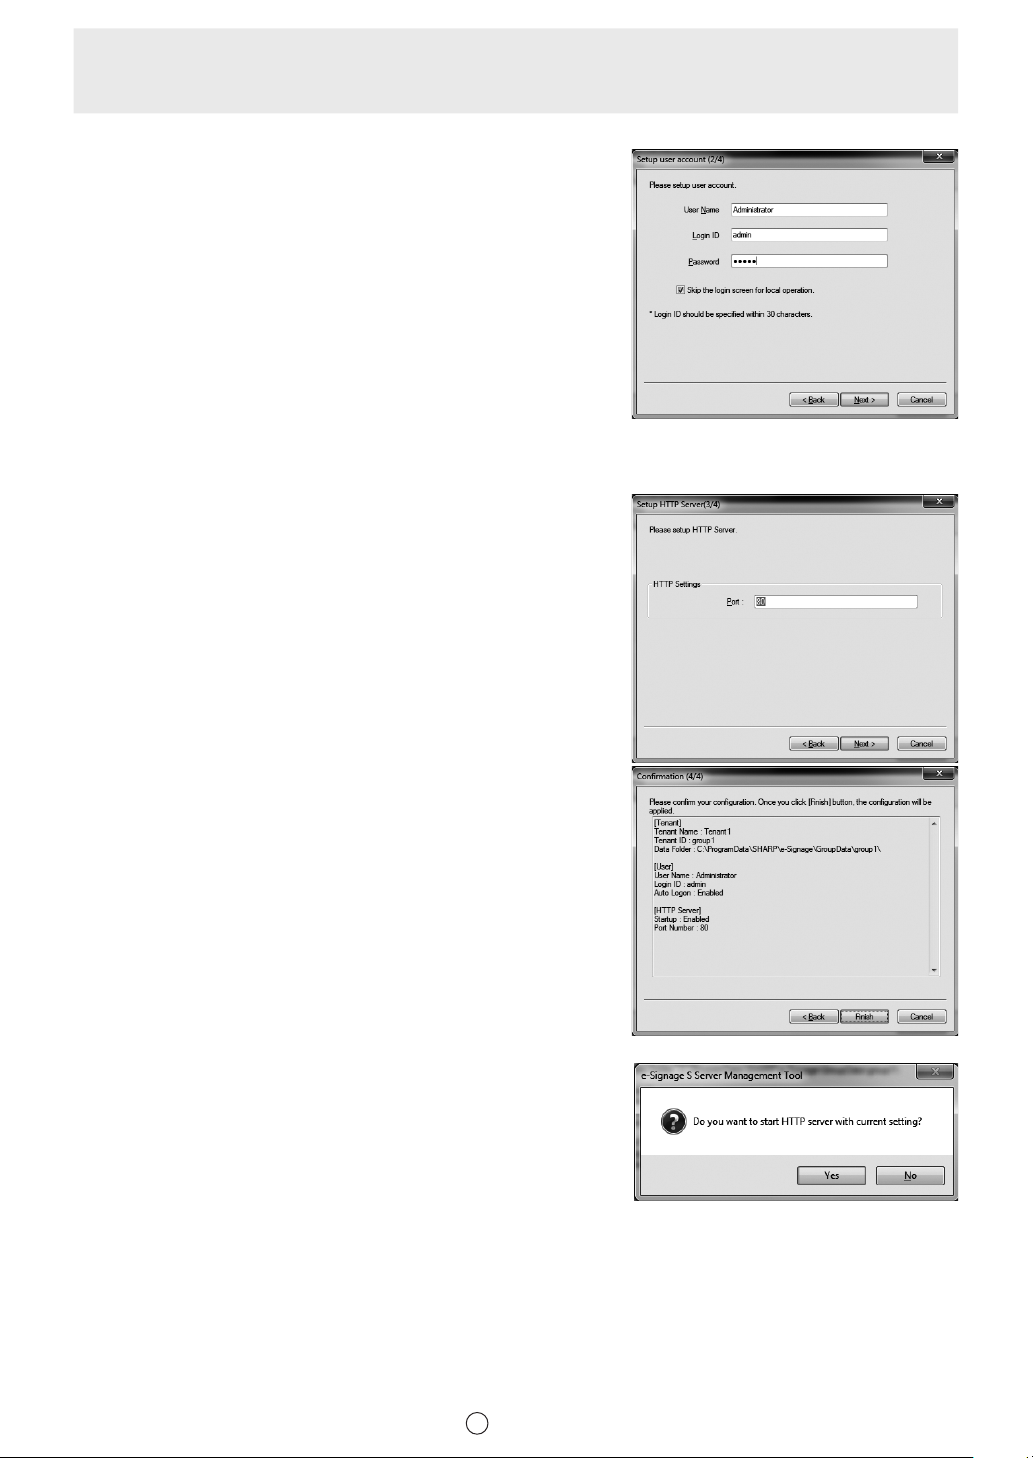
Register an initial user.
4
Register user information for server login.
Enter a user name, login ID (up to 30 alphanumeric
characters) and password (up to 30 alphanumeric
characters).
To skip the login screen when starting, select the “Skip
the login screen for local operation” checkbox.
When you have finished entering, click [Next].
Congure HTTP Server setting.
5
Set the port number.
When you have completed the settings, click [Next].
Review the settings.
6
The settings are shown in the window. To finalize the
settings, click [Finish]. To make changes, click [Back].
If you need to make changes after finalizing the settings,
you can use Server Management Tool.
After checking the settings, click [Finish].
The e-Signage S Server Management Tool window will
appear.
Click [Yes].
7
E
24
Page 25
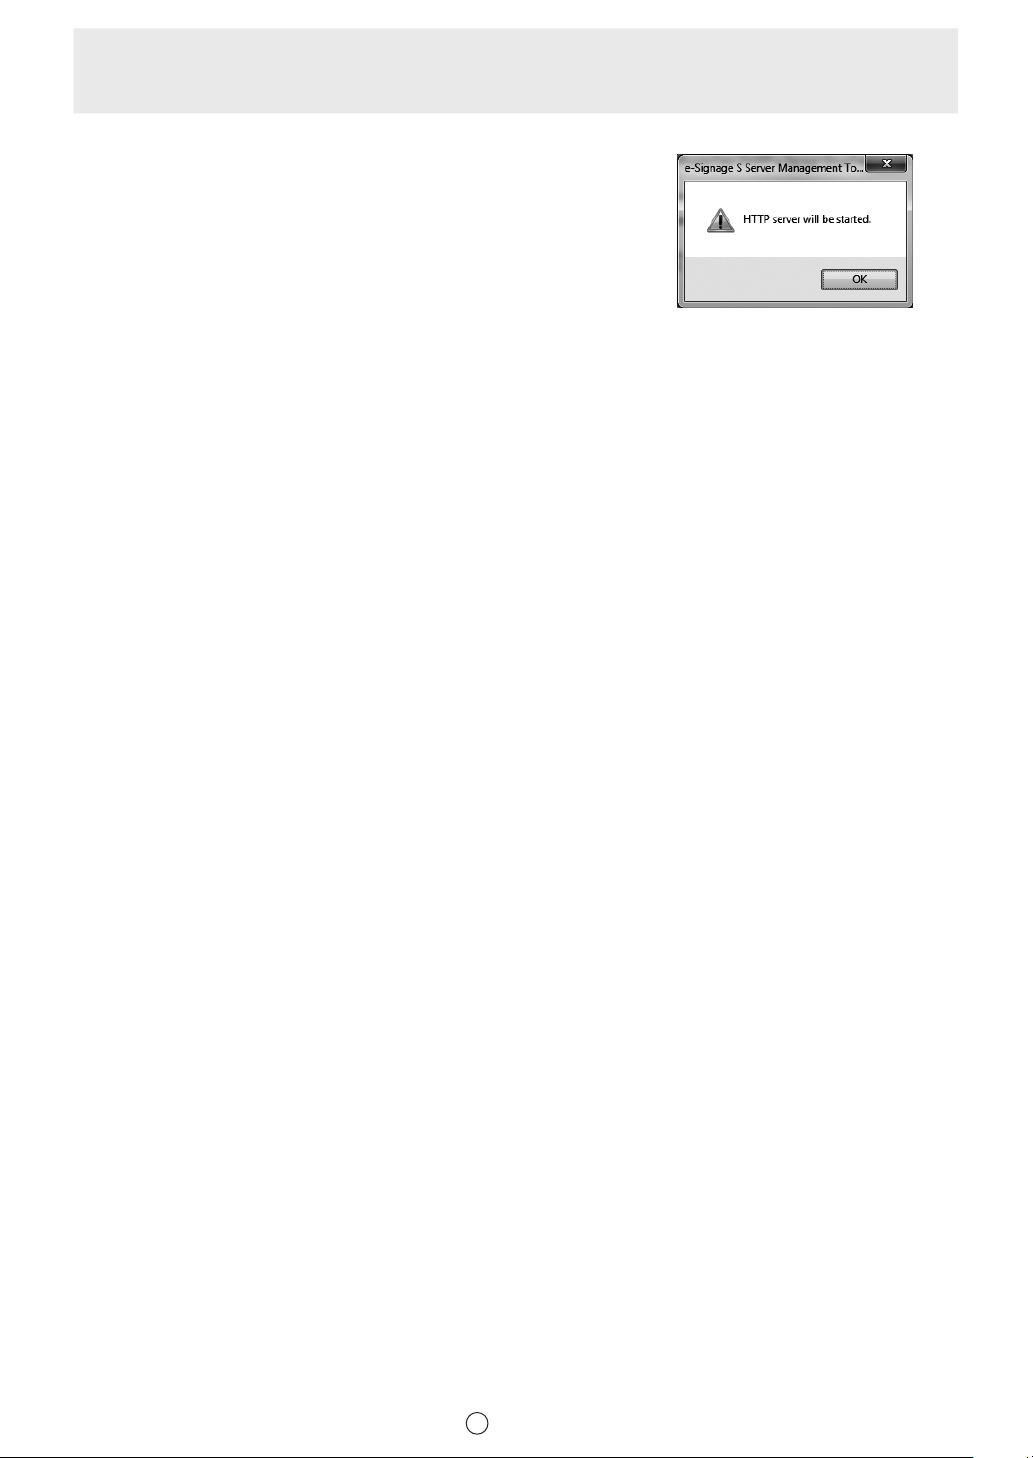
Click [OK].
8
HTTP Server will launch.
Server Settings
E
25
Page 26
Server Settings
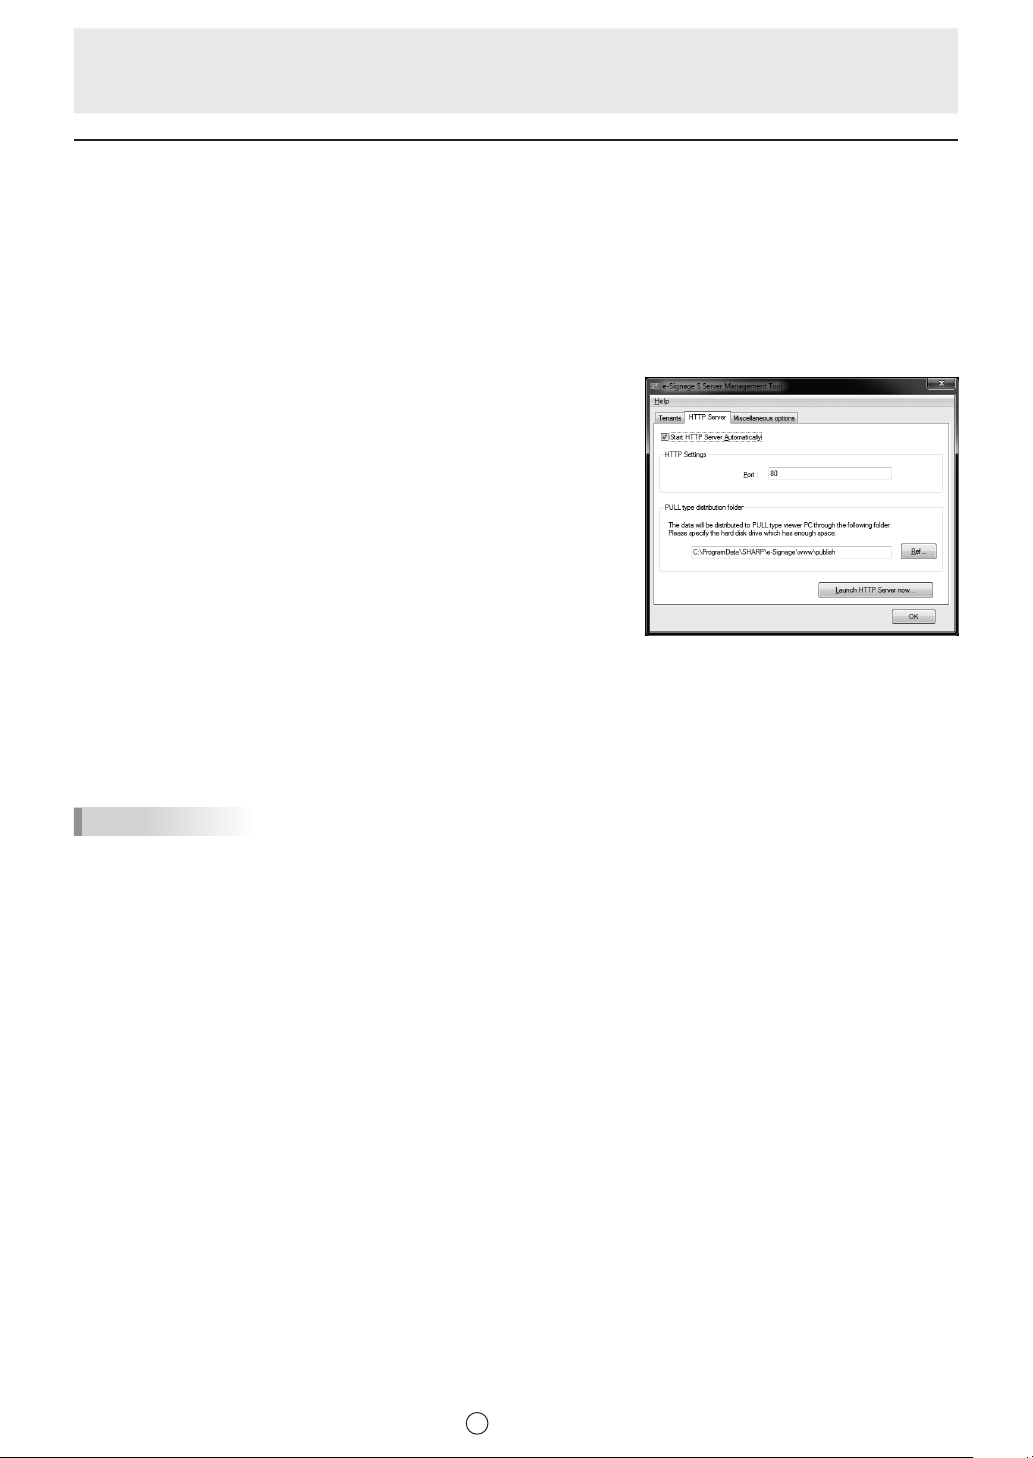
WEB Server Settings
From the Windows taskbar of the management PC, click [Start] - [All Programs] - [SHARP
1
e-Signage S] - [Server Management Tool].
Configuration Tool will launch and e-Signage S Server Management Tool window will appear.
Click the “HTTP Server” tab of the Server Management Tool window.
2
Check the “Start HTTP Server Automatically”
3
checkbox.
HTTP Server will automatically launch when the
management PC is started.
Enter a port number in “HTTP Settings”.
4
80 is set by default.
Click [Ref] in “PULL type distribution folder” and
5
specify a folder.
Set the folder that will be used to store the distribution
data for PULL type distribution.
Click [Launch HTTP Server now].
6
HTTP Server will launch.
TIPS
Server programs of the WEB Server will run as user processes and cannot be run as services. Log in to
Windows using a user account with administrator privileges, and use WEB Server programs (HTTP Server and
Distribution Scheduler) that launch from startup.
E
26
Page 27
Server Settings
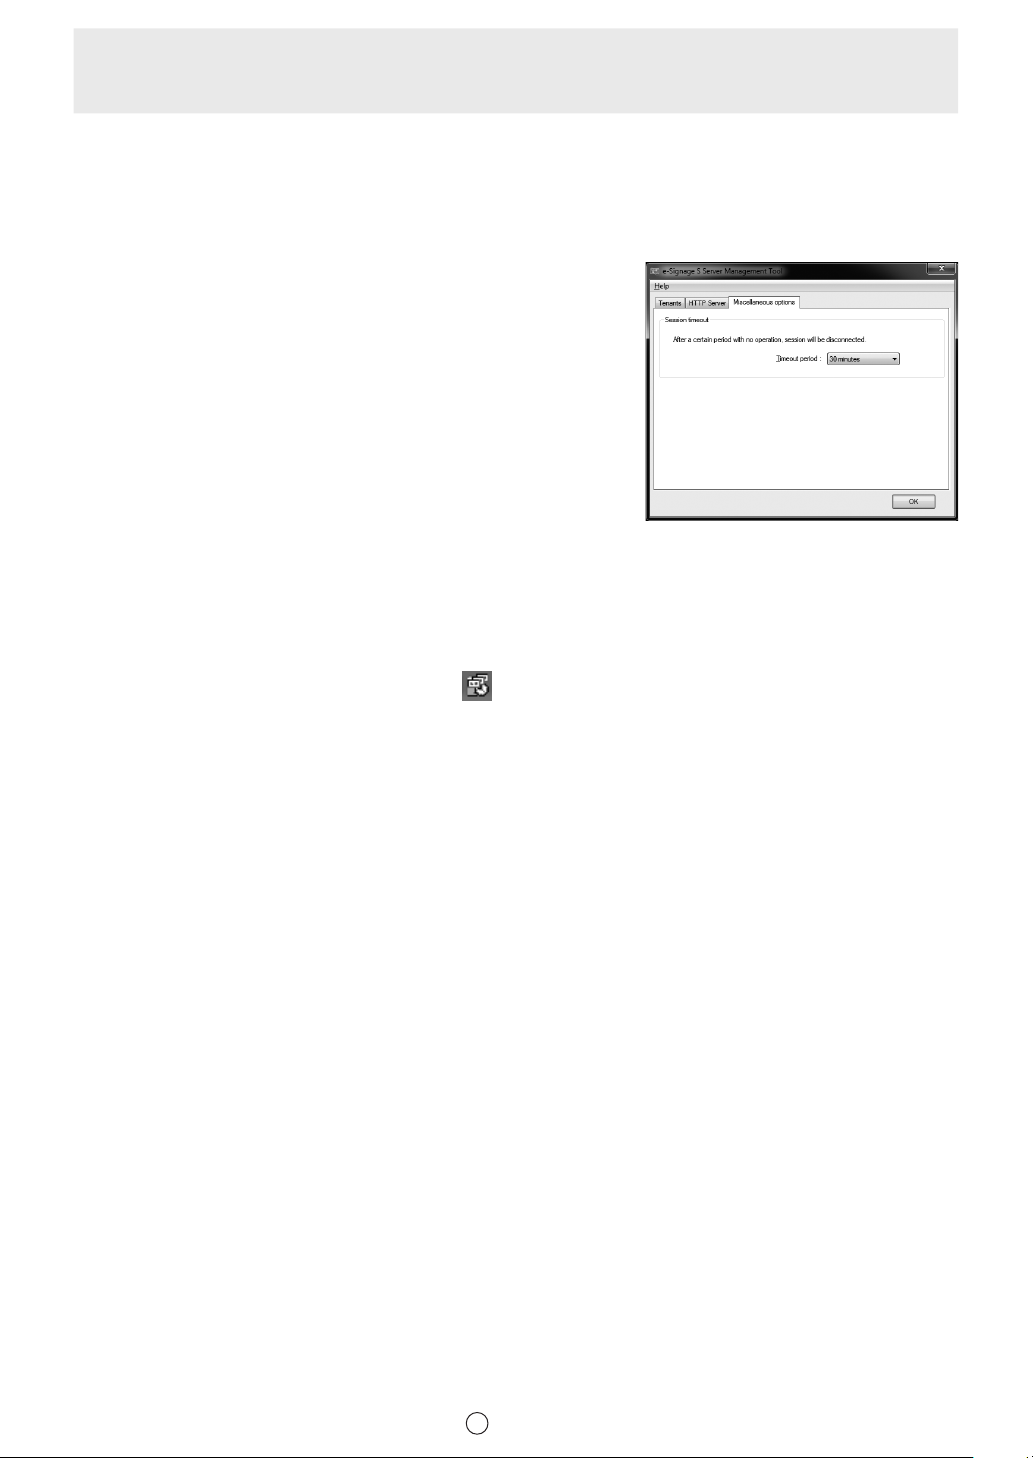
Setting the automatic logout time
Set the time after which automatic logout takes place if no actions are performed after logging in.
The default setting is 30 minutes.
Click the “Miscellaneous options” tab
1
in the Server Management Tool window.
Select a timeout time from the pull-down menu.
2
If you do not want to be logged out automatically, select
“(none)”.
Click [OK].
3
Distribution Scheduler
Distribution Scheduler is a tool for managing e-Signage communication. Distribution Scheduler will launch
automatically from “Startup” when you log in to Windows.
When Distribution Scheduler launches, an icon ( ) is displayed (and resides permanently) in the Task Tray.
Do not exit Distribution Scheduler unnecessarily.
E
27
Page 28

Logging in
Page 29

Logging In
Logging in to WEB Server
Double-click the e-Signage S shortcut icon on Desktop.
1
If a tenant has not been created, the server settings open. (
TIPS
• For Internet Explorer installed on Windows Server 2008 / 2008 R2 / 2012 / 2012 R2 / 2016, functions such
as page redirection are restricted to increase security.
•
If WEB Server does not operate, add the URL for WEB Server (http://(IP address of the server:Port number)/) to
“Trusted Sites”. This can be accessed by clicking “Internet Options” - “Security” in Internet Explorer.
Page 23)
E
29
Page 30
Logging In
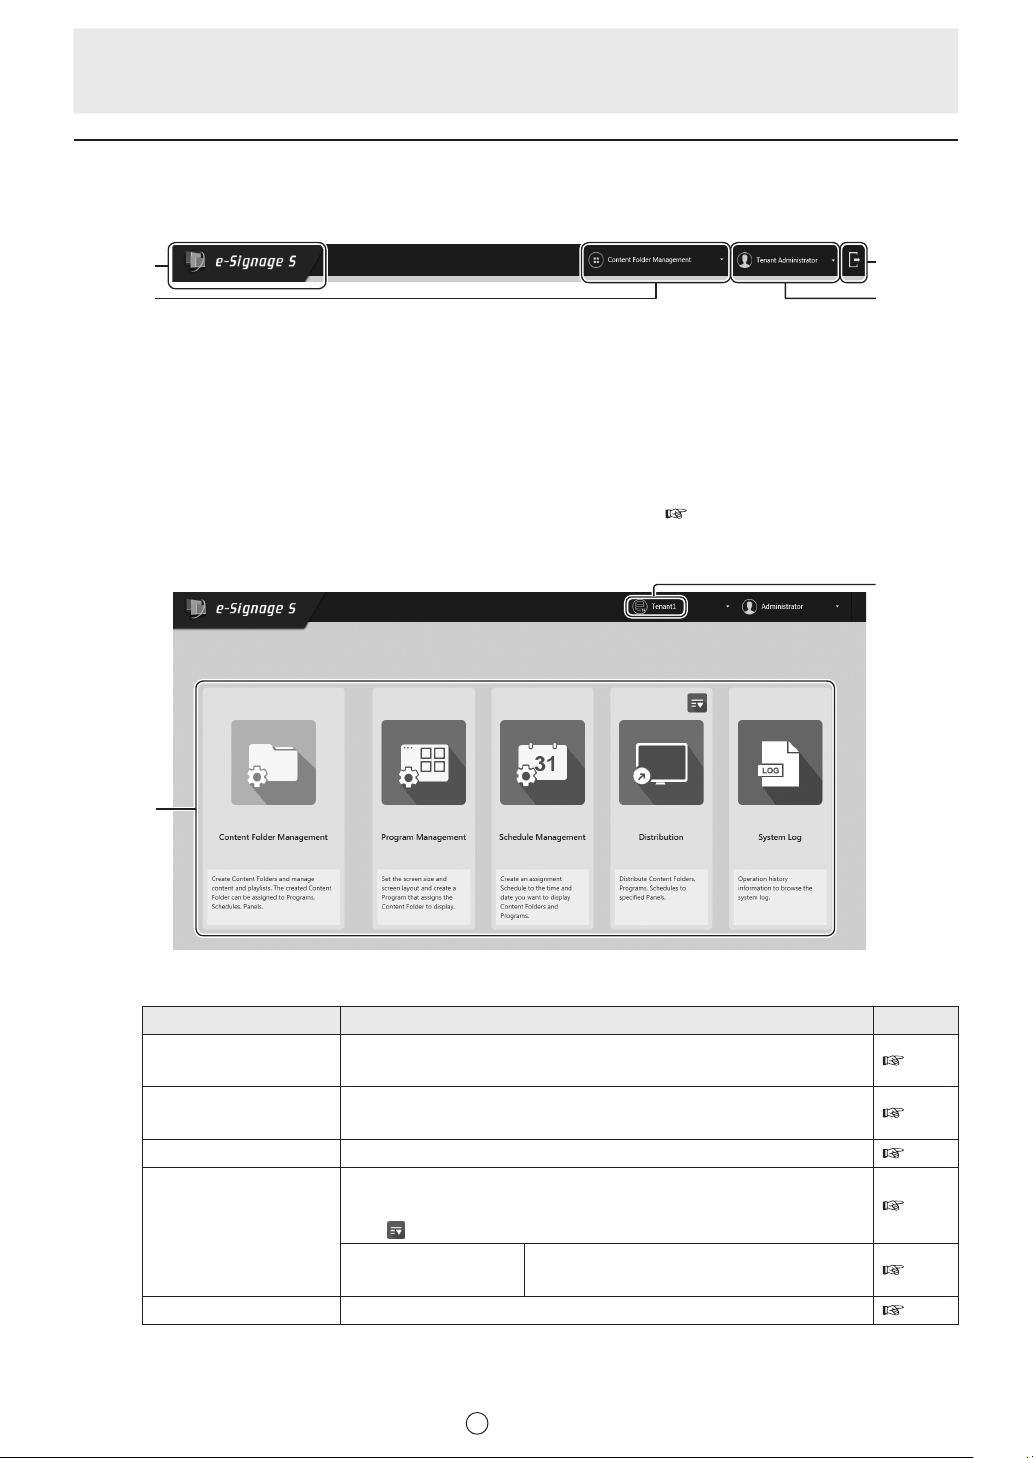
Description of the screen
Toolbar
(1)
(1) Home button
Use this to return to Dashboard from other
screens.
(2) Function selection button
You can select and display functions.
Dashboard
(5)
(4)
(3)(2)
(3) User
Shows the currently logged in user.
You can change the password.
(4) Logout button
Click to log out from the server.
This will not appear if the login screen is
skipped. ( Page 24)
(6)
(5) Function buttons
Tab Description Page
Content Folder
Management
Program Management Create and manage programs that display content in an arranged
Schedule Management Create and manage content folders and program playback schedules.
Distribution Distribute content folders, programs, and schedules.
System Log View logged operation and distribution information.
Create and manage content folders and lists of content (video/
images, audio, scroll messages) stored in content folders.
layout.
You can check distribution schedules and distribution statuses.
to display the following menus.
Click
USB memory / SD
Card Distribution
You can use USB memory (USB flash drive)
or an SD memory card for distribution.
(6) Show data usage button
Show e-Signage S data usage.
E
30
31
52
63
73
81
82
Page 31

Content
Page 32

Content Folder Management
Main window
Content to be played is managed using folders (content folder).
When you click a content folder group in the content folder group management area, the content folders in that
group appear in the content folder management area.
Content Folder group management area Content Folder management area
E
32
Page 33

Managing content folder groups
Content folder group management area
Content Folder Management
(1)
(2)
(3)
(4)
(1) Less button
Click to show less of the menu.
(2) Edit button
Edit the information saved in a content folder group.
(3) Delete button
Delete a content folder group.
(4) Add button
Add a content folder group.
E
33
Page 34

Content Folder Management
Creating a content folder group
Click in the content folder group management area.
1
The Create Content Folder Group window will appear.
Enter each item.
2
Menu option Explanation
Folder Group Name (required) Name of the group.
Parent Group (required) Set the folders that will belong to the group.
3
Click [Add].
E
34
Page 35

Managing content folders
Content folder management area
Content Folder Management
(6)
(1) (4)(2) (3) (5)
(1) Checkbox
Use to delete multiple content folders.
(2) Content folder type icon
Indicates the content folder type.
(3) Folder Name
Indicates the content folder name.
appears next to the folder names of
Player A1 les.
(4) Direct
A checkmark appears when “Direct Mode” is
selected for the folder mode.
(5) Folder Description
Shows the detailed information entered when
the content folder was created.
(7)
(6)
Click to add content to a content folder, or
delete content.
Click to display the following buttons.
(Property Settings button)
(Delete button)
(Preview button)*
(Open Windows Folder button)*
*1 Only on the management PC.
*2 Exit the preview with the [Esc] key.
*3 When previewing Player A1 data on the
computer, there may be some differences
from actual playback. Some video files and
audio files cannot be previewed.
*4 Only when the folder mode is “Direct Mode”.
1,2,3
(7) Menu button
Use to add a content folder.
When this is selected with multiple
checkboxes selected, the Delete menu will
appear.
1,4
E
35
Page 36

Creating content folders
Basic flow for creating a content folder
(1) Create a content folder. ( See below)
Specify the content folder type based on the player software and type of content to be played.
(2) Upload the content les to the content folder you created. ( Page 38)
Assigned to use the content folder with the following functions.
• Distribution (
• Program management (
• Schedule management (
Creating a content folder
Create content folders to manage content.
Select the content folder group to which you want to add a content folder.
1
Click in the content folder management area.
2
Click [Add].
3
The Add Content Folder window will appear.
page 74)
page 53)
page 64)
Specify the items.
4
(1)
(2)
(3)
(4)
(5)
(6)
(7)
(8)
* Example of “Player - Media” window.
E
36
Page 37

Creating content folders
Menu option Explanation
(1) Folder Name Enter the content folder name.
(2) Folder Type
(3) Folder Description You can enter a description.
(4) Available Extensions
(5) Duration Enter the default playback duration that is set when content is added.
(6) Transition Effect
(7) Transition Direction
(8) Folder Mode
Select the content folder type based on the player software to which the
content will be distributed and the combination of content.
You can assign this to the background frame / frames 1 to
Media
Scroll
Message
Audio
Enter the file extensions of content that can be uploaded to the content
folder.
An extension cannot be entered when the content is a scroll message. To
reset to the default settings, click “Reset”.
Select the default transition effect for still image content.
Also set the time that the transition effect is applied.
* “Media” only
Select the default transition direction for still image content.
Some transition effects do not have a transition direction setting or have
varying types.
* “Media” only
To directly manage content folder content using the Explorer window, select
the “Direct Mode” checkbox.
* When “Direct Mode” is selected, content cannot be edited from the
Content Folder Management window.
4 when creating a program, and by schedule or distribution.
Pages 60, 70, 78)
(
You can assign a scroll message to the message frame
when creating a program. (
You can assign this to the audio frame when creating a
program. (
Page 60)
Page 60)
Click [Add].
5
TIPS
• An added content folder cannot be copied.
In addition, the folder name and folder type cannot be changed.
Add a content folder again.
E
37
Page 38

Creating content folders
Editing a content file in a content folder
Upload content files to a content folder you added, and create a playlist.
To edit a content file in a content folder, click
Edit Content File window
“Media” folder
(1)
in the content folder management area.
(14)
(13)
(12)
(2)
(3)
(4)
(5)
1)
2)
3)
“Scroll Message” folder
“Audio” folder
(6)
(1)
(2)
(3)
(4)
(6)
(1)
(2)
(3)
(4)
(5)
(6)
(11)
(10)
(9)
(8)
(7)
6)
5)
4)
(16)
(13)
(12)
(11)
(10)
(9)
(8)
(15)
(13)
(12)
(11)
(10)
(9)
(8)
(7)
Menu option Explanation
(1) Checkboxes Use to delete multiple files.
(2) No. Shows the number of each file.
(3) File Name Shows the filename of each file.
(4) Duration Shows the playback duration of each file.
E
38
Page 39

Menu option Explanation
(5) Condition Name
(6) View toggle button Shows details on attached files.
1) Checkboxes Use to delete multiple attached files.
2) Name Shows the filename of the attached file.
3) Path
4) Delete button Delete an attached file.
5) Upload button Upload attachment files to a specified content folder.
6) Delete All button Delete multiple attached files.
Play Condition Setting
(7)
button
(8) Edit button
(9) Delete button Delete a file.
(10) Download button Download a file. (
(11) Sort button
(12) Upload button
(13) Delete All button Delete multiple files.
(14) View toggle button
Scroll Message Setting
(15)
button
Create Scroll Message
(16)
button
Shows the name of the playback conditions.
* “Media” and “Audio” folder only
Shows the path of the attached file.
TIPS
• When using HTML content, always place the images, video, and other les used
internally in HTML in the same Windows folder as the HTML le, or in a sub-
folder of that folder.
• Make sure that all attached les are dened by their relative paths in the HTML
le.
Set playback conditions. (
* “Media” and “Audio” folder only
Edit the properties of the content.
* Only when the folder mode is not set to “Direct Mode”.
Page 49)
Drag to change the file playback order.
* Only when the folder mode is not set to “Direct Mode”.
Upload a file. (
* This does not appear when the folder type is “Player A1 - Scroll Message”.
Switch the file view between thumbnails and list.
In thumbnail view, the Select All button
* “Media” folder only
Edit the content of scroll messages.
* “Scroll Message” folder only
Create a scroll message. (
* “Scroll Message” folder only
Pages 41, 48)
Page 50)
Page 45)
Creating content folders
appears.
E
39
Page 40

Creating content folders
Files that can be saved in content folders
File types that can be used as content are as follows:
e-Signage S Player content folders
Folder Type File type
Media MPEG, MPEG1, MPEG2, WMV (Windows Media Video (types playable in Windows Media
Scroll message Scroll messages created in Scroll Message Editor
Audio WAVE, MP3, AU, AIFF, WMA (Windows Media Audio (types playable in Windows Media Player)),
Player)), Flash (types playable in Flash Player), MOV, MPEG4 (types playable in
Player
), PowerPoint, HTML, JPEG, BMP, GIF, PNG, executable files (.exe)
MOV, MPEG4 (types playable in
Windows Media Player
), MIDI
e-Signage S Player A1 content folders
Folder Type File type
Media MPEG2, MPEG4, WMV, WEBM, HTML, JPEG, BMP, GIF, PNG
Scroll message Scroll messages created in Scroll Message Editor (.tlp)
Audio WAVE, MP3, WMA, MPEG4
TIPS
• Audio files are assigned to the audio frame. Audio files are used as audio or music (background music) that
plays while a program is played.
• Windows player devices require a codec to play mpeg files.
Windows Media
Content files are recognized by their file extensions.
On Windows player devices, some file types require the installation of associated software.
File extension Content type Required software
.avi .mpeg .mpg .wmv .asf
.mov .mp4
.swf Flash Flash Player
.ppt .pps .pptx .ppsx PowerPoint PowerPoint Viewer
.htm .html HTML
.tlp Scroll message None
.wav .mp3 .au .aif .aiff
.wma .mid .midi
.mov .mp4
.exe Executable file None
.jpeg .jpg .gif .png .bmp Still image None
Video Windows Media Player
Internet Explorer,
e-Signage WEB browser
Sound Windows Media Player
For codecs and software whose operation has not been demonstrated on the installed operating system, check
operation prior to installation.
TIPS
• JPEG files support RGB. CMYK is not supported.
JPEG 2000 is not supported.
• Animation GIF is not supported.
• Two or more PowerPoint files cannot be displayed at the same time.
• The following actions are not supported in PowerPoint content.
Execution of macros, execution of programs, display of link objects, display of embedded objects
•
If too many animations are used in PowerPoint content, displayed characters may become illegible.
• The font used in the content must also be installed on the player device.
• HTML files and web pages cannot be enlarged or reduced.
•
The playback volume can be adjusted for video and audio. Volume adjustment is not supported in Flash and
PowerPoint.
E
40
Page 41

Uploading content files
Upload files to the content folder you created.
• “Media” folder ( See below)
• “Scroll Message” folder ( pages 45, 48)
• “Audio” folder ( page 48)
Uploading files to the “Media” folder
Click in the Edit Content File window.
1
The Add Content Folder window will appear.
Specify the items.
2
“Content” tab
(1)
Creating content folders
(2)
(3)
(4)
(5)
(6)
(7)
E
41
Page 42

Creating content folders
“URL” tab
(1)
(2)
(3)
(4)
(5)
(6)
(8)
“Player Path” tab (Player only)
(1)
(2)
(3)
(4)
(5)
(6)
Menu option Explanation
(1) File type Select the type of file you want to upload.
Content Select to upload content such as an image file or video.
URL Select to display a specified URL as content.
Player Path
Select to show content files and executable files (.exe) that have
been sent to the player.
E
42
Page 43

Creating content folders
Menu option Explanation
(2) Select File
URL
File Path
on Player's
device
(3) Duration Set the playback duration.
The following settings can be specified when the folder mode is not “Direct Mode”.
(4) Background
Use
(5)
Transparent
Select the file you want to upload.
* “Content” tab only
Enter the URL of the HTML you want to show.
* “URL” tab only
Enter a URL that can be accessed by the player device.
TIPS
• Use discretion, as websites are copyrighted.
• If the page you want to display contains errors, it will not display correctly.
If the page you want to display requires a plug-in, the player device must have the
•
plug-in installed.
Specify the path of the executable file to be displayed.
* “Player Path” tab only
You can specify an EXE file. Enter a path that can be referenced by the player device.
For an EXE file, “Parameters” can be added.
TIPS
• When displaying large content les that are not frequently updated, you can save
the les on the player device in advance and then only send the paths to the les.
This will help reduce the time it takes to send program content.
• Specify the absolute path of the player device, or the relative path from the My
Contents folder (
• When specifying an executable (.exe) le, you can use the following parameters.
%L: X coordinate of top left corner of frame
%T : Y coordinate of top left corner of frame
%W : Width of frame
%H : Height of frame
• This software only launches or ends specied executable les at a specied time.
The software does not guarantee the actions of any executable les it launches.
• The specications of some executed programs may prevent the programs from
launching or ending correctly, or displaying windows in the correct position.
Obtain duration
automatically
Select the background color.
The background can be filled in using a specified color.
Click the color swatch to display the dialog box and change the background color.
Select this checkbox to make blank parts of content transparent.
TIPS
Do not set to transparent if the content folder is assigned to the “Background Frame”
of a program.
page 88).
In the case of video files, the playback duration is obtained
automatically.
* “Content” tab only
E
43
Page 44

Creating content folders
Menu option Explanation
Set the layout of the content.
(6) Layout
Picture
(7)
Transition
HTML
(8)
content
settings
When the content type is Still Image or Flash, you can select “Keeping aspect ratio”,
“Not keeping aspect ratio”, or “In original size”.
Temporarily, move
frame
Select image transition settings.
* “Content” tab only
Effect
Direction
Via background
Select the browser that will be used to display content.
* “URL” tab only
Show the HTML
content in Internet
Explorer
Show the HTML
content in
e-Signage WEB
browser
To temporarily change the screen position of the content when the
content folder is assigned to a program frame, select this checkbox
and click [Position Setting]. The position and size of the frame can
be specied for each content item. The screen position must be set
within the background frame.
Select the transition effect.
Also set the time that the transition effect is applied.
Select the transition direction.
Some transition effects do not have a transition direction setting or
have varying types.
Select whether or not transition is via the background.
Show HTML content using Internet Explorer.
Show HTML content using the e-Signage WEB browser.
Click [Add].
3
Repeat steps 1 to 3 as needed to create the playlist.
4
Playlist content is played in order starting with the content file at the top of the list.
If the folder mode of the content folder is set to “Direct Mode”, the files will play in ascending order of
the filenames.
TIPS
• When the folder mode is “Direct Mode”, you can add a playback duration to the end of a filename to
specify the playback duration.
Example:
image1_30s.jpg: 30 seconds
image2_1m15s.jpg: 1 minute and 15 seconds
image3_1h.jpg: 1 hour
• When using the e-Signage WEB browser for display, preloading is not performed, even if HTML is
set to be preloaded. In addition, the data is displayed at the front, regardless of the frame.
E
44
Page 45

Creating a scroll message
Click in the Edit Content File window.
1
The screen for creating a scroll message appears.
Specify the items.
2
(1)
(2)
(3)
(4)
Creating content folders
(5)
(6)
Menu option Explanation
Scroll
(1)
Message
Name
Scroll
(2)
Message
(3)
Use Html Tag
Enter a name for the scroll message.
Enter the message.
TIPS
The greater the number of characters in each line, the more memory will be used. We
recommend breaking lines at a suitable point so that they do not become too long.
Select this checkbox to use the following HTML tags in the “Scroll Message” in order
to specify the font color, size and other effects.
Tag Explanation
<FONT> Defines the text. Takes the COLOR, SIZE and FACE attributes which
respectively define the text color, text size and typeface.
<B> Defines bold text.
<I> Defines italic text.
<U> Defines underlined text.
<S> Defines strikethrough text.
<BIG> Defines bigger text.
<SMALL> Defines smaller text.
E
45
Page 46

Creating content folders
Menu option Explanation
(4) Message
Format
(5) Background Set the background.
Set the message format.
Orientation Select horizontal or vertical for the text orientation.
Font
Text Color Set the text color.
Decoration
Background
Color
Change the font.
TIPS
• You must have the same font installed on the player device.
• With some font types, scrolling may be interrupted because the
text size cannot be acquired.
Select “None”, “Bordering”, or “Shadowing” for the text decoration.
When “Bordering”, or “Shadowing” is selected, the decoration color
can be set.
Set the background color.
Select this checkbox to make the background color transparent.
Drag the Rate slider to the left or right to set the transparency.
Use
Transparent
TIPS
• Do not select this checkbox if you do not want to make the
background color transparent. Even if the slider is set to opaque
at the right end, the background does not become completely
opaque.
• When the checkbox is selected, the color set for the background
is made transparent. For this reason, if “Text Color” and/or
“Decoration Color” are the same as “Background Color”, “Text
Color” and/or “Decoration Color” will also become transparent.
• If transparent or semi-transparent scroll messages are positioned
over a video, the desired effect may not be obtained.
E
46
Page 47

Menu option Explanation
(6) Scrolling Set the scroll direction and speed.
Select the “Direction” from “Leftward”, “Rightward”, “Upward” and “No
Movement”.
TIPS
Direction
Speed
Use fading
in/out when
message
switches
Display Time
of Each Line
• When “Vertical” is selected in “Message Format”, neither “Leftward”
nor “Rightward” can be selected.
• When “No Movement” is selected, scroll messages are displayed
at the center of the specied range line by line. (Any parts outside
this range are not displayed.)
Drag the Speed slider to the left or right to set the scroll speed.
* This does not appear when “No Movement” is selected.
TIPS
• The actual speed of a scroll message may vary slightly from the
set speed due to variations in computer performance.
• When the “Use Transparent” checkbox is selected, the scroll
speed may be slower than opaque scroll messages. It is
recommended that the actual display of scroll messages be tested
before operation.
When “No Movement” is selected, set whether messages will fade-in
and fade-out.
To have the currently displayed scroll message fade out and the next
scroll message fade in when switching scroll messages, select the
checkbox.
TIPS
If fade-in/fade-out scroll messages are positioned over a video, the
desired effect may not be obtained.
When “No Movement” is selected, scroll messages are displayed line
by line. Set the display time.
Creating content folders
3
Click [Add].
E
47
Page 48

Creating content folders
Uploading files to the “Scroll Message” folder or “Audio” folder
TIPS
• Only the player can be used to upload files to the “Scroll Message” folder. Upload files are created in SDSS
(
Page 103).
Click in the Edit Content File window.
1
The Add Content Folder window will appear.
Specify the items.
2
“Scroll Message” folder
(1)
(2)
(4)
(5)
“Audio” folder
(1)
(2)
(3)
Menu option Explanation
(1) Select File Select the file you want to upload.
(2) Duration Set the playback duration.
When selected, the message will be displayed to the
last line even if the playback time is exceeded.
* “Scroll Message” folder only
The playback duration is obtained from the file
information.
* “Audio” folder only
(3) Volume
Scroll to the end of this
message
Obtain duration
automatically
Select the playback volume.
* “Audio” folder only
(4)
E
48
Page 49

Creating content folders
Menu option Explanation
(4) Play Settings Select the action performed after playback finishes.
TIPS
• Youcansettheactiontobeperformedifplaybackofcontentnishesbeforethe
speciedplaybackdurationelapses.Toselectthissetting,click[PlaySettings].
• Whenthe“Scrolltotheendofthismessage”checkboxisnotselected,playback
ofscrollmessagesisforciblyterminatedafterthespecieddurationelapses
evenifplaybackisnotnished(thisapplieswhenthecontenttypeisscroll
message).
Repeat this content Repeat the content.
Stopwithbackgroundcolor/
Stop
Play next content Play the next content file.
(5) Layout Set the layout of the content.
* “Scroll Message” folder only
Temporarily,moveframe
Stopplaybackandshowthebackgroundcolor./Stop
playback.
Tochangethescreenpositionofthecontent
temporarily,selectthischeckboxandclick[Position
Setting].Thepositionandsizeoftheframecanbe
speciedforeachcontentitem.Thescreenposition
mustbesetwithinthebackgroundframe.
Click [Add].
3
Repeat steps 1 to 3 as needed to create the playlist.
4
Downloading content files
Downloadfilesfromthecontentfolder.
In the Edit Content File window, click next to the le you want to download.
1
E
49
Page 50

Playback Condition Setting
You can set playback conditions for content files. (Only for content folders whose “Folder Type” is “Media”.)
If you have set multiple conditions, the content will play when all conditions are met.
Setting playback conditions
In the Edit Content File window, click next to the le whose settings you want to congure.
1
Specify the items.
2
Select the checkboxes of conditions you want to enable.
(1)
(2)
(3)
Menu option Explanation
(1) Condition
Name
(2) Playback
Condition
(3) The Panel
attribute of the
Player Device
You can assign a name to playback conditions.
You can set the playback duration.
Term You can set the beginning and end dates.
Time You can set the beginning and end times.
Date You can set the playback date.
Day You can set a day of the week for playback. (Multiple days can be
selected.)
Week You can set playback on a certain week of every month. (Multiple
weeks can be selected.)
Set playback conditions in the attributes set for the panel.
Panel Name You can set playback to take place on panels with names that contain
or do not contain characters that you enter.
Group You can set playback to take place by groups that contain or do not
contain the characters that you enter.
Comment 1 to 3
You can set playback to take place on panels with comments that contain
or do not contain characters that you enter.
3
Click [OK].
E
50
Page 51

Playback Condition Setting
TIPS
• The Panel Name, Group, and Comment playback conditions reference the panel attribute
information in the player device at the time of playback.
• By setting panel attribute information on player devices in advance, you can distribute identical
content to multiple player devices, and play the content on each player device.
• For information on how to set panel attribute information on player devices, refer to pages 88,
95.
E
51
Page 52

Program
Page 53

Program Management
Main window
This window is used to manage programs displayed on panels.
By assigning content folders to program frames, you can divide the screen.
When you click a program group folder in the program group management area, the programs in that program
group appear in the program management area.
Program group management area Program management area
E
53
Page 54

Program Management
Managing program groups
Program group management area
(1)
(2)
(3)
(4)
(1) Less button
Click to show less of the menu.
(2) Edit button
Edit the information saved in a program group.
(3) Delete button
Delete a program group.
(4) Add button
Add a program group.
E
54
Page 55

Creating a Program Group
Click in the program group management area.
1
The Create Program Group window will appear.
Enter each item.
2
Menu option Explanation
Program Group Name
(required)
Parent Group (required) Set the folders that will belong to the group.
Name of the group. (1 to 50 characters)
Program Management
3
Click [Add].
E
55
Page 56

Program Management
Managing programs
Program Management area
(8)
(7)
(1) (2)
(3)
(4)
(5)
(1) Checkboxes
Use to delete multiple programs.
(2) Program Name
Indicates the program name.
(3) Program Type
Indicates the program type.
(4) Last Modied Time
Indicates the date and time the program was last modied.
(5) Program Color
Indicates the color set for the program.
(6) Menu button
Use to add a program.
When this is selected with multiple checkboxes selected, the Delete menu will appear.
(6)
(7) Edit button
Edit a program.
(8) Delete button
Delete a program.
E
56
Page 57

Creating a Program
Main window
Create programs to be played on panels.
You can drag a content folder from the content folder selection area to a broken-line frame (Frame, Message
Frame, Audio Frame, Background Frame) in the program creation area to assign that content folder to the
frame.
Content folder selection area Program creation area
E
57
Page 58

Creating a Program
Creating programs
Setting the layout
Set the layout of the overall screen.
Click in the program management area and select “Add”.
1
Select the type of player software to which the content will be distributed.
2
Specify the items.
3
(1)
(2)
(3)
(11)
(10)
(9)
(8)
(4)
(5)
Menu option Explanation
Set the interval between the grid lines.
(1) Grid Interval
(2) Layout Lock Use this option to prevent accidental changes to the layout.
(3) Program Name
Frame 1 - 4 Set the content displayed in frames 1 to 4 and the positions of the content.
(4)
PIP
(5) Message Frame 1 - 2
(6) Frame Layout Select whether each frame is shown or hidden.
(7) Screen Size Set the size at which the program is displayed on the panel. (
Screen Top-Left
(8)
Position
Using the grid makes it easy to position items precisely. You can drag items
with your mouse and snap them to a grid line.
The name of the program appears here. If the content of an opened
program is changed, an asterisk (*) will appear after the program name.
Set the content displayed in the PIP frame and the position of the content.
Page 61)
(
* To display a PIP frame, add a checkmark to the frame layout.
Set the content displayed in scroll message frames 1 and 2 and the
positions of the content. (
Set the position of top-left corner of the screen. (
Pages 45, 48)
Page 62)
(7)
(6)
Page 62)
E
58
Page 59

Creating a Program
Menu option Explanation
(9) Audio Frame
(10) Background Frame Set the background of the program.
Preview
(11)
View Play List
Properties Set the program properties (Program Name, Program Color).
Back
Save Save the program currently being edited.
Save As Save the program currently being edited under a different name.
Set the audio or music that plays while a program is displayed. (
48)
Show a preview of the program you created. Exit the preview with the [Esc]
key.
* Save the program with [Save] before showing the preview.
* Select the preview method (ORIGINAL SIZE or FIT TO SCREEN).
* If you preview e-Signage S Player A1 data on a computer, some parts
may differ from actual playback. It may not be possible to preview some
video and audio les.
You can view the details of the content folders assigned to the frames.
(Frame 1 - 4, Message Frame 1 - 2, Audio Frame, Background Frame, PIP Frame)
Return to the main screen of program management without saving your
changes.
Page
Adjust the size of each frame.
4
For the frame, message frame, and PIP frames, click
, change the settings, and click [OK].
Item Description
Coordinate - X
Coordinate - Y
Width
Height
Background
color in case of
no content
Show Frame
TIPS
Set the display position.
Set the display size.
Set the background color for when
content is not used.
* Frame only
Select whether the frame is shown or
hidden.
• Click a frame to select it. Eight resize handles will
appear around the border of the frame. You can drag
these handles with your mouse to resize a frame
while viewing the result.
You can also drag any part of the frame other than a
resize handle to move the frame.
• You can hold down [Shift] while dragging to maintain
the same aspect ratio as you resize a frame.
• You can use the “Grid Interval” to move or resize
frames precisely to the grid lines. (
• The PIP frame cannot be moved in increments of 1
point. Placeable positions vary by LCD monitor.
Page 58)
E
59
Page 60

Creating a Program
Click [Save As].
5
The Save As window will appear.
Item Description
Program
Name
Program
Color
Set each item and click [Save].
6
Set the program name.
Set the program color.
Assigning content folders
From the menu in the content folder selection area,
1
select the appropriate content folder type for the
frame to which the content folder is being assigned.
For a frame or background frame, select “Media
Folders”. For a message frame, select “Scroll Message
Folders”. For the audio frame, select “Audio Folders”.
Select the folder group, and drag and drop the
2
content folder to be assigned.
• For the file types that can be used, refer to page 40.
• You can place multiple content folders in one frame. The content folders and content that have been
placed can be viewed using “View Play List”.
Repeat steps 1 to 2 as needed to create the program.
3
For information on the PIP frame, see page 61.
Click [Save].
4
TIPS
• Assigned content folders can be deleted using “View Play List”.
E
60
Page 61

Creating a Program
Setting the PIP frame
Set the PIP frame size, Input Source, Audio Source, and other parameters. This function can be used only with
a LCD monitor (PN series).
This function is only for Player.
Select the “PIP” checkbox in [Frame Layout].
1
Click and set each item.
2
Item Description
Monitor
model name
Size
Aspect ratio
Input Source Select the Input Source.
Audio Source Select the Audio Source.
Direction
Set the monitor model.
* The items that appear vary by model.
Select the size.
Sizes vary by aspect ratio.
Select the aspect ratio of the screen.
* Select this according to the video or images
that you want to display.
Select the orientation in which the panel is
installed.
* The settings on the LCD monitor cannot
be changed. Select settings that match the
monitor settings.
3
Click [OK].
E
61
Page 62

Creating a Program
Setting the position of the screen
Set “Screen Top-Left Position”.
1
Set the coordinates (-99999 - 99999) for the desired
position of the top left hand corner of the background in
the panel.
“Coordinate - X” and “Coordinate - Y” are normally both
set to “0”.
Setting the screen size
Set the “Screen Size”.
1
The screen size is the size of the background.
Select the “Preset Screen Size” option button, and
choose a size from the pull-down menu.
The screen size is normally set to the panel size
(resolution).
TIPS
• If the desired size is not in the list, select the “Custom” option button and enter the size.
•
If you want to combine multiple panels into a single
display, select the “Custom” option button, click
[Calculate screen size for multi display], and set the
monitor installation direction (orientation) of each
panel.
Display priority order
If frames overlap when a program is displayed, programs will be displayed in the following order from
foreground to background.
“PIP Frame” → “Message Frame” →“Frame4” → “Frame3” → “Frame2” → “Frame1” → “Background Frame”
TIPS
• If the content of a frame or background is a PowerPoint file, EXE file, or e-Signage WEB browser, the frame
will be displayed in the foreground regardless of the display order.
• If a video is displayed in the background, the video may appear in front of other frames.
Set the video in one of frames 1 to 4, not the background.
E
62
Page 63

Schedule
Page 64

Schedule Management
Main window
You can manage “Schedules” for display of content folders and programs on panels.
When you click a schedule group name in the schedule group management area, the schedules in that
schedule group appear in the schedule management area.
Schedule group management area Schedule management area
E
64
Page 65

Managing schedule groups
Schedule group management area
Schedule Management
(1)
(2)
(3)
(1) Less button
Click to show less of the menu.
(2) Edit button
Edit the information saved in a schedule group.
(3) Delete button
Delete a schedule group.
(4) Add button
Add a schedule group.
(4)
E
65
Page 66

Schedule Management
Creating schedule groups
Click in the schedule group management area.
1
The Create Schedule Group window will appear.
Enter each item.
2
Menu option Explanation
Schedule Group Name (required) Name of the group.
Parent Group (required) Set the folders that will belong to the group.
3
Click [Add].
E
66
Page 67

Managing schedules
Schedule management area
Schedule Management
(7)
(6)
(1) (2) (3) (4)
(1) Checkboxes
Use to delete multiple schedules.
(2) Schedule Name
Shows the name of the schedule.
(3) Last Modied Date
Indicates the date and time the schedule was last modied.
(4) Schedule Color
Indicates the color set for the schedule.
(5) Menu button
Use to add a schedule.
When this is selected with multiple checkboxes selected, the Delete menu will appear.
(6) Edit button
Edit a schedule.
(5)
(7) Delete button
Delete a schedule.
E
67
Page 68

Creating Schedules
Main window
Use this window to create “Schedules” for the display of content folders and programs on panels.
You can drag content (a content folder, program, or panel control command) from the content selection area to
the schedule area, and set the time span for display/control.
Content selection area Schedule creation area
E
68
Schedule area
Page 69

Schedule creation area
(1) (5)
Creating Schedules
(2)
(3)
* Example of “Week” window.
Menu option Explanation
(1) Schedule Name
(2) Scale You can select the display scale of the schedule area.
(3) Schedule area Set a playback schedule. (
Display Range Set the display range of the schedule area.
Shows the name of the schedule. If the content of an opened schedule is
changed, an asterisk (*) will appear after the schedule name.
Page 70)
Move the display range.
(4)
Move back to the previous display range.
(4)
“day”, “week”, or “month” can be selected for the display range increment.
Set Span Set the time span displayed in the schedule area.
Properties Set the schedule properties (schedule name, schedule color).
Back Return to the main screen of schedule management without saving your changes.
(5)
Save Save the schedule you are currently editing.
Save As Save the schedule you are currently editing under a different name.
Move to the display range that includes today's date.
Move to the next display range.
E
69
Page 70

Creating Schedules
Creating a schedule
Click in the schedule management area and select “Add”.
1
Select the type of player software to which the content will be distributed.
2
Select the content to be assigned from “Content Folders”, “Programs”, or “Panel Control
3
Commands”.
For “Content Folders” or “Programs”, select the group and display the content to be assigned.
Drag the content to the schedule area.
4
In the case of “month” display, or when the content is dragged to timetable frame above the time span
frame, playback will be all-day.
For details on panel control commands, refer to page 72.
You can set conditions for recurring playback of content (content folder / program). Click
content selection area and set the recurring conditions on the “Recurring” tab.
Start Time: Start time of recurring playback
End Time: End time of recurring playback
Repeat Interval: Interval at which content playback starts
Duration: Duration of content playback
in the
TIPS
• A playback instance that will not end by the “End Time” will not be registered. Playback instances
that will finish by the “End Time” will be registered.
Change the time span as needed.
5
Drag or click a placed item to change it.
Repeat steps 3 to 5 as needed to set the schedule for the day.
6
To use the day schedule for other days, save the schedule as a timetable. ( Page 71)
7
Click [Save As].
8
The Save As window will appear.
Item Description
Schedule Name Set the schedule name.
Schedule Color Set the schedule color.
Set each item and click [Save].
9
E
70
Page 71

Creating Schedules
Adjusting an assigned content folder, program, or panel control command
Changing the playback start time
You can drag a content folder, program, or panel control command assigned to the schedule area to move it.
Changing the playback end time
You can hover your mouse cursor over a content folder or program assigned to the schedule area to display a
handle at the bottom.
You can drag this handle to visually adjust the playback end time of the content folder or program.
Changing/deleting the playback period
You can click a content folder, program, or panel control command assigned to the schedule and change it
using the screen that appears. You can also delete the item in that screen.
Saving a timetable for synchronization
You can save a schedule created for one day as a timetable
in order to use that schedule for another date (synchronized
schedule).
Click the timetable frame above the time span frame
1
of the date for which you want to save the timetable.
The Save As window will appear.
Item Description
Timetable Name Set the timetable name.
Timetable Color Set the timetable color.
Set each item and click [OK].
2
E
71
Page 72

Creating Schedules
Synchronize Timetable
Click the timetable frame of the date for which you
1
want to synchronize the timetable.
The Synchronize window will appear.
Item Description
Existing Timetable
Playback period
Overwrite
Set each item and click [OK].
2
Select the name of the timetable to
be synchronized.
Select the period to be
synchronized.
To overwrite a previously schedule
with synchronized timetable, select
this checkbox.
Panel control commands
Table of panel control commands
Command Description
Turn On Panel Turns the panel (monitor) power ON.
Turn Off Panel Puts the panel (monitor) in standby mode.
Input “No.” Switches the panel (monitor) input source.
Switches the input source of the panel (monitor) to “TV
TV
input”.
The channel cannot be specified. The channel
previously selected on the TV is displayed.
E
72
Page 73

Distribution
Page 74

Distribution
This chapter explains how to assign, and distribute or recurring distribute data to panels.
Main window
You can view distribution information in this window.
Distribution data selection area Panel area
Distribution data selection area
(1)
(2)
(3)
(1) Less button
Click to show less of the menu.
(2) Category selection button
Select from content folders, programs, schedules, or SDSS
schedule for the category of data to be assigned to a panel.
(3) Selection area
Select the distribution data to be assigned.
Only the selected category of distribution data is shown.
E
74
Page 75

Panel area
(1)
Distribution
(7) (6) (5)
(4)
(3)
(2)
(8) (9) (10) (11)
* Example of hourly window.
E
75
Page 76

Distribution
(1) Display area
You can assign distribution data to panel. ( Page 78)
(2) Menu button
Click to show a menu consisting of the following items.
Finalize a distribution schedule and schedule distribution.
Select the panel for which you want to finalize the schedule and click this icon.
Cancel finalization of the schedule that was assigned to a panel.
Select the panel for which you want to cancel finalization and click this icon.
Resend distribution data to a panel for which a distribution error occurred.
TIPS
To cancel a schedule that is waiting for distribution or being distributed, click .
(3) Clear button
Clear an assigned schedule from a panel.
Select the panel from which you want to clear the schedule assignment and click this icon. Cancel the
schedule nalized distribution and operate.
(4) Recurring Distribution button
Set recurring distribution for the panel. Select the day of the week and time, and click “Add”.
(5) View toggle button (Distribution Screen / Status)
Toggle between distribution view and distribution status view.
(6) Display units
Toggle the Distribution Schedule window between day display ( ) and hourly display ( )
(7) Display range
Select the distribution schedule range that is displayed.
Day display
Specify the days to be displayed (starting date and ending date).
Click and select in the dialog box that appears.
Hourly display
Specify the date and time to be displayed.
Click the icon to display a dialog box, click the display date in the
dialog box, and then select a start time and end time from the
pull-down menu.
E
76
Page 77

(8) Panel Name
Displays the panel names.
The distribution type is indicated next to the panel name by icons.
(9) Distribution data
Shows information on the assigned distribution data.
(10) Time table (only in hourly display)
Shows the timetable set for the specied day.
(11) Distribution schedule
Shows information on the distribution schedule assigned to the panel.
Distribution
E
77
Page 78

Distribution
Distributing / Scheduling distribution
Assign and distribute distribution data to a panel, or schedule distribution.
Display the distribution data that you want to assign
1
in the distribution data selection area. (
TIPS
You can assign data by uploading a schedule in SDSS
format. (
Click a panel to put it in the selected state.
2
Page 103)
Page 74)
Drag distribution data to the panel name in the panel
3
area to which the data is to be distributed.
Click → .
4
The settings window appears.
E
78
Page 79

Select distribution options as needed.
5
Menu option Explanation
Turn On Player Device
before starting distribution
Turn Off Player Device after
distribution
Distribute only differences
from content files on Player
Device
Distribution
If the player device is not on, turn on before distributing.
This option is not available in PULL type distribution.
Turn off the player device after distribution is completed.
Distribute only content that has not yet been distributed (data with a different
file name, different file creation date/time, different data size, etc.). Content
that has already been distributed is not distributed.
Click [OK].
6
The distribution is finalized and a finalized mark (
TIPS
• Check if the distribution was completed properly in the Status window. ( Page 80)
• Distribution may take time.
• Past distribution data is not distributed. Only distribution data for the current day (and after) is
distributed.
) appears on the assigned content.
E
79
Page 80

Distribution
Distribution Status
You can check the status of distribution and cancel or resend.
Click the view toggle button (5) (Distribution Screen /
1
Status) in the panel area.
Check the status of distribution.
2
Phase 1 (Confirm Distribution)
Phase 2 (Distribution Schedule) Shows the date and time distribution is scheduled.
Phase 3 (Distribution Start) Shows the date and time distribution was started.
Phase 4
(Distribution Complete)
If needed, click and perform an action below.
3
Cancel the distribution finalized status of a panel to which distribution has been completed. Or,
stop distribution that has not been completed and cancel finalization.
Select the panel to which you want to stop distribution, and click this icon.
Resend distribution data to a panel for which a distribution error occurred.
Select the panel to which you want to resend data and click this icon.
Shows assigned distribution data and the date and time of finalization of
distribution.
Shows the date and time distribution was completed.
If distribution was not completed properly, the reason will be indicated.
E
80
Page 81

USB Memory / SD Card Distribution
Select “Player” or “Player A1” in the left area.
1
Select “Content Folders”, “Programs”, or “Schedules”.
2
Display the data to be distributed.
3
Drag the data to be distributed into the broken-line frame in the right area.
4
Click the [Refresh] button in the upper right.
5
Click the icon that appears on “Launch Utility”.
6
Depending on distribution data, it takes time may not be displayed immediately. In that case, please
click the [Refresh] button again.
Select the destination drive and click [OK].
7
A stop device conrmation screen appears. Click [Yes] and remove the device.
8
Insert the external storage device to which you copied the data into the player device.
9
The content is distributed automatically. When distribution finishes, the USB memory or other external
storage device stops automatically. Check the message and remove the device.
TIPS
• Do not remove the USB memory (USB flash drive) or other external storage device from the PC before
copying is completed.
• Distribution may not be possible with some types of USB memory or other external storage devices.
• Regarding e-Signage S Player A1, USB memory/SD card distribution will not work if you insert USB
memory/SD card when screen of other application is displayed. Launch e-Signage S Player A1 and display
e-Signage S Player A1’s setting screen or playback screen first. After that, you may insert USB memory/SD
card.
E
81
Page 82

System Log
Page 83

Viewing the System Log
You can view the Audit Log, Content Edit Log, and Panel Distribution Log.
Main window
Select and click the system log you want to view and the log will appear in the system log area.
System log selection area System log area
E
83
Page 84

Viewing the System Log
Viewing a system log
Select the log you want to view in the system log selection area.
1
Audit Log This shows a log of actions performed by users other than content editing.
Content Editor Log Log of content editing performed by users.
Panel Distribution Log Log of distribution to panels.
Check the information that appears.
2
(1)
(2)
(3) (4) (5) (6)
* Example of “Audit Log” window.
Menu option Explanation
(1) Page No. Select the page number you want to view.
(2) Log Per Page Select the number of log entries displayed per page.
(3) Login ID / Panel ID Shows the login ID or panel ID.
(4) Name Shows the user name or panel name.
(5) Logged At Shows the date and time of each entry.
(6) Message Shows the result.
E
84
Page 85

Outputting a system log (TXT format / CSV format)
You can output a system log in TXT format or CSV format.
Click in the system log area.
1
Select and save the button for the desired le format.
2
Export to TXT
Export To CSV
Viewing the System Log
E
85
Page 86

Player
Page 87

Receiving Schedules and Displaying Programs
The following explains the settings of the player device that are used when schedules and programs are
distributed from the management PC.
Client Scheduler
Client Scheduler is used on the player device.
Client Scheduler reads received schedules and manages Program Viewer to display specified programs at the
specified time.
Launching Client Scheduler
Client Scheduler is automatically launched by “Startup” when Windows launches.
When Client Scheduler launches, an icon (
Client Scheduler menu
TIPS
• In USB distribution, Client Scheduler is not used.
) appears and resides permanently in the task tray.
Use the menu that opens when the icon in the task tray is right-
clicked to perform the following actions:
Setting
Click the [Setting] menu to display the [Setting of Client Scheduler] dialog box. The tabs in this dialog box
contain the following settings:
[Program Viewer] tab
Configure detailed settings for Program Viewer.
• “Paint the program view area, if no program is played”
checkbox
Select this checkbox to display content even when there are no
programs to display. To set the displayed content, click [Paint
Setting].
• “Dark blue” option button
Show the area specified by the [Display area] settings in
dark blue.
E
87
Page 88

Receiving Schedules and Displaying Programs
• “Content le” option button
Click [Setting], and set the content le path, display mode,
and background color in the [Setting of the contents le]
dialog box.
(1) Click [Ref], and select the desired content le. You can
select any le format that is supported by e-Signage S.
(2) For the “Display mode”, select the “Keeping aspect
ratio”, “Not keeping aspect ratio”, or “In original size”
option button.
(3) Set the “Background color”.
• “Program” option button
Click [Import], and select an existing program. Programs that have been exported with Program Editor
can be selected.
• The area set in the [Display area] eld will be the display area (except when a program is
specied).
• “Set limit of print screen area” checkbox
When multiple screens are output by a player device, using the
screen capture function will capture the entire desktop. Select
this checkbox to capture only part of the screen output.
Click [Area Setting] and specify the area you want to capture.
• “Don’t move focus while program viewer starts” checkbox
This checkbox is usually left unselected.
Select this checkbox if you do not want the Program Viewer focus to move when launching Program Viewer.
• “Hide task bar while showing program” checkbox
When this checkbox is selected, the task bar is hidden when Program Viewer is launched and reappears
when Program Viewer is exited.
• “Show Content Information (to check and preview a program)” checkbox
Select this checkbox to show content information (display coordinates, playing time, etc.) while a program is
playing. Select this checkbox to check playback of content.
Click [Display Settings] to congure settings for the content information display position and size, and
whether scroll messages are forcibly changed when the playback duration elapses. If e-Signage S Player A1
data will be played on a computer, content playback information will not be displayed.
• “My Contents Folder"
Enter the path of the folder in which content distributed in advance is saved.
The default path is as follows:
My Contents folder: C:\ProgramData\SHARP\e-Signage\My Contents
• [Set Panel Attribute]
You can set the panel attributes of the player device. Attributes that can be set are “Panel name”, “Group”
and “Comment.” This setting is used to play different content on each panel during conditional content
playback.
E
88
Page 89

Receiving Schedules and Displaying Programs
[Content display] tab
Use this tab to set content display details.
• “Smooth contents change” checkbox
Select this checkbox to transition smoothly from one content
item to the next by preparing for playback of the subsequent
item before the current item ends.
Also select this checkbox when you need to synchronize the
display of content between frames.
To set content to be preloaded, click [Preload Setting].
TIPS
• Using “Smooth contents change” will increase the load on the
CPU and the amount of memory used. It is recommended that
tests be conducted by actually displaying programs before
operation.
• If content that can be played in Internet Explorer is preloaded,
Flash content and banners embedded in the content may start
from the middle.
• Preloading is not performed on the e-Signage web browser.
• “Play *.mov, *.mp4 files with Windows Media Player. (Windows 7 or later)” checkbox
This checkbox can be selected in Windows 7 or later. Select this checkbox to play les with the extension
".mov" or ".mp4" on Windows Media Player.
• “Show the HTML content in IE version compatibility that is installed on the PC” checkbox
Set the compatibility mode when playing HTML content in Internet Explorer. Check this box to display HTML
in a way that is compatible with the version of Internet Explorer installed on the PC.
• “Don’t show JavaScript error dialog of HTML content” checkbox
Select this checkbox to prevent error dialog boxes from being displayed if a JavaScript error occurs when
HTML content is displayed.
E
89
Page 90

Receiving Schedules and Displaying Programs
[Display Area] tab
• “Display area for distributed program”
When the display area of the program is different from the
resolution of the panel, this tab allows you to display the program
regardless of the display area set for the program.
Select the “Always display the distributed program in the
following area” checkbox and set the area in which the program
is to be displayed.
• “Display area for emergency scroll message”
In SHARP e-Signage S Standalone Edition, this eld is not
used.
[Power Control] tab
Manages power on player devices currently being configured.
• “Shutdown on the designated time” checkbox
Select this checkbox to turn off the player device at the
specied time.
• “Reboot on the designated time” checkbox
Select this checkbox to restart the player device at the specied
time.
E
90
Page 91

Receiving Schedules and Displaying Programs
[Network] tab
In SHARP e-Signage S Standalone Edition, this tab is not used.
[Panel Control] tab
Select the panel control method (RS-232C/LAN/USB).
TIPS
If you set this to a value other than “No panel”, it may take a long
time to access the panel when starting or exiting Client Scheduler
if the setting is not correct.
• “No panel” option button
Panels will not be controlled.
• “Single panel” option button
Click [Connection Setting] and select the panel control method
(RS-232C/LAN/USB).
• [Connection Setting]
From the “Connecting Interface” option button, select and set “RS-232C”, “LAN”, or “USB”.
Setting Description Default
RS-232C
LAN
USB - -
COM port COM1 to COM256 COM1
Baud Rate 9600, 19200, 38400, 115200 9600
Host name or IP
address
Data port
User name
Password
Enter up to 32 alphanumeric characters for the host name or IP
address of the panel to be controlled.
Enter a data port number between 1025 and 65535 for the
panels to be controlled.
If a user name has been set for the panel to be controlled, enter
up to 8 characters for the user name.
If a password has been set for the panel to be controlled, enter
up to 8 characters for the password.
10008
• [Test connection]
Check the connection to conrm that the panel can be controlled.
After the connection is established successfully, the model name of the panel is acquired and displayed.
Operate the panel with the panel power turned on.
-
-
-
E
91
Page 92

Receiving Schedules and Displaying Programs
• “Multiple panels” option button
You can register and control up to 25 panels.
• [Connection Setting]
A list of connected panels appears when you click
[Connection Setting].
The rst time you use this function, click [Add] to add panels
to the list.
Setting Description Default
RS-232C
LAN
USB - -
Panel’s ID
COM port COM1 to COM256 COM1
Baud Rate 9600, 19200, 38400, 115200 9600
Host name or IP
address
Data port
User name
Password
Enter up to 32 alphanumeric characters for the host name or IP
address of the panel to be controlled.
Enter a data port number between 1025 and 65535 for the
panel to be controlled.
If a user name has been set for the panel to be controlled, enter
up to 8 characters for the user name.
If a password has been set for the panel to be controlled, enter
up to 8 characters for the password.
When panels are connected in a daisy chain, select an ID to
identify each panel.
(No daisy chain), 1 to 255
-
10008
-
-
(No daisy
chain)
E
92
Page 93

Receiving Schedules and Displaying Programs
• “Power ON the panel before starting up this software” checkbox
Select this checkbox to turn on the panel when Client Scheduler launches.
• “Power OFF the panel before exiting this software.” checkbox
Select this checkbox to turn off the panel when Client Scheduler is exited.
• “Synchronize the panel time with PC time before starting up this software” checkbox
Select this checkbox to synchronize the panel clock to the time on the player device when Client Scheduler
launches.
• [Advanced]
• “If a panel is not connected at startup, subsequent communication is not performed” checkbox
When this checkbox is selected, no further communication will be performed if a connection cannot be
established with the panel at startup.
• “Allow LAN connected panel to process daisy chain communication.” checkbox
When panels are connected by RS-232C in a daisy chain connection, select this checkbox only if the rst
panel only is connected by LAN. This will enable the following panels in the daisy chain to be controlled
by specifying an ID.
[USB Distribute] tab
In SHARP e-Signage S Standalone Edition, this tab is not used.
[Error control] tab
For service technicians only. Not used for normal operation.
Displaying the log
Click [View the Log] to display the log of Client Scheduler actions.
The log can be cleared and updated.
Pausing a program
Click [Pause to View Program] to pause the currently displayed program.
A checkmark will appear to the left of this item. Click [Pause to View Program] again to resume the program.
E
93
Page 94

Receiving Schedules and Displaying Programs
Deleting Schedule Information
Click [Delete Schedule Information]. A confirmation message will
appear. Click [Yes] to delete all schedule information currently
saved in Client Scheduler.
Deleting Break-in Program Information
In SHARP e-Signage S Standalone Edition, this tab is not used.
Delete Emergency Scroll Message Information
In SHARP e-Signage S Standalone Edition, this tab is not used.
Get data from management PC
To receive distribution data from the management PC, click [Get data from management PC].
This function can only use PULL type distribution.
Version information
Click [Version]. The [Version] dialog box of Client Scheduler will appear.
TIPS
You may be asked to provide version information if you contact SHARP for help with a problem with e-Signage S.
Exiting Client Scheduler
To exit Client Scheduler, click [Exit Client Scheduler].
Normally you should not exit Client Scheduler.
E
94
Page 95

Receiving Schedules and Displaying Programs
Program Viewer
Program Viewer is used on the player device.
Program Viewer displays programs based on schedules loaded by Client Scheduler.
TIPS
• To pause a program, right-click the Client Scheduler icon. In the menu that appears, click [Pause to View
Program].
• To change advanced settings for Program Viewer, right-click the Client Scheduler icon, and in the menu that
appears, click [Setting]. Settings can be adjusted in the [Setting of Client Scheduler] dialog box that opens.
( Page 87)
• After new schedules are sent, old schedules are no longer needed. Unneeded schedules and their
associated content will be automatically deleted the next time Client Scheduler starts.
e-Signage S Player A1 settings
Configure e-Signage S Player A1 settings.
e-Signage S Player A1 settings window
Displaying the settings window
Right-click twice anywhere on the screen. Or, press twice the [RETURN] key on the remote
1
control unit.
The settings window appears.
Description of the settings window
• CONFIGURATION
[Player setting] tab
PLAYER SETTING
Save directory Select the storage destination for
received content.
PANEL ATTRIBUTE SETTINGS
Panel name Set a panel name for the player
device.
Group Set a group for the player device.
Comment 1 to 3 Enter comments regarding the player
device.
E
95
Page 96

Receiving Schedules and Displaying Programs
[Network setting] tab
DISTRIBUTION
Content distribution
method
FTP SETTING
Port number Enter a value between 1024 and
User name
Password
HTTP SETTING
Hostname or IP
Address
Port number
User name
Password
PLAYER ID
Tenant ID Set a tenant ID.
Get Tenant ID from
server
Player ID Set the player ID. Enter a text string
CONNECTION CONFIRM
Connect to
Management PC
Device info
register / update to
Management PC
Set the content distribution method.
32000.
(Default: 2121)
Enter up to 30 alphanumeric characters.
(Default: ftp)
Enter up to 30 alphanumeric characters.
(Default: ftp)
Enter the host name or IP address of
the management PC.
Enter a value between 1 and 65535.
Set the port number to be used by
HTTP protocol.
If the management PC or network
has a firewall, set the firewall to allow
communication using this port number.
Enter up to 30 alphanumeric characters.
(Default: http)
Enter up to 30 alphanumeric characters.
(Default: http)
Retrieve the tenant ID from the tenant
name.
consisting of 2 to 30 characters
beginning with @.
Test the connection with the management
PC.
Register player device information
(distribution type, player ID, FTP
information, MAC address) on the
management PC.
E
96
Page 97

Receiving Schedules and Displaying Programs
[Power management setting] tab
POWER MANAGEMENT SETTING
Panel turns on at
specified time
Time to turn on panel
Panel turns off at
specified time
Time to turn off panel
Android reboots at
specified time
Reboot time Set the time at which Android will
[USB/SD memory distribution setting] tab
USB/SD MEMORY DISTRIBUTION SETTING
Display time of
delivery cancellation
dialog
Select “enable” to turn on the panel at
the specified time.
Set the time at which the panel will turn
on.
Select “enable” to turn off the panel at
the specified time.
Set the time at which the panel will turn
off.
Select
“enable”
specified time.
restart.
Set the time that the dialog box to
cancel distribution is displayed.
to restart Android at the
• OTHERS
[Android settings] tab Configure Android OS settings.
[Device info] tab Shows the MAC address and IP
address of player devices.
[License] tab
[Player version] tab Shows the version of e-Signage S
[Delete all distributed
data] tab
[Go to playback screen]
tab
[Exit player] tab Close the player.
Shows license information used for
e-Signage S Player A1.
Player A1.
Delete all data that has been
distributed to the player device.
Start playback of signage.
E
97
Page 98

Key/Mouse Linkup
This section explains how to change displayed programs using your keyboard or mouse.
Key/Mouse Linkup Tool window
Launching Key/Mouse Linkup Tool
From the Windows Taskbar, click [Start] - [All Programs] - [SHARP e-Signage S Tools] - [Key-
1
Mouse Watcher].
Key/Mouse Linkup Tool launches and an icon (
TIPS
• To have Key/Mouse Linkup Tool automatically start when the computer is started, add Key/Mouse Linkup
Tool to Windows Startup.
) appears and remains permanently in the task tray.
Key/Mouse Linkup Tool menu
The following actions can be performed from the menu that opens
when the icon in the task tray is right-clicked.
Configuration
Set the operation mode of Key/Mouse Linkup Tool.
• “Disable” option button
Disable Key/Mouse Linkup Tool.
• “Screen Saver Mode” option button
Temporarily stop display of a program when a keyboard or
mouse operation is performed.
If the keyboard or mouse is not used for a certain period of
time, the distributed program is displayed.
Click [Conguration] to congure the following settings.
Time to restart program after last key event
You can also restart a program by pressing the [Ctrl], [Alt], and [V] keys.
E
98
Page 99

Key/Mouse Linkup
• “Change Program Mode” option button
By assigning an action to a combination of keys, you can perform the action by pressing the keys.
Up to 20 actions can be assigned.
Click [Conguration], and set the key assignments and action.
(1) Click the item you want to edit and click [Edit].
The [Assign for] dialog box will appear.
(2) Set each item.
• “Key Setting”
Set the combination of keys you want to register.
• “Operation”
Set the action the keys will execute.
•
If you selected “View preset program”, specify the ID
number of the preset program you want to display in “ID
of preset prg.”.
If the preset program has not been imported, specify the
ID number and import the program.
1) Enter the ID number in “ID of preset prg.”.
2) Click [Import].
3) Specify the exported program data and click [Open].
The program is imported to the specied preset number ID.
•
If you selected “Run application”, enter the path of the application to be run in “Path.” It is also possible
to enter “Option.”
(3) Click [OK].
TIPS
• If the same keys are assigned to different IDs, the assigned action is performed in ascending order of the
IDs.
• If the [Ctrl] key is pressed when PowerPoint Viewer is launched, PowerPoint content will not be displayed
in the correct position. Be aware of this when displaying a program containing PowerPoint content.
E
99
Page 100

Key/Mouse Linkup
• “Change program, if a mouse event comes when it shows scheduled program” checkbox
Select this checkbox to assign actions to mouse operations so that the actions can be executed by operating
the mouse.
(1) Click [Detail].
“Assign for mouse input” dialog box will appear.
(2) Set the items.
• “Operation”
Set the action of the registered mouse operation.
•
If you selected “View preset program”, specify the ID
number of the preset program you want to display in “ID
of preset prg.”.
If the preset program has not been imported, specify the
ID number and import the program.
1) Enter the ID number in “ID of preset prg.”.
2) Click [Import].
3) Specify the exported program data and click [Open].
The program is imported to the specied preset number ID.
• If you selected “Run application”, enter the path of the application to be run in “Path.” It is also
possible to enter “Option.”
(3) Click [OK].
TIPS
• The assigned action cannot be executed while a preset program is being displayed.
E
100
 Loading...