


SHARP Digital Signage Software
PN-SS01
PN-SS02
PN-SV01
OPERATION MANUAL

2
Introduction
Precautions on use ........................................................................................................................... 5
Trademarks ........................................................................................................................................ 6
How to read this manual ................................................................................................................... 6
●Icons ............................................................................................................................................................ 6
●Notation ....................................................................................................................................................... 6
Definitions .......................................................................................................................................... 7
System operation precautions ......................................................................................................... 7
Program distribution workflow ........................................................................................................ 9
Installing/Launching
Required operating environment ................................................................................................... 11
Installing SHARP Digital Signage Software .................................................................................. 12
●Installing SHARP Digital Signage Software ........................................................................................... 12
●PC settings ................................................................................................................................................15
●Uninstalling SHARP Digital Signage Software ...................................................................................... 24
Launching and closing the Launcher window .............................................................................. 26
●Launching the Launcher window ............................................................................................................ 26
●Closing the Launcher window ................................................................................................................. 26
●The Launcher window .............................................................................................................................. 26
Program Creation/Editing
The main Program Editor window ................................................................................................. 28
●Launching Program Editor ...................................................................................................................... 28
●The main Program Editor window .......................................................................................................... 28
Creating programs .......................................................................................................................... 30
●Valid content files ..................................................................................................................................... 30
●Positioning content (Layout) ................................................................................................................... 31
●Setting the background/frames 1-4 ....................................................................................................... 34
●Setting the scroll message ...................................................................................................................... 38
●Setting audio and music .......................................................................................................................... 42
●Setting the PIP window ............................................................................................................................ 43
●Saving a program ..................................................................................................................................... 43
●Opening a program .................................................................................................................................. 44
●Checking a program ................................................................................................................................. 44
●Deleting a program ................................................................................................................................... 45
●Displaying program properties ............................................................................................................... 45
●Importing/exporting a program ............................................................................................................... 46
Creating/Editing a Timetable
The main Timetable Editor window ................................................................................................ 48
●Launching Timetable Editor .................................................................................................................... 48
●The main Timetable Editor window ........................................................................................................ 48
Creating a timetable ........................................................................................................................ 50
●Registering a program in the timetable .................................................................................................. 50
●Registering panel control in a timetable ................................................................................................ 51
●Adjusting a timetable ............................................................................................................................... 52
●Saving a timetable .................................................................................................................................... 53
●Opening a timetable ................................................................................................................................. 54
●Checking a timetable ................................................................................................................................ 54
●Deleting a timetable .................................................................................................................................. 55
●Changing timetable name and timetable color ...................................................................................... 55
●Importing/exporting a timetable .............................................................................................................. 56
Contents

3
Contents
Creating/Editing Schedules
The main Schedule Editor window ................................................................................................ 58
●Launching Schedule Editor ..................................................................................................................... 58
●The main Schedule Editor window ......................................................................................................... 58
Creating a schedule ........................................................................................................................ 60
●Registering a timetable in the schedule ................................................................................................. 60
●Saving a schedule .................................................................................................................................... 62
●Opening a schedule ................................................................................................................................. 62
●Deleting a schedule .................................................................................................................................. 63
●Changing schedule name ........................................................................................................................ 63
●Importing/exporting a schedule .............................................................................................................. 64
Panel Management and Option
Managing panels ............................................................................................................................. 66
●Launching Panel Control Management .................................................................................................. 66
●The main Panel Management window .................................................................................................... 66
●Adding/editing a panel ............................................................................................................................. 67
●Adding/editing a group ............................................................................................................................ 68
●Controlling a panel manually .................................................................................................................. 69
●Deleting a panel or group ........................................................................................................................ 69
Option ............................................................................................................................................... 70
●Launching Option ..................................................................................................................................... 70
●Checking version information ................................................................................................................. 70
●Adding default panel settings for panels ............................................................................................... 71
Distributing schedules
The main Schedule Distribution Tool window .............................................................................. 72
●Launching Schedule Distribution Tool ................................................................................................... 72
●The main Schedule Distribution Tool window ....................................................................................... 72
Distributing schedules .................................................................................................................... 73
●Distributing via a network ........................................................................................................................ 73
●Distributing to your own PC .................................................................................................................... 75
●Distributing with USB memory or other external storage device ........................................................ 76
Displaying break-in programs ........................................................................................................ 78
●Distributing via a network and making a break-in display ................................................................... 78
●Distributing to your own PC and making a break-in display ................................................................ 80
List of Reserved Distribution/List of Distribution Log ................................................................. 82
●List of Reserved Distribution .................................................................................................................. 82
●List of Distribution Log ............................................................................................................................ 83
Schedule Management
Server Scheduler ............................................................................................................................. 84
Schedule Reception/Program Display
FTP Server ........................................................................................................................................ 85
●Launching the FTP Server ....................................................................................................................... 85
Client Scheduler .............................................................................................................................. 86
●Launching Client Scheduler .................................................................................................................... 86
●Client Scheduler menu ............................................................................................................................. 86
Program Viewer ............................................................................................................................... 89

4
Monitoring status
The main Status Monitoring Tool window ..................................................................................... 90
●Launching Status Monitoring Tool ......................................................................................................... 90
●The main Status Monitoring Tool window .............................................................................................. 90
Acquiring and displaying panel status .......................................................................................... 93
●Acquiring status of selected panels ....................................................................................................... 93
●Setting panels for which status will not be obtained ............................................................................ 94
●Controlling target PC power .................................................................................................................... 94
●Displaying detailed information for a panel ........................................................................................... 95
●Changing thumbnail size ......................................................................................................................... 96
Setting the operation environment ................................................................................................ 97
Contents
5
Thank you for purchasing SHARP Digital Signage Software.
SHARP Digital Signage Software comes in three versions: The Standalone, Network, and Viewer Versions. This
manual covers all three versions. Where editions differ in terms of usage restrictions and functionality, this fact is
clearly indicated.
IMPORTANT:
To aid reporting in case of loss or theft,
please record the product’s model and
serial numbers in the space provided.
Model No.:
Serial No.:
U.S.A. ONLY
Precautions on use
• This product is subject to exacting quality control and product inspection before shipment. In the unlikely event
that a failure or malfunction occurs, contact your retailer.
• Please understand that SHARP CORPORATION bears no responsibility for errors made during use by the
customer or a third party, nor for any other malfunctions or damage to this product arising during use, except
where indemnity liability is recognized under law.
• Under copyright law, the use of this product to duplicate, edit or otherwise alter copyrighted material is only
permitted in cases where such duplicated or edited material is for individual or home use.
If material is duplicated and/or edited beyond this scope, and if such duplicated or edited material is used,
(except in cases where the user themselves holds the copyright for the object of the duplicated material or
where the user has received permission from the copyright holder), this will constitute a violation of copyright
law and may lead to the copyright holder or other parties claiming compensation for damages. Such use
should therefore be strictly avoided.
When using photo image data, DVD images, TV broadcasts or similar material with this product, the above
uses that constitute copyright violation should, naturally, be strictly avoided. Using, modifying, or otherwise
altering images of other people without permission constitutes a violation of portrait rights, and should also be
strictly avoided.
• When showing TV, DVDs, or similar copyrighted programs and/or material you must obtain the permission of
the copyright holder or copyright holders.
• Transcribing or duplicating part or all of this manual and/or this software without permission from our company
is not permitted.
• As a part of our policy of continuous improvement, SHARP reserves the right to make design and specification
changes for product improvement without prior notice. The performance specification figures indicated are
nominal values of production units. There may be some deviations from these values in individual units.
Introduction
6
Trademarks
• Microsoft, Windows, Windows Vista, PowerPoint, and Windows Media are either registered trademarks or
trademarks of Microsoft Corporation in the United States and/or other countries.
• The Microsoft Internet Explorer logo is a trademark of Microsoft Corporation in the United States and other
countries.
• Flash and Flash Player are either registered trademarks or trademarks of Adobe Systems Incorporated in the
United States and/or other countries.
• Intel, Celeron, and Pentium are either registered trademarks or trademarks of Intel Corporation and/or its
subsidiaries in the United States and/or other countries.
• QuickTime and the QuickTime logo are trademarks of Apple Computer, Inc., registered in the United States
and other countries.
Names of products and other proper nouns are the registered trademarks or trademarks of their respective
copyright holders.
How to read this manual
●Icons
indicates reference information, related details, and restrictions.
indicates pages that contain related information.
●Notation
• Keyboard keys are indicated with square brackets.
E.g. [Shift], [Ctrl], etc.
• Menus, windows, dialog boxes, buttons, and tabs etc are indicated with square brackets.
E.g.
1. From the [Option] menu click [Grid Setting].
The [Grid Setting] dialog box will appear.
• Items, check boxes, and option buttons, etc., are indicated with double inverted commas.
E.g. “X”, “Preset Screen Size” option button, etc.
• This manual assumes that this product has been installed in the following location.
If you have installed the software in a different location, this can be interpreted to refer to the folder where you
installed it.
C:\Program Files\Sharp\SHARP Digital Signage Software (default)
• The screenshots and operational procedures in this manual are only examples.
These may change depending on your monitor, screen settings, or the version of the OS you are using and
other factors. This manual gives instructions using Windows XP as an example.
The content files and fonts in this manual are only examples. Not all of these are included with this software.
• This manual does not contain basic operating instructions for Windows.
Trademarks / How to read this manual
7
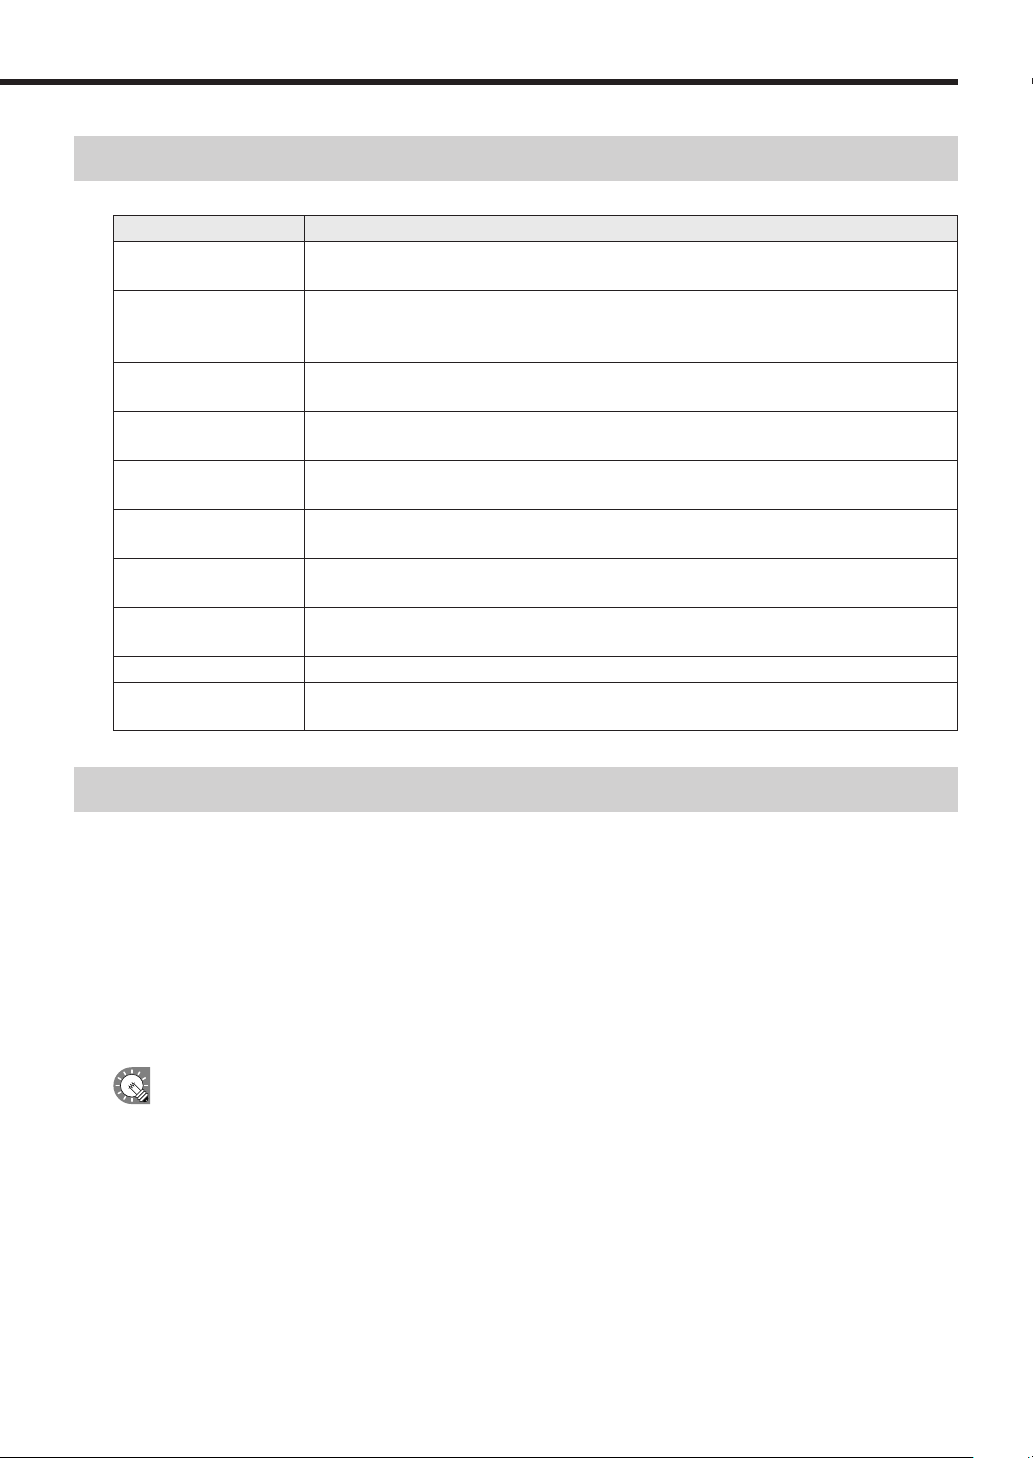
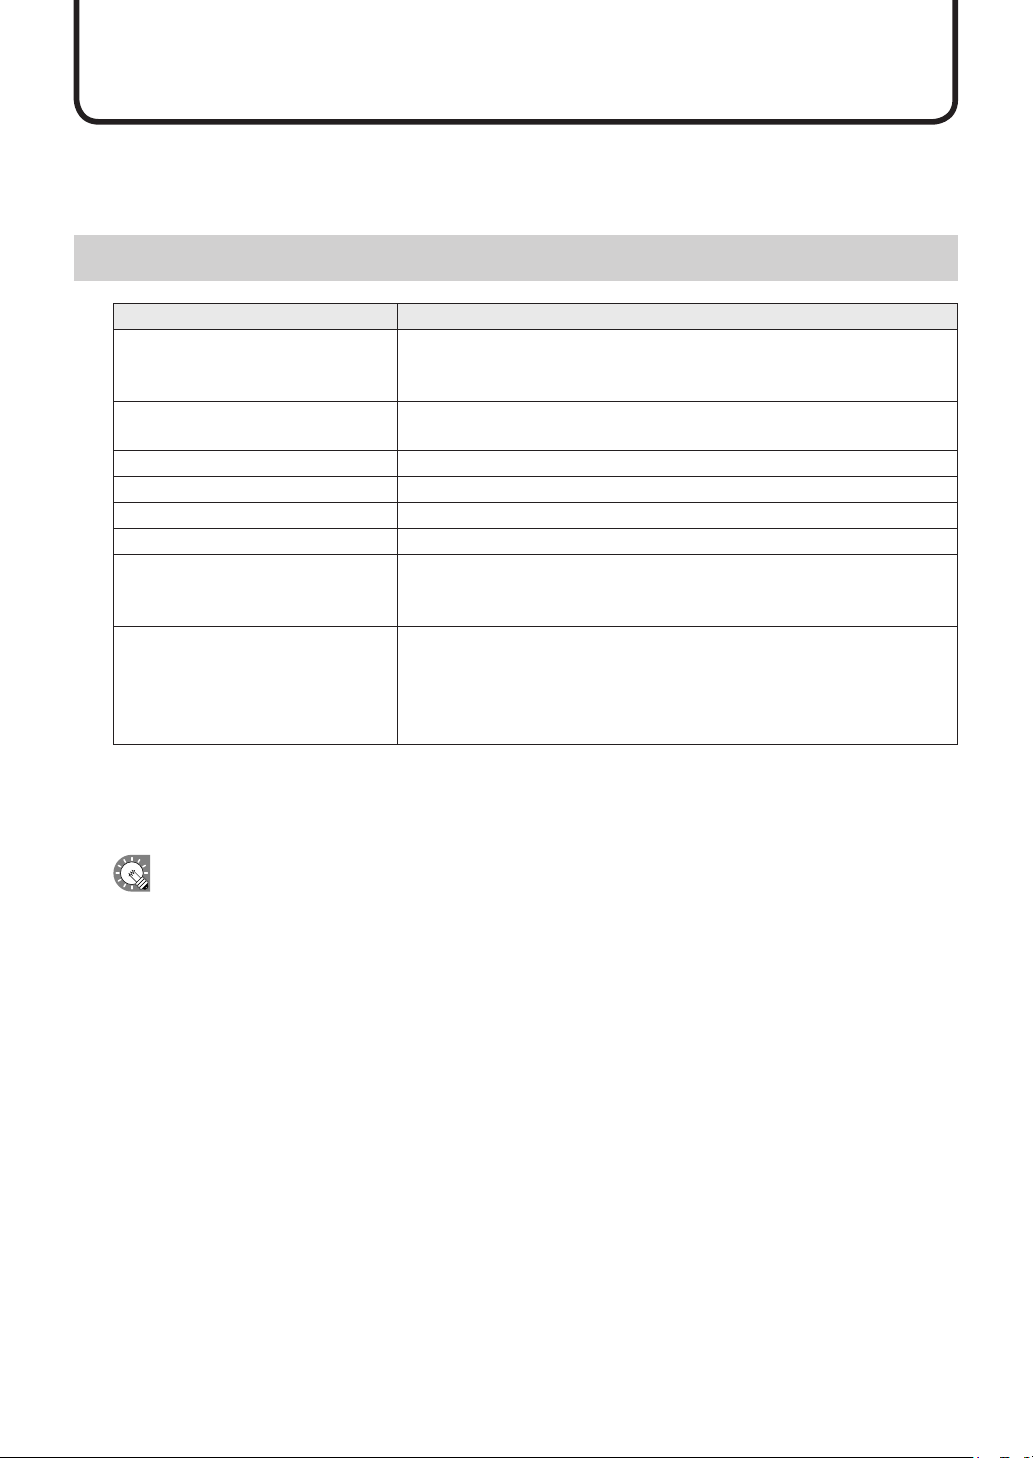
Definitions
This chart provides definitions of terms used in this manual.
Term Definition
Controller PC
The PC that is used to create and distribute programs, timetables and schedules.
Also referred to as a “Server PC”.
Target PC
A PC that displays content according to a schedule.
Also referred to as a “Panel PC” or a “Client PC”. “Panel” refers to an LCD monitor
connected to a target PC.
Content (files)
Material (i.e. files) such as movies, still images, and audio files that are played on the panel.
These are usually prepared by the user.
Playlist
A list that plays multiple content in a desired order.
Contains information such as content data, order of play, and duration, etc.
Frame
Refers to a sub-screen that is used as a display unit when a single panel is divided into
multiple frames.
Scroll message
A scrolling message.
Up to two scroll messages can be displayed.
Program
Programs consist of a frame layout, multiple frames and their assigned playlist
information, scroll message information, etc.
Timetable
Timetables contain information regarding the order and duration of play for multiple
programs that have been assigned to a one-day time frame.
Schedule Schedules contain multiple timetables assigned to desired dates of play.
Attached files
The collective term for the image files, etc, which are required when displaying HTML files,
etc.
System operation precautions
Points to note when creating content and programs
If the PC does not have sufficient processing power, content may not be played correctly. Before operating the
system, run a test using the actual content to be displayed on the panel.
Take care of the following points when creating content or programs:
• Movie players
Playing multiple videos simultaneously is not recommended.
Windows Media Player generally places a heavier load on the CPU than Flash Player (although this depends
on the content).
• A separate, fee-based codec may be necessary to play video files.
• QuickTime Player is required in order to play QuickTime content.
• Flash content
Take care when playing content that makes frequent use of image transparency processing (image fade-in/
fade-out), as this may place an extremely heavy load on the CPU.
• Enlarging/reducing still images and movies
As image size and display size increase, so does the load placed on the CPU. CPU load also increases when
images are displayed at an enlarged or reduced size. Keep the size of the content display area (frame size) as
small as possible. Content should also be created using the same image size as the display size.
Definitions / System operation precautions

8
• Scroll message content
Displaying scroll messages requires a great deal of CPU processing power. When using scroll messages,
programs should be tested by actually displaying them before operation.
· Scroll messages with a larger display area place a larger load on the PC. Do not make the scroll message
display area unnecessarily large.
· If there are a lot of characters in a scroll message line, display may become distorted. If this occurs, start a
new line. (Up to 100 characters per line recommended.)
• PowerPoint
Set PowerPoint data so that it plays repetitively by setting slide transition to advance slides automatically
(automatic slideshow).
PowerPoint Viewer is not capable of simultaneous multiple display. Do not assign PowerPoint files to multiple
frames in the same program. It should also be noted that PowerPoint Viewer only proceeds to play slideshows
when the focus is on itself.
PowerPoint Viewer 2003/2007 is required. Even if you already have Microsoft PowerPoint 2003/2007 installed
on your PC, you must make a separate installation of PowerPoint Viewer 2003/2007.
Continuous operation of target PC
This software is not designed for continuous 24-hour-a-day operation. Be sure to turn the power off on the
target PC every day. (Refer to Power Control on p.68)
PC internal clock
This software executes schedules based on the PC’s internal clock. You should ensure that your PC’s
internal clock is always accurate by synchronizing it with an internet time server or other means.
Accuracy of program display time
Program display is controlled by a timer that starts at 0 seconds every minute. Programs cannot be switched at
intervals of less than 1 minute, or during a 1 minute interval (i.e. in intervals of less than 60 seconds).
Be aware that there may be some delay before content is actually displayed depending on the time taken to
launch applications that display content and the time taken to load content files.
Operation during program display
Do not use the mouse or keyboard (e.g. to click on a window, etc.) during program display. Doing so may
change the window display order or alter the content to be played.
Press [Esc] to finish program preview display.
Backups
This software does not have a backup function. You should make regular backup copies of content files,
etc., during operation.
Daisy chain configuration
Multiple SHARP LCD monitors (PN series) can be connected in a daisy chain configuration. This software
cannot transmit different panel control commands (i.e. ON/OFF commands or input commands) to individual
monitors connected in daisy chain configuration.
Still images
Displaying a still image in the background or in a frame in the same position for a long time may leave a residual
image on the monitor. When creating programs or timetables, you should take measures such as changing still
images and layouts at set intervals to avoid this problem.
Date display
This software displays the date in YYYY/MM/DD format.
System operation precautions
9
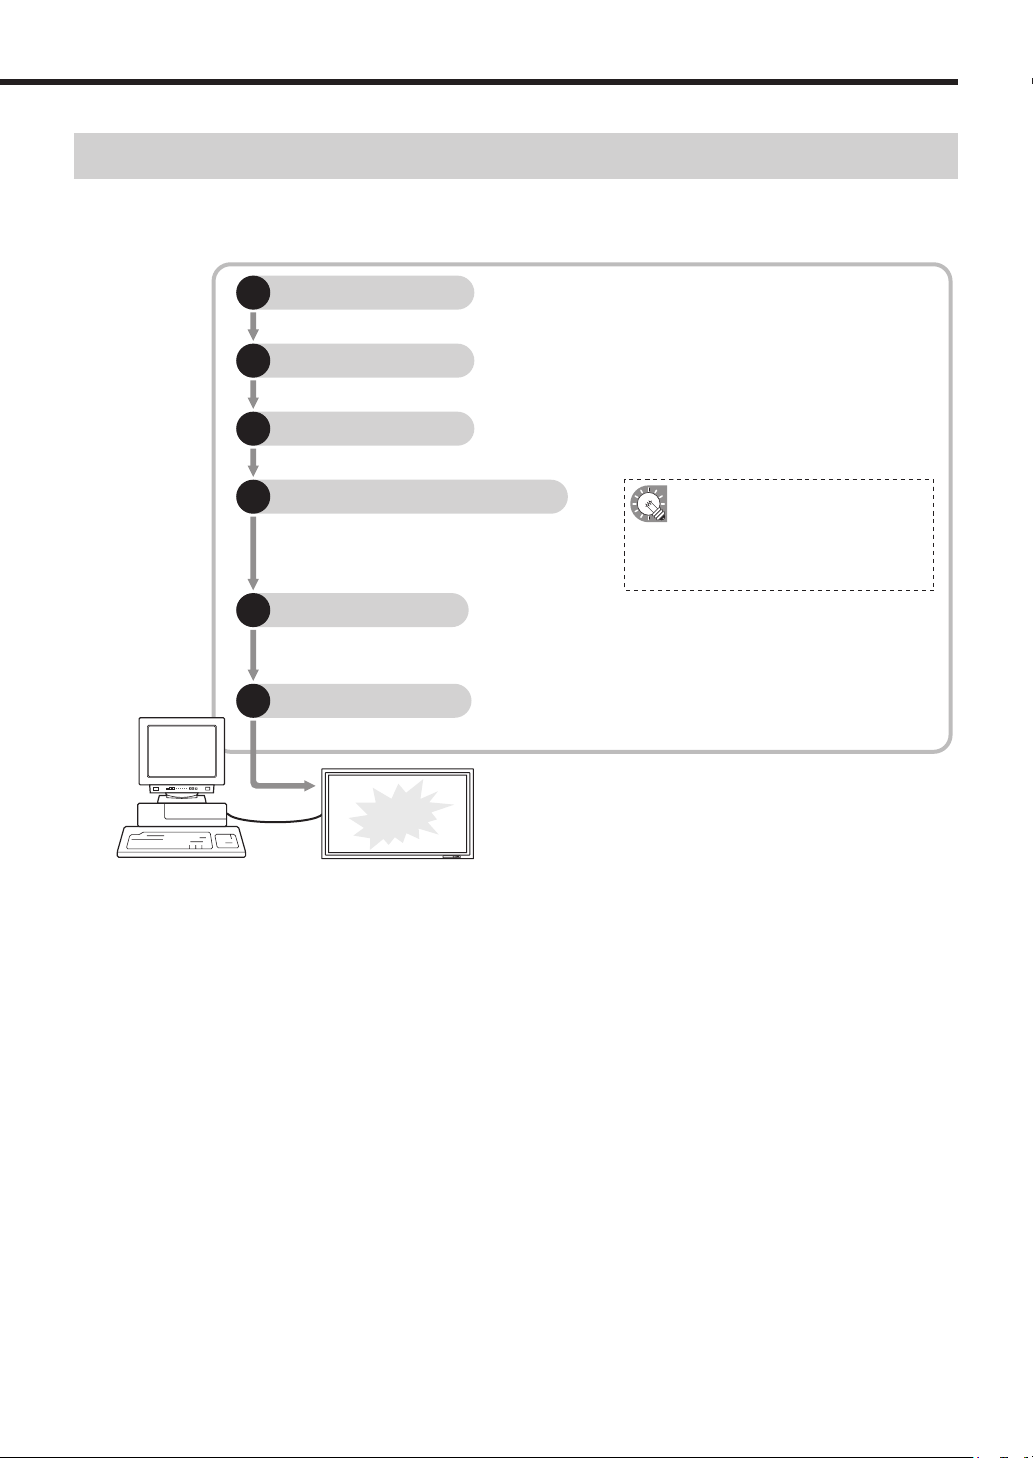
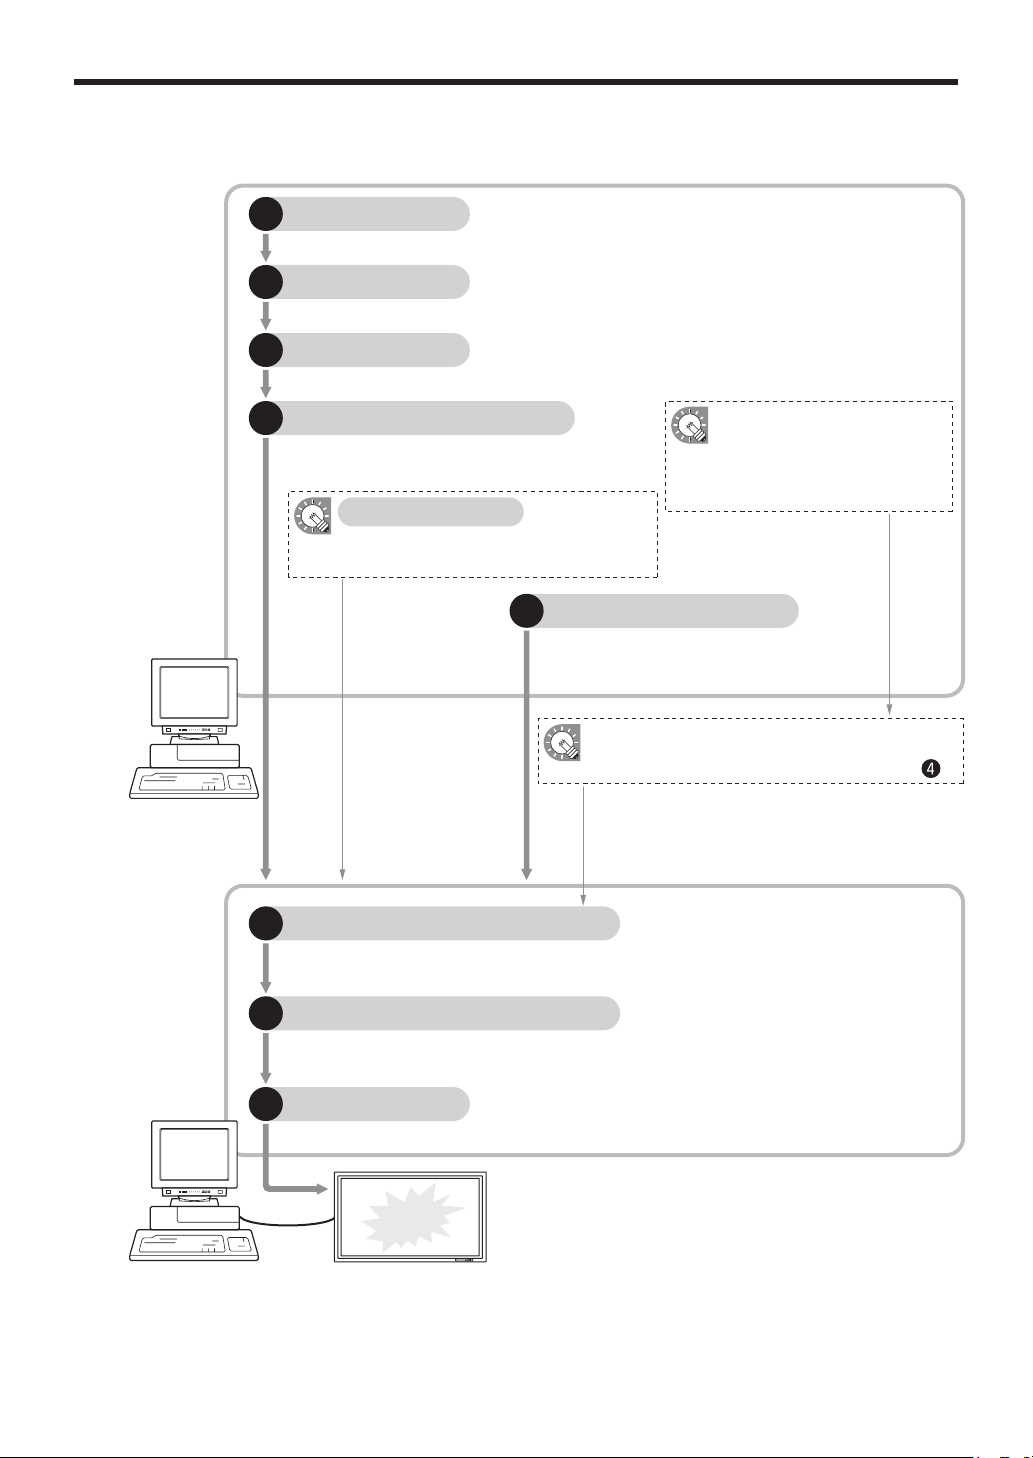
Program distribution workflow
This chart details the process from program creation to the stage where programs can be displayed on a panel.
Standalone Version
Lay out your chosen content and create a program. (p.28)
1
Program Editor
Assign the hour of the day that your program will be shown. (
p.48)
2
Timetable Editor
Assign the dates when daily timetables you have created will be shown. (p.58)
3
Schedule Editor
Distribute schedules and programs you have
created to Client Scheduler. (
p.72)
4
Schedule Distribution Tool
Control Program Viewer so that it displays schedules and programs at a set time. (
p.86)
5
Client Scheduler
Program Viewer displays programs when instructed to do so by Client Scheduler. (p.89)
6
Program Viewer
Program
displayed
You can distribute to a target PC
that has Program Viewer installed
by using USB memory or other
external storage devices. (
p.76)
Program distribution workflow
10
Network Version
Lay out your chosen content and create a program. (
p.28)
1
Program Editor
Assign the hour of the day that your program will be shown. (p.48)
2
Timetable Editor
Assign the dates when daily timetables you have created will be shown. (
p.58)
3
Schedule Editor
Distribute schedules and programs you have created
to a target PC connected to the network. (p.72)
4
Schedule Distribution Tool
Control the distribution schedule and distribute
scheduled times to the FTP server. (
p.84)
Server Scheduler
The FTP server passes schedules and programs it receives to Client Scheduler. (
p.85)
5
FTP Server
Control Program Viewer so that it displays schedules and programs at a set time. (p.86)
6
Client Scheduler
Program Viewer displays programs when instructed to do so by Client Scheduler. (p.89)
7
Program Viewer
Program
displayed
Controller PC
(Network Version)
Target PC
(Viewer Version)
You can distribute to a target PC
that has Program Viewer installed
by using USB memory or other
external storage devices. (p.76)
Schedules and programs can be loaded from USB
memory or other external storage devices. (From )
Distributed via a network
Obtain panel status data and control
target PC power. (p.90)
Status Monitoring Tool
Program distribution workflow
11
Installing/Launching
This section provides installation instructions and information regarding the necessary operating environment,
as well as instructions on how to start and close down the Launcher window. Be sure to read this before using
the software.
Required operating environment
Item Description
PC
CPU: Celeron M 1.3 GHz or higher (Pentium 4 processor recommended)
*3
2 GHz or higher Pentium 4 processor is recommended for movie/content-heavy
programs.
OS
Microsoft Windows 2000/XP, Windows Vista, Windows Server 2003 (English
version)
Memory 256 MB or higher (512 MB or higher recommended)
*3
Hard disk 20 MB or more free space (Additional space required for saving data)
Monitor (for controller PC)
*1
Full color display with resolution of at least 1024 x 768
Monitor (for target PC)
*2
PN series LCD monitor
Interfaces
• USB port (only required if using USB memory)
• LAN port (only required for Network Version [TCP/IP communication must
be functional])
Others
Microsoft Internet Explorer 6.0 or later
PowerPoint Viewer 2003/2007
Windows Media Player 9 or later
Flash Player 6 or later
QuickTime Player 7 or later (in order to play QuickTime content)
*1 Used for creating/editing programs and schedules.
*2 Used to display programs with the Standalone and Viewer Versions.
*3 If you use Windows Vista, please follow the requirement of Vista.
• Panel control can only be used with the PN series.
• When controlling the target PC manually (when turning the panel PC on), the Wake
On LAN function
that operates by Magic Packets from the target PC must be enabled.
If the target PC is outside the same LAN segment, Magic Packets may not get through depending on
router specs/settings. Contact your network administrator for more details.
• Regardless of which version of this software you are using, you must have Flash Player, Windows Media
Player, and PowerPoint Viewer 2003/2007 installed on the PC on which this software is installed.
If you have not installed all of these programs, or have installed different versions of them, a message
prompting you to install may appear. If this happens, download the appropriate programs from the
relevant website and install them.
• A separate, fee-based codec may be necessary to play video files.
12
Installing SHARP Digital Signage Software
You must log in as an administrator before beginning the installation process.
●Installing SHARP Digital Signage Software
1. Start your PC
2. Close down all applications.
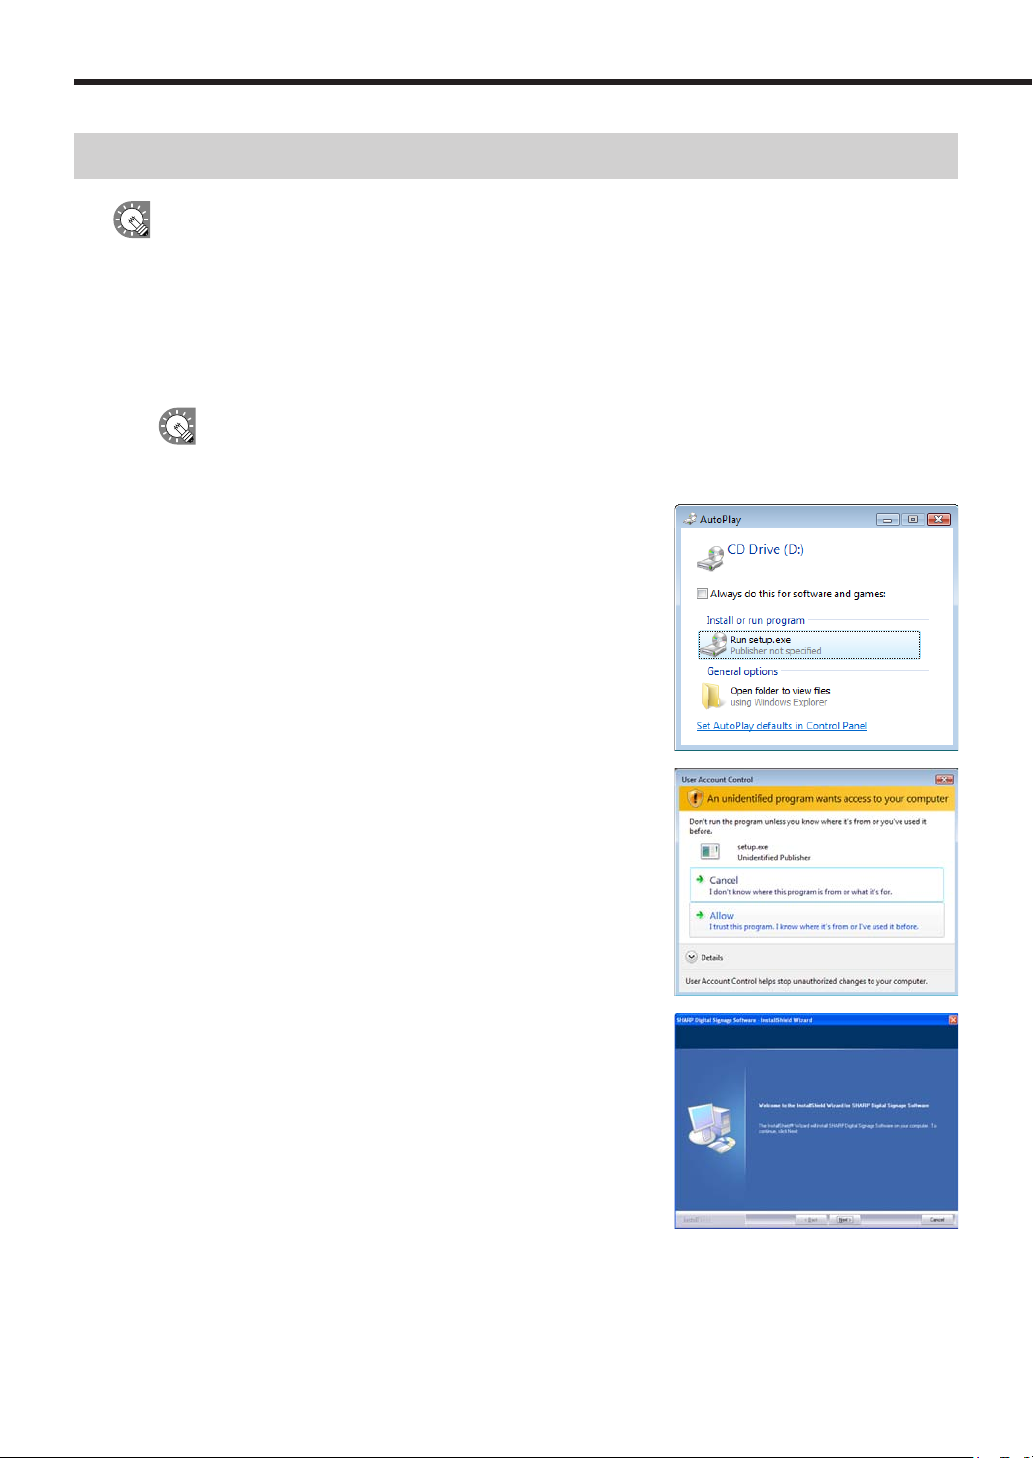
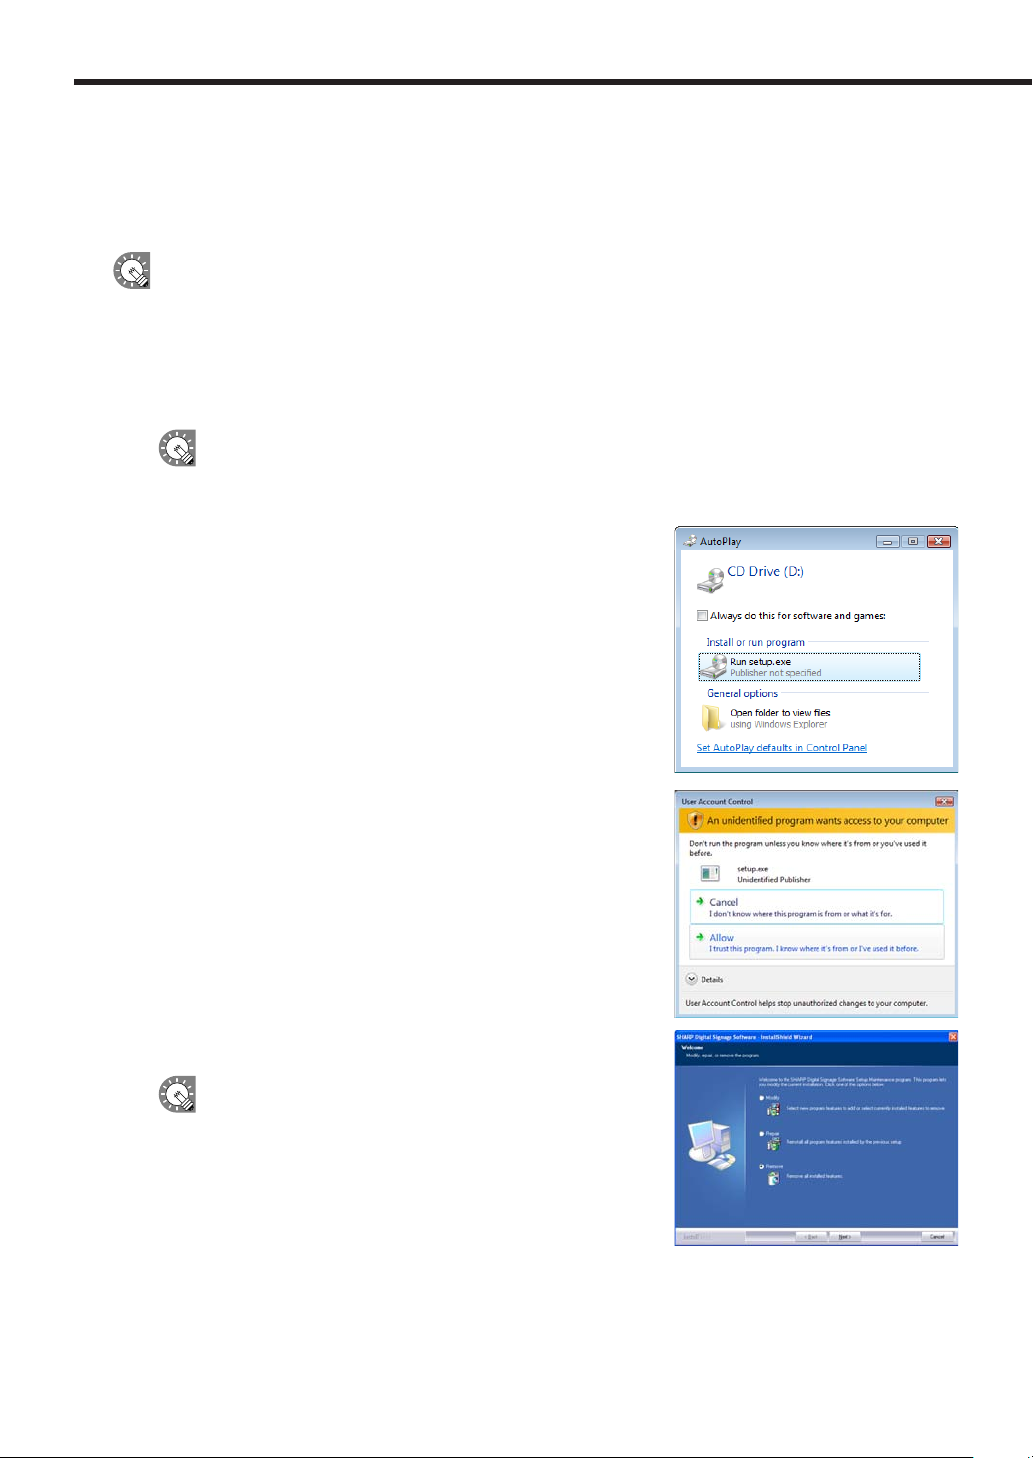
3. Launch the SHARP Digital Signage Software setup program (setup.exe).
Double-click the setup.exe file to launch the setup program.
If a security warning saying ‘The publisher could not be verified.’ is displayed during the installation,
click [Run].
If using the “SHARP Digital Signage Software CD-ROM”
1) Set the CD-ROM in the CD-ROM drive of your PC.
If using Windows 2000/XP, or Windows Server 2003
the setup program will be launched automatically. In this
case, proceed to step 4. If the setup program does not
launch after a few moments, launch the Setup.exe file in
the CD-ROM folder.
2) In the [AutoPlay] dialog box, click “Run setup.exe”.
If the [AutoPlay] dialog box does not appear, double-click
the Setup.exe file in the CD-ROM folder.
3) When the [User Account Control] dialog box appears,
click [Allow].
4. In the [Welcome to the Install Shield wizard...] window,
click [Next].
Installing SHARP Digital Signage Software
5. Read the entire software license agreement.
6. If you agree to the terms of the agreement, select the “I accept
the terms of the license agreement” option button, and click
[Next].
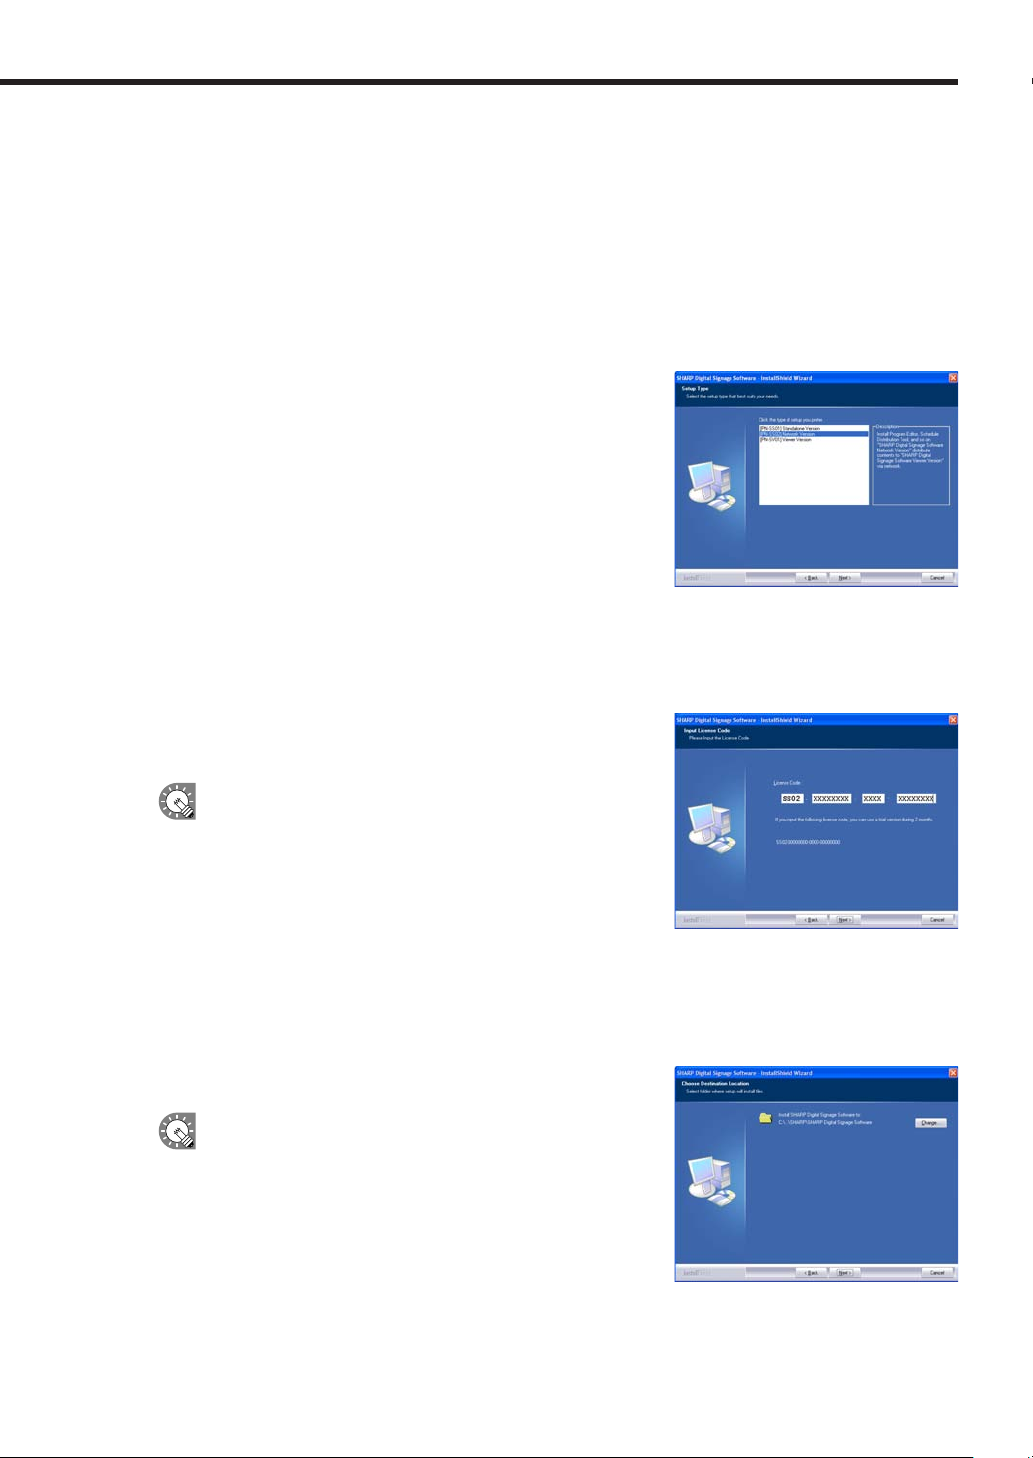
7. Select the version that you have purchased and click [Next].
The three following versions are available:
• [PN-SS01] Standalone Version
For creating programs and distributing/displaying schedules
with a single PC.
• [PN-SS02] Network Version
For use on a controller PC to create programs, distribute
schedules, and check panel status.
Also used for distributing programs and schedules to target PCs
running the “Viewer Version”.
• [PN-SV01] Viewer Version
Only installs software for content display.
For use on a target PC. Displays received programs according to a schedule.
Installing SHARP Digital Signage Software
8. Enter the appropriate license code for your version and click
[Next].
If you entered a temporary license code, you will only be
able to use the software for a two-month trial period. You
should register the license code you obtained before the
end of the trial period.
• If you are using the Standalone or Network Version,
license codes can be registered using the [Register
License Code] dialog box from the [Option] menu.
(
p.70)
9. Click [Next].
• If you are using the Viewer Version, license codes can be registered from the [Version] dialog box
in Client Scheduler. (
If you want to change the location where the installation will
be made, click [Change] and specify a different directory.
p.88)
13
14
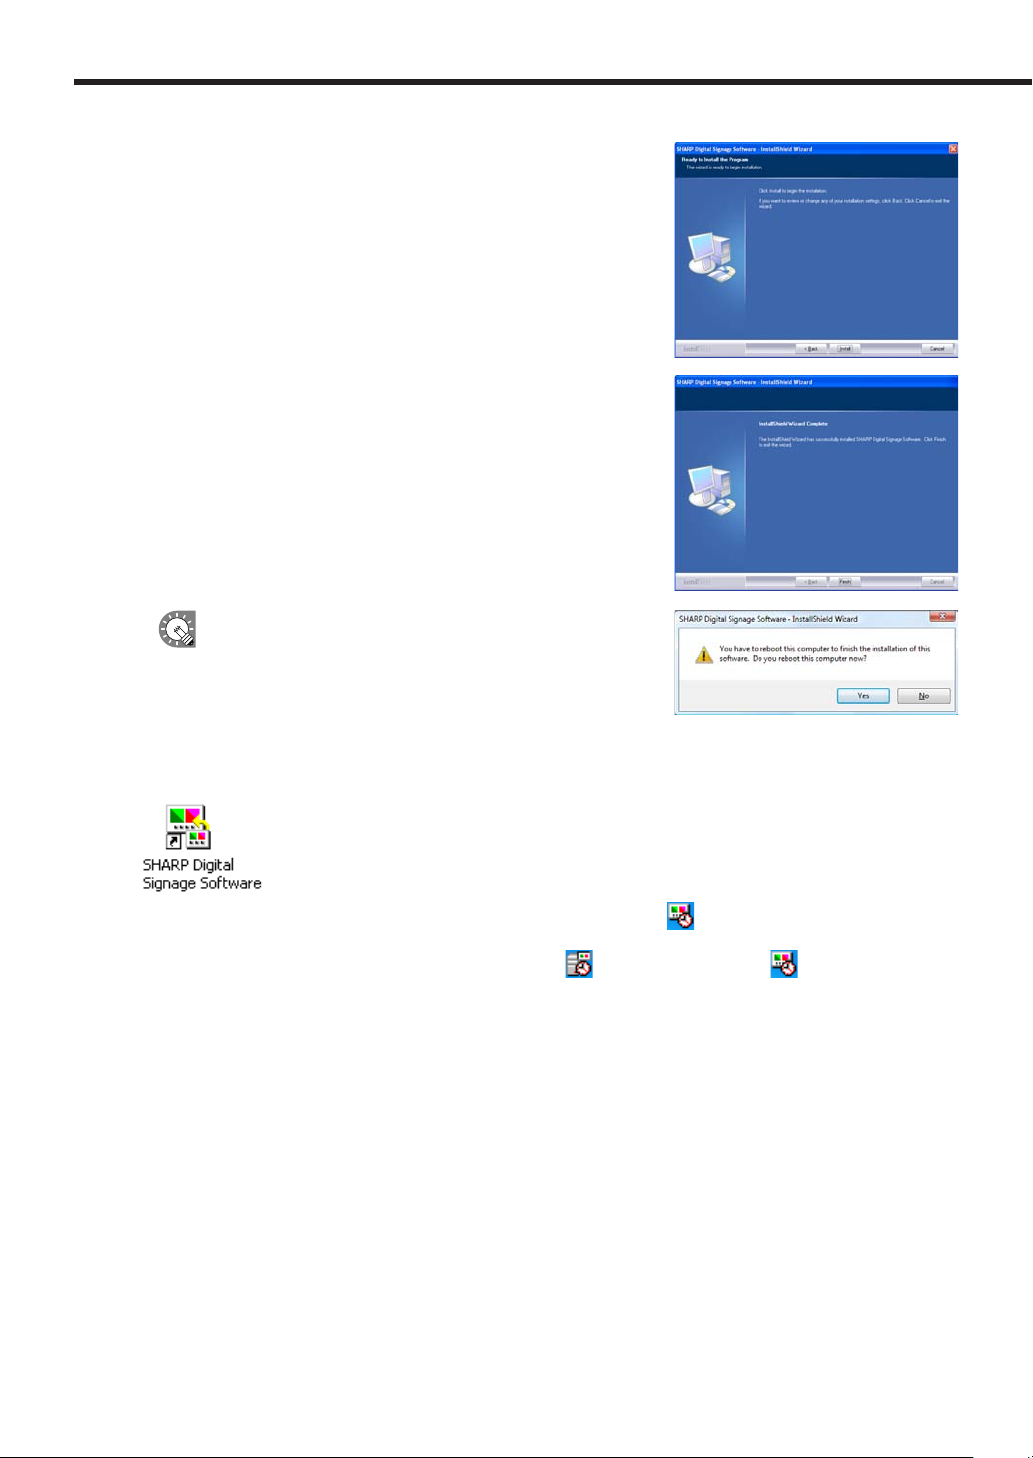
10. Click [Install].
The installation will start.
11. Click [Finish].
The installation is now complete.
If you are using Windows Vista, the following screen will
appear. Click [Yes] to restart your PC.
If you are using the Standalone or Network Versions, a shortcut to SHARP Digital Signage Software will be
created on your desktop.
If you are using the Standalone or Viewer Versions, Client Scheduler ( ) will launch and appear in the
Task Tray.
If you are using the Network Version, Server Scheduler (
) and Client Scheduler ( ) will launch and
appear in the Task Tray.
Installing SHARP Digital Signage Software
15
●PC settings
Once the installation is complete, change the following settings on your PC before using this software.
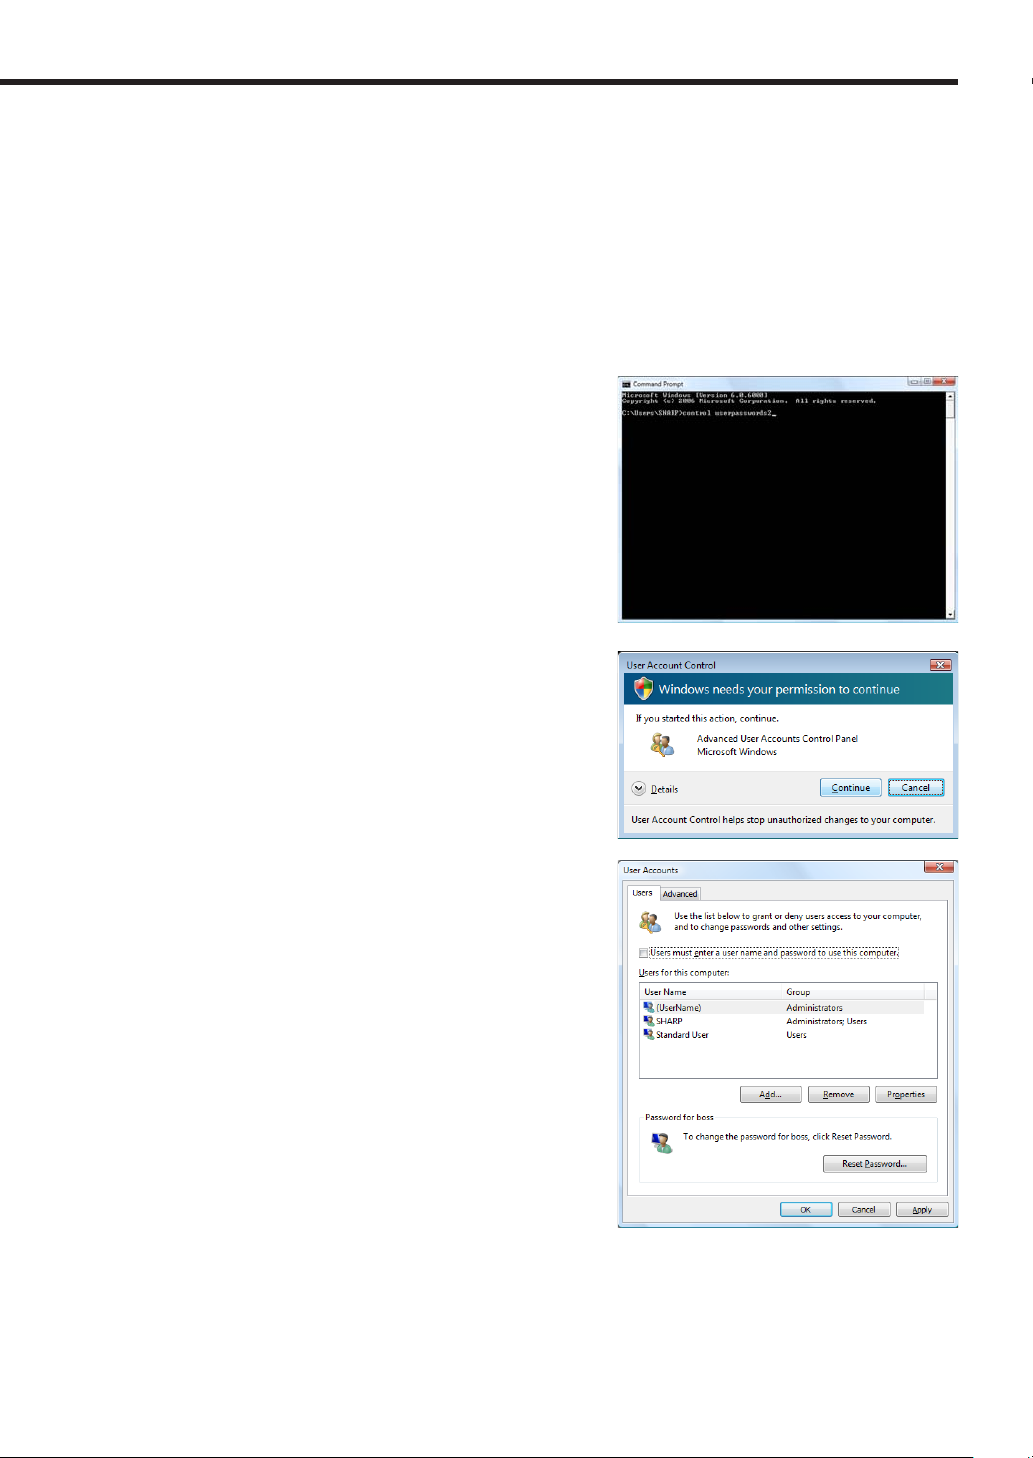
Auto login settings
If the target PC is to be used without an operator, Windows auto login should be enabled.
If using Windows Vista, use the following procedure to enable auto login.
1. From the Windows Taskbar, click [Start], [All Programs], [Accessories], and then [Command
Prompt].
The [Command Prompt] window will appear.
2. Type in “control userpasswords2” (without the inverted
commas) and push [Enter].
3. If the [User Account Control] window appears, click
[Continue].
The [User Accounts] dialog box will appear.
4. Clear the “Users must enter a user name and password
to use this computer” check box.
5. Click [OK].
6. In the [Automatically Log On] window, enter a “User
Name” and “Password”, and click [OK].
7. Type in “exit” and then press [Enter].
Installing SHARP Digital Signage Software
16
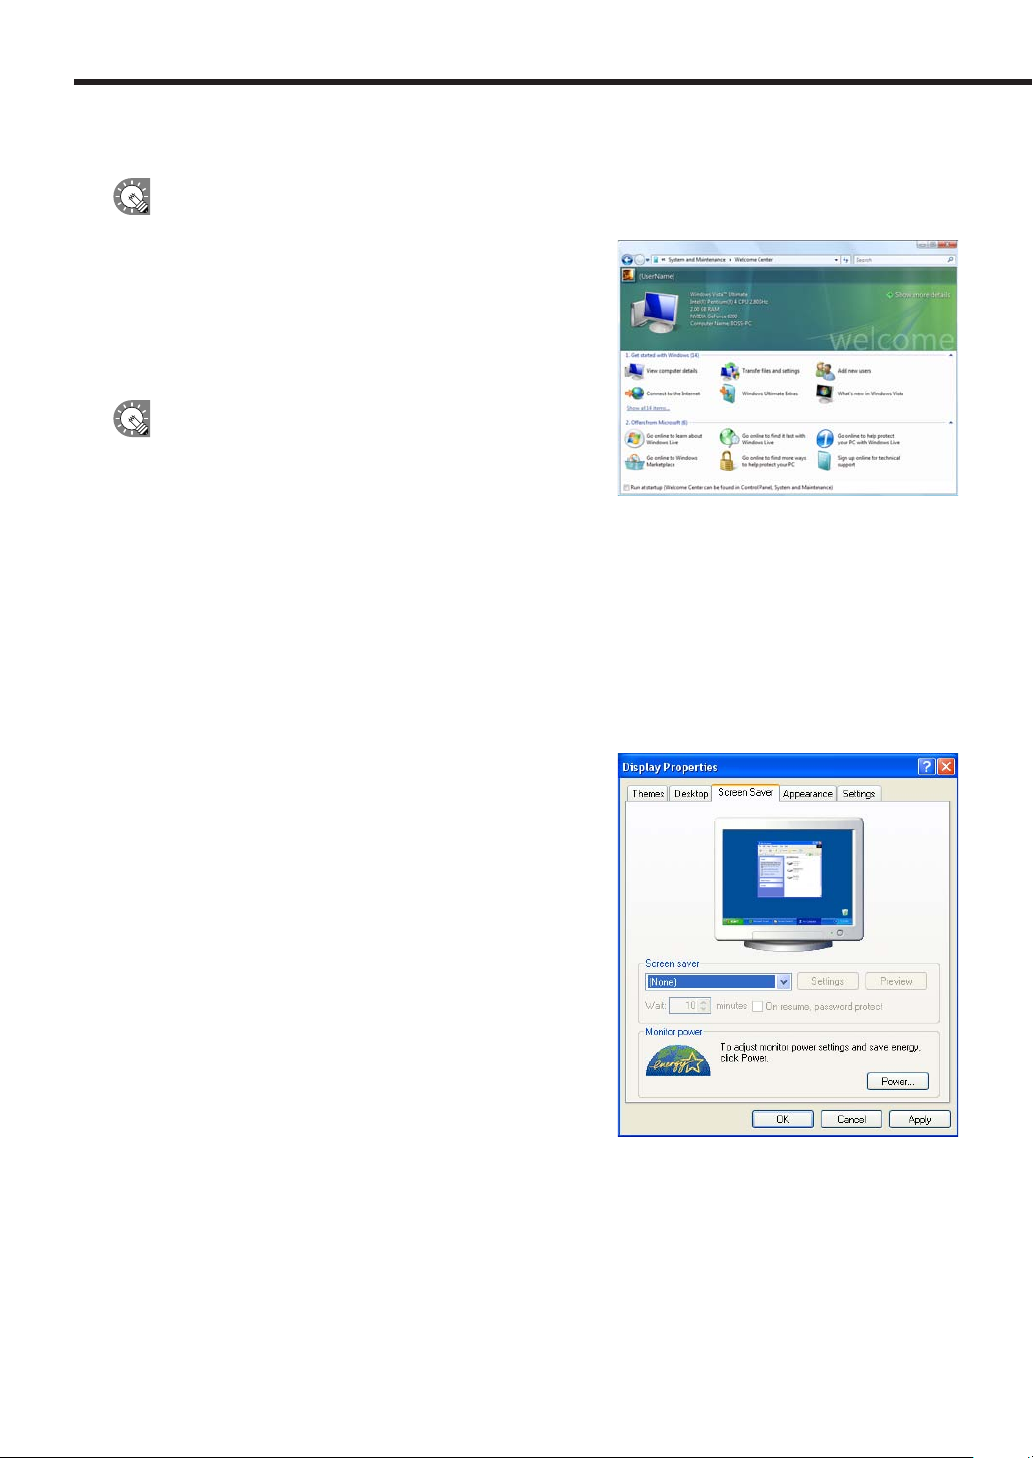
Welcome Center settings (Windows Vista only)
These settings do not apply to Windows 2000/XP or Windows Server 2003.
Under default settings, the “Welcome Center” is displayed when
Windows Vista is started.
Clear the “Run at startup” check box, to stop the “Welcome
Center” from being displayed when a program is displayed in
Program Viewer. The “Welcome Center” will not appear from the
next time the PC is started.
If “Welcome Center” is closed you can display it using
either of the following methods.
• From the Windows Taskbar, click [Start], [Control Panel],
[System and Maintenance], and then [Welcome Center].
• From the Windows Taskbar, click [Start], [All Programs], [Accessories], and then [Welcome Center].
Screen saver settings
Disable the screen saver so that it does not display on the monitor when a program is displayed in Program
Viewer.
•If using Windows 2000/XP or Windows Server 2003
1. Right-click on an empty area of the desktop, and from the menu that appears, click [Properties].
The [Display Properties] dialog box will appear.
2. Click the [Screen Saver] tab and select “(None)” from the
“Screen saver” list.
3. Click [OK].
Installing SHARP Digital Signage Software
17
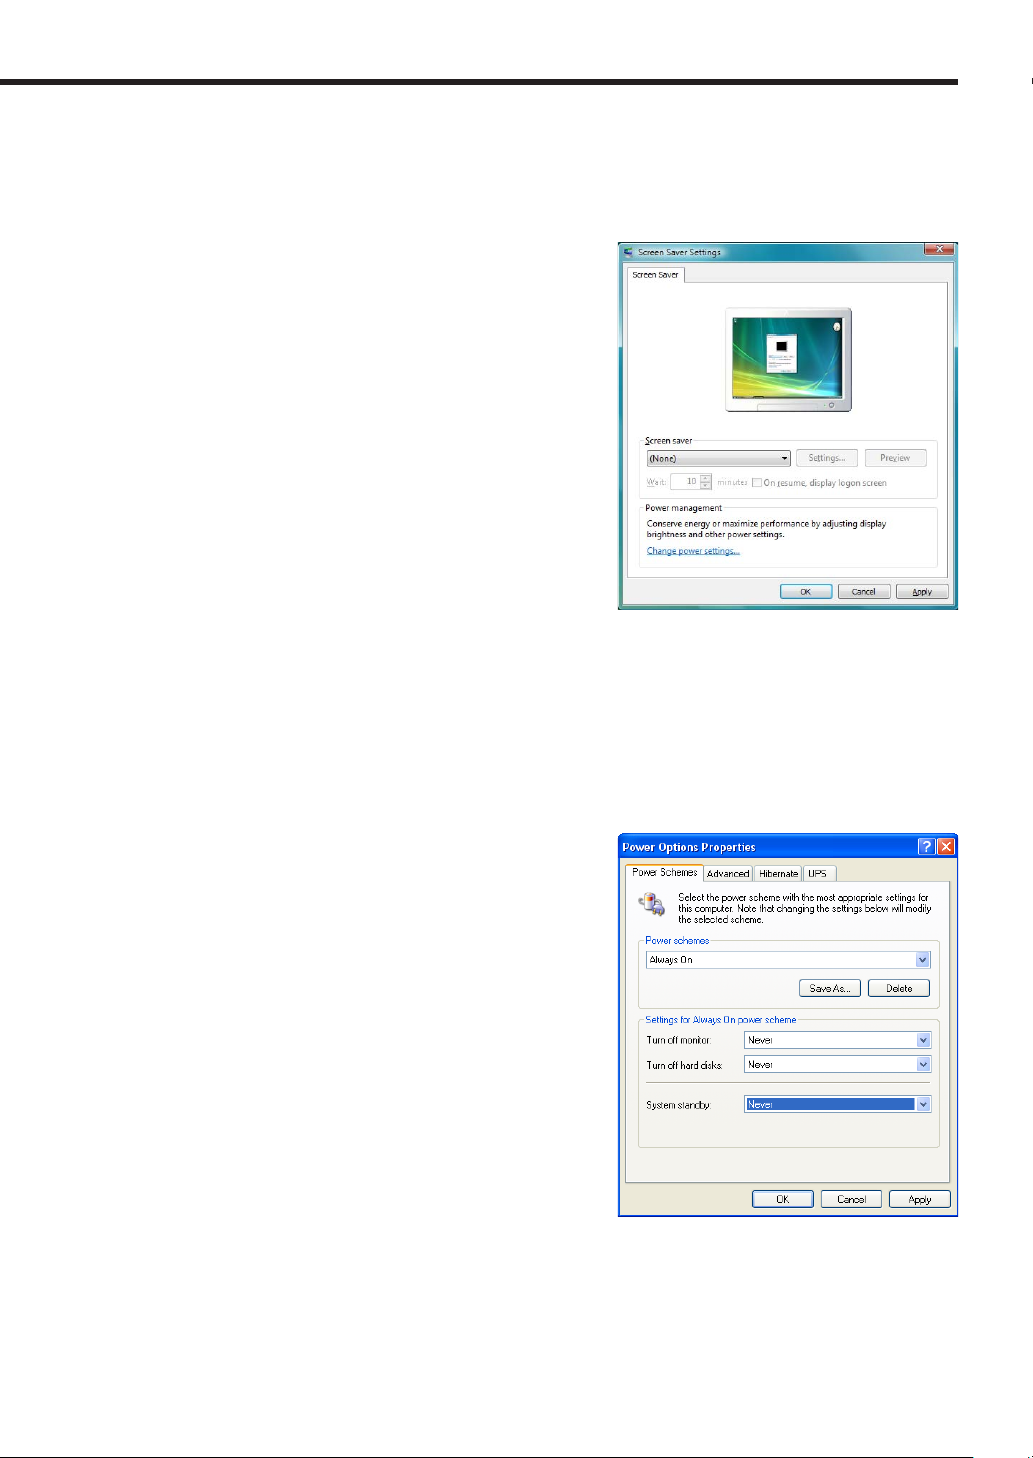
• If using Windows Vista
1. Right-click on an empty area of the desktop and from the menu that appears, click [Personalize] and
then [Screen Saver].
The [Screen Saver Settings] dialog box will appear.
2. Select “(None)” from the “Screen saver” list.
3. Click [OK].
Power control
Adjust settings so that the panel or hard disk do not turn off or go into system standby while a program is
displayed in Program Viewer.
•If using Windows 2000/XP or Windows Server 2003
1. From the Windows Taskbar, click [Start], [Control Panel], [Performance and Maintenance], and then
[Power Options].
The [Power Options Properties] dialog box will appear.
2. Select “Never” from the “Turn off monitor”, “Turn off
hard disks”, and “System standby” pull-down menus on
the [Power Schemes] tab.
3. Click [OK].
Installing SHARP Digital Signage Software
18
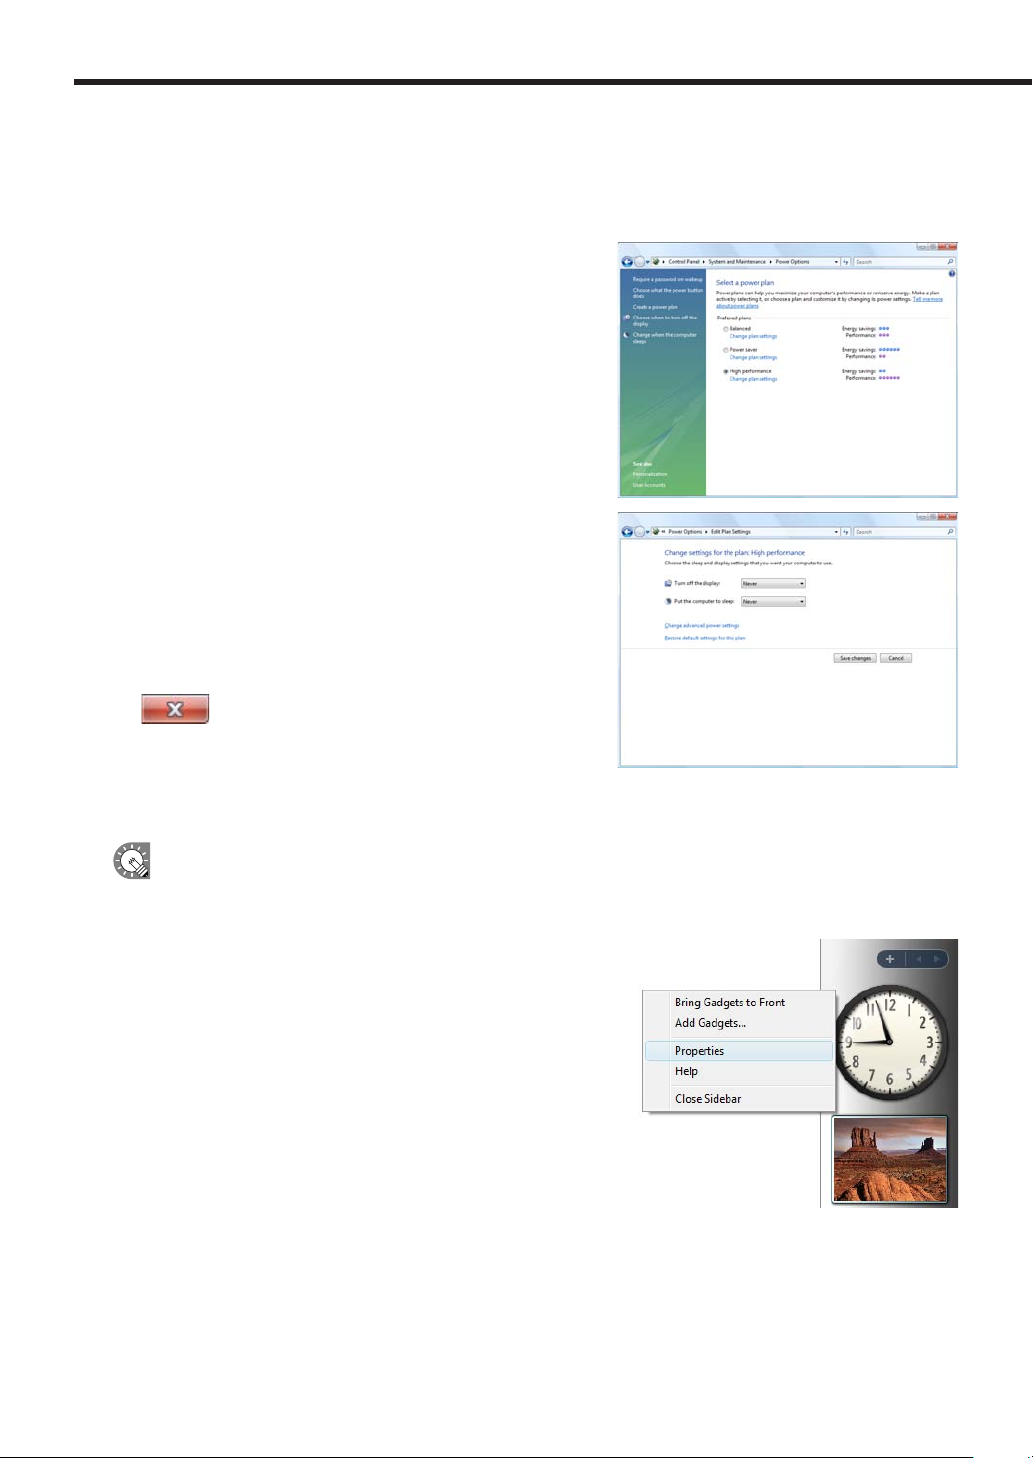
• If using Windows Vista
1. From the Windows Taskbar, click [Start], [Control Panel], [System and Maintenance], and then
[Power Options].
The [Power Options] dialog box will appear.
2. Select “High performance” and double-click [Change
plan settings].
3. Select “Never” from the “Turn off the display” and “Put
the computer to sleep” lists.
4. Click [Save changes].
Return to the [Power Options] dialog box.
5. Close the [Power Options] dialog box by clicking the
button in the upper right corner of the window.
Windows Sidebar (Gadget) settings (Windows Vista Only)
These settings do not apply to Windows 2000/XP or Windows Server 2003.
Adjust Windows Sidebar (Gadget) settings so that the Sidebar (Gadgets) is not displayed.
1. Right-click on an empty area of the Windows Sidebar,
and from the menu that appears, click [Properties].
The [Windows Sidebar Properties] dialog box will appear.
Installing SHARP Digital Signage Software
19
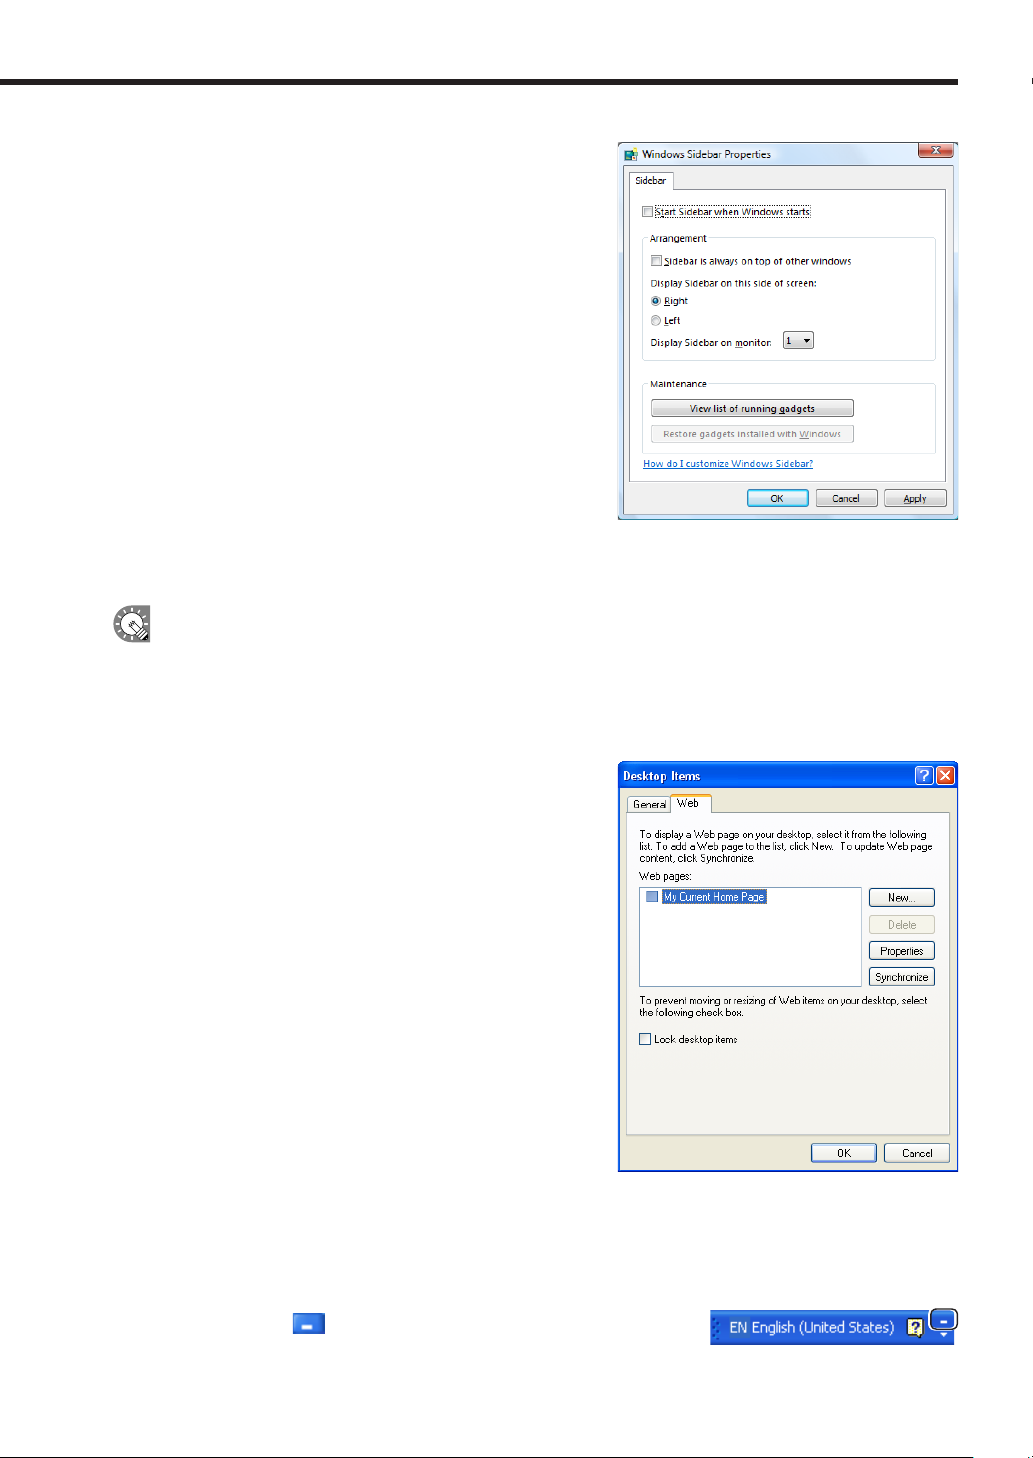
2. Clear the “Start Sidebar when Windows starts” check
box.
3. Click [OK].
4. Restart your PC.
The Windows Sidebar (Gadgets) will no longer appear from the
next time you start Windows Vista.
Active desktop settings (Windows 2000/XP/Server 2003 Only)
Turn Active desktop settings off.
These settings do not apply if you are using Windows Vista.
1. Right-click on an empty area of the desktop, and from the menu that appears, click [Properties].
The [Display Properties] dialog box will appear.
2. Click the [Desktop] tab, and then click [Customize Desktop].
The [Desktop Items] dialog box will appear.
3. Click the [Web] tab and clear all the check boxes under
“Web pages”.
4. Click [OK].
IME Toolbar settings
These settings are not required if the IME Toolbar is not displayed.
Store the IME Toolbar in the Taskbar so that it is not displayed when a program is being displayed in Program
Viewer.
1. Right-click on the IME Toolbar and, from the menu that appears, click [Minimize].
You can also click to minimize the Toolbar.
Installing SHARP Digital Signage Software
20
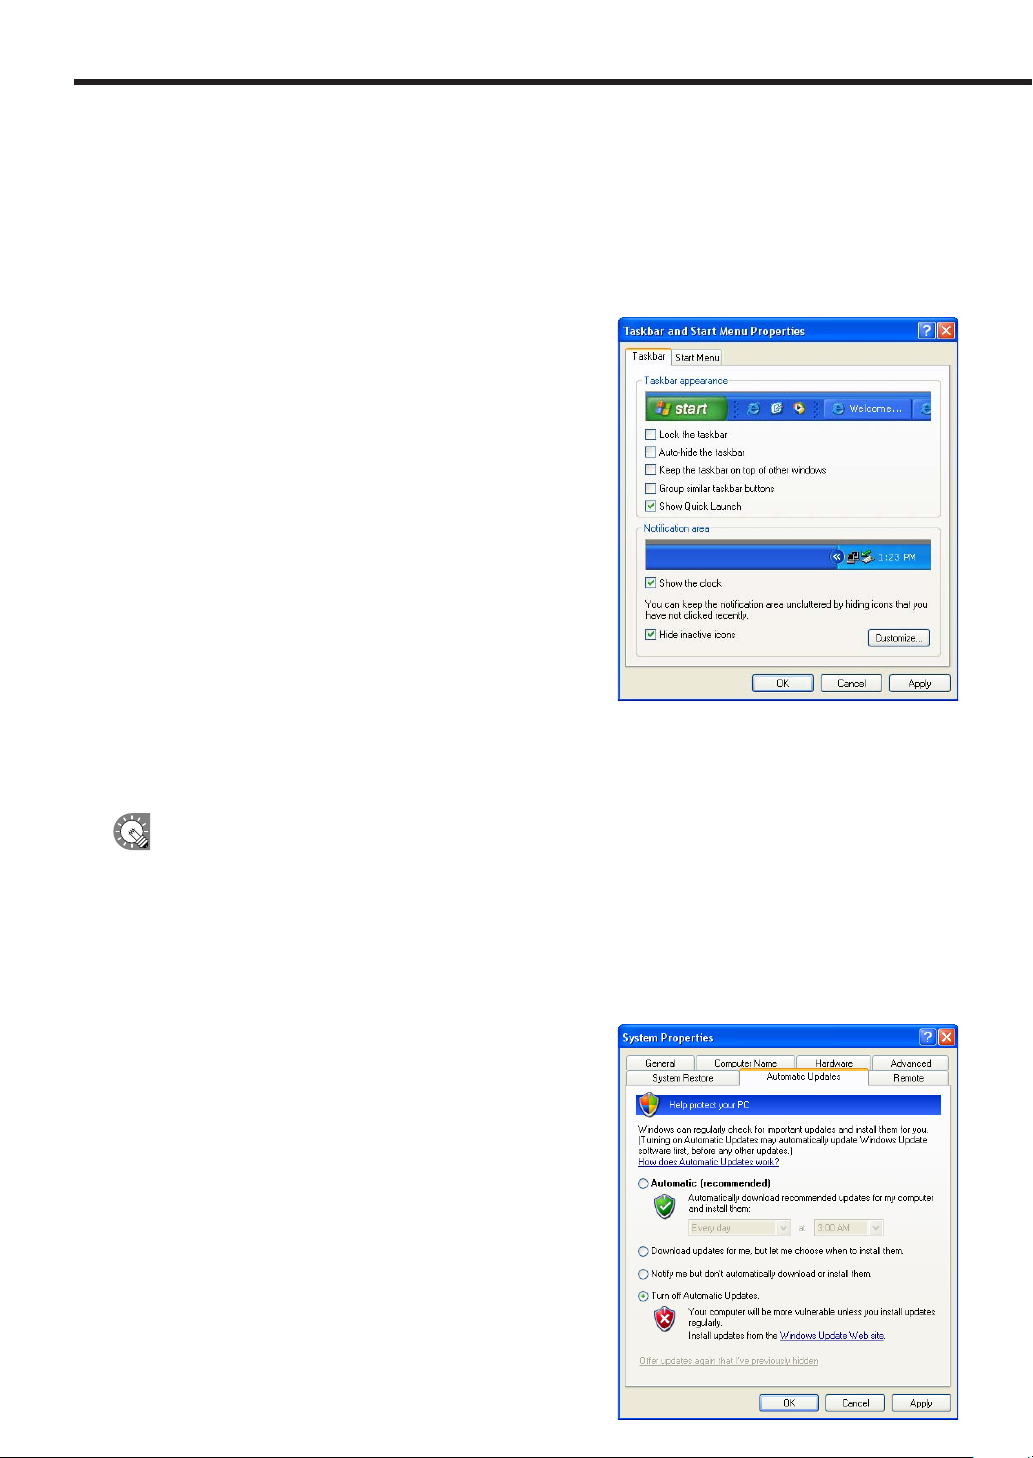
Taskbar settings
Adjust the Taskbar settings so that the Taskbar is not displayed when a program is being displayed in Program
Viewer.
1. Right-click on an empty area of the Taskbar, and from the menu that appears, click [Properties].
The [Taskbar and Start Menu Properties] dialog box will appear.
2. Under “Taskbar appearance” on the [Taskbar] tab, clear
the “Auto-hide the taskbar” and “Keep the taskbar on
top of other windows” check boxes.
3. Click [OK].
Windows Update settings
Set Windows Update so that it does not update automatically and display popup messages (dialog boxes), etc.,
while a program is being displayed in Program Viewer.
If you have disabled automatic updates, remember to check the Windows Update website (http://
windowsupdate.microsoft.com/) regularly and download and install updates manually. Not installing the latest
updates is a security risk and may also lead to performance related issues.
•If using Windows 2000/XP or Windows Server 2003
1. From the Windows Taskbar, click [Start], [Control Panel], [Performance and Maintenance], and then
[System].
The [System Properties] dialog box will appear.
2. Click the [Automatic Updates] tab and select the “Turn
off Automatic Updates” option button.
3. Click [OK].
Installing SHARP Digital Signage Software
21
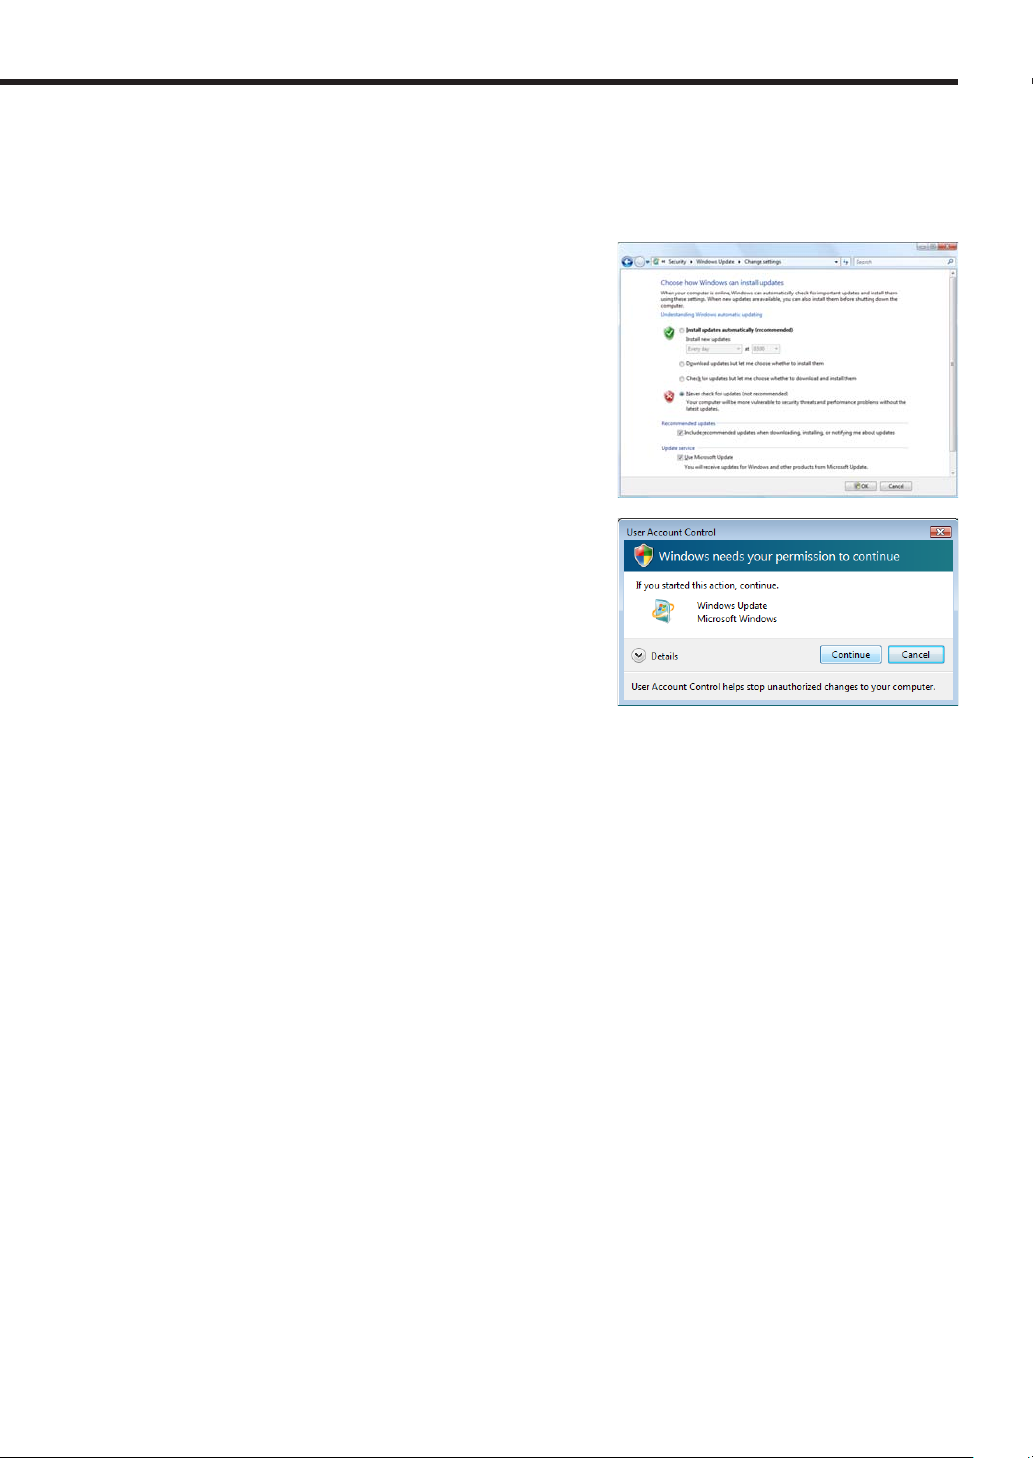
•If using Windows Vista
1. From the Windows Taskbar, click [Start], [Control Panel], [Security], and then [Turn automatic
updating on or off].
The [Change settings] dialog box will appear.
2. Select the “Never check for updates” option button.
3. Click [OK].
4. If the [User Account Control] window appears, click
[Continue].
The [Change settings] dialog box will close.
Resident application settings
Adjust settings for resident applications (e.g. virus scanners) so that they do not display popup messages (dialog
boxes) when a program is being displayed in Program Viewer.
Installing SHARP Digital Signage Software
22
Personal firewall settings
If you plan to distribute content over a network, you must free a TCP/IP port for this software to use when the
distribution port is assigned to a personal firewall.
If you have installed the Viewer Version, a unique FTP server will be installed, and started as a service.
The default TCP/IP port number is 21. If you change the port number, you must also change the FTP
settings for the controller PC (
p.68), and the FTP settings for Client Scheduler on the target PC
(
p.87) to the same port number.
Firewall settings for Status Monitoring Tool (Windows Vista Only)
If using Windows Vista, use the following procedure to change these settings.
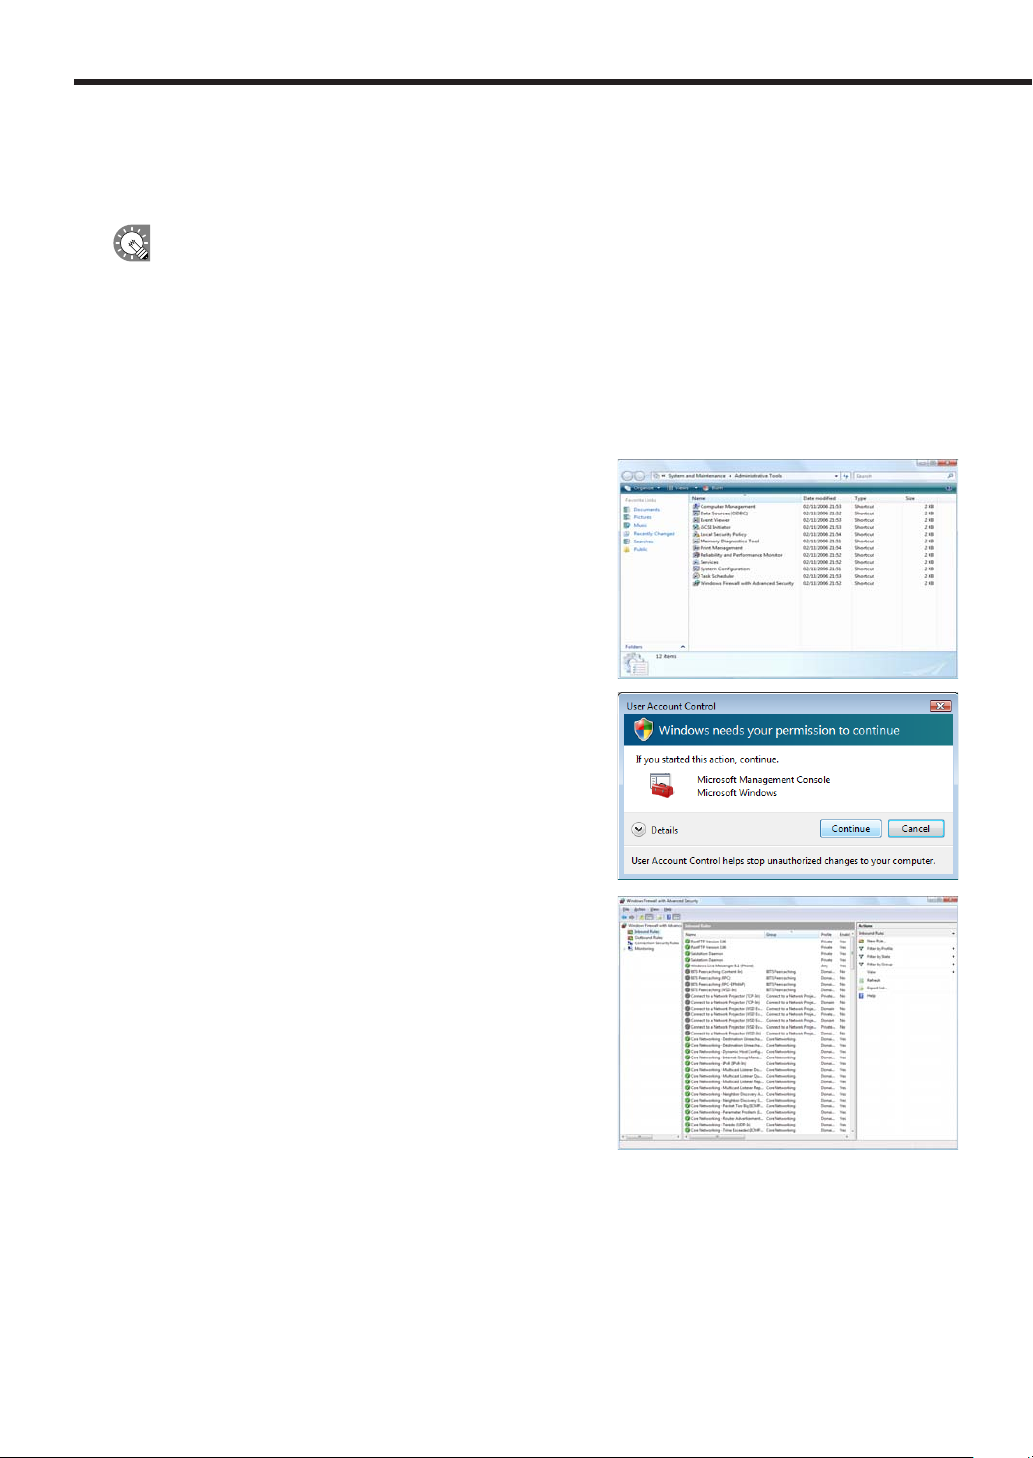
1. From the Windows Taskbar, click [Start], [Control Panel], [System and Maintenance], and then
[Administrative Tools].
2. Double-click “Windows Firewall with Advanced Security”.
3. If the [User Account Control] window appears, click
[Continue].
The [Windows Firewall with Advanced Security] dialog box
will appear.
4. On the left of the window, click [Inbound Rules], then
click “New Rule” under [Actions] in the pane on the right
of the window.
The [New Inbound Rule Wizard] dialog box will appear.
Installing SHARP Digital Signage Software
23
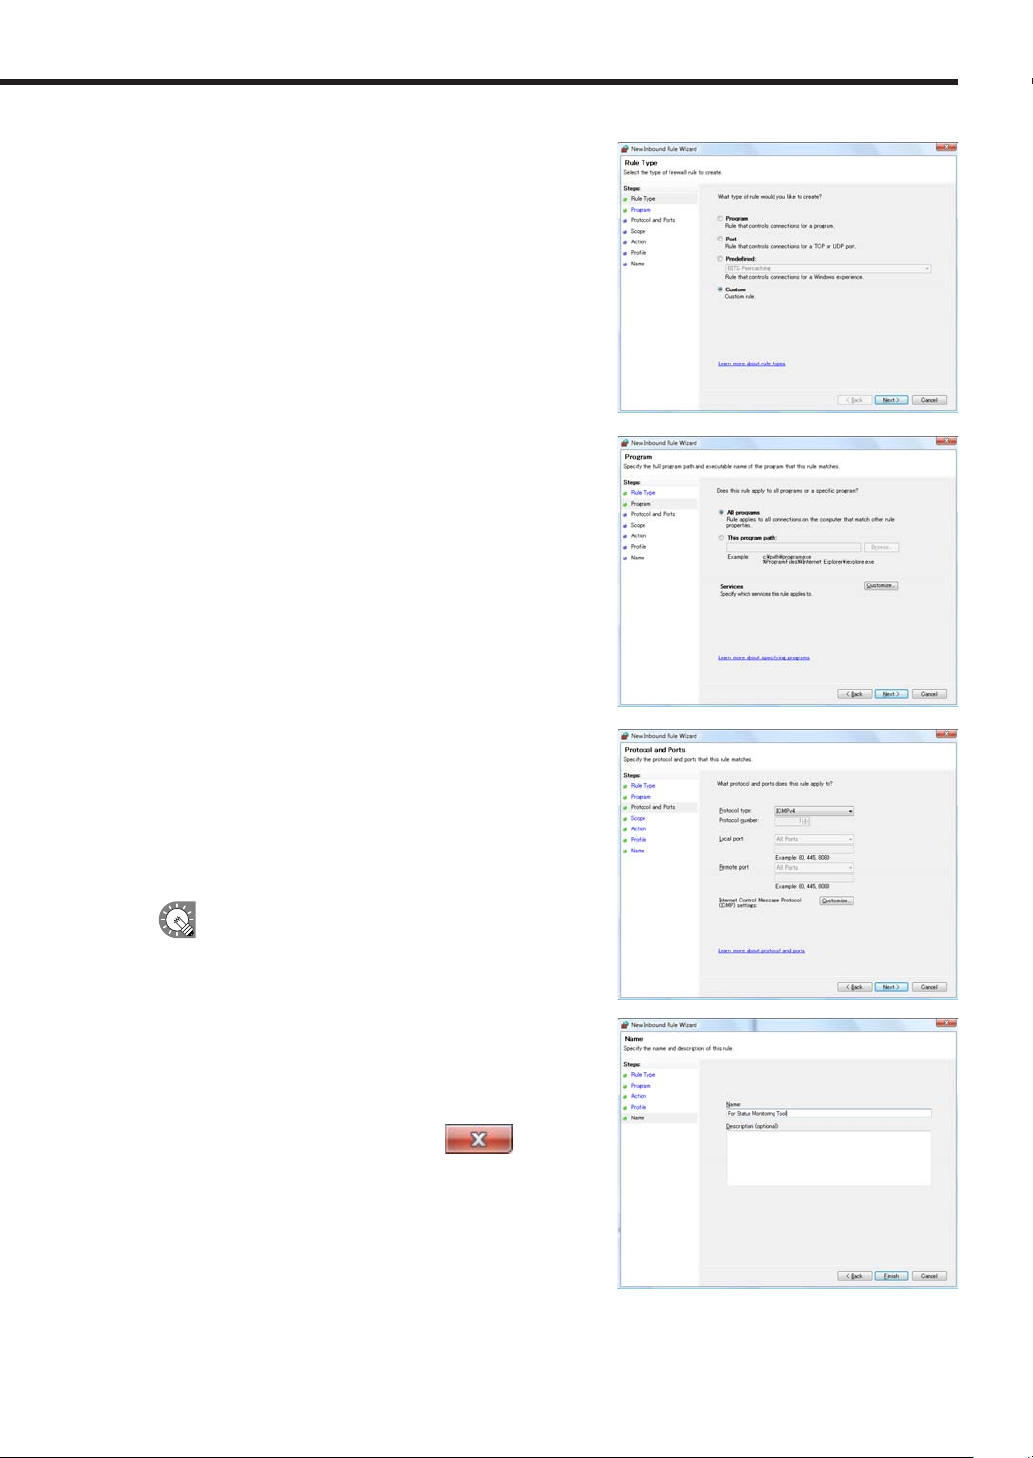
5. Select the “Custom” option button, and click [Next].
6. Select the “All programs” option button, and click [Next].
7. From the “Protocol type” list, select “ICMPv4”, and click
[Next].
8. Set “Protocol and Ports”, “Scope”, “Action”, and
“Profile” in order as necessary. Click [Next] to be taken
to the settings screen for the next step.
Confirm with your network administrator before
adjusting these settings.
9. Enter a “Name”, and click [Finish].
10. Close the [Windows Firewall with Advanced Security],
[Administrative Tools], and [System and Maintenance]
dialog boxes in order, by clicking the
button at
the top right of each window.
Installing SHARP Digital Signage Software
24
●Uninstalling SHARP Digital Signage Software
If this software frequently shuts down incorrectly when a program is being displayed or created, you should
modify the program. If the problem persists even after doing so, we recommend uninstalling, then reinstalling
this software.
Uninstalling this software will not delete any programs, schedules or content files that you have already
created. You will be able to use these files again upon reinstalling this software.
1. Start your PC.
2. Close down all applications.
3. Launch the SHARP Digital Signage Software setup maintenance program (setup.exe).
Double-click the setup.exe file to launch the setup maintenance program.
If a security warning saying ‘The publisher could not be verified.’ is displayed during the installation,
click [Run].
If using the “SHARP Digital Signage Software CD-ROM”
1) Set the CD-ROM in the CD-ROM drive of your PC.
If using Windows 2000/XP, or Windows Server 2003
the setup maintenance program will be launched
automatically. In this case, proceed to step 4. If the
setup maintenance program does not launch after a
few moments, launch the Setup.exe file in the CD-ROM
folder.
2) In the [AutoPlay] dialog box, click “Run setup.exe”.
If the [AutoPlay] dialog box does not appear, double-click
the Setup.exe file in the CD-ROM folder.
3) When the [User Account Control] dialog box appears,
click [Allow].
4. Select the “Remove” option button, and click [Next].
If you select the “Modify” or “Remove” option button, you
will have to reacquire a license.
Installing SHARP Digital Signage Software
25
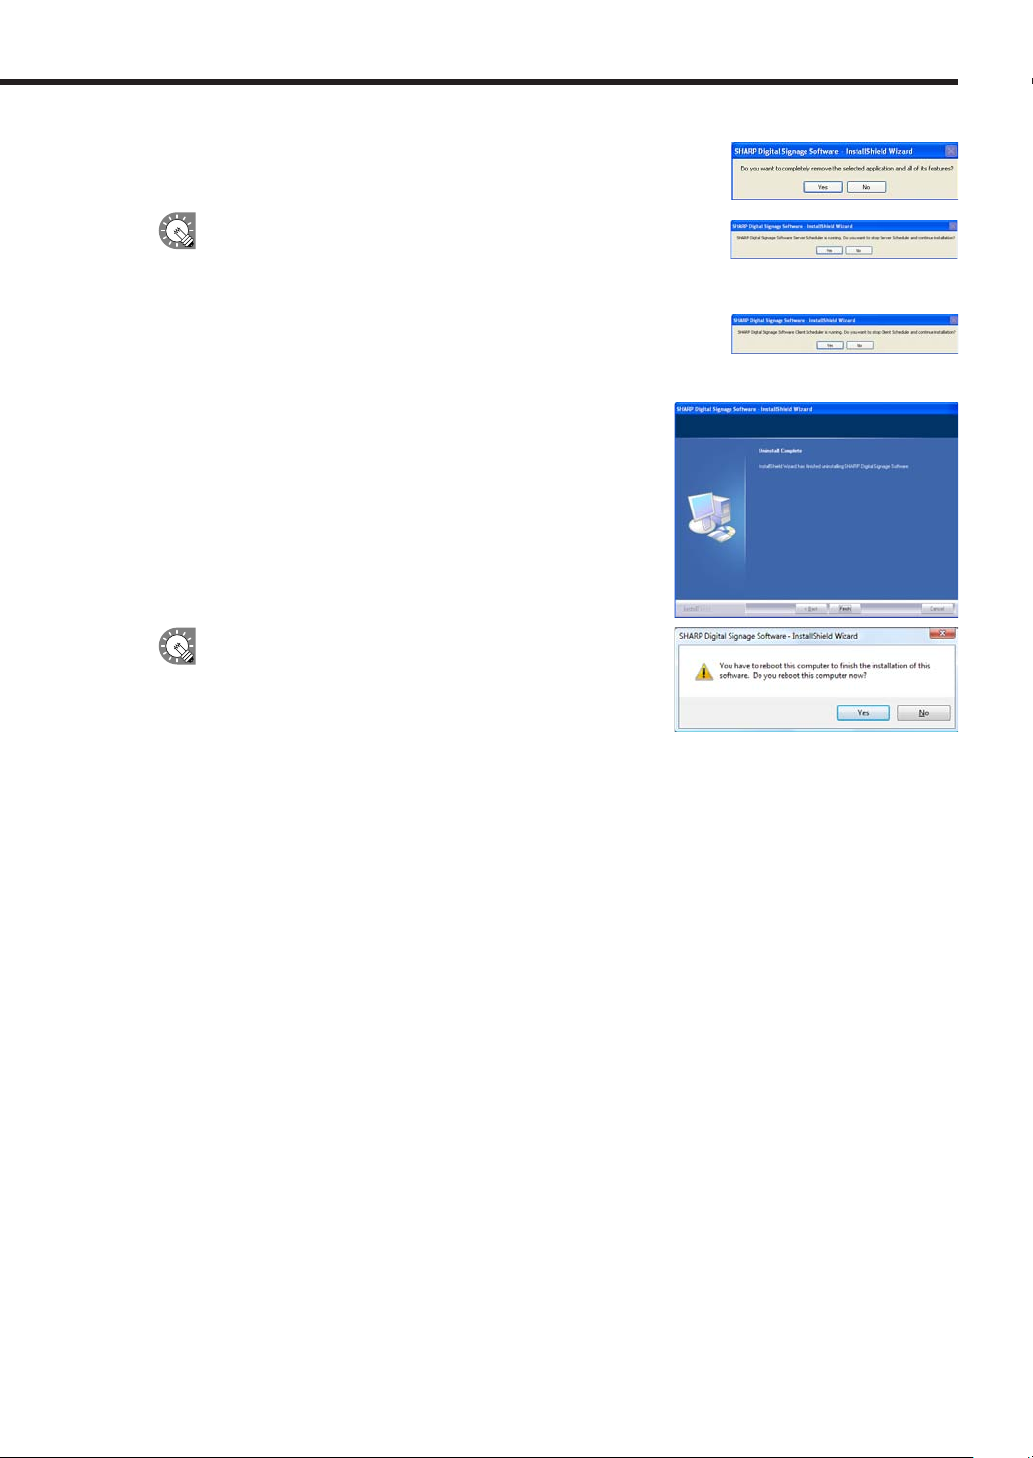
5. Click [Yes].
The uninstallation will start.
If you have forgotten to exit Server Scheduler or Client Scheduler,
a message like the one on the right will appear. Click [No] to
close down Server Scheduler and Client Scheduler, and retry
the uninstallation. If you click [Yes], Server Scheduler and Client
Scheduler will be forcibly terminated and the uninstallation will
continue.
6. Click [Finish].
The uninstallation is now complete.
If you are using Windows Vista, the following screen will
appear. Click [Yes] to restart your PC and complete the
uninstallation.
Installing SHARP Digital Signage Software
26
Launching and closing the Launcher window
●Launching the Launcher window
1. On the desktop, double-click the short cut.
The Launcher window will launch.
The Launcher can also be started by going to the Windows Taskbar and clicking [Start], [All Programs],
[SHARP Digital Signage Software], and then [SHARP Digital Signage Software].
●Closing the Launcher window
1. Click on the Launcher window.
The Launcher window will close.
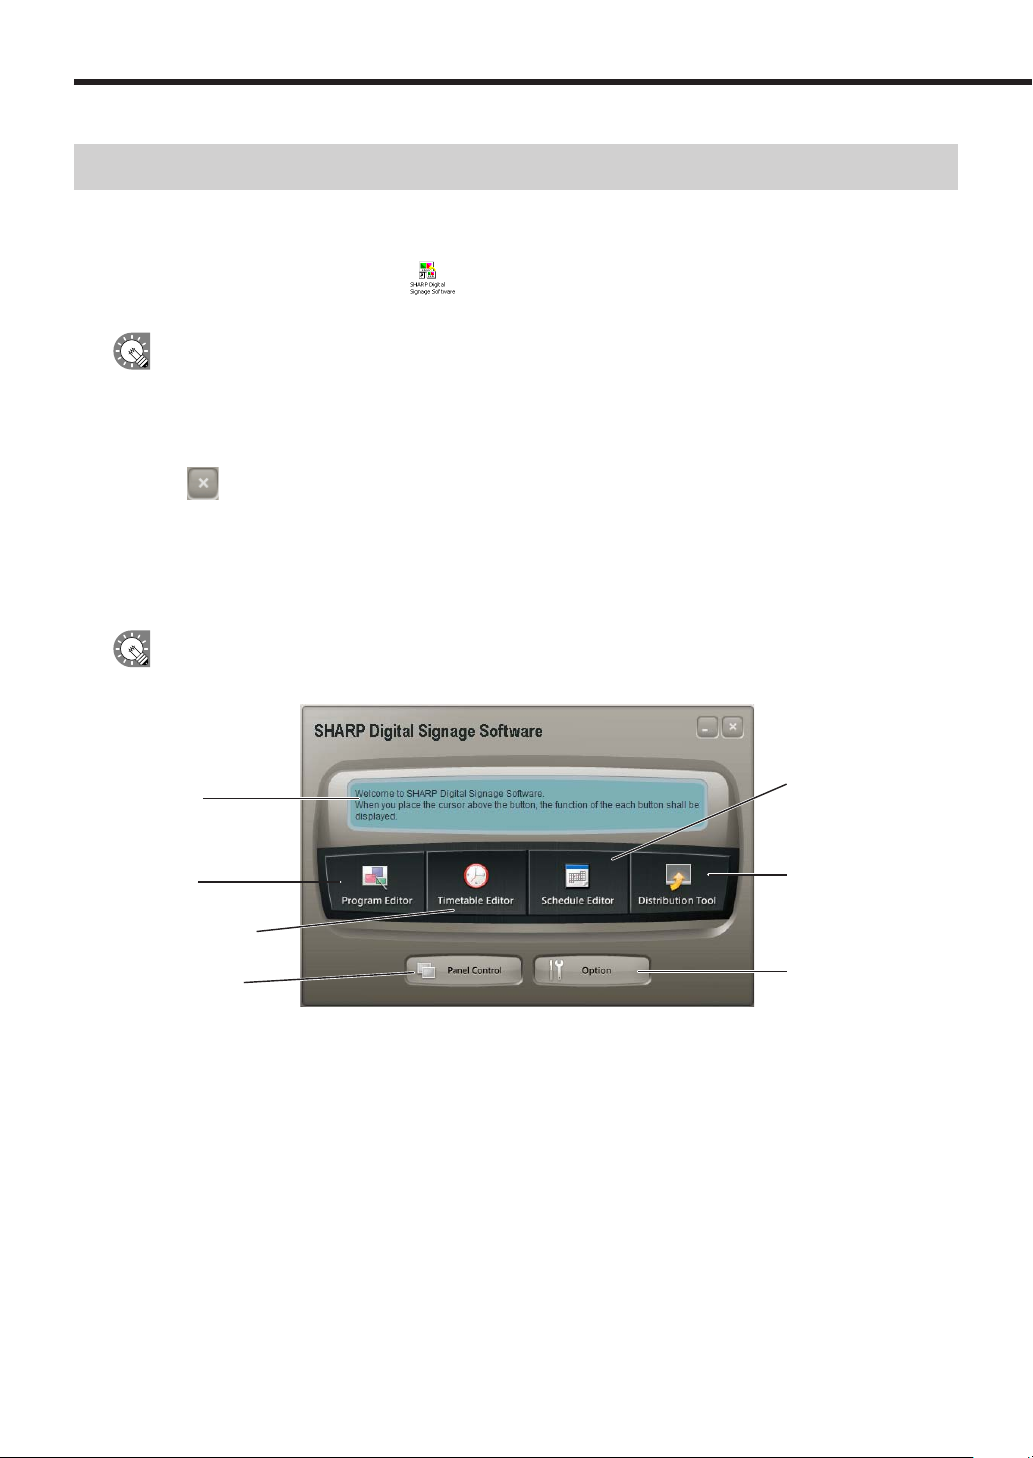
●The Launcher window
The Launcher window is the window from which all operations are started.
There are six buttons for different functions such as program creation and program distribution.
If another tool or dialog box is already launched, it will be displayed in the foreground.
2) Program creation/
editing
3) Timetable
creation/editing
4) Schedule creation/
editing
5) Schedule distribution
6) Panel control
7) Option
1) Button
description
window
1) Button description window
When the cursor is placed over a button, an explanation of the button’s function is displayed in this window.
2) Program creation/editing (
p.28)
This button launches “Program Editor”. Program Editor lets you create programs by setting screen sizes and
layouts, as well as content and scroll messages.
Launching and closing the Launcher window

27
3) Timetable creation/editing (
p.48)
This button launches “Timetable Editor”. Timetable Editor lets you create one-day timetables by assigning
programs you have created to be shown at desired times.
4) Schedule creation/editing (
p.58)
This button launches “Schedule Editor”. Schedule Editor lets you create schedules by assigning timetables you
have created to be executed on desired dates.
5) Schedule distribution (
p.72)
This button launches “Schedule Distribution Tool”. Schedule Distribution Tool lets you send the schedules you
have created to specified panels.
6) Panel control (
p.66)
This button launches the [Panel Management] dialog box. When distributing programs to multiple panels using
the Network Version, you can register and control panels from this dialog box.
This function is only available with the Network Version.
7) Option (p.70)
This button launches the [Option] dialog box. This dialog box displays version information about the Launcher,
and also lets you register license codes.
Launching and closing the Launcher window
28
Program Editor
Program Creation/Editing
Create programs (content) to display on a panel.
The main Program Editor window
●Launching Program Editor
1. Click on the Launcher window.
“Program Editor” will launch.
As soon as Program Editor launches, four pre-defined frames and two scroll messages for creating new
programs will be displayed in the main window. Programs are completed by setting program content in this
window.
• Program Editor can also be started by going to the Windows Taskbar, and clicking [Start], [All Programs],
[SHARP Digital Signage Software], [Tools], and then [Program Editor].
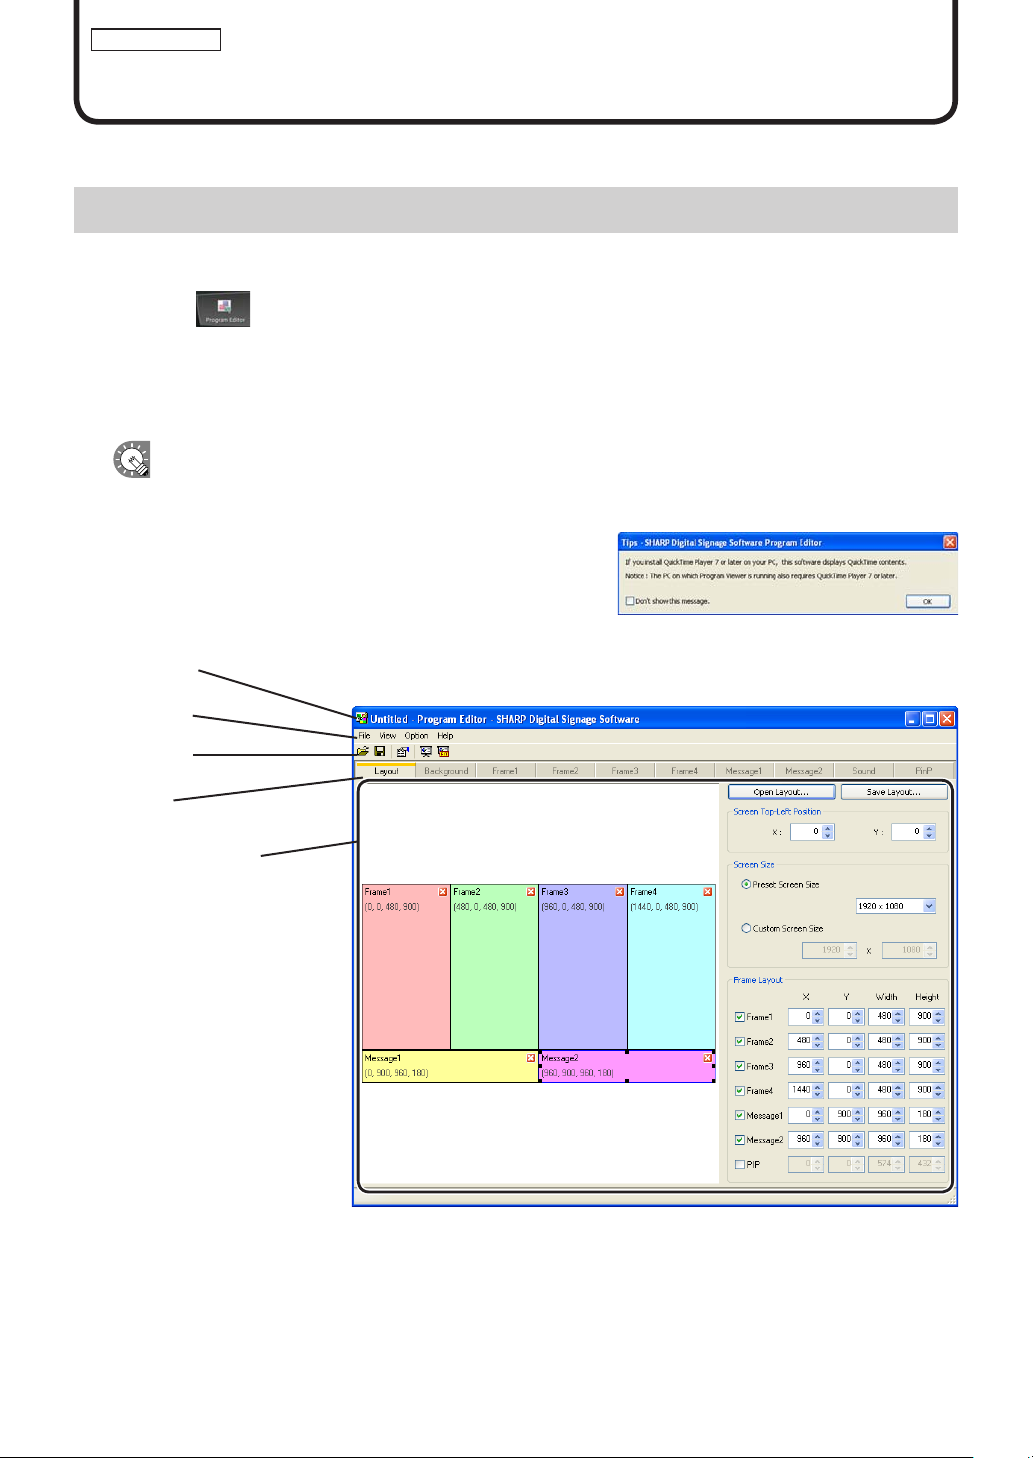
• The first time Program Editor is launched, the [Content Preview] window will appear. (
p.36)
• If QuickTime Player is not installed, the window on the
right will appear. If you intend to play QuickTime content,
you must install QuickTime Player 7 or later.
●The main Program Editor window
1) Title bar
2) Menus
3) Toolbar
4) Tabs
5) Settings window
1) Title bar
The name of the program will be displayed here.
When Program Editor launches, the title bar will read “Untitled”. When a program is saved, it will change to the
name of the program. When content of an opened program is changed, the title bar will display an asterisk (*)
after the program name.
29
Program Editor
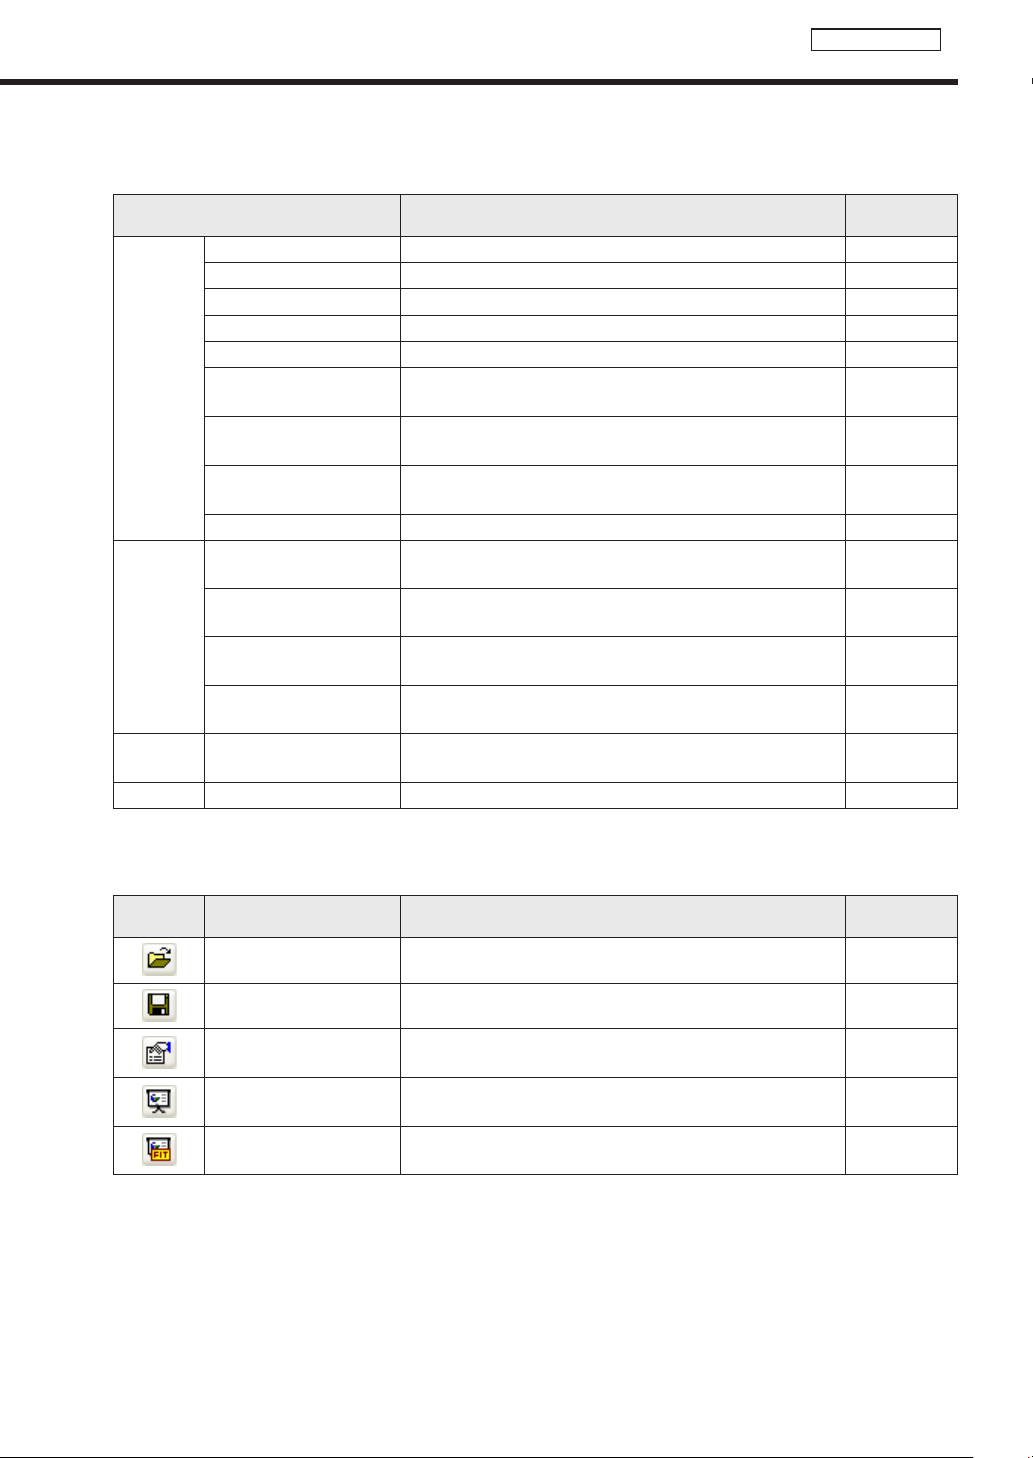
2) Menus
Menu options are as follows:
Menu option Description
Relevant
page
File
Create New Program Opens a new program. -
Open Program Loads a saved program.
p.44
Save Program Overwrites the currently edited program.
p.43
Save Program As Saves the currently edited program under a different name.
p.43
Delete Program Allows the user to specify and delete programs.
p.45
Properties of Program
Displays program properties and allows the user to change
them.
p.45
Import Program
Reads a program that has been exported from another PC
so that it can be used.
p.47
Export Program
Writes out a saved program so that it can be used on
another PC.
p.46
Exit Exits Program Editor.
-
View
Preview Program
[Original size]
Displays a preview of the currently edited program at its
original size.
p.44
Preview Program
[Fit screen]
Displays a preview of the currently edited program fitted to
the size of the screen.
p.44
Show Content Preview
Window
Shows/hides the [Content Preview] window.
p.36
Refresh
Updates the Content folder to reflect additions or deletions of
content files.
-
Option
Grid Setting
Allows the user to fine tune grid settings for positioning
frames and scroll messages with the grid.
p.33
Help About Program Editor Displays version information for Program Editor.
-
3) Toolbar
The toolbar buttons perform the following actions:
Icon Menu option Description
Relevant
page
Open Program Loads a saved program.
p.44
Save Program Overwrites the currently edited program.
p.43
Properties of Program
Displays program properties and allows the user to change
them
p.45
Preview Program
[Original size]
Displays a preview of the currently edited program at its
original size.
p.44
Preview Program
[Fit screen]
Displays a preview of the currently edited program fitted to
the size of the screen.
p.44
4) Tabs
Clicking a tab switches to the settings window for each item.
5) Settings window
Allows the user to set advanced settings for the selected tab.
The main Program Editor window

30
Program Editor
Creating programs
●Valid content files
File types that can be used as content are as follows:
Content name File type
Background,
Frames 1-4
MPEG, MPEG-1, MPEG-2, MPEG-4,
WMV (Windows Media Video – file type playable with Windows Media Player),
Flash (file type playable with Flash Player),
MOV (file type playable with QuickTime Player),
PowerPoint, HTML, JPEG, BMP, GIF, PNG
Scroll messages 1-2 Scroll messages created in Scroll Message Editor
Audio WAVE, MP3, AU, AIFF,
WMA (Windows Media Audio – file type playable with Windows Media Player),
MOV (file type playable with QuickTime Player),
MIDI
Audio files cannot be positioned in the layout. They are used as audio or music (background music) that
plays while a program is displayed.
Content files are recognized by their file extensions.
Certain file types require the installation of corresponding software.
File extension Content type Required software
.avi .mpeg .mpg .wmv .asf
Movie
Windows Media Player
.mov QuickTime Player
.swf Flash Flash Player
.ppt .pps PowerPoint PowerPoint Viewer2003/2007
.htm .html HTML Internet Explorer
.tlp Scroll message None
.wav .wave .mp3 .au .aif
.aiff .wma .mid .midi
Audio
Windows Media Player
.mov QuickTime Player
.jpeg .jpg .gif .png .bmp Still image None
Creating programs

31
Program Editor
●Positioning content (Layout)
[Layout] window
Screens and content size and position, etc., are set in the
[Layout] window.
1. Check that the [Layout] tab is selected.
If it is not, click the [Layout] tab to select it.
2. Set a [Screen Top-Left Position].
Set the coordinates (-9999 - 9999) for where you want the
top left hand corner of the background to be positioned in the
panel.
“X” and “Y” are usually set to “0”. (Default)
3. Set the “Screen Size”.
The screen size is the size of the background.
Select the “Preset Screen Size” option button, and choose a
size from the list.
This is usually set to the size of the panel (i.e. panel
resolution).
• If the size you want is not in the list, select the
“Custom Screen Size” option button, and enter a
size.
• To change the preset screen sizes in the list, edit the “ScreenSize.dat” file found in the folder where
you installed this software (the default directory is, C:\Program Files\Sharp\SHARP Digital Signage
Software) specifying sizes in order of “width” then “height” as in the examples below.
1280,1024
1920,1080
1024,768
When you start Program Editor the screen size on the first line will be selected.
Creating programs

32
Program Editor
4. Set [Frame Layout].
1) Check the checkboxes beside the frames, scroll
messages, or PIP that you want to display.
You can also click the button at the top right
hand corner of a frame or scroll message to hide it.
2) Set “X ”, “Y ”, “Width”, and “Height” coordinates for each
frame or scroll message.
• Only “X ” and “Y ” coordinates can be adjusted for
the PIP frame. To adjust the size of the PIP frame,
click the [PinP] tab, and specify a “Value” for the
“Size” under “Key”.
• Click on a frame or a scroll message to select it.
Eight resize handles will appear around the border
of the frame. By dragging these handles with the
mouse, you can move or resize a frame or scroll
message, and confirm changes visually.
· Dragging while holding down [Shift] allows you
to resize a frame while keeping the same aspect
ratio.
· You can also move frames or scroll messages using the arrow keys.
· You will still be able to adjust the size of a frame if you hold down [Shift] while using the arrow
keys.
• You can move or resize items accurately by aligning them with the grid. (
p.33)
E.g.
Frame1: X = 25, Y = 20, Width = 1338, Height = 835
Frame2: X = 1380, Y = 25, Width = 523, Height = 830
Message1: X = 20, Y = 869, Width = 1883, Height = 194
PIP: X = 576, Y = 395
The above coordinates would produce a layout like the screenshot below.
• The name, position and dimensions
(X coordinate of top left corner,
Ycoordinate of top left corner, width,
height) are displayed in the top left of
each frame or scroll message.
• The PIP frame cannot be moved in 1 pt
increments. Locations where items can
be positioned depend on the kind of
LCD monitor used.
Creating programs

33
Program Editor
Using the grid
Using the grid makes it easy to position items accurately. Items can be dragged with the mouse and aligned on
the grid. The grid can be set with the following procedure:
1. From the [Option] menu click [Grid Setting].
The [Grid Setting] dialog box will appear.
2. Set the “Frame Layout”.
Check the “Frame position in Grid” check box to use the grid.
Clear the check box to position frames in 1 pt increments.
3. Set the “Interval” for the grid.
Enter a whole number between 2-100 pt. (The default value
is 8 pt)
• Show or hide the grid by checking or clearing the “Show Grid” check box. Even if the grid is hidden, if
you have checked the “Frame position in Grid” check box, frames will be aligned to the grid when moved
or resized.
• Even if you have checked the “Frame position in Grid” check box, you will be able to ignore the grid and
move items in 1 pt increments by doing the following:
· Dragging an item while holding down [Ctrl]. This will allow you to ignore the grid when resizing.
· Dragging an item while holding down [Shift] + [Ctrl]. This will allow you to maintain the aspect ratio of a
frame while you resize it and ignore the grid at the same time.
· Holding down [Ctrl] while using the arrow keys. This will allow you to move items in 1 pt increments.
· Holding down [Shift] + [Ctrl] while using the arrow keys. This will allow you to resize items in 1 pt
increments.
Display priority order
Background
Frame1
Frame2
Frame3
Frame4
If frames overlap when a program is displayed, programs will be
displayed in the following order from foreground to background.
“Frame4” → “Frame3” → “Frame2” → “Frame1” → “Background”
• Scrolling message frames, the PIP frame, and any
frames that have PowerPoint or EXE content or have
backgrounds with such content, will be displayed in the
foreground, regardless of the display priority order. In all
cases, PIP will take precedence over all other frames.
The display priority order cannot be set.
• If movies are displayed in the background, they may be displayed in front of other frames in some
cases. Set movies in frames 1-4, not the background.
Using a layout you have created
Click [Save Layout] to save the Layout you have created. The next time you come to create a program you will
then be able to click on [Open Layout] to use the saved layout.
This is especially useful when you want to create a program with the same layout, but different content.
When you save a layout, frame settings are not saved.
Only Screen Top-Left Position, Screen Size, and Frame Layout are saved.
Creating programs

34
Program Editor
●Setting the background/frames 1-4
Set content, order of play and duration for content in the background and frames 1-4.
“Content Folder” tree
“Content File” list
Playlist
1. Click any of the [Background] or [Frame1] – [Frame4]
tabs.
2. From the “Content Folder” tree, select the folder where
the content files you want to use are located.
Confirm that the [Content] tab is selected. If the tab is not
selected, click on it.
You can also display content by specifying a URL or EXE file.
The [URL] tab
Displays the HTML of a specified URL as content.
Enter a URL that can be referenced by the target PC.
If your PC can connect to the Internet, clicking [View URL] will connect to
the URL you have entered. Check that you have connected properly and
that the URL has been displayed correctly.
If the URL is incorrect, a dialog box like the one on the right will appear.
• Use discretion when displaying URLs as websites are subject to copyright.
• If the page you want to display contains errors it will not be displayed correctly.
• If the page that you want to display requires a plug-in the target PC must have the plug-in installed.
Creating programs

35
Program Editor
The [EXE] tab
Executes the executable file specified in the “EXE File Path”. It is
also possible to add “Parameters” to the executable file. Enter an
“EXE File Path” that can be referenced by the target PC.
• The following parameters can be used:
%L : X coordinate of top left corner of frame
%T : Y coordinate of top left corner of frame
%W : Width of frame
%H : Height of frame
• This software only launches or closes specified executable files at a specified time. It does not
guarantee the actions of any executable files it launches.
• Depending on the specifications of the file that is executed, it may not be able to launch or close
correctly, or it may not be able to display windows in the correct position.
• Non-EXE content files may also be specified in the “EXE File Path”. When displaying large
content files that are not frequently updated, distribute the files to the target PC in advance, and
only send the paths that refer to them. This will help reduce the time it takes to send program
content.
3. Select the content you want to use from the “Content
File” list.
Refer to p.30 for a list of file types that can be used with the
background and frames 1-4.
• Click while holding down [Ctrl] or [Shift] to select
multiple content files at the same time.
• You can preview content files in the [Content
Preview] window. (p.36)
• If using HTML content, make sure that images,
movies and other files referred to in the HTML
code are transferred to the same location, or a subdirectory of the same location, where the HTML
file itself is stored (attached files). These can be added from content file properties. (p.37)
Make sure that all attached files are defined by their relative paths in the HTML file.
4. Click .
Content files are added to the end of the playlist.
For more details about the playlist refer to p.36.
In step 3, you can also register content files by
double-clicking them, or dragging them from the
“Content File” list to the “Playlist”.
5. Repeat steps 1 to 4 as necessary. You can set the other frames in the same manner.
Creating programs

36
Program Editor
Content preview
You can preview content files in the [Content Preview] window.
Click [Content Preview] from the [View] menu to preview the files.
Previews for the following types of files will not be displayed
immediately. To preview these files, click the relevant icon
displayed in the [Content Preview] window. (Click the text string if
previewing a scroll message.)
• Files with a size of 2 MB or higher
• PowerPoint files (Preview displayed in full screen mode)
• Scroll message files (Preview displayed in full screen mode)
• PowerPoint and scroll message will be displayed in the foreground, regardless of display priority order.
• Set PowerPoint data so that it plays repetitively by setting slide transition to advance slides automatically
(automatic slideshow).
• Do not use the mouse or keyboard (e.g. to click on a window, etc.) during program display. Doing so may
change the window display order or alter the content to be played.
Playlists
Playlist content is played in order starting with the content file at the top of the list.
“Duration” displays the length of time taken to play a particular content file.
“Total Duration” displays the length of time taken to play the entire contents of the playlist.
Clicking the buttons on the top right of a playlist performs the following actions:
Icon Menu option Description
Show the properties of the
content
Displays the properties of the currently selected content file. For more
details, refer to p.37.
Move the content to upwards
Moves the selected content file one place forward (up) in the list.
(Cannot move multiple content files.)
Move the content to
downwards
Moves the selected content file one place backward (down) in the list.
(Cannot move multiple content files.)
Delete the content
Deletes the selected content files from the list.
Content files may also be deleted by pressing [Delete].
Background color when content is not displayed
When content is not being played, frames can be filled in using a
specified color.
Click the color swatch to display the [Color] dialog box and
change the background color.
Creating programs

37
Program Editor
Properties of content
From the playlist, select a content file, and click to display the [Properties of Content] dialog box.
The following settings may be adjusted:
1) Content File Path
Displays the path to the content file.
• Clicking [Attached Files] will allow you to add a file or files
from the [Attached Files] dialog box which appears.
• Clicking [Change] will allow you to change the file via the
[Open] dialog box that appears.
If using HTML content, make sure that images, movies
and other files referred to in the HTML code are
transferred to the same location, or a subdirectory of the
same location, where the HTML file itself is stored. Make
sure that all attached files referenced in the HTML file are
defined by their relative paths.
2) Duration
The duration of play can be set.
3) Background
If the content is a still image file and you have checked the “Keeping aspect ratio” option button, you can
specify a background color for the content.
Click the color swatch to display the [Color] dialog box and change the background color.
Click the box next to “Transparent” to make the background transparent.
The background color for the background frame cannot be set to transparent.
4) Volume Control
The volume can be set.
5) “Keeping aspect ratio”, “Not keeping aspect ratio”, and “In original size” option buttons
Select whether or not to maintain the aspect ratio of the content.
• This option is only valid if the content is a still image or Flash content.
• The “In original size” option button will only be displayed for the background frame.
This option is only valid if the content is a still image.
6) “Scroll to the end of this message” check box
Clearing this box will cause a scroll message to forcibly switch to the next scroll message once its duration is
complete even if it has not reached the end of its content.
• This is only displayed if the content is a scroll message.
• The check box is checked under default settings so that scrolling is not interrupted part way through.
7) Parameters (for EXE file)
Displays parameters for EXE files.
Creating programs

38
Program Editor
●Setting the scroll message
Set scroll message content, order of play and duration of play.
A scroll message file containing text to be displayed in the scroll message must be prepared in advance. For
details about how to create a scroll message file, refer to p.39.
1. Click the [Message1] or [Message2] tab.
2. From the “Content Folder” tree, select the folder where
the scroll message file you want to use is located.
3. Select the scroll message file you want to use from the
“Content File” list.
Only scroll message files (.tlp files) can be used with
Message1 and Message2.
• Click while holding down [Ctrl] or [Shift] to select
multiple scroll message files at the same time.
• You can preview scroll message files. Scroll
message file previews are available in full screen
mode only. (
p.36)
Clicking the buttons at the bottom of the “Content File” list performs the following actions:
Icon Menu option Description
Create New Scroll
Message
Launches Scroll Message Editor and allows you to create new scroll
messages.
Edit Scroll Message
Launches Scroll Message Editor and allows you to edit the scroll
message selected in the “Content File” list.
Delete Scroll Message Deletes the scroll messages selected in the “Content File” list.
For more details about Scroll Message Editor, refer to p.39.
Creating programs

39
Program Editor
4. Click .
Scroll message files are added to the end of the playlist.
For more details about the playlist, refer to p.36.
In step 3, you can also register scroll message files
by double-clicking them, or dragging them from the
“Content File” list to the “Playlist”.
5. Repeat steps 1 to 4 as necessary. You can set other scroll messages in the same manner.
Creating scroll message files
Create a message to be displayed in a scroll message.
1. Click the [Message1] or [Message2] tab, and then click
under the “Content File” list.
Scroll Message Editor will launch.
1) Title bar
2) Menus
3) Toolbar
4) Settings window
1) Title bar
A file name will be displayed.
When Scroll Message Editor launches, the title bar will read “Untitled”. When a file is saved, it will change to
the name of the file. When content of an opened file is changed, the title bar will display an asterisk (*) after
the file name.
Creating programs

40
Program Editor
2) Menus
Menu options are as follows:
Menu option Description
File
Create New Scroll
Message
Opens a new scroll message file.
Open Scroll Message Loads a saved scroll message file.
Save Scroll Message Overwrites the currently edited scroll message file.
Save Scroll Message As Saves the currently edited scroll message file under a different name.
Exit Exits Scroll Message Editor.
Edit
Cut Cuts the text string selected in the “Scroll message edit box”.
Copy Copies the text string selected in the “Scroll message edit box”.
Paste
Pastes a text string that has been cut or copied into the “Scroll
message edit box”.
Undo Undoes the last action performed in the “Scroll message edit box”.
View Preview Scroll Message
Displays a preview of the currently edited scroll message file.
Press [Esc] to close the preview.
Help
About Scroll Message
Editor
Displays version information for Scroll Message Editor.
3) Toolbar
The toolbar buttons (icons) perform the following actions:
Icon Menu option Description
Open Scroll Message Loads a saved scroll message file.
Save Scroll Message Overwrites the currently edited scroll message file.
Preview Scroll Message
Displays a preview of the currently edited scroll message file.
Press [Esc] to close the preview.
About Scroll Message
Editor
Displays version information for Scroll Message Editor.
4) Settings window
For more details, continue reading from step 2.
2. Enter a text string that you want to use in a scroll
message into the “Scroll message edit box”.
The longer the text string is, the more memory will be used.
We recommend starting a new line at a suitable interval so
that lines do not get too long.
Creating programs

41
Program Editor
Checking the [Use HTML tag] check box allows you to use
the following HTML tags in the “Scroll message edit box” to
define the font color, size and other styles.
Tag Explanation
<FONT>
Defines the text. Takes the COLOR, SIZE and FACE attributes which respectively define the
text color, text size and typeface.
<B> Defines bold text.
<I> Defines italic text.
<U> Defines underlined text.
<S> Defines strikethrough text.
<BIG> Defines bigger text.
<SMALL> Defines smaller text.
3. Set the “Message Format”.
1) Next to “Text Direction”, select the display direction of
text.
2) To change the font, click [Select Font] and choose a font
from the [Font] dialog box.
3) Set the “Text Color” and “Background Color”.
Click the color swatches to display the [Color] dialog box
and change the color.
• You must have the same font installed on the target
PC.
• Depending on the type of font used, text size may
not be acquired correctly resulting in scrolling being
interrupted.
4. Set “Scrolling” options.
1) Next to “Direction”, select the scrolling direction.
2) Drag the “Speed” slider to the left or right to set the scroll
speed (10 steps available).
Even if scroll message speed is set at the same
value, actual scroll speed may vary from according
to the performance of the individual PC.
Creating programs

42
Program Editor
●Setting audio and music
Set audio and music (background music) for program display.
If two or more content files containing audio are set in different frames, both will play.
1. Click the [Sound] tab.
2. From the “Content Folder” tree, select the folder where
the content files you want to use are located.
3. Select the content you want to use from the “Content
File” list.
For a list of compatible audio file types, refer to p.30.
• Click while holding down [Ctrl] or [Shift] to select
multiple content files at the same time.
• Audio cannot be positioned in a layout. If you
select a movie for the content file that will be used
as audio, a movie preview will be displayed in the
[Content Preview] window, but only audio will be
used when the program is actually displayed.
• Clicking the “add no sound portion” button (
) at the bottom of the “Content File” list will allow
you to add a soundless portion to the playlist. Settings for duration and order of play can be set for
soundless portions in the same way as for other content files.
4. Click
.
Content files are added to the end of the playlist.
For more details about the playlist, refer to p.36.
In step 3, you can also register content files by double-clicking them, or dragging them from the
“Content File” list to the “Playlist”.
Creating programs

43
Program Editor
●Setting the PIP window
Set the frame size, aspect ratio, input source, and audio source for the PIP frame.
1. Click the [PinP] tab.
2. Select the “Monitor Model Name”.
3. Set values for each item.
A list will appear when you click on a cell in the “Value”
column.
If using a PN-655 monitor
* Items displayed vary according to the “Monitor Model
Name”.
1) Select “Size”.
Monitor sizes vary according to aspect ratio.
2) Select either “16:9” or “4:3” from the “Aspect Ratio” list.
* Select this according to the video or images that you
want to display.
3) Select “D-Terminal”, “Composit (Video)”, or
“Component” for the “Input Source” option.
4) Select either “PC” or “AV” for “Sound Source”.
5) “Direction” can only be set to “Landscape”.
●Saving a program
Save program
Use this option when you want to save the currently edited program under its original name.
1. From the [File] menu, click [Save Program].
You can also save by clicking
.
The program file will be overwritten and saved with the same name.
When “Program Editor” is started, the title bar will read “Untitled”. If you attempt to save at this
stage the [Save Program] dialog box will be displayed. For the remaining steps, please refer to
step 2 of “Save program as”.
Save program as
Use this option when you want to save the currently edited program under a different name.
1. From the [File] menu, click [Save Program As].
The [Save Program As] dialog box will appear.
Creating programs

44
Program Editor
2. Enter a “Program Name”, and click [Save].
The file will be saved with a different name.
●Opening a program
Load a program that you have already saved and use it.
Editing only the places you want to change in an existing file and saving the file under a new name is an
effective way to create programs.
1. From the [File] menu, click [Open Program].
You can also open a program by clicking
.
The [Open Program] dialog box will appear.
2. From the “Program List”, select a program, and click
[Open].
The program you selected will be loaded into Program Editor
and you will be able to edit it.
Take care when saving the program you have
edited using the [Save Program] option, as the
changes you have made will be reflected in the
original file.
●Checking a program
Check a program using the program preview function.
1. If you want to preview a program at its original size, click
[Preview Program [Original size]] from the [View] menu.
You can also preview a program by clicking
.
A preview of the currently edited program will be displayed at
its original size.
Previews can also be displayed by pressing [F5].
If you want to preview a program at screen size, click [Preview Program [Fit screen]] from the [View]
menu.
You can also preview a program at screen size by clicking
.
A preview of the currently edited program fitted to the size of the screen will be displayed.
2. Check the preview.
• To close the preview, click the preview window and press [Esc].
• If the program screen size is larger than the display resolution of the monitor, the preview cannot
be displayed in full screen mode.
Creating programs

45
Program Editor
●Deleting a program
Delete unnecessary programs.
1. Click [Delete Program] from the [File] menu.
The [Delete Program] dialog box will appear.
2. Select a program from the “Program List” and click
[Delete].
3. Click [Yes].
The selected program has now been deleted.
4. Click [Close].
●Displaying program properties
Change program names and program colors.
1. Click [Properties of Program] from the [File] menu.
You can also display and change program properties by clicking
.
The [Properties of Program] dialog box will appear.
Information about the “Program Name”, “Duration”, “Color of
Program”, and “Data Path” is displayed.
• The “Program Name” can be changed.
• Click the color swatch to display the [Color] dialog box
and change the program color.
The “Color of Program” is the color used to display
the program in the Timetable Editor.
2. Click [OK].
Creating programs

46
Program Editor
●Importing/exporting a program
Exporting a program
The export function is used to write out a program so that it can be used with this product on another PC.
1. From the [File] menu, click [Export Program].
The [Export Program] dialog box will appear.
2. From the “Program List”, select a program, and click
[Export].
The [Select the folder to export] dialog box will appear.
3. Specify the directory where you want to save the file,
enter a “File name”, and click [Save].
The [Export Program] dialog box will appear.
A screen like the one on the right will appear during
the export. Click [Cancel] to cancel the export.
4. Click [OK].
The program export is now complete.
Creating programs

47
Program Editor
Importing a program
The import function is used to load an exported program that has been created with this product on another PC.
1. From the [File] menu, click [Import Program].
The [Select the program to import] dialog box will appear.
2. Select a (.prg) file to import, and click [Open].
The [Import Program] dialog box will appear.
A screen like the one on the right will appear while
the import is being prepared. Click [Cancel] to
cancel the import.
3. Enter a “Program Name”, and click [Import].
4. Click [Yes].
The program will be saved with the name you entered.
The program import is now complete.
Creating programs

48
Timetable Editor
Set programs created with Program Editor to display at a set hour of the day.
The main Timetable Editor window
●Launching Timetable Editor
1. Click on the Launcher window.
“Timetable Editor” will launch.
When Timetable Editor launches, a new blank timetable with no programs assigned will be displayed.
Timetables are completed after program is set on this screen.
Timetable Editor can also be launched by going to the Windows Taskbar and clicking [Start],
[All Programs], [SHARP Digital Signage Software], [Tools], and then [Timetable Editor].
●The main Timetable Editor window
1) Title bar
2) Menus
3) Toolbar
4) Tabs
5) Program/Panel
Control list
6) Timetable
1) Title bar
The name of the timetable will be displayed here.
When Timetable Editor launches, the title bar will read “Untitled”. When a timetable is saved, it will change to
the name of the timetable. When content of an opened timetable is changed, the title bar will display an asterisk
(*) after the timetable name.
Creating/Editing a Timetable

49
Timetable Editor
2) Menus
Menu options are as follows:
Menu option Description
Relevant
page
File
Create New Timetable Opens a new timetable.
-
Open Timetable Loads a saved timetable.
p.54
Save Timetable Overwrites the currently edited timetable.
p.53
Save Timetable As
Saves the currently edited timetable under a different
name.
p.54
Delete Timetable Allows the user to specify and delete saved timetables.
p.55
Preview Timetable Tests the currently edited timetable.
p.54
Properties of Timetable Displays timetable properties.
p.55
Import Timetable
Reads a timetable that has been exported from another
PC so that it can be used.
p.57
Export Timetable
Writes out a timetable so that it can be used on another
PC.
p.56
Exit Exits Timetable Editor.
-
Edit
Select All Selects all programs in the timetable.
-
Delete
Deletes the selected programs from the list.
Programs may also be deleted by pressing [Delete].
-
Copy Copies the selected program.
-
Paste
Pastes the copied program into a timetable.
If a program in the timetable is selected, the copied
program will be allocated immediately after it finishes. If
no programs are selected, it will be pasted at 00:00.
-
Option Set Timetable Span
Sets the timetable to a target time span (start and finish
times). This is used for setting business hours as a time
span, etc.
p.53
Help About Timetable Editor Displays version information for Timetable Editor.
-
3) Toolbar
The toolbar buttons (icons) perform the following actions:
Icon Menu option Description
Relevant
page
Open Timetable Loads a saved timetable.
p.54
Save Timetable Overwrites the currently edited timetable.
p.53
4) Tabs
Clicking a tab switches to the settings window for each item.
5) Program/Panel Control list
Displays a list of programs and panel control commands.
6) Timetable
Displays a timetable.
The main Timetable Editor window

50
Timetable Editor
Creating a timetable
●Registering a program in the timetable
1. Check that the [Program] tab is selected.
If it is not, click the [Program] tab to select it.
The program list will be displayed here.
There are four categories in the list: “Program Name”,
“Duration”, “Screen Size”, and “Screen Position”.
The color of the icon in front of the “Program Name”
represents the “Color of Program”. Click [Properties
of Program] from the [File] menu in “Program
Editor” to change it. (
p.45)
2. From the “Program Name”, select a program, and click ,
or alternatively, double-click the program.
The [Add Program to Timetable] dialog box will appear.
3. Set the “Play back time”.
This is the time of day when the program will be played.
Specify times between 00:00 and 24:00.
4. Click [OK].
The program will be registered to the timetable.
Programs may also be registered by dragging
them from the “Program Name” to the “Timetable”.
Registered programs can be changed in the
Timetable. (
p.52)
5. Repeat steps 2 to 4 as necessary and set all the
programs that you want to display over the course of the
day.
Creating a timetable

51
Timetable Editor
●Registering panel control in a timetable
1. Click the [Panel Control] tab.
A list of panel control commands will be displayed.
There are two categories: “Command Name” and “Input Source”. Commands are as follows:
Command Description
Turn On Display Turns the panel (monitor) power ON.
Turn Off Display Puts the panel (monitor) into standby mode.
Switch Input Source (Input1) Switches the panel (monitor) input source to “Input1”.
Switch Input Source (Input2) Switches the panel (monitor) input source to “Input2”.
Switch Input Source (Input3) Switches the panel (monitor) input source to “Input3”.
Switch Input Source (Input4) Switches the panel (monitor) input source to “Input4”.
Switch Input Source (Input5) Switches the panel (monitor) input source to “Input5”.
Switch Input Source (Input6) Switches the panel (monitor) input source to “Input6”.
Switch Input Source (Input7) Switches the panel (monitor) input source to “Input7”.
Switch Input Source (Input8) Switches the panel (monitor) input source to “Input8”.
Switch Input Source (Input9) Switches the panel (monitor) input source to “Input9”.
Panel control can only be used with PN series LCD monitors. For monitor specifications and
connection instructions, refer to the monitor operation manual.
2. Select the panel control command you want to use from
the “Command Name” and click
.
The [Add Panel Control Command to Timetable] dialog box
will appear.
3. Set the “Time”.
This is the time that the command will be executed.
Specify times between 00:00 and 24:00.
Creating a timetable

52
Timetable Editor
4. Click [OK].
The panel control command will be registered in the timetable
and the control command icons (Turn On Display:
, Turn
Off Display:
, Switch Input Source: ) will be displayed to
the right of the timetable.
Commands may also be registered by dragging them from the “Command Name” to the
“Timetable”.
5. Repeat steps 2 to 4 as necessary and set all the panel control commands that you want to execute
over the course of the day.
●Adjusting a timetable
Clicking the buttons on the top right of the timetable performs the following actions:
Icon Menu option Description
Preview Program Displays a preview of the selected program at its original size.
Preview Program
(Fit Screen)
Displays a preview of the selected program fitted to the size of the
screen.
Properties for Program/
Command
Displays the properties of the selected program/panel control command.
Delete Program/Command
Deletes the selected programs/panel control commands from the
timetable. Programs/panel control command may also be deleted by
pressing [Delete].
Copy Programs/
Panel Control Commands
Copies the selected program/panel control command.
Paste Programs/
Panel Control Commands
Positions the copied program/panel control command into a timetable.
If a program in the timetable is selected, the copied program will be
allocated immediately after it finishes. If no programs are selected, it will
be pasted at 00:00.
Click a program or panel control command positioned on the
timetable to select it.
Drag a resize handle to adjust the playback time/time for the
program or panel control command and confirm the changes
visually.
Creating a timetable

53
Timetable Editor
Changing the timetable span
1. From the [Option] menu, click [Set Timetable Span].
The [Timetable Span] dialog box will appear.
2. Set the “Start” and “End” times.
Specify times between 00:00 and 24:00.
3. Click [OK].
The new times will be reflected in the timetable.
Adjusting the scale
Select intervals of 5, 10, 15, 30 or 60 minutes from the “Scale”
list.
●Saving a timetable
Save timetable
Use this option when you want to save the currently edited timetable under its original name.
1. From the [File] menu, click [Save Timetable].
You can also save a timetable by clicking
.
The timetable file will be overwritten and saved with the same name.
When “Timetable Editor” is started, the title bar will read “Untitled”. If you attempt to save at this
stage the [Save Timetable] dialog box will be displayed. For the remaining steps, refer to step 2 of
“Save timetable as”.
Creating a timetable

54
Timetable Editor
Save timetable as
Use this option when you want to save the currently edited timetable under a different name.
1. From the [File] menu, click [Save Timetable As].
The [Save As] dialog box will appear.
2. Enter a “Timetable Name” and click [Save].
The timetable will be saved with a different name.
●Opening a timetable
Load a timetable that you have already saved, and use it.
Editing only the places you want to change in an existing file and saving the file under a new name is an efficient
way to create timetables.
1. From the [File] menu, click [Open Timetable].
You can also open a timetable by clicking
.
The [Open Timetable] dialog box will appear.
2. From the “List of Timetable”, select a timetable, and
click [Open].
The timetable you selected will be loaded into Timetable
Editor and you will be able to edit it.
Take care when saving a timetable you have edited
using the [Save Timetable] option, as the changes
you have made will be reflected in the original file.
●Checking a timetable
Check a timetable using the program preview function.
1. From the [File] menu, click [Preview Timetable].
A preview of the timetable will be displayed.
2. Check the preview.
• To close the preview, click the preview window and press [Esc].
• If the program screen size is larger than the display resolution of the PC monitor, the preview will
not be able to display the entire program screen.
Creating a timetable

55
Timetable Editor
●Deleting a timetable
Delete unnecessary timetables.
1. From the [File] menu, click [Delete Timetable].
The [Delete Timetable] dialog box will appear.
2. From the “List of Timetable”, select a timetable, and
click [Delete].
3. Click [Yes].
The selected timetable is now deleted.
4. Click [Close].
●Changing timetable name and timetable color
1. From the [File] menu, click [Properties of Timetable].
The [Properties of Timetable] dialog box will appear.
Check the “Name” and “Color”.
• The “Name” can be changed.
• Click the color swatch to display the [Color] dialog box
and change the timetable color.
The “Color” is the color used to display the
timetable in Schedule Editor.
2. Click [OK].
Creating a timetable

56
Timetable Editor
●Importing/exporting a timetable
Exporting a timetable
The export function is used to write out a timetable so that it can be used with this product on another PC.
Exported timetable data includes programs registered in timetables.
1. From the [File] menu, click [Export Timetable].
The [Export Timetable] dialog box will appear.
2. From the “List of Timetable”, select a timetable, and
click [Export].
The [Select the folder to export] dialog box will appear.
3. Specify the directory where you want to save the file,
enter a “File name”, and click [Save].
The [Export Timetable] dialog box will appear.
A screen like the one on the right will appear during
the export. Click [Cancel] to cancel the export.
4. Click [OK].
The timetable export is now complete.
Creating a timetable

57
Timetable Editor
Importing a timetable
The import function is used to load an exported timetable that has been created with this product on another PC.
1. From the [File] menu, click [Import Timetable].
The [Select the timetable to import] dialog box will appear.
2. Select a (.tbl) file to import, and click [Open].
The [Import Timetable] dialog box will appear.
A screen like the one on the right will appear while
the import is being prepared. Click [Cancel] to
cancel the import.
3. Enter a “Timetable Name” and click [Import].
If the same program already exists on the PC
where the import is to be used, a confirmation
dialog box will appear. Choose whether to overwrite
the existing file or import the file under a new name.
4. Click [Yes].
The timetable will be saved with the name you entered.
The timetable import is now complete.
Creating a timetable

58
Schedule Editor
Creating/Editing Schedules
Set timetables created with Timetable Editor to display on a set day.
The main Schedule Editor window
●Launching Schedule Editor
1. Click on the Launcher window.
“Schedule Editor” will launch.
When Schedule Editor launches, a new blank schedule with no timetables assigned will be displayed.
Schedules are completed after timetable is set on this screen.
Schedule Editor can also be started by going to the Windows Taskbar, and clicking [Start], [All
Programs], [SHARP Digital Signage Software], [Tools], and then [Schedule Editor].
●The main Schedule Editor window
1) Title bar
2) Menus
3) Toolbar
4) “Timetable” list
5) Calendar
1) Title bar
The name of the schedule will be displayed here.
When Schedule Editor launches, the title bar will read “Untitled”. When a schedule is saved, it will change to the
name of the schedule. When content of an opened schedule is changed, the title bar will display an asterisk (*)
after the schedule name.
2) Menus
Menu options are as follows:
Menu option Description
Relevant
page
File
Create New Schedule Opens a new schedule.
-
Open Schedule Loads a saved schedule.
p.62

59
Schedule Editor
Menu option Description
Relevant
page
File
Save Schedule Overwrites the currently edited schedule
p.62
Save Schedule As
Saves the currently edited schedule under a different name.
p.62
Delete Schedule Allows the user to specify and delete saved schedules.
p.63
Properties of Schedule
Allows the user to display and change the schedule
name.
p.63
Import Schedule
Reads a schedule that has been exported from another
PC so that it can be used.
p.65
Export Schedule
Writes out a schedule so that it can be used on another
PC.
p.64
Exit Exits Schedule Editor. -
Edit
Add Timetable to Schedule
Adds the timetable that is selected in the “Timetable”
list to the schedule.
p.60
Delete Timetable from
Schedule
Deletes the timetable that is selected in the “Calendar”.
Timetable may also be deleted by pressing [Delete].
p.61
Copy Timetable Copies the selected timetable.
-
Paste Timetable Pastes the copied timetable into a schedule.
-
Select All Selects all timetables in the schedule.
-
View
Show Previous Month
Displays the month before the month that is currently
displayed in the calendar.
p.61
Show Next Month
Displays the month after the month that is currently
displayed in the calendar.
p.61
Show This Month Displays the current month in the calendar.
p.61
Refresh Updates the “Timetable” list.
-
Help About Schedule Editor Displays version information for Schedule Editor.
-
3) Toolbar
The toolbar buttons (icons) perform the following actions:
Icon Menu option Description
Relevant
page
Open Schedule Loads a saved schedule.
p.62
Save Schedule Overwrites the currently edited schedule.
p.62
Delete Timetable
Deletes the timetable that is selected in the “Calendar”.
Timetable may also be deleted by pressing [Delete].
p.61
Copy Timetable Copies the selected timetable. -
Paste Timetable Pastes the copied timetable into a schedule. -
4) “Timetable” list
The “Timetable” list displays a list of timetables you have created in Timetable Editor.
There are two categories: “Timetable Name” and “Last Modified Time”.
The color of the icon in front of the name of each timetable represents the “timetable color”. Click
[Properties of Timetable] from the [File] menu in “Timetable Editor” to change it. (
p.55)
5) Calendar
Timetables are positioned on the calendar to create schedules.
The main Schedule Editor window

60
Schedule Editor
Creating a schedule
●Registering a timetable in the schedule
1. Select a timetable from the “Timetable” list and click ,
or alternatively, double-click the timetable, or from the
[Edit] menu, click [Add Timetable to Schedule].
The [Add Timetable to Schedule] dialog box will appear.
2. Set a “Span”.
This is the length of time that the program will be played for.
Specify dates between 1/1/2005 and 12/31/2020.
If you do not set the “Option” area, the time schedule will be
added to the entire span from “Start” to “End”.
Use the “Option” settings to add timetables to specified days
or weeks.
• If you check the “Select the day(s) of the week below:”
check box and the “Sunday” to “Saturday” check boxes,
the timetable will only be added to the specified days of
the week during the span.
• If you check the “Select the week(s) of the month
below:” check box and the “1st week” to “6th week”
check boxes, the timetable will only be added to the
specified weeks during the span.
• If you specify both “Select the day(s) of the week
below:” and “Select the week(s) of the month below:”,
the timetable will only be added to days that meet both
sets of conditions.
For example, setting “Select the day(s) of the week
below:” to “Wednesday”, and “Select the week(s) of the
month below:” to “2nd week”, would add the timetable
to the second Wednesday of every month.
3. Click [OK].
The timetable will be registered in the schedule.
Timetables may also be registered by dragging
them from the “Timetable” list to the “Calendar”.
Registered timetables can be changed in the
calendar. (
p.61)
4. Repeat steps 2 to 3 as necessary and add all the
timetables that you want to display to the schedule.
Creating a schedule

61
Schedule Editor
The calendar
The calendar can display dates between January 2005 and December 2020.
Days on which a timetable is registered show the “timetable color” and the “timetable name”.
The buttons and lists at the top of the calendar perform the following actions:
Icon Menu option Description
Show Previous Month Displays the month before the month that is currently displayed.
Select Year Displays the year selected for the month that is currently displayed.
Select Month Displays the month selected for the year that is currently displayed.
Show Next Month Displays the month after the month that is currently displayed.
Show This Month Displays the current month.
• Click while holding down [Ctrl] or [Shift] to select multiple days at the same time.
• Select a timetable and press [Delete] to delete it from the calendar.
Timetables are registered to different days depending on where they are dragged on the calendar.
Days that already have timetables registered to them will not be overwritten.
1) Dates
2) Weekday titles
3) Week titles
4) All
1) Dates : Timetables will be added to the day to which they are dragged.
2) Weekday titles: Timetables will be added to the day of the week to which they are dragged for the currently
displayed month.
3) Week titles: Timetables will be added to the week to which they are dragged for the currently displayed
month.
4) All : Timetables will be added to every day of the currently displayed month.
Creating a schedule

62
Schedule Editor
●Saving a schedule
Save schedule
Use this option when you want to save the currently edited schedule under its original name.
1. From the [File] menu, click [Save Schedule].
You can also save a schedule by clicking
.
The schedule file will be overwritten and saved with the same name.
When “Schedule Editor” is started, the title bar will read “Untitled”. If you attempt to save at this
stage the [Save Schedule] dialog box will be displayed. For the remaining steps, refer to step 2 of
“Save schedule as”.
Save schedule as
Use this option when you want to save the currently edited schedule under a different name.
1. From the [File] menu, click [Save Schedule As].
The [Save Schedule As] dialog box will appear.
2. Enter a “Schedule Name”, and click [Save].
The schedule will be saved with a different name.
●Opening a schedule
Load a schedule that you have already saved, and use it.
Editing only the places you want to change in an existing file and saving the file under a new name is an efficient
way to create schedules.
1. From the [File] menu, click [Open Schedule].
You can also open a schedule by clicking
.
The [Open Schedule] dialog box will appear.
2. From the “List of Schedule”, select a schedule, and click
[Open].
The schedule you selected will be loaded into Schedule
Editor and you will be able to edit it.
Take care when saving a schedule you have edited
using the [Save Schedule] option, as the changes
you have made will be reflected in the original file.
Creating a schedule

63
Schedule Editor
●Deleting a schedule
Delete unnecessary schedules.
1. From the [File] menu, click [Delete Schedule].
The [Delete Schedule] dialog box will appear.
2. From the “List of Schedule”, select a schedule, and click
[Delete].
3. Click [Yes].
The selected schedule will be deleted.
4. Click [Close].
●Changing schedule name
1. From the [File] menu, click [Properties of Schedule].
The [Properties of Schedule] dialog box will appear.
Check the schedule name and change it if you wish.
2. Click [OK].
Creating a schedule

64
Schedule Editor
●Importing/exporting a schedule
Exporting a schedule
The export function is used to write out a schedule so that it can be used with this product on another PC.
Exported schedule data includes programs and timetables that are registered to the schedule.
1. From the [File] menu, click [Export Schedule].
The [Export Schedule] dialog box will appear.
2. From the “List of Schedule”, select a schedule, and click
[Export].
The [Select the folder to export] dialog box will appear.
3. Specify the directory where you want to save the file,
enter a “File name” and click [Save].
The [Export Schedule] dialog box will appear.
A screen like the one on the right will appear during
the export. Click [Cancel] to cancel the export.
4. Click [OK].
The schedule export is now complete.
Creating a schedule

65
Schedule Editor
Importing a schedule
The import function is used to load an exported schedule that has been created with this product on another PC.
1. From the [File] menu, click [Import Schedule].
The [Select the schedule to import] dialog box will appear.
2. Select a (.sch) file to import, and click [Open].
The [Import Schedule] dialog box will appear.
A screen like the one on the right will appear while
the import is being prepared. Click [Cancel] to
cancel the import.
3. Enter a “Schedule Name”, and click [Import].
If the same program name or timetable name
already exists on the PC where the import is to be
used, a confirmation dialog box will appear. Choose
whether to overwrite the existing files or import
them under a new name.
4. Click [Yes].
The schedule will be saved with the name you entered.
The schedule import is now complete.
Creating a schedule

66
Panel Management and Option
Panel Management and Option
When distributing programs to multiple panels with the Network Version, you must first set the panels.
Managing panels
This function is only available with the Network Version.
●Launching Panel Control Management
1. Click on the Launcher window.
The [Panel Management] dialog box will appear.
●The main Panel Management window
1) The “List of registered
panel” tree
2) Buttons
1) The “List of registered panel” tree
Displays a list of all registered panels.
Panel icons (
) can be dragged and dropped inside this list to change their attribution (“(All Panels)” or an
“arbitrary group”).
The number of panels that can be managed depends on the license. (Maximum limit is 100 panels)

67
Panel Management and Option
2) Buttons
The buttons perform the following actions:
Name Description Relevant page
Add Panel Adds a new panel to be managed.
Below
Add Group Adds a new group.
p.68
Edit Changes the content of the selected panel or group.
Below, p.68
Delete Deletes the selected panel or group.
p.69
Manual Control Sets panels and control commands to be controlled manually.
p.69
Exit Closes the [Panel Management] window.
-
●Adding/editing a panel
1. Click [Add Panel] to add a new panel to manage.
The [Add Panel (Panel PC)] dialog box will appear.
Click [Edit] to edit an existing panel.
The [Edit Panel (Panel PC)] dialog box will appear.
The settings for the [Add Panel (Panel PC)] and [Edit Panel (Panel PC)] dialog boxes are the
same. Panels can also be edited after they have been added.
2. Set the options.
1) Panel name (Compulsory)
Choose a name that will make it easy to identify the
panel. (Names must be within 50 characters)
2) Group
In the Group box, select a group to add the panel to.
If you do not want to assign the panel to any particular
group, select “(none)”. Panels that are not assigned to
any particular group will be added under “All Panels”.
Clicking [Add Panel] while the “List of registered
panel” tree group or a panel assigned to a group is
selected will add the panel to the respective group.
3) Host name or IP address (Compulsory)
Sets the host name or IP address of target PC which can be accessed from the server.
It is not possible to create two or more panels with the same host name or IP address.
Managing panels

68
Panel Management and Option
4) MAC address
Set the MAC address for the target PC if you want to turn it on from the controller PC.
5) FTP Setting
Enter the “User name” (within 30 alphanumeric characters), “Password” (within 30 alphanumeric
characters), and “Port number” (1-32000) that you set for the target PC FTP settings.
• FTP settings for adding a panel can be set in advance. (
p.71)
• If you have installed the Viewer Version, a unique FTP Server will be installed, and started as a
service. The default TCP/IP port number is 21. If this port number is already used by another
service, change the port number. The FTP settings of the target PC Client Scheduler must use the
same port number. (
p.87)
6) Power Control
If you want to turn the power of the target PC on or off at a specified time, select the “Specify to power
on/off the panel through the server at the designated time”, and set the “Time to start” and “Time to
end”. (Times can be specified in increments of 5 minutes)
3. Click [Add] or [Cancel].
●Adding/editing a group
1. To add a group, click [Add Group].
The [Add Group] dialog box will appear.
To edit a group, select the group you want to edit and click [Edit].
The [Edit Group] dialog box will appear.
• A group cannot be created within a group
• It is not possible to create two or more groups with the same name.
2. Enter a “Group name”.
(Names must be within 50 characters)
3. Click [Add] or [Cancel].
Managing panels

69
Panel Management and Option
●Controlling a panel manually
Set this option when you want to control the target PC manually.
When controlling the target PC manually, (when turning on the panel PC), the Wake On LAN function
that operates by Magic Packets sent from the target PC must be enabled.
If the target PC is outside the same LAN segment, Magic Packets may not get through depending on
router specs and settings. Contact your network administrator for more details.
1. Click [Manual Control].
The [Manual Control for the Panel (Panel PC)] dialog box will appear.
2. Check the check boxes next to the panels or groups that
you want to control.
Select a “Control Command”.
The following three control commands can be sent:
• PC Power ON
• PC Reboot
• PC Power OFF
3. Click [Execute].
The control command will be sent.
●Deleting a panel or group
1. Select the panel or group that you want to delete.
If you select a group, all the panels assigned to that
group will be deleted.
2. Click [Delete].
A confirmation dialog box will appear.
3. Click [OK].
Managing panels

70
Panel Management and Option
Option
Option allows you to check product version information and to set values for adding panels in advance.
●Launching Option
1. Click on the Launcher window.
The [Option] dialog box will appear.
●Checking version information
The [Version] tab displays version information.
Registering a license code
If you input a temporary license code when installing, you will only be able to use the software for a two-month
trial period. Register your license code before the end of the trial period.
1. Click [Register].
The [Register License Code] dialog box will appear.
2. Enter your “license code” and click [Register].
If using Windows Vista, click [Allow] if a User Account
Control window appears.
Option

71
Panel Management and Option
●Adding default panel settings for panels
Set default values for FTP settings that are applied to all newly-added panels.
1. Click the [FTP Setting] tab.
2. Set the [Default to Add the Panel].
• User name (within 30 alphanumeric characters)
• Password (within 30 alphanumeric characters)
• Port number (1-32000)
The initial default values are:
• User name: ftp
• Password: ftp
• Port number: 21
• If you have installed the Viewer Version, a unique FTP Server will be installed, and started as a service.
The default TCP/IP port number is 21. If this port number is already used by another service, change
the port number. The FTP settings of the target PC Client Scheduler must use the same port number.
(
p.87)
• The port number should also be changed if there are security issues.
Option

72
Schedule Distribution Tool
Distribute schedules created with Schedule Editor to the target PC.
The main Schedule Distribution Tool window
●Launching Schedule Distribution Tool
1. Click on the Launcher window.
“Schedule Distribution Tool” will launch.
Schedule Distribution Tool can also be started by going to the Windows Taskbar and clicking [Start], [All
Programs], [SHARP Digital Signage Software], [Tools], and then [Schedule Distribution Tool].
●The main Schedule Distribution Tool window
1) Distribution settings button
2) Tabs
3) Distribution Reservation/
Log window
1) Distribution settings button
Launches a wizard for system and distribution method settings.
2) Tabs
Clicking a tab switches to the list window for each item.
3) Distribution Reservation/Log window
Displays details for the selected tab.
Distributing schedules

73
Schedule Distribution Tool
Distributing schedules
Schedules can be distributed in the following ways:
• Distributed to a target PC via a network (Network Version only)
• Distributed to your own PC
• Distributed via USB memory or other external device
The maximum total size of schedules (including programs and content) that can be distributed with
Schedule Distribution Tool is 2 GB. Data greater than this size cannot be distributed.
●Distributing via a network
Distribute schedules to the target PC via a network.
These instructions only apply to the Network Version.
1. Click [Distribute schedule or program to the panel].
The [Selection of Distribution Methods] dialog box will appear.
2. Select the “Distribute the schedule through the network”
option button, and click [Next].
The [Selection the Schedule to Distribute] dialog box will
appear.
3. Select a schedule.
If you would like to add the selected schedule to the current
schedule on the target PC, check the “Add this schedule on
the running schedule in the target panel” check box. If the box
is not checked, the current schedule on the target PC will be
replaced with the currently selected schedule.
4. Click [Next].
The [Selection of the Distribution Target] dialog box will appear.
Distributing schedules

74
Schedule Distribution Tool
5. Check the check boxes for all the panels and/or groups
that the schedule is to be sent to.
Clicking the buttons in the top right of the window will allow
you to add or edit panels and groups in the same way as the
[Panel Management] window (
p.66).
The buttons perform the following actions:
Button Name Description Relevant page
Add Panel (Panel PC)
Adds a new panel to be managed.
p.67
Add Group Adds a new group.
p.68
Edit Panel/Group
Changes the content of the selected panel or
group.
pp.67-68
Delete Panel/Group Deletes the selected panel or group.
p.69
6. Click [Next].
The [Selection of the Distribution Date Time and Option] dialog box will appear.
7. Select a “Distribution Date Time”.
• “Distribute now” option button
Distributes schedule as soon as the distribution wizard
exits.
• “Distribute at specified date time” option button
Distributes schedule at the set date and time.
8. Set “Distribution Options”.
• “Power ON the panel PC before the distribution” check box
Distributes the schedule after turning the target PC on if it is not
already turned on at the time of distribution.
• “Power OFF the panel PC after the distribution” check box
Turns the target PC power off after the schedule has been distributed.
9. Click [Next].
A [Confirmation] dialog box will appear.
10. Check the distribution settings, and click [Finish].
The distribution or distribution reservation will be executed.
Distribution data can be packaged and saved as
a single file that includes schedule information
including programs, timetables, and content.
Click [Save the Package], and in the [Save the
Package] dialog box that appears, specify a
directory to save the file to. Then enter a “File
name”, and click [Save]. There is usually no need to
use this function.
Distributing schedules

75
Schedule Distribution Tool
11. If you selected the “Distribute now” option button in step
7, a screen like the one on the right will appear. Check
that the distribution was successful and click [Close].
If you selected the “Distribute at specified date time”
option button in step 7, a screen like the one on the right
will appear. Click [OK].
• Schedule and program distribution may take some time. If you perform simultaneous distribution to
multiple panels, data is actually sent sequentially. For this reason, there may be some time difference in
schedule and program distribution.
• Old schedules are no longer required after new schedules have been sent. Unnecessary schedules and
their associated content will be automatically deleted the next time Client Scheduler starts.
●Distributing to your own PC
These instructions only apply to the Standalone Version.
1. Click [Distribute schedule or program to the panel].
The [Selection of Distribution Methods] dialog box will appear.
2. Select the “Distribute the schedule to your PC (My
computer)” option button, and click [Next].
The [Selection the Schedule to Distribute] dialog box will
appear.
3. Select a schedule.
If you want to add the selected schedule to the current open
schedule on your PC, check the “Add this schedule on the
running schedule in the target panel” check box. If the box is
not checked, the currently open schedule on your PC will be
replaced with the currently selected schedule.
4. Click [Next].
A [Confirmation] dialog box will appear.
Distributing schedules

76
Schedule Distribution Tool
5. Check the distribution settings, and click [Finish].
The distribution will be executed.
Distribution data can be packaged and saved as
a single file that includes schedule information
including programs, timetables, and content.
Click [Save the Package], and in the [Save the
Package] dialog box that appears, specify a
directory to save the file to. Then enter a “File
name”, and click [Save]. There is usually no need to
use this function.
6. A screen like the one on the right will appear. Check that
the distribution was successful and click [Close].
●Distributing with USB memory or other external storage device
• Do not remove the USB memory or other external storage device from your PC until the transfer is
complete.
• Certain USB devices and other external storage devices may not be able to distribute correctly.
1. Click [Distribute schedule or program to the panel].
The [Selection of Distribution Methods] dialog box will appear.
2. Select the “Distribute the schedule using external
storage such as USB memory” option button, and click
[Next].
The [Selection the Schedule to Distribute] dialog box will
appear.
Distributing schedules

77
Schedule Distribution Tool
3. Select a schedule.
If you would like to add the selected schedule to the currently
open schedule on the target PC, check the “Add this
schedule on the running schedule in the target panel.” check
box. If the box is not checked, the currently open schedule
on the target PC will be replaced with the currently selected
schedule.
4. Click [Next].
The [Selection of the Drive to Transfer] dialog box will appear.
5. Select the drive to which you want to transfer the schedule to.
6. Click [Next].
A [Confirmation] dialog box will appear.
7. Check the distribution settings, and click [Finish].
The distribution will be executed.
Distribution data can be packaged and saved as a single
file that includes schedule information including programs,
timetables, and content.
Click [Save the Package], and in the [Save the Package]
dialog box that appears, specify a directory to save the
file to. Then enter a “File name”, and click [Save]. There is
usually no need to use this function.
8. Click [Yes].
A confirmation dialog box will appear again.
9. Click [OK].
10. Remove the USB memory or other storage device from
the PC.
If you clicked [No] in step 8, remove the device via the Safely Remove Hardware icon ( ) in the
Task Tray.
11. Connect the USB memory or other external storage device to the target PC.
The schedule will be automatically distributed. The USB memory or other external storage device will
automatically stop when the distribution is complete. Check the message, and remove the device.
Distributing schedules

78
Schedule Distribution Tool
Displaying break-in programs
●Distributing via a network and making a break-in display
This function is only available with the Network Version.
1. Click [Distribute schedule or program to the panel].
The [Selection of Distribution Methods] dialog box will appear.
2. Select the “Distribute the program through network and make a
break-in display” radio button, and click [Next].
The [Selection of the Break-in Program] dialog box will appear.
3. Select a program, and click [Next].
The [Selection of the Distribution Target] dialog box will appear.
4. Check the check boxes for all the panels and/or groups that the
schedule is to be sent to.
Clicking the buttons in the top right of the window will allow you
to add or edit panels and groups in the same way as the [Panel
Management] window (
p.66). For a description of button actions,
refer to p.74.
5. Click [Next].
The [Display Time and Periods of Break-in Program] will appear.
6. Set the “Display Time of Break-in Program” area.
• “Display the break-in program as soon as distribution has been
completed” option button
Displays the program as soon as the distribution wizard exits.
• “Start the break-in program at the time specified” option button
Starts program display at the set time.
7. Set a “Display Time”
Displaying break-in programs

79
Schedule Distribution Tool
8. If you want to perform panel control operations before and after a break-in program, check the
“Conduct panel control before and after the program display” check box, and click [Next].
The [Specification of Panel Control Command] dialog box will appear.
Panel control can only be used with PN series LCD monitors. For monitor specifications and
connection instructions, refer to the monitor operation manual.
If you do not want to perform panel control operations before and after a break-in program, clear the
“Conduct panel control before and after the program display” check box, and click [Next].
A [Confirmation] dialog box will appear. Proceed to step 11.
9. Set the [Panel Control Command].
“Before Display the Break-in Program”
• “Power ON the panel before display the program” check
box
Turns the panel on before displaying the break-in
program.
• “Switch the panel input before display the program as
below” check box
Switches to the specified input before displaying the
break-in program.
“After Display the Break-in Program”
• “Power OFF the panel after display the program” check box
Turns the panel off after the break-in program has finished.
• “Switch the panel input after display the program as below” check box
Switches to the specified input after displaying the break-in program.
10. Click [Next].
A [Confirmation] dialog box will appear.
11. Check the distribution settings, and click [Finish].
The break-in program display or display reservation will be
executed.
Distribution data can be packaged and saved as
a single file that includes schedule information
including programs, timetables, and content.
Click [Save the Package], and in the [Save the
Package] dialog box that appears, specify a
directory to save the file to. Then enter a “File
name”, and click [Save]. There is usually no need to
use this function.
Displaying break-in programs

80
Schedule Distribution Tool
12. A screen like the one on the right will appear. Check that
the distribution was successful and click [Close].
• If the set time has already passed the break-in program
will not be displayed.
• Once the break-in program has been displayed in the
target panel for the amount of time specified in “Display
Time”, the panel will return to the original program.
Display will resume from the start of the content that
would otherwise have been playing when the break-in
program ends.
• Only one break-in program can be registered. Programs
distributed later will be given priority.
●Distributing to your own PC and making a break-in display
This function is only available with the Standalone Version.
1. Click [Distribute schedule or program to the panel].
The [Selection of Distribution Methods] dialog box will appear.
2. Select the “Distribute the break-in program to your PC
(My computer)” option button, and click [Next].
The [Selection of the Break-in Program] dialog box will
appear.
3. Select a program, and click [Next].
The [Display Time and Periods of Break-in Program] will
appear.
4. Set the “Display Time of Break-in Program” area.
• “Display the break-in program as soon as distribution has
been completed” option button
Displays the program as soon as the distribution wizard
exits.
• “Start the break-in program at the time specified” option
button
Starts program display at the set time.
5. Set a “Display Time”
Displaying break-in programs

81
Schedule Distribution Tool
6. If you want to perform panel control operations before and after a break-in program, check the
“Conduct panel control before and after the program display” check box, and click [Next].
The [Specification of Panel Control Command] dialog box will appear.
Panel control can only be used with PN series LCD monitors. For monitor specifications and
connection instructions, refer to the monitor operation manual.
If you do not want to perform panel control operations before and after a break-in program, clear the
“Conduct panel control before and after the program display” check box, and click [Next].
A [Confirmation] dialog box will appear. Proceed to step 9.
7. Set the [Panel Control Command].
“Before Display the Break-in Program”
• “Power ON the panel before display the program” check box
Turns the panel on before displaying the break-in program.
• “Switch the panel input before display the program as
below” check box
Switches to the specified input before displaying the
break-in program.
“After Display the Break-in Program”
• “Power OFF the panel after display the program” check box
Turns the panel off after the break-in program has finished.
• “Switch the panel input after display the program as below” check box
Switches to the specified input after displaying the break-in program.
8. Click [Next].
A [Confirmation] dialog box will appear.
9. Check the distribution settings, and click [Finish].
The break-in program display or display reservation will be
executed.
Distribution data can be packaged and saved as
a single file that includes schedule information
including programs, timetables, and content.
Click [Save the Package], and in the [Save the
Package] dialog box that appears, specify a
directory to save the file to. Then enter a “File
name”, and click [Save]. There is usually no need to
use this function.
Displaying break-in programs

82
Schedule Distribution Tool
10. A screen like the one on the right will appear. Check that
the distribution was successful and click [Close].
• If the set time has already passed the break-in program will not be displayed.
• Once the break-in program has been displayed in the target panel for the amount of time specified in
“Display Time”, the panel will return to the original program. Display will resume from the start of the
content that would otherwise have been playing when the break-in program ends.
List of Reserved Distribution/List of Distribution Log
●List of Reserved Distribution
Click the [Reserved Distribution] tab to display the list of currently reserved distributions. There are five
categories: Schedule Name, Distribution Target, Reserved Date Time, Power ON, and Power OFF. Clicking on a
category will organize the reservations in ascending or descending order.
Deleting reserved distributions
Reserved distributions can be deleted by any of the following three methods:
• Select a reservation and click the button at the top right of the list (
).
• Right-click on a reservation, and from the menu that appears, click [Delete the Reserved Distribution].
• Select a reservation and press [Delete].
Updating
Reserved distributions can be updated by either of the two following methods:
• Right-click in the Reserved Distribution List, and from the menu that appears, click [Refresh the Information].
• Press [F5].
List of Reserved Distribution/List of Distribution Log

83
Schedule Distribution Tool
●List of Distribution Log
Click the [Distribution Log] tab to display a distribution log of schedules and break-in programs.
There are eight categories: Schedule Name, Distribution Target, Complete Date Time, Type, Result, Start Date
Time, Data Size, and Detail Information. Clicking on a category will organize the reservations in ascending or
descending order.
Deleting the entire distribution log
The entire contents of the distribution log can be deleted by either of the following two methods:
• Right-click in the Distribution Log, and from the menu that appears, click [Delete All Distribution Log].
• Press [Delete].
A confirmation dialog box will appear. Click [OK].
Updating
The distribution log can be updated by either of the two following methods:
• Right-click in the Distribution Log, and from the menu that appears, click [Refresh the Information].
• Press [F5].
Outputting CSV File of Distribution Log
The distribution log can be output as a CSV file.
1. Right-click in the Distribution Log, and from the menu that appears, click [Output CSV File of
Distribution Log].
The [Select the CSV file you want to write down] dialog box will appear.
2. Enter a “File Name”, and click [Save].
List of Reserved Distribution/List of Distribution Log

84
Server Scheduler
Schedule Management
This function is only available with the Network Version.
Server Scheduler
Server Scheduler controls reserved distribution schedules that have been reserved with “Schedule Distribution
Tool”, and distributes schedules to the target PC at the scheduled time.
Server Scheduler is automatically started when Windows launches.
When Server Scheduler launches, an icon (
) is displayed (and resides permanently) in the Task Tray.
Do not exit Server Scheduler unnecessarily.

85
FTP Server/Client Scheduler
Schedule Reception/Program Display
This function is available on the Viewer Versions.
This section gives details for target PC settings when schedules and programs are distributed from the controller
PC using the Network Version.
FTP Server
The FTP Server receives schedules and break-in programs from the controller PC, and passes them to the
Client Scheduler.
●Launching the FTP Server
The FTP Server launches automatically when Windows is launched.
To check if the FTP Server service is started or not, use the following method:
• If using Windows 2000/XP or Windows Server 2003
1. From the Windows Taskbar click [Start], [Control Panel], [Performance and Maintenance],
[Administrative Tools], [Services].
The [Services] window will appear.
2. Check that the status of “Information Display FTP Server” under “Services” is “Started”.
If the service is not started click “Start the Service”.
• If using Windows Vista
1. Right-click on an empty area of the Taskbar, and from the
menu that appears, click [Taskbar].
The [Windows Task Manager] dialog will appear.
2. Click the [Process] tab and confirm that “Server
Scheduler” and “Client Scheduler” are displayed.

86
FTP Server/Client Scheduler
Client Scheduler
Client Scheduler is used on the target PC.
It loads the schedules and break-in programs that have been received by the FTP Server, and controls the
Program Viewer to display specified programs at the specified time.
●Launching Client Scheduler
Client Scheduler is automatically launched by “Startup” when Windows launches.
When Client Scheduler launches, an icon (
) is displayed (and resides permanently) in the Task Tray.
●Client Scheduler menu
The menu that appears when the icon in the Task Tray is
right-clicked performs the following actions:
Setting
Clicking the [Setting] menu displays the [Setting of Client
Scheduler] dialog box. The tabs in this dialog box contain the
following settings:
[Program Viewer] tab
Contains detailed settings for the Program Viewer.
• Checking the “The program view area is painted, if there
is no program played.” check box gives you access to the
following three options:
· “Dark blue” option button
Displays the same program display area as the
program that was displayed immediately before, in dark
blue.
· “Content file” option button
Sets the content file path, display method, and
background color from the [Setting of the contents file]
dialog box that appears when [Setting] is clicked.
1) Click [Ref], and select a content file. You may select
any file format that is supported by this product.
2) Select a “Display mode” from the “Keeping aspect
ratio”, “Not keeping aspect ratio”, or “In original size”
option buttons.
3) Set the “Background color”.
· “Program” option button
Click [Import], and select an existing program. You may select programs that have been exported with
Program Editor.
• If no programs have been displayed since Client Scheduler was launched, the area set in “Default of
program display area” will be the display area (except when a program is specified).
Client Scheduler

87
FTP Server/Client Scheduler
[Power Control] tab
Manages target PC power.
• “Shutdown on the designated time” check box
Check this box to turn off the target PC at the specified
time.
• “Reboot on the designated time” check box
Check this box to restart the target PC at the specified
time.
[FTP Server] tab
Sets the FTP Server.
• “User name”: Must be kept within 30 alphanumeric
characters.
• “Password”: Must be kept within 30 alphanumeric
characters.
• “Port Number”: Enter a value between 1 and 32000.
The initial default values are:
• User name: ftp
• Password: ftp
• Port Number: 21
If you have installed the Viewer Version, a unique FTP Server will be installed, and started
as a service. The default TCP/IP port number is 21. If this port number is already used by
another service, change the port number. The FTP settings of the panels registered with “Panel
Management” on the control PC must use the same port number. (
p.68)
[Panel Control] tab
• “COM port for panel control”
Allows the user to change the COM port that controls the
panel
• “Use the function of Picture in Picture (PIP)” check box
Sets whether or not the PIP function is controlled from
this software. Uncheck this box if you would like to adjust
PIP settings on the LCD monitor itself.
• “Power ON the panel before starting up this software”
check box
Checking this box will turn the panel on when Client
Scheduler launches.
• “Power OFF the panel before exiting this software”
check box
Checking this box will turn the panel off when Client Scheduler exits.
Panel control can only be used with PN series LCD monitors. For monitor specifications and
connection instructions, refer to the monitor operation manual.
Client Scheduler

88
FTP Server/Client Scheduler
Displaying the log
Click the [View the Log] menu to display a log of Client Scheduler
operations.
The log can be cleared and updated.
Pausing a program
Clicking the [Pause to View Program] menu will pause the currently displayed program. When the program
is paused a check mark will be displayed to the left of the menu. Clicking [Pause to View Program] again will
restart program display.
Deleting Schedule Information
Click the [Delete Schedule Information] menu. A confirmation
message will appear. Click [Yes] to delete all registered schedule
information currently saved in Client Scheduler.
Deleting Break-in Program Information
Click the [Delete Break-in Program Information] menu. A
confirmation message will appear. Click [Yes] to delete all
registered break-in program information currently saved in Client
Scheduler.
Version information
Click the [Version] menu. The Client Scheduler [Version] dialog
box will appear.
If you input a temporary license code when installing, you will
only be able to use the software for a two-month trial period.
Register your license code before the end of the trial period.
For instructions on how to register License Codes refer to p.70.
Exiting Client Scheduler
To exit Client Scheduler, click the [Exit Client Scheduler] menu.
Do not exit Client Scheduler unnecessarily.
Client Scheduler

89
FTP Server/Client Scheduler
Program Viewer
Program Viewer is used on the target PC.
It displays programs based on schedules and break-in programs loaded by Client Scheduler.
• To pause a program, right-click the Client Scheduler icon, and from the menu that appears, click [Pause
to View Program].
• To change advanced settings for Program Viewer, right-click the Client Scheduler icon and from the
menu that appears, click [Setting]. Settings can be adjusted from the [Setting of Client Scheduler] dialog
box that appears. (
p.86)
Program Viewer

90
Status Monitoring Tool
This function is only available with the Network Version.
The Status Monitoring Tool allows you to check panel status and control target PC power.
The main Status Monitoring Tool window
●Launching Status Monitoring Tool
1. From the Windows Taskbar, click [Start], [All Programs], [SHARP Digital Signage Software], [Tools],
[Status Monitoring Tool].
“Status Monitoring Tool” will launch.
●The main Status Monitoring Tool window
1) Menus
2) Toolbar
3) Group tree
4) Panel list
1) Menus
Menu options are as follows:
Menu option Description
Relevant
page
File Exit Exits Status Monitoring Tool.
-
Panel
Select all panels Selects all panels displayed in the panel list.
p.93
Select panels without
response
Selects all panels in the panel list that are not responding
(including panels for which status has not been acquired).
p.93
Select panels with
response
Selects all panels in the panel list that are responding.
p.93
Monitoring status

91
Status Monitoring Tool
Menu option Description
Relevant
page
Panel
Power control
of controller PC
Power on Turns on the target PC of selected panels.
p.94
Reboot Restarts the target PC of selected panels.
p.94
Power off Turns off the target PC of selected panels.
p.94
Status acquisition of
selected panels
Starts status acquisition of selected panels.
p.93
Property Displays panel status details if only one panel is selected.
p.95
Option
Operation environment Displays the [Setting of operation environment] dialog box.
p.97
Panel setting without status
acquisition
Displays the [Panel setting without status acquisition] dialog
box.
p.94
Thumbnail size
Small
Changes the size of thumbnails displayed in the panel list
to Small.
p.96
Medium
Changes the size of thumbnails displayed in the panel list
to Medium.
p.96
Large
Changes the size of thumbnails displayed in the panel list
to Large.
p.96
Start of status acquisition
Starts status acquisition of all panels registered in Panel
Management (except for panels set without status
acquisition).
p.93
Cancel of status acquisition Cancels panel status acquisition.
p.93
Help About Status Monitoring Tool Displays version information for Status Monitoring Tool.
-
2) Toolbar
The toolbar buttons (icons) perform the following actions:
Icon Menu option Description
Relevant
page
Power on Turns on the target PC of selected panels.
p.94
Rebot Restarts the target PC of selected panels.
p.94
Power off Turns off the target PC of selected panels.
p.94
Show the panel information Displays panel status details if only one panel is selected.
p.95
Small thumbnail
Changes the size of thumbnails displayed in the panel list
to Small.
p.96
Medium thumbnail
Changes the size of thumbnails displayed in the panel list
to Medium.
p.96
Large thumbnail
Changes the size of thumbnails displayed in the panel list
to Large.
p.96
Start of status acquisition
Starts status acquisition of all panels registered in Panel
Management (except for panels set without status
acquisition).
p.93
Cancel of Status
acquisition
Cancels panel status acquisition.
p.93
The main Status Monitoring Tool window

92
Status Monitoring Tool
3) Group tree
Displays groups registered in Panel Management.(
p.66)
When a group is selected, all the panels that belong to it (except for panels set without status acquisition) are
displayed in the panel list.
When “(Select all panels)” is selected, all panels (except for panels set without status acquisition) are displayed
in the panel list.
4) Panel list
Displays a list of all panels in the selected groups in the group tree (except for panels set without status
acquisition).
Panel icons and thumbnails change according to panel status.
Panel icon/thumbnail Description
Displayed when the panel’s status has not been acquired at all since Status
Monitoring Tool started.
Displayed when there is no response from the panel.
Displayed when there is a response from the panel, but screen captures of the
currently displayed program cannot be acquired from the target PC.
(Example image only)
Displayed when there is a response from the panel and screen captures of the
currently displayed program were acquired from the target PC. Thumbnails of these
screen captures will be displayed.
* The icon (thumbnail) displayed will depend on the target PC display.
The main Status Monitoring Tool window

93
Status Monitoring Tool
Acquiring and displaying panel status
●Acquiring status of selected panels
1. Select a group from the group tree, and then select a
panel from the panel list.
• To select all panels in the panel list, either click
[Select all panels] from the [Panel] menu, or press
[Ctrl] + [A].
• To select all panels in the panel list that are not responding
(including panels for which status has not
been acquired)
, either click [Select panels without response] from the [Panel] menu, or press [Ctrl]
+ [Shift] + [A].
• To select all panels in the panel list that are responding, either click [Select panels with response]
from the [Panel] menu, or press [Ctrl] + [Alt] + [A].
2. From the [Panel] menu, click [Status acquisition of selected panels].
Status acquisition of selected panels will start.
• To acquire panel status for all panels registered in Panel Management (except for panels set
without status acquisition), click [Start of status acquisition] from the [Option] menu, or alternatively,
click
.
• To cancel panel status acquisition, click [Cancel of status acquisition] from the [Option] menu, or
alternatively, click
.
When panel status is acquired, panel icons and thumbnails
will change.
Acquiring and displaying panel status

94
Status Monitoring Tool
●Setting panels for which status will not be obtained
It is possible to set panels for which status will not be acquired so that they will not be displayed in the panel list.
1. From the [Option] menu click [Panel setting without status acquisition].
2. Select panels from the “Panel list with getting status”.
3. Click [Add].
The selected panels will move to the “Panel list without
getting status”.
4. Click [OK].
To reset a panel so that its status will be acquired,
select it from the “Panel list without getting status”,
and click [Remove].
●Controlling target PC power
The target PC can be turned on and off, and restarted.
1. Select a group from the group tree, and then select a
panel from the panel list.
2. To turn the target PC on, from the [Panel] menu, click [Power control of controller PC] and then
[Power on], or alternatively, click
.
To restart the target PC, from the [Panel] menu, click [Power control of controller PC] and then
[Reboot], or alternatively, click
.
To turn the target PC off, from the [Panel] menu, click [Power control of controller PC] and then
[Power off], or alternatively, click
.
A confirmation dialog box will appear.
3. Click [Yes].
The process will be executed.
Acquiring and displaying panel status

95
Status Monitoring Tool
4. A screen like the one on the right will appear. Check that
the distribution was successful and click [Close].
●Displaying detailed information for a panel
1. Select a group from the group tree, and then select a
panel from the panel list.
2. From the [Panel] menu click [Property], or alternatively, click
.
The [Panel property] dialog box will appear.
3. Check the settings, and click [Close].
Acquiring and displaying panel status

96
Status Monitoring Tool
●Changing thumbnail size
It is possible to change the size of the thumbnails of the screen captures acquired from the panels.
1. Click the buttons on the toolbar.
(Small:
, Medium: , Large: )
Or alternatively, from the [Option] menu, click [Thumbnail size], and select the size you want to use.
Small Medium Large
Acquiring and displaying panel status

97
Status Monitoring Tool
Setting the operation environment
Set advanced settings for panel status acquisition.
1. From the [Option] menu click [Operation environment].
The [Setting of operation environment] dialog box will appear.
2. Set the options.
1) Check the “Response confirmation of controller PC
through ICMP ECHO packet” check box. (Compulsory)
The check box cannot be cleared.
• Timeout (seconds)
Sets the timeout value for confirming a response from
the target PC. Values of from 1-10 seconds can be
selected.
• Retry count
Sets the number of retries permitted when confirming
a response from the target PC. Values of from 1-10
times can be selected.
If there is no response, a delay of “timeout value x number of retries” seconds will occur.
2) “Acquisition of displaying program information” check box
Check this box to acquire information about the currently displayed program from the target PC.
3) “Acquisition of screen capture displaying by controller PC” check box
Check this box to acquire the currently displayed screen capture from the target PC. The acquired
screen captures will be displayed as thumbnails.
It may not always be possible to acquire screen captures of movies.
4) “Status acquisition of panel (PN series)” check box
Check this box to acquire information about the panel from the target PC.
5) “Auto acquisition under the following interval” check box
Check this box to automatically acquire panel status at regular intervals.
• Acquisition interval
Set the interval at which you want to obtain panel status. Values of 1-60 minutes can be set.
3. Click [OK].
Setting the operation environment

PN-SS01/SS02/SV01 07K(1)
 Loading...