

Page 1
On-line Manual
Fantastic Movie Creator
Quick File Transfer Software
Lite Pack
IMPORTANT INFORMATION
CONTENTS
Easy Creation of Video Clips (Fantastic Movie Creator)
Quick Transfer of Digital Still Camera Data to PC (Quick File Transfer Software)
Please read this on-line manual
carefully before using your software.
Page 2
PREVIOUS PAGE
PREVIOUS PAGE
NEXT PAGE
NEXT PAGE
2
IMPORTANT INFORMATION &
CONTENTS
IMPORTANT INFORMATION
● This on-line manual is written for users who already understand how to use
Microsoft Windows and the mouse.
Should you have any questions on operating Windows or the mouse, refer to the
Windows on-line manual, instruction manual, etc.
● The descriptions in this on-line manual may not correspond exactly to your
computer’s environment.
● This on-line manual provides an example of operations using WindowsR XP.
Copyright
● Microsoft and Windows are registered trademarks or trademarks of Microsoft
Corporation in the United States and other countries.
● Adobe, Acrobat and Acrobat Reader are trademarks or registered trademarks of
Adobe Systems Incorporated.
● PixLab (hereafter referred to as “this software”) is copyrighted by Sharp
Corporation. Copyrights and other rights concerning PixLab belong to Sharp
Corporation.
● Other names of corporations and products are trademarks or registered trademarks
of the respective corporations.
● The contents of the on-line manual may not be reproduced in part or in whole.
They are for personal use only, and as per copyright laws may not be used without
the permission of Sharp Corporation.
● Images or recordings you make on your digital still camera may be used for your
personal enjoyment only. They may not be used without the permission of the
copyright holder per copyright laws. Also note that the use of certain performances,
shows, exhibitions, etc., though intended for personal enjoyment, may be restricted.
Easy Creation of Video Clips (Fantastic Movie Creator) ........... 3
Creating a Video Clip ...............................................................................3
Setting Options .........................................................................................8
Quick Transfer of Digital Still Camera Data to PC (Quick File Transfer Software) ....
9
Connecting Digital Still Camera and PC by USB .....................................9
Transferring Digital Still Camera Data to PC ............................................9
Disabling Quick File Transfer Software ..................................................12
Changes in Icons .................................................................................... 12
Exiting Quick File Transfer Software ......................................................12
CONTENTS
IMPORTANT INFORMATION &
CONTENTS
Note
• Please note that Sharp Corporation will accept no responsibility
for damages, loss of income or claims by third parties resulting
from the use of this software.
• Please note that the specifications of this software and the
contents of the on-line manual are subject to change without
prior notice.
• The contents of the on-line manual have been prepared with
care. If, however, you should have any doubts or notice any
errors, please contact Sharp Corporation.
• Operation may be slow depending on the computer’s operating
environment and processing capabilities.
Page 3

PREVIOUS PAGE
PREVIOUS PAGE
CONTENTS
CONTENTS
NEXT PAGE
NEXT PAGE
3
Easy Creation of Video Clips (Fantastic Movie Creator)
Note
Video clip AVI (Motion JPEG) file of entertaining short films can
be created easily using images recorded with a digital still camera.
• Nine types of stories have been registered in advance.
• The stories also contain background music.
• The following file formats are compatible with Fantastic Movie
Creator:
• Video files: .asf .avi .mov .mpeg .mpg .wmv
• Audio files: .mp3 .wav .wma
• Still picture files: .bmp .jpe .jpeg .jpg
* Video files and audio files refer to those which can be played
back with Windows
R
Media Player. Please note that some
files may not be able to be used.
Creating a Video Clip
[1] Start up Fantastic Movie Creator.
1 Click on the Windows
RR
RR
R
“start” button and click after
moving the pointer to “All Programs”, “SHARP” and
then “SHARP Fantastic Movie Creator”.
Fantastic Movie Creator starts up.
Easy Creation of Video Clips
(Fantastic Movie Creator)
Note
The procedure for starting up the software may vary depending on
the OS.
[2] Prepare the files to be used.
You can add, delete or change the order of files to be
made into the video clip.
Refer to “Setting Options” on page 8.
Preview area
End Fantastic
Movie Creator
Explanation of
functions, operation,
etc.
Playback button
Edit button
“Audio file” area “Files used to
create video”
area
Page 4
PREVIOUS PAGE
PREVIOUS PAGE
CONTENTS
CONTENTS
NEXT PAGE
NEXT PAGE
4
Note
Note
Note
2 Add or delete files.
• When adding a file:
Drag and drop the desired file from Windows
R
Explorer
to the “Files used to create video” area.
• When deleting a file:
Click on the desired file in the “Files used to create
video” area and then click on
of the “Edit” button.
• You can also add files by clicking on of the “Edit” button.
• Files may also be added or deleted later.
3 Change the order of the files.
• When moving a file forward:
Click on the desired file in the “Files used to create
video” area and then click on
of the “Edit” button.
• When moving a file backward:
Click on the desired file in the “Files used to create
video” area and then click on
of the “Edit” button.
When a video file is selected by clicking on a file in the “Files used
to create video” area, that file can be played back by clicking on
the “Playback” button.
Start playback
Pause/Resume playback
Stop playback
Switch between play/stop of audio
4 Click on the “Forward” button.
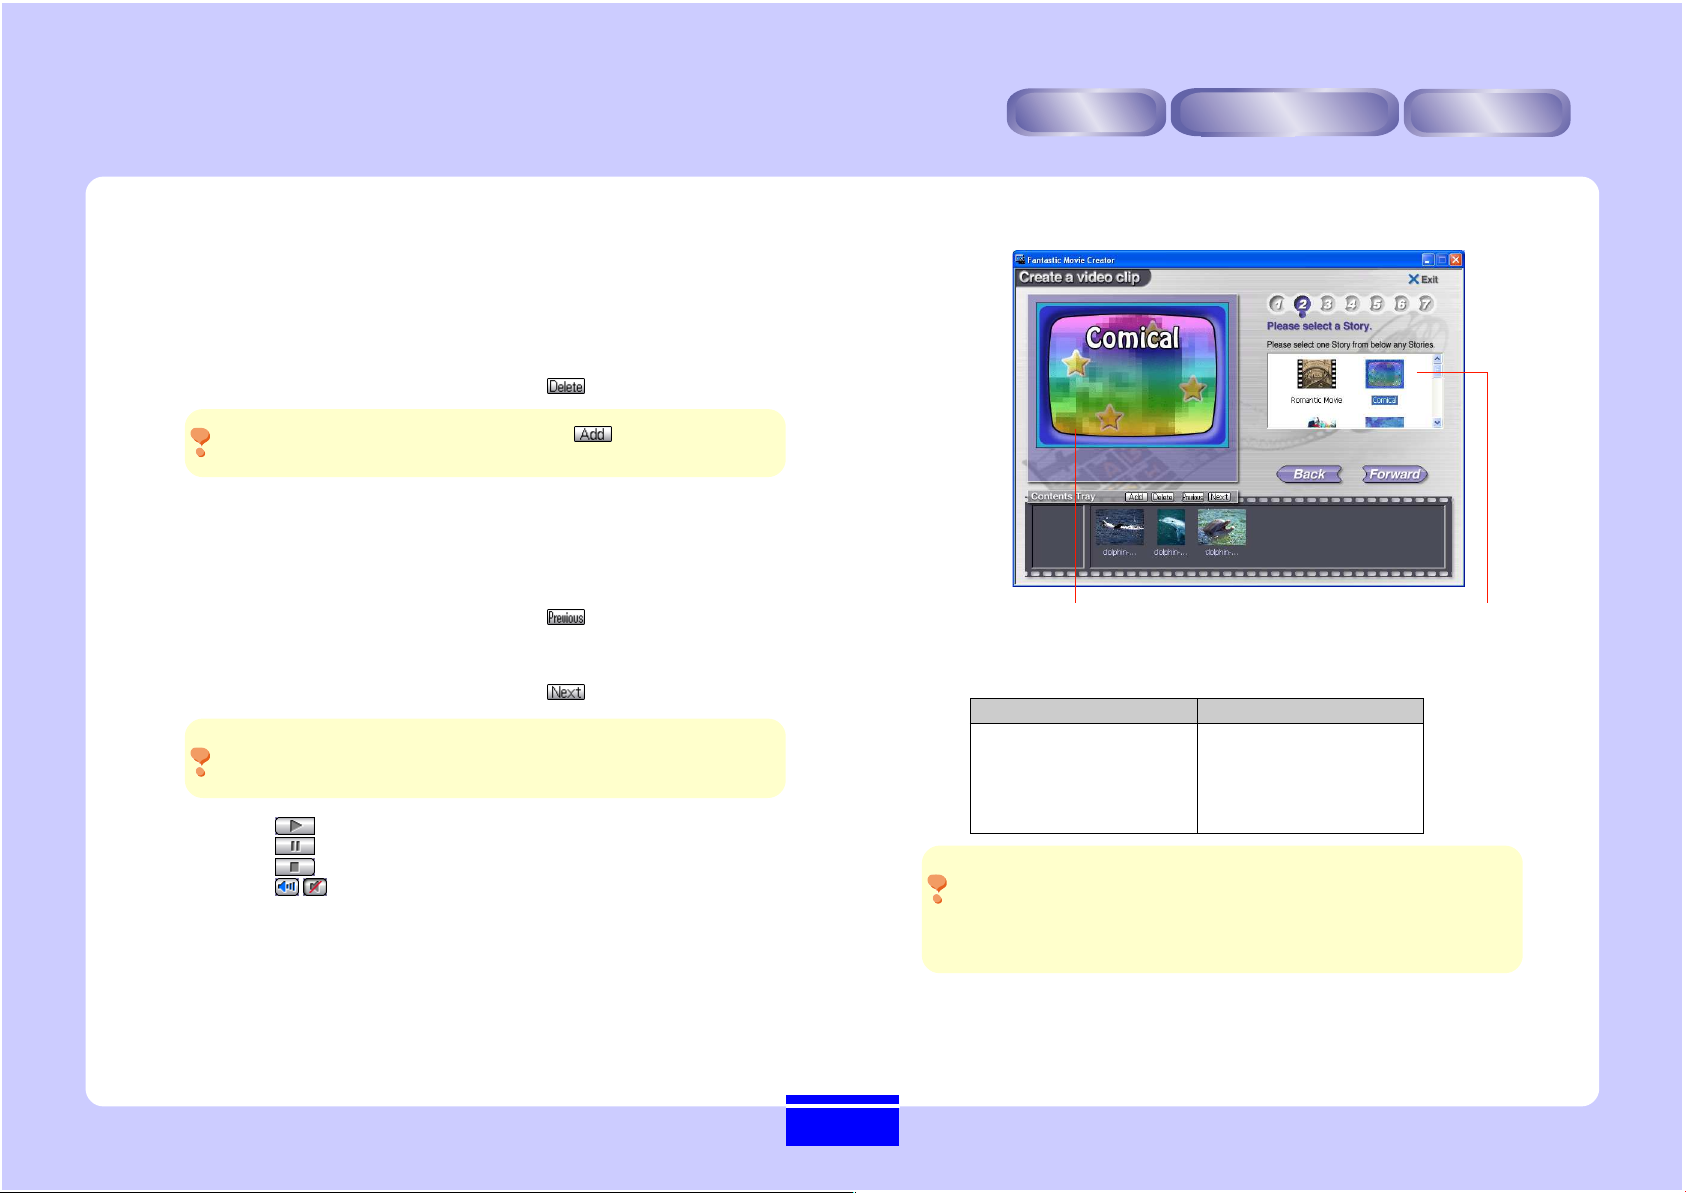
[3] Select a story.
The number of scenes used in the video clip varies
according to the story. See the table below.
The number of scenes used in the video clip is specified for each
story as shown on the table above. If the number of selected files
for the story is less or more than that of scenes specified in the
table, some files among the ones you selected will be added to or
deleted from the video clip.
5 Select a story by clicking on the desired story.
The selected story is displayed in the preview area.
6 Click on the “Forward” button.
Preview area Stories
Romantic Movie 7
Comical 10
Excite 25
News 12
Disco 16
My Memory 9
Fantasy 7
Spy Movie 15
Horror Movie 10
Story
Number of scenes
Story
Number of scenes
Page 5

PREVIOUS PAGE
PREVIOUS PAGE
CONTENTS
CONTENTS
NEXT PAGE
NEXT PAGE
5
Note
[5] Decide on the audio.
10 Specify the audio.
• You can select the story BGM and/or the desired sound. To
listen to the desired sound, drag and drop its audio file in the
“Audio file” area.
• If you want to mix the video sound with the story BGM, click
on “You can mix the BGM sound with Video sound.” to
check it.
• If you want to use only the story BGM, click on “You can
delete the Video sound and use only the BGM sound.”
to check it.
• You can listen to the story BGM by clicking on the “BGM playback”
button. BGM playback is stopped by clicking on the “BGM
playback” button again.
• If the video clip contains only still picture or video files without
audio, there will be no difference in audio output, no matter which
audio setting is selected.
[4] Decide on a title.
7 Click on a title to select.
The selected title is displayed in the preview area.
8 Enter a subtitle in the “Subtitle” box.
Subtitles can be entered using up to 16 characters.
9 Click on the “Forward” button.
Preview area Titles
Subtitle box
Audio setting
“BGM playback” button“Audio file” area
Page 6

PREVIOUS PAGE
PREVIOUS PAGE
CONTENTS
CONTENTS
NEXT PAGE
NEXT PAGE
6
11 Click on the “Forward” button.
[6] Specify the output mode of the video clip.
12 Select the output mode of the video clip.
• “Default (Recommend)”
Normally select this output mode. This enables
adjustment of video quality and sound quality.
• “Economy”
Select this mode when you want to play back the video
clip using a digital still camera with the video playback
function.
Video quality and sound quality cannot be adjusted in
this output mode.
When “Default (Recommend)” has been selected:
You can make fine adjustments in video quality and sound
quality by clicking on
.
You can select from among “High”, “Middle” and “Low”
for each setting.
The current setting is displayed when the pointer
approaches “Default (Recommend)”.
13 Click on the “Create” button.
Creation of the video clip begins.
Page 7

PREVIOUS PAGE
PREVIOUS PAGE
CONTENTS
CONTENTS
NEXT PAGE
NEXT PAGE
7
Note
[7] Save the video clip.
14 Click on the “Playback” button to view the video clip.
Start playback
Pause/Resume playback
Stop playback
Switch between play/stop of audio
If you want to redo creation of the video clip, click on the “Back”
button. The program returns to the previous window.
Playback button
15 Click on the “Save As” button.
The “Save As” dialogue box is displayed.
16 Select a folder where the video clip is to be saved
and then enter a file name.
17 Click on the “Save” button.
Page 8

PREVIOUS PAGE
PREVIOUS PAGE
CONTENTS
CONTENTS
NEXT PAGE
NEXT PAGE
8
Note
Setting Options
You can use this function to make settings for the work
folder of Fantastic Movie Creator.
1 Click on the title bar icon.
2 Align the cursor at the option you want to set and click.
• Select “Option...” to make settings for the work folder.
• Select “Always show in forefront” to always display the
application window in forefront.
• Select “About…” to confirm the version of the software.
Click here.
Options
Note
18 Click on the “Exit” button.
Clicking on the “Top” button lets you continue to create a new
video clip.
Page 9

PREVIOUS PAGE
PREVIOUS PAGE
CONTENTS
CONTENTS
NEXT PAGE
NEXT PAGE
9
Quick Transfer of Digital Still Camera Data to PC (Quick File Transfer Software)
Quick Transfer of Digital Still Camera Data
to PC (Quick File Transfer Software)
This function allows you to quickly transfer data recorded
on the memory card inside the digital still camera to your
PC by connecting your PC and digital still camera using
their respective USB terminals.
Connecting Digital Still Camera and PC by USB
1 Make sure the power of the digital still camera is off.
2 Open the jack cover and insert the DC plug of the AC
adapter into the DC IN jack on the digital still camera,
then plug the AC plug in to a power outlet.
3 Insert the USB cable into the USB terminal on the
digital still camera.
4 Insert the other end of the USB cable into the USB
terminal on the PC.
Transferring Digital Still Camera Data to PC
Note
The data that is transferred is recorded on the memory
card. Data not recorded on a memory card cannot be
transferred. In addition, the names of recorded data (file
names) can be changed collectively during transfer.
[1] Start up Quick File Transfer Software.
1 Confirm that Quick File Transfer Software has been
started up.
Quick File Transfer Software icon
• Quick File Transfer Software is started up automatically when
your PC is turned on.
• Click on the “Show hidden icons” button when the Quick File
Transfer Software icon is not displayed.
➜
• If Quick File Transfer Software has not started up, click on the
Windows
R
“start” button and click after moving the pointer to
“All Programs”, “SHARP” and then “SHARP Quick File
Transfer Software”, and then click to start up Quick File Transfer
Software.
“Show hidden icons” button Quick File Transfer Software icon
5 Press the Power button until the digital still camera
turns on and then press the
button on the digital
still camera.
For further details, refer to “Transferring Data on Card to
Computer” in the digital still camera operation manual.
Page 10

PREVIOUS PAGE
PREVIOUS PAGE
CONTENTS
CONTENTS
NEXT PAGE
NEXT PAGE
10
Note
Note
[2] Specify changes in the transfer destination
or file name.
2 Right click on the Quick File Transfer Software icon,
align the pointer at “Settings...” and click.
3 Click on the “Browse” button.
4 Select the folder where the recorded data is to be
stored.
The following folders cannot be specified.
• Removable disk drive
• Network drive
5 Click on the “OK” button.
6 Select whether or not you want to change the data
name (file name).
Click on “Yes” if you want to change the file name, and
click on “No” if you do not.
• Only the file names of still picture data (data containing the suffix
.jpg) can be changed.
• The following dialogue box is displayed if “Yes” has been
selected.
• Click on “OK” after entering the file name. File names can be
entered using up to 20 characters.
Example: When the file name has been changed to
“Wedding”:
• Clicking on “Cancel” enables transfer to proceed without
changing the file name.
7 Click on the “OK” button.
➜
Recorded data file names
in digital still camera
File names after transfer
PICT0001.jpg
PICT0002.jpg
PICT0003.jpg
Wedding0001.jpg
Wedding0002.jpg
Wedding0003.jpg
Page 11

PREVIOUS PAGE
PREVIOUS PAGE
CONTENTS
CONTENTS
NEXT PAGE
NEXT PAGE
11
Note
[3] Transfer recorded data.
8 Press the button on the digital still camera.
Recorded data begins to be transferred to your PC and
the Quick File Transfer Software icon changes its
appearance.
Appearance of Quick File Transfer Software icon during transfer
When transfer does not begin, right click on the Quick File
Transfer Software icon, align the pointer at “Retry” and click.
The following message is displayed when transfer is finished.
9 Click on the “OK” button.
A folder having the date on which data was transferred as
its file name is created in the folder selected in step 4. The
transferred data is stored in that date folder.
Date folder containing transferred data
Note
The folder names appear as shown below when recorded data is
transferred more than once on the same day.
Example: When data has been transferred three times on
August 24, 2002:
1st transfer: Folder name 08242002
2nd transfer: Folder name 08242002_001
3rd transfer: Folder name 08242002_002
Page 12

PREVIOUS PAGE
PREVIOUS PAGE
CONTENTS
CONTENTS
12
Disabling Quick File Transfer Software
Note
This can be set so that recorded data is not transferred to
your PC even when the
button on the digital still
camera is pressed.
1 Right click on the Quick File Transfer Software icon,
align the pointer at “Disable” and click.
The Quick File Transfer Software icon changes as shown below.
Repeat the procedure starting at step 1 if you want to enable Quick
File Transfer Software.
Changes in Icons
Quick File Transfer Software indicates the current status
with four icons.
Exiting Quick File Transfer Software
1 Right click on the Quick File Transfer Software icon,
align the pointer at “Exit” and click.
Standby
Transferring recorded data
Verifying digital still camera
Disabled
Page 13

documentation manual, user maintenance, brochure, user reference, pdf manual
This file has been downloaded from:
User Manual and User Guide for many equipments like mobile phones, photo cameras, monther board, monitors, software, tv, dvd, and othes..
Manual users, user manuals, user guide manual, owners manual, instruction manual, manual owner, manual owner's, manual guide,
manual operation, operating manual, user's manual, operating instructions, manual operators, manual operator, manual product,
 Loading...