

Page 1
Printed in China
Gedrukt in China
Imprimé en Chine
Impreso en China
9NK5012073200
11P05-CH-NM
Installation Manual [ENGLISH]
AN-PH808EX
AN-PH814EZ
AN-PH818EZ
Do not attempt to exchange the lens
when the projector is installed
hanging from the ceiling. Injury may
occur if the lens cover and lens fall.
AN-PH823EZ
1
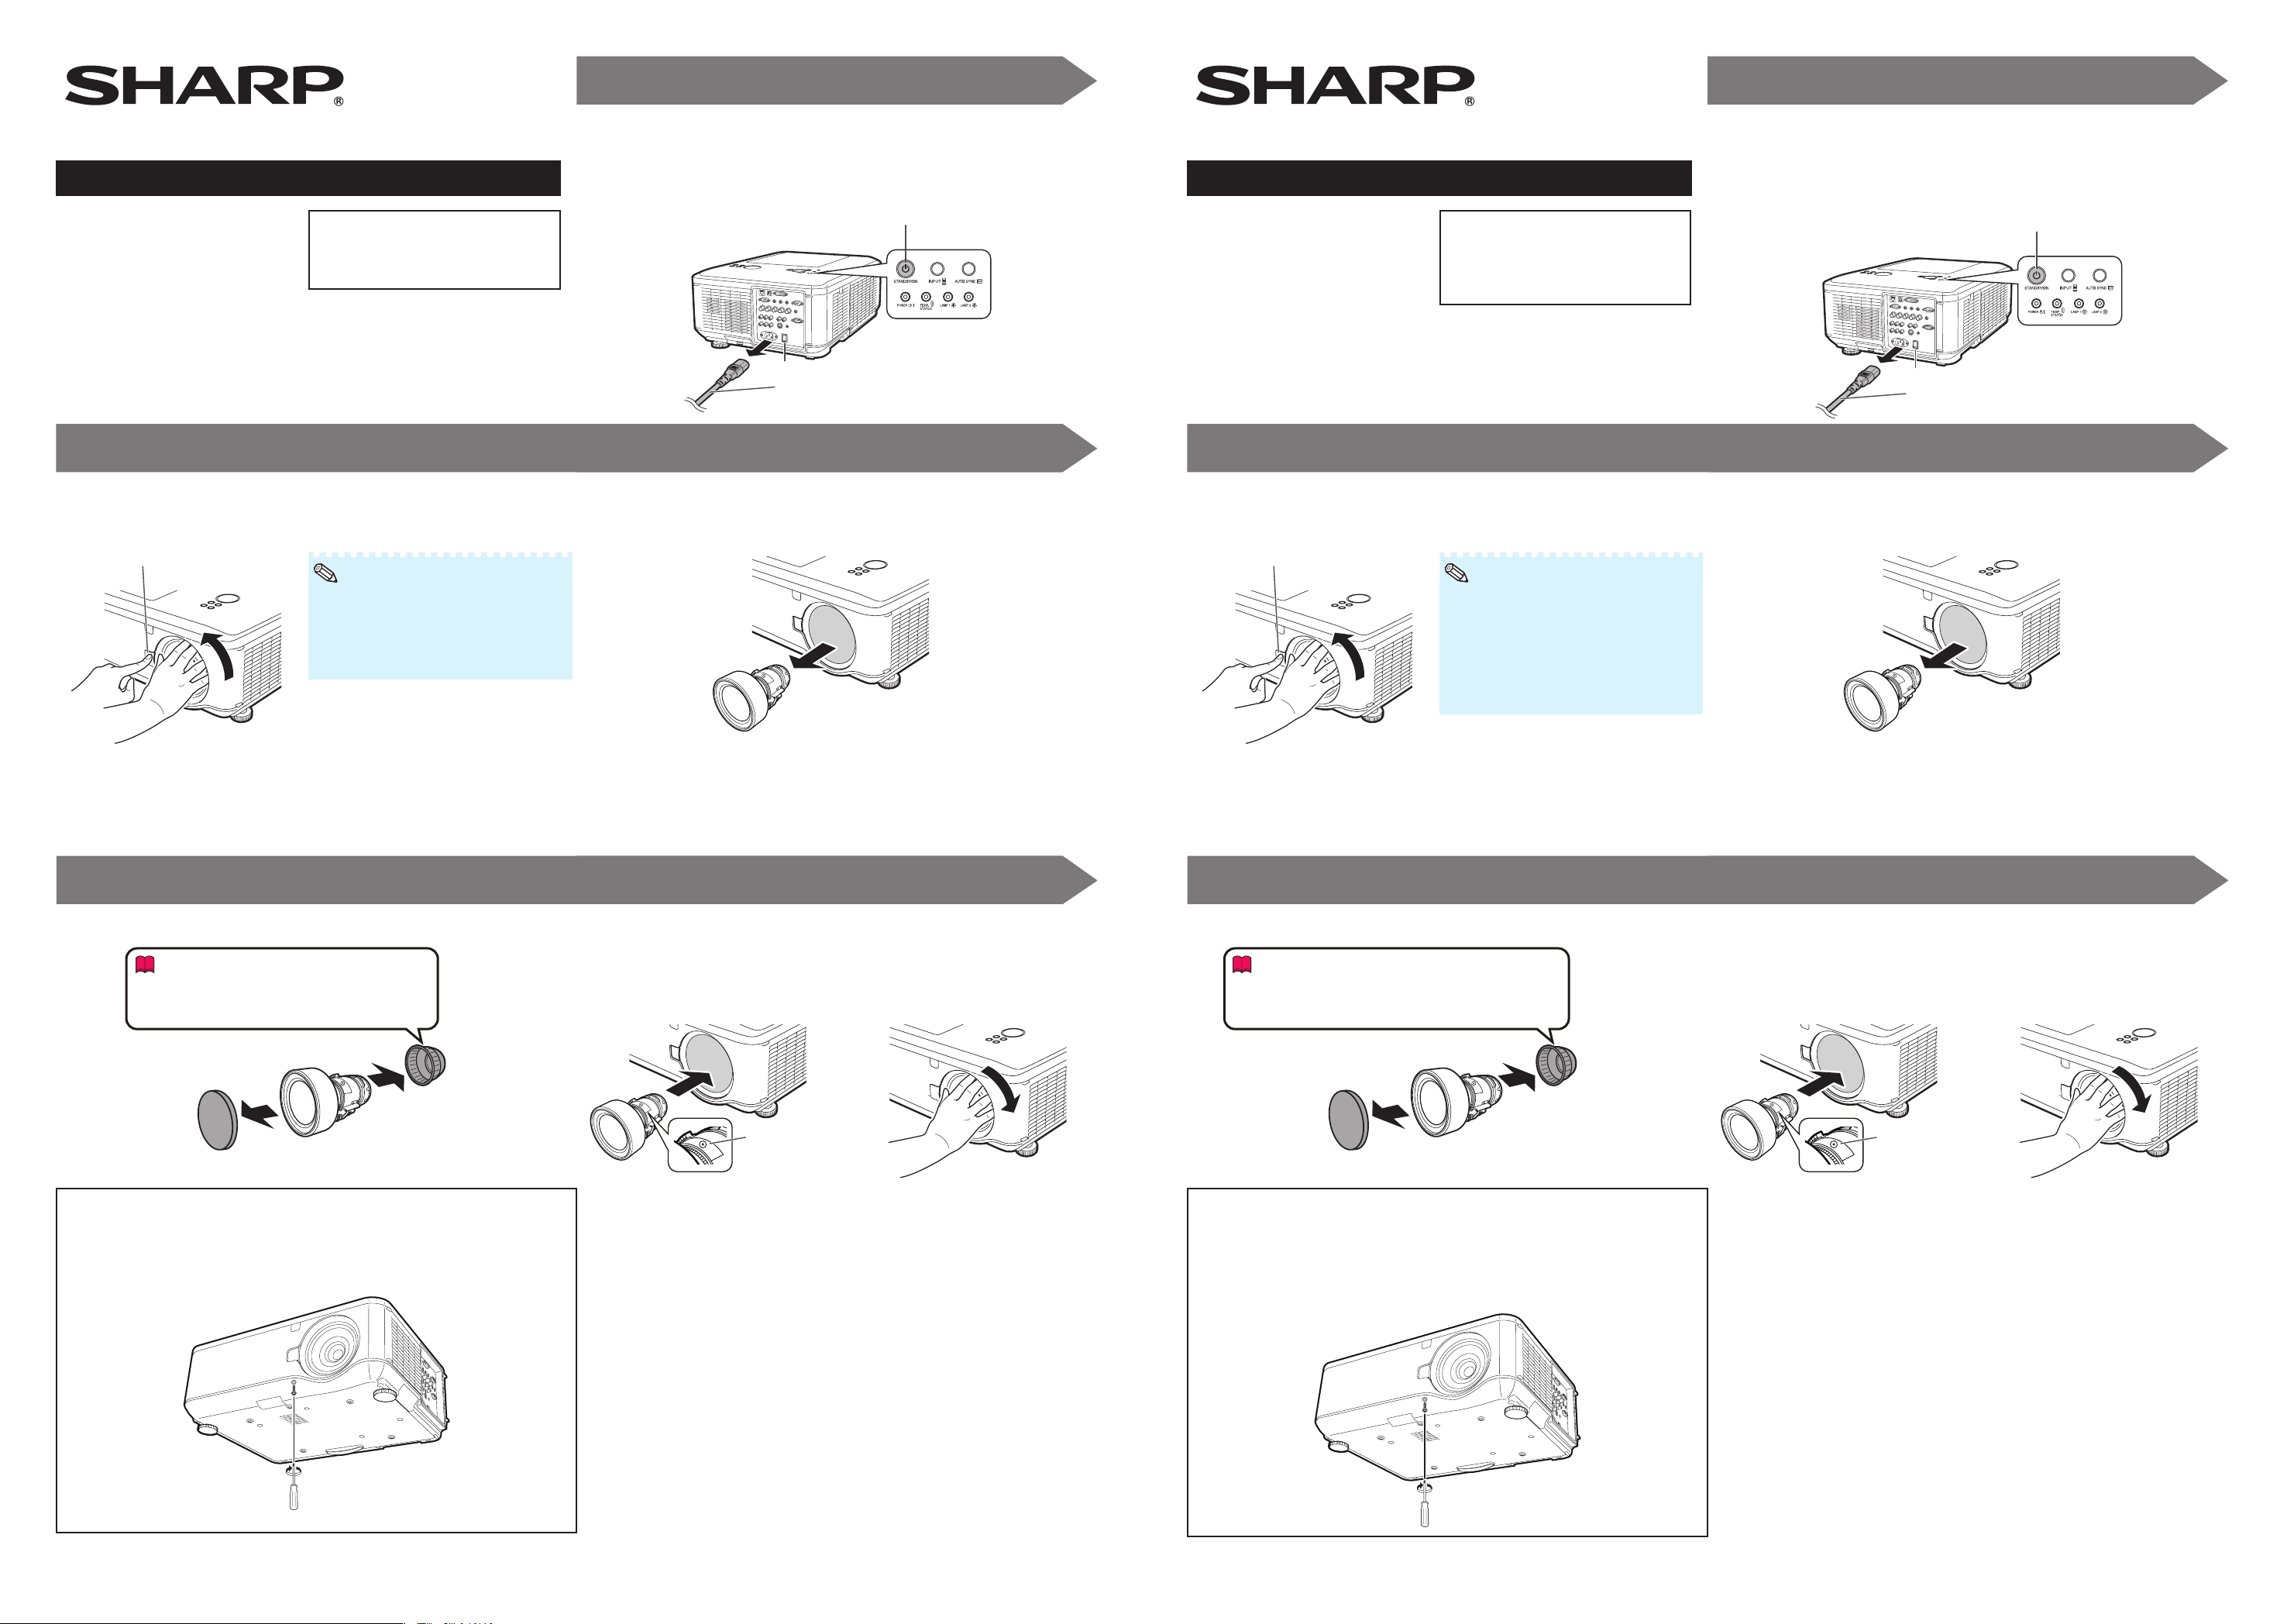
Press STANDBY/ON on the projector or on the remote control
to put the projector into standby mode.
Switch the MAIN POWER switch on the projector to “OFF”.
•
Disconnect the power cord and unplug the power cord from the
•
AC socket after the cooling fan stops.
STANDBY/ON button
Installationsanleitung
AN-PH808EX
AN-PH814EZ
AN-PH818EZ
AN-PH823EZ
[DEUTSCH]
Versuchen Sie nicht das Objektiv
auszutauschen, wenn der Projektor
an der Decke hängt. Man kann sich
verletzen, wenn das Objektiv
herunterfällt.
1
Drücken Sie am Projektor STANDBY/ON oder auf der Fernbedienung,
um den Projektor in den Standby-Modus zu versetzen.
Schalten Sie den HAUPTSCHALTER am Projektor auf „AUS“.
•
Ziehen Sie das Netzkabel aus dem Netzanschluss und aus der
•
Netzsteckdose, nachdem der Lüfter angehalten hat.
STANDBY/ON-Taste
AN-PH845EZ
2 3
Push the LENS RELEASE button all the way in and turn the lens
anti-clockwise.
The lens will be disengaged.•
LENS RELEASE button
Note
•
If the anti-theft screw is used to
secure the lens, the lens cannot be
removed when the LENS RELEASE
button is pressed. In this case,
remove the anti-theft screw first.
Pull the lens out slowly.
MAIN POWER switch
Power cord
AN-PH845EZ
2 3
Drücken Sie die LENS RELEASE-Taste vollständig hinein und
drehen Sie das Objektiv entgegen den Uhrzeigersinn.
Das Objektiv löst sich.•
LENS RELEASE-Taste
Hinweis
Wenn die Diebstahlsicherungsschraube
•
verwendet wird, um das Objektiv zu
befestigen, kann das Objektiv nicht
entfernt werden, wenn die LENS
RELEASE-Taste gedrückt wird. In
diesem Fall entfernen Sie zuerst die
Diebstahlsicherungsschraube.
HAUPTSCHALTER
Netzkabel
Ziehen Sie das Objektiv langsam heraus.
4 5
Remove the lens cap from a replacement lens. Insert the replacement lens with the top position mark on it
facing up, and then turn the lens clock-wise until you hear a
Info
If you try to attach the lens to the projector without
•
removing this cap, the optional lens attachment
part can be damaged.
Using the Anti-Theft Screw
The lens is secured by the above method, but for added security, an anti-theft
•
screw is supplied to secure the lens more tightly.
The screw is designed to be rather long, and to secure the screw, give it about
•
40-50 turns.
click sound.
Make sure that the lens cannot be released even when you try to
•
turn the lens anti-clockwise and pull it out.
Top position mark
4 5
Entfernen Sie die Objektivkappe vom Ersatzobjektiv. Stecken Sie das Ersatzobjektiv mit der oberen
Positionsmarkierung nach oben hinein und dann drehen Sie das
Info
Wenn Sie versuchen das Objektiv am Projektor
•
anzubringen, ohne diese Kappe zu entfernen, kann das
Anbauteil für das optionale Objektiv beschädigt werden.
Verwendung der Anti-Diebstahl-Schraube
Das Objektiv wurde mit der oben genannten Methode befestigt, aber als
•
zusätzliche Sicherheit wurde eine Anti-Diebstahl-Schraube mitgeliefert, um das
Objektiv noch fester zu sichern.
Die Schraube wurde ziemlich groß gemacht und um sie sichern, drehen Sie sie
•
etwa 40-50 Mal.
Objektiv in Uhrzeigerrichtung, bis Sie einen Klickton hören.
Achten Sie darauf, dass das Objektiv nicht gelöst werden kann, selbst wenn Sie
•
versuchen, es entgegen den Uhrzeigersinn zu drehen und es herauszuziehen.
Obere
Positionsmarkierung
Page 2
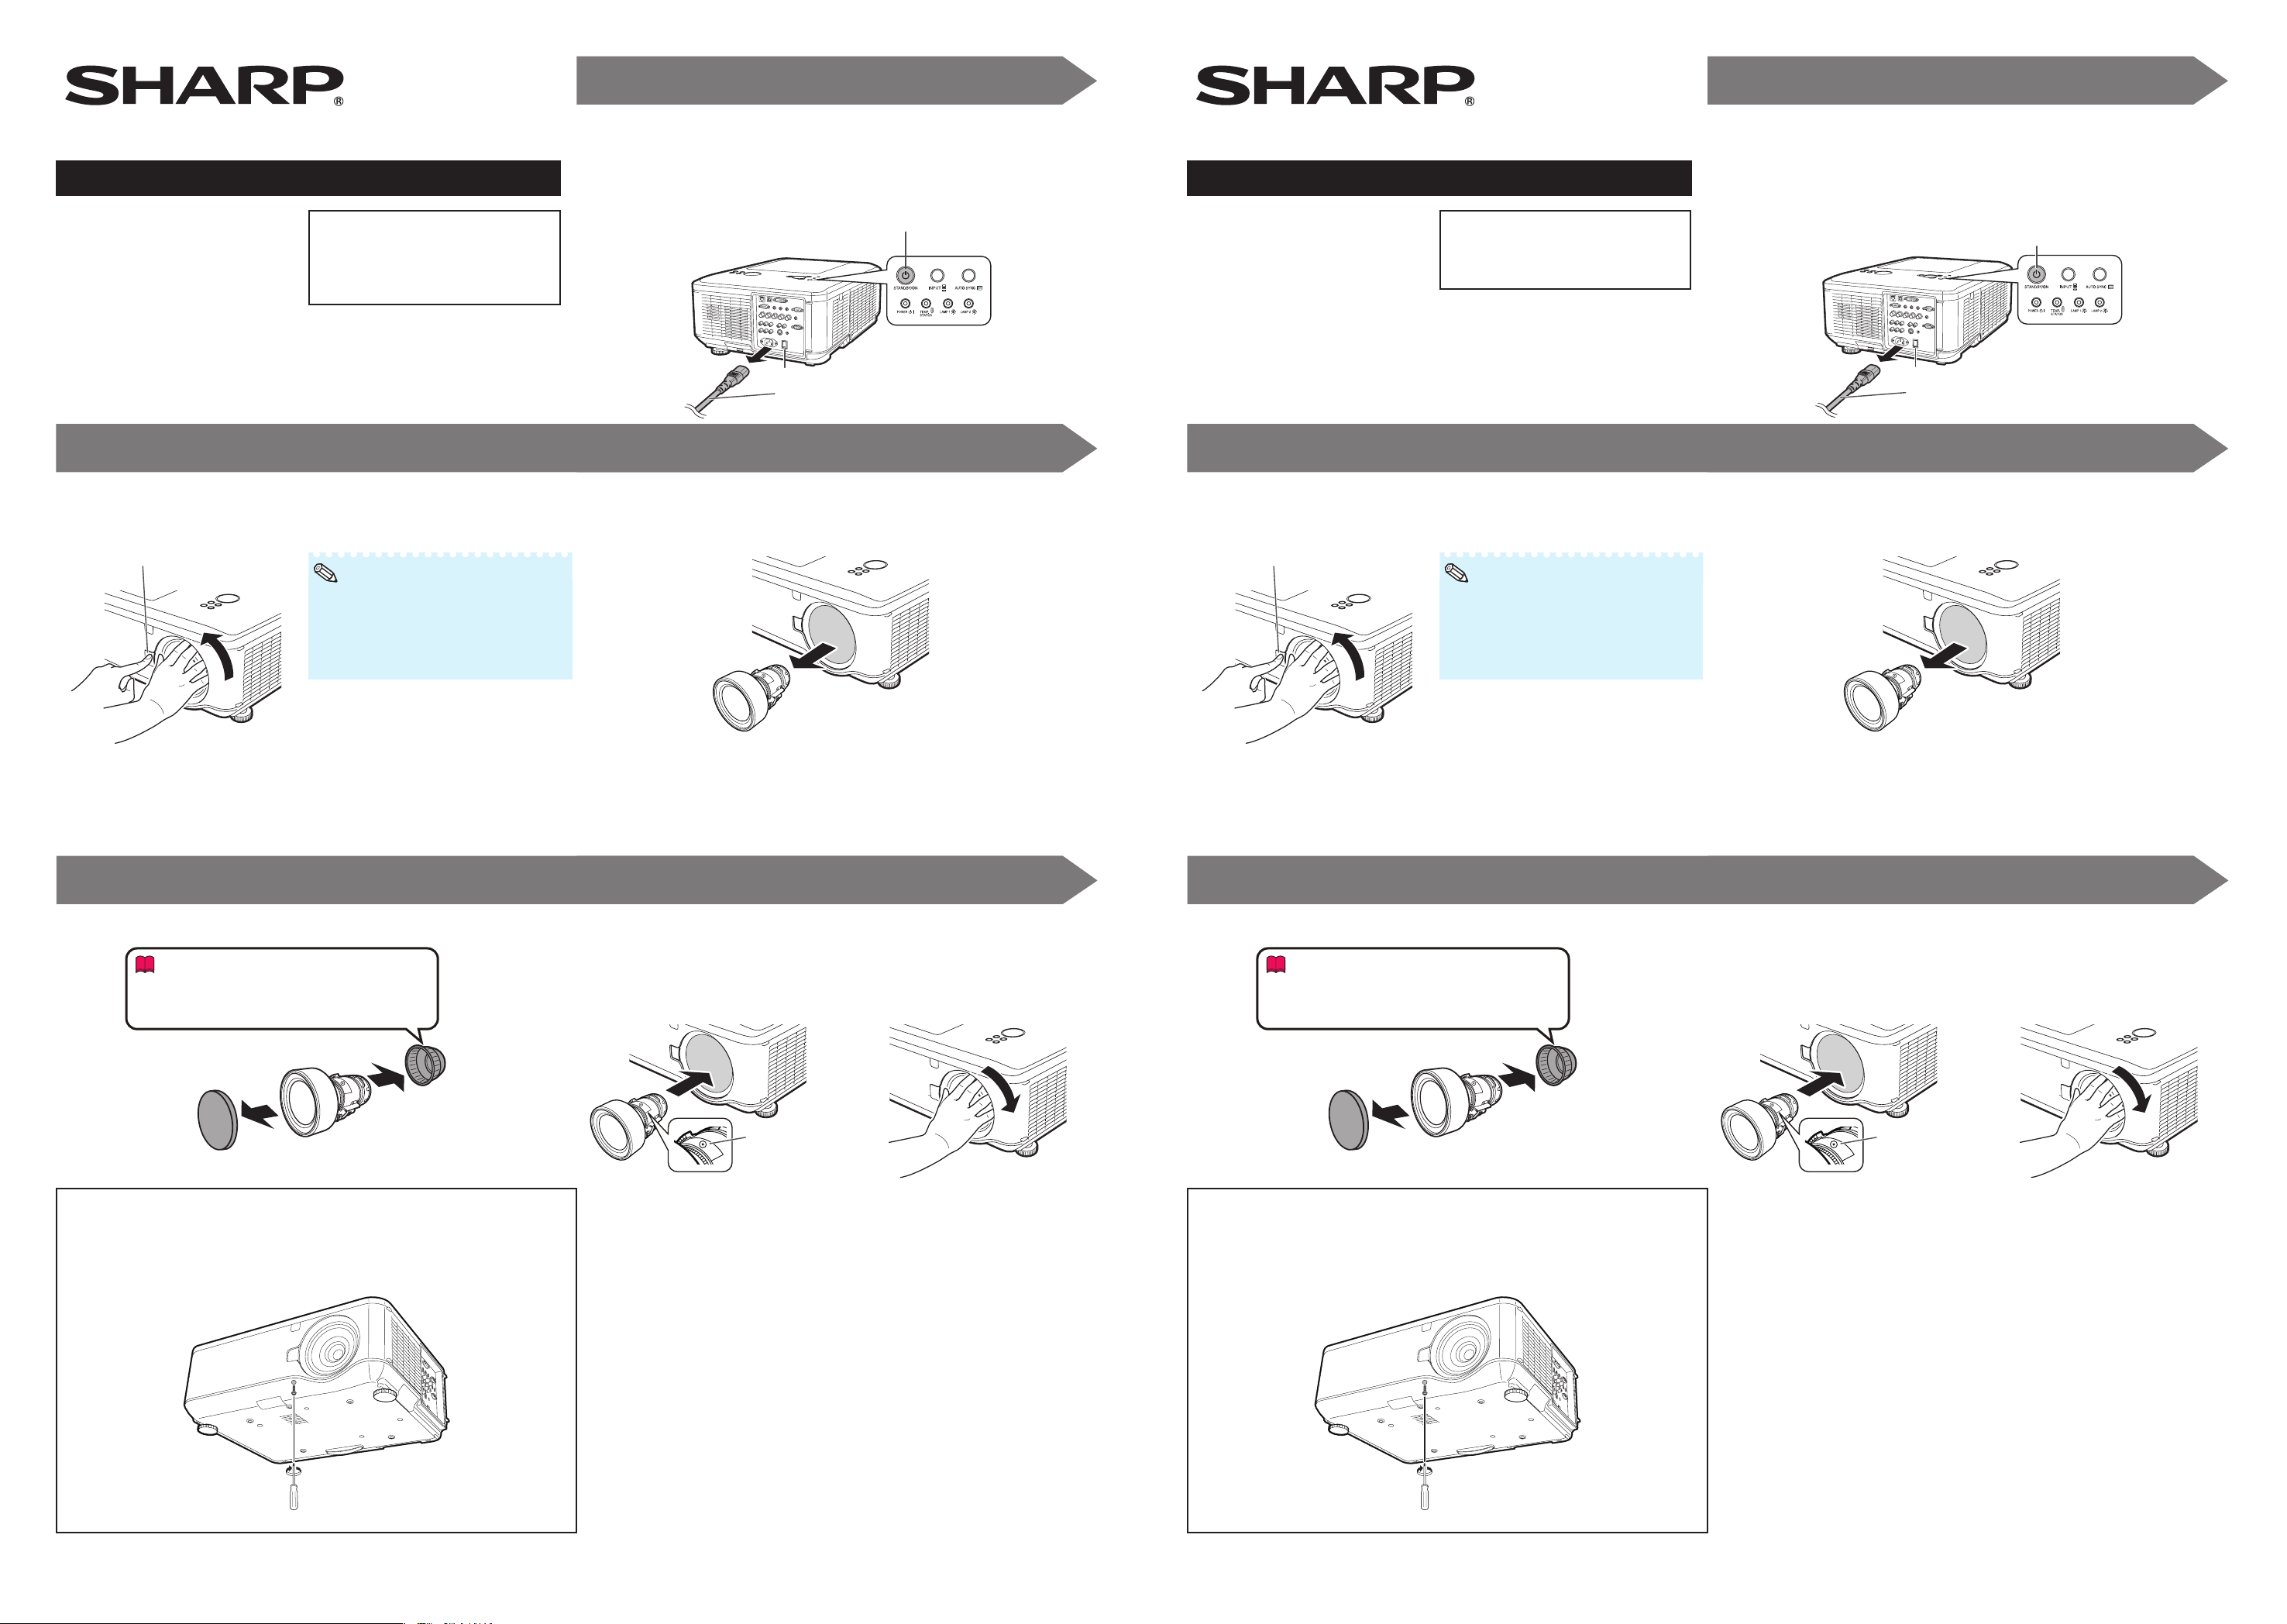
1
1
Manuel d'installation [FRANÇAIS]
AN-PH808EX
AN-PH814EZ
AN-PH818EZ
N'essayez pas de changer l'objectif
quand le projecteur est fixé au
plafond. Vous risquez de subir des
blessures en cas de chute de
l'objectif.
AN-PH823EZ
AN-PH845EZ
2 3
Appuyez à fond sur le bouton LENS RELEASE et tournez
l'objectif dans le sens contraire des aiguilles d'une montre.
L'objectif se libère.•
Bouton LENS RELEASE
Remarque
•
Si vous utilisez la vis antivol pour fixer
l'objectif, vous ne pouvez pas retirer
ce dernier en appuyant sur le bouton
LENS RELEASE. Dans ce cas, retirez
d'abord la vis antivol.
Appuyez sur STANDBY/ON sur le projecteur ou la
télécommande pour mettre le projecteur en mode Veille.
Commutez l'Interrupteur d'ALIMENTATION PRINCIPALE sur le
•
projecteur sur « HORS SERVICE ».
Déconnectez le cordon d'alimentation et débranchez-le de la prise
•
CA lorsque le ventilateur s'est arrêté.
Interrupteur d'ALIMENTATION PRINCIPALE
Cordon d'alimentation
Extrayez lentement l'objectif.
Bouton STANDBY/ON
Manual de instalación [ESPAÑOL]
AN-PH808EX
AN-PH814EZ
AN-PH818EZ
No intente cambiar la lente cuando el
proyector esté instalado colgado del
techo. Puede sufrir lesiones si se cae
la lente.
AN-PH823EZ
AN-PH845EZ
2 3
Empuje el botón LENS RELEASE hasta el fondo y gire la lente
en el sentido contrario a las agujas del reloj.
La lente se desacoplará.•
Botón LENS RELEASE
Nota
•
Si se utiliza un tornillo antirrobo para
fijar la lente, la lente no se puede
quitar cunado esté pulsado el botón
LENS RELEASE. En este caso, retire
antes el tornillo antirrobo.
Pulse STANDBY/ON en el proyector o en el mando a distancia
para poner el proyector en el modo en espera.
Ponga el Interruptor de ALIMENTACIÓN PRINCIPAL del proyector
•
en la posición “DESACTIVADO”.
Desconecte el cable de alimentación y desenchúfelo del zócalo de
•
CA cuando se detenga el ventilador de refrigeración.
Botón STANDBY/ON
Interruptor de ALIMENTACIÓN PRINCIPAL
Cable de alimentación
Tire de la lente hacia fuera lentamente.
4 5
Retirez le capuchon de l'objectif de remplacement. Insérez l'objectif de remplacement avec le repère de position
supérieur orienté vers le haut, puis tournez l'objectif dans le
Info
Si vous tentez de fixer l'objectif au projecteur sans
•
retirer ce capuchon, la pièce de fixation de
l'objectif en option risque d'être endommagée.
Utilisation de la vis antivol
L'objectif est sécurisé par le procédé ci-dessus, mais pour plus de sécurité,
•
une vis antivol est fournie pour sécuriser l'objectif plus étroitement.
La vis est conçue pour être plutôt longue ; pour la fixer, vissez-la d'environ
•
40-50 tours.
sens des aiguilles d'une montre jusqu'à entendre un « clic ».
Vérifiez que vous ne parvenez pas à libérer l'objectif même quand vous essayez
•
de le tourner dans le sens contraire des aiguilles d’une montre et de l'extraire.
Repère de position
supérieur
4 5
Retire la tapa de la lente de recambio. Inserte la lente de recambio con la marca de posición superior
hacia arriba y después gire la lente en el sentido de las agujas
Información
Si intenta colocar la lente en el proyector sin retirar
•
esta tapa, la pieza de acoplamiento de la lente
opcional puede resultar dañada.
Uso del tornillo antirrobo
La lente se sujeta mediante el método anterior, pero para mayor seguridad se
•
suministra un tornillo antirrobo para sujetar la lente con más firmeza.
El tornillo se ha diseñado con una gran longitud y para fijarlo es necesario
•
darle entre 40 y 50 vueltas.
del reloj hasta que oiga un clic.
Asegúrese de que la lente no se puede soltar aunque la gire en el
•
sentido contrario a las agujas del reloj y tire de ella hacia fuera.
Marca de posición
superior
 Loading...