

Page 1

Easy to Use Functions
Easy to Use Functions
Page 2
Using the Network
Before setting the network
This section explains items that can be set in a network. A wireless connection will not be possible if these
items are not set correctly.
Also, as there are values that must be entered in a pre-configured wireless network, make sure to consult
with your network administrator.
IP Address
■ What is an IP Address?
The IP Address is a number for identifying devices connected to the network. An IP address must be
assigned to each device using network values.
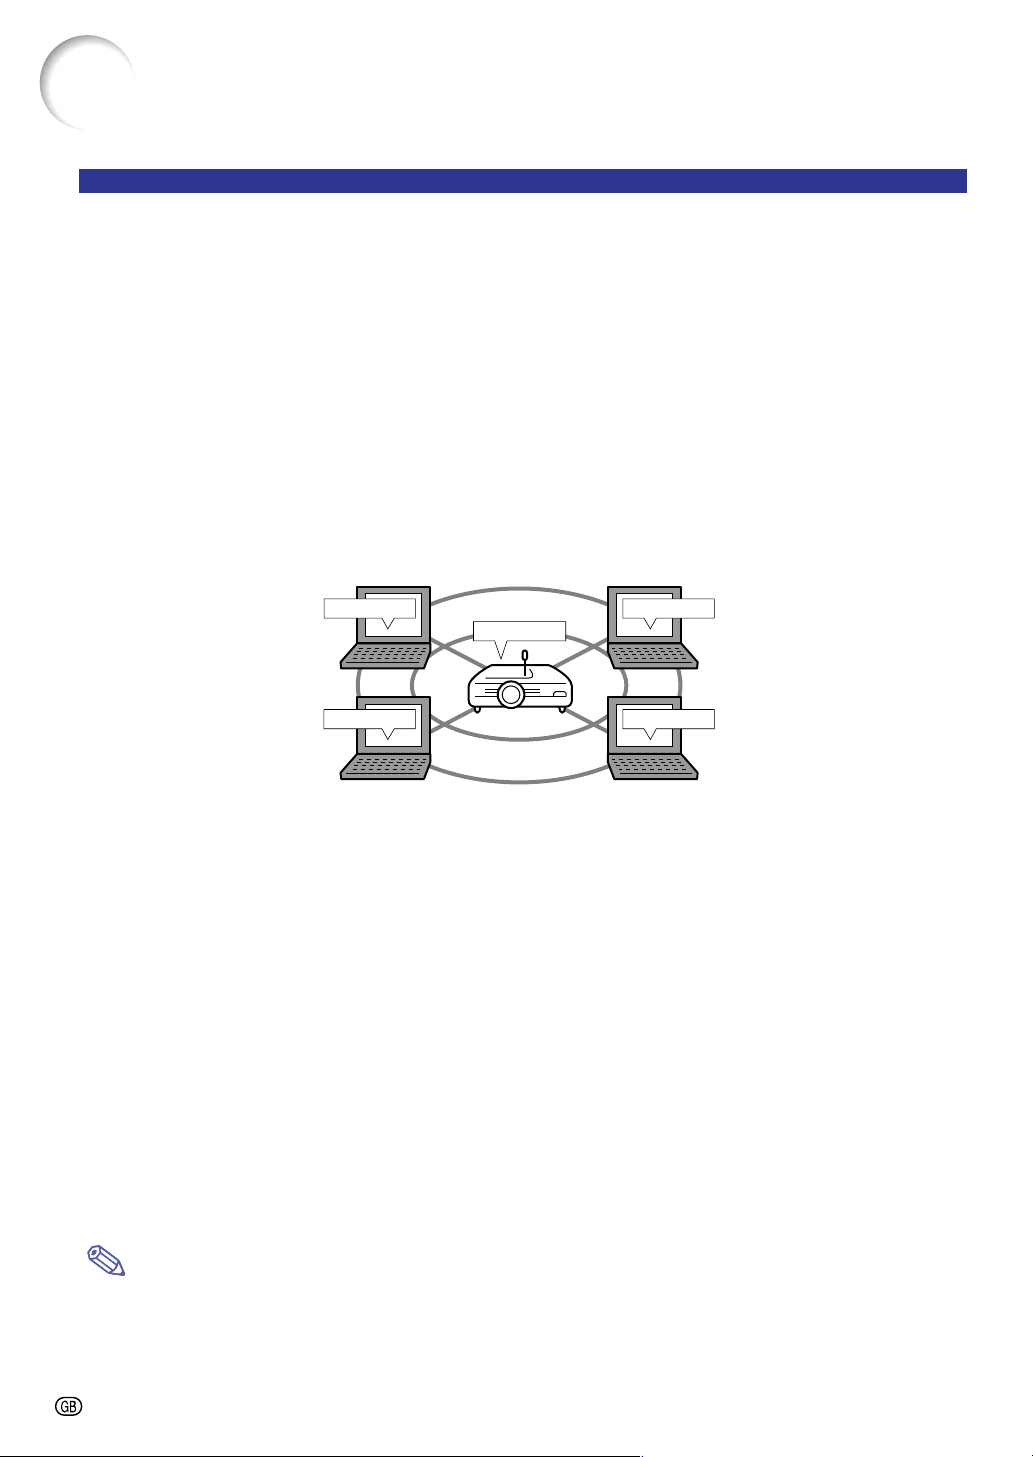
Connecting the projector and a computer via a wireless connection is the same as the computer and
projector being connected to a wireless LAN network. Therefore, if the projector (and computer) is not
assigned an IP address, they cannot be identified and thus a wireless connection cannot be possible.
192.168.150.151
192.168.150.150
192.168.150.152
■ Assigning IP addresses
When creating a local network where the projector and a computer are connected in a wireless environment,
192.168.0.1 to 192.168.255.254 can be assigned as the IP addresses for a local network for the devices
connected to that network.
The IP address of the projector is 192.168.0.1 and as long as there are no conflicts, the default settings do
not have to be changed.
Example
• Projector ................192.168.150.150
• Computer (no. 1) ...192.168.150.151
• Computer (no. 2) ...192.168.150.152
For settings, see page 70.
This projector comes with a DHCP server function that automatically assigns IP addresses to devices
connected to the network.
For details, see page 73.
192.168.150.153
192.168.150.154
Note
• The range of IP addresses that can be assigned in a local network is fixed.
• IP stands for Internet Protocol.
-66
Page 3
DHCP server function
■ What is a DHCP server function?
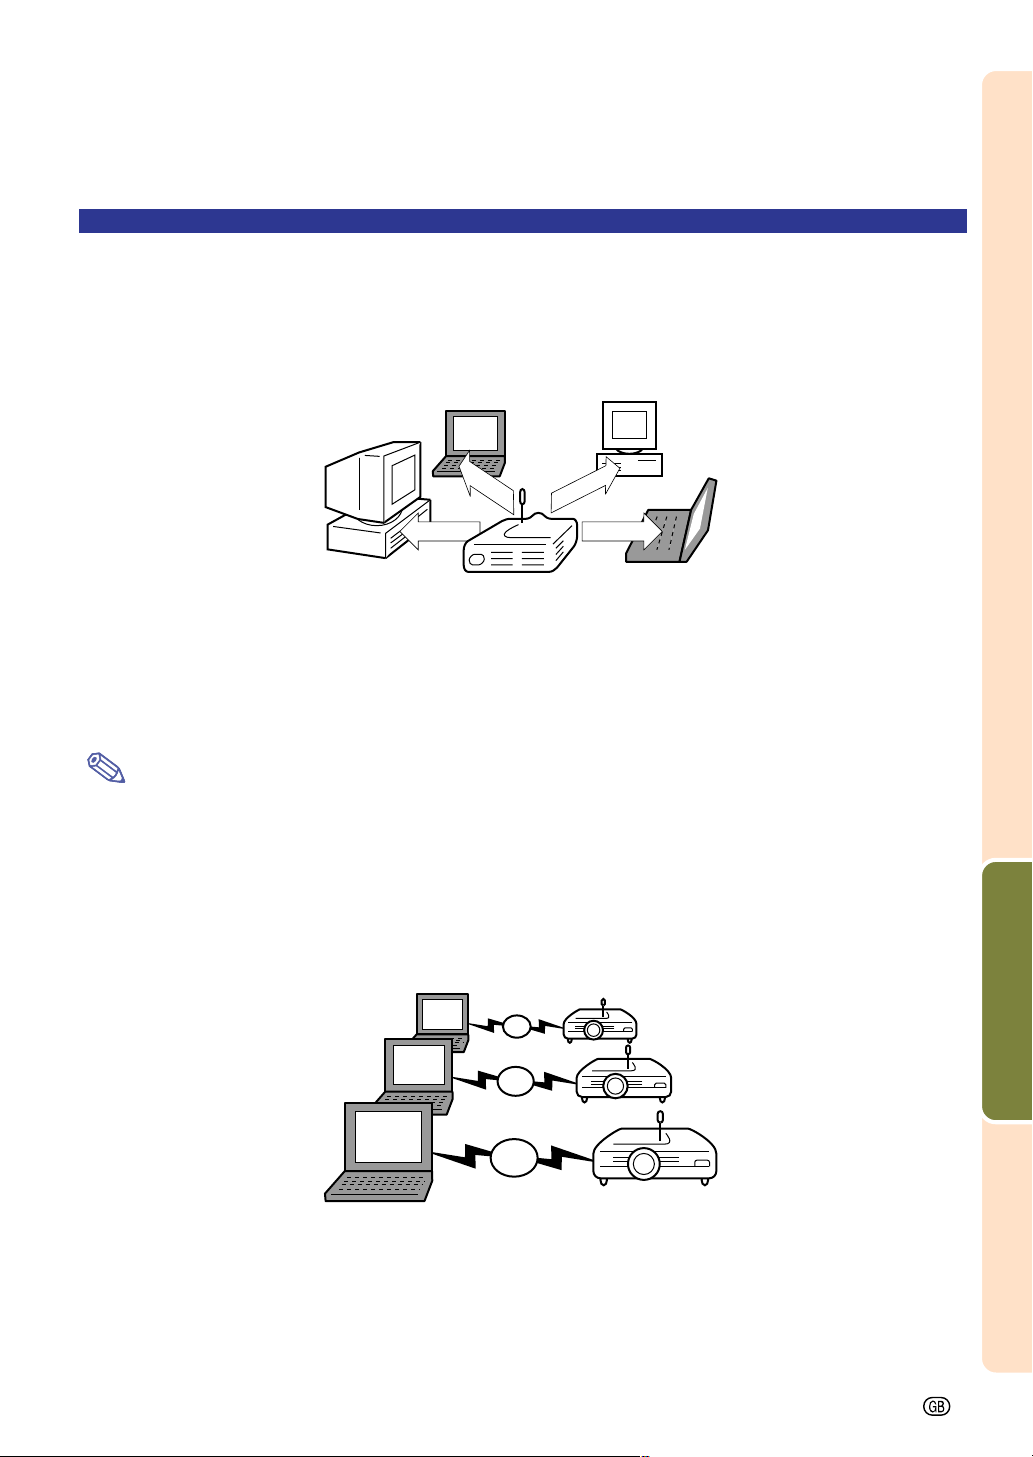
The DHCP server function automatically assigns IP addresses to devices connected to the network. When
the Network Settings on the computer have been set to Automatically get IP address (DHCP server enabled),
the projector will automatically assign IP addresses.
192.168.150.152
192.168.150.153
192.168.150.151
192.168.150.154
Make the following settings when using this function
1Set the DHCP server function on the projector to ON.
2Set the start value of the IP address assigned and an expected number of IP address to be automati-
cally assigned (Maximum number to be assigned).
For settings, see page 73.
Note
• DHCP stands for Dynamic Host Configuration Protocol.
Wireless Channels
■ What is a wireless channel?
A wireless channel is a frequency used by wireless LAN PC cards when communicating. For IEEE802.11b
standard, 14 channels can be used. If other wireless LAN networks are being used near the location where
the projector is, make sure that different channels have been set to avoid interference.
ch
1
ch
6
ch
11
■ Assigned wireless channels
If there are no other networks that can cause interference nearby, set either 1, 6, or 11.
If there are no interferences on 11 channel settings, you do not have to change the default settings.
For settings, see page 71.
Easy to Use Functions
-67
Page 4
Using a Wireless LAN PC Card
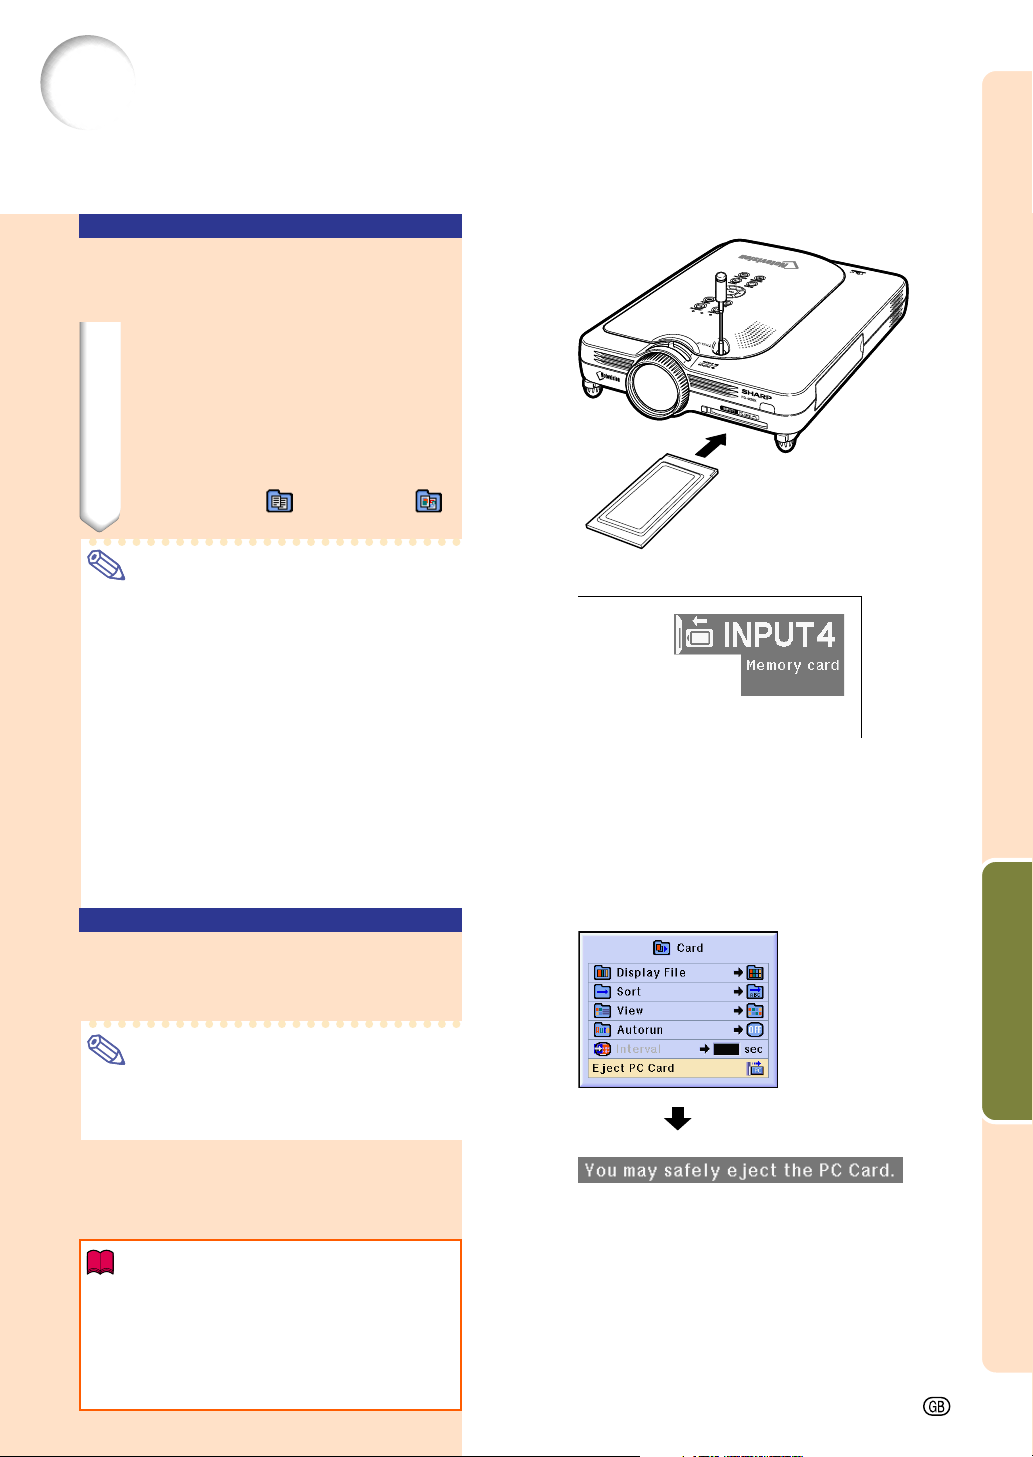
Inserting a wireless LAN PC card into the INPUT 4 PC card slot on the projector allows you to receive images to the
projector and project them via a wireless connection.
Installing a Wireless
LAN PC Card
1
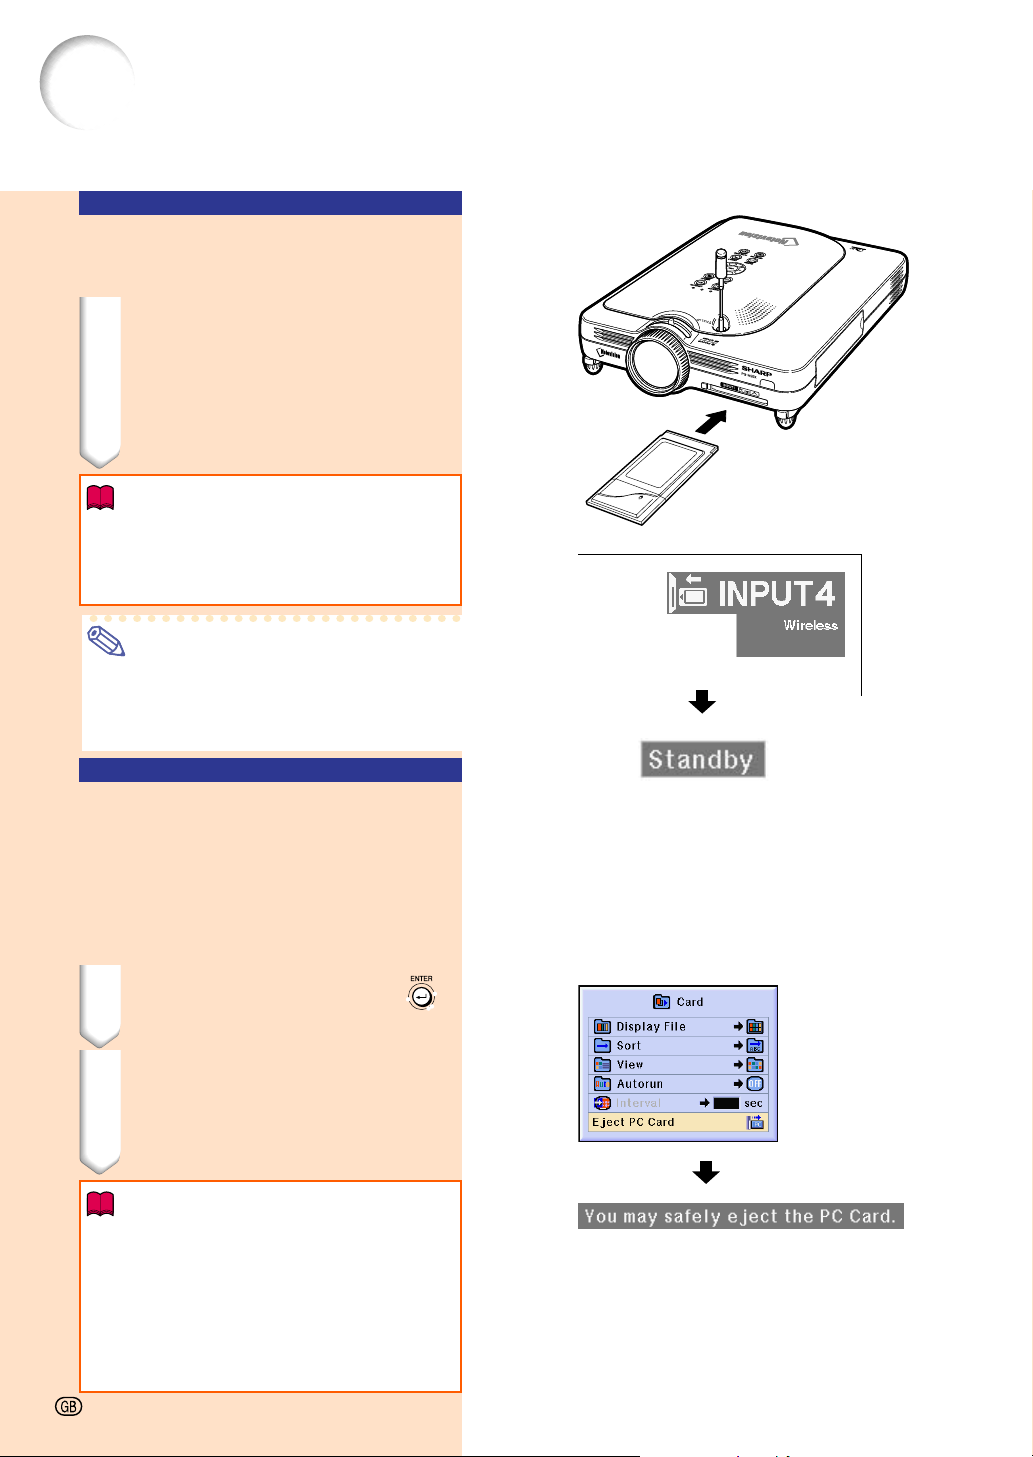
Insert the wireless LAN PC
card into the INPUT 4 PC card
slot on the projector.
• For details on how to install the card,
see page 31.
• When the card is inserted, the input
will automatically change to INPUT 4.
Info
•
Make sure to turn on the projector first, when
receiving images in the projector using a wireless LAN PC card. When “Standby” is displayed on the screen, turn on the computer.
Note
•See page 75 when installing a memory
card in the projector.
Installation should be done after “Standby” is
•
displayed in the lower right corner of the screen.
Ejecting the Card
Make sure to perform the following procedures before removing the card. Select “Eject PC Card” in the Card menu
on the menu screen.
➝ For operating the menu screen, see
pages 50 to 55.
1
Select “Eject PC Card” and press .
•
After a few seconds, the message “You may
safely eject the PC Card.” will be displayed.
2 Remove the card.
• Remove the card after the message
is displayed.
• For details on how to remove the card,
see page 31.
Info
• If the card is removed without selecting
“Eject PC Card” in step 1 above, the data
stored on the PC card may be lost, or the
PC card may be damaged.
When moving the projector, make sure to
•
eject the PC card and that the Eject button is
pressed all the way in. If moved with the Eject
button out, the projector may be damaged.
68
-68
Page 5
Network Settings
• To project images via a wireless connection, make sure to make the necessary network settings on both the
computer and projector.
• See the Wireless Reality software operation manual for details on how to set the computer.
• Also, as there are values that must be entered in a pre-configured network, make sure to consult with your
network administrator.
Setting Up a Projector Name
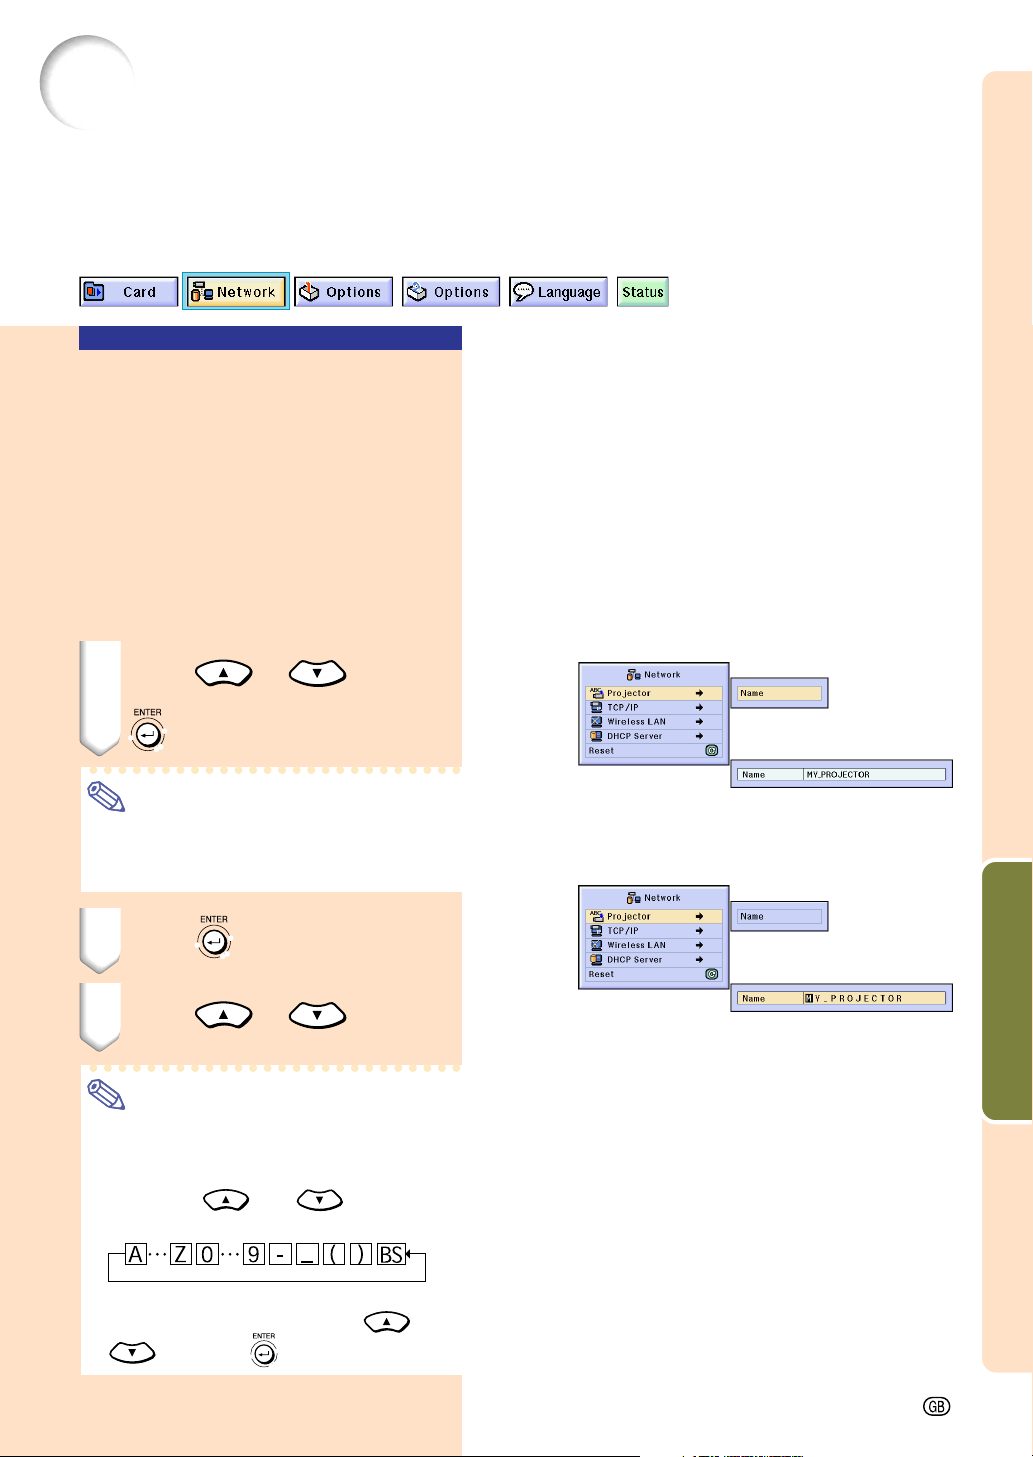
This Network setting assigns a name to the projector. The default setting is “MY_PROJECTOR”.
• The projector name is displayed when the
projector has been found via the computer,
and you can set the name as you like.
When selecting “Projector” in the network menu on the menu screen
➝
For operating the menu screen, see
pages 50 to 55.
1 Press
or
to select
“Projector” and then press
.
Note
• If a password has been set, the password
input box will be displayed when selecting
the “Projector”.
2 Press in “Name”.
3 Press
the characters you want to set.
Note
• The following characters can be entered:
Letters (A-Z), numbers (0 – 9) or symbols
(–, _, ( )).
• Pressing
between procedures as shown below.
or
or
to select
switches
Easy to Use Functions
• If you want to delete one charactor to the
left, select “BS” by pressing
and press
.
or
-69
Page 6
Network Settings (cont.)
4 Press
to move the cursor
to the next charactor.
Note
•
If you want to correct a letter or symbol,
press
character you want to correct, and then use
• Characters can also be selected using
•
If you want to cancel the settings, press
5
or
to move the cursor to the
or
on the GyroRemote.
to correct the character.
Repeat steps 3 and 4 to enter the
remaining characters you want.
Note
•
A maximum of 16 characters can be entered.
6
Press .
• The settings are stored and active.
.
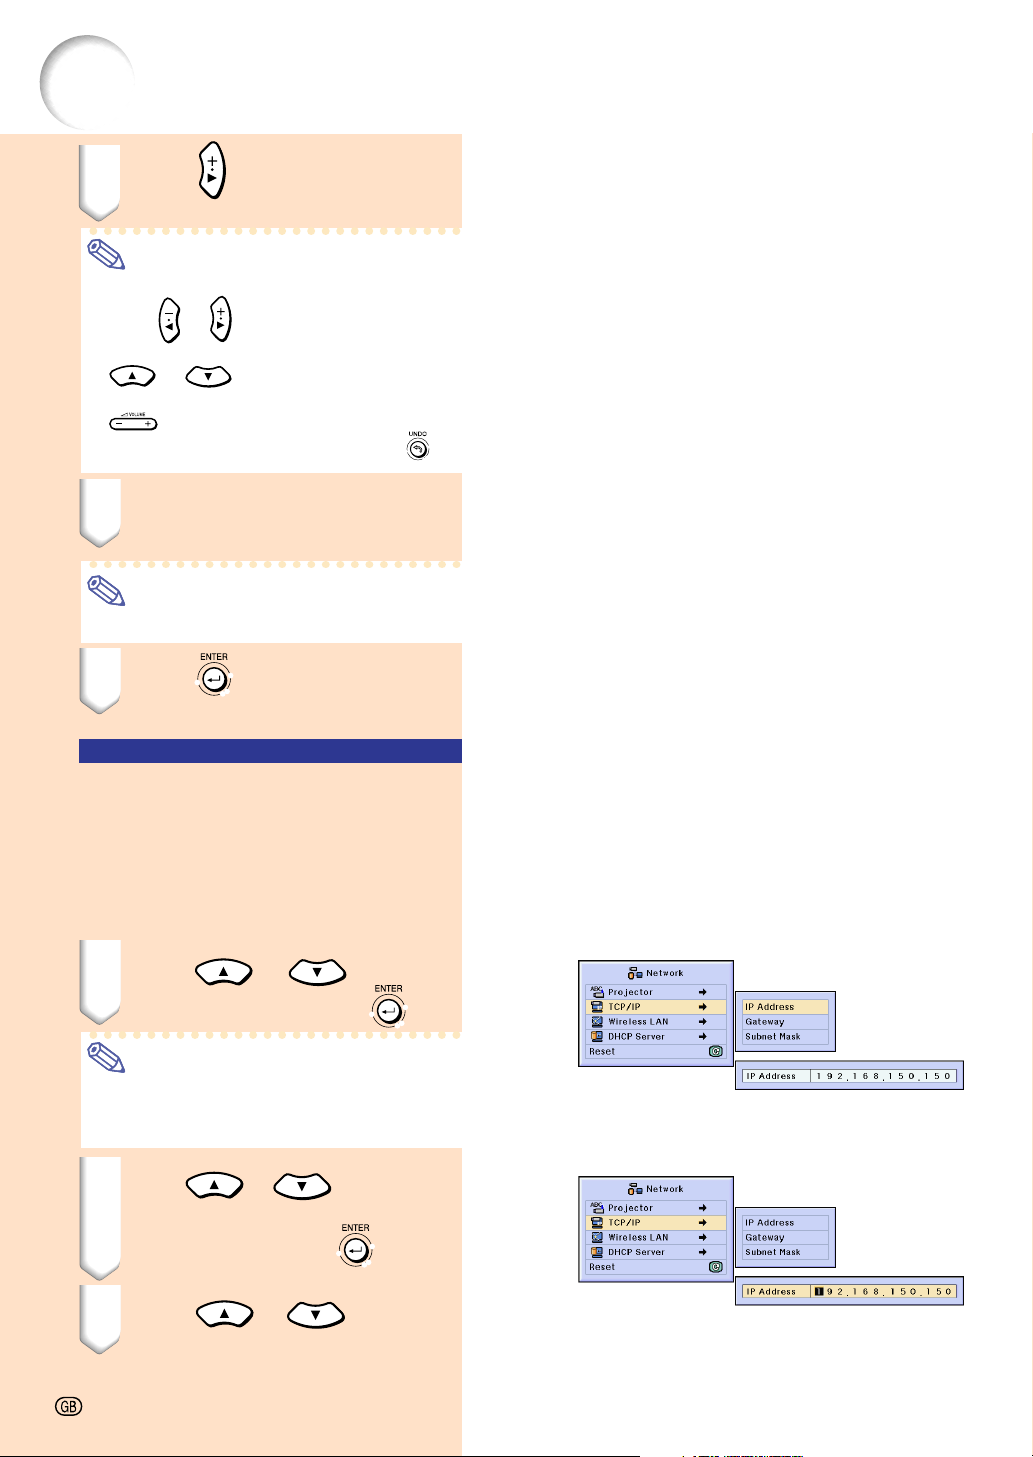
Setting the TCP/IP
Set the IP Address, Gateway, Subnet Mask of
the projector.
Set “TCP/IP” in the network menu on the
menu screen.
➝ For operating the menu screen, see
pages 50 to 55.
1
Press
TCP/IP and then press
Note
• If a password has been set, the password
input box will be displayed when selecting
the “TCP/IP”.
2
Press
Address”, “Gateway” or “Subnet
Mask” and then press
3 Press
the values you want to set.
or
or
or
to select
.
to select “IP
.
to select
70
-70
Page 7
4 Press
cursor to the digit you want to
correct.
Note
• You can also move the cursor by pressing
on the GyroRemote.
• If you want to cancel the settings, press
or
to move the
.
5 Repeat steps 3 and 4 to set all
the digits.
6 Press .
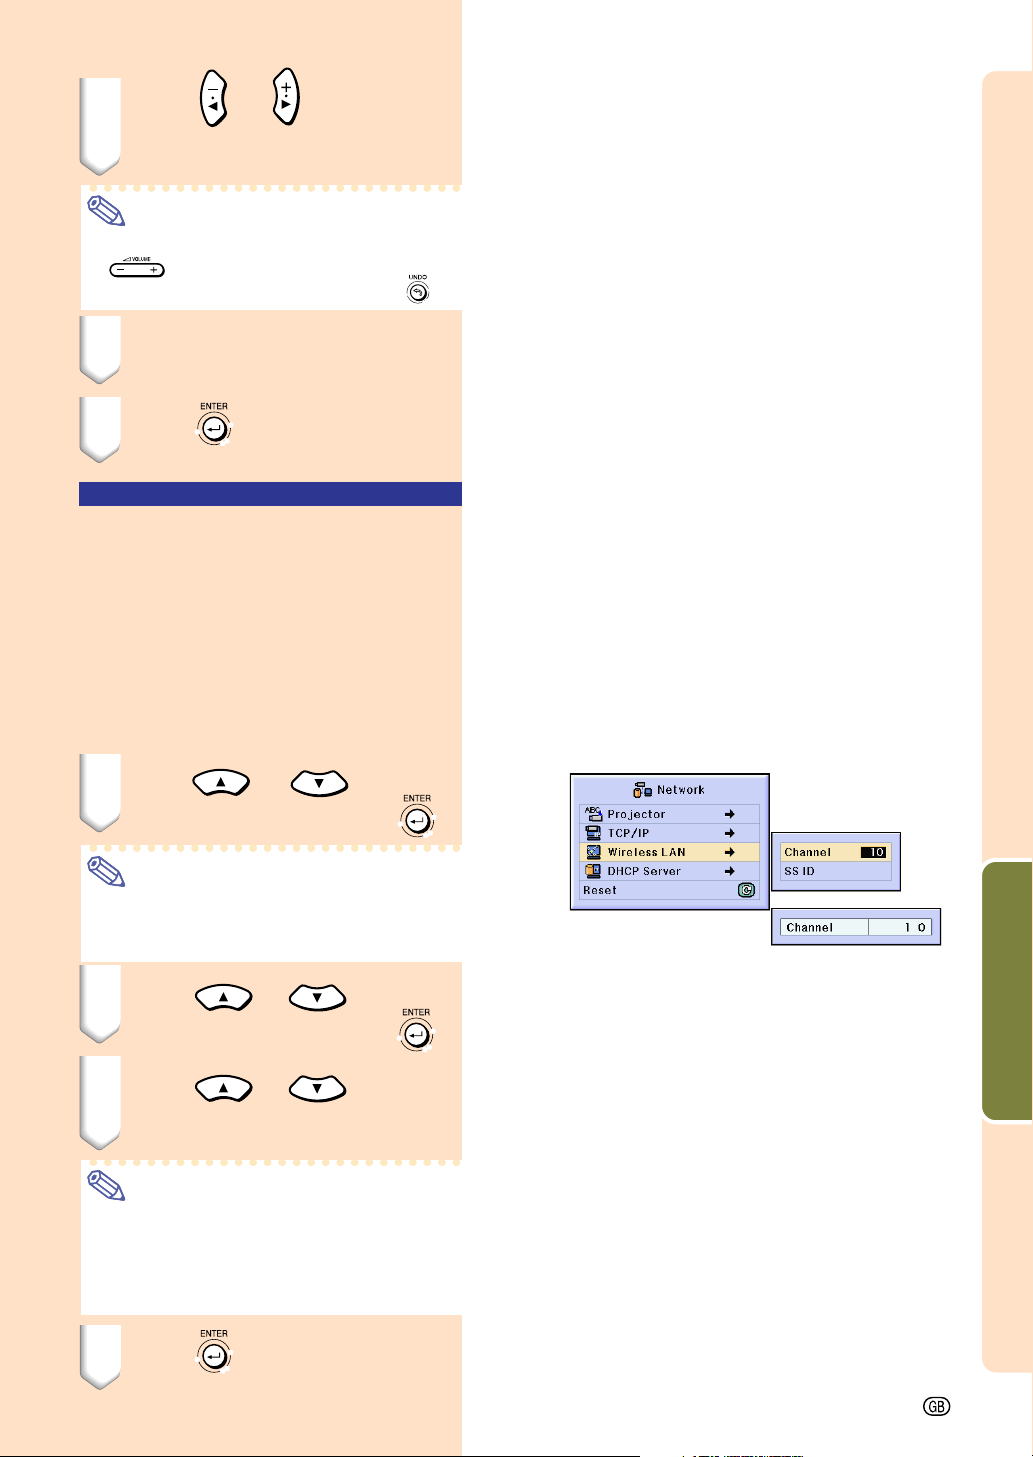
Setting the Wireless
LAN Channel
⁄ Setting the channel
Set the wireless LAN channel so that no interference occurs with another wireless channel.
Select “Wireless LAN” in the network
menu on the menu screen.
➝ For operating the menu screen, see
pages 50 to 55.
1
Press
“Wireless LAN” and the press
Note
• If a password has been set, the password
input box will be displayed when selecting
“Wireless LAN”.
2 Press
“Channel” and then press
3 Press
the wireless channel number
you want to set.
Note
• Depending on the country and geographical location, wireless channels that can
be used are limited. Read the Wireless
LAN PC Card operation manual about the
wireless channels that can be used.
4 Press
.
or
or
or
to select
to select
to select
.
Easy to Use Functions
.
-71
Page 8
Network Settings (cont.)
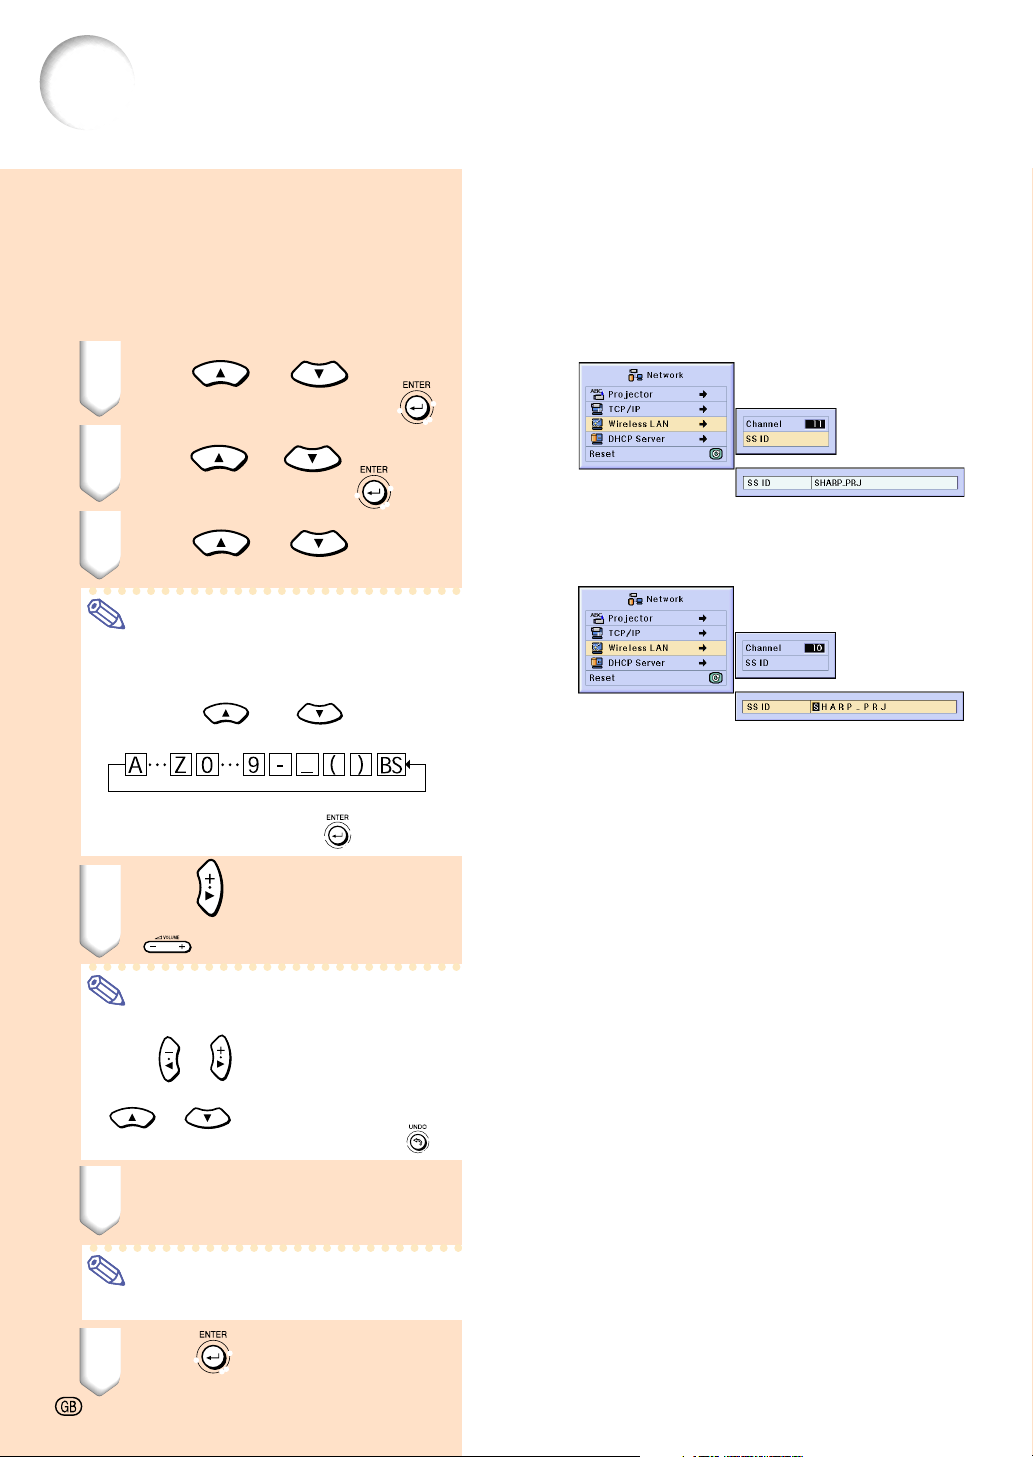
¤ Setting the SS ID
Set the projector’s SS ID.
The default setting is “SHARP_PRJ”.
Select “Wireless LAN” in the network
menu
on the menu screen
➝
For operating the menu screen, see
pages 50 to 55.
1
Press
“Wireless LAN” and then press
or
to select
.
2 Press
“SS ID” and then press .
3 Press
the characters you want to set.
Note
• The characters can be entered following:
Letters (A to Z), numerical (0 to 9),
symbols (–, _, ( ))
• Pressing
between procedures as shown below.
• If you want to delete one character to the
left, select “BS” and press
4 Press
• You can also move the cursor using
Note
• If you want to correct a letter or symbol,
or
or
or
to select
switches
.
on the GyroRemote.
to select
.
press
character you want to correct, and then use
•
If you want to cancel the settings, press
or
or
to move the cursor to the
to correct the character.
5 Repeat steps 3 and 4 to set all
the characters.
Note
• A maximum of 16 characters can be set.
6 Press
72
-72
• The settings are enabled.
.
.
Page 9
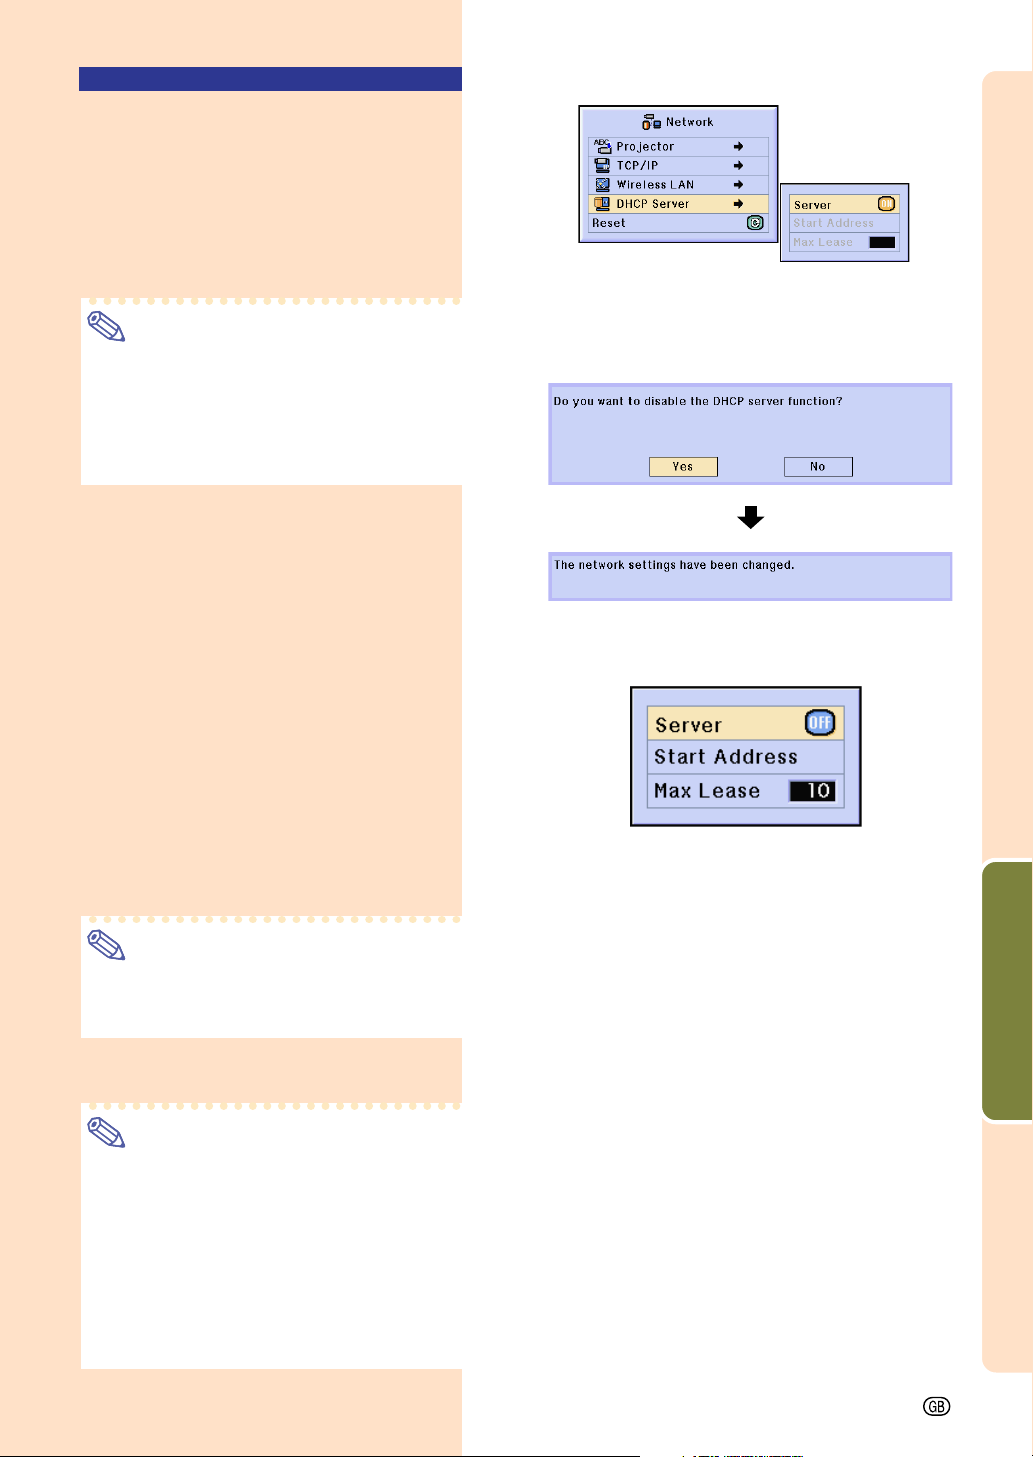
Setting the DHCP Server
This function is set when using the DHCP
server on the projector.
Set “DHCP Server” in the network menu
on the menu screen.
➝ For operating the menu screen, see
pages 50 to 55.
Note
• “Start Address” and “Max Lease” can be
set when DHCP server function is set to
“OFF”.
• If a password has been set, the password
input box will be displayed when selecting
“DHCP Server”.
⁄
Disabling the DHCP server function
Set the “Server” in the submenu to “OFF”.
¤
Setting the Assign “Start Address”
Set the Assign Start Address in Start
Address in the Submenu.
For setting the start address, see the procedure in Setting the TCP/IP (page 70).
‹ Assigning a maximum number of
IP addresses
This function is for setting the maximum
number of IP addresses from the start
address that can be automatically
assigned.
Make sure to set an approximate
amount of the computers that are to
be connected to the wireless LAN.
You can set anywhere between 1 to
253 computers.
Select “Ye s ”
Easy to Use Functions
Note
• IP addresses will not be assigned if the
last three digits of their number are more
than 255.
›
Enabling the DHCP server function.
Set “Server” in the submenu to “ON”.
Note
• When the DHCP server function is set to
“ON”, restart your computer.
• When the DHCP server function of the
projector has been set in a wireless LAN
where there is another DHCP server
(including the projector) connected, the
network may not function correctly. If there
is another DHCP server connected, make
sure to consult with your Network
Administrator.
-73
Page 10
Network Settings (cont.)
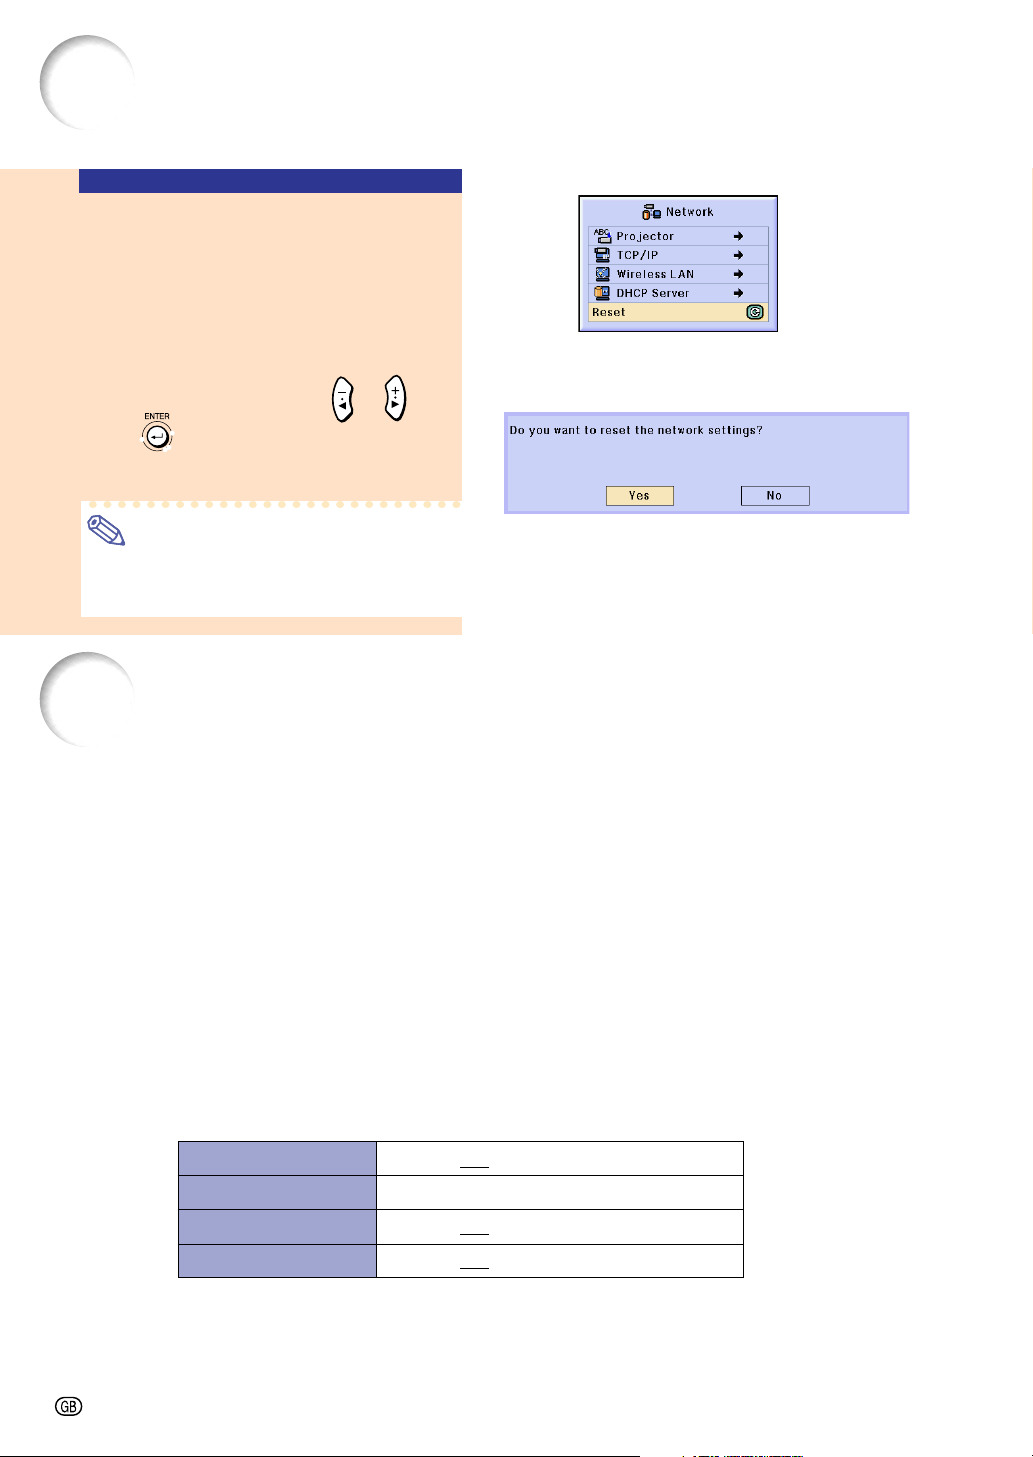
Resetting the Network
Settings
This will return the default values of the
Network Settings.
Select “Reset” in the Network menu on
the menu screen.
When the confirmation screen is dis-
played, select “YES” using
press
➝
For operating the menu screen, see
.
or
and
pages 50 to 55.
Note
• If a password has been set, the password
input box will be displayed when selecting
the “Reset”.
Wireless LAN PC Card: Troubleshooting
Check the following if you cannot connect to the network using your wireless LAN PC card.
1. Is the Link indicator of the wireless LAN PC card lit?
• Lit: operating normally.
• Flashing: the wireless LAN PC card is not operating properly. Consult with your nearest dealer.
• Off: The card is not in operation. Make sure that the card is installed correctly.
2. Are the SSID and channel settings of the projector and computer the same?
• If the SSID and channel settings of the computer are not the same, then they cannot communicate.
• Make sure that the transmission mode has been set to 802.11 ad hoc mode.
3. Check the projector and computer network settings.
● When the “DHCP Server” on the projector is “OFF”:
Check again the IP address, subnet mask and gateway values of the projector and computer.
● When the “DHCP Server” on the projector is ON:
Check the values of the IP address, subnet mask and DHCP start address of the projector.
If part of the IP address or DHCP start address is not identical to the ones specified in the subnet mask,
IP address assigning cannot be properly done.
IP address
Subnet mask
Start address
Start address
192.168.150.120
255.255.255.0
192.168.
192.168.
150.100...correct
050.100...wrong
4. When sending the screen to the projector, make sure to turn on the projector first.
When Standby is displayed on the screen, turn on the computer.
If the above procedure is carried out and the wireless LAN PC card still does not operate, see the Wireless
Reality software operation manual.
-74
Page 11
Using a Memory Card
When a memory card is installed, images stored in the memory card can be projected.
If presentation files are stored in the memory card you can make presentations using only
the projector and the memory card, without having to use a computer.
Displaying of the Contents
in the Card as an Index
1
Insert the memory card into the INPUT 4 PC card slot on the projector.
• For details on installing the card, see
page 31.
The files stored in the card will be dis-
•
played as an index (Index mode). However, Autorun will function when Autorun
has been set to “
Slide Show” (page 79).
Note
• For details about the memory cards that
can be used, see page 121.
• For details about the display format of the
Index mode, see pages 76 and 77.
For details on how to install the wireless
•
LAN PC card in the projector, see page 68.
• The following are the files that this projector can handle.
Non-compressed Bitmap (.BMP)
JPEG files (.JPEG / .JPG)
Non-compressed TIFF files (.TIFF / .TIF)
VQ files (.VQ)
Script files (.SSF)
The file names will be displayed in 8 characters
•
with their extensions (3 characters).
Script Files” or “
Easy to Use Functions
Ejecting the Card
Make sure to perform the following procedures
before removing the card.
Note
• If the card is removed without performing
these procedures, the data stored on the
card may be lost.
Select “Eject PC card” in the Card menu
on the menu screen.
➝
For operating the menu screen, see
pages 50 to 55.
Info
• Before removing the PC card, make sure
to select “Eject PC Card” in the Card menu.
• If the card is removed without selecting
“Eject PC Card” in step 1 above, the data
stored on the memory card may be lost,
or the PC card may be damaged.
-75
Page 12
Using a Memory Card (cont.)
1 Select “Eject PC Card” and
press
• After a few seconds, the message “Yo u
may safely eject the PC Card” will be
displayed.
.
2 Remove the card.
• Remove the card after the message
is displayed.
• For details on how to remove the card,
see pages 31 and 68.
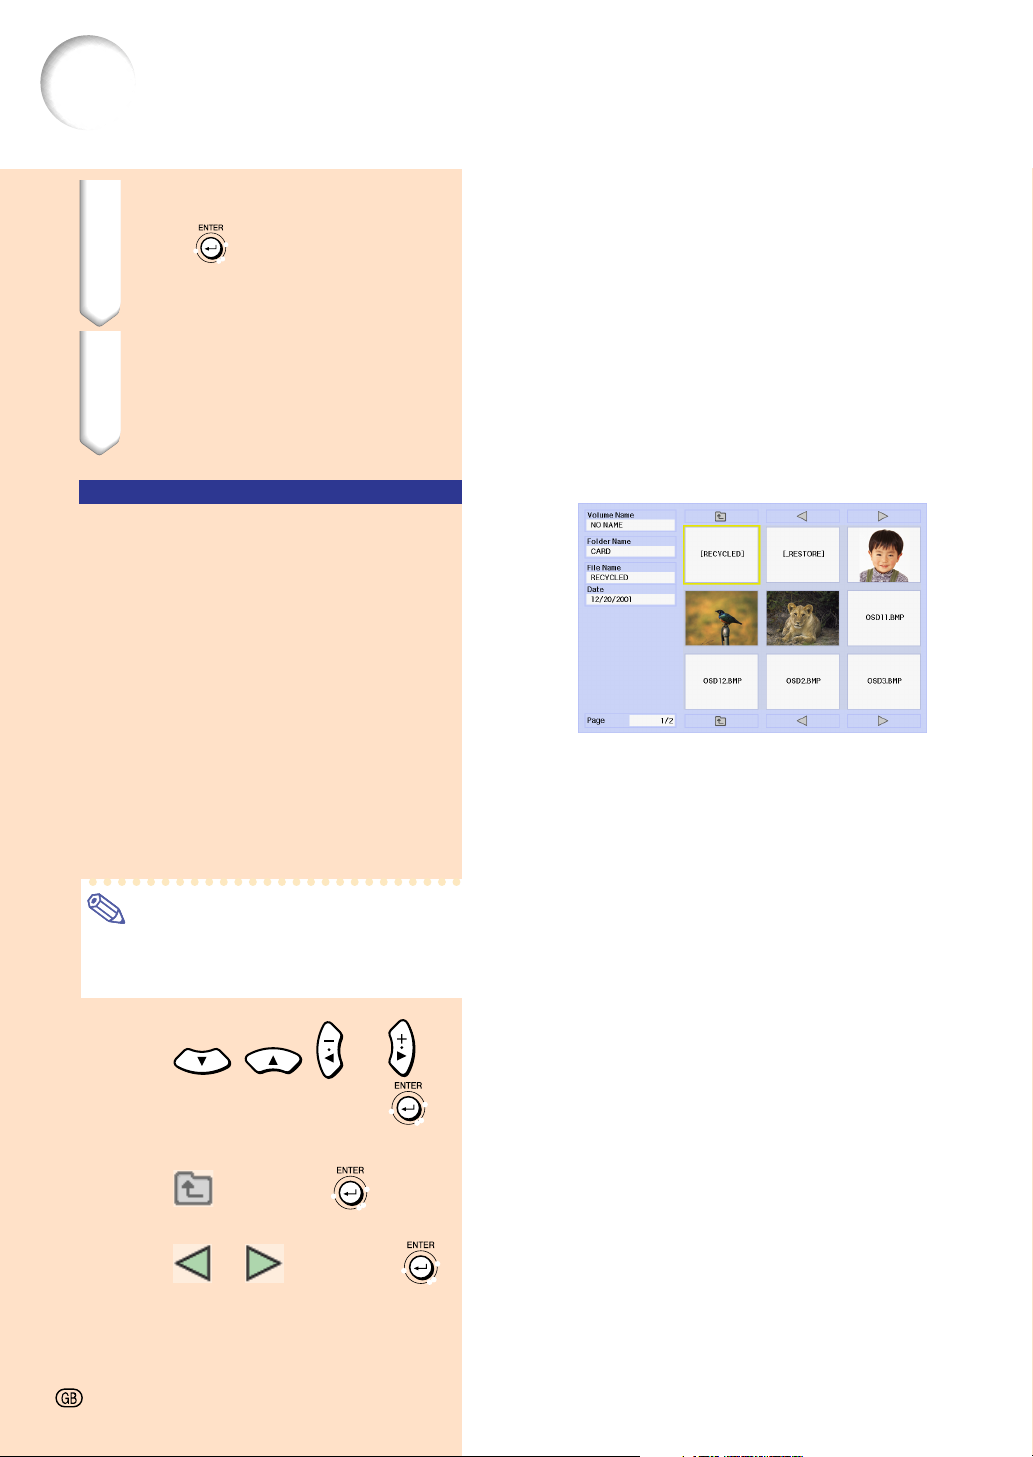
Setting the Thumbnail
Display
You can display JPEG files and VQ files for
slide show as thumbnails. Some files may not
be displayed as thumbnails.
Images files that cannot be displayed as
thumbnails or other files except images will
be displayed only as file names.
• Other file names except for folders, image
files, and script files will be displayed in gray.
• The folders are displayed in [ ].
• The file names will be displayed in 8 char-
acters with their extensions (3 characters).
• If the file name or folder name is composed of other than letters or numbers,
“?” will be displayed.
Note
• JPEG thumnail images are displayed
when displaying files taken using a PCF
compliant digital camera.
Moving folders
• Press
or
select the folder and press
Moving the folder up one level
• Select
and press
.
Changing the page displayed
• Select
or and press
to
.
.
-76
-76
Page 13
Projecting a file
• Press
or
to
select the file and press
• The image of the selected file is
displayed.
•
If you press while the image is
displayed, the submenu is displayed.
• Next
Proceeds to the next page.
• Previous
Moves back one page.
• Rotate (right)
Turns the image to the right by 90°.
• Rotate (left)
Turns the image to the left by 90°.
• Index Mode
Quits automatic display of images.The
screen returns to Index mode.
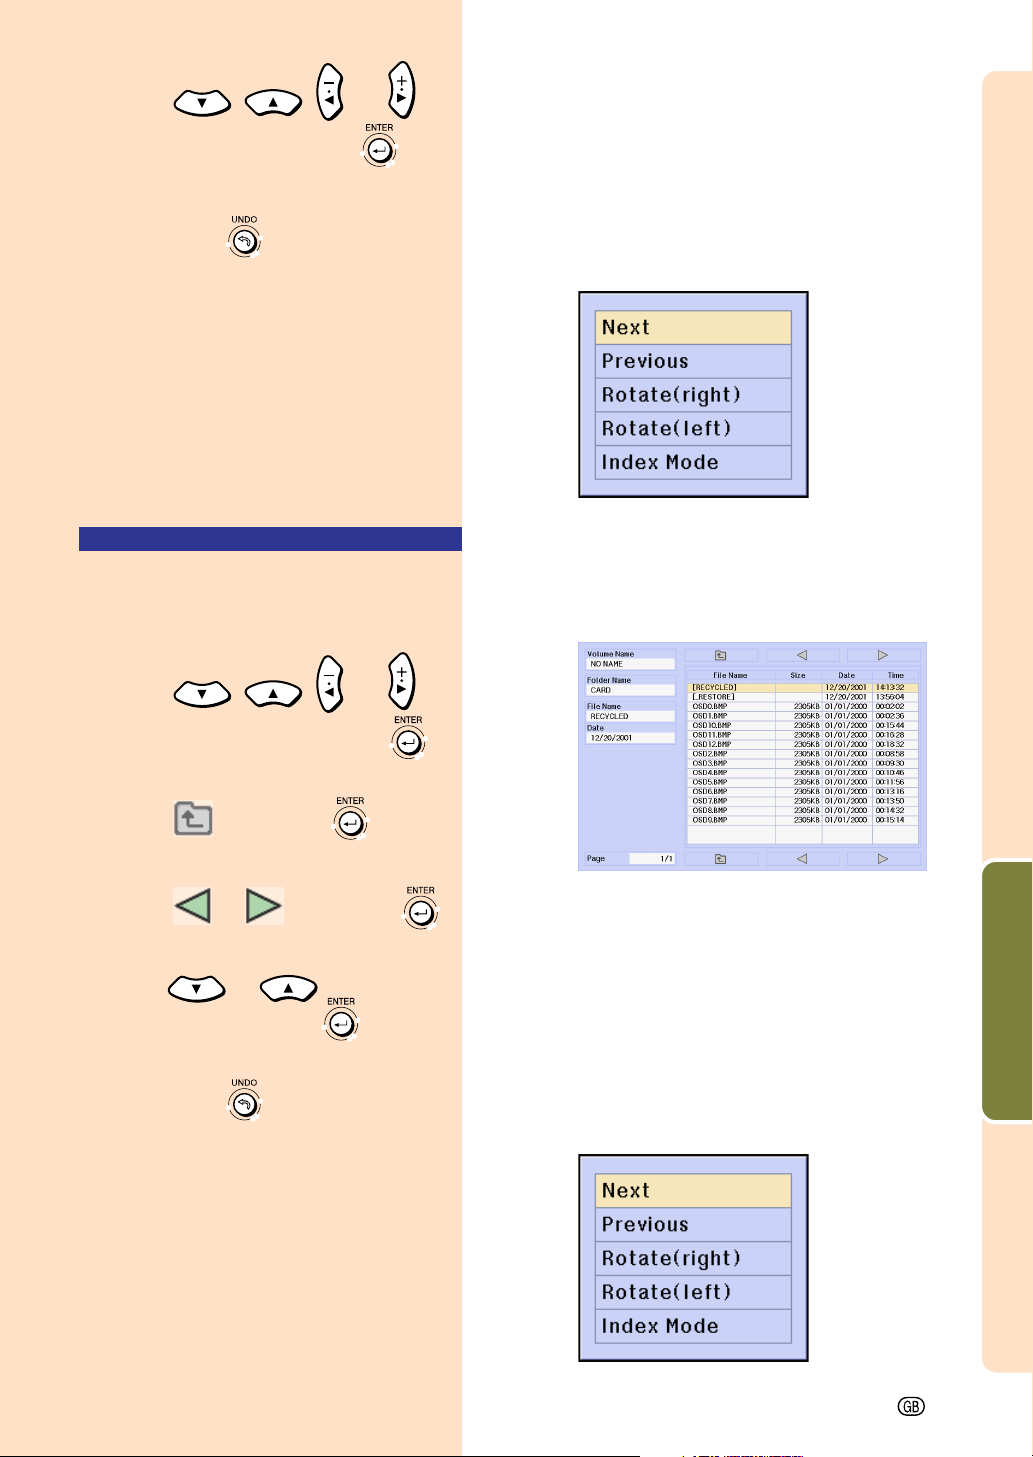
Setting Lists
You can display files in lists.
For list settings, see page 79.
Moving folders
• Press
or
.
to
select the folder and press
Moving the folder up one level
• Select
and press .
Changing the page displayed
• Select
or and press .
Projecting a file
• Press
image file and press
• The selected image is displayed.
•
If you press
or to select the
.
while the image is
displayed, the submenu is displayed.
• Next
Proceeds to the next page.
• Previous
Moves back one page.
• Rotate (right)
Turns the image to the right by 90°.
• Rotate (left)
Turns the image to the left by 90°.
• Index Mode
Quits automatic display of images.The
screen returns to Index mode.
.
Easy to Use Functions
-77
Page 14

Memory Card Settings
Setting Files
You can limit the files displayed in the Index
mode according to their type.
Select “Display File” in the Memory
Card menu
➝
For operating the menu screen, see
pages 50 to 55.
• All Files
All the files and folders are displayed.
• Image File
Only images files and folders are
displayed. The types of images files that
can be displayed are as follows:
JPEG, VQ, TIFF, BMP.
• Script File (.SSF)
Only slide show script files and folders are
displayed.
on the menu screen.
Setting the Display
Order of Files
You can set the display order of files displayed
in the Index mode.
Select “Sort” in the Memory Card menu
on the menu screen.
➝
For operating the menu screen, see
pages 50 to 55.
• Name
Alphabetical order
• Date (New)
New date order
• Date (Old)
Old date order
• Data Type
File type order
-78
-78
Page 15

Setting the Display Format of the Index Mode
Select “View” in the Card menu on the
menu screen.
➝
For operating the menu screen, see
pages 50 to 55.
• Thumbnails
For displaying the contents of the memory
card as thumbnails.
• List
For displaying the contents of the memory
card in a list.
Using Autorun
The Autorun function works under the
following cases:
• When the projector is turned on with the
memory card installed.
• When installing the memory card while the
projector is on.
Select “Autorun” in the Memory Card
menu on the menu screen.
➝ For operating the menu screen, see
pages 50 to 55.
“OFF”
For disabling the Autorun function.
“Script File”
When the script files which are created
by Slide Manager of the Wireless Reality
included with your projector are stored
in the memory card, the Autorun will automatically load the script files and then
projects the image files in order according to the script files.
• The display interval between images is
regulated in the script file.
• Only one file can have Autorun setting per
memory card.
• The display will become an index display,
if there are no script files or SHARP PRJ
folders, or when Autorun is not set even if
there are script files.
“Slide Show”
The image files stored in the root
directory in the memory card will be
projected in order automatically.
• The display will become an index display,
if there are no image files or SHARP PRJ
folders, or when Autorun is not set even if
there are script files.
Easy to Use Functions
-79
Page 16

Memory Card Settings (cont.)
Setting the Display Interval for Image Files
You can set the display interval for slide show
files (image files).
Adjust “Interval” in the Memory Card
menu on the menu screen.
➝
For operating the menu screen, see
pages 50 to 55.
Pressing the button during image
projection via the Autorun function will
display the submenu.
• Next
Proceeds to the next page.
• Previous
Moves back one page.
• Index Mode
Quits automatic display of images.
The screen returns to Index mode.
Info
If the following operations are executed
during Autorun, Autorun will stop.
• AV MUTE, Break Timer, INPUT, LENS.
• Pressing
Note
• During Slide Show playback, the OSD
message “Please wait.” will appear between slides. This message can be eliminated by selecting “
Level B” in “OSD Display”. See page 92
to disable OSD messages.
• Depending on the type of memory card
and the size of the image file, the image
display interval may be longer than the set
time.
to select the Index mode.
Level A” or “
80
-80
Page 17

Displaying a Still Image
This function allows you to instantly freeze a moving image. This is useful when you want to
display a still image from a computer or video, giving you more time to explain the image to
the audience.
Pausing an image
Function 2
1 Press to display “Button
Assign 2/5”.
• The Assign function is displayed at the
bottom right of the screen.
ASSIGN button
button
2 Press .
• The image currently being projected
becomes a still image.
3 Press again to return to the
moving image from the currently connected device.
Info
• The Still Image function does not work in
INPUT 4.
"On-screen Display
Easy to Use Functions
-81
Page 18

Selecting the Picture Display Mode
This function allows you to modify or customize the picture display mode to enhance the
input image. Depending on the input signal, you can choose “NORMAL”, “FULL”, “DOT BY
DOT”, “BORDER”, “STRETCH” or “SMART STRETCH” image.
Switching the Picture
Display Using Different
Input Signals
1 Press to display “Button
Assign 4/5”.
• The Assign function is displayed at the
bottom right of the screen.
2 Press .
Function 3
button
ASSIGN
button
Info
• In the “DOT BY DOT” mode, images are
diplayed with the original resolution,
therefore they are not enlarged.
• When XGA (1024 × 768) signals have
been entered or when using INPUT 4
Mode, they will be fixed as NORMAL.
• “STRETCH” is fixed when 720P or 1080
signals are entered.
• To return to the previous mode, press
while “RESIZE” is displayed on the screen.
I
Screen display of the picture display mode
-82
-82
Page 19

COMPUTER
NORMAL
4:3 aspect ratio
Other aspect ratios
SVGA (800 × 600)
XGA (1024 × 768)
SXGA (1280 × 960)
UXGA (1600 × 1200)
SXGA (1280 × 1024)
1024 × 768
1024 × 768
1024 × 768
1024 × 768
960 × 768
• When XGA (1024 x 768) signals have been entered or when using INPUT 4 Mode, they will be fixed as NORMAL.
Input Signal
Resolution lower than
XGA
4:3 aspect ratio
XGA
4:3 aspect ratio
Resolution higher than
XGA
4:3 aspect ratio
NORMAL
Projects a full screen image
while maintaining the aspect ratio.
FULL
—
—
—
—
1024 × 768
Output screen image
FULL
Projects a full screen image
while ignoring the aspect ratio.
DOT BY DOT
DOT BY DOT
Projects the original resolution
signal of the image.
800 × 600
—
1280 × 960
1600 × 1200
1280 × 1024
SXGA (1280 × 1024)
VIDEO
480I, 480P, NTSC
PAL, SECAM
720P, 1080I
4:3 aspect ratio.
Letter box, squeeze
16:9 aspect ratio
• “STRETCH” is fixed when 720P or 1080
* The Digital Shift function can be used with these images.
Input Signal
4:3 aspect ratio
480I, 480P, NTSC,
PAL, SECAM
Letter box
NORMAL
1024 × 768
I signals are entered.
NORMAL
Projects a full screen image.
BORDER
768 × 576*
—
—
STRETCH
1024 × 576*
SMART STRETCH
1024 × 576*
—
Easy to Use Functions
Output screen image
BORDER
Projects 4:3 image fully in
STRETCH (the following
column) image.
STRETCH
Projects 16:9 image evenly
over entire screen
(top/bottom black bands).
SMART STRETCH
Projects the image fully in a
16:9 screen by enlarging only
the surrounding areas while
keeping the aspect ratio in
the middle part of the image
at 4:3.
720P, 1080I
Squeeze
16:9 aspect ratio
-83
Page 20

Selecting the Picture Display Mode (cont.)
This function allows you to enlarge a specific portion of an image. This is useful when you
want to display a detailed portion of the image.
Displaying an Enlarged
Portion of an Image
1 Press to display “Button
Assign 3/5”.
• The Assign function is displayed at the
bottom right of the screen.
2 Press to enlarge the im-
age.
• To reduce the size of the enlarged
image, press
Note
×1 ×4 ×9 ×16 ×36 ×64×2 ×3
• When an SXGA+ or UXGA (see
page 115) image is displayed, “×2”
and “×3” cannot be selected.
.
To enlarge
To reduce
Function 3
button
"On-screen Display
Function 1
button
Function 2
button
UNDO
button
ASSIGN
button
-84
-84
Screen moving
indicator
Page 21

3 Hold down and move the
GyroRemote to move the enlarged image.
• If the Screen moving indicator has dis-
appeared, press
Screen moving indicator, and then
move the image.
Info
• If OSD display in the “Options (1)”
menu is set to “Level A” or “Level
B”, make sure to set it to “Normal”.
If “Level A” or “Level B” is set, the
Screen moving indicator will not be
displayed, and the “Screen Pan”
cannot be performed.
Note
• You can also move the position of the
enlarged image using
or on the projector.
to display the
or
4 Press to cancel the opera-
tion, then the magnification
returns to ×1.
Note
• In the following cases, the enlarged
image will return to its original size
(×1).
• When switching the input.
• When (undo) has been
pressed.
• When the input signal has been
changed.
• When the image is replaced during
Autorun.
Easy to Use Functions
-85
Page 22

Gamma Correction Function
Gamma is an image quality enhancement function that offers a richer image by brightening
the darker portions of the image without altering the brightness of the brighter portions.
When you are displaying images with frequent dark scenes, such as a film or concert, or
when you are displaying images in a bright room, this feature makes the dark scenes easier
to see and gives the impression of greater depth in the image.
Selected Mode
STANDARD
PRESENTATION
CINEMA
GAME
For Standard picture
Brightens darker portions of image for more enhanced presentations.
Gives greater depth to darker portions of image for a more exciting theater experience.
Natural color gradation for playing a game, etc.
Adjusting Gamma
Correction
1 Press to display “Button
Assign 4/5”.
• The Assign function is displayed at the
bottom right of the screen.
2 Press .
• You can change the gamma correction
type every time you press this button.
Note
• When “sRGB” in the “Options (1)”
menu has been set to “ON”, Gamma
correction cannot be performed for
INPUT 1 and INPUT 4.
Description
Function 1
button
UNDO button
ASSIGN button
STANDARD GAME
3 To return to the default set-
tings, press
“Gamma” is displayed.
Note
• Returning to the following gamma modes.
INPUT mode
INPUT1
INPUT2 S-Video STANDARD
INPUT3 Video STANDARD
INPUT4
-86
-86
INPUT signal GAMMA mode
RGB
Component CINEMA
when
PRESENTATION
PRESENTATION
PRESENTATION CINEMA
Page 23

Selecting the Power Save Mode
The Power Save Mode or the Automatic Power Shutoff function allows you to reduce the
power consumption of the projector.
Setting the Power Save
Mode
Select “Power Save” in the “Options (1)”
menu on the menu screen.
➝ For operating the menu screen, see
pages 50 to 55.
Description of Power Save Modes
ON
OFF
Quantity of light is 80%.
Power consumption is 255W.
Quantity of light is 100%.
Power consumption is 295W.
Note
• It is set to “OFF” normally.
• “Power Save” mode is factory preset to
“OFF”.
• When setting the power save mode to
“ON”, the projected images become dark.
Automatic Power
Shutoff Function
If this is set to “ (On)” and no action is performed for more than 15 minutes, and in the
following cases, the power will turn automatically off.
• When selecting INPUT 1 to 3: If the input
signal cannot be detected.
• When selecting INPUT 4: If there is no card.
The Auto Power Off function will be disabled
when it has been set to “
Select “Auto Power Off” in the “Options
(1)” menu on the menu screen.
➝ For operating the menu screen, see
pages 50 to 55.
(Off)”.
Easy to Use Functions
Note
• When the Auto Power Off function is set
(On)”, 5 minutes before the power
to “
turns off, the message “Power OFF in X
min.” will appear on the screen to indicate
the remaining minutes.
-87
Page 24

Displaying Dual Pictures (Pict in Pict)
Picture in Picture function allows you to display two pictures on the same screen. You can
display the image input from INPUT 2 or 3 as an inset picture overlapping the main picture
from INPUT 1. (This function can only be set in the RGB menu.)
Displaying the Inset Picture
Select “Pict in Pict” in the “Options (1)”
menu on the menu screen.
to operate after signals have been entered in INPUT 1, INPUT 2 and INPUT 3.
➝
For operating the menu screen, see
pages 50 to 55.
Make sure
INPUT
button
Adjustment
buttons ('"\ |)
1 Press
• Select to clear the Pict in Pict mode
• When operating with the
GyroRemote, press
“Button Assign 3/5” and press
• Pict in Pict does not function with
INPUT 4.
2 Press
to select .
Note
to change the image
in the inset picture.
3 Press
,
,
to set the position of the inset
picture.
• Press
ing or to make the frame disappear.
• Hold down
GyroRemote in all directions, when
moving the position of the inset picture using the GyroRemote.
to stop the frame from mov-
Note
and move the
to display
4
or
Enter button
.
UNDO
button
-88
-88
Page 25

4 Press to move the inset pic-
ture.
• The inset picture will be moved to the
inset picture frame.
Note
• The inset picture can only be displayed
with composite video (NTSC/PAL/
SECAM) or S-Video signal.
• The Freeze function works only with the
inset picture, when the Pict in Pict mode
is in operation.
When the signal entered into INPUT 1 is
as follows, Pict in Pict does not work:
• With a resolution that exceeds SXGA.
• When the input signal is 480
720P or 1080
• When the input signal has changed to
the Interlace mode using RGB signals.
• When the picture display mode is set to
“DOT BY DOT”.
• When no signals are sent to INPUT 1,
or when the resolution or refresh rate
(vertical frequency) is changed.
• You can use
on the projector to change the inset
picture.
I.
on the GyroRemote or
I, 480P,
Activating the sRGB Color Management Function
This function calibrates the projector’s output to conform to “sRGB standard (6,500K)”.
Setting the Color Management Function (sRGB)
Select “sRGB” in the “Options (1)” menu
on the menu screen.
➝ For operating the menu screen, see
pages 50 to 55.
Note
•
For additional information about sRGB
function, please visit “http://www.srgb.com/”.
Info
• When setting sRGB to “ON”, the pro-
jected image may become dark; however,
this does not indicate a malfunction.
When “sRGB” is set to “ON”;
• The gamma correction cannot be set.
• “Red”, “Blue” or “CLR Temp” in “Picture”
cannot be adjusted.
Easy to Use Functions
-89
Page 26

Auto Search Function
This function automatically searches for and switches to the input mode in which signals
are being received, when the projector is turned on, or when the INPUT button is pressed.
Using Auto Search
Select “Auto Search” in the “Options
(1)” menu on the menu screen.
➝ For operating the menu screen, see
pages 50 to 55.
Note
• ON
Automatically switches to the input mode
in which signals are being received, when
turning on the projector or pressing
on the projector.
• When the Auto Search function has been
set to ON, select any desired input, using
the Button Assignment of the
GyroRemote.
OFF
•
For switching input modes manually in
order by pressing
• To stop searching for the input mode,
press
GyroRemote.
on the projector or on the
on the projector.
-90-90
Page 27

Video Digital Noise Reduction (DNR) System
Video Digital Noise Reduction (DNR) provides high quality images with minimal dot crawl
and cross color noise.
Reducing Image Noise
Select “DNR” in the “Options (1)”
menu.
➝ For operating the menu screen, see
pages 50 to 55.
Note
• Set a level so as to view a clearer picture.
Make sure to set DNR to “OFF” in the fol-
lowing cases:
• When the image is blurry.
• When the contours and colors of moving
images drag.
• When TV broadcasts with weak signals
are projected.
Info
• Make sure to set when signals have been
input into INPUT 2 or INPUT 3.
• This function is available with INPUT 1
I and 480P signals) and INPUT 2, 3
(480
(all signals).
Easy to Use Functions
-91
Page 28

Setting On-screen Display
This function allows you to turn on or off the on-screen messages. When setting “ Level B”
in “OSD Display”, the input mode display (e.g. “INPUT 1”) will not appear, even if the INPUT
button is pressed.
Selected Item
Normal
Level A
Level B
All On-screen Displays are displayed.
Input/Freeze/Enlarge/Auto Sync/Volume/AV Mute are not displayed.
All On-screen Displays are not displayed.
(except Menu, On-screen displays displayed when the LENS button is pressed, and
warning displays (Power off/Temp./Lamp, etc.))
Turning Off the
On-screen Display
Select “OSD Display” in the “Options
(1)” menu
➝ For operating the menu screen, see
pages 50 to 55.
Note
• The following messages will be displayed
regardless of “OSD Display” level.
• “Standby” when a wireles LAN PC card
is installed in the INPUT 4 PC card slot.
• “Please wait” when a PC card is installed
or when receiving and reading in files
from a memory card.
Description
-92
-92
Page 29

Setting the Video Signal
The video input system mode is preset to “Auto”; however, a clear picture from the con-
nected audio-visual equipment may not be received, depending on the video signal difference. In that case, switch the video signal.
Setting the Video
Signal
Select “Video System” in the “Options
(1)” menu on the menu screen.
➝ For operating the menu screen, see
pages 50 to 55.
Note
• The video signal can only be set in INPUT 2 or INPUT 3 mode.
• In “Auto”, images are displayed in PAL
even if PAL-N or PAL-M input signals are
received.
PA L
SECAM
NTSC4.43
NTSC3.58
When connected to PAL video equipment.
When connected to SECAM video
equipment.
When reproducing NTSC signals in
PAL video equipment.
When connected to NTSC video equipment.
Easy to Use Functions
-93
Page 30

Saving Projected Images
• This projector allows you to capture projected images (RGB signals) and set them as a
startup image, or background image when no signals are being received.
• You can capture the images that are input using analog RGB signals and Digital RGB XGA
signals.
Capturing the Image
Select “Image Capture” in the “Options
(1)” menu on the menu screen
➝ For operating the menu screen, see
pages 50 to 55.
1 Press
“ Save Image” and press .
• The projected image is captured. It
may take some time for capturing.
11
2
1 Press
11
“Yes”.
22
2 Press
22
Note
• The following images can be captured:
• XGA (1024 × 768) non-interlace signals
in INPUT 1.
• XGA (1024 × 768) image files in memory
card in INPUT 4.
• XGA (1024 × 768) images received using
the wireless LAN PC card in INPUT 4.
• The saved image is reduced to 256 colors.
or
or
.
to select
to select
Deleting the Captured
Image
1 Select “ Delete” and press
.
11
2
-94
-94
1 Press
11
“OK”.
22
2 Press
22
or
.
to select
Page 31

Setting a Background Image
This function allows you to select the image displayed when no signal is being sent to the
projector.
Selected Item
Sharp
Custom
Blue
None
*1 You can set a captured image as a background image by selecting “Custom”. (See page 94.)
*2 If the input signal has interference, the screen will be displayed with the interference.
*1
SHARP default image
User customized image (i.e. company logo)
Blue screen
Black screen
*2
Description
Selecting a Background
Image
Select “Background” in the “Options
(1)” menu on the menu screen.
➝ For operating the menu screen, see
pages 50 to 55.
Note
•
When “Custom” is selected, an image saved
using “Image Capture” can be displayed as a
background image. (See page 94.)
•
A “Custom” image is preset as a black screen.
Selecting a Startup Image
This function allows you to specify the image to be displayed upon the projector’s startup.
Selected Item
Sharp
Custom *
None
* You can set a captured image as a startup image by selecting “Custom”.
SHARP default image
User customized image (i.e. company logo)
Black screen
Selecting a Startup Image
Select “Startup Image” in the “Options
(1)” menu on the menu screen.
➝ For operating the menu screen, see
pages 50 to 55.
Note
• When “Custom” is selected, an image
saved using “Image Capture” can be dis-
played as a startup image.
A “Custom” image is preset as a black screen.
•
Description
-95
Page 32

Using an RGB Monitor Loop-out Adaptor
Using an RGB monitor loop-out adaptor (sold separately) and an RGB cable (commercially
available), be sure to set to “ Yes (Y Cable)” when you want to display computer images
both on the projector and on a monitor.
Using an RGB Monitor
Loop-out Adaptor
Select “Monitor Out” in the “Options (1)”
menu on the menu screen.
➝
For operating the menu screen, see
pages 50 to 55.
Note
• Be sure to set to “ Disable” when not
using an RGB monitor loop-out adaptor
(sold separately).
• If the setting is not correct, the image may
be dark, too bright or whitish. This does
not indicate malfunction.
• Make sure to set to “
when using the RGB monitor loop-out
adaptor(sold separately).
Yes (Y Cable)”
Confirming the Lamp Usage Time
Confirming the Lamp
Usage Time
This function allows you to check the lamp usage time.
Select “Options (2)”
screen to see the lamp usage time.
➝ For operating the menu screen, see
pages 50 to 55.
Note
• It is recommended that the lamp be
changed after approximately 1,900 cumulative hours of use.
For lamp replacement, contact your nearest Sharp Authorized Projector Dealer or
Service Center.
-96
menu on the menu
Lamp Usage Time
Page 33

Displaying the Break Timer
Displaying and Setting
the Break Timer
Select “Break Timer” from the “Options
(2)” menu on the menu screen.
➝
For operating the menu screen, see
pages 50 to 55.
1 When
“ ”
is displayed, press
or
to set the
Break Timer.
• You can set anywhere between 1 and
60 minutes (in 1 minute units).
To Cancel the Break
Time
1 Press
press
Note
• Set the Break time using the GyroRemote
(see page 41).
• Auto Power Off will be temporarily disabled during the Break Timer.
If no signal transmission occurs for more
than 15 minutes after the Break Timer has
completed, the projector will turn off.
• The Break Timer will be displayed on the
startup image. To change the screen displayed during the Break Timer, change the
setting of “Startup Image” (see page 95).
on the projector or
on the GyroRemote.
"On-screen Display
Easy to Use Functions
-97
Page 34

Reversing/Inverting Projected Images
This projector is equipped with a reverse/invert image function that allows you to reverse or
invert the projected image for various applications.
Selected Item
Front
Ceiling + Front
Rear
Ceiling + Rear
Normal image
Inverted image
Reversed image
Reversed and inverted image
Setting the Projection Mode
Select “PRJ Mode” in the “Options (2)”
menu on the menu screen.
➝
For operating the menu screen, see
pages 50 to 55.
Note
• If a password has been set, the password
input box will be displayed when selecting the “PRJ Mode”.
• This function is used for the reversed image and ceiling-mount setups. See
page 25 for these setups.
Description
Front Ceiling+Front Rear Ceiling+Rear
-98
-98
Page 35

Locking the Operation Buttons on the Projector
This function can be used to lock the use of certain operation buttons on the projector.
The following are the three keylock levels.
Keylock Level
Normal
Level A
Level B
All operation buttons are functional.
Only INPUT/VOLUME/AV MUTE buttons on the projector are available.
All operation buttons on the projector are unavailable.
Setting up the Keylock
Select “Keylock Level” in the “Options
(2)” menu on the menu screen.
➝
For operating the menu screen, see
pages 50 to 55.
Note
• If a password has been set, the password
input box will be displayed when selecting the “Keylock Level”.
Canceling the Keylock
Setting
When the Keylock Level is set to “Normal”,
all buttons are functional.
Description
Select “Keylock Level” in the “Options
(2)” menu and set
“ Normal”
on the
menu screen.
➝ For operating the menu screen using
the GyroRemote see pages 54 and 55.
Note
• When a password has been set, and
“Keylock Level” is selected, the password
input box will be displayed.
• If both a password and the Keylock Level
have been set at the same time, the password will be necessary before changing
the Keylock Level.
Easy to Use Functions
-99
Page 36

Setting up a Password
A password can be set by the user to prevent adjustments to certain settings on the “Options
(2)” menu. Using a password together with the Keylock Level (page 99) is more effective.
Entering the Password
Select “Password” in the “Options (2)”
menu on the menu screen
➝
For operating the menu screen, see
pages 50 to 55.
1 Press
the desired number and then
press
or
.
to select
2 Enter the 3 remaining digits
and press
.
3 Enter the password again in
“Reconfirm” and press
Note
• When a password is set, you need
to enter the password to change
“PRJ Mode”, “Keylock Level”, “Anti-
Theft”, “Register R/C” and “All Reset” settings.
.
-100-100
Page 37

Changing the Password
Select “Password” in the “Options (2)”
menu on the menu screen
➝
For operating the menu screen, see
pages 50 to 55.
1 Press
enter the password in “Old
Password” and press
2 Press
set the new password and
press
,
,
.
and
and
to
.
to
3 Enter the new 4-digit password
again in “Reconfirm” and
press
Note
• If you do not want to set a password, leave
the fields in procedures 2 and 3 blank and
press
• To cancel the password settings, press
.
.
.
Easy to Use Functions
If You Forget Your
Password
If you forget the password, delete it and set a
new password using the following procedure.
1 Press
-101
Page 38

Setting the Anti-Theft
The anti-theft function prevents unauthorized use of the projector. You can choose to use
this function or not. If you do not want to use this function, just do not enter the keycode.
Once the theft-deterrent function is activated, users will need to enter the correct keycode
each time the projector is started. Failure to enter the correct keycode will prevent images
from being projected. The following procedures explain how to use this function.
Entering the Keycode
• “Anti-Theft” cannot be selected unless
“Password” is set. (See page 100.)
• When “Anti-Theft” is selected, the password
input box will appear. Enter the keycode after the right password is entered.
Select “Anti-Theft” in the “Options (2)”
menu on the menu screen.
➝ For operating the menu screen, see
pages 50 to 55.
1 Press any button on the pro-
jector or on the GyroRemote,
to enter the keycode.
Note
• The following buttons cannot be set
as key codes.
(Both on the projector and
GyroRemote)
• POWER button
• ENTER button
• UNDO button
• MENU button
(GyroRemote)
• GYRO ACTIVE button
• POINTER button
• L-CLICK/ENTER button
• R-CLICK/UNDO button
• MENU button
• TEACH button
• RF CH+ button
-102
-102
Page 39

2 Enter the remaining 3 digits by
pressing any buttons you like.
3 Enter the same keycode once
more in “Reconfirm”.
Note
• The Keylock function will become
temporarily disabled.
When “Anti-Theft” is set, the keycode
inputting section appears after the
power is turned on. At that time, enter
the right keycode.
• Press the buttons on the GyroRemote if the
buttons on the GyroRemote are used for setting the keycode. In the same manner, press
the buttons on the projector if the buttons on
the projector are used for setting the keycode.
Info
• Once the function is activated, you must
remember the correct keycode. We suggest you record the keycode in a safe
place where only authorized users will
have access. If you lose or forget your
keycode, you will need to contact your
nearest Sharp Authorized Projector Dealer
or Service Center (see page 118). You
may need to bring your projector to them
to restore the projector to original factory
condition (password and keycode reset).
• If the Anti-theft function is set using the
buttons of the GyroRemote as the
keycodes and you loose the
GyroRemote, you will not be able to release the Anti-theft function. In case you
loose the GyroRemote, contact your
nearest repair center.
• If you travel with your projector without
your GyroRemote, you will not be able to
unlock the Anti-Theft keycode.
Therefore, we recommend you use the
projector buttons to lock/ unlock the AntiTheft keycode.
Easy to Use Functions
-103
Page 40

Setting the Anti-Theft (cont.)
Changing the Keycode
• When “Anti-Theft” is selected and a pass-
word has been entered, the password input
box is displayed. After the password has been
entered, you can change the keycode.
Select “Anti-Theft” in the “Options (2)”
menu on the menu screen.
➝
For operating the menu screen, see
pages 50 to 55.
1 Enter the preset 4-digit keycode
in “Old Code” using the buttons
on the GyroRemote or on the
projector.
2 Press any button you like on the
GyroRemote or the projector to
enter the new keycode.
3 Enter the same 4-digit keycode
in “Reconfirm” .
Note
• If you do not want to set a keycode, leave
the keycode field blank in steps 2 and 3
and press
.
-104
-104
Page 41

Initializing the Settings
This function allows you to initialize the settings you have made in the projector.
Returning to the
Default Settings
Select “All Reset” in the “Options (2)”
menu on the menu screen.
➝
For operating the menu screen, see
pages 50 to 55.
Note
• If a password has been set, the pass-
word input box will be displayed when
selecting “All Reset”.
The following items cannot be initialized.
• Fine Sync
• Special Modes
• Signal Info
• Options (2)
• Lamp Timer
• Anti-Theft
• Language
• Image stored using “Image Capture”
Easy to Use Functions
-105
Page 42

Displaying the Adjustment Settings
This function can be used to display all the adjusted settings as a list on the screen.
Display example of INPUT 1
Overview of All Menu
Settings
Select the “Status” menu and press
on the menu screen.
➝ For operating the menu screen, see
pages 50 to 55.
-106
-106
 Loading...