

Image Projection
Basic Procedure
Connect the required external equipment to the projector before carrying out the following procedures.
Info
•
The language preset at the factory is English.
If you want to change the on-screen display to
another language, reset the language according to the procedure on page
28
.
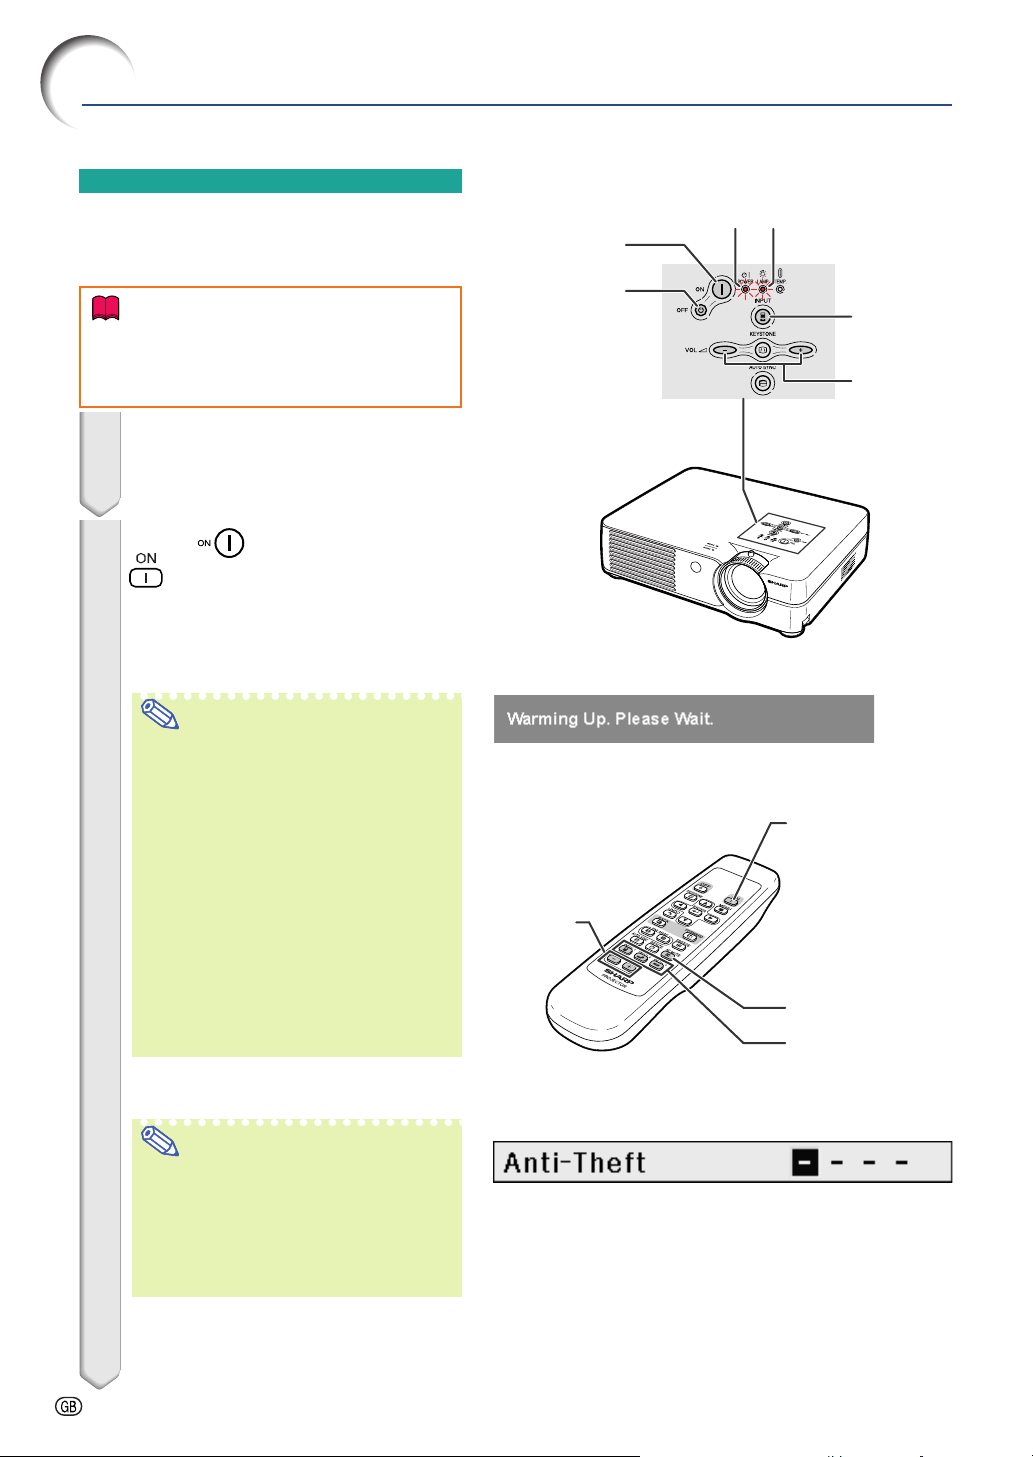
1 Plug the power cord into the wall
outlet.
• The power indicator illuminates red, and
the projector enters standby mode.
2 Press on the projector or
on the remote control.
• The power indicator illuminates green.
After the lamp replacement indicator illuminates and the warming up message
on the display disappears, the projector
is ready to start operation.
Note
•
The lamp replacement indicator illuminates, indicating the status of the lamp.
Green: The lamp is ready.
Blinking in green: The lamp is warming
Red:
• If the power is turned off and immedi-
• When controlling the projector using
• The projector cannot be operated while
• When “Anti-Theft” (see page
the keycode input box will appear. Enter
the keycode.
• When entering the keycode, press the
• For details about the Anti-Theft func-
The lamp should be replaced.
ately switched on again, the lamp replacement indicator may take some
time to illuminate.
RS-232C commands from a computer, wait for at least 30 seconds after the power has been turned on, and
then transmit the commands.
the warming up message is displayed.
Note
buttons previously set on the projector or the remote control.
tion, refer to “Anti-Theft (Setting the
Anti-Theft)” on page 48.
up and shutting down.
48
) is set,
Power ON
button
Power OFF
button
▼Warming up message
Volume
buttons
▼Keycode input box
▼Keycode input box
Power
indicator
Lamp
replacement
indicator
INPUT
button
Volume
buttons
Power ON
button
AV MUTE button
INPUT buttons
-26

3 Press , or on the
remote control to select the INPUT mode.
•
After pressing once on the projector,
use to select the desired input mode.
"On-screen Display (Example)
INPUT 1 mode
Using RGB
➝
Note
• When no signal is received, “NO SIG-
NAL” will be displayed. When a signal
that the projector is not preset to receive is received, “NOT REG.” will be
displayed.
• The INPUT mode is not displayed
when “OSD Display” is set to “OFF”.
(See page 44.)
About the INPUT mode
INPUT 1
(RGB/
Component)
INPUT 2
(S-Video)
INPUT 3
(Video)
Used for projecting images from equipment that
sends RGB signals or
component signals connected to the RGB input
terminal.
Used for projecting images from equipment
connected to the SVIDEO input terminal.
Used for
ages
connected to the VIDEO
input terminal.
projecting
from equipment
im-
Using
Component
➝
INPUT 2 mode
Using S-Video
➝
INPUT 3 mode
Using Video
Basic Operation
4 Press or on the remote
control to adjust the volume.
Note
• Pressing will lower the volume.
Pressing
• On the projector, the volume can be
adjusted by pressing
will raise the volume.
or .
5 Press on the remote con-
trol to temporarily display a
black screen and turn off the
sound.
Note
• Pressing again will turn the pro-
jected image and sound back on.
-27
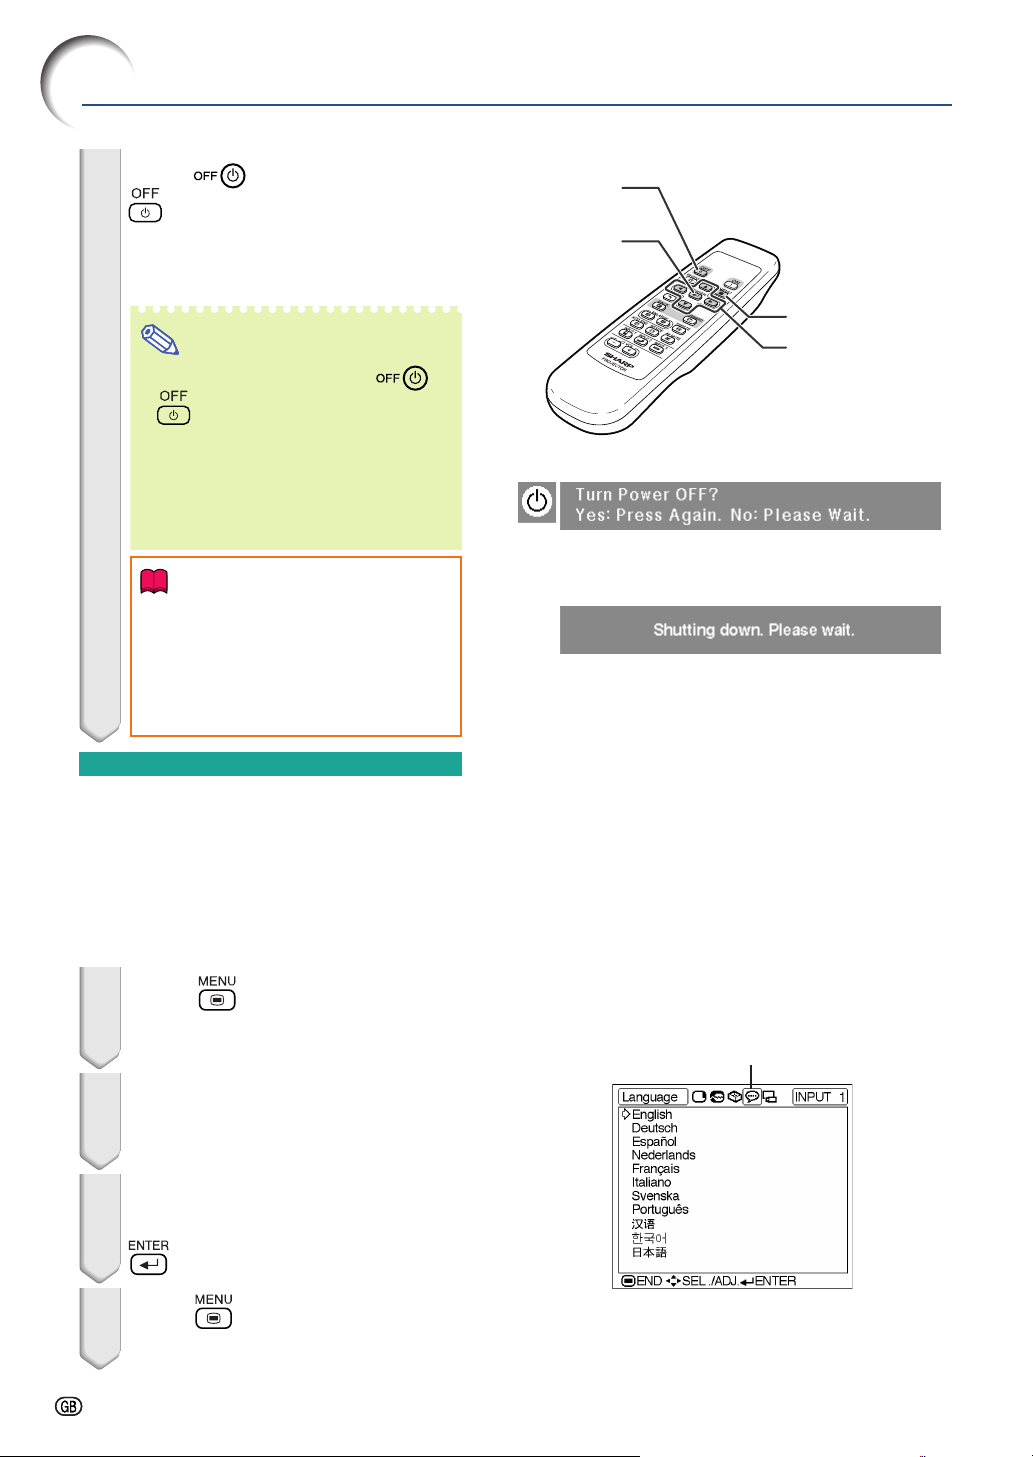
Image Projection
6 Press on the projector or
on the remote control, then
press that button again while the
confirmation message is displayed, to turn off the projector.
Note
• If you accidentally pressed or
and do not want to turn off the
power, wait until the confirmation
message disappears.
• The projector cannot be operated
while a message “Shutting down.
Please wait.” is displayed.
Info
• Do not unplug the power cord during
projection or cooling fan operation.
This can cause damage due to rise
in internal temperature, as the cooling fan also stops.
Power OFF
button
ENTER
button
MENU button
', ", \, |
buttons
Selecting the On-screen
Display Language
The on-screen display language of the projector can be set to English, German, Spanish,
Dutch, French, Italian, Swedish, Portuguese,
Chinese, Korean or Japanese. For operating the
menu screen, see pages 32 to 35.
1 Press on the remote con-
trol.
• The “Picture” menu will be displayed.
2 Press \ or | to select the “Lan-
guage” menu icon.
• The “Language” menu will be displayed.
3 Press ' or " to select the de-
sired language, and then press
.
4 Press .
• The desired language will be set as the
on-screen display.
“Language” menu icon
-28
-28
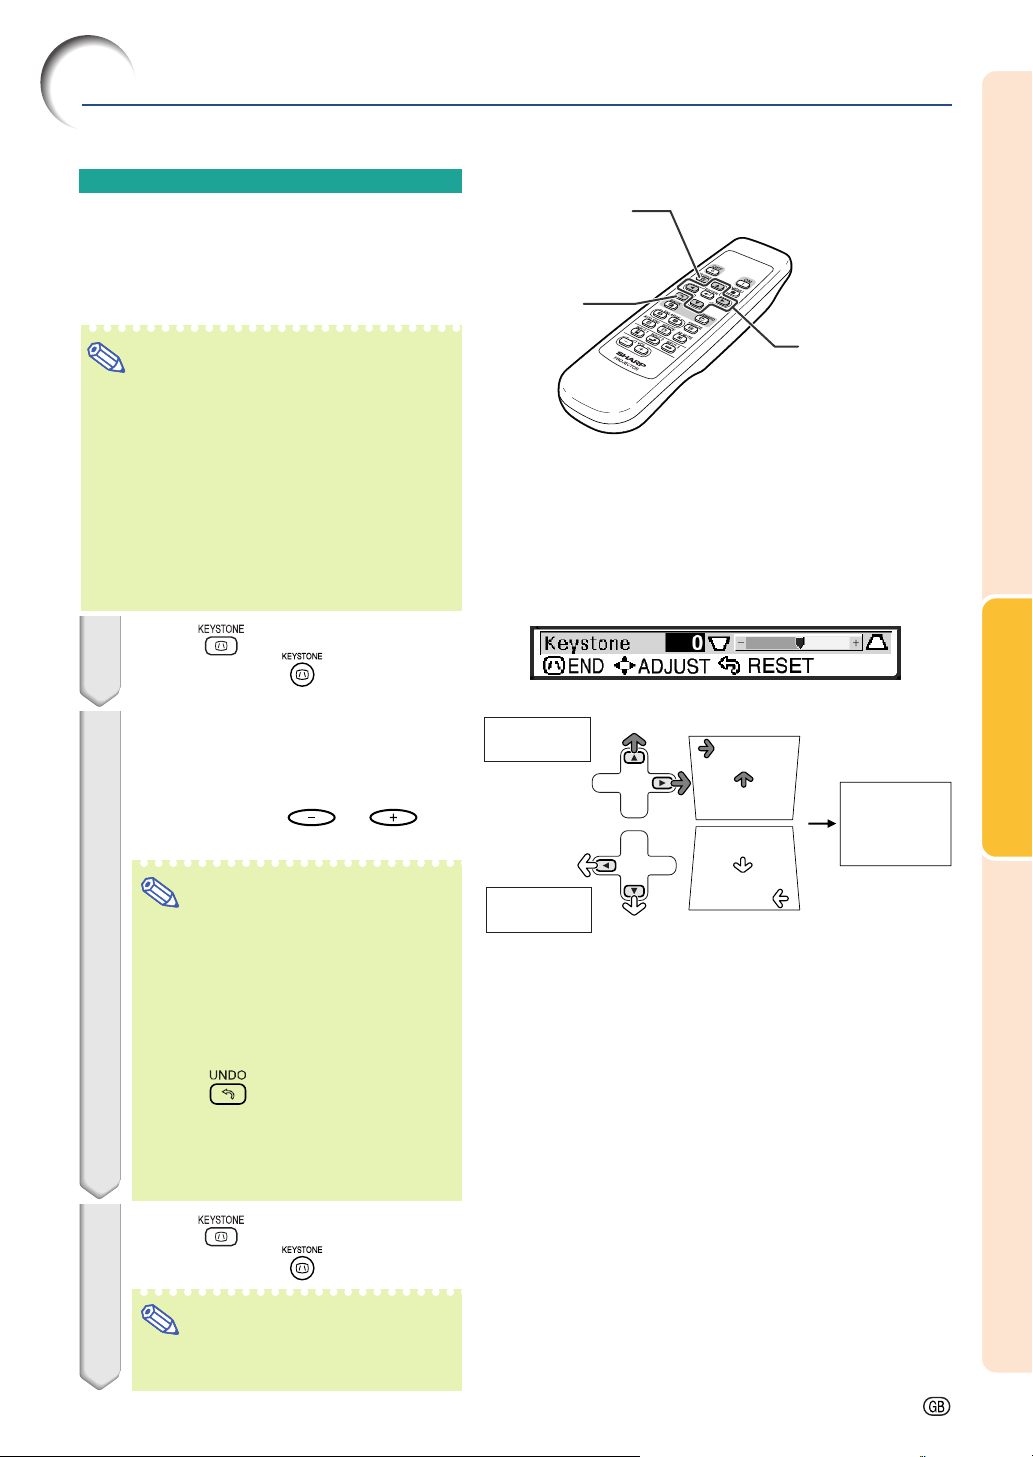
Keystone Correction (Correcting Trapezoidal Distortion)
Correcting Trapezoidal
Distortion
This function allows for Keystone (On-screen
Trapezoidal Distortion) Correction.
Note
• When the image is projected either from the
top or from the bottom towards the screen
at an angle, the image becomes distorted
trapezoidally.
The function for correcting trapezoidal distortion is called Keystone Correction.
• The Keystone Correction can be adjusted up
to an angle of approximately ±35 degrees
(when the picture display mode is set to
40
“NORMAL” (see page
)).
1 Press .
• You can also use on the projector.
2 Press ', ", \ and | to adjust
the Keystone correction.
• You can also adjust the Keystone correction using the or but-
tons on the projector.
KEYSTONE
button
UNDO
button
', ", \, |
buttons
Basic Operation
Compresses
upper side.
Note
• Since the trapezoidal distortion of the
image can be corrected up to an angle
of approximately ±35 degrees (when
the picture display mode is set to
40
“NORMAL” (see page
screen can be diagonally set up to
that angle as well.
• Press
ting.
• Straight lines or the edges of images
may appear jagged while adjusting
the image.
to make the default set-
)), the actual
3 Press .
• You can also use on the projector.
Note
• You can use the same settings used
in NORMAL mode 4:3 for 16:9.
Compresses
lower side.
-29
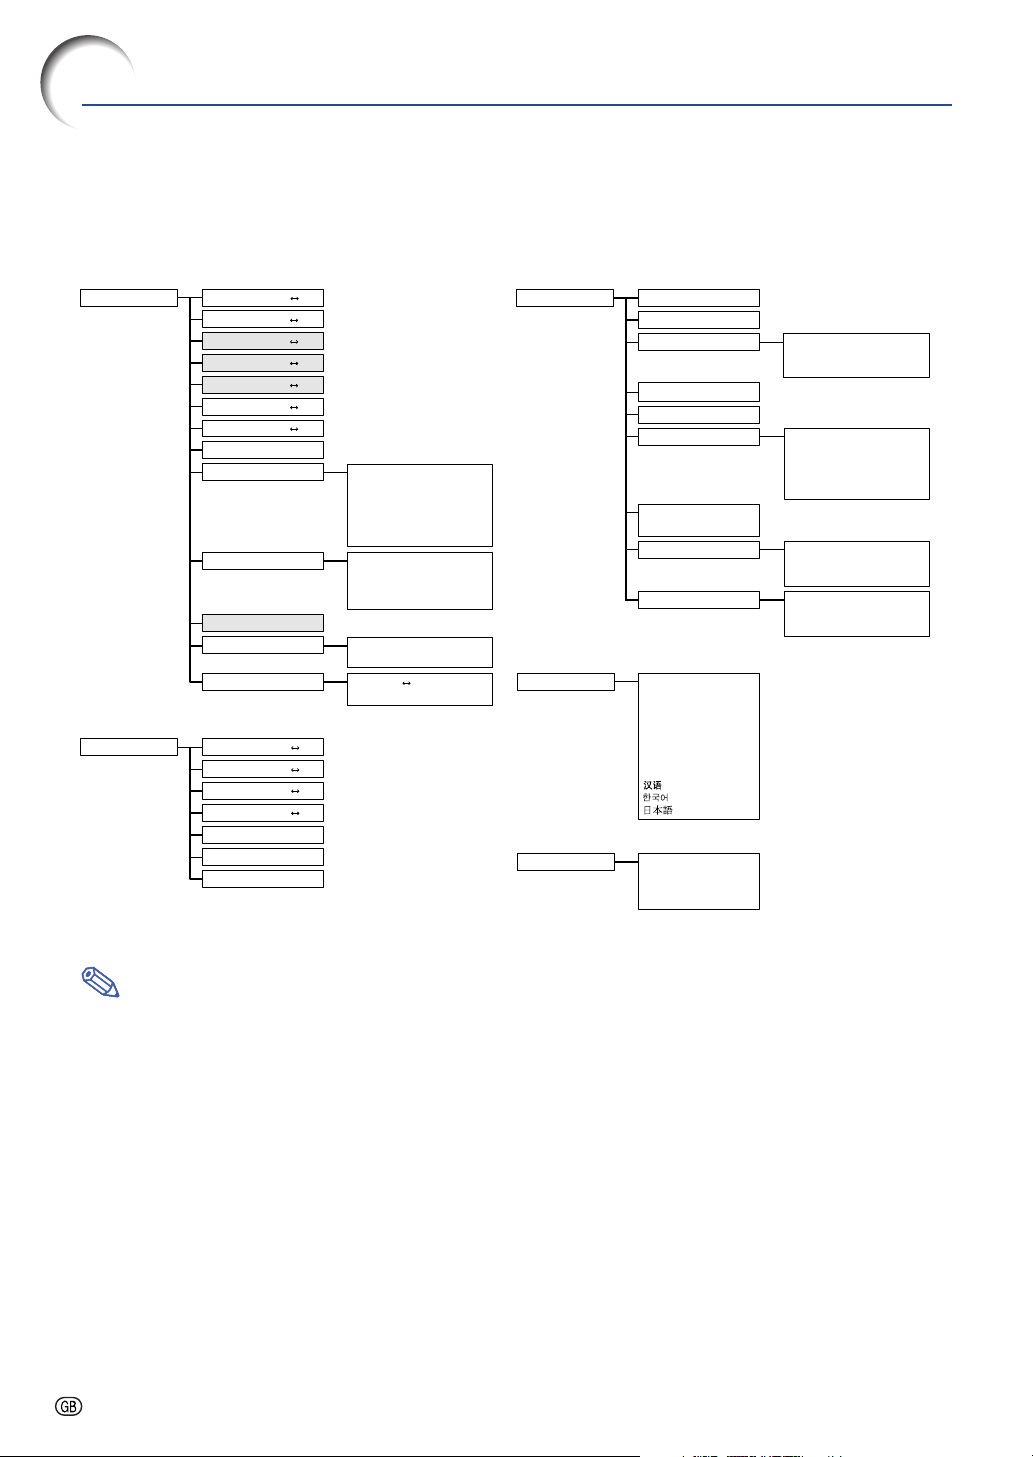
Menu Items
This list shows the items that can be set in the projector.
■ INPUT 1 Mode
Main menu Sub menu
Picture
Page 36
Fine Sync
Page 38
Contrast
Bright
Color
Tint
Sharp
Red
Blue
Reset
CLR Temp
Gamma
sRGB [ON/OFF]
Signal Type
Memory
Clock
Phase
H-Pos
V-Pos
Reset
Special Modes
Signal Info
+30−30
+30−30
+30−30
+30−30
+30−30
+30−30
+30−30
5500 K
6500 K
7500 K
8500 K
9300 K
10500 K
Standard
Presentation
Cinema
Game
RGB
Component
Memory 1
Memory OFF
+30−30
+15−15
+30−30
+30−30
Memory 5
Main menu Sub menu
Options
Page 44
Language
Page 28
PRJ Mode Front
Page 50
Lamp Timer (Life)
OSD Display [ON/OFF]
Background
Eco Mode [Eco/Standard]
Auto Power Off
Menu Position
Menu Color
[Opaque/Translucent]
Password
Anti-Theft
English
Deutsch
Español
Nederlands
Français
Italiano
Svenska
Português
Ceiling+Front
Rear
Ceiling+Rear
[ON/OFF]
Sharp
Blue
None
Center
Upper Right
Lower Right
Upper Left
Lower Left
Old Password
New Password
Reconfirm
Old Code
New Code
Reconfirm
Note
• In the “Picture” menu of INPUT 1, “Color”, “Tint” and “Sharp” are only displayed when “Signal Type” is set
to “Component”.
• In the “Picture” menu of INPUT 1, “sRGB” is only displayed when “Signal Type” is set to “RGB”.
-30
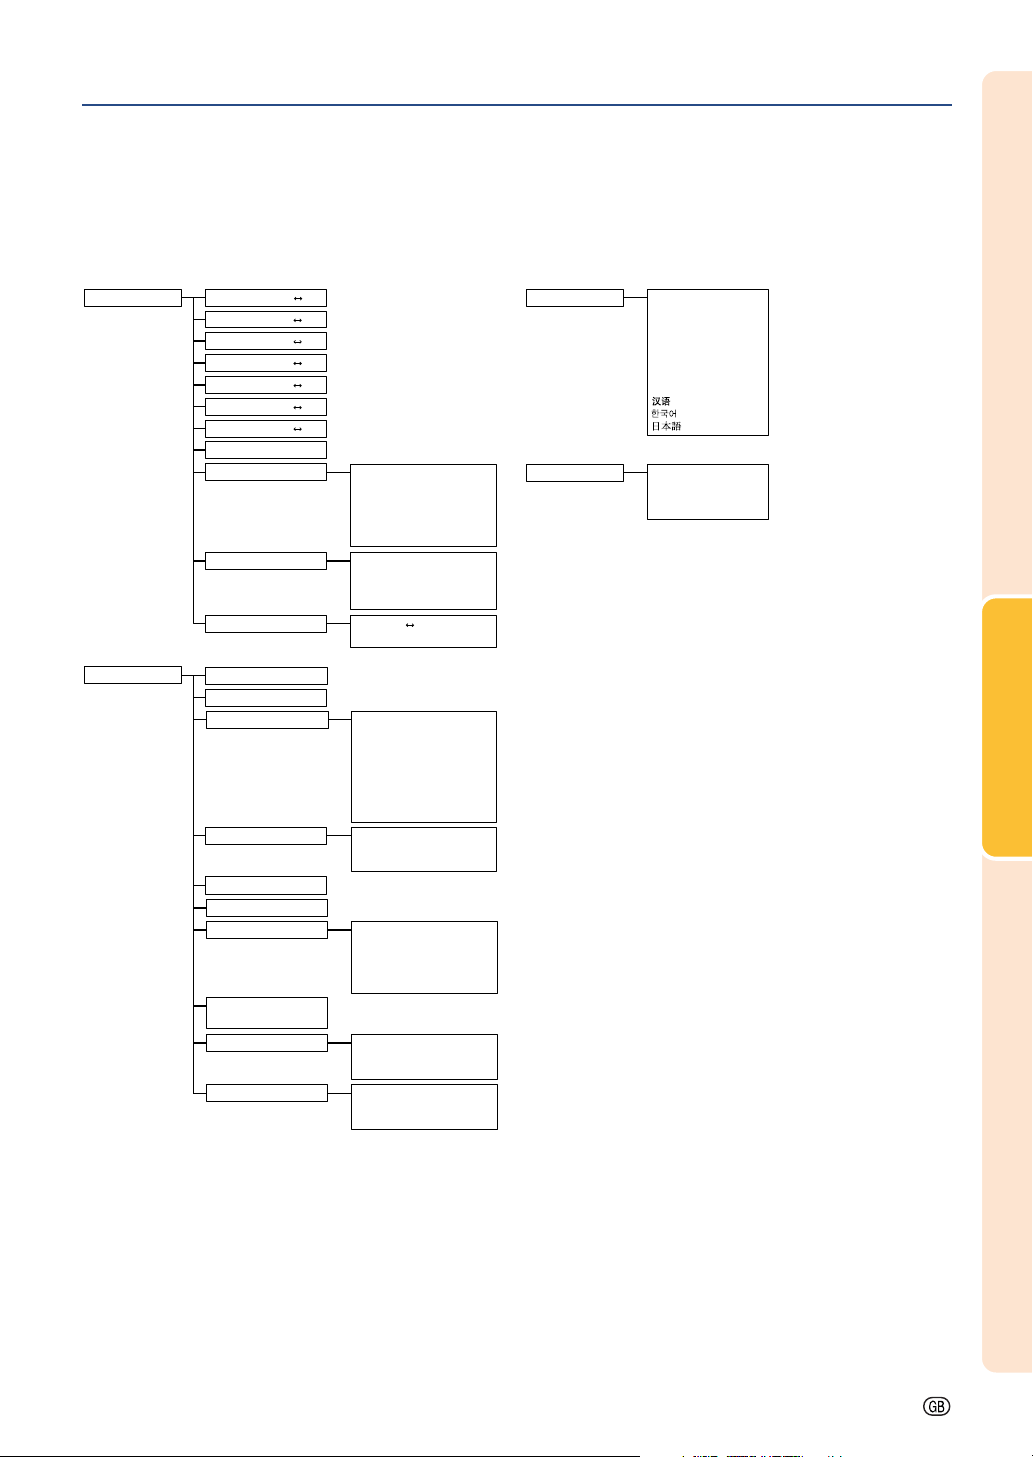
■ INPUT 2 / 3 Mode
Main menu Sub menu
Picture
Page 36
Options
Page 44
Contrast
Bright
Color
Tint
Sharp
Red
Blue
Reset
CLR Temp
Gamma
Memory
Lamp Timer (Life)
OSD Display [ON/OFF]
Video System
Background
Eco Mode [Eco/Standard]
Auto Power Off
Menu Position
Menu Color
[Opaque/Translucent]
Password
Anti-Theft
+30−30
+30−30
+30−30
+30−30
+30−30
+30−30
+30−30
[ON/OFF]
5500 K
6500 K
7500 K
8500 K
9300 K
10500 K
Standard
Presentation
Cinema
Game
Memory 1
Memory OFF
Auto
PAL
NTSC3.58
SECAM
NTSC4.43
PAL-M
PAL-N
PAL-60
Sharp
Blue
None
Center
Upper Right
Lower Right
Upper Left
Lower Left
Old Password
New Password
Reconfirm
Old Code
New Code
Reconfirm
Memory 5
Main menu
Language
Page 28
PRJ Mode Front
Page 50
English
Deutsch
Español
Nederlands
Français
Italiano
Svenska
Português
Ceiling+Front
Rear
Ceiling+Rear
Basic Operation
-31

Using the Menu Screen
The menu screens allow you to adjust the image and various projector settings.
You can operate the menus from the remote control using the following procedure.
Example: “Picture” menu screen for
INPUT 1 (RGB) mode
Menu Selections
(Adjustments)
1 Press .
• The “Picture” menu screen for the se-
lected input mode is displayed.
Note
• The on-screen display shown on the
right is displayed when the INPUT 1
(RGB) mode is selected.
\\
2 Press
menu screens.
• The menu icon for the selected menu
screen is highlighted.
||
\ or
| to display the other
\\
||
Menu icon Menu screen
Picture
Fine Sync
Options
Language
PRJ Mode
ENTER
button
UNDO
button
MENU button
', ", \, |
buttons
Menu icons
-32
-32
Note
• The “Fine Sync” menu is not available
for INPUT 2 or 3.
• For details on the menus, see the tree
charts on pages 30 and 31.

''
3 Press
""
' or
" to select the item
''
""
you want to adjust.
• The selected item is highlighted.
Note
• To display a single adjustment item,
press
Only the selected adjustment item will
be displayed.
Then if you press ' or ", the following item (“Red” after “Bright”) will be
displayed.
• Press
screen.
after selecting the item.
to return to the previous
\\
4 Press
||
\ or
| to adjust the item
\\
||
selected.
• The adjustment is stored.
5 Press .
• The menu screen will disappear.
Basic Operation
-33

Using the Menu Screen
Menu Selections
(Settings)
1 Press .
• The “Picture” menu screen for the se-
lected input mode is displayed.
Note
• The on-screen display shown on the
right is displayed when INPUT 1 (RGB)
mode is selected.
\\
2 Press
menu screens.
• The menu icon for the selected menu
screen is highlighted.
||
\ or
| to display the other
\\
||
ENTER
button
UNDO
button
MENU button
', ", \, |
buttons
Menu icons
-34
-34
Menu icon Menu screen
Picture
Fine Sync
Options
Language
PRJ Mode
Note
• The “Fine Sync” menu is not available
for INPUT 2 or 3.
• For details on the menus, see the tree
charts on pages 30 and 31.

''
3 Press
item you want to set, and then
press
||
| to display the sub menu.
||
• The selected item is highlighted.
Note
• Press or \ to return to the pre-
vious screen.
• For some items, press \ or | to se-
lect the icon using “ ”.
4 Press
ting of the item displayed in the
sub menu.
""
' or
" to select the
''
""
''
""
' or
" to select the set-
''
""
Sub menu
Basic Operation
5 Press .
• The item selected is set.
6 Press .
• The menu screen will disappear.
-35

Picture Adjustment
You can adjust the projector’s picture to your preferences using the “Picture” menu. For
operation of the menu screen, see pages 32 to 35.
Example: “Picture” screen menu for
INPUT 1 (RGB) mode
Adjusting the Image
Select the item on the “Picture” menu and
adjust the image.
Description of Adjustment Items
Selectable items
Contrast
Bright
Color
Tint
Sharp
Red
Blue
Note
• “Color”, “Tint” and “Sharp” are not displayed
when selecting INPUT 1 and setting the “Signal Type” to “RGB”.
• “Sharp” can be adjusted when 480
I, 580P, 720P, 1035I or 1080I signals are
580
detected while “Signal Type” for INPUT 1 is set
to “Component”.
• To reset all adjustment items, select “Reset” and
press .
Press \ Press |
for less contrast.
for less brightness.
for less color intensity.
for making skin tones purplish.
for less sharpness.
for weaker red.
for weaker blue.
for more contrast.
for more brightness.
for more color intensity.
for making skin tones greenish.
for more sharpness.
for stronger red.
for stronger blue.
I, 480P, 540P,
CLR Temp (Adjusting the
Color Temperature)
Select “CLR Temp” on the “Picture” menu
and the desired color temperature setting.
Description of Color Temperature Settings
Selectable settings
5500K
6500K
7500K
8500K
9300K
10500K
For lower color temperature for warmer,
reddish incandescent-like images.
For higher color temperature for cooler, bluish, fluorescent-like images.
Note
• Values for “CLR Temp” are only approximations.
Description
-36

Gamma (Gamma Correction)
Gamma is an image quality enhancement function
that offers a richer image by brightening the darker
portions of the image without altering the brightness of the brighter portions.
When you are displaying images with frequent dark
scenes, such as a film or concert, or when you are
displaying images in a bright room, this feature
makes the dark scenes easier to see and gives the
impression of greater depth in the image.
Select “Gamma” on the “Picture” menu and
the desired gamma mode.
Signal Type (Signal Type
Setting)
Select “Signal Type” on the “Picture” menu
and set it to “RGB” or “Component” for INPUT 1.
Description of Signal Type Settings
Selectable settings
RGB
Component
Set when RGB signals are received.
Set when Component signals are
received.
Description
Description of Gamma Modes
Selectable settings
Standard
Presentation
Cinema
Game
For standard image
Brightens darker portions of image for
more enhanced presentations.
Gives greater depth to darker portions
of image for a more exciting theater
experience.
For natural color gradation for playing
a game, etc.
Description
Note
• Gamma is not available for INPUT 1 when
“sRGB” on the “Picture” menu is set to “ON”.
sRGB (sRGB Setting)
Select “sRGB” on the “Picture” menu and set
it to “ (ON)” when you want to display
the image in a natural tint based on an original image.
Note
• When “sRGB” is set to “ON”;
• Gamma is not available.
• “Red”, “Blue” or “CLR Temp” on the “Picture”
menu cannot be adjusted.
• For additional information about the sRGB function, visit “http://www.srgb.com/”.
Info
• When “sRGB” is set to “ON”, the projected im-
age may become dark, but this does not indicate a malfunction.
Memory
(Storing and Selecting
the Adjustment Settings)
Use this function to store the adjustment settings
on the “Picture” menu. No matter which input mode
or signal type is selected, you can select and apply
the settings you have stored in a memory location.
Select “Memory” on the “Picture” menu and
the memory location where you want to store
the settings. Then adjust the setting items
on the “Picture” menu.
Description of Memory Positions
Selectable
settings
Memory 1
Memory 2
Memory 3
Memory 4
Memory 5
Memory OFF
Settings of all items on the “Picture”
menu can be stored in memory location.
The stored settings can be selected in
any input mode.
Besides “Memory 1” to “Memory 5”, other
settings on the “Picture” menu can be
stored for each input mode. The settings
stored in “Memory OFF” cannot be applied
when another input mode is selected.
Description
If you want to apply the stored settings on
the “Picture” menu, select “Memory” on the
“Picture” menu and the memory location
where you have stored the settings.
Note
• You can change the stored settings after selecting the memory location for those settings.
Basic Operation
-37

Computer Image Adjustment
Using the “Fine Sync” menu, you can adjust the computer image, match the computer display mode, and check the input signal. For operation of the menu screen, see pages 32 to 35.
Example: “Fine Sync” menu screen for
INPUT 1 mode
Adjusting the Computer
Image
In case of irregularities such as vertical stripes or
flickering in portions of the screen, adjust “Clock”,
“Phase”, “H-Pos” or “V-Pos” to obtain an optimal
computer image.
Select the item on the “Fine Sync” menu
and adjust the computer image.
Description of Adjustment Items
Selectable items
Clock
Phase
H-Pos
V-Pos
adjust vertical noise.
adjust horizontal noise (similar to tracking
on your VCR).
center the on-screen image by moving it to
the left or right.
center the on-screen image by moving it up
or down.
Note
• You can automatically adjust the computer image by pressing
on the remote control.
• To reset all adjustment items, select “Reset” and
press .
Use \ and | to
on the projector or
Special Modes (Special
Mode Settings)
Ordinarily, the type of input signal is detected and
the correct resolution mode is automatically selected.
However, for some signals, the optimal resolution
mode in “Special Modes” on the “Fine Sync” menu
may need to be selected to match the computer display mode.
Select “Special Modes” on the “Fine Sync”
menu and the appropriate resolution.
Note
• Avoid displaying computer patterns which repeat
every other line (horizontal stripes).
(Flickering may occur, making the image hard to
see.)
• When a DVD player or Digital Video is connected,
select 480P as the input signal.
• See “Signal Info (Checking the Input Signal)” on
the next page for information on the currently selected input signal.
-38

Signal Info (Checking the
Input Signal)
Select “Signal Info” on the “Fine Sync” menu
to check the current input signal information.
Note
• The projector will display the number of
scanned lines available from audio-visual
equipment such as a DVD player or Digital
Video.
Basic Operation
-39
 Loading...