

CHAPTER 2
Basic Operations
This chapter describes the basic operations of your computer.
Choosing Power Source
You can u s e the comp u ter with one of the followin g power sour ces :
AC power from a wall outlet
•
Use AC power whenever possible; rely on the battery only when AC power is not
available.
Rechargeable battery
•
There is an internal standard battery in the computer. You can use an optional
external battery pack adding to the standard battery. See Chapter 3 for battery
information.
2
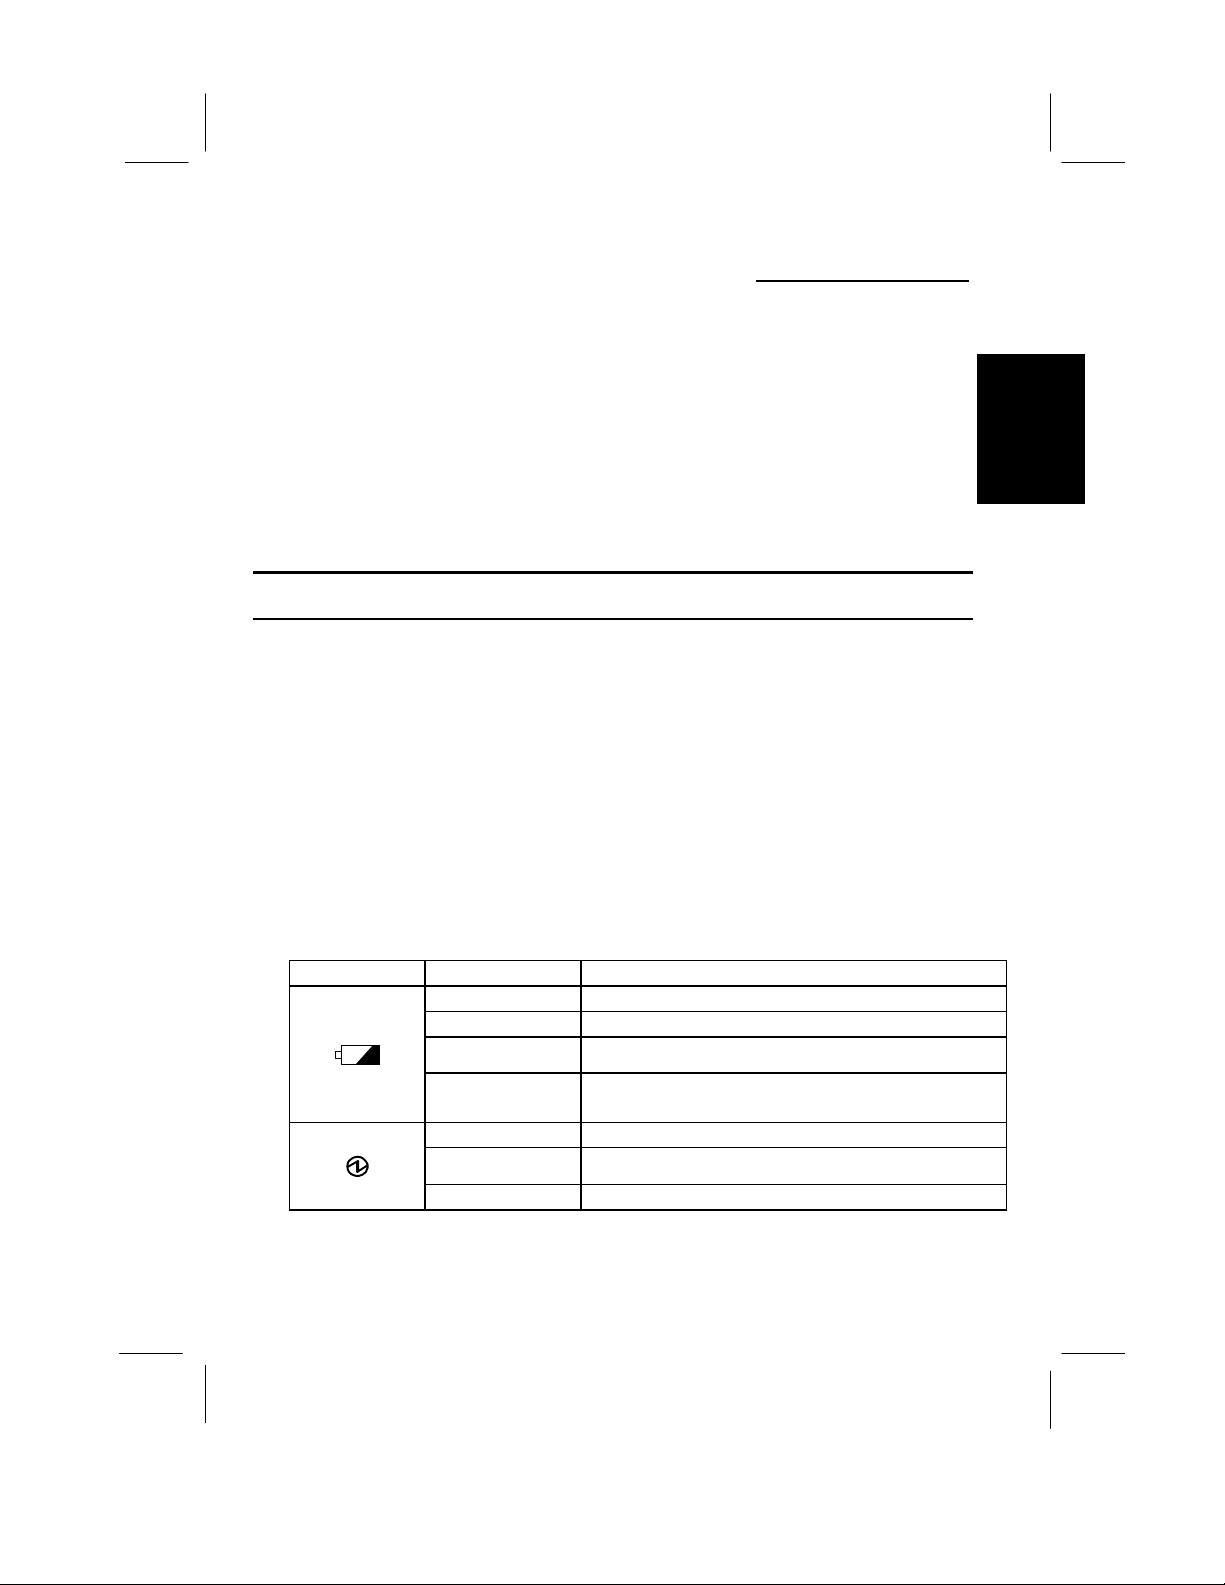
About the Power Indicators
The following indicators show the power status of your computer.
Indicator Light Meaning
Battery Power On (green) Fully charged
On (orange) Being cha rged
Blinking (orange) In abnormal state
On and blinking
(red)
Power On (green) Operating
Blinking (gr een) Suspended to RAM
Off Suspended to Disk or powered off
Almost completely discharged.
The warning beep sounds.
2-1

For more information on Suspend to RAM and Suspend to Disk, see
Chapter 3.
Using the AC Adapte r
2
When connected to a wall outlet, the AC adapter provides power for operation and
charges the battery. The AC input voltage can range from 100 to 240 volts so that
you can use the computer with the appropriate plug adapter.
The AC power cord included with the computer is appropriate for the
voltage used in the area in which you purchased your computer. If you
attempt to connect the computer to a wall outlet other than in this area,
check the voltage of the outlet and use an AC power cord appropriate for
the outlet. Consult local service staff if you are unsure.
2-2
Resetting the System
You may need to reset the system after adding hardware or software so that your
computer will recognize the newly installed devices or software. When the message
appears after the installation, click OK,
You can also restart Windows 98 from the
Restart.
Warm Boot
If the syst e m is locked up because of a software problem, you can reset or r e boot the
system by pressing the
keys again to restart the computer.
Resetting may cause data loss. Use the software reset only if the normal
Windows 98 Shut Down does not work because of software malfunction.
Although resetting will not damage the system, you may lose the data
you are processing.
Ctrl+Alt + De l
Power Switch
You can turn off the computer with the power switch if you encounter hardware or
software problems which lock up the system. In this case, slide and hold the switch
for more than five seconds.
, etc. to restart Windows 98.
Yes
menu. Select
Start
keys simultaneously. Press the
Shut down
; then,
Ctrl+Alt+Del
2
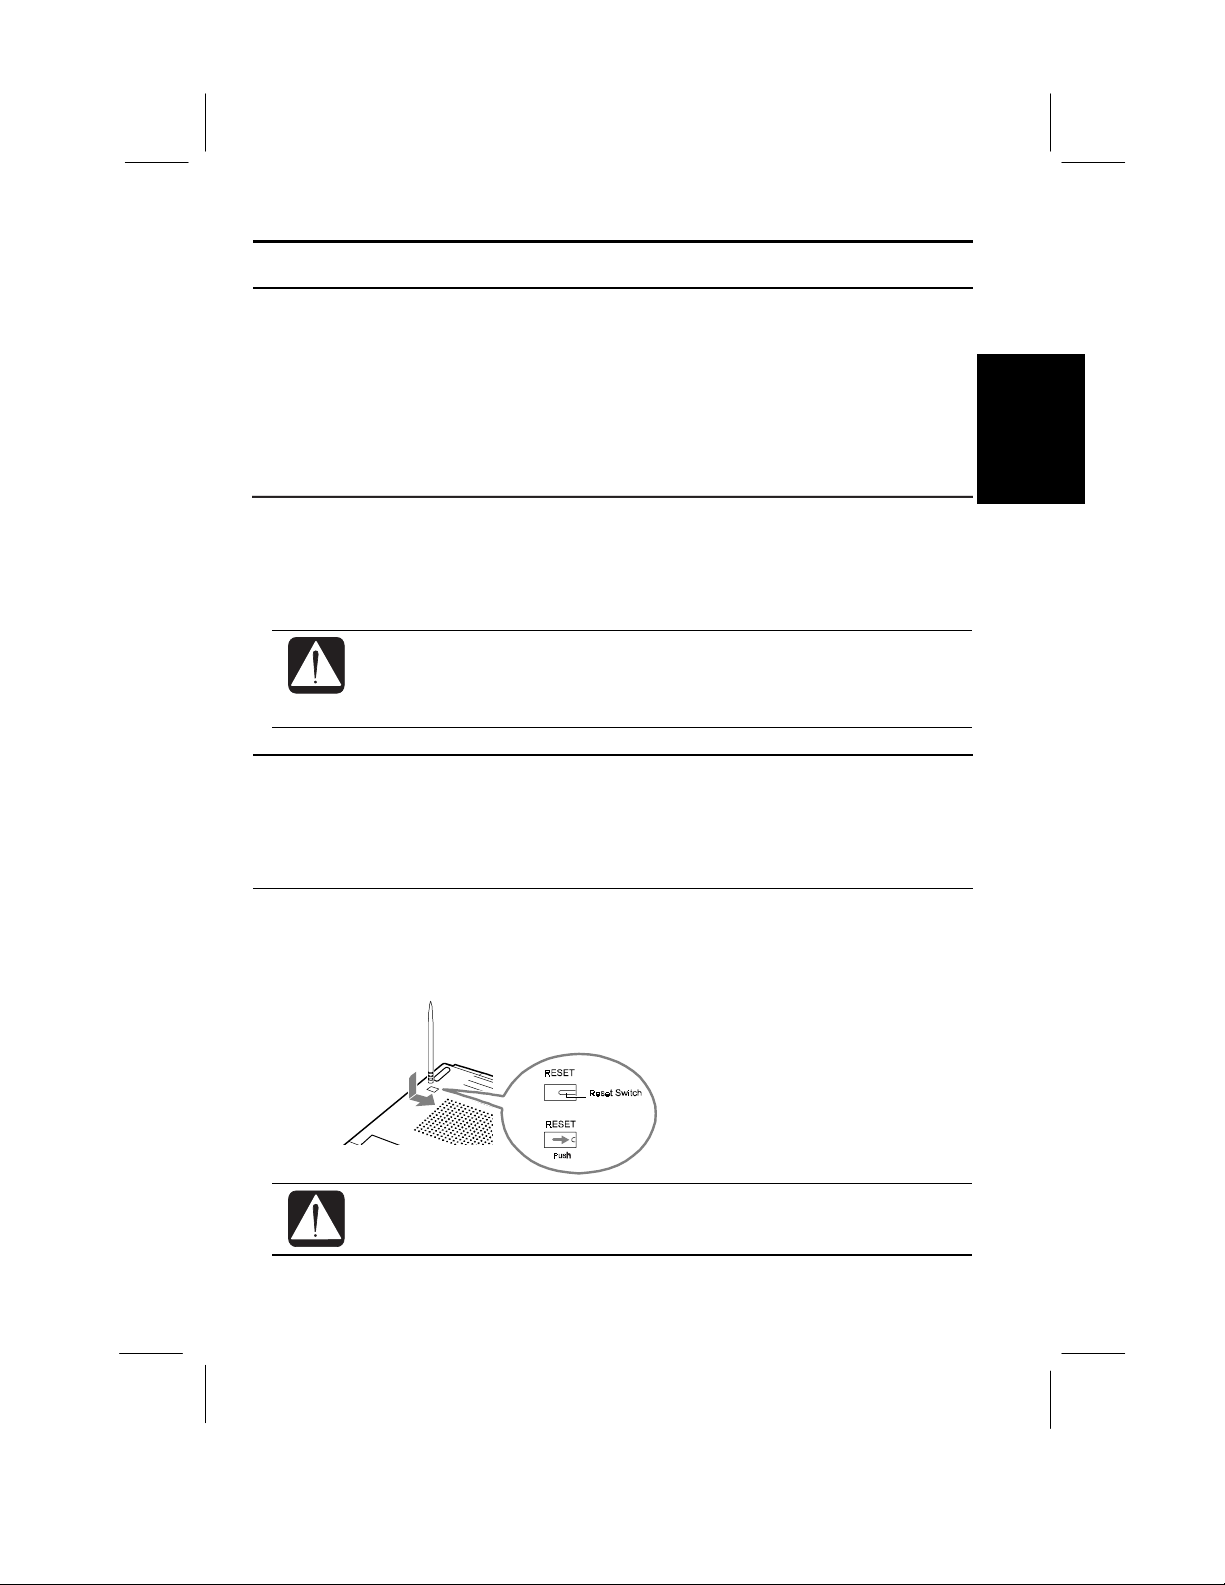
Reset Switch
If you cannot turn off the computer by sliding the power switch, you can use the
reset switch on the bottom of your computer. To reset the system, insert a narrow
object into the small hole to slide the switch as shown.
Do not use metallic materials to slide the reset switch. It may cause
malfunction.
2-3

Using The Glide Pad
Your computer is equipped with an integrated pointing device called a glide pad.
Using the glide pad, you can move the pointer, select an item from a menu, and
perform other tasks in the same way you would with a mouse.
2
• Do not hit or scratch the surface of the glide pad with pointed objects
• Do not operate the glide pad with a moist finger. This may cause the
• You cannot use the glide pad when a mouse is connected
Using the Glide Pad
Take a moment to become familiar with how the glide pad works.
(such as a ballpoint pen).
glide pad to operate incorrectly.
.
Place Your Fingertip
Place your left or right hand n ext to the glide pad, resting your wrist naturally in a
relaxed manner. Place your thumb or finger on the glide pad.
Move Your Fingertip
The rectangular pad of the glide pad acts like a miniature duplicate of the display.
As you slide your fingertip across the pad, the pointer on the screen moves in the
same direction across the screen. The glide pad is very sensitive, so you do not have
2-4

to exert a lot of pressure on the pad. The glide pad will respond to a light touch
from your fingerti p.
Click, Double-click, and Right-click
To click or double-click, you can use the left button just like that of a mouse.
Instead of clicking by pressing the left button, you can just tap gently anywhere on
the rectangular pad. For right-clicking, you can use the right button.
Drag and Drop
You can m ove icon s or windows by using “dr ag a nd d rop” be low:
1. Position the pointer over the object.
2. Press the left button; do not release it.
3. Holding down the button, move the pointer. The object moves together with
the pointer.
4. Release the button when the object reaches its destination.
Scroll
You can scroll through information in a list or in a document by using the glide
pad. Place your finger on the right part of the glide pad and move it back and forth.
This procedure works only in the limited applications.
Changing the Configuration
In the
Mouse Properties
pad, such as swapping left and right buttons, changing the pointer size, etc.
dialog box, you can change the configuration of the glide
2
• If you swap the left and right buttons, "tapping" on the glide pad as an
alternative method of pressing the left button will no longer function.
• If you prefer to use a mouse and turn off the glide pad, you can
disable the glide pad in the Setup Utility. See also Chapter 4.
2-5

Using The Keyboard
Your computer, equipped with the Windows Enhanced Keyboard, provides all the
functionality of a full-sized desktop keyboard.
Windows Logo Keys
2
System Function Keys
When pressed together with the Fn key, function keys set specific system
parameters. This combination is sometimes referred to as “hot keys”.
Opens the Windows Start menu.
Opens an application-specific short-cut menu equivalent to
right-clicking.
Switches the display output between the LCD screen and
exter nal monitor (if connected). See t he
Chapter 4 for details.
Decreases th e LCD scr een brigh t ness.
Display
section in
2-6
Increa ses t he LCD screen bri g htness.
Turns the screen backlight on and off.
Puts th e comput er in susp end mode (to RAM or to Disk,
according to the setup selection). See also Chapter 3.

Using External Floppy Disk Drive Unit
You can use double-density (2DD) 720KB or high-density (2HD) 1.44MB floppy
disks with the external floppy disk drive unit.
The keyboard/mouse port, RS-232C serial port and parallel port are available on
the rear side of the floppy disk drive unit. You can connect peripher a ls to th e floppy
disk drive unit. For more information about peripherals, refer to Chapter 4.
Connecting Exte rnal Floppy Disk Drive Unit
Turn off the computer before connecting the external floppy disk drive
unit; otherwise the floppy disk drive unit may not be recognized.
• Do not place the floppy disk drive unit on its side or upside down.
• Do not press on the floppy disk drive unit. It may damage the drive or
cause malfunction.
• Do not place the AC adapter on the floppy disk drive. It may cause the
drive to malfunction.
1. Tur n off the com p u ter.
2. Open the cover of the external floppy disk drive port on the right side of the
computer.
3. Connect the connector of the floppy disk drive unit to the floppy disk drive
port.
2
2-7

Removing External Floppy Disk Dri ve Unit
1. Remove the floppy disk from the floppy disk drive.
2. Tur n off the com p u ter.
3. Disconnect the floppy disk drive unit by simultaneously pressing the buttons
on each side of the connector and pulling it out.
4. Close the cover of the floppy disk drive port.
2
Handling Floppy Disks
Do not open the shutter and touch the disk inside; otherwise, you will not be able
•
to read or write data to the disk.
Do not place floppy disks near magnets or heat source, in direct sunlight or in a
•
dusty place, etc.
Never subject a disk to sudden shocks or extreme vibration. Do not drop, bend,
•
or p lace heavy objects on a di s k.
Do not spill liquid onto a disk.
•
Inserting and Removing a Floppy Dis k
Inserting
Hold the floppy disk with the arrow facing up and towards the drive. Slide the disk
into the drive until it locks into place.
2-8

Removing
• Always insert a floppy disk straight into the computer.
• When inserting the disk, make sure it is not upside down.
• Do not use excessive force when inserting the floppy disk. If you have
difficulty inserting or removing disks, seek the assistance of an
authorized service technician.
Before removing the floppy disk, make sure the indicator of the floppy
disk drive unit is not lit.
Press the eject button firmly. The disk will pop out slightly. Remove it and store it
properly.
Formatting a Floppy Dis k
1. Make sure the floppy disk is not write-protected, and insert it into the floppy
disk drive.
2. Double-click
3. Click
4. From the capacity drop-down list, select 1.44MB or 720KB.
5. Click
When you format a floppy disk, all data previously stored on the disk is
lost.
My Computer
3 ½ Floppy [A:]
to start formatting.
Start
on the desktop.
. From the
menu, select
File
Format
.
2
Backing Up Data
We recommend that you regularly backup the data on your hard disk drive.
Windows 98 has a backup function you can use to back up your data. See Windows
98 Help for details.
2-9
 Loading...