

Page 1
r::
r::
r::
r:::
r:::
r:::
r:::
r:::
r:::
r:::
-
•
-
-
1
Personal Computer
IIIZ
-
b'illHID
DISK BASIC MANUAL
SHARP
Page 2
DISK BASIC
Manual
Page 3
Introductory Note
This manual
is
based upon the DISK BASIC Interpreter MZ-2Z009, the system
software of the
MZ-700 personal computer.
(1) The DISK BASIC interpreter
MZ-2Z009 includes all commands
of
the
MZ-700 BASIC 1Z-013B. In
other
words, the DISK BASIC
is
an expansion
of
the BASIC 1Z-013B.
(2) For the multi-purpose MZ-700 personal computer, the system software
is
completely supported by a software pack (cassette tape, floppy disk, etc.) in
the
file
form.
This system software and the contents
of
this manual are subject to upgrading
changes for improvement, and for that reason the user
is
urged to particularly
note the file version number.
Please understand that
we
cannot be responsible
for damage incurred during,
or
as a result
of
operation.
(3) All system software for the
MZ-700 series personal computer
is
original
software of
SHARP
Corporation, and
is
covered by applicable copyrights. The
copying
or
reproduction
of
this software and/or this manual and its contents, in
whole
or
in part, and by whatever means and for whatever reason,
is
expressly
forbidden without the written permission by
SHARP
Corporation.
Page 4
Introduction
We want to take this opportunity to thank you for purchasing the Sharp DISK BASIC
system software.
The manual provides a general explanation
of
the use and programming of the DISK
BASIC system software for the personal computer.
This system software
is
provided in the floppy disk format, and careful attention
should be given to the proper use and handling of the disk drive and the disks
themselves.
Please refer to page
108
of
this manual for information regarding the
proper handling
of
the floppy disks.
When the floppy disk
is
to be used, it
is
recommended that the disk, a copy which
is
packed together with the original master disk (DISK BASIC), be used instead of the
master disk. This
is
for protection
of
the master disk in the event of some unexpected
trouble which might make the master disk useless.
Please store the master disk in a
safe place.
Before using the DISK BASIC please carefully and completely read this manual in
order to assure its correct use.
Page 5
• Difference between the
CASSETTE
TAPE
BASIC
and
DISK
BASIC.
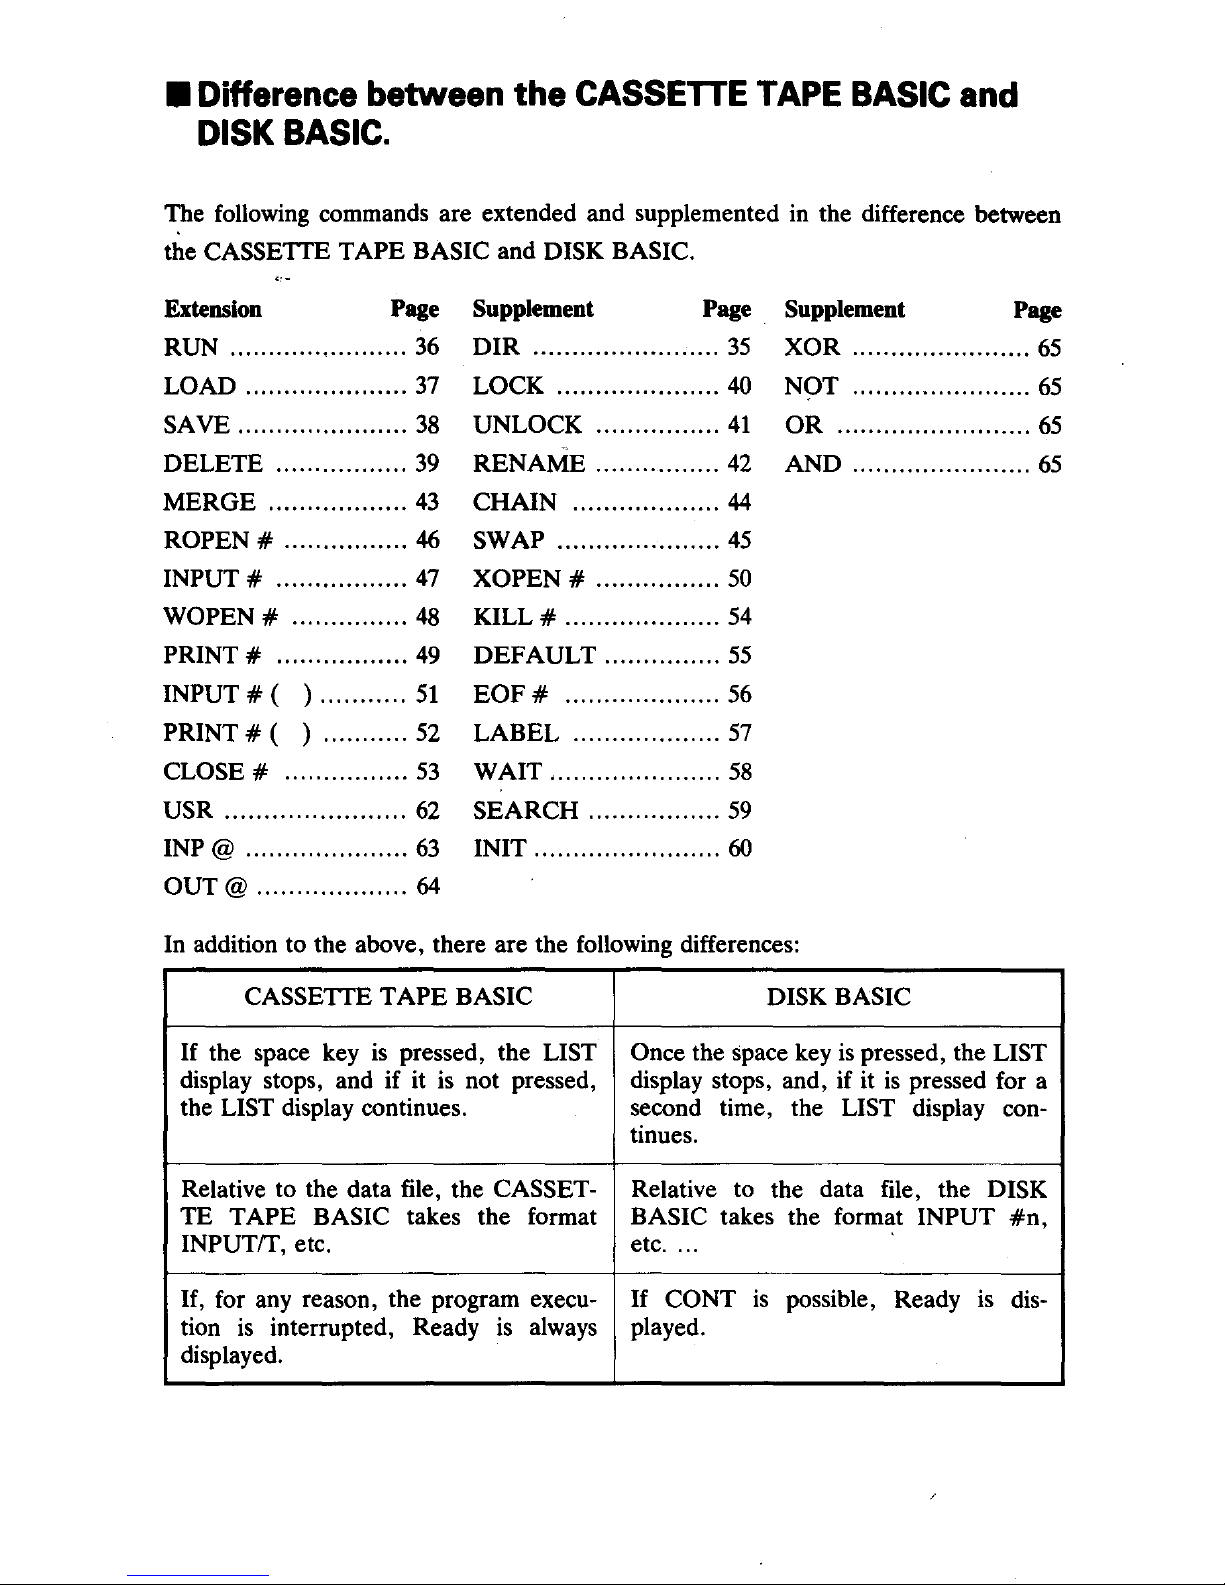
The following commands are extended and supplemented in the difference between
the
CASSETIE TAPE BASIC and DISK BASIC.
Extension Page
Supplement Page
Supplement Page
RUN
.......................
36
DIR
........................
35
XOR
.......................
65
LOAD
.....................
37 LOCK
.....................
40
N()T
.......................
65
SAVE
......................
38 UNLOCK
................
41
OR
.........................
65
DELETE
.................
39
RENAME
................
42
AND
.......................
65
MERGE
..................
43
CHAIN
...................
44
ROPEN #
................
46
SWAP
.....................
45
INPUT #
.................
47
XOPEN #
................
50
WOPEN #
...............
48
KILL #
....................
54
PRINT#
.................
49
DEFAULT
...............
55
INPUT # ( )
...........
51
EOF#
....................
56
PRINT # ( ) ...........
52
LABEL
...................
57
CLOSE #
................
53
WAIT
......................
58
USR
.......................
62
SEARCH
.................
59
INP@
.....................
63
INIT
........................
60
OUT@
...................
64
In
addition to the above, there are the following differences:
CASSETIE
TAPE
BASIC DISK BASIC
If
the space key
is
pressed, the LIST Once the space key
is
pressed, the LIST
display stops, and if it
is
not pressed,
display stops, and, if it
is
pressed for a
the
LIST display continues.
second time,
the LIST display con-
tinues.
Relative to the data file, the
CASSET- Relative to the data file, the DISK
TE TAPE BASIC takes the format BASIC takes the format INPUT
#n,
INPUTrr, etc. etc
....
If,
for any reason, the program execu-
If
CONT
is
possible,
Ready
is
dis-
tion
is
interrupted, Ready
is
always played.
displayed.
Page 6
CAS·SETTE
TAPE
BASIC
DISK BASIC
CONT
is
possible after execution
of
CONT
is
not possible after execution
of
END statement. END statement.
IcrRLI
+
I]]
has not effect.
IcrRLI
+
I]]
initialize the color and con-
sole,
aaQ
il!iIlIilW~iI
PbS:;r
8~.
Neglects space between reserved words;
Does not neglect space between re-
considers
GO~TO~lO
as
GOTO~
10.
served words.
Does not consider
GO~TO~lO
as
GOTO~lO.
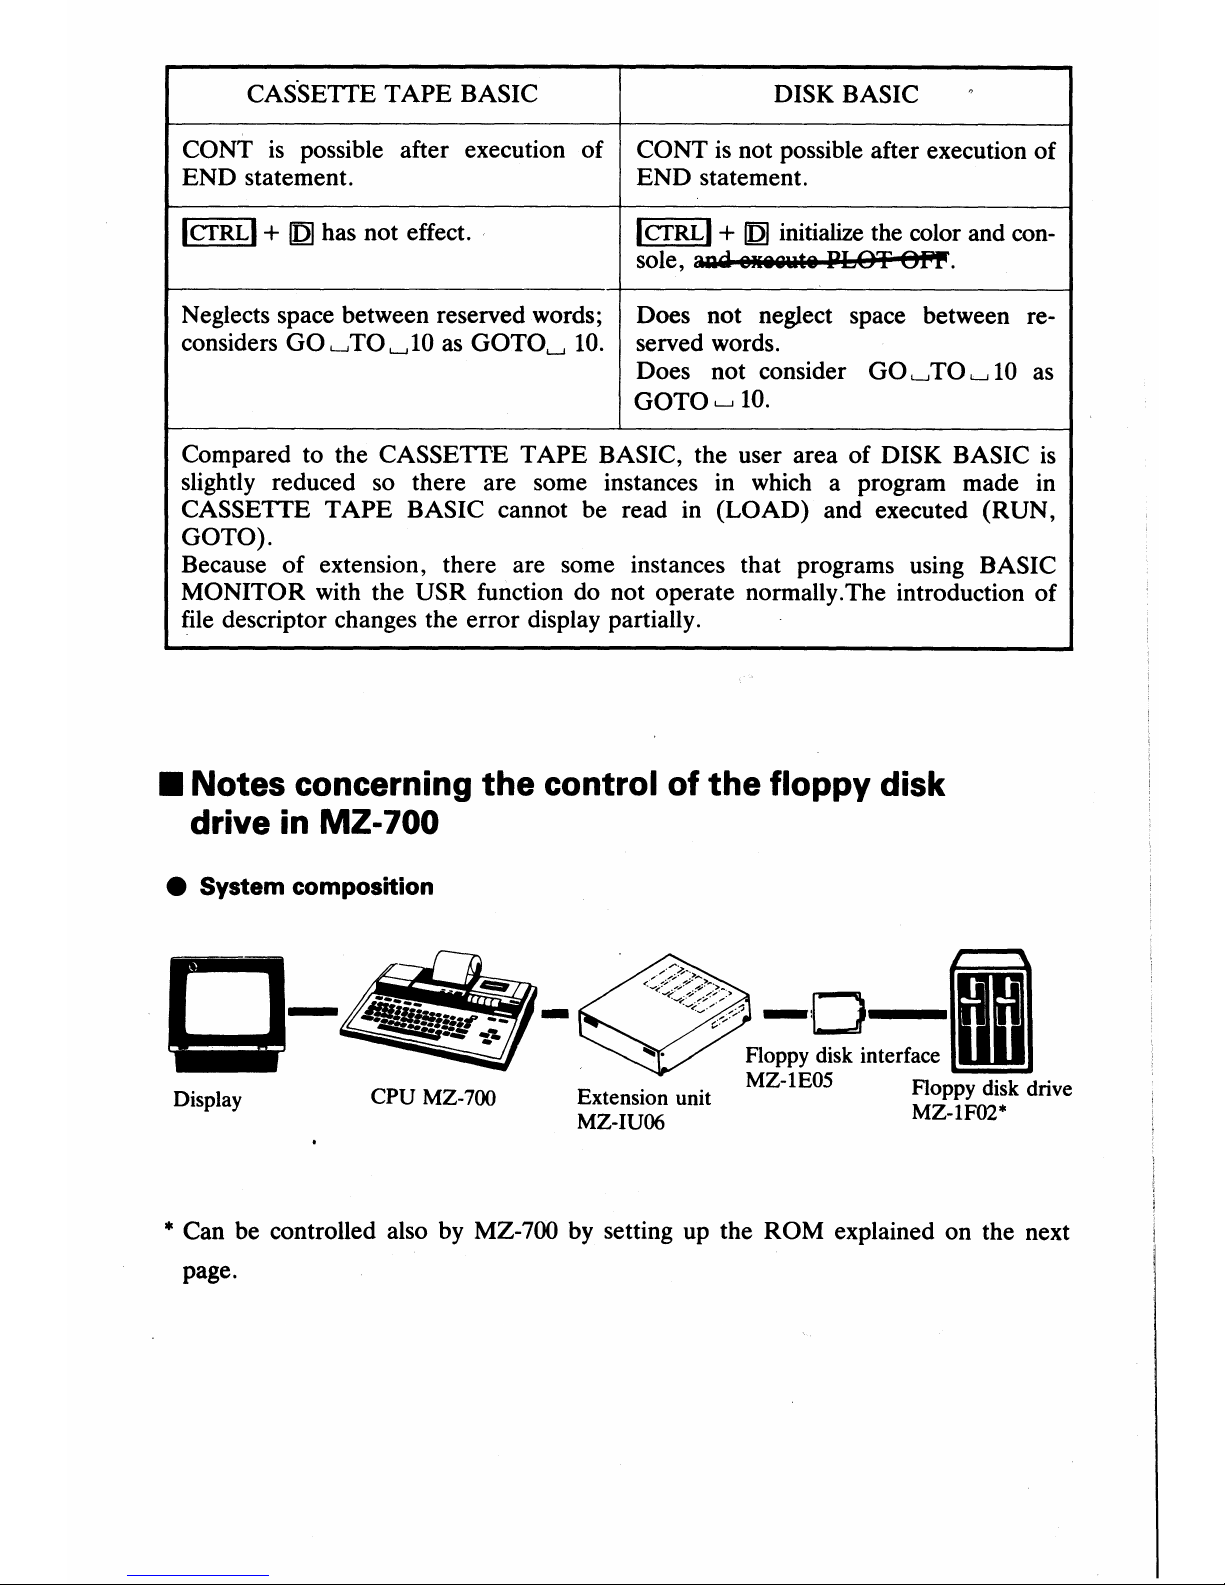
Compared to the CASSETI'E
TAPE
BASIC, the user area
of
DISK BASIC
is
slightly reduced so there are some instances in which a program made in
CASSETTE
TAPE
BASIC cannot be read in (LOAD) and executed
(RUN,
GOTO).
Because
of
extension, there are some instances that programs using BASIC
MONITOR with the USR function do not operate normally. The introduction
of
file descriptor changes the error display partially .
• Notes concerning
the
control of
the
floppy disk
drive in
MZ-
700
• System composition
t:J-
Display CPU MZ-700
• Can be controlled also by MZ-700 by setting up the ROM explained on the next
page.
Page 7
• Increase of floppy
'disk
interface-
ROM
•
Floppy
disk
drive
control
ROM
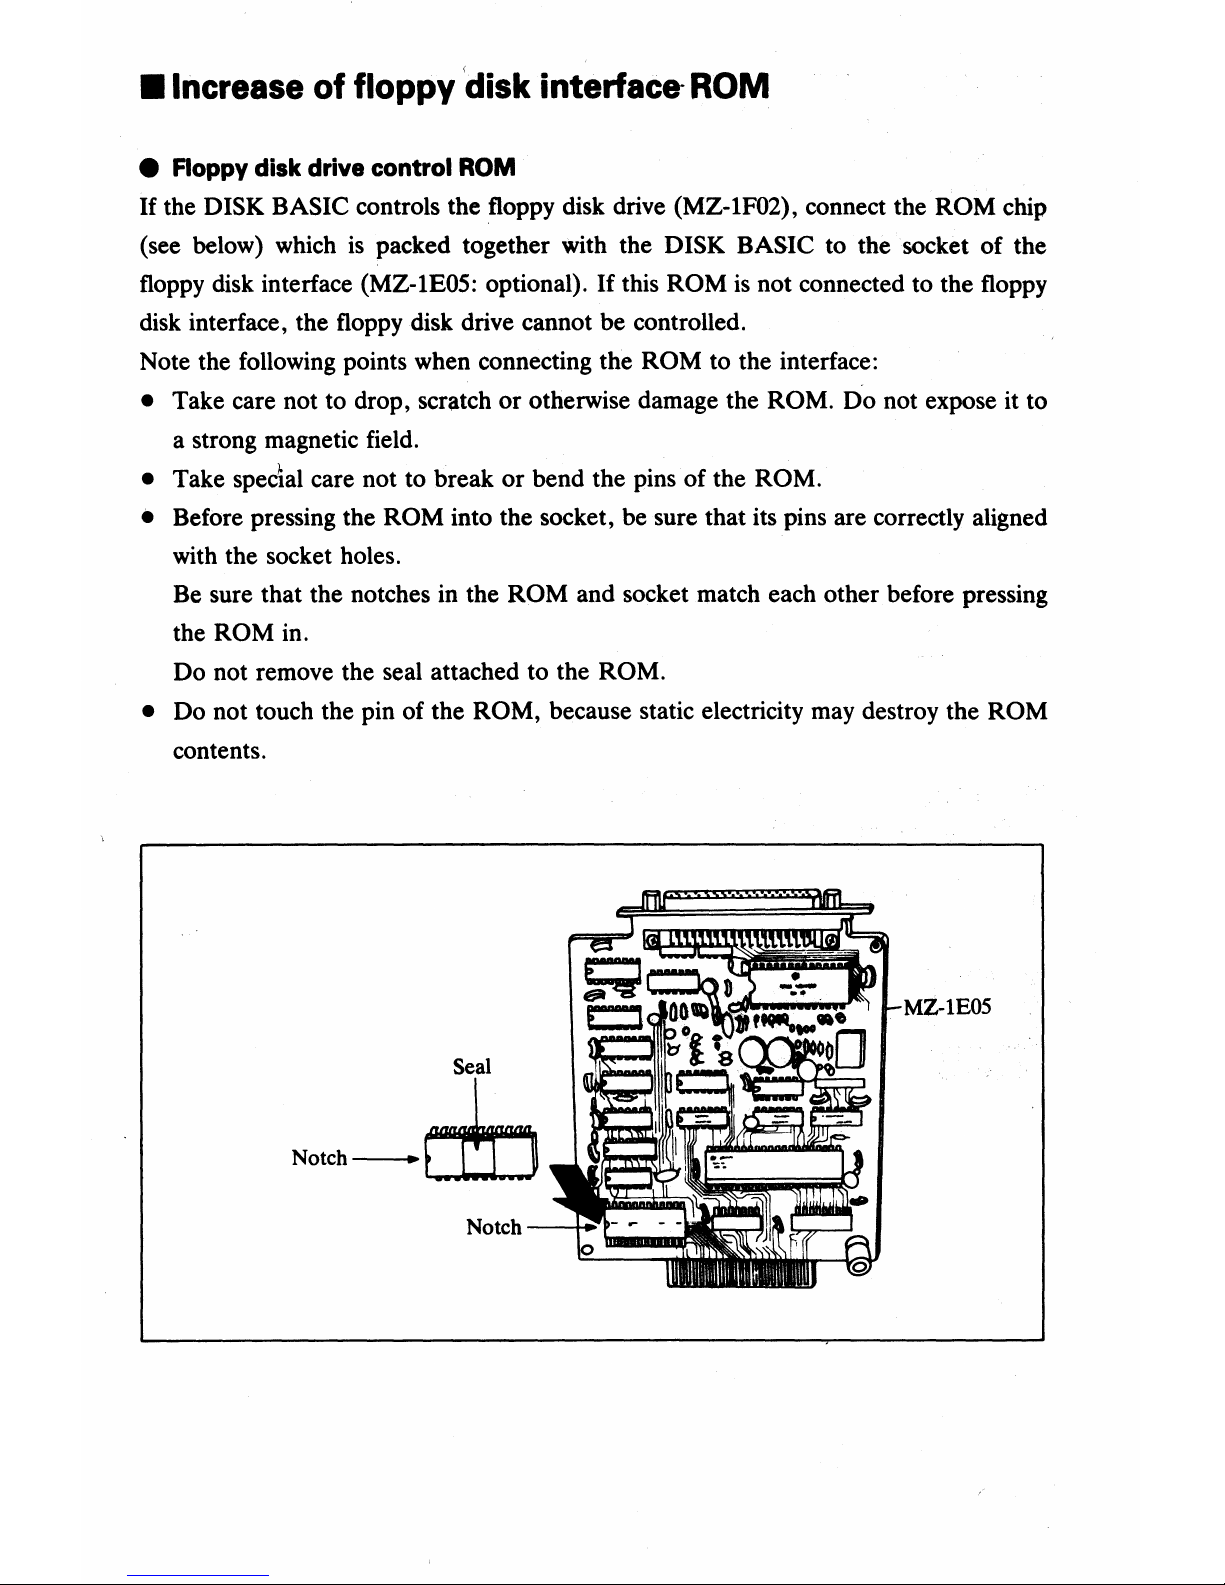
If
the DISK BASIC controls the floppy disk drive (MZ-1F02), connect the ROM chip
(see below) which
is
packed together with the DISK BASIC to the socket of the
floppy disk interface
(MZ-IEOS: optional).
If
this ROM
is
not connected to the floppy
disk interface, the floppy disk drive cannot be controlled.
Note the following points when connecting the
ROM to the interface:
• Take care not to drop, scratch or otherwise damage the ROM. Do not expose it to
a strong magnetic field.
• Take special care not to break
or
bend the pins of the ROM.
•
Before pressing the ROM into the socket, be sure that its pins are correctly aligned
with the socket holes.
Be sure that the notches in the
ROM and socket match each other before pressing
the
ROM in.
Do not remove the seal attached to the
ROM.
•
Do not touch the pin of the ROM, because static electricity may destroy the ROM
contents.
Seal
N_-ctn
Page 8
Contents
What
the DISK BASIC
is
....................................................................
: .......
10
Section
1:
DISK BASIC Outline
.................................................................
13
1.1 Starting the DISK BASIC
.................................................................
14
1.2 How to Copy the DISK BASIC
.........................................................
15
1.3 File Control
...................................................................................
17
1.4 Sequential Access File Control
..........................................................
18
1.5
Random Access File Control
.............................................................
23
1.6
PROGRAM
CHAIN (CHAIN)
.........................................................
26
1.7
PROGRAM
SWAP (SWAP)
............................................................
27
1.8 Reserved Words
.............................................................................
28
1.9 List
of
File Input/Output Devices
.....................................................
31
1.10 Initial Settings
................................................................................
31
Section 2: DISK BASIC Expansion,
New
Commands and Statements
...........
33
DIR
........................................................................................................
35
RUN
.......................................................................................................
36
LOAD
....................................................................................................
37
SAVE
.....................................................................................................
38
DELETE
.................................................................................................
39
LOCK
.....................................................................................................
40
UNLOCK
................................................................................................
41
RENAME
...............................................................................................
42
MERGE
..................................................................................................
43
CHAIN
...................................................................................................
44
SWAP
.....................................................................................................
45
ROPEN #
...............................................................................................
46
INPUT #
.................................................................................................
47
WOPEN #
...............................................................................................
48
PRINT #
.................................................................................................
49
XOPEN #
...............................................................................................
50
INPUT # ( )
........................................................................................
51
PRINT # ( )
...........................................................................................
52
Page 9
CLOSE #
................................................................................................
53
KILL #
................................................... : ...............................................
54
DEFAULT
..............................................................................................
55
EOF(#)
..................................................................................................
56
LABEL
...................................................................................................
57
WAIT
.....................................................................................................
58
SEARCH
................................................................................................
59
INIT
........................................................................................................
60
USR
......................................................................................................
62
INP@
.....................................................................................................
63
OUT@
................................................................................................
64
Logical Operation
......................................................................................
65
Section
3:
BASIC Monitor Functions
.........................................................
67
3.1
Editing Format
.............................................................................
68
3.2 Printer Switch (P Command)
...........................................................
68
3.3 DUMP (D Command)
...................................................................
69
3.4 MEMORY SET (M Command)
.......................................................
69
3.5 FIND (F Command)
........................................................................
70
3.6 GOSUB (G Command)
...................................................................
70
3.7 TRANSFER (T Command)
..............................................................
70
3.8 SAVE
(S
Command)
.......................................................................
70
3.9 LOAD (L Command)
......................................................................
71
3.10 VERIFY (V Command)
...................................................................
71
3.11
RETURN (R Command)
.................................................................
71
Section
4:
Application Programs
.............................................................
73
Use of the File Converter
..........................................................................
74
Section
5:
DISK BASIC Summary
..............................................................
81
5.1
Summary of DISK BASIC Commands, Statements, Functions and
Operations
....................................................................................
82
5.1.1 Commands
....................................................................................
82
5.1.2 File control statements
.....................................................................
84
5.1.3 BSD control statements
....................................................................
86
Page 10
5.1.4 BRD control statements
...................................................................
87
5.1.5 Error processing statements
..............................................................
88
5.1.6 Substitution statements
....................................................................
89
5.1.7 Input/output and color control statements
............................................
89
5.1.8 Loop statements
..........................................................................
: ..
91
5.1.9 Branch statements
...........................................................................
92
5.1.10 Definition statements
.......................................................................
93
5.1.11 Comment statements and control statements
.......................................
94
5.1.12 Music control statements
..................................................................
95
5.1.13 Machine language program control statements
......................................
96
5.1.14 Printer control statements
.................................................................
97
5.1.15 String control function
...................................................................
100
5.1.16 Tab function
................................................................................
101
5.1.17 Arithmetic operators
.....................................................................
101
5.1.18 Comparison logic operators
.............................................................
101
5.1.19 Other symbols
..............................................................................
102
•
5.2 Error Message List (DISK BASIC)
.................................................
104
5.3 Memory
Map........................................................
.....................
107
5.4 Use of the Floppy Disk
..................................................................
108
Page 11
10
What the
DISK
BASIC
is
The DISK BASIC has a strong
file
control function relative to the cassette base
. BASIC. For example, it makes the most of the features of a disk base which has
high-speed read-outlwrite-in capabilities, and, more than simply serving for data
storage, the
file
makes it possible to use the data area directly connected to the
computer system.
Moreover, because this
DISK BASIC also includes the control functions related to the
RS-232C
interface, it makes
it
possible to control various devices, by using the
MZ-SBI03
serial interface (optional).
Thus, it can be said that the
DISK BASIC
is
a new system software which permits the
expansion of the software range of the personal computer.
By
understanding this DISK BASIC and making full use of its many functions, the
user can create a higher level system.
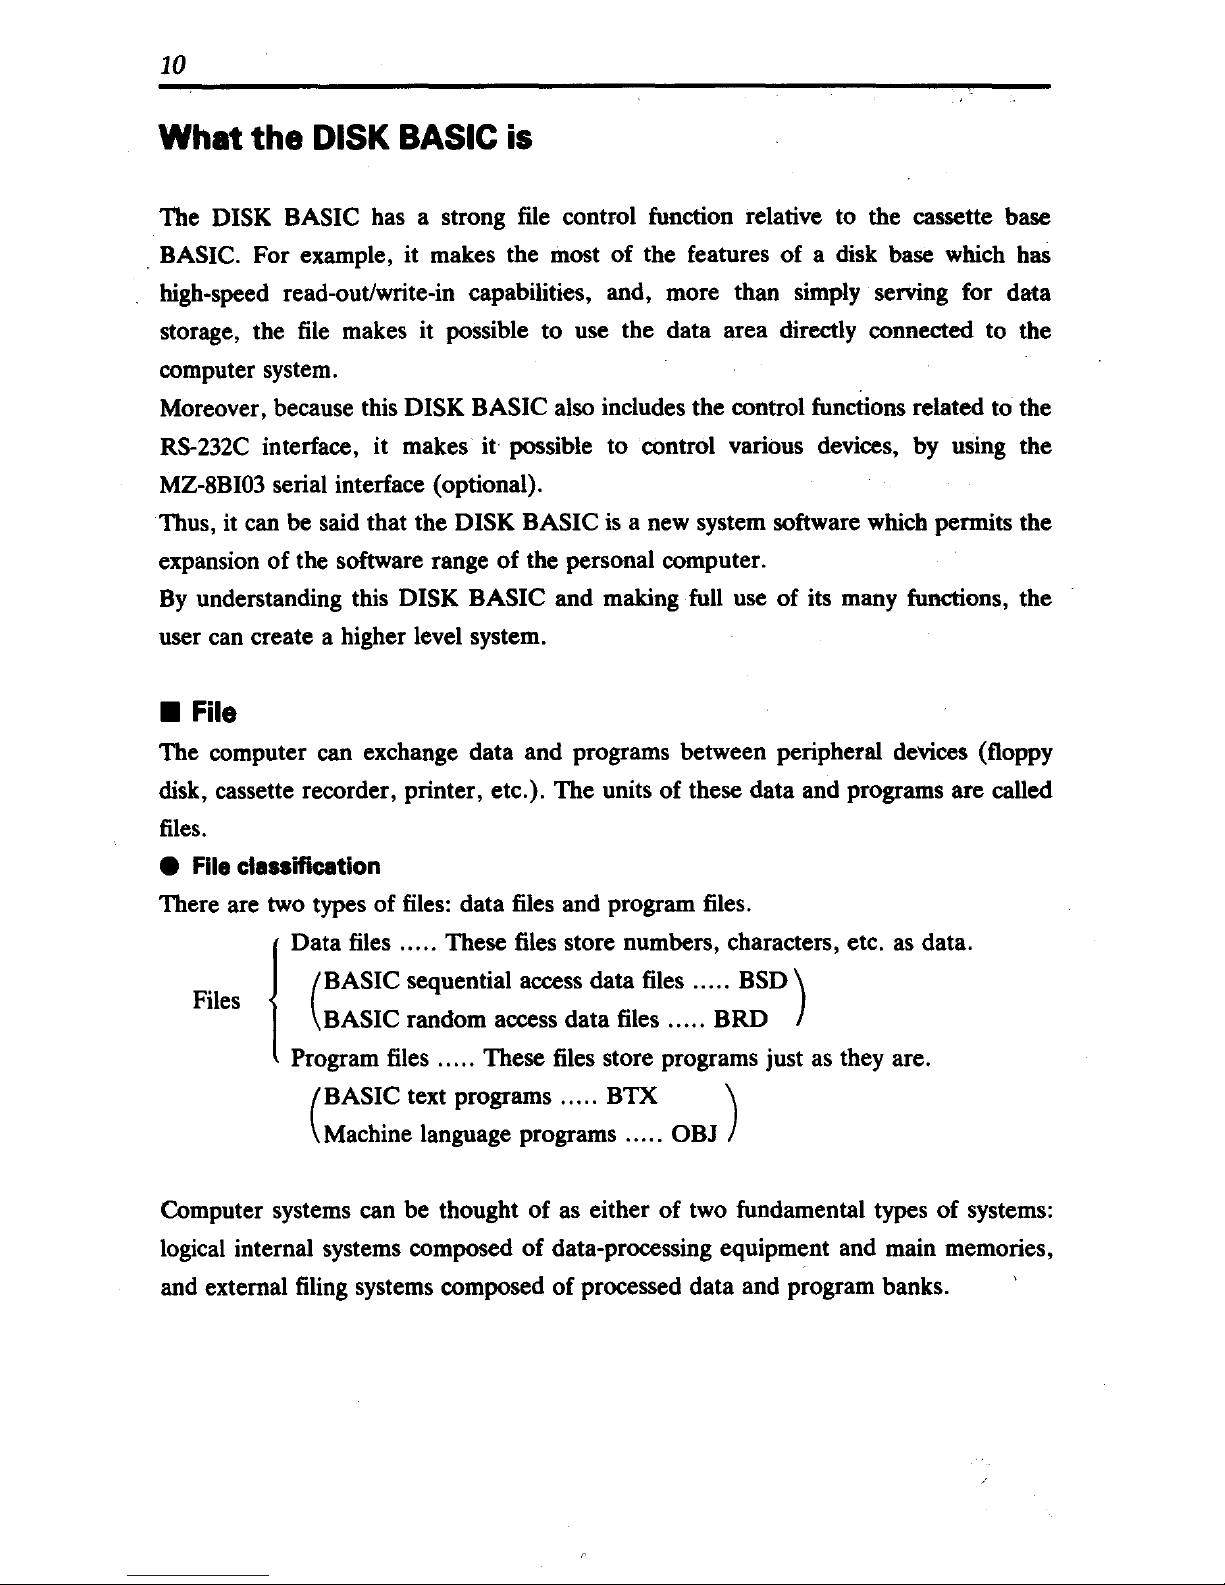
• File
The computer can exchange data and programs between peripheral devices (floppy
disk, cassette recorder, printer, etc.). The units of these data and programs are called
files.
• File cl.ssificatlon
There are two types of files: data files and program files.
1
Data files ..... These files store numbers, characters, etc.
as
data.
(
BASIC
sequential access data files .....
BSD)
Files
BASIC random access data files ..... BRD
Program files ..... These files store programs just
as
they are.
(
BASIC
text programs ..... BTX )
Machine language programs .....
OBJ
Computer systems can be thought of as either of two fundamental types of systems:
logical internal systems composed of data-processing equipment and main memories,
and external filing systems composed of processed data and program banks.
Page 12
11
• Data file control
There are two types of data files, depending upon the format of file access (the method
of data read-out and write-in).
One is called the sequential access
file
and the other
is
called the random access file.
With the sequential access file, the file data
access
is
treated as one sequential block.
The
file
name
is
specified for one group of data, and such data are accessed
in
order
from the heading at the time of registration
or
read-out of the file.
For the random access file on the other hand, the filed data are accessed at random.
One random access file is composed of one data group designated
by
its own
file
name. Each group of data
is
registered
in
the
file
in
a parallel arrangement, and
write-in and read-out of each data group
is
possible
by
using the number (expression)
assigned to that data.
If,
for example, a collection of certain data can be handled
as
a connected group (such
as, for example, data consisting of a series of decimal expressions used when producing
machine language programs by BASIC
POKE command and elements of tables that
can be presented in order from the heading, etc.), collection of such data
in
a
sequential access
file
can be useful and effective. The registration of data
in
a random
access file, on the other hand, can be useful when it
is
necessary to not only consider
the group of overall data but to read-out and/or write-in each element (when it
is
necessary, for example, to rewrite data or to search, arrange, delete, etc.).
Page 13
12
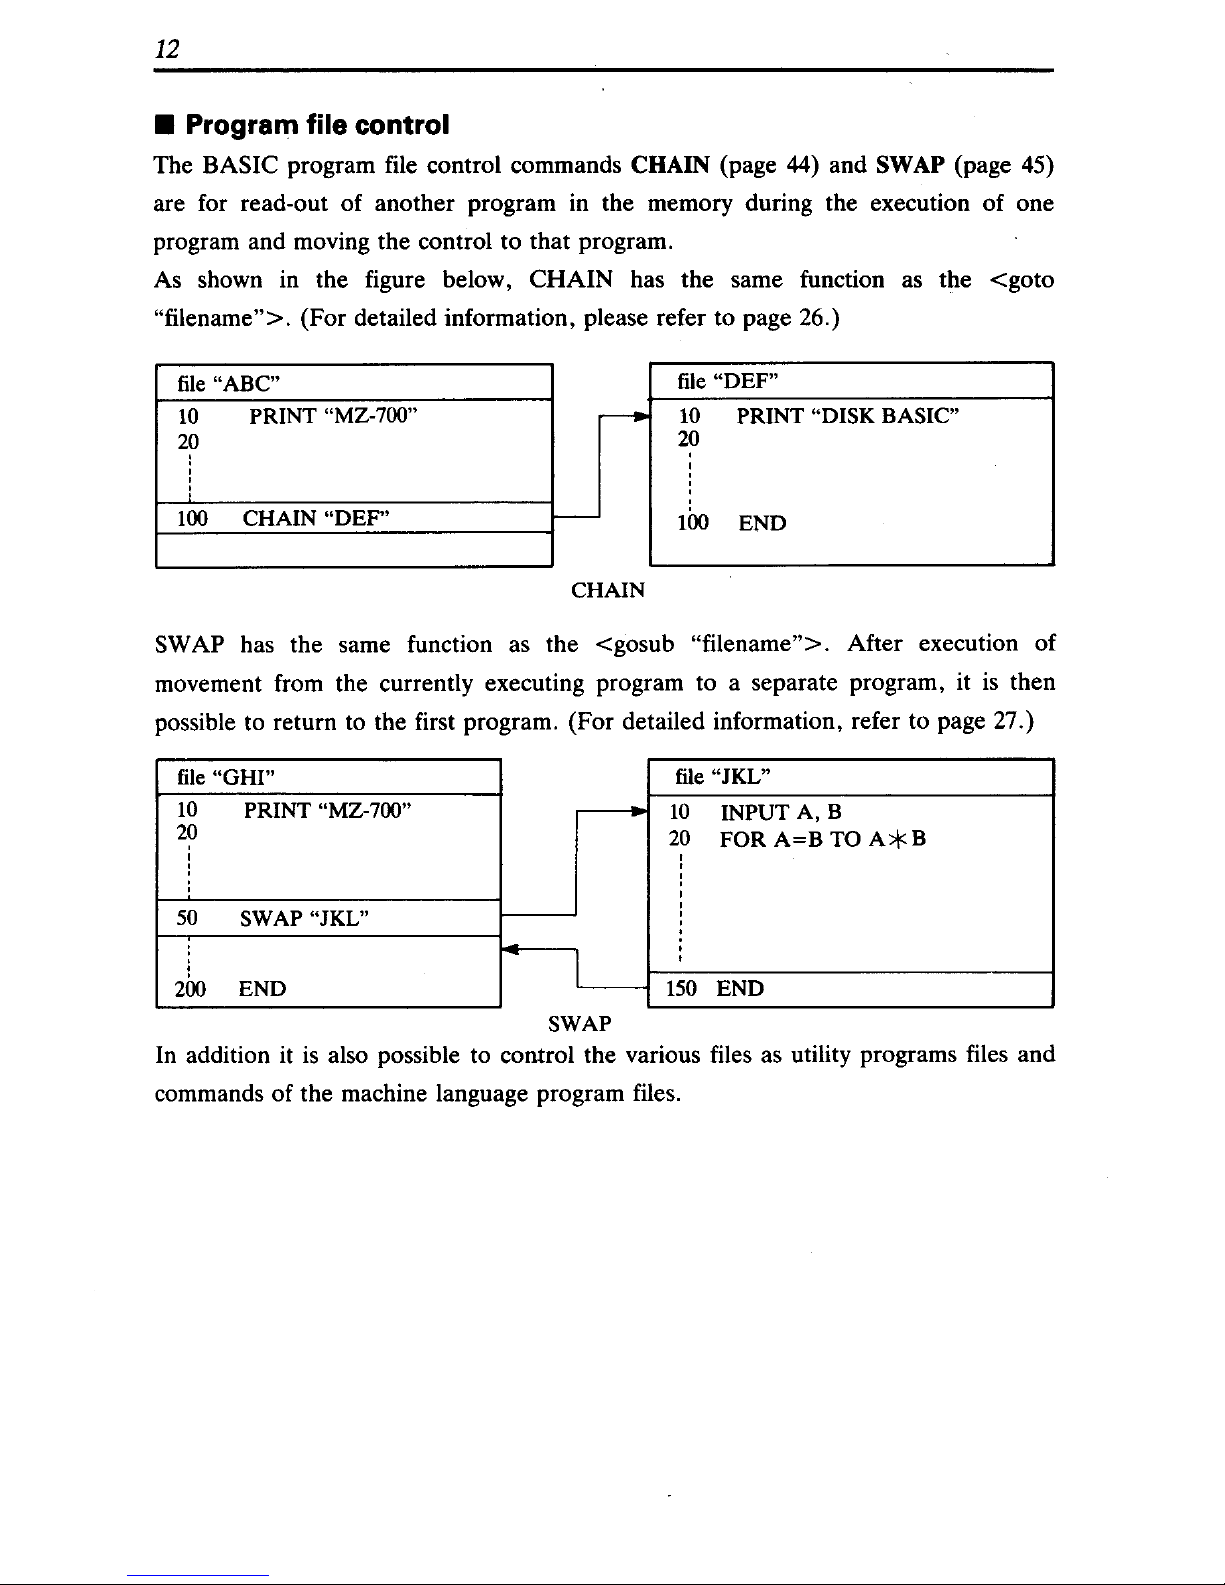
• Program file control
The BASIC program file control commands CHAIN (page 44) and SWAP (page 45)
are for read-out of another program in the memory during the execution of one
program and moving the control to that program.
As shown in the figure below, CHAIN has the same function as the
<goto
"filename">. (For detailed information, please refer to page 26.)
file
"ABC"
file "DEF"
10
PRINT "MZ-700"
,.-
10
PRINT "DISK BASIC"
20
20
,
,
,
,
100
CHAIN "DEF"
-
100
END
CHAIN
SWAP has the same function as the <gosub "filename">. After execution of
movement from the currently executing program to a separate program, it
is
then
possible to return to the first program. (For detailed information, refer to page 27.)
file
"GHI"
file "JKL"
10
PRINT "MZ-700"
,---
10
INPUT A, B
20
!
20
FOR
A=B
TO
A*B
50
SWAP "JKL"
f---
,
IL-
i
200
END
150
END
SWAP
In addition it
is
also possible to control the various files as utility programs files and
commands of the machine language program files.
Page 14
Section 1
DISK BASIC OUTLINE
This section explains the features
of
the DISK BASIC and outlines the file
controls. First
of
all
is
an explanation
of
the DISK BASIC starting method.
Section 2 includes a syntax explanation
of
the new commands and statements
which the DISK BASIC has, and Section 5 includes a summary
of
all commands,
statements, functions and operations which it has.
Page 15
14
1.1
Starting the DISK
BASIC
To make the DISK BASIC run, first perform initial loading by the IPL (Initial
Program Loader). The initial loading
is
easily executed. With the floppy disk drive
connected to the computer, switch the power supply
ON and then set the disk in which
the
DISK BASIC
is
included to drive number 1
(FDl).
After making the setting, the DISK BASIC
will
start when the power supply of the
computer
is
switched ON and F
is
input.
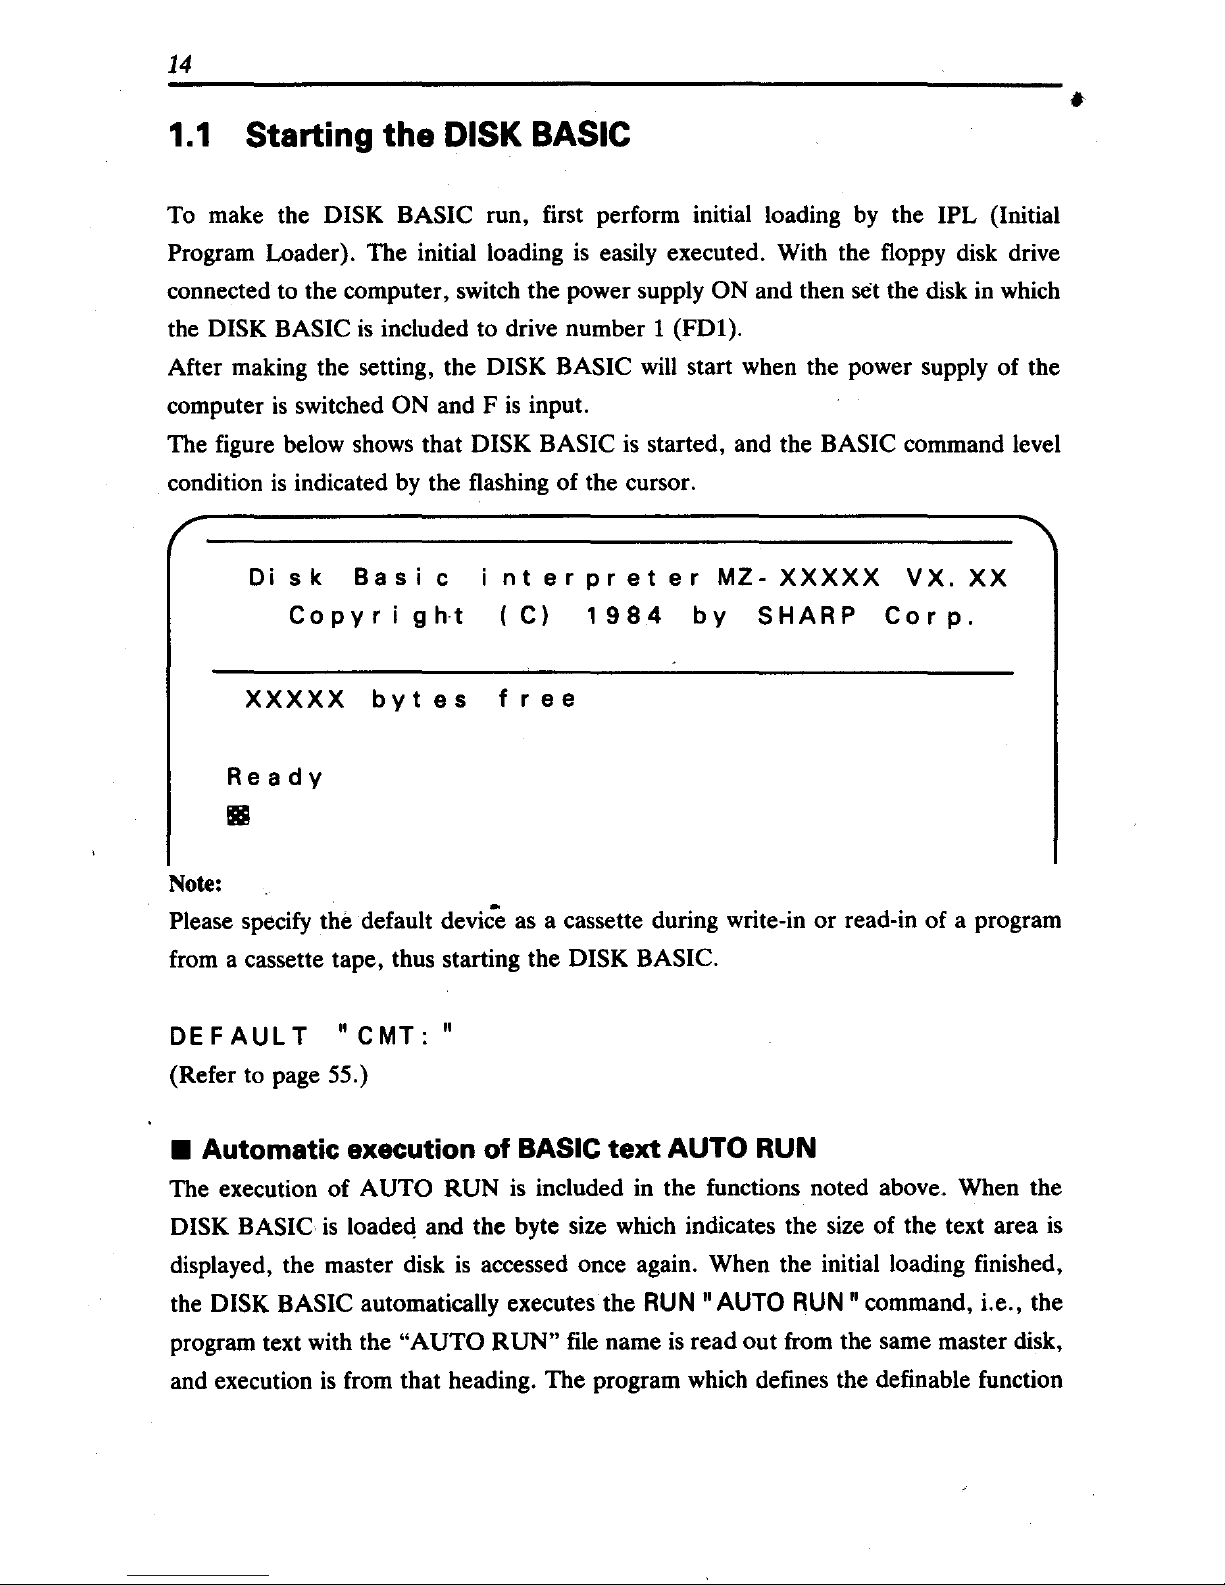
The figure below shows that
DISK BASIC
is
started, and the BASIC command level
condition
is
indicated by the flashing of the cursor.
Disk
Basic
Co
p y
rig
ht
nt
er
pr
et
er
MZ-
XXXXX
VX.
XX
(C)
1984
by
SHARP
Corp.
XXXXX
bytes
free
Note:
Ready
•
Please specify the default device
as
a cassette during write-in or read-in of a program
from a cassette tape, thus starting the
DISK BASIC.
DEFAULT
"CMT:"
(Refer to page 55.)
• Automatic execution of BASIC
text
AUTO RUN
The execution of AUTO RUN
is
included in the functions noted above. When the
DISK BASIC
is
loadeQ and the byte size which indicates the size of the text area
is
displayed, the master disk
is
accessed once again. When the initial loading finished,
the
DISK BASIC automatically executes the RUN"
AUTO
RUN
n command, Le., the
program text with the
"AUTO RUN"
file
name
is
read out from the same master disk,
and execution
is
from that heading. The program which defines the definable function
•
Page 16
15
,
key
is
registered by this file name on the supported master disk.
In addition, because the NEW command
is
at the end of this program,
"READY"
is
displayed after execution, and the text
is
erased before the cursor begins flashing.
(Here, try the execution of
LOAD
"AUTO
RUN"
and check the list.)
If
you want to start a certain program after the start of the DISK BASIC, the file
name
of
that program should be saved on the master disk as
"AUTO
RUN."
1.2 How to Copy the Disk
Basic
Start the DISK BASIC and prepare a new floppy disk for copying.
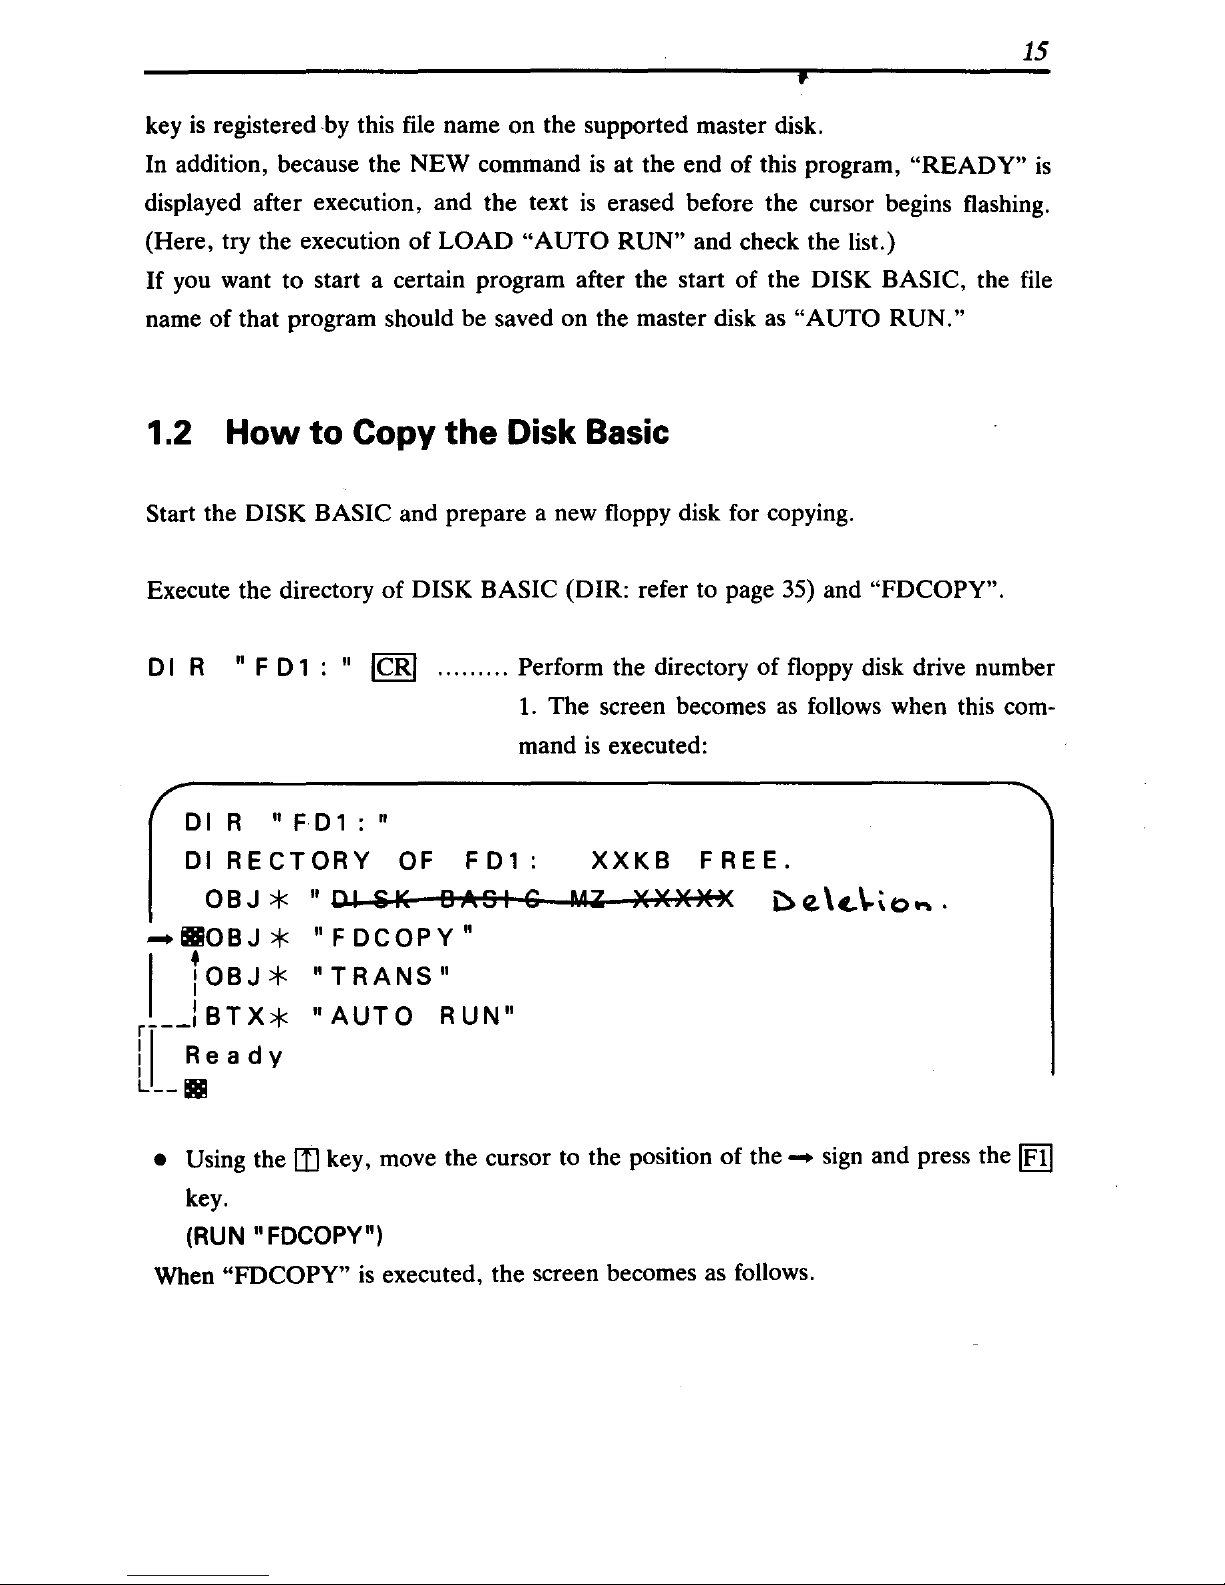
Execute the directory
of
DISK BASIC (DIR: refer to page 35) and "FDCOPY".
01 R
"F
0 1 : "
ICRI
.........
Perform the directory
of
floppy disk drive number
1.
The screen becomes
as
follows when this com-
mand
is
executed:
OIR
"F01:"
01
RECTORY
OF
F01:
XXKB
FREE.
OBJ*"OISK
BASIS
Ul
XXX)H(
i:)e.\'\.;'t>~.
-IIIOBJ
*
"F
OCOPY"
I
iOBJ*
"TRANS"
r--J
BTX*
"AUTO
RUN"
I1
Ready
L_III
• Using the
ill
key, move the cursor to the position of the - sign and press the
~
key.
(RUN
"FOCOPY")
When "FDCOPY"
is
executed, the screen becomes as follows.
Page 17
16
FD
For
mat I Copy
Ut i lit
Y
VX.
xx
[
Funct
i
on
I
F
For
mat
d i s k
C
Copy
d i s k
I
Bo
ot
[
Co
mma n d
are
a I
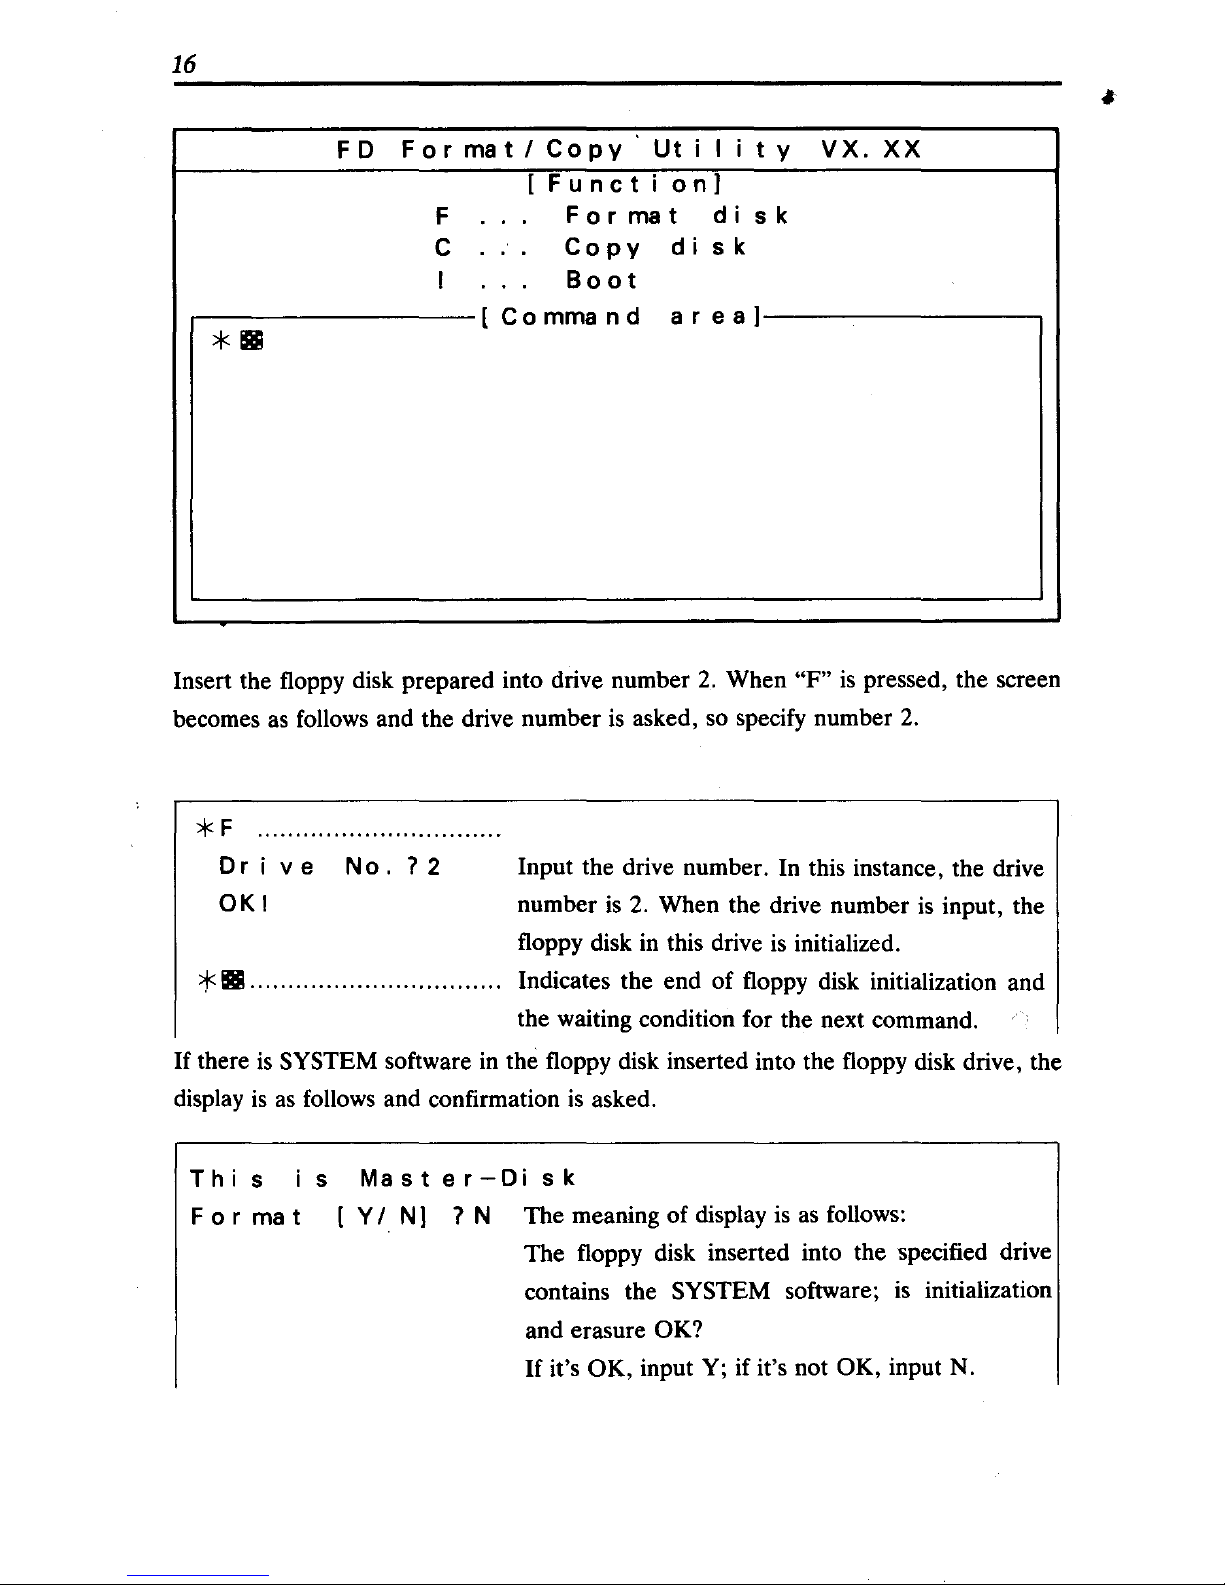
*-
Insert the floppy disk prepared into drive number
2.
When "F"
is
pressed, the screen
becomes
as
follows and the drive number
is
asked, so specify number
2.
*F
..............................
..
Drive
No.?2
OKI
Input the drive number. In this instance, the drive
number
is
2.
When the drive number
is
input, the
floppy disk in this drive
is
initialized.
* _
.. .. .. .. .. .. ..
..
.
..
..
.. ..
.
..
.
..
..
Indicates the end of floppy disk initialization and
the waiting condition for the next command.
If
there
is
SYSTEM software in the floppy disk inserted into the floppy disk drive, the
display
is
as
follows and confirmation
is
asked.
This
is
Master-Disk
For
ma t
[Y
I
NI?
N The meaning
of
display
is
as follows:
The floppy disk inserted into the
1>pecified
drive
contains the
SYSTEM software;
is
initialization
and erasure
OK?
If
it's OK, input Y; if it's not OK, input N.
Page 18

17
*111....................................
If
N
is
input, changes to the condition of awaiting
the next command, and, if Y
is
input, the floppy
disk
is
initialized and changes to the condition of
awaiting the next command.
If
C
is
input, the screen becomes as follows:
* C
.............................
Copies the entire floppy disk.
Source
Drive
NO.?1
............
Specifies the drive of the inserted source disk (original
disk) (drive number 1, in this instance).
De
s t n a t
ion
D r i
ve
No.?
2
...........
" Specifies the drive
of
the inserted destination disk
(new disk) (drive number 2, in this instance).
* III
..............................
Indicates the end of the entire floppy disk copying and
awaiting the next command.
Then the copying of the
DISK BASIC
is
finished. The DISK BASIC
is
started when
" ! "
is
input.
Note:
If
the source drive and the destination drive are the same, refer to REFERENCE
(page 78).
1.3
File
Control
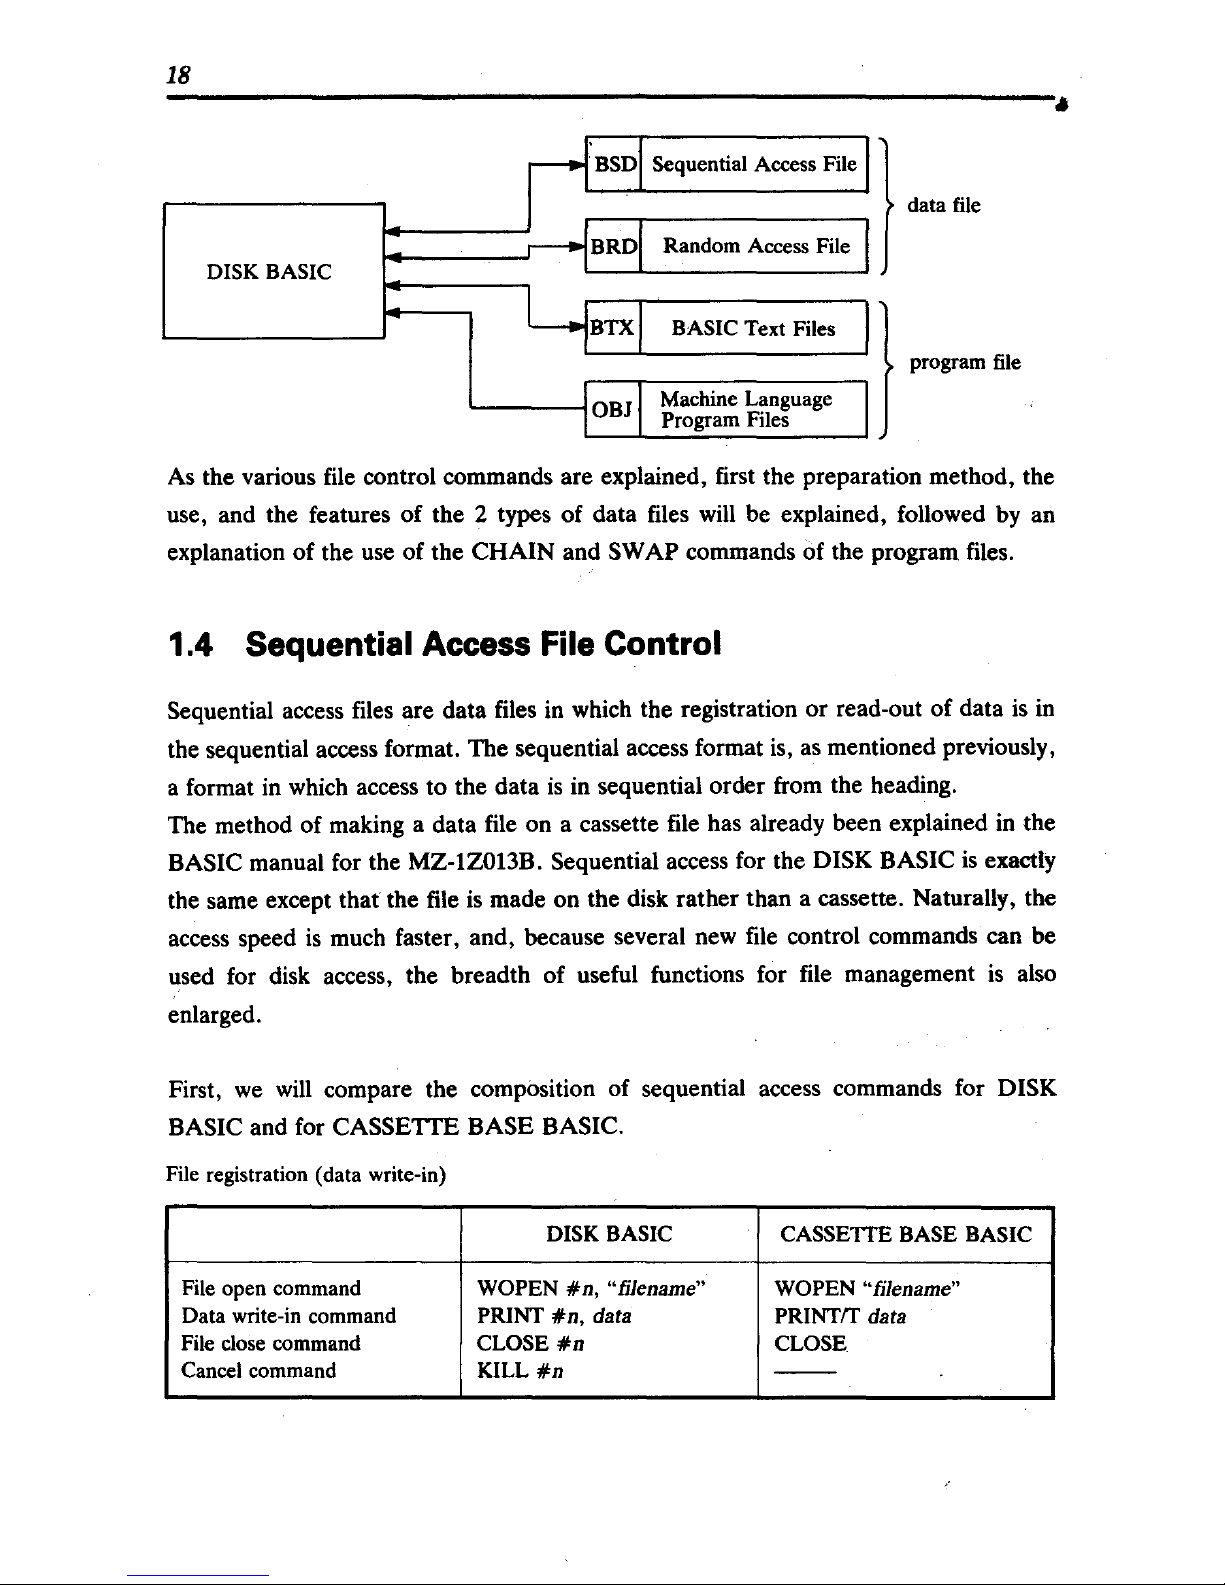
There are, as mentioned in the "File" section, 3 types
of
files produced by the DISK
BASIC:
the 2 types
of
data files, sequential access files (BSD) and random access files
(BRD), and the
BASIC text (BTX) program files. The other type
of
file: the machine
language program files (OBJ),
is
a file which registers programs prepared in the
MONITOR mode, etc. on the floppy disk. This can be a program by itself
or
it can be
linked to a
BASIC text as a BASIC machine language area. Thus, even though it can
be used with the
DISK BASIC, it
is
not a
file
to prepare and to change its contents
with the
DISK BASIC.
Page 19
18
DISK BASIC
Sequential Access File }
data file
BASIC Text Files }
L
..
__
--:---r-------. program file.
_ Machine Language
Program Files
As
the various
file
control commands are explained, first the preparation method, the
use, and the features of the 2 types of data files
will
be explained, followed
by
an
explanation of the use of the CHAIN and
SWAP commands of the program files.
1.4 Sequential
Access
File Control
Sequential access files are data files
in
which the registration or read-out of data
is
in
the sequential access format. The sequential access format is,
as
mentioned previously,
a format
in
which
access to the data
is
in sequential order from the heading.
The method of making a data
file
on a cassette
file
has already been explained
in
the
BASIC manual for the MZ-IZ013B. Sequential access for the DISK BASIC
is
exactly
the same except that the
file
is
made on the disk rather than a cassette. Naturally, the
access speed
is
much faster, and, because several new
file
control commands can be
used for disk access, the breadth of useful functions for
file
management
is
also
enlarged.
First,
we
will
compare the composition of sequential access commands for DISK
BASIC
and for CASSETTE BASE BASIC.
File registration (data write-in)
DISK BASIC
CASSETTE BASE BASIC
File open command WOPEN
#n,
"fjJename" WOPEN "filename"
Data write-in command PRINT
#n,
data
PRINTIT data
File close command CLOSE
#n
CLOSE
Cancel command
KILL
#n
--
Page 20
19
i
File call (data read-out)
DISK BASIC
CASSETIE
BASE BASIC
File open command
ROPEN
#n,
"fjJename" ROPEN "fjJename"
Data read-out command
INPUT
#n,
variable INPUTfT variable
File close command CLOSE
#n
CLOSE
File end detection
IF
EOF
(#n)
THEN
--
As you can see, comparison of the various commands shows an almost I-to-l
relationship. Note, however, that DISK BASIC commands always include elements
#n.
These numbers are called logical numbers, and must always be designated for
DISK BASIC file access.
For
CASS~TIE
BASE BASIC, file access for data write-in or read-out
is
limited to
one file. For DISK BASIC, however, contains several files in order to make the best
use of its random access feature at will, so that it
is
possible to simultaneously control
several
(maximum 10) files. And, if a file
is
opened, optionally selected logical
numbers can be defined and thereafter used for designation of the pertinent file,
thereby eliminating the necessity
of
using the file name each time.
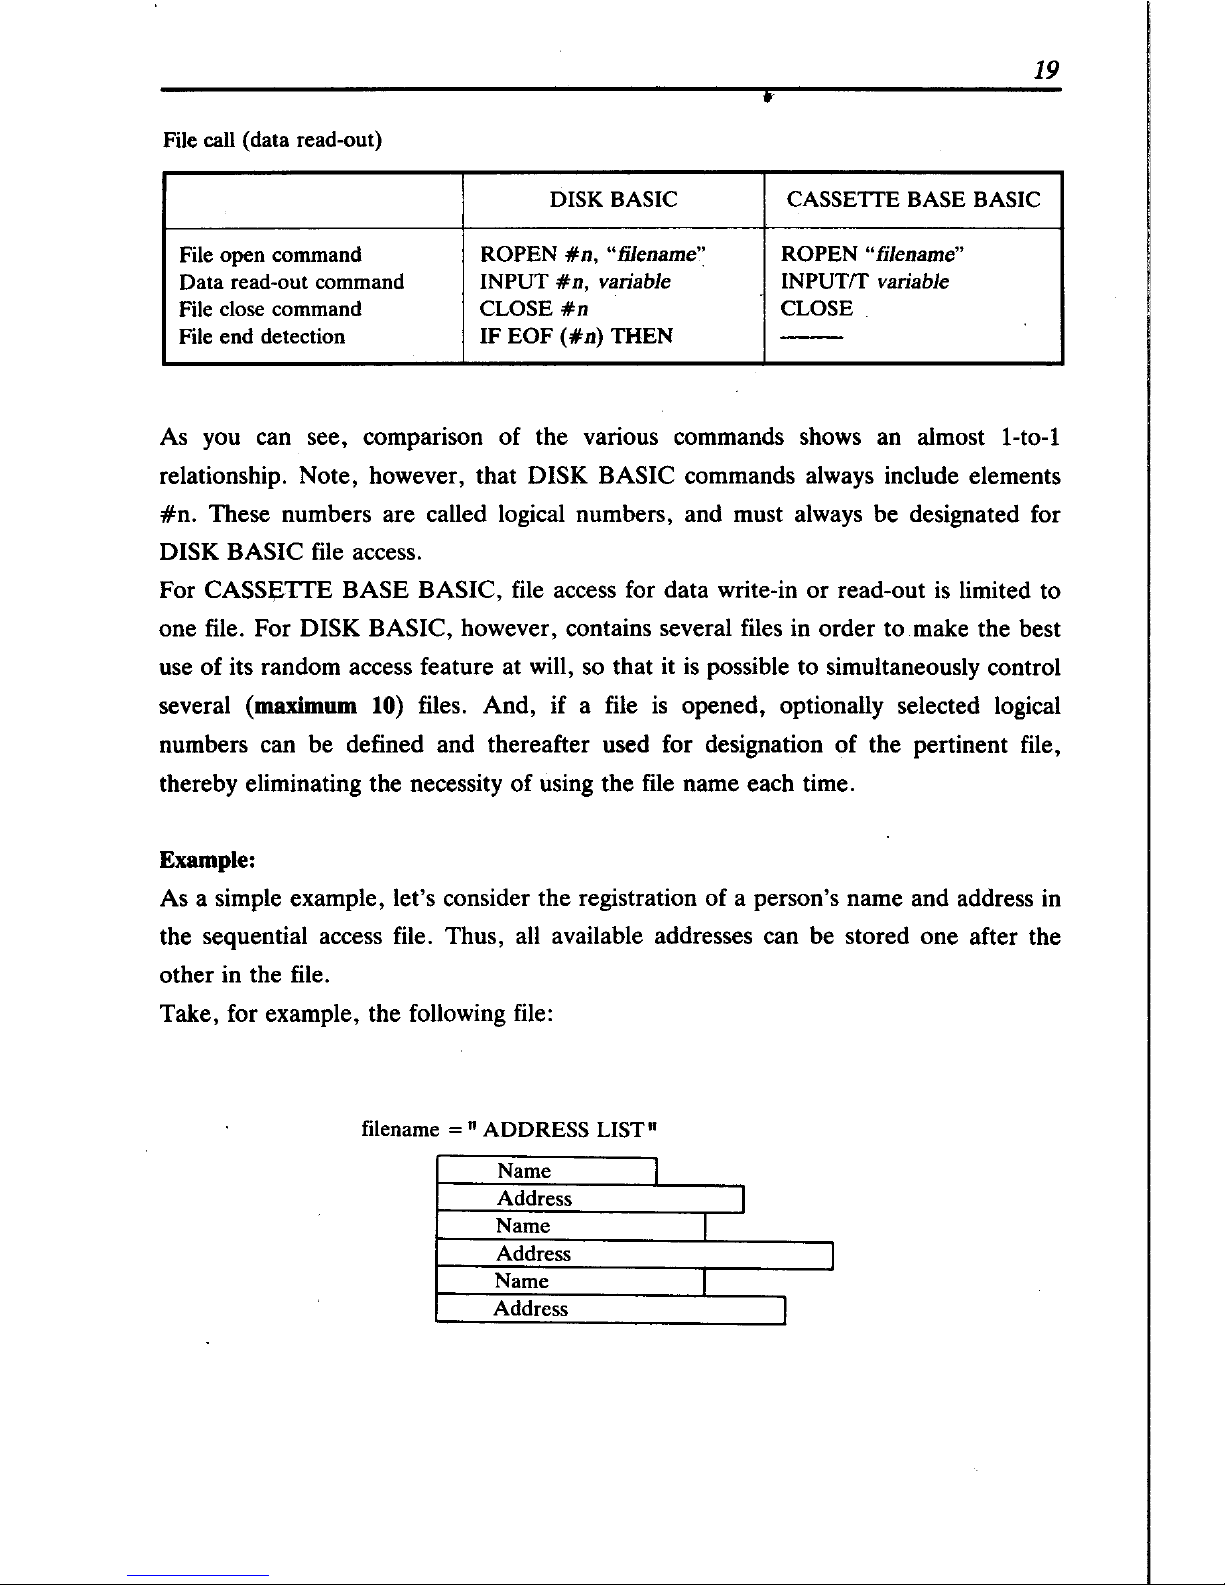
Example:
As a simple example, let's consider the registration of a person's name and address
in
the sequential access file. Thus, all available addresses can be stored one after the
other in the file.
Take, for example, the following file:
filename =
If
ADDRESS LIST"
Name
I
Address
I
Name
I
Address
I
Name
I
Address
I
Page 21
20
The reason that the space used for each name and each address
is
of various lengths
is
because the data registered by sequential access are not usually
of
a fixed length; the
length varies according to the data. For the random access files, to be explained later,
all
data are stored in boxes of a fixed length
of
32
bytes.
If,
as in this example, data are
to be handled
as
one group, and, as for the addresses above,
32
bytes
is
not sufficient,
and the lengths are different, then the use
of
the sequential access file
is
convenient.
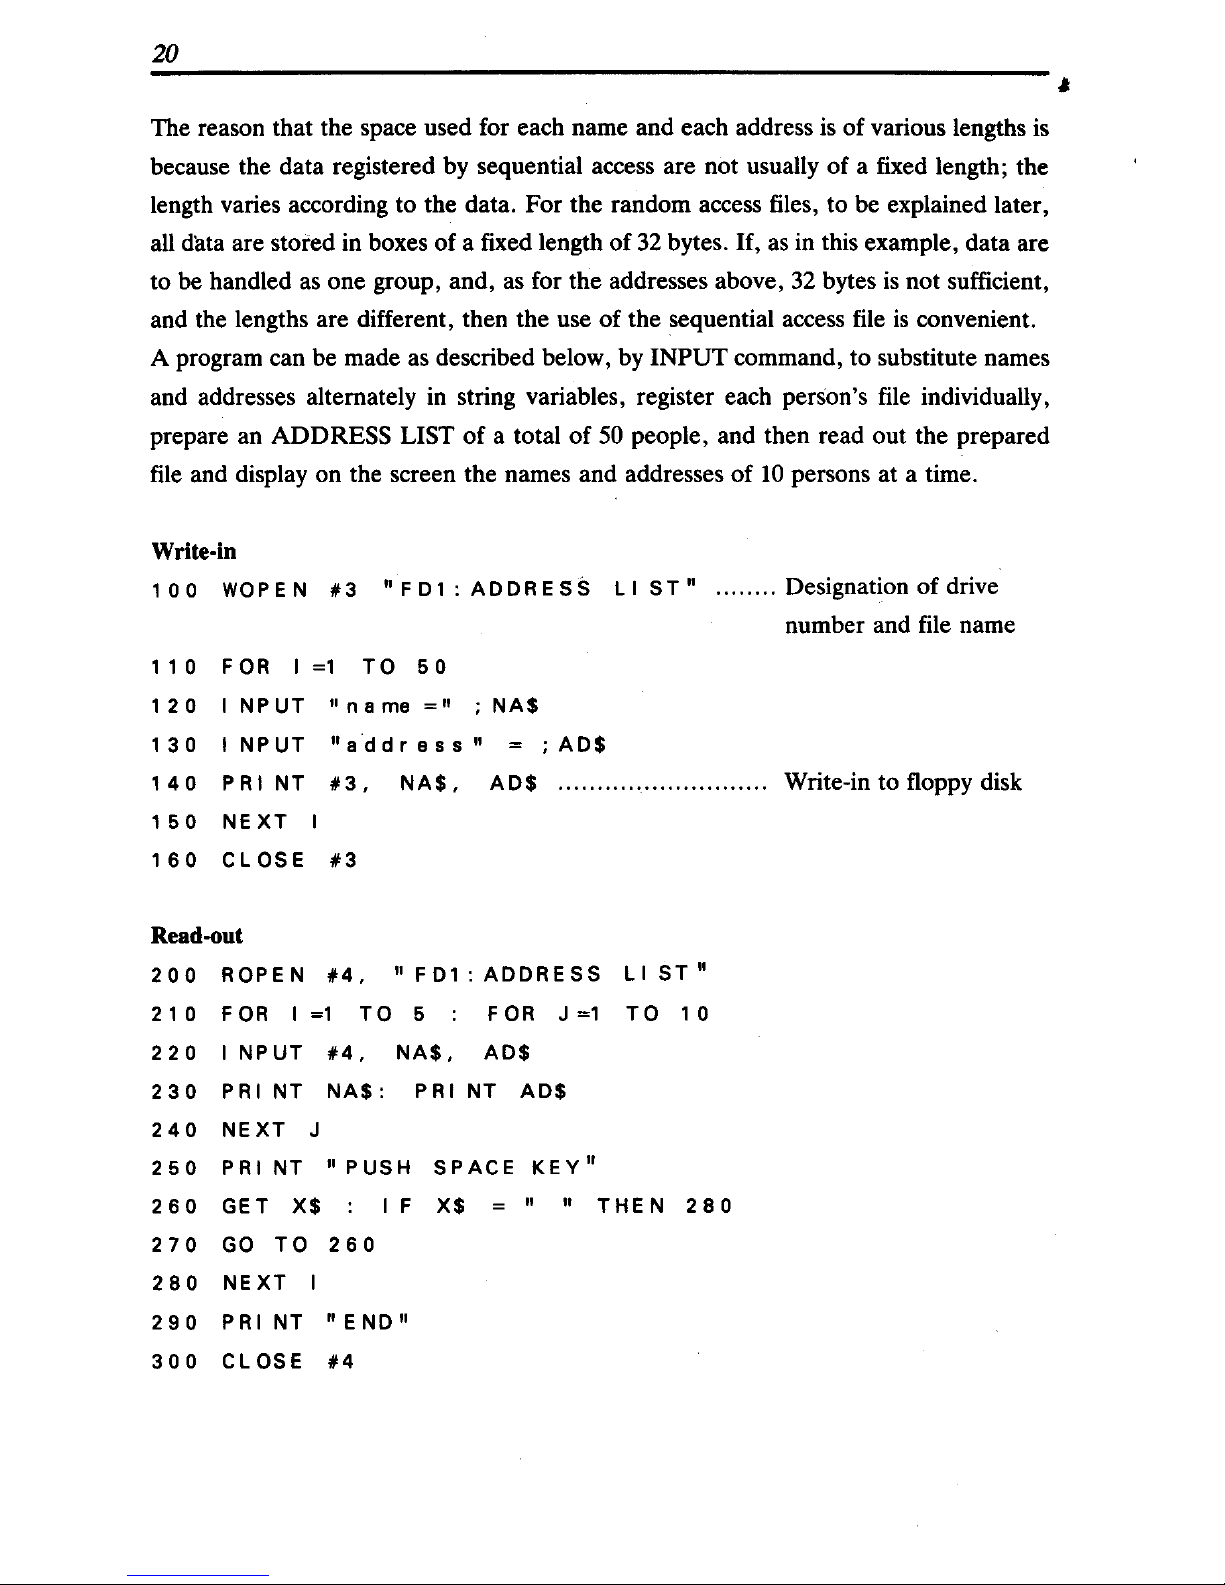
A program can be made as described below, by
INPUT command, to substitute names
and addresses alternately in string variables, register each person's file individually,
prepare an ADDRESS LIST
of
a total
of
50 people, and then read out the prepared
file
and display on the screen the names and addresses
of
10
persons at a time.
Write-in
1 0 0
WO
PEN
# 3
"F
D 1 :
ADD
RES S LIS
T"
........
Designation of drive
number and file name
1 1 0
FOR I =1
TO
5 0
120
INPUT
"name="
;NA$
130
INPUT
"address"
=
;AD$
140
PRI
NT
#3,
NA$,
AD$
...........................
Write-intofloppydisk
150
NEXT
I
160
CLOSE
#3
Read-out
200
ROPE N #4,
"FD1:
ADDRESS
LIST"
210
FOR I =1
TO
5
FOR
J
=1
TO
10
220
INPUT
#4,
NA$,
AD$
230
PRI
NT
NA$ : PRI
NT
AD$
240
NEXT
J
250
PRI
NT
"
PUSH
SPACE
KEY"
260
GET
X$
F
X$
"
THEN
280
270
GO
TO
260
280
NEXT
I
290
PRI
NT
"END"
300
CLOSE
#4
,
Page 22
21
•
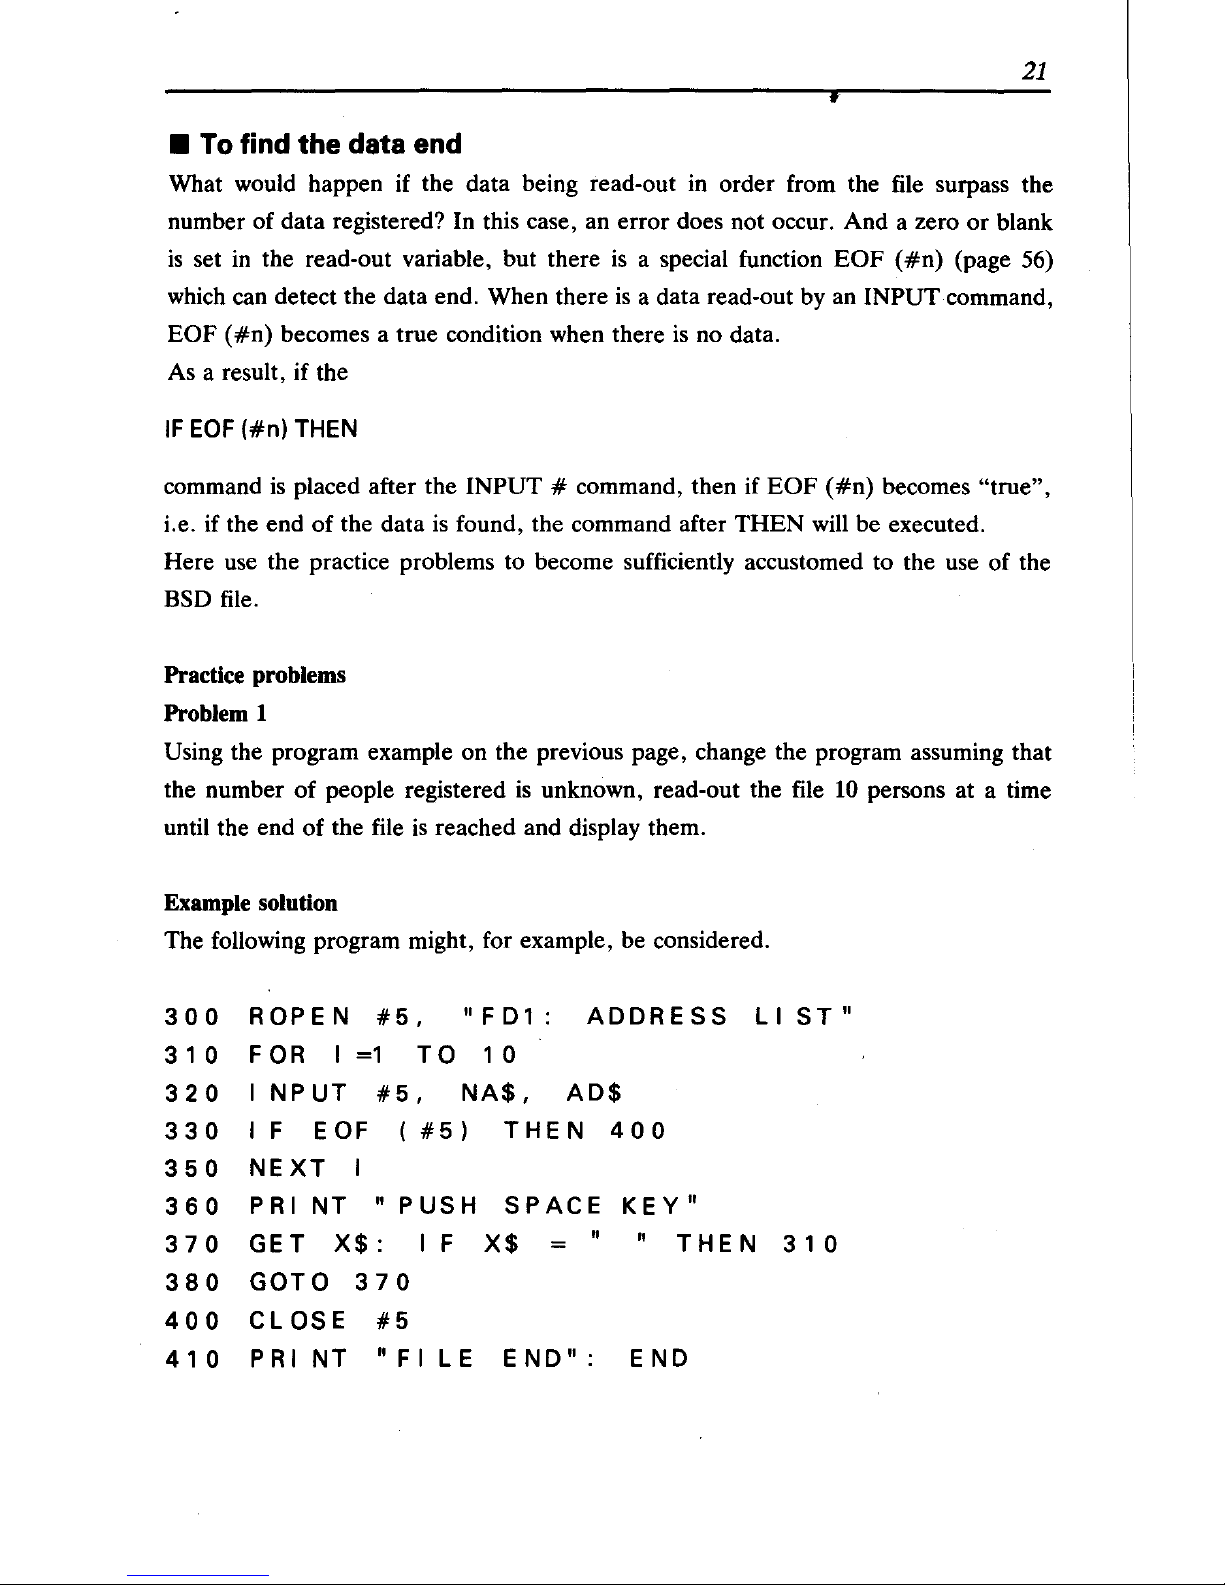
• To find
the
data end
What would happen if the data being read-out in order from the file surpass the
number of data registered? In this case, an error does not occur. And a zero
or
blank
is
set
in
the read-out variable, but there
is
a special function
EOF
(#n)
(page 56)
which can detect the data end. When there
is
a data read-out by an INPUT command,
EOF
(#n)
becomes a true condition when there
is
no data.
As a result, if the
IF
EOF
(#n)
THEN
command
is
placed after the INPUT # command, then if
EOF
(#n)
becomes "true",
i.e. if the end
of
the data
is
found, the command after
THEN
will
be executed.
Here use the practice problems to become sufficiently accustomed to the use of the
BSD file.
Practice problems
Problem 1
Using the program example on the previous page, change the program assuming that
the number
of
people registered
is
unknown, read-out the file
10
persons at a time
until the end of the file
is
reached and display them.
Example solution
The following program might, for example, be considered.
300
ROPEN
#5,
" F D 1
ADDRESS
LI
ST"
3 1 0
FOR
I
=1
TO
1 0
320
INPUT
#5,
NA$,
AD$
330
I F E
OF
(
#5)
THEN
400
350
NEXT
360
PRI
NT
" PUSH
SPACE
KEY"
370
GET
X$: I F
X$
THEN
310
380
GOTO
370
400
CLOSE
#5
410
PRI
NT
" F I
LE
END" :
END
Page 23
22
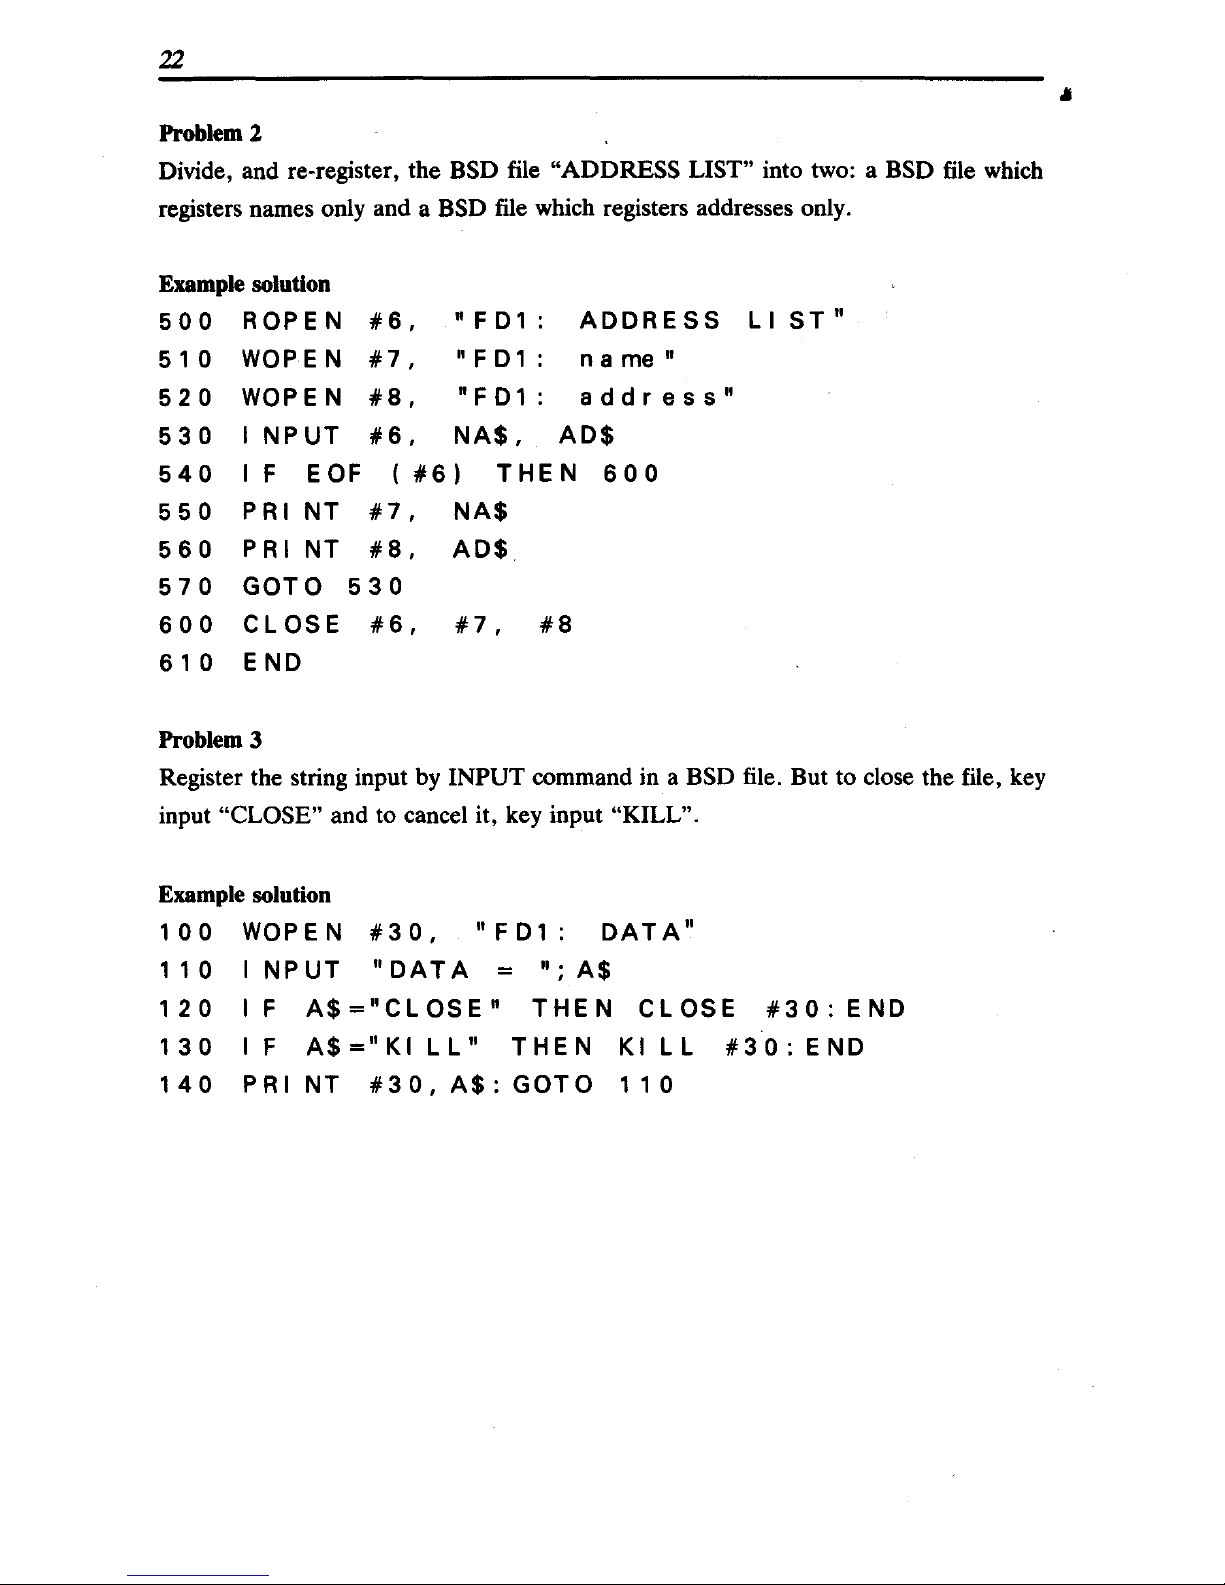
Problem 2
Divide, and re-register, the BSD file "ADDRESS LIST" into two: a BSD file which
registers names only and a
BSD file which registers addresses only.
Example solution
500
ROPEN
#6,
" F D 1 :
ADDRESS
LIST"
5 1 0
WOPEN
#7,
" F
D1
:
na
me"
520
WOPEN
#8,
"F
D1
:
address"
530
INPUT
#6,
NA$,
AD$
540
I F E OF
(
#6)
THEN
600
550
PRI
NT
#7,
NA$
560
PRI
NT
#8,
AD$
570
GOTO
530
600
CLOSE
#6,
#7,
#8
610
END
Problem 3
Register the string input by INPUT command in a BSD file. But to close the file, key
input
"CLOSE" and to cancel it, key input "KILL".
Example solution
100
WOPEN
#30,
"FD1:
DATA"
110
I
NPUT
"DATA
=
";A$
120
IF
A$="CLOSE"
THEN
CLOSE
#30:
END
130
IF
A$="KI
LL"
THEN
KI
LL
#30:
END
140
PRINT
#30,A$:GOTO
110
Page 24

23
i
1.5 Random
Access
File Control
Random access files are data files in which the registration
or
read-out
of
data
is
in the
random access format. The
randoll\ access format
is
the
format in which the access
is
done by specifying the array format.
In other words, compared to the sequential access format in which access must be
from the heading
of
the data, the random access format can be used for access to any
data in the file at random.
In order to access data in the random access file in a specified array,
PRINT # (page
49)
and INPUT # (page 47) are used, as described below, as expressions following
logical numbers.
PRINT
#n
(expression), data
INPUT
#n
(expression), variable
Designation of
tay
element
The expression
is
assigned by numbers
or
variables.
For example, the statement
INPUT
#7
(21), A$
means a command to read-out, to string variable
AS, the data registered as the 21st
element
of
the data collected as the random access file opened by logical number
#7.
Note that random access files in which data such as this can be accessed have the
condition that all data must be
register~d
at a fixed length, Le., when numbers
or
string variables are registered in the file, they must each be set within a "box" with a
limited length
of
32
bytes.
expression
~
32-byte fixed length
{
~
+.
12345678+ElO
Random access 3
file 4 ABCDEFGHI
- 5
I-Ac::B-=C
_____
--t
6
:
+-
Variable A=O. 12345678+ElO
+-
String "ABCDEFGHI"
:.- String "ABC"
For numerical variables, even exponential expressions are always stored within the
32-byte length, but, because string variables can be as long as
249
bytes, a string which
exceeds
32
bytes cannot be registered in one data element of a random access file.
One other point which
is
different from sequential access files
is
that even though a
file
Page 25
24
11
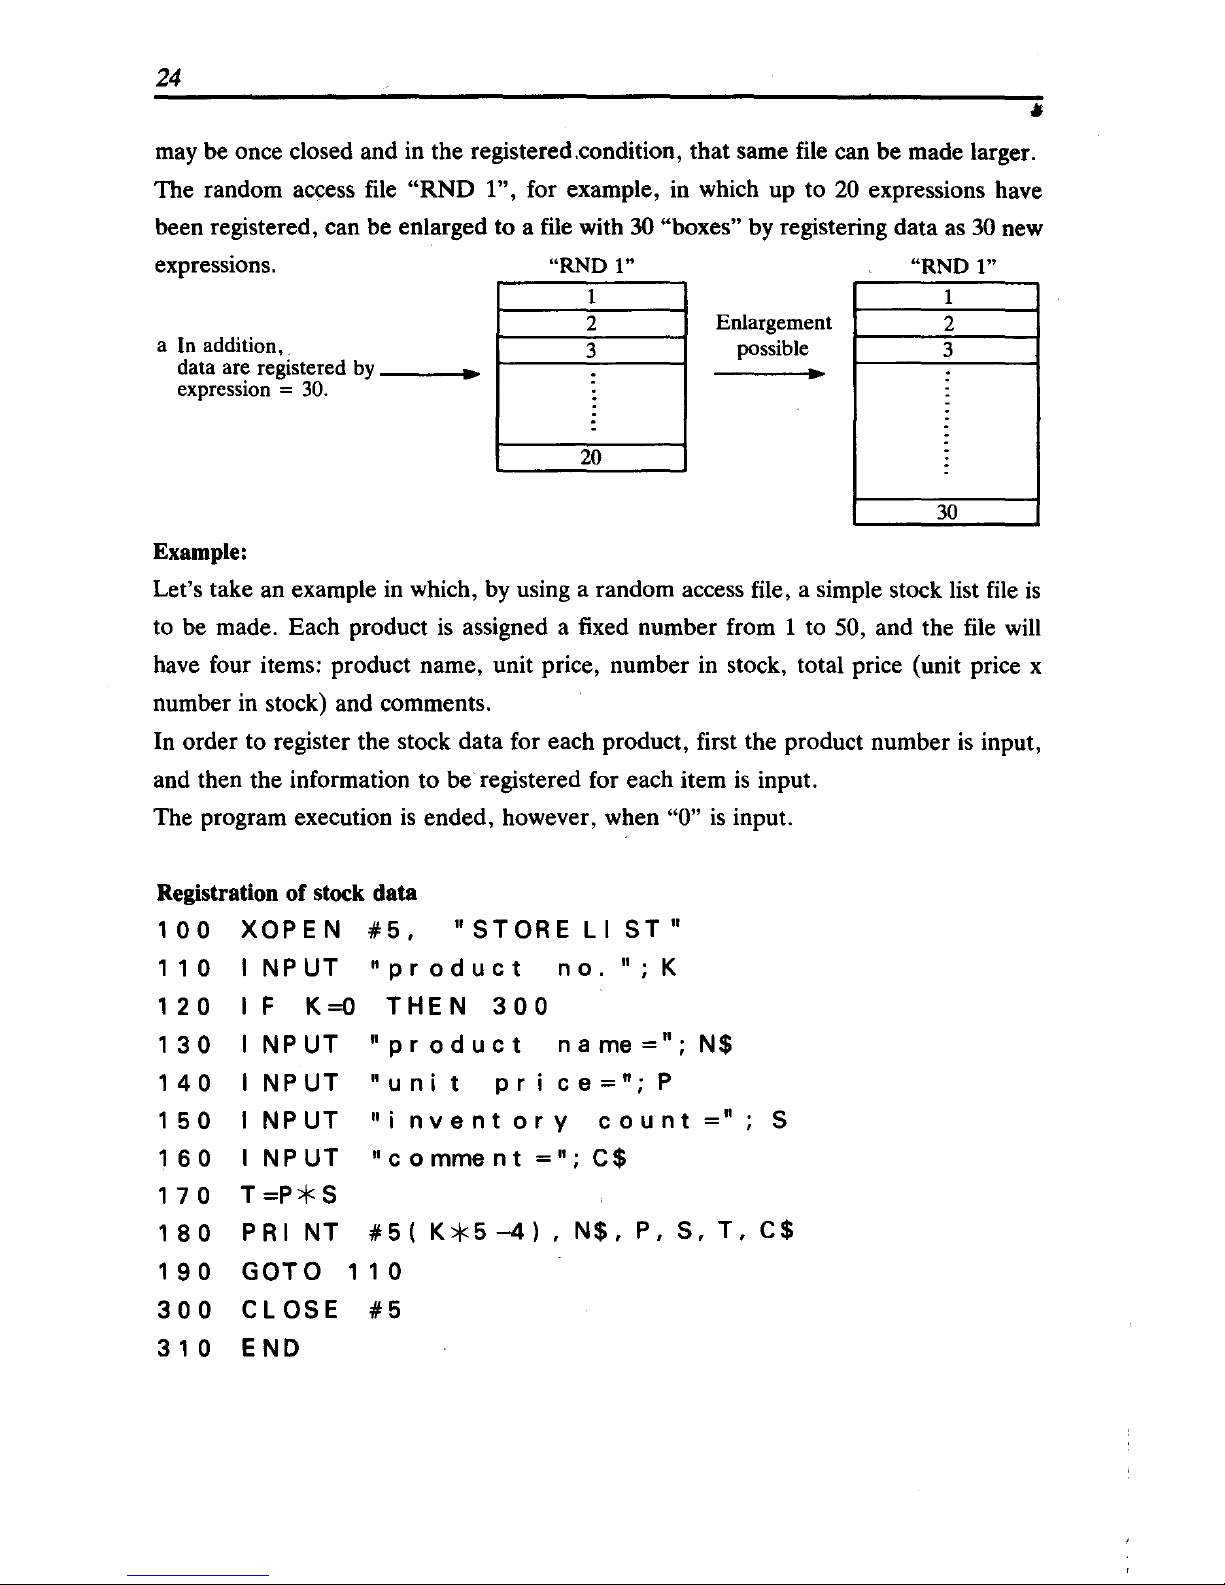
may be once closed and in the registered.condition, that same file can be made larger.
The random access file
"RND
1", for example, in which up to
20
expressions have
been registered, can be enlarged to a file with
30 "boxes" by registering data as 30 new
expressions.
"RND
I"
"RND
I"
1 1
2
Enlargement
2
a In addition,
.
data are registered
by
-----1~
expression =
30.
3
possible
3
•
•
20
30
Example:
Let's take an example in which, by using a random access file, a simple stock list file
is
to be made. Each product
is
assigned a fixed number from 1 to 50, and the file will
have four items: product name, unit price, number in stock, total price (unit price x
number
in
stock) and comments.
In order to register the stock data for each product, first the product number
is
input,
and then the information to be registered for each item
is
input.
The program execution
is
ended, however, when "0"
is
input.
Registration of stock data
100
XOPEN
#5,
"STORELIST"
110
INPUT
"product
no.";K
120
IF
K=O
THEN
300
130
I
NPUT
"product
name=";
N$
140
INPUT
"uni
t
pr
ce=";
P
150
INPUT
"i
nventory
count
1 6 0 I N
PUT
" c 0 mme n t
=";
C $
170
T
=P*
S
"
S
180
PRINT
#5(K*5-4),N$,P,S,T,C$
190
GOTO
110
300
CLOSE
#5
310
END
Page 26
25
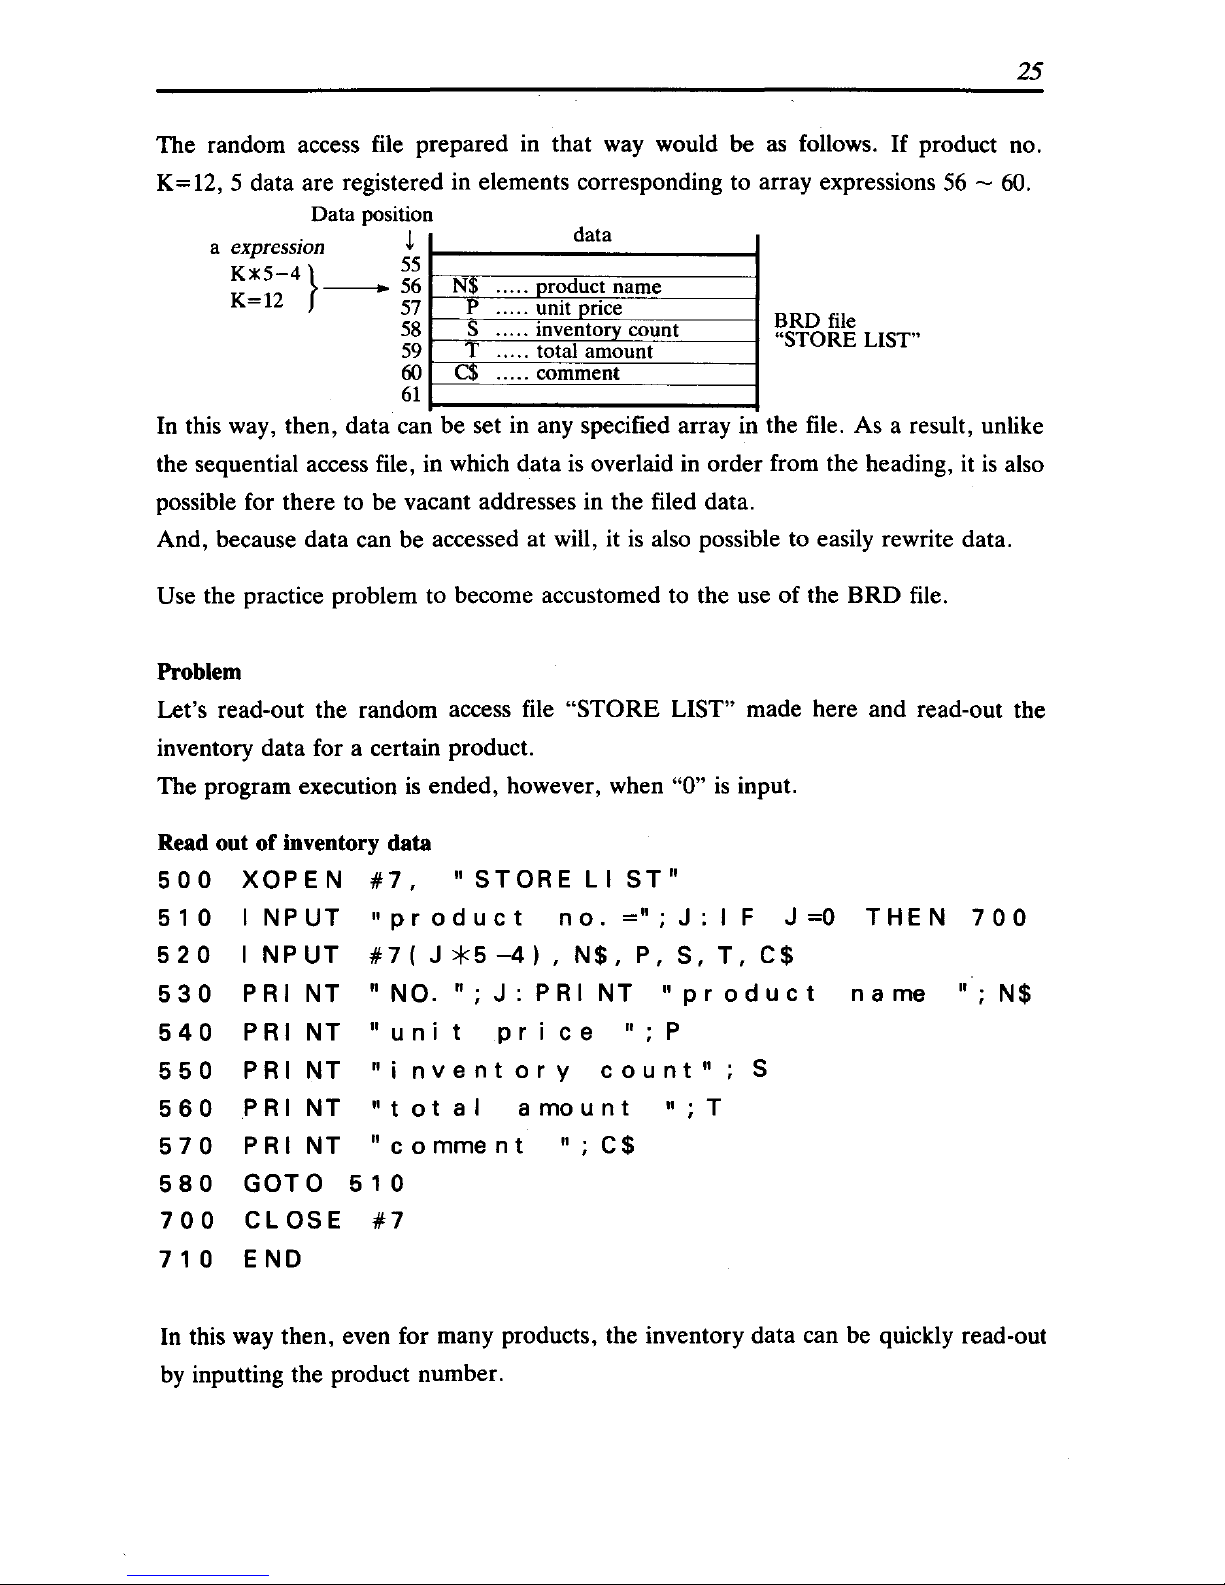
The random access file prepared in that way would be as follows.
If
product no.
K=12, 5 data are registered in elements corresponding to array expressions
56
- 60.
Data
position
a expression
~
KJl:5-4}
55
___
56
K=12
57
58
59
60
61
N$
p
S
T
C$
d
ata
.....
product name
.....
unit price
.....
inventory count
.....
total amount
.....
comment
BRD
file
"STORE
LIST"
In this way, then, data can be set in any specified array in the file. As a result, unlike
the sequential access file, in which data is overlaid in
order
from the heading, it
is
also
possible for there to be vacant addresses in the filed data.
And, because data can be accessed
at
will, it
is
also possible to easily rewrite data.
Use the practice problem to become accustomed to the use
of
the
BRD
file.
Problem
Let's read-out the random access file
"STORE
LIST" made here and read-out the
inventory data for a certain product.
The program execution
is
ended, however, when "0"
is
input.
Read out
of
inventory data
500
XOPEN
#7,
"STORE
LI
ST"
5 1 0
520
530
INPUT
INPUT
PRI
NT
"
pro
d u c t
no.
=";
J : I F J =0
THE
N
700
#7(
J*5-4),
N$,
P,
S,
T,
C$
"
NO.
";
J :
PR I NT
"p
rod
u c t n a me
";
N$
540
PR I NT
"u
n i
price
";P
550
PRI
NT
"i
nventory
count"
S
560
PR I NT
"t
0 t a I a
mo
u n t
";
T
5 7
0 P R I N T
"c
0 mme n t
";
C $
580
GOTO
510
700
CLOSE
#7
710
E NO
In this way then, even for many products, the inventory data can be quickly read-out
by inputting the product number.
Page 27
26
1.6 Program Chain (CHAIN)
Next, following the data
file
control commands,
will
be an explanation of program
file
controls. The commands explained here are CHAIN (page
44)
and SWAP (page 45).
When these commands are used, the program
is
registered on the floppy disk in job
units and, while the program
is
being run, a separate program can be read-out and
control moved to it, i.e., a program can be connected (CHAIN) to a program
registered on the floppy disk, and can be read-out
(SWAP)
in
the form of a sub
routine. The CHAIN command, which connects and links the programs,
will
be
explained first.
The form of a CHAIN command can be, for example,
as
follows:
700
CHAI
N
"F01:
TeXT
2"
This statement means that the program currently within the text area
is
made NEW
(although the variable
will
be retained), the "TEXT
2"
file
registered on the floppy
disk
in
drive number 1
is
to be overlaid (that is, to overlay text areas and be read out),
and control
is
moved to the heading of that text.
When this statement
is
executed, control
will
move away from the BASIC text now
running,
newly
read out the "TEXT 2" text, and control
will
move to that heading.
When the program CHAIN
is
executed, the variable, and the function defined
by
DEF FN,
will
be transferred to the CHAIN destination program.
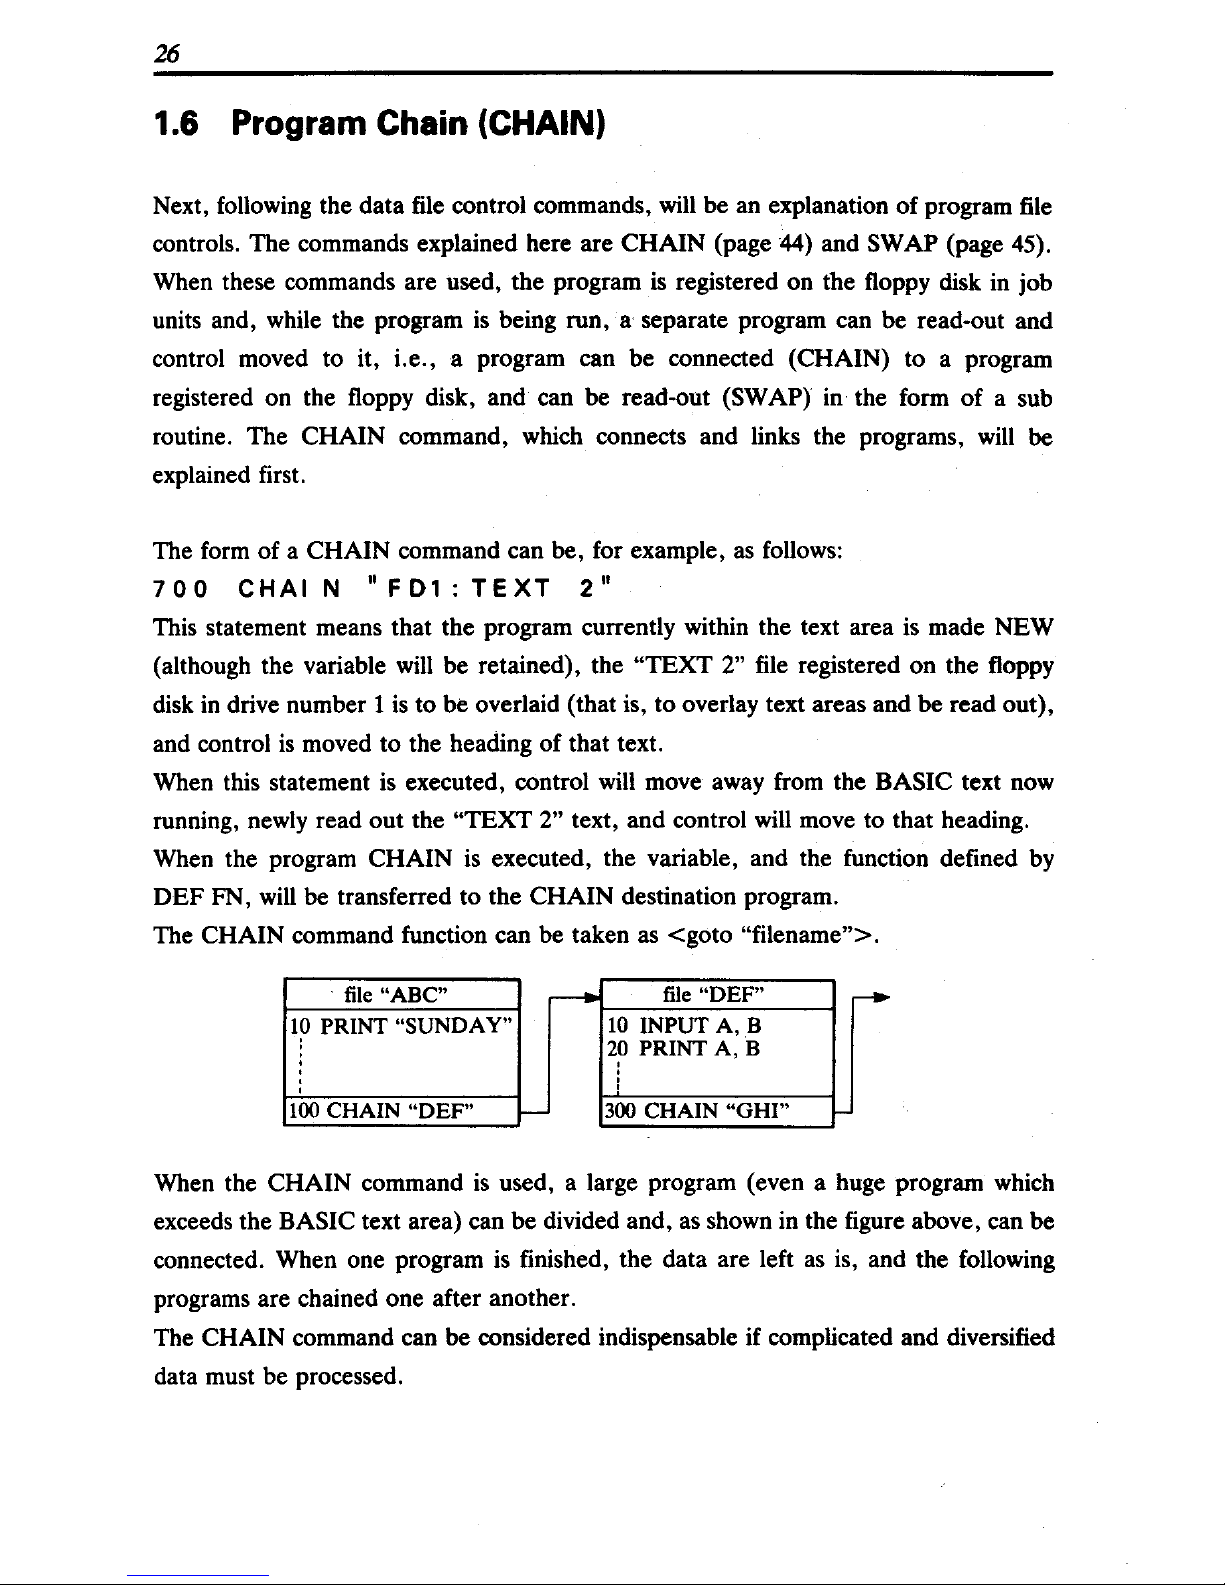
The CHAIN command function can be taken
as
<goto "filename"> .
.
file
"ABC"
~
file
"DEF"
-
10
PRINT "SUNDAY"
10
INPUT
A,S
,
2i
PRINT A, B
:
100
CHAIN "DEF"
r-
300
CHAIN "GHI"
When the CHAIN command
is
used, a large program (even a huge program which
exceeds the
BASIC text area) can
be
divided and,
as
shown in the figure above, can be
connected. When one program
is
finished, the data are left
as
is, and the following
programs are chained one after another.
The CHAIN command can be considered indispensable if complicated and diversified
data must be processed.
Page 28
27
1.7 Program Swap (SWAP)
Program files on the floppy disk are read-in to the memory, and control
is
moved to
this program,
by
SWAP command but, when this program
is
finished, the original
program (the program which did the
SWAP command) can be reset. This movement
is
exactly
in
the same
way
as the sub-routine
in
the program, and the reset to the original
program becomes a return to the next command, which did the
SWAP command. As a
result, the
SWAP command can be taken
as
<gosub "filename">.
In
order for this operation to be made, the program which has the SWAP command
is
temporarily shunted to the floppy disk during SWAP execution. Then the program
area
is
made NEW, and another program
is
read in. After the end of the other
program, the original program
is
read in. The usual form of the SWAP command
is:
SWAP"
FDn
: filename"
This
is
a command to SWAP the sub-program designated
by
the "filename" registered
on the floppy disk in drive number n (n = 1
- 4), and the shunting of the program
prior to the read-in of the other program
is
done on the floppy disk
in
the drive set
by
the default condition. Therefore, a floppy disk on which it
is
possible to temporarily
write-in the program text must be set in that drive. The
SWAP level must not exceed
the 1 level.
In order to understand the
SWAP command, let's take a simple example and follow
the movement of the program file.
Program now
in
text area
10
REM
COMPOSER
2 0 M 1 $
~.
" A 7 B 6 + C 3 A 7 A 3 "
30
M2$="B+C+D+E
6A3"
4 0
M3
$ = " + F 6 A 3 +E 7 H
50
PR I
NT
"P L AY
T HE
CELL
0"
60
SWAP
"FD2:
PLAYER"
70
PRINT
"VERY
GOOD"
80
END
Page 29
28
Program
file
"PLAYER"
10
REM
CELLO
PLAYER
20
MUSI
C
M1$, M2$,
M3$
30
PRI
NT"OK7"
40
E
NO
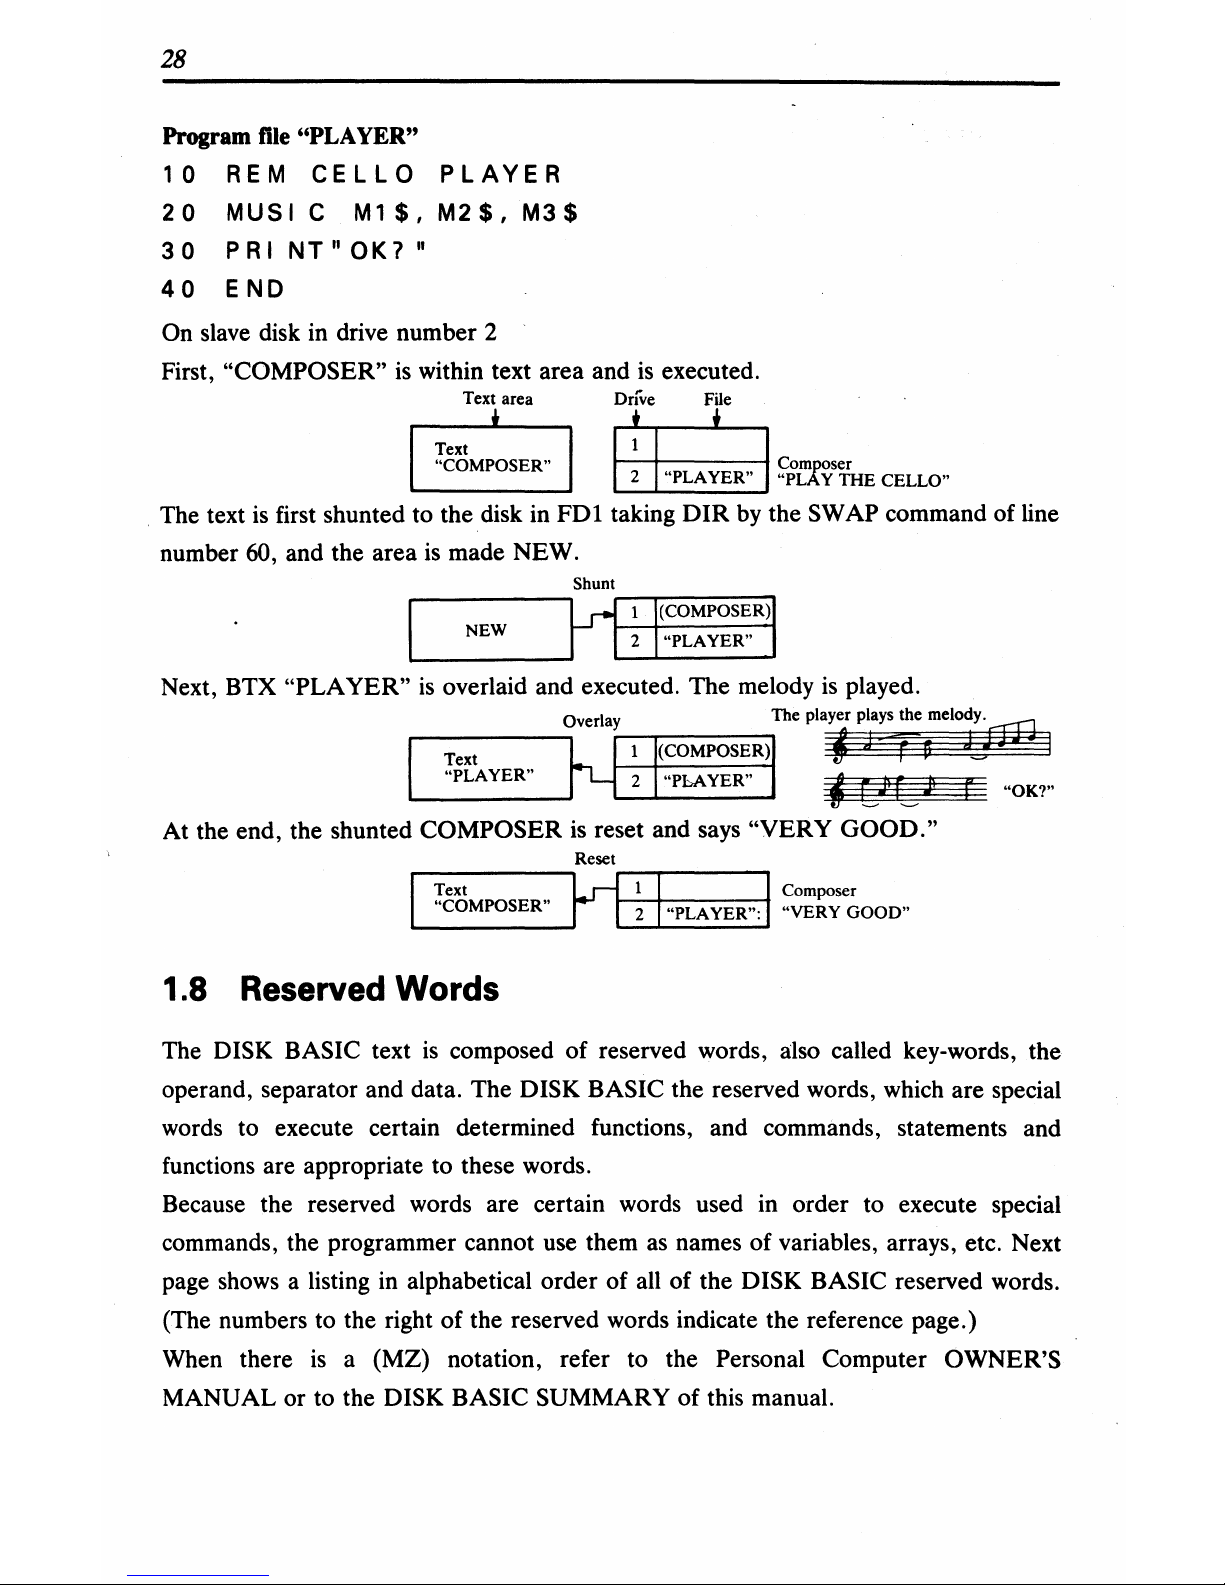
On slave disk in drive number 2
First,
"COMPOSER"
is
within text area and
is
executed.
Text
area
~
Dr:ve
File
Corn oser
2
"PLAYER"
"PL:'{'y
THE
CELLO"
The text
is
first shunted to the disk in
FDl
taking
DIR
by the SWAP command of line
number 60, and the area
is
made NEW.
r----------,~r-l~lr(C~O-M-P-O~SE~R~)1
NEW I I 2 .
"PLAYER"
.
1--
___
--'
Next, BTX "PLAYER"
is
overlaid and executed. The melody
is
played.
Text
"PLAYER"
At the end, the shunted COMPOSER
is
reset and says "VERY
GOOD."
Reset
r-1-!-·C-~-M-PO--SE-R-
..
-'r1r--r-I,,-p-LA-Y-E-R-
..
...,:
I
~~~~e~OOD
..
1.8 Reserved Words
The DISK BASIC text
is
composed of reserved words, also called key-words, the
operand, separator and data. The
DISK BASIC the reserved words, which are special
words to execute certain determined functions, and commands, statements and
functions are appropriate to these words.
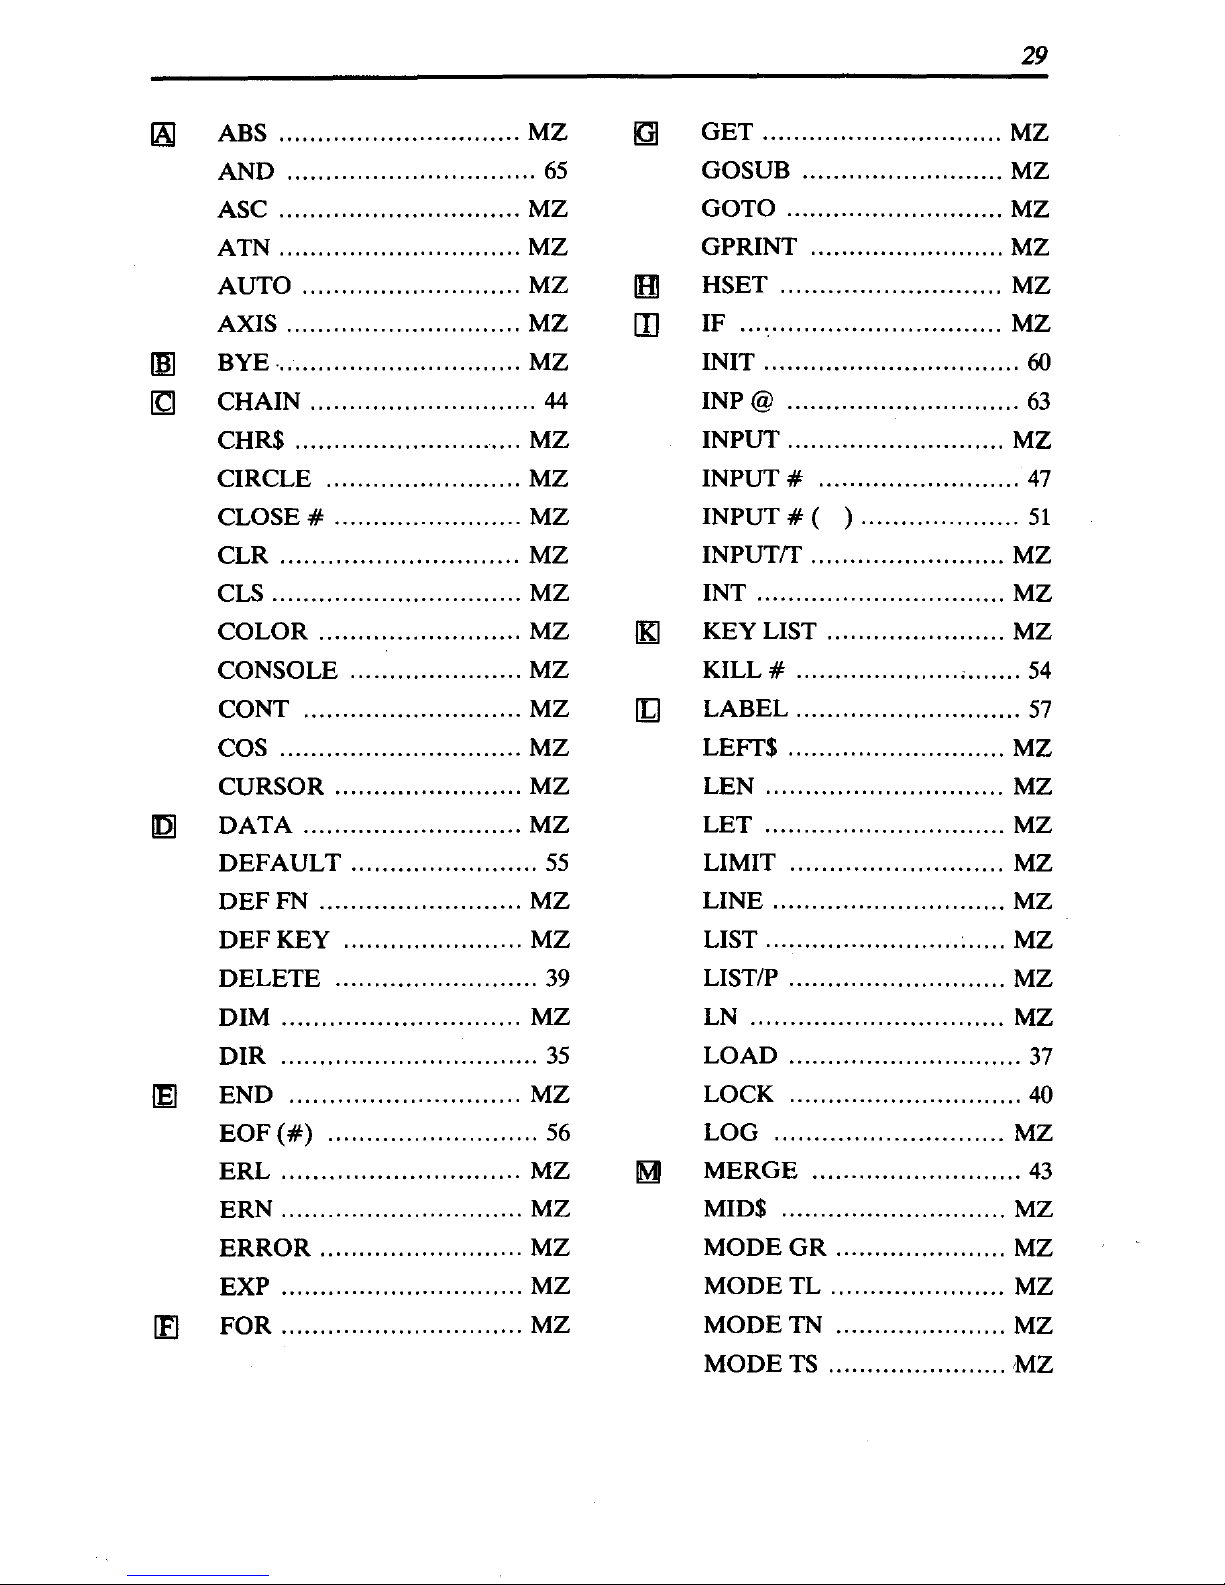
Because the reserved words are certain words used in order to execute special
commands, the programmer cannot use them as names of variables, arrays, etc. Next
page shows a listing
in
alphabetical order of all
of
the DISK BASIC reserved words.
(The numbers to the right
of
the reserved words indicate the reference page.)
When there
is
a (MZ) notation, refer to the Personal Computer OWNER'S
MANUAL or to the DISK BASIC SUMMARY of this manual.
Page 30
29
161
ABS
...............................
MZ
K]
GET
...............................
MZ
AND
................................
65
GOSUB
..........................
MZ
ASC
...............................
MZ
GOTO
............................
MZ
ATN
...............................
MZ
GPRINT
.........................
MZ
AUTO
............................
MZ
!HI
HSET
............................
MZ
AXIS
..............................
MZ
rn
IF
..................................
MZ
!HI
ByE·
...............................
MZ
INIT
.................................
60
~
CHAIN
.............................
44
INP@
..............................
63
CHR$
.............................
MZ
INPUT
............................
MZ
CIRCLE
.........................
MZ
INPUT #
..........................
47
CLOSE #
........................
MZ
INPUT # ( )
....................
51
CLR
..............................
MZ
INPUTrr
.........................
MZ
CLS
................................
MZ
INT
................................
MZ
COLOR
..........................
MZ
!KI
KEY
LIST
.......................
MZ
CONSOLE
......................
MZ
KILL #
.............................
54
CONT
............................
MZ
[1J
LABEL
.............................
57
COS
...............................
MZ
LEFT$
............................
MZ
CURSOR
........................
MZ
LEN
..............................
MZ
~
DATA
............................
MZ
LET
...............................
MZ
DEFAULT
........................
55
LIMIT
...........................
MZ
DEFFN
..........................
MZ
LINE
..............................
MZ
DEFKEY
.......................
MZ
LIST
......................... ~ .....
MZ
DELETE
..........................
39 LIST/P
............................
MZ
DIM
..............................
MZ
LN
................................
MZ
DIR
.................................
35
LOAD
..............................
37
~
END
.............................
MZ
LOCK
..............................
40
EOF
(#)
........................... 56
LOG
.............................
MZ
ERL
..............................
MZ
M
MERGE
...........................
43
ERN
...............................
MZ
MID$
.............................
MZ
ERROR
..........................
MZ
MODEGR
......................
MZ
EXP
...............................
MZ
MODE
TL
......................
MZ
!El
FOR
...............................
MZ
MODETN
......................
MZ
MODE
TS
.......................
MZ
Page 31

30
MOVE
............................
MZ
RLINE
...........................
MZ
MUSIC
...........................
MZ RMOVE
.........................
MZ
1Nl
NEW
..............................
MZ RND
..............................
MZ
NEXT
.............................
MZ ROPEN #
.........................
46
NOT
.................................
65
RUN
................................
36
IQ]
ON
.................................
MZ
[S]
SAVE
...............................
38
OR
...................................
65
SEARCH
..........................
59
OUT@
............................
64 SET
................................
MZ
~
PAGE
............................
MZ
SGN
..............................
MZ
PAl
................................
MZ SIN
...............................
MZ
PCOLOR
........................
MZ
SIZE
..............................
MZ
PEEK
.............................
MZ SKIP
.............................
MZ
PHOME
.........................
MZ
SPC
...............................
MZ
PLOT OFF
.....................
MZ
SQR
..............................
MZ
PLOT ON
.......................
MZ
STOP
.............................
MZ
POKE
.............................
MZ
STR$
..............................
MZ
PRINT
...........................
MZ
SWAP
..............................
45
PRINT # ...........................
49
TAB
...............................
MZ
PRINT # ( )
....................
52
TAN
...............................
MZ
PRINT USING
................
MZ
TEMPO
..........................
MZ
PRINT/P
........................
MZ
TEST
.............................
MZ
PRINTIT
.........................
MZ
THEN
............................
MZ
PRINT
[€x,
~]
................... MZ
TI$
.................................
MZ
!RI
RAD
..............................
MZ
I1JJ
UNLOCK
..........................
41
READ
............................
MZ
USR
................................
62
REM
..............................
MZ
IYI
VAL
...............................
MZ
RENAME
.........................
42
VERIFY
.........................
MZ
RENUM
.........................
MZ
~
WOPEN #
........................
48
RESET
...........................
MZ
WAIT
...............................
58
RESTORE
......................
MZ
IXI
XOPEN #
.........................
50
RESUME
.......................
MZ
XOR
................................
65
RETURN
.......................
MZ
RIGHT$
.........................
MZ
Page 32

31
~----------------------~--------------------------~--~~
1.9
Table of
File
Input/Output
Devices
Indicates the DISK BASIC descriptors
.'
Floppy disk Cassette tape
RS232C
device name
FDl:
- FD4:
CMT:
RS1:
- RS2:
CHAIN
0
O.
x
CLOSE # 0 0
0
DEFAULT
O·
0
0
DELETFlRENAME
0
x
x
DIR 0
x
x
INIT
x x
0
INPUT #
0 0
0
KILL # 0
~
•
LOAD/SAVE
0
x
LOCKlUNLOCK
0
x
x
MERGE 0
0
x
PRINT # 0 0
0
ROPEN #
0 0
0
RUN 0 0
x
SWAP
0
x
x
WOPEN#
0 0
0
XOPEN #
0
x
x
OPEN limit
-
Including RIW. 1 file only
OPEN is possible for as many as
10
devices.
• Format
of
rde descriptor
Composed
of
"<Device
Name>
<Filename>",
<Option>
1.10 Initial Settings
The default values
of
system variables, etc. are set as follows when the DISK BASIC
is
started by the IPL:
•
File
descriptor
Initialization is set for the device which started the DISK BASIC.
•
Keyboard
related
1)
Operation mode: normal
2) Lower case character input
is
at the normal mode shift position.
3) The defineable function key
is
set as follows by BTX
"AUTO
RUN."
Page 33

32
DEF
KE Y( 1 )
="
RUN
+CHR$(13)
DEF
KE Y(
2)
="
II
ST"
DEF
KE
Y(
3)
="
AUTO"
DEF
KEY(4)
="RENUM"
DEF
KE Y(
5)
="
01
R"
DEF
KE
Y(
6)
="CHR$(
"
DEF
KE Y(
7)
="DEFKEY("
DEF
KE Y(
8)
="CONT"
DEF
KE Y(
9)
="
SAVE
DEF
KEY(
10)
="lOAD
•
eRT
display related
1)
Character display mode: normal (background: black)
2)
Character display digit count: 40 characters/line
3) Character display scrolling area: maximum (from line
0 to line 24)
• Internal clock
Starts at
TI$="OOOOOO"
initialization
• Music functions
1)
Tempo default value: (moderate tempo, moderato)
2)
Default value: (quarter note, J
• Other
1)
Array variables: All undefined
2)
BASIC text area upper limit: number $FFFF (i.e., LIMIT
MAX
condition)
•
Page 34

Section 2
DISK BASIC EXPANSION,
NEW COMMANDS AND STATEMENTS
Page 35

34
In this section each statement, function and system variable
is
explained. How to
describe
is
explained
in
FORMAT. This symbols have the following meanings:
< > : Indicates the general description, such as, variables and data.
Describes the
most generic meaning.
Notes:
<variable> includes <array element>.
<variable> includes <numerical variables> and <character variable>.
<data>
includes <variable> and <constant>.
[1
: Indicates that tlie part enclosed
by
[ 1 can be omitted.
[ 1
...
: Indicates that the part enclosed
by
[ 1
...
can be omitted or more than one
repetition
is
possible.
{
AB}
: Choose one, A or B.
Page 36

35
DIR (directory)
Displays directory contents.
Format:
DIR
[/P] [<device name>]
Note:
Only FDn device name.
Abbreviated form:
DI.
Explanation:
• Displays information, i.e., directory contents, relative to files registered in each
device.
• When the <device
name>
is
abbreviated, the device
is
considered to be designated
by
DEFAULT statement.
• When
JP
is
described, the contents of the directory are output to the printer.
• The devices designated by
DIR
are the same ones that have been explained in the
DEFAULT statement.
Examples:
D
I R " F D 1 . "
or
DIR
FD1
..... Outputs on the screen the directory of the file registered in the floppy disk (drive
number 1).
DIR/P
"FD1:"orDIR/PFD1
..... Outputs to the printer the directory
of
the
file
registered
in
the floppy disk (drive
number 1).
Reference:
DEFAULT (page 55)
I
i
i,
II
11
!I
I
I'
i
Page 37

36
I
RUN
(run)
Executes
the
I!rogrilm.
Format:
RU
N " [<device
name>
:]
<file
name> " [{
~:~~f
]
Note: Only
FDn
or
CMT device name.
Abbreviated form:
R.
Explanation:
• When a description of the
<filename>
follows the RUN command, BASIC
is
initialized (same as NEW command), the BASIC program memorized
as
a file
is
read out, and then the program from the heading
is
executed, continuing to the
floppy disk, etc.
• For RUN only, the program within the text area
is
executed.
• The specifying file
is
limited to the BTX
or
OBJ files.
•
If
option
"A"
is
applied, BSD file
is
considered
as
ASCII format and
is
executed.
And if option
"R"
is
applied, read-in
is
executed putting the memory in the same
condition
as
read-in from OBJ file IPL. This
"R"
option
is
necessary when using
the
9BJ
program
of
MZ-80K series.
Example:
RUN
"FD1:PROG"
..... Reads out and executes file named
"PROG"
on floppy disk.
Page 38

37
LOAD (load)
Reads out
the
program file.
Format:
LOAD"
[<device
name>
:]
<filename> " [<,A>]
Note: Only
FDn
or
CMT device name
Abbreviatied form:
LO.
Explanation:
• Reads out program from external memory device.
• Specifies the file to be read out depending upon the <device
name>
and
<filename>
description.
•
If
the device specified by the
DEFAULT
statement
is
designated, the <device
name>
can be omitted.
•
If
option
"A"
is
applied, BSD file
is
considered
as
ASCII format and
is
read in.
After read-in, time
is
required for conversion.
• The filename must not be omitted, but from cassette tape a call out
is
possible
even when the file name
is
omitted.
Examples:
LOAD
"FD1
MZ -
700"
..... The file named "MZ-700"
is
read out from the floppy disk (drive number 1).
LOAD
"c
MT : MZ -
700
"
..... The file named "MZ-700"
is
read out from the cassette tape.
•
Page 39

38
SAVE (save)
Registers
the
program as a file.
Format:
SAVE"
[<device
name>
:]
<filename> "
[<,A>]
Note: Only FDn or CMT device name.
Abbreviated form:
SA.
Explanation:
• Registers the program as a file on the floppy disk, etc.
•
If
the device designated
by
the
DEFAULT
statement
is
specified, the <device
name>
can be omitted.
•
If
option
"A"
is
applied, the SAVE
is
as
ASCiI format.
The
file
is
saved
as
a BSD file, so take care not to assign a filename which would be
confused with the data file made by
WOPEN # and PRINT # statements.
• The
file
type created
by
the SAVE command
is
a BTX
or
BSD file.
• The <file
name>
cannot be omitted.
Example:
SAVE
"FD1:PROG"
..... Puts the file name
"PROG"
in the program on the floppy disk (drive number
1)
and registers it. The type of registered file becomes BTX.
Page 40

39
DELETE (delete)
Deletes desianated file.
Format:
DELETE" [<device
name>
:]
<filename>
n
Note: Only FDn device name.
Abbreviated form:
D.
Explanation:
• When the device name
is
omitted, processing proceeds relative to device designated
by
DEFAULT
statement.
Example:
DELETE
"FD1:
SAMPLE"
..... Deletes "SAMPLE" file
of
floppy disk (drive number 1).
Page 41

40
LOCK
(lock)
Perform the protection (lock) of
the
file.
Format:
LOCK
" [<device
name>
: ]
<filename>
"
Note: Only FDn device name.
Abbreviated form:
LOC.
Explanation:
•
If
the file
is
locked, this file
is
fixed on the floppy disk and it will not accept any
change commands. For instance,
DELETE
and RENAME commands and data
write-in are prohibited.
Put a lock on any file which you don't want to destroy
or
change.
•
The"
* " mark
is
displayed before the file specs in the directory display on locked
files.
For example:
LOCK
"SAMPLE"
If
the command above
is
executed, the file
is.
locked and the directory display
is
as
follows:
*
"SAMPLE"
L sign
to
indicate file locking.
• Locking can be cancelled by the UNLOCK statement.
Example:
LOCK
"FD1:SAMPLE"
..... Locks the file named SAMPLE on file set
in
drive number
1.
Page 42

41
UNLOCK (unlock)
Unlocks
the
specified locked file.
Format:
UNLOCK" [<device
name>
:]
<filename>"
Note:
Only FDn device name.
Explanation
• Unlocks the specified locked file.
Example:
UNLOCK
"SAMPLE"
..... releases the lock
of
file
named SAMPLE
Page 43

42
I
RENAME
\rename)
Changes
the
filename.
Format:
- ,
RENAME
• [ < dev i ce
Rue>:]
• "
<old
filename> " ,
"<new
filename> "
Note: Only FDn device name.
Abbreviated form:
RENA.
Explanation:
• The
file
name change specifies
the
current filename and the new filename, in that
order.
• The new
file
name becomes an error if a
file
of the same name exists
in
that device.
Example:
RENAME
"F01:
OLOPROG",
"NEWPROG"
..... The filename
"OLDPROG"
in the floppy disk
file
is
changed to "NEWPROG".
Page 44

43
MERGE
(merge)
A-,»rogram in
the
file is added
to
a program in
the
memory
..
Format:
MERGE
["
[<device
name>
:]
< filename > "]
[<,A>]
Note: Only FDn
or
CMT device name.
Abbreviated form:
ME.
Explanation:
• Reads in the program in the
file
designated by the <device
name>,
adding it after
the
progra~
currently in the memory.
•
If
the <device
name>
is
omitted, the
file
of
the device designated
by
the
DEFAULT statement will be read in.
•
If
line number
of
the program within the computer
is
the same as the line number
of the program read
in
from the file, the program from the file has priority, and the
former program
will
be deleted.
•
If
option
"A"
is
applied, the BSD file
is
considered as ASCII format and
is
merged.
Examples:
Program in the memory "PROG" program on floppy disk
1 0 B =2
1
0
A=1
30
PRI
NT
B
20
PRI
NT
A
50
END
40
END
..... when these are merged by
MERGE
"FDl:
PROG",
the result
is
as follows.
1
0 A=1
20
PR
I
NT
A
30
PR
I
NT
B
40
END
50
END
Page 45

44
CHAIN (chain)
Movement of execution from active program
to
program
in
file
Format:
CHAIN" [<device
name>
:]
<filename>
"
Note: Only FDn
or
CMT device name.
Abbreviated form:
CH.
Explanation:
• The execution
of
the program
is
moved from the currently active program to a
different program in the file.
• The
CHAIN
statement
is
also considered to be a file opening.
• Although the
CHAIN
statement has a function similar to the execution of the
RUN
command in a program, the variables, arrays, etc.
of
the original program are
transferred to the new program without change when there
is
a chain.
Example:
1
0
A=l
20
8 =2
30
CHAI
N
"F
D 1
PROG"
40
END
..... The program
of
the file named
"PROG"
on the floppy disk in the floppy disk
drive (drive number 1)
is
executed.
In this instance, the value
of
variables A and B don't change;
A=1,
B=2.
Page 46

45
SWAP (swap)
Calls out a program
in
the
file during execution of the program.
Format:
SWAP
11
[<device
name>
:]
<filename>
11
Note: Only
FDn
device name.
Abbreviated form:
SW.
Explanation:
• Subroutine calls separate program in file from program being executed. Program
in
program area
is
temporarily evacuated to vacant area in floppy disk, and called
program
is
read into text area. The original variable in the text area at this time
is
transferred to the called program. (See page 27.)
• An error occurs if a write-protect seal
is
put on the default drive floppy disk.
Example:
1 0
A=1:
B =2
20
30
,--.40
PR I NT
11
A =
";
A,
11
~!';~cf}·i:.,·.
.,
SWAP
11
F D 2 :
PRO
G'" . j ..
""
•
11
11
•
11
./i~~
" "
PR I NT
A =
,A,
B.:=,.
1'~'~ii.~,,~'
50
END
10
A=A*10:B=B*10
20
END
(SWAP
FD2
PROG)
..... When this program
is
executed, A = 1 and B = 1 are displayed on
CRT
screen
when line
20
is
executed. At line 30, the SWAP command
is
executed and the
program file
"PROG"
in floppy disk drive 2
is
executed. At end, automatically
returns to original program, A
=
10
and B =
20
are displayed when line
40
is
executed, and program execution finishes.
Page 47

46
ROPEN # (read open)
Opens
the
BSO
file for read-out.
Format:
ROPEN
# <logical
number>,
"[<device
name>:] < filename>
"
Note: Only
FDn,
CMT,
or
RSn device name.
Abbreviated form:
RO.#
Explanation:
•
Opens
the file so
that
filed
data
can be
read
out.
•
The
ROPEN # statement
has an
order
for
data
read-out; it specifies the file to be
read
out,
specifying by
<device
name>
and
<filename>.
• When the
<device
name>
is
omitted,
the device designated by the
DEFAULT
statement
is
specified.
•
When"
RS
J 1 \
:"
is
specified, input
is
specified
to
RS-232C.
\21
Examples:
10
ROPEN
#1,
"FD1:DATA"
.....
The floppy disk's (drive
number
1)
BSD
file
"DATA"
is
read out.
1 0 ROPEN
# 1
,
• ftSl: •
I
.....
The
input by
INPUT
commane
is set
to
RS-232C.
1 0 ROPEN
#2,
"DATA"
20
FOR I
=1
TO
99
30
I
NP
UT
#2,
A
40
PR I NT
A
50
NEXT I
60
CLOSE
#2
70
END
.....
The
file made by
WOPEN # command
is
read
out
and
data
are displayed.
References:
INPUT
# (page 47)
WOPEN
# (page 48)
CLOSE
# (page 53)
EOF(#)
(page 56)
Page 48

INPUT # (Input)
Reads out data from BSO file.
Format:
INPUT # <logical
number>,<variable>,<variable>,
.....
Abbreviated form:
1.#
Explanation:
47
• Reads out data in sequence from heading of file opened for read-out by ROPEN #
statement and
is
set to
<variable>.
•
<variable>
may be array element.
• The file which reads out the data becomes the file set to <logical number>
by
ROPEN # statement.
• In the same way as for
READ -DATA
statements, error
is
generated if data and
<variable>
data type do not coincide.
• The end
of
the file data can be determined by the
EOF
function.
However, for FD device only.
Example:
1 0
ROPEN
#2,
"DATA"
20
I NP UT
#2,A,B,C
30
PRI
NT
A,B,C
40
CLOSE
#2
50
END
..... Reads out numerical data from BSD file opened for read-out by logical number 2,
and substitutes to numerical variables A,
Band
C.
References:
ROPEN # (page 46)
CLOSE # (page 53)
EOF
(#)
(page 56)
Page 49

48
WOPEN
# (write open)
Opens the files for write-in.
Format:
WOPEN
# <logical
number>,
" [<device
name>
:]
<filename>
"
Note: Only
FDn,
CMT,
or
RSn device name.
Abbreviated form:
WO. #
Explanation:
• This
is
a statement to prepare for file write-in; it specifies the file's logical number
and name.
•
If
the <device
name>
is
omitted, processing occurs relative to the device specified
by
the
DEFAULT
statement.
• When RS is specified for the device' name, the filename can be omitted.
Examples:
1 0
WOP
EN
#1,"
F
01 : OAT
A"
..... Opens the
"DATA"
file defined to logical number 1 for write-in.
1 0 WOP
EN
#
1,
"R
S 1 : "
..... Output
by
the
PRINT
# command
is
set in RS-232C.
1 0
WOPEN
#2,
"DATA"
20
FOR
I
=1
TO
99
30
PRI
NT
#2,
40
NEXT
50
CLOSE
#2
60
END
..... 1 -
99
count
is
written into the file.
References:
PRINT # (page 49)
ROPEN # (page 46)
CLOSE # (page 53)
INPUT # (page 47)
Page 50

49
PRINT # (print)
Writes data in BSD files.
Format:
PRINT # <logical
number>,
<data>
[,
<data>
] ...
Abbreviated form:
R.#
Explanation:
• Writes data in order into files opened by the
WOPEN
# statement for write-in.
• Files into which data are to be written are to be correctly specified by the logical
number when opened.
• (Data) are numerical value data
or
character data.
Example:
1
0
WOPEN
# 1 ,
"
DATA"
20
PRI
NT
# 1 , 1 ,
2,
3
30
CLOS
#1
40
END
..... Numerical data 1, 2 and 3 are written in the file that has been opened to write in
logical number
1.
References:
WOPEN # (page 48)
CLOSE # (page 53)
Page 51

50
XOPEN
#
(cross
open)
Opens
BRD
file for read-out
and
Format:
XOPEN # <logical
number>,"
[<device
name>
:]
<filename>
"
Note: Only FDn device name.
Abbreviated form:
X.#
Explanation:
Opens the random access data file (BRD), and opens (cross opens) theread-out/writein
of the random access data. Newly registers
BRD
files, prepares for data read-out
from, and new data write-in to, the
BRD
file, and defines the logical number for file
access.
Examples:
10
XOPEN
#1,"
FD1:
DATA"
20
NPUT"
pr
oduct
no.
=";
K
30
F K=O
THEN
110
40
NPUT
"product
name=";NS
50
NPUT
"unit
price=";P
60
INPUT
"st
ock
amount
="S
70
I
NPUT
"comment
=";
CS
80
T =
P*S
90
PR
I NT # 1
(K
* 5
-4)
,
N$,
P,
S,
T,
C $
100
GOTO
20
1 1 0
CL
OS
E # 1
120
END
..... Cross opens (read-out, write-in)
BRD
files. The 5 items of input (product name,
unit price, amount in stock, total amount (T = total amount (P *
S»,
and
comment are registered in the
BRD
file
"DATA".
Page 52

51
INPUT # ( )(input)
Reads out data from BRD file.
Format:
INPUT # <logical
number>,
«data
element
number»,
<variable> [,<variable>, ... ]
Abbreviated form:
1.#(
)
Explanation:
• The data
of
the position designated by the data element number are read from the
file cross-opened by the
XOPEN
# statement into the designated variable.
It
makes no difference if the variable
is
an array variable.
• The file which reads out the
data
becomes the file set to <logical
number>
by
the
XOPEN
# statement.
• In the same way as for the
READ -DATA
statements, an error
will
be generated
if the data and the
<variable>
data type do not coincide.
• The end
of
the file data can be detemined by
EOF
function.
• The data element position is from 1 - n.
Example:
1 0
XOPEN
#2,
11
F D 1
:
DATA
11
20
Z
=3
30
INPUT
#2 ( Z)
,
1 0
40
I F E OF
(
#2)
THEN
80
50
PRI
NT
S
60
Z
=Z
+5
70
GOTO
30
80
CLOSE
#2
Data
ele~:::
:::::i::-=:
11121~
41516171~191101111121~llt~~
..... When this program
is
executed, the data at positions
CD,
@ and @ data positions
indicated by Z in the figure are read in and displayed in order. When the data
end, the
EOF
# function becomes truth at line 40, and jumps to line 80.
Reference:
PRINT # ( ) (page 52)
Page 53

52
PRINT # ( ) (print)
Writes in data
to
BRD files.
Format:
PRINT
# <logical
number>,
«data
element
number»,
<data>
[,
<data>,
... ]
Abbreviated form:
P.#(
)
Explanation:
Writes in contents specified by variable
or
numerical value to data position specified
by
data element number from file cross opened by
XOPEN
# statement. Variable may
be array variable.
The file which writes in the data becomes the file specified to (logical number) by the
XOPEN # statement.
The data are numerical data
or
character data.
The possible write-in data length
is
32
bytes and the data element position is from 1 -
n.
Example:
10
XOPEN
#4,
"FD1:DATA"
20
FOR
Z=3
TO
13
STEP
5
30
PRINT
#4
(Z),O
40
NEXT
Z
50
CLOSE
#4
Data
ele~:~:
::!:~:=
11121~
41516171~191101111121~1141
~~~
..... When this program is executed, data "0" are written in at the G), @ and
<ID
data
position indicated by
Z,
as shown in the figure.
Reference:
INPUT # ( ) (page 51)
Page 54

53
CLOSE # (close)
Closes
the
file.
Format:
CLOSE
[#
<logical number>]
Abbreviated form:
CLO.#
Explanation:
• Closes the data file opened by the logical number; returns this number to the
non-define
a condition.
• CLOSE relative to XOPEN #
Closes the
BRD
file opened for read-outlwrite-in and returns all logical numbers
used to the non-defined condition.
• CLOSE relative to WOPEN #
Registers formally the BSD file opened for write-in; and returns the logical number
used to the non-defined condition.
• CLOSE relative to ROPEN #
Closes the BSD file opened for data read-out; and returns the logical number used
to the non-defined condition.
• When logical number not specified, closes all currently open files, and returns all
logical numbers to non-defined condition.
• When do not specify logical number, closes all currently open files; logical numbers
are returned
to
non-defined condition.
Examples:
10
CLOSE#1
..... Closes logical number #1 file.
20
CLOSE
..... Closes all files.
References:
XOPEN # (page 50)
WOPEN
# (page 48)
ROPEN # (page 46)
Page 55

54
I
KILL # (kill)
Stops file registration.
Format:
KILL
[#
<logical number>]
Abbreviated form:
KI.#
Explanation:
• Stops registration of the file opened to <logical number>. In other words, the
file
making
is
prepared by the XOPEN #
or
WOPEN # statement,
or
stops, during
registration, the formal registration
of
the file thereafter executing the PRINT #
( )
or
PRINT
#.
•
If
the <logical
number>
is
not designated, the formal registration of the file
currently being made
is
stopped and, in addition;all files already opened are closed
and all <logical numbers> are returned to the non-defined condition.
• Because the KILL command can be used as a direct execution command, this
command can be executed directly prior to exchange of the cassette tape, floppy
disk. In order to thereby protect the contents of all files by closing them.
Examples:
200
KI
LL
#3
..... Kills the file opened by the logical number
3.
300
KI
LL
..... Kills
all
files opened.
Reference:
XOPEN # (page 50)
WOPEN
# (page 48)
Page 56

55
DEFAULT (default)
Sets device names.
Format:
DEFAULT" <device
name>:
"
Note: Only
FDn,
CMT,
or
RSn device name.
Abbreviated form:
OEF.
Explanation:
• Defines available device name if <device
name>
is omitted by command
statement.
• The device name reading DISK BASIC
is
defined in
FDl.
• Device names are as follows.
F On :
C
MT
:
R
S{;
\:
Examples:
floppy disk (n
= 1 - 4)
cassette tape
RS-232C interface (n = 1 -
2)
DEFAULT
"CMT:"
..... Considered to be cassette tape if <device
name>
is
omitted in each command.
DE F AUL
T
"F
02:
"
..... Considered to be floppy disk (drive 2) if (device name)
is
omitted in each
command.
Page 57

56
EOF
(#)
(end of file)
Function
to
locate end of data file data.
Format:
EOF
(#
<logical
number»
Abbreviated form:
EO.(#
Explanation:
• The function used to determine the end
of
the data for file read-out.
• When read-out continues after the end
of
data in the data file, there is no error
generation, and
0
or
null ("
")
is provided as the data value.
• Error
is
generated, however, when
data
are read out from CMT.
• This function
is
used in combination with the IF statement and placed after each
INPUT statement.
Example
10
ROPEN
#3,"
DATA"
20
I
NPUT#3,A
30
IF
EOF(
#3)
THEN
END
40
PR I NT
A
50
GOTO
20
..... With this program data are read-out in sequence from the
"DATA"
file and are
displayed on the screen.
And,
if the read-out data are out of file, this process
should be end.
Page 58

57
LABEL
(label)
Sets
the
label.
Format:
LABEL"
<label
name>
"
<label
name>
: character line to
249
characters
Abbreviated form:
LA.
Explanation:
•
It
is
possible to set a label which expresses the branch destination
of
the
GOTO
statement,
GOSUB,
etc. In this way, the program can be made easier to see and
easier to understand.
Example:
1 0
PRI
NT
"SAMPLE"
20
GOSUB
"ABC"
30
PRI
NT
"END"
40
END
100
LABEL
"ABC"
1 1 0
PRI
NT
"LABEL
SAMPLE"
120
RE'TURN
..... The line number
20
GOSUB statement branch destination
is
set to the
"ABC"
label on line number 100. As a result, the subroutine after the line number
100
is
called out by the GOSUB statement.
Page 59

58
WAIT (wait)
Interrupts the program execution for a definite time.
Format:
WAIT <numerical
data>
Abbreviated form:
W.
Explanation:
• Interrupts the program execution for the time period specified by (numerical data).
The unit
is
111000
second.
Example:
1 0 WAI T
100
..... Interrupts the program execution for 0.1 (100/1000) second.
Page 60

59
SEARCH (search)
Searches the character data through the text.
Format:
SEARCH
[IP)
<character
data>
Abbreviated form:
SE.
Explanation:
• Searches for and finds the character data specified
in
the <character
data>
through
the program text and displays it on the screen.
• When the space key
is
pressed during execution, the display stops temporarily;
when the key
is
pressed once again, the execution
is
started again.
• The execution
is
stopped by ISHIFTI +
IBREAKI
.
• Uflfler ease aRa
lewsr
esse
llilulilfs
eaRRet
be
disclimindled withIn <character
~-T-tnts,
"see"
aRe"
c).BC"
anI
~gRsiQ@F@a
te
88
the sl'lft'le ehalaetel el'lta.
•
If
double quotation marks are used, CHRS (34)
is
used as the <character
data>.
• When IP
is
specified, data are printed by the printer, not displayed on the screen.
Example:
SEARCH
"ABC"
..... Searches for and finds, in the program text, the line including the character data
"ABC",
and displays it on the screen.
SEARCH
"PRI
NT"+CHR$(
34)
+"A"+CHR$(
34)
..... Searches for and finds the line including the character data
PRINT"
A".
Page 61

60
INIT (Initialize)
Sets
the
RS
mode.
Format:
INIT"RS{~
}
<monitoring
code>,
<initialization setting
code>(,<end
code>] "
Explanation:
• Sets the mode of RS-232C
<Monitoring
code>
7
6
5
lID
<Initialization setting
code>
5
4 3
2 o
DCD
reception monitoring
DCD
transmission monitoring
CTS transmission monitoring
Not
used. Usually
O.
RTS
OFF
transmission enable.
All character transmission
out
monitoring.
1..-
___
p.
01 -odd
parity
1
00
-
non
parity
anty
10 - non parity
11 -even
parity
.
01
- 1
stop
bit
1
00
- not used
L
_______
Stop bIt 10 _ 1 +
112
stop bit
Not
used. Usually 0
'--
Transmission/reception character length
{
0
-,~
bitslCHR
1
~'bitslCHR
<ending
code>
Values from 0 - 255 ($00 - $FF)
11
- 2 stop bits
Page 62

61
<breference>
To exchange information between two MZ-700s, prepare a cable provided with the
following connections:
Signal name
Pin number
Pin number Signal name
TXD
2
~--
2
TXD
RXD
3
--
--
3 RXD
RTS
4
~
4 RTS
ers
5
5
crs
DTR
6
7~
6
DTR
DCD
7
7 DCD
Ground
1,8
1,8
Ground
• Both are used in the terminal mode. (Refer to RS-232C user's manual.)
• The following are programs to transmit/receive numbers from 0 to 9, the contents
of A$, when exchanging information between two
MZ-700s.
<Reception side>
<transmission
side>
1 0
I NI
T
"RS1
:$00,$8C"
1 0 I NI T
"RS1:$00,
$8C"
20
ROPEN
#1
,
"
R S 1 :
DATA"
20
A$
"0123456789"
30
INPUT
#1 , A$
30
\l\K)PEN
#1
,
"RS
1 : "
40
PRI
NT
A$
40
PRI
NT
#1,
A$
50
CLOSE
#1
50
CLOSE
#2
60
END
60
END
..
\
Page 63

62
USR
(user)
Calls out and executes in BASIC the machine language program.
Format:
USR
«address> , <input
character variable> ,
<output
character variable)
<address>
: numerical data
or
4-digit hexadecimal number
Abbreviated form:
U.
Explanation:
• Calls out and executes the machine language program during BASIC program
execution. This
is
the same
as
the branch command and CALL
<address>
to the
machine language subroutine. Consequently, when there
is
a return command in a
machine language program, control moves to the next statement following the
executed statement.
• At the point
in
time when the machine language program
is
called out, the value
following the
<input
character variable>
is
set in the register.
DE
register: heading address
of
memory area
of
<input
character variable>
B register: length
of
<input
character variable>
IX register: address if error-processing routine
is
announced
•
At
the point
in
time
of
return from the machine language program, the value
of
the
data indicated
by
the subsequent register becomes the
<output
character
variable>.
DE
register: heading address
of
memory area
of
<output
character variable>
B register: length
of
<output
character variable>
•
If
error-processing
is
necessary in a machine language program, the following
process occurs.
(1)
An
error-processing routine
is
established by the ON
ERROR
GOTO
statement in the BASIC program.
(2) An error code
is
substituted
in
the A register, and
is
jumped to the address
indicated
by
the IX register.
Page 64

63
INP@ (input)
Inputs data
at
110
ports
to
variables.
Format:
INP@
<port
number>,
<variable>
Abbreviated form:
I.@
Explanation:
• Inputs 8-bit
data
from
<port
number>
input port and sets to
<variable>
the value
(0 - 255) converted to a decimal number .
• From 0 to
127
($00 - $7F in hexadecimal), the
<port
number>
can be determined
freely. From
128
to
255
($FO
- $80 in hexadecimal), the use
is
exclusively
as
ports
for external devices.
Example:
1 0
FOR
I =0
TO
20
20
C
=1
+32
30
GOSUB
"SUB"
40
NEXT
50
END
60
LABEL
"SUB"
70
I
NP@
$FE,
A
80
I F
NOT
(A
AND
$OD)
=0
THEN
70
90
OUT@
$FF,C
100
OUT@
$FE,
$80
1 1 0
I
NP@
$FE,
A
120
I F
NOT
(A
AND
$ 0 D)
=1
THE
N 1 1 0
130
OUT@
FE,
0
140
RETURN
Reference:
OUT@ (page 64)
Page 65

64
IOUT@(OUT)
Outputs data
to
1/0
ports.
Format:
OUT @
<port
number>,
<numerical
data>
Abbreviated form:
OU.@
Explanation:
• Converts <numerical
data>
values
(0
- 255) to binary numbers and outputs to the
<port
number>
output port.
• From 0 to
127
($00 - $7F in hexadecimal), the
<port
number>
can
be
determined
freely. From
128
to
255
($FO -$80
in hexadecimal), tne use
is
exclusively as ports
for external devices.
• For control of peripheral devices, etc., data are output to 110 ports. Thus, if there
is
a mistake of the
<port
number>,
etc. by this OUT@ command, there
is
the
possibility that such a mistake
will
cause abnormal operation of the peripheral
equipment, etc.,
so
care must be taken
in
that regard.
Example:
1 0
FOR
1 =0
TO
20
20
C
=1
+32
30
GOSUB
"SUB"
40
NEXT
1
50
60
70
80
90
100
1 1 0
120
1
30
140
END
LABEL
"SUB"
1
NP@
$FE,
A
1 F
NOT
(A
AND
$ 0 D) =0
OUT@
$FF,C
OUT@
$FE,
$80
1
NP@
$FE,
A
1 F
NOT
(A
AND
$ 0 D)
=1
OUT@
$ F,E, 0
RE
T UR N
Reference:
INP@ (page
63)
THE
N
70
THEN
110
Page 66

65
• Logical operation
Logical operation
The task of giving YES
or
ON results, by judgment, are not few
in
computers. Here
let
us
consider some logical expressions used to judge some conditions. The logical
operators
NOT, AND,
OR
and
XOR
are used
in
logical expressions.
CD
X AND Y (logical product = and)
AND means X moreover Y
XY
X and Y
1 1 1
1
0 0
0
1 0
0 0 0
® NOT X (negation = not)
Means that it
is
not X
NOT
X
o
® X
OR
Y (logical addition = inclusive or)
OR
means either X
or
Y
XY
XORY
1 1
1
1
0
1
0
1 1
0
0 0
@ X
XOR
Y (Exclusive logical addition =
exclusive or)
Means X and
Y are not equal
XY
XXORY
1 1
0
1 0
1
0 1
1
0 0
0
The logical operation
is
usually used in
IF -THEN
- ELSE command, explained
before. For instance, it
is
used as follows:
•
IF
-30<X
AND
Y>20
THEN
120
ELSE
100
(The meaning above
is:
if the X value
is
-30<X
moreover
Y>29
go to line number
120,
if not jump to line
100)
•
IF
-30<X
OR
Y>20
THEN
10
ELSE
100
(The meaning above
is:
if the X value
is
-30<X
or
Y>20
to to line number 120, if
not jump to line
100).
Page 67

Section 3
BASIC MONITOR FUNCTIONS
Page 68

68
In order to make the input of machine language programs easier, the DISK BASIC
has a monitor section following the
IOCS section. As the stack work area,
$FFOO
-
$FFFF (hexadecimal) are used.
This monitor,
in
the same way as the BASIC, has a built-in screen editor, and, by
using the editing format described below, any address of the main memory 64K bytes
can be rewritten.
3.1
EDITING FORMAT
: Address =
dataL-JdataL-Jdata
: (Colon)
..... a symbol which indicates an editable line
Address
..... designated by a four digit hexadecimal; main memory address, including
heading data
(0000 - FFFF)
= (equal mark)
..... a separator used to distinguish address and data
Data
..... designated by two digit hexadecimal
or
semi-colon + character; 8-bit data or
specified character ASCII code
is
written into specified memory address; as a
rule, a space
is
used for data intervals.
3.2 PRINTER SWITCH
(P
Command)
Directs D and F commands to printer
or
screen. When
in
monitor, becomes screen
mode. The mode reverses each time this command
is
executed.
If
a printer
is
not
connected,
ERR?
appears and a command
is
awaited, so check the printer or execute
the
P command to return to the screen mode.
Page 69

69
3.3 DUMP
CD
Command}
* D <heading address[ < final address> J>
Displays the memory contents. When the final address
is
omitted,
128
bytes from the
heading address are displayed. When the heading address
is
omitted,
128
bytes from
the subsequent address are displayed. Dumping
is
by
the following format.
:
HHHH=HH'-JHH'-JHH
HH HH HH
HH
HH I
ABCDE.
G.
t
~--------------~v---------------~
~
Heading address 8-byte hexadecimal data 8-byte character data
If
the memory content
is
changed, move the cursor to the data to be changed, make
the correction, and then input ICRI.
Note:
The final 8-byte characters are displayed
by
data ASCII code, and the control
code
is
indicated by a "
...
(period). The display
is
stopped only by the IBREAKI
key
by I SHIFT I +
IBREAKI
there
is
a return to
a~aiting
a command.
3.4 MEMORY SET
CM
Command}
*
IM
[heading addressJ
Rewrites the memory content. When the heading address
is
omitted, rewrite
is
from
the current pointer.
To
get out of this mode, press ISHIFTI + IBREAKI.
Because the address and data are displayed and the cursor superimposes over the
data, designate the data
by
the editing format and press ICRI. The designated data
and address
will
be added and continue to the next line.
Page 70

70
3.5 FIND
(F
Command)
* F <heading address>L.J<final address>L.J<data>L.J[<data
...
>]
Searches from the heading address to the final address for continuous data
of
the
number specified by the data, and, if found, outputs that address and data at the dump
mode.
Stopped by ISHIFrI + IBREAKI.
3.6 GOSUB
(G
Command)
* G <call
address>
Sub-routine calls the designated call address. Stack pointer
is
at FFFE (hexadecimal).
3.7
TRANSFER (T Command)
* T <heading address>L.J<final
address>~transfer
heading
address>
Transfers data between designated addresses from the transfer heading address.
3.8 SAVE
(S
Command)
*5
<heading address>L.J<final address>L.J<execution heading
address>:
[<devica
name>
: filename]
Records data between designated addresses to the designated device name. The
"execution heading address"
is
the execution heading address when loaded from IPL.
Specify
the file name in the same way as for DISK BASIC (after a
colon"
: ").
Page 71

71
3.9
LOAD
(L
Command)
* L <load heading address> [<device
name>
: fllaname)
Loads the designated file from the designated device name. When the heading address
is
specified, loading
is
from that address; if not specified, loading of information
is
done exactly
as
it was saved.
If
filename
is
not specified, the first file found
is
loaded.
When there
is
BREAK
or
if check sum error appears, ERR?
is
displayed, and returns
to awaiting command; if no error appears, returns to awaiting command.
3.10 VERIFY (V Command)
* V <fllename>
Reads designated file from cassette and compares with main memory. Used to check
whether correctly saved; if not correct,
ERR?
is
displayed.
3.11
RETURN
(R
Command)
Returns monitor to called system.
If
from BYE command of DISK BASIC, returns to
DISK BASIC by this command. SP (stack pointer) and
HL
register are stored, so next
command after BYE
is
executed.
If
SP
is
called from a system such
as
$FFOO
- $FFFF, or if there
is
no return address in
the stack, return
is
not possible by this command; call that system's hot start by the G
command.
Page 72

Section 4
APPLICATION PROGRAMS
Page 73

74
Use of
the
File Converter
• The
file
converter
is
registered on the DISK BASIC floppy disk by the "TRANS"
file name. To execute this, press the following keys (RUN: refer to page 36)
RUN "TRANS"
ICRI
The specification items which appear on the initial screen are specified in order from
the top. Choose the right item number from the menu area specification contents and
make the key input. The specification item and the initial screen become as follows.
Specification
items
Specification contents
(menu display area)
F i
le
Convert
Ut i lit
Y
VX.
XX
[Source)
'.,
Syst
em
:
De v ice
:
Fi
I e
Mode
:
.
F i
le
Na
me
:
[
De
s t i
net
i
on)
Syst
em
:
MZ-
700
BASI
C
De v ice
:
Fi
le
Mo
de
:
Fi
le
Na
me
:
*System
Me
n u
1 .
MZ
- 7 0 0 .a.Mi
I-e'
BCHic
2.
MZ-
80
K
~
Ba...s;
c
3.
MZ-
80
K
~C
"",.
f"
«.
C
4.
MZ-
80
K
F
DOS
Page 74

75
• Explanation of contents and specification method
of
menu area display
* System menu
• Specify the source system (the destination system
is
fixed in the MZ-7(0). The
source program specification inputs: Which
MZ
series machine was the program
made for?
For
instance, if the program file converter
is
for the
MZ-SOK,
and
moreover if it
is
made
by
double precision the DISK BASIC (W-PREC), key
input
"3".
•
Moreover, the objects are the following systems
MZ-700 Basic
\
CASSETE
TAPE
BASIC
DISK BASIC
MZ-SOKBasic
{=
~p.60\s
MZ-SOK
{
FDOS
MZ-80K FODS
S~~foI
Pft8@JftAm
Display contents
Menu display area
*fSyst
em
Menu)
1 .
MZ
- 7 0 0 B a
sic
2.
MZ
- 8 0 K
Ba
sic
3.
MZ -80
K
W-
Pr
e c
4.
MZ-
80K
FDOS
Page 75

76
*
Device
menu
• Specifies the device name (source device, destination device) to perform
conversion.
Display contents
* File mode
Menu display area
{Devi
ce
menu]
1 . F D 1 :
2. F D2:
3. F D3!
4. F D4:
5.
CMT
~
• Displays the file mode conversion possibilities specified in the system menu and
device. However, the destination
file
mode
is
made automatically possible
file
mode from the specification of source file mode.
Display contents
Menu display area
{F
i I e
MOde]
1.
OBJ
·
...
,t·,
2.
BTX
3.
BSD
4.
BRD
.~'
: r
* File name
• Inputs the
file
name of
file
to be conterted (maximum
16
characters). To display
the disk directory from this condition, key input
ICTRLI +
~.
Page 76

77
Display contents
Menu
display
area
* F i I e n a me J i n
put
?
Co~~rol
-A
==>
£:):r.cz.c..~or1
Display mode
Example
of
display when I CTRL I +
IIii
is
key input
and
device
''1''
(FD)
is
specified.
refe,
~o
pc;..'11L
J '-i
File
Convert
Ut
lity
01
RECTORY
OF
FD:
OBJ
"DATAl"
f
Funct
i
on
and,
1
Any
key.
"t
Next
~age"
..I.
Anv,
.k.;8)1'
Error
••
ssale
COlYert
alain,
[Y/N]
?
* Related to the message
Funct
i
on
and,
1
Any
key.
Returns
to
the file
name
input waiting
condition when key input (any key)
is
performed.
Ne x t p
age,
1
An
y
key.
.
.........
Display when
one
screen
is
not enough
to
display the directory.
The
display
of
the
Err
0 r
-,
1
All
Y
f"\
Q..>).
~
Q..
eO,..\I
cz.r~
.
..
~
....
"
V/N.
"v·
2
~
remaining directory
is
performed
when
once again a key
is
input.
IH"
Indicate;;hat
,beca~se
of
so~~
error
,directory
display
is
not
~
possible
~n
I
When
key i
npu
t I S
made
once
a,ain
,a.aitin,
source
syste.
input
;.hen
-H-
key
i.put
,DISK
•.
BASIC
is
started.
---------------
~,.,.
'.'.:
Page 77

SeJ
I
78
Reference:
If,
for file conversion, the source drive
and
destination drive
are
the
same,
the
following display
is
added.
Display:
1~1"""t
source,
1.
Any
key
a:!Il
or
~Q
•
.\'
[
I<.~t
dest
i
nat
ion,
1.
An y key
a:!Il
J
Explanation:
The
above display occurs if the
input
of
the
destination file has
ended.
First,
there
will
be a display
meaning
"insert
the
source disk",
and
then,
after
the
source disk
is
inserted into
the
disk drive, press a key (any key).
When
the
key input occurs, the
content
of
the source disk file
is
read
into the
memory
of
the
MZ-700.
When
this
read-in
is
finished,
there
will
be
a display meaning "insert the destination disk".
Take
out
the source disk
and
insert
the
destination disk into the floppy disk drive in its
place.
After
insertion
is
completed,
press a key (any key).
When
the key input occurs,
the
data
in the
memory
of
the MZ-700 will be written into the destination disk.
Display when conversion finishes
:1:".
•
Thf
following display will
be
shown
after
the conversion finishes.
i/
,..-,----
;: : I
**E.d
of
o b * *
j..
'~.,
..
~
.
B're
a ,
,
..
Convert
".in
[Y/N]
'iJ:
,:---
Explanation:
The
"END
OF
JOB"
message means
that
the conversion has finished.
"BREAK"
means
that
there
was an
interruption
I SHIFT I + IBREAKI during
the
job.
"ERROR
xx"
means
that
there
was an
error
during
the
job.
Page 78

79
After the end
of
either message display,
there
will be a display meaning "will
conversion be made again?
or
will conversion be
ended?".
If
conversion will be made
again, input
"Y",
if the
end,
input
"N".
When
"Y"
is
input, there will be a return to
the initial screen used for convert execution, and, when
"N"
is
input, there will be a
return to the monitor condition.
.
....
,
••
4
Page 79

Section 5
DISK BASIC
SUMMARY
Page 80

82
5.1
Summary of DISK BASIC Commands, Statements,
Functions and Operations
5.1.1
Commands
DIR
DIRIP
LOAD
DIR
DIR
FD1
DIR
Displays floppy disk directory.
Information indicated
at
directory display is as follows:
Registered filemode, registration condition (locked
or
not) and filename
Note:
For
the directory display
on
the
CRT
screen, there is a
stop when one screen amount is displayed, and the cursor
appears.
To
continue the directory display the
~
key
can
be
pushed,
or
it is possible to move
to
another
command.
Displays the directory of the floppy disk in floppy disk
drive number
1.
When the
DIR
command is executed, the
system memorizes that drive number, and thereafter the
drive number can
be
omitted to designate direct execution
commands and file access commands for that same floppy
disk drive.
Displays the directory of the floppy disk in the floppy disk
drive that was executed
by
the most recent
DIR
com-
mand.
DIR/P"
FD1" Prints floppy directory on line printer.
LOAD"
FD1 : DAY"
Reads
out
BASIC
texqaofX)
with
"DAY"
fife
name in
floppy disk.
LOAD
"FD2:SUN".
Consider BSD file
"SUN"
file name in floppy disk drive
A number 2 as ASCII format and read it out.
LIMIT
$DOOO:
LOAD
For
read-out
of
machine language program file (OBJ)
"B"
linked
to
a BASIC text, it
is
necessary to separate the
machine language area and the BASIC area by the LIMIT
command. Refer to the command used for linking with
the machine language program.
Page 81

SAVE
RUN
MERGE
VERIFY
AUTO
LIST
LISTIP
83
SAVE"
FDl : DAY"
Names the BASIC text currently in the text area
"DAY"
and writes in to floppy disk. One file with filename
"DAY"
and file mode BTX
is
registered.
SAVE
"CMT:E"
RUN
RUN
1000
RUN
"FD1:F"
RUN
"FD3:G"
MERGE
Names the BASIC text currently in the text area
"E"
and
writes in to the cassette tape.
Executes the program from the heading
of
the BASIC
text currently in the text area.
Note:
At
the
RUN
command, all variables become 0
or
null
immediately prior to program execution.
Executes program from statement number
1000.
Reads
out
BASIC program file
"F"
from floppy disk, and
executes program from the program heading.
Reads
out
program text
"G"
from volume number 7
of
the floppy disk in drive number 3, and then executes
program from the designated execution address. In this
instance, the system
is
not controlled by BASIC.
Adds the program in the file to the program.
MERGE
"FDl
:PR Merges program currently in the memory and
"PROG"
OG
11
file in the floppy disk.
VERIFY"H"
AUTO
AUTO
200.20
LIST
LlST-50D
LlST/P
Compares program text currently in BASIC text area and
content
of
cassette tape file specified by file name
"H".
Automatically generates line numbers 10, 20, 30
'"
during
text making.
Automatically generates
200, 220, 240 ... in steps
of
20,
from statement number 200.
AUTO
command
is
released
by
pressing I SHIFT I +
hREAKI
keys.
Displays all lists
of
BASIC text currently in text area.
Displays list
up
to statement number 500.
Display list goes to printer. (TEXT
MODE)
Page 82

84
RENUM
SEARCH
NEW
CONT
BYE
KEY
LIST
RENUM
RENUM
100
SEARCH
n ABC
11
NEW
CONT
BYE
KEY
LIST
Changes statement number of the program.
Renumbers all statements beginning with first statement
number
100,
and in steps of
10.
Searches for and finds lines including "ABC" character
data in program text, and displays on screen.
Erases
BASIC text currently in text area and clears
variable area. Machine language area specified
by
LIMIT
command
is
not cleared.
Continues program execution. In other words, restarts
execution from point of interruption
by
I
SHIFf
I + I BREAK I
keys
or
STOP statement during program. CONT command becomes invalid when, during a program break, the
BASIC text
is
edited.
Moves system control from
DISK BASIC to monitor.
(The return from monitor to
DISK BASIC can be made
by monitor
<;ommand
"R".)
,
Lists, on the CRT display, the definition condition of the
definable function keys.
5.1.2 File Control Statements
LOCK
UNLOCK
LOCK n FD2:ABC n Locks file "ABC".in floppy disk drive number
2.
UNLOCK n
ABC"
Locked files cannot be changed or deleted. In the
directory display, locked files are denoted by the
*
symbol.
Unlocks "ABC" file in active drive.
100 UNLOCK "FD1: Executes the program unlocking of
"A"
file in floppy disk
A"
drive number 1.
Page 83

RENAME
DELETE
CHAIN
SWAP
85
RENAME·
FD1
:A.B
• Changes file name
of
file
"A"
in floppy disk drive number
1 to filename
"B".
DELETE
HA"
Deletes file
"A"
from disk in default drive.
CHAIN
"FD1
:TEXT
Chains program execution to BASIC text
"TEXT
B" in
BH
floppy disk. In
other
words,
"TEXT
B"
is
read out to
BASIC text area, and program execution contin'ues from
that heading.
The original program in the text area at this time
is
made
NEW, and the content of the variable and user function is
transferred to the chained text.
It
can
be
understood that
the function
of
the CHAIN statement
is
as a
GOTO
"filename".
SWAP"
FD2:TEXT
Swaps program execution to BASIC text "TEXT S-R" in
S-R
" floppy disk drive number
2.
In other words, the text in execution
is
once shunted to the
floppy disk in the default drive, then
"TEXT S-R"
is
read
out to the
BASIC text area, and program execution
continues from that heading.
When the swapped program
is
finished, the original text
is
then read out, and the program execution continues from
the next statement after the
SWAP statement. When each
program execution
is
linked, the content of the variable and
user function
is
transferred. The SWAP level must not
exceed
1. In other words, SWAP instructions cannot be
made
within a swapped text.
In can be understood that the function of the
SWAP
statement is as the GOSUB "filename".
Page 84

86
5.1.3 BSD (BASIC Sequential Access, Data File) Control Statements
Note: For
file
descriptors
FD
and CMT
WOPEN #
WOPEN
#3
"FD2:S Opens the file for write-in so that one BASIC sequential
PRINT #
CLOSE #
KILL #
ROPEN #
INPUT #
EO
DATA
1" access file (BSD) can be made. In other words, it defines
the filename
of
the BSD being made as "SEQ
DATAl",
and opens,
as
logical number 3, a file
in
floppy disk drive
number
2.
PRINT
#3.
A.
AS
Writes in, in order, the content of variable A and string
variable
AS
on BSD; a file opened in logical number 3
by
the WOPEN # statement.
File close is executed by the
CLOSE # statement, and
BSD
is
formally registered as one BSD.
CLOSE
#3
Closes the BSD, the file opened in logical number 3 by
(Corresponding to the
WOPEN # statement.
WOPEN#)
KILL
#3
By closing the file, one BSD with the file name specified
by the WOPEN # statement
is
made on the specified
floppy disk, and the logical number
(3
in this instance)
becomes undefined once more.
Kills the BSD, the file opened
in
logical number 3 by the
WOPEN # statement. In other words, it cancels
or
erases
the BSD, and the logical number
(3
in this instance)
becomes undefined once more.
ROPEN
#4.
n
FD2:
SE
Opens the file for read-out of the data in the BASIC
o DATA2· sequential access data
file
(BSD). In other words, it
opens,
as
logical number
4,
the BSD file "SEQ DATA2"
in volume number 7 of the floppy disk in floppy disk drive
number
2.
INPUT
#4.
A(1).
BS
Reads out sequential data from the BSD, a file opened in
logical number 4 by the ROPEN # statement, and
substitutes numerical data in array variable
A(
1)
and
string in string variable B$.
Read-in data are sequentia,lIy accessed from the BSD
heading data.
Page 85

87
CLOSE #
CLOSE
#4
Closes the BSD; the file opened in logical number 4 by
(Corresponding to the
ROPEN
# statement.
ROPEN
#)
Logical number 4 becomes undefined once more.
5.1.4 BRD (BASIC Random Access, Data File) Control Statements
Note: For file descriptor
FD
only.
XOPEN #
XOPEN
#5
"FD3:D Opens (cross opens) for data write-inlread-out to the
PRINT
#(
)
INPUT
#(
)
CLOSE #
ATA
R1
n BASIC random access file (BRD).
In other words, cross opens BRD file
"DATA
RI"
on the
floppy disk
in
drive number 3 to logical number 5, or, if
the file does not yet exist, cross opens so that the BRD
file
"DATA
RI"
can be newly made on that floppy disk.
PRINT
#5(11).
R(11)
Writes in the content
of
a one-dimensional numerical
array variable
R(l1)
to element
11
of the BRD
file
opened in logical number 5
by
the XOPEN # statement.
PRINT #5(20). AR$. Writes in string variables AR$ and AS$ to, respectively,
AS$ elements
20
and
21
of the same BRD
as
above. Because
all elements in the BRD are a fixed length of
32
bytes,
any part of the string length which exceeds
32
bytes
will
be invalid.
INPUT #5(21).
R$
Reads out (substitutes), to string variable R$, the data in
element
21
of
the BRD file opened to logical number 5
by
the XOPEN # statement.
INPUT #5(11).
A(11).
Reads out the data in elements
11
and
12
of
the BRD, as
A$(12) described above, to the one-dimensional numerical array
variable A(11) and one-dimensional string array variable
A$(12) respectively.
CLOSE
#5
CLOSE
Closes the BRD file opened to logical number 5 by the
XOPEN
# statement.
Closes all files opened by WOPEN, ROPEN
or
XOPEN.
Page 86

88
KILL #
IFEOF
(#)
KILL
#5
KILL
Kills the
BRD
opened in logical number 5
by
the XOPEN
#
statement.
Kills all files opened by
WOPEN, ROPEN or XOPEN.
IF
EOF
(#5)
THEN
If
the file end occurs during execution of the INPUT #
700
statement relative to BSD, or during execution of the
INPUT
# ( ) statement relative to BRD, this
is
a branch
statement that commands to jump to the processing
routine in statement number
700.
5.1.5 Error Processing Statements
ON
ERROR
GO
ON
ERROR
GOTO
If
an error occurs during program execution, this
is
a
TO 1000 sentence saying to jump to statement number
1000.
IF ERN
IF
ERN
= 44
THEN
If
the error number is 44, this is a command to jump to
1050 statement number
1050.
IF ERL
IF
ERL
= 350
THEN
A command to jump to statement number
1090
if the
RESUME
1090 error statement number
is
350.
IF
(ERN
=
53)
*
(ER
A command to finish the program if the error number
is
L =
700)
THEN
END
53
and the error statement number
is
700.
650
RESUME
For the DISK BASIC, if an error occurs during the
program, the error number and error statement number
will
be set, respectively, to variables ERN and ERL.
Transfers control once again to the command generating
the error.
700
RESUME
Transfers control to the command following the command
~
NEXT
generating the error.
750
RESUME
400 Transfers control to statement number
400.
800
RESUME
0 Transfers control to the program heading.
Page 87

89
5.1.1 Substitution Statements
LET
LET
A=X+3
Substitutes sum results
of
numerical variable X and
numerical
data
3 to numerical variable A. LET can be
omitted.
5.1.7 Input/Output and Color Control Statements
COLOR
PRINT
10
CaLOR
.•.
2
20 CaLOR 3.2.7
Changes all screen background color to red.
Changes the color of characters at coordinates (3,2) to
white.
30
CaLOR
4.204.2
Makes the color
of
characters
at
coordinates (4,2) green,
10 PRINT A
?A$
100 PRINT [6.5] " AB
C"
110
PRINT
[A] "DE
F"
120
PRINT
[704]
"G
HI"
200 PRINT
and the background color red.
Displays the content of numerical variable A on the
CRT
display.
Displays the content of string variable A$ on the
CRT
display.
Writes the
"ABC"
string in
yellow on a light blue
background.
Writes the
"DEF"
string
in
yellow
on
a green background.
Writes the
"OHI"
string in white on a green background.
New line if
PRINT only.
PRINT
USING PRINT
USING"
##
A designation which lines up decimal point positions
by
a
INl'UT
#.##";A
10 INPUT A
20 INPUT A$
fixed decimal point display.
Inputs values relative to variable A from the keyboard.
Inputs strings relative to string variable A$ from the
keyboard.
30 INPUT "VALUE?" Before input from the keyboard, the question string data
;D
VALUE?
is
displayed. The semi-colon
is
used to separate
the string from the variable.
Page 88

90
SET
RESET
GET
40
INPUT
X,
XS,
y, Numerical variables and string variables can
be
combined
YS
by using the comma ( , ) to separate them,
but
it
is
necessary to match the type of variable
at
the time
of
input.
SET
30,15
RESET
30,15
10
GET
N
20
GET
KS
Illuminates the position
of
coordinates (30,15).
Er!Ules
the position of coordinates (30,15).
Inputs one numerical character from the keyboard relative
to numerical variable N.
If
the key
is
not pressed
at
that
time,
0
is
input.
Inputs one string from the keyboard relative to string
variable
KS.
If
the key
is
not pressed
at
that time,
AS
becomes vacant.
READ
- DATA 10
READ
A,B,C
1010
DATA
25,
-0.5,500
Numerical data 25,
-0.5
and 500 are substituted to,
respectively, numerical variables
A,
B and C by execution
of
the
READ-DATA
statements
at
the left.
RESTORE
10
READ
HS,
H,
SS,
The first data
of
the
DATA
statement, i.e., string data
S
"HEART",
is
substituted for the first variable
of
the
30
DATA
"HEART",
3READ
statement, i.e., for the string variable HS. Next,
35
DATA"
SPADE
",
numerical data 3 is substituted for the second variable
H,
1 1 and read-in continues one after the other.
10
READ
A,B,C
In the example
at
the left, 3, 6 and 9 are respectively
20
RESTORE
substituted for variables
A,
Band
C by the
READ
30
READ
D,E
statement in statement number 10, but, because the
100
DATA
3,6,9,
RESTORE
statement occurs next, the values next substi-
12, 15 tuted for variables D and E by statement number 30's
READ
are, respectively, 3 and 6, not
12
and 15.
700
RESTORE
200 Moves the data read-out pointer in the
READ-DATA
statement to the heading
of
the
DATA
statement in
statement number
200.
Page 89

91
5.1.8 Loop statements
FOR-
TO
NEXT
10
FOR
A
==
1 TO
The
statement number 10 is a command
to
change
10 variable A
and
substitute for values from 1
to
10; the
20
PRINT A
30
NEXT A
value
of
the
first A becomes
1.
Because the value
of
A is
displayed
on
the
eRT
screen by statement number
20,
the
numeral 1 is displayed. Next,
the
value
of
A becomes 2 by
statement number 30, and this loop is repeated. The loop
is repeated in this way until the value
of
A becomes 10.
(At
the point when the loop ends, the value
11
is entered
to
A.)
10 FOR B
==
2 TO A command
to
change variable B
and
substitute for values
8 STEP 3 from 2
to
8 in steps
of
3 (statement number 10).
It
is
also
20 PRINT B
~ble
to
make the STEP value negative and make the
30
NEXT variable smaller each time.
An
example
of
an
overlay
of
the
FOR -NEXT
loops
10
FOR
A=1
TO
3 (variables A
and
B). Note
that
B loop is placed inside A
20
FOR
8S1. 0 TO
30
J
'"I>
loop. Nesting
of
loops (doubling tripling ... ) is possible
30
PRINT
A,
8
ff
' ,
40
NEXT
8
but
the
inner loop must
be
enclosed within the outer loop.
50
NEXT
A
60
NEXT
B,
A
FOR -NEXT
nesting must not
e~ed
15
levels.
70
NEXT
A,
B
t
It
is possible, by the previous double loop, to group
Becomes
error.
statement numbers 40
and
50, as in statement number 60
at
the
left, into one
NEXT
statement.
For
an operand
such as shown in statement number
70, however,
an
error
occurs.
Page 90

92
5.1.9 Branch Statements
GOTO
GOSUB RETURN
IF
- THEN
IF -GOTO
IF
- GOSUB
ON-
GOTO
ON-
GOSUB
100 GOTO 200
100 GOSUB 700
800
RETURN
Jumps to statement number
200
(=
movement
of
program
execution).
Branches
to
statement number
700
subroutine (calling
of
subroutine). Ends subroutine execution by
RETURN
statement, and returns to statement following GOSUB
command in the
main
program.
10
IF
A>20
THEN Jumps to statement number
200
if variable A
is
larger
200 than
20.
Executes next statement if A is
20
or
less.
50
IF
B<3
THEN
B Substitutes B + 3 for variable B if variable B is less than
=B+3
100
IF
A>=B
GO
TO 10
3.
Executes next statement if B is 3
or
greater.
Jumps to statement number
10
if variable A is equal to
or
greater than variable B. Executes next statement if A is
less than B.
30
IF
A=B
* 2
GO
Branches
to
statement number
90
subroutine if value
of
SUB 90 variable A is equal to twice the value of B.
If
not,
executes next statement.
(If
there is a multi-statement following a conditional
statement, the
ON
statement is executed when the
condition is not reached, but the
IF
statement moves the
execution to the next statement number if the condition
is
not reached,
and
the multi-statement is ignored.)
50
ON
A GOTO 70, Jumps
to
statement number
70
if variable A is 1, to
80. 90 statement number
80
if it is 2, and to statement number
90
if it is 3. The next statement is executed if A
is 0 or 4 or
more. The INT function is included in
ON,
so jumps
to
statement number
80
if A is 2.7, in the same way as
2.
90
ON
A GOSUB
700. 800
Branches to statement number
700
subroutine if variable
A
is
1, and to statement number 800 if it is 2. The next
statement is executed if A is 0
or 3 or
more.
Page 91

93
5.1.10 Definition Statements
DIM
DEFAULT
DEFFN
10
DIM
A(20)
20
DIM
B(79,79)
30
DIM
C1$(10)
40
DIM
K$(7,5)
DEFAULT"
FD1
"
For one-dimensional numerical array variable A( ),
21
array variables become available, from
A(O)
to A(20).
For two-dimensional numerical array variable
8(
),6400
array variables become available, from
8(0,
0)
to 8(79,
79).
For one-dimensional string array variable C1$( ),
11
array variables become available, from C1$(0) to C1$(10).
For two-dimensional string array variable
K$(
),
48
array variables become available, from
K$(O,
0)
to K$(7,
5).
Considered to be floppy disk drive number 1 if device
names are omitted
by
commands.
100
DEF
FNA(X)
= Statement number
100
defines
X2
-x
to FNA(X),
x t 2 - X statement number
110
defines
10gJOX
+ 1 to FN8(X), and
110
DEF
FNB(X)
= statement number
120
defines
108e
Y
to
FNZ(Y).
LOG(X)
+ 1
120
DEF
FNZ(Y)
=
LN(Y)
Each function
is
limited to 1 variable.
Page 92

94
DEF
KEY
INIT
LABEL
15
DEF
KEY(1) = "L
The
DEF
KEY
statement
of
statement number
15
defines
1ST"
-+-
CHRS(13)
the function LIST
IQY
to
25
DEF
KEY(2)
="
L function key number 1, and statement number
25
defines
OAD:RUN" + the function
LOAD:RUN
IQY.
CHRS
(13)
INIT" RS1:"
210
LABEL
"SUB"
220
Sets
the
RS-232C mode.
Defines subroutine name beginning from statement number
210 as "SUB".
5.1.11 Comment Statements and Control Statements
REM 200
REM
JOB-1
REM
is a comment statement; ignored when program is
executed.
STOP
END
CLR
CLS
CURSOR
850 STOP
2000
END
300
CLR
Stops program execution and awaits command.
If
CONT
command given here, program continues.
Indicates
end
of
program. Executes program end.
All numerical variables and character variables become 0
or
vacant (null); all array variables return to undeter-
mined condition. All
DEF
FN statements also become
invalid.
10
CLS
Erases the secreen in the scroll range.
50
CURSOR 25. 15 Specifies the position by numerals
or
variables: from 0 -
60
PRINT" ABC" 39 from the left
end
in the X axis direction, and 0 - 24
from the top
end
in the Y axis direction.
For
the example
at
the left, string
"ABC"
is
displayed from the 26th cursor
position from the left
end
of
the screen and the 16th
cursor position from the top end.
Page 93

CONSOLE
SIZE
TI$
10 CONSOLE 0, 25, The scroll range covers the whole screen.
0,
40
95
20 CONSOLE
5,
15 Specifies the scroll range from the 5th line to the
lOth
line.
30
CONSOLE
0,
25, Specifies the scroll range from the 5th line
to
the 30th
5,30
line.
40 CONSOLE 0, 10, Specifies the scroll range
to a 10x
10
range.
0, 10
50 CONSOLE
2,
20, Specifies the scroll range
to
the scroll range shown in the
2,
35
figure below. (0,0) 7 (39,0)
2
--'lfT-r-J"7-ri~
(39,24)
?
SIZE
Displays the unused size (in bytes)
of
the BASIC text
area.
100
TI$
= "222030" Sets the internal clock to 10:20:30 PM. Time data are
expressed as a 6-digit figure within quotation marks.
5.1.12 Music Control Statements
MUSIC
TEMPO
300 TEMPO 7 Tempo 7 (fastest speed)
is
specified by statement number
310
MUSIC"
DE#
300.
By
statement number 310, re mi
iJ:I~1
la (mid-
FGA"
range) are played at tempo
7.
U there
is
no
TEMPO
statement,
the
music is played at the tempo of the default
value.
300
M1$ = "C3EG In this example, the melody is substituted to the 3 string
+
C"
variables and the MUSIC command
is
executed. When
310 M2$ =
"BGD
the staff notation
is
used, the notes below are played.
- G" Note that, because there is no
TEMPO
statement, the
320 M3$ = "C8R5" playing
is
at
the default value tempo.
330
MUSIC
M1$,M
2$,M3$
Page 94

96
5.1.13 Machine Language Program Control Statements
INP@ INP@ $E8,A Substitutes data at port number $E8 for variable A.
OUT@ OUT@ $E8,A Outputs variable A to port number $E8.
LIMIT
POKE
PEEK
USR
100 LIMIT 49151
100 LIMIT A
Limits the area used
by
the BASIC program to the
49151
address (BFFF with hexadecimal notation).
Limits the area used by the
BASIC program to the
address
of
variable A.
100 LIMIT $BFFF Limits the area used by the BASIC program to the
300
LI
M IT
MAX
address BFFF in hexadecimal notation. A hexadecimal
notation is indicated by an "$" mark before the notation.
Returns the area used by the
BASIC program to the
maximum memory.
120
POKE
49450,
175
Sets data
175
(decimal notation) to the decimal notation
address
49450.
130
POKE
AD, DA Sets the value (0 - 255) indicated by variable
DA
to the
address specified by variable AD.
150 A =
PEEK
(494 Changes the data at decimal notation address
49450
to a
50) decimal number, and substitutes for variable A.
160 B =
PEEK(C)
Changes data entered at the decimal notation address
specified by variable C to a decimal notation, and
substitutes for variable B.
500 USR(49152)
550
USR
(AD)
570
USR($COOO)
Moves program control to decimal address 49152. This
control movement has the same function as the machine
language CALL command. As a result, when the
RET
command
(201
at decimal notation) is in the machine
language program, returns to the BASIC program.
Calls the decimal address specified by variable AD.
Calls the hexadecimal address
COOO.
Page 95

97
5.1.14 Printer Control Statements
AXIS
CIRCLE
GPRINT
HSET
LINE
MODE
MOVE
Valid in
GRAPH
mode.
30
AXIS
O.
-10.
48 Adds a scale of
48
graduations
in
increments of
10
to the
Y-coordinate axis from the current pen position.
50
AXIS
1.
10. 48 Adds a scale of
48
graduations
in
increments of
10
to the
X-coordinate axis from the current pen position.
Valid in
GRAPH
mode
50
CIRCLE
O.
O.
240. Draws a circle (radius
240)
from coordinates (0,0).
0.360.
O.
2
Valid in
GRAPH
mode.
30
GPRINT
(2.2).
" A • Prints the character A upside down at the size of the
26
digit mode of the TEXT mode.
Specifies the current pen position' to a new starting point.
(Valid in GRAPH mode.)
Valid in
GRAPH
mode.
10
LlNE%
1.240.
O.
Coordinates (240,0), (240,-240), (0,-240) and (0,0) are
240.
-240.
O.
connected by a solid line from the current pen position.
-240.0.0
MODE
TN
Returns from the graphic mode to the text mode
(4O
characters per line).
MODE
TL
Returns from the graphic mode
to the text mode (26
characters per line).
MODE
TS
Returns from the graphic mode to the text mode
(80
characters per line).
MODE
GR
Switches from the text mode to the graph mode (in order
to draw graphs and figures).
Valid in
GRAPH
mode.
10
MOVE
150. 100 Moves the pen upward from the current pen position to
coordinates (150,
100).
Page 96

98
RMOVE Valid in
GRAPH
mode.
20
RMOVE
-240.
Moves the pen upward relatively from the current pen
240 position by
-240
(X direction) and
240
(Y direction).
PAGE Valid in
TEXT
mode.
PCOLOR
PHOME
PLOT
PRINTIP
PRINTIP
USING
KLINE
SKIP
TEST
10
PAGE
30
10 PCOlOR 1
20
PR
INT/P
"ABC"
PLOT
ON
PLOT
OFF
10
PRINT/P
A.AS
Specifies
30
lines per page.
Valid in both TEXT and
GRAPH
mode
Prints "ABC" to the plotter printer in blue.
Moves the pen upward from the current pen position and
returns to the starting point. (Valid in
GRAPH
mode)
Enables use
of
color plotter printer as substitution for the
display. (Valid in
TEXT
mode.)
Cancels above function.
Valid in TEXT mode
Outputs string variable A$ content after the numerical
variable A content to printer.
20
PRINT/P
~I
• For form feed
of
printer.
Outputs format specified data to screen. Format specification
is
written after the word USING. ( )
PRINT/P
USING
"#
Numerical variable A contents are output to printer
###
";A within 4 digits, justified right.
Valid in
GRAPH
mode.
70
RLlNE%
1.
240. Connects specified positions, relatively from current pen
O.
-120.
-SO.
position (240,0),
(-120,
-SO)
and (-120080)
by
solid line.
-12.
SO
10
SKIP
10
20
SKIP
-10
Valid in
TEXT
mode.
Advances the paper
10
lines.
Rewinds
10
lines.
Checks color specification and ink amount and dryness.
(Valid in
TEXT
mode)
Page 97

LN
RND
100 A =
LN
(X)
99
Regarding the value of '9ariable X, gets natural logarithm
IO!!e
X and substitutes for variable A. X must be a positive
value.
110 A =
LOG
(X)/L In order
to
obtain logy X when the logarithm base
is
Y, it
OG(Y)
can be obtained
by
statement number
110
or
statement
120 A =
LN
(X)/LN
number
120.
(Y)
100
A=RND
(1)
110 B=RND
(10)
When there
is
a positive integral number
in
parentheses,
such
as
in statement number
100
or
110,
generates a
random number using values from
0.00000001 to
0.99999999 sequentially each time the RND function is
used. (This has no relationship to the positive integral
number in parentheses.)
200
A=RND
(0)
When there is a 0 or negative integral number in
210 B=RND
(-3)
parentheses, such
as
in statement number
200
or 210,
initialization of random number generation occurs, a
specific number
is
always generated, and the same value
is
substituted for A and for
B.
Page 98

100
5.1.15 String Control Functions
LEFfS
MIDS
RIGHTS
SPC
CHRS
ASC
STRS
VAL
LEN
10 A$ = LEFT$
(X$,
Substitutes string variable
XS
(from beginning to Nth
N) character) for string variable
AS.
It
doesn't matter
whether N
is
a constant, variable
or
numerical formula.
20 B$ =
MID$
(X$,
M.
N)
30
C$
= RIGHT$
(X
$,
N)
40 D$ =
SPC
(N)
60 F$ = CHR$
(A)
70 A = ASC
(X$)
80 N$ = STR$
(I)
90 I = VAL
(N$)
100
LX = LEN
(X$)
110
LS = LEN
(X$
+
Y$)
Substitutes string variable
XS
(from Mth character to N
character) for string variable
SS.
Substitutes string variable X$ (from end to N character)
for string variable
CS.
Substitutes N number
of
spaces for string variable D$.
Converse to the
ASC function, substitutes ASCII code
characters which are equivalent to the value of real
number A for string variable F$.
It
doesn't matter
whether A
is
a constant, variable
or
numerical formula.
Substitutes the value
of
the ASCII code
of
the first
character of
st~ng
variable
X$
for variable A.
Converse to the V
AL
variable, substitutes the numerical
variable I
as
if it were a string for string variable N$.
Substitutes the numerical string
of
string variable
N$
as if
it were a number for variable
I.
Substitutes the character length (character number)
of
string variable
X$
for variable LX.
Substitutes the sum of the character length
of
string
variables
X$
and
Y$
for variable LS.
Page 99

101
5.1.16 Tab Function
TAB
10 PRINT TAB (X);A Displays the value of variable A
at
the X + 1 character
position counting from the left edge
of
the screen.
5.1.17 Arithmetic Operations
The calculation priority
is
of
white figures
on
dark background
at
left side, but the calculation of
figures in parentheses ( ) has even higher priority.
t 10 A = X t Y Substitutes the X t Y calculation result for variable A.
*
+
(power)
10 A =
-B
(minus sign)
10A=X*Y
(multiplication)
10A
=
XIY
(division)
10 A = X + Y
(addition)
10 A = X - Y
(subtraction)
(Note, however, that an error occurs if
Y
is
not an
integral number when X
is
a negative number at X t Y.)
0-
8
is
a subtraction; note that the
"-"
of
-8
is
a minus
sign.
Substitutes the multiplication result of X and
Y for
variable A.
Substitutes the division result of X and
Y for variable
A.
Substitutes the addition result of X and Y for variable A.
Substitutes the subtraction result of X and
Y for variable
A.
5.1.18 Comparison
Logic
Operators
>
10
IF
A = X THEN
20
IF
A$ =
"XYZ"
If
variables A and X are equal, executes commands from
THEN
onward.
If
string variable
AS
content
is
string XYZ, executes
THEN ............... commands from
THEN
onward.
10
IF
A>X
THEN
...
If
variable A is greater than X, executes commands from
THEN
onward.
Page 100

102
<
<>
or
><
>=or=<
<=or=<
*
+
10
IF
A<X
THEN."
If
variable A
is
smaller than X, executes commands from
THEN
onward.
10
IF
A<>F
THEN
...
If
variable A and X are not equal, executes commands
from THEN onward.
10
IF
A>=X
THEN
10
IF
A<=X
THEN
40
IF
(A>X) *
(8)
If
variable A
is
greater than or equal to X, executes
commands from THEN onward.
If
variable A
is
smaller than or equal to X, executes
commands from THEN onward.
If
variable A is greater than X and variable B
is
greater
Y)
THEN
.......... than
Y,
executes commands from THEN onward.
50
IF
(A>X) +
(8)
If
variable A
is
greater than X or variable B
is
greater
Y)
THEN
.......... than Y, executes commands from THEN onward.
5.1.19 Other Symbols
?
•
200 ? "A+B=
"; A Can be used instead of PRINT. Consequently, statement
+ B number
200
and
210
are the same.
210
PRINT
"A+B
=";
A+B
220
A=X:B=X t 2:
A symbol to express punctuation of the command state-
lA.B
ment; used in multiple commands. There are 3 command
statements used in the statement number
220
multiple
command.
230
PRINT
"AB";
"C
Executes PRINT continuously. As a result line number
0";
"EF" 230, "ABCDEF"
is
displayed
on
the screen continuously,
with no space.
240
INPUT
"X=";
X Displays "X
="
on screen; awaits data key input of string
$ variable
XS.
250 PRINT"
AB
n,"C Executes PRINT with tabulation. For statement number
0",
"E"
250,
first AB
is
displayed on the screen, then CD
is
displayed in the position
10
characters to the right of A,
and then E
is
displayed in the position
10
characters to the
right of C.
 Loading...