

Page 1

NETWORK EXPANSION KIT
OPERATION GUIDE
MODEL
MX-NB12
Page 2
INTRODUCTION
Note
The optional Network expansion kit (MX-NB12) enables the machine to be used as a network printer and a network
scanner.
• This manual refers to the digital multifunction device equipped with the network function as "the machine".
• This manual only explains features that can be used when the optional Network expansion kit is installed. For
information on loading paper, replacing toner cartridges, clearing paper misfeeds, handling peripheral devices,
and other copier-related information, please refer to the Operation Guide for the machine.
• The machine's default settings and default settings for the printer function can be changed using the system
settings. For more information, see the Operation Guide for the machine.
• The explanations in this manual assume that the person who will install the product and the users of the
product have a working knowledge of Microsoft Windows.
For information on the operating system, please refer to your operating system manual or the online Help function.
•
•
The explanations of screens and procedures in this manual are for Windows Vista® in Windows® environments.
The screens may vary in other versions of the operating systems.
• Where "AR-XXXX" appears in this manual, please substitute the name of your model.
• The explanations in this manual are based on the North American version of the software. Versions for other
countries and regions may vary slightly from the North American version.
Warranty
While every effort has been made to make this Operation Guide as accurate and helpful as possible, SHARP
Corporation makes no warranty of any kind with regard to its content. All information included herein is subject to
change without notice. SHARP is not responsible for any loss or damages, direct or indirect, arising from or related
to the use of this Operation Guide.
Trademark Acknowledgments
• Sharpdesk is a trademark of Sharp Corporation.
•Microsoft
Windows Vista
Corporation in the U.S.A. and other countries.
• Adobe, the Adobe logo, Acrobat, the Adobe PDF logo, and Reader are registered trademarks or trademarks of
Adobe Systems Incorporated in the United States and other countries.
• Netscape Navigator is a trademark of Netscape Communications Corporation.
• PCL is a trademark of the Hewlett-Packard Company.
• All other trademarks and copyrights are the property of their respective owners.
®
, Windows®, Windows® 2000, Windows® XP, Windows Server® 2003, Windows Server® 2008,
®
, Windows® 7 and Internet Explorer® are registered trademarks or trademarks of Microsoft
SOFTWARE LICENSE
The SOFTWARE LICENSE will appear when you install the software from the CD-ROM. By using all or any portion
of the software on the CD-ROM or in the machine, you are agreeing to be bound by the terms of the SOFTWARE
LICENSE.
The display screens, messages, and key names shown in the manual may differ from those on the actual machine
due to product improvements and modifications.
- 2 -
Page 3

CONTENTS
INTRODUCTION ............................................... 2
1
CD-ROMS AND SOFTWARE ........................... 5
● CD-ROMS IN THE NETWORK EXPANSION
● SYSTEM REQUIREMENTS ............................6
SYSTEM SETTINGS FOR THE NETWORK
EXPANSION KIT............................................... 7
2
SETTING THE IP ADDRESS OF THE MACHINE
BY SYSTEM SETTINGS................................... 8
● ENABLING/DISABLING DHCP .......................8
● SETTING THE IP ADDRESS
● SETTING/CHANGING THE IP ADDRESS
INSTALLING THE SOFTWARE ..................... 10
● USING THE MACHINE WITH A USB
● CONNECTING A USB CABLE ......................12
● USING THE MACHINE AS A NETWORK
● SHARING THE PRINTER USING WINDOWS
● INSTALLING THE PRINTER STATUS
CONFIGURING THE PRINTER DRIVER ....... 18
BEFORE INSTALLATION
KIT ...................................................................5
SETUP
AUTOMATICALLY ...........................................8
MANUALLY......................................................9
CONNECTION...............................................10
PRINTER .......................................................13
NETWORKING ..............................................15
MONITOR ......................................................17
3
BASIC PRINTING ............................................19
OPENING THE PRINTER DRIVER FROM THE
"Start" BUTTON..............................................21
PRINTER DRIVER SETTINGS ........................22
TWO-SIDED PRINTING (ONLY FOR MODELS
THAT SUPPORT TWO-SIDED PRINTING) ....23
● PAMPHLET STYLE ...................................... 24
PRINTING MULTIPLE PAGES ON ONE PAGE
.........................................................................25
FITTING THE PRINTED IMAGE TO THE
PAPER .............................................................26
ROTATING THE PRINT IMAGE 180 DEGREES
.........................................................................27
CREATING OVERLAYS FOR PRINT DATA
.........................................................................28
● CREATING AN OVERLAY FILE ................... 28
● PRINTING WITH AN OVERLAY FILE .......... 28
PRINTING THE FRONT COVER PAGE ON
DIFFERENT PAPER........................................29
ADDING INSERTS WHEN PRINTING ............30
PRINTING A WATERMARK............................31
● HOW TO PRINT A WATERMARK................ 31
PRINTING TEXT AND LINES IN BLACK .......32
● PRINTING TEXT IN BLACK ......................... 32
● PRINTING LINES AND VECTOR GRAPHICS
SAVING FREQUENTLY USED PRINT
SETTINGS .......................................................33
● SAVING SETTINGS AT THE TIME OF
PRINTER FUNCTIONS
IN BLACK...................................................... 32
PRINTING ..................................................... 33
- 3 -
4
PRINTER STATUS MONITOR ........................34
● BEFORE USING THE PRINTER STATUS
USING THE PRINTER STATUS MONITOR....35
● CHANGING THE PRINTER STATUS
● CHECKING THE PRINTER STATUS ........... 36
PRINTER STATUS MONITOR
MONITOR ..................................................... 34
MONITOR SETTINGS .................................. 35
Page 4

5
WEB FUNCTIONS IN THE MACHINE
8
SPECIFICATIONS
ABOUT THE WEB PAGES............................. 37
● HOW TO ACCESS THE WEB PAGE AND
VIEW HELP ...................................................37
CHANGING/CHECKING THE IP ADDRESS IN
THE WEB PAGE............................................. 38
ABOUT THE WEB PAGES
(FOR USERS) ................................................. 39
CONFIGURING THE PRINTER CONDITION
SETTINGS....................................................... 40
● HOW TO CONFIGURE THE SETTINGS ......40
● PRINTER CONDITION SETTING MENU ......41
● PRINTER CONDITION SETTINGS ...............41
ABOUT THE WEB PAGES
(FOR THE ADMINISTRATOR) ....................... 43
PROTECTING INFORMATION PROGRAMMED
IN THE WEB PAGE ([Passwords]) ............... 44
ADMINISTRATOR SETTINGS ....................... 45
● CONFIGURING A SETTING IN THE
ADMINISTRATOR SETTINGS ......................45
● ADMINISTRATOR SETTINGS ......................46
E-MAIL STATUS AND E-MAIL ALERT
SETTINGS....................................................... 47
● INFORMATION SETUP .................................47
● SMTP SETUP ................................................47
● STATUS MESSAGE SETUP .........................48
● ALERTS MESSAGE SETUP .........................48
NETWORK EXPANSION KIT
SPECIFICATIONS ...........................................58
PRINTER SPECIFICATIONS ..........................58
SCANNER SPECIFICATIONS ........................59
● USB MEMORY SCAN .................................. 59
● TWAIN/BUTTON MANAGER SCAN............. 59
PRINTER DRIVER SPECIFICATIONS............60
6
ABOUT THE SCANNER FUNCTIONS........... 49
USB MEMORY SCAN..................................... 51
● BASIC SETTINGS FOR USB MEMORY SCAN
● USING THE USB MEMORY SCAN FUNCTION
7
TROUBLESHOOTING .................................... 54
REMOVING THE SOFTWARE ....................... 57
SCANNER FUNCTIONS
(FOR THE ADMINISTRATOR) ......................51
.......................................................................52
TROUBLESHOOTING
- 4 -
Page 5
1
Caution
CD-ROMS AND SOFTWARE
CD-ROMS IN THE NETWORK EXPANSION KIT
The Network expansion kit contains the following two CD-ROMs: "Software CD-ROM" and "Sharpdesk".
"Software CD-ROM"
The "Software CD-ROM" contains the following software programs:
Software for Windows
• Printer driver
• Scanner driver
• Printer Status Monitor
• Button Manager
BEFORE INSTALLATION
The Printer Status Monitor on the "Software CD-ROM" cannot be used when the machine is
connected to your computer by a USB.
These allow the machine to be used as a printer.
- PCL6 printer driver
The machine supports the Hewlett-Packard PCL6 printer control languages.
The scanner driver allows you to use the scanning function of the machine with TWAIN-compliant and
WIA-compliant applications.
This allows you to check the status of the network printer on your computer screen.
Button Manager allows you to use the scanner menus on the machine to scan a document.
"Sharpdesk" CD-ROM (for Windows)
Sharpdesk is a desktop document management application that makes it easy to start applications and file
documents and images.
- 5 -
Page 6

BEFORE INSTALLATION
SYSTEM REQUIREMENTS
Before installing the software described in this manual, make sure that your computer satisfies the following
requirements.
Computer type IBM PC/AT or compatible computer equipped with a USB2.0*1 or
10Base-T/100Base-TX LAN interface
Operating system*2*3*
4
Windows 2000 Professional, Windows XP, Windows Server 2003, Windows Vista,
Windows Server 2008, Windows 7
Display
Hard disk free space
Other hardware
requirements
*1 Compatible with Windows 2000 Professional, Windows XP Professional/Home Edition, Windows Vista or Windows 7
preinstalled model equipped standard with a USB port.
2
Printing is not available in MS-DOS mode.
*
3
The machine does not support printing from a Macintosh environment.
*
*4 Administrator's rights are required to install the software using the installer.
1024 x 768 dots resolution and 16-bit colour or higher is recommended.
100 MB or more
An environment on which any of the operating systems listed above can fully
operate
Installation environment and usable software
The following table shows the drivers and software that can be installed for each version of Windows and interface
connection method.
Operating System
MFP Printer
Driver
MFP
Scanner
Driver
Button
Manager
Cable
USB Yes Yes Yes Yes N/A N/A
LAN Yes Yes Yes Yes Yes Yes
USB Yes Yes Yes Yes N/A N/A
LAN N/A N/A N/A N/A N/A N/A
USB Yes Yes Yes Yes N/A N/A
LAN N/A N/A N/A N/A N/A N/A
Windows
2000
XP Vista 7
Server
2003
Server
2008
Printer
Status
Monitor
USB N/A N/A N/A N/A N/A N/A
LAN Yes Yes Yes Yes Yes Yes
- 6 -
Page 7
SYSTEM SETTINGS FOR THE
Note
NETWORK EXPANSION KIT
When the Network expansion kit is installed in the machine, the following programs are added to the system
settings.
The IP address and other network settings are configured using these system settings.
The procedure for selecting a system setting is explained in "SELECTING A SETTING FOR A SYSTEM
SETTING" in the Operation Guide for the machine.
Additional system settings
Program
number
37 IP ADDRESS
Program name
SETTING
Setting codes (factory
default settings appear in
bold)
1:
ENABLE DHCP
- YES
-NO
IP ADDRESS SETTING
- IP ADDRESS
- SUBNET MASK
-DEFAULT GATEWAY
Explanation
• If "YES" is selected (factory default setting) and
the machine is connected to a TCP/IP network,
the IP address will be acquired automatically.
This is the factory default setting.
If you will manually assign an IP address,
select "NO".
For the detailed procedure, see
"ENABLING/DISABLING DHCP
• This program is used to set the IP address (IP
address, Subnet Mask, and Gateway) of the
machine when TCP/IP protocol is used on the
network.
For the detailed procedure, see
"SETTING/CHANGING THE IP ADDRESS
MANUALLY" (p.9).
" (p.8).
- 7 -
Page 8

2
SETUP
Note
Note
SETTING THE IP ADDRESS OF THE MACHINE BY SYSTEM SETTINGS
To set the IP address of the machine, perform the program number (37) in the system settings (p.7).
The procedure for selecting a system setting is explained in "SELECTING A SETTING FOR A SYSTEM SETTING"
in the Operation Guide for the machine.
ENABLING/DISABLING DHCP
Use this setting to have the IP address obtained automatically using DHCP (Dynamic Host Configuration Protocol).
When this setting is enabled, it is not necessary to manually enter an IP address.
Press the [Copy ratio display] key
1
().
• Every press of [Copy ratio display] key
( ) switches enabling and disabling of
DHCP.
• DHCP is enabled by the factory default.
SETTING THE IP ADDRESS AUTOMATICALLY
When the DHCP is set to on, set IP address of the machine by the following operation.
Turn the machine power off and then
1
back on.
The IP address of the machine will be detected
and set.
If DHCP is used, the IP address assigned to
the machine may change automatically. If
the IP address changes, printing will not be
possible.
When the ZOOM indicator is lit:
DHCP is enabled.
When the ZOOM indicator is off:
DHCP is disabled.
- 8 -
Page 9
SETUP
AUTO
Note
Note
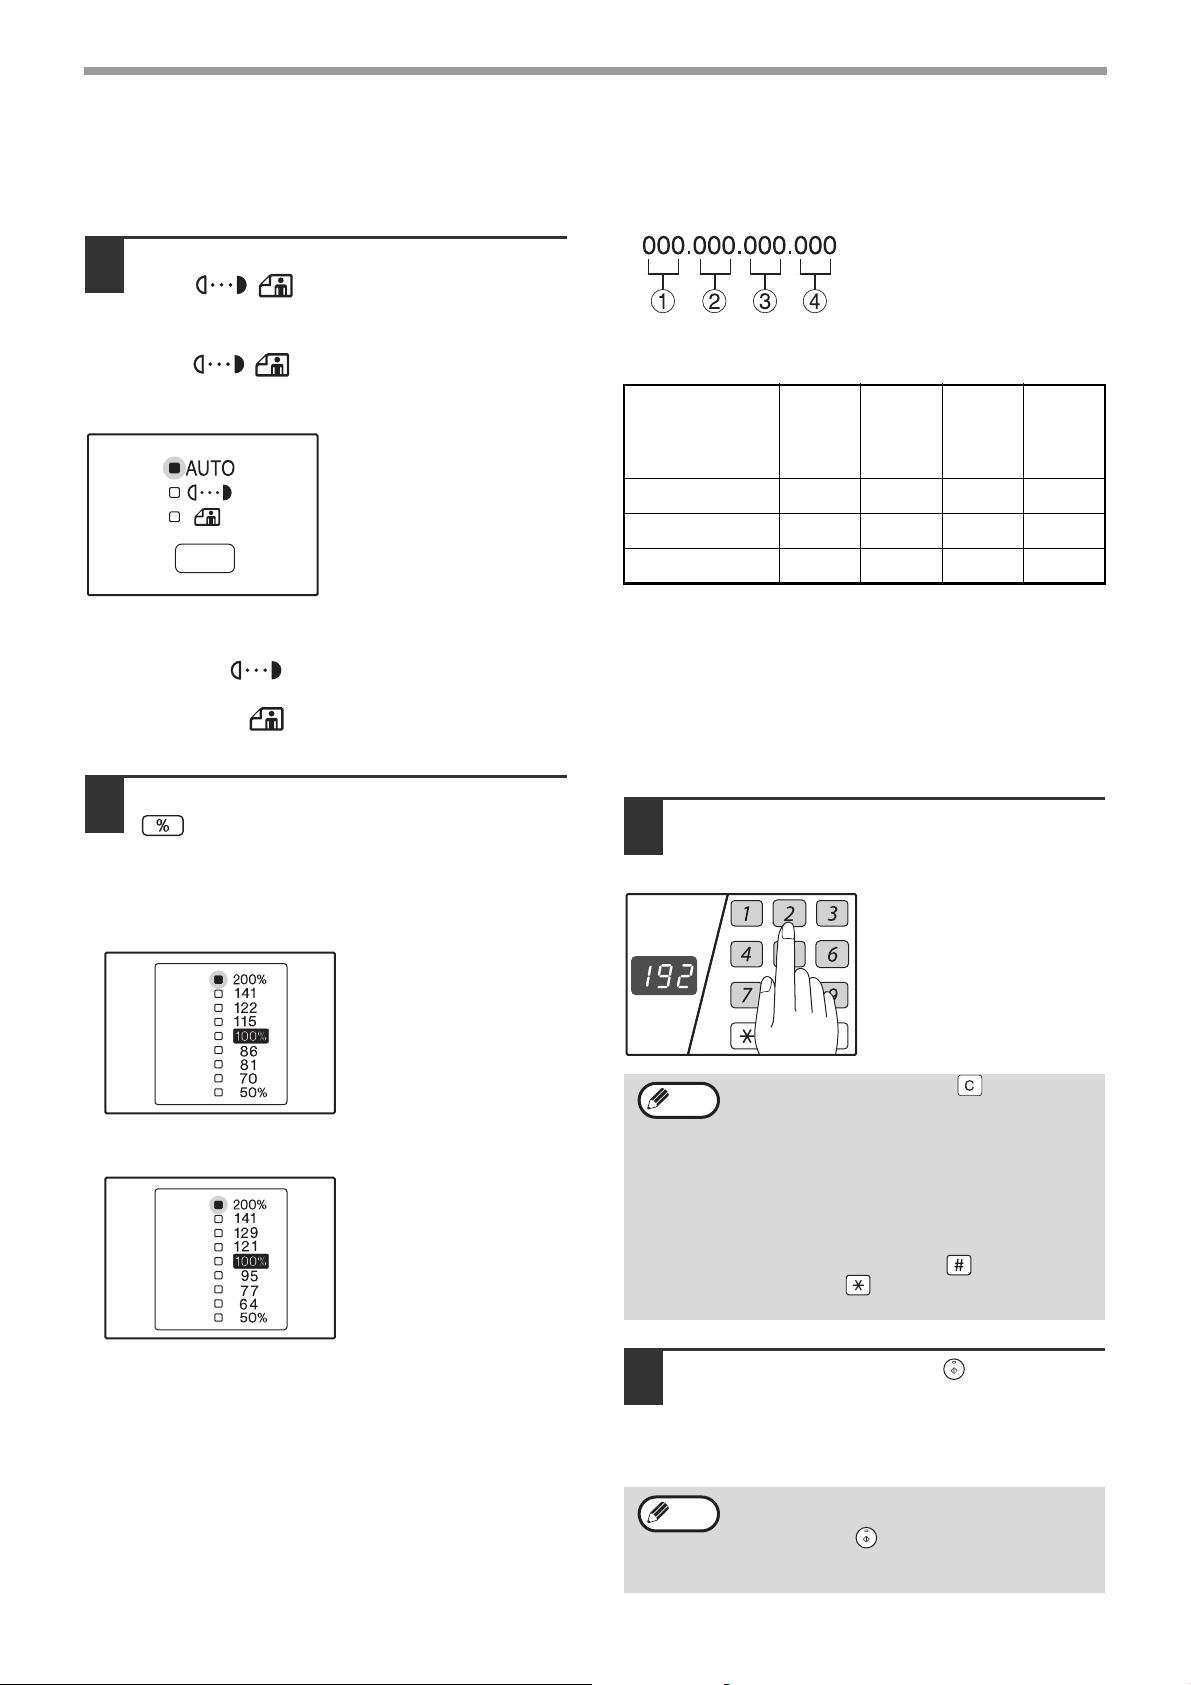
SETTING/CHANGING THE IP ADDRESS MANUALLY
Perform the following procedure to use a fixed IP address.
Press the [AUTO/TEXT/PHOTO]
1
( / / ) key to select an item
AUTO
to set.
Every press of [AUTO/TEXT/PHOTO]
( / / ) key switches the item to
select.
The indicator of the selected item lights up.
You can enter the
numbers only when the
indicator for the item to set
is lit.
Available numbers for the IP address (The default
setting for each digit is "000".)
cdef
Item
IP address 0-223 0-255 0-255 0-255
Subnet Mask 0-255 0-255 0-255 0-255
Default Gateway 0-223 0-255 0-255 0-255
(First
digit)
(Second
digit)
(Third
digit)
(Fourth
digit)
When "AUTO" ( ) is lit:
Enter the IP address.
When "TEXT" ( ) is lit:
Enter the Subnet Mask.
When "PHOTO" ( ) is lit:
Enter the Default Gateway.
Press the [Copy ratio display] key
2
AUTO
( ) to turn off the ZOOM indicator.
The PRESET RATIO indicator that is allocated
for the digits to be entered lights up.
Metric (AB) series
Inch series
When the "200%" indicator is lit:
Enter the three digits for
When the "141" indicator is lit:
Enter the three digits for
When the "122 (129)" indicator is lit:
Enter the three digits for
When the "115 (121)" indicator is lit:
Enter the three digits for
Enter a desired address with the
3
➀ in the address.
➁ in the address.
➂ in the address.
➃ in the address.
numeric keys.
The entered numbers will appear on the display.
• Press the [CLEAR] key ( ) to clear the
currently entered three digits.
• You cannot change the IP address if
DHCP is set to on.
• When DHCP is set to on, the display
shows the IP address obtained
automatically.
• "- - -" appears on the display if the IP
address cannot be recognized.
• The [READ-END] key ( ) and Audit
clear key ( ) ( ) cannot be
used.
ACC.#-C
- 9 -
Press the [START] key ( ) to fix the
4
entered numbers.
The entered numbers will be fixed and the
indicator for the next three digits lights up.
Repeat steps 2 to 5 to enter the whole address.
If the entered digits are not available, a
sound notifies the error after you press the
[START] key ( ) and the maximum
available 3-digit number appears on the
display.
Page 10
INSTALLING THE SOFTWARE
Note
Note
Note
• If you need to use a different connection method after installing the software using a USB or network
connection, you must first uninstall the software and then install it using the new connection method.
• In the following explanations it is assumed that the mouse is configured for right hand operation.
• The scanner feature only works when using a USB cable.
• If an error message appears, follow the instructions on the screen to solve the problem. After the problem is
solved, the installation procedure will continue. Depending on the problem, you may have to click the "Cancel"
button to exit the installer. In this case, reinstall the software from the beginning after solving the problem.
USING THE MACHINE WITH A USB CONNECTION
The USB cable must not be connected
1
to the machine. Make sure that the
cable is not connected before
proceeding.
If the cable is connected, a Plug and Play window
will appear. If this happens, click the "Cancel"
button to close the window and disconnect the
cable.
The cable will be connected in step 12.
Insert the "Software CD-ROM" into
2
your computer's CD-ROM drive.
Click the "Start" button, click
3
"Computer", and then double-click the
CD-ROM icon ( ).
• In Windows XP, click the "start" button, click
"My Computer", and then double-click the
CD-ROM icon.
• In Windows 2000, double-click "My Computer",
and then double-click the CD-ROM icon.
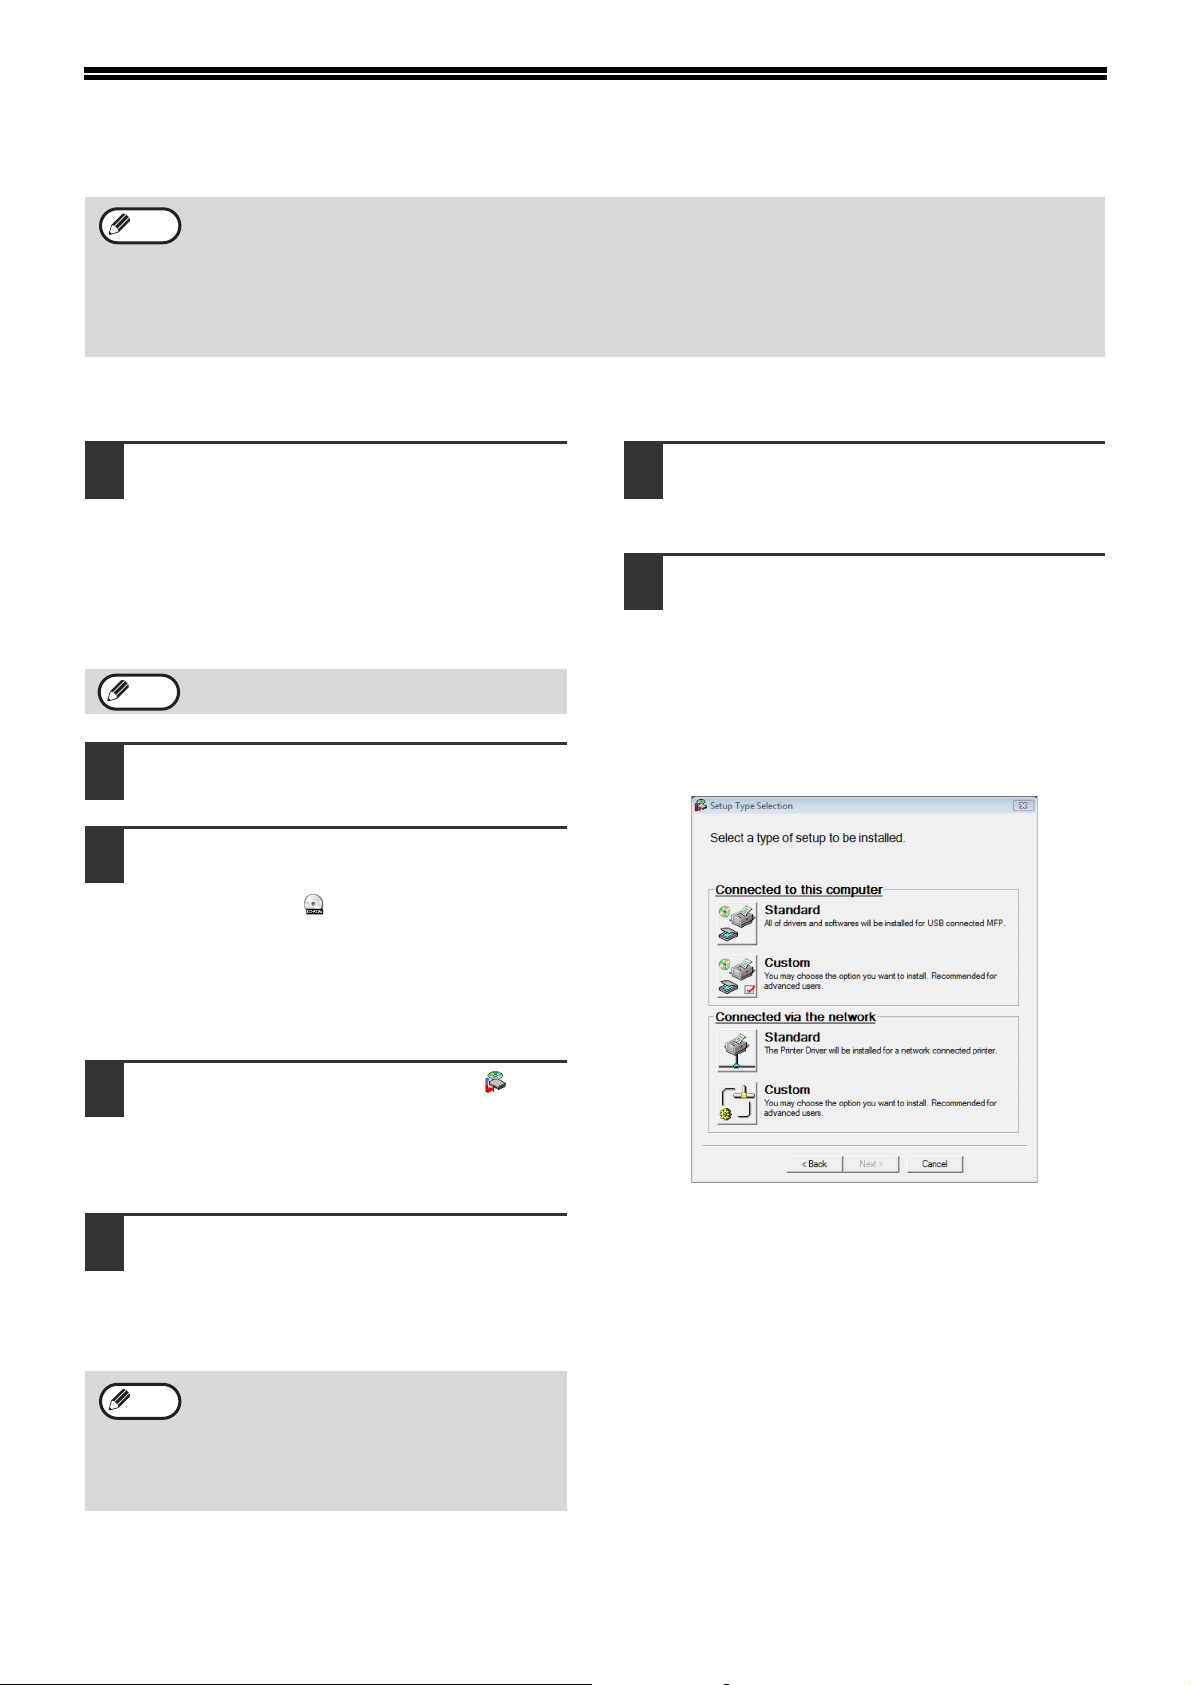
Read the message in the "Welcome"
6
window and then click the "Next"
button.
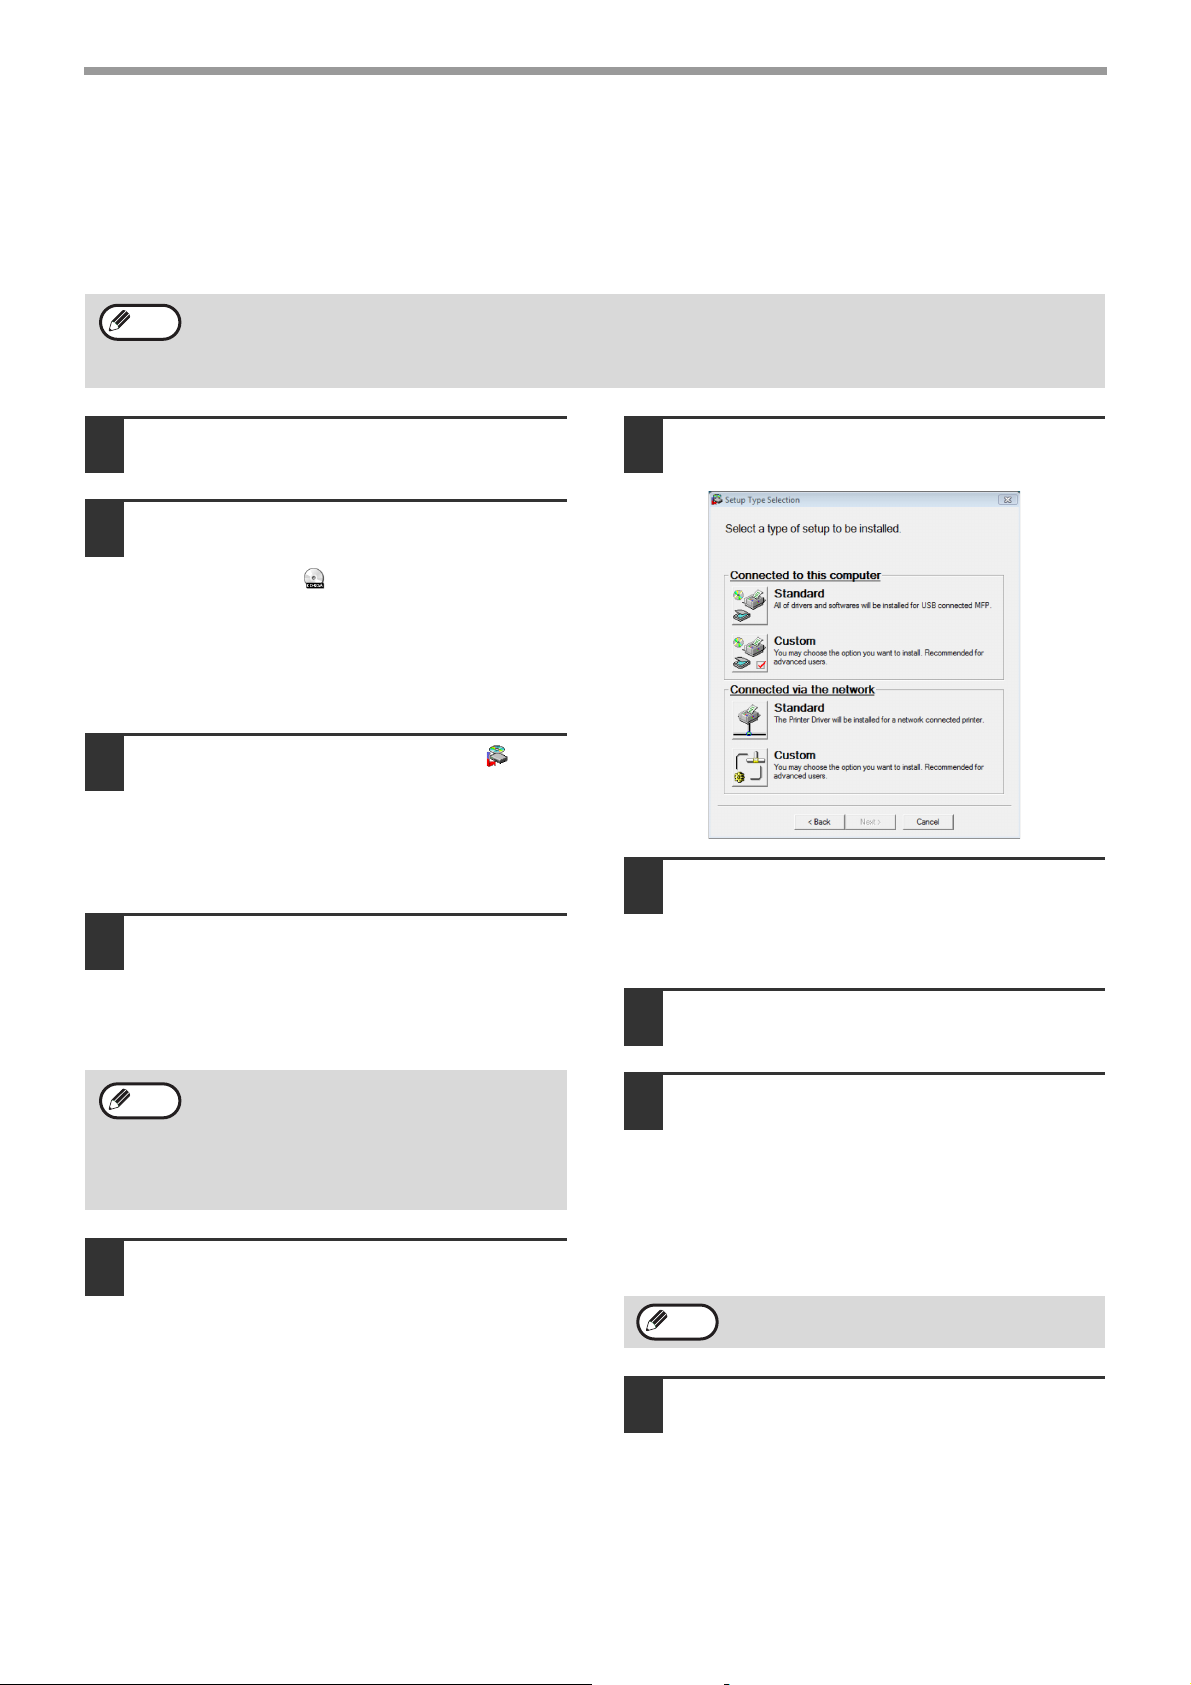
To install all of the software, click the
7
"Standard" button of the "Connected
to this computer" menu and go to step
12.
To install particular packages, click
the "Custom" button and go to next
step.
Double-click the "Setup" icon ( ).
4
• In Windows 7, if a message screen appears
asking you for confirmation, click "Yes".
• In Windows Vista, if a message screen appears
asking you for confirmation, click "Allow".
The "SOFTWARE LICENSE" window
5
will appear. Make sure that you
understand the contents of the
software license, and then click the
"Yes" button.
You can show the "SOFTWARE LICENSE"
in a different language by selecting the
desired language from the language menu.
To install the software in the selected
language, continue the installation with that
language selected.
- 10 -
Page 11
SETUP
Caution
Note
Caution
Note
Caution
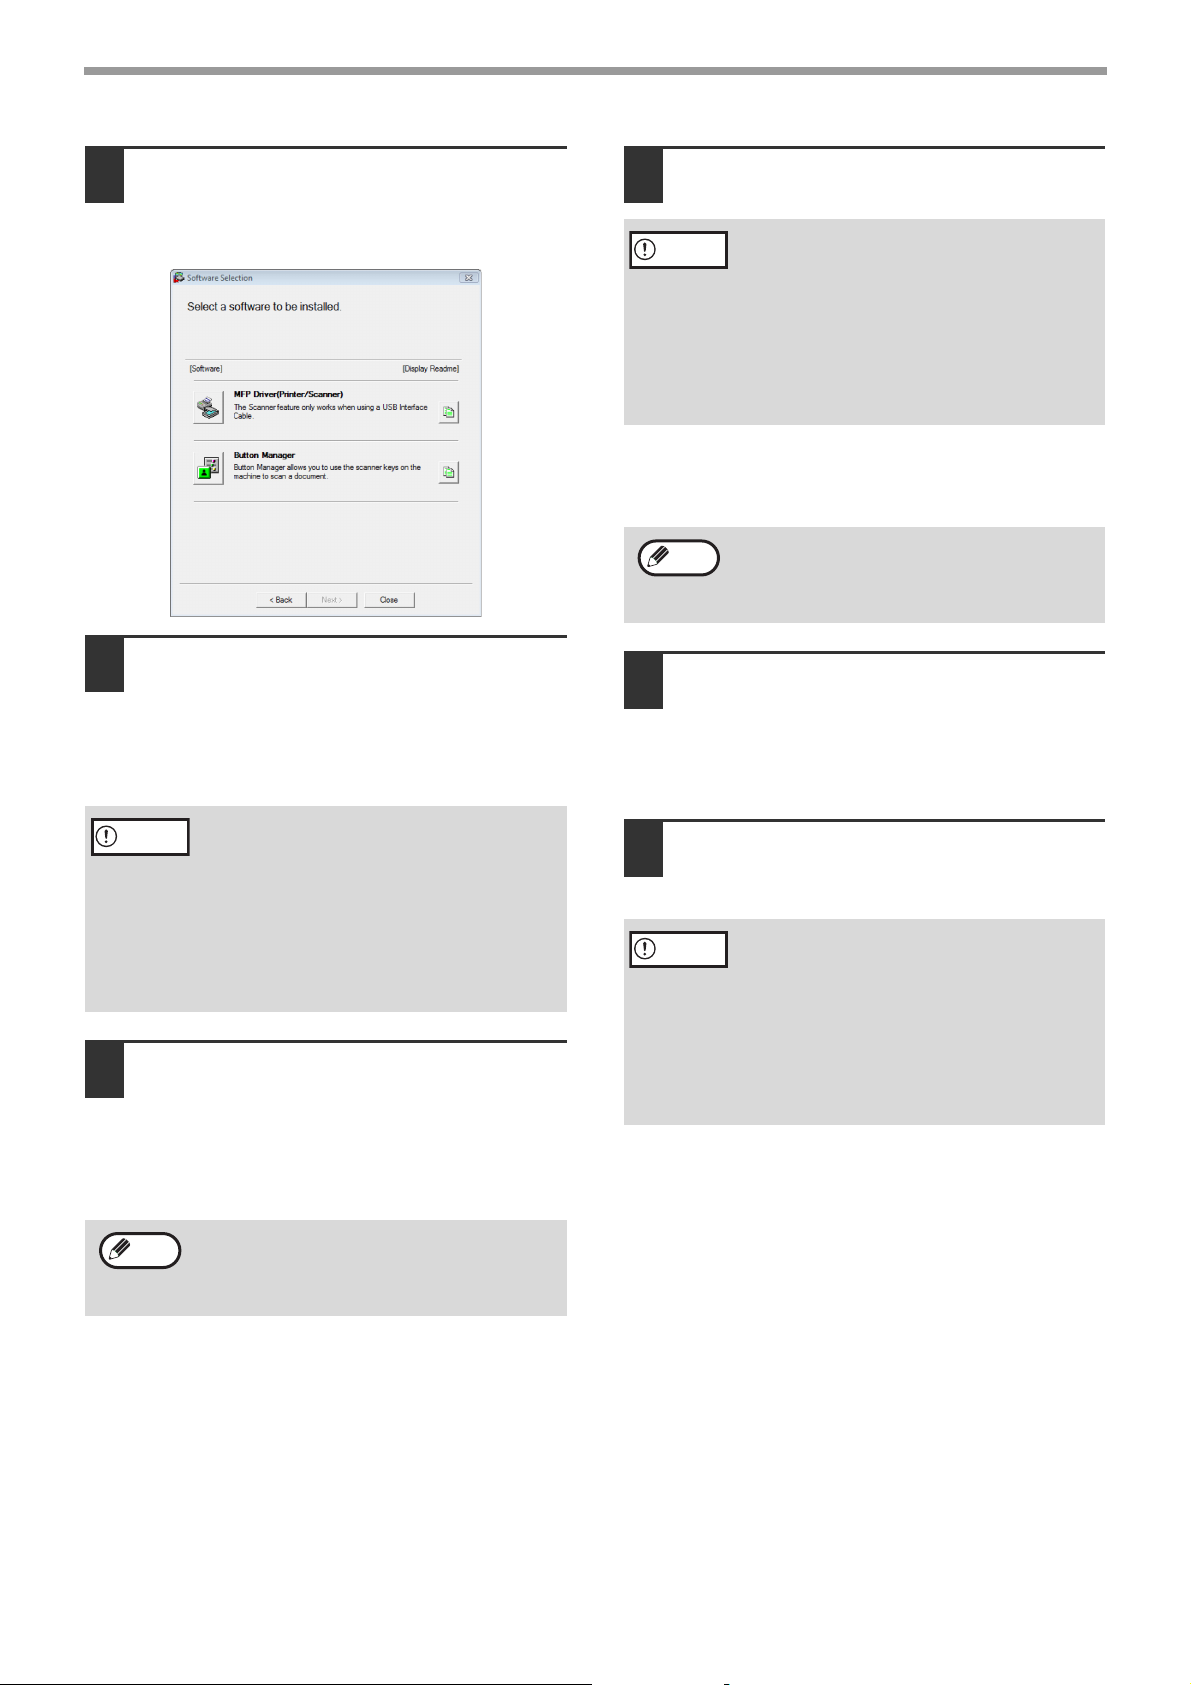
Click the "MFP Driver" button.
8
Click the "Display Readme" button to show
information on packages that are selected.
The files required for installation of
9
the MFP driver are copied.
Follow the on-screen instructions.
When "The installation of the SHARP software is
complete." appears, click the "OK" button.
When installing is finished, click the
11
"Close" button.
• If you are using Windows Vista/7 and a
security warning window appears, be sure
to click "Install this driver software
anyway".
• If you are running Windows 2000/XP and
a warning message appears regarding
the Windows logo test or digital signature,
be sure to click "Continue Anyway" or
"Yes".
A message will appear instructing you to connect
the machine to your computer. Click the "OK"
button.
After the installation, a message prompting
you to restart your computer may appear. In
this case, click the "Yes" button to restart
your computer.
Make sure that the power of the
12
machine is turned on, and then
connect the USB cable (p.12).
Windows will detect the machine and a Plug and
Play screen will appear.
• If you are using Windows Vista/7 and a
security warning window appears, be sure
to click "Install this driver software
anyway".
• If you are running Windows 2000/XP and
a warning message appears regarding
the Windows logo test or digital signature,
be sure to click "Continue Anyway" or
"Yes".
You will return to the window of step
10
8. If you wish to install Button
Manager, click the "Button Manager"
button.
If you do not wish to install Button Manager, go to
step 11.
After the installation, a message prompting
you to restart your computer may appear. In
this case, click the "Yes" button to restart
your computer.
Follow the instructions in the Plug
13
and Play window to install the driver.
Follow the on-screen instructions.
• If you are using Windows Vista/7 and a
security warning window appears, be sure
to click "Install this driver software
anyway".
• If you are running Windows 2000/XP and
a warning message appears regarding
the Windows logo test or digital signature,
be sure to click "Continue Anyway" or
"Yes".
This completes the installation of the software.
If you installed Button Manager, set up Button
Manager as explained in the Operation Guide for the
machine.
- 11 -
Page 12
SETUP
Caution
Note
CONNECTING A USB CABLE
Follow the procedure below to connect the machine to your computer.
A USB cable for connecting the machine to your computer is not included with the machine. Please purchase the
appropriate cable for your computer.
• USB is available with a PC/AT compatible computer that was originally equipped with USB and had Windows
2000 Professional, Windows XP Professional, Windows XP Home Edition, Windows Vista or Windows 7
preinstalled.
• Do not connect the USB cable before installing the MFP driver. The USB cable should be connected during
installation of the MFP driver.
• If the machine will be connected using a USB 2.0 port of your computer, please purchase a USB cable that
supports USB 2.0.
• Even when the Microsoft USB 2.0 driver is used, it may not be possible to obtain full USB 2.0 speed if a PC
card supporting USB 2.0 is used. To obtain the latest driver (which may enable a higher speed), contact the
manufacturer of your PC card.
• Connection is also possible using a USB 1.1 port on your computer. However, the specifications will be USB
1.1 specifications (Full-Speed).
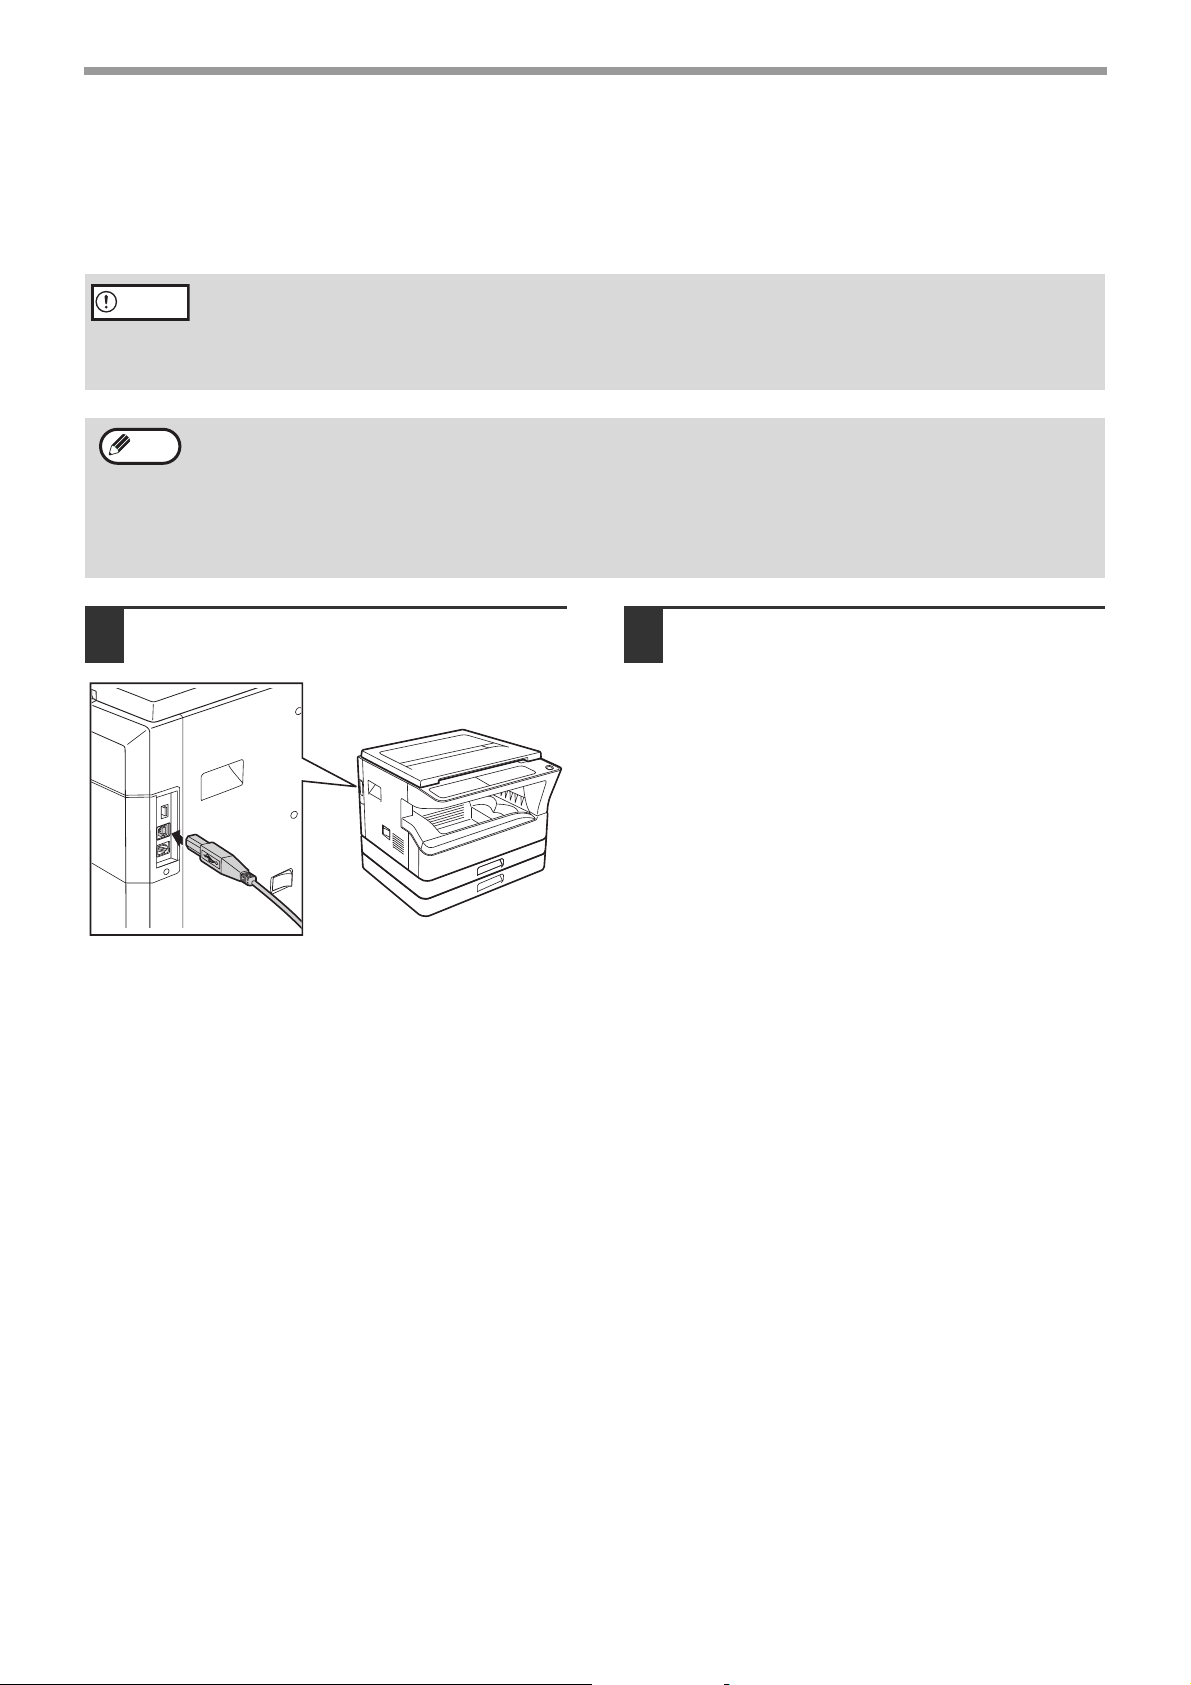
Insert the cable into the USB
1
connector on the machine.
Insert the other end of the cable into
2
your computer's USB port.
- 12 -
Page 13
USING THE MACHINE AS A NETWORK PRINTER
Note
Note
Note
Interface cables for connecting the machine to your computer are not included with the machine. Please
purchase the appropriate cable for your computer.
SETUP
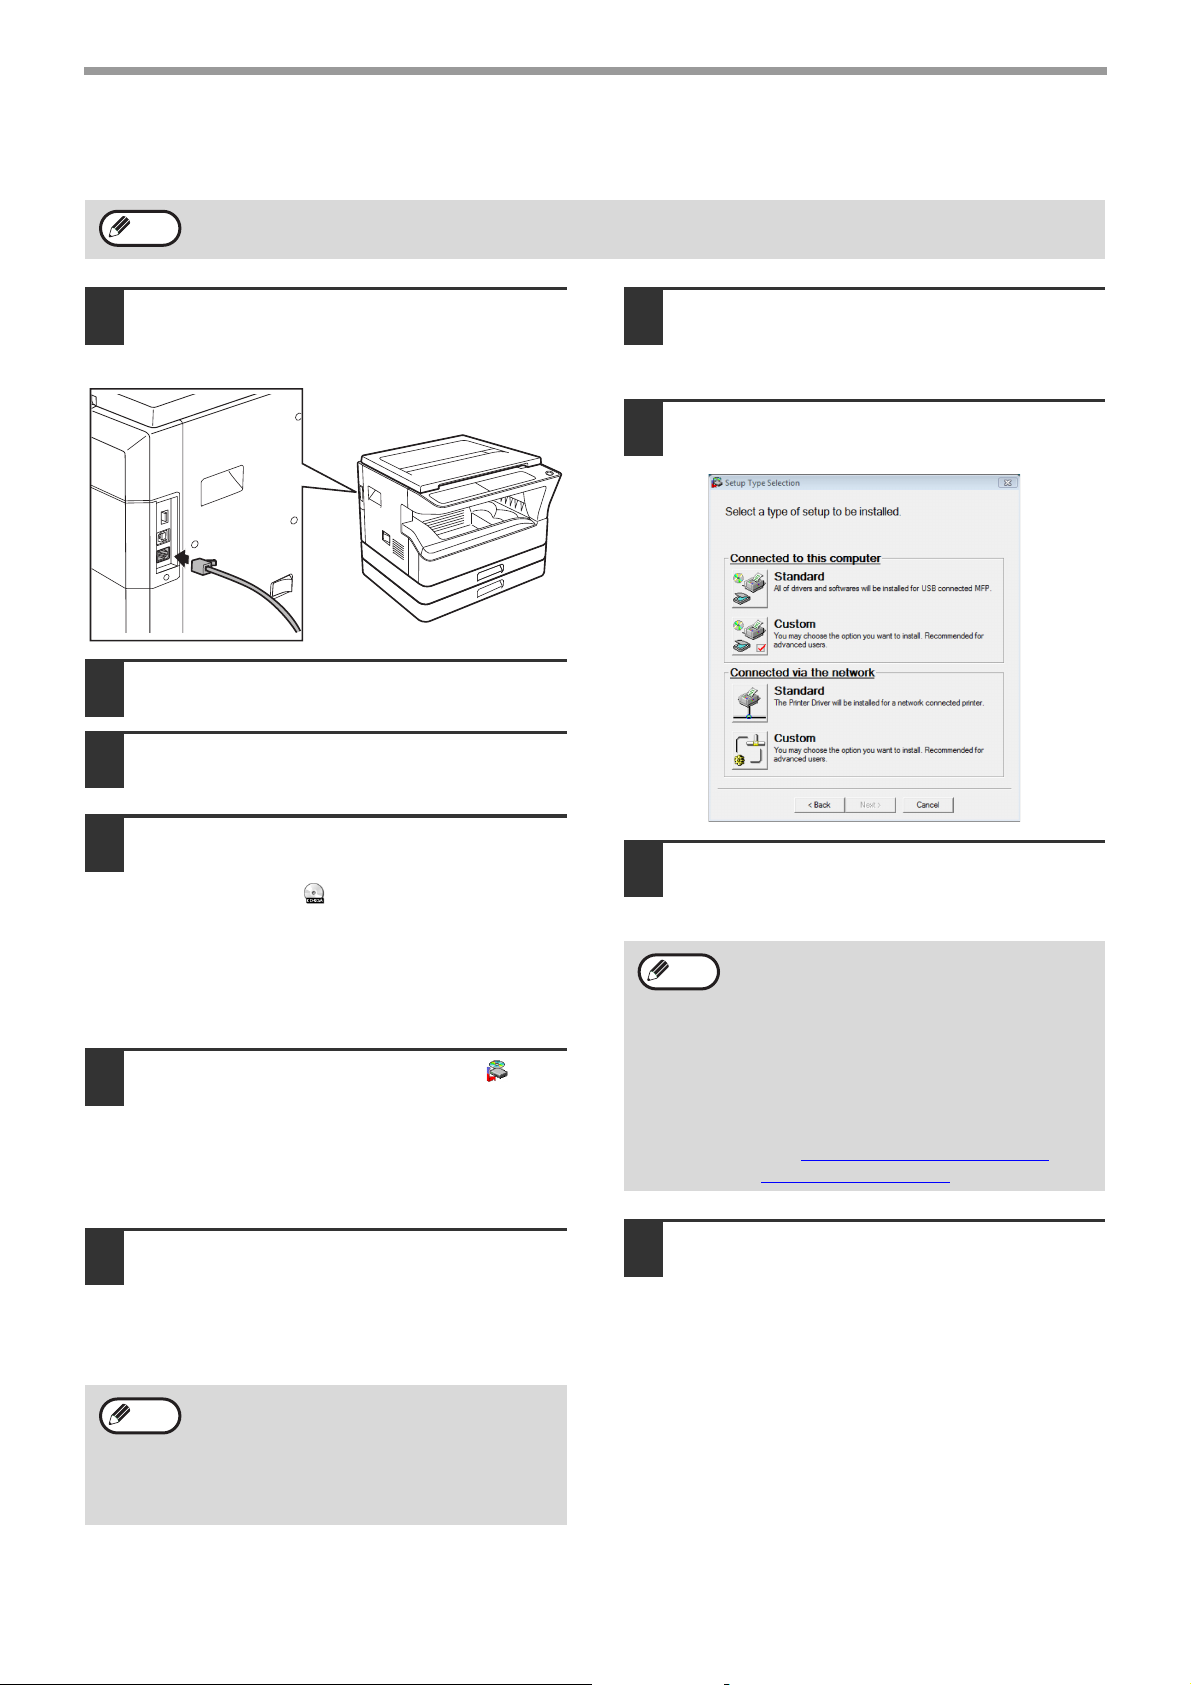
Insert the LAN cable into the LAN
1
connector on the machine.
Use a network cable that is shielded.
Turn on the machine.
2
Insert the "Software CD-ROM" into
3
your computer's CD-ROM drive.
Click the "Start" button, click
4
"Computer", and then double-click the
CD-ROM icon ( ).
• In Windows XP, click the "start" button, click
"My Computer", and then double-click the
"CD-ROM" icon.
• In Windows 2000, double-click "My Computer",
and then double-click the CD-ROM icon.
Double-click the "Setup" icon ( ).
5
• In Windows 7, if a message screen appears
asking you for confirmation, click "Yes".
• In Windows Vista, if a message screen appears
asking you for confirmation, click "Allow".
Read the message in the "Welcome"
7
window and then click the "Next"
button.
Click the "Standard" button of the
8
"Connected via the network" menu.
Printers connected to the network are
9
detected. Select the machine and click
the "Next" button.
• If the machine is not found, make sure
that the machine is powered on and that
the machine is connected to the network,
and then click the [Re-search] button.
• You can also click the [Specify condition]
button and search for the machine by
entering the machine's name (host name)
or IP address.
To check the IP address of the machine,
see "SETTING/CHANGING THE IP
ADDRESS MANUALLY" (p.9).
The "SOFTWARE LICENSE" window
6
will appear. Make sure that you
understand the contents of the license
agreement, and then click the "Yes"
button.
You can show the "SOFTWARE LICENSE"
in a different language by selecting the
desired language from the language menu.
To install the software in the selected
language, continue the installation with that
language selected.
- 13 -
A confirmation window appears.
10
Check the contents and then click the
"Next" button.
Page 14
SETUP
Note
Note
Note
When the printer driver selection
11
window appears, select the printer
driver to be installed and click the
"Next" button.
Select the checkboxes of the printer drivers to be
installed.
Select whether or not you wish the
12
printer to be your default printer and
click the "Next" button.
If you are installing multiple printer drivers, select
the printer driver to be used as the default printer.
If you do not wish to set either printer driver as
the default printer, select "No".
If you clicked the "Custom" button in step 8,
the following windows will appear.
• Printer name window
If you wish to change the printer name,
enter the desired name and click the
"Next" button.
• Window confirming installation of the
display fonts
To install the display fonts for the PCL
printer driver, select "Yes" and click the
"Next" button.
This completes the installation of the software.
• After installation, see "CONFIGURING THE
PRINTER DRIVER" (p.18) to check the printer driver
settings.
• To install the Printer Status Monitor, see
"INSTALLING THE PRINTER STATUS MONITOR
(p.17).
"
Follow the on-screen instructions.
13
Read the message in the window that appears
and click the "Next" button.
Installation begins.
• If you are using Windows
2000/XP/Server 2003
If a warning message regarding the
Windows logo test or digital signature
appears, be sure to click the "Continue
Anyway" or "Yes" button.
• If you are using Windows Vista/7
If a security warning window appears, be
sure to click "Install this driver software
anyway".
When the installation completed
14
screen appears, click the "OK" button.
Click the "Close" button.
15
After the installation, a message prompting
you to restart your computer may appear. In
this case, click the "Yes" button to restart
your computer.
- 14 -
Page 15
SETUP
Note
Note
Note
SHARING THE PRINTER USING WINDOWS NETWORKING
If the machine will be used as a shared printer on a network, follow these steps to install the printer driver in the
client computer.
To configure the appropriate settings in the print server, see the operation manual or help file of your operating
system.
"Print server" as explained here, is a computer that is directly connected to the machine, and a "Client" is any
other computer that is connected to the same network.
Insert the "Software CD-ROM" into
1
your computer's CD-ROM drive.
Click the "Start" button, click
2
"Computer", and then double-click the
CD-ROM icon ( ).
• In Windows XP, click the "start" button, click
"My Computer", and then double-click the
"CD-ROM" icon.
• In Windows 2000, double-click "My Computer",
and then double-click the CD-ROM icon.
Double-click the "Setup" icon ( ).
3
• In Windows 7, if a message screen appears
asking you for confirmation, click "Yes".
• In Windows Vista, if a message screen appears
asking you for confirmation, click "Allow".
The "SOFTWARE LICENSE" window
4
will appear. Make sure that you
understand the contents of the license
agreement, and then click the "Yes"
button.
Click the "Custom" button of the
6
"Connected via the network" menu.
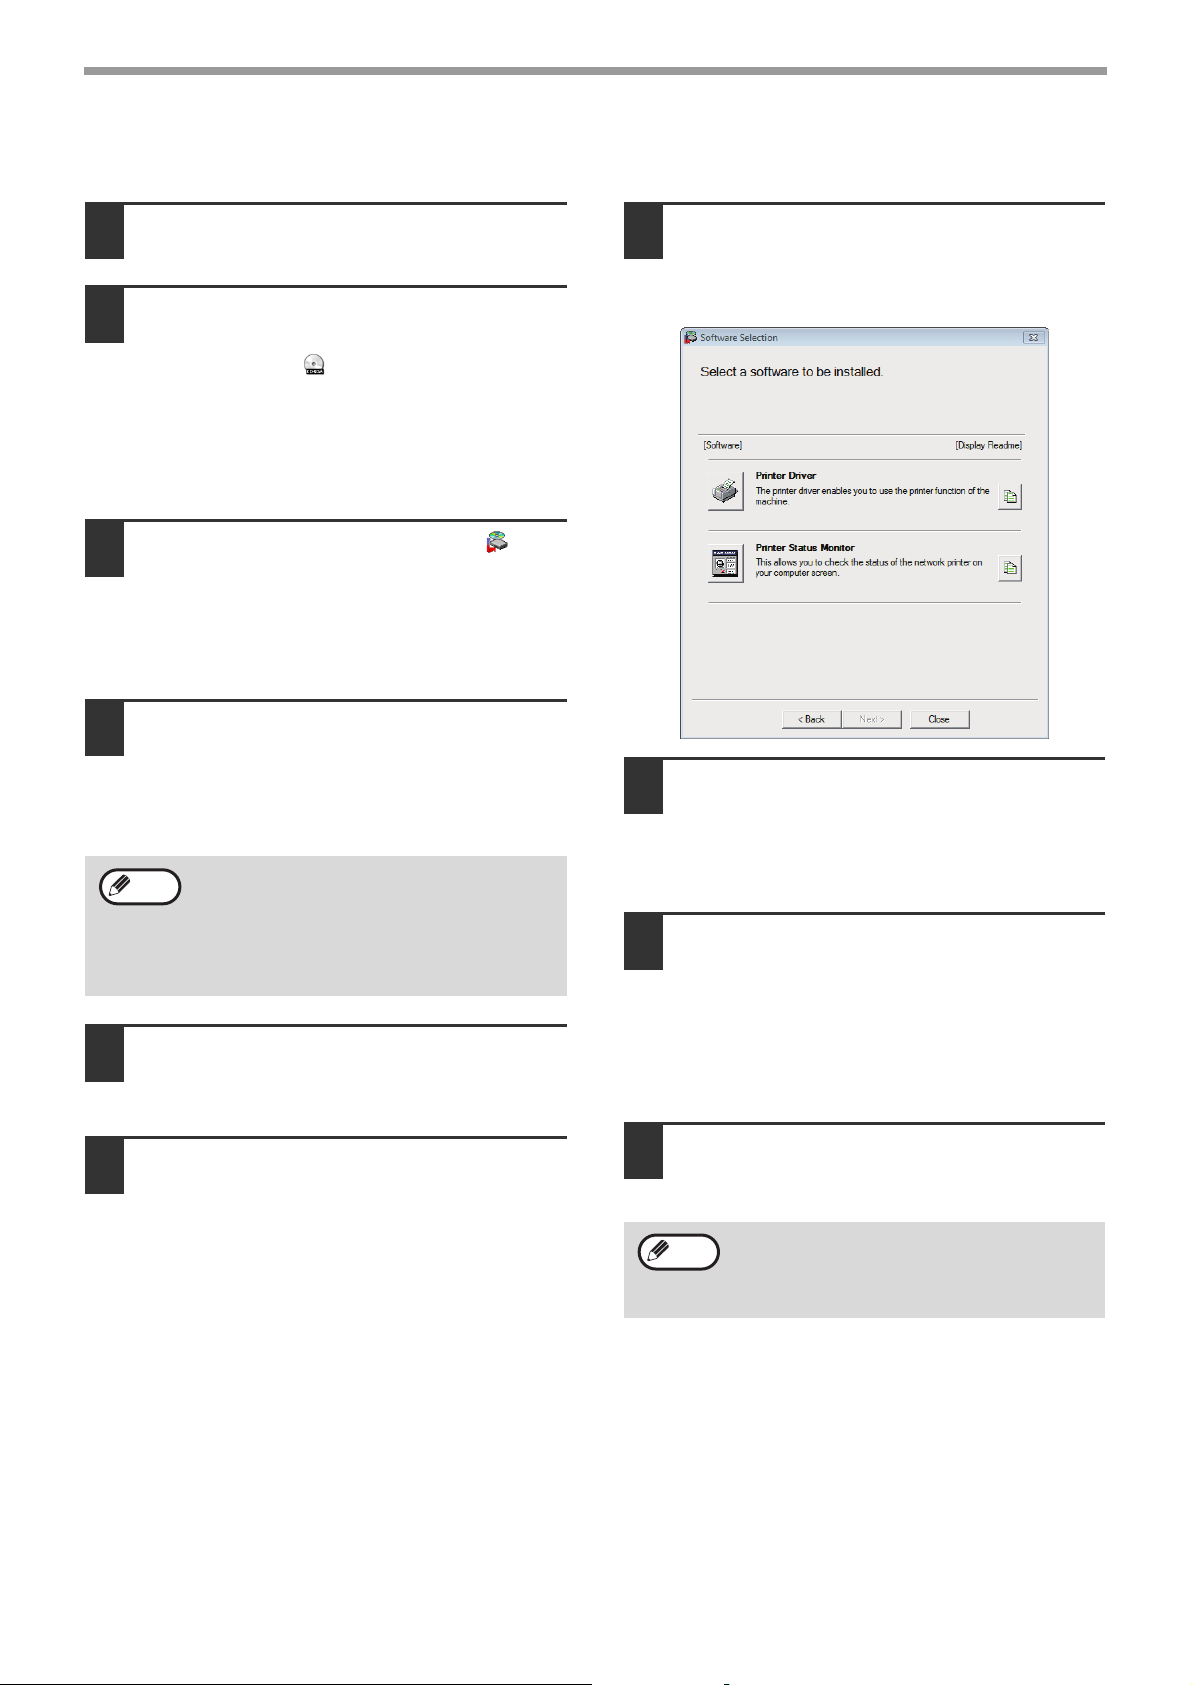
Click the "Printer Driver" button.
7
To view information on the software, click the
"Display Readme" button.
Select "Shared Printer" and click the
8
"Next" button.
You can show the "SOFTWARE LICENSE"
in a different language by selecting the
desired language from the language menu.
To install the software in the selected
language, continue the installation with that
language selected.
Read the message in the "Welcome"
5
window and then click the "Next"
button.
- 15 -
For the port to be used, select the
9
machine set as a shared printer, and
click the "Next" button.
If you are using Windows 2000/XP, you can also
click the "Add Network Port" button and select the
printer to be shared by browsing the network in
the window that appears. (In Windows Vista/7,
the "Add Network Port" button does not appear.)
If the shared printer does not appear in the
list, check the settings in the printer server.
When the model selection window
10
appears, select model name of your
machine and click the "Next" button.
Page 16
SETUP
Note
Note
When the printer driver selection
11
window appears, select the printer
driver to be installed and click the
"Next" button.
Be sure to select the same printer driver as the
printer driver used in the print server (the
machine).
Follow the on-screen instructions.
12
Read the message in the window that appears
and click the [Next] button.
Installation begins.
• If you are using Windows
2000/XP/Server 2003
If a warning message regarding the
Windows logo test or digital signature
appears, be sure to click the "Continue
Anyway" or "Yes" button.
• If you are using Windows Vista/Server
2008/7
If a security warning window appears, be
sure to click "Install this driver software
anyway".
When the installation completed
13
screen appears, click the "OK" button.
Click the "Close" button in the
14
window of step 6.
After the installation, a message prompting
you to restart your computer may appear. If
this message appears, click the "Yes" button
to restart your computer.
This completes the installation of the software.
• After installation, see "CONFIGURING THE
PRINTER DRIVER" (p.18) to check the printer driver
settings.
• To install the Printer Status Monitor, see
"INSTALLING THE PRINTER STATUS MONITOR
(p.17).
"
- 16 -
Page 17
INSTALLING THE PRINTER STATUS MONITOR
Note
Note
SETUP
Insert the "Software CD-ROM" into
1
your computer's CD-ROM drive.
Click the "Start" button, click
2
"Computer", and then double-click the
CD-ROM icon ( ).
• In Windows XP, click the "start" button, click
"My Computer", and then double-click the
"CD-ROM" icon.
• In Windows 2000, double-click "My Computer",
and then double-click the CD-ROM icon.
Double-click the "Setup" icon ( ).
3
• In Windows 7, if a message screen appears
asking you for confirmation, click "Yes".
• In Windows Vista, if a message screen appears
asking you for confirmation, click "Allow".
The "SOFTWARE LICENSE" window
4
will appear. Make sure that you
understand the contents of the license
agreement, and then click the "Yes"
button.
You can show the "SOFTWARE LICENSE"
in a different language by selecting the
desired language from the language menu.
To install the software in the selected
language, continue the installation with that
language selected.
Read the message in the "Welcome"
5
window and then click the "Next"
button.
Click the "Printer Status Monitor"
7
button.
To view information on the software, click the
"Display Readme" button.
Follow the on-screen instructions.
8
Read the message in the window that appears
and click the [Next] button.
Installation begins.
When the installation completed
9
screen appears, click the "Finish"
button.
To have the Printer Status Monitor start
automatically when your computer is started,
select the "Add this program to your Startup
folder" checkbox.
Click the "Custom" button of the
6
"Connected via the network" menu.
- 17 -
Click the "Close" button in the
10
window of step 6.
After the installation, a message prompting
you to restart your computer may appear. If
this message appears, click the "Yes" button
to restart your computer.
This completes the installation.
For the procedures for using the Printer Status
Monitor, see the Help file. Follow these steps to view
the Help file:
Click the Windows "Start" button, select "All Programs"
("Programs" in Windows 2000), select "SHARP Printer
Status Monitor" and then select "Help".
Page 18
CONFIGURING THE PRINTER
Note
Note
DRIVER
After installing the printer driver, you must configure the printer driver settings appropriately for the number of paper
trays on the machine and the size of paper loaded in each tray.
Click the "Start" button, click "Control
1
Panel", and then click "Printer".
• In Windows 7, click the "Start" button and then
click "Devices and Printers".
• In Windows XP/Server 2003, click the "start"
button and then click "Printers and Faxes".
• In Windows 2000, click the "Start" button, select
"Settings", and then click "Printers".
In Windows XP, if "Printers and Faxes" does
not appear in the "start" menu, select
"Control Panel", select "Printers and Other
Hardware", and then select "Printers and
Faxes".
Click the "SHARP AR-XXXX" printer
2
driver icon and select "Properties"
from the "Organize" menu.
• In Windows 7, right-click the "SHARP
AR-XXXX" printer driver icon, and then click
"Printer properties".
• In Windows XP/2000, select "Properties" from
the "File" menu.
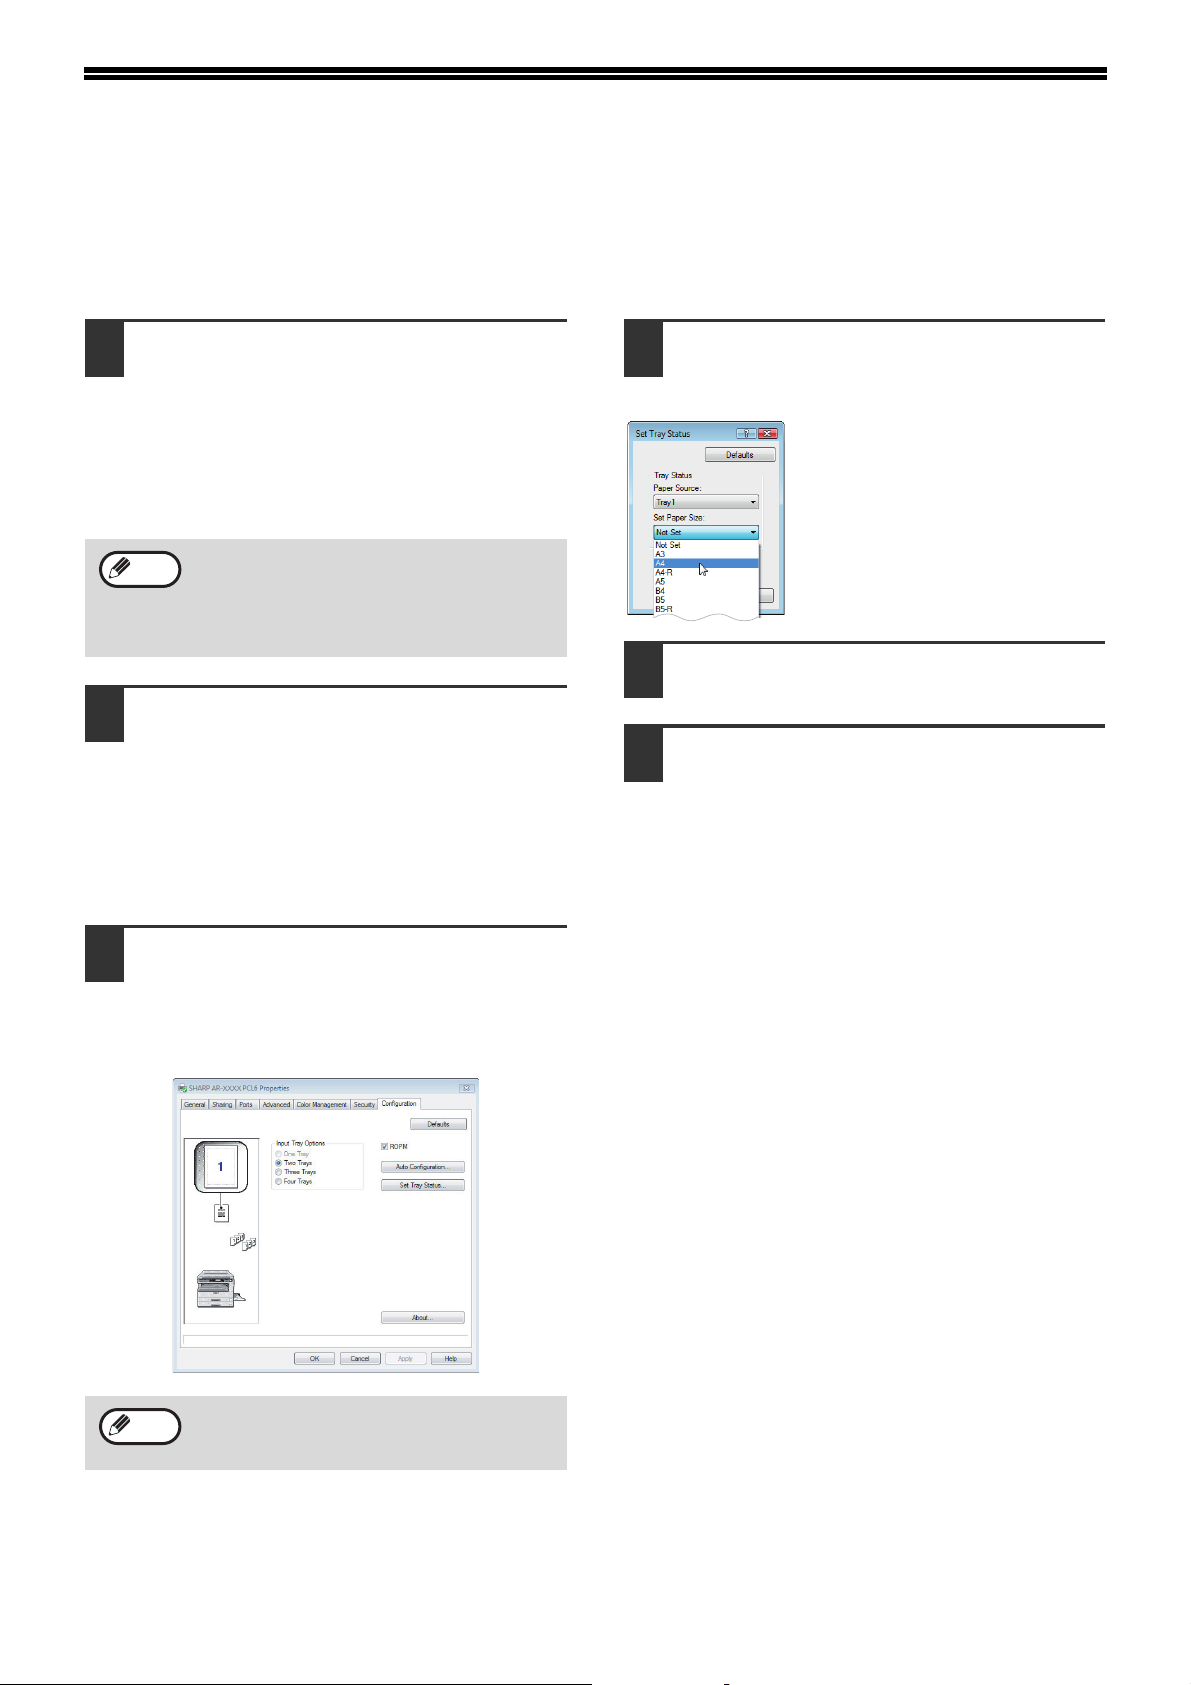
Click the "Set Tray Status" button and
4
select the size of paper that is loaded
in each tray.
Select a tray in the "Paper Source"
menu, and select the size of paper
loaded in that tray from the "Set
Paper Size" menu. Repeat for
each tray.
Click the "OK" button in the "Set Tray
5
Status" window.
Click the "OK" button in the printer
6
properties window.
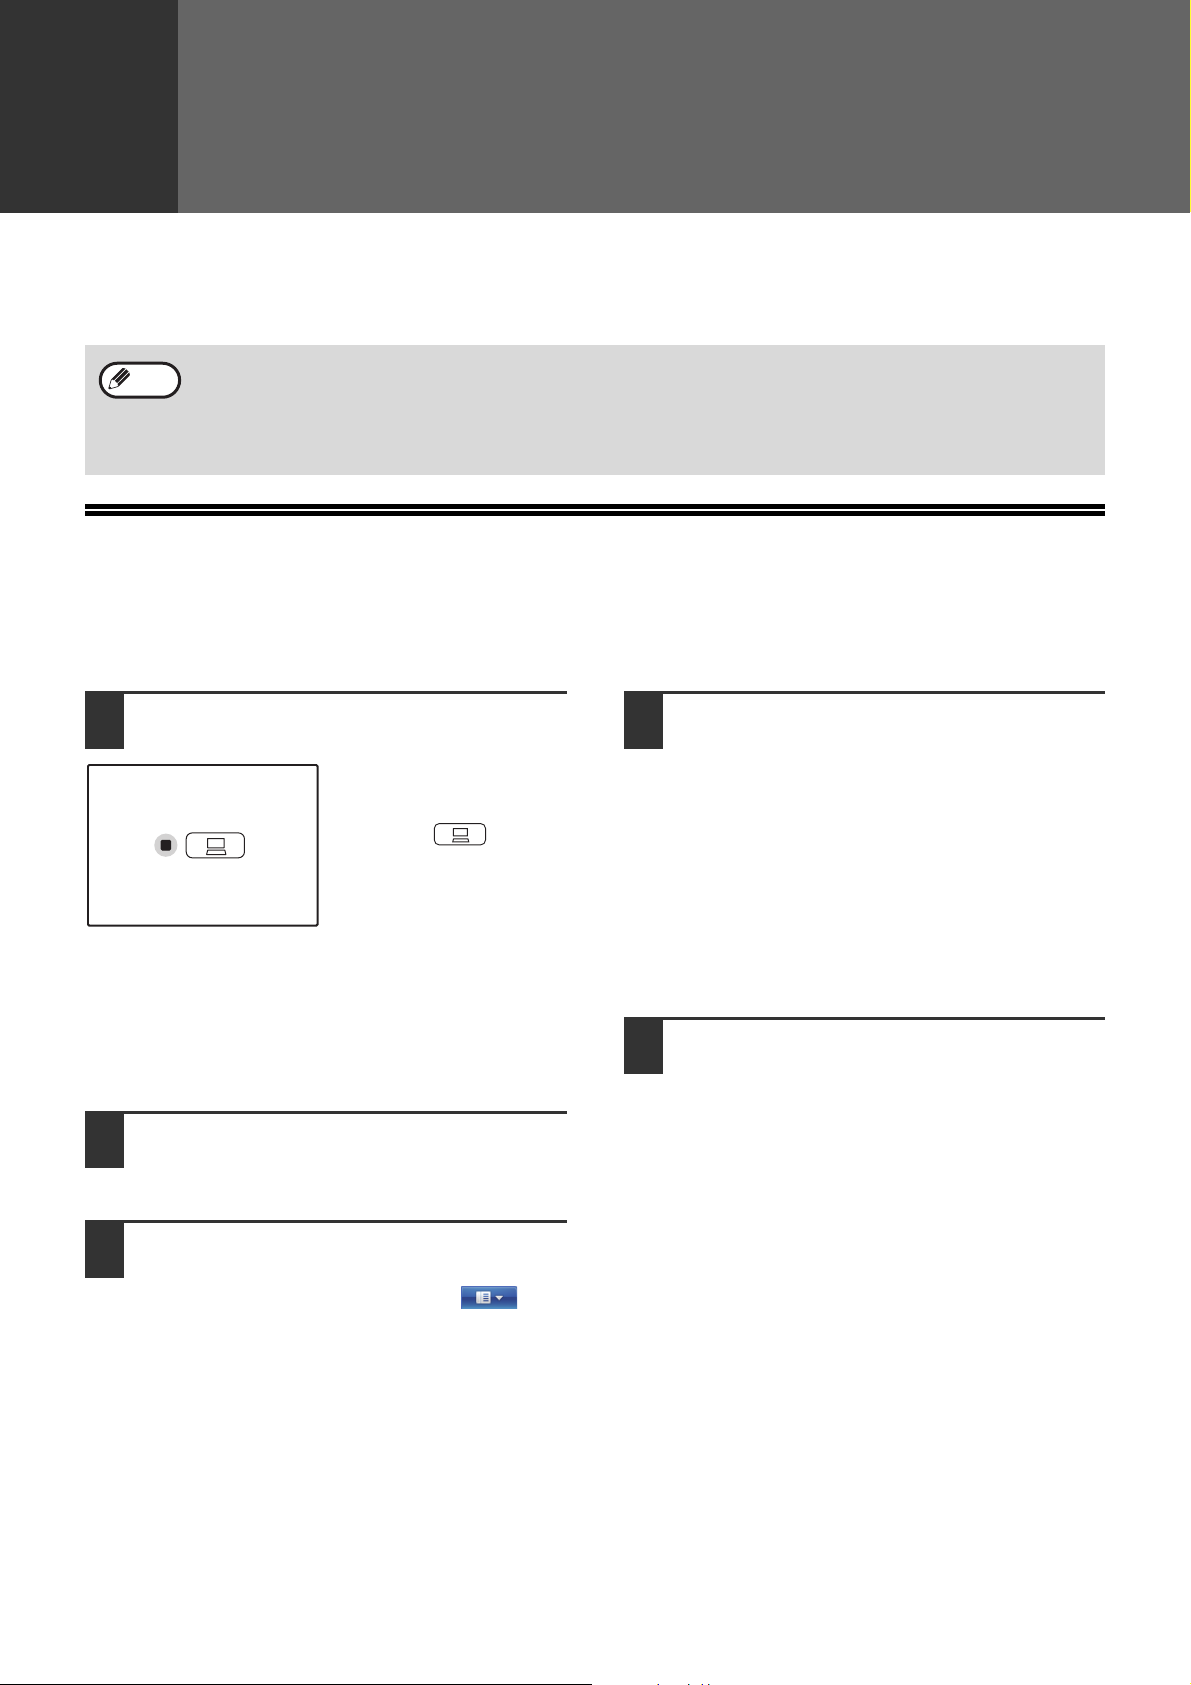
7
Click the "Configuration" tab and set
3
the printer configuration based on the
options that have been installed.
Set the printer configuration properly. Otherwise,
printing may not take place correctly.
To automatically configure the settings
based on the detected machine status, click
the "Auto Configuration" button.
- 18 -
Page 19
3
PRINTER FUNCTIONS
Note
This chapter explains how to use the printer functions.
The procedure for loading paper is the same as for loading copy paper. See the Operation Guide for the machine.
• Print jobs received while the machine is copying or scanning will be stored in memory. When the copy job is
finished, the print jobs will begin printing.
• Printing is not possible when the front or side cover is opened for machine maintenance, or when a misfeed
occurs or the machine runs out of paper or toner, or when the drum cartridge reaches its replacement time.
• If an original misfeed occurs in the SPF/RSPF, printing will not be possible until the misfed original is removed
and the SPF/RSPF is restored to a usable state.
BASIC PRINTING
The following example explains how to print a document from WordPad.
Before printing, make sure that the correct size of paper for your document has been loaded in the machine.
Make sure that the ON LINE indicator
1
on the operation panel is lit.
If the ON LINE indicator is
not lit, press the [ON
LINE] key ( ).
When the indicator is:
• Lit, the machine is online and ready to print, or is
printing.
• Blinking, the machine is processing print data in
memory or printing has been paused.
• Off, the machine is off-line and cannot print.
Start WordPad and open the
2
document that you wish to print.
Select "Print" from the application's
3
"File" menu.
If you are using Windows 7, click the
button.
The "Print" dialog box will appear.
Make sure that "SHARP AR-XXXX" is
4
selected as the printer.
If you need to change any print settings, click the
"Preferences" button to open the printer driver
setup screen.
The printer driver setup screen will appear.
Windows 2000 does not have the "Preferences" button
in this dialog box. Select settings as needed on each
of the tabs in the setup screen and click the "OK"
button.
"PRINTER DRIVER SETTINGS" (p.22)
Click the "Print" button.
5
Printing begins.
The print job will be delivered to the output tray.
- 19 -
Page 20

PRINTER FUNCTIONS
If the tray runs out of paper during printing
Add paper to the tray or press the [PAPER SELECT] key ( ) to select a different tray, and then press the [ON
LINE] key ( ) to resume printing.
Note that if the "Auto tray switching" setting in the system settings is enabled on a model that has two or more paper
trays and there is the same size of paper in another tray, the machine will automatically switch to the other tray and
continue printing.
Pausing a print job
To pause a print job during printing, press the [ON LINE] key ( ) on the operation panel to switch the machine
off-line. Printing will be paused and the ON LINE indicator will blink.
• To cancel a print job, press the [CLEAR] key ( ) or the [CLEAR ALL] key ( ).
• To resume printing, press the [ON LINE] key ( ) to switch the machine online.
When "Paper Source" is set to "Auto Select"
If "Paper Source" is set to "Auto Select" in the "Paper" tab of the printer driver setup screen and the correct size of
paper for a print job is not loaded in the machine, the printing procedure will vary depending on the "Use close paper
size" setting in the system settings. See the Operation Guide for the machine.
When "Use close paper size" is disabled
The PAPER SIZE indicator on the operation panel will blink. You can press the [PAPER SELECT] key ( ) to select
a tray manually, or load paper in the bypass tray and press the [ON LINE] key ( ) to begin printing.
* The paper sizes that appear in the operation panel will vary by country and region.
Metric (AB) series Inch series
When "Use close paper size" is enabled
Printing will take place using a size of paper that is close to the size of the print image.
- 20 -
Page 21

OPENING THE PRINTER DRIVER
Note
FROM THE "Start" BUTTON
To change the printer driver settings, follow the steps below. Settings adjusted in this way will be the initial settings
when you print from an application. (If you change the settings in the printer driver setup screen at the time of
printing, the settings will revert to the initial settings when you quit the application.)
Click the "Start" button and select
1
"Control Panel" and then select
"Printer".
• In Windows 7, click the "Start" button and then
click "Devices and Printers".
• In Windows XP, click the "start" button, and
then click "Printers and Faxes".
• In Windows 2000, click the "Start" button and
point to "Settings", and then select "Printers".
In Windows XP, if "Printers and Faxes" does
not appear in the "start" menu, select
"Control Panel", select "Printers and Other
Hardware", and then select "Printers and
Faxes".
Click the "SHARP AR-XXXX" printer
2
driver icon.
Select "Properties" from the
3
"Organize" menu.
• In Windows 7, right-click the "SHARP
AR-XXXX" printer driver icon, and then click
"Printer properties".
• In Windows XP/2000, select "Properties" from
the "File" menu.
Click the "Printing Preferences"
4
button in the "General" tab.
In Windows 7, click the "Preferences" button in
the "General" tab.
The printer driver setup screen will appear.
☞ "PRINTER DRIVER SETTINGS
" (p.22)
- 21 -
Page 22

PRINTER DRIVER SETTINGS
Note
Note
Some restrictions exist on the combinations of settings that can be selected in the printer driver setup screen. When
a restriction is in effect, an information icon ( ) will appear next to the setting. Click the icon to view an
explanation of the restriction.
(1)
(2)
(3)
(4)
(5)
(6)
(7)
(8)
(9)
(10)
(1) Tab
The settings are grouped on tabs. Click on a tab to
bring it to the front.
(2) Drop-down list
Allows you to make a selection from a list of
choices.
(3) Print setting image
This shows the effect of the selected print settings.
(4) Checkbox
Click on a checkbox to activate or deactivate a
function.
(5) Machine image
The paper tray (in blue) selected in "Paper
Selection" on the "Paper" tab.
You can also click on a tray to select it.
(6) Check button
Allows you to select one item from a list of options.
(7) "OK" button
Click this button to save your settings and exit the
dialog box.
(8) "Cancel" button
Click this button to exit the dialog box without
making any changes to the settings.
(9) "Apply" button
Click to save your settings without closing the
dialog box.
The "Apply" button does not appear when
you open this window from an application.
(
10
)"Help" button
Click this button to display the help file for the
printer driver.
•
The settings and the image of the machine will vary depending on the model. If a tray option is installed, see
"CONFIGURING THE PRINTER DRIVER" (p.18) to configure the settings for the option.
•
For information on the printer function, see "PRINTER DRIVER SPECIFICATIONS" (p.60).
- 22 -
Page 23

TWO-SIDED PRINTING (ONLY FOR
Note
MODELS THAT SUPPORT
TWO-SIDED PRINTING)
On models that have the two-sided printing function, both sides of the paper can be printed on.
To use this function, open the printer driver setup screen and select "2-Sided(Book)" or "2-Sided(Tablet)" from
"Document Style" in the "Main" tab.
See "BASIC PRINTING
Two-sided printing also helps conserve paper.
•
Paper sizes that can be used for two-sided printing are Ledger, Letter, Legal, Foolscap, A3, A4, A5, B4 and B5.
•
The bypass tray cannot be used for two-sided printing.
The following example shows the result when portrait data is printed on both sides of the paper.
" (p.19) for details on how to open the printer driver.
Print data
Printing result
2-Sided(Book) 2-Sided(Tablet)
The pages are printed so that
they can be bound at the side.
The pages are printed so that
they can be bound at the top.
- 23 -
Page 24

PRINTER FUNCTIONS
Note
PAMPHLET STYLE
Pamphlet style prints two pages each on the front and back of each sheet of paper (four pages total on one sheet)
so that the sheets can be folded down the centre and bound to create a pamphlet. This function is convenient when
you wish to compile printed pages into a pamphlet.
To use this function, open the printer driver and select "Titled Pamphlet" or "2-Up Pamphlet" in "Document Style" in
the "Main" tab.
The direction of opening of the pamphlet can be selected with the "Right Turning Pamphlet" checkbox in the
"Advanced" tab. The following examples show how 8 pages are printed when "Titled Pamphlet" is selected.
Print data
Right Turning Pamphlet Right Turning Pamphlet
• Only letter, invoice, A4 and A5 size paper can be used for pamphlet style printing.
• Because four pages are printed on each sheet of paper, blank pages are automatically added at the end when
the total number of pages is not a multiple of four.
• When "Titled Pamphlet" is selected, printing will take place on paper that is twice the size of the paper size
specified in the application.
• When "2-Up Pamphlet" is selected, each page is reduced in the same way as for 2-Up and printed on the size
of paper that is specified in the application.
Printing result
- 24 -
Page 25

PRINTING MULTIPLE PAGES ON
Note
Note
ONE PAGE
This feature allows you to reduce and print two, four, six, eight or sixteen document pages on a single sheet of
paper.
To use this function, open the printer driver setup screen and select the number of pages per sheet (2-Up, 4-Up,
6-Up, 8-Up, 9-Up, or 16-Up) in "N-Up Printing" in the "Main" tab.
The order of the pages can be changed in the "Order" menu.
☞See "BASIC PRINTING
The "N-Up Printing" setting is not available when "Fit To Paper Size" is selected.
☞"FITTING THE PRINTED IMAGE TO THE PAPER
For example, when "2-Up" or "4-Up" is selected, the result will be as follows depending on the selected order.
" (p.19) for details on how to open the printer driver.
" (p.26)
N-Up Left to Right Right to Left
[2-Up]
N-Up
[4-Up]
If you select the "Border" checkbox, borderlines will be printed around each page.
Examples for 2-Up and 4-Up are shown here. The order of 6-Up, 8-Up, 9-Up, and 16-Up is the same as 4-Up.
The order can be viewed in the print setting image in the printer driver setup screen.
☞"PRINTER DRIVER SETTINGS
" (p.22)
Right , and
Down
Down , and
Right
Left , and
Down
Down , and
Left
- 25 -
Page 26
FITTING THE PRINTED IMAGE TO
Note
THE PAPER
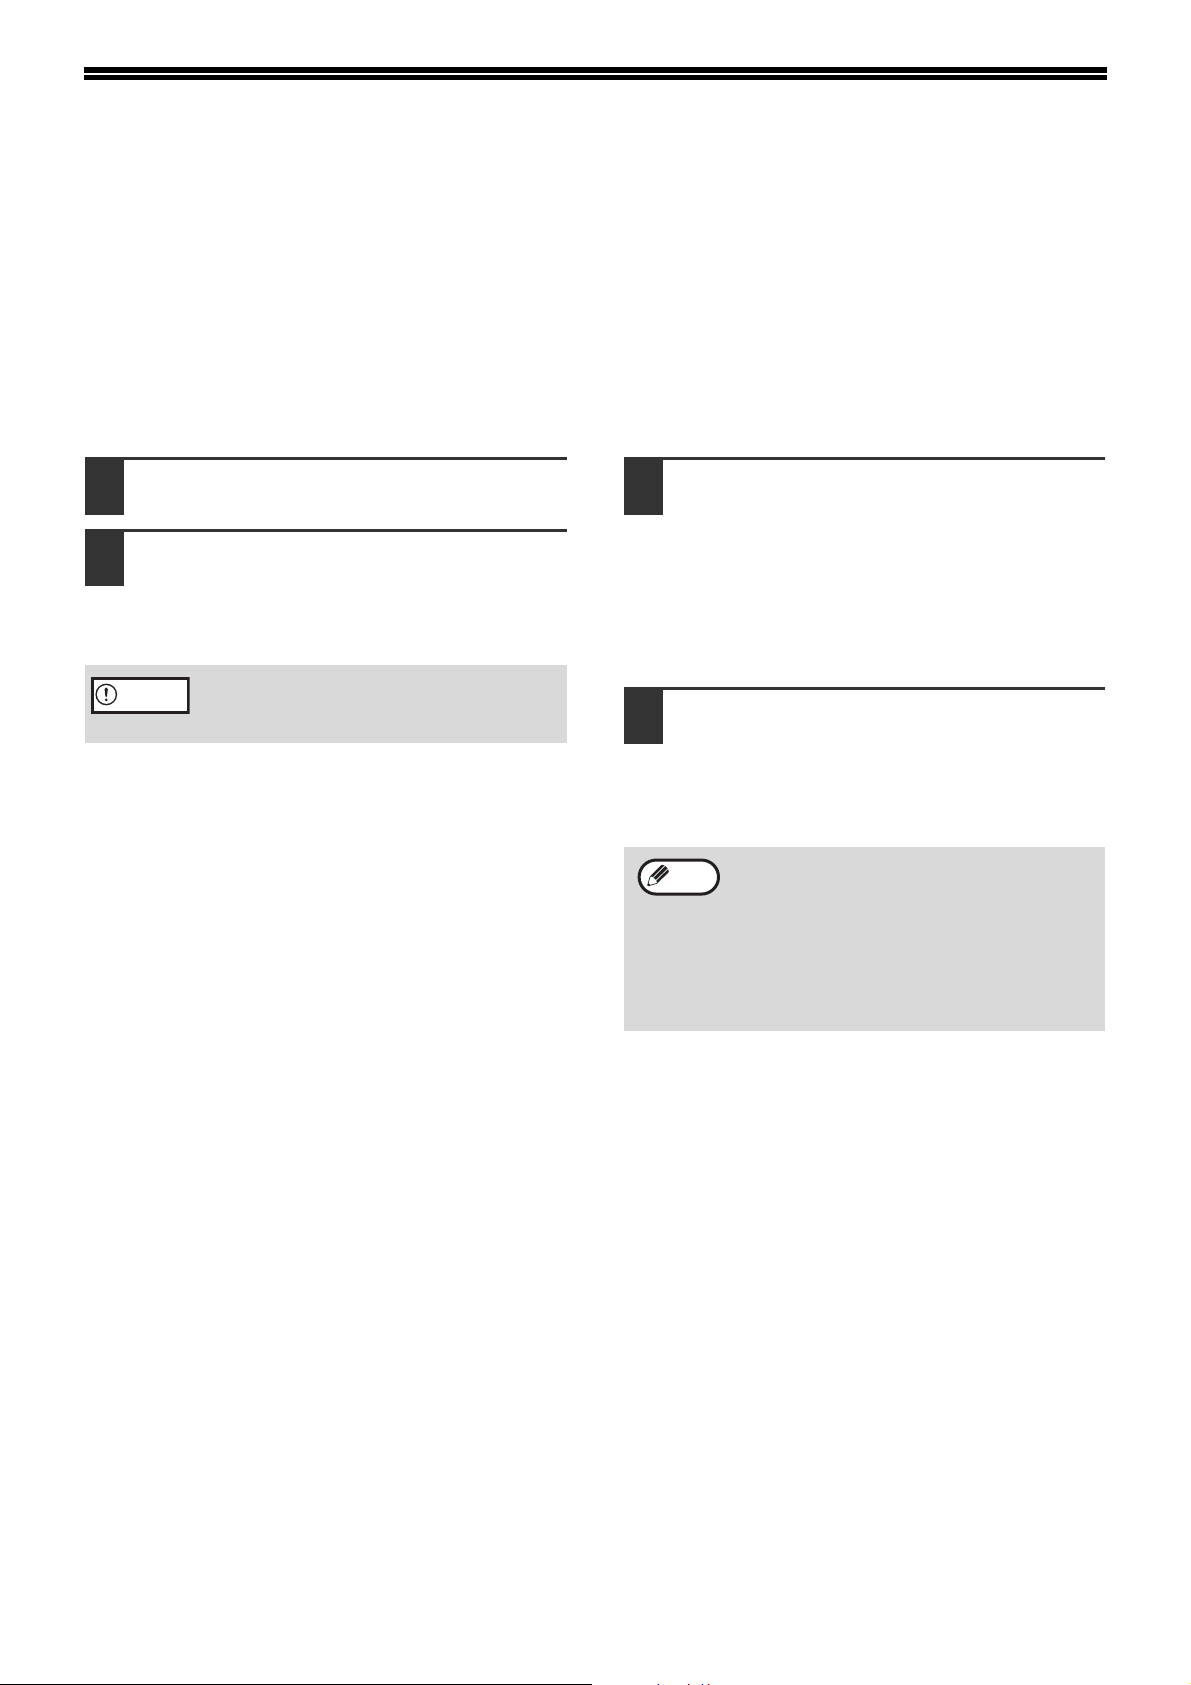
The printer driver can adjust the size of the printed image to match the size of the paper loaded in the machine.
Follow the steps shown below to use this function. The explanation below assumes that you intend to print A4
(letter) size document onto B5 (invoice) size paper.
☞See "BASIC PRINTING
The "Fit To Paper Size" setting is not available when "N-Up Printing" is selected.
☞"PRINTING MULTIPLE PAGES ON ONE PAGE
" (p.19) for details on how to open the printer driver.
" (p.25)
Click the "Paper" tab in the printer
1
driver setup screen.
Select the original size (A4 (letter)) of
2
the print image in "Paper Size".
Check the "Fit To Paper Size" button.
3
Select the actual size of paper to be
4
used for printing (B5 (invoice)).
The size of the printed image will be
automatically adjusted to match the paper loaded
in the machine.
Paper Size: A4 (letter)
Fit To Paper Size: B5 (invoice)
A4 or Letter size
document
(Paper Size)
B5 or Invoice size
paper
(Fit To Paper Size)
- 26 -
Page 27

ROTATING THE PRINT IMAGE 180
ABCD
ABCD
Note
DEGREES
The print image can be rotated 180 degrees.
This feature rotates the print image 180 degrees to enable correct printing on paper that can only be loaded in one
orientation.
To use the function, select the image orientation in "Image Orientation" on the "Main" tab, and then select the
"Rotate 180 degrees" checkbox.
☞See "BASIC PRINTING
" (p.19) for details on how to open the printer driver.
Printing result
Rotate 180 degrees Rotate 180 degrees
The procedure for loading paper is explained in the Operation Guide for the machine.
- 27 -
Page 28

CREATING OVERLAYS FOR PRINT
Note
DATA
The print data can be printed in a previously created overlay. By creating table rulings or a decorative frame in an
application different from that of the text file and registering the data as an overlay file, an attractive print result can
be easily obtained without the need for complex manipulations.
☞See "BASIC PRINTING
" (p.19) for details on how to open the printer driver.
CREATING AN OVERLAY FILE
To register an overlay file, create a document with any application and perform the following procedure.
Click the "Advanced" tab in the printer
1
driver setup screen.
Configure the printer driver settings from the
software application that you wish to use to
create the overlay file.
Click the "Edit" button.
2
Click the "Create Overlay" button and
3
specify the name and folder to be
used for the overlay file that you wish
to create.
The file will be created when the settings are
completed and printing is started.
• When printing is started, a confirmation
message will appear. The overlay file will
not be created until the "Yes" button is
clicked.
• To register a previously existing overlay
file, click the "Load Overlay" button.
PRINTING WITH AN OVERLAY FILE
Click the "Advanced" tab in the printer
1
driver setup screen.
Configure the printer driver settings from the
application from which you wish to print using the
overlay file.
Select an overlay file.
2
A previously created or stored overlay file can be
selected from the pull-down menu.
- 28 -
Page 29

PRINTING THE FRONT COVER
Note
PAGE ON DIFFERENT PAPER
The front cover page of a document can be printed on paper that is different from the other pages. Use this function
when you wish to print the front cover page on a different type of paper.
☞See "BASIC PRINTING
" (p.19) for details on how to open the printer driver.
Click the "Special Modes" tab in the
1
printer driver setup screen.
Select "Different Paper" and click the
2
"Settings" button.
Check the "Cover Page" box.
3
From the "Paper Source" drop-down
4
list, select the tray that you wish to
feed paper.
• When "Bypass Tray" is selected in "Paper
Source", be sure to load paper in the
bypass tray.
• If the "2-Sided" box is checked, the front
cover page and the next page after it will
be printed on the front and reverse side of
the paper.
- 29 -
Page 30

ADDING INSERTS WHEN PRINTING
Note
An identical insert page can be interleaved after each printed page.
☞See "BASIC PRINTING
" (p.19) for details on how to open the printer driver.
Click the "Special Modes" tab in the
1
printer driver setup screen.
Select "Page Interleave" and click the
2
"Settings" button.
From the "Overlays" drop-down list,
3
select the overlay file that you wish to
print.
When you want to insert blank pages, select "No
Overlay".
The overlay files must be created in
advance. To create an overlay file, see
"CREATING OVERLAYS FOR PRINT
DATA" (p.28).
Specify the position to insert the page
4
data in "Insert Position".
- 30 -
Page 31

PRINTING A WATERMARK
You can print a watermark such as "CONFIDENTIAL" on your document. To print a watermark, open the printer
driver, click the "Watermarks" tab, and follow the steps below.
☞See "BASIC PRINTING
HOW TO PRINT A WATERMARK
From the "Watermark" drop-down list, select the watermark that you wish to print (for example "CONFIDENTIAL"),
and start printing.
You can enter text to create your own custom watermark. For details on watermark settings, view printer driver Help.
☞"PRINTER DRIVER SETTINGS
" (p.19) for details on how to open the printer driver.
Print sample
" (p.22)
- 31 -
Page 32

PRINTING TEXT AND LINES IN
ABCD
EFGH
ABCD
EFGH
ABCD
EFGH
Note
Note
BLACK
Colour text and lines that are normally printed in light colour can be printed in black. Colour text and lines that are
faint when printed normally can be printed in black to improve legibility.
PRINTING TEXT IN BLACK
Text that is any colour other than white is printed in black.
To use this function, open the printer driver setup screen and select the "Text To Black" checkbox in the "Advanced"
tab.
Print data
Text To Black Text To Black
If "Print as graphics" is selected in "TrueType Mode" of "Font" in the "Advanced" tab, this function cannot be used.
Printing result
PRINTING LINES AND VECTOR GRAPHICS IN BLACK
Lines and solids that are any colour other than white are printed in black.
To use this function, open the printer driver setup screen and select the "Vector To Black" checkbox in the
"Advanced" tab.
Print data
Vector To Black Vector To Black
Printing result
If "Raster" is selected in "Graphics Mode" in the "Advanced" tab, this function cannot be used.
- 32 -
Page 33

SAVING FREQUENTLY USED PRINT
Note
SETTINGS
Settings configured on each of the tabs at the time of printing can be saved as user settings. Saving frequently used
settings or complex colour settings under an assigned name makes it easy to select those settings the next time you
need to use them.
SAVING SETTINGS AT THE TIME OF PRINTING
Settings can be saved from any tab of the printer driver properties window. Settings configured on each tab are
listed at the time of saving, allowing you to check the settings as you save them.
For the steps for opening the printer driver, see "BASIC PRINTING
" (p.19).
Configure print settings on each tab
1
and click the "Save" button on any
tab.
Using saved settings
Select the user settings that you wish to use on any tab.
After checking the displayed settings,
2
enter a name for the settings
(maximum of 20 characters).
• Up to 30 sets of user settings can be saved.
• A watermark that you created cannot be
saved in user settings.
Click the "OK" button.
3
Deleting saved settings
Select the user settings that you want to delete in "Using saved settings" (above), and click the "Delete" button.
- 33 -
Page 34

4
PRINTER STATUS MONITOR
Note
PRINTER STATUS MONITOR
"Printer Status Monitor" is on the "Software CD-ROM".
This allows the user to check on the computer screen whether or not the machine is able to print.
It provides information on error states such as paper misfeeds and shows the configuration of the machine (number
of trays, etc.) by means of illustrations. Available paper sizes and paper remaining are also indicated.
• In order to use the Printer Status Monitor, the machine must be connected to a network.
• To install the Printer Status Monitor, see "INSTALLING THE PRINTER STATUS MONITOR
BEFORE USING THE PRINTER STATUS MONITOR
To use the Printer Status Monitor to monitor the status of the machine, the printing environment must be configured
as explained below.
" (p.17).
Printing via a server
Install the software as explained in "USING THE MACHINE AS A NETWORK PRINTER" (p.13).
When the first print job is executed after starting up the Printer Status Monitor, the machine's IP address is
automatically set in the Printer Status Monitor.
Direct printing without a server
Install and configure the software as explained in "INSTALLING THE SOFTWARE" (p.10). (This is not necessary if
the software has already been installed and configured.)
- 34 -
Page 35

USING THE PRINTER STATUS MONITOR
For information on using the Printer Status Monitor, see the Help file. The Help file can be viewed as follows:
Click the "Start" button, point to "All Programs" ("Programs" in Windows 2000) and then "SHARP Printer Status
Monitor". Select "Help".
CHANGING THE PRINTER STATUS MONITOR SETTINGS
Once installed, the Printer Status Monitor normally runs in the background in Windows. If you need to change the
Printer Status Monitor settings, follow the steps below.
Right-click the Printer Status Monitor
1
icon ( ) on the task bar, and select
"Preferences" from the pop-up menu.
Change the Printer Status Monitor
2
settings as desired.
For information on the Printer Status Monitor
settings, see Printer Status Monitor Help. (Click
the "Help" button in the settings window.)
- 35 -
Page 36

PRINTER STATUS MONITOR
Note
Note
CHECKING THE PRINTER STATUS
The Printer Status Monitor allows you to check whether or not toner and paper remain in the machine.
Right-click the Printer Status Monitor
1
icon ( ) on the task bar, and select
"Show the Status" from the pop-up
menu.
The icon turns red when printing is not
possible due to a machine error or other
problem.
Check the current status of the printer
2
in the screen that appears. If you wish
to know more detailed status
information, click the "Detail" button.
The screen will change to the detailed status
screen.
To return to the abbreviated status screen, click
the "Hide detail" button.
By default, the abbreviated status screen
appears when "Show the Status" is selected
in Step 1. If desired, you can change the
setting to have the detailed status screen
initially appear.
☞"CHANGING THE PRINTER STATUS
MONITOR SETTINGS" (p.35)
- 36 -
Page 37

5
WEB FUNCTIONS IN THE MACHINE
ABOUT THE WEB PAGES
The Network expansion kit includes a built-in Web server. The Web server is accessed using a Web browser on
your computer. The Web pages include both pages for users and pages for the administrator. In the user Web
pages, users can monitor the machine, directly print a file specified on a computer, and select printer configuration
settings. In the administrator Web pages, the administrator can configure the machine's e-mail settings, settings for
print by e-mail, and passwords. Only the administrator is allowed to configure these settings.
HOW TO ACCESS THE WEB PAGE AND VIEW HELP
Use the following procedure to access the Web pages. [Help] can be clicked at the bottom of the menu frame to view
information on the various function settings that can be configured remotely over the network from the machine's
Web pages. For the settings of each function, see the explanations in Help.
Open the Web browser on your
1
computer.
Supported browsers:
Internet Explorer: 6.0 or higher (Windows
Netscape Navigator: 9 (Windows
Firefox: 2.0 or higher (Windows
In the "Address" field of your Web
2
browser, enter the IP address that has
been configured in the machine.
If you do not know the IP address, see
"SETTING/CHANGING THE IP ADDRESS
MANUALLY" (p.9).
When the connection is completed, the Web
page will appear in your Web browser.
☞ "ABOUT THE WEB PAGES (FOR USERS)
(p.39)
Click the [Help] button at the bottom
3
of the menu frame.
To view information on a function setting, click
the corresponding item in the Help screen.
®
)
®
)
When finished, close the Web pages.
4
When you have finished using the Web pages,
®
)
"
click the (close) button in the top right corner
of the page.
- 37 -
Page 38

CHANGING/CHECKING THE IP ADDRESS IN THE WEB PAGE
The settings of the IP address, Subnet Mask, and Default Gateway can be changed in the Web page.
You can also check the machine's current IP address settings.
Note
Click [Network Status] in the menu
1
frame of the Web page.
Click [TCP/IP].
2
• To acquire the IP address automatically, set "DHCP" to "Enable".
• When "DHCP" settings are changed, the change will take effect after the machine is restarted.
Enter desired "IP Address", "Subnet
3
Mask", and "Default Gateway".
When you have finished entering all
4
items, click [Submit].
The entered settings are stored.
- 38 -
Page 39

ABOUT THE WEB PAGES
(2)
(1)
(3)
(4)
(5)
(6)
(FOR USERS)
When you access the user Web pages in the machine, the following page will appear in your browser.
A menu frame appears on the left side of the page. When you click an item in the menu, a screen appears in the
right frame that allows you to configure settings for that item.
(1) Menu frame
Click a setting in the menu to configure it.
(2) System Information
Shows the current status of the machine and
model name.
• Device Status
Shows the current status of the machine, paper
trays, output trays, toner and other supplies, and
page counts.
Out of paper and other warnings appear in red.
• Device Configuration
Shows what options are installed.
• Network Status
Shows the network status. Information on
"General" and "TCP/IP" is shown on the
respective pages.
(3) Printer Test Page
The "Printer Settings List", which shows printer
condition settings and system settings, and various
font lists can be printed.
(4) Condition Settings
Configure basic printer settings and printer
language settings.
☞"CONFIGURING THE PRINTER CONDITION
SETTINGS" (p.40)
(5) Admin Mode
To open the Web pages for the administrator, click
here and then enter the administrator's user name
and password.
☞"ABOUT THE WEB PAGES (FOR THE
ADMINISTRATOR)" (p.43)
☞"PROTECTING INFORMATION
PROGRAMMED IN THE WEB PAGE
([Passwords])" (p.44)
(6) Display Language Setting
Select the desired language setting from the
pull-down menu.
- 39 -
Page 40

CONFIGURING THE PRINTER
Note
(2)
(3)
(4)
(1)
CONDITION SETTINGS
The printer condition settings allow basic printer settings to be configured. The following items can be set:
● "Default Settings
● "PCL Settings
" (p.41): Basic settings that are mainly used when the printer driver is not used.
" (p.42): PCL symbol set, font, line feed code, and other settings.
When the printer driver is used and the same settings are configured both in the printer driver and in the above
screens, the settings configured in the printer driver override the settings in the above screens. If a setting is
available in the printer driver, use the printer driver to configure the setting.
HOW TO CONFIGURE THE SETTINGS
To display the Condition Settings screen, click [Condition Settings] in the menu frame.
For detailed explanations of the procedures for establishing settings, click [Help] in the menu frame.
(1) Condition Settings
This displays the page for configuring the printer
condition settings.
(2) Default Settings/ PCL
Select the type of condition settings that you wish
to configure.
(3) Settings
The factory default settings are displayed.
Change the settings as desired by selecting from
drop-down lists and by directly entering settings.
For information on the settings, see "PRINTER
CONDITION SETTINGS" (p.41).
(4) Submit
Click to store the Web page settings in the
machine.
- 40 -
Page 41

WEB FUNCTIONS IN THE MACHINE
PRINTER CONDITION SETTING MENU
Click on a setting to view an explanation of the setting.
Condition Settings
Default Settings Factory default settings
Copies 1
Orientation Por trait
Default Paper Size A4
Default Paper
Source
2-Sided Print 1-Sided
Original Type (USB
Memory Scan)
ROPM (Rip Once,
Print Many)
Auto
1-Sided
Enable
Condition Settings
PCL Settings Factory default settings
Symbol Set PC-8
Font 0: Courier (internal font)
Line Feed Code CR=CR; LF=LF; FF=FF
Wide A4 Disable
PRINTER CONDITION SETTINGS
Factory default settings are indicated in bold.
Default Settings
Item Selections Description
Copies 1 - 999 This is used to select the number of copies.
Orientation Por trait, Landscape This sets the orientation of the printed page. Select [Portrait] when
the image is longer in the vertical direction, or [Landscape] when the
image is longer in the horizontal direction.
Default Paper Size A3, B4, A4, B5, A5,
Ledger, Legal,
Foolscap, Letter,
Invoice
Default Paper
Source
2-Sided Print 1-Sided,
Original Type (USB
Memory Scan)
ROPM (Rip Once,
Print Many)
Auto, Tray 1,
Tray 2*, Tray 3*,
Tra y 4 *, B y p as s
(Manual), Bypass
(Auto)
2-Sided (Book),
2-Sided (Tablet)
1-Sided,
2-Sided
Enable, Disable This enables the ROPM function. When enabled, multi-page print
This sets the default paper size used for printing. Even if the set size
of paper is not in any of the trays, the printed image is formed in
accordance with this setting.
This sets the default paper tray.
*Selections available depend on the trays that are installed.
When [2-Sided (Book)] is selected, two-sided printing takes place so
as to allow binding at the left side. When [2-Sided (Tablet)] is
selected, two-sided printing takes place so as to allow binding at the
top. (Only for models that support two-sided printing.)
This sets whether or not to allow two-sided original for USB Memory
Scan. (Only for models that support two-sided original.)
jobs are stored in memory before printing, and thus the computer
does not need to repeatedly send the print data when multiple
copies are printed.
- 41 -
Page 42

WEB FUNCTIONS IN THE MACHINE
PCL Settings
Item Selections Description
Symbol Set Select one of 35
sets.
Font Select one internal
or one external font.
Line Feed Code CR=CR; LF=LF;
FF=FF,
CR=CR+LF; LF=LF;
FF=FF,
CR=CR;
LF=CR+LF;
FF=CR+FF,
CR=CR+LF;
LF=CR+LF;
FF=CR+FF
Wide A4 Enable, Disable This setting can be enabled to print 80 lines on A4 size paper with
This specifies which country's characters (PCL symbol set) are
assigned to certain of the symbols in the character code list. The
factory default setting is [PC-8].
This specifies which PCL font to use for printing. One font can be
specified from among the internal fonts. The factory default setting is
[0: Courier].
This specifies the line break code by means of a combination of the
"CR" (return) code, "LF" (line break) code, and "FF" (page break)
code. The factory default setting is printing based on the transmitted
code. The setting can be changed by selecting one of four
combinations.
each line 10CPI font (English characters). When the setting is
disabled (a checkmark does not appear), each line is 78 characters
long.
- 42 -
Page 43

ABOUT THE WEB PAGES
XX-XXXXX
(6)
(1)
(2)
(4)
(5)
(7)
(8)
(3)
(FOR THE ADMINISTRATOR)
In addition to the menus that appear for users, other menus that can only be used by the administrator appear in the
administrator Web pages.
A menu frame appears on the left side of the page. When you click an item in the menu, a screen appears in the
right frame that allows you to configure settings for that item. Settings that can only be configured by the
administrator are explained here.
(1) Information
Configure machine identification information for
the status & alert E-mail function.
☞"INFORMATION SETUP
(2) Passwords
To protect the Web site, the system administrator
can establish passwords. Enter a password that
you would like to establish and click the [Submit]
button.
One password can be established for the
administrator and one password can be
established for users.
☞"PROTECTING INFORMATION
PROGRAMMED IN THE WEB PAGE
([Passwords])" (p.44)
(3) Administrator Settings
Setting changes can be prohibited and interface
settings can be configured.
☞"ADMINISTRATOR SETTINGS
" (p.47)
" (p.45)
(4) Status Message
Configure parameters required for sending status
messages, such as destination addresses and
time schedules.
☞"STATUS MESSAGE SETUP
(5) Alerts Message
Store destination addresses for alert messages.
☞"ALERTS MESSAGE SETUP
(6) Security
Unused ports can be disabled for greater security
and port numbers can be changed.
(7) Services
Configure information concerning the e-mail
system.
☞"SMTP SETUP
(8) Print Port
Configure settings for LPD and Raw print.
" (p.47)
" (p.48)
" (p.48)
- 43 -
Page 44
PROTECTING INFORMATION
Caution
Note
PROGRAMMED IN THE WEB PAGE
([Passwords])
Passwords can be set (click [Passwords] in the menu frame) to restrict Web page access and protect settings. The
administrator must change the password from the factory default setting. The administrator must also take care to
remember the new password. The next time the Web pages are accessed, the new password must be entered.
A password can be set for the administrator and a password can be set for users.
Click [Passwords] in the menu frame.
1
Enter the current password in "Admin
2
Password".
When establishing a password for the first time,
enter "Sharp" in "Admin Password".
Be sure to enter "S" in upper case and
"harp" in lower case (passwords are case
sensitive).
Enter passwords in "User Password"
3
and "Admin Password".
• A maximum of 7 characters and/or numbers
can be entered for each password (passwords
are case sensitive).
• Be sure to enter the same password in
"Confirm Password" as you did in "New
Password".
When you have finished entering all
4
items, click [Submit].
The entered password is stored.
After setting the password, turn the machine
power off and then back on.
When prompted to enter a user name, a
user should enter "user" and an
administrator should enter "admin" in "User
Name". In "Password", the respective
password for the entered user name should
be entered.
For more information, click [Help] in the
upper right-hand corner of the window.
- 44 -
Page 45

ADMINISTRATOR SETTINGS
The administrator settings are used to prohibit changes to the [Condition Settings] and to configure interface
settings.
●
"Default settings" (p.46): Select the setting for which you wish to prohibit changes.
●
"Interface settings" (p.46): Enable monitoring of data sent to the network port and set restrictions.
CONFIGURING A SETTING IN THE ADMINISTRATOR SETTINGS
Click [Administrator Settings] in the
1
menu frame.
The "Default Settings" screen of the
[Administrator Settings] will appear. If you wish to
select a setting in the "Default Settings" screen,
go to step 3
Click the desired setting.
2
.
Make a selection for the setting in the
3
screen that appears.
See "ADMINISTRATOR SETTINGS"
(p.46) for descriptions of the settings.
Click [Submit] to store the entered
4
information.
- 45 -
Page 46

WEB FUNCTIONS IN THE MACHINE
ADMINISTRATOR SETTINGS
When "YES, NO" appears in the "Settings" column, "YES" is selected when a checkmark appears in the checkbox of
the item, and "NO" is selected when checkmark does not appear.
Default settings
Item Settings Description
Prohibit Test
Page Printing
Disable Default
Setting Changes
Interface settings
Item Settings Description
I/O Timeout 1- 60 - 999 (sec) During reception of a print job, if remaining data is not received after the
Port Switching
Method
YES, NO This setting is used to prohibit printing of a printer test page.
YES, NO This setting is used to prohibit changes to the default condition settings.
time set here elapses, the port connection is broken and the next print job
is begun.
Switch at End
of Job, Switch
after I/O Timeout
Select the method for switching network ports.
- 46 -
Page 47

E-MAIL STATUS AND E-MAIL ALERT SETTINGS
These functions send information on machine use (print count, copy count, etc.) and error conditions (paper
misfeed, out of paper, out of toner, etc.) via e-mail to the administrator of the machine or the dealer.
INFORMATION SETUP
Machine identification information for the status and alert e-mail functions is configured in the "Information Setup"
screen. The entered information will be included in status and alert e-mail messages.
Click [Information] in the menu frame.
1
The "Information Setup" screen will appear.
Enter the machine information.
2
For detailed information, click the [Help] button in
the upper right-hand corner of the window.
Click [Submit] to store the entered
3
information.
SMTP SETUP
The Status and alert e-mail functions use SMTP (Simple Mail Transport Protocol) to send e-mail. The following
procedure is used to set up the e-mail environment. This must be done by the system administrator or other person
familiar with the network.
Click [Services] in the menu frame.
1
The "Services Setup" screen will appear.
Click [SMTP].
2
Enter the information required to set
3
up the e-mail environment.
For detailed information, click the [Help] button in
the upper right-hand corner of the window.
Click [Submit] to store the entered
4
information.
- 47 -
Page 48

WEB FUNCTIONS IN THE MACHINE
Note
Note
STATUS MESSAGE SETUP
Use the status message function to send the current counter information, including the copy count, print count, and
total output count, based on the specified schedule. The destinations can be set for administrators and dealers
respectively.
To set up the status message, follow these steps.
Click [Status Message] in the menu
1
frame.
The "Status Message Setup" screen will appear.
Enter the required information,
2
including the destination addresses
and time schedule.
For detailed information, click the [Help] button in
the upper right-hand corner of the window.
Click [Submit] to store the entered
3
information.
When the E-mail Status settings are completed, printer
count information will be sent periodically by e-mail to
the specified e-mail addresses.
If you quit the browser before clicking
[Submit], the settings will be cancelled. To
send printer information immediately to the
specified e-mail addresses, click [Send
Now].
ALERTS MESSAGE SETUP
Use the alert message function to send alert information, such as empty toner and paper and trouble including paper
misfeeds, to specified destinations when such problems occur. The destinations can be set for administrators and
dealers respectively.
To set up the alert message, follow the procedure below.
Click [Alerts Message] in the menu
1
frame.
The "Alerts Message Setup" screen will appear.
Enter the destination addresses.
2
For detailed information, click the [Help] button in
the upper right-hand corner of the window.
Click [Submit] to store the entered
3
information.
If these parameters are set, event information for the
printer will be transmitted to the specified addresses
via E-mail each time a specified event occurs. The
meaning of each event item is shown below.
(Example)
Paper Jam: A paper misfeed has occurred.
Toner Low: Toner is low.
Toner Empty: Toner must be added.
Paper Empty: Paper must be loaded.
If you quit the browser before clicking
[Submit], the settings will be cancelled.
- 48 -
Page 49

6
SCANNER FUNCTIONS
1. Scanning from a TWAIN-compliant or WIA-compliant
application
The scanner driver installed into your PC allows you to use the
scanning function of the machine with TWAIN-compliant or
WIA-compliant applications.
When you use the machine with the Network expansion kit,
"SHARP MFP TWAIN AB" can be installed to your computer.
For more information on scanning from a TWAIN-compliant or
WIA-compliant application, see the Operation Guide for the
machine.
2. Scanning from the machine using the Button Manager
Button Manager is a software utility that allows you to use the scanner
function at the machine.
When you use the machine with the Network expansion kit, "Sharp
Button Manager AB" can be installed to your computer. Once installed,
Button Manager normally runs in the background in the Windows
operating system.
Button Manager allows you to configure five sets of scanning settings as
a scan menu on the machine. (See "Button Manager scan menu
" (p.50)
for the factory default menus.)
For more information on Button Manager and changing the settings, see
the Operation Guide for the machine.
3. Sending the scanned image to a USB memory
The scanned image can be sent to a USB memory installed on the
machine. This is called "USB Memory Scan" in this manual.
For more information on USB Memory Scan, see "USB MEMORY
SCAN" (p.51).
ABOUT THE SCANNER FUNCTIONS
With this machine a document or photo can be scanned into an image file. You can select from the following
scanning methods.
- 49 -
Page 50

SCANNER FUNCTIONS
Button Manager scan menu
Display/Button Manager menu Application that starts
SC1: Sharpdesk
SC2: Email
SC3: OCR
SC4: Microsoft Word
SC5: Filing
- 50 -
Page 51

USB MEMORY SCAN
Note
BASIC SETTINGS FOR USB MEMORY SCAN (FOR THE ADMINISTRATOR)
To use the USB Memory Scan function, setting from the Web page is required.
Click [Network Scanning] (p.43
access this screen. (p.44
of each of the items, click [Help] in the menu frame.
) in the menu frame and configure the required settings. A password is required to
) These settings should only be configured by the network administrator. For explanations
Click [Network Scanning] in the menu
1
frame.
The Network Scanning
setup page appears.
Select "USB Memory Scan".
2
In the "Enable Scanner Delivery to:" field, click
the checkbox so that a checkmark appears in the
checkbox.
Select the method for assigning a file
3
name to a scanned image.
Select the method for assigning a file name to a
scanned image. In "File Naming", click the items
that you wish to use in the file name. "Date &
Time" is initially selected.
If you are going to send images more than
once, we recommend that you also select
"Unique Identifier" to prevent sending
multiple files with the same name, which
would result in each successive file
overwriting the previous file.
Click [Submit].
4
After entering the settings, be sure to click
[Submit] to store them.
- 51 -
Page 52

SCANNER FUNCTIONS
mark
Original size scale
Note
USING THE USB MEMORY SCAN FUNCTION
A scanned image can be sent to a commercially available USB memory device that has been connected to the
Network expansion kit on the back of the machine.
Connect the USB memory to the USB
1
connector of the Network expansion
kit.
Press the [SCAN] key ( ).
2
Place the original(s) that you wish to
3
scan on the document
glass/SPF/RSPF.
When scanning from the document glass
Place the original face
down on the document
glass. Align the edge of
the original with the
original size scale, to be
centred with the centring
mark ( ).
When scanning from the SPF/RSPF
Press the [USB MEMORY SCAN] key
4
().
"USB" will appear in the display and the START
indicator is lit.
Press the [START] key ( ) to begin
5
scanning.
While the original is scanned into the USB
memory, the display blinks and the START
indicator goes out.
After scanning is finished, the display will stop
blinking and the START indicator is lit again.
The machine is ready to start the next scanning.
• Press the [CLEAR] key ( ) or the
[CLEAR ALL] key ( ) to stop scanning
in the middle of a run. If you press the
[CLEAR ALL] key ( ), the scanning job
and the scanning settings for the USB
Memory Scan are cleared.
• If you press the [CLEAR ALL] key ( ) or
move to another function in the USB
Memory Scan mode, the machine will
revert to the initial settings.
• When an invalid key is pressed, a beep
sound will be heard.
Set the original(s) face up
in the document feeder
tray.
- 52 -
Page 53

Changing the scanning settings
If you wish to change the scan settings, follow the
procedures below after performing step 3.
To change the scanning density
Press the [Light] key ( ) or [Dark] key ( ) to
lighten or darken the density level as desired.
• There are five density
levels indicated by three
indicators.
• If exposure level 2 or 4 is
selected, the two
indicators will light
simultaneously.
The density level and the indicators are as follows.
When level 1 is selected:
When level 2 is selected:
SCANNER FUNCTIONS
When level 3 is selected*:
When level 4 is selected:
When level 5 is selected:
*Factory default
To select the original size
Press the [ORIGINAL] key ( ) and select the
original size.
When scanning from the document glass:
The factory default is set to A3 (11" x 17").
When scanning from the SPF/RSPF:
The factory default is set to the size that was detected
by the original size scale.
To scan on both sides of an original
Press the [ORIGINAL TO COPY] key to select
two-sided scanning.
Make sure that the
indicator is lit.
When scanning from the document glass, press the
[READ-END] key ( ) when you have finished
scanning the original pages.
- 53 -
Page 54

7
TROUBLESHOOTING
If a problem or question arises, try to solve the situation using the following information before contacting your
authorised SHARP dealer.
For problems related to the machine such as running out of paper or paper misfeeds, see the Operation Guide for
the machine.
Points to check for connections
■ Are you using a port that was created with Standard TCP/IP Port?
If you are using a port created using Standard TCP/IP Port in Windows environment, printing may not take place
correctly if "SNMP Status Enabled" is selected in the port settings of the printer driver. Open the printer driver
properties and click the "Configure Port" button on the "Ports" tab. In the window that appears, make sure the
"SNMP Status Enabled" checkbox is not selected.
TROUBLESHOOTING
Problem Cause and solution Page
Cannot connect to the
network.
Print jobs are not
received.
(ON LINE indicator does not
blink.)
The LAN cable is disconnected.
→ Make sure that the LAN cable is firmly inserted in the connectors on the
Network expansion kit and your computer.
The machine configured for use is not on the same network as the
computer.
→ The machine cannot be used if it is not connected to the same network as
the computer, or if it is not configured for use on the network.
For more information, consult your network administrator.
The machine is set to off-line mode.
→ Press the [ON LINE] key ( ) to turn on the ON LINE indicator.
Your machine is not selected correctly in the current application for
the print job.
→ When choosing "Print" from the "File" menu located in applications, be sure
you have selected "SHARP AR-XXXX" (where XXXX is the model name of
your machine) printer displayed in the "Print" dialog box.
Copy or scan job is performed.
→ Wait until the copy or scan job is complete.
The printer driver has not been installed correctly.
→ Install the proper printer driver.
The port setting is not correct.
→ Printing is not possible if the printer driver port setting is not correct. Set the
port correctly.
13
–
19
–
–
10
15
Printing does not take
place.
(ON LINE indicator is
blinking.)
A Notice Page (UP-001)
has been printed, but the
print data has not been
printed completely.
There is no paper in the specified tray.
→ Load paper in the tray.
A print job containing more data than can be held in the print memory
is sent to the machine.
→ Disable the ROPM function on the "Configuration" tab of the printer driver
setup screen. If you need to use the ROPM function, divide the pages of the
print data into two or more print jobs.
→ The memory allocated to the printer function can be changed in the system
setting "Memory allocated to printer mode".
- 54 -
Operation
Guide
18
Operation
Guide
Page 55

TROUBLESHOOTING
Problem Cause and solution Page
Printing is slow.
The printed image is light
and uneven.
The printed image is dirty.
The printed image is
skewed or it runs off the
paper.
The scanned image is
clipped.
The scanned image data
cannot be opened.
Transmission takes a long
time.
Simultaneous use of two or more application software programs.
→ Start printing after quitting all unused application software programs.
The paper is loaded so that printing takes place on the back side of
the paper.
→ Some paper types have a front and back side. If the paper is loaded so that
printing takes place on the back side, toner will not adhere well to the paper
and a good image will not be obtained.
You are using paper that is outside the specified size and weight
range.
→ Use copy paper within the specified range.
Paper curled or damp.
→ Do not use curled or crimped paper. Replace with dry copy paper. During
periods when the machine is not used for a long time, remove the paper from
the tray and store it in a dark place in a bag to prevent moisture absorption.
You did not set sufficient margins in the paper settings of your
application.
→ The top and bottom of the paper may be dirty if the margins are set outside
of the specified print quality area.
→ Set the margins in the software application within the specified print quality
area.
The paper loaded in the tray is not the same size as that specified in
the printer driver.
→ Check if the "Paper Size" options suit the size of the paper loaded in the tray.
If the "Fit To Paper Size" setting is activated, make sure that the paper size
selected from the drop-down list is the same as the size of the loaded paper.
The orientation of document setting is not correct.
→ Click the "Main" tab in the printer driver setup screen, and verify if the "Image
Orientation" option is set to your requirements.
Paper is not loaded properly.
→ Make sure the paper is properly loaded.
The margins are not set correctly in the application.
→ Check the paper size and margin settings in the application. Also make sure
that the print settings are correct for the paper size.
The selected "Scan Size" setting is smaller than the actual original
size.
→ Set the scan size to the actual original size and make sure that the original is
placed in the correct orientation.
If you intentionally selected a size setting smaller than the actual original
size, take into consideration the part of the original that you wish to scan
when placing the original. For example, if the actual size is A4 (8-1/2" x 11")
and you selected B5 (5-1/2" x 8-1/2") for the size setting, place the original
so that the part that you wish to scan is within the B5 (5-1/2" x 8-1/2") area at
the left, centre of the glass.
The viewer program does not support the format of the scanned
image data.
→ The scanned image is provided in PDF format.
To view the image in PDF format, Acrobat Reader or Adobe Reader of
Adobe Systems Incorporated is required. If neither program is installed on
your computer, the programs can be downloaded from the following URL:
http://www.adobe.com/
When there is a large amount of image information, the data file is also
large and transmission takes a long time.
–
Operation
Guide
Operation
Guide
Operation
Guide
–
–
–
–
Operation
Guide
–
–
–
–
- 55 -
Page 56

TROUBLESHOOTING
Problem Cause and solution Page
The START indicator is
not lit in the USB Memory
Scan mode.
"ERR" appears in the
display during USB
Memory Scan.
"FUL" appears in the
display during USB
Memory Scan.
The USB memory is not recognized or not inserted, or any device
other than USB memory is inserted in the USB port.
→ Check the USB port of the Network expansion kit.
Any device other than USB memory is inserted in the USB port, the
USB memory is write-protected, or it was taken off during USB
Memory Scan.
→ Check your USB memory device and use it properly.
The memory of the USB device became full.
→ Use the USB device with sufficient memory.
–
–
–
- 56 -
Page 57

REMOVING THE SOFTWARE
In the event that you need to remove the driver or utilities, follow these steps:
Click the "Start" button, and then click
1
"Control Panel".
• In Windows XP, click the "start" button and then
click "Control Panel".
• In Windows 2000, click the "Start" button, select
"Settings", and then click "Control Panel".
Click "Uninstall a program".
2
• In Windows XP, click "Add or Remove
Programs".
• In Windows 2000, double-click the
"Add/Remove Programs" icon.
Select the driver or utility that you
3
wish to remove from the list, and click
the appropriate button to remove it.
For more information, refer to your operating
manual or to the help files for your operating
system.
Restart your computer.
4
- 57 -
Page 58

8
SPECIFICATIONS
Note
For information on power requirements, power consumption, dimensions, weight, and other specifications that are
common to all features of the machine, refer to the Operation Guide for the machine.
NETWORK EXPANSION KIT SPECIFICATIONS
Memory 256 MB
Emulation PCL6
Interface 10Base-T/100Base-TX Ethernet, USB 2.0 (Full Speed / Hi Speed compatible
interface)
PRINTER SPECIFICATIONS
Printing speed The print speed based on the machine specifications
Resolution 600 dpi / 300 dpi
Network expansion kit memory 256 MB
Emulation PCL6
Installed fonts PCL6 compatible: 80 outline fonts and 1 bitmap font
Interface 10Base-T/100Base-TX Ethernet, USB 2.0 (Full Speed / Hi Speed compatible
interface)
• As a part of our policy of continuous improvement, SHARP reserves the right to make design and specification
changes for product improvement without prior notice. The performance specification figures indicated are
nominal values of production units. There may be some deviations from these values in individual units.
• Some discrepancies may exist in the illustrations and content due to improvements to the machine.
- 58 -
Page 59

SCANNER SPECIFICATIONS
Note
USB MEMORY SCAN
File format File type: PDF
Scanning colours Colour
Resolution 300 dpi
Device USB memory
Interface USB 2.0 (Full-Speed/Hi-Speed compatible interface)
Paper Size A5, B5, B5R, A4, A4R, B4, A3
(5-1/2" x 8-1/2", 8-1/2" x 11", 8-1/2" x 11"R, 8-1/2" x 14", 11" x 17")
TWAIN/BUTTON MANAGER SCAN
Type Flatbed scanner
Scanning method Document glass/SPF/RSPF
Light source Cold cathode fluorescent lamp
Resolution Factory default: 150 dpi
Setting range: 50 dpi - 9600 dpi
Original types Sheets, bound documents
Effective scanning area Approx. 297 mm (11-11/16") (Lengthwise) x 431 mm (16-31/32") (Width)
Scanning speed 1.44 msec/line (Colour), 0.48msec/line (Greyscale/Black and White)
Input Data 1 bit or 12 bit
Output Data 1 bit or 8 bit
Scanning colours Black and white 2 value, Greyscale, Colour
Protocol TWAIN, WIA (Windows XP/Vista/7), STI
Interface USB 2.0 (Full-Speed/Hi-Speed compatible interface)
Drop out colour No
Supported operating
systems
Void area Max. 2.5 mm (1/10") (leading and trailing edges)
Interface cables [USB cable]
Scanner utilities Button Manager
Windows 2000/XP/Vista/7
Max. 3.0 mm (3/25") (along other edges in total)
Shielded twisted pair cable (max. length 3 m (10 feet), must support USB 2.0)
Please purchase a commercially available USB cable.
• As a part of our policy of continuous improvement, SHARP reserves the right to make design and specification
changes for product improvement without prior notice. The performance specification figures indicated are
nominal values of production units. There may be some deviations from these values in individual units.
• Some discrepancies may exist in the illustrations and content due to improvements to the machine.
- 59 -
Page 60

PRINTER DRIVER SPECIFICATIONS
Function PCL6
Frequently used functions Number of copies 1 to 999
Printing orientation Yes
Two-sided printing Yes
Binding Style Book/Tablet
Pamphlet Style Yes
N-up Number 2, 4, 6, 8, 9, 16
Order Selectable
Border Yes/No
Paper Paper Size Yes
Custom Paper Size 1 size
Source Selection Yes
Cover Settings Yes
Graphics Resolution 600/300 dpi
Graphics Mode Yes
Fit to Page Yes
Fonts Resident fonts 80 fonts
Selectable download fonts bitmap,
TrueType,
Graphics
Other functions Auto configuration Settings Yes
ROPM Yes
Overlay Yes
Different Paper Yes
Page Interleave Yes
Watermark Yes
- 60 -
Page 61

MX-NB12
SHARP CORPORATION
 Loading...