

Sharp MX-M450NA,MX-M350N,MX-M450N Administration Manual

• PURPOSE OF THE
ADMINISTRATOR
SETTINGS
• ADMINISTRATOR
SETTINGS LIST
• USING THE
ADMINISTRATOR
SETTINGS
• GENERAL SETTINGS
• COPY SETTINGS
• DOCUMENT FILING
SETTINGS
• TO THE ADMINISTRATOR
OF THE MACHINE
1
3
4
7
16
18
22
Page
ADMINISTRATOR
SETTINGS
GUIDE
Be sure to become thoroughly familiar with this manual to gain
the maximum benefit from the product.
Before installing this product, be sure to read the installation
requirements and cautions sections of the "Operation manual
(for general information and copier operation)".
Be sure to keep all operation manuals handy for reference
including this manual, the "Operation manual (for general
information and copier operation)" and operation manuals for any
optional equipment which has been installed.
This manual explains settings for use by the administrator of the
machine.
LASER PRINTER


1
Contents page
●PURPOSE OF THE ADMINISTRATOR SETTINGS ............................................................................1
●ADMINISTRATOR SETTINGS LIST ....................................................................................................3
●USING THE ADMINISTRATOR SETTINGS.........................................................................................4
●GENERAL SETTINGS .........................................................................................................................7
●COPY SETTINGS...............................................................................................................................16
●DOCUMENT FILING SETTINGS .......................................................................................................18
●TO THE ADMINISTRATOR OF THE MACHINE ................................................................................22
PURPOSE OF THE ADMINISTRATOR
SETTINGS
The administrator settings are configured by the administrator of the machine. These settings are used to enable or
disable functions to suit the needs of your workplace.
This manual explains settings related to general use of the machine, settings for the copy function, and settings for
the document filing function*. For administrator settings related to the printer function, fax function, network scanner
function, and Internet fax function, see the following manuals:
●Printer . . . . . . . . . . . . . . . . . . . . . . . . . . . . . . . Operation manual (for printer), chapter 6
●Fax . . . . . . . . . . . . . . . . . . . . . . . . . . . . . . . . . . Operation manual (for facsimile), chapter 8
●Network scanner / Internet fax . . . . . . . . . . . . . Operation manual (for image send), chapter 8
To access the administrator settings, the administrator password must be entered.
* Can only be used on the MX-M350N/MX-M450N, or when the document filing function has been added.
General settings
These settings are used to enable number-based auditing mode, adjust power consumption, manage the machine
and peripheral devices, specify the network connection method, and configure security parameters.
Auditing mode can be enabled separately for the copy, printer, fax/Internet fax/network scanner, and document filing*
functions. When auditing mode is enabled for a function, a valid account number must be entered in order to use the
function.
* Can only be used on the MX-M350N/MX-M450N, or when the document filing function has been added.
When auditing mode is enabled for the printer function, an account number is entered at the user's computer when
the print command is selected. (Depending on the setting of "Cancel jobs of invalid accounts" (page 8), a job may be
printed even if an incorrect account number is entered.)
* The account number is a 5-digit number, and up to 500 accounts can be created.
Copy settings
These settings can be are used to change the factory default copy settings as needed to suit the needs of your
workplace.
When auditing mode is enabled for the copy function,
● A valid account number must be entered to make a copy.
(Copying is not possible unless a valid account number is entered.)
● A count is kept of the number of copies made by each account. This allows you to monitor copier usage by
each account. (The counts can be totaled.)
● A limit can be set for the number of copies that can be made by each account.
The display screens, messages, and key names shown in the manual may differ from those on the actual machine
due to product improvements and modifications.
NOTE
An account number must also be entered to print a document that was saved during copying using the document
filing function. (Printing is not possible unless an account number is entered.) The number of pages printed is
added to the copy count.

2
PURPOSE OF THE ADMINISTRATOR SETTINGS
Document filing settings
These settings can be used to change the factory default settings for the document filing function as needed to suit
the needs of your workplace.
This function can only be used on the MX-M350N/MX-M450N, or when the document filing function has been added.
When auditing mode is enabled for the document filing function,
● An account number must be entered to print an image that was scan-saved.
(Printing is not possible unless an account number is entered.)
● A count is kept of the number of pages printed by each account, making it possible to monitor each account's
usage of the document filing function (a document filing count is kept).
● A limit can be set for the number of scan-saved image file pages that can be printed.
Setting an administrator password
The administrator password is a 5-digit number that must be entered in order to access the key operator programs.
The administrator of the machine should change the factory default administrator password that was set at the factory
to a new 5-digit number. Be sure to remember the new administrator password, as it must be entered each time the
administrator settings are subsequently used. (Only one administrator password can be set.)
The administrator password is initially set to "00000" at the factory.
To change the administrator password, see "USING THE ADMINISTRATOR SETTINGS" on page 4.

3
ADMINISTRATOR SETTINGS LIST
Settings for general use of the machine, the copy function, and the document filing function are shown in the following list.
The administrator password must be entered in order to use these programs.
● General settings
Setting name Page
Account control
Auditing mode 7
Total pages per account 7
Resetting account 8
Account limit setting 8
Account number control 8
Account number security 8
Cancel jobs of invalid accounts 8
Enter account number in Sharp OSA mode 8
Job log control
Clear all job log data 9
Energy save
Toner save in printer mode 9
Toner save in copy mode 9
Auto power shut-off 9
Auto power shut-off timer 9
Preheat mode setting 9
Operation settings
Keys touch sound 10
Auto clear setting 10
Disabling of job priority operation 10
Message time setting 10
Disabling of bypass printing 10
Display language setting 10
Key operation setting 10
Disabling switching of display order 11
Disabling of clock adjustment 11
Device control
Original size detector setting 11
Disabling of document feeder 11
Disabling of duplex 11
Disabling of stapler 11
Disabling of punch 11
Disabling of optional paper drawer 11
Disabling of finisher 11
Disabling of mail-bin stacker 11
Disabling of covers/inserts mode 11
Saddle stitch position adjust 12
High speed stacking 12
Rotated output 12
Auto paper selection setting 12
Optimization of a hard disk 12
Network settings
IPv4 setting 13
IPv6 setting 13
Enable TCP/IP 13
Enable NetWare 13
Enable EtherTalk 13
Enable NetBEUI 13
Reset the NIC 13
Tandem setting 14
PING command 14
Security settings
SSL setting 14
List print 14
Sharp OSA settings
Default display setting 14
External account setting 14
Change admin password 14
Product key
PS3 expansion kit 14
Network scanner expansion kit 14
Internet fax expansion kit 15
E-mail alert and status 15
Network expansion kit 15
Data security kit 15
Application integration module 15
Application communication module 15
External account module 15
Serial number 15
Initialize and/or store settings
Restore factory defaults 15
Store current configuration 15
Restore configuration 15
● Copy settings
Setting name Page
Copy settings
Initial status settings 16
Exposure adjustment 16
Rotation copy setting 16
Add or change extra preset ratios 16
600dpi x 600dpi scanning mode for document feeder
16
Quick scan from document glass 16
Initial margin shift setting 17
Erase width adjustment 17
Card shot settings 17
Setting a maximum number of copies 17
Disabling deletion of job programs 17
Disabling of bypass-tray in duplex copy 17
Disabling of auto paper selection 17
● Document filing settings
Setting name Page
Document filing settings
Default mode settings 18
The number of user name displayed setting
18
Sort method setting 18
Document output options 18
Administrator authority setting 18
Default output tray 18
Delete all quick files 18
Scan complete sound setting 19
Initial resolution setting 19
Default exposure settings 19
Batch print settings 19
Default display setting 19
NOTE
The administrator settings that can be accessed depend on the optional equipment that is installed.
4
USING THE ADMINISTRATOR SETTINGS
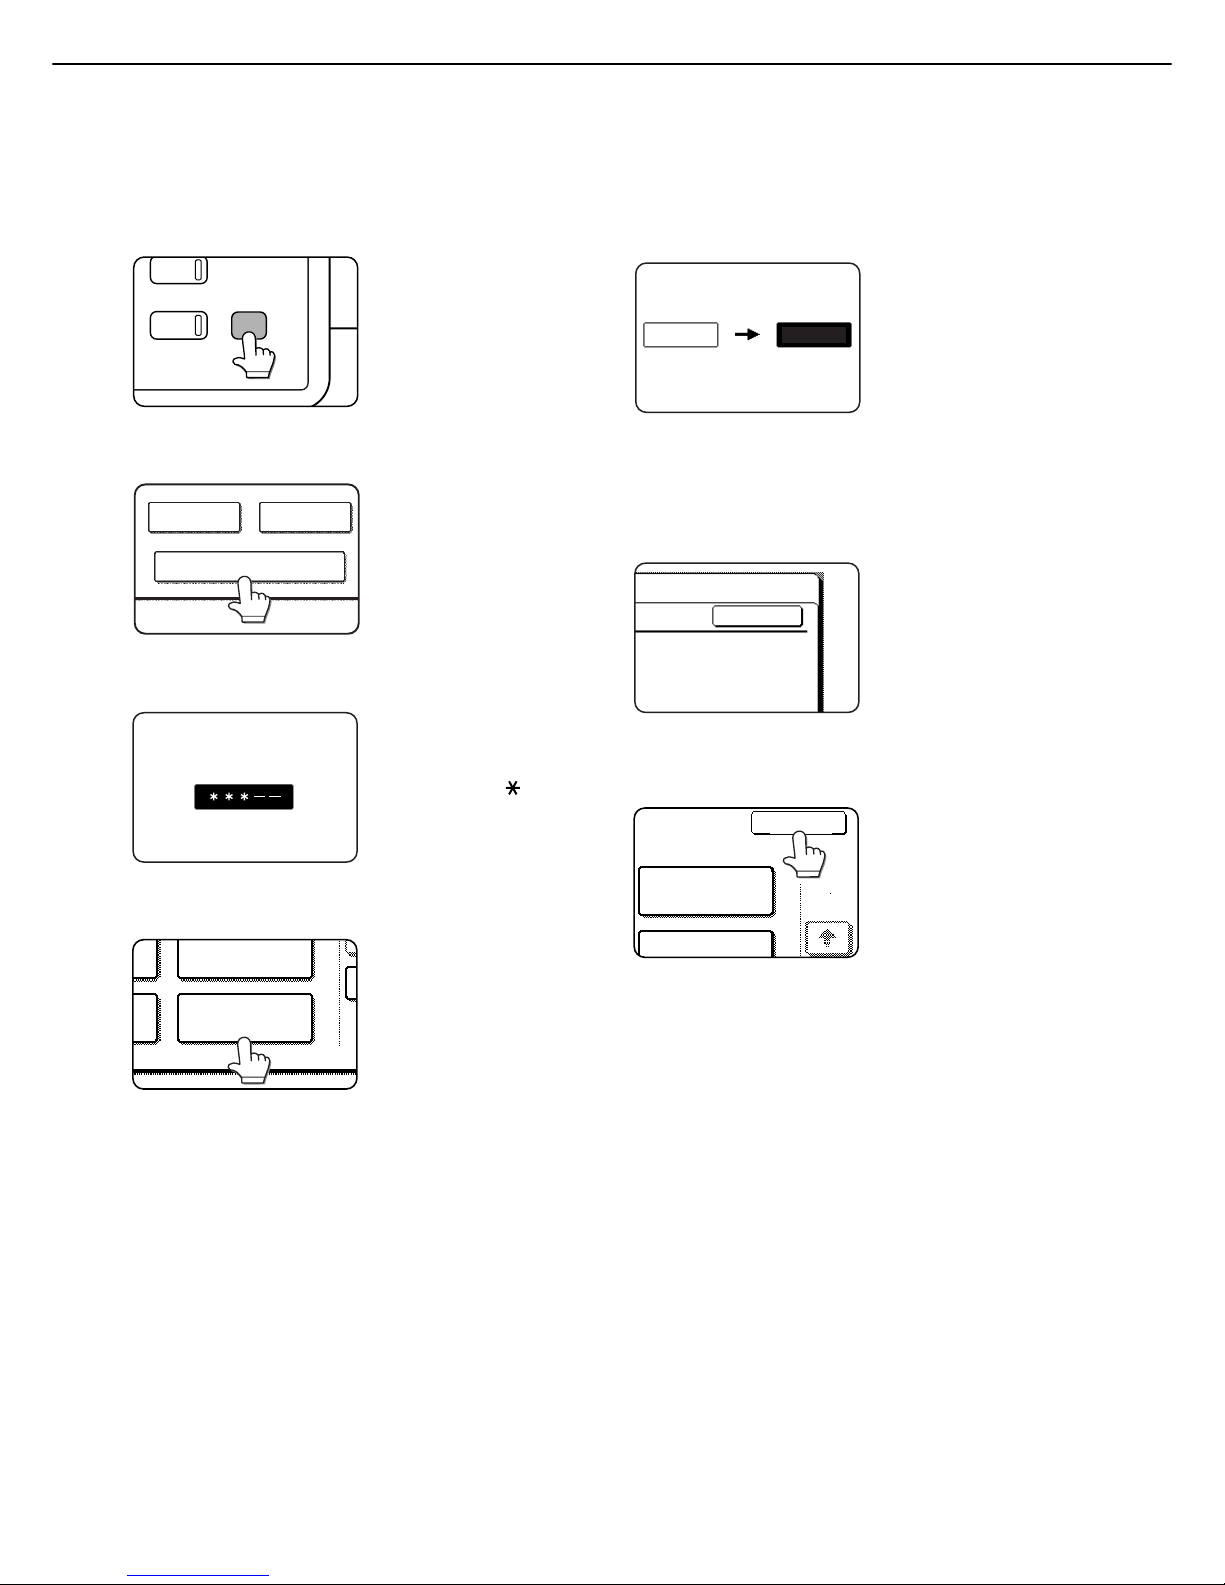
1
Press the [SYSTEM SETTINGS] key.
2
Touch the [ADMINISTRATOR SETTINGS]
key.
3
Use the numeric keys to enter the 5-digit
administrator password.
Each time a number is
entered, the dashes (-)
in the display will change
to asterisks ( ). The
factory default setting for
the key operator code
number is 00000.
4
Touch the [CHANGE ADMIN PASSWORD]
key .
If you wish to configure a
different administrator
setting, select the
desired setting in this
step.
A screen for the selected
setting will appear.
Configure the setting as explained on pages 7 and
following of this manual.
5
Use the numeric keys to enter the new
5-digit administrator password.
Use a number for the
administrator password
that has not been set as
an account number for
auditing mode (a
number that has been
set as an account
number cannot be used). The entered number will
be the new administrator password. Be sure to
remember this number.
6
Touch the [OK] key. You will return to the
screen of step 4.
This completes the
procedure for changing
the administrator
password. If you wish to
configure another
setting, touch the key of
the desired setting in the
screen of step 4.
7
Touch the [EXIT] key.
You will exit the
administrator settings.
PY
JOB STATUS
SYSTEM
SETTINGS
ADMINISTRATOR SETTINGS
SENDER CONTROL
FAX DATA
RECEIVE/FORWARD
ADMINISTRATOR PASSWORD
CHANGE ADMIN
PASSWORD
PRINTER
SETTINGS
00000
-----
OK
OPERATION
SETTINGS
EXIT
PRINTER
1/2
5
USING THE ADMINISTRATOR SETTINGS
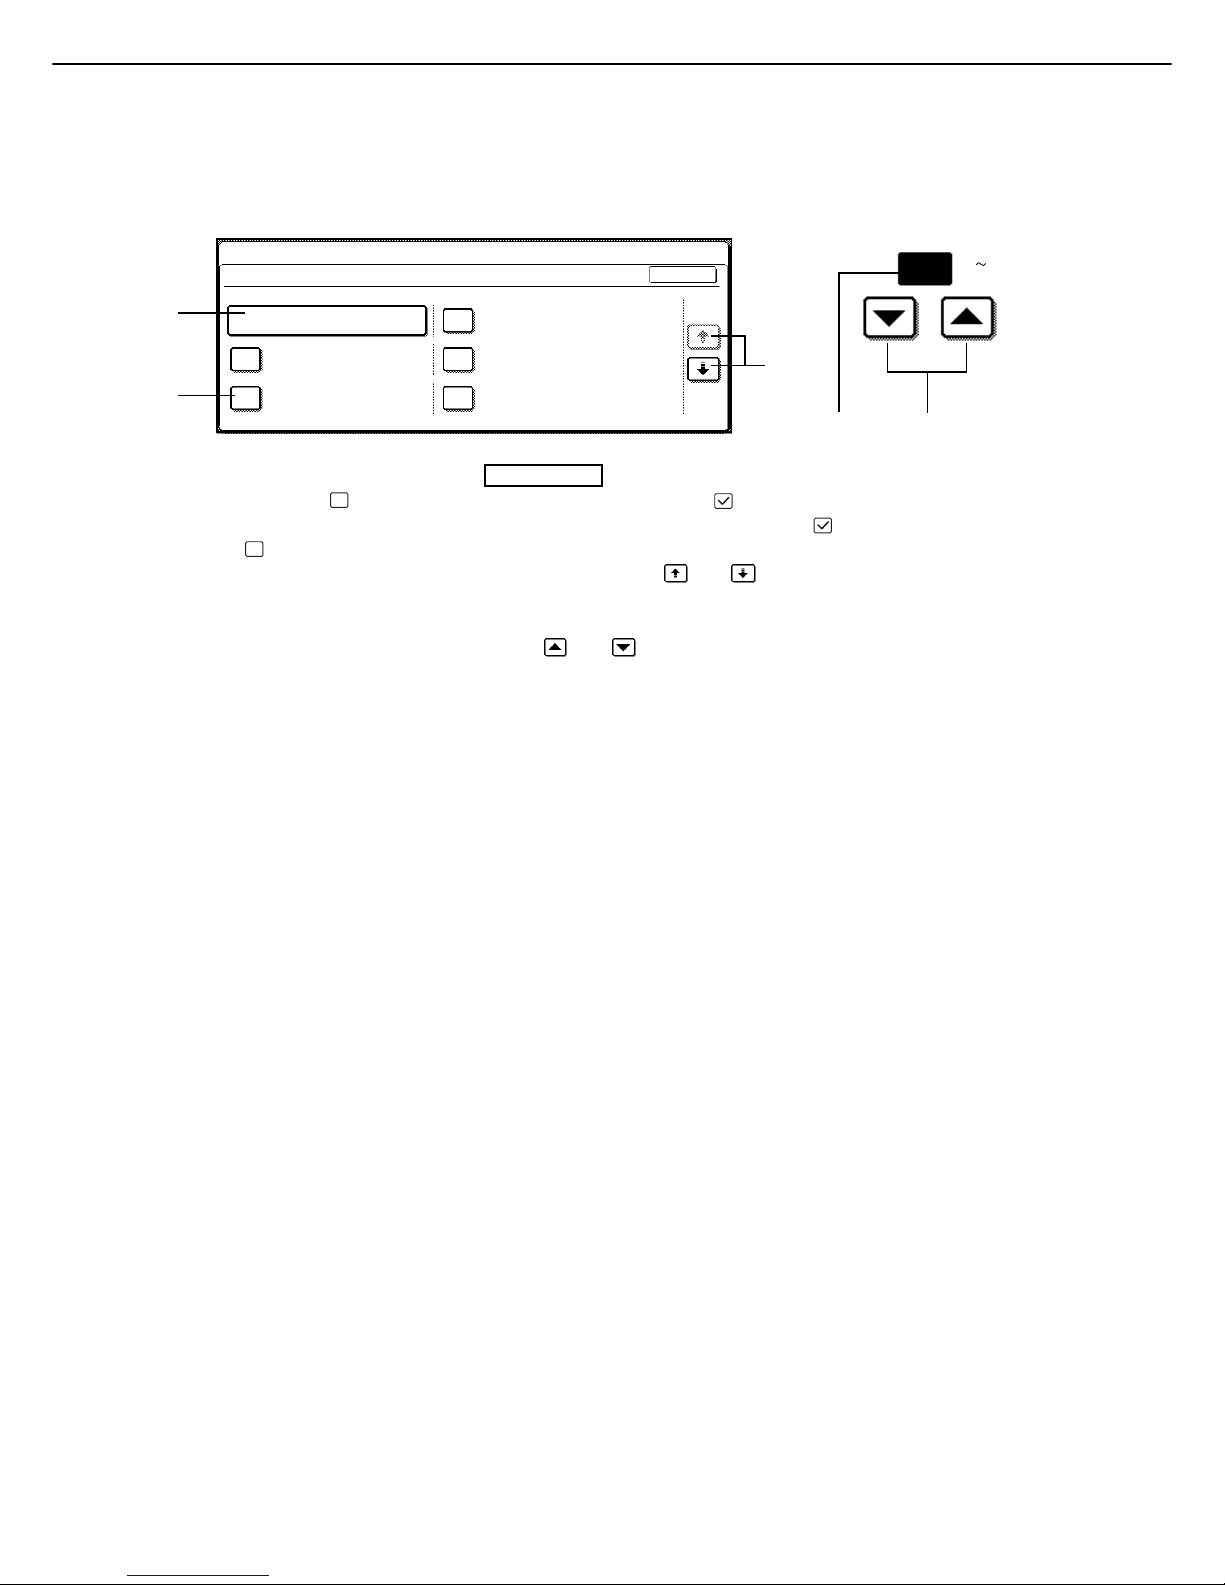
Additional information on using the keys to configure administrator settings
A When a key that appears in the form is touched, the setting screen of that key will appear.
B When a checkbox ( ) appears in front of a setting, a checkmark ( ) will appear when the checkbox is touched.
This indicates that the setting is enabled. If a checkbox with a checkmark ( ) is touched, the checkmark is
cleared ( ) and the setting is disabled.
C If the settings continue on the following screen(s), touch the and keys to move back and forth through the
screens. To return to the category selection screen, touch the [OK] key.
D The currently set numerical value is displayed.
E Numerical values can be set by touching the and keys.
20
(1 999)
OK
DISABLING OF DOCUMENT
FEEDER
DISABLING OF PUNCH
DISABLING OF LARGE
CAPACITY CASSETTE
DISABLING OF DUPLEX
DISABLING OF STAPLER
ORIGINAL SIZE DETECTOR SETTING
DEVICE CONTROL
SYSTEM SETTINGS
1/2
A
B
C
DE
These keys and indicator are available
on setting screens that require the entry
of numerical values.
XXX
6
USING THE ADMINISTRATOR SETTINGS
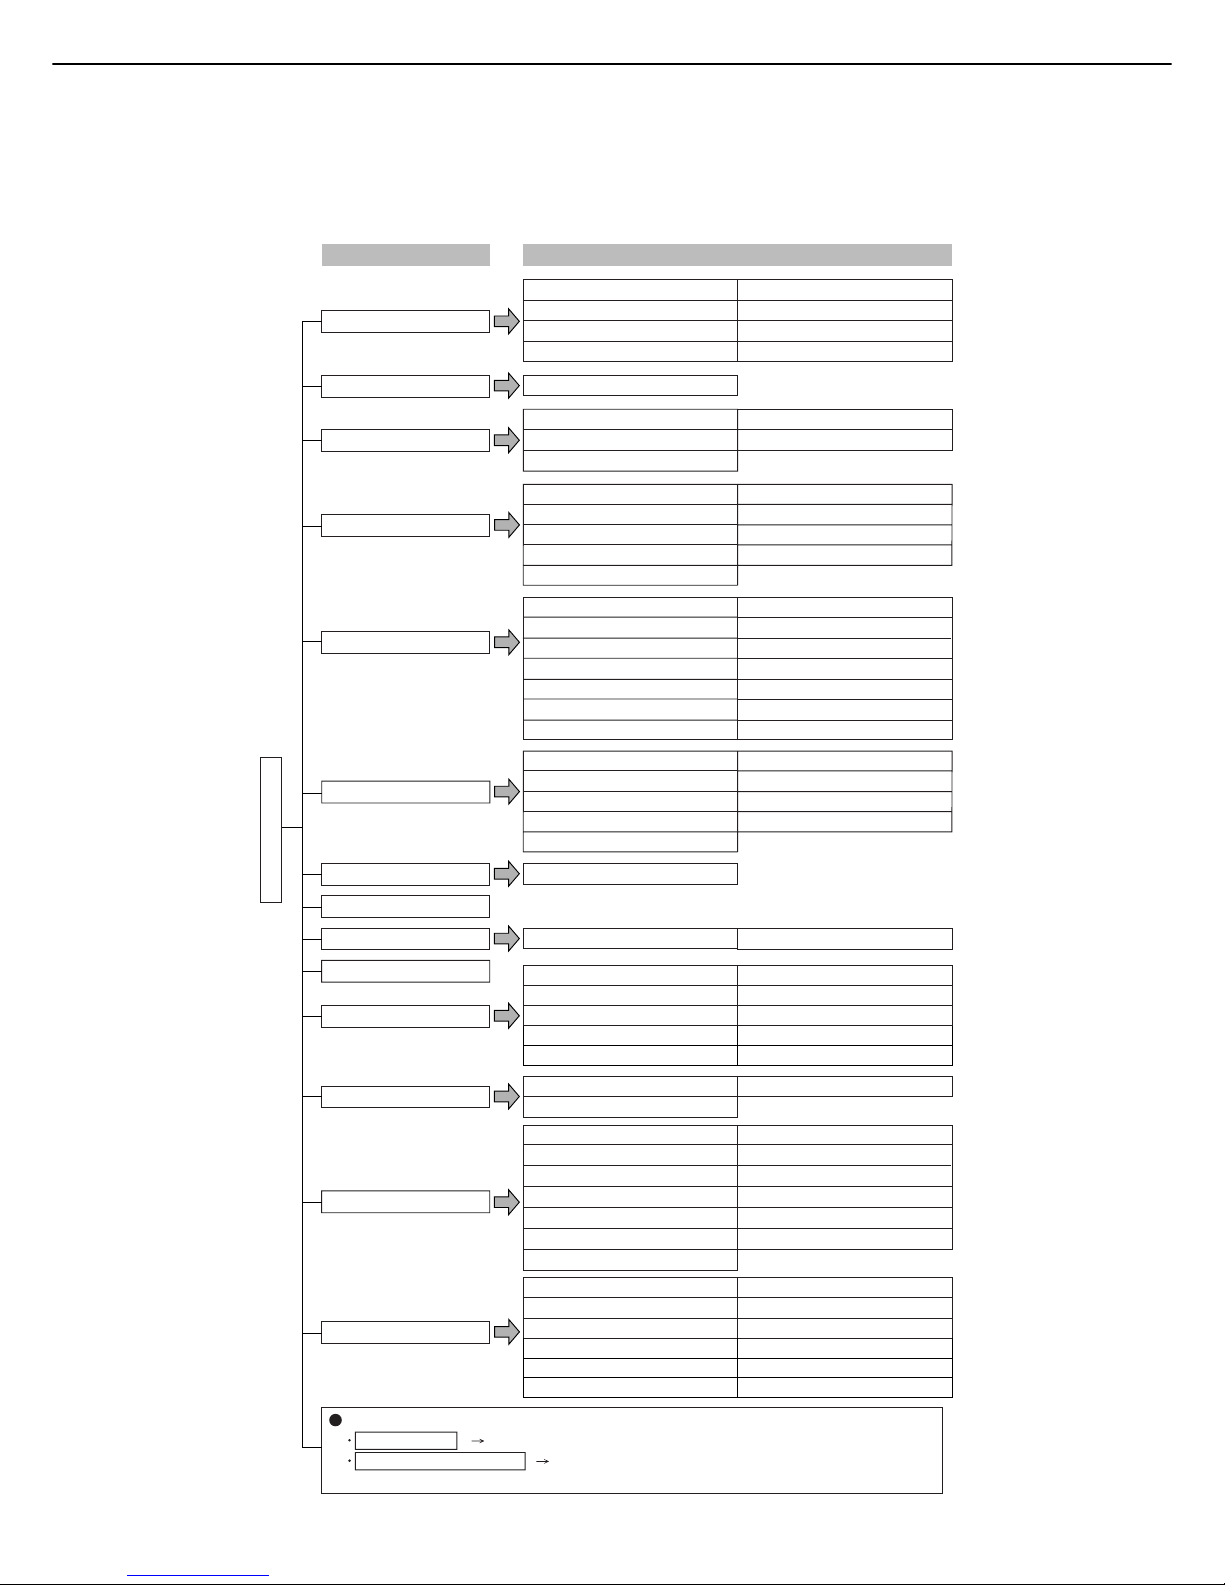
Administrator settings menu
The administrator settings are arranged in the following menu.
Refer to this menu when enabling or disabling the settings that are explained beginning on the following page.
* Some items contain an additional level of settings.
For the following settings, see the indicated manuals.
Printer settings Operation manual (for printer)
Fax / Image send settings Operation manual (for facsimile) and
Operation manual (for image send)
TONER SAVE IN PRINTER MODE
TONER SAVE IN COPY MODE
AUTO POWER SHUT-OFF
KEYS TOUCH SOUND
AUTO CLEAR SETTING
DISABLING OF JOB PRIORITY OPERATION
MESSAGE TIME SETTING
DISABLING OF BYPASS PRINTING
ORIGINAL SIZE DETECTOR SETTING
DISABLING OF DOCUMENT FEEDER
DISABLING OF DUPLEX
DISABLING OF STAPLER
DISABLING OF PUNCH
DISABLING OF OPTIONAL PAPER DRAWER
DISABLING OF FINISHER
ACCOUNT CONTROL
OPERATION SETTINGS
DEVICE CONTROL
CHANGE ADMIN PASSWORD
ENERGY SAVE
COPY SETTINGS
LIST PRINT
AUDITING MODE
TOTAL PAGES PER ACCOUNT
RESETTING ACCOUNT
ACCOUNT LIMIT SETTING
CLEAR ALL JOB LOG DATA
ACCOUNT NUMBER CONTROL
ACCOUNT NUMBER SECURITY
CANCEL JOBS OF INVALID ACCOUNTS
ENTER ACCOUNT NUMBER IN Sharp OSA MODE
DISPLAY LANGUAGE SETTING
KEY OPERATION SETTING
DISABLING SWITCHING OF DISPLAY ORDER
DISABLING OF CLOCK ADJUSTMENT
PRODUCT KEY
JOB LOG CONTROL
Level 2Level 1
SSL SETTING
SECURITY SETTING
IPv4 SETTING
IPv6 SETTING
ENABLE TCP/IP
ENABLE NetWare
ENABLE EtherTalk
NETWORK SETTINGS
ENABLE NetBEUI
RESET THE NIC
TANDEM SETTING
PING COMMAND
DISABLING OF MAIL-BIN STACKER
DISABLING OF COVERS/INSERTS MODE
SADDLE STITCH POSITION ADJUST
HIGH SPEED STACKING
ROTATED OUTPUT
AUTO PAPER SELECTION SETTING
OPTIMIZATION OF A HARD DISK
INITIAL STATUS SETTINGS
EXPOSURE ADJUSTMENT
ROTATION COPY SETTING
ADD OR CHANGE EXTRA PRESET RATIOS
600dpi x 600dpi SCANNING MODE FOR DOCUMENT FEEDER
QUICK SCAN FROM DOCUMENT GLASS
INITIAL MARGIN SHIFT SETTING
ERASE WIDTH ADJUSTMENT
CARD SHOT SETTINGS
SETTING A MAXIMUM NUMBER OF COPIES
DISABLING DELETION OF JOB PROGRAMS
DISABLING OF BYPASS-TRAY IN DUPLEX COPY
DISABLING OF AUTO PAPER SELECTION
AUTO POWER SHUT-OFF TIMER
PREHEAT MODE SETTING
RESTORE FACTORY DEFAULTS
STORE CURRENT CONFIGURATION
INITIALIZE AND/OR STORE SETTINGS
RESTORE CONFIGURATION
DEFAULT DISPLAY SETTING
Sharp OSA SETTINGS
EXTERNAL ACCOUNT SETTING
DEFAULT MODE SETTINGS
THE NUMBER OF USER NAME DISPLAYED SETTING
SORT METHOD SETTING
DOCUMENT OUTPUT OPTIONS
ADMINISTRATOR AUTHORITY SETTING
DEFAULT OUTPUT TRAY
DOCUMENT FILING SETTINGS
DELETE ALL QUICK FILES
SCAN COMPLETE SOUND SETTING
INITIAL RESOLUTION SETTING
DEFAULT EXPOSURE SETTINGS
BATCH PRINT SETTINGS
DEFAULT DISPLAY SETTING
Enter admin password
PS3 EXPANSION KIT
NETWORK SCANNER EXPANSION KIT
INTERNET FAX EXPANSION KIT
E-MAIL ALERT AND STATUS
NETWORK EXPANSION KIT
DATA SECURITY KIT
APPLICATION INTEGRATION MODULE
APPLICATION COMMUNICATION MODULE
EXTERNAL ACCOUNT MODULE
SERIAL NUMBER
7
GENERAL SETTINGS
Administrator settings for general use of the machine are explained in this section.
Account control
"Account control" consists of the following settings.
Auditing mode
Total pages per account
Resetting account
Account limit setting
Account number control
Account number security
Cancel jobs of invalid accounts
Enter account number in Sharp OSA mode
Auditing mode
When AUDITING MODE is enabled, a count is kept of
the pages printed by each account (up to 500 accounts
can be established). The page counts can be viewed in
the display. To use the machine, a valid 5-digit account
number must be entered.
This function is initially disabled.
Touch the [AUDITING MODE] key to display the
following screen.
Auditing mode is enabled for functions that have
checkmarks in the checkboxes. If you need to
disable auditing mode for a function, touch its
checkbox to remove the checkmark.
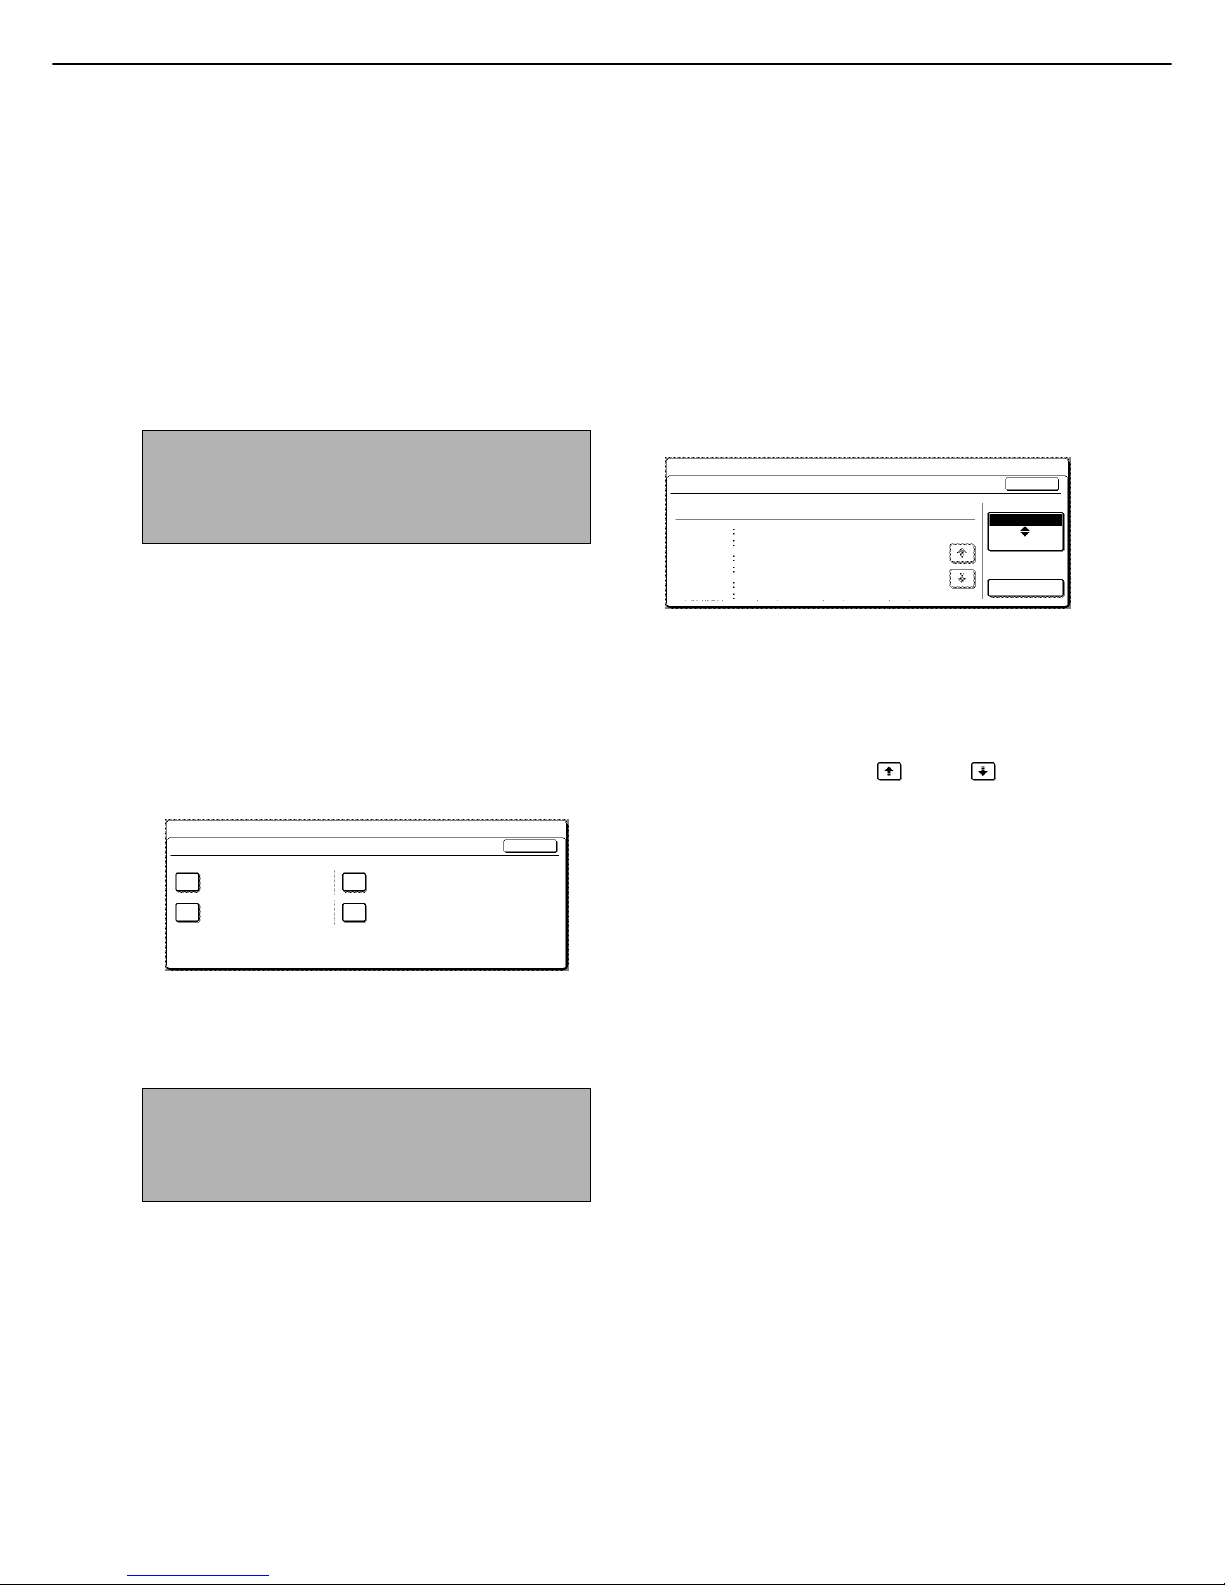
Total pages per account
This
setting
is used to display or print the total number
of pages printed by each account. Misfed paper is not
counted.
When using the network scanner feature and fax
feature, the number of transmitted pages can also be
displayed or printed. (Touch the [IMAGE SEND] key to
change screens.)
Touch the [TOTAL PAGES PER ACCOUNT] key to
display the following screen.
Printing out all accounts
Touch the [PRINT] key to print out the total pages of
all accounts. If the [CANCEL] key appears, this key
can be touched to cancel printing.
Displaying only selected accounts
If the account that you wish to view does not appear
in the screen, touch the key or key until it
appears.
NOTE
Some items in the programs may not be available
depending on your machine and what options are
installed.
NOTE
To enable Auditing mode, program an account
number as explained in "Account number control" on
page 8.
SYSTEM SETTINGS
OK
AUDITING MODE
DOCUMENT FILING
COPIES PRINTS
IMAGE SEND
SYSTEM SETTINGS
OK
PAPER OUTPUT
TOTAL PAGES PER ACCOUNT
ACCOUNT
NUMBER
COPIES PRINTS
1/1
PRINT
IMAGE SEND
DOCUMENT
FILING
00001
MAXIMUM
00002
MAXIMUM
00003
MAXIMUM
00,005,678
20,000,000
00,045,678
20,000,000
00,000,678
20,000,000
00,045,678
40,000,000
00,045,678
40,000,000
00,005,678
40,000,000
00,000,678
--,---,--00,000,678
--,---,--00,000,678
--,---,---
 Loading...