


 OPERATION GUIDE
Search based on |
|
Searchrch usingusing thethe |
|
||
what you want to do |
|
table ofof contentscontents |
|
|
|
|
|
|
|
|
|
|
|
|
|
|
|
|
|
|
|
|
|
|
|
|
|
|
|
|
|
|
|
|
|
|
|
|
|
|
|
|
|
|
|
|
|
|
|
|
|
|
|
|
|
|
|
|
|
|
|
|
|
|
|
|
|
|
|
|
|
|
|
|
|
|
|
|
|
|
|
|
|
|
|
|
|
|
|
|
|
|
|
|
|
|
|
|
|
|
|
|
|
|
|
|
|
|
|
|
|
|
|
|
|
|
|
|
|
|
|
|
|
|
|
|
|
|
|
|
|
|
|
|
|
|
|
|
|
|
|
|
|
|
|
|
|
|
|
|
|
|
|
|
|
|
|
|
|
|
|
|
|
|
MAKE A COPY |
|
|
|
PRINT A DOCUMENT |
SEND A FAX |
|||||||||||||||||
|
|
|
|
|
|
|
|
|
|
|
|
|
|
|
|
|
|
|
|
|
|
|
|
|
|
|
|
|
|
|
|
|
|
|
|
|
|
|
|
|
|
|
|
|
|
|
|
|
|
|
|
|
|
|
|
|
|
|
|
|
|
|
|
|
|
|
|
|
|
|
|
|
|
|
|
|
|
|
|
|
|
|
|
|
|
|
|
|
|
|
|
|
|
|
|
|
|
|
|
|
|
|
|
|
|
|
|
|
|
|
|
|
|
|
SCAN AN IMAGE / |
SAVE A JOB AND |
SEND AN INTERNET FAX |
REUSE IT LATER |

 BEFORE USING THE MACHINE

 COPIER

 PRINTER

 FACSIMILE

 SCANNER / INTERNET FAX

 DOCUMENT FILING

 SYSTEM SETTINGS

 TROUBLESHOOTING

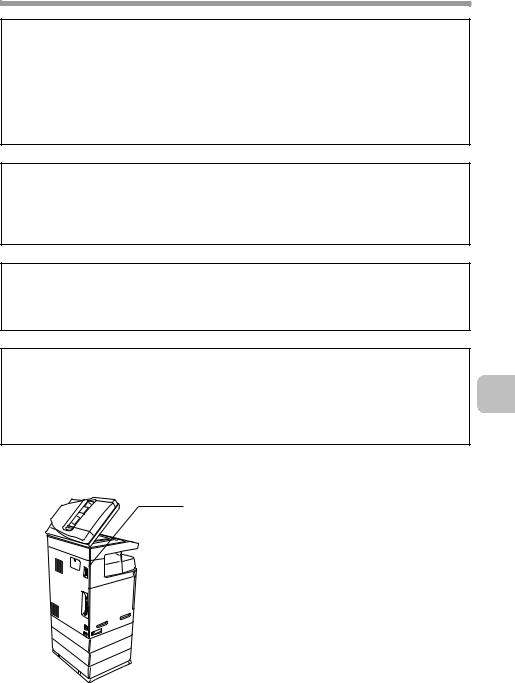
 About Operation Guide

MODEL: MX-C311
MX-C401
DIGITAL FULL COLOR MULTIFUNCTIONAL SYSTEM
Maintenance & Safety Guide
Please read first
Please read this guide first to ensure safe use of the machine.
Before installing this product, be sure to read the "TO ENSURE SAFE USE OF THE MACHINE" and "INSTALLATION REQUIREMENTS" sections.
TO ENSURE SAFE USE
OF THE MACHINE
INSTALLATION
REQUIREMENTS
SUPPLIES
REPLACING SUPPLIES AND
MAINTENANCE
SPECIFICATIONS
TO THE ADMINISTRATOR
OF THE MACHINE
Keep this manual close at hand for reference whenever needed.

Each instruction also covers the optional units used with these products.
Caution!
For complete electrical disconnection, pull out the main plug.
The socket-outlet shall be installed near the equipment and shall be easily accessible. To reduce the risk of fire, use only UL-Listed No.26 AWG or larger telecommunication line cord.
FAX interface cable and Line cable:
These special accessories must be used with the device.
FOR YOUR RECORDS ...
To protect against loss or theft, record and retain for reference the machine's serial number located at the lower left corner of the left side of the machine.
Model Number
Serial Number
Date of Purchase
Place of Purchase
Authorized Sharp Printer
Service Department Number
Notice for Users in U.S.A.
EMC (this machine and peripheral devices)
WARNING:
FCC Regulations state that any unauthorized changes or modifications to this equipment not expressly approved by the manufacturer could void the user's authority to operate this equipment.
Shielded interface cables must be used with this equipment to maintain compliance with EMC regulations.
NOTE:
This equipment has been tested and found to comply with the limits for a Class A digital device, pursuant to Part 15 of the FCC Rules. These limits are designed to provide reasonable protection against harmful interference when the equipment is operated in a commercial environment. This equipment generates, uses, and can radiate radio frequency energy and, if not installed and used in accordance with the instruction manual, may cause harmful interference to radio communications. Operation of this equipment in a residential area is likely to cause harmful interference in which case the user will be required to correct the interference at his own expense.
This machine contains the software having modules developed by Independent JPEG Group.
This product includes Adobe® Flash® technology of Adobe Systems Incorporated. Copyright© 1995-2007 Adobe Macromedia Software LLC. All rights reserved.

Contents
TO ENSURE SAFE USE OF THE MACHINE . . . . . . . . . . . . . . . . . . 3
Cautions . . . . . . . . . . . . . . . . . . . 3 Warnings . . . . . . . . . . . . . . . . . . 4 Laser information . . . . . . . . . . . . 6
INSTALLATION REQUIREMENTS . . . 7
SUPPLIES. . . . . . . . . . . . . . . . . . 9
Storage of supplies. . . . . . . . . . . 9
Supply of spare parts and consumables . . . . . . . . . . . . . . . 9
REPLACING SUPPLIES AND MAINTENANCE . . . . . . . . . . . . 10
Replacing the toner
cartridges . . . . . . . . . . . . . . . . . 10 Replacing the toner collection container. . . . . . . . . . . . . . . . . . 15 Replacing the developer cartridge / drum cartridge. . . . . . . . . . . . . . . . . 18 Replacing the developer cartridge . . 18 Replacing the drum cartridge . . 26 Replacing the staple cartridge
in the finisher . . . . . . . . . . . . . . 28 Regular maintenance . . . . . . . . 31 Cleaning the document glass and automatic document feeder. . . . . 31 Cleaning the main charger of the photoconductive drum . . . . . . . 32 Cleaning the bypass tray
rollers . . . . . . . . . . . . . . . . . . . . 37 Cleaning the automatic
document feeder rollers . . . . . . 40 Cleaning the laser unit . . . . . . . 43 Cleaning the PT charger of the primary transfer belt unit. . . . . . 50
SPECIFICATIONS . . . . . . . . . . 53
Machine specifications / copier specifications . . . . . . . . . . . . . . 53 Continuous copying speeds . . . 57 Ambient environment . . . . . . . . 57 Acoustic noise emission (measurement according to ISO7779) . . . . . . . . . . . . . . . . . 58 Automatic document feeder specifications . . . . . . . . . . . . . . 59 Business card feeder specifications . . . . . . . . . . . . . . 60 500-sheet paper feed unit specifications . . . . . . . . . . . . . . 61 Finisher specifications . . . . . . . 62 Printer specifications . . . . . . . . 64 Network scanner / Internet Fax specifications . . . . . . . . . . . . . . 65 Pull scan function (TWAIN) specifications . . . . . . . . . . . . . . 66 Facsimile specifications . . . . . . 67
TO THE ADMINISTRATOR OF THE MACHINE . . . . . . . . . . . . . 70
Factory default passwords . . . . 70
Forwarding all transmitted and received data to the administrator
(document administration function). . 70
For the users of the fax function . . .71
Trademark acknowledgments . . . 75
1

Note:
•Considerable care has been taken in preparing this manual. If you have any comments or concerns about the manual, please contact your dealer or nearest SHARP Service Department.
•This product has undergone strict quality control and inspection procedures. In the unlikely event that a defect or other problem is discovered, please contact your dealer or nearest SHARP Service Department.
•Aside from instances provided for by law, SHARP is not responsible for failures occurring during the use of the product or its options, or failures due to incorrect operation of the product and its options, or other failures, or for any damage that occurs due to use of the product.
Products that have earned the ENERGY STAR® are designed to protect the environment through superior energy efficiency.
The Environmental Choice Program guidelines are applied to the products only in Canada. The products that meet the Environmental Choice Program guidelines carry the logo shown to the left. The products without the logo may not meet the Environmental Choice Program guidelines.
Warranty
While every effort has been made to make this document as accurate and helpful as possible, SHARP Corporation makes no warranty of any kind with regard to its content. All information included herein is subject to change without notice. SHARP is not responsible for any loss or damages, direct or indirect, arising from or related to the use of this operation manual.
©Copyright SHARP Corporation 2008. All rights reserved. Reproduction, adaptation or translation without prior written permission is prohibited, except as allowed under copyright laws.
2

TO ENSURE SAFE USE OF THE MACHINE
Cautions
•Do not make any modifications to this machine. Doing so may result in personal injury or damage to the machine.
•Do not make copies of anything which is prohibited from copying by law. The following items are normally prohibited from printing by national law. Other items may be prohibited by local law.
● Money ● Stamps ● Bonds ● Stocks
● Bank drafts ● Checks ● Passports ● Driver's licenses
•Do not use a flammable spray to clean the machine. If gas from the spray comes in contact with hot electrical components or the fusing unit inside the machine, fire or electrical shock may result.
•Do not place a vessel that contains water or other liquid on the machine. Do not place metal objects on the machine that may fall into the machine.
•In the event that a metal object falls or liquid spills into the machine, first turn off the machine's main power switch and then unplug the power cord.
•If a thunderstorm begins, turn off the machine's main power switch and unplug the power cord in order to prevent electrical shock and fire due to a lightning strike.
•If you find that condensation has formed on the surface of the machine or the display, open the right cover and check for condensation inside the machine. If condensation has formed inside the machine, turn off the main power.
Turning on the main power when condensation has formed inside the machine may cause a failure. Leave the right cover open until the condensation evaporates naturally.
To keep foreign matter from getting on the primary transfer belt unit or secondary transfer roller unit while the right cover is open, place a cover over the opening.
•Do not plug in or unplug the power cord with a wet hand.
3

TO ENSURE SAFE USE OF THE MACHINE
Warnings
•When turning off the power, be sure to press the [POWER] key on the operation panel, then wait 20 seconds and switch off the main power switch. In the event that the main power is suddenly interrupted due to a power failure or other reason, turn the machine power back on and then turn it off in the correct order.
If the machine is left for a long time with the main power having been turned off prior to the [POWER] key, abnormal noises, degraded image quality, and other problems may result.
•Do not touch the transfer belt and the transfer roller. Scratches or smudges on the transfer belt or the transfer roller will cause dirty prints.
• The fusing unit is extremely hot. Exercise care in this area.
• Do not look directly at the light source. Doing so may damage your eyes.
• The machine is heavy. To prevent injury when
moving the machine, it is recommended that it be |
Fusing unit |
|
moved by four or more persons. |
||
|
•Do not throw toner, a toner container (toner cartridge), or a toner collection container into a fire. Toner may fly and cause burns.
•Store toner, toner containers (toner cartridges),
and toner collection containers out of the reach of children.
•Do not place the machine on a wobbly, slanted, or unstable surface. Install the machine only on a surface that can withstand the weight of the machine.
•When unplugging the power cord, do not grasp and pull on the cord.
4
TO ENSURE SAFE USE OF THE MACHINE
The machine includes the document filing function, which stores document image data on the machine's hard drive. Stored documents can be called up and printed or transmitted as needed. If a hard drive failure occurs, it will no longer be possible to call up the stored document data. To prevent the loss of important documents in the unlikely event of a hard drive failure, keep the originals of important documents or store the original data elsewhere.
With the exception of instances provided for by law, Sharp Corporation bears no responsibility for any damages or loss due to the loss of stored document data.
"BATTERY DISPOSAL"
THIS PRODUCT CONTAINS A LITHIUM PRIMARY MEMORY BACK-UP BATTERY THAT MUST BE DISPOSED OF PROPERLY. PLEASE CONTACT YOUR LOCAL SHARP DEALER OR AUTHORIZED SERVICE REPRESENTATIVE FOR ASSISTANCE IN DISPOSING OF THIS BATTERY.
This product utilizes a CR coin Lithium battery which contains a Perchlorate material. Special handling for this material may apply, California residents, See www.dtsc.ca.gov/hazardouswaste/perchlorate/
Others, consult local environmental officers.
This product utilizes tin-lead solder, and fluorescent lamp containing a small amount of mercury. Disposal of these materials may be regulated due to environmental consideration. For disposal or recycling information, please contact your local authorities, the Electronics Industries Alliance: www.eiae.org, the lamp recycling organization: www.lamprecycle.org or Sharp at 1-800-BE-SHARP.
(For U.S.A. Only)
For North America
Non LPS
Do not connect to devices other than specified peripheral devices of our company.
5
TO ENSURE SAFE USE OF THE MACHINE
Laser information
Wave length |
790 nm ±10 nm |
|
|
Pulse times |
4.1 µs ±4.1 ns /7 mm |
(North America and Europe) |
|
|
|
Output power |
Max 0.6 mW (LD1+ LD2) |
|
|
Caution
Use of controls or adjustments or performance of procedures other than those specified herein may result in hazardous radiation exposure.
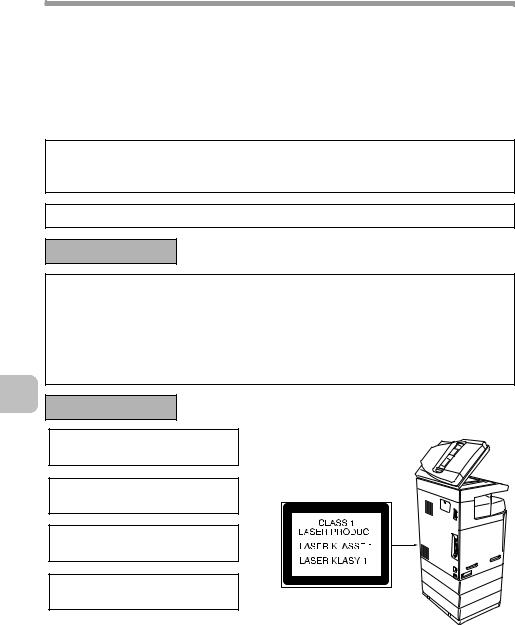
This Digital Equipment is CLASS 1 LASER PRODUCT (IEC 60825-1 Edition 1.2-2001)
For North America:
SAFETY PRECAUTIONS
This Digital Equipment is rated Class 1 and complies with 21 CFR 1040.10 and 1040.11 of the CDRH standards. This means that the equipment does not produce hazardous laser radiation. For your safety, observe the precautions below.
•Do not remove the cabinet, operation panel or any other covers.
•The equipment's exterior covers contain several safety interlock switches. Do not bypass any safety interlock by inserting wedges or other items into switch slots.
For Europe:
CLASS 1 LASER PRODUCT
LASER KLASSE 1
LUOKAN 1 LASERLAITE
KLASS 1 LASERAPPARAT
6

INSTALLATION REQUIREMENTS
Improper installation may damage this product. Please note the following during initial installation and whenever the machine is moved.
1. The machine should be installed near an accessible power outlet for easy connection.
2. Be sure to connect the power cord only to a power outlet that meets the specified voltage and current requirements. Also make certain the outlet is properly grounded.
• For the power supply requirements, see the name plate in the lower left corner of the left side of the machine.
Connect the machine to a power outlet which is not used for other electric appliances. If a lighting fixture is connected to the same outlet, the light may flicker.
3. Do not install the machine in areas that are:
• damp, humid, or very dusty
• exposed to direct sunlight
•subject to extreme temperature or humidity changes, e.g., near
an air conditioner or heater |
|
• poorly ventilated. |
|
4. Be sure to allow the required space |
|
around the machine for servicing |
|
and proper ventilation. |
|
5. The machine includes a built-in |
|
hard drive. Do not subject the |
|
machine to shock or vibration. In |
|
particular, never move the machine |
|
while the power is on. |
11-13/16" |
|
(30 cm) |
11-13/16" |
17-23/32" |
(30 cm) |
(45 cm) |
7
INSTALLATION REQUIREMENTS
Do not install the machine in a location with poor air circulation.
A small amount of ozone is created inside the machine during printing. The amount of ozone created is not sufficient to be harmful; however, an unpleasant odor may be noticed during large copy runs, and thus the machine should be installed in a room with a ventilation fan or windows that provide sufficient air circulation. (The odor may occasionally cause headaches.)
*Install the machine so that people are not directly exposed to exhaust from the machine. If installed near a window, ensure that the machine is not exposed to direct sunlight.
8

SUPPLIES
Standard supplies for this product that can be replaced by the user include paper, toner cartridges, and staple cartridges for the finisher.
Be sure to use only SHARP-specified products for the toner cartridges, finisher staple cartridge, and transparency film.
For best copying results, be sure to use only Sharp Genuine Supplies which are designed, engineered, and tested to maximize the life and performance of Sharp products. Look for the Genuine Supplies label on the toner package.
GENUINE SUPPLIES
Storage of supplies
Proper storage
1.Store the supplies in a location that is:
•clean and dry
•at normal temperature with minimal temperature fluctuations
•not exposed to direct sunlight
2.Store paper in the wrapper and lying flat.
3.Paper stored in packages standing up or out of the wrapper may curl or become damp, resulting in paper misfeeds.
Storing toner cartridges
Store the box that contains the toner cartridge horizontally; do not store it standing up. If the toner cartridge is stored standing up, the toner may solidify inside the cartridge.
Store the toner in a location that is cooler than 104°F (40°C). Storage in a hot location may cause the toner in the cartridge to solidify.
Staple cartridge
The finisher requires the following staple cartridge:
MX-SCX1 (for finisher)
Approx. 5000 per cartridge x 3 cartridges
Supply of spare parts and consumables
The supply of spare parts for repair of the machine is guaranteed for at least 7 years following the termination of production. Spare parts are those parts of the machine which may break down within the scope of the ordinary use of the product, whereas those parts which normally exceed the life of the product are not to be considered as spare parts. Consumables too, are available for 7 years following the termination of production.
9
REPLACING SUPPLIES AND MAINTENANCE
This section explains the procedures for replacing supplies such as toner and staple cartridges and routine maintenance.
Replacing the toner cartridges
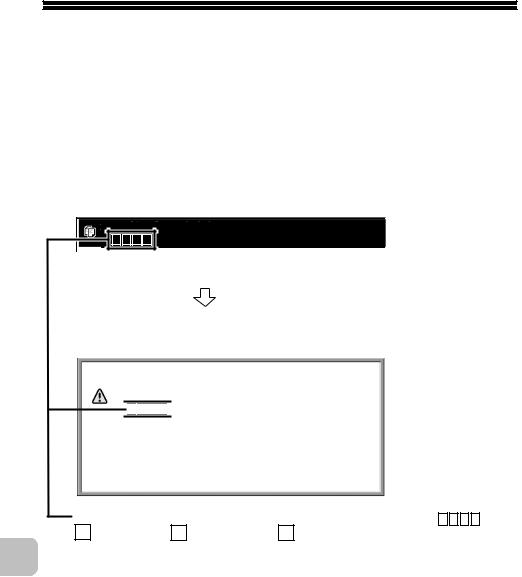
Be sure to replace the toner cartridge when the message "Change the toner cartridge." appears.
In copy mode
Ready to scan for copy. |
|
( |
Change the toner cartridge.) |
When the message appears in the message display, replace the toner cartridge for the indicated color.
If you continue to use the machine without replacing the cartridge, the following message will appear when the toner runs out.
Change the toner cartridge. (


 )
)
|
OK |
|
|
|
|
Colors that are running low or have run out of toner are indicated in ( |
). |
||||
Y : Yellow toner, M : Magenta toner, C : Cyan toner, |
Bk |
: Black toner |
|
||
Replace the toner cartridges of the indicated colors. |
|
||||
10
REPLACING SUPPLIES AND MAINTENANCE
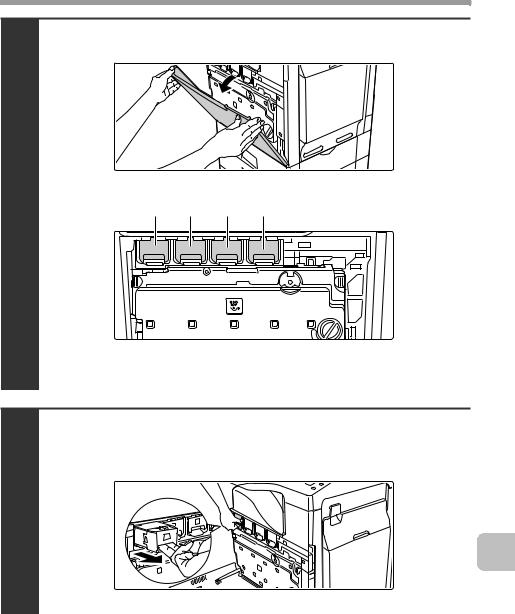
Open the front cover.
Locations of color toner cartridges
1 |
(Y) |
(M) (C) |
(Bk) |
|
(Y): Yellow (M): Magenta
(C): Cyan (Bk): Black
Pull the toner cartridge toward you.
Example: Replacing the yellow toner cartridge
2
11
REPLACING SUPPLIES AND MAINTENANCE
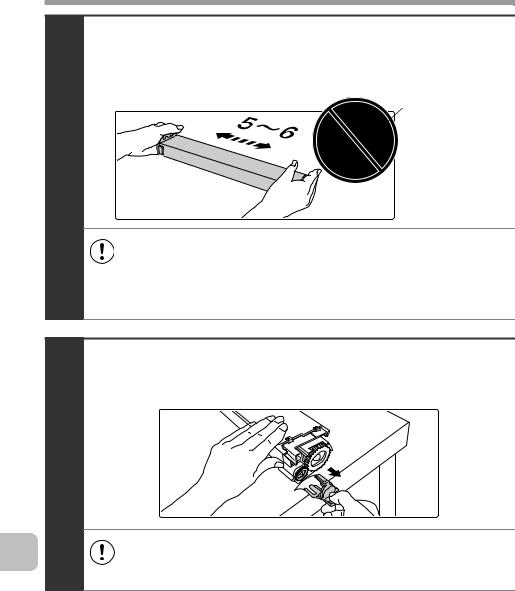
Take out the new toner cartridge, hold it with both hands, and shake 5 or 6 times horizontally.
Protective
material
3
• When shaking the toner cartridge, be sure to shake with the protective material inserted in the cartridge. If you shake the cartridge after removing the protective material, toner may spill out.
•Shake the toner cartridge only in the horizontal direction. If shaken in any other direction, toner may collect in one part of the cartridge.
Remove the protective material from the new toner cartridge.
4
• Hold the toner cartridge firmly while removing the protective material.
• After the protective material has been removed, do not point the toner cartridge down or shake it. Toner may spill out.
12
REPLACING SUPPLIES AND MAINTENANCE
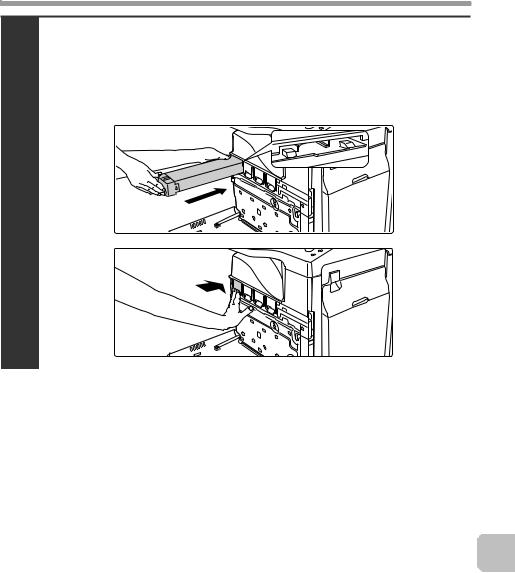
Insert the new toner cartridge horizontally and push it firmly in.
The shape of the toner cartridge varies by color. Insert in the same location as the toner cartridge that was removed.
5
13
REPLACING SUPPLIES AND MAINTENANCE
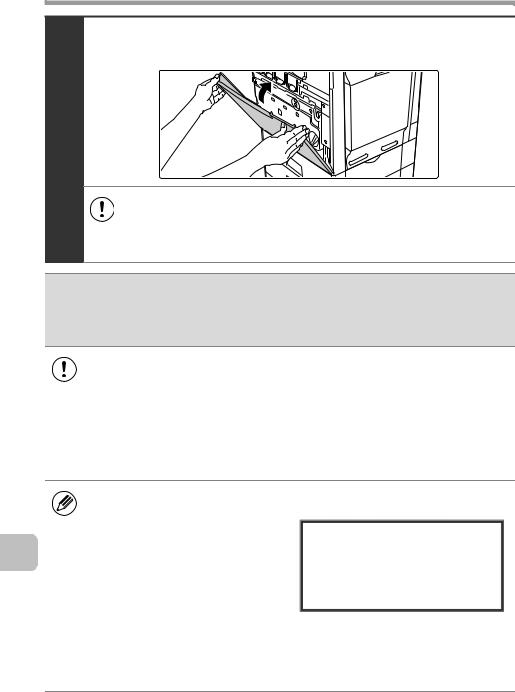
Close the front cover.
6
• After the toner cartridge is replaced, the machine automatically enters image adjustment mode. Image adjustment will not take place if the cover is not closed.
• Take care that your fingers are not pinched when closing the cover.
 Caution
•Do not throw a toner cartridge into a fire. Toner may fly and cause burns.
•Store toner cartridges out of the reach of small children.
• Store the box that contains the toner cartridge horizontally; do not store it standing up. If the toner cartridge is stored standing up, the toner may solidify inside the cartridge.
Store the toner in a location that is cooler than 104°F (40°C). Storage in a hot location may cause the toner in the cartridge to solidify.
•If a toner cartridge other than a SHARP-recommended toner cartridge is used, the machine may not attain full quality and performance and there is a risk of damage to the machine. Be sure to use a SHARP-recommended toner cartridge.
•Keep the used toner cartridge in a plastic bag (do not discard it). Your service
technician will collect the used toner cartridge.
• To view the approximate amount of
toner remaining, continually touch |
Total Count |
B/W:00,000,000 |
|
Full Color:00,000,000 |
|
the [COPY] key during printing or |
|
2-color:00,000,000 |
|
Single color:00,000,000 |
|
when the machine is idle. The |
|
|
Toner Quantity |
[Bk]:100-75% |
|
percentage of toner remaining will |
|
[C]:100-75% |
|
[M]:100-75% |
|
appear in the display while the key |
|
|
|
[Y]:100-75% |
|
is touched. When the percentage |
|
|
falls to "25-0%", obtain a new toner cartridge and keep it ready for |
||
replacement. When the remaining toner falls to "25-0%", colors in the output may be faint or partially missing when an original or image with dark colors is copied or printed.
14
REPLACING SUPPLIES AND MAINTENANCE
Replacing the toner collection container
The toner collection container collects excess toner that is produced during printing. When the toner collection container becomes full, "Replace used toner container." will appear. Follow the procedure below to replace the toner collection container.
It is also necessary to remove the toner collection container in order to replace the transfer unit. Refer to the procedure below to remove the toner collection container when replacing the transfer unit.
Toner may spill when the toner collection container is replaced. Before replacing the toner collection container, take measures such as placing covers on and around the machine to prevent soiling.
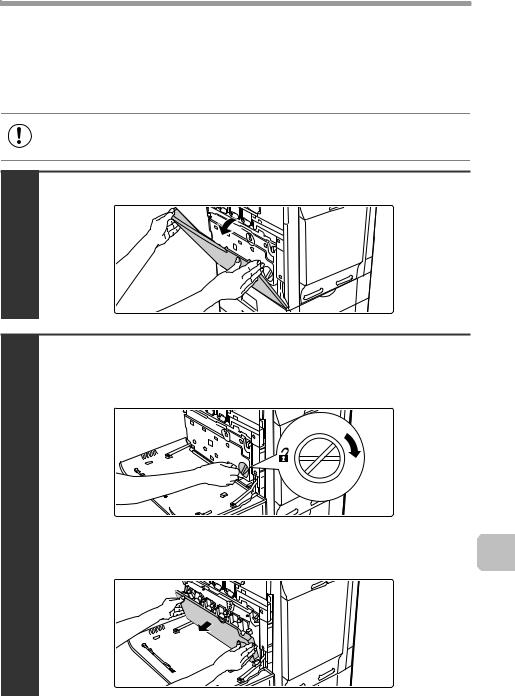
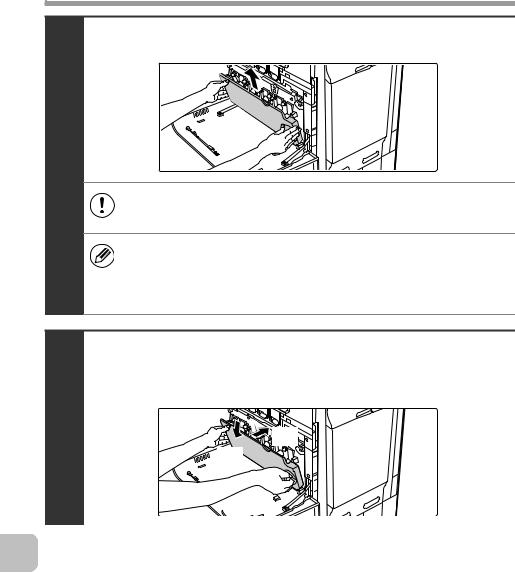
Open the front cover.
1
Release the used toner collection container.
(1)Turn the toner collection container lock lever to the right until it is horizontal.
2
(2) Tip the toner collection container forward.
Grasp the top right of the toner collection container with your right hand and support the bottom left with your left hand, and slowly tip the container toward you.
15
REPLACING SUPPLIES AND MAINTENANCE
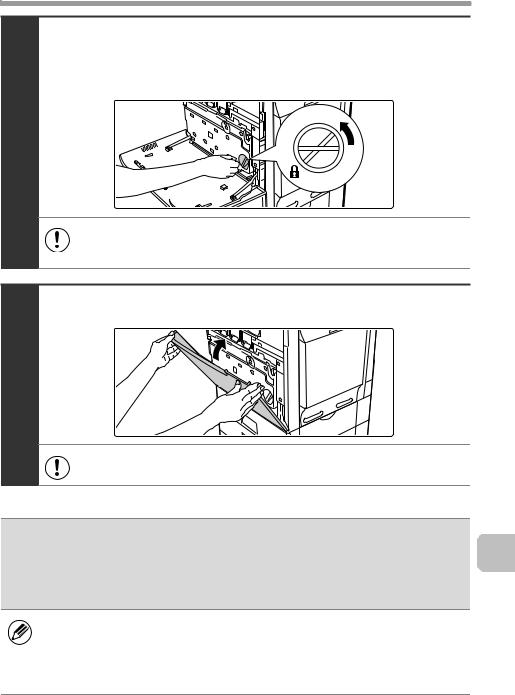
Remove the toner collection container.
3
•If the toner collection container is tipped forward too far, it will not be possible to remove it.
•Do not point the holes down as used toner will spill out.
•Hold the container by both hands and lift it up slowly.
• Do not discard the toner collection container. Place it in a plastic bag and keep it until your service technician comes to perform maintenance. Your service technician will collect the toner collection container.
Install the new toner collection container.
Insert the container from above at a slant. (The direction opposite to when you removed it.)
4 |
(2) |
|
(1) |
16
REPLACING SUPPLIES AND MAINTENANCE
Turn the lock lever on the toner collection container to the left.
Turn the lock lever to the left until it stops.
5
If the lock lever does not turn, check if the toner collection container is installed correctly. In particular, make sure that the top left corner of the toner collection container is correctly in place.
Close the front cover.
6
Take care that your fingers are not pinched when closing the cover.
 Caution
•Do not throw the toner collection container into a fire. Toner may fly and cause burns.
•Store the toner collection container out of the reach of small children.
• Toner may spill when the toner collection container is replaced. Take measures so that there will be no problem if toner spills on the machine, around the machine, or on your clothes.
•Do not touch the part soiled with toner of the removed toner collection container. If you accidentally touch the toner, immediately wash your hands.
17
REPLACING SUPPLIES AND MAINTENANCE
Replacing the developer cartridge / drum cartridge
Before replacing the developer cartridge or drum cartridge, turn off the main power of the machine and wait briefly.
Replacing the developer cartridge
Your service technician will replace the developer cartridge. Only replace the cartridge as explained below if your service technician instructs you to. Follow the instructions carefully.
It is also necessary to remove the developer cartridge in order to replace the drum cartridge. Refer to the procedure below to remove the developer cartridge when replacing the drum cartridge.
Press the [POWER] key ( ) on the operation panel to turn off the panel power, and then switch the main power switch to the off position.
1
Open the front cover and remove the toner collection container.
Replacing the toner collection container (page 15)
2
18
REPLACING SUPPLIES AND MAINTENANCE
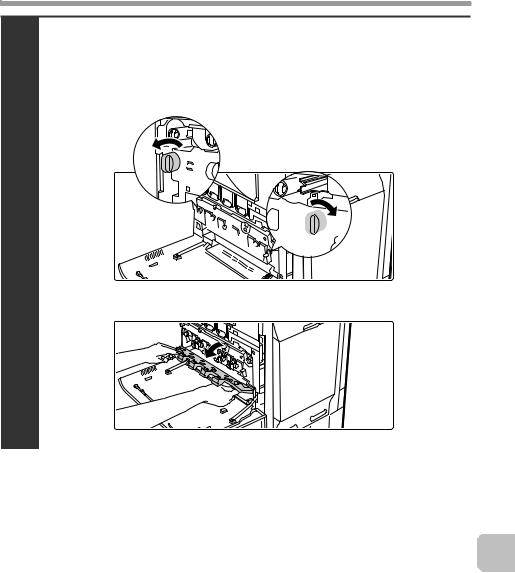
Open the main charger cover.
(1)Turn the main charger cover lock levers in the direction of an arrow below.
When the lock levers are horizontal, the lock is released.
3


(2)Grasp the lock levers and tip the cover forward.
19
REPLACING SUPPLIES AND MAINTENANCE
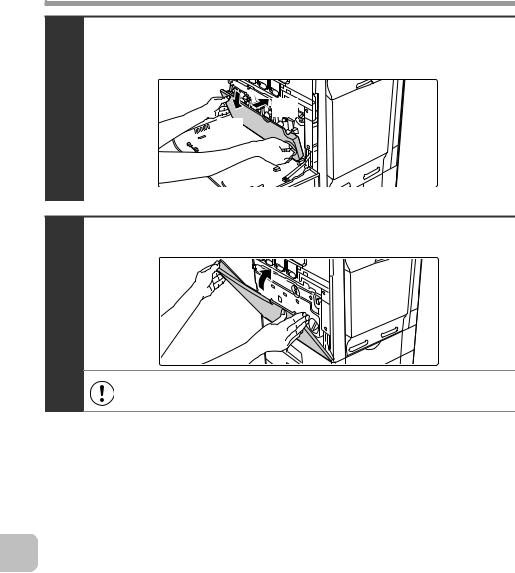
Remove the developer cartridge.
(1)Grasp the developer cartridge lock and pull it forward and down.
(2)Squeeze the lever on the developer cartridge
(3)Pull the developer cartridge out horizontally.
|
|
(3) |
4 |
(2) |
(2) |
(4)Support the developer cartridge near the middle with your hand and completely remove the developer cartridge.
Roller
• When removing the developer cartridge, grasp it with both hands at the middle.
•Try to keep the developer cartridge horizontal as you remove it. If tipped during removal, developer may spill out.
•There will be toner on the roller area of the removed developer cartridge. Do not touch the roller area. If you accidentally touch the toner, immediately wash your hands.
20
REPLACING SUPPLIES AND MAINTENANCE
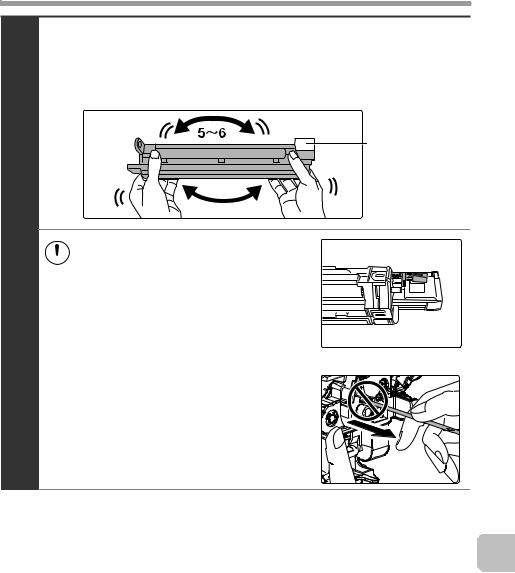
Shake the new developer cartridge 5 or 6 times as shown.
Hold the developer cartridge firmly as shown below and shake forward and back, left and right.
Remove the protective material after shaking the developer cartridge.
Protective material
• The part of the developer cartridge
5  shown below is easily deformed or damaged. Do not touch this part when handling the cartridge.
• Do not touch the roller in the developer cartridge. If the roller is accidentally touched, image problems may result. In that case, replace the developer cartridge with a new cartridge.
• The seal must not be removed when shaking the new developer cartridge.
• Take care not to damage the developer cartridge when shaking it. If damaged, the developer in the cartridge may leak out.
21
REPLACING SUPPLIES AND MAINTENANCE
Insert the new developer cartridge horizontally.
Insert the new developer cartridge in the same location as the cartridge that was removed.
6
• Do not tilt the developer cartridge or insert it in the wrong direction or orientation. This may damage the developer cartridge or drum cartridge and cause failure.
•When inserting the developer cartridge, grasp it with both hands at the middle.
•Do not remove the seal from the developer cartridge until the cartridge is installed in the machine. If the seal is removed when the cartridge is not locked, the cartridge may fall out of the machine.
Insert with the arrow on the cartridge aligned with the arrow on the machine.
Grasp the developer cartridge lock and replace it on the machine.
7
22
REPLACING SUPPLIES AND MAINTENANCE
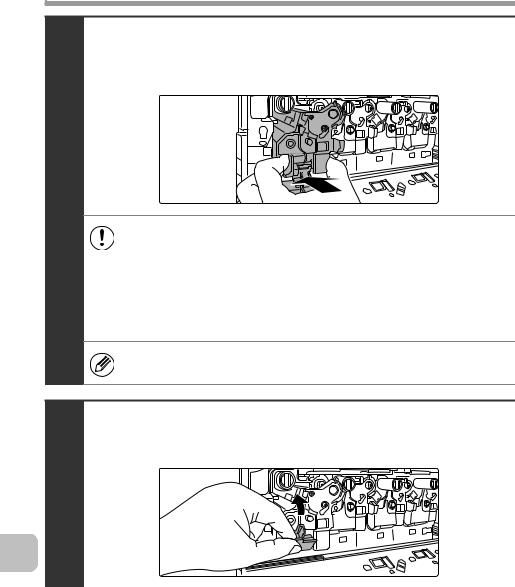
Hold the developer cartridge with one hand and slowly remove the seal with the other hand.
Slowly pull the seal straight and horizontally out.
8
If excessive force is used or the seal is pulled out diagonally, it may tear.
There is a mark (red belt) on the end of the seal. After removing the seal, be sure to verify that the mark (red belt) is on the end of the seal. If the seal has been cut on the developer cartridge, the cartridge cannot be used. Replace with a new developer cartridge.
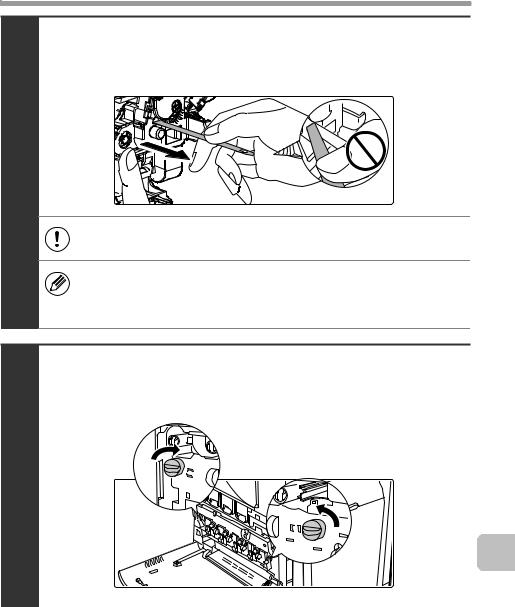
Close the main charger cover and rotate the lock levers in the direction of the arrows to lock the cover.
When the lock levers are vertical, the cover is locked.
9
23
REPLACING SUPPLIES AND MAINTENANCE
Install the toner collection container.
Replacing the toner collection container (page 15)
10 |
(2) |
|
(1) |
||
|
Close the front cover.
11
Take care that your fingers are not pinched when closing the cover.
24
REPLACING SUPPLIES AND MAINTENANCE
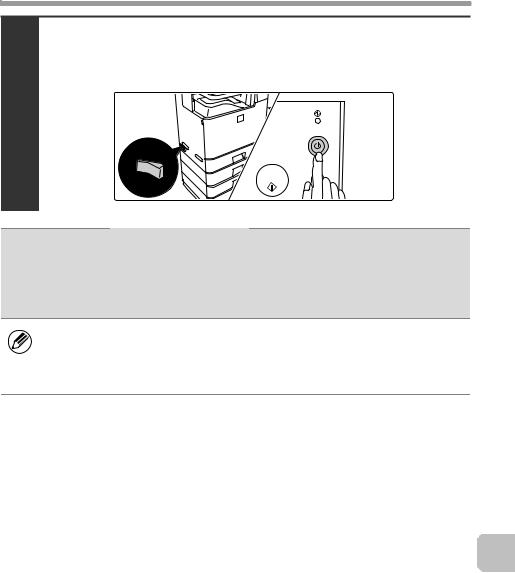
Turn on the power.
Switch the main power switch "ON" and press the [POWER] key (  ) on the operation panel to turn on the operation panel power.
12
 Caution
•Do not throw the developer cartridge into a fire. Toner may fly and cause burns.
•Store the developer cartridge out of the reach of small children.
• When replacing the developer cartridge, be aware that it may soil your clothes or the immediate surroundings.
•Do not touch the part soiled with toner of the removed toner collection container. If you accidentally touch the toner, immediately wash your hands.
25
REPLACING SUPPLIES AND MAINTENANCE
Replacing the drum cartridge
Your service technician will replace the drum cartridge. Only replace the cartridge as explained below if your service technician instructs you to. Follow the instructions carefully.
•Do not leave the drum cartridge outside of its package for a long time, and do not remove cartridge from its package in a location where there is bright sunlight or bright light. This may cause a failure.
•When you remove a drum cartridge, place it in a dark location and do not allow light to shine on the cartridge.
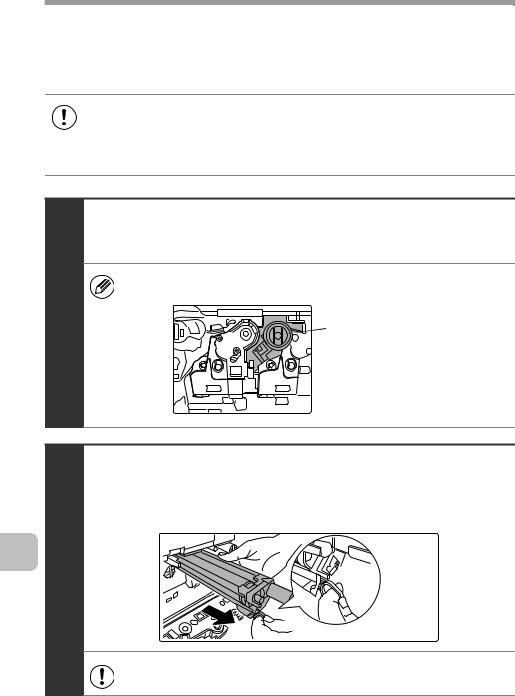
Turn off the power and remove the developer cartridge.
For the procedure for removing the developer cartridge, see steps 1 to 4 of "Replacing the developer cartridge" (page 18).
To remove the drum cartridge, the developer cartridge must first be removed.
1 |
Drum cartridge |
 Developer cartridge
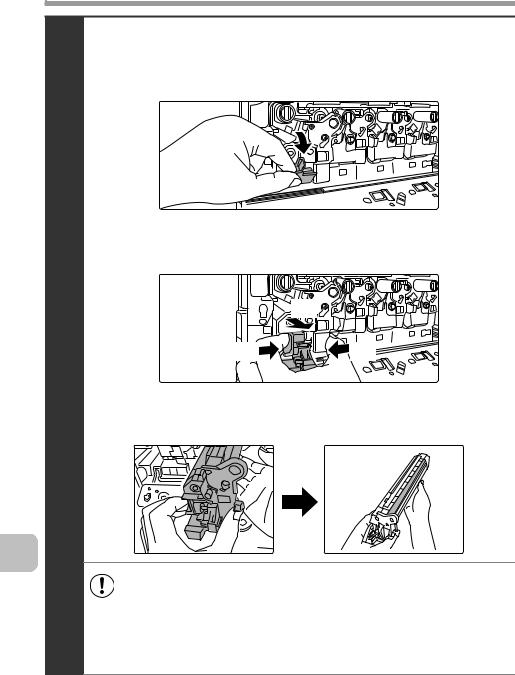
Hold down the lever on the drum cartridge with your finger and pull the drum cartridge toward you.
Place one hand at the middle of the drum cartridge and pull out with both hands.
2
Do not touch toner on the old drum cartridge. If you accidentally touch the toner, immediately wash your hands.
26
REPLACING SUPPLIES AND MAINTENANCE
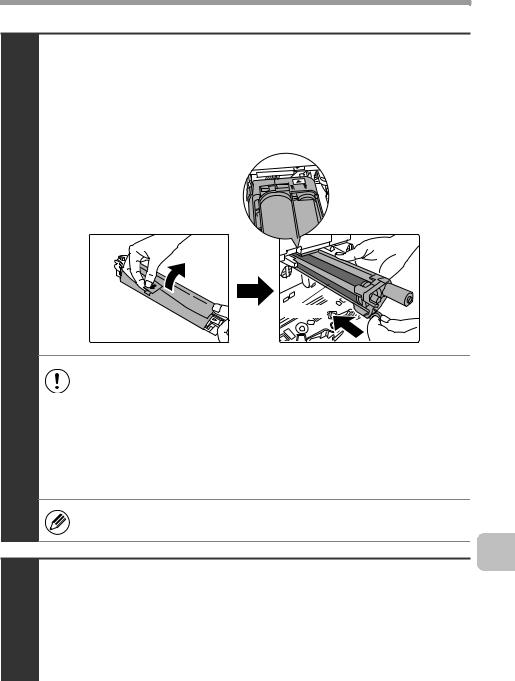
Remove the protective material from the drum cartridge and slowly insert the drum cartridge along the guides.
Make sure that the  mark on the drum cartridge is aligned with the
  mark on the machine as you insert the drum cartridge.
3
Drum
•To remove the protective material, slowly pull it straight out so that it does not tear.
•When installing the drum cartridge, do not touch or damage the drum. This may cause a failure.
•After removing the protective material, immediately insert the drum cartridge in the machine. Do not allow the drum cartridge to be directly exposed to sunlight or electric light.
•Do not tilt the drum cartridge or insert it in the wrong direction or orientation. This may damage the drum cartridge or cause a failure.
Make sure that the colors on the new drum cartridge and the insertion label match.
Replace the developer cartridge and toner collection container, close the front cover of the
4 machine, and turn on the power.
For the procedure for replacing the developer cartridge and toner collection container, see steps 7 to 8 and steps 10 to 11 of "Replacing the developer cartridge" (page 18).
27
 Loading...