

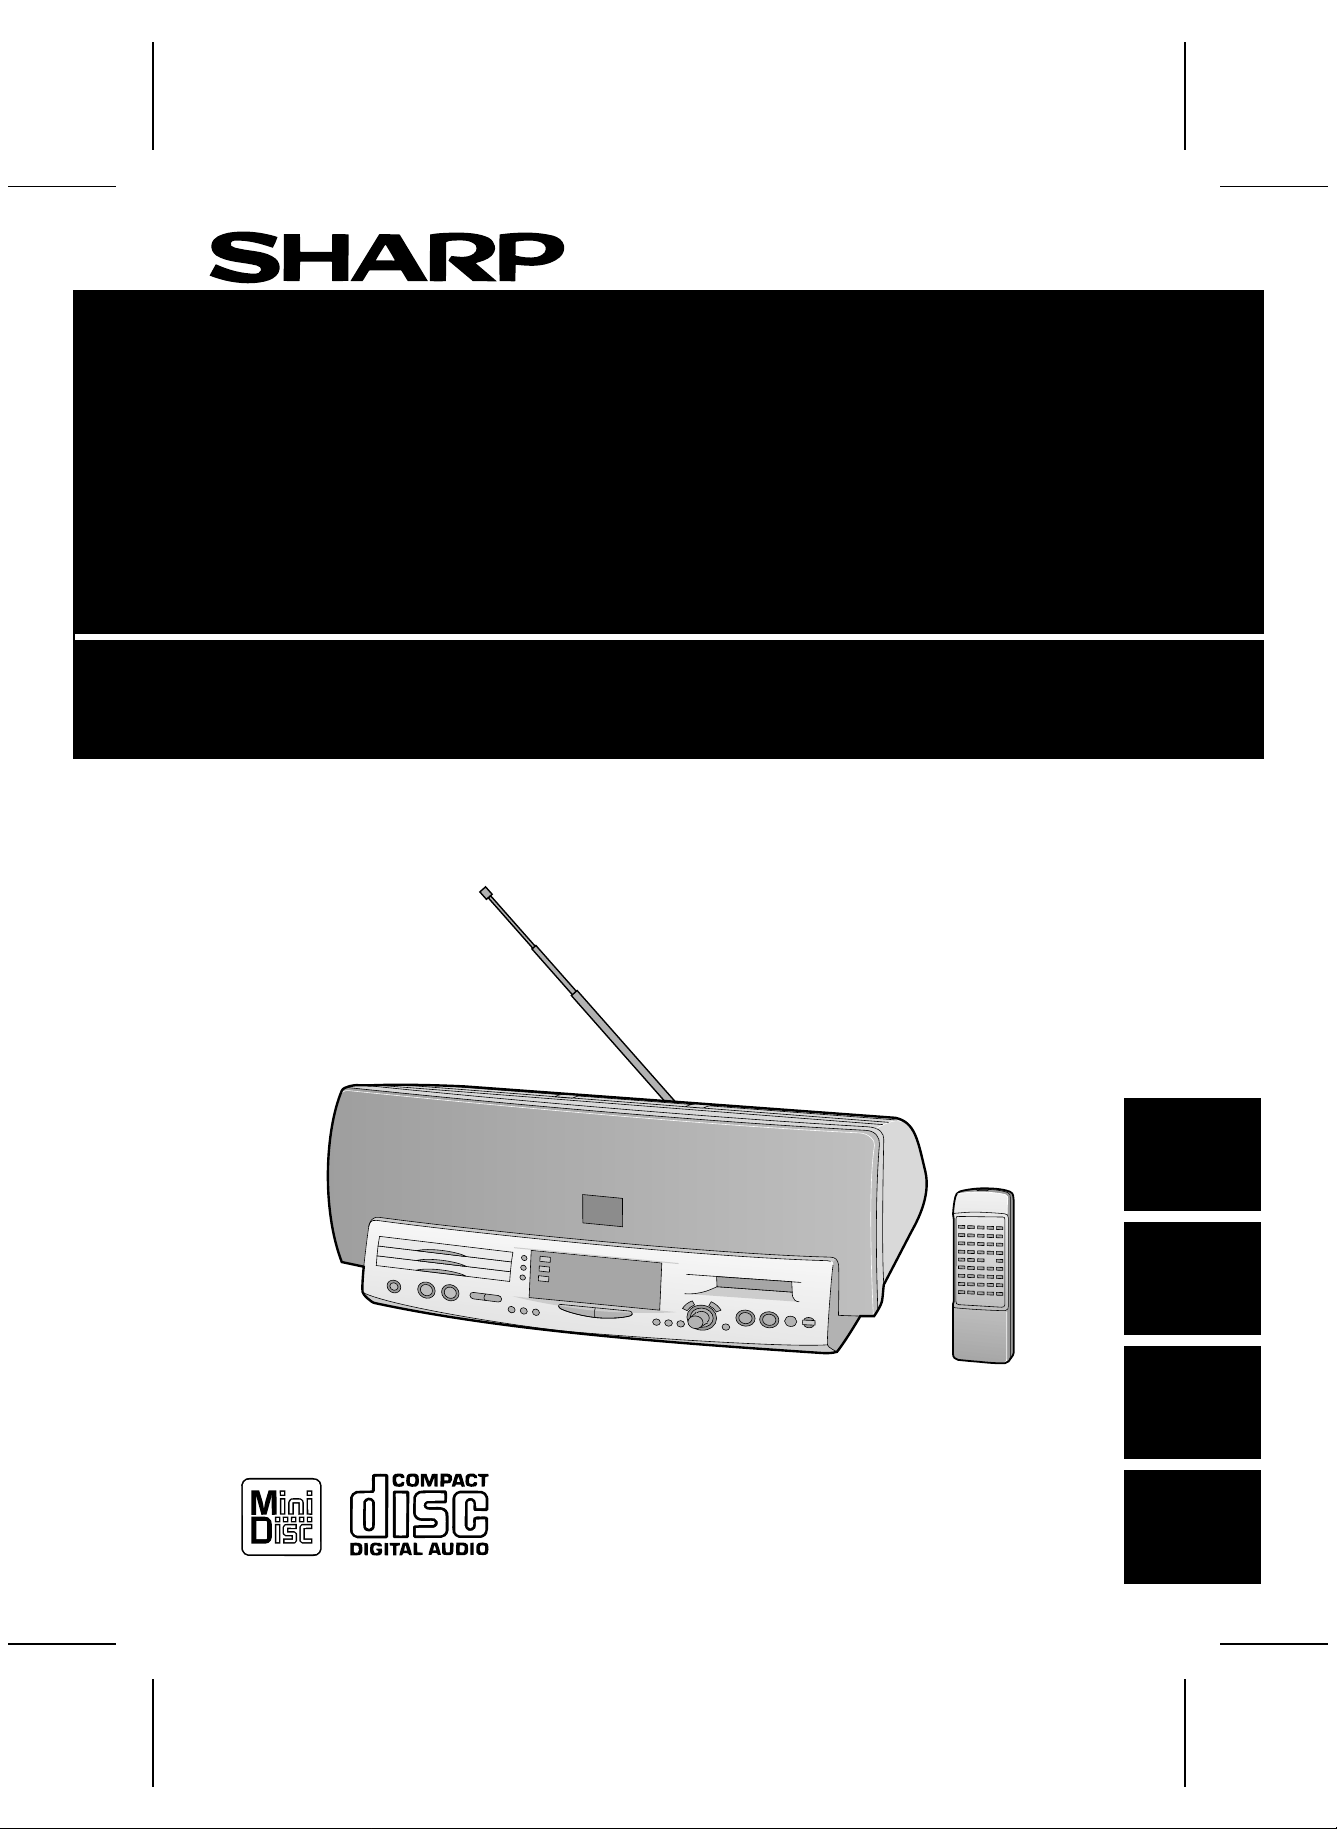
Sharp MDZV-30-H Owners manual
S
M
<P=001>
S
M
<P=001> S
M
<P=001> S
M
<P=001>
MD STUDIO
MD STUDIO
MD STUDIO
MD STUDIO
BEDIENUNGSANLEITUNG
OPERATION MANUAL
MODEL
MODELL
MODÈLE
MODELO
MD-ZV30H
MODE D’EMPLOI
MANUAL DE MANEJO
MD-ZV30H TINSZ0217AWZZ
ESPAÑOL FRANÇAIS DEUTSCH ENGLISH

SM <P=001>
SPECIAL NOTES FOR UK CUSTOMERS ONLY
NOTE FOR USERS IN THE U.K.
The mains lead of this product is fitted with a non-rewireable (moulded) plug incorporating a 3A fuse. Should the
fuse need to be replaced, a BSI or ASTA approved BS
1362 fu se marke d or and of the same rati ng as
above, which is also indicated on the pin face of the plug
must be used.
Always refit the fuse cover after replacing the fuse. Never
use the plug without t he fuse cover fitted.
In the unlikely event of the socket outlet in your home
not being compatible with the plug supplied, cut-off the
mains pl ug and fit a n appropriat e type.
DANGER:
The fuse from the cut-off plug should be removed and
the cut-off plug destroyed immediately and disposed of
in a safe manner.
Under no circumstances should the cut-off plug be inserted elsewhere into a 13A socket outlet as a serious
electric shock may occur.
To fit an appropriate plug to the mains lead, follow the
instructions below:
IMPORTANT:
The wires in the mains lead are coloured in accordance
with the follo wing code:
Blue : Neutral
Brown : Live
As the colours of the wires in the mains lead of this
product may not correspond with the coloured markings
identifying the terminals in your plug, proceed as follows:
● The wire which is coloured blue must be connected to
the plug terminal which is marked N or coloured black.
● The wire which is coloured brown must be connected
to the plug terminal which is marked L or coloured red.
Ensure that neither the brown nor the blue wire is connected to the earth terminal in your three pin plug.
Before replacing the plug cover, make sure that:
● If the new fitted plug contains a fuse, its value is the
same as that removed from the cut-off plug.
● The cord grip is clamped over the sheath of the mains
lead and not simply over the lead wires.
IF YOU HAVE ANY DOUBT, CONSULT A QUALIFIED
ELECTRICIAN.
SERVICE INFORMATION
In the unlikely event of your equipment requiring repair,
please contact the dealer or supplier from whom it was
purchased. Where this is not possible, please contact the
telephone number listed below. You will then be given
details of how to obtain service.
0345-1 25387
Please no te; all calls will b e charged at lo cal rate.
Certain replacement parts and accessories may be ob-
tained from our main parts distributor, who can be contacted on the follo wing numbe rs;
WILLOW VALE ELECTRONICS LTD.
MANCHESTER 0161-682-1415
READING 01734-8 76444
In the unlikely event of this equipment requiring repair
during the guarantee period, you will need to provide
proof of the date of purchase to the repairing company.
Please keep your invoice or receipt, which is supplied at
the time of purchase.
● Recording and playback of any material may require
consent, which SHARP is unable to give. Please refer
particularly to the provisions of the Copyright Act 1956,
the Dramatic and Musical Performers Protection Act
1958, the Performers Protection Acts 1963 and 1972 and
to any subsequent statutory enactments and orders.
● This equipment complies with the requirements of
Directives 89/336/EEC and 73/23/EEC as amended by
93/68/EEC.
● SRS technology Licensed from SRS Labs. SRS
technology holds the following patents:U.S. Patent No.
4,748,669 and U.S. Patent No. 4,841,572.
● SRS, the SRS Logo (●) and the Sound Retrieval System
are registered trademarks of SRS Labs, Inc. in the United
States.
US and foreign patents licensed from Dolby Laboratories
Licensing Corporation.
MD-ZV30H TINSZ0217AWZZ
● When the ON/STAND-BY switch is set at STAND-BY
position mains voltage is still present inside the unit.
When the ON/STAND-BY switch is set at STAND-BY
position and the clock is displayed, the unit may be
brought into operation by the timer mode or remote
control.
Warning:
This unit contains no user serviceable parts. Never remove
covers unless qualified to do so. This unit contains dangerous voltages, always remove mains plug from the socket
before any service operation and when not in use for a long
period.
Caution:
Use the MD studio only in accordance with the instructions
given in this manual and do not attempt to interfere with the
interlock switch or make any other adjustment as this may
result in exposure to hazardous radiation.
i
SM <P=001>
INTRODUCTION
Thank you for purchasing this SHARP product.
To obtain the best performance from this product please read this manual carefully. It will guide you in operating your
SHARP product.
CONTENTS
ENGLISH
ACCESSORIES . . . . . . . . . . . . . . . . . . . . . . . . . . . . . . . . . .1
Page
PRECAUTIONS . . . . . . . . . . . . . . . . . . . . . . . . . . . . . . . . . .2
NAMES OF CONTROLS AND INDICATORS . . . . . . . . . .3
REMOTE CONTROL . . . . . . . . . . . . . . . . . . . . . . . . . . . . 4-5
PREPARATION FOR USE . . . . . . . . . . . . . . . . . . . . . . . . .5
SETTING THE CLOCK . . . . . . . . . . . . . . . . . . . . . . . . . . . .6
SOUND CONTROL . . . . . . . . . . . . . . . . . . . . . . . . . . . . . 7-8
COMPACT DISC OPERATION . . . . . . . . . . . . . . . . . . 9-10
MINIDISC OPERATION . . . . . . . . . . . . . . . . . . . . . . . . . .11
RADIO OPERATION . . . . . . . . . . . . . . . . . . . . . . . . . . 12-13
CONVENIENT CD AND MD OPERATIONS . . . . . . . 14-17
ACCESSORIES
● For European
customers
● For U.K. customers
AM loop aerial × 1
AC Power Lead × 1
RECORDING . . . . . . . . . . . . . . . . . . . . . . . . . . . . . . . . 18-22
EDITING . . . . . . . . . . . . . . . . . . . . . . . . . . . . . . . . . . . 23-32
HOW TO USE THE BUILT-IN TIMER . . . . . . . . . . . 33-35
USING EXTERNAL UNITS . . . . . . . . . . . . . . . . . . . . 36-37
WHAT IS A MINIDISC? . . . . . . . . . . . . . . . . . . . . . . . 38-39
MINIDISC SYSTEM LIMITATIONS . . . . . . . . . . . . . . . . .39
TROUBLESHOOTING . . . . . . . . . . . . . . . . . . . . . . . . 40-42
TRANSPORTING THE UNIT . . . . . . . . . . . . . . . . . . . . . . 42
MAINTENANCE . . . . . . . . . . . . . . . . . . . . . . . . . . . . . . . . 43
SPECIFICATIONS . . . . . . . . . . . . . . . . . . . . . . . . . . . . . . . 43
"AA" size battery
Remote control × 1
(UM/SUM-3, R6, HP-7
or similar) × 2
Page
Blank (Recordable)
MiniDisc × 1
Note:
Parts and equipment mentioned in this operation manual other
than those shown above are not included.
E-1
MD-ZV30H TINSZ0217AWZZ

<P=002>
PRECAUTIONS
■General
● Please ensure that the equipment is positioned in a well
ventilated area and ensure that there is at least 5 cm of
free space along the sides, top and back of the equipment.
● Do not use oil, solvents, petrol, paint thinners or insecticides on the unit.
● Do not expose the unit to moisture, to temperatures
higher than 60˚C (140˚F) or to extreme low temperatures.
● Keep the unit away from direct sunlight, strong magnetic
fields, excessive dust, humidity and electronic/electrical
equipment (home computers, facsimiles, etc.) which
generates electrical noise.
● Hold the AC power plug by the head when removing it
from the AC socket, since pulling the lead can damage
internal wires.
● Remove the AC power plug from the wall socket before
cleaning the heads, pinch rollers, etc.
This unit contains dangerous voltages.
Do not remove the outer cover, as this may result in
electric shock. Refer internal service to your local SHARP
service facility.
● Use the unit on a firm, level surface free from vibration,
and do not place anything on the top of the unit.
● If the unit does not work properly whilst in use, set the
ON/STAND-BY switch to STAND-BY, then disconnect
the AC power lead from the AC socket. Plug the AC
power lead back in, and then set the ON/STAND-BY
switch to ON.
● If a lightning storm is taking place near you, it is suggested that you disconnect the AC power lead from the
AC socket for safety.
■Care of compact discs
Compact discs are fairly resistant to damage, however mistracking can occur due to an accumulation of dirt on the
disc surface.
Follow the guidelines below for maximum enjoyment from
your CD collection and player.
● Do not write on either side of the disc, particularly the
non-label side. Signals are read from the non-label side.
Do not mark this surface.
● Keep your discs away from direct sunlight, heat, and excessive moisture.
● Always hold the CDs by the edges. Fingerprints, dirt, or
water on the CDs can cause noise or mistracking. If a
CD is dirty or does not play properly, clean it with a soft,
dry cloth, wiping straight out from the centre, along the
radius.
Warning:
The voltage used must be the same as that specified on
this unit. Using this product with a higher voltage than that
which is specified is dangerous and may result in a fire or
other type of accident causing damage. SHARP will not be
held responsible for any damage resulting from use of this
unit with a voltage other than that which is specified.
■Volume control
It is advisable to avoid exposure to high volume levels, which
occur whilst turning the unit on with the volume control setting up high, or whilst continually listening at high volumes.
■Condensation
Sudden temperature changes, storage or operation in an
extremely humid environment may cause condensation inside the cabinet (CD pickup, MD pickup, etc.) or on the
transmitter window on the remote control.
Condensation can cause the unit to malfunction.
If this happens, leave the power on with no disc in the unit
until normal playback is possible (about 1 hour) or wipe off
any condensation on the transmitter window with a soft cloth
before operating the unit.
■About the transport card
This unit is shipped with a transport card in place to prevent
damage during shipping.
Before using, follow these steps to remove the transport
card:
1 Set the ON/STAND-BY switch to ON.
2 Press the
7
button of the disc 1 to open the disc tray.
3 Remove the transport card.
1
ON/STAND-BY
DISC-1
DISC-2
DISC-3
CD
2
1
2
3
CD PLAY
VOLUME
TUNER
SURROUND
3D
TRACK START
(BAND)
MODE
ON/OFF
1 2 3
CD MD DIGITAL EDIT
TUNING
CURSOR
MD
NAME /
TIMER /
TOC EDIT
DELETE DISPLAY
REC
ENTER
3
1
TUNING
2
DISC-2
3
CD PLAY
DISC-3
CD
VOLUME
ON/STAND-BY
TRACK
TUNER
UND
SURRO
3D
(BAND)
F
F
/O
N
O
MODE
CD MD DIGITAL EDIT
REC
MD
CURSOR
Transport card
ENTER
/
R
E
IM
T
/
E
M
A
N
Y
LA
P
IS
D
E
T
LE
E
D
IT
D
E
C
TO
START
E-2
MD-ZV30H TINSZ0217AWZZ

<P=003>
NAMES OF CONTROLS AND INDICATORS
123456
TRACK
7
1
MONO LP
2
8
9
REC
3
TOC
1 2 3 4 5 6 7 8 9 10 11 12 13 14 15 16 17 18 19 20
ST
STEREO
DATE
CLOCK
15
16
17
19
PRGM
RANDOM
20
4
21
3D
0dB
SURROUND
OVER12DISC
TOTAL
REMAIN
kHz
MHz
10
11
12
13
14
18
23 24 25 26
22
● Display window
11. Disc Name Indicator
12. Track Name Indicator
13. Date Indicator
14. Level Meter/Character Information Display
15. Programme Indicator
16. Random Play Indicator
17. Monaural Long-Play Mode Indicator
18. Disc Indicators
19. MD TOC Indicator
10. Recording Level Too High Indicator
11. 3D Surround Indicator
12. Total Time Indicator
13. Remaining Time Indicator
14. More Tracks Indicator
15. MD Record Indicator: REC
16. MD Pause Indicator:
6
17. FM Stereo Indicator: ST
18. Music Schedule/Preset Number Indicators
19. FM Stereo Mode Indicator
20. Repeat Indicator:
R
21. Clock Indicator
ON/STAND-BY
27
28
29
30
48
DISC-1
DISC-2
DISC-3
CD
1 2 3
1
2
3
CD PLAY
VOLUME
TUNER
SURROUND
3D
(BAND)
MODE
ON/OFF
31
32
34
33
45 46 47
PHONES
INPUT
MONITOR
AUX
LEVEL
OUT
MIN MAX
AC INPUT
49
50
51
TRACK START
CD MD DIGITAL EDIT
(STEREO)
52
35
MIC
AM ANTENNA
53
NAME /
TOC EDIT
36
RESET
TIMER /
DELETE DISPLAY
37
TUNING
CURSOR
38
ENTER
39
MD
40
41
REC
42
43
44
22. CD Disc Trays
23. CD Eject Buttons
24. CD Play Buttons
25. Tuning/Cursor Buttons
26. MD Loading Slot
27. On/Stand-by Switch
28. CD Stop Button: ■
29. CD Play/Pause Button:
30. Volume Up/Down Buttons:
0 6
X / W
31. 3D Surround Mode Select Button
32. 3D Surround On/Off Button
33. Tuner Call (Band Select) Button
34. CD Track Select Button
35. CD Edit Button
36. Name/TOC-Edit Button
37. Timer/Delete Button
38. Display Button
39. Jog Dial
40. Enter Button
41. MD Stop Button: ■
42. MD Play/Pause Button:
0 6
43. MD Record Button: ●
44. MD Eject Button:
7
45. Headphone Socket
46. Reset Button
47. FM Telescopic Rod Aerial
48. AC Power Input Socket
49. Monitor Output Socket
50. Auxiliary Input Socket
51. Auxiliary Input Level Control
52. Microphone Socket
53. AM Loop Aerial Input Socket
E-3
MD-ZV30H TINSZ0217AWZZ

<P=004>
REMOTE CONTROL
1
23
MD/CD/TUNER DIRECT KEY
1 2 3 4 5
6
4
5
6
7
8
9
10
11
12
7 8 9 10/0
ST-MODE
10
PROGRAM
CLEAR
REC
REC
MODE
1 2 3
1 2 3
SLEEP
DISPLAY
ON/
AUX
STAND-BY
13
26 27 28 29
TUNER
BAND
P-MODE
AUTO
MARK
TIME
BASS/
TREBLE
MD
CD
SURROUND
3D
MODE ON/OFF
VOLUME
14
15
16
17
18
19
20
21
22
23
24
25
■Names of controls
11. Clear Button
12. FM Stereo Mode Button
13. Tuner Call (Band Select) Button
14. Tuner Preset/CD/MD Track Number Input Buttons
15. Programme Button
16. Play Mode Button
17. MD Record Button: ●
18. MD Record Mode Button
19. CD Play Buttons
10. CD Eject Buttons
11. Sleep Button
12. On/Stand-by Button
13. Display Button
14. MD Stop Button: ■
15. MD Play/Pause Button:
16. MD Track Up/Cue Button:
17. MD Track Down/Review Button:
18. MD Eject Button
19. Auto Mark Button
20. CD Play/Pause Button:
21. CD Stop Button: ■
22. CD Track Up/Cue Button:
23. CD Track Down/Review Button:
24. 3D Surround On/Off Button
25. 3D Surround Mode Select Button
26. Auxiliary Select Button
27. Time Display Select Button
28. Bass/Treble Select Button
29. Volume Up/Down Buttons: /
0 6
2 / 4
3 / 5
0 6
2 / 4
3 / 5
■Loading the batteries for the remote
control
1
1 Remove the battery compartment cover.
2 Insert 2 "AA" size batteries (UM/SUM-3, R6, HP-7 or similar)
into the battery compartment.
● When inserting the batteries, push them towards the ë battery
terminals.
● Placing the batteries the wrong way round can cause the unit
to malfunction.
3 Replace the battery compartment cover.
2
3
Battery removal:
● Push the batteries towards the ë battery terminals to remove
them.
Precautions for battery use:
● Insert the batteries according to the direction indicated in the
battery compartment.
● Replace all old batteries with new ones at the same time.
● Remove the battery if weak or if the unit is not in use for
long periods to prevent potential damage due to battery leakage.
● Do not mix old and new batteries.
Caution:
Do not use rechargeable batteries (nickel-cadmium battery, etc.).
E-4
MD-ZV30H TINSZ0217AWZZ
<P=005>
(Continued)
■Proper use of the remote control
1
DISC-1
DISC-2
DISC-3
CD
VOLUME
POWER
SURROUND
3D
ODE
M
TUNING
2
3
CD PLAY
START
TRACK
TUNER
(BAND)
ON/OFF
CD MD DIGITAL EDIT
REC
MD
CURSOR
ENTER
TIMER /
NAME /
DISPLAY
DELETE
TOC EDIT
0.2 m - 6 m
(8" - 20’)
15
PREPARATION FOR USE
AM loop aerial
321
15
Notes concerning use:
● Replace the batteries if control distance decreases or operation becomes erratic.
● Periodically clean the transmitter window on the remote control and the sensor on the main unit with a soft cloth.
● Exposing the sensor on the main unit to strong light may
interfere with operation. Change the lighting or the direction
of the unit.
● Keep the remote control away from moisture, excessive heat,
shock, and vibrations.
● Unplug the AC power lead from the AC socket before
connecting or disconnecting any component.
■Aerial connection
Connect the AM loop aerial wire to the AM ANTENNA socket.
Position the AM loop aerial for optimum reception.
Place the AM loop aerial on a shelf, etc., or attach it to a stand
or wall with screws (not supplied).
Notes:
● Do not place the aerial on the unit. It may result in noise
generation, since the unit is equipped with digital electronics.
Place the aerial away from the unit for better reception.
● If the AM loop aerial is placed near the AC power lead, it
may cause interference.
To AC INPUT
To AC INPUT
● For European customers
1
2
AC 230 V, 50 Hz
To an AC socket
● For U.K. customers
1
AC 230 V, 50 Hz
2
To an AC socket
Unplugging the connector:
Hold the connector and remove it in the direction indicated by
the arrow. Do not pull on the lead.
■Connecting the AC power lead
● After connecting the aerial, connect the AC power lead to the
AC power input socket, then connect the AC power lead plug
to an AC socket.
● Unplug the AC power lead from the AC socket if the unit is
not to be used for a prolonged period of time.
● Never use any power lead other than the one supplied. Otherwise, a malfunction or an accident may occur.
● Before unplugging the AC power lead, set the ON/STAND-BY
switch to STAND-BY. If the AC power lead is unplugged whilst
the power is on, the information for track numbers may not
be written properly during recording or editing.
E-5
MD-ZV30H TINSZ0217AWZZ

SM <P=001>
SETTING THE CLOCK
DISC-1
DISC-2
DISC-3
ON/STAND-BY
CD
1 2 3
ON/STAND-BY
1
2
3
4
5
6
7
8
9
1
2
3
CD PLAY
VOLUME
TUNER
SURROUND
3D
TRACK START
(BAND)
MODE
ON/OFF
CD MD DIGITAL EDIT
TIMER /
DELETE
DATE
Date setting mode
DATE
DATE
DATE
DATE
DATE
DATE
Time setting mode
DATE
DATE
CLOCK
CLOCK
CLOCK
CLOCK
CLOCK
CLOCK
CLOCK
CLOCK
CLOCK
CLOCK
When recording, the date and time are recorded on the MiniDisc
(page 18), but only when the date and time have been previously
TUNING
CURSOR
MD
NAME /
TIMER /
TOC EDIT
DELETE DISPLAY
REC
ENTER
ENTER
entered, as described in the instructions below.
■Setting the date
1 Set the ON/STAND-BY switch to ON and press the
TIMER/DELETE button.
2 Within 10 seconds, turn the jog dial until "TIME ADJUST"
appears.
3 Within 10 seconds, press the ENTER button.
● The unit will enter the date setting mode.
4 Set the "year" using the jog dial.
● When you turn the jog dial and let go, the year will change
up or down by one. When you turn and hold it, the year will
change continuously.
● The year 2000 or later is set as follows:
[00] indicates the year 2000.
[01] indicates the year 2001.
5 Press the ENTER button to set the "year".
6 Set the "month" repeating steps 4 and 5.
AM
AM
AM
AM
AM
7 Set the "day" repeating steps 4 and 5.
● The unit will enter the date setting mode.
8 Set the "hour" using the jog dial.
● When you turn the jog dial and let go, the hour will change
up or down by one. When you turn and hold it, the hour will
change continuously.
● The clock uses the 24-hour system.
9 Press the ENTER button to set the "hour".
10 Adjust the "minute" using the jog dial.
11 Press the ENTER button to set the "minute".
● When the ENTER button is pressed, the clock will show the
correct time.
Note:
● If a power failure continues for more than 10 minutes or the
AC power lead is disconnected for more than 10 minutes,
the date and time settings will be lost.
If they are lost, set them again.
Checking the date and time:
After pressing the TIMER/DELETE button, turn the jog dial until
the date and time are displayed.
10
11
Resetting the date and time:
DATE
CLOCK
DATE
ST
CLOCK
See "Setting the clock".
● Once you have set the date and time, "TIME ADJUST" will
not be displayed in step 2. Turn the jog dial to make the date
and time appear.
● If you don’t need to change the settings, just press the
ENTER button without turning the jog dial again.
E-6
MD-ZV30H TINSZ0217AWZZ

<P=002>
SOUND CONTROL
(Main unit) (Remote control)
VOLUME
VOLUME
BASS/
TREBLE
■Volume
Press t he VOLUME button to i ncrease the volume and t he
VOLUME button to decrease the volume.
● The volume display can be changed within the range of "0"
to "10".
■Treble
Remote control operation
Press the BASS/TREBLE button until the TREBLE display appears. Press the VOLUME W button to increase the high-frequency level, and press the VOLUME X button to decrease the
level.
■Bass
Remote control operation
Press the BASS/TREBLE button until the BASS display appears.
Press the VOLUME W button to increase the low-frequency level,
and press the VOLUME X button to decrease the level.
E-7
MD-ZV30H TINSZ0217AWZZ

<P=003>
(Continued)
DISC-1
DISC-2
DISC-3
ON/STAND-BY
CD
1 2 3
MD/CD/TUNER DIRECT KEY
1 2 3 4 5
6
7 8 9 10/0
ST-MODE
TUNER
CLEAR
REC
REC
MARK
1 2 3
1 2 3
ON/
AUX
BAND
P-MODE
AUTO
MARK
TIMESLEEP DISPLAY
BASS/
TREBLE
10
PROGRAM
STAND-BY
VOLUME
3D
MODE
3D
MODE
MD
CD
SURROUND
3D
MODE ON/OFF
VOLUME
1
2
3
CD PLAY
TUNER
SURROUND
(BAND)
ON/OFF
SURROUND
ON/OFF
TRACK START
CD MD DIGITAL EDIT
SURROUND
3D
MODE
NAME /
TIMER /
DISPLAY
TOC EDIT
DELETE
ON/OFF
Ordinary stereo sound
Listening area
(Listening range with good stereo fidelity)
3D SURROUND
■SRS (●) 3D SURROUND
TUNING
CURSOR
MD
REC
ENTER
About SRS (●) 3D surround:
SRS is a breakthrough technology that creates 3-dimensional
sound by processing sound signals based on the human auditory
system. It produces real depth and localization of the sound
image which cannot be accomplished by ordinary stereo. SRS
only requires two speakers.
SRS (●) 3D surround effects:
● Live performance atmosphere
(Simulates a live concert atmosphere)
● The localization of various musical sources is quite clear.
(The positions of the musical instruments and singers are
very clear.)
● Reproduction of depth
(Sounds from the front and back of an orchestra can be identified easily.)
● Expansion of the sound field
(The sound image is spread out over a wide area.)
When listening to a stereo sound source:
When the sound source is in stereo, you can select from any of
5 different 3D surround effect.
1 Select any desired audio source and begin playback.
2 Press the 3D SURROUND ON/OFF button to enter the 3D
surround mode.
● "3D SURROUND" will appear.
3 Press the MODE button repeatedly to select the desired
mode.
● When the MODE button is pressed in the 3D surround mode,
the current mode will be displayed. When you press the
MODE button again, you can switch the mode. About 3 seconds later, the display will return to the original mode.
MODE 1 MODE 2 MODE 3 MODE 4 MODE 5 3D MONO
SURROUND
MODE
MODE-1
MODE-2 This setting gives you a maximum sound field
MODE-3
MODE-4
Effect from each mode
You will enjoy a sound image that produces an
intimate sound field. (as in a medium-size hall)
as music comes out beyond the speakers. (as
in a large, domed arena)
This setting is great for live recording and vocal
music.
You will hear more vocals in an intimate sound
field. (as at a live music performance)
Wide listening area
(Stereo music can be heard anywhere in the room.)
MD-ZV30H TINSZ0217AWZZ
MODE-5
This setting greatly increases the amount of vocals or center sounds in a recording. (as in a
small club)
3D MONO
This setting produces a 3D surround sound
from a monaural sound source, for example a
video game with monaural output.
To cancel the 3D surround effect:
Press the 3D SURROUND ON/OFF button.
● "SURROUND OFF" will be displayed, and the 3D surround
effect will be cancelled.
E-8
<P=004>
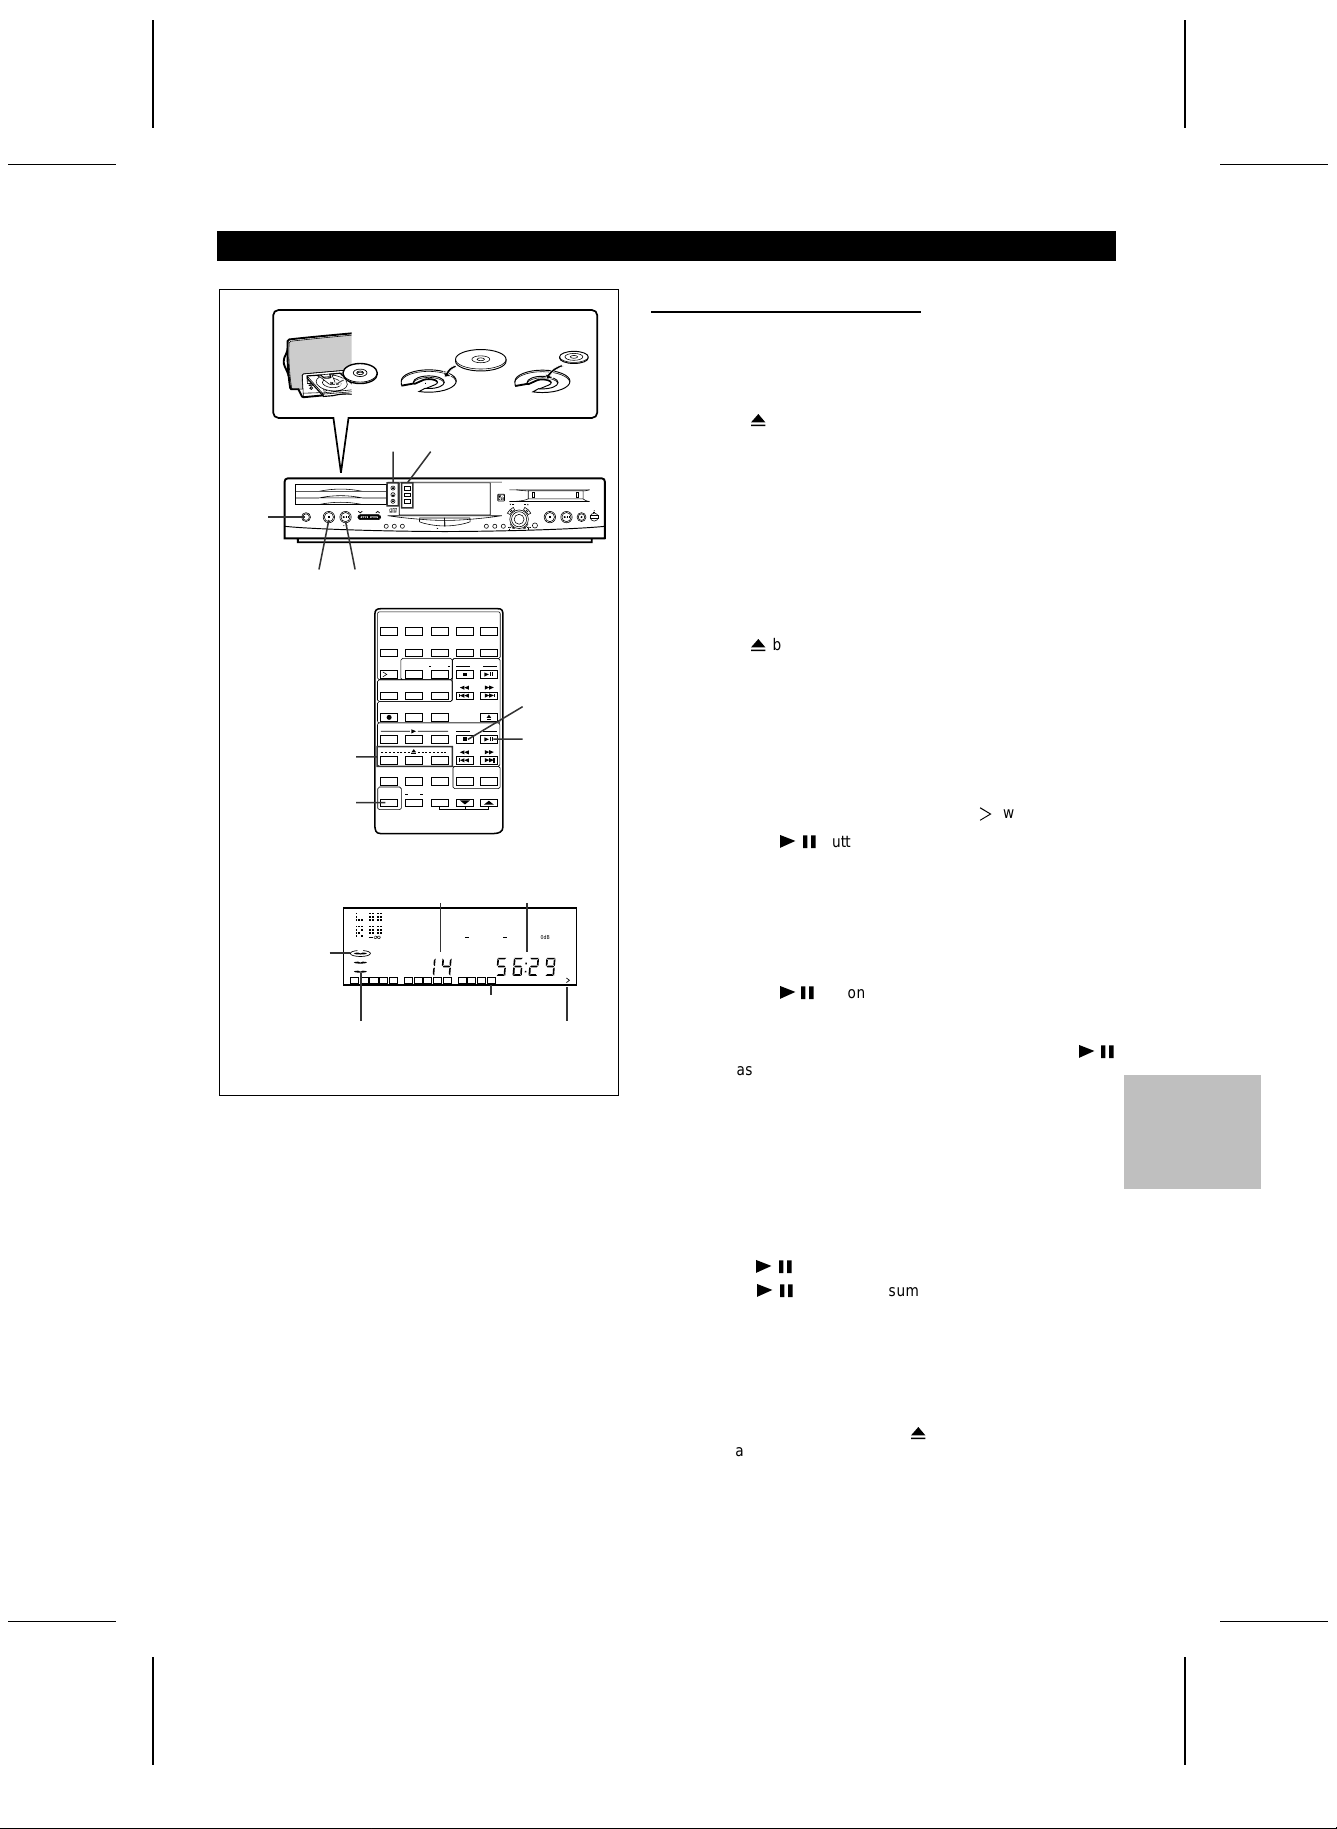
COMPACT DISC OPERATION
■Loading and playing CDs
DISC-2
DISC-3
CD
POWER
ON/STAND-BY
1
26
3,5
Total number of tracks
The red frame
that corresponds to the
selected CD
tray will light
up.
The tray with a CD
will be displayed.
4
12 cm (5")
1
TUNING
2
3
CD PLAY
VOLUME
TUNER
SURROUND
3D
(BAND)
ON/OFF
MODE
DISC-1
DISC-2
DISC-3
CD
1 2 3
1
1 2 3 4 5 6 7 8 9 10 11 12 13 14
REC
MD
CURSOR
ENTER
TIMER /
NAME /
DISPLAY
DELETE
TOC EDIT
START
ACK
TR
CD MD DIGITAL EDIT
3,5
CD PLAY
1
2
3
CD PLAY
VOLUME
TUNER
SURROUND
3D
(BAND)
MODE
ON/OFF
MD/CD/TUNER DIRECT KEY
1 2 3 4 5
6
7 8 9 10/0
ST-MODE
10
PROGRAM
CLEAR
REC
REC
MARK
1 2 3
1 2 3
ON/
AUX
STAND-BY
1
2
3
TRACK START
CD MD DIGITAL EDIT
TUNER
BAND
P-MODE
AUTO
MARK
TIMESLEEP DISPLAY
BASS/
TREBLE
8 cm (3")
TUNING
CURSOR
MD
NAME /
TIMER /
TOC EDIT
DELETE DISPLAY
MD
REC
ENTER
2
CD
6
SURROUND
3D
MODE ON/OFF
VOLUME
Total playing time
12
4 0dB
OVER
TOTAL
Music schedule
(More tracks indicator)
1 Set the ON/STAND-BY switch to ON.
2 Press the CD ■ button.
3 Press the
● Press the button of the disc tray (1 - 3) where you want to
load a disc.
● You cannot open more than one disc tray at the same time.
7
button to open the disc tray.
4 Place the CD(s) on the disc tray, label side up.
● Be sure to place 8 cm (3") disc in the middle of a disc holder.
Caution:
Do not place more than 1 CD in any tray position.
This can damage the player and the CDs.
5 Press the
● Repeat steps 3 - 5 to load one disc each into the second
and third disc trays.
● The total number of tracks and the total playing time on the
selected disc will be displayed. At this time, the red frame
that corresponds to the selected disc tray will light up.
● The music schedule will be displayed only for the number of
tracks on the disc.
● If the CD contains more than 21 tracks, "Y" will appear.
6 Press the CD
● Playback will begin from track 1 on the disc you have specified to play.
● After the disc finishes playing, the next disc will be automatically played.
● When there is no CD in one of the disc 1 - 3 positions, that
position will be skipped and the next CD will be played.
● When the CD
with the jog dial whilst the red frame mark of Disc 1 is lit,
playback will start from the chosen track.
● When the CD PLAY "2" button is pressed after the CD
button has been pressed, continuous playback will be performed, in order, from disc 2 and disc 3.
When the CD PLAY "3" button is pressed, only disc 3 will be
played back.
● When the last track on the third disc has finished playing, the
unit will stop automatically.
7
button of the disc tray which is open.
0 6
button.
0 6
button is pressed after a track is chosen
0 6
To interrupt playback:
Press the CD
Press the CD
point.
To stop playback:
Press the CD ■ button.
To remove the CDs:
Whilst in the stop mode, press the 7 button.
● When playing back a CD, it is possible to remove or change
the other two as required.
To switch the unit off after use:
Set the ON/STAND-BY switch to STAND-BY.
E-9
MD-ZV30H TINSZ0217AWZZ
0 6
button.
0 6
button to resume playback from the same

<P=005>
(Continued)
DISC-1
DISC-2
DISC-3
ON/STAND-BY
CD
1 2 3
CD
1 2 3
MD/CD/TUNER DIRECT KEY
1 2 3 4 5
6
7 8 9 10/0
ST-MODE
10
PROGRAM
CLEAR
REC
REC
MODE
1 2 3
1 2 3
ON/
AUX
STAND-BY
VOLUME
TUNER
BAND
P-MODE
AUTO
MARK
TIMESLEEP DISPLAY
BASS/
TREBLE
TUNER
SURROUND
3D
(BAND)
MODE
ON/OFF
CD PLAY
3D
MODE ON/OFF
1
2
3
CD PLAY
1
2
3
MD
CD
SURROUND
VOLUME
TRACK START
CD MD DIGITAL EDIT
TUNING
CURSOR
NAME /
TIMER /
TOC EDIT
DELETE DISPLAY
MD
ENTER
CD
1 2 3
■When choosing a CD for playback
REC
Press one of the buttons CD PLAY 1 - CD PLAY 3 to select the
CD you want to listen to.
● Only the selected CD will be played back.
When selecting
disc tray 1
1
2
3
When selecting
disc tray 2
1
2
3
When selecting
disc tray 3
1
2
3
Notes:
● If any disc tray is open, it will be automatically closed.
● If the CD
0 6
button is pressed, continuous playback will
be performed from the first track of disc 1, even after disc 2
or disc 3 has been selected.
Direct playback:
If a CD is loaded in the unit, pressing the CD
the power on and begins playback.
0 6
button turns
Cautions:
● Do not carry the unit whilst CD’s are in the trays or a MiniDisc
is loaded. The discs may come loose inside the unit and be
damaged or cause damage to the unit. This may also cause
malfunctions.
● Do not place two CDs in one disc position.
● Do not push the disc tray whilst it is moving.
● Do not attempt to push the disc tray by hand. This may cause
malfunctions.
● If power fails whilst the tray is open, wait until the power
supply returns or gently push the tray manually to close it.
● If the disc tray is stopped forcibly, "TRAY ERROR" will appear
on the display and the unit will not function.
If this occurs, turn off the ON/STAND-BY switch and turn it
on again.
● If TV or radio interference occurs during CD operation, move
the unit away from the TV or radio.
● If a disc is damaged, dirty, or loaded upside down, the disc
will be skipped and the next disc will be automatically played.
● If the CDs are dirty or have label adhesive on their surface,
make sure to clean them before loading. If a rental CD is
loaded or a label has been peeled off from the CD, the surface may be dirty or sticky. Wipe any dirt from the surface.
If a dirty CD is loaded and played back, it may become damaged, or it could become stuck in the unit.
● If the CD
0 6
button, CD PLAY 1 - 3 button or the 7 button
is pressed when a disc tray is open, the disc tray will be
automatically closed. Be careful not to catch your finger.
● If the machine is shaken by impact or vibration, playback may
be disrupted. If the playback volume of a CD is raised excessively, playback may be disrupted. If this happens, lower
the playback volume.
E-10
MD-ZV30H TINSZ0217AWZZ

SM <P=001>
MINIDISC OPERATION
■Loading and playing MiniDiscs
1 Set the ON/STAND-BY switch to ON.
ON/STAND-BY
1
Disc name
DISC-1
DISC-2
DISC-3
CD
VOLUME
POWER
DISC-1
DISC-2
DISC-3
CD
VOLUME
3D
MODE
1 2 3
PROGRAM
STAND-BY
1
Total number
of tracks
1
2
3
CD PLAY
START
TRACK
TUNER
SURROUND
3D
(BAND)
ON/OFF
MODE
CD MD DIGITAL EDIT
1
2
3
CD PLAY
TUNER
SURROUND
TRACK START
(BAND)
ON/OFF
CD MD DIGITAL EDIT
MD/CD/TUNER DIRECT KEY
1 2 3 4 5
6
7 8 9 10/0
ST-MODE
TUNER
BAND
10
P-MODE
CLEAR
AUTO
REC
REC
MARK
MODE
1 2 3
1 2 3
ON/
3D
TIMESLEEP DISPLAY
MODE ON/OFF
BASS/
AUX
TREBLE
3
TUNING
CURSOR
ENTER
TIMER /
NAME /
DISPLAY
DELETE
TOC EDIT
TUNING
CURSOR
NAME /
TIMER /
ENTER
TOC EDIT
DELETE DISPLAY
2
MD
CD
SURROUND
VOLUME
Total playing
time
2 Press the MD ■ button.
REC
MD
MD
REC
4
2
4
3 Load a MiniDisc in the direction indicated by the arrow on
the MiniDisc, with the labeled side facing up.
● The total number of tracks and the total disc playing time will
be displayed.
● The music schedule will be displayed only for the number of
tracks on the disc.
● If the MD contains more than 21 tracks, "Y" will appear.
4 Press the MD
● If the MD has a name, the name will be scrolled.
● If the disc name or track name has not been programmed,
"NO NAME" will appear.
● When the last track has been played back, this unit will stop
automatically.
To interrupt playback:
Press the MD
● Press the MD
point.
To stop playback:
Press the MD ■ button.
To remove a MiniDisc:
Press the 7 button.
● The MiniDisc will be ejected.
0 6
button.
0 6
button.
0 6
button to resume playback from the same
DISC
1 2 3 4 5 6 7 8 9 10 11 12
Music schedule
TOTAL
(More tracks indicator)
Direct playback:
If a MiniDisc is loaded in the unit, pressing the MD
turns the power on, and begins playback.
Notes:
● The power cannot be turned off during reading of the information on a MiniDisc.
● If TV or radio interference occurs during MD operation, move
the unit away from the TV or radio.
● Although MiniDiscs will not normally skip due to vibration, you
may hear a skip in the sound if there is continuous vibration.
When the volume is turned up too high, a skip may occur
depending on the contents of MDs. If this happens, turn the
volume down and the skipping should stop.
● If "DISC ERROR" is displayed during MD operation, see
"TROUBLESHOOTING" on page 40, and try again.
0 6
button
E-11
MD-ZV30H TINSZ0217AWZZ

<P=002>
RADIO OPERATION
ON/STAND-BY
DISC-1
DISC-2
DISC-3
CD
1 2 3
1
2
3
CD PLAY
VOLUME
TUNER
SURROUND
3D
(BAND)
MODE
ON/OFF
TRACK START
CD MD DIGITAL EDIT
■Tuning
1 Set the ON/STAND-BY switch to ON.
4
TUNING
CURSOR
MD
NAME /
TIMER /
TOC EDIT
DELETE
DISPLAY
REC
ENTER
2 Press the TUNER (BAND) button.
3 Press the TUNER (BAND) button to select the desired fre-
quency band. (FM or AM)
4 Press the TUNING (
station.
X
or W) button to tune into the desired
1
2,3
MD/CD/TUNER DIRECT KEY
1 2 3 4 5
6
7 8 9 10/0
ST-MODE
TUNER
MD
BAND
10
P-MODE
PROGRAM
CLEAR
AUTO
REC
REC
MARK
MODE
TIMESLEEP DISPLAY
BASS/
TREBLE
CD
SURROUND
3D
MODE ON/OFF
VOLUME
1 2 3
1 2 3
ON/
AUX
STAND-BY
1
Aerial adjustment
AM FM
Manual tuning:
Press the TUNING (X or W) button as many times as required
to adjust the frequency shown on the display to the frequency
of the desired station.
2,35,6
Auto tuning:
When the TUNING (X or W) button is pressed for more than
0.5 seconds, scanning will start automatically and the tuner will
stop at the first receivable broadcast station.
Notes:
● When radio interference occurs during auto scan tuning, auto
scan tuning may stop automatically at that point.
● If a weak station signal is found during auto scan tuning, the
station will be skipped.
● To stop the auto tuning, press the TUNING (X or W) button
again.
5 To receive an FM stereo transmission, press the ST-MODE
button on the remote control so that the "STEREO" indicator
on the display lights up.
● "ST" will appear when an FM broadcast is in stereo.
6 If the FM reception is weak, press the ST-MODE button on
the remote control so that the "STEREO" indicator goes out.
● Although the reception changes to monaural, the sound
becomes clearer.
POW
ER
CD
VOLUME
TUNING
CURSOR
TUN
ER
TUNER
TUNER
(BAN
D)
(BAND)
MD
(BAND)
TRACK
REC
START
N
A
M
E
/
T
IM
E
R
/
T
O
C
E
D
IT
D
E
LE
T
E
D
IS
P
LA
Y
CD M
EN
TER
D DIG
ITAL EDIT
POW
ER
CD
VOLUME
TUNING
CURSOR
TUNER
TUNER
TUNER
(BAND)
(BAND)
MD
(BAND)
TRACK START
REC
N
A
M
E
/
T
IM
E
R
/
T
O
C
E
D
IT
D
E
LE
T
E
D
IS
P
LA
Y
CD
ENTER
M
D
DIG
ITAL EDIT
To switch the unit off after use:
Set the ON/STAND-BY switch to STAND-BY.
Notes:
● The tuners memory will store the last station you were listening to in each band, even when the ON/STAND-BY button is
switched to STAND-BY.
● If the unit receives a radio broadcast near a radio or a TV
set, the radio, the TV set or the unit may pick up noise.
Move the unit as far away from the TV set or radio as
possible.
Direct playback:
When the TUNER (BAND) button is pressed and the power is
turned on and the last received station will be selected.
E-12
MD-ZV30H TINSZ0217AWZZ
 Loading...