

Y
<P=001>
O
Y
O
<P=001>
Y
O
<P=001>
Y
<P=001>
O
Y
<P=001>
O
MD/CD DECK
PLATINE MD/CD
PLATINA MD/CD
MD/CD DECK
PIASTRA PER MD/CD
MD/CD DECK
MD/CD DECK
MODELL
MODÈLE
MODELO
MODELL
MODELLO
MODEL
MODEL
MD-R3H
BEDIENUNGSANLEITUNG
MODE D’EMPLOI
MANUAL DE MANEJO
BRUKSANVISNING
MANUALE DI ISTRUZIONI
GEBRUIKSAANWIJZING
OPERATION MANUAL
MD-R3H
ENGLISH NEDERLANDS ITALIANO SVENSKA ESPAÑOL FRANÇAIS DEUTSCH
BESONDERE ANMERKUNGEN
REMARQUES SPÉCIALES
NOTAS ESPECIALES
SÄRSKILDA ANMÄRKNINGAR
NOTE PARTICOLARI
BIJZONDERE OPMERKINGEN
SPECIAL NOTES
● This equipment complies with the requirements of
Directives 89/336/EEC and 73/23/EEC as amended
by 93/6 8/EEC.
● Dieses Gerät entspricht den Anforderungen der
EG-Richtlinien 89/336/EWG und 73/23/EWG mit
Änderung 93/68/EW G.
● Ce matériel répond aux exigences contenues dans
les directives 89/336/CEE et 73/23/CEE modifiées
par la dir ective 93/6 8/CEE.
● Dit apparaat voldoet aan de eisen van de richtlijnen
89/336/EEG en 73/23/EEG, gewijzigd door
93/68/E EG.
● Dette udstyr overholder kravene i direktiv nr.
89/336/EEC og 73/23/EEC med tillæg nr.
93/68/E EC.
● Quest’ apparecchio è conforme ai requisiti delle
direttive 89/336/EEC e 73/23/EEC, come emendata
dalla direttiva 93/68/EEC.
● Este equipamento obedece às exigências das
directivas 89/336/CEE e 73/23/CEE, na sua versão
corrig ida pela dire ctiva 93/68/ CEE.
● Este aparato satisface las exigencias de las
Directivas 89/336/CEE y 73/23/CEE, modificadas por
medio de la 93/68/CEE.
● Denna utrustning uppfyller kraven enligt riktlinjerna
89/336/EEC och 73/23/EEC så som kompletteras av
93/68/E EC.
● Dette produktet oppfyller betingelsene i direktivene
89/336/EEC og 73/23/EEC i endringen 93/68/EEC.
● Audio-visuelles Material kann Urheberrechte
umfassen, die ohne Genehmigung des Eigentümers
dieser Urheberrechte nicht aufgenommen werden
dürfen. Siehe die entsprechenden nationalen
Gesetze.
● Le matériel audio-visuel peut comporter des oeuvres
faisant l’objet de droits d’auteur qui ne peuvent être
enregistrées sans l’autorisation du possesseur du
droit d’auteur, veuillez vous référer aux
réglementations nationales en vigueur.
● El material audiovisual puede consistir en trabajos
que tengan derechos de autor y que no deben
grabarse sin la autorización del poseedor de dichos
derechos de autor. Sírvase consultar las leyes
aplicables en su país.
● Audiovisuellt material kan innehålla
upphovsrättsarbete som inte skall mångfaldigas utan
tillstånd av copyrightinnehavaren. Se den tillämpliga
lagen i ditt land.
● Il materiale audio-visivo che fosse soggetto a
copyright non può essere registrato senza
l’autorizzazione del possessore del copyright. Si
prega di attenersi alle leggi in vigore sul territorio
nazionale.
● Audio-visueel materiaal kan worden beschermd door
auteursrechten, in welk geval het niet mag worden
opgenomen zonder de toestemming van de
auteursrechthouder. Zie voor nadere informatie de
betreffende wetten in het land van gebruik.
● Audio-visual material may consist of copyrighted
works which must not be recorded without the
authority of the owner of the copyright. Please refer
to relevant law in your country.
US and forein patents licensed from Dolby Laboratories Licensing Corporation.
● Tämä laite täyttää direktiivien 89/336/EEC ja
73/23/EEC vaatimukset, joita on muutettu direktiivillä
93/68/EEC.
MD-R3H
i
● Bei Einstellung der ON/STAND-BY-Taste auf
STAND-BY ist die Netzspannung immer noch im
Gerät vorhanden.
Wenn die ON/STAND-BY-Taste auf STAND-BY
eingestellt und die Uhr angezeigt wird, kann das
Gerät unter Verwendung der Timer-Betriebsart oder
Fernbedienung in Betrieb gesetzt werden.
Warnung:
In diesem Gerät sind keine vom Benutzer wartbaren
Teile vorhanden. Niemals Abdeckungen entfernen,
außer wenn Sie dafür qualifiziert sind. In diesem
Gerät sind gefährliche Spannungen vorhanden. Vor
Ausführung von irgendwelchen Kundendienstarbeiten oder bei längerer Nichtverwendung des Gerätes
stets den Netzstecker aus der Netzsteckdose ziehen.
● Lorsque la touche ON/STAND-BY est mise en
STAND-BY, l’appareil est toujours sous tension.
Lorsque la touche ON/STAND-BY se trouve sur la
position STAND-BY et que l’horloge est affichée,
l’appareil est prêt à fonctionner par la minuterie ou
la télécommande.
Avertissement:
Cet appareil contient des pièces non réparables par
l’utilisateur. Personne non qualifiée n’enlèvera jamais
les couvercles.L’appareil contenant des organes
portés à haute tension, débrancher l’appareil avant
toute rép aration ou en pé riode de non- utilisation .
● Cuando el botón ON/STAND-BY está puesto en la
posición STAND-BY, todavía hay tensión dentro del
aparato.
Cuando el botón ON/STAND-BY está puesto en la
posición STAND-BY y el reloj se enciende, el
aparato puede ponerse en funcionamiento utilizando
el modo del temporizador o el controlador remoto.
Advertencia:
Tenga en cuenta que dentro de este aparato no hay
piezas que pueda reparar. No quite nunca las tapas
a menos que se esté cualificado para hacerlo. Este
aparato tiene en su interior tensiones peligrosas.
Desenchufe siempre la clavija de la red del
tomacorriente antes de realizar cualquier servicio de
mantenimiento y cuando no se use el aparato
durante un largo per íodo de tiempo.
● Når ON/STAND-BY-knappen er sat pä STAND-BY
positionen, er der stadig netspænding til stede i
apparatet.
Når ON/STAND-BY-knappen er sat i STAND-BYposition, og uret vises, kan apparatet startes v.hj.a.
timer-funksjonen eller fjernbetjeningen.
Advarsel:
Apparatet indeholder ingen dele, der kan repareres
af brugeren selv. Fjern aldrig kabinettet med mindre
De er kvalificeret hertil. Apparatet indeholder farlig
strømspænding. Træk altid stikket ud af
stikkontakten før der foretages reparationer, eller
hvis appara tet ikke er i brug i længere tid.
● Quando il tasto ON/STAND-BY si trova in posizione
STAND-BY, all’interno dell’apparecchio c’è ancora la
corrente.
Se il tasto ON/STAND-BY si trova nella posizione
STAND-BY e l’orologio è visualizzato, l’unità può
venire accesa con il modo timer o con il
telecomando.
Avvertenza:
L’apparecchio non contiene parti riparabili dall’utente.
Non togliere mai i coperchi, a meno di non essere
qualificati per farlo. All’interno dell’apparecchio ci
sono tensioni pericolose, per cui si deve sempre
staccare la spina del cavo d’alimentazione dalla
presa di corrente prima di qualsiasi intervento di
manutenzione e quando non si usa l’apparecchio per
un lungo periodo di tempo.
● Wanneer de ON/STAND-BY toets in de STAND-BY
stand staat, loopt er nog steeds stroom
(netspanning) rond in het toestel. Wanneer de
ON/STAND-BY toets in de STAND-BY stand staat
en de klok in het display oplioht, kan het toestel
ingeschakeld worden via de timerfunktie of de
afstandsbediening.
Waarschuwing:
Dit toestel bevat geen door de gebruiker te repareren
onderdelen. Verwijder de behuizing nooit tenzij u
deskundig bent op dit gebied. In het toestel loopt
een gevaarlijke spanning rond; haal de stekker altijd
uit het stopkontakt alvorens onderhoud uit te voeren
of wanneer het toestel voor langere tijd niet gebruikt
wordt.
● När ON/STAND-BY knappen är i läge STAND-BY,
finns nätspänning i apparaten.
Med ON/STAND-BY knappen i läge STAND-BY och
när klocktid visas, kan apparaten startas med
timerfunktion eller fjärrkontrollen.
Varning:
Apparaten innehåller inga delar som kan åtgärdas
av kunden. Höljet får endast öppnas av kvalificerad
personal. Apparaten innehåller farliga spänningar.
Stickkontakten ska därför dras ut från nätuttaget före
reparationsarbeten och bör dras ut om apparaten
inte ska användas på mycket läng e.
SEEGSP02.CHP
MD-R3H
● When the ON/STAND-BY button is set at STAND-BY
position, mains voltage is still present inside the unit.
When the ON/STAND-BY button is set at STAND-BY
position and the clock is displayed, the unit may be
brought into operation by the timer mode or remote
control.
Warning:
This unit contains no user serviceable parts. Never
remove covers unless qualified to do so. This unit
contains dangerous voltages, always remove mains
plug from the socket before any service operation
and when not in use fo r a long perio d.
DENNA APPARAT ÄR ANSLUTEN TILL 230 V
VÄXELSTRÖM NÄR STICKPROPPEN ÄR INSKJUTEN
I VÄGGUTTAGET. FÖR ATT FULLSTÄNDIGT
KOPPLA IFRÅN APPARATEN, V.G. DRAG UT
STICKPROPPEN.
ii
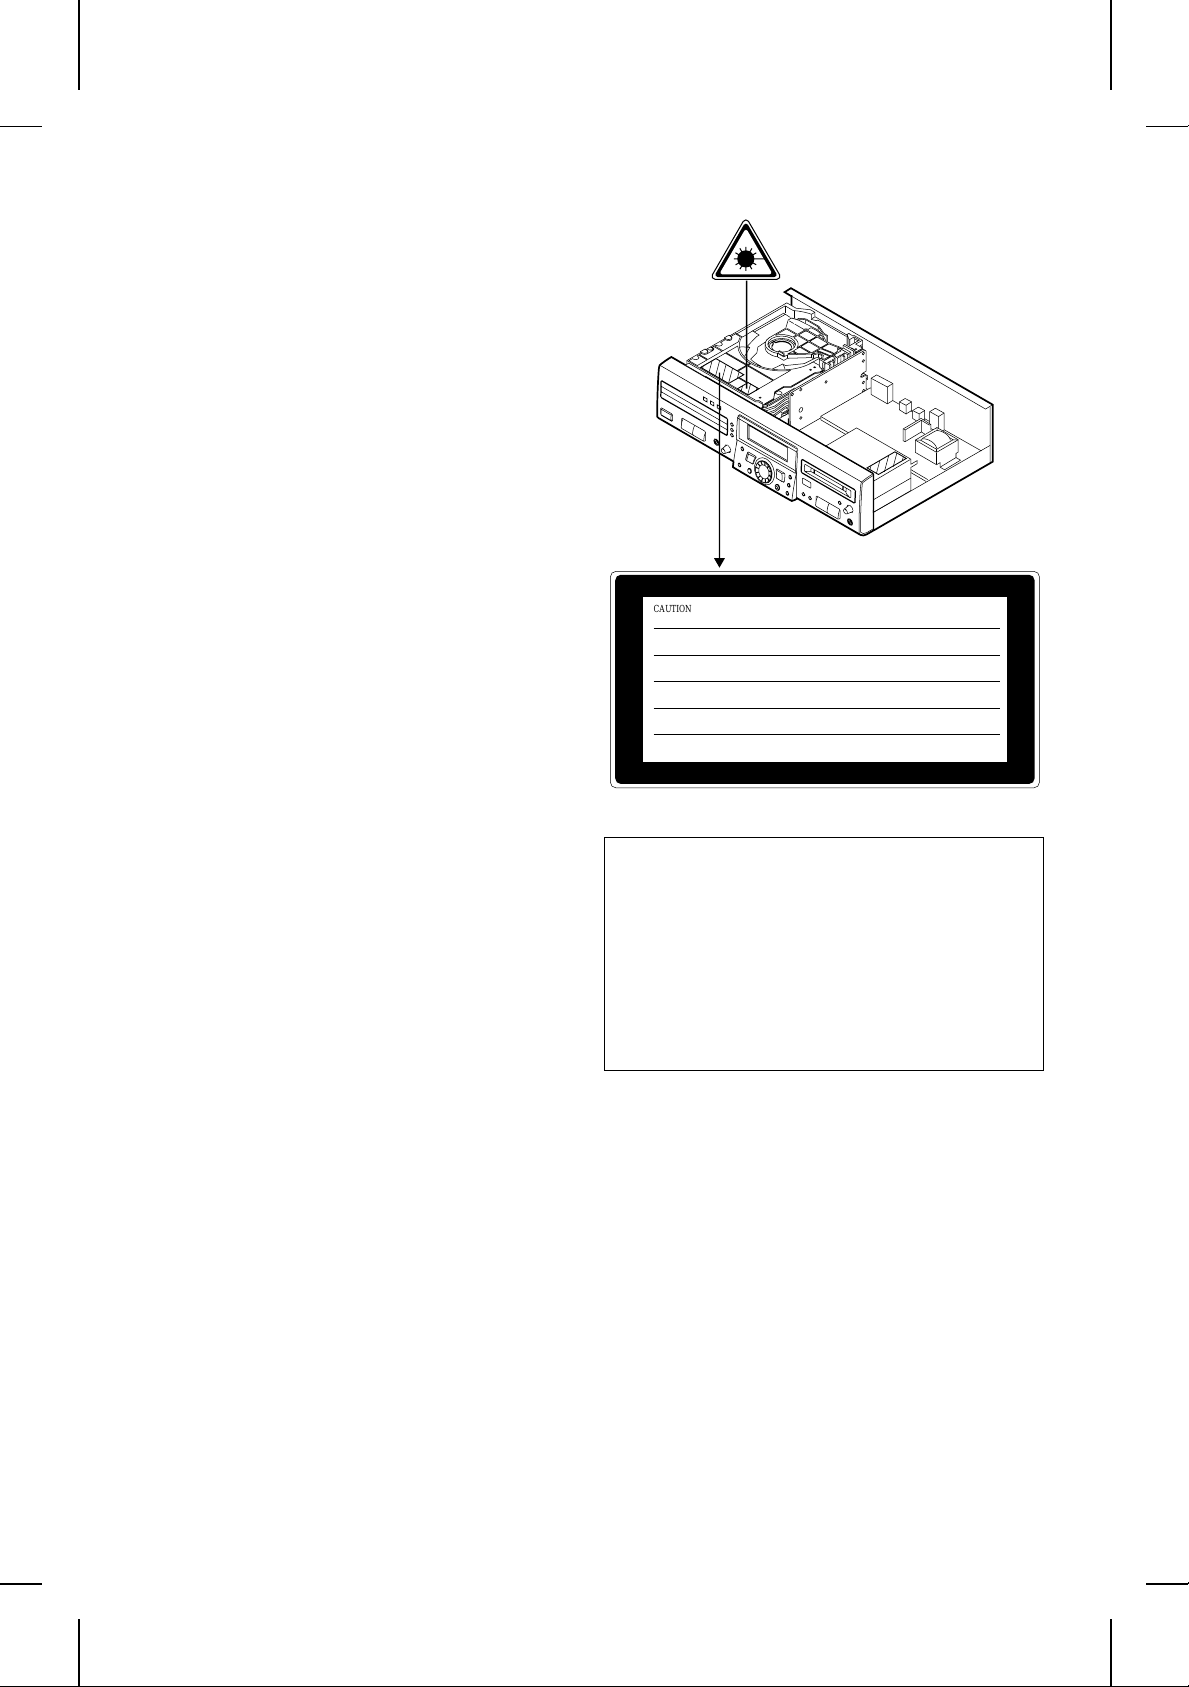
● CAUTION
Use the MD/CD deck only in accordance with the
instructions given in this manual and do not attempt
to interfere with the interlock switch or make any other
adjustment as this may result in exposure to
hazardous radiation.
● VORSICHT
Verwenden Sie das MD/CD Deck nur entsprechend
den in dieser Anleitung angegebenen Anweisungen,
und versuchen Sie nicht, den Verriegelungsschalter zu
beeinträchtigen, oder machen Sie keine andere
Einstellung, da dies dazu führen kann, gefährlicher
Ausstrahlung ausgesetzt zu werden.
● ATTENTION
Utiliser la platine MD/CD en respectant les indications
données dans ce manuel et éviter l’intervention sur le
commutateur de verrouillage ou tout autre réglage. En
cas de non-respect, on s’exposera à une radiation
dangereuse.
● PRECAUCIÓN
Utilice la platina MD/CD sólo de acuerdo con las
instrucciones dadas en este manual y no intente
interferir el interruptor de bloqueo ni realizar ningún
otro ajuste porque podría ocasionar la exposición a
radiación peligrosa.
● OBSERVERA
Använd den MD/CD deck endast i enlighet med
anvisningarna i denna bruksanvisning och försök inte
påverka låsningsströmbrytaren eller göra andra
inställningar som kan leda till risk för farlig strålning.
● ATTENZIONE
Quando si usa la piastra per MD/CD, seguire le
istruzioni di questo. Non cercare di interferire con
l’interruttore interbloccato e non effettuare altre
regolazioni, poiché ciò potrebbe provocare
un’esposizione a pericolose radiazioni.
● LET OP
Gebruik dit MD/CD deck alleen zoals in de
aanwijzingen in deze gebruiksaanwijzing staat
vermeld. Maak geen veranderingen in de
interlockschakelaar of andere onderdelen, daar dit
mogelijk blootstelling aan gevaarlijke stralingen
veroorzaakt.
Bij dit produkt zijn batterijen geleverd.
Wanneer deze leeg zijn, moet u ze niet
weggooien maar inleveren als KCA.
LASER KLASSE 1
LUOKAN 1 LASERLAITE
KLASS 1 LASERAPPARAT
MD-R3H
iii
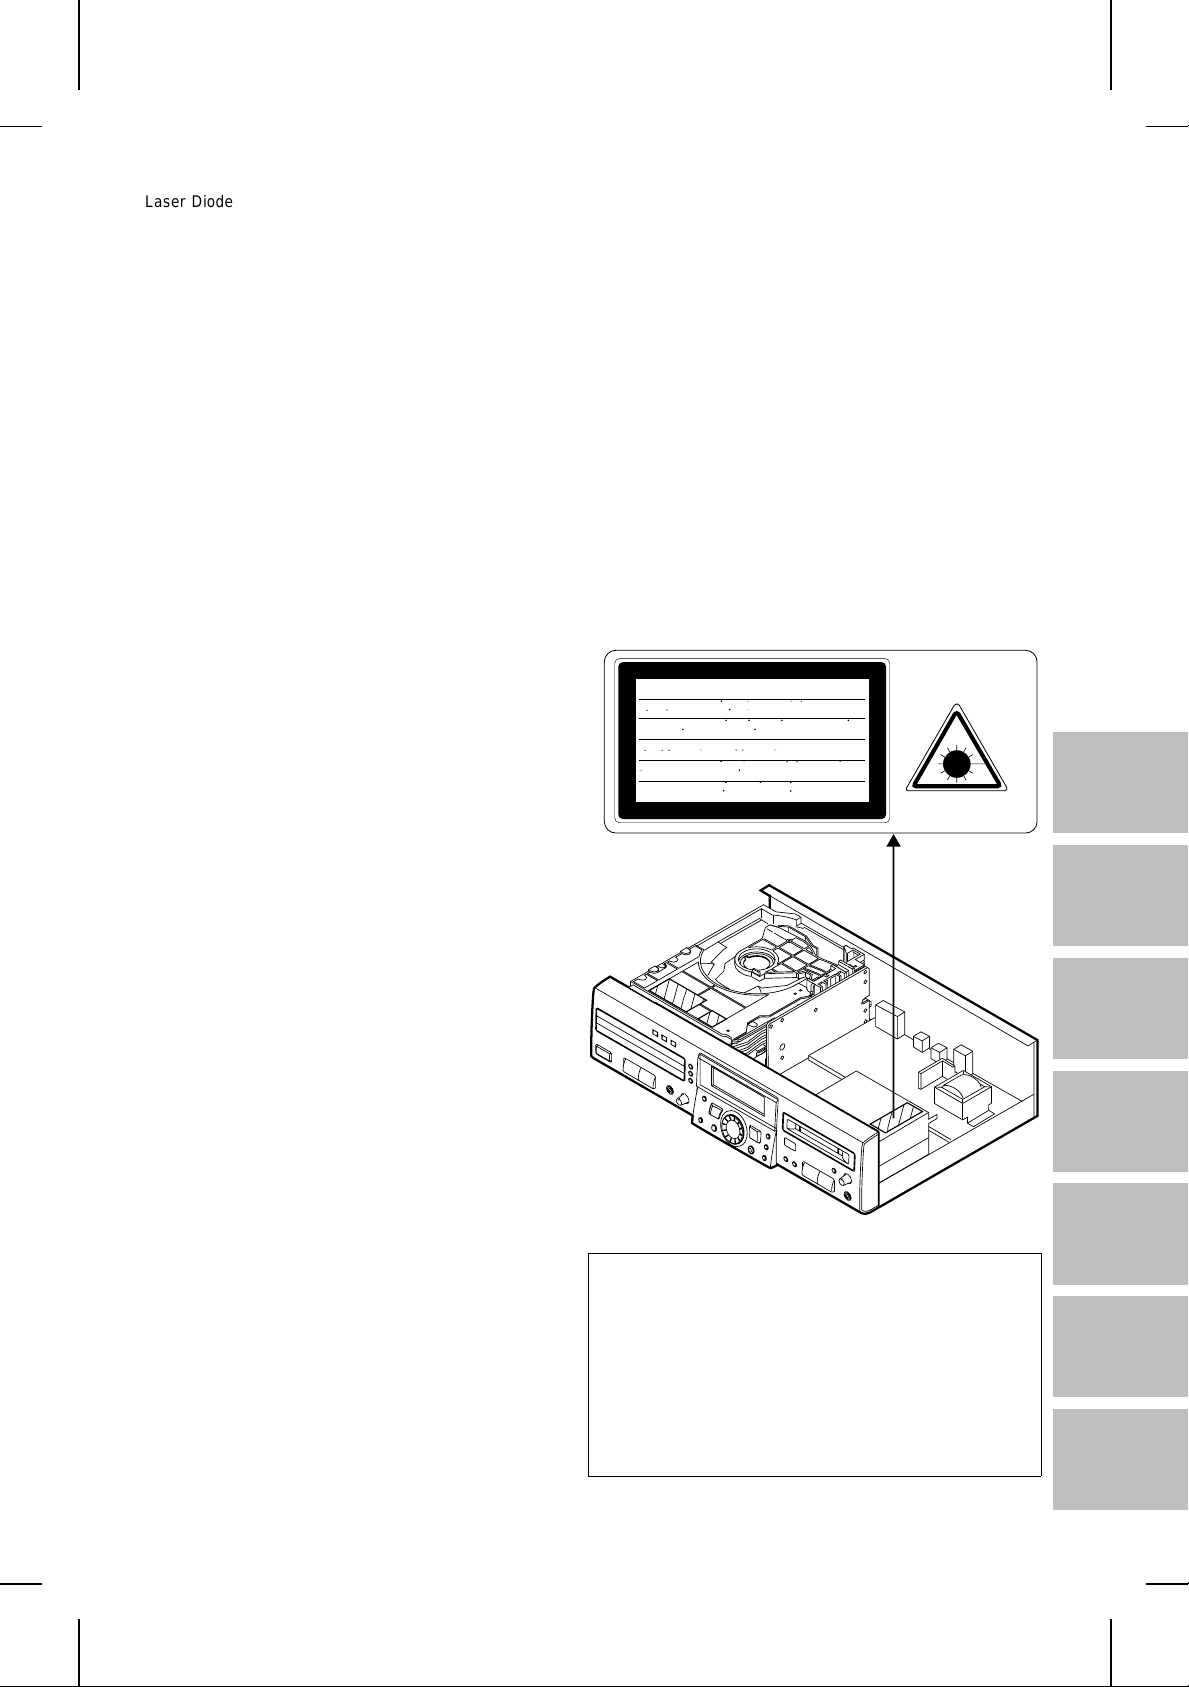
Laser Diode Properties
● Material: GaAlAs
● Wavelength: 785 nm
● Pulse time:
Read mo de: 0.8 mW Co ntinuous
Write mode: max 10 mW 0.5S
min cycle 1.5S
Repetition
Laserdiodens egenskaber
● Materiale: GaAlAs
● Bolgelængde: 785 nm
● Impulstider:
Læsemodus: 0,8 mW kontinuerlig
Skrivemodus: max 10 mW 0,5 S
min cyklus 1,5 S
Repetition
Eigenschaften der Laserdiode
● Material: GaAlAs
● Wellenlänge: 785 nm
● Impulszeit:
Lesemodus: 0,8 mW, kontinuierlich
Schreibmodus: max. 10 mW, 0,5 S
min. Zyklus 1,5 S
Wiederholung
Caractéristiques de la diode laser
● Matière: GaAlAs
● Longueur d’onde: 785 nm
● Durées de l’impulsion:
Mode de lecture: 0,8 mW (ininterrompue)
Mode d’écriture: 10 mW (maxi), 0,5 s
Cycle mini 1,5 s
Répétition
Propiedades del diodo láser
● Material: GaAlAs
● Longitud de onda: 785 nm
● Tiempos del pulso:
Modo de lectura: 0,8 mW continuo
Modo de escritura: máx. 10 mW 0,5s
Ciclo min 1,5s
Repetición
Laserdiodens egenskaper
● Material: GaAlAs
● Våglängd: 785 nm
● Impulstider:
Läsfunktion: 0,8 mW kontinuerlig
Skrivfunktion: max. 10 mW 0,5 S
min. cykel 1,5 S
Repetition
Laserdiodens egenskaper
● Material: GaAlAs
● Bølgelengde: 785 nm
● pulstid:
Lese-modus: 0,8 mW kontinuerlig
Skrive-modus: maks. 10 mW 0,5 S
min. syklus 1,5 S
Gjentakelse
CAUTION - INVISIBLE LASER RADIATION WHEN OPEN AND INTERLOCKS
DEFEATED . AVOID EXPOSURE TO BEAM .
VARNING - OSYNLIG LASERSTRALNING NAR DENNA DEL AR OPPNAD OCH
AR URKOPPLADE . STRALEN AR FARLIG.
SPARRAR
ADVARSEL - USYNLIG LASERSTRALING NAR DEKSEL APNES OG SIKKERHEDSLAS
BRYTES . UNNGA EKSPONERING FOR STRALEN .
VARO! AVATTAESSA JA SUOJALUKITUS OHITETTAESSA OLET ALTTIINA
NAKYMATON LASERSATEILYLLE . ALA KATSO SATEESEN .
VARNING - OSYNLIG LASERSTRALING NAR DENNA DEL AR OPPNAD OCH SPARREN
AR URKOPPLAD . BETRAKTA EJ STRALEN .
ADVARSEL - USYNLIG LASERSTRALING VED ABNING . NAR SIKKERHEDSAFBRYDERE
ER UDE AF FUNKTION . UNDGA UDSETTELSE FOR STRALING .
Proprietà del diodo laser
● Materiale: GaAlAs
● Lunghezza d’onda: 785 nm
● Tempo di impulso:
Modo di lettura: 0,8 mW Continua
Modo di scrittura: max 10 mW 0,5 S
ciclo minimo 1,5 S
Ripetizione
Karakteristieken van laserdiode
● Materiaal: GaAlAs
● Golflengte: 785 nm
● Pulstijden:
Leesfunktie: 0,8 mW Doorlopend
Schrijffunktie: max. 10 mW 0,5 S
min. cycle 1,5 S
Herhaling
VAROITUS! LAITTEEN KÄYTTÄMINEN MUULLA KUIN
TÄSSÄ
KÄYTTÖOHJEESSA MAINITULLA TAVALLA SAATTAA
ALTISTAA KÄYTTÄJÄN TURVALLISUUSLUOKAN 1
YLITTÄVÄLLE NÄKYMÄTTÖMÄLLE LASERSÄTEILYLLE.
VARNING - OM APPARATEN ANVÄNDS PÅ ANNAT SÄTT
ÄN I DENNA BRUKSANVISNING SPECIFICERAS. KAN
ANVÄNDAREN UTSÄTTAS FÖR OSYNLIG
LASERSTRÅLNING, SOM ÖVERSKRIDER GRÄNSEN FÖR
LASERKLASS 1.
iv
MD-R3H
Eigenschaften der Laserdiode
Material: GaAIAs
Wellenlänge: 780 nm
Emissionsdauer: kontinuierlich
Laser-Ausgang: max. 0,6 mW
Caractéristiques de la diode laser
Matériel: GaAIAs
Longueur d’onde: 780 nm
Durée d’émission: ininterrompue
Puissance de sortie laser maximale: 0,6 mW
Características del diodo láser
Material: GaAIAs
Longitud de onda: 780 nm
Duración de emisión: continua
Salida de láser: máx. 0,6 mW
Laserdiodens egenskaper
Material: GaAIAs
Våglängd: 780 nm
Utstrålningsvaraktighet: kontinuerlig
Lasereffekt: max. 0,6 mW
Proprietà del diodo laser
Materiale: GaAIAs
Lunghezza d’onda: 780 nm
Durata di emissione: continua
Uscita massima del laser: 0,6 mW
Laser diode specifikaties
Materiaal: GaAIAs
Golflengte: 780 nm
Stralingsduur: doorlopend
Laseruitgang: max. 0,6 mW
Laser Diode Properties
Material: GaAIAs
Wavelength: 780 nm
Emission Duration: continuous
Laser Output: max. 0.6 mW
CAUTION - INVISIBLE LASER RADIATION WHEN OPEN AND INTERLOCKS DEFEATED
AVOID EXPOSURE TO BEAM .
VARNING - OSYNLIG LASERSTRÅLNING NÄR DENNA DEL ÄR ÖPPNAD OCH SPÄRRAR
ÄR URKOPPLADE. STRÅLEN ÄR FARLIG.
ADVARSEL - USYNLIG LASERSTRÅLING NÅR DEKSEL ÅPNES OG SIKKERHEDSLÅS
BRYTES. UNNGÅ EKSPONERING FOR STRÅLEN.
VARO! AVATTAESSA JA SUOJALUKITUS OHITETTAESSA OLET ALTTIINA
NÄKYMÄTÖN LASERSÄTEILYLLE. ÄLÄ KATSO SÄTEESEN.
VARNING - OSYNLIG LASERSTRÅLING NÄR DENNA DEL ÄR ÖPPNAD OCH SPÄRREN
ÄR URKOPPLAD. BETRAKTA EJ STRÅLEN.
ADVARSEL - USYNLIG LASERSTRÅLING VED ÅBNING NÅR SIKKERHEDSAFBRYDERE
ER UDE AF FUNKTION. UNDGÅ UDSETTELSE FOR STRÅLING.
VAROITUS! LAITTEEN KÄYTTÄMINEN MUULLA KUIN
TÄSSÄ
KÄYTTÖOHJEESSA MAINITULLA TAVALLA SAATTAA
ALTISTAA KÄYTTÄJÄN TURVALLISUUSLUOKAN 1
YLITTÄVÄLLE NÄKYMÄTTÖMÄLLE LASERSÄTEILYLLE.
VARNING - OM APPARATEN ANVÄNDS PÅ ANNAT
SÄTT ÄN I DENNA BRUKSANVISNING SPECIFICERAS.
KAN ANVÄNDAREN UTSÄTTAS FÖR OSYNLIG
LASERSTRÅLNING, SOM ÖVERSKRIDER GRÄNSEN
FÖR LASERKLASS 1.
MD-R3H
v
ENGLISH
INTRODUCTION
Thank you for purchasing this SHARP product.
For the best performance, read this manual carefully. It will guide you in operating your SHARP product.
CONTENTS
Page
ACCESSORIES . . . . . . . . . . . . . . . . . . . . . . . . . . . . . . . . 1
PRECAUTIONS . . . . . . . . . . . . . . . . . . . . . . . . . . . . . . . . 2
NAMES OF CONTROLS AND INDICATORS . . . . . . . . 3
REMOTE CONTROL . . . . . . . . . . . . . . . . . . . . . . . . . . . . 4
CONNECTIONS . . . . . . . . . . . . . . . . . . . . . . . . . . . . . . .5-7
SETTING THE CLOCK . . . . . . . . . . . . . . . . . . . . . . . . .8-9
MINIDISC OPERATION . . . . . . . . . . . . . . . . . . . . . . . . 10
COMPACT DISC OPERATION . . . . . . . . . . . . . . . .11-12
CD AND MD OPERATIONS . . . . . . . . . . . . . . . . . . .13-17
RECORDING . . . . . . . . . . . . . . . . . . . . . . . . . . . . . . .18-24
EDITING . . . . . . . . . . . . . . . . . . . . . . . . . . . . . . . . . . .25-35
HOW TO USE THE BUILT-IN TIMER . . . . . . . . . . .36-38
WHAT IS A MINIDISC? . . . . . . . . . . . . . . . . . . . . . . 39-40
MINIDISC SYSTEM LIMITATIONS . . . . . . . . . . . . . . . 40
TROUBLESHOOTING . . . . . . . . . . . . . . . . . . . . . . . 41-43
TRANSPORTING THE UNIT . . . . . . . . . . . . . . . . . . . . 43
MAINTENANCE . . . . . . . . . . . . . . . . . . . . . . . . . . . . . . 44
SPECIFICATIONS . . . . . . . . . . . . . . . . . . . . . . . . . . . . . 44
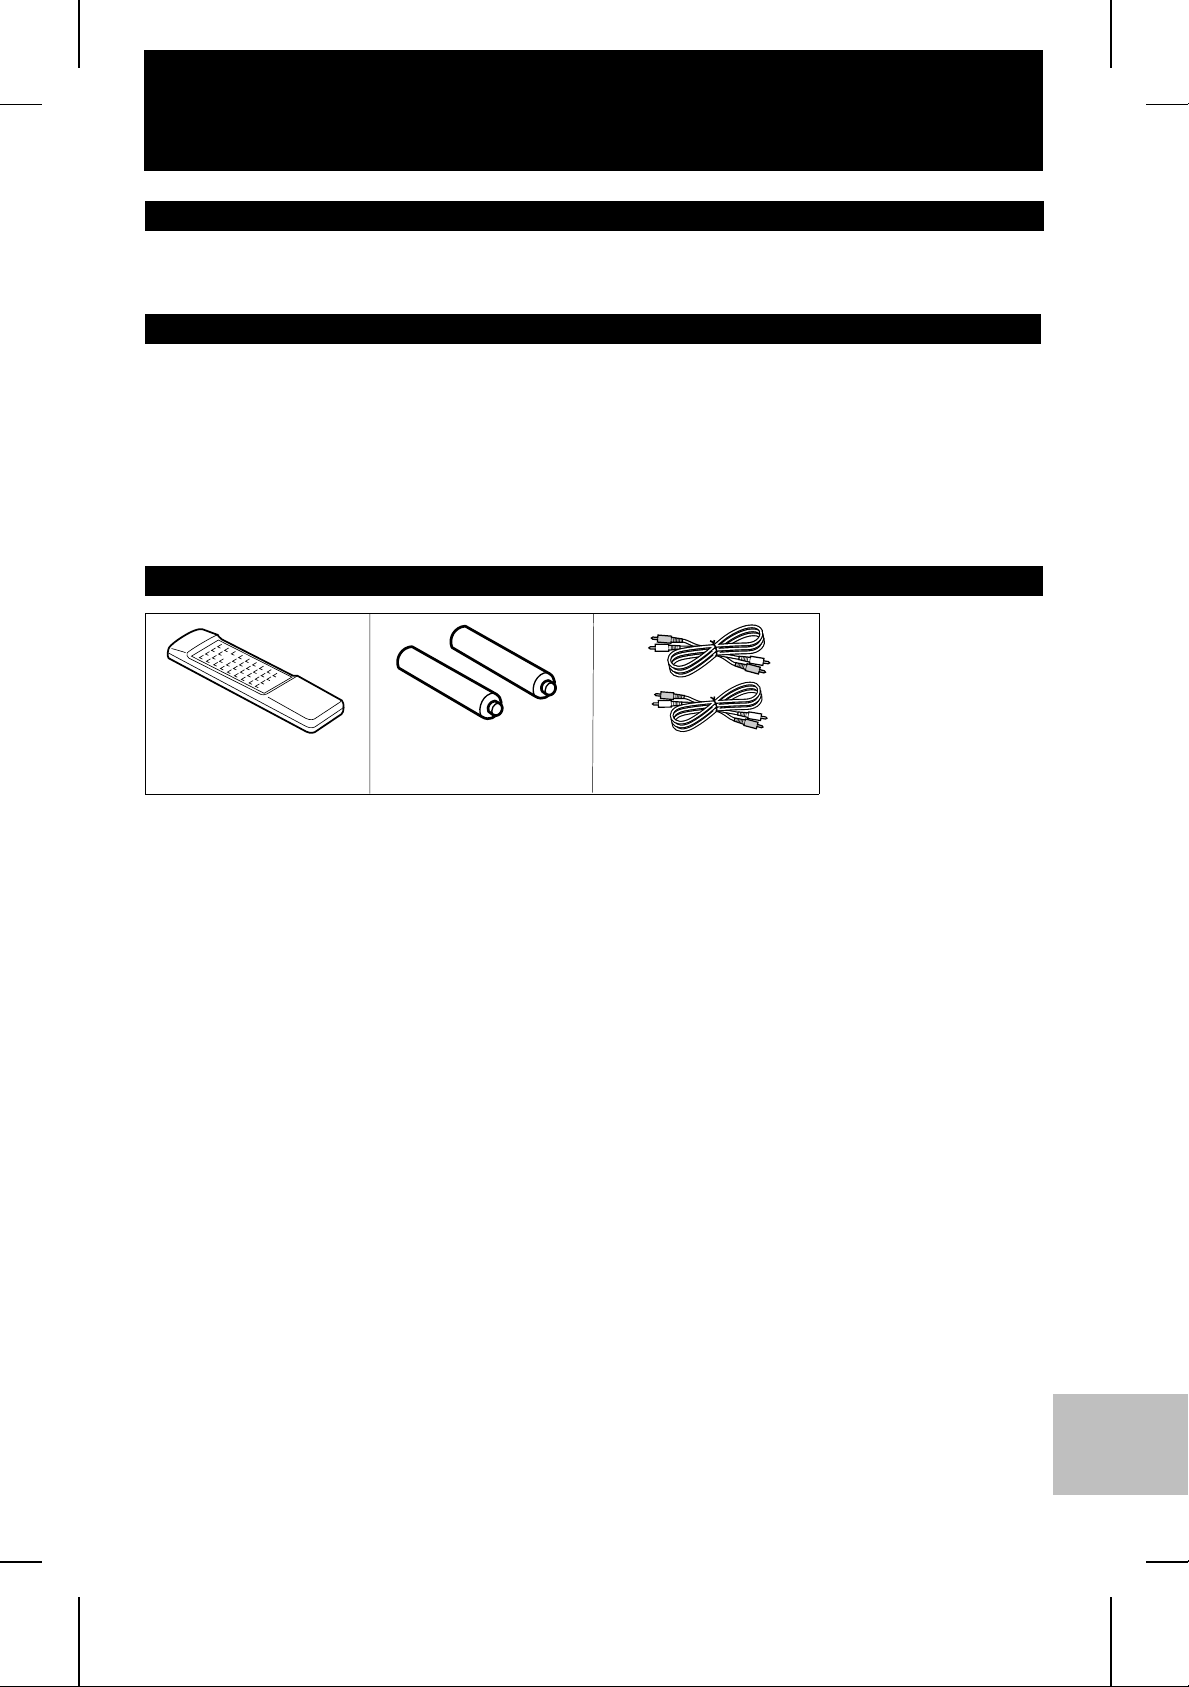
ACCESSORIES
Remote control x 1
Note:
Parts and accessories mentioned in this operation manual other than those shown to the above are not included.
“AA” size battery (UM/SUM3, R6, HP-7 or similar) x 2
Analogue connecting
cable x 2
Page
MD-R3H
E-1
PRECAUTIONS
■ General
● Do not use oil, solvents, petrol, paint thinners or
insecticides on the unit.
● Do not expose the unit to moisture, to temperatures
higher than 60oC (140oF) or to extreme low temperatures.
● Keep the unit away from direct sunlight, strong magnetic
fields, excessive dust, humidity and electronic/electrical
equipment (home computers, facsimiles, etc.) which
generates electrical noise.
● Hold the AC power plug by the head when removing it
from the AC socket, since pulling the lead can damage
internal wires.
● Never open the cabinet. If a foreign object drops into the
set, contact your dealer.
● Use the unit on a firm, level surface free from vibration,
and do not place anything on the top of the unit.
● If the unit does not work properly whilst in use, press the
ON/STAND-BY button to enter the stand-by mode, then
discon nect th e AC power lead f rom the AC so cket . Plug
the AC power lead back in, and then press the
ON/STAND-BY button to turn the power on.
● If a lightning storm is taking place near you, it is
suggested that you disconnect the AC power lead from
the AC socket for safety.
● Before moving the unit, be sure to removing all CDs and
MDs from the unit. Then, turn the power off and unplug
the AC power cord.
If you move the unit with CDs or MDs left in it, they may
jam inside the unit, leading to damage.
Warning:
The voltage used must be the same as that specified on
this unit. Using this product with a higher voltage than that
which is specified is dangerous and may result in a fire or
other type of accident causing damage. SHARP will not be
held responsible for any damage resulting from use of this
unit with a voltage other than that which is specified.
■ Condensation
Sudden temperature changes, storage or operation in an extremely humid environment may cause condensation inside
the cabinet (CD pickup, MD pickup, etc.) or on the transmitter
window on the remote control.
Condensation can cause the unit to malfunction.
If this happens, leave the power on with no disc in the unit
until normal playback is possible (about 1 hour) or wipe off
any condensation on the transmitter window with a soft cloth
before operating the unit.
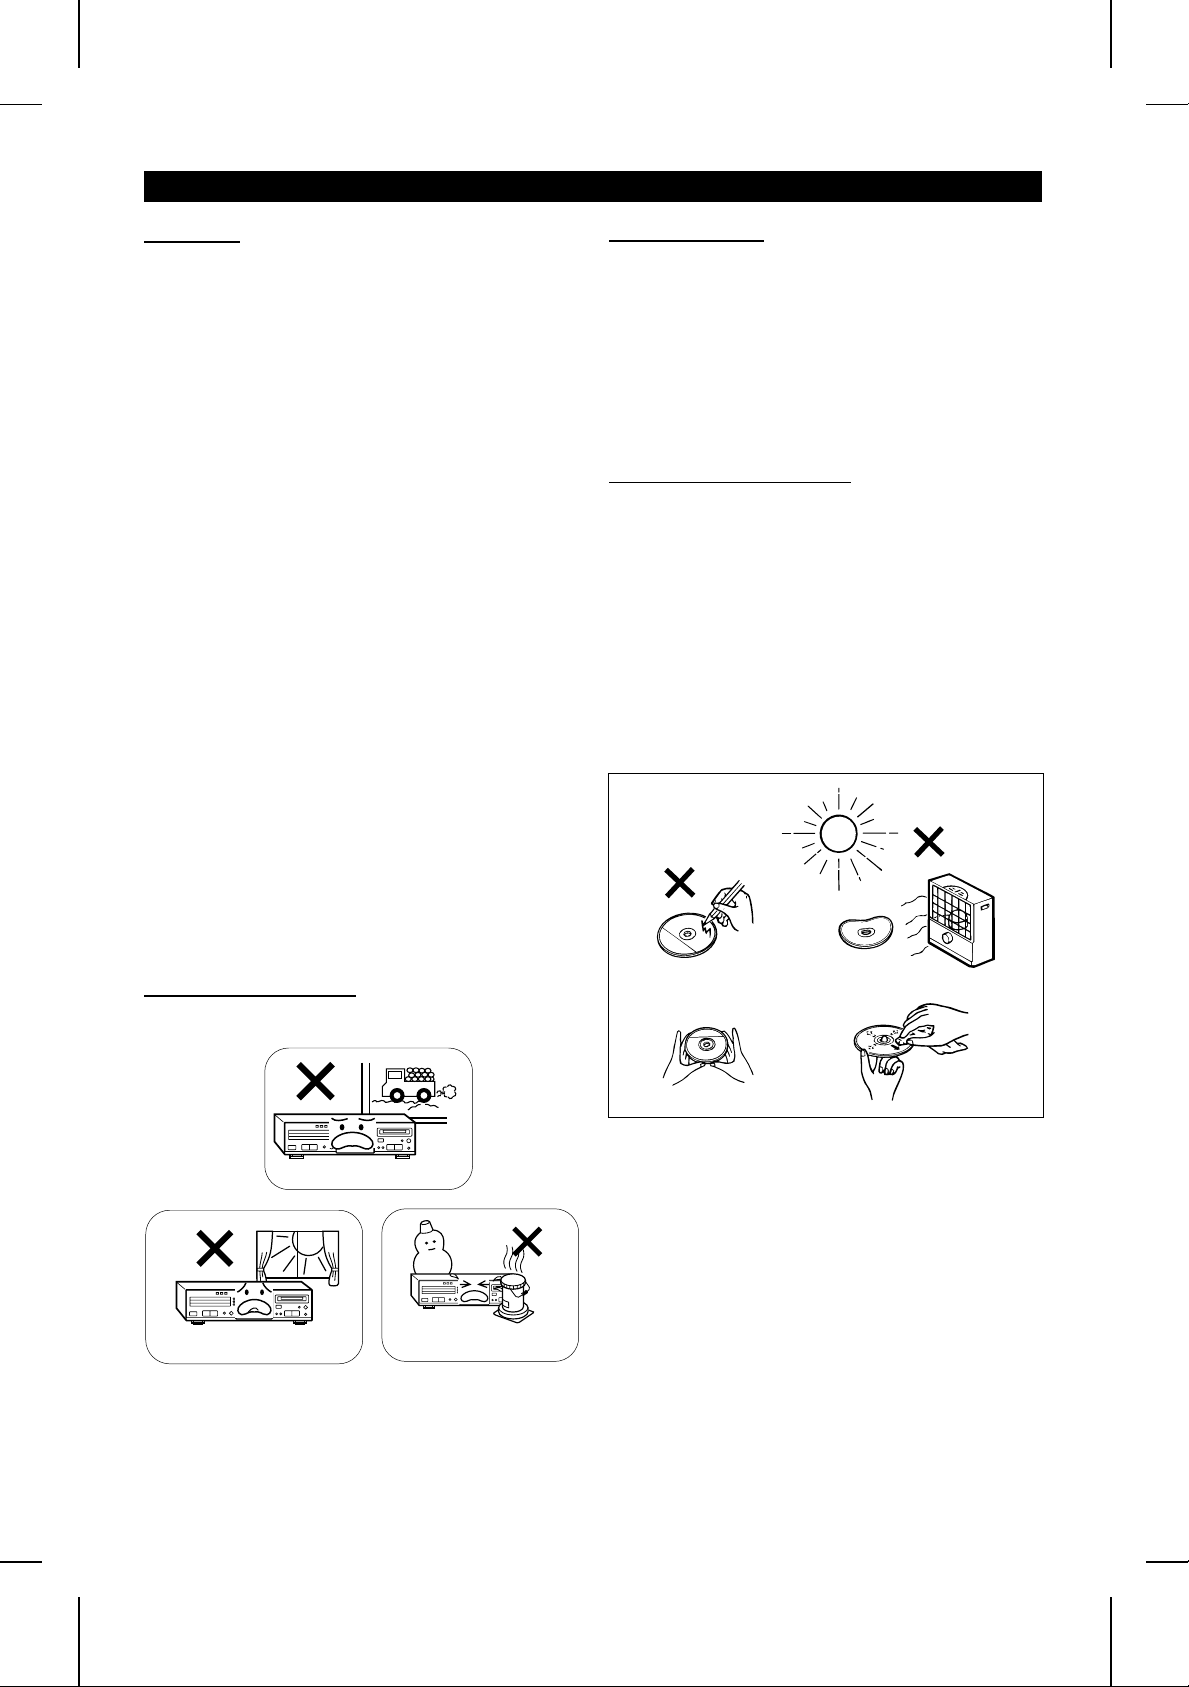
■ Care of compact discs
Compact discs are fairly resistant to damage, however
mistracking can occur due to an accumulation of dirt on the
disc surface.
Follow the guidelines below for maximum enjoyment from
your CD collection and player.
● Do not write on either side of the disc, particularly the
non-label side. Signals are read from the non-label side.
Do not mark this surface.
● Keep your discs away from direct sunlight, heat, and
excessive moisture.
● Always hold the CDs by the edges. Fingerprints, dirt, or
water on the CDs can cause noise or mistracking. If a
CD is dirty or does not play properly, clean it with a soft,
dry cloth, wiping straight out from the centre, along the
radius.
■ Installation location
Do not install the unit in the following places.
Otherwise, it may cause trouble or accidents.
Places exposed to vibration
Places exposed to direct sunlight for
many hours
● Places exposed to high humidity.
● Places exposed to excessive dust.
● Poorly ventilated places.
● Places exposed to water, for example, a bathroom.
● Places near objects which generate magnetism or electric
noise.
Hot places
Extremely cold places
E-2
MD-R3H
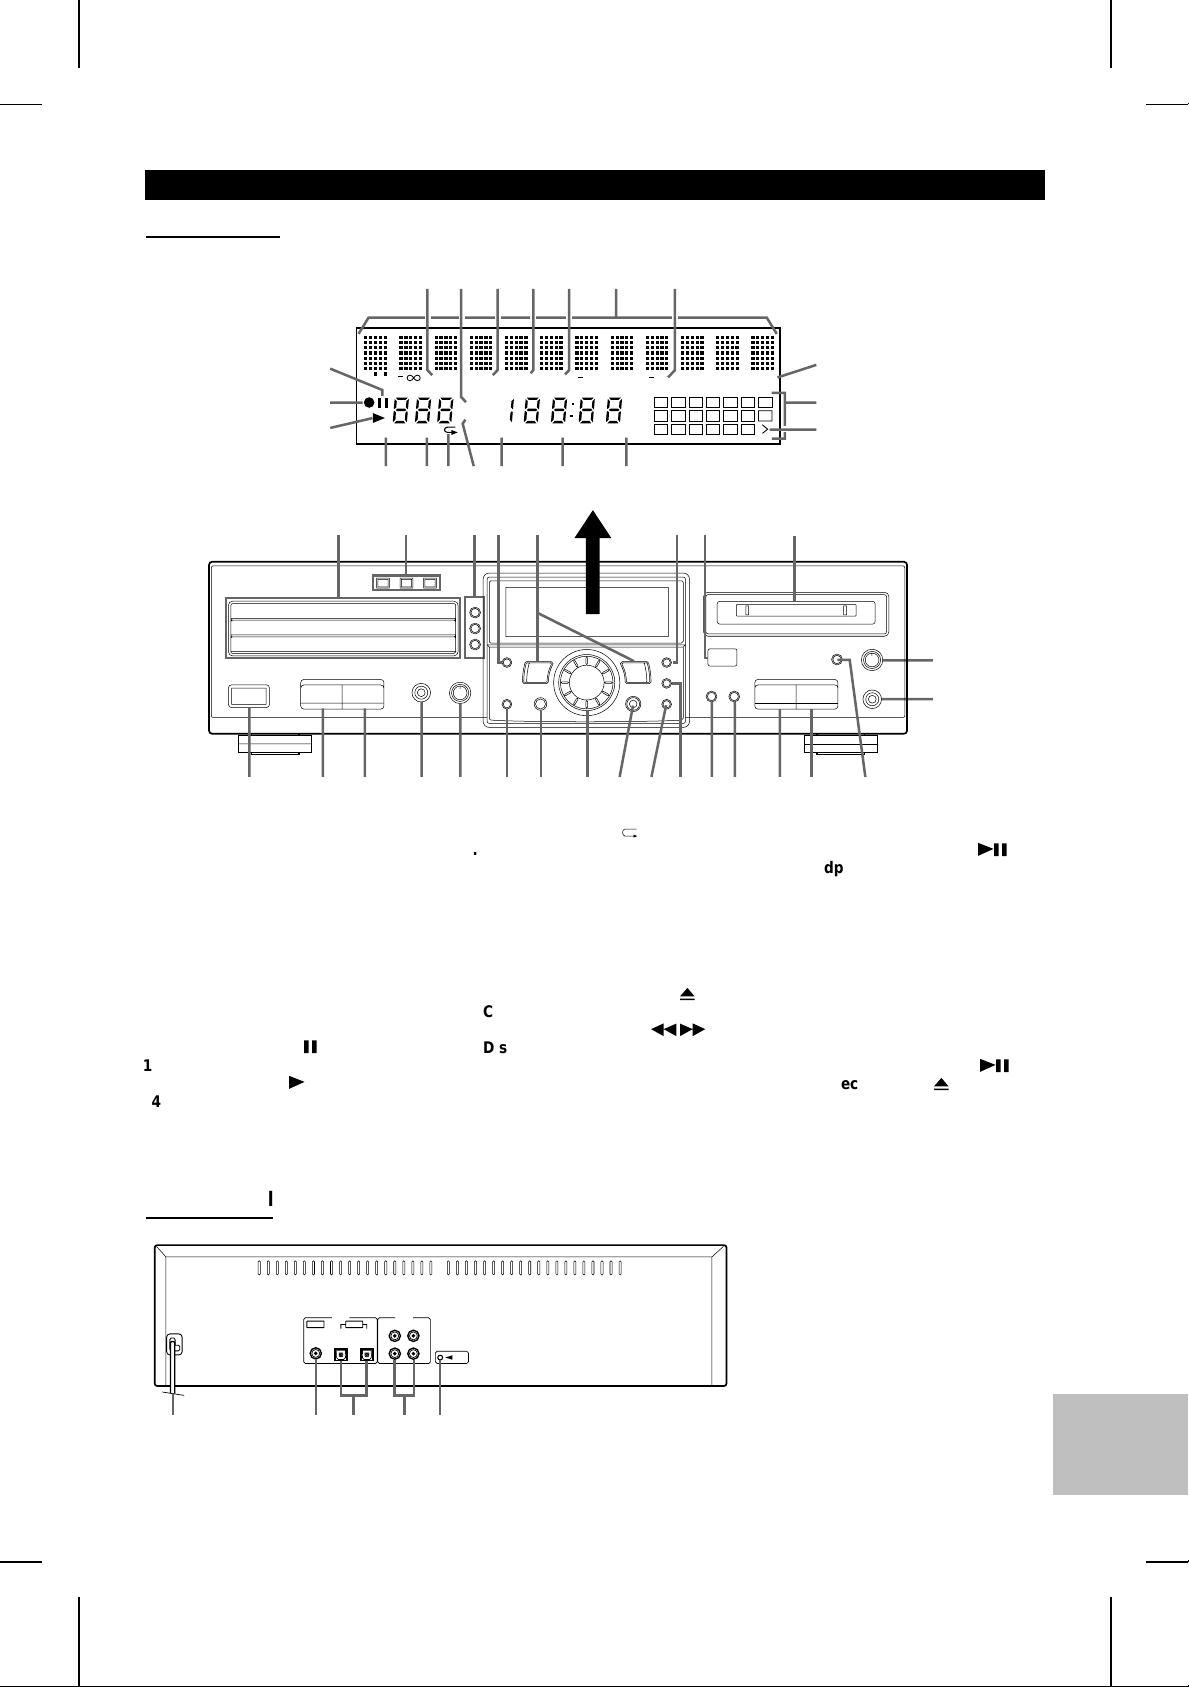
NAMES OF CONTROLS AND INDICATORS
■ Front panel
12345 6 7
11
12
MONO LP PRGM RANDOM
13
14 1516 1817 19 20
31 32 33 34 35 43424140 44 45 4638 393736
1. MD TOC Indicator: TOC
2. Total Time Indicator
3. Disc Name Indicator
4. Track Name Indicator
5. Date Indicator
6. Level Meter/Character Information Display
7. Recording Level Indicator
8. Recording Level Too High Indicator
9. Music Calendar
10. More Tracks Indicator
11. Pause Indicator:
12. Record Indicator: ●
13. Play Indicator:
14. Monaural Long-Play Mode Indicator
15. Programme Indicator
6
0
TOC
TRACK
TOTAL
REMAIN
16. Repeat Indicator:
17. Remaining Time Indicator
18. Random Play Indicator
19. Timer Playback/Timer Recording Indicator
20. Clock Indicator
21. CD Trays
22. CD Direct Play Buttons and
Indicators
23. CD Open/Close Buttons:
24. CD Track Select Button
25. Cue/Review Buttons: 3/
26. Display/Character Button
27. Remote Sensor
28. MD Loading Slot
29. Record Level Control
30. Microphone Socket
31. On/Stand-by Button
12
DATE
AM
TIMER REC CLOCK
PM
R
4 0dB OVERDISC
1 2 3 4 5 6 7
8 9 10 11 12 13
15 16 17 18 19 20
8
14
9
10
26 27 282221 23 2524
29
30
32. CD Stop Button: ■
7
2
33. CD Play/Pause Button:
34. Headphone Socket
35. Headphone Level Control
36. CD Edit Button
37. Programme Button
38. Jog Dial (Next/Previous)
39. Enter Button
40. Delete/Clear/Timer Button
41. Name/TOC Edit Button
42. Input Select Button
43. Record Button: ●
44. MD Stop Button: ■
45. MD Play/Pause Button:
46. MD Eject Button:
06
06
7
■ Rear panel
12345
MD-R3H
1. AC Power Lead
2. Coa xial Input Socket
(Digital)
3. O ptical Input/Output Soc kets
(Digital)
4. Lin e Input/Output Socket s
(Analogue)
5. Reset Button
E-3
REMOTE CONTROL
1
2
3
4
5
6
7
8
9
10
11
23
22
1
12
13
14
15
16
17
18
19
20
21
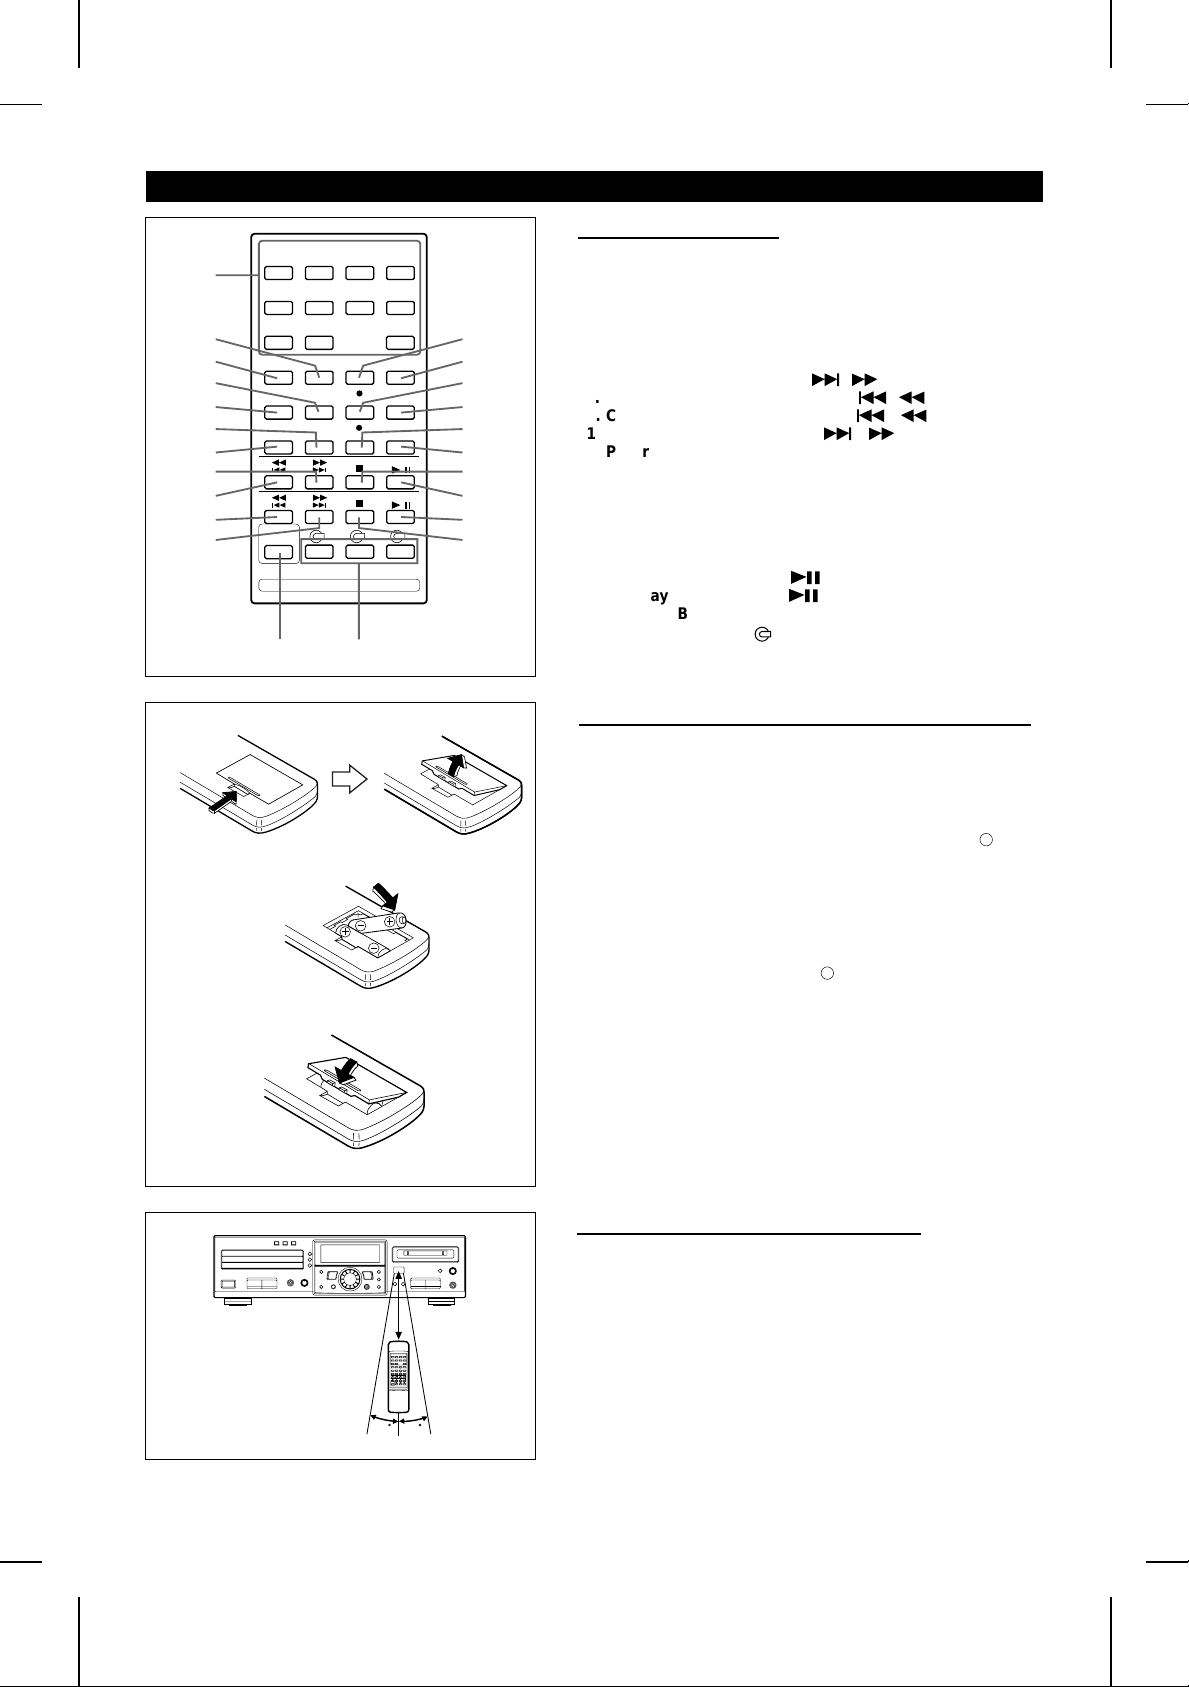
■ Names of controls
1. Direct Key Buttons
2. Play Mode Button
3. Music Scan Button
4. Input Select Button
5. Display Button
6. Auto Mark Button
7. Time Button
8. MD Track Up/Cue Button: 4 /
9. MD Track Down/Review Button: 5 /
10. CD Track Down/Review Button: 5 /
11. CD Track Up/Cue Between: 4 /
12. Programme Button
13. Clear Button
14. Synchro Record Button: ●
15. Record Cancel Button
16. Record Button: ●
17. Record Mode Button
18. MD Stop Button: ■
19. MD Play/Pause Button:
20. CD Play/Pause Button:
21. CD Stop Button: ■
22. CD Play Buttons: 1 - 3
23. On/Stand-by Button
06
06
2
3
3
2
■ Loading the batteries for the remote control
1 Remove the battery compartment cover.
2 Insert 2 “AA” size batteries (UM/SUM-3, R6, HP-7 or similar)
into the battery compartment.
● When inserting the batteries, push them towards the – battery
terminals.
2
● Placing the batteries the wrong way round can cause the unit
to malfunction.
3 Replace the battery compartment cover.
Battery removal:
● Push the batteries towards the – battery terminals and remove
them.
Precautions for battery use:
3
0.2 - 6 m (8" - 20’)
1515
● Insert the batteries according to the direction indicated in the
battery compartment.
● Replace all batteries with new ones at the same time.
● Remove the batteries if weak or if the unit is not in use for
long periods to prevent potential damage due to battery
leakage.
● Don’t mix old and new batteries.
Caution:
Do not use rechargeable batteries (nickel cadmium battery, etc.).
■ Proper use of the remote control
Aim the remote control at the remote control sensor within 30
with no obstacles, and operate as shown.
Notes concerning use:
● Replace the batteries if the control distance decreases or
operation becomes erratic.
● Periodically clean the transmitter window on the remote
control and the sensor on the main unit with a soft cloth.
● Exposing the sensor on the main unit to strong light can
interfere with operation. Change the lighting or the direction
of the unit.
● Keep the remote control away from moisture, excessive heat,
shock, and vibrations.
● The remote control’s usable range is between 0.2 m (8") and
6 m (20’) away from the sensor.
o
MD-R3H
E-4
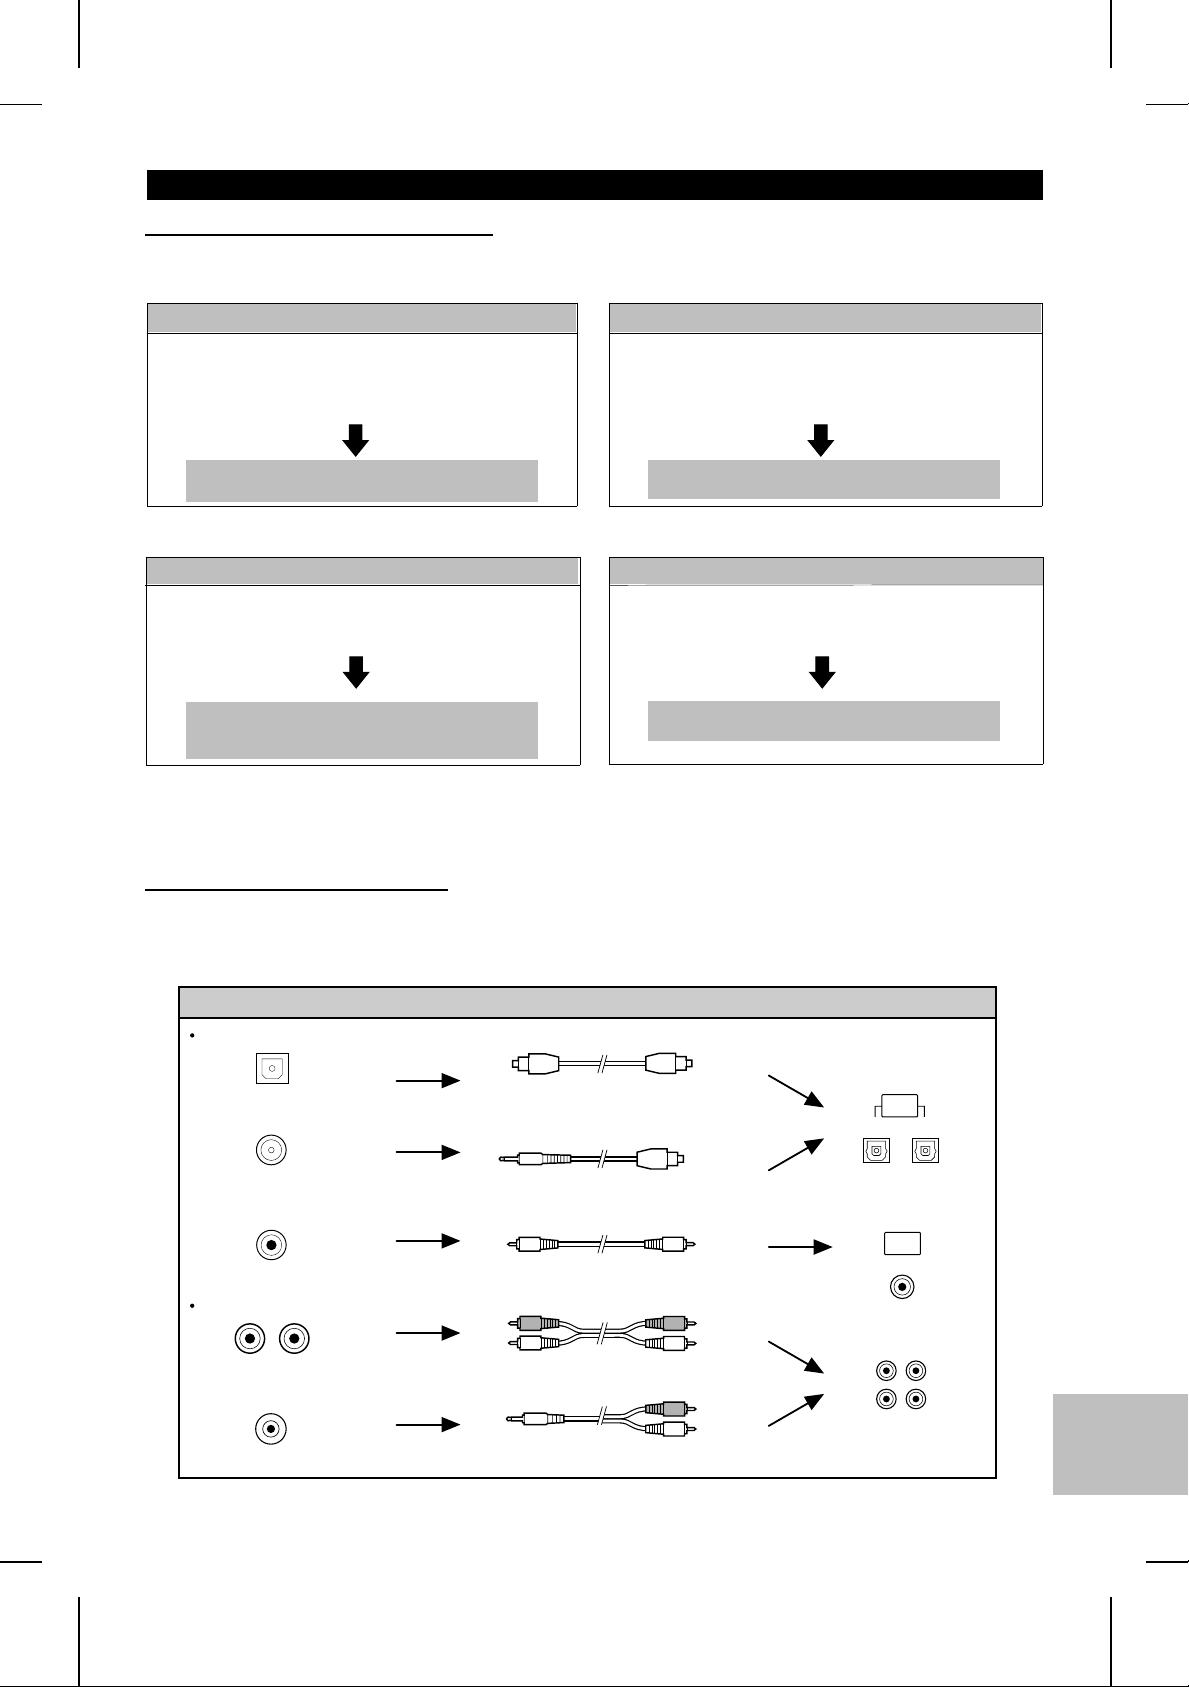
CONNECTIONS
■ Digital and analogue connections
This unit can be connected to your equipment by making a digital or analogue connection.
● When recording the playback signals from other equipment using this unit
Digital connection
Digital equipment with an optical output
socket or a coaxial output socket
Stereo system, CD player, MD player, MD recorder,
DAT, etc.
Equipment with line output sockets or a
headphone socket
CD player, headphone stereo, radio cassette player,
stereo system, video, etc.
Analogue connection
Can be recorded with high fidelity, without
converting the original digital signals.
● When listening to a recording on this unit or recording its output on other equipment
Digital connection
Digital equipment with an optical input socket
Stereo system, MD recorder, DAT, etc.
Can be played back or recorded from with
high fidelity, without converting the original
digital signals.
● Depending on the digital equipment, the sampling frequency may be different (DAT etc.) from this unit’s sampling
frequency. This unit supports these digital devices using an automatic switching function (Sampling rate converter: 32
kHz, 48 kHz → 44.1 kHz automatically switched).
Digital signals, such as those from a CD
player, can be recorded as analogue signals.
Analogue connection
Equipment with line input sockets
Stereo system, radio cassette recorder, video, etc.
Played back or recorded from with analogue
signals.
■ About the connecting cables
The type of cables required to make connections depends on the type of signal (digital/analogue) and input/output sockets
on the equipment being connected to this unit.
Check the shape of the sockets carefully before making connections.
Sockets to be connected
Digital connection
Square plug
Cables used Sockets on this unit
Square plug
Optical input/output,
digital input/output, etc.
Optical input/output,
digital input/output, etc.
Digital output etc.
Analogue connection
LR
Line input/output,
AUX input/output, etc.
PHONES
Headphones etc.
Model: AD-M3DC
(available separately)
Round plug
Square plug
Model: AD-M1DC
(available separately)
Yellow
Pin plug
Yellow
Pin plug
Commercially available video coaxial cable
Pin plug
Pin plug
Connecting cable included with this unit
Stereo mini-plug
Pin plug
Commercially available audio
connecting cable
E-5
MD-R3H
OPTICAL
OPTICAL
OUT IN
COAXIAL
COAXIAL
IN
LINE OUT LINE IN
L
R
L
R
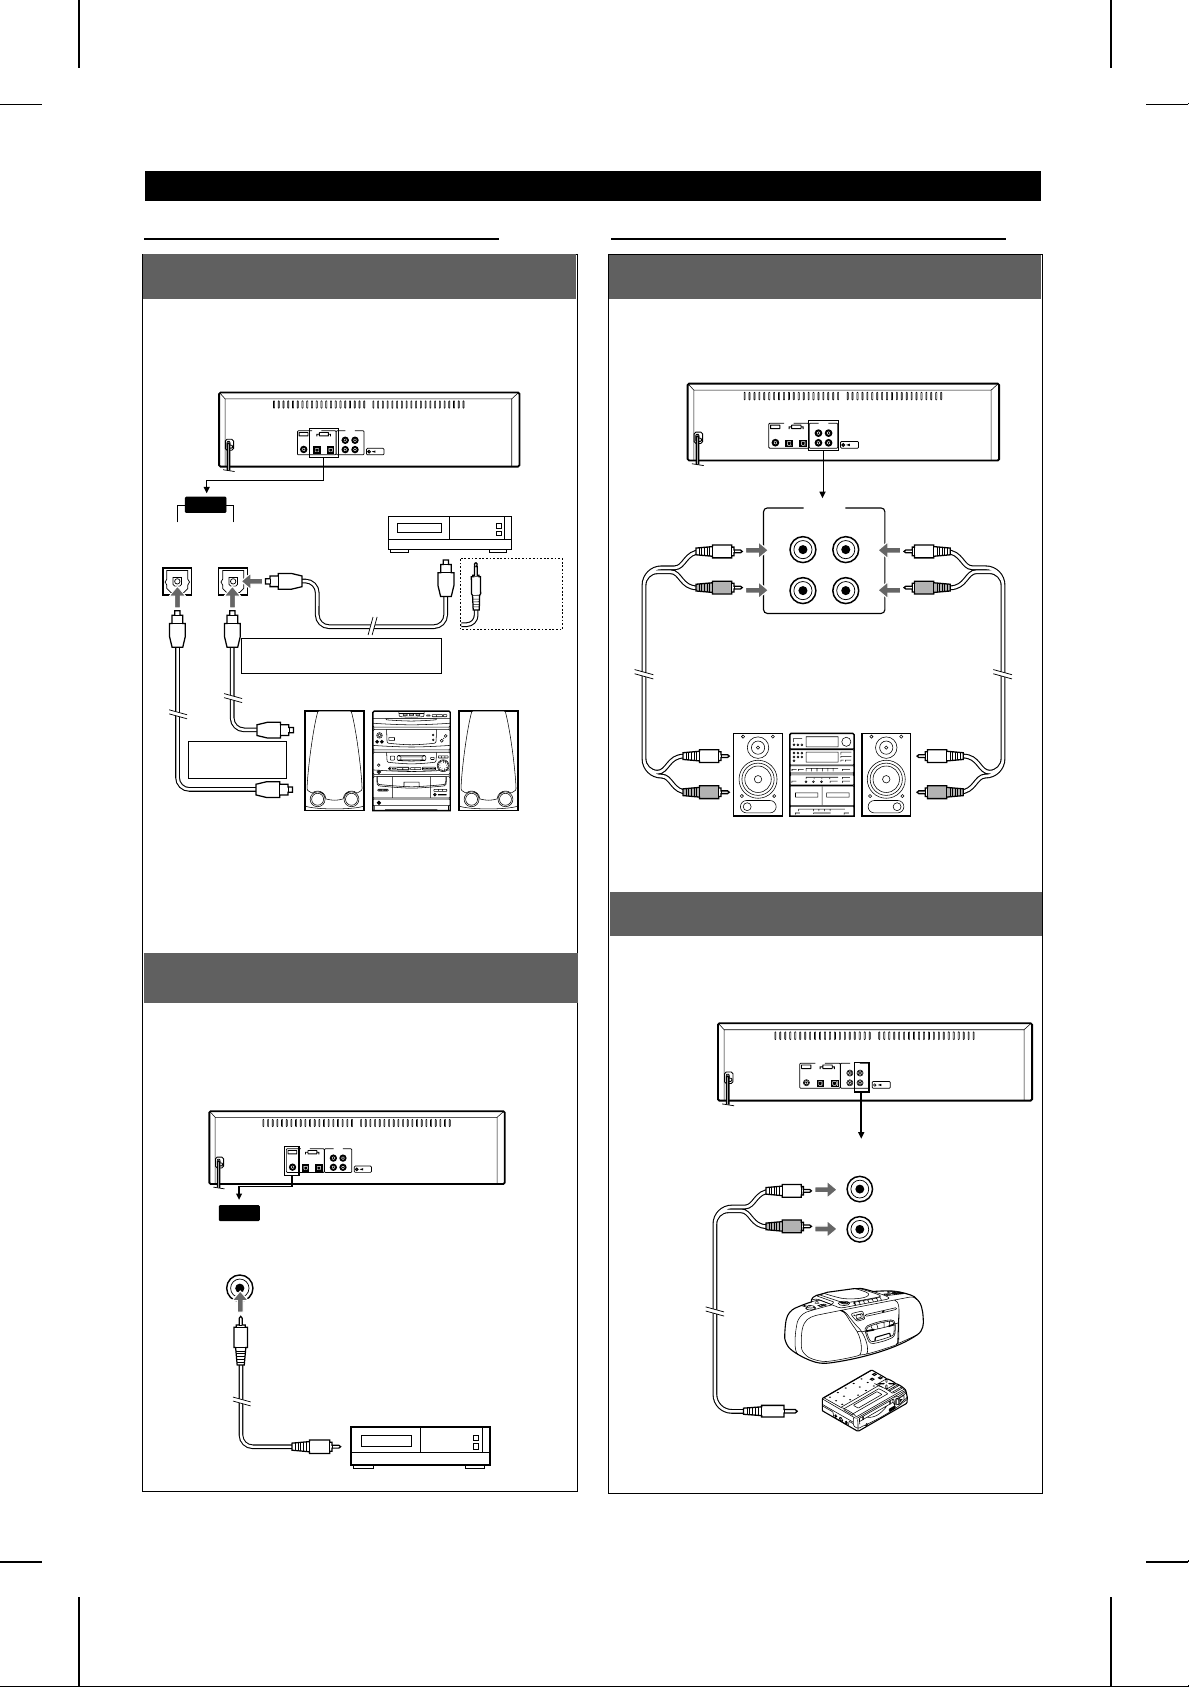
(Continued)
■ When making a digital connection
When connecting the unit to equipment
that has square/round optical sockets:
Connect the other equipment to the “OPTICAL
sockets” on the back of this main unit.
To the optical
output socket
AD-M3DC
MD/CD player, etc.
AD-M1DC
When it’s
a round
optical
socket
OPTICAL
OUT IN
When connecting
this unit to a
recorder/player
When connecting this unit to
other equipment for playback
To the optical
output socket
■ When making an analogue connection
When connecting the unit to equipment
that has line sockets:
Connect the other equipment to the “ANALOG
sockets” on the back of this main unit.
ANALOG
LINE OUT LINE IN
Connecting cable
included with this unit
To the line
input (left) socket
L
R
L
R
Connecting cable
included with this unit
To the line
output (left) socket
To the optical
input socket
Stereo, DAT, MD recorder, etc.
with an optical input/output socket
● If this unit is connected to a stereo, the digital audio
section of a CD (or other digital source) can be
recorded. When recording from a cassette tape, radio
broadcast, etc. an analogue connection is required.
When connecting this unit to equipment
that has a coaxial socket:
Connect the other equipment to the “COAXIAL
socket” on the back of this main unit.
● The coaxial connection is only an input to this unit.
COAXIAL
IN
Commercially available
video coaxial cable
To the line
input (right) socket
Stereo, radio cassette
player, etc. with line
input/output sockets
To the line
output (right) socket
When connecting this unit to equipment
that only has a headphone socket:
Connect the other equipment to the "LINE IN
sockets" on the back of this main unit.
LINE IN
L
R
Commercially
available audio
connecting cable
To the digital
output socket
MD-R3H
E-6
To the headphone
socket
Headphone stereo, radio
cassette player, CD player, etc.
(Continued)
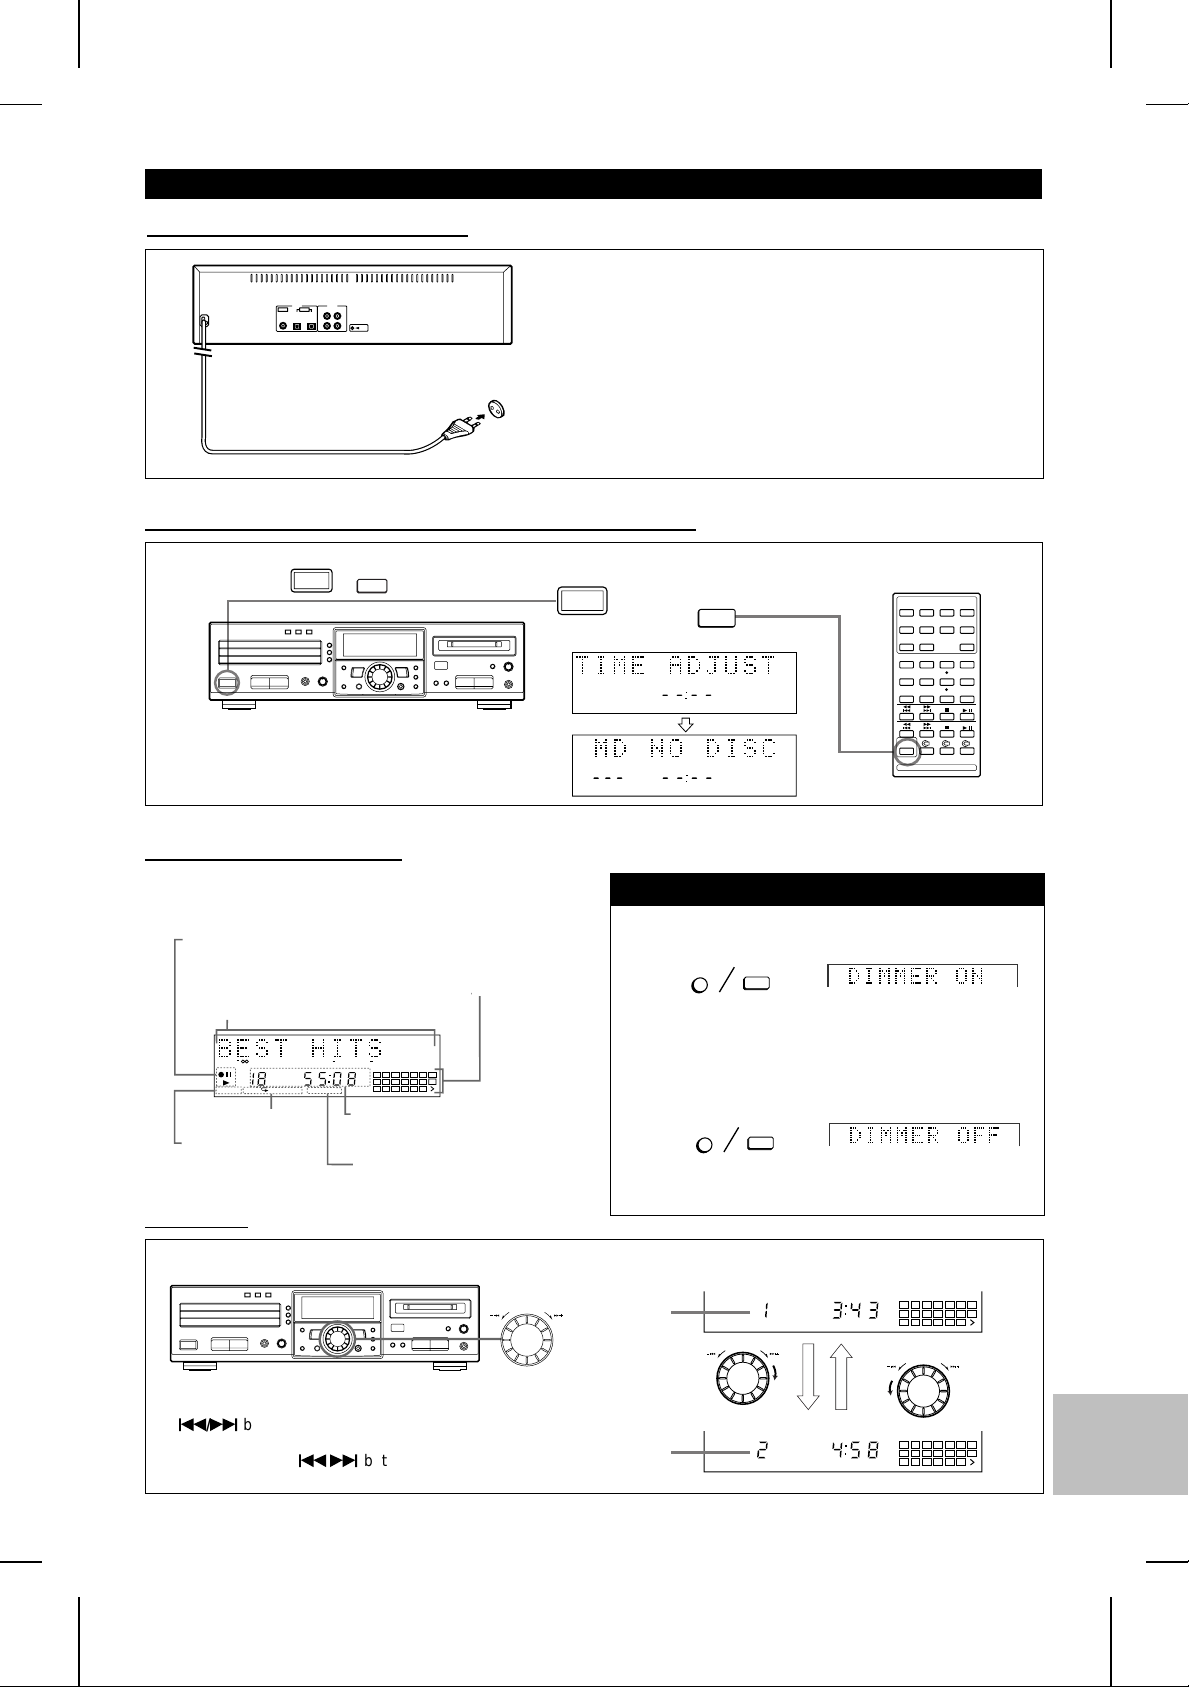
■ Connecting the AC power lead
If you will not be using this unit for a prolonged period of
time, unplug the AC power lead from the AC socket. Even
when the power is turned off, a small amount of current is
still consumed.
To an AC socket
AC 230 V, 50 Hz
■ How to turn the power on or enter the stand-by mode
ON/
STAND-BY
Press the or button.
● When the power is turned on, the display will change.
● Press it again to enter the stand-by mode.
ON/
STAND-BY
ON/
STAND-BY
ON/
STAND-BY
CLOCK
■ How to read the display
Various messages, describing the operations and contents
of MiniDiscs are displayed in the display section.
Indicators of the playback
and recording operations
Area where track names and disc names
are displayed.
During playback it becomes a level meter.
TOC
TOTAL
REMAIN
MONO LP PRGM RANDOM
Display related to
playback
Display related to recording
12
4 0dB OVERDISC TRACK DATE
1 2 3 4 5 6 7
AM
8 9 10 11 12 13
PM
TIMER REC CLOCK
15 16 17 18 19 20
Area where playing time,
track numbers and the time
are displayed
Display related to the timer
Music calendar
Shows the number of
tracks recorded on an
MD and the number of
tracks on the CD.
14
To change the brightness of the display
Turn the power on and hold down the DISPLAY/CHARACTER (DISPLAY) button for at least two seconds.
DISPLAY/CHARACTER
● The "DIMMER ON" display will appear, and the display
will become dimmer.
To return to the original brightness, hold down the DISPLAY/CHARACTER (DISPLAY) button for at least two seconds.
DISPLAY/CHARACTER
● The "DIMMER OFF" display will appear, and the original
brightness will be restored.
DISPLAY
DISPLAY
■ Jog Dial
The jog dial on the main unit can be used to select track numbers (page 13) or to select characters (page 31).
Jog dial
● When the dial is turned gently, it will stop at an angle
of about 15o. This has the same effect as pressing the
5/4
button on the remote control. (Track up/down)
● When the dial is twisted harder, it has the same effect
as pushing the 5/4 button on the remote control
repeatedly. (Track up/down)
Track
number
Track
number
The track
number increases.
REMAIN
REMAIN
1 2 3 4 5 6 7
8 9 10 11 12 13
15 16 17 18 19 20
The track
number decreases.
1 2 3 4 5 6 7
8 9 10 11 12 13
15 16 17 18 19 20
14
14
MD-R3H
E-7
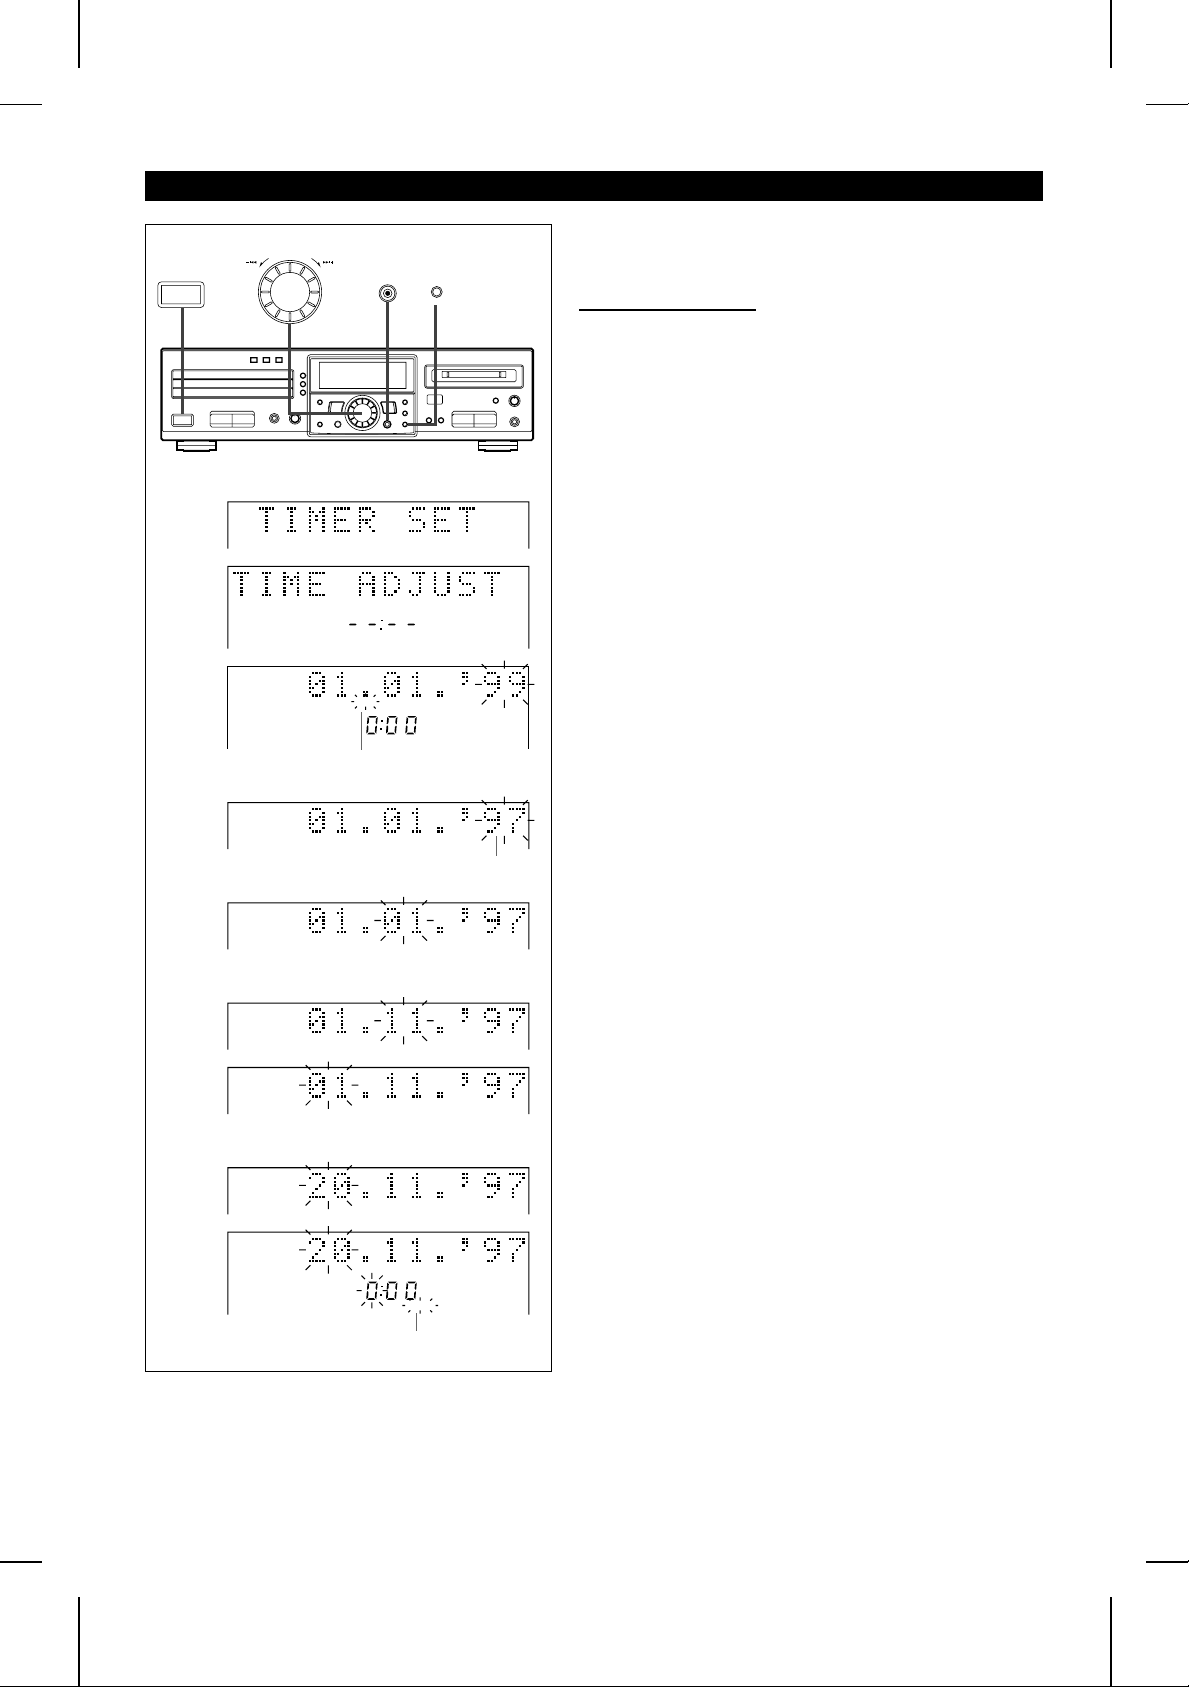
SETTING THE CLOCK
ON/
STAND-BY
1
2
3
DATE
ENTER
CLOCK
DELETE/CLEAR
TIMER
When recording, the date and time are recorded on the Minidisc
(page 18).
■ Setting the date
1 Press the ON/STAND-BY button to turn the power on and
press the TIMER button.
2 Within 10 seconds, turn the jog dial until “TIME ADJUST”
appears.
3 Within 10 seconds, press the ENTER button.
● The unit will enter the date setting mode.
4 Set the “year” using the jog dial.
● When you turn the jog dial and let go, the year will change
up or down by one.
● The year 2000 or later is set as follows:
[00] indicates the year 2000.
[01] indicates the year 2001.
● The range of dates that can be entered is from January 1,
1997 to December 31, 2099.
5 Press the ENTER button to set the “year”.
4
5
6
7
Date setting mode
Each time the button is pressed,
the display will change.
CLOCK
DATE
CLOCK
6 Set the “month” repeating steps 4 and 5.
7 Set the “day” repeating steps 4 and 5.
● The unit will enter the time setting mode.
Time setting mode
E-8
MD-R3H
(Continued)
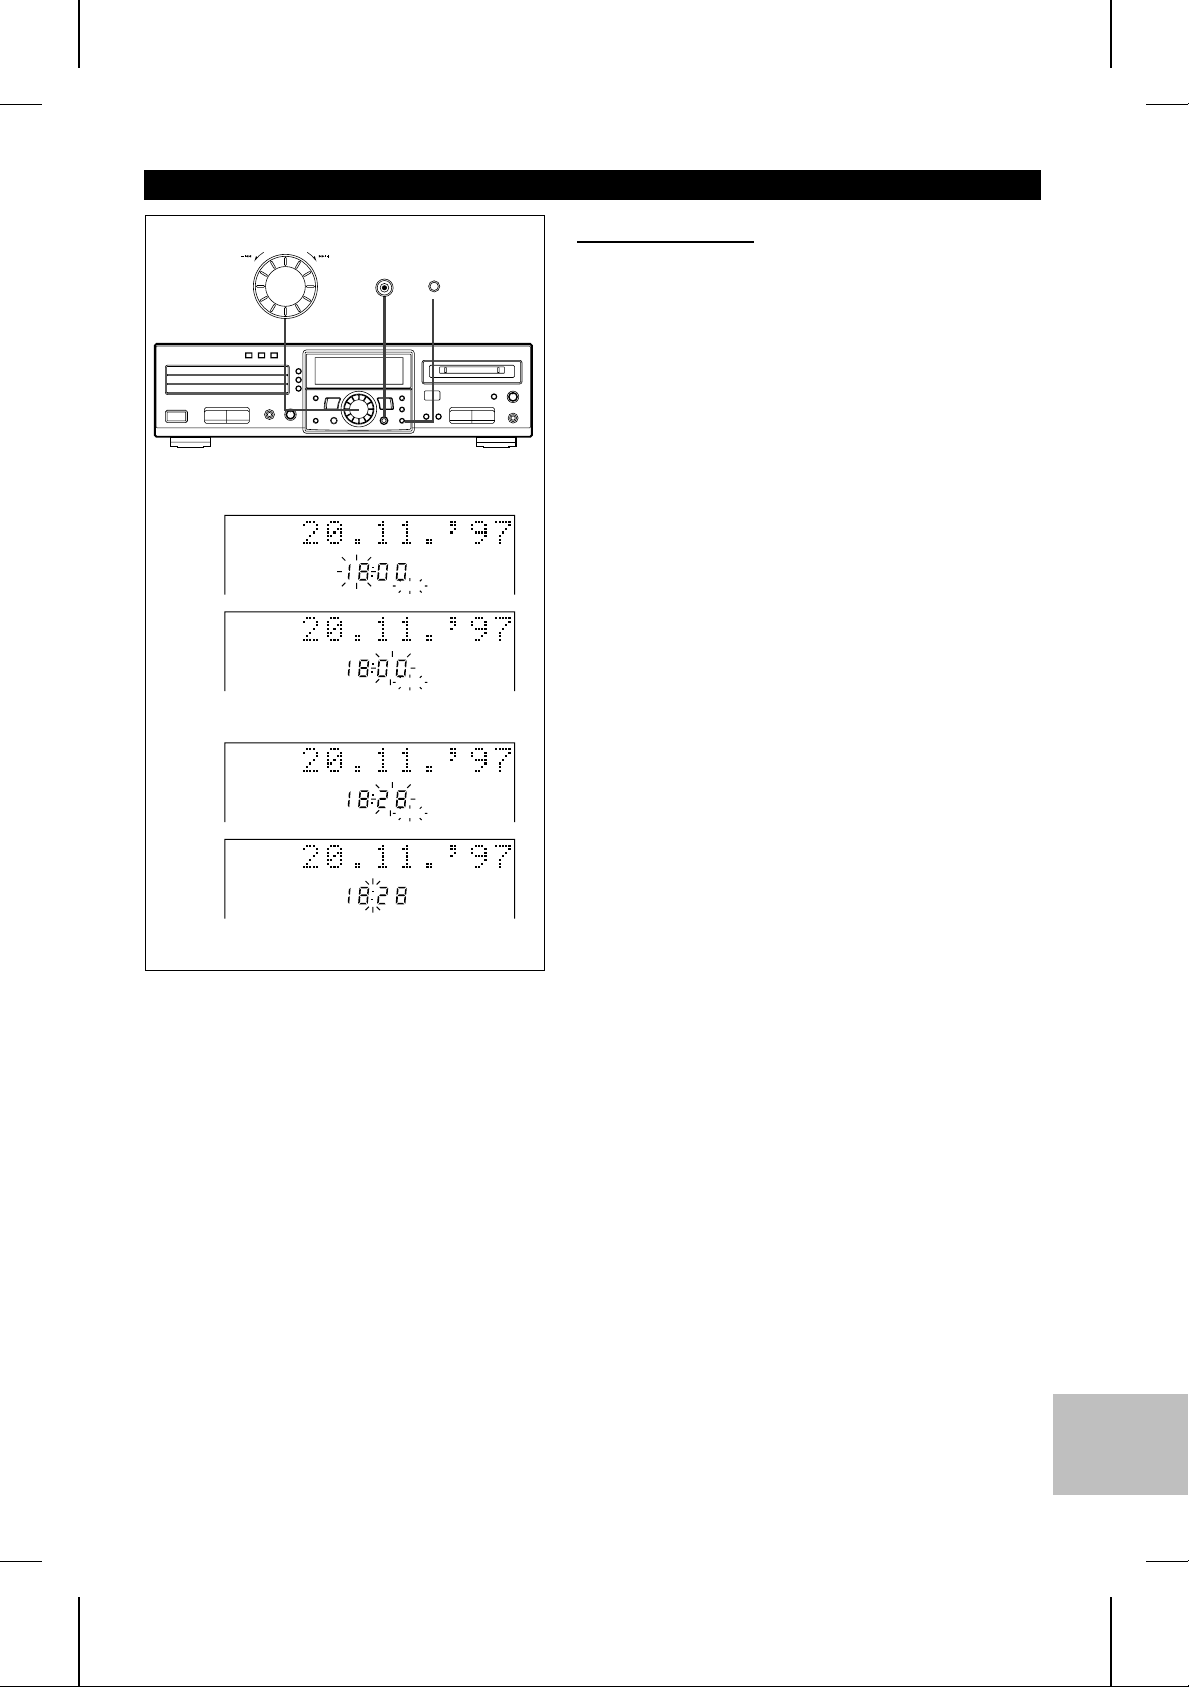
■Setting the time
10
11
ENTER
DELETE/CLEAR
TIMER
After step 7, described in the “Setting the date” section
8 Set the “hour” using the jog dial.
● When you turn the jog dial and let go, the hour will change
up or down by one. When you turn and hold it, the hour will
change continuously.
● The clock uses the 24-hour system.
9 Press the ENTER button to set the “hour”.
10Adjust the “minute” using the jog dial.
11Press the ENTER button to set the “minute”.
8
DATE
CLOCK
● When the ENTER button is pressed, the clock will show the
correct time.
9
DATE
CLOCK
DATE
CLOCK
DATE
CLOCK
Checking the date and time
After pressing the TIMER button, turn the jog dial until the date
and time are displayed.
Resetting the date and time
See “Setting the clock”.
● Once you have set the date and time, “TIME ADJUST” will
not be displayed in step 2. Turn the jog dial to make the date
and time appear.
● If you don’t need to change the settings, just press the ENTER
button without turning the jog dial again.
MD-R3H
E-9
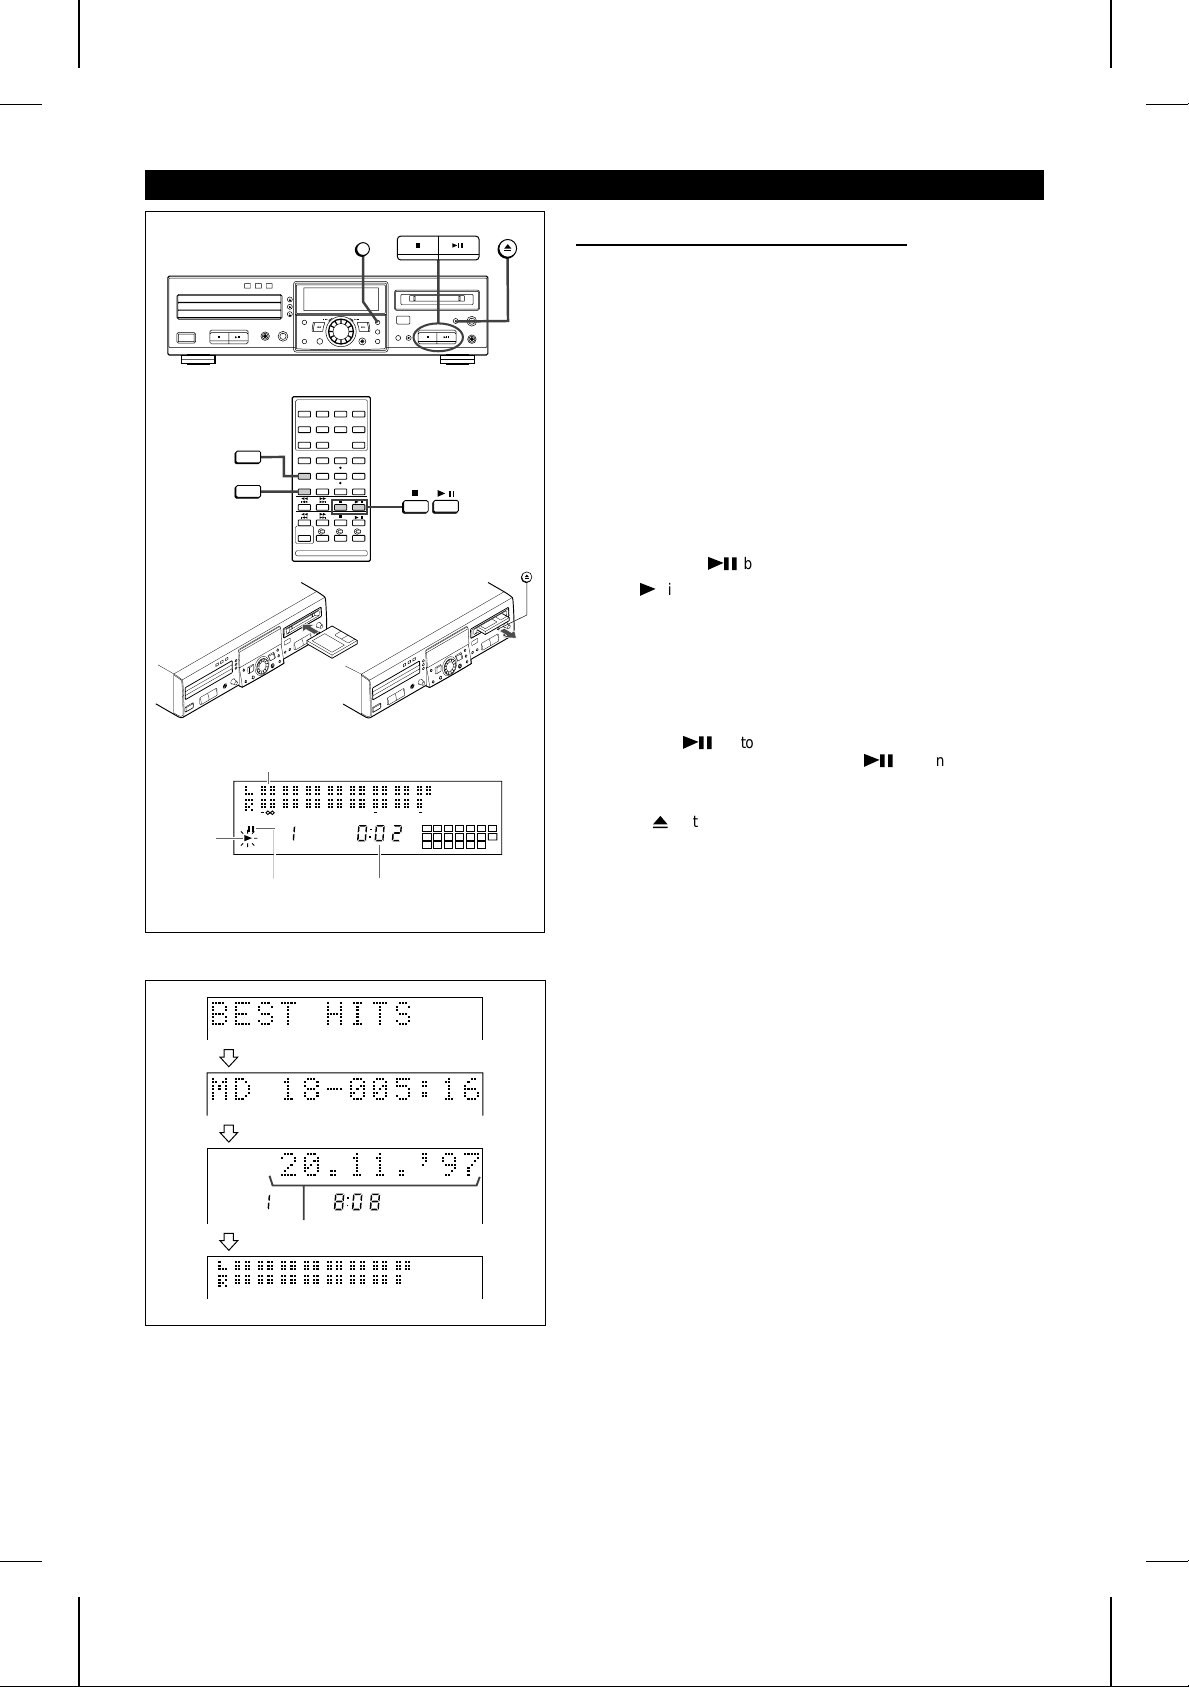
MINIDISC OPERATION
Playback
display
DISPLAY/CHARACTER
DISPLAY
TIME
When a long track name has been assigned,
it will be scrolled across the display.
PAUSE indicator
MD
12
4 0dB OVER
1 2 3 4 5 6 7
8 9 10 11 12 13
15 16 17 18 19 20
The elapsed playing
time for the track is
displayed.
EJECT
14
■Loading and playing a MiniDisc
1 Switch the external unit to the MD unit input.
2 Press the MD ■ button
3 Load a MiniDisc in the direction indicated by the arrow on the
MiniDisc, with the label side facing up.
(Insert the MiniDisc firmly, until a click is heard.)
● After a few seconds, the total number of tracks, total disc
playing time and disc name (where recorded) will be displayed.
● The music schedule will be displayed only for the number of
tracks on the disc.
● If the MD contains more than 21 tracks, ">" will appear.
4 Press the MD
● The “0” indicator will light up.
● When the last track has been played back, this unit will stop
automatically.
● To stop playback before the last track has finished playing,
press the MD ■ button.
To interrupt playback:
Press the MD 06 button during playback.
● To resume playback, press the MD 06 button again.
To remove a MiniDisc:
Press the 7 button.
● The MiniDisc will be ejected.
● If a MiniDisc has been left in the unit for several hours, when
it is removed it will be warm to the touch. This is normal.
06
button to start playback.
when a track name has
Track
name
Number of
recorded tracks
Date and time recorded
Level meter
not been programmed,
“NO NAME” will appear.
TRACK DATE
Remaining
recording time
To check a track name or the date of a recording during playback:
Press the DISPLAY/CHARACTER (DISPLAY) button during playback or whilst the unit is in the pause mode.
● Each time this button is pressed, the display will switch.
● In the following case, the track name will not be displayed:
● A MiniDisc that has not been given a track name.
● In the following cases, the number of tracks, the remaining
recordable time, and the recording dates will not be displayed:
● A playback-only MiniDisc.
● A MiniDisc recorded on a recorder that did not write a re-
cording date.
Note:
● Although MiniDiscs will not normally skip due to vibration, you
may hear a skip in the sound if there is a continuous vibration.
When you listen to MiniDiscs near a radio or a TV set, the
radio or the TV set may pick up noise.
Keep the unit as far away as possible from tuners.
E-10
MD-R3H

COMPACT DISC OPERATION
■Loading and playing CDs
1 2 3
CD DIRECT PLAY
EJECT
CD
1 2 3
The selected CD tray
1 Press the CD ■ button.
2 Press the
● It is impossible to open plural disc trays at a time.
7
button to open the disc tray.
3 Place the CD(s) on the disc tray, label side up.
● Be sure to place 8 cm (3") CDs in the middle of the disc
trays.
Caution:
Do not stack CDs in the tray.
This can damage the player and the CDs.
4 Press the
● The CD DIRECT PLAY button will light for the tray loaded
with a CD.
● Repeat steps 2 - 4 to load discs into the second and third
disc trays.
● The total number of tracks and the total disc playing time will
be displayed.
● The music schedule will be displayed only for the number of
tracks on the disc.
● If the CD contains more than 21 tracks, "Y" will appear.
5 Press the CD
● Playback will begin from track 1 on the DISC-1.
● DISC-1, DISC-2 and DISC-3 will be played continuously in
that order.
● If you press the CD DIRECT PLAY 2 ( 2) button after
pressing the CD 06 button, DISC-2 and DISC-3 will be
played continuously.
● If you press the CD DIRECT PLAY 3 ( 3) button after
pressing the CD 06 button, only DISC-3 is to be played.
● If you press the CD 06 button after selecting a track by
turning the jog dial, playback will begin on DISC-1, from the
track you selected.
● After the disc finishes playing, the next disc will be automatically played.
● When there is no CD in one of the disc trays, that tray will
be skipped, and the next CD will be played.
● When all of the tracks on the CDs completed playing, it stops
automatically.
7
button to close the disc tray.
06
button.
DISC
TOTAL
Total number of
tracks
Total playing
time
1 2 3 4 5 6 7
8 9 10 11
Music schedule
More
tracks
indica-
tion
MD-R3H
To interrupt playback:
Press the CD 06 button.
Press the CD 06 button to resume playback from the same
point.
To stop playback:
Press the CD ■ button.
To remove the CDs:
Whilst in the stop mode, press the 7 button.
E-11

(Continued)
■When choosing a CD for playback
ON/
STAND-BY
ON/
STAND-BY
1 2 3
CD DIRECT PLAY
EJECT
1 2 3
Press one of the C D DIRECT PL AY 1 - 3 ( 1 - 3) butto ns to
select the CD you want to listen to.
● Only the selected CD will be played back.
When selecting
disc tray 1
When selecting
disc tray 2
When selecting
disc tray 3
Notes:
● If any disc tray is open, it will be automatically closed.
● If the CD
0 6
button is pressed, continuous playback will be
performed from the first track of disc 1, even after disc 2 or
disc 3 has been selected.
Direct playback:
If a CD is loaded in the unit, pressing the CD
0 6
button or
any of the CD DIREC T PLAY 1 - 3 ( 1 - 3) but tons turns the
power on and begins playback.
Cautions:
● Do not carry the unit whilst CDs are in the trays or a
MiniDisc is loaded. The discs may come loose inside the
unit and be damaged or cause damage to the unit. This
may also cause malfunctions.
● Do not place two CDs in one disc position.
● Do not push the disc tray whilst it is moving.
● Do not attempt to push the disc tray by hand. This may
cause malfunctions.
● If power fails whilst the tray is open, wait until the power
supply returns or gently push the tray manually to close it.
● If the disc tray is stopped forcibly, "TRAY ERROR" will
appear in the display and the unit will not function.
If this occurs, turn off the ON/STAND-BY button and turn
it on again.
● If TV or radio interference occurs during CD operation,
move the unit away from the TV or radio.
● If a disc is damaged, dirty, or loaded upside down, the disc
will be skipped and the next disc will be automatically
played.
● Do not use CDs with tape or loose labels on them, or CDs
which have a sticky surface left by tape or labels that have
peeled off. If such a CD is inserted, you may not be able
to remove the CD or the unit may malfunction.
● If the CD
0 6
button, any of the CD DIRECT PLAY 1 3 ( 1 - 3) buttons or the 7 button is pr essed when a
disc tray is open, the disc tray will be automatically closed.
Be careful not to catch your finger.
MD-R3H
E-12

CD AND MD OPERATIONS
1234
5678
9 10/0 10
MD
CD
1 2 3
12
Selected track number
4 0dB OVER
8 9 10 11 12 13
15 16 17 18 19 20
4 5 6 7
■Direct-selection play (remote control
operation)
By using the track number input buttons on the remote control,
you can play any track you wish directly.
1 Select the desired programme source, CD or MD, by pressing
the CD ■ or MD ■ button.
2 Select the disc to be played by pressing one of the 1
- 3 buttons. (Only for CD playback)
3 Use the track number input buttons to enter the desired track
number.
A. To enter track numbers 11 to 99
Press the Y10 button first, then press the track number.
For example to select 28:
14
1 Press the
Y
10 button.
2 Within 5 seconds, press the "2" button.
3 Within 5 seconds, press the "8" button.
B. To select tracks numbered 100 or higher (only for
MDs)
Press the Y10 button twice, then enter the track number.
For example to select 105:
1 Press the
2 Within 5 seconds, press the
Y
10 button.
Y
10 button.
3 Within 5 seconds, press the "1" button.
4 Within 5 seconds, press the "10/0" button.
5 Within 5 seconds, press the "5" button.
The beginning of the selected track will be found, and play will
begin automatically.
Notes:
● You cannot select a track number higher than the number of
tracks on the disc.
● During APMS play or random play, direct track number selection is not possible.
■APSS (Auto Program Search System)
APSS automatically locates the beginning of each track.
To move to the beginning of the next track:
During playback ... Turn the jog dial clockwise.
Or press the 4 button on the remote control.
To restart the track being played:
During playback ... Turn the jog dial anti-clockwise.
Or press the 5 button on the remote control.
MD
When using the jog dial whilst in the stop mode:
CD
Every time the jog dial is turned (or each time the 5 or
button on the remote control is pressed), the track number will
go up or down by one. If you press the 06 button, playback
will begin from the track being displayed.
4
MD-R3H
E-13

(Continued)
The elapsed playing time is reduced.
■Cue and review
Hold down the 2 button during playback for audible fast forward, or hold down the 3 button during playback for audible
fast reverse.
● Normal playback will resume when the 3 or 2 button is
released.
● When the beginning of the first track is reached, normal playback will start.
● When the end of the last track is reached, “DISC END” will
light, and the unit will pause.
MD
If you want to listen to a portion of a track again, press the
3
button to return to the point in the track you want to listen
to. Normal playback will start from that point.
CD
To search very quickly:
When fast forward or fast reverse is used whilst in the pause
mode, the playback point will move more quickly than when using
audible fast forward or audible fast reverse playback.
12 4 0dB OVER
3 4 5 6 7
8 9 10 11 12 13
15 16 17 18 19 20
14
● In this mode, no sound is heard. Therefore, you must refer
to the time display.
● When you lift your finger, the unit will re-enter the pause
mode.
■Repeat play and random play
12 4 0dB OVER
8 9 10 11 12 13
15 16 17 18 19 20
The elapsed playing time is increased.
PLAY
MODE
“REPEAT” indicator
RANDOM
“RANDOM” indicator
MD
CD
1 2 3 4 5 6 7
8 9 10 11 12 13
1 2 3 4 5 6 7
8 9 10 11 12 13
6 7
14
1 Select the desired programme source, CD or MD, by pressing
the CD ■ or MD ■ button.
2 Press the PLAY MODE button.
● Each time this button is pressed, the mode will change in the
following order:
Repeat play → Random p lay → Normal pla y
(Remote control operation)
3 Press the
● When all of the tracks have been played in random order,
the unit will stop automatically.
To stop playback:
Press the CD ■ or MD ■ button.
To cancel repeat play or random play:
Press the PLAY MODE button until “R” or “RANDOM” disappears.
To repeat playback of selected tracks:
Enter the programme for the tracks you want and start repeat
play.
You can programme a single track and play it repeatedly.
Notes:
● During APMS play, random play is not possible.
● When repeat or random play is selected whilst a CD or MD
is playing, repeat or random play will start at that point.
When more than one CD is inserted:
When you press the CD 06 button ...
● All of the CDs in the unit will be played repeatedly or randomly. (Playback will continue until the unit is stopped manually.)
If you press any of the 1 - 3 buttons:
Only tracks from the selected CD will be played repeatedly or
randomly.
● When all of the tracks have been played in random order,
the unit will stop. (None of the tracks is played twice.)
06
button to start playback.
MD-R3H
E-14

(Continued)
2
“PRGM” indicator
4
6
7
“PRGM” will disappear.
PROGRAM
MD
CD
PRGM
TOTAL
PRGM
TOTAL
PRGM
Total playing
time
PRGM
PRGM
The playing time will appear
about 2 seconds later.
DELETE/CLEAR
TIMER
1234
5678
9 10/0 10
PROGRAM
CLEAR
MD
CD
2
2 3 6
8 9
Selected track
number
2 3 6
8 9
1 2 3 4 5 6 7
8 9 10 11 12 13
15 16 17 18 19 20
8 9
14
2 3 6
■APMS
(Automatic Programmable Music Selector)
1 Select the desired programme source, CD or MD, by pressing
the CD ■ or MD ■ button.
2 Press the PROGRAM button whilst in the stop mode.
● Programmes cannot be set or cancelled whilst in the playback
or pause mode.
3 I f you have sele cted CD, pr ess one of the but tons ( 1
- 3) to select the disc to be played.
4 Select a desired track number by pressing the DIRECT KEY
button.
● If the total programme playing time exceeds 199 minutes and
59 seconds, “— : —” will appear. However, the programmed
selections will still be memorised.
5 Repeat steps 3 and 4 for any other tracks. Up to 20 MD
tracks or 32 CD tracks can be programmed.
● To select a track on an MD or on the same CD, skip step 3.
● The programmed playback order and the total playing time of
the programmed tracks will be displayed automatically, and
only those track numbers will appear in the music schedule.
6 Press the CD ■ or MD ■ button.
7 Press the CD
programmed selections.
● After all of the programmed tracks have finished playing, the
unit will automatically stop.
To clear the programmed selections:
Press the DELETE/CLEAR (CLEAR) button whilst the “PRGM”
indicator is flashing.
● Each time the button is pressed, one track will be cleared,
beginning with the last track programmed.
To cancel the APMS:
Whilst the unit is stopped in the APMS mode, press the CLEAR
button on the remote control to turn off “PRGM”.
When you use the DELETE/CLEAR button on the main unit, all
of the programmed contents will be erased by holding it down
for at least 2 seconds. (If you simply press this button briefly, the
unit will enter the timer mode.)
● The programme contents will be erased.
● When you open the disc tray or a MiniDisc is removed, the
APMS mode will be cancelled.
To check which tracks are programmed:
Whilst the unit is stopped in the APMS mode, turn the jog dial.
Or press the 5 or 4 button on the remote control.
● When the jog dial is turned clockwise, the next track number
will appear. When it is turned anti-clockwise, the previous
track number will appear.
To add tracks to the APMS:
When a programme has been entered ("PRGM" will be lit), perform steps 2 - 6. Additional tracks can be selected and they will
be stored after the last track you entered.
Notes:
● It is not possible to insert an additional track between programmed tracks that have already been entered.
● Programming and cancelling are not possible during playback
or in the pause mode.
06
or MD 06 button to start playback of the
MD-R3H
E-15

(Continued)
■Music scan play
MUSIC
SCAN
PLAY
MODE
DISC
12
(When you have selected a CD)
2
TOC DISC
PRGM
PROGRAM
CLEAR
MD
CD
1 2 3 4 5 6 7
8 9 10 11 12 13
15 16 17 18 19 20
4 0dB OVERDISC
1 2 3 4 5 6 7
8 9 10 11 12 13
15 16 17 18 19 20
(Remote control operation)
1 Select the desired programme source, CD or MD, by pressing
the CD ■ or MD ■ button.
2 Press the MUSIC SCAN button whilst in the stop mode.
● "M.SCAN PLAY" will appear.
● Starting from the first track, approximately the first 12 seconds
at the beginning of each track will be played.
14
● After the last track has been played, the unit will stop auto-
matically.
● When one or more CDs are inserted and music scan play is
started, all of the tracks on all of the CDs will be played in
order, until the last track on the last CD is reached. Then the
14
unit will stop.
You cannot select just one of the discs for music scan play.
To stop music scan play:
Press the CD ■ or MD ■ button.
To perform music scan play repeatedly:
During music scan play, press the PLAY MODE button until "R"
appears.
Note:
● You can also select repeat play before music scan play.
To programme selected tracks during music scan
play: (Music scan programme selection)
During music scan play, the current track being previewed can
be stored in memory.
1 Select the desired programme source, CD or MD, by pressing
the CD ■ or MD ■ button.
3
4
5
TOC DISC
PRGM
TOC DISC
TOTAL
PRGM
When you press the ENTER button
TOC
PRGM
12
4 0dB OVERDISC
2 3
2 3 5
2 3 5
2 Press the PROGRAM button.
● “PRGM” will flash.
3 Press the MUSIC SCAN button.
● “M.SCAN PRGM” will appear.
4 Press the PROGRAM button whilst playing the beginning of
a track to be stored in memory.
5 To halt the programme, press the CD ■ or MD ■ button.
● When you have selected an MD, the unit will enter the stop
mode.
● When you have selected a CD, "M.SCAN REC?" will appear.
To halt the programme, press the CD ■ button again.
When you press the ENTER button on the main unit whilst
"M.SCAN REC?" is displayed, you can record the programmed tracks.
To clear the programmed selections:
Press the CLEAR button on the remote control to turn off
"PRGM".
When you use the DELETE/CLEAR button on the main unit, all
of the programmed contents will be erased by holding it down
for at least 2 seconds.
● The programme contents will be erased.
E-16
MD-R3H

(Continued)
TIME
1
2
REMAIN
1 2 3 4 5 6 7
8 9 10 11 12 13
15 16 17 18 19 20
1 2 3 4 5 6 7
8 9 10 11 12 13
15 16 17 18 19 20
■Switching the time display
(Remote control operation)
Each time the TIME button is pressed whilst in the playback or
pause mode, the display will change as described below.
See the diagram to the left.
1 The elapsed playing time for each track will be displayed.
2 The remaining playing time for the current track will be dis-
played.
3 The total remaining playing time for the disc from the point
being played at that time will be displayed.
Notes:
14
14
● During random play, only the elapsed playing time for each
track will be displayed. The display cannot be switched.
● Depending on a CD or MD to be played, the playing time
display may not match the playing time which is indicated on
the CD or MD jacket, because the time between the tracks
is not included.
3
PHONES
TOTAL
REMAIN
1 2 3 4 5 6 7
8 9 10 11 12 13
15 16 17 18 19 20
14
■Connecting headphones
This unit can be used with commercially available headphones.
Plug them into the PHONES socket on the front of the unit.
About headphones
Be sure that your headphones have a 6.3 mm (1/4") diameter
plug and between 16 ohms and 50 ohms impedance. The recommended impedance is 32 ohms.
■Listening to music through headphones
When headphones are connected to the unit and a MiniDisc is
played, you can hear the recording.
● It is not necessary to supply power to any other equipment,
such as a stereo, which is connected to the unit.
To adjust the headphone volume:
Rotate the PHONE LEVEL control towards MAX to increase the
volume, and towards MIN to decrease the volume.
MD-R3H
E-17
RECORDING
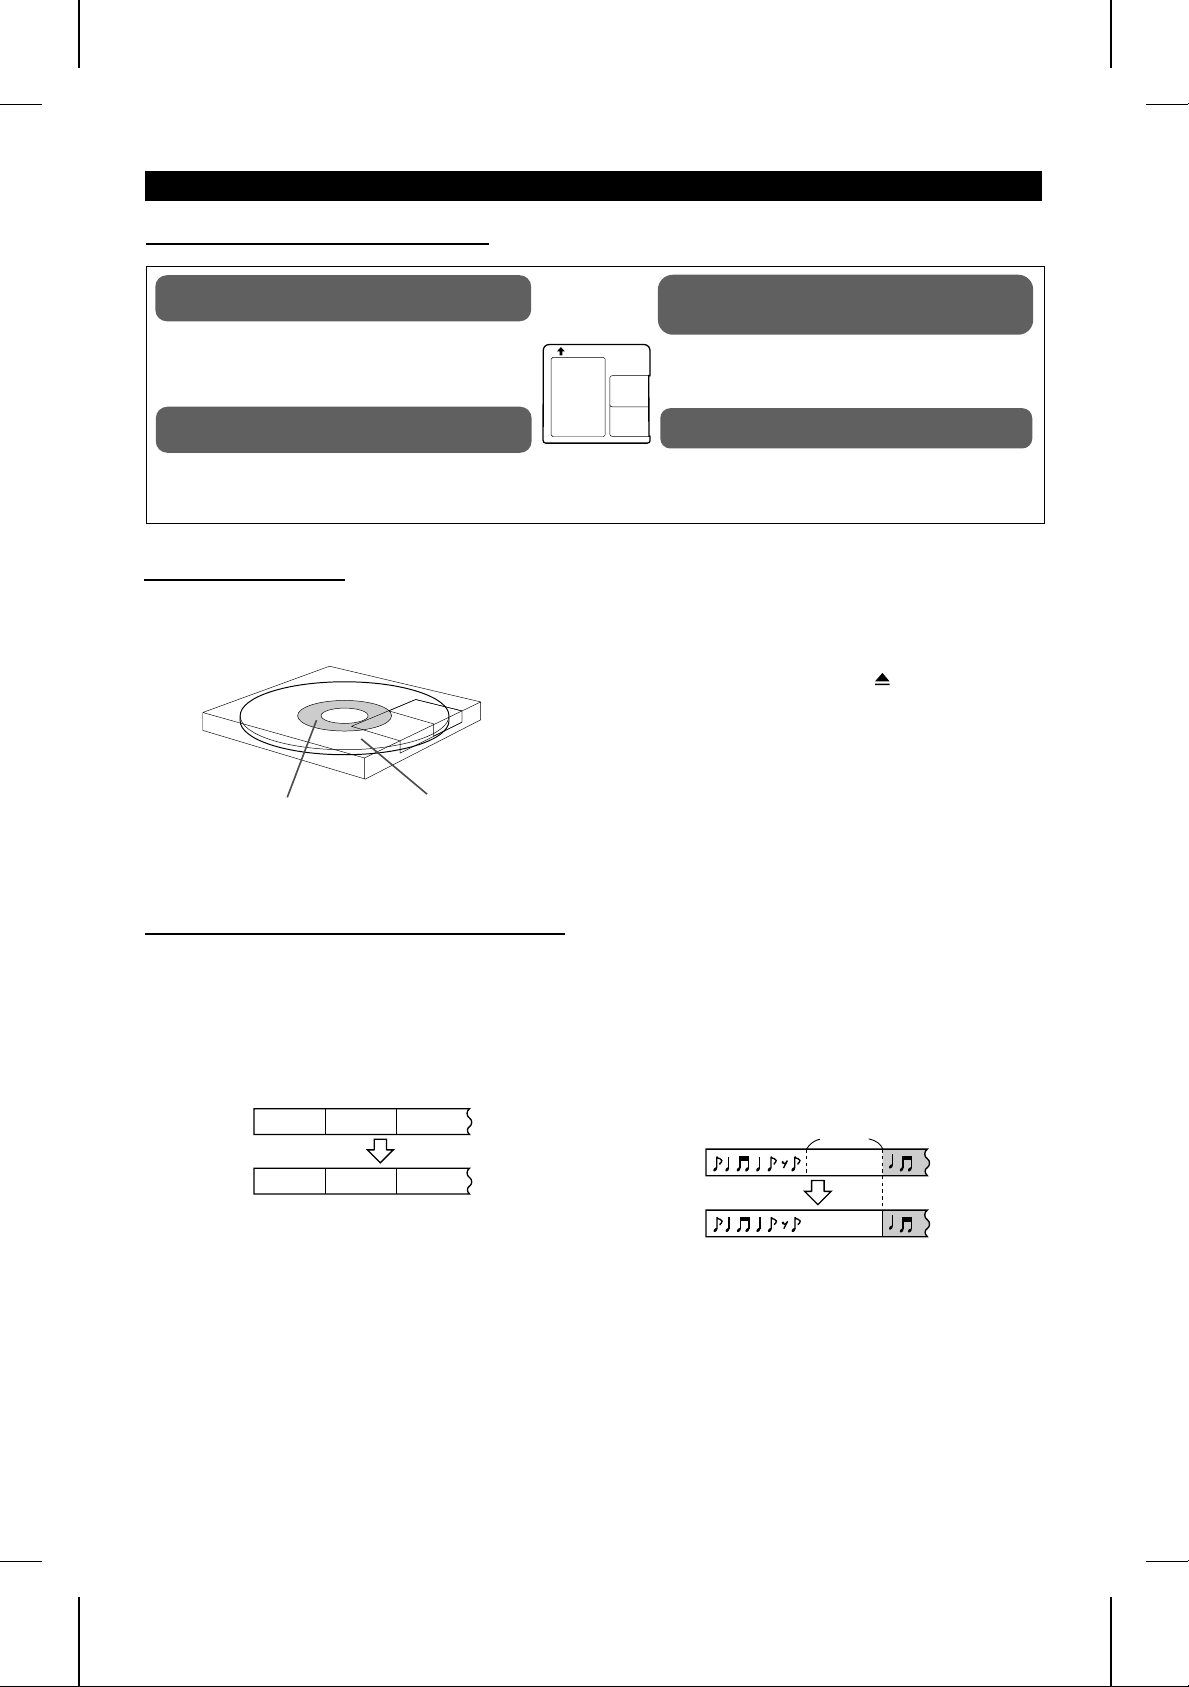
■Differences from tape recordings
You cannot record music on the reverse side
of a MiniDisc.
MiniDiscs cannot be incorrectly inserted, i.e. upside
down. (Page 40)
You don’t need to search for the starting
point at which to record.
The unit automatically finds the point at which recording can start. Recording will start from that
point.
■Disc writing (TOC)
MiniDiscs have one area in which the sound is recorded
and another area where track number, track name, and
disc name information is recorded.
Area for recording track
numbers, track names, etc.
Area for recording the
sound
You can check the total or remaining
recordable time (possible recording) before
recording.
This lets you plan a recording session so that the
last song will not come to an abrupt end before it
has finished. (Pages 20, 22)
The date and time of a recording are
automatically saved with the recording.
If you have set the date and time, they will be
automatically recorded when a recording is made.
(Page 10)
First the sound is recorded on a MiniDisc, and then the information (TOC: Table of Contents) for finding the tracks is recorded.
This TOC is vitally necessary for playback. Tracks can be edited
by rewriting the TOC. When the ON/STAND-BY button is pressed
to enter the stand-by mode or when the 7 button is pressed to
remove the Minidisc, the current version of the TOC will be written
on the disc. Therefore, after pressing the ON/STAND-BY button,
do not jar the main unit. It may not be possible to perform playback properly if the TOC is not written correctly on the disc.
■Track numbers are created automatically
When recording from another CD or MD using the
digital connectors
When you make a digital recording from a CD player or
another MD player, new track numbers will be created automatically for each track, regardless of the amount of silence between tracks. (Synchro marker function)
First track Second track Third track
Track A
First track
Track A
● When you record from a CD to a Minidisc, the track
numbers recorded on the MiniDisc may not match the
track numbers on the CD.
● When recording from digital equipment such as DAT tape
recorders, the synchro marker function will not work. The
auto marker function will work the same way it does
when recording from an analogue input.
● When a DAT is recorded using the digital inputs and the
DAT mode (sampling frequency) changes during the recording session, the track numbers will change.
Very occasionally, some noise may be recorded.
If this happens, you can edit out the noise after recording.
(Page 27)
Track B Track C
Second
track Third track
Track CTrack B
When recording from analogue inputs
When making an analogue recording, if there is 1.5 seconds or more of silence, the blank space is assumed to
be the space between tracks, and a new track number will
be created automatically.
This is called the auto marker function.
By creating track numbers, you can locate the beginning
of the tracks.
About 1.5
seconds
Silence
First track Second track
● If you do not use the auto marker function, you can
record musical selections as a single track.
MD-R3H
E-18

(Continued)
■Note about making digital copies
Playback
CD player, MD
player, etc.
Playback
Analogue recording is possible.
Digital cable
Digitally recorded MiniDisc
Digital cable
Recording
Recording
■How to select the inputs
MiniDiscs are designed so that second generation digital copies
cannot be made. This is a specification of the SCMS (Serial
Copy Management System).
Press the INPUT SELECT button to select the input
from which you want to record.
INPUT
SELECT
Each time the INPUT SELECT but-
INPUT
ton is pressed, the input mode will
SELECT
appear for 1.5 seconds in the Character Information Display. Then, the
display will return to the normal
mode.
Digital input
(OPTICAL socket)
Digital input
(COAXIAL socket)
Analogue input
(LINE IN sockets)
● Each time the button is pressed, the active input will
be changed.
Recordings cannot be made in the following situations.
● If you try recording on a playback-only MiniDisc (commercially available music)
● If a MiniDisc is protected against accidental erasure
(Page 39)
● If there is no more recording time left on the disc (Pages
20, 22)
● When the “TOC FULL” message appears (Page 42)
● If a disc’s TOC has been damaged
● If you are trying to copy a digital signal that has been
encoded with the SCMS signal (Serial Copy Management
System)
About the recording level
■ When making a digital recording:
The recording level is automatically set the same as the
level of the original.
It is not necessary to adjust the recording level.
■ When recording from analogue inputs:
Before recording, adjust this unit’s recording level. (Page
22)
● When this unit is connected to the headphone socket
of some other equipment, the playback level of the
other equipment should also be adjusted.
● When this unit is connected to line sockets on the
other equipment, it is not necessary to adjust the
playback level of the other equipment. (The playback
volume of the other equipment will not have any effect on the recording.)
Note:
● When recording important selections, be sure to make
a preliminary test to ensure that the desired material is
being properly recorded.
MD-R3H
E-19

(Continued)
START
DISPLAY/CHARACTER
■Recording from a CD onto a MiniDisc
(One-Touch Editing)
1 Press the CD ■ button.
2 Load a compact disc and a recordable MiniDisc.
● The total number of tracks and the total playing time on the
CD will be displayed.
3 Press the START button.
● Playback of the first track and recording will begin.
● When all discs are recorded, recording will automatically stop.
DISPLAY
3
TOTAL
TOC 12 4 0dB OVERDISC
MD
CD
1 2 3 4 5 6 7
8 9 10 11 12
1 2 3 4 5 6 7
8 9 10 11 12
If recording does not begin:
When discs are loaded in all of the disc trays 1 - 3 and if all of
the tracks on the discs cannot be recorded, the number of tracks
that cannot be recorded will be displayed, and the CD DIRECT
PLAY button for the disc that cannot be recorded will flash. Then,
the number of tracks that can be recorded will appear, and the
CD DIRECT PLAY buttons for the discs that can be recorded
will light. Then, the unit will enter the recording stand-by mode.
Press the START button.
● Recording will begin, starting from the first track on disc tray
1.
● After recording all of the tracks that can be recorded, the unit
will automatically stop.
To stop recording:
Press the CD ■ or MD ■ button.
● It is not possible to pause recording.
TOC
REMAIN
1 2 3 4 5 6 7
8 9 10 11 12
Number of tracks that cannot
be recorded
TOC
TOTAL
1 2 3 4 5 6 7
8 9 10 11 12
Number of tracks that can be recorded
Number of tracks
already recorded
12
4 0dB OVERDISC TRACK DATE
Recordable time
(39 minites and 14 seconds)
TOTAL
MONO LP
“MONO LP” indicator
TOTAL
“MONO LP” will disappear.
To check the remaining time available for recording:
1 Load a MiniDisc.
2 Press the MD ■ button.
3 Press the DISPLAY/CHARACTER (DISPLAY) button.
● The number of tracks that have already been recorded and
the available time remaining will be displayed, and five seconds later the unit will return to the original display.
■To record for a long time in the monaural
mode (monaural long-play mode)
When a recording is made in the monaural long-play mode, it
can be about twice as long as the recording time available for a
stereo recording. The monaural long-play mode is very useful for
recording songs that were originally recorded in monaural, or for
recording talk programmes.
Press the REC MODE button on the remote control.
● Each time the button is pressed, the display will switch between the stereo mode and the monaural long-play mode.
● This mode cannot be changed whilst recording.
● The recording mode will not change back until you change it
manually. After you have made a recording in the monaural
long-play mode, it is recommended that you return the unit
to the stereo mode so that you won’t forget to do so later.
MD-R3H
E-20

(Continued)
■Recording desired tracks from a compact disc
onto a MiniDisc (Track Editing)
START
TRACK
3
4
TOC DISC
REMAIN
Track number at which recording starts
TOC
TOTAL
RECORD
Starting
track
1 2 3 4 5 6 7
8 9 10 11 12
3
Ending
track
1 Press the CD ■ button.
2 Load a compact disc and a recordable MiniDisc.
3 Select the track to start recording by turning the jog dial.
● The selected track number appears.
4 Press the TRACK button.
● To record a single track, skip to step 6.
5 Select the last track to record by repeatedly pressing the
TRACK button.
6 Press the START button.
● Recording will start from the tracks selected in disc 1, disc 2
and disc 3, in that order. After recording, the CD and the MD
will stop automatically.
To cancel the track edit operation:
Press the CD ■ button before pressing the START button.
To stop recording:
Press the MD ■ button.
● It is not possible to pause recording.
■APMS recording
1 Select tracks for APMS playback. (Page 15)
2 Load a recordable MiniDisc.
5
TOC
TOTAL
Total playing time from the
third track to the seventh track
3 4 5 6 7
3 Press the START button.
● APMS playback will start, and recording will start automatically.
● Programmed tracks will be recorded in order. After the unit
has finished recording the last track, recording will stop automatically.
To stop recording:
Press the MD ■ button.
■To record without using One-Touch Editing
Without using one-touch recording, the following operation allows
you to record from the first track.
1 Press the CD ■ button.
2 Load a compact disc and a recordable MiniDisc.
3 Press the REC ● button.
● The unit will enter the record stand-by mode.
4 Press the CD
To stop recording:
Press the MD ■ button.
● After the track number has been written on the MiniDisc, the
recording will stop. However, CD playback will continue.
0 6
button.
MD-R3H
E-21

(Continued)
■Sound synchro recording
RECORD
DISPLAY/CHARACTER
INPUT
SELECT
DISPLAY
REC
INPUT
SELECT
MD
3
When the digital optical input is selected
4
TOC
“PAUSE” indicator
12
SYNC REC
REC
CANCEL
1
4 0dB OVER
1
REC LEVEL
MIN
When music is played on another piece of equipment, such as
a stereo, that is connected to this unit, this unit will automatically
MAX
start recording on the MD.
1 Press the MD ■ button.
2 Insert a recordable MiniDisc.
3 Press the INPUT SELECT button to select the input. (Page
19)
● If you will be recording from the analogue input, adjust the
recording level after selecting the input.
4 Press the SYNC REC button on the remote control.
● The unit will enter the recording stand-by mode.
“SYNC STANDBY” will appear.
5 Start playing the music you want to record using the other
equipment.
● This unit will automatically start recording. When the other
equipment has finished playback, this unit will enter the recording stand-by mode. Press the MD ■ button to cancel it.
● To stop recording at any time, press the MD ■ button.
To adjust the recording level: (Analogue input only)
After you select analogue input in step 3, press the RECORD
(REC) button, and then play the music on the other equipment.
↓
Adjust the recording level using the REC LEVEL control.
● Adjust the recording level so that the maximum level does not
exceed “0 dB”.
● After the level is adjusted, stop the other equipment, and go
to step 3.
Manual recording:
12
0dB
4 0dB OVER
1
Select the input, and then press the RECORD (REC) button.
● The unit will enter the recording stand-by mode.
Press the MD 06 button.
● This unit will start recording.
● The space cut function will not work.
Space cut function:
● During sound synchro recording, if there are more than 3 seconds of silence in the playback sound, this unit will automatically enter the recording stand-by mode. ("SYNC STANDBY"
will appear.) Then, when further playback is started on the
other equipment, this unit will resume recording. (A silence of
up to 3 seconds can be created between tracks.)
● If there is noise between the tracks on the original recording,
the sound synchro recording or space cut function may not
work properly. If this happens, use manual recording.
● When recording tracks or sounds in which there are 3 seconds
or more of very small continuous sounds that you want to
record, use manual recording.
E-22
MD-R3H

(Continued)
INPUT
SELECT
ENTER
RECORD
RECORD
MIC
REC LEVEL
MIN
■Recording from the microphone
1 Connect the stereo microphone to the MIC socket on the main
MAX
unit.
2 Insert a recordable MiniDisc.
3 Press the INPUT SELECT button until "ANALOG" appears.
4 Press the RECORD button.
● The unit will enter the recording stand-by mode.
5 Adjust the recording level using the REC LEVEL control.
● Adjust the recording level so that the maximum level does
not exceed "0 dB".
6 Press the MD
● Recording will start.
To interrupt a recording:
Press the MD 06 button whilst recording.
● The unit will enter the recording stand-by mode.
● To resume recording, press the MD 06 button again.
● The track number will increase by one each time you interrupt
a recording.
To stop recording:
Press the MD ■ button.
06
button.
REC
1
(When recording starting from 3 minutes
and 32 seconds into the fourth track)
12
2
3
TOC
12
MD
4 0dB OVER
4 5 6 7
8 9 10 11 12 13
15 16 17 18
4 5 6 7
8 9 10 11 12 13
15 16 17 18
4 0dB OVER
1 2 3 4 5
■To re-record
When you want to re-record a track, erase the previously recorded track and start a new recording, or start recording from
any point within the old track. If you start recording from within
a track, all of the tracks and track names that follow will be
erased. If you want to erase all of the tracks and re-record the
disc, you can erase all of the tracks using the all erase function.
Then you simply perform the normal recording operations. (Page
30)
1 During playback, press the MD
06
button at the point where
you want to begin re-recording.
14
● The unit will pause.
2 Press the RECORD (REC) button.
● To cancel the operation, press the MD ■ button.
3 Press the ENTER button.
14
● This unit will be in the recording pause mode.
4 Select the recording source and start recording.
4
TOC
12
4 0dB OVER
1 2 3 4 5
E-23
MD-R3H

(Continued)
RECORD
REC
12
4 0dB OVER
1 2 3 4 5
● The track number increases by one.
AUTO
MARK
■To create your own track numbers whilst re-
cording
By creating your own track numbers whilst recording, you can
mark and later search for any passage you wish.
(You can also create your own track numbers during digital recording.)
Press the RECORD (REC) button during recording at the point
where you want to create a track number.
● After the track number has been written on the disc, the recording will continue.
Note:
● If you use the MD editing function, the recorded track numbers
can be changed, and the space between tracks can be
changed. (Page 25)
■Recording tracks as a single track
(Remote control operation)
When making an analogue recording, you can record several
pieces of music as a single track, without using the auto marker
function.
1 Press the AUTO MARK button on the remote control whilst
the recording is paused.
● “A.MARK OFF” will appear.
“A.MARK OFF” will appear.
12
SYNC REC
1
4 0dB OVER
1
REC
CANCEL
2 Press the MD
06
button.
● This unit will start recording.
Note:
● When making digital recordings using a CD player or an MD
player, track numbers will be created automatically regardless
of the setting of the auto marker function.
■To cancel the selection currently being re-
corded (Rec cancel)
Whilst making the following recordings, you can erase any tracks
you don’t want to record.
● Whilst making a sound synchro recording
● Whilst making a normal recording from an external unit, using
the auto marker function
● Whilst making a recording from a CD without using the track
edit or one-touch edit function
Press the REC CANCEL button whilst recording.
● The selection currently being recorded will be erased from the
MD and the unit will enter the normal recording stand-by
mode.
(The playback on the other unit will not stop.)
● Whilst a track is being erased, the sound from the other unit
will not be heard.
To resume recording:
Press the MD 06 button.
● To resume sound synchro recording, press the SYNC REC
button.
Note:
● The track currently being recorded cannot be cancelled whilst
you are making an APMS or random recording from a CD.
MD-R3H
E-24

EDITING
We will explain the 5 editing functions with which you can create your own original discs from recorded MiniDiscs.
Playback-only MiniDiscs cannot be edited.
DIVIDE
A track can be divided into two tracks. If two selections
were recorded as a single track because there was
not enough silent space between the pieces, you can
use the DIVIDE function to separate the selections.
This feature is also convenient for identifying specific
points with one selection so that you can locate those
points easily whenever you like.
(Page 27)
123
A
B
1234
AB
D
C
C
D
COMBINE
Two adjacent tracks (for example, the third and fourth
tracks) can be combined.
If there is a prolonged silent section in the middle of
a selection that is recorded, a single piece of music
may be recorded as two tracks. If this happens, these
two tracks can be combined into a single track.
(Page 28)
MOVE
The order of the recorded tracks can be changed. This
feature is different from programme play. A new track
order can be recorded directly on the disc. When the
power is turned off, the revised order will not be
changed.
(Page 29)
1234
ABC
1234
C
A
D
D
B
Programme move function
This function allows the track numbers to be automatically rearranged in the order specified for programmed
playback. The track numbers will be adjusted as
needed, automatically.
(The tracks that are not included in the programmed
selections will be put at the end of the new track numbers.)
(Page 29)
123
A
B
123
A
B
4
D
C
C
D
ERASE
Tracks you want to erase can be erased one at a time
or all at once.
Once a track has been erased, it cannot be recovered.
Double-check the track number before erasing it.
(Page 30)
1234
ABC
1234
B
A
DE
5
D
E
1234
A
B
CD
1234
CA
DB
TRACK/DISC NAME
You can assign titles to recorded tracks and to discs.
The characters must be capital and lowercase letters,
or symbols. Track and disc names can use up to 100
characters per name.
(Page 31)
TOC 4DISC
TOTAL
1 2 3 4 5 6 7
8 9 10 11 12 13
15 16 17 18
14
MD-R3H
E-25

(Continued)
■Using the editing function
We will show you some examples of how to use the editing functions. You can create a disc of your favourite selections
by recording tracks from a variety of input sources such as CDs, tapes, and radio broadcasts.
STEP 1
Recording tracks to
be edited on an MD
Digital recording
from a CD
A B C D D Talk E Live performance
Recording a
broadcast
Analogue recording
from tape
STEP 2
Putting the space
between tracks in order
STEP 3
Cutting unnecessary
sections
STEP4
Rearranging tracks in
your preferred order
STEP 5
Finish by putting
names on the disc
and tracks
A B C D D Talk E
The tracks are
combined using the
combine function.
A B C D Talk E F G CM H
A B C D E F G H
The tracks are
rearranged
using the programme
move function.
D E A C B H F G
(Disc name) (Track name)
The tracks are
divided using the
divide function.
Cut using the
erase function.
The track is moved
using the move function.
Live performance
Cut using the
erase function.
The editing functions are selected from the edit menu. The functions which can be selected from the edit menu will vary,
depending on the state in which an editing operation is started.
STEP 1 Edit menu display
/
NAME/TOC EDIT
Each time the button is pressed,
the edit menu will appear.
STEP 2 Edit menu selection
menu
Each time the dial is turned, the
next menu will appear in order.
Next menuPrevious
STEP 3 Editing start
ENTER
You can edit the selected
menus.
(Move function)
A different menu may be displayed.
(Track name function)
Within 10 seconds, perform
step 3.
To stop editing anytime,
press the MD button.
This function Can be selected in the following conditions.
Disc name
Track name
Divide
Combine
Move
Programme move
Erase
All erase
When stopped
The total number
(
of tracks appears
When stopped
Selection of
)
(
track numbers
During
playback
)
Playback
in the pause
mode
During recording/
in the recording
stand-by mode
E-26
MD-R3H
When entering
a programme

(Continued)
ENTER
NAME/TOC EDIT
■DIVIDE
1 Play the track which you want to divide into two, and press
the MD 06 button at the point where you want to divide the
track.
● The unit will enter the pause mode.
2 Press the NAME/TOC EDIT button, and then select “DIVIDE”
using the jog dial.
3 Within 10 seconds, press the ENTER button.
1
12
4 0dB OVER
4 5 6 7
8 9 10 11 12 13
15 16 17 18
(To divide the fourth track into two)
14
2
4 5 6 7
8 9 10 11 12 13
15 16 17 18
14
3
● To cancel the operation, press the MD ■ button.
4 Press the ENTER button again.
● The track is divided, and the unit is paused at the beginning
of the second of the two tracks.
● The numbers of the tracks which come after the divided track
are automatically increased by one.
● When a track which has been given a name is divided, the
two new tracks will have the same name and date. If the
“TOC FULL” message is seen, the second track may not be
given a name. (Page 42)
Notes:
● This unit can hold up to 255 tracks. However, even if the
number of tracks assigned has not reached 255, it might not
be possible to make any further divisions of tracks.
(Page 40)
● This function cannot be used if a programme is being entered
("PRGM" is lit: Page 15) or whilst in the random play mode
("RANDOM" is lit: Page 14). First, cancel the programme or
random play mode before trying to use this function.
4
TOC TRACK
REMAIN
1 2 3 4 5 6 7
8 9 10 11 12 13
15 16 17 18 19
14
MD-R3H
E-27

(Continued)
ENTER
■COMBINE
NAME/TOC EDIT
1 Whilst in the stop mode, select the second of the two tracks
you want to combine using the jog dial.
Or start playing the second of the two tracks you want to
combine, and then press the MD 06 button.
● The unit will enter the pause mode.
2 Press the NAME/TOC EDIT button, and then select “COM-
BINE” using the jog dial.
1
TRACK
REMAIN
(To combine the fourth track and the
fifth track)
2
REMAIN
3
4
TOC TRACK
REMAIN
1 2 3
4 5 6 7
8 9 10 11 12 13
15 16 17 18
1 2 3
4 5 6 7
8 9 10 11 12 13
15 16 17 18
1 2 3 4 5 6 7
8 9 10 11 12 13
15 16 17
3 Within 10 seconds, press the ENTER button.
● To cancel the operation, press the MD ■ button.
14
14
14
4 Press the ENTER button again.
● The two tracks are combined, and the unit is paused at the
beginning of the combined track.
● The numbers assigned to the tracks following the combined
track are automatically decreased by one.
When both tracks have a name:
● When only the first track has a name → That name will b e
used.
● When only the second of the two tracks has a name → Tha t
name will be used.
● When both tracks have a name → The na me of the fir st trac k
will be used.
To combine two non-continuous tracks:
(Example: the first and third tracks)
Move the third track to the second track using the MOVE function.
(Page 29)
Then, combine the first and second tracks using the COMBINE
function.
MD-R3H
Notes:
● Tracks recorded from analogue inputs cannot be combined
with tracks recorded from CDs or MDs using the digital inputs.
● Tracks recorded in the stereo mode cannot be combined with
tracks recorded in the monaural long-play mode.
● Tracks where either track’s recording time is less than 15
seconds may not be combined.
E-28

(Continued)
ENTER
NAME/TOC EDIT
1 Whilst in the stop mode, select the track you want to move
■MOVE
using the jog dial.
Or start playing the track to be moved, and then press the
MD 06 button.
● The unit will enter the pause mode.
2 Press the NAME/TOC EDIT button, and then select “MOVE”
using the jog dial.
1
TRACK
REMAIN
(To move the eighth track)
1 2 3
4 5 6 7
8 9 10 11 12 13
15 16 17 18
14
2
REMAIN
8 9 10 11 12 13
15 16 17 18
14
1 2 3
4 5 6 7
3
(To move to the fifth track)
4
TOC TRACK
REMAIN
1 2 3 4 5 6 7
8 9 10 11 12 13
15 16 17 18
14
3 Within 10 seconds, press the ENTER button.
● To cancel the operation, press the MD ■ button.
4 Select the direction to move the track using the jog dial or
the 5/4 button on the remote control.
● To increase the track number ....
● To decrease the track number ....
4
5
5 Press the ENTER button again.
● The track is moved, and the unit is stopped at the beginning
of the track.
Notes:
● When a track has been moved, the other tracks which are
affected will be assigned new track numbers automatically.
Example: When moving the fifth track to the third track, the old
● This function cannot be used if a programme is being entered
third track will become the new fourth track, and the
old fourth track will become the new fifth track.
("PRGM" is lit: Page 15) or whilst in the random play mode
("RANDOM" is lit: Page 14). First, cancel the programme or
random play mode before trying to use this function.
■Programmed move
1
2
PRGM
PRGM
TOTAL
TOTAL
1 3 5 7
9 111814
1 3 5 7
9 111814
1 Select the tracks you want to move and enter them into a
programme. (Page 15)
2 Make sure that the “PRGM” indicator is lit, and then press
the NAME/TOC EDIT button.
● “PRGM MOVE” will appear.
3 Within 10 seconds, press the ENTER button.
3
● To cancel the operation, press the MD ■ button.
4 Press the ENTER button again.
4
TOC TRACK
REMAIN
1 2 3 4 5 6 7
8 9 10 11 12 13
15 16 17 18
14
MD-R3H
● The tracks will be moved, and the programmed move mode
will end.
Notes:
● The tracks that are not included in the programmed selections
will be put at the end of the new track numbers.
● When the same track has been entered into the programme
twice or more, the last programmed position will have priority.
E-29

(Continued)
ENTER
NAME/TOC EDIT
■ERASE
To erase tracks one at a time:
1 Whilst in the stop mode, select the track to be erased using
the jog dial.
Or start playing the track which you want to erase, and press
the MD 06 button.
● The unit will enter the pause mode.
2 Press the NAME/TOC EDIT button, and then select “ERASE”
1
TRACK
REMAIN
(To erase the sixth track)
1 2 3 4 5 6 7
8 9 10 11 12 13
15 16 17 18
14
2
TRACK
REMAIN
1 2 3 4 5 6 7
8 9 10 11 12 13
15 16 17 18
14
3
4
TOC TRACK
REMAIN
1 2 3 4 5 6 7
8 9 10 11 12 13
15 16 17
14
using the jog dial.
3 Within 10 seconds, press the ENTER button.
● To cancel the operation, press the MD ■ button.
4 Press the ENTER button again.
● The track is erased, and the unit is paused at the beginning
of the previous track.
Notes:
● Once a track has been erased, it cannot be recovered. Double-check the track number before erasing it.
● When a track is erased, the numbers assigned to the tracks
following the erased track will be automatically decreased by
one.
● When a track is erased, the track name will be erased at the
same time.
To erase all of the tracks at once:
1
TRACK
TOTAL
1 2 3 4 5 6 7
8 9 10 11 12 13
15 16 17 18
14
1 Press the MD ■ button.
● The total number of tracks and the total playing time for the
MD will be displayed.
2 Press the NAME/TOC EDIT button, and then select “ALL
2
ERASE” using the jog dial.
TOTAL
1 2 3 4 5 6 7
8 9 10 11 12 13
15 16 17 18
14
3 Within 10 seconds, press the ENTER button.
● To cancel the operation, press the MD ■ button.
4 Press the ENTER button again.
3
4
TOC DISC
TOTAL
● All of the track numbers and track names will be erased.
Note:
● This function cannot be used if a programme is being entered
("PRGM" is lit: Page 15) or whilst in the random play mode
("RANDOM" is lit: Page 14). First, cancel the programme or
random play mode before trying to use this function.
E-30
MD-R3H
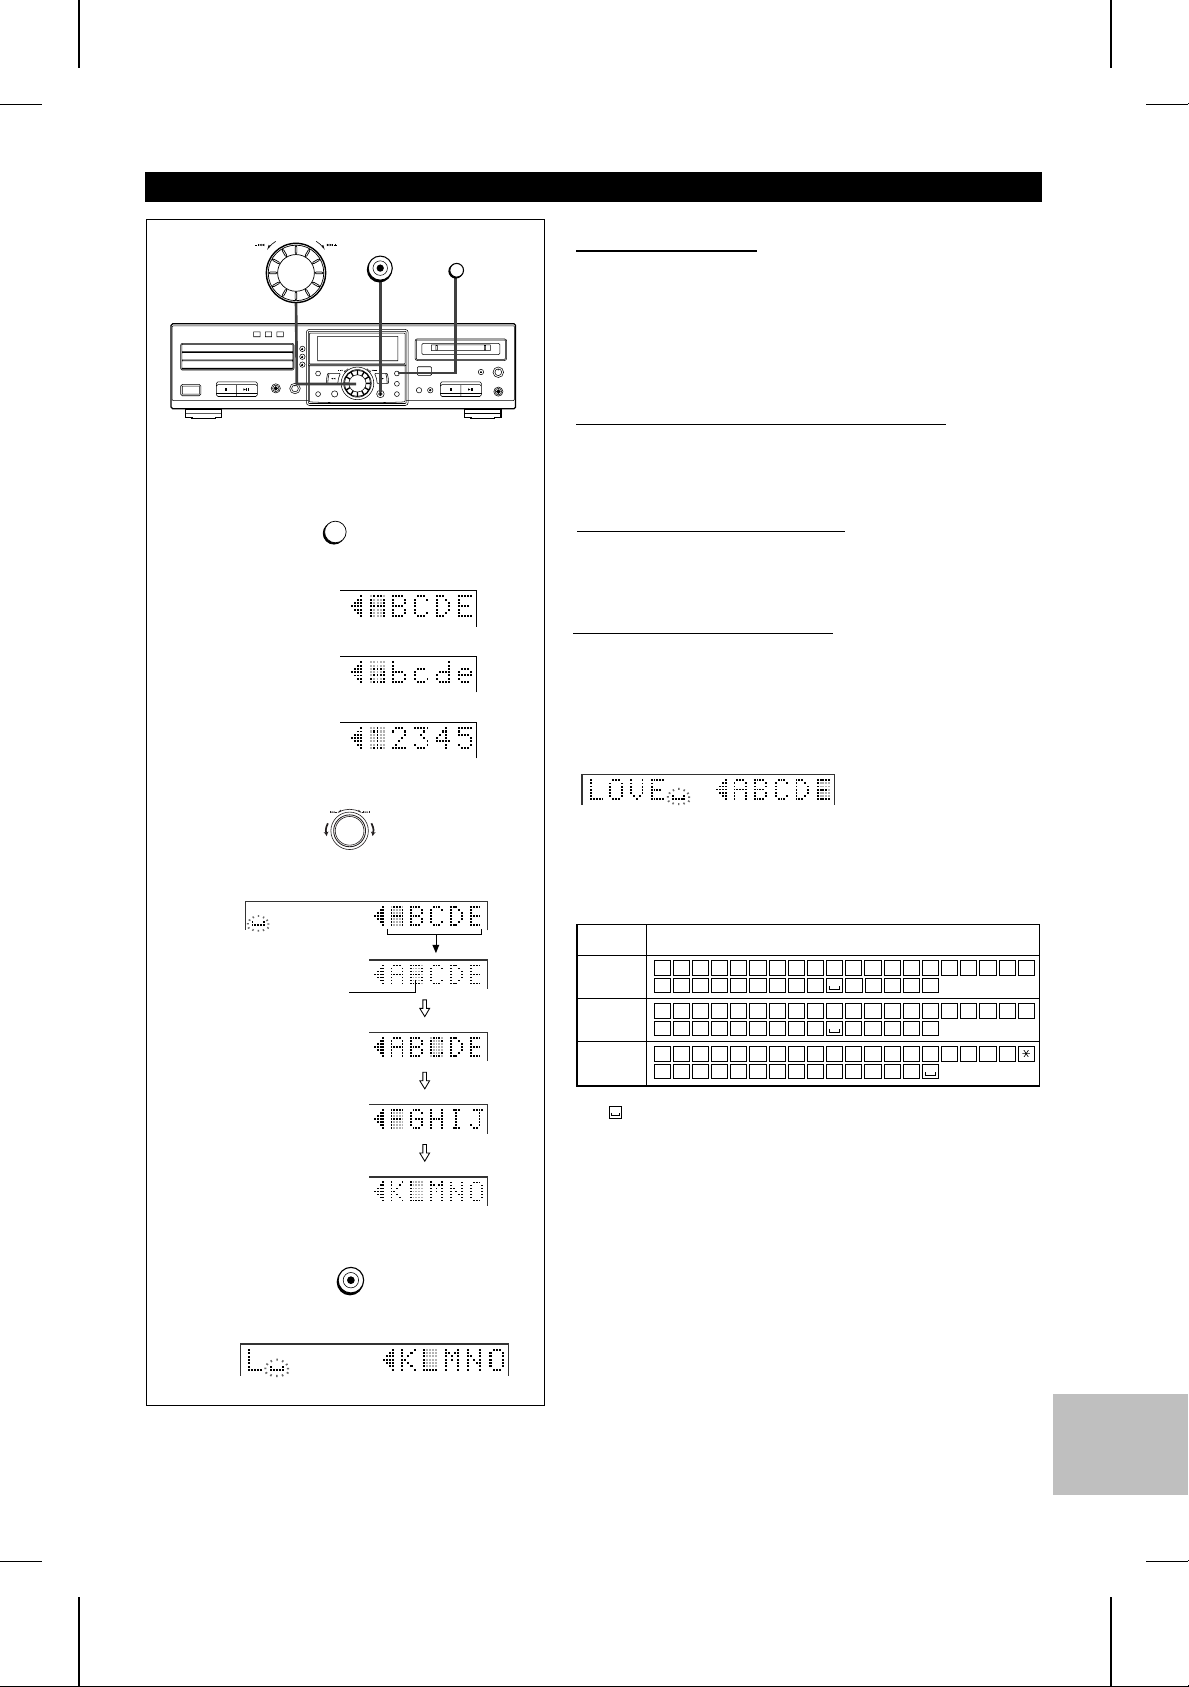
(Continued)
ENTER
STEP 1
DISPLAY/CHARACTER
Each time the button is pressed, the available characters
will switch as follows:
Alphabet
(capital letters)
Alphabet
(lower-case letters)
Numbers or symbols
STEP 2
Previous character Next character
DISPLAY/CHARACTER
■Track/disc name
● Up to 255 tracks can be named on each disc, and each disc
can be given a disc name.
When naming discs and tracks, the characters should
be entered as follows:
To select the type of characters: (STEP 1)
Press the DISPLAY/CHARACTER button.
To select characters: (STEP 2)
Select characters using the jog dial.
To enter characters: (STEP 3)
Press the ENTER button.
Repeat STEP 1 to STEP 3 as necessary to enter the characters
in the name.
Each time the dial is turned, the cursor (■) over
the character will move.
Cursor
When the DISPLAY/
CHARACTER button is pressed
with the cursor at the edge
of the display, another 5
characters will be displayed.
Move the cursor to the
character you want.
STEP 3
ENTER
The selected character will be entered in the
character input column.
Type of characters used:
Type of
characters
A
Capital
letters
Lower-case
letters
Symbols
B C D E F G H I J K L M N O P Q R S T
U V W X Y Z
a b c d e f g h i j k l m n o p q r s t
u v w x y z . ,
1 2 3 4 5 6 7 8 9 0 ! " # $ % & '
+ ,-./: ; < = >
● means a space.
Notes:
Number of characters you can enter
■ Disc names and track names
Up to 100 characters (including spaces) can be entered for
each name. If more than 100 characters are entered, “NAME
FULL” will appear.
■ Total number of characters per MiniDisc
A total of approximately 1700 characters can be used for all
of the disc and track names. If more than 1700 characters
are entered, “TOC FULL 1” will appear.
Characters <symbols>
/
/
,
,
? @ _ `
. ,
! " # $
! " # $
( )
MD-R3H
E-31

(Continued)
■To create a disc name
ENTER
DISPLAY/CHARACTER
NAME/TOC EDIT
A name for the whole disc. Disc names are displayed when an
MD is inserted.
1 Press the MD ■ button.
● The total number of tracks and the total playing time for an
MD will appear.
2 Press the NAME/TOC EDIT button, and then select “DISC
NAME” using the jog dial.
1
DISC
TOTAL
1 2 3 4 5 6 7
8 9 10 11 12 13
15 16 17 18
14
3 Within 10 seconds, press the ENTER button.
● The unit will enter the character input mode.
4 Press the DISPLAY/CHARACTER button to select the type
of characters you want to use. (Page 31)
Total number
of tracks
Total playing
time
5 Select the character you want using the jog dial.
6 Press the ENTER button to enter the character.
2
TOTAL
1 2 3 4 5 6 7
8 9 10 11 12 13
15 16 17 18
14
● Repeat steps 4 to 6 above to enter the characters in the
name. When the next character’s type is the same as the
previous character, step 4 can be skipped.
7 After entering all of the characters in the name, press the
3
DISC
TOTAL
1 2 3 4 5 6 7
8 9 10 11 12 13
15 16 17 18
14
NAME/TOC EDIT button.
● The disc name will be recorded.
4
● If you have selected capital letters
5
(If you have selected "B")
6
Disc name recorded
7
TOC DISC
TOTAL
1 2 3 4 5 6 7
8 9 10 11 12 13
15 16 17 18
Note:
● This function cannot be used if a programme is being entered
("PRGM" is lit: Page 15) or whilst in the random play mode
("RANDOM" is lit: Page 14). First, cancel the programme or
random play mode before trying to use this function.
14
MD-R3H
E-32

(Continued)
1
2
3
DISPLAY/CHARACTER
ENTER
(To name the first track)
TRACK
NAME/TOC EDIT
1 2 3 4 5 6 7
8 9 10 11 12 13
15 16 17 18
1 2 3 4 5 6 7
8 9 10 11 12 13
15 16 17 18
■To create a track name
Name each track.
A track’s name will be displayed whenever you select it and during playback.
1 During playback, press the NAME/TOC EDIT button.
● “TRACK NAME” will appear.
2 Within 10 seconds, press the ENTER button.
● The unit will enter the character input mode.
● The track you are listening to will be played repeatedly.
3 Press the DISPLAY/CHARACTER button to select the type of
14
characters. (Page 31)
4 Select the character you want using the jog dial.
5 Press the ENTER button to enter the character.
● Repeat steps 3 to 5 above to enter characters in the name.
When the next character’s type is the same as the previous
14
character, step 3 can be skipped.
6 After entering all of the characters in the name, press the
NAME/TOC EDIT button.
● The track name will be recorded.
● The unit will return to normal playback.
(If you have selected capital letters)
4
(If you select “L”)
5
Track name recorded
Notes:
● This function cannot be used if a programme is being entered
("PRGM" is lit: Page 15) or whilst in the random play mode
("RANDOM" is lit: Page 14). First, cancel the programme or
random play mode before trying to use this function.
● The track name function can be used whilst in the stop mode
(when selecting a track), in the pause mode, or in the recording mode. (Select “TRACK NAME” from the edit menu.)
● If you create a track name whilst recording the track, make
sure you finish entering the name before you finish recording
the track.
If the end of the recording is reached before you have entered
the complete name, only the characters entered before the
recording ended will be recorded.
6
TOC TRACK
TOTAL
1 2 3 4 5 6 7
8 9 10 11 12 13
15 16 17 18
14
MD-R3H
E-33

(Continued)
1
2
3
ENTER
DISC
TOTAL
NAME/TOC EDIT
1 2 3 4 5 6 7
8 9 10 11 12 13
15 16 17 18
■To change disc names and track names
To change disc names:
1 During playback, press the MD ■ button.
2 Press the NAME/TOC EDIT button.
3 Within 5 seconds, press the ENTER button.
● The unit will enter the character input mode.
● To cancel this operation, press the MD ■ button.
Now you can erase or add characters. (Page 35)
14
To change track names:
1
TRACK
4 5 6 7
8 9 10 11 12 13
15 16 17 18
14
1 Whilst in the stop mode, select the track name you want to
change, using the jog dial.
2 Press the NAME/TOC EDIT button.
3 Within 5 seconds, press the ENTER button.
● The unit will enter the character input mode.
● To cancel this operation, press the MD ■ button.
2
Now you can erase or add characters. (Page 35)
3
E-34
MD-R3H

(Continued)
DISPLAY/CHARACTER
NAME/TOC EDIT
DELETE/CLEAR
TIMER
ENTER
■To erase a character
After performing steps 1 to 3 on page 34, do the following:
Example: To change “BESUT” to “BEST”
4 Press the
erase begin flashing.
3/2
button to make the character you want to
5 Press the DELETE/CLEAR button.
6 Press the NAME/TOC EDIT button.
4
(To erase the letter "U")
5
● The character will disappear.
6
4
TOC DISC
(To add a character to left of the "S")
■To add a character
After performing steps 1 to 3 on page 34, do the following:
Example: To change “BST” to “BEST”
4 Press the
at the place you want to add a letter.
3/2
button to make the character begin flashing
5 Select the character you want to add, using the jog dial. Then,
5
(To add the letter "E")
● The original characters will move
to the right by one.
6
TOC DISC
press the ENTER button.
6 Press the NAME/TOC EDIT button.
■To correct a spelling
After putting the unit in the character input mode, erase the wrong
character. Then, enter the correct character.
■To erase disc names or track names
After performing steps 1 to 3 on page 34, do the following:
Press the DELETE/CLEAR button for at least 2 seconds, and
then press the ENTER button.
● The disc or track name will be erased.
E-35
MD-R3H

HOW TO USE THE BUILT-IN TIMER
● Before setting the timer, make sure that the clock setting is correct. (Pages 8 - 9)
● The start time and stop time, which are set with this operation, will be kept in memory until the AC power lead is
unplugged or the setting is changed.
1
2
3
4
5
ENTER
DELETE/CLEAR
TIMER
■Timer playback
Before timer playback, the following preparations are required.
● Load a CD or MD.
● Select a CD to be played.
1 Whilst in the stop mode, press the TIMER button, and then
turn the jog dial until "TIMER SET" appears.
2 Within 10 seconds, press the ENTER button, and then select
the timer mode using the jog dial.
3 Press the ENTER button.
● The start time setting display will appear.
4 Enter the “hour”, using the jog dial. Then, press the ENTER
button.
5 Enter the “minute”, using the jog dial. Then, press the ENTER
button.
● The stop time setting display will appear.
6 Enter the “hour”, using the jog dial. Then, press the ENTER
button.
7 Enter the “minute”, using the jog dial. Then, press the ENTER
button.
● The start and stop times are now set.
● The stop time setting display will appear.
● The “hours” display will be automatically increased one hour.
6
7
8
1
(Timer standby mode)
2
Timer playback indicator
TIMER
8 Select the source programme using the jog dial.
MD → CD
9 Press the ENTER button.
Setting for timer playback:
1 Press the TIMER button.
● If the display shows the wrong mode, correct it using the jog
dial.
2 Press the ENTER button.
● The settings will appear in order, and the unit will enter the
timer playback stand-by mode. (The power will be turned off.)
Preparations for any equipment connected to this unit
Any equipment, such as a stereo, that is connected to this unit
should be set up in advance as follows:
● Adjust the sound level of the equipment.
● If it has a timer function, set it so that the power will be
turned on at the same time as the timer’s start time.
● Adjust the playback volume.
MD-R3H
E-36

(Continued)
1
2
3
4
5
ENTER
DELETE/CLEAR
TIMER
REC LEVEL
MIN
■Timer recording
MAX
Before timer recording, the following preparations are required.
● Load a recordable MD.
1 Whilst in the stop mode, press the TIMER button, and then
turn the jog dial until "TIMER SET" appears.
2 Within 10 seconds, press the ENTER button, and then select
the timer mode using the jog dial.
3 Press the ENTER button.
● The start time setting display will appear.
4 Enter the “hour”, using the jog dial. Then, press the ENTER
button.
5 Enter the “minute”, using the jog dial. Then, press the ENTER
button.
● The stop time setting display will appear.
6 Enter the “hour”, using the jog dial. Then, press the ENTER
button.
7 Enter the “minute”, using the jog dial. Then, press the ENTER
button.
● The start and stop times are now set.
8 Select the source programme using the jog dial.
ANALOG → DIGITAL OPT → DIGITAL COAX
● If you select the analogue input, adjust the recording level.
(Page 22)
9 Press the ENTER button.
● The stop time setting display will appear.
● The “hours” display will be automatically increased one hour.
6
7
8
When the digital optical input was selected
1
(Timer standby mode)
2
Timer recording indicator
TIMER REC
Setting timer for recording:
1 Press the TIMER button.
● If the display shows the wrong mode, correct it using the jog
dial.
2 Press the ENTER button.
● The settings will appear in order, and the unit will enter the
timer recording stand-by mode. (The power will be turned off.)
Preparations for any equipment connected to this unit
Any equipment, such as a stereo, that is connected to this unit
should be set up in advance as follows:
● Set it up so that music to be recorded will be played at the
same time as the timer’s start time.
MD-R3H
E-37

(Continued)
(Timer confirmation mode)
ENTER
DELETE/CLEAR
TIMER
■To check the timer setting
1 Whilst in the timer stand-by mode, press the TIMER button.
● If the display shows the wrong mode, correct it using the jog
dial.
2 Turn the jog dial until “TIMER CALL” appears.
3 Press the ENTER button within 10 seconds.
● The timer settings will appear in order, and then the original
display will reappear.
■To cancel the timer operation
(Timer cancel mode)
When the power is turned on, the timer will be cancelled.
The timer operation can also be cancelled as follows.
1 Whilst in the timer stand-by mode, press the TIMER button.
● If the display shows the wrong mode, correct it using the jog
dial.
2 Turn the jog dial until “TIMER CANCEL” appears.
3 Press the ENTER button.
● The timer operation will be cancelled. ("TIMER" or “TIMER
REC” will go out.) The start and stop times will still be stored.
Notes:
● When the CD or MD is played to the end, playback will stop
before the stop time.
If you wish to play to the stop time, set repeat play for the
CD or MD.
● This timer in this unit cannot be used to control equipment
connected to this unit. You must use the timer in the other
equipment, if it has one.
● The timer payback and timer recording functions cannot be
used at the same time.
In the following cases, the timer recording function will not work.
● When a MiniDisc has not been inserted.
● When a playback-only MiniDisc is inserted.
● When the MiniDisc you inserted is protected against acciden-
tal erasure.
● When there is no recording space left on the MiniDisc you
inserted (when the "TOC FULL" or "DISC FULL" messages
appear).
MD-R3H
E-38

WHAT IS A MINIDISC?
The disc is stored in a cartridge. You can handle it easily without worrying about dust, fingerprints, etc.
However, dust entering the opening of the cartridge, dirt on the cartridge, warping, etc. may cause malfunctions. Please
note the following.
■Handling the MiniDisc
Do not touch the disc directly!
Do not open the shutter or touch the disc directly.
If the shutter is opened forcibly, it may break.
Disc
Shutter
Where not to store discs:
Do not store discs in places with high temperatures or humidity. Specifically, do not leave discs in places exposed to
direct sunlight or in cars with doors and windows closed.
Do not leave discs in places where sand can get into the
cartridge easily (e.g., beaches).
Regular cleaning:
If the surface of the cartridge becomes dusty or dirty, clean
it with a dry cloth.
Cartridge
■To prevent recorded discs from being
erased accidentally
(accidental erasure prevention)
Slide the accidental erase prevention tab, located on the
side of the disc, in the direction indicated by the arrow.
● The disc will then be protected against accidental erasure.
● To add a recording to such a disc, slide the accidental
erase prevention tab back to its original position.
Tab
Protected against
accidental erasure
■What is a MiniDisc?
● A MiniDisc is a 64 mm (2-1/2") diameter disc which is
stored in a cartridge. MiniDiscs are easy to handle, compared to compact discs, because they are protected
against dust and scratches.
● Recording and playback use a digital system with a
sound quality that is similar to that found on compact
discs.
MiniDiscs cannot twist or stretch like tapes. The quality
of sound will not deteriorate. MiniDiscs are extremely
durable.
● Never disassemble MiniDiscs.
■Adaptive TRansformed Acoustic Coding
[ATRAC]
MD-R3H
The ATRAC (Adaptive TRansformed Acoustic Coding) is a
new technology that is designed to eliminate the information
in sounds which you can not hear and to compress the
remaining sound data so that the recording uses about 1/5
of the original sound information.
Sound data is analysed and filtered to take advantage of
psycho acoustic masking. The acoustic quality of the sound
is not impaired.
E-39
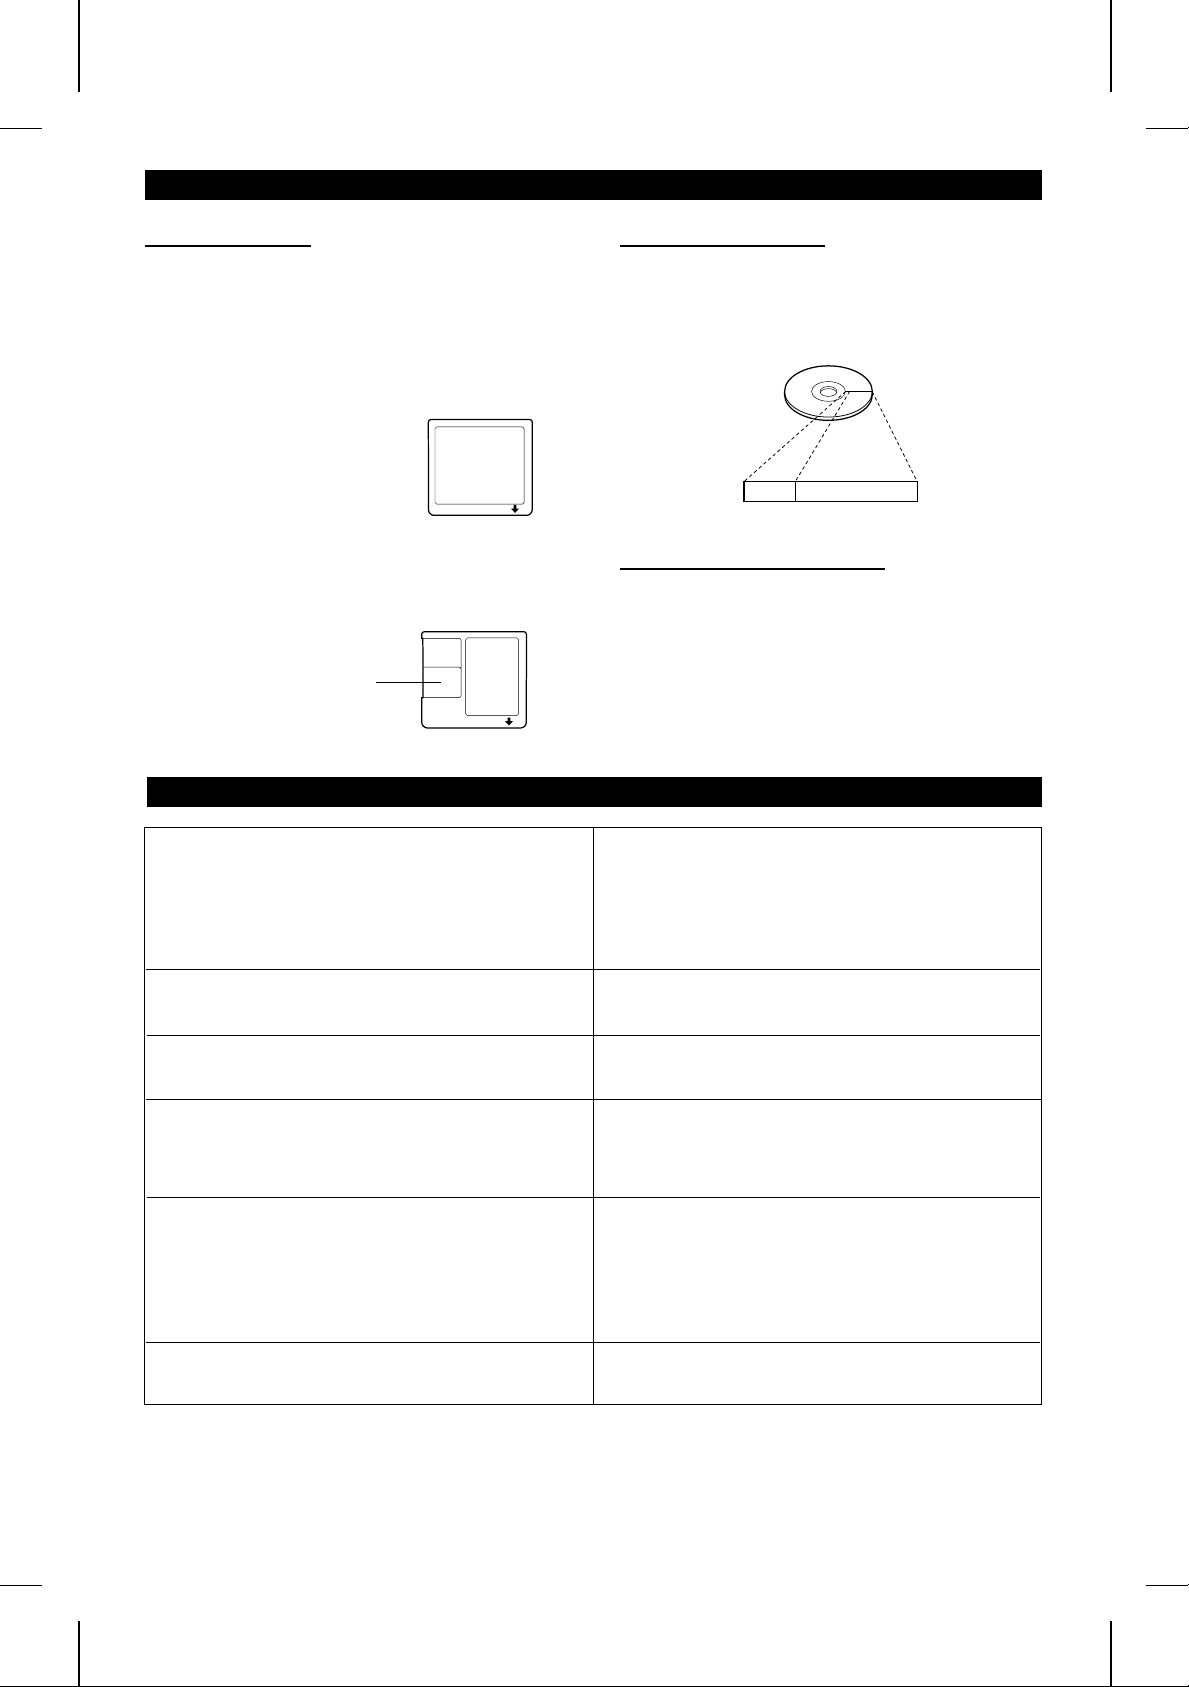
(Continued)
■Types of discs
There are two types of discs: playback-only and recordable
type.
● Playback-only MiniDisc:
This type of MiniDisc is used for commercially available
pre-recorded music. This is the same kind of optical disc
as CDs. Playback is performed using an optical pickup.
(Recording and editing are not possible.)
A shutter will be used
on only one side (back).
● Recordable MiniDisc:
This is a “raw disc” on which recording can be performed.
A magneto optical disc is used.
Recordings are made using a laser and magnetic field.
Repeated recording is possible.
Shutters will be used on
both sides.
MINIDISC SYSTEM LIMITATIONS
■High-speed access
A unique feature of the MiniDisc is the ability to locate the
beginning of a desired track at high speed.
This is because the track number and track name data is
stored in a TOC (Table of Contents).
Disc
TOC
Sound data
■Shock Resistant Memory
During playback, approximately 10 seconds of information
is stored in the semiconductor memory. Therefore, even
when the pickup cannot read information for a second or
two due to an external shock, the sound continues without
interruption because the information stored in memory is
output.
"TOC FULL" may be displayed even if the maximum recording
time on a MiniDisc has not been reached.
Even if the maximum MiniDisc recording time has not been
reached, "DISC FULL" may be displayed.
Even if several short tracks are erased, the remaining recording time may not show an increase.
Two tracks may not be combined in editing. For MiniDiscs on which repeated recording and editing oper-
The total of the recorded time and time remaining on a disc
may not add up to the maximum possible recording time.
If you fast reverse or fast forward over recorded tracks,
the sound may skip.
In the MD system, the recording area on an MD is programmed in a TOC. If tracks are recorded, edited and partial
erased repeatedly, the TOC will fill up with information about
the tracks, even though the track limit (255 tracks) has not
been reached. If that happens, further recording will be impossible. (If you use the all erase function, the MD can be
reused as a blank MD.)
If there is a flaw on the MiniDisc surface, that area is automatically excluded from the space available for recording.
Therefore, the available recording time will be reduced.
When the remaining recording time of a disc is displayed,
short tracks less than 8 seconds long may not be included in
the total.
ations were performed, the COMBINE function may not work.
Tracks recorded from a CD (digital recordings) and tracks recorded from some other equipment (analogue recordings) cannot be combined.
A cluster (about 2 seconds) is normally the minimum unit of
recording. So, even if a track is less than 2 seconds long, it
will use about 2 seconds of space on the disc. Therefore, the
time actually available for recording may be less than the remaining time displayed.
If there are scratches on discs, those sections will be automatically avoided (no recording will be placed in those sections). Therefore, the recording time will be reduced.
An MD which has been recorded or edited repeatedly may
skip during fast reverse or fast forward.
MD-R3H
E-40

TROUBLESHOOTING
■If a problem occurs
If this unit functions abnormally during operation, first check the following items. If the unit continues to function abnormally,
or if an abnormality appears other than listed below, turn off the player’s power and disconnect the AC power plug, then
consult your SHARP dealer or service personnel.
General
SYMPTOM
The clock is wrong. Did a power failure occur? Try setting it again.
When a button is pressed, the unit does
not respond.
Radios make unusual noise or the picture
on the TV screen is distorted.
CD playback
SYMPTOM POSSIBLE CAUSE REMEDY
Even though a disc has been loaded, "NO
DISC" or "ERROR" is displayed.
Playback stops in the middle of a track,
or playback is not performed properly.
Playback sounds are skipped.
The disc is loaded up-side down.
The disc is very dirty. Clean the disc.
The disc does not satisfy the standards. Load the correct disc.
Is the unit located near excessive vibra-
tions?
Has condensation formed inside the unit?
POSSIBLE CAUSE REMEDY
Turn the power off and on again, and
then retry the operation.
When a radio or TV which uses an indoor aerial is placed near the unit, the
picture on the TV screen may be distorted or the radio may not function properly.
It is recommended that you use an outdoor aerial.
Load the disc with the correct side up.
Place the unit on a firm, level surface free
from vibration.
Remove the disc and leave the power
turned on. The unit should function properly
in about 1 hour.
MD recording and playback
SYMPTOM POSSIBLE CAUSE REMEDY
A recording cannot be made. Is the MiniDisc protected against acci-
Even though a disc has been loaded,
“NO DISC” or “ERROR” is displayed.
Playback stops in the middle of a track,
or playback is not performed properly.
Playback sounds are skipped.
dental erasure?
Did you try to make recording on a playback-only MiniDisc?
Can you see the “TOC FULL” message
in the display?
Is the disc scratched?
Is the unit located near excessive vibration?
Is the unit located near excessive vibrations?
Has condensation formed inside the unit?
Remote control
SYMPTOM POSSIBLE CAUSE REMEDY
The remote control does not function or
does not operate properly.
The power cannot be turned on from the
remote control.
The batteries (polarity) are not inserted
properly.
The batteries inside the remote control
are dead.
The remote control is operated from an
incorrect distance or angle.
No disc has been loaded. Load a disc.
Is the AC power lead plugged in? Connect the AC power lead.
Slide the accidental erase prevention tab
back to its original position.
Replace it with a recordable disc.
Put in another recordable disc with recording space on it.
Replace the disc.
Place the unit on a firm, level surface
free from vibration.
Place the unit on a firm, level surface free
from vibration.
Remove the disc and leave the power
turned on. The unit should function properly in about 1 hour.
Insert properly.
Replace the batteries.
Operate it within a range of 0.2 m (8") to
6 m (20’) and within an angle of 15o to
either side of centre.
MD-R3H
E-41

(Continued)
When an error message is displayed, proceed as follows:
Error messages Meaning Remedy
BLANK MD ●Nothing is recorded.
Can’t COPY ●You tried to record from a disc which you are
Can’t EDIT ●A track cannot be edited. ● Change the stop position of the track and then
Can’t REC ●Recording cannot be performed correctly due to
DEFECT ●Since this disc has scratches on it, the
CH ERROR ●The CD changer is not working properly. ●Press the ON/STAND-BY button to enter the
Din UNLOCK ●Incorrect digital signals are input. ●Connect correct digital signals.
DISC ERR ●The disc is damaged or there is no TOC on the
DISC FULL ●The disc is out of recording space. ●Replace the disc with another recordable disc.
EDIT OVER ●There is no space left to record the remainder
FOCUS ERROR ●The proper focus cannot be obtained. ●Reload the MiniDisc.
MD ERROR ●The unit has determined that it is out of order
MECHA ERR* ●There is a mechanical problem and the disc is
NAME FULL ●The number of characters for the disc name or
*NO DISC* ●A disc has not been loaded.
NOT AUDIO ●The data recorded on this disc is not audio data. ●Select another track.
PLAYBACK MD ●You tried to record on a playback-only disc.
PROTECTED ●The MiniDisc is write protected. ●Move the write protection tab back to its original
TEMP OVER ●The temperature is too high. ●Press the ON/STAND-BY button to enter the
TOC ERR* ●The disc has a large amount of damage.
TOC FULL* ●There is no space left for recording character
TOC W ERROR ●The unit has determined that it is abnormal by
U TOC ERR* ●The TOC information on this disc does not
U TOC W ERR ●The TOC information could not be created
? DISC ●The data contains an error. ●Replace the disc with another disc.
0 0:00 ●Music is not being recorded. ●Replace the disc with a recorded disc.
(Neither music nor a disc name have been
recorded on this MD.)
not allowed to copy.
vibration.
recording operation was skipped.
disc.
of the CD.
by performing a self-diagnosis.
not working properly.
track name exceeds 100.
●The disc data cannot be read.
●The data of disc names and track names are
not able to move from playback-only discs.
●TOC information cannot be read.
●The MD does not meet the specifications for
MDs.
information (track names, disc names, etc.)
performing a self-diagnosis.
meet the MD specifications or it cannot be read.
properly due to a mechanical shock or to
scratches on the disc.
●Replace the disc with a recorded disc.
●Replace it with another disc which you can
copy from (regular CD).
try editing it.
●Move the unit away from the source of vibration.
●Replace the disc with another recordable disc.
stand-by mode, and disconnect the AC power
lead from the AC socket. Then connect the AC
power lead, and turn on the power again.
●Use the analogue input socket.
●Reload the disc or replace it.
●Replace the MD with another recordable disc.
●Ask the store where you purchased this unit,
about repairs.
●Press the ON/STAND-BY button to enter the
stand-by mode, and press the 7 button.
●Shorten the disc or track name.
●Load a disc.
●Reload the disc.
●Replace the disc.
●Replace it with a recordable MiniDisc.
●Edit only the sound.
position.
stand-by mode, and wait for a while.
●Replace the disc with another disc.
●Replace it with another recordable disc.
●Ask the store where you purchased this unit,
about repairs.
●Replace it with another disc.
●Erase all the data, and try recording.
●Press the ON/STAND-BY button to enter the
stand-by mode, and try to write the TOC again.
(Remove any source of shock or vibration whilst
writing.)
*: Number or symbol
E-42
MD-R3H

(Continued)
■Moisture condensation
In the following cases, condensation may form inside
the unit.
● Shortly after turning on a heater.
● When the unit is placed in a room where there is exces-
sive steam or moisture.
● When the unit is moved from a cool place to a warm
place.
When the unit has condensation inside, the disc signals
cannot be read, and the product may not function properly.
● If this happens, remove the disc, and open the disc tray.
The condensation should evaporate in approximately 1
hour. The unit will then function properly.
■If a power failure occurs during recording
If the AC power plug is disconnected from the AC socket
or a power failure occurs during recording (before the
TOC information has been recorded on the disc), the
audio portion being recorded at that time will be erased.
When a recording is being added to a MiniDisc which
already has a recording on it, if the TOC is not updated
before the power failure, the added recording will be
erased.
● If a power failure occurs or the AC power lead is disconnected for about 10 minutes, when power is restored,
the TOC will be written on the disc.
■If a problem occurs
If this product is subjected to strong external interference (mechanical shock, excessive static electricity, abnormal supply voltage due to lightning, etc.) or if it is
operated incorrectly, it may malfunction or the display
may not function correctly. If such a problem occurs,
do the following:
Unplug the AC power lead from the AC socket.
➀
Wait about 20 - 30 seconds and then plug the AC power
➁
lead back into the AC socket.
Press the RESET button on the back of the unit.
➂
RESET
Pen, pencil, etc.
● When the RESET button is pressed, all of the settings
in memory will be erased.
● If strange sounds, smells or smoke come out of the unit
or if a foreign object falls into the unit, turn off the power,
unplug the AC power lead from the AC socket, immediately. Contact the shop where you purchased the
unit.
TRANSPORTING THE UNIT
1,4,5 2
When transporting the unit, proceed as follows:
1 Press the ON/STAND-BY button to turn the power on.
2
2 Remove all discs CDs/MD from the unit.
3 Press the RESET button on the rear of the unit.
● When the RESET button is pressed, all of the settings in memory will be erased.
4 Make sure "TIME ADJUST" appears in the display, then press
the ON/STAND-BY button to turn the power on again.
5 Press the ON/STAND-BY button to enter the stand-by mode.
6 Make sure the message on the display has changed from
"GOOD BYE!" to "TIME ADJUST", and then unplug the AC
power lead from the AC socket.
E-43
MD-R3H

MAINTENANCE
■External care
● Periodically wipe the cabinet with a soft cloth and dilute soap
solution, then wipe with a dry cloth.
● Do not use chemically treated cleaning cloths or other chemicals.
SPECIFICATIONS
As a part of our policy of continuous improvement, SHARP reserves the right to make design and specification changes
for product improvement without prior notice. The performance specification figures indicated are nominal values of
production units. There may be some deviations from these values in individual units.
●General
Type: MD/CD Deck
Power source: AC 230 V, 50 Hz
Power consumption: 20 W
Dimensions: Width: 430 mm (16-15/16")
Weight: 5.1 kg (11.3 lbs)
Input sockets
Socket
name
LINE IN Pin socket Over
OPTICAL
IN (Optical)
COAXIAL
(Coaxial)
MIC (Micro-
phone)
Socket
shape
Square
optical
connector
Pin socket 75 ohms 500 mVp-p
Stereo
socket
Output sockets
Socket name Socket shape Output
PHONES
(Headphones)
LINE OUT Pin socket 2 Vrms 50 kohms
OPTICAL
OUT (Optical)
6.3 mm (1/4") stereo
socket
Square optical connector
Height: 118 mm (4-11/16")
Depth: 302 mm (11-15/16")
Input
impedance
22 kohms
600 ohms 6 mVrms
Reference
input level
680 mVrms 170 mVrms
level
15 mW 32 ohms
Load
impedance
Minimum
input level
●MiniDisc recorder section
Type: MiniDisc recorder
Signal readout: Non-contact, 3-beam semi-con-
ductor laser pick-up
Audio channels: Stereo 2 channels/monaural
(long-play mode) 1 channel
Frequency response: 4 – 20,000 Hz (+0/-1 dB)
Rotation speed: 400 – 900 rpm CLV, Approx.
Error correction: ACIRC (Advanced Cross Inter-
leave Reed-Solomon Code)
Coding: ATRAC (Adaptive TRansformed
Acoustic Coding)
Recording method: Magnetic modulation overwrite
method
A/D, D/A converter: 1 bit
Sampling frequency: 44.1 kHz
Wow and flutter: Unmeasurable (less than
±0.001% W. peak).
Signal/noise ratio: 100 dB (1 kHz)
Dynamic range: 90 dB (1 kHz)
T.H.D. at 1 kHz: 0.008%
●Compact disc player
Type: 3-disc multi-play compact disc
player
Signal readout: Non-contact, 3-beam semiconduc-
tor laser pickup
Rotation speed: 200 - 500 rpm CLV, Approx.
Error correction: CIRC (Cross Interleave Reed-Sol-
omon Code)
Quantization: 16-bit linear
Frequency response: 4 - 20,000 Hz (+0/–1 dB)
D/A converter: 1 bit
Signal/noise ratio: 100 dB (1 kHz)
Dynamic range: 90 dB (1 kHz)
Wow and flutter: Unmeasurable
(less than 0.001% W. peak)
MD-R3H
●Timer/clock
Type: Digital clock with date function
Timer: ON/OFF, once a day
E-44

MEMORANDUM
MD-R3H
E-45

MEMORANDUM/MÉMORANDUM/MEMORÁNDUM/ANTECKNINGAR
/ANNOTAZIONI/MEMORANDUM/MEMO
MD-R2H

SHARP CORPORATION
TINSZ0287AWZZ
A9711.HK
MD-R3H
 Loading...