

Page 1
Quick Guide / Guía rápida
PORTABLE MINIDISC RECORDER
GRABADOR/REPRODUCTOR MINIDISC
PORTÁTIL
MODEL/MODELO
MD-MT877
Quick Setup Guide
Guía rápida de configuración
Follow the setup procedure (1-3) before you use
this unit.
Siga los procedimientos de configuración (1-3) antes de utilizar el aparato.
Quick Operation Guide
Guía rápida de operación
Explains basic recording and playback procedures.
Explica los procedimientos básicos de grabación y
reproducción.
Refer to the operation manual for details.
Para más detalles, consulte el manual de manejo.
Page 2
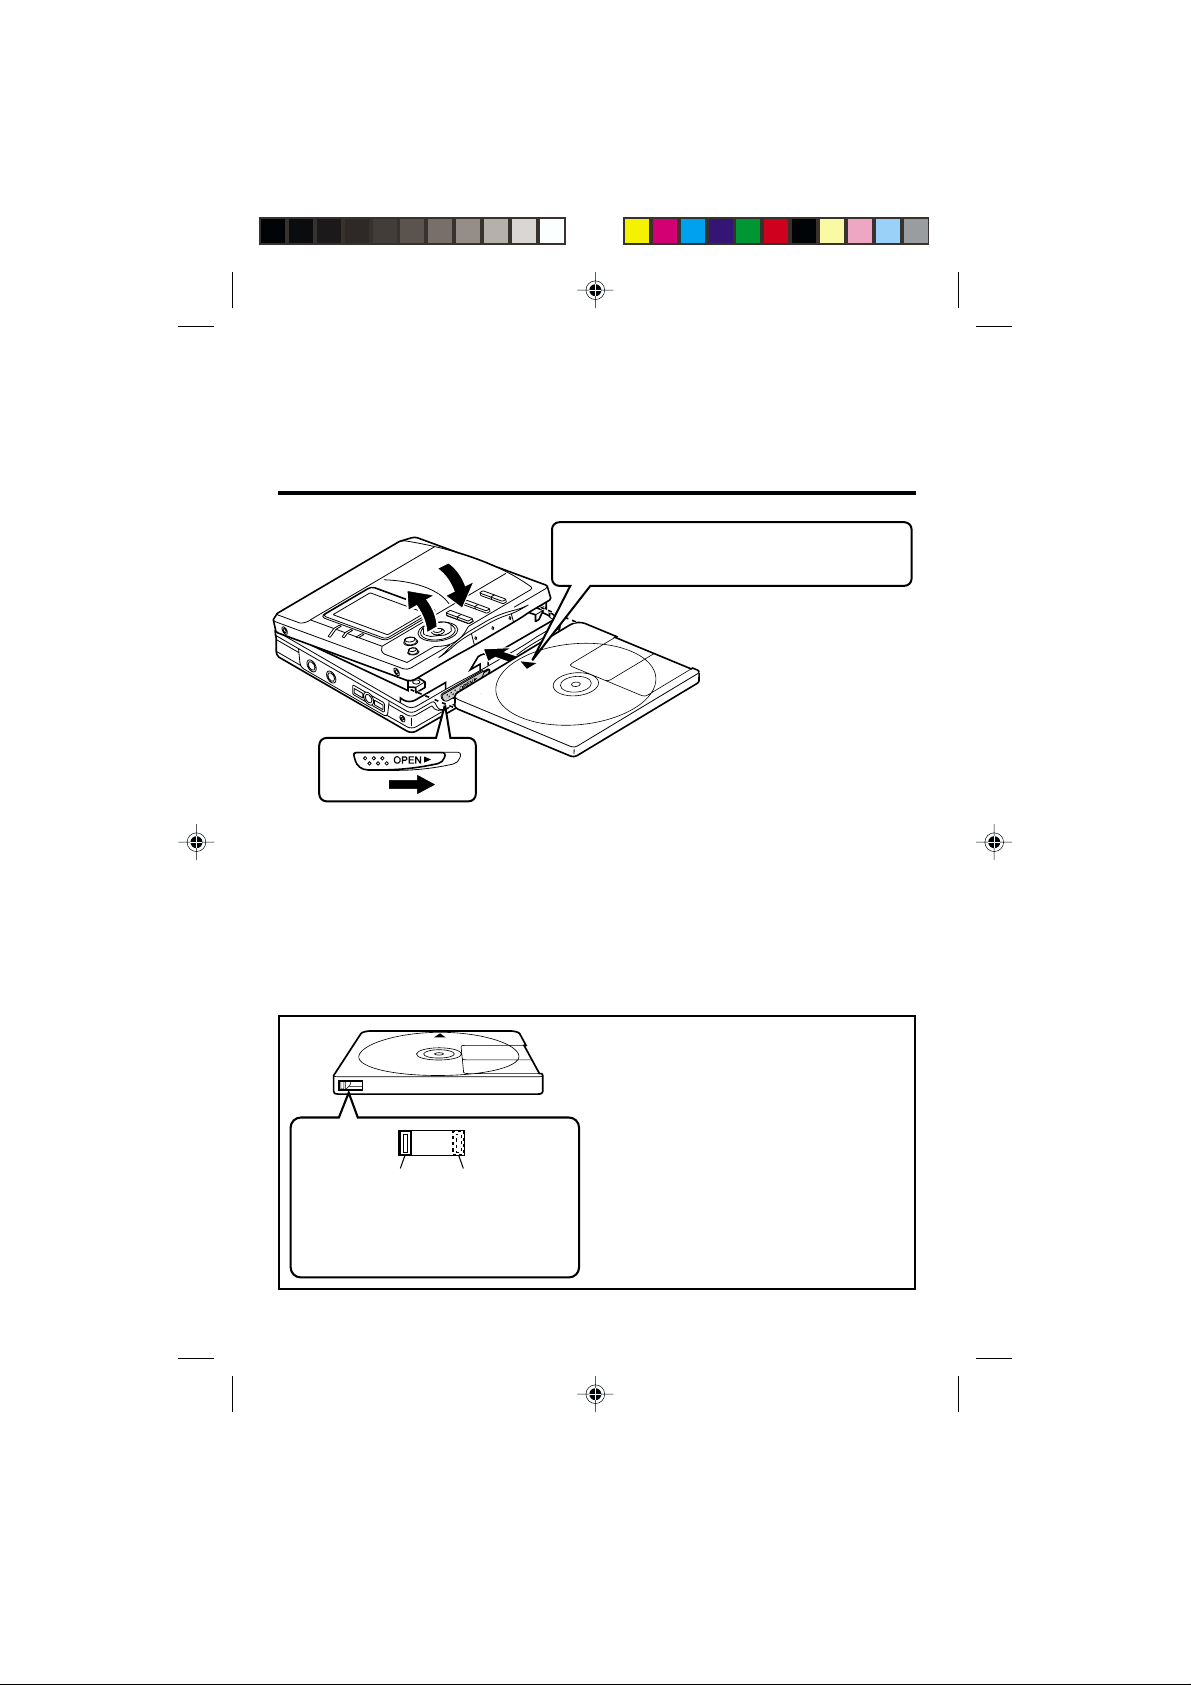
1 Insert a MiniDisc
Inserte un minidisco
44
222
Insert according to the direction of the arrow.
Insértelo de acuerdo con la dirección de la flecha.
33
1
1 Slide the OPEN lever to re-
lease the compartment door.
Deslice la palanca OPEN para
abrir la puerta del compartimiento.
2 Lift it up.
Levantelo.
Recordable
Para poder
grabar
Recording
prevented
Para no poder
grabar
3 Insert a MiniDisc as shown.
Inserte un minidisco como se
muestra.
4 Close the compartment.
Cierre el compartimiento.
When you record on a MiniDisc,
check that the erase prevention tab
is set to the “recordable” position.
Cuando desee grabar en un
minidisco, compruebe que la
lengüeta de protección contra
borrado esté colocada en la posición
para "poder grabar".
Page 3

2 Connect the AC adaptor
Conecte el adaptador de CA
AC 120V, 60 Hz
120V CA, 60Hz
RELEASE
LOCK
To the DC IN 5V jack
A la toma DC IN 5V
1 Move the Charge/Operation
switch to Charge mode (RELEASE).
Mueva el selector de carga/
operación al modo de carga
(RELEASE).
2 Insert the portable MD into
the battery charger.
Inserte el MD portátil en el
cargador de baterías.
Before using the unit with a rechargeable battery, the battery has to be charged. Refer
to “Using with the rechargeable battery”, page 12 (operation manual) for details.
Antes de emplear el aparato con una batería recargable, se deberá cargar la
batería. Consulte el apartado de "Empleo con la batería recargable", en la página
12 (manual de manejo) para más detalles.
Insert securely, all the way in.
Insértelo con seguridad a fondo.
3 Move the Charge/Operation
switch to Operation mode
(LOCK).
Mueva el selector de carga/
operación al modo de operación
(LOCK).
4 Plug the AC adaptor.
Enchufe el adaptador de CA.
To an AC outlet
A un tomacorriente
de CA
Page 4

3 Connection
Conexión
OPTICAL/
Red: To Right
Rojo: A la
derecha
LINE IN
White: To Left
Blanco: A la
izquierda
LINE OUT
NOTE:
Refer to page 19 (operation manual) for connecting the unit to a stereo system
with “DIGITAL OUT” or “OPTICAL OUT” jacks.
NOTA:
Para conectar el aparato a un sistema estéreo provisto de tomas de salida digital
"DIGITAL OUT" o de salida óptica "OPTICAL OUT", consulte la página 19 (manual
de manejo).
T o a stereo system with
jacks (See left. Analog connection)
Note:
LEFTRIGHT
If the audio system has only one pair of jack then they are usually
input only and recording via this connection is not possible.
A un sistema estéreo provisto de tomas de salida de
línea "LINE OUT" o de salida de audio "AUDIO OUT"
(Vea a la izquierda, Conexión analógica)
Nota:
Si el sistema de audio sólo tiene un par de tomas, normalmente
son sólo de entrada y no puede realizarse la grabación mediante
esta conexión.
“LINE OUT” or “AUDIO OUT”
Page 5

Preparation for use
Preparación para su utilización
The unit does not work if the • ■ / –HOLD button is set to HOLD.
Este aparato no funciona si el botón • ■ / –HOLD está puesto en HOLD.
Press the • ■ / –HOLD button for 2 seconds or more.
Pulse el botón •
Move it to operation mode when playing back or recording.
Muévalo a la posición del modo de operación para la reproducción o grabación.
CAUTION:
It is not recommendable to put the MiniDisc into a rear
pocket, as this may damage the product when sitting.
PRECAUCIÓN:
No se recomienda ponerse un minidisco en el bolsillo
trasero del pantalón, porque podría dañarlo al sentarse.
■
/–HOLD durante 2 o más segundos.
Hold
Retención
For operations
Para operaciones
Released
Liberación
Operation mode
Modo de operación
Page 6

Recording
Grabación
Check that the unit is connected to the stereo system.
Compruebe que el aparato esté conectado al sistema estéreo.
1 Press the REC button.
Pulse el botón REC.
2 Begin playback on the stereo system connected to this unit.
Inicie la reproducción en el sistema estéreo conectado a este aparato.
3 Press the
Adjust the recording level so that the maximum sound volume from the
source makes the reading swing somewhere between –4 dB and 0 dB.
Pulse el botón
Ajuste el nivel de grabación para que el volumen de sonido máximo de la fuente
produzca una indicación de entre –4 dB y 0 dB.
55
5 or
55
44
4 button
44
55
44
5
o
4
55
Level meter indicator
Indicador del medidor de nivel
para ajustar el nivel de grabación.
44
to adjust the recording level.
0dB
4dB
Page 7

4 Press the P AUSE button on the stereo system to enter the play-
back pause mode at the point you wish to start recording.
Pulse el botón PAUSE del sistema estéreo para entrar en el modo de pausa
de reproducción en el punto en el que desee iniciar la grabación.
5 Press the MODE button repeatedly to select the recording mode.
Pulse repetidamente el botón MODE para seleccionar el modo de grabación.
6 Press the
Pulse el botón
7
Begin playback on the stereo system, the output will be recorded.
Inicie la reproducción del sistema estéreo, y se grabará la salida.
To stop recording
Press the • ■ / :OFF button.
When recording stops, “TOC” appears
(Table Of Contents). While “TOC” appears, the MiniDisc recorded contents
have not yet been updated.
Para detener la grabación
Pulse el botón •
Cuando se detenga la grabación,
aparecerá “TO C” (índice). Mientras
aparece “TOC”, aún no se habrá
actualizado el contenido grabado en el MD.
0606
06 button to start recording.
0606
0606
06
para iniciar la grabación.
0606
T o update the recorded contents
of the MiniDisc
Press the • ■ / :OFF button while in
the stop mode.
The power turns off after recorded
contents have been updated on the
MiniDisc.
■
/:OFF.
TOC display
Visualización
TOC
Para actualizar el contenido
grabado del MD
Pulse el botón •
parada.
La alimentación se desconectará después
de haber actualizado el contenido grabado
en el MD.
■
/:OFF en el modo de
Page 8

Playing
Reproducción
1 Insert the earphones plug firmly into the earphones jack on
the remote control unit.
Inserte firmemente la clavija de los auriculares en la toma de auriculares del
controlador remoto.
2 Plug the remote control into the jack on the unit.
Enchufe el controlador remoto a la toma del aparato.
3 Insert a MiniDisc.
Inserte un MD
4 Press the
Pulse el botón
To stop playback
Press the • ■ / :OFF button (Remote
control: press the ■ button).
If the unit is not operated for at least 2
minutes while in the stop mode, the
power will shut off automatically .
TINSZ0640AWZZ
A0101.TO
06 06
06 button.
06 06
0606
06
.
0606
Para detener la reproducción
Pulse el botón • ■/:OFF . (Controlador
remoto: pulse el botón ■.)
Si el aparato no se utiliza durante un
mínimo de 2 minutos en el modo de
parada, la alimentación se desconectará
automáticamente.
Printed in Malaysia
Impreso en Malaysia
 Loading...