

Page 1
TINS-F220WJZZ
LC-40LX530H
LC-46LX530H
SLEEP
OPC
POWER
液晶彩色電視機
LCD COLOUR TELEVISION
使用說明書
OPERATION MANUAL
ENGLISH
中文
cover_40LX530H.indd 1 2011-6-14 10:18:11
Page 2

親愛的SHARP顧客
衷心感謝惠購SHARP液晶彩色電視機。為確保安全使用本機及令本機更加耐用,在使用本產品之前請務必仔細
閱讀關於安全的重要注意事項。
目錄
頁碼
親愛的 SHARP 顧客 ..................................................1
目錄 ...........................................................................1
日常使用的注意事項 ..................................................2
商標 ...........................................................................2
關於安全的重要注意事項 ...........................................3
隨機附件 ....................................................................4
準備 ...........................................................................5
在打開電源之前 .........................................................7
連接外部設備 .............................................................8
遙控器 ........................................................................9
部件名稱 ..................................................................10
A-TV(模擬電視)/ D-TV(數碼電視)
入模式選項表中的項目 .........................................12
輸
電腦輸入模式選項表中的項目 ..................................13
打開或關閉電視機 ....................................................14
連接天線電源 ...........................................................14
初始自動安裝 ...........................................................14
檢查信號資訊 ...........................................................14
自動安裝 ..................................................................15
頻道設置 ..................................................................15
選項表操作 ...............................................................18
影像選項表 ...............................................................18
音頻選項表 ...............................................................19
ECO 選項表 .............................................................20
頁碼
設置選項表 ...............................................................20
選項選項表 ...............................................................22
數碼設置選項表 .......................................................25
節目指南 ..................................................................26
資訊 .........................................................................26
A-TV(模擬電視)/ D-TV(數碼電視)按鈕 ...........27
切換模擬音頻格式 ....................................................27
切換數碼音頻格式 ....................................................28
EPG(電子節目指南) ............................................29
圖字文件 ..................................................................30
影像和靜止影像 .......................................................30
寬屏模式 ..................................................................30
連接電腦 ..................................................................31
電腦相容性列表 .......................................................32
RS-232C 指令列表 ..................................................32
連接 USB 設備 .........................................................33
附錄 .........................................................................37
規格 .........................................................................38
輪廓圖 ......................................................................39
清除密碼 ..................................................................40
1
Page 3
日常使用的注意事項
請遵守以下事項
外殼的保養方法
• 清潔外殼的時候,請用柔軟的布(棉、絨等質料)輕輕地擦拭。請不要使用附有化學成分的乾、濕抹布,因為這樣會導致
外殼本體成分的變質或裂開。
• 請注意不要使用質地堅硬的布來擦拭,或擦拭時過於用力,這樣會導致外殼表面劃傷。
• 外殼不潔的時候,可使用柔軟的布(棉、絨等質料)浸取少量稀釋過的中性洗劑,擰乾後擦拭,然後再用柔軟的乾布擦乾。
• 由於外殼為塑膠製品,汽油、稀釋劑類的溶劑會導致其變質,或塗料脫落,所以請不要使用此類溶劑來清潔外殼。
• 由於塑膠中含有塑化劑,與某些物質接觸會出現變質、塗料脫落等狀況,所以請遠離殺蟲劑等揮發性物質。另外,請不要
與橡膠和樹脂類製品長期接觸。
屏
幕的保養方法
• 在開始清潔屏幕之前,請務必關閉電視機電源,並將電源插頭從插座中拔出。
• 清潔屏幕時,請使用柔軟的乾布(棉、絨等質料)來輕輕擦拭屏幕表面。為了保護屏幕,請不要使用不乾淨的布、清洗劑、
或附有化學成分的乾、濕抹布等物品來擦拭,因為這樣會造成顯示屏表面的剝落。
• 請注意不要使用質地堅硬的布來擦拭,或擦拭時過於用力,這樣會導致顯示屏表面劃花。
• 屏幕不潔的時候,可以用柔軟的布(棉、絨等質料)稍微用水打濕後,輕輕地擦拭。擦拭時不可過於用力,以免造成顯示
屏表面劃花。
• 如果液晶顯示屏表面粘上了灰塵,請使用市面有售的除塵刷(除靜電刷)來清潔。
商標
• TruSurround HD、SRS 及 標誌是 SRS Labs, Inc. 的註冊商標。
本產品已獲 SRS Labs, Inc. 授權使用 TruSurround HD 技術。
• SRS TruSurround HDTM 通過兩個揚聲器營造出逼真而內涵豐富的環繞聲感受,同時提供豐富的低音、清晰的對話和高音細
節。
• 由 Dolby Laboratories 授權製造。“杜比”、“Dolby”與雙 D 標誌是 Dolby Laboratories 的商標。
• “HDMI”,HDMI 標誌和“High-Definition Multimedia Interface”(高清晰度多媒體接口)是 HDMI Licensing LLC 在美国和
其它国家的商標或註冊商標。
• DivX®、DivX Certified® 和相关標誌是 DivX, Inc. 的商標,經授權许可使用。
• 關於 DIVX 影片: DivX® 是 DivX, Inc. 創建的數位影片格式。这是可播放 DIVX 影片的 DivX Certified® 官方认证装置。 如
需进一步资讯以及可用来转档成 DIVX 影片的软体工具,请浏览 divx.com。
• 關於 DIVX 随选影片: 此 DivX Certified® 装置必須註冊, 才能播放所购买的 DivX 随选(VOD)影片。若要取得註册码,請
在选项选单中寻找 DIVX VOD 区段。有关如何完成註冊的进一步资讯,請移至 vod.divx.com。
2
Page 4
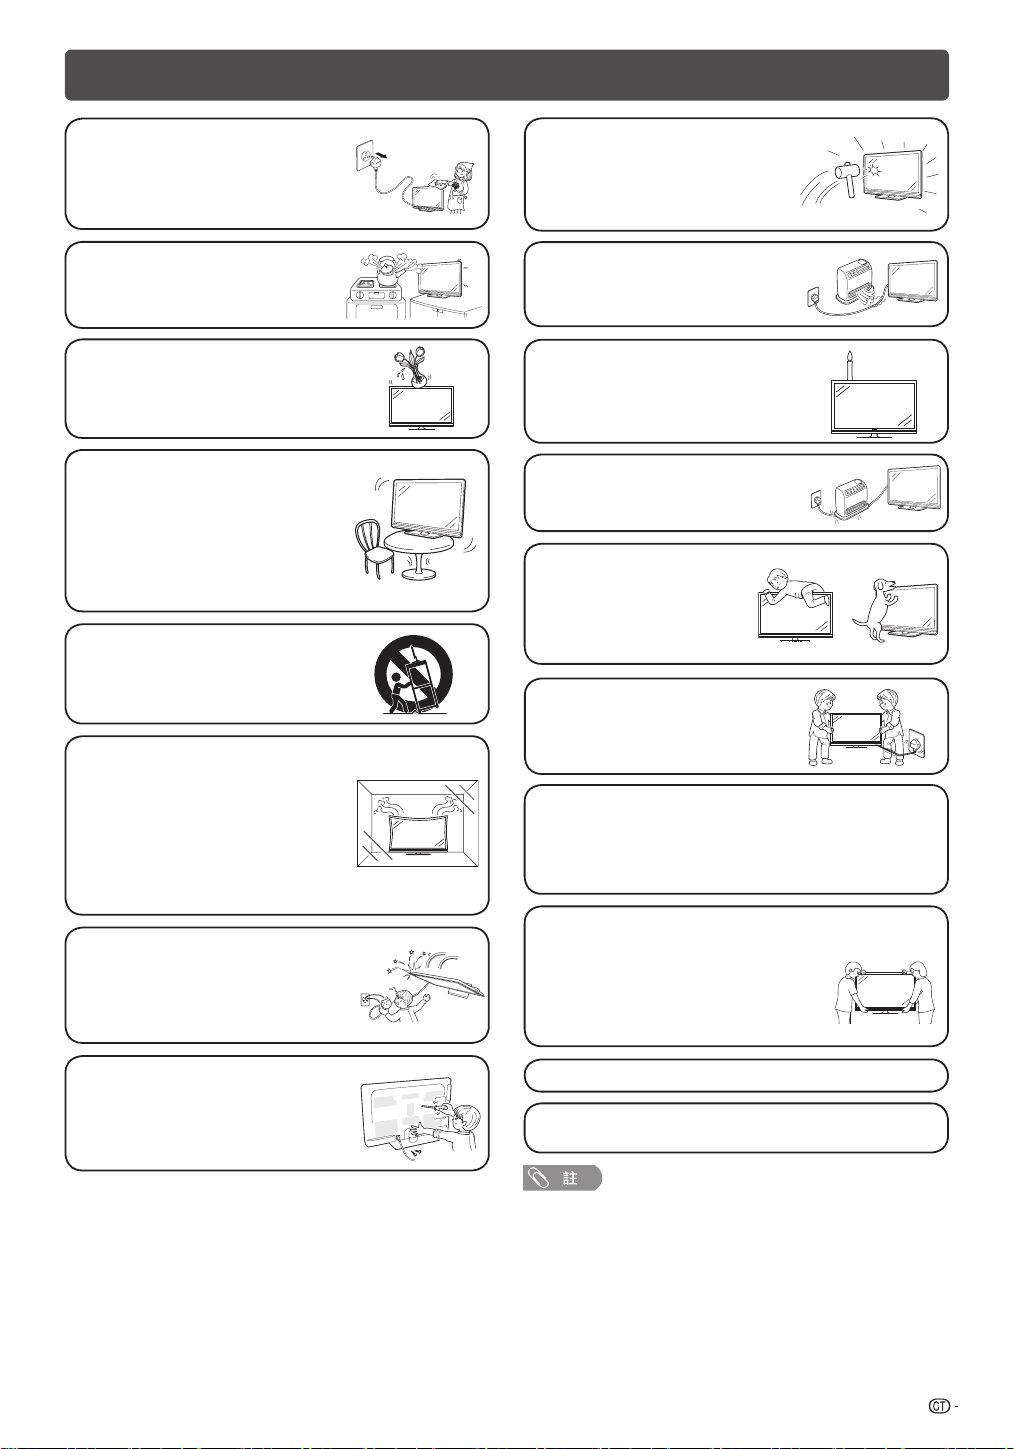
關於安全的重要注意事項
• 清掃 — 在清掃本機之前,務必先將交流
電源線插 頭從 交流電源插 座中 拔出。 用
擰乾的濕 布將 本機擦拭乾 淨。請 勿使 用
液態清潔 劑、噴 霧清潔劑或 化學 布料 清
潔,因為這 類材 質可能會對 產品 造成 損
害。
• 水和潮 濕 — 不要在近水 之處使用本 機,
例如在靠近洗澡盆、洗臉盆、廚房洗滌槽、
洗衣 盆、游 泳池等, 也不 要在潮 濕的 地
下室中使用。
• 請勿在本機 之上 放置 花瓶或任何其他盛水
的容器。
若有 水滴 濺到 本機 之上, 就可 能引 起火 災
或觸電。
• 台座 — 不要將 本 機放置 於不穩 定 的推
車、台 座、三腳 架或 桌 面上。 不穩固 的
基座可能 會使 本機掉落,導 致嚴 重的 人
身傷 害、以 及產品 損壞。 請僅使 用本 製
造商所推薦或與本產品配套出售的推車、
台座、 三腳架、 托 架、或桌 子。將本 機
安裝於牆 上時, 請務必遵照 本製 造商 的
指示,而且 只可 以使用本製 造商 所推 薦
的安裝器材。
• 將本機放 置於 推車上搬運 時,必 須小 心
注意 安全。急 停、用 力 過度、 地面不 平
等等,都會導致本機從推車上掉落。
• 通風 — 本機外殼上的散熱孔與其他開口
之處, 用於 散熱通 風。請 勿堵塞 這些 散
熱孔或開 口之 處,通風散熱 不良 會使 本
機過 熱、縮 短本機 的使 用壽命。 請勿 將
本機 置於臥 床、沙 發、 地毯、 或其他 類
似物品之 上,因 為這些物品 會堵 塞散 熱
通風孔。本 產品 之設計不適 用於 嵌入 式
安裝, 所以 不要將 本機 置於像 書櫃、 機
架等封閉 之處, 除非提供合 適的 通風 或
遵照本製造商的專門指示說明。
• 本機如果不慎摔落,外殼破損,請務必關
閉本機電源,並拔出插頭。如果繼續使用,
會有火災和觸電的危險。
• 本機 所 用 之 液晶顯示 屏 是 用 玻璃製 造
的。因此,在受到強力撞擊或被尖銳物
刻劃 時會 損壞。 萬一液 晶顯 示屏破碎,
請小心不要受到碎玻璃的割傷。
• 熱源 — 請勿讓本機接近熱源,如取暖器、
加熱 器、火 爐、或者 其他 任何會 產生 熱
力的東西(包括擴音機在內)。
• 為防止發 生火 災,請勿將任 何種 類的 蠟
燭或火焰置於本機的頂部或其附近。
• 為了防止 遭受 起火或觸電 的危 險,請 勿
將交流電源線置於本機或其他重物之下。
• 請勿 在本機 之上 放置重 物或攀
爬於 本機之 上。 這樣做 可能導
致本 機傾倒 而 造成傷 害。特別
要注意近旁的兒童和寵物。
• 搬運 電 視機 之 前,請先 把 插頭 拔 出。
如果不預先拔出,很容易拉損電源線,
產生觸電危險。
液晶顯示屏是用非常高超的技術製造的,具有 2,073,600
個像素,能顯示出精細的畫面。
由於像素數目極多,偶然也可能會有一些無效的像素出現
在屏幕上,看上去是固定不變的藍色、綠色或紅色的亮點。
請注意,這是屬於產品規格範圍之內,並不是故障。
在搬運電視機時的注意事項
• 在搬運電 視機時,切勿握住 顯示屏搬運或使
顯示屏受到壓力。
在搬運本電視機時,無論何時都必須由兩個
人用雙 手搬 運 — 電視機的每 一側用一隻手
握住。
• 請不要打開後殼改造電路。內部存在高電
壓,會引起觸電傷害。如果需要檢修,請
聯絡經銷商。
• 請勿長時間顯示靜止影像,這可能會導致殘留影像。
• 請將本機安裝於能將交流電源線容易從交流電源插座上拔出的
地方。
• 以上均為示意圖,以實物為准。
3
Page 5
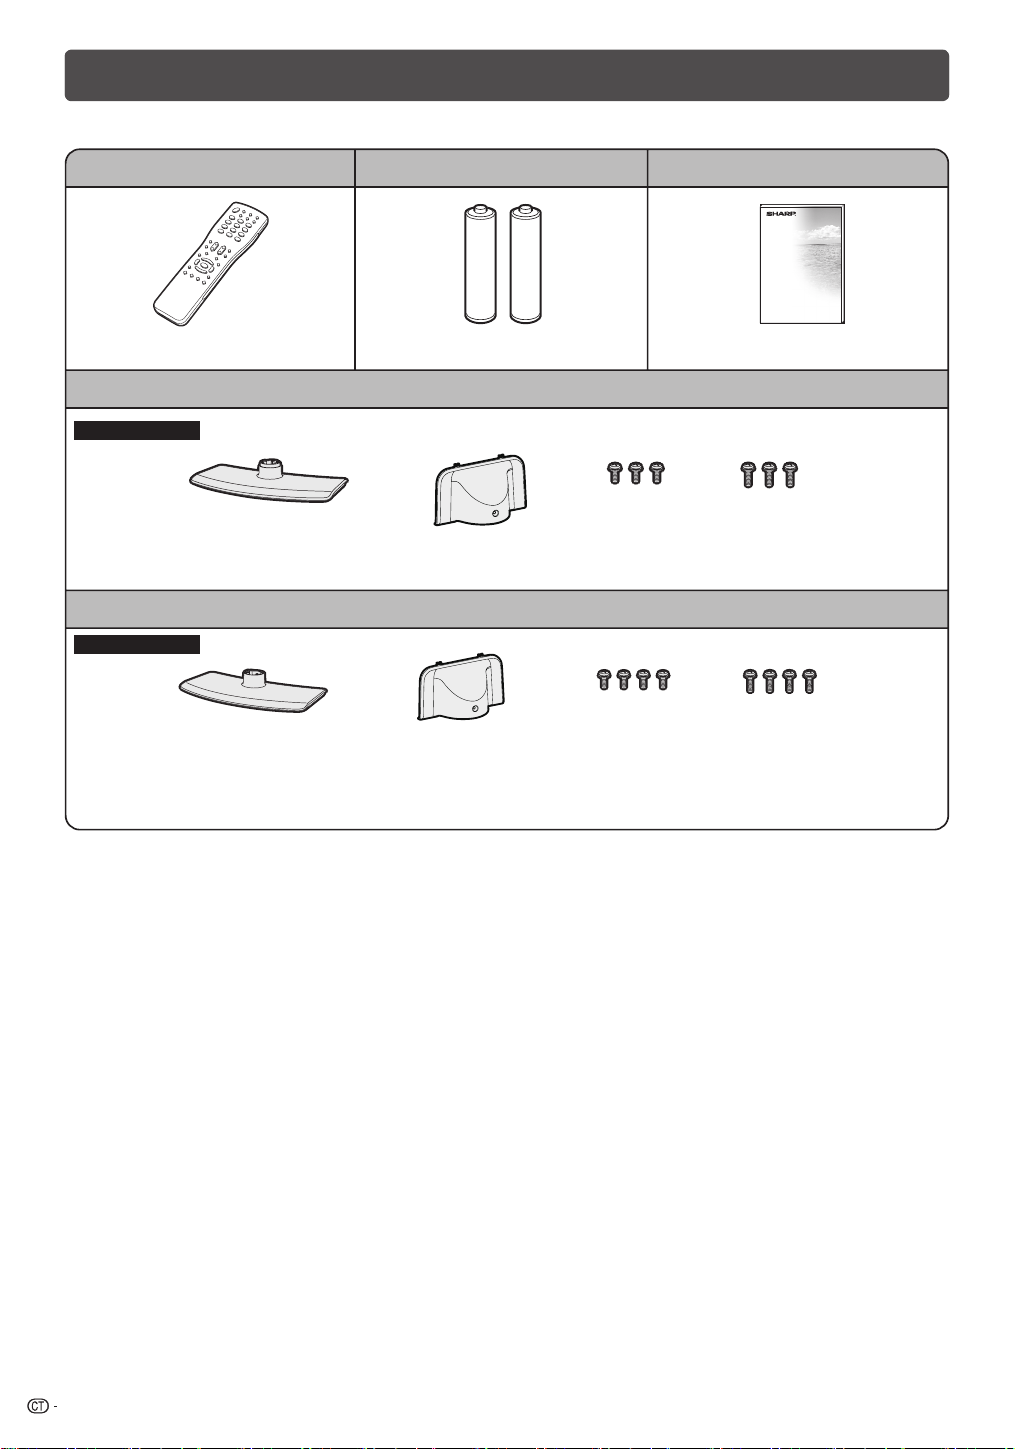
隨機附件
請確認如下附件隨同本機附送。
LC-40LX530H
LC-46LX530H
遙控器
第 9 頁
底座
“AAA”型電池(g2)
第 10 頁
底座組件
底座支柱组件
第 6 頁
底座組件
短螺絲釘(g3) 長螺絲釘(g3)
使用說明書
底座 底座支柱组件
第 6 頁
短螺絲釘(g4)
長螺絲釘(g4)
4
Page 6
準備
壁掛電視機的處置和注意事項
• 可用另外購買的托架,將電視機安裝在牆上。
• 詳情請參閱另外購買的托架所附之說明書。
• 本電視機只能使用 SHARP 公司推薦的壁掛托架來將電視機安裝到牆上。使用其他壁掛托架可能導致安裝不穩而引致嚴重人
身傷害。
• 安裝液晶彩色電視機需要特別的技能,只有具有專業資格的服務人員才能夠安裝。用戶不可自己進行這項工作。對於不正確
的安裝,或是由於安裝引起的事故或傷害,SHARP 不承擔任何責任。
使用另外購買的托架來安裝電視機
• 可請經資質認證的服務人員用另外購買的托架將電視機安裝到牆上。
• 在開始操作之前,請先仔細閱讀隨同托架提供的使用說明書。
• 若要將本電視機安裝在牆上,用隨同壁掛托架附送的螺絲釘將壁掛托架固定到電視機的背後。
安裝底座
• 在安裝(或拆卸)底座之前,請將交流電源線從交流電源插座中拔出。
• 在執行操作之前,請在放置電視機的地方鋪設軟墊,以防電視機損壞。
• 正確安裝底座。
• 請務必遵照說明進行安裝。若底座安裝得不正確,則可能導致電視機傾倒。
5
Page 7
準備(續)
LC-40LX530H LC-46LX530H
確認 6 枚隨同底座附送的螺絲釘。
1
短螺絲釘(g3)
(在步驟 5 使用)
分拆底座支柱組件示意圖。
2
長螺絲釘(g3)
(在步驟 3 使用)
確認 8 枚隨同底座附送的螺絲釘。
1
短螺絲釘(g4)
(在步驟 5 使用)
分拆底座支柱組件示意圖。
2
長螺絲釘(g4)
(在步驟 3 使用)
用3枚長螺絲釘將底座的支撑柱安裝到底座
3
上。
將底座插入電視機底部的插槽(扶住底座以免
4
掉落)。
將3枚短 螺絲釘插入電視機背面的3個孔中並
5
擰緊。
用4枚長螺絲釘將底座的支撑柱安裝到底座
3
上。
將底座插入電視機底部的插槽(扶住底座以免
4
掉落)。
將4枚短 螺絲釘插入電視機背面的4個孔中並
5
擰緊。
將步驟2拆下来的1枚短螺絲釘插入底座盖中
6
间的孔中並擰緊。
將步驟2拆下来的1枚短螺絲釘插入底座盖中
6
间的孔中並擰緊。
• 若要拆卸底座,請以相反的次序進行。
• LC-40LX530H/LC-46LX530H的底座不能調節角度。
6
Page 8
在打開電源之前
Ŀ
࠱ႂຸ⛬֖Ф߱ᤋଋ⛬உЙႂ⛬݂Юፄnj
ŀ࠱ႂ⛬
݂ቇߗડጊ˫ុᓫnj
ᔩ᜵ౚႂ⛬݂ẅ
ឯ࠱ʼᦉុᓫ౺ʽẅ
ᝌᩙՐ࠱ႂ⛬݂ুܬnj
ݟ౦ႂ⛬݂ᄉ⛬ẅ
ឯвᤈᛠቇߗnj
在打開電源之前
設置電視機位置之說明
• 勿使電視機受到陽光直射,並將其置於通風良好之處。
• 請將電視機置於水平的地方。
• 在連接交流電源線之前,請勿打開電視機的電源。
• 若本机外壳上贴有保护膜,为了确保正常使用本机,请在使用前将其去除。
連接天線
1
為了能盡情享受清晰的電視影像,請使用室外電視天線。以下是關於同軸連接線的連接方法之簡要說
明。
標準 DIN45325 型插頭(IEC169-2)
75 歐姆同軸連接線(圓形連接線)
天線連接線(市面有售)
接至天線端子
2
連接外部設備
室內天線端子
(75 歐姆類型)
關於連接外部設備,例如錄影機及 DVD 影碟機,請參閱第 8 頁。
連接交流電源線
3
• 請將電視機置於靠近交流電源插座之處,並使電源插頭便於插拔。
• 如長期不使用本電視機,請將交流電源線從交流電源插座中拔出。
捆綁電線
4
電視機(後視圖)
交流電源插座
交流電源線
如圖所示,請將電線夾插入電視機上的孔中,並把電線放入電線夾内捆綁。
• 為了防止遭受電擊的危險,在連接著電源線時,請不要觸碰接線任何未經絕緣的部份。
電線夾
7
Page 9
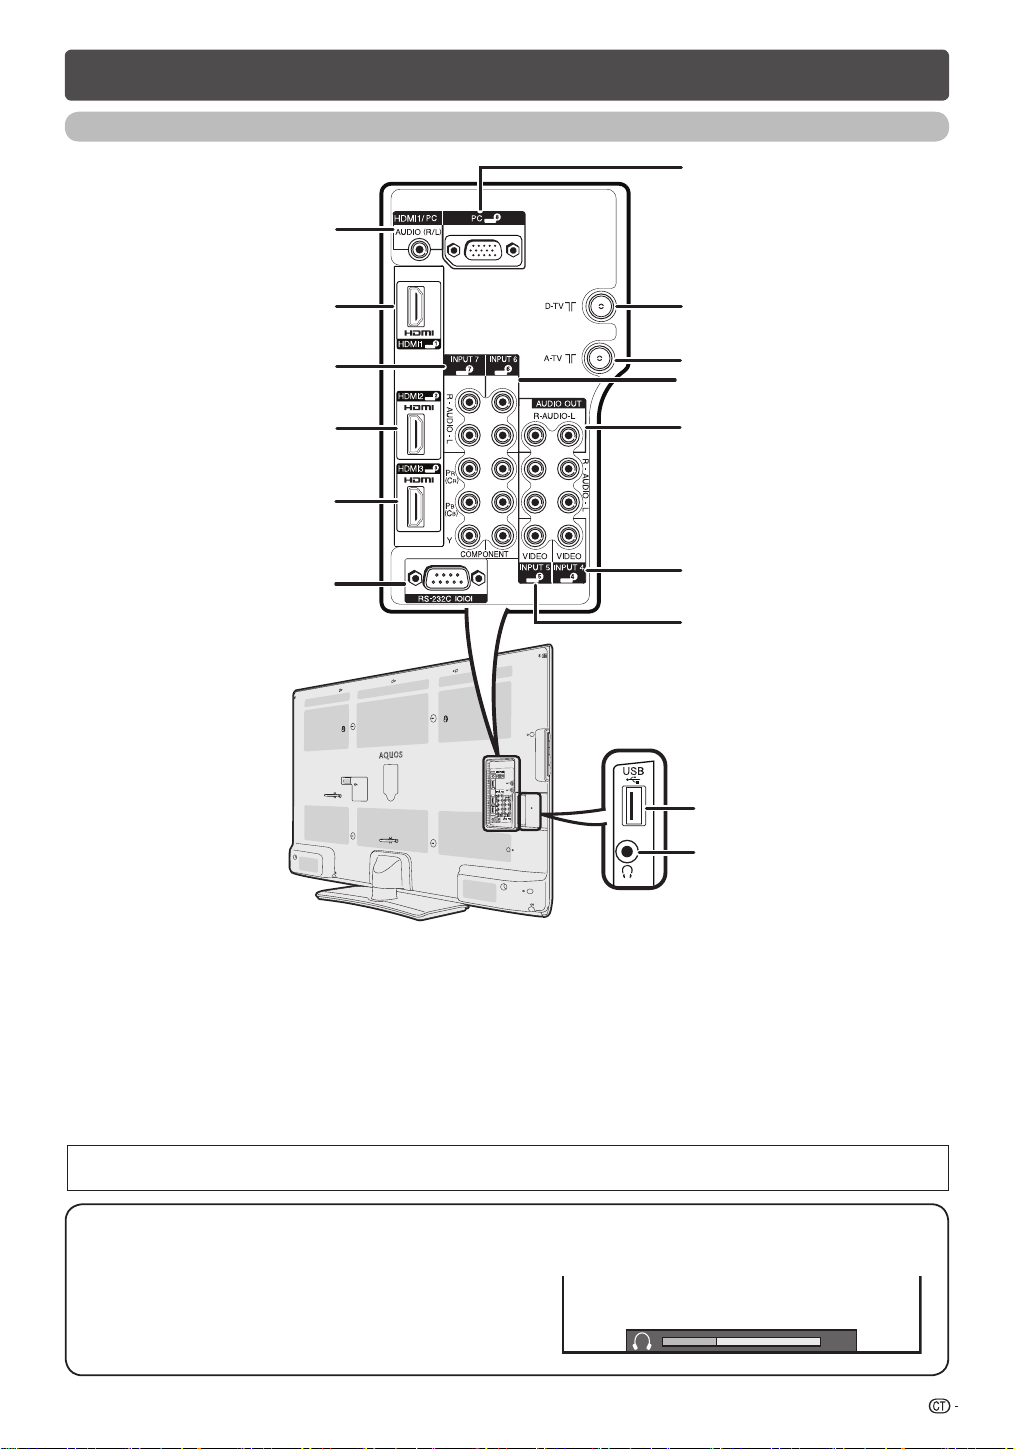
連接外部設備
AUDIO LR
AUDIO LR VIDEO
ANALOG
RGB
AUDIO
(L/R)
AUDIO LR
AUDIO LR VIDEO
可將許多類型的外部設備連接到電視機上,如錄影機、遊戲機、攝錄機、DVD 影碟機、數碼電視機機頂盒(STB)
和電腦等。要觀看外接源的影像,請從遙控器上的
視頻)來選擇輸入源。
• 為保護所有的設備,在連接錄影機、遊戲機、攝錄機、DVD 影碟機、數碼電視機機頂盒(STB)、 電腦或其他設備之前,請
務必先關閉電視機的電源。
• 在進行連接之前,請仔細閱讀有關的使用說明書(錄影機、DVD 影碟機等)。
連接錄影機、遊戲機或攝錄機
使用 INPUT4(輸入 4)/ INPUT 5(輸入 5)(複合視頻)、INPUT6(輸入 6)/INPUT7(輸入 7)(色差)端子,
可方便地連接錄影機、遊戲機、攝錄機及其他影音設備。
當使用色差連接線時
(市面有售)
錄影機/遊戲機/攝錄機
連接 DVD 影碟機 / 數碼電視機機頂盒(STB)
連接 DVD 影碟機 / 數碼電視機機頂盒(STB)及其他影音設備時,可使用 HDMI1/HDMI2/HDMI3(HDMI [ 高清晰
度多媒體接口 ])、INPUT4(輸入 4)/INPUT5(輸入 5)(複合視頻)端子、INPUT6(輸入 6)/INPUT7(輸入 7)
(色差)端子。
TV/VIDEO
(電視 / 視頻)或電視機上的
當使用複合視頻連接線時
(市面有售)
TV/VIDEO
或
錄影機/遊戲機/攝錄機
(電視 /
• 当使用DVI-HDMI转接头时,请使用HDMI1/PC(音频输入端子)输入音频信号。(请参阅第22页。)
使用HDMI(高清 晰度多媒體接口)
連接線時(市面有售)
DVD 影碟機 / 數
碼電視機機頂盒
(STB)
當使 用色差連接 線時
(市面有售)
DVD 影碟機 / 數碼電視機機頂盒(STB)
當使用 複 合 視頻 連 接 線時
(市面有售)
連接電腦
當連接電腦時,可使用PC(電腦)输入端子。(請參
閱第31頁。)
DVD 影碟機 / 數
碼電視機機頂盒
(STB)
電腦
8
Page 10
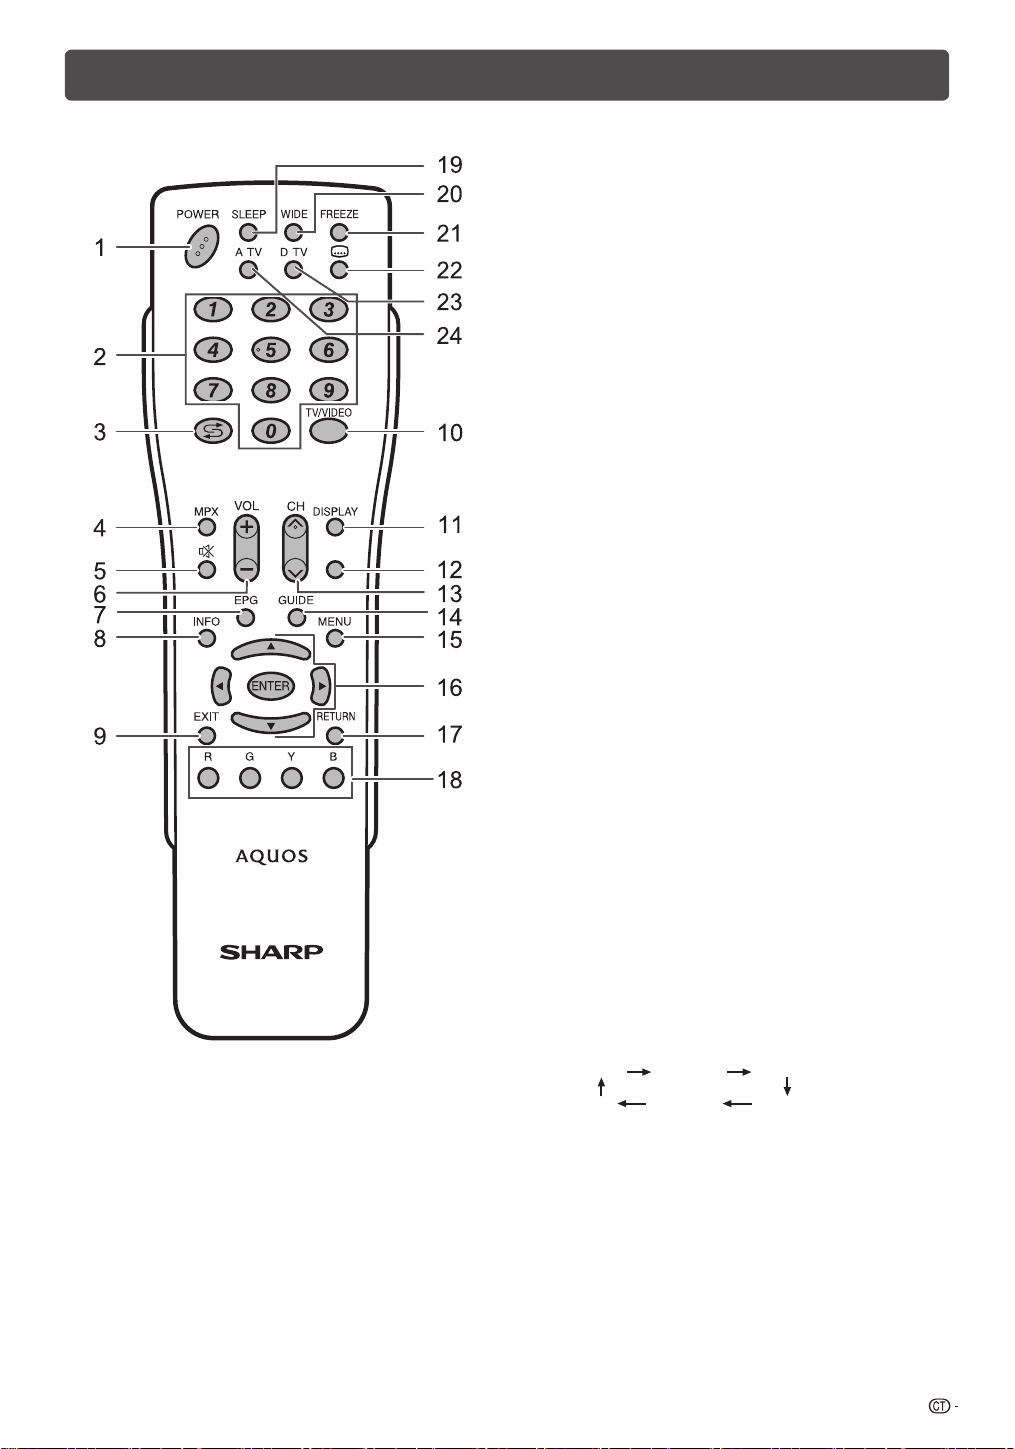
遙控器
ᄻ᭮ܲ ᄻ᭮ܲ
ᄻ᭮ܲ
ᄻ᭮ܲ
ᄻ᭮ܲ
䬈
-
-
TEXT
1 POWER(電源備用∕打開)
打開和關掉電源。(請參閱第14頁。)
2 0 – 9
選擇頻道。(請參閱第27頁。)
3 A(閃回)
按下 A 以返回前一個選擇的頻道或外部輸入模式。
4 MPX(多重聲音)
選擇多重聲音模式。(請參閱第27頁。)
5 e(靜音)
按下 e 以關閉聲音。
再按下 e 以恢復聲音。
經過 30 分鐘之後,靜音將會取消。但電視機並不會突然
輸出很大的聲音,因為音量會自動設置到 0。按 VOLe
增大音量。
6 VOLk/VOL
l
設置音量。
(VOLk) 增加音量。
(VOLl) 減少音量。
7 EPG(電子節目指南)
仅适用於數碼電視:顯示出電子節目指南(EPG)畫
面。(請參閱第29頁到第30頁。)
8 INFO(信息)
仅适用於數碼電視:
顯示節目資訊。
(請參閱第26頁。)
9 EXIT(退出)
返回默認畫面。
10 TV/VIDEO(電視/視頻)(輸入源)
選擇一個輸入源
11 DISPLAY(屏幕顯示)
顯示頻道或輸入資訊。
12 TEXT(图字文件)
僅適用於數碼電視:显示MHEG-5数码广播资讯。(請
參閱第30頁。)
13 CHr/CHs(頻道r/頻道s)
電視輸入模式:請選擇頻道。
(CHr) 增大頻道號碼。
(CHs) 減少頻道號碼。
14 GUIDE(指南)
仅适用於數碼電視:顯示節目列表。
(請參閱第26頁。)
15 MENU(選項表)
顯示選項表。(請參閱第18頁。)
16 a/b/c/
d(遊標)
在設置畫面上選擇一個所需的項目。
ENTER(確定)
執行一個命令。
17 RETURN(返回)
選項表模式:返回到前一個選項表畫面。
18 彩鍵 (R/G/Y/B)
僅適用於數碼電視和USB:彩色按鈕用於選擇選項表畫
面上對應顏色的項目。(請參閱第 15 至 16 頁、29 至
30 頁、34 至 35 頁。)
19 SLEEP(定時)
設置定時關機。
20 WIDE(寬屏模式)
改變寬屏幕影像模式。(請參閱第30頁。)
21 FREEZE(靜止)
使活動影像變為靜止。(請參閱第30頁。)
22 [(字幕)
僅適用於數碼電視:切換字幕。(請參閱第25頁。)
23 D-TV(數碼電視)
按該鍵進入 D-TV(數碼電視)模式。
(請參閱第27頁。)
24 A-TV(模擬電視)
按該鍵進入 A-TV(模擬電視)模式。
(請參閱第27頁。)
9
Page 11
遙控器(續)
SLEEP
OPC
POWER
SLEEP
OPC
POWER
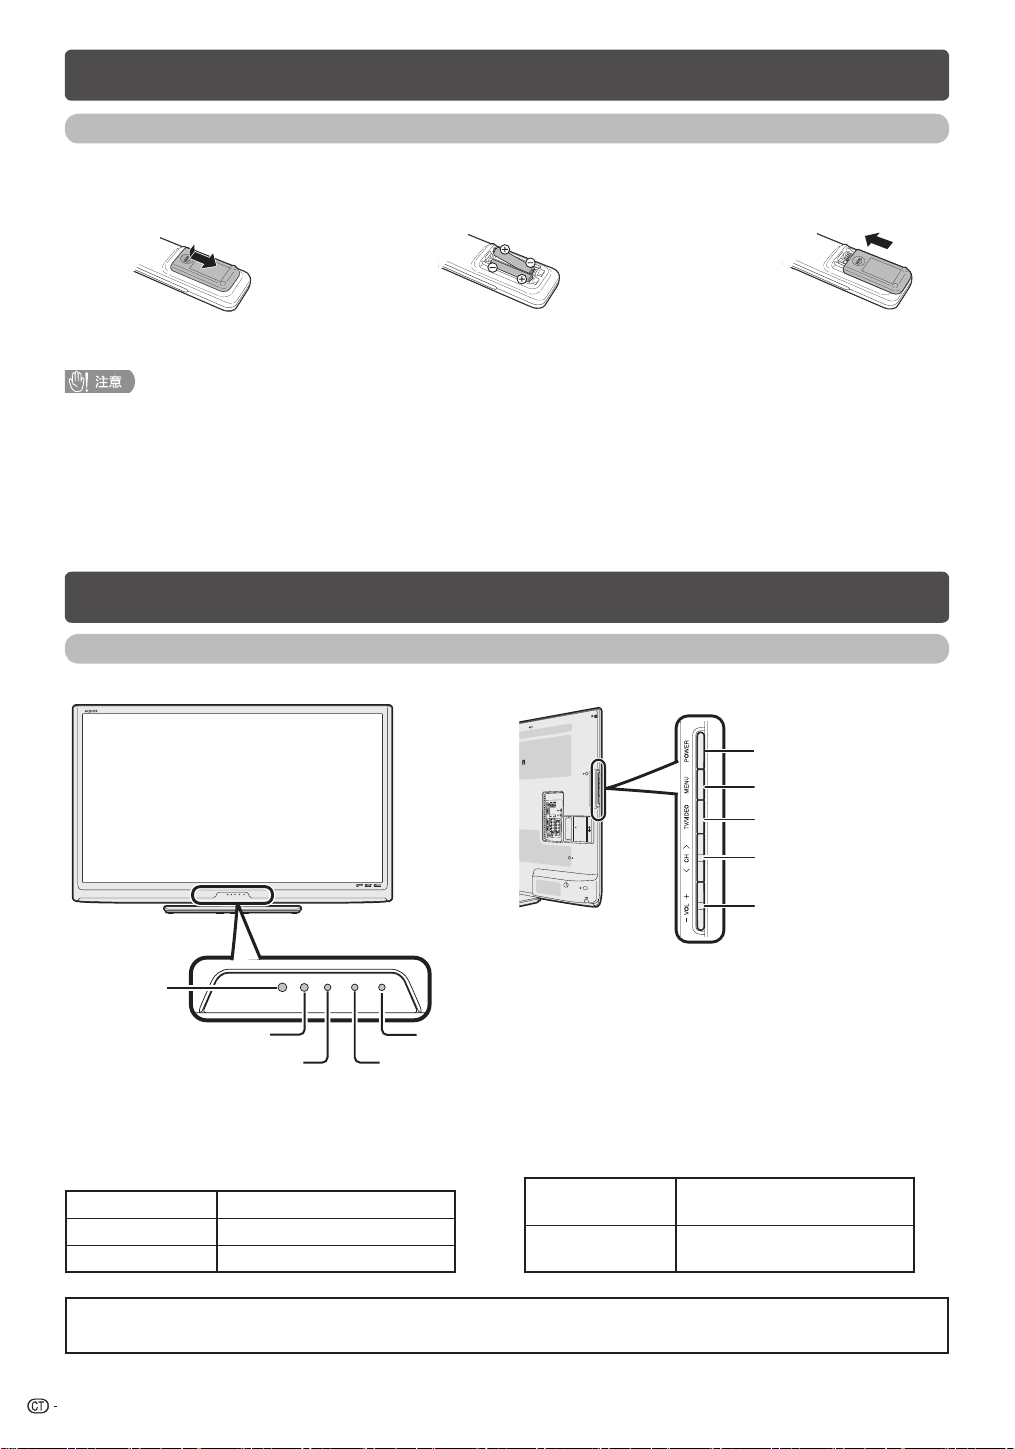
裝入電池
在第一次使用本電視機之前,請插入兩枚“AAA”型電池(附送)。如果電池耗盡,而且遙控器不能操作,請使
用新的“AAA”型電池替換。
打開電池蓋。
1
• 不要將不同型號的電池混合使用。不同型號的電池具有不同的特性。
• 不要將新舊程度不同的電池混合使用。如果新電池與舊電池混合使用,那麼就會縮短新電池的使用壽命,或者導致舊電池的
化學物質泄漏。
• 當電池的電量耗盡之時,要立即將電池取出。從電池漏出的化學物質會腐蝕電池艙內零件。如果發現有任何化學物質泄漏,
那麼請用布將化學物質徹底擦拭乾淨。
• 由於儲存條件不同,隨同本機附送之電池可能會達不到預期的使用壽命。
• 如果將會長期不使用遙控器,那麼請將電池從遙控器中取出。
• 請勿將電池(電池組或已安裝的電池)置於過熱的環境,例如火及直射陽光等。
插入附送的“AAA”型電池。
2
•
在裝入電池時,要注意電池端子的極性要與電池艙內的極性
標記(e)和(f)一致。
關上電池蓋。
3
部件名稱
電視機(前視圖 / 側視圖)
OPC感應器
遙控器感應器
POWER
(電源)指示燈 *
POWER
*
關 電源關閉。
(電源)指示燈
OPC指示燈 **
定时指示燈
OPC
**
(光學圖像控制)指示燈
關
點亮(紅色) 電視機處於備用狀態。
點亮(綠色) 電視機開啟。
• 本說明書中的插圖和屏幕顯示是以解釋為目的,可能與實際操作略有差別。
• 本說明書所用的插圖全部是根據LC-46LX530H進行說明。
點亮(綠色)
POWER
(電源開 / 關)
按鈕
MENU
(選項表)按鈕
TV/VIDEO
按鈕
CH r/
(頻道遞增(r)/ 遞減
(s))按鈕
VOL k/
(音量遞增(k)/ 遞減
(l))按鈕
(電 視 / 視頻 )
s
l
在“光學圖像控制”設置中
選擇“關”。
在“光學圖像控制”設置中選
擇“開”或“開:顯示”。
10
Page 12
20
1
2
4
5
8
9
11
12
6
13
7
14
15
3
10
部件名稱(續)
電視機(後視圖)
1 HDMI1/PC(音頻輸入)端子*
2 HDMI1端子
3 INPUT7(色差)端子
4 HDMI2端子
5 HDMI3端子
6 RS-232C端子
7 PC(电脑)輸入端子*
8 D-TV(數碼天線)端子
* HDMI1端子及PC(电脑)輸入端子可使用相同的模擬音頻輸入端子。但是,必須在“電腦音頻選擇”選項表中選擇適當的項
目。(請參閱第 22 頁)。
• 使用說明書中的插圖是用於進行解釋的(有些可能經過放大或裁剪),可能會與實際畫面稍有不同。
關於耳機插孔
• 請使用配備立體聲小型插頭(直徑 3.5 mm)的耳機。
• 不使用耳機時,請將耳機插頭拔出。
• 插入耳機後,音箱就不會發出聲音。
• 在插入了耳機時,不能操作“音頻”選項表。
9 A-TV(模擬天線)端子
10 INPUT6(色差)端子
11 AUDIO OUT(音頻輸出)端子
12 INPUT4(複合視頻)端子
13 INPUT5(複合視頻)端子
14 USB 端子
15 耳機插孔
插入耳機時的音量顯示
11
Page 13

ᒝ
᪤ⷨ㽙㒚
䖤䴱
&$0
A-TV(模擬電視)/ D-TV(數碼電視)輸入模式選項
表中的項目
幫助您操作的 A-TV(模擬電視)/ D-TV(數碼電視)選項表項目列表
影音模式 .................................................第 18 頁
OPC(光學圖像控制) ...........................第 18 頁
背光 ........................................................第 19 頁
對比度 ......................................................第 19 頁
亮度 .........................................................第 19 頁
色彩 ........................................................第 19 頁
色調 ........................................................第 19 頁
銳度 ........................................................第 19 頁
高級的
色溫 ...............................................第 19 頁
Quick shoot ..................................第 19 頁
影院模式 .......................................第 19 頁
對比度 ....................................第 19 頁
动态
3D-Y/C ..........................................第 19 頁
單色 ...............................................第 19 頁
圖像抑噪 ........................................第 19 頁
還原 ........................................................第 18 頁
高音 ........................................................第 19 頁
低音 ........................................................第 19 頁
平衡 ........................................................第 19 頁
SRS TS HD ............................................第 19 頁
低音增强 .................................................第 19 頁
還原 ........................................................第 19 頁
自動安裝 .................................................第 15 頁
模擬節目設置 ..........................................第 16 頁
數碼節目設置 ..........................................第 15 頁
兒童安全鎖 ..............................................第 20 頁
入跳越 .................................................第 21 頁
輸
入標記 .................................................第 21 頁
輸
定位 .........................................................第 21 頁
HDMI自動觀看 ........................................第 21 頁
WSS .......................................................第 21 頁
4:3模式 ................................................第 22 頁
快速啟動 ..................................................第 22 頁
語言 (Language) ....................................第 22 頁
辨認 ........................................................第 22 頁
還原 ........................................................第 22 頁
電腦音頻選擇 ..........................................第 22 頁
出音量選擇 ..........................................第 23 頁
輸
自動音量 .................................................第 23 頁
清晰的語音 ..............................................第 23 頁
僅限音頻 .................................................第 23 頁
遊戲時間 .................................................第 23 頁
彩色制式 .................................................第 23 頁
DivX登記碼 .............................................第 24 頁
版本升級 .................................................第 24 頁
無訊號自動關機 ......................................第 20 頁
無操作自動關機 ......................................第 20 頁
環保模式 .................................................第 20 頁
•
由於選擇的輸入源有所不同,某些選項表項目可能不會顯示出來。
12
音頻語言 .................................................第 25 頁
字幕語言 .................................................第 25 頁
用於聽覺障礙者 ...................................第 25 頁
适
時區 ........................................................第 25 頁
夏令時間 .................................................第 25 頁
OAD 設置 ...............................................第 25 頁
Page 14
ᒝ
᪤ⷨ㽙㒚
䖤䴱
&$0
電腦輸入模式選項表中的項目
幫助您操作的電腦選項表項目列表
影音模式 .................................................第 18 頁
OPC(光學圖像控制) ...........................第 18 頁
背光 ........................................................第 19 頁
對比度 ......................................................第 19 頁
亮度 .........................................................第 19 頁
高級的
色溫 ...............................................第 19 頁
還原 ........................................................第 18 頁
高音 ........................................................第 19 頁
低音 ........................................................第 19 頁
平衡 ........................................................第 19 頁
SRS TS HD ............................................第 19 頁
低音增强 .................................................第 19 頁
還原 ........................................................第 19 頁
電源管理 .................................................第 20 頁
無操作自動關機 ......................................第 20 頁
環保模式 .................................................第 20 頁
入跳越 .................................................第 21 頁
輸
入標記 .................................................第 21 頁
輸
快速啟動 ..................................................第 22 頁
語言 (Language) ....................................第 22 頁
辨認 ........................................................第 22 頁
還原 ........................................................第 22 頁
出音量選擇 ..........................................第 23 頁
輸
自動音量 .................................................第 23 頁
僅限音頻 .................................................第 23 頁
微調同步
輸
入訊號 ........................................第 24 頁
自動同步 ........................................第 23 頁
水平定位 ........................................第 24 頁
垂直定位 ........................................第 24 頁
時鐘 ...............................................第 24 頁
相位 ...............................................第 24 頁
還原 ...............................................第 24 頁
DivX登記碼 .............................................第 24 頁
版本升級 .................................................第 24 頁
•
由於選擇的輸入源有所不同,某些選項表項目可能不會顯示出來。
音頻語言 .................................................第 25 頁
字幕語言 .................................................第 25 頁
用於聽覺障礙者 ...................................第 25 頁
适
時區 ........................................................第 25 頁
夏令時間 .................................................第 25 頁
OAD 設置 ...............................................第 25 頁
13
Page 15
-
-
打開或關閉電視機
-
-
-
-
開啟 / 關閉電源
• 開啟電源
按下電視機上的
音顯示出來。)
• 關閉電源
按下電視機上的
POWER
(電源)。(稍后,影像伴隨著聲
POWER
(電源)。
备用模式
• 進
入备用模式
如果電視機已開啟,可按下遙控器上的
以切換至备用模式。
• 從备用模式開啟電源
在备用模式時,按下遙控器上的
• 如果長時間不使用本電視機,請務必將交流電源線插頭從
交流電源插座中拔出來。
• 即使電視機處於備用狀態時,也會略微消耗電量。
POWER
POWER
(電源)。
(電源),
連接天線電源
首次安裝 D–TV(數碼電視)天線,或將天線連接到社
區天線時,您需要遵循本手冊進一步設置天線。
所選擇的項目 說明
是 如果天線是獨立設定及連接,請選擇
否 如果無需提供電壓給天線,即天線連
“是”。
接至電視共用天線,則選擇“否”。
(原廠設定為“否”。)
初始自動安裝
購買電視機之後,當首次打開電源時,就會顯示出初
始自動安裝的嚮導。請按照選項表所示,一步一步地
進行所需的設置。
按下電視上的
1
• 顯示出初始自動安裝的嚮導。
按下a/b,來選擇所需的語言,然後按下
2
ENTER
按下c/d,來選擇“家”或“商店”,然後按
ENTER
下
• 家:“影音模式”設置的預設值為“標準”。
• 商店:“影音模式”設置的預設值為“動態(固定)”。
“影音模式”改變後,30 分鐘內若未繼續設置電視
機,則其會自動切換回“動態(固定)”。
選擇“商店”,按下c/d選擇“是”或“否”進
行確認。
按下a/b/c/d,來選擇“D-TV”、“A-TV
或“D-TV + A-TV”模式,然後按下
(確定)。
按下
a
下
ENTER
• 只有信號搜索設為“A-TV”或“D-TV + A-TV”模
式時,聲音制式才可選擇。
• 會執行自動安裝。
• 在自動搜索過程中不需要做任何操作。
POWER
(確定)。
(確定)。
,來選擇所需的聲音制式,然後按
b
/
(確定)。
(電源)按鈕。
ENTER
”
14
D-TV
按下
1
按下
2
按下c/d,來選擇“設置”。
3
按下a/
4
下
ENTER
按下a/
5
ENTER
按下c/d,來選擇“是”,然後按下
6
(確定)。
(數碼電視)進入 D–TV 模式。
MENU
(選項表),顯示選項表畫面。
b
,來選擇“數碼節目設置”,然後按
(確定)。
b
,來選擇“電源電壓”,然後按下
(確定)。
ENTER
檢查信號資訊
如果首次安裝 D-TV 天線或重裝,則應調整天線方向,
以得到良好的接收信號,同時檢查天線設置。
MENU
按下
1
按下c/d,來選擇“設置”。
2
按下a/
3
下
ENTER
(選項表),顯示選項表畫面。
,來選擇“數碼節目設置”,然後按
b
(確定)。
Page 16
D-TV
D-TV
D-TV
ᭌ⺐㆔Ⳃ䀁㕂
䙌᳡ࢭˈ✊ᕠᣝ丣㡆ᣝ䟩䘆㸠ᬍDŽ
᳡ࢭ
㰳⺐
᳡ࢭ
ৡ々
᳡ࢭৡ々
䙌䷙㸼
丏䘧
䏇䍞
䥪
㛻
䖨ಲ⺎ᅮ䙌 ㌖ℶ
㧂㑆㊐㈻
䀁㕂
檢查信號資訊(續)
ࠁ᥈㉎
䵧䕿㮋ⷨ
㼶㮋৭䈖
㜖ࠁ᥈㉎
㼶㮋ᑣᏒ
⤪
ࠁ㿫レ
㼶㮋䇳㼶
䰧⎼䰧
ᰬ๓
⤪ ᰬ๓
頻道設置
H
檢查信號資訊
請按下a/b,來選擇“訊號資訊”。
調整天線,以獲得最佳的“訊號強度”及“訊
4
號品質”值。
• “訊號強度”及“訊號品質”值表示何時需要檢查天線作適
當調整。
自動安裝
即使設置好預置頻道之後,您也可以再進行自動安裝。
MENU
按下
1
按下c/d,來選擇“設置”。
2
按下a/b,來選擇“自動安裝”,然後按下
3
ENTER
如果已經設置了密碼,那麼請在此輸入密碼。
4
• 關於設置密碼,請參閱第 20 頁。
(選項表),顯示選項表畫面。
(確定)。
數碼設置
您可自動或手動重新配置 D–TV(數碼電視)頻道設置。
MENU
按下
1
按下c/d,來選擇“設置”。
2
按下a/
3
下
ENTER
麼請在此輸入密碼。
• 關於設置密碼,請參閱第20頁。
按下
4
5
ENTER
下
按下c/d,來選擇“是”,然後按下
(確定)。
H
自動搜索(數碼)
完成自動安裝後,使用本選項表以便自動新增頻道服
務。
H
手動搜索(數碼)
在指定頻段內新增服務。
• 按下c/d
,來選擇頻道,然後按下 ENTER(確
定)。
H
手動調節(數碼)
使用顏色(
R, G, B
設定。
(選項表),顯示選項表畫面。
,來選擇“數碼節目設置”,然後按
b
(確定)。如果已經設置了密碼,那
a
/b,選擇想要的選項表項目,然後按
(確定)。
ENTER
)按鈕,為各項頻道服務設置不同
5
6
按下c/d,來選擇“是”,然後按下
ENTER
(確定)。
按下a/b,來選擇所需的語言,然後按下
ENTER
(確定)。
按下a/b/c/d,來選擇“D-TV”、“A-TV”
或“A-TV
+
D-TV”模式,然後按下
ENTER
(確定)。
按下
a
,來選擇所需的聲音制式,然後按
b
/
下
ENTER
• 只有信號搜索設為“A-TV”或“A-TV + D-TV”模
式時,聲音制式才可選擇。
(確定)。
在自動搜索過程中不需要做任何操作。按下
MENU
(選項表)退出。
按下a/b,選擇想要的服務。
1
根據您想要設置的項目,按下遙控器上對應的顏色
2
按鈕。
• 每次按下顏色按鈕後,您可將對應的操作設定為
開 / 關。
手動調節操作按鈕
選項表 項目遙控器
鎖 R 鎖定頻道後,每次要接收該頻道時
頻道
跳越
排序 B 頻道的位置可排序。
按鈕
G
都需輸入密碼。
按下電視機 / 遙控器上的r/
時,選擇了“跳越”,會忽略所選
的頻道。
說明
s
15
Page 17
搜索
標簽
[ ]
增強器
跳越
鎖
[
關
]
[
關
]
[
關
]
微調
彩色制式
[
自動
]
聲音制式
[
D/K
]
頻道頻率設定
MHz
儲存
取消
下一步
527.25
標簽
結束
A B C D E F G H I J
U V W X Y Z + – . _
增強器
跳越
鎖
KL MN OP QR S T
0 1 2 3 4 5 6 7 8 9
清除
後退
廣播電視台名稱設定
搜索
微調
彩色制式
聲音制式
[ ]
[
關
]
[
關
]
[
關
]
[
自動
]
[
B/G
]
頻道設置(續)
D-TV 005 Maori Television
D-TV 022 Parliament TV
D-TV 100 Freeview I HD
D-TV 005
Maori Television
D-TV 022 Parliament TV
D-TV 100 Freeview I HD
服務频道的位置可排序。
按下a/b,來選擇要移動項目位置的頻道,然後
1
按下B。
搜索
將按照順序搜尋下一個頻道。
按下a/b,來選擇所需的位置,然後按下
2
ENTER
(確定)。
重複步驟1及2,直至所有服務頻道都已排序。
3
模擬頻道設定
H 自動搜索(模擬)
也可以進行以下操作來自動搜索電視頻道。其功能與
自動安裝中用的頻道自動搜索相同。
MENU
按下
1
按下c/d,來選擇“設置”。
2
按下a/b,來選擇“模擬節目設置”,然後按
3
4
5
ENTER
下
如果已經設置了密碼,那麼請在此輸入密碼。
• 關於設置密碼,請參閱第 20 頁。
按下a/b,來選擇“自動搜索”,然後按下
ENTER
(選項表),顯示選項表畫面。
(確定)。
(確定)。
微調
可調校頻率至所需的位置。
• 以背景影像作為檢查的參考,來進行調校。
• 除了按下c/d以調校頻率,也可用
0 — 9
數字按鈕直接
輸入頻道的頻率數以設置。
• 在“微調”畫面上設置頻率時,頻率的最後數字必須設置
為“0”或“5”。
例
• 179.25 MHz: 按下
• 49.25 MHz: 按下
1 s 7 s 9 s 2 s 5
。
4 s 9 s 2 s 5 s ENTER
(確定)。
彩色制式
選擇最佳的彩色制式以接收。(自動、PAL、 SECAM、
NTSC 3.58、NTSC 4.43、PAL-60)
聲音制式(廣播制式)
選擇最佳的聲音制式(廣播制式)以接收。(B/G, D/K,
I, M)
標簽
可自由為頻道作標記。
• 按下a/b/c/d:為頻道的新名稱選擇文字,然後按下
ENTER
重複這個步驟直至拼出名稱。
(確定)。
按下
6
c/d
(確定)。
按下a/b,來選擇所需的聲音制式,然後按
ENTER
下
在自動搜索過程中不需要做任何操作。按下
MENU
H
手動調節(模擬)
可手動設置部分頻道項目。
重複“
1
按下a/b,來選擇“手動調節”,然後按下
2
ENTER
按下c/d,來選擇“是”,然後按下
3
(確定)。
按下a/b/c/d,來選擇要編輯的頻道,然
4
後按下
• 所選擇頻道的資訊就會顯示出來。
按下a/b,來選擇所需的選項表,然後按下
5
16
ENTER
按下a/b或c/d,來選擇所需的項目或將
6
該項目調整到所需的位置。若有需要,則按下
ENTER
,來選擇“是”,然後按下
(確定)。
(選項表)退出。
自動搜索
”的步驟 1 至 4。
(確定)。
ENTER
(確定)。
(確定)。
(確定)。
ENTER
ENTER
• 名稱的字母最多為 5 個。選擇“結束”以設定頻道名稱。
增強器
在信號較弱時可加強畫質,信號強時不建議啟用此功
能,以免出現雜訊。(開、關)
跳越
在觀看電視節目時,即使用
CHr/
選擇了“跳越”
s
被設置為“開”的頻道,該頻道也會被跳越過去。
鎖
可鎖定頻道。
• 關於設定密碼,請參閱“兒童安全鎖”。
• 如果頻道的“鎖”設為“開”,選擇該頻道時,就會顯示
“兒童安全鎖已啟動”,該頻道的影像和聲音也會被鎖定。
• “兒童安全鎖已啟動”時,如果按下
顯示密碼輸入選項表。輸入正確密碼可暫時開鎖,直至關閉
電源為止。
ENTER
(確定),就會
Page 18

頻道設置(續)
H
排序(模擬)
頻道位置可以自由地進行排序。
自動搜索
重複“
1
按下a/b,來選擇“排序”,然後按下
2
ENTER
(確定)。
”的步驟 1 至 4。
按下c/d,來選擇“是”,然後按下
3
(確定)。
按下a/b/c/d,來選擇您想要移動的頻道,
4
然後按下
按下a/b/c/d,將該頻道移動到所需的位
5
置,然後按下
重複第 4 步和第 5 步的操作,直到所有需要排
6
序的頻道都已經按要求編排了次序。
H
刪除節目(模擬)
可以刪除個別頻道。
重複“
1
按下a/b,來選擇“刪除節目”,然後按下
2
ENTER
按下c/d,來選擇“是”,然後按下
3
(確定)。
按下a/b/c/d,來選擇您想要刪除的頻道,
4
然後按下
然後按下
5
重複第 4 步和第 5 步的操作,直到將所有需要
6
刪除的頻道全部刪除為止。
ENTER
自動搜索
(確定)。
ENTER
ENTER
(確定)。
ENTER
(確定)。
”的步驟 1 至 4。
(確定)。
(確定),來清除該頻道。
ENTER
ENTER
17
Page 19
+16
40
+30
+30
+30
+10
MENU [Picture −−− Backlight
]
ᒝ
䴟䵧
ECO
ᒝ䴟Ὅᐻ
ٵႤూᣓݢ
㗸ٵ
ᄹ℀Ꮢ
ϚᏒ
㞞ᒕ
㞞㿫
䟟Ꮢ
倄㉆⮰
䖰࣋
<ὅ⏂>
<䬈>
0
–16
+16
+
30
0
0
4
+
[
[
[
[
[
[ ]
]
]
]
]
]
2
–30
–30
–30
–10
ENTER
:
選擇
:
確定
MENU
:
終止
RETURN
:
返回
選項表操作
按下 MENU(選項表),顯示選項表畫面。
1
按下 c/d 來選擇所需的選項表。(影像、音
2
頻、ECO、設置、選項、數碼設置)
按下 a/b 來選擇所需的選項表項目。若有需
3
要,則按下 ENTER(確定)繼續操作。
按下 a/b 或 c/d 來選擇所需的項目或將該
4
項目調整到所需的程度。若有需要,則按下
ENTER(確定)。
按下 EXIT(退出)或 MENU(選項表)來退
5
出選項表。
使用電視機的控制面板
w
也可使用電視機上的控制面板來操控選項表。
如下所示,控制面板上的按鈕操作與遙控器上的按鈕
操作相對應。
上面的條狀圖是遙控器的操作指南。隨著每
個不同的選項表設置畫面,條狀圖也會相應
改變。
影像選項表
H
影音模式
影音模式提供幾個觀看選項,以完美配合系統環境。
系統環境隨各種因素而有所改變,例如房間亮度、所
觀看的節目類型、外部設備所輸入的影像類型。
電視機控制面板按鈕
TV/VIDEO(電視 / 視頻) ENTER(確定)
• 選擇不同的輸入模式時,選項表中可選的項目可能會有不
同。但是其操作過程是一樣的。
• 使用說明書中的畫面是用於進行解釋的(有些可能被放大
或裁剪),可能會與實際畫面稍有不同。
關於引導顯示
畫面底部的“引導顯示”,顯示使用“遙控器”可進行
的操作。
18
遙控器按鈕
MENU(選項表) MENU(選項表)
CH r(頻道 r)
CH s(頻道 s)
VOL e(音量 e)
VOL
(音量 f)
f
a
b
d
c
所選擇的項目 說明
標準 在一般照明度的房間中以獲得高清晰度的
影像。
電影 用於電影。
遊戲 用於玩遊戲。
電腦 用於電腦(僅在輸入 HDMI 或 PC〔電
腦〕信號時有效。)
用戶 可以根據用户的需要進行設置。可以為每
個輸入源設置模式。
動態(固定)
將影像和聲音的設置恢復到出廠時的預設
值。沒有可允許的調校。
動態 用於觀看體育運動場景以獲得較高對比度
的清晰的影像。
• 對於每一個輸入模式,可選擇不同的影音模式項目。
(例如,電視輸入可選擇“標準”,而視頻輸入可選擇“動態”。)
• 使用電腦輸入模式時,“影音模式”只可選擇“標準”、“電
腦”或“用戶”。
OPC(光學圖像控制)設定
H
可將電視機設置為根據周圍照明條件自動調校背照明
燈亮度。
所選擇的項目 說明
開 : 顯示 在調節屏幕亮度時,屏幕上顯示 OPC(光
開 自動調校。
關 亮度固定於在“背光”中所設置的值。
• 請確認沒有物體遮擋 OPC(光學圖像控制)感應器,否則
會影響其檢測周圍光線的能力。
• 為了獲得最佳的畫質,在低溫環境下使用本機時,“光學
圖像 控 制 ” 及“背光” 功 能 可能失靈,電 視 機 並沒有問
題,溫度回復正常時,這些功能就會恢復。
學圖像控制)效果。
Page 20
–15
–15
[ 0]
L
[ 0]
+15
+15
R
<䬈>
[ 0]
MENU [Audio
]
䴟䵧
ECO
ὅ⏂
倄䴟
Ѻ䴟
㶍
SRS TS HD
䖰࣋
㽙㒚
Ѻ䴟්ᑣ
<䬈>
H
關
高
低
自動
抑制圖像噪音
影像調整
所選擇的項目
c
按鈕
d
按鈕
背光 畫面變暗 畫面變亮
對比度 減弱對比度 增強對比度
亮度 減弱亮度 增強亮度
色彩 減弱色彩強度 增強色彩強度
色調 使皮膚色調略帶紫色 使皮膚色調略帶綠色
銳度 減弱清晰度 增強清晰度
• 若要將所有的調校項目重新設定為出廠預設值,請按下
a
/b,來選擇“還原”,按下
來選擇“是”,然後按下
H
高級的
ENTER
ENTER
(確定),按下c/d,
(確定)。
色溫
調校色溫以得到最佳的白色平衡。
所選擇的項目 說明
高
白色略帶藍色調
中-高
中
中-低
低
白色略帶紅色調
Quick shoot (Fine Motion Advanced)
使用“Quick shoot”功能可更清晰地觀賞高速運動的影
像。
所選擇的項目 說明
開 啟用“Quick shoot”功能。
關 關閉“Quick shoot”功能。
• “Quick shoot”功能可能會在影像上產生雜訊。若出現這
種情況,請將該功能設置為“關”。
影院模式
自動檢測出以影院模式製作的視頻源(也就是原來以每秒
鐘 24 或 25 幅畫面來進行編碼的資料,取決於垂直頻率),
然後進行分析,再重新構成每一幅靜止影院畫面,由此得
到高清晰度的影像品質。(開、關)
動態對比度
根據畫面自動調節影像的對比度。(開、關)
3D-Y/C
減少畫面的蠕動點和交錯的色彩信噪,提供高質素的影
像。(開、關)
音頻選項表
H
音頻調整
所選擇的項目
c
按鈕
高音 減弱高音 增強高音
低音 減弱低音 增強低音
平衡 減弱右邊音箱的聲音減弱左邊音箱的聲
H
SRS TruSurround (TS) HD
可享受 SRS TruSurround HDTM的優美環繞聲,如同置身於影
院中一樣。
所選擇的項目 說明
開 在觀賞具有環繞聲聲道的 DVD 或電視節
目時,SRS TruSurround HDTM可讓您體
驗真正高品質的環繞聲效果。
關 輸出普通的聲音。
w
低音增強
選擇“開”時,即增強低音效果。
• SRS TS HD 設為“開”時,即可享受 SRS Labs, lnc. 研發
的“低音增強”功能。
• SRS TS HD 設為“關”時,“低音增強”功能仍可設為
“開”或“關”。
•
若要將所有的調校項目重新設定為出廠預設值,請按下
a
/b,來選擇“還原”,按下
來選擇“是”,然後按下
• 在插入了耳機或“输出音量选择”设置為“可變的”時,
不能操作“音頻”選項表。
ENTER
ENTER
(確定)。
d
按鈕
音
TM
(確定),按下c/d,
• 取決於輸入信號類型,有時不能選擇 3D-Y/C。
• 取決於輸入信號類型或輸入信號中雜信強度,3D-Y/C 有可
能不能運作。
單色
用於觀看單色影像。(開、關)
圖像抑噪
減少畫面上的雜訊,產生更加清晰的視頻影像。(關、
高、低、自動)。
19
Page 21
ECO 選項表
<
喖ᄻ᭮
>
MENU [ECO
]
♍᧹҈㜖ࠁ䬈ᾋ
⧜ԉὍᐻ
䖤䴱
䰧⎼ネ⤲
4
設置
㽙㒚
<ᰵᩴ>
♍㼶㮋㜖ࠁ䬈ᾋ
ECO
MENU [Setup
]
⯇࡚ㅛ
㆔Ⳃ䀁㕂
ᙇ┳❥⏖㉑⧡
㖱ݣ㒭㑘
㖱ݣ᧐㉃
4
4
ׅ
4
㗦㊘
㚍ࣥ
<㧷>
<ݥᜀ>
<㨸>
㉑⧡
㚁㮴
)%.*⯇࡚㈊⏭
844
᧘ᅴ
ሐ㙀࡚
ݓ⛐ݥ㤘
ᙇ┳㉑⧡
㊥㈲-BOHVBHF
<ԋ ᙔ
⥝
>
ჲⷨ
– – – –
ڹ⁍ⷦ㾹
ᰠᩥჲⷨ
⌱䮐ჲⷨ
ტ䪣ふ㉆
– – – –
㿷⩔ѹ᪤ႃ䑤ڑჲⷨ
H
無訊號自動關機
可將電視機設定為在接收無節目的信號後約 15 分鐘時
自動關閉電源,例如,在整天的廣播節目結束之後。
(有效、無效)
• 在電源關閉之前的 5 分鐘,會每隔一分鐘顯示出剩餘時間。
• “無效”是本機出廠時預先設置的值。
• 當電視頻道終止,但是電視機接收到輸入信號時,該功能
可能不起作用。
H
電源管理(只適用於電腦輸入模式)
可將電視機設定為在電腦上沒有顯示影像時自動關閉
電源。
所選擇的項目 說明
關 • 沒有電源管理
模式 1 • 如果在大約 8 分鐘內沒有信號輸入,電
模式 2 • 如果在大約 8 秒鐘內沒有信號輸入,電
• 本機出廠時預先設置的值。
源就會關閉。
• 即使用電腦來啟動並且重新輸入信號,
電視機仍然保持在關閉狀態。
POWER
• 按下
(電源),電視機就重新
打開。(請參閱第 14 頁。)
源就會關閉。
• 當使用電腦來啟動並且重新輸入信號
時,電視機就會打開。
POWER
• 按下
(電源),電視機就重新
打開。(請參閱第 14 頁。)
設置選項表
H
兒童安全鎖(只適用於 A-TV(模擬電視)及 D-TV
(數碼電視)模式)
可以用密碼來防止某些設置被意外地更改。
設置密碼
選項表操作
重複
1
頁)。
按下a/b,來選擇“兒童安全鎖”,然後按下
2
ENTER
如果已設定密碼,請在此輸入。
3
按下a/b,來選擇“更改密碼”,然後按下
4
ENTER
用
5
(確定)。
(確定)。
0–9
來輸入一個 4 位數字作為密碼。
的步驟 1 至 2(請參閱第 18
• 当在电源管理中设置為“模式2”时,如果用拔出交流电源
線的方式来关闭电源,那么在重新打开电源之后电视机可
能不会正常运行。如果发生这种情况,那么请按遙控器上
的电源。
• 按下电视机上的电源,也会有同样的结果。
H
無操作自動關機
可將電視機設定為在連續 30 分鐘或 3 小時以上不操
作電視機時自動關閉電源。(30 分鐘、3 小時、無效)
• 在電源關閉之前的 5 分鐘,會每隔一分鐘顯示出剩餘時間。
• “無效”是本機出廠時預先設置的值。
H
環保模式
當設置為“是”時,電視機將會執行如下省電模式。
• “光學圖像控制”設為“開”。(請參閱第 18 頁。)
• “無訊號自動關機”設置為“有效”(請參閱第 20 頁。)
• “電源管理”設為“模式 1”。(請參閱第 20 頁。)
• “無操作關閉”設為“3 小時”。(請參閱第 20 頁。)
• “快速啟動”設為“關”。(請參閱第 22 頁。)
• 不能用選擇“否”來使環保模式無效。如果要使環保模式
無效,那麼必須分別改變每一項設置。
20
如步驟 5,輸入相同的 4 位數字,來再次確認
6
密碼。
• 要觀看鎖定的頻道,就必須輸入密碼。(在模擬頻道設置的
“手動調節”中,鎖定設置設為“開”。)選擇鎖定的頻道
時,就會顯示“兒童安全鎖已啟動”。
ENTER
• 按下
(確定)可顯示密碼輸入窗口。
清除密碼
讓您清除密碼。
設置密碼
重複
1
按下a/b,來選擇“清除密碼”,然後按下
2
ENTER
按下c/d,來選擇“是”,然後按下
3
(確定)。
中的第 1 至第 3 的步驟。
(確定)。
ENTER
Page 22
設置選項表(續)
+'0,
ۉస
ᰃ ৺
跳越HDMI輸入選擇
+'0,
+'0,
級
家長等
該功能可限制觀看被鎖定的電視頻道。
這樣就可防止兒童觀看被認為是兒童不宜的暴力或色
情場面。
反覆操作
1
按下
2
ENTER
按下a/b,來選擇所需的等級,然後按下
3
ENTER
設置密碼
a
/b,來選擇“家長等級”,然後按下
中的步驟 1 到 3。
(確定)。
(確定)。
H
輸入標記
可為每一個輸入源指定一個自己喜歡的標記。
TV/VIDEO
按下
1
的輸入源。
MENU
按下
2
按下c/d,來選擇“設置”。
3
按下a/b,來選擇“輸入標記”,然後按下
4
ENTER
(確定)。
(電視 / 視頻),來選擇所需
(選項表),顯示選項表畫面。
所選擇的項目 說明
無阻隔 取消限制。
年齡 5-18 歲 選擇要限制的年齡。
H
輸入跳越
(例)如選定“限 制 13 歲及 以下”,則
會限制 13 歲以上才可觀看的節目。
利用本設置可跳越“輸入信源”選項表的 HDMI(高
清晰度多媒體接口)或電腦輸入。
按下a/b/c/d選擇文字,然後按下
5
(確定),以此來標記輸入源。
• 如果想要更改已經指定為默認名稱的輸入標記,
那麼請按下
“清除”,然後按下ENTER(確定)。
重複以上步驟,直到名稱的字母全部拼出
6
c/d
移動到“輸入標記”畫面上的
ENTER
來。
•名稱的字母最多為 6 個。
•想要設置的輸入源名稱少於 6 個字時,請按下
RETURN(返回),從標記選項表退出。
• 如果輸入源為 A-TV(模擬電視)及 D-TV(數碼電視)模式,
就不能改變標記。
H
定位
用於調校一幅影像的水平和垂直的位置。
所選擇的項目 說明
水平定位 左右移動影像,將其調校到中央位置。
垂直定位
還原 將位置還原至原廠設定值。
• 根據不同的輸入源,所有的調校內容會被分別記憶起來。
• 由於設置和(或)輸入信號各有不同,影像有可能不能夠
正確地顯示出來。
H
HDMI 自動觀看 ﹝ 僅適用於 HDMI [ 高清晰度多媒
上下移動影像,將其調校到中央位置。
體接口 ] 輸入模式 ﹞
可選擇的項目 說明
有效 / 無效 選擇是否根據信號識別(包括 HDMI [ 高
H
WSS
清晰度多媒體接口 ] 信號)使用“寬屏模
式”。
WSS 使電視機能夠在不同的螢幕格式之間自動切換。
(開、關)
• 如果影像沒有切換到正確的屏幕格式,請設置到寬屏幕模
式。當電視廣播信號不包含寬屏幕信號的信息(WSS)時,
即使設置為“開”,該功能也不起作用。
• 當接收比較弱或不穩定的信號時,為避免把信號錯誤判斷,
建議將 WSS 設置為“關”。
21
Page 23
䙌䷙
䳏㜺䷇丏䙌
㞾ࢩ䷇䞣
ڙ䰤䷇丏
[HDMI1]
>䭟@
ᭌ⺐䀁㕂
䘞᠆ᰖ䭧
4
ᔽ㡆ࠊᓣ
4
ᖂ䂓ৠℹ
4
⠜ᴀ㋮
䔌ߎ䷇䞣䙌
>ᅮⱘ@
⏙᱄ⱘ䁲䷇
>䭟@
'LY;ⱏ㿬⺐
設置選項表(續)
H
4:3 模式
WSS 信號具有 4:3 自動切換功能,可讓您在全景和
標準之間做出選擇。
所選擇的項目 說明
全景 不帶有邊緣條的寬屏幕影像
標準 正常範圍保持在 4:3 或者 16:9 的屏幕高寬
4:3 模式“全景” 4:3 模式“標準”
H
快速啟動
可以縮短用遙控器開啟電源後電視機的啟動時間。
所選擇的項目 說明
開
關
H
語言
您可以從設置選項表裡挑選一種語言。
3 種語言可供選擇:英文、繁體中文及簡體中文。
H
辨認
可在畫面上檢查軟件的當前版本。
H
還原
如果經過了複雜的調校之後,設置不能夠恢復到正常
狀態,那麼請將設置還原到出廠時的預設值。
比
寬屏幕信號(WSS)4:3 畫面
能從备用狀態迅速開啟電視機。
在备用狀態下電力消耗比較小。
選項選項表
H
電腦音頻選擇
當使用 HDMI [ 高清晰度多媒體接口 ] 連接線連接外部
設備和 HDMI1 端子,並且從音頻輸入端子輸入模擬音
頻信號時。
所選擇的項目 說明
HDMI1 當使用 HDMI [ 高清晰度多媒體接口 ] 連
電腦
• 使用HDMI連接線連接外部設備到HDMI1端子並且從音頻輸
入端子輸入模擬音頻信號時,音頻選擇应当设定为电脑。
如果设定为HDMI1時,就不会输出声音。
• 如果只使用HDMI連接線連接外部設備到HDMI1端子時,音
頻選擇应当设定HDMI1。
接線連接外部設備和 HDMI1 端子時。
當使用 HDMI [ 高清晰度多媒體接口 ] 連
接線連接外部設備和 HDMI1 端子並且從
音頻輸入端子輸入模擬音頻信號時。
• 執行“還原”時,所有設置例如影像、音頻、頻道及語言,
將還原至原廠預設值。
22
Page 24
可變的固定的
音频输出端子设置
選項選項表(續)
H
輸出音量選擇
允許您選擇用什麼模式來控制音頻的輸出。
MENU
按下
1
按下c/d,來選擇“選項”。
2
按下a/b,來選擇“輸出音量選擇”,然後按
3
4
ENTER
下
按下c/d,來選擇“固定的”或者“可變
的”,然後按下
所選擇的項目 說明
固定的
可變的
(選項表),顯示選項表畫面。
(確定)。
ENTER
•用 遙 控 器或 是 電 視機 上 的
(音量k/l)來調校音箱的聲音。
AUDIO OUT
• 經過
輸出的聲音不可以調校,是恆定的輸出。
AUDIO OUT
• 經過
輸出的聲音,可以用遙控器或電視機上
VOL
的
• 從電視機音箱及耳機所發出的聲音被關
掉。
(確定)。
(音頻輸出)端子所
(音頻輸出)端子所
k/l來調校。
VOL
k/l
H
僅限音頻
收聽音樂節目時,可將顯示屏關掉,只收聽聲音。
所選擇的項目 說明
開 只輸出聲音而沒有屏幕影像。
關 屏幕影像和聲音兩者都輸出。
• 在進行會 改 變 電 視畫面的操 作 時 ,例如改變輸 入 信 號源
時,“僅限音頻”功能被設置於“關”的狀態。
H
遊戲時間
本功能顯示已經過的遊戲時間,所以就不會遺漏時間
的信息。
若要顯示已經過的時間,那麼在遊戲開始之前,請對
連接遊戲機的端子的輸入模式在“影音模式”下選擇
“遊戲”。
所選擇的項目 說明
開 在輸入HDMI1/2/3,輸入4/5/6/7的情況
關 沒有顯示。
H
彩色制式
下,將視聽模式切換為“遊戲”模式時,
那麼每 30 分鐘就會顯示一次已經過的
時間。
可以將彩色制式更改為與屏幕上的影像兼容。(自
動、PAL、SECAM、NTSC 3.58、NTSC 4.43、PAL-
60)
• 本機出廠時預先設置的值為“自動”。
• 如果選擇了“自動”,頻道的彩色制式就會自動設置。如
果影 像 不 能 清晰地顯示 出 來 ,那麼請選擇 另 一 種彩色制
式。(例如,PAL 或 NTSC4.43 制式)。
• 只有在輸入複合視頻信號時,才能選擇“彩色制式”。
H
微調同步(僅適用於電腦輸入模式)
自動調整電腦影像
• 在選擇了“可變的”時,不能操作“音頻”選項表。
H
自動音量
不同音源的音量往往不一樣,例如電影與廣告的音量
不同。自動音量調節可解決這個問題,平衡音量。
(開、關)
H
清晰的語音
此功能可以強調在背景噪聲中人物的語音,以便更好
地聽取人物語音。(開,關)
•
在 SRS TS HD 設為“關”時,不能操作這項功能。
自動同步
在用市面有售的 RGB 接線等連接電視機和電腦的模擬
端子時,本功能可使畫面自動調整到可能的最佳狀態。
• 當輸入的電腦影像中有寬闊的垂直條紋(例如,具有高對
比度的條紋圖案或交叉並行線條)時,自動同步就比較容
易成功。
當輸入的電腦影像比較平淡(低對比度)時,自動同步容
易失敗。
• 在進行自動同步操作之前,請務必確認電腦已經與電視機
連接,並且已經開啟電源。
23
Page 25

選項選項表(續)
手動調整電腦影像
H
版本升級
本功能只能由合資格的 SHARP 技術人員用 USB 設備
將軟件更新到最新的版本。必須通過 USB 端子才能更
新軟件。
通常,用自動同步就可以很容易地根據需要改變影像
的位置。然而,在某些情況下,需要用手動調校方式
來優化影像。
所選擇的項目 說明
水平定位 左右移動影像,將其調校到中央位置。
垂直定位
時鐘 當影像閃爍並有垂直條紋時進行調校。
相位 當文字的對比度低或當影像閃爍時進行調
• 若要將所有的調校項目重新設定為出廠預設值,請按下a/
b來選擇“還原”,然後按下 ENTER(確定),再按下
c/d
來選擇“是”,然後按下 ENTER(確定)。
• 由於設置和(或)輸入信號各有不同,影像有可能不能夠
正確地顯示出來。
上下移動影像,將其調校到中央位置。
校。
輸入訊號
• 部分輸入信號可能需要手動註冊,以便正確地顯示。
• 下表所列的成對輸入信號(解像度)在接收時無法
區分。 在 這 種情況 下 , 必須手 動 地 設定正 確 的 信
號。設定一次之後,當再次輸入相同的信號(解像
度)時,將會顯示。
1280 x 768 1360 x 768
• 當接收上表所列的两種輸入信號的其中一種時,只可以在
設置選項表上選擇“輸入訊號”。
H
DivX® 設置
該功能可以讓您確認註冊碼。
• 若有問題,請聯絡合資格的 SHARP 技術人員。
插入存有軟件更新文件的 USB 設備。
1
按下 MENU(選項表),顯示選項表畫面。
2
按下 c/d,來選擇“選項”。
3
按下 a/b,來選擇“版本升級”,然後按下
4
ENTER(確定)。
按下 c/d,來選擇“是”,然後按下
5
ENTER(確定)。
• 確保將 USB 設備正確插入端子。
開始升級作業。
6
• 該操作可能需要進行一段時間。
完成升級之後,重新拔插電源線。
7
按下 MENU(選項表),顯示選項表畫面。
1
按下 c/d,來選擇“選項”。
2
按下 a/b,來選擇“DivX 登記碼”,然後按
3
下 ENTER(確定)。
DivX® VOD 登記
您需要浏览 DivX® 主頁註冊您的電視,然後才可播放
DivX® 內容。
DivX® VOD 取消登記
您可查找取消註冊碼。
• 更多關於 DivX® VOD 的信息請浏览 www.DivX.com。
24
• 若數據與系統不兼容,則畫面上會出現一個錯誤訊息。按
下 ENTER(確定)之後,請重覆步驟 3 和步驟 4。
• 若顯示出錯誤訊息,則請檢查:
• USB 設備是否已可靠地插入。
• USB 記憶體中只有一個軟件升級檔案。
• USB 記憶體中沒有用於更新系統的數據。
• 軟件更新文件已損壞。
• 軟件更新文件與電視機的軟件不兼容。
Page 26

數碼設置選項表
䙌䷙
䷇丏䁲㿔
ᄫᐩ䁲㿔
ᆩᮐ㙑㾎䱰⻭㗙
ᰖ
Ҹᰖ䭧
2$'䀁㕂
>䮰@
>䮰@
>䮰@
ᭌ⺐䀁㕂
(适用於听觉障碍者) 第一语言
第二语言
关
• • • • • • • •
˄ၸவեᬩᆽᏧ˅
ኃʶឥᝒ ኃឥᝒ
С
• • • •
選擇音頻語言
H
在提供的音頻語言中,最多可選擇顯示兩種偏好的多
音頻語言。
MENU
按下
1
按下
2
按下a/b,來選擇“音頻語言”,然後按下
3
ENTER
按下a/b,來選擇“第一語言”或“第二語
4
言”,然後按下
按下c/d,來選擇所需的語言,然後按下
5
ENTER
(選項表),顯示選項表畫面。
c/d
,來選擇“數碼設置”。
(確定)。
ENTER
(確定)。
(確定)。
選擇字幕語言
H
按下MENU(選項表),顯示選項表畫面。
1
按下c/d,來選擇“數碼設置”。
2
按下a/b以 選 擇 “字 幕 語 言” , 然 後按 下
3
ENTER(確定)。
按下a/b,來選擇“第一語言”或“第二語
4
言”,然後按下ENTER(確定)。
按下c/d,來選擇所需的語言,然後按下
5
ENTER(確定)。
• 如果所接收的廣播節目不提供所選擇語言的字幕,則不會
顯示該語言的字幕。
時區
H
這項功能讓您選擇當地時區。
MENU
1
2
3
4
按下
按下
按下
ENTER
按下
(確定)。
(選項表),顯示選項表畫面。
c/d
,來選擇“數碼設置”。
a
/
,來選擇“時區”,然後按下
b
(確定)。
c/d
,來選擇時區,然後按下
ENTER
• 本功能取決於電視台的音頻語言資訊。
切換字幕語言
H
每按下一次遙控器上的 [,就會切換一次字幕。
設定“适用於聽覺障礙者”為“開”
設定“适用於聽覺障礙者”為“關”
為聽覺障礙者顯示字幕
H
在提供的字幕語言中,可在廣播節目中顯示字幕,以
輔助聽覺障礙者。
按下MENU(選項表),顯示選項表畫面。
1
按下c/d,來選擇“數碼設置”。
2
按下a/b,來選擇“适用於聽覺障礙者”,
3
然後按下 ENTER(確定)。
按下c/d,來選擇“開”,然後按下
4
ENTER(確定)。
• 如果 EPG(電子節目指南)不符合當地時間,您可利用這
項功能以選擇適當的時區。
夏令時間
H
夏令設為“開”時,“標準時間”為 +1 小時。
(自動、 開、 關)
OAD 設置
H
• “OAD 設置”設為“開”時,這項功能可透過數碼廣
播,自動下載版本升級軟件的資料。
• 若要下載,在數碼廣播期間出現下載訊息時,請遵照
指示操作。
•
軟件升級時,請勿拔出交流電源線,否則可能導致升級失
敗。如有問題,請於軟件升級有效期內查詢合資格的服務
人員。
25
Page 27

-
-
輸入資料
ABC2
People Dimensions
[
星期六] 23 三月 20 10
13:30 - 14:00
視頻 : 576i
音頻 : 立體聲
年齡
: 09
7
6
5
1
4
2
3
節目指南
-
-
頻道清單
[
星期一] 18/6 13:27
020 ABC HDTV
Dorothy The Dinosaur
002 ABC TV Sydne
020 ABC HDTV
021 ABC2
頁 增/減
選擇頻道
: 確定
: 節目信息
: 返回 退出
022 ABC TV
Dorothy The Dinosaur
Dorothy The Dinosaur
Gardening Australia
Dorothy The Dinosaur
13:23 - 13:30
R
ENTER
MENU
RETURN
可查看數碼電視(D-TV)節目的時間表,並觀看現在
節目的詳細資訊。
資訊
GUIDE
按下
1
表。
按下a/b,顯示出所需的節目,然後按下
2
ENTER
• 按下
按下R,來檢視節目資訊。
3
按下
4
以退出。
(當前節目),顯示出節目指南列
(確定)。
ENTER
(確定)後,會跳至選擇的頻道。
RETURN
(返回)或
MENU
(選項表)
在觀看數碼電視(D-TV)時,可用遙控器上的
(資訊)按鈕來查看更多的節目資訊。
一般資訊畫面
服務名稱
1
節目名稱
2
當前節目播放日期
3
當前節目播放時間
4
視頻系統
5
音頻系統
6
家長評級
7
•
如有更多資訊,按下c/d可轉至下一頁或返回上一頁。
• 可按下
INFO
(資訊)或
EXIT
(退出)取消這項資訊。
INFO
26
Page 28

-
-
TEXT
B/G
01
BBC1
B/GPAL
NICAM
PAL
01
A-TV A-TV
BBC1
B/G
A
01
BBC1
B/G
B
PAL
NICAM
PAL
NICAM
01
A-TV A-TV
BBC1
B/G
01
BBC1
B/G
AB
PAL PAL
NICAM
01
A-TV A-TV
BBC1
B/G
01
BBC1
B/GPAL
NICAM
PAL
01
A-TV A-TV
BBC1
A-TV(模擬電視)/ D-TV
-
-
TEXT
(數碼電視)按鈕
用遙控器上的如下按鈕來操控選項表。
A-TV
(模擬電視):按該鈕切換到模擬電視模式。從
數碼電視或外部輸入模式切換到模擬電視模式之後,
頻道會切換至最近觀看過的模擬電視頻道。
D-TV
(數碼電視):按該鈕切換到數碼電視模式。從
模擬電視或外部輸入模式切換到數碼電視模式之後,
頻道會切換至最近觀看過的數碼電視頻道。
首次觀看該電視機時
購買電視機之後,當首次打開電源時,請執行自動安
裝程序。
A-TV(模擬電視)
可運行自動安裝程序,來自動設置頻道。
若要觀看模擬電視,請在“設置”選項表上選
1
擇“自動安裝”。(請參閱第 15 頁。)
切換模擬音頻格式
在觀看多音頻或立體聲廣播節目時,可切換多種音頻
模式。
在 NICAM(麗音)電視廣播模式下
在接收到立體聲信號時
每一次按下
(麗音)立體聲和單聲道之間切換。
在接收到雙語廣播信號時
每一次按下
(麗音)頻道 A、NICAM(麗音)頻道 B、 NICAM(麗
音)頻道 AB、以及單聲道之間切換。
MPX
(多重聲音),模式就會在 NICAM
立體聲模式
MPX
(多重聲音),模式就會在 NICAM
雙語模式
設置好頻道之後,即可用遙控器上的CH
2
s
(頻道
r/s
)或
0 – 9
按鈕來選擇頻道。
r
/
D-TV(數碼電視)
當電視機首次進入數碼電視模式時,需要運行自動搜
索功能。想要搜尋所在地區的所有可能的服務,則請
按照如下步驟操作。
若要觀看 D-TV(數碼電視)廣播節目,請於安
1
裝選項表中,選擇 D-TV(數碼電視)。(請參
閱第 15 頁。)
設置好頻道之後,即可用遙控器上的 CH
2
r/s(頻道 r/s)或 0 – 9 按鈕來選擇
頻道。
在接收到單聲道廣播信號時
每一次按下
MPX
(多重聲音),模式就會在 NICAM
(麗音)單聲道與單聲道之間切換。
單聲道模式
27
Page 29

切換模擬音頻格式(續)
B/G
01
BBC1
B/GPAL PAL
01
A-TV A-TV
BBC1
B/G
A
01
BBC1
B/G
B
PAL
NICAM
PAL
01
A-TV A-TV
BBC1
B/G
AB
PAL
01
A-TV
BBC1
B/GPAL
01
A-TV
BBC1
切換數碼音頻格式
在A2電視廣播的電視模式下
在接收到立體聲信號時
每一次按下
MPX
(多重聲音),模式就會在立體聲與
單聲道之間切換。
立體聲模式
在接收到雙語廣播信號時
每一次按下
MPX
(多重聲音),模式就會在頻道 A、
頻道 B、頻道 AB 之間切換。
雙語模式
在接收到單聲道廣播信號時
MPX
在按下
(多重聲音)時,就會顯示出“單聲道”。
單聲道模式
當接收以不同音頻語言廣播的數碼節目時,可透過
MPX(多重聲音)按鈕來選擇所需的語言。
• 可選擇的音頻語言視乎所接收的廣播信號而異。
• “BBC1”、“01”和“PAL”是假設的網路名稱、頻道和彩
色制式。
28
Page 30

20, 21
-
-
:確定 :選擇
R G Y B
ENTER
MENU
INFO
081 Jade 宣傳易
08 11 2010 10:59
DTV
08 12 11:35-11:40
08 12 11:40-11:45
08 12 11:45-12:40
08 12 12:40-12:45
08 12 12:45-13:00
08 12 11:30-11:35
新聞提要
交易現場
秀才遇著兵
宣傳易
交易現場
宣傳易
:前一天 :後一天 :一覽表
:提示
:終止:節目資訊
提示
服務名稱
小時
分
模式 一次
星期二 22
六月
日期
月
提示列表
節目名稱
時間 日期
星期二 22 六月
服務名稱
EPG(電子節目指南)
電子節目指南設置
H
什麼是電子節目指南(EPG)?
“電子節目指南(EPG)”是在電視畫面上顯示節目時間表。電子節目指南是與數碼電視(D-TV)一起被廣播的。
如果電視機正在接收數碼電視廣播信號,那麼當按下遙控器上的 EPG(電子節目指南)按鈕時,電視畫面上
就會顯示出電子節目指南。EPG(電子節目指南)可讓您搜索節目、查看詳細的節目時間表。
基本操作
顯示出電子節目指南(EPG)畫面
H
EPG
1
按下
(電子節目指南)。
3
4
2
按下R/G來選擇想要搜索的日期。
2
按下c/d來選擇想要搜索的服務台。
3
按下a/b來選擇所需的節目。
4
關閉電子節目指南(EPG)畫面
H
5 再次按下 EPG(電子節目指南),或按下 MENU(選項表)以退出。
• EPG 顯示的時間為電視台發送的信息。
提示定時器設定
可針對未來的節目安排提示,頻道會依安排準時自動變更。
按下
1
按下 a/b/c/d/R/G 來選擇想觀看的節目。
2
按下 B 以設定提示時間。
3
按下
4
• 會顯示“時間儲存成功”。
•
如果重複設定相同的時間,就會顯示“時間重疊”。
•
如果設為已過去的時間,就會顯示“時間已過”。
EPG
(電子節目指南)。
ENTER
(確定),來儲存提示時間。
按下
5
按下
6
南)以退出。
ENTER
(確定),來儲存提示時間。
MENU
(選項表)或
EPG
(電子節目指
29
Page 31

EPG(電子節目指南)(續)
寬屏模式
檢視提示時間表
EPG
按下
1
按下Y,來顯示提示時間表。
2
按下a/b,來顯示上一個或下一個時間表中
3
的節目。
按下
4
南)以退出。
(電子節目指南)。
MENU
(選項表)或
EPG
(電子節目指
取消提示時間表設定
EPG
按下
1
按下Y,來顯示提示時間表。
2
按下a/b,來選擇要取消的節目。
3
按下R,來刪除提示時間表中的節目。
4
按下
5
以退出。
字文件
图
香港地区设有 MHEG-5 数据广播节目。您可以通过按
TEXT(图字文件)按钮收看 MHEG-5 数据广播节目。
(電子節目指南)。
MENU
(選項表)或
EPG
(電子節目指南)
影像和靜止影像
可在顯示器上定格一個活動影像。
按下FREEZE(靜止)。
1
• 一幅靜止的影像顯示在畫面上。靜止影像是在您
按下FREEZE(靜止)的時刻所捕捉到的活動影
像的一幅畫面。
再一次按下FREEZE(靜止),退出靜止影
2
像。
• 靜止影像會在30分鐘之後自動消失。
• 當本功能不起作用時,就會顯示出“無靜止圖片顯示”。
• 使用電腦輸入模式時,靜止功能將不起作用。
自動選擇
如已按設置選項表設置了 WSS(寬屏幕信號)和 4:3
模式,在有 WSS(寬屏幕信號)信息的廣播時,最佳
的寬屏模式將會自動選擇。
“WSS”(寬屏幕信號)選項表
為了讓自動選擇有效, 請將設置選項表裏的“WSS”
(寬屏幕信號)設置為“開”。(請參閱第 21 頁。)
“4:3 模式”選項表
為了設置寬屏幕的類型,請在 4:3 模式選項表裏選擇
“全景”或者“標準”。(請參閱第 22 頁。)
4:3 模式設置為“全景” 4:3 模式設置為“標準”
•
如果電視廣播信號不包含寬屏幕信號(WSS),那麽即使寬屏
幕信號(WSS)選擇項有效,自動選擇也不起作用。
手動選擇
可以為每一種影像選擇不同的屏幕模式。
WIDE
按下
1
• 就會顯示出“寬屏模式”選項表。
• 選項表中列舉了對於目前接收到的視頻信號類型
可供選擇的寬屏幕模式選擇項。
當“寬屏模式”選項表還顯示在屏幕上的時候,
2
請按下
• 當您選定選項時,每一模式都會立即顯示在電視
機上。
所選擇的項目 說明
標準 用於 4:3 標準影像。左右兩側都出現一個
14:9縮放
全景 在這種模式下,影像被一步步拉闊到屏幕
全
屏
16:9 影院 用於 16:9 信箱型影像。在某些節目時頂部
14:9 影院 用於 14:9 信箱型影像。在某些節目時頂部
優化掃描 僅在接收 720p 信號時顯示“優化掃描”
逐點 僅在接收 1080i/1080p 時,在畫面上顯示
(寬屏模式)。
WIDE
(寬屏模式)或者a/
邊緣條。
用於 14:9 的信箱型影像。左右兩側出現一
個狹窄的邊緣條,並且在某些節目情况下
可以看見頂部和底部也出現邊緣條。
的兩側邊緣。
用於 16:9 擠壓型影像。
和底部可能出現邊緣條。
和底部可能出現邊緣條。
影像。顯示高解像度影像時調節到最佳。
對於某些節目,畫面邊緣可能會出現雜波。
相同像素的影像。
b
。
• 由於輸入信號各有不同,有可能不會顯示某些影像尺寸。
30
Page 32

15
141312
9
11
10
8
7
6
5
4 3
2
1
連接電腦
ANALOG
RGB
AUDIO
(L/R)
用電腦端子與電腦連接。
模擬連接
直徑 3.5 mm 立體聲小型插孔
連接線(市面有售)
15- 針小型 D-sub 連接器的信號名稱
• 對於某些Macintosh(蘋果)系列電腦,可能需要用Macintosh(蘋果)轉接器。
• 有关电视机相容的电脑信号列表,请参阅第 32 页。
• 当使用HDMI線连接电脑时,请参阅第 22 页上的使用HDMI输出设备时的设定。
紅綠藍(RGB)連接線
(市面有售)
電腦
31
Page 33

電腦相容性列表
解像度 水平頻率
垂直頻率
VGA 640 g 480 31.5 kHz 60 Hz
SVGA 800 g 600 37.9 kHz 60 Hz
XGA 1024 g 768 48.4 kHz 60 Hz
WXGA
SXGA
SXGA+
1280 g 768
1360 g 768 47.7 kHz 60 Hz
1280 g 1024 64.0 kHz 60 Hz
1400 g 1050 65.3 kHz 60 Hz
47.8 kHz 60 Hz _
VESA 標準
4
4
4
4
4
4
• 本電視機僅限與電腦兼容,僅在視頻卡完全符合 VESA 60Hz 標準的情况下才可保證正確運作。若與該標準有任何差異,都
可導致畫面變形。
DDC 是 Video Electronics Standards Association(視頻電子標準協會)的註冊商標。
Power Management 是 Sun Microsystems, Inc.(太陽微系統公司)的註冊商標。
VGA 和 XGA 是 International Business Machines Corp.(IBM,國際商用機器公司)的註冊商標。
RS-232C 指令列表
指令
• 此處未列出之指令,不能確保其能夠運作。
控制項目 指令 參數 控制內容
電源設置 P O W R 0 _ _ _ 電源關閉 ( 備用 )
輸入選擇 A I T G D _ _ _ _ 輸入關開 ( 切換 )
I T V D _ _ _ _ 模擬電視 (A-TV) ( 頻道固定 )
I D T V _ _ _ _ 數碼電視 (D-TV) ( 頻道固定 )
I A V D * _ _ _
頻道 D C C H * * _ _ 電視直接頻道 (1 – 99)
C H U P _ _ _ _ 頻道增
C H D W _ _ _ _ 頻道減
D T V D * * * _
D T U P _ _ _ _ 數碼電視 (D-TV) 頻道增
D T D W _ _ _ _ 數碼電視 (D-TV) 頻道減
AV 模式選擇 A V M D 0 _ _ _ 切換
A V M D 1 _ _ _ 標準
A V M D 2 _ _ _ 電影
A V M D 3 _ _ _ 游戲
A V M D 4 _ _ _ 用戶
A V M D 5 _ _ _ 動態 ( 固定 )
A V M D 6 _ _ _ 動態
A V M D 7 _ _ _ 電腦
音量 V O L M * * _ _ 音量 (0 – 60)
HDMI1/2/3, 输入 4/5/6/7,
电脑 8
數碼電視 (D-TV) 直接頻道 (1-999)
控制項目 指令 參數 控制內容
定位 H P O S * * * _
H P O S * * * _
V P O S * * * _
V P O S * * * _
C L C K * * * _
P H S E * * * _
寬屏模式 W I D E 0 _ _ _ 切換 (AV)
W I D E 1 _ _ _ 標準 (AV)
W I D E 2 _ _ _ 縮放 14:9 (AV)
W I D E 3 _ _ _ 全景 (AV)
W I D E 4 _ _ _ 全屏 (AV)
W I D E 5 _ _ _ 影院 16:9 (AV)
W I D E 6 _ _ _ 影院 14:9 (AV)
W I D E 7 _ _ _ 標準 ( 電腦 )
W I D E 9 _ _ _ 全屏 ( 電腦 )
W I D E 1 0 _ _ 逐點 (AV/ 電腦 )
W I D E 1 1 _ _ 優化掃描 (AV)
靜音 M U T E 0 _ _ _ 切換
M U T E 1 _ _ _ 靜音開啟
M U T E 2 _ _ _ 靜音關閉
環繞聲 A C S U 0 _ _ _ SRS TS HD 切換
A C S U 1 _ _ _ SRS TS HD 開啟
A C S U 2 _ _ _ SRS TS HD 關閉
音頻切換 A C H A _ _ _ _ 切換
睡眠定時器 O F T M 0 _ _ _ 關閉
O F T M 1 _ _ _ 睡眠定時器 30 分
O F T M 2 _ _ _ 睡眠定時器 1 小時
O F T M 3 _ _ _ 睡眠定時器 1 小時 30 分
O F T M 4 _ _ _ 睡眠定時器 2 小時
O F T M 5 _ _ _ 睡眠定時器 2 小時 30 分
水平定位 (AV)
水平定位 ( 電腦 )
垂直定位 (AV)
垂直定位 ( 電腦 )
時鐘 (0-180)
相位 (0-15)
• 如果下線標(_)出現在參數欄,請輸入空格。
• 如果星號(*)出現,請輸入控制內容欄括弧內所指示範圍內的數值。
32
Page 34

86%ၦҟ᪁ᬒ
ENTER
ᄰ
候ࢩ఼
候ࢩ఼
候ࢩ఼
候ࢩ఼
候ࢩ఼
候ࢩ఼
候ࢩ఼
候ࢩ఼
ENTER
86%ၦҟ᪁ᬒ
ᄰ
連接 USB 設備
如下所示將 USB 設備連接到電視機。
• 將 USB 設備插入 USB 端子後,電視機會自動切換到 USB
模式。
• 電視機可能無法識別 USB 設備內含的數據。
• 命名文件時僅可使用字母、數字或字符。
• 若文件名超過 80 個字符(可能因字符設置而異),則可能
無法顯示。
• 切勿反覆將 USB 設備連接到電視機並斷開。
• 若連接的 USB 設備只有一個驅動器,則無需在步驟 2 中
選擇驅動器。
• 最多可顯示 16 個驅動器。
USB 視頻和照片查看器 / 音樂播放器
在此模式中,您可欣賞外置 USB 設備中的相片,聆聽
其中的音樂,觀看其中的視頻。從“輸入信源”選項
表選擇“USB media”,進入此模式。
• 若未連接 USB 設備到電視機,則無法進入此模式。
• 在 USB 模式,“寬屏模式”為固定的。
選擇模式和設備
H
按下 c/d 選擇“影片模式”、“音樂模式”
1
或“相片模式”。
按下a/b/c/d選擇您要查找文件的驅動器。
2
影片模式
按下c/d選擇“影片模式”,然後按下
1
ENTER
按下a/b選擇所需文件夾或目錄,然後按下
2
ENTER
按下a/b選擇所需影片。
3
影片模式按鈕
按鈕 說明
ENTER
(確定)
a
(遊標)
/
b
c/d
(遊標)
RETURN
(返回)
(確定)。
(確定)。
全屏顯示影片。
選擇所需項目。
上 / 下一頁。
返回模式列表。
按下ENTER(確定)。
3
33
Page 35

H 觀看影片
R G Y
B
ENTER
RETURN
䴭䴭 䔀ఊ
᧙ᩪᯗֈ Ծ䔬ݹ䕞 ᠳࢃ䪷䬈
䙌䷇ῖ
᭛ӊৡ々
᪁ᬒ˖
ᰖ䭧
䙌 䖨ಲ᪁ᬒ ذℶ ᪁ᬒ᱿ذ
ڙ䰤䷇丏
䅇
䅇
䅇
䅇
䅇
䅇
䅇
䅇
䅇
䅇
ᄻ
音樂模式
用於全屏顯示操作的按鈕
按鈕 說明
ENTER
(確定)
a
(遊標)
b(遊標)
d
(遊標)
c
(遊標)
RETURN(返回)
B 按鈕 顯示隱藏指南顯示。
R 按鈕
G 按鈕
Y 按鈕
播放 / 暫停影片。
轉至上一個文件。
轉至下一個文件。
每 次 按 下d都 會 改 變 FWD( 前 進 )
速度。播放完畢後,播放器會轉至下
一個文件,然後開始播放。
每 次 按 下c都 會 改 變 REW( 倒 退 )
速度。後退至起始處後,播放器會開
始播放同一個文件。
返回影片列表畫面。
每次在遙控器上按下 R 時,字幕會切
換顯示。
每次按下遙控器上的 G 按鈕,都會切
換音頻。
每次按下遙控器上的 Y 按鈕,都會切
換視頻。
按下c/d,來選擇“音樂 模 式 ”, 然 後 按 下
1
ENTER
按下a/b選擇 所需文件夾, 然後按
2
(確定)。
按下a/b選擇 所需音樂,然 後按下
3
(確定)。
(確定)。
ENTER
ENTER
音樂模式按鈕
按鈕 說明
ENTER
(確定)
(遊標)
a/b
c(遊標)
d(遊標)
RETURN(返回)
R 按鈕
G 按鈕 播放/暫停音樂。
B 按鈕 僅限音頻。
• 若有無效音樂文件,則該文件會顯示有X標記。
• 根據文件不同,顯示的播放時間可能會與實際播放時間稍有不同。
選擇音樂文件時:播放音樂。
選擇所需項目。
上一頁。
下一頁。
返回模式列表。
停止播放音樂。
34
Page 36

相片模式
䙌Ⳍ⠛
䙌 乃⼎Ⳍ⠛ 䖨ಲ
Ϟϔᄻ ϟϔᄻ
䙌㚠᱃䷇ῖ
ᑏ➜⠛᪁ᬒ
ᄻ
H 選擇背景音樂(BGM)
H 查看縮圖
按下c/d,來選擇“相片 模 式 ”, 然 後 按 下
1
ENTER
按下a/b/c/d選擇所需文件夾,然 後按下
2
ENTER
按下a/b/c/d選擇所需相片。
3
圖操作按鈕
縮
按鈕 說明
ENTER
(確定)
a
d
(遊標)
/b/c/
B 按鈕
R 按鈕
G 按鈕
Y 按鈕
(確定)。
(確定)。
全屏顯示相片。
選擇所需項目。
幻燈片播放。
上一頁。
下一頁。
選擇背景音樂。
按下 c/d 來選擇“相片模式”,然後按下
1
ENTER(確定)。
按下 Y 按鈕,再按下 a/b 選擇資料夾,然後
2
3
4
5
ENTER
按下
按下
a
(確定)。
/b選擇 所 需的音樂,然 後 按下 Y 按
鈕。
RETUR N
按下
(返回)以 返 回 相 片 選 擇 模
式,再按下 a/b/c/d來選擇所需的 資 料
夾,然後按下
ENTER
(確定)。
按下 a/b/c/d 選擇所需的相片,然後按下
B
按鈕(幻燈片播放),BGM(背景音樂)
就會伴隨相片播放。
• 只有在播放幻燈片時,才提供 背景音樂(BGM)功能。
• 若有無效照片文件,則該文件會顯示有X標記。
• 您可在屏幕左下角查看所選照片的文件名、拍攝日期、文件大小和
像素大小(僅 EXIF 文件格式顯示拍攝日期)。
H 全屏查看照片
用於全屏顯示操作的按鈕
按鈕 說明
c/d
(遊標)
RETURN(返回)
R 按鈕
G 按鈕
B 按鈕 顯示/隱藏指南顯示。
• 旋轉照片僅會應用到臨時選定的項目,並不會保存該設置。
轉至同 一目 錄下的上一張 / 下一張照
片。
返回至縮圖選擇屏幕。
向左旋轉照片 90 度。
向右旋轉照片 90 度。
35
Page 37

與 USB 模式相容的文件列表
USB 設備
文件系統
相片文件格式
音樂文件格式
USB 記憶體、USB 讀卡器(大容量存儲模式)
FAT/FAT32/NTFS
JPEG (.jpg) ( 與 DCF2.0 兼容 )
MP3 (.mp3)
比特率 : 32 k, 40 k, 48 k, 56 k, 64 k, 80 k, 96 k, 112 k, 128 k, 160 k, 192 k, 224 k, 256 k, 320 kbps
採樣頻率 : 32 k, 44.1 k, 48 kHz
視頻文件格式
文件擴展名 檔案類型 視頻解碼器 像素 音頻解碼器 幀率 (fps)
Divx 3.11/4/4.12/5.x/6 1920×1080
*.avi
*.mkv MKV
*.mp4 MP4
*.vob VOB MPEG2 1920×1080
*.mpg/*.mpeg PS
*.rm/*.rmvb RM RM codec 1280×720 Real Audio 24/25/30 10
*.ts/*.trp/*.tp
*.divx
*.dat
AVI
Divx 3.11/4/4.12/5.x/6 1920×1080
TS
Divx Divx 3.11/4/4.12/5.x/6 1920×1080
DAT
Xvid 1920×1080 6-30 8
H.264 1920×1080 6-30 20
MPEG2 1920×1080 6-30 8
H.264
MPEG2
MPEG1
Xvid 1920×1080 6-30 8
H.264 1920×1080 6-30 20
MPEG2 1920×1080
MPEG1 1920×1080 24/25/30 20
H.264 1920×1080
MPEG2 1920×1080 24/25/30 20
MPEG2 1920×1080
MPEG1 1920×1080 6-30 8
1920×1080
1920×1080 6-30 8
1920×1080 6-30 8
MP3/Dolby
Digital plus
MP3/Dolby
Digital plus
MP3/Dolby
Digital plus
MP3/Dolby
Digital plus
MP3/Dolby
Digital plus
MP3/Dolby
Digital plus
MP3/Dolby
Digital plus
MP3/Dolby
Digital plus
6-30 8
6-30 20
6-30 8
24/25/30 20
24/25/30 20
6-30 20
6-30 20
6-30 8
比特率
(Mbps)
• 不支持 Progressive jpeg 格式文件。
• USB 1.1 設備中的文件可能無法正確播放。
• 不保證可以使用 USB 集線器。
• 可能不保證與 USB 外置硬碟相容。
• 根據文件不同,某些視頻文件格式可能無法播放。
• 視比特率而定,某些文件可能無法播放。
36
Page 38

附錄
故障分析
下述問題並非一定由於故障而引起。在請人修理電視機之前,請再次檢查電視機。
故障 可能的解决方案
• 沒有電源。
• 不能操作本機。 • 外來的影響,例如閃電、靜電等等,都可能導致不能正常運行。在這種情况下,請先關閉電
• 遙控器不起作用。
• 畫面被切斷。 • 影像位置是否正確?(請參閱第 21 頁。)
• 奇怪的顏色、色彩淺淡、
色調昏暗、或色彩不能對
準。
• 電源突然關閉。 • 機器內部的溫度升高。
• 沒有影像。 • 與其外部設備之間的連接是否正確?(請參閱第 8 頁。)
•沒有聲音。 • 音量是否太低?(請參閱第 9 頁。)
• 電視機有時會發出破裂聲。• 這並非故障。由於溫度變化,機殼會有輕微的熱脹冷縮,此時可能發出聲響。這並不影響電
• 檢查是否按下了遙控器上的
如果電視機上的指示燈以紅色點亮,請按下
• 交流電源線是否沒有連接?
• 主電源是否被打開?(請參閱第 14 頁。)
視機的電源,或者拔下交流電源線並等待 1 到 2 分鐘之後再重新插入,然後再操作電視機。
• 電池是否按極性 (e, f) 對齊了裝入 ?(請參閱第 10 頁。)
• 電池是否已經電量耗盡?(更換新的电池。)
• 是否在強光或者熒光燈下使用?
•是否有熒光燈照射到遙控感應器上?
• 屏幕模式調校(例如影像尺寸)是否正確? ( 請參閱第 21,24,30 頁。)
• 調校影像色調。( 請參閱第 19 頁。)
• 房間是否太亮?在特別明亮的房間裡畫面可能看起來比較暗淡。
• 檢查彩色制式的設置。(請參閱第 23 頁。)
• 檢查輸入信號的設置。(請參閱第 24 頁。)
• 檢查“HDMI 自動觀看”。(請參閱第 21 頁。)
移開擋住通風口的物體,或是清潔通風口。
• 檢查“ECO”的設置。(請參閱第 20 頁。)
• 是否設置了睡眠定時器?(請參閱第 9 頁。)
• 連接之後,輸入信號是否已經正確設置?(請參閱第 14 頁。)
• 是否選擇了正確的輸入?
• 影像調校是否正確?(請參閱第 18-19 頁。)
• 天線是否正確地連接好了?(請參閱第 7 頁。)
• 在“僅限音頻”選項中,是否選擇了“開”?(請參閱第 23 頁。)
• 請確認沒有連接耳機。
視機的性能。
POWER
(電源)。(請參閱第 14 頁。)
POWER
(電源)。
故障分析 •數碼廣播
接收廣播的相關錯誤訊息
畫面顯示的錯誤訊息範例
• 接收不到廣播。
• 無電視廣播信號。
在高溫和低溫環境下使用的注意事項
• 當機器在低溫空間使用時(例如房間、辦公室),影像可能會出現拖尾或是出現少許延遲。這並不是故障,當溫度恢復正常
時,本機的顯示也會恢復正常。
• 勿將本機置於很熱或很冷的地方。也不要將本機置於受到陽光直接照射或接近熱源的地方,否則可能會引起外殼變形,並
導致液晶顯示屏發生故障。
儲藏溫度為 f20 ˚C 到 e60 ˚C。
錯誤代碼
E202
E203
• 檢查天線,天線務必正確連接。
• 檢查當前的電視廣播信號。
可能的解決方案
37
Page 39

規格
項目
解像度 2,073,600 像素 (1920 g 1080)
視頻彩色制式 PAL/SECAM/NTSC 3.58/NTSC 4.43/PAL 60
電視標準電視制式 模擬 PAL: B/G, D/K, I SECAM: B/G, D/K, K/K
接收頻道 VHF/UHF 44.25—863.25 MHz
數碼地面廣播 470 MHz - 862 MHz
電視調諧系統 自動預設99個頻道
立體聲/雙語 麗音 (NICAM): B/G, I, D/K A2 立體聲: B/G
音頻輸出功率 10 W g 2
揚聲器
端子 後面 A-TV(模擬天線) UHF/VHF 75 q DIN 型插座
D-TV(數碼天線) UHF/VHF 75 q DIN 型插座
HDMI1 HDMI輸入(480I, 576I, 480P, 576P, 720P/50Hz, 720P/60Hz, 1080I/50Hz,
HDMI2 HDMI輸入(480I, 576I, 480P, 576P, 720P/50Hz, 720P/60Hz, 1080I/50Hz,
HDMI3 HDMI輸入(480I, 576I, 480P, 576P, 720P/50Hz, 720P/60Hz, 1080I/50Hz,
INPUT4(輸入4) 視頻輸入,音頻輸入
INPUT5(輸入5) 視頻輸入,音頻輸入
INPUT6(輸入6) 色差輸入 (480I, 576I, 480P, 576P, 720P/50Hz, 720P/60Hz, 1080I/50Hz, 1080I/60Hz),
INPUT7(輸入7) 色差輸入 (480I, 576I, 480P, 576P, 720P/50Hz, 720P/60Hz, 1080I/50Hz, 1080I/60Hz),
PC(電腦)輸入 15 針小型 D-sub, 音頻輸入(與HDMI1 共用)(直徑 3.5 mm 插孔)
AUDIO OUT
(音頻輸出)
RS-232C 9 針D-sub 凸型插頭
側面 USB USB 2.0
耳機 直徑 3.5 mm 立體聲(音頻輸出)
屏幕顯示的語言 英文 / 簡體中文/ 繁體中文
電源要求 AC 220 V, 50 Hz
整機消耗功率(備用) 100 W(0.50 W) 115 W(0.50 W)
重量
工作溫度 0 ˚C 到 40 ˚C
• 作為不斷改進產品性能的方針之一,SHARP公司保留為改進產品而改變設計與規格不需事先通知的權利。所示之性能規格指
標,為生產本機之相應的標稱值。對於具體的每一台機器,其指標可能會多少偏離一些對應的標稱值。
不包括底座 13.7 kg 18.3 kg
包括底座 16.5 kg 21.6 kg
型號
數碼
CATV S1—S41ch 頻道(包括超頻段)
DMB-T/H(MHEG-5)
15 g 3.4 cm 2個
1080I/60Hz, 1080P/24Hz, 1080P/50Hz, 1080P/60Hz), 音頻輸入(與电脑共用)
(直徑3.5 mm 插孔)
1080I/60Hz, 1080P/24Hz, 1080P/50Hz, 1080P/60Hz)
1080I/60Hz, 1080P/24Hz, 1080P/50Hz, 1080P/60Hz)
音頻輸入
音頻輸入
音頻輸出
LC-40LX530H LC-46LX530H
NTSC:M
1
38
Page 40

輪廓圖
LC-40LX530H
單位:毫米
LC-46LX530H
39
Page 41

清除密碼
-
-
TEXT
若忘記了密碼,請用如下操作來清除密碼。
MENU
按下
1
(選項表),顯示選項表畫面。按下c/d,來選擇“設置”。
按下a/b來選擇“兒童安全鎖”,然後按下
2
畫面就會顯示出來。
0 – 9
若用
3
用
4
鍵輸入了“3001”,那麼就會顯示出“兒童安全鎖”設置選項表。
0 – 9
來輸入一個 4 位數字作為密碼。現在已設置了新密碼。
ENTER
(確定),密碼輸入
密碼是 。
• 作為一個預防措施,請把您的密碼寫在上面,並從本說明書上剪下來,保存在一個熟悉的地方。
40
Page 42

Dear SHARP customer
Thank you for your purchase of the SHARP LCD colour TV product. To ensure safety and many years of
trouble-free operation of your product, please read the Important Safety Precautions carefully before
using this product.
Contents
Page
Dear SHARP customer ............................................1
Contents ...................................................................1
Precautions for daily use
Trademarks ..............................................................2
Important safety precautions
Supplied accessories
Preparation ..............................................................5
Before turning on the power
Connecting external devices
Remote control unit
Part names
A-TV(Analogue TV)/D-TV(Digital TV)/AV input mode
menu items
PC input mode menu items
Turning the TV on/off
Supplying electric power to the antenna
Initial auto installation
Checking signal information
Auto installation
Programme setup
Menu operation
Picture menu
Audio menu
ECO menu
.............................................................10
.............................................................12
.....................................................15
.....................................................18
..........................................................18
............................................................19
..............................................................20
........................................2
.................................3
..............................................4
..................................7
..................................8
................................................9
..................................13
............................................14
............14
...........................................14
................................14
..................................................15
Setup menu
Option menu
Digital setup menu
Programme guide
Info ..........................................................................26
A-TV (Analogue TV)/D-TV (Digital TV)buttons
Switching the analogue audio format
Switching the digital audio format
EPG (Electronic Program Guide)
TEXT .......................................................................30
Picture and still image
Wide Mode
Connecting a PC
PC compatibility chart
RS-232C commands list
Connecting a USB device
Appendix ................................................................37
Specifications ........................................................38
Dimensional drawings
Clearing the password
............................................................20
..........................................................22
................................................25
..................................................26
.................27
.......................28
..........................29
..........................................30
.............................................................30
....................................................31
..........................................32
.......................................32
.....................................33
...........................................39
..........................................40
Page
.....27
1
Page 43

Precautions for daily use
Observe the following items
Maintenance of the cabinet
• When cleaning the cabinet, use a soft cloth (made of cotton, floss, etc.) to clean gently.
Do not use a dry or damp rag mixed with chemicals, as this could cause the ingredients of the cabinet body to deteriorate
or crack.
• Be careful not to use an abrasive cloth for cleaning or clean with excessive force, as this could scratch the surface of the
cabinet.
• If the cabinet is greatly soiled, clean with a soft cloth (made of cotton, floss, etc.) soaked with a small amount of diluted
neutral detergent and wrung out, and then clean with a soft dry cloth.
• Because the cabinet is made of plastic, solvents such as benzene or thinner could cause it to deteriorate, or make its
coating come off. Therefore do not use such solvents to clean the cabinet.
• Because plasticizer is included in the plastics, deterioration or the coating peeling off could occur when the cabinet comes
into contact with some substances. Therefore keep it away from volatile substances such as insecticide. In addition, do not
let it come into contact with objects made of rubber, resin, etc. for a long time.
Maintenance of the LCD panel
• Before cleaning the LCD panel, be sure to turn off the TV set and unplug the power cord from the outlet.
• When cleaning the LCD panel, use a dry and soft cloth (made of cotton, floss, etc.) to clean the surface of the LCD panel
gently. For protecting the LCD panel, do not clean with a dirty cloth, detergent, or a dry or damp rag mixed with chemicals,
as this could cause peeling of the panel surface.
• Be careful not to clean with an abrasive cloth or with excessive force, as this could cause the panel surface to be scratched.
• If the LCD panel is greatly soiled, clean it gently with a soft cloth (made of cotton, floss, etc.) soaked with a small amount of
water Do not clean with excessive force, so as to avoid the scratch of the panel surface.
• If dust sticks on the surface of the LCD panel, clean the panel with a commercially available cleaning brush (anti-static
brush).
Trademarks
• TruSurround HD, SRS and symbol are trademarks of SRS Labs, Inc.
TruSurround HD technology is incorporated under license from SRS Labs, Inc.
• SRS TruSurround HD
rich bass, high frequency detail and clear dialog.
• Manufactured under license from Dolby Laboratories.
“Dolby” and the double-D symbol are trademarks of Dolby Laboratories.
• “HDMI,the HDMI Logo, and High-Definition Multimedia Interface are trademarks or registered trademarks of HDMI
Licensing LLC in the United States and other countries.
• DivX® is a registered trademark of DivX, Inc., and is used under license.
• ABOUT DIVX VIDEO: DivX® is a digital video format created by DivX, Inc. This is an official DivX Certified® device that
plays DivX video. Visit divx.com for more information and software tools to convert your files into DivX video.
• ABOUT DIVX VIDEO-ON-DEMAND: This DivX Certified® device must be registered in order to play purchased DivX
Video-on-Demand (VOD) movies. To obtain your registration code, locate the DivX VOD section in your opiton menu.
Go to vod.divx.com for more information on how to complete your registration.
TM
creates an immersive, feature-rich surround sound experience from two speakers, complete with
2
Page 44

NOTE
Important safety precautions
• Cleaning — Unplug the AC cord from the
AC outlet bef ore cleaning the product.
Use a damp cloth to clean the product.
Do not use li qui d c l ean ers , aer o so l
cleaners or chemical cloth to clean it, as
such materials may damage the product.
• Water and moisture — Do not use the
pro duct near water, such as batht ub,
was hb asin, k itche n sink , laundry tub,
swimming pool and in a wet basement.
• Do not place vases or any other water-filled
containers on this product.
The wat er may spil l o nt o the pro du c t
causing fire or electric shock.
• Stand — Do not place the product on
an unstable cart, stand, tripod or table.
Doing so can cause the product to fall,
resulting in serious personal injuries as
well as damage to the product. Use only
a cart , stand , tripod, bracket or ta ble
recommended by the man ufa ctu rer or
sold with the product. When mounting
the product on a wall, be sure to follow
the manufacturer’s instructions. Use only
the mounting hardware recommended by
the manufacturer.
• When relocating the product placed on
a cart , it must be mo ved with ut most
care . Sudden stop s, exce ss ive fo rce
and uneven floor surface can cause the
product to fall from the cart.
• The LCD panel used in this product is
made of glass. Therefore, it can break
when the product is struck forcefully or
with a sharp object. If the LCD panel is
broken, be careful not to be injured by
broken glass.
• Heat sources — Keep the product away
from heat s ources such a s radiators ,
heaters, stoves and other heat-generating
products (including amplifiers)
• To prevent fire, never place any type of
can dle or na ked flames on th e top or
near the TV set.
• To prevent fire or shock hazard, do not
place the AC power cord under the TV
set or other heavy items.
• Do not pla ce hea vy obje cts
on t hi s pro du ct or sta nd on
it. Doing so could cause injury
if th e product overturns. Take
special care near children and
pets.
• Unp lug th e power co rd before you
mov e the TV set. If not unplugg ed
be for eh a nd , t he pow er cor d m ay
become damaged and cause electric
shock.
• Ve n t i lati o n — The ve n t s and ot h e r
openings in the cabinet are designed for
ventilation. Do not cover or block these
vents a nd open in gs since insuffic ie nt
ventilation can cause overheating and/or
shor ten the life of the pro duct. Do not
place the produc t on a bed, sofa, rug
or other similar surface, since they can
block ventilation openings. This product
is not designed for built-i n insta llation ;
do not place the product in an enclosed
place such as a bookcase or rack, unless
pr op er ven ti lat io n is pro vi ded o r the
manufacturer’s instructions are followed.
• In case the product is dropped and the
cabinet is damaged, be sure to turn off
the power of the product , and unpl ug
the pow er cord. If you continue to use
the product, it may cause fire or electric
shock.
• Do not open the rear cover of the cabinet
to reconst ruct the circui ts. There exist s
high v ol ta ge with in the cab in et and it
may cause el ect ric shock and injur y. If
maint en an ce is r equired , contac t your
dealer.
The LCD panel is a very high technology product with
2,073,600 pixels, giving you fine picture details.
Due to the very large number of pixels, occasionally a few
non-active pixels may appear on the screen as a fixed
point of blue, green or red.
Th i s i s wit hin prod u ct speci fica t ion s an d doe s no t
constitute a fault.
Precautions when transporting the TV
• When transporting the TV, never carry it by
holding or otherwise putting pressure onto
the display.
Be sur e t o a lw ays car ry the TV by two
peopl e hold in g it with two ha nds — one
hand on each side of the TV.
• Do not display a still picture for a long time, as this could cause
an afterimage to remain.
• Install the produc t on the place where the AC cord can be
unplugged easily from the AC outlet, or from the AC INPUT
terminal on the rear of the product.
• The above are pictures for reference only; the actual item might be
different.
3
Page 45

Supplied accessories
Make sure the following accessories are provided with the product.
Remote control unit
LC-40LX530H
Stand
LC-46LX530H
Page 9
“AAA” size battery (g2)
Page 10
Stand unit
Stand unit
Page 6
Stand unit
Short screws (g3)
Operation manual
Long screws (
g3)
Stand Stand unit
Page 6
Short screws (
g4)
Long screws (
g4)
4
Page 46

CAUTION
CAUTION
NOTE
Preparation
Handling and precautions with the wall-mounted TV
• You can mount the TV on the wall using the optional bracket.
• For details, refer to the instructions supplied with the optional bracket.
• This TV should be mounted on a wall only with a wall mount bracket recommended by SHARP. The use of other
wall mount brackets may result in an unstable installation and may cause serious injuries.
• Installing the TV requires special skills that should only be performed by qualified service personnel. Customers
should not attempt to do the work themselves. SHARP bears no responsibility for improper mounting or mounting
that results in accident or injury.
Using a SHARP recommended bracket to mount the TV
• You can ask a qualified service professional about using a SHARP recommended bracket to mount the TV to the wall.
• Carefully read the instructions that come with the bracket before beginning work.
• If you want to mount the TV on the wall, use the screws provided with the wall-mount bracket to affix the bracket to the rear of
the TV.
Attaching the stand
• Before attaching (or detaching) the stand, unplug the AC power cord from the AC power outlet.
• Before performing work, spread cushioning over the base area to lay the TV on. This will prevent it from being
damaged.
• Attach the stand in the correct direction.
• Be sure to follow the instructions. Incorrect installation of the stand may result in the TV falling over.
5
Page 47

Preparation (Continued)
NOTE
LC-40LX530H LC-46LX530H
Confirm the 6 screws supplied with the stand.
1
Short screws (m3)
(used in step 5)
Detach the stand unit as show below.
2
Attach the stand post onto the base with the 3
3
long screws.
Long screws (m3)
(used in step 3)
Confirm the 8 screws supplied with the stand.
1
Short screws (m4)
(used in step 5)
Detach the stand unit as show below.
2
Attach the stand post onto the base with the 4
3
long screws.
Long screws (m4)
(used in step 3)
Insert the stand into the openings on the bottom
4
of the TV (Hold the stand in case of dropping).
Insert and tighten the 3 short screws into the 3
5
holes on the rear of the stand.
Insert and tighten the short screw detached in
6
step 2 into the hole of the stand cover.
Insert the stand into the openings on the bottom
4
of the TV (Hold the stand in case of dropping).
Insert and tighten the 4 short screws into the 4
5
holes on the rear of the stand.
Insert and tighten the short screw detached in
6
step 2 into the hole of the stand cover.
• To detach the stand, perform the steps in reverse order.
6
• Angle adjustment is not available with the LC-40LX530H/
LC-46LX530H .
Page 48

CAUTION
Before turning on the power
Ŀ
'JY"$DPSEBOEPUIFSXPSFTXJUIBXPSFIPMEFS
ŀ
1VMMUIFCBOEUISPVHIUIFIPMEUPBEKVTUUIFEFHSFF
PGUJHIUOFTT
5PMPPTFOUIFXJSFIPMEFS
QSFTTUIFCVJUPO
*GUIFCBOEJTUPPMPOH
QVMMJUUISPVHIUIFPUIFSIPMF
Before turning on the power
Notes on installing the TV
• Avoid direct sunlight and place the TV in a well-ventilated location.
• Place the TV in a level location.
• Do not turn on the power of the TV before connecting the AC cord.
• If there are any protective plastic sheets on the TV cabinet, please take them off before connecting.
Connecting the antenna cable
1
To enjoy a clearer picture, use an outdoor antenna. The following is a brief explanation of the types of
connections that are used for coaxial cable.
Standard DIN45325 plug (IEC169-2)
75-ohm coaxial cable (round cable)
Antenna cable (commercially available)
Room antenna terminal
(75-ohm type)
2
Connecting external devices
To antenna terminal
See page 8 for connecting external equipment, such as a VCR and DVD player.
Connecting the AC cord
3
TV (rear view)
AC outlet
AC cord
• Place the TV close to the AC outlet, and keep the power plug within reach.
• Disconnect the AC cord from the AC outlet if the TV will not be used for a long period of time.
Bundling the cables
4
As the picture illustrated, put the cable into the cable clamp for banding.
• TO PREVENT RISK OF ELECTRIC SHOCK, DO NOT TOUCH UN-INSULATED PARTS OF ANY CABLES WITH THE
AC CORD CONNECTED.
Cable clamp
7
Page 49

Connecting external devices
CAUTION
AUDIO LR
AUDIO LR VIDEO
ANALOG
RGB
AUDIO
(L/R)
AUDIO LR
NOTE
AUDIO LR VIDEO
You can connect many types of external equipment to your TV, like a VCR, game console, camcorder, DVD player,
Digital TV Set Top Box (STB) and PC. To view external source images, select the input source from
TV/VIDEO on the remote control unit or TV/VIDEO on the TV.
• To protect all equipment, always turn off the TV before connecting to a VCR, game console, camcorder, DVD player, Digital TV
Set Top Box (STB), PC or other external equipment.
• Refer to the relevant operation manual (VCR, DVD player, etc.) carefully before making connections.
Connecting a VCR, game console or camcorder
A VCR, game console, camcorder and some other audiovisual equipment can be conveniently connected using the
INPUT 4/INPUT 5 (Composite), INPUT 6/INPUT 7 (Component) terminals.
When using component cable
(commercially available)
VCR/Game console/Camcorder
When using composite cable
(commercially available)
VCR/Game console/Camcorder
Connecting a DVD player/Digital TV Set Top Box (STB)
You can use the HDMI 1/HDMI 2/HDMI 3 (HDMI), INPUT4/INPUT5(Composite) INPUT 6/INPUT 7 (Component)
terminals when connecting to a DVD player/Digital TV Set Top Box (STB) and other audiovisual equipment.
• When using a DVI-HDMI conversion adaptor,input the audio signal from the HDMI1/PC AUDIO INPUT terminal.(See page 22.)
When using HDMI-certified cable
(commercially available)
When using composite cable
(commercially available)
When using component cable
(commercially available)
DVD player/Digital TV Set Top Box (STB)
DVD player/
Digital TV Set
Top Box (STB)
Connecting a pc
You can use the PC terminals when connecting to a PC.
(See page 31.)
DVD player/Digital TV Set
Top Box (STB)
8
PC
Page 50

Remote control unit
0hr.30min. 1hr.00min.
2hr.30min.
1hr.30min.
2hr.00min.
Off
-
-
TEXT
1 POWER (STANDBY/ON)
To switch the power on and off. (See page 14.)
2 0 – 9
Select the channel. (See page 27.)
A
(Flashback)
3
Press
A
to return to the previous selected channel or
external input mode.
4 MPX
Select the sound multiplex mode. (See page 27.)
e
5
(Mute)
Press
e s
Mutes sound.
Press e again s Restores sound.
Mute will be cancelled after 30 minutes. However, the TV
will not suddenly output loud sound as the volume level
will be set to 0 automatically. Increase the volume level by
pressing VOL k.
k
6 VOL
/VOL
l
Set the volume.
(VOLk) Increase the volume.
(VOLl) Decrease the volume.
7 EPG
D-TV only: To display EPG (Electronic Programme Guide)
screen. (See pages 29 to 30.)
8 INFO
D-TV only: Display the programme information. (See page 26.)
9 EXIT
Return to the default screen.
10 TV/VIDEO (INPUT SOURCE)
Select an input source.
11 DISPLAY
Display the channel or input information.
12 TEXT
D-TV only:To display MHEG-5 broadcasts.(See page 30.)
13 CH
r/CHs
TV input mode: Select the channel.
(CHr) Increase the channel number.
(CHs) Decrease the channel number.
14 GUIDE
D-TV only: Display the programme list. (See page 26.)
15 MENU
Display the menu screen.(See page 18.)
a
16
/b/c/d (Cursor)
Select a desired item on the setting screen.
ENTER
Execute a command.
17 RETURN
MENU mode: Return to the previous menu screen.
18 Colour Buttons (R/G/Y/B)
D-TV and USB only: The coloured buttons are used to
select correspondingly to the coloured items in the menu
screen. (See page 15 to 16 and page 29 to 30 and page
34 to 35.)
19 SLEEP
Set the Sleep timer.
20 WIDE
Change the wide image mode. (See page 30.)
21 FREEZE
Freeze a motion picture on the screen. (See page 30.)
22
[ (Subtitle)
D-TV only: To toggle the subtitle display. (See page 25.)
23 D-TV
Press to access D-TV mode. (See page 27.)
24 A-TV
Press to access A-TV mode. (See page 27.)
9
Page 51

Remote control unit (Continued)
SLEEP
OPC
POWER
SLEEP
OPC
POWER
CAUTION
Inserting the battery
Before using the TV for the first time, insert two “AAA” size batteries (supplied). When the batteries become depleted
and the remote control fails to operate, replace the batteries with new “AAA” size battery.
Open the battery cover.
1
• Do not mix batteries of different types. Different types of batteries have different characteristics.
• Do not mix old and new batteries. Mixing old and new batteries can shorten the life of new batteries or cause chemical leakage
in old batteries.
• Remove batteries as soon as they have worn out. Chemicals that leak from batteries can cause a rash. If you find any chemical
leakage, wipe thoroughly with a cloth.
• The batteries supplied with this product may have a shorter life expectancy due to storage conditions.
• If you will not be using the remote control unit for an extended period of time, remove the batteries from it.
• Batteries (batteries pack or batteries installed) shall not be exposed to excessive heat such as sunshine, fire or the like.
Insert the supplied “AAA” size batteries.
2
•
Place
batteries
and (f) indications in the battery compartment.
with their terminals corresponding to the (e)
Close the battery cover.
3
Part names
TV (Front / Side)
POWER (On/Off) button
MENU button
TV/VIDEO button
CH r/
s
(Channel up/down) buttons
VOL k/
l
(Volume up/down) buttons
OPC sensor
Remote control sensor
POWER indicator*
* POWER indicator
Light off Power off
Light (Red) The TV is in standby mode.
Light (Green) The TV is on.
• The illustrations and on-screen displays in this operation manual are for explanation purposes and may vary slightly from
the actual operations.
• The illustrations used throughout this manual are based on LC-46LX530H.
OPC indicator**
SLEEP timer indicator
**
OPC (Optical Picture Control) indicator
Light off “Off” is selected in the OPC setting.
Lighted (Green)
“On” or “On: Display” is selected in the
OPC setting.
10
Page 52

20
1
2
4
5
8
9
11
12
6
13
7
14
15
3
10
Part names (Continued)
TV (Rear)
1 HDMI 1/PC (AUDIO) terminal*
2 HDMI 1 terminal
3 INPUT 7(Component) terminal
4 HDMI 2 terminal
5 HDMI 3 terminal
6 RS-232C terminal
7 PC terminal*
8 D-TV (Digital antenna) terminal
* The HDMI1 and PC terminals share the same analogue audio input terminal. However, the proper item must be selected in the
“PC audio select” menu. (See page 22.)
• The illustrations in this operation manual are for explanation purposes and may vary slightly from the actual operations.
9 A-TV (Analogue antenna) terminal
10 INPUT 6(Component) terminal
11 AUDIO OUT terminal
12 INPUT 4 (Composite) terminal
13 INPUT 5 (Composite) terminal
14 USB terminal
15 Headphone jack
Regarding the headphone jack
• Use headphones with a stereo mini plug ( 3.5 mm).
• Be sure to unplug headphones from the jack when they are not in
use.
• The speakers do not output volume when headphones are
plugged in.
• The “Audio” menu cannot be operated when headphones are
plugged in.
Volume display when headphones are plugged in
11
Page 53

Picture
Audio
Setup
Option
Digital setup
Power control
A-TV(Analogue TV)/D-TV(Digital TV)/AV input mode
NOTE
menu items
List of A-TV/D-TV/AV menu items to help you with operations
AV mode ........................................................ 18
OPC (Optical Picture Control)
Backlight ........................................................ 19
Contrast .......................................................... 19
Brightness ...................................................... 19
Colour
Tint
Sharpness
Advanced
Reset
Treble ............................................................. 19
Bass
Balance
SRS TS HD
Bass enhancer
Reset
............................................................ 19
................................................................. 19
..................................................... 19
Colour temp
Quick shoot
Film mode
Active contrast
3D-Y/C
Monochrome
DNR
....................................................... 19
.............................................................. 18
............................................................... 19
.......................................................... 19
.............................................................. 19
......................................... 19
.......................................... 19
............................................ 19
.................................... 19
.................................................. 19
........................................ 19
.................................................... 19
.............................................. 19
..................... 19
Auto installation ............................................ 15
Analogue programme setup
Digital programme setup
Child lock
Input skip
Input label
Position ........................................................... 21
HDMI auto view
WSS
4:3 mode
Quick start
Language
Identification
Reset
PC audio select ............................................. 22
Output volume select
Auto volume
Clear voice
Audio only
Game play time
Colour system
DivX Reg. Code
Version up
...................................................... 20
....................................................... 21
...................................................... 21
............................................ 21
............................................................... 21
......................................................... 22
......................................................22
....................................................... 22
................................................. 22
.............................................................. 22
.................................................. 23
.................................................... 23
..................................................... 23
..............................................23
............................................... 23
............................................. 24
..................................................... 24
........................ 16
............................. 15
................................... 23
No signal off .................................................. 20
No operation off
Ecology
Some menu items may not be displayed depending on the selected input source.
•
12
.......................................................... 20
............................................ 20
Audio language
Subtitle language
Hearing impaired
Time zone
Summer time
OAD setup
...................................................... 25
..................................................... 25
............................................. 25
.......................................... 25
.......................................... 25
................................................. 25
Page 54

Picture
Audio
Setup
Option
Digital setup
Power control
NOTE
PC input mode menu items
List of PC menu items to help you with operations
AV mode ........................................................ 18
OPC (Optical Picture Control)
...................... 19
Backlight ........................................................ 19
Contrast .......................................................... 19
Brightness ...................................................... 19
Advanced
Colour temp
Reset
.............................................................. 18
......................................... 19
Treble ............................................................. 19
Bass
............................................................... 19
Balance
SRS TS HD
Bass enhancer
Reset
.......................................................... 19
.................................................... 19
.............................................. 19
.............................................................. 19
Power management ..................................... 20
No operation off
Ecology
.......................................................... 20
............................................ 20
Input skip ....................................................... 21
Input label
Quick start
Language
Identification
Reset
...................................................... 21
......................................................22
....................................................... 22
................................................. 22
.............................................................. 22
Output volume select ................................... 23
Auto Volume
Audio only
Audio output
.................................................. 23
..................................................... 23
................................................. 23
Fine sync.
Input signal
Auto sync.
H-Position
V-Position
Clock
Phase
Reset
DivX Reg. Code
Version up
........................................... 24
............................................ 23
............................................ 24
............................................. 24
..................................................... 24
.................................................... 24
..................................................... 24
............................................. 24
..................................................... 24
Audio language
............................................. 25
Subtitle language
Hearing impaired
Time zone
Summer time
OAD setup
...................................................... 25
................................................. 25
..................................................... 25
• Some menu items may not be displayed depending on the selected input source.
.......................................... 25
.......................................... 25
13
Page 55

-
-
Turning the TV on/off
NOTE
-
-
-
-
Turning on/off the power
• To turn on the power
Press POWER on the TV. (After a few seconds, an image
appears with sound.)
• To turn off the power
Switch it off by pressing POWER on the TV.
Standby mode
• To standby mode
If the TV is switched on, you can switch it to standby mode
by pressing POWER on the remote control.
• Switching on from standby mode
Under standby mode, press POWER on the remote control.
Selected item Description
Yes Select “Yes” when your antenna is set-
No Select “No” when you do not need to
up and connected independently.
supply voltage to your antenna, i.e.
when your antenna is connected to
a community antenna. (The factory
default setting of this function is “No”.)
Initial auto installation
When the TV powers on for the first time after
purchase, the initial auto installation wizard appears.
Follow the menus and make the necessary settings
one after another.
Press POWER on the TV.
1
• The initial auto installation wizard appears.
• If you are not going to use this TV for a long period of time,
be sure to remove the AC cord from the AC outlet.
• Minor power is consumed when the unit is in standby mode.
Supplying electric
power to the antenna
When you set-up the D-TV antenna for the first time, or
connect the antenna to a community antenna, you need
to proceed to set the antenna by following this manual.
Press D-TV to access D-TV mode.
1
Press MENU and the MENU screen displays.
2
Press a/
2
and then press
Press
and then press
• HOME: “STANDARD” will be the default value for the “AV
mode” setting.
• STORE: “DYNAMIC (Fixed)” will be the default value for
the “AV mode” setting. If the “AV mode” is changed, the
TV will automatically switch back to “DYNAMIC (Fixed)”
when there is no further change to TV setting for 30
minutes. When selecting “STORE”, press
“Yes”or “No” to confirm.
Press a/b/c/
“A-TV + D-TV”, and then press
Press
system, and then press
• Sound system is selectable when the signal search
is set to “A-TV” or “A-TV + D-TV” mode only.
• Auto installation will be executed.
• You do not need to do anything during the auto
search.
to select the desired language,
b
ENTER.
to select “HOME” or “STORE”,
c/d
a/b
ENTER.
to select “D-TV”, “A-TV” or
d
to select the desired sound
ENTER.
c/d
ENTER.
to select
Checking signal
information
If you install a D-TV antenna for the first time or relocate
it, you should adjust the alignment of the antenna to
receive a good reception while checking the antenna
setup screen.
Press c/d to select “Setup”.
3
Press a/b to select “Digital programme
4
setup” and then press
Press a/
5
then press
Press c/d to select “Yes” and then press
6
ENTER.
14
to select “Supply Voltage” and
b
ENTER.
ENTER.
Press MENU and the MENU screen displays.
1
Press c/d to select “Setup”.
2
Press a/
3
setup”, and then press
to select “Digital programme
b
ENTER.
Page 56

Digital programme setup]
Checking signal
Supply voltage
NOTE
Programme setup
information (Continued)
H
Checking signal information
Press
Position and align the antenna so that the
4
maximum possible values for “Signal strength”
and “Signal quality” are obtained.
• The values of “Signal strength” and “Signal quality” indicate
when to check the appropriate alignment of the antenna.
to select “Signal information”.
a/b
Auto installation
You can run auto installation again, even after setting
up the preset channels.
Press MENU and the MENU screen displays.
1
Press c/d to select “Setup”.
2
Digital settings
You can reconfigure D-TV services settings automatically
or manually.
Press MENU and the MENU screen displays.
1
Press c/d to select “Setup”.
2
Press a/
3
setup”, and then press
already set the password, enter it here.
• See page 20 for setting a password.
Press a/b to select the desired menu item,
4
and then press
Press
5
ENTER.
H
Auto search (Digital)
Use this menu to add new services automatically after
auto installation has been completed.
H
Manual search (Digital)
Add new services within a specified frequency band.
•
Press
c/d to select the frequency and then press
ENTER.
H
Manual adjust (Digital)
Configure various settings for each service using the
Colour (
R, G, B) buttons.
to select “Digital programme
b
ENTER.
to select “Yes”, and then press
c/d
ENTER. If you have
Press a/
3
then press
If you have already set the password, enter it
4
here.
• See page 20 for setting a password.
Press c/
5
ENTER.
Press a/b to select the desired language,
6
and then press
Press
“A-TV + D-TV”, and then press
Press
system, and then press
• Sound system is selectable when the signal search
is set to “A-TV” or “A-TV + D-TV” mode only.
You do not need to do anything during the
auto search. Press
to select “Auto installation”, and
b
ENTER.
to select “Yes”, and then press
d
ENTER.
a/b/c/d
a/b
to select “D-TV”, “A-TV” or
ENTER.
to select the desired sound
ENTER.
MENU to exit.
Press a/
1
Press the colour button on the remote control
2
corresponding with the item you want to
reconfigure.
• Each time the colour button is pressed, you can
switch the corresponding operation on/off.
Buttons for Manual adjust operation
Menu
items
Lock R When the service is locked,
CH
Skip
Sort B The item position of services can be
Remote
to select desired service.
b
control
buttons
you must enter your password
whenever you tune to the service.
G Services with “Skip” are passed
over when pressing r/s in the
TV/remote control unit.
sorted.
Description
15
Page 57

Search
Channel frequency settings
MENU [Setup Anabogue programe setup]
Sound system
Search
Fine
Colour system
Label
[ ]
[ ]
Auto
[ ]
D/K
Booster
[ ]
Off
[ ]
Off
[ ]
Off
Skip
Lock
Store
Cancel
Next
MHz
527.25
NOTE
Sound system
Search
Fine
Colour system
Label
Broadcasting station name settings
CLEAR
BACK
END
A BC DE F GH IJ
U VW XY Z +– . _
[ ]
Auto
[ ]
[ ]
B/G
Booster
[ ]
Off
[ ]
Off
[ ]
Off
Skip
Lock
KL MNO PQR ST
0 1 23 4 5 6 7 89
NOTE
DTV 005 Maori Television
DTV 022 Parliament TV
DTV 100 Freeview I HD
DTV 005
Maori Television
DTV 022 Parliament TV
DTV 100 Freeview I HD
Programme setup (Continued)
The next channel will be searched in order.
The item position of services can be sorted
Press
1
position you want to move, and then press
to select the service whose item
a/b
B.
Press
2
then press
Repeat steps 1 and 2 until all desired service
3
to move it to the desired position, and
a/b
ENTER.
items are sorted.
Analogue settings
H Auto search (Analogue)
You can also automatically search by performing
the procedure below. This is the same function as
programme auto search in auto installation.
Press MENU and the MENU screen displays.
1
Press c/d to select “Setup”.
2
Press a/
3
setup”, and then press
If you have already set the password, enter it
4
here.
• See page 20 for setting a password.
Press a/
5
press
to select “Analogue programme
b
ENTER.
to select “Auto search”, and then
b
ENTER.
Fine
You can adjust the frequency to your desired position.
• Adjust while checking the background picture as a
reference.
• Instead of pressing c/
to adjust the frequency, you can
d
set by directly entering the frequency number of the channel
with 0 — 9
.
• When setting a frequency on the “Fine” screen, the last
figure of the frequency needs to be “0” or “5”.
a
• 179.25 MHz: Press 1
• 49.25 MHz: Press 4
7 s 9 s 2 s 5
s
9 s 2 s 5 s ENTER
s
.
.
Colour system
Select the optimum colour system to receive. (Auto,
PAL, SECAM, NTSC 3.58, NTSC 4.43, PAL-60)
Sound system (Broadcasting system)
Select the optimum sound system (Broadcasting
system) to receive. (B/G, D/K, I, M)
Label
You can change individual channel names.
• Press a/b/c/d: To select each character of the new
name for the channel, and then press ENTER.
Repeat until the name is fully spelt out.
Press c/
6
ENTER.
Press
system, and then press
You do not need to do anything during the
auto search. Press
H
Manual adjust (Analogue)
You can set some channel item manually.
Repeat steps 1 to 4 in Auto search.
1
Press a/
2
then press
Press c/
3
ENTER.
Press a/b/c/
4
want to edit, and then press
• The selected channel information displays.
16
Press a/
5
then press
Press a/
6
or adjust the item to the desired level. Press
ENTER if necessary.
to select “Yes”, and then press
d
to select the desired sound
a/b
ENTER.
MENU to exit.
to select “Manual adjust”, and
b
ENTER.
to select “Yes”, and then press
d
to select the channel you
d
ENTER.
to select the desired menu, and
b
ENTER.
or
b
to select the desired item
c/d
• The name can be 5 characters or less. Select “END” to set
the channel name.
Booster
Enhance the picture quality during weak signal. It is
not recommended to turn on during strong signal
condition. It may induced unwanted noise. (On, Off)
Skip
Channels with “Skip” set to “On” are passed over when
using
CHr/
even if selected while watching the image
s
from the TV.
Lock
You can block the viewing of any channel.
• See “Child lock” for setting a password.
• If “Lock” is set to “On” for a channel, “Child lock has been
activated” is displayed when you select the channel, and the
image and sound of the channel is blocked.
• When pressing ENTER while “Child lock has been activated”
is displayed, password input menu will be displayed. Inputting
the correct password lifts the child lock temporarily until the
power is turned off.
Page 58

Programme setup (Continued)
H
Sort (Analogue)
Channel position can be sorted freely.
Repeat steps 1 to 4 in Auto search.
1
Press a/b to select “Sort”, and then press
2
ENTER.
Press c/d to select “Yes”, and then press
3
ENTER.
Press a/b/c/d to select the channel you
4
want to move, and then press ENTER.
Move it to the desired position by pressing
5
a/b/c/d
Repeat the steps 4 and 5 until all desired
6
channels are sorted.
H
Erase programme (Analogue)
The individual programme can be erased.
Repeat steps 1 to 4 in Auto search.
1
Press a/b to select “Erase programme”, and
2
then press ENTER.
, and then press ENTER.
Press c/d to select “Yes”, and then press
3
ENTER.
Press a/b/c/d to select the channel you
4
want to erase, and then press ENTER.
Press ENTER to erase the channel.
5
Repeat the step 4 and 5 until all desired
6
channels are erased.
17
Page 59

+16
40
+30
+30
+30
+10
MENU [Picture −−− Backlight
]
Picture
Audio
ECO
AV mode
OPC
Backlight
Contrast
Brightness
Colour
Tint
Sharpness
Advanced
Reset
[
STANDARD
]
[
Off
]
0
–16
+16
+
30
0
0
4
+
[
[
[
[
[
[ ]
]
]
]
]
]
2
–30
–30
–30
–10
ENTER
: Select : Enter
MENU
: End
RETURN
: Back
NOTE
Menu operation
NOTE
Press MENU and the MENU screen displays.
1
Press c/d to select the desired menu. (Picture,
2
Audio, ECO, Setup, Option, Digital setup)
Press a/b to select the desired menu item.
3
Press ENTER to proceed if necessary.
Press a/b or c/d to select the desired item
4
or adjust the item to the desired level. Press
ENTER if necessary.
Press EXIT or MENU to exit from the menu.
5
Using the control panel of the TV
w
You can also operate the Menu using the control panel
of the TV.
Button operations on the control panel correspond to
the ones on the remote control as shown below.
The bar above is an operational guide for
the remote control. The bar will change in
accordance with each menu setting screen.
Picture menu
H
AV mode
“AV mode” gives you several viewing options to choose
from to best match the system environment, which
can vary due to factors like room-brightness, type of
programme watched or the type of image input from
external equipment.
TV control panel buttons Remote control buttons
• Menu options differ in the selected input modes, but the
operating procedures are the same.
• The screens in the operation manual are for explanation
purposes (some are enlarged, others cropped) and may
vary slightly from the actual screens.
About Guide Display
The Guide Display at the bottom of the screen shows
operations with a Remote Control.
18
MENU MENU
TV/VIDEO ENTER
CH
r
CH
s
VOL
e
VOL
f
a
b
d
c
Selected item Description
STANDARD For a highly defined image in a normally
bright room.
MOVIE For a movie.
GAME For game play.
PC For PC. (Available only when inputting an
HDMI or PC signal.)
USER Allows the user to customise settings as
desired. You can set the mode for each
input source.
D Y N A M I C
(FIXED)
Changes the image and sound settings to
the factory preset values. No adjustments
are allowed.
DYNAMIC For a clear-cut image emphasising high
contrast for sports viewing.
•
You can select a different AV mode item for each input mode.
(For example, select STANDARD for TV input and DYNAMIC for
VIDEO input.)
•
During PC input mode, only “STANDARD”, “PC” and “USER”
can be selected under the AV mode selection.
Page 60

NOTE
H
NOTE
NOTE
NOTE
Off
High
Low
Auto
Reducing picture noise
NOTE
–15
–15
[ 0]
L
[ 0]
+15
+15
R
[
Off
]
[ 0]
MENU [Audio
]
Audio
ECO
STANDARD
Treble
Bass
Balance
SRS TS HD
Reset
Setup
Bass enhancer
[
Off
]
OPC (Optical Picture Control) setting
You can set the TV to automatically adjust the screen
to suitable backlight brightness according to the
lighting conditions.
Selected item Description
On:Display Displays the OPC effect on the screen while
On Automatically adjusts.
Off The brightness is fixed at the value set in
• Make sure no object obstructs the OPC sensor, which
could affect its ability to sense surrounding light.
•In order to get a better picture quality, “OPC” and “Backlight”
functions may not work when the TV set is at a relatively low
temperature. It is not a problem, and these functions will be
active when the temperature becomes normal.
H
Picture adjustments
Selected item
Backlight The screen dims The screen brightens
Contrast For less contrast For more contrast
Brightness For less brightness For more brightness
Colour For less colour
Tint Skin tones become
Sharpness For less sharpness For more sharpness
adjusting the brightness of the screen.
“Backlight”.
c
button
d
button
For more colour
intensity
intensity
Skin tones become
purplish
greenish
3D-Y/C
Provides high quality images with minimal dot crawl and
cross colour noise. (On, Off)
• 3D-Y/C is not selectable depending on the input signal
type.
• 3D-Y/C may not operate depending on the input signal type
or noisy input signal.
Monochrome
For viewing images in monochrome. (On, Off)
DNR (Digital Noise Reduction)
Reduces noise on screen and produces a clearer video image.
(“Off”, “High”, “Low”, “Auto”)
Audio menu
• For resetting all adjustment items to factory preset values,
H
Colour temp. (Colour Temperature)
Adjusts the colour temperature to give the best white
image.
Selected item Description
High
Mid-High
Middle
Mid-Low
Low
Quick shoot (Fine Motion Advanced)
Using the advanced “Quick shoot” function can view
the high speed motion image more clearly.
• “Quick shoot” may cause image noise. If this occurs, turn
Film mode
Automatically detects a film-based source (originally
encoded at 24/25 frames/second, depending on the
vertical frequency), analyses it then recreates each still film
frame for high-definition picture quality. (On, Off)
Active contrast
Automatically adjusts the contrast of an image according
to the scene. (On, Off)
press a/b to select “Reset”, press ENTER, press c/d to
select “Yes”, and then press ENTER.
Advanced
White with bluish tone
White with reddish tone
Selected item Description
On
Off
the function “Off”.
Turn on “Quick shoot”.
Turn off “Quick shoot”.
H
Audio adjustments
Selected item
c
button
d
button
Treble For weaker treble For stronger treble
Bass For weaker bass For stronger bass
Balance Decrease audio from
the right speaker
H
SRS TruSurround (TS) HD
Decrease audio
from the left speaker
TM
You can enjoy SRS TruSurround HDTM sound, the
same as if you were in a movie theatre.
Selected item Description
On
SRS TruSurround HDTM creates a high
quality surround sound experience,
when watching DVD movies and TV
programmes broadcast in surround
sound.
Off Outputs the normal sound.
w
Bass Enhancer
When “On” is selected, the bass effect is enhanced.
• Bass Enhancer powered by SRS Labs, lnc. when SRS TS
HD is selected “ON”.
• When SRS TS HD is set to “Off”, Bass Enhancer can be set
to “On” or “Off”.
• For resetting all adjustment items to the factory preset
values, press a/b to select “Reset”, press ENTER, press
to select “Yes”, and then press ENTER.
c/d
• The “Audio” menu is greyed out when “Output volume
select” is set to “Variable” or headphones are connected.
19
Page 61

ECO menu
[
3hr.
]
MENU [ECO
]
No operation off
Ecology
Option
Power management
4
Setup
[
Enable
]
No signal off
ECO
NOTE
NOTE
NOTE
MENU [Setup
]
Auto installation
Analogue programme setup
Digital programme setup
Input skip
Input label
4
4
Position
4
Identification
Reset
[On]
[
Panorama
]
[
Off
]
Setup
Option
HDMI auto view
WSS
4:3 mode
Quick start
Child lock
Digital setup
Language
[
English
]
New password
– – – –
Reconfirm
Change password
Clear password
Parental rating
– – – –
Enter your new password. Use 4 digits
NOTE
H
You can set the TV to automatically power off in about
15 minutes after the TV goes into a state of receiving
no programme signals, such as the end of a broadcast
day. (Enable, Disable)
• Five minutes before the power shuts down, the remaining
time displays every minute.
• “Disable” is the factory preset value.
• When a TV programme finishes, but the TV receives signal
input, this function may not operate.
H
You can set the TV to automatically power off when no
image is displayed on PC.
Selected item Description
Off • No power management
Mode1 • If no signal inputs for approximately
Mode2 • If no signal inputs for approximately
H
You can set the TV to automatically power off when no
TV operation is performed for 30 minutes or more than
3 hours.
(30 min., 3 hr., Disable)
• Five minutes before the power shuts down, the remaining
time displays every minute.
• “Disable” is the factory preset value.
H
When set to “Yes”, the TV activates the following
power saving mode.
• “OPC” set to “On”. (See page 18.)
• “No signal off” set to “Enable”. (See page 20.)
• “Power management” set to “Mode1”. (See page 20.)
• “No operation off” set to “3 hr.”. (See page 20.)
• “Quick start” set to “Off”. (See page 22.)
• Ecology mode cannot be deactivated by selecting “No”.
Each setting must be changed individually to deactivate
Ecology mode.
20
No signal off
Power management (PC input mode only)
• Factory preset value.
8 minutes, the power shuts down.
• Even if you start using the PC and the
signal inputs again, the TV stays off.
• The TV turns on again by pressing
POWER. (See page 14.)
8 seconds, the power shuts down.
• When you start using the PC and the
signal inputs again, the TV turns on.
• The TV turns on again by pressing
POWER. (See page 14.)
No operation off
Ecology
Setup menu
H
Child lock (A-TV and D-TV input mode only)
Allows you to use a password to protect certain
settings from being accidentally changed.
Setting a password
Repeat steps 1 to 2 in Menu operation.(See
1
page 18).
Press a/b to select “Child lock”, and then
2
press ENTER.
If you have already set the password, enter it here.
3
Press a/b to select “Change password”, and
4
then press ENTER.
Enter the 4-digit number as a password using
5
0 — 9.
Enter the same 4-digit number as in step 5 to
6
confirm.
• To view a locked channel (Lock setting in Analogue
programme setup “Manual adjust” is set to “On”), you must
enter a password. When you select a locked channel, “Child
lock has been activated” is displayed.
• Press ENTER to display the password input window.
Clearing the password
Allow you to clear your password.
Repeat steps 1 to 3 in Setting a password.
1
Press a/b to select “Clear password”, and
2
then press ENTER.
Press c/d to select “Yes”, and then press
3
ENTER.
Page 62

NOTE
NOTE
NOTE
Setup menu (Continued)
HDMI1
PC
Yes No
Skip input selection of HDMI
HDMI2
HDMI3
Parental rating
This function allows TV channels to be restricted.
It prevents children from watching violent or sexual
scenes that may be considered inappropriate.
Repeat steps 1 to 3 in Setting a password.
1
Press a/b to select “Parental rating”, and
2
then press ENTER.
Press a/b to select your desired rating, and
3
then press ENTER.
H
Input label
You can assign each input source a label as you
prefer.
Press TV/VIDEO to select the desired input
1
source.
Press MENU and the MENU screen displays.
2
Press c/d to select “Setup”.
3
Press
4
press ENTER.
to select “Input label”, and then
a/b
Selected
item
No block
Block 5-18
age and
below
H
Input skip
Cancel the restriction.
Select desired age to restrict.
(Example) If “Block 13 age and below”
is selected, programmes rated for ages
of 13 or more are restricted.
Description
This setting allows you to skip the HDMI or PC input
on the “Input Source” menu.
Press a/b/c/d to select letters, and then
5
press ENTER to label the input source.
• When you want to change the input label that you
have already assigned to the default name, press
c/d to move to “CLEAR” on the “Input Label”
screen, and then press ENTER.
Repeat the above until the name is fully spelt
6
out.
•The name can be 6 characters or less.
•When you want to set an input source name of
less than 6 characters, press RETURN to exit
from the labelling menu.
• You cannot change labels if the input source is A-TV and
D-TV.
H
Position
For adjusting a picture’s horizontal and vertical
position.
Selected item Description
H-Position Centres the image by moving it to the left
V-Position Centres the image by moving it up or
Reset Reset position to factory preset values.
or right.
down.
• Adjustments are stored separately according to input
source.
• Images may not be displayed properly depending on the
settings and/or signals.
H
HDMI auto view (HDMI input mode only)
Selected item Description
Enable/
Disable
H
WSS
Set whether or not to use WIDE MODE
based on signal recognition, including an
HDMI signal.
WSS allows a television to switch automatically among
the different screen formats. (On, Off)
• Try to set WIDE mode if an image does not switch to the
correct screen format. When the broadcast signal contains
no WSS information, the function will not work even if
enabled.
• When receiving weak or unstable signals and for avoiding
wrong estimation of the signals, it is recommended to set
WSS to “Off”.
21
Page 63

Option
PC audio select
Auto volume
Audio only
[HDMI1]
[On]
Digital setup
Game play time
4
Colour system
4
Fine sync.
4
Version up
Output volume select
[Fixed]
Clear voice
[On]
DivX Reg Code
NOTE
Setup menu (Continued)
NOTE
H
4:3 mode
The WSS signal has 4:3 auto-switching that allows you
to select between Panorama and Normal.
Selected item Description
Panorama Wide image without side bars
Normal Normal range keeping 4:3 or 16:9 aspect
4:3 mode “Panorama” 4:3 mode “Normal”
H
Quick start
You can reduce the TV’s start-up time after turning on
the power with the remote control unit.
Selected item Description
On The TV quickly starts up from standby,
Off Power consumption is small during
H
Language
You can also select a language from setup menu.
Select from 3 languages: English, Traditional Chinese
and Simplified Chinese.
H
Identification
You can check the current version of the software on the
screen.
H
Reset
If complex adjustments are made and the settings
cannot be restored to normal, you can reset the
settings to the factory preset values.
ratio
WSS signal 4:3 screen
more of power consumption is required
during standby.
standby.
Option menu
H
PC audio select
When connecting devices with HDMI cable to the
HDMI1 terminal, and inputting analogue audio signals
from the HDMI1/PC(AUDIO) terminal.
Selected item Description
HDMI1 When connecting devices with HDMI
PC When connecting devices with HDMI
• Set this to “PC” when connecting devices with HDMI cable
to the HDMI1 terminal and inputting analogue audio signals
from the HDMI1/PC(AUDIO) terminal. If “HDMI1” is set,
there will be no sound output.
• Set this to “HDMI1” when connecting devices with HDMI
cable to the HDMI1 terminal only.
cable to the HDMI1 terminal.
cable to the HDMI1 terminal, and
inputting analogue audio signals from the
HDMI1/PC(AUDIO) terminal.
• If you execute “Reset”, all the settings such as Picture,
Audio, Programme and Language will be reset to the factory
preset values.
22
Page 64

NOTE
Variable Fixed
Audio output terminal setting
NOTE
NOTE
NOTE
NOTE
Option menu (Continued)
H
Output Volume Select
Allows you to select what controls the audio output.
Press MENU and the MENU screen displays.
1
H
Audio only
When listening to music from a music programme, you
can set the display off and enjoy audio only.
Selected item Description
On Audio is output without screen image.
Off Both screen images and audio are output.
Press c/d to select “Option”.
2
Press a/b to select “Output Volume Select”,
3
and then press ENTER.
Press
4
then press ENTER.
Selected
item
Fixed • Sound via speakers is adjusted with
Variable • Sound via the AUDIO OUT terminals is
•
The “Audio” menu cannot be operated when “Variable” is selected.
H
Auto volume
to select “Fixed” or “Variable”, and
c/d
Description
VOL k/l on the remote control unit
or the TV.
• Sound via the AUDIO OUT terminals is
adjusted and constantly outputs.
adjusted with VOL k/l on the remote
control unit or the TV.
•
Sound via speakers/headphone is muted
.
Different sound sources, fairly often do not have the
same volume level, for example the changing from
movie to the advertisements. Auto volume solves this
problem and equalises the volume levels. (On, Off)
H
Clear voice
This function emphasises speech against background
noise for greater intelligibility. (On, Off)
•
This function cannot be operated when “SRS TS HD” is set to “Off”.
• When you make operations that change the picture on the TV
such as by changing the input source, the Audio only function
is set to “Off”.
H
Game play time
This function displays the elapsed game time so you do
not lose track of the time.
To display the elapsed time, select “GAME” under
“AV mode” for the input mode of the terminal connected
to the game console before starting the game.
Selected item Description
On When using HDMI 1-3,INPUT 4-7 the AV
Off There is no display.
H
Colour system
MODE is change to “Game”, the elapsed
time is displayed every 30 minutes.
You can change the colour system to one that is
compatible with the image on the screen. (Auto, PAL,
SECAM, NTSC 3.58, NTSC 4.43, PAL-60)
• Factory preset value is “Auto”.
• If “Auto” is selected, colour system for input signal is
automatically set. If an image does not display clearly, select
another colour system (e.g. PAL, NTSC 4.43).
• “Colour system” is selectable only when inputting an SVIDEO or composite signal.
H
Fine sync. (PC input mode only)
Adjusting the PC image automatically
Auto sync.
This function enables the screen to be automatically
adjusted to its best possible condition when the
analogue terminals of the TV and PC are connected
with a commercially available RGB cable, etc.
• Auto sync. is likely to succeed when an input PC image has
wide vertical stripes (e.g. pattern with high contrast stripes,
or cross-hatched).
It may fail when an input PC image is solid (low contrast).
• Be sure to connect the PC to the TV and switch it on before
starting Auto sync.
23
Page 65

Option menu (Continued)
NOTE
NOTE
NOTE
CAUTION
CAUTION
CAUTION
Adjusting the PC image manually
Ordinarily you can easily adjust the picture as necessary
to change image position using Auto sync. In some
cases, however, manual adjustment is needed to
optimise the image.
Selected item Description
H-Position Centres the image by moving it to the left
V-Position Centres the image by moving it up or
Clock Adjusts when the image flickers with vertical
Phase Adjusts when characters have low contrast
• For resetting all adjustment items to the factory preset values,
press a/b to select “Reset”, press ENTER, press c/d to
select “Yes”, and then press ENTER.
• Images may not be displayed properly depending on the
settings and/or input signals.
Input signal
• Some input signals may have to be registered manually
to display properly.
• The pairs of input signals (resolutions) in the list below
are not distinguishable when received. In such case,
you have to set the correct signal manually. After
setting once, it will display when the same signal
(resolution) is input again.
1280 g 768 1360 g 768
• You can only select the “Input Signal” on the Setup menu
when receiving one of the 2 input signals listed above.
H
DivX® setup
This is the function to confirm your registration code.
Press MENU and the MENU screen displays.
1
Press c/d to select “Option”.
2
Press a/b to select “DivX Reg Code”, and
3
then press ENTER.
or right.
down.
stripes.
or when the image flickers.
H
Version up
This function is only for SHARP qualified service
personnel to update to the latest software using a USB
device. Updating the software should be made through
the USB terminal.
• If a problem arises, ask SHARP qualified service personnel.
Insert the USB device containing the software
1
update file.
Press MENU and the MENU screen displays.
2
Press c/d to select “Option”.
3
Press a/b to select “Version up”, and then
4
press ENTER.
Press c/d to select “Yes”, and then press
5
ENTER.
• Be sure to insert the USB device correctly into the terminal.
Start the update operation.
6
• This operation may take a while.
After completing the update, please plug the
7
AC power cord again.
• If the data is not compatible with the system, an error
message appears on the screen. Repeat steps 3 and 4 after
pressing ENTER.
• When an error message displays, check to see if:
• The USB device is inserted firmly.
• There is only one software update file in the
memory.
• No data for updating the system exists in the USB
memory.
• The software update file is broken.
• The software update file is not compatible with your
TV’s software.
USB
DivX® VOD registration
You need to visit the DivX ® main page to register your
TV, then you can play DivX ® content.
DivX® VOD deregistration
You can find the deregistration code.
• Visit www.DivX.com for more information about DivX® VOD.
24
Page 66

CAUTION
Digital setup menu
Option
Audio language
Subtitle language
Hearing impaired
Time zone
Summer time
OAD setup
[Off]
[Off]
[Off]
Digital setup
NOTE
(Hearing impaired) 1st Language
2nd Language
Off
• • • • • • • •
(Hearing impaired)
1st Language 2nd Language
Off
• • • •
NOTE
Selecting the audio language
H
Set up to two preferred multi audio languages to
display if the audio languages are available.
Press MENU and the MENU screen displays.
1
Press c/d to select “Digital setup”.
2
Press a/b to select “Audio language”, and
3
then press ENTER.
Press a/b to select “1st Language” or “2nd
4
Language”, and then press ENTER.
Press c/d to select the desired language,
5
and then press ENTER.
• This function depends on audio lanugage information from
broadcasters.
Switching subtitle languages
H
Each time you press [ on the remote control, the
subtitle switches.
Set “Hearing impaired” to “On”
Set “Hearing impaired” to “Off”
Selecting subtitle language
H
Press MENU and the MENU screen displays.
1
Press c/d to select “Digital setup”.
2
Press a/b to select “Subtitle language”, and
3
then press ENTER.
Press a/b to select “1st Language” or “2nd
4
Language”, and then press ENTER.
Press c/d to select the desired language, and
5
then press ENTER.
• If subtitles for the selected language are not included in
a received broadcast, subtitles will not be shown for that
language.
Time zone
H
This function enables you to select your local time zone.
Press MENU and the MENU screen displays.
1
Press c/d to select “Digital setup”.
2
Press a/b to select “Time zone”, and then
3
press ENTER.
Press c/d to select the desired time zone
4
and then press ENTER.
• This function lets you select the right time zone in case the
time displayed in the EPG does not match the local time of
your area.
Summer time
H
When the summer time is set to “On”, the Standard
Time is plus one hour. (Auto, On, Off)
H
OAD setup
• This function is for automatically download the
data for the version update software over digital
broadcasts when the “OAD setup” is set to “On”.
• To download, follow the instructions when the
download message appears during a digital
broadcast.
Displaying subtitles for the hearing impaired
H
You can display subtitles for the hearing impaired in
the broadcast if the subtitle languages are available.
Press MENU and the MENU screen displays.
1
Press c/d to select “Digital setup”.
2
Press a/b to select “Hearing impaired”, and
3
then press ENTER.
Press c/d to select “On”, and then press
4
ENTER.
• Do not disconnect the AC cord when the software
upgrade is in progress, as this may cause the upgrade
to fail. If problem arises ask a qualified service
personnel before the software upgrade period expires.
25
Page 67

-
-
Input Info.
ABC2
People Dimensions
[Sat.] 23 Mar 2010
13:30 - 14:00
Video : 576i
Audio : MPEG
Age : 09
7
6
5
1
4
2
3
Programme guide
-
-
Channel list
[Mon.] 18/6 13:27
020 ABC HDTV
Dorothy The Dinosaur
002 ABC TV Sydne
020 ABC HDTV
021 ABC2
Page up/down
Select channel
: Enter
: Program information
: Back Exit
022 ABC TV
Dorothy The Dinosaur
Dorothy The Dinosaur
Gardening Australia
Dorothy The Dinosaur
13:23 - 13:30
R
ENTER
MENU
RETURN
You can check the current schedule of D-TV events
and view detailed information about current events.
Info
Press GUIDE to display the programme guide
1
list.
Press
2
programme, and then press ENTER.
to display your desired
a/b
• When you press ENTER, the TV jumps to the
channel.
Press R to view programme information.
3
Press RETURN or MENU to exit.
4
While watching D-TV you can check the extended
programme information on the screen using INFO on
the remote control.
General INFO screen
Service name
1
Title
2
Date for the current programme
3
Time for the current programme
4
Video system
5
Audio system
6
Parental rating
7
• If there is more information, pressing
to the next page or return to the previous page.
• You can cancel this info by pressing INFO or EXIT.
allows you to go
a/b
26
Page 68

-
-
TEXT
B/G
STEREO
01
BBC1
B/G
MONO
PAL
NICAM
PAL
01
A-TV A-TV
BBC1
B/G
CH A
01
BBC1
B/G
CH B
PAL
NICAM
PAL
NICAM
01
A-TV A-TV
BBC1
B/G
MONO
01
BBC1
B/G
CH AB
PAL PAL
NICAM
01
A-TV A-TV
BBC1
B/G
MONO
01
BBC1
B/G
MONO
PAL
NICAM
PAL
01
A-TV A-TV
BBC1
A-TV (Analogue TV)/D-TV
-
-
TEXT
Switching the analogue
(Digital TV)buttons
Use the following buttons on the remote control to
operate the menu.
A-TV: Press to switch to analogue TV mode. After
switching from digital TV or external input mode to
analogue TV mode, the TV jumps to the most recently
viewed analogue channel.
D-TV: Press to switch to digital TV mode. After
switching from analogue TV or external input mode
to digital TV mode, the TV jumps to the most recently
viewed digital TV channel.
When you watch the TV for the first time
When the TV powers on for the first time after
purchase, perform the auto installation.
A-TV (Analogue TV)
You can run the auto installation to set channels
automatically.
To watch the analogue TV, select “Auto
1
installation” from Setup menu. (See page 15.)
After setting the channels, you can select
2
a channel using CH r/s or 0 – 9 on the
remote control unit.
D-TV
When the TV accesses to D-TV mode for the first time,
you need to run the auto search. To scan all available
services in your area, follow the procedures below.
To watch D-TV broadcasts, select “DTV” from
1
auto installation menu. (See page 15.)
After setting the channels, you can select
2
a channel using CH r/s or 0 – 9 on the
remote control unit.
audio format
You can switch between multiple audio modes
when watching a multiple audio or stereo broadcast
programme.
In the NICAM TV broadcasts
When receiving a stereo signal
Each time you press MPX, the mode switches
between NICAM STEREO and MONO.
Stereo mode
When receiving a bilingual signal
Each time you press MPX, the mode switches among
NICAM CH A, NICAM CH B, NICAM CH AB and MONO.
Bilingual mode
When receiving a monaural signal
Each time you press MPX, the mode switches
between NICAM MONO and MONO.
Monaural mode
27
Page 69

Switching the analogue
B/G
STEREO
01
BBC1
B/G
MONO
PAL PAL
01
A-TV A-TV
BBC1
B/G
CH A
01
BBC1
B/G
CH B
PAL
NICAM
PAL
01
A-TV A-TV
BBC1
B/G
CH AB
PAL
01
A-TV
BBC1
B/G
MONO
PAL
01
A-TV
BBC1
NOTE
NOTE
Switching the digital
audio format (Continued)
In the TV mode of A2 TV broadcasts
When receiving a stereo signal
Each time you press MPX, the mode switches
between STEREO and MONO.
Stereo mode
When receiving a bilingual signal
Each time you press MPX, the mode switches among
CH A, CH B and CH AB.
Bilingual mode
audio format
When receiving digital TV broadcast that contains multi
sound modes, you can press MPX button to switch
between different audio languages.
• Selectable items vary depending on the received
broadcasts.
When receiving a monaural signal
When you press MPX, “MONO” displays.
Monaural mode
• “BBC1”, “01” and “PAL” are tentative network name,
channel and colour system.
28
Page 70

20, 21
-
-
: Select
: Enter
Previous day
: End
R
Next dayGScheduleYReminder
B
ENTER
MENU
INFO
: Information
081 Jade TV Easy
11 Aug 2010 11:00
DTV
11 Aug 11:35-11:40
11 Aug 11:40-11:45
11 Aug 11:45-12:40
11 Aug 12:40-12:45
11 Aug 12:45-13:00
11 Aug 11:30-11:35
News Headlines
Inside the Stock Exchange
The Gentle Crackdown
TV Easy
Inside the Stock Exchange
TV Easy
NOTE
June
Service NameProgramme Name
Service Name
NOTE
EPG
EPG setup
H
What is an EPG?
An “EPG (Electronic Programme Guide)” is a programme schedule, which is displayed on the TV screen. The
EPG is broadcasted together with D-TV. The TV screen shows the EPG when the viewer presses EPG on
the remote control, provided that the TV is receiving the digital broadcasting signal. The EPG enables you to
search for a programme, do timer view the programme schedule in detail.
Basic Operation
Display the EPG screen
H
Press EPG.
1
3
4
2
Press R/G to select the date you want to search.
2
Press c/dto select the desired service name.
3
Press a/b to select the desired programme.
4
Close the EPG screen
H
5 Press EPG again or MENU to exit.
• The time displayed on the EPG is information sent by the TV station.
Reminder timer setting
You can schedule a reminder for future programmes. Channel will automatically change on time as scheduled.
Press EPG.
1
Press
2
you want to watch.
Press B to set reminder time.
3
Press ENTER to save reminder timer.
4
• “Timer Save Success” will display.
•
“Timer Overlap” will display if same time is set twice.
•
“Timer Past” will display if past time is set.
/b/c/d/R/G
a
to select the programme
Press ENTER to display the reminder schedule list.
5
Press MENU or EPG to exit.
6
29
Page 71

NOTE
NOTE
EPG (Continued)
NOTE
Wide Mode
Viewing the reminder schedule list
Press EPG.
1
Press Y to display the reminder schedule list.
2
Press
3
programmes in schedule list.
Press MENU or EPG to exit.
4
/
to display next or previous
a
b
Cancelling the reminder timer setting
Press EPG.
1
Press Y to display the reminder schedule list.
2
Press
3
to cancel.
Press R to delete a programme from reminder list.
4
Press MENU or EPG to exit.
5
/
to select a programme you want
a
b
Text
MHEG-5 data broadcast is scheduled in Hong Kong.
You can watch a MHEG-5 data broadcast after
pressing the TEXT button.
Picture and still image
You can freeze a motion picture on the Display.
Press FREEZE.
1
• A still image displayed on the screen. The still image
is one frame captured from a moving image at the
movement you press FREEZE.
Press FREEZE again to exit from still image.
2
• The still image automatically goes out after 30 minutes.
• When this function is not available, “No still image display
available” will appear.
• During PC input mode, still image function will not function.
Auto Selection
If you set “WSS” and “4:3 mode” in the Setup menu,
the optimum WIDE mode is automatically chosen for
every broadcast containing the WSS information.
“WSS” menu
To enable Auto Selection, set “WSS” in the Setup
menu to “On”. (See page 21.)
“4:3 mode” menu
To set the type of the wide screen, select “Panorama”
or “Normal” in the 4:3 mode menu. (See page 22.)
4:3 mode set to “Panorama” 4:3 mode set to “Normal”
•
If the broadcast signal contains no WSS information, Auto
Selection will not function even when the WSS option is enabled.
Manual SelectionManual Selection
You can select different picture sizes that account for
the kind of each picture.
Press WIDE.
1
• The WIDE MODE menu displays.
• The menu lists the wide mode options selectable
for the type of video signal currently received.
Press WIDE or a/b while the WIDE MODE
2
menu displays on the screen.
• As you toggle down the options, each mode is
immediately reflected on the TV.
Selected item Description
Normal For 4:3 “standard” pictures. A side bar
Zoom14:9 For 14:9 letterbox pictures. A thin side bar
Panorama In this mode the picture is progressively
Full For 16:9 squeeze pictures.
Cinema16:9 For 16:9 letterbox pictures. Bars may
Cinema14:9 For 14:9 letterbox pictures. Bars may
Underscan Display with an “Underscan” image only
Dot by Dot Display an image with the same number of
appears on each side.
appears on each side, and you may also
see bars on the top and bottom with some
programmes.
stretched toward each side of the screen.
appear on the top and bottom with some
programmes.
appear on the top and bottom with some
programmes.
when receiving a 720p signal. Display
with the High-Definition image adjusted
optimally. Noise may appear on the edge
of the screen with some programmes.
pixels on the screen (only when receiving
1080i/1080p signal).
• Some picture size may not be displayable depending on the
input signal.
30
Page 72

NOTE
15
141312
9
11
10
8
7
6
5
4 3
2
1
Pin No. Signal name Pin No. Signal name Pin No. Signal name
R GND (Ground) Not connected
G GND (Ground) SDA
B GND (Ground) HD
Not connected +5V VD
CSYNC GND (Ground) SCL
Connecting a PC
ANALOG
RGB
AUDIO
(L/R)
Use the PC terminals to connect a PC.
Analogue Connection
Ø 3.5 mm stereo
mini jack cable
(Commercially
available)
PC
Signal names for 15-pin mini D-sub connector
• Macintosh adaptor may be required for use for some Macintosh computers.
• Refer to page 32 for a list of PC signals compatible with the TV.
• Refer to page 22 for the PC audio select, when connecting TV with HDMI cable to PC.
RGB cable
(Commercially
available)
31
Page 73

HDMI1/2/3,INPUT4/5/6/7,PC 8
NOTE
PC compatibility chart
NOTE
Resolution
VGA 640 g 480 31.5 kHz 60 Hz
SVGA 800 g 600 37.9 kHz 60 Hz
XGA 1024 g 768 48.4 kHz 60 Hz
WXGA
SXGA
SXGA+
• This TV has only limited PC compatibility, correct operation can only be guaranteed if the video card conforms exactly to the
VESA 60Hz standard. Any variations from this standard will result in picture distortions.
1280 g 768
1360 g 768 47.7 kHz 60 Hz
1280 g 1024 64.0 kHz 60 Hz
1400 g 1050 65.3 kHz 60 Hz
Horizontal
Frequency
47.8 kHz 60 Hz
Vertical
Frequency
VESA Standard
4
4
4
_
4
4
4
DDC is a registered trademark of Video Electronics Standards Association. Power Management is a registered
trademark of Sun Microsystems, Inc. VGA and XGA are registered trademarks of international Business Machines Corp.
RS-232C commands list
Commands
• Commands not indicated here are not guaranteed to operate.
• If an underbar (_) appears in the parameter column, enter a space.
• If an asterisk (*) appears, enter a value in the range indicated in brackets under CONTROL CONTENTS.
32
Page 74

NOTE
USB media player
Select mode
Photo mode Music mode Moive mode
Select
Enter
ENTER
NOTE
%SJWF
%SJWF
%SJWF
%SJWF
%SJWF
%SJWF
%SJWF
%SJWF
Photo mode
Music mode Moive mode
USB media player
Select mode
Select
Enter
ENTER
Connecting a USB device
Connect a USB device to the TV as shown below.
• The TV automatically switches to the USB mode when a
USB device is inserted in the USB terminal.
• Depending on the USB device, the TV may not be able to
recognise the contained data.
• Use only alphanumeric characters for naming files.
• File names over 80 characters (may vary depending on
character set) may not be displayed.
• Do not connect and disconnect a USB device from the TV
repeatedly.
• You do not need to select the drive in step 2 when there is
only one drive in the connected USB device.
• 16 is the maximum number of drives that can be displayed.
Movie mode
USB Movie and Photo viewer/Music Player
In this mode, you can enjoy viewing photos and
listening to music and viewing videos from external USB
devices. Select “USB media” from the “Input Source”
menu to enter this mode.
• You cannot enter this mode when there is no USB device
connected to the TV.
• “Wide mode” is fixed during the USB mode.
Selecting modes and devices
H
Press c/d to select between “Movie mode”,
1
“Music mode” and “Photo mode”.
/b/
a
Press
2
you want to find your files.
to select the drive where
c/d
Press c/d to select “Movie mode”, and then
1
press ENTER.
Press a/b to select the desired folder or
2
directory, and then press ENTER.
Press a/b to select the desired movie.
3
Buttons for Movie mode
Buttons Description
ENTER
(Cursor) Select a desired item.
a/b
(Cursor) Page up/down.
c/d
Return
Display the movie in full screen.
Return to the mode list.
Press
3
ENTER.
33
Page 75

H Viewing movie
Previous/Next
Back Play / Pause
RETURN
REW/FWD Guide Off / On
R G Y
B
ENTER
Select music
Stop
Play/Pause
Audio only
File name Time
USB g220\Audio\mp3
SO N G_ 01. MP 3 3: 05
SO N G_ 02. MP 3 3:1 5
SO N G_ 03. MP 3 3: 02
SO N G_ 04. MP 3 6: 05
SO N G_ 05. MP 3 4: 52
SO N G_ 06. MP 3 9 :25
SO N G_ 07. MP 3 3: 13
SO N G_ 08. MP 3 3 :23
SO N G_ 09. MP 3 3: 33
SO N G_ 10. MP 3 3 :43
Playing:
\USB g220\Audio\mp3
Select
Play Back
1/1 page
RETURN
R
G
B
ENTER
䅇
䅇
䅇
䅇
䅇
䅇
䅇
䅇
䅇
䅇
NOTE
Music mode
Buttons for full screen display operation
Buttons Description
ENTER
a (Cursor)
b (Cursor)
d (Cursor)
c (Cursor)
Return
B button
R button
G button
Y button
Play/Pause the movie.
Go to the previous file.
Go to the next file.
The FWD speed changes every time
you press d. After playing to the end,
the player goes to the ne xt fil e and
starts to play.
The REW speed changes every time
you press c. After going back to the
beginning, the player starts to play the
same file.
Return to the movie list screen.
Reveal/hide the guide display.
Each time you press R button on the
remote control, the subtitle switches.
Each time you press G button on the
remote control, the audio switches.
Each time you press Y button on the
remote control, the VIDEO switches.
Press c/d to select “Music mode”, and then
1
press ENTER.
Press a/b to select the desired folder, and
2
then press ENTER.
Press a/b to select the desired music, and
3
then press ENTER.
Buttons for music mode
Buttons Description
ENTER
(Cursor)
a/b
c (Cursor)
d (Cursor)
Return
R button
G button
B button
• When there are invalid music files, the X mark will be displayed for
the file.
• The displayed play time may differ slightly from the actual play time
depending on the files.
When selecting a music file: Play the music.
Select a desired item.
Page up.
Page down.
Return to the mode list.
Stop music.
Play/Pause music.
Audio only.
34
Page 76

Photo mode
NOTE
NOTE
Select photo
Display photo
Back
Prev
Next
Slide show
JPEG
\\USB g220\pic
USB g220\pic
Selecting BGM
RETURN
R G
Y
B
ENTER
Select
1/1 page
NOTE
H Selecting BGM (Background Music)
H Viewing thumbnails
Press c/d to select “Photo mode”, and then
1
press ENTER.
Press a/b/c/d to select the desired folder,
2
and then press ENTER.
Press a/b/c/d to select the desired photo.
3
Buttons for thumbnail operations
Buttons Description
ENTER
a/b/c/d
B button
R button
G button
Y button
(Cursor)
Display the photo in full screen.
Select a desired item.
Slide show.
Page up.
Page down.
Selecting BGM.
Press c/d to select “Photo mode”, and then
1
press ENTER.
Press Y button, and press a/b to select the
2
desired folder, and then press ENTER.
Pressa/b to select the desired music, and
3
then press Y button.
Press RETURN to return to photo selection
4
mode , a nd press a/b/c/dto sele ct the
desired folder, and then press ENTER.
Press
5
a/b/c/d
and then press B button
to select the desired photo,
(Silde show), then
BGM playing with the photo.
• Background Music (BGM) function is available only when the slide
show is on.
• When there are invalid photo files, the X mark will be displayed for
the file.
• You can see the file name, shooting date, file size and pixel size of
the selected photo in the lower-left corner of the screen (shooting
date is only available in the EXIF file format).
H Viewing photos in full screen
Buttons for full screen display operation
Buttons Description
(Cursor)
c/d
Return
R button
G button
B button
• Rotating photos only applies to the temporarily selected item and
this setting is not saved.
Go to the previous/next photo in the
same directory.
Return to the thumbnail selection screen.
Rotate the photo by 90 degrees to the left.
Rotate the photo by 90 degrees to the right.
Reveal/hide the guide display.
35
Page 77

List of files compatible with USB mode
NOTE
USB device
File system
Photo file format
Music file format
USB Memory, USB card reader (Mass Storage class)
FAT/FAT32/NTFS
JPEG (.jpg) (DCF2.0 compliant)
MP3 (.mp3)
Bitrate: 32 k, 40 k, 48 k, 56 k, 64 k, 80 k, 96 k, 112 k, 128 k, 160 k, 192 k, 224 k, 256 k, 320 kbps
Sampling frequency: 32 k, 44.1 k, 48 kHz
Video file format
File
extension
*.avi
File type Video decoder Resolution
Divx 3.11/4/4.12/5.x/6 1920×1080
AVI
Xvid 1920×1080 6-30 8
H.264 1920×1080 6-30 20
Audio
decoder
MP3/Dolby
Digital plus
Frame rate
(fps)
6-30 8
MPEG2 1920×1080 6-30 8
*.mkv MKV
*.mp4 MP4
H.264
MPEG2
MPEG1
1920×1080
1920×1080 6-30 8
1920×1080 6-30 8
Divx 3.11/4/4.12/5.x/6 1920×1080
Xvid 1920×1080 6-30 8
MP3/Dolby
Digital plus
MP3/Dolby
Digital plus
6-30 20
6-30 8
H.264 1920×1080 6-30 20
*.vob VOB MPEG2 1920×1080
*.mpg/*.mpeg PS
MPEG2 1920×1080
MPEG1 1920×1080 24/25/30 20
MP3/Dolby
Digital plus
MP3/Dolby
Digital plus
24/25/30 20
24/25/30 20
*.rm/*.rmvb RM RM codec 1280×720 Real Audio 24/25/30 10
*.ts/*.trp/*.tp
*.divx
*.dat
TS
H.264 1920×1080
MPEG2 1920×1080 24/25/30 20
Divx Divx 3.11/4/4.12/5.x/6 1920×1080
DAT
MPEG2 1920×1080
MPEG1 1920×1080 6-30 8
MP3/Dolby
Digital plus
MP3/Dolby
Digital plus
MP3/Dolby
Digital plus
6-30 20
6-30 20
6-30 8
Bit rate
(Mbsp)
• Progressive format jpeg files are not supported.
• Files in USB 1.1 devices may not be played properly.
• Operation using USB hubs is not guaranteed.
• The compatibility of USB HDDs may not be guaranteed.
• Some video file formats may not be played depending on the file.
• Files may not be playable depending on the bitrate.
36
Page 78

Appendix
Troubleshooting
The problems described below are not always caused by malfunctions. Check the TV again before having the TV
serviced.
Problem Possible Solution
• No power. • Check if you pressed
• Unit cannot be operated. • External influences such as lightning, static electricity, etc., may cause improper operation. In
• Remote control unit does
not operate.
• Picture is cut off. • Is the image position correct? (See page 21.)
• Strange colour, light
colour, or dark, or colour
misalignment.
• Power is suddenly turned
off.
• No picture. • Is the connection to external equipment correct? (See page 8.)
• No sound. • Is the volume too low? (See page 9.)
• The TV sometimes makes
a cracking sound.
If the indicator on the TV lights up red, press
• Is the AC cord disconnected?
• Has the power been turned on? (See page 14.)
this case, operate the unit after first turning the TV power off or unplugging the AC cord and
re-plugging it in after 1 or 2 minutes.
• Is battery inserted with polarity (
• Is battery worn out? (Replace with new battery.)
• Are you using it under strong or fluorescent lighting?
• Is a fluorescent light shining on the remote control sensor?
• Are screen mode adjustments such as picture size made correctly? (See pages 21,24,30.)
• Adjust the picture tone. (See page 19.)
• Is the room too bright? The picture may look dark in a room that is too bright.
• Check the colour system setting. (See page 23.)
• Check the input signal setting. (See page 24.)
• Check the HDMI auto view setting. (See page 21.)
• The unit’s internal temperature has increased.
Remove any objects blocking the vent or clean.
• Check the ECO setting. (See page 20.)
• Is the sleep timer been set? (See page 9.)
• Has the input signal setup been performed correctly after connection? (See page 14.)
• Is the correct input selected?
• Is the picture adjustment correct? (See page 18-19.)
• Is the antenna connected properly? (See page 7.)
• Is “On” selected in “Audio only”? (See page 23.)
• Make sure that headphones are not connected.
• This is not a malfunction. This happens when the cabinet slightly expands and contracts
according to changes in temperature. This does not affect the TV’s performance.
POWER on the remote control unit. (See page 14.)
e, f
POWER.
) aligned? (See page 10.)
Troubleshooting-Digital broadcasting
The error message about reception of broadcast
The example of an error message
displayed on a screen
• Failed to receive broadcast.
• No broadcast now.
Cautions regarding use in high and low temperature environments
• When the unit is used in a low temperature space (e.g. room, office), the picture may leave trails or appear slightly delayed.
This is not a malfunction, and the unit will recover when the temperature returns to normal.
• Do not leave the unit in a hot or cold location. Also, do not leave the unit in a location exposed to direct sunlight or near a
heater, as this may cause the cabinet to deform and the LCD panel to malfunction.
Storage temperature: f20°C to e60°C.
Error code
E202
E203 • Check the current broadcast.
• Check the antenna cable. Check that the antenna is correctly setup.
Possible Solution
37
Page 79

Specifications
Item
Resolution 2,073,600 pixels (1920 g 1080)
Video Colour System PAL/SECAM/NTSC 3.58/NTSC 4.43/PAL 60
TV
Function
Audio amplifier 10 W g 2
Speakers
Terminals Rear
OSD language English/Simplified Chinese/Traditional Chinese
Power Requirement AC 220 V, 50 Hz
Power Consumption (Standby) 100 W (0.50 W) 115 W (0.50 W)
Weight
Operating Temperature 0°C — 40°C
• As a part of policy of continuous improvement, SHARP reserves the right to make design and specification changes for product
improvement without prior notice. The performance specification figures indicated are nominal values of production units. There
may be some deviations from these values in individual units.
TV- Standard Analogue PAL: B/G, D/K, I SECAM: B/G, D/K, K/K
Receiving
Channel
Digital terrestrial broadcast 470 MHz - 862 MHz
TV-Tuning System Auto Preset 99 ch
Stereo/Bilingual NICAM: B/G, I, D/K A2 stereo: B/G
A-TV (Analogue antenna)
D-TV (Digital antenna)
HDMI 1 HDMI input (480I, 576I, 480P, 576P, 720P/50Hz, 720P/60Hz, 1080I/50Hz, 1080I/60Hz,
HDMI 2 HDMI input (480I, 576I, 480P, 576P, 720P/50Hz, 720P/60Hz, 1080I/50Hz, 1080I/60Hz,
HDMI 3 HDMI input (480I, 480P, 576I, 576P, 720P/50Hz, 720P/60Hz, 1080I/50Hz, 1080I/60Hz,
INPUT 4 VIDEO in, AUDIO in
INPUT 5 VIDEO in, AUDIO in
INPUT 6 COMPONENT in (480I, 576I, 480P, 576P, 720P/50Hz, 720P/60Hz, 1080I/50Hz,
INPUT 7 COMPONENT in (480I, 576I, 480P, 576P, 720P/50Hz, 720P/60Hz, 1080I/50Hz,
PC input
AUDIO OUT Audio Output
RS-232C 9 pin D-sub male connector
Side USB USB 2.0
Headphone Ø 3.5 mm stereo
without stand 13.7 kg 18.3 kg
with stand 16.5 kg 21.6 kg
Model
Digital DMB-T/H(MHEG-5)
VHF/UHF 44.25—863.25 MHz
CATV S1—S41ch (including Hyperband)
15 g 3.4 cm 2pcs
UHF/VHF 75 q DIN type
UHF/VHF 75 q DIN type
1080P/24Hz, 1080P/50Hz, 1080P/60Hz), AUDIO in (common use with PC INPUT)
( 3.5 mm jack)
1080P/24Hz, 1080P/50Hz, 1080P/60Hz)
1080P/24Hz, 1080P/50Hz, 1080P/60Hz)
1080I/60Hz), AUDIO in
1080I/60Hz), AUDIO in
15 pin mini D-sub, AUDIO in (common use with HDMI 1) ( 3.5 mm jack)
LC-40LX530H LC-46LX530H
NTSC:M
1
38
Page 80

Dimensional drawings
LC-40LX530H
Unit: mm
LC-46LX530H
39
Page 81

Clearing the password
-
-
TEXT
NOTE
If you forget the password, clear the password using the following procedures.
c/d
Press MENU to display the MENU screen, and then press
1
select “Setup”.
Press a/b to select “Child lock”, and then press ENTER and the
2
password input screen display.
If you enter “3001” using 0 – 9, the “Child lock” setting menu will
3
be displayed.
Enter the 4-digit number as a password using 0 – 9. The new
4
password is now set.
to
The Password is .
• As a precautionary measure, make a note of your password above, remove it from this manual, and keep it in a familiar place.
40
 Loading...