

Page 1
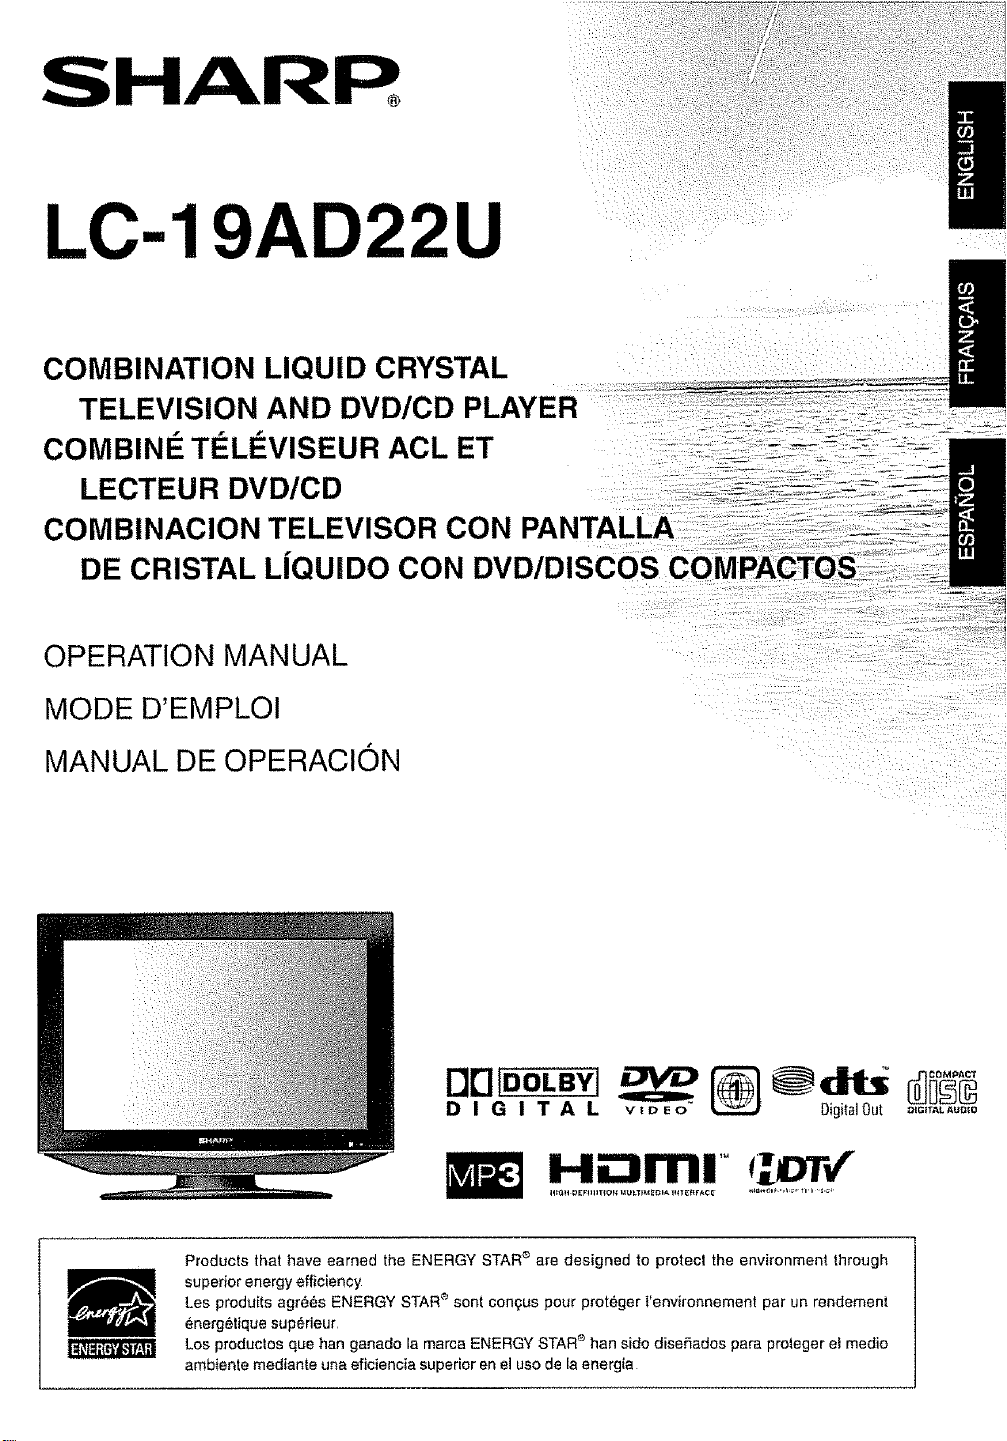
LC-19AD22U
COMBINATION LIQUID CRYSTAL
TELEVISION AND DVD/CD PLAYER
COMBIN# T#LI_VISEUR ACL ET
LECTEUR DVD/CD
OPERATION MANUAL
MODE D'EMPLOI
MANUAL DE OPERACION
D I G I T A L Oigital0ut O,G,TALAur,,0
I HiOml I.o'r/
Products that have earned the ENERGY STAR _ are designed to protect the environmen!, through
superior energy efficiency
Les produits agr6_s ENERGY STARe sent census pour pret6ger t'environnement par un rendement
energ6tique sup6rieur
Los produclos que han ganado la marca ENERGY STAR'_ han side diseSades para pro_eger el medio
ambiente mediante una eficiencia superior en el use de la energia
Page 2
MPORTANT HNFORMATUON
CAUTION: TO PREVENT ELECTRIC SHOCK, MATCH WIDE BLADE OF PLUG TO WIDE SLOT, FULLY
INSERT.
CAUTION:
DO NOT PLACE THIS PRODUCT ON AN UNSTABLE CART, STAND, TRIPOD. BRACKET, OR TABLE. THE
PRODUCT MAY FALL CAUSING SERtOUS PERSONAL INJURY AND SERIOUS DAMAGE TO THE PRODUCT,
USE ONLY WiTH A CART, STAND, TRIPOD, BRACKET, OR TABLE RECOMMENDED BYTHE MAN UFACTURER
OR SOLDWITHTHE PRODUCT FOLLOWTHE MANUFACTURER'S INSTRUCTIONS WHEN iNSTALLING THE
PRODUCT AND USE MOUNTING ACCESSORIES RECOMMENDED BYTHE MANUFACTURER, A PRODUCT
AND CART COMBINATION SHOULD BE MOVED WiTH CARE. QUICK STOPS, EXCESSIVE FORCE. AND
UNEVEN SURFACES MAY CAUSE THE PRODUCT AND CART COMBiNATION TO OVERTURN
WARNING: FCC Regulations state that any unauthorized changes o_ modifications to this equipment not expressly |
approved by the manufacturer could void the user's authority to operate this equipment
CAUTION:
This product satisfies FCC regulations when shielded cables and connectors are used to connect the unit to other
equipment To prevent electromagnetic interference with etectfic appliances such as radios and televisions, use shielded
cables and connectors for connections.
"Note to CATV system installer: This reminder is provided to call the CATV system instalie_'s attention to Article 820-40 of
the National Electrical Code that provides guide+ines for proper grounding and, in particular+ specifies that the cable ground
shall be connected to the grounding system of the building, as ctese to the point of cable
entry as practicer"
This product utilizes tin-lead solder, and fluorescent +amp containing a small amount of mercury Disposal of these
materials may be regulated due to environmental considerations For disposal o+ recyc+ing information, please contact your
local authorities or the Electronic Industries A+fiance: www.eia.org
CAUTION:
THIS DIGITAL VIDEO PLAYER EMPLOYS A LASER SYSTEM
TO ENSURE PROPER USE OF THIS PRODUCT, PLEASE READ THIS USER'S GUIDE CAREFULLY AND RETAIN FOR FUTURE
REFERENCE. SHOULD THE UNIT REQUIRE MAINTENANCE CONTACT AN AUTHORIZED SERVICE LOCATION SEE SERVICE
PROCEDURE.
USE OF CONTROLS, ADJUSTMENTS OR THE PERFORMANCE OF PROCEDURES OTHER THAN THOSE SPEC+FIED HEREIN MAY
RESULT IN HAZARDOUS RADIATION EXPOSURE
TO PREVENT DIRECT EXPOSURE TO LASER BEAM DO NOTTRY TO OPEN THE ENCLOSURE, V_SIBLE LASER
RADIATION MAY BE PRESENT WHEN THE ENCLOSURE IS OPENED. DO NOT STARE INTO BEAM,
J
Q+2{
DECLARATION OF CONFORMITY
SHARP COMBINATION LIQUID CRYSTAL TELEVISION AND DVD CD PLAYER MODEL LC+lgAD22U
Th_s device complies w_{h Part t5 ot the FCC Rules Operation is subject to the l'oHowing two conditions:
(1) This device may not cause harmful interference and (2) this device must accept any interfererlce received including interference
that may cause undesired operation
RESPONSIBLE PARTY:
SHARP ELECTRONICS CORPORATION
Sharp P+aza, Mahwah, New Jersey 07430-2135
TEL: 1-800+BE+SHARP
For Business Customers: URL h_+://v._.,cw+sharpusa, corn
INFORMATION:
This equipment has been tested and [ound to comply with the limits for a Class B digital devtce_ pursuant to Part 15 of
the FCC Rules These limits are designed to provide reasonable protection against harmful interference in a residential
installation This equipment generates uses and can radiate radio frequency energy and+ if not installed and used in
accordance with the _nstructions may cause harmful interference to radio communications However. there is no
guarantee that interference will not occur In a particular installation If this equipment does cause harmful interference to
radio or television reception which can be determined by turning the equipment off and on the user is encouraged to
try to correct the interference by one or more of the relieving measures:
--Reorient or relocate the receiving antenna
--Increase the separation between the equipment and receiver
--Connect the equipment into an ouget on a circuit dift'erent from that to which the receiver is connected
--Consult the dea_er or an experienced radio/TV technician for help
Trademarks ....
" Manufactured under license from Dotby Laboratories "Dolby" and the doubte-D symbol are trademarks of Do_by ILaboratories.
" "HDMI, the HDMI logo and High-Definition Multimedia Fnterface are trademarks or registered trademarks of HDMI 1
Licensing LLC."
+ . +_ . ]
• *DTS and DTS Digital Out are registered trademarks of DTS, tnc.
i;
J
1
J
Page 3
DEAR SHARP CUSTOMER
Thank you for your purchase of the Sharp Combination Liquid Crystal Television and DVD/CD player,
To ensure safety and many years of trouble-free operation of your product, please read the Important
Safety Instructions carefully before using this product.
gMPORTANT SAFETY gNSTRUCTaONS
(" Electricity is used to perform many usefut functions, but it can also cause personal injuries and property damage if
improperly handled This product has been engineered and manufactured with the highest priority an safety However,
improper use can result in electdc shock and/or fire In order to prevent potential danger, please observe the following
instructions when installing, operating and cleaning the product. To ensure your safety and prolong the service life of
your Liquid Crysta_ Television, please read the following precautions carefully before using the product
t) Read these instructions
2) Keep these instructions
3) Heed all warnings
4) Follow all instructions
5) Do not use this apparatus near water
6) Clean only with dry cloth.
7) Donotblockanyventilatienopenings fnstal] in acoordance with the manufacturer's instructions.
8) Do not instatt near any heat sources such as radiators, heat registers, stoves, or other apparatus (including
amplifiers) that produce heat
9) Do not defeat the safety purpose of the polarized or grounding-type plug A polarized plug has two blades with
one wider than the other A grounding type plug has two blades and e third grounding prong The wide btade or
the third prong are provided for your safety If the provided plug does not fit into your outlet, censuft an electrician
for replacement of the obsolete outlet
10) Protect the power cord from being walked on or pinched particularly at ptugs, convenience receptac]es, and the
point where they exit from the apparatus
1t) Only use attachments/accessories specified by the manufacturer
12) Use only with the cart, stand, tripod, bracket, or table specified by the manufacturer, or sold with the
apparatus When a cart is used. use caution when moving the cart/apparatus combination to avoid
injury from tip*over
I3) Unplug this apparatus during lightning storms or when unused for long periods of time
14) Refer ail servicing to qualified service personnel Servicing is required when the apparatus has been damaged in
any way, such as power-supply cord or plug is damaged, liquid has been spilled or objects have fallen into the
apparatus, the apparatus has been exposed to rain or moisture, does not operate normally, or has been dropped
Additiona! Safety information
15) Power Sources--This product should be operated only from the type of power source indicated on the marking
labei If you are not sure of the type of power supply to your home. consutt your product dealer or local power
company For products intended to operate from battery power, or other sources, refer to the operating
instr,Jcfions
16) Overloading--De net overload wai! oufiets, extension cords, or integral convenience receptacles as this can
result in a risk of fire or electric shock
17) Object and Liquid Entry--Never push objects ofany kind into this product through openings as they may touch
dangerous voltage points or short-out parts that could resutt in a fire or electric shock Never spill tiquid of any
kind an the product
18) Damage Requiring Service--Unplug this product from the wall oufiet and refer servicing to qualified service
personnel under the following conditions:
a) When the AC cord or plug is damaged,
b) If liquid has been sp]_led, or objects have fallen into the product,
c) tf the product has been exposed to rain or water,
d) If the product does not operate normally by following lhe operating instructions,
Adjust only those controls that are covered by the operating instructions as an improper adjustment of other
controls may result in damage and will often require extensive work by a qualified technician to restore the
product to its normal operation,
e) If the product has been dropped or damaged in any way, and
0 When the product exhibits a distinct change in performance - this indicates a need for service
19) Replacement Pads--When replacement parts are required, be sure the service technician has used replacement
parts specified by the manufacturer or have the same characteristics as the original part Unauthorized
substitutions may result in fire, electric shock, or other hazards.
20) Safety Check--Upon completion of any service or repairs to this product, ask the service technician to perform
safety checks to determine that the product is in proper operating condition
2t ) Wail or ceiling mounting--When mounting the product on a watt or ceiling, be sure to install the product according
to the method recommended by the manufacturer
(_)-3
Page 4
nMPORTANT SAFETY nNSTRUCTMONS
,' Water and Moisture -- Do not use this product near water - for example, near a bath tub, wash bowl, kitchen sink, or
laundry tub; in a wet basement; or near a swimming pool; and the like.
cause the product to fail, resulting in serious personal injuries as well as damage to the product. Use only a cart, s_and,
tripod, bracket or table recommended by the manufacturer or sold with the product. When mounting the product on awall.
i tand -- Do not place the product on an unstable cart, stand, tripod or table. Placing the product on an unstable base can
be sure to fot_ow the manufacturer s instructions_ Use onty the mounting hardware recommended by the manufacturer
Selecting the location -- Select a place with no direct sunlight and good ventilation.
• Ventilation -- The vents and other openings in the cabinet are designed for ventilation, Do net cover or block these vents
and openings since insufficient ventilation can cause overheating and/or shorten the life of the product Do not place
the product on a bed, sofa, rug or other similar sudace, since they can block ventilation openings. This product isnot
designed for built-in installation; do net place the product in an enclosed place such as a bookcase or rack unless proper
ventiIafion is provided or the manufacturer s inslruclions are followed.
The Liquid Crystal panel used in this product is made of glass Therefore, it can break when the product is dropped or
i applied with impact Be careful net to be injured by broken glass pieces in case the panel breaks.
Heat -- The product should be situated away from heat sources such as radiators, heat registers, stoves= or o her
products (including amplifiers) that produce heat.
• The Liquid Crystal panel isa very high technology product with 3,888,000 thinfilm transistors, giving you fine picture
details.
Occasionally. a low non-active pixeIs may appear on the screen as a fixed point of blue, green or red Please note that
this does not affect the performance of your product.
• Lightning -- For added protection for this television equipment during a lightning storm, or when itis left unattended and
unused for Iong periods of time, unplug it from the wall outlet and disconnect the antenna This will prevent damage to the
equipment due to lightning and power-line surges.
• Power Lines -- An outside antenna system should not be _ocated in the vicinity of overhead power lines or other electric
_ight or power circuits, or where it can falt into such power lines or circuits When installing an outside antenna system,
extreme care should be taken to keep from touching such power lines or circuits as contact with them might be fatal
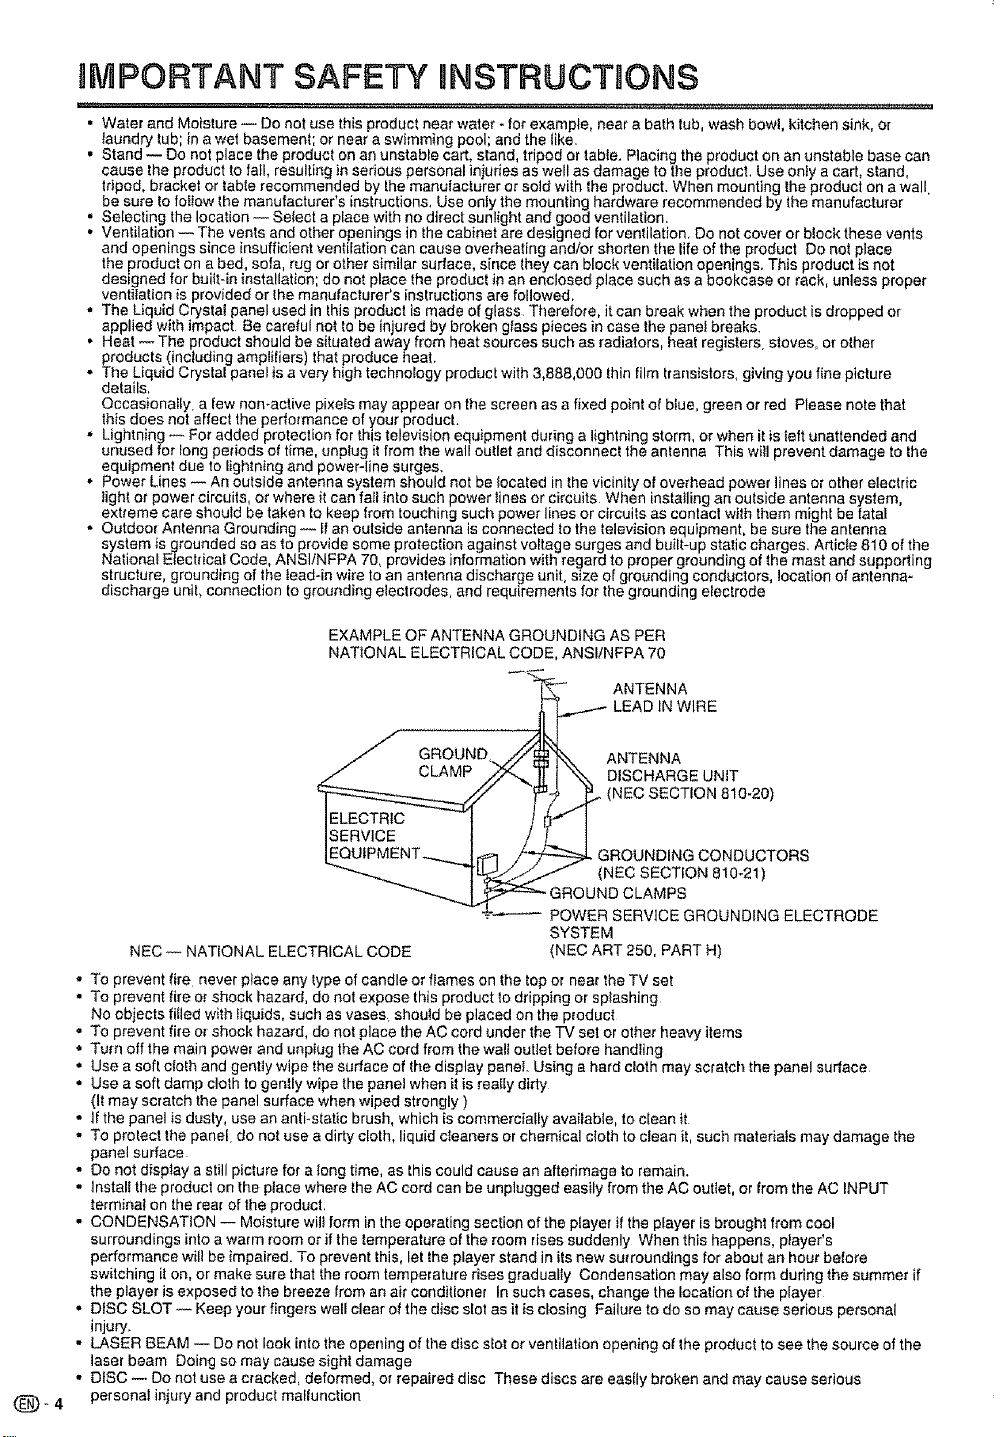
• Outdoor Antenna Grounding -- If an outside antenna is connected to the television equipment, be sure the antenna
system is grounded so as to provide some protection against voltage surges and built-up static charges. Article 810 of the
National Electrical Code, ANSI/NFPA 70, provides information with regard to proper grounding of the mast and supporting
structure, grounding of the _ead-in wire to an antenna discharge unit, size el grounding conductors !ocation of antenna-
discharge unit, connection to grounding electrodes, and requirements for the grounding eleclrode
EXAMPLE OF ANTENNA GROUNDING AS PER
NATIONAL ELECTRICAL CODE, ANSI/NFPA 70
(_4
__ ANTENNA
/_ LEAD IN WIRE
GROUND I\
ou,N c??o;,ONS,O21,2ROUNDINGCONDUCTORS
'- POWERSERWOEGROUNDINGELECTRODE
SYSTEM
NEC -- NATIONAL ELECTRICAL CODE (NEC ART 250, PART H)
', To prevent fire never place any type of candle or flames on the top or near the TV set
• To prevent _ire or shock hazard, do not expose this product fo dripping or splashing
No objects filled with liquids, such as vases_ shouId be placed on the product
,, To prevent fire or shock hazard, do not place the AC cord under the TV set or other heavy items
o Turn off the main power and unplug the AC cord from the wall outlet before handling
° Use a soft cloth and gently wipe the surface of the display panel. Using a hard cloth may scralch the panel surface
° Use a soft damp cloth to gently wipe the panel when it is really dirty
(It may scratch the panel surface when wiped strongly )
, 1[the panel is dusty, use an anti.static brush, which is commercially available, to clean it
• To protect the panel do not use a dirty cloth, liquid cleaners or chemical cloth to clean it, such materials may damage the
panel surface
• Do not display a still picture for a tong time, as this could cause an afterimage to remain.
• Install the product on the place where the AC cord can be unplugged easily trom the AC outlet, or Irom the AC INPUT
termina! on the rear of the product.
• CONDENSATION -- Moisture will form in the operating section of the player if the player is brought from cool
surroundings into a warm room or if the temperature of the room rises suddenly When this happens, player's
performance will be impaired. To prevent this, let the player stand in its new surroundings for about an hour before
switching it on, or make sure that the room temperature rises gradually Condensation may also form during the summer if
the player is exposed to the breeze from an air conditioner In such cases, change the location of the player
• DISC SLOT -- Keep your fingers well clear of the disc slot as it is closing Failure to do so may cause serious personal
injury.
• LASER BEAM -- Do not look into the opening of the disc slot or ventilation opening o! the product to see the source of the
laser beam Doing so may cause sight damage
• DISC -- Do not use a cracked, deformed, or repaired disc These discs are easily broken and may cause serious
personal injury and product matlunction
Page 5
Disc
, , i
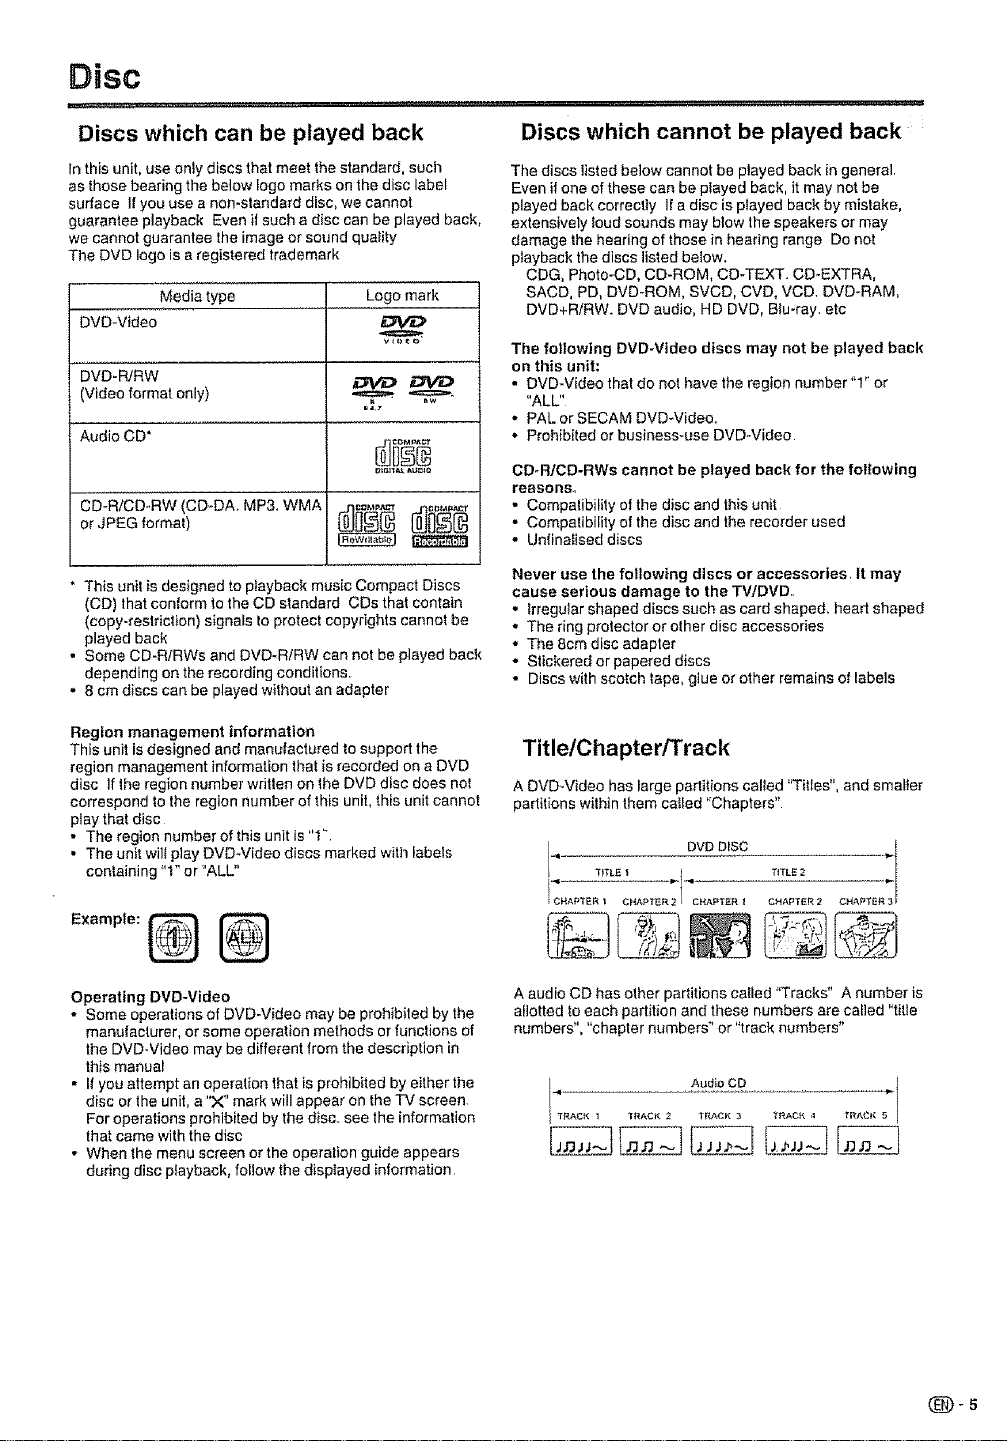
Discs which can be played back
In this unit, use ontydiscs that meet the standard, such
as those bearing the below logo marks on the disc label
surface I[you use a non-standard disc, we cannot
guarantee playback Even il such a disc can be played back,
we cannot guarantee the image or sound quality
The DVD logo is a registered trademark
Media type
DVD-Video
DVD-RiRW ............
(Video format only)
Audio CD °
or JPEG format) _
* This unit is designed to playback music Compact Discs
(CD) that conform to the CD standard CDs that contain
(copy-restdcaon) signals to protect copyrights cannot be
played back
. Some CD-R/RWs and DVD-RiRW can not be played back
depending on the recording conditions
. 8 cm discs can be played without an adapter
Logo mark
Discs which cannot be played back
The discs listed below cannot be played back in general,
Even if one of these can be played back, it may not be
played back correctly If a disc is played back by mistake,
extensively loud sounds may blow the speakers or may
damage the hearing of those in heating range Do not
playback the discs listed below.
CDG, Photo-CD, CD-ROM, CD*TEXT, CD-EXTRA,
SACD, PD, DVD-ROM, SVCD, CVD, VCD, DVD-RAM,
DVD+R!RW. DVD audio, HD DVD, Blu-ray. etc
The foi!owing DVD-Vldeo discs may not be played back
on this unit:
• DVD-VIdeo that do not have the region number "1" or
"ALL"
• PAL or SECAM DVD_Video.
• Prohibited or business-use DVD-Video
CD-R/CD-RWs cannot be played back for the following
reasons,,
• Compatibility of the disc and this unit
• Compatibility of the disc and the recorder used
• Unfinafised discs
Never use the following discs or accessories, It may
cause serious damage to the TVIDVD.
° irregular shaped discssuch as card shaped, heart shaped
• The ring protector or other disc accessories
• The 8cm disc adapter
• Stickered or papered discs
• Discs with scotch tape, glue or other remains of labels
Region management information
This unit is designed and manufacfured to support the
region management information thai is recorded on a DVD
disc If the region number written on _he DVD disc does not
correspond to the region number of this unit, this unit cannot
play that disc
• The region number of this unit is "1"
• The unit will play DVD-Video discs marked with labels
containing "1" or "ALL"
Operating DVD-Video
• Some operations of DVD.Video may be prohibited by the
manulaeturer, or some operation methods or functions of
the DVD-Video may be different from the description in
this manua!
• II you attempt an operation that is prohibited by either the
disc or the unit, a "X" mark will appear on the TV screen
For operations prohibited by the disc. see the information
that came with the disc
• When the menu screen or the operation guide appears
during disc playback, follow the dispIayed information
Title/Chapter/Track
A DVD-Video has large partitions called "Titles", and smaller
partitions within them called "Chapters"
T_TL_ 2
CHAPTER 2 CHAPTER3
A audio CD has other partitions cabled "Tracks" A number is
allotted to each partition and these numbers are called "title
numbers", "chapter numbers" or "track numbers"
f TR&CK 1 _IRACK 2 TRACK 3 TRACK ,I _I_ACI(
Audio CD i:
Page 6
Disc
, , ..,
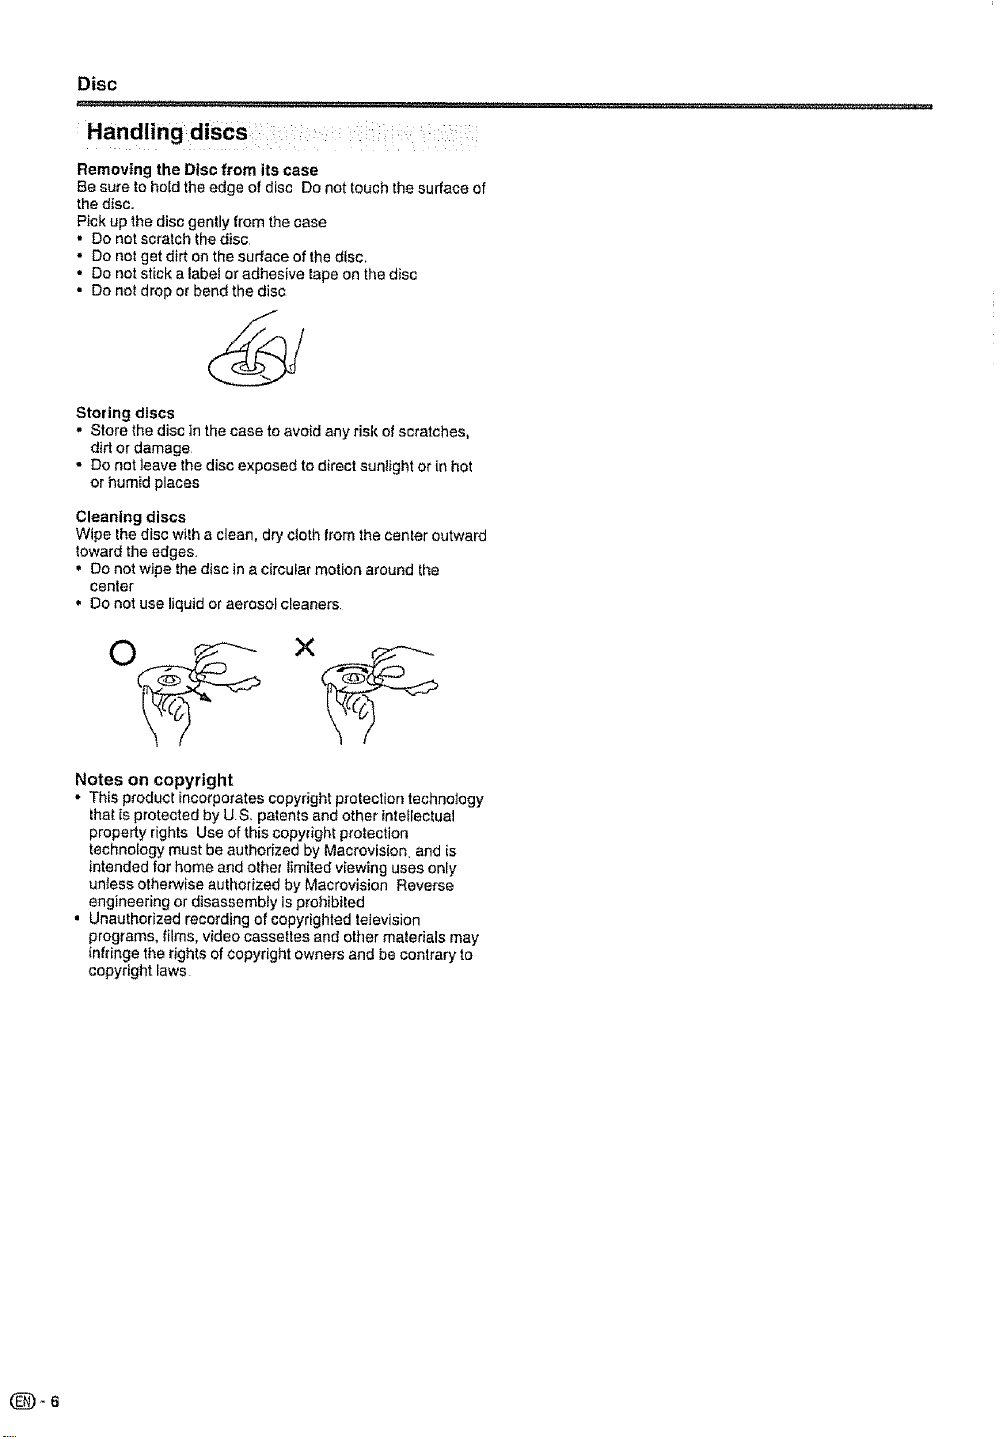
Removing the Disc from its case
Be sure to ho{d the edge of disc Do not touch the surface of
the disc.
Pick up the disc gently from the case
• Do not scratch the disc
• Do not get dirt on the surface of the disc.
° Do not stick a label or adhesive tape on the disc
,, Do not drop or bend the disc
Storing discs
• Store the disc in the case to avoid any risk of scratches,
dirt or damage
+ Do not leave the disc exposed to d+rect sunlight or in hot
or humid places
Cleaning discs
Wipe the disc witha clean, dry c+oth from the canter outward
toward the edges.
• Do not wipe the disc in a c+rcular motion around the
center
• Do not use I+quidor aerosol cleaners
Notes on copyright
• This product incorporates copyright protection technology
that is protected by US+ patents and other inte_tectual
property rights Use of this copyright protection
technology must be authorized by Macrovision. and is
intended for home and other timited viewing uses only
untess otherwise authorized by Macrovision Reverse
engineering or disassemb+y is prohib+ted
• Unauthorized recording of copyrighted television
programs, films, v+deocassettes and other materials may
infringe the rights of copyright owners and be contrary to
copyright laws
(_) +6
Page 7
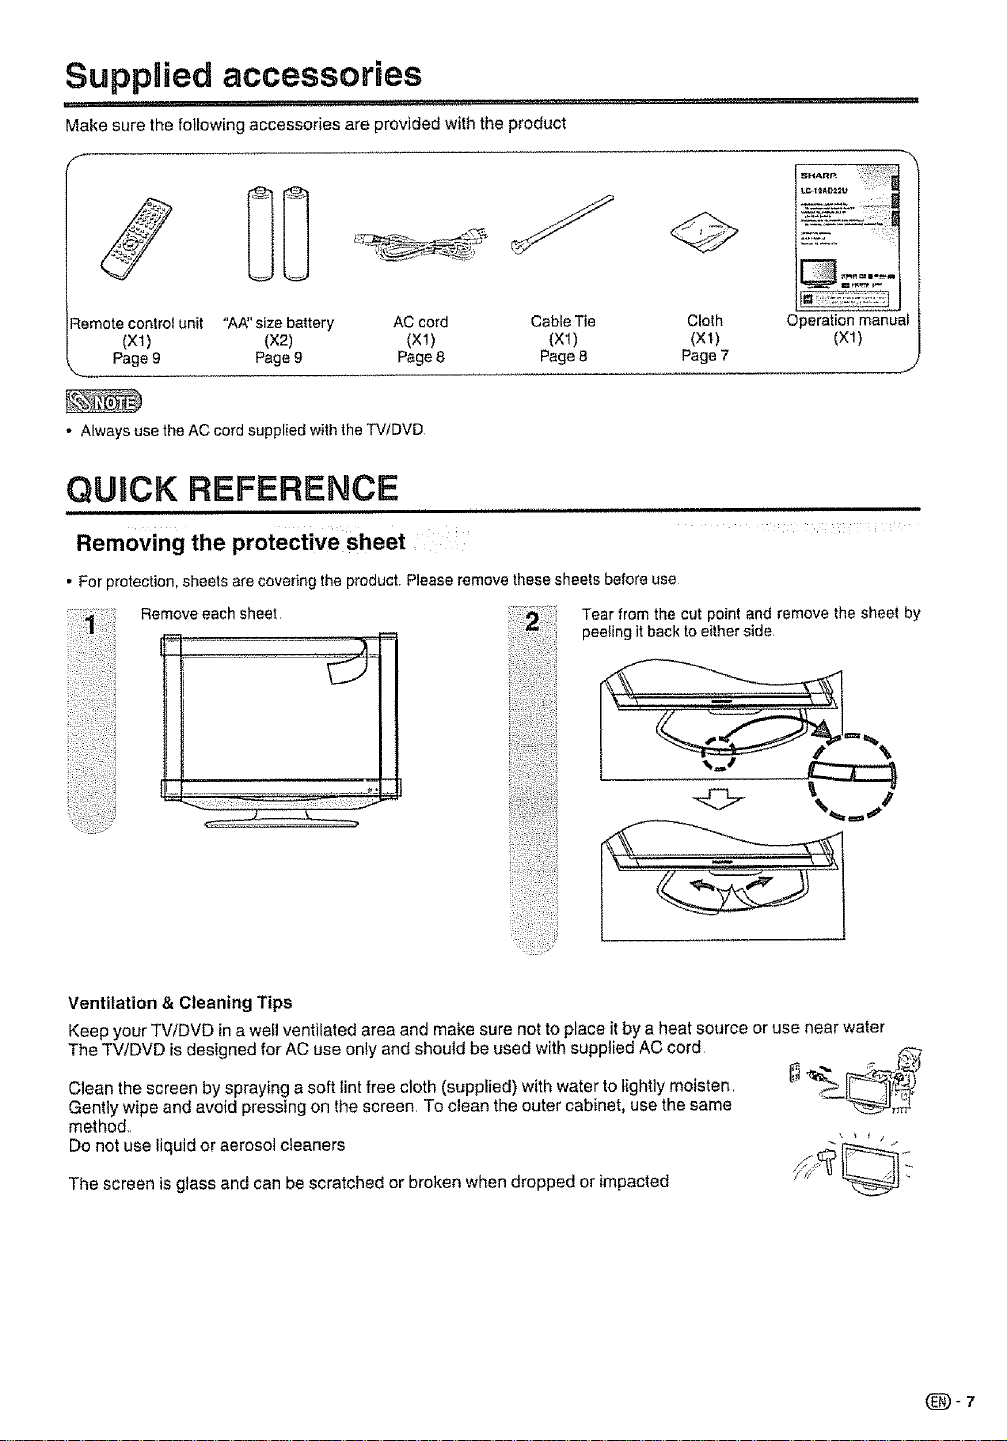
Supplied accessorDes
_, _,,,,, ,,,,, ,,,_,_ , u _,,,,,,,,,,
Make sure the following accessories are provided with the product
°J,;,",'L:
Remotecontrol unit "AA"size buttery AC cord CableTie Cloth
(Xl) {X2) (Xl) (X1) (X1)
Page9 Page9 Page8 Page8 Page7
• Always usethe ACcord suppliedwiththe TV/DVD
QUICK REFERENCE
,u,,.,
oving .....
Rein the protective sheet
• For protection, sheets are covering the product Please remove these sheets before use
Removeeachsheet
_1_-!I
Tear from the cut point and remove the sheet by
peeling it back to either side
Operationmanual
(xl)
Ventilation & Cleaning Tips
Keep your TV/DVD in awefl ventilated area and make sure not to place it by a heat source or use near water
The TV/DVD is designed for AC use onlyand should be used with supplied AC cord
Clean the screen by spraying asoft lint free cloth (supplied) with water to lightly moisten
Gently wipe and avoid pressing on the screen, To clean the outer cabinet, use the same
method,,
Do not use liquid or aerosol cleaners
The screen is glass and can be scratched or broken when dropped or impacted
(_-7
Page 8
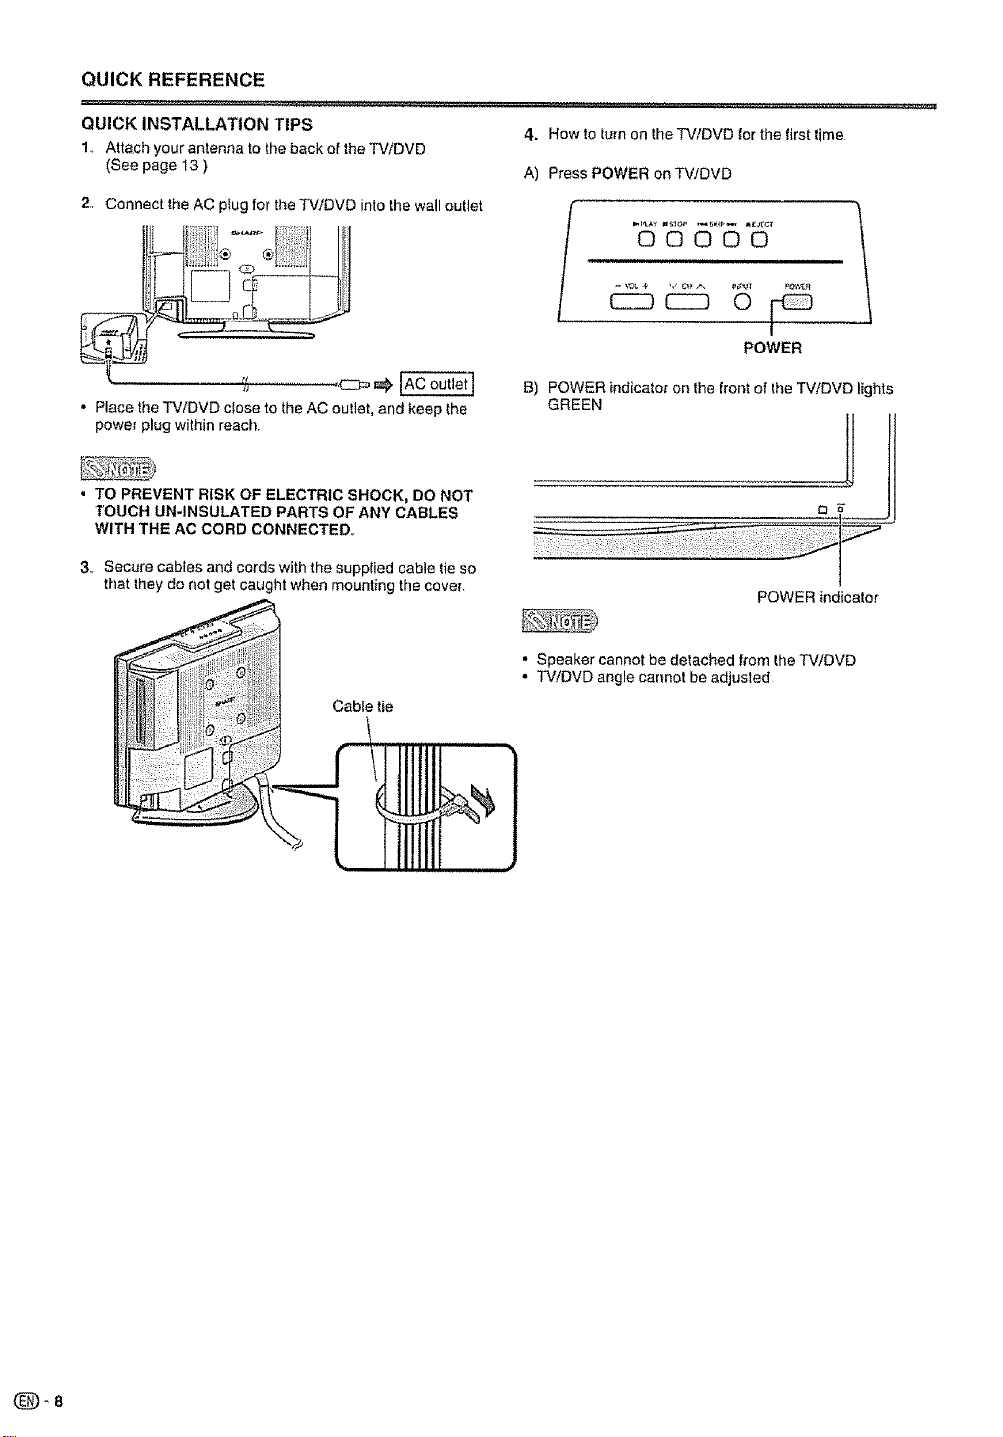
QUICK REFERENCE
........... , ,.,,,,,,,,, , ,,
QUICK INSTALLATION TIPS
1,, Attach your antenna to the back of the TViDVD
(See page 13 )
2. Connect the AC plug for the TV/DVD into the wall outlet
• Place the TV/DVD close to the AC outlet, end keep the
power plug within reach
• TO PREVENT RISK OF ELECTRIC SHOCK, DO NOT
TOUCH UN-INSULATED PARTS OF ANY CABLES
WITH THE AC CORD CONNECTED_
3_ Secure cables and cords with the supplied cable tie so
that they do not get caught when mounting the cover
,'..", ,r,,,,,,,,,, ,,
4. How to turn on the TVIDVD for the tirst time
A) Press POWER on TV/DVD
00000
POWER
B) POWER indicator on the front of the TV!DVD lights
GREEN
POWER indicator
Cable tie
• Speaker cannot be detached from the TV/DVD
,, TV/DVD angle cannot be adjusted
Page 9
QUICK REFERENCE
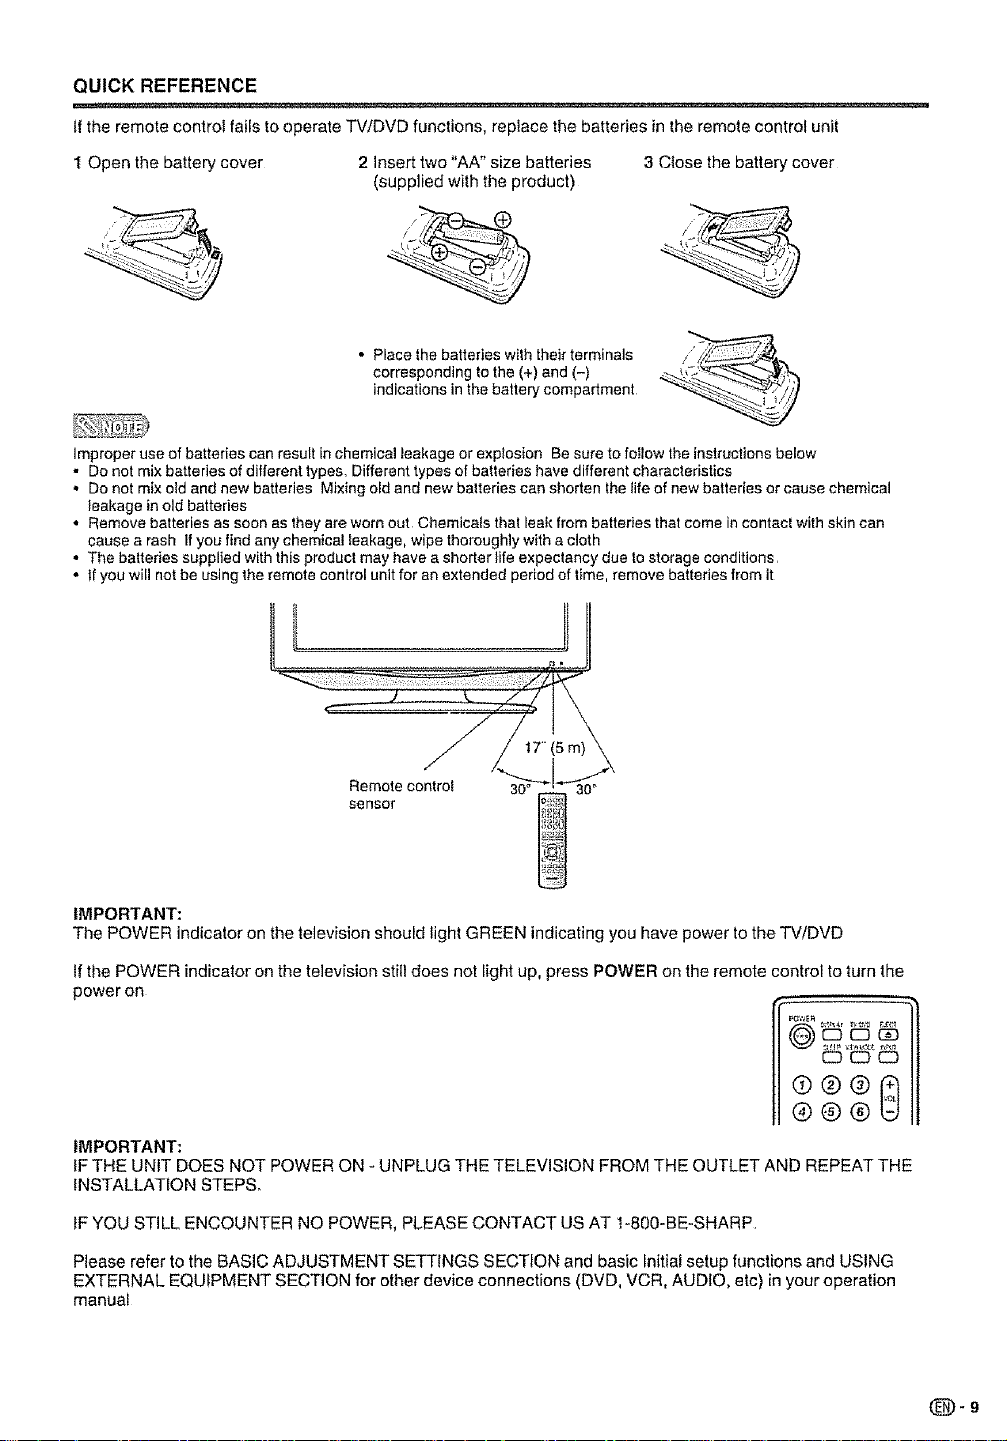
If the remote control fails to operate TV/DVD functions, replace the batteries in the remote control unit
t Open the battery cover
2 Insert two "AA" size batteries
(supplied with the product)
3 Close the battery cover
/
.....
• Place the batteries with their terminals
corresponding to the (+) and (-)
indications in the battery compartment
Improper use of batteries can result in chemical leakage or explosion Be sure to follow the instructions below
• De not mlx batteries of different types. Different types of batteries have different characteristics
• Do not mix old and new batteries Mixing old and new batteries can shorten the life of new batteries or cause chemical
leakage in old batteries
• Remove batteries as soon as they are worn out Chemicals that leak from batteries that come in contact with skin can
cause a rash If you find any chemical leakage, wipe thoroughly with a cloth
• The balteries supplied with this produc! may have a shorter }ire expectancy due to storage conditions.
• If you will not be using the remote control unit for an extended period of time, remove batteries from it
Remote control 30°
sensor
IMPORTANT:
The POWER indicator on the television should light GREEN indicating you have power to the TV/DVD
If the POWER indicator on the television still does not light up, press POWER on the remote control to turn the
power on
IMPORTANT:
IF THE UNIT DOES NOT POWER ON - UNPLUG THE TELEVISION FROM THE OUTLET AND REPEAT THE
INSTALLATION STEPS.
IF YOU STILL ENCOUNTER NO POWER, PLEASE CONTACT US AT !-800-BE-SHARP.
Please refer to the BASIC ADJUSTMENT SETTINGS SECTION and basic Initial setup functions and USING
EXTERNAL EQUfPMENT SECTION for other device connections (DVD, VCR, AUDIO, etc) in your operation
manual
Page 10

Contents
IMPORTANT INFORMATION ................................... 1
Trademarks .............................................................. 2
DEAR SHARP CUSTOMER ..................................... 3
iMPORTANT SAFETY INSTRUCTIONS ................... 3
Disc ........................................................................... 5
Discs which can be played back .................. 5
Discs which cannot be played back .............. 5
TitieiChaptedTrack ............................................. 5
Handling discs ................................ 6
Supplied accessories ............................................. 7
QUICK REFERENCE ................................................ 7
Removing the protective sheet ............... 7
Contents ................................................................. !0
Part names ..................................................................11
TV/DVD (Top/Front) ..................................... t 1
TV/DVD (Right) .......................................... 11
TV/DVD (Rear) ................................... 11
Remote control unit ........................... 12
Preparation ............................................................ 13
Using the remote control unit ....................... 13
Cautions regarding remote control unit ........ t 3
Antennas ................................................ 13
Using external equipment .............................................14
Displaying an extema! equipment image ......... t4
Connecting a DVD player or a digita!
TV STB (Cable) ................................... 15
Connecting a VCR, game consdle
or camcorder .................................... 15
Using digital audio output .......................... 15
Connecting HDMf equipment .......................... 16
Displaying an image from HDM1 equipment ...... t6
Selecting HDMI audio input source .................. 16
Watching TV............................................................................17
Preparation ............................................. 17
Turning on the power ......................... 17
Select the TV mode ................................ 17
Turning off the power ................................. 17
Changing channels ................................. 17
Initial setup ................................................. t 8
Setting MTS/SAP stereo mode ................ 19
Setting surround sound .................... 19
Display the channe_information .................... t9
Basic adjustment settings .................................... 20
Menu operation buttons .................................... 20
Menu items ............................................. 20
Labeling channels .................................... 21
input label ................................................... 21
Picture adjustments ................................ 22
Color temperature ....................... 22
Back lighting ......................................... 22
Cinema mode ............................................ 22
Sound adjustments .................................. 23
Digital audio output ................................ 23
Useful adjustment settings .................................. 24
AV mode ......................................................... 24
Selecting the digital audio language ............ 24
View mode for 4:3 programs .................................25
View mode for HD programs ............................ 25
Picture scroll ................................................... 25
Aspect .................................................................. 25
Closed captions and digital closed captions, . 26
Caption setup ................................................. 27
Password setting for parental control ................ 28
Parental control (V-CHIP) ........................................29
TV Parental Guidelines (TV Guidelines) ...... 30
Voluntary movie rating system (MPAA) ............. 30
Canadian rating systems .......................... 31
Canadian English ratings .......................... 32
Canadian French ratings ..................................... 32
How to temporarily release the V-CHIP block 32
Reactivating the temporarily released
V-CHIP block ................................. 32
Other viewing options ........................................... 33
Signal meter ........................................... 33
Auto shut off ........................................... 33
Connecting a PC (Personal computer) .................34
Viewing an image from a PC................ 34
Displaying an image from aPC ..................... 34
Pictureand Audio adjustments in PC mode ....... 35
PC compatibility chart ................................ 35
Watching the DVD ................................................. 36
Preparation ................................................ 36
Turning on the power .................................... 36
Select the DVD mode ............................... 36
Turning off the power .................................. 36
Playback procedure .................................... 37
Status display of DVD disc ......................... 37
Special playback ................................................ 38
Zooming ................................................ 38
Locating desired scene ................................... 38
Repeat playback ................................................ 39
A-B Repeat playback .............................. 39
Marking desired scenes .......................... 39
Changing angles ........................................ 40
Title selection .......................................... 40
DVD menu ........................................... 40
Changing soundtrack language .................... 41
Subtitles ......................................................... 41
MP3/WMA/JPEG and Audio CD operation .......... 42
MP3!WMA/JPEG CD information ................... 42
Loading CD ................................................ 43
MP3/WMA and Audio CD playback ............... 43
Select Files ........................................... 43
JPEG playback ........................................ 44
Slide show playback ............................. 44
Repeat playback (CD) ........................... 45
Random playback (CD) .............................. 45
Program playback (CD) ........................ 45
Function setup .............................................................46
Basic operation buttons ........................... 46
Menu items ....................................... 46
Setting the language ................................... 47
Setting the aspect ratio of TV screen ............. 47
Setting on screen display .....................................47
Setting the picture mode ............................... 48
Setting the JPEG interval ......................... 48
Night Mode ............................................. 48
Digital Out .................................................. 48
Parental control setting ............................... 49
Set the new password ................................. 49
Temporary' disabling of rating level by DVD
disc ........................................................ 50
Appendix .................................................................... 51
Language code list ........................... 51
Troubleshooting .................................... 52
Troubleshooting- Digital broadcasting ............. 52
Troubleshooting*PC mode .............................. 52
Troubleshooting-DVD ................................... 53
Specifications ......................................... 54
Calling for Service ................................................. 56
LIMITED WARRANTY ............................................ 56
Dimensional Drawings
,, The dimensional drawings for the TViDVD set are
shown on the inside back cover
(_'10
Page 11
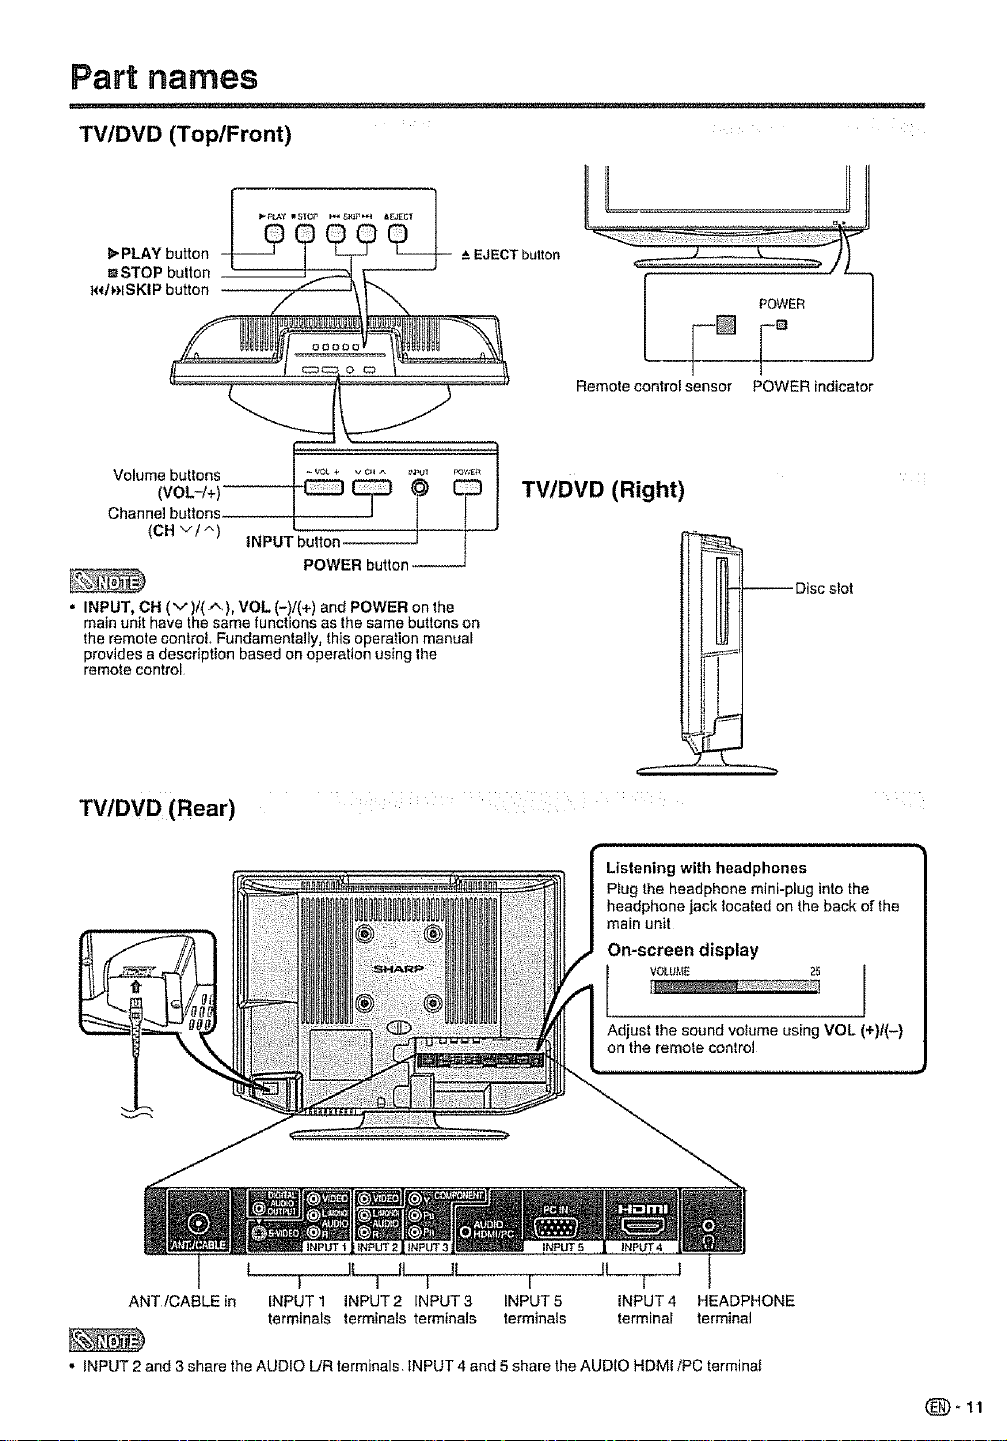
Part names
TV/DVD (Top/Front)
l_-PLAY button
mSTOP bulton
j,t,Ut,HSKIP button --
Channel buttons
Remote control sensor POWER indicator
TV/DVD (Right)
(OH vl ^) INPUT button J j
• INPUT, OH (v)/(A), VOL (-)/(+) and POWER on the
main unit have the same functions as the same buttons on
the remote control. Fundamentally, this operation manual
provides a description based on operation using the
remote control
POWER button --
TV/DVD (Rear)
slot
--Disc
i ¸
I with headphones
I
1 ]L._[.__i_ I il I I1 I
ANT iCABLE in INPUT 1 iNPUT2 INPUT3 iNPUT5 INPUT4 HEADPHONE
. INPUT 2 and 3 share the AUDIO L/R terminals INPUT 4 and 5 share the AUD{O HDMI/PC terminal
terminals terminals terminals terminals terminal terminal
I
(_-11
Page 12
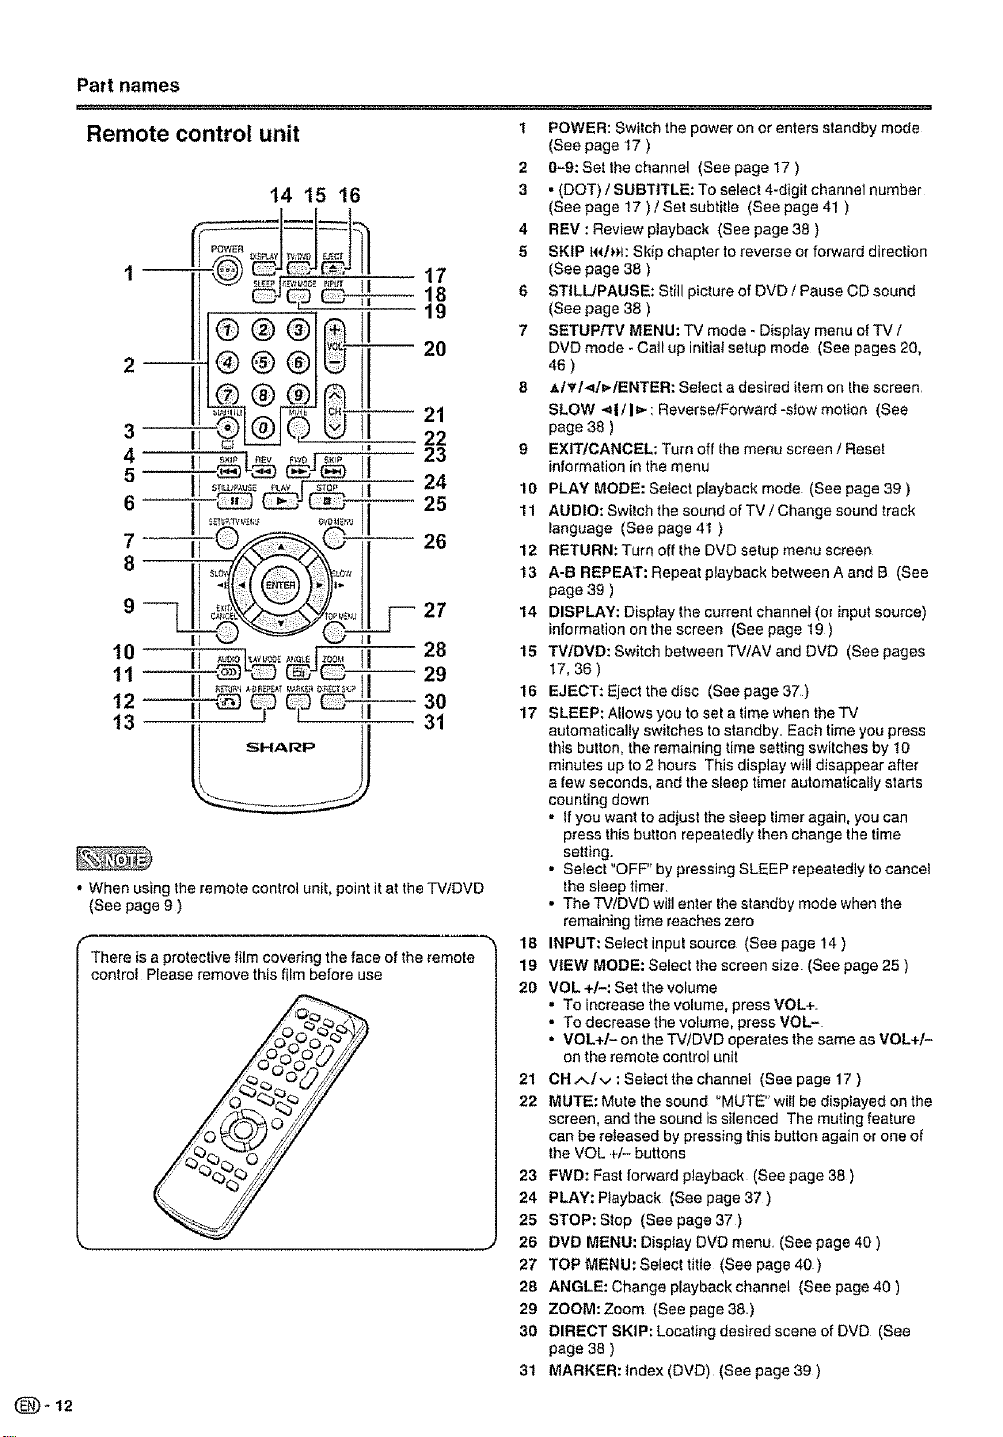
Part names
Q_12
Remote control unit
14 15 16
17
18
19
-- 2O
®®®I
®®®18_tl
-- 21
5 _- ,'r_L_ ___;J(_ II
6 I o_ _ _ 25
9 _l_ 27
!0 I1 II 28
11 -'---TT- _v-e_ _ _ _ -29
t2 iT Jt-t 30
13 31
l SHARP IJ
• When using the remote control unit, point it at the TV/DVD
(See page 9 )
There is a protective ftlm covering the face of the remote
control Please remove this film before use
1 POWER: Switch the power on or enters standby mode
(See page 17 )
2 0_9: Set the channel (See page 17 )
3 • (DOT) / SUBTITLE: To select 4-d{git channel number
(See page 17 ) / Set subtitle (See page 41 )
4 REV : Review playback (See page 38 )
5 SKIP t_*/_,_:Skip chapter to reverse or forward direction
(See page 38 }
6 STILL/PAUSE: Still picture of DVD / Pause CD sound
(See page 38 )
7 SETUP/TV MENU: TV mode - Display menu of TV /
DVD mode - Call up initial sefup mode (See pages 20,
46 )
8 Atv'I._I_IENTER: Se{ect a desired item on lhe screen
SLOW _ I/ I_.-: Reverse/Forward -slow motion (See
page 38 )
9 EXlTICANCEL: Turn off the menu screen / Reset
information in the menu
10 PLAY MODE: Select playback mode (See page 39 )
11 AUDIO: Switch the sound of TV / Change sound track
language (See page 41 }
12 RETURN: Turn off lhe DVD setup menu screen
13 A-B REPEAT: Repeat playback between A and B (See
page 39 )
14 DISPLAY: Display the current channel (or input source)
information on the screen (See page !9 )
15 TVfDVD: Switch between TV/AV and DVD (See pages
17, 36)
16 EJECT: Eject the disc (See page 37 }
17 SLEEP: Allows you to set a lime when the TV
automafically switches to standby. Each time you press
this button, the remaining time setting switches by 10
minutes up to 2 hours This display will disappear after
a few seconds, and the sleep timer automatically starts
eounling down
,, If you want to adiust the sleep limer again, you can
press this button repeatedly then change the time
setting.
• Selecl "OFF" by pressing SLEEP repeatedly to cancel
the sleep timer.
• The TV/DVD will enter the standby mode when the
remaining time reaches zero
1B INPUT: Select input source (See page 14 )
19 VIEW MODE: Select the screen size (See page 25 )
20 VOL +1-: Set the volume
. To increase the volume, press VOL+,
• To decrease the volume, press VOL-
• VOL+/- on the TV/DVD operates the same as VOL+t-
on the remote control unit
21 CH^/v : Select thechannel (See page 17 )
22 MUTE: Mute fhe sound "MUTE" will be displayed on the
screen, and the sound is silenced The muting feature
can be released by pressing this button again or one of
the VOL +/- buttons
23 FWD: Fast forward playback (See page 38 }
24 PLAY: Playback (See page 37 )
25 STOP: Stop (See page 37 )
26 DVD MENU: Display DVD menu (See page 40 )
27 TOP MENU: Select title (See page 40)
28 ANGLE: Change playback channel (See page 40 )
29 ZOOM: Zoom (See page 38}
30 DIRECT SKIP: Locating desired scene of DVD (See
page 38 )
31 MARKER:Index (DVD) (See page 39 )
Page 13
Preparation
Using theremote control unit ' :
Use the remote control unit by pointing ittowards the remote control sensor on
the TV/DVD Objects between the remote control unit and the remote control
sensor may prevent proper operation
Cautions regarding remote control unit
. Do not expose the remote control unit to shock
In addition, do not expose the remote controt unit to liquids, and do not place in an area
with high humidity
° Do not install or place the remote control unit under direct sunlight The heat may cause
deformation of the remote control unit
. The remote control unit may not work properly if the remote control sensor on the TViDVD
is under direct sunlight or strong lighting insuch cases, change the angle of the lighting or
the TViDVD, or operate the remote control unit closer to the remote control sensor
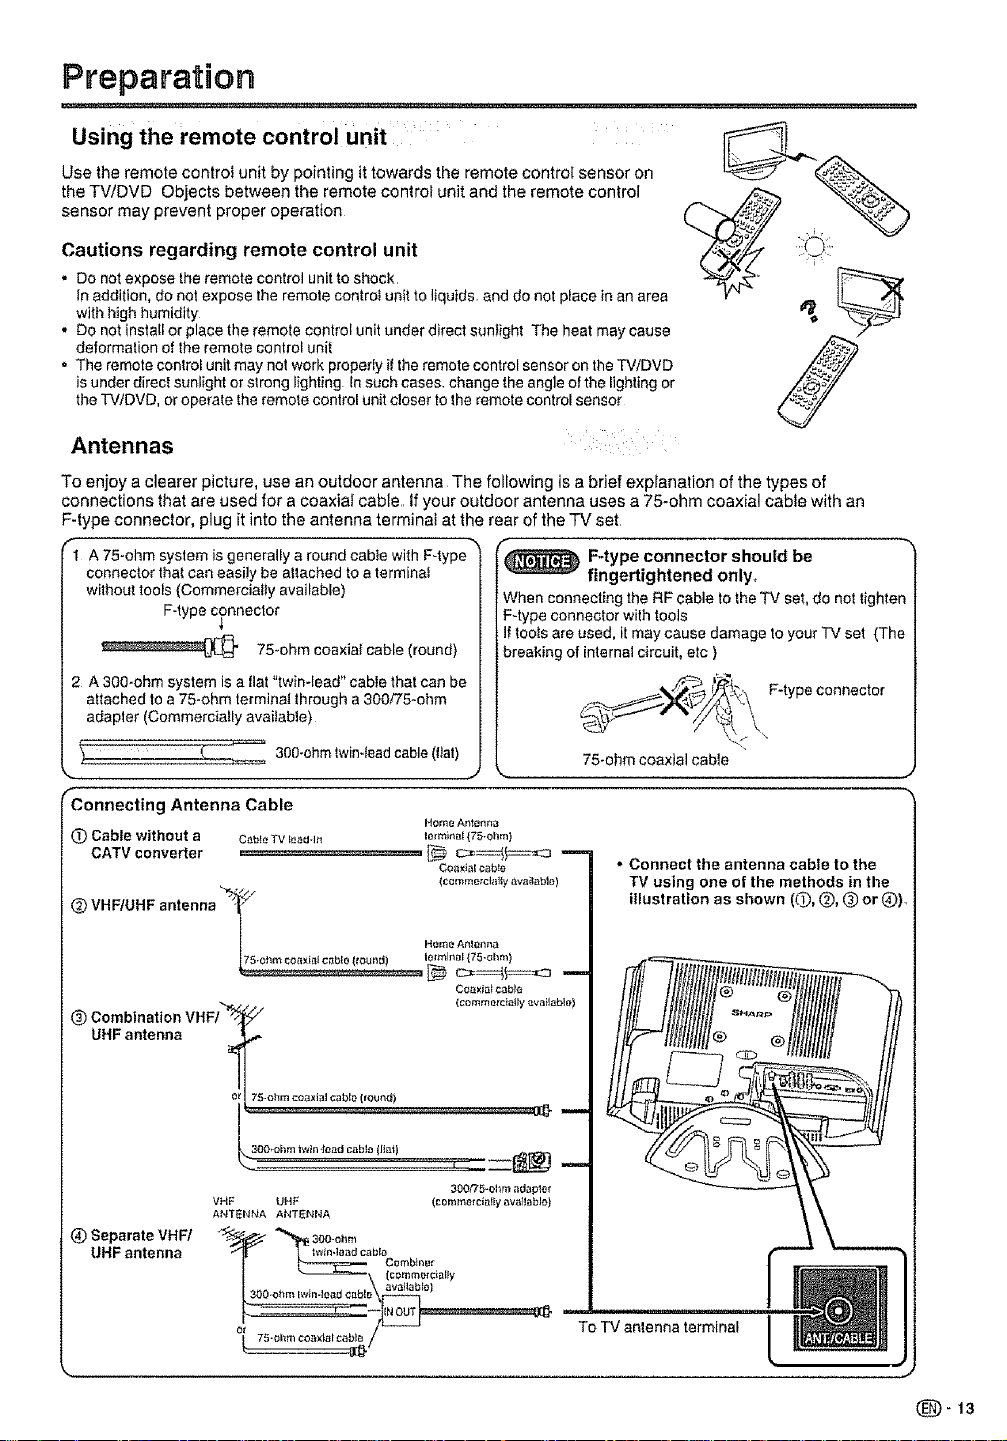
Antennas
To enjoy a clearer picture, use an outdoor antenna The following is a brief explanation of the types of
connections that are used for a coaxiat cable, if your outdoor antenna uses a 75-0hm coaxial cable with an
F-type connector, plug it into the antenna terminal at the rear of the TV set
"1 A 75-ohm system is generally a round cable with F-type
connector that can easily be attached to a terminal
without tools (Commercially available)
F-type connector
75-ohm coaxial cable (round)
2 A 300-ohm system is a fiat "twin-lead" cable that can be
attached to a 75-ohm terminal through a 300/75-ohm
adapler (Commercially avaiJable)
When connecting the RF cable to the TV sat, do net tighten
F-type connector with tools
If tools are used, it may cause damage toyour TV set (The
breaking of internal circuit, etc )
F-type connector should be
fingertightened only,,
F-type connector
Q Separate VHFI
UHF antenna
75-ohm coaxial cable
• Connect the antenna cable to the
TV using one of the methods in the
illustration as shown (_..),O, @ or @),
(_)- 13
Page 14
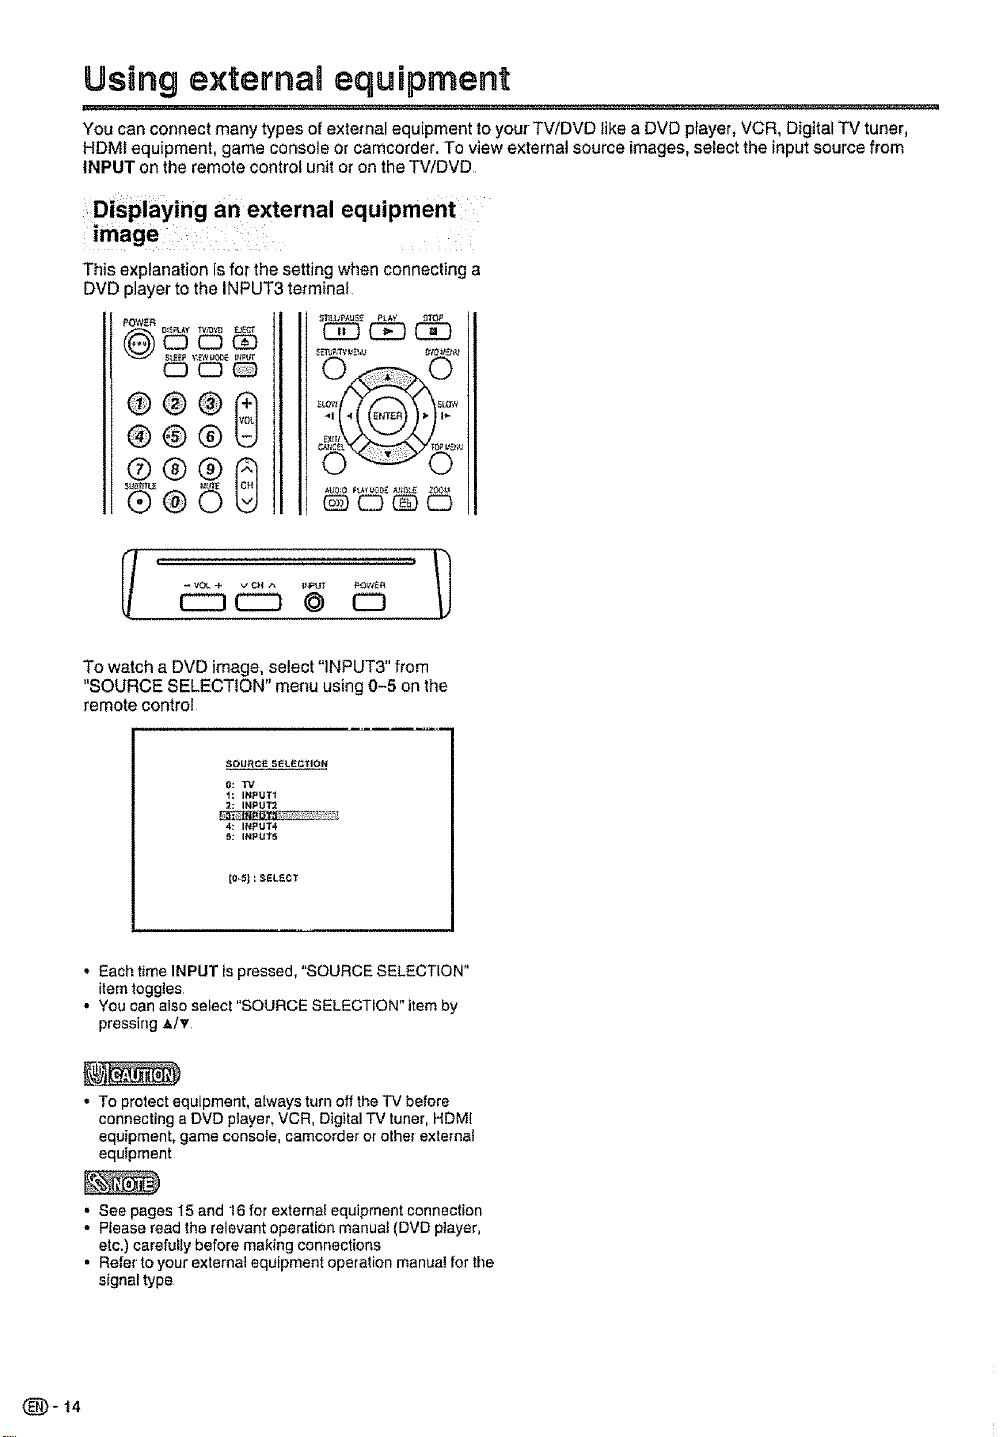
Using e×ternaA equipment
You can connect many types of external equipment to your TV/DVD like a DVD player, VCR, Digital TV tuner,
HDMf equipment, game console or camcorder. To view external source images, select the input source from
INPUT on the remote control unit or on the TV/DVD
'DiSplaying an external equipment
This explanation is fat the setting when connecting a
DVD player to the INPUT3 terminat
PL_' STOt_
CZ]CZ) CE)
CD CZ] _
®®®G
@@®
@®®
_C3_CD
To watch a DVD image, select 'INPUT3" from
"SOURCE SELECTION" menu using 0-5 on the
remote control
SQURC£ SEL£CTION
_: TV
t: INPUT1
2:INPUT2
4:INPUT4
_: INPUT5
. Each time INPUT ispressed, "SOURCE SELECTION"
item toggles
• You can also select "SOURCE SELECTION" item by
pressing *Iv
• To protect equipment, always turn off the TV before
connecting a DVD player, VCR, Digital TV tuner, HDMI
equipment, game console, camcorder or other external
equipment
• See pages 15 and 16 for external equipment connection
• Please read the relevant operation manual (DVD player,
etc.) carefully before making connections
• Refer to your external equipment opera_ion manual for lhe
signal type
(_-t4
Page 15

Using external equipment
Connecting a DVD player or a digital TV STB (Cable)
You can use the INPUT1-3, 5 terminals when connecting to a DVD player, a Digital TV STB (Cable) and other
audiovisual equipment,
When using composite cable. (INPUT1 or 2) When using component cable_ (INPUT3)
Audio cable (commercially available)
(commercially avaitaMe)
Component video cable
(commercially availaMe)
..... __,_ Digital TV STB
o See page 16for connecting a DVD player or a Digital TV STB to the HDMI terminal
Connecting a VCR, game console or
-_DVD player/
_._L-- DVD player/
Using digital audio output
camcorder
It is possible to output audio through the COAXIAL
AVCR, game consote, camcorder and other
audiovisual equipment can be conveniently connected
using the 1NPUT1 or 2 terminals
S-video cable AV cable
(commercially (commercially
available) available)
DIGITAL AUDIO OUTPUT terminal (See page 23 for
details ) PCM audio outputs from the termina!
Coaxial digital cable
To coaxial digital input of
external audio devices
Y _" "° DtgitaITVSTB
........ _ . VCR/Game console/
• The S-video terminal takes priority over the video
terminals
Camcorder
Page 16
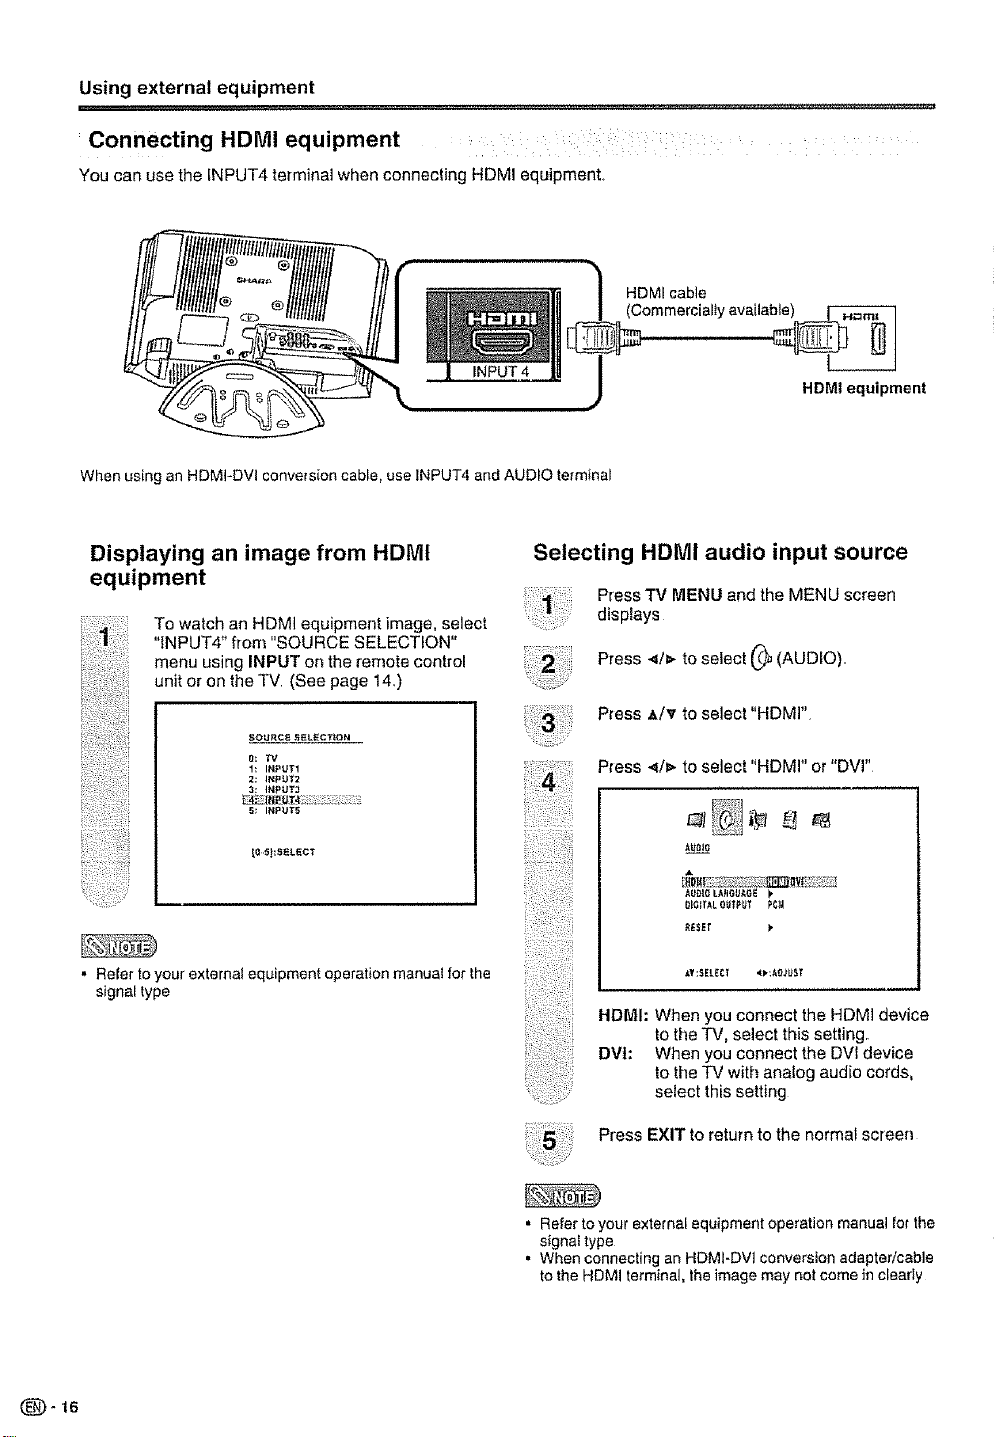
Using external equipment
r.................
Connecting HDiVll equipment
You can use the INPUT4 terminal when connecting HDMI equipment,
When using an HDMI-DVI conversion cable, use INPUT4 and AUDIO terminal
HDMI cable
HDMI equipment
Displaying an image from HDMI
equipment
To watch an HDMI equipment image, select
"INPUT4" from "SOURCE SELECTION"
menu using INPUT on the remote control
unit or on the TV (See page 14,)
SOURC_ SEL_CTtON
1:INPUT1
2t INPUT2
3:INPUT3
E4_5[tlE_I_,_
5; INPUT5
[O ,5]:SELECT
,, Refer to your external equipment operation manual for the
signal type
Selecting HDMi audio input source
Press TV MENU and the MENU screen
displays
Press </b- to select (_ (AUDIO),.
Press A/_ to select "HDMI"
Press </_,- to select "HDMI" or "DVP
O_GFTALO_TPL_T PC_
_T:SELECT <_:_OJUST
HDMh When you connect the HDM] device
to the TV, select this setting..
DVh When you connect the DVI device
to the TV with analog audio cords,
select this setting
Press EXIT to return to the normai screen
(_-16
• Refer to your external equipment operation manual [or the
signal type
• When connecting an HDMI-DVI conversion adapter/cable
to the HDMI terminal, the image may net come in clearly
Page 17
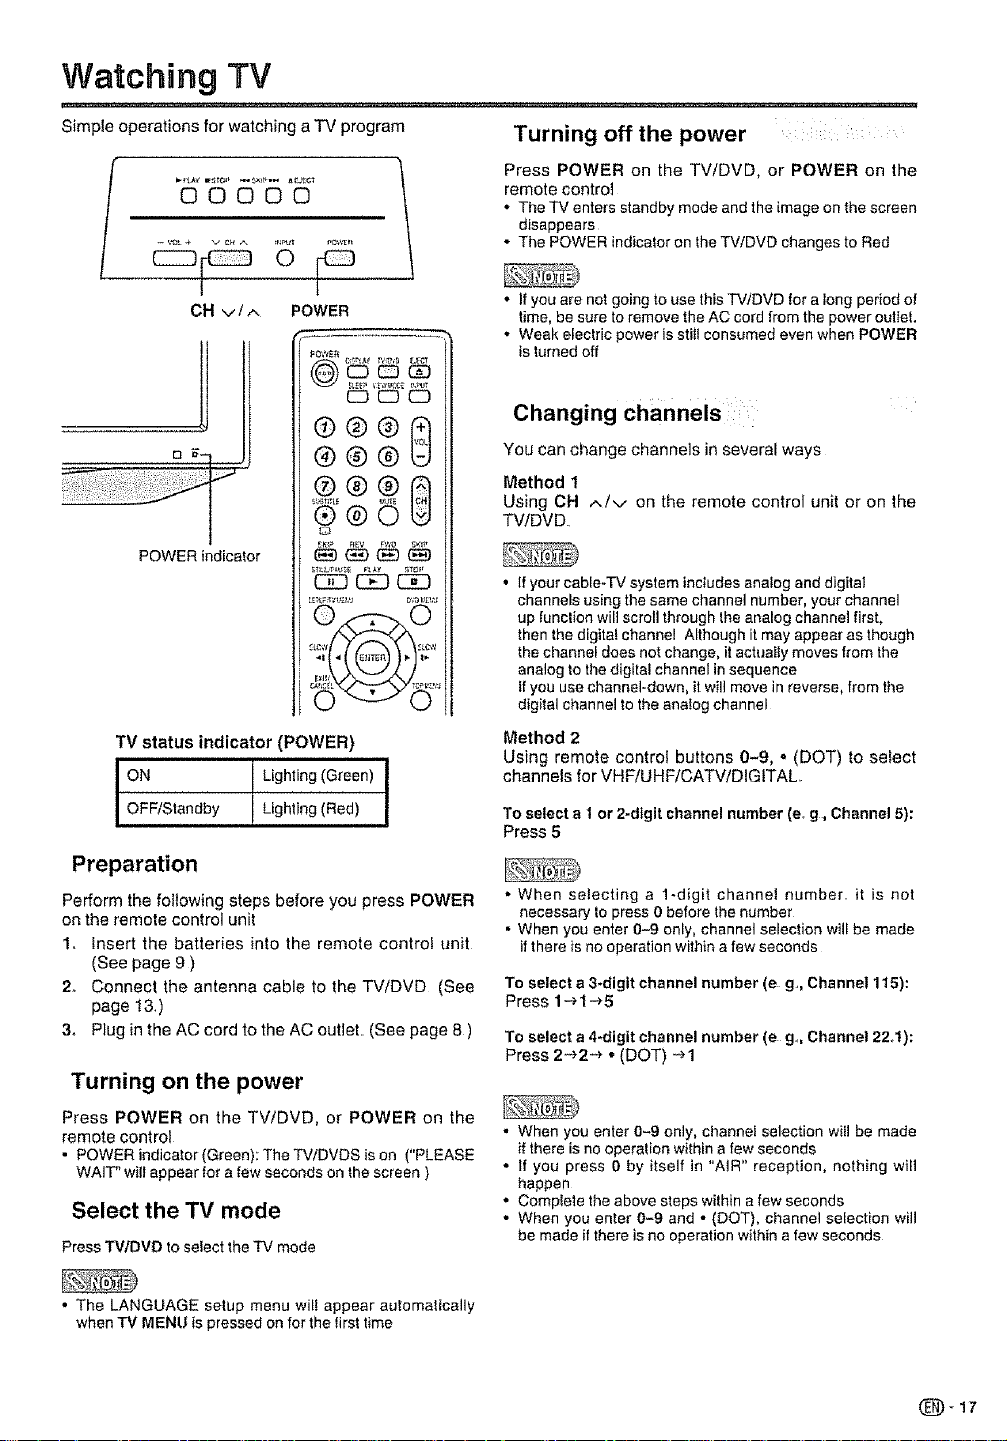
Watching TV
Simple operations for watching a TV program
00000
.............o
! l
CH v / ^ POWER
K3 CD CD
@@@8
®®®
®N®
POWER indicator
U<zY
TV status indicator (POWER)
ON Lighting (Green)
OFF/Standby Lighting (Red)
Turning off the power ....
\
Press POWER on the TV!DVD, or POWER on the
remote controt
* The TV enters standby mode and the image on the screen
disappears
* The POWER indicator on the TViDVD changes to Red
• If you ere not going to use this TViDVD for a long period of
time, be sure to remove the AC cord from the power oulIet.
• Weak electric power is stiII consumed even when POWER
is turned off
Changing channels i
You can change channels in several ways
Method 1
Using CH ^/v on the remote control unit or on the
TV/DVD
• If your cable-TV system inciudes analog and digital
channels using the same channel number, your channel
up function will scroll through the analog channel first,
then the digita! channel Although it may appear as though
the channel does not change, it actually moves from the
analog to the digital channel in sequence
if you use channel-down, it will move in reverse, from the
digital channel to the analog channel
Method 2
Using remote control buttons 0-9, o (DOT) to select
channels for VHF/UHF/CATV/DIGtTAL
To select a 1 or 2-digit channel number (e. g, Channel 5):
Press 5
Preparation
Perform the following steps before you press POWER
on the remote control unit
1o Insert the batteries into the remote control unit
(See page 9 )
2. Connect the antenna cable to the TV/DVD (See
page 13.)
3o Plug in the AC cord to the AC outlet. (See page 8 )
Turning on the power
Press POWER on the TV/DVD, or POWER on the
remote control
• POWER indicator (Green): The TV/DVDS is on ("PLEASE
WAIT" will appear for a few seconds on the screen )
Select the TV mode
Press TVIDVD to select the TV mode
• The LANGUAGE setup menu wil! appear automatically
when TV MENU is pressed on for the first time
• When selecting a 1-digit channel number, it is not
necessary to press 0 before the number
,' When you enter 0-9 only, channel selection will be made
if there is no operation within a few seconds
To select a3-digit channel number(e g,, Channel 115):
Press 1-.1-_5
To select a 4*digit channel number (e g.,, Channel 22_1):
Press 2._-2-e - (DOT) -el
• When you enter 0-9 only, channel selection witl be made
if there is no operalion within a few seconds
• If you press 0 by itself in "AIR" reception, nothing wilt
happen
° Complete the above steps within a few seconds
. When you enter 0-9 and * (DOT), channel selection will
be made if there is no operation within a few seconds
Page 18
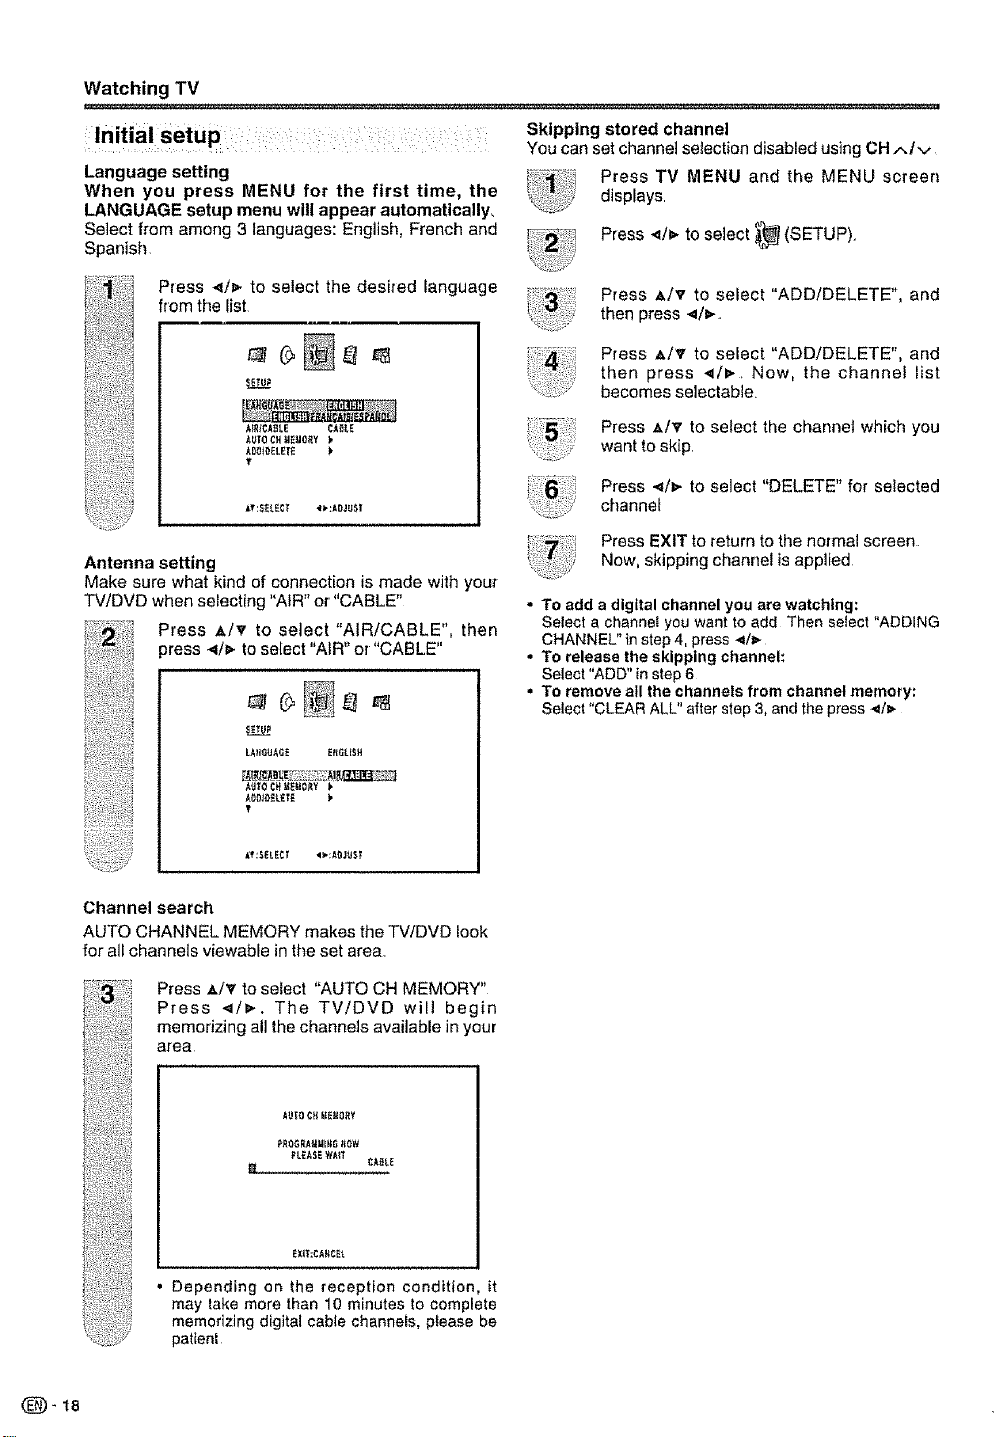
Watching TV
Language setting
When you press MENU for the first time, the
LANGUAGE setup menu will appear automatically_
Select from among 3 languages: English, French and
Spanish,
Skipping stored channel
You can set channel selection disabled using CH .--.Iv
Press TV MENU and the MENU screen
displays
Press _/t,- to select _,_ (SETUP),
Press _i/_- to select the desired language
from the list
A_CABLE CABLE
&_fO CHgEUO_Y
ADO_OELE[E
T
AV:_EL_Cf _*:AOJU_I
Antenna setting
Make sure what kind of connection is made with your
TV/DVD when selecting "AIR" or "CABLE"
Press .m/'v to select "AIR/CABLE", then
3ress 4/_- to select "AIR" or "CABLE"
AgTOCH_E_ORY
AOOIO_L£TE
V
AT:SELECT <*:AOJ_$_
Press _/T to select "ADD/DELETE', and
then press _/_-..
Press A/v to select "ADD/DELETE", and
then press ._/_-. Now, the channel list
becomes selectabte.
Press _,/_to select the channel which you
want to skip.
Press ._/_- to select "DELETE" for selected
channel
Press EXIT to return to the normat screen
Now, skipping channel isapplied
• To add a digital channel you are watching:
Select a channet you want to add Then select "ADDING
CHANNEL" in step 4, press _/=-
• To release the skipping channel:
Select "ADD" in step 6
° To remove all the channels from channel memory:
Select "CLEAR ALL" after step 3, and the press 4/_-
(_)- t8
Channel search
AUTO CHANNEL MEMORY makes the TV/DVD look
for all channels viewable in theset area.
Press ,_I_' to select "AUTO CH MEMORY"
Press ._/_-. The TV/DVD will begin
memorizing all the channels available in your
area
;',_OGF,ABU_fiGttOt9
_L£ASEYi_,ff
• Depending on the reception condition, it
may take more than 10 minutes to complete
memorizing digital cable channels, please be
patient
CAELE
Page 19
Watching TV
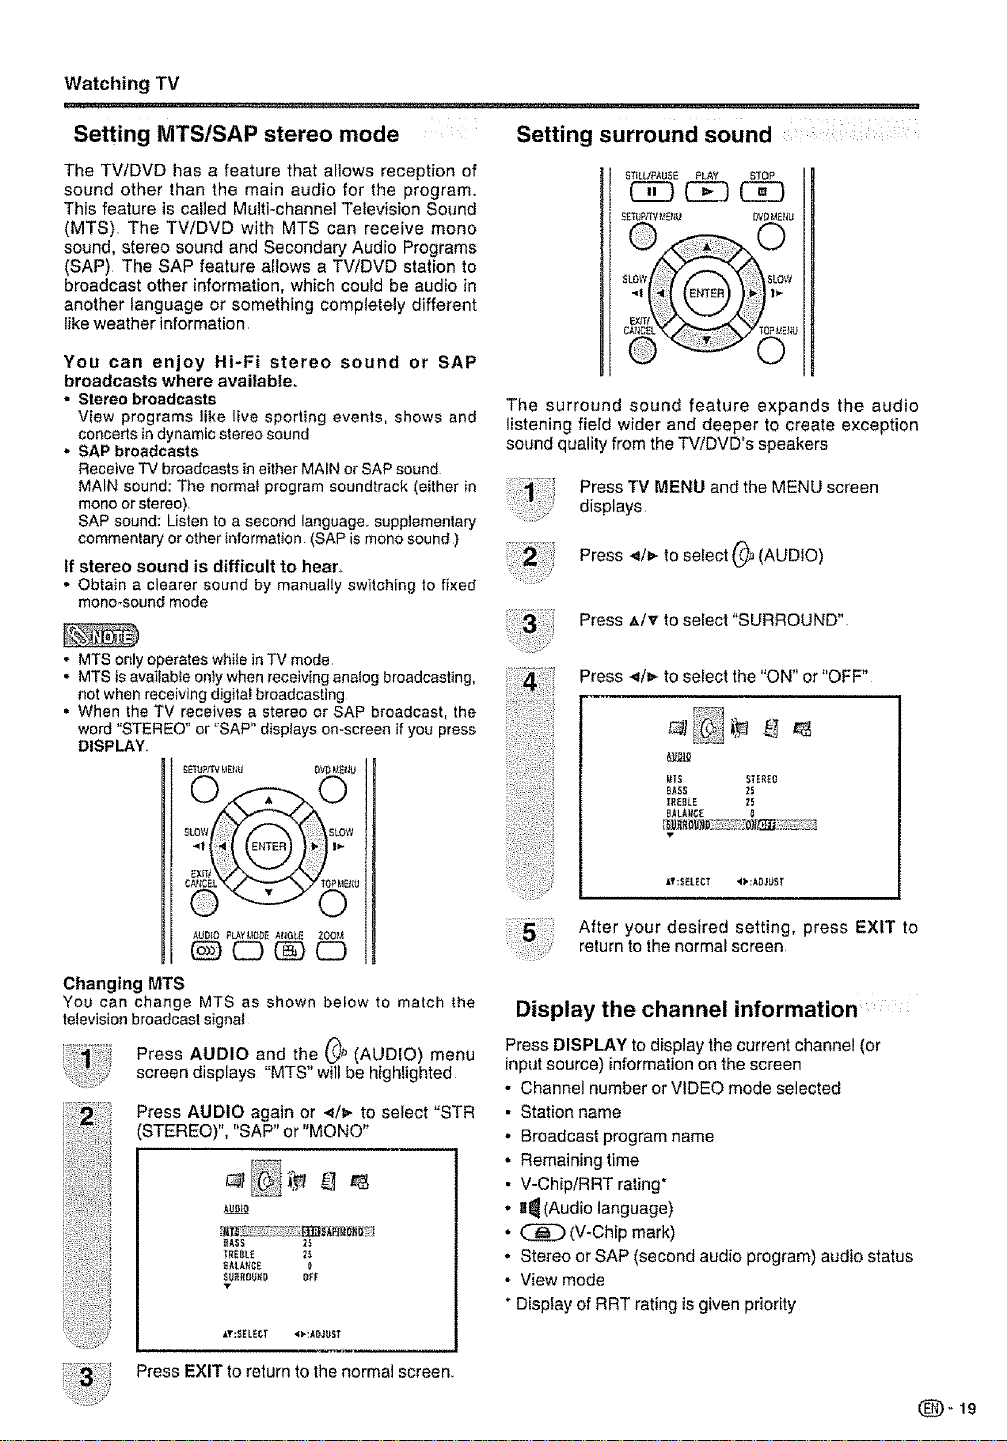
Setting MTS/SAP stereo mode Setting surround sound : :
The TWDVD has a feature that allows reception of
sound other than the main audio for the program.
This feature is called Multi-channel Television Sound
(MTS) The TV/DVD with MTS can receive mono
sound, stereo sound and Secondary Audio Programs
(SAP) The SAP feature allows a TV/DVD station to
broadcast other information, which could be audio in
another language or something completely different
like weather information
You can enjoy Hi-Fi stereo sound or SAP
broadcasts where available.
• Stereo broadcasts
View programs like live sporting events, shows and
conceals in dynamic stereo sound
• SAP broadcasts
Receive TV broadcasts in either MAIN orSAP sound
MAIN sound: The normal program soundtrack (either in
mono or stereo).
SAP sound: Listen to a second language, supp]ementa,'y
commentary or other information (SAP ismono sound )
If stereo sound is difficult to hear.
• Obtain a clearer sound by manually switching to fixed
mono-sound mode
. MTS only operates while in TV mode
. MTS is avaitable only when receiving analog broadcasting,
not when receiving digitaf broadcasting
• When the TV receives a stereo or SAP broadcast, lhe
word "STEREO" or "SAP" displays on-screen if you press
DISPLAY
_TILU_AUSE PLAY _TOP
C]Z]C]E](ZE]
SZ'rOP_Ype_ DyD_._tlu
The surround sound feature expands the audio
listening field wider and deeper to create exception
sound quality from the TV/DVD's speakers
Press TV MENU and the MENU screen
displays
Press 4/_,- to select 0;_ (AUDIO)
Press A/v to select "SURROUND"
Press ._/=,-to select the "ON" or "OFF"
l
_LQ
_I$ STEREO
BASS 25
TREELE 25
BALARCE 0
AUDIO R_YI,ID_EAt4GLE ZOO?_
(ZZ) (Z]
Changing MTS
You can change MTS as shown below to match the
televisionbroadcast signal
Press AUDIO and the 0 _ (AUDIO) menu
screen displays "MTS" will be highlighted
Press AUDIO again or .,_h,-to select "STR
(STEREO)", "SAP" or "MONO"
ARRiO
RASS 2_
TREBLE 2_
eALA_RE
_RRO_Rp R[F
Ilr:SELERT _=-:AR,IRST
Press EXIT to return to the normal screen.
IT;SELECT 4_':ARJL_ST
After your desired setting, press EXIT to
return to the norma_ screen
Display the channel information
Press DISPLAY to displaythe currentchannel (or
inputsource) informationonthe screen
• Channel number or VIDEO mode selected
• Station name
• Broadcast program name
• Remaining time
• V-Chip/RRT rating*
• gl_(Audiolanguage)
• (_[_) (V-Chip mark)
• Stereo or SAP (second audio program) audio status
• View mode
• Display of RRT rating isgiven priority
Page 20
BasDcadjustment settings
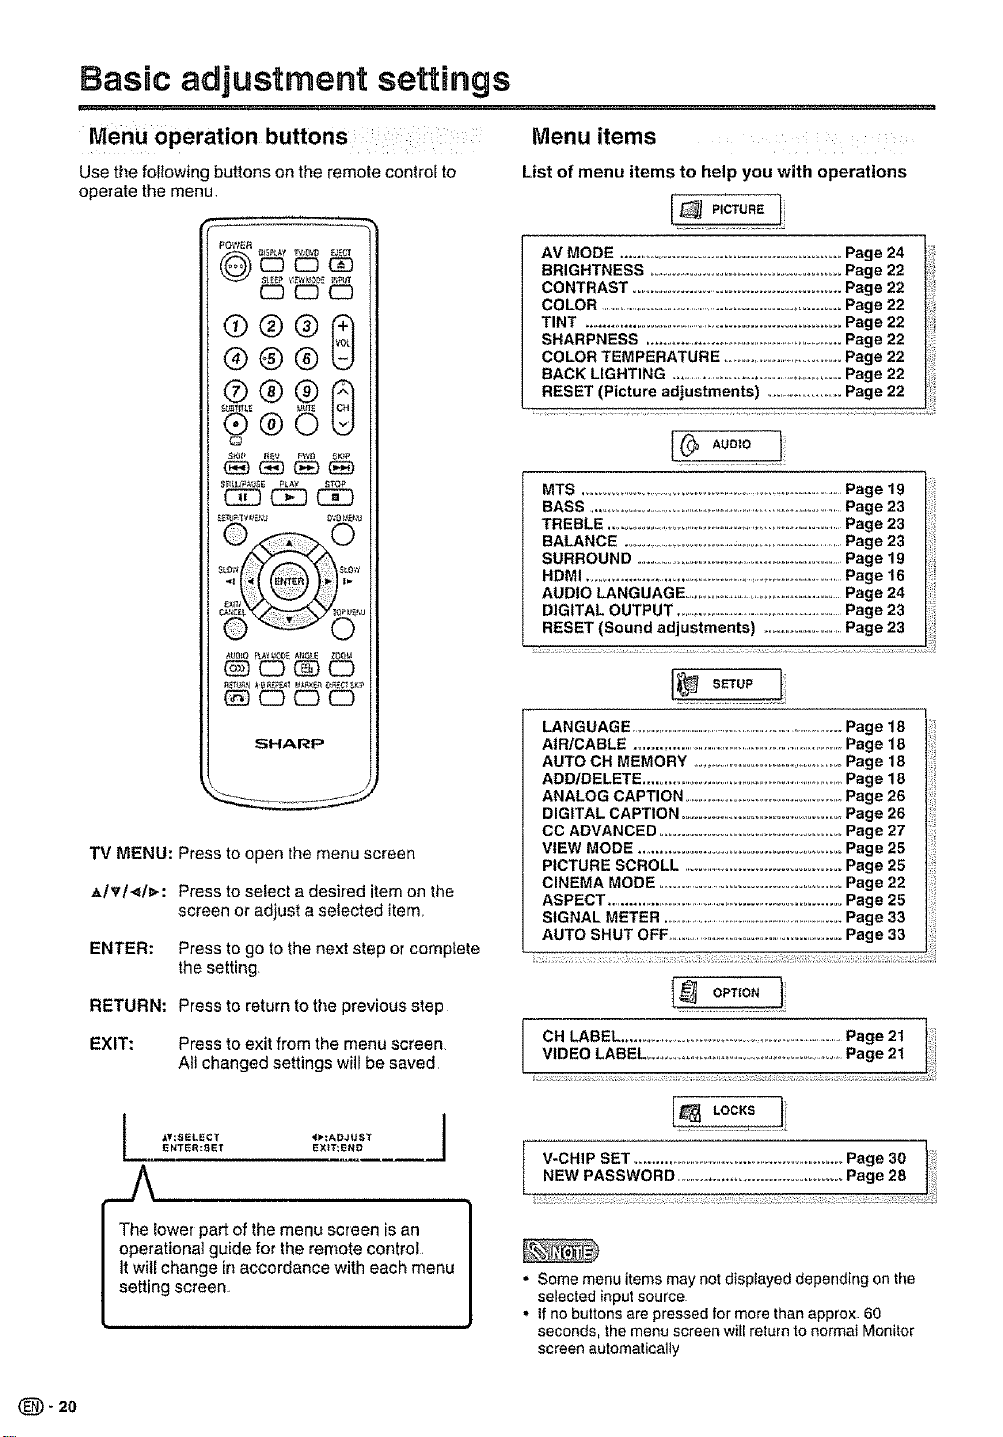
Menu operation buttons :
Use the following buttons on the remote control to
operate the menu,
e®®8
@@@
S'®5
STtL_/Pa_JSE PLAY _TOP
CSD
Menu items ....
List of menu items to help you with operations
AV MODE .............................................................Page 24
BRIGHTNESS ..................................................Page 22
CONTRAST .......................................................Page 22
COLOR .........................................................................Page 22
TINT .........................................................................Page 22
SHARPNESS ..................................................................Page 22
COLOR TEMPERATURE ...........................................Page 22
BACK LIGHTING ...........................................................Page 22
RESET (Picture adjustments) .........................Page 22
,oe,o
MTS ........................................................................................Page 19
BASS ......................................................................................Page 23
TREBLE ..................................................................................Page 23
BALANCE ..........................................................................Page 23
SURROUND ....................................................................Page 19
HDMI ..............................................................................Page 16
AUDIO LANGUAGE ...........................................................Page 24
DIGITAL OUTPUT ............................................................Page 23
RESET (Sound adjustments) ............................Page 23
SHARP
TV MENU: Press to open the menu screen
,klvl._l_,.: Press to select a desired item on the
screen or adjust a setected item.
ENTER: Press to go to the next step or complete
the setting
RETURN: Press to return to the previous step
EXIT: Press to exit from the menu screen
All changed settings will be saved
*_¥:SELECT _*:ADJUST
ENTE_:_ET EXIT_END
Tile lower part of the menu screen is an
operational guide for the renlote cor_trol,
tt will change in accordance with each menu
setting screen
LANGUAGE ................................................................................ Page 18
AIR/CABLE .......................................................................... Page 18
AUTO CH MEMORY .............................................Page 18
ADD/DELETE ..............................................................Page 18
ANALOG CAPTION ................................................Page 26
DIGITAL CAPTION ......................................... Page 26
CC ADVANCED ............................................. Page 27
ViEW MODE ................................................. Page 25
PICTURE SCROLL .........................................Page 25
CINEMA MODE ................................................Page 22
ASPECT ........................................................................Page 25
SIGNAL METER ......................................................................Page 33
AUTO SHUT OFF ..............................................................Page 33
2 4,,
CH LABEL ...................................................................................Page21
VCHIP SET ........... ................................................... Page aO ]
NEW PASSWORD .............................................Page 28
o Some menu items may not displayed deperrd[r_g en the
selected input source
• tf no buttons are pressed for more than approx 60
seconds, the menu screen will return to normal Monitor
screen automatically
(_- 20
Page 21
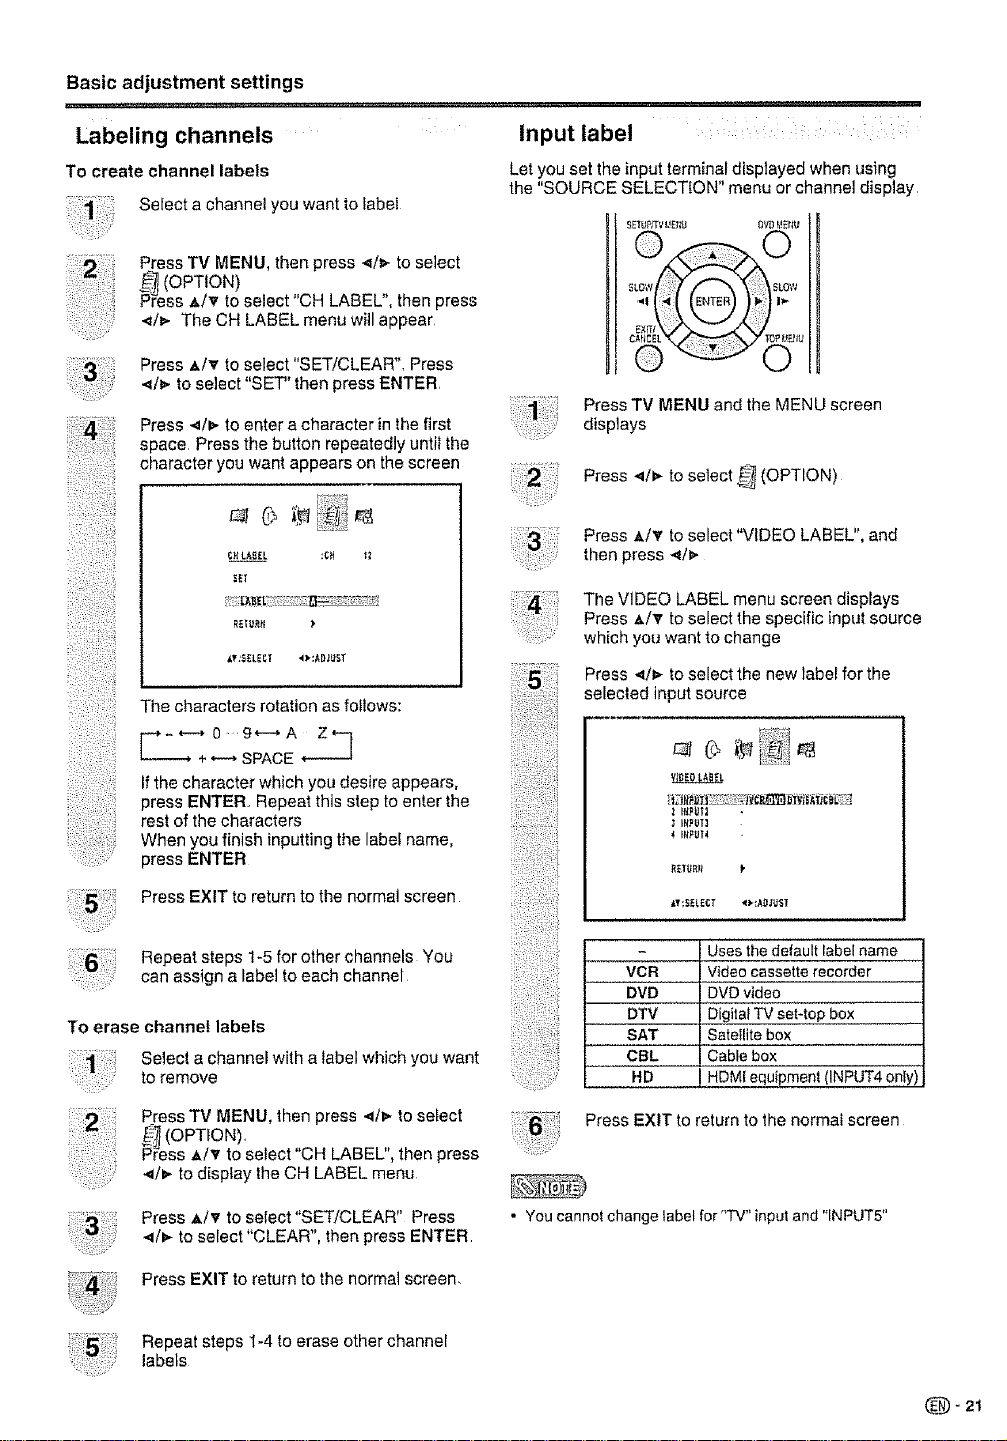
Basic adjustment settings
Labeling channels
To create channel labets
Select a channel you want to _abel
Press TV MENU, then press 4/v to select
_ (OPTION)
_ress A/_, to select "CH LABEL", then press
,,_/_,-The CH LABEL menu will appear
Press _,/_ to select "SET!CLEAR', Press
•,_/_ to select "SET" then press ENTER,
Press 4/_,-to enter a character inthe first
space Press the button repeatedly untii the
character you want appears on the screen
_ET
"he characters rotation as foltows:
Input label
Let you set the input terminal displayed when using
the "SOURCE SELECTION" menu or channel display
Press TV MENU and the MENU screen
::: displays
Press ,4/1> to select _ (OPTION)
Press _/_ to select "VIDEO LABEL", and
then press _/_
i
The VIDEO LABEL menu screen displays
Press a./_' to select the specific input source
which you want to change
Press _!_,-to select the new label for the
selected input source
__._*--*0 9_--*A Z _']
+*-"* SPACE +___._a
Ifthe character which you desire appears,
press ENTER. Repeat this step to enter the
rest of the characters
When you finish inputtingthe label name,
press ENTER
Press EXIT to return to the normal screen
Repeat steps 1-5 for other channels You
can assign a label to each channel
To erase channel labels
Select a channef witha label which you want
to remove
Press TV MENU, then press .4/p-to select
_ (OPTION) i ,,
Press h,/T to select CH LABEL", then press
4/_ to display the CH LABEL menu
Press A/v to select "SET/CLEAR" Press
_111_to select "CLEAR", then press ENTER
Press EXIT to return to the normal screen.
;t Hl?gt_
t Ht_T)
4 _#PgY4
_T;_ELECT 4>:k_&_J_T
- Uses the default label name
VCR Video cassette recorder
DVD DVD video
DTV Digital TV set4oP box
SAT Satellite box
CBL Cable box
....... HD i HDMI equipment (INPUT4 onfy)
Press EXIT to return tothe normal screen
• You cannot change label for "IV" input and 'INPUT5"
Repeat steps I-4 toerase ether channel
labets
Page 22
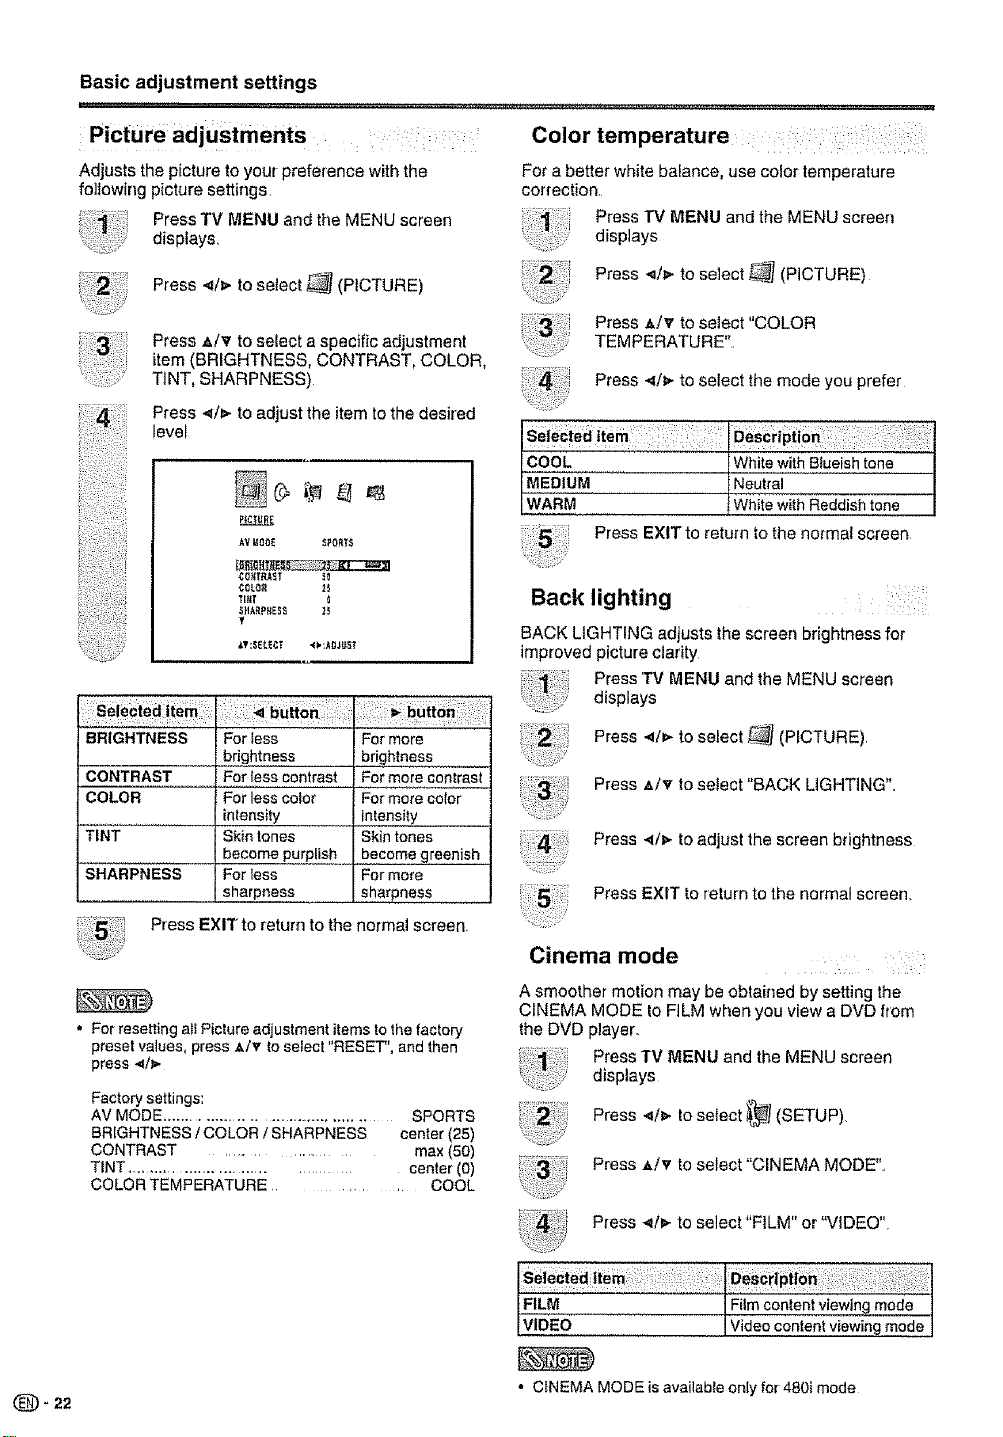
Basic adjustment settings
Picture adjustments
Adjusts the picture to your preference with the
following picture settings.
Press TV MENU and the MENU screen
displays.
Press 4/_- to select _ (PICTURE)
Press A/v to select a specific adjustment
item(BRIGHTNESS, CONTRAST, COLOR,
TINT, SHARPNESS)
Press -_I/_to adjust the item to the desired
level
_Y;SELECT _>;AOJO_
: :
'B'RIGHTN'ESS
CONTRAST
COLOR
TINT
SHARPNESS
Press EXIT to return to the normal screen.
For tess
bdghtness
Fo_ less contrast
For less color
intensity
Skin tones
become purplish
For less
sharpness
For more
brightness
For more con!rest
For more color
intensity_
Skin tones
become greenish
For more
sharpness
Color temperature
For a better white balance, use color temperature
correction.
Press TV MENU and the MENU screen
displays
Press ._/_- to select __ (PICTURE)
Press A/v to select "COLOR
TEMPERATURE"
Press ._/3,-to select the mode you prefer
COOL White with Btueish tone
MEDIUM Neutral
WARM White WitflReddishtone
Press EXIT to return to the normal screen
Back lighting
BACK LIGHTING adjusts the screen brightness for
improved picture clarity
Press TV MENU and the MENU screen
displays
Press _/=- to select _ (PICTURE)
Press ,*/'_' to select "BACK LiGHTiNG",,
Press 4/I,. toadjust the screen brightness
Press EXIT to return to the normal screen.
(_ 22
• For resetting a_!Picture adjustment items to the factory
preset values, press A/v to select "RESET", and then
press _l/_.
Factory settings:
AV MODE ............................................ SPORTS
BRIGHTNESS / COLOR / SHARPNESS center (25)
CONTRAST ................... max (50)
TiNT .......................................... center (0)
COLOR TEMPERATURE ........ COOL
Cinema mode
A smoother motion may be obtained by setting the
CINEMA MODE to FILM when you view a DVD from
the DVD player.
Press TV MENU and the MENU screen
displays
Press _1/_. to setect _ (SETUP).
Press z,/v to select "CINEMA MODE".
Press _,li=,.to select "FILM" or "VIDEO".
FILM ....... Film content viewing mode
VIDEO Video content viewing m0de
• CINEMA MODE is available only for 480i mode
Page 23
Basic adjustment settings
Sound adjustments : ;
You can adjust the sound quality to your preference
with the following settings,
Press TV MENU and the MENU screen
displays.
Press </1_ to select 0 _'(AUDIO).
wrs SlER_O
TREBL_ 25
_U_OU_D OFF
T
_T:SELECT _:kDJU_
,i,,, ,,,,,r,,,r,,,,,
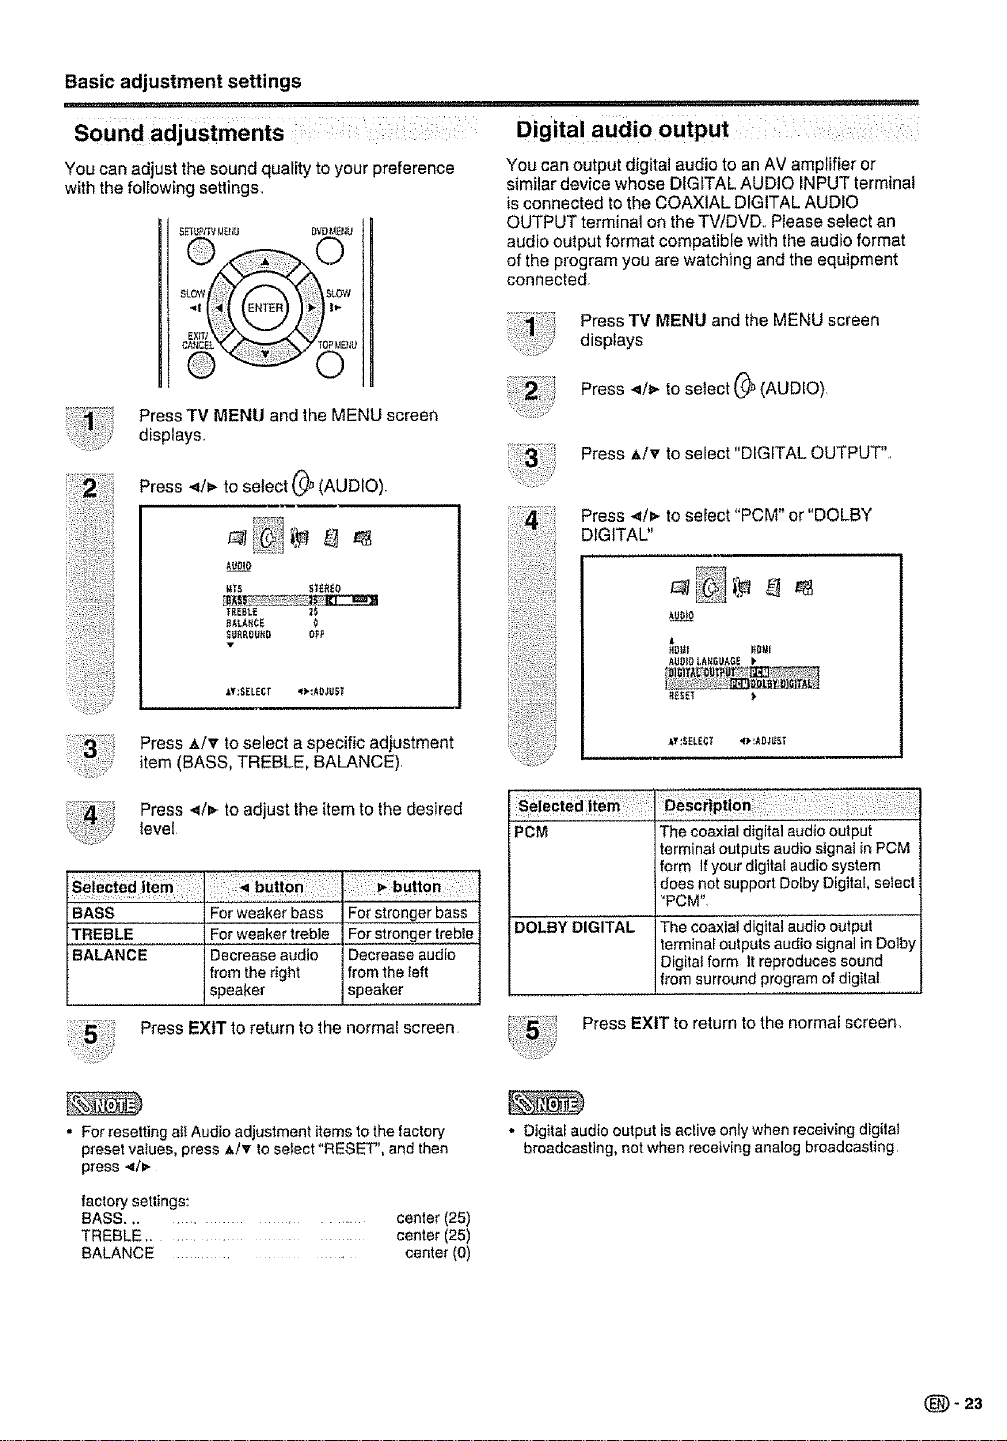
You can output digital audio to an AV amplifier or
similar device whose DIGITAL AUDIO INPUT terminal
is connected to the COAXIAL DIGITAL AUDIO
OUTPUT terminal on the TV/DVD. Please select an
audio output format compatible with the audio format
of the program you are watching and the equipment
connected.
Press TV MENU and the MENU screen
displays
Press 4/t_ to select (_ (AUDIO)
Press A/T to select "DIGITAL OUTPUT".
Press 4/_ toselect "PCM" or "DOLBY
DIGITAL"
AUDI_
A
AgO_OLk_GUAGEk
Press _,/'_' to select a specific adjustment
item (BASS, TREBLE, BALANCE)
Press </_ to adjust the item to the desired
level
BASS For weaker bass For stronger bass
TREBLE For weaker treble For stronger treble i
BALANCE Decrease audio Decrease audio
from the right from the {eft
speaker speaker
Press EXIT toreturn to the normal screen
. For resetting al{ Audio adjustment items tothe factory
preset values, press _!T to select "RESET", and then
press ._/_.
factory settings:
BASS ............. center (25)
TREBLE ........... center (25)
BALANCE ........... center (0)
_Y:_ELECr <_:AD_ST
PDM
DOLBY DIGITAL
Press EXIT to return to the normal screen.
,. Digital audio output is active only when receiving digital
broadcasting, not when receiving analog broadcasting
The coaxial digital audio output
terminat outputs audio signal in PCM
form Ifyour digital audio system
does net support Do[by Digital, select
'PCM"
The coaxia_ digital audio output
terminal outputs audio signal in Dolby
Digital form It reproduces sound
'rom surround program of digital
Page 24
Useful adjustment settings
AV mode
AV mode gives you four viewing options to choose
from to best match the surrounding environment of
the TV/DVD, which can vary due to factors like room
brightness, type of program watched or the type of
image input from external equipment
L_J_ t,_L_ DVDI,IEt i_J
AUO]O FLA¥!._OOEAt_GLE ZQ0t.{
C3 (D C3
Press TV MENU and the MENU screen
displays
Press </p- toselect_j(PiCTURE)
i;;iii_i;
Press _/v to select "AV MODE"
Press _/_ to select the desired mode
• The mode canbe chosenfromthe listbelow
Selecting the digital audio language
When two or more audio languages are included
in a digital signal, you can select one of the audio
languages,
Press TV MENU and the MENU screen
displays,
Press 4/_,. to select 0_ (AUDIO)
Press z_/V to setect "AUDIO LANGUAGE",
and then press _/_.
016_rA_output Pc_I
Press ,_/_ to select your desired language,
then press ENTER
8AI6ilTKE_ ;_
¢oltTRA_T _
COLOR 2_
Tl#r
S_fA_PflOSS ]$
Y
,t'_tSELECT
: Description : :
SPORTS
For a clear-cut image
emphasizing high cot=hast,
usefu_ for spo,rts viewing
STANDARD
For a highly defined image
in a normal lighting
MOVtE
MEMORY
For a movie
AIIows the user to customize
settings as desired You can
set the mode for each input
SouTce,
Press EXit to return to the no[real screen
• You can select a different AV MODE item for TV,
Composite (S-video), Component and HDM! input mode
(For example, select STANDARD for TV input and
SPORTS for VIDEO input )
} SPA_IISH
i t_O#ire
II},7_;SELECT
EfiTER:SEIr
5 Press EXIT to return to the normal screen
• Digital audio language is active only when receiving digital
boardcasting, not when receiving analog boardcasting
(_- 24
Page 25
Useful adjustment settings
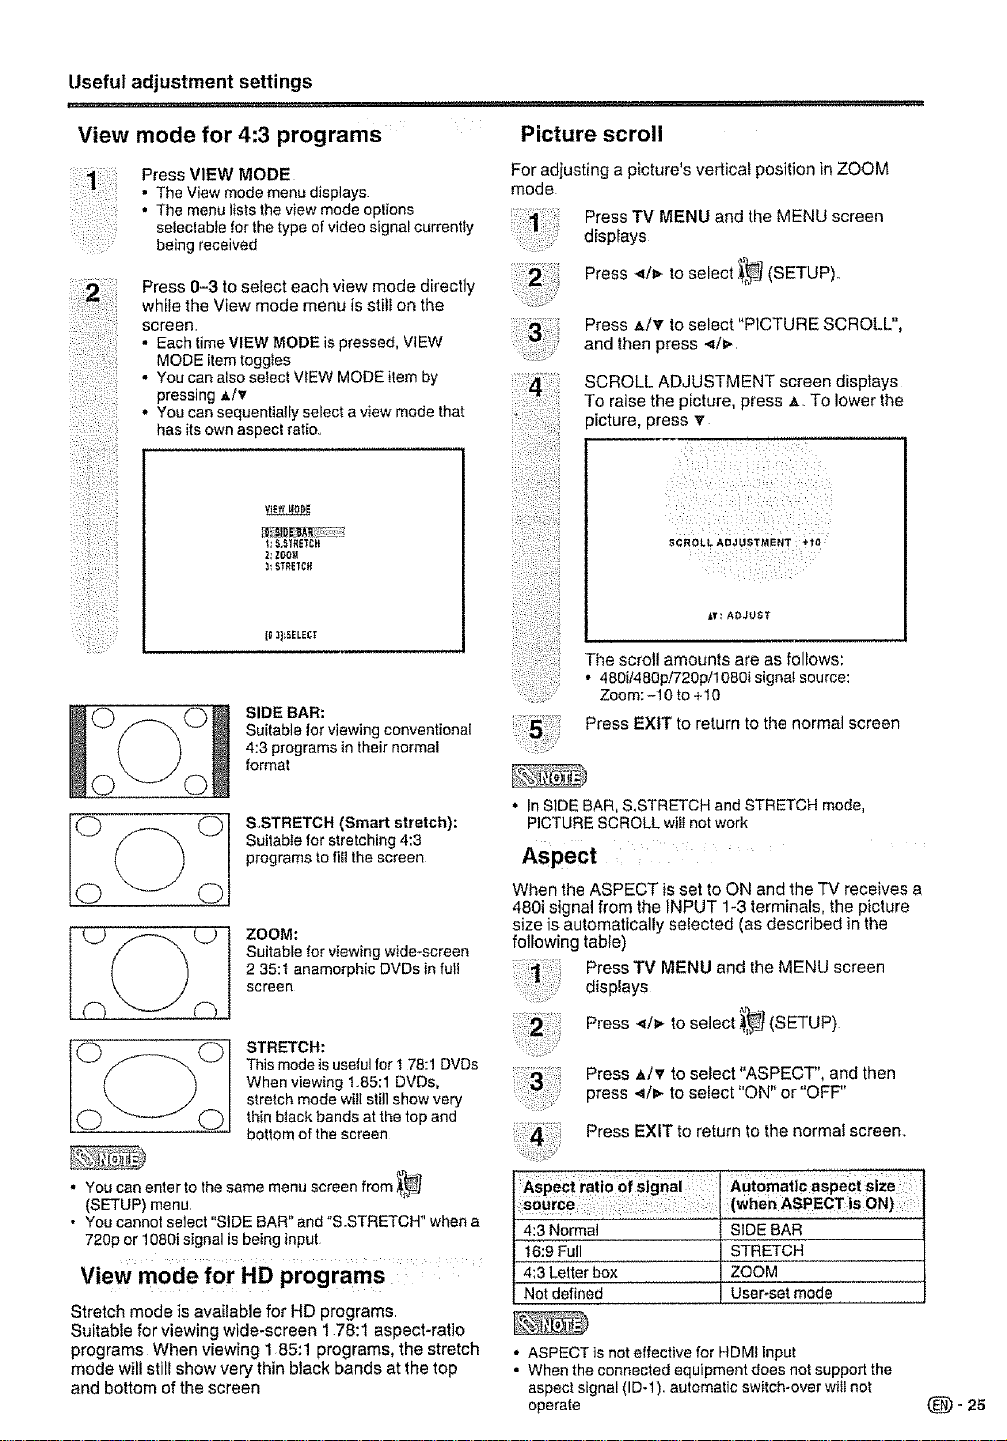
View mode for 4:3 programs
Press VIEW MODE
• The View mode menu displays
• The menu lists the view mode options
selectable for the type of video signal currently
being received
Press 0-3 to select each view mode directly
while the View mode menu is stili on the
screen
• Each time VIEW MODEls pressed, VIEW
MODE item toggles
• You can also select VIEW MODE item by
pressing A/v
• You can sequentially select a view mode that
has itsown aspect ratio..
£ $,_'iRE'_CR
2:ZOOM
_ 5TRE1¢H
[D 31:5ELE(:_r
SIDE BAR:
Suitable lot viewing conventional
4:3 programs in their normal
format
Picture scroll
For adiusting a picture's vertical position in ZOOM
mode
Press TV MENU and the MENU screen
displays
Press </_,- to select J)_ (SETUP)..
Press h,/v to select "PICTURE SCROLL",
and then press ,,_/v
SCROLL ADJUSTMENT screen displays
To raise the picture, press ,t,. To lower the
picture, press T
SCROLL ADJUSTMENT : +10
k"t: ADJUST
The scroll amounts are as foliows:
• 480{/480pi720p/1080i signa! source:
Zoom: -10 to +10
Press EXIT to return to the normal screen
&STRETCH (Smart stretch):
Suitab}e for stretching 4:3
programs to fitlthe screen
ZOOM:
Suitable for viewing wide-screen
2 35:t anamorphic DVDs in ful!
screen
STRETCH:
This mode is useful for I 78:1 DVDs
When viewing t85:1 DVDs,
stretch mode wi!l still show very
thin biack bands at the top and
bottom of the screen
• You can enter to the same menu screen from _]
(SETUP) menu
* You cannol seJect 'SIDE BAR and "S.STRETCH" when a
720p or 1080i signal isbeing input
t
_,,_
View mode for HD programs
Stretch mode is available for HD programs
Suitable for viewing wide-screen 178:1 aspect-ratio
programs When viewing 185:1 programs, the stretch
mode will still show very thin black bands at the top
and bottom of the screen
• In SIDE BAR, S,STRETCH and STRETCH mode,
PICTURE SCROLL wilt not work
Aspect
When the ASPECT is set to ON and the TV receives a
480i signal from the INPUT 1-3 terminals, the picture
size is automatical{y seiected (as described in the
following table)
Press TV MENU and the MENU screen
displays
Press 4/_ to select .:,_,_(SETUP)
Press A/v to select "ASPECT", and then
press </_,-to select "ON" or "OFF"
Press EXIT to return to the normal screen.
A.tomatiCaspectsize i:i
:sourCe :: : ::::i :i : :(when ASPECT Is ON) :
4:3 Normal SIDE BAR
t6:9 Full STRETCH
4:3 Letter box ZOOM
Not defined User*set mode
• ASPECT is not effective for HDM; input
• When the connected equipment does not support the
aspect signal (iD-1). automatic switch-over wiII not
operate (_- 25
Page 26
Useful adjustment settings
Closed captions and digital closed
captions
• C_osed Caption might not appear according to the
condition of the signal from the broadcasting station
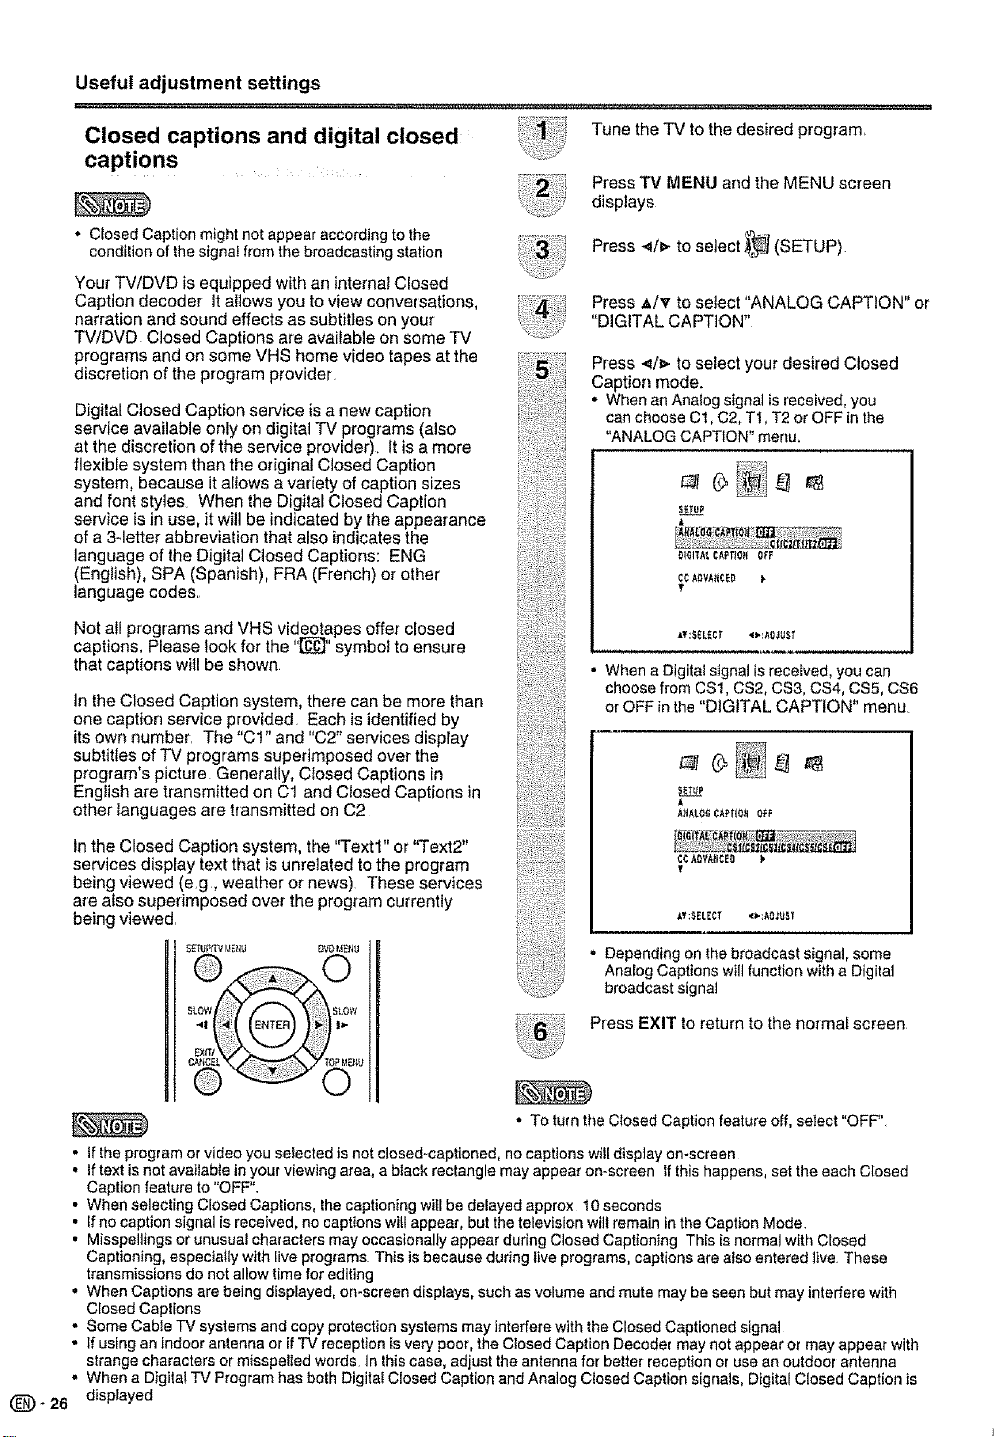
Your TV/DVD is equipped with an internal Closed
Caption decoder It allows you to view conversations,
narration and sound effects as subtitles on your
TV/DVD Closed Captions are available on some TV
programs and on some VHS home video tapes at the
discretion of the program provider
Digital Closed Caption service is a new caption
service available only on digital TV programs (also
at the discretion of the service provider), It is a more
flexible system than the original Closed Caption
system, because itallows a variety of caption sizes
and font styles, When the Digital Closed Caption
service is in use, it will be indicated by the appearance
of a 3-letter abbreviation that also indicatesthe
language of the Digital Closed Captions: ENG
(English), SPA (Spanish), FRA (French) or other
language codes,.
Not all programs and VHS videotapes offer closed
captions, Please look for the "_ symbof to ensure
that captions will be shown
tn the Closed Caption system, there can be more than
one caption service provided Each isidentified by
its own number, The "C1"and "C2" services dispiay
subtitles of TV programs supedmposed over the
program's picture Generally, Ciosed Captions in
English are transmitted on C1 and Closed Captions in
other languages are transmitted on C2
Tune the TV to the desired program,
Press TV MENU and the MENU screen
displays
Press _1/1_to select _} (SETUP)
Press ,_/'_"to select "ANALOG CAPTION" or
"DIGITAL CAPTION"
Press -,_/_- to select your desired Closed
Caption mode.
• When an Analog signal is received, you
can choose C1, C2, T1, T2 or OFF in the
"ANALOG CAPTION" menu.
_I_11A_.CAPTIO_tOFF
¢Ck_VA_tCEO 1,
T
AY:SELECr _:_gJUST
• When a Digital signal is received, you can
choose from CS1, CS2, CS3, CS4, CS5, CS6
or OFF inthe "DIGITAL CAPTION" menu
A
A_JkLO_ckeno_o_E
In the Closed Caption system, the "Text1" or "Text2"
services display text that is unrelated to the program
being viewed (eg, weather or news) These services
are atso superimposed over the program currently
being viewed,
° if the program or video you selected is not closed-captioned, no captions witldisplay on-screen
• If text is not available inyour viewing area, a black rectangle may appear on-screen Ifthis happens, set the each Closed
Caption feature to "OFF",
• When selecting Closed Captions, the captioning will be delayed approx t0 seconds
• If no caption signal is received, no captions wilt appear, but the television wilt remain in the Caption Mode
• Misspellings or unusual characters may occasionally appear during Closed Captioning This is normal with Closed
Captioning, especially with live programs This is because during live programs, captions are also entered Hve These
transmissions do not allow time for editing
• When Captions are being displayed, on-screen displays, such as volume and mute may be seen but may interfere with
Ciosed Captions
• Some Cable TV systems and copy protection systems may interfere with the Closed Captioned signal
• If usingan indoor antenna or ifTV reception is very poor, the Closed Caption Decoder may not appear or may appear with
strange characters or misspelled words, in this case, adjust the antenna for better reception or use an outdoor antenna
• When a Digital TV Program has both Digita_ Closed Caption and Analog Closed Caption signals, D_gitalClosed Caption is
(_) - 26 displayed
S£_UPfl'V h_Ettg DI_ t._Et_U
CCkQVA}ICEO I,
f
= Depending on the broadcast signal, some
Analog Captions will function with a Digital
broadcast sig nat
Press EXIT to return to the normal screen
• To turnthe Closed Caption feature off, select "OFF"
Page 27
Useful adjustment settings
.,r,,
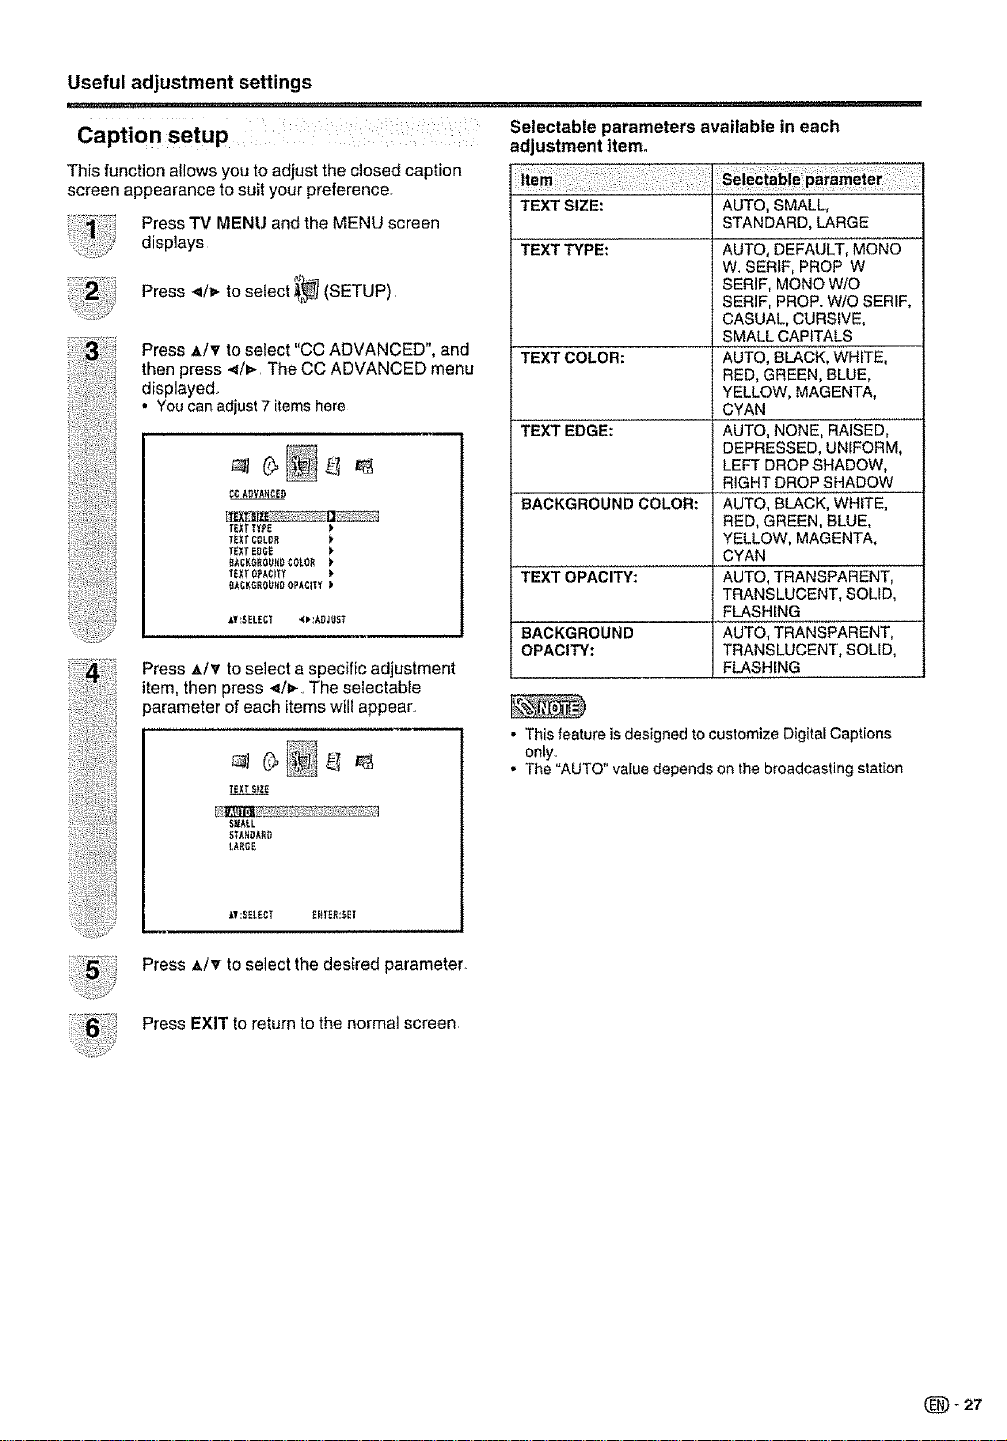
Caption setup _ i Selectableparametersavailableineach
This functionallows you to adjust the closed caption
screen appearance to suit your preference,
........ adjustment item°
TEXT SIZE:
PressTV MENU and the MENU screen
displays
TEXTTYPE:
Press _l/=,-to select _-] (SETUP)
Press A/v to select "CC ADVANCED", and
then press 4/1_ The CC ADVANCED menu
TEXT COLOR:
displayed,
• Youcan adjust7 itemshere
TEXT EDGE: ........
CCADVA_E_
T_T TYPE
T_T CaLOR
TEXTED6_
TExlr(}PACffY _'
(tACK6RO#_OOPACITY)
M]SELECT _:AOJUS_
BACKGROUND COLOR:
TEXT OPACITY:
BACKGROUND
OPACITY;
Press _,/v to select a specific adjustment
item,then press ,_/_, The selectable
_arameter of each items will appear
• This feature is designed to customize Digital Captions
only,,
T£XTStZ_
S_ALL
LARGE
• The "AUTO" value depends on the bt'oadcasting station
AUTO, SMALL,
STANDARD, LARGE
AUTO, DEFAULT, MONO
W. SERIF, PROP W
SERIF, MONO WlO
SERIF, PROP. W/O SERIF,
CASUAL, CURSIVE,
SMALL CAPITALS
AUTO, BLACK, WHITE,
RED, GREEN, BLUE,
YELLOW, MAGENTA,
CYAN
AUTO, NONE, RAISED,
DEPRESSED, UNIFORM,
LEFT DROP SHADOW,
RIGHT DROP SHADOW
AUTO, BLACK, WHITE,
RED, GREEN, BLUE,
YELLOW, MAGENTA,
CYAN
AUTO, TRANSPARENT,
TRANSLUCENT, SOLID,
FLASHING
AUTO, TRANSPARENT,
TRANSLUCENT, SOLID,
FLASHING
_T;SELEcr [#TE_:SET
Press ,,/v to select the desired parameter°
Press EXIT to return to the normal screen
1_)- 27
Page 28
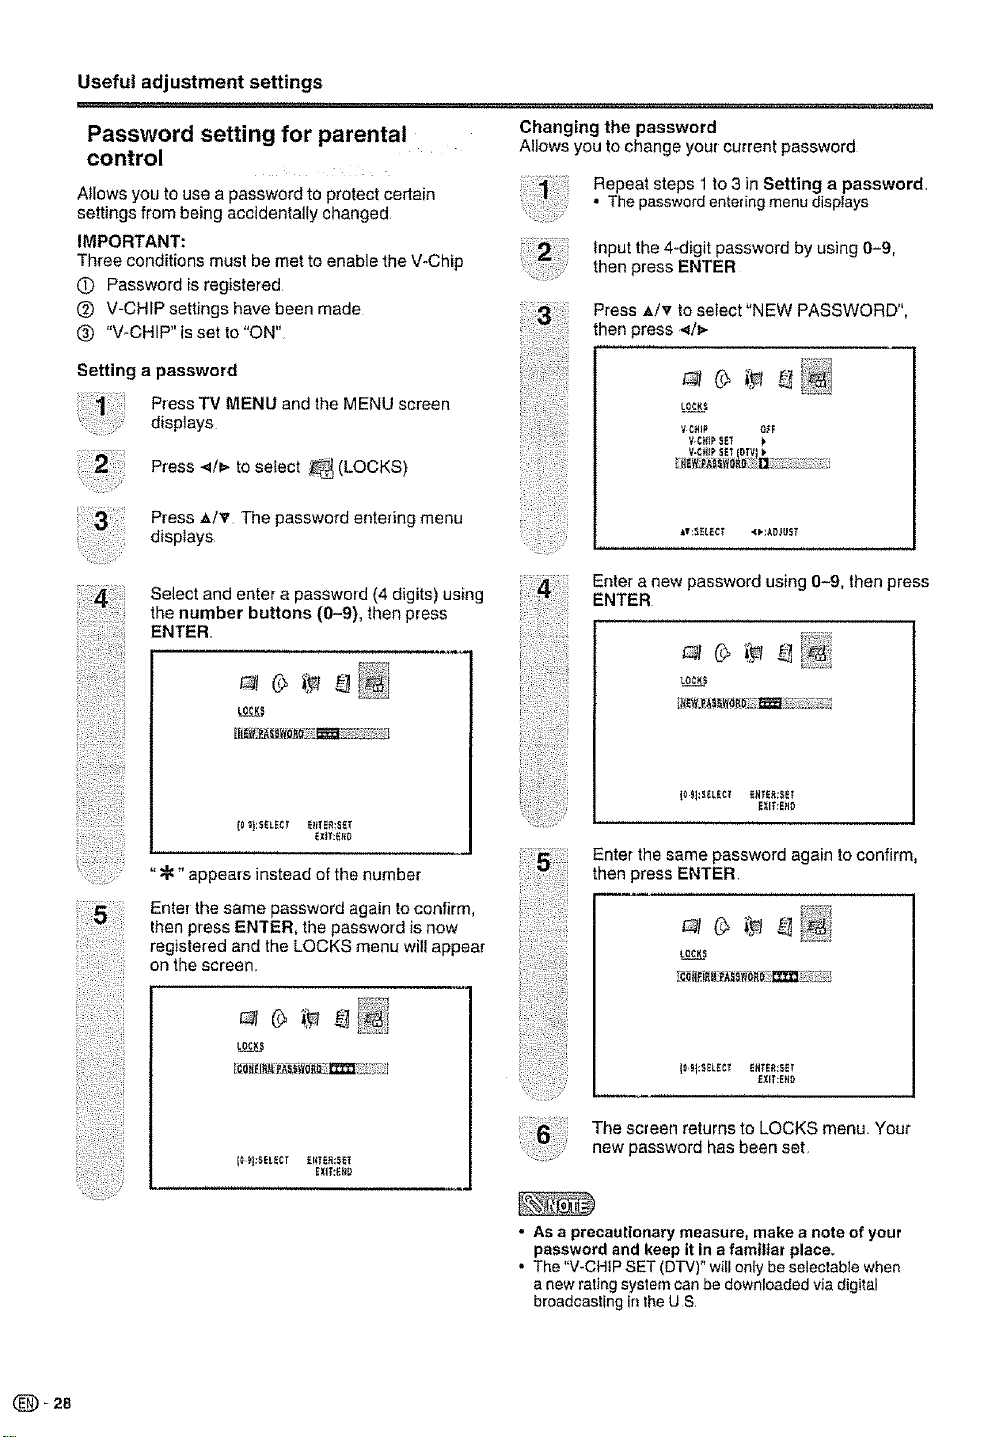
Usefut adjustment settings
Password setting for parental
control
Allows you to use a password to protect certain
settings from being accidentally changed
IMPORTANT:
Three conditions must be met to enable the V-Chip
(D Password is registered
@ V-CHIP settings have been made
(_) "V-CHIP" is set to "ON"
Setting a password
Press TV MENU and the MENU screen
displays
Press _/1_ to select _ (LOCKS)
Press A/v The password entering menu
displays
Select and enter a password (4 digits) using
the number buttons (0-9), then press
ENTER.,
Changing the password
Allows you to change your current password
Repeat steps 1to 3 in Setting a password,
, The passwordenteringmenu displays
Input the 4-digit password by using 0-9,
then press ENTER
Press A/v to select "NEW PASSWORD",
then press _/v
tT:SEL_CT 4_ADJU_T
Enter a new password using 0-9, then press
ENTER
i!!
"•" appears instead of the number
Enter the same password again to confirm,
then press ENTER, the password is now
registered and the LOCKS menu will appear
on the screen,,
{_9}:SELE{) EIITER;@_T
[l_9_:SELECT EI_TE_:_Et
EXIT:EtID
lO_I;SELEC'r EETER:._ET
Enter the same password again to confirm,
then press ENTER
,i
]0 tt:_ELECT E_TER:,_ET
The screen returns to LOCKS menu Your
new password has been seL
• As a precautionary measure, make a note of your
password and keep it in a familiar place.
• The "V-CHIP SET (DTV)" will only be selec_abie when
a new rating system can be downloaded via digital
broadcasting in the US
EXIT:E_ID
(_2B
Page 29
Useful adjustment settings
.................... ,_H,,_,.u_,_,._,,,,,,,,,,,,,,,,,,, ,,,,,,,, ,,,, , ..... , , , , ,_.............................
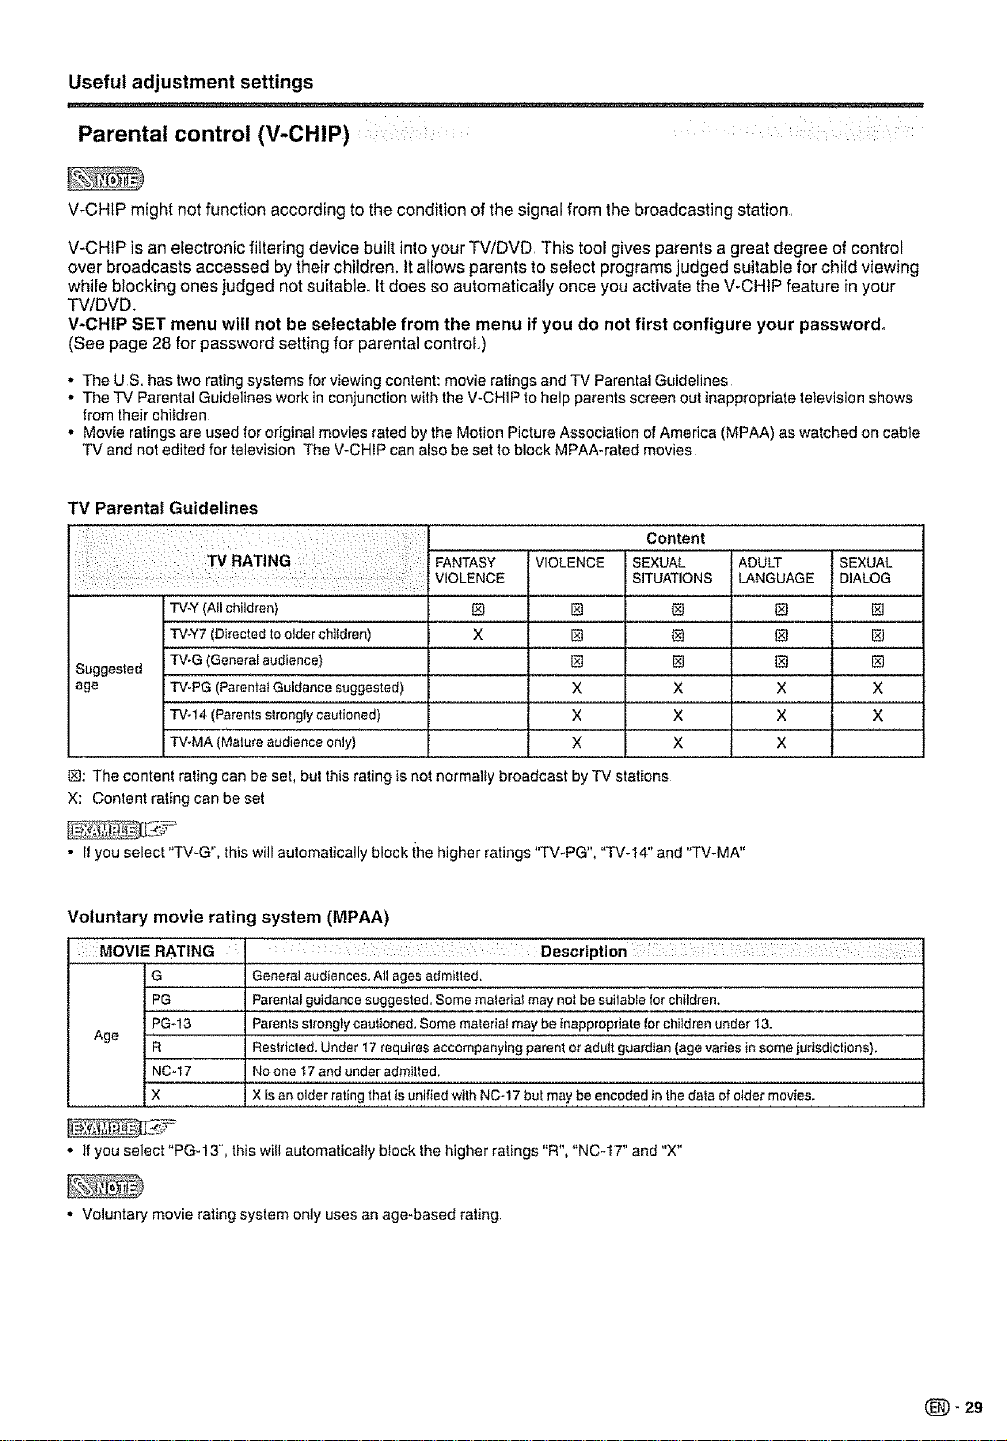
Parental control (V-CHIP) ......
V-CHtP might not function according to the condition of the signal from the broadcasting station,
V-CHiP is an electronic filtering device built into your TV/DVD This tool gives parents a great degree of control
over broadcasts accessed by their children. It allows parents to select programs judged suitable for child viewing
while blocking ones judged not suitable. It does so automatically once you activate the V-CHIP feature in your
TV/DVD.
V-CHIP SET menu will not be selectabte from the menu if you do not first configure your password_
(See page 28 for password setting for parental controL)
• The US. has two rating systems for viewing content: movie ratings and TV Parental Guidelines
• The TV Parental Guidelines work in conjunction with the V-CHIP to help parents screen out inappropriate television shows
from their chiidren
• Movie ratings are used for original movies rated by the Motion Picture Association of America (MPAA) as watched on cable
TV and not edited for television The V-CHIP can also be set to block MPAA-rated movies
TV Parental Guidelines
Content
FANTASYVIOLENCESEXUAL ADULT SEXUAL
VIOLENCE SITUATIONS LANGUAGE DIALOG
TV-Y (All children) [_ l&l _ _J
TV-Y7 (Directed to older children) X [_ f_ _J I_
Suggested TV-G (General audience) [_ [_ L_ !_
age TV-PG (Parental Guidance suggested) X X X X
TV-14 (Parents strongly cautioned) X X X X
TVoMA (Mature audience only) X X X
_]: The content rating can be set, but this rating is not normally broadcast by TV stations
X: Content rating can be set
• II you select "TV-G", this will automatically block ihe higher ratings "TV_PG", "TV-t4" and 'q'V-MA"
Voluntary movie rating system (MPAA)
MOVIE RATING :i : : Description : :: ' : : :i :: :: :
G General audiences,All agesadmitted,
PG....... Parentalguidance suggested, Somemateriat mayno_be auilableior children,
PG-13 Parentssl_onglycautioned.Same material maybe _nappropdate{orchildrenunder 13.
Age
R Restricted,Under 17requiresaccompanying parentoradult guardian{agevariesin some jurisdictions).
NC_17 Noone !7 and under admitted,
X X is an elderrating that is unifiedw_thNC-17 but may beencoded in the dala ofeider movies.
• If you select "PG-13", this wit! automatically block the higher ratings "R", "NC-t7" and "X"
• Voluntary movie rating system only uses an age-based rating
(_ 29
Page 30
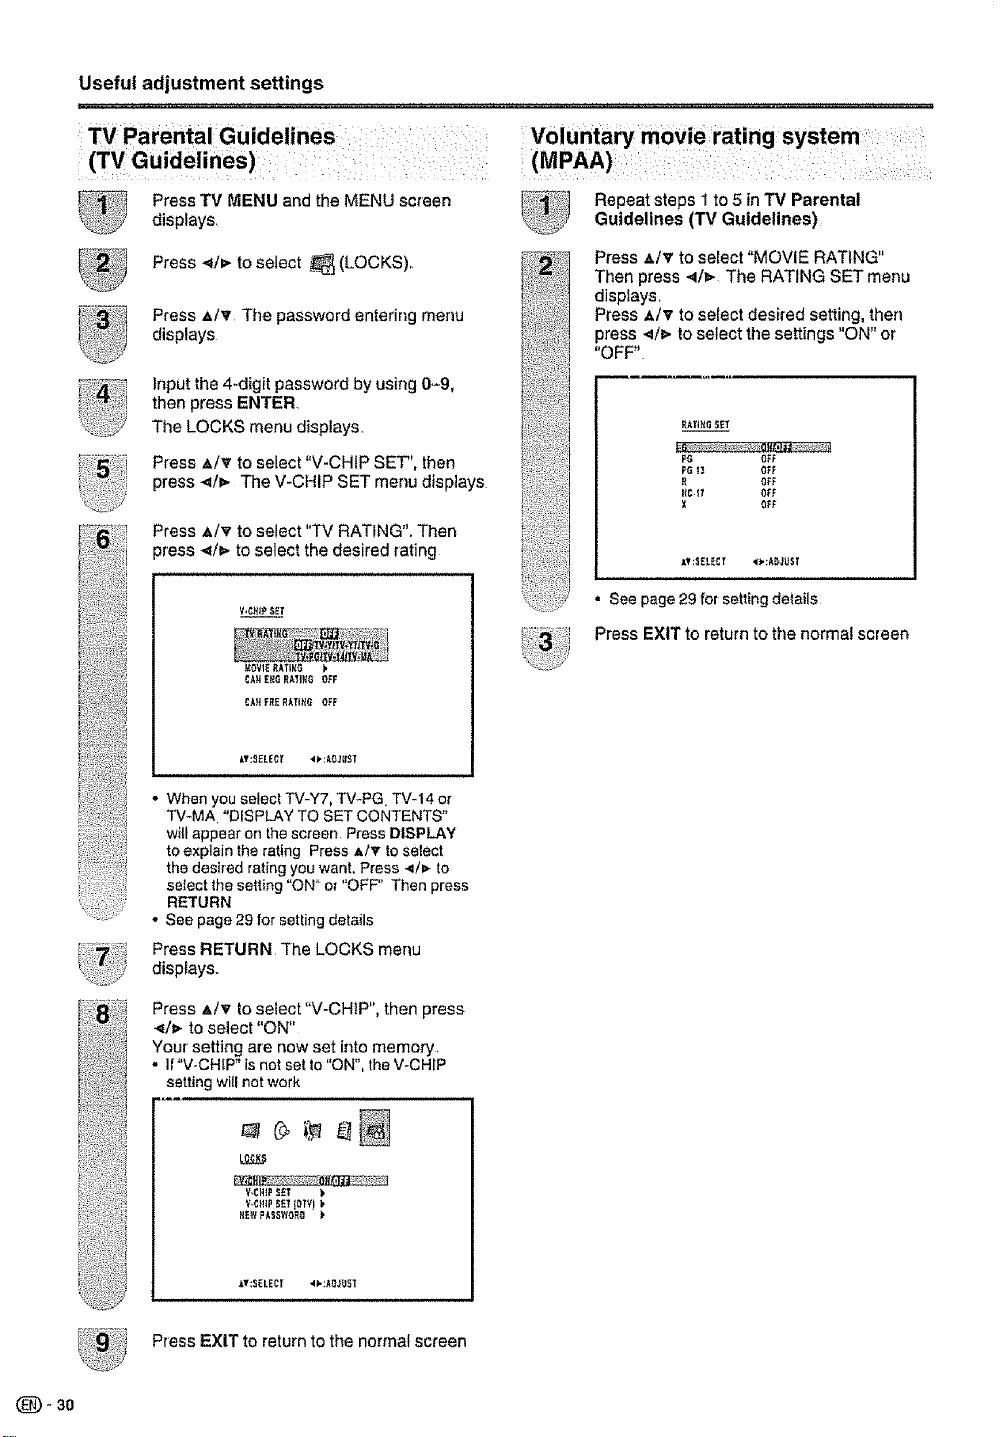
Useful adjustment settings
Press TV MENU and the MENU screen
displays
Press .,_/_ to select _ (LOCKS),.
Press A/v The password entering menu
displays
Input the 4-digit password by using 0-9,
then press ENTER,
The LOCKS menu displays.
Press A/'_' to select "V-CHIP SET", then
press -,_/P.The V-CHIP SET menu displays
Press _,/_t to select "TV RATING". Then
)tess _/=,. to select the desired rating
V,CH_PSET
=OVIE8ATIRG )
EAHE_GRAT]He OEF
CAH FFJEAATIIIG OFF
AT:_ELEC[ 4_AOJ_ST
Repeatsteps1to5 inTV Parental
Guidelines(TV Guidelines)
Press A/v to select "MOVIE RATING"
Then press ._/v The RATING SET menu
displays.
Press A/_t to select desired setting, then
press .4/=. to select the settings "ON" or
"OFF"
_ATJ_GSET
PG O_E
XC_T O_F
X O_F
X'_':_ELE_T ,q_,_ADJ_ST
• See page 29 for setting details
Press EXIT to return to the normal screen
OFF
• When you select TV-Y7, TV-PG TV-14 or
TV-MA "DISPLAY TO SET CONTENTS"
will appear on the screen. Press DISPLAY
to explain the rating Press ,_/v to select
the desffed rating you want. Press 4/_ to
setect the setting "ON" or "OFF" Then press
RETURN
• See page 29 for setting details
Press RETURN The LOCKS menu
displays..
Press &tv to select "V-CHIP", then press
-_/_" to select "ON"
Your setting are now set into rnemory_
• I! "V.CHtP" is net set to "ON", the V-CHIP
setting wi!l not work
V,EHIPSET ),
V,CH_P_ET{OTVJ
HE_ PASSV_'OEO )'
AT:SELECT 4F_AOJUST
Press EXIT to return to the normal screen
(_ - 30
Page 31

Useful adjustment settings
Canadian rating systems _ : __:
,, The TV rating systems in Canada are based on the Canadian Radio-Television and Telecommunications Commission
(CRTC) policy on violence in television programming
• While violence is the most important content element to be rated, the structure developed takes intoconsideration other
program content like _anguage, nudity, sexuality and mature themes
• When setting the V-CHIP on the Canadian system you can choose either the Canadian English ratings or the Canadian
French ratings
Canadian English ratings
E Exempt: _ncludes news, sports, documentaries and other information programming; talk shows,
C that could threaten their sense of security and well-being.
C8+ way to resolve conffict; nor encourage children to imitate dangerous acts which they may see on
G
Age
PG (under the age of 8) because it could contain controversial themes or issues.
14+ staryline, but it must be integral to the development of plot or character Language usage could be
18+ white related to the development of plot, character or themes, are intended for adair v_ewing
,, if you setect "G", this will automatically b_ock the higher ratings "PG', "14+" and "18+"
Canadian French ratings
E Exempt programming
G General: Atl ages and children, contains minimal direct violence, but may be integrated into the
8ans+ contain scenes disturbing to children under 8 who cannot distinguish between imaginary and real
Age situations Recommended for viewing with parent
13ans+ viewing with parent
music videos, and variety programming.
Children: lntended for younger children under the age of 8 years Pays careful attention to themes
Children over 8 years aid: Contains no portrayal of violence as the preferred, acceptable, or only
the screen.
General: Considered acceptable for all age groups Appropriate viewing for the entire fami{y,
contains very tittle violence, physical, verbal or emotional
Parental Guidance: Intended for a general audience, bul may not be suitabie for younger children
Over t4 Years: Could contain themes where violence is one of the dominant elements of the
profane and nudity present within the context of the theme
Adults: Intended for viewers 18 years and older and might contain depictions of violence, which
Could contain graphic fanguage and portrayals ofsex and nudity
plot in a humorous or unrealistic manner
General but inadvisable for young children: May be viewed by a wide public audience, but could
Over 13years: Could contain scenes el frequent violent scenes and therefore recommended for
16arts+ Over 16 years: Coutd contain frequent viola nt scenes and intense via{once
1Sans+ Over 18years: Only for adult viewing Could contain frequent violent scenes and extreme
• If you select "Sans+", this will automatically block the higher ratings "13ans+", "16arts+" and "18ans+"
violence
(_- 31
Page 32

Useful adjustment settings
Canadian English ratings Canadian French ratings
Press TV MENU and the MENU screen
displays
Press -q/_- to select _ (LOCKS)
Press _,lV The password entering menu
displays
Input the 4-digit password by using 0-9,
then press ENTER
The LOCKS menu displays
Press ,_/v to selecl "V-CHIP SET", then
press ,,_/_ The V-CHIP SET menu displays
Press _,/v to select "CAN ENG RATING"
Then press 4/_ to select the desired rating
V4;HIP SET
TV RATI_;G OFF
_OV_E_ATIttG _"
CA_ FRE RATING OFf" ....
k_:SELECT <>:AO_f
* See page 31 for setting details
Press RETURN The LOCKS menu
displays
Press _/_ to select "V-CHIP", then press
_ip to select "ON"
Your setting are now set intomemory,
• If"V-CHIP"is notset to"ON", theV-CHIP
settingwilt notwork
F '_:'_
V,C]_l_SE_r t,
V,CHPSEt(0rv_ P
)I_W PA$_O_g P
Repeat steps 1 to 5 in Canadian English
ratings
Press A/v to select "CAN FRE RATING"
Then press _/_,- to select the desired rating
¥=_tiIPSET
TV_AT_ OFF
UOVlE_Arl_G
AV:S_L_CT 4P_AD_UST
- See page31 forsetting detaits
3 Press EXIT to returnto the normat screen
How to temporarily release the
V-CHIP block ....
The V-CHIP block is working and censors a
broadcast, "THIS PROGRAM HAS BEEN BLOCKED!"
displays
Press MUTE while the V-CHIP is working
and then the password entering menu
displays
Enter ye_r 4-digit password with 0-9, then
i iiii!pressENTE-At this time V-CHIP block temporarily
........... releases
Reactivating the temporarily
released V-CHIP block
You can reactivate the temporarily re_eased V-CH_P
block as shown below
Method 1:
Change to the other channel
Method 2:
Switch off the TV power
(_)- 32
Press EXIT to return to the normal screen
* Performinganyof thetwo abovewill activatethe V-CHIP
block
Page 33
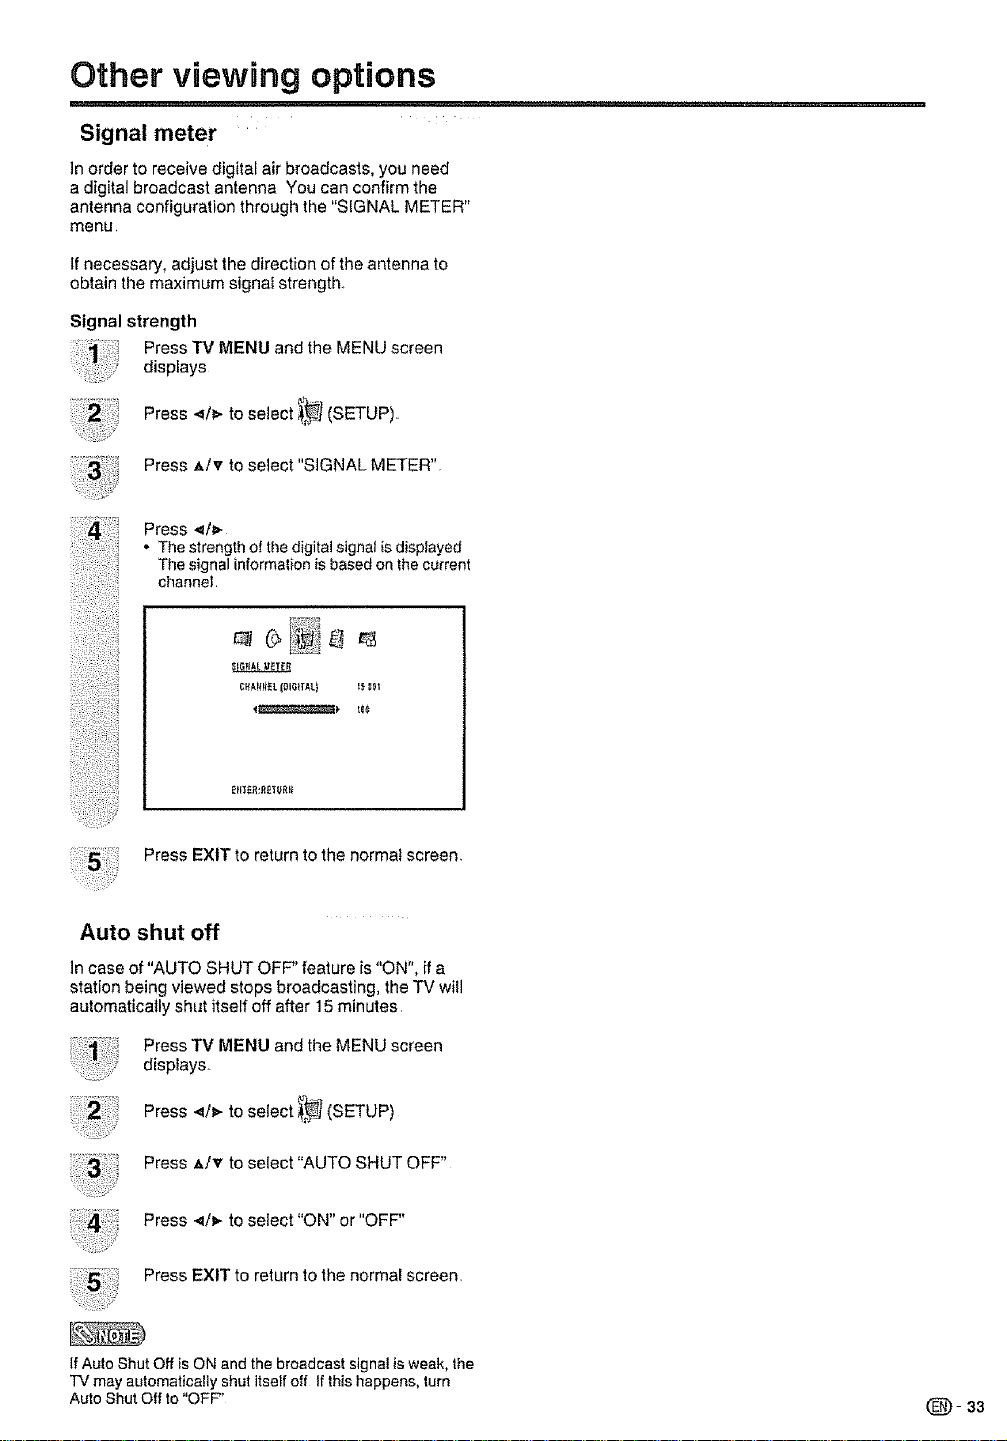
Other viewing options
Signal meter
In order to receive digital air broadcasts, you need
a digital broadcast antenna You can confirm the
antenna configuration throughthe "SIGNAL METER"
menu.
if necessary, adjust the direction of the antenna to
obtain the maximum signal strength.
Signal strength
Press TV MENU and the MENU screen
displays
Press 4/_. to select _] (SETUP).
Press ,A./v to select "SIGNAL METER"
Press 4/_
• Thest_ngth ofthe digitalsignallsdisplayed
The signalinforma{ionis based onthe current
channel
CBARN_t(DIG{rAL} I__I
Press EXIT to return to the normal screen,
Auto shut off
in case of"AUTO SHUT OFF" feature is "ON", if a
station being viewed stops broadcasting, the TV will
automatically shut itselfoff after 15 minutes
Press TV MENU and the MENU screen
display&
Press 4/1_ to select ,_,_](SETUP)
Press A/T to select "AUTO SHUT OFF"
Press .,4/t,- to select "ON" or "OFF"
Press EXIT to return to the normal screen
IfAuto ShutOff isON andthe broadcastsignalis weak,the
TV may automaticallyshut itselfoft Ifthishappens,turn
AutoShut Off to OFF'
(_- 33
Page 34

Connecting a PC (Personae computer)
Viewing an image from a PC
Use the INPUT5 (PC) terminals to connect a PC
• The PC input terminals are DDC1i2B-compatib]e.
• Refer to page 35 for a list of PC signals compatible with the System
• Make sure to select the same signal vatues for the output signal of a PC and the input signal of the TV/DVD set before
connecting with the PC (See page 35)
• Depending on the PC being used, images may not be shown without converting the output signals into external output
Please refer to your PC's manuals regarding converting to external output
• Connect the RGB cable making sure
that it tits correctly into the terminal
Then f#mly secure the connectors by
tightening the screws on both sides
of the plug
PC
Signal names for 15-pin mini D-sub connecter
_.( @® @@¢ "L-_ P!n_' s!gnalname
U\ @@@(b<elt) Q
_[_@ @ @ @ ]-- @
. ®
®
®
• Pin No 5 is not used for inputting the signal.
• Pin No 9 is not connected with the supplied RGB cabte
n ®
G 0
B ®
Notconnecled {_
CSYNC
Displaying an image from a PC
To view an image from a PC, perform the following
procedure
(_ Select the INPUT5 (PC) mode using INPUT on the
CDCD_
[_15PLAY TVJOVO EJECt i
remote control or the TV/DVD set {See page 14 )
Q Select the PC input signal (See page 35 )
0 Adjust the "PICTURE." items if the PC image does
not come in clearly (See page 35)
@@@
PinNo.
_._ Pin No, Signal name
GND (Ground) @ SDA
GND (Ground) @ HD
+5v @ VD
GN# (Gr#und) (_ SCL
@" - Not connec{ed
z: _IPUTZ
_- 34
Page 35
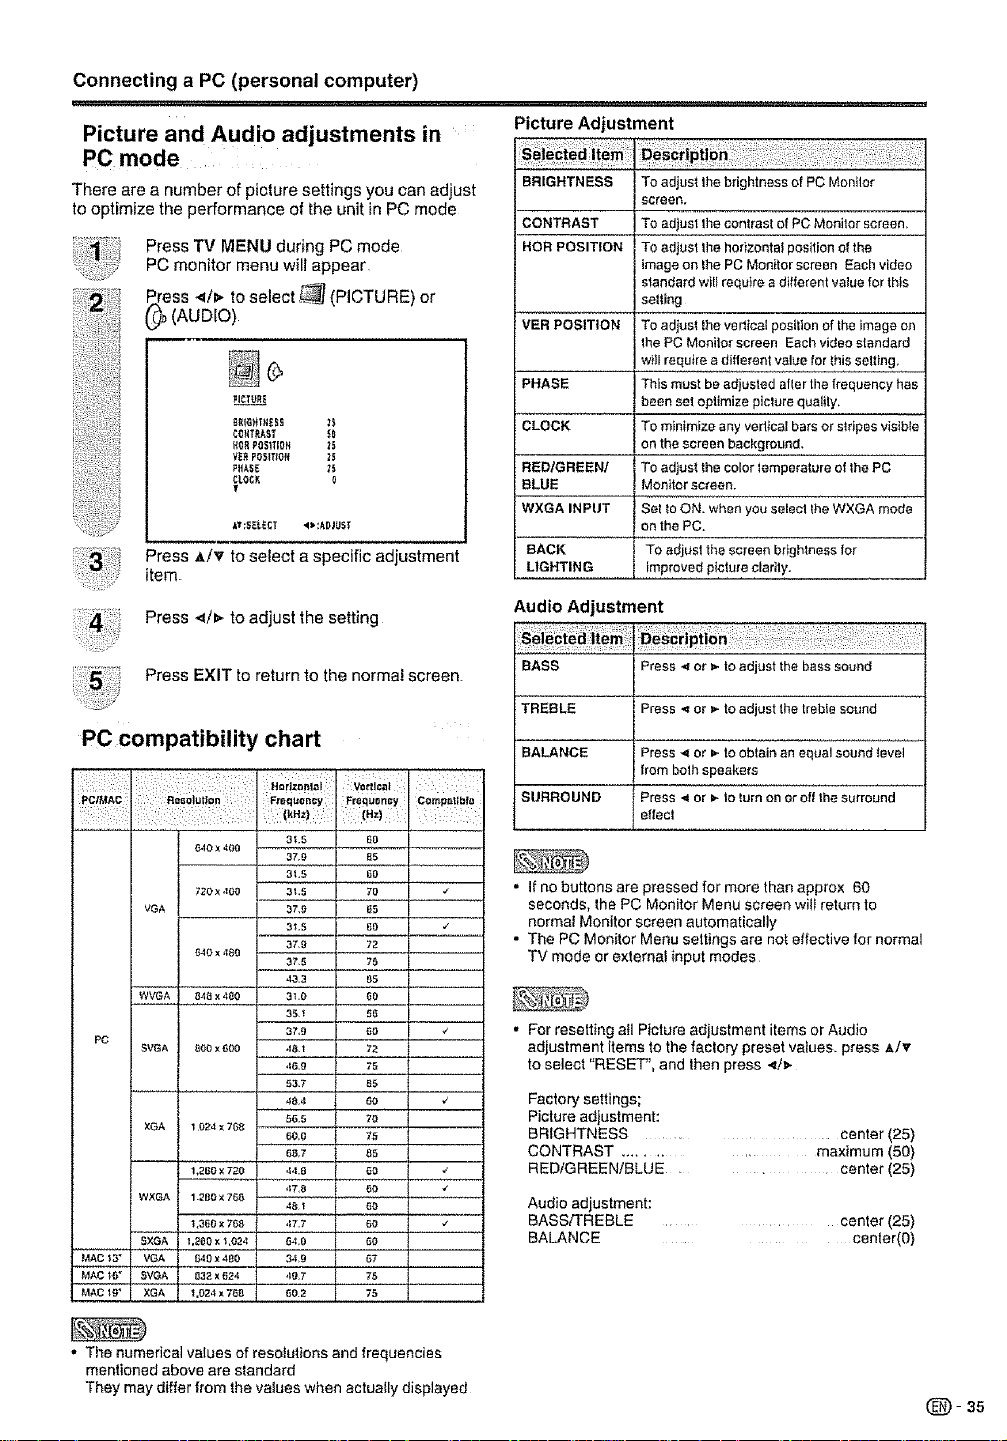
Connecting a PC (personal computer)
Picture and Audio adjustments in
PC mode
There are a number of picture settings you can adjust
to optimize the performance of the unit in PC mode
Press TV MENU during PC mode
PC monitor menu will appear
ess </l_ to select _ (PICTURE) or
(AUDIO)
B_;G_ruEss _$
COXTRAST 50
HORPOSITIOH 25
V_RPostnslt 25
PHASE _5
CLOC[ 0
Y
k'r;$ELECT ,I_':ADJUST
Press _i,/v to select a specific adjustment
item
Press </_ to adjust the setting
Press EXIT to return to the norma! screen.
PC compatibility chart
Frequency : Comp_Sble
::: (H=)::
3L5 60
37,9 95
3L5 60
31,5 69
37,9 72
37,5 75
,l&3 S5
35,1 59
37,9 SO _'
,16,9 75
93,7 85
48,'t
56,5 7a
6O,O 75
68,7 S5
,17,8 S0 _"
4_ 60
ev
,/
,z
PC
MAC la"
MAC re"
MAC lS"
_1ox499
720X ,IO9 3_.5 70 _'
VGA 37,9 1_5
640 x leo
WVGA
6,IS x ,180 31 ,e so
SVBA
900 x 600 4&t 72
XGA 1924x768
1,zse x 72e 44,9 6e
WXGA 12Be×76e
t ,360x768 47,7 60 z
SXGA t,SOOx_,e24 64,0 60
VGA 840x480 34,9 67
SVGA 032x624 ,IS,7 75
XGA t ,e24x708 60.2 75
Picture Adjustment
BRIGHTNESS To adjust the brightness of PC Monitor
CONTRAST To adjust the contrast of PC Monitor screen,
HOR POSITION TO adjust the horizontal position et the
VER POSITION To adjust the verliea! position of the image on
PHASE
CLOCK
RED/GREEN/
BLUE
WXGA INPUT
BACK
LIGHTING
screen,
image on the PC Monitor screen Each video
standard will requtre a different value for this
setting
the PC Monitor screen Each video standard
w_Hrequke a diflerent value for this setting,
This must be acfjusted afler the frequency has
been set optimize piclure quality,
To minimize any vedical bars or sldpes visible
en the screen background.
To adjust the color lempereture of the PC
MonSter screen.
Set to ON, when you select the WXGA mode
en the PC,
TO adjust the screen brightness for
improved picture clarity.
Audio Adjustment
BASS
TREBLE
BALANCE
SURROUND
. If no buttons are pressed for more than approx 60
seconds, the PC Monitor Menu screen witl return to
normai Monitor screen automatically
• The PC Monitor Menu settings are net effective for normal
TV mode or externat input modes
For resetting all Picture adjustment items or Audio
adjustment items to the factory preset values, press My
to select "RESET", and then press <it,-
Factory settings;
Picture adjustment:
BRIGHTNESS
CONTRAST .......
RED/GREEN/BLUE
Audio adjustment:
BASS/TREBLE
BALANCE
Press < or _- to adjust the bass sound
Press < or _ to adjust the trebSesound
Press < or _ to obtain an equal sound {eve]
from bolh speakers
Press < or _- to turn on Or off the surround
effect
.... center (25)
.... maximum (50)
center (25)
.... center (25)
center(0)
- The numerical values of resolutions and frequencies
mentioned above are standard
They may differ from the values when actuaIly displayed
(_- 35
Page 36

Watching the DVD
Simple operations for watching a DVD
CZD CZ30 p _
POWER
POWER indicator
TV/DVD status indicator (POWER)
ON Lighting (Green) I
OFF/Standby Lighting (Red)
POWER (On/Standby)
TVtDVD
Preparation
Perform the following steps before you press POWER
on the remote control unit
1o insert the batteries into the remote control unit
(See page 9)
2,, Plug in the AC cord to the AC outlet (See page &)
Turning on the power
Press POWER on the TViDVD, or POWER on the
remote control
• POWER indicator (Green): The TV/DVD is on,
("PLEASE WAIT" wilt appear for a few seconds on the
screen )
Select the DVD mode
Press TV/DVD to select the DVD mode
Turning off the power
Press POWER on tile TV/DVD, or POWER on the
remote control
• The TViDVD enters standby mode and the image on the
screen disappears
- The POWER indicator on the TViDVD changes io Red,
" If you are not going to use th}s TV/DVD for a long period
of time, be sure to remove the AC cord from the power
outlet
• Weak electric power is sti]] consumed even when POWER
is turned off
POWER
DISPLAY DVO EJ_CI"
@ CD _ (3D
CD CD CD
e®®8
®®®
®®®
o
SKiP REV FWO SKtP
SflLL.mgUSE FLAY STOP
CSDC_ C_
SETIJPfTV _,{et_J DV!)Melu
(_D" 36
Page 37

Watching the DVD
Playback procedure
0,s0P,aces,o,thew,thd,s0the'°t.e,abe,
(If the disc has a
label ) Held the disc
without touching its
surface, align it with
the guides, and place
..... it in position,
On the screen, "_--."changes to "Reading"
and then playback will commence
,, A menu screen appear on the TV screen, if the
disc has a menu feature In this case, press
*/v/</_ or ENTER to operate a menu feature
Press STOP to end playback
• The unit memorizes the stopped point,
depending on the disc 'I_' appears on the
screen Press PLAY to resume playback (from
the scene point).
= tf you press STOP again ("m" appears on the
screen) or unload the disc, the TViDVD will
clear the stopped point
Press EJECT
Remove the disc and then press POWER
The TV!DVD turns off
• Whenyou ejectthedisc, you may hear
mechanismnoise, butitis not malfunction
St u i la fDVDdisc ....
at sdsp yo
Press DISPLAY The status display of the disc will
appear on the screen in order tikethe figure below
D!SC OPERATION TIME TIME
TITLE NO
ANGLE NO SUBTITLE LANGUAGE
AUDIO LANGUAGE A KIND OF AUDtO
If the TV/DVD does not operate properly:
Stalic electricity, etc, may affect the player's operation
Disconnect the AC power cord once, then connect it again
ELAPSED TOTAL
CHAPTER
-NO
• If a non*compatible disc is loaded, "Incorrect Disc", "Region Cede Error" or "Parental Error" will appear on theTV screen
according to the type of loaded disc if these appear, check your disc again (see pages 5 and 49)
• Some discs may take a minute or so to start playback
• When an 8 cm disc is placed into the disc slot. and the playback picture or menu display does not appear, press PLAY
• A "Prohibition" symbol "X" may appear at the upper right of the screen This symbol means eilher the feature you tried is
not available on the disc, or the TV/DVD cannot access the feature at this time This does not indicate a problem with the
TV/DVD
• When you set a single-faced disc label downwards (i.e the wrong way up) "Reading" wilt appear on the display and then
"incorrect Disc" will be displayed.
• Some playback operations of DVDs may be intentionally fixed by software producers Since this TViDVD plays DVDs
according to the disc content recorded, some playback features may not be available Also refer to the instructions supp_Ied
with the DVDs
• Do not move the unit during playback. Doing so may damage the disc
,, Use EJECT to unload and eject the disc
• Do not put any objects other than discs on the disc slot. Doing so may cause the unit to malfunction
• In many instances, a menu screen will appear after playback of a movie is completed Prolonged display of an on-screen
menu may damage your television set, permanently etching that image onto its screen To avold this, be sure to press
POWER on your remote control once the movie is completed
• There may be a sfight delay between the button ispressed and the function activates
(_ 37
Page 38

Watching the DVD
Special playback Zooming
SKiP REV FWO SKIP
ST_LU_USE _LAY STOP
_[U_V P_t4L_ OVD_ENLJ
This TV!DVD will aitow you to zoom in on the frame
image You can then make selections by switching the
positionof the frame
Fast Forward Playback
Press FWD during normal piayback,
Each pressof FWD wiil increasethe speed of the search
(x 2)._ (x 4), _ (x 8), _ (x 20)
. To resumenormalp]ayback pressPLAY
• The abovefigureshownin parenthesesindicatesthe
averagespeedmuttipliez
Review Playback
Press REV during normal playback
Each press of REV will increase the speed of the search
(x 2), "_ (x 4), _'_ (x 8), _"_'_'_(x 20)
oTo resume nmmal playback, press PLAY
° The above figure shown in parentheses ir_dicates the
average speed multiplier
Still Playback
Press STILL!PAUSE during no_mai playback to pause
playback
•To resumenorma_playback,p_essPLAY
• You can select the Still Playback or Fast Forward
(Review) Playback in the zoom mode
• Some discs may not respond to zoom feature
Press ZOOM during playback
The center part of the image will be zoomed
in
Each press of ZOOM will change the ZOOM
magnification O,.1 (x 1 3), L._2 (x 1 5) and Q,
3 (x 20)
Press A/vi4/p- to view a different part of the
frame
You may move the frame from the center
position UP, DOWN, LEFT or RIGHT
In the zoom mode press ZOOM repeatedly
to returnto a 1:1 view (O,.off)
Frame Advance
Press STILL/PAUSE during stili piayback
One frame is advanced each time you press STILL/
PAUSE
• To resume normal playback,press PLAY
Slow-motion Playback
Press SLOW (11=-)or SLOW (-,41)during normat
playback or still playback
Each press of SLOW will change the speed of the
slow xi/2, xl/4, x!/6, xl/7
• To resume normal playback, press PLAY
• To resume the still playback_ press STILL/PAUSE
Locating a chapter or track
Press SKIP(_I_) Forward or SKIP(I_I-_) Reverse
during playback to locate a chapter that you want to
watch
Each time you press the button, a chapter or track is
skipped
• The TV/DVD is capable of holding a stilI video image
or On screen display image on your television screen
indefinitely If you leave the still video image or On screen
dispiay image displayed on your TV for an extended
period of time. you risk permanent damage to your
television screen
Locating desired scene : i
Use the title,chapter and time recorded on the disc to
locate the desired point to play back
Press DIRECT SKIP during playback
D_rect Skip
Ti{le _--
Chapter _-.
Time _":'":-"
Press ,_/T to select the "Time", "Title" or
"Chapter"
Press Number buttons (0-9) to input the
number,
• Jfyou input a wrong number, press CANCEL
. Refer tothe packagesupptied withthe discto
check the numbers
Press ENTER.
• Playback starts
• When you change the title, playback starts from
Chapter 1 of the selected title.
• Some discs may not work in the above
operalion
(_ 38
Page 39

Watching the DVD
,,,,,,, i ...... ,,,,,,,. ,' ,'", '- ' '""
Repeat playback Marking desired scenes
SLO'_; £LGW
"_1 |m-
E_tT!
AUDIO _LAY_ODENtGLE Z_,_
Press PLAY MODE during playback or stop
mode,
Press ENTER to select "Chapter" or "Title",
• The unit aatomaticafly starts repeat playback
after finishing the current t)t(eor chapter
( Ropo_t : e(f
Press PLAY MODE again to make the
screen disappear
. (f you set the repeat mode daring stop mode,
,, To resume normat playback, select Repeat
• Some discs may not be compatibie with the repeat
operation.
• Chapter/Track repeat function is canee(ed whenever SKIP
or I,H ispressed
P(ay Mod_ ]]
press PLAY to start Repeat playback
"Off"
A-B Repeat playback
A-B repeat playback allows you to repeat material
between two selected points
The TV/DVD stores the points that you want to watch
again up to 3 points.
You can resume playback from each scene
A(JDIO_L_Y_+!ODEA_GLE 200f,_
C:D C:D
Marking the scenes
Press MARKER during playback
FMarken -- :-- _-- )
Mmke¢2
Select the blank Marker using *.Iv, then
press ENTER at the desired scene,,
• Up to 3 scenes can be selected
• Repeat this procedure to set the olher 2
scenes
Press MARKER to return to the normal
screen
Returning to the scenes
PressMAR Rdur,ngp,oybaokorstop
mode
Press _,/_ to select the Marker 1-3
@ C::}C:}
Press A-B REPEAT during playback
The start point is selected
Press A-B REPEAT again,
The end point is selected
Ptayback starts at the point that you
selected Playback stops at the end point,
returns to Point A automatically, then starts
again
• To resume normal playback press A-B
REPEAT again
t--i
",.._, Off" appears on the screen
• In A-B Repeat mode, subtitles near the A or B locations
may not be displayed,
• You cannot set the A-B Repeat for the scenes that include
multiple angles
• You may not be able to set A-B Repeat during certain
scenes of the DVD
• A-B Repeat does not work with an interactive DVD, MP3!
WMAiJPEG-CD
Press ENTER
Playback starts from the marked scene
To cancel the Marker
Follow the above steps 1_2, then press CANCEL,
• Some discs may not work with the marking operation
• The maddng is cancelled when you eject the disc or turn
the power off
• Some subtitles recorded around the madrer may fail to
appear
(_- 39
Page 40

Watching the DVD
..................... ,_,,,,,,_u,,,,,,,,,,,,_,,_, ., ,,, ,,. ,,_ , ,, , ,
When playing back a disc recorded with multi-angle
facility, you can change the view angle
,,,,.i
DVD menu
Some DVDs allow you to select the disc contents
using the menu.
When you play back these DVDs, you can select the
subtitle tanguage and soundtrack language, etc. using
the DVD menu
: i
Press ANGLE repeatedly until the desired
angle is selected.
= In case o{ JPEG-playback, the JPEG-image is rotated
90 degrees to the right
• Depending on the DVD, you may not be able tochange
the angles even if mufti-angles are recorded on the DVD,
Title selection
Two or more titles are recorded on some discs, tf the
title menu is recorded on the disc, you can select the
desired title
Press TOP MENU during playback
Title menu appears on the screen
Press AI_!<I_. to select the desired title..
Press ENTER or PLAY
The playback of the selected titlewiltstart
i
Press DVD MENU during playback,
The DVD menu appears on the screen
• Press DVD MENU again to resume playback at
the scene when you pressed DMD MENU
Press h,/v/_i_- to select the desired item
Press ENTER
The menu continues to another screen
Repeat steps 2 and 3to set additional items
if any
• Depending on the DVD, you may not be able to select the
title Depending on the DVD, a 'title menu" may simply be
called a "menu" or "title" in the instructions supplied with
the disc
- 40
Page 41

Watching the DVD
Changing soundtracklanguage ' Subtitles
You can select the language when you play a
multilingual disc
AUg_O FLAYP._O_}EA_GtE ZOO_
Changing the subtitle language
You can select the language when playing back adisc
recorded with multNinguai subtitles
CD (3DCD
R£TUF_ A,BREFEAT hlA_K£B 04_EC'/E_F_
@ CD CD CD
Press AUDIO during playback,
The current soundtrack language will
appear
Press AUDIO repeatedly until the desired
language is selected
The on-screen display wiUdisappear after a
Press SUBTITLE repeatedly during
playback until your desired language
appears,
The on-screen display will disappear after a
few seconds,,
[ _o{t ]
• tf the desired language is not heard after pressing AUDIO
several times, the language is not recorded on the disc
• Changing soundtrack language is cancelled when you
eject the disc
The initial default language or available language willbe
heard if the disc is played back again
Turning the subtitles on and off
Press SUBTITLE during playback until "Off' appears.
• Changing subtitle language is cancelled when you eject
the disc
, Some functions may not work on some DVDs You may
not be able to turn subtitles on or off or change subtitles
While playing the DVD, the subtitle may change when:
- you eject or insert the disc
- you change the title
• In some cases, the subtitle language is not changed to the
selected one immediately
(_-41
Page 42
MP3/WMA/JPEG and Audio CD operation
.... ,,,,,,:,, , .. : ............ ............
This TV/DVD can playback the MP3!WMA!JPEG-data which has been recorded on CD-R or CD-RW. Audio CD
also can be piayed back To produce the MP3!WMA/JPEG-data, you need a Windows=PC with CD-R/RW drive
and a MP3/WMA!JPEG-enooding Software (not supplied)
The Appie-HFS-System cannot be played
This TViDVD requires discs/recordings to meet certain technical standards in order to achieve optimal playback quality
Pro-recorded DVDs are automatically set to these standards. There are many dilferent types of recordable disc formats
(including CD-R containing MP3Nv'MA files) Given the fact that technology in this area is stitl maturing, this unit cannot
guarantee that all genre of recerdable discs will produce optimat playback quality The technical criteria sat out in this owner's
manual are meant as a guide only
Please be advised that you must obtain permission from the applicable copyright owners to download copyrighted content,
including music flies, in any format, including the MP3 and WMA formats, prior to the downloading thereof
MP3/WMA/JPEG CD information
Limitations on MP3/WMA/JPEG CD playback
* MP3iWMA/JPEG CD is the disc that is standardized by ISO9660, its rite name must include 3-digits extension Fetters,
"mp3", "wma" ,"'jpg,"
. MP3,'WMA/JPEG CD must be correspond to the iSO standardized fi_es.
• This "fV/DVD can read 2000 files per disc If one disc has more than 2000 _es, it reads up to 2000 flies, the remaining liles
will be omitted.
• MP3/WMA!JPEG CDs cannot be used for the purpose of recording
• If the CD has both audio tracks and MP3A,VMA/jPEG files, only audio tracks are played
• it may take more than one minute for thisunit to read MP3Nv'MA/JPEG filesdepending on its structure.
• Music recorded by "Joliet Recording Specification" can be played back, the file name is displayed (within t5 totters) on the
screen Long file names will be condensed.
. The music flies recorded by "Hierarchical File System" (HFS) cannot be played
Limitations on display
• The maximum number for display is 15 letters
Availabfe letters for display are the following:
capital or small alphabets of A through Z, numbers of 0 through 9, and _ (under score)
,, Other Ietters than those above are replaced in hyphen
Notes on MP3/WMA/JPEG files
To playback MP3/WMA!JPEG CD in the recorded order,
1 Use MP3/WMA/JPEG software that records data alphabetically ornumerically.
2 Name each file including two-digit or three-digit number (ex "0t" "02" or "001" "002")
3 Relrain from making Ioo many sub4oiders
CAUTION:
• Some MP3.hNMA]JPEG CDs cannot be played back depending on the recording conditions
" The CD-R!RW that has no music data or non MP3/WMA/JPEG files cannot be played back
Standard, sampling frequency, and the bit rate:
MP3 CD
MPEG-1 Audio
32kHz, 44,t kHz, 48kHz
32kbps - 320kbps (constant bit rate or variable bit rate)
The recommend recording setting for a high-quality sound is 44 lkHz of sampling frequency and 128kbps of constant bit
rate
WMA CD
WMA version 7, and 8
32kHz, 48kbps
44.1kHz, 48kbps - 192kbps
48kHz, 128kbps _ 192kbps
The file recorded by mono 48kHz, 48 kbps is not avaitabte to this unit
Microsoft, Windows Media, and the Windows Logo are either registered trademarks or trademarks of Microsoft
Corporation in the United States and/or other countries
(_- 42
Page 43

MP3,SNMA/JPEG and Audio CD operation
Loading CD
Load a disc on which MP3 or WMA _es
have been recorded in the disc slot.
"Reading" will appear on the TV screen
Reading time will depend on the number of
files on the disc
A file browser screen will appear on the TV
screen
Operation sla_u_ File _lumber E_epsed time Selected I_lename
F_Io l_t
• in case the current directory includes 8 files or
mere, press &/v to scroll in the file list.
• To see contents in folder, select the folder end
then press ENTER, To return to the parent
directory, select "_1 Go Up ,," then press
ENTER
• In case of a CD containing a mixture of MP3,
WMA and JPEG files, the files are played back
by selecting them from the file browser
Filetype
,,b : IndicatesMusicfile(Audio CDIMP3/WMA)
[_ : IndicatesPicturefile(JPEG)
=Toolkit
windaw
MP3/WMA and Audio CD playback
In the file browser, press ,Wv to select the
desired file,
• When PLAY is pressed after displaying
file browser displayed, playback begins
automatically starting from the first file tn
this case, ifthe first tile is an MP3/WMA
file, only MP3/WMA files are played back in
order.. If the first file is a JPEG file, the lirst
JPEG file is played back tf there is no file
at a root directory, playback does not begin
automalically
Press ENTER,
The selected file starts playing back,
Press STOP to end playback
• The unit records the stopped point. "!_"
appears on the screen Press PLAY to resume
playback (from the scene point)
- If you press STOP again or unload the disc, the
unit will clear the stopped point
,, MP3 or WMA file on Ihe Kodak Picture CD is not
recognized on this unit.
* During MP3iWMA/JPEG-Playback, you cannel use JUMP
and A-B Repeat functions
,, You can use Repeat (Track or All), Random functions and
Program playback for MP3/WMA!JPEG*Playback (see
page 45)
Select Files
The file type tomake it display in the file browser can
be chosen
Press ,,_/m-to select "Select Files" at right
column in the file browser
• PressENTER,thenpressA/v toselect file
type fromthe list (Music or Picture)
Press ENTER to add/remove check mark.
Checked file type will be displayed in the file
browser
Press RETURN to save the setting
(_- 43
Page 44

MP3/WMA/JPEGandAudioCDoperation
JPEG playback
In the file browser, press ,_/v' to select the
desired JPEG file
To display a thumbnail list, press DVD MENU
Press ._!_!A/v to select the desired file,
(To return to the file browser+ press TOP MENU)
, When PLAY is pressed after display+ng the rite
browser, playback begins automatically starting
from the first file. In this case, if the first file is
a JPEG file, the first JPEG file is played back
tf the first file is an MP3iWMA rite only MP3/
WMA flies are p+ayed back in order If there is
no file at a root directory, playback does not
begin automatlca+iy
Press ENTER, The selected picture appears
on the screen,.
Rotating an image
You can rotate an image by 90 degrees
Press ANGLE durin_ playback of the image
"_+", "_", "'_" or "=_" appears on the screen
Slide show playback _
The slide show enables you to view pictures (files)
one after another automatically
Preparation:
Set "JPEG Interval" setting to "5 Seconds", "10
Seconds" or "15 Seconds" (see page 48)+
Select your desired starting fiie for the slide
show in step t on the left
Press ENTER or PLAY to start slide show
from the selected file
• If you press STILL!PAUSE during the slide
show, the slide show stops temporary "u"
appears briefly on the screen
• If the picture appears upside down or
sideways, press ANGLE repeatedly/until it's
right side up "_'+", -+_=" '-÷_" or "_" appears
On the screen
• Press PLAY or SKIP _ again to resume the
slide show
• When the slide show playback linished, the file
list appears
• To stop the siide show press STOP The file
list appears
• During JPEG playback, you cannot use Direct Skip and
A-B Repeat functions
. It may have a longer interval due to a size of data
Zooming an image
Zoom function also can be used in viewing JPEG files
Press ZOOM (see "Zooming" or+page 38)
Press STOP to end playback
• The fiIe browser appears on the screen ]l you
want towatch the other file, repeat steps 1 - 2
• When an +rnageexceeds 5760 x 3840 pixels, the entire
image cannot be displayed on a screen, preview window
or thumbnail list
(_ - 44
Page 45
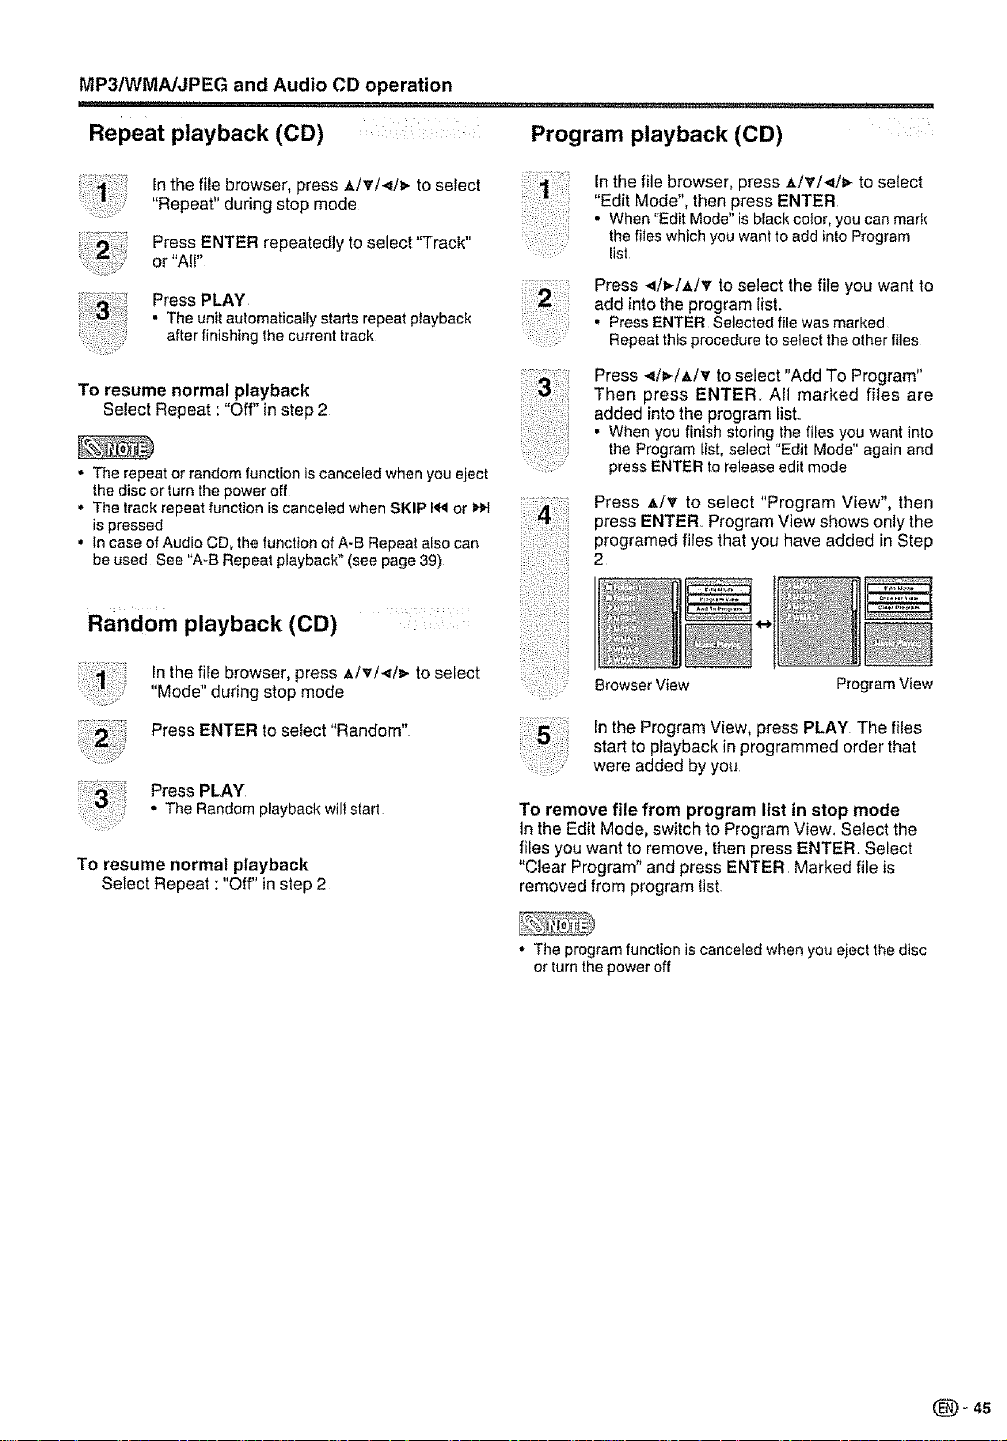
MP3/WMA/JPEG and Audio CD operation
Repeat playback (CD) _ Program playback (CD)
In the file browser, press _./v!.,q/_. to select
"Repeat" during stop mode
Press ENTER repeatedly to select "Track"
or "Air
Press PLAY
• The unit automatically starts repeat playback
after finishing the current track
To resume normal playback
Select Repeat : "Off" in step 2
• The repeat or random function is canceled when you eject
the disc orturn the power off
• The track repeat function is canceled when SKIP !_ or I_H
is pressed
= In case of Audio CD, the function of A-B Repeat also can
be used Sea "A-B Repeat playback" (see page 39)
Random playb k (CD) ........
ac
Inthe fife browser, press ,_lv/._l_ toselect
"Mode" during stop mode
Press ENTER to select "Random"
Press PLAY
• The Random playback will start
To resume normal playback
Select Repeat : "Off" in step 2
In the file browser, press z./v'/_/_ to select
"Edit Mode", then press ENTER
. When "Edit Mode" is black color, you can mark
the flies which you want to add into Program
list
Press .,_!_/A/v toselect the file you want to
add into the program {ist.
• PressENTER Selected filewas marked
Repeatthis procedureto selectthe other files
Press .,q/_,-/_./v to select "Add To Program"
Then press ENTER All marked files are
added into the program list.
• When you finish storing the files you want into
the Program {ist, select "Edit Mode" again and
press ENTER to release edit mode
Press A/v to select "Program View", then
press ENTER. Program View shows only the
programed files that you have added in Step
2
Browser View Program View
In the Program View, press PLAY The files
stad to playback in programmed order that
were added by yotJ
To remove file from program list in stop mode
Inthe Edit Mode, switch to Program View. Select the
files you want to remove, then press ENTER. Select
"Clear Program" and press ENTER Marked file is
removed from program list
• The program function is canceled when you eject the disc
or turn the power off
(_- 45
Page 46
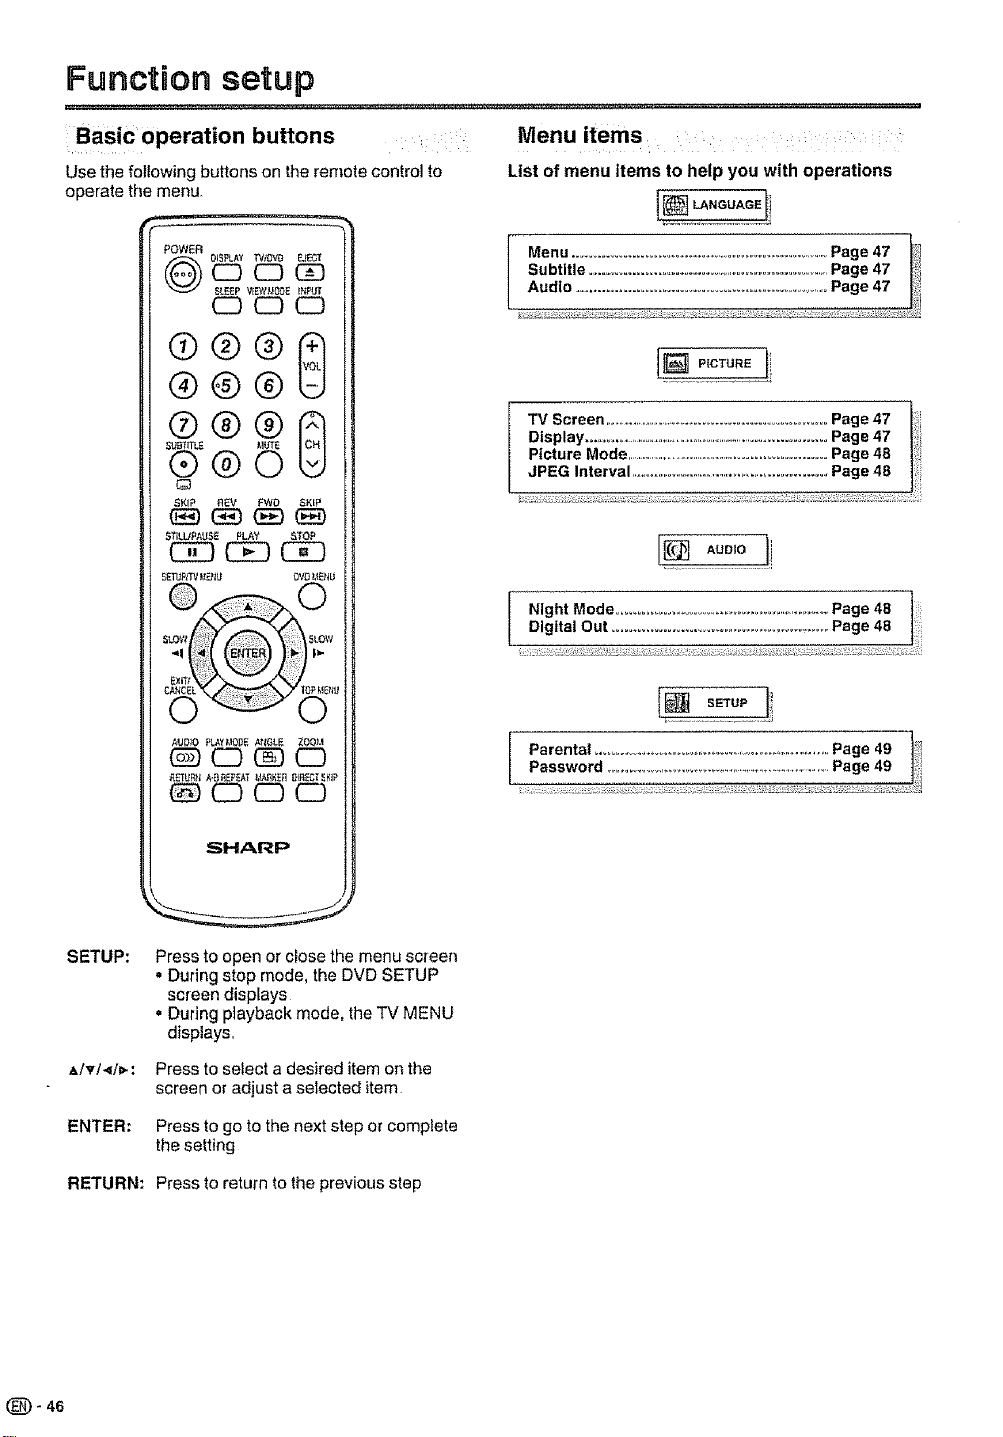
FunctBon setup
Basic operation buttons
Use the following buttons on the remote control to
operate the menu,
CZ3 CZ) C_3
I)ISPLAY i_IDVD F.JE_
_LE£P VIEYtJ_IQ0_ _N_Ur
CD (Z3 CZ3
List of menu items to help you with operations
®@®
'6'@6
S_P REV FW0 SKiP
ST[LUPAUS_ PLAY STOP
CSDC5_ CK3
SETI_P_V_,t_IL_ OVO MENU
© ©
?;t
AUDIO PLAY,ODEA_GLE ZOOJ.t
_ C) C) (_
SHARP
SETUP:
A/v/</_-: Press to select a desired item on the
Press to open or close the menu screen
. During stop mode, the DVD SETUP
screen displays
" During playback mode, the TV MENU
displays,.
screen or adjust a selected item
TMScreen...............................................................Page47 |
Display...................................................................................Page47
Picture Mode................................................................Page48
JPEG Interval....................................................................Page48
j Parental ........................................................ ................ Page 49 ]'_!
Password...................................................................Page 49 ]"
l
1
(_)- 46
ENTER; Press to go to the next step or complete
the setting
RETURN: Press to return to the previous step
Page 47
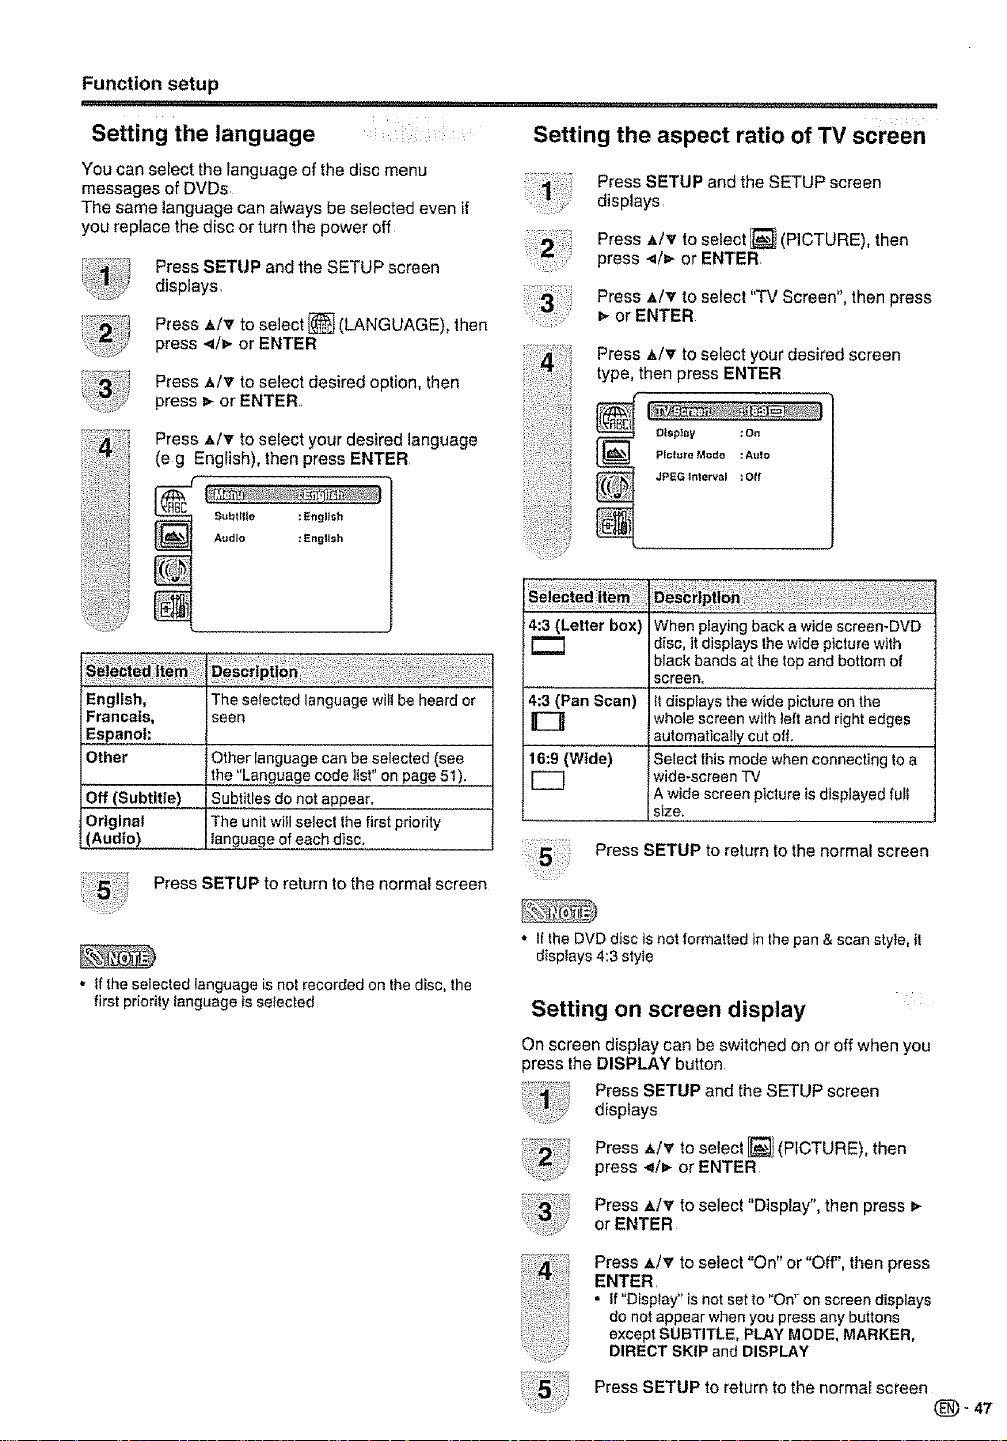
Function setup
,,.,,,,,, ,, ,,, .,_,.,,,,,,_,,,,,,,,, ,,, ,
Setting the language :
You can select the language of the disc menu
messages of DVDs
The same language can always be selected even if
you replace the disc or turn the power off
Press SETUP and the SETUP screen
displays.
Press A/v to select _ (LANGUAGE), then
press 4/_ or ENTER
Press A/v to select desired option, then
press _. or ENTER..
Press A/v to seiect your desired language
(e g English), then press ENTER
Subtllto : English
Audio : English
English,
Francats,
Espanoh
Other
Off (Subtitle)
Original
(Audio)
The selected language will be heard or
seen
Other language can be selected (see
the "Language code list°'on page 51).
Subtitles do not appear,
The unit will select the first priority
language of each disc.
Press SETUP to return to the normal screen
Setting the aspect ratio of TV screen
Press SETUP and the SETUP screen
displays
Press A/v to select _ (PICTURE), then
press ._/_,-or ENTER
PressA/vtoselect"TVScreen",thenpress
orENTER
Press A/v to select your desired screen
type, then press ENTER
J
elsp_y :On
PIclure Mode : AUlO
JPEG_ntOtWl :Off
4:3 (Letter box) When playing back a wide screen-DVD
r"--1 disc, it displays Ihe wide picture with
4:3 (Pan Scan) t!displays the wide picture on the
0 whole screen with teft and right edges
16:9 (Wide) Select this mode when connecting to a
E_ wide-screen TV
black bands at the top and bottom o!
screen.
automatically cut o{f.
A wide screen picture is displayed full
size.
Press SETUP to return to the normal screen
', If the selected language is not recorded on the disc, the
first priority _anguage {s selected
* tl the DVD disc is not formatted in the pan & scan style, it
displays 4:3 style
Setting on screen display
On screen display can be switched on or off when you
press the DISPLAY button
Press SETUP and the SETUP screen
disptays
Press A/V to select [_1 (PICTURE), then
press </1_ or ENTER
Press A/v to select "Display", then press
or ENTER
Press A/v to select "On" or "Off", then press
ENTER.
• if "Display _'is not set to "On" on screen displays
do not appear when you press any buttons
except SUBTITLE, PLAY MODE, MARKER,
DIRECT SKIP and DISPLAY
Press SETUP to return to the normal screen
Page 48

Function setup
, t ,u ,,,,,.,,,. ,,,,,,,.,,u,,,, ,,v,,,,,,vt
Setting the picture mode _
There are two types of source content in pictures
recorded in DVD video discs: _m content (pictures
recorded from films at 24 frames per second) and
video content (video signals recorded at 30 frames
per second) Make this selection according to the type
of content being viewed.
Press SETUP and the SETUP screen
displays
Press A/v to select [_] (PICTURE), then
press ._/_,-or ENTER,
Press t./v to setect"Picture Mode", then
press _.-or ENTER
Press _/v to setect your desired picture
mode, then press ENTER
Auto
Film
Video
Select this positron normaUy The DVD
player automaticatty detects source
content, film or video, of playback source.
Suitable for ptayback of ft_mcontent
pictures.
Suitable forplayback of video content
pictures,
Press SETUP to return to the normal screen.
Night Mode
Night Mode enables you to control the dynamic range
so as to achieve a suitable sound for your equipment
Press SETUP and the SETUP screen
displays,
Press A/_r to select (T_t (AUDIO), then press
4/p or ENTER
Press _/v to select "Night Mode", then
press v or ENTER
Press ,e,/T to select "On" or "Off", then press
ENTER,
O_glt_t out _Pcl'_
Off It p_ays back at the recording level on
the disc.
On Loud sound such as explosion or sim+lar
is toned down slighliy when prayed
back This makes it suitable for when it
is connected to a stereo.
Press ;ETUP to return to the normal screen
Setting the JPEG interval
You can continuously playback atl JPEG files
automatically
Press SETUP and the SETUP screen
displays
Press A/v' to select l_ (PICTUR), then
press 4/v or ENTER
Press ,_/v to select "JPEG Interval",then
press 1,-or ENTER
i Press ,_/v to select your desired time, then
press ENTER
Off ......................P.!a.ysback one file at a time,
5 Seconds Displays imagesin the form of a slide show
i0 Seconds Disptays images in theform el a slide show
15 Seconds Displays images in the form of a slide
Every 5 seconds the imagechanges,
Every 10 seconds the image changes,
show Every 15 seconds the image
changes.
Press SETUP to return to the normal screen
' E
• This function works only during playback of Dolby Digitai
recorded discs
• The tevel of Dynamic Range Reduction may differ
depending on DVD video disc
Digital Out
You can select the digital output sound format
corresponding to your system connection
Press SETUP and the SETUP screen
displays
Press ,_/v to select _ (AUDIO), then press
_/_. or ENTER
Press A/_' to select "Digital Out", then press
_. or ENTER
Press _./v to select desired mode, then
press ENTER.
Off
PCM
Bitstream Disc audio bitstream data witl be output,
There is no sound output from DIGITAL
AUDIO OUT jack.
Change Dotby Digital to PCM for the
output
Select when connected to a 2 channel
digital stereo amplifie_.
(_- 48
• You cannot display DVD SETUP screen when disc is
playback
+ Even if you select "Bitstream ", MPEG audio wil_be output
in PCM format
Page 49

Function setup
,,,,,,,,,,,,,,,
Parental control setting
Some discs are specified as not suitable for children
Playback of such discs can be restricted with this
TV/DVD
Press SETUP and the SETUP screen
displays
Press ,_/v to select [_!!|!(SETUP), then
press 4/_- or ENTER
Press A/_r to select "ParentaF, then press
or ENTER
"Enter Password" screen wil! appear
Press0000°sin°Nombo,bu,,o°s{0-9)
(Please note, this is pre-setting password of
level list witl appear
• If you input a wrong number, press CANCEL
Level Off The parental control setting does not
Level 8 Virtually a!] DVD software can be played
Level 1 DVD software for adults cannot be
• Select from level 1to level 8 The limitation will be more
severe as the level number decreases
function.
back.
_tayed back,
Press A/v to select from the level 1 to level
8 The limitationwill be more severe as the
level number is lower Then press ENTER
Press SETUP to return to the normal screen
After the rating ls locked, the setting cannot be
changed unless you enter the correct password
Set the new password : :
Press SETUP and the SETUP screen
displays
Press A/_' to select LF_._;(SETUP), then press
.</_.or ENTER
Press .t,/v to select "Password", then press
or ENTER
"Enter Current Password" screen will
appear
Press Number buttons (0-9) to enter the
password you have stored
• ifyou input a wrong number, press CANCEL
P_ ro_t _ : off
Then press ENTER. "Enter New Password"
screen will appear Press Number buttons
(0-9) to input the new password
Press ENTER Now your new password has
been set 8e sure to remember this number!
If you forget the password ....
t Press EJECT to remove the disc
2 While holding 7 down on the remote control and at the
same time press STOP on the front panel 'Password
Clear" appears on the screen Now the password has
been returned to lhe initialvalue ("0000")
• The password is required every time when you change
the parental levet
', Depending on the discs, the TViDVD may not be able to
limit playback
,, Some discs may not be encoded with specific rating tevel
information fhough its disc jacket says "adult" For those
discs, the parental control feature wi!i not work
(_- 49
Page 50

Function setup
Depending on the DVD disc, the disc may try to
temporarily cancel the rating level that you have set
[tis up to you to decide whether to cancet the rating
level or not.
Load a DVD disc (See page 37)
tfthe DVD disc has been designed to
temporarily cancel the rating level, the
screen which follows the "Reading" screen
will change, depending on which disc is
played, tf you select "YES" with pressing
ENTER, password input screen will then
appear
Enter the password with Number buttons
(0-9)
Then press ENTER.
• if you interrupt theentering,pressRETURN
Playback wiltcommence ifthe entered
password was correct.
• This temporarycancellationoftheratinglevelwiltbe kept
untilthe discis ejected
Whenthe disc is ejected,the originalratingleve_will be
setagain automatically
(_ 50
Page 51

AppendBx
Language code list
Enter the appropriate code number for the initial settings "Menu", "Subtitle" and/or "Audio" (see page 47)
LanguageName Code
Abkhazian 11I2
Afar ! 111
Afrikaans 1116
Albanian 2927
Amharic 1123
Arabic 1128
Armenian 1835
Assamese 1129
Aymara 1135
Azerbaijani 1136
Bashkir
Basque
Bengali;Bangla
Bhutani
Bihari
Breton
Bulgarian
Burmese
Byelorussian
Cambodian
Catalan
Chinese
Corsican
Croatian
Czech
Danish
Dutch
English
Esperanto
Estonian
Faroese
!2! !,. Gujarati
1531 Hausa
1224 Hebrew
1436 Hindi
1218 Hungarian
1228 icelandic
12!7 indonesian
2335 Intedingua
1215 Irish
2123 italian
1311
36t8
1325
1828
1329
1411
2422
1524
1525
1530
1625
LanguageName
Fiji
Finnish
French
Frisian
Gatician
Georgian
German
Greek
Greenlandic
Guarani
Code LanguageName Code LanguageName Code
1620 Lingaia 2224 Singhalese 2919
1619 Lithuanian 2230 Slovak 292l
1628 Macedonian 2321 S!ovenian 2922
1635 Matagasy 2317 Somali 2925
1722 Malay 2329 Spanish 1529
2!!! .,Malayalam 2322 Sundanese 293t
1415 Maltese 2330 Swahili 2933
1522 Maod 2319 Swedish 2932
2t22 Marathi 2328 Tagalog 3022
1724 Moldavian 2325 Tajik 3017
1731 Mongolian 2324 Tamil 3011
1811 Nauru 2411 Tatar 3030
1933 Nepafi 2415 Tetugu 3015
1819 Norwegia,n.......... 2425 Thai .................... 3018
1831 Oriya 2528 Tibetan 1225
1929 Panjabi 2611 Tigrinya 3019
1924 Pashte, Pushto 2629 Tonga 3025
1911 Persian 1611 Turkish 3028
17!1 Polish 2622 Turkmen 3021
1930 Portuguese 2630 Twi 3033
Japanese 2011
Javanese 2033
Kannada 2124
Kashmiri 2129
Kazakh
,K!rghiz
Korean
Kurdish
Laothian
Latin
Latvian, Lettish
2121 Samoan 2923 VoiapQk
2135 Sanskrit 2911 Welsh
2125 Scots Gaelic 1714 Wolof
213t Serbian 2928 Xhosa
2225 Serbo_Croatian 2918 Yiddish
2211 Shona 2924 Yoruba
2232 Sindhi 2914 Zutu
Quechua
Rhaelo-Romance
Romanian
Russian
2731 Ukrainian
2823 Urdu
2825!Uzbek
2831
Vietnamese 32t9
3121
3128
3136
3225
!335
3325
3418
2019
3525
3631
(_- 51
Page 52
Troubleshooting
.....
o NOpower
• Unit cannot be operated
• Remote control unit does not
operate
i• Picture iscut offlwith sidebar *
screen.
• Strange color, light color, or cotor*
misetignment °
• Power is suddenty turned off •
• No picture
• No sound
• Tire TV sometimes makes a
cracking sound
Possible Solution
; Check ff you pressed Po'WE'FIon"ihe remote control unit. (Se'e"page 17.)if the
indicator on the TViDVD does not fight up, press POWER or} the TV/DVD
,, is the AC cord disconnected? (See page 8 )
• Has the power been turned err? (See page 17.)
• External influences such as lightning, static electricity, may cause improper
operation, In this case, operate the unit after first turning on the power of the TV/
DVD or unplugging the AC cord and replugging it in after 1 or 2 minutes,
• Are batteries inserted with polarity (+, -) aligned? (See page 9 )
Are batteries worn out? (Replace with new batteries )
Are you using it under strong or fluorescent lighting?
Is a,[!uorescen!,!!ght illuminated near the remote control sensor?
Are screen mode adjustments such as view mode choose made correctly? (See
page 25,)
Adjust the picture tone 'i'See pa'ge 22 )
Is the room too bright? The £!€,!,ure,may,,Iookdark irra room that istoo bright.
Is the sleep timer set? (See page 12 )
_e
Check the power control settings (See page 17 )
_e
The unitts internal temperature has increased
Remove any obiect s blocking vent or clean,:.............
,• Is connection to other components correct? (See pages 15 to t6 )
,• Is correct input signal source selected after connection? (See page 16 )
,• Is the correct input selected? (See page 16.)
,. Is picture adjustment correct? !See page 22_) ........................................
• is the volume too low? (See page 12 )
• Have you pressed MUTE on the remote control unit? (See page,l,2_,)...........
I• This is not a malfunction This happens when the cabinet slightly expands and
contracts according to change in temperature This does not effect the TV's
performance.
(_- 52
Troubleshooting-Digital broadcasting
The example of an error Possible Solution
messag e displayed on a screen
DIGITAL CHANNEL SIGNAL •Check the antenna cable Check that the antenna is correctly setup
STRENGTH IS LOW
DIGITAL CHANNEL IS • tt is subscription channel Contact the service provider
SCRAMBLED
AUDIO ONLY -The channeI has audio contents on!y_
Troubleshooting,PC mode
Problem
• There is no image
. There is no sound
• Make sure the RGB cable isproperly connected (See page 34 )
° Make sure the output signai of the PC and the input slgnsl setting of the LCD TV set
are matched(See page 35 )
° Some sottware prohibit video playback on an externa{ display when p_aying back a
video with a notebook PC. This is not attributable to a problem with the LCD TV set.
• Make sure the PC audio cable is properly connected (See page 34 )
• Check if the mute function activates, or if the volume is set to minimum (See page
!2,)
• ' 'T'hetext is blurred. • Adjust "CLOCK" and "PHASE" using the PICTURE menu, (See page 35.)
• The image is not displayed in the * Adjust "HOR POSITION" and "VER POSITION" using the PICTURE menu (See
center of the screen, page 35.) ......
Cautions regarding use in high and low temperature environments
• When the unit is used in a low temperature space (eg room, office), the picture may _eave trails or appear slightty
detayed, This is not a malfunction, and the unit wilt recover when the temperature returns to normal
• Do not teave the unit in a hot or cord locat}on Also, do not leave the unit in a tocetion exposed to direct sunlight or near a
heater, as this may cause the cabinet to deform and the Liquid Crystal panel to malfunction
Storage temperature: -4°F to +140°F (-20_C to +60_C)
Possible Solution
Page 53

Appendix
Troubleshooting-DVD
Problem
• Playback doesn't start
,, No picture ,, TV/DVD selector is not set correctly (See page 36 )
• No sound * Check the input selector of the amplifier is set propedy
• Picture is distoded during fast ,' The picture wit_be distorted occasionally
reverse/forward playback.
• Stopping playback, search, • Some discs may not do some of the functions
slowmotion play, repeat ptay. or
program play, etc cannot be
performed
• No on-screen display , Select Display to On (See page 47 )
• No surround sound • The setup does not match your stereo system
• The TV/DVD or remote operation
key is not functioning
• Playback does not start when the
titte is selected.
• Audio soundtrack and!or subtitle
_anguage is not changed when
you playback a DVD.
• No subtitle
• Angle cannot be changed
• "X" appears on the screen
• No disc is inserted. (See page 37 )
• The disc may be dirty Clean up the disc (See page 6 )
• The TViDVD cannot play CD-ROMs, etc (See page 5 )
• The TViDVD is in the special playback mode (See page 38 )
• Select the correct Audio Output position on AV amplifier.
• Turn off the TV/DVD and unplug the AC power cord for several minutes, then
replug it
• Check the Parental setup. (See page 49 )
• Multilingual language is not recorded on the DVD disc (See page 4I )
• Some discs have no subtitles (See page 41 )
• Subtitles are cleared Press SUBTITLE (See page 41 )
!,, Multi-angles are not recorded on the DVD disc (See page 40 )
l, The function is prohibited with the TWDVD or the disc (See page 37 )
Possible Solution
(_- 53
Page 54

Appendix
, ,,r,
i
Specifications
Item Modei'i LC-19AD22U
LCD panel 19" Advanced Super View & BLACK TFT LCD
Actual screen size 18_¢/r_'"measured diagonal,ly)
Number of dots 3,888,000 dots (1440 x g00 x 3 dots)
TV TV-standard (CCIR) lAmerican TV Standard ATSCiNTSC System
iFunction Receiving VHF/UHF IVHF2-13ch, UHF 14-69eh
Channel CATV 1-125ch (non-scrambled channel only.)
Digital Terrestrial 2-69ch
Br0adcas ! (8VSB)
Digital Cable" 1-125ch (nomscrambled channel only )
(64/256 QAM)
Audio multiplex
Audio out t ,5W x 2
Ferminals AV in, S_VIDEO in
OSD language English!French/Spanish
Powe_ Rec uirement AC 120 V, 60 Hz
Power Consumption 58 W (0.9W Standby with AC 120V)
Weight
Dimension W XH XD):_
DVD Signal syste m
section Applicable disc
Operating temperature
Emergency alert messages via Cable are unreceivable
_The dimensional drawings are shown on the inside back cover
° Typical time for power output decrease of about one-half assuming continuous use in a room with normal lighting, normal
brightness and temperature at 77°F/25°C
. As part of policy of continuous improvement, SHARP reserves the right to make design and specification changes for
product improvement without prior notice The performance specification figures indicated a_e nominal values of production
unffs There may be some deviations from these values in individual units
Side INPUT 1
INPUT 2
iNPUT 3
_NPUT 4
iNPUT 5
DIGITAL AUDIO
OUTPUT
ANT/CABLE
HEADPHONE Mini-iack for stereo (o3.5 ram)
Frequency response
Wow and flutter
Pickup
BTSC System
AV in
COMPONENT in, Audio in
HDMI in with HDCP, Audio in
PC Connector: 15-pin mini D-sub PC, Audio in
Coaxial Digital audio oufput x t (PCM/Dofby Digital)
75 _ unbalance, F Type x 1 for Analog (VHF/UHF/CATV)
and Digital (AIR/CABLE)
with stand: 14,9 lbs,/6,7 kg
with stand: 19 x 15s/_ x 87/.inch
NTSC
DVD (12 cm, 8 cm), CD (12 cm, 8 cm)
DVD : 4 Hz- 22K Hz/CD : 4 Hz- 20K Hz
Below Measurable Level
CD : Wavelength: 780- 790 nm
Maximum output power: 7 mW
DVD : Wavelength: 652 - 662 nm
Maximum output power: 5 mW
+41_F to +104°F (+5°C to +4Q°C)
Q - 54
Page 55

CLEARING THE PASSWORD
If you forget the password, clear the password using the following procedure
00000
OCE3 0 ED
®®0
8KIP F_EV FWD 8KiP
STILUNUgE PLAY STOP
CSD
Press and hold both VOL - on the TVtDVD and press 0 on the remote control simultaneously for a
few seconds until _ (LOCKS) menu appears on the screen
Now the old password was cleared You can set the new password
The
password is I J I I I °
NNN
• As a precautionarymeasure,make a noteofyour passwordabove, cut itfrom thismanual,and keep itinasafe place
I_° 55
Page 56

Calling for Service
For location of the nearest Sharp Authorized Service, or to obtain product literature, accessories, supplies, or
customer assistance, please call 1-800-BE-SHARP
LRMUTEDWARRANTY
CONSUMER LIMITED WARRANTY
SHARP ELECTRONICS CORPORATION warrants to the first consumer purchaser that this Sharp brand product (the
"Product"), when shipped in its origina! container, will be free from defective workmanship and materials, and agrees that
it will, at its option, either repair the defect or replace the defective Product or part thereof with a new or remanufactured
equivalent at no charge to the purchaser for parts or labor for the period(s) set forth betow
This warranty does not apply to any appearance items of the Product nor to the additional excluded item(s) set forth
below nor to any Product the exterior of which has been damaged or defaced, which has been subiected to improper
voltage or other misuse, abnormal service or handling, or which has been altered or modified in design or construction.
In order to enforce the rights under this limited warranty, the purchaser shouId foltow the steps set forth below and
provide proof of purchase to the serviee_
The limited warranty described herein is in addition to whatever implied warranties may be granted to purchasers by
law. ALL IMPLIED WARRANTIES INCLUDING THE WARRANTIES OF MERCHANTAB]MTY AND FITNESS FOR USE
ARE LIMITED TO THE PERIOD(S) FROM THE DATE OF PURCHASE SET FORTH BELOW Some states do not allow
limitations on how long an implied warranty lasts, so the above limitation may not apply to you.
Neither the sales personnel of the seller nor any other person is authorized to make any warranties other than those
described herein, or to extend the duration of any warranties beyond the time period described herein on behalf of
Sharp
The warranties described herein shall be the sole and exclusive warranties granted by Sharp and shall be the sole and
exclusive remedy available to the purchaser. Correction of defects, in the manner and for the period of time described
herein, shall constitute complete fulfillment of all liabilities and responsibilities of Sharp to the purchaser with respect to
the Product, and shalt constitute full satisfaction of all claims, whether based on contract, negligence, strict liability or
otherwise. In no event shall Sharp be Iiable, or in any way responsible, for any damages or defects in the Product which
were caused by repairs or attempted repairs performed by anyone other than an authorized servicer; Nor shatl Sharp be
liable or in any way responsible for any incidental or consequential economic or property damage Some states do not
allow the exclusion of incidental or consequential damages, so the above exclusion may not apply to you.
THIS WARRANTY GIVES YOU SPECIFIC LEGAL RIGHTS YOU MAY ALSO HAVE OTHER RIGHTS WHICH VARY FROM
STATE TO STATE
I_ _ 56
Model Specific Section
Your product Model Number & Description:
Additional Item s(_=.Excludedfrom
Warranty Coveraqe fifany}:
Where to Obtain Service:
What to do to Obtain Service:
TO OBTAIN PRODUCT INFORMATION, CALL 1-800-BE-SHARP OR VISIT www.sharpusa_com
SHARR
SHARP ELECTRONICS CORPORATION
Sharp Plaza, Mahwah, New Jersey 07430-2135
SHARP CORPORATION
LC-19AD22U Combination Liquid Crystal Television And
DVD/CD Player
(Be sure to have this inlormation available when you need
service for your Product )
One (1 } year paris and ninety (90) days labor from the date of
purchase
Non-rechargeable batteries
From a Sharp Authorized Servicer located in the United
States To find the location of the nearest Sharp Aulhorized
Servicer, call Sharp toll free at 1-800*BE-SHARR
Ship prepaid or carry in your Product to a Sharp Authorized
Servicer Be sure to have Proof of Purchase available if you
ship the ProducL be sure it is insured and packaged securely
Please use two persons to carry the Product, transport it in its
originai packaging, and ensure that the Product is covered to
avoid scratches and damage
Page 57

VALID IN CANADA ONLY _
LIMITED WARRANTY
Consumer Electronics Products
Congratulations on your purchase!
Sharp Electronics ot Canada Ltd (hereinafter called "Sharp") gives the following express warranty to the first consumer purchaser for this
Sharp brand product, when shtpped in its original container and sold or disldbuled in Canada by Sharp or by an Aulhorized Sharp Dealer:
Sharp warrants that this product is free. under normal use and maintenance, from any defects in mateda] and workmanship It any such
de|eels should be found in this product within the applicable werranly period. Sharp shall at fts option, repair or replace the product as
specified herein
This warranty shall not apply to:
(a) Any defects caused or repairs required as a result of abusive operagon, negtigence, accidenL improper instalfaiion or inappropriate
usa as outlined tn the owner's manual
(b) Any Sharp product tampered with. moditied, adjusted or repaired by any party other lhan Sharp. Sharps Authorized Service Cen1_'es
er Sharp's Authorized Servicing Dealers
(c) Damage caused or repairs required as a result of the use with items neI spec;l_ed or approved by Sharp, including but not limited to
head cleaning tapes and chemtcat cieantng agents
(d) Any rep|acement el accessories, glassware, consumable or periphera} ilems required through normal use of the product including but
net limited lo earphones, remote conlrote AC adapters batteries, temperature probe, slylus, trays, fillers, belts, ribbons, cabtes and
paper
(e) Any cosmetic damage tr._the sudace or exterior that has been defaced or caused by normal wear aod tear.
(|) Any damage caused by axlema] or environmental conditions, including but not limited to transmission Itne/power line voltage or liquid
spillage
(g) Any product received without appropbale model, serial number and CSALeUL markings
(h) Any products used for rental or commercial purposes
(i) Any_nsta{tetion. selup and/or programming charges
Should th_s Sharp product fat_ to operate during lhe warranty period, warranty service may be obtained upon delivery of lhe Sharp product
togelher with proof of purchase and a copy at Ihta UMITED WARRANTY sta_emenl to an Authorized Sharp Service Centre or an
Authorized Sharp Servicing Dea_er In home wa_'l'anty service may be provided at Sherp's diserelion on any Sharp television wi_h lhe
acreen size el 27" or larger and on any Sharp Over4he-Range Microwave Oven
Tbts warranty oonstitoles the enl#e express warranly granted by Sharp and no other dealer, service centre or their agenl or employee is
autho_zed Io extend, enlarge or t_ansfer th_s warranty an bahai| ef Sharp To the extent the _aw permits, Sharp disclaims any and all
_labiiity for direc_ or indirect damages or losses or tar any incidental¸ special or consequential damages or loss of prel_ls resulting from a
detect tn matedal or workmanship relaling to the product, including damages fo_ the toss of lime or use of lhla Sharp product or the less
of i_ormaiien The purchaser wilt be responsible for any removal reinstallalion, transportation and Insurance oasis incurred, Coi'_eclion of
dalesls, in the manner and period e! time described herein, constilule complete tuItitimenl of all obligations and responsibilities of Sharp
to the purchaser with respect to the product and shall constitute tulf sat}sfaction of alt claims, whether based on contract, neg_igence_ strict
lieb_lity or olhe_Mse
WARRANTY PERIODS:
Audio Products t year
Camcerder t year
DVD Produols 1 year
Projector f year (lamp 90 days)
LCD & Plasma Display TV I year
Microwave Oven ! year (magnetron component-4 addilionat years}
Television Products I year (plclure tube component-! additional year)
VCR Products _ year
Vacuum Cleaner I year
Parle & Labour (exceptions noted)
For more information on this Warranty, Sharp Extended Warranty
Offers, Sharp Canada Products, Accessory Sales, Dealer or Service SHARP
Revision04/22/03
to ol_l;_in rh_ zlam_ al_d ;=ddr_,_sol" _]_cn_:_r_sl Aulhmtz_'d $h=l_p S_rvi¢_ C_n_r_ ¢_rD_=l_r plc_su c<lnla_t:
SllA_t _ E[EC'rRONICS OF CANADA LTD 33_; Bri_rmi;] Ro;_d Ea_t, Mis_i_l_, Om;_r_o [-IZ IW9
Locations, ptease calf (905) 568-7140 _ _
Visit our Web site: www.sharp.ca %. SERVICE/::.-
(_- 57
Page 58

LC=lgAD U
COr,,/IBINI_ Ti_LEVISEUR ACL ET LECTURE DVD/CD
FRAN(_AIS
MODE D'EMPLOI
• Les illustralions ettes alfichages _]i'ecran darts ce mode
d'emplo{ sont presentes &titre explicatif at peuvent vader
I_geremen! des operations reelles.
', Les rubriques du menu qui ne sont pas s_lectionnab_es
soat es|omp_es en gris
iMPORTANT:
Pour facititer ia d#ciaration de perte ou de vot, veuiilez noter
les numet'os de modele et de serie dans l'espace pr_.vu &
cat effet Vous trouverez ces numeros au dos du TV/DVD
N" de module :
N° de serie :
INFORMATIONS UMPORTANTES
AVERTISSEMENT : POUR REDUIRE LES RISQUES D'fNCENDIE OU
D°ELECTROCUT!ON, N'EXPOSEZ PAS CET
APPAREIL ,& LA PLUIE OU A L'HUMIDIT#.
Ce symbole (6c_airdans un triangle
_quilat6_'af) avedit rutilisateur de la
presence darts fe bo'ffier de rappareil
d'une "tension dangereuse" non
D'_LECTROCUTION
NE PAS OUVR R J
ATTENTION : AFIN DE R_DUIRE LE RISQUE
D'_LECTROCUTION, NE PAS RETiRER LE COUVERGLE
PAS DE PI_CES R_PARABLES PAR L'UT_LISATEUR/_
CONFIER TOUTE PROCEDURE D ENTRETIEN ]k UN
(OU PANNEAU ARRiI_RE),
L'INTt_R{EUR.
PERSONNEL D'ENTRETtEN QUALfF_.
isoI_e suffisamment 61erie pour
causer une e_ectrocution aux
pe_-sonnes
Ce symbole (point d'exciamation
dans un triangJe _quilat_ral) avertit
t'utilisateur de la presence
d'instructions d'utilisation et
d'entretien (d_pannage)importantes
dans la documentation
accompagnant I'appareil
_)-1
Page 59

DNFORMATBONS8MPORTANTES
ATTENTION : POUR NE PAS RiSQUER UNE I_LECTROCUTION, PRg:SENTEZ LA FICHE
AVEC SA LAME LA PLUS LARGE FACE A LA FENTE CORRESPONDANTE DE
LA PRISE ET ENFONCEZ-LAA FOND,
ATTENT!ON :
NE PAS PLACER CETAPPAREIL SUR UNE TABLE, UN CHARIOT, UN TRI_PiED OU UN SUPPORT QUI
N'EST PAS STABLE. L'APPAREIL POURRA_T TOMBER El" CAUSER DES BLESSURES GRAVES ET
SUBIR DES DOMMAGES IMPORTANTS. UTtUSER SEULEMENT SUR UNE TABLE, UN CHARIOT, UN
TRt_PIED OU UN SUPPORT RECOMMAND_S PAR LE FABRICANT OU VENDU AVEC L'APPAREtL.
SU_VRE LES tNSTRUCTIONS DU FABRtCANT POUR _NSTALLER L'APPAREIL ET UTtLISER LES
DISPOSmFS DE MONTAGE RECOMMAND¢:S PAR LE FABRtCANT, L'ENSEMBLE APPAREIL.i
SUPPORT DOlT _TRE DE_PLAC_ AVEC SOIN DES ARR_:TS BRUSQUES, UNE FORCE EXCESSIVE
ET DES SURFACES IN'GALES PEUVENT FAtRE BASCULER L'ENSEMBLE.
AVERTISSEMENT : Las r_g]es de }a FCC stipulant qua tout charigement eu modification apperte(e) a cot appareil
cans I'autodsation expresse du fabricant pout entrainer la r_vecafion du droit de J'uti_isa_ew d_utitiser cot appareil
ATTENTION :
Cot apparei} est conforme aux r_glements FCC Iorsque des c&bles et connecteurs b_ind6s sent utitises pour te brancher
surun autre appareil Pour eviter les interfbrences elect_omagnetiques avec los appareils 61ecttiques comme lee radios et
los tbl_viseurs, utifisez des cables et connecteurs b_indbs pour lea connexions.
"Note & I'inten_ionde I'instaItateur de t_vision per c&ble :Nous attirons F'a_tent_onde t_instaI_ateurde t_t_visioo par c_ble su_"fedicle 820-40 du Code
Naticaal de I'_lccldcite qui fournit des dlrect_vespour ]'executioncorrecte de ia mice ._la terra et spL_citienotamment qua la torte
du c&ble doii _lre reli_e au r_seaude raise ,_la terre du b&timent le plus pros possibte du point d'entrbe de e_ble."
Cet appareil comprend des soudures d'_lain-plomb, aiesi qu'une lempe Iluorescente contenanL une petite quaetitb de mercure. II ae
peut qua {a raise au rebut de cos materiaux soil seumise _ des rbglementations environnementales Pour obtenir plus de dbtat_s our la
mice au rebut o_.__e recyclage veuillez contacter lee autorit6s Ioca_es concernbes ou consulter le site Web d_E_ectronic Industries
A{liance : www.ela,org
PRECAUTIONS :
CE LECTEUR V_D_O NUMSRIQUE EST DOT_ D UN FAtSCEAU LASER POUR LA LECTURE,
POUR UTILISER CORRECTEMENT CETAPPAREIL, VEUILLEZ LIRE ATTENTIVEMENT CE GUIDE D UT_LISATEUR ET
CONSERVEZ-LE AFIN DE POUVOIR VOUS Y R_F_RER E_VENTUELLEMENT S_L'APPAREIL DO{T _TRE R_PAR{_
ADRESSEZ-VOUS A UN CENTRE DE SERVICE AUTORIS_.
L'UTILISATION DES COMMANDES, DES RI_GLAGES OU L'EX_CUTION DE PROCEDURES QUI NE SeNT PAS SP$CtFII._ES
DANS CE DOCUMENT PEUVENT ENTRAINER UNE EXPOSITION DANGEREUSE AU RAYON LASER.
POUR SVITER TOUTE EXPOS{TION DIRECTE AU RAYON LASER NE TENTEZ PAS D OUVRIR LE BOITIER DE CET APPAREIL
UN RAYONNEMENT LASER R_SQUE D'eTRE VISIBLE QUAND LE BOiTIER OU LE COMPARTIMENT,& D[SQUE EST OUVERT
NE FIXEZ SURTOUT PAS LE FA$SCEAU,
DECLARATION DE CONFORMITE
COMBIN_ T_L_VISEUR ACL ET LECTURE DVD/CD SHARP, MOD_LE LC-19AD22U
Cet appare_l satisfait _ la pattie t5 des rogues de ta FCC Son forictionnement est soumis aux deux conditiorts cuivantes :
{1} t'appareit ne dolt pas causer d'interf_rences nuisibles et (2) il dolt accepter to_tes interferences re,_ues y compds cellee capabies
d'entraver sa bonne marche
PARTIE RESPONSABLE :
SHARP ELECTRONICS CORPORATION
Sharp Ptaza. Mahwah, New Jersey 07430.2135
T$L : 1-800-_BE-SHARP
Pour |a cIient_le commerciale : URL http:/]www.sharpusa,com
iNFORMATION:
Cot _quipement a _t_ test_ et reconnu cenferme aux timites pour _emat_-del num_rique de classe B, semenles sp6ciQcations de la
pattie 15 des r&gles de la FCC Cos _imites sent con_.ues pour _ournir une protection raisonnable centre lee interferences _uieibles
dana one installation r,_sident{e_le. Cot &quipement g_n_re uWise et pout irradier de ]',_nergie radio_lectrique at, si ce mat_rie_ n_est
pea insta_16et employ6 en suivent tes instructions, il pout brouiller los communications radio Toutefois, II n'est pas gatanti que des
interf6rences n'auront pas lieu dane une installation parlicoli_re Si cot 6qoipement inted'('_re bet et bien avecla r_ception radio au
t_tbvlsion ce qu'en pout dbterm_ner en coupant et en inerrant I'alJmenta_ion I'uWtsateur devrait essayer de rem_dier & la situation
par t'une ou piusieurs des mesures cuivantes :
--RReorienter ou d_placer t'antenne r_ceptrice
--_loigner I'_qu{pemen! du r_cepteur,
--Brancher te Gordon d'alimenta_ion de t'appareii dane one prise cur un circuit separ_ du r&cepteur
--Consulter le revendeur ou un technician exp_,riment_ en rediofTV pour assistance
F_)_2
Marques = =: _ =:
• Fabriqu_ sous licence de Delby Laboratories Le terme "De,by" et le sigte double D sent des marques commerciales de
Do]by Laboratories,
• "HDMI, le toga HDM[ et High-Definition Multimedia _n_erface sent des marques de commerce ou des marques depos_es
de HDMt Licensing LLC.'
• "DTS" et "DTS Digita_ Out" sent des marquee d6pes_e par DTS, _nc
1
Page 60
CriER CLaENT SHARP
iiIn ,,,,r , ,,,.r
Nous vous remercions pour votre achat de ce TV/DVD Sharp. Pour en assurer la s_curit_ et le ben
fonctionnement pendant de Iongues annees, veuillez life attentivement les consignes de s_curit_
importantes avant I'utilisation.
CONSIGNES DE SECURITE IMPORTANTES
f-._-
L'electdcite remplit de nembreuses fonctions utiles, mais si on [util{se mal. elle peut occasionner des blessures et des
deg_ts materiels Bien que la conception et la fabrication de ce produit aient eta axees sur [a secudt& une mauvaise
utiHsation de I'appareil peut faire coudr un risque d'eIectrocutien eltou d'{ncendie Pour ne pus voas exposer _ de tels
dangers, respectez les consignes suivan_es Iorsque vous installez, uti_isez ou nettoyez le televiseur Par mesure de
securite et pour prolonger la duree de service de votre televiseur _ cdslaux liquides, veuillez tire les precautions
suivanles avant de I'ufiliser :
1) Lisez ces instructions
2) Conservez cesinstructions
3) Respectez lea raises en garde
4) Suivez toutes les instructions
5) N'utilisez pus cet appareil _ proximit6 de {'eau
6) Nettoyez uniquement avec un chiffon sac.
7) Ne b_oquez pas les ouvertures de ventilation lnstallez I'appareii en respectant les instructions du lubricant
8) N'insta!lez pus I'appareil _ proximite de sources de chaleur comma des radiateurs, des chauffages, des
cuisinieres ou d'autres appareils (y compris _esamplificateurs) produisant de [a cha_eur
9) Ne passez pus outre la caracteristlque de securite de la fiche potadsee ou avec raise & _atorte Une fiche
po_arisee comprend deux lames dent une plus large que rautre Une fiche avec raise _ la terra comprend deux
lames et une troisieme broche de terre La lame la plus large ou la troisieme broche est une mesure de securite
Si la fiche fournie ne rentre pas dans votre prise secteur, consultez un electricien pour remp_acer la prise
obsolete
10) Assurez-vous que le cordon secteur ne puisse etre pietine eu piece lout particulierement au niveau des fiches,
des prises de courant et aux points ouil sort de t'appareiJ
1"_)N'utitisez que des accessoireslfixafions recommandes par le lubricant
12) Placez rappareil uniquement surun chariot, un socle, un trepied, un suppor_ ou une table
recommande par te fabdcant ou vendu avec l'appareit Si yeas utilisez un chariot, manoeuvrez avec
precaution I ensemble chariob'appareil afin d'empecher route bfessure suite & an renversement
13) Debranchez cet appareil pendant un orage ou Iorsqu'il doit rester Iongtemps inuti{ise
t4) Faites appe[ e un technician qualifie pour tout depannage Un depannage est requis torsque rappareil a eta
endommage d'une fa_.on ou d'une autre, comme !orsque le cordon secteur eu ta fiche est endommag& du liquide
a eta renverse sur rapparei$ ca des objets sent tombes dans rappareiL t'appareil a eta expose & la pluie ou
rhumidit& rappareil ne fonctionne pus normaiement ou t'appareit eat tombe
Informetiens de securit6 supplementaires
t5) Alimentation electrique -- Cet apparei_ ne doit etre utilis_* quavec [alimentalion specifiee sur retique_te
signa_tique En cas de doute sur le type de caurant de votre dam{clio, consultez votre revendeur ou la
compagnie d'electricite locale Pour tes appareils fonctionnant sur batteries ou sur tout autre type d'alimentation,
consultez _emode d'emptoi
16) Surcharge etectdque -- Ne depassez pus la capacite etectr{que des prises murales, des rallonges ou des prises
de courant integrates, ceci risquant de provoquer un {ncendie ou une electrocution
t7) Pone{ration d'objets et de _iquides -- N'introduisez jamais d'objets par les orifices de cet appareiI. IIs pourraient
toucher des points seas tension el court-circuiter des pieces et provoquer ainsi un incendie ou une electrocution
Veiltez {_gatement & ne jamais renverser de tiquide dens I'appareil
t8) Dommages necessitant une reparation _ Dens les situations ci-dessous, debranchez t'appareil de ia prise
murale et faites appel _ un technicien qual_fie pour les reparations :
a) sile cordon secteur ou la fiche est endommagee ;
b) si du liquide a _,te renverse sur I'apparei_ ou si des objets sent tombes e rint_rieur ;
c) si t'appareil a ere expose & la pluie ou _ reau ;
d) si [appareil ne fonctionne pus normalement en suivant le mode d'emp_oi
Ne touchez quaux commandes indiquees dens le mode d'emploi Un reglage {ncorrect d'autres
commandes peut causer des dommages qui demanderont par Ia su{te un travait intensif e un technicien
qua_ifie
e) si ['apparei_ est tombe oua eta endommage ;
f) Si rapparei_ pr_sente des changemen_s visibles de performances - Ceci indique la necessitY, d'une
inspection d'entretien
t9) Pieces de rechange -- Si des pieces sent a remp}acer, assurezwous que le technicien utilise bien les pieces de
rechange prescrites par le lubricant ou ayant los memos caractefistiques qua los pieces d'origine L'utilisation de
pieces non autorisees peat occasionner un incendie, une electrocution et d'autres dangers
20) Verification de securite --Apres un travail d'entretien ou de reparation, demandez au technicien d'effectuer les
verifications de securile necessaires pour s'assurer qua I'apparell est en ben etat de fonctionnement.
21) Montage au piafond ou au mur--Si vous montez rappareil au mur ou au plafond, ebservez la procedure
d'instat_afion recommandee par _elubricant
Q-3
Page 61

CONSUGNES DE SECURgTE JMIPORTANTES
,, Eau et humidite -- N'utilisez pas Lapparei! e proximite de I'eau_ pros d'une baignoire, d'un lavabo, d'un _vier, d'une machine e
laver, par exempfe, oi dane un sous-so[ humide ou & proximit_ d'une piscine
* Support--No placez pas I'appareil our un chafioL un support, un trepied ou une tabte instable
S'il est sur une base instabIe, rappareil peat tomber et provoquer des blessures personneIles graves ea _tre endommage Utiffsez
uniquement un chariot, un support, un tr_pied ou une table recommandes par le fabricanf ou vendus avec $'apparelt Pour reenter t"
appareil surun tour, suivez Ies instructions du fabricant et n'utilisez que du materiel recommand_ par ca demier
• Selection de ]'emplacement -- Cholsissez un lieu bien ventiI6 et non expose aux rayons directs du so_eiL
,, Ventilation--Les events et autres ouvertures du coffret soot destines e la ventilation, Ne les recouvrez paset neles bloquez pas
oar une ventilation insuffisante risque de provoquer uoe surchauffe et/ou de reduire Sadurra de vie de E'appareil Ne piacez pas
I'appareil surun lit, un sofa, un topis ou une autre surface simitaire dsquanl de bloquer les ouvertures de ventilation Ce produit
n'est pas con;u pour _tre encastre ; ne le p]acez pas dans des endro[ts c[os comme une bibliotheque ou une _.tagere, saul s[ one
ventilation adequate est pr,_vue ou ai les instructions du Iabrieant sent reepeclees.
• Le paoneau & cristaux tiqufdes de cet apparei] est en verre. It peut done se briser s'il tombe ou sit subit uo choc Veiflez e nepas
vous blesser avec des morceaux de verre si Ie panoeau e cristaux liquides vlent e se briser.
• Sources de chaleur-- Etoignez i'appareil des sources de the{ear comma les radiateurs, les chauffages el tes autres appareils
produisant de la chaleur (y compris les ampfiticateurs)
• Le panneeu e crislaux Iiquides est un appareil de tr_ashaute technologie avec 3 888 000 t_ansistore e couche mince qui vous offre
une tr_s grande finesse de delaiL
Un pelit nombre de pixeis non actits peuven! occasionnetlement apparaitre e i'ecran scus forme de point ftxe bleu, vert ou rouge
Notez que cola n'affecte en den lee pedormanees de rappareil
• F_udre_P_urmieuxpr_tegercete_eviseurpenda_tu_rageouIor_qui_d_itresler_ngtempssanssu_ve_I_anceetinut_}se_
debranchez-le de la prise muraie et deconnectez I*antenoe Ceci I'emp_chera d'etre endommag6 par la foudre ou los surtensions
de Ia ligne electrique
• Lignes_ectriques_L_ante_nee×_beurened_itpa_setrouverepr_xlmitede_igne_e_ectriquesaer[ennes_ud._utres_ircuits
d'eclairage ou de distdbulion electrique Eile ne doit pas non plus _tre instatl_e sur une position d'oO eIle pourrait tomber sur ces
tignes ou circuils Lors de l'instaflation d'une antenna e×terieure, toutes los precautions daivent _lre prises pour nepas toucher ces
tignes ou circuits electriques Tout contact avec eux pourrail _tre mortet
o Mise e Ia ferre de I'antenne ext_rieure -- Si le televiaeur est raccorde e une antenna exterieure, assurez-vous que ceIle-cl est
reliee e la terre aria de proteger le poste centre los sautes de tension at I'accumulation de charges _lectrostatiques.
L'arttcle 810 du Code naltonal de l'_,leclricit_ ANSI!N FPA 70 foumil des informations sur _a raise _ la terra correote du met
d'antenne et de sa structure de support, la mise & la terre de la desceote d'antenne e une unit_ de d_charge d'antenne, le catibre
des conducteurs I emplacement de runit6 de decharge d'antenne Ie raccerdement aux _lectrodes de terre etles conditions
requ}ses pour I'electrode de terra
EXEMPLE DE MISE ,_ LA TERRE D'UNE ANTENNE SELON LE
CODE NATIONAL DE L'ELECTR]CITE ANSItNFPA 70
(_4
--"S-'_T,_. DESCENTE
TENNE
CONDUCTEUR . .
z
/_ _/"_£I _ D'ANTENNE
Ice. MPAGNIE , / _ I
L_E_ECT_ICt___._ _ i-_:_=_LCONDUCTEU_SDETE_RE
_,_ji_ (NEC SECTION 810-21)
__,.zr=_.. COLLIERS DE MISE A LA TERRE
NEC : CODE NATIONAL DE L I_LECTRICITE (NEC ART 250 PARTIE H)
• Ne placez pas de bougies ni de flammes hues sur te t_[6viseur eue sa proximtte, afin d'_viter les incendies.
• Pour _viter tes incendies ou les _leclroeutions, veillez ene pas eclabousser ni faire tombet de l'eau sur eet appareil
Ne placez jamais d'objets remplis de liquide, comma des vases, sur I'appareiL
• Afin d'emp_cher tout incendie ou electrocution ne plaoez paste cordon d'alimentation sous I ensemble du t61eviseur ou autres
objets velumineux
• Mettez t'atimentation principale hers _ension et deb_anchez _ecordon secteur de la prise murale avanl ta manipulalion
• Utilisez un chitlon doux et essuyez delicatement la surface du panneau daffichage
L'utitisation d'un chiffon r_ohe risque de raye_ la surface du panneau
" Utilisez un chiffon doux et mouil!_ pour essuyer d_licatement te panneau sll est vraiment sale
(Frotter fort risque de rayer ta surface du panneau )
• Sile panneau est poussiereux, utilisez une brosse antistatique, en vente dens le commerce, pour le nettoyer
• Pour preserver le panneau, n'utilisez poe de chiffon sale, de d6tergents l[quides ou de chiffons trait_s chimiquement pour _e
neltoyer, car de tels mat_riaux risqueraienl d'endommager sa surface.
,, N'affichez pas une image fixe pendant une pedode prolongee, sous petrie de laisser une image consecutive e l'ec[an
• lnstaIlez le produil e un eodroit o_ ilesl facile de debrancher le cordon d a[imentalton de la prise de courant ou de la borne AC
INPUT e i'arriere du produil
• CONDENSATION -- De la condensation risque de se former sur les composantes inlernes du tecteur appareit sice dernier
est deplace d'un environnement froid e un endroit temper,e ou st la temperature dens la piece o_ il se trouve augmente
subitemenL Dens ces cas-le, la performance du appareil sere alter_e. Pour Oviter qua cola su_ienne, assurez-vous de placer t'
appareil pendant au moins une heure dane le neural environnement plus chaud event de tenter de t'allumet, ou faites monter la
temperature de la pi_.ce gradueltement De la condensation peut egalemenl se former sur les composantes internes du apparei_
si _'appareil est expose e t'air d'un clima_iseur pendant une chaude ioumee d'6t_, Si cela survient, changez t'emplacement du
appareit
• COMPARTIMENT ,a,DISQUE-- Gardez tes doigts e I'ecart du compartiment e disque quand iI se ferme, since vous risquez de
vous btesser sedeusement
• FAISCEAU LASER -- Ne regardez pase Hnlerieur du compartiment e disque oue travers los orifices d'aOration de
Lappareil pour tenter d'apercevcir Sefaisceau tumineux du _aser cat vous risquez ainsi d'endommager yes yeux.
• DISQUE -- N'utilisez pas de dlsques fissures d_formes ou r6par_s Ces disques se brisent facilemeet et peuvent causer des
blessures serteuses et un mauvais fonetionoement de i'appareil
ELECTRODE DE TERRE DE LA COMPAGNIE
D'ELECTRICITI_
Page 62

Disque
I II iii1,11,,,,,,,,,,, i iiii]llli,li,iI
Disques qui peuvent _tre utilisds
Cet apparei_ permet la lecture des disques standard
et dent les loges ci-dessous figurent sur te disque
Nous ne pouvons garantir la bonne reproduction des
formats autres que ceux figurant ci-dessous :
Le logo DVD est une marque d@os_e
Types de disque Logo
DVD+Video
DVD+R!RW
(Format video seulement) _
CD Audio =
MP3, WMA ou JPEG) [0J_['_
Cet appareil est con_u pouria lecture des Compact Discs
(CD) qui sent conformes au standard CD. Les CDs qui
sent proteges par un dispositif de securite ne peuvent etre
reproduits
• Certains CD.R/RW e! DVD+R/RW ne peuvent pas _tre lus
solon los conditions d+enregistrement
,Les disques de 8 cm peuvent _tre ius sans adaptateor
Information sur la gestion des zones
Cet appareil est con_u pour acceder aux informations
sur la gestion des codes r6gion des disques DVD
Sile code r6gion du disque ne correspond pas au
code attribu6 & cot appareil, le disque DVD ne pourra
6tre lu
• Lecode region de cet appareilest : "t-
•Cet appareilnepourralife que des disques evec lecode
regionlecode zone "1'"ou"ALL"
v_r_l_ o
_J_ltt ^u_ltl
,,,, ,, iii1' I,L_,II,,, i
Disques qui ne peuvent _tre lus
Les disques repfis ci-dessous ne peuvent generalement
pas 6tre lus S'ils tepeuvent, ils ne +eseront
probablement pas correctement Si par erreur, un disque
marqu_ d'un sos sigles mentionn_s ci+dessousetait lu, il
pourrait endommager les haut-parleurs
Ne pas utifiser les disques suivants :
CDG,Photo+CD,CD+ROM,CD-TEXT,CD-EXTRA,
SACD,PD,DVD-ROM. SVCD,CVD, VCD.DVD-RAM,
DVD+R/RW,DVDaudio,HD DVD+Btu-rayetc
Les DVD-Video suivants ne peuvent _tre utilis_s :
• Los DVD+Video qui ne portent pas le code region "1" ou ie
code region "ALL",
• PAL ou SECAM DVD+Video+
• Les DVD+Video interdits ou & usage professionnel
Les formats CD+R/CD-RWs ne peuvent 6tre lus
pour lee raisons suivantes :
• Incempatibilite du disque el de cet appareil
• tncompatibilite du disque et de l'enregistreur
,, nachevement du disque
N'utilisez jamais les disques ou les accessoires
suivants. Cela pourrait gravement endommager
le TWDVD,
•Les disques de forme irreguliere+comme ceux en forme
de carte, de coeur
* Un protecteur d'anneau ou d'autres accessoires de
disque
• Un adaptateur de disque de 8 cm
• Des disques sur lesquels on a applique des autocollants
ou du papier
• Des disques sur lesquels se trouventdu papier cotlant, de
la cello ou d'autres residus d'et+quettes
Titre/Chapitre/Plage :
Le disque DVD est constitu_ de grandes unites
appelees Titres qui sont divisees en "Chapitres"
@
Opdrations DVD-Video
* Certaines fonctions du DVD-Video peuvent _tre interdites
par le fabricant Certaines modafites relatives & I'utilisaiion
du DVD-Video peuvent etre ditferentes de ceIIes d_crites
darts ce manuel.
* Lorsque des operations sent impossibles, & cause du
disque ou de I'appareil : "X" apparaitra & I'ecran Pour les
operations rendues impossibles par le disque, consulter
les informations sur le disque
, Lersque le Menu appara;t #, recran pendant ta Iecture du
disque, suivez les instructions qui apparaissent & {'ecran
TiTRE 2 _i
CHAPTRE _ CHAPTRE 3
Un CD Audio est divise en "Ptages" Un numero est
attfibu6 &chaque titre, chapitre ou plage :
"N° de titre", "N ° de chapitre" ou "N ° de plage"
_"'PL_OE CD Audio Pu',o5 ,5
1 PL._G£ 2 PL_G_ 3 PLAGE ,1
(_-5
Page 63

Disque
Pour sortir le disque du tiroir
Vei!ler ,_ ]e tenir par le bord sans toucher ta surface, et
& te manipuler avec prudence
• Veiller a ne pas le rayer
• Veil_er & ne pas setir fa surface du d[sque
• N'y colrer ni _tiquette, ni adh_sif
• Ne pas le faire tomber ni ]e drstordre
Rangement des disques
', Toujours remettre re disque dens se pochette pour evitet"
de ;'endommager,
°Ne pas le ]afsse_-a I'exposition du sorell ni le precer dens
un Iieu trop chaud ou trop humrde
Nettoyage du disque
Essuyer tedisque avec un chiffon sec et propte
depuis le centre vers le bord
• Ne pas renetteyerentoumant]edisque
• Ne pas uti_tserde nettoyanttfqurdeou ena6roso]
Remarques du droit d'auteur
• Ce produit integre une technologie de protection du
drort d'auteur qui est elle-m_me protegee par les
revendications de certains brevets am_riceies ainst
que par d'autres droits de propri_te intellectuelre Toute
utilisation de cette technorogie de protection du droit
d'auteur doit _Ire autorisee par Macrovision et cette
technologie est destinee & _'utilisation domestique et
&d'autres ut[lisations restreintee, sauf autorisation
particuli6re accord_e par Macrovision Toute tentative
d'ingSnie_'[e inverse ou de desassemblage est interdite,
• L'enregistrement non autods_ d'em[ssions de t_]evision,
de films, de bandes vid6o ou d'autres materiaux proteges
par la toi retative & ta protection des droits d'auteur peuf
constituer uneinfraction & ladite _oi
(_-6
Page 64
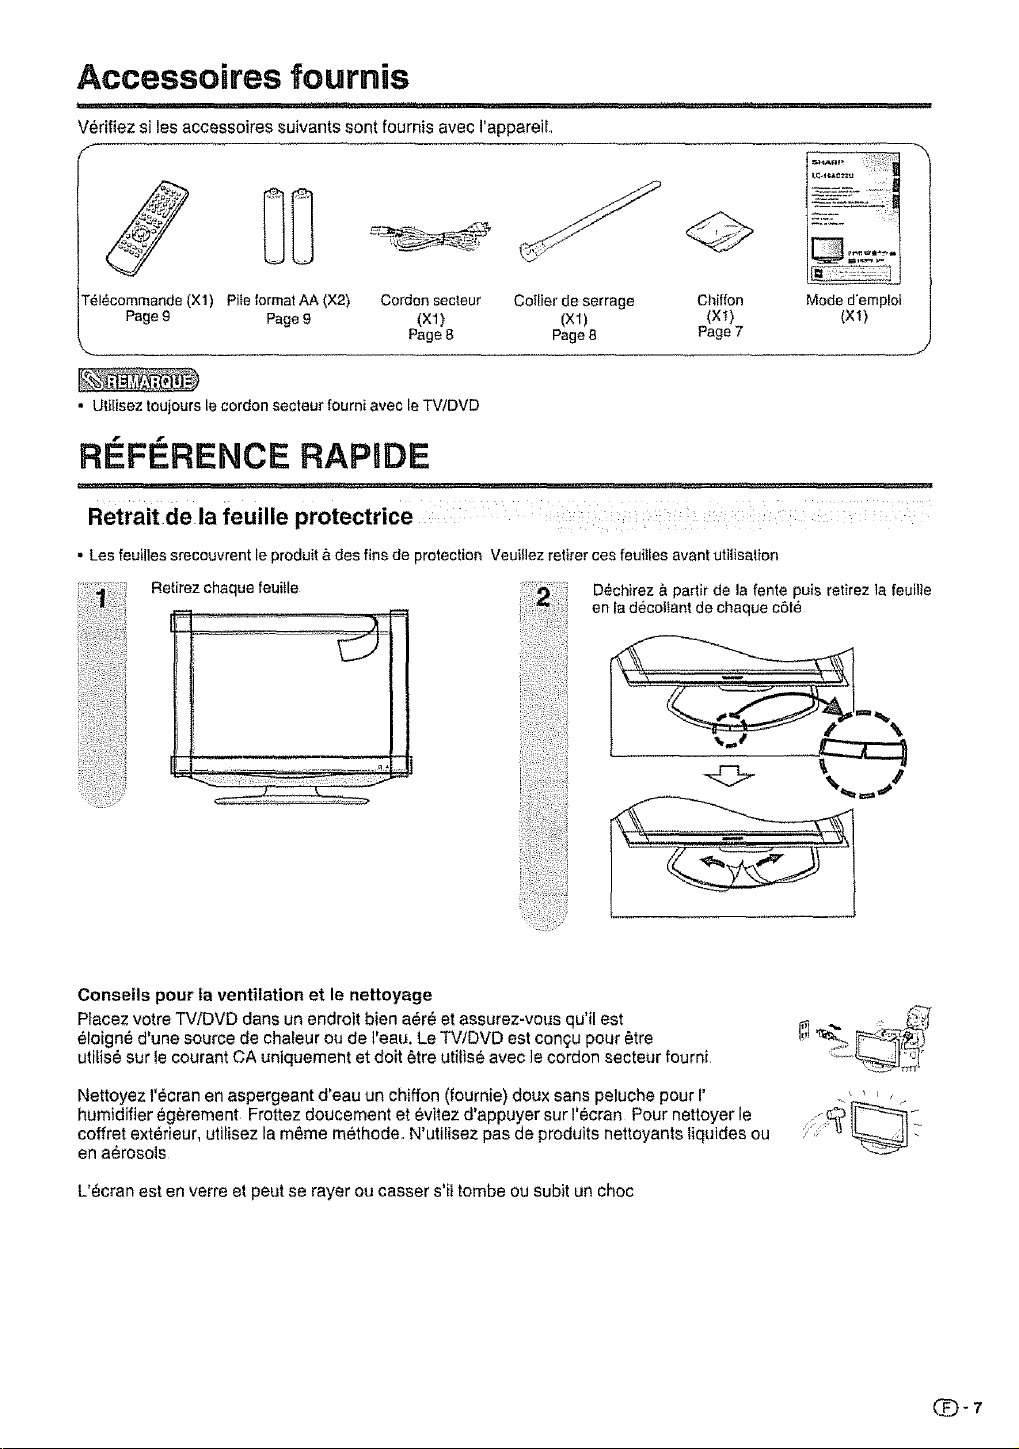
Accessoires fournis
_ .,,_,_1, i I ,lilllUIq'll ...... i,ll . ,,i Nil' i ...... 'lqr ,
V6dfiez si les accessoires _uivants sent fournis avec I'appareiL
T_l_commande(X1) PileformatAA (X2) Cordonsecteur Coltierde serrage Chiffon
Page9 Page9 (X1) (X1) (XI)
Page8 Page8 Page7
• UtIliseztoujoursle cordon secteurfourniavecle TV/DVD
REFi RENCE RAPIDE
............... ,, ,,,,,,,,_,.,,_,,,, , ,i,,,_ii ',_,_,,_,_I,,,;..... , ,,,,,,11 .........
Retrait de la feuille protectrice .... : : :
• Les feuiliessrecouvrentleproduit&des fins de protection VeuiflezretirercesfeuiUesavantutitisalion
Retirezchaquefeuitle Dechirez_ padlr de la fente puis retirez la feuille
en ladecoflantde chaque cSte
Mode d'emploi
(xt)
Conseils pour la ventilation et le nettoyage
Placez votre TV/DVD dans un endreit bien a_r6 et assurez-vous qu'il est
_loigne d'une source de chaleur eu de l'eau. Le TV/DVD est conQupour _tre
utilis_ sur le courant CA uniquement et doit 6tre utifise avec le cordon secteur fourni
Nettoyez I'_cran en aspergeant d'eau un chiffon (fournie) doux sans peluche pour r
humidifier egerement Frottez doucement et _vitez d'appuyer sur I'_cran Pour nettoyer le
coffret ext_rieur, utilisez la m6me methode. N'utilisez pas de produits nettoyants ;iquidesou
en a_rosols
L'_cran est en verre et peut se rayer ou casser s'ii tombe ou subit un choc
Page 65
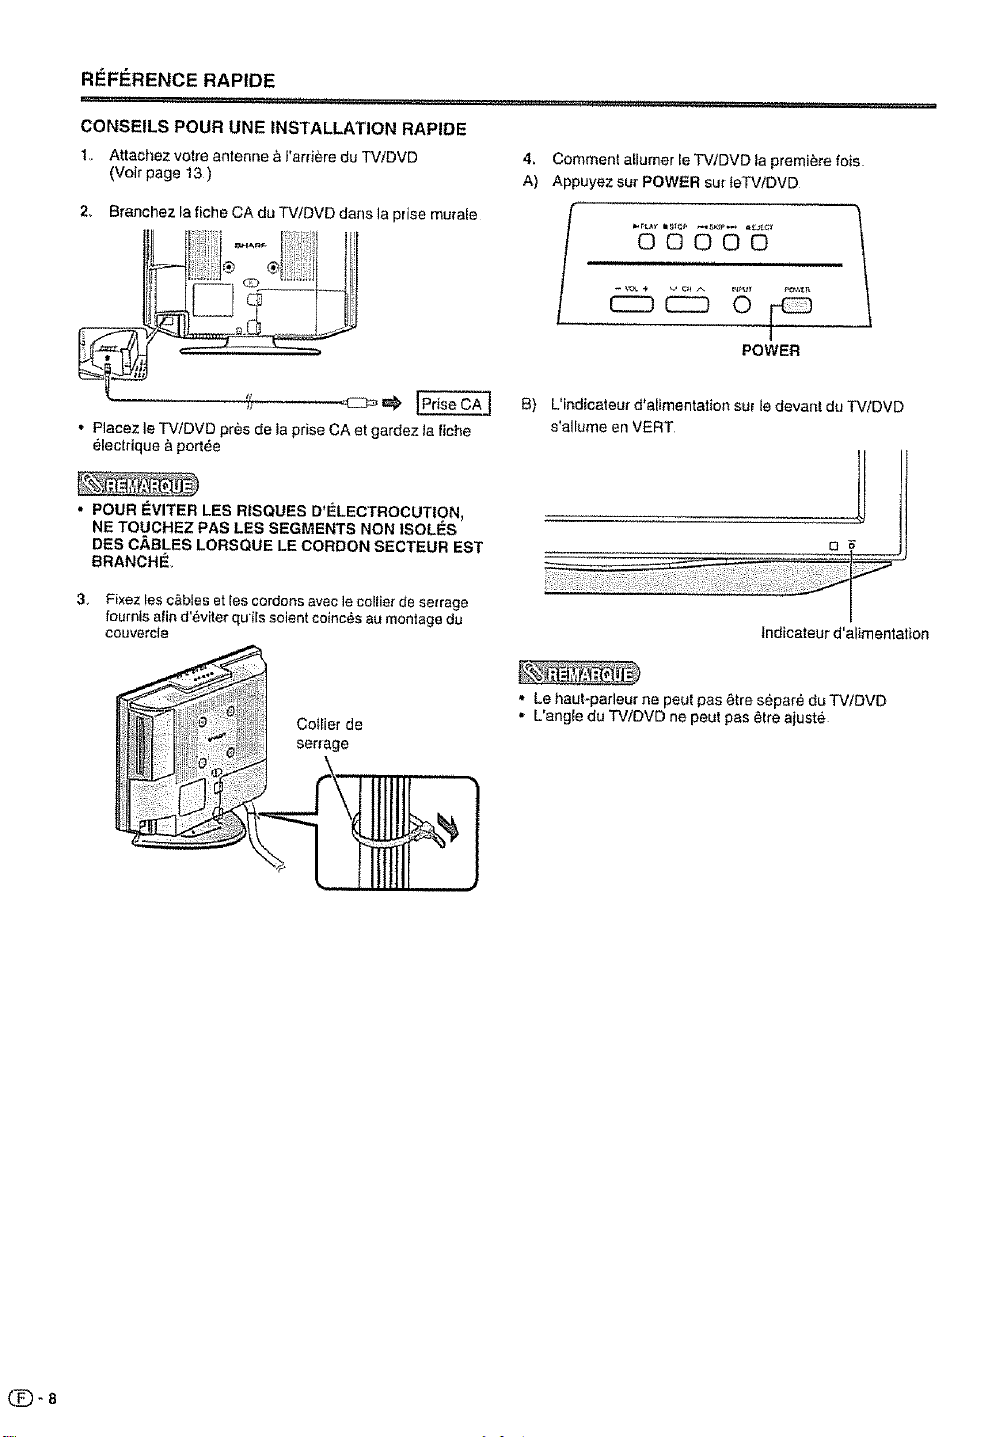
REFISRENCE RAPIDE
, ...... ......... I1"_ ...... r,t ,,,t,J, ' r r ,, '"'"'"J ,-t ''''''''Ju'' _'J' J ' 'J' "
CONSEILS POUR UNE INSTALLATION RAPIDE
1• Attachez votre antenne _ l'arr_re du TV/DVD
(Voir page 13 )
2+ Branchez la fiche CA du TV/DVD dens la prise mu+ale
4, Comment aElumerle TV/DVD +apremiere fo+s
A) Appuyez sur POWER sut _eTViDVD
,,i,ll ....................
/ ......................o+o°o 1
POWER
B) L'indicateu_ d'alimentation sur le devant du TV/DVD
', Placez le TViDVD pres de ta prise CA et gardez +afiche
elecLrique a port_e
• POUR IEVlTER LES RISQUES D'I_LECTROCUTION,
NE TOLtCHEZ PAS LES SEGMENTS NON ISOLES
DES CABLES LORSQUE LE CORDON SECTEUR EST
BRANCHI_
3, Fixez les c&bles et lee cordons avec le co
RI_FleRENCE RAPIDE
Si la t61ecommande ne contr61e plus _es fonctions du TV/DVD, remplacez les piles dans ia t_l_commande,
I Ouvrez le couvercle des piles 2 Inserez les deux piles format
3 Refermez le couvercle
"AA" (fournies avec !'appareil)
//,,
• Placez les piIes en faisant
correspondre teurs bornes avec
les indications (+) et (-) dens le
compadimant
Une utilisation ineorrecte des piles peut provoquer des fuites ou une explosion Veitlez & suivre les instructions
ci-dessous
• N'utilisez pas ensemble des piles de types diff_rents Les autres piles ont des caract_ristiques differentes
• N'utilisez pas ensembEe des piles usag_es et neuves Ceci peut raccourcir la dur_-ede vie des pites neuves ou provoquer
des {uites des piles usag_es
• Retirez tes piles des qu'elles sent us_es Le contact avec ta peau de produits chimiques s'_coutant d'une pile peut
provoquer une eliergie Encas de fuite, essuyez soigneusement avec un chiffon
• Les piles fournies avec I'appare}i peuvenl avoir une dur_e de vie p_uscourte que p__vue en raison des conditions de
stockage.
• Si vous n'avez pas I'intention d'ulil{ser ta t_]_commande pendant une pefiode protong_e, retirez les piles
/
Capteur de
telecommande 30°
IMPORTANT :
L'indicateur d'aiimentafion sur ie televiseur dolt s'atlumer en VERT indiquant par I&que le TV/DVD est soUS
tension
Si t'indicateur d'elimentat[on sur le t_l_viseur ne s'allume pas, appuyez sur POWER
sur la t_I_commande pour mettre le t6t_viseur sous tension
®@®
IMPORTANT :
SI L'UNITE NE SE MET PAS SOUS TENSION - D_:BRANCHEZ LE TELI_VISEUR DE LA PRISE SECTEUR ET
R_P_TEZ LES ETAPES DE L'INSTALLATION,
SI LE TI_LI_VISEUR NE SE MET TOUJOURS PAS SOUS TENSION, CONTACTEZ-NOUS AU 1-800-BE-
SHARP,
Reportez-vous & la section RI_GLAGES DE BASE pour les fonctions de base du r_glage des canaux ef
UT_LISATION D'APPAREILS EXTERNES pour le raccordement d'autres appareils (fecteur DVD,
magn_toscope, tecteuraudio, etc,) dens le mode d'empioi de votre f_l_viseur
(_9
Page 67

Tabae des rnatnbres
INFORMATIONS IMPORTANTES ........................................1
Marques ...............................................................................................2
CHER CLIENT SHARP ..................................................... 3
CONSIGNES DE SI_CURtTI_ IMPORTANTES ................3
Disque ....................................................................................................5
Disques qui peuvent _tre utilises ................. 5
Disques qui ne peuvent 6tre Ius ................ 5
TitreiChapitreiPlage ............................ 5
Manipulation des disques .............. 6
Accessoires fournis .................................................................7
REFERENCE RAPIDE ...............................................................7
Retrait de ta feuitle protectdce ............................ 7
Table des mati_res ....................................................................10
Nomenclature .........................................................................11
TV/DVD (superieudavant) ............................. 11
TViDVD (arri_re) ................................. 11
TV/DVD (cbt_ droit) .................................. 11
T616commande ..................... 12
Pr'_paration .................................................................................13
Utilisation de Ia tet_commande ........... 13
Precautions sur la t6tecommande ................. t3
Antennes .............................................. t3
Utilisation d'appareils externes ..................................... 14
Affichage d'une image d'un appareil exteme ..... 14
Raccordement d'un lecteur DVD ou un STB
pour TV namerique (C&ble) .................... t5
Raccordement d'un magnetoscope, console de jeu
ou camescope ......................... 15
Utilisation de la sortie audio-numedque ................. 15
Raccordement d'un appareil HDMi ........... 16
Affichage d'une image a. partir d'un appareil
HDMI ..................................................... t6
SeIection de la source d'entr_e audio HDMI ...... 16
Pout regarder la t61_vision ......................................................17
Preparation ........................... 17
Mise sous tension ..................... 17
S_lection du mode TV ............. 17
Mise hors tension .................. 17
Changer de canal ................. I7
installation ]nit]ale .............................. 18
R_glage du mode stereo MTSiSAP ......... 19
Reglage du son ambiophonique ................... 19
Affichage des informalions sur le canal ........ 19
R_glages de base ...................................................................20
Touches de commando de menu ................... 20
Rubdques du menu ............................. 20
Attribution d'un nora au× diff_rentes chaines ..... 2!
I_tiquette d'entree ....................... 2!
Regtages de l'image ................................ 22
Temperature de couleur ............................ 22
Retroeclairage ......................... 22
Mode cinema ................................... 22
R_glage du son .............................. 23
Sortie audio num6rique .......................... 23
R_glages pratiques .................................................................24
Mode AV ........................................... 24
S_lection de la langue audio numerique .......... 24
Mode de visionnement pour los
programmes 4:3 ........................................... 25
Mode de visionnement pour los
programmes HD ....................... 25
D_filement d'image ........................... 25
Rapport hauteudlargeur .............................. 25
Sous-titrage et sous-titrage humor]qua ....... 26
R,_glage des sous4itres .............................. 27
Reglage du num6ro secret pour
verrouiitage enfant ............................ 28
Verroui!lage enfants (PUCE-V) ................... 29
Directives televis6es parentales (Directives TV). ,30
Sysl_me volontaire de codage des films
(MPAA) ....................................... 30
Systemes de codage du Canada .............. 31
Classifications anglaises canadiennes ....... 32
Classifications #angaises canadiennes .............. 32
Comment lib6rer provisoirement le blocage
PUCE-V .............................................................. 32
Reactivation du blocage PUCE-V provisoirement
lib_re ........................................... 32
Autres options de vue .........................................................33
Mesureur de signal ............................ 33
Arr_t automatique ............................................ 33
Branchement d'un PC (ordinateur personnel) ...........34
Visionnement d'une image provenant d'un PC ...... 34
Affichage d'une image provenant d'un PC .......... 34
Ajustements de I'image el du son en mode PC ..... 35
Tableau de compatibilit_ PC ......................... 35
Visionnement du DVD ...........................................................36
Preparation .................................... 36
Mise sous tension .................................... 36
S_Jection du mode DVD ............................... 36
Mise hors tension ............................... 36
Lecture en mode basique ........................ 37
Affichage d'etat du disque ...................... 37
Lecture en modes sp_ciaux .................... 38
Zoom .................................................... 38
Reperage de Is scene des]roe .................... 38
Lecture rep6t_e ................................. 39
Lecture repetee A-B ............................... 39
Marquage des scenes d,_sirees ................ 39
Changement des angles ......................... 40
S_lection du titre........................ 40
Menu DVD ........................................... 40
Changement de langue de la bande son .......... 41
Sous-titres ....................................... 4I
Fonctiennement de CD avec ficbiers
MP3!WMA/JPEG et CD Audio ....................................... 42
Informations concernant les CD de fichiers MP3!
WMA/JPEG ...................... 42
Loading CD .......................................... 43
Lecture d'un CD en MP3/WMA et CD Audio ....... 43
Selection de fichiers .................. 43
Lecture JPEG CD ..................... 44
Lecture en diaporama ....................... 44
Lecture r_p_t_e (CD) .................... 45
Lecture al_atoire (CD) ......................... 45
Lecture programmee (CD) ........................... 45
R_glage des fonetions ..........................................................46
Touches de commande de menu .................. 46
Rubriques du menu .......................... 46
Selection de la langue ...................... 47
Regtage du format _cran ........................... 47
Reglage de I'affichage ..................................... 47
Reglage du mode d'image ............................. 48
Reglage du rythme de lecture de ]'image JPEG 48
Mode null ................................................ 48
Sortie digit ...................................................... 48
Reglage des diff6rents niveaux de blocage ...... 49
Pour modifier le niveau parental ...................... 49
Fonction d'annutalion temporaire du verrouillage
parental dans le disque DVD ..................... 50
Annexe ................................................................................... 51
Liste des codes de tangues ..................... 51
Guide de depannage ................................... 52
Guide de depannage - Diffusion num6rique ........ 52
Guide de depannage - Mode PC ...................... 52
Guide de depannage - DVD ....................... 53
Fiche technique ................................................ 54
GARANTIE LIMtTEE ................................................................56
Schemas dimensionnels
•Les "Dimensional D_awings" (Schemas dimensionnels) du
t_l_viseu_ LCD se trouvent sur la face interne du couvercte
arri_re,
Notez quetes vaieurs num_riques sont indiquees en anglais
et que t'unile de Iongueur es! le pouce et le miiUm,_tre(mm)
Page 68
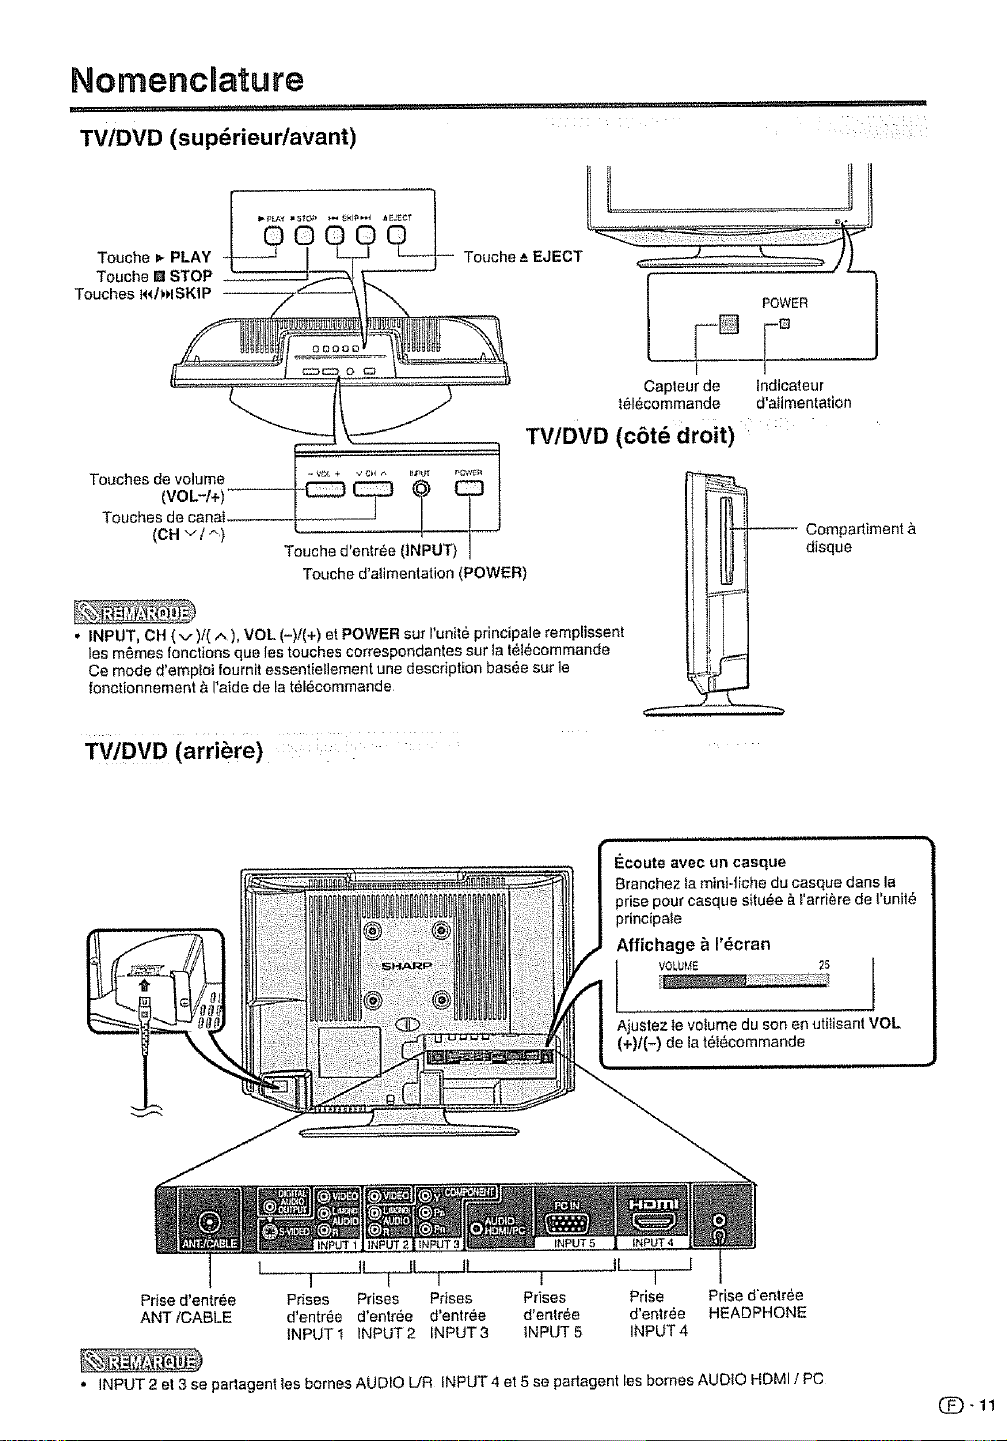
Nomenclature
' I'11' I 'u, ,_,F,111111111r I IIJ _ L,*H ....._j .................. '[
TV/DVD (sup_rieur/avant) ::
To,,ohed'entr_e(,NPUTII I] I III11 d_sqoe
Tooohe ,o,i eoiotioo,POW ° IIL Jt
• INPUT CH(v)/(^),VOL(-)/(+)etPOWERsurlunit_principaleremplissenI It tl t I
les m_mes fonctions que les touches correspondantes sur ta telecommande It _
Ce mode d'emploi fournit essentiellement une description bas_e sur le _.J;J_ I
fonctionnement & I'aide de la tel_commande _L._._..._
, fill1 l
TV/DVD (artiste) i
Prise d'entr_,e Prises Prises Prises Prises Prise Prise d'entree
ANT;CABLE d'entr_e d'entr_e d'entr_e d'entr_e d'entree HEADPHONE
INPUT1 INPUT2 INPUT3 INPUT5 INPUT4
• INPUT 2 el 3 se partagent les bornes AUDIO L/R INPUT 4 et 5 se partagent les bornes AUDIO HDMI / PC
(_)- 11
Page 69
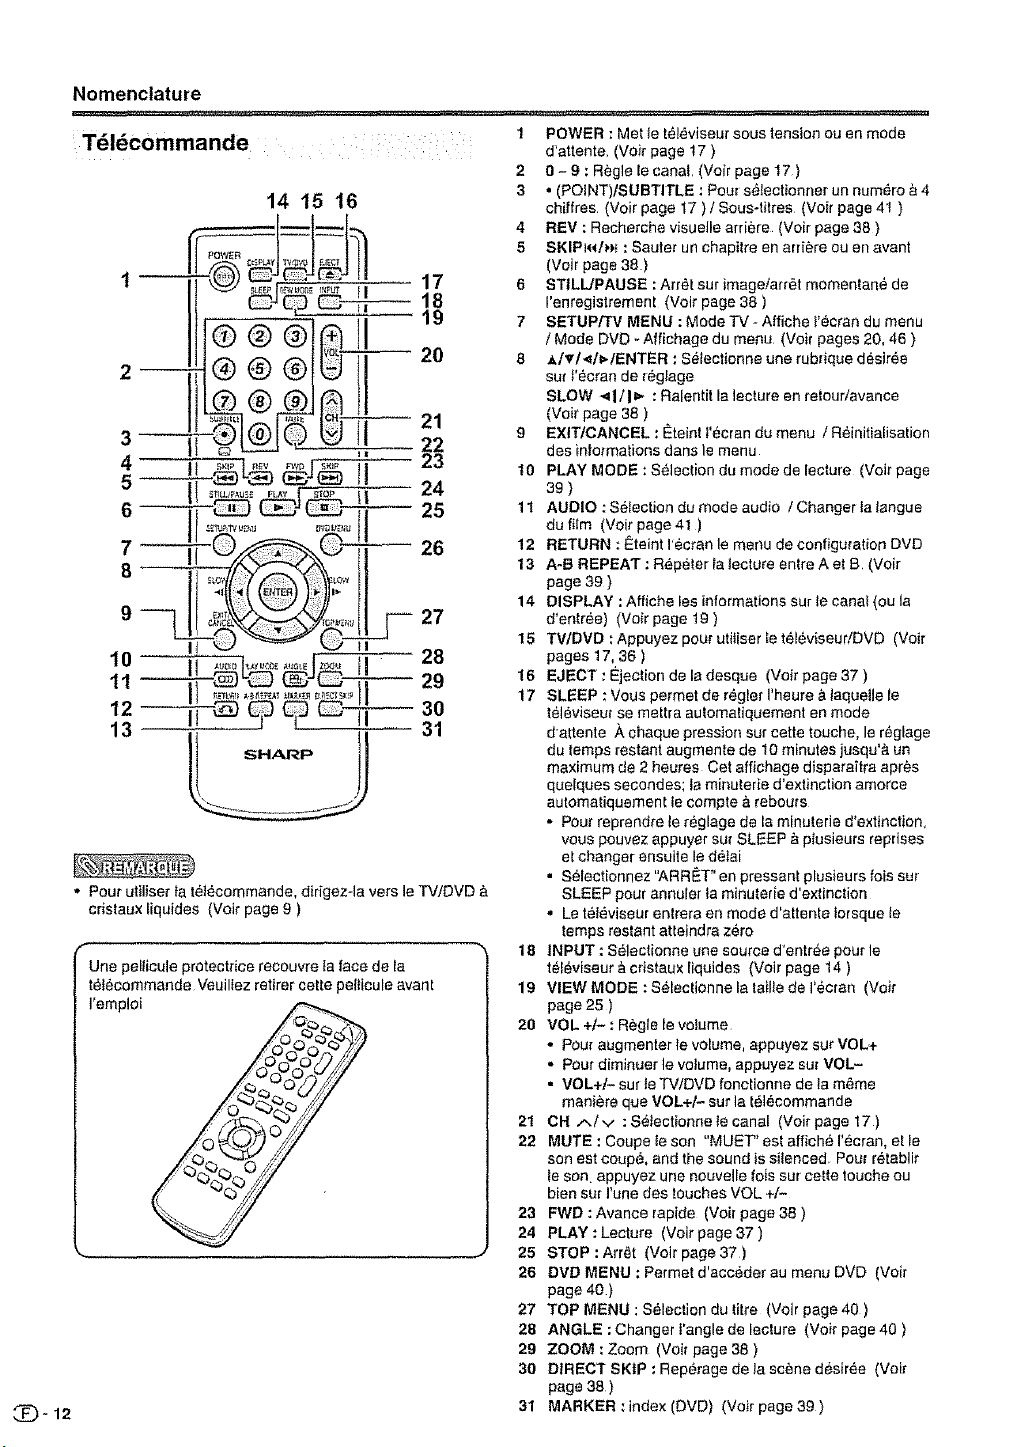
Nomenclature
:,_._o 12
T_l_commande
14 15 16
17
CC3_ _r
18
19
-- 20
®®®
a u
--V--4
5 _ _)L3E_ _J(_ Jl
6 Ji __ 25
7 26
_I_LL!PA_J _ FLJ_¥ _IP " .
-_ __ ] j 24
21
22
s li II
It _ _ _1
12 II _ _]"' _l"_ tl 30
13 31
SHARP
- Pour utiliser ta tsiecommande, dirigez-la vers le TV/DVD
cristaux liquides (Volt page 9 )
Une pel{icule protectrice reeouvre la face de la
t@t@commandeVeuiliez retirer cette pe{licule avant
I'emploi
1 POWER : Met te t_l_viseur sous tension ou en mode
d'attente. (Voir page 17 )
2 0 - 9 : Regle [e canal (Voir page 17 )
3 * (POINT)/SUBTITLE : Pour s_lectionner un num,.re a 4
chiffres (Voir page 17 ) / Sous4itres (Voir page 4t )
4 REV : Recherche visuelle art{ere (Volt page 38 )
5 SKIPmth,_f: Sauter un chapitre en atria,re ou en avant
(Voir page 38.)
6 STILL/PAUSE : Arr@tsur Jmage/arr@tmomentane de
I'enregistrement (Volt page 38 )
7 SETUP/TV MENU : Mode iV- Affiche i'ecran du menu
/ Mode DVD - Affichage du menu (Voimpages 20, 46 )
8 I_t_I<IvlENTER : Selectionne une rubtique desir@e
sumi'ecran de teglage
SLOW _1/I _ : Ralentit la lecture en relouriavance
(Vok page 38 )
9 EXlTICANCEL : Eteint t'ecran du menu / Reinitialisation
des inlotmations dans le menu
10 PLAY MODE : S@lection du mode de lecture (Volt page
39 )
11 AUDIO : S6lection du mode audio / Changer ia league
du film (Vok page 41 )
12 RETURN : Eteint l'_cran le menu de configuration DVD
13 A-B REPEAT : Rep@ter Ia lecture entre A et B, (Voir
page 39 )
14 DISPLAY : AfJiche les informatiens sur le canal (ou la
d'entr@e) (Voir page t9 )
15 TV/DVD : Appuyez pour utilJser _et@l@viseuriDVD (Vok
pages !7, 36 )
16 EJECT : Ejection de la desque (Voir page 37 )
17 SLEEP : Vous permet de r_glemI'heure _ laquetle _e
televiseum se mettra au_omatiquement en mode
dattente ,,_cheque pression sur cette touche, le r_glage
du temps restant augmente de 10 minutes jusqu'_{ un
maximum de 2 heures Cet affichage disparaftra apres
quelques securities; la minuterie d'exfinction amerce
automatiquement Secompte & rebours
• Pout reprendre le r_glage de la minuterie d'extinction,
vous pouvez appuyer sur SLEEP a p_usieurs reprises
et changer ensuite ledetai
• Selectionnez "ARRET" en pressant plusieurs lois sut
SLEEP pour annulet ta minuterie d'extinction
° Let_J_viseurentreraenmeded'atten_e_orsquele
temps restant at_eindra zero
18 INPUT : S_lectJenne une source d'entr_e pour le
t_I_viseur a cristau× Iiquides (Volr page t4 )
19 VIEW MODE : S_lec_ionne la ta_ltede r_cran (Voir
page 25 )
20 VOL +1- : R_,gle {evolume
• Pour augmenter fe volume, appuyez sur VOL+
. Pour dimlnuer le vo{ume, appuyez sur VOL-
,, VOL+/- sumle TViDVD fonclionne de ta m_me
manf_re que VOL+/- sur la _618commande
21 CH .,"./v : Setectfonne te canal (Voir page 17 )
22 MUTE : Coupe _eson "MUET" est affiche recran, et te
son est coup(_, and the sound is silenced Pour r_tablir
te son. appuyez une nouvelle lois sur cette touche ou
bien su_I'une des touches VOL +/-
23 FWD : Avance mapide(Voimpage 38 )
24 PLAY : Lecture (Vok page 37 )
25 STOP : Arr_t (Voir page 37)
26 DVD MENU : Permet d'acceder au menu DVD (Voir
page 40.)
27 TOP MENU : Selection du titre (Muirpage4O )
28 ANGLE : Changer I'angle de lecture (Volt page 40 )
29 ZOOM : Zoom (Voir page 38 )
30 DIRECT SKIP : Reperage de la scene desiree (Voir
page 38 )
31 MARKER :index (DVD) (Voir page 39)
Page 70
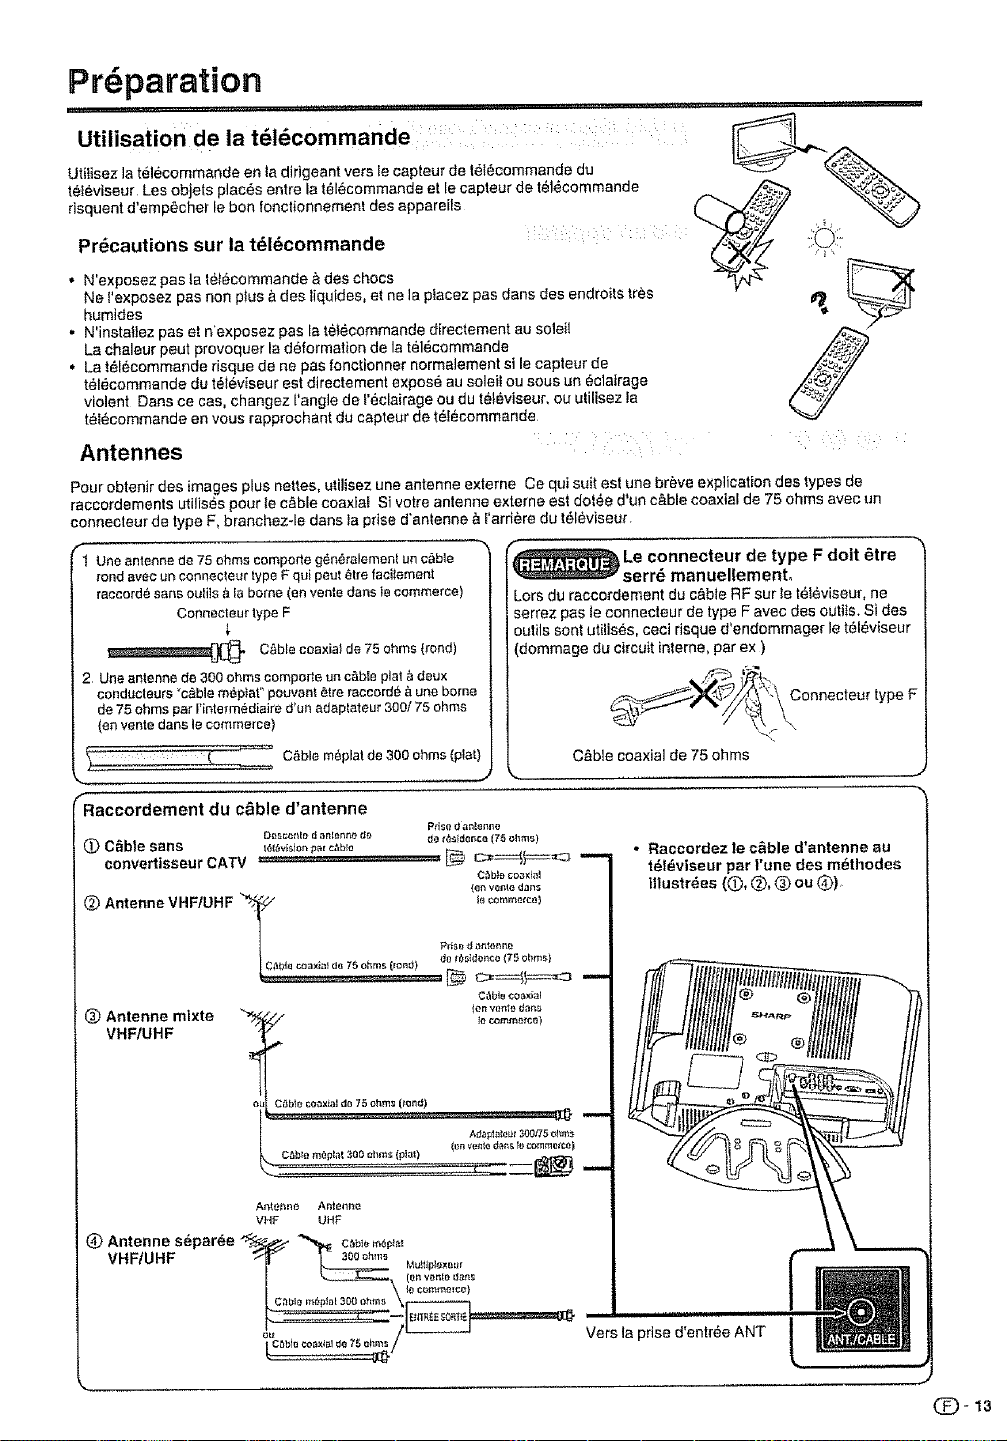
Preparation
...... " I'" =,,,,,,,,....... ql ' ' ' ....'" "......
Utilisation de ia t_ldcommande ___._,
Uti,isez ,ate,_commande en la difigeant vers 'e Capteu' de 'el_commande du i
televiseur Les ob ets plac6s entre la t_lecommande el le capteur de t_l_comm nde A "-'-"I_,_,_ _'"-_.q-o{o_>.
Precautions sur la t_l_commande :::i: : :!i
risquent d'emp_,cher le ben fonctionnemen, des appareils C_ _" "_
• N'exposez pus la te_commande a des chocs "%4 _"
Ne l'exposez pus non plus a des liquides, et ne la ptacez pas duns des endroils tres #_ _F
humides _" _ _'_
• N'instaHez pas et n'exposez pas la t6t_commande direetement au soleH
La chaleur peut provoquer la deformation de la tel_commande ./_.:_/
• La t_lecommande risque de ne pus fonctionner normalement sile capteur de .//_._._/"
t_,l_commande du televiseur est directement expos_ au soleil ou sous un _clairage [_dT/
violent Duns cecas, changez l'angle de l'_clairage ou du tel_viseur, ou ulilisez fa
t_I6commande en vous rapprochant du capteur de t_l_commande
Antennes
Pour obtenir des images plus nettes, utilisez une antenne externe Ce qui suit est une breve explication des types de
raccerdements utilis_s pour fe cable coaxial Si votre antenne externe est defoe d'un cable coaxial de 75 ohms avee un
connecteur de type F, branchez-le duns la prise d'antenne a t'arriere du t_leviseur
f.-
I Uneantennede 75ohms comporteg_n{_ralementun c_ble
rendavec unconnectear type F qui peat etre facifement
racco_'d_sans oulils _la borne ten vente duns tecommerce)
Connecteur type F
CAbleceaxia! de75 ohms (rend)
2 Uneantenne de 300ohms comporte uncable plat &deux
cenducteurs _c_blemid.plat"pouvant_treraccord_ &une borne
de 75 ohms par rinterm6diaired'un adaplateur 300/75 ohms
(on vente dunsle commerce)
CAblemeplatde 300ohms (plat)
Lors du raeeordement du cable RF sur le t_l('_viseur,ne
serrez pus te eonnecteur de type F avec des outHs, Si des
outils sent uti!ises, ceci risque d'endommager le t_l_viseur
dommage du circuit interne, par ex )
Le connecteur de type F dolt *}tre
serrd manueltement°
Coooecteurtype
CAble coaxial de 75 ohms
Raccordement du c_ble d'antenne
(_) C_ble sans _,_I_vi_l,_,__.,_b_
convertisseur CATV ......................................... _ c:_----,t_.3
(_)Antenne mlxte -._ _ tonvontedan5
VHFtUHF
O_scenlo d ,3nlonne do de _stde_ce (75 _hms)
I C_ de 75 ohn_s (lend)
, _o_ommefc_3)
C_ble coaxial de 75 ohms (lend)
,. C_bte m_pla_ 300 _hnlS (plal)
,,..._: :: : ' _-_L__i,_;,_ _
.... de f6side_lce 175 ohms}
Pdse d a_lenne
(en venle darts
A_pI_le_t 300f75 Ollm,_
C_b}o coaxial
C_b_e¢Oaxi_l
• Raceordez te cable d'antenne au
tdl_viseur par t'une des m_thodes
Hlustr_es ((_),Q, O ou (_)
Page 71
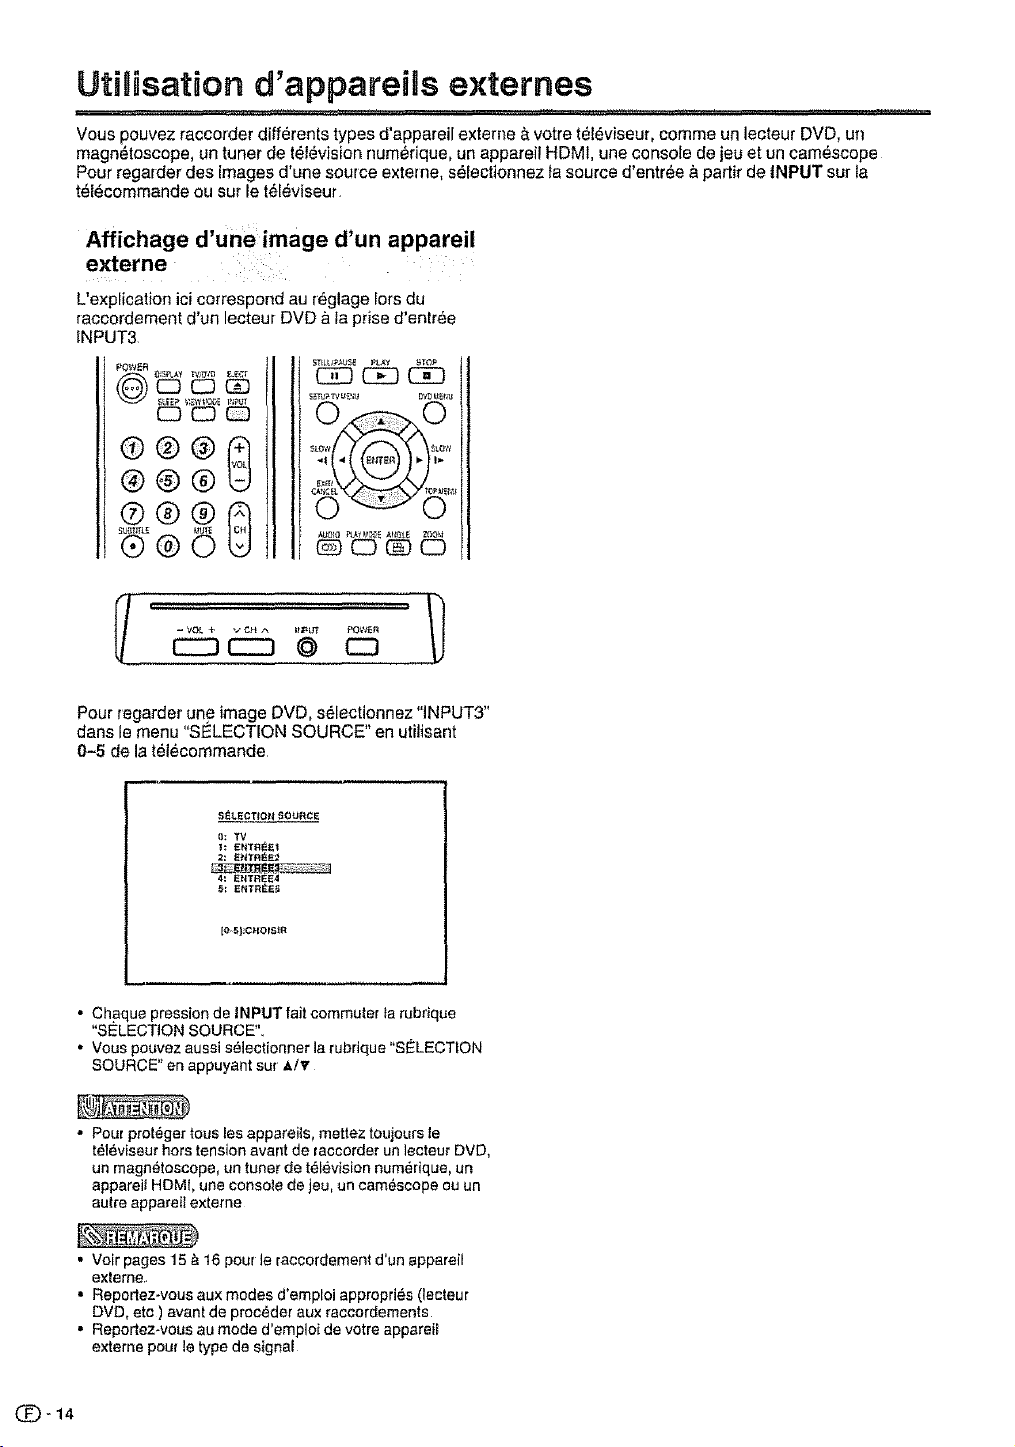
UtiUisation d'appareils externes
........................... ,,:lr_,,_*r',t:''*_ r ,,,, ' .......... """'" ,,, '"'"" :_" ' ' ...............................
Vous pouvez raccorder differents types d'apparei[ exteme a votre teldviseur, eomme un lecteur DVD, un
magn_toscope, un tuner de t_i_vision num_fique, un appareit HDMI, une consote de jeu et un cam_scope
Pour regarder des images d'une source externe, sdlectionnez la source d'entr_e & partir de INPUT sur te
t_I_commande ou sur le t_Ieviseur
Affichage d'une image d'un appareil
externe
L'explication ici correspond au r_glage Iors du
raccordement d'un lecteur DVD & la prise d'entree
INPUT3
POWER
®®®
(D®®
czDr--q @ C3
Pour tegarder urte image DVD, selectionnez 'INPUT3"
dens le menu "SELECTION SOURCE" en utilisant
0-5 de la telecommande
S_LECT/Ott _OL_RCE
8: TV
4_ E_TF;E_4
5_ E_IT_E_
[O 5|:CHOISlR
• Chaque pression de INPUT fait commuter la rubrique
"SELECTION SOURCE".
• Vous pouvez aussi s_iectionner ]a rubrique "SI_LECTfON
SOURCE" en appuyant sur _/v
• Pour prot_ger tous les appareils, mettez toujours _e
t_leviseurhers tension avant de _accorder un lecteur DVD,
un magn_toscope, un tuner de t_levision numerique, un
appareit HDMI, une console de jeu, un cam_scope ou un
autre appareil exteme
•Vo[r pages 15 _ 16 pour le raccordement d'un sppareil
exteme.
• Repertez-vous aux modes d'emploi appropries (lecteur
DVD, etc )avant de preceder aux raccordements
• Reportez-vous au mode d'emploi de votre appareii
externe pou_ ]e type de signal
O-14
Page 72
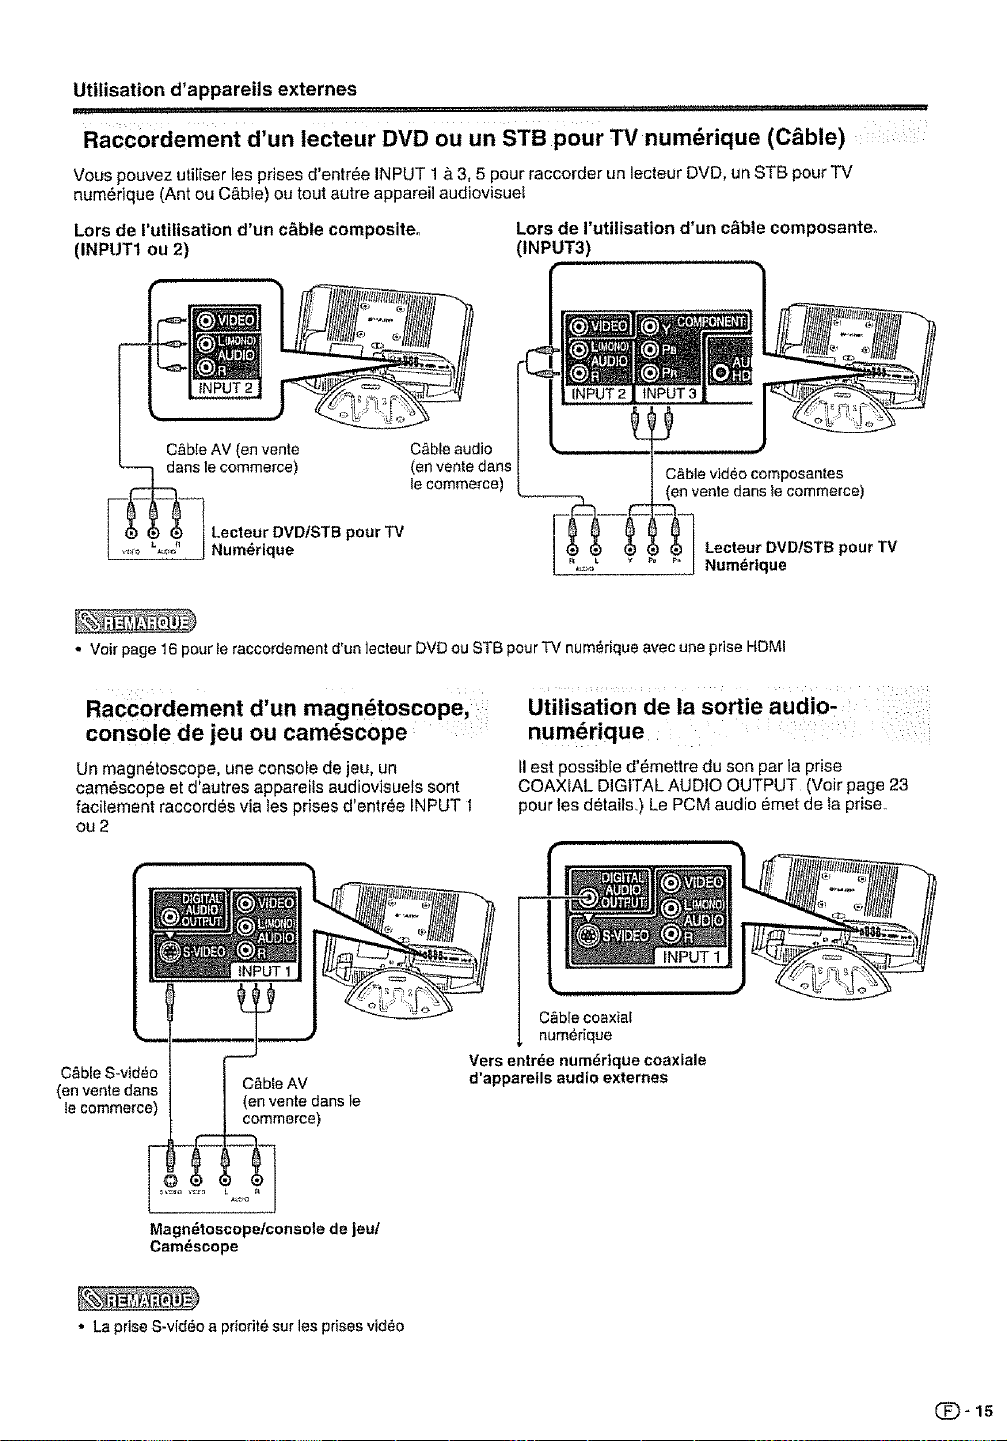
Utilisation d'appareils externes
...... = =,= .. ,, . ,.,
Raccordement d'un lecteur DVD ou un STB pour TV num_rique (C_ble)
Vous pouvez utiliser les prises d'entree INPUT 1 ,_3, 5 pour raccorder un lecteur DVD, un STB pour TV
numerique (Ant ou C&ble) ou tout autre apparei] audiovisuei
Lors de rutilisation d'un c&bfe composite, Lors de I'utilisation d'un c_ble composanteo
(INPUT1 ou 2) (INPUT3)
C&ble AV (en vente C&ble audio
Lecteur DVD/STB pour TV
,-_ L j_ Num_rique
*Voir page 16 pour fe raccordement d'un lecteur DVD ou STB pour "TVnum6rique avec une prise HDMI
Raccordement d'un magndtoscope,
console de jeu ou camdscope
Un magnetoscope, une consofe de jeu, un
camescope et d'autres appareils audiovisuels sont
facilement raccordes via les prises d'entree iNPUT 1
_) (en vente dans
le commerce)
C&ble vid6o composantes
(en vente dans te commerce)
Lecteur DVD/STB pour TV
Numdrtque
Utilisation de la sortie audio-
numdrique
Ii est possible d'_mettre du son par la prise
COAXIAL DIGITAL AUDIO OUTPUT (Voir page 23
pour les details.) Le PCM audio emet de ta prise,,
ou 2
C,_bfecoaxial
C_bleS-video
(envente dans I C&bieAV
Vers entrde numdrique coaxlale
d'appareils audio externes
num_rique
tooomme,oe o"2 n; ce a°s'e
Magn_toeeopetconsolede jeu/
Cam_scope
• La priseS-video a priodte sur lesprises video
Q-15
Page 73

Utilisation d'appareils externes
Raccordement d,un appareil HDMI _ _: i:
Utilisez la prise d'entr_e _NPUT4 lots du raccordement d'un appareil HDMI
C_ble HDMI
(en vente dens
le commerce)
Lorsque vous utilisez un c&bte de conversion HDMI-DVI entrez le signal Audio & partit de la priseAUDIO de INPUT 4
Apparell HDMI
Affichage d'une image & partir d'un
appareil HDMI
Pour regarder une image de t'appareit
HDM{, selectionnez "ENTREE4" dens
"SELECTION SOURCE" en utilisant INPUT
de la telecommande ou sur le t_leviseur
(Volt page 14 )
_LECT}OH SOU_3E
O: I"V
I: ENTR_I
2:ENTREE2
_: ENTREE3
;!E _BTS_
_: ENTREE{;
[O-_I:CHOIStR
, Repertez-vous au mode d'emptoi de votre eppareil
externe pour le type de signa_
S_lection de la source d'entr_e
audio HDMi
Appuyez sur TV MENU pour afficher f'_cran
MENU,.
Appuyez su_ 4/=- pour select{onner L)"
(AUDIO)
Appuyez sur ,_/v pour selectionner "HDMF,.
Appuyez sur -,_/_ pour seiectionner "HDMI"
ou"DVI"
LMI_;UEAUE)IO _,
&V:Cff0151_ 4_:A_8_rEE
HDMh Loredu raccordement d'un appareil HDMI
au televiseur, s_lectionnez ce reg_age
DVh Lots du raccerdement d'un appa_e{_DV{
au t_{6viseur avec des cordons audio
analogiques, s_{ectionnez ce reglage
(_-16
Appuyez sur EXIT pour retoumer a t'_cran
normal
• Reportez-vous au mode d'emploi de votre appareil
externe pour determiner le type de signal
• Lorsqu'un adaplateur ou ue c&bte de conversion HDMF
DVl est raccorde & la borne HDMI, la clarte de I'image
peut 6ire mauvaise
Page 74

Pour regarder Uat6R6visJon
, ,i ,_L..............................
Op6rations simples pour regarder un programme
televis6
00o00
, ,,,,_,L u ,u
Mise hors tension
Appuyez sur ta touche d'alimentation (POWER) du
TViDVD, ou POWER de ta t616commande
• Le televiseur entre en mode d'attente et !'image &I'ecran
disparait
, L'indicaleur d'alimentation POWER du TV/DVD passe au
rouge
CH ^/v POWER
C3 C3 C3
®@®
®®®
Indicateur d'a]imentation
Indicateur de statut de t616viseur (POWER)
MARCHE .t Allume(Vert) "]
ARR T/Attente /
Pr6paration
Procedez aux etapes suivantes avant d'appuyer sur
POWER de la tetecommande
1, tntroduisez les piles dans ta telecommande
(Voir page 9 )
2, Raccordez Iec&ble d'antenne au TV/DVD
(Voir page t3 )
3, Branchez le cordon secteur dans la prise secteur
(Voir page 8 )
Mise sous tension
Appuyez sur fa touche d'alimentation (POWER) du
TV/DVD, ou POWER de la telecommande
• Indicateur d'alimentation (Vert): Le TVIDVD est en marche
("S V P. ATTENDRE" appara_tra quelques secondes &
!'ecran )
S61ection du mode TV
Appuyez sur TV/DVD pour selectionner le mode TV
• Le menu d'installation LANGUE surgit automatiquemenL
Iorsque TV MENU est pressee pour la premiere lois
G_
CSDC_ C_
,' Si vous prevoyez de nepas utitiser le televiseur pendant
une periode protong6e, veiltez & rotifer lecordon secfeur
de la prise d'alimentation
• Une faible quantit_ d'61ectricit6 est consommee m_me
Iorsque POWER est #taint
Changer de canal
Vous pouvez changer de canal de plusieurs fa_ons
Methode 1
En ut[lisant CH " / \," de la teiecommande ou sur le TV/
DVD
• Si votre service de c&blodistribution oi|re des canaux
analogiques et numeriques sur le meme num_ro de canal,
votre fonction de navigation vers le hau| syntonisera
d'abord I'appareil sur Ie canal ana]ogique, puis sur le canal
numerique Meme sil semble que le canal ne change
pas, I'appareil commute en fait do canal analogique au
num_rique, en sequence.
Si vous utilisez la navigation vers lebas, ta commutation
inverse se produit, du canal numedque & l'analogique.
Methode 2
Utitisation des touches de la telecommande 0-9," (POINT)
pour selectionner ]es canaux pour VHF/UHFICATV/
NUMI_RIQUE
Pour selectionner un numero de canal &un ou
deux chiffres (par ex, le canal 5) :
Appuyez sur 5
• Lorsque vous selectionnez un numero de canal & un
chiffre, il n'est pas necessaire d'appuyer sur 0 avant le
chiffre.
• Quand vous saisissez 0-9 uniquement, ta selection du
canal sere accomplie s'il n'y apas d'opera_ion pendant
quelques secondes
Pour s61ectionner url num6ro de canal _ trois chiffres
(par exemple le canal 115):
Appuyez sur 1 --.1_5
Pour s61ectionner un num6ro& 4 chiffres
(par example lecanal 22,,1):
Appuyez sur 2-_2--_ • (POINT) -_1
• Quand vous saisissez 0-9 uniquament, la selection du
canal sara accompHe s'il n'y apas d'operation pendant
quetques secondes.
* Si vous appuyez uniquemenl sur 0 en reception 'AIR",
den nese produit
, Effectuez les operations cFdessus en quelques secondes
• Quand vous saisissez 0-9 et • (POINT), la selection du
canal sera accomplie s'it n'y a pas d'operation pendant
quelques secondes
(_-17
Page 75

Pour regarder la t_ldvision
Installation initiale :
Rdglage de la langue
Lorsque vous pressez MENU pour la premiere
fois, le menu d'lnstaltation LANGUE surgit
automatiquement,.
S_lectionnez parmi 3 langues : Anglais, Frangais et
Espagnot
Appuyez sur .4/p- pour selectionner la
langue desir6e.
........... ,'_,'_,J'_,',J,J_, ,,r
Omission d'un canal en m_moire
Vouspouvez d_sactiver uncanal selectionn_ _ I'aide de
OH^Iv
Appuyez sur TV MENU pour afficher r,_cran
MENU.
Appuyez sur ._/_,.pour s_lectionner _]
(REGLAGE)
Appuyez sur _./v pour s#lectionner
"AJOUTER/ANNULATION", et appuyez sur
Appuyez sur ,_/'_ pour seiectionner
"AJOUTER/ANNULATION", et appuyez sur
•_/_,- IIest maintenant possible d'effectuer
une s_lect[on dans )aliste de canaux_
Appuyez sur _/_ pour choisir le canal &
sauter
t,f;C_0fStR <I_:AJUS_E_
Rdglage de l'antenne
Verifiez le type de branchement qui est effectu6 avec
votre t61eviseur lots de ta s_lection de "ANT" ou de
,,C,g,BLE,,
Appuyez sur _/_ pour s_lectionner
ANT/CABLE', et appuyez sur 4/_- pour
s6(ectionner "ANT" ou "C.'_BLE"
AUTO¢_lL_E_O
_T:CHOISIE 4_;A_T£_
Recherche des canaux
Avec AUTO CNL MEMO, le t_l_viseurrecherche tousles
canaux visibles dans la r_gion d6termin_e
Appuyez sur ,&/v pour s_lectionner "AUTO
CNL MEMO"
Appuyez sur _h,-.. Le teI_viseur commence
&mettre en memoire tousles canaux
disponibles dons votre region..
Appuyez sur .,_/_ pour mettre {e canal
selectionne sur "ANNU'L
Appuyez sur EXIT pour retourner &l'6cran
normal L'omission de canal est maintenant
en rig ueur
• Pour ajouterun canal num_rtque que vousregardez:
S_lectlonnezlecanalquevousd_sirezajouter Ensuite
seiectionnez"AJOUTCANAL" &I°_tape4,appuyez sur
', Pour annuler f'omisaion de canal:
S_]ectionnez"AJO"&l'6tape 6,
• Pourrettrer touslescanaux de la m_moire des canaux:
S6(ectionnez"EFFACERTOUS"apr#st'etape3, puis
appuyez sur ._/1=,.
())_)- 18
A_TOC_LgEgO
SV_ ArrE_E C_LE
B
EX)TtA_UL_R
Se]on [es conditions de r_ception, (a
m_morisation des canaux num_riques
c&blodistfibu_s peut prendre ptus 10 minutes; il
fau! donc 6tre patient
Page 76
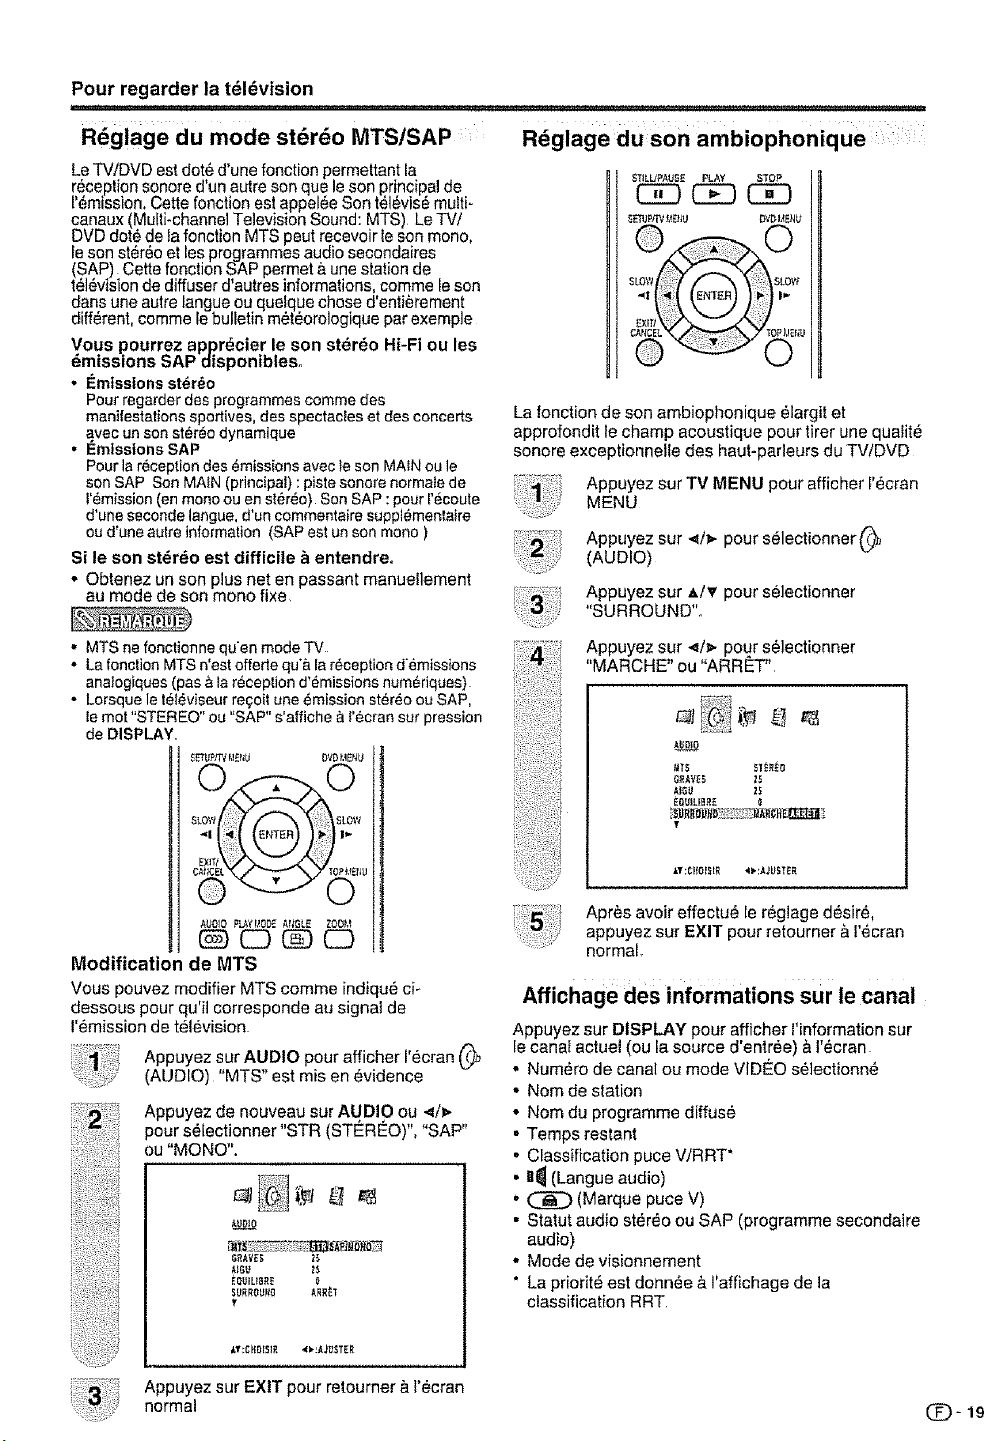
Pour regarder la t616vision
i , , ,,,,,,,,
R6glage du mode st6rdo MTS/SAP
LeTViDVD est dot6d'une fonction permeltant la
r6ceplion sonored'un autre son que le son principal de
l'6mission. Cette fonction estappel6e Son t_16vis6muiti-
canaux (Multi-channel Television Sound: MTS) Le TV/
DVD dot6 de la fonction MTS peut recevoir te sonmono,
Ieson st6,r6oetles programmes audiosecondaires
(SAP) Carte fonction SAP permet &une station de
tel6visionde diffuser d'autres informations,comme le son
dans une autre langue ou quelque chose d'enti_rement
diff,.rent, comme Iebulletin m6t6orologique parexemple
Vous pourrez appr6cier le son st6r6o Hi-Fi ou les
6missions SAP disponibles.
, I_mIssions st6r6o
Pourregarderdesprogrammescomme des
manifestationssportives,desspectacles et desconcerts
avecun sonst6r6odynamique
• I_missionsSAP
Pourlar6ceptiondes6missionsavecteson MAINoule
sonSAP SonMA_N(principal): pistesonora normatede
t'6mission(enmonoou enst6r6o) SonSAP :pourr6coute
d'unesecondelangue,d'uncommentairesuppl6menlaire
oud'uneautre information(SAPestun senmono)
Si le son st_r6o est difficite &entendreo
• Obtenez un son plus net en passant manueilement
au mode de son mono fixe
° MTS ne fonctionnequ'enmode TV
• Lafonclion MTSn'est offertequ'&la r_ceptiond6missions
analogiques(pas#,iarecepliond'6missionsnum6dques)
• LorsqueIst616viseurre_oitune6missionst6reoeu SAP,
_emot "STEREO"ou "SAP"s'affiche aI'(_cransur prassion
deDISPLAY,
Rdglage du son ambiophonique ':: : :
ST&IJPAUSE PLAY STOP
_E_JPS_V_!_U OW31,{ENU
La fonction de son ambiophonique 61argitet
approfondit le champ acoustique pour tirer une qualite
sonore exceptionnelle des haut-parleurs du TV/DVD
Appuyez sur TV MENU pour afficher t'ecran
MENU
Appuyez sur .<iv pour s61ectionner(_
(AUDIO)
Appuyez sur AI_, pour s6Iecfionner
"SURROUND",
......
Appuyez sur .</_- pour s6lectionner
"MARCHE" ou "ARRET"
_lllJ
Modification de MTS
Vous pouvez modifier MTS comma indiqu6 ci-
dessous pour qu'il corresponde au signal de
l'6mission de tet6vision
Appuyez sur AUDIO pour afficher 1'6cran(_
(AUDIO) "MTS" est mis en 6.vidence
Appuyez de nouveau sur AUDIO ou .4/_.
pour s6lectionner "STR (STEREO)", "SAP"
ou "MONO".
T
Appuyez sur EXIT pour retourner a !'_,cran
normal _- 19
ii
Apr_s avoir effectu,6 le r6glage d6sir6,
appuyez sur EXIT pour retourner & i'_cran
normal r
Affichage des informations sur ie canal
Appuyez sur DISPLAY pour afficher l'information sur
Ie canaf actual (ou la source d'entr6e) & I'ecran
• Num6ro de canal ou mode VIDEO s61ectionn6
• Nom de station
• Nom du programme diffus{_
• Temps restant
• Classification puce V/RRT*
• _l_l(Langue audio)
• _ (Marque puce V)
• Statut audio st6r6o ou SAP (programme secondaire
audio)
• Mode de vfsionnement
• La priorit6 est donn6e & I'affichage de la
classification RRT.
Page 77

R6gnages de base
Touches de commande de menu
Utilisez Ies touches suivantes de la t616commande
pour commander le menu
C3 C3 C_3
C3 C_ C3
®®®9
®®®
®®®
._T_LIJ_Atl_._ P_ky _P
c_ c_ c_D
_ CZ)£) C)
Rubriques du menu
Liste des rubriques du menu pour vous aider
avec les op6rations
MODE AV..-: ........................................................................Page 24
LUMINOSITE .............................................................Page 22
CONTRASTE ...............................................................Page 22
COULEUR ....................................................... Page 22
TEINTE_, .....................................................................................Page 22
NETTETE ..............:.........................................................Page 22
COULEUR TEMPERATURE ................................Page 22
AFFICH LUMI ...............................................................................Page 22
REPLACER (R6glages de I'image) ...............Page 22
Io,,u0!0]
MTS ......................................................................Page 19
GRAVES ...............................................................Page 23
AIGU ............................................................................................. Page 23
EQUILIBRE ........................................................................Page 23
SURROUND ...................................................................Page 19
HDMI .....................................................................................Page 16
LANGUE AUDIO ..........................................................Page 24
FORMAT SORTIE .........................................................Page 23
REPLACER (R_glages du son) .....................Page 23
SHARP
TV MENU: Pressez pour ouvrir I'ecran de menu
,_/v/.4/_-: Pressezpour selectionner la rubrique
d6siree _,1'6cran ou pour regler la
rubrique s61ectionnee
ENTER: Pressez pour passer & r6tape suivante
ou pour parachever le r6glage
RETURN: Pressez pour retourner a,i'6tape
pr6c6dente,
EXIT: Pressez pour sortir de 1'6cran de menu..
Tous ]as reglages modifi6s seront
sauvegard6s
E}_T_R;R _G_,,AG_ £XtT;TERMIt_R
^
un mode d'emploi de ta t616commande
!l change en fonction de chaque _cran de
I ap-J \artie inf6rieure de l'6cran de menu est
param6trage de menu
LANGUE ......................................................... Page 18
ANT/CABLE ...........................................................................Page 18
AUTO CNL MEMO ............................................Page 18
AJOUTER/ANNULATION ..........................................Page 18
TITRAGE ANAL OGIQUE ....................................................Page 26
TITRAGE NUMERIQUE...: ...........................................Page 26
SOUS-TITRAGE AVANCE ...........................................Page 27
MODE VUE .......................................................................Page 25
DEFILEMENT DqMAGE .............................................Page 25
MODE CINEMA ........................................................Page 22
FORMAT ..................................................................Page 25
MESURE SIGNAL .....................................................Page 33
AUTO ETEINT ................................................ Page 33
I S-TITCANAL .................................................................................Page 21
LABEL V1DEO............................................................................Page 21
I REGLAGE PUCE-V ...............................................Page 30
NOUVEAU MOT DE PASSE .............................Page =_ I
:::%:
• I1se peut qua certaines rubriques de menu ne s'affiehent
pas salon la source d'antree s_,leclionn6e
• Si aucunes touches ne sont press6es pendant plus
de 60 secondes environ, I'ecran de menu retourne
aulomaliquement a I'_cran de moniteur normal
O" 20
Page 78

R_glages de base
Attribution d'un nom aux diff_rentes
chaines
Pour crder des noms de chaines
S_fectionnez une chafne a laquelle vous
souhaitez attfibuer un nora
Appuyez sur TV MENU, et appuyez sur 4/_,-
pour afficher t'ecran _ (OPTION)
Appuyez sur M'I' pour selectionner "S-TIT
CANAL", etappuyez sur ._/_,-.Afficher l'ecran
S-TIT CANAL
Appuyez sur ,_/_f pour s_lectionner
"REGLAGE!EFFACER". Appuyez sur <i_,-
pour selectionner "REGLAGE", et appuyez
sur ENTER.
Appuyez sur </_ pour entrer uncaractere
dans lepremier espace. Appuyez piusieurs
lois sur tatouche jusqu'& ce que lecaract6re
que vous souhaitez apparaisse & I'_cran
R_6LA6r'
_ETOUR
I_tiquette d'entrde
Vous permet de regler la prise d'entree affich_e en
utilisant le menu SELECTION SOURCE ou l'affichage
du canal
Appuyez sur TV MENU pour afficher I'_cran
MENU
Appuyez sur 4/_- pour s_lectionner _._
(OPTION)
Appuyez sur ,_/_r pour s_lectionner "LABEL
VIDEO", et appuyez sur ._/_.
L'_cran du menu LABEL VIDEO s'affiche
Appuyez sur ,e,/_,pour s_lectionner la
source d'entree particuli_re & modifier
Appuyez sur ._/_ pour choisir la nouvelle
6tiquette pour tasource d'entr_e selectionnee
Le caract#re change comme suit:
- *---* 0 Zq
___ + ,_.._ 9 _''_ A
Si le caract_re desir6 apparait, appuyez sur
ENTER R6p_tez cette etape pour entrer te reste
des caract_res
Une fois que vous avez tap6 lout te nom.
appuyez sur ENTER
Appuyez sur EXIT pour retoumer & I'_cran
normal
SPACE ,--
Repetez les etapes I &5 pour les autres
canaux Vous pouvez attribuerune etiquette
&cheque canal
Pour supprimer lea noms des chafnes
S_lectionnez la chaTne dont vous voulez
supprimer le nora
Appuyez sur TV MENU, et appuyez sur </1_
pour afficher t'ecran _ (OPTION),
Appuyez sur ,_/v pour s_lectionner "S-TIT
CANAL", et appuyez sur ._/_,-,pour afficher
I'_cran S-TIT CANAL
Appuyez sur _./v pour s61ectionner
"REGLAGE/EFFACER" Appuyez sur 4/_-
pour s_fectionner "EFFACER", et appuyez
sur ENTER
Appuyez sur EXIT pour retourner &l'#cran
normal
L_B[[ vlo_o
2 _T_EZ
I - Utiliselenorad'etiquettepar d_faut
i
VCR Magnetoscope
DVD LecteurDVD
DTV Decodeurde DTV
SAT Demodulateur/d_codeursatellite
CBL Decodeur deTV c&bl_e
HD Appareil HDMI (ENTRE_E4
seulement)
Appuyez sur EXIT pour retourner &l'ecran
normal
• II est impossible de changer reliquette de I'entree "TV" et
"ENTREE5"
R6p_tez les etapes 1 & 4 pour supprimer le
nom d'autres chafnes (:J_- 21
Page 79

Rdglages de base
Ajustez _'image selon vos pr6f6rences avec les
reglages de I'image suivants
AppuyezsurTVMENUpourafficherl'ecran
MENU
Appuyez sur _/_- pour select[onner _l
(IMAGE)
Appuyez sur J,/v pour selectionner une
rubrique de r_g_age specifique
(LUMINOSITE, CONTRASTE, COULEUR,
TEINTE, NETTETE)
Appuyez sur -_/p. pour regler la rubrique sur
Ia position desir_e
@
U88£AY _P#Rrs
LU_t_OS_T_ 2_
CS_L_ 2S
TE_tTE Q
f
_r :C1_01_JR '4_.;A_gSTE_
s_tectlonnee:
LUMINOSITI_ Pourattenuerla PouraccentuerIa
CONTRASTE Pourdiminuer le Pouraugmenter
COULEUR Pourdiminuer Pouraugmenter
TEINTE Lestonschair Lestons chair
NETTET# Pourdiminuerla Pouraugmenter
Appuyez sur EXIT pour retoumer &l'ecran
nerma!
. Pourremettreroutesles rubdquesde reg_agedimage
auxvaleurspr_r_gl_es d'usine, appuyezsur A/_. pour
s6iectionner"REPLACER",etappuyez sur .</_
Reglages dr]sine;
MODE AV ............................................... SPORTS
LUM]NOSITI_ / COULEUR / NETTETE ........centre (25)
CONTRASTE ................ maximum (50)
TE_NTE........................... i, ............. centre (0)
COULEUR TEMPI_RATURE ........... FRAIS
[uminosite luminosit_
contraste le contraste
t'intensitedes l'intensit_des
couleurs couleurs
deviennentplus deviennentplus
viotets verts.
nettet_ lanettet_
Tempdrature de couleur
Pour une meilleure balance des b_ancs,utilisez la
correction de temperature de ta couleur
Appuyez sur TV MENU pour afficher l'_,cran
MENU
Appuyez sur _/_,- pour selectionner
(IMAGE)
Appuyez sur _,/v pour s_lectionner
"COULEUR TEMPERATURE",,
Appuyez sur -_/_"pour selectionner le mode
que vous preferez,
FRAIS B_ancavec nuancebleue
MOYEN Neutre
CHAUD Blancavec nuancerouge
Appuyez sur EXIT pour retoumer & i'ecran
normal,
Rdtrodclairage
AFFICH LUMI ajuste la tuminositede I'_cran pour
accroitre la clarke de f'image
Appuyez sur TV MENU pour afficher l'*_cran
MENU
Appuyez sur 4/_ pour selectionner _
(iMAGE)
Appuyez sur ,&/_' pour selectionner
"AFFICH LUMF
Appuyez sur </_- pour regretIa luminosite
de 1'6cran
Appuyez sur EXIT pour retourner & i'ecran
normal
Mode cinema
Vous pouvez r_gulariser tesmouvements en r_glant le
MODE CINEMA sur FILM quand vous visionnez un DVD
gr&ce& un lecteur DVD
Appuyez sur TV MENU pour afficher I'ec_an
MENU
Appuyez sur 4/_-pour s_tectionner
(REGLAGE),
Appuyez sur _/_' pour s_lectionner "MODE
CINEMA"
Appuyez sur ,,_/_-pour selectionner "FILM"
ou "VIDEO"
Q - 22
FILM Modedevis[onnementdecontenufiIm
VIDISO Modedevisionnernentdecontenuv_d_o
• MODE CINt_MAn'estoffert qu'en mode480i
Page 80
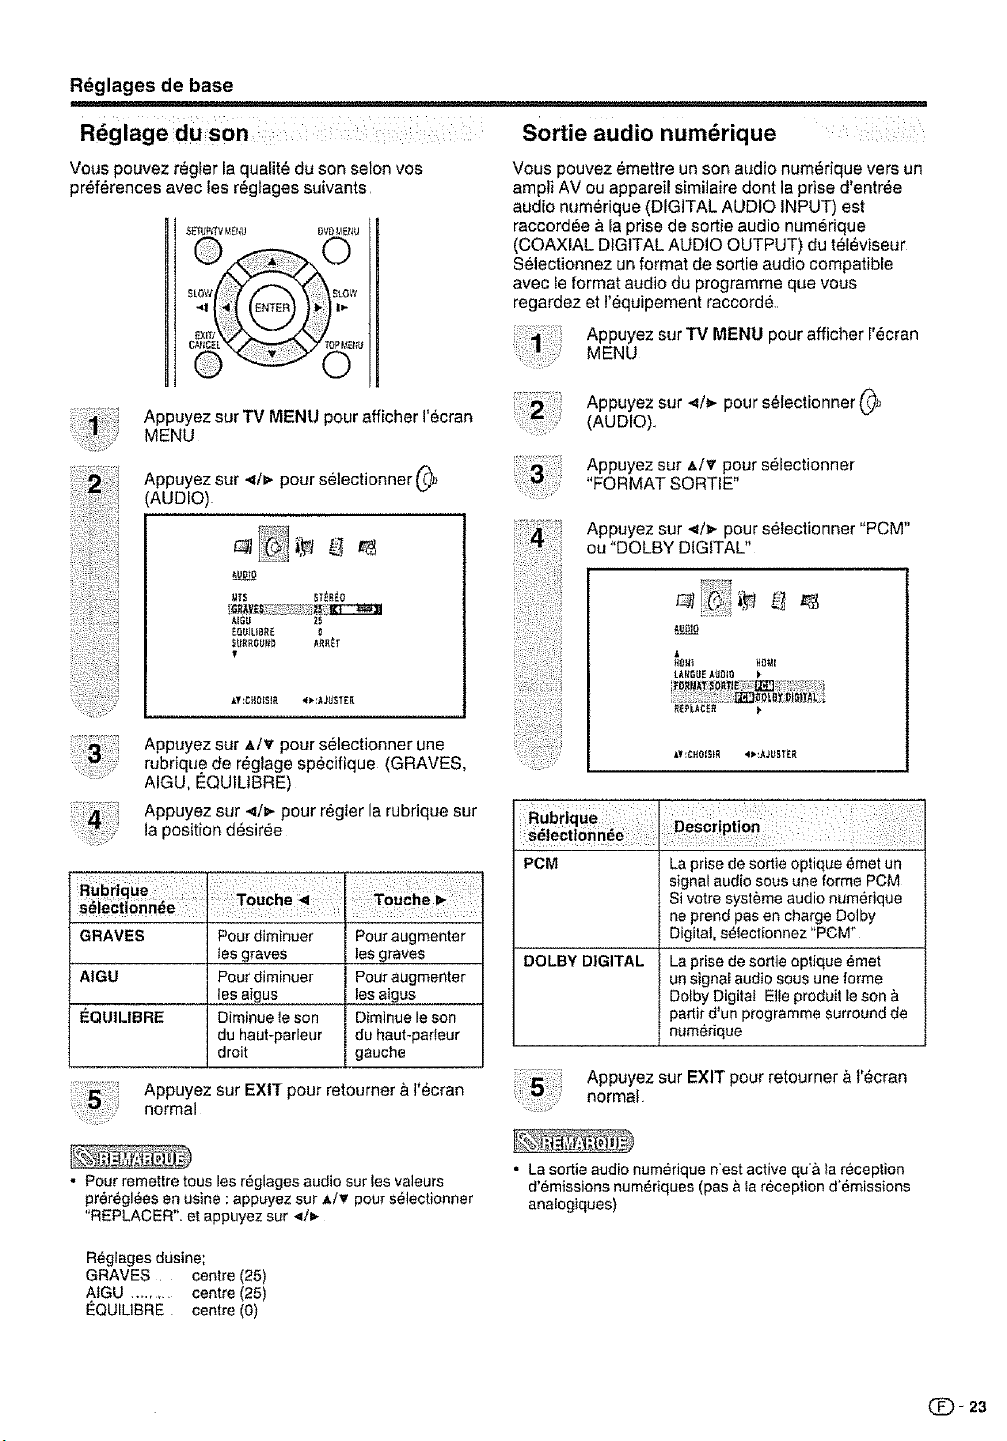
Rdglages de base
Vous pouvez regler la qualit_ du son selon yes
preferences avec les r_gtages suivants
Appuyez sur TV MENU pourafficher I'ecran
MENU
Appuyez sur .,=/_ pour selectionner {(_
(AUDIO)
_s ST_R_0
AIGU Z_
_Q_tL+BR£
Sortie audio num_rique
_ _!:i ;i/_
Vous pouvez _mettre un son audio nume_riquevers un
ampli AV ou appareil similaire dent la prise d'entrSe
audio numSrique (DIGITAL AUDIO iNPUT) est
raccord6e a Ia prise de sortie audio numerique
(COAXIAL DIGITAL AUDIO OUTPUT) du t_leviseur
Seiectionnez un format de sortie audio compatible
avec _eformat audio du programme que vous
regardez et r_quipement raccord_.
Appuyez sur TV MENU pour afficher l'_cran
MENU
Appuyez sur .,_/v pour s_lectionner (._
(AUDIO).
Appuyez sur t,/v pour s_lectionner
"FORMAT SORTIE"
r_
Appuyez sur .,_/_-pour selecfionner "PCM"
ou "DOLBY DIGfTAL"
A
HO_] H0_i
LA_6UE ._9_)lO P
_PLACE_
Appuyez sur &lv pour s_lectionner une
rubdque de r_glage sp_cifique (GRAVES,
AIGU, EQU1LtBRE)
Appuyez sur .,q/_ pour r_gler la rubrique sur
la position d6sir_e
S_,lectionn_e
GRAVES Pour diminuer Pour augmenter
les g+-aves les graves
AIGU Pour diminuer Pour augmenter
Ies aigus les aigus
EQuiLiBRE Diminue le son Diminue le son
du haut-parleur du haut+par+eur
droit gauche
Appuyez sur EXIT pour retourner a l'ecran
normal
• Pour remettre tous les r_glages audio sur +esvaleurs
prSrSglees en usine : appuyez sur _,iv pour s_lectienner
"REPLACER". et appuyez sur _/_-
R_glages dusine;
GRAVES centre (25)
AIGU ......... centre (25)
€:QUILIBRE centre (0)
•_t CH_ISI_ '+_':MUS_EE
S_leCtf0n n_e::::
PCM
DOLBY DIGITAL
La prise de sortie oplique eimet un
signal audio sous une forme PCM
Si votre syst_me audio num_rique
ne prend pas en charge Dolby
Digital, selectionnez "PCM"
La prise de sortie oplique 6met
un signa+audio sous une forme
Dolby Digitat Elb preduit le son
partir d'un programme surround de
numerique
Appuyez sur EXIT pour retourner & t'ecran
normal
• La sortie audio numerique n'est active qu& _arecep|ion
d'emissions numSriques (pas &Ia reception d+emissions
anatogiques)
1_- 23
Page 81

R gnages pratUques
Mode AV
Le Mode AV vous offre quatre options de
visionnementb,partir desquetles vous pouvez
selectionner celle qui convient le mieux &
I'environnement du t61_viseur, qui peut varier en
raisonde facteurs comme la {uminosit6 de tapiece, le
type de programme regard_ ou fe type d'entr_e
d'image & partir d'un appareil externe
_Jtt
A=J£_OFLAYt_08_t,t_GLE ZO0_4
0 (!D CD
Appuyez sur TV MENU pour afficher l'ecran
MENU
Appuyez sur 4/=- pour s_lectionner _]
(iMAGE)
Appuyez sur A/v pour selectionner
"MODE AV"
Appuyez sur _/=- pour selectionner tamode
d6sir_e
- Le modepeut_trechoisiclansIalisteci-dessous
Sdlection de la langueaudio ::_
num_rique ;:
Quand deux langues audio ou plus sont incluses clans
un signal num_rique, vous pouvez choisir I'une des
langues audio
Appuyez sur TV MENU pour afficher I'ecran
MENU
Appuyez sur 4/=- pour selectionner
(AUDIO),
Appuyez sur A/v pour selectionner
"LANGUE AUDIO", et appuyez sur .,_t=-.
Appuyez sur A/v pour selectionner la
langue d_sirg,e, et appuyez sur ENTER,
LA_GL_EAUJ310
SPORTS Poutuneimage nelte avec
STANDARD Poutune image haute
FILM Pout un film
MEMOIRE Permet&I'utilisateurde
. Vous pouvezselectionnerune rubdque MODEAV
differentepourTV, Composite(S-video),Composante
et HDM1moded'entr_e. (Parexemple,s_lectionnez
STANDARDpour l'entr_eTV et SPORTSpour I'entree
(Z)-24 WDEO)
N_TT_T_ _5
f
descontras_esaccentues
pout regarderlessports.
d_finitiondens une piece
normaIement_clairee
personnaliser_esreglages
VouspouvezrSglerle
modepourchaquesource
d'entr6e.
Appuyez sur EXIT pour retoumer & I'ecran
normat
Appuyez sur EXIT pour retoumer &I'_cran
normal
• La langue audio num_rique n'est active qu'& la r_ception
d'_missions num_riques (pas & }a r_cep_ion d'6missions
analogiques)
Page 82

Rdglages pratiques
Mode de Visionnement pour les
programmes 4-3
Appuyez sur VIEW MODE
• Le menu du Mode Vue a'affiche
• Le menu donne une liste des options du Mode
Vue s_ectiennables pour te type de signal
video actueltement regu
Appuyez sur 0-3 pour s_iectionner
directement chaque mode de visionnement
tandis quete menu de selection se trouve
toujours E r_cran,
• Cheque pression de VIEW MODE fait
commuter ]a rubrique MODE VUE
• Vous pouvez aussJ s_lectionner la rubfique
MODE VUE en appuyant sur A/V'
• Vous pouvez ensuite s_leclionner un mode
Vue ayant son propre rapport hauteur/largeur
t: ALLg_GE S[_A_T
=;Z00_t
_ ALLO_GE
BARRE LATERALE :
Convient pour regarder des _mlssions
orr,Jina+res en 4:3 dens leur format
norma!
D_filement d'image
Pour ajuster la pos{tion verticale d'une image en mode
ZOOM.
Appuyez sur TV MENU pour afficher ]'6cran
MENU
Appuyez sur </_ pour s_lectionner _t
(REGLAGE)
Appuyez sur ,_/'_' pour s_lectionner
"DEFILEMENT D'IMAGE", et appuyez sur
</v,
Affichez i'_cran AJUST DU DEFILEMENT
Pour deplacer I'image vers te haut, appuyez
sur ,_ Pour d6ptacer I'image vers iebas,
appuyez sur
_I: A JUSTER
Los quantit_s pouvant defiler sent les suivantes:
. Source de s+gnat480ii4B0pi72(}p/1080i:
ZOOM ; -10 a +10
Appuyez sur EXIT pour retourner & l'ecran
normai
ALLONGE SMART
(Amplfacl6n Inte!igente) :
Convient pour a]_onger tes _m[ss[ons
en 4:3 et remplir I'_cran
ZOOM :
Convient pour regarder des DVD
anamorphtques grand _eran 2,35:1
sur pIein _cran
ALLONGE :
Ce roods es_ prafique pour los
DVD 1,7S:1 Lors du vislonnement de
DVD t,85:!, le mode a_long_ pr_sente
enco_e de tr_s minces bandes noires
en haut et en bas de I'_eran
• VOUSpouvez passer au mOme ecran de menu depuis le
menu _ (REGLAGE).
• Vous ne pouvez pas s_lectionner' BARRE LATERALE +
et "ALLONGE SMART" Iorsque le signal d'entr_e est de
720p ou de 1080i
Mode de Visionnement pour les ::
programmes HD :_ .... ......
Le mode allong_ est offert pour les programmes HD
11convient au visionnement de programmes large
_cran avec un rapport hauteudIargeur de 1,78:1 Lors
du visionnement de programmes t,85:1, le mode
allong_ laissera toujours para_tre des bandes noires
tr_s minces dans le haut et {e bas de r_cran
• En mode BARRE LATERALE. ALLONGE SMART et
ALLONGE, DEFILEMENT D'IMAGE ne fonctionne pas
Rapport hauteur/largeur
Lorsque FORMAT est active et que le t_feviseur re_;oit
un signal 480i dens les prises d'entr_e INPUT t a 3,
+araffle de rimage est automatiquement selectionnee
(comrne le d_crit le tableau suivant)
Appuyez sur TV MENU pour afficher t'ecran
MENU
Appuyez sur _1/_- pour s_ oct onner ',i_t
(REGLAGE)
Appuyez sur */v pour selectionner
"FORMAT", et appuyez sur </_,- pour
selectionner "MARCH E" ou "ARRET",,
Appuyez sur EXIT pour retourner ,_ recran
normal.
e!a S0urce de signa!
4:3 Normal
16:9 piein
4:3 boite aux lettres
Non de{ini
FORMAT ne s'app+ique pas a rentree HDMI.
Si I'_quipement connect_ ne prend pas an charge le
signa{ de rapport hauteurilargeur 0Dd), ]acommutation
automatique ne fonctionoe pas
(Iorsque FORMATest activd)
BARRE LATERALE
ALLONGE
ZOOM
Mode d_fini par I'uti_isateur
(_ 25
Page 83

R_giages pratiques
numerlque : :,
• It se peut qua {e sous4itrage n'apparaisse pas selon
I'etat du signal de la station 6mettfice
Votre TViDVD est dote d'un d6codeur de sous-tJtres
interne. Ce qui vous permet de regarder des
conversations, des narrations et des effets sonores sous
torme de sous-titres sur votre t616v[seur Le sous-titrage
est disponible sur certains programmes TV/DVD et sur
certaines cassettes video VHS, au gr_ du fournisseur de
programme
Le sous-titrage numertque est un nouveau service de
sous-titres disponible uniquement sur ]as programmes
de television num6rique (6galement au gr6 du
fournisseur de service) Us'agit d'un syst_.me plus
flexible que te syst_me de Sous4itrage odginaf, car il
offre un large choix de formats de sous4itre et de styles
de police. Lorsque le sous4itrage num6dque est utilis6,
ilsera indiqu6 sous I'apparence d'une abr6viation & 3
tettres indiquant ega[ement ta tangue des sous-titres
num6riques : ENG (Anglais), SPA (Espagno}), FRA
(Fran£:ais) ou d'autres codes de langue
Tousles programmes etles cassettes video VHS ne sont
pas dotes de sous4ilre& Recherchez fe symbole "[_'
pour vous assurer que les sous4itres seront indiqu6s
Dans ]e systSme de Sous-titrage, plus d'un service de
sous-titre peut 6tre fourni. Chacun est identifi6 par son
propre numero Les services "C1" et "C2" affichent les
sous-titres des programmes t61evis6s superposes sur
l'image des programmes En g6n6ral, les sous4itres
codes en anglais sont transmis sur C1, et ceux darts
d'autres iangues sur C2
Dans ]e syst_me de Sous-titrage, les services "Textel"
ou "Texte2" affichent un texte sans rapport avec ie
programme actuellement visionn6 (par example, la
met6o ou les intormations) Ces services sont _jalement
superposes sur le programme qua vous 6tes en train de
regarder
S_TUP_V_AE_J_ bVD_,_EI_U
Syntontsezletel_viseursurleprogramme
d6sire
Appuyez sur TV MENU pour aft[chef i'ecran
MENU
Appuyez sur ,_/=- pour setectionner _
(REGLAGE)
Appuyez surA/T pours_lectionner
"TITRAGE ANALOGIQUE" ou "TtTRAGE
NUMt_RIQUE"
Appuyez sur _l/_, pour selectionner le mode
de sous4itrage cod6 voulu
• Lorsqu'un signa{ analogique est regu, vous
pouvez choisir entre C1, C2, T1, T2 ou ARRET
dans te menu 'q'ITRAGE ANALOGIQUE
Lorsqu'un signat numerique est re(_u,vous
pouvez choJsir entre CS1, CS2, CS3, CS4,
CS5, CS6 ou ARRET dans {e menu "TITRAGE
NUMERtQUE"
• Si votre programme ou votre videon'offre pas de sous4itres cod6s, fien ne s'afliche _.I'ecran
• Si aucun texte n'est offert dans votre zone de visionnement, un rectangle noir peut appara]tre &t'ecran. Si cela se produiL
mettez ]a fonction de sous-t]trage cod6 sur "ARR&T'
o Lorsque le d6codeur de sous4itres est mis en fonction, Ies sous4itres apparaissent A I'ecran environ 10 secondes pIus tard
• Si auoun signal de sous4itrage n'est regu, aucun sous4itre n'apparaffra, mais le televiseur restera en mode de sous-titrage
• Des fautes d'orthographe ou des caract_res inso{ites apparaissent parfois dans les sous4itres C'est tout a taft normal
surtout si I'emission est en direct, car aiors les sous-titres sont crees en direct et tl n'y a pas assez de temps pour les
verifier
* Lorsque le decodeur de sous4itres est mis en fonction, Vaffichage du volume ou de la mise en sourdine peut ne pas _tre
visible ou peut interferer avec les sous4itres
• Certains systemes de c#,b{odistribution ou de protection anticopie peuvent interf6rer avec [es sous4itros.
• Si vous utilisez une antenne int6rieure ou si la reception est mauvaise, Ie texte ou les sous4itres peuvent no pas apparaffre
ou apparaftre avec des fautes ou des caract6res Insolites. Dans ce cas, changez _aposition de !'antenne ou utiltsez une
antenne exterieure
• Lorsqu'un programme {6levise numedque a des signaux de sous4itros code numerique et de sous-titre cod6 analogique,
(_ - 26 les sous4itres codes num6riques s'aff[chent
Se[on le signal de radiodiffusion, certains sous-
titres analogiques fonctionnent avec un signal
de radiodiffusion numerique
Appuyez sur EXIT pour retourner A 1'6cran
normal
• Pour d6sacliver le sous4itrage code, select[onnez
"ARRET"
Page 84

R_iglages pratiques
i,,11,
....................... rll n, i, ii,lllllr,,i,_,ll,llfr
Rdglage des sous:titres ':
Cette fonction vous permet d'ajuster I'apparence de
I'ecran des sous4itres & votre guise
Appuyez sur TV MENU pour afficher l'Gcran
MENU
Appuyez sur 4/D,- pour sGiectionner _'_
(REGLAGE)
Appuyez sur A/T pour sGlectionner "SOUS-
TITRAGE AVANCE, et appuyez sur ._/ .
L'ecran SOUS-TITRAGE AVANC_ s'affiche.
• Vous pouvez choisir 7 rubfiques ici
Appuyez sur A/T pour s_Iectionner une
rubrique de r_glage d_termin_e, puis sur
,,=#,,,Le param_tre sefectionnabie de
chaque rubrique surgit
TAILLE_OgS._I_'H=_
Param_tres sdlectionnables offerts &chaque rubrique
de r_glage.,
TAILLE SOUS*TITRES:
TYPE TEXTE SOUS-
TITRES:
'COULEURTEXTE S0{iS'_
TITRES:
BORDuRE TEXTE SOUS-
TiTRES:
COULEUR D'ARRII_RE -
PLAN:
OPACIT_ DE TEXTE:
OPAC|T_ DE FOND:
• Cette fonction est congue pour personnaliser tes sous-
titres num_r_ques seulement
• La va[eur "AUTO" dGpend de la station _mettrice
AUTO, PETIT, STANDARD,
GRAND
AUTO, Di_FAUT, MONO
AVEC EMPATT., PROP.
W SERIF, MONO SANS
EMPATF., PROP. W/O
SERIF, S_MFLE, CURSIF,
PETITES MAJUSCULES
AUTO, NOIR, BLANC,
ROUGE. VERT, BLEU,
JAUNE, MAGENTA, CYAN
AUTO, SANS, EN RELIEF,
EN RETRAIT, UNtFORME,
OMBRAGE ]_ GAUCHE
OMBRAGE A DROITE
AUTO, NOIR, BLANC,
ROUGE, VERT, BLEU,
JAUNE, MAGENTA, CYAN
AUTO, TRANSPARENT,
TRANSLUC1DE, SOLIDE,
FLASHING
AUTO, TRANSPARENT,
TRANSLUCIDE, SOLIDE,
FLASHING
STMt_A_D
Appuyez sur A/T pour setectionner le
paramGtre dGs[re
Appuyez sur EXIT pour retourner & i'_cran
normal
Q - 27
Page 85

Rdgfages pratiques
R_glage du num'_ro secret pour i' ii Changertenum_rosecret
, verrouillage enfant ...... ....... Vouspermetde changer le num_ro secret
Vous permet d'utiliser un num_ro secret pour proteger
certains reglages d'6tre accidenteltement changes
IMPORTANT:
Trois conditions doivent 6tre remplies pour activer la
PUCE-V
(_) Le num_ro secret dolt _tre enregistr6.
(_) Les r_glages PUCE-V ant ete effectues
0 "PUCE-V" est regle sur "MARCHE".
R_glage d'un num6ro secret
Appuyez sur TV MENU pour afficher r_cran
MENU.
Appuyez sur 4/_,- pour selecfionner
(VERROUtLLAGES)
Appuyez sur A/v Le menu de saisie du mot
de passe s'affiche
R6p6tez fes _,tapes I & 3 de R@glage d'un
num_ro secret
• Le menu du reglage du num6ro secret eet affich6
Entrez le numero & 4 chiffres &i'aide de
touches num_riques (0-9), puis en
appuyant sur ENTER..
Appuyez sur _.lY pour selectionner
"NOUVEAU MOT DE PASSE", et appuyez
ensuite sur ._/_-
S_lectiennez et entrez te mot de passe (4
chiffres) en utilisant les touches
num_riques (0-9), puis en appuyant sur
ENTER
IO_'}_CHOI$1R E_'fE_:_EGLA_E
EXIT:TERLt_,R
"•" apparaTt & la ptace du chiffre
Retapez le mSme mot de passe pour
confirrner, puis appuyez sur ENTER
Le mot de passe est maintenant enregistre,
et le menu VERROUILLAGES s'affiche &
I'_cran.
EXITrTER_&_II£R
Entrez te nouveau mot de passe en utilisant
les touches num_riques (0-9), puis
appuyez sur ENTER
1__]_CH01$1_ _tTEA;R_GLAO_
Entrez de nouveau le meme mot de passe
}our confirmation, puis appuyez su[ ENTER
EXft:TESgI_EA
L'ecrarl retoume au menu
VERROUILLAGES
Votre nouveau mot de passe a et6 defini
* Par mesure de pr6caution, notez votre num_ro
secret et conservez-le dana un endrott sot.
" "REGLAGE PUCE-V (DTV)" ne pourra _tre s_Iectionnee
que lorsqu'un nouveau syst4_mede classification pourra
_tre t_l_charg_ au moyen d'une radiodiffusion num_rique
aux E-U
(_)- 28
Page 86
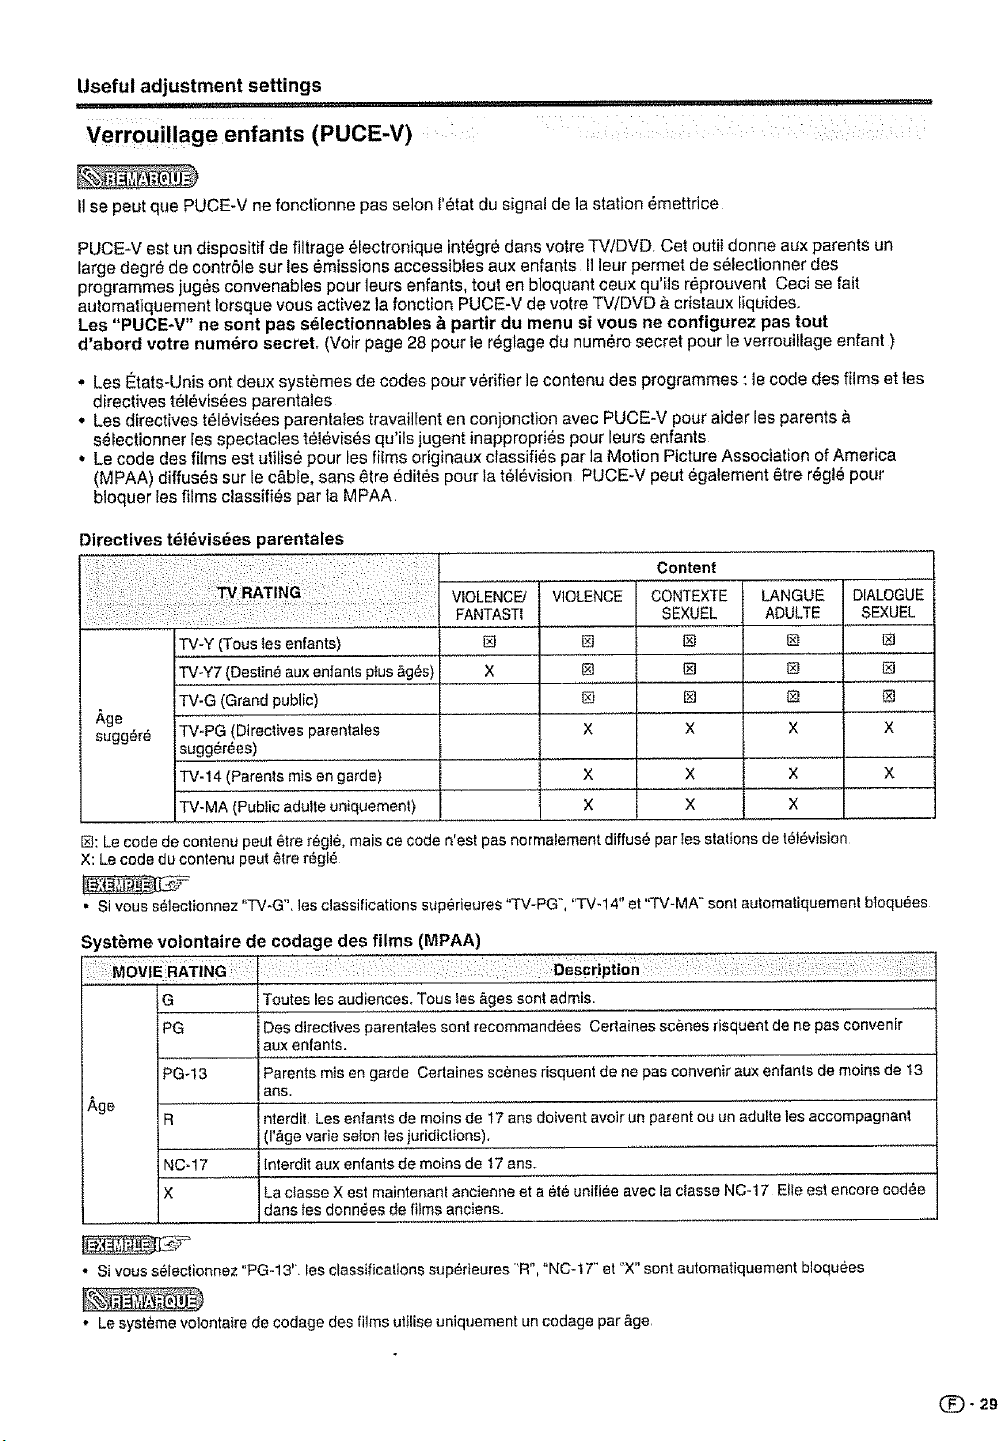
Useful adjustment settings
, ,111111111,1 , ,, ,,,,111[,,
,, ,,,,,,,,,,, ,,, ==
Verrouillage enfants (PUCE-V) :
I1se pout que PUCE-V ne fonctionne pas seion l'_tat du signal de ia station _mettrice
PUCE-V est un dispositif de filtrage electronique integre dans votre TV/DVD Cot outil donne aux parents un
large degr_ de contrSle sur los emissions accessibies aux enfants I] leur permet de s61ectionner des
programmes juges convenables pour louts enfants, tout en bloquant ceux qu'ils reprouvent Ceci se fair
automatiquement lorsque vous activez la fonction PUCE-V de votre TV/DVD &cdstaux iiquides,
Los "PUOE-V" ne sent pas selectionnables & partir du menu si vous ne configurez pas tout
d'abord votre numero secret, (Voir page 28 pour le r_glage du numero secret pour le verrouillage enfant )
o Les Etats-Unis ont deux systemes de codes pour verifier le contenu des programmes : lecode des films et los
directives televisees parentales
•Les directives tel6vis_es parentaies travail[ent en conjenction avec PUCE-V pour aider les parents &
s_lectionner les spectacles televises qu'ils jugent inappropri_s pour leurs enfants
° Le cede des films est utilis_ pour les films originaux classifies par la Motion Picture Association of America
(MPAA) diffus6s sur le c&ble, sans etre edites pour ta t_l_vision PUCE-V peut egaiement 6tre r_gle pour
bloquer los films classifies par la MPAA
Directives td|dvisees parentales
Content
VIOLENCE/
FANTASTI
TV-Y (Tous los enfants)
TV-Y7 (Destine aux enfants plus &g_s)
TV-G (Grand public)
Age ...............
sugg_r_ TV_PG (Directives parentales
sugg_r_es) ......................
iTV-14 (Parents mis en garde)
TV-MA (Pubtic adulte uniquement)
I_: Le code de contenu peut 6tre r_gle, mais ce code n'est pas norma[ement diffus6 par [es stations de t_l_vision
X: Le code du contenu pout 6tre regl_
X
VIOLENCE
X
X
CONTEXTE
SEXUEL
®
[]
_g
X
X
X
LANGUE
ADULTE
®
[]
[]
X
X
X
DIALOGUE
SEXUEL
[]
[]
X
X
• Si vous s_]ectionnez "TV*G". les classifications sup_rieures 'q'V-PG", "TV-14" et 'q'V-MA sent automatiquement btoqu_es
Syst6me volontaire de codage des films (MPAA)
i oViE RATINGi:
G
PG
PG-13
Age .....
• Si vous s_leclionnez "PG-13 '".les classifica|ions supedeures 'R", "NC-17" et "X" sent automatiquement bloquees
• Le systeme volontaire de codage des films utilise uniquement un codage par &ge
R
NC-17
X
Toutes los audiences. Tous _es&gos sent admis, .......
Des directives parentates sent recommandees Certaines scenes risquent de ne pas conven[r
iaux enfants.
I ....... ...........
Parents mis en garde Certaines scenes risquent de ne pas convenir aux enfants de moins de 13
aes.
nterdit Les enlants de rnoins de 17 ans doivent avoir un parent ou un adulte les accompagnant
(l'&ge vade seton les juridiclions).
lnterdit aux enfants de moins de t7 an&
La classe X est maintenan! ancieene eta _,te unifiee avec la c[asse NC-17 Eiie esl encore cod_e
dans Jes donn6es de films anciens.
(_- 29
Page 87

Rdglages pratiques
Directives t_l_vis_es parentales
(Directives TV)
Appuyez sur TV MENU pour afficher t'ecran
MENU
Appuyez sur _/_,- pour selectionner _
(VERROUILLAGES).
Appuyez sur A!v Le mot de passe pour
acceder & I'affichage des _crans
Entrez le numero & 4 chiffres & I'aide de
touches num_riques (0-9), puisen
appuyant sur ENTER.
Affichez I'_cran VERROUILLAGES
S:
Appuyez sur ,A/v pour selectionner
REGLAGE PUCE-V. Appuyez sur -_/_.
pour afficher I'ecran REGLAGE PUCE-V
Appuyez sur z,/v pour s_Fectionner
"CLASS, PROG TV" Appuyez ensuite sur
<1/_ pour s_lectionner te code d_sire.
R_GLAOEPUC£,V
CLAH_ FU F
CLASH CAHA_G ARR_T
CLASHCAtiFHA ARR_T
Syst_me Volontaire de codagedes
films (MPAA) :
R_petez les etapes 1 _.5 dans Directives
t_ldvisdes parentales (Directives TV),
Appuyez sur A/v pour selectionner
"CLASSIF FILM":Appuyezsur _/_ pour
afficher l'_cran REGLAGE CLASS.
Appuyez sur _,/v pour selectionner fa
classification desir_e, appuyez ensuite
sur .,_/_-pour seiectionner "MARCHE" ou
"ARRET"
P6 I_ k_T
E k_R_
X A_T
. Des d_tails surle r_glagetigurent&[apage29
Appuyez sur EXIT pourretourner a r_cran
normal.
i¸_i_i!i
J.v :CH01SIH "_:MUSTE_
Dens le ces de TV.Y7, TV-PG, TV.14 ou TV.
MA, "DISPLAY-CHANGE. CONTENU" s'affiche
fl t'ecran Appuyez sur DISPLAY pour conna_tre
te niveau Appuyez sur &/v pour s6lecttonner
Ia valeur voulue Appuyez sur .q/t,- pour choisir
"MARCHE' ou "ARRET" Appuyez ensuite sur
RETURN
• Des details sur te reglege ligurent & le page 29
Appuyez sur RETURN pour afficher l'_cran
VERROU1LLAGES
Appuyez sur ,L/_t pour selectionner
"PUCE-V" Appuyez sur -,a/_.pour
selectionner "MARCHE" Vos r_giages sont
maintenant en m6moire
• si "PUCE-V"n'esfpasreglesur "MARCHE",
les r_glagesPUCE-Vne fonctionnentpas
Q" 30
Appuyez sur EXIT pour retourner a l'ecran
normal
Page 88

Rdglages pratiques
Syst_mes de codage du Canada
........
=Les systemes de codage du Canada soot bas_s sur la politique de la Commission Canadienne de Radio-
T_l_vision et de T_l_communications (CRTC) sur la violence dans ]es programmes televises
. Si la violence constitue fe principa! _lCment du codage, la structure d6velopp_e tient egalement compte
d'autres parties du contenu, comme le langage, la nudit6, la sexualitY,et les themes pour aduttes.
• Lorsque vous r6glez PUCE-V sur te systeme canadien, vous pouvez choisir soit les codes anglais du Canada,
soit les codes frangais du Canada
Codes anglais du Canada
E Exempt6 : Ir=clatles informations, los sports, Ies documentaires et tes autres programmes
C Entants : Destin_ aux jeunes enfants de moins de 8 ans Apporte une attention particuliere
C8+ )r6f6re, acceptable ou unique pour resoudre un conflit N'encourage pas non plus les
G Grand public ; Considere eomme acceptable pour teusles groupes d'&ge Peut 6tre vu par
Age
PG enfants (de moins de 8 arts) car il peut cor=tenir des themes ou des questions controversies.
14+ de l'histoire, mais dolt faire pattie du developpement de l'intrigue ca du personnage Le
18+ ou des themes, s'adressent exclusivement aux adultes Pout contenir du langage
d'informalions ;los causeries, videos musicales, et los programmes de vari6t6s.
]ux themes pouvant menacer lear sens de ta securite el leur bien-6tre.
Enfar=ts de plus de 8 arts : Ne cor=tient pas de scene de violence en tact que moyen
enfants & !miter des actes dangereux qu'ifs ont pu voir a l'{_cran.
route la familte, confier=t tres peu de violence physique, verbale ou emotior=nelte.
Directives parer=tales : Destin6 au grand public mais pout ne pas convenir aux jeunes
Plus de 14 arts : Pout cor=tenir des themes ou fa violence est !'un des el6ments pr6dominanfs
langage utilise peut 6tre cru et des scenes de nu etre visibles dar=sIe contexte du th_me
Aduttes : Destine aux spectateurs de !8 ar=set plus et pouvant canter=Jrdes scenes de
violence qui, tout en etant en relation avec le developpement de rintrigue, du personnage
graphique et des scenes de sexe et de nudite.
,, S! vous s61ectionnez "G", Ies classifications superieures "PG", "14+" et "18+" sor=tautomatiquement bioquees
Codes fran_ais du Canada
E
G
Sans+
Age
13ans+
16arts+
18ans+
Programmation e×emptee
Grand pubtic ; Tousles &ges et los enfants ;contient un minimum de vioience directel mais
etie peut etre integr_e & I'intrigue de maniere humoristique ou tantatsiste
Grand public mais d_'.conseitl_ aux jeunes enfants :Peut 6tre regarde par un vaste public
mais peut contenir des scenes pouvant perturber les enfants de moins de 8 ans qui r=e
peuver=t pas faire la distinction entre des situations imaginaires et reeiles Le visionnemer=t
avec los parents est recommande.
Plus de 13 ans : Pout contenir des scenes de vioter=ce fr_quentes et itest donc pr_.ferable
de regarder I'emission avec los parents. .......................
=lus de 16 ans: Peut contenir des sc_nes de violence frequente et de violence intense
Plusde 18 ans: Reserve aux adultes Peut conter=ir des scenes de violence frequer=_e et de
violence extr6me,
_7
• Si vous selectio nnez "8arts+", los classifications superieures "13at=s+", "16arts+" et "1Bans+" sor=t automatiquement
bloquees
Q-3!
Page 89
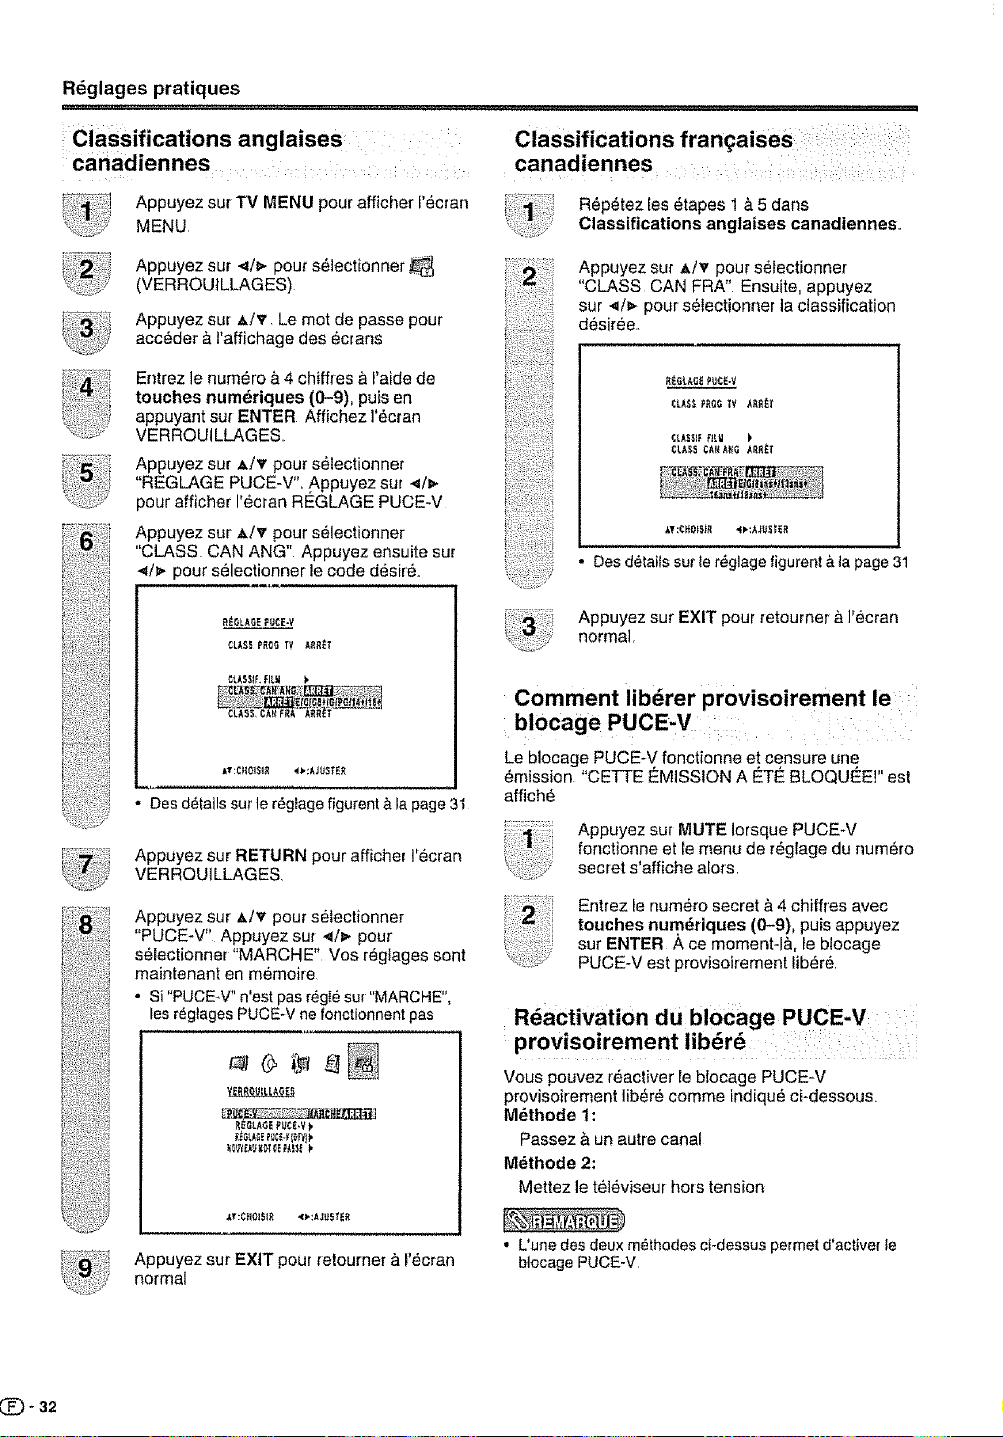
Rdglages pratiques
, , , , ,, ,, ,
Classifications anglaises
Appuyez sur T'V MENU pour afficher f'_cran
MENU
Appuyez sur </_. pour s_lectionner
(VERROUfLLAGES)
Appuyez sur My. Le mot de passe pour
acceder __raffichage des _crans
Entrez te numero #,4 chiffres & Haide de
touches num_riques (0-9), puis en
appuyant sur ENTER Affichez l'6cran
VERROUILLAGES
Apt3uyez sur _x/v pour s_lectionnet
"REGLAGE PUCE-V'L Appuyez sur 4/=,.
pour afficher I'ecran REGLAGE PUCE-V
Appuyez sur A/v pour selectionner
"CLASS CAN ANG" Appuyez ensuite sur
-,_/=.pour selectionner le code desir&
R_OLAGE P_E-V
CL_S PROG TV A_T
CtkS$tF,_I_,M I.
Des d_tailssur le r_gtagefigurent & lapage 31
Appuyez sur RETURN pour afficher I'ecran
VERROU1LLAGES.
Appuyez sur A/v pour selectionner
"PUCE-V" Appuyez sut _/v pour
s_lectionner "MARCHE'* Vos r_glages sent
maintenant en memoire
• Si "PUCE-V"n'est pas reg_ su_"MARCHE",
lesr_glagesPUCE-V nefenctionnentpas
Classifications franqaiseS
canadiennes ..... :
R_p_tez les _tapes 1 & 5 dans
Classifications anglaises canadiennes
Appuyez sur A/v pour setectionnet
"CLASS CAN FRA" Ensuite, appuyez
sur .,=/_,-pour s_Iectionner la classification
desiree.,
R_0tkG_ PUC_.V
C_AS_PRQGTY A_R_t
CLASSI_FILfd I,
eL,ASS¢AJ_/_6 AEE_T
kT:CHOfS_R _:A_US_ER
Des detaitssur ter_glage figurenta la page31
Appuyez sur EXIT pour _etourner a ]'ecran
normal,
Comment lib_rer provisoirement le
biocage PUCE-V
Le b_ocage PUCE-V fonctionne et censure une
_mission "CE-I-IE EMISSION A ETE BLOQUEEI" est
affich6
......... Appuyez sur MUTE lorsque PUCE-V
fonctionne et le menu de r6glage du num6ro
secret s'affiche alo_s
Entrez le num_ro secret _,4 chiffres avec
touches num_riques (0-9), puis appuyez
sur ENTER A ce moment-I&, ie blocage
PUCE-V est provisoirement lib_r_,
Rdactivation du blocage PUCE-V :
provisoirement lib_r6 ::
Vous pouvez r'_activer le blocage PUCE-V
provisoirement lib_r_ comme indiqu6 ci-dessous.
M_thode 1:
Passez & un autre canal
M_thode 2:
Mettez le tei_viseur hors tension
Appuyez sur EXIT pourretourner & I'ecran
normal
• L'unedesdeux methedes ci-dessuspermetd'activer le
blocage PUCE-V
Page 90

Autres options de vue
Pour recevoir des emissions num_riques hertziennes,
vous aurez besoin d'une antenne d'_mission
num6rique Vous pouvez confirmer ta configuration de
rantenne sur I'ecran "MESURE SIGNAL"
Au besoin, ajustez te sens de l'antenne pour obtenir
ia force de signal maximum
Force du signal
Appuyez sur TV MENU pour afficher I'ecran
MENU
Appuyez sur 4/_ pour s_,fectionner
(REGLAGE),
Appuyez sur A!,v pour selectionner
"MESURE SIGNAL"
Appuyez sur ._/_,
• La force du signal de NUMI:!:RIQUE (Ant)
s'atfiche Les informations du signal sent
basees sur le canal acluel
i i , i I 'll'lll'llll'lllllll'lqlH'"'l
Appuyez sur EXIT pour retoumer & I'ecran
normal
Arr_t automatique i
Lorsque la fonction "AUTO F_TEINT,,"est regime sur
"MARCHE", si lastationque vous regardezcesse
d'_mettre,le t_16viseurse met hors circuitautomatiquement
au bout de ! 5minutes
Appuyez sur TV MENU pour afficher !'_cran
MENU
Appuyez sur _/m+pour setectionner _
(REGLAGE)
Appuyez sur A/v pour s61ectionner
"AUTO ETEINT"
Appuyez sur </_ pour s_.lectionner
"MARCHE' ou "ARR_T"
AppuyezsurEXIT pourretoumer&l'_cran
normal
• Si l'Arr#t automatique est active et que re signal de
diffusion est faible, il se peut que te t_t_viseur s'_teigne
automaliquement Si tel est le cas, d_sactivez I'Arr_t
automatique
Q+ 33
Page 91

Branchement d'un PC (ordinateur personnel)
Visionnement d'une image provenant d'unPC : :
i i
Uti]isezles bomes INPUT5 (PC) pour raccorderun PC
•Les bornes d'entr6e PCson! compatibles DDC1/2B
, Reportez-vous & la page 35 pour obtenir une listedes signaux PC compatibles avec le syst6me
• Veillez & selectionner tes m6mes valeurs de signat, pour le signal de sortie d'un PC et {esignal d'entr6e du TV/
DVD, avant d'effectuer te raccordement avec le PC (Volt page 35 )
• En fonction du PC utilis6, les images peuvent ne pas s'afficher sans convertir les signaux de sortie en sortie
exteme,, En ce qui concerne la conversion en sortie exteme, veuillez vous reporter aux manuels du PC
• Raccordez fe cable RVB en vous
assurant qu'lf s'ajuste correcternent
dons la borne
Fixez ensuite solidernent los
connecteurs en serrant les vis des
_==i: deu×c_t_sdelaf_che
Vsm la bn f,qn do
\/C_bln RVB (nn vnnto dons Ii
Inc_memn)
Nomsde signauxpour leconnecteurt5 brochesmini D-sub
N_debrechB Nom de signal
@ @ @ @ @/U @ a
_ ® B
0 Pas de connexion
_), ,, CSYNC
• La broche n" 5 n'est pas utifisee pour f'entree du signal
• La broche n" 9 n'est pas connect6e avec le cable RVB foumi
N_debroche Nora de signal N_debrQche
_) GND (_erre) @
(_) GND (terra) @
® GND (_er_e)
"@ +_v @
(_ .... GND {ferre) (_
Nora de signal
Pas de connexion
SDA
HD
VD
SCL
Affichage d'une image provenant d'un PC: : : :::: ::: : :::::::;
Pour visualiser une image provenant d'un PC,
CZ)CZ]CE)
DISPLAY ?W_VD EJECT
CZ]CZ]_
®@®
suivez la demarche suivante.
(_ S@lectionnez le mode ENTRt_E5 (PC) au moyen
de la touche INPUT de la tel@commando ou du
TV/DVD. (Volt page 14,)
SOlectionnez le signal d'entree PC (Voir page
35 )
® Ajustez los rubriques "iMAGE" si ]'image du PC n'
apparait pas nettement, (Volt page 35 )
Page 92
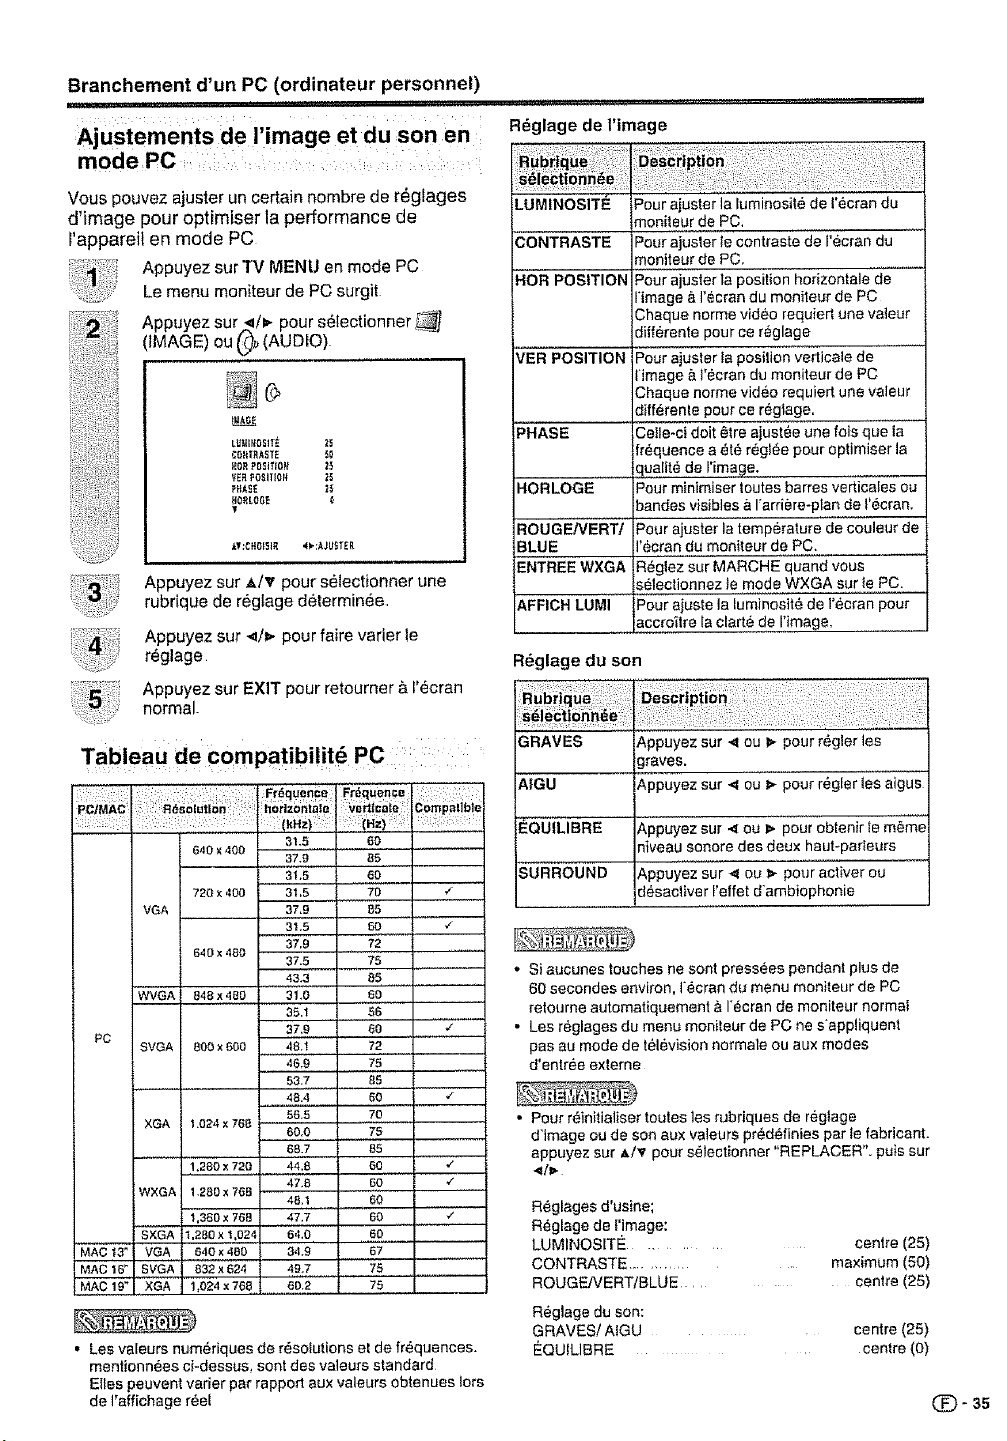
Branchement d'un PC (ordinateur personnel)
Ajustements de I'image et du son en
mode PC ..... ....
, i,lU ,lllU', ,,,,,,,,,,,,r ''_
Rdglage de l'image
Vous pouvez ajuster un certain nombre de rdglages
d'image pour optimiser la performance de
rappareil en mode PC
Appuyez surTV MENU en mode PC
Le menu moniteur de PC surgit
Appuyez sur </_ pour sdlectionner _
(IMAGE) ou (_ (AUDIO)
L_UtNOS_TJ_ 2_
COIIT_ASTE _0
HOR P0strlo_l Z_
YERPOSIT{ON 2_
_HA_E 2_
,f
Appuyez sur A/V pour sdiectionner une
rubfique de regtage determin_e,
Appuyez sur </t,. pour faire varier te
rdglage
Appuyez sur EXIT pour retoumer & I'ecran
normal
Tableaude compatibilitd PC ::
FrdquenCe Frdquen_e
640 x 400
720 x 400 31 _5 70 '/
VGA -- -- 37_9 ] 85
640 x 480 ............
WVGA 848 x 480 31,0 60
Pc
SVGA 800 x 890 48.1 72
XGA 1024 x 769
l
MAC 13" " VGA 640x480 34,9 67
1,280 x 720, 44,8 60
WXGA 1,280x 769
1,350 x 769 47,7 60
SXGA 1,280 x 1,024 64,0 60
MAd16_ SVGA _32×524 4_7 75
MAC 19 + XGA 1,024 x 768 60.2 75
• Les valeurs num6riques de rdso{utions el de frequences.
mentionnees ci-dessus, sont des valeurs standard
Eiles peuvent varier par rapport aux valeurs obtenues Iors
de I'affichage rdel
31-5 60
37.9 85
31,5 60
31,5 60 "_
37,9 72
37.5 75
43.3 55...........
35,1 56
37,9 ............. 60
46,9 75
5_.7....... as
48.4 60 J
56.5 70
60,0 75
68.7 85
47,8 50 _"
4&I 60
LUMINOSITE
Pour ajuster la luminosite de t'dcran du
imoniteur de PC,
CONTRASTE
Pour ajuster le contraste de recran du .......
moniteur de PC.
HOR POSITION
Pour ajuster la position horizontale de
I'image & I'ecran du moniteur de PC
Chaque norme video requiert une valeur
diifdrente pour ce reglage
VER POSITION
Pour ajuster Ia position verticale de
rimage & l'deran du moniteur de PC
Chaque norme video requiert une valeur
diff6rente pour ce regtage,
PHASE
Ce_e-ci dolt 0Ire ajustde une fols que la
frequence a dtd regi6e pour optimiser la
qualit6 de I'image.
HORLOGE
Pour minimiser routes barres verticales ou
bandes visibles a I'arriere-plan de }'ecran.
ROUGE/VERTt
BLUE
ENTREE WXGA
Pour ajuster la temperature de couleur de
I'ecran,,du moniteur de, PC.
Rdglez sur MARCHE quand vous
selectionnez }e mode WXGA sur te PC.
AFFICH LUMI
Pour ajuste la luminositd de recran pour
accro_tre la clarte de I'image.
Rdglage du son
GRAVES
Appuyez sur .,_ou _ pour rdgler les
graves.
AIGU
'_QUILIBRE
Appuyez sur _1ou _ pour rdgler les aigus
Appuyez sur _ ou _ pour obtenir le m0me
niveau sonore des deux haut-parIeurs
SURROUND
Appuyez sur ,_ ou 1>pour activer ou
ddsactiver I'effet d'ambiophonie
• Si aucunes touches ne sont pressdes pendant plus de
60 secondes environ, rdcran du menu moniteur de PC
retourne automatiquement a I'ecran de moniteur normal
• Les rdglages du menu moniteur de PC ne s'appliquent
pas au mode de tdldvision normale ou aux modes
d'entree externe
• Pour rdinltialiser routes les rubriques de regfage
d'tmage ou de son aux valeurs prdd_finies par le fabricant.
appuyez sur &/v pour selectionner "REPLACER". puis sur
Rdglages d'usine;
Reglage de ['image:
LUMINOSITE_ ......
CONTRASTE ............
ROUGE!VERT/BLUE
centre (25)
maximum (50)
centre (25)
Rdglage du son:
GRAVES/AIGU
EQUtLIBRE
centre (25)
centre (0)
Q- 35
Page 93
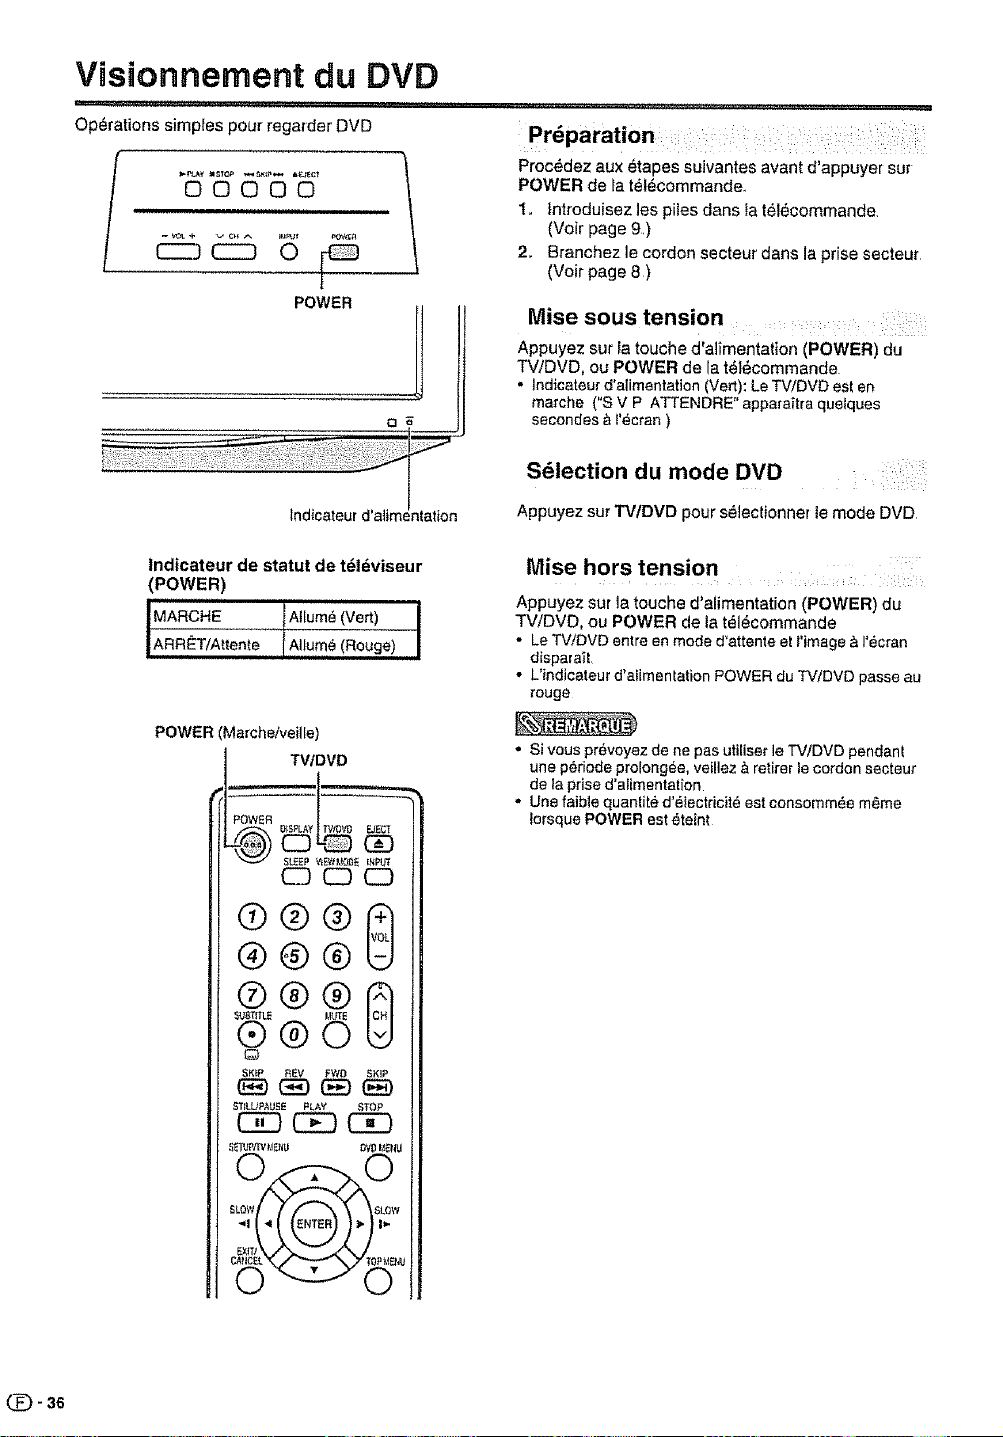
Visaonnement du DVD
_J _,_,ui_,J,LU!,H_,,, ,,a,r qu ' II '
Op6rations simpbs pour regarder DVD
1
00000
um
/
CZDC_ 0 _,
POWER
Pr6paration _: = : :;
Proc6dez aux etapes suivantes event d'appuyer sur
POWER de _atel6commande.
1. lntroduisez ]es piles dons Ia t61ecommande
(Voir page 9.)
2o Branchez le cordon secteur dons la prise secteur
(Voir page 8 )
Mise sous tension :
Appuyez sur fa touche d'alimentation (POWER) du
TV/DVD, ou POWER de la t616commande
• Indicateur d'alimentation (Vert): Le TV/DVD est en
marche ("S V P ATTENDRE" apparaitra queiques
secondes a t'ecran )
S61ection du mode DVD
Appuyez sur TV/DVD pour s_lectionner le mode DVD
lndicateur de statut de t61dviseur
(POWER)
i MARCHE Atlum_iVert)
ARRET/Attente A urn6(Rouge) t
POWER Marche/veille)
TV/DVD
_CD _ C_u
@®®
SKiP REV FWO SKIP
ST_LU_USE
Mise hers tension
Appuyez sur ]a touche d'alimentation (POWER) du
TV/DVD, ou POWER de la t616commande
• Le TV/DVD entre en mode d'attante et Fimage &1'6cran
disparait,
• L'indicateur d'alimentation POWER du TVIDVD passe au
rouge
• Si vous prevoyez de nepas utiliser leTV/DVD pendanl
une p6riode prolongee, veillez &retirer le cordon sacteur
de la prise d'alimentatien
• Une foible quanlit6 d'_{ectricit6 est consomm6e m6me
lorsque POWER est eteint
(,_ - 36
Page 94

Visionnernent du DVD
Lecture en mode basique
Chargez le disque
_.disque avec
f'6tiquette vers
I'avant (Sile disque _"
porte une etiquette )
Tenez le disque sans toucher ni I'une ni
l'autre de ses surfaces, alignezqe sur les
guides el mettezqe en place
............. Le compartiment & disque se terme
Sur l'ecran TV, "__."passe & "Lecture" puts la
I.ectu re commence
Un ecran de menu peut s'alficher sur I'_cran
automatiquement
"IV, site disque a one fonction de menu, Dans
ce cas, appuyez sur Ai_r!</_- ou ENTER pour
utiliser une fonction de menu
i
I i i,,,,1111'11'11i'1
Afflchage d dtat du dmque .....
.&,cheque fois que vous appuyez sur DISPLAY,
l'affichage d'etat du disque apparait a recran et
change de la maniere suivante
D_SQUE EN COURS ECOUL{_ TOTALE
NUMERO
DETtTRE
HUMI_RO LANGUE DE SOUS-TtTRE
D'ANGLE
LANGUE AUDIO TYPE DE AUDIO
Si le TV/DVD fonctionne mal:
L'_lectricite statique ou un autre facteur nuit peut-etre au
fonctionnement du tecteur
Debranchez le cordon d'alimenlation CA une lois. puis
rebranchez-fe
TEMPS DUREE
NUMERO
- DE
CHAPITRE
Appuyez sur STOP pour finir la lecture
° TViDVD enregistre te point final eelon le disque
"t#" s'affiche _ I'ecran Appuyez sur PLAY pour
reprendre lalecture (& partir de ta sc#ne)
• Si vous reappuyez sur STOP ("ta- s'affiche &
l'ecran) ou d_chargez le disqoe. TV/DVD efface
le point final
Appuyez sur EJECT.
Retirez le disque et appuyez sur POWER,
Le TV/DVD doit s'eteindre
• Lorsque de l'ejection du disque de
I'appareil, vous entendrez te bruit que fait
les composantes du mecanisme interne,
ceci est tout &fait normal
• Si un disque non compatible est charge, "Ce Disque Ne Peu_Etre Lu ", "Code Regional Incorrect" ou "Erreur Bloq Parental"
s'aflichera sur I'ecran TV solon le type de disque charge Dans ce cas, reverifiez votre disque (volt pages 5 et 49)
• Certains disques ont besoin d'environ une minute event queta lecture demarre,
° Lorsqu'un dlsque de 8 cm est plac_ dens fa fente d'insertion du disque et que rtmage &tire ou I'ecran de menu ne
s'affiche pas, appuyez sur PLAY
• II se pout que le symbole X "Interdiction" apparaisse darts le coin superieur gauche de l'_cran Ce symbote signifie soit
que la fonction que vous voufez utitiser n'est pas disponibte sur le disque, soit que le TV/DVD ne peut pas acceder & cette
fonction & ce moment-I& fl ne s'agit pas d'une defaillance de ce TV/DVD
• Quand vous placez le cet_ imprime d'un disque vers lebas (c -&-d darts te mauvais sens), "Lecture" s'affichera, puts "Ce
Disque Ne Pout Etre Lu "continuera &s'afficher
° Certaines operations de lecture DVD peuvent _tre fix_es deliberement par les realisateurs de logiciels Puisque cet
appareil TV/DVD lit lee DVD selon teur contenu, certaines fonctions de lecture peuvent etre inaccessibles Consultez
egalement los instructions fournies avec les DVD
• Ne d_placez pasle TViDVD pendant la lecture d'un disque car if pourrail en #tre endommage
• Servez-vous de EJECT pour ouvrir et refermer le plateau du disque Ne faites pas obstacle au mouvement du plateau, car
ce serait une cause de d6faiJtance de ]'appareil
• Ne poussez pas sur le plateau et n'y placez pas d'objets autres que des disques, car ce serait aussi une cause de
defaillance de ['appareil
• Dans bien des cas, un ecran de menu apparait quand la reproduction d'un film est termines Ou un affichage proIong_ d'un
tel menu sur _cran risque d*endommager vetre televiseur en incrustant de raged permanente cette image sur I'ecran Pour
eviter ceci, prenez soin d'appuyer sur POWER de votre telecommande one fois que le film est termine
• Un leger retard peut se manifester apres que vous ayez appuye sur [e bouton pour activer la fonction (_' - 37
Page 95

VisionnementduDVD
Lecture en modes speclaux""
REV PaD SKI_
ST_LL/PAUS_ PL._Y
© ©
,,,r,
Zoom
: !y : I
;LOW_LOW£xfft41 |_
Lecture rapide
Appuyez sur FWD pendant ta lecture normale,
Chaque lois que vous appuyez sur FWD, la vitesse de
recherche augmente par I>b. (x 2), _ (x 4), _bt>.(x 8),
_,_._H>(x2o)
• Pour reprendre ta lecture normaIe, appuyez sur PLAY
• Le chiffre entre parenthbses cFdessus indique le facteur
de vitesse moyen
Lecture en arri_re
Appuyez sur REV pendant la lecture normale.
Chaque lois que vous appuyez sur REV, la vitesse de
recherche augmente par <M {x 2), ._,_d (x 4), ,d_<l(x 8),
4,_l<l,_(x20)
" Pour reprendre ta lecture normate, appuyez sur PLAY
" Le chiffre entre parentheses cFdessus indique le facteur
de vitesse moyen
Arr_t de lecture
Appuyez sur STILL/PAUSE pendant la lecture normale
la pour pauser.
• Pour reprendre la lecture normale, appuyez sur PLAY
Avance d'image
Appuyez sur STILl]PAUSE pendant I'arr_t sur image
Vous avancez d'une image chaque tois que vous
appuyez sur STILL/PAUSE
• Pour reprendre la lecture normale, appuyez sur PLAY
Lecture au ralenti
Appuyez sur SLOW (1=-) ou SLOW ("ql) pendant la
lecture normale ou I'arr_t sur image.
Cheque fois que vous appuyez sur SLOW, la vitesse de
ralenli augmente par xl/2, xl/4, xl/6, xt/7
• Pour reprendre la lecture nermale, appuyez sur PLAY
° Pour reprendre rarr_t sur image, appuyez sur STILL!
PAUSE
Cet TV/DVD vous permet de faire un zoom avant sur
t'{mage Ensuite, vous pouvez effectuer des
s61eclions en changeant fa position de rimage
Appuyez sur ZOOM pendant la lecture
Vous ferez un zoom event sur la partie
centrale de I'image
Chaque pression de ZOOM modifie le
facte_ d'agrandissement ZOOM O.1 (x
t 3), L.,_2(x 1 5) and U_3 (x 20)
Appuyez sur _/_/_/_ pour afficher une autre
partie de l'image
1Ivous est possible de d@lacer l'image
depuis sa position centrale vers le HAUT,
vers le BAS, vers ia GAUCHE ou
vers la DROiTE
an, mode oom,appo ezsurZOOM
plusieurs reprises pour retourner & une vue
:: (0`Arret)
• Vous pouvez selectionner Pause, Ratenti ou Recherche
dans le mode zoom
• Certains disques ne r_pondent pas &la fonction zoom
Repdrage de la scbne ddsirde
Utilise_ le titre, le chapitre et t'heure enregistr_s sur re
disque pour reperer la position de relecture requise.
Appuyez sut DIRECT SKIP pendant la
lecture.
........... Diroclsa0i
Appuyez sur ,a/v pour s_lectionner "Titre/
Piste", "Chapitre" ou "Temps"
Localisation d'un chapitre ou d'une piste
Appuyez sur SKIP(t>b-II) avance ou SKIP(I<<I) retour
pendant la lecture pour Iocaliser un chapitre que vous
souhaitez regarder
Chaque fois que vous appuyez sur la commande, vous
sautez un chapitre ou une piste
,, Cet TV/DVD est capable de maintenir indefiniment une
_mage video & _'arr0tou une image affich0e sur votre
_cran de television Si vous laissez I'image video &l'arr_t
ou l'affichage & I'_cran trop Iongtemps sur votre _cran de
I_l_avision, vous risquez d'endommager votre _eran de
(_ - 38 t_,l_avisionde fa;on permanente
Appuyez sut lee touches touches
num_riques (0 _ 9) pour taper le numero.
, Si vous tapez un numero incorrect, appuyez
sur CANCEL
• Se reporter &I'emballage fourni avec te disque
pour v_dlier _esnumeros
Appuyez sur ENTER
• La tecture commence
• Lorsque vous changez le titre, la relecture
commence &partir du chapitre 1 du titre
selectionn_
• II se peut que l'operation ci-dessus ne soit pas
possible pour certains disques
Page 96

Visionnement du DVD
Lecture rdp_t_e =
SLOW SLOW
EX_
n t&
AUDIO _LAY_._ODEAlleLE ZOOM
(iN Q
Appuyez sur PLAY MODE pendant ta lecture
ou le mode d'arr_t
Appuyez sur ENTER pour s6lectionner
"Chapitre" ou "Titre"
,, L'appareil commence automatiquement
r_p6ter la tecture apr4_savoir Iini de fire le titre
ou le chapitre en cours
Mod_d_lo_tur_
{ Repetition i Arret lJ
R_appuyez sur PLAY MODE pour faire
disparaitre ce menu de l'_cran
• SI vous r_glez te mode r_p_tition pendant
te mode arr_.I, appuyez sur PLAY pour
commencer la lecture rep6t_e
• Pour reprendre la lecture normale, desactivez
le mode de lecture rep_tee en selectionnant
"Arret" darts te menu a I'_cran
• Certains disques ne sent pas dot_s de la fonction de
lecture r_p_t_.e
,, La fonclion de r_petition de ChapitreiPiste est annul_e
quand SKIP t<.4ou _I est appuye
/
Marquage des sc_nes d_sir_es
Cet appareil peut memoriser jusqu'_. 3 reperes que
vous souhaffez regarder de mani_re r_p_t_e
Vous pouvez reprendre la Iecture& padir de ces
scenes
AUDIO RLAYf.EODEA_JGL_{ ZOOM
(Z9 Q
Marquage des sc_nes d_sir_es
Appuyez sur MARKER pendant la lecture
t'_ j
Lm._x1 -- :--
Index2 -_ :- - :--
Index 3 -- :-- :--
S61ectionnez le repute au moyen de ,_/v
Puis appuyez sur ENTER &la sc_ne
d_sir_e.
: If est possibledee_lec_ionnerjus_u'&3scenes
Reprenezcette procedurepour d_finirles 2
autressc_nes
Appuyez sur MARKER pour supprimer cet
affichage.
Lecture r_pdt_e A-B
La fonction de lecture repetee vous permet de r_peter
Ie visionnement d'une portion sp_cifique du disque,
dite A-B
CD (2DC3
F_"_ruRnA_BREF_$ P_F_(£B DIi_ECrSRI_"
CD C3
Appuyez sur A-B REPEAT pendant
la lecture Le point de d6marrage est
s6{ectionn_
R_'appuyez sur A-B REPEAT
Le point d'arr6t est s_lectionne La lecture
commence au point que vous avez
s6lectionne La lecture s'arr6te au point final,
retourne au Point A.
• Pour reprendre la lecture nermate,reappuyez
sur A-B REPEAT
"_ Arret"s'effiche&l'ecran
• En mode Lecture repdtee A-S, il est possible que les
sous-titres &proximite de A ou B ne s'affchent pas.
- Le r6glage de la Lecture r_p_t6e A-B est impossible pour
Ies scenes comprenant plusieurs angtes de vue
• II est possible que le r6gtage de la Lecture r6p6t6e A-B
soit impossible pendant certaines scenes du DVD
• La r_p6titlon A-B ne fonctionne pas avec un DVD. MP3i
WMA/JPEG CD interactif
Pour revenir aux sc_nes
Appuyez sur MARKER pendant la lecture
ou Ie mode d'arr_.t
Appuyez sur ,,Iv pour s_lectionner te Index
!&3
Appuyez sur ENTER.
La lecture commence & partir de la scene
marquee
Pour annuler le rep_re
Suive les operations 1 et 2, puis appuyez sur
CANCEL
• I1se peut que certains disques ne soient pas compatibles
avec rop6ration de marquage
• La fait d'ouvrir Ie lecteur de disque ou de mettre le TVi
DVD hers tension annule le marquage
• II se peut que certains sous-tilres enregislres autour du
rep_re n'apparaissent pas
(_ 39
Page 97

Visionnement du DVD
changement des angles
Quand vous passezundisque enregistr_avec unefenction
multi-angles,vous pouvez changerl'angle devue.
Appuyez sur ANGLE pendant la lecture..
L'ang[e actuel s'afficheo
Appuyez sur ANGLE & piusieurs reprises
jusqu'&ce que I'angie voulu soit s_lectionne
• En _ecture JPEG, I'image JPEG subit une rotation de 90 _'
vers la drolte
• Se!on le DVD, if peut s'av_rer impossible de modifier tes
angles m_me si des angles multiples sent enregisfr_s sur
le DVD
S_lection du titre
Au moins deux autres titres sent enregistres sur
certains disques Si le menu titre est enregistr_ sur le
disque, vous pouvez sOlectionner le titre voulu
Appuyez sur TOP MENU pendant la lecture
Le menu Titre s'affiche & L'_cran.
Menu DVDI
Certains DVD vous permettent de s_lectionner Ie
contenu du disque & t'a[de du menu
Quand vous passez ces DVD, vous pouvez
sf_lectionner ta]angue de sous4itrage et la langue de
la bande sonore, etc, &I'aide du menu DVD..
Appuyez sur DVD MENU pendant la lecture
Le menu DVD s'affiche & I'ecran
,, Reappuyez sur DVD MENU pour reprendre ia
lecture & fa sc_ne qui passait quand vous avez
appuy_ sur DVD MENU
Appuyez sur ,_/v/,_/_ pour selectionner
I'el_ment voutu
Appuyez sur ENTER
Si le menu s'etend sur plus d'un page,
repetez les procedures decrites aux _tapes
2 et 3 pour seiectionner I'_lement d6sire
• Selon le DVD, il peut savere_" impossible de s_,lectionner
Is titre, Selon Is DVD, un "menu titre" peut simplement
s'appeler un "menu" ou un "titre" darts lee instructions
fournies avec le dfsque
Appuyez sur _./v14!_ pour selectionner le
titre voulu.
Appuyez sur ENTER ou PLAY
La lecture du titre s_lectionne commence.
(_" 40
Page 98

Visionnement du DVD
SOrl : ......
Vous pouvez selectionner ia langue quand vous
passez un disque muitilingue
_ CD C_DC_
I AUDIO PLAY_ODE ANGLE ZOOPA I
G_)CD CD CD
Appuyez sur AUDIO pendant ta lecture
La langue actuelle de la bande son
s'affiche
Appuyez sur AUDIO A piusieurs reprises
,a,ao0uevo,,,ue,o,t
L'affichage & r6cran disparaft apr_s
quelques secondes ,
i
l
Modification de la tangue de sous-titrage
Vous pouvez s_lectionner la langue quand vous
repassez un disque enregistre avec des sous-titres
muftilingues
Appuyez sur SUBTITLE & plusieurs reprises
pendant la lecture jusqu'_ I'affichage de la
langue voulue.,
i
L'affichage & r_cran disparaft apr_s
quelques secondes
' iiii
Activer ou d_sactiver lea sous-titres
Appuyez sur SUBTITLE pendant _alecture jusqu'&
I'affichage de "Arret",
, Si vous n'entendez pas la langue d_sir6e apres avoir
appuye sur AUDIO plusieurs lois, ta tangue de votre choix
n'est pas enregistr_e sur le disque
• La modification de la langue de la bande son est annul_e
quand vous ouvrez le compartiment & dlsque
Vous entendrez la langue initiate par defaut ou la langue
disponible si vous repassez le disque
• La modification de/la langue de soustitrage eat annul_e
quand vous ouvrez te compadiment & disque
• Certaines fonctions peuvent ne pas marcher sur certains
DVD ]1se peut que vous ne puissiez pas acliver ou
d6sactiver ou changer les sous-titres,
Pendant la lecture du DVD, le sous-titre peut changer
quand :
- vous euvrez ou fermez le compartiment a disque;
vous chengez le titre
* Dans certains cas, la tangue de soustitrage ne passe pas
imm6diatement & la langue selectionnee
(_- 41
Page 99

FonctionnementdeCDavecfichiersMP3/WMA/JPEGetCDAudio
Ce [ecteur peut tire les donn_es MP3/WMA/JPEG qui sent enregistr_es sur CD-R ou CD-RW. Les disques
CD audio sent aussi disponsibles Pour produire ]es donnees MP3!WMA/JPEG, il vous faut disposer d'un PC
Windows comportant un graveur de CD-R/RW et un Iogiciel de codage MP3/WMA/JPEG (non feurni).
Los fichiers enregistrees au volume Apple ® HFS (hierarchial file system) ne peut pas etre lu
Avec ce TV/DVD, les disquesienregistrements doivent satislaire &certaines normes techniques pour llvrer une qualite de
lecture optimate
Les DVD pre-enregistres sent aulomatiquement assujettis &ces normes It exisle de nombreux types differenls de formats
de disque inscriptible (entre autres les CD-R contenant des fichiers MP3iWMA) PuJsque ce secteur techno{ogique evolue
encore, cet appareil ne peut pas garantir qua tousles types de disques inscriptibles genereront une quallte de reproduction
optimaie Les c_it_res techniques _nonces clans le present mode d'emploi ne visent qu'_ vous guider
Veuillez prendre hole que vous devez obtenir la permission des titulaires de copyright pertinenls avant de telecharger un
contenu protege par les droits d'auteur, notamment des flchiersde musique sous run ou rautre format, y compris los formats
MP3 et WMA
Informations concernant les CD de fichiers MP3/WMA/JPEG
Limitations de ia lecture de CD avec fichiers MP3/WMA/JPEG
• Los CD MP3/WMA!JPEG daivent satisfaire aux normes ISO9660 Les fichiets doivent porter I'une des extensions
suivantes: rap3, wma ou jpg
• Le num des repertoires et des fichiers du CD MP3!WMA/jPEG doivent correspondre aux normes des fichiers ISO
• Cot appareii peut t{re iusqu'& 2000 fichiers par disque Si un r_pertoire comporte p{us de 2000 lichiers, [esfichiers
excedentaires sont ignores
•Les CD MP3A,'VMA/JPEG ne peuvent pas 6ire utiJises pour l'enregistrement,
• Si Jedlsque comporte & _alois des fichiers audio el des fiehiers MP3/WMA/jPEG, seutes tes pistes audio sont lues
,, La lecture des fichiers MP3/WMNJPEG pout demander une minute el ptus &cot appareil, selon leur structure,
• La musique enregistree se]on la norme d'enregistrement "Joliet" peut _tre lue; dans eecas, Ie nora du fichier (max 15
letlres) est affich_ sur t'_cran de maniere abregee
•Cet appareil n'effectue pas fa lecture des fichiers musicaux enregistres selon tes paramelres "Hierarchical File System"
(HFS)
Limitations de I'afficheur
• La Iongueur maxlmale d'affichage est de 15 letlres
Les caract6res disponibies pour raffichage sonl ies suivants :
maiuscules ou minuseules de A & Z, chiffres de 0 &9, et _ (souligne)
• Los Iettres autres que celles enumer_es ci-dessus sont rernptacees par des tirets
Remarques concernant les fichiers MP3/WMA/JPEG
Pour Jirele CD de fichiers MP3,n2VMA!JPEG dans I-ordre d'enregistrement,
1 Veuillez utiliser le iegiciet MP3/WMA/JPEG avec une fonction permettent un enregJstrement aiphab6tique ou numerique
des donnees
2 Nous vous recommandans d'affecler a chaque richter un nom comportant deux ou trois chiffres comma "01" "02" ou "001"
"002"
3 Veuillez eviter de constituer un trap grand hombre de sous-dossiers pour _efleter yes pr_fEirences
REMARQUE:
• Certains CD de fichiers MP3,nAtMA!JPEG ne pourront pas _tre lus si _esconditions d'enregistrement ne sent pas
conformes.
• Los CD-R/RW qui ne compodent pas de fichiersde musique ou qui comportenf des fichiers non MP3iWMA/jPEG ne
peuvent pas 6tre tus
Standard, fr_quence d'_chantillonnage et d_bit btnaire:
CD MP3
MPEG-1 Audio
32 kHz, 44,1 kHz, 48 kHz
32 ko!s - 320 ko/s (debi! binaire constant ou debit binaire variable)
Los parametres d'enregistrement recommandes pour obtenir un son de grande quallte sent de 44,1 kHz pour la fr_quence
d'echanfilbnnage et de 128 ko!s pour te d6bit binaire constant
CD WMA
WMA version 7 et 8
32 kHz, 48 kois
44,I kHz, 48 ko/s - 192 kois
48 kHz, t28 ko/s- 192 ko/s
Les tichiers enregistres en mona, 48kHz, 48 kois ne sent pas disponibles avec cot apparei}
Windows Media et le logo Windows sont des marques deposees ou des marques d@os6es
enregistr_es chez Microsoft Corporation aux Etats-Unis eb'ou dans d'autres pays,
(_- 42
Page 100

Fonctionnement de CD avec fichiers MP3/WMNJPEG et CD Audio
Lecture d'un CD en MP3iWMA et CD Audio :
Placez dans le lecteur un disque sur
lequei des fichiers MP3 ou WMA ont et_
enregistr_s,
Sur l'ecran du tel6viseur, le message
"Lecture" affich_s La duree de lecture
depend du nombre de fichiers
Le navigateur de fichiers apparait & I'ecran
• Dens I'_ventualite oL_le r_pertoire acLue]
comprend plus de 8 fichiers, appuyaz sur A/v
pour faire defi!er la lisle de fichiers
• Pour voir le con_enu d'un dossier, s_lectionnez-
]e, puts eppuyez sur ENTER Pour retourner au
repertoire parent, selectionnez"_ Plus fort ",
puis faites ENTER
•Dans lecas d'un CD contenant un melange de
fichiers MP3, WMA et JPEG, lee fichiers sont
]us torsqu'ils sent selectionn_s _.partir du menu
fichier
Dens le navigateur de fichiers, appuyez sur
A/T pour selectionner le fichier de votre
choix.
• Si vous appuyez sur PLAY apres I'affichage
du navigateur de lichiers, ta lecture demarre
automatiquement &partir du premier fichier.
Dens ce cas, sile premier f[chier est un fichier
JPEG, le premier richer JPEG est reproduit
Si le premier iichier est un richer MP3/WMA,
souls los fichiers MP3!WMA sont reprodui|s
dens I'ordre. Site repertoire racinene contient
aucun fichier, la lecture ne commence pas
automatiquement
Appuyez sur ENTER
La lecture du fichier s_lectionn6 commence
Appuyez sur STOP pour finir la lecture.
• TV/DVD enregistre le point final '_" s'affiche
&I'_cran. Appuyez sur PLAY pour reprendre la
lecture (& partir de [ascene).
• Si vous r_appuyez sur STOP ou dechargez le
disque. TViDVD elface Ie point final
• Cot TViDVD ne lit pas los standards MP3 ou WMA du CD
KODAK PICTURE
Durant la lecture de MP3/WMA/JPEG CD, la fonclion
Recherche et repetition A-B ne fonctionne pas
• Vous pouvez utiliser _esfonctions de teclure rep_t_e
(Repeat) ou aleatoire (random) et de lecture de
programme pour la lecture des CD MP3/WMNJPEG (Voir
page 45)
S_lection de fichiers
II est possible de choisir le type de fichier _ afficher
dans le navigateur.
Appuyez sur ",=/_,-pour seiectionner
"Selection Files" en evidence dens la
colonne de droite du navigateur de fichiers
. Appuyez sur ENTER. puis sur _/v pour
s_lectionner un type de fichier dans ]a lisle
(Musique, image ou Film)
Appuyez sur ENTER pour ajoutedretirer
Ia coche Los types de fichier coches vont
s'afficher dens le navigateur
Appuyez sur RETURN pour enregistrer le
r6giage
t'_ _ 43
 Loading...