


LC-19SB15U
LC-19SB25U
LC-19SB25U-W
LIQUID CRYSTAL TELEVISION
ENGLISH
OPERATION MANUAL
IMPORTANT: |
Model No.: |
To aid reporting in case of loss or theft, please record the |
|
TV's model and serial numbers in the space provided. The |
Serial No.: |
numbers are located at the rear of the TV. |
|
|
|
IMPORTANT INFORMATION
ENGLISH

 1
1
IMPORTANT INFORMATION
SHARP LIQUID CRYSTAL TELEVISION, MODEL LC-19SB15U/LC-19SB25U/LC-19SB25U-W
Trademarks
•Manufactured under license from Dolby Laboratories. “Dolby” and the double-D symbol are trademarks of Dolby Laboratories.
•“HDMI, the HDMI logo and High-Definition Multimedia Interface are trademarks or registered trademarks of HDMI Licensing LLC.”
•Products that have earned the ENERGY STAR® are designed to protect the environment through superior energy efficiency.

 2
2

DEAR SHARP CUSTOMER
Thank you for your purchase of the Sharp Liquid Crystal Television. To ensure safety and many years of trouble-free operation of your product, please read the Important Safety Instructions carefully before using this product.
IMPORTANT SAFETY INSTRUCTIONS
 3
3
IMPORTANT SAFETY INSTRUCTIONS
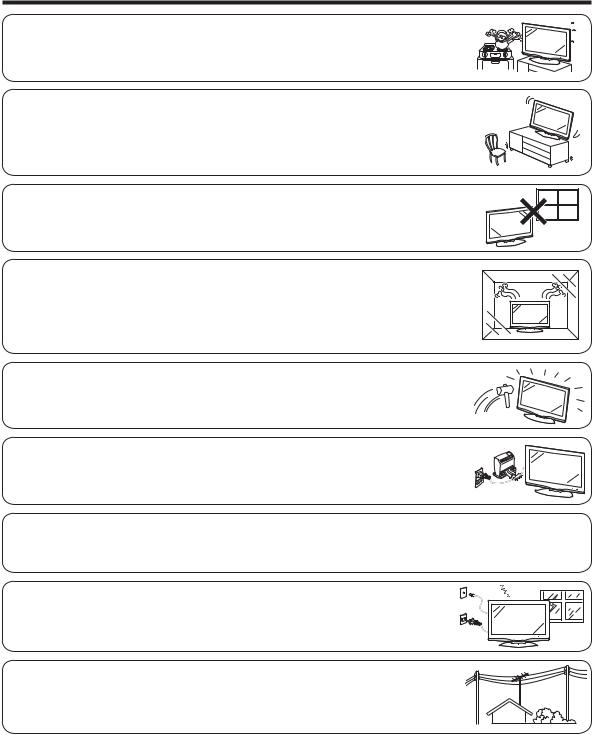
• Water and Moisture — Do not use this product near water - for example, near a bath tub, wash bowl, kitchen sink, or laundry tub; in a wet basement; or near a swimming pool; and the like.
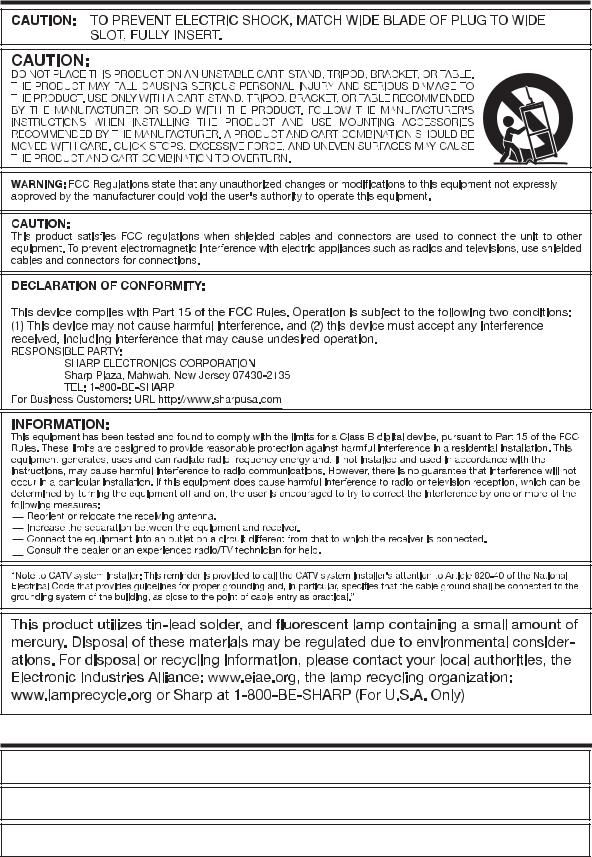
•Stand — Do not place the product on an unstable cart, stand, tripod or table. Placing the product on an unstable base can cause the product to fall, resulting in serious personal injuries as well as damage to the product. Use only a cart, stand, tripod, bracket or table recommended
by the manufacturer or sold with the product. When mounting the product on a wall, be sure to follow the manufacturer's instructions. Use only the mounting hardware recommended by the manufacturer.
• Selecting the location — Select a place with no direct sunlight and good ventilation.
• Ventilation — The vents and other openings in the cabinet are designed for ventilation. Do not cover or block these vents and openings since insuffi cient ventilation can cause overheating and/or shorten the life of the product. Do not place the product on a bed, sofa, rug or other similar surface, since they can block ventilation openings. This product is not designed for builtin installation; do not place the product in an enclosed place such as a bookcase or rack, unless proper ventilation is provided or the manufacturer's instructions are followed.
•The Liquid Crystal panel used in this product is made of glass. Therefore, it can break when the product is dropped or applied with impact. Be careful not to be injured by broken glass pieces in case the panel breaks.
•Heat — The product should be situated away from heat sources such as radiators, heat
registers, stoves, or other products (including amplifi ers) that produce heat.
•The Liquid Crystal panel is a very high technology product with 1,049,088 pixels, giving you fi ne picture details.
Occasionally, a few non-active pixels may appear on the screen as a fi xed point of blue, green or red. Please note that this does not affect the performance of your product.
• Lightning — For added protection for this television equipment during a lightning storm, or when it is left unattended and unused for long periods of time, unplug it from the wall outlet and disconnect the antenna. This will prevent damage to the equipment due to lightning and power-line surges.
• Power Lines — An outside antenna system should not be located in the vicinity of overhead power lines or other electric light or power circuits, or where it can fall into such power lines or circuits. When installing an outside antenna system, extreme care should be taken to keep from touching such power lines or circuits as contact with them might be fatal.

 4
4
IMPORTANT SAFETY INSTRUCTIONS
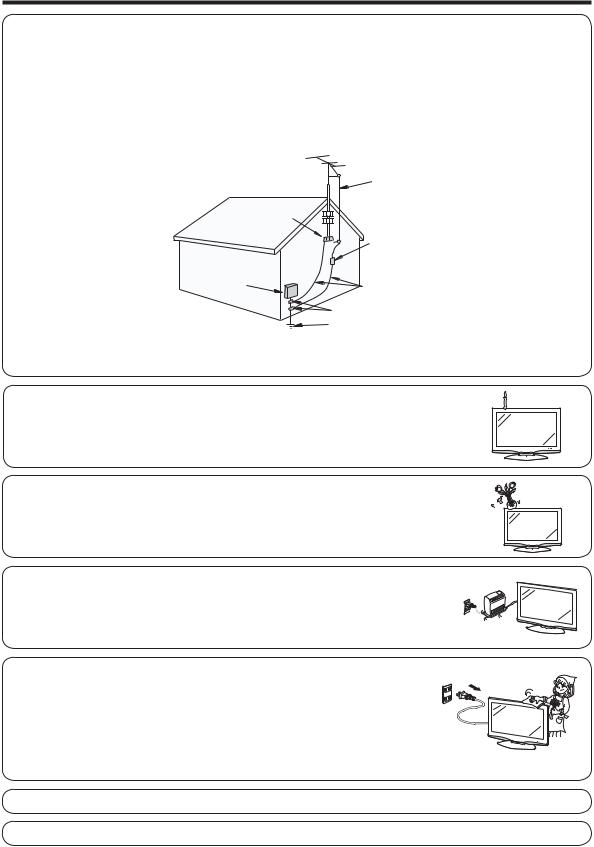
•Outdoor Antenna Grounding — If an outside antenna is connected to the television equipment, be sure the antenna system is grounded so as to provide some protection against voltage surges and built-up static charges.
Article 810 of the National Electrical Code, ANSI/NFPA 70, provides information with regard to proper grounding of the mast and supporting structure, grounding of the lead-in wire to an antenna discharge unit, size of grounding conductors, location of antenna-discharge unit, connection to grounding electrodes, and requirements for the grounding electrode.
EXAMPLE OF ANTENNA GROUNDING AS PER
NATIONAL ELECTRICAL CODE, ANSI/NFPA 70
|
ANTENNA |
|
LEAD IN WIRE |
GROUND |
ANTENNA |
CLAMP |
DISCHARGE UNIT |
|
(NEC SECTION 810-20) |
ELECTRIC |
|
SERVICE |
GROUNDING CONDUCTORS |
EQUIPMENT |
|
|
(NEC SECTION 810-21) |
|
GROUND CLAMPS |
|
POWER SERVICE GROUNDING ELECTRODE |
|
SYSTEM |
NEC — NATIONAL ELECTRICAL CODE |
(NEC ART 250, PART H) |
• To prevent fi re, never place any type of candle or fl ames on the top or near the TV set.
• To prevent fi re or shock hazard, do not expose this product to dripping or splashing. No objects fi lled with liquids, such as vases, should be placed on the product.
•To prevent fi re or shock hazard, do not place the AC cord under the TV set or other heavy items.
•Turn off the main power and unplug the AC cord from the wall outlet before handling.
•Use a soft cloth and gently wipe the surface of the display panel. Using a hard cloth may
scratch the panel surface.
• Use a soft damp cloth to gently wipe the panel when it is really dirty. (It may scratch the panel surface when wiped strongly.)
• If the panel is dusty, use an anti-static brush, which is commercially available, to clean it.
• To protect the panel, do not use a dirty cloth, liquid cleaners or chemical cloth to clean it, such materials may damage the panel surface.
•To clean the outer cabinet, use the same method. Do not use liquid or aerosol cleaners.
•Do not display a still picture for a long time, as this could cause an afterimage to remain.
•When cleaning the TV or the stand, use the cloth supplied with the TV.

 5
5
IMPORTANT SAFETY INSTRUCTIONS
CHILD SAFETY:
It Makes A Difference How and Where You Use Your Flat Panel Display
Congratulations on your purchase! As you enjoy your new product, please keep these safety tips in mind:
THE ISSUE
• The home theater entertainment experience is a growing trend and larger fl at panel displays are popular purchases. However, fl at panel displays are not always supported on the proper stands or installed according to the manufacturer’s recommendations.
• Flat panel displays that are inappropriately situated on dressers, bookcases, shelves, desks, speakers, chests or carts may fall over and cause injury.
THIS MANUFACTURER CARES!
• The consumer electronics industry is committed to making home entertainment enjoyable and safe.
TUNE INTO SAFETY
•One size does NOT fi t all. Follow the manufacturer’s recommendations for the safe installation and use of your fl at panel display.
•Carefully read and understand all enclosed instructions for proper use of this
product.
•Don’t allow children to climb on or play with furniture and television sets.
•Don’t place fl at panel displays on furniture that can easily be used as steps, such as a chest of drawers.
• Remember that children can become excited while watching a program, especially on a “larger than life” fl at panel display. Care should be taken to place or install the display where it cannot be pushed, pulled over, or knocked down.
•Care should be taken to route all cords and cables connected to the fl at panel display so that they cannot be pulled or grabbed by curious children.
WALL MOUNTING: IF YOU DECIDE TO WALL MOUNT YOUR FLAT PANEL DISPLAY, ALWAYS:
•Use a mount that has been recommended by the display manufacturer and/or listed by an independent laboratory (such as UL, CSA, ETL).
•Follow all instructions supplied by the display and wall mount manufacturers.
•If you have any doubts about your ability to safely install your fl at panel display, contact your retailer about professional installation.
•Make sure that the wall where you are mounting the display is appropriate. Some wall mounts are not designed to be mounted to walls with steel studs or old cinder block construction. If you are unsure, contact a professional installer.
•A minimum of two people are required for installation. Flat panel displays can be heavy.
Note: CEA is the preeminent trade association promoting growth in the $161 billion U.S. consumer electronics industry. More than 2,200 companies enjoy the benefi ts of CEA membership, including legislative advocacy, market research, technical training and education, industry promotion and the fostering of business and strategic relationships.
 6
6

Supplied accessories
Make sure the following accessories are provided with the product.
Remote control unit (g1) |
Stand (g1) |
AC cord (g1) |
Cable Clamp (g1) |
|||||
“AA” size manganese battery (g2) |
Page 7 |
Page 8 |
|
Page 8 |
||||
|
|
Page 9 |
|
|
|
|
|
|
|
|
|
|
|
|
|
|
|
|
|
|
|
|
|
|
|
|
|
|
|
|
|
|
|
|
|
|
|
|
|
|
|
|
|
|
|
|
|
|
|
|
|
|
|
Screws (g3) |
Hex key (g1) |
Cleaning cloth (g1) |
Operation manual |
Page 7 |
Page 7 |
Page 5 |
(g1) |
• Always use the AC cord supplied with the TV.
Before using the TV unit
Attaching the stand
•Before attaching (or detaching) the stand, unplug the AC cord from the AC INPUT terminal.
•Before performing work spread cushioning over the base area to lay the TV on. This will prevent it from being damaged.
 CAUTION
• Attach the stand in the correct direction.
• Be sure to follow the instructions. Incorrect installation of the stand may result in the TV falling over.
1 |
Confi rm the 3 screws supplied with the TV. |
|
|
|
|
|
Screws (g3) |
|
|
(Used in step 2) |
|
2 |
1 Insert the stand into the |
Soft cushion |
|
||
|
openings on the bottom of |
|
|
the TV. |
|
2 Insert and tighten the 3 screws into the 3 holes on the rear of the stand.
 NOTE
NOTE
• To detach the stand, perform the steps in reverse order.
 7
7
QUICK REFERENCE
Ventilation & Cleaning Tips
Keep your television in a well ventilated area and make sure not to place it by a heat source or use near water. The television is designed for AC use only and should be used with supplied AC cord.
Clean the screen by spraying a soft lint free cloth with water to lightly moisten. Gently wipe and avoid pressing on the screen. To clean the outer cabinet, use the same method. Do not use liquid or aerosol cleaners.
The screen is glass and can be scratched or broken when dropped or impacted.
Notes on installing the TV
•Avoid direct sunlight and place the TV in a well-ventilated location.
•Place the TV in a level location.
•Do not turn on the power of the TV before connecting the AC cord.
QUICK INSTALLATION TIPS |
|
|
||
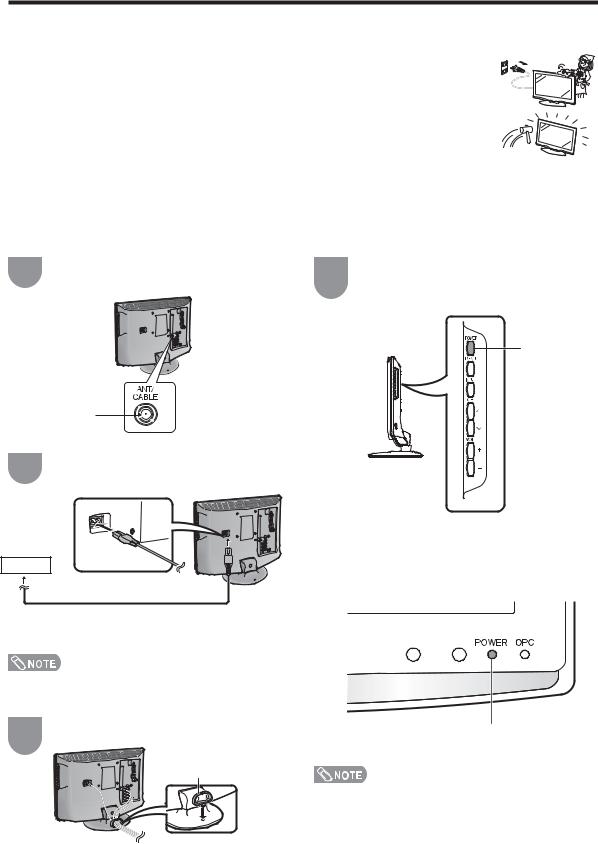
1 |
Attach your antenna to the back of the |
4 |
How to turn on the television for the fi rst time. |
|
television. (See page 13.) |
A) Press POWER on television. |
|||
|
|
|||
|
|
|
||
POWER
2 |
Connect the AC plug for the television into the |
|
AC outlet. |
||
|
AC outlet
AC cord
•Place the TV close to the AC outlet, and keep the power plug within reach.
•TO PREVENT RISK OF ELECTRIC SHOCK, DO NOT TOUCH UN-INSULATED PARTS OF ANY CABLES WITH THE AC CORD CONNECTED.
3 |
Bundle the cords properly with cable clamps . |
|
|
|
Cable calmp |
B)POWER indicator on the front of the television lights GREEN.
POWER indicator
•Speakers cannot be detached from the TV.
•To change the vertical angle of the LCD TV set, tilt the screen up to 2.5 degrees forward or 10 degrees
backwards. Please adjust the angel so that the LCD TV set can be watched most comfortably.

 8
8
QUICK REFERENCE
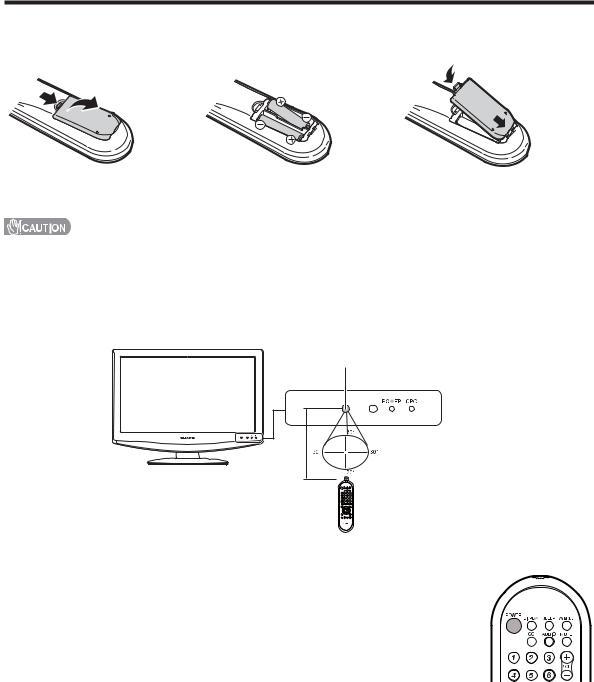
If the remote control fails to operate TV functions, replace the batteries in the remote control unit.
1 Open the battery cover.
2Insert two “AA” size batteries (supplied with the product).
3 Close the battery cover.
•Place the batteries with their terminals corresponding to the (e) and (f) indications in the battery compartment.
Improper use of batteries can result in chemical leakage or explosion. Be sure to follow the instructions below.
•Do not mix batteries of different types. Different types of batteries have different characteristics.
•Do not mix old and new batteries. Mixing old and new batteries can shorten the life of new batteries or cause chemical leakage in old batteries.
•Remove batteries as soon as they are worn out. Chemicals that leak from batteries that come in contact with skin can cause a rash. If you fi nd any chemical leakage, wipe thoroughly with a cloth.
•The batteries supplied with this product may have a shorter life expectancy due to storage conditions.
•If you will not be using the remote control unit for an extended period of time, remove batteries from it.
Remote control sensor
17Q (5 m)
IMPORTANT:
The POWER indicator on the television should light GREEN indicating you have power to the television.
If the POWER indicator on the television still does not light up, press POWER on the remote control to turn the power on.
IMPORTANT:
IF THE UNIT DOES NOT POWER ON - UNPLUG THE TELEVISION FROM THE OUTLET AND REPEAT THE INSTALLATION STEPS.
IF YOU STILL ENCOUNTER NO POWER, PLEASE CONTACT US AT 1-800-BE-SHARP.

 9
9

Contents
IMPORTANT INFORMATION ................................. |
1 |
Trademarks............................................................. |
2 |
DEAR SHARP CUSTOMER .................................... |
3 |
IMPORTANT SAFETY INSTRUCTIONS................. |
3 |
Supplied accessories............................................. |
7 |
Before using the TV unit ......................................... |
7 |
QUICK REFERENCE............................................... |
8 |
Contents................................................................ |
10 |
Part names............................................................. |
11 |
TV (Front)........................................................... |
11 |
TV (Side/Rear).................................................... |
11 |
Remote control unit ........................................... |
12 |
Preparation ............................................................ |
13 |
Using the remote control unit............................. |
13 |
Cautions regarding the remote control |
|
unit ............................................................. |
13 |
Antennas ........................................................... |
13 |
Connecting a VCR, game console |
|
or camcorder................................................... |
13 |
Connecting a Blu-ray disc player, HD-DVD player, |
|
DVD player or a Digital TV STB (Air or Cable) ... |
14 |
Using Digital Audio Output................................. |
14 |
Connecting HDMI equipment............................. |
15 |
Connecting a PC ............................................... |
15 |
PC compatibility chart........................................ |
15 |
Watching TV........................................................... |
16 |
Turning on the power......................................... |
16 |
Turning off the power......................................... |
16 |
Initial setup ........................................................ |
17 |
Simple button operations for |
|
changing channels ......................................... |
18 |
Displaying the receiving channel information ...... |
18 |
Simple button operations for |
|
changing volume/sound ................................. |
19 |
Setting MTS/SAP stereo mode .......................... |
20 |
Setting Digital broadcasting audio mode............ |
20 |
Basic adjustment settings................................... |
21 |
Menu operation buttons.................................... |
21 |
On-Screen Display............................................ |
21 |
Menu items for TV/INPUT 1/2 ........................... |
22 |
Menu items for HDMI/PC-IN ............................. |
22 |
EZ Setup .......................................................... |
23 |
Channel Setup.................................................. |
23 |
Favorite channel setting .................................... |
25 |
Picture adjustments .......................................... |
26 |
OPC setting ................................................. |
26 |
Advanced picture settings................................. |
27 |
C.M.S. .......................................................... |
27 |
Color Temperature ....................................... |
27 |
Film Mode ................................................... |
27 |
3D-Y/C ........................................................ |
27 |
Monochrome ............................................... |
27 |
I/P Setting ..................................................... |
27 |
Sound adjustment ............................................ |
28 |
Power Control .................................................. |
29 |
Power Management .......................................... |
29 |
Using external equipment.................................... |
30 |
Displaying an external equipment image ........... |
30 |
Displaying an image from HDMI equipment....... |
31 |
Useful adjustment settings.................................. |
32 |
Auto Sync. Adjustment |
|
(for Analog PC input mode only) ..................... |
32 |
Fine Sync. Adjustment ...................................... |
32 |
Picture Rotate.................................................... |
33 |
Language setting .............................................. |
34 |
Image position .................................................. |
34 |
Reset................................................................ |
34 |
Input Label........................................................ |
35 |
Sleep Timer ...................................................... |
35 |
View Mode for 4:3 Programs ............................ |
36 |
View Mode for HD Programs ............................ |
36 |
View Mode (for PC input mode) ........................ |
37 |
Advanced Option settings................................. |
38 |
DNR.............................................................. |
38 |
Audio Only ................................................... |
38 |
Color System ............................................... |
38 |
Digital Audio................................................. |
39 |
AV MODE ......................................................... |
40 |
Input Signal (for Analog PC input mode only) .... |
40 |
Closed Captions and Digital Closed |
|
Captions......................................................... |
41 |
Digital Caption Setup ........................................ |
42 |
Secret number setting for parental control ........ |
43 |
Parental control (setting V-CHIP level) ............... |
45 |
How to temporarily release |
|
the V-CHIP BLOCK ........................................ |
48 |
Reactivating the temporarily released |
|
V-CHIP BLOCK .............................................. |
48 |
Other viewing options.......................................... |
49 |
Freezing images................................................ |
49 |
Appendix ............................................................... |
50 |
Troubleshooting................................................ |
50 |
Troubleshooting-Digital broadcasting................ |
50 |
Specifi cations .................................................. |
51 |
Information on the software license for this |
|
product ........................................................... |
53 |
Calling for Service ................................................ |
54 |
LIMITED WARRANTY ........................................... |
54 |
Dimensional drawings
•The dimensional drawings for the LCD TV set are shown on the inside back cover.
 10
10
Part names
TV (Front)
Remote control sensor 
OPC indicator**
OPC sensor*
POWER indicator**
*OPC: Optical Picture Control (See page 26.) **See page 16 for TV status indicator.
TV (Side/Rear)
AC INPUT terminal
POWER button
MENU button
INPUT button
Channel buttons (CHr/s)
Volume buttons (VOLk/l)
INPUT 4 terminals (PC IN)
INPUT 3 terminals (HDMI)
HEADPHONE terminal
DIGITAL AUDIO OUTPUT terminal
INPUT 1 terminals
INPUT 2 terminals
Antenna/Cable in
Regarding the headphone jack
•Use headphones with a stereo mini plug (Ø 3.5 mm).
•Be sure to unplug headphones from the jack when they are not in use.
•The speakers do not output volume when headphones are plugged in.
•You can set the volume to different levels for each input source.
|
|
|
|
|
|
Volume display when |
|
|
|
|
|
|
headphones are plugged in |
|
|
|
|
20 |
|
|
|
|
|
|
|
|
|
•The illustrations in this operation manual are for explanation purposes and may vary slightly from the actual operations.
•The examples used throughout this manual are based on the LC-19SB25U model.

 11
11
Part names
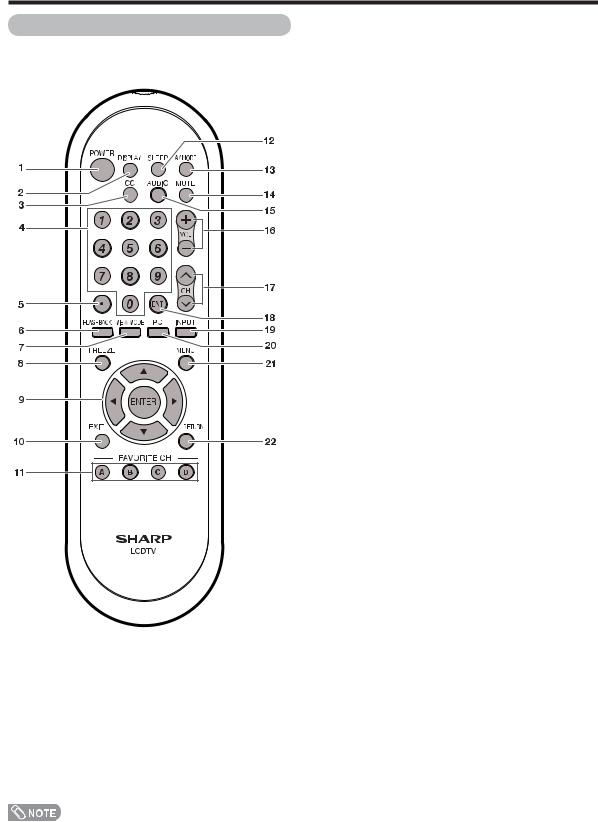
Remote control unit
• When using the remote control unit, point it at the TV.
1POWER: Switch the TV power on or enters standby. (See page 16.)
2DISPLAY: Display the channel information. (See page 18).
3CC: Display captions from a closed-caption source. (See page 41.)
40 – 9: Set the channel. (See page 18.)
5• (DOT): (See pages 18.)
6FLASHBACK: Return to the previous channel or external input mode. (See page 18.)
7VIEW MODE: Select the screen size. (See pages 36 and 37.)
8FREEZE: Set the still image. Press again to return to normal screen. (See page 49.)
9a/b/c/d/ENTER: Select a desired item on the screen.
10EXIT: Turn off the menu screen.
11FAVORITE CH
A, B, C, D: Select 4 preset favorite channels in 4 different categories. (See page 25 for details.)
While watching, you can toggle the selected channels by pressing A, B, C and D.
12SLEEP: Set the sleep timer. (See page 35.)
13AV MODE: Select an audio or video setting. (When the input source is TV, INPUT 1 or 2: STANDARD, MOVIE, GAME, USER, DYNAMIC (Fixed), DYNAMIC. When the input source is INPUT 3: STANDARD, MOVIE, GAME, PC, USER, DYNAMIC (Fixed), DYNAMIC. When the input source is INPUT 4: STANDARD, PC, USER) (See page 40.)
14MUTE: Mute the sound. (See page 19.)
15AUDIO: Selects the MTS/SAP or the audio mode during multi-channel audio broadcasts. (See page 20.)
16VOL k/l: Set the volume. (See page 19.)
17CHr/s: Select the channel. (See page 18.)
18ENT: Jumps to a channel after selecting with the 0–9 buttons.
19INPUT: Select a TV input source. (TV, INPUT 1, INPUT 2, INPUT 3, INPUT 4) (See pages 30 and 31.)
20PC: Quickly access to PC mode. (See pages 30 and 32.)
21MENU: Display the menu screen.
22RETURN: Return to the previous menu screen.

 12
12

Preparation
Using the remote control unit
Use the remote control unit by pointing it towards the remote control sensor on the TV. Objects between the remote control unit and the remote control sensor may prevent proper operation.
Cautions regarding the remote control unit
• Do not expose the remote control unit to shock. In addition, do not expose the remote control unit to liquids, and do not place in an area with high humidity.
• Do not install or place the remote control unit under direct sunlight. The heat may cause deformation of the remote control unit.
• The remote control unit may not work properly if the remote control sensor on the TV is under direct sunlight or strong lighting. In such cases, change the angle of the lighting or the TV, or operate the remote control unit closer to the remote control sensor.
Antennas
To enjoy a clearer picture, use an outdoor antenna. The following is a brief explanation of the types of connections that are used for a coaxial cable. If your outdoor antenna uses a 75-ohm coaxial cable with an F-type connector, plug it into the antenna terminal at the rear of the TV set.
1.A 75-ohm system is generally a round cable with F-type connector that can easily be attached to a terminal without tools (Commercially available).
F-type connector


 75-ohm coaxial cable (round)
2.A 300-ohm system is a fl at “twin-lead” cable that can be attached to a 75-ohm terminal through a 300/75-ohm adapter (Commercially available).
 300-ohm twin-lead cable (fl at)
Connecting Antenna Cable
1Cable without a CATV converter
2 VHF/UHF antenna
3 Combination VHF/
UHF antenna
4 Separate VHF/UHF
antenna
NOTICE |
F-type connector should be finger- |
|
tightened only. |
||
|
When connecting the RF cable to the TV set, do not tighten F-type connector with tools.
If tools are used, it may cause damage to your TV set. (The breaking of internal circuit, etc.)
F-type connector
75-ohm coaxial cable
• Connect the antenna cable to the TV using one of the methods in the illustration as shown (1, 2, 3 or 4).
To TV antenna terminal
 13
13
Preparation
You can connect many types of external equipment to your TV like a Blu-ray disc player, HD-DVD player, DVD player, VCR, Digital TV tuner, HDMI equipment, game console or camcorder. To view external source images, select the input source from INPUT on the remote control unit or on the TV. (See pages 30 and 31.)
•To protect equipment, always turn off the TV before connecting any external equipment.
•Please read the relevant operation manual (Blu-ray disc player, etc.) carefully before making connections.
•If your Blu-ray disc player offers a choice of output formats, please select 720p for use with this TV.
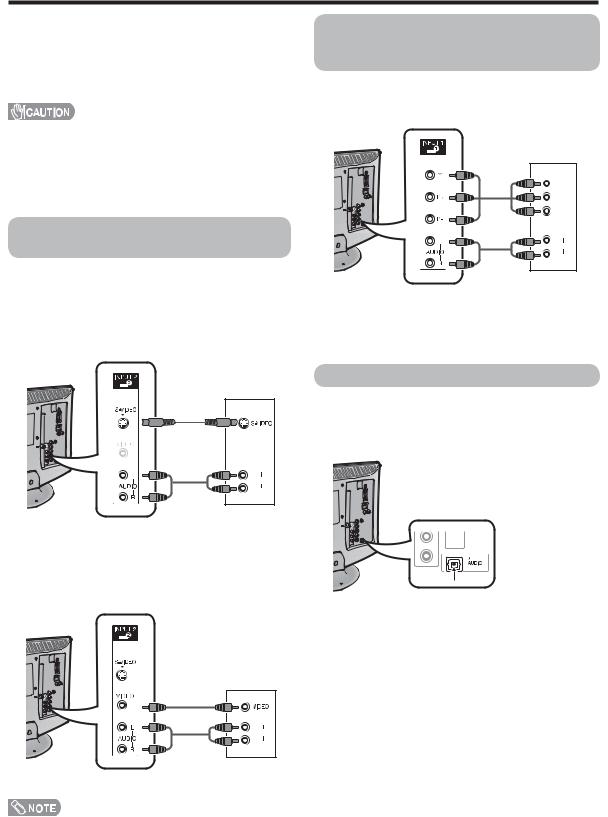
Connecting a VCR, game console or camcorder
A VCR, game console, camcorder and other audiovisual equipment can be conveniently connected using the INPUT 2 terminals.
When using S-VIDEO cable (commercially available).
Connecting a Blu-ray disc player, HD-DVD player, DVD player or a Digital TV STB (Air or Cable)
When using component cable. (INPUT 1)
Component video cable (commercially available)
|
Y |
|
PB |
|
PR |
|
L |
|
AUDIO |
|
R |
Audio cable |
Blu-ray disc |
player/HD- |
|
(commercially |
DVD player/ |
available) |
DVD player/ |
|
|
|
Digital TV STB |
L
AUDIO
R
VCR/Game
console/ Camcorder
When using composite cable (commercially available).
L
AUDIO
R
VCR/Game console/
Camcorder
•The S-VIDEO terminal takes priority over the video terminals. (INPUT 2 only)
Using Digital Audio Output
It is possible to output audio through the DIGITAL AUDIO OUTPUT terminal.


 To optical

 digital input of
  external audio
devices
Optical fi ber cable (commercially available)

 14
14
Preparation
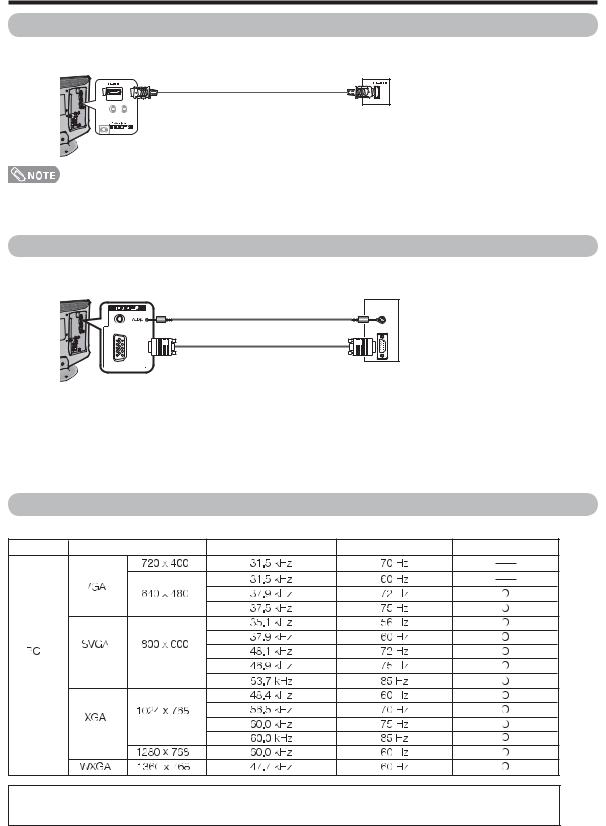
Connecting HDMI equipment
You can use the INPUT 3 terminal when connecting HDMI equipment.
HDMI-certifi ed cable (commercially available)
HDMI equipment
•When using an HDMI-DVI conversion cable, input the audio signal to AUDIO terminal of INPUT 3.
•When receiving an incompatible signal, such as 1080p, the message below appears without the image on the screen. For an incompatible video signal: “Not compatible with this signal.”
Connecting a PC
When connecting to a PC with an analog RGB terminal. (INPUT 4)
ANALOG RGB
( PC IN )
Ø 3.5 mm stereo minijack cable (commercially available)
RGB cable |
|
(commercially available) |
PC |
PC compatibility chart
It is necessary to set the PC correctly to display XGA and WXGA signal. Refer to page 40 to set PC input signals.
PC |
Resolution |
Horizontal Frequency |
Vertical Frequency |
VESA Standard |
DDC is a registered trademark of Video Electronics Standards Association.
Power Management is a registered trademark of Sun Microsystems, Inc.
VGA and XGA are registered trademarks of International Business Machines Corp.

 15
15
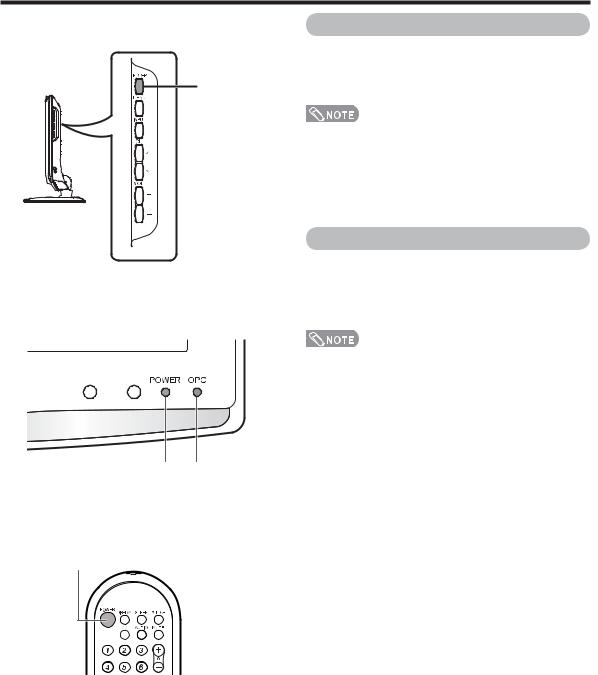
Watching TV
Simple operations for watching a TV program
POWER
POWER OPC indicator indicator
POWER (On/Standby)
Turning on the power
Press POWER on the TV, or POWER on the remote control unit.
•POWER indicator (Green): The TV is on. (After a few seconds, a window appears with sound.)
•The initial setup starts when the TV powers on for the fi rst time. If the TV has been turned on before, the EZ Setup will not be invoked. See page 25 for performing EZ Setup from the Setup menu.
Turning off the power
Press POWER on the TV, or POWER on the remote control unit.
•The TV enters standby and the image on the screen disappears.
•The POWER indicator on the TV turns off.
•If you are not going to use this TV for a long period of time, be sure to remove the AC cord from the AC outlet.
•Weak electric power is still consumed even when POWER is turned off.
TV status indicator (POWER)
Off |
Power off, Standby mode |
|
|
Green |
The TV is on |
|
|
TV status indicator (OPC)
Lights off |
“Off” is selected in OPC setting |
|
|
Lighting (Green) |
“On” or “On: Display” is selected in OPC setting |
|
|
• See page 26 for details.

 16
16
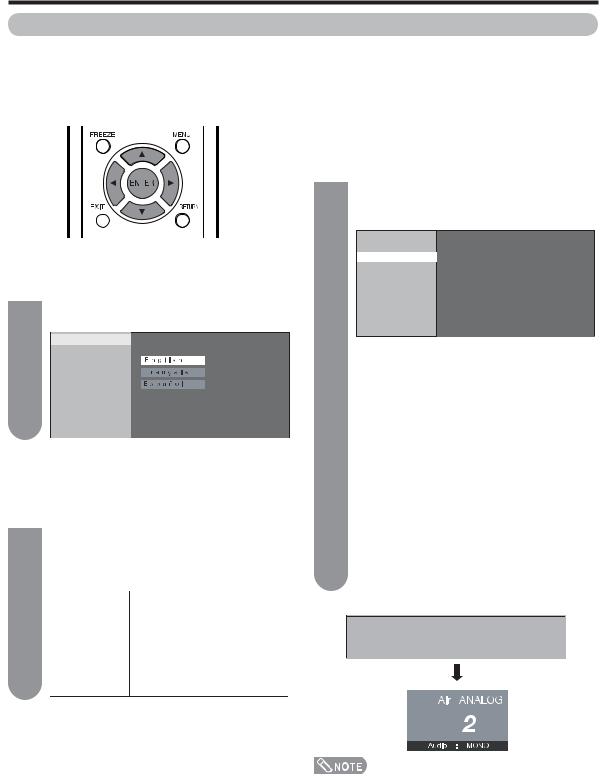
Watching TV
Initial setup
When you turn on the TV for the fi rst time, it will automatically memorize the broadcasting channels where you live. Perform the following steps before you press POWER on the remote control unit.
1.Insert the batteries into the remote control unit. (See page 9.)
2.Connect the antenna cable to the TV. (See page 13.)
3.Plug in the AC cord to the AC outlet. (See page 8.)
|
Channel search |
||
|
Channel auto search makes the TV look for all |
||
|
channels viewable in the set area. |
||
|
3 |
When “Air/Cable” has been selected in |
|
|
Antenna setting and then press ENTER |
||
|
|
again. |
|
|
|
Language |
|
Language setting |
Air/Cable |
||
CH Search |
|||
Select from among 3 languages: English, French and |
|||
|
|||
Spanish. |
|
||
1 |
Press a/b to select the desired language |
|
|
listed on the screen, and then press ENTER. |
|
||
|
Language |
Press a/b to select “Analog & Digital” to |
|
|
Air/Cable |
||
|
CH Search |
search both analog and digital broadcasts or |
|
|
|
||
|
|
“Analog” to search only analog broadcasts or |
|
|
|
“Digital” to search only digital broadcasts, and |
|
|
|
then press ENTER. |
|
|
|
Press a/b to select “Yes” or “No”, and then |
|
|
|
press ENTER. |
|
Antenna setting
Make sure what kind of connection is made with your TV when selecting “Air”, “Cable(STD)”, “Cable(HRC)” or “Cable(IRC)”.
Press a/b to select “Air”, “Cable(STD)”, 2 “Cable(HRC)” or “Cable(IRC)”.
Press ENTER to enter the setting.
Example
Language |
|
|
|
||
Air/Cable |
|
|
|
||
|
CH Search |
|
|
|
|
|
|
|
Air |
|
|
|
|
|
|
|
|
|
|
|
|
|
|
|
|
|
|
Cable (STD) |
|
|
|
|
|
Cable (HRC) |
|
|
|
|
|
Cable (IRC) |
|
|
|
|
|
|
|
Analog & Digital |
|
|
|
Digital |
|
|
|
Analog |
|
Yes |
|
|
|
|
|
|
|
No |
|
|
|
|
|
•The Channel search will start automatically.
•To exit the Channel search screen, press
RETURN.
Example
Analog
Air [69]
•If no channel is found, confi rm the type of connection made with your TV and try EZ Setup again. (See page 23.)

 17
17
 Loading...