

Page 1

The illustrations and on-screen displays in this operation manual are for explanation purposes and may vary slightly from •
the actual operations.
Contents
OPERATION MANUAL
ENGLISH
ENGLISH
Contents ................................................................ 1
Introduction ........................................................... 2
Dear SHARP customer ................................... 2
Important Safety Precautions .......................... 2
Important Warning .......................................... 3
Trademarks ..................................................... 3
Remote control unit ........................................ 4
TV (Front view) ................................................ 5
TV (Rear view) ................................................. 5
Preparation............................................................ 7
Supplied accessories ...................................... 7
Mount the TV stand ........................................ 7
Wall mounting ................................................. 8
Installation of batteries .................................... 8
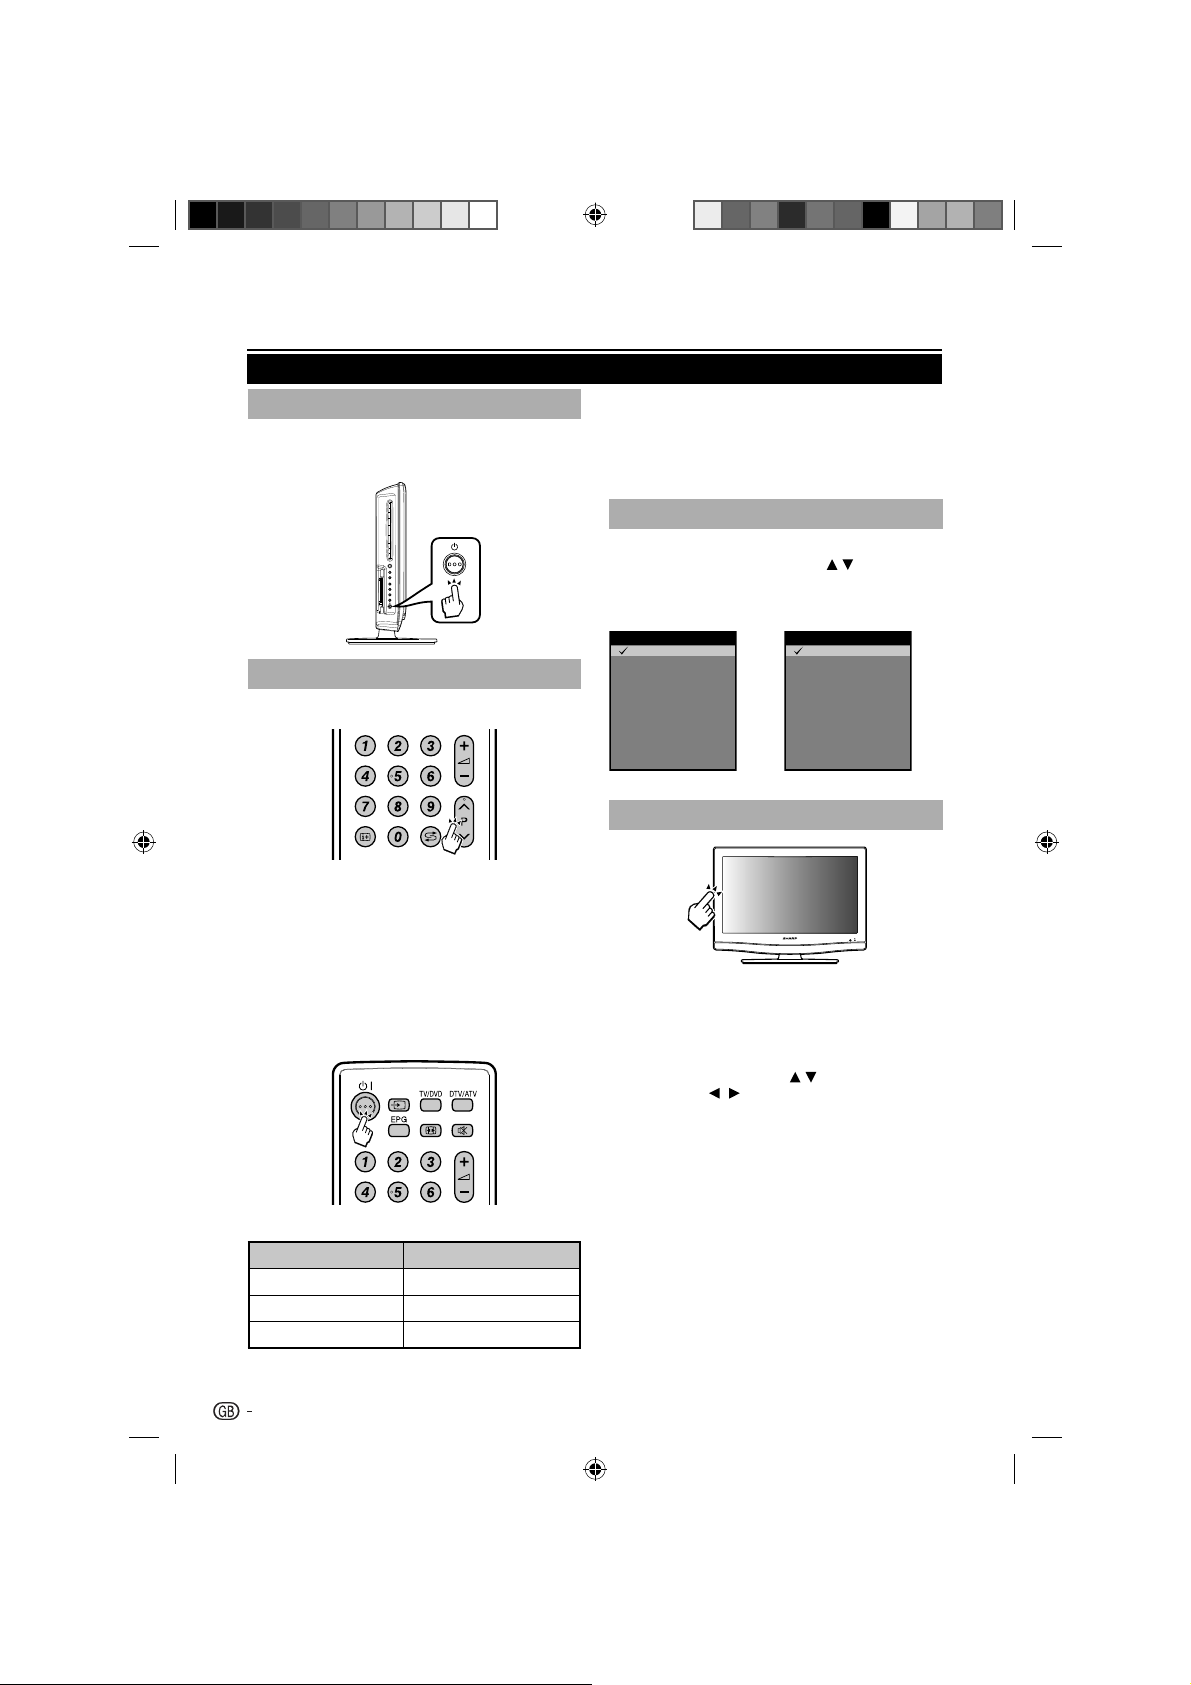
Using the remote control ................................ 8
Display the Menu Screen .......................... 8
Select an item by the remote control ......... 8
Exit the Menu Screen ................................ 8
Quick guide ........................................................... 9
Initial installation overview................................ 9
Watching TV ........................................................ 10
Daily operation .............................................. 10
Turning on/off the power ......................... 10
Changing channels ................................. 10
Selecting external video source ............... 10
Operation without a remote control ......... 10
EPG (Electronic Programme Guide) .............. 11
Teletext ......................................................... 12
Select a Teletext language ....................... 12
Using the MHEG5 application (UK only) .. 12
TV menu .............................................................. 13
Picture .......................................................... 13
Adjust picture settings ............................. 13
Use smart picture .................................... 13
HDMI overscan ....................................... 13
Audio ............................................................ 14
Adjust Audio settings .............................. 14
TV ................................................................. 14
Select a digital audio language ................ 14
Automatically install channels .................. 14
Update Scan ........................................... 15
Single RF Scan ....................................... 15
Channel Skip .......................................... 15
Channel Sort ........................................... 16
Channel Edit ........................................... 16
Analogue Ch Fine Tune ........................... 17
Features ....................................................... 17
Change picture format ............................ 17
Power Management ................................ 18
Change the time zone ............................. 18
Set the clock .......................................... 18
Automatically switch the TV on or off (On /
Off time) ............................................... 18
Automatically switch the TV to standby
(Sleep timer) ......................................... 18
No Operation Power Off ......................... 18
AV Input (Only shown in AV mode) ......... 19
Use subtitles ............................................. 19
Auto 4 : 3 Mode ........................................ 19
Reset Default ............................................ 19
Parental .......................................................... 20
Access Parental menu .............................. 20
Lock one or more channels ....................... 20
To set parental ratings ............................... 20
Set / Change password ............................ 20
DVD Operation ...................................................... 21
Disc ................................................................ 21
Playing Audio files ..................................... 22
Playing a disc .................................................. 23
Zooming (DVD/VCD) ....................................... 24
Locating desired scene (DVD/VCD/Audio CD) . 24
Changing Soundtrack Language (DVD/VCD)... 24
Subtitles (DVD) ................................................ 24
Changing angles (DVD) ................................... 25
Title selection (DVD) ........................................ 25
DVD menu (DVD) ............................................ 25
Disc status ...................................................... 25
Using HOME MENU ........................................ 25
Play mode ...................................................... 26
A-B repeat playback ................................. 26
Repeat playback ....................................... 26
Random playback ..................................... 26
Program playback ..................................... 26
Locating desired scene ............................. 27
Audio Settings menu ....................................... 27
Video Adjust menu .......................................... 28
Customizing The Function Settings ................. 28
Parental Control .............................................. 30
Language Code List ........................................ 31
Country/Area Code List .................................. 31
Connecting external devices ............................... 32
HDMI connection ............................................ 32
YPbPr (Component connection) ...................... 32
SCART connection ......................................... 33
S-Video connection ........................................ 33
Speaker / Amplifier connection ....................... 34
Inserting a CA Card ........................................ 34
Access CI Module service ......................... 34
Connecting a PC ............................................ 35
Digital connection ..................................... 35
Analogue connection ................................ 35
Supported display resolutions ................... 35
Appendix ............................................................... 36
Troubleshooting .............................................. 36
Troubleshooting-PC mode .............................. 36
Troubleshooting-DVD ...................................... 37
Specification ................................................... 38
1
54B0101A_English.indd 154B0101A_English.indd 1 2/27/2010 17:23:062/27/2010 17:23:06
Page 2
Introduction
Dear SHARP customer
Thank you for your purchase of the SHARP LCD colour TV product. To ensure safety and many years of trouble-free
operation of your product, please read the Important Safety Precautions carefully before using this product.
Important safety precautions
Cleaning—Unplug the AC cord from the AC outlet before cleaning the product. Use a damp cloth to clean the •
product. Do not use liquid cleaners or aerosol cleaners.
Use a soft damp cloth to gently wipe the panel when it is dirty. To protect the panel, do not use a chemical cloth to •
clean it. Chemicals may cause damage or cracks in the cabinet of the TV.
Water and moisture—Do not use the product near water, such as bathtub, washbasin, kitchen sink, laundry tub, •
swimming pool and in a wet basement.
Do not place vases or any other water-filled containers on this product. The water may spill onto the product causing •
fire or electric shock.
Stand—Do not place the product on an unstable cart, stand, tripod or table. Doing so can cause •
the product to fall, resulting in serious personal injuries as well as damage to the product. Use only
a cart, stand, tripod, bracket or table recommended by the manufacturer or sold with the product.
When mounting the product on a wall, be sure to follow the manufacturer’s instructions. Use only the
mounting hardware recommended by the manufacturer.
When relocating the product placed on a cart, it must be moved with utmost care. Sudden stops, •
excessive force and uneven floor surface can cause the product to fall from the cart.
Ventilation—The vents and other openings in the cabinet are designed for ventilation. Do not cover •
or block these vents and openings since insufficient ventilation can cause overheating and/or
shorten the life of the product. Do not place the product on a bed, sofa, rug or other similar surface,
since they can block ventilation openings. This product is not designed for built-in installation; do
not place the product in an enclosed place such as a bookcase or rack, unless proper ventilation is
provided or the manufacturer’s instructions are followed.
The LCD panel used in this product is made of glass. Therefore, it can break when the product is •
dropped or impact applied. If the LCD panel is broken, be careful not to be injured by broken glass.
Heat sources—Keep the product away from heat sources such as radiators, heaters, stoves and •
other heatgenerating products (including amplifiers).
To prevent fire, never place any type of candle or naked flames on the top or near the TV set.•
To prevent fire or shock hazard, do not place the AC cord under the TV set or other heavy items.•
Headphones—Do not set the volume at a high level. Hearing experts advise against extended listening at high •
volume levels.
Do not display a still picture for a long time, as this could cause an afterimage to remain.•
There is power consumption always if main plug is connected.•
Servicing—Do not attempt to service the product yourself. Removing covers can expose you to high voltage and •
other dangerous conditions. Request a qualified person to perform servicing.
Do not insert foreign objects into the product. Inserting objects in the air vents or other openings may result in fire or •
electric shock. Exercise special caution when using the product around children.
Condensation — Moisture will form in the operating section of the player if the product is brought from cool •
surroundings into a warm room or if the temperature of the room rises suddenly. When this happens, player’s
performance will be impaired. To prevent this, let the product stand in its new surroundings for about an hour before
switching it on, or make sure that the room temperature rises gradually. Condensation may also form during the
summer if the product is exposed to the breeze from an air conditioner. In such cases, change the location of the
product.
Disc slot — Keep your fingers well clear of the disc slot as it is closing. Failure to do so may cause serious personal •
injury.
Laser beam — Do not look into the opening of the disc slot or ventilation opening of the product to see the source of •
the laser beam. Doing so may cause sight damage.
Disc — Do not use a cracked, deformed, or repaired disc. These discs are easily broken and may cause serious •
personal injury and product malfunction.
The LCD panel is a very high technology product, giving you fine picture details.
Due to the very large number of pixels, occasionally a few non-active pixels may appear on the screen as a fixed point
of blue, green or red. This is within product specifications and does not constitute a fault.
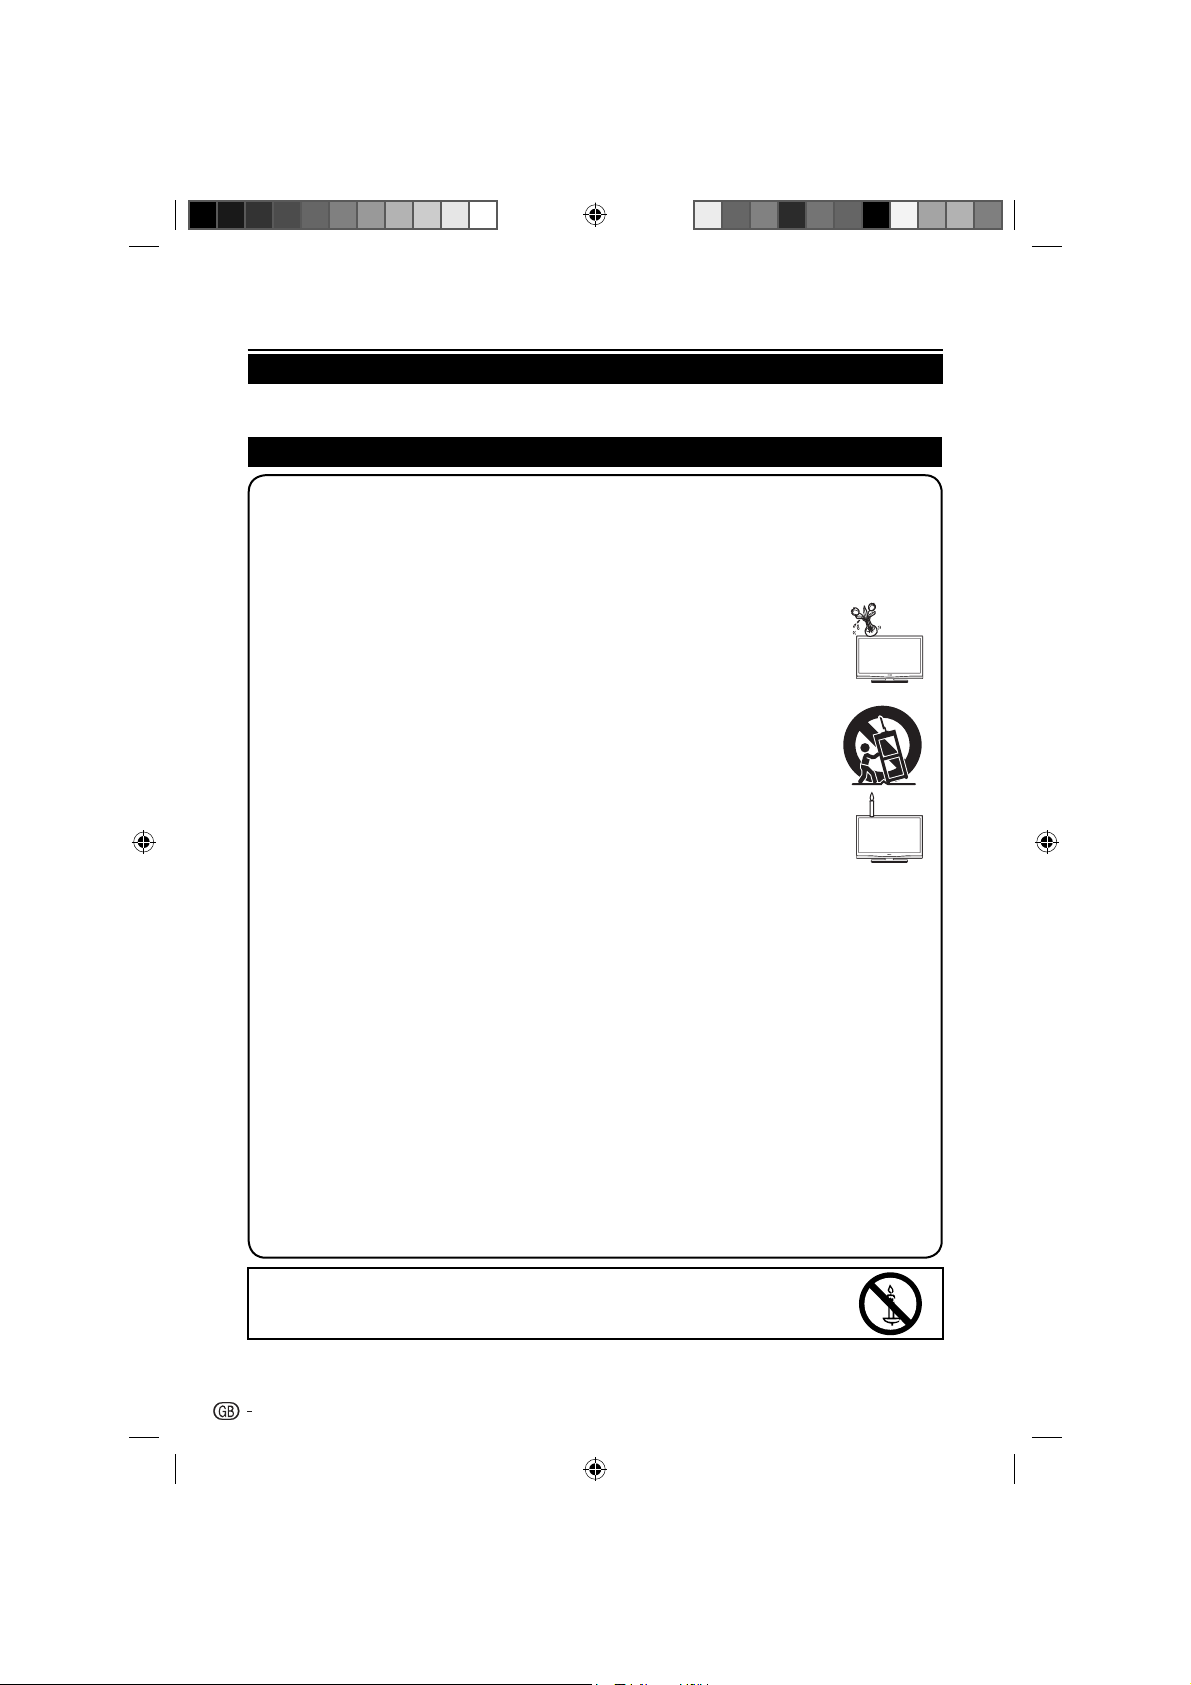
WARNING
To prevent the spread of fire, keep candles or other open flames away from this product at all times.
2
54B0101A_English.indd 254B0101A_English.indd 2 3/2/2010 11:01:113/2/2010 11:01:11
Page 3
Introduction
Important Warning
CAUTION:
A UNIT IS A CLASS 1 LASER PRODUCT. HOWEVER THIS UNIT USES A VISIBLE LASER BEAM WHICH
COULD CAUSE HAZARDOUS RADIATION EXPOSURE IF DIRECTED. BE SURE TO OPERATE THE PLAYER
CORRECTLY AS INSTRUCTED.
THE FOLLOWING CAUTION LABEL IS LOCATED ON THE REAR PANEL OF THE UNIT.
WHEN THIS UNIT IS PLUGGED INTO THE WALL OUTLET, DO NOT PLACE YOUR EYES CLOSE TO THE
OPENINGS TO LOOK INTO THE INSIDE OF THIS UNIT.
USE OF CONTROLS OR ADJUSTMENTS OR PERFORMANCE OF PROCEDURES OTHER THAN THOSE
SPECIFIED HEREIN MAY RESULT IN HAZARDOUS RADIATION EXPOSURE.
DO NOT OPEN COVERS AND DO NOT REPAIR YOURSELF. REFER SERVICING TO QUALIFIED
PERSONNEL.
Precautions when transporting the TV
When transporting the TV, never carry it by holding onto the speakers. Be sure to always carry the TV by two people holding
it with two hands—one hand on each side of the TV.
Wall mounting
Installing the LCD Colour TV requires special skill that should only be performed by qualified service personnel. Customers
should not attempt to do the work themselves. SHARP bears no responsibility for improper mounting or mounting that
results in accident or injury.
Trademarks
“HDMI, the HDMI Logo and High-Definition Multimedia Interface are trademarks or registered trademarks of •
HDMI Licensing LLC.”
The “HD TV” Logo is a trademark of DIGITALEUROPE. •
DVB is a registered trademark of the DVB Project. •
Manufactured under license from Dolby Laboratories. Dolby and the double-D symbol are trademarks of Dolby •
Laboratories.
Manufactured under license under U.S.Patent#: 5,451,942 & other U.S. and worldwide patents issued & •
pending. DTS and the Symbol are registered trademarks and DTS Digital Out and the DTS logos are trademarks
of DTS, Inc. Product includes software. © DTS, Inc. All Rights Reserved.
DivX• ® is a registered trademark of DivX, Inc., and is used under license.
This product incorporates copy protection technology that is protected by U.S. and other intellectual property •
rights. The use of Rovi Corporation’s copy protection technology in the product must be authorized by Rovi
Corporation. Reverse engineering or disassembly is prohibited.
• is a trademark of DVD Format/Logo Licensing Corporation.
This product is protected by certain intellectual property rights of Microsoft. Use or distribution of such •
technology outside of this product is prohibited without a license from Microsoft.
THIS PRODUCT IS LICENSED UNDER THE AVC PATENT PORTFOLIO LICENSE FOR THE PERSONAL •
AND NON-COMMERCIAL USE OF A CONSUMER TO (i) ENCODE VIDEO IN COMPLIANCE WITH THE AVC
STANDARD (“AVC VIDEO”) AND/OR (ii) DECODE AVC VIDEO THAT WAS ENCODED BY A CONSUMER
ENGAGED IN A PERSONAL AND NON-COMMERCIAL ACTIVITY AND/OR WAS OBTAINED FROM A VIDEO
PROVIDER LICENSED TO PROVIDE AVC VIDEO. NO LICENSE IS GRANTED OR SHALL BE IMPLIED FOR ANY
OTHER USE. ADDITIONAL INFORMATION MAY BE OBTAINED FROM MPEG LA, L.L.C. SEE HTTP://WWW.
MPEGLA.COM
3
54B0101A_English.indd 354B0101A_English.indd 3 3/2/2010 11:01:113/2/2010 11:01:11
Page 4
Introduction
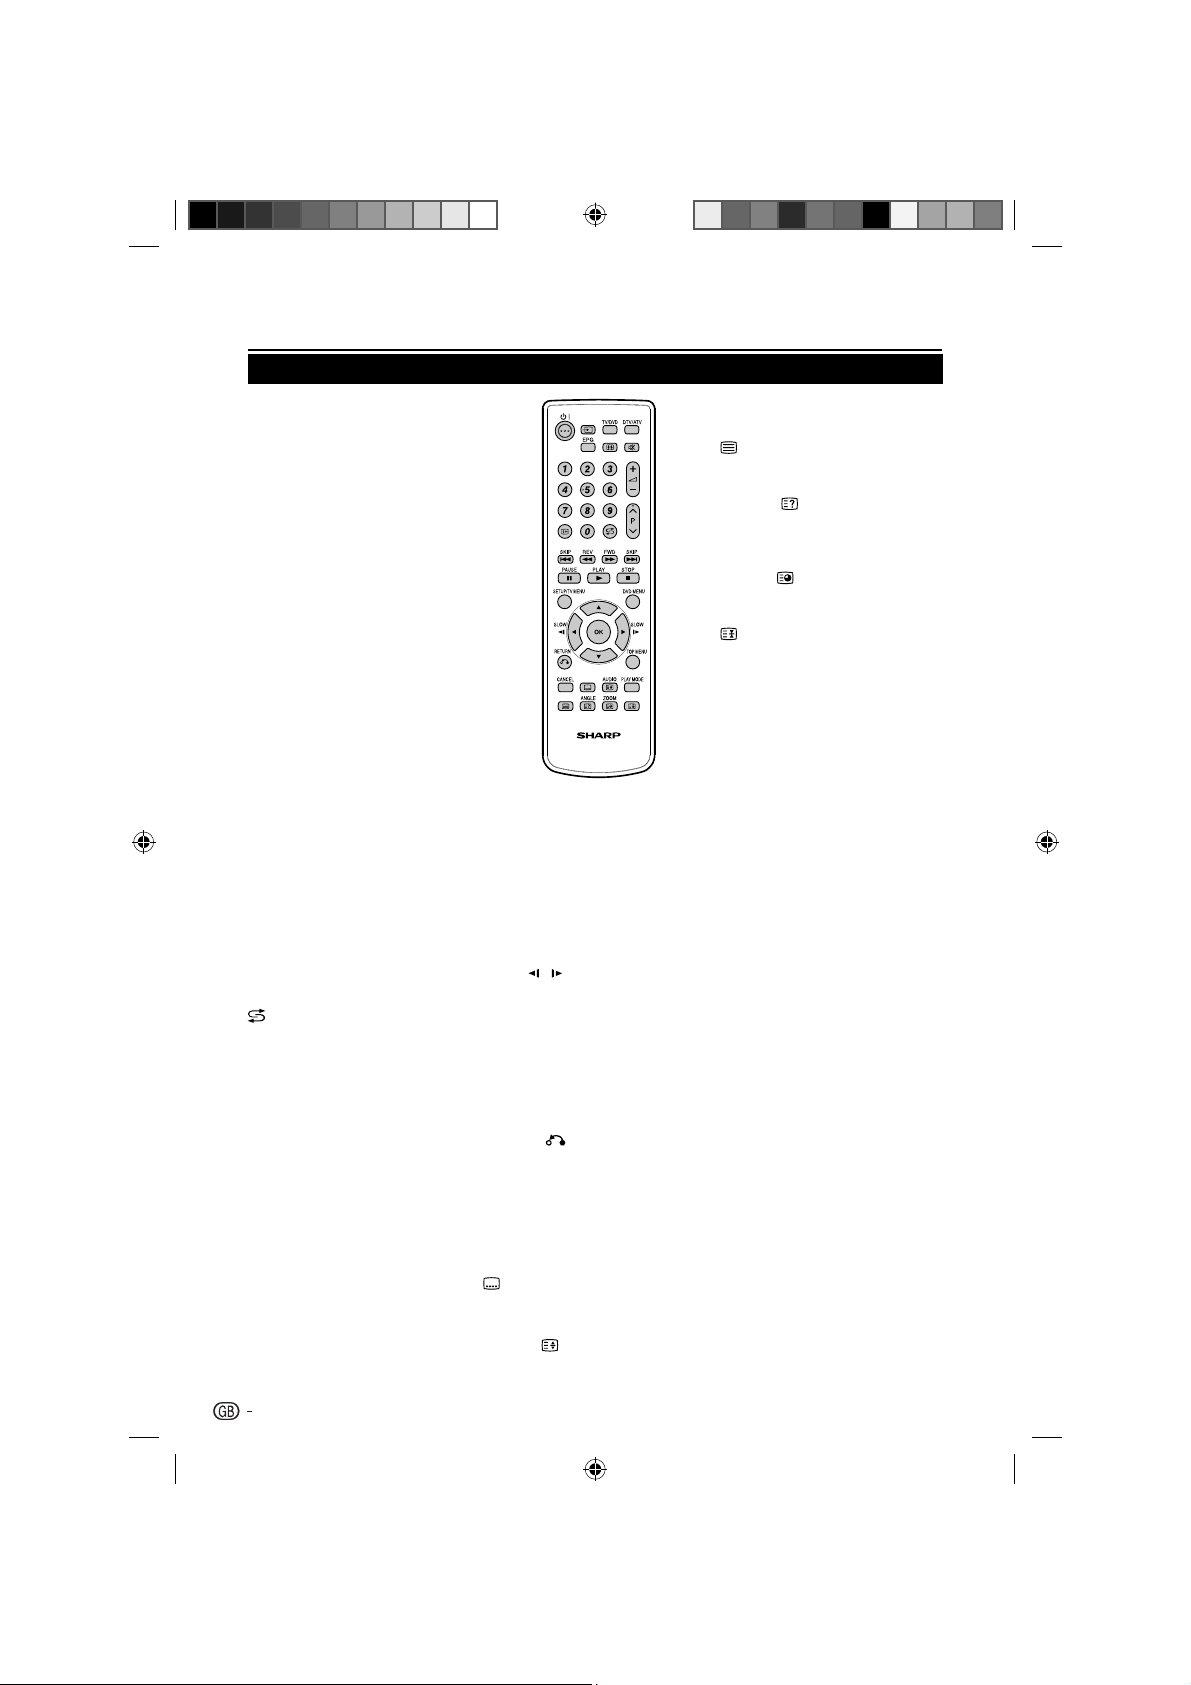
Remote control unit
B (POWER)
Press to turn the LCD TV on or
enter standby mode.
Ø (INPUT SOURCE)
Select an input source.
TV/DVD
Select to operate TV/DVD.
DTV/ATV
Switches between the analogue TV
and the digital TV.
EPG
Press this button to display
electronic programme guide when
watching digital channels.
∏ (Picture format)
Select picture format to Auto / 4:3 /
16:9/ 14:9 / Cinema / Real
¬ (MUTE)
Press to toggle audio on and off.
0-9 DIGIT BUTTONS
To select a TV channel directly.
” (+/-)
Press to adjust the volume.
P (</>)
Press to select the channel.
Ë
Display programme information, if
available.
(PRE PR)
To display the previous selected TV
channel.
/
SKIP
Skip chapter/track to forward or
reverse direction.
REV/FWD /
Fast Forward/Review playback.
ƒ
PAUSE
Pause picture of DVD.
PLAY
Playback.
STOP ■
Stop.
SETUP/TV MENU
TV MENU : for TV operation - Display
menu of TV
SETUP : for DVD operation - Call up
initial setup mode.
Press
confirm your selection.
SLOW
Forward/Reverse- slow motion.
OK
Memorize.
Display channel list.
DVD MENU
Display DVD menu.
RETURN
Remove setup menu.
TOP MENU
Select title.
CANCEL
Reset information in the menu.
(SUBTITLE)
Press this button to toggle off /
between available subtitle languages.
AUDIO / (SIZE)
Change sound track language.
Teletext enlargement.
/
to navigate and
PLAY MODE
Select playback mode.
(TELETEXT)
Press this button to activate Teletext.
(See page 12.)
ANGLE / (REVEAL)
Change playback angle/Reveal
hidden information such as answers
to a quiz.
ZOOM /
Zoom/To select the subpage w hen
the current page contains subpage(s).
Press this button to stop the
scrolling of pages.
The text decoder stops receiving
data. / Press to freeze a moving
image on the screen. (Only available
when your input source is TV).
(SUBPAGE)
(HOLD) / FREEZE
4
54B0101A_English.indd 454B0101A_English.indd 4 2/27/2010 17:23:062/27/2010 17:23:06
Page 5
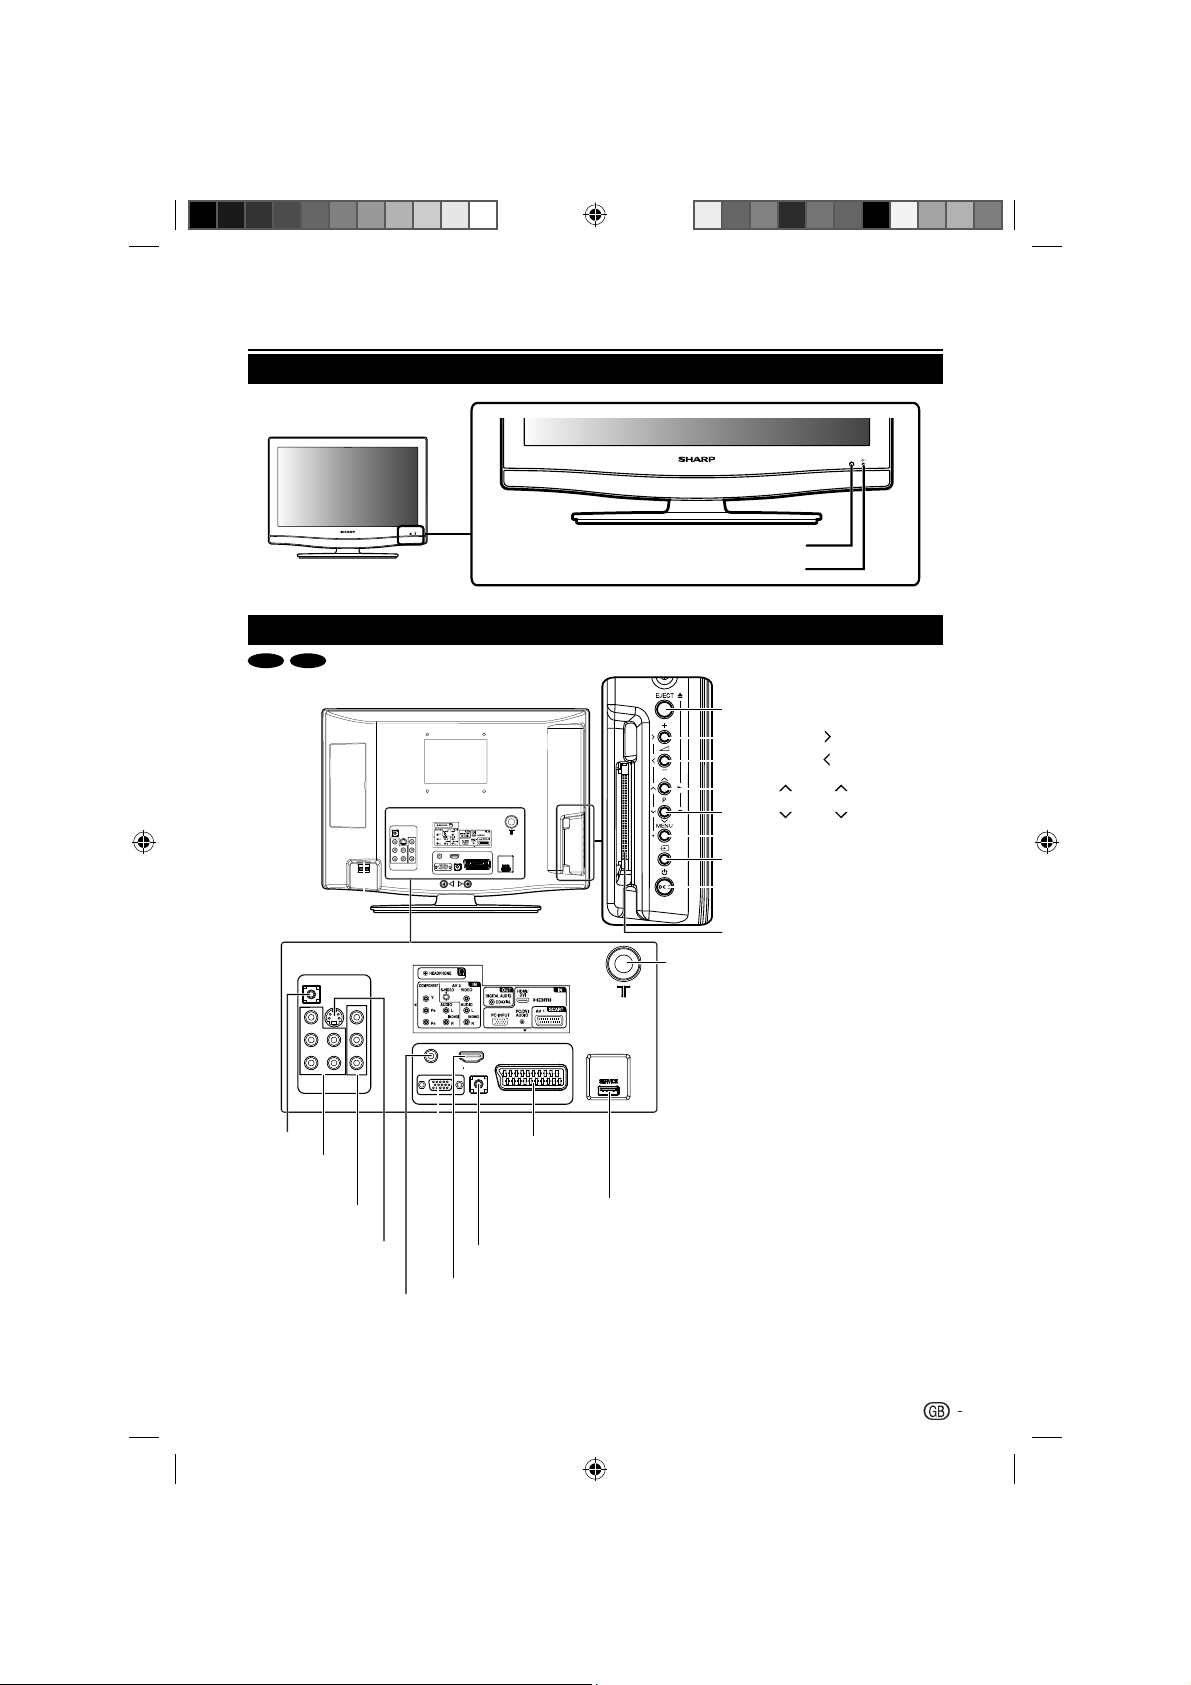
Introduction
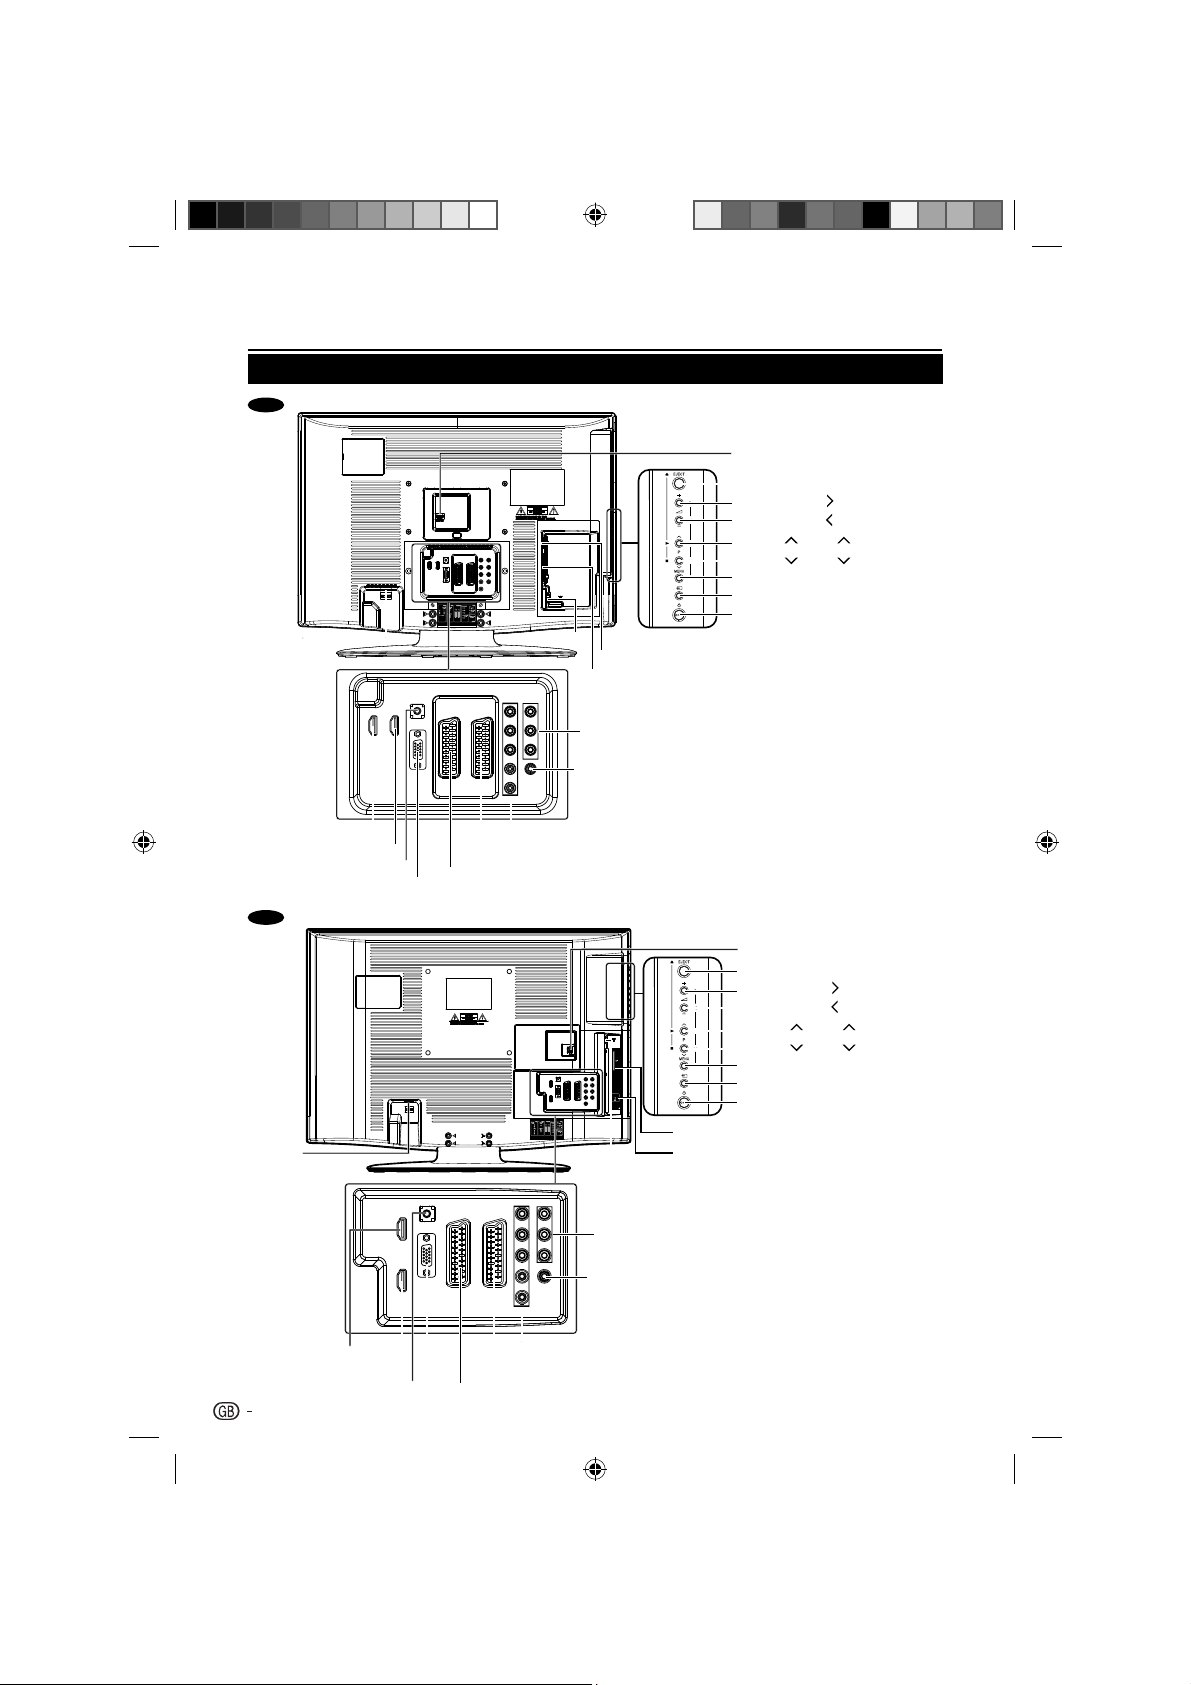
TV (Front view)
TV (Rear view)
19” 22”
Remote control sensor
(Standby/On) indicator
B
EJECT button
Volume +/Menu button
Volume –/Menu
Channel
Channel
MENU button
INPUT SOURCE / OK button
POWER button
button
/Menu /PLAY button
/Menu /STOP button
AC INPUT
HEADPHONE
COMPONENT
VIDEO and AUDIO
L/R INPUT
VIDEO and
AUDIO L/R INPUT
S-VIDEO INPUT
DIGITAL AUDIO
COAXIAL OUTPUT
AV2
AV2
AV1 (SCART) INPUT
SERVICE socket
PC/DVI AUDIO INPUT
HDMI / DVI INPUT
PC - INPUT
COMMON INTERFACE slot
ANT. INPUT
5
54B0101A_English.indd 554B0101A_English.indd 5 2/27/2010 17:23:072/27/2010 17:23:07
Page 6
Introduction
TV (Rear view)
26”
AC INPUT
ANT. INPUT
HEADPHONE INPUT
COMMON INTERFACE
AV 3 (VIDEO and L/R AUDIO INPUT)
DIGITAL AUDIO COAXIAL OUTPUT
SERVICE socket
EJECT button
Volume +/Menu
Volume –/Menu
Channel
Channel
button
button
/Menu /PLAY button
/Menu /STOP button
MENU button
INPUT SOURCE / OK button
POWER button
32”
AC INPUT
6
HDMI 2 (HDMI)
HDMI 1 (HDMI/DVI)
PC/DVI AUDIO INPUT
HDMI 2 (HDMI)
PC/DVI AUDIO INPUT
PC-INPUT
HDMI 1 (HDMI/DVI)
PC-INPUT
COMPONENT VIDEO and
L/R AUDIO INPUT
AV 2 (SCART) INPUT
AV 1 (SCART) INPUT
COMPONENT (VIDEO and
L/R AUDIO INPUT)
AV 2 (SCART) INPUT
AV 1 (SCART) INPUT
SERVICE socket
EJECT button
Volume +/Menu
Volume –/Menu
Channel
Channel
MENU button
INPUT SOURCE / OK button
POWER button
COMMON INTERFACE
HEADPHONE INPUT
ANT. INPUT
AV 3 (VIDEO and L/R AUDIO INPUT)
DIGITAL AUDIO COAXIAL OUTPUT
button
button
/Menu /PLAY button
/Menu /STOP button
54B0101A_English.indd 654B0101A_English.indd 6 2/27/2010 17:23:082/27/2010 17:23:08
Page 7
Preparation
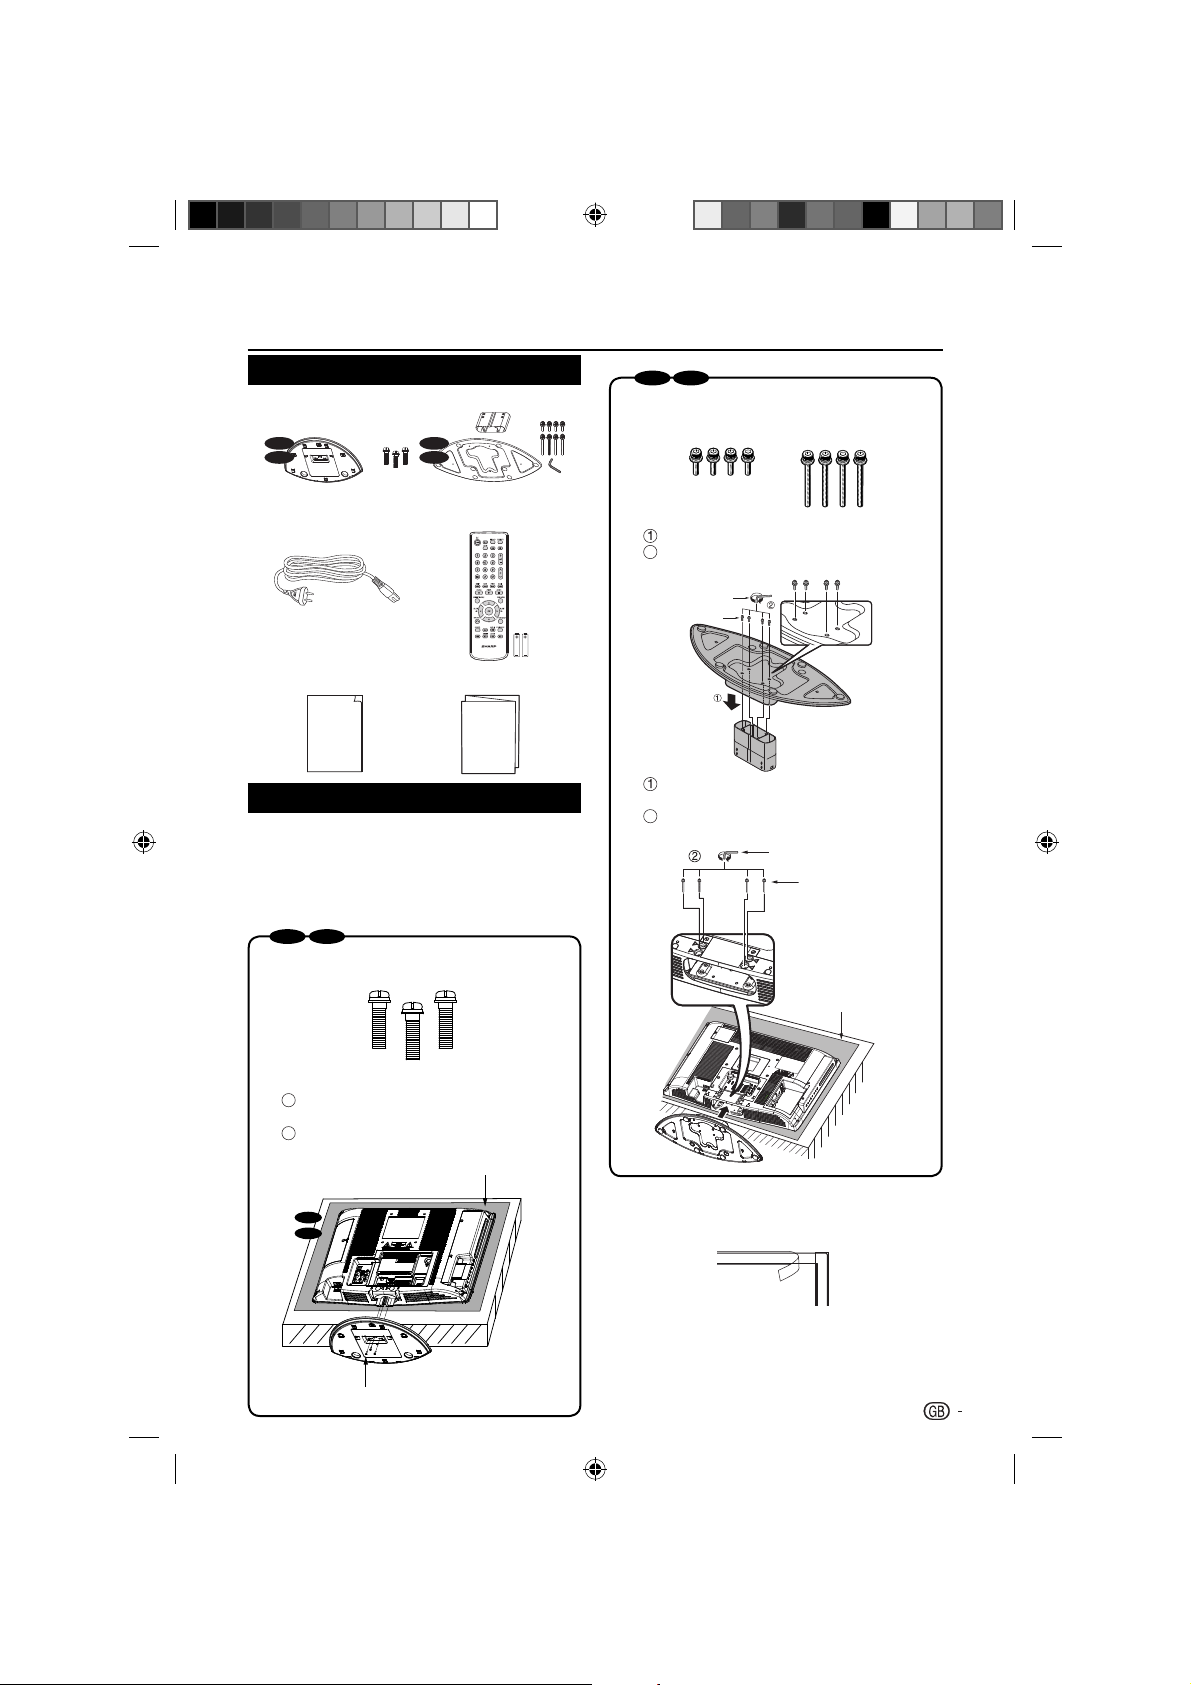
Supplied accessories
Stand unit and screws
19”
22”
AC cord (x1)
Product shape varies
in some countries
Operation Manual Quick Setup Guide
Operation Manual
26”
32”
Remote control (×1)
AA battery (×2)
Quick Setup Guide
Mount the TV stand
Before performing work spread cushioning over
the base area to lay the TV on, making sure the
area is completely flat.
This will prevent it from being damaged.
Before attaching (or detaching) stand, unplug the AC
cord from the AC INPUT terminal.
19” 22”
1.
Confirm the 3 screws supplied with the TV.
Screws (X3)
26” 32”
Confirm the 8 screws supplied with the TV.1.
Short screws (X4)
(used in step 2)
Long screws (X4)
(used in step 3)
Remove the covering sheet before use.2.
Attach the base to the post.
Attach the base to the 4 screws into the 4
2
holes on the bottom of the base.
Hex key
Screw
3. Insert the stand into the openings on the
bottom of the TV.
Insert and tighten the 4 screws into the 4
2
holes on the rear of the TV.
Hex key
Screw
Soft cushion
Remove the covering sheet before use.2.
1
Insert the stand into the openings on the
bottom of the TV.
Insert and tighten the 3 screws into the 3
2
holes on the bottom of the stand.
Soft cushion
NOTE
19”
22”
Screw
54B0101A_English.indd 754B0101A_English.indd 7 2/27/2010 17:23:152/27/2010 17:23:15
For protection, sheets are covering the product. Please •
remove these sheets before use.
To detach the TV stand, perform the steps in reverse •
order.
7
Page 8
Preparation
Wall mounting
W
H
TV
screen
size
( Inches)
VESAcompatible
wall br acket
(millimeters)
(W x H)
Screw type
19”, 22” 100 x 100 mm Metric 4 x 10 mm
26” 200 x 100 mm Metric 4 x 10 mm
32” 200 x 200 mm Metric 6 x 10 mm
NOTE
At the time of purchasing wall bracket, please check if •
there is enough space between the wall bracket and TV
terminals for the terminal connection.
Installation of batteries
Insert two AA batteries into Remote control. 1.
Make sure (k) and (l) are facing the proper
direction.
Replace the cover.2.
The batteries supplied with this product may have a •
shorter life expectancy due to storage conditions.
If you will not be using the remote control unit for •
an extended period of time, remove the batteries
from it.
Note on disposing batteries:
The batteries provided contain no harmful materials
such as cadmium, lead or mercury.
Regulations concerning used batteries stipulate
that batteries may no longer be thrown out with the
household rubbish. Deposit any used batteries free of
charge into the designated collection containers set up
at commercial businesses.
Using the remote control
Use the remote control unit by pointing it towards the
remote control sensor. Objects between the remote
control unit and sensor may prevent proper operation.
5m
30° 30°
Remote control sensor
Display the Menu Screen
Press TV MENU and the menu screen displays.
Select an item by the remote control
Press 1. / / to select the desired menu.
Press
2. / to select / adjust the item to the
desired level. The setting on screen is applied
immediately.
3. RETURN to return to the previous layer.
Press
NOTE
If the remote control will not to be used for a long •
time, remove the batteries to avoid remote control
damage.
CAUTION
Improper use of batteries can result in chemical
leakage or explosion. Be sure to follow the instructions
below.
Do not mix batteries of different types. Different •
types of batteries have different characteristics.
Do not mix old and new batteries. Mixing old and •
Picture
Option
Lock
Picture Preference
Brightness
Contrast
Colour
Tint
Sharpness
Colour Temperature
Advanced Settings
DBC
Reset
3
Standard
On
50
85
50
0
0
new batteries can shorten the life of new batteries or
cause chemical leakage in old batteries.
Remove batteries as soon as they have worn out. •
Chemicals that leak from batteries can cause a rash.
If you find any chemical leakage, wipe thoroughly
with a cloth.
Exit the Menu Screen
The operation will exit the menu screen if you press TV
MENU before it is complete.
8
54B0101A_English.indd 854B0101A_English.indd 8 2/27/2010 17:23:212/27/2010 17:23:21
Page 9
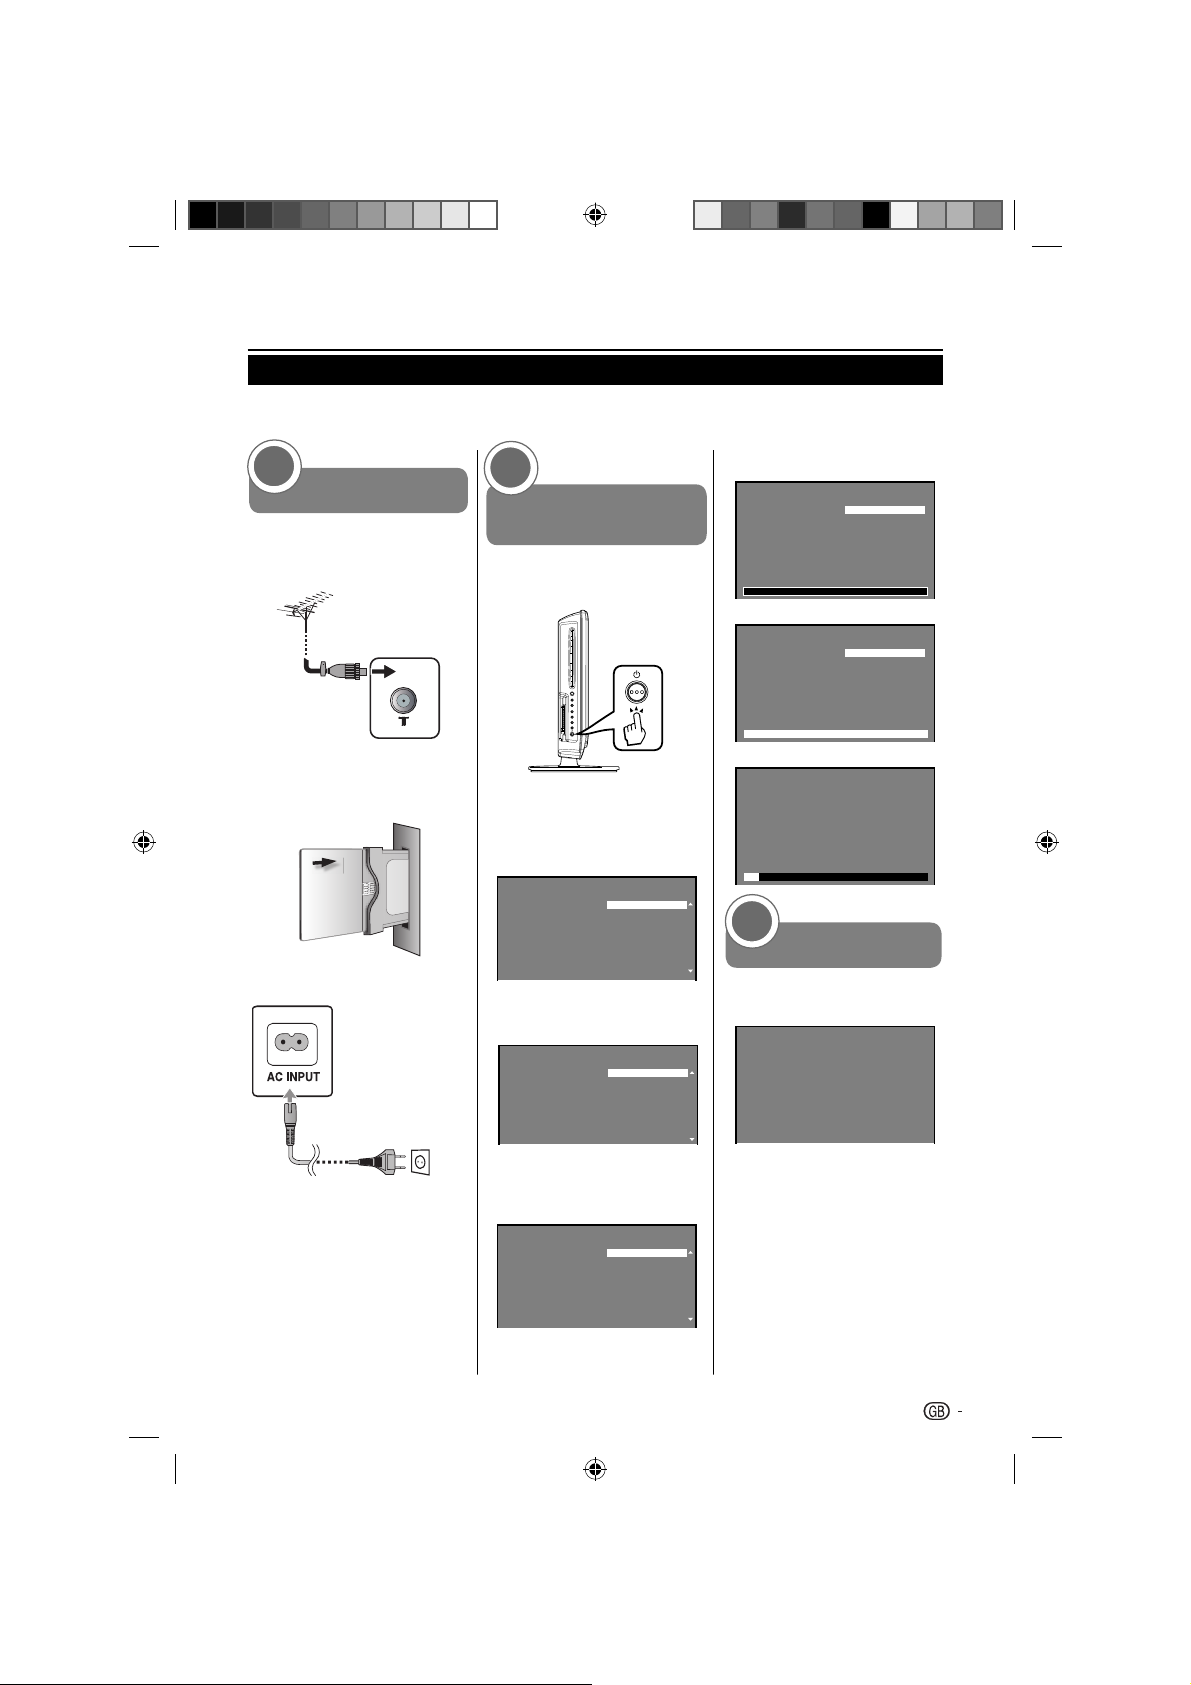
Quick guide
75Ω
Initial installation overview
Follow the below steps one by one when using the TV for the first time. Some steps may not be necessary
depending on your TV installation and connection.
1
Preparation
Connect antenna cable to
the antenna terminal.
If necessary, insert CA card
into the CI slot to watch
scrambled broadcasts.
Connect the AC cord to the
TV.
AC cord (x1)
Product shape
varies in some
countries.
2
Power on and run the
auto installation
Turn on the TV power with
a.
Run the initial auto
installation.
✔ Language setting
Auto Installation
Please select your language
then press “OK”
on your remote control:
✔ Country setting
Auto Installation
Please select your country
then press “OK”
on your remote control:
English
Deutsch
Français
Italiano
Nederlands
Español
Ελληνιкά
UK
Germany
France
Spain
Italy
Poland
Belgium
Language
Country
✔ Start searching channels
Auto Installation
TV will search for Digital CH,
please connect aerial(RF) lead.
Then press "OK".
If you skip this step,
it can be performed via MENU.
Auto Installation
TV will search for Analogue CH,
please connect aerial(RF) lead.
Then press "OK".
If you skip this step,
it can be performed via MENU.
Auto Installation
Please wait, channel search in
progress
Status : Scanning...
Analog Channels Found : 9
Channel Scan
Scan
0%
Channel Scan
Scan
100%
Channel Scan
10%
3
Watch TV
Congratulations! Now you
can watch TV.
Auto Installation
Congratulations !!
Completed Initial Setup.
Please press [OK] to exit.
Complete
✔ TV Location setting
Auto Installation
Please select where the TV will be
placed.
The picture will be optimized for
that location.
Home
Store
TV Location
If necessary, adjust the
antenna to attain maximum
signal reception.
9
54B0101A_English.indd 954B0101A_English.indd 9 2/27/2010 17:23:222/27/2010 17:23:22
Page 10
Watching TV
Daily operation
Turning on/off the power
Press B on the TV.
Switch it off by pressing B on the TV.
NOTE
If you are not going to use this TV for a long period of •
time, be sure to remove the AC cord from the power
outlet.
A small amount of electric power is still consumed even •
when B is turned off.
Selecting external video source
Once the connection is made, press b to display the
Input Select screen, and then press
/ to switch over
to the appropriate external source with OK.
Changing channels
With P<>:
Standby mode
E
To standby mode
If the TV set is switched on, you can switch it to
standby by pressing B on the remote control.
E
Switching on from standby
From standby, press B on the remote control.
TV indicator status
B indicator
Off Power off
Green Power on
Red Standby
Status
19” / 22”
Input Select
TV
AV1
AV2 (CVBS)
AV2 (S-Video)
Component
HDMI
DVD
PC
26” / 32”
Input Select
TV
AV1
AV2
AV3
Component
HDMI1
HDMI2
DVD
PC
Operation without a remote control
This function is useful when there is no remote control
within your reach.
1. MENU briefly to display the direct control
Press
screen.
2. P <> instead of / or i k/l
Press
instead of
Press
3. b to confirm the selection.
NOTE
The direct control menu screen will disappear if left •
unattended for several seconds.
/ to select the item.
10
54B0101A_English.indd 1054B0101A_English.indd 10 2/27/2010 17:23:222/27/2010 17:23:22
Page 11
Watching TV
EPG (Electronic Programme Guide)
EPG is an on-screen guide that displays scheduled
digital TV programmes. This guide is not available with
analogue channels. You can navigate, select and view
programmes.
There are two types of EPG, “Now and Next” and “7
or 8 day” EPG. “Now and Next” is always available
but the “7 or 8 day” EPG is only available in certain
countries.
With the EPG menu you can:
View a list of currently broadcast digital programmes.•
View upcoming programmes.•
Switch on EPG
NOTE
The first time you use EPG, you may be prompted •
to perform an update. If so, follow the on-screen
instructions.
Use the 2. colour buttons on the remote control
to activate available actions.
Television l TV guide
Service
Date: Sun, 20 Aug
670
STU
671
MNO
672
VWXYZ
674
TCM
679
800
801
802
PQR
ARTE
SAT.1
Prev page
DEF
list
1:00
1:01
1:02
1:03
1:04
1:05
2:10
3:00
Next page
Time: Sun, 20 Aug 01:00:52
679_VWXYZ_Monosco_0820_...
679_VWXYZ_Monosco_0820_...
679_VWXYZ_Monosco_0820_...
679_VWXYZ_Monosco_0820_...
679_VWXYZ_Monosco_0820_...
679_VWXYZ_Monosco_0820_...
679_VWXYZ_Monosco_0820_...
679_VWXYZ_Monosco_0820_...
1:00 ~ 1:01 No category
Service list•
Prev page (Red):* List the previous service
list.
Next page (Green):* List the next service list.
Events list•
Prev day (Red):* List the previous day’s EPG.
Next day (Green):* List the next day’s EPG.
Info (Yellow):* Displays the information of
your highlighted programme.
Events
list
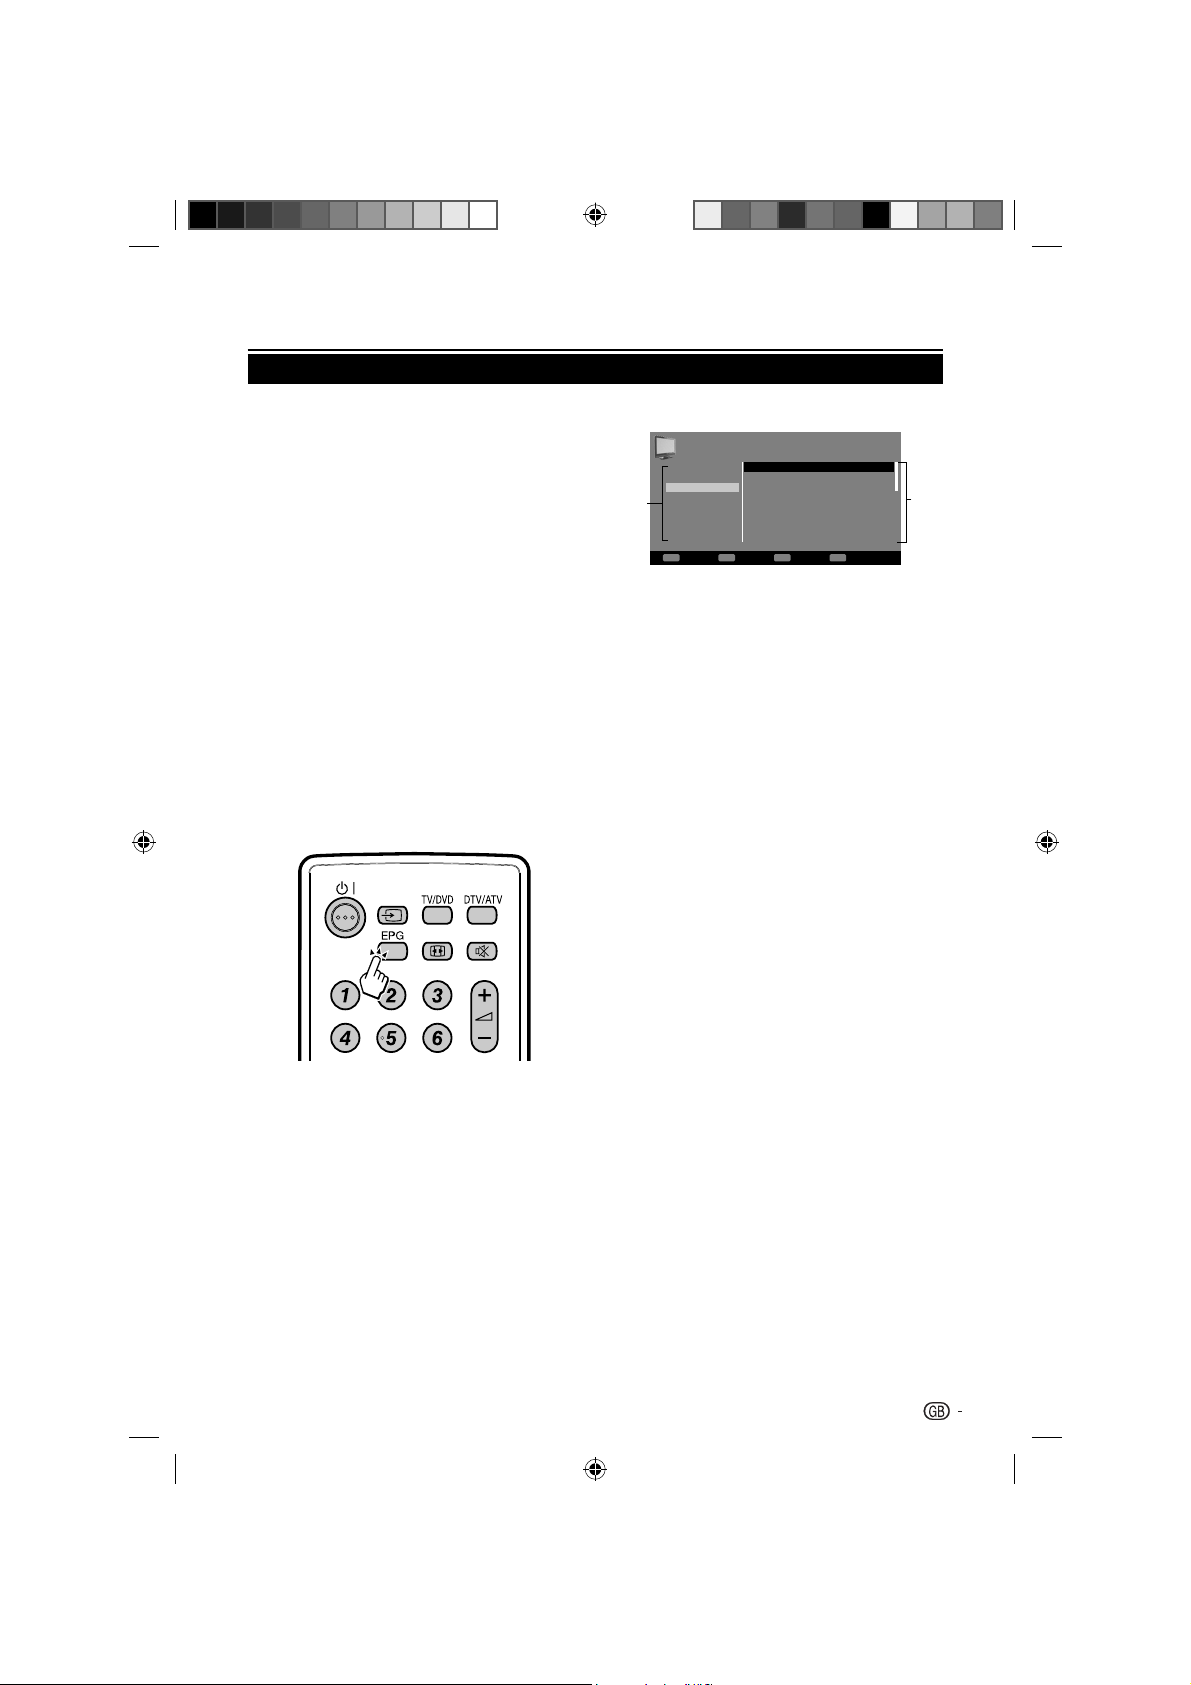
Press 1. EPG on the remote control, the “Now
and Next” EPG will appear and the detailed
information about the current programme is
displayed.
Press 3. EPG or RETURN to exit .
11
54B0101A_English.indd 1154B0101A_English.indd 11 2/27/2010 17:23:232/27/2010 17:23:23
Page 12

Watching TV
Teletext
What is Teletext?
Teletext broadcasts pages of information and
entertainment to specially equipped television sets.
Your TV receives Teletext signals broadcast by a TV
network, and decodes them into graphical format for
viewing. News, weather and sports information, stock
exchange prices and programme previews are among
the many services available.
Turning on and off Teletext
Select a TV channel or external source
1.
providing a Teletext programme.
Press
2. to display Teletext.
Many stations use the TOP operating system, •
while some use FLOF (e.g. CNN). Your TV
supports both these systems. The pages are
divided into topic groups and topics. After
switching on the teletext, up to 1000 pages are
stored for fast access.
If you select a programme with no Teletext •
signal, “No Teletext ” displays.
The same message displays during other •
modes if no Teletext signal is available.
Press 3. again to display the Teletext and
normal image at the same time on the screen.
NOTE
Teletext will not work if the selected signal type is RGB. •
Buttons for teletext operations
Buttons Description
P (rs)
Colour
(R/G/Y/B)
0 - 9
(TEXT)
(SIZE)
(HOLD)
(REVEAL)
Increa se or decrease the page
number.
Selec t a group or block of pages
displaye d in the coloured brackets
at the bot tom of the screen by
pressing the corresponding
Colour (R/G/Y/B) on the remote
control unit.
Directly select any page from 100
to 899 by using 0 - 9.
Press this button to activate
Teletext with T V.
Switch the Teletext imag e to Top,
Bottom o r Full.
Stop updating Teletext pages
automatically or release the hold
mode.
Reveal or hide hidden information
such as an answer to a quiz.
Buttons Description
(SUBPAGE)
Selec t the subp age when the
current page co ntains subpage(s).
Press nu mber bu ttons on the
remote control to access the
subpage directly. (four dig its)
Select a Teletext language
Press 1. TV MENU on the remote control and
select
Press
2. OK or to enter Teletext menu and
press
≥ Teletext.
/ to select one of the following.
Digital Teletext Language.•
Analog Teletext Language.•
Highlight your selection and press 3. / to
make a selection.
4.
Follow the on-screen instructions to exit.
Using the MHEG5 application (UK only)
Some services bring you programmes with the MHEG
(Multimedia and Hypermedia Expert Group) application
encoded, letting you experience DTV interactively.
When provided, the MHEG5 application will start when
you press
(TELETEXT) or the Red button.
Sample MHEG5 screen
12
54B0101A_English.indd 1254B0101A_English.indd 12 2/27/2010 17:23:242/27/2010 17:23:24
Page 13

TV menu
Picture
Adjust picture settings
Press 1. TV MENU on the remote control and
Picture
Option
Lock
.
Picture Preference
Brightness
Contrast
Colour
Tint
Sharpness
Colour Temperature
Advanced Settings
DBC
Reset
Standard
select
Press
2. OK or to enter the list.
Press 3. / to select one of the following
settings:
• Picture Preference: See right colum.
Brightness: • Changes the level of light in the
picture.
Contrast: • Changes the level of bright parts in
the picture keeping the dark parts unchanged.
• Colour: Changes the level of saturation.
Tint: • Changes the colours to reddish or bluish.
Sharpness: • Changes the level of sharpness of
fine details.
Colour Temperature:• Press OK
and press
item: Sets the colour temperature to Cool
(bluer), Medium (balanced), Warm (redder),
Memory (R Gain / G Gain / B Gain).
/ to select one of the following
Advanced Settings: • Press OK
and press
item:
/ to select one of the following
DNR:* Filters and reduces the noise in the
picture. Selects the level to Low / Medium /
High. Or select Off to disable this function.
Blue Back: * Auto blue screen and mute the
sound if the signal is weak or absent.
Back Light:* Adjusts the background brighter
or darker.
HDMI Mode: * See right colum.
DBC: • Change the Black level automatically
acording to the brightness an image.
PC: • Press OK
select one of the following item:
Auto Adjust: * Hor Position, Ver Position,
Phase and Clock are adjusted automatically
as per the input PC video signal.
When PC-input mode was selected and a
PC-signal was input, Auto Adjust will be
performed automatically.
Hor Position: * To adjust the horizontal placing
of the image.
or to enter and press / to
50
85
50
0
0
On
or to enter
or to enter
Ver Position: * To adjust the vertical placing of
the image.
Phase: * Eliminates the horizontal (PHASE)
interfering lines.
Clock:* Eliminates the vertical (CLOCK)
interfering lines.
Reset:• Select “Reset” to reset Picture
Preference, Brightness, Contrast, Colour, Tint,
Sharpness, Colour Temperature and Back Light
to the factory preset values.
Press 4. / to select / adjust the item to the
desired level.
5.
Follow the on-screen instructions to exit.
NOTE
When the DBC function is ON, the backlight cannot be •
adjusted.
Use smart picture
Apart from manually adjusting picture settings, you can
use Picture Preference to set your TV to a predefined
picture setting.
1. TV MENU on the remote control and
Press
select
2. OK or to enter and select Picture
Press
.
Preference.
3. / to select one of the following
Press
settings:
• Sport
• Standard
Movie•
Memory•
Follow the on-screen instructions to exit.4.
HDMI overscan
When you watch TV via HDMI input source, you could
use this function to enlarge the picture. It may have few
loss of video content.
1. TV MENU on the remote control and
Press
select
≥ Advanced Settings ≥ HDMI
Mode.
2. / to select Auto, PC or Video.
Press
3.
Follow the on-screen instructions to exit.
13
54B0101A_English.indd 1354B0101A_English.indd 13 2/27/2010 17:23:252/27/2010 17:23:25
Page 14

TV menu
Audio
Adjust Audio settings
This section describes how to adjust sound settings.
Press
1. TV MENU on the remote control and
2. OK or to enter the list.
select
Press
.
Picture
Option
Lock
Balance
Bass
Treble
Surround
Equalizer
Speaker
Audio Description Setting
Reset
0
50
50
Off
Off
On
Press 3. / to select one of the following
settings:
Balance: • Sets the balance of the left and right
speakers to best fit your listening position.
Bass: • Adjusts the amount of bass.
Treble: • Adjusts the amount of treble.
Surround: • Automatically switches the TV to
the best surround sound mode available from a
broadcast. Select On or Off.
Equalizer: • Change the characteristic of audio
frequency. Select the Off, Rock, Pop, Live,
Dance, Techno, Classic or Soft.
Speaker (•
output from speaker to “On” or “Off”.
Audio Description Setting: • You can set the
output audio of Visual Impaired Audio. This
option is available, when the Audio Description
setting is “On” only. Press OK or
following options.
Reset:• Select “Reset” to reset Balance, Bass,
Treble to the factory preset values.
26” 32”
Audio Description: * You can set the Visual
Impaired Audio. Visual Impaired Audio is
verbal narration inserted to explain detailed
scene in parallel with normal audio for people
with visual impairment.
Volume: * You can adjust the audio volume of
Visual Impaired audio.
): You can set the audio
to enter the
Press 4. / to select / adjust the item to the
desired level.
5.
Follow the on-screen instructions to exit.
TV
The first time you set up your TV, you are prompted to
select an appropriate menu language and to perform
automatic installation of TV and digital radio channels
(If available).
This chapter provides instructions on how to reinstall
channels as well as other useful channel installation
features.
NOTE
Re-installing channels modifies the channel list.•
Select a digital audio language
Press 1. TV MENU on the remote control and
.
select
Press
2. OK or to enter TV menu.
3. / to select Audio Language or
Press
Audio Language 2nd.
4. / to
Highlight your selection and press
select an audio language.
5.
Follow the on-screen instructions to exit.
NOTE
If your selected audio language is not broadcasted, the •
default audio language will be displayed.
Automatically install channels
This section describes how to search and store
channels automatically. Instructions are for both digital
and analogue channels.
E
Step 1: Select your menu language
Press
1. TV MENU on your remote control and
select
Press
2. / to select your language.
Follow the on-screen instructions to exit.
3.
≥ OSD Language.
14
54B0101A_English.indd 1454B0101A_English.indd 14 3/2/2010 18:51:463/2/2010 18:51:46
Page 15

TV menu
E
Step 2: Select your country
Select the country where you are located. The TV
installs and arranges channels according to your
country.
1. TV MENU on the remote control and
Press
≥ Country.
select
Press
2. / or to select your country.
Follow the on-screen instructions to exit.
3.
E
Step 3: Automatic installation
Your TV searches and stores all available digital and
analogue TV channels as well as all available digital
radio channels.
1. TV MENU on the remote control and
Press
≥ Channel Set Up. Then press OK
select
.
or
NOTE
You are prompted to enter current password to enter •
Channel Set Up if Channel Block in the Parental
menu is not the default setting.
Select 2. Auto Scan ≥ Start and press OK or
to start channel installation. The installation
may take a few minutes.
3.
When complete, follow the on-screen
instructions to exit.
Update Scan
Update Scan has similar function with Auto Scan.
The difference is you could update channel list without
erasing the original information.
1. TV MENU on the remote control and
Press
select
≥ Channel Set Up. Then press OK
.
or
NOTE
You are prompted to enter current password to enter •
Channel Set Up if Channel Block in the Parental
menu is not the default setting.
Press 2. / to select Update Scan ≥ Start
and press OK or
When complete, follow the on-screen
3.
instructions to exit.
Single RF Scan
If using digital broadcasts, you can check the quality
and signal strength of digital channels. This allows you
to reposition and test your antenna or satellite dish.
1. TV MENU on the remote control and
Press
≥ Channel Set Up. Then press OK
select
.
or
to start channel update.
NOTE
You are prompted to enter current password to enter •
Channel Set Up if Channel Block in the Parental
menu is not the default setting.
Press 2. / to select Signal Status and press
to enter.
OK or
Picture
Signal Strength
Signal Quality
Option
Lock
When the scan is completed, the result of 3.
Signal Strength and Signal Quality appear on
the screen.
4.
Follow the on-screen instructions to exit.
NOTE
If the signal quality and strength is poor, reposition •
the antenna or satellite dish and retest.
If you have further problems with the reception of •
your digital broadcast, contact a specialised installer.
Good
100
Channel Skip
Channel skip allows you to skip one or more channels
when pressing P <> on the remote control to switch
between channels.
1. TV MENU on the remote control and
Press
≥ Channel Set Up. Then press OK
select
.
or
NOTE
You are prompted to enter current password to enter •
Channel Set Up if Channel Block in the Parental
menu is not the default setting.
Press 2. / to select Channel Skip and press
to enter the channel list.
OK or
Press
3. / to select one or more channels you
preferred to skip.
4. OK to mark or cancel.
Press
Follow the on-screen instructions to exit.
5.
NOTE
To watch the skipped channels, enter the channel •
numbers by using the digit buttons on the remote
control or select from channel list.
If you perform Auto Scan, your stored settings will be •
erased and you will have to perform this operation again.
15
54B0101A_English.indd 1554B0101A_English.indd 15 2/27/2010 17:23:262/27/2010 17:23:26
Page 16

TV menu
Channel Sort
Channel sort allows you to reorder the channels in the
channel list.
1. TV MENU on the remote control and
Press
≥ Channel Set Up. Then press OK
select
.
or
NOTE
You are prompted to enter current password to enter •
Channel Set Up if Channel Block in the Parental
menu is not the default setting.
Press 2. / to select Channel Sort and press
to enter the channel list.
OK or
Press
3. / to select one channel and press
OK to mark.
4. / to select another channel and press
Press
OK to mark. The two channels your marked are
exchanged.
5.
Repeat step 3 to 4 to reorder more channels.
Follow the on-screen instructions to exit.6.
NOTE
If you perform Auto Scan, your stored settings will be •
erased and you will have to perform this operation again.
Channel Edit
Channel edit allows you to change the channel number
or the channel name.
1. TV MENU on the remote control and
Press
≥ Channel Set Up. Then press OK
select
.
or
NOTE
You are prompted to enter current password to enter •
Channel Set Up if Channel Block in the Parental
menu is not the default setting.
Press 2. / to select Channel Edit and press
to enter the channel list.
OK or
Press
3. / to select one channel you prefer
to edit.
4. OK to enter.
Press
Press 5. / to highlight one of the following:
Channel Number:• Enter a new channel
number by using the digit buttons on the
remote control.
Channel Name:• Press the digit buttons on
the remote control to rename the channel.
Please refer to the graphic below for available
characters. (Press each button repeatedly to
change between characters.)
0-9 digit buttons with available characters
(
button works as "Back space".)
Remote key Action
0 +, –, ., 0
1 ABC1
2 DEF2
3 GHI3
4 JKL4
5 MNO5
6 PQR6
7 STU7
8 VWX8
9 YZ9
Frequency:• Enter the frequency value by using
the digit buttons on the remote control. (Only
for analogue channels)
Colour system:• Press
colour system. (Only for analogue channels)
Sound system: • Press
sound system. (Only for analogue channels)
/ to select the
/ to select the
Back space
Follow the on-screen instructions to exit.6.
NOTE
The new channel number you have entered can not •
override the exist one.
If you perform Auto Scan, your stored settings will be •
erased and you will have to perform this operation again.
Picture
Option
Lock
Network Name:
Channel Number:
Channel Name :
Frequency
Colour system
Sound system
CESKE RADIOKOMU...
805
NOVA
498
Auto
B/G
16
54B0101A_English.indd 1654B0101A_English.indd 16 2/27/2010 17:23:272/27/2010 17:23:27
Page 17

TV menu
Analogue Ch Fine Tune
You can manually fine tune analogue channels when
reception is poor.
1. TV MENU on the remote control and
Press
≥ Channel Set Up. Then press OK
select
.
or
NOTE
You are prompted to enter current password to enter •
Channel Set Up if Channel Block in the Parental
menu is not the default setting.
Press 2. / to select Fine and press OK or
to enter the analogue channel list.
Press
3. / to select one channel and press
OK to enter.
4. / to adjust the frequency.
Press
When complete, press
5. OK to set the frequency.
The fine tuned channel is stored under the
current channel number.
6.
Follow the on-screen instructions to exit.
NOTE
This option is unavailable if no analogue channels were •
found.
Features
Change picture format
Change the picture format to suit your content.
Press
1. ∏ repeatedly to select one of the
following picture formats.
illustration 1:
Letterbox image is increased
WSS:
Public broadcasters include 16:9 identification,
the WSS signal (WideScreenSignalling), during
transmission in order to ensure automatic conversion
to 16:9.
Other formats
Press ∏ until the desired size is reached.
4:3
The picture is displayed in 4:3 format with black bars to
the right and left.
16:9
The width of the picture will be zoomed evenly.
14:9
The picture is increased somewhat but not up to the
full screen width. Black bars remain on the right and left
and also at the top and bottom.
Cinema
Use Cinema to increase a small 4:3 letterbox signal.
If the picture is surrounded by a black border as in the
illustration, this is a 4:3 letterbox signal.
Cinema increases this picture that is too small as far
as possible.
Real (HDMI / PC mode)
The picture is displayed with original size.
Auto
The picture is automatically only then shown in a
format-filling display when a WSS-TV signal is received.
Example:
If the analogue tuner receives a letterbox image with
WSS signal then the resulting image looks like this:
NOTE
In PC mode, the picture size feature is available only for •
16:9-, 4:3- or Real format.
For PC input signal over WXGA, Real format is not •
availabe and adjusted to 16:9 format.
External receivers can automatically adjust the picture •
size via a SCART cable. Please read the instructions for
the external receiver.
17
54B0101A_English.indd 1754B0101A_English.indd 17 2/27/2010 17:23:282/27/2010 17:23:28
Page 18

TV menu
Power Management
Press 1. TV MENU on the remote control and
Select
2. / to select:
Press
≥ Power Management.
On: If a period of time is elapsed with no video
signal in PC mode, the power status is changed
to stand by mode automatically. When there is
available video signal again, the power status is
returned to power on mode automatically.
Off: Disable Power Management.
Change the time zone
Press 1. TV MENU on your remote control and
select
2. OK or to enter Time Setup.
Press
Select
3. Time Zone and press / to select
≥ Time Setup.
your time zone.
4.
Follow the on-screen instructions to exit.
Set the clock
Press 1. TV MENU on your remote control and
select
2. OK or to enter Time Setup.
Press
Press
3. / to select Time and press OK or
≥ Time Setup.
to enter.
ronization
Auto Synch
Date
Time
Timer
Power On Timer
Power Off Timer
On
2009/10/21
01:01:39
f
Of
00:00:00
00:00:00
Automatically switch the TV on or off (On /Off time)
On / Off time switches the TV to power on or standby
at a specified time.
NOTE
Before using off time function, you have to set the time •
on your TV correctly.
Press 1. TV MENU on your remote control and
select
Press
2. OK or to enter Time Setup.
Press
3. / to select Time and press OK or
≥ Time Setup.
to enter.
4. to select Timer and press / to
Press
select:
Both On / Power On Timer / Power Off •
Timer: Press
Timer or Power Off Timer box and set power
on or off time by using the digit buttons on
your remote control.
Off: • Disable Timer.
to highlight the Power On
Follow the on-screen instructions to exit.5.
Automatically switch the TV to standby (Sleep timer)
Sleep timer switches the TV to standby after a defined
period of time.
1. TV MENU on your remote control and
Press
select
2. OK or to enter Time Setup.
Press
Press
3. / to select Sleep Timer.
Press
4. / to select the period of time before
≥ Time Setup.
TV enters to standby.
5.
Follow the on-screen instructions to exit.
Select 4. Auto Synchronization and press /
to select:
On:• Sets the clock automatically the same with
the digital signal time. (Only if digital signal is
available).
Off:• Press
or system Time manually by using the digit
buttons on your remote control.
/ to set your system Date
When the clock setting is completed, follow the 5.
on-screen instructions to exit.
No Operation Power Off
When the Set and Remote key operation are not
operated with specified period by this setting (1/2/4
Hours), the power status is changed to stand by mode
automatically.
1. TV MENU on your remote control and
Press
select
Press
2. OK or to enter Time Setup.
Press
3. / to select No Operation Power Off.
4. / to select the period of time before
Press
≥ Time Setup.
TV enters to standby.
5.
Follow the on-screen instructions to exit.
18
54B0101A_English.indd 1854B0101A_English.indd 18 2/27/2010 17:23:282/27/2010 17:23:28
Page 19

TV menu
AV Input (Only shown in AV mode)
It is possible to manually adjust various settings for
connections with external devices. Select the
appropriate signal type for the signals from the video
equipment connected the AV1 or AV2 (
Press
1. TV MENU on your remote control and
select
2. / to select AV1 Input or AV2 Input.
Press
Press
3. / to select the desired signal type.
Auto:
RGB (only for AV1 input):
CVBS:
S-Video:
.
Factory setting, normally OK.
When RGB is input.
When Composite is input.
When S-Video is input.
26” 32”
).
Use subtitles
You can enable subtitles for each TV channel.
Subtitles are broadcasted via teletext or DVB-T digital
broadcasts. With digital broadcasts, you have the
additional option of selecting a preferred subtitle
language.
E
Set analogue subtitles
Press
1. TV MENU on the remote control and
select
Press
2. OK or to enter Subtitle.
Select
3. Analog Subtitle.
Press
4. / to select On to display subtitle
always. Select Off to close subtitles.
5.
Follow the on-screen instructions to exit.
E
Select a subtitle language on digital TV
channels
When you select a subtitle language on a digital TV
channel as described below, the preferred subtitle
language set in the TV menu is temporarily overruled.
1. TV MENU on the remote control and
Press
select
Press
2. OK or to enter Subtitle.
3. / to select Digital Subtitle Language
Press
or Digital Subtitle Language 2nd.
4. / to
Highlight your selection and press
select a subtitle language.
5.
Follow the on-screen instructions to exit.
NOTE
If your selected subtitle language is not broadcasted, the •
default language subtitle will be displayed.
≥ Subtitle.
≥ Subtitle.
If the • Digital Subtitle Language you selected is not
available, the Digital Subtitle Language 2nd will be
displayed.
E
Select Hearing impaired subtitle
When watching channels with hearing impaired
services, you can enable the subtitle commentary for
hearing impaired. For digital channels only.
1. TV MENU on the remote control and
Press
select
Press
2. OK or to enter Subtitle.
Press
3. / to select Hearing Impaired.
4. / to select On or Off as your subtitle
Press
type.
5.
Follow the on-screen instructions to exit.
≥ Subtitle.
Auto 4 : 3 Mode
This option selects the default way that a 4:3 signal
is shown - either as normal “4:3” or expanded in the
“16:9” mode, according to your preferences.
1. TV MENU on the remote control and
Press
select
Press
2. / to select 4 : 3 or 16 : 9.
3.
Follow the on-screen instructions to exit.
≥ 4 : 3 Mode.
Reset Default
When you activate the Reset Default, the TV enters to
first time installation.
1. TV MENU on the remote control and
Press
select
Press
2. OK or to enter.
3.
Input password (0000: default password).
Follow the on-screen instructions to reset your 4.
TV settings.
≥ Reset TV Setting.
19
54B0101A_English.indd 1954B0101A_English.indd 19 2/27/2010 17:23:292/27/2010 17:23:29
Page 20

TV menu
Parental
Lock TV channels with a four digit code to prevent
children from watching unauthorized content.
Access Parental menu
Press 1. TV MENU on the remote control and
select
Press
2. OK or to highlight the password box.
Enter your password by using the 3. digit buttons
on the remote control. If your password is
correct, the Parental menu appears.
NOTE
You have to enter a 4-digit password everytime to •
access Parental menu.
Enter “0000” as the default password.•
If you forget your password, enter “3001” to override •
any existing passwords.
Picture
Option
Lock
.
Password
* * * *
Lock one or more channels
Enter your password to access the 1. Parental
menu. (See “Access Parental menu” on this
page)
2. Channel Block and press OK or to
Select
enter the channel list.
3. / to select one or more channels you
Press
preferred to lock.
4. OK to lock or unlock the channel you
Press
selected.
5.
Follow the on-screen instructions to exit.
To set parental ratings
Some digital broadcasters rate their programmes
according to age. You can set TV to display only
programmes with age ratings higher than your child’s.
1. Parental
Enter your password to access the
menu. (See “Access Parental menu” on this
page)
2. / to select Program Block and press
Press
to enter.
OK or
3. / to select an Age Rating.
Press
Follow the on-screen instructions to exit.
4.
NOTE
If you switch to the locked channel, you will be •
prompted to enter your password. (If your password is
correct, the locked input source will be unlocked before
the TV restarts from standby.)
Set / Change password
Enter your password to access the 1. Parental
menu. (See “Access Parental menu” on this
page)
Press
2. / to select Change Password and
press OK or
Enter your new password in the
3. New
Password box by using the digit buttons on
the remote control.
4. Confirm
Enter your new password again in the
Password box.
5. Parental
When complete, the TV reruns to the
menu.
6.
Follow the on-screen instructions to exit.
to enter.
NOTE
If you switch to the locked channel, you will be •
prompted to enter your password. (If your password is
correct, the locked channel will be unlocked before the
TV restarts from standby.)
20
54B0101A_English.indd 2054B0101A_English.indd 20 2/27/2010 17:23:292/27/2010 17:23:29
Page 21

DVD Operation
Disc
DVD discs must be Region 2 or Region ALL type to play on this unit.
The loaded Disc (DVD and Audio-CD) will be recognized automatically.
The suitable disc formats are: DVD-Video, DVD-R/-RW (Video format only), Audio CD, Fujicolor CD, KODAK Picture
CD, CD-R/CD-RW, Video CD, SVCD and DivX.
Some CD-R/RW discs may be incompatible.
This unit can play an 8cm disc. Please do not use a disc adapter. It may cause trouble.•
Please do not insert any disc of an irregular shape into the unit, as it may interfere with the function of the unit.•
able to remove it.
If you tilt or move the unit while DVD or CD discs are placed inside, your discs may be damaged.•
Please do not use after market accessories, such as a ring protector, as this may cause trouble with the operation of the •
unit.
When you play a movie that has been edited with a DVD recorder (partially deleted, etc), it may be paused for a moment •
where edited.
When you play a movie that has been edited with a DVD recorder or such, it may not be played exactly as you edited it.•
You may not be
Do not play DVD-ROM, DVD-Audio, CD-G or Photo CD to prevent accidental erasure of prerecorded material.
Title
When two or more movies are recorded on a disc, the disc is divided
into two or more sections. Each section is called a “TITLE”.
Chapter
TITLE1 TITLE2
CHAPTER 1
DVD DISC
CHAPTER 2 CHAPTER 2 CHAPTER 3CHAPTER 1
The titles can be subdivided into many sections.
Each section is called a “CHAPTER”.
Track
An Audio CD/VCD can contain several items.
These are assigned to tracks.
TRACK 1 TRACK 2 TRACK 3 TRACK 4 TRACK 5
Audio-CD/VCD
Removing Disc from Case
Be sure to hold the edge of disc. Do not touch the surface of the disc.
Pick up the disc gently from the case.
Do not scratch the disc.•
Do not get dirt on the surface of the disc.•
Do not stick a label or adhesive tape on the disc.•
Do not drop or bend the disc.•
Storing Disc
Store the disc in the case to avoid risk of scratches, dirt or damage.•
Do not leave disc exposed to direct sunlight or in hot or humid places.•
Cleaning Disc
Wipe the disc with a clean, dry cloth from center to edge.
Do not wipe in circular direction.•
Do not use liquid or aerosol cleaners.•
On Video CDs
This unit supports Video CDs equipped with the PBC (Version 2.0) function. (PBC
is the abbreviation of Playback Control.) You can enjoy two playback variations
depending on types of discs.
Video CD not equipped with PBC function •
(Version 1.1) Sound and movie can be played on this TV/DVD in the same way as an
audio CD.
Video CD equipped with PBC function•
(Version 2.0) In addition to operation of a Video CD not equipped with the PBC function, you can enjoy playback of
interactive software with search function by using the menu displayed on the TV screen (Menu Playback). Some of the
functions described in this owner’s manual may not work with some discs.
To turn off the PBC
Press one of the track numbers by Number buttons (0-9) in the Stop mode.
Press OK.
To turn on the PBC
Once remove the disc with EJECT and insert it again.
21
54B0101A_English.indd 2154B0101A_English.indd 21 2/27/2010 17:23:302/27/2010 17:23:30
Page 22

DVD Operation
PC-created disc compatibility
You may not be able to play discs recorded using a •
personal computer or recorder for disc compatibilities,
scratches or marks on the disc, dirty lenses of the unit
or condensation and so on.
Discs recorded using a personal computer may not be •
playable in this unit due to the setting of the application
software used to create the disc. In these particular
instances, check with the software publisher for more
detailed information.
Playable files
ISO 9660 Level 1 or 2 compliant.•
Romeo and Joliet file systems are both compatible with
this player.
DRM (Digital Rights Management) protected files will not •
play in this player.
For detailed information, please see the instruction
manuals or help files that came with your PC and/or
software.
File structure (may differ): Up to 299 folders on a disc; •
up to 648 files within each folder.
Folder and file names can be displayed as long as they •
are typed in alphabets and numbers. If folder and file
names are other than alphabets and numbers, they may
be replaced and displayed as “_”. Garbled characters
may also be displayed in this case.
Playing image files
JPEG files recorded in DVD-R/-RW and CD-R/-RW can
be played.
JPEG file compatibility
Image files should be saved in JPEG format.•
Files recorded in Fuji Colour CD, Kodak Picture CD or •
CD-R/-RW can be played.
Compatible formats: Baseline JPEG and EXIF 2.2* still •
image files up to a resolution of 3072 x 2048.
*File format used by digital still cameras.
Files with extensions .jpg or .JPG can be played.•
Progressive JPEG formatted files do not work.•
It may take some more time to start to play larger files •
than usual.
JPEG files with different aspect ratio may be displayed •
with black bands (either vertical or horizontal).
Playing Audio files
WMA and MP3 files recoded in DVD-R/-RW, CD-R/RW can be played.
Windows Media Audio (WMA) compatibility
WMA is an acronym for Windows Media Audio and •
refers to an audio compression technology developed
by Microsoft Corporation.
You can encode your files by using Windows Media •
Player Ver.7, 7.1, Windows Media Player for Windows
XP or Windows Media Player 9 Series.
When encoding your files, use only applications •
approved by Microsoft Corporation. If you use nonapproved application, it may not work properly.
This unit is compatible with audio files recorded with the •
following sampling frequency: 32 kHz, 44.1 kHz and
48 kHz.
It is not compatible with loss-less encoding.•
Files with extensions .wma or .WMA can be played.•
Playing MP3 (MPEG-1 Audio Layer-3) files
This unit is compatible with audio files recorded with the •
following sampling frequency: 32 kHz, 44.1 kHz and
48 kHz.
Files with extensions .mp3 or .MP3 can be played.•
For the best quality of sound, 128 kbps or higher bit rate •
is recommended.
Copy Control CD (CCCD)
This product is designed to conform to CD-DA
(Compact Disc Digital Audio). Any other discs than
CD-DA are not guaranteed with their operation and
performance in this product.
DivX
DivX• ® media files contain highly compressed video with
high visual quality that maintains a relatively small file
size.
ABOUT DIVX VIDEO:• DivX® is a digital video format
created by DivX,Inc. This is an official DivX Certified
device that plays DivX video.
Visit www.divx.com for more information and software
tools to convert your files into DivX video.
ABOUT DIVX VIDEO-ON-DEMAND:• This DivX
Certified® device must be registered in order to play DivX
Video-on-Demand (VOD) content.
To generate the registration code, locate the DivX VOD
section in the device setup menu. Go to vod.divx.com
with this code to complete the registration process and
learn more about DivX VOD.
22
54B0101A_English.indd 2254B0101A_English.indd 22 2/27/2010 17:23:302/27/2010 17:23:30
Page 23

DVD Operation
Playing a disc
This section shows you the basics on how to play a
disc.
E
Basic playback (DVD/VCD/Audio CD)
Preparation
Make sure that the B (Power) key on the unit is
pressed (ON). (The B (Standby/On) indicator lights
up.)
1. TV/DVD on
Press
the remote control
to select the DVD
mode.
2.
Place the disc in
the disc slot with
the label side facing forward. (If the disc has a
label.)
Do not place a disc which is unplayable in this •
unit.
On the TV-screen, “3. ” changes to “Loading”
and then playback commences.
A menu screen will appear on the TV screen if •
the disc has a menu feature.
Press •
/ / / to select title, then press OK.
Title is selected and play commences.
Press 4. STOP to end playback.
The unit can record where you stop a video, •
but it depends on a disc you are using.
Press PLAY
The unit can store a memory of stopped point
of last five discs that you have played. When
one of these discs is next loaded, you can
resume playback from where you stopped
playing last time.
If you press•
appears on the screen.), the unit will clear the
memory of its stopped point.
It is only DVD videos that a stopped point can •
be stored in the unit with.
You cannot save a stopped point for some •
discs.
If a number of discs played and stored in the
unit exceeds five, a new memory will overwrite
the old stored memory.
E
To start playback in the stop mode
Press PLAY
NOTE
If the unit does not operate property:•
Static electricity, etc., may affect the player’s operation.
Disconnect the AC power cord once, then connect it
again.
If a disc is inserted during some modes other than DVD •
mode, it may switch to DVD mode and then playback
may be begun automatically.
to resume a playback point.
STOP again (“Resume off”
.
E
To pause playback (still mode)
Press PAUSE
To resume normal playback, press PLAY
The sound is muted during still mode.•
E
To stop playback
during playback.
.
Press STOP .
E
To remove the disc
Press EJECT
Remove the disc after the disc comes out.
Using inferior discs may result that you cannot remove •
the disc. In this case, press PLAY to play the disc
and then press EJECT
When a Disc is inserted on TV mode, the TV will •
automatically change to DVD mode and start playback.
(In some case it takes some time to insert a disc for
loading.)
When a Disc has been inserted previously, no other Disc
can be inserted. Please insert Disc once again after
removing previous disc on DVD mode.
NOTE
If a non-compatible disc is loaded, “Can’t play disc” or •
“Incompatible disc region number Can’t play disc” will
appear on the TV screen according to the type of loaded
disc. In this case, check your disc again (see pages 21
and 37).
Some discs may take a minute or so to start playback.•
When you set a single-faced disc label backwards (i.e. •
the wrong way), “Loading” will appear on the display for
a few minutes and then “Can’t play disc” will continue to
be displayed.
Some playback operations of DVDs may be intentionally •
fixed by software producers. Since this unit plays DVDs
according to the disc contents the software producers
designed, some playback features may not be available.
Also refer to the instructions supplied with the DVDs.
Do not move the unit during playback. Doing so may •
damage the disc.
In many instances, a menu screen will appear after •
playback of a movie is completed. Prolonged display
of an on-screen menu may damage your television
set, permanently etching that image onto its screen. To
avoid this, be sure to press Power ( ) on your remote
control once the movie is completed.
There may be a slight delay between the button is •
pressed and the function activates.
E
Playing in fast reverse or fast forward
.
on the unit.
directions (DVD/VCD/Audio CD)
Press REV
REV
FWD
Each time you press REV
playback speed changes.
To resume normal playback, press PLAY
NOTE
The unit mutes sound during reverse and forward scan •
of DVD/VCD discs.
The playback speed may differ depending on the disc.•
or FWD during playback.
: Fast reverse playback
: Fast forward playback
or FWD , the
.
23
54B0101A_English.indd 2354B0101A_English.indd 23 2/27/2010 17:23:302/27/2010 17:23:30
Page 24

DVD Operation
E
Playing frame by frame (DVD/VCD)
Press PAUSE during playback.
Each time you press REV
advances one frame.
To resume normal playback, press PLAY
NOTE
The sound is muted during frame by frame playback•
Reverse frame by frame does not work on VCD.•
E
Playing in slow-motion (DVD/VCD)
Press SLOW or SLOW during playback.
Each time you press SLOW or SLOW , the slowmotion speed changes.
To resume normal playback, press
NOTE
The sound is muted during slow-motion playback.•
Reverse slow (•
E
Locating a chapter or track (DVD/VCD/Audio CD)
) does not work on VCD.
Press SKIP or SKIP repeatedly to display the
chapter or track number you want.
Press SKIP
to playback starts from the selected
chapter or track.
Press SKIP
to locate succeeding chapters or
tracks.
Playback starts from the beginning of the current
chapter or track.
NOTE
A prohibition message “Depending on the disc, this •
operation may be prohibited” or “This operation can’t
be performed” may appear at the screen. This message
means either the feature you tried is not available on the
disc, or the unit cannot access the feature at this time.
This does not indicate a problem with the unit.
Zooming (DVD/VCD)
This unit will allow you to zoom in on the frame image.
You can then make selections by switching the position
of the frame.
1. ZOOM during playback. The centre part
Press
of the image will be zoomed in. Each press of
ZOOM will change the Zoom 2x and 4x.
2. / / / to view a different part of
Press
the frame. You may move the frame from the
centre position to UP, DOWN, LEFT or RIGHT
direction.
3. ZOOM repeatedly to
In the zoom mode, press
return to a 1:1 view.
NOTE
You can select the Pause or Slow in the zoom mode.•
Some discs may not respond to zoom feature.•
or FWD , the picture
.
PLAY .
Locating desired scene (DVD/VCD/Audio CD)
Use the title, chapter or track recorded on the disc to
locate the desired point to playback.
To check the title and chapter/track, press
.
Press 1. Number buttons (0–9) to input the
number during playback or stop mode.
If you input a wrong number, press • CANCEL.
Refer to the package supplied with the disc to •
check the numbers.
Press 2. OK. Playback starts.
When you change the title, playback starts •
from Chapter 1 of the selected title.
Some discs may not work in the above •
operation.
NOTE
In case of the VCD playback with PBC, this feature does •
not work. Turn off the PBC (see page 21).
This Function cannot be used for DivX disc.•
Changing Soundtrack Language (DVD/VCD)
You can select the language when you play a
multilingual disc.
1. AUDIO during playback. The current
Press
soundtrack language will appear.
Current/Total
Audio 1/2 English Dolby Digital 2/0CH
Press 2. AUDIO repeatedly until the desired
language is selected.
The on screen display will disappear after a few •
seconds.
E
In case of Video CD playback
Audio type changes as follows each time you press
AUDIO.
Audio Left
Audio Right
Audio Stereo
Subtitles (DVD)
When playing back a disc recorded with subtitles, you
can select the subtitle language or turn the subtitle off.
1. repeatedly during playback until the
Press
desired language is selected.
Current/Total
Subtitle 1/2 English
To turn off the subtitle, press 2. until “Off”
appears.
The on screen display will disappear after a few •
seconds.
24
54B0101A_English.indd 2454B0101A_English.indd 24 2/27/2010 17:23:312/27/2010 17:23:31
Page 25

DVD Operation
NOTE
If the desired language is not heard after pressing the button •
several times, the language is not recorded on the disc.
The selected soundtrack language is cancelled when •
you eject the disc. The initial default language or available
language will be heard if the disc is played back again.It does
not go back to the initial default language if the unit has a
resuming memory.
When you want to play DTS audio, connect this unit to a •
DTS-compatible amplifer or decoder using a digital audio
cable.
Depending on the DVD, you may not be able to change •
subtitles, or to turn subtitles on or off.
While playing a DVD, the subtitle may change when you •
loaded or eject the disc.
In some cases, a selected subtitle language may not be •
changed immediately.
Changing angles (DVD)
When playing back a disc recorded with multi-angle
facility, you can change the angle that you are viewing
the scene from.
1. ANGLE during playback.
Press
The current angle will appear.
Current/Total
Angle 1/2
Press 2. ANGLE repeatedly until the desired angle
is selected.
NOTE
Depending on the DVD, you may not be able •
to change the angles even if multi-angles are
recorded on the DVD.
This function cannot be used for DivX disc.•
Title selection (DVD)
Two or more titles are recorded on some discs. If the
title menu is recorded on the disc, you can select the
desired title.
1. TOP MENU during playback.
Press
Title menu appears on the screen.
2. / / / to select the desired title.
Press
Press
3. OK.
The playback of the selected title will start.
NOTE
Some DVDs allow you to select the disc •
contents using the menu.
When you playback these DVDs, you can •
select the subtitle language and soundtrack
language, etc. using the menu.
DVD menu (DVD)
Two or more titles are recorded on some discs. If the
title menu is recorded on the disc, you can select the
desired title.
1. DVD MENU during playback.
Press
The DVD menu appears on the screen.
Press • DVD MENU again to resume playback at
the scene when you pressed DVD MENU.
Press 2. / / / to select the desired item.
3. OK.
Press
The menu continues to another screen. Repeat
steps 2 and 3 to set the item completely.
NOTE
Depending on the DVD, you may not be able •
to resume playback from the scene point when
you press DVD MENU.
Disc status
With press of , the status of the disc will appear on
the screen. To cancel the display, press
Display messages may change at every time when you •
for some discs or files.
press
again.
Using HOME MENU
E
Playing a disc
Press
1. SETUP during stop mode.
HOME MENU will appear.
2. / / / to select Disc Navigator, then
Press
press OK.
HOME MENU
Audio Settings Video Adjust
Play Mode
Initial Settings
Press 3. / to select desired option, then press
OK.
Disc Navigator
Title
Chapter
Some discs may not work • Disc Navigator.
Depending on a disc, you can select Title, •
Chapter, or both.
Press 4. / / / or Number Buttons (0-9) to
select Title, Chapter, Track or Time, then press
OK.
Press • SKIP or SKIP to move next/
previous page.
Press • RETURN to go to previous step.
DVD
Disc Navigator
25
54B0101A_English.indd 2554B0101A_English.indd 25 2/27/2010 17:23:312/27/2010 17:23:31
Page 26

DVD Operation
E
Playing a file
1. SETUP during stop mode.
Press
HOME MENU will appear.
2. / / / to select Disc Navigator, then
Press
press OK.
Press
3. / to select folder, then press OK.
00:00/ 00:00 0kbps
Folder1
Folder2
Folder3
Folder4
Press 4. / to select file, then press OK.
If you select JPEG file, unit shows the pictures •
one after another automatically.
Press • RETURN to return to HOME MENU
screen.
Press • SETUP to exit the menu.
NOTE
When music files and JPEG files are recorded •
in one disc, you can play simultaneously.
Please select the music file then select the
JPEG file.
File names of up to 14 letters can only be •
shown on screen.
Play mode
A-B repeat playback
A-B repeat playback allows you to repeat selection
between two selected points.
1. PLAY MODE during playback.
Press
Play Mode screen will appear.
Play Mode
A-B Repeat
Repeat
Random
Program
Search Mode
A(Start Point)
B(End Point)
Off
NOTE
Some discs may not work • Play Mode function.
A-B Repeat playback does not work with MP3/WMA •
CD.
Repeat playback
Press 1. PLAY MODE during playback.
Play Mode screen will appear.
2. / to select Repeat, then press or
Press
OK.
3. / to select desired repeat option, then
Press
press OK.
The unit automatically starts repeat playback
after finishing the current title or chapter.
E
To resume normal playback
Select Repeat Off in step 3.
NOTE
Some discs may not work with the repeat operation.•
Random playback
Press 1. PLAY MODE during playback.
Play Mode screen will appear.
2. / to select Random, then press or
Press
OK.
3. / to select desired random playback
Press
option, then press OK.
The unit automatically starts random playback.
E
To resume normal playback
Select Random Off in step 3.
NOTE
You cannot play Random for programmed contents •
(Random play is not permitted during Program
playback).
During Random playback, it may repeat the same title, •
chapter or track.
During stop mode, you can also enter • Play Mode
screen by selecting Play Mode in HOME MENU.
Program playback
Press 2. / to select A-B Repeat, then press
or OK.
Press
3. / to select A(Start Point), then press
OK. The start point is selected.
4. / to select B(End Point), then press
Press
OK.
The end point is selected. Playback starts
Press 1. PLAY MODE during playback.
Play Mode screen will appear.
2. / to select Program, then press
Press
or OK.
3. / to select Create/Edit, then press
Press
OK. Create/Edit display differs, depending on
discs or files.
at the point that you selected. Playback
stops at the end point and returns to Point A
automatically, then starts again.
E
To resume normal playback
Select Off in step 3.
26
54B0101A_English.indd 2654B0101A_English.indd 26 2/27/2010 17:23:322/27/2010 17:23:32
Page 27

DVD Operation
Program
Program Step
01. 01
02.
03.
04.
05.
06.
07.
08.
Current Title:02 Chapter:001
Title 1-38
Title 01
Title 02
Title 03
Title 04
Title 05
Title 06
Title 07
Title 08
Chapter 1-004
Chapter 001
Chapter 002
Chapter 003
Chapter 004
NOTE
You can locate desired scene in Menu screen •
for some DVD video.
During stop mode, you can also enter • Play
Mode screen by selecting Play Mode in HOME
MENU.
Press 4. / / / to select Title, Chapter, Track or
File, then press OK.
When you add a program, find where you •
want to add it (Program Step) and select Title,
Chapter or Track then press OK. (It will be
added to the bottom if File is added.)
To go to previous step, press • RETURN.
To delete a program, select Program Step that •
you want to delete and press CANCEL.
Press 5. PLAY .
To play existing programmed contents, select •
Playback Start from Play Mode screen and
press OK.
To resume normal playback, select • Playback
Stop in Play Mode screen and press OK. Your
programmed contents are saved.
To delete all programmed contents, select •
Program Delete in Play Mode screen and
press OK.
NOTE
You can repeat the programmed contents. •
Select Program Repeat from Repeat in the
Play Mode screen during Program playback.
During stop mode, you can also enter • Play
Mode screen by selecting Play Mode in HOME
MENU.
Locating desired scene
Press 1. PLAY MODE during playback.
Play Mode screen will appear.
2. / to select Search Mode, then press
Press
or OK.
Press
3. / to select desired search mode
option, then press
Search Mode options differs, depending on •
discs or files.
or OK.
Input Title, Chapter, Track or Folder number 4.
or Time by using Number buttons (0-9) and
press OK.
Play Mode
A-B Repeat
Repeat
Random
Program
Search Mode
Title Search
Chapter Search
Time Search
Input Chapter
0 0 1
Audio Settings menu
The Audio Settings menu offers features for adjusting
the way discs sound.
1. SETUP during stop mode.
Press
HOME MENU will appear.
2. / / / to select Audio Settings, then
Press
press OK.
HOME MENU
Off
Rock
Pop
Live
Dance
Techno
Classic
Soft
DVD
Disc Navigator
Audio Settings Video Adjust
Play Mode
Initial Settings
Press 3. / / / to setting the option, then press
OK.
Audio Settings
Equalizer
Audio DRC
Dialog
Press 4. SETUP to save the setting.
Equalizer
Select the most suitable setting to match a
category of music that you are listening to.
Audio DRC
Loud sound level goes down and quiet sound •
level goes up while playing. This is useful, for
instance, when you watch a film in the late
night.
It only works with Dolby Digital Sound.•
The effect depends on your AV amplifier and •
speakers volume. Adjust the sound as you wish
and find the most effective setting.
Dialog
Adjust setting when you cannot hear dialogs very well.
NOTE
It may not be very effective for some discs or files.•
For instance, if you want to enter 1hr 4min •
(64:00), input 6, 4, 0, 0.
27
54B0101A_English.indd 2754B0101A_English.indd 27 2/27/2010 17:23:322/27/2010 17:23:32
Page 28

DVD Operation
Video Adjust menu
From the Video Adjust menu you can adjust various
settings that affect how the picture is presented.
1. SETUP during stop mode.
Press
HOME MENU will appear.
Press
2. / / / to select Video Adjust, then
press OK.
HOME MENU
Audio Settings Video Adjust
Play Mode
Initial Settings
Press 3. / / / to setting the option, then press
OK.
Video Adjust
Sharpness
Brightness
Contrast
Gamma
Hue
Chroma Level
Press 4. SETUP to save the setting.
Sharpness
Adjust sharpness of images.
Brightness
Adjust brightness of images.
Contrast
Adjust a ratio of brightness between the brightest part
and the darkest part.
Gamma
Emphasize dark part of images.
Hue
Adjust a balance between green and red.
Chroma Level
Adjust color density. It is effective with animation or
something with high color density.
NOTE
It may not be very effective for some discs or files.•
DVD
Fine
Standard
Soft
Disc Navigator
Customizing The Function Settings
You can change the default settings to customize
performance to your preference.
E
Setting procedure
Press
1. SETUP during stop mode.
HOME MENU will appear.
2. / / / to select Initial Settings, then
Press
press OK.
HOME MENU
Audio Settings Video Adjust
Play Mode
Initial Settings
Press 3. / / / to select the desired option,
then press OK.
4. / / / or OK, by
Change the selection using
referring to the corresponding page 29.
Repeat steps 3 and 4 to change other option.•
To clear 5. HOME MENU screen, press SETUP.
DVD
Disc Navigator
28
54B0101A_English.indd 2854B0101A_English.indd 28 2/27/2010 17:23:332/27/2010 17:23:33
Page 29

DVD Operation
Customizing The Function Settings
Setting Option
Digital Audio Out settings
Digital Out On Digital audio is output from the digital outputs.
Dolby Digital Out Dolby Digital
DTS Out DTS DTS encoded digital audio is output when playing a DTS disc. (Noise will be
96kHz PCM Out 96kHz > 48kHz 96 kHz digital audio is converted to 48 kHz for digital output.
MPEG Out MPEG MPEG encoded digital audio is output as is.
Video Output settings
TV Screen 4:3 (Letter Box) Set if you have a conventional 4:3 TV. Widescreen movies are shown with
NTSC Out NTSC Output NTSC discs as NTSC-TV system.
Language settings
Audio Language English If there is an English soundtrack on the disc then it will be played.
Subtitle Language English
DVD Menu Lang. w/Subtitle Lang. DVD disc menus will be displayed in the same language as your selected
Subtitle Display On
Display settings
Angle Indicator On
Options settings
Parental Lock See page 30.
DivX VOD Activate Display the player’s registration code required to play DivX VOD files.
NOTE
If you want to change the OSD language, you can perform it by TV menu.•
Off No digital audio output.
Dolby Digital > PCM Dolby Digital audio is converted to PCM audio before being output.
Off No digital audio is output.
96kHz 96 kHz digital audio is output as is at 96 kHz.
MPEG > PCM
4:3 (Pan & Scan) Set if you have a conventional 4:3 TV. Widescreen movies are shown with the
16:9 (Wide) Set if you have a widescreen TV.
NTSC > PAL Output NTSC discs converting to PAL-TV system.
Languages as
displayed
Other Language Select to choose a language other than the ones displayed. (see Language
Languages as
displayed
Other Language Select to choose a language other than the ones displayed. (see Language
Languages as
displayed
Other Language Select to choose a language other than the ones displayed. (see Language
Off Subtitles are always off by default when you play a DVD disc (note that some
Off No multi-angle indication is shown.
Deactivate Display the VOD deactivation code.
®
VOD content is protected by DRM (Digital Rights Management) system. This restricts playback
DivX
of content to specific registered devices.
If the incorrect DRM file is loaded, “Authorization Error” will appear on the screen. When you attempt
to play DivX
®
VOD, the number of plays is limited will appear on the screen.
If the number of plays goes over the limit, then “Rental Expired” will be displayed.•
Dolby Digital encoded digital audio is output when playing a Dolby Digital DVD disc.
output if your amplifier/receiver is not compatible with DTS audio.)
MPEG encoded digital audio is converted to PCM audio for digital output.
black bars top and bottom.
sides cropped so that the image fills the screen.
If there is the language selected on the disc, then it will be played.
Code List on page 31)
If there is an English subtitle on the disc, then it will be displayed.
If there is the subtitle language selected on the disc, then it will be displayed.
Code List on page 31)
subtitle language, if possible.
DVD disc menus will be displayed in the selected language, if possible.
Code List on page 31)
Subtitles are displayed according to your selected subtitle language (see above).
discs override this setting).
A camera icon is displayed on-screen during multi-angle scenes on a DVD disc.
29
54B0101A_English.indd 2954B0101A_English.indd 29 2/27/2010 17:23:342/27/2010 17:23:34
Page 30

DVD Operation
Parental Control
Some discs are specified as not suitable for children.
Such discs can be limited not to playback with the unit.
E
How to into the Parental menu
Press
1. SETUP during stop mode.
HOME MENU will appear.
2. / / / to select Initial Settings, then
Press
press OK.
3. / to select Options, then press .
Press
Then press
E
Set Password
Press
1. or to select Password, then press
OK.
Press 2. Number buttons (0–9) to input the
password, then press OK.
E
Change Password
Press
1. or to select Password Change, then
press OK.
2. Number buttons (0–9) to input the
Press
current password, then press OK.
3. Number buttons (0–9) to input the new
Press
password. Press OK. Now your new password
has been set. Be sure to remember this
number!
to enter the Parental Lock menu.
Initial Settings
Parental Lock
Digital Audio Out
Video Output
Language
Display
Options
Initial Settings
Digital Audio Out
Video Output
Language
Display
Options
Initial Settings
Digital Audio Out
Video Output
Language
Display
Options
Password
DivX VOD
Level Change
Country Code
Parental Lock: Register Code Number
Parental Lock: Password Change
Password
New Password
Press2. Number buttons (0–9) to input the
current password, then press OK.
Initial Settings
Digital Audio Out
Parental Lock: Level Change
Video Output
Language
Display
Options
Password
12345678Off
Press 3. or to select from the level 1 to level
8. The limitation will be more severe as the level
number is lower. Then press OK.
Initial Settings
Digital Audio Out
Parental Lock: Level Change
Video Output
Language
Display
Options
Password
5
1234 678Off
Level 1: DVD software for adults cannot be
played back.
Level 8: Virtually all DVD software can be
played back.
Level Off: The parental control setting does not
function.
E
Country Code
1. or to select Country Code, then
Press
press OK.
Initial Settings
Parental LockDigital Audio Out
Password Change
DivX VOD
Video Output
Language
Display
Options
Level Change
Country Code
Press 2. Number buttons (0–9) to input the
current password, then press OK.
Initial Settings
Digital Audio Out
Parental Lock: Change Country Code
Video Output
Language
Display
Options
Password
Country Code List Code
2
us
1 1 9
Press 3. or to select the input mode from
Country Code List or Code.
Initial Settings
Digital Audio Out
Parental Lock: Change Country Code
Video Output
Language
Display
Options
Password
Country Code List Code
2
us
1 1 9
E
Level Change
Press
1. or to select Level Change, then
press OK.
Initial Settings
Parental LockDigital Audio Out
Password Change
DivX VOD
Video Output
Language
Display
Options
Level Change
Country Code
30
When you selected • Country Code List : Press
or
to select Country Code, then press OK.
When you selected • Code : Press then use
the Number buttons (0-9) to enter the 4-digit
Country Code. Press OK. (see Country/Area
Code List on page 31)
NOTE
Depending on the discs, the unit cannot limit playback.•
Some discs may not be encoded with specific rating •
level information though its disc jacket says “adult.” For
those discs, the age restriction will not work.
If you input a wrong number, press • , then input correct
number.
54B0101A_English.indd 3054B0101A_English.indd 30 2/27/2010 17:23:342/27/2010 17:23:34
Page 31

DVD Operation
Language Code List
Language (Language code letter), Language code
Japanese (ja), 1001
English (en), 0514
French (fr), 0618
German (de), 0405
Italian (it), 0920
Spanish (es), 0519
Chinese (zh), 2608
Dutch (nl), 1412
Portuguese (pt), 1620
Swedish (sv), 1922
Russian (ru), 1821
Korean (ko), 1115
Greek (el), 0512
Afar (aa), 0101
Abkhazian (ab), 0102
Afrikaans (af), 0106
Amharic (am), 0113
Arabic (ar), 0118
Assamese (as), 0119
Aymara (ay), 0125
Azerbaijani (az), 0126
Bashkir (ba), 0201
Byelorussian (be), 0205
Bulgarian (bg), 0207
Bihari (bh), 0208
Bislama (bi), 0209
Bengali (bn), 0214
Tibetan (bo), 0215
Breton (br), 0218
Catalan (ca), 0301
Corsican (co), 0315
Czech (cs), 0319
Welsh (cy), 0325
Danish (da), 0401
Bhutani (dz), 0426
Esperanto (eo), 0515
Estonian (et), 0520
Basque (eu), 0521
Persian (fa), 0601
Finnish (fi), 0609
Fiji (fj), 0610
Faroese (fo), 0615
Frisian (fy), 0625
Irish (ga), 0701
Scot-Gaelic (gd), 0704
Galician (gl), 0712
Guarani (gn), 0714
Gujarati (gu), 0721
Hausa (ha), 0801
Hindi (hi), 0809
Croatian (hr), 0818
Hungarian (hu), 0821
Armenian (hy), 0825
Interlingua (ia), 0901
Interlingue (ie), 0905
Inupiak (ik), 0911
Indonesian (in), 0914
Icelandic (is), 0919
Hebrew (iw), 0923
Yiddish (ji), 1009
Javanese (jw), 1023
Georgian (ka), 1101
Kazakh (kk), 1111
Greenlandic (kl), 1112
Cambodian (km), 1113
Kannada (kn), 1114
Kashmiri (ks), 1119
Kurdish (ku), 1121
Kirghiz (ky), 1125
Latin (la), 1201
Lingala (ln), 1214
Laothian (lo), 1215
Lithuanian (lt), 1220
Latvian (lv), 1222
Malagasy (mg), 1307
Maori (mi), 1309
Macedonian (mk), 1311
Malayalam (ml), 1312
Mongolian (mn), 1314
Moldavian (mo), 1315
Marathi (mr), 1318
Malay (ms), 1319
Maltese (mt), 1320
Burmese (my), 1325
Nauru (na), 1401
Nepali (ne), 1405
Norwegian (no), 1415
Occitan (oc), 1503
Oromo (om), 1513
Oriya (or), 1518
Panjabi (pa), 1601
Polish (pl), 1612
Pashto, Pushto (ps), 1619
Quechua (qu), 1721
Ladin (rm),
1813
Kirundi (rn), 1814
Romanian (ro), 1815
Rwanda (rw), 1823
Sanskrit (sa), 1901
Sindhi (sd), 1904
Sangho (sg), 1907
BCS (sh), 1908
Sinhalese (si), 1909
Slovak (sk), 1911
Slovenian (sl), 1912
Samoan (sm), 1913
Shona (sn), 1914
Somali (so), 1915
Albanian (sq), 1917
Serbian (sr), 1918
Siswati (ss), 1919
Sesotho (st), 1920
Sundanese (su), 1921
Swahili (sw), 1923
Tamil (ta), 2001
Telugu (te), 2005
Tajik (tg), 2007
Thai (th), 2008
Tigrinya (ti), 2009
Turkmen (tk), 2011
Tagalog (tl), 2012
Setswana (tn), 2014
Tonga (to), 2015
Turkish (tr), 2018
Tsonga (ts), 2019
Tatar (tt), 2020
Twi (tw), 2023
Ukrainian (uk), 2111
Urdu (ur), 2118
Uzbek (uz), 2126
Vietnamese (vi), 2209
Volapuk (vo), 2215
Wolof (wo), 2315
Xhosa (xh), 2408
Yoruba (yo), 2515
Zulu (zu), 2621
Country/Area Code List
Country/Area, Country/Area code, Country/Area code letter
Argentina, 0118, ar
Australia, 0121, au
Austria, 0120, at
Belgium, 0205, be
Brazil, 0218, br
Canada, 0301, ca
Chile, 0312, cl
China, 0314, cn
Denmark, 0411, dk
Finland, 0609, fi
France, 0618, fr
Germany, 0405, de
Hong Kong, 0811, hk
India, 0914, in
Indonesia, 0904, id
Italy, 0920, it
Japan, 1016, jp
Republic of Korea,
1118, kr
Malaysia, 1325, my
Mexico, 1324, mx
Netherlands, 1412, nl
New Zealand, 1426, nz
Norway, 1415, no
Pakistan, 1611, pk
Philippines, 1608, ph
Portugal, 1620, pt
Russian Federation, 1821, ru
Singapore, 1907, sg
Spain, 0519, es
Sweden, 1905, se
Switzerland, 0308, ch
Taiwan, 2023, tw
Thailand, 2008, th
United Kingdom,
USA, 2119, us
0702, gb
31
54B0101A_English.indd 3154B0101A_English.indd 31 2/27/2010 17:23:352/27/2010 17:23:35
Page 32

Connecting external devices
E
Before connecting ...
Be sure to turn off the TV and any devices before making any connections.•
Firmly connect a cable to a terminal or terminals.•
Carefully read the operation manual of each external device for possible connection types. This also helps you •
get the best possible audiovisual quality to maximise the potential of the TV and the connected device.
HDMI connection
Example of connectable devices
E DVD E Blu-ray player/recorder
The HDMI connections (High Definition Multimedia
Interface) permit digital video and audio transmission
via a connection cable from a player/recorder. The
digital picture and sound data are transmitted without
data compression and therefore lose none of their
quality. Analogue/digital conversion is no longer
necessary in the connected devices, which also would
result in quality losses.
DVI
HDMI cable
DVI-HDMI cable
Audio cable
PC IN
HDMI device
HDMI
19”
22”
YPbPr (Component connection)
Example of connectable devices
E VCR E DVD E Blu-ray player/recorder
You will enjoy accurate colour reproduction and high
quality images through the (YPbPr) when connecting a
DVD recorder or other recording equipment.
(YPbPr) Component
Connection
Component cable
Audio cable
COMPONENT
26”
32”
DVI/HDMI conversion
Using an DVI/HDMI adapter cable, the digital video •
signals of a DVD can also be played via the compatible
HDMI connection. The sound must be fed in additionally.
Both HDMI and DVI use the same HDCP copy •
protection method.
Supported video signal:
480i, 480p, 576i, 576p, 720p, 1080i and 1080p
See page 35 for PC signal compatibility.
32
54B0101A_English.indd 3254B0101A_English.indd 32 2/27/2010 17:23:352/27/2010 17:23:35
Page 33

Connecting external devices
SCART connection
Example of connectable devices
E Decoder
E
When using the SCART 1
Full SCART, which transmits RGB, S-Video and CVBS
in, and CVBS tuner out.
Decoder
SCART cable
19”
SCART
22”
26”
SCART
AV1
32”
NOTE
In cases when the decoder needs to receive a signal •
from the TV, make sure to select the appropriate input
source.
Do not connect the decoder to the SCART 2.•
You cannot connect the VCR with Decoder using a fully •
wired SCART cable under the SCART 2 source.
S-Video connection
Example of connectable devices
E VCR E DVD E Blu-ray player/recorder
E Game concole E Camcorder
You can use the S-Video when connecting to a game
console, camcorder, a DVD recorder and some other
equipment.
S-Video
connection
Audio cable
S-video cable
Example of connectable devices
E VCR E DVD recorder
E
When using the SCART 2
19”
22”
Half SCART, which transmits S-Video or CVBS in, and
CVBS monitor out.
VCD / DVD
recorder
26”
32”
SCART
AV2
SCART cable
NOTE
When using a S-video cable, you also need to connect •
an audio cable (R/L).
33
54B0101A_English.indd 3354B0101A_English.indd 33 2/27/2010 17:23:362/27/2010 17:23:36
Page 34

Connecting external devices
Speaker / Amplifier connection
E
Connecting an amplifier with digital audio
input
Speaker / Amplifier
connection
Digital audio in
(COAXIAL)
DIGITAL AUDIO
COAXIAL OUT
Digital audio cable
Inserting a CA Card
In order to receive coded digital stations, a Common
Interface Module (CI Module) and a CA Card must be
inserted in the CI slot of your TV set.
The CI Module and the CA Card are not supplied
accessories. They are usually available from your
dealer.
Inserting the CA Card into the CI Module
1.
With the side with the gold coloured contact
chip facing the side of the CI Module marked
with the provider’s logo, push the CA Card
into the CI Module as far as it will go. Note the
direction of the arrow printed on the CA card.
Inserting the CI Module in the CI slot.2.
Carefully insert the CI Module in the CI slot with 3.
the contact side forward. The logo on the CI
Module must be facing forward from the rear of
the TV. Do not use excessive force. Make sure
the module is not bent in the process.
Access CI Module service
After inserting and activating the CI Module, make sure
the input source is TV.
1. TV MENU on the remote control.
Press
2. > Common Interface.
Go to
On-screen applications and content are provided by
your digital TV service operator.
34
54B0101A_English.indd 3454B0101A_English.indd 34 2/27/2010 17:23:382/27/2010 17:23:38
Page 35

Connecting external devices
Connecting a PC
Digital connection
HDMI
PC
DVI
HDMI
Ø 3,5 mm stereo mini jack cable
PC IN
Analogue connection
VGA
PC
HDMI
DVI-I
HDMI cable
DVI-HDMI cable
Ø 3,5 mm stereo mini jack cable
RGB cable
DVI-I / RGB
conversion cable
Supported display resolutions
Computer formats (PC)
Resolution Refresh rate
640 x 480 60Hz
800 x 600 60Hz
1024 x 768 60Hz
1280 x 720 60Hz
1280 x 768 60Hz
1360 x 768 60Hz
Video formats (HDMI only)
Resolution Refresh rate
480i 60Hz
480p 60Hz
576i 50Hz
576p 50Hz
720p 50Hz, 60Hz
1080i 50Hz, 60Hz
1080p
24Hz, 50Hz, 60Hz
Ø 3,5 mm stereo mini jack cable
PC IN
35
54B0101A_English.indd 3554B0101A_English.indd 35 2/27/2010 17:23:392/27/2010 17:23:39
Page 36

Appendix
Troubleshooting
Problem Possible Solution
No power.•
Unit cannot be operated.• External influences such as lightning, static electricity, etc., may cause •
Remote control unit does not •
operate.
Picture is stretched vertically.• Are wide mode adjustments made correctly? (See page 17.)•
Strange colour, light colour, or dark, •
or colour misalignment.
Power is suddenly turned off.• The unit’s internal temperature has increased.•
No picture.• Is connection to other components correct? (See pages 32 - 35.)•
No sound.• Is the volume too low? (See page 4.)•
The TV sometimes makes a cracking •
sound.
Check if you pressed •
If the indicator on the TV lights up red, press • B on the remote control
unit.
Is the AC cord disconnected? (See page 9.)•
Check if you pressed • B on the remote control unit. (See page 10.)
improper operation. In this case, operate the unit after first turning the
power off, or unplugging the AC cord and re-plugging it in after 1 or 2
minutes.
Are batteries inserted with polarity (+, −) aligned? (See page 8.)•
Are batteries worn out? (Replace with new batteries.)•
Are you using it under strong or fluorescent lighting?•
Is a fluorescent light illuminating the remote control sensor? •
Adjust the picture tone. (See page 13.)•
Is the room too bright? The picture may look dark in a room that is too •
bright.
Remove any objects blocking vent or clean.•
Is the correct input source selected? (See page 10.)•
Is picture adjustment correct? (See page 13.)•
Is the antenna connected properly? (See page 9.)•
Make sure that headphones are not connected. (See page 5.)•
Check if you pressed •
This is not a malfunction. This happens when the cabinet slightly expands •
and contracts according to change in temperature. This does not affect the
TV’s performance.
on the TV. (See page 9.)
on the remote control unit. (See page 4.)
Troubleshooting-PC mode
Problem Possible Solution
There is no image.•
There is no sound.• Make sure the PC audio cable is properly connected. (See page 35.)•
The text is blurred.• Adjust “Clock” and “Phase” using the PC Setting menu. (See page 13.)•
The image is not displayed in the •
center of the screen.
Make sure the RGB cable is properly connected. (See page 35.)•
Make sure the output signal of the PC and the input signal setting of the •
LCD TV set are matched. (See page 35.)
Some software prohibit video playback on an external display when playing •
back a video with a notebook PC. This is not attributable to a problem with
the LCD TV set.
Check if the mute function activates, or if the volume is set to minimum. •
(See page 4.)
Adjust “Hor Position” and “Ver Position” using the PC Setting menu. (See •
page 13.)
36
54B0101A_English.indd 3654B0101A_English.indd 36 2/27/2010 17:23:402/27/2010 17:23:40
Page 37

Appendix
Troubleshooting-DVD
Problem Possible Solution
Playback doesn’t start.•
No picture.• TV/DVD selector is not set correctly. (See page 23.)•
No sound.• Check the input selector of the amplifier is set properly.•
Picture is distorted during fast •
reverse/forward playback.
Stopping playback, search, slow •
motion play, repeat play, or program
play, etc. cannot be performed.
No surround sound.• The setup does not match your stereo system.•
The TV/DVD or remote operation •
key is not functioning.
Playback does not start when the •
title is selected.
Audio soundtrack and/or subtitle •
language is not changed when you
playback a DVD.
No subtitle.• Some discs have no subtitles. (See page 24.)•
Angle cannot be changed.• Multi-angles are not recorded on the DVD disc. (See page 25.)•
“This operation can’t be performed” •
appears on the screen.
No disc is inserted. (See page 23.)•
The disc may be dirty. Clean up the disc. (See page 21.)•
The TV/DVD cannot play CD-ROMs, etc. (See page 21.)•
The TV/DVD is in the special playback mode. (See pages 23, 24.)•
Select the correct Audio Output position on AV amplifier.•
The picture will be distorted occasionally.•
Some discs may not do some of the functions.•
Turn off the TV/DVD and unplug the AC power cord for several minutes, •
then replug it.
Check the Parental setup. (See page 30.)•
Multilingual language is not recorded on the DVD disc. (See page 24.)•
Subtitles are cleared. Press •
The function is prohibited with the TV/DVD or the disc. (See page 24.)•
. (See page 24.)
Cautions regarding use in high and low temperature environments
When the unit is used in a low temperature space (e.g. room, office), the picture may leave trails or appear •
slightly delayed. This is not a malfunction, and the unit will recover when the temperature returns to normal.
Do not leave the unit in a hot or cold location. Also, do not leave the unit in a location exposed to direct •
sunlight or near a heater, as this may cause the cabinet to deform and the LCD panel to malfunction.
Storage temperature: –20°C to +60°C.
Devices connected to the protective earthing of the building installation through the MAINS connection or
through other devices with a connection to protective earthing and to a television distribution system using
coaxial cable, may in some circumstances create a fire hazard. Connection to a television distribution system
therefore has to be provided through a device providing electrical isolation within a certain frequency range
(galvanic isolator, see EN 60728-11).
NOTE
For requirements in Norway and Sweden, the requirements for isolation are also relevant for devices that can •
be connected to television distribution systems.
37
54B0101A_English.indd 3754B0101A_English.indd 37 3/2/2010 11:01:123/2/2010 11:01:12
Page 38

Appendix
Specification
Item Model: LC-19DV200E Model: LC-22DV200E
LCD
panel
Video Colour System PAL/SECAM/NTSC 3.58/NTSC 4.43/PAL 60
TV
Function
Audio out 1.5W x 2
Terminals Rear AV 1 SCART (AV input, Y/C input, RGB input, TV output)
OSD language English, German, French, Italian, Dutch, Spanish, Greek, Portuguese, Swedish, Finnish,
Power Requirement AC 220-240 V, 50 Hz
Power Consumption 36 W (0.7 W Standby with AC 230V) 49 W (0.7 W Standby with AC 230V)
Weight TV + stand 4.8 kg 5.3 kg
Size TV + stand 472 mm x 361 mm x 201 mm 536.5 mm x 396 mm x 201 mm
DVD
section
Operating temperature +5°C to +40°C
Size 19” diagonal 22” diagonal
Resolution 1,049,088 pixels (1366 x 768)
TV-Standard Analogue CCIR (B/G, I, D/K, L/L’)
Receiving
Channel
TV-Tuning System Auto Preset 2,000 ch, Auto Label, Auto Sort
STEREO/BILINGUAL NICAM/A2
Side C. I. (Common
TV only 4.2 kg 4.7 kg
TV only 472 mm x 332 mm x 67 mm 536.5 mm x 367.5 mm x 67 mm
Signal system NTSC, PAL
Applicable disc DVD (12 cm, 8 cm), CD (12 cm, 8 cm)
Frequency response DVD : 4 Hz - 22K Hz / CD : 4 Hz - 20K Hz
Wow and flutter Below Measurable Level
Pickup CD : Wavelength: 780 - 790 nm
Digital DVB-T
VHF/UHF ATV : Ire-E69, DVB-T : E5-E69
CATV S-band, S1–S41ch
AV 2 S-VIDEO (Y/C input), RCA pin (AV input)
COMPONENT Y/Pb(Cb)/Pr(Cr), RCA pin (L/R)
HDMI / DVI HDMI in with HDCP
PC / DVI AUDIO Ø 3.5mm jack (Audio input)
PC - INPUT D-sub 15 pin (AV input)
OUTPUT Coaxial Digital audio output
ANTENNA
HEADPHONE Ø 3.5mm jack (Audio output)
Interface)
(2K/8K OFDM, 16QAM/64QAM), DVB-T HD (H.264)
UHF/VHF 75 q
EN50221, R206001
Russian, Polish, Turkish, Hungarian, Czech, Slovak, Danish, Norwegian, Estonian, Latvian,
Lithuanian, Slovenian, Ukrainian
Maximum output power: 7 mW
DVD : Wavelength: 652 - 662 nm
Maximum output power: 5 mW
38
54B0101A_English.indd 3854B0101A_English.indd 38 2/27/2010 17:23:412/27/2010 17:23:41
Page 39

Appendix
Specification
Item Model: LC-26DV200E Model: LC-32DV200E
LCD
panel
Video Colour System PAL/SECAM/NTSC 3.58/NTSC 4.43/PAL 60
TV
Function
Audio out 10W x 2
Terminals Rear AV 1 SCART (AV input, Y/C input, RGB input, TV output)
OSD language English, German, French, Italian, Dutch, Spanish, Greek, Portuguese, Swedish, Finnish,
Power Requirement AC 220-240 V, 50 Hz
Power Consumption 65 W (0.5 W Standby with AC 230V) 95 W (0.5 W Standby with AC 230V)
Weight TV + stand 9.6 kg 11.5 kg
Size TV + stand 661 mm x 508 mm x 243 mm 796.2 mm x 596.6 mm 243 mm
DVD
section
Operating temperature +5°C to +40°C
NOTE
Size 26” diagonal 32” diagonal
Resolution 1,049,088 pixels (1366 x 768)
TV-Standard Analogue CCIR (B/G, I, D/K, L/L’)
Receiving
Channel
TV-Tuning System Auto Preset 2,000 ch, Auto Label, Auto Sort
STEREO/BILINGUAL NICAM/A2
Side C. I. (Common
TV only 8.2 kg 10.0 kg
TV only 661 mm x 462.5 mm x 100.5 mm 796.2 mm x 546.6 mm x 105.5 mm
Signal system NTSC, PAL
Applicable disc DVD (12 cm, 8 cm), CD (12 cm, 8 cm)
Frequency response DVD : 4 Hz - 22K Hz / CD : 4 Hz - 20K Hz
Wow and flutter Below Measurable Level
Pickup CD : Wavelength: 780 - 790 nm
As a part of policy of continuous improvement, SHARP reserves the right to make design and specification changes •
for product improvement without prior notice. The performance specification figures indicated are nominal values of
production units. There may be some deviations from these values in individual units.
Refer to the inside back cover for dimensional drawings.•
Audio cannot be output through the HDMI terminal.•
Digital DVB-T
VHF/UHF ATV : Ire-E69, DVB-T : E5-E69
CATV S-band, S1–S41ch
AV 2 SCART (AV input, Y/C input, TV monitor)
AV 3 RCA pin (AV input)
COMPONENT Y/Pb(Cb)/Pr(Cr), RCA pin (L/R)
HDMI / DVI HDMI in with HDCP
HDMI HDMI in with HDCP
PC / DVI AUDIO Ø 3.5mm jack (Audio input)
PC - INPUT D-sub 15 pin (AV input)
OUTPUT Coaxial Digital audio output
Interface)
ANTENNA
HEADPHONE Ø 3.5mm jack (Audio output)
(2K/8K OFDM, 16QAM/64QAM), DVB-T HD (H.264)
EN50221, R206001
UHF/VHF 75 q
Russian, Polish, Turkish, Hungarian, Czech, Slovak, Danish, Norwegian, Estonian, Latvian,
Lithuanian, Slovenian, Ukrainian
Maximum output power: 7 mW
DVD : Wavelength: 652 - 662 nm
Maximum output power: 5 mW
39
54B0101A_English.indd 3954B0101A_English.indd 39 2/27/2010 17:23:412/27/2010 17:23:41
Page 40

Attention: Your product is
marked with this symbol. It
means that used electrical
and electronic products
should not be mixed
with general household
waste. There is a separate
collection system for these
products.
A. Information on Disposal for Users (private households)
1. In the European Union
Attention: If you want to dispose of this equipment, please do not use the ordinary
dust bin!
Used electrical and electronic equipment must be treated separately and in
accordance with legislation that requires proper treatment, recovery and recycling
of used electrical and electronic equipment.
Following the implementation by member states, private households within the
EU states may return their used electrical and electronic equipment to designated
collection facilities free of charge*. In some countries* your local retailer may also
take back your old product free of charge if you purchase a similar new one.
*) Please contact your local authority for further details.
If your used electrical or electronic equipment has batteries or accumulators, please
dispose of these separately beforehand according to local requirements.
By disposing of this product correctly you will help ensure that the waste undergoes
the necessary treatment, recovery and recycling and thus prevent potential negative
effects on the environment and human health which could otherwise arise due to
inappropriate waste handling.
2. In other Countries outside the EU
If you wish to discard this product, please contact your local authorities and ask for
the correct method of disposal.
For Switzerland: Used electrical or electronic equipment can be returned free of
charge to the dealer, even if you don’t purchase a new product. Further collection
facilities are listed on the homepage of www.swico.ch or www.sens.ch.
B. Information on Disposal for Business Users
1. In the European Union
If the product is used for business purposes and you want to discard it:
Please contact your SHARP dealer who will inform you about the take-back of the
product. You might be charged for the costs arising from take-back and recycling.
Small products (and small amounts) might be taken back by your local collection
facilities.
For Spain: Please contact the established collection system or your local authority
for take-back of your used products.
2. In other Countries outside the EU
If you wish to discard of this product, please contact your local authorities and ask
for the correct method of disposal.
For EU: The crossed-out wheeled bin Implies that used batteries should not be put
to the general household waste ! There is a separate collection system for used
batteries, to allow proper treatment and recycling in accordance with legislation.
Please contact your local authority for details on the collection and recycling
schemes.
For Switzerland: The used battery is to be returned to the selling point.
For other non-EU countries: Please contact your local authority for correct method
of disposal of the used battery.
40
54B0101A_English.indd 4054B0101A_English.indd 40 2/27/2010 17:23:412/27/2010 17:23:41
 Loading...