

Page 1

KC-A60Y
KC-A50Y
KC-A40Y
R
AIR PURIFIER
with Humidifying Function
Device of this mark is a trademark
of Sharp Corporation.
Plasmacluster is a registered trademark
or a trademark of Sharp Corporation.
Lambang ini merupakan merek dagang dari
Sharp Corporation.
Plasmacluster merupakan merek dagang
terdaftar atau merek dagang dari Sharp
Corporation.
OPERATION MANUAL
PENJERNIH UDARA Dengan
Moisturizing Function
PETUNJUK PENGOPERASIAN
* The number in this technology mark indicates an approximate number of ions supplied into air of 1 cm
measured around the center of a room with the “high-density
plasmacluser 7000” applicable floor area (at 1.2 m height
above the floor) at the medium wind volume in humidifying &
air purifying mode, or in air purifying mode, when a humidifier/air purifier or an air purifier using the high-density plasmacluster ion evolving device is placed close to a wall.
This product is equipped with a device corresponding
capacity.
3
, which is
to this
ENGLISH
INDONESIA
Free standing type
Tipe Berdiri
No. Reg. : 03/DJ-ILMEA/MG/I/2000
No. Reg. : 42/PDN/MG/VII/2003
*Angka dalam tanda teknologi ini menandakan perkiraan
jumlah ion yang dipasok ke udara dalam satuan 1 cm
diukur di sekeliling bagian tengah ruangan dengan area
lantai yang sesuai “plasmacluster kepadatan-tinggi 7000”
(pada ketinggian 1,2 m dari lantai) dengan volume angin
medium dalam mode pelembaban & pemurnian udara, atau
dalam mode pemurnian udara, jika humidifier/air purifier
atau air purifier yang menggunakan unit pengembang
plasmacluster kepadatan tinggi terpasang di dekat dinding.
Produk ini dilengkapi dengan perangkat yang sesuai dengan
kapasitas ini.
3
, yang
Page 2

Please read before operating your new Air Purifier
The air purifier draws in room air from the air intake, passes the air through a Pre-Filter,
a Washable Deodorizing Filter and a HEPA Filter inside of the unit, then discharges
the air through the air outlet. The HEPA Filter can remove 99.97% of dust particles as
small as 0.3 microns that pass through the filter and also helps absorb odours.
The Washable Deodorizing Filter gradually absorbs odours as they pass through the filter.
Some odours absorbed by the filters may break down over time, resulting in additional
odour. Depending on the usage environment, especially when the product is used in
extreme environments (significantly more severe than normal household use), this
odour may become strong in a shorter period than expected. If the odour persists, the
filters should be replaced.
NOTE
• The air purifier is designed to remove air-suspended dust and odour, but not harmful gases (for
example, carbon monoxide contained in cigarette smoke). If the source of the odour still exists, the
air purifier may not completely remove the odour.
HEPA Filter
Deodorizing Filter
Pre-Filter
(Common illustration has used “KC-A60Y”.)
Page 3

ENGLISH
FEATURES
Unique Combination of Air Treatment
Technologies
Triple Filtration System + Plasmacluster
+ Humidification
TRAPS DUST*
Washable pre-filter traps dust and other
large airborne particles.
DECREASES ODOURS
Washable deodorizing filter absorbs many
common household odours.
REDUCES POLLEN & MOLD*
HEPA filter traps 99.97% of particles as
small as 0.3 microns.
FRESHENS
Plasmacluster treats the air similar to the
way nature cleans the environment by
emitting a balance of positive and negative
ions.
HUMIDIFIES
Runs up to 10 hours per filling.**
*When air is drawn through the filter system.
**Room size:
up to 48 m
up to 38 m2 (KC-A50Y)
up to 26 m2 (KC-A40Y)
Sensor Technology continuously monitors
air quality, and automatically adjusting operation based on detected air purity and
humidity.
2
(KC-A60Y)
CONTENTS
IMPORTANT SAFETY INSTRUCTIONS
• WARNING
• CAUTIONS CONCERNING OPERATION
• INSTALLATION GUIDELINES
• FILTER GUIDELINES
PART NAMES
• FRONT / BACK
• MAIN UNIT DISPLAY
• ILLUSTRATIVE DIAGRAM
PREPARATION .............................................
• FILTER INSTALLATION
• REFILLING THE WATER TANK
OPERATION
• CLEAN AIR & HUMIDIFY
• CLEAN AIR
• CLEAN ION SHOWER
• FAN SPEED
• PLASMACLUSTER ION ON/OFF
USEFUL FUNCTION
• LIGHTS CONTROL
• CHILD LOCK
• SOUND INDICATOR SETTING
• ADJUSTMENT OF SENSOR
DETECTION SENSITIVITY
CARE AND MAINTENANCE
• FILTER INDICATOR
• CARE INDEX
• HUMIDIFYING DISINSTALLATION
• WATER TANK
• HUMIDIFYING FILTER
• HUMIDIFYING TRAY AND COVER
• BACK PANEL
• DEODORIZING FILTER
• UNIT
• FILTER REPLACEMENT
TROUBLESHOOTING
.............................................
...............................................
...............................
.................
............................
...
E-2
E-4
E-6
ENGLISH
E-8
E-10
E-11
E-16
SPECIFICATIONS
....................................
Thank you for purchasing this SHARP Air
Purifier. Please read this manual carefully
before using the air purifier.
After reading, keep the manual in a convenient location for future reference.
E-1
E-19
Page 4

IMPORTANT SAFETY INSTRUCTIONS
When using electrical appliances, basic safety precautions should be followed, including the
following:
WARNING
• Read all instructions before using the unit.
• Use only a 220 volt outlet.
• Do not use the unit if the power cord or plug is damaged or the connection to the wall outlet
is loosened.
• Periodically remove dust from the plug.
• Do not insert fingers or foreign objects into the air intake or air outlet.
• When removing the power plug, always hold the plug and never pull on the cord.
Electrical shock and/or fire from a short circuit may result.
• Do not damage the power cord by caster when moving the main unit.
(It may cause electric shock, heat generation or fire.)
• Do not remove the plug when your hands are wet.
• Do not use this unit near gas appliances or fireplaces.
• When refilling the Water Tank, cleaning the unit, or when the unit is not in use, be sure to unplug
the unit. Electrical shock and/or fire from a short circuit may result
• If the power cord is damaged, it must be replaced by the manufacturer, its service agent, a
Sharp authorized Service Centre or similarly qualified person in order to avoid a hazard.
• Only a Sharp Authorized Service Centre should service this air purifier. Contact the nearest Service
Centre for any problems, adjustments, or repairs.
• Do not operate when using aerosol insecticides or in rooms where there is oily residue, incense,
sparks from lit cigarettes, chemical fumes in the air, or in locations where the unit may get wet,
such as a bathroom.
• Be cautious when cleaning the unit. Strong corrosive cleansers may damage the exterior.
• When carrying the unit, remove the Water Tank and Humidifying Tray first and hold the unit by han-
dles on both sides.
• Do not drink the water in the Humidifying Tray or Water Tank.
• Change the water in the Water Tank daily with fresh tap water and regularly clean the Water Tank
and Humidifying Tray. (See E-12 and E-13). When unit is not in use, dispose of the water in the
Water Tank and Humidifying Tray. Leaving water in the Water Tank and/or Humidifying Tray may
result in mold, bacteria, and bad odours.
In rare cases, this bacteria may cause harmful physical effects.
• This appliance is not intended for use by persons (including children) with reduced physical, sensory or mental capabilities, or lack of experience and knowledge, unless they have been given supervision or instruction concerning use of the appliance by a person responsible for their safety.
Children should be supervised to ensure they do not play with the appliance.
– To reduce the risk of electrical shock, fire or injury to persons:
NOTE
If this air purifier should cause interference to radio or television reception, try to correct the interference by one or more of the following measures:
• Reorient or relocate the receiving antenna.
• Increase the separation distance between the unit and radio/TV receiver.
•
Connect the equipment into an outlet on a circuit different from that to which the receiver is connected.
• Consult the dealer or an experienced radio/TV technician for help.
– Radio or TV Interference
E-2
Page 5

CAUTIONS CONCERNING OPERATION
• Do not block the intake and/or air outlet.
• Do not use the unit near or on hot objects, such as stoves or heaters, or where it may come into
contact with steam.
• Always operate the unit in an upright position.
• Hold the unit by using the handles on both sides when moving.
Do not move when the unit is in operation.
• Do not move or change the direction of the main unit while dragging the casters.
• Lift it up and move such as a tatami mat, a floor which gets damaged easily, an uneven place, and
thick-poled carpet.
• When moving by the caster, move it slowly to horizontal direction.
• When moving, make sure to stop operation and remove the water tank and Humidifying Tray by
holding the side handle of the unit.
• When remove the water tank, be careful not to get your finger caught in.
•
Do not operate the unit without the filters, Water Tank, and Humidifying Tray properlyinstalled.
• Do not wash and reuse the HEPA filter.
Not only does it not improve filter performance, it may cause electric shock or malfunction.
• Clean the exterior with a soft cloth only.
Do not use volatile fluids and/or detergents.
The unit surface may be damaged or cracked.
In addition, the sensors may malfunction as a result.
•
Frequency of maintenance required (descaling) will depend on the hardness or the impurities
of the water that you use; the harder the water the more often descaling will be necessary.
• Keep the unit away from water.
ENGLISH
INSTALLATION GUIDELINES
• When using the unit, place at least 2m away from equipment utilizing electric waves such
as televisions or radios to avoid electrical interference.
• Avoid a location where the sensor is exposed to direct wind.
The unit may not operate properly.
• Avoid use in locations where furniture, fabrics or other items may come in contact with and
restrict the air intake and/or air outlet.
• Avoid use in locations where the unit is exposed to condensation or drastic temperature
changes. Appropriate conditions are when room temperature is between 5 – 35 ºC.
• Place on a stable surface with sufficient air circulation.
When placing the unit on a heavily carpeted area, the unit may vibrate slightly.
Place the unit on an even surface to avoid water leakage from the Water Tank and/or Humidifying Tray.
• Avoid locations where grease or oily smoke is generated.
The unit surface may crack or the sensor may malfunction as a result.
• Place the unit about 30 cm(1 ft) away from the wall in order to ensure proper airflow.
The wall directly behind the air outlet may become dirty over time. When using the unit for an ex-
tended period of time in the same location, periodically clean the wall and protect the wall with a
vinyl sheet, etc. to prevent the wall from becoming dirty.
FILTER GUIDELINES
• Follow the instructions in this manual for correct care and maintenance of the filters.
E-3
Page 6

PART NAMES
FRONT / BACK
1
2
3
1 Main Unit Display
2
Front Monitor
3
Main Unit
(Ref.E-5)
1
2
3
4
5
6
7
8
1 Air Outlet 6 Float
2 Handle
Sensor
•Dust Senser
3
•Temperture / Humidity Senser
•Odour Senser
(KC-A60Y•KC-A50Y ONLY)
4 Water Tank
5 Humidifying Filter
(2 Locations)
(Internal)
7 Humidifying Tray
8 Caster
9 HEPA Filter
10 Deodorizing Filter
11 Back Panel
12 Air Inlet
13 Power Cord / Plug
9
10
11
12
13
(Shape of plug depends on country.)
(4 Locations)
(white)
(black)
(Pre-Filter)
INCLUDED
• Operation manual
• Slipper
×4
E-4
Page 7

MAIN UNIT DISPLAY
2
3
1
6 78
5
4
1 POWER ON Button
a CLEAN AIR MODE Button /INDICATOR LIGHT
b CLEAN AIR & HUMIDIFY MODE Button / INDICATOR LIGHT
c CLEAN ION SHOWER MODE Button / INDICATOR LIGHT
2 LIGHT CONTROL Button 5 CHILD-LOCK Button /
3 Plasmacluster Ion ON / OFF Button /
INDICATOR LIGHT
4 FILTER RESET Button /
INDICATOR LIGHT
(green)
(red)
a
b
6 Plasmacluster Sign
7 FAN SPEED Button /
8 POWER OFF Button
c
(green)
(green)
(green)
INDICATOR LIGHT
INDICATOR LIGHT
(green)
(green)
ILLSTRARATIVE DIAGRAM
Humidity Monitor
Indicates approximate humidity level
in the room.
Humidity setting cannot be adjusted.
Odour Monitor*
Indicates the odour intensity of the
room in 3 stages colours.
green
ENGLISH
red
Humidify Light
green
off
red
(Flash
ing)
Humidity ON
Humidity OFF
need to supply water
E-5
Faint Strong
* KC-A60Y, KC-A50Y ONLY
Dust Moniter
Indicates the air purity of the room
in 5 stages colours.
Clean
Impure
green
red
Page 8
PREPARATION
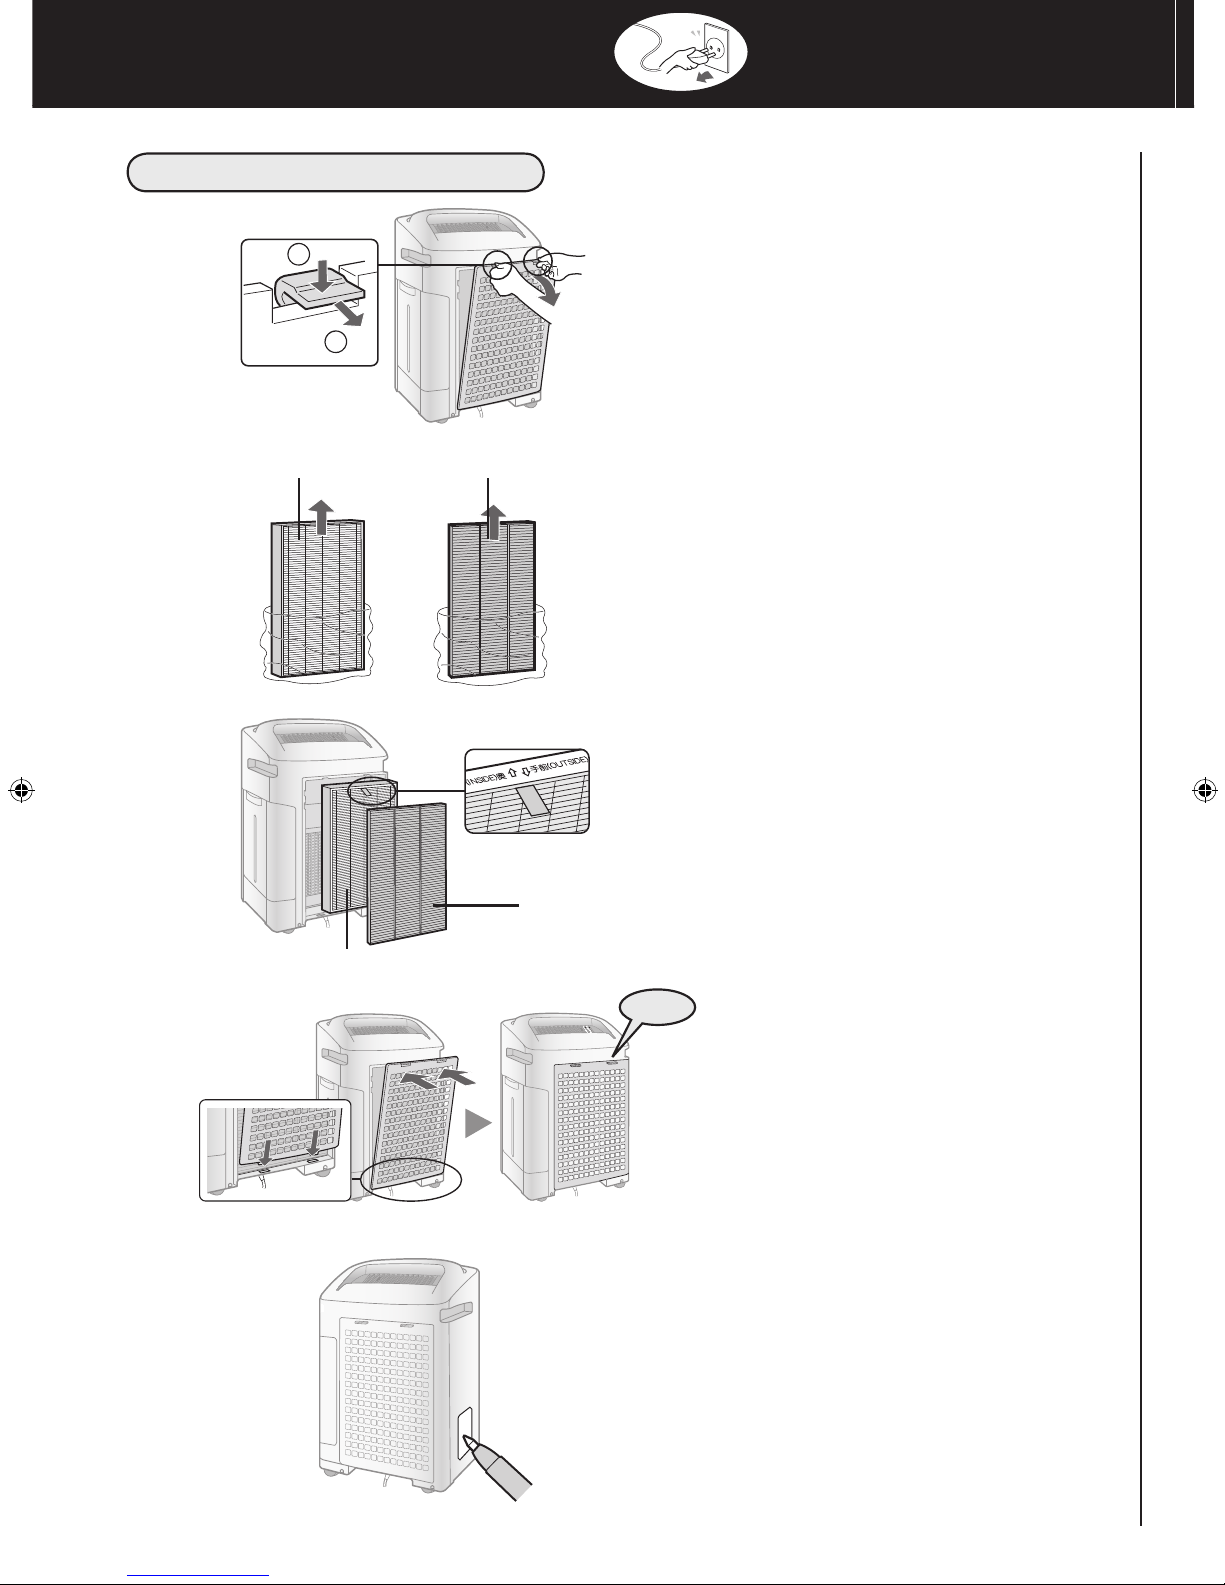
FILTER INSTALLATION
Be sure to remove the power
plug from the wall outlet.
Remove the Back Panel.
1
1
2
HEPA filter (White)
Remove the Filters from the plas-
2
Install the Filters in the correct
3
Deodorizing filter (Black)
tic bag.
order as shown.
Deodorizing filter (Black)
HEPA filter (White)
Click
Install the Back Panel.
4
Fill in the usage start date on the
5
Date Label.
E-6
Page 9

REFILLING THE WATER TANK
When using the Clean Air & Humidify Mode, or the Clean ION Shower Mode.
1
Fill the Water Tank with tap water.
1
2
3
Remove the Water Tank.
2
MAX
CAUTION
•
Check to see that there is no water leaking.
• Be sure to wipe off any excess water on
the outside of the Water Tank.
• When carrying the Water Tank, hold it
Tighten
with both hands so that the Water Tank
opening is facing up.
ENGLISH
Install the Water Tank.
3
1
CAUTION
• Do not expose the unit to water. Short circuit and/or electrical shock may occur as a result.
•
Do not use hot water (40 ºC), chemical agents, aromatic substances, dirty water, or other damaging
substances, deformation and/or malfunction may occur.
• Use only fresh tap water. Use of other water sources may promote the growth of mold, fungus and/
or bacteria.
2
Click
E-7
Page 10
OPERATION
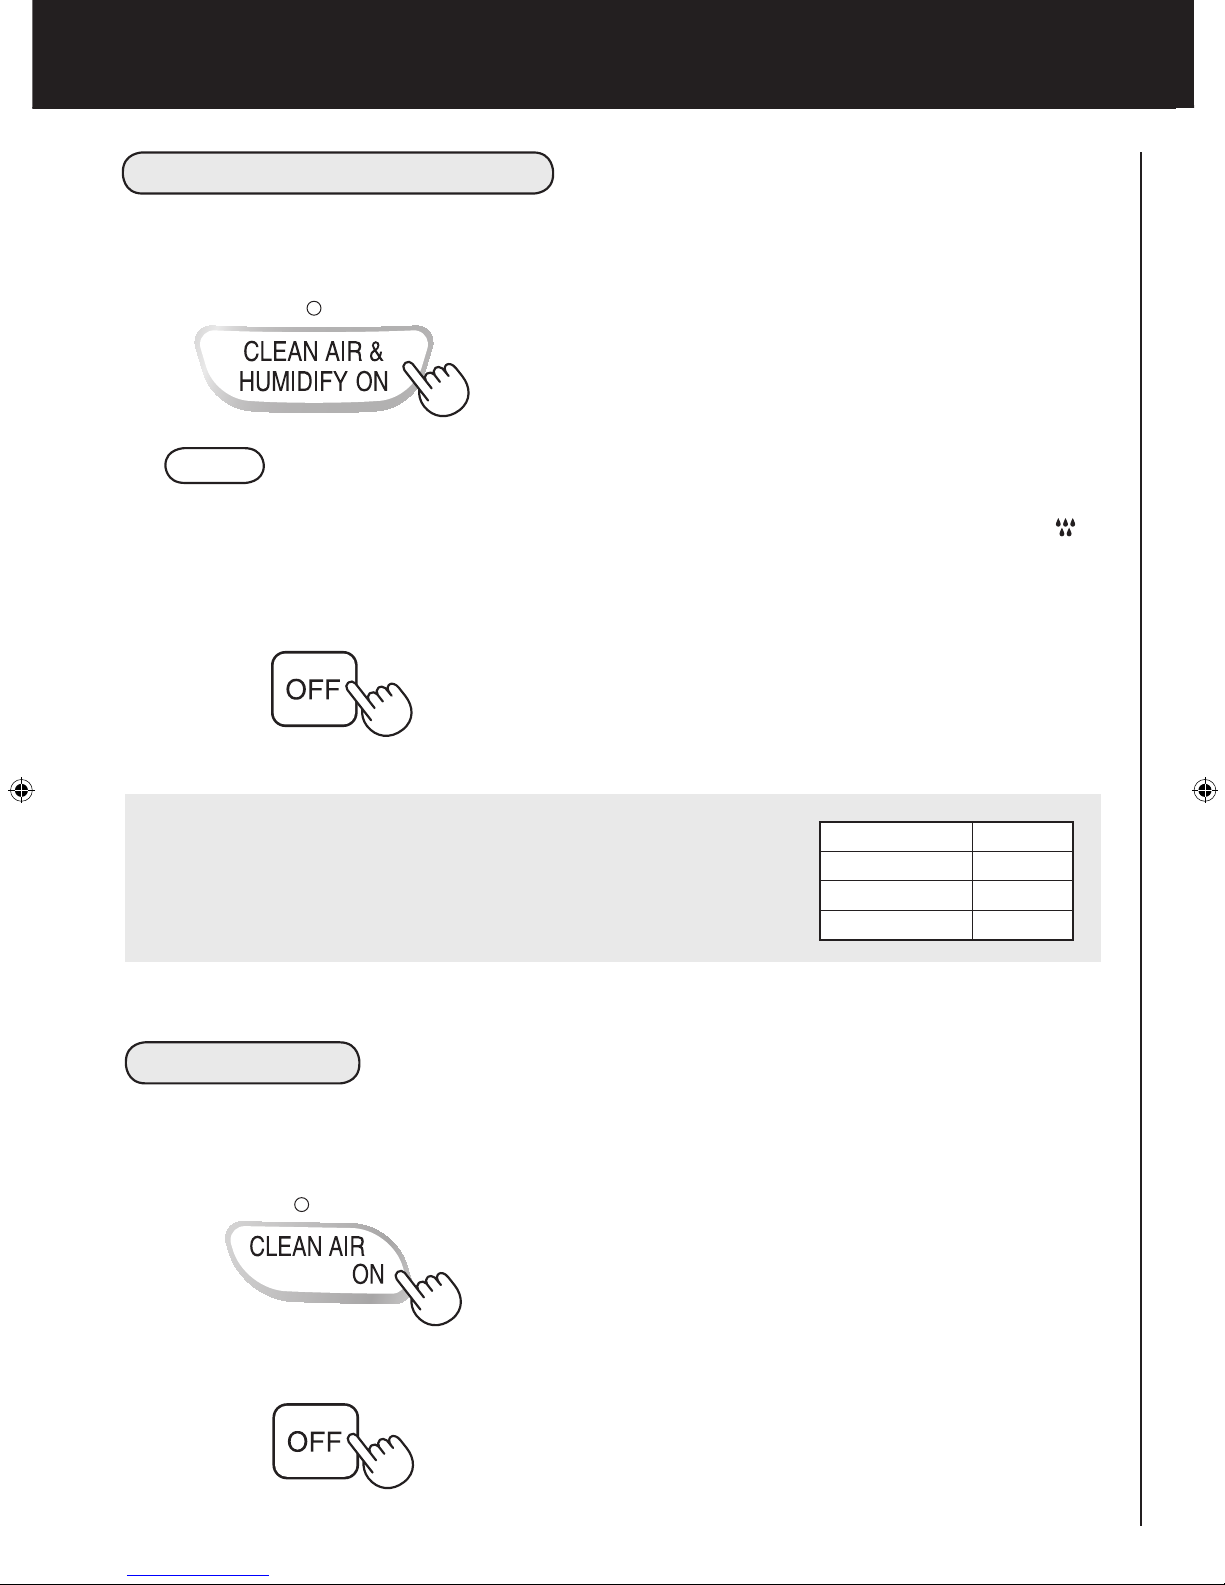
CLEAN AIR & HUMIDIFY
Using to quickly clean the air, reduce odours and to humidify.
START
• Select the desired fan speed.(Ref. E-9)
• Unless the power cord has been unplugged, the operations starts in the previous mode it was operated in.
NOTE
• Fill the Water Tank.(Ref. E-7)
• When the Water Tank is empty, the unit will operation “CLEAN AIR MODE”and is
flashing(red).
STOP
About Automatic Humidify Mode
The Temperature/Humidity sensors automatically detect and adjust
humidity according to changes in room temperature. Depending on
the size and humidity of the room, humidity may not reach 55~65 %.
In such cases, it is recommended that CLEAN AIR & HUMIDIFY/
MAX MODE be used.
CLEAN AIR
Using when additinal humidity is not required.
START
• Select the desired fan speed.(Ref. E-9)
• Unless the power cord has been unplugged, the operations starts in the previous mode it was operated in.
Temperature Humidity
~18 ºC 65 %
18 ºC~24 ºC 60 %
24 ºC~ 55 %
STOP
E-8
Page 11

CLEAN ION SHOWER
Releases high-density Plasmacluster ions and discharges strong air flow for 60 minutes.
START
NOTE
• If the “Plasmacluster Ion is OFF,
the plasmacluster ion will be not released.
• When the operation finishes, the unit will return to
the prior operation mode.
It is able to change the other mode and
this mode.
FAN SPEED
Select the desired fan speed.
during
ENGLISH
AUTO POLLEN
MAX
MED
LOW
NOTE
AUTO
POLLEN
The fan speed is automatically switched (between HIGH and LOW) depending
on the amount of impurities in the air. The sensors detect impurities for efficient
air purfication.
The unit will operate at High Level
for 10 minutes, then will alternate
between MEDIUM and HIGH.
10 minutes: High fan level
20 minutes: Medium fan level
20 minutes: High fan level
PLASMACLUSTER ION ON/OFF
When Plasmacluster is ON, both the Indicator Light and Plasmacluster Indicator Light turn on.
ON
OFF
E-9
Page 12

USEFUL FUNCTION
LIGHT CONTROL
Use this function to select the desired brightness.
brighter
darker
turn off
CHILD LOCK
Operation of the unit display will be locked.It is the same method as starting operation.
ON
more 3 sec.
CANCELLATION
more 3 sec.
SOUND INDICATOR SETTING
The unit can be set to signal with an audible deep when the Water Tank is empty.
ON
(with the unit OFF)
more 3 sec. more 3 sec.
CANCELLATION
(with the unit OFF)
ADJUSTMENT OF SENSOR DETECTION SENSITIVITY
DUST MONITOR and ODOUR MONITOR is constantly red to reduce sensitivity, and set to “high’ if
the DUST MONITOR and ODOUR MONITOR is constantly green to increase sensitivity.
RED••••••••SET to “LOW’ GREEN•••SET to “HIGH’
1
(with the unit OFF)
more 3 sec.
2
3
CAUTION
• If the power OFF Button is not pushed within 8 seconds of adjusting sensor
sensitivity, the setting will be saved automatically.
• The sensor sensitivity setting will be saved even if the unit is unplugged.
High
Standard
Low
E-10
Page 13
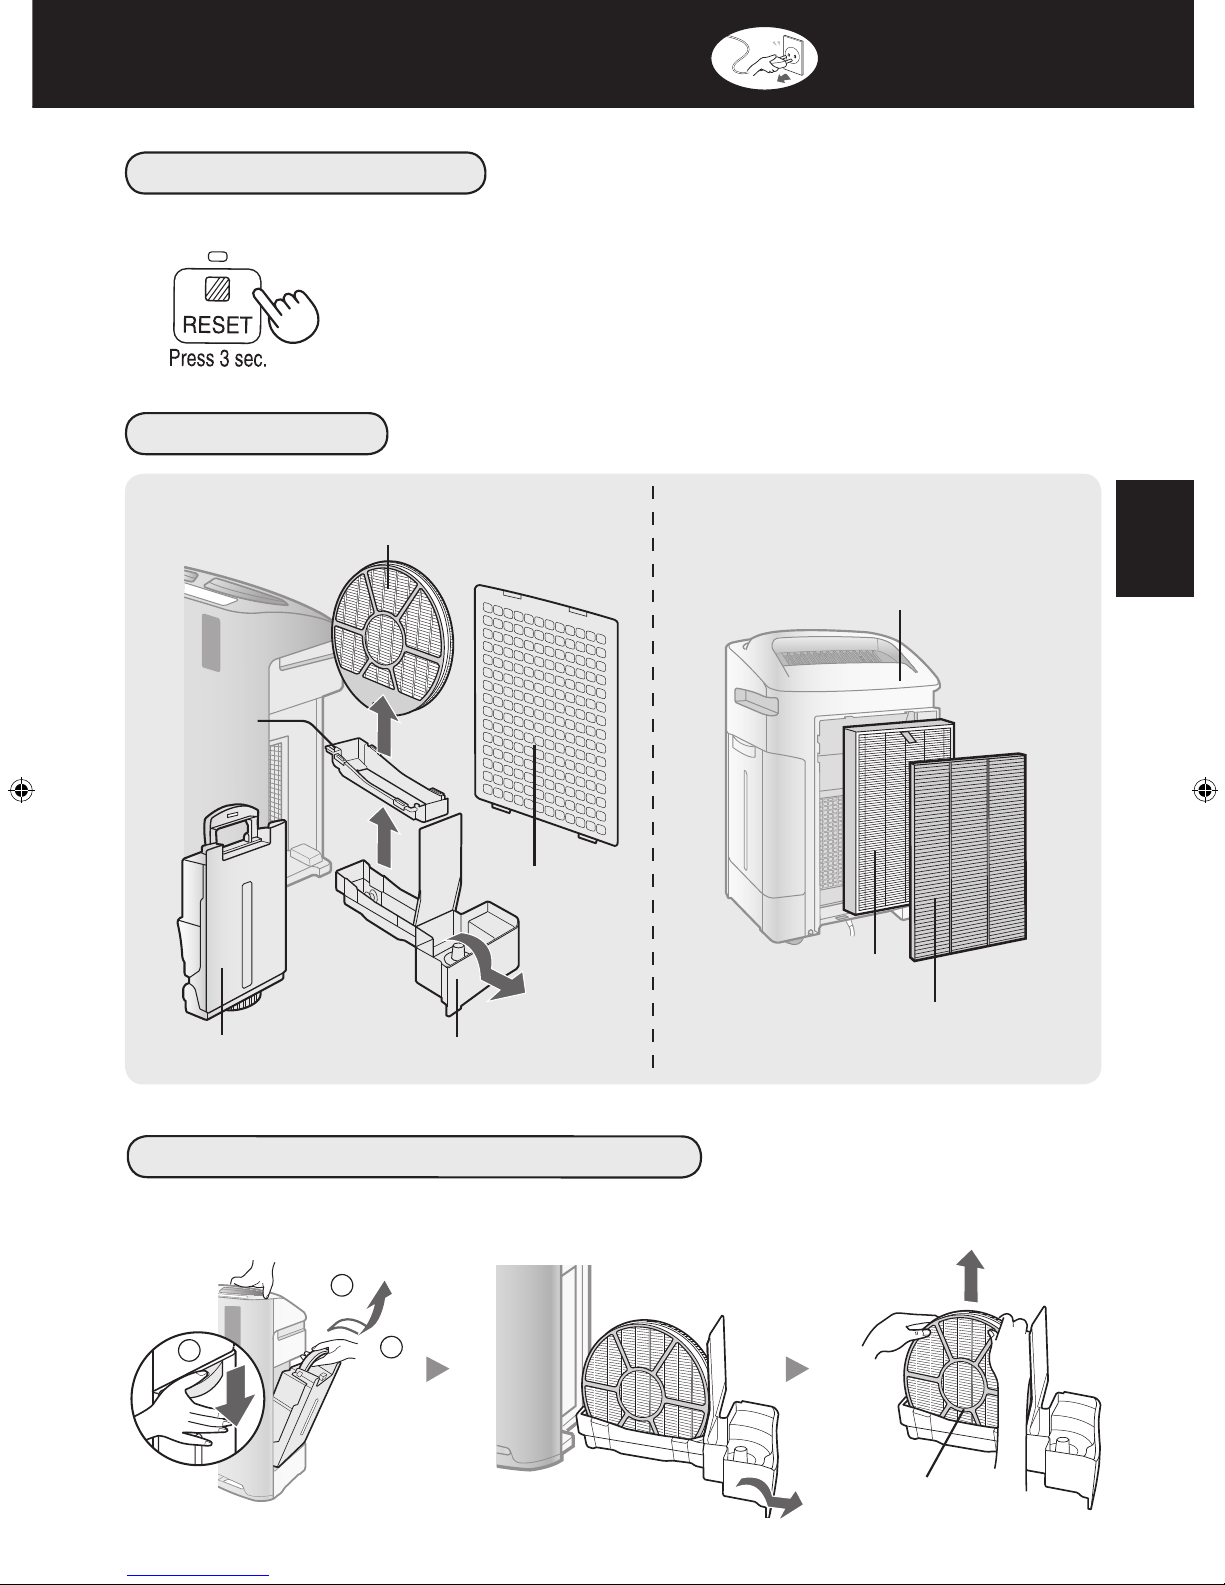
Be sure to remove the power
CARE AND MAINTENANCE
plug from the wall outlet
FILTER INDICATOR
The Indicator Light will turn on after approximately 720 hours. (30days×24hours=720)
Reminder to perform maintenance of parts below.
After performing maintenance, reset the Filter Indicator. (Ref. E-12)
more 3 sec.
CARE INDEX
.
Filter Indicator Light turn on.
•
Humidifying Filter (Ref. E-12)
Humidifying
Tray Cover
(Ref. E-13)
Water Tank (Ref. E-12)
Back Panel
(Ref. E-13)
Humidifying Tray (Ref. E-13)
Notice an unpleasant odor from the air out-
•
let.
• Filter performance appears fall and / or
odor persist.
Unit (Ref. E-14)
HEPA Filter
Cannot be care.
Deodoiziing Filter
(Ref. E-14)
ENGLISH
HUMIDIFYING DISINSTALLATION
After maintenance, replace the parts accurately.
2
1
3
frame colour : gray
E-11
Page 14
CARE AND MAINTENANCE
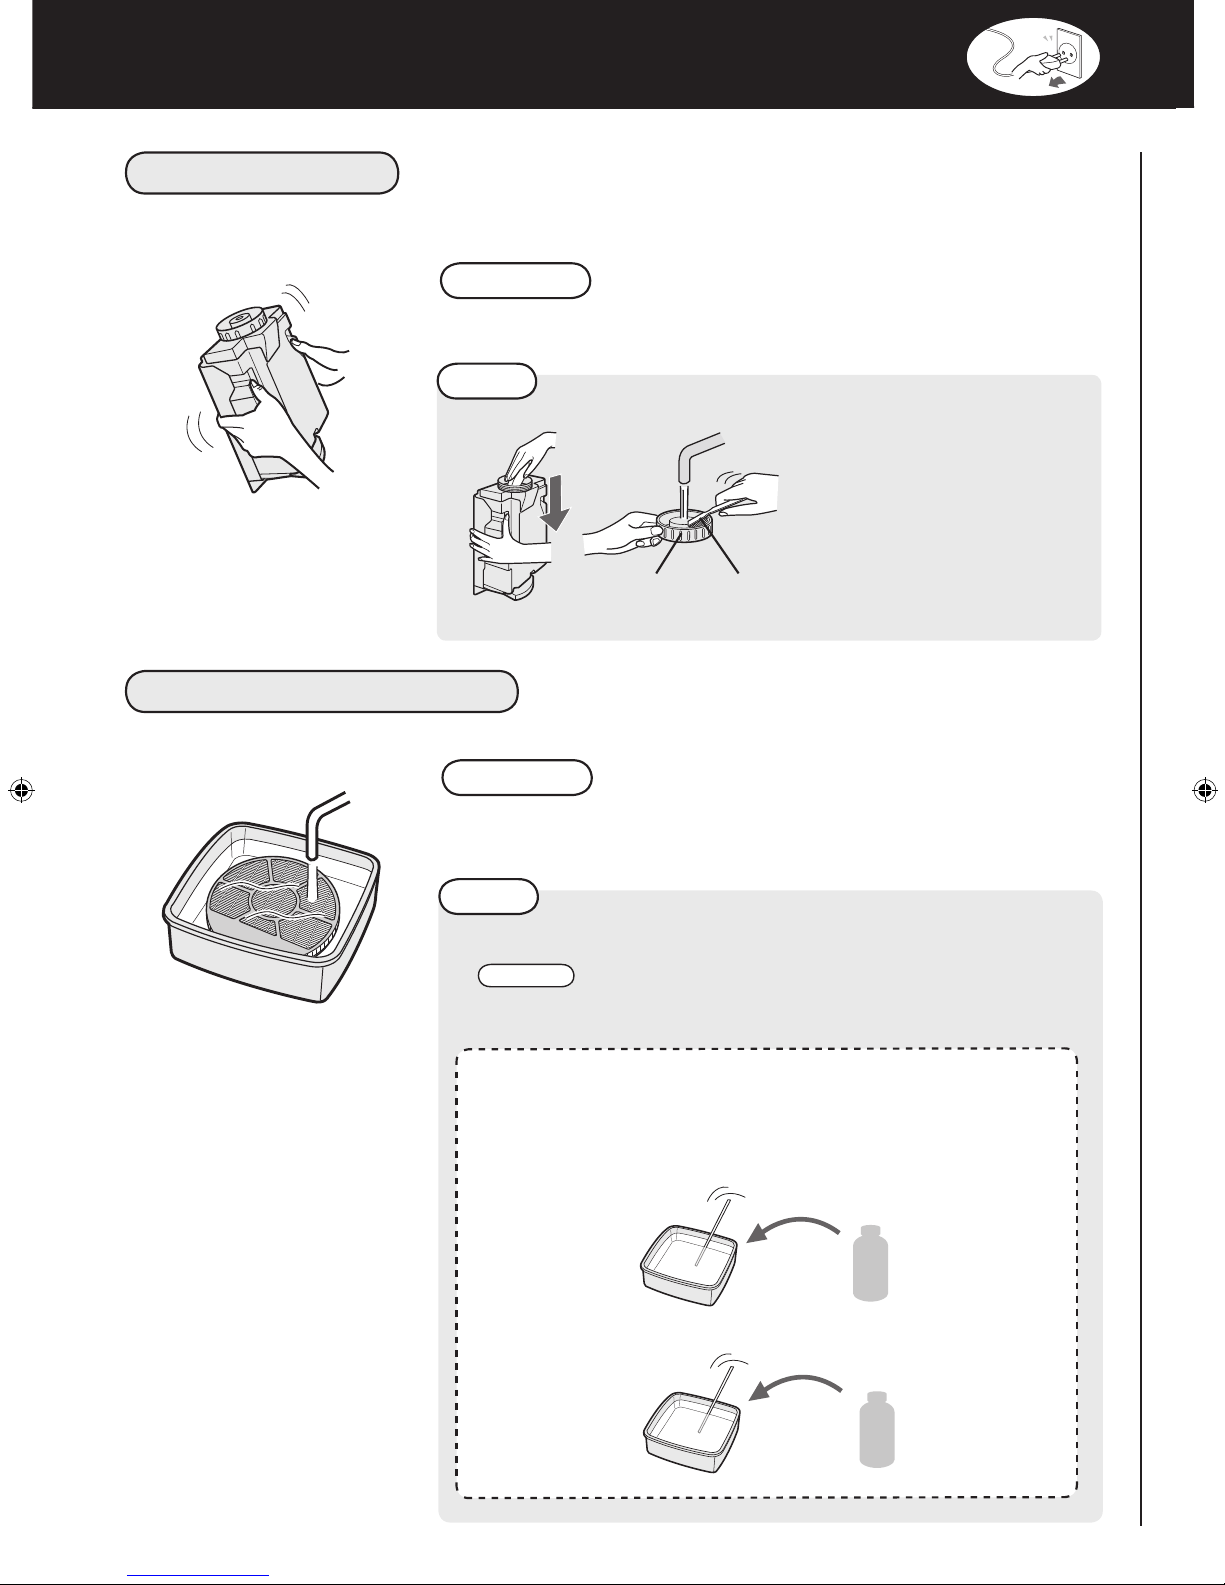
WATER TANK
Rinse the inside with a small amount of water.
CAUTION
•Do not shake the Water Tank with holding the carrying handle.
NOTE
HUMIDIFYING FILTER
Rinse with plenty of water.
CAUTION
• Do not remove the Humidifying Filter from a filter frame.
• Avoid spilling water from the Humidifying Tray.
NOTE
1.
Soak in water with the descaling solution about 30minutes.
for Stubborn dirt...
Tank Cap
Tooth Brushs
for Stubborn dirt...
Clean inside of the water tank
with a soft sponge and the
tank cap with a cotton swab or
a toothbrush.
CAUTION
2.
Remove the descaling solution with plenty of water.
Descaling solution
• Citric acid (available at some drugstores)
• 100% bottled lemon juice with no pulp.
<For using citric acid>
2 1/2 cups of water
<For using lemon juice>
3 cups of water
When using lemon juice, soak time more longer.
stir well!
3 teaspoons
stir well!
1/4 cup
E-12
Page 15

Be sure to remove the power
plug from the wall outlet.
HUMIDIFYING TRAY AND COVER
1. Remove the Humidifying Tray Cover.
2. Rinse the inside of the Humidifying Tray and the
Humidifying Tray Cover
Humidifying Tray Cover with a toothbrush.
CAUTION
• Do not remove the Float and the Roller.
• If the Float and / or the Roller comes off. (Ref. E-17)
Float
Roller
NOTE
TRAY
COVER
for Stubborn dirt...
1.
2.
3.
4.
1.
2.
Clean difficult to Reach parts
Fill the tray half way with water.
Add a small amount of kitchen
detergent.
Sork for 30 minutes.
Remove the kitchen detergent
with clean water.
Soak in water with a small
amount of kitchen detergent
about 30 minutes.
Remove the kitchen detergent
with clean water.
with a cotton swab or toothbrush.
CAUTION
DO NOT use the detergents
shown on E-14.
If cause deformation, tarnishing,
cracking (water leakage)
ENGLISH
BACK PANEL
Back Panel
Gently remove dust with a vacuum cleaner
attachment or similar tool.
NOTE
for Stubborn dirt...
1.
2.
3.
Soak in water with kitchen deter-
gent about 10 minutes.
CAUTION
DO NOT scrub the back panel
hard.
Remove the kitchen detergent
with clean water.
Dry filter completely in a well ven-
tilated area.
E-13
Page 16

CARE AND MAINTENANCECARE AND MAINTENANCE
DEODORIZIING FILTER
1
2
3
HAND WASH ONLY!
DO NOT DRY IN CLOTHES DRYER!
Remove the dust on the DEODORIZING FILTER.
Rinse the DEODORIZING FILTER with water.
CAUTION
• When washing the filter for the first time, the rinse water may
be brown.
This does not affect deodorization performance.
• Avoid bending or folding the filter when washing.
Remove as much of the moisture as possible.
4
When possible , dry outdoors.
UNIT
Dry filter completely in a well ventilated area.
(about 6 hours to dry out)
CAUTION
• Avoid drying filter outdoors during inclement weather (e.g.
rain or cold temperatures).
• Do not allow filter to freeze.
•
If filter is dried indoors, take precautions, such as placing towels, etc under the filter to prevent water damage to the floor.
Wipe with a dry, soft cloth.
CAUTION
Do not use volatile fluids
•
Benzene paint thinner, polish powder, may damage the
surface.
Do not use detergents
•
Detergent ingredients may damage the unit.
E-14
Page 17

FILTER REPLACEMENT
Replacement timing
Filter life will vary depending on the room environment, usage, and location of the unit. If dust or
odour persists, replace the filter.
(Refer to “Please read before operating your new Air Purifier”)
The following filter life and replacement period is based on the condition of smoking 5 cigarettes per
day and the dust collection/deodorization power is reduced by half compared with that of new filter.
We recommend to replace the filter more frequently if the product is used in a condition significantly
severer than normal household use.
•HEPA filter About 10 years after opening
•Deodorizing filter* About 10 years after opening
•Humidifying filter About 10 years after opening
(U_qf_`jcbcmbmpgxgledgjrcpa_l`cpcnc_rcbjwsqcb_drcpu_qfgle*
mpgra_l`cpcnj_acb
.
Replacement Filter Model
Please consult your dealer for purchase of replacement filter.
REPLACEMENT FILTER MODEL
AIR PURIFIER MODEL
KC-A40 FZ-A40HFE FZ-A40DFE
KC-A60 FZ-A60HFE FZ-A60DFE
NOTE
HEPA Filter :
1 unit
Use the date label as a reminder for next replacement.
Deodorizing
Filter : 1 unit
Humidifying
Filter : 1unit
FZ-A60MFEKC-A50 FZ-A50HFE FZ-A50DFE
Disposal of Filters
Please dispose of used filters according to any local laws and
regulations.
HEPA Filter material :
• Filter : Polypropylene
• Frame: Polyester
ENGLISH
Humidifying Filter
Filter Frame (white)
Filter Frame (gray)
Deodorizing Filter material :
• Deodorizer : Activates charcoal
• Filter : Polyester, Rayon
Humidifying Filter material :
• Filter : Rayon, Polyester
HEPA filter
Deodorizing filter
E-15
Page 18

TROUBLESHOOTING
Before calling for service, please review the Troubleshooting chart below, since the problem may not
be a unit malfunction.
SYMPTOM REMEDY (not a malfunction)
Odours and smoke are not removed.
The Front Monitor illuminates
green even when the air is impure.
The Front Monitor illuminates
orange or red even when the air
is clean.
A clicking or ticking sound is
heard from the unit.
The discharged air has an
odour.
The unit does not operate when
cigarette smoke is in the air.
• Clean or replace the filters if they appear to be heavily soiled.
(Ref. E-11,E-12,E-14)
• The air could be impure at the time the unit was plugged in.
Unplug the unit, wait one minute, and plug the unit in again.
• Sensor operation is affected if the dust sensor openings are
dirty or clogged. Gently clean the dust sensors. (Ref. E-11).
• Clicking or ticking sounds may be audible when the unit is
generating ions.
• Check to see if the filters are heavily soiled.
• Clean or replace the filters.
• Plasmacluster Air Purifiers emit small traces of ozone which
may produce an odour.
• Is the unit installed in a location that is difficult for the sensor to
detect cigarette smoke?
• Are the dust sensor openings blocked or clogged?
(In this case, clean the openings.) (Ref. E-11)
Filter Indicator Light is illuminated.
The Front Monitor are turned
off.
The Water Supply Indicator
Light does not illuminate when
the tank is empty.
Water lever in the tank does not
decrease or decreases slowly.
The Front Monitor lights change
colour frequently.
• After replacing filters, connect the power cord to an outlet and
press the Filter Reset Button. (Ref. E-11)
• Check to see if the Lights OFF Mode selected. If so, then press
the Lights Control Button to activate the indicator lights.
(Ref. E-10)
• Check Styrofoam float for impurities. Clean the HumidifyingTray.
Ensure unit is located on a level surface.
• Check to see if the Humidifying Tray and Water Tank are
correctly installed. Check the Humidifying Filter.
• Clean or replace the filter when it is heavily soiled.
(Ref. E-14 and E-15).
• The Front Monitor lights automatically change colours as
impurities are detected by the dust sensor and odour sensor.
E-16
Page 19

SYMPTOM REMEDY (not a malfunction)
When the Roller / Float was removed.
FLOAT
1. Insert the float under
this tab.
2. Inner the tab
of float into
the hole.
3. Insert the tab on the other
side of the float into the
hole.
AUTO RESTART
Cross-Section view
Tab
• Install the Roller / Float in order below.
ROLLER
Fix the roller in the tray from side way.
Float
Float
NOTE
Check the direction
of the roller.
ENGLISH
After a power failure, automatically resume
the operation when the power recovers.
ON
(with the unit OFF)
(simultaneously for more 3 sec.)
If the , , lamp lights up for
10 seconds, the setting is complete.
Auto Restart can be set.
• Even when the plug is unplugged or the breaker
is thrown during the operation, the operation resumes at the previous operation mode and settings if the power recovers.
CANCELLATION
(with the unit OFF)
(simultaneously for more 3 sec.)
E-17
Page 20

TROUBLESHOOTING
ERROR DISPLAY
DIGITAL
INDICATION
LAMP INDICATION ERROR DETAILS REMEDY
Flashing of the Clean Air &
Humidify Indicator Light.
Flashing of the Fan Speed
Indicator Light ‘
Flashing of the Clean Ion
Shower Indicator Light.
Flashing of the Clean Air
Indicator Light.
If error occurs again, contact the Sharp Service Centre.
Abnormal humidity filter. Verify if the Humidifying
Abnormal fan motor.
‘.
- Abnormal temperature-
humidity sensor.
-
Problem in circuit board.
Filter, Humidifying Tray and
Water Tank are properly installed and then turn power
ON again.
Turn power OFF to cancel
the error display, wait one
minute, and then turn power
ON.
Unplug the unit, wait one
minute, and plug the unit in
again.
Flashing of the Fan Speed
Indicator Light ‘
Flashing of the Fan Speed
Indicator Light ‘
‘.
‘.
E-18
Page 21

SPECIFICATIONS
ENGLISH
MAX MED LOW MAX MED LOW MAX MED LOW
Power supply 220 V 50 Hz
Model KC-A60Y KC-A50Y KC-A40Y
Fan Speed Adjustment
60 22 5.3 42 18 4.3 25 15 4
396 270 84 306 216 60 216 168 48
3
49 40 19 49 41 16 46 40 16
366 270 120 288 216 90 180 144 60
/hour)
Fan Speed (m
Rated Power (W)
/hour)
3
Noise Level (dBA)
Fan Speed (m
CLEAN AIR
44 24 9 36 20 7.4 19 13 6.8
47 40 24 47 41 23 42 35 20
730 600 300 600 500 250 450 400 200
*3 ~35 ~28 ~21
)
2
)*2 ~48 ~38 ~26
2
Rated Power (W)
Noise Level (dBA)
Humidification (mL/hour)*1
CLEAN AIR
& HUMIDIFY
Recommended Room Size (m
High density Plasmacluster ion recommended room size (m
Dust/Odour/Temperature & Humidity Dust/Temperature & Humidity
Dust collection HEPA with Microbial control *4
Deodorization Washable Deodorizing
Water Tank Capacity (L) 4.0 3.6 3.0
Sensors
Filter type
Cord Length (m) 2.0
floor) when the product is placed next to a wall and run at the MED operation position.
• Size of a room in which approximately 7000 ions can be measured per cubic centimeter in the center of the room (at a height of approximately 1.2 meters from the
Dimensions (mm) 416 (W) × 295 (D) × 643 (H) 399 (W) × 273 (D) × 603 (H) 382 (W) × 242 (D) × 570 (H)
Weight (kg) 11.0 9.2 8.1
*1 • Humidification Amount changes in accordance with indoor and outdoor temperature and humidity.
Humidification Amount increases as temperatures rise or humidity decreases.
Humidification Amount decreases as temperatures decrease or humidity rises.
• Measurement Condition: 20 ºC, 30 % humidity (JEM1426)
*2 • The Recommended Room Size is appropriate for operating the unit of maximum fan speed.
• The Recommended Room Size area indicates the space where a certain amount of dust particles can be removed in 30 minutes.
*3
• The filter removes more than 99.97% of particles of 0.3-micron dust. (JEM1467)
Standby Power
In order to operate the electrical circuits while the power plug is inserted in the wall outlet, this
product consumes about 0.9 W of standby power.
For energy conservation, unplug the power cord when the unit is not in use.
*4
E-19
Page 22

Memo
Page 23

Page 24

Harap dibaca sebelum mengoperasikan Penjernih Udara Anda
Penjernih Udara menyedot udara dari saluran masuk, meneruskan udara ke Pre-Filter,
filter Washable Deodorizing Filter dan filter HEPA di dalam unit, lalu melepaskan
kembali udara melalui saluran keluar. Filter HEPA dapat menghilangkan 99.97% partikel
debu seukuran 0.3 micron yang melaluinya dan juga membantu menghilangkan bau.
Filter Washable Deodorizing secara berangsur menyerap bau yang melalui filter.
Bau yang diserap di filter dapat menghasilkan tambahan bau. Tergantung faktor
lingkungan, lebih khususnya bila produk digunakan pada lingkungan yang intensitas
debu atau bau lebih besar sehingga bau yang menempel menjadi lebih kuat dalam
waktu yang lebih singkat dari yang diperkirakan. Bila bau ini tidak hilang, filter-filter
harus diganti.
CATATAN
• Air purifier dirancang untuk menyaring debu dan bau di udara, bukan gas-gas berbahaya (contohnya
karbon monoksida yang terkandung pada asap rokok). Bila sumber bau tetap ada, pembersihan
udara membutuhkan waktu yang lebih lama.
Filter HEPA
Filter Deodorizing
Pre-Filter
(Ilustrasi menggunakan model “KC-A60Y”.)
Page 25

INDONESIA
FITUR
Kombinasi unik dari Penjernih Udara
Tiga Tahap Filter + Plasmacluster +
Moisturizing Function
PERANGKAP DEBU*
Washable pre-filter menangkap debu dan
partikel ukuran besar di udara.
MENGURANGI BAU
Filter Washable deodorizing menyerap
beragam bau rumah tangga pada umumnya.
MENGURANGI SERBUK & JAMUR*
Filter HEPA filter menangkap 99.97%
partikel seukuran 0.3 mikron.
MENYEGARKAN UDARA
Plasmacluster memperlakukan udara sama
halnya membersihkan lingkungan secara
alami dengan mengeluarkan ion-ion positif
dan negatif secara seimbang.
KELEMBABAN
Menjaga 10 jam kelembaban ruangan**
*
Bila udara mengalir melalui sistem penyaringan.
**Ukuran ruangan:
sampai 48 m2 (KC-A60Y)
sampai 38 m2 (KC-A50Y)
sampai 26 m2 (KC-A40Y)
Teknologi Sensor secara terus menerus
memantau kualitas udara dan otomatis
mengatur kerja peralatan berdasarkan
pada pendeteksian udara.
DAFTAR ISI
PETUNJUK PENTING KESELAMATAN
• PERINGATAN
• PERHATIAN SAAT MENGOPERASIKAN
• PEDOMAN PEMASANGAN
• PEDOMAN FILTER
NAMA-NAMA BAGIAN
• DEPAN / BELAKANG
• TAMPILAN UNIT UTAMA
• DIAGRAM ILUSTRASI
PERSIAPAN ..............................................
• PEMASANGAN FILTER
• MENGISI ULANG TANGKI AIR
PENGOPERASIAN
• CLEAN AIR & HUMIDIFY
• CLEAN AIR
• CLEAN ION SHOWER
• KECEPATAN KIPAS
• TOMBOL ION PLASMACLUSTER ON/OFF
FUNGSI BERGUNA ................................
• KONTROL LAMPU
• KUNCI PENGAMAN ANAK
• PENGATURAN INDIKATOR SUARA
• MENGATUR SENSITIFITAS PENDETEKSIAN
SENSOR
.........................
................................
PERAWATAN DAN PEMELIHARAAN
• INDIKATOR FILTER
• INDEKS PERAWATAN
PEMBONGKARAN KOMPONEN PENAMPUNG AIR
•
• TANGKI AIR
• FILTER AIR
• PENAMPUNG AIR DAN PENUTUP
• PANEL BELAKANG
• FILTER DEODORIZING
• UNIT
• PENGGANTIAN FILTER
PEMECAHAN MASALAH
..................
...
IND-10
....
IND-11
IND-16
IND-2
IND-4
IND-6
IND-5
INDONESIA
SPESIFIKASI
........................................
Terima kasih atas kepercayaan anda membeli
Air Purifier SHARP. Bacalah panduan ini
secara seksama sebelum menggunakannya.
Setelah itu, simpan panduan ini ke lokasi
yangmudah dikenali untuk referensi.
IND-1
IND-19
Page 26

PETUNJUK PENTING KESELAMATAN
Saat menggunakan alat listrik, peringatan keselamatan dasar harus diikuti, termasuk yang
berikut ini:
–
PERINGATAN
• Baca semua petunjuk sebelum menggunakan unit ini.
• Hanya gunakan stopkontak 220 volt.
•
Jangan gunakan unit bila kabel atau steker listrik rusak atau penyambungan ke stopkontak kendor.
• Secara teratur bersihkan debu dari steker listrik.
• Jangan memasukan jari anda atau benda lain ke saluran masuk atau keluar udara.
Saat mencabut steker listrik, peganglah bagian kepalanya saat mencabutnya dan bukan kabelnya.
•
Sengatan listrik dan/atau api dari hubung pendek mungkin bisa terjadi.
• Jangan merusak kabel listrik dengan kaster saat memindahkan unit utama.
(Ini mungkin menyebabkan sengatan listrik, dihasilkannya panas atau kebakaran.)
• Jangan mencabut steker listrik saat tangan anda basah.
• Jangan menggunakan unit dekat peralatan gas atau api.
• Saat mengisi ulang tangki air, membersihkan unit atau unit tidak digunakan, pastikan mencabut
steker listriknya. Sengatan listrik dan/atau api dari hubung pendek bisa terjadi.
•
Bila steker listrik rusak, harus diganti oleh pabrik pembuatnya, agen service-nya, Pusat
Service resmi Sharp atau orang yang memiliki kualifikasi untuk mencegah bahaya kecelakaan.
• Hanya Pusat Service resmi SHARP yang seharusnya menangani servis air purifier ini. Hubungi
Pusat Service terdekat bila dijumpai masalah, memerlukan pengaturan atau perbaikan.
• Jangan mengoperasikan unit saat menggunakan pembasmi serangga semprot atau di dalam
ruangan yang mengandung sisa-sisa minyak, semprotan minyak wangi, puntung rokok, semprotan
kimia atau di tempat yang memungkinkan unit basah, seperti kamar mandi.
•
Berhati-hatilah saat membersihkan unit. Pembersih korosif yang kuat bisa merusak lapisan luar unit.
•
Saat membawa unit, lepaskan Tangki Air dan Penampung Air dan peganglah unit pada pegangannya
di kedua sisi unit.
• Jangan meminum air di Penampung Air atau Tangki Air.
• Ganti air setiap hari di Tangki Air dengan air kran bersih dan bersihkan secara teratur Tangki Air
dan Penampung Air. (Lihat halaman IND-12 dan IND-13). Saat unit tidak digunakan, buang air
di Tangki Air dan Penampung Air. Membiarkan air pada Tangki Air dan/atau Penampung Air bisa
menimbulkan jamur, bakteri dan bau tak sedap.
Pada kasus tertentu, bakteri ini mengakibatkan efek yang berbahaya bagi tubuh.
• Perangkat ini tidak diperuntukan untuk digunakan oleh orang (termasuk anak-anak) yang memiliki
keterbatasan fisik, panca indera atau kapabilitas mental, atau kurang berpengalaman dan
pengetahuan, kecuali mereka mendapat pengawasan atau pengarahan penggunaan oleh orang
yang bertanggung jawab te.rhadap keselamatannya.
Anak-anak harus diawasi untuk memastikan mereka tidak bermain-main dengan perangkat ini.
Untuk mengurangi risiko kejutan listrik, kebakaran atau cedera pada orang-orang:
CATATAN
Bila air purifier ini mengakibatkan gangguan penerimaan radio atau TV, cobalah perbaiki dengan
salah satu atau lebih cara pencegahan berikut:
• Pindahkan arah atau lokasi antena penerima.
• Tambahkan jarak antara unit dengan penerima radio/TV.
• Sambungkan peralatan ke stopkontak yang berbeda jalur arusnya dimana penerima dihubungkan.
• Konsultasi ke dealer atau teknisi Radio/TV yang berpengalaman untuk membantu Anda.
– Gangguan gelombang Radio atau TV
IND-2
Page 27

PERHATIAN SAAT MENGOPERASIKAN
• Jangan menghalangi saluran masuk/keluar udara.
• Jangan menggunakan unit dekat atau di atas benda panas, seperti kompor gas atau pemanas,
atau tempat dimana unit terkena uap air panas.
• Selalu operasikan unit pada posisi menghadap ke depan.
• Pegang unit melalui pegangan di kedua sisi unit saat memindahkannya.
Jangan memindahkan unit saat sedang beroperasi.
• Jangan memindahkan atau mengubah arah unit utama saat menarik kaster.
•
Angkat dan pindahkan, seperti tikar tatami, lantai yang mudah rusak, tempat yang tidak rata, dan karpet tebal.
• Jika memindahkan dengan kaster, pindahkan perlahan-lahan dengan arah horizontal.
• Saat dipindahkan, pastikan unit tidak sedang dioperasikan dan lepaskan tangki air dan
Penampung Air dengan memegang pegangan samping unit.
• Saat memindahkan tangki air, berhati-hatilah agar tangan Anda tidak terjepit.
•
Jangan mengoperasikan unit bila filter, tangki air, dan penampung air tidak terpasang dengan benar.
• Jangan mencuci dan menggunakan ulang filter HEPA.
Bukan hanya tidak mampu memperbaiki kinerja filter, juga bisa berakibat tersengat listrik atau
kegagalan fungsi.
• Bersihkan kabinet luar dengan kain lembut.
Jangan gunakan cairan dan/atau detergen yang mudah menguap.
Permukaan unit bisa rusak atau retak.
Selain itu, sensor-sensor bisa tidak berfungsi.
•
Waktu perawatan akan bergantung pada tingkat kekeruhan atau kualitas air yang anda gunakan;
semakin kotor semakin sering anda perlu melakukan perawatan.
• Jauhkan unit dari air.
INDONESIA
PEDOMAN PEMASANGAN
• Saat menggunakan, tempatkan unit sekitar 2 m dari peralatan lain yang menggunakan
listrik seperti TV atau radio untuk mencegah gangguan kelistrikan.
• Hindari penempatan dimana sensor terpapar langsung oleh angin.
Unit mungkin tidak beroperasi dengan benar.
• Hindari lokasi dimana furniture, kain atau item lainnya menutupi unit dan membatasi aliran
udara masuk dan/atau keluar.
• Hindari lokasi dimana unit terpapar kondensasi atau perubahan suhu yang drastis. Kondisi
yang ideal bila suhu ruang antara 5 – 35ºC.
• Tempatkan di permukaan yang rata dengan sirkulasi udara yang cukup.
Saat menempatkan unit pada area berkarpet, unit mungkin berguncang lembut.
Tempatkan unit pada permukaan datar untuk mencegah kebocoran air dari Tangki Air dan/atau
Penampung air.
• Hindari lokasi dimana dihasilkan asap minyak atau gemuk.
Permukaan unit bisa rusak atau sensor mungkin tidak berfungsi.
•
Tempatkan unit sekitar 30cm(1ft) menjauh dari dinding untuk menjamin aliran udara mengalir lancar.
Dinding dibelakang saluran keluar udara mungkin lama kelamaan menjadi kotor. Bila unit
digunakan untuk waktu lama di lokasi yang sama, bersihkan secara teratur dinding dan lindungilah
dengan lembar vinyl, dll. untuk mencegah dinding menjadi kotor.
PEDOMAN FILTER
• Ikuti petunjuk pada buku panduan ini untuk perawatan filter-filter yang benar.
IND-3
Page 28

NAMA-NAMA BAGIAN
DEPAN / BELAKANG
1
1 Tampilan Unit Utama
2
2
3
Monitor Depan
3
Unit Utama
(Lihat IND-5)
1
2
3
4
5
6
7
8
(Bentuk colokan tergantung pada negara.)
1 Saluran keluar udara 6 Pelampung
2 Pegangan (2 Lokasi) 7 Penampung air
3 Sensor-sensor (Internal)
• Sensor debu
• Sensor Suhu/ Kelembaban
• Odour Sensor
(Hanya KC-A60Y•KC-A50Y)
4 Tangki Air
5 Filter Air
8 Kaster
9 Filter HEPA
10 Filter Deodorizing (hitam)
11 Panel Belakang (Pre-Filter)
12 Saluran Masuk Udara
13 Kabel listrik / Steker
(4 Lokasi)
(putih)
9
10
11
12
13
DISERTAKAN BERSAMA PRODUK
• Panduan pengoperasian
• Sandal
×4
IND-4
Page 29

TAMPILAN UNIT UTAMA
2
3
1
6 78
5
4
1 Tombol Power ON
a Tombol CLEAN AIR MODE / Lampu Indikator (hijau)
b Tombol CLEAN AIR & HUMIDIFY MODE / Lampu indikator (hijau)
c Tombol CLEAN ION SHOWER MODE / Lampu indikator (hijau)
2 Tombol KENDALI LAMPU 5 Tombol CHILD-LOCK / Lampu indikator
3 Tombol ON / OFF Ion Plasmacluster /
Lampu indikator (hijau)
4 Tombol FILTER RESET / Lampu
Indikator (merah)
a
b
6 Tanda Plasmacluster
7
8 Tombol POWER OFF
c
(hijau)
Tombol Kecepatan / Lampu indikator (hijau)
DIAGRAM ILUSTRASI
Monitor Kelembaban
Menunjukkan tingkat kelembaban
rata-rata di dalam ruangan.
Pengaturan kelembaban tidak dapat
disesuaikan.
MONITOR BAU*
Menunjukkan intensitas bau
ruangan dalam 3 warna tahapan.
Hijau
Merah
INDONESIA
Lampu Kelembaban
hijau
mati
merah
(Menyala
Lembab ON
Lembab OFF
perlu diisi air
)
IND-5
Rendah Tinggi
* Hanya KC-A60Y, KC-A50Y
Monitor Debu
Menunjukkan kemurnian udara di
ruangan dalam 5 warna tahapan.
Bersih
Tidak murni
Hijau
Merah
Page 30

PERSIAPAN
PEMASANGAN FILTER
Pastikan telah melepas colokan
listrik dari stopkontak di dinding.
Buka Panel Belakang.
1
1
2
Filter HEPA (putih)
Mengeluarkan Filter dari tas
2
Pasang Filter dengan urutan yang
3
Filter Deodorizing (hitam)
plastik.
benar seperti yang ditunjukkan.
Filter Deodorizing (hitam)
Filter HEPA (putih)
Klik
Pasang Panel Belakang.
4
Isikan tanggal awal penggunaan
5
di Label Tanggal.
IND-6
Page 31

MENGISI ULANG TANGKI AIR
Jika menggunakan Mode Clean Air & Humidify, atau Mode Clean ION Shower.
1
Isi Tangki Air dengan air keran.
1
2
3
Lepaskan Tangki Air.
2
MAX
PERHATIAN
•
Periksa apakah ada kebocoran air.
• Pastikan mengelap sisa-sisa air pada
sisi luar tangki air.
•
Saat membawa tangki air, pegang dengan
Kencangkan
kedua tangan dengan bukaan tangki air
menghadap atas.
INDONESIA
Pasang Tangki Air.
3
1
PERHATIAN
• Jangan paparkan unit ke air. Hubungan pendek dan/atau sengatan listrik bisa terjadi.
• Jangan gunakan air panas (40ºC), bahan kimia, wewangian, air kotor, atau bahan-bahan yang
merusak lainnya, perubahan bentuk dan/atau kegagalan fungsi bisa terjadi.
• Gunakan hanya air segar. Penggunaan sumber air lain dapat menimbulkan tumbuhnya jamur, dan/
atau bakteri.
2
Klik
IND-7
Page 32

PENGOPERASIAN
CLEAN AIR & HUMIDIFY
Gunakan ini untuk membersihkan udara, mengurangi bau dan melembabkan secara cepat.
START
• Pilih kecepatan kipas yang diinginkan.
(Lihat IND-9)
• Operasi akan dimulai dengan mode
sebelumnya, kecuali apabila kabel listrik
telah dilepas dari stopkontak.
CATATAN
• Isi Tangki Air. (Lihat IND-7)
•
Jika Tangki Air kosong, unit akan mengoperasikan “CLEAN AIR MODE” dan menyala (merah).
STOP
Tentang Mode Kelembaban Otomatis
Sensor-sensor suhu/kelembaban secara otomatis mendeteksi dan
mengatur kelembaban sesuai perubahan suhu uangan. Tergantung
ukuran dan kelembaban ruangan, kelembaban mungkin tidak
mencapai 55~65 %. Dalam hal ini disarankan menggunakan mode
CLEAN AIR & HUMIDIFY/MAX.
CLEAN AIR
Gunakan jika kelembaban tambahan tidak diperlukan.
START
• Pilih kecepatan kipas yang diinginkan.
(Lihat IND-9)
• Operasi akan dimulai dengan mode
sebelumnya, kecuali apabila kabel listrik
telah dilepas dari stopkontak.
Suhu Humidity
~18ºC 65%
18ºC~24ºC 60%
24ºC~ 55%
STOP
IND-8
Page 33

CLEAN ION SHOWER
Meluncurkan ion Plasmacluster kepadatan tinggi dan penyemburan udara yang kuat selama 60 menit.
START
CATATAN
• Jika “Plasmacluster Ion OFF, Ion Plasmacluster
tidak dilepaskan.
• Jika pengoperasian selesai, unit akan kembali ke
mode pengoperasian sebelumnya.
Unit dapat beralih ke mode lainnya dan
mode ini.
selama
KECEPATAN KIPAS
Pilih kecepatan kipas yang diinginkan.
INDONESIA
OTOMATIS POLLEN
MAX
MED
CATATAN
OTOMATIS
POLLEN
Kecepatan kipas berubah secara otomatis (antara HIGH dan LOW) sesuai
tingkat kekeruhan udara. Sensor mendeteksi kekeruhan untuk mengefisienkan
penjernihan udara.
Unit akan beroperasi di level High
selama 10menit, lalu berganti
antara MEDIUM dan HIGH.
10 menit: level Tinggi
20 menit: level Medium
20 menit: level Tinggi
ION PLASMACLUSTER ON/OFF
Jika Plasmacluster ON, Lampu Indikator dan Lampu Indikator Plasmacluster menyala.
ON
MATI
RENDAH
IND-9
Page 34

FUNGSI BERGUNA
KONTROL LAMPU
Gunakan fungsi ini untuk memilih kecerahan yang diinginkan.
Lebih terang
Lebih gelap
Padam
KUNCI PENGAMAN ANAK
Pengoperasian tampilan unit akan dikunci. Jika metode yang sama digunakan untuk memulai pengoperasian.
ON
3 detik lagi
MEMBATALKAN
3 detik lagi
PENGATURAN INDIKATOR SUARA
Unit dapat diatur untuk memberikan sinyal dengan getar yang dapat terdengar apabila Tangki Air kosong.
ON
(jika unit OFF)
3 detik lagi 3 detik lagi
MEMBATALKAN
(jika unit OFF)
MENGATUR SENSITIFITAS PENDETEKSIAN SENSOR
MONITOR DEBU dan MONITOR BAU terus menyala merah untuk mengurangi sensitivitas, dan diatur ke
“high’ jika MONITOR DEBU dan MONITOR BAU terus menyala hijau untuk meningkatkan sensitivitas.
MERAH••••••••ATUR ke “LOW’ HIJAU•••ATUR ke “HIGH’
1
(jika unit OFF)
3 detik lagi
2
3
•
PERHATIAN
Jika Tombol OFF daya tidak ditekan selama 8 detik untuk menyesuaikan
sensitivitas
• Pengaturan sensitivitas sensor akan disimpan meskipun unit dimatikan.
TINGGI
Standard
RENDAH
sensor, pengaturan akan disimpan secara otomatis.
IND-10
Page 35

PERAWATAN DAN PEMELIHARAAN
Pastikan telah melepas colokan
listrik dari stopkontak di dinding.
INDIKATOR FILTER
Lampu Indikator akan menyala setelah sekitar 720 jam. (30 hari × 24 jam = 720)
Pengingat untuk melakukan perawatan bagian di bawah ini.
Setelah melakukan perawatan, reset indikator Filter. (Lihat IND-12)
3 detik lagi
INDEKS PERAWATAN
• Lampu Indikator Filter menyala.
Filter air (Lihat IND-12)
Penutup
Penampung Air
(Lihat IND-13)
Tangki Air (Lihat IND-12)
Penampung Air (Lihat IND-13)
Panel Belakang
(Lihat IND-13)
• Perhatikan bau tidak sedap dari saluran
keluar udara.
• Kinerja filter akan menurun dan / atau
ada bau.
Unit (Lihat IND-14)
Filter HEPA
Tidak dapat
dirawat.
Filter Deodorizing
(Lihat IND-14)
INDONESIA
PEMBONGKARAN KOMPONEN PENAMPUNG AIR
Setelah perawatan, pasang bagian-bagian dengan akurat.
2
1
3
warna rangka: abu-abu
IND-11
Page 36

PERAWATAN DAN PEMELIHARAAN
TANGKI AIR
Bilas bagian dalam dengan sedikit air.
PERHATIAN
•Jangan menggoyang-goyangkan Tangki Air dengan memegang
pegangan pembawa.
FILTER AIR
CATATAN
Untuk Debu Membandel...
Bersihkan bagian dalam tangki
air dengan spons lembut dan
pembuka tangki dengan lap
katun atau sikat gigi.
Pembuka Tangki
Sikat gigi
Bilas dengan banyak air.
PERHATIAN
• Jangan melepaskan Filter Air dari rangka filter.
• Cegah tumpahan air dari penampung air.
CATATAN
1.
Rendam dalam air dengan larutan pembersih sekitar 30 menit.
Untuk Debu Membandel...
PERHATIAN
lebih lama.
2.
Bilas larutan pembersih dengan banyak air
Larutan pembersih
• Bubuk sitrun (tersedia di toko obat-obatan)
• 100% jus lemon tanpa ampas.
<Menggunakan bubuk sitrun>
2 1/2 cangkir air
<Menggunakan jus lemon>
3 cangkir air
Jika menggunakan jus lemon, waktu perendaman
aduk rata!
aduk rata!
IND-12
3 sendok teh
1/4 cangkir
Page 37

Pastikan telah melepas colokan
listrik dari stopkontak di dinding.
PENAMPUNG AIR DAN PENUTUP
1. Lepaskan Penutup Penampung Air.
2. Bilas bagian dalam Penampung Air dan Penutup
Penutup Penampung Air
Penampung Air dengan sikat gigi.
PERHATIAN
• Jangan lepaskan Pelampung dan Penggulung.
Jika Pelampung dan / atau Penggulung dilepaskan. (Lihat IND-17)
•
Pelampung
Penggulung
CATATAN
PENAMPUNG
PENUTUP
Untuk Debu Membandel...
1.
Isi penampung dengan air hingga
setengahnya.
2.
Tambahkan sedikit deterjen.
3.
Rendam selama 30 menit.
4.
Bersihkan deterjen dengan air
bersih.
1.
Rendam dalam air dengan
sedikit deterjen sekitar 30 menit.
2.
Bersihkan deterjen dengan air bersih.
Bersihkan bagian-bagian yang
sulit dijangkau dengan lap katun
atau sikat gigi.
PERHATIAN
JANGAN gunakan deterjen yang
ditunjukkan pada IND-14.
Deterjen ini menyebabkan penyok,
kusam, retak (kebocoran air)
INDONESIA
PANEL BELAKANG
Panel Belakang
Bersihkan debu secara hati-hati dengan vacuum
cleaner atau alat sejenisnya.
CATATAN
Untuk Debu Membandel...
1.
Rendam dalam air dengan
deterjen sekitar 10 menit.
PERHATIAN
JANGAN menggosok panel
belakang dengan keras.
2.
Bersihkan deterjen dengan air
bersih.
3.
Keringkan filter pada area
berventilasi.
IND-13
Page 38

PERAWATAN DAN PEMELIHARAANPERAWATAN DAN PEMELIHARAAN
FILTER DEODORIZING
1
2
3
DICUCI DENGAN TANGAN!
JANGAN MENGERINGKAN DI PENGERING BAJU!
Bersihkan debu di atas FILTER DEODORIZING.
Bilas FILTER DEODORIZING dengan air.
PERHATIAN
•
Saat mencuci filter pertama kali, air bilasan mungkin kecoklatan.
Ini tidak berpengaruh pada kinerja penghilangan bau.
• Jangan menekuk atau melipat filter saat mencuci.
Bersihkan sebanyak mungkin embun.
Keringkan filter pada area berventilasi.
4
Jika memungkinkan, keringkan di luar.
UNIT
(perlu sekitar 6 jam untuk pengeringan)
PERHATIAN
• Jangan menjemur filter selama cuaca tidak cerah (hujan
atau musim dingin).
• Jangan biarkan filter membeku.
•
Bila dijemur di
menempatkan serbet, dll. di bawah filter untuk mencegah air
merusak lantai.
Usap dengan lap kering dan lembut.
PERHATIAN
Jangan gunakan cairan mudah menguap.
•
Pengencer cat benzena, bubuk pengilap, dapat merusak
permukaan.
Jangan gunakan cairan mudah menguap.
•
Bahan deterjen dapat merusak unit.
dalam
ruangan, ambil tindakan seperti
IND-14
Page 39

PENGGANTIAN FILTER
Waktu Penggantian
Usia filter akan bervariasi tergantung lingkungan ruangan, penggunaan dan lokasi unit, Bila debu dan
bau tetap ada, gantilah filter.
(Lihat “Harap membaca sebelum mengoperasikan air purifier anda”)
Usia filter dan periode penggantian berikut berdasarkan kondisi merokok 5 batang per hari dan
penumpukan debu/daya penghilang bau berkurang menjadi separuhnya dibandingkan filter yang baru.
Kami sarankan penggantian filter sesering mungkin apabila produk digunakan dalam kondisi yang
lebih buruk dibandingkan kondisi rumah tangga normal.
•Filter HEPA Sekitar 10 tahun setelah beroperasi
•Filter Deodorizing* Sekitar 10 tahun setelah beroperasi
•Filter Air Sekitar 10 tahun setelah beroperasi
(Dgjrcpbcmbmpgxglew_le`gq_bgasagb_n_rbgesl_i_l`cpsj_le
i_jgqcrcj_fbgasag*_r_sb_n_rbge_lrg,
Model Filter Pengganti
Hubungi dealer untuk pembelian atau penggantian filter.
MODEL FILTER PENGGANTI
MODEL PENJERNIH
UDARA
KC-A40 FZ-A40HFE FZ-A40DFE
KC-A60 FZ-A60HFE FZ-A60DFE
CATATAN
Filter HEPA :
1 unit
Gunakan label tanggal sebagai pengingat
untuk penggantian berikutnya.
Filter Deodor-
izing : 1 unit
Filter Air: 1 unit
FZ-A60MFEKC-A50 FZ-A50HFE FZ-A50DFE
Pembuangan Filter
Buanglah filter bekas sesuai peraturan dan regulasi pemerintah
setempat.
Material filter HEPA:
• Filter : Polypropylene
• Rangka : Polyester
Filter Air
Rangka filter (putih)
INDONESIA
Rangka filter (abu-abu)
Bahan Filter Deodorizing :
• Penghilang bau : Arang aktif
• Filter : Polyester, Rayon
Material filter air:
• Filter : Rayon, Polyester
Filter HEPA
Filter Deodorizing
IND-15
Page 40

PEMECAHAN MASALAH
Sebelum menghubungi pusat service, lihatlah bagan pemecahan masalah berikut, karena mungkin
masalah yang muncul bukan kegagalan fungsi unit.
GEJALA PERBAIKAN (bukan kegagalan fungsi)
Bau dan asap tidak bisa
dihilangkan.
Monitor depan memancarkan
warna hijau walaupun udara
tercemar.
Monitor depan memancarkan
warna kuning atau merah
walaupun udara bersih.
Bunyi klik atau gemelitik
terdengar dari unit.
Udara yang keluar bau.
Unit tidak beroperasi saat asap
rokok berada di udara.
• Bersihkan atau ganti filter bila tampak sangat kotor.
(Lihat IND-11, IND-12, IND-14)
• Udara mungkin tidak murni saat unit dinyalakan.
Cabut unit, tunggu satu menit, dan sambungkan unit lagi.
• Operasi sensor terpengaruh bila bukaan sensor debu kotor atau
tersumbat. Bersihkan sensor debu. (Lihat IND-11)
• Bunyi klik atau gemelitik mungkin terdengar saat unit
menghasilkan ion-ion.
• Periksa apakah filter sangat kotor.
• Bersihkan atau ganti filter.
• Plasmacluster menghasilkan sedikit bekas ozon yang bisa
menghasilkan bau.
• Apakah unit dipasang di lokasi yang sulit untuk mendeteksi
asap rokok?
• Apakah bukaan sensor terhalang debu atau tersumbat?
(Dalam hal ini, bersihkan bukaan.) (Lihat IND-11)
Lampu indikator Filter menyala.
Monitor depan padam.
Lampu indikator Air tidak
menyala saat tangki air kosong.
Level air di tangki tidak
berkurang atau lambat
berkurangnya.
Lampu Monitor depan sering
berubah warna.
• Setelah mengganti filter, hubungkan kabel listrik ke sumber
tegangan dan tekan tombol reset filter. (Lihat IND-11)
• Periksa bila mode Lights OFF dipilih. Bila ya, tekan tombol
Kendali Lampu untuk mengaktifkan lampu indikator.
(Lihat IND-10)
• Periksa pelampung styrofoam dari kotoran. Membersihkan
Penampung Air. Pastikan unit diletakan pada bidang datar.
• Periksa apakah penampung air dan tangki air terpasang sesuai
arahnya. Periksa filter air.
• Periksa atau ganti filter saat terlihat sangat kotor.
(Lihat IND-14 dan IND-15)
• Lampu-lampu Monitor depan secara otomatis berganti warna
sesuai kekeruhan udara yang dideteksi sensor debu dan bau.
IND-16
Page 41

GEJALA PERBAIKAN (bukan kegagalan fungsi)
Jika Penggulung / Pelampung dilepaskan.
PELAMPUNG
1. Sisipkan pelampung
di bawah tab ini.
2. Sisipkan tab
pelampung ke
dalam lubang.
3. Masukan tab di sisi lain
pelampung ke dalam lubang.
Pelampung
Tab
Tampilan Penampang
• Memasang Penggulung / Pelampung dengan
urutan di bawah ini.
PENGGULUNG
Kencangkan penggulung di penampung
dari arah samping.
CATATAN
Pelampung
Periksa arah
penggulung.
INDONESIA
RESTART OTOMATIS
Otomatis melanjutkan pengoperasian saat
listrik kembali hidup setelah terjadi kegagalan daya.
ON
(jika unit OFF)
(bersamaan selama lebih dari 3 dtk.)
Jika lampu , , menyala
selama 10 detik, maka pengaturan
selesai.
Mulai Ulang Otomatis bisa diatur.
• Meskipun steker dilepaskan atau breaker terlempar selama pengoperasian, operasi berlanjut pada
mode dan pengaturan operasi sebelumnya jika listrik kembali hidup.
MEMBATALKAN
(jika unit OFF)
(bersamaan selama lebih dari 3 dtk.)
IND-17
Page 42

PEMECAHAN MASALAH
Bila kesalahan terjadi lagi, hubungi pusat service Sharp.
TAMPILAN KESALAHAN
INDIKASI
ANGKA
INDIKASI LAMPU KESALAHAN PERBAIKAN
Menyalakan lampu indikator
Clean air & Humidity.
Menyalakan lampu indikator
Fan Speed '
Menyalakan lampu indikator
Clean Ion Shower.
Menyalakan lampu indikator
Clean Air.
Menyalakan lampu indikator
Fan Speed '
Menyalakan lampu indikator
Fan Speed '
'.
- Sensor suhu-kelembaban
-
'.
'.
Filter Air tidak normal
Motor kipas tidak normal
tidak normal.
Masalah di papan sirkuit.
Pastikan filter air, penampung
air dan tangki air terpasang
dengan benar dan lalu
nyalakan kembali unit.
Matikan unit untuk
mematikan tampilan, tunggu
satu menit, lalu nyalakan
unit kembali.
Cabut unit, tunggu satu menit,
dan sambungkan unit lagi.
IND-18
Page 43

SPESIFIKASI
2.0
INDONESIA
Debu/Bau/Suhu & Kelembaban Debu/Suhu & Kelembaban
~35 ~28 ~21
/jam) 396 270 84 306 216 60 216 168 48
3
/jam) 366 270 120 288 216 90 180 144 60
3
)*2 ~48 ~38 ~26
2
11.0 9.2 8.1
416 (W) × 295 (D) × 643 (H) 399 (W) × 273 (D) × 603 (H) 382 (W) × 242 (D) × 570 (H)
Kecepatan kipas (m
Daya listrik (W) 60 22 5.3 42 18 4.3 25 15 4
Level noise (dBA) 49 40 19 49 41 16 46 40 16
Kecepatan kipas (m
Daya listrik (W) 44 24 9 36 20 7.4 19 13 6.8
Level noise (dBA) 47 40 24 47 41 23 42 35 20
Tegangan Listrik AC 220 V 50 Hz
Model KC-A60Y KC-A50Y KC-A40Y
Penyetelan Kecepatan Kipas MAX MED LOW MAX MED LOW MAX MED LOW
CLEAN AIR
CLEAN AIR
&HUMIDIFY
Pengumpul debu HEPA dengan kontrol mikroba *4
Pelembaban (mL/hour)*1 730 600 300 600 500 250 450 400 200
Kapasitas tangki air (L) 4.0 3.6 3.0
Ukuran ruangan yang Disarankan (m
Ukuran ruang yang disarankan untuk ion
Sensor-sensor
plasmacluster kepadatan tinggi (m2)*3
Anti bau Washable Deodorizing
Tipe Filter
Panjang Kabel (m)
Dimensi (mm)
IND-19
Filter ini menghilangkan lebih dari 99,97% partikel debu berukuran 0,3-mikron. (JEM1467)
jika produk diletakkan di samping dinding dan dijalankan pada posisi operasi MED.
Berat (kg)
*1 • Angka kelembaban berubah sesuai suhu dan kelembaban di dalam dan di luar ruangan.
Angka kelembaban naik bila suhu naik atau kelembaban turun.
Angka kelembaban turun bila suhu turun atau kelembaban naik.
• Kondisi pengukuran: 20ºC, 30% kelembaban (JEM1426)
*2 • Ukuran ruangan yang disarankan sesuai untuk unit pada kecepatan kipas maksimal.
• Ukuran ruangan yang disarankan menyatakan luas area dimana sejumlah partikel debu tertentu bisa dihilangkan dalam 30 menit.
*3 • Ukuran ruang yang di dalamnya sekitar 7000 ion bisa dihitung per centimeter kubik di tengah ruangan (yang tingginya sekitar 1,2 meter dari lantai)
*4 •
Mode Siaga
Untuk mengoperasikan sirkuit listrik saat terhubung ke sumber tegangan, produk ini mengkonsumsi
daya sekitar 0.9 W pada mode siaga.
Untuk konservasi energi, cabutlah unit dari tegangan listrik bila tidak digunakan.
Page 44

P.T. Sharp Electronics Indonesia
Jl.Swadaya IV,
Komp. Pedurenan Kel. Rawaterate Kec. Cakung,
Pulogadung Jakarta 13920 Indonesia
Printed in china
TINS-A472KKRZ CN 11E- 1
 Loading...