

Page 1
R
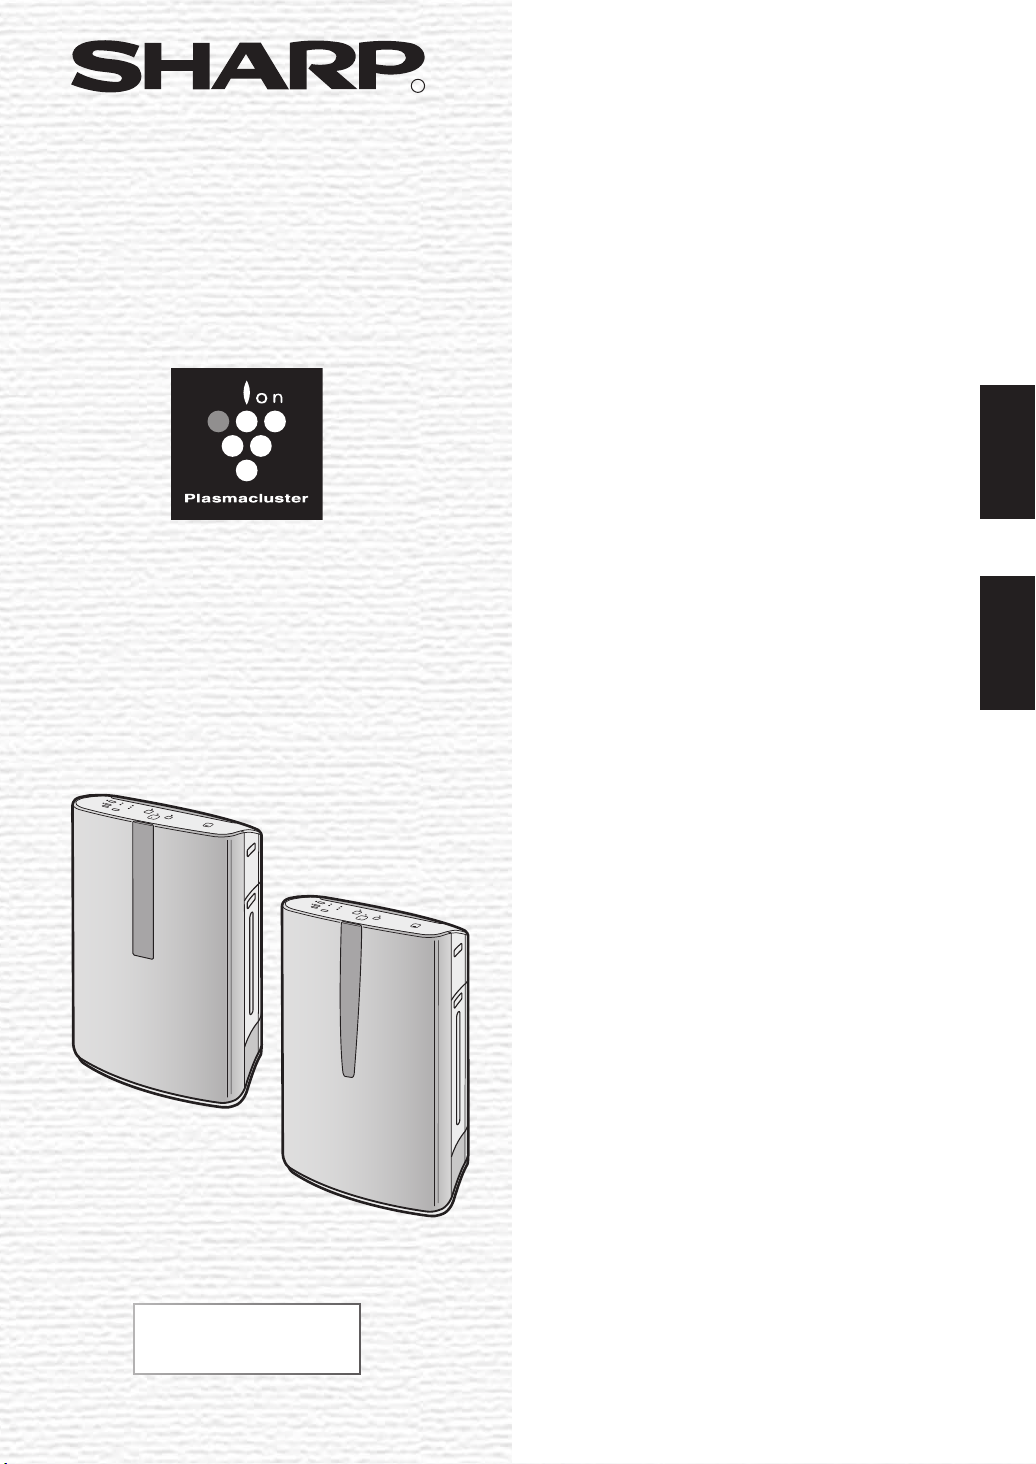
KC-850EK
KC-860EK
AIR PURIFIER
with Humidifying Function
* Plasmacluster is a trademark of Sharp
Corporation.
OPERATION MANUAL
加湿空気清浄機
取扱説明書
ENGLISH
日本語
KC-850EK
Free standing type
床置き・卓上兼用型
KC-860EK
Page 2
Please read before operating your new Air Purier
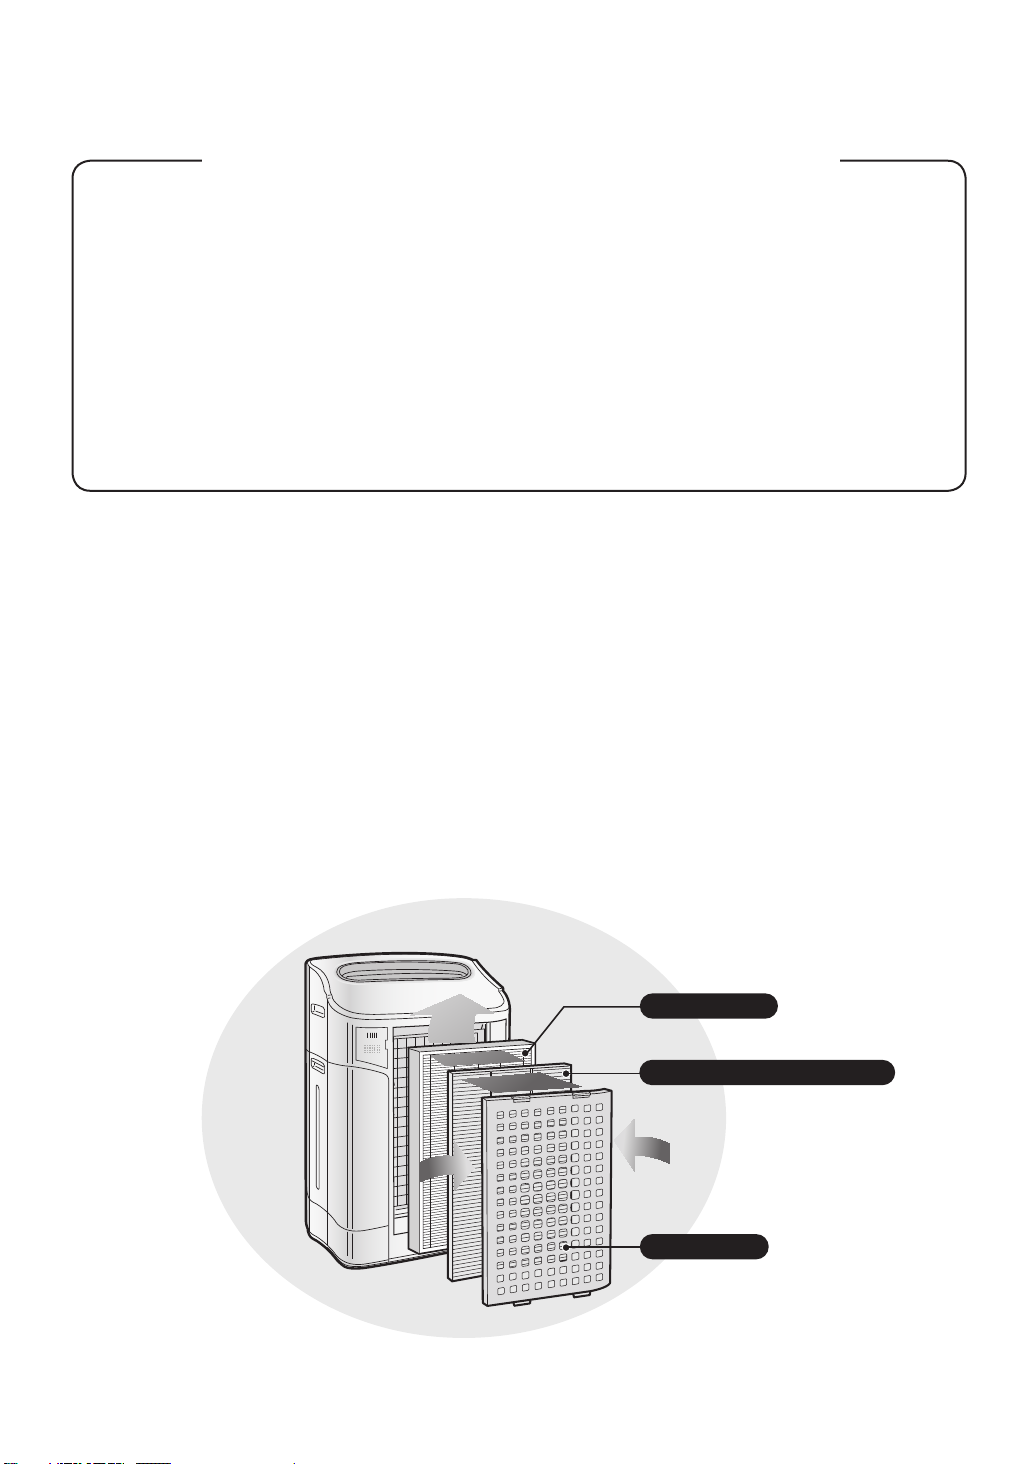
The air purier draws in room air from the air intake, passes the air through a Pre-Filter, a Washable Deodorizing Filter and a HEPA Filter inside of the unit, then discharges the air through the air outlet. The HEPA Filter can remove 99.97% of dust particles
as small as 0.3 microns that pass through the lter and also helps absorb odours. The
Washable Deodorizing Filter gradually absorbs odours as they pass through the lter.
Some odours absorbed by the lters may break down over time, resulting in additional
odour. Depending on the usage environment, especially when the product is used in
extreme environments (significantly more severe than normal household use), this
odour may become strong in a shorter period than expected. If the odour persists, the
lters should be replaced.
NOTE
• The air purier is designed to remove air-suspended dust and odour, but not harmful gases (for
example, carbon monoxide contained in cigarette smoke). If the source of the odour still exists, the
air purier may not completely remove the odour.
HEPA Filter
Washable Deodorizing Filter
Pre-Filter
(Common illustration has used “KC-850EK”.)
Page 3

ENGLISH
FEATURES
Unique Combination of Air Treatment
Technologies
Triple Filtration System + Plasmacluster
+ Humidication
TRAPS DUST*
Washable pre-filter traps dust and other
large airborne particles.
DECREASES ODOURS
Washable deodorizing lter absorbs many
common household odours.
REDUCES POLLEN & MOLD*
HEPA filter traps 99.97% of particles as
small as 0.3 microns.
FRESHENS
Plasmacluster treats the air similar to the
way nature cleans the environment by
emitting a balance of positive and negative
ions.
HUMIDIFIES
Runs up to 10 hours per lling.**
*When air is drawn through the filter sys-
tem.
**Room size:
up to 48 m2 (KC-860EK)
up to 38 m2 (KC-850EK)
Sensor Technology continuously monitors
air quality, and automatically adjusting operation based on detected air purity and
humidity.
CONTENTS
......
...
E-10
E-10
E-10
E-10
E-12
E-12
E-13
E-14
E-15
E-16
E-18
..
E-19
IMPORTANT SAFETY INSTRUCTIONS
• WARNING ..................................................
• CAUTIONS CONCERNING OPERATION .
• INSTALLATION GUIDELINES ....................
• FILTER GUIDELINES ................................
PART NAMES
• ILLUSTRATIVE DIAGRAM .........................
• BACK ..........................................................
• FRONT MONITOR .....................................
PREPARATION FOR USE ............................
• FILTER INSTALLATION .............................
• REFILLING WATER TANK .........................
OPERATION
• MAIN UNIT DISPLAY .................................
• CLEAN AIR & HUMIDIFY MODE ...............
• CLEAN AIR MODE .....................................
• CLEAN ION SHOWER MODE ...................
• FAN SPEED BUTTON ................................
• Plasmacluster ON/OFF BUTTON .............
• LIGHTS CONTROL BUTTON ..................
• WATER SUPPLY INDICATOR LIGHT ......
• ADJUSTMENT OF SENSOR
DETECTION SENSITIVITY ......................
CARE AND MAINTENANCE
• FILTER INDICATOR LIGHT .....................
• BACK PANEL AND SENSORS ................
• UNIT ........................................................
• WATER TANK ...........................................
• WASHABLE DEODORIZING
FILTER CARE ..........................................
• HUMIDIFYING TRAY ...............................
• HUMIDIFYING FILTER .............................
•
FILTER REPLACEMENT GUIDELINES
TROUBLESHOOTING
SPECIFICATIONS
.............................................
...............................................
.................
............................
....................................
INFORMATION ON PROPER DISPOSAL
E-2
E-2
E-3
E-3
E-3
E-4
E-4
E-4
E-5
E-6
E-6
E-7
E-8
E-8
E-8
E-9
E-9
E-9
E-11
E-11
E-11
E-11
ENGLISH
日本語
Thank you for purchasing this SHARP Air
Purifier. Please read this manual carefully
before using the air purier.
After reading, keep the manual in a conven-
ient location for future reference.
E-1
Page 4

IMPORTANT SAFETY INSTRUCTIONS
When using electrical appliances, basic safety precautions should be followed, including the
following:
WARNING
• Read all instructions before using the unit.
• Use only a 220~240 volt outlet.
• Do not use the unit if the power cord or plug is damaged or the connection to the wall outlet
is loosened.
• Periodically remove dust from the plug.
• Do not insert ngers or foreign objects into the air intake or air outlet.
• When removing the power plug, always hold the plug and never pull on the cord.
Electrical shock and/or re from a short circuit may result.
• Do not remove the plug when your hands are wet.
• Do not use this unit near gas appliances or replaces.
When relling the Water Tank, cleaning the unit, or when the unit is not in use, be sure to unplug
•
the unit. Electrical shock and/or re from a short circuit may result
• If the power cord is damaged, it must be replaced by the manufacturer, its service agent, a
Sharp authorized Service Centre or similarly qualied person in order to avoid a hazard.
• Do not operate when using aerosol insecticides or in rooms where there is oily residue, incense,
sparks from lit cigarettes, chemical fumes in the air, or in locations where the unit may get wet,
such as a bathroom.
• Be cautious when cleaning the unit. Strong corrosive cleansers may damage the exterior.
• Only a Sharp Authorized Service Centre should service this air purier. Contact the nearest Service
Centre for any problems, adjustments, or repairs.
• When carrying the unit, remove the Water Tank and Humidifying Tray rst and hold the unit by han
dles on both sides.
• Do not drink the water in the Humidifying Tray or Water Tank.
• Change the water in the Water Tank daily with fresh tap water and regularly clean the Water Tank
and Humidifying Tray. (See E-12 and E-13). When unit is not in use, dispose of the water in the
Water Tank and Humidifying Tray. Leaving water in the Water Tank and/or Humidifying Tray may
result in mold, bacteria, and bad odours.
In rare cases, this bacteria may cause harmful physical effects.
• This appliance is not intended for use by persons (including children) with reduced physical, sen
sory or mental capabilities, or lack of experience and knowledge, unless they have been given supervision or instruction concerning use of the appliance by a person responsible for their safety.
Children should be supervised to ensure they do not play with the appliance.
– To reduce the risk of electrical shock, re or injury to persons:
-
-
NOTE
If this air purier should cause interference to radio or television reception, try to correct the interference by one or more of the following measures:
• Reorient or relocate the receiving antenna.
• Increase the separation distance between the unit and radio/TV receiver.
• Connect the equipment into an outlet on a circuit different from that to which the receiver is con-
nected.
• Consult the dealer or an experienced radio/TV technician for help.
– Radio or TV Interference
E-2
Page 5

ENGLISH
日本語
CAUTIONS CONCERNING OPERATION
• Do not block the intake and/or air outlet.
• Do not use the unit near or on hot objects, such as stoves or heaters, or where it may come into
contact with steam.
• Always operate the unit in an upright position.
• Hold the unit by using the handles on both sides when moving.
Do not move when the unit is in operation.
• Do not operate the unit without the lters, Water Tank, and Humidifying Tray properly in
stalled.
• Do not wash and reuse the HEPA lter.
Not only does it not improve lter performance, it may cause electric shock or malfunction.
• Clean the exterior with a soft cloth only.
Do not use volatile uids and/or detergents.
The unit surface may be damaged or cracked.
In addition, the sensors may malfunction as a result.
• Frequency of maintenance required (descaling) will depend on the hardness or the impuri
ties of the water that you use; the harder the water the more often descaling will be necessary.
• Keep the unit away from water.
-
-
INSTALLATION GUIDELINES
• When using the unit, place at least 2m away from equipment utilizing electric waves such
as televisions or radios to avoid electrical interference.
• Avoid a location where the sensor is exposed to direct wind.
The unit may not operate properly.
• Avoid use in locations where furniture, fabrics or other items may come in contact with and
restrict the air intake and/or air outlet.
• Avoid use in locations where the unit is exposed to condensation or drastic temperature
changes. Appropriate conditions are when room temperature is between 5 – 35 ºC.
• Place on a stable surface with sufcient air circulation.
When placing the unit on a heavily carpeted area, the unit may vibrate slightly.
Place the unit on an even surface to avoid water leakage from the Water Tank and/or Humidifying
Tray.
• Avoid locations where grease or oily smoke is generated.
The unit surface may crack or the sensor may malfunction as a result.
• Place the unit about 30 cm~60 cm(1~2 ft) away from the wall in order to ensure proper air
ow.
The wall directly behind the air outlet may become dirty over time. When using the unit for an ex
tended period of time in the same location, periodically clean the wall and protect the wall with a
vinyl sheet, etc. to prevent the wall from becoming dirty.
FILTER GUIDELINES
• Follow the instructions in this manual for correct care and maintenance of the lters.
-
-
E-3
Page 6
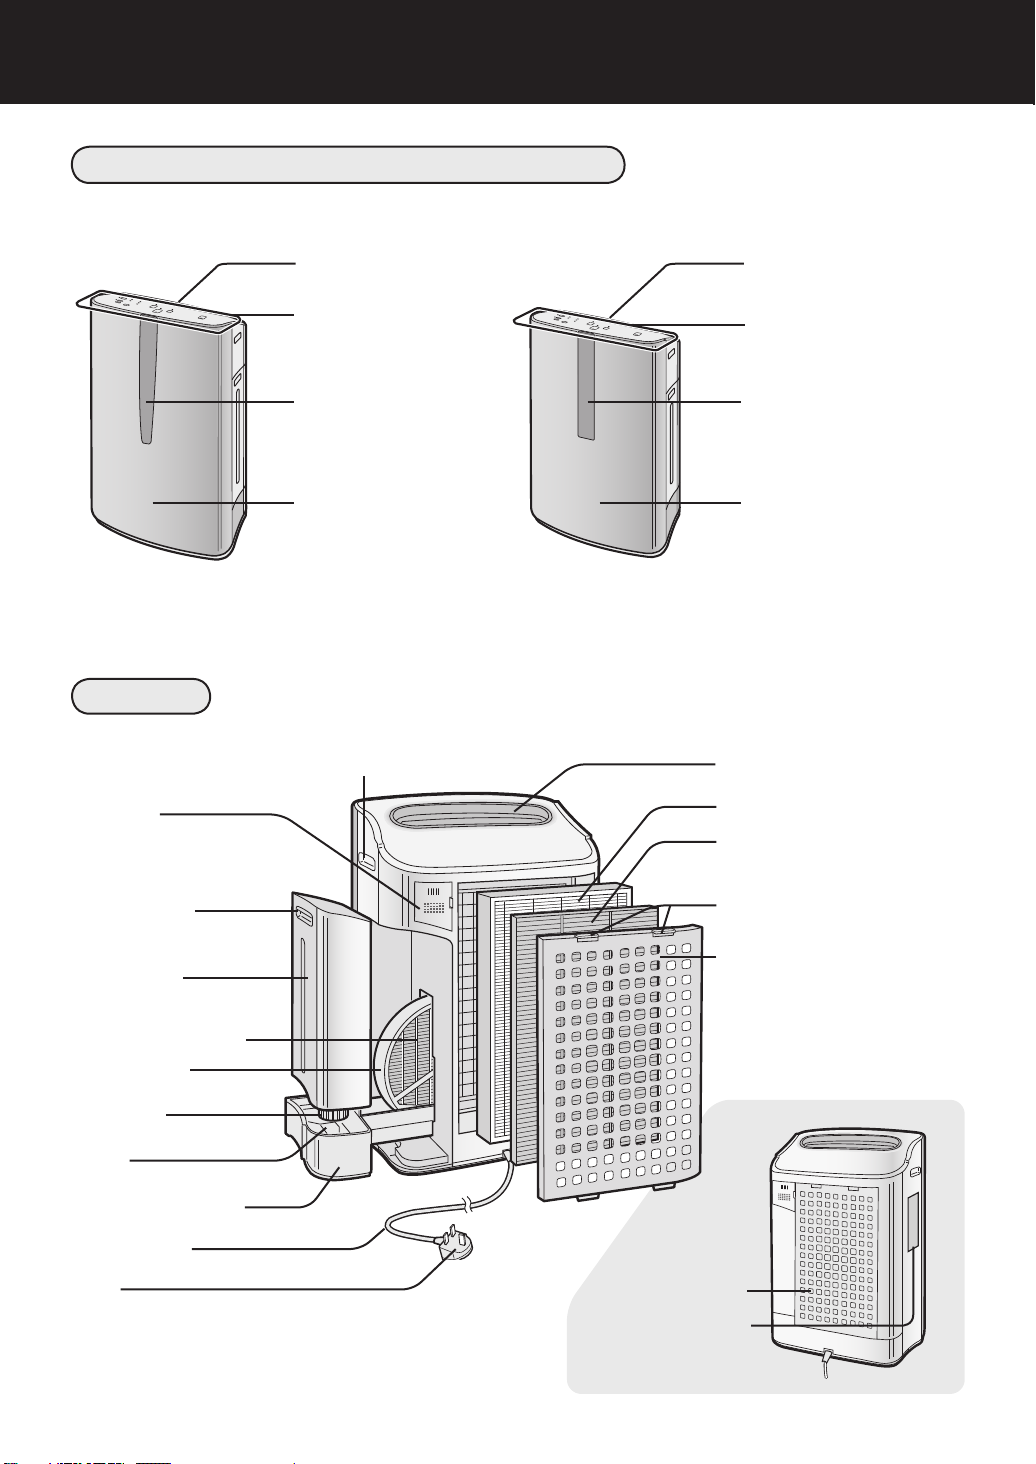
PART NAMES
ILLUSTRATIVE DIAGRAM – FRONT
Air Outlet
Main Unit Display
Front Monitor
Main Unit
KC-860EK
BACK
Handle (2 locations left and right)
Sensors
• Dust Sensor
•
Temperature / Humidity Sensor
•
Odour Sensor
Tank Handle
Air Outlet
Main Unit Display
Front Monitor
Main Unit
KC-850EK
Air Outlet
HEPA Filter (white)
Washable Deodorizing
Filter (black)
Tabs
Water Tank
(For humidifying)
Humidifying Filter
Filter Frame
Tank Cap
Float
Humidifying Tray
Power Cord
Plug
E-4
Air Inlet
Date Label
(Rating Label)
Back Panel (Pre-Filter)
Page 7

ENGLISH
日本語
Sensor Reading
Sensor Reading
Flashing
Clean
All green
Green
Yellow
Very lmpure
All red
Clean
All green
Green
Yellow
Very lmpure
All red
Flashing
Flashing
Flashing
FRONT MONITOR
Odour in the room
Faint
Strong
Green Yellow
Red
depending on odour intensity.
Faint
Green
Odour in the room
Strong
Red
Yellow
Indicates condition and humidity of room air.
Indicates the room condition of odour, dust, and humidity.
DUST MONITOR
The dust sensor continuously monitors
the air and changes colour depending on
air purity.KC-860EK has 5 levels of dust
detector.
When the dust sensor detects dust,
the ashing light moves depending on
dustiness.
ODOUR MONITOR
The odour sensor continuously
monitors the air and changes colour
depending on odour intensity.
Dust and odor are detected by different
sensors.The colours may not change
simultaneously.
Water Supply Indicator Light (red)
This light will illuminate when the water
tank needs to be re lled.
Plasmacluster Indicator Light (blue)
Blue: Plasmacluster ON
Light off: Plasmacluster OFF
Humidity Indicator Light (green)
Displays the approximate humidity level
in the room. Humidity setting cannot be
adjusted.
(Ex.) At 60 % humidily
80 % or more
Less than 30 %
E-5
Page 8
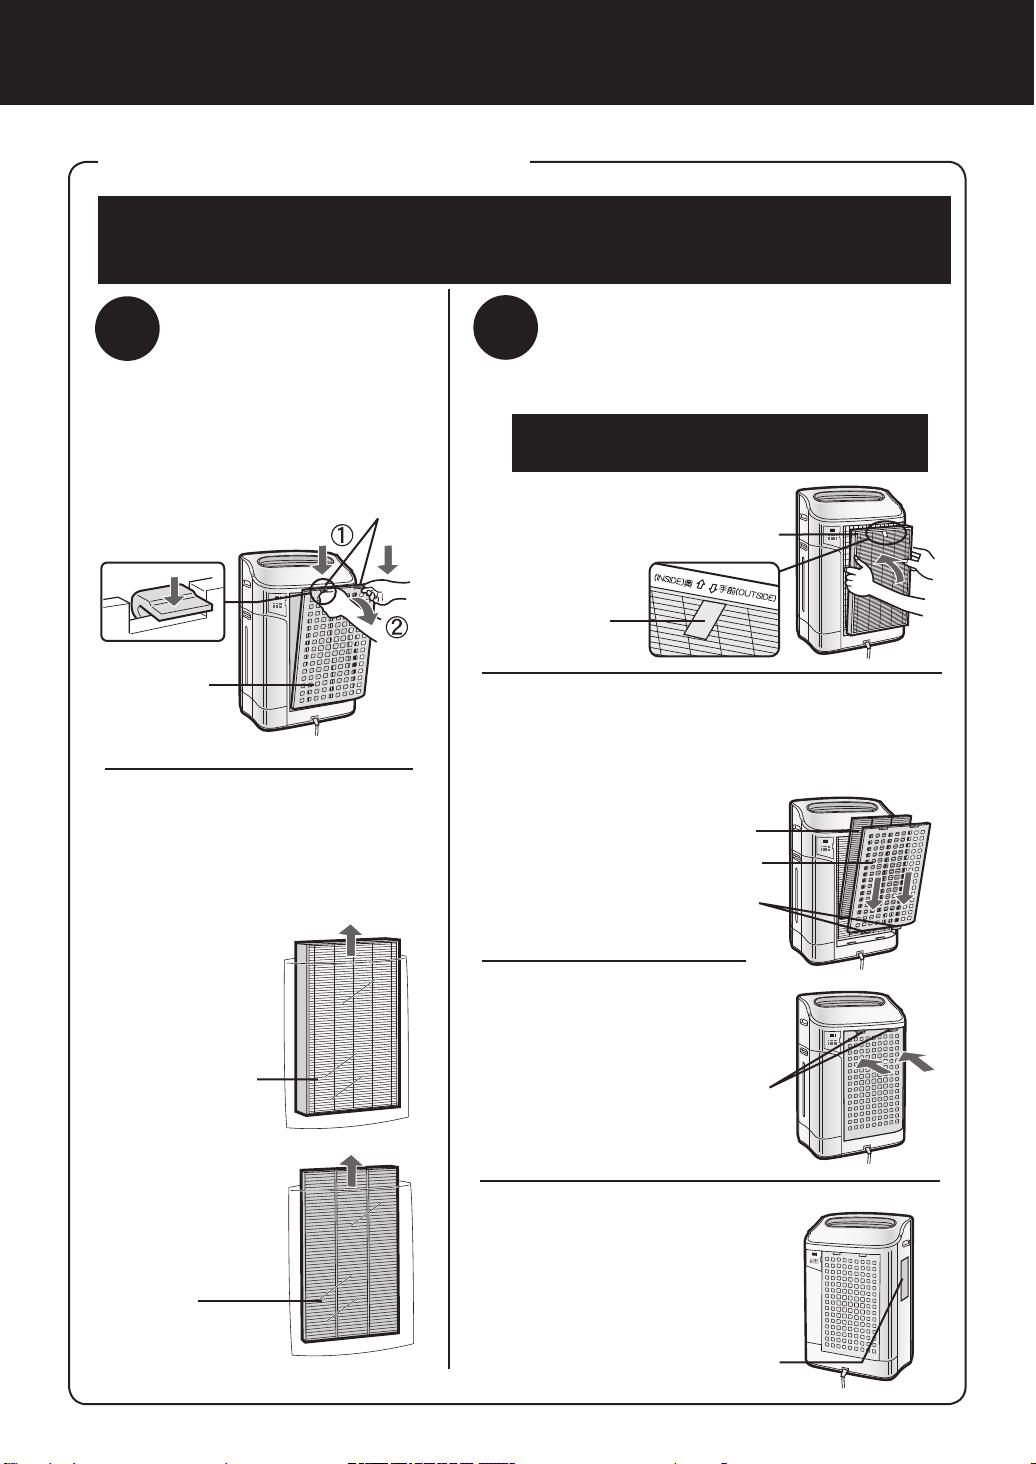
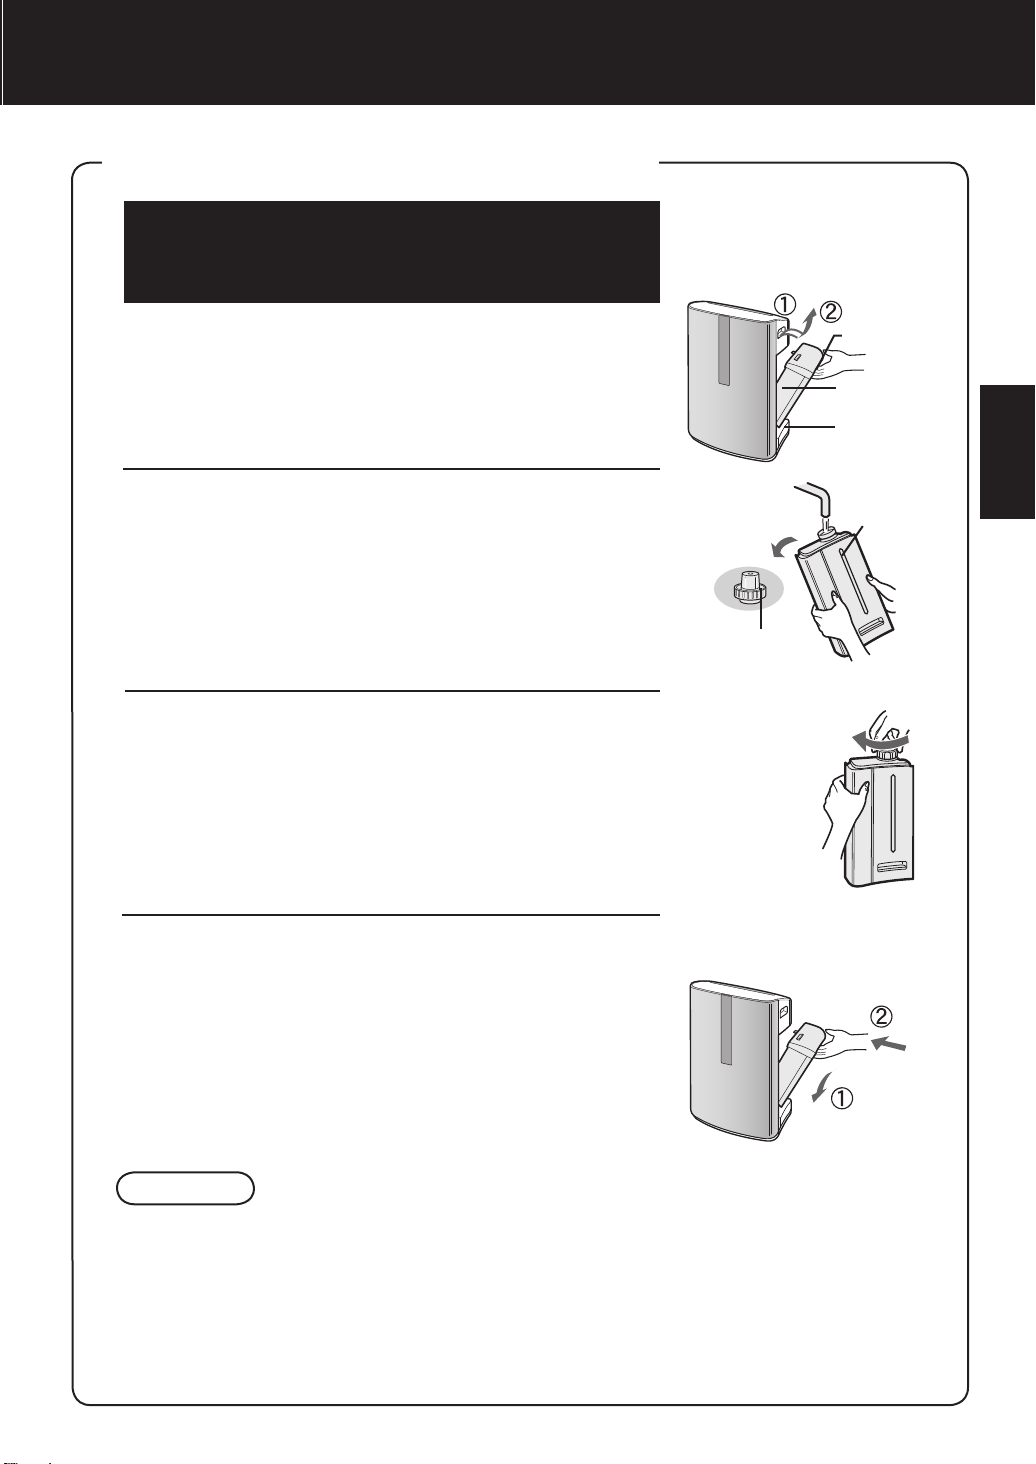
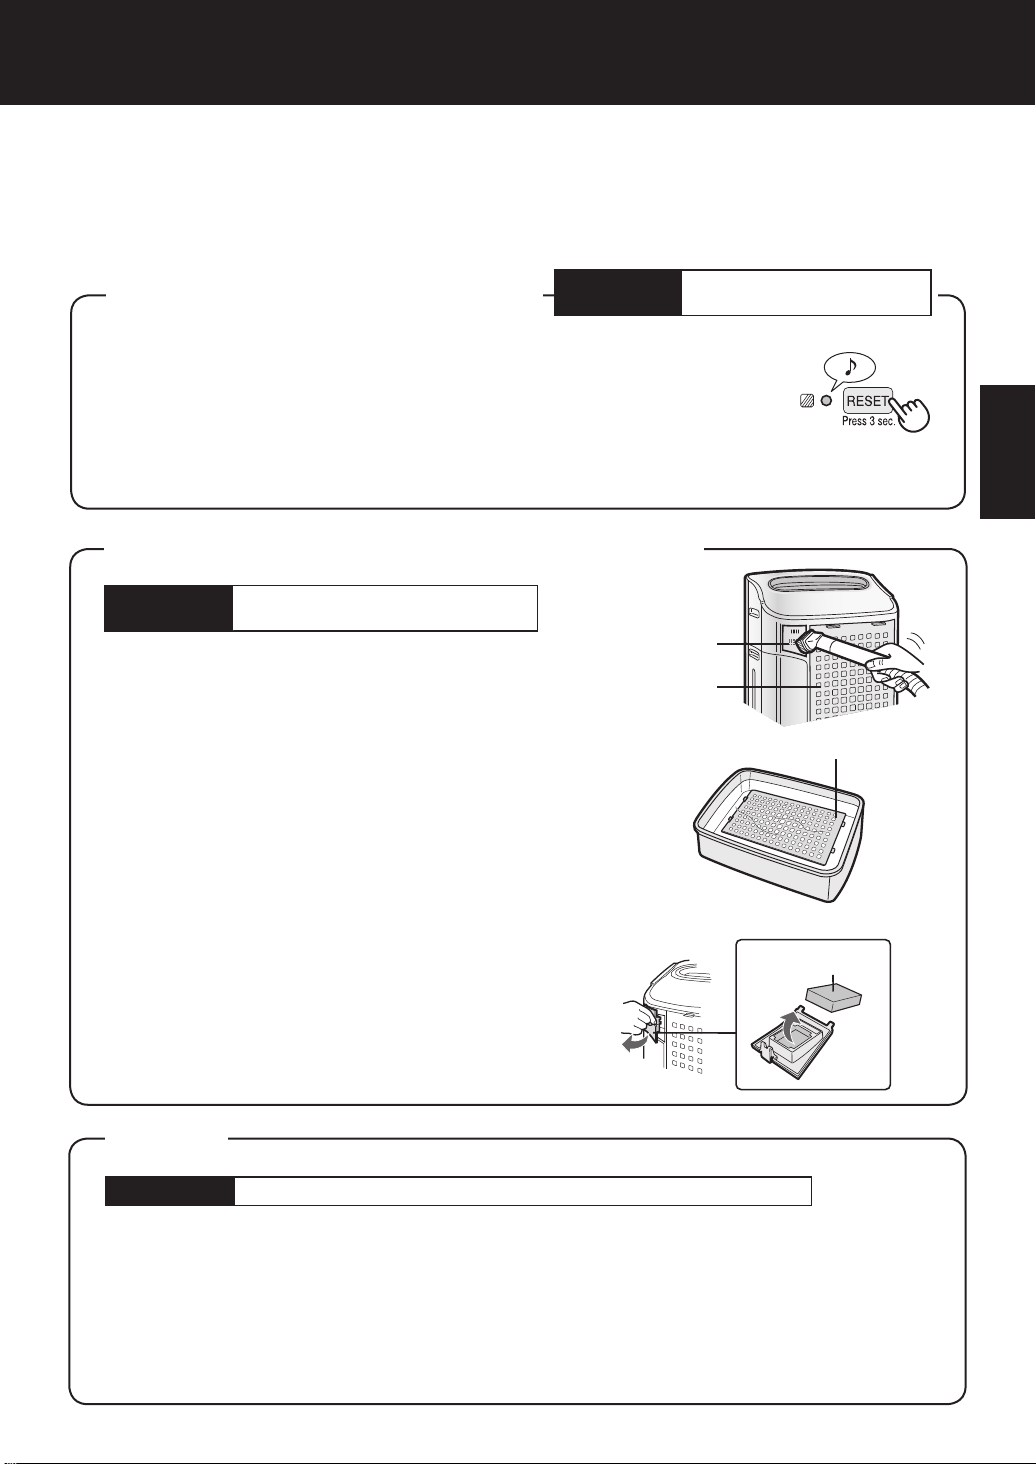
Unplug the unit before installing
1
2
PREPARATION FOR
USE
or adjusting the lters.
FILTER INSTALLATION
To maintain the quality of the lters, they are packed in plastic bags and placed in the
unit. Be sure to remove the lters from the plastic bags and replace the lters in the
unit before initial use.
Remove the lters
Remove the Back Panel.
1
Gently push down on the tabs,
then tilt and remove the back
panel.
Tabs on the top
Back Panel
R e m o v e t h e Wa s h -
2
able Deodorizing Filter
(black) and HEPA Filter
(white) from the plastic
bags.
Install the lters
Install the HEPA Filter.
1
Please make sure that the HEPA Filter is
placed in proper orientation.
Installing the filter backwards
will affect the performance of
the unit.
Tab
Insert the Back Panel’s 2 bottom tabs
(left and right) into the small holes in the
2
unit, and slide the Washable Deodorizing Filter between the HEPA Filter and
the Back Panel.
Washable Deodorizing Filter
HEPA Filter
Back Panel
Bottom tabs
HEPA Filter
Washable
Deodorizing
Filter
Gently push in the up-
3
per tabs (left and right)
to lock in place.
Upper tabs
Fill in the usage start
4
date on the Date Label.
Use the usage start date as
a guide for when the lters
should be replaced.
Date Label
E-6
Page 9
ENGLISH
日本語
REFILLING THE WATER TANK
The unit can be used in the Clean Air Mode without
putting water in the Water Tank. When using the Clean
Air & Humidify Mode, or the CLEAN ION SHOWER
Mode, the Water Tank should be lled with water.
Remove the Water Tank by unlatching the
1
top.
Remove the Water Tank Cap and carefully
2
ll the Water Tank with tap water.
• Change the water in the Water Tank every day with
fresh tap water.
After lling, securely tighten the Tank Cap.
3
• Check to see that there is no water leaking.
• Be sure to wipe off any excess water on the outside of
the Water Tank.
• When carrying the Water Tank, hold it with both hands
so that the Water Tank opening is facing up.
Tank Handle
Water Tank
Humidifying
Tray
Water Tank
Tank Cap
tighten
Replace the Water Tank in the unit.
4
• The top latch will “click” in place when the Water Tank
is properly installed.
CAUTION
• Do not expose the unit to water. Short circuit and/or electrical shock may occur as a result.
• Do not use hot water (40 ºC), chemical agents, aromatic substances, dirty water, or other
damaging substances, deformation and/or malfunction may occur.
• Use only fresh tap water. Use of other water sources may promote the growth of mold, fungus and/or bacteria.
E-7
Page 10
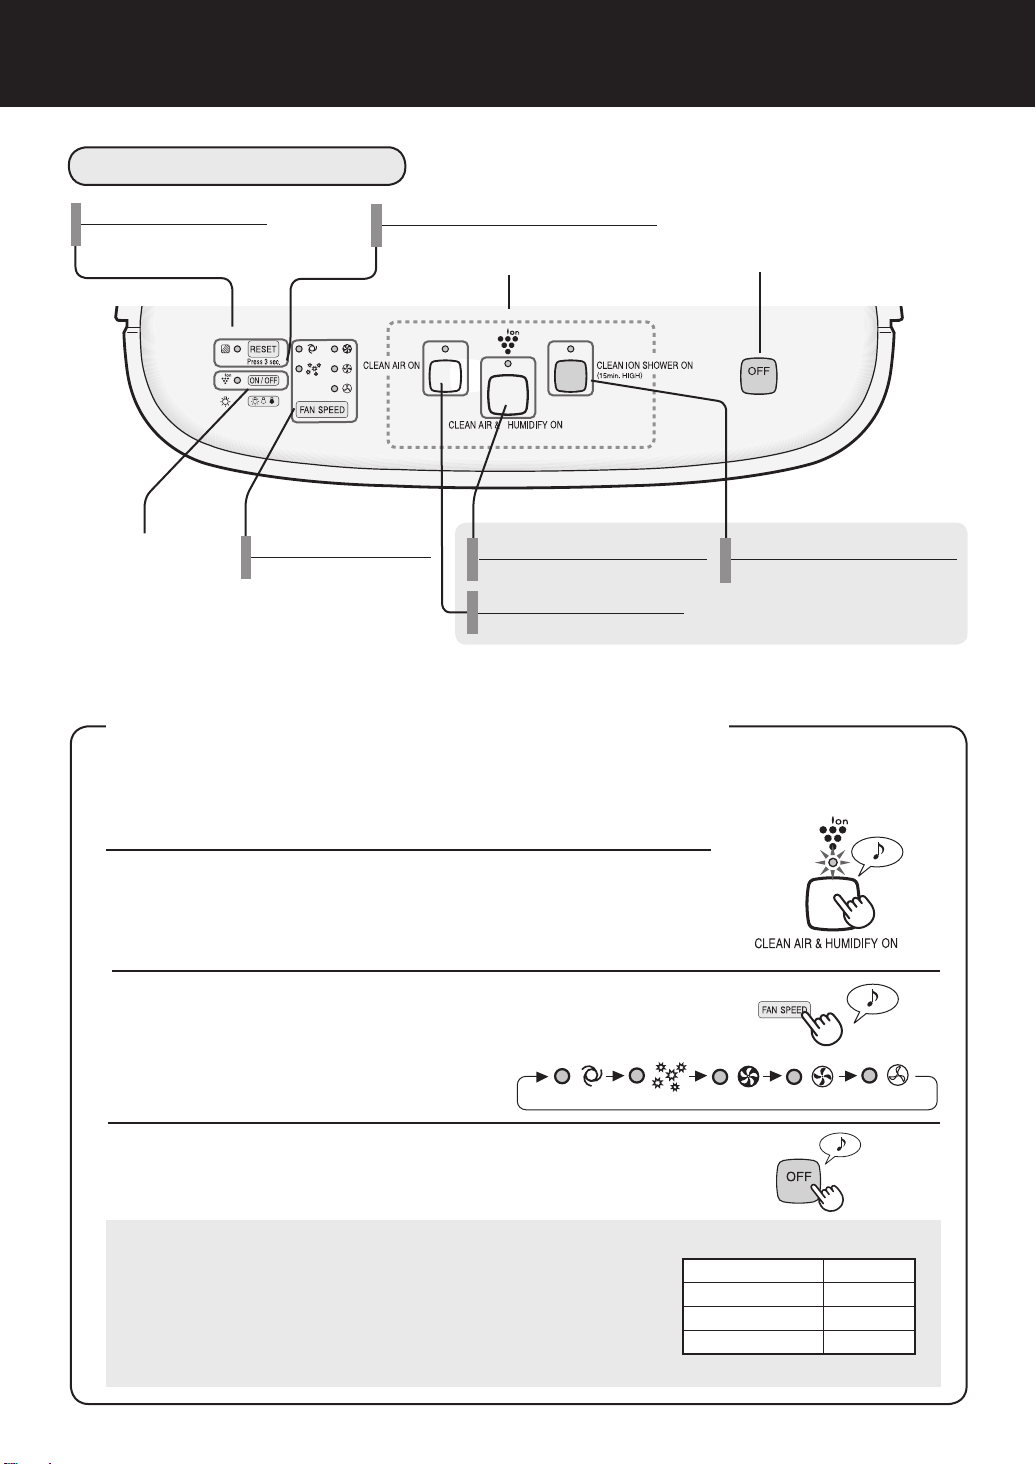
OPERATION
MAIN UNIT DISPLAY
Filter Reset Button/
Indicator Light (red)
Light Control
Button
Fan Speed Button/
Indicator Light (green)
Plasmacluster ON/OFF Button/
Indicator Light (green)
Power ON Button
Pres s any of the buttons to select
mode and start the unit.
Clean Air & Humidify MODE Button/
Indicator Light (green)
Clean Air MODE Button/
Indicator Light (green)
Power OFF Button
CLEAN ION SHOWER MODE Button/
Indicator Light (blue)
CLEAN AIR & HUMIDIFY MODE
Use the Clean Air & Humidify Mode to quickly clean the air, reduce odours and to humidify.
Fill Water Tank. (See E-7)
1
Press the CLEAN AIR & HUMIDIFY MODE Button.
2
• If the power cord was not unplugged between uses, the unit
will automatically re-start at the previously selected settings.
Press the FAN SPEED Button to select the de-
3
sired fan speed.
• Indicator lights will show the fan speed
currently selected.
Press the Power OFF Button to turn the unit off.
About Automatic Humidify Mode
The Temperature/Humidity sensors automatically detect and
adjust humidity according to changes in room temperature.
Depending on the size and humidity of the room, humidity
may not reach 55~65 %. In such cases, it is recommended
that CLEAN AIR & HUMIDIFY/MAX MODE be used.
Temperature Humidity
~18 ºC 65 %
18 ºC~24 ºC 60 %
24 ºC~ 55 %
E-8
Page 11
ENGLISH
日本語
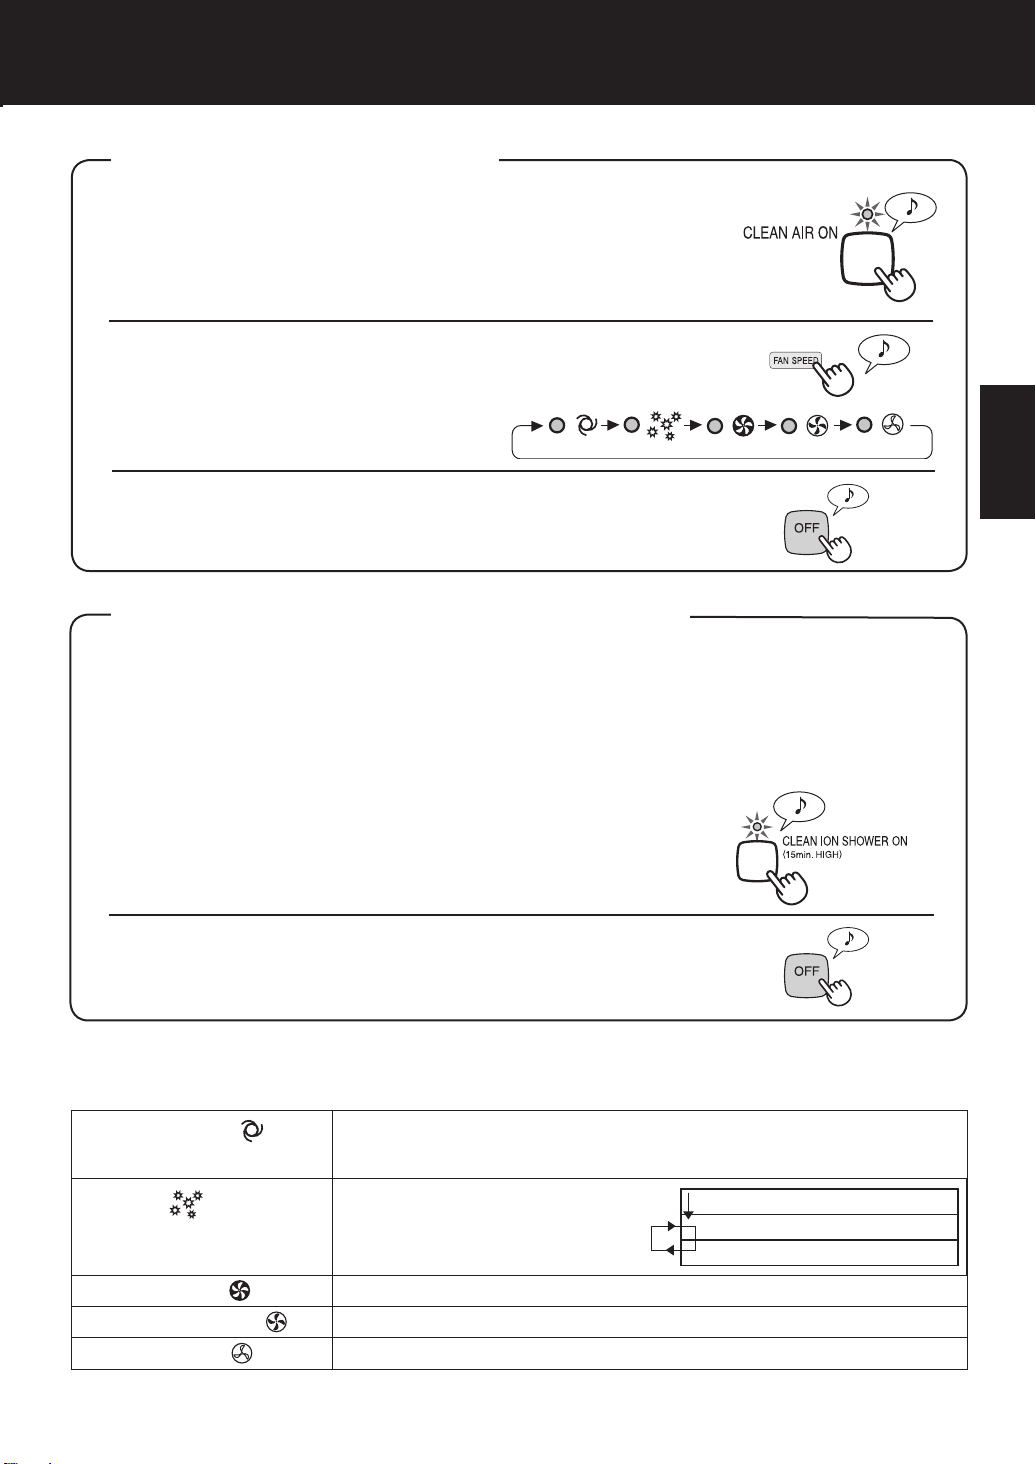
CLEAN AIR MODE
Use the Clean Air Mode when additional humidity is not required.
Press the CLEAN AIR MODE Button on the display.
1
• If the power cord was not unplugged between uses, the unit will
automatically re-start at the previously selected settings.
Press the FAN SPEED BUTTON to select the de-
2
sired fan speed.
• Indicator lights will show the fan
speed currently selected.
Press the Power OFF Button to turn the unit off.
CLEAN ION SHOWER MODE
CLEAN ION SHOWER Mode with humidication releases high-density Plasmacluster ions.
By continuously discharging strong airow for 15 minitues, the unit effectively removes airborne dust, pollen, mold and allergens from the air as they are drawn through the lter system.Water must be in the Water Tank when this mode is selected.
The unit humidies when there’s water in the Water Tank, and it operates without humidifying
when there’s no water in it.
Press the CLEAN ION SHOWER MODE Button
1
on the display to select this mode.
When the operation nishes, the unit will return to the prior
operation.
Press the Power OFF Button to turn the unit off.
Fan Speed Button
Please note the fan speed cannot be adjusted during the CLEAN ION SHOWER MODE.
AUTO operation
POLLEN mode
operation
The fan speed is automatically switched (between HIGH and LOW) depending on the amount of impurities in the air. The sensors detect impurities for
efcient air purcation.
The unit will operate at High Level for
10 minutes, then will atternate between MEDIUM and HIGH.
10 minutes: High fan level
20 minutes: Medium fan level
20 minutes: High fan level
MAX operation
MEDIUM operation
LOW operation
The unit will operate at maximum fan speed.
The unit will operate at medium fan speed.
The unit will operate quietly using minimal air intake.
*HiGH fan speed is an intermediate speed between MEDIUM and MAX.
E-9
Page 12
OPERATION
The lights on the front panel are brighter.
The lights on the front panel are darker.
The lights on the front monitor turn off
「 」
「 」
「 」
Flashing
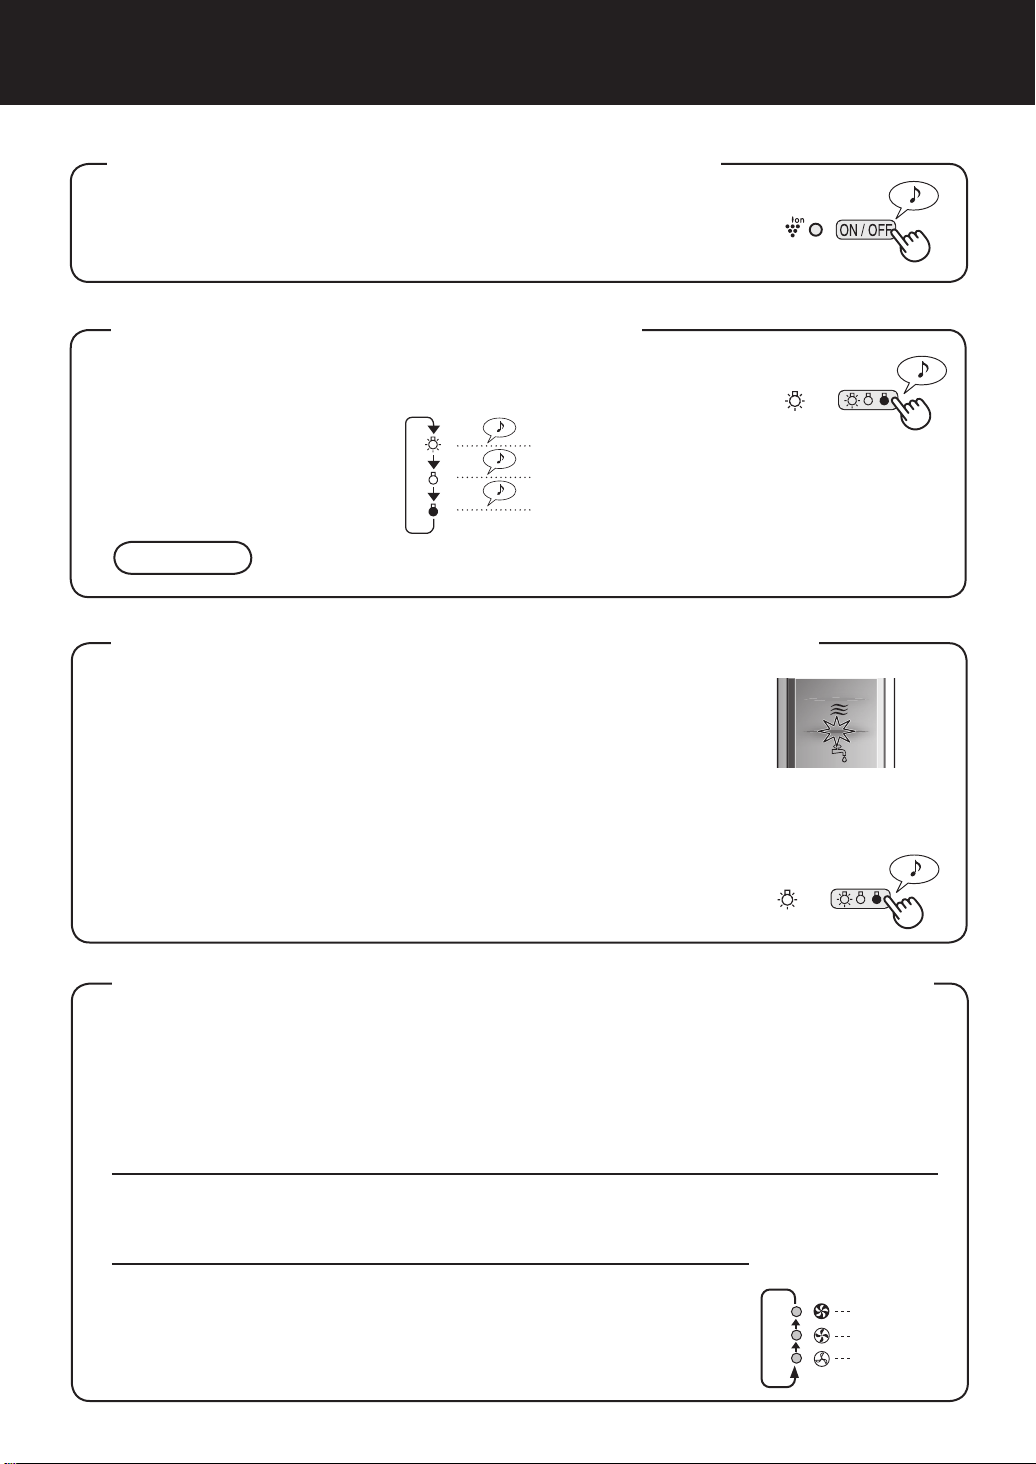
Plasmacluster ON/OFF Button
Press the Plasmacluster ON/OFF Button to turn Plasmacluster Ion Mode ON and OFF.
When Plasmacluster is ON, both the Indicator Light and
Plasmacluster Indicator Light turn on.
LIGHTS CONTROL Button
Use when the light on the
front panel is too bright.
CAUTION
The lights on the front monitor are always brighter when starting.
Refe r t o th e d iagr a m t o se l e ct th e de s i r e d
brightness on the front panel.
WATER SUPPLY INDICATOR LIGHT
When the Water Tank is empty, the Water Supply Indicator Light will ash
to indicate that the Water Tank should be re lled. Please note the light
will not ash even when the Water Tank is empty during the Clean
Air Mode and the Clean ION SHOWER Mode.
Sound indicator setting for water supply.
In addition to the Indicator Light, the unit can be set to signal with an audible beep when the
Water Tank is empty. With the unit OFF, press the Lights Control button for 3 seconds to turn
the audible signal ON.
Cancellation
To cancel the audible signal, with the unit OFF, press the Lights
Control button again more than 3 seconds.
ADJUSTMENT OF SENSOR DETECTION SENSITIVITY
Set to “low” if the DUST MONITOR and ODOUR MONITOR is constantly red to reduce
sensitivity, and set to “high’ if the DUST MONITOR and ODOUR MONITOR is constantly
green to increase sensitivity.
With the unit OFF, press the Fan Speed Button for 3 seconds.
1
The Fan Speed Indicator Lights will display the currently set sensor sensitivity level. The
factory setting is Standard, indicated by the MED light.
Press the Fan Speed Button to set the desired sensor sensitivity.
2
Refer to the diagram on the right to select the desired sensor sensitivity level.
Press the Power OFF Button.
3
Note that if the Power OFF Button is not pushed within 8 seconds
of adjusting sensor sensitivity, the setting will be saved automatically. The sensor sensitivity setting will be saved even if the unit is
unplugged.
E-10
Fan Speed
Indicator
Light
Sensor
Detection
sensitivity
High
Standard
Low
Page 13
ENGLISH
日本語
CARE AND MAINTENANCE
To maintain optimum performance of this air purier, please clean the unit including
the sensor and lters periodically.
When cleaning the unit, be sure to rst unplug the power cord, and never handle the
plug with wet hands. Electrical shock and/or bodily injury may occur as a result.
FILTER INDICATOR LIGHT
The Filter Indicator Light will illuminate as a reminder to perform maintenance
of the Back Panel, Sensors, and Humidifying Filter. The Indicator Light will turn
on after approximately 720 hours of use.
After performing maintenance, reset the Filter Indicator. Plug the unit in, turn
power ON, and press the RESET button for 3 seconds. The Filter Indicator
Light will go off. Even if the Filter Indicator Light is already off, the RESET but-
ton should be pressed to reset the maintenance timer.
Care Cycle
After 720 hours of use
30days × 24hours = 720)
(
BACK PANEL and SENSORS
Care Cycle
Gently remove dust from the sensor opening and the
back panel, using a vacuum cleaner attachment or
similar tool.
When the back panel has stubborn dirt
In case of oily dirt, soak the back panel in water with
kitchen detergent.
1
Avoid scrubbing the back panel hard when washing.
Rinse the back panel repeatedly with clean water to re-
move the solution residue.
2
Drip dry lter to remove excess water.
Whenever dust accumulates
on the unit or every 2 months
Sensor
Back Panel
Back Panel
3
SENSOR FILTER CARE
Remove the sensor filter and tap it lightly over a sink
or bin to dislodge dust. If it is very dirty, wash it gently
with lukewarm water. Do not use any detergents or
chemicals of any kind to clean the lter. Dry the lter
completely before replacing in the unit. Do not operate
unit without all lters properly installed.
Sensor Filter
UNIT
Care Cycle
To prevent dirt or stains on the unit, clean regularly. If stains are allowed to remain, they may
become difcult to remove.
Wipe with a dry, soft cloth
For stubborn stains or dirt, use a soft cloth dampened with warm water.
Do not use volatile uids
Benzene, paint thinner, polishing powder, may damage the surface.
Do not use detergents
Detergent ingredients may damage the unit.
Whenever dust accumulates on the unit or every 2 months
E-11
Page 14
CARE AND MAINTENANCE
WATER TANK
Care Cycle
Rinse the inside of the tank by leaving a small amount of lukewarm water inside, closing the tank cap firmly, and shaking
the tank. Mild household detergents may be used to clean the
inside of the tank, but detergent should be diluted and the tank
should be thoroughly rinsed to remove all detergent residue.
(Note the Water Tank is not dishwasher safe.)
TANK CAP CARE <
The small cap back of the tank cap is removable.
When the tank cap and small cap are dirty and slimy,
cleaning is necessary.
Use a cotton swab or a toothbrush.
Every day when Humidifying
care cycle... once a month>
Tank Cap
Tank Cap
Water Tank
Toothbrush
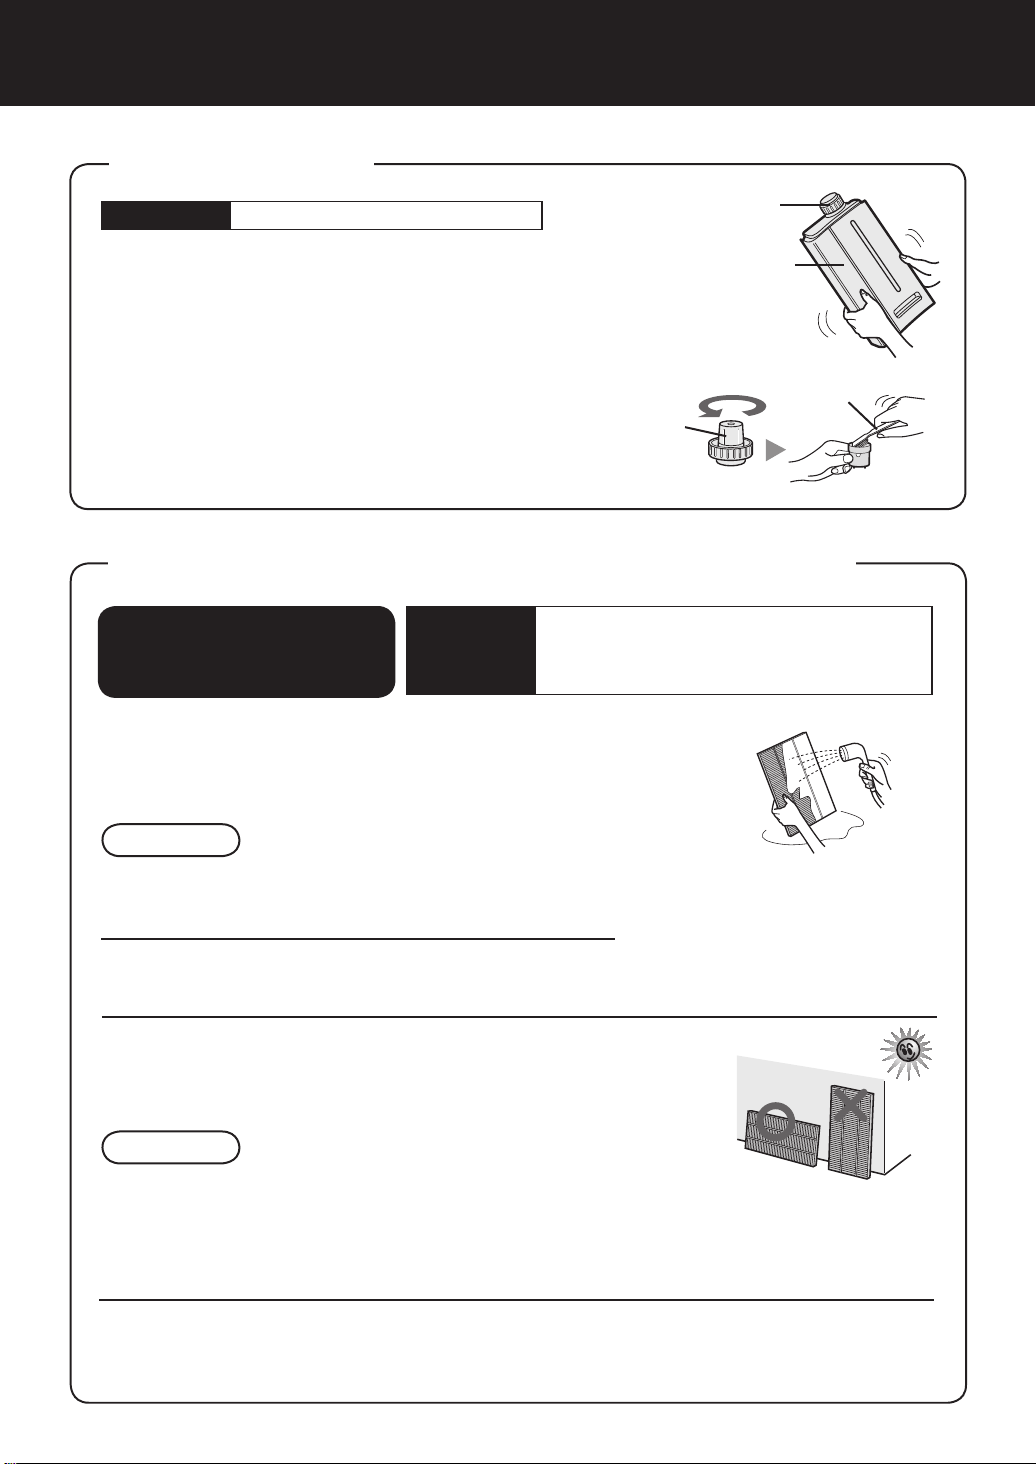
WASHABLE DEODORIZING FILTER CARE
HAND WASH ONLY!
DO NOT DRY IN CLOTHES
DRYER!
Care Cycle
Rinse dirt from the WASHABLE DEODORIZING
1
FILTER under lukewarm water.
Remove dust on the washable deodorizing lter before washing.
When an unpleasant odour is noticed
from the air outlet.
When performance of lter seems to be
reduced and odours persist.
CAUTION
• When washing the lter for the rst time, the rinse water may
be brown. This does not affect deodorization performance.
• Avoid bending or folding the lter when washing.
Drip dry lter to remove excess water.
2
Dry filter completely in a well ventilated area. If
3
possible, dry outdoors.
Dry lter in a sideways position to avoid warping of the lter.
The lter takes about 6 hours to dry out.
CAUTION
• Avoid drying lter outdoors during inclement weather (e.g. rain or cold
temperatures).
Do not allow lter to freeze.
• If lter is dried indoors, take precautions, such as placing towels, etc
under the lter to prevent water damage to the oor.
Replace the lter in unit. (See E-6).
4
Dry lter completely before replacing to prevent odours.
Do not operate unit without all lters properly installed.
E-12
Page 15

ENGLISH
日本語
HUMIDIFYING TRAY
Care Cycle
Remove the Water Tank and Humidifying
1
Tray.
Unl a tch t he Wate r
Tank firs t, then remove the tray. Use
b o t h h and s whe n
pu lling o ut the Hum i d ify i n g Tr ay to
avoid spilling water.
Remove the Humidifying Filter from the
Humidifying Tray. Drain accumulated wa-
2
ter by tilting the Humidifying Tray slowly.
Humidifying Filter
1 month
Frequency of maintenance cycle will depend on the hardness
of the water. Avoid spilling water when removing or cleaning
the tray.
Tank Handle
Water Tank
Do not hold
this part.
H u m i dif y i n g
Tray
Rinse the inside of the Humidifying
3
Tray with lukewarm water to remove
impurities.
• Do not remove the
Styrofoam oat.
• Clean difcult-toreach parts with a
cotton-tipped swab
or tooth brush.
Float
Replace the Humidifying Filter and re-
4
place the Humidifying Tray in the unit.
The Humidifying Filter will not
t if placed in backwards. Be
sure there is no gap between
the Humidifying tray and the
unit when the Humidifying Tray
is replaced in the unit. The unit
may not operate properly if the
Humidifying Tray is not properly replaced in the unit.
Colour: Gray
When Water Deposits are Difcult to Remove
Fill Humidifying Tray half-
way with lukewarm water,
1
add a small amount of mild
kitchen detergent, and leave
to soak for about 30 min-
utes.
Dilute detergent according to
instructions on the container.
Clean difcult-to-reach parts
with a cotton
swab or tooth
brush.
Rinse the Humidifying
2
Tray with lukewarm water.
• Rinse until all detergent residue
is removed.
• Inadequate rinsing may
cause the detergent odour
or changes
in the shape/
colour of the
main unit.
CAUTION
• Use only mild kitchen detergents to
clean the Humidifying Tray. Use of
non-designated chemicals or detergents can cause deformation, tarnishing, cracking (water leakage).
If the Styrofoam oat comes off,
replace by inserting the tabs of
the Float into the holes in the
Humidifying Tray as shown in the
diagram.
Insert the tab of the
oat into the hole.
Insert the oat below
this tab.
I n s e r t t h e ta b on
the other side of the
oat into the hole.
E-13
Page 16

CARE AND MAINTENANCECARE AND MAINTENANCE
HUMIDIFYING FILTER
Care Cycle
Frequency of maintenance cycle will depend on the hardness or the impuri
you use; the harder the water the more often descaling will be necessary.
Pay attention not to spill water when cleaning the lter.
Remove the Water Tank an d
1
Humidifying Tray.
Once a month or when the Filter Indicator Light is on.
ties of the water that
Rinse the Humidifying Filter re-
5
peatedly with lukewarm water
to remove all the solution resi-
Humidifying lter
Humidifying
Tray
Water Tank
Humidifying
Tray
due.
Inadequate rinsing may cause odour and
affect the performance and/or appear-
ance of the unit.
* Do not scrub the Humidi
fying Filter, rinse gen tly
under l u k e w a r m water
only.
Attach the Humidifying Filter
Remove the Humidifying Filter
2
from the Humidifying Tray.
Avoid spilling water from the Humidifying
Tray.
Preparing the descaling solu-
3
tion.
Citric acid, available at some drugstores,
or 100 % bottled lemon juice are used for
descaling. Choose either one to use, and
prepare the descaling solution.
<For using citric acid>
Dissolve 3 teaspoons of citric acid and 2
1/2 cups of lukewarm water in a suitable
container, and stir well.
<For using lemon juice>
100 % bottled lemon juice can be used
for descaling. Use only 100 % bottled
lemon juice with no pulp (strain juice if
necessary). Combine 1/4 cup lemon juice
and 3 cups of lukewarm water in a container large enough to hold the Humidifying Filter and stir well.
P
re-soak the Humidifying Filter
4
in the solution for 30 minutes
before cleaning.
When using lemon juice,
it is recommended to presoak longer than citric
acid.
6
to the Humidifyi ng Tray, and
replace the Humidifying Tray in
the unit.
•T he Humidif ying Filter will n ot fit if
placed in backwards. Be sure there is
no gap between the Humidifying Tray
and the unit when the Humidifying Tray
is replaced in the unit. The unit may not
operate properly if the Humidifying Tray
is not properly replaced in the unit.
•When not using the
unit for a long periods of time, dry the
Hum i difyi n g Fi lter
com plet ely befor e
replacing.
Plug in th e u n it, turn po w e r
7
ON, and press the Filter Reset
Button on the display for more
than 3 seconds to reset.
You may notice reddish-brown or white
deposits forming on the surface of the
Humidifying Filter. These impurities (calcium, etc.) are due to the impurities contained in tap water; this is not a defect.
Replace the Humidifying Filter when it is
covered completely in white deposits.
-
E-14
Page 17

ENGLISH
日本語
FILTER REPLACEMENT GUIDELINES
Filter life will vary depending on the room environment, usage, and location of the unit. If dust
or odours persist, replace the lters.
(Refer to “Please read before operating your new Air Purier”)
Guide for lter replacement timing
HEPA Filter
Filter life can be greatly reduced depending on the room environment. Cigarette smoke, pet dander,
and other airborne particles can reduce lter life. Check lters regularly and replace as necessary.
Up to 5 years after opening
Washable Deodorizing Filter
The lter can be repeatedly used after washing, or it can be replaced.
Humidifying Filter
Filter life can be greatly reduced depending on the room environment. Even if 2 years have not
passed, replace the Humidifying Filter if you notice the following:
• Mineral deposits (white, black, or red masses) which are not removed after cleaning or the Humidi
fying Filter is still dirty.
• Filter is severely damaged or warped.
Up to 2 years after opening
Replacement Filters
• HEPA Filter: 1unit
Model FZ-C150HFE (for KC-860EK)
FZ-C100HFE (for KC-850EK)
• Washable Deodorizing Filter: 1unit
Model FZ-C150DFE (for KC-860EK)
FZ-C100DFE (for KC-850EK)
• Humidifying Filter: 1unit
Model FZ-C100MFE
(Gray)
Filter Frame (Gray)
Humidifying lter
(white)
Filter Frame (white)
-
Replacing the Filters
1. Replace lters according to the instructions provided with the replacement lters.
2. Use the date labels as a reminder for when the lters should be replaced.
Disposal of Filters
Please dispose of used lters according to any local laws and regulations.
HEPA Filter materials:
• Filter: Polypropylene • Frame: Polyester
Washable Deodorizing Filter materials:
• Polyester, Rayon, Activated charcoal
Humidifying Filter materials:
• Rayon, Polyester
E-15
Page 18

TROUBLESHOOTING
Before calling for service, please review the Troubleshooting chart below, since the problem may not
be a unit malfunction.
SYMPTOM REMEDY (not a malfunction)
Odours and smoke are not
removed.
The Front Monitor illuminates
green even when the air is
impure.
The Front Monitor illuminates
orange or red even when the
air is clean.
A clicking or ticking sound is
heard from the unit.
The discharged air has an
odour.
The unit does not operate
when cigarette smoke is in the
air.
Filter Indicator Light is
illuminated.
• Clean or replace the lters if they appear to be heavily soiled.
(See E-11,E-12,E-14)
• The air could be impure at the time the unit was plugged in.
Unplug the unit, wait one minute, and plug the unit in again.
• Sensor operation is affected if the dust sensor openings are
dirty or clogged. Gently clean the dust sensors (See E-11).
• Clicking or ticking sounds may be audible when the unit is
generating ions.
• Check to see if the lters are heavily soiled.
• Clean or replace the lters.
• Plasmacluster Air Puriers emit small traces of ozone which
may produce an odour.
• Is the unit installed in a location that is difcult for the sensor
to detect cigarette smoke?
• Are the dust sensor openings blocked or clogged?
(In this case, clean the openings.) (See E-11)
• After replacing lters, connect the power cord to an outlet and
press the Filter Reset Button. (See E-11)
The Front Monitor are turned
off.
The Water Supply Indicator
Light does not illuminate when
the tank is empty.
Water lever in the tank does
not decrease or decreases
slowly.
The Front Monitor lights
change colour frequently.
• Check to see if the Light OFF Mode selected. If so, then press
the Light Control Button to activate the indicator lights.
(See E-10)
• Check Styrofoam oat for impurities. Clean the Humidifying-
Tray. Ensure unit is located on a level surface.
(See E-13)
• Check to see if the Humidifying Tray and Water Tank are cor-
rectly installed. Check the Humidifying Filter.
• Clean or re place th e fi l t er w h e n i t is he a vily so i l e d
(See E-14 and E-15).
• The Front Monitor lights automatically change colours as im-
purities are detected by the dust sensor and odour sensor.
E-16
Page 19

ENGLISH
日本語
ERROR DISPLAY
If error occurs again, contact the Sharp Service Centre.
DIGITAL
INDICATION
LAMP INDICATION ERROR DETAILS REMEDY
Flashing of the Clean Air &
Humidify Indicator Light.
Fl ashin g o f the Fan Speed
Indicator Light ' '.
Fla s h ing o f th e Cl ean I on
Shower Indicator Light.
Flashing of the Clean Air Indicator Light.
Flashing of the Fan Speed Indicator Light ' '.
Flashing of the Fan Speed Indicator Light ' '.
Abnormal humidity lter Verify if the Humidifying Filter,
Abnormal fan motor
Abnormal temperaturehumidity sensor
Problem in circuit board
Hu midifying Tr ay a nd Water
Tank are properly installed and
then turn power ON again.
Turn power OFF to cancel the
error display, wait one minute,
and then turn power ON.
Unplug the unit, wait one
minute, and plug the unit in
again.
LAMP INDICATION ERROR DETAILS REMEDY
Flashing of the Clean Air &
Humidify Indicator Light.
Fl ashin g o f the Fan Speed
Indicator Light ' '.
Flashing of the Humidity Indi-
cator Light ‘High’ or ‘Low’.
Fla s h ing o f th e Cl ean I on
Shower Indicator Light.
Flashing of the Clean Air Indi-
cator Light.
Flashing of the Fan Speed In-
dicator Light ' '.
Flashing of the Fan Speed In-
dicator Light ' '.
Abnormal humidity lter Verify if the Humidifying Filter,
Abnormal fan motor
Abnormal temperature-
humidity sensor
Problem in circuit board
Hu midifying Tr ay a nd Water
Tank are properly installed and
then turn power ON again.
Turn power OFF to cancel the
error display, wait one minute,
and then turn power ON.
Unplug the unit, wait one
minute, and plug the unit in
again.
E-17
Page 20

SPECIFICATIONS
Model KC-860EK
~48
4.3
~38
4.0
11.0
398 (W) × 288 (D) × 627 (H)
Power supply
Fan Speed Adjustment
CLEAN AIR
& HUMIDIFY
CLEAN AIR
Recommended Room Size(m
2
) *1
Water Tank Capacity (L)
Cord Lenght (m)
Dimensions (mm)
Weight (kg)
Sensors
Filter type
Fan Speed (m
3
/hour)
Fan Speed (m
3
/hour)
Rated Power (W)
Noise Level (dBA)
Rated Power (W)
Dust collection
Deodorization
Noise Level (dBA)
Humidification (mL/Hour) *2
220 ~ 240 V 50/60 Hz
Dust/odour/Temperature & Humidity
HEPA with Microbial control *3
Washable Deodorizing
2.0
MAX
396
56
51
396
56
50
730
240
19
39
240
21
39
500
84
5.5(4.9)
17
120
8.8(8.2)
25
300
MED LOW
KC-850EK
9.0
378 (W) × 265 (D) × 586 (H)
MAX
306
41
47
288
40
47
600
168
11.6
35
168
13.5
35
400
60
3.8(3.3)
15
84
6.8(6.3)
22
230
MED LOW
396 240 84 306 168 60 210 132 48
56 19 5.5 (4.9) 41 11.6 3.8 (3.3) 26 9.5 3.7 (3.4)
51 39 17 47 35 15 45 34 15
396 240 120 288 168 84 186 132 54
56 21 8.8 (8.2) 40 13.5 6.8 (6.3) 21 11.5 6.1 (5.8)
50 39 25 47 35 22 42 34 20
730 500 300 600 400 230 450 330 170
Dust/odour/Temperature & Humidity Dust/Temperature & Humidity
Model KC-860E KC-850E KC-840E
/hour)
3
Power supply 220 ~ 240 V 50/60 Hz
Fan Speed (m
Rated Power (W)
Fan Speed Adjustment MAX MED LOW MAX MED LOW MAX MED LOW
CLEAN AIR
/hour)
3
Noise Level (dBA)
Fan Speed (m
Rated Power (W)
Noise Level (dBA)
Humidication (mL/hour)*2
CLEAN AIR
& HUMIDIFY
)*1 ~48 ~38 ~26
2
Dust collection HEPA with Microbial control *3
Deodorization Washable Deodorizing
Water Tank Capacity (L) 4.3 4.0 3.0
Sensors
Filter type
Cord Lenght (m) 2.0
Dimensions (mm) 398 (W) × 288 (D) × 627 (H) 378 (W) × 265 (D) × 586 (H) 360 (W) × 233 (D) × 550 (H)
Recommended Room Size (m
Weight (kg) 11.0 9.0 8.0
E-18
The class of the HEPA lter by EN1822 is H10.
*1 • The Recommended Room Size is appropriate for operating the unit of maximum fan speed.
• The Recommended Room Size area indicates the space where a certain amount of dust particles can be removed in 30 minutes.
*2 • Humidication Amount changes in accordance with indoor and outdoor temperature and humidity.
Humidication Amount increases as temperatures rise or humidity decreases.
Humidication Amount decreases as temperatures decrease or humidity rises.
• Measurement Condition: 20 ºC, 30 % humidity (JEM1426)
*3 •
Standby Power
In order to operate the electrical circuits while the power plug is inserted in the wall outlet, this
product consumes about 0.7 W of standby power.
For energy conservation, unplug the power cord when the unit is not in use.
Page 21

ENGLISH
日本語
A. Information on Disposal for Users (private households)
1. In the European Union
Attention: If you want to dispose of this equipment, please do not use the ordinary dust
bin!
Used electrical and electronic equipment must be treated separately and in
accordance with legislation that requires proper treatment, recovery and recycling of
used electrical and electronic equipment.
Following the implementation by member states, private households within the EU
states may return their used electrical and electronic equipment to designated
collection facilities free of charge*. In some countries* your local retailer may also
take back your old product free of charge if you purchase a similar new one.
*) Please contact your local authority for further details.
If your used electrical or electronic equipment has batteries or accumulators, please
dispose of these separately beforehand according to local requirements.
By disposing of this product correctly you will help ensure that the waste undergoes
the necessary treatment, recovery and recycling and thus prevent potential negative
effects on the environment and human health which could otherwise arise due to
inappropriate waste handling.
2. In other Countries outside the EU
If you wish to discard this product, please contact your local authorities and ask for the
correct method of disposal.
For Switzerland: Used electrical or electronic equipment can be returned free of
charge to the dealer, even if you don’t purchase a new product. Further collection
facilities are listed on the homepage of
www.swico.ch or www.sens.ch.
B. Information on Disposal for Business Users.
1. In the European Union
If the product is used for business purposes and you want to discard it:
Please contact your SHARP dealer who will inform you about the take-back of the
product. You might be charged for the costs arising from take-back and recycling.
Small products (and small amounts) might be taken back by your local collection
facilities.
For Spain: Please contact the established collection system or your local authority for
take-back of your used products.
2. In other Countries outside the EU
If you wish to discard of this product, please contact your local authorities and ask for
the correct method of disposal.
Attention: Your product is
marked with this symbol. It
means that used electrical
and electronic products
should not be mixed with
general household waste.
There is a separate
collection system for these
products.
EN
E-19
Page 22

Memo
Page 23

ENGLISH
日本語
Memo
Page 24

HEPAフィルター
洗える脱臭フィルター
後ろパネル
お使いになる前に
空気清浄機はお部屋の空気を取り込み、本体の中のプレフィルター、洗え
る脱臭フィルター、HEPA フィルターを通過した空気を、吹き出し口から
排出します。 HEPA フィルターは 0.3 ミクロンの大きさのちりほこりを
99.97% 除去すると共に、フィルターにニオイが付着するのを防ぐ効果が
あります。 洗える脱臭フィルターはニオイを含んだ空気がフィルターを通
過することで少しずつニオイを除去します。
フィルターで除去したニオイが時間と共にフィルター自身からニオイを発
することがあります。ご使用の環境によっては(ご家庭での日常の使用を
上回るような、ニオイの強い場所でのご使用など)、フィルターの交換目安
時期よりも早くニオイが強くなることがあります。 このような場合は、
フィルターを交換してください。
ご注意
•
本製品は空気中に漂うホコリやニオイは除去しますが、有害ガス(タバコの一酸化炭素など)は
除去しません。また、ニオイの原因がある場合、完全にニオイを除去することはできません。(建
材臭、ペット臭など)
•
喫煙などの際は、換気との併用をお勧めします。
( 一般の具体例は「KC-850EK」を使用しています )
Page 25

ENGLISH
日本語
日本語
特長
トリプルフィルター+プラズマク
ラスター+加湿の組み合わせによ
る独自の空気浄化技術
ホコリを除去
洗えるプレフィルターが空気中の大
きなちりほこりを捕集します
ニオイを除去
洗える脱臭フィルターが日常のニオ
イを低減します
花粉やカビ菌を除去
HEPA フ ィル ターが 0.3 ミク ロ ン
の 花 粉・ カ ビ菌・ ちり ほこ り等 を
99.97% 捕集します
空気清浄
プラズマクラスターイオンがプラス
イオンとマイナスイオンを放出する
ことで、自然の浄化作用と同じよう
にお部屋の空気を浄化します
加湿
最大 10 時間の加湿を実現
お部屋の空気をフィルターで取り
※ 1
込んだとき
適用床面積:
※ 2
~ 48 ㎡(KC-860EK)
~ 38 ㎡(KC-850EK)
センサーが常にお部屋の環境をモニター
し、お部屋の汚れ度や湿度に応じ、自動
で調整します。
※ 1
※ 2
もくじ
安全上のご注意
•
警告 •注意
•
使用上の注意
•
設置について
•
フィルターについて
各部のなまえ
•
•
•
ご使用前の準備
•
•
..........................................................
前 面
..........................................................
背 面
前面モニター
フィルターの取り付け
タンクに水を入れる
運転のしかた
•
•
•
•
•
•
•
•
•
..........................................................
操作部
加湿空気清浄運転
空気清浄運転
イオンシャワー運転
風量切換ボタン
プラズマクラスターイオンの入/切
前面モニターの明/暗/切
給水ランプについて
センサー感度を調整する
お手入れ
•
フィルターお手入れランプ
•
後ろパネルとセンサー部
•
•
•
•
•
•
.......................................................
本 体
.......................................................
タンク
洗える脱臭フィルター
.......................................................
トレー
加湿フィルター
フィルターの交換について
トラブルシューティング
仕 様
.........................................................
.............................................
...............................................
...............................................
...................................
................................................
...............................................
..............................................
................................
....................................
................................................
........................................
...............................................
....................................
...........................................
......................
.................................
..........................
......................................................
.......................
...........................
.............................
........................................
........................
.........................
........
J-2
J-3
J-3
J-3
J-4
J-4
J-4
J-5
J-6
J-6
J-7
J-8
J-8
J-8
J-9
J-9
J-9
J-10
J-10
J-10
J-10
J-11
J-11
J-11
J-11
J-12
J-12
J-13
J-14
J-15
J-16
J-18
お買いあげいただき、まことにありがとうございまし
た。
この取扱説明書をよくお読みのうえ、正しくお使いく
ださい。
ご使用の前に 「 安全上のご注意 」 を必ずお読みください。
この取扱説明書は、いつでも見ることができる所に必
ず保存してください。
J-1
Page 26

安全上のご注意
必ずお守りください。
お使いになる人や他の人への危害、財産への損害を防止するため、お守りいただくことを説明
しています。
■表示を無視して、誤った取り扱いをすることによって生じる内容を次のように区分しています。
警 告
してはいけない 「 禁止 」 内容です。
警 告
「 死亡または重傷を負うおそ
れがある 」 内容です。
:
火災や感電、けがを防ぐ
• ご使用前にお読みください。
• 交流 220-240V 以外では使用しない
• 電源コードや差込プラグが傷んだり、コンセントの差し込みがゆるいときは使用しない。
• 電源コードを傷付けたり、無理に曲げたり、引っ張ったり、束ねたり、重い物を載せたり、
加工したりしない。
• 濡れた手で抜き差ししない。
• 改造はしない。また修理技術者以外の人は、分解や修理をしない。
• 電源コードが傷ついた場合は、事故を防ぐため、シャープのサービスセンターや、販売店
の修理技術者に交換を依頼してください。
注 意 :漏電やけがを防ぎ、家財を守る
• ガス器具や暖炉の近くで使用しない。
• 可燃性のものや火のついたたばこ・線香などを吸込口に近付けない。
• 浴室など、湯気の多い場所・水のかかる場所では使用しない。
• 吹出口や吸引口に、指や棒などを入れない。
• ベンジン・シンナーで拭いたり、殺虫剤をかけない。
• 室内くんじょうタイプ ( 発煙型 ) の殺虫剤使用時は運転しない。
• トレー内やタンクの水を飲まない、飲ませない。
注 意
必ずしなければいけない 「 強制 」 内容です。
「 けがや財産に損害を受け
るおそれがある 」 内容です。
• 差込ブラグのほこりなどは、定期的に取る。
• 電源コードは必ず差込プラグを持って抜く。
• 給水時やお手入れ時、長時間使用しないときは必ず差込プラグをコンセントから抜く。
• 幼児の手の届く範囲では使用しない。
•
移動時は、タンク・トレーを抜いて、本体側面のとってを両手でしっかり持ち、水平に持ち運ぶ。
• タンクおよびトレーの水は、定期的にお手入れする。使用しないときはトレーとタンクの
水を捨てる。( 水を入れたままにしておくと、カビや雑菌が繁殖し、悪臭の原因 )
まれに体質によっては過敏に反応し、健康を害することがあります。
この商品は、責任者によってこの機器の使用に関する指導がおこなわれない限り、運動能力・感覚能力・
知的能力が低下した人、または、子供を含めた経験・知識が不足した人による使用を意図しておりません。
子供や幼児の手の届く範囲では使用しない。(商品で遊ばないように指導してください)
-
電波について
ご注意
本製品によってラジオやテレビにノイズが入ってしまう場合、以下のことをしてください。
• アンテナの位置を変える。
• 本製品とラジオ / テレビをできるだけ離して設置する。
• 本製品とラジオ / テレビの電源プラグは、異なった場所のコンセントを使用する。
• ラジオ / テレビの技術者に相談する。
-
J-2
Page 27

ENGLISH
日本語
使用上の注意
• 吸込口・吹出口をふさがない。
• 暖房器具など、熱いものの近くや蒸気に接する所で使用しない。
• 横にしたり、傾けたりして使用しない。
• 持ち運びの際は、必ず両方のとってを持つ。
( タンク・トレー・後ろパネルを持って運ぶと、本体が落下し、ケガをする可能性があります )
• HEPA フィルターを洗浄したり、再利用したりしない。
( フィルターの性能が下がるだけでなく、感電や故障の原因になるおそれがあります )
• 本体表面のお手入れに洗剤は使わず、柔らかい布で拭く。
( 製品を傷めるだけでなく、故障の原因になります )
• 必ずフィルター・タンク・トレーを装着して、運転する。
• 加湿フィルターのお手入れの頻度は、お使いになる水の硬度によって異なります。水の硬度が高
いほどお手入れが必要になります。
設置について
• テレビやラジオ、電波時計など電波を利用する機器からは約 2m 離して置く。
寒暖の差が激しい場所で使用しない。
•
( もし難しい場合は電源を入れるまで 1 時間ほど置いてください。また、5 ~ 35℃のお部屋で使用して
ください )
安定した場所に設置する。厚いじゅうたんの敷かれている場所では本体が振動することがあります。
•
閉めきった部屋では使用しない。
•
すすの発生する可能性のある場所に設置しない。( 表面が割れるおそれがあります )
•
壁から 30 ~ 60cm 離して設置する。
•
( 吹出口後方の壁が汚れることがありますので、同じ場所で長期間使用される場合はビニールシートなど
の使用をおすすめします。また、定期的に壁を清掃してください )
フィルターについて
正しくお手入れしてください。フィルターは本製品にのみ使用可能です。
J-3
Page 28

各部のなまえ
前 面
KC-860EK
背 面
とって
( 左右 2 カ所 )
センサー部
•
ホコリセンサー
•
温湿度センサー
•
ニオイセンサー
タンクとって
吹出口
操作部
前面モニター
本 体
吹出口
操作部
前面モニター
本 体
KC-850EK
吹出口
HEPA フィルター ( 白 )
洗える脱臭フィルター
( 黒 )
つまみ
タンク
( 加湿用 )
加湿フィルター
フィルターわく
タンクキャップ
フロート
トレー
電源コード
差込プラグ
後ろパネル
( プレフィルター )
吸込口
お手入れラベル
J-4
Page 29

ENGLISH
日本語
前面モニター
汚れていく状態
きれいになっていく状態
汚れていく状態
点滅(橙)
きれいになっていく状態
きれい
すべて緑
緑
橙
汚れている
きれい
緑
汚れている
すべて赤
すべて緑 橙 すべて赤
点滅
点滅(橙)
点滅
お部屋の空気
お部屋のニオイ
弱い
強い
緑 黄
赤
わります。
お部屋のニオイ
弱い
緑
強い
赤
黄
お部屋の空気の汚れ具合 ( ホコリやニオイなど )・湿度の目安をお知らせします。
ダストモニター
ホコリセンサーでお部屋の汚れを細かく見
張って、ハウスダストの舞い上がり状態と
きれいになっていく状態を、ランプの色の
変化でお知らせします。KC-860EK は 5
段階表記です。
ホコリセンサーが汚れを検知すると汚
れ具合に応じて、点滅が移動します。
ニオイモニター
ニオイセンサーが、お部屋のニオ
イを感知すると、3 段階で色が変
わります。
ハウスダスト・ニオイモニターは別々
のセンサーで感知しています。同時に
色が変化するとは限りません。
給水ランプ ( 赤 )
ランプが点滅したときは給水してくだ
さい。
プラズマクラスターイオンランプ (
青 : プラズマクラスターイオン「入」
消灯 : プラズマクラスターイオン「切」
青 )
J-5
現在湿度 ( 目安 ) モニター ( 緑 )
室内の現在湿度の目安を 1%刻みで表
示。( お好みの湿度に設定することはで
きません )
( 例 ) 湿度 60%のとき
80% 越
30%未満
Page 30

必ず差込プラグをコンセントに差し
1
2
ご使用前の準備
込む前におこなってください。
フィルターの取り付け
本体に入っている 2 種類のフィルターは必ずポリ袋から取り出し、再び本体へ取り付けて
ください。
フィルターを取り出す
後ろパネルをはずす。
1
上側つまみ ( 左右 2 カ所 )
を下に押さえながら、手前
に引く。
後ろパネル
洗える脱臭フィルター
2
( 黒 ) と HEPA フィル
ター ( 白 ) をポリ袋から
取り出す。
上側つまみ
( 左右 2 カ所 )
フィルターを取り付ける
HEPA フィルターを取り付ける。
1
( 水色側が手前 )
手前・奥を逆にとりつけると、清浄効果が
得られません。
HEPA フィルター
タブ
後ろパネルの下側ツメ ( 左右 2 カ所 ) を
2
本体の穴に差し込み、「洗える脱臭フィ
ルター」を HEPA フィルターと後ろパ
ネルの間に取り付ける。
洗える脱臭フィルター
( 表裏はありません )
後ろパネル
下側ツメ
HEPA
フィルター
洗える脱臭
フィルター
後ろパネルの上側 ( 左
3
右 2 カ所 ) を押し込む。
上側つまみ
本体側面のお手入れラベ
4
ルに使用開始日を記入す
る。
フィルター交換時期の目安に
してください。
お手入れラベル
J-6
Page 31

ENGLISH
日本語
タンクに水を入れる
加湿空気清浄運転のさいは、水を入れてください。
空気清浄運転・イオンシャワー運転は、タンクに
水を入れなくても使用できます。
タンクをはずす。
1
タンクキャップをはずし、タンクに水
2
を入れる。
水は毎日新しい水道水と入れ替えてください。
給水後はタンクキャップをしっかり締
3
める。
• 水もれがないことを確認してください。
• タンクの周りについた水滴は、必ず拭き取っ
てください。
• タンクを持ち運ぶときはタンクキャッブを
上にして、両手で持ち運んでください。
タンクとって
タンク
トレー
タンク
タンクキャップ
締める
タンクを本体に取り付ける。
4
「カチッ」と音がするまで押して、しっかりと
取り付けてください。
ご注意
• 本体に水をかけない。
( ショート・感電の原因になります )
• 40℃以上のお湯やアロマオイル・化学薬品・汚れた水・洗剤・芳香剤を入れない。
( 変形や故障の原因になります )
• 水道水以外は使わない。
( カビや雑菌が発生する原因になります )
J-7
Page 32

運転のしかた
お部屋の温度
〜18℃
18℃〜24℃
24℃〜
65%
60%
55%
適した湿度
操作部
フィルターリセットボタン
フィルターリセットランプ ( 赤 )
前面モニター
明 / 暗 / 切
ボタン
風量切換ボタン
風量切換ランプ ( 緑
プラズマクラスターイオン入 / 切ボタン
プラズマクラスターイオン入 / 切ランプ ( 緑 )
運転入ボタン
加湿空気清浄ボタン
)
加湿空気清浄ランプ ( 緑 )
空気清浄ボタン
空気清浄ランプ ( 緑 )
加湿空気清浄運転
舞い上がったハウスダストやニオイの除去、加湿をしたいとき
停止ボタン
イオンシャワーボタン
イオンシャワーランプ ( 青 )
1
2
3
タンクに水を入れる。
加湿空気清浄ボタンを押す。
差込プラグを抜かない限り、2 回目からは前回と同じ設定で運
転します。
風量切換ボタンで、お好みの風量を選ぶ。
ボタンを押すと、次の順序で風量が変わります。
停止ボタンで運転を停止します。
加湿空気清浄運転での「自動」について
お部屋の状態をホコリ・ニオイ・温湿度センサーで見張り、
風量を切り換えて運転します。本体内部にある温湿度セ
ンサーで、お部屋の温度に適した湿度になるように調節
します。湿度が上がりにくく、加湿量を増やしたいときは、
「 強 」 運転にしてください。
J-8
Page 33

ENGLISH
日本語
空気清浄運転
湿度の高いときのハウスダストやニオイの除去をしたいときに
空気清浄ボタンを押す。
1
差込プラグを抜かない限り、2 回目からは前回と同じ設定で運転します。
風量切換ボタンでお好みの風量を選ぶ。
2
ボタンを押すと、次の順序で風量が変わります。
停止ボタンで運転を停止します。
イオンシャワー運転
風量「強め」※で 15 分間運転した後、シャワー運転直前の運転にもどります。衣類に付着し
た花粉・雑菌や、舞い上がったハウスダストをすばやく除去したいときに効果的です。タン
クに水があるときは加湿空気清浄運転、入っていないときは空気清浄運転になります。
イオンシャワーボタンを押す。
1
イオンシャワー運転終了後は前の運転に戻ります。
停止ボタンで運転を停止します。
風量切換ボタン
※イオンシャワー運転時は設定できません。
自動
花粉
強
中
弱
お部屋の状態を「センサー」で見張り、風量を強めと弱の間で自動的に切り
換えて運転します。
10 分間風量「強め」で運転した後、風量「中」と風量「強め」を 20 分間
ずつ繰り返します。
風量「強」で運転します。
風量「中」で運転します。
風量「弱」で静かに運転します。
※風量「強め」とは、風量「中」と「強」の間の風量です。
J-9
Page 34

運転のしかた
The lights on the front panel are brighter.
The lights on the front panel are darker.
The lights on the front monitor turn off
「 」
「 」
「 」
点滅
プラズマクラスターイオンの入/切
• 押すたびにプラズマクラスターイオンの「入」「切」を繰り返します。
•
プラズマクラスターイオン「入」のときは、プラズマクラスターイオンラ
ンプと前面モニターのプラズマクラスターイオンランプが点灯します
前面モニターの明 / 暗 / 切
。
前面モニターがまぶしいと
きにご利用ください。
ご注意
前面モニター「切」・「暗」で運転を停止した場合、次回は前面モニター「明」で
運転を開始します。
押すたびに前面モニターの表示状態が下図のよう
に切り換わります。
前面モニター「点灯」で明るい表示。
前面モニター「点灯」でまぶしくない表示。
前面モニター「消灯」
給水ランプについて
タンクの水がなくなり、トレーの水が少なくなると給水ランプが点滅し
ます。タンクに水を入れてください。(J-7 ページ )
• 空気清浄運転または、イオンシャワー運転にすると水が入っていなく
ても、給水ランプは点滅しません。
<
給水時期を音でお知らせしたいとき
運転停止中に前面モニター「明 / 暗 / 切」ボタンを 3 秒以上押し続けると、「ピッ」と鳴って、
給水ランプ点滅時に「ピーピー…」( 約 10 秒間 ) と音が鳴るように設定できます。
<
解除するとき
もう一度、前面モニター「明 / 暗 / 切」ボタンを 3 秒以上押し続けると、
「ピピッ」と鳴って設定を解除できます。
※差込プラグを抜いた場合、設定は解除され、音は鳴らなくなります。
>
>
センサー感度を調整する
ハウスダストモニターやニオイモニターが「赤」のまま変わらないときは「低い」に「緑」
のまま変わらないときは、「高い」に設定してください。
( 運転停止中に )
1
風量ランプが点灯して、現在の設定されているセンサー感度を表示します。
出荷時には「標準」に設定されています。
もう一度風量切換ボタンを押して、お好みのセンサー感度を設定する。
2
ボタンを押すごとにセンサー感度は、右図のように切り換わります。
停止ボタンを押す。
3
• 停止ボタンを押さなくても、8 秒間何も操作をしないと、自動的
に調整は完了します。
• センサー感度の設定は、差込プラグを抜いた場合も、記憶してい
ます。
風量切換ボタンを 3 秒以上押す。
J-10
風量ランプ
センサー感度
高い
標準
低い
Page 35

ENGLISH
日本語
お手入れ
お手入れ時期
1カ月に1回、
720時間(30日×24時間=720)
お手入れ時期
2カ月に1回、または、ホコリが気になるとき
お手入れ時期
2カ月に1回、または、ホコリが気になるとき
清潔に長くお使いいただくために、定期的にお手入れをしてください。
お手入れのさいは、必ず運転を停止し、差込プラグをコンセントから抜いてください。
また、濡れた手で抜き差ししないでください。感電やけがをすることがあります。
フィルターお手入れランプ
フィルターお手入れランプが点灯したら、後ろパネル、センサー部、加湿フィ
ルターをお手入れしてください。ランプは 720 時間使用後点灯します。
お手入れ後、差込プラグをコンセントに差し込み、運転を開始し、リセッ
トボタンを 3 秒以上押してください。「 ピッ 」 と音がしてランプが消灯
します。ランプが点灯していなくても、「 ピッ 」 と音がするまでリセット
ボタンを押し続けてください。
後ろパネルとセンサー部
後ろパネルとセンサー部の穴に付着したホコリを掃除機など
で吸い取る。
<
後ろパネルの汚れがひどいとき
油分を含んだ汚れが付着した場合は、台所用の合成洗
1
剤を溶かした容器でつけ置き洗いをする。( 約 10 分 )
※後ろパネル ( プレフィルター ) はやぶれるおそれが
ありますので力を加えて洗わないでください。
洗剤が残らないよう十分にすすぐ。
( 力を加えないでください )
>
2
水分を取り、陰干しをする。
3
<
センサーフィルターのお手入れ
センサーカバーを取りはずし、センサーフィルターを取り出す。
センサーフィルターのホコリをとる。汚れがひどい場合
は水洗いし、十分に乾かす。(
センサーフィルターを取り付け、センサーカバーを本体へ取り
付ける。( フィルターをはずしたまま運転しないでください )
本体
>
洗剤は使用しないでください
センサー
後ろパネル
)
後ろパネル
センサーフィルター
表面を柔らかい布で拭く。
汚れがひどい場合は、水または、ぬるま湯 (40℃以下 ) を含ませた布で拭く。
• 本体を水洗いしない。( ショート・感電の原因 )
• 揮発性のものや洗剤 ( ベンジン・シンナー・みがき粉・アルコール・石油など ) を使用しない。
( 変形・破損の原因 )
J-11
Page 36

お手入れ
お手入れ時期
給水のたび
お手入れ時期
吹出口からニオイがするとき、
または、ニオイが取れにくいとき
お手入れ時期
1カ月に1回
タンク
タンクキャップ
タンクに少量の水を入れ、タンクキャップを閉めて振
り洗いをする。
汚れが取れにくいときは、薄めた台所用合成洗剤を使用して
ください。
( 洗剤が残らないようしっかりすすいでください )
<
タンクキャップ
タンクキャップに付属の小キャップは取りはずしで
きます。タンクキャップ、小キャップが汚れたり、
ぬるぬるしているときはお手入れをしてください。
※綿棒や歯ブラシなどで汚れを落としてください。
>
小キャップ
洗える脱臭フィルター
手洗いのみ
乾燥機を使わないでください。
流水で 「 洗える脱臭フィルター 」 の汚れを洗い流す。
1
※ 「 洗える脱臭フィルター 」 の表面に付着しているホコリを
取り除いてから水洗いしてください。
タンク
歯ブラシ
2
3
4
初めて洗うときに水が茶色になることがありますが、清浄効
果および、健康面には影響ありません。
力を加えて洗わないでください。洗える脱臭フィルターの形がくずれます。
水分をよくきる。
屋外の風通しのよい場所で陰干しする。
右図のように横置きに立てて干してください。
たて置きにすると洗える脱臭フィルターの形がくずれます。
※乾燥時間の目安は約 6 時間です。
ご注意
• 悪天候下での乾燥はさけてください。
凍らせないでください。
• 部屋干しをするさいは、タオルなどを敷き、床をぬらさないようにしてください。
「洗える脱臭フィルター」を本体に取り付ける。
洗浄後は、十分に乾かしてから取り付けてください。
乾燥が不十分な場合、ニオイが残ることがあります。
J-12
(J-6 ページ )
Page 37

ENGLISH
日本語
トレー
お手入れ時期
1カ月に1回
水質により加湿フィルターのお手入れ時期は異なります。
トレーをはずすときやお手入れ時の水こぼれに注意してください。
タンクをはずし、トレーを引き出す。
1
•
トレーは、タンクを
取り出してからはず
します。
•
トレーはゆっくり取
り出してください。
急に取り出すと、ト
レーの水がこぼれる
場合があります。
加湿フィルターを取りはずす。
2
タンクとって
タンク
この部分を持た
ないでください
<
水アカが取れにくいとき
トレーに約1/2( 約 700ml)
1
の水を入れ、台所用合成洗
剤 ( 粉末 ) を溶かし、つけ
置き洗いをする。( 約 30分 )
• フロートをはずさないでくださ
い。
• 細部は綿棒や歯ブラシなどで汚
れを落としてください。
>
加湿フィルター
トレー内を水洗いする。
3
• フロートをはずさな
いでください。
• 細部は綿棒や歯ブラ
シなどで汚れを落と
してください。
加湿フィルターを取り付け、トレーを本
4
体に取り付ける。
• 加湿フィルターは前後の方向
があります。フィルターわく
の色が右図になる方向に取り
付けてください。
• トレーと本体はすき間がない
ように、取り付けてください。
フロート
トレー
色 ( グレー )
きれいな水で 2 〜 3 回、す
2
すぎ洗いをする。
すすぎが不十分な場合、洗剤の
ニオイや泡の発生、または本体
の変形・変色・の原因になります。
ご注意
台所用の合成洗剤 ( 粉末 ) 以外
の洗剤を使用しますと、変形・
変色・割れ ( 水もれ ) の原因に
なります。
<
フロートがはずれた場合の取り付けかた
フロートは分解しない
でください。
フロートのツメを穴
に入れる
>
J-13
フロートをこの突起
の下に入れる
フロートの反対側の
ツメを穴に入れる
Page 38

CARE AND MAINTENANCE
お手入れ時期
1カ月に1回、または、フィルターお手入れランプが点灯したら
お手入れ
お手入れの際は必ず運転を停止し、差込プラグをコンセントから抜いてください。
プラグを抜くときは、ぬれた手でさわらないでください。
( 感電やけがの原因 )
加湿フィルター
水質により、加湿フィルターのお手入れ時期は異なります。
トレーをはずすときやお手入れ時、水こぼれに注意してください。
タンクをはずし、トレーを引き出す。
1
加湿フィルターをトレーからはずす。
2
トレーから水がこぼれないよう注意して
ください。
汚れがひどいとき
お手入れ前に、クエン酸やレモン
ジュースを溶かした水、またはぬ
るま湯に 30 分、つけ置きをする。
< クエン酸を使用するとき >
• 21/2カップの水または、ぬるま
湯にクエン酸約スプーン 3 杯を
溶かす。
<
100% レモンジュースを使用するとき
• 3 カップの水または、ぬるま湯
に1/2カップの 100% のレモン
ジュースを混ぜる。
•
クエン酸は薬局、薬店でお求
めいただけます。
• レモンジュースは果肉が入ら
ないよう、必要に応じ茶こし
などで取り除いてください。
汚れが落ちるまで、何回かすすぎ洗い
3
する。
トレーに加湿フィルターを設置し、ト
4
レーを本体に取り付ける。
•
加湿フィルターは前後の向きがありま
す。正しい方向に取りつけてください。
• トレーと本体はすき間がないように取
りつけてください。
< 長期間使用しない場合 >
加湿フィルターとトレーをよく乾かし、
本体に取り付けておく。
>
差込プラグをコンセントに差し込み運
5
転を開始し、リセットボタンを 3 秒
以上押して、フィルターお手入れラン
プが消灯するのを確認する。
ご使用とともに加湿フィルターに赤茶色
や白い固まりが付着しますが、水道水に
含まれる不純物 ( カルシウム ) で、異常
ではありません。
お手入れしても付着が取れにくくなった
場合は、加湿フィルターを交換してくだ
さい。
すすぎが不十分な場合、汚れやニオイ
の原因になります。また、加湿機能に
影響することがあります。
※力を加えて洗わ
ないでください。
J-14
Page 39

ENGLISH
日本語
フィルターの交換について
5年に1回
2年に1回
フィルターの寿命はご使用の環境によって大きく変わります。
汚れやなニオイを感じたら交換してください。
( 表紙裏の「お使いになる前に」を参照してください )
•
フィルターの寿命や交換の目安は、1日にタバコの煙5本相当の粉塵を吸った時に、集じ
ん能力が 50%になるまでの時間を目安にしています。
交換時の注意
集じんフィルター
使用環境によって、フィルターの寿命は異なります。タバコの煙やペットのふけなど
の浮遊微小粒子は、フィルターの寿命を縮めます。
定期的にフィルターを確認し、必要に応じて交換してください。
洗える脱臭フィルター
定期的に水洗いすることで、くり返し使用できます。
また、別売品として交換することもできます。
加湿フィルター
•
水質により加湿フィルターの寿命は異なります。
2 年以内でも、次のような状態になった場合は交換してください。
・お手入れしても水あかやニオイが取れない。
・変色 ( 黒色・黄色 ) や汚れがひどい。
・白い固まりが加湿フィルター全面に付着している。
・傷みや型くずれがひどい。
交換用フィルター
( 灰色 )
加湿フィルター
• 集じんフィルター : 1 セット
型名 FZ-C150HFE(KC-860EK)
FZ-C100HFE(KC-850EK)
• 洗える脱臭フィルター : 1 セット
型名 FZ-C150DFE(KC-860EK)
FZ-C100DFE(KC-850EK)
• 加湿フィルター : 1 セット
型名 FZ-C100MFE
フィルターわく ( 灰色 )
フィルターわく ( 白色 )
( 白 )
フィルターの交換方法
別売品に同梱している取扱説明書にしたがい、交換してください。
フィルターの使用開始日を、本体側面のお手入れラベルに記入してください。
フィルターの処分方法
交換したフィルターの廃棄に際しては、お住まいの地域のルールにしたがってください。
集じんフィルターの素材
•フィルター : ポリプロピレン
•枠材 : ポリエステル
脱臭フィルターの素材
•ポリエステル・レーヨン・活性炭
加湿フィルターの素材
•レーヨン・ポリエステル
J-15
Page 40

トラブルシューティング
次のような場合は故障でないことがありますので、修理依頼やお問い合わせの前にもう一度お調べ
ください。
こんなときは 確認してください ( 故障ではありません )
ニオイや煙が取れない
部屋が汚れているのに、ハウス
ダストモニターまたは、ニオイ
モニターが緑から変わらない
ハウスダストモニターまたは、
ニオイモニターが変わらない
製品吹出口から「チッチッチッ」
や「ジー、ジー、ジー」と音が
する
吹出口から嫌なニオイの風が
出る
タバコの煙を吹きかけても、
反応がない
•フィルターが汚れていませんか?
い。(J-15 ページ )
•
プラグを差し込んだとき部屋が汚れていた可能性があります。
プラグを抜いて、再度入れ直してください。
•
運転開始後しばらくはセンサーの感度が安定せず、ニオイモニター
の色が変わらないときがあります。数分運転すると、センサーの
感度が安定しますが、それでも感度が悪いと感じるときは感度調
整をしてください。(J-10 ページ )
•
センサー部が汚れていませんか?→センサー部を清掃してください。(J-11 ページ )
•
プラズマクラスターイオン発生時に出る音です。
•
フィルターが汚れていませんか?
→フィルターをお手入れ、または交換してください。
•
微量のオゾンが発生するため、吹出口からニオイがすることがあ
ります。オゾン量はごくわずかであり、健康には支障ありません。
•
煙や汚れを検知しにくい場所に設置していませんか ?
→本体を移動させてください。
→センサー部が汚れていませんか?お手入れしてください。
→フィルターを交換してくださ
フィルターお手入れランプが消
えない
ハウスダストモニターまたは、
ニオイモニターが点灯しない
タンクに水が入っているのに、
給水ランプが消えない
タンクの水が減らない、減るの
が遅くなった
ハウスダストモニターまたは、
ニオイモニターが頻繁に切り換
わる
•
お手入れ後、フィルターリセットボタンを押しましたか?
(J-11 ページ )
→リセットボタンを 3 秒以上押してください。
•
前面モニター「明/暗/切」ボタンで「切」を選択していませんか?
→前面モニター「明/暗/切」ボタン
(J-10 ページ )
•
フロートが引っ掛かっていませんか?
→トレーのお手入れをして、フロートの周りのごみを取り除いて、
正しく取り付けてください。(J-13 ページ )
•
タンク・トレー・加湿フィルターが確実に取り付けられていますか?
→確実に取り付けられているか確認してください。
•
加湿フィルターに水あかやごみが付着していませんか?
→お手入れしてください。(J-14 ページ )
•
ドアの開閉による風や、急激な温度変化に反応することがありま
す。
を押してください。
J-16
Page 41

ENGLISH
日本語
エラー表示
くり返しエラー表示になるときは、お買いあげの販売店に連絡ください。
デジタル表示
ランプ表示 エラー内容 処置方法
「加湿空気清浄運転」
ランプ点滅
「 」ランプ点滅
「
イオンシャワー
」ランプ点滅
「空気清浄」ランプ点滅
「 」ランプ点滅
「 」ランプ点滅
加湿フィルター異常
ファンモーター異常
温湿度センサー異常
基板異常
加湿フィルター・トレーがきちんと取り
付けられているか確認してから、もう一
度運転操作をおこなってください。
停止ボタンを押してエラー表示を解除し、
もう一度運転操作をおこなってください。
差込プラグを抜いて、しばらく時間をお
いてから、ふたたび差し込み、もう一度
運転操作をおこなってください。
J-17
Page 42

仕 様
形 名
KC-860EK
~48
4.3
~38
4.0
11.0
398 (W) × 288 (D) × 627 (H)
電 源
運転モード
加湿空気清浄
空気清浄
空清適用床面積 (m
2
)
※1
タンク容量 (L)
コードの長さ (m)
外形寸法 (mm)
質量 (kg)
センサー
フィルタータイプ
風量(m
3
/hour)
風量(m
3
/hour)
消費電力(W)
運転音(dBA)
消費電力(W)
集じん
脱臭
運転音(dBA)
加湿量(mL/Hour)
※2
220 ~ 240 V 50/60 Hz
ほこり / ニオイ / 温湿度
制菌 HEPA フィルター
※3
洗える脱臭フィルター
2.0
MAX
396
56
51
396
56
50
730
240
19
39
240
21
39
500
84
5.5(4.9)
17
120
8.8(8.2)
25
300
MED LOW
KC-850EK
9.0
378 (W) × 265 (D) × 586 (H)
MAX
306
41
47
288
40
47
600
168
11.6
35
168
13.5
35
400
60
3.8(3.3)
15
84
6.8(6.3)
22
230
MED LOW
KC-860E KC-850E KC-840E
220 ~ 240 V 50/60 Hz
MAX MED LOW MAX MED LOW MAX MED LOW
396 240 84 306 168 60 210 132 48
56 19 5.5 (4.9) 41 11.6 3.8 (3.3) 26 9.5 3.7 (3.4)
51 39 17 47 35 15 45 34 15
396 240 120 288 168 84 186 132 54
56 21 8.8 (8.2) 40 13.5 6.8 (6.3) 21 11.5 6.1 (5.8)
50 39 25 47 35 22 42 34 20
730 500 300 600 400 230 450 330 170
※ 3
ホコリ / ニオイ / 温湿度 ホコリ / 温湿度
~48 ~38 ~26
運転モード
形 名
電 源
(W)
/hour)
3
(m
風量
消費電力
空気清浄
(W)
/hour)
3
(dBA)
(m
運転音
風量
消費電力
加湿空気清浄
※ 2
※ 1
)
2
(dBA)
(mL/hour)
(m
運転音
加湿量
(L) 4.3 4.0 3.0
加湿空清適用床面積
タンク容量
集じん 制菌 HEPA フィルター
脱臭 洗える脱臭フィルター
センサー
フィルタータイプ
(m) 2.0
(mm) 398 (W) × 288 (D) × 627 (H) 378 (W) × 265 (D) × 586 (H) 360 (W) × 233 (D) × 550 (H)
(kg) 11.0 9.0 8.0
空清適用床面積は空気清 浄「強 」で運転したときに規定の粉じん濃度の汚れを 30 分で洗浄できる部屋の面 積です。「( 社 ) 日本電機工業会規格 JEM1467」によるものです。
室内の温度・湿 度によって加湿量が変わります。 (・温度が高い,または湿度 が低いほど加湿量が多くなる ・温度が低い、または湿度が高いほど加湿量が少なくなる )
2
質量
1
※
※
電源コードの長さ
外形寸法
J-18
室内温 度 20℃ / 湿度 30%での測定 (JEM1426)
HEPA フィルターの 性能は H10 クラスです。(EN1822 による )
3
※
待機時消費電力の削減について
この製品は差込プラグを差し込んだ状態では電子回路を動作させるために、約 0.7W の待機時消費電力を消費しています。
省エネルギー推進のため、ご使用にならないときは差込プラグを抜いてください。
Page 43

ENGLISH
日本語
メモ
Page 44

CN 1
Sharp Electronics (U.K.) Ltd
London, U. K.
U.K.: 08705 274277 (office hours)
Ireland: 01 676 0648 (office hours)
Website: http://www.sharp.co.uk/support
Printed in China
TINS-A379KKRZ 09K-
 Loading...