

Page 1
* Plasmacluster is a trademark
of Sharp Corporation.
AIR PURIFIER
with Humidifying Function
KC-840E
KC-850E
KC-860E
OPERATION MANUAL
ČISTIČKA VZDUCHU
s funkcí zvlhčování
NÁVOD K OBSLUZE
ČISTIČKA VZDUCHU
s funkciou zvlhčovania
NÁVOD NA POUŽITIE
LÉGTISZTÍTÓ
párásító funkcióval
HASZNÁLATI ÚTMUTATÓ
ОЧИСНИК ПОВІТРЯ
з Функцією Зволожування
ENGLISH
ČESKY
SLOVENSKYMAGYAR
KC-840E
KC-850E
KC-860E
ПОСІБНИК З ЕКСПЛУАТАЦІЇ
УКРАЇНСЬКА
Page 2

Please read before operating your new Air Purifi er
The air purifi er draws in room air from the air intake, passes the air through a Pre-Fil-
ter, a Washable Deodorizing Filter and a HEPA Filter inside of the unit, then discharges the air through the air outlet. The HEPA Filter can remove 99.97% of dust particles
as small as 0.3 microns that pass through the fi lter and also helps absorb odours. The
Washable Deodorizing Filter gradually absorbs odours as they pass through the fi lter.
Some odours absorbed by the fi lters may break down over time, resulting in additional
odour. Depending on the usage environment, especially when the product is used in
extreme environments (significantly more severe than normal household use), this
odour may become strong in a shorter period than expected. If the odour persists, the
fi lters should be replaced.
NOTE
• The air purifi er is designed to remove air-suspended dust and odour, but not harmful gases (for
example, carbon monoxide contained in cigarette smoke). If the source of the odour still exists, the
air purifi er may not completely remove the odour.
HEPA Filter
Washable Deodorizing Filter
Pre-Filter
(Common illustration has used “KC-850E”.)
Page 3
ENGLISH
FEATURES
Unique Combination of Air Treatment
Technologies
Triple Filtration System + Plasmacluster
+ Humidifi cation
TRAPS DUST*
Washable pre-filter traps dust and other
large airborne particles.
DECREASES ODOURS
Washable deodorizing fi lter absorbs many
common household odours.
REDUCES POLLEN & MOLD*
HEPA filter traps 99.97% of particles as
small as 0.3 microns.
FRESHENS
Plasmacluster treats the air similar to the
way nature cleans the environment by
emitting a balance of positive and negative
ions.
HUMIDIFIES
Runs up to 10 hours per fi lling.**
*When air is drawn through the filter sys-
tem.
**Room size:
up to 48 m
up to 38 m
up to 26 m2 (KC-840E)
Sensor Technology continuously monitors
air quality, and automatically adjusting operation based on detected air purity and
humidity.
2
(KC-860E)
2
(KC-850E)
CONTENTS
......
...
E-10
E-10
E-10
E-10
E-12
E-12
E-13
E-14
E-15
E-16
E-18
..
E-19
IMPORTANT SAFETY INSTRUCTIONS
• WARNING ..................................................
• CAUTIONS CONCERNING OPERATION .
• INSTALLATION GUIDELINES ....................
• FILTER GUIDELINES ................................
PART NAMES
• ILLUSTRATIVE DIAGRAM .........................
• BACK ..........................................................
• FRONT MONITOR .....................................
PREPARATION FOR USE ............................
• FILTER INSTALLATION .............................
• REFILLING WATER TANK .........................
OPERATION
• MAIN UNIT DISPLAY .................................
• CLEAN AIR & HUMIDIFY MODE ...............
• CLEAN AIR MODE .....................................
• CLEAN ION SHOWER MODE ...................
• FAN SPEED BUTTON ................................
• Plasmacluster ON/OFF BUTTON .............
• LIGHTS CONTROL BUTTON ..................
• WATER SUPPLY INDICATOR LIGHT ......
• ADJUSTMENT OF SENSOR
DETECTION SENSITIVITY ......................
CARE AND MAINTENANCE
• FILTER INDICATOR LIGHT .....................
• BACK PANEL AND SENSORS ................
• UNIT ........................................................
• WATER TANK ...........................................
• WASHABLE DEODORIZING
FILTER CARE ..........................................
• HUMIDIFYING TRAY ...............................
• HUMIDIFYING FILTER .............................
•
FILTER REPLACEMENT GUIDELINES
TROUBLESHOOTING
SPECIFICATIONS
.............................................
...............................................
.................
............................
....................................
INFORMATION ON PROPER DISPOSAL
E-2
E-2
E-3
E-3
E-3
E-4
E-4
E-4
E-5
E-6
E-6
E-7
E-8
E-8
E-8
E-9
E-9
E-9
E-11
E-11
E-11
E-11
ENGLISH
Thank you for purchasing this SHARP Air
Purifier. Please read this manual carefully
before using the air purifi er.
After reading, keep the manual in a convenient location for future reference.
E-1
Page 4

IMPORTANT SAFETY INSTRUCTIONS
When using electrical appliances, basic safety precautions should be followed, including the
following:
WARNING
• Read all instructions before using the unit.
• Use only a 220~240 volt outlet.
• Do not use the unit if the power cord or plug is damaged or the connection to the wall outlet
is loosened.
• Periodically remove dust from the plug.
• Do not insert fi ngers or foreign objects into the air intake or air outlet.
• When removing the power plug, always hold the plug and never pull on the cord.
Electrical shock and/or fi re from a short circuit may result.
• Do not remove the plug when your hands are wet.
• Do not use this unit near gas appliances or fi replaces.
• When refi lling the Water Tank, cleaning the unit, or when the unit is not in use, be sure to unplug
the unit. Electrical shock and/or fi re from a short circuit may result
• If the power cord is damaged, it must be replaced by the manufacturer, its service agent, a
Sharp authorized Service Centre or similarly qualifi ed person in order to avoid a hazard.
• Do not operate when using aerosol insecticides or in rooms where there is oily residue, incense,
sparks from lit cigarettes, chemical fumes in the air, or in locations where the unit may get wet,
such as a bathroom.
• Be cautious when cleaning the unit. Strong corrosive cleansers may damage the exterior.
• Only a Sharp Authorized Service Centre should service this air purifi er. Contact the nearest Service
Centre for any problems, adjustments, or repairs.
• When carrying the unit, remove the Water Tank and Humidifying Tray fi rst and hold the unit by han-
dles on both sides.
• Do not drink the water in the Humidifying Tray or Water Tank.
• Change the water in the Water Tank daily with fresh tap water and regularly clean the Water Tank
and Humidifying Tray. (See E-12 and E-13). When unit is not in use, dispose of the water in the
Water Tank and Humidifying Tray. Leaving water in the Water Tank and/or Humidifying Tray may
result in mold, bacteria, and bad odours.
In rare cases, this bacteria may cause harmful physical effects.
• This appliance is not intended for use by persons (including children) with reduced physical, sensory or mental capabilities, or lack of experience and knowledge, unless they have been given supervision or instruction concerning use of the appliance by a person responsible for their safety.
Children should be supervised to ensure they do not play with the appliance.
– To reduce the risk of electrical shock, fi re or injury to persons:
NOTE
If this air purifi er should cause interference to radio or television reception, try to correct the interfer-
ence by one or more of the following measures:
• Reorient or relocate the receiving antenna.
• Increase the separation distance between the unit and radio/TV receiver.
• Connect the equipment into an outlet on a circuit different from that to which the receiver is connected.
• Consult the dealer or an experienced radio/TV technician for help.
– Radio or TV Interference
E-2
Page 5

CAUTIONS CONCERNING OPERATION
• Do not block the intake and/or air outlet.
• Do not use the unit near or on hot objects, such as stoves or heaters, or where it may come into
contact with steam.
• Always operate the unit in an upright position.
• Hold the unit by using the handles on both sides when moving.
Do not move when the unit is in operation.
• Do not operate the unit without the fi lters, Water Tank, and Humidifying Tray properly in-
stalled.
• Do not wash and reuse the HEPA fi lter.
Not only does it not improve fi lter performance, it may cause electric shock or malfunction.
• Clean the exterior with a soft cloth only.
Do not use volatile fl uids and/or detergents.
The unit surface may be damaged or cracked.
In addition, the sensors may malfunction as a result.
• Frequency of maintenance required (descaling) will depend on the hardness or the impurities of the water that you use; the harder the water the more often descaling will be necessary.
• Keep the unit away from water.
INSTALLATION GUIDELINES
• When using the unit, place at least 2m away from equipment utilizing electric waves such
as televisions or radios to avoid electrical interference.
• Avoid a location where the sensor is exposed to direct wind.
The unit may not operate properly.
• Avoid use in locations where furniture, fabrics or other items may come in contact with and
restrict the air intake and/or air outlet.
• Avoid use in locations where the unit is exposed to condensation or drastic temperature
changes. Appropriate conditions are when room temperature is between 5 – 35 ºC.
• Place on a stable surface with suffi cient air circulation.
When placing the unit on a heavily carpeted area, the unit may vibrate slightly.
Place the unit on an even surface to avoid water leakage from the Water Tank and/or Humidifying
Tray.
• Avoid locations where grease or oily smoke is generated.
The unit surface may crack or the sensor may malfunction as a result.
• Place the unit about 30 cm~60 cm(1~2 ft) away from the wall in order to ensure proper airfl ow.
The wall directly behind the air outlet may become dirty over time. When using the unit for an ex-
tended period of time in the same location, periodically clean the wall and protect the wall with a
vinyl sheet, etc. to prevent the wall from becoming dirty.
ENGLISH
FILTER GUIDELINES
• Follow the instructions in this manual for correct care and maintenance of the fi lters.
E-3
Page 6

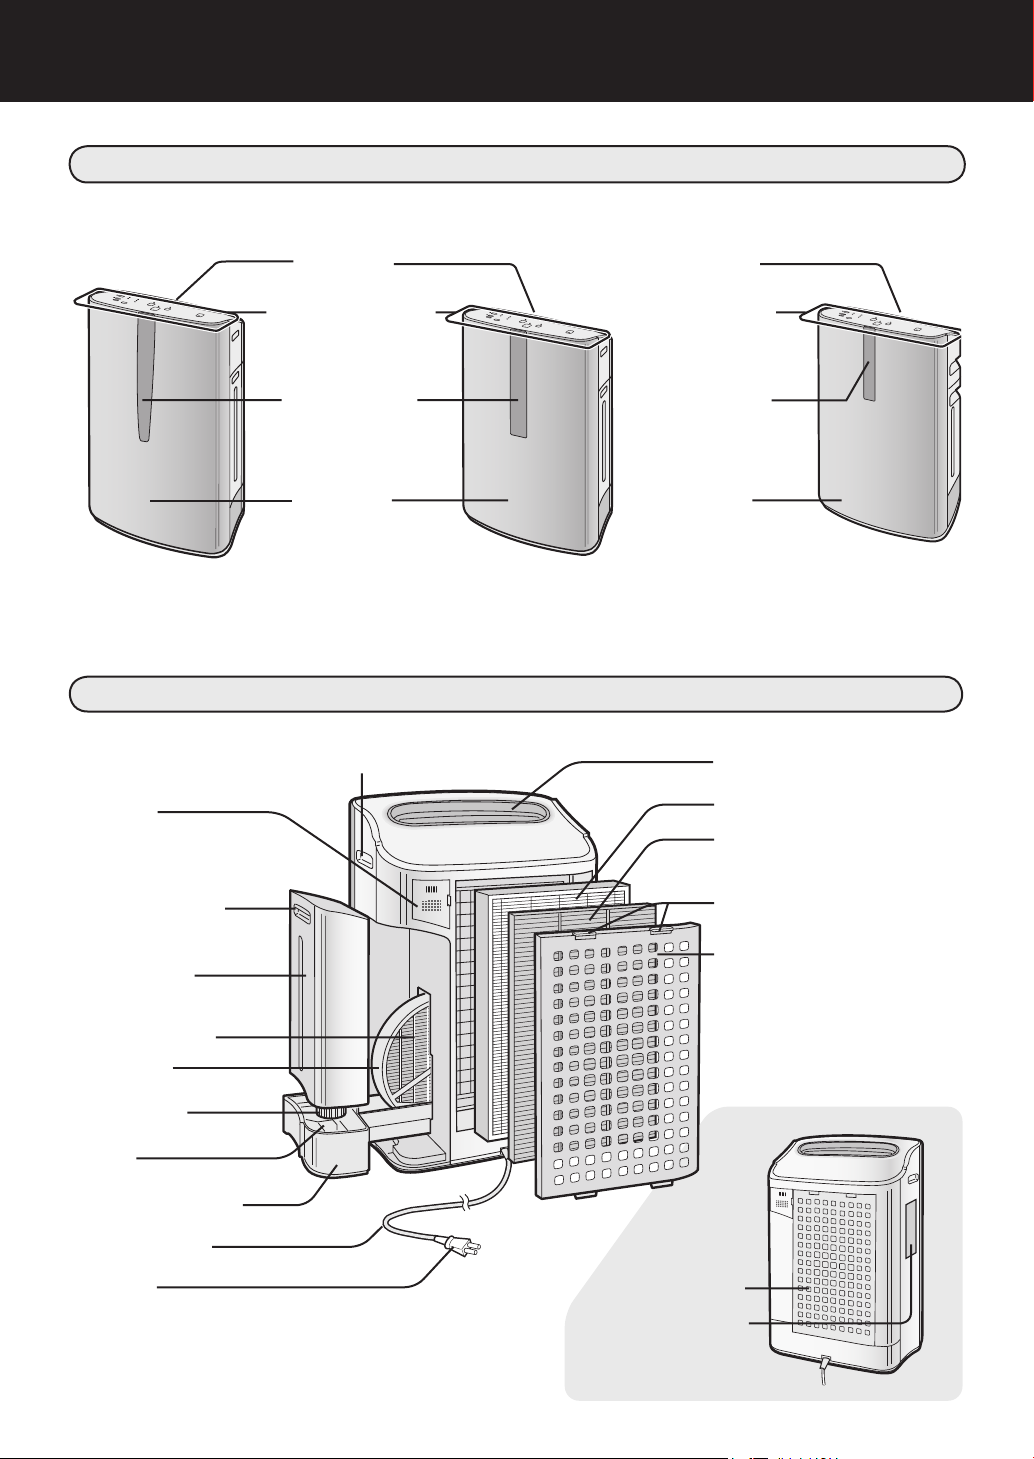
PART NAMES
ILLUSTRATIVE DIAGRAM – FRONT
Air Outlet
Main Unit Display
Front Monitor
Main Unit
KC-860E
BACK
Handle (2 locations left and right)
Sensors
• Dust Sensor
•
Temperature / Humidity Sensor
•
Odour Sensor(KC860E•KC850E)
Tank Handle
KC-850E
Air Outlet
Main Unit Display
Front Monitor
Main Unit
KC-840E
Air Outlet
HEPA Filter (white)
Washable Deodorizing
Filter (black)
Tabs
Water Tank
(For humidifying)
Humidifying Filter
Filter Frame
Tank Cap
Float
Humidifying Tray
Power Cord
Plug
(Shape of plug depends on country.)
E-4
Air Inlet
Date Label
(Rating Label)
Back Panel (Pre-Filter)
Page 7
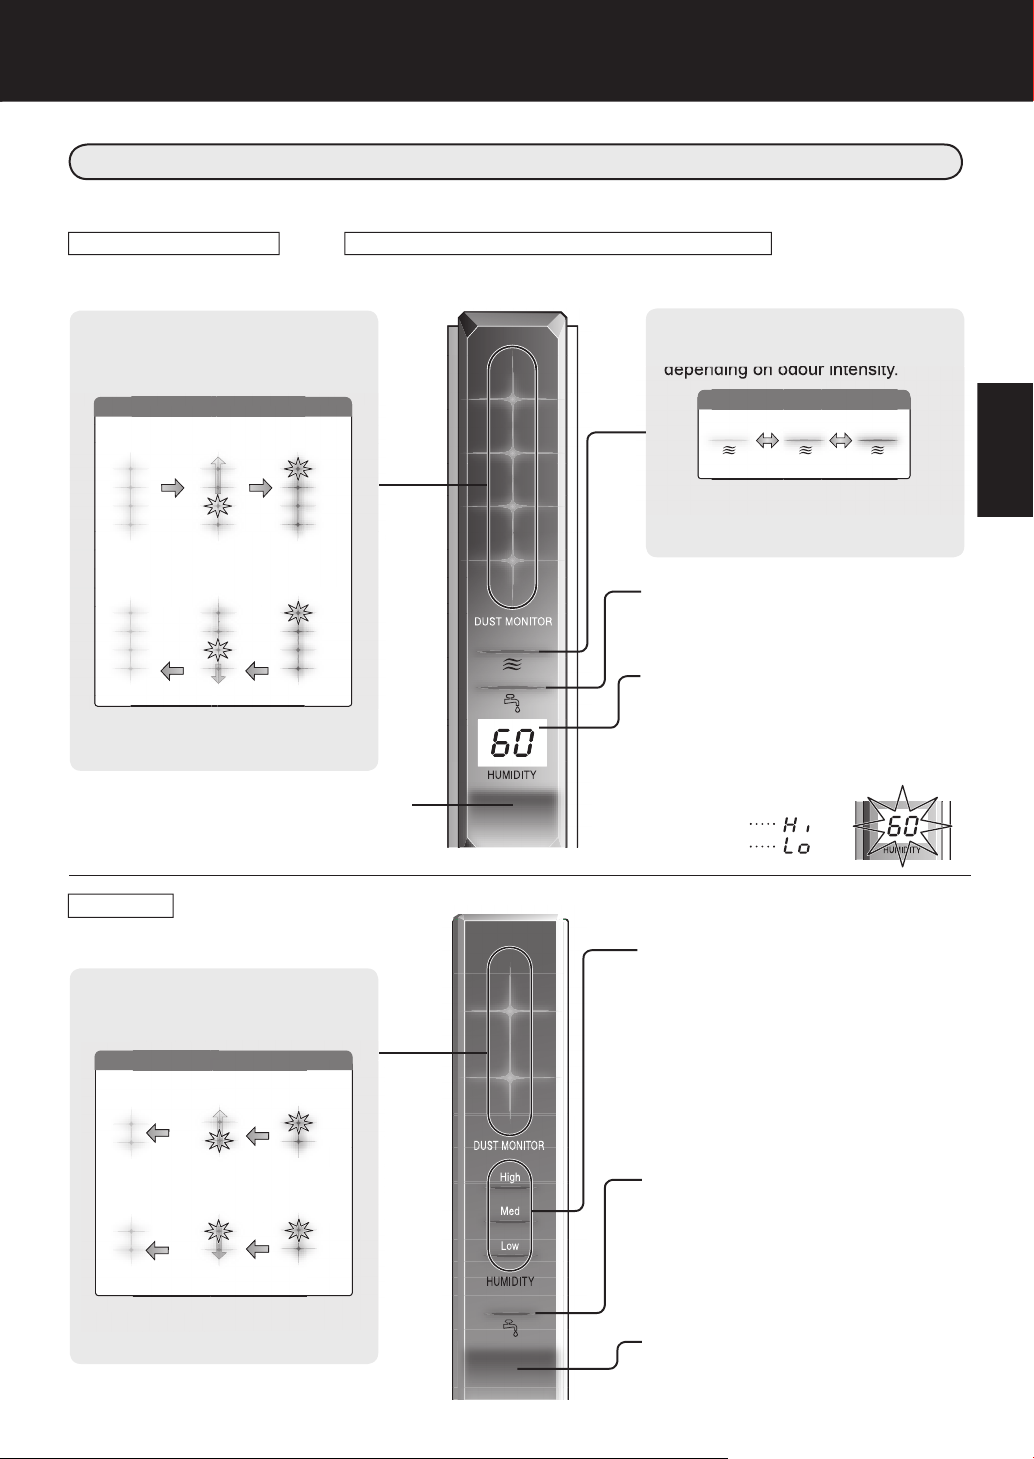
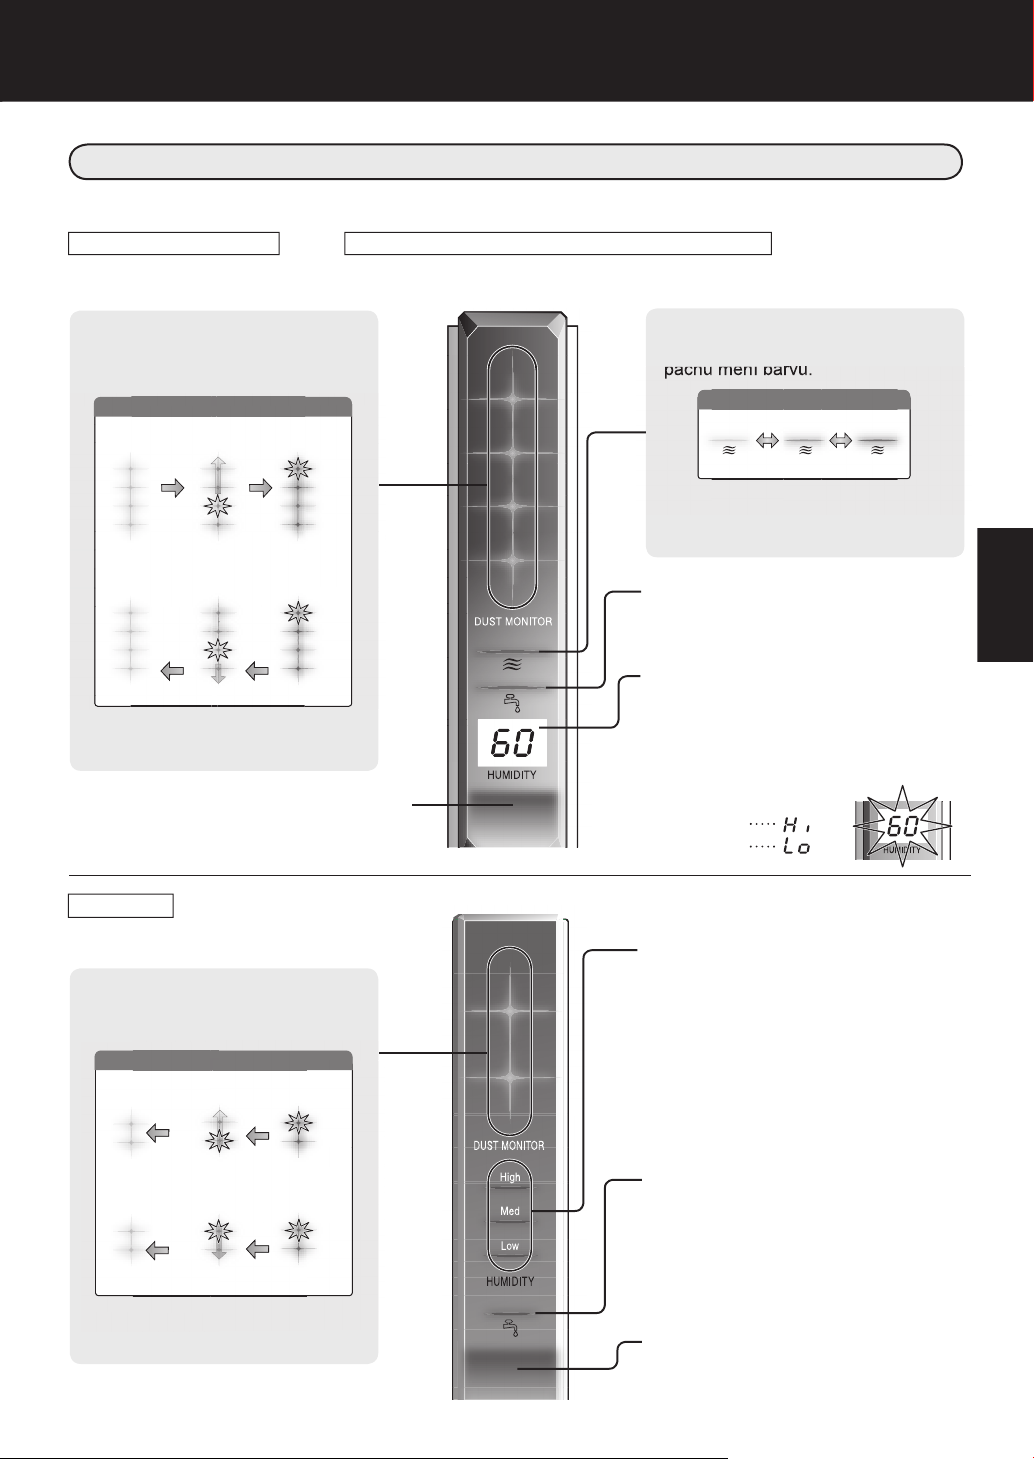
FRONT MONITOR
Indicates condition and humidity of room air.
KC-850E KC-860E
Indicates the room condition of odour, dust, and humidity.
DUST MONITOR
The dust sensor continuously monitors
the air and changes colour depending on
air purity.KC-860E has 5 levels of dust
detector.
Sensor Reading
Clean
All green
Clean
All green
Green
Flashing
Yellow
Green
Flashing
Yellow
Very lmpure
Flashing
All red
Very lmpure
Flashing
All red
When the dust sensor detects dust,
the fl ashing light moves depending on
dustiness.
Plasmacluster Indicator Light (blue)
Blue: Plasmacluster ON
Light off: Plasmacluster OFF
ODOUR MONITOR
The odour sensor continuously
monitors the air and changes colour
depending on odour intensity.
Odour in the room
Faint
Green Yellow Red
Dust and odor are detected by different
sensors.The colours may not change
simultaneously.
Strong
Water Supply Indicator Light (red)
This light will illuminate when the water
tank needs to be refi lled.
Humidity Indicator Light (green)
Displays the approximate humidity level
in the room. Humidity setting cannot be
adjusted.
(Ex.) At 60 % humidily
80 % or more
Less than 30 %
ENGLISH
KC-840E
DUST MONITOR
The dust sensor continuously
monitors the air and changes colour
depending on air purity.
Sensor Reading
Clean
All green
Clean
All green
Green
Flashing
Yellow
Green
Flashing
Yellow
When the dust sensor detects dust,
the fl ashing light moves depending on
dustiness.
Very lmpure
Flashing
All red
Very lmpure
Flashing
All red
Humidity Indicator Light (green)
Displays the approximate humidity level
in the room. Humidity setting cannot be
adjusted.
High – 65 % or more
Med – 65 % or less of 40 % or more
Low – 40 % or less
Water Supply Indicator Light(red)
This light will illuminate when the water
tank needs to be refi lled.
Plasmacluster Indicator Light (blue)
Blue: Plasmacluster ON
Light off: Plasmacluster OFF
E-5
Page 8

Unplug the unit before installing
PREPARATION FOR
USE
or adjusting the fi lters.
FILTER INSTALLATION
To maintain the quality of the fi lters, they are packed in plastic bags and placed in the
unit. Be sure to remove the fi lters from the plastic bags and replace the fi lters in the
unit before initial use.
1
1
Back Panel
2
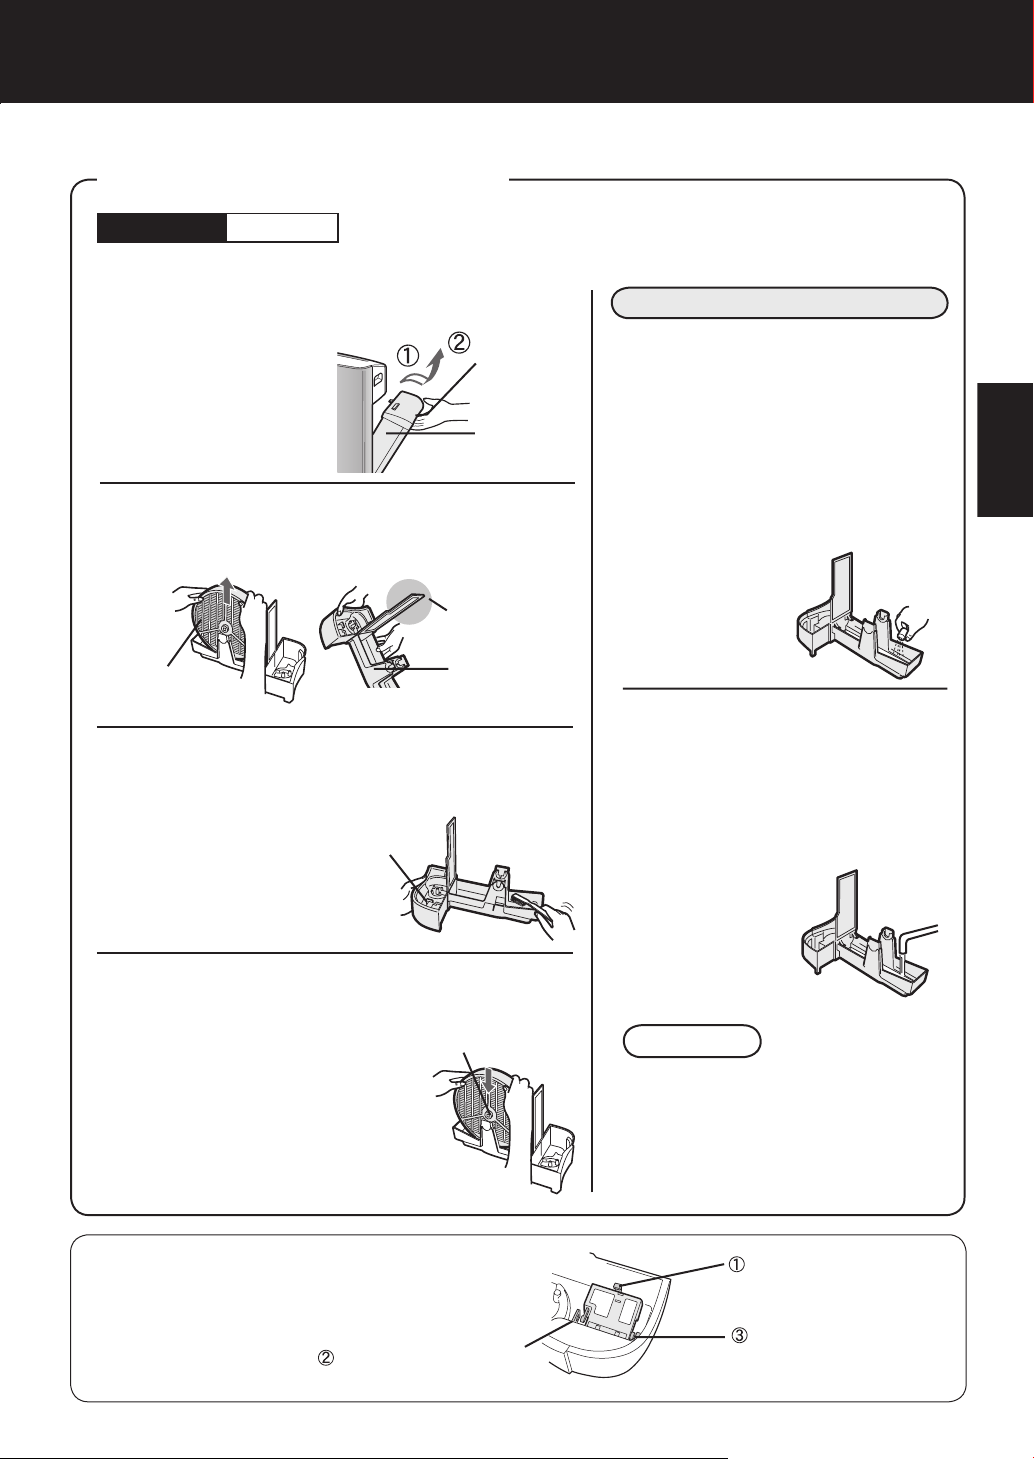
Remove the fi lters
Remove the Back Panel.
Gently push down on the tabs,
then tilt and remove the back
panel.
Tabs on the top
Remove the Wash-
able Deodorizing Filter
(black) and HEPA Filter
(white) from the plastic
bags.
2
1
2
Install the fi lters
Install the HEPA Filter.
Please make sure that the HEPA Filter is
placed in proper orientation.
Installing the filter backwards
will affect the performance of
the unit.
Ta b
Insert the Back Panel’s 2 bottom tabs
(left and right) into the small holes in the
unit, and slide the Washable Deodorizing Filter between the HEPA Filter and
the Back Panel.
Washable Deodorizing Filter
HEPA Filter
Back Panel
Bottom tabs
HEPA Filter
Washable
Deodorizing
Filter
Gently push in the up-
3
per tabs (left and right)
to lock in place.
Upper tabs
Fill in the usage start
4
date on the Date Label.
Use the usage start date as
a guide for when the fi lters
should be replaced.
Date Label
E-6
Page 9

REFILLING THE WATER TANK
The unit can be used in the Clean Air Mode without
putting water in the Water Tank. When using the Clean
Air & Humidify Mode, or the CLEAN ION SHOWER
Mode, the Water Tank should be fi lled with water.
Remove the Water Tank by unlatching the
1
top.
Remove the Water Tank Cap and carefully
2
fi ll the Water Tank with tap water.
• Change the water in the Water Tank every day with
fresh tap water.
After fi lling, securely tighten the Tank Cap.
3
• Check to see that there is no water leaking.
• Be sure to wipe off any excess water on the outside of
the Water Tank.
• When carrying the Water Tank, hold it with both hands
so that the Water Tank opening is facing up.
Tank Handle
Water Tank
Humidifying
Tray
ENGLISH
Water Tank
Tank Cap
tighten
Replace the Water Tank in the unit.
4
• The top latch will “click” in place when the Water Tank
is properly installed.
CAUTION
• Do not expose the unit to water. Short circuit and/or electrical shock may occur as a result.
• Do not use hot water (40 ºC), chemical agents, aromatic substances, dirty water, or other
damaging substances, deformation and/or malfunction may occur.
• Use only fresh tap water. Use of other water sources may promote the growth of mold, fungus and/or bacteria.
E-7
Page 10
OPERATION
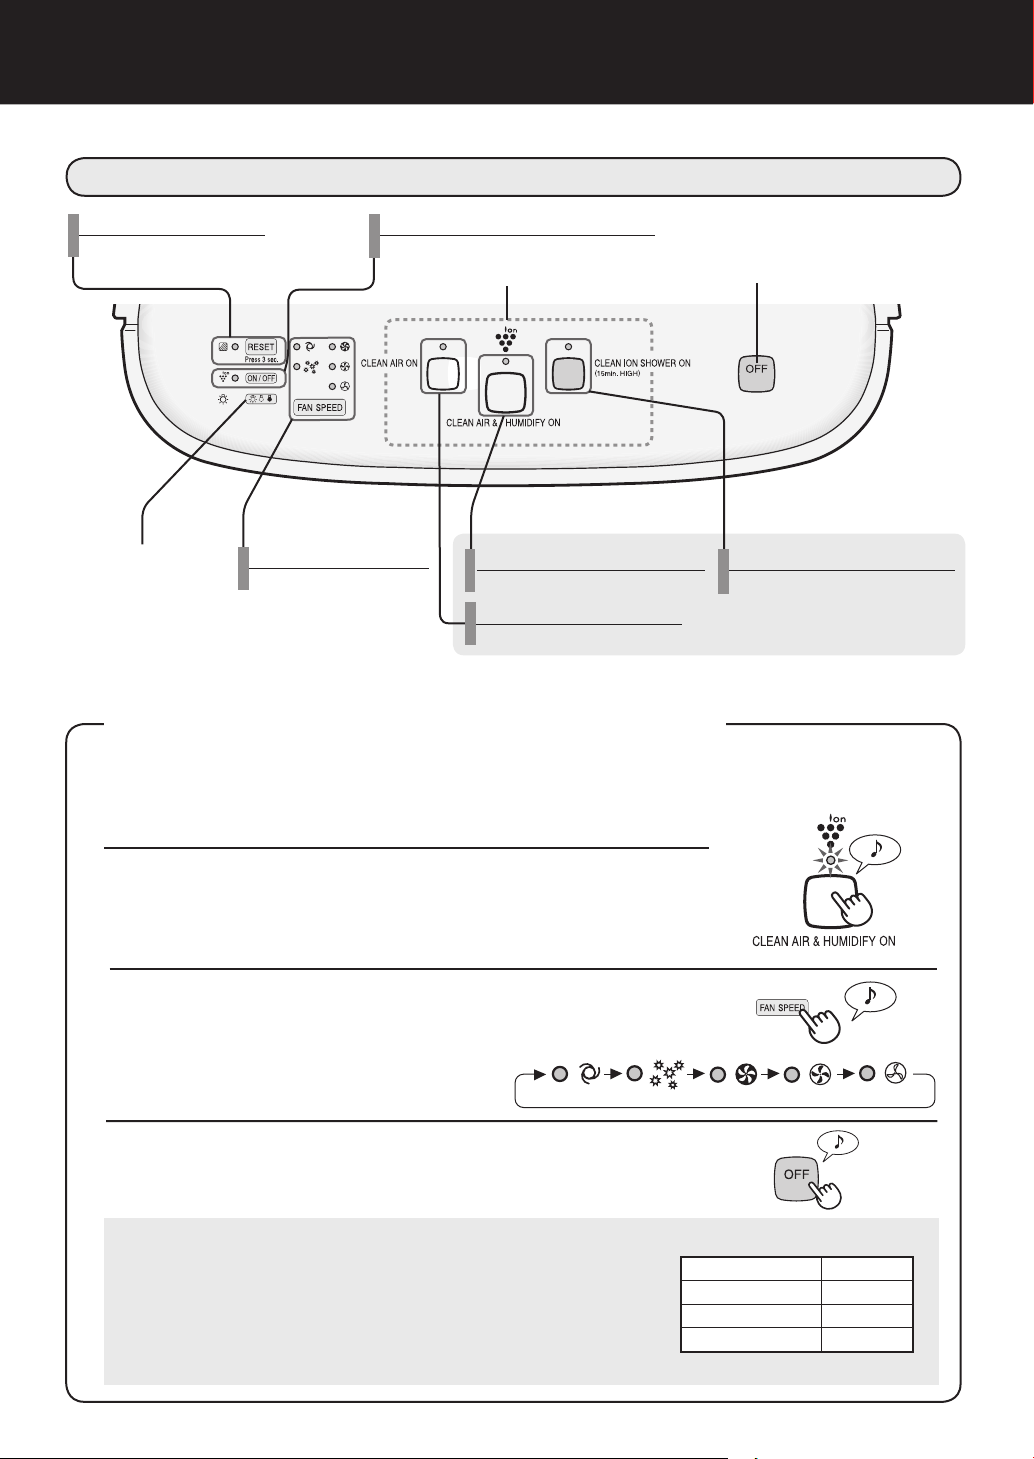
MAIN UNIT DISPLAY
Filter Reset Button/
Indicator Light (red)
Light Control
Button
Fan Speed Button/
Indicator Light (green)
Plasmacluster ON/OFF Button/
Indicator Light (green)
Power ON Button
Press any of the buttons to select mode and start the unit.
Clean Air & Humidify MODE Button/
Indicator Light (green)
Clean Air MODE Button/
Indicator Light (green)
Power OFF Button
CLEAN ION SHOWER MODE Button/
Indicator Light (blue)
CLEAN AIR & HUMIDIFY MODE
Use the Clean Air & Humidify Mode to quickly clean the air, reduce odours and to humidify.
Fill Water Tank. (See E-7)
1
Press the CLEAN AIR & HUMIDIFY MODE Button.
2
• If the power cord was not unplugged between uses, the unit
will automatically re-start at the previously selected settings.
Press the FAN SPEED Button to select the de-
3
sired fan speed.
• Indicator lights will show the fan speed
currently selected.
Press the Power OFF Button to turn the unit off.
About Automatic Humidify Mode
The Temperature/Humidity sensors automatically detect and
adjust humidity according to changes in room temperature.
Depending on the size and humidity of the room, humidity
may not reach 55~65 %. In such cases, it is recommended
that CLEAN AIR & HUMIDIFY/MAX MODE be used.
Temperature Humidity
~18 ºC 65 %
18 ºC~24 ºC 60 %
24 ºC~ 55 %
E-8
Page 11
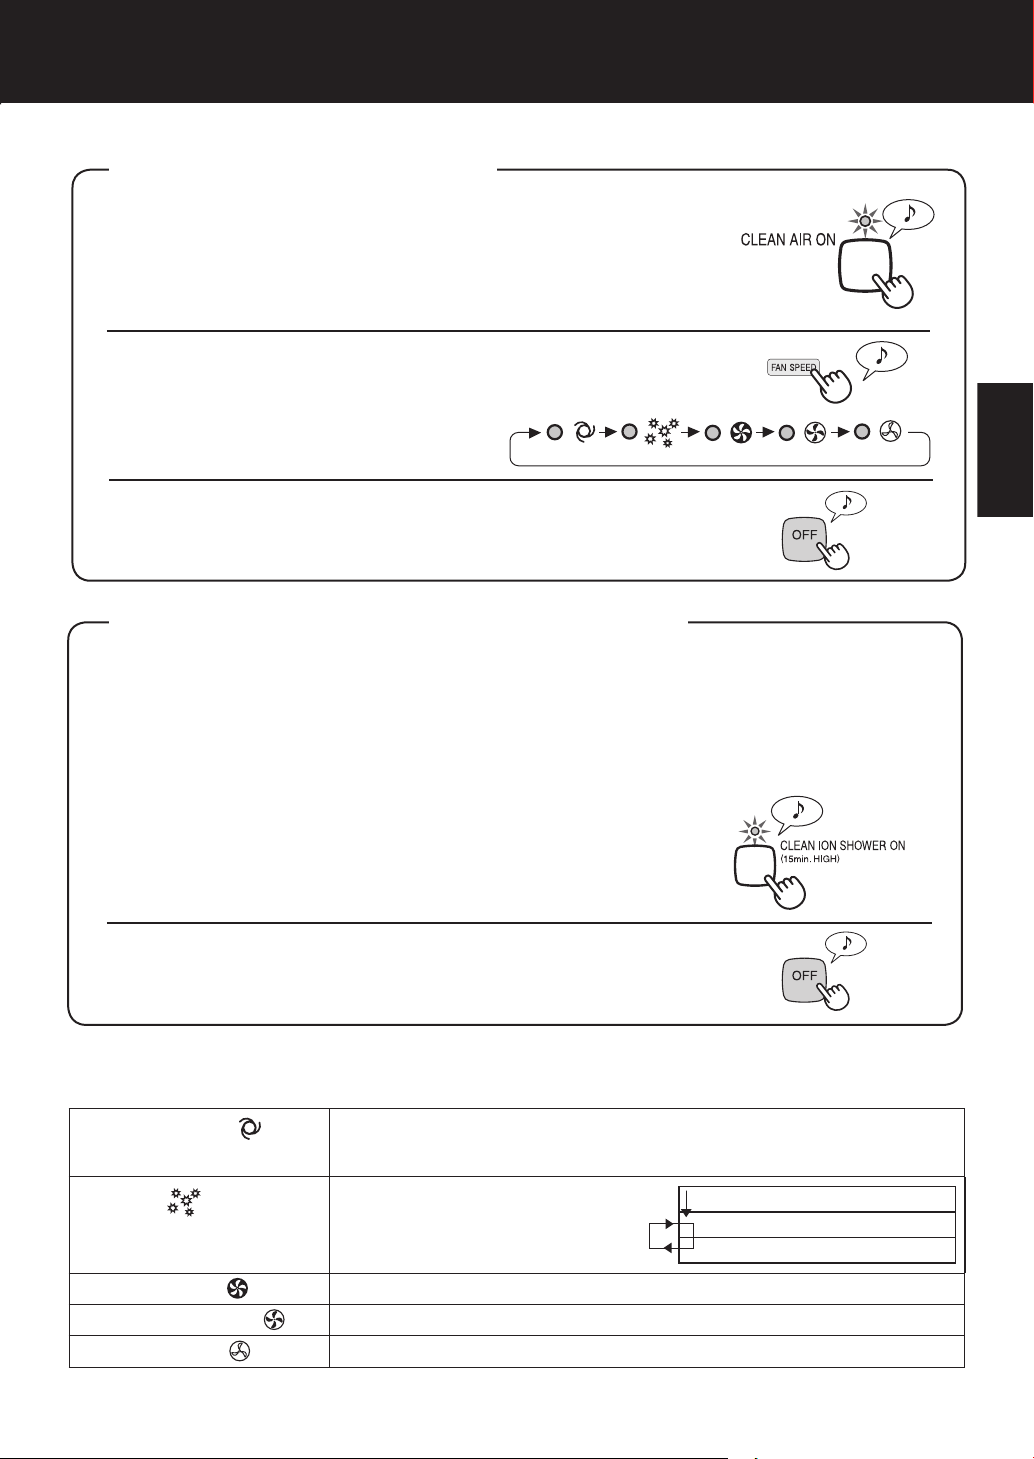
CLEAN AIR MODE
Use the Clean Air Mode when additional humidity is not required.
Press the CLEAN AIR MODE Button on the display.
1
• If the power cord was not unplugged between uses, the unit will
automatically re-start at the previously selected settings.
Press the FAN SPEED BUTTON to select the de-
2
sired fan speed.
• Indicator lights will show the fan
speed currently selected.
Press the Power OFF Button to turn the unit off.
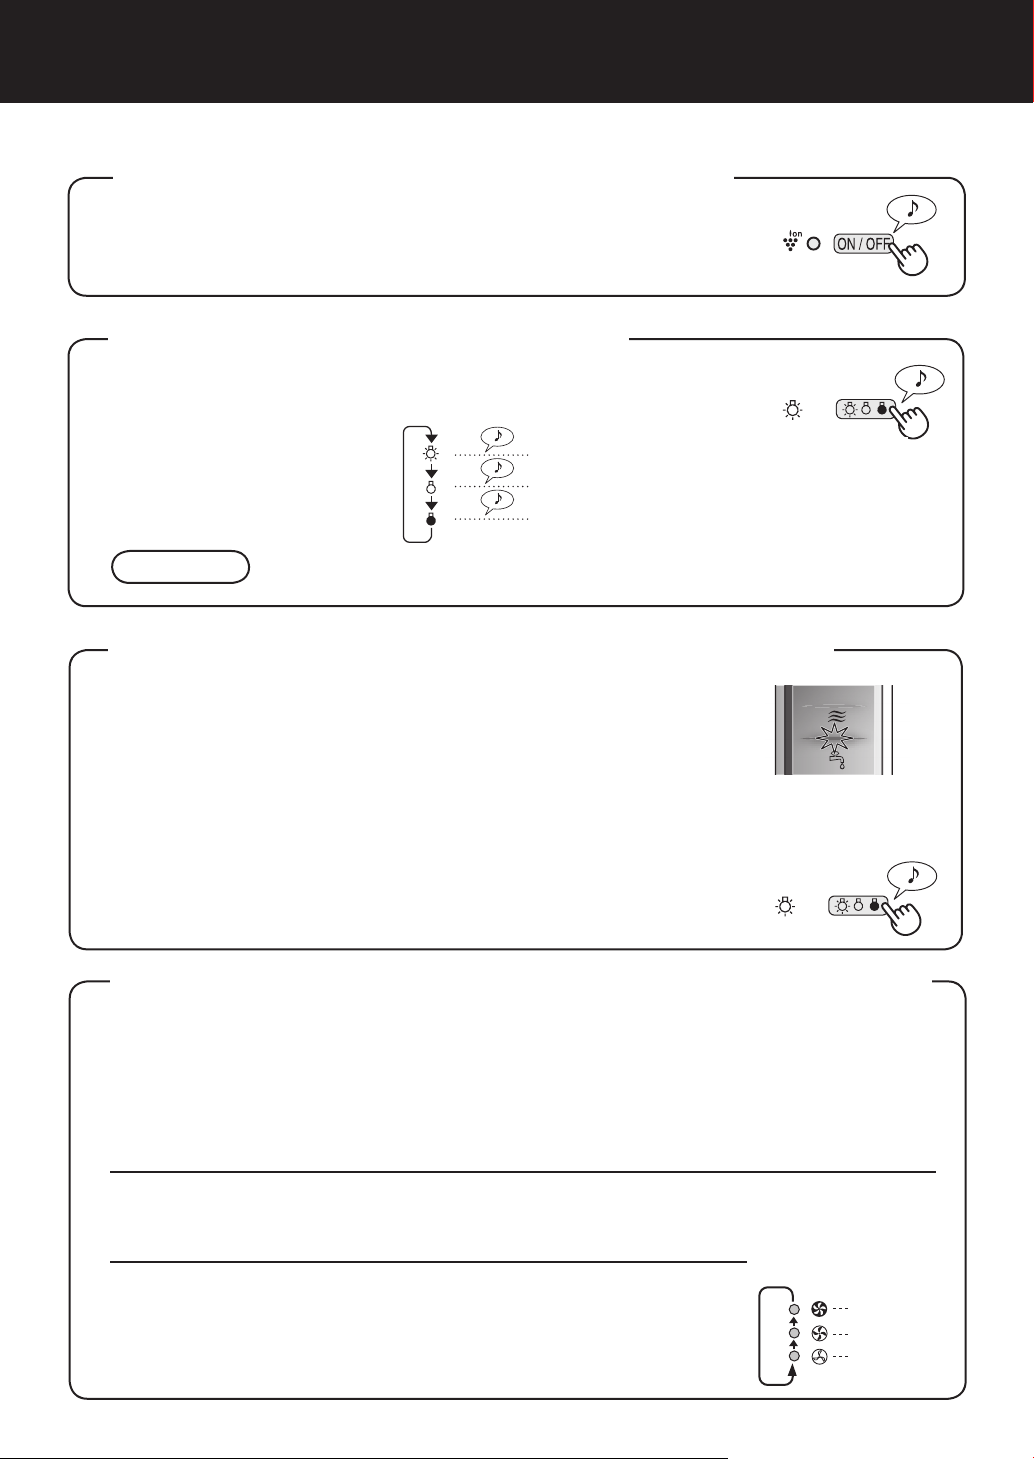
CLEAN ION SHOWER MODE
CLEAN ION SHOWER Mode with humidifi cation releases high-density Plasmacluster ions.
By continuously discharging strong airfl ow for 15 minitues, the unit effectively removes air-
borne dust, pollen, mold and allergens from the air as they are drawn through the fi lter system.
Water must be in the Water Tank when this mode is selected.
The unit humidifi es when there’s water in the Water Tank, and it operates without humidifying
when there’s no water in it.
Press the CLEAN ION SHOWER MODE Button
1
on the display to select this mode.
When the operation fi nishes, the unit will return to the prior
operation.
Press the Power OFF Button to turn the unit off.
Fan Speed Button
Please note the fan speed cannot be adjusted during the CLEAN ION SHOWER MODE.
AUTO operation
POLLEN mode
operation
The fan speed is automatically switched (between HIGH and LOW) depending on the amount of impurities in the air. The sensors detect impurities for
effi cient air purfi cation.
The unit will operate at High Level for
10 minutes, then will atternate between MEDIUM and HIGH.
10 minutes: High fan level
20 minutes: Medium fan level
20 minutes: High fan level
ENGLISH
MAX operation
MEDIUM operation
LOW operation
The unit will operate at maximum fan speed.
The unit will operate at medium fan speed.
The unit will operate quietly using minimal air intake.
*HiGH fan speed is an intermediate speed between MEDIUM and MAX.
E-9
Page 12
OPERATION
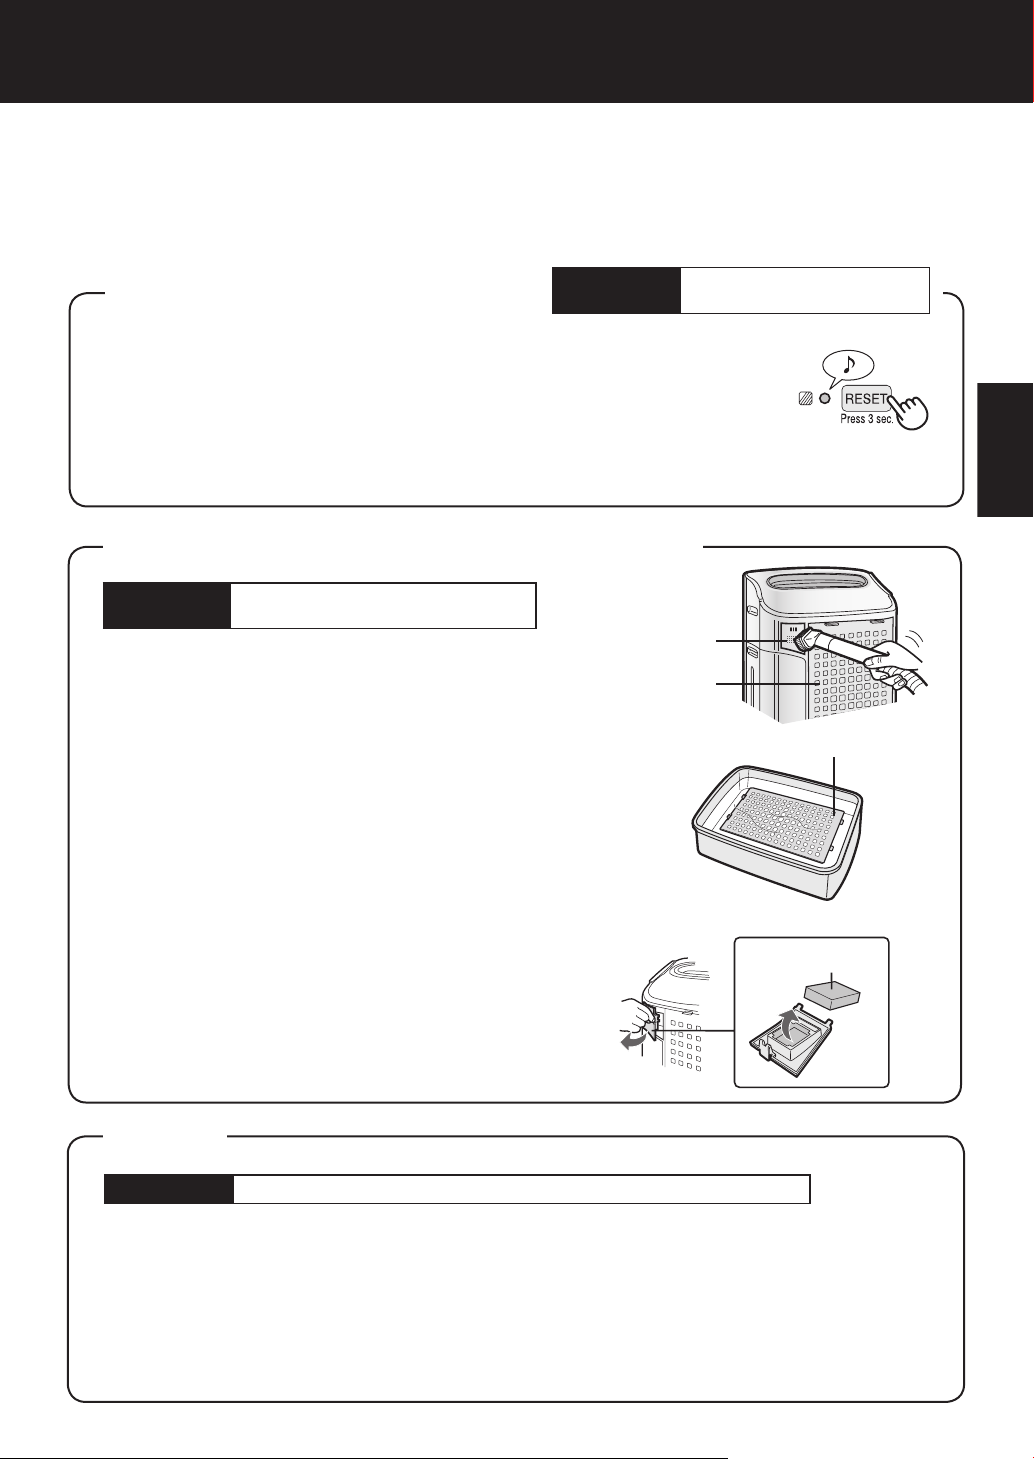
Plasmacluster ON/OFF Button
Press the Plasmacluster ON/OFF Button to turn Plasmacluster Ion Mode ON and OFF.
When Plasmacluster is ON, both the Indicator Light and
Plasmacluster Indicator Light turn on.
LIGHTS CONTROL Button
Use when the light on the
front panel is too bright.
CAUTION
The lights on the front monitor are always brighter when starting.
Refer to the diagram on the right to select the
desired brightness on the front panel.
The lights on the front panel are brighter.
「 」
「 」
「 」
The lights on the front panel are brighter.
The lights on the front panel are darker.
The lights on the front panel are darker.
The lights on the front monitor turn off
The lights on the front monitor turn off.
WATER SUPPLY INDICATOR LIGHT
When the Water Tank is empty, the Water Supply Indicator Light will fl ash
to indicate that the Water Tank should be refi lled. Please note the light
will not fl ash even when the Water Tank is empty during the Clean
Air Mode and the Clean ION SHOWER Mode.
Sound indicator setting for water supply.
In addition to the Indicator Light, the unit can be set to signal with an audible beep when the
Water Tank is empty. With the unit OFF, press the Lights Control button for 3 seconds to turn
the audible signal ON.
Cancellation
To cancel the audible signal, with the unit OFF, press the Lights
Control button again more than 3 seconds.
Flashing
ADJUSTMENT OF SENSOR DETECTION SENSITIVITY
Set to “low” if the DUST MONITOR and ODOUR MONITOR is constantly red to reduce
sensitivity, and set to “high’ if the DUST MONITOR and ODOUR MONITOR is constantly
green to increase sensitivity.
With the unit OFF, press the Fan Speed Button for 3 seconds.
1
The Fan Speed Indicator Lights will display the currently set sensor sensitivity level. The
factory setting is Standard, indicated by the MED light.
Press the Fan Speed Button to set the desired sensor sensitivity.
2
Refer to the diagram on the right to select the desired sensor sensitivity level.
Press the Power OFF Button.
3
Note that if the Power OFF Button is not pushed within 8 seconds
of adjusting sensor sensitivity, the setting will be saved automatically. The sensor sensitivity setting will be saved even if the unit is
unplugged.
E-10
Fan Speed
Indicator
Light
Sensor
Detection
sensitivity
High
Standard
Low
Page 13
CARE AND MAINTENANCE
To maintain optimum performance of this air purifi er, please clean the unit including
the sensor and fi lters periodically.
When cleaning the unit, be sure to fi rst unplug the power cord, and never handle the
plug with wet hands. Electrical shock and/or bodily injury may occur as a result.
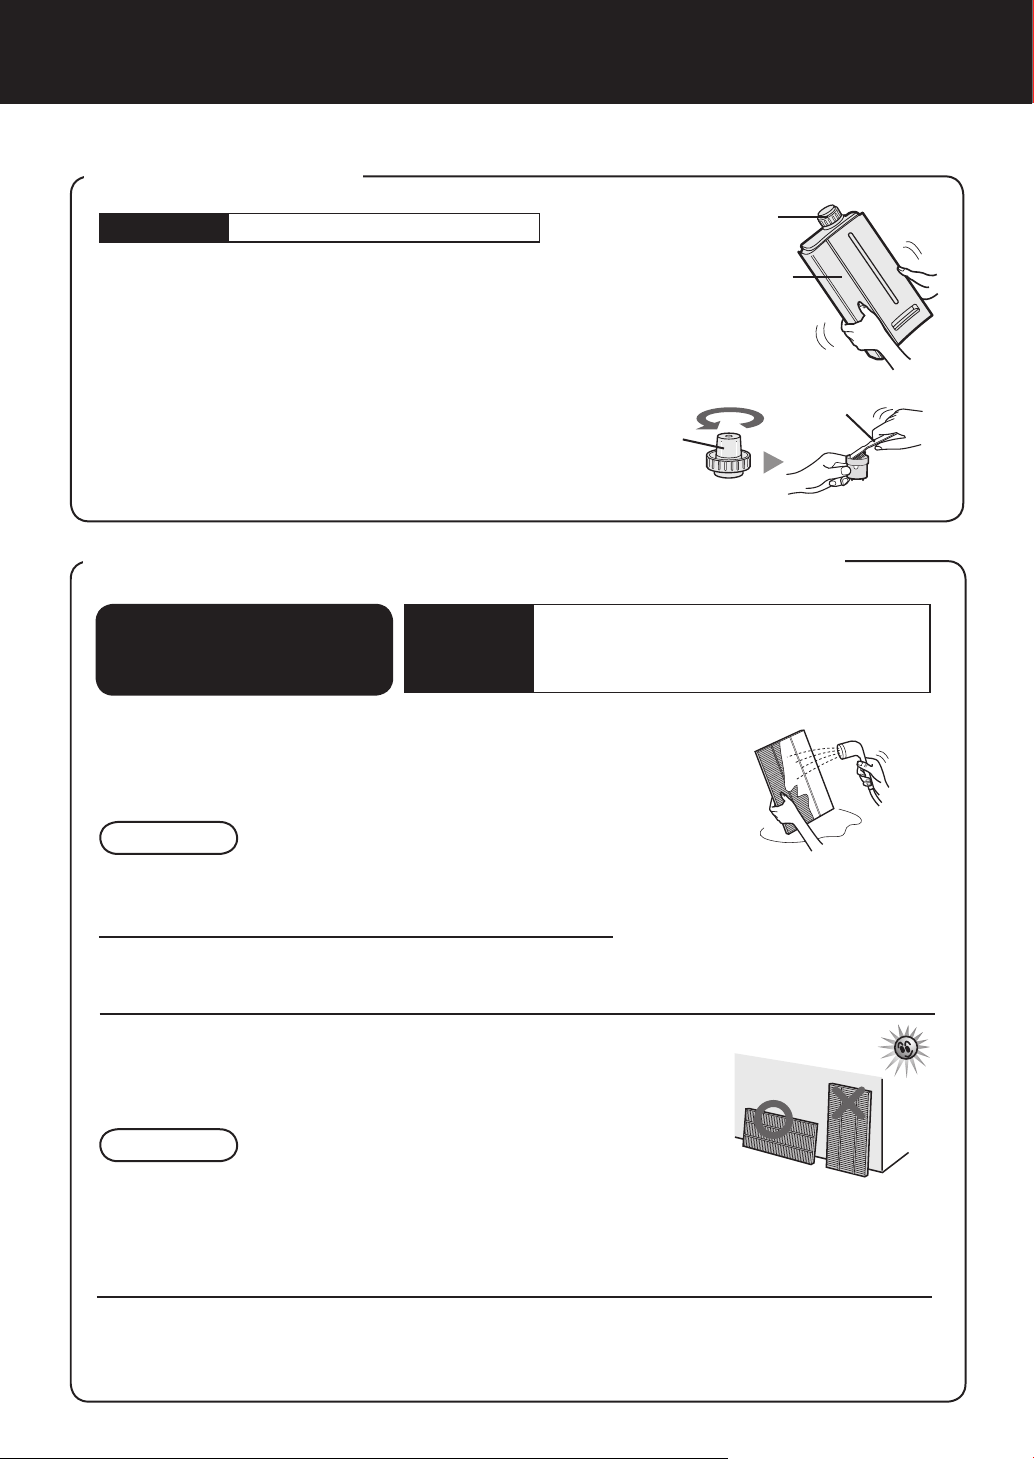
FILTER INDICATOR LIGHT
The Filter Indicator Light will illuminate as a reminder to perform maintenance
of the Back Panel, Sensors, and Humidifying Filter. The Indicator Light will turn
on after approximately 720 hours of use.
After performing maintenance, reset the Filter Indicator. Plug the unit in, turn
power ON, and press the RESET button for 3 seconds. The Filter Indicator
Light will go off. Even if the Filter Indicator Light is already off, the RESET but-
ton should be pressed to reset the maintenance timer.
Care Cycle
After 720 hours of use
30days × 24hours = 720)
(
BACK PANEL and SENSORS
Care Cycle
Gently remove dust from the sensor opening and the
back panel, using a vacuum cleaner attachment or
similar tool.
When the back panel has stubborn dirt
In case of oily dirt, soak the back panel in water with
kitchen detergent.
1
Avoid scrubbing the back panel hard when washing.
Rinse the back panel repeatedly with clean water to re-
move the solution residue.
2
Drip dry fi lter to remove excess water.
Whenever dust accumulates
on the unit or every 2 months
Sensor
Back Panel
Back Panel
3
ENGLISH
SENSOR FILTER CARE
Remove the sensor filter and tap it lightly over a sink
or bin to dislodge dust. If it is very dirty, wash it gently
with lukewarm water. Do not use any detergents or
chemicals of any kind to clean the fi lter. Dry the fi lter
completely before replacing in the unit. Do not operate
unit without all fi lters properly installed.
Sensor Filter
UNIT
Care Cycle
To prevent dirt or stains on the unit, clean regularly. If stains are allowed to remain, they may
become diffi cult to remove.
Wipe with a dry, soft cloth
For stubborn stains or dirt, use a soft cloth dampened with warm water.
Do not use volatile fl uids
Benzene, paint thinner, polishing powder, may damage the surface.
Do not use detergents
Detergent ingredients may damage the unit.
Whenever dust accumulates on the unit or every 2 months
E-11
Page 14
CARE AND MAINTENANCE
WATER TANK
Care Cycle
Rinse the inside of the tank by leaving a small amount of lukewarm water inside, closing the tank cap firmly, and shaking
the tank. Mild household detergents may be used to clean the
inside of the tank, but detergent should be diluted and the tank
should be thoroughly rinsed to remove all detergent residue.
(Note the Water Tank is not dishwasher safe.)
TANK CAP CARE
The small cap back of the tank cap is removable.
When the tank cap and small cap are dirty and slimy,
cleaning is necessary.
Use a cotton swab or a toothbrush.
Every day when Humidifying
care cycle... once a month
Tank Cap
Tank Cap
Water Tank
Toothbrush
WASHABLE DEODORIZING FILTER CARE
HAND WASH ONLY!
DO NOT DRY IN CLOTHES
DRYER!
Care Cycle
Rinse dirt from the WASHABLE DEODORIZING
1
FILTER under lukewarm water.
Remove dust on the washable deodorizing fi lter before washing.
When an unpleasant odour is noticed
from the air outlet.
When performance of fi lter seems to be
reduced and odours persist.
CAUTION
• When washing the fi lter for the fi rst time, the rinse water may
be brown. This does not affect deodorization performance.
• Avoid bending or folding the fi lter when washing.
Drip dry fi lter to remove excess water.
2
Dry filter completely in a well ventilated area. If
3
possible, dry outdoors.
Dry fi lter in a sideways position to avoid warping of the fi lter.
The fi lter takes about 6 hours to dry out.
CAUTION
• Avoid drying fi lter outdoors during inclement weather (e.g. rain or cold
temperatures).
Do not allow fi lter to freeze.
• If fi lter is dried indoors, take precautions, such as placing towels, etc
under the fi lter to prevent water damage to the fl oor.
Replace the fi lter in unit. (See E-6).
4
Dry fi lter completely before replacing to prevent odours.
Do not operate unit without all fi lters properly installed.
E-12
Page 15
HUMIDIFYING TRAY
Care Cycle
Remove the Water Tank and Humidifying
1
Tray.
Unlatch the Water
Tank first, then remove the tray. Use
both hands when
pulling out the Humidifying Tray to
avoid spilling water.
Remove the Humidifying Filter from the
Humidifying Tray. Drain accumulated wa-
2
ter by tilting the Humidifying Tray slowly.
Humidifying Filter
1 month
Frequency of maintenance cycle will depend on the hardness
of the water. Avoid spilling water when removing or cleaning
the tray.
Tank Handle
Water Tank
Do not hold
this part.
Humidifying
Tray
Rinse the inside of the Humidifying
3
Tray with lukewarm water to remove
impurities.
• Do not remove the
Styrofoam fl oat.
• Clean diffi cult-to-
reach parts with a
cotton-tipped swab
or tooth brush.
Float
Replace the Humidifying Filter and re-
4
place the Humidifying Tray in the unit.
The Humidifying Filter will not
fi t if placed in backwards. Be
sure there is no gap between
the Humidifying tray and the
unit when the Humidifying Tray
is replaced in the unit. The unit
may not operate properly if the
Humidifying Tray is not properly replaced in the unit.
Colour: Gray
When Water Deposits are Diffi cult to Remove
Fill Humidifying Tray halfway with lukewarm water,
1
add a small amount of mild
kitchen detergent, and leave
to soak for about 30 minutes.
Dilute detergent according to
instructions on the container.
Clean diffi cult-to-reach parts
with a cotton
swab or tooth
brush.
Rinse the Humidifying
2
Tray with lukewarm water.
• Rinse until all detergent residue
is removed.
• Inadequate rinsing may
cause the detergent odour
or changes
in the shape/
colour of the
main unit.
CAUTION
• Use only mild kitchen detergents to
clean the Humidifying Tray. Use of
non-designated chemicals or detergents can cause deformation, tarnishing, cracking (water leakage).
ENGLISH
If the Styrofoam fl oat comes off,
replace by inserting the tabs of
the Float into the holes in the
Humidifying Tray as shown in the
diagram.
Insert the tab of the
fl oat into the hole.
Insert the fl oat below
this tab.
Insert the tab on
the other side of the
fl oat into the hole.
E-13
Page 16
CARE AND MAINTENANCECARE AND MAINTENANCE
HUMIDIFYING FILTER
Care Cycle
Frequency of maintenance cycle will depend on the hardness or the impuri
you use; the harder the water the more often descaling will be necessary.
Pay attention not to spill water when cleaning the fi lter.
Remove the Water Tank and
1
Humidifying Tray.
Once a month or when the Filter Indicator Light is on.
ties of the water that
Rinse the Humidifying Filter re-
5
peatedly with lukewarm water
to remove all the solution resi-
Humidifying fi lter
Humidifying
Tray
Water Tank
Humidifying
Tray
due.
Inadequate rinsing may cause odour and
affect the performance and/or appearance of the unit.
* Do not scrub the Humidi-
fying Filter, rinse gently
under lukewarm water
only.
Attach the Humidifying Filter
Remove the Humidifying Filter
2
from the Humidifying Tray.
Avoid spilling water from the Humidifying
Tray.
Preparing the descaling solu-
3
tion.
Citric acid, available at some drugstores,
or 100 % bottled lemon juice are used for
descaling. Choose either one to use, and
prepare the descaling solution.
<For using citric acid>
Dissolve 3 teaspoons of citric acid and 2
1/2 cups of lukewarm water in a suitable
container, and stir well.
<For using lemon juice>
100 % bottled lemon juice can be used
for descaling. Use only 100 % bottled
lemon juice with no pulp (strain juice if
necessary). Combine 1/4 cup lemon juice
and 3 cups of lukewarm water in a container large enough to hold the Humidifying Filter and stir well.
P
re-soak the Humidifying Filter
4
in the solution for 30 minutes
before cleaning.
When using lemon juice,
it is recommended to presoak longer than citric
acid.
6
to the Humidifying Tray, and
replace the Humidifying Tray in
the unit.
•The Humidifying Filter will not fit if
placed in backwards. Be sure there is
no gap between the Humidifying Tray
and the unit when the Humidifying Tray
is replaced in the unit. The unit may not
operate properly if the Humidifying Tray
is not properly replaced in the unit.
•When not using the
unit for a long periods of time, dry the
Humidifying Filter
completely before
replacing.
Plug in the unit, turn power
7
ON, and press the Filter Reset
Button on the display for more
than 3 seconds to reset.
You may notice reddish-brown or white
deposits forming on the surface of the
Humidifying Filter. These impurities (calcium, etc.) are due to the impurities contained in tap water; this is not a defect.
Replace the Humidifying Filter when it is
covered completely
in white deposits.
E-14
Page 17
FILTER REPLACEMENT GUIDELINES
Filter life will vary depending on the room environment, usage, and location of the unit. If dust
or odours persist, replace the fi lters.
(Refer to “Please read before operating your new Air Purifi er”)
Guide for fi lter replacement timing
HEPA Filter
Filter life can be greatly reduced depending on the room environment. Cigarette smoke, pet dander,
and other airborne particles can reduce fi lter life. Check fi lters regularly and replace as necessary.
Up to 5 years after opening
Washable Deodorizing Filter
The fi lter can be repeatedly used after washing, or it can be replaced.
Humidifying Filter
Filter life can be greatly reduced depending on the room environment. Even if 2 years have not
passed, replace the Humidifying Filter if you notice the following:
• Mineral deposits (white, black, or red masses) which are not removed after cleaning or the Humidifying Filter is still dirty.
• Filter is severely damaged or warped.
Up to 2 years after opening
Replacement Filters
• HEPA Filter: 1unit
Model FZ-C150HFE (for KC-860E)
FZ-C100HFE (for KC-850E)
FZ-C70HFE (for KC-840E)
• Washable Deodorizing Filter: 1unit
Model FZ-C150DFE (for KC-860E)
FZ-C100DFE (for KC-850E)
FZ-C70DFE (for KC-840E)
• Humidifying Filter: 1unit
Model FZ-C100MFE
(Gray)
Humidifying fi lter
ENGLISH
Replacing the Filters
1. Replace fi lters according to the instructions provided with the replacement fi lters.
2. Use the date labels as a reminder for when the fi lters should be replaced.
Filter Frame (Gray)
Filter Frame (white)
Disposal of Filters
Please dispose of used fi lters according to any local laws and regulations.
HEPA Filter materials:
• Filter: Polypropylene • Frame: Polyester
Washable Deodorizing Filter materials:
• Polyester, Rayon, Activated charcoal
Humidifying Filter materials:
• Rayon, Polyester
E-15
(white)
Page 18
TROUBLESHOOTING
Before calling for service, please review the Troubleshooting chart below, since the problem may not
be a unit malfunction.
SYMPTOM REMEDY (not a malfunction)
Odours and smoke are not
removed.
The Front Monitor illuminates
green even when the air is
impure.
The Front Monitor illuminates
orange or red even when the
air is clean.
A clicking or ticking sound is
heard from the unit.
The discharged air has an
odour.
The unit does not operate
when cigarette smoke is in the
air.
Filter Indicator Light is
illuminated.
• Clean or replace the fi lters if they appear to be heavily soiled.
(See E-11,E-12,E-14)
• The air could be impure at the time the unit was plugged in.
Unplug the unit, wait one minute, and plug the unit in again.
• Sensor operation is affected if the dust sensor openings are
dirty or clogged. Gently clean the dust sensors (See E-11).
• Clicking or ticking sounds may be audible when the unit is
generating ions.
• Check to see if the fi lters are heavily soiled.
• Clean or replace the fi lters.
• Plasmacluster Air Purifi ers emit small traces of ozone which
may produce an odour.
• Is the unit installed in a location that is diffi cult for the sensor
to detect cigarette smoke?
• Are the dust sensor openings blocked or clogged?
(In this case, clean the openings.) (See E-11)
• After replacing fi lters, connect the power cord to an outlet and
press the Filter Reset Button. (See E-11)
The Front Monitor are turned
off.
The Water Supply Indicator
Light does not illuminate when
the tank is empty.
Water lever in the tank does
not decrease or decreases
slowly.
The Front Monitor lights
change colour frequently.
• Check to see if the Lights OFF Mode selected. If so, then
press the Lights Control Button to activate the indicator lights.
(See E-10)
• Check Styrofoam fl oat for impurities. Clean the Humidifying-
Tray. Ensure unit is located on a level surface.
• Check to see if the Humidifying Tray and Water Tank are correctly installed. Check the Humidifying Filter.
• Clean or replace the filter when it is heavily soiled
(See E-14 and E-15).
• The Front Monitor lights automatically change colours as impurities are detected by the dust sensor and odour sensor.
E-16
Page 19
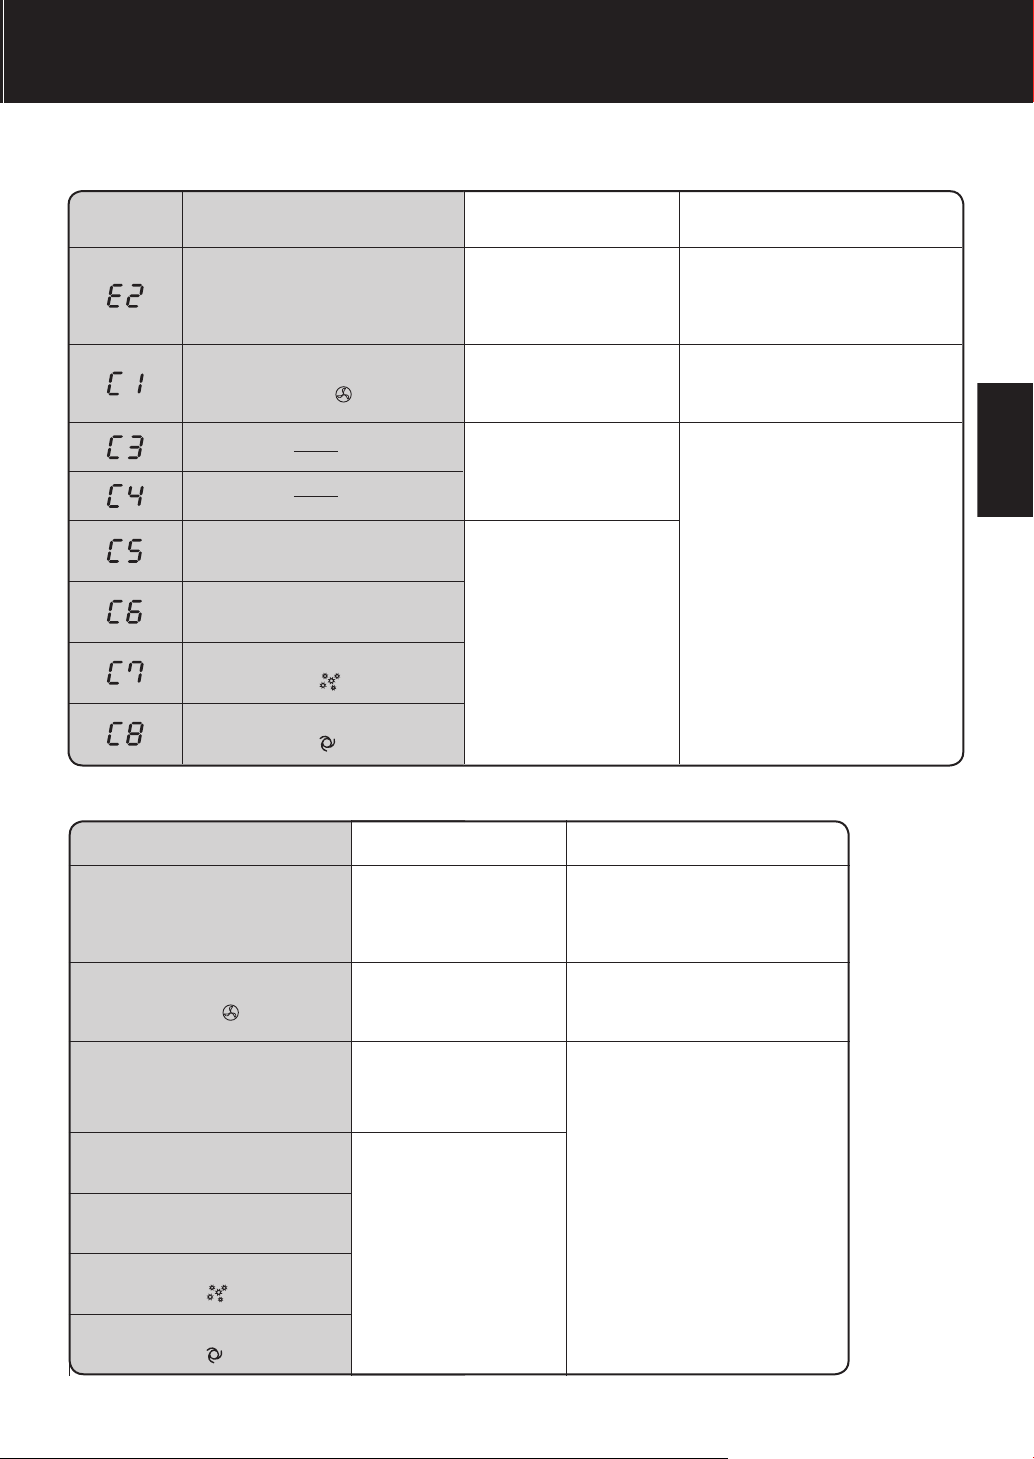
ERROR DISPLAY
KC-850E•KC-860E
If error occurs again, contact the Sharp Service Centre.
DIGITAL
INDICATION
LAMP INDICATION ERROR DETAILS REMEDY
Flashing of the Clean Air &
Humidify Indicator Light.
Flashing of the Fan Speed
Indicator Light '
Flashing of the Clean Ion
Shower Indicator Light.
Flashing of the Clean Air Indicator Light.
Flashing of the Fan Speed Indicator Light ' '.
Flashing of the Fan Speed Indicator Light ' '.
'.
Abnormal humidity fi lter Verify if the Humidifying Filter,
Abnormal fan motor
Abnormal temperaturehumidity sensor
Problem in circuit board
Humidifying Tray and Water
Tank are properly installed and
then turn power ON again.
Turn power OFF to cancel the
error display, wait one minute,
and then turn power ON.
Unplug the unit, wait one
minute, and plug the unit in
again.
ENGLISH
KC-840E
LAMP INDICATION ERROR DETAILS REMEDY
Flashing of the Clean Air &
Humidify Indicator Light.
Flashing of the Fan Speed
Indicator Light '
Flashing of the Humidity Indicator Light ‘High’ or ‘Low’.
Flashing of the Clean Ion
Shower Indicator Light.
Flashing of the Clean Air Indicator Light.
Flashing of the Fan Speed Indicator Light '
Flashing of the Fan Speed Indicator Light '
'.
'.
'.
Abnormal humidity fi lter Verify if the Humidifying Filter,
Abnormal fan motor
Abnormal temperaturehumidity sensor
Problem in circuit board
Humidifying Tray and Water
Tank are properly installed and
then turn power ON again.
Turn power OFF to cancel the
error display, wait one minute,
and then turn power ON.
Unplug the unit, wait one
minute, and plug the unit in
again.
E-17
Page 20

SPECIFICATIONS
Model KC-860E KC-850E KC-840E
Power supply 220 ~ 240 V 50/60 Hz
56 19 5.5 (4.9) 41 11.6 3.8 (3.3) 26 9.5 3.7 (3.4)
396 240 84 306 168 60 210 132 48
/hour)
3
Fan Speed (m
Rated Power (W)
Fan Speed Adjustment MAX MED LOW MAX MED LOW MAX MED LOW
CLEAN AIR
51 39 17 47 35 15 45 34 15
56 21 8.8 (8.2) 40 13.5 6.8 (6.3) 21 11.5 6.1 (5.8)
50 39 25 47 35 22 42 34 20
396 240 120 288 168 84 186 132 54
/hour)
3
Noise Level (dBA)
Fan Speed (m
730 500 300 600 400 230 450 330 170
Rated Power (W)
Noise Level (dBA)
Humidifi cation (mL/hour)*2
CLEAN AIR
& HUMIDIFY
Dust/odour/Temperature & Humidity Dust/Temperature & Humidity
)*1 ~48 ~38 ~26
2
Dust collection HEPA with Microbial control *3
Deodorization Washable Deodorizing
Water Tank Capacity (L) 4.3 4.0 3.0
Sensors
Filter type
Cord Lenght (m) 2.0
Dimensions (mm) 398 (W) × 288 (D) × 627 (H) 378 (W) × 265 (D) × 586 (H) 360 (W) × 233 (D) × 550 (H)
Recommended Room Size (m
Weight (kg) 11.0 9.0 8.0
The class of the HEPA fi lter by EN1822 is H10.
*1 • The Recommended Room Size is appropriate for operating the unit of maximum fan speed.
• The Recommended Room Size area indicates the space where a certain amount of dust particles can be removed in 30 minutes.
*2 • Humidifi cation Amount changes in accordance with indoor and outdoor temperature and humidity.
*3 •
Humidifi cation Amount increases as temperatures rise or humidity decreases.
Humidifi cation Amount decreases as temperatures decrease or humidity rises.
• Measurement Condition: 20 ºC, 30 % humidity (JEM1426)
Standby Power
In order to operate the electrical circuits while the power plug is inserted in the wall outlet, this
product consumes about 0.7 W of standby power.
For energy conservation, unplug the power cord when the unit is not in use.
E-18
Page 21

Attention: Your product is
marked with this symbol. It
means that used electrical
and electronic products
should not be mixed with
general household waste.
There is a separate
collection system for these
products.
A. Information on Disposal for Users (private households)
1. In the European Union
Attention: If you want to dispose of this equipment, please do not use the ordinary dust
bin!
Used electrical and electronic equipment must be treated separately and in
accordance with legislation that requires proper treatment, recovery and recycling of
used electrical and electronic equipment.
Following the implementation by member states, private households within the EU
states may return their used electrical and electronic equipment to designated
collection facilities free of charge*. In some countries* your local retailer may also
take back your old product free of charge if you purchase a similar new one.
*) Please contact your local authority for further details.
If your used electrical or electronic equipment has batteries or accumulators, please
dispose of these separately beforehand according to local requirements.
By disposing of this product correctly you will help ensure that the waste undergoes
the necessary treatment, recovery and recycling and thus prevent potential negative
effects on the environment and human health which could otherwise arise due to
inappropriate waste handling.
2. In other Countries outside the EU
If you wish to discard this product, please contact your local authorities and ask for the
correct method of disposal.
ENGLISH
For Switzerland: Used electrical or electronic equipment can be returned free of
charge to the dealer, even if you don’t purchase a new product. Further collection
facilities are listed on the homepage of
B
. Information on Disposal for Business Users.
www.swico.ch or www.sens.ch.
1. In the European Union
If the product is used for business purposes and you want to discard it:
Please contact your SHARP dealer who will inform you about the take-back of the
product. You might be charged for the costs arising from take-back and recycling.
Small products (and small amounts) might be taken back by your local collection
facilities.
For Spain: Please contact the established collection system or your local authority for
take-back of your used products.
2. In other Countries outside the EU
If you wish to discard of this product, please contact your local authorities and ask for
the correct method of disposal.
E-19
EN
Page 22

Memo
Page 23

Page 24
Pročtěte si tuto příručku před zahájením obsluhy své nové čističky vzduchu
Čistička vzduchu nasává vzduch z místnosti z přívodu vzduchu, nechá vzduch projít přes předfi ltr (umývatelný dezodorizační fi ltr a HEPA fi ltr vevnitř přístroje), a pak
vypustí vzduch přes odvod vzduchu. HEPA filtr dokáže odstranit 99,97 % prachových částic velkosti 0,3 mikronů, které procházejí přes fi ltr a taky pomáhá absorbovat
pachy. Umývatelný dezodorizační fi ltr postupně absorbuje pachy během jejich prochá-
zení fi ltrem.
Některé pachy absorbované fi ltry se můžou časem rozložit a způsobit další pachy.
V závislosti na prostředí, ve kterém se přístroj používá, především, když se výrobek
používá v extrémních prostředích (podstatně horších než je běžné používání v domácnosti), tyto pachy můžou být v krátkém čase intenzivnější než se očekává. Jestli pachy
přetrvávají, měli byste vyměnit fi ltry.
POZNÁMKA
• Čistička vzduchu je navržena tak, aby odstraňovala prach a pachy rozptýlené ve vzduchu, ale ne
škodlivé plyny (například oxid uhelnatý obsažený v cigaretovém kouři). Nachází-li se v místnosti
stále zdroj zápachu, čistička vzduchu nemůže pach odstranit úplně.
HEPA fi ltr
Umývatelný dezodorizační fi ltr
Předfi ltr
(Obvykle je na ilustracích zařízení „KC-850E“.)
Page 25
ČESKY
FUNKCE
Unikátní kombinace technologií úpravy
vzduchu
Trojitý fi ltrační systém + Plasmacluster
+ Zvlhčení
ZACHYTÁVÁ PRACH*
Umývatelný předfi ltr zachytává prach a jiné
velké částice ve vzduchu.
POTLAČUJE PACHY
Umývatelný dezodorizační filtr absorbuje
mnoho běžných pachů v domácnosti.
ZMENŠUJE MNOŽSTVÍ PYLU A PLÍSNÍ*
HEPA fi ltr zachytává 99,97 % částic s vel-
kostí 0,3 mikronů.
OSVĚŽUJE
Plasmacluster upravuje vzduch podobně
jako se v přírodě čistí životní prostředí emitováním rovnováhy pozitivních a negativních ionů.
ZVLHČUJE
Pracuje až 10 hodin na jedno naplnění.**
*
Když je vzduch nasáván fi ltračním systémem.
**Velkost pokoje:
max. 48 m2 (KC-860E)
max. 38 m
max. 26 m
Technologie senzorů neustále monitoruje
kvalitu vzduchu a automaticky upravuje
provoz na základě zjištěné čistoty a vlhkosti vzduchu.
2
(KC-850E)
2
(KC-840E)
OBSAH
DŮLEŽITÉ BEZPEČNOSTNÍ POKYNY
• VÝSTRAHA .............................................
•
UPOZORNĚNÍ VZTAHUJÍCÍ SE K PROVOZU
• POKYNY K INSTALACI ..........................
• SMĚRNICE TÝKAJÍCÍ SE FILTRU ........
NÁZVY ČÁSTÍ
• ILUSTRAČNÍ DIAGRAM .........................
• ZADNÍ ČÁST ...........................................
• PŘEDNÍ MONITOR .................................
PŘÍPRAVA NA POUŽITÍ
• INSTALACE FILTRU ...............................
• DOPLNĚNÍ VODNÍ NÁDRŽE ..................
PROVOZ
• DISPLEJ HLAVNÍ JEDNOTKY ................
•
REŽIM ČISTÉHO VZDUCHU A ZVLHČENÍ
• REŽIM ČISTÉHO VZDUCHU ..................
• REŽIM ČISTÉ IONOVÉ SPRCHY ...........
•
TLAČÍTKO RYCHLOSTI VENTILÁTORU
• TLAČÍTKO ZAP./VYP. Plasmacluster ...
• TLAČÍTKO OVLÁDÁNÍ KONTROLEK ...
• KONTROLKA INDIKÁTORU
DODÁVÁNÍ VODY ................................
• NASTAVENÍ CITLIVOSTI DETEKCE
SENZORU .............................................
PÉČE A ÚDRŽBA
• KONTROLKA INDIKÁTORU FILTRU ...
• ZADNÍ PANEL A SENZORY .................
• JEDNOTKA ..........................................
• VODNÍ NÁDRŽ ......................................
• PÉČE O UMÝVATELNÝ
DEZODORIZAČNÍ FILTR ......................
• ZVLHČOVACÍ MISKA ...........................
• ZVLHČOVACÍ FILTR ............................
•
POKYNY K VÝMĚNĚ FILTRU
ŘEŠENÍ PROBLÉMŮ
TECHNICKÉ ÚDAJE
.........................................
........................
...................................................
.................................
.................
...........................
............................
INFORMACE O SPRÁVNÉ LIKVIDACI
..
...
...
...
CZ-10
CZ-10
CZ-10
CZ-10
CZ-11
CZ-11
CZ-11
CZ-11
CZ-12
CZ-12
CZ-13
CZ-14
CZ-15
CZ-16
CZ-18
...
CZ-19
CZ-2
CZ-2
CZ-3
CZ-3
CZ-3
CZ-4
CZ-4
CZ-4
CZ-5
CZ-6
CZ-6
CZ-7
CZ-8
CZ-8
CZ-8
CZ-9
CZ-9
CZ-9
ČESKY
Děkujeme vám za zakoupení této čističky
vzduchu od společnosti SHARP. Přečtěte si,
prosím, pozorně tento návod k obsluze dřív,
než budete používat čističku vzduchu.
Po přečtení tento návod uschovejte na
dostupném místě, abyste do něj mohli
nahlédnout i v budoucnosti.
CZ-1
Page 26

DŮLEŽITÉ BEZPEČNOSTNÍ POKYNY
Při používaní elektrických zařízení byste měli dodržovat základní bezpečnostní opatření, mimo jiné:
VÝSTRAHA
• Před použitím přístroje si přečtěte všechny pokyny.
• Používejte jen zásuvku s napětím 220 – 240 voltů.
• Přístroj nepoužívejte, jsou-li napájecí kabel nebo zástrčka poškozené, nebo je-li připojení k
elektrické zásuvce uvolněné.
• Ze zástrčky odstraňujte pravidelně prach.
• Do přívodu ani vývodu vzduchu ventilace nedávejte prsty ani jiné cizí předměty.
• Při vytahování zástrčky vždy uchopte zástrčku a nikdy netahejte za kabel.
Mohlo by to způsobit elektrický výboj a/nebo požár vlivem zkratu.
• Nevytahujte zástrčku mokrýma rukama.
• Nepoužívejte přístroj v blízkosti plynových zařízení ani ohnišť.
• Při doplňování vodní nádrže, čištění přístroje, nebo když přístroj nepoužíváte, nezapomeňte ho
odpojit z elektrické zásuvky. Jinak může dojít k elektrickému výboji a/nebo požáru vlivem zkratu
• Je-li napájecí kabel poškozen, může ho vyměnit pouze výrobce, jeho servisní technik, autorizované servisní středisko společnosti Sharp nebo kvalifi kovaná osoba, aby se zabránilo
nebezpečí.
• Přístroj nepoužívejte, když používáte aerosolové insekticidy, ani v místnostech, kde jsou ve vzduchu zbytky oleje, kadidla, jiskry od zapálených cigaret, chemické výpary, ani na místech, ve kterých
se může př
• Při čištění přístroje si dávejte pozor. Silné korosivní čistící prostředky můžou poškodit zevnějšek
přístroje.
• Servis této čističky vzduchu může vykonávat jen autorizované servisní středisko společnosti Sharp.
Při výskytu problémů, potřebě nastavení nebo opravy kontaktujte nejbližší servisní středisko.
• Při přenášení přístroje odstraňte nejdříve vodní nádrž a zvlhčovací misku a držte přístroj pomocí
držadel nacházejících se na obou stranách.
• Nepijte vodu ze zvlhčovací misky nebo vodní nádrže.
• Vyměňte každý den vodu ve vodní nádrži čerstvou vodou z vodovodního kohoutku a pravidelně
čistěte vodní nádrž a zvlhčovací misku. (Viz CZ-12 a CZ-13). Když přístroj nepoužíváte, vylijte
vodu z vodní nádrže a zvlhčovací misky. Necháte-li ve vodní nádrži a/nebo zvlhčovací misce vodu,
může to způsobit plesnivění, množení bakterií a zápachy.
V ojedinělých případech můžou tyto bakterie nepř
• Tento přístroj není určen k používání osobami (včetně dětí) se sníženými fyzickými, smyslovými nebo
mentálními schopnostmi, nebo nedostatkem zkušeností a znalostí, pokud na ně nedohlíží osoba
zodpovědná za jejich bezpečnost, nebo pokud jim tato osoba nedala pokyny ohledně používání.
Na děti je potřeba dohlížet, aby se zaručilo, že si se zařízením nebudou hrát.
– pro snížení nebezpečí zkratu, požáru, nebo poranění:
ístroj namočit, jako například v koupelnách.
íznivě působit na zdraví.
POZNÁMKA
Pokud tato čistička vzduchu způsobí rušení příjmu radia nebo televize, pokuste se opravit rušení jedním nebo více následujícími opatřeními:
• Přeorientujte nebo přemístěte příjmovou anténu.
• Zvyšte vzdálenost mezi přístrojem a radiovým/televizním přijímačem.
• Připojte zařízení do zásuvky v jiném okruhu než je ten, do kterého je zapojený přijímač.
• Vyhledejte pomoc u prodejce nebo zkušeného radiového/televizního technika.
– rušení rádia nebo televizoru
CZ-2
Page 27

UPOZORNĚNÍ VZTAHUJÍCÍ SE K PROVOZU
• Neblokujte vstupní a/nebo výstupní otvory ventilace.
• Nepoužívejte přístroj u ani na horkých předmětech, jako jsou například sporáky nebo ohřívače, ani
tam, kde můžou přijít do kontaktu s párou.
• Přístroj obsluhujte vždy ve svislé poloze.
• Při přesouvání přístroje ho držte pomocí držadel nacházejících se na obou stranách.
Když je přístroj v provozu, nepřesouvejte jej.
• Nespouštějte přístroj bez správné instalace fi ltrů, vodní nádrže a zvlhčovací misky.
• Neumývejte ani opětovně nepoužívejte HEPA fi ltr.
Nejenom, že tím nezlepšíte výkon fi ltru, ale můžete tak způsobit úraz elektrickým proudem nebo
poruchu.
• Zevnějšek čistěte jen jemným hadříkem.
Nepoužívejte prchavé látky ani čistící prostředky.
Mohli byste jimi poškodit povrch přístroje nebo by mohl prasknout.
Taky by vlivem toho nemusely senzory pracovat správně.
• To, jak často je třeba vykonávat údržbu (odstraňování vodního kamene), závisí na tvrdos-
ti vody a množství nečistot v používané vodě; čím je voda tvrdší, tím častěji musíte vodní
kámen odstraňovat.
• Udržujte přístroj z dosahu vody.
POKYNY K INSTALACI
• Přístroj umístěte nejmíň 2 m od zařízení využívající elektrické vlny, jako jsou například televizory nebo rádia, abyste při používaní přístroje zabránili elektrickému rušení.
• Vyhněte se místem, kde bude senzor vystaven přímému větru.
Přístroj nemusí fungovat správně.
• Vyhněte se používání na místech, kde se může přístroj dostat do kontaktu s nábytkem, látkami, nebo jinými předměty, které by mohly zabránit vstupu/výstupu vzduchu ventilace.
• Přístroj nepoužívejte na místech, kde bude vystaven kondenzaci nebo velkým teplotním
změnám. Vhodná teplota místnosti je mezi 5 – 35 °C.
• Umístěte na stabilní povrch s dostatečnou cirkulací vzduchu.
Když přístroj umístíte na oblast s hrubou kobercovou plochou, může mírně vibrovat.
Přístroj umístěte na rovný povrch, abyste zabránili unikání vody z vodní nádrže a/nebo zvlhčovací
misky.
• Přístroj nepoužívejte na místech, kde se tvoří mastnota nebo olejový kouř.
Mohl by vlivem toho prasknout povrch, nebo by senzor nemusel pracovat správně.
• Přístroj umístěte asi 30 cm – 60 cm (1 – 2 ft) od zdi, abyste zajistili správné proudění vzduchu.
Časem se může zeď nacházející se přímo za výfukem ventilace zašpinit. Používáte-li tento přístroj
delší dobu na stejném místě, pravidelně čistěte zeď a chraňte zeď vinylovou pokrývkou nebo ně-
čím podobným, aby se nezašpinila.
ČESKY
SMĚRNICE TÝKAJÍCÍ SE FILTRU
•
Postupujte podle pokynů v tomto návodu, abyste se správně starali o fi ltry a abyste je dobře udržovali.
CZ-3
Page 28
NÁZVY ČÁSTÍ
ILUSTRAČNÍ DIAGRAM – PŘEDNÍ ČÁST
Odvod
vzduchu
Displej hlavní
jednotky
Přední
monitor
Hlavní
jednotka
KC-860E
ZADNÍ ČÁST
Držadlo (2 umístění vlevo a vpravo)
Senzory
• Prachový senzor
•
Senzor teploty / vlhkosti
•
Pachový senzor (KC860E•KC850E)
Držadlo nádrže
KC-850E
Odvod vzduchu
Displej hlavní
jednotky
Přední
monitor
Hlavní
jednotka
KC-840E
Odvod vzduchu
HEPA fi ltr (bílý)
Umývatelný dezodorizační fi ltr (černý)
Ouška
Vodní nádrž
(na zvlhčení)
Zvlhčovací fi ltr
Rám fi ltru
Víko nádrže
Plovák
Zvlhčovací miska
Napájecí kabel
Zástrčka
(Tvar zástrčky závisí na zemi.)
CZ-4
Přívod vzduchu
Štítek s datem
(Jmenovitý štítek)
Zadní panel (předfi ltr)
Page 29
PŘEDNÍ MONITOR
Označuje čistotu a vlhkost vzduchu v místnosti.
KC-850E KC-860E
Označuje množství pachů, prachu a vlhkosti v místnosti.
MONITOR PRACHU
Prachový senzor neustále monitoruje
vzduch a v závislosti na čistotě vzduchu
mění barvu. Přístroj KC-860E má 5 úrovní detektoru prachu.
Výklad senzoru
Žlutá
Žlutá
Velmi špinavé
Blikání
Všechno
červené
Velmi špinavé
Blikání
Všechno
červené
Čisté
Všechno
zelené
Čisté
Všechno
zelené
Zelená
Blikání
Zelená
Blikání
Zachytí-li prachový senzor prach, bude
se v závislosti na zaprášení pohybovat
blikající kontrolka.
Kontrolka indikátoru Plasmacluster (modrá)
Modrá: Plasmacluster ZAP.
Vypnutá kontrolka: Plasmacluster VYP.
MONITOR PACHŮ
Pachový senzor neustále monitoruje vzduch a v závislosti na intenzitě
pachu mění barvu.
Pach v místnosti
Slabé
Zelená Žlutá Červená
Prach a pachy se zjišťují různými senzory. Barvy se nemusí měnit současně.
Silné
Kontrolka indikátoru dodávání
vody (červená)
Tato kontrolka se rozsvítí, je-li potřeba
doplnit vodní nádrž.
Kontrolka indikátoru vlhkosti (zelená)
Zobrazuje přibližnou úroveň vlhkosti v
místnosti. Nastavení vlhkosti se nedá
upravit.
(Př.) při 60 % vlhkosti
80 % nebo víc
Méně než 30 %
ČESKY
KC-840E
MONITOR PRACHU
Pachový senzor neustále monitoruje vzduch a v závislosti na čistotě
vzduchu mění barvu.
Výklad senzoru
Žlutá
Žlutá
Velmi špinavé
Blikání
Všechno
červené
Velmi špinavé
Blikání
Všechno
červené
Čisté
Všechno
zelené
Čisté
Všechno
Zelená
Blikání
Zelená
Blikání
Zachytí-li prachový senzor prach, bude
se v závislosti na zaprášení pohybovat
blikající kontrolka.
Kontrolka indikátoru vlhkosti
(zelená)
Zobrazuje přibližnou úroveň vlhkosti v
místnosti. Nastavení vlhkosti se nedá
upravit.
Vysoká – 65 % nebo víc
Střední – mezi 40 % a 65 %
Nízká – 40 % nebo méně
Kontrolka indikátoru dodávání
vody (červená)
Tato kontrolka se rozsvítí, je-li potřeba
doplnit vodní nádrž.
Kontrolka indikátoru Plasmacluster
(modrá)
Modrá: Plasmacluster ZAP.
Vypnutá kontrolka: Plasmacluster VYP.
CZ-5
Page 30

Před instalací nebo úpravou fi ltrů
PŘÍPRAVA NA
POUŽITÍ
odpojte přístroj z elektrické sítě.
INSTALACE FILTRU
K udržení kvality fi ltrů jsou zabaleny v umělohmotných sáčcích a umístěny v přístroji.
Nezapomeňte vyndat fi ltry z umělohmotných sáčků a před prvním použitím dejte fi ltry
opět do přístroje.
1
1
Zadní panel
2
Vyndejte fi ltry
Odstraňte zadní panel.
Jemně zatlačte na ouška a pak
nakloňte a odstraňte zadní panel.
Ouška na vrchu
Vyberte umývatelný
dezodorizační filtr (černý) a HEPA filtr (bílý) z
umělohmotných sáčků.
2
1
2
Instalujte fi ltry
Instalujte HEPA fi ltr.
Ujistěte se, je-li HEPA fi ltr umístěn se správ-
nou orientací.
Instalováním filtru v opačném
směru ovlivníte výkon přístroje.
HEPA fi ltr
Ouško
Vložte 2 dolní ouška zadního panelu (levé
a pravé) do malých otvorů v přístroji a
zasuňte umývatelný dezodorizační filtr
mezi HEPA fi ltr a zadní panel.
Umývatelný dezodorizační fi ltr
Zadní panel
Dolní ouška
HEPA fi ltr
Umývatelný
dezodorizační
fi ltr
Jemně zatlačte na horní
3
ouška (levé a pravé), aby
zapadli na své místo.
Horní ouška
Vyplňte na štítku s datem
4
počáteční datum používání.
Počáteční datum používání
použijte jako pomůcku na zjiště-
ní, kdy byste měli vyměnit fi ltry.
Štítek s datem
CZ-6
Page 31

DOPLNĚNÍ VODNÍ NÁDRŽE
Přístroj se může používat v režimu čistého vzduchu
bez toho, abyste dali do vodní nádrže vodu. Chceteli použít režim čistého vzduchu a zvlhčení nebo režim
čisté ionové sprchy, musíte dát do vodní nádrže vodu.
Odstraňte vodní nádrž odjištěním vrchu.
1
Odstraňte víko vodní nádrže a opatrně
2
naplňte vodní nádrž vodou z vodovodního
kohoutku.
• Každý den vyměňte vodu ve vodní nádrži čistou vodou
z vodovodního kohoutku.
Po naplnění bezpečně utáhněte víko nádrže.
3
• Zkontrolujte, neuniká-li voda.
• Nezapomeňte otřít všechny zbytky vody na zevnějšku
vodní nádrže.
• Při přenášení vodní nádrže ji držte oběma rukama tak,
aby otvor vodní nádrže směřoval nahoru.
Držadlo nádrže
Vodní nádrž
Zvlhčovací
miska
Vodní nádrž
ČESKY
Víko nádrže
Utáhnout
Vložte zpět vodní nádrž do přístroje.
4
• Je-li vodní nádrž správně nainstalována, horní západ-
ka zaklapne na své místo.
UPOZORNĚNÍ
• Přístroj nevystavujte vlivu vody. Mohlo by to způsobit zkrat a/nebo elektrický výboj.
• Nepoužívejte horkou vodu (40 °C), chemické látky, aromatické látky, špinavou vodu ani jiné
poškozující látky, jinak by mohlo dojít k deformaci a/nebo závadě.
• Používejte jen čerstvou vodu z vodovodního kohoutku. Používáním jiných zdrojů vody byste
mohli pomoci množení plísní, hub a/nebo bakterií.
CZ-7
Page 32

PROVOZ
DISPLEJ HLAVNÍ JEDNOTKY
Tlačítko resetování fi ltru/
Kontrolka indikátoru (červená)
Tlačítko ovládání
kontrolek
Tlačítko rychlosti ventilátoru/
Kontrolka indikátoru (zelená)
Tlačítko zap./vyp. Plasmacluster
Kontrolka indikátoru (zelená)
Tlačítko Zap.
Stiskněte libovolné tlačítko pro
výběr režimu a spuštění přístroje.
Tlačítko režimu čistého vzduchu a zvlhčení/
Kontrolka indikátoru (zelená)
Tlačítko režimu čistého vzduchu/
Kontrolka indikátoru (zelená)
Tlačítko Vyp.
Tlačítko režimu čisté ionové sprchy/
Kontrolka indikátoru (modrá)
REŽIM ČISTÉHO VZDUCHU A ZVLHČENÍ
Režim čistého vzduchu a zvlhčení použijte na rychlé vyčištění vzduchu, potlačení pachů a na zvlhčení vzduchu.
Naplňte vodní nádrž. (Viz CZ-7)
1
Stiskněte tlačítko režimu čistého vzduchu a zvlhčení.
2
• Jestli jste neodpojili mezi používáním napájecí kabel, přístroj
se automaticky restartuje s nastavenými nastaveními z minula.
Stiskněte tlačítko rychlosti ventilátoru pro výběr
3
požadované rychlosti ventilátoru.
• Kontrolky indikátoru zobrazí aktuálně
vybranou rychlost ventilátoru.
Stiskněte tlačítko Vyp. na vypnutí přístroje.
O režimu automatického zvlhčení
Senzory teploty/vlhkosti automaticky zjišťují a upravují vlhkost podle změn teploty v místnosti. V závislosti na velkosti
a vlhkosti místnosti nesmí vlhkost přesáhnout 55 – 65 %. V
takových případech se doporučuje používat režim čištění
vzduchu a zvlhčení/max.
Teplota Vlhkost
~18 °C 65 %
18 °C~24 °C 60 %
24 °C~ 55 %
CZ-8
Page 33

REŽIM ČISTÉHO VZDUCHU
Režim čistého vzduchu použijte tehdy, nepotřebujete-li zvýšit vlhkost vzduchu.
Stiskněte na displeji tlačítko režimu čistého vzduchu.
1
• Jestli jste neodpojili mezi používáním napájecí kabel, přístroj se
automaticky restartuje s nastavenými nastaveními z minula.
Stiskněte tlačítko rychlosti ventilátoru pro výběr
2
požadované rychlosti ventilátoru.
• Kontrolky indikátoru zobrazí aktuálně
vybranou rychlost ventilátoru.
Stiskněte tlačítko Vyp. na vypnutí přístroje.
REŽIM ČISTÉ IONOVÉ SPRCHY
Režim čisté ionové sprchy se zvlhčením uvolňuje velmi husté iony Plasmacluster.
Neustálým uvolňováním silného proudu vzduchu po dobu 15 minut přístroj ze vzduchu efektivně odstraní prach, pyl, plíseň a alergeny, když projdou fi ltračním systémem. Zvolíte-li tento
režim, musí být ve vodní nádrži voda.
Je-li ve vodní nádrži voda, přístroj zvlhčí vzduch, a když ve vodní nádrži není voda, bude fungovat bez zvlhčování.
Pro vybrání tohoto režimu stiskněte na displeji
1
tlačítko režimu čisté ionové sprchy.
Když přístroj dokončí práci, vrátí se do předcházejícího
režimu.
Stiskněte tlačítko Vyp. na vypnutí přístroje.
Tlačítko rychlosti ventilátoru
Pamatujte si prosím, že se rychlost ventilátoru během režimu čisté ionové sprchy nedá nastavit.
AUTOM. provoz
Režim PYL
provoz
Rychlost ventilátoru se automaticky přepne (mezi nastavením VYSOKÁ a
NÍZKÁ) v závislosti na množství nečistot ve vzduchu. Senzory detekují nečistoty kvůli efektivnímu čištění vzduchu.
Přístroj bude pracovat 10 minut s vyšší
rychlostí a pak bude střídat střední a
vysokou rychlost.
10 minut: vys. rychl. ventilátoru
20 minut: střed. rychl. ventilátoru
20 minut: vys. rychl. ventilátoru
ČESKY
MAX. provoz
STŘED. provoz
NÍZKÝ provoz
Přístroj bude pracovat s maximální rychlostí ventilátoru.
Přístroj bude pracovat se středně velkou rychlostí ventilátoru.
Přístroj bude pracovat potichu pomocí minimálního přívodu vzduchu.
*VYSOKÁ rychlost ventilátoru je okamžitá rychlost mezi nastaveními STŘED. a MAX.
CZ-9
Page 34

PROVOZ
Tlačítko zap./vyp. Plasmacluster
Stiskněte tlačítko zap./vyp. Plasmacluster pro zapnutí a vypnutí režimu ionů
Plasmacluster.
Je-li režim Plasmacluster zapnutý, zapne se kontrolka indikátoru a kontrolka
Plasmacluster.
Tlačítko ovládání kontrolek
Použijte, je-li světlo na předním panelu příliš silné.
UPOZORNĚNÍ
Při spuštění jsou světla na předním monitoru vždy světlejší.
Podívejte se na diagram na pravé straně pro výběr
požadovaného jasu předního panelu.
The lights on the front panel are brighter.
「 」
「 」
「 」
Světla na předním panelu jsou světlejší.
The lights on the front panel are darker.
Světla na předním panelu jsou tmavší.
The lights on the front monitor turn off
Světla na předním monitoru jsou vypnuta.
KONTROLKA INDIKÁTORU DODÁVÁNÍ VODY
Je-li vodní nádrž prázdná, bude kontrolka indikátoru dodávání vody blikat
na znamení toho, že je třeba doplnit vodní nádrž. Pamatujte si prosím,
že během režimu čistého vzduchu a režimu čisté ionové sprchy
nebude kontrolka blikat ani když bude vodní nádrž prázdná.
Nastavení zvukového indikátoru pro dodávání vody.
Kromě kontrolky indikátoru se dá přístroj nastavit tak, aby prázdnou vodní nádrž signalizoval
i pomocí zřetelného pípnutí. Je-li přístroj vypnutý, stiskněte po dobu 3 sekund tlačítko ovládání
kontrolek, abyste zapnuli zvukový signál.
Zrušení
Pro zrušení zvukového signálu vypněte přístroj a stiskněte znovu po
dobu alespoň 3 sekund tlačítko ovládání kontrolek.
Blikání
Flashing
NASTAVENÍ CITLIVOSTI DETEKCE SENZORU
Je-li monitor prachu a monitor pachů neustále červený, nastavte nastavení na „nízká“, abyste
snížili citlivost, a je-li monitor prachu a monitor pachů neustále zelený, nastavte nastavení na „
vysoká“, abyste zvýšili citlivost.
Je-li přístroj vypnutý, stiskněte a na 3 sekundy podržte tlačítko rychlosti ventilátoru.
1
Kontrolky indikátoru rychlosti ventilátoru zobrazí aktuálně nastavenou úroveň citlivosti
senzoru. Továrenské nastavení je Standard (označeno kontrolkou STŘED).
Stiskněte tlačítko rychlosti ventilátoru pro nastavení požadované citlivosti senzoru.
2
Pro výběr požadované úrovně citlivosti senzoru si prohlédněte
diagram na pravé straně.
Stiskněte tlačítko Vyp.
3
Nezapomeňte, že když do 8 sekund od nastavování citlivosti senzoru nestisknete tlačítko Vyp., nastavení se automaticky uloží.
Nastavení citlivosti senzoru se uloží dokonce i když je přístroj
odpojen z elektrické sítě.
CZ-10
Kontrolka indikátoru rychlosti ventilátoru
Citlivost
detekce
senzoru
Vyšší
Standard
Nižší
Page 35

PÉČE A ÚDRŽBA
K udržení optimálního výkonu této čističky vzduchu musíte přístroj pravidelně čistit, včetně sen-
zoru a fi ltrů.
Při čištění přístroje ho nezapomeňte nejdřív odpojit z elektrické zásuvky a se zástrčkou nikdy
nemanipulujte mokrýma rukama. Jinak může dojít k elektrickému zkratu a/nebo poranění osoby.
KONTROLKA INDIKÁTORU FILTRU
Kontrolka indikátoru filtru bude svítit, abyste nezapomněli vykonat
údržbu zadního panelu, senzorů a zvlhčovacího fi ltru. Kontrolka indi-
kátoru se zapne přibližně po 720 hodinách používání.
Po vykonání údržby resetujte indikátor fi ltru. Zapojte přístroj, zapněte ho
a asi 3 sekundy podržte stisknuto tlačítko RESET. Kontrolka indikátoru
fi ltru zhasne. Dokonce i když je kontrolka indikátoru fi ltru už vypnuta,
musíte stisknout tlačítko RESET, abyste resetovali časovač údržby.
Údržbový
cyklus
Po 720 hodinách používá-
30 dní × 24 hodin = 720)
ní (
ZADNÍ PANEL A SENZORY
Údržbový
cyklus
Pomocí příslušenství k vysavači nebo podobného
nástroje jemně odstraňte prach z otvoru senzoru a zadního panelu.
Když je na zadním panelu těžce odstranitelná nečistota
Je-li na zadním panelu olejová nečistota, namočte zadní
panel do vody s kuchyňským čistícím prostředkem.
1
Při umývání se vyhněte drsnějšímu kartáčování zadního panelu.
Opakovaně opláchněte zadní panel čistou vodou, abys-
te odstranili zbytky roztoku.
2
Nechte fi ltr vysušit, aby se odstranila přebytečná voda.
Vždy, když se na přístroji nahromadí
prach, nebo každé 2 měsíce
Senzor
Zadní panel
Zadní panel
3
ČESKY
PÉČE O FILTR SENZORU
Odstraňte filtr senzoru a jemně s ním poklepte o dřez
nebo koš, abyste uvolnili prach. Je-li velmi špinavý, umyjte
ho jemně vlažnou vodou. Na čištění fi ltru nepoužívejte
žádné čistící prostředky ani chemikálie. Před vrácením
fi ltru do přístroje ho pořádně osušte. Nejsou-li všechny fi l-
try správně nainstalovány, přístroj nepoužívejte.
Filtr senzoru
JEDNOTKA
Údržbový cyklus
Abyste na přístroji zabránili výskytu špíny nebo skvrn, pravidelně jej čistěte. Necháte-li skvrny
tak, může být jejich odstranění v budoucnosti náročné.
Vytřete suchým jemným hadříkem
Při těžce odstranitelných skvrnách nebo špíně použijte jemný hadřík namočený v teplé vodě.
Nepoužívejte prchavé látky
Benzen, ředidlo, nebo leštící prášek můžou poškodit povrch.
Nepoužívejte čistící prostředky
Přísady čistících prostředků můžou poškodit přístroj.
Vždy, když se na přístroji nahromadí prach, nebo každé 2 měsíce
CZ-11
Page 36

PÉČE A ÚDRŽBA
VODNÍ NÁDRŽ
Údržbový cyklus
Opláchněte vnitřek nádrže, nechejte vevnitř trochu vlažné vody,
zavřete pevně víko nádrže a zatřepte nádrží. K čištění vnitř-
ku nádrže můžete použít jemné čistící prostředky, ale čistící
prostředek musíte zředit a nádrž musíte pořádně opláchnout,
abyste odstranili všechny zbytky čistícího prostředku.
(Vodní nádrž není vhodná do myčky nádobí.)
ÚDRŽBA VÍKA NÁDRŽE
Malé víko z víka nádrže je odebíratelné.
Jsou-li víko nádrže a malé víko špinavé a slizké, musíte je vyčistit.
Použijte vatový tampon nebo zubní kartáček.
Každý den, když zvlhčujete
údržbový cyklus... jednou za měsíc
Víko nádrže
Vodní nádrž
Zubní kartáček
Víko
nádrže
PÉČE O UMÝVATELNÝ DEZODORIZAČNÍ FILTR
UMÝVEJTE JEN V RUKÁCH!
NESUŠTE V SUŠIČKÁCH
NA ŠATY!
Údržbový
cyklus
Opláchněte vlažnou vodou umývatelný dezodori-
1
zační fi ltr.
Před umytím odstraňte z umývatelného dezodorizačního fi ltru prach.
Ucítíte-li z výstupu vzduchu nepříjemný
pach.
Sníží-li se výkon fi ltru a ve vzduchu zůstá-
vají pachy.
UPOZORNĚNÍ
• Při prvním umývání fi ltru můžou být splašky hnědé. To neovliv-
ní výkon při dezodorizaci.
• Filtr při umývání neohýbejte ani neskládejte.
Nechte fi ltr vysušit, aby se odstranila pře-
2
bytečná voda.
Pořádně fi ltr osušte na dobře větraném místě. Je-li
3
to možné, osušte jej venku.
Filtr sušte v šikmé poloze, abyste zabránili pokřivení fi ltru.
Vysušení fi ltru trvá asi 6 hodin.
UPOZORNĚNÍ
• Nesušte fi ltr venku, je-li tam nevlídné počasí (např. déšť nebo nízká
teplota).
Nenechte fi ltr zmrznout.
• Suší-li se fi ltr vevnitř, udělejte určitá opatření, například pod fi ltr položte
ručníky a pod., abyste vodou nepoškodili podlahu.
Vložte fi ltr zpátky do přístroje. (Viz CZ-6).
4
Před vložením fi ltru ho nechte úplně vysušit, abyste zabránili výskytu pachů.
Nejsou-li všechny fi ltry správně nainstalovány, přístroj nepoužívejte.
CZ-12
Page 37

ZVLHČOVACÍ MISKA
Údržbový cyklus
Vyberte vodní nádrž a zvlhčovací misku.
1
Nejdřív odjistěte vodní nádrž a pak vyberte misku. Při vytahování zvlhčovací misky
použijte obě ruce,
abyste zabránili vylití
vody.
Vyjměte ze zvlhčovací misky zvlhčovací
fi ltr. Odstraňte nahromaděnou vodu poma-
2
lým nakloněním zvlhčovací misky.
Zvlhčovací fi ltr
Opláchněte vlažnou vodou vnitřek zvlh-
3
čovací misky, abyste odstranili nečistoty.
• Nevybírejte polystyrénový plovák.
• Těžce dosažitelné
části vyčistěte špičatým vatovým tamponem nebo zubním
kartáčkem.
Vraťte zpátky do přístroje zvlhčovací fi ltr
4
a zvlhčovací misku.
Zvlhčovací fi ltr nebude paso-
vat, budete-li jej dávat opačně.
Při vkládání zvlhčovací misky
do přístroje se ujistěte, není-li
mezi zvlhčovací miskou a přístrojem mezera. Přístroj nemusí fungovat správně, neníli zvlhčovací miska v přístroji
uložena správně.
1 měsíc
To, jak často je třeba vykonávat údržbu, závisí na tvrdosti
vody. Při vyjímání nebo čištění misky zabraňte vylití vody.
Držadlo
nádrže
Vodní nádrž
Nedržte tuto část.
Zvlhčovací
miska
Plovák
Barva: šedá
Když je těžké odstranit zbytky vody
Naplňte do poloviny vlažnou
vodou zvlhčovací misku,
1
přidejte malé množství jemného kuchyňského čistícího
prostředku a nechte asi 30
minut odmočit.
Z
řeďte čistící prostředek podle
pokynů na nádobě.
Těžce dosažitelné části vyčistěte špičatým
vatovým
tamponem
nebo zubním
kartáčkem.
Opláchněte vlažnou vodou
2
zvlhčovací misku.
•
Oplachujte, dokud se neod-
straní všechny zbytky čistícího
prostředku.
•
Nedostatečné opláchnutí může
způsobit
zápach čistící-
ho prostředku
nebo změny
v tvaru/barvě
hlavní jednot-
ky.
UPOZORNĚNÍ
• K čištění zvlhčovací misky použí-
vejte jen jemné kuchyňské čistící
prostředky. Používáním neozna-
čených chemikálií, nebo čistících
prostředků můžete způsobit defor-
maci, ztrátu lesku, prasknutí (únik
vody).
ČESKY
Vypadne-li polystyrénový plovák,
dejte jej zpátky vložením oušek
plováku do otvorů ve zvlhčovací
misce tak, jak je to zobrazeno na
diagramu.
Vložte do otvoru
ouško plováku.
CZ-13
Vložte plovák
pod toto ouško.
Vložte do otvoru ouško
na druhé straně plováku.
Page 38

PÉČE A ÚDRŽBAPÉČE A ÚDRŽBA
ZVLHČOVACÍ FILTR
Údržbový cyklus
To, jak často je třeba vykonávat údržbu, závisí na tvrdosti vody a množství nečistot
vodě; čím je voda tvrdší, tím častěji musíte vodní kámen odstraňovat.
Při čištění fi ltru si dejte pozor, abyste nevylili vodu.
Vyndejte vodní nádrž a zvlhčovací
1
misku.
Jendou měsíčně nebo svítí-li kontrolka indikátoru fi ltru.
Opakovaně opláchněte vlažnou
5
vodou zvlhčovací filtr, abyste
odstranili všechny zbytky roztoku.
Zvlhčovací fi ltr
Zvlhčovací
miska
Vodní nádrž
Zvlhčovací
miska
Nedostatečné opláchnutí může způsobit
zápach a ovlivnit výkon a/nebo vzhled
přístroje.
Zvlhčovací fi ltr nedrhněte, jen jej opláchněte
*
jemně pod vlažnou vodou.
Připojte zvlhčovací filtr k zvlh-
Vyberte zvlhčovací fi ltr ze zvlhčo-
2
vací misky.
Dejte si pozor, abyste nevylili vodu ze zvlhčovací misky.
Příprava roztoku na odstraňování
3
vodního kamene.
K odstraňování vodního kamene se používá
kyselina citrónová (dostupná v některých drogeriích nebo lékárnách) nebo 100% citrónová
šťáva. Vyberte si, co budete používat a připravte roztok pro odstraňování vodního kamene.
<Při použití kyseliny citrónové>
Rozpusťte ve vhodné nádobě 3 čajové lžičky
kyseliny citrónové a 2 1/2 šálku vlažné vody a
dobře promíchejte.
<Při použití citrónové šťávy>
Pro odstraňování vodního kamene můžete
použít 100% citrónovou šťávu. Použijte jen
100% citrónovou šťávu bez dužiny (v případě
potřeby šťávu přeceďte). Dejte 1/4 šálku citrónové šťávy a 3 šálky vlažné vody do nádoby,
která je dostatečně velká na to, aby se do ní
vměstnal zvlhčovací fi ltr, a dobře promíchejte.
Před čištěním zvlhčovacího fi ltru jej
4
nechte 30 minut namočit v roztoku.
Používáte-li citrónovou
šťávu, doporučujeme
fi ltr namáčet déle než při
kyselině citrónové.
6
čovací misce a vyměňte zvlhčovací misku v přístroji.
•Zvlhčovací fi ltr nebude pasovat, budete-
li jej dávat opačně. Při vkládání zvlhčo-
vací misky do přístroje se ujistěte, neníli mezi zvlhčovací miskou a přístrojem
mezera. Přístroj nemusí fungovat
správně, není-li zvlhčovací miska v přístroji uložena správně.
•Nebudete-li přístroj delší dobu používat,
pořádně před výmě-
nou vysušte zvlhčovací fi ltr.
Zapojte přístroj do elektrické zásuv-
7
ky, zapněte jej a na resetování na
displeji stiskněte a podržte po dobu
3 sekund tlačítko resetování fi ltru.
Na povrchu zvlhčovacího fi ltru se můžou
formovat červeno-hnědé nebo bílé nánosy. Tyto nečistoty (vodní kámen a pod.)
vznikají vlivem nečistot obsažených ve
vodě z vodovodního kohoutku; toto není
vada. Je-li zvlhčovací fi ltr úplně pokryt
bílými nánosy,
vyměňte jej.
v používané
CZ-14
Page 39

POKYNY K VÝMĚNĚ FILTRU
Životnost fi ltru se liší v závislosti na prostředí v místnosti, používání a umístění přístroje. Pře-
trvávají-li prach nebo pachy, měli byste vyměnit fi ltry.
(Viz část „Pročtěte si tuto příručku před zahájením obsluhy své nové čističky vzduchu“)
Pomůcka pro načasování výměny fi ltru
HEPA fi ltr
Životnost fi ltru se může vlivem prostředí v místnosti velmi snížit. Cigaretový kouř, pach zvířat a jiné
částečky ve vzduchu můžou snížit životnost fi ltru. Filtry pravidelně kontrolujte a v případě potřeby je
vyměňte.
Do 5 let po otevření
Umývatelný dezodorizační fi ltr
Filtr můžete po umytí opakovaně používat (nebo jej můžete vyměnit).
Zvlhčovací fi ltr
Životnost fi ltru se může vlivem prostředí v místnosti velmi snížit. Zpozorujete-li následující příznaky,
vyměňte zvlhčovací fi ltr (i když ještě neuplynuli 2 roky):
• Nánosy minerálů (bílé, černé, nebo červené), které se po čištění neodstraní, nebo je-li zvlhčovací
fi ltr stále špinavý.
• Filtr je velmi poškozen nebo zdeformován.
Do 2 let po otevření
Náhradní fi ltry
• HEPA fi ltr: 1 jednotka
Model FZ-C150HFE (pro KC-860E)
FZ-C100HFE (pro KC-850E)
FZ-C70HFE (pro KC-840E)
• Umývatelný dezodorizační fi ltr: 1 jednotka
Model FZ-C150DFE (pro KC-860E)
FZ-C100DFE (pro KC-850E)
FZ-C70DFE (pro KC-840E)
• Zvlhčovací fi ltr: 1 jednotka
Model FZ-C100MFE
(šedá)
Zvlhčovací fi ltr
ČESKY
Rám fi ltru (šedý)
Výměna fi ltrů
1. Filtry vyměňte podle pokynů dodaných s náhradními fi ltry.
2. Štítky s daty použijte jako pomůcku na zjištění, kdy byste měli vyměnit fi ltry.
Likvidace fi ltrů
Použité fi ltry zlikvidujte v souladu s místními zákony a nařízeními.
Materiály HEPA fi ltru:
• Filtr: polypropylén • Rám: polyester
Materiály umývatelného dezodorizačního fi ltru:
• polyester, umělé hedvábí, aktivní uhlí
Materiály zvlhčovacího fi ltru:
• umělé hedvábí, polyester
CZ-15
(bílá)
Rám fi ltru (bílý)
Page 40

ŘEŠENÍ PROBLÉMŮ
Před zavoláním na servis si prosím projděte níže uvedenou tabulku Řešení problémů, jelikož problémem nemusí být porucha přístroje.
SYMPTOM NÁPRAVA (není závada)
Pachy a kouř se neodstraňují.
Přední monitor svítí zeleně,
dokonce i když je vzduch
špinavý.
Přední monitor svítí oranžově
nebo červeně, dokonce i když
je vzduch čistý.
Z přístroje je slyšet klepání
nebo tikot.
Vypouštěný vzduch zapáchá.
Přístroj nefunguje, je-li ve
vzduchu cigaretový kouř.
Svítí kontrolka indikátoru fi ltru.
• Zdají-li se vám fi ltry velmi špinavé, vyčistěte je, nebo je vyměň-
te. (Viz CZ-11, CZ-12, CZ-14)
• Vzduch může být špinavý v čase, když byl přístroj připojen.
Odpojte přístroj, počkejte jednu minutu a pak přístroj opět
zapojte.
• Jsou-li otvory prachového senzoru špinavé nebo ucpané,
může se tím ovlivnit činnost senzoru. Jemně očistěte prachové
senzory (Viz CZ-11).
• Když přístroj generuje iony, může být z něj slyšet klepání nebo
tikot.
• Zkontrolujte, nejsou-li fi ltry silně znečištěny.
• Vyčistěte nebo vyměňte fi ltry.
• Čističky vzduchu Plasmacluster emitují stopové množství ozo-
nu, který může způsobovat zápach.
• Je přístroj instalován na místě, kde je pro senzor těžké detekovat cigaretový kouř?
• Jsou otvory prachového senzoru zablokované nebo ucpané?
(V takovém případe vyčistěte otvory.) (Viz CZ-11)
• Po výměně fi ltrů připojte napájecí kabel k zásuvce a stiskněte
tlačítko resetování fi ltru. (Viz CZ-11)
Přední monitor je vypnutý.
Kontrolka indikátoru dodávání
vody nesvítí, je-li nádrž
prázdná.
Hladina vody v nádrži se
nesnižuje, nebo se snižuje
pomalu.
Kontrolky na předním monitoru
často mění barvu.
• Zkontrolujte, je-li nastaven režim vypnutí kontrolek. Je-li to tak,
stiskněte tlačítko ovládání kontrolek k aktivaci kontrolek indikátoru. (Viz CZ-10)
• Zkontrolujte polystyrénový plovák, není-li špinavý. Vyčistěte
zvlhčovací misku. Ujistěte se, nachází-li se přístroj na rovném
povrchu.
• Zkontrolujte, jsou-li zvlhčovací miska a vodní nádrž správně
nainstalovány. Zkontrolujte zvlhčovací fi ltr.
• Je-li filtr silně zanesen, vyčistěte jej, nebo jej vyměňte
(Viz CZ-14 a CZ-15).
• Kontrolky předního monitoru automaticky mění barvy tak, jak
se pomocí prachového senzoru a senzoru pachů detekují
nečistoty.
CZ-16
Page 41

ZOBRAZENÍ CHYB
KC-850E•KC-860E
Vyskytne-li se chyba znovu, kontaktujte servisní středisko Sharp.
DIGITÁLNÍ
OZNAČENÍ
OZNAČENÍ KONTROLKAMI
Blikání kontrolky čistého vzduchu a kontrolky indikátoru vlhkosti.
Blikání kontrolky indikátoru
rychlosti ventilátoru „
Blikání kontrolky indikátoru
čisté ionové sprchy.
Blikání kontrolky č istého
vzduchu.
Blikání kontrolky indikátoru
rychlosti ventilátoru „ “.
Blikání kontrolky indikátoru
rychlosti ventilátoru „ “.
“.
DETAILY O CHYBĚ NÁPRAVA
Porucha zvlhčovacího
fi ltru
Porucha motoru ventilátoru
Porucha senzoru teploty a vlhkosti
Problém na obvodové
desce
Zkontrolujte, jsou-li zvlhčovací
filtr, zvlhčovací miska a vodní
nádrž správně nainstalovány, a
pak opět zapněte napájení.
Vypněte přístroj pro zrušení
zobrazení chyb, počkejte jednu
minutu, a pak jej znovu zapněte.
Odpojte přístroj, počkejte jednu
minutu, a pak jej znovu zapojte.
ČESKY
KC-840E
OZNAČENÍ KONTROLKAMI
Blikání kontrolky č istého
vzduchu a kontrolky indikátoru vlhkosti.
Blikání kontrolky indikátoru
rychlosti ventilátoru „
Blikání kontrolky indikátoru
vlhkosti „Vysoká“ nebo „Nízká“.
Blikání kontrolky indikátoru
čisté ionové sprchy.
Blikání kontrolky č istého
vzduchu.
Blikání kontrolky indikátoru
rychlosti ventilátoru „
Blikání kontrolky indikátoru
rychlosti ventilátoru „ “.
“.
“.
DETAILY O CHYBĚ NÁPRAVA
Porucha zvlhčovacího
fi ltru
Porucha motoru ventilátoru
Porucha senzoru teploty a vlhkosti
Problém na obvodové
desce
Zkontrolujte, jsou-li zvlhčovací
filtr, zvlhčovací miska a vodní
nádrž správně nainstalovány, a
pak opět zapněte napájení.
Vypněte přístroj pro zrušení
zobrazení chyb, počkejte jednu
minutu, a pak jej znovu zapně-
te.
Odpojte přístroj, počkejte jednu
minutu, a pak jej znovu zapojte.
CZ-17
Page 42
TECHNICKÉ ÚDAJE
Model KC-860E KC-850E KC-840E
Napájení 220 ~ 240 V 50/60 Hz
56 19 5,5 (4,9) 41 11,6 3,8 (3,3) 26 9,5 3,7 (3,4)
51 39 17 47 35 15 45 34 15
396 240 84 306 168 60 210 132 48
/hodinu)
3
Rychlost ventilátoru (m
Jmenovitý výkon (W)
Č ISTÝ
Nastavení rychlosti ventilátoru MAX STŘED. NIŽŠÍ MAX STŘED. NIŽŠÍ MAX STŘED. NIŽŠÍ
VZDUCH
56 21 8,8 (8,2) 40 13,5 6,8 (6,3) 21 11,5 6,1 (5,8)
396 240 120 288 168 84 186 132 54
/hodinu)
3
Rychlost ventilátoru (m
Úroveň hluku (dBA)
ČISTÝ
Prach/pach/teplota a vlhkost Pach/teplota a vlhkost
50 39 25 47 35 22 42 34 20
730 500 300 600 400 230 450 330 170
)*1 ~48 ~38 ~26
2
Jmenovitý výkon (W)
Úroveň hluku (dBA)
Zvlhčení (ml/hodinu)*2
Kapacita vodní nádrže (l) 4,3 4,0 3,0
VZDUCH A
ZVLHČENÍ
Senzory
Doporučovaná velkost místnosti (m
Sběr prachu HEPA s mikrobiální kontrolou *3
Dezodorizace Umývatelná dezodorizace
Typ fi ltru
Délka kabelu (m) 2,0
Rozměry (mm) 398 (Š) × 288 (H) × 627 (V) 378 (Š) × 265 (H) × 586 (V) 360 (Š) × 233 (H) × 550 (V)
Hmotnost (kg) 11,0 9,0 8,0
*1 • Doporučovaná velikost místnosti je vhodná k provozu přístroje s maximální rychlostí ventilátoru.
• Doporučovaná velikost místnosti označuje prostor, ve kterém se může do 30 minut odstranit určité množství prachových částic.
*2 • Účinnost zvlhčování se mění podle vnitřní a vnější teploty a vlhkosti.
Účinnost zvlhčování se zvyšuje se zvyšováním teploty nebo snižováním vlhkosti.
Účinnost zvlhčování se snižuje se snižováním teploty nebo zvyšováním vlhkosti.
Třída HEPA fi ltru podle EN1822 je H10.
*3 •
• Podmínky měření: 20 °C, 30 % vlhkost (JEM1426)
Aby mohli být během toho, když je napájecí kabel zapojen do elektrické zásuvky, obsluhovány
elektrické obvody, spotřebuje tento výrobek asi 0,7 W energie v pohotovostním režimu.
Nepoužíváte-li přístroj, odpojte pro šetření energie napájecí kabel.
Spotřeba energie v pohotovostním režimu
CZ-18
Page 43

Pozor: Výrobek
je označen tímto
symbolem.
Ten znamená,
že elektrická a
elektronická zařízení
nepatří do běžného
domovního odpadu.
Tyto výrobky
odevzdávejte do
samostatných
sběrných systémů.
A. Informace o likvidaci pro uživatele (domácnosti)
1. V zemích Evropské unie
Pozor: Toto zařízení nelikvidujte v běžných odpadkových koších!
Použité elektrické a elektronické vybavení je třeba likvidovat samostatně a v souladu s
legislativou, která vyžaduje řádnou likvidaci, obnovení a recyklaci použitého elektrického a
elektronického vybavení.
Na základě dohody členských států mohou domácnosti v zemích Evropské unie vracet použité
elektrické a elektronické vybavení v určených sběrnách zdarma*. V některých zemích* od vás
může místní prodejce odebrat zdarma použitý výrobek, pokud zakoupíte nový podobný.
*) Další podrobnosti vám sdělí orgány místní správy.
Pokud použité elektrické nebo elektronické vybavení obsahuje baterie nebo akumulátory,
zlikvidujte je předem samostatně v souladu s místními vyhláškami.
Řádnou likvidací tohoto výrobku pomáháte zajistit, že bude odpad vhodným způsobem
zlikvidován, obnoven a recyklován a zabráníte tak možnému poškození životního prostředí a
zdraví obyvatel, ke kterému by mohlo dojít v případě nesprávné likvidace.
2. V ostatních zemích mimo Evropskou unii
Chcete-li tento výrobek zlikvidovat, obraťte se na místní správní orgány, které vás seznámí s
vhodnou metodou likvidace.
B. Informace o likvidaci pro podnikatelské subjekty
1. V zemích Evropské unie
Chcete-li zlikvidovat výrobek, který je používán pro podnikatelské účely:
Obraťte se na prodejce SHARP, který vás informuje o odebrání výrobku. Odebrání a recyklace
mohou být zpoplatněny. Malé výrobky (a malá množství) mohou odebírat místní sběrny
odpadu.
2. V ostatních zemích mimo Evropskou unii
Chcete-li tento výrobek zlikvidovat, obraťte se na místní správní orgány, které vás seznámí s
vhodnou metodou likvidace.
ČESKY
CZ-19
Page 44

Poznámky
Page 45

ČESKY
Page 46

Prečítajte si túto príručku pred začatím obsluhy svojej novej čističky vzduchu
Čistička vzduchu nasáva vzduch z miestnosti z prívodu vzduchu, nechá vzduch prejsť
cez predfi lter (umývateľný deodorizačný fi lter a HEPA fi lter vnútri prístroja), a potom
vypustí vzduch cez odvod vzduchu. HEPA fi lter dokáže odstrániť 99,97 % prachových
častíc veľkosti 0,3 mikrónov, ktoré prechádzajú cez fi lter a tiež pomáha absorbovať
pachy. Umývateľný deodorizačný fi lter postupne absorbuje pachy počas ich prechá-
dzaním fi ltrom.
Niektoré pachy absorbované fi ltrami sa môžu časom rozložiť a spôsobiť ďalšie pachy.
V závislosti od prostredia, v ktorom sa prístroj používa, najmä keď sa výrobok používa
v extrémnych prostrediach (podstatne horších ako je bežné používanie v domácnosti),
tieto pachy môžu byť v krátkom čase intenzívnejšie ako sa očakáva. Ak pachy pretrvávajú, mali by ste vymeniť fi ltre.
POZNÁMKA
• Čistička vzduchu je navrhnutá tak, aby odstraňovala prach a pachy rozptýlené vo vzduchu, ale nie
škodlivé plyny (napríklad oxid uhoľnatý obsiahnutý v cigaretovom dyme). Ak sa zdroj zápachu stále nachádza v miestnosti, čistička vzduchu nemôže pach odstrániť úplne.
HEPA fi lter
Umývateľný deodorizačný fi lter
Predfi lter
(Obvykle je na ilustráciách zariadenie „KC-850E“.)
Page 47
SLOVENSKY
FUNKCIE
Unikátna kombinácia technológií úpravy vzduchu
Trojitý fi ltračný systém + Plasmacluster
+ Zvlhčenie
ZACHYTÁVA PRACH*
Umývateľný predfilter zachytáva prach a
iné veľké častice vo vzduchu.
POTLÁČA PACHY
Umývateľný deodorizačný filter absorbuje
mnoho bežných pachov v domácnosti.
ZMENŠUJE MNOŽSTVO PEĽU A PLESNÍ*
HEPA filter zachytáva 99,97 % častíc s
veľkosťou 0,3 mikrónov.
OSVIEŽUJE
Plasmacluster upravuje vzduch podobne
ako sa v prírode čistí životné prostredie
emitovaním rovnováhy pozitívnych a negatívnych iónov.
ZVLHČUJE
Pracuje až 10 hodín na jedno naplnenie.**
*
Keď je vzduch nasávaný fi ltračným systémom.
**Veľkosť izby:
max. 48 m2 (KC-860E)
max. 38 m
max. 26 m
Technológia senzorov neustále monitoruje
kvalitu vzduchu a automaticky upravuje
prevádzku na základe zistenej čistoty a
vlhkosti vzduchu.
2
(KC-850E)
2
(KC-840E)
OBSAH
DÔLEŽITÉ BEZPEČNOSTNÉ POKYNY SK-2
• VÝSTRAHA .............................................
•
UPOZORNENIA TÝKAJÚCE SA PREVÁDZKY
• POKYNY K INŠTALÁCII .........................
• SMERNICE TÝKAJÚCE SA FILTRA .....
NÁZVY ČASTÍ
• ILUSTRAČNÝ DIAGRAM ........................
• ZADNÁ ČASŤ ..........................................
• PREDNÝ MONITOR ...............................
PRÍPRAVA NA POUŽITIE .........................
• INŠTALÁCIA FILTRA ..............................
• DOPLNENIE VODNEJ NÁDRŽE ............
PREVÁDZKA
• DISPLEJ HLAVNEJ JEDNOTKY ............
•
REŽIM ČISTÉHO VZDUCHU A ZVLHČENIA
• REŽIM ČISTÉHO VZDUCHU ..................
• REŽIM ČISTEJ IÓNOVEJ SPRCHY .......
•
TLAČIDLO RÝCHLOSTI VENTILÁTORA
• TLAČIDLO ZAP./VYP. Plasmacluster ...
•
TLAČIDLO OVLÁDANIA KONTROLIEK
• KONTROLKA INDIKÁTORA
DODÁVANIA VODY ..............................
• NASTAVENIE CITLIVOSTI
DETEKCIE SENZORA ..........................
STAROSTLIVOSŤ A ÚDRŽBA
• KONTROLKA INDIKÁTORA FILTRA ....
• ZADNÝ PANEL A SENZORY ................
• JEDNOTKA ..........................................
• VODNÁ NÁDRŽ ....................................
• STAROSTLIVOSŤ O UMÝVATEĽNÝ
DEODORIZAČNÝ FILTER ....................
• ZVLHČOVACIA MISKA .........................
• ZVLHČOVACÍ FILTER ..........................
•
POKYNY K VÝMENE FILTRA
RIEŠENIE PROBLÉMOV
TECHNICKÉ ÚDAJE
.........................................
...........................................
...........
.................
....................
............................
INFORMÁCIE O SPRÁVNEJ LIKVIDÁCII
...
...
..
SK-10
...
SK-10
SK-10
SK-10
SK-11
SK-11
SK-11
SK-11
SK-12
SK-12
SK-13
SK-14
SK-15
SK-16
SK-18
...
SK-19
SK-2
SK-3
SK-3
SK-3
SK-4
SK-4
SK-4
SK-5
SK-6
SK-6
SK-7
SK-8
SK-8
SK-8
SK-9
SK-9
SK-9
SLOVENSKY
Ďakujeme vám za zakúpenie tejto čističky
vzduchu od spoločnosti SHARP. Prečítajte
si, prosím, pozorne tento návod na použitie
skôr, ako budete používať čističku vzduchu.
Po prečítaní tento návod uschovajte na dostupnom mieste, aby ste doň mohli nahliadnuť aj v budúcnosti.
SK-1
Page 48

DÔLEŽITÉ BEZPEČNOSTNÉ POKYNY
Pri používaní elektrických zariadení by ste mali dodržiavať základné bezpečnostné opatrenia, mimo iné:
VÝSTRAHA
• Pred použitím prístroja si prečítajte všetky pokyny.
• Používajte len zásuvku s napätím 220 – 240 voltov.
• Prístroj nepoužívajte, ak sú napájací kábel alebo zástrčka poškodené, alebo ak je pripojenie
k elektrickej zásuvke uvoľnené.
• Zo zástrčky odstraňujte pravidelne prach.
• Do prívodu ani vývodu vzduchu ventilácie nedávajte prsty ani iné cudzie predmety.
• Pri vyberaní zástrčky vždy uchopte zástrčku a nikdy neťahajte za kábel.
Mohlo by to spôsobiť elektrický výboj a/alebo požiar vplyvom skratu.
• Nevyberajte zástrčku mokrými rukami.
• Nepoužívajte prístroj v blízkosti plynových zariadení ani ohnísk.
• Pri dopĺňaní vodnej nádrže, čistení prístroja alebo keď prístroj nepoužívate, nezabudnite ho odpojiť
z elektrickej zásuvky. Inak môže dôjsť k elektrickému výboju a/alebo požiaru vplyvom skratu
• Ak je napájací kábel poškodený, musí ho vymeniť výrobca, jeho servisný technik, autorizované servisné stredisko spoločnosti Sharp alebo kvalifi kovaná osoba, aby sa zabránilo ne-
bezpečenstvu.
• Prístroj nepoužívajte, keď používate aerosolové insekticídy, ani v miestnostiach, kde sú vo vzduchu zvyšky oleja, kadidlá, iskry od zapálených cigariet, chemické výpary, ani na miestach, v ktorých sa môže prístroj namočiť, ako napríklad kúpeľniach.
•
Pri čistení prístroja si dávajte pozor. Silné korozívne čistiace prostriedky môžu poškodiť vonkajšok prístroja.
• Servis tejto čističky vzduchu môže vykonávať len autorizované servisné stredisko spoločnosti Sharp.
Pri výskyte problémov, potrebe nastavenia alebo opravy kontaktujte najbližšie servisné stredisko.
• Pri prenášaní prístroja odstráňte najprv vodnú nádrž a zvlhčovaciu misku a držte prístroj pomocou
držadiel nachádzajúcich sa na oboch stranách.
• Nepite vodu zo zvlhčovacej misky alebo vodnej nádrže.
• Vymeňte každý deň vodu vo vodnej nádrži čerstvou vodou z vodovodného kohútika a pravidelne
čistite vodnú nádrž a zvlhčovaciu misku. (Pozrite si strany SK-12 a SK-13). Keď prístroj nepoužívate, vylejte vodu z vodnej nádrže a zvlhčovacej misky. Ak vo vodnej nádrži a/alebo zvlhčovacej
miske necháte vodu, môže to spôsobiť plesnivenie, množenie baktérií a zápachy.
V ojedinelých prípadoch môžu tieto baktérie nepriaznivo pôsobiť na zdravie.
•
Tento prístroj nie je určený na použitie osobami (vrátane detí) so zníženými fyzickými, zmyslovými
alebo mentálnymi schopnosťami, alebo nedostatkom skúseností a znalostí, pokiaľ na nich nedohliada
osoba zodpovedná za ich bezpečnosť, alebo ak im táto osoba nedala pokyny ohľadom používania.
Na deti je potreba dohliadať, aby sa zaručilo, že sa so zariadením nebudú hrať.
– na zníženie nebezpečenstva skratu, požiaru, alebo poranenia:
POZNÁMKA
Ak táto čistička vzduchu môže spôsobiť rušenie príjmu rádia alebo televízie, pokúste sa opraviť rušenie jedným alebo viacerými nasledujúcimi opatreniami:
• Preorientujte alebo premiestnite príjmovú anténu.
• Zvýšte vzdialenosť medzi prístrojom a rádiovým/televíznym prijímačom.
• Pripojte zariadenie do zásuvky v inom okruhu ako je ten, do ktorého je zapojený prijímač.
• Vyhľadajte pomoc u predajcu alebo skúseného rádiového/televízneho technika.
– rušenie rádia alebo televízora
SK-2
Page 49

UPOZORNENIA TÝKAJÚCE SA PREVÁDZKY
• Neblokujte vstupné a/alebo výstupné otvory ventilácie.
• Nepoužívajte prístroj v blízkosti ani na horúcich predmetoch, ako sú sporáky alebo ohrievače, ani
tam, kde môžu prísť do kontaktu s parou.
• Prístroj obsluhujte vždy vo zvislej polohe.
• Pri presúvaní prístroja ho držte pomocou držadiel nachádzajúcich sa na oboch stranách.
Keď je prístroj v prevádzke, nepresúvajte ho.
• Nespúšťajte prístroj bez správnej inštalácie fi ltrov, vodnej nádrže a zvlhčovacej misky.
• Neumývajte ani opätovne nepoužívajte HEPA fi lter.
Nielenže tým nezlepšíte výkon fi ltra, ale môžete tak spôsobiť úraz elektrickým prúdom alebo poru-
chu.
• Vonkajšok čistite len jemnou handričkou.
Nepoužívajte prchavé látky ani čistiace prostriedky.
Mohli by ste nimi poškodiť povrch prístroja alebo by mohol prasknúť.
Tiež by vplyvom toho nemuseli senzory pracovať správne.
• To, ako často je treba vykonávať údržbu (odstraňovanie vodného kameňa), závisí od tvrdosti vody a množstve nečistôt v používanej vode; čím je voda tvrdšia, tým častejšie musíte
vodný kameň odstraňovať.
• Udržujte prístroj z dosahu vody.
POKYNY K INŠTALÁCII
• Prístroj umiestnite najmenej 2 m od zariadení využívajúcich elektrické vlny, ako sú napríklad televízory alebo rádiá, aby ste pri používaní prístroja zabránili elektrickému rušeniu.
• Vyhnite sa miestam, kde bude senzor vystavený priamemu vetru.
Prístroj nemusí fungovať správne.
• Vyhnite sa používaniu na miestach, kde sa môže prístroj dostať do kontaktu s nábytkom,
látkami, alebo inými predmetmi, ktoré by mohli zabrániť vstupu/výstupu vzduchu ventilácie.
• Prístroj nepoužívajte na miestach, kde bude vystavený kondenzácii alebo veľkým teplotným
zmenám. Vhodná teplota miestnosti je medzi 5 – 35 °C.
• Umiestnite na stabilný povrch s dostatočnou cirkuláciou vzduchu.
Keď prístroj umiestnite na oblasť s hrubou kobercovou plochou, môže mierne vibrovať.
Prístroj umiestnite na rovný povrch, aby ste zabránili unikaniu vody z vodnej nádrže a/alebo zvlh-
čovacej misky.
• Prístroj nepoužívajte na miestach, kde sa tvorí mastnota alebo olejový dym.
Mohol by vplyvom toho prasknúť povrch alebo by senzor nemusel pracovať správne.
• Prístroj umiestnite asi 30 cm – 60 cm (1 – 2 ft) od steny, aby ste zaistili správne prúdenie
vzduchu.
Časom sa môže stena nachádzajúca sa priamo za výfukom ventilácie zašpiniť. Ak tento prístroj
používate dlhšiu dobu na tom istom mieste, pravidelne čistite stenu a chráňte stenu vinylovou pokrývkou alebo niečím podobným, aby sa nezašpinila.
SLOVENSKY
SMERNICE TÝKAJÚCE SA FILTRA
• Postupujte podľa pokynov v tomto návode, aby ste sa správne starali o fi ltre a aby ste ich dobre
udržovali.
SK-3
Page 50

NÁZVY ČASTÍ
ILUSTRAČNÝ DIAGRAM – PREDNÁ ČASŤ
Odvod
vzduchu
Displej hlavnej
jednotky
Predný monitor
Hlavná
jednotka
KC-860E
ZADNÁ ČASŤ
Držadlo (2 umiestnenia vľavo a vpravo)
Senzory
• Prachový senzor
•
Senzor teploty / vlhkosti
•
Pachový senzor (KC860E•KC850E)
Držadlo nádrže
KC-850E
Odvod
vzduchu
Displej hlavnej
jednotky
Predný
monitor
Hlavná
jednotka
KC-840E
Odvod vzduchu
HEPA fi lter (biely)
Umývateľný deodorizačný
fi lter (čierny)
Ušká
Vodná nádrž
(na zvlhčenie)
Zvlhčovací fi lter
Rám fi ltra
Veko nádrže
Plavák
Zvlhčovacia miska
Napájací kábel
Zástrčka
(Tvar zástrčky závisí od krajiny.)
SK-4
Prívod vzduchu
Štítok s dátumom
(Menovitý štítok)
Zadný panel (predfi lter)
Page 51

PREDNÝ MONITOR
Označuje čistotu a vlhkosť vzduchu v miestnosti.
KC-850E KC-860E
Označuje množstvo pachov, prachu a vlhkosti v miestnosti.
MONITOR PRACHU
Prachový senzor neustále monitoruje
vzduch a v závislosti od čistoty vzduchu
mení farbu. Prístroj KC-860E má 5 úrovní detektora prachu.
Výklad senzora
Čisté
Všetko
zelené
Čisté
Všetko zelené
Zelená
Blikanie
Zelená
Blikanie
Žltá
Žltá
Veľmi špinavé
Blikanie
Všetko
červené
Veľmi
špinavé
Blikanie
Všetko červené
Keď prachový senzor zachytí prach,
bude sa v závislosti od zaprášenia
pohybovať blikajúca kontrolka.
Kontrolka indikátora Plasmacluster (modrá)
Modrá: Plasmacluster ZAP.
Vypnutá kontrolka: Plasmacluster VYP.
MONITOR PACHOV
Pachový senzor neustále monitoruje vzduch a v závislosti od intenzity
pachu mení farbu.
Pach v miestnosti
Slabé
Zelená Žltá Červená
Prach a pachy sa zisťujú rôznymi
senzormi. Farby sa nemusia meniť
súčasne.
Silné
Kontrolka indikátora dodávania
vody (červená)
Táto kontrolka sa rozsvieti, keď je potreba doplniť vodnú nádrž.
Kontrolka indikátora vlhkosti (zelená)
Zobrazuje približnú úroveň vlhkosti v miestnosti. Nastavenie vlhkosti sa nedá upraviť.
(Pr.) pri 60 % vlhkosti
80 % alebo viac
Menej ako 30 %
SLOVENSKY
KC-840E
MONITOR PRACHU
Prachový senzor neustále monitoruje vzduch a v závislosti od čistoty
vzduchu mení farbu.
Výklad senzora
Čisté
Všetko
zelené
Čisté
Všetko zelené
Zelená
Blikanie
Zelená
Blikanie
Keď prachový senzor zachytí prach,
bude sa v závislosti od zaprášenia
pohybovať blikajúca kontrolka.
Žltá
Žltá
Veľmi špinavé
Blikanie
Všetko
červené
Veľmi
špinavé
Blikanie
Všetko červené
Kontrolka indikátora vlhkosti (zelená)
Zobrazuje približnú úroveň vlhkosti v miestnosti. Nastavenie vlhkosti sa nedá upraviť.
Vysoká – 65 % alebo viac
Stredná – medzi 40 % a 65 %
Nízka – 40 % alebo menej
Kontrolka indikátora dodávania
vody (červená)
Táto kontrolka sa rozsvieti, keď je potreba doplniť vodnú nádrž.
Kontrolka indikátora Plasmacluster
(modrá)
Modrá: Plasmacluster ZAP.
Vypnutá kontrolka: Plasmacluster VYP.
SK-5
Page 52

Pred inštaláciou alebo úpravou fi ltrov
PRÍPRAVA NA
POUŽITIE
odpojte prístroj z elektrickej siete.
INŠTALÁCIA FILTRA
Na udržanie kvality fi ltrov sú zabalené v umelohmotných vreckách a umiestnené v prí-
stroji. Nezabudnite vybrať fi ltre z umelohmotných vreciek a pred prvým použitím dajte
fi ltre opäť do prístroja.
1
1
Zadný panel
2
Vyberte fi ltre
Odstráňte zadný panel.
Jemne zatlačte na ušká a potom
nakloňte a odstráňte zadný panel.
Ušká na vrchu
Vyberte umývateľ ný
deodorizačný fi lter (čier-
ny) a HEPA fi lter (biely) z
umelohmotných vreciek.
2
1
2
Inštalujte fi ltre
Inštalujte HEPA fi lter.
Uistite sa, či je HEPA filter umiestnený so
správnou orientáciou.
Inštalovaním filtra v opačnom
smere ovplyvníte výkon prístroja.
HEPA fi lter
Uško
Vložte 2 dolné ušká zadného panela (ľavé
a pravé) do malých otvorov v prístroji a
zasuňte umývateľný deodorizačný fi lter
medzi HEPA fi lter a zadný panel.
Umývateľný deodorizačný fi lter
Zadný panel
Dolné ušká
HEPA fi lter
Umývateľný
deodorizačný
fi lter
Jemne zatlačte na horné
3
ušká (ľavé a pravé), aby
zapadli na svoje miesto.
Horné ušká
Vyplňte na štítku s
4
dátumom počiatočný
dátum používania.
Počiatoč ný dátum používania
použite ako pomôcku na zistenie, kedy by ste mali vymeniť
fi ltre.
SK-6
Štítok s dátumom
Page 53

DOPLNENIE VODNEJ NÁDRŽE
Prístroj sa môže používať v režime čistého vzduchu bez
toho, aby ste dali do vodnej nádrže vodu. Keď chcete použiť režim čistého vzduchu a zvlhčenia alebo režim čistej
iónovej sprchy, musíte dať do vodnej nádrže vodu.
Odstráňte vodnú nádrž odistením vrchu.
1
Odstráňte veko vodnej nádrže a opatrne
2
naplňte vodnú nádrž vodou z vodovodného
kohútika.
• Každý deň vymeňte vodu vo vodnej nádrži čistou vodou z vodovodného kohútika.
Po naplnení bezpečne utiahnite veko nádrže.
3
• Skontrolujte, či neuniká voda.
• Nezabudnite otrieť všetky zvyšky vody na vonkajšku
vodnej nádrže.
• Pri prenášaní vodnej nádrže ju držte obomi rukami tak,
aby otvor vodnej nádrže smeroval hore.
Držadlo nádrže
Vodná nádrž
Zvlhčovacia
miska
Vodná nádrž
Veko nádrže
Utiahnuť
SLOVENSKY
Vložte späť vodnú nádrž do prístroja.
4
• Keď je vodná nádrž správne nainštalovaná, horná
západka zaklapne na svoje miesto.
UPOZORNENIE
• Prístroj nevystavujte vplyvu vody. Mohlo by to spôsobiť skrat a/alebo elektrický výboj.
• Nepoužívajte horúcu vodu (40 °C), chemické látky, aromatické látky, špinavú vodu ani iné
poškodzujúce látky, inak by mohlo dôjsť k deformácii a/alebo poruche.
• Používajte len čerstvú vodu z vodovodného kohútika. Používaním iných zdrojov vody by ste
mohli pomôcť množeniu plesní, húb a/alebo baktérií.
SK-7
Page 54

PREVÁDZKA
DISPLEJ HLAVNEJ JEDNOTKY
Tlačidlo resetovania fi ltra/
Kontrolka indikátora (červená)
Tlačidlo ovládania kontroliek
Tlačidlo rýchlosti ventilátora/
Kontrolka indikátora
(zelená)
Tlačidlo zap./vyp. Plasmacluster/
Kontrolka indikátora (zelená)
Tlačidlo Zap.
Stlačte ľubovoľné tlačidlo na vybratie režimu a spustenie prístroja.
Tlačidlo režimu čistého vzduchu a zvlhčenia/
Kontrolka indikátora (zelená)
Tlačidlo režimu čistého vzduchu/
Kontrolka indikátora (zelená)
Tlačidlo Vyp.
Tlačidlo režimu čistej iónovej sprchy/
Kontrolka indikátora (modrá)
REŽIM ČISTÉHO VZDUCHU A ZVLHČENIA
Režim čistého vzduchu a zvlhčenia použite na rýchle vyčistenie vzduchu, potlačenie pachov a na zvlhčenie vzduchu.
Naplňte vodnú nádrž. (Pozrite si stranu SK-7)
1
Stlačte tlačidlo režimu čistého vzduchu a zvlhčenia.
2
• Ak ste medzi používaním neodpojili napájací kábel, prístroj sa
automaticky reštartuje s predtým nastavenými nastaveniami.
Stlačte tlačidlo rýchlosti ventilátora na vybratie
3
požadovanej rýchlosti ventilátora.
• Kontrolky indikátora zobrazia aktuálne
vybratú rýchlosť ventilátora.
Stlačte tlačidlo Vyp. na vypnutie prístroja.
O režime automatického zvlhčenia
Senzory teploty/vlhkosti automaticky zisťujú a upravujú vlhkosť podľa zmien teploty v miestnosti. V závislosti od veľkosti
a vlhkosti miestnosti nesmie vlhkosť presiahnuť 55 – 65 %.
V takých prípadoch sa odporúča používať režim čistenia vzduchu a zvlhčenia/max.
Teplota Vlhkosť
~18 °C 65 %
18 °C~24 °C 60 %
24 °C~ 55 %
SK-8
Page 55

REŽIM ČISTÉHO VZDUCHU
Režim čistého vzduchu použite vtedy, keď nepotrebujete zvýšiť vlhkosť vzduchu.
Stlačte na displeji tlačidlo režimu čistého vzduchu.
1
• Ak ste medzi používaním neodpojili napájací kábel, prístroj sa
automaticky reštartuje s predtým nastavenými nastaveniami.
Stlačte tlačidlo rýchlosti ventilátora na vybratie po-
2
žadovanej rýchlosti ventilátora.
• Kontrolky indikátora zobrazia aktuálne
vybratú rýchlosť ventilátora.
Stlačte tlačidlo Vyp. na vypnutie prístroja.
REŽIM ČISTEJ IÓNOVEJ SPRCHY
Režim čistej iónovej sprchy so zvlhčením uvoľňuje veľmi husté ióny Plasmacluster.
Neustálym uvoľňovaním silného prúdu vzduchu po dobu 15 minút prístroj zo vzduchu efektívne odstráni prach, peľ, pleseň a alergény, keď prejdú fi ltračným systémom. Keď vyberiete
tento režim, musí byť vo vodnej nádrži voda.
Keď je vo vodnej nádrži voda, prístroj zvlhčí vzduch, a keď vo vodnej nádrži nie je voda, bude
fungovať bez zvlhčovania.
Na vybratie tohto režimu stlačte na displeji tla-
1
čidlo režimu čistej iónovej sprchy.
Keď prístroj dokončí prácu, vráti sa do predchádzajúceho režimu.
SLOVENSKY
Stlačte tlačidlo Vyp. na vypnutie prístroja.
Tlačidlo rýchlosti ventilátora
Pamätajte si prosím, že sa rýchlosť ventilátora počas režimu čistej iónovej sprchy nedá nastaviť.
AUTOM. prevádzka
Režim PEĽ
MAX. prevádzka
STRED. prevádzka
NÍZKA prevádzka
Rýchlosť ventilátora sa automaticky prepne (medzi nastavením VYSOKÁ a
NÍZKA) v závislosti od množstva nečistôt vo vzduchu. Senzory detekujú nečistoty kvôli efektívnemu čisteniu vzduchu.
Prístroj bude pracovať 10 minút s vyššou rýchlosťou a potom bude striedať
strednú a vysokú rýchlosť.
Prístroj bude pracovať s maximálnou rýchlosťou ventilátora.
Prístroj bude pracovať so stredne veľkou rýchlosťou ventilátora.
Prístroj bude pracovať potichu pomocou minimálneho prívodu vzduchu.
*VYSOKÁ rýchlosť ventilátora je okamžitá rýchlosť medzi nastaveniami STRED. a MAX.
10 minút: vys. rýchl. ventilátora
20 minút: stred. rýchl. ventilátora
20 minút: vys. rýchl. ventilátora
SK-9
Page 56

PREVÁDZKA
Tlačidlo zap./vyp. Plasmacluster
Stlačte tlačidlo zap./vyp. Plasmacluster na zapnutie a vypnutie
režimu iónov Plasmacluster.
Keď je režim Plasmacluster zapnutý, zapne sa kontrolka indikátora a kontrolka Plasmacluster.
Tlačidlo ovládania kontroliek
Použite, keď je svetlo na
prednom paneli príliš silné.
UPOZORNENIE
Pozrite si diagram na pravej strane pre výber poža-
dovaného jasu predného panelu.
The lights on the front panel are brighter.
「 」
「 」
「 」
Pri spustení sú svetlá na prednom monitore vždy svetlejšie.
Svetlá na prednom paneli sú svetlejšie.
The lights on the front panel are darker.
Svetlá na prednom paneli sú tmavšie.
The lights on the front monitor turn off
Svetlá na prednom monitore sú vypnuté.
KONTROLKA INDIKÁTORA DODÁVANIA VODY
Keď je vodná nádrž prázdna, bude kontrolka indikátora dodávania vody
blikať na znak toho, že je treba doplniť vodnú nádrž. Pamätajte si pro-
sím, že počas režimu čistého vzduchu a režimu čistej iónovej sprchy nebude kontrolka blikať ani keď bude vodná nádrž prázdna.
Nastavenie zvukového indikátora pre dodávanie vody.
Okrem kontrolky indikátora sa dá prístroj nastaviť tak, aby prázdnu vodnú nádrž signalizoval aj
pomocou zreteľného pípnutia. Keď je prístroj vypnutý, stlačte po dobu 3 sekundy tlačidlo ovlá-
dania kontroliek, aby ste zapli zvukový signál.
Zrušenie
Na zrušenie zvukového signálu vypnite prístroj a stlačte opäť po
dobu aspoň 3 sekundy tlačidlo ovládania kontroliek.
Blikanie
Flashing
NASTAVENIE CITLIVOSTI DETEKCIE SENZORA
Ak je monitor prachu a monitor pachov neustále červený, nastavte nastavenie na „nízka“, aby ste znížili citlivosť, a ak je monitor prachu a monitor pachov neustále zelený,
nastavte nastavenie na „vysoká“, aby ste zvýšili citlivosť.
Keď je prístroj vypnutý, stlačte a na 3 sekundy podržte tlačidlo rýchlosti ventilátora.
1
Kontrolky indikátora rýchlosti ventilátora zobrazia aktuálne nastavenú úroveň citlivosti
senzora. Továrenské nastavenie je Štandard. (označené kontrolkou STRED.).
Stlačte tlačidlo rýchlosti ventilátora na nastavenie požadovanej citlivosti senzora.
2
Pre výber požadovanej úrovne citlivosti senzora si pozrite diagram na pravej strane.
Stlačte tlačidlo Vyp.
3
Nezabudnite, že ak do 8 sekúnd od nastavovania citlivosti senzora
nestlačíte tlačidlo Vyp., nastavenie sa automaticky uloží. Nastavenie citlivosti senzora sa uloží dokonca aj keď je prístroj odpojený
z elektrickej siete.
SK-10
Kontrolka indikátora rýchlosti ventilátora
Citlivosť
detekcie
senzora
Vyššia
Štandard
Nižšia
Page 57

STAROSTLIVOSŤ A ÚDRŽBA
Na udržanie optimálneho výkonu tejto čističky vzduchu musíte prístroj pravidelne čis-
tiť, vrátane senzora a fi ltrov.
Pri čistení prístroja ho nezabudnite najprv odpojiť z elektrickej zásuvky a so zástrčkou nikdy
nenarábajte mokrými rukami. Inak môže dôjsť k elektrickému skratu a/alebo poraneniu osoby.
KONTROLKA INDIKÁTORA FILTRA
Kontrolka indikátora fi ltra bude svietiť, aby ste nezabudli vykonať údržbu za-
dného panelu, senzorov a zvlhčovacieho fi ltra. Kontrolka indikátora sa zapne
približne po 720 hodinách používania.
Po vykonaní údržby resetujte indikátor fi ltra. Zapojte prístroj, zapnite ho a asi
3 sekundy podržte stlačené tlačidlo RESET. Kontrolka indikátora fi ltra zhasne.
Dokonca aj keď je kontrolka indikátora fi ltra už vypnutá, musíte stlačiť tlačidlo
RESET, aby ste resetovali časovač údržby.
Údržbový
cyklus
Po 720 hodinách používa-
30 dní × 24 hodín = 720)
nia (
ZADNÝ PANEL A SENZORY
Údržbový
cyklus
Pomocou príslušenstva k vysávaču alebo podobného
nástroja jemne odstráňte prach z otvoru senzora a zadného panelu.
Keď je na zadnom paneli ťažko odstrániteľná nečistota
Keď je na zadnom paneli olejová nečistota, namočte zadný panel do vody s kuchynským čistiacim prostriedkom.
1
Pri umývaní sa vyhnite drsnejšiemu kefovaniu zadného panelu.
Opakovane opláchnite zadný panel čistou vodou, aby
ste odstránili zvyšky roztoku.
2
Nechajte fi lter vysušiť, aby sa odstránila prebytočná voda.
Vždy, keď sa na prístroji nahromadí
prach alebo každé 2 mesiace
Senzor
Zadný panel
Zadný panel
3
SLOVENSKY
STAROSTLIVOSŤ O FILTER SENZORA
Odstráňte filter senzora a jemne s ním poklepte o dres
alebo kôš, aby ste uvoľnili prach. Ak je veľmi špinavý,
umyte ho jemne vlažnou vodou. Na čistenie fi ltra nepou-
žívajte žiadne čistiace prostriedky ani chemikálie. Pred
vrátením fi ltra do prístroja ho poriadne osušte. Keď nie sú
všetky fi ltre správne nainštalované, prístroj nepoužívajte.
Filter senzora
JEDNOTKA
Údržbový cyklus
Aby ste na prístroji zabránili výskytu špiny alebo škvŕn, pravidelne ho čistite. Ak škvrny necháte tak, môže byť ich odstránenie v budúcnosti náročné.
Vytrite suchou jemnou handričkou.
Pri ťažko odstrániteľných škvrnách alebo špine použite jemnú handričku namočenú v teplej vode.
Nepoužívajte prchavé látky
Benzén, riedilo, či leštiaci prášok môžu poškodiť povrch.
Nepoužívajte čistiace prostriedky
Prísady čistiacich prostriedkov môžu poškodiť prístroj.
Vždy, keď sa na prístroji nahromadí prach alebo každé 2 mesiace
SK-11
Page 58

STAROSTLIVOSŤ A ÚDRŽBA
VODNÁ NÁDRŽ
Údržbový cyklus
Opláchnite vnútro nádrže, nechajte vo vnútri trochu vlažnej vody,
zatvorte pevne veko nádrže a potrepte nádržou. Na čistenie
vnútra nádrže môžete použiť jemné čistiace prostriedky, ale čistiaci prostriedok musíte zriediť a nádrž musíte poriadne oplách-
nuť, aby ste odstránili všetky zvyšky čistiaceho prostriedku.
(Vodná nádrž nie je vhodná do umývačky riadu.)
ÚDRŽBA VEKA NÁDRŽE
Malé veko z veka nádrže je odoberateľné.
Keď sú veko nádrže a malé veko špinavé a slizké,
musíte ich vyčistiť.
Použite vatový tampón alebo zubnú kefku.
Každý deň, keď zvlhčujete
údržbový cyklus... raz za mesiac
Veko nádrže
Vodná nádrž
Zubná kefka
Veko
nádrže
STAROSTLIVOSŤ O UMÝVATEĽNÝ DEODORIZAČNÝ FILTER
UMÝVAJTE LEN V RUKÁCH!
NESUŠTE V SUŠIČKÁCH
NA ŠATY!
Údržbový
cyklus
Opláchnite vlažnou vodou umývateľný deodori-
1
začný fi lter.
Pred umytím odstráňte z umývateľného deodorizačného fi ltra prach.
Keď ucítite z výstupu vzduchu nepríjemný
pach.
Keď sa zníži výkon fi ltra a vo vzduchu ostá-
vajú pachy.
UPOZORNENIE
• Pri prvom umývaní fi ltra môžu byť splašky hnedé. To neovplyv-
ní výkon pri deodorizácii.
• Filter pri umývaní neohýbajte ani neskladajte.
Nechajte fi lter vysušiť, aby sa odstránila
2
prebytočná voda.
Poriadne fi lter osušte v dobre vetranom mieste. Ak
3
je to možné, osušte ho vonku.
Filter sušte v šikmej polohe, aby ste zabránili pokriveniu fi ltra.
Vysušenie fi ltra trvá asi 6 hodín.
UPOZORNENIE
• Nesušte fi lter vonku, keď je tam nevľúdne počasie (napr. dážď alebo
nízka teplota).
Nenechajte fi lter zmrznúť.
• Ak sa fi lter suší vo vnútri, urobte určité opatrenia, napríklad pod fi lter
položte uteráky a pod., aby ste vodou nepoškodili podlahu.
Vložte fi lter späť do prístroja. (Pozrite si stranu SK-6).
4
Pred vložením fi ltra ho nechajte úplne vysušiť, aby ste zabránili výskytu pachov.
Keď nie sú všetky fi ltre správne nainštalované, prístroj nepoužívajte.
SK-12
Page 59

ZVLHČOVACIA MISKA
Údržbový
cyklus
Vyberte vodnú nádrž a zlhčovaciu misku.
1
Najprv odistite vodnú
nádrž a potom vyberte misku. Pri vyťahovaní zvlhčovacej
misky použite obidve
ruky, aby ste zabránili vyliatiu vody.
Vyberte zo zlvhčovacej misky zvlhčovací
filter. Odstráňte nahromadenú vodu po-
2
malým naklonením zvlhčovacej misky.
Zvlhčovací fi lter
1 mesiac
To, ako často je treba vykonávať údržbu, závisí od tvrdosti
vody. Pri vyberaní alebo čistení misky zabráňte vyliatiu vody.
Držadlo nádrže
Vodná nádrž
Nedržte túto
časť.
Zvlhčovacia
miska
Opláchnite vlažnou vodou vnútro
3
zvlhčovacej misky, aby ste odstránili
nečistoty.
• Nevyberajte polystyrénový plavák.
•
Ťažko dosiahnuteľné
časti vyčistite špicatým
vatovým tampónom
alebo zubnou kefkou.
Plavák
Vráťte späť do prístroja zvlhčovací fi l-
4
ter a zvlhčovaciu misku.
Zvlhčovací fi lter nebude paso-
vať, ak ho budete dávať opačne. Pri vkladaní zvlhčovacej
misky do prístroja sa uistite, či
nie je medzi zvlhčovacou miskou a prístrojom medzera. Prístroj nemusí fungovať správne,
ak zvlhčovacia miska nie je v
prístroji uložená správne.
Farba: sivá
Keď je ťažké odstrániť zvyšky vody
Naplňte do polovice vlažnou
vodou zvlhčovaciu misku,
1
pridajte malé množstvo jemného kuchynského čistiaceho prostriedku a nechajte
asi 30 minút odmáčať.
Zrieďte čistiaci prostriedok podľa
pokynov na nádobe.
Ťažko dosiahnuteľné časti vyčistite špicatým
vatovým tampónom alebo
zubnou kefkou.
Opláchnite vlažnou vo-
2
dou zvlhčovaciu misku.
•
Oplachujte, kým sa neodstránia všetky zvyšky čistiaceho prostriedku.
•
Nedostatočné opláchnutie
môže spôsobiť zápach
čistiaceho
prostriedku
alebo zmeny
v tvare/farbe hlavnej
jednotky.
UPOZORNENIE
• Na čistenie zvlhčovacej misky
používajte len jemné kuchynské
čistiace prostriedky. Používaním
neoznačených chemikálií alebo
čistiacich prostriedkov môžete
spôsobiť deformáciu, stratu lesku,
prasknutie (únik vody).
SLOVENSKY
Ak vypadne polystyrénový plavák,
dajte ho späť vložením ušiek plaváka do otvorov vo zvlhčovacej
miske tak, ako je to zobrazené na
diagrame.
Vložte do otvoru
uško plaváka.
Vložte plavák pod
toto uško.
Vložte do otvoru
uško na druhej strane plaváka.
SK-13
Page 60

STAROSTLIVOSŤ A ÚDRŽBASTAROSTLIVOSŤ A ÚDRŽBA
ZVLHČOVACÍ FILTER
Údržbový cyklus
To, ako často je treba vykonávať údržbu, závisí od tvrdosti vody a množstve nečistôt
vode; čím je voda tvrdšia, tým častejšie musíte vodný kameň odstraňovať.
Pri čistení fi ltra si dajte pozor, aby ste nevyliali vodu.
Vyberte vodnú nádrž a zvlhčo-
1
vaciu misku.
Raz mesačne alebo keď svieti kontrolka indikátora fi ltra.
Opakovane opláchnite vlažnou
5
vodou zvlhčovací filter, aby ste
odstránili všetky zvyšky roztoku.
Zvlhčovací fi lter
Zvlhčovacia
miska
Vodná nádrž
Zvlhčovacia
miska
Nedostatočné opláchnutie môže spôsobiť zápach a ovplyvniť výkon a/alebo
vzhľad prístroja.
Zvlhčovací fi lter nedrhnite, len ho oplách-
*
nite jemne pod vlažnou
vodou.
Pripojte zvlhčovací fi lter k zvlh-
Vyberte zvlhčovací fi lter zo zvlh-
2
čovacej misky.
Dajte si pozor, aby ste nevyliali vodu zo
zvlhčovacej misky.
Príprava roztoku na odstraňova-
3
nie vodného kameňa.
Na odstraňovanie vodného kameňa sa
používa kyselina citrónová (dostupná v
niektorých drogériách alebo lekárňach)
alebo 100 % citrónová šťava. Vyberte si,
čo budete používať a pripravte roztok na
odstraňovanie vodného kameňa.
<Pri použití kyseliny citrónovej>
Rozpusťte vo vhodnej nádobe 3 čajové
lyžičky kyseliny citrónovej a 2 1/2 šálky
vlažnej vody a dobre premiešajte.
<Pri použití citrónovej šťavy>
Na odstraňovanie vodného kameňa môžete
použiť 100 % citrónovú šťavu. Použite len
100 % citrónovú šťavu bez dužiny (v prípade
potreby šťavu preceďte). Dajte 1/4 šálky citrónovej šťavy a 3 šálky vlažnej vody do nádoby,
ktorá je dostatočne veľká na to, aby sa do nej
zmestil zvlhčovací fi lter, a dobre premiešajte.
Pred čistením zvlhčovacieho filtra
4
ho nechajte 30 minút namočiť v roztoku.
Keď používate citrónovú
šťavu, odporúčame fi lter
namáčať dlhšie ako pri
kyseline citrónovej.
6
čovacej miske a vymeňte zvlh-
čovaciu misku v prístroji.
•Zvlhčovací filter nebude pasovať, ak
ho budete dávať opačne. Pri vkladaní
zvlhčovacej misky do prístroja sa uistite, či nie je medzi zvlhčovacou miskou
a prístrojom medzera. Prístroj nemusí
fungovať správne, ak zvlhčovacia miska nie je v prístroji uložená správne.
•Keď nebudete prístroj dlhšiu dobu používať, poriadne pred
výmenou vysušte
zvlhčovací fi lter.
Zapojte prístroj do elektrickej zá-
7
suvky, zapnite ho a na resetovanie
na displeji stlačte a podržte po dobu
3 sekúnd tlačidlo resetovania fi ltra.
Na povrchu zvlhčovacieho fi ltra sa môžu
formovať červeno-hnedé alebo biele
nánosy. Tieto nečistoty (vodný kameň a
pod.) vznikajú vplyvom nečistôt obsiahnutých vo vode z vodovodného kohútika;
toto nie je nedostatok. Keď je zvlhčovací
fi lter úplne pokrytý
bielymi nánosmi,
vymeňte ho.
v používanej
SK-14
Page 61

POKYNY K VÝMENE FILTRA
Životnosť fi ltra sa líši v závislosti od prostredia v miestnosti, používania a umiestnenia prí-
stroja. Ak prach alebo pachy pretrvávajú, mali by ste vymeniť fi ltre.
(Pozrite si časť „Prečítajte si túto príručku pred začatím obsluhy svojej novej čističky vzduchu“)
Pomôcka na načasovanie výmeny fi ltra
HEPA fi lter
Životnosť fi ltra sa môže vplyvom prostredia v miestnosti veľmi znížiť. Cigaretový dym, pach zvierat a
iné čiastočky vo vzduchu môžu znížiť životnosť fi ltra. Filtre pravidelne kontrolujte a v prípade potreby
ich vymeňte.
Do 5 rokov po otvorení
Umývateľný deodorizačný fi lter
Filter môžete po umytí opakovane používať (alebo ho môžete vymeniť).
Zvlhčovací fi lter
Životnosť fi ltra sa môže vplyvom prostredia v miestnosti veľmi znížiť. Pokiaľ spozorujete nasledujúce
príznaky, vymeňte zvlhčovací fi lter (aj keď ešte neuplynuli 2 roky):
• Nánosy minerálov (biele, čierne, alebo červené), ktoré sa po čistení neodstránia, alebo ak je zvlhčovací fi lter stále špinavý.
• Filter je veľmi poškodený alebo zdeformovaný.
Do 2 rokov po otvorení
Náhradné fi ltre
• HEPA fi lter: 1 jednotka
Model FZ-C150HFE (pre KC-860E)
FZ-C100HFE (pre KC-850E)
FZ-C70HFE (pre KC-840E)
• Umývateľný deodorizačný fi lter: 1 jednotka
Model FZ-C150DFE (pre KC-860E)
FZ-C100DFE (pre KC-850E)
FZ-C70DFE (pre KC-840E)
• Zvlhčovací fi lter: 1 jednotka
Model FZ-C100MFE
(sivá)
Zvlhčovací fi lter
SLOVENSKY
Rám fi ltra (sivý)
Výmena fi ltrov
1. Filtre vymeňte podľa pokynov dodaných s náhradnými fi ltrami.
2. Štítky s dátumami použite ako pomôcku na zistenie, kedy by ste mali vymeniť fi ltre.
Rám fi ltra (biely)
Likvidácia fi ltrov
Použité fi ltre zlikvidujte v súlade s miestnymi zákonmi a nariadeniami.
Materiály HEPA fi ltra:
• Filter: polypropylén • Rám: polyester
Materiály umývateľného deodorizačného fi ltra:
• polyester, umelý hodváb, aktívne uhlie
Materiály zvlhčovacieho fi ltra:
• umelý hodváb, polyester
SK-15
(biela)
Page 62

RIEŠENIE PROBLÉMOV
Pred zavolaním na servis si prosím pozrite nižšie uvedenú tabuľku Riešenie problémov, keďže problémom nemusí byť porucha prístroja.
SYMPTÓM NÁPRAVA (nie je porucha)
Pachy a dym sa neodstraňujú.
Predný monitor svieti zelene,
dokonca aj keď je vzduch
špinavý.
Predný monitor svieti oranžovo
alebo červene, dokonca aj keď
je vzduch čistý.
Z prístroja je počuť klepanie
alebo tikot.
Vypúšťaný vzduch zapácha.
Prístroj nefunguje, keď je vo
vzduchu cigaretový dym.
Svieti kontrolka indikátora
fi ltra.
• Ak sa vám fi ltre zdajú byť veľmi špinavé, vyčistite ich alebo ich
vymeňte. (Pozrite si strany SK-11, SK-12, SK-14)
• Vzduch môže byť špinavý v čase, keď bol prístroj pripojený.
Odpojte prístroj, počkajte jednu minútu a potom prístroj opäť
zapojte.
• Ak sú otvory prachového senzora špinavé alebo upchané,
môže sa tým ovplyvniť činnosť senzora. Jemne očistite prachové senzory (Pozrite si stranu SK-11).
• Keď prístroj generuje ióny, môže byť z neho počuť klepot alebo tikot.
• Skontrolujte, či fi ltre nie sú silne znečistené.
• Vyčistite alebo vymeňte fi ltre.
• Čističky vzduchu Plasmacluster emitujú stopové množstvo
ozónu, ktorý môže spôsobovať zápach.
• Je prístroj inštalovaný na mieste, kde je pre senzor ťažké detekovať cigaretový dym?
• Sú otvory prachového senzora zablokované alebo upchané?
(V takom prípade vyčistite otvory.) (Pozrite si stranu SK-11)
• Po výmene fi ltrov pripojte napájací kábel k zásuvke a stlačte
tlačidlo resetovania fi ltra. (Pozrite si stranu SK-11)
Predný monitor je vypnutý.
Kontrolka indikátora dodávania
vody nesvieti, keď je nádrž
prázdna.
Hladina vody v nádrži sa
neznižuje, alebo sa znižuje
pomaly.
Kontrolky na prednom
monitore často menia farbu.
• Skontrolujte, či je nastavený režim vypnutia kontroliek. Ak je to
tak, stlačte tlačidlo ovládania kontroliek pre aktiváciu kontroliek
indikátora. (Pozrite si stranu SK-10)
• Skontrolujte polystyrénový plavák, či nie je špinavý. Vyčistite
zvlhčovaciu misku. Uistite sa, či sa prístroj nachádza na rovnom povrchu.
• Skontrolujte, či sú zvlhčovacia miska a vodná nádrž správne
nainštalované. Skontrolujte zvlhčovací fi lter.
• Keď je filter silne zanesený, vyčistite ho alebo ho vymeňte
(Pozrite si strany SK-14 a SK-15).
• Kontrolky predného monitora automaticky menia farby tak, ako
sa pomocou prachového senzora a senzora pachov detekujú
nečistoty.
SK-16
Page 63

ZOBRAZENIE CHÝB
KC-850E•KC-860E
Ak sa chyba vyskytne znovu, kontaktujte servisné stredisko Sharp.
DIGITÁLNE
OZNAČENIE
OZNAČENIE KONTROLKAMI
Blikanie kontrolky čistého
vzduchu a kontrolky indikátora vlhkosti.
Blikanie kontrolky indikátora
rýchlosti ventilátora „
Blikanie kontrolky indikátora
čistej iónovej sprchy.
Blikanie kontrolky čistého
vzduchu.
Blikanie kontrolky indikátora
rýchlosti ventilátora „ “.
Blikanie kontrolky indikátora
rýchlosti ventilátora „ “.
“.
DETAILY O CHYBE
Porucha zvlhčovacieho fi ltra
Porucha motora
ventilátora
Porucha senzora
teploty a vlhkosti
Problém na obvodovej doske
NÁPRAVA
Skontrolujte, či sú zvlhčovací fi lter,
zvlhčovacia miska a vodná nádrž
správne nainštalované a potom
opäť zapnite napájanie.
Vypnite prístroj na zrušenie zobrazenia chýb, počkajte jednu minútu,
a potom ho opäť zapnite.
Odpojte prístroj, počkajte jednu
minútu, a potom ho opäť zapojte.
KC-840E
OZNAČENIE KONTROLKAMI
Blikanie kontrolky čistého
vzduchu a kontrolky indikátora vlhkosti.
Blikanie kontrolky indikátora
rýchlosti ventilátora „
Blikanie kontrolky indikátora vlhkosti „Vysoká“ alebo
„Nízka“.
Blikanie kontrolky indikátora
čistej iónovej sprchy.
Blikanie kontrolky čistého
vzduchu.
Blikanie kontrolky indikátora
rýchlosti ventilátora „
Blikanie kontrolky indikátora
rýchlosti ventilátora „
“.
“.
“.
DETAILY O CHYBE NÁPRAVA
Porucha zvlhčovacieho
fi ltra
Porucha motora ventilátora
Porucha senzora teploty a vlhkosti
Problém na obvodovej
doske
Skontrolujte, či sú zvlhčovací
fi lter, zvlhčovacia miska a vodná
nádrž správne nainštalované a
potom opäť zapnite napájanie.
Vypnite prístroj na zrušenie zobrazenia chýb, počkajte jednu
minútu, a potom ho opäť zapnite.
Odpojte prístroj, počkajte jednu
minútu, a potom ho opäť zapojte.
SLOVENSKY
SK-17
Page 64

TECHNICKÉ ÚDAJE
Model KC-860E KC-850E KC-840E
Napájanie 220 ~ 240 V 50/60 Hz
56 19 5,5 (4,9) 41 11,6 3,8 (3,3) 26 9,5 3,7 (3,4)
51 39 17 47 35 15 45 34 15
396 240 84 306 168 60 210 132 48
/hodinu)
3
Rýchlosť ventilátora (m
Menovitý výkon (W)
Úroveň hluku (dBA)
Nastavenie rýchlosti ventilátora MAX STRED, NIŽŠIA MAX STRED, NIŽŠIA MAX STRED, NIŽŠIA
Č ISTÝ
VZDUCH
56 21 8,8 (8,2) 40 13,5 6,8 (6,3) 21 11,5 6,1 (5,8)
50 39 25 47 35 22 42 34 20
396 240 120 288 168 84 186 132 54
/hodinu)
3
Rýchlosť ventilátora (m
ČISTÝ
730 500 300 600 400 230 450 330 170
Menovitý výkon (W)
Úroveň hluku (dBA)
Zvlhčenie (ml/hodinu)*2
VZDUCH A
ZVLHČENIE
Prach/pach/teplota a vlhkosť Pach/teplota a vlhkosť
)*1 ~48 ~38 ~26
2
Kapacita vodnej nádrže (l) 4,3 4,0 3,0
Senzory
Odporúčaná veľkosť miestnosti (m
Zber prachu HEPA s mikrobiálnou kontrolou *3
Deodorizácia Umývateľná deodorizácia
Typ fi ltra
Dĺžka kábla (m) 2,0
Rozmery (mm) 398 (Š) × 288 (H) × 627 (V) 378 (Š) × 265 (H) × 586 (V) 360 (Š) × 233 (H) × 550 (V)
Hmotnosť (kg) 11,0 9,0 8,0
*1 • Odporúčaná veľkosť miestnosti je vhodná na prevádzku prístroja s maximálnou rýchlosťou ventilátora.
• Odporúčaná veľkosť miestnosti označuje priestor, v ktorom sa môže do 30 minút odstrániť určité množstvo prachových častíc.
*2 • Účinnosť zvlhčovania sa mení podľa vnútornej a vonkajšej teploty a vlhkosti.
Účinnosť zvlhčovania sa zvyšuje so zvyšovaním teploty alebo znižovaním vlhkosti.
Účinnosť zvlhčovania sa znižuje so znižovaním teploty alebo zvyšovaním vlhkosti.
• Podmienky merania: 20 °C, 30 % vlhkosť (JEM1426)
Trieda HEPA fi ltra podľa EN1822 je H10.
*3 •
Spotreba energie v pohotovostnom režime
Aby mohli byť počas toho, ako je napájací kábel zapojený do elektrickej zásuvky, obsluhované
elektrické obvody, spotrebuje tento výrobok asi 0,7 W energie v pohotovostnom režime.
Keď prístroj nepoužívate, odpojte pre šetrenie energie napájací kábel.
SK-18
Page 65

Pozor: Výrobok
je označený
týmto symbolom.
Ten znamená,
že elektrické
a elektronické
zariadenia nepatria
do bežného
domového odpadu.
Tieto výrobky
odovzdávajte do
samostatných
zberných systémov.
A. Informácie o likvidácii pre používateľov (domácnosti)
1. V krajinách Európskej únie
Pozor: Toto zariadenie nelikvidujte v bežných odpadkových košoch!
Použité elektrické a elektronické zariadenia musia byť spracované oddelene a podľa platných
zákonov, ktoré vyžadujú správne zaobchádzanie, obnovu a recyklovanie použitých elektrických
a elektronických zariadení.
Podľa implementácie v jednotlivých členských štátoch môžu domácnosti v štátoch EÚ
vrátiť použité elektrické a elektronické zariadenia na určené zberné miesta bez poplatkov*.
V niektorých štátoch* môžu vaše staré výrobky zdarma odobrať tiež miestni maloobchodní
predajcovia, ak si zakúpite podobný nový výrobok.
*) Ďalšie podrobnosti sa dozviete od vašich miestnych orgánov.
Ak sa vo vašich použitých elektrických alebo elektronických zariadeniach nachádzajú batérie,
zlikvidujte ich samostatne vopred, podľa miestnych požiadaviek.
Správnou likvidáciou tohto výrobku pomôžete pri zabezpečení toho, aby odpad prešiel
potrebnou úpravou, obnovou a recykláciou a takto sa predchádzalo možným negatívnym
vplyvom na životné prostredie a zdravie osôb, ku ktorým by inak mohlo dochádzať v dôsledku
nevhodného zaobchádzania s odpadom.
2. V ostatných krajinách mimo Európskej únie
Ak si želáte znehodnotiť tento výrobok, obráťte sa na vaše miestne orgány a informujte sa o
správnej metóde likvidácie.
B. Informácie o likvidácii pre komerčných používateľov
1. V krajinách Európskej únie
Ak sa výrobok používa na komerčné účely a chcete ho znehodnotiť:
Obráťte sa na vášho predajcu SHARP, ktorý vás informuje o spätnom odobratí výrobku. Môžu
vám byť účtované náklady vyplývajúce zo spätného odobratia a recyklácie. Malé výrobky (a
malé množstvá) môžu spätne odobrať vaše lokálne zberné miesta.
2. V ostatných krajinách mimo Európskej únie
Ak si želáte znehodnotiť tento výrobok, obráťte sa na vaše miestne orgány a informujte sa o
správnej metóde likvidácie.
SLOVENSKY
SK-19
Page 66

Poznámky
Page 67

Page 68

Kérjük, olvassa el ezt az útmutatót, mielőtt használná az új Légtisztítóját.
A légtisztító a szoba levegőjét szívja be a beömlő nyílásain keresztül, a levegő áthalad
a készülékben található Előszűrőn, a Mosható szagtalanító szűrőn és a HEPA szű-
rőn, majd távozik a levegő a kiömlő nyíláson keresztül. A HEPA szűrő képes a szűrőn
áthaladó, 0,3 mikronnyi porrészecskék 99,97%-nak kiszűrésére és a szagok elnyelésében is közreműködik. A Mosható szagtalanító szűrő fokozatosan elnyeli a szagokat, ahogy azok áthaladnak a szűrőn.
A szűrők által elnyelt szagok egy része idővel lebomlik, kellemetlen illatot eredményezve. A felhasználási környezettől függően, különösen ha a készüléket extrém körülmények között használják (a normál háztartási használatnál lényegesen komolyabb
igénybevétel), ez a szag a vártnál rövidebb idő alatt erőssé válhat. Ha a szag nem
múlik el, cserélje ki a szűrőket.
MEGJEGYZÉS
• A légtisztító kiszűri a levegőben lebegő port és megszünteti a kellemetlen illatokat, de nem távolítja el a káros gázokat (pl. a cigaretta füstben lévő szén-monoxidot). Ha a szag forrása továbbra is
fenn áll, a légtisztító nem képes teljesen megszüntetni a kellemetlen szagot.
HEPA szűrő
Mosható szagtalanító szűrő
Előszűrő
(A közös illusztrációkon a “KC-850E” modell látható.)
Page 69
MAGYAR
JELLEMZŐK
A levegő kezelő technológiák egyedülálló kombinációja
Háromszoros szűrő rendszer + Plasmacluster + Párásítás
KISZŰRI A PORT*
A mosható előszűrő csapdába ejti a port
és más nagyobb méretű levegőben szálló
részecskéket.
SZAGTALANÍT
A mosható szagtalanító szűrő magába
szívja a legtöbb, háztartásban kialakuló
kellemetlen szagot.
CSÖKKENTI A POLLEN & PENÉSZSPÓRÁK SZINTJÉT*
A HEPA szűrő az apró, 0,3 mikronnyi részecskék 99,97%-át kiszűri.
FRISSÍTŐ ÜZEMMÓD
Plasmacluster egység pozitív és negatív
ionok kibocsátásával a természethez hasonló módon tisztítja meg a levegőt.
PÁRÁSÍT
Feltöltésenként akár 10 órát is képes működni.**
*
Ahogy a levegő áthalad a szűrőrendszeren.
**Helység mérete:
Az érzékelő rendszer folyamatosan fi gyeli
a levegő minőségét, és automatikusan beállítja a megfelelő üzemmódot az érzékelt
levegőtisztaság és páratartalom alapján.
2
-ig (KC-860E)
48 m
38 m2-ig (KC-850E)
2
26 m
-ig (KC-840E)
TARTALOMJEGYZÉK
.....
.......
....
HU-2
HU-2
HU-3
HU-3
HU-3
...
HU-4
HU-4
HU-4
HU-5
HU-6
HU-7
HU-8
HU-8
HU-8
HU-9
HU-9
HU-9
HU-10
HU-10
HU-10
HU-10
HU-11
HU-11
HU-11
HU-11
HU-12
HU-12
HU-13
HU-14
.
HU-15
HU-16
HU-18
HU-19
FONTOS BIZTONSÁGI ELŐÍRÁSOK
• FIGYELMEZTETÉS ................................
• HASZNÁLATRA VONATKOZÓ
FIGYELMEZTETÉS ................................
• TELEPÍTÉSI ÚTMUTATÓ .......................
• SZŰRŐ KEZELÉSE ...............................
AZ ALKATRÉSZEK MEGNEVEZÉSEI
• DIAGRAM – ELŐLAP ..............................
• HÁTLAP ..................................................
• ELŐLAP KIJELZŐJE ...............................
ÜZEMBE HELYEZÉS ..........................HU-6
• SZŰRÖK BEHELYEZÉSE ......................
• A VÍZTARTÁLY ÚJRATÖLTÉSE ............
MŰKÖDTETÉS
• FŐEGYSÉG KIJELZŐJE ........................
• LÉGTISZTÍTÁS & PÁRÁSÍTÁS MÓD .....
• LÉGTISZTÍTÁS ÜZEMMÓD ....................
• TISZTÍTÁS ION ZUHANNYAL MÓD .......
• VENTILÁTOR SEBESSÉG GOMB .........
• PLASMACLUSTER KI/BE GOMB .........
• FÉNYERŐ SZABÁLYOZÓ GOMB ........
• VÍZTARTÁLY KIJELZŐJE .....................
• AZ ÉRZÉKELŐ ÉRZÉKENYSÉGÉNEK
SZABÁLYOZÁSA ..................................
........................................
TISZTÍTÁS ÉS KARBANTARTÁS
• SZŰRŐ KIJELZŐ ..................................
• HÁTLAP és ÉRZÉKELŐK .....................
• KÉSZÜLÉK ...........................................
• VÍZTARTÁLY .........................................
• A MOSHATÓ SZAGTALANÍTÓ
SZŰRŐ TISZTÍTÁSA ............................
• PÁRÁSÍTÓ TÁLCA ................................
• PÁRÁSÍTÓ SZŰRŐ ...............................
•
ÚTMUTATÓ A SZŰRŐK CSERÉJÉHEZ
HIBAKERESÉSI SEGÉDLET
MŰSZAKI JELLEMZŐK
.............
......................
HULLADÉK ELHELYEZÉSRE
VONATKOZÓ TÁJÉKOZTATÓ
MAGYAR
Köszönjük, hogy megvásárolta ezt a SHARP
légtisztítót! Kérjük, olvassa el figyelmesen
ezt az útmutatót, mielőtt használná a légtisztító készüléket.
A használati útmutatót elolvasás után tegye
könnyen elérhető helyre az esetleges későbbi használat érdekében!
HU-1
Page 70

FONTOS BIZTONSÁGI ELŐÍRÁSOK
Elektromos berendezések használatakor bizonyos alapvető biztonsági szabályokat be kell tartani, beleértve az alábbiakat is:
FIGYELMEZTETÉS
• A készülék használata előtt olvassa el a teljes használati útmutatót.
• Kizárólag 220-240 voltos tápcsatlakozót használjon.
• Ne használja a készüléket, amennyiben a tápkábel vagy a tápcsatlakozó sérült, illetve amenynyiben a tápcsatlakozó lötyög a fali csatlakozóban!
• Rendszeresen távolítsa el a port a tápcsatlakozóról!
• Ne dugja be az ujját vagy bármiféle más tárgyat a készülék levegő beömlő, illetve levegő kiömlő nyílásaiba!
• A tápcsatlakozó kihúzása során mindig a tápcsatlakozót fogja meg! Sose próbálja a csatlakozót a kábelnél fogva kihúzni!
Ellenkező esetben fennáll a rövidzárlatból fakadó áramütés és/vagy tűz veszélye.
• Sose húzza ki a tápcsatlakozót nedves kézzel a csatlakozóból!
• Ne használja a készüléket gázkészülékek vagy tűzhelyek közelében!
• A víztartály feltöltésekor, a készülék tisztításakor, vagy amikor nem használja a készüléket, mindig
győződjön meg róla, hogy kihúzta a készülék tápcsatlakozóját. Ellenkező esetben fennáll a rövidzárlatból fakadó áramütés és/vagy tűz veszélye.
• Amennyiben a tápkábel sérült, a kockázatok kiküszöbölése érdekében cseréltesse ki azt a
gyártóval, a gyártó megbízottjával, a Sharp hivatalos márkaszervizével, vagy megfelelő képesítéssel rendelkező szakemberrel!
• NE használja a készüléket, amikor rovarirtót fúj a levegőbe vagy olyan helységekben, ahol olajszármazékok, füstölő vagy cigaretta szikrája, illetve vegyszerek gőze kerül a levegőbe. Ne használja olyan helységben sem, ahol a készüléket nedvesség érheti (pl.: fürdőszobában).
• Legyen körültekintő, amikor a készüléket tisztítja. Az erős maró hatású tisztítószerek károsíthatják
a készülék külsejét.
• Kizárólag hivatalos Sharp Márkaszerviz végezheti el a légtisztító szervizelését. Bármilyen hiba, beállítási vagy javítási munka ügyében forduljon a legközelebbi márkaszervizhez.
• A készülék szállítása előtt először távolítsa el a víztartály és a párásító szűrőt. A készüléket a két
oldalán lévő fogantyúknál fogva tartsa.
• Ne igya meg a párásító szűrőben vagy a víztartályban lévő vizet.
• Naponta cserélje ki a víztartályban lévő vizet friss csapvízre és rendszeresen tisztítsa meg a víztartályt és a párásító szűrőt. (Lásd az HU-12 és a HU-13 oldalakat). Ha nem használja a készüléket,
távolítsa el a vizet a víztartályból és a párásító szűrőből. Ha állni hagyja a vizet a víztartályban és/
vagy a párásító szű
Ritkán előforduló esetekben ez a baktérium ártalmas fi zikai hatásokat okozhat.
• A készüléket nem úgy tervezték, hogy azt fi zikai, érzékelési vagy mentális képességeiben korláto-
zott személyek (beleértve gyerekek), vagy kezelési ismeret és tapasztalat nélküli személyek használják, kivéve ha a biztonságukért felelős személytől a készülék használatára vonatkozó tájékoztatást megkapták vagy tevékenységüket egy ilyen személy felügyeli.
Gyerekek felügyelet nélkül ne tartózkodjanak a készülék közelében! Győződjön meg róla, hogy
nem játszanak a berendezéssel.
rőben, az penész, baktériumok és rossz szagok kialakulásához vezethet.
- Elektromos áramütés, tűz vagy más sérülés elkerülése érdekében:
MEGJEGYZÉS
Ha a légtisztító interferenciát okoz a rádió vagy a televízió vételben, próbálja meg elkerülni az interferenciát az alábbi lépések valamelyikével:
• Változtassa meg a vételi antenna helyét vagy pozícióját.
• Növelje meg a légtisztító berendezés és a rádió/TV közötti távolságot.
• Csatlakoztassa a rádió vagy TV készüléket a légtisztító berendezésétől eltérő, másik áramkörön
lévő tápcsatlakozóba.
• Kérjen tanácsot, illetve segítséget a kereskedőtől vagy egy szakképzett rádió/TV szerelőtől.
- Rádió vagy TV interferencia
HU-2
Page 71

HASZNÁLATRA VONATKOZÓ FIGYELMEZTETÉS
• Ne takarja le a levegő bemeneti és a kimeneti nyílást!
• Ne használja a készüléket forró tárgyak (pl. sütő vagy hősugárzó) közelében vagy tetején! Ne
használja továbbá olyan helyen sem, ahol gőz érheti a készüléket!
• Mindig függőleges helyzetbe állítva használja a készüléket!
• A készülék mozgatásakor a két oldalán lévő fogantyúknál fogva tartsa azt.
Működés közben ne mozgassa a készüléket!
• Ne működtesse a készüléket a szűrők, a víztartály és a párásító szűrő megfelelő telepítése
nélkül.
• Ne mossa ki, és ne használja újra a HEPA szűrőt!
A mosás nem javítja a szűrő hatásfokát, ráadásul a kimosott szűrő áramütést és meghibásodást
eredményezhet.
• A készülék külsejét kizárólag puha ruhával tisztítsa.
Ne használjon illékony folyadékokat és/vagy tisztítószereket!
A készülék külseje károsodhat, megrepedhet.
Továbbá az érzékelők működésében is rendellenességek jelentkezhetnek.
• A szükséges karbantartás (vízkőtelenítés) gyakorisága függ a használt víz keménységégé-
nek, illetve tisztaságának fokától. Minél keményebb a víz, annál gyakrabban van szükség
vízkőtelenítésre.
• A készüléket ne érje víz!
TELEPÍTÉSI ÚTMUTATÓ
• Elektromos hullámokat használó berendezésektől (pl.: televízió, rádió) legalább 2 m távolságra helyezze el a készüléket, az interferencia elkerülése érdekében.
• Kerülje az olyan elhelyezést, ahol az érzékelőt közvetlenül légáramlat, huzat éri.
Ellenkező esetben a készülék működésében rendellenességek jelentkezhetnek.
• Kerülje az olyan elhelyezést, ahol bútorok, textilek vagy más tárgyak érintkeznek a készülék
nyílásaival vagy gátolják a levegő ki és/vagy beáramlást.
• Ne használja a készüléket olyan helyen, ahol az pára lecsapódásnak vagy drasztikus hő-
mérséklet ingadozásnak van kitéve! A megfelelő körülmények akkor állnak fenn, ha a szoba
hőmérséklete 5 és 35 ºC közötti.
• Stabil felületen helyezze el, ahol a légkeringés megfelelő.
Ha vastag szőnyeggel borított felületen helyezi el a készüléket, az egység kis mértékben vibrálhat.
Helyezze a készüléket sík felületre a víztartályból és/vagy a párásító tálcáról történő vízszivárgás
megelőzése érdekében.
• Ne használja a készüléket olyan helyen, ahol zsír- vagy olajrészecskék kerülnek a levegőbe.
Hatásukra a készülék külseje megsérülhet vagy az érzékelő meghibásodhat.
A megfelelő légáramlás érdekében helyezze a készüléket kb. 30 cm ~ 60 cm távolságra a faltól.
•
Idővel közvetlenül a levegő kiömlő nyílás mögött található falfelület bepiszkolódhat. Ha hosszabb
ideig azonos helyen használja a készüléket, rendszeresen tisztítsa meg a falat és védje meg a
szennyeződésektől egy PVC fólia felhelyezésével.
MAGYAR
SZŰRŐ KEZELÉSE
• A szűrők helyes kezelése és karbantartása érdekében kövesse az útmutató utasításait.
HU-3
Page 72

AZ ALKATRÉSZEK MEGNEVEZÉSEI
DIAGRAM – ELŐLAP
Levegő
kiömlő nyílás
Főegység
kijelzője
Előlap kijelzője
Alapkészülék
KC-860E
HÁTLAP
Fogantyú (2 helyen - bal és jobb oldalt)
Érzékelők
• Porérzékelő
•
Hőmérséklet / Páratartalom érzékelő
•
Szagérzékelő (KC860E•KC850E)
Tartály fogantyú
KC-850E
Levegő kiömlő nyílás
Főegység kijelzője
Előlap kijelzője
Alapkészülék
KC-840E
Levegő kiömlő nyílás
HEPA szűrő (fehér)
Mosható szagtalanító
szűrő (fekete)
Fülek
Víztartály
(Párásításhoz)
Párásító szűrő
Szűrő keret
Tartály sapka
Úszó
Párásító tálca
Tápkábel
Tápcsatlakozó
(A tápcsatlakozó formája országonként eltérhet.)
Levegő beömlő nyílás
Dátum címke
(Besorolás címkéje)
HU-4
Hátsó panel (Előszűrő)
Page 73

ELŐLAP KIJELZŐJE
A szoba levegőjének állapotát és páratartalmát jelzi.
KC-850E KC-860E
A szoba szag, por és páratartalmának állapotát jelzi.
POR KIJELZŐ
A porérzékelő folyamatosan érzékeli a szoba levegőjének minőségét és a kijelző színe a levegő
tisztaságának megfelelően változik. A KC-860E
készülék porérzékelője 5 szinttel rendelkezik.
Az érzékelő jelzései
Tiszta
Mindegyik
zöld
Tiszta
Mindegyik zöld
Villog
Sárga
Villog
Sárga
Zöld
Zöld
Erősen szeny-
nyezett
Villog
Mindegyik
piros
Erősen szeny-
nyezett
Villog
Mindegyik piros
Ha a porérzékelő port érzékel, a villogó
fényjelzés elmozdul a levegő porszenynyezettségétől függően.
Plasmacluster Kijelző (kék)
Kék: Plasmacluster BEkapcsolva
Nincs fény: Plasmacluster KIkapcsolva
SZAG KIJELZŐ
A szagérzékelő folyamatosan érzékeli a
levegő minőségét és a szagok intenzitásától függően a kijelző fénye megváltozik.
Szag a helységben
Gyenge
Zöld Sárga Piros
A levegőben lévő port, illetve szagokat
eltérő érzékelők érzékelik. A kijelző színei nem együtt váltanak.
Erős
Víztartály kijelzője (piros)
A kijelző világít, ha a víztartály újratöltésére van szükség.
Páratartalom kijelzője (zöld)
A szoba páratartalmának hozzávetőleges értékét jelzi. A páratartalom értéke
nem állítható.
(Pl.) 60 %-os páratartalom
80 % vagy magasabb
Alacsonyabb, mint 30 %
KC-840E
POR KIJELZŐ
A porérzékelő folyamatosan érzékeli a szoba
levegőjének minőségét és a kijelző színe a
levegő tisztaságának megfelelően változik.
Az érzékelő jelzései
Tiszta
Villog
Mindegyik
zöld
Tiszta
Mindegyik
zöld
Sárga
Villog
Sárga
Ha a porérzékelő port érzékel, a villogó
fényjelzés elmozdul a levegő porszenynyezettségétől függően.
Zöld
Zöld
Erősen szeny-
nyezett
Villog
Mindegyik
piros
Erősen
szennyezett
Villog
Mindegyik
piros
MAGYAR
Páratartalom kijelző (zöld)
A szoba páratartalmának hozzávetőleges értékét jelzi. A páratartalom értéke
nem állítható.
High – 65 % vagy magasabb
Med – 40 % és 65 % közötti érték
Low – 40 % vagy alacsonyabb
Víztartály kijelzője (piros)
A kijelző világít, ha a víztartály újratöltésére van szükség.
Plasmacluster kijelzője (kék)
Kék: Plasmacluster BEkapcsolva
Nem világít: Plasmacluster KIkapcsolva
HU-5
Page 74

Húzza ki a készüléket a szűrők behelyezése
ÜZEMBE
HELYEZÉS
vagy beállítása előtt.
SZŰRÖK BEHELYEZÉSE
A készülékbe helyezett szűrők minőségük megőrzése érdekében nejlonzacskóba vannak csomagolva. A készülék használata előtt távolítsa el a szűrőkről a nejlonzacskót
és helyezze vissza a szűrőket!
1
1
2
Szűrők eltávolítása
Távolítsa el a hátlapot.
Óvatosan nyomja le a füleket,
döntse meg és vegye le a hátlapot.
Fülek a hátlap tetején
Hátlap
Vegye ki a mosható szagtalanító szűrőt (fekete) és
a HEPA szűrőt (fehér) a
nejlonzacskókból.
2
1
2
Szűrők behelyezése
A HEPA szűrő behelyezése.
Kérjük, győződjön meg róla, hogy a HEPA
szűrő a megfelelő irányba lett behelyezve.
Ha fordítva helyezi be a szűrőt,
az befolyásolja a készülék mű-
ködését.
Fül
Illessze a hátlap 2 alsó fülét (bal és jobb)
a készüléken lévő apró nyílásokba, majd
csúsztassa a mosható szagtalanító szű-
rőt a HEPA szűrő és a hátlap közé.
Mosható szagtalanító szűrő
HEPA szűrő
Hátlap
Alsó fülek
HEPA szűrő
Mosható szagtalanító szűrő
Óvatosan nyomja be a
3
felső füleket (bal és jobb),
hogy helyére rögzítse a
hátlapot.
Felső fülek
Írja fel a használatba vé-
4
tel napját a dátum címkére.
A használatba vétel napját a
szűrő csere idejének meghatározásához használhatja
segítségül.
HU-6
Dátum címke
Page 75

A VÍZTARTÁLY ÚJRATÖLTÉSE
A készülék használható Légtisztító Módban a víztartály vízzel történő megtöltése nélkül. A Légtisztító &
Párásító Mód vagy a TISZTÍTÁS ION ZUHANNYAL Mód
használatakor a víztartályt fel kell tölteni vízzel.
A felső rész kioldásával vegye ki a víztartályt.
1
Tartály fogantyú
Víztartály
Párásító tálca
Vegye le a víztartály sapkáját és óvatosan
2
töltse meg a tartályt csapvízzel.
• Cserélje ki minden nap a víztartály vizét friss csapvízzel.
Miután megtöltötte, óvatosan tekerje vissza
3
a tartály sapkát.
• Ellenőrizze, hogy nem szivárog-e a víz.
• Törölje le a kifolyt vizet a víztartály külsejéről.
• A víztartály szállításkor tartsa két kézzel,úgy, hogy a
tartály nyílása felfelé néz.
Helyezze vissza a víztartályt a készülékbe.
4
• A felső retesz a helyére “kattan”, amikor a víztartályt
megfelelően a helyére illesztik.
Víztartály
Tartály sapka
meghúz
MAGYAR
FIGYELMEZTETÉS
• Ne érje víz a készüléket! Ellenkező esetben fennáll a rövidzárlat és/vagy az áramütés veszélye.
• Ne használjon forró vizet (40 ºC), vegyszereket, illatosító anyagokat, szennyezett vizet vagy
más, káros hatású anyagot, mivel ezek a készülék elváltozását és/vagy hibás működését
okozhatják.
• Csak friss csapvizet használjon! Más vízforrás használatával nő a penészgombák, gombák
és/vagy baktériumok elszaporodásának lehetősége.
HU-7
Page 76

MŰKÖDTETÉS
FŐEGYSÉG KIJELZŐJE
Szűrő nullázó gomb/
kijelző (piros)
Fényerő szabályozó
gomb
Ventilátor sebesség gomb/
kijelző (zöld)
Plasmacluster KI/BEKAPCSOLÁS gomb/
kijelző (zöld)
BEKAPCSOLÁS gomb
Nyomja meg valamelyik gombot az üzemmód
kiválasztásához és a készülék elindításához.
Légtisztítás & Párásítás MÓD gomb/
kijelző (zöld)
Légtisztítás MÓD gomb/
kijelző (zöld)
KIKAPCSOLÁS gomb
TISZTÍTÁS ION ZUHANNYAL MÓD gomb/
kijelző (kék)
LÉGTISZTÍTÁS & PÁRÁSÍTÁS MÓD
Használja a Légtisztítás & Párásítás módot a levegő gyors tisztításához és párásításához, illetve a szagok csökkentéséhez.
Töltse meg a víztartályt. (Lásd az HU-7. oldalon)
1
Nyomja meg a LÉGTISZTÍTÁS & PÁRÁSÍTÁS MÓD gombot.
2
• Ha két használat közben nem volt kihúzva a tápcsatlakozó
kábele, akkor a készülék automatikusan az előzőleg választott
beállításokkal indul el.
Nyomja meg a FAN SPEED (Ventilátor sebesség)
3
gombot a kívánt ventilátor sebesség kiválasztásához.
• A világító kijelző jelzi a kiválasztott
ventilátor sebességet.
Nyomja meg az OFF (Kikapcsolás) gombot a készülék kikapcsolásához.
Az automatikus párásítás módról
A hőmérséklet/páratartalom érzékelők automatikusan érzékelik és szabályozzák a páratartalmat a szoba hőmérséklet-
ében bekövetkező változásoknak megfelelően. A szoba méretétől és páratartalmától függően a páratartalom nem érheti
el az 55~65 %-os szintet. Ilyen esetekben a LÉGTISZTÍTÁS
& PÁRÁSÍTÁS/MAXIMÁLIS MÓD használata javasolt.
Hőmérséklet
18 ºC~24 ºC 60 %
24 ºC~ 55 %
Páratartalom
~18 ºC 65 %
HU-8
Page 77
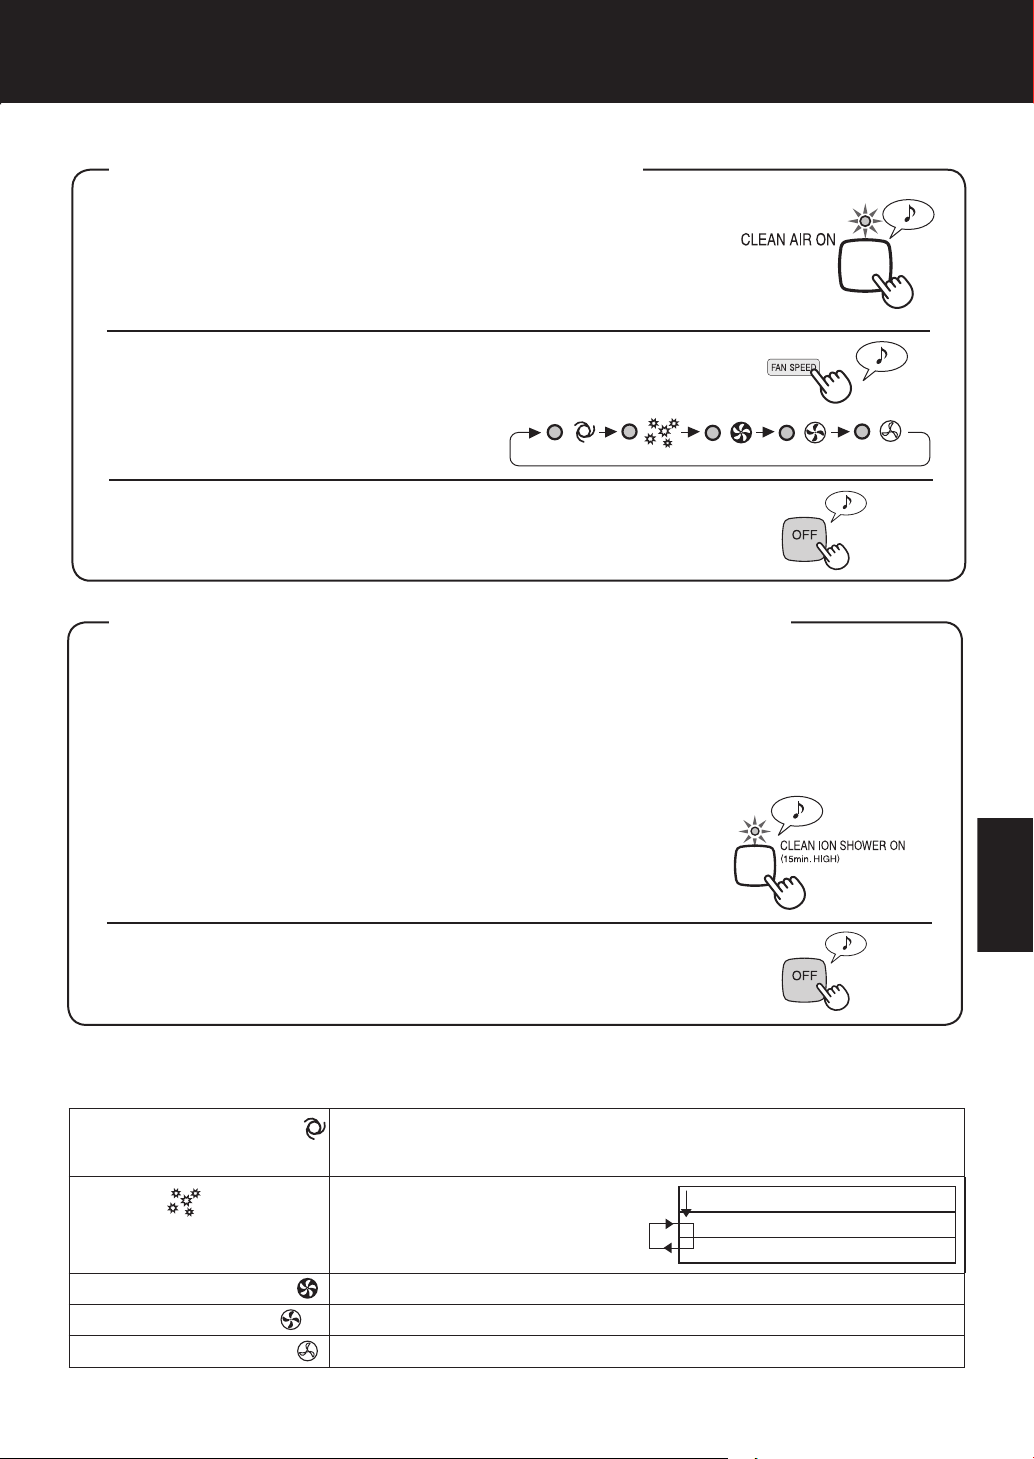
LÉGTISZTÍTÁS ÜZEMMÓD
Használja a légtisztítás módot, ha nincs szükség kiegészítő párásításra.
Nyomja meg a CLEAN AIR MODE gombot a kijelzőn.
1
•
Ha két használat közben nem volt kihúzva a tápcsatlakozó kábele, akkor
a készülék automatikusan az előzőleg választott beállításokkal indul el.
Nyomja meg a FAN SPEED (Ventilátor sebesség) GOM-
2
BOT a kívánt ventilátor sebesség kiválasztásához.
• A világító kijelző jelzi a kiválasztott
ventilátor sebességet.
Nyomja meg az OFF (Kikapcsolás) gombot a készülék kikapcsolásához.
TISZTÍTÁS ION ZUHANNYAL MÓD
A TISZTÍTÁS ION ZUHANNYAL mód párásítás funkcióval nagysűrűségű Plasmacluster ionokat bocsát ki.
Azáltal, hogy 15 percen keresztül folyamatosan erős légáramlatot bocsát ki, a készülék hatásosan
megtisztítja a szűrőrendszerén áthaladó levegőt a lebegő porrészecskéktől, pollentől, penészgomba
spóráktól és az allergén részecskéktől. A mód kiválasztása esetén vízzel kell feltölteni a víztartályt.
A készülék párásít, ha van víz a víztartályban, illetve párásítás nélkül működik, ha nincs víz a tartályban.
Nyomja meg a TISZTÍTÁS ION ZUHANNYAL MÓD
1
gombot a kijelzőn az üzemmód kiválasztásához.
A művelet befejeztével a készülék visszatér a korábbi üzemmódhoz.
MAGYAR
Nyomja meg az OFF (Kikapcsolás) gombot a készülék kikapcsolásához.
Ventilátor sebesség gomb
Kérjük, vegye fi gyelembe, hogy a ventilátor sebessége nem szabályozható a TISZTÍTÁS ION ZUHANNYAL MÓD közben.
AUTOMATIKUS üzemmód
POLLEN
üzemmód
MAXIMÁLIS üzemmód
KÖZEPES üzemmód
ALACSONY üzemmód
A ventilátor sebessége automatikusan változik (MAGAS és ALACSONY mód
között) a levegő tisztaságának függvényében. Az érzékelők érzékelik a szenynyező anyagokat a hatékony légtisztítás érdekében.
A készülék magas szinten üzemel
10 percig, majd váltakozva KÖZEPES
és MAGAS szinten.
A készülék maximális ventilátor sebességgel működik.
A készülék közepes ventilátor sebességgel működik.
A készülék halk üzemmódban működik minimális levegő beáramlással.
*A MAGAS ventilátor sebesség a KÖZEPES és a MAXIMÁLIS sebesség közötti sebesség szint.
10 perc: Magas ventilátor szint
20 perc: Közepes ventilátor szint
20 perc: Magas ventilátor szint
HU-9
Page 78
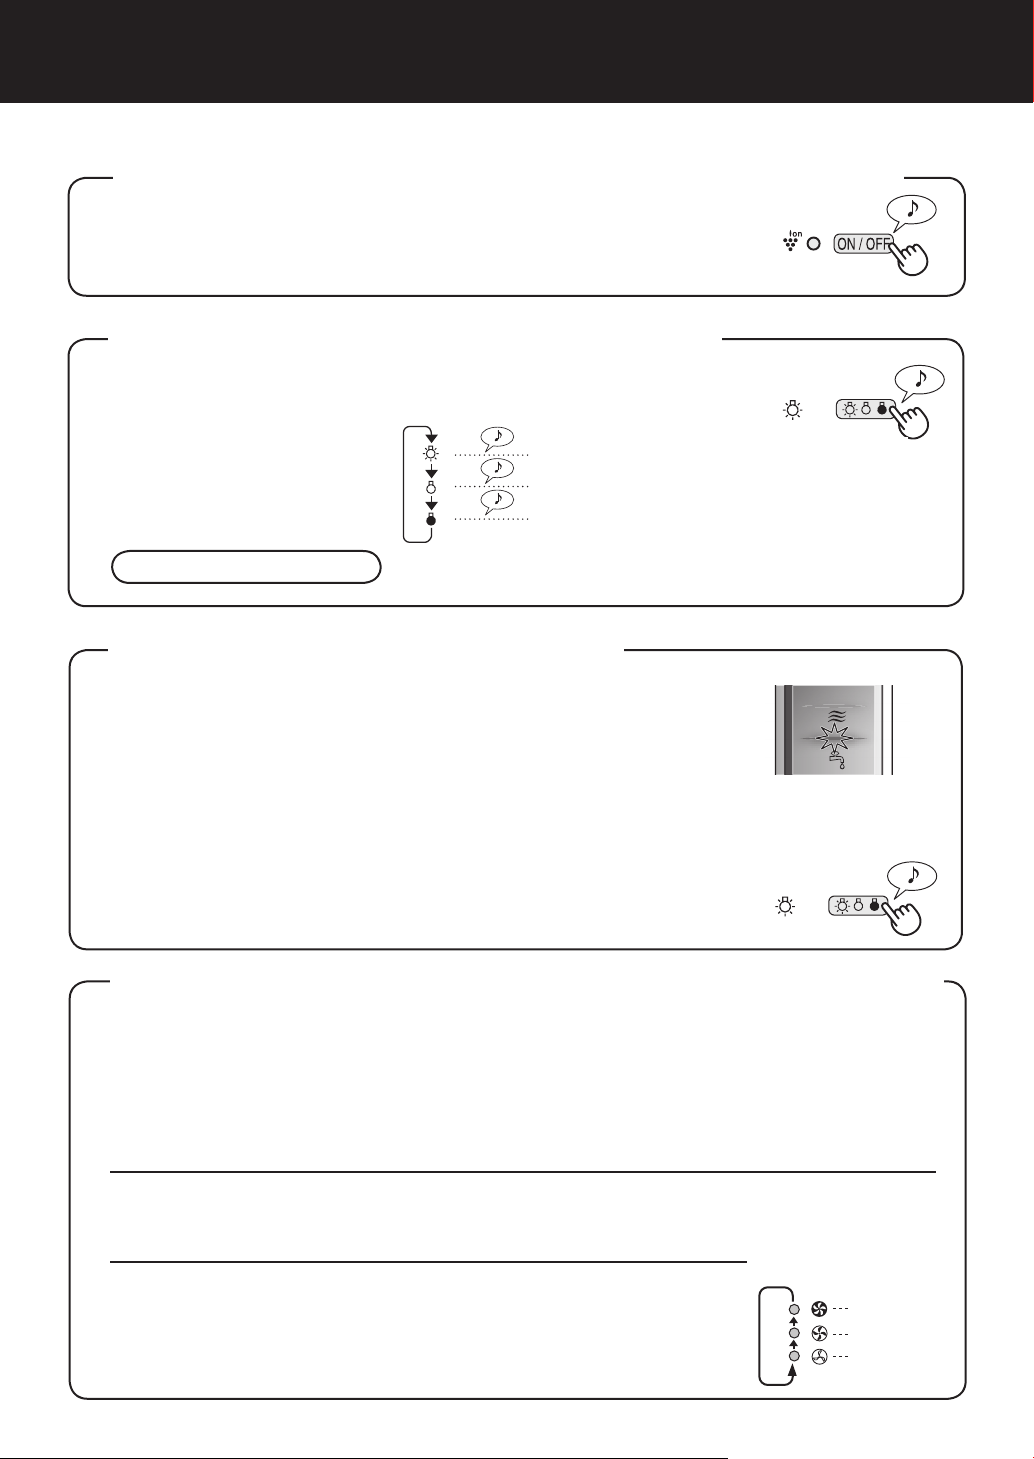
MŰKÖDTETÉS
Plasmacluster KI/BEKAPCSOLÁS gomb
Nyomja meg a Plasmacluster KI/BEKAPCSOLÁS gomb a
Plasmacluster Ion Mód BE- és KIKAPCSOLÁSÁHOZ.
Ha a Plasmacluster funkció BE van kapcsolva, a kijelző fénye és a Plasmacluster kijelző fénye is világít.
FÉNYERŐ SZABÁLYOZÓ gomb
Akkor használja, ha az előlap
fényei túl világosak.
FIGYELMEZTETÉS
A jobb oldali diagram segítséget nyújt az előlap kí-
vánt fényerejének kiválasztásához.
The lights on the front panel are brighter.
「 」
「 」
「 」
Indításkor az előlapi kijelző fényei mindig világosabbak.
Az előlap fényei világosabbak.
The lights on the front panel are darker.
Az előlap fényei sötétebbek.
The lights on the front monitor turn off
Az előlapi kijelzők fényei kikapcsolva.
VÍZTARTÁLY KIJELZŐJE
Amikor a víztartály üres, a víztartály kijelzője villog, ezzel jelezve, hogy a
tartály újratöltése szükséges. Kérjük, vegye fi gyelembe, hogy légtisz-
títás üzemmódban és Tisztítás ION ZUHANNYAL módban a kijelző
nem villog, még akkor sem, ha a tartály valóban üres.
Víztartály hangjelzésének beállítása.
A kijelző fénye mellett, a készülék beállítható, hogy hangjelzést is adjon, ha a víztartály üres. A
készülék KIKAPCSOLT állapotában tartsa lenyomva a Fényerő szabályozó gombot legalább 3
másodpercig a hangjelzés BEKAPCSOLÁSÁHOZ.
Hangjelzés törlése
A hangjelzés törléséhez a készülék KIKAPCSOLT állapotában tartsa
újból legalább 3 másodpercig lenyomva a Fényerő szabályozó gombot.
Villog
Flashing
AZ ÉRZÉKELŐ ÉRZÉKENYSÉGÉNEK SZABÁLYOZÁSA
Állítsa “alacsony” (low) fokozatra az érzékenység csökkentéséhez, ha a POR KIJELZŐ és a
SZAG KIJELZŐ folyamatosan pirosan világít, illetve állítsa “magas” (high) fokozatra az érzékenység növeléséhez, ha a POR KIJELZŐ és a SZAG KIJELZŐ folyamatosan zölden világít.
A készülék KIKAPCSOLT állapotában tartsa lenyomva 3 másodpercig a Ventilátor sebesség gombot.
1
A Ventilátor sebesség kijelző megjeleníti a érzékelő beállított érzékenységi fokozatát. A gyári beállítás
szabványos, a KÖZÉPSŐ fény jelzi.
Nyomja meg a Ventilátor sebesség gombot a kívánt érzékelő érzékenységi fokozat beállításához.
2
A jobb oldali diagram segítséget nyújt a kívánt érzékelő érzékeny-
ségi fokozat kiválasztásához.
Nyomja meg a KIKAPCSOLÁS gombot.
3
Ha az érzékelő érzékenységének beállítása után 8 másodpercen
belül nem nyomja meg a KIKAPCSOLÁS gombot, a beállítást automatikusan elmenti a készülék. Az érzékelő érzékenységi fokát
elmenti a készülék akkor is, ha ki van húzva a tápcsatlakozója.
HU-10
Ventilátor
sebesség
kijelzője
Érzékelő
érzékenységi fokozata
Magas
Standard
Alacsony
Page 79

TISZTÍTÁS ÉS KARBANTARTÁS
A légtisztító optimális működése érdekében rendszeresen tisztítsa meg a készüléket,
az érzékelőket és a szűrőket is beleértve.
A készülék tisztítása előtt ne feledje el kihúzni a készülék tápcsatlakozóját! Nedves kézzel sose
nyúljon a tápcsatlakozóhoz! Ellenkező esetben fennáll az áramütés és/vagy a testi sérülés veszélye.
SZŰRŐ KIJELZŐ
A Szűrő kijelző fénye világít, emlékeztetve a hátlap, az érzékelők és a párásító tálca
karbantartásának szükségességére. A kijelző fénye kb. 720 óra használat után fog
felgyulladni.
A karbantartás elvégzése után, nullázza le a szűrő kijelzőt. Dugja be a készülék tápcsatlakozóját, kapcsolja BE, majd 3 másodpercig tartsa lenyomva a RESET gombot.
A szűrő kijelző fénye kialszik. Ha a szűrő kijelző fénye már korábban kialudt volna, ak-
kor is meg kell nyomni a RESET gombot a karbantartás időzítőjének lenullázásához.
Karbantartási időköz
720 óra használat után
30 nap × 24 óra = 720)
(
HÁTLAP és ÉRZÉKELŐK
Karbantar-
tási időköz
Porszívó felcsatolható szívófejével vagy hasonló eszközzel óvatosan tisztítsa meg a portól az érzékelő nyílását és a hátlapot.
Ha a hátlap erősen szennyezett
Olajos szennyeződés esetén áztassa be a hátlapot konyhai tisztítószeres vízbe.
1
Kerülje el a hátlap mosás közbeni erőteljes súrolását!
Öblítse le többször tiszta vízzel a hátlapot a mosószer
eltávolításához.
2
Csepegtesse le a szűrőt a felesleges víz eltávolításához.
Kéthavonta vagy amikor por
gyűlik össze a készüléken
Érzékelő
Hátlap
Hátlap
3
ÉRZÉKELŐ SZŰRŐJÉNEK TISZTÍTÁSA
Vegye ki az érzékelő szűrőjét és óvatosan kocogtassa a
mosogatóhoz vagy egy szemetes kukához a por eltávolítása érdekében. Ha erősen szennyezett, mossa meg
óvatosan langyos vízzel. Ne használjon semmilyen
tisztítószert vagy vegyszert a szűrő tisztításához. A
készülékbe való visszahelyezés előtt teljesen szárítsa
meg a szűrőt. Ne használja a készüléket az összes szű-
rő megfelelő behelyezése nélkül.
Érzékelő szűrője
KÉSZÜLÉK
Karbantartási időköz
Rendszeresen tisztítsa meg a készüléket a szennyeződésektől és a foltoktól. Ha nem tisztítja
le a szennyeződéseket, később nehezebben lesznek eltávolíthatók.
Törölje át egy száraz, puha ruhával
Makacs szennyeződések és foltok esetén használjon egy puha, meleg vízzel átnedvesített rongyot.
Ne használjon illékony folyadékokat
Benzol, festék hígító, polírozó por károsíthatja a készülék külsejét.
Ne használjon tisztítószereket
A tisztítószerek összetevői károsíthatják a készüléket.
Kéthavonta vagy amikor por gyűlik össze a készüléken
HU-11
MAGYAR
Page 80

TISZTÍTÁS ÉS KARBANTARTÁS
VÍZTARTÁLY
Karbantartási időköz
Öblítse ki a tartályt úgy, hogy kis mennyiségű langyos vizet hagy
benne, rátekeri a tartálysapkát és megrázza a tartályt. A tartály
belsejének tisztításához használhat enyhe háztartási tisztítószereket, de a tisztítószert mindenképpen hígítsa fel és a tartályt
alaposan ki kell öblíteni az összes tisztítószer eltávolításához.
(Vegye fi gyelembe, hogy a víztartály nem mosható mosogatógépben.)
TARTÁLYSAPKA TISZTÍTÁSA
A tartálysapka egy része leszerelhető.
Ha a tartálysapka és a leszerelhető része piszkos és
csúszós, tisztításukra van szükség.
Használjon egy pamut rongyot vagy egy fogkefét.
Minden nap, amikor párásít
Tisztítási gyakoriság... havonta egyszer
Tartály sapka
Víztartály
Fogkefe
Tartály
sapka
A MOSHATÓ SZAGTALANÍTÓ SZŰRŐ TISZTÍTÁSA
CSAK KÉZI MOSÁSSAL!
NE SZÁRÍTSA RUHASZÁRÍTÓBAN!
Karbantartás
gyakorisága
Öblítse le a szennyeződést langyos vízzel a MOS-
1
HATÓ SZAGTALANÍTÓ SZŰRŐRŐL.
Lemosás előtt távolítsa el a port a mosható szagtalanító szűrőről.
Amikor kellemetlen illat érződik a levegő
kiömlő nyílásból.
Amikor a szűrő teljesítménye csökkeni
látszik és a szag nem múlik el.
FIGYELMEZTETÉS
• A szűrő első lemosásakor az öblítő víz barnás színű lehet. Ez
nem befolyásolja a szagtalanítás hatásfokát.
• Mosáskor kerülje el a szűrő meghajlítását.
Csepegtesse le a szűrőt a felesleges víz
2
eltávolításához.
Teljesen szárítsa meg a szűrőt egy jól szellőző he-
3
lyen. Ha lehetséges, kültéren szárítsa meg.
Oldalára állítva szárítsa a szűrőt, hogy megakadályozza a szűrő elgörbülését.
A szűrő kb. 6 óra alatt szárad meg.
FIGYELMEZTETÉS
• Ne szárítsa a szűrőt kültéren zord időjárási körülmények (pl. eső vagy
alacsony hőmérséklet) esetén.
Ne hagyja, hogy a szűrő megfagyjon.
• Ha beltéren szárítja a szűrőt, legyen elővigyázatos. Helyezzen pl. egy
törölközőt a szűrő alá, hogy megakadályozza az esetlegesen kicsepegő víz kárt tegyen a padlóban.
Helyezze vissza a szűrőt a készülékbe. (Lásd az HU-6 oldalt).
4
Teljesen szárítsa meg a szűrőt, mielőtt visszahelyezné a kellemetlen szagok megakadályozása érdekében.
Ne használja a készüléket az összes szűrő megfelelő behelyezése nélkül.
HU-12
Page 81

PÁRÁSÍTÓ TÁLCA
Karbantar-
tási időköz
Vegye ki a víztartályt és a párásító tálcát.
1
Először a víztartályt
kattintsa ki, majd vegye ki a tálcát. A párásító tálca kivételekor használja mindkét
kezét a víz véletlen
kiöntésének elkerülése érdekében.
Vegye ki a párásító szűrőt a párásító tál-
2
cából. A párásító tálca lassú megdöntésével öntse ki belőle az összes vizet.
Párásító szűrő
Öblítse ki a párásító tálca belsejét langyos
3
vízzel a szennyeződések eltávolításához.
• Ne távolítsa el a
polisztirolhab úszót.
• Tisztítsa meg a
nehezen elérhető
helyeket egy pamut
végű tisztító ecsettel
vagy egy fogkefével.
1 hónap
A karbantartás gyakorisága függ a használt víz keménységégének
fokától. Ne löttyintse ki a vizet, amikor kiveszi vagy tisztítja a tálcát.
Tartály
fogantyú
Víztartály
Ne tartsa ennél
a résznél fogva!
Párásító tálca
Úszó
Helyezze vissza a párásító szűrőt és a
4
párásító tálcát a készülékbe.
A párásító szűrő nem illeszthető be fordítva. A párásító tálca
visszahelyezésekor győződjön
meg róla, hogy nincsen rés a
párásító tálca és a készülék
között. A készülék nem működik megfelelően, ha a párásító
tálcát nem megfelelően helyezik vissza a készülékbe.
Szín: szürke
Ha a vízkő lerakódás nehezen eltávolítható
Töltse meg félig a párásító
tálcát langyos vízzel, adjon
1
hozzá egy kis adag enyhe
konyhai tisztítószert, majd
hagyja ázni kb. 30 percig.
Hígítsa a tisztítószert a csomagolásán lévő utasítások szerint.
Tisztítsa meg a nehezen elérhető helyeket egy pamut rongygyal vagy egy
fogkefével.
Öblítse ki a párásító tál-
2
cát langyos vízzel.
• Addig öblögesse, amíg az öszszes tisztítószert el nem távolította.
• A nem megfelelő kiöblítés hatására a tisztítószer kellemetlen szagot
okozhat vagy
a készülék
alakja/színe
megváltozhat.
FIGYELMEZTETÉS
• Csak enyhe konyhai tisztítószereket használjon a párásító tálca
tisztítására. A nem megfelelő vegyszerek vagy tisztítószerek használatának hatására deformáció,
elszíneződések, repedések (vízszivárgás) jelenhetnek meg.
MAGYAR
Ha a polisztirolhab úszó leválik,
helyezze vissza az úszó füleinek
a párásító tálca nyílásaiba való
beillesztésével, az ábrán látható
módon.
Illessze az úszó fülét
a nyílásba.
Illessze az úszót a
fül alá.
Illessze az úszó másik oldalán lévő fület
a nyílásba.
HU-13
Page 82

TISZTÍTÁS ÉS KARBANTARTÁSTISZTÍTÁS ÉS KARBANTARTÁS
PÁRÁSÍTÓ SZŰRŐ
Karbantartás gyakorisága
A karbantartás gyakorisága függ a használt víz keménységégének, illetve tisztaságának
fokától. Minél keményebb a víz, annál gyakrabban van szükség vízkőtelenítésre.
Ügyeljen rá, hogy ne öntse ki a vizet a szűrő tisztításakor.
Vegye ki a víztartályt és a párá-
1
sító tálcát.
Havonta egyszer vagy amikor a szűrő kijelző világít.
Öblítse le többször langyos vízzel
5
a párásító szűrőt a mosószer teljes
eltávolításához.
Párásító szűrő
Párásító tálca
Víztartály
Párásító
tálca
Vegye ki a párásító szűrőt a pá-
2
rásító tálcából.
Vigyázzon, hogy ne öntse ki a vizet a párásító tálcából.
A vízkőtelenítő folyadék előkészítése.
3
Vízkőtelenítéshez használható néhány üzletben kapható citromsav vagy
100 %-os palackozott citromlé. Válassza
ki valamelyiket és készítse el a vízkőtelenítő folyadékot.
<Citromsav használatakor>
Egy megfelelő edényben hígítson fel 3 teáskanálnyi citromsavat 2 és 1/2 csésze langyos
vízzel és alaposan keverje össze őket.
<Citromlé használatakor>
Vízkőtelenítésre 100 %-os palackozott
citromlé is felhasználható. Csak 100 %-os
rost nélküli citromlevet (szűrje le a levet, ha
szükséges) használjon. Keverjen össze 1/4
csésze citromlevet és 3 csésze langyos vizet egy akkora edényben, amiben a párásító szűrő is elfér, és alaposan keverje össze.
Nem megfelelő kiöblítés miatt kellemetlen szagok keletkezhetnek és a készülék
működését vagy/és megjelenését befolyásolhatja.
* Ne súrolja kefével a párá-
sító szűrőt, csak óvatosan
öblítse le langyos vízben.
Csatlakoztassa a párásító szűrőt a
6
párásító tálcához és helyezze viszsza a készülékbe a párásító tálcát.
•A párásító szűrő nem illeszthető be fordítva. A párásító tálca visszahelyezésekor győződjön meg róla, hogy nincsen
rés a párásító tálca és a készülék között. A készülék nem működik megfelelően, ha a párásító tálcát nem megfelelően helyezik vissza a készülékbe.
•Ha hosszabb ideig nem használja a
készüléket, teljesen
szárítsa meg a párásító szűrőt mielőtt
visszahelyezné.
Dugja be a készüléket, kapcsolja
7
BE, majd a kijelzőn nyomja le
a Szűrő nullázó (reset) gombot
több, mint 3 másodpercig a lenullázáshoz.
Tisztítás előtt áztassa be legalább
4
30 percre a párásító szűrőt a folyadékba.
Citromlé használatakor
ajánlott hosszabb ideig
beáztatni, mint citromsav
alkalmazásakor.
A párásító szűrő felszínén vöröses-barna
vagy fehér üledék jelenhet meg. Ezek a
szennyeződések (kalcium, stb.) a csapvízben megtalálható szennyeződések miatt jelennek meg, a jelenség nem számít meghibásodásnak. Cserélje
ki a párásító szűrőt, ha
már teljesen beborítja
a fehér üledék.
HU-14
Page 83

ÚTMUTATÓ A SZŰRŐK CSERÉJÉHEZ
A szűrő élettartama függ a környezetétől, a használattól, és a készülék elhelyezésétől. Ha a
por és a szagok nem szűnnek meg, cserélje ki a szűrőket.
(Tekintse át a “Kérjük, olvassa el ezt az útmutatót, mielőtt használná az új Légtisztítóját” részt)
Útmutató a szűrőcsere időpontjának megválasztásához
HEPA szűrő
A szűrő élettartamát nagyban befolyásolja a szoba jelentette környezet. A cigaretta füst, kisállatok
hámsejtjei, és egyéb apró lebegő részecskék csökkenthetik a szűrő élettartamát. Rendszeresen ellenőrizze a szűrőket és cserélje ki őket, ha szükséges.
Felnyitás után akár 5 évig
Mosható szagtalanító szűrő
A szűrő kimosás után többször is használható, de ki is cserélhető.
Párásító szűrő
A szűrő élettartamát nagyban csökkentheti a szoba jelentette környezet. Még ha nem is telt el 2 év,
cserélje ki a Párásító szűrőt, ha a következőket tapasztalja:
• Ásványi lerakódás (fehér, fekete, vagy piros anyag), ami nem volt eltávolítható tisztításkor vagy a
Párásító szűrő még mindig szennyezett.
• A szűrő súlyosan sérült vagy elvetemedett.
Felnyitás után akár 2 évig
Csereszűrők
• HEPA szűrő: 1 egység
Modell FZ-C150HFE (KC-860E modellhez)
FZ-C70HFE (KC-840E modellhez)
• Mosható szagtalanító szűrő: 1 egység
Modell FZ-C150DFE (KC-860E modellhez)
FZ-C70DFE (KC-840E modellhez)
• Párásító szűrő: 1 egység
Modell FZ-C100MFE
FZ-C100HFE (KC-850E modellhez)
FZ-C100DFE (KC-850E modellhez)
(Szürke)
Párásító szűrő
MAGYAR
(fehér)
Szűrő kerete (szürke)
A szűrők cseréje
1. Cserélje ki a szűrőket a csereszűrőkhöz mellékelt leírás alapján.
2. Használja a dátum címkéket a szűrő csere idejére való emlékeztetőként.
Szűrő kerete (fehér)
A szűrők elhelyezése
Kérjük, az elhasznált szűrőket a helyi előírásoknak és jogszabályoknak megfelelően helyezze el.
HEPA szűrő anyaga:
• Szűrő: Polipropilén • Keret: Poliészter
Mosható szagtalanító szűrő anyaga:
• Poliészter, műselyem, aktivált szén
Párásító szűrő anyaga:
• Műselyem, Poliészter
HU-15
Page 84

HIBAKERESÉSI SEGÉDLET
A szerviz hívása előtt kérjük, nézze át az alábbi hibakeresési segédlet táblázatot. Elképzelhető, hogy
a felmerült hibajelenség nem a készülék hibás működéséből ered.
JELENSÉG MEGOLDÁS (nem meghibásodás)
Nem távolítja el a szagokat és a
füstöt.
Az előlapi kijelző a levegő
szennyezettsége ellenére
zölden világít.
Az előlapi kijelző
narancssárgán vagy pirosan
világít, amikor a levegő tiszta.
Kattogó vagy ketyegő hang
hallatszik a készülékből.
A készülékből kijövő levegő
nem szagtalan.
A készülék nem működik,
amikor cigaretta füst van a
levegőben.
Világít a Szűrő kijelző fénye.
• Ha erősen szennyezettnek tűnnek a szűrők, tisztítsa meg vagy
cserélje ki őket. (Lásd az HU-11, HU-12, HU-14 oldalakat)
• A levegő szennyezett lehet, amikor a készüléket bedugja.
Húzza ki a készüléket, várjon egy percet, majd csatlakoztassa
újból a konnektorba a készüléket.
• Az érzékelő működését akadályozza, ha a porérzékelő nyílásai eltömődtek vagy szennyezettek. Óvatosan tisztítsa meg a
porérzékelőket (Lásd az HU-11 oldalt).
• Kattogó vagy ketyegő hang hallható a készülékből, amikor az
ionokat állít elő.
• Ellenőrizze, hogy szűrők nem erősen szennyezettek-e.
• Tisztítsa meg vagy cserélje ki a szűrőket.
• Plasmacluster légtisztítók kis mennyiségben ózont bocsátanak
ki, ami kellemetlen illattal járhat.
• Olyan helyen található a készülék, ahonnan az érzékelő nehezen képes érzékelni a cigarettafüstöt?
• Nincsenek eltömődve vagy eldugulva a porérzékelő nyílásai?
(Ebben az esetben tisztítsa meg a nyílásokat.) (Lásd az
HU-11. oldalon.)
• A szűrők visszahelyezése után csatlakoztassa a tápkábelt egy
konnektorhoz és nyomja meg a Szűrő nullázás gombot. (Lásd
az HU-11. oldalon)
Az Előlapi kijelző KI van
kapcsolva.
Nem világít a Víztartály
kijelzője, amikor a tartály üres.
A tartályban lévő vízszint jelző
nem csökken vagy csak lassan.
Az előlapi kijelző fényei
gyakran színt váltanak.
• Ellenőrizze, hogy nincs-e kiválasztva a Fények KIKAPCSOLVA
mód. Ha igen, nyomja meg a Fényerő szabályozó gombot a kijelző fényeinek bekapcsolásához. (Lásd az HU-10 oldalon.)
• Ellenőrizze, hogy nem szennyezett-e a polisztirolhab úszó.
Tisztítsa meg a párásító tálcát. Győződjön meg róla, hogy a
készülék vízszintes felületen van elhelyezve.
• Ellenőrizze, hogy a párásító tálca és a víztartály megfelelően
lettek-e behelyezve. Ellenőrizze a párásító szűrőt.
• Ha erősen szennyezett a szűrő, tisztítsa meg vagy cserélje ki.
(Lásd az HU-14 és az HU-15 oldalon).
• Az előlapi kijelző fényei automatikusan színt váltanak, ha a porérzékelő vagy a szagérzékelő szennyeződést észlel.
HU-16
Page 85

HIBAÜZENETEK
KC-850E•KC-860E
Ha a hiba újból előfordul, lépjen kapcsolatba a Sharp szervizközpontjával.
DIGITÁLIS
KIJELZŐ
LÁMPA KIJELZŐ HIBA LEÍRÁSA MEGOLDÁS
A Levegőtisztítás & Párásító
kijelző fénye villog.
A Ventilátor sebesség kijelző
fénye villog ‘
Tisztítás ion zuhannyal kijelző fénye villog.
A Levegőtisztítás kijelző fénye villog.
A Ventilátor sebesség kijelző
fénye villog ‘ ‘.
A Ventilátor sebesség kijelző
fénye villog ‘ ‘.
‘.
Rendellenesség a
párásító szűrőnél
Rendellenesség a ventilátor motorjánál
Rendellenesség a hőmérséklet-páratartalom
érzékelőnél
Hiba a nyomtatott
áramkörnél
Ellenőrizze, hogy a párásító szű-
rő, a párásító tálca és a víztartály
megfelelően vannak telepítve, majd
kapcsolja BE újból a készüléket.
Kapcsolja KI a készüléket a hibaüzenet törléséhez, várjon egy percet,
majd kapcsolja BE újból az egységet.
Húzza ki a készüléket, várjon egy
percet, majd csatlakoztassa újból
a konnektorba a készüléket.
KC-840E
LÁMPA KIJELZŐ HIBA LEÍRÁSA MEGOLDÁS
A Levegőtisztítás & Párásító
kijelző fénye villog.
A Ventilátor sebesség kijelző
fénye villog ‘
A Páratartalom kijelző ‘Magas’
vagy ‘Alacsony’ jelzése villog.
Tisztítás ion zuhannyal kijelző fénye villog.
A Levegőtisztítás kijelző fénye villog.
A Ventilátor sebesség kijelző
fénye villog ‘
A Ventilátor sebesség kijelző
fénye villog ‘
‘.
‘.
‘.
Rendellenesség a
párásító szűrőnél
Rendellenesség a ventilátor motorjánál
Rendellenesség a hőmérséklet-páratartalom
érzékelőnél
Hiba a nyomtatott
áramkörnél
Ellenőrizze, hogy a párásító szű-
rő, a párásító tálca és a víztartály
megfelelően vannak telepítve, majd
kapcsolja BE újból a készüléket.
Kapcsolja KI a készüléket a hibaüzenet törléséhez, várjon egy percet,
majd kapcsolja BE újból az egységet.
Húzza ki a készüléket, várjon
egy percet, majd csatlakoztassa
újból a konnektorba a készüléket.
MAGYAR
HU-17
Page 86

MŰSZAKI JELLEMZŐK
56 19 5,5 (4,9) 41 11,6 3,8 (3,3) 26 9,5 3,7 (3,4)
51 39 17 47 35 15 45 34 15
396 240 84 306 168 60 210 132 48
MAXIMUM KÖZEPES ALACSONY MAXIMUM KÖZEPES ALACSONY MAXIMUM KÖZEPES ALACSONY
/óra)
3
Ventilátor sebesség (m
Modell KC-860E KC-850E KC-840E
Tápfeszültség 220 ~ 240 V 50/60 Hz
Ventilátor sebesség beállítása
LÉGTISZTÍ-
3
Névleges teljesítmény (W)
Zajszint (dBA)
TÁS
56 21 8,8 (8,2) 40 13,5 6,8 (6,3) 21 11,5 6,1 (5,8)
50 39 25 47 35 22 42 34 20
396 240 120 288 168 84 186 132 54
/óra)
Ventilátor sebesség (m
LÉGTISZTÍ-
730 500 300 600 400 230 450 330 170
)*1 ~48 ~38 ~26
2
Névleges teljesítmény (W)
Zajszint (dBA)
Párásítás (mL/óra)*2
TÁS & PÁRÁ-
SÍTÁS
Víztartály kapacitása (L) 4,3 4,0 3,0
Ajánlott szobaméret (m
Por/szag/Hőmérséklet & Páratartalom Por/Hőmérséklet & Páratartalom
Portalanítás HEPA mikrobiális vezérléssel *3
Szagtalanítás Mosható szagtalanító
Kábelhossz (m) 2,0
Méretek (mm) 398 (Ho) × 288 (Mé) × 627 (Ma) 378 (Ho) × 265 (Mé) × 586 (Ma) 360 (Ho) × 233 (Mé) × 550 (Ma)
Szűrő típusa
Érzékelők
Tömeg (kg) 11,0 9,0 8,0
*1 • Az ajánlott szobaméret a készülék maximális ventilátor sebességgel való működésével lett kalkulálva.
• Az ajánlott szobaméret területe akkora helységet jelöl, aminek levegőjét a készülék képes megtisztítani 30 percen belül meghatározott számú porrészecskétől.
A HEPA szűrő EN1822 szerinti besorolása: H10.
*2 • A párásítás mértéke függ a belső és a külső hőmérséklettől, illetve a páratartalomtól.
• Mérési körülmények: 20 ºC, 30 %-os páratartalom (JEM1426)
*3 •
A párásítás mértéke nő, ahogy a hőmérséklet értéke nő vagy a páratartalom csökken.
A párásítás mértéke csökken, ahogy a hőmérséklet értéke csökken vagy a páratartalom növekszik.
Teljesítmény-felvétel készenléti állapotban
Amennyiben a készülék a tápforrásra csatlakoztatva van, az elektromos áramkörök működtetése
0,7 W teljesítmény-felvételt igényel.
Energiatakarékossági célból húzza ki a tápcsatlakozót, amikor a készülék nem működik!
HU-18
Page 87

Figyelem: A
terméket ezzel a
jelöléssel látták el.
Ez azt jelenti, hogy a
használt elektromos
és elektronikus
termékek nem
keverhetők az
általános háztartási
hulladékkal. Ezekre
a termékekre külön
begyűjtő rendszer
létezik.
A. Hulladék-elhelyezési tájékoztató felhasználók részére (magán
háztartások)
1. Az Európai Unióban
Figyelem: Ha a készüléket ki akarja selejtezni, kérjük, ne a közönséges szemeteskukát
használja!
A használt elektromos és elektronikus berendezéseket külön, és a használt elektromos és
elektronikus berendezések szabályszerű kezeléséről, visszanyeréséről és újrahasznosításáról
rendelkező jogszabályokkal összhangban kell kezelni.
A tagállamok általi végrehajtást követően az EU államokon belül a magán háztartások
használt elektromos és elektronikai berendezéseiket díjmentesen juttathatják vissza a kijelölt
gyűjtőlétesítményekbe*. Egyes országokban* a helyi kiskereskedés is díjmentesen visszaveheti
Öntől a régi terméket, ha hasonló új terméket vásárol.
*) A további részletekről, kérjük, érdeklődjön az önkormányzatnál.
Ha használt elektromos vagy elektronikus berendezésében elemek vagy akkumulátorok
vannak, kérjük, előzetesen ezeket selejtezze ki a helyi előírásoknak megfelelően.
A termék szabályszerű kiselejtezésével Ön segít biztosítani azt, hogy a hulladék
keresztülmenjen a szükséges kezelésen, visszanyerési és újrahasznosítási eljáráson, ezáltal
közreműködik a lehetséges káros környezeti és humán egészségi hatások megelőzésében,
amelyek ellenkező esetben a helytelen hulladékkezelés következtében előállhatnának.
2. Az EU-n kívüli egyéb országokban
Ha a terméket ki szeretné selejtezni, kérjük, forduljon az önkormányzathoz, és érdeklődjön a
helyes hulladék-elhelyezési módszerről.
B. Hulladék-elhelyezési tájékoztató vállalati felhasználók részére
1. Az Európai Unióban
Ha a terméket üzleti célokra használta, és ki kívánja selejtezni:
Kérjük, forduljon a SHARP kereskedéshez, ahol tájékoztatják Önt a termék visszavételéről.
Lehetséges, hogy a visszavételből és újrahasznosításból eredő költségeket felszámítják.
Előfordulhat, hogy a helyi hulladékbegyűjtő létesítmény átveszi a kisebb termékeket (és kis
mennyiségeket).
2. Az EU-n kívüli egyéb országokban
Ha a terméket ki szeretné selejtezni, kérjük, forduljon az önkormányzathoz, és érdeklődjön a
helyes hulladék-elhelyezési módszerről.
MAGYAR
HU-19
Page 88

Jegyzet
Page 89

Page 90

Будь ласка, прочитайте перед використанням
вашого нового очисника повітря
Очисник повітря робить забір кімнатного повітря через отвір забору повітря, пропускає повітря через фільтр попередньої очистки, фільтр, що миється та дезодорує, та фільтр HEPA, що знаходяться усередині пристрою, а потім випускає повітря через отвір для випуску повітря. Фільтр HEPA здатен улавлювати 99,97 %
часток пилу, розміром до 0,3 мікрона, які проходять через фільтр
магає поглинати запахи. Дезодоруючий фільтр, що миється поступово поглинає
запахи в міру їх проходження через фільтр.
Деякі запахи, що поглинаються фільтрами, можуть з часом розділятися на компоненти, що може стати причиною появи додаткового запаху. У залежності від середи використання, особливо якщо пристрій експлуатується в екстрімальних
вах (білш жорстких, ніж домашні), запах може посилитися значно скоріше. Якщо
запах не зникає, фільтри повністю відпрацьовані, і необхідно замінити фільтри.
, а також допо-
умо-
ПРИМІТКА
• Очисник повітря призначений для видалення зваженого пилу та запахів, та нешкідливих
газів (наприклад, угарного газу, котрий міститься у сигаретному димі). При наявності джерел
запахів, пристрій не може повністю знищити запахи.
Фільтр HEPA
Дезодоруючий Фільтр,
що миється
Фільтр для попереднього
очищення
(На іллюстраціях зазвичай використовують “KC-850E”.)
Page 91

УКРАЇНСЬКА
ТЕХНІЧНІ
ХАРАКТЕРИСТИКИ
Унікальна комбінація технологій очищення повітря
Система потрійної фільтрації + Plasmacluster + Зволоження
УЛОВЛЮЄ ПИЛ*
Фільтр попереднього очищення, що миється, уловлює пил та інші великі зважені в повітрі частки.
ЗМЕНШУЄ ЗАПАХИ
Дезодоруючий фільтр, що миється, поглинає більшу кількість звичайних домашніх запахів.
ЗНИЖУЄ ВМІСТ ПИЛКУ І ЦВІЛІ*
Фільтр HEPA уловлює до 99,97% часток
менших
ОСВІЖАЄ
Plasmacluster очищує повітря аналогічно
природньому механізму очищення довколишнього середовища за допомогою
генерації позитивних і негативних іонів.
ЗВОЛОЖУЄ
Працює до 10 годин на одному заповненні.**
*Якщо забір повітря відбувається через
фільтруючу систему.
**Розмір кімнати:
Датчики постійно слідкують за якістю повітря, автоматично настроюючи режими
роботи згідно обумовленої чистоти та
вологості повітря.
ніж 0,3 мікрон.
до 48 м
до 38 м2 (KC-850E)
до 26 м2 (KC-840E)
2
(KC-860E)
ЗМІСТ
ВАЖЛИВІ ІНСТРУКЦІЇ З БЕЗПЕКИ
• ЗАСТЕРЕЖЕННЯ ..................................
•
ПОПЕРЕДЖЕННЯ, ЯКІ СТОСУЮТЬСЯ
ФУНКЦІОНУВАННЯ ...............................
•
МЕТОДИЧНІ ВКАЗІВКИ З УСТАНОВКИ
•
ІНСТРУКЦІЇ З ОБСЛУГОВУВАННЯ ФІЛЬТРІВ
НАЙМЕНУВАННЯ ЧАСТИН
•
НАГЛЯДНА ДІАГРАМА - ВИД СПЕРЕДУ
• ВНУТРІШНЯ СТОРОНА ........................
• ПЕРЕДНІЙ ІНДИКАТОР .........................
ПІДГОТОВКА ДО ВИКОРИСТАННЯ
• ІНСТАЛЯЦІЯ ФІЛЬТРІВ .........................
• НАПОВНІТЬ ЄМНІСТЬ ДЛЯ ВОДИ .......
ФУНКЦІОНУВАННЯ
• ДІСПЛЕЙ ОСНОВНОГО БЛОКУ ...........
• РЕЖИМ ОЧИЩЕННЯ ПОВІТРЯ ТА
ЗВОЛОЖЕННЯ ......................................
• РЕЖИМ ОЧИЩЕННЯ ПОВІТРЯ ...........
• РЕЖИМ ІОННОГО ДОЩУ .....................
•
ВИБІР ШВИДКОСТІ РОБОТИ ВЕНТИЛЯТОРУ
• КНОПКА Plasmacluster УВМ/ВИМК.....
•
КНОПКА КЕРУВАННЯ ІНДИКАТОРАМИ
• ІНДИКАТОР РІВНЯ ВОДИ ...................
•
НАСТРОЮВАННЯ ЧУТЛИВОСТІ ДАТЧИКІВ
..............................
ДОГЛЯД І ОБСЛУГОВУВАННЯ
• ІНДИКАТОР ФІЛЬТРА .........................
• ЗАДНЯ ПАНЕЛЬ ТА ДАТЧИКИ ...........
• БЛОК ....................................................
• ЄМНІСТЬ ..............................................
•
ОБСЛУГОВУВАННЯ ДЕЗОДОРУЮЧОГО
ФІЛЬТРУ, ЩО МИЄТЬСЯ
• ЛОТОК ДЛЯ ВОДИ ...............................
• ЗВОЛОЖУЮЧИЙ ФІЛЬТР ...................
•
ІНСТРУКЦІЇ ПО ЗАМІНІ ФІЛЬТРУ
.......................UA-12
ВИЯВЛЕННЯ НЕСПРАВНОСТЕЙ
СПЕЦИФІКАЦІЇ
.....................................
ІНФОРМАЦІЯ ЩО ДО ПРАВИЛЬНОЇ
УТИЛІЗАЦІЇ
..............................................
......
...
...
................
...
...
...
...
...
.......
..........
...
UA-2
UA-2
UA-3
UA-3
UA-3
UA-4
UA-4
UA-4
UA-5
UA-6
UA-6
UA-7
UA-8
UA-8
UA-8
UA-9
UA-9
UA-9
UA-10
UA-10
UA-10
UA-10
UA-11
UA-11
UA-11
UA-11
UA-12
UA-13
UA-14
UA-15
UA-16
UA-18
UA-19
УКРАЇНСЬКА
Дякуємо за придбання цього Очищувача
Повітря Корпорації SHARP. Будь ласка,
ретельно прочитайте це керівництво
з експлуатації перед використанням
очищувача повітря.
Після прочитання, тримайте посібник
з експлуатації в зручному місці для
подальших інструкцій.
UA-1
Page 92

ВАЖЛИВІ ІНСТРУКЦІЇ З БЕЗПЕКИ
Під час використання єлектричних приладів треба додержуватись запобіжних заходів,
включаючи такі:
ЗАСТЕРЕЖЕННЯ ─
• Прочитайте усі інструкції перед використанням приладу.
• Користуйтесь розетками тільки з напругою 220~240 вольтів.
• НЕ використовуйте прилад, якщо шнур електроживлення або штепсельна вилка
пошкоджені, або не подається струм до розетки у стіні.
• Періодично видаляйте пил з штепсельної вилки.
• НЕ засовуйте пальці або сторонні предмети до отвіру для впуску повітря або
випуску повітря.
•
Під час від’єднання вилки від розетки, завжди тримайтесь за вилку і ніколи не тягніть за шнур.
Це може призвести до ураження електричним струмом та/або загорянню за допомогою
короткого замикання.
• НЕ від’єднуйте штепсельну вилку вологими руками.
• НЕ використовуйте прилад поблизу газових приладів або камінів.
• Під час заповнення ємнсоті водою, чищення приладу, та якщо прилад не використовується,
від’єднуйте вилку від розетки. Це може призвести
загорянню за допомогою короткого замикання.
• Якщо шнур електроживлення пошкоджений, він повинен бути замінений виробником,
його сервісним агентом, авторизованим Сервісним Центром корпорації Sharp або
кваліфікованою людиною за для запобігання ризиків ушкодження.
• НЕ вмикайте прилад під час використання аерозолю проти комах або у кімнатах, де є
масла, диму з масляними домішками, іскри від запалювання сигарет, хімічні випари у повітрі,
або у місці, де прилад може намокнути, наприклад ванні кімнати.
• Додержуйтесь обережності під час чищення приладу. Сильні коррозійні очищувачі можуть
пошкодити корпус.
• Обслуговувати очищувач повітря має тільки Авторизований Сервісний Центр Sharp. У разі
виникнення проблем, необхідності настроювання
Сервісного Центру.
• Під час транспортування приладу, від’єднайте ємність та лоток для води, та тримайте прилад
за ручки, що знаходяться з обох боків.
• Не вживайте воду, що знаходиться у Ємності або Лотку для води.
• Змінюйте кожен день воду у ємності, наливаючи свіжу воду з
ємність та лоток для води. (Дивись UA-12 та UA-13). Якщо пристрій не використовується,
вилийте воду з ємності та лотку для води. Якщо залишити воду у лотку / ємності, це може
спричинити утворення цвілі, бактерій та неприємних запахів.
У деяких випадках бактерії можуть стати наслідком шкідливого впливу на здоров
• Цей прилад не підходить для використання особами (враховуючи дітей) з обмеженими
фізичними, сенсорними або психічними можливостями, або особ, які недостатньо досвідчені
чи неграмотні, доки вони не будуть знаходитись під наглядом, або доки їм не буде надано
інструкції щодо використання приладу людиною, що є відповідальною за їхню безпеку.
Діти
повинні бути під наглядом за для впевнення, що вони не грають з приладом.
Для запобігання ризику електричного шоку, вогню або тілесного ушкодження
отвіру для
до ураження електричним струмом та/або
залишки
або ремонту, зверніться до найближчого
під крану, та регулярно чистіть
’я.
ПРИМІТКА
Якщо цей очищувач повітря може вплинути на радіо чи телевізійний прийом передач,
спробуйте виправити це за допомогою одного або декількох слідуючих способів:
• Переорієнтуйте або змініть положення антени.
• Збільшіть відстань між приладом та радіо/ТБ приймачем.
• Під’єднайте обладнання в іншу розетку, ніж у ту, де
• Зверніться за допомогою до дилера або до досвідченого радіо/ТБ технічного спеціалісту.
- Радіо або ТБ Інтерфейс
увімкнений приймач.
UA-2
Page 93

ПОПЕРЕДЖЕННЯ, ЯКІ СТОСУЮТЬСЯ ФУНКЦІОНУВАННЯ
• НЕ блокуйте отвір для впуску повітря та/або отвір для випуску повітря.
• НЕ використовуйте прилад біля або на гарячих об’єктах, таких як печі або повітронагрівачі,
або в місцях, де прилад може контактувати з паром.
• Завжди використовуйте головний прилад у вертикальному положенні.
• Під час переміщення приладу тримайтесь за обидві
боки приладу.
Не переміщайте прилад під час його функціонування.
• Не використовуйте прилад без правильно встановлених фільтрів, ємності та лотку
для води.
• Не мийте та не використовуйте знову фільтр HEPA.
Це не тільки не покращує роботу фільтру, але й може стати причиною ураження електрич-
струмом або пошкодження обладнання.
ним
• Протирайте корпус тільки м’якою тканиною.
Не використовуйте сильнодіючі рідини та/або очисні засоби.
Поверхня приладу може бути пошкоджена або тріснути.
Окрім цього, як результат, датчики можуть бути пошкоджені.
• Інтервали обслуговування (чищення) будуть залежати від твердості домішок у воді,
яку ви використовуєте; чім жорсткіша
• Тримайте головний прилад подалі від води.
вода, тим частіше треба робити чищення.
ручки, що знаходяться по обидва
МЕТОДИЧНІ ВКАЗІВКИ З УСТАНОВКИ
• Встановлюйте прилад не менш ніж на 2м від обладнання, що виробляє електричні
хвилі, таке як телевізори або радіо приймачі, щоб запобігти єлектричних перешкод під
час використання приладу.
• Уникайте місць, де на датчик дме прямий вітер.
Пристрій може функціонувати неправильно.
• Уникайте місць, де меблі, тканини або інші предмети можуть блокувати отвіри забору
чи/або випуску повітря.
• Уникайте роботи приладу у вологих місцях та у місцях з різкими перепадами температури. Відповідні умови для функціонування у місцях, де температура становить від
5 – 35 ºC.
• Встановлюйте на стійку поверхню у приміщеннях з достатньою циркуляцією повітря.
У разі встановлення приладу на коврові покриття, прилад може незначною мірою вібрувати.
Встановлюйте прилад на ровну поверхню, щоб запобігти витіканню води з Ємності та/або
Лотку для води.
• Уникайте місць, де є домішки масляного диму.
Як результат цього може тріснути поверхня приладу, або датчик може вийти з ладу.
• Встановіть прилад на відстані приблизно 30-60 см (1-2 фути) від стіни для забезпечення достатнього руху повітря.
Стіна, яка знаходиться одразу за отвіром виходу повітря, з часом може забруднитись. Вико-
ристовуючи прилад довгий час у тому самому місці, періодично чистіть стіну та закривайте ії
вініловим щітом, і т.п., щоб попередити забруднення стіни.
УКРАЇНСЬКА
ІНСТРУКЦІЇ З ОБСЛУГОВУВАННЯ ФІЛЬТРІВ
• Слідуйте інструкціям цього керівництва для правильного догляду та обслуговування фільтрів.
UA-3
Page 94

НАЙМЕНУВАННЯ ЧАСТИН
НАГЛЯДНА ДІАГРАМА - ВИД СПЕРЕДУ
Отвір для
випуску повітря
Дісплей
основного
блоку
Передній
індикатор
Основний
Блок
KC-860E
ВНУТРІШНЯ СТОРОНА
Ручки (2 положення зліва та справа)
Датчики
• Датчик пилу
•
Датчик Температури / Вологості
•
Датчик Запаху (KC860E•KC850E)
Ручка Ємності
KC-850E
Отвір для випуску
повітря
Дісплей
основного
блоку
Передній
індикатор
Основний
Блок
KC-840E
Отвір для випуску
повітря
Фільтр HEPA (білий)
Дезодоруючий Фільтр,
що миється (чорний)
Виступи
Ємність
(Для Зволожування)
Зволожуючий фільтр
Каркас Фільтру
Кришка Ємності
Поплавець
Лоток для води
Шнур електроживлення
Штепсельна вилка
(Форма вилки залежить від країни.)
Отвір для забору
повітря
Наклейка з датами початку
експлуатації фільтрів
(Таблиця з характеристиками)
UA-4
Задня панель (Фільтр
попереднього
очищення)
Page 95

ПЕРЕДНІЙ ІНДИКАТОР
Показує стан та вологість повітря у кімнаті.
KC-850E KC-860E
Показує стан запаху, пилу та вологості у кімнаті.
ІНДИКАТОР ПИЛУ
Датчик пилу постійно контролює стан
повітря; колір індикатора змінюється
у залежності від чистоти повітря.
Модель KC-860E має 5 рівнів індикації
ступеню забруднення повітря.
Показання Датчика
Чистити
Усі зелені
Чистити
Усі зелені
Зелений
Мигає
Жовтий
Зелений
Мигає
Жовтий
Дуже забруд-
нений
Мигає
Усі червоні
Дуже за-
бруднений
Мигає
Усі червоні
Коли датчик пилу виявляє пил,
мигаючий індикатор переміщюєтсья у
залежності від запилованості.
Plasmacluster Індикатор (блакитний)
Блакитний: Plasmacluster УВІМКНЕНО (УВМ)
Не світиться: Plasmacluster ВИМКНЕНИЙ (ВМК)
ІНДИКАТОР ЗАПАХУ
Датчик запаху постійно контролює
стан повітря та змінює колір
індикатора у залежності від
інтенсивності запаху.
Запах у кімнаті
Незначний
Зелений Жовтий Червоний
Пил та запах виявляються різними
датчиками. Кольори можуть не
змінюватися одночасно.
Сильний
Індикатор рівня води
Цей індикатор засвітиться, коли ємність
для води буде потребувати напонення.
Індикатор Вологості (зелений)
Показує приблизний рівень вологості
у кімнаті. Параметри вологості не
можна настроїти.
(Приклад) Рівень вологості 60 %
80 % або більше
Меньш ніж 30 %
KC-840E
ІНДИКАТОР ПИЛУ
Датчик пилу постійно контролює стан
повітря; колір індикатора змінюється у
залежності від чистоти повітря.
Показання Датчика
Чистити
Усі зелені
Чистити
Усі зелені
Зелений
Мигає
Жовтий
Зелений
Мигає
Жовтий
Коли датчик пилу виявляє пил,
мигаючий індикатор переміщюєтсья у
залежності від запилованості.
Дуже забруд-
нений
Мигає
Усі червоні
Дуже за-
бруднений
Мигає
Усі червоні
UA-5
Індикатор Вологості (зелений)
Показує приблизний рівень вологості
у кімнаті. Параметри вологості не
можна настроїти.
Висока – 65 % або більше
Середня – 65 % або нижче до 40 % або більше
Низька – 40 % або менше
Індикатор рівня води (червноий)
Цей індикатор засвітиться, коли
ємність для води буде потребувати
напонення.
Plasmacluster Індикатор (блакитний)
Блакитний: Plasmacluster УВІМКНЕНО (УВМ)
Не світиться: Plasmacluster ВИМКНЕНИЙ (ВМК)
УКРАЇНСЬКА
Page 96

Від’ єднайте прилад перед
ПІДГОТОВКА ДО
інсталяцією або регулюванням
фільтрів.
ВИКОРИСТАННЯ
ІНСТАЛЯЦІЯ ФІЛЬТРІВ
Для збереження характеристик фільтрів, вони пакуються у поліетиленові мішки
та містяться в прилад. Не забувайте знімати поліетиленові мішки з фільтрів та
монтувати фільтри назад до пристрою перед першою експлуатацією приладу.
1
1
Задня панель
2
Від’єднайте фільтри
Від’єднайте задню панель.
Натисніть злегку на виступи,
потім нахиліть та від’єднайте
задню панель.
Верхні виступи
Витягніть Дезодорую-
чий фільтр, що миється (чорний) та НЕРА
фільтр (білий) з поліетиленових мішків.
2
1
2
Монтуйте фільтри
Монтуйте Фільтр HEPA.
Будь ласка, переконайтесь, що Фільтр
НEPA монтований правильно.
Монтування фільтру зворотньою
стороною відобразиться на
роботі приладу.
Виступ
Вставте 2 нижні виступи (лівий та правий) задньої панелі у невеликі отвори
у приладі, потім вставте дезодоруючий
фільтр, що миється поміж задньою панеллю та Фільтром НЕРА.
Дезодоруючий Фільтр, що миється
Фільтр HEPA
Задня панель
Нижні виступи
Фільтр HEPA
Дезодоруючий
Фільтр, що
миється
Легко натисніть на верх-
3
ні виступи (лівий та правий) та зафіксуйте.
Верхні виступи
Запишіть дату початку
4
експлуатації на наклейці
з датами.
Використовуйте дату початку
експлуатації як орієнтир для
визначення інтервалів заміни
фільтрів.
UA-6
Наклейка з датами початку
експлуатації фільтрів
Page 97

НАПОВНІТЬ ЄМНІСТЬ ДЛЯ ВОДИ
Цей пристрій може використовуватись у режимі очищення повітря без води у ємності. У разі використання
режиму очищення та зволожування повітря, або режиму
іонного дощу, ємність необхідно заповнити водою.
Від’єднайте ємність, потягнув ручку єм-
1
ності уверх.
Від’єднайте кришку ємності та обережно
2
наповніть ємність водопровідною водою.
• Міняйте воду у ємності для води кожного дня свіжою водопровідною водою.
Після заповнення водою, щільно затяг-
3
ніть кришку ємності.
• Переконайтеся, що вода ніде не тече.
• Зайву воду на зовнішній стінці ємності видаляйте
тряпкою.
• Під час перенесення ємності тримайте її обидвома
руками отвіром уверх.
Ручка Ємності
Ємність
Лоток для
води
Ємність
Кришка Ємності
затягніть
Монтуйте Ємність для води у прилад.
4
• Верхній засув заклацнеться у положенні при пра-
вильно встановленій ємності.
Попередження
• Не піддавайте прилад вплаву води. Це може спричинити коротке замикання та / або
спричинити ураження електричним струмом.
• Не використовуйте гарячу воду (40 ºC), хімічні речовини, ароматичні речовини, брудну
воду, або інші шкідливі речовини, це може спричинити деформацію та/або вихід приладу з ладу.
• Використовуйте тільки свіжу водопровідну воду. Використання іншої води
чинити появу цвілі, грибків та / або бактерій.
може спри-
UA-7
УКРАЇНСЬКА
Page 98

ФУНКЦІОНУВАННЯ
ДІСПЛЕЙ ОСНОВНОГО БЛОКУ
Кнопка Cкидання фільтру/
Індикатор (червоний)
Управління
індикаторами
Кнопка
Вибір швидкості
роботи вентилятору
Індикатор (зелений)
Кнопка Plasmacluster УВМ/ВИМК
Індикатор (зелений)
Кнопка увімкнення
Живлення
Натисніть будь-яку кнопку щоб обрати
режим функціонування і увімкніть прилад.
РЕЖИМ ОЧИЩЕННЯ ПОВІТРЯ ТА
ЗВОЛОЖЕННЯ Індикатор (зелений)
Кнопка режиму очищення
повітря/ Індикатор (зелений)
Кнопка вимкнення
Живлення
РЕЖИМ ІОННОГО ДОЩУ
Індикатор (блакитний)
РЕЖИМ ОЧИЩЕННЯ ПОВІТРЯ ТА ЗВОЛОЖЕННЯ
Використовуйте режим очищення та зволожування повітря для швидкого очищення повітря, винищення запахів та зволожування повітря.
Наповніть Ємність для води. (Дивись UA-7)
1
Натисніть кнопку режиму очищення повітря та
2
зволоження.
• Якщо шнур живлення не було від’єднано між використанням,
прилад почне функціонувати у попередньообраному режимі.
Натисніть кнопку швидкості вентилятору щоб
3
обрати бажану швидкість вентилятору.
• Індикатор покаже обрану на даний
момент швидкість вентилятору.
Натисніть кнопку вимкнення живлення щоб вимкнути прилад.
Про режим Автоматичного Зволожування
Датчики температури/вологості автоматично визначають та
регулюють вологість у залежності від зміни температури у
кімнаті. У залежності від розміру та зволоження кімнати, вологість може не сягнути 55~65 %. У таких випадках рекомендується використовувати режим очищення повітря та зволоження при максимальній швидкості роботи вентилятору.
UA-8
Температура
~18 ºC 65 %
18 ºC~24 ºC 60 %
24 ºC~ 55 %
Зволоження
Page 99
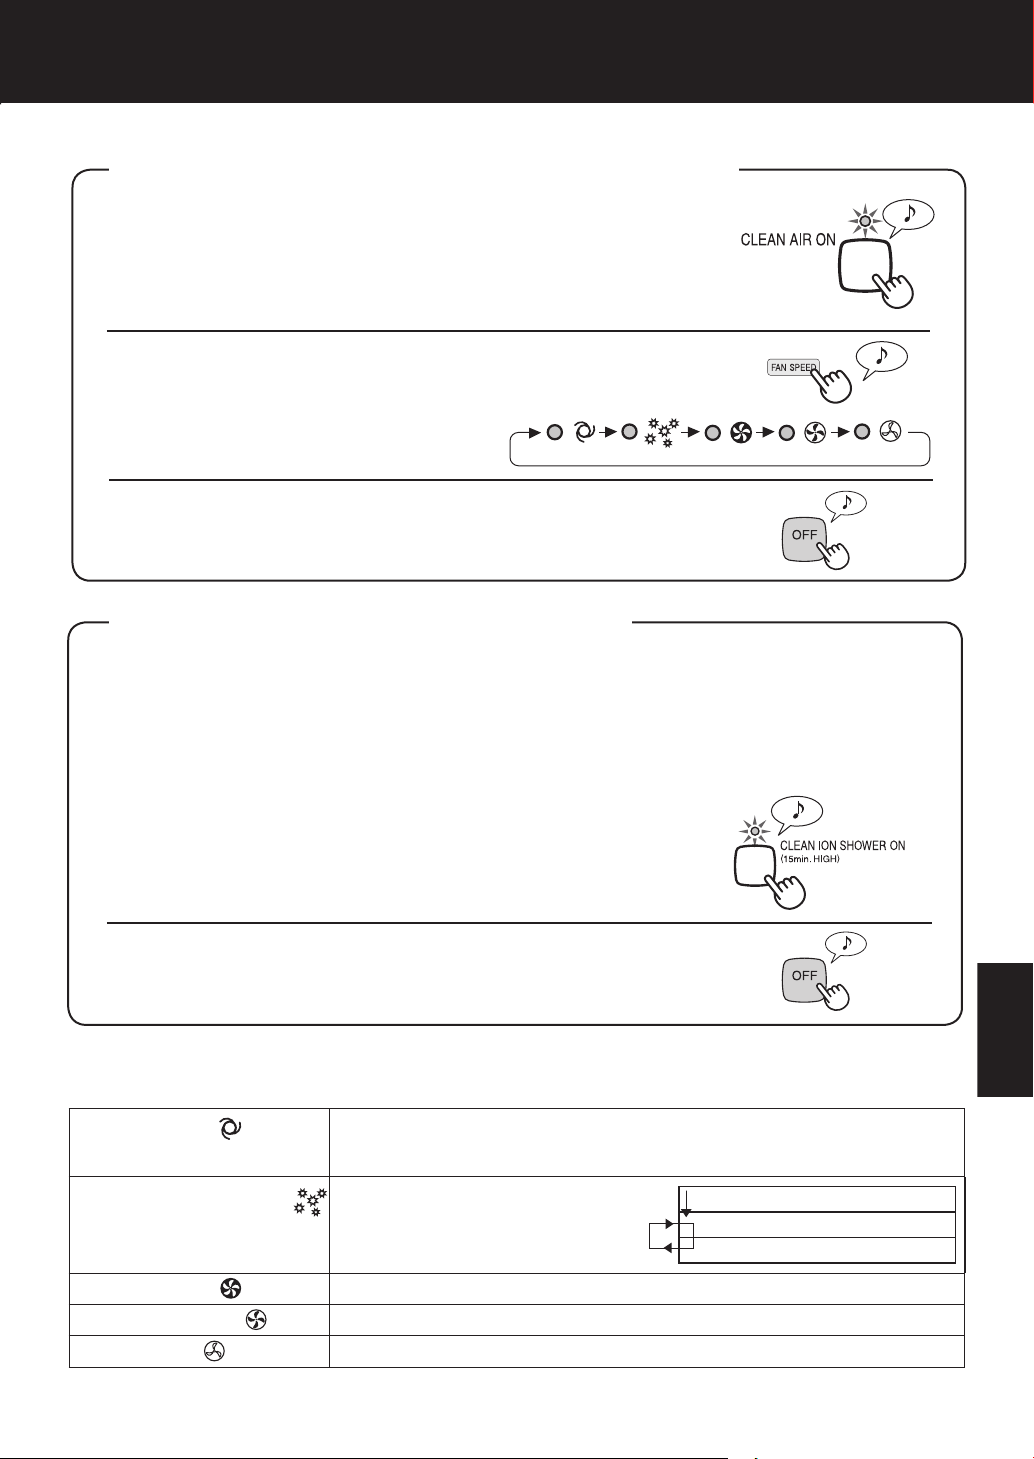
РЕЖИМ ОЧИЩЕННЯ ПОВІТРЯ
Використовуйте режим очищення повітря, якщо не потрібне
додаткове зволоження.
Натисніть кнопку режиму очищення повітря на дісплеї.
1
• Якщо шнур живлення не було від’єднано між використанням,
прилад почне функціонувати у попередньообраному режимі.
Натисніть кнопку швидкості вентилятору щоб
2
обрати бажану швидкість вентилятору.
• Індикатор покаже обрану на даний
момент швидкість вентилятору.
Натисніть кнопку вимкнення живлення щоб вимкнути прилад.
РЕЖИМ ІОННОГО ДОЩУ
Під час роботи у режимі іонного дощу виділяються Plasmacluster іони високої щільності.
Подаючи безперервно міцний потік повітря у перебігу 15 хвилин, прилад ефективно
видаляє аерозольний пил, пилок, цвіль і алергени з повітря, яке проходить крізь
фільтруючу систему. Під час вибору цього режиму необхідно заповнювати ємність водою.
Прилад зволожує повітря коли у ємності є вода, та працює без зволоження, коли води у
ємності нема.
Натисніть на дісплеї кнопку режиму Іонного
1
Дощу, щоб обрати цей режим.
Коли робота у цьому режимі закінчиться, прилад повернеться
до роботи у режимі, у котрому він працював до цього.
Натисніть кнопку вимкнення живлення щоб вимкнути прилад.
ВИБІР ШВИДКОСТІ РОБОТИ ВЕНТИЛЯТОРУ
Будь ласка зверніть увагу на те, що швидкість вентилятору не може бути відрегульована у режимі Іонного Дощу.
Робота АВТО
Робота у режимі ПИЛОК
функціонування
Робота МАКС
Робота СЕРЕДН
Робота НИЗ
*ВИСОКА швидкість роботи вентилятору є проміжною швидкістю між СЕРЕДНЬОЮ та МАКСИМАЛЬНОЮ.
Швидкість вентилятору перемикається автоматично (з високої на низьку та
у зворотньому напрямку) у залежності від вмісту домішок у повітрі. Датчик
визначає рівень забруднення для забезпечення ефективного очищення повітря.
Прилад буде працювати при високій
швидкості протягом 10 хвилин, потім швидкість буде чергуватися між
СЕРЕДНЬОЮ та ВИСОКОЮ.
Пристрій працюватиме при максимальній швидкості вентилятору.
Пристрій працюватиме при середній швидкості вентилятору.
Прилад буде працювати у спокійному режимі з мінімальним забором повітря.
10 хвилин: Висока швидкість вентилятору
20 хвилин: Середня швидкість вентилятору
20 хвилин: Висока швидкість вентилятору
UA-9
УКРАЇНСЬКА
Page 100

ФУНКЦІОНУВАННЯ
Кнопка Plasmacluster УВМ/ВИМК
Натисніть кнопку Plasmacluster УВМ/ВИМК, щоб
увімкнути чи вимкнути режим іонізації.
Зелений індикатор, що світиться, показує, що режим
іонізаціі Plasmacluster увімкнено.
Кнопка
Використовуйте, якщо
індикатори на передній панелі світяться дуже яскраво.
Попередження
КЕРУВАННЯ ІНДИКАТОРАМИ
Щоб обрати необхідну яскравість для індикаторів
на передній панелі, див. малюнок зправа.
The lights on the front panel are brighter.
「 」
「 」
「 」
Індикатори на передній панелі завжди світяться яскравіше під час запуску.
Індикатори на передній панелі світяться яскравіше.
The lights on the front panel are darker.
Індикатори на передній панелі світяться слабкіше.
The lights on the front monitor turn off
Індикатори на передній панелі вимкнені.
ІНДИКАТОР РІВНЯ ВОДИ
Коли у ємності буде закінчуватись вода, індикатор рівня води почне
мигати, нагадуючи про те, що потрібно наповнити ємність. Будь ласка,
враховуйте, що у режимі очищення повітря та у режимі іонного дощу,
цей індикатор не почне мигати, навіть якщо ємність буде пустою.
Встановлення звукового індикатора рівня води.
Окрім світлового індикатору, прилад може бути настроєний на спрацьовування звукового
індикатору, коли у ємності закінчується вода. Коли прилад вимкнений, натисніть та тримайте кнопку
керування індикаторами 3 секунди, щоб увімкнути звуковий сигнал.
Відміна
Щоб вимкнути звуковий сигнал, коли прилад вимкнений, натисніть
Кнопку керування індикаторами та тримайте її більш ніж 3 секунди.
Мигає
Flashing
НАСТРОЮВАННЯ ЧУТЛИВОСТІ ДАТЧИКІВ
Якщо індикатор ПИЛУ та індикатор ЗАПАХУ постійно світяться червоним світлом, встановіть на “низьку”, щоб зменшити чутливість, а для збільшення чутливості втсановіть
на “високу”, якщо індикатор ПИЛУ та індикатор ЗАПАХУ постійно світяться зеленим.
Натисніть кнопку Швидкості вентилятору на 3 секунди, коли прилад вимкнений.
1
Індикатор швидкості вентилятору покаже рівень чутливості датчику на даний момент.
Фабричне установлення - Стандарт, що визначається індикатором СЕРЕДН.
Натиснніть кнопку швидкості вентилятору щоб встановити бажану
2
чутливість датчиків.
Дивіться діаграму зправа, щоб обрати потрібний рівень чутливості датчиків.
Натисніть кнопку вимкнення подачі живлення.
3
Зауважте, що якщо кнопка вимкнення подачі живлення не натискається у продовж 8 секунд після встановлення чутливості датчиків, то встановлення зберігаються автоматично. Встановлення чутливості датчиків
зберігається навіть якщо виммкнути прилад з розетки.
UA-10
Індикатор
Швидкості
Вентилятору
Датчики
Чутливості
Висока
Стандарт
Низька
 Loading...