

Page 1
*Plasmacluster is a trademark
of Sharp Corporation.
AIR PURIFIER
with Humidifying Function
KC-840E
KC-850E
KC-840E
KC-850E
KC-860E
OPERATION MANUAL
LUFTREINIGER
mit Befeuchtungsfunktion
BEDIENUNGSANLEITUNG
Puricateur d’air avec
fonction d’humidication
MANUEL D’UTILISATION
LUCHTREINIGER
met luchtbevochtiger
GEBRUIKSAANWIJZING
Воздухоочиститель с
функцией увлажнения
РУКОВОДСТВО ПО
ЭКСПЛУАТАЦИИ
ENGLISH
DEUTSCH
FRANÇAIS
NEDERLANDS
РУССКИЙ
KC-860E
SHARP CORPORATION
OSAKA, JAPAN
Printed in China
TINS-A279KKRZ 08H-
Page 2
Please read before operating your new Air Purier
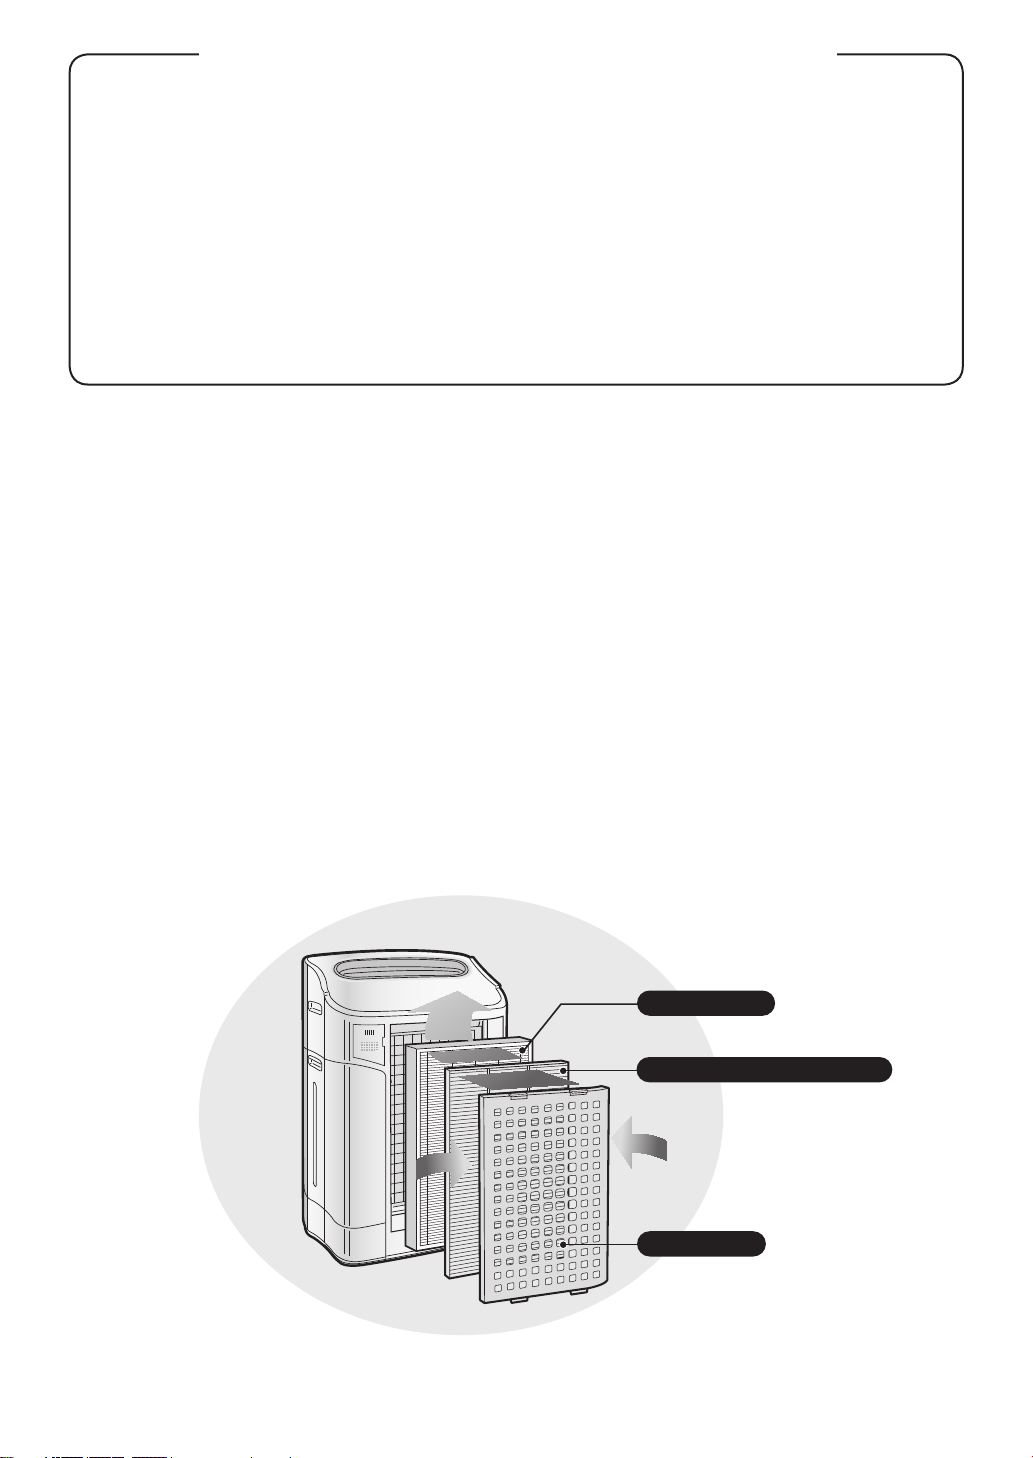
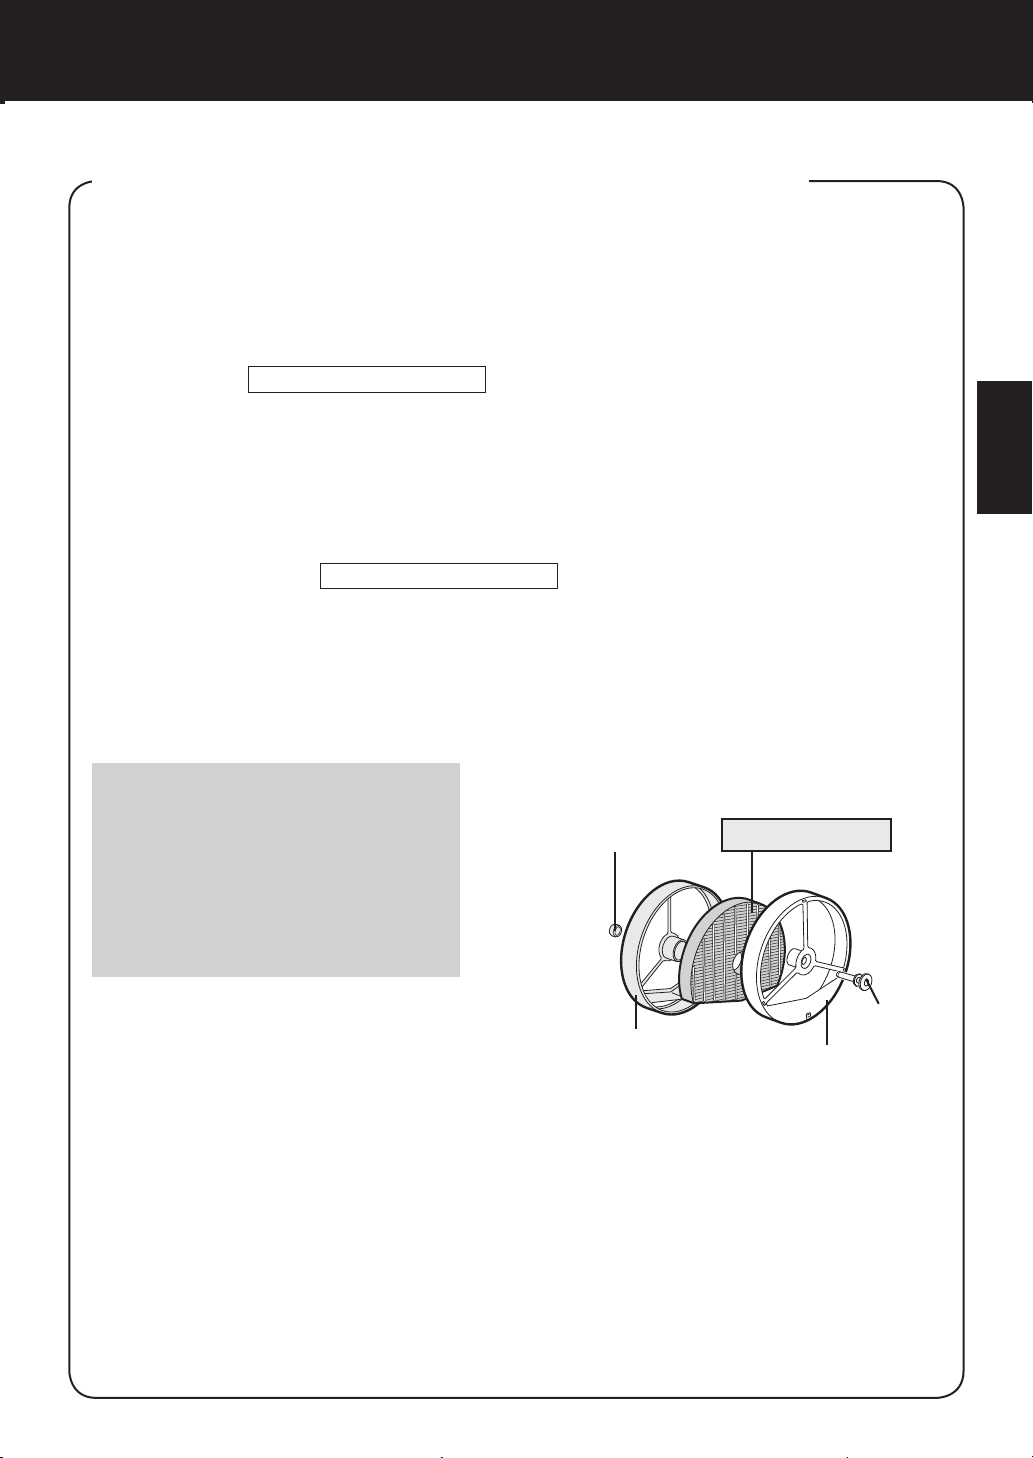
The air purier draws in room air from the air intake, passes the air through a Pre-Filter, a Washable Deodorizing Filter and a HEPA Filter inside of the unit, then discharges the air through the air outlet. The HEPA Filter can remove 99.97% of dust particles
as small as 0.3 microns that pass through the lter and also helps absorb odours. The
Washable Deodorizing Filter gradually absorbs odours as they pass through the lter.
Some odours absorbed by the lters may break down over time, resulting in additional
odour. Depending on the usage environment, especially when the product is used in
extreme environments (significantly more severe than normal household use), this
odour may become strong in a shorter period than expected. If the odour persists, the
lters should be replaced.
NOTE
• The air purier is designed to remove air-suspended dust and odour, but not harmful gases (for
example, carbon monoxide contained in cigarette smoke). If the source of the odour still exists, the
air purier may not completely remove the odour.
HEPA Filter
Washable Deodorizing Filter
Pre-Filter
(Common illustration has used “KC-850E”.)
Page 3

ENGLISH
FEATURES
Unique Combination of Air Treatment
Technologies
Triple Filtration System + Plasmacluster
+ Humidication
TRAPS DUST*
Washable pre-filter traps dust and other
large airborne particles.
DECREASES ODOURS
Washable deodorizing lter absorbs many
common household odours.
REDUCES POLLEN & MOLD*
HEPA filter traps 99.97% of particles as
small as 0.3 microns.
FRESHENS
Plasmacluster treats the air similar to the
way nature cleans the environment by
emitting a balance of positive and negative
ions.
HUMIDIFIES
Runs up to 10 hours per lling.**
*When air is drawn through the filter sys-
tem.
**Room size:
up to 48 m2 (KC-860E)
up to 38 m2 (KC-850E)
up to 26 m2 (KC-840E)
Sensor Technology continuously monitors
air quality, and automatically adjusting operation based on detected air purity and
humidity.
CONTENTS
......
...
E-10
E-10
E-10
E-10
E-12
E-12
E-13
E-14
E-15
E-16
E-18
..
E-19
IMPORTANT SAFETY INSTRUCTIONS
• WARNING ..................................................
• CAUTIONS CONCERNING OPERATION .
• INSTALLATION GUIDELINES ....................
• FILTER GUIDELINES ................................
PART NAMES
• ILLUSTRATIVE DIAGRAM .........................
• BACK ..........................................................
• FRONT MONITOR .....................................
PREPARATION FOR USE ............................
• FILTER INSTALLATION .............................
• REFILLING WATER TANK .........................
OPERATION
• MAIN UNIT DISPLAY .................................
• CLEAN AIR & HUMIDIFY MODE ...............
• CLEAN AIR MODE .....................................
• CLEAN ION SHOWER MODE ...................
• FAN SPEED BUTTON ................................
• Plasmacluster ON/OFF BUTTON .............
• LIGHTS CONTROL BUTTON ..................
• WATER SUPPLY INDICATOR LIGHT ......
• ADJUSTMENT OF SENSOR
DETECTION SENSITIVITY ......................
CARE AND MAINTENANCE
• FILTER INDICATOR LIGHT .....................
• BACK PANEL AND SENSORS ................
• UNIT ........................................................
• WATER TANK ...........................................
• WASHABLE DEODORIZING
FILTER CARE ..........................................
• HUMIDIFYING TRAY ...............................
• HUMIDIFYING FILTER .............................
•
FILTER REPLACEMENT GUIDELINES
TROUBLESHOOTING
SPECIFICATIONS
.............................................
...............................................
.................
............................
....................................
INFORMATION ON PROPER DISPOSAL
E-2
E-2
E-3
E-3
E-3
E-4
E-4
E-4
E-5
E-6
E-6
E-7
E-8
E-8
E-8
E-9
E-9
E-9
E-11
E-11
E-11
E-11
ENGLISH
DEUTSCH
FRANÇAIS
NEDERLANDS
РУССКИЙ
Thank you for purchasing this SHARP Air
Purifier. Please read this manual carefully
before using the air purier.
After reading, keep the manual in a conven-
ient location for future reference.
E-1
Page 4

IMPORTANT SAFETY INSTRUCTIONS
When using electrical appliances, basic safety precautions should be followed, including the
following:
WARNING
• Read all instructions before using the unit.
• Use only a 220~240 volt outlet.
• Do not use the unit if the power cord or plug is damaged or the connection to the wall outlet
is loosened.
• Periodically remove dust from the plug.
• Do not insert ngers or foreign objects into the air intake or air outlet.
• When removing the power plug, always hold the plug and never pull on the cord.
Electrical shock and/or re from a short circuit may result.
• Do not remove the plug when your hands are wet.
• Do not use this unit near gas appliances or replaces.
When relling the Water Tank, cleaning the unit, or when the unit is not in use, be sure to unplug
•
the unit. Electrical shock and/or re from a short circuit may result
• If the power cord is damaged, it must be replaced by the manufacturer, its service agent, a
Sharp authorized Service Centre or similarly qualied person in order to avoid a hazard.
• Do not operate when using aerosol insecticides or in rooms where there is oily residue, incense,
sparks from lit cigarettes, chemical fumes in the air, or in locations where the unit may get wet,
such as a bathroom.
• Be cautious when cleaning the unit. Strong corrosive cleansers may damage the exterior.
• Only a Sharp Authorized Service Centre should service this air purier. Contact the nearest Service
Centre for any problems, adjustments, or repairs.
• When carrying the unit, remove the Water Tank and Humidifying Tray rst and hold the unit by han
dles on both sides.
• Do not drink the water in the Humidifying Tray or Water Tank.
• Change the water in the Water Tank daily with fresh tap water and regularly clean the Water Tank
and Humidifying Tray. (See E-12 and E-13). When unit is not in use, dispose of the water in the
Water Tank and Humidifying Tray. Leaving water in the Water Tank and/or Humidifying Tray may
result in mold, bacteria, and bad odours.
In rare cases, this bacteria may cause harmful physical effects.
• This appliance is not intended for use by persons (including children) with reduced physical, sen
sory or mental capabilities, or lack of experience and knowledge, unless they have been given supervision or instruction concerning use of the appliance by a person responsible for their safety.
Children should be supervised to ensure they do not play with the appliance.
– To reduce the risk of electrical shock, re or injury to persons:
-
-
NOTE
If this air purier should cause interference to radio or television reception, try to correct the interference by one or more of the following measures:
• Reorient or relocate the receiving antenna.
• Increase the separation distance between the unit and radio/TV receiver.
• Connect the equipment into an outlet on a circuit different from that to which the receiver is con-
nected.
• Consult the dealer or an experienced radio/TV technician for help.
– Radio or TV Interference
E-2
Page 5

CAUTIONS CONCERNING OPERATION
• Do not block the intake and/or air outlet.
• Do not use the unit near or on hot objects, such as stoves or heaters, or where it may come into
contact with steam.
• Always operate the unit in an upright position.
• Hold the unit by using the handles on both sides when moving.
Do not move when the unit is in operation.
• Do not operate the unit without the lters, Water Tank, and Humidifying Tray properly in
stalled.
• Do not wash and reuse the HEPA lter.
Not only does it not improve lter performance, it may cause electric shock or malfunction.
• Clean the exterior with a soft cloth only.
Do not use volatile uids and/or detergents.
The unit surface may be damaged or cracked.
In addition, the sensors may malfunction as a result.
• Frequency of maintenance required (descaling) will depend on the hardness or the impuri
ties of the water that you use; the harder the water the more often descaling will be necessary.
• Keep the unit away from water.
INSTALLATION GUIDELINES
• When using the unit, place at least 2m away from equipment utilizing electric waves such
as televisions or radios to avoid electrical interference.
• Avoid a location where the sensor is exposed to direct wind.
The unit may not operate properly.
• Avoid use in locations where furniture, fabrics or other items may come in contact with and
restrict the air intake and/or air outlet.
• Avoid use in locations where the unit is exposed to condensation or drastic temperature
changes. Appropriate conditions are when room temperature is between 5 – 35 ºC.
• Place on a stable surface with sufcient air circulation.
When placing the unit on a heavily carpeted area, the unit may vibrate slightly.
Place the unit on an even surface to avoid water leakage from the Water Tank and/or Humidifying
Tray.
• Avoid locations where grease or oily smoke is generated.
The unit surface may crack or the sensor may malfunction as a result.
• Place the unit about 30 cm~60 cm(1~2 ft) away from the wall in order to ensure proper air
ow.
The wall directly behind the air outlet may become dirty over time. When using the unit for an ex
tended period of time in the same location, periodically clean the wall and protect the wall with a
vinyl sheet, etc. to prevent the wall from becoming dirty.
-
ENGLISH
-
DEUTSCH
FRANÇAIS
NEDERLANDS
-
РУССКИЙ
-
FILTER GUIDELINES
• Follow the instructions in this manual for correct care and maintenance of the lters.
E-3
Page 6

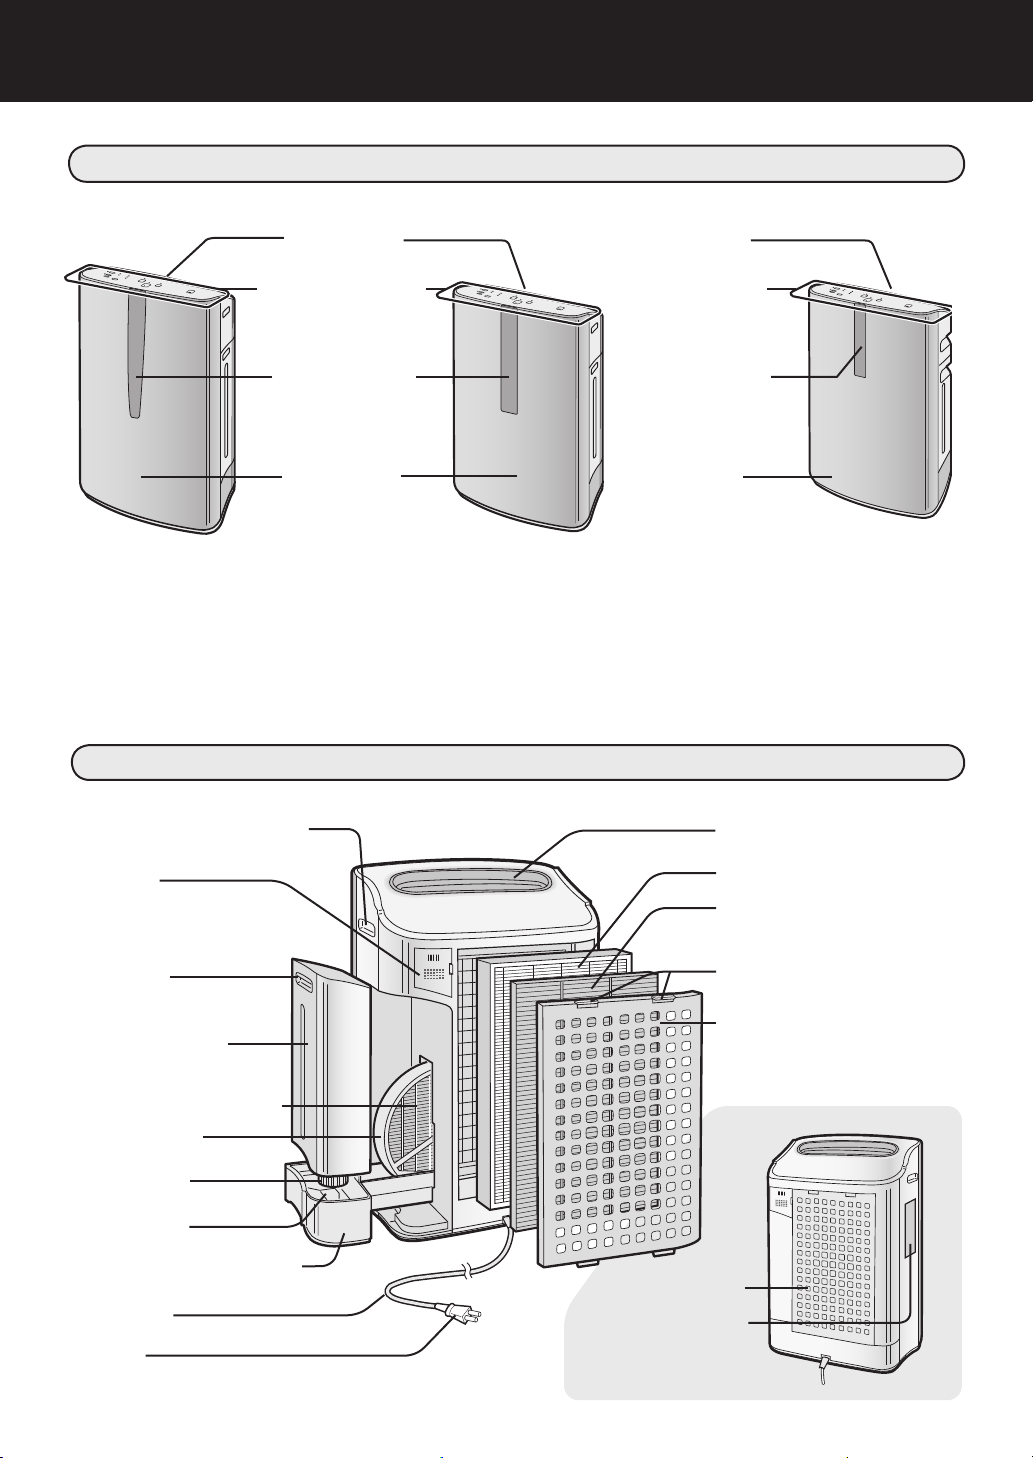
PART NAMES
ILLUSTRATIVE DIAGRAM – FRONT
Air Outlet
Main Unit Display
Front Monitor
Main Unit
KC-860E
BACK
Handle (2 locations left and right)
Sensors
• Dust Sensor
•
Temperature / Humidity Sensor
•
Odour Sensor(KC860E•KC850E)
Tank Handle
KC-850E
Air Outlet
Main Unit Display
Front Monitor
Main Unit
KC-840E
Air Outlet
HEPA Filter (white)
Washable Deodorizing
Filter (black)
Tabs
Water Tank
(For humidifying)
Humidifying Filter
Filter Frame
Tank Cap
Float
Humidifying Tray
Power Cord
Plug
(Shape of plug depends on country.)
E-4
Air Inlet
Date Label
(Rating Label)
Back Panel (Pre-Filter)
Page 7
Sensor Reading
Sensor Reading
Flashing
Clean
All green
Green
Yellow
Very lmpure
All red
Clean
All green
Green
Yellow
Very lmpure
All red
Flashing
Flashing
Flashing
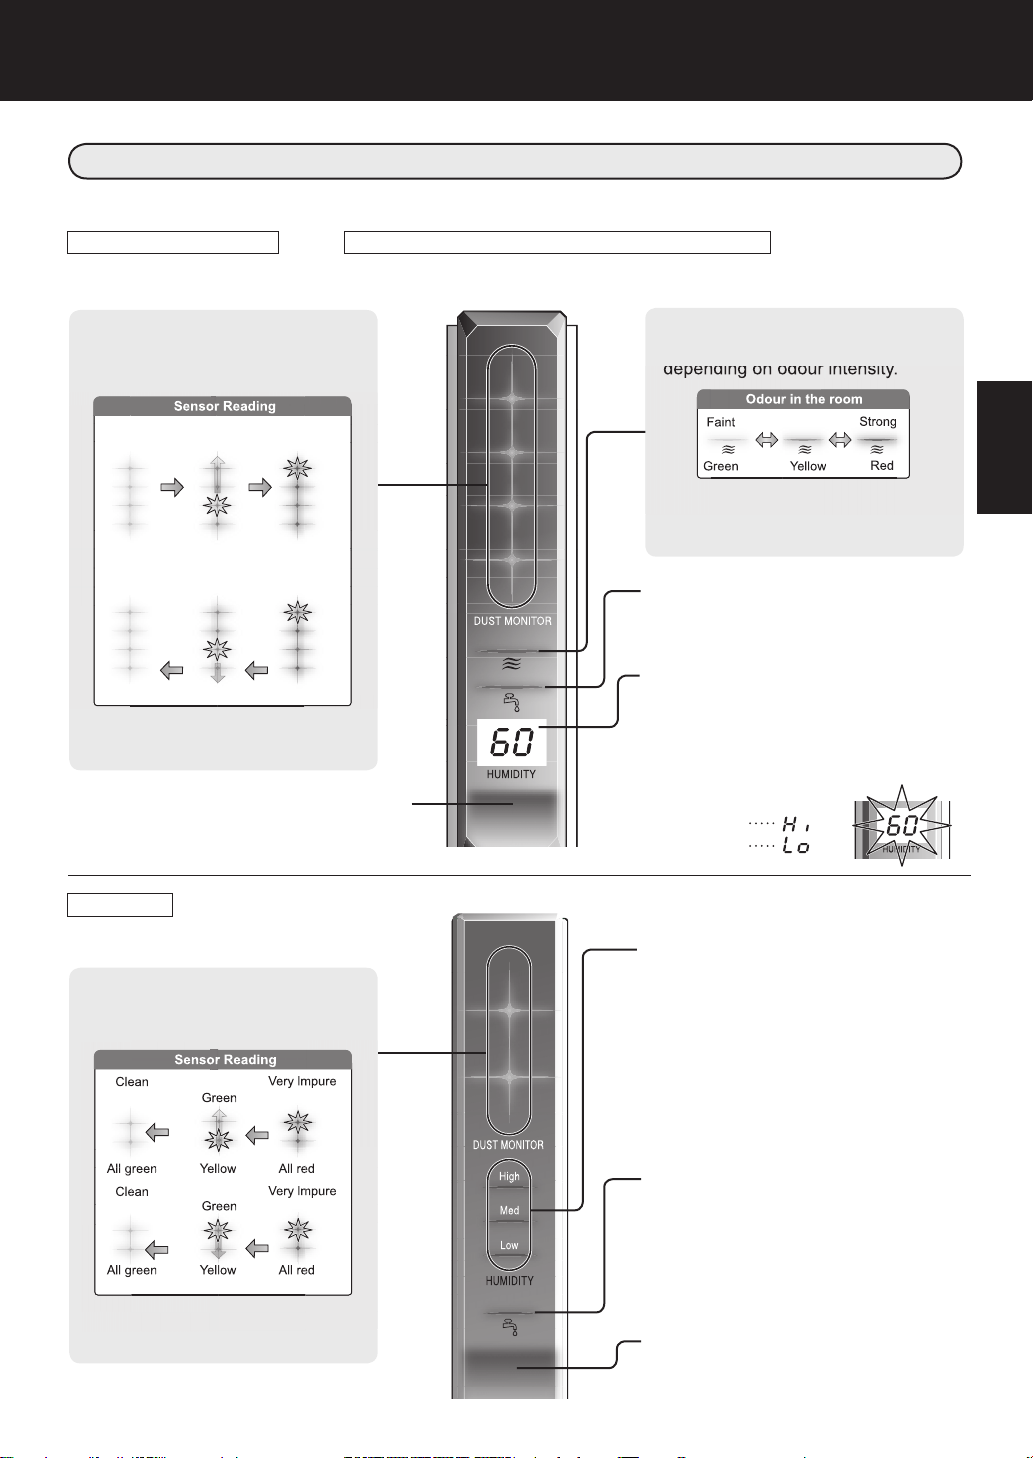
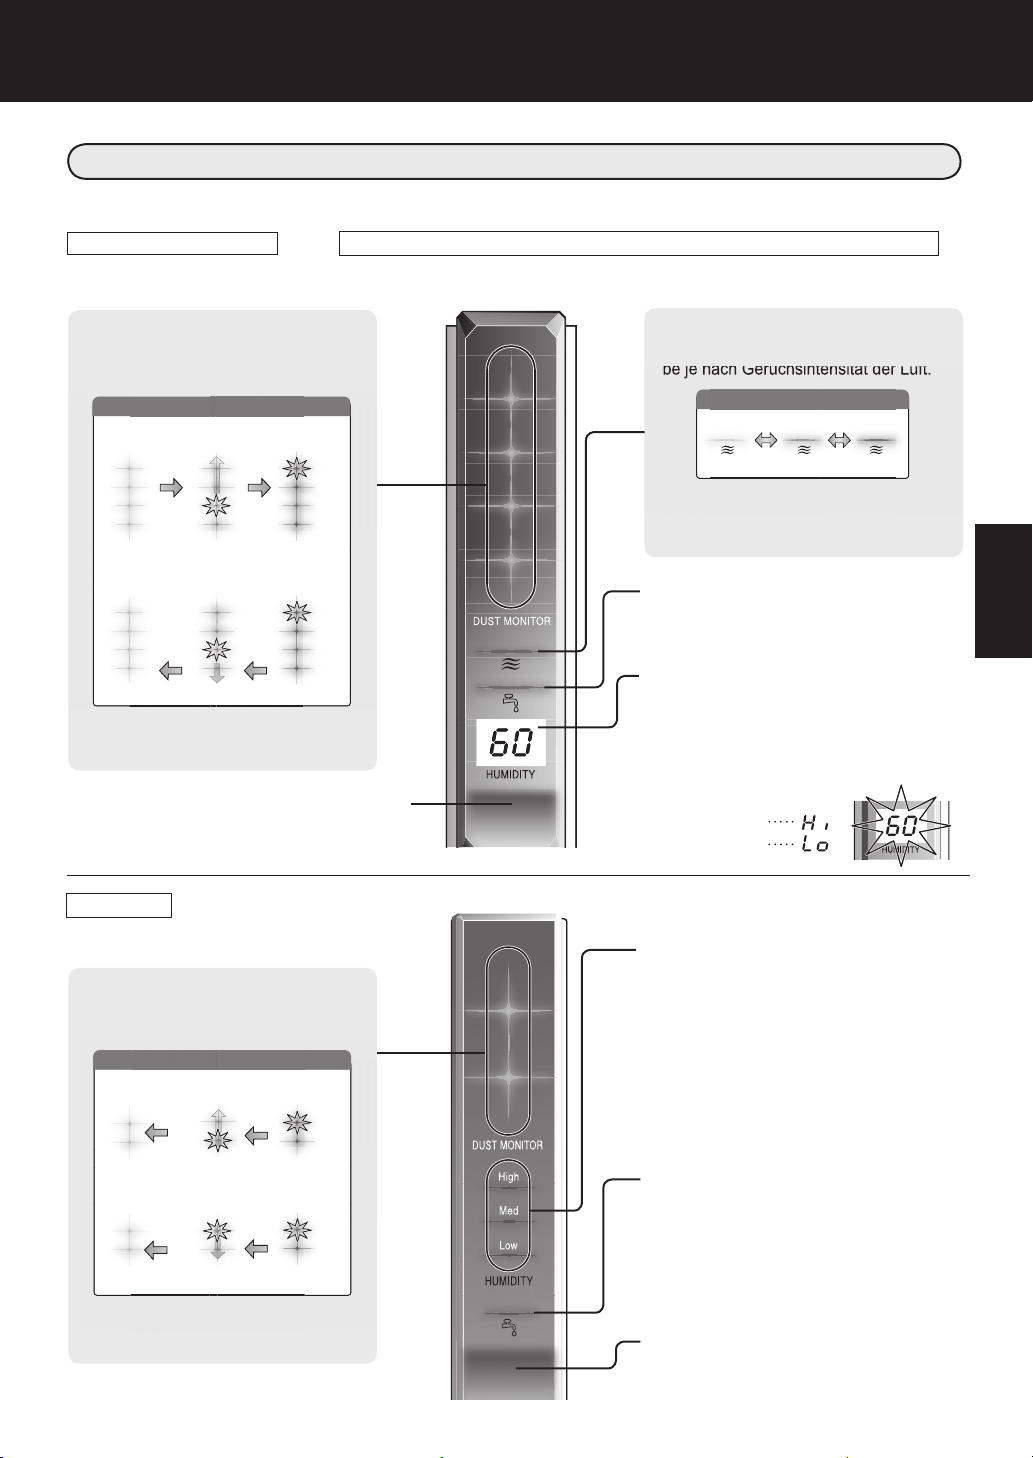
FRONT MONITOR
Odour in the room
Faint
Strong
Green Yellow
Red
depending on odour intensity.
Faint
Green
Odour in the room
Strong
Red
Yellow
Sensor Reading
Clean
All green
Green
Yellow
Very lmpure
All red
Clean
All green
Green
Yellow
Very lmpure
All red
Clean
All green
All green
Clean
Sensor Reading
Green
Yellow
Green
Yellow
All red
Very lmpure
All red
All red
Very lmpure
Flashing
Flashing
Flashing
Flashing
Indicates condition and humidity of room air.
KC-850E KC-860E
Indicates the room condition of odour, dust, and humidity.
DUST MONITOR
The dust sensor continuously monitors
the air and changes colour depending on
air purity.KC-860E has 5 levels of dust
detector.
When the dust sensor detects dust,
the ashing light moves depending on
dustiness.
Plasmacluster Indicator Light (blue)
Blue: Plasmacluster ON
Light off: Plasmacluster OFF
ODOUR MONITOR
The odour sensor continuously
monitors the air and changes colour
depending on odour intensity.
Dust and odor are detected by different
sensors.The colours may not change
simultaneously.
Water Supply Indicator Light (red)
This light will illuminate when the water
tank needs to be re lled.
Humidity Indicator Light (green)
Displays the approximate humidity level
in the room. Humidity setting cannot be
adjusted.
(Ex.) At 60 % humidily
80 % or more
Less than 30 %
ENGLISH
DEUTSCH
FRANÇAIS
KC-840E
DUST MONITOR
The dust sensor continuously
monitors the air and changes colour
depending on air purity.
When the dust sensor detects dust,
the ashing light moves depending on
dustiness.
E-5
Humidity Indicator Light (green)
Displays the approximate humidity level
in the room. Humidity setting cannot be
adjusted.
High – 65 % or more
Med – 65 % or less of 40 % or more
Low – 40 % or less
Water Supply Indicator Light(red)
This light will illuminate when the water
tank needs to be re lled.
Plasmacluster Indicator Light (blue)
Blue: Plasmacluster ON
Light off: Plasmacluster OFF
NEDERLANDS
РУССКИЙ
Page 8
Unplug the unit before installing
1
2
PREPARATION FOR
USE
or adjusting the lters.
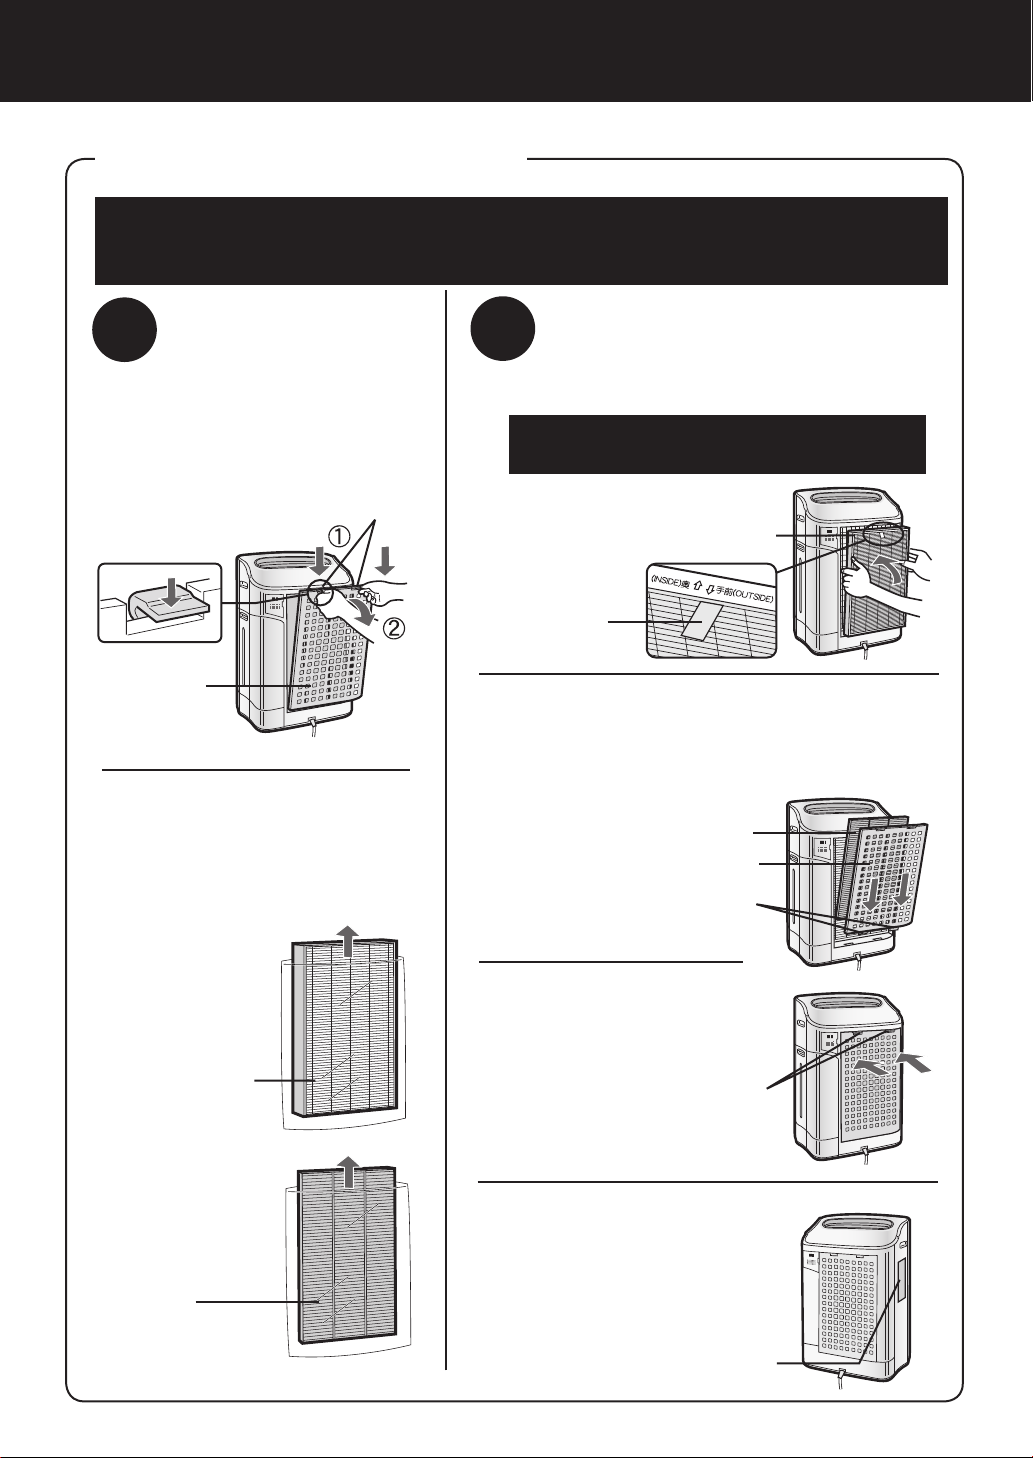
FILTER INSTALLATION
To maintain the quality of the lters, they are packed in plastic bags and placed in the
unit. Be sure to remove the lters from the plastic bags and replace the lters in the
unit before initial use.
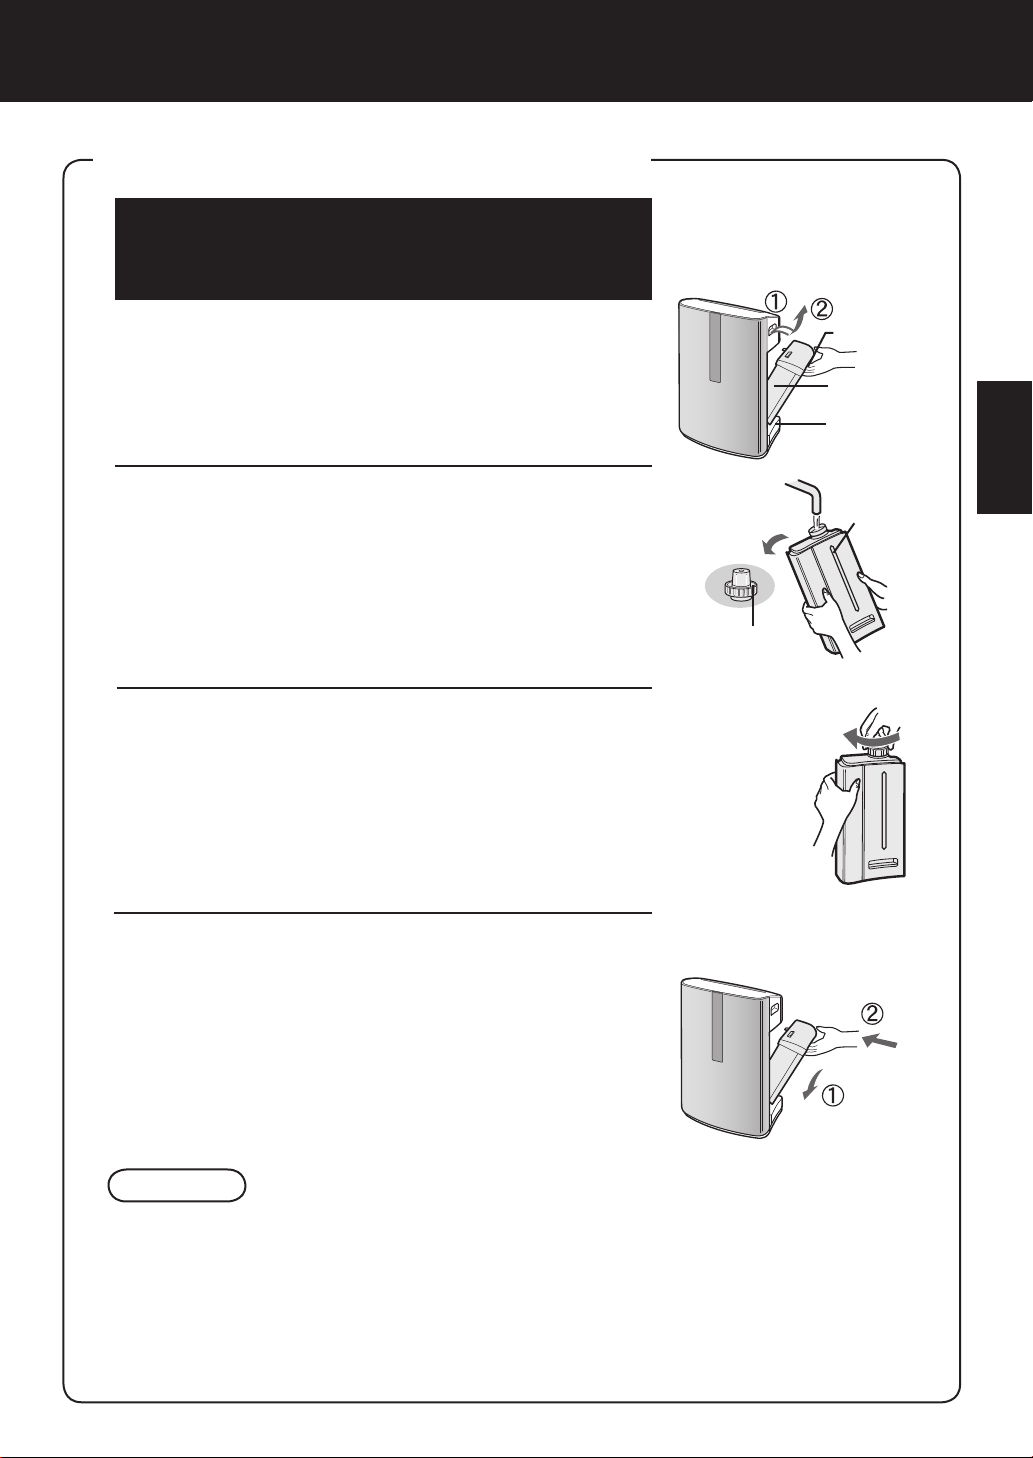
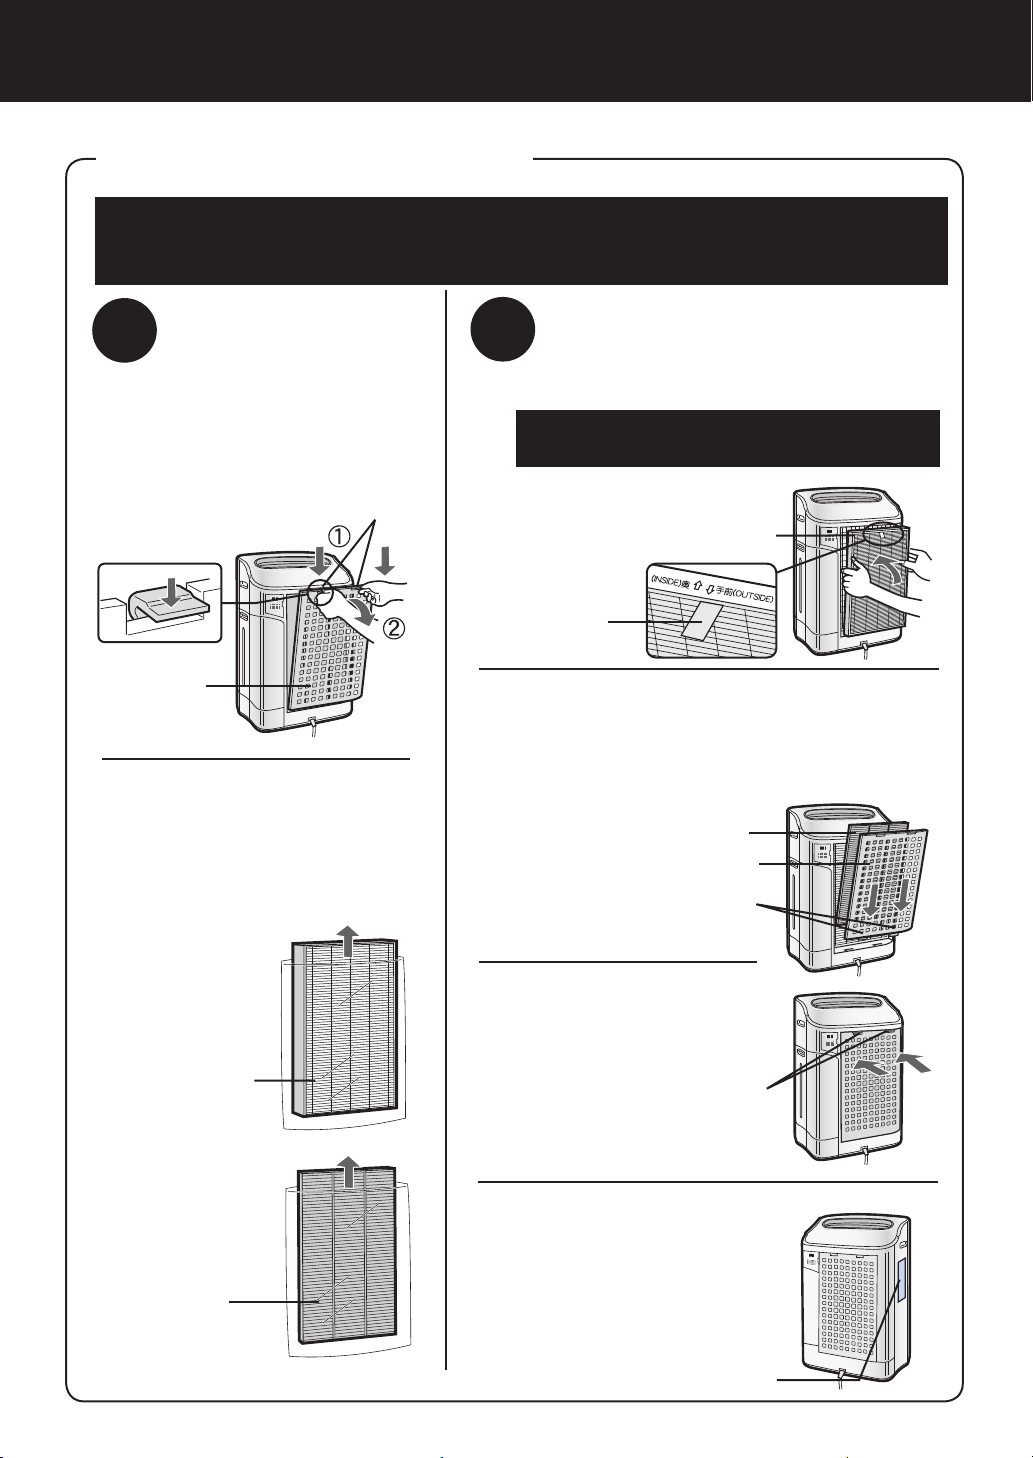
Remove the lters
Remove the Back Panel.
1
Gently push down on the tabs,
then tilt and remove the back
panel.
Tabs on the top
Back Panel
R e m ov e t h e W a s h -
2
able Deodorizing Filter
(black) and HEPA Filter
(white) from the plastic
bags.
Install the lters
Install the HEPA Filter.
1
Please make sure that the HEPA Filter is
placed in proper orientation.
Installing the filter backwards
will affect the performance of
the unit.
Tab
Insert the Back Panel’s 2 bottom tabs
(left and right) into the small holes in the
2
unit, and slide the Washable Deodorizing Filter between the HEPA Filter and
the Back Panel.
Washable Deodorizing Filter
HEPA Filter
Back Panel
Bottom tabs
HEPA Filter
Washable
Deodorizing
Filter
Gently push in the up-
3
per tabs (left and right)
to lock in place.
Upper tabs
Fill in the usage start
4
date on the Date Label.
Use the usage start date as
a guide for when the lters
should be replaced.
Date Label
E-6
Page 9
REFILLING THE WATER TANK
The unit can be used in the Clean Air Mode without
putting water in the Water Tank. When using the Clean
Air & Humidify Mode, or the CLEAN ION SHOWER
Mode, the Water Tank should be lled with water.
Remove the Water Tank by unlatching the
1
top.
Remove the Water Tank Cap and carefully
2
ll the Water Tank with tap water.
• Change the water in the Water Tank every day with
fresh tap water.
After lling, securely tighten the Tank Cap.
3
• Check to see that there is no water leaking.
• Be sure to wipe off any excess water on the outside of
the Water Tank.
• When carrying the Water Tank, hold it with both hands
so that the Water Tank opening is facing up.
Tank Cap
Tank Handle
Water Tank
Humidifying
Tray
ENGLISH
Water Tank
DEUTSCH
tighten
FRANÇAIS
Replace the Water Tank in the unit.
4
• The top latch will “click” in place when the Water Tank
is properly installed.
CAUTION
• Do not expose the unit to water. Short circuit and/or electrical shock may occur as a result.
• Do not use hot water (40 ºC), chemical agents, aromatic substances, dirty water, or other
damaging substances, deformation and/or malfunction may occur.
• Use only fresh tap water. Use of other water sources may promote the growth of mold, fungus and/or bacteria.
E-7
NEDERLANDS
РУССКИЙ
Page 10
OPERATION
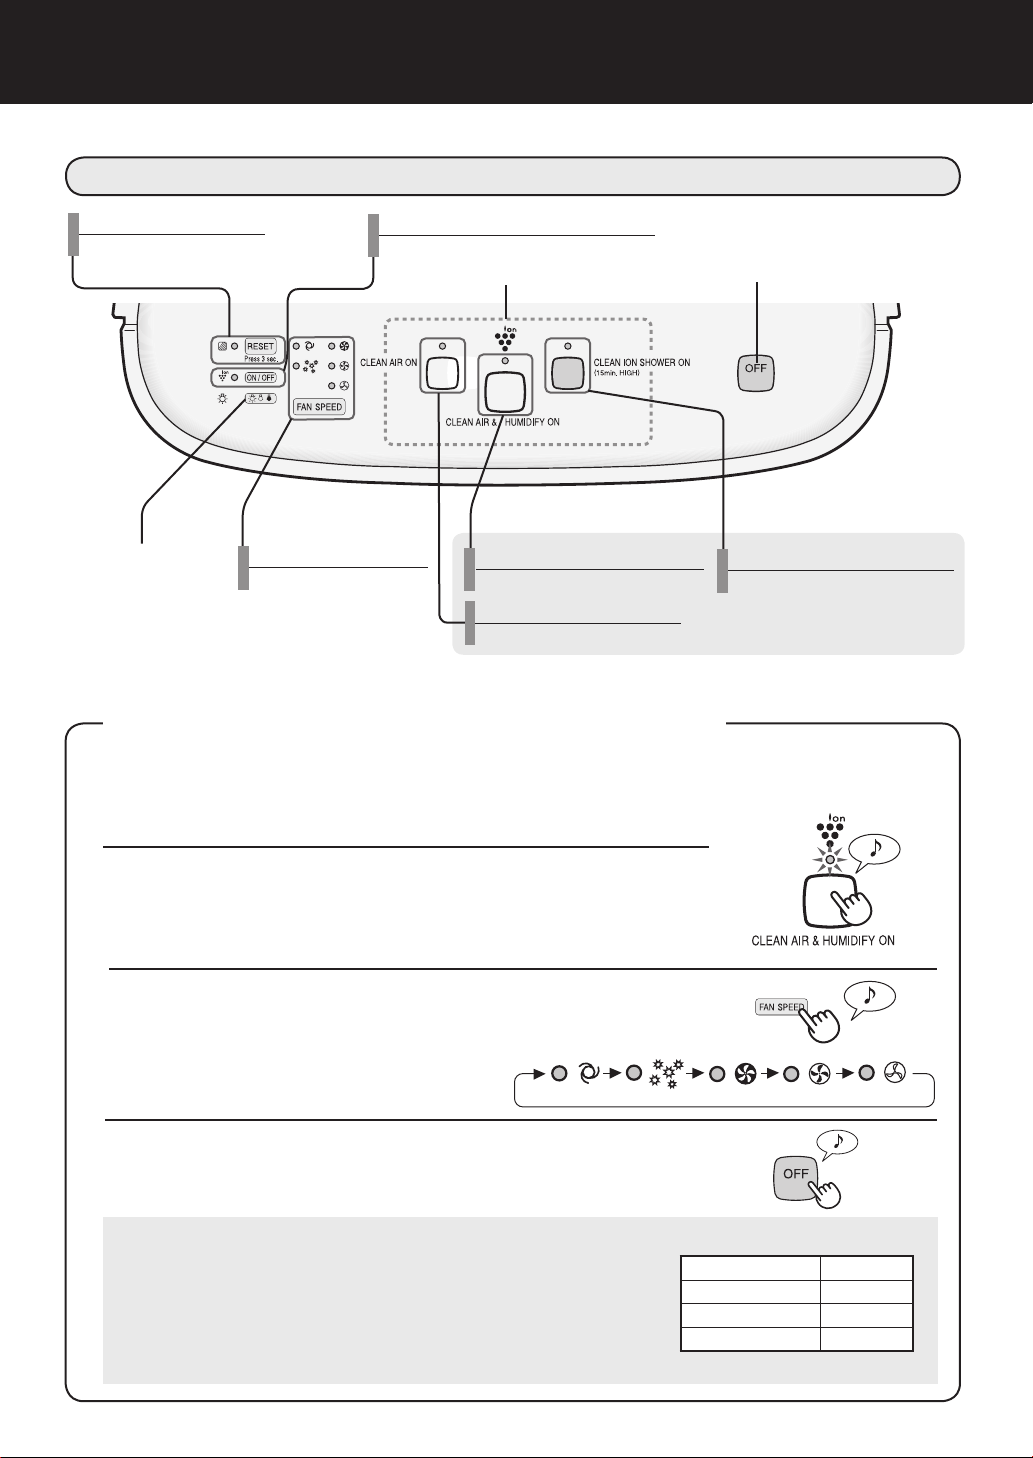
MAIN UNIT DISPLAY
Filter Reset Button/
Indicator Light (red)
Light Control
Button
Fan Speed Button/
Indicator Light (green)
Plasmacluster ON/OFF Button/
Indicator Light (green)
Power ON Button
Press any of the buttons to select mode and start the unit.
Clean Air & Humidify MODE Button/
Indicator Light (green)
Clean Air MODE Button/
Indicator Light (green)
Power OFF Button
CLEAN ION SHOWER MODE Button/
Indicator Light (blue)
CLEAN AIR & HUMIDIFY MODE
Use the Clean Air & Humidify Mode to quickly clean the air, reduce odours and to humidify.
Fill Water Tank. (See E-7)
1
Press the CLEAN AIR & HUMIDIFY MODE Button.
2
• If the power cord was not unplugged between uses, the unit
will automatically re-start at the previously selected settings.
Press the FAN SPEED Button to select the de-
3
sired fan speed.
• Indicator lights will show the fan speed
currently selected.
Press the Power OFF Button to turn the unit off.
About Automatic Humidify Mode
The Temperature/Humidity sensors automatically detect and
adjust humidity according to changes in room temperature.
Depending on the size and humidity of the room, humidity
may not reach 55~65 %. In such cases, it is recommended
that CLEAN AIR & HUMIDIFY/MAX MODE be used.
Temperature Humidity
~18 ºC 65 %
18 ºC~24 ºC 60 %
24 ºC~ 55 %
E-8
Page 11
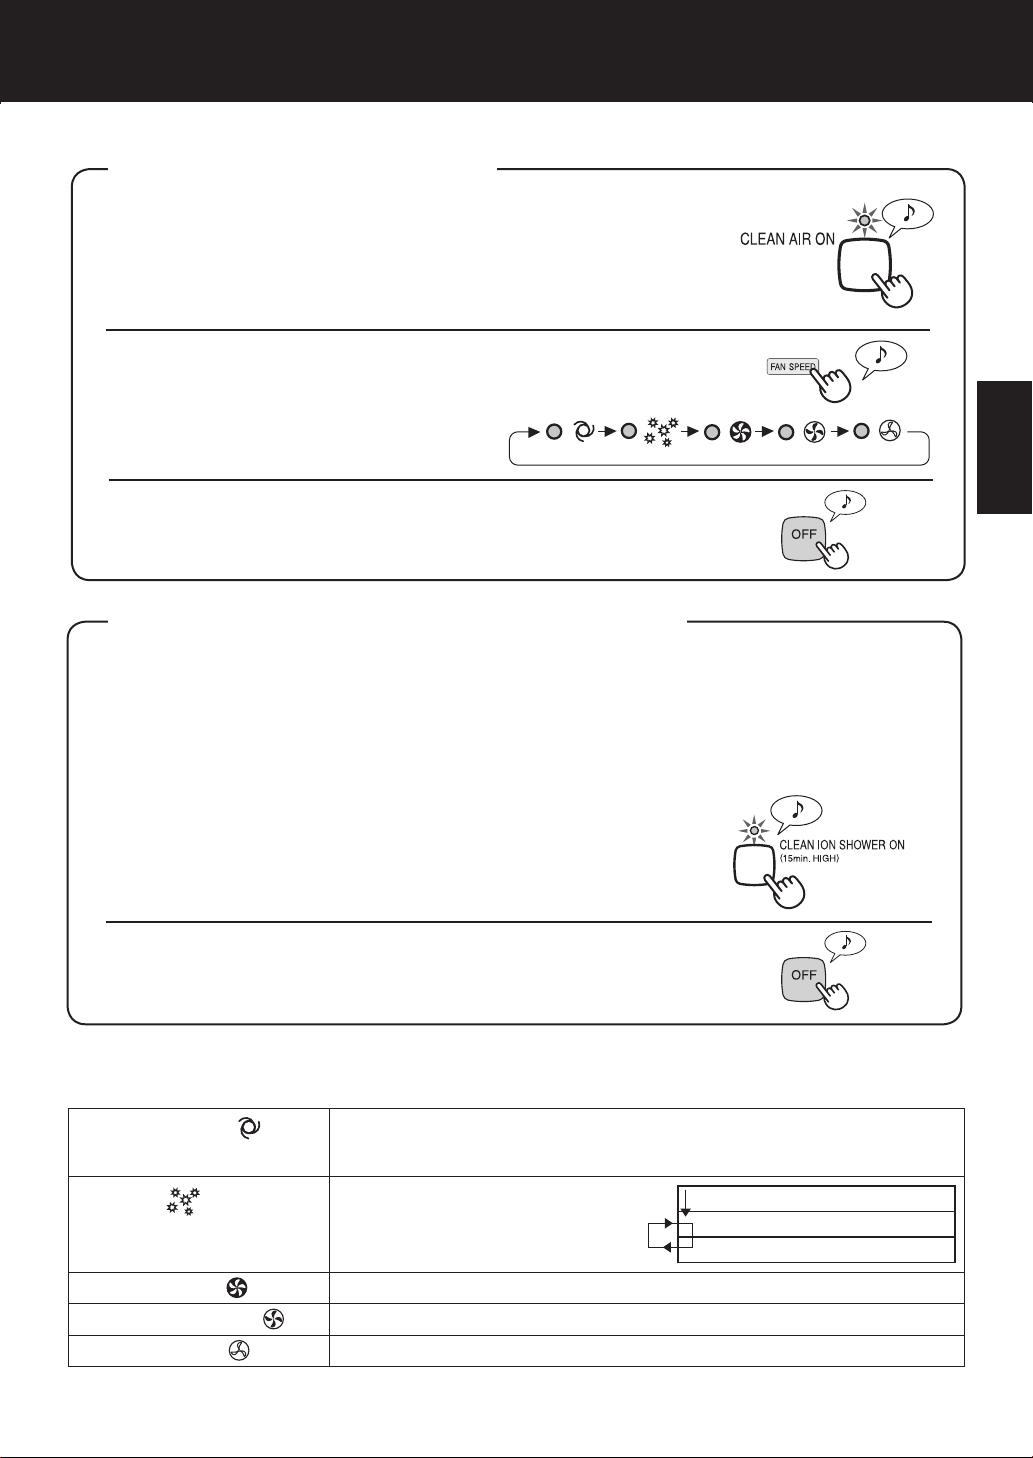
CLEAN AIR MODE
Use the Clean Air Mode when additional humidity is not required.
Press the CLEAN AIR MODE Button on the display.
1
• If the power cord was not unplugged between uses, the unit will
automatically re-start at the previously selected settings.
Press the FAN SPEED BUTTON to select the de-
2
sired fan speed.
• Indicator lights will show the fan
speed currently selected.
Press the Power OFF Button to turn the unit off.
CLEAN ION SHOWER MODE
CLEAN ION SHOWER Mode with humidication releases high-density Plasmacluster ions.
By continuously discharging strong airow for 15 minitues, the unit effectively removes air-
borne dust, pollen, mold and allergens from the air as they are drawn through the lter system.
Water must be in the Water Tank when this mode is selected.
The unit humidies when there’s water in the Water Tank, and it operates without humidifying
when there’s no water in it.
Press the CLEAN ION SHOWER MODE Button
1
on the display to select this mode.
When the operation nishes, the unit will return to the prior
operation.
Press the Power OFF Button to turn the unit off.
Fan Speed Button
Please note the fan speed cannot be adjusted during the CLEAN ION SHOWER MODE.
AUTO operation
POLLEN mode
operation
The fan speed is automatically switched (between HIGH and LOW) depending on the amount of impurities in the air. The sensors detect impurities for
efcient air purcation.
The unit will operate at High Level for
10 minutes, then will atternate between MEDIUM and HIGH.
10 minutes: High fan level
20 minutes: Medium fan level
20 minutes: High fan level
ENGLISH
DEUTSCH
FRANÇAIS
NEDERLANDS
РУССКИЙ
MAX operation
MEDIUM operation
LOW operation
The unit will operate at maximum fan speed.
The unit will operate at medium fan speed.
The unit will operate quietly using minimal air intake.
*HiGH fan speed is an intermediate speed between MEDIUM and MAX.
E-9
Page 12
E-10
OPERATION
The lights on the front panel are brighter.
The lights on the front panel are darker.
The lights on the front monitor turn off
「 」
「 」
「 」
Flashing
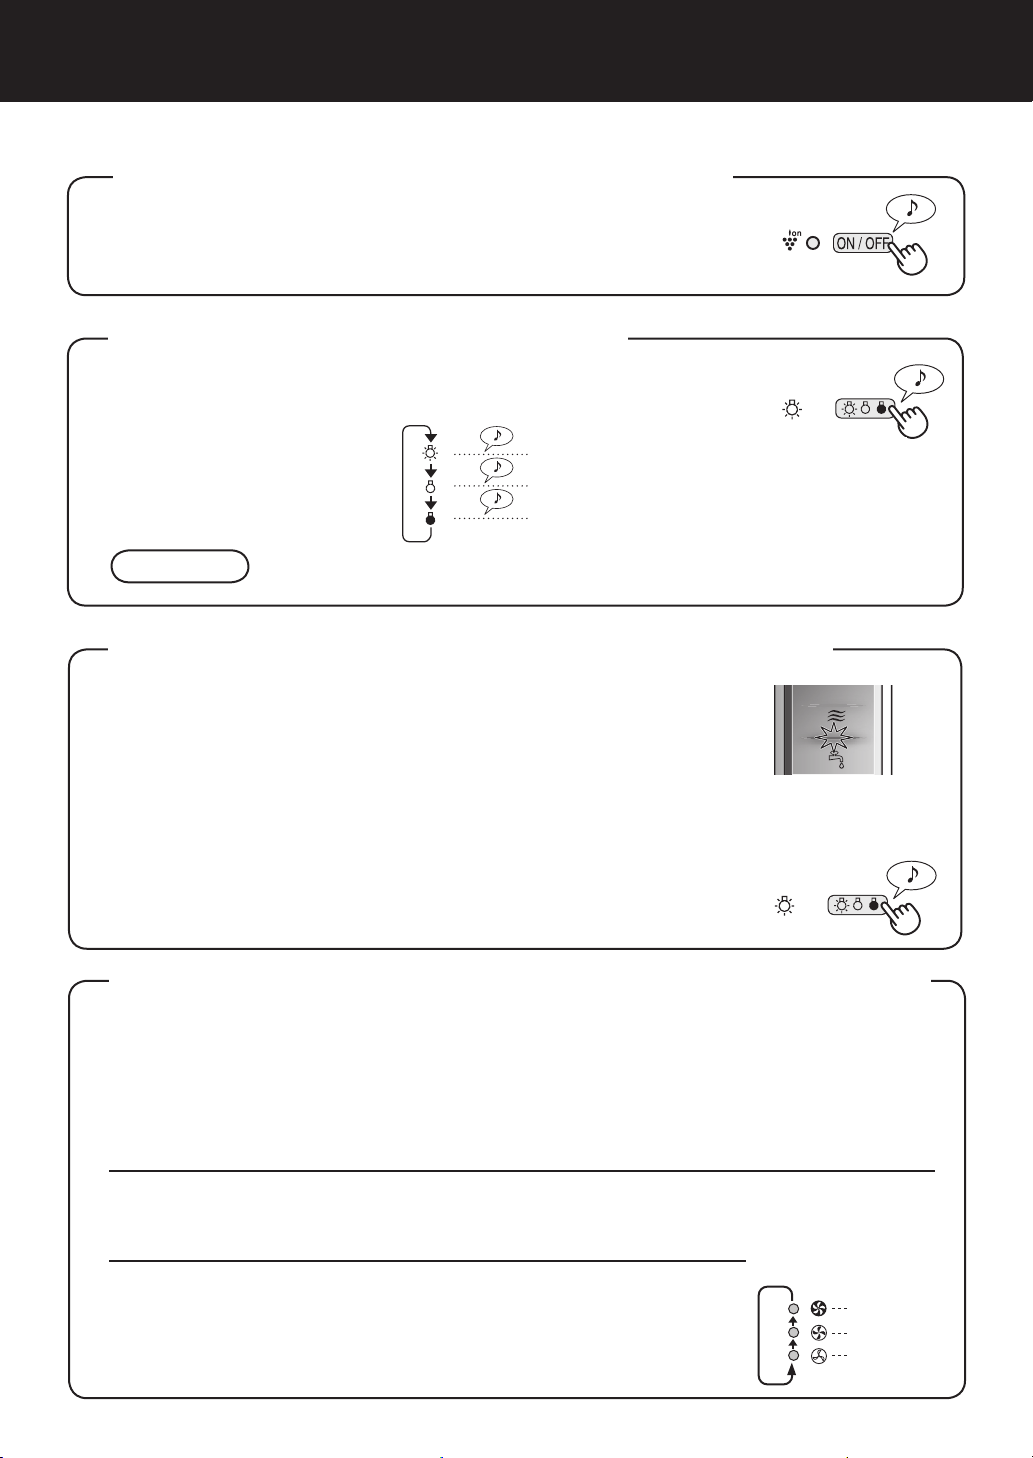
Plasmacluster ON/OFF Button
Press the Plasmacluster ON/OFF Button to turn Plasmaclus-
ter Ion Mode ON and OFF.
When Plasmacluster is ON, both the Indicator Light and
Plasmacluster Indicator Light turn on.
LIGHTS CONTROL Button
Use when the light on the
front panel is too bright.
CAUTION
The lights on the front monitor are always brighter when starting.
Refer to the d iagram on the right to select the
desired brightness on the front panel.
The lights on the front panel are brighter.
The lights on the front panel are darker.
The lights on the front monitor turn off.
WATER SUPPLY INDICATOR LIGHT
When the Water Tank is empty, the Water Supply Indicator Light will ash
to indicate that the Water Tank should be re lled. Please note the light
will not ash even when the Water Tank is empty during the Clean
Air Mode and the Clean ION SHOWER Mode.
Sound indicator setting for water supply.
In addition to the Indicator Light, the unit can be set to signal with an audible beep when the
Water Tank is empty. With the unit OFF, press the Lights Control button for 3 seconds to turn
the audible signal ON.
Cancellation
To cancel the audible signal, with the unit OFF, press the Lights
Control button again more than 3 seconds.
ADJUSTMENT OF SENSOR DETECTION SENSITIVITY
Set to “low” if the DUST MONITOR and ODOUR MONITOR is constantly red to reduce
sensitivity, and set to “high’ if the DUST MONITOR and ODOUR MONITOR is constantly
green to increase sensitivity.
With the unit OFF, press the Fan Speed Button for 3 seconds.
1
The Fan Speed Indicator Lights will display the currently set sensor sensitivity level. The
factory setting is Standard, indicated by the MED light.
Press the Fan Speed Button to set the desired sensor sensitivity.
2
Refer to the diagram on the right to select the desired sensor sensitivity level.
Press the Power OFF Button.
3
Note that if the Power OFF Button is not pushed within 8 seconds
of adjusting sensor sensitivity, the setting will be saved automatically. The sensor sensitivity setting will be saved even if the unit is
unplugged.
Fan Speed
Indicator
Light
Sensor
Detection
sensitivity
High
Standard
Low
Page 13
CARE AND MAINTENANCE
To maintain optimum performance of this air purier, please clean the unit including
the sensor and lters periodically.
When cleaning the unit, be sure to rst unplug the power cord, and never handle the
plug with wet hands. Electrical shock and/or bodily injury may occur as a result.
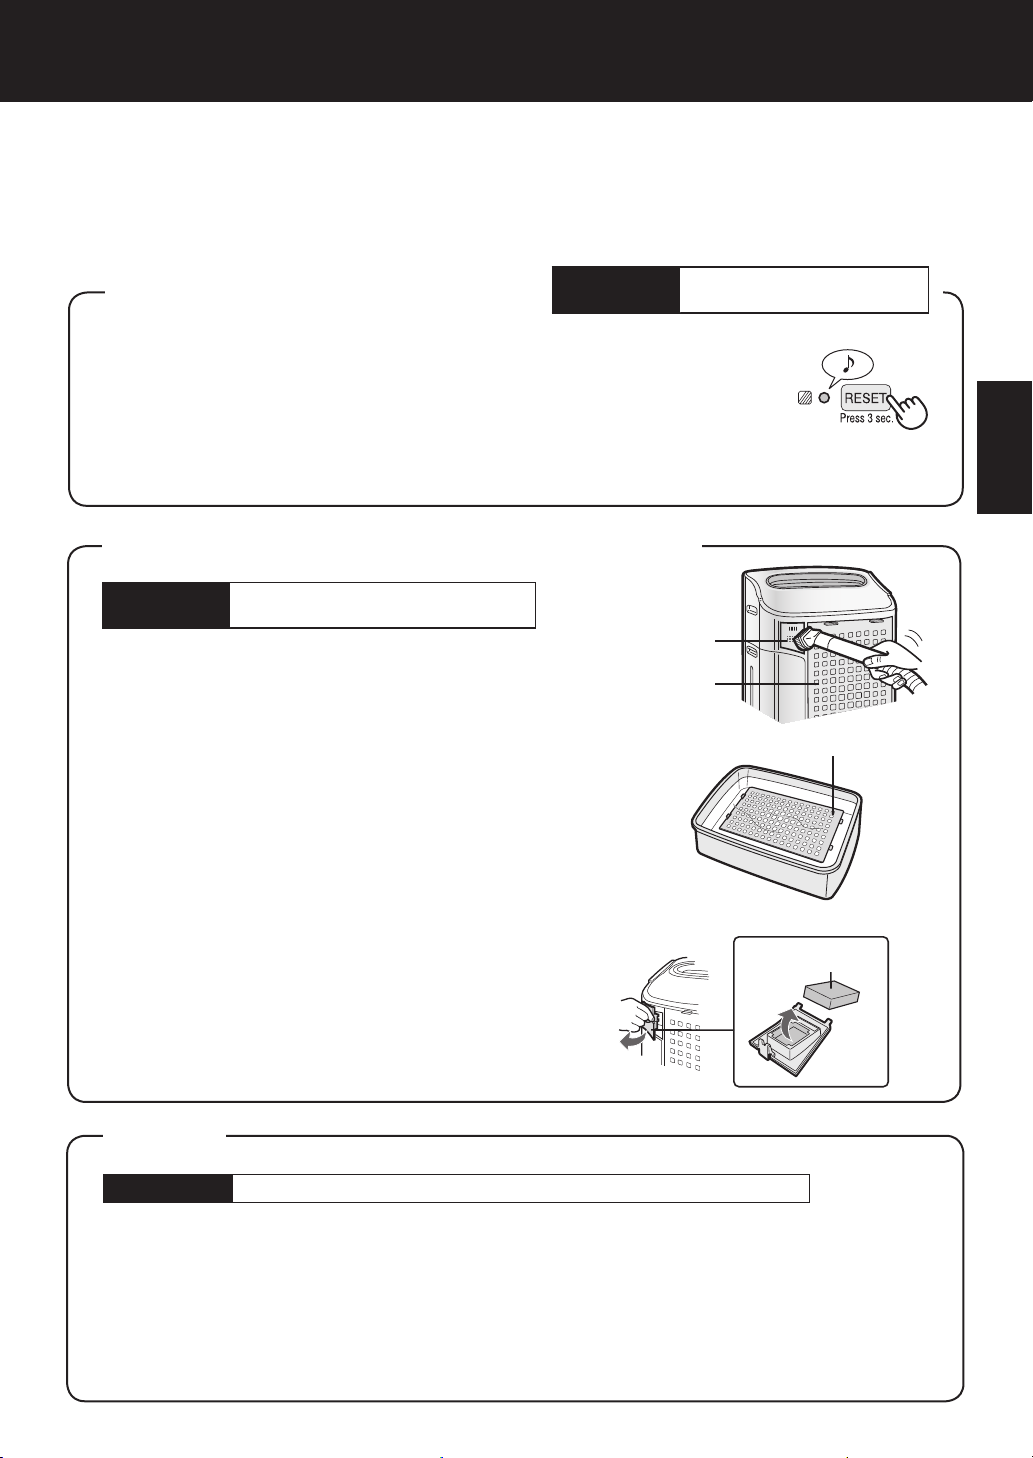
FILTER INDICATOR LIGHT
The Filter Indicator Light will illuminate as a reminder to perform maintenance
of the Back Panel, Sensors, and Humidifying Filter. The Indicator Light will turn
on after approximately 720 hours of use.
After performing maintenance, reset the Filter Indicator. Plug the unit in, turn
power ON, and press the RESET button for 3 seconds. The Filter Indicator
Light will go off. Even if the Filter Indicator Light is already off, the RESET button should be pressed to reset the maintenance timer.
Care Cycle
After 720 hours of use
30days × 24hours = 720)
(
BACK PANEL and SENSORS
Care Cycle
Gently remove dust from the sensor opening and the
back panel, using a vacuum cleaner attachment or
similar tool.
When the back panel has stubborn dirt
In case of oily dirt, soak the back panel in water with
kitchen detergent.
1
Avoid scrubbing the back panel hard when washing.
Rinse the back panel repeatedly with clean water to re-
move the solution residue.
2
Drip dry lter to remove excess water.
Whenever dust accumulates
on the unit or every 2 months
Sensor
Back Panel
Back Panel
3
ENGLISH
DEUTSCH
FRANÇAIS
SENSOR FILTER CARE
Remove the sensor filter and tap it lightly over a sink
or bin to dislodge dust. If it is very dirty, wash it gently
with lukewarm water. Do not use any detergents or
chemicals of any kind to clean the lter. Dry the lter
completely before replacing in the unit. Do not operate
unit without all lters properly installed.
Sensor Filter
UNIT
Care Cycle
To prevent dirt or stains on the unit, clean regularly. If stains are allowed to remain, they may
become difcult to remove.
Wipe with a dry, soft cloth
For stubborn stains or dirt, use a soft cloth dampened with warm water.
Do not use volatile uids
Benzene, paint thinner, polishing powder, may damage the surface.
Do not use detergents
Detergent ingredients may damage the unit.
Whenever dust accumulates on the unit or every 2 months
E-11
NEDERLANDS
РУССКИЙ
Page 14
CARE AND MAINTENANCE
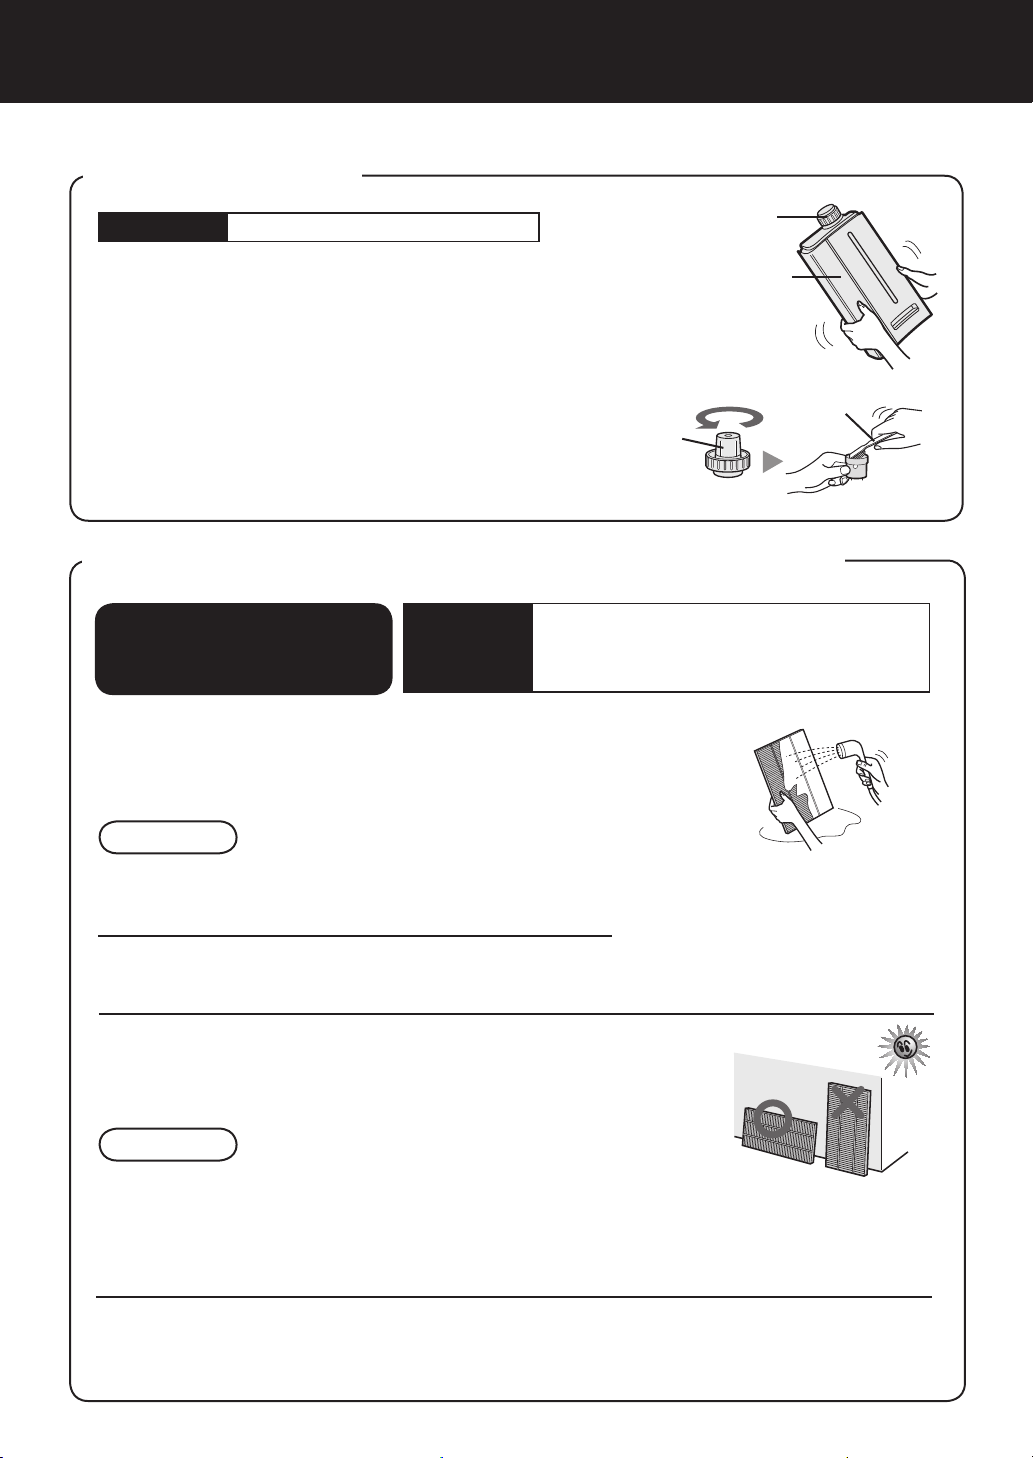
WATER TANK
Care Cycle
Rinse the inside of the tank by leaving a small amount of lukewarm water inside, closing the tank cap firmly, and shaking
the tank. Mild household detergents may be used to clean the
inside of the tank, but detergent should be diluted and the tank
should be thoroughly rinsed to remove all detergent residue.
(Note the Water Tank is not dishwasher safe.)
TANK CAP CARE
The small cap back of the tank cap is removable.
When the tank cap and small cap are dirty and slimy,
cleaning is necessary.
Use a cotton swab or a toothbrush.
Every day when Humidifying
care cycle... once a month
Tank Cap
Tank Cap
Water Tank
Toothbrush
WASHABLE DEODORIZING FILTER CARE
HAND WASH ONLY!
DO NOT DRY IN CLOTHES
DRYER!
Care Cycle
Rinse dirt from the WASHABLE DEODORIZING
1
FILTER under lukewarm water.
Remove dust on the washable deodorizing lter before washing.
When an unpleasant odour is noticed
from the air outlet.
When performance of lter seems to be
reduced and odours persist.
CAUTION
• When washing the lter for the rst time, the rinse water may
be brown. This does not affect deodorization performance.
• Avoid bending or folding the lter when washing.
Drip dry lter to remove excess water.
2
Dry filter completely in a well ventilated area. If
3
possible, dry outdoors.
Dry lter in a sideways position to avoid warping of the lter.
The lter takes about 6 hours to dry out.
CAUTION
• Avoid drying lter outdoors during inclement weather (e.g. rain or cold
temperatures).
Do not allow lter to freeze.
• If lter is dried indoors, take precautions, such as placing towels, etc
under the lter to prevent water damage to the oor.
Replace the lter in unit. (See E-6).
4
Dry lter completely before replacing to prevent odours.
Do not operate unit without all lters properly installed.
E-12
Page 15
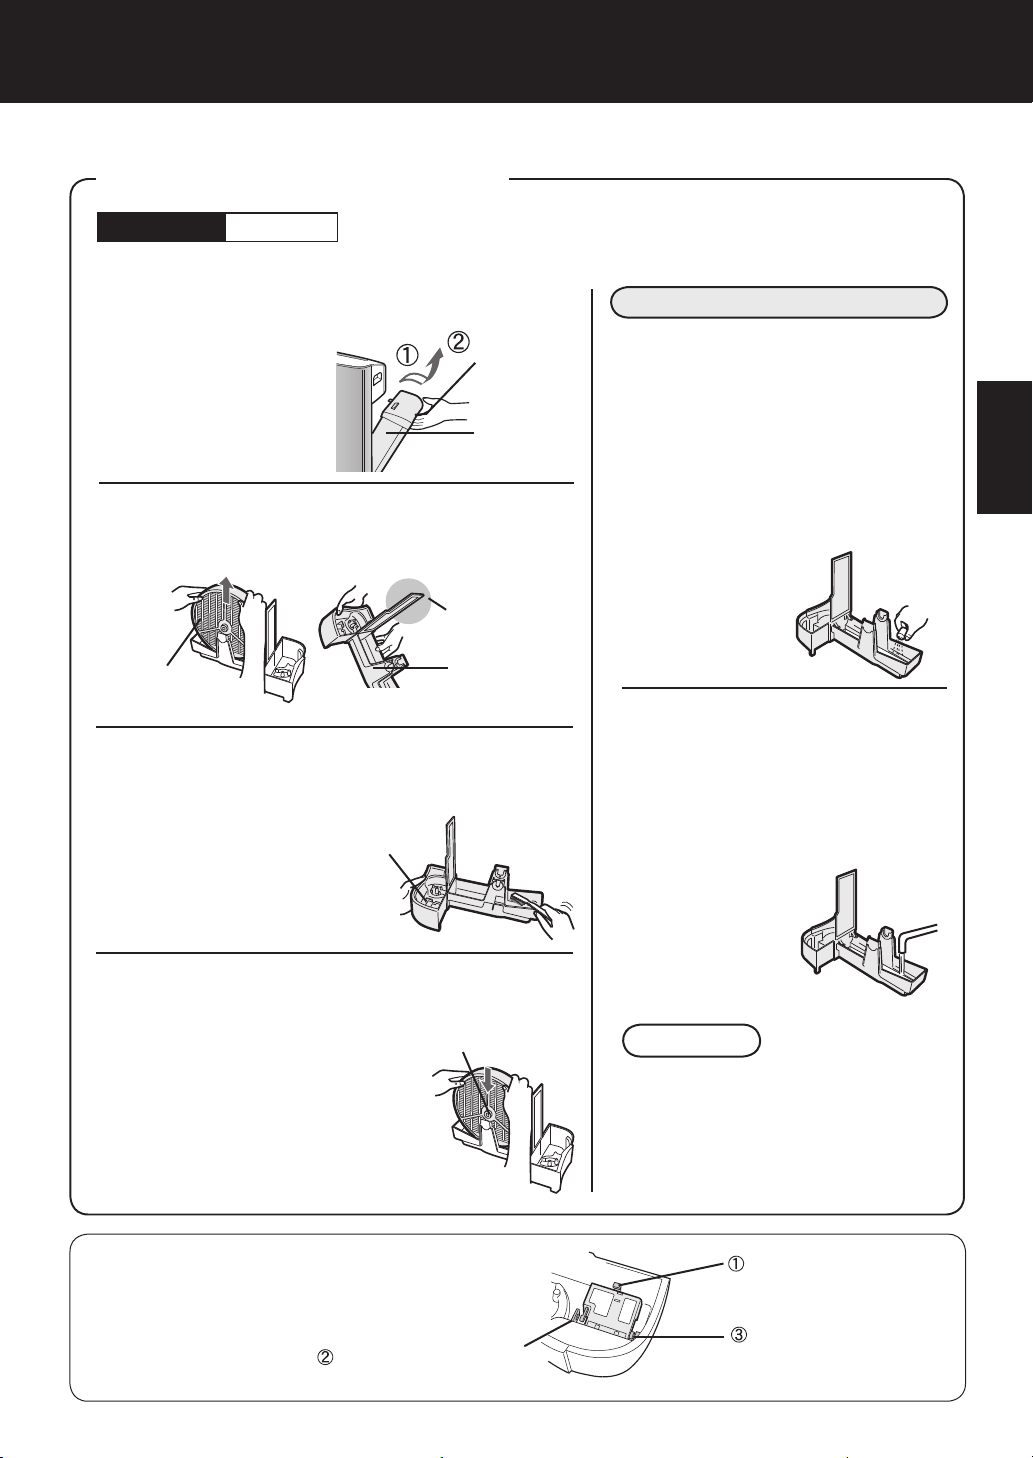
HUMIDIFYING TRAY
Care Cycle
Remove the Water Tank and Humidifying
1
Tray.
Unlatc h the Water
Tank first, then remove the tray. Use
bo t h ha nd s wh e n
pulling out the Humi d i fy i n g Tr a y to
avoid spilling water.
Remove the Humidifying Filter from the
Humidifying Tray. Drain accumulated wa-
2
ter by tilting the Humidifying Tray slowly.
Humidifying Filter
1 month
Frequency of maintenance cycle will depend on the hardness
of the water. Avoid spilling water when removing or cleaning
the tray.
Tank Handle
Water Tank
Do not hold
this part.
Hu m id i fy i n g
Tray
Rinse the inside of the Humidifying
3
Tray with lukewarm water to remove
impurities.
• Do not remove the
Styrofoam oat.
• Clean difcult-toreach parts with a
cotton-tipped swab
or tooth brush.
Float
Replace the Humidifying Filter and re-
4
place the Humidifying Tray in the unit.
The Humidifying Filter will not
t if placed in backwards. Be
sure there is no gap between
the Humidifying tray and the
unit when the Humidifying Tray
is replaced in the unit. The unit
may not operate properly if the
Humidifying Tray is not properly replaced in the unit.
Colour: Gray
When Water Deposits are Difcult to Remove
Fill Humidifying Tray halfway with lukewarm water,
1
add a small amount of mild
kitchen detergent, and leave
to soak for about 30 min-
utes.
Dilute detergent according to
instructions on the container.
Clean difcult-to-reach parts
with a cotton
swab or tooth
brush.
Rinse the Humidifying
2
Tray with lukewarm wa-
ter.
• Rinse until all detergent residue
is removed.
• Inadequate rinsing may
cause the de-
tergent odour
or changes
in the shape/
colour of the
main unit.
CAUTION
• Use only mild kitchen detergents to
clean the Humidifying Tray. Use of
non-designated chemicals or detergents can cause deformation, tarnishing, cracking (water leakage).
ENGLISH
DEUTSCH
FRANÇAIS
NEDERLANDS
РУССКИЙ
If the Styrofoam oat comes off,
replace by inserting the tabs of
the Float into the holes in the
Humidifying Tray as shown in the
diagram.
Insert the tab of the
oat into the hole.
Insert the oat below
this tab.
In se rt th e ta b on
the other side of the
oat into the hole.
E-13
Page 16
CARE AND MAINTENANCECARE AND MAINTENANCE
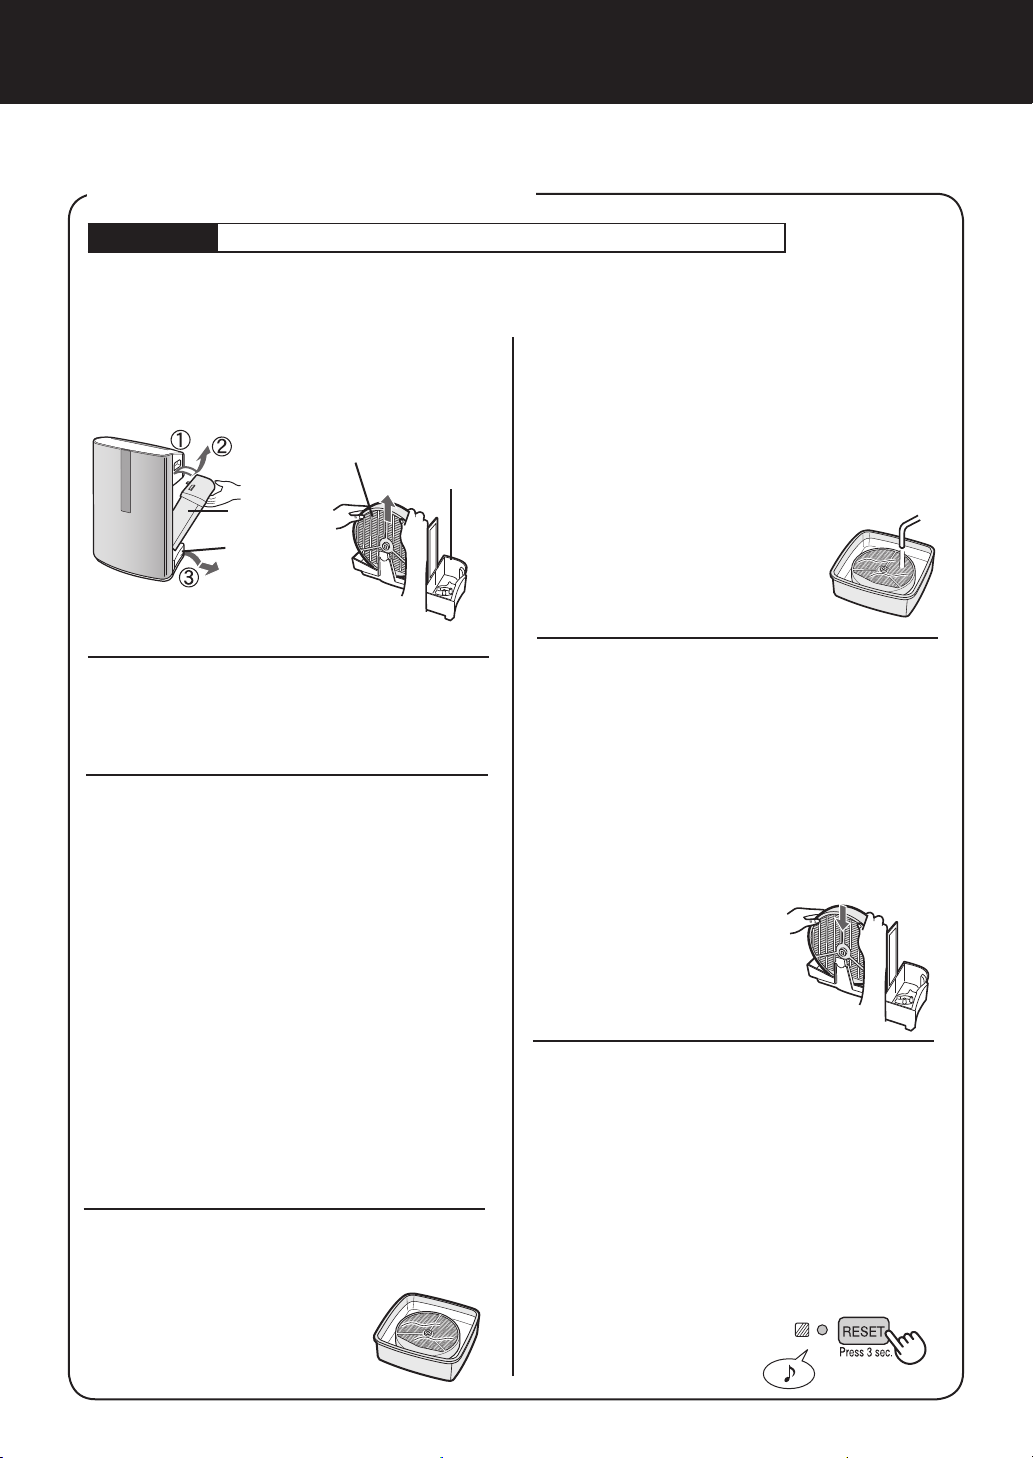
HUMIDIFYING FILTER
Care Cycle
Frequency of maintenance cycle will depend on the hardness or the impuri
you use; the harder the water the more often descaling will be necessary.
Pay attention not to spill water when cleaning the lter.
Remove the Water Tank and
1
Humidifying Tray.
Once a month or when the Filter Indicator Light is on.
ties of the water that
Rinse the Humidifying Filter re-
5
peatedly with lukewarm water
to remove all the solution resi-
Humidifying lter
Humidifying
Tray
Water Tank
Humidifying
Tray
due.
Inadequate rinsing may cause odour and
affect the performance and/or appearance of the unit.
* Do not scrub the Humidi
fying Filter, rinse gently
und er luk ewa rm wat er
only.
Attach the Humidifying Filter
Remove the Humidifying Filter
2
from the Humidifying Tray.
Avoid spilling water from the Humidifying
Tray.
Preparing the descaling solu-
3
tion.
Citric acid, available at some drugstores,
or 100 % bottled lemon juice are used for
descaling. Choose either one to use, and
prepare the descaling solution.
<For using citric acid>
Dissolve 3 teaspoons of citric acid and 2
1/2 cups of lukewarm water in a suitable
container, and stir well.
<For using lemon juice>
100 % bottled lemon juice can be used
for descaling. Use only 100 % bottled
lemon juice with no pulp (strain juice if
necessary). Combine 1/4 cup lemon juice
and 3 cups of lukewarm water in a container large enough to hold the Humidifying Filter and stir well.
P
re-soak the Humidifying Filter
4
in the solution for 30 minutes
before cleaning.
When using lemon juice,
it is recommended to pre-
soak longer than citric
acid.
6
to the Humidifying Tray, and
replace the Humidifying Tray in
the unit.
•The Humidifying Filter will not fit if
placed in backwards. Be sure there is
no gap between the Humidifying Tray
and the unit when the Humidifying Tray
is replaced in the unit. The unit may not
operate properly if the Humidifying Tray
is not properly replaced in the unit.
•When not using the
unit for a long periods of time, dry the
Humidi fying Fil ter
completely before
replacing.
Plug in the unit, turn power
7
ON, and press the Filter Reset
Button on the display for more
than 3 seconds to reset.
You may notice reddish-brown or white
deposits forming on the surface of the
Humidifying Filter. These impurities (calcium, etc.) are due to the impurities contained in tap water; this is not a defect.
Replace the Humidifying Filter when it is
covered completely
in white deposits.
-
E-14
Page 17
FILTER REPLACEMENT GUIDELINES
Filter life will vary depending on the room environment, usage, and location of the unit. If dust
or odours persist, replace the lters.
(Refer to “Please read before operating your new Air Purier”)
Guide for lter replacement timing
HEPA Filter
Filter life can be greatly reduced depending on the room environment. Cigarette smoke, pet dander,
and other airborne particles can reduce lter life. Check lters regularly and replace as necessary.
Up to 5 years after opening
Washable Deodorizing Filter
The lter can be repeatedly used after washing, or it can be replaced.
Humidifying Filter
Filter life can be greatly reduced depending on the room environment. Even if 2 years have not
passed, replace the Humidifying Filter if you notice the following:
• Mineral deposits (white, black, or red masses) which are not removed after cleaning or the Humidi
fying Filter is still dirty.
• Filter is severely damaged or warped.
Up to 2 years after opening
Replacement Filters
• HEPA Filter: 1unit
Model FZ-C150HFE (for KC-860E)
FZ-C100HFE (for KC-850E)
FZ-C70HFE (for KC-840E)
• Washable Deodorizing Filter: 1unit
Model FZ-C150DFE (for KC-860E)
FZ-C100DFE (for KC-850E)
FZ-C70DFE (for KC-840E)
• Humidifying Filter: 1unit
Model FZ-C100MFE
(Gray)
Humidifying lter
ENGLISH
DEUTSCH
-
FRANÇAIS
NEDERLANDS
Replacing the Filters
1. Replace lters according to the instructions provided with the replacement lters.
2. Use the date labels as a reminder for when the lters should be replaced.
Filter Frame (Gray)
Filter Frame (white)
Disposal of Filters
Please dispose of used lters according to any local laws and regulations.
HEPA Filter materials:
• Filter: Polypropylene • Frame: Polyester
Washable Deodorizing Filter materials:
• Polyester, Rayon, Activated charcoal
Humidifying Filter materials:
• Rayon, Polyester
E-15
(white)
РУССКИЙ
Page 18

TROUBLESHOOTING
Before calling for service, please review the Troubleshooting chart below, since the problem may not
be a unit malfunction.
SYMPTOM REMEDY (not a malfunction)
Odours and smoke are not
removed.
The Front Monitor illuminates
green even when the air is
impure.
The Front Monitor illuminates
orange or red even when the
air is clean.
A clicking or ticking sound is
heard from the unit.
The discharged air has an
odour.
The unit does not operate
when cigarette smoke is in the
air.
Filter Indicator Light is
illuminated.
• Clean or replace the lters if they appear to be heavily soiled.
(See E-11,E-12,E-14)
• The air could be impure at the time the unit was plugged in.
Unplug the unit, wait one minute, and plug the unit in again.
• Sensor operation is affected if the dust sensor openings are
dirty or clogged. Gently clean the dust sensors (See E-11).
• Clicking or ticking sounds may be audible when the unit is
generating ions.
• Check to see if the lters are heavily soiled.
• Clean or replace the lters.
• Plasmacluster Air Puriers emit small traces of ozone which
may produce an odour.
• Is the unit installed in a location that is difcult for the sensor
to detect cigarette smoke?
• Are the dust sensor openings blocked or clogged?
(In this case, clean the openings.) (See E-11)
• After replacing lters, connect the power cord to an outlet and
press the Filter Reset Button. (See E-11)
The Front Monitor are turned
off.
The Water Supply Indicator
Light does not illuminate when
the tank is empty.
Water lever in the tank does
not decrease or decreases
slowly.
The Front Monitor lights
change colour frequently.
• Check to see if the Lights OFF Mode selected. If so, then
press the Lights Control Button to activate the indicator lights.
(See E-10)
• Check Styrofoam oat for impurities. Clean the HumidifyingTray. Ensure unit is located on a level surface.
• Check to see if the Humidifying Tray and Water Tank are correctly installed. Check the Humidifying Filter.
• Cl ean or re pla c e the f i lter wh en it is he a v ily so ile d
(See E-14 and E-15).
• The Front Monitor lights automatically change colours as impurities are detected by the dust sensor and odour sensor.
E-16
Page 19
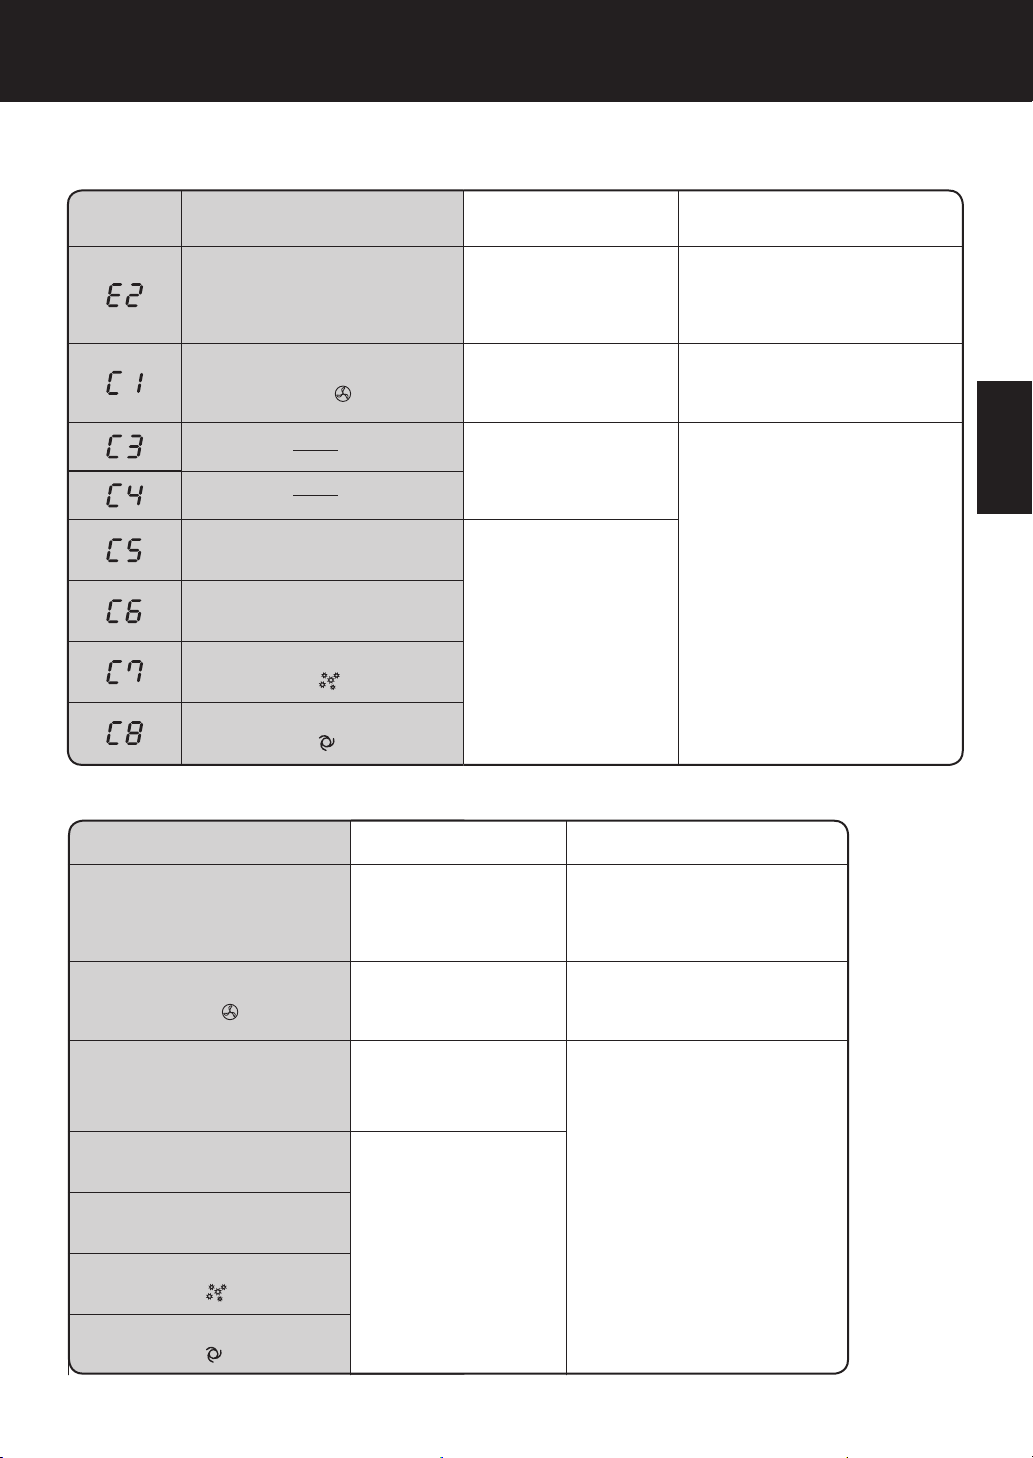
ERROR DISPLAY
KC-850E•KC-860E
If error occurs again, contact the Sharp Service Centre.
DIGITAL
INDICATION
KC-840E
LAMP INDICATION ERROR DETAILS REMEDY
Flashing of the Clean Air &
Humidify Indicator Light.
Flashing of the Fan Speed
Indicator Light ' '.
Flash i ng of the Clea n Ion
Shower Indicator Light.
Flashing of the Clean Air Indicator Light.
Flashing of the Fan Speed Indicator Light ' '.
Flashing of the Fan Speed Indicator Light ' '.
Abnormal humidity lter Verify if the Humidifying Filter,
Abnormal fan motor
Abnormal temperaturehumidity sensor
Problem in circuit board
Humidifying Tray and Water
Tank are properly installed and
then turn power ON again.
Turn power OFF to cancel the
error display, wait one minute,
and then turn power ON.
Unplug the unit, wait one
minute, and plug the unit in
again.
ENGLISH
DEUTSCH
FRANÇAIS
LAMP INDICATION ERROR DETAILS REMEDY
Flashing of the Clean Air &
Humidify Indicator Light.
Flashing of the Fan Speed
Indicator Light ' '.
Flashing of the Humidity Indicator Light ‘High’ or ‘Low’.
Flash i ng of the Clea n Ion
Shower Indicator Light.
Flashing of the Clean Air Indicator Light.
Flashing of the Fan Speed Indicator Light ' '.
Flashing of the Fan Speed Indicator Light ' '.
Abnormal humidity lter Verify if the Humidifying Filter,
Abnormal fan motor
Abnormal temperaturehumidity sensor
Problem in circuit board
Humidifying Tray and Water
Tank are properly installed and
then turn power ON again.
Turn power OFF to cancel the
error display, wait one minute,
and then turn power ON.
Unplug the unit, wait one
minute, and plug the unit in
again.
E-17
NEDERLANDS
РУССКИЙ
Page 20
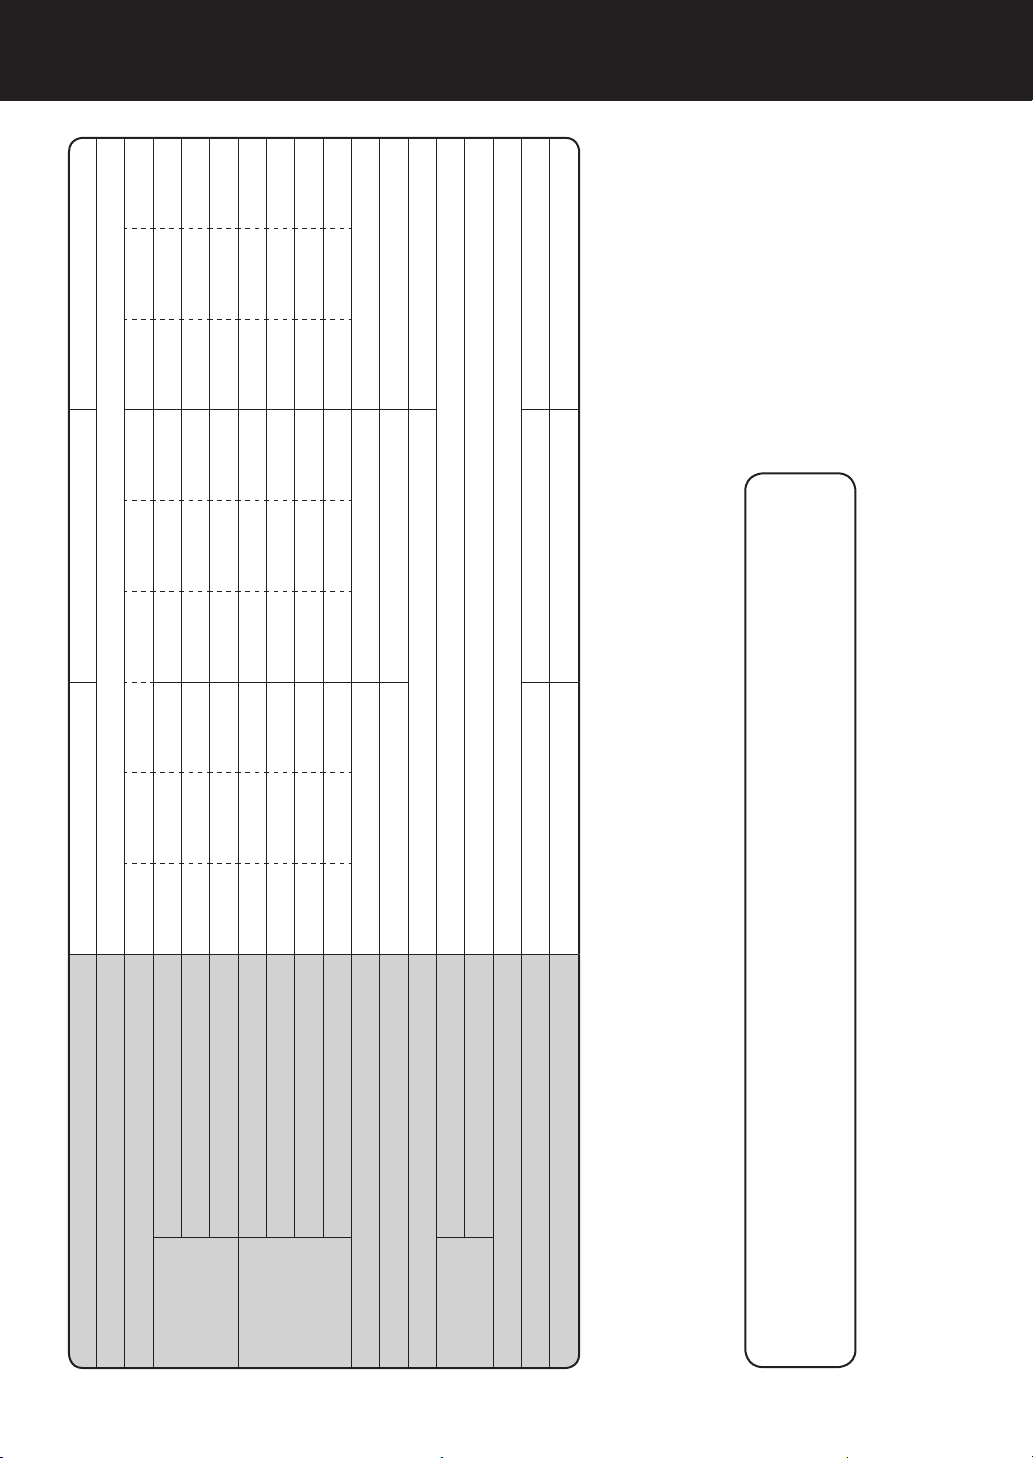
SPECIFICATIONS
Model KC-860E KC-850E KC-840E
Power supply 220 ~ 240 V 50/60 Hz
56 19 5.5 (4.9) 41 11.6 3.8 (3.3) 26 9.5 3.7 (3.4)
396 240 84 306 168 60 210 132 48
/hour)
3
Rated Power (W)
Fan Speed (m
Fan Speed Adjustment MAX MED LOW MAX MED LOW MAX MED LOW
CLEAN AIR
51 39 17 47 35 15 45 34 15
56 21 8.8 (8.2) 40 13.5 6.8 (6.3) 21 11.5 6.1 (5.8)
50 39 25 47 35 22 42 34 20
396 240 120 288 168 84 186 132 54
/hour)
3
Noise Level (dBA)
Fan Speed (m
730 500 300 600 400 230 450 330 170
Rated Power (W)
Noise Level (dBA)
Humidication (mL/hour)*2
CLEAN AIR
& HUMIDIFY
Dust/odour/Temperature & Humidity Dust/Temperature & Humidity
)*1 ~48 ~38 ~26
2
Dust collection HEPA with Microbial control *3
Deodorization Washable Deodorizing
Water Tank Capacity (L) 4.3 4.0 3.0
Sensors
Filter type
Cord Lenght (m) 2.0
Dimensions (mm) 398 (W) × 288 (D) × 627 (H) 378 (W) × 265 (D) × 586 (H) 360 (W) × 233 (D) × 550 (H)
Recommended Room Size (m
Weight (kg) 11.0 9.0 8.0
The class of the HEPA lter by EN1822 is H10.
*1 • The Recommended Room Size is appropriate for operating the unit of maximum fan speed.
• The Recommended Room Size area indicates the space where a certain amount of dust particles can be removed in 30 minutes.
*2 • Humidication Amount changes in accordance with indoor and outdoor temperature and humidity.
Humidication Amount increases as temperatures rise or humidity decreases.
Humidication Amount decreases as temperatures decrease or humidity rises.
• Measurement Condition: 20 ºC, 30 % humidity (JEM1426)
*3 •
Standby Power
In order to operate the electrical circuits while the power plug is inserted in the wall outlet, this
product consumes about 0.7 W of standby power.
For energy conservation, unplug the power cord when the unit is not in use.
E-18
Page 21

A. Information on Disposal for Users (private households)
1. In the European Union
Attention: If you want to dispose of this equipment, please do not use the ordinary dust
bin!
Used electrical and electronic equipment must be treated separately and in
accordance with legislation that requires proper treatment, recovery and recycling of
used electrical and electronic equipment.
Following the implementation by member states, private households within the EU
states may return their used electrical and electronic equipment to designated
collection facilities free of charge*. In some countries* your local retailer may also
take back your old product free of charge if you purchase a similar new one.
*) Please contact your local authority for further details.
If your used electrical or electronic equipment has batteries or accumulators, please
dispose of these separately beforehand according to local requirements.
By disposing of this product correctly you will help ensure that the waste undergoes
the necessary treatment, recovery and recycling and thus prevent potential negative
effects on the environment and human health which could otherwise arise due to
inappropriate waste handling.
2. In other Countries outside the EU
If you wish to discard this product, please contact your local authorities and ask for the
correct method of disposal.
For Switzerland: Used electrical or electronic equipment can be returned free of
charge to the dealer, even if you don’t purchase a new product. Further collection
facilities are listed on the homepage of
www.swico.ch or www.sens.ch.
B. Information on Disposal for Business Users.
1. In the European Union
If the product is used for business purposes and you want to discard it:
Please contact your SHARP dealer who will inform you about the take-back of the
product. You might be charged for the costs arising from take-back and recycling.
Small products (and small amounts) might be taken back by your local collection
facilities.
For Spain: Please contact the established collection system or your local authority for
take-back of your used products.
2. In other Countries outside the EU
If you wish to discard of this product, please contact your local authorities and ask for
the correct method of disposal.
Attention: Your product is
marked with this symbol. It
means that used electrical
and electronic products
should not be mixed with
general household waste.
There is a separate
collection system for these
products.
EN
ENGLISH
DEUTSCH
FRANÇAIS
NEDERLANDS
РУССКИЙ
E-19
Page 22

Memo
SHARP CORPORATION
OSAKA, JAPAN
E-20
Printed in China
TINS-A248KKRZ 07K-
Page 23

ENGLISH
DEUTSCH
FRANÇAIS
NEDERLANDS
РУССКИЙ
Page 24

Bitte lesen Sie sich diese Bedienungsanleitung vor der ersten
Inbetriebnahme Ihres neuen Luftreinigers sorgfältig durch.
Der Luftreiniger saugt die Raumluft durch seinen Lufteinlass ein, führt diese Luft durch
einen Vorfilter, einen auswaschbaren Desodorierungsfilter sowie einen HEPA-Filter
im Inneren des Geräts und gibt die gereinigte Luft anschließend über den Luftauslass
wieder aus. Der HEPA-Filter ist in der Lage, 99,97 % aller bis zu 0,3 Mikrometer kleinen Staubpartikel zu beseitigen, die mit der angesaugten Luft durch den Filter geführt
werden, und trägt so auch dazu bei, schlechte Gerüche zu beseitigen. Der auswasch-
bare Desodorierungslter absorbiert Schritt für Schritt die Gerüche beim Passieren der
Luft durch den Filter.
Einige der durch die Filter absorbierten Gerüche können sich allerdings gegenseitig
beeinussen und so nach einer bestimmten Zeit eine eigene Geruchsentwicklung verursachen. Je nach Betriebsumgebung und insbesondere bei Verwendung des Gerätes
unter extremen Bedingungen (die nicht mehr den Bedingungen in einem herkömmlichen Haushalt entsprechen), kann sich diese Geruchsentwicklung in einer kürzeren
Zeit als ursprünglich angenommen verstärken. Falls diese Geruchsentwicklung anhält,
sollten die Filter ausgetauscht werden.
HINWEIS
• Der Luftreiniger wurde für die Beseitigung von in der Luft enthaltenem Staub und Gerüchen konzipiert; für eine Beseitigung schädlicher Gase (beispielsweise von in Zigarettenrauch enthaltenem
Kohlenmonoxid) ist er nicht geeignet. Falls die Quelle eines bestimmten Geruchs nicht eliminiert
wird, ist auch der Luftreiniger nicht in der Lage, diesen Geruch vollständig zu beseitigen.
HEPA-Filter
Auswaschbarer Desodorierungslter
Vorlter
(Dieselbe Abbildung wurde auch beim Modell „KC-850E“ verwendet.)
Page 25

DEUTSCH
LEISTUNGSMERKMALE
Einzigartige Kombination unterschiedlichster Technologien zur Luftbehandlung
Dreifachlter-System + Plasmacluster +
Luftbefeuchtung
SAMMELT STAUB*
Der auswaschbare Vorlter entfernt Staub
und andere größere Partikel aus der Luft.
REDUZIERT GERÜCHE
Der auswaschbare Desodorierungsfilter
absorbiert die meisten herkömmlichen
Haushaltsgerüche.
REDUZIERT POLLEN UND SCHIMMELPILZE*
Der HEPA-Filter fängt 99,97 % aller bis zu
0,3 Mikrometer kleinen Partikel ein.
AUFFRISCHUNG
Die Plasmacluster-Technologie sorgt für
eine Verbesserung der Raumluft ähnlich
wie in der Natur: sie gibt eine genau aus-
balancierte Menge an positiven und negativen Ionen ab.
LUFTBEFEUCHTUNG
Eine Füllung reicht für bis zu 10 Stunden.**
*Wenn Luft durch das Filtersystem geführt
wird.
**Raumgröße:
bis zu 48m2. (KC-860E)
bis zu 38m2. (KC-850E)
bis zu 26m2. (KC-840E)
Die Sensortechnologie überwacht ständig
die Luftqualität und stellt den Betrieb auf
Grundlage der ermittelten Luftreinheit und
-feuchtigkeit automatisch ein.
INHALT
WICHTIGE SICHERHEITSHINWEISE
• WARNUNG ................................................. D-2
• SICHERHEITSHINWEISE FÜR DEN
BETRIEB .................................................... D-3
• RICHTLINIEN ZUR INSTALLATION ..........
• RICHTLINIEN ZUM UMGANG MIT
FILTERN ..................................................... D-3
BEZEICHNUNG DER EINZELNEN
KOMPONENTEN
• EXPLOSIONSZEICHNUNG .......................
• RÜCKSEITE ...............................................
•
ANZEIGENFELD AN DER VORDERSEITE
VORBEREITUNG DER INBETRIEBNAHME
• FILTERINSTALLATION .............................. D-6
AUFFÜLLEN DES WASSERBEHÄLTERS
•
BETRIEB
• ANZEIGEN AM HAUPTGERÄT ................. D-8
• LUFTREINIGUNGS- UND
LUFTBEFEUCHTUNGSMODUS ............... D-8
• LUFTREINIGUNGSMODUS ......................
• IONENDUSCHE-REINIGUNGSMODUS ...
• GEBLÄSEGESCHWINDIGKEITS-TASTE ..
• PLASMACLUSTER-EIN-/AUS-TASTE .....
• LEUCHTANZEIGENSTEUERTASTE .......
• WASSERVORRATS-ANZEIGELEUCHTE ..
• EINSTELLUNG DER SENSOR-
EMPFINDLICHKEIT ................................. D-10
.....................................................
PFLEGE UND WARTUNG
• FILTER-ANZEIGELEUCHTE ....................
• RÜCKWAND UND SENSOREN ..............
• GERÄT .....................................................
• WASSERBEHÄLTER ...............................
• PFLEGE DES AUSWASCHBAREN
DESODORIERUNGSFILTERS ................
• LUFTBEFEUCHTUNGSWANNE .............
• LUFTBEFEUCHTUNGSFILTER ...............
• RICHTLINIEN FÜR DEN FILTERAUS-
TAUSCH ...................................................
STÖRUNGSBESEITUNG
TECHNISCHE DATEN
.......................................
.....................
.......................
............................
ENTSORGUNGSINFORMATIONEN
......
...........
D-2
D-3
D-4
D-4
D-4
...
D-5
...
D-6
... D-7
D-8
D-9
D-9
D-9
D-10
D-10
D-10
D-11
D-11
D-11
D-11
D-12
D-12
D-13
D-14
D-15
D-16
D-18
D-19
ENGLISH
DEUTSCH
FRANÇAIS
NEDERLANDS
РУССКИЙ
POLSK
Wi r d an k e n Ih n e n h e r z li c h f ü r d e n Ka u f e i n e s
Luftreinigers von SHARP. Bitte lesen Sie sich diese
Bedienungsanleitung sorgfältig durch, bevor Sie den
Luftreiniger in Betrieb nehmen.
Be wahr en Sie d ie Bedi enun gsan leitung na ch dem
Lesen an einem sicheren Ort auf, damit Sie bei Bedarf
nachschlagen können.
D-1
Page 26

WICHTIGE SICHERHEITSHINWEISE
Bei der Verwendung elektrischer Geräte müssen eine Reihe grundlegender Sicherheitshinweise
einschließlich der folgenden beachtet werden:
WARNUNG
- Bitte halten Sie sich an die folgenden Anweisungen, um das Risiko von Stromschlägen, Bränden oder Verletzungen bei Personen zu vermeiden:
• Lesen Sie sich die Bedienungsanleitung vor der Inbetriebnahme sorgfältig durch.
• Verwenden Sie ausschließlich eine Steckdose mit einer Spannung von 220 ~ 240 Volt.
• Verwenden Sie das Gerät auf keinen Fall, wenn das Netzkabel oder der Netzstecker beschädigt oder wenn
der Anschluss an die Wandsteckdose instabil ist.
• Entfernen Sie regelmäßig den auf dem Stecker bendlichen Staub.
• Stecken Sie niemals Ihre Finger oder irgendwelche Gegenstände in den Lufteinlass oder -auslass.
• Halten Sie beim Entfernen des Netzsteckers stets den Stecker selbst und niemals das Kabel fest.
Anderenfalls kann es zu einem Kurzschluss und dadurch zu einem elektrischen Schlag bzw. Brand kommen.
• Fassen Sie den Stecker niemals mit feuchten Händen an.
• Verwenden Sie dieses Gerät niemals in der Nähe von Gasgeräten oder offenen Flammen.
•
Stellen Sie sicher, dass Sie das Gerät stets von der Stromversorgung abtrennen, bevor Sie den Wasserbehälter
auffüllen, das Gerät reinigen oder das Gerät über einen längeren Zeitraum hinweg nicht verwendet werden soll.
Anderenfalls kann es zu einem Kurzschluss und dadurch zu einem elektrischen Schlag bzw. Brand kommen.
• Falls das Netzkabel beschädigt ist, muss es durch den Hersteller selbst, eine seiner Service Niederlas
sungen, ein durch Sharp autorisierten Dienstleister oder durch einen qualifizierten Techniker ausgetauscht werden, um mögliche Risiken zu vermeiden.
• Betreiben Sie das Gerät niemals, wenn Sie Insektenspray verwenden oder wenn es sich in einem Raum ben
det, in dem ölige Rückstände, Rauch von Räucherstäbchen, Funken eben angezündeter Zigaretten, chemische
Dämpfe o. ä. in der Luft vorhanden sind; dasselbe gilt für Räume wie beispielsweise Badezimmer, in denen das
Gerät feucht werden könnte.
• Lassen Sie bei der Reinigung des Geräts die gebotene Vorsicht walten. Stark ätzende Reinigungsmittel können
eine Beschädigung der Außenäche verursachen.
• Die Servicearbeiten an diesem Luftreiniger sollten ausschließlich durch ein von Sharp autorisierten Dienstleister
ausgeführt werden. Konsultieren Sie bei irgendwelchen Fragen oder Problemen hinsichtlich erforderlicher Ein-
stellungen oder Reparaturen eine Service-Niederlassung in Ihrer Nähe.
• Entfernen Sie vor einem Transport des Geräts zuerst den Wasserbehälter und die Luftbefeuchtungswanne und
halten Sie das Gerät beim Transport an beiden Griffen fest.
• Trinken Sie niemals das Wasser aus der Luftbefeuchtungswanne oder dem Wasserbehälter.
• Ersetzen Sie das Wasser im Wasserbehälter täglich durch frisches Leitungswasser und reinigen Sie den Wasserbe
hälter und die Luftbefeuchtungswanne in regelmäßigen Abständen. (Siehe dazu Seite D-12 und D-13).
Lassen Sie das Wasser aus dem Wasserbehälter und der Luftbefeuchtungswanne ab, wenn Sie das Gerät über
einen längeren Zeitraum hinweg nicht verwenden. Falls das Wasser im Wasserbehälter bzw. in der Luftbefeuchtungswanne belassen wird, kann es zu Schimmelpilz- oder Bakterienbildung kommen, was schlechte Gerüche
zur Folge hat.
In einigen wenigen Fällen können die so entstandenen Bakterien sogar schädliche Auswirkungen auf die Ge
sundheit haben.
• Dieses Gerät ist nicht für die Benutzung durch Personen (einschließlich Kindern) gedacht, die nur über eingeschränkte
körperliche, sensorische oder geistige Fähigkeiten oder mangelndes Wissen oder Erfahrung verfügen.
Es sei denn ihnen wurde Aufsicht oder Anweisung zur Benutzung des Gerätes, von einer für deren Sicherheit verant
wortliche Person, gegeben.
Kinder sollten beaufsichtigt werden, damit sie nicht mit dem Gerät spielen.
-
-
-
-
-
HINWEIS
- Störung des Radio- oder Fernsehempfangs
Falls dieser Luftreiniger eine Störung des Radio- oder Fernsehempfangs verursacht, versuchen Sie
bitte, die Störung durch eine oder mehrere der folgenden Maßnahmen zu beseitigen:
• Richten Sie die Empfangsantenne anders aus oder installieren Sie diese an einem anderen Ort.
• Vergrößern Sie den Abstand zwischen dem Gerät und dem Radio/Fernsehgerät.
• Schließen Sie das Gerät an eine Steckdose an, die mit einem anderen Stromkreis verbunden ist
als die Steckdose, an die das Radio/Fernsehgerät angeschlossen ist.
• Konsultieren Sie Ihren Händler oder einen erfahrenen Radio-/Fernsehtechniker.
D-2
Page 27

SICHEITHEITSHINWEISE FÜR DEN BETRIEB
• Blockieren Sie niemals den Lufteinlass bzw. -auslass.
• Verwenden Sie das Gerät niemals in der Nähe oder auf heißen Objekten wie beispielsweise Her
de, oder an Orten, an denen es mit heißem Dampf in Kontakt kommen könnte.
• Betreiben Sie das Gerät ausschließlich in aufrechter Stellung.
• Halten Sie das Gerät beim Transport immer an beiden Griffen fest.
Transportieren Sie das Gerät nicht, wenn es in Betrieb ist.
• Betreiben Sie das Gerät niemals, wenn die Filter, der Wasserbehälter oder die Luftbefeuch
tungswanne nicht ordnungsgemäß installiert sind.
• Waschen Sie den HEPA-Filter niemals aus; er kann nicht wiederverwendet werden.
Die Filterleistung würde dadurch nicht verbessert, obendrein besteht die Gefahr von Stromschlä
gen oder Fehlfunktionen.
• Reinigen Sie die Außenächen des Geräts nur mit einem weichen und trockenen Tuch.
Verwenden Sie keine leicht üchtigen Flüssigkeiten und/oder Reinigungsmittel.
Anderenfalls könnte die Oberäche beschädigt oder rissig werden.
Darüber hinaus könnte es zu einer Fehlfunktion der Sensoren kommen.
• Die Häugkeit der erforderlichen Wartung (Entkalkung) variiert je nach Wasserhärte oder
Reinheit des von Ihnen verwendeten Wassers; je härter das Wasser ist, desto häuger ist
eine Entkalkung erforderlich.
• Halten Sie das Gerät von Wasser fern.
RICHTLINIEN ZUR INSTALLATION
• Stellen Sie das Gerät für die Inbetriebnahme mindestens 2 m von Geräten entfernt auf, die
elektromagnetische Felder erzeugen können oder mit Hochfrequenz arbeiten (wie beispielsweise Fernsehgeräte oder Radios), um elektrische Störungen zu vermeiden.
• Meiden Sie Aufstellungsorte, an dem sich der Sensor im direkten Luftstrom (Wind) bendet.
Anderenfalls funktioniert das Gerät nicht ordnungsgemäß.
• Meiden Sie Aufstellungsorte, an denen Möbel, Textilien oder andere Gegenstände mit dem
Lufteinlass bzw. -auslass in Kontakt kommen oder diesen blockieren könnten.
• Meiden Sie Aufstellungsorte, an denen das Gerät Kondensation oder extremen Temperatur
schwankungen ausgesetzt wäre. Die Betriebsumgebung ist geeignet, wenn die Raumtemperatur zwischen 5 und 35 ºC liegt.
• Stellen Sie das Gerät auf einer stabilen Oberäche auf und achten Sie auf eine ausrei
chende Luftzirkulation.
Wenn das Gerät auf einem dicken Teppich aufgestellt wird, kann es zu leichten Vibrationen kom-
men.
Stellen Sie das Gerät auf einer ebenen Oberäche auf, damit kein Wasser aus dem Wasserbehäl-
ter bzw. der Luftbefeuchtungswanne austritt.
• Meiden Sie Aufstellungsorte, an denen sich Fett oder öliger Rauch ansammelt.
Anderenfalls könnte die Geräteoberäche rissig werden oder es könnte eine Fehlfunktion des Sen
sors verursacht werden.
• Stellen Sie das Gerät 30~60 cm (1~2 ft) von der Wand entfernt auf, um eine ausreichende
Luftbewegung zu gewährleisten.
Mit der Zeit kann es zu einer Verunreinigung der Wand direkt hinter dem Luftauslass kommen.
Wenn Sie das Gerät über einen längeren Zeitraum hinweg am selben Ort verwenden, reinigen Sie
die dahinter bendliche Wand bitte regelmäßig und schützen Sie sie durch eine Vinylfolie o. ä., um
eine Verunreinigung der Wand zu vermeiden.
-
-
-
-
ENGLISH
DEUTSCH
FRANÇAIS
-
NEDERLANDS
РУССКИЙ
-
POLSK
RICHTLINIEN ZUM UMGANG MIT FILTERN
• Befolgen Sie für eine ordnungsgemäße Pege und Wartung der Filter alle in dieser Bedienungsanleitung aufgeführten Anweisungen.
D-3
Page 28
BEZEICHNUNG DER EINZELNEN
KOMPONENTEN
EXPLOSIONSZEICHUNG - VORDERSEITE
KC-860E
RÜCKSEITE
Luftauslass
HauptgerätAnzeige
Vorderanzeige
Hauptgerät
KC-850E
Luftauslass
Hauptgerät-
Anzeige
Vorderanzeige
Hauptgerät
KC-840E
Griff (2, links und rechts)
Sensoren
• Staubsensor
•
Temperatur-/Feuchtigkeitssensor
•
Geruchssensor (KC860E•KC850E)
Tankgriff
Wasserbehälter
(zur Luftbefeuchtung)
Luftbefeuchtungslter
Filterrahmen
Tankdeckel
Schwimmer
Luftbefeuchtungswanne
Netzkabel
Stecker
(Die Steckerform variiert je nach Bestimmungsland.)
Lufteinlass
Datumsaufkleber
(Nennleistungs-Aufkleber)
Luftauslass
HEPA-Filter (weiß)
Auswaschbarer Desodo-
rierungslter (schwarz)
Laschen
Rückwand (Vorlter)
D-4
Page 29
ANZEIGENFELD AN DER VORDERSEITE
be je nach Geruchsintensität der Luft.
Hier werden die Umgebungsbedingungen sowie die Feuchtigkeit der Raumluft angezeigt.
KC-850E KC-860E
Zeigt den Zustand der Raumluft nach Geruch, Staub und Feuchtigkeit an.
STAUBANZEIGE
Der Staubsensor überwacht die Raumluft
ständig und ändert seine Farbe je nach
Reinheitsgrad der Luft. Der KC-860E hat
5 Stufen der Stauberkennung.
Staub im Raum
Rein
Blinkend
Alle grün
Rein
Alle grün
Wenn der Staubdetektor Staub erkennt,
bewegt sich das Blinklicht je nach Staubanfall schneller oder langsamer.
Stark verunreinigt
Grün
Blinkend
Gelb Alle rot
Stark verunreinigt
Grün
Gelb
Alle rot
Plasmacluster-Leuchtanzeige (blau)
Blau: Plasmacluster Ein
Erloschen: Plasmacluster Aus
GERUCHSANZEIGE
Der Geruchssensor überwacht die
Raumluft ständig und ändert seine Farbe je nach Geruchsintensität der Luft.
Geruch im Raum
Schwach Stark
Grün Gelb Rot
Staub und Geruch werden von verschie-
denen Sensoren erfasst. Daher ändern sich
die Farben möglicherweise nicht gleichzeitig.
ENGLISH
Wasserversorgungs-Leuchtanzeige (rot)
Diese Anzeige leuchtet, wenn der Wasserbehälter aufgefüllt werden muss.
DEUTSCH
Feuchtigkeits-Leuchtanzeige (grün)
Hier wird der ungefähre Feuchtigkeitsgrad
der Raumluft angezeigt. Die Feuchtigkeitseinstellung kann nicht reguliert werden.
(Bsp.) Bei einer Luftfeuchtigkeit
von 60 %
80 % oder mehr
Weniger als 30 %
FRANÇAIS
KC-840E
STAUBANZEIGE
Der Staubsensor überwacht die
Raumluft ständig und ändert seine
Farbe je nach Reinheitsgrad der Luft.
Staube im Raum
Rein
Blinkend
Alle grün
Rein
Blinkend
Alle grün
Wenn der Staubdetektor Staub erkennt,
bewegt sich das Blinklicht je nach Staubanfall schneller oder langsamer.
Stark verunreinigt
Grün
Blinkend
Gelb Alle rot
Stark verunreinigt
Grün
Blinkend
Gelb Alle rot
D-5
Feuchtigkeits-Leuchtanzeige (grün)
Hier wird der ungefähre Feuchtigkeitsgrad der Raumluft angezeigt. Die
Feuchtigkeitseinstellung kann nicht
reguliert werden.
Hoch – 65 % oder mehr
Mittel – zwischen 65 und 40 %
Niedrig – 40 % oder weniger
Wasserversorgungs-Leuchtan-
zeige (rot)
Diese Anzeige leuchtet, wenn der Wasserbehälter aufgefüllt werden muss.
Plasmacluster-Leuchtanzeige (blau)
Blau: Plasmacluster Ein
Erloschen: Plasmacluster Aus
NEDERLANDS
РУССКИЙ
POLSK
Page 30
VORBEREITUNG DER
1
2
INBETRIEBNAHME
Trennen Sie das Gerät von der
Stromversorgung, bevor Sie die
Filter installieren oder einstellen
FILTERINSTALLATION
Damit die hohe Qualität der Filter auch während des Transports beibehalten werden kann, wurden sie in
Plastikbeuteln verpackt im Gerät installiert. Stellen Sie vor der ersten Inbetriebnahme des Geräts unbedingt
sicher, dass Sie die Filter aus ihren Plastikbeuteln herausnehmen und ordnungsgemäß im Gerät installieren.
Filter
herausnehmen
Nehmen Sie die Rück-
1
wand ab.
Drücken Sie die Laschen vorsichtig
nach unten, kippen Sie die Rückwand an und entfernen Sie diese.
Laschen an der Oberseite
Rückwand
Entnehmen Sie den
2
auswaschbaren De-
sodorierungslter
(schwarz) und den
HEPA-Filter (weiß) aus
den Plastikbeuteln.
Filter installieren
Installieren Sie den HEPA-Filter.
1
Prüfen Sie, dass der HEPA-Filter ordnungsgemäß
eingesetzt ist.
Falls die Installation verkehrt
herum durchgeführt wird, wird
die Leistung des Geräts erheblich beeinträchtigt.
Lasche
Setzen Sie die beiden unteren Laschen
2
der Rückwand (links und rechts) in die
kleinen Öffnungen des Geräts ein und
schieben Sie den auswaschbaren De-
sodorierungslter zwischen den HEPA-
Filter und die Rückwand.
Auswaschbarer Desodorie-
rungslter
HEPA-Filter
Rückwand
Untere Laschen
HEPA-Filter
Auswaschbarer Desodo-
rierungslter
Drücken Sie leicht
3
gegen die oberen
Laschen (links und
rechts), bis der Filter
einrastet.
Tragen Sie das Datum der
4
Inbetriebnahme auf dem
Datumsaufkleber ein.
Verwenden Sie das Datum
der Inbetriebnahme als Richtlinie für den künftigen Austausch der Filter.
D-6
Obere Laschen
Datumsaufkleber
Page 31

AUFFÜLLEN DES WASSERBEHÄLTERS
Im Luftreinigungsmodus kann das Gerät betrieben
werden, ohne dass zuerst der Wasserbehälter aufgefüllt werden muss. Wenn Sie das Gerät allerdings im
Luftreinigungs- und Luftbefeuchtungs- oder Ionendusche-Reinigungsmodus verwenden, sollten Sie
den Wasserbehälter auffüllen.
Bauen Sie den Wasserbehälter aus, indem
1
Sie die Oberseite lösen.
Tankgriff
Wasserbehälter
Luftbefeuchtungswanne
Nehmen Sie den Deckel des Wasserbehäl-
2
ters ab und befüllen Sie den Wasserbehälter vorsichtig mit frischem Leitungswasser.
• Ersetzen Sie das Wasser im Wasserbehälter täglich
durch frisches Leitungswasser.
Schließen Sie den Tankdeckel nach dem
3
Befüllen fest und sicher.
• Stellen Sie sicher, dass keinerlei Wasser austritt.
• Wischen Sie überschüssiges Wasser von der Außenseite des Wasserbehälters ab.
• Halten Sie den Wasserbehälter beim Transport mit
beiden Händen fest und achten Sie darauf, dass die
Wasserbehälteröffnung immer nach oben weist.
Setzen Sie den Wasserbehälter wieder in
4
das Gerät ein.
• Die obere Lasche rastet mit einem Klicken ein, sobald
der Wasserbehälter ordnungsgemäß installiert ist.
Tankdeckel
Anziehen
Wasserbehälter
ENGLISH
DEUTSCH
FRANÇAIS
NEDERLANDS
VORSICHT
• Halten Sie das Gerät von Wasser fern. Sonst könnte ein Kurzschluss und/oder ein Stromschlag verursacht werden.
• Verwenden Sie kein heißes Wasser (40 ºC), chemische Zusätze, aromatische Substanzen,
verunreinigtes Wasser oder andere schädliche Flüssigkeiten; anderenfalls kann es zu einer
Verformung bzw. Fehlfunktion kommen.
• Verwenden Sie ausschließlich frisches Leitungswasser. Die Verwendung einer anderen
Wasserquelle kann eine Schimmelpilz- bzw. Bakterienbildung fördern.
D-7
РУССКИЙ
POLSK
Page 32

BETRIEB
ANZEIGEN AM HAUPTGERÄT
Filter-Rückstelltaste/
Anzeigeleuchte (rot)
Leuchtanzeigensteuertaste
Gebläsegeschwindigkeits-
Taste/ Anzeigeleuchte (grün)
Plasmacluster-Ein-/Aus-Taste/
Anzeigeleuchte (grün)
EIN-Taste
Drücken Sie eine beliebige Taste,
um einen Modus auszuwählen und
das Gerät zu starten.
Luftreinigungs- und Luftbefeuchtungs-
MODUS-Taste/ Anzeigeleuchte (grün)
LuftreinigungsMODUS-
Taste/ Anzeigeleuchte (grün)
AUS-Taste
IONENDUSCHE-REINIGUNGSMO-
DUS-Taste/Anzeigeleuchte (blau)
LUFTREINIGUNGS- UND LUFTBEFEUCHTUNGSMODUS
Verwenden Sie den Luftreinigungs- und Luftbefeuchtungsmodus, um die Raumluft schnell
und effektiv zu reinigen, unerwünschte Gerüche zu beseitigen und die Luft zu befeuchten.
Füllen Sie den Wasserbehälter auf. (Siehe dazu
Seite D-7.)
1
Drücken Sie die LUFTREINIGUNGS- UND LUFTBEFEUCHTUNGSMODUS-Taste.
2
• Falls Sie das Netzkabel zwischen den einzelnen Verwen-
dungen nicht vom Stromnetz getrennt haben, wird das
Gerät automatisch mit den zuvor ausgewählten Einstel-
lungen gestartet.
Drücken Sie zur Einstellung der gewünschten Gebläsegeschwindigkeit die GEBLÄSEGESCHWINDIGKEITS-Taste.
3
• Die Anzeigeleuchte leuchtet und zeigt
die gegenwärtig ausgewählte Gebläsegeschwindigkeit an.
Drücken Sie die AUS-Taste, um das Gerät auszuschalten.
Wissenswertes über den automatischen Luftbefeuchtungsmodus
Die Temperatur-/Feuchtigkeitssensoren erfassen die Luftfeuch-
tigkeit automatisch und stellen die Feuchtigkeit entsprechend
der Raumtemperatur ein. Je nach Größe und Luftfeuchtigkeit
des Raums erreicht die Luftfeuchtigkeit u. U. nicht mehr als
55 ~ 65 %. In solchen Fällen empfehlen wir Ihnen die Verwendung des LUFTREINIGUNGS- UND LUFTBEFEUCHTUNGSMODUS.
Temperatur
~ 18 ºC
18 ºC ~ 24 ºC
24 ºC ~
Luftfeuchtigkeit
65 %
60 %
55 %
D-8
Page 33

LUFTREINIGUNGSMODUS
Verwenden Sie den Luftreinigungsmodus, wenn Sie keine zusätzliche Luftfeuchtigkeit wünschen.
Drücken Sie die LUFTREINIGUNGSMODUS-Taste auf der Anzeige.
1
• Falls Sie das Netzkabel zwischen den einzelnen Verwendungen
nicht vom Stromnetz getrennt haben, wird das Gerät automatisch
mit den zuvor ausgewählten Einstellungen gestartet.
Drücken Sie zur Einstellung der gewünschten Gebläsege-
2
schwindigkeit die GEBLÄSEGESCHWINDIGKEITS-Taste.
•
Die Anzeigeleuchte leuchtet und zeigt
die gegenwärtig ausgewählte Gebläsegeschwindigkeit an.
Drücken Sie die AUS-Taste, um das Gerät auszuschalten.
IONENDUSCHE-REINIGUNGSMODUS
REINIONENDUSCHE-Modus mit Luftbefeuchtung setzt hoch verdichtete Plasmacluster-Ionen
frei.Das Gerät gibt für 15 Minuten einen starken Luftstrom ab und entfernt so wirksam Staub,
Pollen, Schimmelpilze und Allergene aus der Luft, indem sie durch das Filtersystem geführt
werden.Zur Auswahl dieses Modus muss sich Wasser im Wasserbehälter benden.
Das Gerät befeuchtet die Raumluft, wenn sich Wasser im Wasserbehälter bendet, und be-
feuchtet nicht, wenn kein Wasser vorhanden ist.
Drücken Sie die IONENDUSCHE-REINIGUNGSMODUS-
1
Taste auf der Anzeige, um diesen Modus auszuwählen.
Nach Abschluss des Betriebs schaltet sich das Gerät in den zu-
vor eingestellten Betrieb um.
Drücken Sie die AUS-Taste, um das Gerät auszuschalten.
ENGLISH
DEUTSCH
FRANÇAIS
NEDERLANDS
Gebläsegeschwindigkeit
Beachten Sie bitte, dass die Gebläsegeschwindigkeit während des IONENDUSCHE-REINIGUNGSMODUS nicht eingestellt werden kann.
AUTO-Betrieb
POLLEN -Modus
Betrieb
MAXIMALER Betrieb
MITTLERER Betrieb
NIEDRIGER Betrieb
*Die Gebläsegeschwindigkeit HOCH bendet sich zwischen der Stellung MITTEL und MAXIMAL.
Die Gebläsegeschwindigkeit wird je nach Verunreinigungsgrad der Luft automatisch umgeschaltet (zwischen HOCH und NIEDRIG). Die Sensoren erfas-
sen jede Verunreinigung und sorgen so für eine efziente Luftreinigung
Das Gerät arbeitet 10 Minuten mit
hoher Geschwindigkeit und schaltet
dann zwischen mittlerer und hoher
Geschwindigkeit hin und her.
Das Gerät arbeitet mit maximaler Gebläsegeschwindigkeit.
Das Gerät arbeitet mit mittlerer Gebläsegeschwindigkeit.
Das Gerät arbeitet sehr ruhig bei minimalen Lufteinlass.
10 Minuten: Hohe Lüftergeschwindigkeit
20 Minuten: Mittlere Lüftergeschwindigkeit
20 Minuten: Hohe Lüftergeschwindigkeit
РУССКИЙ
POLSK
D-9
Page 34

BETRIEB
Blinkend
The lights on the front panel are brighter.
The lights on the front panel are darker.
The lights on the front monitor turn off
「 」
「 」
「 」
Plasmacluster-Ein-/Aus-
Drücken Sie die Plasmacluster-Ein-/Aus-Taste, um den Plasmaclusterionen-Modus ein- und auszuschalten.
Wenn der Plasmacluster eingeschaltet ist, leuchten sowohl die
Leuchtanzeige als auch die Plasmacluster-Leuchtanzeige auf
Taste
.
LEUCHTANZEIGENSTEUERTASTE
Mit dieser Taste kann die
Helligkeit der Anzeigen
auf der Vorderseite geregelt werden.
ACHTUNG
Die Leuchtanzeigen an der Vorderanzeige sind heller, wenn das Gerät startet.
Die gewünschte Helligkeit an der Vorderseite können Sie aus der Abbildung rechts entnehmen.
Die Leuchtanzeigen auf der Vorderanzeige sind heller.
Die Leuchtanzeigen auf der Vorderanzeige sind dunkler.
Die Leuchtanzeigen auf der Vorderanzeige gehen aus.
WASSERVORRATS-ANZEIGELEUCHTE
Sobald der Wasserbehälter leer ist, blinkt die Wasservorrats-Anzeige-
leuchte, um darauf hinzuweisen, dass der Wasserbehälter wieder aufgefüllt werden muss. Beachten Sie jedoch, dass diese Anzeige auch bei
leerem Wasserbehälter nicht blinkt, wenn sich das Gerät im Luftrei-
nigungs- oder IONENDUSCHE-Reinigungsmodus be ndet.
Signalton-Einstellung für den Wasservorrat
Darüber hinaus kann das Gerät auch so eingestellt werden, dass zusätzlich zum Blinken der Leuchtanzeige ein
Tonsignal ausgegeben wird, wenn der Wasserbehälter leer ist. Drücken Sie bei ausgeschaltetem Gerät für 3 Sekunden die Leuchtanzeigensteuertaste, um das Tonsignal zu aktivieren.
Abbruch
Um das Tonsignal wieder zu deaktivieren, drücken Sie erneut bei ausge-
schaltetem Gerät für mehr als 3 Sekunden die
Leuchtanzeigensteuertaste
.
EINSTELLUNG DER SENSOREMPFINDLICHKEIT
Stellen Sie die Emp ndlichkeit auf „Niedrig“, wenn die STAUB- oder GERUCHSANZEIGE fortwährend
rot leuchtet, um die Emp ndlichkeit zu reduzieren; stellen Sie die Emp ndlichkeit auf „Hoch“, wenn
die STAUB- oder GERUCHSANZEIGE fortwährend grün leuchtet, um die Emp ndlichkeit zu erhöhen.
Drücken Sie die Gebläsegeschwindigkeits-Taste bei AUSGESCHALTETEM Gerät für 3 Sekunden.
1
Die Gebläsegeschwindigkeits-Anzeigeleuchte zeigt die gegenwärtig eingestellte Sensorempfindlichkeit
Werkseitig ist das Gerät auf „Standard“ eingestellt, was durch die Anzeigeleuchte für MITTEL angezeigt wird.
Drücken Sie zur Einstellung der gewünschten Sensoremp ndlichkeit die Gebläsegeschwindigkeits-Taste.
2
Sehen Sie sich hinsichtlich der Auswahl der gewünschten Sensor-
emp ndlichkeit die rechte Abbildung an.
Drücken Sie die AUS-Taste.
Beachten Sie, dass die Einstellung automatisch gespeichert wird,
3
wenn nicht innerhalb von 8 Sekunden nach Einstellung der Sensoremp ndlichkeit die AUS-Taste gedrückt wird. Die Einstellung der
Sensoremp ndlichkeit wird anschließend auch nach Trennung des
Geräts von der Stromversorgung gespeichert.
D-10
GebläsegeschwindigkeitsAnzeigeleuchte
an.
Sensor-
emp nd-
lichkeit
Hoch
Standard
Niedrig
Page 35

PFLEGE UND WARTUNG
Bitte reinigen Sie das Gerät einschließlich sämtlicher Sensoren und Filter regelmäßig, damit die optimale Leistung
dieses Luftreinigers erhalten bleibt.
Stellen Sie bei der Reinigung des Geräts sicher, dass Sie zuerst das Netzkabel von der Stromversorgung trennen, und
handhaben Sie den Netzstecker niemals mit feuchten Händen. Anderenfalls kann es zu Stromschlägen bzw. zu Personenschäden kommen.
FILTER-ANZEIGELEUCHTE
Die Filter-Anzeigeleuchte leuchtet, um Sie darauf hinzuweisen, dass eine Wartung der
Rückwand, der Sensoren sowie des Luftbefeuchtungslters durchgeführt werden muss.
Die Anzeigeleuchte beginnt nach etwa 720 Betriebsstunden zu leuchten.
Stellen Sie die Filter-Anzeigeleuchte nach der Wartung wieder zurück. Schließen Sie den
Netzstecker des Geräts wieder an die Stromversorgung an, schalten Sie das Gerät ein
und drücken Sie für 3 Sekunden die Rückstelltaste. Nun erlischt die Filter-Anzeigeleuchte.
Selbst wenn die Filter-Anzeigeleuchte bereits erloschen ist, empehlt sich das Gedrückthalten der Rückstelltaste, um den Wartungstimer ordnungsgemäß zurückzustellen.
Pegezyklus
RÜCKWAND UND SENSOREN
Nach 720 Betriebsstunden
(30 Tage x 24 Stunden = 720)
ENGLISH
Pegezyklus
Beseitigen Sie den Staub von der Sensoröffnung vorsichtig mit einem Staubsauger-Aufsatz oder einem
anderen geeigneten Gerät.
Wann immer sich Staub auf dem Gerät
angesammelt hat oder alle 2 Monate
Sensor
Rückwand
Wenn die Rückseite hartnäckige Verschmutzungen aufweist
Bei öligen Verschmutzungen legen Sie die Rückwand in Wasser
mit Haushaltsreiniger.
1
Vermeiden Sie kräftiges Schrubben beim Waschen der Rückwand.
Spülen Sie die Rückwand einige Male mit sauberem Wasser
ab, um sämtliche Reinigungsmittel-Rückstände zu beseitigen.
2
Lassen Sie überschüssiges Wasser vom Filter ablaufen.
Rückwand
3
SENSORFILTER-PFLEGE
Bauen Sie den Sensorfilter aus und halten Sie ihn über einen
Ausguss oder Abfalleimer, während Sie leicht dagegenklopfen,
um den Staub zu entfernen. Falls der Filter sehr verunreinigt
ist, können Sie ihn vorsichtig mit warmem Wasser waschen.
Verwenden Sie auf keinen Fall Reinigungsmittel oder irgendwelche chemischen Substanzen, um den Filter zu reinigen. Lassen Sie den Filter vollständig trocknen, bevor Sie ihn
wieder im Gerät installieren. Betreiben Sie das Gerät niemals
ohne zuvor sämtliche Filter ordnungsgemäß zu installieren.
GERÄT
Pegezyklus
Reinigen Sie das Gerät regelmäßig, um eine Verunreinigung oder Fleckenbildung zu vermeiden. Falls
Flecken auf dem Gerät belassen werden, sind diese später schwer zu beseitigen
Wischen Sie das Gerät mit einem trockenen, weichen Tuch ab.
Bei hartnäckigeren Verunreinigungen oder Flecken können Sie auch ein mit lauwarmem Was-
ser angefeuchtetes Tuch verwenden.
Verwenden Sie keine leicht üchtigen Flüssigkeiten.
Benzin, Farbverdünner oder Polierpaste könnten die Geräteoberäche beschädigen.
Verwenden Sie keine Reinigungsmittel.
Die Zusatzstoffe eines Reinigungsmittels könnten die Geräteoberäche beschädigen.
Wann immer sich Staub auf dem Gerät angesammelt hat oder alle 2 Monate
Sensorlter
.
DEUTSCH
FRANÇAIS
NEDERLANDS
РУССКИЙ
POLSK
D-11
Page 36

PFLEGE UND WARTUNG
WASSERBEHÄLTER
Pegezyklus
Spülen Sie das Innere des Tanks aus, indem Sie eine kleine Menge
lauwarmen Wassers in den Wasserbehälter füllen, den Tankdeckel
fest und sicher schließen und den Wasserbehälter schütteln. Zur Reinigung der Wasserbehälter-Innenseite kann herkömmlicher Haushalts-
reiniger verwendet werden; dieser sollte allerdings verdünnt werden.
Anschließend muss der Wasserbehälter gründlich ausgespült werden,
um sämtliche Reiniger- Rückstände zu beseitigen.
(Beachten Sie bitte, dass der Wasserbehälter nicht spülmaschinengeeignet ist.)
PFLEGE DES BEHÄLTERDECKELS
Reinigungszyklus......................................einmal im Monat
Die kleine Rückseite des Behälterdeckels lässt sich abnehmen.
Wenn der Behälterdeckel und der kleine Deckel schmutzig und
schmierig sind, müssen sie gereinigt werden.
Nehmen Sie dazu einen Wattebausch oder eine Zahn
PFLEGE DES AUSWASCHBAREN DESODORIERUNGSFILTERS
Bei täglicher Luftbefeuchtung
bürste.
Behälterdeckel
Wasserbehälter
Zahnbürste
Behälterdeckel
WASCHEN SIE DEN FILTER
NUR VON HAND!
TROCKNEN SIE IHN NIEMALS
IM WÄSCHTROCKNER!
Spülen Sie die Verunreinigungen mit lauwarmem Was-
1
ser vom auswaschbaren Desodorierungslter ab.
Entfernen Sie vor dem Auswaschen den Staub vom auswaschbaren
Desodorierungslter.
Pegezyklus
Wenn ein unangenehmer Geruch über den Luftauslass austritt.
Wenn die Leistung des Filters
reduziert zu sein scheint oder der Geruch andauert
ACHTUNG
• Wenn Sie den Filter zum ersten Mal waschen, wird das Spülwasser u.
U. braun. Dies hat jedoch keinerlei Einuss auf die Desodorierungsleistung.
• Vermeiden Sie beim Waschen ein Verbiegen des Filters.
Klopfen Sie anschließend auf den Filter, um das überschüssige Was-
2
ser zu beseitigen.
Lassen Sie den Filter an einem gut belüfteten Ort vollstän-
3
dig trocknen. Trocken Sie ihn wenn möglich im Freien.
Trocknen Sie den Filter in einer seitlichen Stellung, um ein e Ver-
formung des Filters zu vermeiden.
Lassen Sie ihn etwa 6 Stunden lang trocknen.
ACHTUNG
• Vermeiden Sie es, den Filter während ungeeigneten Wetters (z. B. bei Regen oder niedrigen
Temperaturen) im Freien zu trocknen.
Stellen Sie sicher, dass der Filter nicht gefriert.
• Falls der Filter in einem geschlossenen Raum getrocknet wird, treffen Sie bitte die entspre
chenden Vorkehrungen und decken Sie den Boden des Trocknungsbereichs beispielsweise mit
einem Handtuch o. ä. ab, um Wasserschäden am Boden zu verhindern.
-
Setzen Sie den Filter wieder in das Gerät ein. (Siehe dazu Seite D-6.)
4
Lassen Sie den Filter vollständig trocknen, bevor Sie ihn wieder installieren, um Geruchsbildung zu vermeiden
Betreiben Sie das Gerät niemals ohne zuvor sämtliche Filter ordnungsgemäß zu installieren.
D-12
Page 37

LUFTBEFEUCHTUNGSWANNE
Pegezyklus
1 Monat
Die Häufigkeit der erforderlichen Wartung variiert je nach
Wasserhärte. Vermeiden Sie Wasserspritzer, wenn Sie die
Wanne herausnehmen oder reinigen.
Herausnehmen des Wasserbehälters und der
Luftbefeuchtungswanne.
1
Lösen Sie die Laschen
des Wasserbehälters und
nehmen Sie anschließend
die Wanne heraus. Ziehen
Sie die Luftbefeuchtungswanne immer mit beiden
Händen heraus, damit kein
Wasser verschüttet wird.
Tankgriff
Wasserbehälter
Nehmen Sie den Wasserbehälter und Luftbefeuchtungsfilter von der Luftbefeuchtungswanne ab.
2
Lassen Sie das angesammelte Wasser ab, indem
Sie die Luftbefeuchtungswanne langsam ankippen.
Halten Sie die
Wanne nicht
an diesem Teil
fest.
Luftbefeuchtungslter
Luftbe f euchtungswanne
Spülen Sie das Innere der Luftbefeuchtungs-
wanne mit lauwarmem Wasser ab, um evtl.
3
vorhandene Verunreinigungen zu beseitigen.
• Entfernen Sie auf
keinen Fall den Styropor-Schwimmer.
• Reinigen Sie die
schwer zugänglichen
Teile mit einem
Wattestäbchen oder
einer Zahnbürste.
Schwimmer
Einsetzen des Luftbefeuchtungsfilters sowie
der Luftbefeuchtungswanne in das Hauptgerät.
4
Der Luftbefeuchtungslter kann nur in
einer Richtung in das Gerät eingesetzt werden. Stellen Sie sicher, dass
sich keine Lücke zwischen der Luftbefeuchtungswanne und dem Gerät
bendet, wenn die Luftbefeuchtungswanne wieder in das Gerät eingesetzt
wird. Falls die Luftbefeuchtungswanne nicht ordnungsgemäß in das Gerät eingesetzt wird, funktioniert das
Gerät u. U. nicht ordnungsgemäß.
Farbe: Grau
Falls sich das Restwasser nur schwer entfernen lässt
Befüllen Sie die Luftbefeuchtungswanne halb mit lau-
1
warmem Wasser, fügen Sie
eine kleine Menge herkömmlichen Spülmittels hinzu und
lassen Sie die Lösung für
etwa 30 Minuten einwirken.
Verdünnen Sie das Spülmittel entsprechend den Anweisungen auf
der Verpackung.
Reinigen Sie die
schwer zugänglichen Teile mit
einem Wattebausch oder ei-
ner Zahnbürste.
ENGLISH
DEUTSCH
Spülen Sie die Luftbefeuchtungswanne mit lauwarmem
2
Wasser ab.
• Spülen Sie so lange, bis die auch die
letzten Reinigungsmittel-Rückstände
beseitigt sind.
• Falls Sie das Spülen nicht ordnungsgemäß durchführen,
kann dies eine
Geruchsentwicklung
durch das Spülmittel
oder eine Verände-
rung der Form bzw.
Farbe
des Hauptgeräts
verursachen.
FRANÇAIS
NEDERLANDS
ACHTUNG
•
Verwenden Sie zur Reinigung der Luftbefeuchtungswanne ausschließlich
mildes Spülmittel. Eine Verwendung
von nicht für die Reinigung vorgesehenen Chemikalien oder Reinigungsmitteln kann Verformungen, Anlaufen
oder Risse (und damit das Austreten
von Wasser) verursachen.
РУССКИЙ
POLSK
Falls sich der Styropor-Schwimmer lösen sollte,
setzen Sie ihn bitte wieder ein, indem Sie die
Laschen des Schwimmers wie in der Abbildung
dargestellt in die Öffnungen der Luftbefeuchtungswanne einführen.
Führen Sie die Lasche
des Schwimmers in die
Öffnung ein.
D-13
Setzen Sie den
Schwimmer unterhalb
dieser Lasche ein.
Führen Sie die Lasche
auf der anderen Seite
des Schwimmers in die
Öffnung ein.
Page 38

PFLEGE UND WARTUNG
Luftbefeuchtungslter
Pegezyklus
Die Häugkeit der erforderlichen Wartung variiert je nach Wasserhärte oder Reinheit des von Ihnen
verwendeten Wassers; je härter das Wasser ist, desto häuger ist eine Entkalkung erforderlich.
Achten Sie darauf, dass Sie bei der Filterreinigung kein Wasser verschütten.
Herausnehmen des Wasserbehäl-
1
ters und der Luftbefeuchtungswanne.
Herausnehmen des Luftbefeuchtungs-
lters aus der Luftbefeuchtungswanne.
2
Achten Sie darauf, dass Sie kein Wasser der
Luftbefeuchtungswanne verschütten.
Vorbereitung der Entkalkungslösung
3
Für das Entkalken können Sie im Handel
erhältliche Zitronensäure oder 100-%igen
Zitronensaft verwenden. Wählen Sie eine
dieser Möglichkeiten und bereiten Sie die
Entkalkungslösung vor.
<Verwendung von Zitronensäure>
Lösen Sie 3 Teelöffel Zitronensäure in einem
geeigneten Behälter in 2 1/2 Tassen lauwarmen Wassers auf und rühren Sie gut um.
<Verwendung von Zitronensaft>
Für das Entkalken können Sie auch
100-%igen Zitronensaft verwenden. Verwenden Sie ausschließlich 100-%igen Zitronensaft ohne Frucht eisch (sieben Sie den Saft
falls erforderlich). Vermengen Sie 1/4 Tasse
Zitronensaft mit 3 Tassen lauwarmen Wassers in einem Behälter, der groß genug ist
um den Luftbefeuchtungslter aufzunehmen,
und rühren Sie die Lösung gut um.
Einmal pro Monat oder wenn die Filter-Anzeigeleuchte leuchtet
Spülen Sie den Luftbefeuchtungslter einige Male mit lauwarmem Was-
5
ser ab, um sämtliche Reinigungs-
Luftbefeuchtungslter
Luftbefeuch-
tungswanne
Wasserbehälter
Luftbefeuchtungswanne
mittel-Rückstände zu beseitigen.
Ein nicht ordnungsgemäßes Spülen kann
eine Geruchsentwicklung verursachen und
die Leistung bzw. das Erscheinungsbild des
Geräts beeinträchtigen.
*
Schrubben Sie den Luftbe-
feuchtungsfilter auf keinen
Fall, sondern spülen Sie
ihn nur vorsichtig mit lauwarmem Wasser ab.
Bringen Sie den Luftbefeuchtungslter an der Luftbefeuchtungswan-
6
ne und installieren Sie die Luftbefeuchtungswanne wieder im Gerät.
• Der Luftbefeuchtungslter kann nur in einer Richtung in das Gerät eingesetzt werden. Stellen Sie
sicher, dass sich keine Lücke zwischen der Luftbefeuchtungswanne und dem Gerät befindet, wenn
die Luftbefeuchtungswanne wieder in das Gerät
eingesetzt wird. Falls die Luftbefeuchtungswanne
nicht ordnungsgemäß in das Gerät eingesetzt wird,
funktioniert das Gerät u. U. nicht ordnungsgemäß.
•
Wenn das Gerät über
einen längeren Zeitraum
nicht verwendet warden
soll, lassen Sie den Luftbefeuchtungsfilter bitte
vollständig trocknen, bevor Sie ihn austauschen.
Schließen Sie das Gerät an die
Stromversorgung an, schalten Sie
7
es ein und drücken Sie die FilterRückstelltaste auf der Anzeige für
mindestens 3 Sekunden, um die
Rückstellung durchzuführen.
Lassen Sie die Lösung für mindestens
30 Minuten einwirken, bevor Sie mit der
4
Reinigung des Luftbefeuchtungslters
beginnen.
Bei der Verwendung von
Zitronensaft empfehlen wir
Ihnen eine längere Einwirkzeit als bei der Verwendung
von Zitronensäure.
Auf der Oberäche des Luftbefeuchtungslters
bilden sich u. U. rotbraune oder weiße Rückstände. Hierbei handelt es sich um Verunreinigungen
(Kalzium u. ä.), die auf eine mögliche Verunreinigung des Leitungswassers zurückzuführen sind;
dies ist völlig normal. Tauschen Sie den Luftbefeuchtungslter aus,
wenn er vollständig von
weißen Rückständen
bedeckt ist.
D-14
Page 39

RICHTLINIEN FÜR DEN FILTERAUSTAUSCH
Die Lebensdauer der Filter variiert je nach Betriebsumgebung des Geräts, Verwendungshäugkeit sowie Aufstellungsort. Falls das Gerät die Raumluft nicht mehr von Staub oder Gerü-
chen reinigt, müssen die Filter ausgetauscht werden.
(Lesen Sie dazu den Abschnitt „Bitte lesen Sie sich diese Bedienungsanleitung vor der ersten Inbetriebnahme Ihres neuen Luftreinigers sorgfältig durch.“)
Richtlinien für den Zeitpunkt eines Filteraustauschs
HEPA-Filter
Die Lebensdauer des Filters hängt stark von der Betriebsumgebung ab. Zigarettenrauch, Staub von
Haustieren und andere Partikel in der Luft können die Lebensdauer de Filter erheblich reduzieren.
Überprüfen Sie die Filter regelmäßig und tauschen Sie sie falls erforderlich aus.
Bis zu 5 Jahre nach dem Öffnen
Auswaschbarer Desodorierungslter
Dieser Filter kann nach dem Auswaschen erneut verwendet werden; Sie können ihn allerdings auch
austauschen.
Luftbefeuchtungslter
Die Lebensdauer des Filters hängt von der Betriebsumgebung ab. Falls Sie eines der folgenden
Probleme feststellen, muss der Luftbefeuchtungslter bereits vor Ablauf von 2 Jahren ausgetauscht.
• Mineral-Rückstände (weiß, schwarz oder rot), die sich selbst durch eine Reinigung nicht beseitigen
lassen; der Luftbefeuchtungslter ist nach der Reinigung weiterhin verunreinigt.
• Der Filter ist beschädigt oder verbogen.
Bis zu 2 Jahre nach dem Öffnen
Austauschlter
• HEPA-Filter: 1 Einheit
Modell FZ-C150HFE (für KC-860E)
FZ-C100HFE (für KC-850E)
FZ-C70HFE (für KC-840E)
• Auswaschbarer Desodorierungslter: 1 Einheit
Modell FZ-C150DFE (für KC-860E)
FZ-C100DFE (für KC-850E)
FZ-C70DFE (für KC-840E)
• Luftbefeuchtungslter: 1 Einheit
Modell FZ-C100MFE
(grau)
Filterrahmen (grau)
Luftbefeuchtungslter
(weiß)
Filterrahmen (weiß)
Austausch der Filter
ENGLISH
DEUTSCH
FRANÇAIS
NEDERLANDS
РУССКИЙ
1. Tauschen Sie die Filter entsprechend den im Lieferumfang des jeweiligen Austauschlters enthaltenen Anweisungen aus.
2. Verwenden Sie die Datumsaufkleber als Richtlinie für den künftigen Austausch der Filter.
Entsorgung der Filter
Entsorgen Sie die ausgetauschten Filter bitte entsprechend den örtlichen Umweltschutzrichtlinien
und -bestimmungen.
Materialien des HEPA-Filters:
• Filter: Polypropylen • Rahmen: Polyester
Materialien des auswaschbaren Desodorierungslters:
• Polyester, Rayon, Aktivkohle
Materialien des Luftbefeuchtungslters:
• Rayon, Polyester
D-15
POLSK
Page 40

STÖRUNGSBESEITIGUNG
Sehen Sie sich bei Problemen mit dem Gerät bitte zuerst die unten aufgeführte Tabelle zur Störungs-
beseitigung an, bevor Sie den Kundendienst konsultieren, da es sich bei einigen Problemen u. U.
nicht um eine Fehlfunktion des Geräts handelt.
PROBLEM
Gerüche und Rauch werden
nicht beseitigt.
Das Anzeigenfeld auf der Vorderseite leuchtet auch bei verunreinigter Luft grün.
Das Anzeigenfeld auf der Vorderseite leuchtet auch bei reiner
Luft orange oder rot.
Das Gerät erzeugt ein klickendes
oder tickendes Geräusch.
Die abgegebene Luft weist einen
Geruch auf.
Das Gerät funktioniert nicht,
wenn Zigarettenrauch in der Luft
vorhanden ist.
Die Filter-Anzeigeleuchte
leuchtet.
Das Anzeigenfeld auf der
Vorderseite ist erloschen.
Die Wasserversorgungs-Anzeigeleuchte leuchtet bei leerem
Wasserbehälter nicht.
Der Wasserstand im Wasserbehälter nimmt nicht oder nur sehr
langsam ab.
ABHILFE (keine Fehlfunktion)
• Reinigen Sie die Filter oder tauschen Sie sie aus, falls sie
extrem verunreinigt sind. (Siehe dazu die Seiten D-11, D-12,
D-14.)
• Die Luft war u. U. verunreinigt, als das Gerät an die Stromversorgung angeschlossen wurde.
Trennen Sie das Gerät von der Stromversorgung, warten Sie
eine Minute und schließen Sie das Gerät danach wieder an.
• Falls die Sensoröffnungen verunreinigt oder verstopft sind,
beeinträchtigt dies den Sensorbetrieb. Reinigen Sie die
Staubsensoren vorsichtig (siehe dazu Seite D-11).
• Das klickende oder tickende Geräusch wird durch die Erzeugung der Ionen hervorgerufen und stellt keine Fehlfunktion dar.
• Überprüfen Sie, ob die Filter stark verunreinigt sind.
• Reinigen Sie die Filter oder tauschen Sie sie aus.
• Plasmacluster-Luftreiniger geben stets geringe Spuren von
Ozon in die Luft ab, die Sie eventuell als Geruch wahrneh-
men können.
• Wurde das Gerät an einem Ort aufgestellt, an dem der Sen-
sor den vorhandenen Zigarettenrauch nicht ordnungsgemäß
erfassen kann?
• Sind die Staubsensor-Öffnungen blockiert oder verunreinigt?
(Reinigen Sie die Öffnungen falls erforderlich.) (Siehe dazu
Seite D-11.)
• Schließen Sie das Netzkabel nach dem Austausch der Filter an eine Steckdose an und drücken Sie die Filter-Rückstelltaste. (Siehe dazu Seite D-11.)
• Überprüfen Sie, ob der Beleuchtung-AUS-Modus ausgewählt wurde. Sollte dies der Fall sein, drücken Sie bitte die
Leuchtanzeigensteuertaste, um die Beleuchtung zu aktivieren. (Siehe dazu Seite D-10.)
• Überprüfen Sie den Styropor-Schwimmer auf Verunreinigungen. Reinigen Sie die Luftbefeuchtungswanne. Stellen
Sie sicher, dass das Gerät auf einer ebenen Fläche aufgestellt wurde.
• Überprüfen Sie, ob die Luftbefeuchtungswanne und der
Wasserbehälter ordnungsgemäß installiert wurden. Über-
prüfen Sie den Befeuchtungs lter.
• Reinigen Sie den Filter oder tauschen Sie ihn aus, falls er
stark verunreinigt ist. (Siehe dazu Seite D-14 und D-15).
Die Anzeigen auf dem Anzeigenfeld der Vorderseite ändern ihre
Farbe häug.
• Die Anzeigen auf dem Anzeigenfeld auf der Vorderseite
ändern automatisch ihre Farbe, sobald der Staub- und Geruchssensor Verunreinigungen erfasst.
D-16
Page 41

FEHLERMELDUNG
KC-850E•KC-860E
Falls der Fehler erneut auftritt, konsultieren Sie bitte eine Sharp Service-Niederlassung.
DIGITALAN-
ZEIGE
KC-840E
LEUCHTANZEIGE FEHLERDETAILS ABHILFEMASSNAHME
Die Luftreinigungs- und
Befeuchtungs-Leuchtanzeige
blinkt.
Die LüftergeschwindigkeitsLeuchtanzeige blinkt „ “.
Die Luftreinigungs- und Reinigungsionendusche-Leuchtanzeige blinkt.
Die Luftreinigungs-Leuchtanzeige blinkt.
Die LüftergeschwindigkeitsLeuchtanzeige blinkt „ “.
Die LüftergeschwindigkeitsLeuchtanzeige blinkt „ “.
Fehlfunktion des Be-
feuchtungslters
Fehlfunktion des Lüftermotors
Fehlfunktion des
Temperatur-Feuchtigkeitssensors
Problem mit dem
Schaltkreis
Stellen Sie sicher, dass Befeuchtungslter,
Befeuchtungsfach und Wasserbehälter ordnungsgemäß eingesetzt sind, und schalten
Sie das Gerät anschließend wieder ein.
Schalten Sie das Gerät aus , um die Fehlermeldung zu löschen, warten Sie 1 Minute und
schalten Sie das Gerät anschließend wieder ein.
Ziehen Sie den Stecker aus
der Steckdose, warten Sie eine
Minute und schließen Sie das
Gerät danach wieder an.
ENGLISH
DEUTSCH
FRANÇAIS
LEUCHTANZEIGE FEHLERDETAILS ABHILFEMASSNAHME
Die Luftreinigungs- und BefeuchtungsLeuchtanzeige blinkt.
Die Lüftergeschwindigkeits-Leuchtanzeige
blinkt „ “.
Die Luftfeuchtigkeitsanzeige blinkt
"Hoch" oder "Niedrig".
Die Luftreinigungs- und Reinigungsionendusche-Leuchtanzeige blinkt.
Die Luftreinigungs-Leuchtanzeige blinkt.
Die Lüftergeschwindigkeits-Leuchtanzeige
blinkt „ “.
Die Lüftergeschwindigkeits-Leuchtanzeige
blinkt „ “.
Fehlfunktion des Be-
feuchtungslters
Fehlfunktion des Lüftermotors
Fehlfunktion des
Temperatur-Feuchtigkeitssensors
Problem mit dem
Schaltkreis
Stellen Sie sicher, dass Befeuch-
tungslter, Befeuchtungsfach und
Wasserbehälter ordnungsgemäß
eingesetzt sind, und schalten Sie
das Gerät anschließend wieder ein.
Schalten Sie das Gerät aus, um die
Fehlermeldung zu löschen, warten
Sie 1 Minute und schalten Sie das
Gerät anschließend wieder ein.
Ziehen Sie den Stecker aus
der Steckdose, warten Sie eine
Minute und schließen Sie das
Gerät danach wieder an.
NEDERLANDS
РУССКИЙ
POLSK
D-17
Page 42

TECHNISCHE DATEN
48
15
54
20
170
3,7(3,4)
6,1(5,8)
9,5
132
KC-840EKC-860E
26
210
MAXIMAL MITTEL NIEDRIG
60
3,8(3,3)
168
11,6
KC-850E
220~240V 50/60Hz
41
306
MAXIMAL MITTEL NIEDRIG
84
5,5(4,9)
19
240
34
45
15
35
47
17
39
132
186
84
168
288
120
240
34
11,5
21
42
22
6,8(6,3)
35
13,5
40
47
25
8,8(8,2)
21
39
330
450
230
400
600
300
500
3,0
~26
Staub/Temperatur und Feuchtigkeit
4,0
~38
Auswaschbar, desodorierend
HEPA mit Mikrobenkontrolle *3
4,3
~48
Staub/Geruch/Temperatur und Feuchtigkeit
8,0
360 (B) × 233 (T) × 550 (H)
9,0
2,0
378 (B) × 265 (T) × 586 (H)
11,0
56
51
56
396
MAXIMAL MITTEL NIEDRIG
/Stunde)
3
Gebläsegeschwindigkeit (m
Modell
Stromversorgung
Einstellung der Gebläsegeschwindigkeit
LUFTREINI-
3
Nennleistung (W)
Geräuschentwicklung (dBA)
GUNG
50
396
/Stunde)
Gebläsegeschwindigkeit (m
Nennleistung (W)
Geräuschentwicklung (dBA)
LUFTREINI-
GUNG UND
LUFTBE-
FEUCHTUNG
730
)*1
2
Staubbeseitigung
Lutfbefeuchtungsleistung*2
Empfohlene Raumgröße (m
Fassungsvermögen des Wasserbehälters (l)
Desodorierung
Filtertyp
Sensoren
Kabellänge (m)
D-18
398 (B) × 288 (T) × 627 (H)
Abmessungen (mm)
Gewicht (kg)
*1 •Die empfohlene Raumgröße eignet sich für den Betrieb des Geräts bei maximaler Gebläsegeschwindigkeit.
•Die empfohlene Raumgröße bezieht sich auf einen Bereich, in dem eine bestimmte Menge von Staubpartikeln in 30 Minuten entfernt werden kann.
*2 •Die Luftbefeuchtungsleistung variiert je nach Innen- und Außentemperatur und Luftfeuchtigkeit.
Bei ansteigender Temperatur oder abnehmender Luftfeuchtigkeit wird die Luftbefeuchtungsleistung erhöht.
Bei abnehmender Temperatur oder ansteigender Luftfeuchtigkeit wird die Luftbefeuchtungsleistung reduziert.
•Messbedingungen: 20 ºC, 30 % relative Luftfeuchtigkeit (JEM1426)
*3 •Die Kategorie des HEPA Filters durch EN1822 ist H10.
Standby-Betrieb
Damit die elektrischen Schaltkreise bei an die Stromversorgung angeschlossenem, aber ausgeschaltetem Gerät weiter-
hin betrieben werden können, verbraucht dieses Gerät 0,7 W Standby-Strom.
Wenn Sie das Gerät nicht verwenden, können Sie den Netzstecker vom Stromnetz trennen, um Strom zu sparen.
Page 43

A. Entsorgungsinformationen für Benutzer aus Privathaushalten
1. In der Europäischen Union
Achtung: Werfen Sie dieses Gerät zur Entsorgung bitte nicht in den normalen
Hausmüll !
Gemäß einer neuen EU-Richtlinie, die die ordnungsgemäße Rücknahme, Behandlung
und Verwertung von gebrauchten Elektro- und Elektronikgeräten vorschreibt, müssen
elektrische und elektronische Altgeräte getrennt entsorgt werden.
Nach der Einführung der Richtlinie in den EU-Mitgliedstaaten können Privathaushalte
ihre gebrauchten Elektro- und Elektronikgeräte nun kostenlos an ausgewiesenen
Rücknahmestellen abgeben*.
In einigen Ländern* können Sie Altgeräte u.U. auch kostenlos bei Ihrem Fachhändler
abgeben, wenn Sie ein vergleichbares neues Gerät kaufen.
*)Weitere Einzelheiten erhalten Sie von Ihrer Gemeindeverwaltung.
Wenn Ihre gebrauchten Elektro- und Elektronikgeräte Batterien oder Akkus enthalten,
sollten diese vorher entnommen und gemäß örtlich geltenden Regelungen getrennt
entsorgt werden.
Durch die ordnungsgemäße Entsorgung tragen Sie dazu bei, dass Altgeräte
angemessen gesammelt, behandelt und verwertet werden. Dies verhindert mögliche
schädliche Auswirkungen auf Umwelt und Gesundheit durch eine unsachgemäße
Entsorgung.
2. In anderen Ländern außerhalb der EU
Bitte erkundigen Sie sich bei Ihrer Gemeindeverwaltung nach dem ordnungsgemäßen
Verfahren zur Entsorgung dieses Geräts.
Für die Schweiz: Gebrauchte Elektro- und Elektronikgeräte können kostenlos beim
Händler abgegeben werden, auch wenn Sie kein neues Produkt kaufen. Weitere
Rücknahmesysteme finden Sie auf der Homepage von www.swico.ch oder
www.sens.ch.
B. Entsorgungsinformationen für gewerbliche Nutzer
1. In der Europäischen Union
Wenn Sie dieses Produkt für gewerbliche Zwecke genutzt haben und nun entsorgen
möchten:
Bitte wenden Sie sich an Ihren SHARP Fachhändler, der Sie über die Rücknahme des
Produkts informieren kann. Möglicherweise müssen Sie die Kosten für die
Rücknahme und Verwertung tragen. Kleine Produkte (und kleine Mengen) können
möglicherweise bei Ihrer örtlichen Rücknahmestelle abgegeben werden.
Für Spanien: Bitte wenden Sie sich an das vorhandene Rücknahmesystem oder Ihre
Gemeindeverwaltung, wenn Sie Fragen zur Rücknahme Ihrer Altgeräte haben.
2. In anderen Ländern außerhalb der EU
Bitte erkundigen Sie sich bei Ihrer Gemeindeverwaltung nach dem ordnungsgemäßen
Verfahren zur Entsorgung dieses Geräts.
Achtung: Ihr Produkt trägt
dieses Symbol. Es besagt,
dass Elektro- und
Elektronikgeräte nicht mit
dem Haushaltsmüll entsorgt,
sondern einem getrennten
Rücknahmesystem
zugeführt werden sollten.
DE
ENGLISH
DEUTSCH
FRANÇAIS
NEDERLANDS
РУССКИЙ
POLSK
D-19
Page 44

SERVICE PROCEDURE / SERVICE VORGEHENSWEISE
SERVICE PROCEDURE - ONLY EFFECTIVE IN GERMANY
Dear SHARP customer,
SHARP machines are proprietary articles which are produced with precision and care according
to most modern production methods.
In case of proper handling and with considering of the instruction book, this machine will serve
you well for a long time.
Of course, a defect cannot be ruled out.
If your appliance has a warrantyable defect in the period of warranty, please contact your dealer,
where you bought the appliance. This dealer is your only contact person for any claim of warranty.
As proof for repairs during Warranty period, you need the invoice of the machine.
Please bring your defect appliances also to your dealer (where you bought the appliance) when
the warranty period is over.
SHARP ELECTRONICS (EUROPE) GmbH
Parts & Technical Service
SERVICE VORGEHENSWEISE - GILT NUR FÜR DEUTSCHLAND
Lieber SHARP-Kunde
SHARP- Geräte sind Markenartikel, die mit Präzision und Sorgfalt nach modernen
Fertigungsmethoden hergestellt werden.
Bei sachgemäßer Handhabung und unter Beachtung der Bedienungsanleitung wird lhnen lhr
Gerät lange Zeit gute Dienste leisten.
Das Auftreten von Fehlern ist aber nie auszuschließen.
Sollte lhr Gerät während der Gewährleistungsfrist einen gewährleistungspflichtigen Mangel
aufweisen, so wenden Sie sich bitte an den Handelsbetrieb, bei dem Sie dieses Gerät erworben
haben, denn dieser ist lhr alleiniger Ansprechpartner für jegliche Gewährleistungsansprüche.
Als Nachweis lm Gewährleistungsfall dient lhr Kaufbeleg.
Sollte sich nach Ablauf der Gewährleistungsfrist ein Fehier des Gerätes zeigen, so wenden Sie
sich bitte auch in diesem Fall an den Handelsbetrieb, bei dem Sie dieses Gerät erworben
haben.
SHARP ELECTRONICS (EUROPE) GmbH
Parts & Technical Service
D-20
Page 45

ENGLISH
DEUTSCH
FRANÇAIS
NEDERLANDS
РУССКИЙ
POLSK
Page 46

Veuillez lire ces instructions avant de faire fonctionner votre nouveau puricateur d’air
Le puricateur d'air achemine l'air de la pièce par l'entrée d'air, le fait passer à l'intérieur de l'appareil par un pré-ltre, un ltre désodorisant lavable et un ltre HEPA, puis
l'air est évacué par la sortie d'air. Le ltre HEPA peut arrêter 99,97 % des particules de
poussière, jusqu'à une taille de 0,3 microns, passant par le ltre tout en aidant à absorber les odeurs. Le ltre désodorisant lavable absorbe graduellement les odeurs qui
le traversent.
Certaines odeurs absorbées par les ltres peuvent se dégrader avec le temps et se
dégager sous forme de nouvelle odeur. Suivant le lieu d’utilisation, surtout dans des
conditions extrêmes (beaucoup plus exigeantes qu’une utilisation domestique normale), cette odeur risque de devenir forte dans un laps de temps plus court qu'à la
normale. Si l’odeur persiste, les ltres devraient être remplacés.
NOTE
• Le puricateur d’air est conçu pour éliminer la poussière et les odeurs en suspension dans l’air,
mais pas les gaz nocifs (par exemple le monoxyde de carbone contenu dans la fumée de cigarette). Si la source de l’odeur est toujours présente, il se peut que le puricateur d’air ne chasse pas
entièrement l’odeur.
Filtre HEPA
Filtre désodorisant lavable
Pré-ltre
(Illustration commune utilisant le « KC-850E ».)
Page 47

FRANÇAIS
CARACTÉRISTIQUES
Combinaison unique de techniques de
traitement de l’air
Action de trois ltres + Plasmacluster +
humidication
CAPTE LA POUSSIÈRE*
Le pré-ltre lavable capte la poussière et
les autres grosses particules en suspension dans l’air.
RÉDUIT LES ODEURS
Le ltre désodorisant lavable absorbe un
grand nombre d'odeurs domestiques courantes.
RÉDUIT LE POLLEN ET LES MOISISSURES*
Le filtre HEPA bloque 99,97 % des particules jusqu'à 0,3 microns.
RAFRAÎCHIT
Plasmacluster traite l’air à peu près de la
même façon que la nature se purifie en
émettant un mélange équilibré d’ions positifs et négatifs.
HUMIDIFIE
Chaque remplissage permet jusqu’à 10
heures d’humidication.**
*Lorsque l’air est acheminé à travers les
ltres.
**Taille de la pièce :
jusqu’à 48 m². (KC-860E)
jusqu’à 38 m². (KC-850E)
jusqu’à 26 m². (KC-840E)
Des capteurs contrôlent la qualité de l’air
en continu pour ajuster automatiquement
le fonctionnement suivant la pureté et l’
humidité de l’air détectées.
TABLE DES MATIÈRES
INSTRUCTIONS DE SÉCURITÉ
IMPORTANTES
• AVERTISSEMENT .....................................
• PRÉCAUTIONS CONCERNANT
LE FONCTIONNEMENT ............................
• GUIDE D’INSTALLATION ...........................
• GUIDE D’UTILISATION DES FILTRES .....
DÉSIGNATION DES PIÈCES
• SCHÉMA ILLUSTRATIF .............................
• DOS DE L’APPAREIL .................................
• MONITEUR AVANT ....................................
PRÉPARATIFS AVANT L’EMPLOI ...............
• INSTALLATION DES FILTRES ..................
• REMPLISSAGE DU RÉSERVOIR D’EAU ..
FONCTIONNEMENT
• AFFICHAGE DE L’UNITÉ PRINCIPALE .....F-8
• MODE D’ÉPURATION DE L’AIR
D’HUMIDIFICATION ....................................F-8
• MODE D’ÉPURATION DE L’AIR .................
•
MODE D'ÉPURATION PAR PLUIE D'IONS
•
TOUCHE DE VITESSE DU VENTILATEUR
• TOUCHE DE MARCHE/ARRÊT
DU Plasmacluster ......................................F-10
•
TOUCHE DE CONTRÔLE DES TÉMOINS
• VOYANT D’ALIMENTATION EN EAU .......
• RÉGLAGE DE LA SENSIBILITÉ
DES CAPTEURS ......................................F-10
SOIN ET ENTRETIEN
• VOYANT DU FILTRE .................................F-11
• PANNEAU ARRIÈRE ET CAPTEURS ......
• APPAREIL ................................................
• RÉSERVOIR D’EAU ..................................
• ENTRETIEN DU FILTRE
DÉSODORISANT LAVABLE .....................F-12
• BAC D’HUMIDIFICATION .........................
• FILTRE D’HUMIDIFICATION .....................
•
GUIDE DE REMPLACEMENT DES FILTRES
RÉSOLUTION DES PROBLÈMES
CARACTÉRISTIQUES
INFORMATIONS SUR LA MISE AU REBUT
...........................................
..................
.................................
....F-9
.....F-10
.............................
...F-15
.......
............................
...
F-2
F-2
F-3
F-3
F-3
F-4
F-4
F-4
F-5
F-6
F-6
F-7
F-8
F-9
...F-9
F-10
F-11
F-11
E-11
F-12
F-13
F-14
F-16
F-18
F-19
ENGLISH
DEUTSCH
FRANÇAIS
NEDERLANDS
РУССКИЙ
POLSK
Merci de vous être porté acquéreur d’un
puricateur d’air SHARP. Veuillez lire attentivement le présent manuel avant d’utiliser le
puricateur d’air.
Après avoir lu le manuel, gardez-le à portée
de main pour future référence.
F-1
Page 48

INSTRUCTIONS DE SÉCURITÉ IMPORTANTES
Lors de l’utilisation d’appareils électriques, les précautions de sécurité de base doivent être
suivies, notamment les suivantes :
AVERTISSEMENT
• Lisez toutes les instructions avant d’employer l’appareil.
• Utilisez uniquement une prise de 220 ~ 240 volts.
• N’utilisez pas l’appareil si le câble d’alimentation ou sa che a subi des dommages ou en
core si le raccordement à la prise du secteur n’est pas sûr.
• Dépoussiérez régulièrement la che.
• N’introduisez pas les doigts ou le moindre objet dans les ouïes d’entrée ou d’évacuation de
l’air.
• Pour débrancher le câble d’alimentation, tirez-le en le tenant par la che, ne tirez jamais sur
le câble.
Vous risqueriez de provoquer une électrocution et/ou un incendie à la suite d’un court-circuit.
• Ne débranchez pas la che avec les mains mouillées.
• N’utilisez pas cet appareil près d’un appareil à gaz ou d'un foyer de cheminée.
Lorsque vous remplissez le réservoir d’eau, que vous nettoyez l’appareil ou que l’appareil ne sert
•
pas, assurez-vous de couper l’alimentation au secteur. Vous risqueriez de provoquer une électrocution et/ou un incendie à la suite d’un court-circuit.
• Si le câble d'alimentation est endommagé, il doit être remplacé par le fabricant, son agent
de service, un centre de service Sharp agréé ou par une personne similaire qualiée an
d'éviter tout danger.
• Ne faites pas fonctionner pas l'appareil en même temps que vous utilisez un insecticide en aéro
sol ou dans une pièce dans laquelle se trouvent des résidus huileux, de l'encens, des ammèches
provenant de cigarettes allumées, des fumées provenant de produits chimiques ou dans un emplacement où l'appareil risque d'être mouillé (p. ex. dans une salle de bains).
• Usez de prudence lors du nettoyage. Les nettoyants corrosifs puissants risquent d’endommager
l’extérieur de l’appareil.
• Seul un centre de service Sharp agréé peut effectuer le SAV de ce puricateur d'air. Contactez le
centre de service le plus proche en cas de problèmes, de réglages ou de réparations.
• Lorsque vous transportez l’appareil, retirez d’abord le réservoir d’eau et le bac d’humidication et
tenez l’appareil par les poignées situées de chaque côté.
• Ne buvez pas l’eau du bac d’humidication ou du réservoir d’eau.
• Remplacez quotidiennement l’eau du réservoir par de l’eau fraîche du robinet et nettoyez régu
lièrement le réservoir d’eau et le bac d’humidication. (Reportez-vous aux pages F-12 et F-13.)
Quand l’appareil ne sert pas, videz l’eau du réservoir d’eau et du bac d’humidication. Si vous
laissez de l’eau dans le réservoir d’eau ou dans le bac d’humidication des moisissures, des bactéries et des mauvaises odeurs risquent de se développer.
Dans de rares cas, ces bactéries peuvent occasionner des effets physiques nocifs.
• Cet appareil ne doit pas être utilisé par des personnes (enfants inclus) aux capacités physiques,
sensorielles ou mentales réduites, ou par des personnes manquant d'expérience et de connaissances, à moins qu'elles soient supervisées par une personne responsable de leur sécurité ou
que cette personne leur ait donné les instructions nécessaires à l'utilisation de cet appareil.
Les enfants doivent être surveillés an de s'assurer qu'ils ne jouent pas avec l'appareil.
- Pour réduire le risque d’électrocution, d’incendie ou de blessures corporelles :
-
-
-
NOTE
Si ce puricateur d’air perturbe la réception de la radio ou de la télévision, essayez de remédier aux
interférences en prenant une ou plusieurs des mesures suivantes :
• Réorientez ou déplacez l’antenne de réception.
• Éloignez l’appareil du poste de radio ou de télévision.
• Branchez l’équipement et le récepteur sur des circuits électriques différents.
• Consultez le revendeur ou un technicien radio/TV conrmé pour obtenir de l’aide.
- Brouillage de la radio ou de la télévision
F-2
Page 49

PRÉCAUTIONS CONCERNANT LE FONCTIONNEMENT
• N’obturez ni l’ouïe d’entrée, ni l’ouïe d’évacuation.
• N’utilisez pas l’appareil sur des objets chauds ou à proximité, comme sur une cuisinière ou un ra
diateur ou près d’une source de vapeur d’eau.
• Utilisez toujours l’appareil en position verticale.
• Tenez l'appareil par les poignées situées de chaque côté lorsque vous le déplacez.
Ne déplacez pas l'appareil lorsqu'il est en cours de fonctionnement.
• Ne faites jamais fonctionner l’appareil sans que les ltres, le réservoir d’eau et le bac d’hu
midication soient correctement mis en place.
• Ne pas laver ni réutiliser le ltre HEPA.
Non seulement l’efcacité du ltre n'est pas accrue, mais cela présente également des risques
d’électrocution ou de dysfonctionnement.
• Nettoyez l’extérieur avec un chiffon doux uniquement.
N’utilisez pas de liquides et/ou détergents volatils
La surface de l’appareil risque d’être endommagée ou craquelée.
De plus, les capteurs risquent de ne plus fonctionner.
• La fréquence de l’entretien requis (détartrage) dépend de la dureté ou des impuretés de
l’eau que vous utilisez ; plus l’eau est dure, plus le détartrage doit être fréquent.
• Ne mouillez pas l’appareil.
GUIDE D’INSTALLATION
• Lorsque vous utilisez l'appareil, placez-le à au moins 2m de toute équipement utilisant
des ondes électriques, comme les radios ou télévisions, an d'éviter les interférences
électriques.
• Évitez les emplacements où les capteurs sont exposés directement au vent.
L’appareil risque de ne pas fonctionner correctement.
• Evitez les emplacements où des meubles, des tissus ou d'autres objets risquent d'entrer
en contact avec l'entrée et/ou la sortie d'air et de réduire ainsi leur efcacité.
• Evitez les emplacements où l'appareil est exposé à la condensation ou à de fortes uctua
tions de température. La plage de température ambiante appropriée est de à 5 - 35 ºC.
• Placez l’appareil sur une surface stable dans un endroit aéré.
Sur un tapis épais, l’appareil peut vibrer légèrement.
Placez l’appareil sur une surface plane pour éviter les fuites hors du réservoir d’eau ou du bac
d’ humidication.
• Evitez les emplacements générant des graisses ou des fumées huileuses.
La surface de l’appareil risque de craqueler ou le capteur de ne plus fonctionner.
• Placez l’appareil à environ 30 cm~60 cm du mur an de garantir une circulation d’air suf
sante.
Le mur situé directement derrière l’ouïe d’évacuation peut devenir sale avec le temps. En cas
d’ utilisation au même endroit pendant une longue durée, nettoyez régulièrement le mur et protégez-le d’une feuille de vinyle, etc., pour empêcher qu’il ne se salisse.
-
-
-
-
ENGLISH
DEUTSCH
FRANÇAIS
NEDERLANDS
РУССКИЙ
GUIDE D’UTILISATION DES FILTRES
• Suivez les instructions de ce manuel pour bien assurer le soin et l’entretien des ltres.
F-3
POLSK
Page 50

DÉSIGNATION DES PIÈCES
SCHÉMA ILLUSTRATIF - AVANT
Sortie d’air
Afchage de
l’unité principale
Moniteur avant
Unité
principale
KC-860E
DOS DE L’APPAREIL
Poignée (2 emplacements, gauche et droit)
KC-850E
Sortie d’air
Afchage
de l’unité
principale
Moniteur avant
Unité
principale
KC-840E
Sortie d’air
Capteurs
• Capteur de poussière
•
Capteur de température/humidité
•
Capteur d’odeur (KC860E•KC850E)
Poignée du
réservoir
Réservoir d’eau
(pour l’humidication)
Filtre d’humidication
Cadre de ltre
Bouchon du
réservoir
Flotteur
Bac d’humidication
Câble d’alimentation
Fiche
(Le type de che dépend des pays.)
F-4
Filtre HEPA (blanc)
Filtre désodorisant lava-
ble (noir)
Languettes
Panneau arrière
(Pré-ltre)
Entrée d’air
Étiquette de date
(Etiquette de caracté-
ristiques nominales)
Page 51

MONITEUR AVANT
en fonction de l’intensité des odeurs.
Indique l’état et l’humidité de l’air de la pièce.
KC-850E KC-860E
Indique les conditions actuelles d’odeur, poussière et humidité dans la pièce.
MONITEUR DE POUSSIÈRE
Le capteur de poussière surveille en permanence l’air et change de couleur en
fonction de la pureté de l’air. Le KC-860E
dispose d’un ventilateur à 5 niveaux.
Odeur dans la pièce
Propre
Tout vert
Propre
Tout vert
Dès que le capteur détecte la présence
de poussières, le témoin clignotant se
déplace en fonction de sa quantité.
Vert
Clignote
Jaune
Vert
Clignote
Jaune
Très impur
Clignote
Tout rouge
Très impur
Clignote
Tout rouge
Voyant indicateur du Plasmacluster (bleu)
Bleu : Plasmacluster activé
Voyant éteint : Plasmacluster désactivé
MONITEUR D’ODEUR
Le capteur d’odeur surveille en permanence l’air et change de couleur
en fonction de l’intensité des odeurs.
Odeur dans la pièce
Faible Élevé
Vert Jaune Rouge
Les poussières et les odeurs sont détectées
par des capteurs différents. Les couleurs
peuvent ne pas changer simultanément.
Voyant indicateur de l’alimentation en eau (rouge)
Ce voyant s’allume quand le réservoir
d’eau a besoin d’être rempli.
Voyant indicateur d’humidité (vert)
Af che le niveau d’humidité approximatif dans la pièce. Le réglage de l’
humidité ne peut pas être ajusté.
(Ex.) À une humidité
de 60 %
80 % ou plus
Moins de 30 %
ENGLISH
DEUTSCH
FRANÇAIS
KC-840E
MONITEUR DE POUSSIÈRE
Le capteur de poussière surveille en
permanence l’air et change de couleur en fonction de la pureté de l’air.
Odeur dans la pièce
Propre
Tout vert
Propre
Tout vert
Dès que le capteur détecte la présence
de poussières, le témoin clignotant se
déplace en fonction de sa quantité.
Clignote
Vert
Jaune
Vert
Jaune
Clignote
Tout rouge
ClignoteClignote
Tout rouge
Très impur
Très impur
F-5
Voyant indicateur d’humidité (vert)
Af che le niveau d’humidité approximatif
dans la pièce. Le réglage de l’humidité
ne peut pas être ajusté.
Elevé – 65 % ou supérieur
Moyen – Entre 40 % ou plus et 65 % ou moins
Faible – 40 % ou inférieur
Voyant indicateur de l’alimentation en eau (rouge)
Ce voyant s’allume quand le réservoir
d’eau a besoin d’être rempli.
Voyant indicateur du
Plasmacluster (bleu)
Bleu : Plasmacluster activé
Voyant éteint : Plasmacluster désactivé
NEDERLANDS
РУССКИЙ
POLSK
Page 52

PRÉPARATIFS AVANT L’EMPLOI
1
2
Débranchez l’appareil avant
d’installer ou d’ajuster les ltres.
INSTALLATION DES FILTRES
Pour maintenir la qualité des ltres, ceux-ci sont emballés dans des sacs en plastique
et placés dans l’appareil. N’oubliez pas de retirer les ltres des sacs et de les replacer
dans l’appareil avant l’utilisation initiale.
Retirez les ltres
Retirez le panneau arrière.
1
Pressez délicatement les languettes, puis inclinez et retirez
le panneau arrière.
Languettes situées en haut
Panneau
arrière
Retirez le Filtre déso-
2
dorisant lavable (noir)
et le Filtre HEPA (blanc)
des sacs en plastique.
Installez les ltres
Installez le ltre HEPA.
1
Assurez-vous que le ltre HEPA est placé
dans le bon sens.
L'appareil est moins efcace si
le ltre est installé à l'envers.
Filtre HEPA
Languette
Insérez les 2 languettes inférieures (gauche et droite) du panneau arrière dans
2
les petits orices de l'appareil et faites
coulisser le Filtre désodorisant lavable
entre le Filtre HEPA et le panneau arrière.
Filtre désodorisant lavable
Panneau arrière
Languettes inférieures
Filtre HEPA
Filtre désodorisant lavable
Enfoncez dé-
3
licatement les
languettes supérieures (gauche
et droite) pour
bloquer le pan-
neau arrière.
Inscrivez la date de
4
début d’utilisation sur
l’étiquette de date.
Utilisez la date de début d’
utilisation pour savoir quand
les filtres doivent être remplacés.
F-6
Étiquette de date
Languettes supérieures
Page 53

REMPLISSAGE DU RÉSERVOIR D’EAU
On peut utiliser l’appareil en mode d’épuration de
l’air sans remplir le réservoir d’eau. Lorsque vous
utilisez le mode d'épuration d'air et d'humidication
ou le mode d'épuration par pluie d'ions, le réservoir
d'eau doit être rempli.
Retirez le réservoir d’eau en le débloquant
1
par le haut.
Poignée du
réservoir
Réservoir
d’ eau
Bac d’humidication
Retirez le bouchon du réservoir d’eau et
2
remplissez soigneusement le réservoir
avec de l’eau du robinet.
• Remplacez chaque jour l’eau du réservoir par de l’eau
fraîche du robinet.
Après le remplissage, serrez bien le bou-
3
chon du réservoir.
• Assurez-vous qu’il n'y a pas de fuite d’eau.
• Ne manquez pas d’essuyer tout excès d’eau sur l’extérieur du réservoir.
• Lorsque vous transportez le réservoir d’eau, tenez-le
à deux mains et orientez son ouverture vers le haut.
Replacez le réservoir d’eau dans l’appareil.
4
• Le verrou supérieur s’enclenche lorsque le réservoir
d’ eau est bien installé.
Bouchon du
réservoir
ENGLISH
Réservoir d’eau
DEUTSCH
Serrer
FRANÇAIS
NEDERLANDS
ATTENTION
• N’exposez pas l’appareil à l’eau. Cela risque de provoquer un court-circuit ou une électrocution.
• N'utilisez pas d'eau chaude (40 ºC), d'agents chimiques, de substances aromatiques, d'eau
sale ou d'autres substances pouvant provoquer des dégâts, des déformations ou des dysfonctionnements.
• N'utlisez que de l'eau fraiche du robinet. Les autres eaux risquent de favoriser la formation
de moisissures, de champignons ou d'autres bactéries.
F-7
РУССКИЙ
POLSK
Page 54

FONCTIONNEMENT
AFFICHAGE DE L’UNITÉ PRINCIPALE
Touche de réinitialisation de
ltre/Voyant indicateur (rouge)
Touche De Contrôle Des
Témoins
MODE D’ÉPURATION DE L’AIR ET D’HUMIDIFICATION
Utilisez le mode d’épuration de l’air et d’humidication pour rapidement épurer l’air, réduire les odeurs et humidier.
Remplissez le réservoir d’eau. (Voir page F-7)
1
Touche de marche/Arrêt du Plasmacluster/
Voyant indicateur (vert)
Touche de vitesse
du ventilateur/
indicateur (vert)
Voyant
Touche de mise en marche de
l’appareil
Appuyez sur l’une des touches
pour sélectionner un mode et
démarrer l’appareil.
Touche de mode d’épuration de l’air et
d’humidication/
Touche de mode d’épuration
de l’air/voyant indicateur (vert)
Voyant indicateur (vert)
Touche d’arrêt de l’appareil
Touche de mode d'épuration par pluie
d'ions/Voyant indicateur (bleu)
Appuyez sur la touche de mode d’épuration de
l’air et d’humidication.
2
• Si le câble d'alimentation n'a pas été débranché entre
deux utilisations, l'appareil redémarre automatiquement
à partir des réglages sélectionnés précédemment.
Appuyez sur la touche de vitesse du ventilateur pour sélectionner la vitesse désirée.
3
• Les voyants indiquent la vitesse de ventilateur sélectionnée.
Appuyez sur la touche d’arrêt de l’appareil pour l'éteindre.
À propos du mode d’humidication automatique
Les capteurs de température/humidité détectent et ajustent
automatiquement l’humidité en fonction des uctuations de
la température ambiante. Selon la taille et l’humidité de la
pièce, il se peut que l’humidité n’atteigne pas 55 ~ 65 %. Il
est alors recommandé d’utiliser le mode d’épuration de l’air
et d’humidication/maximum.
F-8
Température
~ 18 ºC
18 ºC ~ 24 ºC
24 ºC ~
Humidité
65 %
60 %
55 %
Page 55

MODE D’ÉPURATION DE L’AIR
Utilisez le mode d’épuration de l’air lorsqu’il n’est pas nécessaire d’accroître l’humidité.
Appuyez sur la touche de mode d’épuration de l’air sur l’afchage.
1
• Si le câble d'alimentation n'a pas été débranché entre deux
utilisations, l'appareil redémarre automatiquement à partir des
réglages sélectionnés précédemment.
Appuyez sur la touche de vitesse du ventila-
2
teur pour sélectionner la vitesse désirée.
• Les voyants indiquent la vitesse de ven
tilateur sélectionnée.
Appuyez sur la touche d’arrêt de l’appareil pour l'éteindre.
-
MODE D’ÉPURATION PAR PLUIE D'IONS
Le mode de DOUCHE D’IONS PROPRES à humidication libère des ions Plasmacluster à
densité élevée.
Ce ux d’air puissant permet d’éliminer en 15 minutes toutes les poussières, moisissures et
allergènes de l’air ambiant en les faisant passer par son système de ltrage.
Il doit y avoir de l’eau dans le réservoir lorsque ce mode est sélectionné.
L’appareil humidie s’il y a de l’eau dans le réservoir et il fonctionne sans humidier si le réser-
voir est vide.
ENGLISH
DEUTSCH
FRANÇAIS
Appuyez sur la touche de mode d'épuration par pluie
1
d'ions de l'afchage pour sélectionner ce mode.
Une fois l’opération terminée, l’appareil rétablit l’opération précédente.
Appuyez sur la touche d’arrêt de l’appareil pour l'éteindre.
Vitesse de ventilateur
Veuillez noter que la vitesse de ventilateur ne peut pas être ajustée en mode d'épuration par pluie d'ions.
Fonctionnement
automatique
Fonctionnement en mode
POLLEN
Fonctionnement maximum
Fonctionnement moyen
Fonctionnement faible
* La vitesse élevée du ventilateur est une vitesse intermédiaire entre MOYEN et MAxIMUM.
La vitesse de ventilateur change automatiquement (entre faible et élevée)
en fonction de la quantité d'impuretés dans l'air. Les capteurs détectent les
impuretés pour permettre une purication efcace de l'air.
L’appareil fonctionne à plein régime
pendant 10 minutes, puis alterne
entre les modes MOYEN et MAX.
L’appareil fonctionne à la vitesse maximale du ventilateur.
L’appareil fonctionne à la vitesse moyenne du ventilateur.
L’appareil fonctionne silencieusement en aspirant le minimum d’air.
10 minutes : Vitesse maximale du ventilateur
20 minutes : Vitesse moyenne du ventilateur
20 minutes : Vitesse maximale du ventilateur
.
F-9
NEDERLANDS
РУССКИЙ
POLSK
Page 56

FONCTIONNEMENT
The lights on the front panel are brighter.
The lights on the front panel are darker.
The lights on the front monitor turn off
「 」
「 」
「 」
Clignote
Touche MARCHE/ARRÊT du Plasmacluster
Appuyez sur la touche de marche/arrêt du Plasmacluster pour activer et désactiver le mode d’ions Plasmacluster.
Lorsque le Plasmacluster est activé, les deux témoins Indicateur et de Plasmacluster sont allumés.
TOUCHE DE CONTRÔLE DES TÉMOINS
S’utilise pour réduire la
luminosité des voyants
du panneau avant.
ATTENTION
Les voyants du moniteur avant sont toujours plus lumineux au démarrage.
Reportez-vous au schéma de droite pour sélectionner
le niveau de sensibilité souhaité du panneau avant
Les voyants du panneau avant sont plus lumineux.
Les voyants du panneau avant sont plus sombres.
Les voyants du panneau avant s’éteignent.
.
VOYANT D’ALIMENTATION EN EAU
Lorsque le réservoir d’eau est vide, le voyant d’alimentation en eau clignote pour
indiquer que le réservoir a besoin d’être rempli. Veuillez noter que le voyant ne
clignote pas, même si le réservoir d'eau est vide lorsque l'appareil est en
mode d'épuration d'air ou en mode d'épuration par pluie d'ions.
Réglage de l’indicateur sonore de l’alimentation en eau.
En plus du voyant indicateur, l’appareil peut être réglé pour émettre un signal sonore lorsque
le réservoir d’eau est vide. Lorsque l’appareil est éteint, appuyez sur la touche de contrôle des
témoins pendant 3 secondes pour activer le signal sonore.
Annulation
Pour annuler le signal sonore, lorsque l’appareil est éteint, appuyez encore une fois sur la touche de contrôle des témoins pour
plus de 3 secondes.
RÉGLAGE DE LA SENSIBILITÉ DES CAPTEURS
Réglez-la sur « faible » si le MONITEUR DE POUSSIÈRE et le MONITEUR D'ODEUR
sont en rouge a n de réduire la sensibilité et réglez-la sur ‘élevée’ si le MONITEUR DE
POUSSIÈRE et le MONITEUR D'ODEUR sont en vert a n d'augmenter la sensibilité.
Lorsque l’appareil est éteint, appuyez sur la touche de vitesse du
ventilateur pendant 3 secondes.
1
Les voyants indicateurs de vitesse du ventilateur af chent le niveau de sensibilité des capteurs
actuellement dé ni. Le réglage d’usine est le niveau standard, indiqué par le voyant MOYEN.
Appuyez sur la touche de vitesse du ventilateur
pour régler la sensibilité des capteurs.
2
Reportez-vous au schéma de droite pour sélectionner le niveau de
sensibilité souhaité des capteurs.
Appuyez sur la touche d’arrêt de l’appareil.
Notez que si la touche d’arrêt de l’appareil n’est pas pressée dans les 8
3
secondes suivant le réglage de la sensibilité des capteurs, le réglage est
automatiquement sauvegardé. Le réglage de la sensibilité des capteurs
est sauvegardé même si l’appareil est débranché.
F-10
Voyant in-
dicateur de
vitesse du
ventilateur
Sensibilité
des capteurs
Elevée
Standard
Faible
Page 57

SOIN ET ENTRETIEN
Pour maintenir le rendement optimal de ce puricateur d’air, veuillez nettoyer l’appareil régulièrement, y compris le capteur et les ltres.Lorsque vous nettoyez l’appareil, prenez soin de
débrancher le câble d’alimentation en premier et ne manipulez jamais la che avec les mains
mouillées. Vous vous exposez sinon à une électrocution ou à des blessures corporelles.
Cycle d’
VOYANT DU FILTRE
Le voyant de ltre s’allume pour rappeler qu’il est temps d’effectuer l'entretien du panneau
arrière, des capteurs et du ltre d’humidication. Le voyant indicateur s’allume au bout d’
environ 720 heures d’utilisation.
Après avoir effectué l’entretien, réinitialisez le voyant indicateur de ltre. Branchez l’appareil, allumez-le et appuyez sur la touche de réinitialisation pendant 3 secondes. Le voyant
de ltre s’éteint. Même si le voyant de ltre est déjà éteint, la touche de réinitialisation doit
être enfoncée pour que la minuterie d’entretien soit réinitialisée.
entretien
Après 720 heures d’utilisation (30 jours × 24 h = 720)
PANNEAU ARRIÈRE ET CAPTEURS
Cycle
d’entretien
Dépoussiérez délicatement l’ouverture des capteurs et
le panneau arrière, à l’aide d’un accessoire d’aspirateur
ou d’un outil similaire.
Lorsque le panneau arrière est encrassé
Si ce dernier est recouvert d’une couche de crasse huileuse,
plongez-le dans une solution de détergent de cuisine.
1
Evitez toute éraure du panneau arrière pendant son lavage.
Rincez plusieurs fois le panneau arrière à l’eau propre
2
pour éliminer tout résidu de solution.
Faites égoutter le ltre pour que l’excès d’eau s’en échappe.
3
ENTRETIEN DU FILTRE DE CAPTEUR
Retirez le ltre de capteur et tapotez-le légèrement au-dessus d’un
évier ou d’une poubelle pour déloger la poussière. S’il est très sale,
lavez-le avec précaution à l’eau tiède. N’utilisez aucun détergent
ou produit chimique, quel qu’il soit, pour nettoyer le ltre. Séchez le ltre complètement avant de le replacer dans l’appareil. Ne
faites pas fonctionner l’appareil sans que tous les ltres soient correctement installés.
Quand la poussière s’accumule
sur l’appareil ou tous les 2 mois
Capteur
Panneau
arrière
Panneau arrière
Filtre de capteur
ENGLISH
DEUTSCH
FRANÇAIS
NEDERLANDS
РУССКИЙ
APPAREIL
Cycle d’entretien
Nettoyez régulièrement l'appareil an d’éviter l’accumulation de saleté ou de taches. Si vous
laissez les taches trop longtemps, elles peuvent être difciles à nettoyer.
Essuyez avec un chiffon sec et doux
Essuyez les taches ou salissures rebelles avec un chiffon doux humidié avec de l’eau tiède.
N’utilisez pas de liquides volatils
Le benzène, le diluant de peinture, la pâte à polir, risquent d’endommager la surface.
N’utilisez pas de détergents
Les agents détersifs risquent d'abîmer l’appareil.
Quand la poussière s’accumule sur l’appareil ou tous les 2 mois
F-11
POLSK
Page 58

SOIN ET ENTRETIEN
RÉSERVOIR D’EAU
Bouchon du
Cycle d’entretien
Rincez l’intérieur du réservoir en laissant une petite quantité d’
eau tiède à l’intérieur, en fermant bien le bouchon du réservoir,
puis en secouant le réservoir. Les détergents ménagers doux
peuvent servir à nettoyer l’ intérieur du réservoir, mais ils doivent être dilués, et le réservoir doit être rincé méticuleusement
pour éliminer tout résidu de détergent.
(Notez que le réservoir d’eau ne va pas au lave-vaisselle.)
ENTRETIEN DU BOUCHON DE RESERVOIR
Le petit bouchon du réservoir peut être retiré.
Un nettoyage est nécessaire dès que le bouchon du
réservoir et le petit bouchon sont sales.
Utilisez à cet effet un coton-tige ou une brosse à dents.
Chaque jour en cas d’humidication
cycle d’entretien... une fois par mois
Bouchon
du réservoir
réservoir
Réservoir
d’eau
Brosse à dent
ENTRETIEN DU FILTRE DÉSODORISANT LAVABLE
LAVAG E À L A MA IN UN IQUEMENT !
PAS DE SÉCHAGE EN MACHINE !
Rincez à l’eau tiède la saleté accumulée sur le
1
FILTRE DÉSODORISANT LAVABLE.
Retirez toute trace de poussière du ltre désodorisant lavable
avant de le laver.
Cycle d’ entretien
Lorsque vous remarquez une odeur désa-
gréable en provenance de la sortie d'air.
Lorsque le rendement du ltre semble
baisser et que les odeurs persistent.
ATTENTION
• Lorsque vous lavez le ltre pour la première fois, l’eau de rin
çage peut être brune. Ceci ne compromet en rien le pouvoir de
désodorisation.
• Veillez à ne pas plier ou tordre le ltre lors du lavage.
Faites égoutter le ltre pour que l’excès
2
d’eau s’en échappe.
Séchez totalement le filtre dans un endroit bien
3
aéré, si possible, à l’extérieur.
Séchez le ltre en position latérale pour éviter qu’il ne se déforme.
Compter une durée de séchage d’environ 6 heures.
ATTENTION
• Évitez de sécher le ltre à l’extérieur s’il ne fait pas beau (p. ex. en cas
de pluie ou de temps froid).
Ne laissez pas le ltre geler.
•
Si le ltre est séché à l’intérieur, prenez des précautions (comme placer des
serviettes, etc., sous le ltre) pour éviter que l’eau n’endommage le sol.
Replacez le ltre dans l’appareil. (Voir page F-6.)
4
Séchez le ltre complètement avant de le replacer pour éviter les odeurs.
Ne faites pas fonctionner l’appareil sans que tous les ltres soient correctement installés.
-
F-12
Page 59

BAC D’HUMIDIFICATION
Cycle d’entretien
Retirez le réservoir d’eau et le bac d’humidication.
1
Déverrouillez d’abord
le réservoir d’eau,
puis retirez le bac.
Tirez le bac d’humidication avec les deux
mains pour éviter de
renverser l’eau.
Retirez le réservoir d’eau et le ltre d’ humidification du bac d’humidification.
2
Videz l’eau accumulée en inclinant lentement le bac d’humidication.
Filtre d’humidication
1 mois
La fréquence de l'entretien dépend de la dureté de l'eau. Evitez de renverser l'eau lorsque vous retirez ou nettoyez le bac.
Poignée du
réservoir
Réservoir d’
eau
Ne pas tenir
cette partie.
Bac d’humidication
Rincez l’intérieur du bac d’humidication à l’eau tiède pour retirer les
3
impuretés.
• Ne retirez pas le otteur
de mousse de polystyrène.
• Nettoyez les parties difciles à atteindre avec un
coton-tige ou une brosse
à dents.
Flotteur
Remettez le filtre d’humidification en
4
place et réinsérez le bac d’humidication
dans l’appareil.
Le ltre d’humidication n’entre
pas s’il est mis à l’envers. Assurezvous qu’il n’y a pas d’espace entre
le bac d’humidication et l’appareil
lorsque vous replacez le bac d’
humidication dans l’appareil. L’
appareil risque de mal fonctionner
si le bac d’humidication n’est pas
correctement inséré à l’intérieur.
Couleur : gris
Si les dépôts de l’eau sont difciles à enlever
Remplissez le bac d’humidication à demi avec de
1
l’ eau tiède, ajoutez une
petite quantité de détergent
de cuisine doux et laissez
tremper environ 30 minutes.
Diluez le détergent conformément aux instructions gurant
sur l’emballage.
Nettoyez les parties difciles
à atteindre avec
un coton-tige
ou une brosse
à dents.
ENGLISH
DEUTSCH
Rincez le bac d’humidi-
2
cation à l’eau tiède.
• Rincez jusqu’à ce que tout résidu
de détergent ait disparu.
• Un rinçage inadéquat peut causer une odeur de détergent ou
des changements
dans la forme /
couleur de l’unité
principale.
FRANÇAIS
NEDERLANDS
ATTENTION
• N’utilisez que des détergents de cuisine
doux pour nettoyer le bac d’humidication. L’utilisation de produits chimiques
ou de détergents inadéquats peut entraîner une déformation, un ternissement, des craquelures (fuite d’eau).
РУССКИЙ
POLSK
Si le flotteur de mousse de polystyrène se détache, replacez-le en insérant les languettes du otteur dans les
fentes du bac d’humidication comme
l’illustre le schéma.
Insérez la languette du
otteur dans la fente.
Insérez le otteur
sous cette languette.
Insérez la languette de
l’autre côté du otteur
dans la fente.
F-13
Page 60

SOIN ET ENTRETIEN
FILTRE D’HUMIDIFICATION
Cycle d’entretien
La fréquence du cycle d’entretien dépend de la dureté ou des impure
utilisez ; plus l’eau est dure, plus le détartrage doit être fréquent.
Faites attention de ne pas renverser d’eau lors du nettoyage du ltre.
Retirez le réservoir d’eau et le
1
bac d’humidication.
Une fois par mois ou lorsque le voyant de ltre est allumé.
tés de l’eau que vous
Rincez plusieurs fois le ltre
5
d’ humidication à l’eau tiède
pour éliminer tout résidu de
Filtre d’humidication
Bac d’humidication
Réservoir
d’eau
Bac d’humidication
Retirez le ltre d’humidication
du bac d’humidication.
2
Évitez de renverser de l’eau du bac d’humidication.
Préparez la solution de détartrage.
3
Utilisez de l’acide citrique, en vente
dans certaines pharmacies, ou du jus de
citron pur à 100 % en bouteille pour le
détartrage. Choisissez l’un ou l’autre et
préparez la solution de détartrage.
<Utilisation d’acide citrique>
Dissolvez 3 cuillères à café d'acide citrique et 2 tasses 1/2 d'eau tiède dans un
récipient adapté et mélangez.
<Utilisation de jus de citron>
Le jus de citron pur à 100 % en bouteille
peut servir au détartrage. N’utilisez que
du jus de citron pur à 100 % en bouteille
sans pulpe (passez le jus si nécessaire).
Versez 1/4 de tasse de jus de citron et
3 tasses d'eau tiède dans un récipient
assez grand pour contenir le ltre d'humidication et mélangez.
Laissez tremper le ltre d’
humidication dans la solution
4
pendant 30 minutes avant de
nettoyer.
Avec le jus de citron, il est
recommandé de laisser
tremper plus longtemps
qu’avec l’acide citrique.
solution.
Un rinçage inadéquat peut causer des
odeurs et nuire au rendement de l’appareil et à son aspect.
* Ne frottez pas le ltre
d’ humidication ; limitezvous à le rincer délicatement sous l’eau tiède.
Fixez le ltre d’humidication
au bac d’humidication et repla-
6
cez le bac d’humidication dans
l’appareil.
•Le filtre d’humidification n’entre pas s’il est
mis à l’envers. Assurez-vous qu’il n’y a pas
d’espace entre le bac d’humidification et
l’ appareil lorsque vous replacez le bac d’humidication dans l’appareil. L’appareil risque
de mal fonctionner si le bac d’humidication
n’ est pas correctement inséré à l’intérieur.
•Quand l’appareil
reste longtemps inutilisé, séchez le ltre
d’humidication complètement avant de
le remettre en place.
Branchez l’appareil, allumezle et appuyez sur la touche de
7
réinitialisation de ltre sur l’
afchage pendant plus de 3 secondes pour réinitialiser.
Vous risquez de remarquer des dépôts
rouge-bruns ou blancs se former à la surface du ltre d'humidication. Ces impuretés (calcium, etc.) proviennent de l’eau du
robinet; il ne s’agit pas d’une défectuosité.
Remplacez le ltre d’humidication lorsqu’
il est entièrement
couvert de dépôts
blancs.
F-14
Page 61

GUIDE DE REMPLACEMENT DES FILTRES
La durée de vie des ltres varie selon les conditions ambiantes, l’emploi et l’emplacement de l’appareil. Si la poussière ou les odeurs persistent, remplacez les ltres.
(Reportez-vous à « Veuillez lire ces instructions avant de faire fonctionner votre nouveau puricateur d’
air ».)
Guide de remplacement des ltres
Filtre HEPA
La durée de vie des ltres peut être considérablement réduite selon les conditions ambiantes. La
fumée de cigarette, les poils et les squames d’animaux domestiques et les autres particules en suspension dans l’air peuvent écourter la durée de vie des ltres. Examinez les ltres régulièrement et
remplacez-les au besoin.
Jusqu’à 5 ans après ouverture
Filtre désodorisant lavable
Le ltre peut être réutilisé plusieurs fois après lavage ou il peut être remplacé.
Filtre d’humidication
La durée de vie des ltres peut être considérablement réduite selon les conditions ambiantes. Même
avant que 2 années ne s’écoulent, remplacez le ltre d’humidication si vous remarquez ce qui suit :
• Des dépôts minéraux (des masses blanches, noires ou rouges) demeurent après le nettoyage ou le
ltre d’humidication est encore sale.
• Le ltre est gravement endommagé ou déformé.
Jusqu’à 2 ans après ouverture
Filtres de rechange
• Filtre HEPA : 1 unité
Modèle FZ-C150HFE (pour KC-860E)
FZ-C100HFE (pour KC-850E)
FZ-C70HFE (pour KC-840E)
• Filtre désodorisant lavable : 1 unité
Modèle FZ-C150DFE (pour KC-860E)
FZ-C100DFE (pour KC-850E)
FZ-C70DFE (pour KC-840E)
• Filtre d’humidication : 1 unité
Modèle FZ-C100MFE
(gris)
Cadre de ltre (gris)
Filtre d’humidication
(blanc)
Cadre de ltre (blanc)
Remplacement des ltres
ENGLISH
DEUTSCH
FRANÇAIS
NEDERLANDS
РУССКИЙ
1. Remplacez les ltres en suivant les instructions fournies avec les ltres de rechange.
2. Utilisez les étiquettes de date pour vous rappeler quand les ltres doivent être remplacés.
Mise au rebut des ltres
Veuillez mettre au rebut les ltres usagés conformément à toutes lois et réglementations en vigueur.
Matériaux du Filtre HEPA :
• Filtre : polypropylène • Cadre : polyester
Matériaux de ltre désodorisant lavable :
• Polyester, rayonne, charbon actif
Matériaux du ltre d’humidication :
• Rayonne, polyester
F-15
POLSK
Page 62

RÉSOLUTION DES PROBLÈMES
Avant de faire appel au SAV, veuillez lire le tableau de résolution de problèmes ci-dessous, car le
problème n’est peut être pas un dysfonctionnement de l’appareil.
SYMPTÔME
Les odeurs et la fumée ne
sont pas éliminées.
Le moniteur avant s’allume en
vert même lorsque l’air est impur.
Le moniteur avant s’allume en
orange ou en rouge même lorsque l’air est propre.
L'appareil émet un cliquetis.
L’air refoulé dégage une odeur.
L’appareil ne s’active pas en
présence de fumée de cigarette
dans l’air.
SOLUTION (pas un dysfonctionnement)
• Nettoyez ou remplacez les ltres s’ils semblent très sales.
(Voir pages F-11, F-12, F-14.)
• L’air était peut-être pollué au moment où l’appareil a été branché.
Débranchez l’appareil, attendez une minute et rebranchez-le.
• Le fonctionnement des capteurs est compromis si les
ouvertures des capteurs de poussière sont sales ou bouchées. Nettoyez délicatement les capteurs de poussière
(voir page F-11).
• C’est le son qui est émis lorsque l’appareil est en mode de
génération d’ions.
• Est-ce que les ltres sont très sales ?
• Nettoyez ou remplacez les ltres.
• Les puricateurs d’air à Plasmacluster émettent de faibles
quantités d’ozone qui peuvent avoir une odeur.
• Est-ce que l’appareil est installé dans un endroit où il est
difcile pour le capteur de détecter la fumée de cigarette ?
• Les ouvertures des capteurs de poussière sont-elles bloquées ou bouchées ?
(Dans ce cas, nettoyez les ouvertures.) (Voir page F-11.)
Le voyant de ltre est allumé.
Le moniteur avant est éteint.
Le voyant d’alimentation en eau
ne s’allume pas quand le réservoir est vide.
Le robinet d’eau du réservoir ne
s’abaisse pas ou baisse lentement.
Les voyants du moniteur avant
changent fréquemment de couleur.
• Après avoir remplacé les ltres, branchez le câble d’alimentation sur le secteur et appuyez sur la touche de réinitialisation de ltre. (Voir page F-11.)
• Vériez si le mode voyants éteints est sélectionné. Si oui,
appuyez alors sur la touche de contrôle des témoins pour
activer les voyants indicateurs. (Voir page F-10.)
• Vériez s’il y a des impuretés sur le otteur de mousse de
polystyrène. Nettoyez le bac d’humidication. Assurez-vous
que l’appareil est situé sur une surface de niveau.
• Est-ce que le bac d’humidication et le réservoir d’eau sont
bien installés ? Vériez aussi le ltre d’humidication.
• Nettoyez ou remplacez le ltre lorsqu’il est très sale.
(Voir pages F-14 et F-15.)
• Les voyants du moniteur avant changent automatiquement
de couleur lorsque des impuretés sont détectées par les
capteurs de poussière et par le capteur d'odeur.
F-16
Page 63

AFFICHAGE D’ERREUR
KC-850E•KC-860E
Si l'erreur de reproduit, contactez le centre de service Sharp.
AFFICHAGE
NUMERIQUE
AFFICHAGE LUMINEUX
Clignotement du voyant indicateur d’épuration de l’air et
d’humidication.
Clignotement du voyant indi-
cateur de vitesse du ventila-
teur Faible « ».
Clignotement du voyant de
pluie d’ions.
Clignotement du voyant indicateur de pluie d’ions.
Clignotement du voyant indicateur de
vitesse du ventilateur Faible « ».
Clignotement du voyant indicateur de
vitesse du ventilateur Faible « ».
DE L’ERREUR
Anomalie du ltre
d’humidication
Anomalie du moteur
de ventilateur
Anomalie du capteur
de température/humidité
Problème avec la carte
de circuits
ORIGINE
SOLUTION
Vériez si le ltre d’humidication, le bac d’humidication et le
réservoir d’eau sont bien installés, puis rallumez l’appareil.
Coupez l’alimentation pour annuler
l’afchage d’erreur, attendez une
minute, puis rallumez l’appareil.
Débranchez l’appareil, attendez
une minute et rebranchez-le.
ENGLISH
DEUTSCH
FRANÇAIS
KC-840E
AFFICHAGE LUMINEUX
Clignotement du voyant indicateur d’épuration de l’air et d’humidication.
Clignotement du voyant indicateur de
vitesse du ventilateur Faible ‘ ‘.
Le témoin d’humidité clignote de manière
‘Élevée’ ou ‘Faible’.
Clignotement du voyant de pluie d’ions. Problème avec la carte
Clignotement du voyant indicateur de
pluie d’ions.
Clignotement du voyant indicateur de
vitesse du ventilateur Faible ‘ ‘.
Clignotement du voyant indicateur de
vitesse du ventilateur Faible ‘ ‘.
ORIGINE DE L’ERREUR
Anomalie du ltre
d’humidication
Anomalie du moteur de
ventilateur
Anomalie du capteur
de température/humidité
de circuits
SOLUTION
Vériez si le ltre d’humidication, le bac d’humidication et le
réservoir d’eau sont bien installés, puis rallumez l’appareil.
Coupez l’alimentation pour annuler l’afchage d’erreur, attendez une minute, puis rallumez
l’appareil.
Débranchez l’appareil, attendez
une minute et rebranchez-le.
NEDERLANDS
РУССКИЙ
POLSK
F-17
Page 64

CARACTÉRISTIQUES
A. Informations sur la mise au rebut à l'intention des utilisateurs privés
(ménages)
1. Au sein de l'Union européenne
Attention : si vous souhaitez mettre cet appareil au rebut, ne le jetez pas dans une
poubelle ordinaire !
Les appareils électriques et électroniques usagés doivent être traités séparément et
conformément aux lois en vigueur en matière de traitement, de récupération et de
recyclage adéquats de ces appareils.
Suite à la mise en oeuvre de ces dispositions dans les Etats membres, les ménages
résidant au sein de l'Union européenne peuvent désormais ramener gratuitement*
leurs appareils électriques et électroniques usagés sur des sites de collecte désignés.
Dans certains pays*, votre détaillant reprendra également gratuitement votre ancien produit si
vous achetez un produit neuf similaire.
*) Veuillez contacter votre administration locale
pour plus de renseignements.
Si votre appareil électrique ou électronique usagé comporte des piles ou des
accumulateurs, veuillez les mettre séparément et préalablement au rebut
conformément à la législation locale en vigueur.
En veillant à la mise au rebut correcte de ce produit, vous contribuerez à assurer le
traitement, la récupération et le recyclage nécessaires de ces déchets, et préviendrez
ainsi les effets néfastes potentiels de leur mauvaise gestion sur l'environnement et la
santé humaine.
2. Pays hors de l'Union européenne
Si vous souhaitez mettre ce produit au rebut, veuillez contacter votre administration
locale qui vous renseignera sur la méthode d'élimination correcte de cet appareil.
Suisse : les équipements électriques ou électroniques usagés peuvent être ramenés
gratuitement au détaillant, même si vous n'achetez pas un nouvel appareil. Pour
obtenir la liste des autres sites de collecte, veuillez vous reporter à la page d'accueil
du site
www.swico.ch ou www.sens.ch .
B
. Informations sur la mise au rebut à l'intention des entreprises
1. Au sein de l'Union européenne
Si ce produit est utilisé dans le cadre des activités de votre entreprise et que vous
souhaitiez le mettre au rebut :
Veuillez contacter votre revendeur SHARP qui vous informera des conditions de
reprise du produit. Les frais de reprise et de recyclage pourront vous être facturés.
Les produits de petite taille (et en petites quantités) pourront être repris par vos
organisations de collecte locales.
Espagne : veuillez contacter l'organisation de collecte existante ou votre
administration locale pour les modalités de reprise de vos produits usagés.
2. Pays hors de l'Union européenne
Si vous souhaitez mettre ce produit au rebut, veuillez contacter votre administration
locale qui vous renseignera sur la méthode d'élimination correcte de cet appareil.
Attention : votre produit
comporte ce symbole. Il
signifie que les produits
électriques et électroniques
usagés ne doivent pas être
mélangés avec les déchets
ménagers généraux. Un
système de collecte séparé
est prévu pour ces produits.
FR
48
3,7(3,4)
9,5
132
KC-840EKC-860E
210
MAX MOYEN FAIBLE
60
168
26
3,8(3,3)
11,6
KC-850E
220~240V 50/60Hz
306
MAX MOYEN FAIBLE
41
84
5,5(4,9)
15
54
20
6,1(5,8)
34
11,5
21
42
22
6,8(6,3)
35
13,5
40
47
170
330
450
230
400
600
~26
3,0
8,0
360 (L) × 233 (P) × 550 (H)
Poussière/température et humidité
~38
4,0
2,0
9,0
Désodorisant lavable
378 (L) × 265 (P) × 586 (H)
34
132
45
186
15
84
35
168
47
288
HEPA avec contrôle microbien *3
17
25
120
300
8,8(8,2)
19
39
240
396
MAX MOYEN FAIBLE
56
21
240
51
56
396
/heure)
3
Vitesse de ventilateur (m
Modèle
Alimentation
EUPURATION
Réglage de la vitesse du ventilateur
/heure)
3
Vitesse de ventilateur (m
Puissance nominale (W)
DE L'AIR
Puissance nominale (W)
Niveau de bruit (dBA)
EPURATION
ET HUMIDI-
39
50
Niveau de bruit (dBA)
FICATION DE
L'AIR
4,3
500
~48
Poussière/odeur/température et humidité
730
)*1
2
Collecte de poussière
Humidication (mL/heure)*2
Taille de pièce recommandée (m
Capacité du réservoir d’eau (L)
Désodorisation
Type de
ltre
Capteurs
Longueur du câble (m)
11,0
398 (L) × 288 (P) × 627 (H)
Dimensions (mm)
Poids (kg)
*1 •La taille de pièce recommandée est déterminée pour le fonctionnement de l'appareil avec la vitesse de ventilateur maximale.
•La taille de pièce recommandée indique l'espace oè une certaine quantité de particules de poussière peut être retirée en 30 minutes.
*2 •La quantité d’humidication change suivant la température et l’humidité intérieures et extérieures.
La quantité d’humidication augmente au fur et à mesure que la température monte ou que l’humidité baisse.
La quantité d’humidication diminue au fur et à mesure que la température baisse ou que l’humidité monte.
•Conditions lors des mesures : 20 ºC, humidité de 30 % (JEM1426)
*3 •La classe du ltre de HEPA par EN1822 est H10.
Consommation en veille
Pour être capable de faire fonctionner les circuits électriques lorsque le câble d’alimentation est raccordé
au secteur, cet appareil consomme environ 0,7 W en mode veille.
Pour économiser l’énergie, débranchez le câble d’alimentation lorsque l’appareil n’est pas utilisé.
F-18
Page 65

A. Informations sur la mise au rebut à l'intention des utilisateurs privés
(ménages)
1. Au sein de l'Union européenne
Attention : si vous souhaitez mettre cet appareil au rebut, ne le jetez pas dans une
poubelle ordinaire !
Les appareils électriques et électroniques usagés doivent être traités séparément et
conformément aux lois en vigueur en matière de traitement, de récupération et de
recyclage adéquats de ces appareils.
Suite à la mise en oeuvre de ces dispositions dans les Etats membres, les ménages
résidant au sein de l'Union européenne peuvent désormais ramener gratuitement*
leurs appareils électriques et électroniques usagés sur des sites de collecte désignés.
Dans certains pays*, votre détaillant reprendra également gratuitement votre ancien produit si
vous achetez un produit neuf similaire.
*) Veuillez contacter votre administration locale
pour plus de renseignements.
Si votre appareil électrique ou électronique usagé comporte des piles ou des
accumulateurs, veuillez les mettre séparément et préalablement au rebut
conformément à la législation locale en vigueur.
En veillant à la mise au rebut correcte de ce produit, vous contribuerez à assurer le
traitement, la récupération et le recyclage nécessaires de ces déchets, et préviendrez
ainsi les effets néfastes potentiels de leur mauvaise gestion sur l'environnement et la
santé humaine.
2. Pays hors de l'Union européenne
Si vous souhaitez mettre ce produit au rebut, veuillez contacter votre administration
locale qui vous renseignera sur la méthode d'élimination correcte de cet appareil.
Suisse : les équipements électriques ou électroniques usagés peuvent être ramenés
gratuitement au détaillant, même si vous n'achetez pas un nouvel appareil. Pour
obtenir la liste des autres sites de collecte, veuillez vous reporter à la page d'accueil
du site
www.swico.ch ou www.sens.ch .
B
. Informations sur la mise au rebut à l'intention des entreprises
1. Au sein de l'Union européenne
Si ce produit est utilisé dans le cadre des activités de votre entreprise et que vous
souhaitiez le mettre au rebut :
Veuillez contacter votre revendeur SHARP qui vous informera des conditions de
reprise du produit. Les frais de reprise et de recyclage pourront vous être facturés.
Les produits de petite taille (et en petites quantités) pourront être repris par vos
organisations de collecte locales.
Espagne : veuillez contacter l'organisation de collecte existante ou votre
administration locale pour les modalités de reprise de vos produits usagés.
2. Pays hors de l'Union européenne
Si vous souhaitez mettre ce produit au rebut, veuillez contacter votre administration
locale qui vous renseignera sur la méthode d'élimination correcte de cet appareil.
Attention : votre produit
comporte ce symbole. Il
signifie que les produits
électriques et électroniques
usagés ne doivent pas être
mélangés avec les déchets
ménagers généraux. Un
système de collecte séparé
est prévu pour ces produits.
FR
ENGLISH
DEUTSCH
FRANÇAIS
NEDERLANDS
РУССКИЙ
POLSK
F-19
Page 66

Memo
Page 67

ENGLISH
DEUTSCH
FRANÇAIS
NEDERLANDS
РУССКИЙ
POLSK
Page 68

Lees het onderstaande aandachtig door voordat u uw nieuwe
luchtreiniger in gebruik neemt
De luchtreiniger neemt via de luchtinlaat de kamerlucht op, voert de lucht achtereen-
volgens door een voorlter, een afwasbaar geurlter en een HEPA-lter en blaast de
lucht via de luchtuitlaat weer de kamer in. Het HEPA-lter verwijdert 99,97 % van alle
deeltjes groter dan 0,3 micron. Deze worden door het lter opgezogen.
Geuren die het afwasbaar geurlter passeren, worden geleidelijk opgenomen.
Sommige geuren die door de filters geabsorbeerd worden, worden na verloop van
tijd afgebroken waardoor er een bijkomende geur ontstaat. Afhankelijk van de gebruiksomgeving van de luchtreiniger, kan deze bijkomende geur sneller dan verwacht
sterker worden; dit is met name het geval wanneer het product wordt gebruikt in een
omgeving die aanzienlijk veeleisender is dan een huishoudelijke omgeving. Wanneer
deze bijkomende geur niet verdwijnt, moeten de lters worden vervangen.
OPMERKING
• De luchtreiniger is bedoeld om luchtgedragen stofdeeltjes, pollen, micro organismen (huisstofmijt,
bacterieën, virussen en schimmels) en geuren uit de lucht te verwijderen, maar niet om schadelijke
gassen (bijvoorbeeld koolmonoxide in sigarettenrook) te verwijderen. Als u de bron van de geur
niet verwijdert, dan is de luchtreiniger mogelijk niet in staat de geur volledig weg te lteren.
HEPA-lter
Afwasbaar geurlter
Voorlter
(Voorbeeldillustratie van de “KC-850E”.)
Page 69

NEDERLANDS
KENMERKEN
Unieke combinatie van 3 luchtbehandelingstechnologieën
Drievoudig filtratiesysteem + Luchtzuivende Plasmacluster ionen + Luchtbevochtiger
PLASMACLUSTER-IONEN
Plasmacluster ionen zijn luchtzuiverende
negatieve en positieve ionen, die een
natuurlijke scheikundige reactie aangaan
met deeltjes in de lucht die daarbij worden
ontbonden of gedeactiveerd.
VANGT STOFDEELTJES EN POLLEN OP*
Het afwasbaar voorfilter vangt stofdeeltjes, pollen en andere grote luchtgedragen
deeltjes op.
VERMINDERT GEUREN
Het afwasbaar geurfilter absorbeert veel
van de in normale huishoudens voorko-
mende geuren. Bepaalde geuren worden
ook door de luchtzuiverende plasmacluster
ionen in de ruimte zelf afgebroken.
DEACTIVEERT MICRO ORGANSIMEN
Het HEPA-filter vangt 99,97 % van alle
deeltjes groter dan 0,3 micron op.* Luchtzuiverende plasmacluster ionen maken
een veelvoud van luchtgedragen bacterie
ën,virussen,schimmels en de huistofmijt in
de ruimte zelf onschadelijk.
VERFRIST
Met een uitgebalanceerde afgifte van positieve en negatieve ionen behandelt de
plasmacluster luchtreiniger, de lucht op de-
zelfde wijze als de wijze waarop de natuur
het milieu verfrist.
BEVOCHTIGT
Werkt tot 10 uur per vulling.**
*Wanneer de lucht via het filtersysteem
naar binnen wordt gezogen.
**Vloeroppervlakte:
tot 48 m2. (KC-860E)
tot 38 m2. (KC-850E)
tot 26 m2. (KC-840E)
Sensortechnologie bewaakt voortdurend
de luchtkwaliteit en op basis van de gemeten luchtkwaliteit en luchtvochtigheid wordt
de werking van de luchtreiniger automatisch aangepast.
INHOUD
BELANGRIJKE
VEILIGHEIDSVOORSCHRIFTEN
• WAARSCHUWING .....................................
• VOORZORGSMAATREGELEN
VOOR GEBRUIK ........................................
• RICHTLIJNEN VOOR INSTALLATIE .........
• RICHTLIJNEN VOOR GEBRUIK
VAN DE FILTERS .......................................
BENAMING VAN DE ONDERDELEN
• OVERZICHTSSCHEMA - VOORZIJDE ....
• ACHTERZIJDE ...........................................
• DISPLAY .....................................................
VOORBEREIDINGEN VOOR GEBRUIK ......
• INSTALLATIE VAN DE FILTERS ................
•
VULLEN VAN HET WATERRESERVOIR
BEDIENING
• DISPLAY VAN HET HOOFDTOESTEL ......
• HET PROGRAMMA LUCHTREINIGEN &
LUCHTBEVOCHTIGEN .............................
• HET PROGRAMMA LUCHTREINIGEN ....
•
HET PROGRAMMA CLEAN ION SHOWER
• DE VENTILATORSNELHEID .....................
• PLASMACLUSTER AAN/UIT-KNOP ........
• VERLICHTING-KNOP ..............................
• WATER BIJVUL-INDICATOR ...................
• INSTELLEN VAN DE GEVOELIGHEID
VAN DE SENSOREN ..............................
ZORG EN ONDERHOUD
• FILTERINDICATOR .................................
• ACHTERPANEEL EN SENSOREN ..........
• LUCHTREINIGER ...................................
• WATERRESERVOIR ................................
• ONDERHOUD VAN HET
AFWASBAAR GEURFILTER ...................
• LUCHTBEVOCHTIGINGSBAK ................
• LUCHTBEVOCHTIGINGSFILTER ...........
• ONDERHOUD VAN HET
AFWASBAAR GEURFILTER ...................
PROBLEMEN OPLOSSEN
TECHNISCHE GEGEVENS
INFORMATIE OVER DE AFVALVERWERKING
.................................................
.......................
...................
..............
.....
...................
...
....
...
N-2
N-2
N-3
N-3
N-3
N-4
N-4
N-4
N-5
N-6
N-6
N-7
N-8
N-8
N-8
N-9
N-9
N-9
N-10
N-10
N-10
N-10
N-11
N-11
N-11
N-11
N-12
N-12
N-13
N-14
N-15
N-16
N-18
N-19
ENGLISH
DEUTSCH
FRANÇAIS
NEDERLANDS
РУССКИЙ
POLSK
Dank u voor het vertrouwen dat u in de deze luchtreiniger van
SHARP heeft gesteld.Lees deze gebruiksaanwijzing in zijn geheel aandachtig door voordat u de luchtreiniger in gebruik neemt.
Bewaar de gebruiksaanwijzing na het lezen op een goed bereikbare plaats om hem later opnieuw te kunnen raadplegen.
N-1
Page 70

BELANGRIJKE VEILIGHEIDSVOORSCHRIFTEN
Bij het gebruik van elektrische apparaten dient u altijd enkele fundamentele veiligheidsvoorschriften in acht te nemen, waaronder:
WAARSCHUWING
• Lees alle instructies goed door voordat u de luchtreiniger in gebruik neemt.
• Gebruik uitsluitend een stopcontact van 220 ~ 240 volt.
• Gebruik de luchtreiniger niet als het netsnoer of de stekker beschadigd is of de aansluiting
op het stopcontact loszit.
• Stof de stekker regelmatig af.
• Steek geen vingers of vreemde voorwerpen in de luchtinlaat of luchtuitlaat.
• Houd bij het verwijderen van het netsnoer altijd de stekker vast en trek nooit aan het snoer.
Anders kan kortsluiting met elektrische schokken het gevolg zijn.
• Hanteer de stekker niet met natte handen.
• Gebruik deze luchtreiniger niet in de buurt van gastoestellen of een open haard.
Trek de stekker uit het stopcontact voordat u het waterreservoir vult en wanneer u de luchtreiniger
•
schoonmaakt of niet gebruikt. Anders kan er gevaar voor een elektrische schok en/of brand als
gevolg van kortsluiting ontstaan.
• Als het netsnoer beschadigd is, moet het om alle mogelijke risico's uit te sluiten
vervangen door de fabrikant, zijn onderhoudsvertegenwoordiger, door Sharp erkend onderhoudspersoneel of ander bevoegd personeel.
• Gebruik de luchtreiniger niet wanneer u insecticiden spuit of in kamers waar oliebestanddelen,
wierook, vonken van brandende sigaretten of chemische dampen in de lucht aanwezig zijn of in
ruimtes waar de luchtreiniger nat kan worden, zoals in badkamers.
• Wees voorzichtig bij het schoonmaken van de luchtreiniger. Agressieve reinigingsmiddelen kunnen
de buitenkant beschadigen.
• Onderhoud aan deze luchtreiniger mag alleen door Sharp erkend onderhoudspersoneel worden
uitgevoerd. Neem in geval van problemen of voor afstelling of reparatie contact op met het dichtstbijzijnde servicecenter.
• Wanneer de luchtreiniger moet worden verplaatst, verwijdert u eerst het waterreservoir en de
luchtbevochtigingsbak en tilt u het toestel aan de handgrepen aan weerszijden van het toestel op.
• Drink niet van het water dat in de luchtbevochtigingsbak of het waterreservoir zit.
• Ververs het water in het waterreservoir dagelijks met schoon kraanwater en maak het waterre
servoir en de luchtbevochtigingsbak regelmatig schoon. (Zie pagina's N-12 en N-13.) Haal al het
water uit het waterreservoir en de luchtbevochtigingsbak wanneer de luchtreiniger niet wordt gebruikt. Wanneer er water in het waterreservoir en/of de luchtbevochtigingsbak achterblijft, kan dit
een voedingsbodem voor schimmels en bacteriën en een bron van kwalijke geuren vormen.
In zeldzame gevallen kunnen dergelijke bacteriën een gevaar voor de gezondheid betekenen.
• Dit apparaat is niet bestemd voor gebruik door personen (inclusief kinderen) met beperkte fysi
sche, sensorische of mentale capaciteiten, of een gebrek aan ervaring en kennis, tenzij ze supervisie of aanwijzingen hebben gekregen betreffende het gebruikt van het toestel door een persoon
die instaat voor hun veiligheid.
Kinderen moeten onder toezicht worden gehouden om er zeker van te zijn dat ze niet met het toe
stel spelen.
- Om het gevaar voor een elektrische schok, brand of lichamelijk letsel
te voorkomen:
worden
-
-
-
OPMERKING
Als deze luchtreiniger de radio- of televisieontvangst verstoort, probeer deze storing dan op te lossen
met een of meer van de volgende maatregelen:
• Verander de plaats of oriëntatie van de ontvangstantenne.
• Vergroot de afstand tussen de luchtreiniger en de ontvangstantenne.
• Sluit de luchtreiniger aan op een stopcontact in een andere stroomgroep dan die waarop de radio
of televisie is aangesloten.
• Raadpleeg de leverancier of een ervaren radio- of televisietechnicus.
- Verstoring van de radio- of televisieontvangst
N-2
Page 71

VOORZORGSMAATREGELEN VOOR GEBRUIK
• Blokkeer de luchtinlaat en/of luchtuitlaat niet.
• Gebruik de luchtreiniger niet in de buurt van of boven hete voorwerpen, zoals een kachel of oven,
noch op plaatsen waar hij aan stoom kan worden blootgesteld.
• Gebruik de luchtreiniger altijd rechtopstaand.
• Gebruik altijd de handgrepen aan weerszijden van de luchtreiniger om het toestel te ver
plaatsen.
Verplaats de luchtreiniger niet terwijl deze is ingeschakeld.
• Schakel de luchtreiniger niet in als de lters, het waterreservoir en de luchtbevochtigings
bak niet of niet goed zijn geïnstalleerd.
• Het HEPA-lter kan niet worden gewassen of opnieuw worden gebruikt.
Het lter gaat er niet beter door werken, en bovendien veroorzaakt het een risico op elektrische
schokken en slecht functioneren.
• Reinig de buitenkant alleen met behulp van een zachte doek.
Gebruik geen vluchtige vloeistoffen en/of reinigingsmiddelen.
Anders kan de behuizing barsten of worden beschadigd.
Bovendien kunnen de sensoren defect raken.
• Hoe vaak de luchtreiniger moet worden schoongemaakt (ontkalkt) is afhankelijk van de
hardheid en zuiverheid van het gebruikte water; hoe harder het water, hoe vaker de luchtreiniger zal moeten worden ontkalkt.
• Stel de luchtreiniger niet bloot aan water.
RICHTLIJNEN VOOR INSTALLATIE
• Bewaar bij het gebruik van de luchtreiniger een afstand van ten minste 2 m tot apparatuur
die afhankelijk is van elektrische golven, zoals televisie- en radiotoestellen, om interferentie
te voorkomen.
• Vermijd plaatsen waar de sensor wordt blootgesteld aan wind of tocht.
Anders functioneert de luchtreiniger mogelijk niet naar behoren.
• Vermijd het gebruik op plaatsen waar meubels, gordijnen of andere voorwerpen in contact
kunnen komen met de luchtin- en/of de luchtuitlaat.
• Vermijd het gebruik op plaatsen waar de luchtreiniger wordt blootgesteld aan condens of
grote temperatuursschommelingen. Goede omstandigheden zijn plaatsen waar de kamertemperatuur tussen 5 - 35ºC is.
• Plaats de luchtreiniger op een vlakke en stabiele ondergrond en zorg dat een goede lucht
circulatie mogelijk is.
Wanneer de luchtreiniger op een dik tapijt of vloerkleed staat, kan het toestel een beetje gaan tril-
len.
Een vlakke ondergrond is van belang om te voorkomen dat er water uit het waterreservoir en/of de
luchtbevochtigingsbak kan lekken.
• Vermijd plaatsen waar een vette of olieachtige rook kan voorkomen.
Anders kan de buitenkant van de luchtreiniger barsten of kan de sensor defect raken.
• Plaats de luchtreiniger ca 30~60 cm van de muur om een goede luchtstroom te garanderen.
De muur achter de luchtuitlaat kan na verloop van tijd vuil worden. Wanneer de luchtreiniger ge
durende langere tijd op dezelfde plaats wordt gebruikt, is het raadzaam om de muur zo nu en dan
schoon te maken of de muur tegen vuil te beschermen met behulp van een acrylplaat e.d.
-
-
-
ENGLISH
DEUTSCH
FRANÇAIS
NEDERLANDS
РУССКИЙ
-
POLSK
RICHTLIJNEN VOOR GEBRUIK VAN DE FILTERS
• Volg de in deze gebruiksaanwijzing vermelde instructies voor het op de juiste wijze behandelen en
reinigen van de lters.
N-3
Page 72

BENAMING VAN DE ONDERDELEN
OVERZICHT - VOORZIJDE
Luchtuitlaat
Bedieningspaneel
Display
Hoofdtoestel
KC-860E
ACHTERZIJDE
Handgrepen (aan weerszijden)
KC-850E
Luchtuitlaat
Bedieningspaneel
Display
Hoofdtoestel
KC-840E
Luchtuitlaat
Sensoren
•
Stofsensor
•
Temperatuur-/Luchtvochtigheidssensor
•
Geursensor (KC860E•KC850E)
Handgreep van het
waterreservoir
Waterreservoir
(voor luchtbevochtiging)
Luchtbevochti-
gingslter
Filterframe
Dop van het
waterreservoir
Vlotter
Luchtbevochtigingsbak
Netsnoer
Stekker
(De vorm van de stekker kan per land verschillen.)
N-4
Luchtinlaat
Datumetiket
(kenplaat)
HEPA-lter (wit)
Afwasbaar geurlter
(zwart)
Lipjes
Achterpaneel (voorlter)
Page 73

DISPLAY
siteit met behulp van kleuren weer.
Het display laat de toestand van de lucht in de kamer zien.
KC-850E KC-860E
STOFMONITOR
De stofsensor voert voortdurend metingen uit en geeft de luchtkwaliteit met
behulp van kleuren weer. De KC-860E
heeft 5 gevoeligheidsniveaus.
STOFDEELTJES IN DE K AMER
Schoon Zeer onzuiver
Volledig groen
Schoon
Volledig groen
Wanneer de stofsensor stof detecteert,
knippert de indicator afhankelijk van de
hoeveelheid stof.
Knipperen
Knipperen
Groen
Geel
Groen
Geel
Knipperen
Volledig rood
Zeer onzuiver
Knipperen
Volledig rood
Plasmacluster-indicator (blauw)
Blauw: Plasmacluster AAN
Indicator uit: Plasmacluster UIT
Laat de toestand van de lucht in de kamer zien van geur, stof en vochtigheid.
GEURMONITOR
De geursensor voert voortdurend
metingen uit en geeft de geurintensiteit met behulp van kleuren weer.
Geuren in de kamer
Zwak Sterk
Groen Geel Rood
Stof en geur worden gedetecteerd
door verschillende sensoren.
Water bijvul-indicator (rood)
Deze indicator licht op om aan te geven dat
het waterreservoir moeten worden bijgevuld.
Luchtvochtigheidindicator (groen)
Deze indicator geeft de luchtvochtigheid
in de kamer bij benadering weer. De
luchtvochtigheid is niet instelbaar.
(Vb.) Bij een luchtvochtigheid van 60 %
80 % of meer
Minder dan 30 %
ENGLISH
DEUTSCH
FRANÇAIS
KC-840E
STOFMONITOR
De stofsensor voert voortdurend
metingen uit en geeft de luchtkwaliteit met behulp van kleuren weer.
STOFDEELTJES IN DE K AMER
Schoon
Knipperen
Schoon Zeer onzuiver
Knipperen
Volledig groen
Wanneer de stofsensor stof detecteert,
knippert de indicator afhankelijk van de
hoeveelheid stof.
Groen
Groen
Geel
Zeer onzuiver
Knipperen
Knipperen
Volledig rood
N-5
Luchtvochtigheidindicator
(groen)
Deze indicator geeft de luchtvochtigheid
in de kamer bij benadering weer. De
luchtvochtigheid is niet instelbaar.
Hoog – 65 % of hoger
Matig – tussen 40 % en 65 %
Laag – 40 % of lager
Water bijvul-indicator (rood)
Deze indicator licht op om aan te geven
dat het waterreservoir moeten worden
bijgevuld.
Plasmacluster-indicator (blauw)
Blauw: Plasmacluster AAN
Indicator uit: Plasmacluster UIT
NEDERLANDS
РУССКИЙ
POLSK
Page 74

Trek de stekker uit het stopcontact
1
2
VOORBEREIDINGEN VOOR GEBRUIK
voordat u de luchtreiniger instal-
leert of de lters plaatst.
INSTALLATIE VAN DE FILTERS
Om de kwaliteit van de lters te waarborgen zijn ze verpakt in plastic in de luchtreiniger geplaatst. Verwijder het plastic en plaats de lters terug in de luchtreiniger voor-
dat u het apparaat in gebruik neemt.
Verwijderen van
de lters
Verwijder het achterpaneel.
1
Druk voorzichtig op de lipjes
en neem het achterpaneel al
kantelend weg.
Lipjes aan de bovenkant
Achterpaneel
Neem het afwasbare
2
geurlter (zwart) en het
HEPA-lter (wit ) uit het
plastic.
Installeren van
de lters
Installeer het HEPA-lter.
1
Zorg ervoor dat u het HEPA-lter in de juiste richting installeert.
Het achterstevoren plaatsen
van het filter zal de prestaties
van de luchtreiniger negatief
beïnvloeden.
Lipje
Steek de 2 onderste lipjes (aan de linker- en
2
rechterkant) van het achterpaneel in de twee
uitsparingen in de luchtreiniger en schuif
het afwasbare geurlter tussen het HEPAlter en het achterpaneel.
Afwasbaar geurlter
Lipjes aan de onderkant
HEPA-lter
Achterpaneel
HEPA-lter
Afwasbaar
geurlter
Druk voorzichtig op de
3
lipjes aan de bovenkant
(aan de linker- en rechterkant) om het achterpaneel
te bevestigen.
Noteer de datum van de
4
ingebruikname van het
lter op het datumetiket.
Gebruik deze datum om u te helpen
herinneren aan de datum waarop
de filters moeten worden vervangen.
N-6
Lipjes aan de
bovenkant
Datumetiket
Page 75

VULLEN VAN HET WATERRESERVOIR
Met het programma LUCHTREINGEN kan de luchtreiniger worden gebruikt zonder dat er water in het
waterreservoir zit. Voor de programma's LUCHTREINGEN & LUCHTBEVOCHTIGEN en CLEAN ION
SHOWER moet het waterreservoir met water zijn
gevuld.
Maak het waterreservoir aan de bovenkant
1
los en neem het reservoir uit de luchtreiniger.
Handgreep
van het waterreservoir
Waterreservoir
Luchtbevochti-
gingsbak
Neem de dop van het waterreservoir en
2
vul het waterreservoir met kraanwater.
• Ververs het water in het waterreservoir dagelijks met
schoon kraanwater.
Draai na het vullen de dop van het waterre-
3
servoir stevig vast.
• Controleer of er geen water uit het waterreservoir lekt.
• Droog de buitenkant van het waterreservoir af, indien
u water heeft gemorst.
• Houd het waterreservoir met beide handen en met de
opening naar boven vast.
Plaats het waterreservoir in de luchtreiniger.
4
• Wanneer het waterreservoir goed wordt geïnstalleerd,
„klikt“ de sluiting op zijn plaats.
Dop van het
waterreservoir
Vastdraaien
ENGLISH
Waterreservoir
DEUTSCH
FRANÇAIS
NEDERLANDS
LET OP
• Stel de luchtreiniger niet bloot aan water. Anders kunnen kortsluiting en elektrische schokken het gevolg zijn.
• Gebruik geen heet water (40 ºC), chemische middelen, aromatische stoffen, vuil water e.d.
Vervorming en slecht functioneren kan het gevolg zijn.
• Gebruik alleen schoon kraanwater. Het gebruik van andere bronnen van water kan de groei
van schimmels en/of bacteriën bevorderen.
N-7
РУССКИЙ
POLSK
Page 76

BEDIENING
BEDIENINGSPANEEL VAN HET HOOFDTOESTEL
Filterresetknop met/
Indicator (rood)
Verlichtingknop
Ventilatorsnelheidknop/
(groen)
met indicator
Plasmacluster AAN/UIT-knop met/
Indicator (groen)
AAN-knop
Gebru ik deze knoppen om een
programma te sele cteren en de
luchtreiniger in te schakelen.
Programmaknop Luchtreinigen & Luchtbevochtigen met / Indicator (groen)
Programmaknop Luchtreinigen
met indicator (groen)
UIT-knop
Programmaknop CLEAN ION
SHOWER
met / Indicator (blauw)
HET PROGRAMMA LUCHTREINIGEN &
LUCHTBEVOCHTIGEN
Gebruik het programma Luchtreinigen & Luchtbevochtigen om de lucht te reinigen, te bevochtigen en om geuren te verminderen.
Vul het waterreservoir. (Zie pagina N-7)
1
Druk op de programmaknop LUCHTREINIGEN &
LUCHTBEVOCHTIGEN.
2
• De luchtreiniger start met hetzelfde programma als toen
het apparaat werd uitgeschakeld, tenzij u tussentijds de
stekker uit het stopcontact heeft getrokken.
Druk op de VENTILATORSNELHEIDKNOP om
de gewenste ventilatorsnelheid te selecteren.
3
• De indicator toont de geselecteerde
ventilatorsnelheid.
Druk op de UIT-knop om de luchtreiniger uit te schakelen.
Over het programma Automatisch luchtbevochtigen
De temperatuur-/luchtvochtigheidssensoren bewaken voortdurend de tempe-
ratuur en de luchtvochtigheid en passen de werking van de luchtreiniger aan
op basis van veranderingen in de kamer. Mogelijk kan een luchtvochtigheid
van 55 ~ 65 % niet worden gehaald; dit hangt mede af van de vloeroppervlak
te van de ruimte en de heersende luchtvochtigheid. In dat geval is het raadzaam om het programma LUCHTREINIGEN & LUCHTBEVOCHTIGEN/MAX
te gebruiken.
Temperatuur
~ 18 ºC
18 ºC ~ 24 ºC
-
24 ºC ~
Luchtvochtigheid
65 %
60 %
55 %
N-8
Page 77

HET PROGRAMMA LUCHTREINIGEN
Gebruik het programma Luchtreinigen wanneer de lucht niet bevochtigd hoeft te worden.
Druk op de programmaknop LUCHTREINIGEN op de display.
1
• De luchtreiniger start met hetzelfde programma als toen het
apparaat werd uitgeschakeld, tenzij u tussentijds de stekker
uit het stopcontact heeft getrokken.
Druk op de VENTILATORSNELHEIDKNOP om
2
de gewenste ventilatorsnelheid te selecteren.
• De indicator toont de geselecteerde
ventilatorsnelheid.
Druk op de UIT-knop om de luchtreiniger uit te schakelen.
ENGLISH
HET PROGRAMMA CLEAN ION SHOWER
Het programma CLEAN ION SHOWER met luchtbevochtiging produceert een zeer grote hoeveel-
heid plasmacluster ionen.Door continu een grote luchtstroom uit te blazen gedurende 15 minuten,
worden op efciënte wijze luchtgedragen stofdeeltjes, pollen en micro organismen uit de lucht via
het ltersysteem naar binnen gezogen.De lucht wordt gedurende dit programma op een uiterst efciënte wijze gereinigd.
De luchtreiniger bevochtigt de lucht als er water in het waterreservoir zit. Anders wordt het
programma afgewerkt zonder de lucht te bevochtigen.
Druk op de programmaknop CLEAN ION SHOWER
1
op de display om dit programma te selecteren.
Wanneer het programma eindigt, wordt het daarvoor
geselecteerde programma weer ingeschakeld.
Druk op de UIT-knop om de luchtreiniger uit te schakelen.
De ventilatorsnelheid
De ventilatorsnelheid is tijdens het programma CLEAN ION SHOWER niet instelbaar is.
AUTOMATISCHE snelheid
POLLEN programma
snelheid
De ventilatorsnelheid wordt automatisch ingesteld (op een snelheid tussen
HOOG en LAAG) op basis van de hoeveelheid onzuiverheden in de lucht, die
worden gemeten door de ingebouwde sensoren.
De luchtreiniger werkt gedurende
10 minuten met de ventilator op Hoge
snelheid en schakelt daarna tussen
matige en hoge snelheid.
10 minuten: Hoge ventilatorsnelheid
20 minuten: Matige ventilatorsnelheid
20 minuten: Hoge ventilatorsnelheid
DEUTSCH
FRANÇAIS
NEDERLANDS
РУССКИЙ
POLSK
MAXIMALE snelheid
MATIGE snelheid
LAGE snelheid
De luchtreiniger werkt met de ventilator op maximale snelheid.
De luchtreiniger werkt met de ventilator op matige snelheid.
De luchtreiniger werkt geruisloos met een minimale inname van lucht.
*De HOGE ventilatorsnelheid ligt tussen MATIGE en MAXIMALE snelheid.
N-9
Page 78

BEDIENING
The lights on the front panel are brighter.
The lights on the front panel are darker.
The lights on the front monitor turn off
「 」
「 」
「 」
Knipperen
Plasmacluster AAN/UIT-knop
Druk op de plasmacluster AAN/UIT-knop om het programma Plasmacluster
ionen AAN en UIT te zetten.De groene indicator licht op om aan te geven
dat het programma Plasmacluster ionen is ingeschakeld.
VERLICHTING-KNOP
Gebruik deze wanneer het
licht van het display aan
de voorkant te helder is.
LET OP
Het display is altijd helderder bij opstarten.
Selecteer de gewenste helderheid van het display
aan de hand van de onderstaande afbeelding.
De verlichting van de monitordisplay is helderder.
De verlichting van de monitordisplay is donkerder.
De verlichting van de monitordisplay is uitgeschakeld.
WATER BIJVUL-INDICATOR
Wanneer het waterreservoir leeg is, begint de water bijvul-indicator te
knipperen om aan te geven dat het waterreservoir moet worden bijgevuld. De indicator gaat niet knipperen wanneer het waterreservoir
leeg is en het programma Luchtreinigen of het programma Clean
ION SHOWER is geselecteerd.
Instellen van een geluidssignaal voor het water bijvullen.
De luchtreiniger kan bij een leeg waterreservoir ook een geluidssignaal afgeven. Schakel de
luchtreiniger UIT en houd de Verlichting-knop 3 seconden ingedrukt om het geluidssignaal IN
te schakelen.
Uitschakelen
Schakel de luchtreiniger UIT en houd de Verlichting-knop opnieuw meer
dan 3 seconden ingedrukt om het geluidssignaal uit te schakelen.
INSTELLEN VAN DE GEVOELIGHEID VAN DE SENSOREN
Stel de gevoeligheid in op ‘laag’ als de STOFMONITOR en GEURMONITOR voortdurend rood zijn en
stel de gevoeligheid in op ‘hoog’ als de STOFMONITOR en GEURMONITOR voortdurend groen zijn.
Houd terwijl de luchtreiniger is uitgeschakeld de ventilatorsnelheid-
1
knop gedurende 3 seconden ingedrukt.
De huidige gevoeligheidsinstelling van de meetsensoren wordt aangeduid met behulp
van de ventilatorsnelheidindicators. De gevoeligheid is op de fabriek ingesteld op Standaard, hetgeen wordt aangegeven met de indicator voor de MATIGE snelheid.
Druk op de ventilatorsnelheidknop om
de gewenste gevoeligheid te selecteren.
2
Selecteer de gewenste gevoeligheid van de meetsensoren aan de hand van de afbeelding.
Druk op de UIT-knop.
3
De instelling wordt automatisch opgeslagen als er na het in-
stellen van de gevoeligheid meer dan 8 seconden verstrijken
voordat er op de UIT-knop wordt gedrukt. De gevoeligheidsinstelling van de meetsensoren wordt zelfs opgeslagen als de
stekker niet in het stopcontact zit.
N-10
Ventilatorsnelheidindicator
Gevoeligheid van
de meetsensoren
Hoog
Standaard
Laag
Page 79

ZORG EN ONDERHOUD
Voor optimale prestaties van de luchtreiniger moet het apparaat, inclusief de sensoren en de
lters, regelmatig worden schoongemaakt.
Trek de stekker uit het stopcontact voordat u met schoonmaken begint, maar pak nooit de
stekker met natte handen vast. Anders riskeert u een elektrische schok en/of lichamelijk letsel.
FILTERINDICATOR
De lterindicator licht op om u eraan te herinneren dat het achterpaneel, de sensoren en het luchtbevochtigingslter moeten worden schoongemaakt. De indicator licht op na 720 gebruiksuren.
Na het schoonmaken moet de lterindicator worden gereset. Steek de stekker in
het stopcontact, zet de luchtreiniger AAN en houd de RESET-knop gedurende
3 seconden ingedrukt. De lterindicator dooft. Ook als u de luchtreiniger schoonmaakt voordat de filterindicator is gaan branden, moet u op de RESET-knop
drukken om de onderhoudstijdklok weer op nul te zetten.
Onderhoudscyclus
Na 720 gebruiksuren
(30 dagen × 24 uren = 720)
ACHTERPANEEL EN SENSOREN
Onderhoudscyclus
Verwijder voorzichtig al het stof uit de sensoropeningen
en van het achterpaneel met behulp van het borstelhulpstuk van de stofzuiger.
Wanneer er hardnekkig vuil op het achterpaneel zit
In geval van olieachtig vuil, dompel het achterpaneel in
water met allesreiniger
1
Vermijd hard borstelen bij het wassen van het achterpaneel.
Spoel het achterpaneel herhaaldelijk af met schoon wa-
ter om alle resten van de oplossing weg te spoelen.
2
Laat overtollig water even van het lter afdruipen.
Wanneer er stof op de luchtreiniger zit of elke 2 maanden
Sensor
Achterpaneel
.
3
ENGLISH
DEUTSCH
Achterpaneel
FRANÇAIS
ONDERHOUD VAN HET SENSORFILTER
Verwijder het sensorlter en klop het stof er boven de gootsteen of vuilnisbak voorzichtig uit. Als het filter erg vuil is,
mag het lter in handwarm water worden gewassen. Gebruik
bij het schoonmaken geen schoonmaakmiddelen of che-
micaliën om het lter te reinigen. Laat het lter volledig
opdrogen voordat u het filter terugplaatst. Gebruik de
luchtreiniger niet als niet alle lters zijn geïnstalleerd.
Sensorlter
LUCHTREINIGER
Onderhoudscyclus
Maak de luchtreiniger regelmatig schoon om te voorkomen dat er vlekken of vuil kunnen achterblijven. Vlekken die niet onmiddellijk worden verwijderd, zijn later vaak moeilijker te verwijderen.
Gebruik een droge, zachte doek
Hardnekkige vlekken kunnen worden verwijderd met een doek die met handwarm water is bevochtigd.
Gebruik geen vluchtige vloeistoffen
Benzeen, verfverdunner, polijstpasta en dergelijke kunnen het oppervlak beschadigen.
Gebruik geen schoonmaakmiddelen
De ingrediënten kunnen de luchtreiniger beschadigen.
Wanneer er stof op de luchtreiniger zit of elke 2 maanden
N-11
NEDERLANDS
РУССКИЙ
POLSK
Page 80

ZORG EN ONDERHOUD
WATERRESERVOIR
Onderhoudscyclus
Maak de binnenkant van het waterreservoir schoon door er een kleine
hoeveelheid handwarm water in te doen, de dop goed dicht te draaien
en het waterreservoir goed te schudden. Hierbij mag een mild schoonmaakmiddel worden gebruikt, dat echter wel moet worden verdund.
Daarna moet het waterreservoir goed worden uitgespoeld om alle resten van het schoonmaakmiddel te verwijderen.
(
Het waterreservoir is niet vaatwasbestendig.
ONDERHOUD VAN DE DOP VAN HET WATERRESERVOIR
onderhoudscyclus...eens per maand
De kleine dop achter de dop van het waterreservoir kan verwijderd worden.
Wanneer de dop van het waterreservoir en de kleine dop vies en glibberig
zijn, moeten deze worden schoongemaakt.
Gebruik een wattenstaafje of een tandenborstel.
Dagelijks als de lucht wordt bevochtigd
)
Dop van
het waterreservoir
Dop van het
waterreservoir
Waterreservoir
Tandenborstel
ONDERHOUD VAN HET AFWASBAAR GEURFILTER
ALLEEN MET DE HAND
WASSEN!
NIET DROGEN IN DE
DROOGTROMMEL!
Onderhoudscyclus
Spoel vuil van het AFWASBAAR GEURFILTER met
1
handwarm stromend water weg.
Verwijder stof van het afwasbaar geurlter voordat u het gaat afwassen.
Wanneer er een onaangename geur uit
de luchtuitlaat komt.
Wanneer de werking van het lter lijkt
af te nemen en de geur aanhoudt.
LET OP
•
Wanneer u het lter voor het eerst afwast, kan het water bruin
worden. Dit heeft geen invloed op de werking van het geurlter.
•
Let erop dat u het lter tijdens het afwassen niet verbuigt of vouwt.
Laat overtollig water even van het lter
2
afdruipen.
Laat het lter op een goed geventileerde plaats op-
3
drogen. Doe dit bij voorkeur buitenshuis.
Zet het lter dwars neer om kromtrekken te voorkomen.
Laat het lter gedurende 6 uur drogen.
LET OP
• Laat het lter niet buitenshuis opdrogen als het slecht weer is (bv. als
het regent of vriest).
Laat het lter niet bevriezen.
• Laat u het lter binnenshuis opdrogen, neem dan de nodige voorzorgs
maatregelen, zoals het neerleggen van handdoeken om te voorkomen
dat de vloer vuil of beschadigd wordt.
Plaats het lter terug in de luchtreiniger. (Zie pagina N-6).
4
Laat het lter volledig opdrogen om nare geurtjes te voorkomen.
Gebruik de luchtreiniger niet als niet alle lters zijn geïnstalleerd.
-
N-12
Page 81

LUCHTBEVOCHTIGINGSBAK
Onderhoudscyclus
Eens per
maand
De onderhoudscyclus is mede afhankelijk van de hardheid
van het water. Probeer bij het verwijderen en schoonmaken
van de luchtbevochtigingsbak geen water te morsen.
Verwijder het waterreservoir en de
1
luchtbevochtigingsbak.
Maak eerst het waterreservoir los en verwijder
daarna de luchtbevochtigingsbak. Gebruik beide
handen om geen water
uit de luchtbevochtigingsbak te morsen.
Neem het waterreservoir en het luchtbevochti-
gingslter uit de luchtbevochtigingsbak. Giet
2
het opgevangen water langzaam weg door de
luchtbevochtigingsbak schuin te houden.
Houd de bak
niet hieraan
vast.
Luchtbevochtigingslter
Luchtbevochtigingsbak
Spoel de binnenkant van de luchtbevochtigingsbak uit met handwarm
3
water om vuil te verwijderen.
•
Verwijder de tempex vlotter
niet.
•
Maak de moeilijk te berei-
ken hoekjes schoon met behulp van een wattenstaafje
of een tandenborstel.
Vlotter
Plaats het luchtbevochtigingslter terug en plaats
4
de luchtbevochtigingsbak terug in de luchtreiniger.
Het luchtbevochtigingslter kan niet
achterstevoren worden geplaatst.
Zorg ervoor dat er geen ruimte zit
tussen de luchtbevochtigingsbak
en de luchtreiniger wanneer u
de luchtbevochtigingsbak terugplaatst. De luchtreiniger zal niet
naar behoren functioneren als de
luchtbevochtigingsbak niet goed in
de luchtreiniger is teruggeplaatst.
Kleur: Grijs
Handgreep
van het
waterreservoir
Waterreservoir
Wanneer de neerslag moeilijk te verwijderen is
Vul de luchtbevochtigingsbak
half met handwarm water,
1
voeg een kleine hoeveelheid
van een schoonmaakmiddel
voor huishoudelijk gebruik
toe en laat dit ongeveer
30 minuten weken
Verdun het schoonmaakmiddel
volgens de instructies op de verpak-
king.
Maak de moeilijk
te bereiken hoekjes schoon met
behulp van een
wattenstaafje of
een tandenborstel.
.
ENGLISH
DEUTSCH
Spoel de luchtbevochtigings-
2
bak af met handwarm water.
• Zorg ervoor dat alle resten van
FRANÇAIS
het schoonmaakmiddel worden
weggespoeld.
• Anders kan er een onaangename
geur ontstaan en
kan de vorm of
kleur van de
luchtreiniger
worden aange
-
NEDERLANDS
tast.
LET OP
• Gebruik een mild schoonmaakmiddel voor huishoudelijk gebruik om
de luchtbevochtigingsbak schoon te
maken. Het gebruik van onjuiste chemicaliën of schoonmaakmiddelen kan
leiden tot vervorming, aantasting of
barsten (waterlekkage).
РУССКИЙ
POLSK
Als de tempex vlotter losraakt, kunt
u hem terugplaatsen door de lipjes
van de vlotter in de uitsparingen in de
luchtbevochtigingsbak te steken zoals
de afbeelding laat zien.
Steek het lipje van de
vlotter in de uitsparing.
Plaats de vlotter
onder dit lipje.
Steek het lipje aan
de andere kant van
de vlotter in de uit-
sparing.
N-13
Page 82

ZORG EN ONDERHOUD
LUCHTBEVOCHTIGINGSFILTER
Onderhoudscyclus
De onderhoudscyclus is mede afhankelijk van de hardheid en onzuiverheid van het gebruikte
water
; hoe harder het water, hoe vaker de luchtreiniger zal moeten worden ontkalkt.
Probeer bij het schoonmaken van het lter geen water te morsen.
Verwijder het waterreservoir en
1
de luchtbevochtigingsbak.
Eens per maand of wanneer de lterindicator oplicht.
Spoel het luchtbevochtigings-
5
lter herhaaldelijk af met handwarm water om alle resten van
Luchtbevochtigingslter
Luchtbevochtigingsbak
Waterreser-
voir
Luchtbevochtingsbak
Neem het luchtbevochtigingslter uit de luchtbevochtigingsbak.
2
Probeer geen water uit de luchtbevochtigingsbak te morsen.
Prepareren van de ontkalkingsoplossing.
3
Voor het ontkalken kan citroenzuur,
verkrijgbaar bij sommige drogisterijen, of
100 % puur citroensap worden gebruikt.
Kies voor een van beide stoffen en prepareer de ontkalkingsoplossing als volgt.
<Bij gebruik van citroenzuur>
Meng 3 theelepels citroenzuur met 2 1/2
kopjes handwarm water in een teil en
roer het mengsel goed.
<Bij gebruik van citroensap>
Voor het ontkalken kan 100 % puur
citroensap worden gebruikt. Gebruik
uitsluitend 100 % puur citroensap zonder
pulp (zeef indien nodig). Meng 1/4 kopje
citroensap en 3 kopjes handwarm water
in een teil waarin het luchtbevochtigingslter past en roer het mengsel goed.
Laat het luchtbevochtigingslter ongeveer 30 minuten in de oplossing weken
4
voordat u het lter schoonmaakt.
Wanneer u citroensap
gebruikt, is het raadzaam
om het lter langer te
laten weken dan wanneer
u citroenzuur gebruikt.
de oplossing weg te spoelen.
Onvoldoende naspoelen kan een geur
veroorzaken en een negatieve invloed
hebben op de prestaties en/of het uiterlijk
van de luchtreiniger.
* Gebruik geen borstel,
maar spoel het luchtbevochtigingslter voorzichtig
af met handwarm water.
Bevestig het luchtbevochtigingslter aan de luchtbevochtigingsbak
6
en plaats de luchtbevochtigingsbak
terug in de luchtreiniger.
• Het luchtbevochtigingslter kan niet achterstevoren worden geplaatst. Zorg ervoor dat er geen
ruimte zit tussen de luchtbevochtigingsbak en de
luchtreiniger wanneer u de luchtbevochtigingsbak
terugplaatst. De luchtreiniger zal niet naar behoren functioneren als de luchtbevochtigingsbak
niet goed in de luchtreiniger is teruggeplaatst.
• Laat het luchtbe
vochtigingslter eerst
volledig opdrogen als
u de luchtreiniger ge-
durende langere tijd
niet gaat gebruiken.
-
Steek de stekker in het stopcontact, zet de luchtreiniger
7
AAN en houd de lterresetknop
op het display gedurende ten
minste 3 seconden ingedrukt.
Mogelijk ziet u een roodbruine of witte neerslag op het oppervlak van het luchtbevochtigingslter. Deze onzuiverheden (calcium,
e.d.) zijn afkomstig van het kraanwater;
dit duidt niet op een defect. Vervang het
luchtbevochtigingslter wanneer het
helemaal met witte
neerslag is bedekt.
N-14
Page 83

RICHTLIJNEN VOOR HET VERVANGEN VAN DE FILTERS
De levensduur van de lters is afhankelijk van de omstandigheden, het gebruik en de locatie van
de luchtreiniger. Vervang de lters wanneer stof of nare geuren niet meer worden verwijderd.
(Lees ook “Lees het onderstaande aandachtig door voordat u uw nieuwe luchtreiniger in gebruik neemt”)
Richtlijnen voor het tijdstip waarop de lters
moeten worden vervangen
HEPA-lter
De levensduur van de lters is in grote mate afhankelijk van de omstandigheden in de kamer. Siga-
rettenrook, huidschilfers van huisdieren en andere luchtgedragen deeltjes kunnen de levensduur
aanzienlijk verkorten. Controleer de lters regelmatig en vervang ze wanneer nodig.
Tot 5 jaar na opening
Afwasbaar geurlter
Het lter is afwas- en herbruikbaar, maar ook vervangbaar.
Luchtbevochtigingslter
De levensduur van de lters is in grote mate afhankelijk van de omstandigheden in de kamer. Vervang
het luchtbevochtigingslter voordat er 2 jaren zijn verstreken wanneer u het volgende opmerkt:
• Neerslag van mineralen (wit, zwart of rode vlekken) worden door schoonmaken niet verwijderd of
het luchtbevochtigingslter wordt niet meer schoon.
• Het lter is verbogen of beschadigd.
Tot 2 jaar na opening
Vervangingslters
• HEPA-lter: 1 stuks
(grijs)
Model FZ-C150HFE (voor KC-860E)
FZ-C100HFE (voor KC-850E)
FZ-C70HFE (voor KC-840E)
• Afwasbaar geurlter: 1 stuks
Model FZ-C150DFE (voor KC-860E)
FZ-C100DFE (voor KC-850E)
FZ-C70DFE (voor KC-840E)
• Luchtbevochtigingslter: 1 stuks
Model FZ-C100MFE
Filterframe (grijs)
Luchtbevochtigingslter
(wit)
Filterframe (wit)
Vervangen van de lters
ENGLISH
DEUTSCH
FRANÇAIS
NEDERLANDS
РУССКИЙ
1. Vervang de lters volgens de aanwijzingen die met de lters worden meegeleverd.
2. Gebruik de datumetiketten om u te helpen herinneren aan het tijdstip waarop de lters moeten
worden vervangen.
Verwijdering van lters
Verwijder de lters volgens de milieuvoorschriften.
Materialen van het HEPA-lter:
• Filter: polypropyleen • Frame: polyester
Materialen van het afwasbaar geurlter:
• Polyester, kunstzijde, actieve koolstof
Materialen van het luchtbevochtigingslter:
• Kunstzijde, polyester
N-15
POLSK
Page 84

PROBLEMEN OPLOSSEN
Lees de onderstaande tabel voordat u contact opneemt met een reparateur. Een probleem duidt niet
altijd op een defect.
PROBLEEM
Geuren en rook worden niet
verwijderd.
De stof of geur monit or li cht
groen op hoewel de lucht niet
schoon is.
De st of of ge urm onito r l ich t
oranje of roo d o p ho ewe l d e
lucht schoon is.
Er komt een kloppend of tikkend
geluid uit de luchtreiniger.
De uitgestoten lucht heeft een
geur.
De luchtreiniger werkt niet als er
een sigarettenlucht hangt.
OPLOSSING (geen defect)
• Reinig of vervang de lters als ze erg vuil lijken. (Zie pagina's N-11, N-12, N-14)
• Mogelijk was de lucht niet schoon op het moment waarop
de stekker in het stopcontact werd gestoken.
Trek de stekker uit het stopcontact, wacht ongeveer een mi-
nuut en steek de stekker weer in het stopcontact.
• De werking van de sensoren wordt beïnvloed door stof in
de sensoropeningen. Maak de stofsensoren voorzichtig
schoon (zie pagina N-11).
• Wanneer de luchtreiniger plasmacluster ionen produceert,
kan er een zacht kloppend of tikkend geluid hoorbaar zijn.
• Controleer of de lters erg vuil zijn.
• Reinig of vervang de lters.
• Plasmacluster luchtreinigers geven een zeer kleine hoeveelheid ozon af die de geur kunnen veroorzaken.
• Staat de luchtreiniger op een plaats waar de sigarettenrook
moeilijk waar te nemen is?
• Zit er stof in de openingen van de stofsensoren?
(Maak dan de openingen schoon.) (Zie pagina N-11)
De lterindicator brandt.
Het display op het voorpaneel
is uit.
De water bijvul-indicator licht
niet op hoewel het waterreservoir leeg is.
Het water in het waterreservoir
daalt niet of heel langzaam.
De verlichting verandert
regelmatig van kleur.
• Steek de stekker in het stopcontact nadat u de lters heeft
vervangen en druk op de lterresetknop. (Zie pagina N-11)
• Controleer of de verlichting UIT staat. Zo ja, druk dan op de
Verlichting-knop om de verlichting AAN te zetten.
(Zie pagina N-10)
• Controleer de tempex vlotter op vuil. Maak de luchtbevochtigingsbak schoon. Controleer of de luchtreiniger op een
vlakke ondergrond staat.
• Controleer of de luchtbevochtigingsbak en het waterreservoir goed zijn geïnstalleerd. Controleer het luchtbevochtigingslter.
• Reinig of vervang het lter als het erg vuil is.
(Zie pagina's N-14 en N-15)
• De verlichting van de stof en geur monitor verandert automatisch van kleur wanneer de stofsensor en de geursensor
onzuiverheden in de lucht waarnemen.
N-16
Page 85

FOUTAANDUIDINGEN
KC-850E•KC-860E
Neem contact op met het Sharp servicecenter wanneer dezelfde fout nogmaals optreedt.
DIGITALE
INDICATIE
KC-840E
INDICATIE
Knipperen van de Luchtreinigen & Luchtbevochtigen indicator.
Knipperen van de ventilatorsnelheidindicator „ “
Knipperen van de Luchtreinigen
& Luchtbevochtigen indicator.
Knipperen van de Luchtreinigen
& Luchtbevochtigen indicator.
Knipperen van de ventilatorsnelheidindicator „ “.
Knipperen van de ventilatorsnelheidindicator „ “.
.
DETAILS VAN DE FOUT
Probleem in het luchtvochtigheidslter
Probleem in de ventila-
tormoto
Probleem in de temperatuur-/luchtvochtig-
heidssensor
Probleem in de printplaat
r
OPLOSSING
Controleer of het luchtbevochtigingsfilter, de luchtbevochtingsbak en het
waterreservoir goed zijn geïnstalleerd
en zet de luchtreiniger weer AAN.
Schakel de luchtreiniger UIT om de foutmelding te laten verdwijnen, wacht ongeveer een
minuut en zet de luchtreiniger weer AAN
Trek de stekker uit het stop-
contact, wacht ongeveer een
minuut en steek de stekker
weer in het stopcontact.
.
ENGLISH
DEUTSCH
FRANÇAIS
INDICATIE
Knipperen van de Luchtreinigen & Luchtbevochtigen indicator.
Knipperen van de ventilatorsnelheidindicator „ “.
Knipperen van de luchtvochtigheidsindicator ‘Hoog’ of ‘Laag’.
Knipperen van de Luchtreinigen & Luchtbevochtigen indicator.
Knipperen van de Luchtreinigen & Luchtbevochtigen indicator.
Knipperen van de ventilatorsnelheidindicator „ “.
Knipperen van de ventilatorsnelheidindicator „ “.
DETAILS VAN DE FOUT
Probleem in het luchtvochtigheidslter
Probleem in de ventila-
tormotor
Probleem in de temperatuur-/luchtvochtig-
heidssensor
Probleem in de printplaat
N-17
OPLOSSING
Controleer of het luchtbevochtigingsfilter, de luchtbevochtingsbak en het
waterreservoir goed zijn geïnstalleerd
en zet de luchtreiniger weer AAN.
Schakel de luchtreiniger UIT om
de foutmelding te laten verdwijnen,
wacht ongeveer een minuut en zet
de luchtreiniger weer AAN.
Trek de stekker uit het stop-
contact, wacht ongeveer een
minuut en steek de stekker
weer in het stopcontact.
NEDERLANDS
РУССКИЙ
POLSK
Page 86

TECHNISCHE GEGEVENS
A. Informatie over afvalverwijdering voor gebruikers (particuliere
huishoudens)
1. In de Europese Unie
Let op: Deze apparatuur niet samen met het normale huisafval weggooien!
Afgedankte elektrische en elektronische apparatuur moet gescheiden worden
ingezameld conform de wetgeving inzake de verantwoorde verwerking, terugwinning
en recycling van afgedankte elektrische en elektronische apparatuur.
Na de invoering van de wet door de lidstaten mogen particuliere huishoudens in de
lidstaten van de Europese Unie hun afgedankte elektrische en elektronische
apparatuur kosteloos* naar hiertoe aangewezen inzamelingsinrichtingen brengen*.
In sommige landen* kunt u bij de aanschaf van een nieuw apparaat het oude product kosteloos
bij uw lokale distributeur inleveren. *) Neem contact op met de plaatselijke autoriteiten
voor verdere informatie.
Als uw elektrische of elektronische apparatuur batterijen of accumulatoren bevat dan moet u
deze afzonderlijk conform de plaatselijke voorschriften weggooien.
Door dit product op een verantwoorde manier weg te gooien, zorgt u ervoor dat het
afval de juiste verwerking, terugwinning en recycling ondergaat en potentiële
negatieve effecten op het milieu en de menselijke gezondheid worden voorkomen die
anders zouden ontstaan door het verkeerd verwerken van het afval.
2. In andere landen buiten de Europese Unie
Als u dit product wilt weggooien, neem dan contact op met de plaatselijke autoriteiten
voor informatie omtrent de juiste verwijderingsprocedure.
Voor Zwitserland: U kunt afgedankte elektrische en elektronische apparatuur
kosteloos bij de distributeur inleveren, zelfs als u geen nieuw product koopt.
Aanvullende inzamelingsinrichtingen zijn vermeld op de startpagina van
www.swico.ch
or www.sens.ch.
B
. Informatie over afvalverwijdering voor bedrijven.
1. In de Europese Unie
Als u het product voor zakelijke doeleinden heeft gebruikt en als u dit wilt weggooien:
Neem contact op met uw SHARP distributeur die u inlichtingen verschaft over de
terugname van het product. Het kan zijn dat u een afvalverwijderingsbijdrage voor de
terugname en recycling moet betalen. Kleine producten (en kleine hoeveelheden)
kunnen door de lokale inzamelingsinrichtingen worden verwerkt.
Voor Spanje: Neem contact op met de inzamelingsinrichting of de lokale autoriteiten
voor de terugname van uw afgedankte producten.
2. In andere landen buiten de Europese Unie
Als u dit product wilt weggooien, neem dan contact op met de plaatselijke autoriteiten
voor informatie omtrent de juiste verwijderingsprocedure.
Let op: Uw product is van dit
merkteken voorzien. Dit
betekent dat afgedankte
elektrische en elektronische
apparatuur niet samen met
het normale huisafval
mogen worden weggegooid.
Er bestaat een afzonderlijk
inzamelingssysteem voor
deze producten.
Bij dit produkt zijn batterijen geleverd.
Wanneer deze leeg zijn, moet u ze niet weggooien maar inleveren als KCA.
NL
48
3.7(3,4)
9,5
132
KC-840EKC-860E
26
210
MAXIMAAL MATIG LAAG
60
3,8(3,3)
168
11,6
KC-850E
220~240 V 50/60 Hz
306
41
MAXIMAAL MATIG LAAG
84
5.5(4,9)
19
240
15
54
132
186
84
20
6.1(5,8)
34
11,5
21
42
22
170
330
450
230
~26
3,0
8,0
360 (B) × 233 (D) × 550 (H)
Stof/temperatuur & luchtvochtigheid
34
45
15
6,8(6,3)
35
47
17
39
168
288
120
240
35
13,5
40
47
25
8,8(8,2)
21
39
400
600
300
500
9,0
~38
4,0
2,0
Afwasbaar geurlter
378 (B) × 265 (D) × 586 (H)
HEPA-lter met micro regeling *3
4,3
~48
Stof/geur/temperatuur & luchtvochtigheid
11,0
56
51
56
396
MAXIMAAL MATIG LAAG
/uur)
3
/uur)
3
396
50
730
2
398 (B) × 288 (D) × 627 (H)
)*1
Luchtverplaatsings capaciteit (m
Nominaal verbruik (W)
Geluidsniveau (dBA)
Luchtverplaatsings capaciteit (m
Nominaal verbruik (W)
Geluidsniveau (dBA)
Luchtbevochtiging (mL/uur)*2
Stofopvang
Ontgeuren
Filtertype
Snoerlengte (m)
Afmetingen (mm)
LUCHTREI-
Model
Voeding
Afstelling ventilatorsnelheid
NIGEN
LUCHTREI-
NIGEN &
LUCHTBE-
VOCHTIGEN
Aanbevolen vloeroppervakte (m
Inhoud waterreservoir (L)
Sensoren
Gewicht (kg)
*1 •De aanbevolen vloeroppervakte geldt voor een luchtreiniger die met maximale ventilatorsnelheid wordt gebruikt.
•De aanbevolen vloeroppervakte geeft aan over welke oppervlakte stofdeeltjes kunnen worden verwijderd in 30 minuten.
*2 •De mate van luchtbevochtiging is afhankelijk van de temperatuur en luchtvochtigheid binnens- en buitenshuis.
De mate van luchtbevochtiging neemt toe naarmate de temperatuur stijgt of de luchtvochtigheid daalt.
De mate van luchtbevochtiging neemt af naarmate de temperatuur daalt of de luchtvochtigheid stijgt.
•Meetomstandigheden: 20 ºC, 30 % luchtvochtigheid (JEM1426)
*3 •De HEPA lter klasse is H10.(volgens de EN 1822 norm)
N-18
Stand-by stroomverbruik
Voor het voeden van de elektrische circuits terwijl de stekker in het stopcontact zit, verbruikt deze lucht-
reiniger in de stand-by ongeveer 0,7 W.
Trek de stekker uit het stopcontact om energie te besparen wanneer u de luchtreiniger niet gebruikt.
Page 87

A. Informatie over afvalverwijdering voor gebruikers (particuliere
huishoudens)
1. In de Europese Unie
Let op: Deze apparatuur niet samen met het normale huisafval weggooien!
Afgedankte elektrische en elektronische apparatuur moet gescheiden worden
ingezameld conform de wetgeving inzake de verantwoorde verwerking, terugwinning
en recycling van afgedankte elektrische en elektronische apparatuur.
Na de invoering van de wet door de lidstaten mogen particuliere huishoudens in de
lidstaten van de Europese Unie hun afgedankte elektrische en elektronische
apparatuur kosteloos* naar hiertoe aangewezen inzamelingsinrichtingen brengen*.
In sommige landen* kunt u bij de aanschaf van een nieuw apparaat het oude product kosteloos
bij uw lokale distributeur inleveren. *) Neem contact op met de plaatselijke autoriteiten
voor verdere informatie.
Als uw elektrische of elektronische apparatuur batterijen of accumulatoren bevat dan moet u
deze afzonderlijk conform de plaatselijke voorschriften weggooien.
Door dit product op een verantwoorde manier weg te gooien, zorgt u ervoor dat het
afval de juiste verwerking, terugwinning en recycling ondergaat en potentiële
negatieve effecten op het milieu en de menselijke gezondheid worden voorkomen die
anders zouden ontstaan door het verkeerd verwerken van het afval.
2. In andere landen buiten de Europese Unie
Als u dit product wilt weggooien, neem dan contact op met de plaatselijke autoriteiten
voor informatie omtrent de juiste verwijderingsprocedure.
Voor Zwitserland: U kunt afgedankte elektrische en elektronische apparatuur
kosteloos bij de distributeur inleveren, zelfs als u geen nieuw product koopt.
Aanvullende inzamelingsinrichtingen zijn vermeld op de startpagina van
www.swico.ch
or www.sens.ch.
B
. Informatie over afvalverwijdering voor bedrijven.
1. In de Europese Unie
Als u het product voor zakelijke doeleinden heeft gebruikt en als u dit wilt weggooien:
Neem contact op met uw SHARP distributeur die u inlichtingen verschaft over de
terugname van het product. Het kan zijn dat u een afvalverwijderingsbijdrage voor de
terugname en recycling moet betalen. Kleine producten (en kleine hoeveelheden)
kunnen door de lokale inzamelingsinrichtingen worden verwerkt.
Voor Spanje: Neem contact op met de inzamelingsinrichting of de lokale autoriteiten
voor de terugname van uw afgedankte producten.
2. In andere landen buiten de Europese Unie
Als u dit product wilt weggooien, neem dan contact op met de plaatselijke autoriteiten
voor informatie omtrent de juiste verwijderingsprocedure.
Let op: Uw product is van dit
merkteken voorzien. Dit
betekent dat afgedankte
elektrische en elektronische
apparatuur niet samen met
het normale huisafval
mogen worden weggegooid.
Er bestaat een afzonderlijk
inzamelingssysteem voor
deze producten.
Bij dit produkt zijn batterijen geleverd.
Wanneer deze leeg zijn, moet u ze niet weggooien maar inleveren als KCA.
NL
ENGLISH
DEUTSCH
FRANÇAIS
NEDERLANDS
РУССКИЙ
POLSK
N-19
Page 88

(»dõæªdG ΩGóîà°SÉdG) RÉ¡édG øe ᪫∏°ùdG ¢ü∏îàdG á≤jôW ∫ƒM äÉeƒ∏©e.CG
.∂éàæe ≈∏Y õeôdG ™°Vh ” :¬«ÑæJ
§∏N ΩуY Цйj ¬fCG ∂dP »ж©jh
б«fhОμdE’Gh б«FЙHф¡μdG дЙйажŸG
б«dхжŸG дЙjЙШжdG ™e πª©а°щŸG
¢UЙN ™«ªŒ ΩЙ¶f уLƒj .бeЙ©dG
.дЙйажŸG √т¡d
»HhQhC’G OÉ–’G ∫hO ‘ .
!…OÉ©dG äÉjÉØædG Öμe ‘ ¬«eQ ΩóY AÉLôdG ,RÉ¡÷G Gòg øe ¢ü∏îàdG äOQCG GPEG :¬«ÑæJ
á÷É©ŸG øª°†J »àdG ÚfGƒ≤dG Ö°ùM π°üØæe πμ°ûH πeÉ©J ¿CG Öéj á«fhÎμdE’G h á«FÉHô¡μdG Iõ¡LC’G ¿EG
.ôjhóàdG IOÉYEG h ᪫∏°ùdG
¿CG kÉ«dõæe á«FÉHô¡μdG h á«fhÎμdE’G Iõ¡LC’G »eóîà°ùe ≈∏Y ÖLƒàj ,AÉ°†YC’G ¿Gó∏ÑdG äɪ«∏©J Ö°ùM
*
¿Gó∏ÑdG ¢†©H ‘ .*Ωƒ°SQ ájCG ¿hO áæ«©e ™«ªéàdG äÉ¡L h ≥aGôe ¤EG áeóîà°ùŸG Iõ¡LC’G ∂∏J Ghó«©j
ób
.ójóL ôNBG AGô°ûH âªb Ée GPEG Ωƒ°SQ ájCG ¿hO Ëó≤dG Ωóîà°ùŸG RÉ¡÷G óªà©ŸG »∏ëŸG π«cƒdG ™Lΰùj
.äÉeƒ∏©ŸG øe ójõŸ á«∏ëŸG áÄ«¡dÉH ∫É°üJ’G AÉLôdG
Ö°ùM k’hCG É¡æe ¢ü∏îJ ,øjõîJ äÉjQÉ£H hCG äÉjQÉ£H …ƒëj ÊhÎμdE’G hCG »FÉHô¡μdG ∑RÉ¡L ¿Éc GPEG
.á«∏ëŸG íFGƒ∏dG
h á÷É©ª∏d í«ë°üdG ∂∏°ùŸG äÉjÉØædG ∑ƒ∏°S øª°†«°S áë«ë°üdG á≤jô£dÉH RÉ¡÷G Gòg øe ∂°ü∏îJ
øe º«∏°S Ò¨dG ¢ü∏îàdÉH IOó¡e íÑ°üJ ób »àdG h ¿É°ùfE’G áë°U h áÄ«ÑdG ájɪM ‹ÉàdÉH h ôjhóàdG IOÉYEG
.äÉjÉØædG
»HhQhC’G OÉ–’G êQÉN iôNC’G ¿Gó∏ÑdG.2
øY ô°ùØà°SG h á°üàîªdG á«∏ëªdG äÉÄ«¡dÉH ∫É°üJ’G AÉLôdG ,RÉ¡édG Gòg øe ¢ü∏îàdG …ƒæJ âæc GPEG
.∂dòd áë«ë°üdG á≤jô£dG
ºàj ºd ¿EG h ≈àM ,äÉ©«ÑªdG π«ch ≈dEG á«FÉHô¡μdG h á«fhôàμdE’G Iõ¡LC’G IOÉYEG øμªj :Gô°ùjƒ°ùH ¢UÉN
. www.sens.ch hCGwww.swico.ch ™bƒªdG Gòg »a áLQóe iôNCG ™«ªéJ •É≤f .ójóL èàæe AGô°T
™bGƒe »a ΩGóîà°SÉdG) RÉ¡édG øe ᪫∏°ùdG ¢ü∏îàdG á≤jôW ∫ƒM äÉeƒ∏©e.Ü
.(ÖJÉμªdG h πª©dG
1
*
»HhQhCÉdG OÉëJÉdG ∫hO »a.1
:ÖJÉμªdG hCG πª©dG ™bGƒe »a RÉ¡édG Gòg Ωóîà°ùJ âæc GPEG
∂∏«ªлJ ºаj уb .RЙ¡йdG ´ЙLQE’ бHƒ∏£ªdG дЙeƒ∏©ªdЙH ∑Ohх«°S …тdG ЬQЙ°T π«cƒH ∫Й°ьJ’G AЙLфdG
,(Iф«¨°ьdG дЙ«ªμdG h) Iф«¨°ьdG дЙйажª∏d бС°щжdЙH .фjhуаdG IOЙYEG h ´ЙLQEЙdЙH б°UЙоdG ∞jQЙ°ьªdG
.á«∏ëªdG ™«ªéàdG •É≤f ≈dEG É¡©LôJ ¿CG ∂æμªj
™«ªéàdÉH á°UÉîdG á«∏ëªdG áÄ«¡dG hCG á°UÉîdG ™«ªéàdG á°ù°SDƒªH ∫É°üJ’G AÉLôdG :É«fÉÑ°SCÉH ¢UÉN
.á∏ª©à°ùªdG Iõ¡LC’G É¡ª«∏°ùàd
»HhQhCÉdG OÉëJÉdG êQÉN iôNCÉdG ¿Gó∏ÑdG.2
øY ô°ùØà°SG h á°üàîªdG á«∏ëªdG äÉÄ«¡dÉH ∫É°üJ’G AÉLôdG ,RÉ¡édG Gòg øe ¢ü∏îàdG …ƒæJ âæc GPEG
.∂dòd áë«ë°üdG á≤jô£dG
»HôY
A-19
Page 89

RGô£dG
AGƒ¡dG ∞«¶æJ
áMhôŸG áYô°ùH ºμëàdG
»FÉHô¡μdG QÉ«àdG Qó°üe
Ω) áMhôŸG áYô°S
3
(•Gh) ábÉ£dG ∫ó©e
(áYÉ°S/
AGƒ¡dG
Ö«WôJ h ∞«¶æJ
Ω) áaô¨∏d áMÎ≤ŸG áMÉ°ùŸG
2
(
*
1
Ω) áMhôŸG áYô°S
3
(•Gh) ábÉ£dG ∫ó©e
(áYÉ°S/πe) Ö«WÎdG
*
(πÑ«°ùjO) 䃰üdG iƒà°ùe
(áYÉ°S/
2
(πÑ«°ùjO) 䃰üdG iƒà°ùe
äÉ°ùéŸG
Î∏ØdG ´ƒf
(Îd) AÉŸG ¿GõN á©°S
(Ω) »FÉHô¡μdG ∂∏°ùdG ∫ƒW
QÉѨdG •É≤àdG
á¡jôμdG íFGhôdG ádGREG
(≠c) ¿RƒdG
(·) OÉ©HC’G
*
*
1
2
*
3
Qɶàf’G ™°Vh ‘ RÉ¡÷G ¿ƒμj ÉeóæY ábÉ£dG
k
.EN1822 πÑb øe H10 »g ÉÑ«g Î∏a áÑJQ •
Ó°Uƒe RÉ¡÷G ¿ƒμj ɪæ«M á«FÉHô¡μdG äGQGódG 𫨰ûàd
∫ÉY §°Sƒàe ¢†Øîæe ∫ÉY §°Sƒàe §°Sƒàe
KC-860EKC-850EKC-840E
~24050/60
220
âdƒ"
ﺰﺗﺮﻫ
¢†Øîæe ∫ÉY
396
240
84
306
168
60
56
51
39
19
17
5.5(4.9)
41
47
35
11.6
15
3.8(3.3)
396
240
120
288
168
84
56
50
21
39
25
8.8(8.2)
40
47
35
13.5
22
6.8(6.3)
730
500
300
600
400
230
4.3
~48
áHƒWQ h IQGôM/íFGhQ/QÉÑZ
4.03.0
~38
ÉjÒàμÑdÉH ºμ– ™e ÉÑ«g
*
3
π°ù¨∏d πHÉb á¡jôμdG íFGhô∏d πjõe
2.0
(ﻉﺎﻔﺗﺭﺍ)627×(ﻖﻤﻋ)288×(ﺽﺮﻋ)398(ﻉﺎﻔﺗﺭﺍ)586×(ﻖﻤﻋ)265×(ﺽﺮﻋ)378(ﻉﺎﻔﺗﺭﺍ)550×(ﻖﻤﻋ)233×(ﺽﺮﻋ)360
11.09.0
.áMhôª∏d iƒ°ü≤dG áYô°ùdÉH RÉ¡÷G 𫨰ûàd áÑ°SÉæe áMÎ≤ŸG áaô¨dG áMÉ°ùe •
.á«LQÉÿG h á«∏NGódG áHƒWôdG h IQGô◊G áLQO ±ÓàNG ™e Ö«WÎdG áÑ°ùf ∞∏àîJ •
3∫ÓN QÉѨdG øe áæ«©e ᫪c ádGREG ≈∏Y RÉ¡÷G IQób ¤EG ô°TDƒe áMÎ≤ŸG áaô¨dG áMÉ°ùe •
.≥FÉbO
.áHƒWôdG ´ÉØJQG h IQGô◊G áLQO ¢VÉØîfÉH Ö«WÎdG áÑ°ùf π≤J
.áHƒWôdG ¢VÉØîfG hCG IQGô◊G áLQO ´ÉØJQÉH Ö«WÎdG áÑ°ùf OGOõJ
.(JEM1426) áHƒWôdG áÑ°ùf 30% ,ájƒÄe áLQO20:QÉÑàN’G ±hôX •
.RÉ¡÷G Ωóîà°ùJ ’ ɪæ«M Qó°üŸG øe ¢ùÑ≤ŸG ´õfG ,ábÉ£dG ≈∏Y ®ÉØë∏d .Qɶàf’G ™°Vh
0.7 ¤GƒM RÉ¡÷G Gòg ∂∏¡à°ùj ,»FÉHô¡μdG QÉ«àdG Qó°üÃ
ábÉW øe •Gh
210
132
48
¢†Øîæe
26
45
34
9.5
15
3.7(3.4)
186
132
54
21
42
34
11.5
20
6.1(5.8)
450
330
170
~26
áHƒWQ h IQGôM/QÉÑZ
8.0
A-18
Page 90

Î∏ØdG ∫GóÑà°SG äɪ«∏©J
.ÜQÉ°T áeóN õcôÃ π°üJG ,iôNCG Iôe CÉ£ÿG ô¡X GPEG
CÉ£ÿG π«°UÉØJí«ë°üàdG
,Ö«WÎdG á«æ«°U h ,Ö«WÎdG Î∏a ¿CG øe ócCÉJ
í«ë°üdG πμ°ûdÉH áàÑãe É¡©«ªL AÉŸG ¿GõN h
.iôNCG Iôe RÉ¡÷G π¨°T ºK
IóŸ ô¶àfG ,CÉ£ÿG ¢VôY AɨdE’ RÉ¡÷G ÅØWCG
.RÉ¡÷G π¨°T ºK IóMGh á≤«bO
ô¶àfG ,Qó°üŸG øe AÉHô¡μdG ¢ùÑ≤e êôNCG
Iôe QÉ«àdG Qó°üà ¬∏p°U ºK IóMGh á≤«bód
.iôNCG
πμ°ûH πª©j ’ Ö«WÎdG Î∏a
»©«ÑW πμ°ûH πª©J ’ áMhôŸG
áHƒWôdG h IQGô◊G äÉ°ù›
á«FÉHô¡μdG IQGódG ‘ π£Y
»©«ÑW
»©«ÑW πμ°ûH πª©J ’
KC-850•KC-860E
IAÉ°VE’G ô°TDƒe
Ö«WôJ h ∞«¶æJ ô°TDƒe Aƒ°V ¢†«eh
.AGƒ¡dG
áYô°ùH ºμëàdG ô°TDƒe ¢†«eh
.áMhôŸG
.äÉfƒjC’G ≥aO ô°TDƒe ¢†«eh
.AGƒ¡dG ∞«¶æJ ô°TDƒe ¢†«eh
.áMhôŸG áYô°S ô°TDƒe ¢†«eh
.áMhôŸG áYô°S ô°TDƒe ¢†«eh
»ªbôdG ô°TDƒŸG
á«æ«°U h ,Ö«WÎdG Î∏a ¿CG øe ócCÉJ
áàÑãe É¡©«ªL AÉŸG ¿GõN h ,Ö«WÎdG
Iôe RÉ¡÷G π¨°T ºK í«ë°üdG πμ°ûdÉH
.iôNCG
ô¶àfG ,CÉ£ÿG ¢VôY AɨdE’ RÉ¡÷G ÅØWCG
.RÉ¡÷G π¨°T ºK IóMGh á≤«bO IóŸ
ô¶àfG ,Qó°üŸG øe AÉHô¡μdG ¢ùÑ≤e êôNCG
QÉ«àdG Qó°üà ¬∏p°Uh ºK IóMGh á≤«bód
.iôNCG Iôe
»©«ÑW πμ°ûH πª©j ’ Ö«WÎdG Î∏a
»©«ÑW πμ°ûH πª©J ’ áMhôŸG
πª©J ’ áHƒWôdG h IQGô◊G äÉ°ù›
»©«ÑW πμ°ûH
á«FÉHô¡μdG IQGódG ‘ π£Y
A-17
KC-840
IAÉ°VE’G ô°TDƒeCÉ£ÿG π«°UÉØJí«ë°üàdG
Ö«WôJ h ∞«¶æJ ô°TDƒe ¢†«eh
.AGƒ¡dG
áYô°ùH ºμëàdG ô°TDƒe ¢†«eh
.áMhôŸG
áHƒWôdG ô°TDƒe ¢†«eh
.Low hCG High
.High áHƒWôdG ô°TDƒe ¢†«eh
.äÉfƒjC’G ≥aO ô°TDƒe ¢†«eh
.AGƒ¡dG ∞«¶æJ ô°TDƒe ¢†«eh
.áMhôŸG áYô°S ô°TDƒe ¢†«eh
.áMhôŸG áYô°S ô°TDƒe ¢†«eh
»HôY
Page 91

.¬°ùØf RÉ¡÷G ‘
k
Ó£Y ¿ƒμJ ’ ób áKOÉ◊G á∏μ°ûŸG ¿CG å«M ,√ÉfOCG áëFÓdG á©LGôe AÉLôdG ,áfÉ«°üdG áeóîH ∫É°üJ’G πÑb
.ájɨ∏d áî°Sh É¡fCG â¶M’ GPEG äGÎ∏ØdG ∫GóÑà°SG hCG ∞«¶æàH ºb
(
A-11، A-12، A-14
¤EG ™LQG)
¢VGôYC’G(kÓ£Y ¢ù«d) í«ë°üàdG
•
.¿’hõj ’ ¿ÉNódG h á¡jôμdG íFGhôdG
RÉ¡÷G ´õf É¡«a ” »àdG á¶ë∏dG ‘ »≤f ÒZ AGƒ¡dG ¿ƒμj ób •
á≤«bód ô¶àfG h QÉ«àdG øe ¢ùÑ≤ŸG ´õæH ºb .»FÉHô¡μdG QÉ«àdG øe
.á«fÉK RÉ¡÷G π«°UƒJ óYCG ºK IóMGh
hCG áî°ùàe äÉ°ùéŸG äÉëàa âfÉc Ée GPEG äÉ°ùéŸG πªY ôKCÉàj •
(
A-11 ¤EG ™LQG).≥aQ h ájÉæ©H äÉ°ùéŸG ∞¶f .IOhó°ùe
ó«dƒJ ≈∏Y RÉ¡÷G πª©j ɪæ«M 䃰üdG Gòg ™ª°ùj ób •
.äÉfƒjC’G
.ñÉ°ShC’ÉH á∏ªfi ÒZ äGÎ∏ØdG ¿CG øe ócCÉJ •
.äGÎ∏ØdG ∫óÑà°SG hCG ∞¶f •
ᣫ°ùH QÉKBG ΰù∏cÉeRÓH äÉfƒjCG AGƒg äÉ«≤æe øe å©Ñæj ób •
.á¡jôc íFGhQ Qó°üJ ób »àdG h ¿hRhC’G RÉZ øe
¿ÉNO ∞°ûc äÉ°ùéŸG ≈∏Y Ö©°üj ™bƒe ‘ RÉ¡÷G ™°Vh πg •
?ôFÉé°ùdG
?IOhó°ùe hCG ábÉ©e äÉ°ùéŸG äÉëàa πg •
(
A -11¤EG ™LQG) (дЙлаШdG ∞¶f ,бdЙ◊G √тg ‘)
QÉ«àdG Qó°üe ¤EG π«°UƒàdG ∂∏°S π°U ,äGÎ∏ØdG Ö«côJ ó©H •
(
A -11¤EG ™LQG) .äGÎ∏ØdG º«¶æJ IOÉYEG QR §¨°VG h »FÉHô¡μdG
Gòg ¿Éc GPEG .kGQÉàfl AGƒ°VC’G AÉØWEG §‰ ¿Éc GPEG Ée ócCÉJ •
𫨰ûàd IAÉ°VE’ÉH ºμëàdG QR ≈∏Y §¨°VG ,ôeC’G ƒg
(
A -10¤EG ™LQG) .ô°TDƒŸG AGƒ°VCG
p
ô°†NC’G ¿ƒ∏dÉH á«eÉeC’G á°TÉ°ûdG A»°†J
.»≤f ÒZ AGƒ¡dG ¿Éc ¿EG h ≈àM
‹É≤JÈdG ¿ƒ∏dÉH á«eÉeC’G á°TÉ°ûdG A»°†J
.kÉØ«¶f AGƒ¡dG ¿Éc ¿EG h ≈àM ôªMC’G hCG
.RÉ¡÷G øe áμàμJ hCG á≤£≤W 䃰U Qó°üj
øe êQÉÿG AGƒ¡dG øe á¡jôc íFGhQ Qó°üJ
.RÉ¡÷G
ôFÉé°ùdG ¿ÉNO óLGƒàj ÚM RÉ¡÷G πª©j ’
.AGƒ¡dG ‘
.AÉ°†e Î∏ØdG ô°TDƒe Aƒ°V
.ICÉØ£e á«eÉeC’G á°TÉ°ûdG
øe ócCÉJ .Ö«WÎdG á«æ«°U ∞¶f .ÖFGƒ°ûdG øe áeGƒ©dG ƒ∏N øe ócCÉJ •
.ájƒà°ùe á«°VQCG ≈∏Y ´ƒ°Vƒe RÉ¡÷G ¿CG
.í«ë°U πμ°ûH AÉŸG ¿GõN h Ö«WÎdG á«æ«°U â«ÑãJ øe ócCÉJ •
Ö«WÎdG Î∏a §Ñ°VG
h
A -14 ™LGQ) ñÉ°ùJ’G Iójó°T âfÉc GPEG äGÎ∏ØdG ∫óÑà°SG hCG ∞¶f •
(
A -10
ºàj »àdG á¡jôμdG íFGhôdG h ÖFGƒ°ûdG Ö°ùM IAÉ°VE’G Ò¨àJ •
íFGhôdG äÉ°ù› h QÉѨdG äÉ°ù› πÑb øe É¡æY ∞°ûμdG
.á¡jôμdG
A-16
¿GõN ¿ƒμj ÉeóæY AÉŸG PÉØf ô°TDƒe A»°†j ’
.kÉZQÉa AÉŸG
¢†ØîæJ hCG ¢†ØîæJ ’ ¿GõÿG ‘ AÉŸG á©aGQ
.A§ÑH
.…QhO πμ°ûH á«eÉeC’G á°TÉ°ûdG AGƒ°VCG Ò¨àJ
Page 92

Î∏ØdG ∫GóÑà°SG äɪ«∏©J
hCG QÉѨdG OƒLh ôªà°SG GPEG .RÉ¡÷G ™bƒe h ΩGóîà°S’G h áaô¨dG ƒ÷ kÉ©ÑJ Î∏Ø∏d »°VGÎa’G ôª©dG Ò¨àj
.äGÎ∏ØdG ∫óÑà°SG ,á¡jôμdG íFGhôdG
(“ójó÷G AGƒ¡dG »≤æe ΩGóîà°SÉH AóÑdG πÑb ‹ÉàdG IAGôb AÉLôdG ” ¤EG ™LQG)
Î∏ØdG ∫GóÑà°S’ í«ë°üdG âbƒdG ¤EG ∂∏«dO
¬ëàa ó©H äGƒæ°S 5 ≈àM
ÉÑ«g Î∏a
ôªY øe ô°ü≤J ¿CG á«dõæŸG äÉfGƒ«◊G Qƒ°ûb h ôFÉé°ùdG ¿ÉNód øμÁ .áaô¨dG ƒ÷ kÉ©ÑJ ÒÑc πμ°ûH Î∏ØdG ôªY ô°ü≤j ób
.Ωhõ∏dG óæY É¡dóÑà°SG h …QhO πμ°ûH äGÎ∏ØdG ¢üëaG .Î∏ØdG
π°ù¨∏d πHÉ≤dG á¡jôμdG íFGhôdG ádGREG Î∏a
.¬dGóÑà°SG ºàj ¿CG øμÁ ɪc ,π°ù¨dG ó©H kGQGôe Î∏ØdG ΩGóîà°SG øμÁ
¬ëàa ó©H Úàæ°S ≈àM
Ö«WÎdG Î∏a
Ö«WÎdG Î∏a ∫óÑà°SG ,Î∏ØdG ΩGóîà°SG ≈∏Y ¿ÉeÉY ôÁ ⁄ ¿EG h ≈àM .áaô¨dG ƒ÷ kÉ©ÑJ ÒÑc πμ°ûH Î∏ØdG ôªY ô°ü≤j ób
:‹ÉàdG â¶M’ GPEG
k
Éî°Sh Ö«WÎdG Î∏a »≤H Ée GPEG hCG ,∞«¶æàdG ó©H ∫hõJ ’ »àdG h (AGôªM hCG AGOƒ°S ,AÉ°†«H) á«fó©e Ö°SGhQ •
.¬Ø«¶æJ ó©H ≈àM
.¬≤≤°ûJ hCG Î∏ØdG ∞∏J •
äGÎ∏ØdG ∫GóÑà°SG
:RGô£dG ºbQ :IóMGh á©£b :ÉÑ«g Î∏a •
(KC-860E ـﻟ) FZ-C150HFE
(KC-850E ـﻟ) FZ-C100HFE
(KC-840E ـﻟ) FZ-C70HFE
:π°ù¨∏d πHÉ≤dG á¡jôμdG íFGhôdG ádGREG Î∏a •
:RGô£dG ºbQ :IóMGh á©£b
(KC-860E ـﻟ) FZ-C150DFE
(KC-850E ـﻟ) FZ-C100DFE
(KC-840E ـﻟ) FZ-C70DFE
:RGô£dG ºbQ :IóMGh á©£b : Ö«WÎdG Î∏a •
FZ-C100MFE
(…OÉeQ)
(…OÉeQ) Î∏ØdG QÉWEG
Ö«WÎdG Î∏a
(¢†«HCG)
(…OÉeQ) Î∏ØdG QÉWEG
:äGÎ∏ØdG â«ÑãJ
.äGÎ∏ØdG ™e á≤aôŸG äGOÉ°TQE’G Ö°ùM äGÎ∏ØdG â«ÑãàH ºb.1
.Î∏ØdG ∫GóÑà°S’ ΩOÉ≤dG óYƒŸÉH ∑Òcòàd ïjQÉàdG äÉbÉ£H Ωóîà°SG.2
:äGÎ∏ØdG øe ¢ü∏îàdG
íFGƒ∏dG h ÚfGƒ≤dG Ö°ùM á∏ª©à°ùŸG äGÎ∏ØdG øe ¢ü∏îàdG AÉLôdG
.kÉ«∏fi É¡H ∫ƒª©ŸG
ÉÑ«g Î∏ØH á°UÉÿG OGƒŸG
.ΰù«dƒÑdG :QÉWE’G• Ú∏«HhÈ«dƒÑdG :Î∏ØdG•
π°ù¨∏d πHÉ≤dG á¡jôμdG íFGhôdG ádGREG Î∏ØH á°UÉÿG OGƒŸG
.§q°ûæŸG ºëØdG ,»YÉæ°üdG ôjô◊G ,ΰù«dƒÑdG •
Ö«WÎdG Î∏ØH á°UÉÿG OGƒŸG
.ΰù«dƒÑdG ,»YÉæ°üdG ôjô◊G •
A-15
»HôY
Page 93

Ö«WÎdG Î∏a
.Î∏ØdG ô°TDƒe A»°†j ÚM hCGk Éjô¡°T IóMGh Iôe
ájÉæ©dG IQhO
âfÉc ɪ∏c ,É¡eóîà°ùJ »àdG AÉŸG ‘ ÖFGƒ°ûdG áHÓ°U ≈∏Y áfÉ«°üdG ájQhO óªà©à°S
.ÌcCG …QhO πμ°ûH áfÉ«°ü∏d âéàMG ɪ∏c Ö∏°UCG
kGQGôe ôJÉØdG AÉŸÉH Ö«WÎdG Î∏a ∞£°TG
.Ö°SGhQ ájCG ádGRE’
íFGhQ Qƒ¡¶H Î∏Ø∏d ó«÷G ∞£°ûdG ΩóY ÖÑ°ùàj ób
.RÉ¡÷G ô¡¶e hCG/h AGOCG ≈∏Y ÒKCÉàdG h á¡jôc
Î∏a ∞ëH º≤J ’
¬Ø£°TG ,Ö«WÎdG
AÉe â– ≥aôH
.§≤a QÉL ôJÉa
á«æ«°U ≈∏Y Ö«WÎdG Î∏a â«ÑãJ óYCG
.RÉ¡÷G ‘ á«æ«°üdG âÑK h Ö«WÎdG
πμ°ûH ¬©°VƒH âªb GPEG Ö«WÎdG Î∏a âÑãj ød
á«æ«°U ÚH ÆGôa OƒLh ΩóY øe ócCÉJ .¢Sƒμ©e
RÉ¡÷G πª©j ’ ób .É¡à«ÑãJ óæY RÉ¡÷G h Ö«WÎdG
áàÑãe Ö«WÎdG á«æ«°U øμJ ⁄ GPEG í«ë°U πμ°ûH
.RÉ¡÷G πNGO º«∏°S πμ°ûH
∂eGóîà°SG ΩóY óæY •
,á∏jƒW äGÎØd RÉ¡é∏d
Ö«WÎdG Î∏a ∞ØL
πNGO ¬à«ÑãJ πÑb ÉeÉ“
.RÉ¡÷G
5
*
6
•
IOÉe õ«¡Œ h ΩGóîà°SÓd ÚJOÉŸG óMCG ÎNG .∞«¶æàdG
2½ h ∂jΫ°ùdG ¢†ªM øe …É°T ≥YÓe 3 áHGPEÉH ºb
.kGó«L É¡£∏NG h áÑ°SÉæe IƒÑY ‘ ôJÉØdG AÉŸG øe ܃c
.Ö«WÎdG á«æ«°U h AÉŸG ¿GõN êôNCG
Ö«WÎdG Î∏a
Ö«WÎdG á«æ«°U
AÉŸG ¿GõN
Ö«WÎdG á«æ«°U
.Ö«WÎdG á«æ«°U øe Ö«WÎdG Î∏a êôNCG
.Ö«WÎdG á«æ«°U øe AÉŸG ÜÉμ°ùfG ÖæŒ
.∞«¶æàdG ∫ƒ∏fi Ò°†–
º¶©e ‘ óLGƒàŸG ,∂jΫ°ùdG ¢†ªM Ωóîà°ùj
á«∏ªY ‘
100% Ö∏©e ¿ƒª«d Ò°üY hCG ,äÉ«dó«°üdG
.∞«¶æàdG
<∂jΫ°ùdG ¢†ªM ΩGóîà°SG óæY>
1
2
3
§¨°VG h ,RÉ¡÷G π¨°T ,AÉHô¡μdÉH RÉ¡÷G π°U
¿GƒK çÓK
AÉ°†«H hCG Iôª◊G ¤EG á∏FÉe á«æH Ö°SGhQ ßë∏J ób
ÖFGƒ°ûdG √òg ô¡¶J .Ö«WÎdG Î∏a í£°S ≈∏Y πμ°ûàJ
AÉe ‘ IOƒLƒŸG ÖFGƒ°ûdG ÖÑ°ùH (ïdEG ,Ωƒ«°ùdÉc)
Î∏a âÑK .∞∏J hCG π£Y …CG ≈∏Y ∫óJ ’ h á«Øæ◊G
.AÉ°†«ÑdG Ö°SGhôdÉH kÉeÉ“ ≈£¨e ¿ƒμj ɪæ«M Ö«WÎdG
3 øe ÌcCG Î∏ØdG º«¶æJ IOÉYEG QR
.º«¶æàdG IOÉYE’
p
7
‹ÉÿG
êõeG .(ôeC’G Ωõd GPEG Ò°ü©dG á«Ø°üàH ºb).Ö∏dG øe
ôJÉØdG AÉŸG øe ÜGƒcCG
.kGó«L §∏NG h Ö«WÎdG Î∏Ød ™°ùàJ IÒÑc IƒÑY ‘
á≤«bO
A-14
<¿ƒª«∏dG Ò°üY ΩGóîà°SG óæY>
100% Ö∏©ŸG ¿ƒª«∏dG Ò°üY ΩGóîà°SG øμÁ
3 ™e ¿ƒª«∏dG Ò°üY øe ܃c ¼
30 IóŸ ∫ƒ∏ëŸG ‘ Ö«WÎdG Î∏a ™≤fG
.¬Ø«¶æJ πÑb
í°üæj ,¿ƒª«∏dG Ò°üY ΩGóîà°SG óæY
áeRÓdG ∂∏J øe ∫ƒWCG IóŸ Î∏ØdG ™≤æH
.∂jΫ°ùdG ¢†ªM ΩGóîà°SG óæY
4
Page 94

Ö«WÎdG á«æ«°U
óæY AÉŸG Öμ°S ÖæŒ .√É«ŸG áHÓ°U ≈∏Y ájÉæ©dG IQhO QGôμJ óªà©j
.á«æ«°üdG ∞«¶æJ hCG ´õf
AÉŸG äÉØ∏fl øe ¢ü∏îàdG Ö©°üdG øe ¿ƒμj ɪæ«M
∞°üædG ¤EG Ö«WÎdG á«æ«°U CÓeEG
øe kGÒ¨°U kGQGó≤e ∞°VCG ,ôJÉa AÉÃ
¬côJG ,∞«ØÿG ïÑ£ŸG ∞¶æe
ÜPCG .ÉÑjô≤J á≤«bO
≈∏Y áæ«ÑŸG äGOÉ°TQE’G Ö°ùM ∞¶æŸG
∫ƒ°UƒdG Ö©°üj »àdG AGõLC’G ∞¶f .IƒÑ©dG
IÉ°Tôa hCG á«æ£b ájÉ¡f …P Oƒ©H É¡«dEG
.ôJÉØdG AÉŸÉH Ö«WÎdG á«æ«°U ∞£°TG
ôKCG …CG ∫hõj ≈àM AÉŸÉH ∞£°TG •
±Éc Ò¨dG ∞£°ûdG ÖÑ°ùàj ób •
‘ Ò¨J hCG á¡jôμdG íFGhôdG ódƒàH
.»°ù«FôdG RÉ¡÷G πμ°T/¿ƒd
30 Ióe
k
ÉYƒ≤æe
.¿Éæ°SCG
.∞«¶æàdG OGƒŸ
1
2
ºK k’hCG AÉŸG ¿GõN êôNCG
Ωóîà°SG .Ö«WÎdG á«æ«°U
á«æ«°U Öë°ùd ÚàæK’G ∂jój
ÜÉμ°ùf’ kÉÑæŒ Ö«WÎdG
AÉŸG øe ¢ü∏îJ .Ö«WÎdG á«æ«°U øe Ö«WÎdG Î∏a ∫RCG
Ö«WÎdG á«æ«°U
ádGRE’ ôJÉØdG AÉŸÉH πNGódG øe Ö«WÎdG á«æ«°U ∞£°TG
.á«æ«∏ØdG áeGƒ©dG ádGREÉH º≤J ’ •
Ö©°üj »àdG øcÉeC’G ∞¶f •
ájÉ¡f …P Oƒ©H É¡«dEG ∫ƒ°UƒdG
.¿Éæ°SCG IÉ°Tôa hCG á«æ£b
óMGh ô¡°T
.Ö«WÎdG á«æ«°U h AÉŸG ¿GõN ´õfEG
.AÉŸG
.A§ÑH Ö«WÎdG á«æ«°U AÉæMEÉH ™ªéàŸG
áeGƒY
ájÉæ©dG IQhO
¿GõÿG ¢†Ñ≤e
AÉŸG ¿GõN
Gò¡H ∂°ù“ ’
.Aõ÷G
Ö«WÎdG Î∏a
.ÖFGƒ°T ájCG
1
2
3
áØ«ØÿG ïÑ£ŸG äÉضæe §≤a Ωóîà°SG
OGƒe ΩGóîà°SG ¿EG .Ö«WÎdG á«æ«°U ∞«¶æàd
´ó°üJ ‘ ÖÑ°ùàj ób á∏bÉ°U OGƒe hCG á«FÉ«ª«c
.AÉŸG Üô°ùJ ‹ÉàdÉH h ¿GõÿG
≈∏Y IOƒLƒŸG äGAƒàædG πNOCG
‘ áeGƒ©dG øe ôNB’G ±ô£dG
.áëàØdG √òg
πNGO Ö«WÎdG á«æ«°U h Ö«WÎdG Î∏a â«ÑãJ óYCG
âªb GPEG Ö«WÎdG Î∏a âÑãj ød
ΩóY øe ócCÉJ .¢Sƒμ©e πμ°ûH ¬©°VƒH
h Ö«WÎdG á«æ«°U ÚH ÆGôa OƒLh
πª©j ’ ób .É¡à«ÑãJ óæY RÉ¡÷G
øμJ ⁄ GPEG í«ë°U πμ°ûH RÉ¡÷G
º«∏°S πμ°ûH áàÑãe Ö«WÎdG á«æ«°U
.RÉ¡÷G πNGO
Gòg πØ°SCG áeGƒ©dG πNOCG
.AƒàædG
≈∏Y IOƒLƒŸG äGAƒàædG πNOCG
.áëàØdG √òg ‘ áeGƒ©dG
A-13
Й¡а«СгJ уYCG ,Й¡fЙμe шe бeGƒ©dG вLфN GPEG
дЙлаШdG πNGO бeGƒ©dG ‘ дGAƒажdG ∫ЙNOEЙH
ƒg Ée Ö°ùM Ö«WÎdG á«æ«°U ‘ IOƒLƒŸG
…OÉeQ :¿ƒ∏dG
.»ë«°VƒàdG º°SôdG ‘ ôgÉX
.RÉ¡÷G
4
»HôY
Page 95

¿GõÿG AÉ£Z
AÉŸG ¿GõN
AÉŸG ¿GõN
Ö«WÎdG óæY Ωƒj πc
ºK ¬bÓZEG h ¿GõÿG πNGO AÉŸG øe á∏«∏b ᫪c ∑ÎH ôJÉØdG AÉŸÉH ¿GõÿG πNGO ∞£°TG
AÉŸG ‘ ¬àHGPE’ ó©H øμd h πNGódG øe ¬Ø«¶æàd ∞«ØN ‹õæe ∞¶æe ΩGóîà°SG øμÁ .¬qLQ
.∞¶æª∏d QÉKBG ájCG ádGRE’ ΩÉJ πμ°ûH ¿GõÿG ∞£°T Öéj ɪc
ájÉæ©dG IQhO
¿Éæ°SCG IÉ°Tôa
¿GõÿG AÉ£Z
ÖLƒàj ¿GAÉ£¨dG ¿Gòg ï°ùàj ɪæ«M.ádGREÓd πHÉb ¿GõÿG AÉ£Z ∞∏N OƒLƒŸG Ò¨°üdG AÉ£¨dG
(¿ƒë°üdG ádÉ°ùZ ‘ ¿GõÿG π°ùZ øμÁ ’) :á¶MÓe
k
Éjô¡°T Iôe ... ájÉæ©dG IQhO ¿GõÿG AÉ£¨H ájÉæ©dG
.¿Éæ°SCG IÉ°Tôa hCG ø£≤dG øe á©£b ΩGóîà°SG.∞«¶æàdG
π°ù¨∏d πHÉ≤dG á¡jôμdG íFGhôdG ádGREG Î∏ØH ájÉæ©dG
.AGƒ¡dG êôfl øe á¡jôc áëFGQ ßMÓJ ɪæ«M
ôªà°ùJ h á«dÉ©a πbCG Î∏ØdG AGOCG hóÑj ɪæ«M
.á¡jôμdG íFGhôdG
π°ù¨∏d πHÉ≤dG á¡jôμdG íFGhôdG ádGREG Î∏a øe ñÉ°ShC’G ∞£°TG
á«dÉ©a ≈∏Y ∂dP ôKDƒj ’ .kÉ«æH ∞£°ûdGAÉe ¿ƒd ¿ƒμj ób ,¤hC’G Iôª∏d Î∏ØdG π°ùZ óæY •
ájÉæ©dG IQhO
º≤J ’ !§≤a kÉjhój π°ù¨dG
!¢ùHÓŸG áaÉ°ûf ‘ ¬Ø«°ûæàH
.π°ù¨dG πÑb QÉѨdG ∫RCGôJÉa AÉe â–
.¬∏°ùZ πÑb π°ù¨∏d πHÉ≤dG íFGhôdG ádGREG Î∏a øY QÉѨdG ∫RCG
.á¡jôμdG íFGhôdG ádGREG
.π°ù¨dG óæY Î∏ØdG AÉæMEG hCG »W ÖæŒ •
1
.óFGõdG AÉŸG ¬æY ∫õæj h ∞é«d Î∏ØdG ∑ôJG
.ájƒ¡àdG ó«L ¿Éμe ‘ ΩÉJ πμ°ûH Î∏ØdG ∞ØL
.¬«W Öæéàd »ÑfÉL ™°VƒH Î∏ØdG ∞ØL .êQÉÿG ‘ ¬ØØL ,¿ÉμeE’ÉH ¿Éc GPEG
.∞é«d äÉYÉ°S
QÉ£eC’G) áØ°UÉY AGƒLCG ‘ êQÉÿG ‘ Î∏ØdG ∞«ØŒ ÖæŒ •
.óªéàj Î∏ØdG ´óJ ’ h (á°†ØîæŸG IQGô◊G äÉLQO h
πãe ájRGÎMG äGAGôLEG òîJG ,kÉ«∏NGO Î∏ØdG ∞«ØŒ ” GPEG •
.á«°VQC’G ±ÓJEG øe Üô°ùàŸG AÉŸG ™æŸ Î∏ØdG πØ°SCG ∞°TÉæŸG ™°Vh
6 Î∏ØdG Ωõ∏j
(A - 6 áëØ°U ™LGQ) .RÉ¡÷G πNGO Î∏ØdG âÑK
.RÉ¡÷G ‘ ¬à«ÑãJ πÑb kÉeÉ“ Î∏ØdG ∞ØL
.¬∏NGO á©HQC’G äGÎ∏ØdG â«ÑãJ ¿hO RÉ¡÷G π¨°ûJ ’
A-12
2
3
4
Page 96

.äGÎ∏ØdG h äÉ°ùéŸG ∂dP ‘ Éà kÉjQhO ¬Ø«¶æJ AÉLôdG ,RÉ¡÷G Gò¡d ‹ÉãŸG AGOC’G ≈∏Y ®ÉØë∏d
kGóHCG ¢ùÑ≤ŸG ∂°ù“ ’ h ,AÉHô¡μdG Qó°üe øe ¢ùÑ≤ŸG ´õæH »FÉHô¡μdG QÉ«àdG øe ¬∏°üa øe ócCÉJ ,RÉ¡÷G ∞«¶æJ óæY
.ájó°ùL áHÉ°UEG h/hCG á«FÉHô¡c áeó°üH ÖÑ°ùàJ ób .Úàdƒ∏Ñe øjó«H
ΩGóîà°S’G øe áYÉ°S 720 ó©H
(
720=áYÉ°S 24×Ωƒj 30)
¢ùéŸG
»Ø∏ÿG ìƒ∏dG
»Ø∏ÿG ìƒ∏dG
ájÉæ©dG IQhO
äÉ°ùéŸG h »Ø∏ÿG ìƒ∏dG áfÉ«°U ܃Lh ≈∏Y ád’ó∏d Î∏ØdG ô°TDƒe Aƒ°V A»°†«°S
.kÉÑjô≤J ∫ɪ©à°S’G øe áYÉ°S
≈∏Y §¨°VEG h AÉHô¡μdÉH RÉ¡÷G π°Uh .áfÉ«°üdG ó©H Î∏ØdG ô°TDƒe º«¶æJ IOÉYEÉH ºb
ňM
RESET QR §¨°V Öéj .Î∏ØdG ô°TDƒe Aƒ°V ÅØ£«°S .¿GƒK çÓãd RESET QR
.áfÉ«°üdG OGóY º«¶æJ IOÉYE’ CÉØ£e Î∏ØdG ô°TDƒe Aƒ°V ¿Éc ¿EG h
Î∏ØdG ô°TDƒe Aƒ°V
720 ó©H ô°TDƒŸG Aƒ°V A»°†«°S .Ö«WÎdG Î∏a h
äÉ°ùéŸG h »Ø∏ÿG ìƒ∏dG
øjô¡°T πc hCG RÉ¡÷G ≈∏Y QÉѨdG ºcGôJ ɪ∏c
»Ø∏ÿG ìƒ∏dG h äÉ°ùéŸG äÉëàa øe ≥aôH QÉѨdG ∫RCG
ájCG hCG á«FÉHô¡μdG á°ùæμŸÉH á°ü°üîŸG IGOC’G ΩGóîà°SÉH
»Ø∏ÿG ìƒ∏dG ≈∏Y Ió«æ©dG ñÉ°ShC’G ºcGÎJ ɪæ«M
AÉŸG ‘ »Ø∏ÿG ìƒ∏dG ™≤fG ,á«ægódG ñÉ°ShC’G ádÉM ‘
.ïÑ£ŸG äÉضæe ¢†©H ™e
.∞«¶æàdG óæY ójó°ûdG â◊G ÖæŒ
…CG ádGRE’ ∞«¶ædG AÉŸÉH kGQGôe »Ø∏ÿG ìƒ∏dG ∞£°TG
ájÉæ©dG IQhO
.áÑ°SÉæe iôNCG IGOCG
1
.äÉضæŸG øe Ö°SGhQ
2
¢ùéŸG Î∏a
.óFGõdG AÉŸG πc ¬æY ∫õæ«d kÉÑfÉL Î∏ØdG ∑ôJG
äÉ°ùéŸG Î∏ØH ájÉæ©dG
áeɪ≤dG ájhÉM hCG á∏°ù¨e ¥ƒa ≥aôH ¬Hô°VG h äÉ°ùéŸG Î∏a êôNCG
.ôJÉØdG AÉŸÉH ≥aôH ¬∏°ùZG ,ñÉ°ùJ’G ójó°T ¿Éc GPEG .QÉѨdG ¬æY ∫õæ«d
´ƒf …CG øe á«FÉ«ª«c OGƒe hCG äÉضæe ájCG Ωóîà°ùJ ’
‘ á«fÉK ¬©°Vh πÑb ΩÉJ πμ°ûH Î∏ØdG ∞«ØéàH ºb .Î∏ØdG ∞«¶æàd
É¡fÉμe ‘ áàÑãe äGÎ∏ØdG ¿CG øe ócCÉàdG πÑb RÉ¡÷G π¨°ûJ ’ .RÉ¡÷G
3
.í«ë°üdG
RÉ¡÷G
øjô¡°T πc hCG RÉ¡÷G ≈∏Y QÉѨdG ºcGôJ ɪ∏c
.kÉ≤M’ É¡àdGREG Ö©°üà°S ,RÉ¡÷G ≈∏Y AÉ≤ÑdÉH ™≤Ñ∏d â몰S GPEG .QGôªà°SÉH ¬Ø¶f ,RÉ¡÷G ≈∏Y ™≤ÑdG hCG ñÉ°ShC’G ºcGôJ ™æŸ
.AÉŸG øe π«∏≤dÉH á©£≤dG π∏H ,Ió«æ©dG ñÉ°ShC’G h ™≤Ñ∏d
IôjÉ£àŸG πFGƒ°ùdG Ωóîà°ùJ ’
.í£°ù∏d ∞∏àdG ÖÑ°ùJ É¡∏c ,π≤°üdG ¥ƒë°ùe ,ÔãdG ,øjõæÑdG
.RÉ¡÷G ∞∏àJ ¿CG äÉضæª∏d øμÁ
ájÉæ©dG IQhO
áªYÉf ¢Tɪb á©£≤H í°ùeG
äÉضæŸG Ωóîà°ùJ ’
»HôY
A-11
Page 97

ΰù∏cÉeRÓH ±É≤jEG/𫨰ûJ QR
ɪæ«M .ΰù∏cÉeRÓH äÉfƒjCG §‰ ±É≤jEG h 𫨰ûàd ΰù∏cÉeRÓH ±É≤jEG/𫨰ûJ QR §¨°VEG
.kÉ©e ΰù∏cÉeRÓH ô°TDƒe Aƒ°V h ô°TDƒŸG Aƒ°V A»°†«°S ,𫨰ûàdG ™°Vh ‘ ΰù∏cÉeRÓH ¿ƒμJ
IAÉ°VE’ÉH ºμëàdG QR
/ /
áLQO QÉ«àN’ QÉ°ù«dG ≈∏Y »ë«°VƒàdG º°SôdG ¤EG ™LQEG
.»eÉeC’G ìƒ∏d áHƒ∏£ŸG ¥Gô°TE’G
.kÉbGô°TEG ÌcCG »eÉeC’G ìƒ∏dG AGƒ°VCG
.áªàY ÌcCG »eÉeC’G ìƒ∏dG AGƒ°VCG
.ICÉØ£e »eÉeC’G ìƒ∏dG AGƒ°VCG
.RÉ¡÷G ΩGóîà°SÉH AóÑdG óæY kÉbGô°TEG ÌcCG á«eÉeC’G á°TÉ°ûdG AGƒ°VCG ¿ƒμJ
ìƒ∏dG Aƒ°V ¿ƒμj ÚM ¬eóîà°SG
.¥Gô°TE’G ó°S ó°T »eÉeC’G
AÉŸG ójhõJ ô°TDƒe Aƒ°V
.¿GõÿG Aπe IOÉYEG ܃Lh ≈∏Y ád’ó∏d AÉŸG ójhõJ ô°TDƒe ¢†eƒj ,AÉŸG ¿GõN ÆôØj ɪæ«M
IAÉ°VEG
QR ≈∏Y §¨°VEG ,CÉØ£e RÉ¡÷G ¿ƒμj ɪæ«M .»Fƒ°†dG ô°TDƒŸG ÖfÉL ¤EG ÆQÉa AÉŸG ¿GõN ¿CG ≈∏Y ád’ó∏d ᪨f §Ñ°V øμÁ
/ /
ΩGóîà°SG óæY kÉZQÉa ¿GõÿG ¿Éc ¿EG h ≈àM ¢†eƒj ød Aƒ°†dG ¿CG ßM’
.äÉfƒjC’G ≥aO §‰ h AGƒ¡dG ∞«¶æJ §‰
.»Jƒ°üdG AÉŸG ójhõJ ô°TDƒe §Ñ°V
.á«Jƒ°üdG ᪨ædG 𫨰ûàd á∏°UGƒàe ¿GƒK çÓãd IAÉ°VE’ÉH ºμëàdG
AɨdEÓd
¿GƒK çÓãd IAÉ°VE’ÉH ºμëàdG QR §¨°VEG ,á«Jƒ°üdG ᪨ædG AɨdE’
.CÉØ£e RÉ¡÷G ¿ƒμj ÚM iôNCG
¢ùéŸG ∞°ûc áLQO §Ñ°V
π«∏≤àd QGôªà°SÉH ôªMC’G ¿ƒ∏dÉH áÄ«°†e á¡jôμdG íFGhôdG á°TÉ°T h QÉѨdG á°TÉ°T âfÉc GPEG z¢†Øîæe{ áLQO ≈∏Y §Ñ°VG
ô°†NC’G ¿ƒ∏dÉH áÄ«°†e á¡jôμdG íFGhôdG á°TÉ°T h QÉѨdG á°TÉ°T âfÉc GPEG z™ØJôe{ áLQO ≈∏Y §Ñ°VG h .∞°ûμdG áLQO
.∞°ûμdG áLQO ™aôd QGôªà°SÉH
¿GƒK çÓãd áMhôŸG áYô°ùH ºμëàdG QR ≈∏Y §¨°VG h RÉ¡÷G ÅØWCG
ô¡¶J h á«°SÉ«b ™æ°üŸG πÑb øe áWƒÑ°†ŸG áLQódG .á«dÉ◊G ¢ùéŸG ∞°ûc áLQO áMhôŸG áYô°S ô°TDƒe IAÉ°VEG ô¡¶à°S
.z
MED{ ô°TDƒe IAÉ°VEÉH
áHƒZôŸG ¢ùéŸG ∞°ûc áLQO §Ñ°†d áMhôŸG áYô°ùH ºμëàdG QR §¨°VG
ô°TDƒe Aƒ°V
áMhôŸG áYô°S
∞°ûc áLQO
¢ùéŸG
™ØJôe
»°SÉ«b
¢†Øîæe
ºà«°S ,¢ùéŸG ∞°ûc áLQO §Ñ°V øe ¿GƒK
ÒZ RÉ¡÷G ¿ƒμj ÚM ≈àM äGOGóYE’G ßØM ºà«°S .kÉ«FÉ≤∏J äGOGóYE’G øjõîJ
.áHƒZôŸG áLQódG QÉ«àN’ Úª«dG ≈∏Y »ë«°VƒàdG º°SôdG ¤EG óY
±É≤jE’G QR §¨°VEG
8 ∫ÓN ±É≤jE’G QR §¨°V ºàj ⁄ GPEG
.AÉHô¡μdÉH π°Uƒe
A-10
1
2
3
Page 98

AGƒ¡dG ∞«¶æJ §‰
.AGƒ¡dG ¤EG áHƒWôdG øe ójõŸG AÉØ°VEG Ωõ∏j ’ ÚM AGƒ¡dG ∞«¶æJ §‰ Ωóîà°SG
.á°TÉ°ûdG ≈∏Y AGƒ¡dG ∞«¶æJ §‰ QR §¨°VEG
RÉ¡édG 𪩫°S ,∫ɪ©à°SG πc ø«H kÉYhõæe »FÉHô¡μdG ¢ùÑ≤ªdG øμj ºd GPEG •
.≥HÉ°ùdG ∫ɪ©à°S’G óæY É¡£Ñ°V ºJ »àdG äGOGóYEÓd kÉ©ÑJ »FÉ≤∏J πμ°ûH
áHƒ∏£ŸG áYô°ùdG QÉ«àN’ áMhôŸG áYô°ùH ºμëàdG QR §¨°VEG
.kÉ«dÉM IQÉàîªdG áYô°ùdG ô°TDƒªdG IAÉ°VEG ô¡¶à°S •
.RÉ¡édG ±É≤jE’ ±É≤jE’G QR §¨°VEG
1
2
‘ AGƒ¡dG ∞«¶æJ
𫨰ûàdG ™°Vh
äÉfƒjC’G ≥aO §‰
π°UGƒàe ¥ÓWEÉH RÉ¡÷G Ωƒ≤j .áaÉãμdG á«dÉY ΰù∏cÉeRÓH äÉfƒjCG ôjô– ≈∏Y Ö«WÎ∏d ÖMÉ°üŸG äÉfƒjC’G ≥aO §‰ πª©j
äÉæ«LôdC’G h äÉjô£ØdG h ™∏£dG QÉÑZ h AGƒ¡dG ‘ ôjÉ£àŸG QÉѨdG ádGREG ≈∏Y πª©j ɇ ,á≤«bO
.§ªædG Gòg 𫨰ûJ QÉ«àNG óæY AÉŸÉH kÉÄ∏à‡ ¿GõÿG ¿ƒμj ¿CG Öéj .IÎ∏ØdG Ωɶf πNGO ܃ë°ùŸG AGƒ¡dG øe
.kÉZQÉa ¿GõÿG ¿ƒμj ÉeóæY Ö«WôJ ¿hO πª©j ɪæ«H ,¿GõÿG ‘ AÉŸG OƒLh óæY Ö«WÎdÉH RÉ¡÷G Ωƒ≤j
á°TÉ°ûdG ≈∏Y äÉfƒjC’G ≥aO §‰ 𫨰ûJ QR §¨°VEG
§ªædG Ö°ùM πª©∏d RÉ¡édG Oƒ©«°S ,§ªædG Gòg øeR »¡àæj ɪæ«M
.kÉ≤HÉ°S QÉàîªdG
15 IóŸ äÉfƒjC’G øe ∞«ãc ≥aód
1
‘ äÉfƒjC’G ≥aO §‰
(m∫ÉY ,á≤«bO 15)
𫨰ûàdG ™°Vh
.äÉfƒjC’G ≥aO §‰ ‘ áMhôŸG áYô°S πjó©J øμÁ ’ ¬fCG á¶MÓe AÉLôdG
á«dÉY áMhôŸG áYô°S :á≤«bO10
ᣰSƒàe áMhôŸG áYô°S :á≤«bO20
á«dÉY áMhôŸG áYô°S :á≤«bO20
.äÉfƒjC’G ≥aO §‰ ‘ áMhôŸG áYô°S πjó©J øμÁ ’ ¬fCG á¶MÓe AÉLôdG
.äÉfƒjC’G ≥aO §‰ ‘ áMhôŸG áYô°S πjó©J øμÁ ’ ¬fCG á¶MÓe AÉLôdG
.äÉfƒjC’G ≥aO §‰ ‘ áMhôŸG áYô°S πjó©J øμÁ ’ ¬fCG á¶MÓe AÉLôdG
.RÉ¡édG ±É≤jE’ ±É ≤jE’G QR §¨°VEG
áMhôŸG áYô°ùH ºμëàdG QR
.äÉfƒjC’G ≥aO §‰ ‘ áMhôŸG áYô°S πjó©J øμÁ ’ ¬fCG á¶MÓe AÉLôdG
»FÉ≤∏àdG 𫨰ûàdG
IóŸ ‹É©dG iƒà°ùŸG ≈∏Y RÉ¡÷G 𪩫°S
áYô°ùdG ÚH ìhGΫ°S ºK ≥FÉbO
.iƒ°ü≤dG áYô°ùdG h ᣰSƒàŸG
.äÉfƒjC’G ≥aO §‰ ‘ áMhôŸG áYô°S πjó©J øμÁ ’ ¬fCG á¶MÓe AÉLôdG
A-9
™∏£dG QÉÑZ §‰
10
≈°übC’G 𫨰ûàdG
§°SƒàŸG 𫨰ûàdG
≈fOC’G 𫨰ûàdG
»HôY
*
Page 99

á«°ù«FôdG ¢Vô©dG á°TÉ°T
/Î∏ØdG º«¶æJ IOÉYEG QR
(ôªMCG) ô°TDƒŸG Aƒ°V
ºμëàdG QR
IAÉ°VE’ÉH
.AGƒ¡dG Ö«WôJ h á¡jôμdG íFGhôdG ôKCG π«∏≤J h áYô°ùH AGƒ¡dG ∞«¶æàd AGƒ¡dG Ö«WôJ h ∞«¶æJ §‰ Ωóîà°SG
/áMhôŸG áYô°S QR
(ô°†NCG) ô°TDƒŸG Aƒ°V
/ ΰù∏cÉeRÓH ±É≤jEG/𫨰ûJ QR
(ô°†NCG) ô°TDƒŸG Aƒ°V
±É≤jE’G QR𫨰ûàdG QR
§ªædG QÉ«àN’ QGQRC’G øe ÉjCG §¨°VEG
/AGƒ¡dG Ö«WôJ h ∞«¶æJ §‰ QR
(ô°†NCG) ô°TDƒŸG Aƒ°V
.RÉ¡÷G 𫨰ûàH AóÑdG h
/äÉfƒjC’G ≥aO §‰ QR
(¥QRCG) ô°TDƒŸG Aƒ°V
/AGƒ¡dG ∞«¶æJ §‰ QR
(ô°†NCG) ô°TDƒŸG Aƒ°V
AGƒ¡dG Ö«WôJ h ∞«¶æJ §‰
𫨰ûàdG ™°Vh ‘ AGƒ¡dG Ö«WôJ h ∞«¶æJ
ájƒÄe áLQO
áLQO
ájƒÄe áLQO
24
24
18
~
~
18
~
áHƒWôdGIQGô◊G áLQO
65%
60%
55%
(A-7 áëØ°U ™LGQ) .AÉŸG ¿GõN CÓeEG
.AGƒ¡dG Ö«WôJ h ∞«¶æJ §‰ QR §¨°VEG
,∫ɪ©à°SG πc ø«H kÉYhõæe »FÉHô¡μdG ¢ùÑ≤ªdG øμj ºd GPEG •
ºJ »àdG äGOGóYEÓd kÉ©ÑJ »FÉ≤∏J πμ°ûH RÉ¡édG 𪩫°S
.≥HÉ°ùdG ∫ɪ©à°S’G óæY É¡£Ñ°V
QÉ«àN’ áMhôŸG áYô°ùH ºμëàdG QR §¨°VEG
.áHƒ∏£ŸG áYô°ùdG
.kÉ«dÉM IQÉàîªdG áYô°ùdG ô°TDƒªdG IAÉ°VEG ô¡¶à°S •
.RÉ¡÷G ±É≤jE’ ±É≤jE’G QR §¨°VEG
»FÉ≤∏àdG Ö«WÎdG §‰ ∫ƒM
πjó©J h ±É°ûàcG ≈∏Y kÉ«FÉ≤∏J áHƒWôdG/IQGô◊G äÉ°ù› πª©J
Ö°ùM .áaô¨dG IQGôM áLQO ≈∏Y CGô£J »àdG äGÒ¨à∏d kÉ©ÑJ áHƒWôdG
‘ .
55 65% ¤EG áHƒWôdG áÑ°ùf π°üJ ’ ób ,áaô¨dG áHƒWQ h ºéM
Ö«WôJ h ∞«¶æJ §‰ ΩGóîà°SÉH í°üæj ,ä’É◊G √òg
~
.≈°übC’G §ªædG/AGƒ¡dG
1
2
3
A-8
Page 100

AÉŸG ¿GõN áÄÑ©J
¿hO AGƒ¡dG ∞«¶æJ §‰ ‘ RÉ¡÷G ΩGóîà°SG øμÁ
óæY AÉŸÉH ¿GõÿG Aπe »¨Ñæj .AÉŸÉH ¿GõÿG Aπe
§‰ h äÉfƒjC’G ≥aO §‰ ‘ RÉ¡÷G ΩGóîà°SG
.AGƒ¡dG Ö«WôJ h ∞«¶æJ
¿GõÿG ¢†Ñ≤e
.≈∏YC’G øe ¬Ñë°ùH AÉŸG ¿GõN êôNCG
øe ¿GõÿG CÓeG h AÉŸG ¿GõN AÉ£Z ´õfEG
.¢UôëH QƒÑæ°üdG
kÉ«eƒj AɪdG ¿GõN »a OƒLƒªdG AɪdG ô««¨àH ºb •
.QƒÑæ°üdG øe ójóL AɪH
.¿GõÿG Aπe ó©H AÉ£¨dG ¥ÓZEG ΩÉμMEÉH ºb
.Aɪ∏d Üô°ùJ OƒLh ΩóY øe ócCÉJ •
.¿GõîdG êQÉN AÉe ÉjÉ≤H …CG ∞«°ûæJ øe ócCÉJ •
≈dEG ¿GõîdG áëàa ¿ƒμJ å«ëH ø«àæKEÉdG ∂jó«H ¿GõîdG πªMG •
.≈∏YCÉdG
1
2
3
AÉŸG ¿GõN
Ö«WÎdG á«æ«°U
AÉŸG ¿GõN
¿GõÿG AÉ£Z
¥ÓZE’G ºμMCG
RÉ¡÷G πNGO AÉŸG ¿GõN â«ÑãJ IOÉYEG
¿GõN â«ÑãJ óæY ¢†Ñ≤ªdG á≤W 䃰U ™ª°ùà°S •
.í«ë°üdG ¬fÉμe »a AɪdG
.á«FÉHô¡c áeó°üd ¢Vô©àdG ô£N hCG/h ô«°üb IQGO ∂dP óæY èàæj ób .Aɪ∏d RÉ¡édG ¢Vô©J ’ •
å«M IQÉ°V OGƒe ájCG hCG ,kÉî°ùàe AÉe hCG ,ájô£Y OGƒe hCG ,á«FÉ«ª«c OGƒe hCG ,(ájƒÄe áLQO
.iôNCG AÉe QOÉ°üe ΩGóîà°SG óæY Éjô«àμÑdG hCG äÉjô£ØdG ódƒàJ ób .QƒÑæ°üdG øe AÉe Ωóîà°SG •
A-7
4
40) øNÉ°ùdG AɪdG Ωóîà°ùJ ’ •
.∞∏à∏d RÉ¡édG ¢Vô©J ¿CG øμªj
»HôY
 Loading...