

Page 1

Version 2.2
R
SSharp Programmable Controller
New Satellite JW20H/30H
ME-NET module
User's Manual
Produced in April 2002
Model name
JW-21MN
Page 2

Thank you for purchasing the ME-NET module (JW-21MN) for the SHARP programmable controller.
Read this manual thoroughly to completely familiarize yourself with the operation according to the
examples.
Keep this manual for future reference. We are confident that this manual will be helpful whenever
you encounter a problem.
Note
- This manual describes the JW-21MN that will be compatible with the JW30H. The JW-21MN that
is applied to JW30H has a 30Hn mark in front of the module.
Beside this, the JW-21MN has models with 30H marks and without 30H marks.
30Hn mark
(Compatible
with JW30H)
8
7
9
6
0
5
1
4
2
3
8
8
7
7
9
9
6
6
0
0
5
5
1
1
4
4
2
2
3
3
JW-21MN Descriptions
Can be used when installing the JW-21MN into JW30H
With 30Hn mark
control module: JW-31CUH/32CUH/33CUH (conventional
models) and JW-31CUH1/32CUH1/33CUH1/33CUH2
/33CUH3 (new models).
Can be used when installing the JW-21MN into JW30H
With 30H mark
control module (conventional models). When installing the
JW-21MN into the new models, the control module can be
used as conventional models.
The JW-21MN cannot be used with the JW30H control
No mark
module (both conventional and new models). It can be used
only with the JW20/JW20H control module.
- New functions in the revised edition in order to apply to JW30H are represented by the V2 mark.
Marks used in this manual Descriptions
V2
Functions that can be used when the JW-21MN (compatible with the
JW30H) is installed into the JW20/JW20H/JW30H.
- In this manual, programmable controller is referred to as "PC." Number and symbol in
parentheses added to address or setting value indications represent the following:
Octal··················· (8)
Hexadecimal······ (H)
Decimal·············· (D) or no indication
Note
- This manual was written with the utmost care. However, if you have any questions or inquiries
concerning the product, please feel free to contact our dealers or service agents.
- No part of this manual may be reproduced in any form without the written permission of Sharp
corporation.
- The contents of this manual are subject to change without prior notice.
Page 3

Safety Precautions
Read this manual and attached documents carefully before installation, operation, maintenance and
checking in order to use the machine correctly. Understand all of the machine knowledge, safety
information, and cautions before starting to use. In this instruction manual, safety precautions are
ranked into "danger" and "caution" as follows.
Danger : Wrong handling may possibly lead to death or heavy injury.
Caution : Wrong handling may possibly lead to medium or light injury.
Even in the case of Caution , a serious result may be experienced depending on the
circumstances. Anyway, important points are mentioned. Be sure to observe them strictly.
The picture signs of prohibit and compel are explained below.
: It means don’ts. For example, prohibition of disassembly is indicated as ( ).
: It means a must. For example, obligation of grounding is indicated as ( ).
1) Installation
Caution
- Use in the environments specified in the catalog, instruction manual, and user's manual.
Electric shock, fire or malfunction may be caused when used in the environments of high
temperature, high humidity, dusty or corrosive atmosphere, vibration or impact.
-Install according to the manual.
Wrong installation may cause drop, breakdown, or malfunction.
-Never admit wire chips or foreign matters.
Or fire, breakdown or malfunction may be caused.
2) Wiring
- Be sure to ground.
Unless grounded, electric shock or malfunction may be caused.
- Connect the rated power source.
Connection of a wrong power source may cause a fire.
- Wiring should be done by a qualified electrician.
Wrong wiring may lead to fire, breakdown or electric shock.
Compel
Caution
Page 4

3) Use
- Don't touch the terminal while the power is being supplied or you may have an electric shock.
- Assemble the emergency stop circuit and interlock circuit outside of the programmable
controller. Otherwise breakdown or accident damage of the machine may be caused by the
trouble of the programmable controller.
- "RUN" or "STOP" during operation should be done with particular care by confirming safety.
Misoperation may lead to damage or accident of the machine.
- Turn on the power source in the specified sequence. Turning ON with wrong sequence may
lead to machine breakdown or accident.
4) Maintenance
- Don’t disassemble or modify the modules.
Or fire, breakdown or malfunction may be caused.
Danger
Caution
Prohibit
Caution
- Turn OFF the power source before detaching or attaching the module.
Or electric shock, malfunction or breakdown may be caused.
Page 5

ME-NET Module: JW-21MN
- User's Manual -
Chapter 1 Features and Functions
Chapter 2 Safety Precautions
Chapter 3 System Configuration
Chapter 4 Name and Function of Each Part
Chapter 5 Installation
Chapter 6 Processing of Cables
Chapter 7 Wiring Method
Chapter 8 Memory Address on the ME-NET
Chapter 9 Description for Data Link Operation
Chapter 10 Description for Computer Link Operation
Chapter 11 Setting of Switches and Parameters
Chapter 12 Errors and Countermeasures
Chapter 13 Replacement of the JW-21MN
Chapter 14 Support Tools
Chapter 15 Specifications
Chapter 16 Appendix
Alphabetical Index
Page 6

Table of contents
Chapter 1: Features and Functions .......................................................................... 1-1
Chapter 2: Safety Precautions ...........................................................................2-1 to 3
2-1 Installation.................................................................................................................................... 2-1
2-2 Wiring........................................................................................................................................... 2-1
2-3 Treatment..................................................................................................................................... 2-3
2-4 Static electricity ............................................................................................................................ 2-3
2-5 Maintenance ................................................................................................................................ 2-3
2-6 Allocation of relay number ........................................................................................................... 2-3
Chapter 3: System Configuration ............................................................................. 3-1
Chapter 4: Name and Function of Each Part ........................................................... 4-1
Chapter 5: Installation ............................................................................................... 5-1
Chapter 6: Processing of Cables ....................................................................... 6-1 to 6
6-1 Processing cable end .................................................................................................................. 6-2
6-2 Connector crimping procedure .................................................................................................... 6-5
Chapter 7: Wiring Method .................................................................................. 7-1 to 7
7-1 Cable trunk and branch lines ....................................................................................................... 7-1
7-2 Relaying of trunk cables .............................................................................................................. 7-1
7-3 Cable wiring procedure in control panel ...................................................................................... 7-2
7-4 Waterproof and insulation processing of connectors ................................................................... 7-4
7-5 Wiring of cables at outside control panels ................................................................................... 7-5
7-6 Check after wiring ........................................................................................................................ 7-5
7-7 Wiring method for adding a communication station ..................................................................... 7-6
Chapter 8: Memory Address on the ME-NET.................................................... 8-1 to 4
8-1 Memory address for data links..................................................................................................... 8-1
8-2 Memory addresses for computer links ......................................................................................... 8-3
Chapter 9: Description for Data Link Operation............................................... 9-1 to 7
9-1 Communication method ............................................................................................................... 9-1
[1] Data link (Standard function) ..................................................................................................... 9-1
[2] Data link (Save memory function) .............................................................................................. 9-2
9-2 Required transmission time and communication delay time........................................................ 9-3
[1] Required transmission time ....................................................................................................... 9-3
[2] Communication delay time......................................................................................................... 9-4
[3] Data transmission between master PC and slave PC ............................................................... 9-5
9-3 Expansion of network .................................................................................................................. 9-6
[1] Multiple installation of the JW-21MN.......................................................................................... 9-6
[2] Hierarchical link.......................................................................................................................... 9-7
Page 7

Chapter 10: Description for Computer Link Operation ............................... 10-1 to 14
10-1 Computer link function ............................................................................................................. 10-1
[1] Basic commands...................................................................................................................... 10-1
[2] Optional commands ................................................................................................................. 10-1
10-2 Basic commands ..................................................................................................................... 10-2
10-3 Optional commands ................................................................................................................. 10-3
[1] Read free memory size ............................................................................................................ 10-4
[2] Monitor TMR, CNT, and MD..................................................................................................... 10-4
[3] Reading PC mode.................................................................................................................... 10-5
[4] Setting PC mode ...................................................................................................................... 10-5
[5] Reading system memory ......................................................................................................... 10-6
[6] Writing system memory ........................................................................................................... 10-6
[7] Reading date............................................................................................................................ 10-7
[8] Setting date .............................................................................................................................. 10-7
[9] Reading time ............................................................................................................................ 10-8
[10] Setting time ............................................................................................................................ 10-8
[11] Correct clock time .................................................................................................................. 10-9
[12] Monitor step status: JW20/JW20H only ................................................................................. 10-9
[13] Read the optional parameters.............................................................................................. 10-10
[14] Set the optional parameters ................................................................................................. 10-10
[15] Read the special I/O parameters ..........................................................................................10-11
[16] Set the special I/O parameters ............................................................................................. 10-11
[17] Set the secret function: JW30H only .................................................................................... 10-12
[18] Release the secret function, register password: JW30H only.............................................. 10-12
[19] Check the secret function: JW30H only ............................................................................... 10-13
[20] Response on error ............................................................................................................... 10-14
Chapter 11: Setting of Switches and Parameter .......................................... 11-1 to 28
11-1 Operation procedure .................................................................................................................11-1
11-2 Switch setting of master station and slave station ....................................................................11-2
[1] Mode switch (MODE) ................................................................................................................11-2
[2] Module No. switch (UNIT NO.) .................................................................................................11-2
11-3 Setting contents of master station parameters ......................................................................... 11-5
[1] Setting contents ........................................................................................................................11-5
[2] Communication area map .........................................................................................................11-7
[3] Setting range of relay link area, register link area, and flag area............................................ 11-11
[4] Setting procedure....................................................................................................................11-13
11-4 Setting slave station parameters (common for all slave stations) ..........................................11-22
[1] Setting contents ......................................................................................................................11-22
[2] Setting range of flag area........................................................................................................11-23
[3] Setting procedure....................................................................................................................11-24
Chapter 12: Errors and Countermeasures...................................................... 12-1 to 7
12-1 Indication lamps ....................................................................................................................... 12-1
12-2 Flag .......................................................................................................................................... 12-2
[1] Flag table ................................................................................................................................. 12-2
[2] In the case of a master station ................................................................................................. 12-3
[3] In the case of slave station 01 to 77(8) ...................................................................................... 12-4
[4] Monitor operation condition by each station PC ...................................................................... 12-5
Page 8

12-3 Storage of error code ............................................................................................................... 12-6
Chapter 13: Replacement of the JW-21MN ............................................................ 13-1
Chapter 14: Support Tools ............................................................................... 14-1 to 2
Chapter 15: Specifications ............................................................................... 15-1 to 3
15-1 General specifications ............................................................................................................. 15-1
15-2 Communication specifications ................................................................................................. 15-1
15-3 Data link specifications ............................................................................................................ 15-2
15-4 Computer link specifications .................................................................................................... 15-3
Chapter 16: Appendix .....................................................................................16-1 to 16
16-1 Maintenance and check ........................................................................................................... 16-1
16-2 Recovery method at communication errors ............................................................................. 16-2
16-3 Table of parameter memory ..................................................................................................... 16-8
16-4 Special functions unique to the JW-21MN ............................................................................. 16-13
Page 9

Chapter 1: Features and Functions
JW-21MN is a ME-NET module for JW20/JW20H/JW30H. Using this module, you can construct an MENET combining various FA equipment such as personal computer and robot.
Using this module, you can easily transmit and receive ON/OFF signals and data with devices that
have a network module which is compatible with the ME-NET specifications.
[When you want to install a JW-21MN in the JW30H, make sure to select one that is compatible with
the JW30H. (See precautions inside the front page of this manual.)]
(1) Data link function
- Send and receive an ON/OFF signal (relay link) and data (register link)
between modules on the ME-NET.
Number of linkage pointsLinkage method
Relay link 2048 (256 bytes) in total
Register link 2048 bytes in total
*The amount of data that can be transmitted by one station is a maximum of 1024 bytes,
including both relay link and register link.
- In order to use memory effectively, the JW-21MN has a memory save function. When this
function is enabled, it only needs to receive the specifically required data.
.
(2) Computer link function
- Triggered on commands (instructions) from a host computer which has a network module
compatible with the ME-NET specifications, the JW-21MN starts reading and writing the memory
in the JW20/JW20H/JW30H.
- After an instruction is received from the host computer, the JW-21MN returns a response.
Therefore, the host computer is required to create an application program. For detailed
description of how to transmit instructions and receive responses, see the instruction manual for
the host computer.
1
(3) This module is available communication up to 64 stations. By using a cable, it can be
extended up to 1 km.
Reference
ME-NET is a communication network to link different brands of devices and equipment with different
models of facility control equipment. It has been developed under the support of Toyota Motor Co.,
Ltd.
1-1
Page 10
Chapter 2: Safety Precautions
2-1 Installation
Do not install or store the JW-21MN in the following conditions.
- Direct sunlight
- Ambient temperature exceeding the range of 0 to 55 ˚C (Storage temperature : -20 to 70 ˚C)
- The relative humidity exceeding the range of 35 to 90%.
- Sudden temperature changes which may cause condensation.
- Corrosive or inflammable gas
- Vibration or hard jolts
Prior to installing or detaching the JW-21MN, make sure to turn OFF the power supply to the JW20/
JW20H/JW30H (main PC of the system).
All screws must be tightened firmly.
2-2 Wiring
Make sure to use only the recommended types (see page 6-1) for cables, connectors, and
crimping tools. Cable and connector installation and changes must be performed only by specialists
approved by the ME-NET bureau.
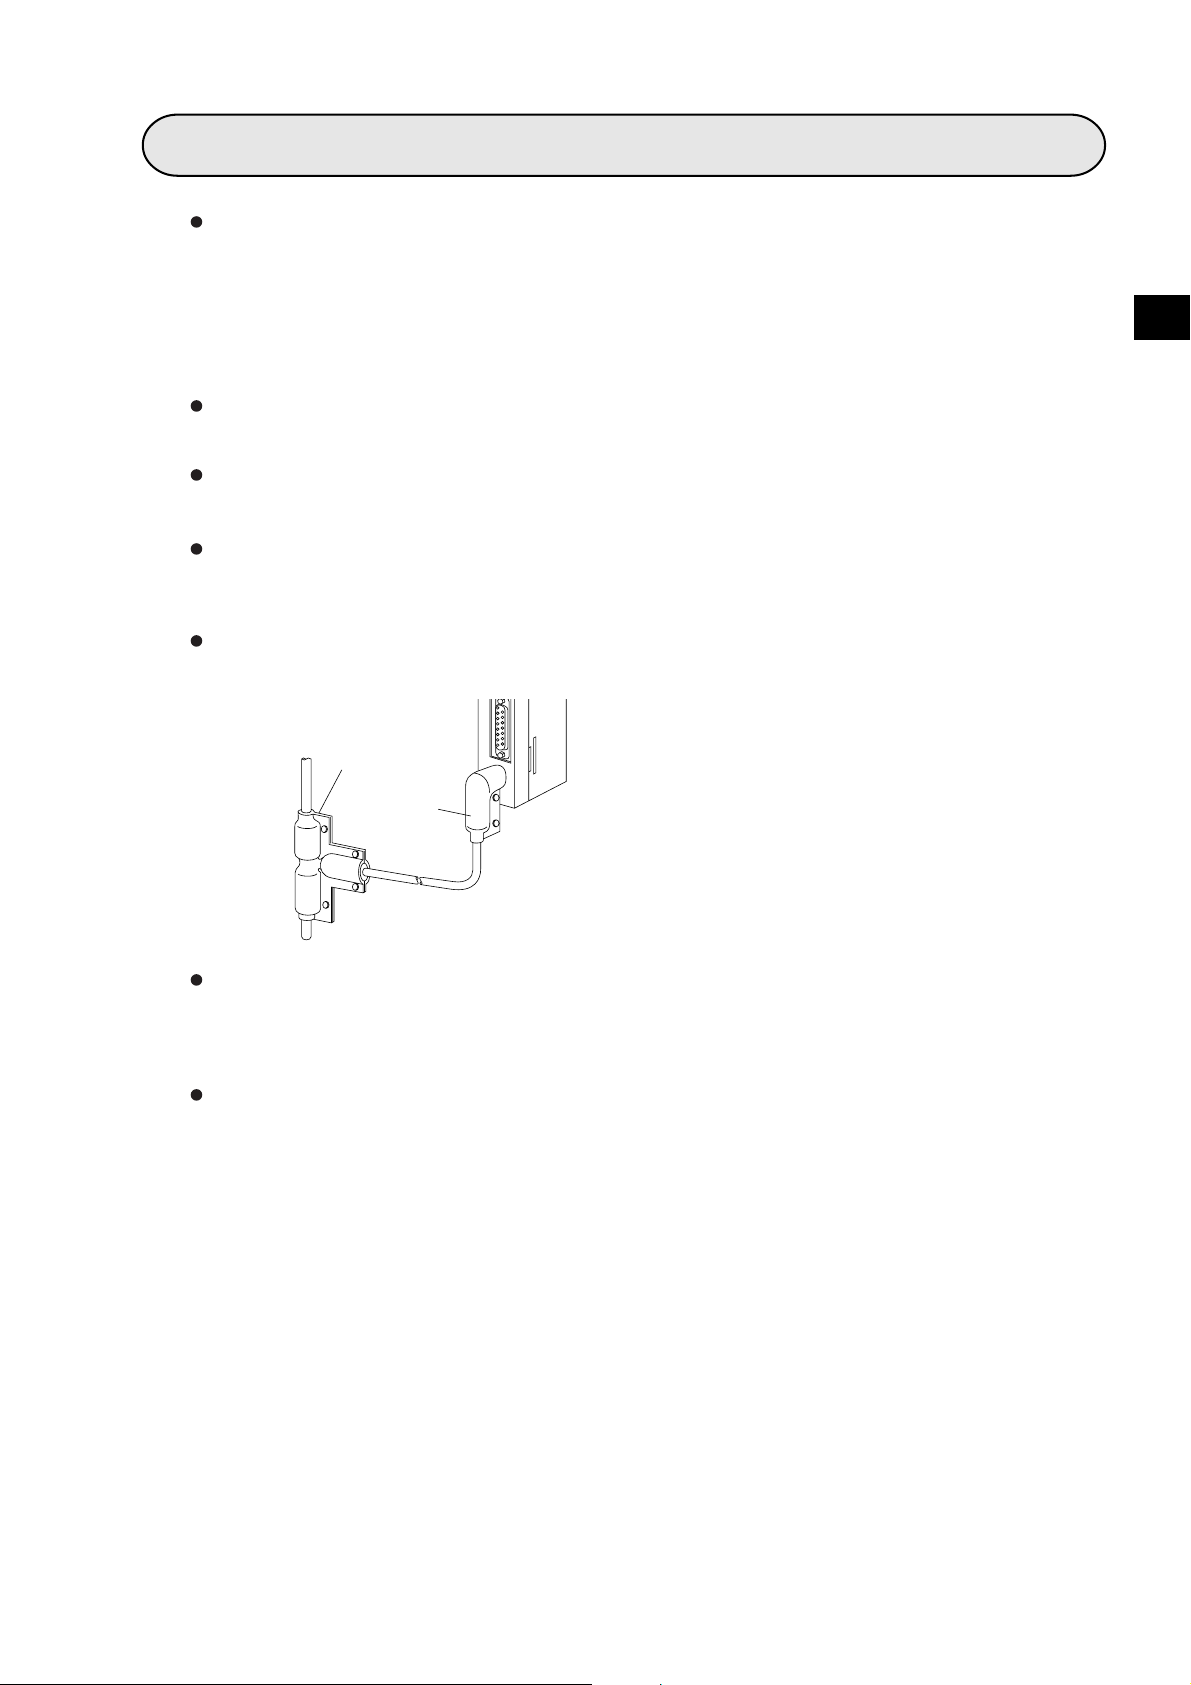
When using connectors for branch or joint lines, provide jackets to protect connectors.
(When a connector touches with an external enclosure or the like, a communication error may
occur.)
2
"T" jacket
(insulation cover)
"L" jacket
(insulation cover)
Do not connect the ground terminal of the power supply module together with other equipment's
ground lines. Make sure to provide class-3 grounding.
When the JW-21MN is used without connecting a class-3 grounding, malfunctions by noise may
occur.
Communication cables should be arranged as far from any high voltage lines and strong power
lines as possible. Do not lay the communication cable parallel or proximate to these lines.
2-1
Page 11

Communication cables should be laid from the master station to the slave station one by one.
Multiple wiring from one point or wiring without terminators may cause communication errors.
Joint using a
connector
2
Arrange total cable length within 1 km.
Arrange branch cable line from a trunk within 400 mm.
Prior to any electric welding around the JW-21MN, take out the coaxial cable from the JW-21MN.
While the coaxial cable is connected to the JW-21MN, any electric welding nearby the JW-21MN
will cause the welding current to enter the JW-21MN and may damage part of its circuit pattern.
JW-21MN
Turn "ON"
shield ground switch
FG
Coaxial cable
Wraparound current
(Note)
Electric welder
JW-21MN
Turn "ON"
shield ground switch
FG
Rack etc.
Note: In case enough conductivity is not
established.
2-2
Page 12

2-3 Treatment
For ventilation, holes are provided in the cabinet to prevent a temperature rise. Do not block the
ventilation holes. Good ventilation is necessary.
Never allow a liquid such as water and chemical solution and a metallic object like a copper wire
inside the JW-21MN to avoid a possible hazard. Otherwise, it may be a cause of machine trouble.
When a trouble or abnormal condition such as overheat, fume, or smoke is met, stop the operation
immediately, and call your dealer or our service department.
2-4 Static electricity
In extremely dry circumstances, the human body may have excessive static current. This excessive
static current may damage parts in the JW-21MN's PC board. Therefore, prior to accessing the JW21MN, touch your hand to a grounded piece of metal to discharge the static current in your body.
2-5 Maintenance
Use a clean, dry cloth when cleaning the JW-21MN. Do not use volatile chemicals such as thinner or
alcohol as it may result in deformation and color fading.
2-6 Allocation of relay number
JW20/JW20H/JW30H which installs JW-21MN are laid out 16 points to the JW-21MN as a relay
number. These 16 points are dummy area which is not used in JW-21MN.
2
2-3
Page 13

Chapter 3: System Configuration
- An example of system configuration using the JW-21MN as a master station
Robot
(8)
Slave station 77
(8)
Robot control section
ME-NET
module
Master station 00
JW20
JW20H
JW-21MN
JW30H
Slave station 01(8)
(8)
JW-21MN
Slave station 03
Personal computer
Slave station 02
(8)
Programmable controller
ME-NET module
ME-NET module
ME-NET (64 stations max., 1 km max.)
- An example of system configuration using some other module as a master station
Robot
Master station 00
JW50H
JW70H
JW-21MN
JW100H
(8)
Slave station 01
JW20
JW20H
JW30H
JW-21MN
Slave station 02
(8)
Programmable controller
ME-NET module
(8)
ME-NET (64 stations max., 1 km max.)
Slave station 03
Personal computer
ME-NET module
(8)
Slave station 77
Robot control section
ME-NET
module
(8)
3
3-1
Page 14

Chapter 4: Name and Function of Each Part
Ventilation hole
(Prevent temperature rise inside)
Indication lamp
(See page 12-1)
Module number switch(UNITNO.)
(See page 11-2)
Station number switch(STANO.)
(See page 11-3)
Support tool connection connector
Connect a support tool
and set parameters
Communication cable
connection connector
(Connect master station and slave station)
ME-NET mark
Module insertion guide
(Insert into a rack panel)
Mode switch (MODE)
(See page 11-2)
(Front view)
Module retention screw
(For fixing on a rack panel)
30Hn
mark
(Applied to JW30H)
Rating plate
Switch
Module No. switch
UNIT
NO.
STANO.
STANO.
Station No. switch
Mode switch
4
3
2
1
0
F
E
D
4
Factory
setting
8
7
9
6
0
5
1
4
2
3
8
7
9
6
0
5
1
4
2
3
×10
8
7
9
6
0
5
1
4
2
3
×1
5
6
7
8
9
MODE
A
B
C
0
0
0
2
Termination resistance switch (LT)
(See page 11-3)
Shield ground switch (LG)
(See page 11-4)
Module retention rib
(For fixing on a rack panel)
4
5
3
6
2
7
1
8
0
9
F
A
E
B
D
C
(Rear view)
4-1
Termination resistance
Shield ground switch
Ventilation hole
(Prevent temperature rise inside)
ON
OFF
ON
OFF
switch
LT
LG
OFF
ON
Page 15

Chapter 5: Installation
MODE
ON
OFF
LT
LG
ON
OFF
Installation procedure
Turn "OFF" the power supply to the JW20/JW20H/JW30H.
Set the mode switch, the termination resistance switch, and the shield ground switch on
the rear side of the JW-21MN.
(See page 11-2 to 11-4 for settings)
(Rear view of the JW-21MN)
Applicable screwdriver
Mode switch
Termination
resistance switch
Shield ground switch
2to3mm
5
0.5mm
Hang the module retention rib of the JW-21MN on the retention rib insertion hole of the JW20/
JW20H/JW30H's basic rack panel, and press in the JW-21MN. Then tighten the module retention
screws at the top of the JW-21MN module using a Phillips screwdriver.
Partition plate or control panel
Basic rack panel
Module insertion guide
JW-21MN
Module retention rib insertion hole
Module retention rib
(Installation example)
Power supply
module
Phillips
screwdriver
Controlmodule
JW-21CU/22CU,JW-31CUH/32CUH/33CUH
JW-31CUH1/32CUH1
JW-33CUH1/33CUH2/33CUH3
Ventilation hole
Module retention screw
Basic rack panel
JW-21MN
Remarks
- The JW-21MN cannot be installed on the expansion rack panel.
- Number of installations of the JW-21MN on the same JW20/JW20H/JW30H basic rack panel should
be within 7 in total including other option module (including JW-21MN). Installation of more than seven
modules of the JW-21MN will not allow the JW20/JW20H/JW30H to function.
- Make sure to tighten the module retention screws securely. Looseness of the screws may cause
malfunctions.
5-1
Page 16

Chapter 6: Processing of Cables
Make sure to use the qualified products shown below for cables and connectors. Cable and connector
installation and changes must be performed only by specialists approved by the ME-NET bureau.
Name
Cable
Crimping tools
Stripper for high frequency
Jacket
Insulation
tape
High frequency
coaxial cable
coaxial cable
"L" jacket
"T" jacket
Self-adhesive tape
Connector
Model
ME-5C-2V
ME-42H
Dice: 67-42H
CST-TM
The system consists of the
main body, a blade cassette,
and a blade setting gauge
SB-2878
SB-2879
NO.11
ME-GP-01
Maker
Mitsubishi Cable
Industries,. Ltd.
Fujikura Cable,. Ltd.
Furukawa Denko
Corporation
Chugoku Cable,. Ltd.
Shinagawa Cable,. Ltd.
Toko Denshi Corporation
Nihon Weidmüller
Co., Ltd.
Shinagawa Shoko
Co., Ltd.
Nitto Denko
Corporation
6
Connectors
Straight
Elbow
T’s
Termination
ME-JJ-01
Toko Denshi Corporation
ME-LA-01
DDK Ltd.
ME-TA-01
ME-75
6-1
Page 17

6-1 Processing cable end
Applicable cable
High frequency coaxial cable: ME-5C-2V
Required tools
Stripper for high frequency coaxial cable: CST-TM
Processing procedure
<Basic operation>
Move the cam wheel of the stripper (amber colored
Cable holder
ring) back and forth and the cable holder moves back
and forth accordingly. Confirm this movement of the
stripper first.
To hold the stripper, put your forefinger through the
hole and move the cam while pushing back and forth
with your thumb.
6
<Pressure setting>
Set the operation range of the cable holder by moving
the slider at the bottom of the body. Move to the left
to increase pressure.
In this example, set the slider to the cam wheel side’s
end (right side) to set the pressure to low.
Blade cassette
Front
Cam wheel
Rear
Blade (slashed area)
<Adjustment of blade cutting depth>
Adjust the cutting depth of the blade by turning the
two screws at both ends of the screw holder. Set
the blade position to within 1 mm from the cutting
surface of the blade cassette prior to adjusting the
cutting depth. For the cutting depth adjustment, use
the "blade setting gauge" supplied as an accessory
and match the blade position with the caved position
of the gauge. Then move the cam wheel forward
and secure firmly. Turn right lightly both adjustment
screws at either end of the screw holder for
adjustment. (Be careful not to break the blade setting
gauge as it is made of aluminum.)
(Fine adjustment is required to get the
optimum cutting depth.)
To the next page
Left
Slider
Screw holder
Within 1 mm
Set the blade to within
1 mm in order not to
damage the blade by
the blade setting gauge.
Cam wheel
Right
Blade setting gauge
6-2
Page 18

Coating
(black)
External conductor
(meshed annealed copper wire)
Insulator
(semi-transparent)
From the previous page
<Cutting of coating, external conductor, and insulator>
Put a coaxial cable while remaining approximately 10 mm into
the cable stripper and securely tighten the cable with the middle
finger, ring finger, and little finger of your left hand in order to
hold stable during turning the stripper.
Put your right hand forefinger into the cam wheel and execute
the procedure in order from step 1 below.
Internal conductor
(annealed copper single wire)
While holding the coaxial cable with your left hand, grip the
cable stripper so that it keeps a right angle against the coaxial
cable, and press out the cable stripper with your left hand’s
thumb.
When the adjustment
of the blade is not
required
Step 1
Press the cam wheel forward 3 times and turn
the stripper in the direction of arrow 2 to 3
times.
Step 2
Press the cam wheel forward 1 time and then
turn the stripper in the direction of arrow a
further 2 to 3 times.
Step 3
Press the cam wheel forward 1 more time and
turn the stripper in the direction of the arrow
another 2 to 3 times.
<Removal of coating, external conductor, and insulator>
If the stripper cannot be removed smoothly,
adjustment of the blade is not appropriate. In this
case slide the cam wheel backward and remove
the coaxial cable. Then adjust the blade.
6
10mm
<Fine adjustment of blade cutting depth>
When the cutting depth is too shallow or too deep, and
damages the external conductor or the internal conductor, turn
the screws on the screw holder and adjust the blade depth a
little.
To the next page
6-3
Page 19

From the previous page
We recommend that in order to keep the adjusted
position of the adjustment screws, after completion
of adjustment for the coaxial cable and the screw
holder, write the screw position etc. on a sticker
and adhere it to the adjustment screws.
<Display of blade setting>
KADAEA
KEDAADFS
K
A
E
C
A
A
D
A
A
D
F
S
F
G
H
H
G
<Replacement of blades>
Blade cassette
Hold up the upper section of the screw holder with
a minus driver, and open the screw holder.
6
Remove the blade cassette and reinsert by turning
the current blade back side front or insert a new
blade cassette from its top.
Screw holder
<Processing of cable end>
Cut the internal conductor of the coaxial cable,
which is already cut by the stripper, using a nipper
etc. to the optimum dimension of 4 mm.
10mm±0.5mm
6-4
BA
A:10±0.5mm
B: 4±0.5mm
Page 20

6-2 Connector crimping procedure
9
.
1
.
TT-237
TT
237
Required tools: Hand-held crimping tool
Model
Dice No.
Crimping width
: ME-42H
: 67-42H
: 10 mm
Connector: ME-GP-01
Processing procedure
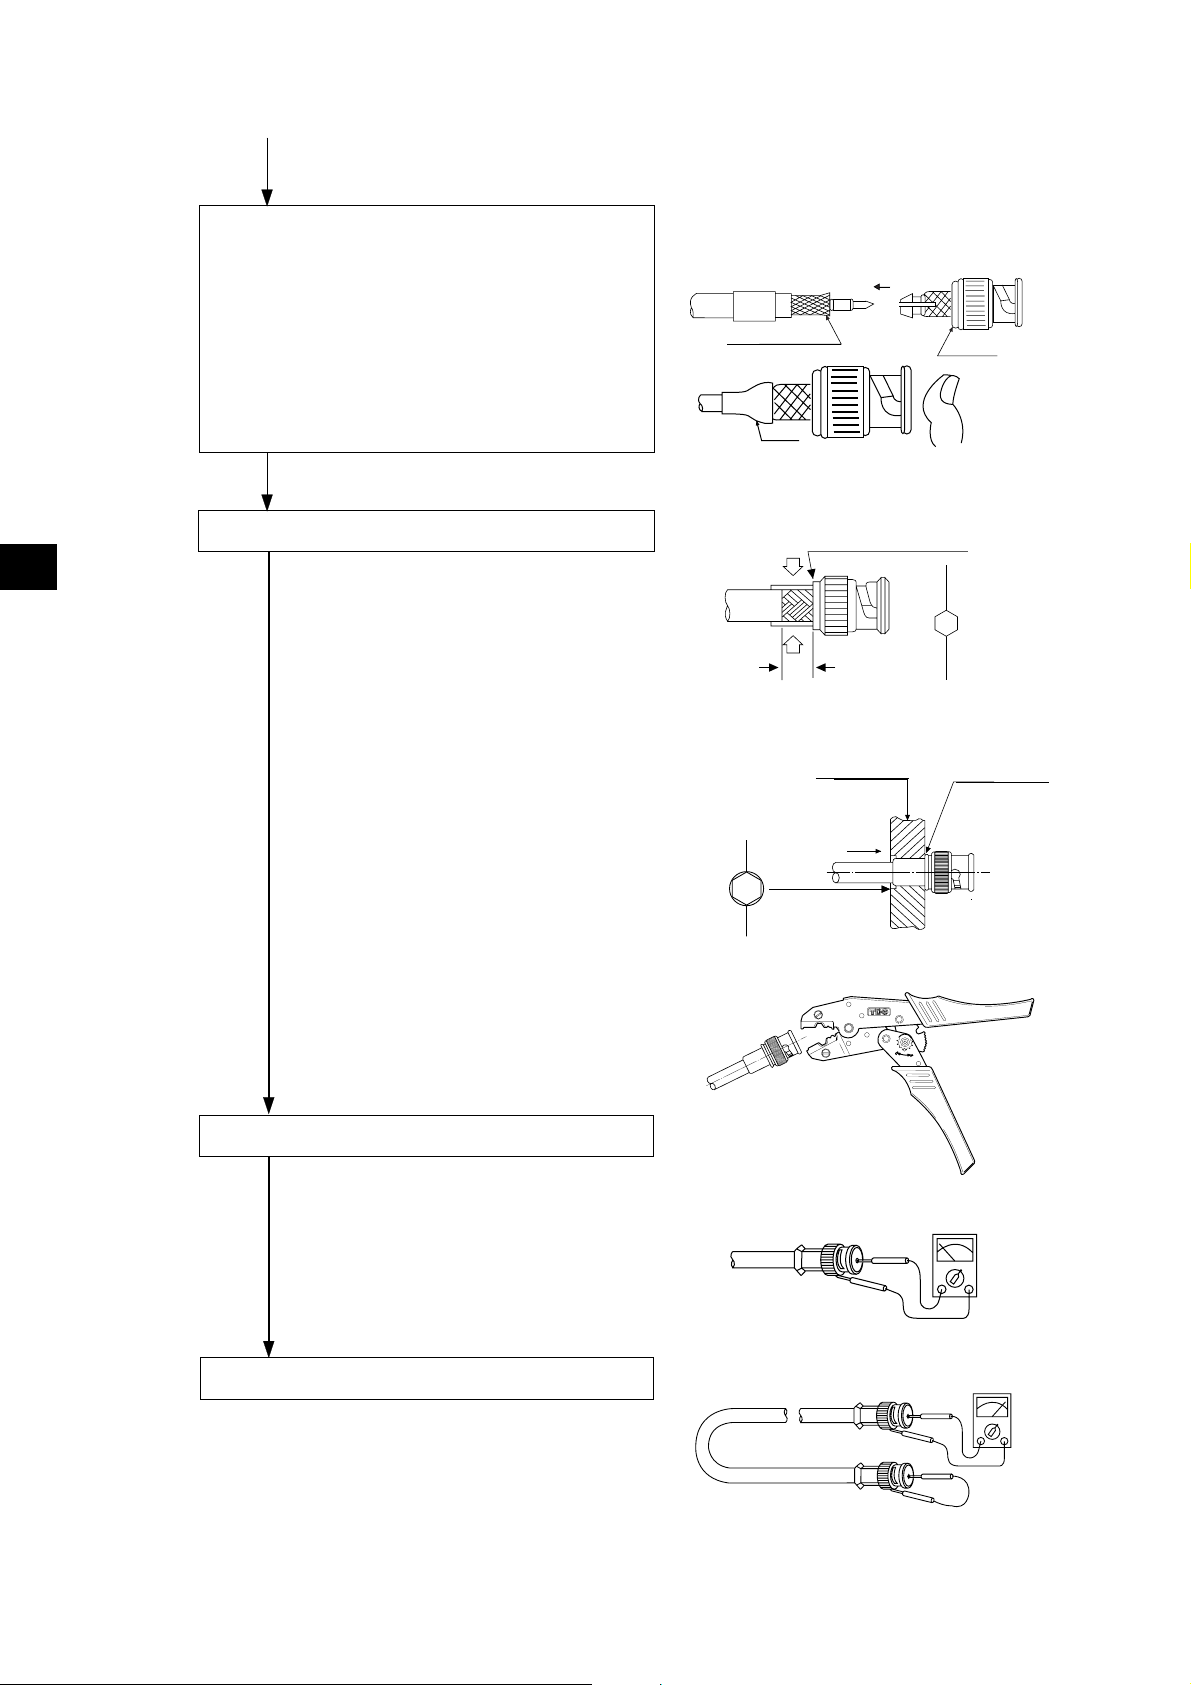
<Insert a sleeve>
Put through a sleeve to an end-processed high
frequency coaxial cable.
<Crimping contact>
Insert a contact into the internal conductor and crimp.
Sleeve
Connector parts
Contact
A:10±0.5mm
B: 4±0.5mm
Shell
A
Sleeve
B
6
Put a contact into dice having a
diamond shape and closely stick its
end surface with the insulator and the
dice. Pull the moving frame to the
fixing frame side and crimp until the
ratchet is removed.
(Crimping width: 2.2 mm)
Widen a little
Crimp
Dice blade shape
2.2 mm
Closed contact
* Use the crimping tool in the direction
shown in the illustration right.
Using the crimping tool in the reverse
direction will not crimp correctly.
Internal conductor
Crimping dice
Moving frame
Insulator
Crimping dice
-
TT
237
9
.
.
1
Contact
Fixing frame
Contact
Closed
contact
To the next page
6-5
Page 21
From the previous page
TT
237
<Fixing the connector>
Slightly widen the external conductor of the
coaxial cable, which is crimped to a contact on
the internal conductor, in order to smoothly enter
the shell inside the external conductor. Press in
the external conductor end of the coaxial cable
to just before the crimping part of the shell and
put the sleeve into the crimping section. Then
press in the coaxial cable until a “click” sound
can be heard. Confirm that the contact end point
touches your finger cushion.
Widen a little
Sleeve
Shell
Crimping section
Finger
<Crimping external conductor>
Crimp the external conductor.
6
Insert thoroughly the sleeve into the
Completely put into
the crimping section.
crimping section of the shell and crimp.
Put the sleeve in the hexagonal dice
and closely stick the shell to the
crimping dice. Pull the moving frame
to the fixing frame side while pressing
the coaxial cable and shell from both
10
Dice blade shape
sides, and crimp until the ratchet is
removed.
(Crimping width: 10 mm)
Dice blade shape
looking from this side
Crimping dice
Push
Closed contact
* Use the crimping tool in the direction
shown in the illustration right.
Using the crimping tool in the reverse
direction will not crimp correctly.
-
TT
237
9
.
.
1
Insulation test of shell and contact
Using a tester, check the conductivity
between the internal conductor and
the external conductor in the
connector. When the indication of
the tester shows ¥ ohms, the
insulation is appropriate.
Conductivity test
After short-circuiting the one end
of the connector crimped to the
coaxial cable, check that
conductivity is attained.
<Insulation test>
<Conductivity test>
6-6
Page 22

Chapter 7: Wiring Method
7-1 Cable trunk and branch lines
On the illustration of the cable wiring below, a bold line means a trunk and the thin lines branched
from the trunk with a "T" shape are called branch lines.
400mm max.
The length of branch lines branched from the trunk should be within 400 mm.
Branch line
Trunk cable
7
400mm
Total cable length should be within 1 km.
Branch line
Trunk cable
7-2 Relaying of trunk cables
To relay trunk cables, use the straight joint (ME-JJ-01).
ME-JJ-01
Relaying of trunk cables should be limited to indispensable cases only. Inadvertent relaying of trunk
cables may cause a communication fault such as a weakened signal level due to contact resistance
in the junction connector (straight).
Junction
Junction
7-1
Page 23

7-3 Cable wiring procedure in control panel
(1) Fixing of the cable
In order not to put any force on the cable and the
JW-21MN, fasten the cable to an line nearby input of
a control panel or a "T" branch point to the JW21MN using saddles etc.
(2) Extra length of cable
Provide an extra length of the cable of 2 to 3 m
inside a control panel for easier processing of the
cable end and easier wiring when changing module
positions.
7
(3) Connection to the JW-21MN
The connector to the JW-21MN should be turned
right to secure locking, not merely inserted.
Communication cable
connection connector
Saddle
JW-21MN
Saddle
Anextralengthof
cableof2to3m
(4) Insulation cover
When the connector touches with a high voltage
section or external enclosures, communication
errors may occur. Make sure to install an insulation
cover.
"T" jacket
(insulation cover)
"L" jacket
(insulation cover)
(5) Grounding of power supply module (JW-22PU/31PU)
Make sure to use a class-3 grounding to connect the GND terminal of the power supply module.
- If the power supply module is not grounded, the JW-21MN cannot conduct with the ground after
turning "ON" the shield ground switch.
When using a JW-31PU AC power supply module
Class-3
grounding
POWER
INPUT
100-120VAC
HALT
OUTPUT
100-120VAC
(24VDC)
1A
SHORT
GND
L
Power input terminal for
85 to 132 VAC
N
GND (ground) terminal
Halt output terminal
7-2
Page 24

(6) Bending radius of the signal cable should be less than 45 mm (outside).
R45 or larger
- Specification of the cable manufacturer is that bending radius should be 6x of the cable finish
outside diameter (approx. 7.5 mm).
(7) When you install morethan one module of the JW-21MN into one programmable controller, we
recommend to put identification tag on each dable.
7
(8) Before transport or store the JW-21MN, put a protection cap on the connector of the JW-21MN.
7-3
Page 25

7-4 Waterproof and insulation processing of connectors
In order to prevent water intrusion into the "T" branch connectors and the straight connectors, we
recommend to wind a self-adhesive tape and provide waterproof processing for them. For insulation
purposes, cover these connectors with jackets.
(1) "T" branch connector
To wind a self-adhesive tape, cut the tape at about 10 cm each and start winding from position .
Start winding cut tapes from and as well.
Self-adhesive tape
T’s
7
(2) Straight connector
To wind the self-adhesive tape, cut the tape at about 15 cm each and start winding from position
.
Self-adhesive tape
Straight
Remarks
Prior to adhering the tape, clean the surface of the connectors and stick the adhesive side of
the tape on the connector surface. Wind to lightly spread on the connector surface, and overlap
with the next wrap to half of the tape width. Wind the tape for each wrap evenly so that the
connector metal portion is completely covered with the tape.
Be careful not to excessively stretch the tape.
7-4
Page 26

7-5 Wiring of cables at outside control panels
Do not bundle the coaxial cable (the trunk and branch lines) together with power cables, and
separate from power cables at least by 100 mm. Do not put the coaxial cable into a power line wired
duct. The best way is to put the communication line in an independent duct.
Be careful that the coaxial cable does not receive any load by laying under a heavy weight such as
other cables.
When other cables run in the same duct as the coaxial cable, run the coaxial cable on the top
position.
Do not run the coaxial cable outdoors as it may cause damage to the JW-21MN due to inductive
lightning or atmospheric charge during lightning.
7-6 Check after wiring
Check the items below after completion of wiring.
Check contents
1 The recommended connector types are used.
7
2 The connectors are securely locked.
3 The connectors are insulated by "T" jacket or "L" jacket.
4 The recommended coaxial cable type is used.
5 Curved radius of the coaxial cables are more than 45 mm.
6Noheavy load is on the coaxial cables.
The coaxial cable is not bundled with a power line cable.
7
(Away from power line cables more than 100mm.)
8 Length oh branch lines is shorter than 400mm.
9 Total length of the cable is less than 1km.
Settings of the termination resistance switch and the shield ground switch are as
10
per the drawings.
7-5
Page 27

7-7 Wiring method for adding a communication station
(1) Branching method
When branching a line for an additional station, be sure to branch from the trunk using a T
connector.
Never branch from a branch line.
(2) Station number of the additional station
Station number
(8)
0 2
Trunk
cable
Station number
Branch
line
0 3
(8)
Addition
Station number
(8)
0 2
Station number
(8)
0 2
Trunk
cable
Station number
(8)
0 6
Station number
(8)
0 6
Station number
Junction
Station number
0 3
0 3
(8)
(8)
Branch line
7
Station number of the newly added station should be next largest number from the current largest
numbered station. Each station should not be required to be arranged in order of each station’s
number.
01(8)
02(8)
03(8)
Addition
Sequential number
00(8)
01(8)
02(8)
03(8)06(8)
means the termination resistance switch being turned "ON."
04(8)00(8)
04(8)
05(8)
05(8)
7-6
Page 28

(3) Notes
When adding a communication station, follow the items below.
No.
Branch from the trunk cable.
1
Don’t use the same station number
2
twice.
Check the termination resistance
3
switch.
Provide extra length for the
4
expansion cable.
Do not exceed the 1 km limit for total
5
length of the cable.
Change the layout drawing for
6
installation.
Do not overlap with any PC’s
7
communication area.
Set the parameter memory of the
master station and that of the newly
8
added station.
Item Reason
Another branch line from a branch line may not give
appropriate communication by reflection wave.
The use of the same station number twice may cause
communication errors.
When the newly added station becomes a termination of
the circuit, change the setting of the LT switch.
Have enough cable length in order to provide easy wiring.
Longer wiring may cause communication error by signal
attenuation.
Maintain the added work data for future maintenance use.
When the communication area or the flag area of the
added station overlaps with other addresses in use,
communication errors may occur.
Without setting the parameter memory of the master
station and that of the slave station, the added station
cannot communicate.
7
7-7
Page 29

Chapter 8: Memory Address on the ME-NET
The ME-NET employs a system for addressing individual memory banks in all of the connected
equipment by allocating address throughout the ME-NET. Therefore, the top address in any link area
which will contain in the data link parameters and memory addresses used for computer link
instructions must be a valid memory address in the ME-NET.
The relationship between memory addresses in Sharp PCs (JW20/JW20H/JW30H) and those on the
ME-NET are shown below.
8-1 Memory address for data links
The memory addresses(8) on the ME-NET correspond to the file addresses(8) in a Sharp PC (JW20/
JW20H/JW30H).
(1) Memory address map (against JW20/JW20H)
JW20/20H address ME-NET address
Byte address
1 address = 1
point
I/O relay 00000 to 03777
Byte address
(8)
1 address = 8
コ 0000 to コ 0377
points
File address
(8)
1 address = 8
000000 to 000377 0000 to 00FF 000000 to 000377
points
(8)
Byte unit:
Hexadecimal
Byte unit: Octal
Auxiliary relay 04000 to 06777
Latched relay 07000 to 07777
General-purpose
relay
TMR/CNT contact
point
TMR/CNT current
value
Register
Self diagnosis
result storage
register
10000 to 15777
T-C000 to T-C777 001600 to 001777 0380 to 03FF 001600 to 001777
コ 0400 to コ 0677
コ 0700 to コ 0777
コ 1000 to コ 1577
b0000 to b1777 002000 to 003777 0400 to 07FF 002000 to 003777
09000 to 09777 004000 to 004777 0800 to 09FF 004000 to 004777
19000 to 19777 005000 to 005777 0A00 to 0BFF 005000 to 005777
29000 to 29777 006000 to 006777 0C00 to 0DFF 006000 to 006777
39000 to 39777 007000 to 007777 0E00 to 0FFF 007000 to 007777
49000 to 49777 010000 to 010777 1000 to 11FF 010000 to 010777
59000 to 59777 011000 to 011777 1200 to 13FF 011000 to 011777
69000 to 69777 012000 to 012777 1400 to 15FF 012000 to 012777
79000 to 79777 013000 to 013777 1600 to 17FF 013000 to 013777
89000 to 89777 014000 to 014777 1800 to 19FF 014000 to 014777
99000 to 99777 015000 to 015777 1A00 to 1BFF 015000 to 015777
E0000 to E1777 016000 to 017777 1C00 to 1FFF 016000 to 017777
000400 to 000677 0100 to 016F 000400 to 000677
000700 to 000777 0170 to 01FF 000700 to 000777
001000 to 001577 0200 to 0037F 001000 to 001577
8
- For details about the address range of relay link, register link, and the JW-21MN flag, see page
11-11 in this manual.
- The addresses that can be used vary with PC model in which the JW-21MN is installed and with
the memory capacity of the PC. For details, see the instruction manual for a particular PC.
8-1
Page 30

(2) Memory address map (against JW30H)
JW30H address ME-NET address
Byte address
1 address=1point
Relay 00000 to 15777
TRM/CNT contact
point
T-C0000 to T-C0777 001600 to 001777 0380 to 03FF 001600 to 001777
TMR/CNT current
value
(8)
Byte address
1 address = 8
コ 0000 to コ 1577
b0000 to b1777 002000 to 003777 0400 to 07FF 002000 to 003777
09000 to 09777 004000 to 004777 0800 to 09FF 004000 to 004777
19000 to 19777 005000 to 005777 0A00 to 0BFF 005000 to 005777
29000 to 29777 006000 to 006777 0C00 to 0DFF 006000 to 006777
39000 to 39777 007000 to 007777 0E00 to 0FFF 007000 to 007777
49000 to 49777 010000 to 010777 1000 to 11FF 010000 to 010777
points
File address
(8)
1 address = 8
point
(8)
Byte unit:
Hexadecimal
Byte unit: Octal
000000 to 001577 0000 to 037F 000000 to 001577
Register
59000 to 59777 011000 to 011777 1200 to 13FF 011000 to 011777
69000 to 69777 012000 to 012777 1400 to 15FF 012000 to 012777
79000 to 79777 013000 to 013777 1600 to 17FF 013000 to 013777
89000 to 89777 014000 to 014777 1800 to 19FF 014000 to 014777
8
99000 to 99777 015000 to 015777 1A00 to 1BFF 015000 to 015777
E0000 to E5777 016000 to 023777 1C00 to 27FF 016000 to 023777
Register (storable
error history)
TMR/CNT current
value
Expansion relay 20000 to 75777
TMR/CNT contact
point
T-C1000 to T-C1777
E6000 to E7777 024000 to 025777 2800 to 2BFF 024000 to 025777
b2000 to b3777 026000 to 027777 2C00 to 2FFF 026000 to 027777
コ 2000 to コ 7577
コ 7600 to コ 7777
030000 to 035577 3000 to 3B7F 030000 to 035577
035600 to 035777 3B80 to 3BFF 035600 to 035777
File 1 000000 to 037777 1-000 to 3FFF 000000 to 037777
File 2 000000 to 177777 2-000 to FFFF 000000 to 177777
File 3 000000 to 177777 3-000 to FFFF 000000 to 177777
000000 to 177777 10-000 to FFFF 000000 to 177777
000000 to 177777 11-000 to 3FFFF 000000 to 177777
000000 to 177777 1F-000 to FFFF 000000 to 177777
000000 to 177777 20-000 to FFFF 000000 to 177777
000000 to 177777 21-000 to FFFF 000000 to 177777
File
register
File 10
(H)
File 10
(H)
::::
File 1F
(H)
File 20
(H)
File 21
(H)
::::
File 2C
(H)
000000 to 177777 2C-000 to FFFF 000000 to 177777
* ME-NET addresses for file 10 to 2C(H) are out of the range the ME-NET specification.
These are special addresses for the JW-21MN.
- As for address setting range of relay link, register link, and flag of the JW-21MN, see page 11-12
in this manual.
- Available addresses vary with PC model on which the JW-21MN is installed and its capacity. For
details, see an instruction manual for each PC.
8-2
Page 31

8-2 Memory addresses for computer links
- Data memory byte addresses in the computer link must be entered the same way a data link address
is entered.
- The relay numbers and TMR/CNT numbers are the same for the ME-NET. However the TMR/CNT
contact points correspond to the even addresses from 16000 to 17777(8).
- Program addresses correspond to addresses of file (SEG)8.
For details about the detailed addresses to use on the host computer, see the instruction manual for
the host computer.
(1) Memory address map (against JW20/JW20H)
JW20/20H
address
I/O relay 00000 to 03777 SEG0 00000.0 to 00377.7 2048 points
Auxiliary relay/JW20H 04000 to 06777 SEG0 00400.0 to 00677.7 1536 points
Latched relay 07000 to 07777 SEG0 00700.0 to 00777.7 512 points
General-purpose relay 10000 to 15777 SEG0 01000.0 to 01577.7 3072 points
TMR/CNT contact point T-C000 to T-C777
I/O relay
コ 0000 to コ 0377
(8)
ME-NET address
Even addresses of SEG0
01600.0 to 01777.7
SEG0 00000 to 00377 256 bytes
(8)
Capacity Remarks
512 points
Bit
address
Auxiliary relay
Latched relay
General-purpose relay
TMR/CNT current value b0000 to b1777 SEG0 02000 to 03777 1024 bytes
Register
TMR/CNT number 000 to 777 0000 to 0777 512 pieces -----
Program
address
JW-21CU/22CU 000000 to 006777 SEG8 000000 to 006777 3584 step -----
JW-22CU 000000 to 016777 SEG8 000000 to 016777 7680 step -----
コ 0400 to コ 0677
コ 0700 to コ 0777
コ1000 to コ1577
09000 to 09777 SEG0 04000 to 04777 512 bytes
19000 to 19777 SEG0 05000 to 05777 512 bytes
29000 to 29777 SEG0 06000 to 06777 512 bytes
39000 to 39777 SEG0 07000 to 07777 512 bytes
49000 to 49777 SEG0 10000 to 10777 512 bytes
59000 to 59777 SEG0 11000 to 11777 512 bytes
69000 to 69777 SEG0 12000 to 12777 512 bytes
79000 to 79777 SEG0 13000 to 13777 512 bytes
89000 to 89777 SEG0 14000 to 14777 512 bytes
99000 to 99777 SEG0 15000 to 15777 512 bytes
E0000 to E1777 SEG0 16000 to 17777 1024 bytes
SEG0 00400 to 00677 192 bytes
SEG0 00700 to 00777 64 bytes
SEG0 01000 to 01577 384 bytes
Byte
address
8
- Relay addresses 07300 to 07377(8) and 15760 to 15767(8) in the JW20/JW20H are special
address ranges for relays.
- Available addresses vary with PC model on which the JW-21MN is installed and its capacity.
For details, see an instruction manual for each PC.
8-3
Page 32

(2) Memory address map (against JW30H)
Relay
Extension relay
TMR/CNT contact points
Relay
Extension relay
JW30H address
00000 to 15777
20000 to 75777
T-C0000 to T-C0777
T-C1000 to T-C1777
コ 0000 to コ 1577
コ 2000 to コ 7577
(8)
TMR/CNT current value b2000 to b3777 SEG0 26000 to 27777 1024 bytes
09000 to 09777 SEG0 04000 to 04777 512 bytes
19000 to 19777 SEG0 05000 to 05777 512 bytes
29000 to 29777 SEG0 06000 to 06777 512 bytes
39000 to 39777 SEG0 07000 to 07777 512 bytes
49000 to 49777 SEG0 10000 to 10777 512 bytes
Register
59000 to 59777 SEG0 11000 to 11777 512 bytes
69000 to 69777 SEG0 12000 to 12777 512 bytes
79000 to 79777 SEG0 13000 to 13777 512 bytes
89000 to 89777 SEG0 14000 to 14777 512 bytes
99000 to 99777 SEG0 15000 to 15777 512 bytes
E0000 to E5777 SEG0 16000 to 23777 3072 bytes
Register (storable error
history)
E6000 to E7777 SEG0 24000 to 25777 1024 bytes
TMR/CNT number 0000 to 1777 0000 to 1777 1024 pcs. -----
8
File 1 000000 to 037777 SEG1 000000 to 037777 16 K bytes
File 2 000000 to 177777 SEG2 000000 to 177777 64 K bytes
File 3 000000 to 177777 SEG3 000000 to 177777 64 K bytes
000000 to 177777 SEG10 000000 to 177777 64 K bytes
000000 to 177777 SEG11 000000 to 177777 64 K bytes
000000 to 177777 SEG1F 000000 to 177777 64 K bytes
000000 to 177777 SEG20 000000 to 177777 64 K bytes
000000 to 177777 SEG21 000000 to 177777 64 K bytes
File
register
*
File 10
(H)
File 10
(H)
:: : :
File 1F
(H)
File 20
(H)
File 21
(H)
:: : :
File 2C
(H)
000000 to 177777 SEG2C 000000 to 177777 64 K bytes
JW-31CUH/H1 000000 to 016777 SEG8 000000 to 016777 7680 steps
JW-32CUH 000000 to 036777 SEG8 000000 to 036777 15872 steps
Program
address
JW-32CUH1
000000 to 036777 SEG8 000000 to 036777 15872 steps
000000 to 076777 SEG8 000000 to 076777 32256 steps
JW-33CUH/H1 000000 to 076777 SEG8 000000 to 076777 32256 steps
JW-33CUH2/H3
000000 to 076777,
100000 to 176777
ME-NET address
(8)
Capacity Remarks
SEG0 00000.0 to 1577.7 7168 points
SEG0 30000.0 to 35577.7 23552 points
SEG0 01600.0 to 01777.7 512 points
SEG0 35600.0 to 35777.7 512 points
SEG0 00000 to 01577 896 bytes
SEG0 30000 to 35577 2944 bytes
SEG8 000000 to 076777,
SEG9 000000 to 076777
64512 steps
Bit
address
Byte
address
Byte
address
-----
* ME-NET addresses (SEG10 to 2C) of file 10 to 2C(H) are out of ranges of the ME-NET
specification. These are special addresses for the JW-21MN.
- Available addresses vary with PC model on which the JW-21MN is installed and its capacity.
For details, see an instruction manual for each PC.
8-4
Page 33

Chapter 9: Description for Data Link Operation
The data link function is used to send and receive ON/OFF signals (relay link) and data (register link)
between modules by assigning one module from PCs or FA devices as the master station and other
units as slave stations in the satellite net system. Up to 64 sets of PCs and FA devices can be
connected in the satellite net.
Each station sends data in its sending area cyclically and stores data received from other stations in its
receiving area. For the JW-21MN to execute automatically these sending and receiving procedures, a
special program for communications is required.
When the JW-21MN is assigned as a slave station, it has the standard function and save memory
function for data link, but the data contents for receiving from other stations is different between these
two functions. (When the JW-21MN is used as a master station, only the standard function is available.)
[When all of a master station and slave stations are JW-21MN]
- Master station Data link (Standard function)
- Slave station Data link (Standard function)
Data link (Save memory function)
For the standard function and the save memory function of the JW-21MN, see page 15-2.
9-1 Communication method
[1] Data link (Standard function)
Each station cyclically sends and receives ON/OFF signals and data of the relay link area and register
link area set to a master station parameter.
(1) Relay link
Mainly used for sending and receiving ON/OFF information
[Example] In the case of sending 1-byte data from a master station and slave stations 01 and 02.
Receiving data of all of the relay link area and
}
all of the register link area of all the stations.
In order to effectively use the
memory, unify a partial data area or
sending/receiving address (program)
of slave stations.
9
Master station (PC00) Slave station (PC01) Slave station (PC02)
コ0200
コ0201
コ0202
PC00 Program PC01 Program PC02 Program
02010
02020
02000
02000
02010
02020
02000
02010
02020
:
Send
:
Receive
- The link relay of the receiving station must be programmed as input signal by the PC programming. Also, it may be used as source (S) side of application instruction.
- The sending and receiving data correspond in bits of one point unit.
(Master station) (Slave station)
コ0200
コ0201
7 6 5 4 3 2 1 0
7 6 5 4 3 2 1 0
Is the same value as
コ0201 of the slave station.
コ0200
コ0201
7 6 5 4 3 2 1 0
Is the same value as
7 6 5 4 3 2 1 0
コ0200 of the master station.
9-1
Page 34

(2) Register link
Mainly used for sending and receiving numerical data.
[Example] In the case of sending 1 byte data from a master station and slave station 01 and 02.
Masterstation(PC00) Slavestation(PC01) Slavestation(PC02)
09200
09201
09202
:Send
:Receive
Register
F-00 コ0000 09200 09200
Register
09201
Register
09202
F-00 コ0000 09201
Register
09202
Register
09200
Register
09201
F-00 コ0000 09202
- The register link of the sending station may be used as D (Destination) side of the application
instruction of the PC program.
- The register link of the receiving station may be used as S (Source) side of the application
instruction of the PC program.
[2] Data link (Save memory function)
The save memory function is to provide a part of the data link area in the slave station data memory as
9
a receiving area. A slave station can receive only the required area by relay link/register link so that the
slave stations can save on use of the memory area.
As this function can unify the receiving area address and the sending area address of each slave
station, the same program can be used for each slave station. Mixed allocation of the addresses with
the data link (standard function) is also possible.
Slave station "n" (JW-21MN: Set to save memory function)
Top address of
master station
link area
Number of
sending bytes of
the master station
Receiving area
from slave station
1 to (n to 1)
Receiving area
from slave station
"n"
Master station 00
:Send
:Receive
Number of offset bytes of
slave station "n"
Address
Top address of slave station
"n" link area
Number of sending bytes
of slave station "n"
+
Memory inside
JW-21MN
Top address of
slave station
"n" link area
Memory inside
control module
Available setting
each slave station
V2
Number of sending
bytes of slave
station "n"
Addresses are allocated as
receiving and sending alternately
*
- Top address of receiving area in a slave station shall be set by the number of offset bytes from
the link area's top. (0 £ Number of offset bytes £ total number of bytes of link area)
Setting item
Set location
Top address of master station link area
Number of sending bytes of the master station
Master station’s parameter
Number of offset bytes of slave station
Number of sending bytes of the slave station
Top address of slave station link area
Number of receiving bytes of slave station
V2
Module No. switch of slave station
Slave station's parameter
*
* When JW-21MNs without 30Hn mark and 30H mark are used, these cannot set each slave
station.
Automatically allocated with the same number of the sending bytes of the slave station.
9-2
Page 35

9-2 Required transmission time and communication delay time
[1] Required transmission time
This is the time required for the master station to complete communication with all stations, and is
determined by the number of connected stations with and the number of data items to transmit.
Transmission T operation cycle = + 2.5 × P + α + 16 (ms)
N:Total number of link points (value to be calculated by relay link bytes and register link bytes
8 points).
P:Number of connected stations (master + slave)
136 : 136 bits are used for station address and error check data on the communication format.
1250 : Transmission rate: 1.25M bits per second
2.5 : Inter-station wait time plus processing time to move to next station (unit : ms)
α : Communication recovery operation time
• When an error occurs at any station, the master station periodically treats the error.
α = 3.5 × number of error stations ms
16 : Time to maintain token bus. It can enter at random intervals.
[Example] In the case of two connected stations and 8 bytes of link points,
N + 136 × P
1250
PC operation
cycle
Master station
(PC00)
Slave station
(PC01)
Note: Data exchange time between a PC and the JW-21MN can be obtained by the following
Transmission T operation cycle =
8 bytes×8 points×2 stations + 136×2 stations
1250
+ 2.5 × 2 stations + 16 = 21.32 ms
I/O processing
PC operation PC operation
Data exchange Note
T : Send
: Receive
I/O processing
Data exchange
formula:
When the control module is JW-31CUH1/32CUH1/33CUH1/33CUH2/33CUH3,
0.5 ms + 0.5μs x number of bytes to transfer.
(When the number of bytes to transfer is maximum (2304 bytes), 0.5 ms + 0.5μs x 2304 =
1.65 ms)
9
9-3
Page 36

[2] Communication delay time
The communication data on the ME-NET may have the delay shown below.
PC00 PC01
PC00
PC01
ON
I/O
PC00
JW-21MN
JW-21MN
PC01
I/O
9
Delay of input module
Time required for PC to detect input state (one operation cycle max.)
1
2
Operation cycle
3
4
(Communication)
5
6
7
ON
Operation time of sending PC (one operation cycle)
Time to complete sending of operation result (one communication cycle max.)
Time required for receiving PC to write receive data in PC data memory (one operation cycle max.)
Operation time of receiving PC (one operation cycle)
Delay of output module
Communication delay time is the total time of to above.
Remarks
The buffer memory contents of the JW-21MN is renewed for each PC operation cycle.
Therefore, a contact point which turns "ON" for only one operation cycle of a PC may
not be transferred.
9-4
Page 37

[3] Data transmission between master PC and slave PC
Providing synchronous transfer gives positive data communication.
[An example of synchronized transfer by OUT instruction]
Master station (PC00) Slave station (PC01)
コ0200
コ0203
コ0200
コ0203
Program in master station
00000
02000
F-44
02030
:Send
02000
02000
: Receive
Program in slave station
02000 02030
- 00000 is turned "ON" at the master station side.(OUT 02000 is a self-holding circuit.)
-When 02000 is turned "ON" at the slave station side, OUT 02030 is also turned "ON." This is sent
back to the master station side.
9
9-5
Page 38

9-3 Expansion of network
The JW-21MN can transmit data between 64 stations at maximum. If more than 64 stations are
required for data link, you can add communication stations with the procedure below.
[1] Multiple installation of the JW-21MN
Mounting more than one JW-21MN on the basic rack panel of the JW20/JW20H/JW30H can increase
the number of stations.
[In the case of mounting 4 sets of JW-21MN]
Master MasterMasterMaster
Slave
01 02 03 04 05 73 74 75 76 77
63 stations max.
Slave
01 02 03 04 05 73 74 75 76 77
63 stations max.
Slave
01 02 03 04 05 73 74 75 76 77
72
63 stations max.
9
Slave
01 02 03 04 05 73 74 75 76 77
63 stations max.
Remarks
-When installing multiple number of modules on a single PC, make them allocated so that relay
link area, register link area, and flag area may not overlap with each other.
- When installing multiple number of modules on a single PC, pay attention to the total communication data volume and the number of bytes available for communication area.
- Though more than one JW-21MN can be mounted on single basic rack panel, they cannot
directly communicate with other stations beyond one network.
72
: Master station
Slave station number 01 to 77: octal
: Slave station
9-6
Page 39

[2] Hierarchical link
When 2 sets of JW-21MN are mounted on the basic rack panel of the JW20/JW20H/JW30H,
hierarchical link communication is possible and can increase the number of stations.
Master
Slave
01
Slave
20
02
63 slaves
21
Master
Slave
Master
03
04 05 06 07 10 11 12 13 14 15 16 17 20 21
63 slaves
63 slaves
63 slaves
63 slaves
22
23 24 25 73 74 75 76 77
63 slaves
63 slaves
63 slaves
:Masterstation
:Slavestation
63 slaves
63 slaves
63 slaves
63 slaves
63 slaves
63 slaves
Slave station number 01 to 77 : octal
GroupC
ThisPCisthemasterofgroupA
whileservingasaslaveingroupC.
Slave
Master
ThisPCisthemasterofgroupBwhile
servingasaslaveingroupC.
63 slaves
63 slaves
9
Slave
Slave
GroupA
Slave
Slave
Slave
GroupB
Slave
Remarks
- Pay attention to hierarchical link system consisting of more than two levels as it takes time for
communication between the stations at the highest level and at the lowest level.
- Though more than one JW-21MN can be mounted on single basic rack panel, they cannot
directly communicate with other stations beyond one network.
9-7
Page 40

Chapter: 10 Description for Computer Link Operation
When connected to a host computer with a network module that is compatible with the ME-NET
specifications, the JW-21MN can transfer data.
10-1 Computer link function
The host computer communicates with each station number one by one. On the computer link, the
host computer can communicate with any required station regardless of whether it is the master or
slave station.
(1) The host computer instructs station number/communication contents/memory address/data etc. of
the communicating station as a "command."
(2) The "command" receiving station processes this data and returns the result as "response."
(System example)
Master station (00) Slave station 01(8)
Slave station 02(8) Slave station 03(8)
Command
Response
In order to use the computer link function above, the host computer needs program application
software. For programming this software, see the instruction manual attached with the network
module.
Computer link commands of the ME-NET can be roughly classified into basic commands and
optional commands.
Host computer
[1] Basic commands
Commands mainly used with PCs.
These commands are the functions used to read and write relays and registers. The JW-21MN
supports all of the basic commands (for both the 47 and 57 family). See the next page.
Reference
The 47 and 57 family: ME-NET computer link commands are divided into the 47 and 57 families of
commands, which use different communication formats. However, you do not
need to be concerned about the differences in these families when using the
computer link function.
[2] Optional commands
Commands other than the basic commands. These are individual commands specific to each device.
See page 10-3.
10
10-1
Page 41

10-2 Basic commands
Meaning and available memory address ranges of each command are shown in the table below
- Numeric values of each command are command numbers specified by the ME-NET.
- Write mode assignment shows write enabled/disabled to the PC memory. (See command No. F9(H).)
10
Command
Reading Relay
20
(H)
Relay start/reset
30
(H)
Reading register current value
24
(H)
Write to register
34
(H)
Write the same data into
register
35
(H)
Set/reset TMR/CNT
32
(H)
Read program memory 04
(H)
Write program memory
14
(H)
Read PC operation status
E8
(H)
Stop PC operation
F8
(H)
Restart PC operation
P8
(H)
Read write mode status
E9
(H)
Assign write mode
F9
(H)
Read manufacturer code
6F
(H)
Setting available address range (octal) and notes for use
JW20/JW20H JW30H
00000 to 15777 (relay)
T-C000 to 777 (TMR/CNT contact
point)
00000 to 15777,
20000 to 75777 (relay)
T-C0000 to 0777,
T-C1000 to 1777 (TMR/CNT contact)
Set in units of one points
00000 to 15777 (relay)
00000 to 15777
20000 to 75777 (relay)
Set in units of one points (SET = 1, RESET = 0)
コ 0000 to コ 1577
b0000 to b1777
09000 to 09777, 19000 to 19777
29000 to 29777, 39000 to 39777
49000 to 49777, 59000 to 59777
69000 to 69777, 79000 to 79777
89000 to 89777, 99000 to 99777
E0000 to E1777
コ 0000 to コ 1777, コ 2000 to コ 7777
b0000 to b1777, b2000 to b3777
09000 to 09777, 19000 to 19777
29000 to 29777, 39000 to 39777
49000 to 49777, 59000 to 59777
69000 to 69777, 79000 to 79777
89000 to 89777, 99000 to 99777
E0000 to E1777
- For details about the file register,
see page 8-4.
Can be set to read up to 1024 bytes at one time.
Write to register 24
.
(H)
The allowable address ranges are the same as shown in "Reading the
register's current value 24
Can be set up to 1024 bytes at one time.
."
(H)
You must enter a value for the number of bytes that will be written.
The allowable address ranges are the same as shown in "Reading the
register's current value 24
Can be set up to 1024 bytes at one time.
."
(H)
000 to 777 000 to 0777, 1000 to 1777
Set in units of one points (SET = 1, RESET = 0)
Different with control module and
memory module types
- JW-21CU: 000000 to 006777
- JW-22CU: 000000 to 006777
When using memory
module JW-21MA
/21MO/21ME)
000000 to 016777
(When using memory
Different with control module
- JW-31CUH/H1: 000000 to 016777
- JW-32CUH: 000000 to 036777
- JW-32CUH1: 000000 to 036777
or 000000 to 076777
- JW-33CUH/H1: 000000 to 0076777
- JW-32CUH2/H3: 000000 to 076777,
1000000 to 176777
module JW-22MA)
Can be set up to 512 steps per one reading.
Data are read out with machine language.
The allowable address ranges are the same as shown in "Reading program
memory 04
Can be set up to 512 steps per one writing
.
(H)
This command can be executed only when a PC is stopped operation with
"PC operation stop" command, and "write mode specification as 2."
-----
When this command is executed, the PC cannot be restarted using a support
tool.
This command is effective only when the PC is stopped operation by the "PC
operation stop" command. When the PC stops operation with another reason,
the PC cannot restart operation with this command.
-----
Prohibit writing all PC memory --- 0
Allows writing to PC data memory --- 1
Allows writing to PC all memory --- 3 Choose any of these.
The JW-21MN returns manufacturer code (CL: SHARP), and model code (A:
PC).
Write mode
assignment
None
1or2
None
1or2
None
2 only
None
10-2
Page 42

10-3 Optional commands
The JW-21MN optional commands are any commands not specified in the ME-NET specifications.
These are commands specific to the JW-21MN. The host computer may use these optional
commands for communication between JW-21MNs and PCs (JW20/JW20H/JW30H) with a JW-21MN
installed. The table below shows optional commands (1) to (19) for the JW-21MN.
Optional command Reference page
[1] Read free memory size 10-4
[2] Monitor TMR, CNT, and MD 10-4
[3] Reading PC mode 10-5
[4] Setting PC mode 10-5
[5] Reading system memory 10-6
[6] Writing system memory 10-6
[7] Reading date 10-7
[8] Setting date 10-7
[9] Reading time 10-8
[10] Setting time 10-8
[11] Correct clock time 10-9
[12] Monitor step status 10-9
[13] Read the optional parameters 10-10
[14] Set the optional parameters 10-10
[15] Read the special I/O parameters 10-11
[16] Set the special I/O parameters 10-11
[17] Set the secret function 10-12
[18] Release the secret function, register a password 10-12
[19] Check the secret status 10-13
JW20/JW20H only
JW30H only
10
[Communication format, basic pattern]
Command
"+" "C" "L" "A" CMD SUB ATTR C.TEXT
Response (normal)
"+" ACK "C" "L" "A" CMD SUB ATTR C.TEXT
- Response on error: See page 10-14.
Symbol Data Details
(H)
"+" 2B
"C" 43
"L" 4C
"A" 41
CMD *1 Function code
SUB *2 Sub code
ATTR 00
C.TEXT
R.TEXT
*3
ACK 00
Optional command
(H)
SHARP manufacturer
Identification code
(H)
(H)
Model code (PC)
(H)
Always set to 00
Assignment detail of
each optional code
(H)
Response (when normal)
*1, *2, and *3
See each optional
command (10-4 to 10-13)
(H)
10-3
Page 43

[1] Read free memory size
Read free memory size.
[Write mode assignment]: None
[Communication format]
Command
"+" "C" "L" "A" CMD SUB ATTR
10
Response
"+" ACK "C" "L" "A" CMD SUB ATTR MODE
Symbol Data Details
(H)
CMD 43
SUB 4D
03
M
07
07
07
Function code
(H)
Sub code
(H)
Program memory capacity: 3.5 k words
(H)
Program memory capacity: 7.5 k words
(H)
Program memory capacity: 15.5 k words
(H)
Program memory capacity: 31.5 k words
(Symbols other than the
left: See page 10-3.)
Ex. When reading the amount of free program memory (up to 7.5 k words). The data in the cells are
hexadecimal numbers.
Command
Response
2B 43 4C 41 43 4D 00
"+" "C" "L" "A" CMD SUB ATTR
2B 00 43 4D 41 43 4D 00 07
ACK CMD SUB 7.5k word
[2] Monitor TMR, CNT, and MD
Read out the current value and attributed data from TMR, CNT, and MD in the specified area.
[Write mode assignment]: None
[Communication format]
Command
"+" "C" "L" "A" CMD SUB ATTR TMR.NO. N
Response
Symbol Data Details
CMD 42
SUB 23
TMR NO
N 0000 to 0100
D1 to DN See the example
"+" ACK "C" "L" "A" CMD SUB ATTR TMR.NO. N
D1 DN TA1 TAN
Symbol Data Details
(H)
(H)
When JW20/JW20H is
used: 000 to 777
When JW30H is used:
0000 to 7777
(TMR, CNT, MD)
1000 to 1777
(TMR, CNT)
(8)
(8)
(8)
(8)
Function code
Sub code
TMR, CNT, MD number
(in order of 2 bytes data,
L and H.)
Number of reading data
(in order of 2 bytes data,
L and H.)
Reading current value
data
(Data 2 bytes x number
of reading data)
TA1
to
TAN
Not used as TMR,
00
(H)
CNT, or MD
(H)
ZW/JW MD
01
(H)
ZW CNT
02
(H)
ZW TMR
04
(H)
DTMR (BCD)
08
(H)
DTMR (BIN)
09
(H)
UTMR (BCD)
0A
(H)
UTMR (BIN)
0B
(H)
DCNT (BCD)
0C
(H)
DCNT (BIN)
0D
(H)
UCNT (BCD)
0E
(H)
UCNT (BIN)
0F
(See page 10-3 for other symbols not described above)
[Ex.] Read the current value of TMR, CNT, and MD at addresses 000 to 002(8)
(The data in cells are in hexadecimal notation)
Command
Response
2B 43 4C 41 42 23 00 00 00 03 00
"+" "C" "L" "A" CMD SUB ATTR 000
2B 00 43 4C 41 42 23 00 00 00 03 00
ACK CMD SUB ATTR 000
65 38 32 60 14 73 08 0C 0E
No. 000
Current value:
3865
No. 001
Current value:
6032
No. 002
Current value:
7314
DTMR
000
(BCD)
DCNT
001
(BCD)
10-4
(8)
UCNT
002
(BCD)
Data 1 bytes
x
Number of reading
data
3 pieces
(8)
3 pieces
Page 44

[3] Reading PC mode
Read PC's mode.
[Write mode assignment]: None
[Communication format]
Command
"+" "C" "L" "A" CMD SUB ATTR
Response
"+" ACK "C" "L" "A" CMD SUB ATTR MODE
Symbol Data Details
(H)
CMD 43
SUB 4E
MODE
00
02
03
Function code
(H)
Sub code
(H)
Monitor code
(H)
Change mode
(H)
Program mode
(Symbols other than the left: See page 10-3.)
[Ex.] When the PC reads program mode (Data in the cells are hexadecimal notation).
Command
Response
2B 43 4C 41 43 4E 00
"+" "C" "L" "A" CMD SUB ATTR
2B 00 43 4C 41 43 4E 00 03
ACK CMD SUB ATTR Program
Mode
[4] Setting PC mode
Set the PC to an assigned mode.
[Write mode assignment]: None
[Communication format]
Command
Response
Symbol Data Details
CMD 43
SUB 5E
MODE
"+" "C" "L" "A" CMD SUB ATTR MODE
"+" ACK "C" "L" "A" CMD SUB ATTR
(H)
Function code
(Symbols other than the left: See page 10-3.)
00
02
03
(H)
Sub code
(H)
Monitor code
(H)
Change mode
(H)
Program mode
10
[Ex.] When to set the PC to the change mode. (Data in cells are hexadecimal notation)
Command
Response
2B 43 4C 41 43 5E 00 02
"+" "C" "L" "A" CMD SUB ATTR Change mode
2B 00 43 4C 41 43 5E 00
ACK CMD SUB ATTR
10-5
Page 45

[5] Reading system memory
Read the specified number of bytes of data from the specified address in system memory.
[Write mode assignment]: None
[Communication format]
Command
Response
Symbol Data Details
CMD 43
SUB 44
SEG 08
SADR 0000 to 00FF
N 0001 to 0100
D1 to DN See the example
[Ex.] To read data from system memory addresses #201 and #202
(201(8) = 81(H), Data in cells: Hexadecimal notation)
Command
Response
"+" "C" "L" "A" CMD SUB ATTR SEG SADR N
"+" ACK "C" "L" "A" CMD SUB ATTR SEG SADR N D1
(H)
(H)
(H)
Function code
Sub code
Read out segment
Read out address #000 to #377
(H)
H)
(H)
Number of read out bytes (2 byte data, in order of L and H)
(8)
(2 byte data, in order of L and
Reading data of system memory (1 byte data x number of
reading data bytes)
2B 43 4C 41 43 44 00 08 81 00 02 00
"+" "C" "L" "A" CMD SUB ATTR SEG SADR N
2B 00 43 4C 41 43 44 00 08 81 00 02 00 01 01
ACK CMD SUB ATTR SEG SADR N #201 #202
−−−
−−−
−−−
−−−
DN
10
[6] Writing system memory
Write the specified number of bytes of data from the specified address in system memory.
[Write mode assignment]: 2 (When the PC has been stopped with a "halt PC operation F8(H)"
command)
[Communication format]
Command
Response
Symbol Data Details
CMD 43
SUB 54
SEG 08
SADR 0000 to 00FF
N 0001 to 0100F
D1 to DN See the example
[Ex.] To write data 01(H), 01(H) to data from system memory addresses #201 and #202
(201(8) = 81(H), Data in cells: Hexadecimal notation)
"+" "C" "L" "A" CMD SUB ATTR SEG SA DR N D1
"+" ACK "C" "L" "A" CMD SUB ATTR SEG SA DR N
(H)
(H)
(H)
Function code
Sub code
Write segment
(H)
Write address #000 to #377
(H)
Number of writing bytes (2 byte data, in order of L and H)
(8)
(2 byte data, in order of L and H)
Write data of system memory (1 byte data x number of write
data bytes)
Read data
DN
Command
Response
2B 43 4C 41 43 54 00 08 81 00 02 00 01 01
"+" "C" "L" "A" CMD SUB ATTR SEG SADR N #201 #202
Write data
2B 00 43 4C 41 43 54 00 08 81 00 02 00
ACK CMD SUB ATTR SEG SADR N
10-6
Page 46

[7] Reading date
Read the year, month, date, and day of week. However, when JW-21CU or JW-31CUH/H1 is used as
PC, they do not have clock function and the reading will be meaningless.
[Write mode assignment]: None
[Communication format]
Command
"+" "C" "L" "A" CMD SUB ATTR
Response
"+" ACK "C "L" "A" CMD SUB ATTR Y D DW
Symbol Data Details
(H)
CMD 45
SUB A2
Y00to99
M01to12
D01to31
DW 00 to 06
Function code
(H)
Sub code
(H)
00 to 99 year (lower two digits of western year)
(H)
January to December
(H)
1st to 31st day of month
Day of week (Sunday: 00
(H)
Wednesday: 03
06
(H)
)
(H)
, Thursday: 04
(H)
, Monday: 01
(H)
(H)
, Tuesday: 02
, Friday: 05
(H)
, Saturday:
(H)
,
[Ex.] Reading out April 25, 1996 (Thursday). (The data in cells are in hexadecimal notation)
Command
Response
2B 43 4C 41 45 A2 00
"+" "C" "L" "A" CMD SUB ATTR
2B 00 43 4C 41 45 A2 00 96 04 25 03
ACK CMD SUB 1996 April 25 Thursday
[8] Setting date
Set year, month, day, and day of week. However, when JW-21CU or JW-31CUH/H1 is used as PC,
these PC do not have clock function and date cannot be set.
[Write mode assignment]: 1 or 2
[Communication format]
Command
"+" "C" "L" "A" CMD SUB ATTR Y M D DW
10
Response
"+" ACK "C" "L" "A" CMD SUB ATTR
Symbol Data Details
(H)
CMD 45
SUB B2
Function code
(H)
Sub code
(Symbols other than the
left: See page 10-3.)
Y, M, D, DW Same as the "Reading out date" above.
[Ex.] Set May 1st (Wednesday), 1996 (Data in frame: Hexadecimal)
Command
Response
2B 43 4C 41 45 B2 00 96 05 01 02
"+" "C" "L" "A" CMD SUB ATTR 1996 May 1 Wednesday
2B 00 43 4C 41 45 B2 00
ACK CMD SUB
10-7
Page 47

[9] Reading time
Read out time (hour, minute, second) of clock. However, when JW-21CU or JW-31CUH/H1 is used as
PC, these PC do not have clock function and the read out data will be unsettled.
[Write mode assignment]: None
[Communication format]
Command
"+" "C" "L" "A" CMD SUB ATTR
10
Response
"+" ACK "C" "L "A" CMD SUB ATTR H M S
Symbol Data Details
(H)
CMD 45
SUB A3
H00to23
M00to59
S00to59
Function code
(H)
Sub code
(H)
00 to 23 o'clock
(H)
00 to 59 minutes
(H)
00 to 59 seconds
(Symbols other than the
left: See page 10-3.)
[Example] Reading a time of 8 : 30 : 30 AM. (The data in cells are in hexadecimal notation)
Command
Response
2B 43 4C 41 45 A3 00
"+" "C" "L" "A" CMD SUB ATTR
2B 00 43 4C 41 45 A3 00 08 30 30
ACK CMD SUB 8: 30: 30AM
[10] Setting time
Set time (hour, minute, second) of clock. However, when JW-21CU or JW-31CUH/H1 is used as PC,
these PC do not have clock function and date cannot be set.
[Write mode assignment]: 1 or 2
[Communication format]
Command
"+" "C" "L" "A" CMD SUB ATTR H M S CTRL
Response
"+" ACK "C" "L" "A" CMD SUB ATTR
Symbol Data Details
(H)
CMD 45
SUB B3
Function code
(H)
Sub code
H, M, S Same as the "Reading out time" above.
(H)
Start operation of the clock
(H)
Stop operation of the clock
(H)
Reset digits lower than the second
Correct 30 seconds (Round off 0 to
(H)
29 sec., and round up 30 to 59 sec.)
CTRL
00
01
02
08
[Example] When the time is 13 : 30 : 00. (The data in cells are in hexadecimal notation)
Command
Response
2B 43 4C 41 45 B3 00 13 30 00 00
"+" "C" "L" "A" CMD SUB ATTR 13 30 00 At operation
2B 00 43 4C 41 45 B3 00
ACK CMD SUB
10-8
Page 48

[11] Correct clock time
Correct the clock setting. However, when a JW-21CU or JW-31CUH/H1 is used as PC, they do not
have clock function and the reading will be meaningless.
[Write mode assignment]: 1 or 2
[Communication format]
Command
"+" "C" "L" "A" CMD SUB ATTR CTRL
Response
"+" ACK "C" "L" "A" CMD SUB ATTR
Symbol Data Details
(H)
CMD 45
SUB B4
00
01
CTRL
02
08
Function code
(H)
Sub code
(H)
Start operation of the clock
(H)
Stop operation of the clock
(H)
Reset digits lower than the second
Correct 30 seconds (Round off 0 to
(H)
29 sec., and round up 30 to 59 sec.)
[Ex.] To stop the clock. (The data in cells are in hexadecimal notation)
Command
Response
2B 43 4C 41 45 B4 00 01
"+" "C" "L" "A" CMD SUB ATTR Stop operation
2B 00 43 4C 41 45 B4 00
ACK CMD SUB
[12] Monitor step status: JW20/JW20H only
Read out "N" byte data from specified process and step.
[Write mode assignment]: None
[Communication format]
10
Command
Response
"+" "C" "L" "A" CMD SUB ATTR PRS STP N
"+" ACK "C" "L" "A" CMD SUB ATTR PRS SPT N D1 D2 DN
Symbol Data Details
CMD 44
SUB 64
(H)
(H)
PRS 000 to 003
STP 000 to 007
N01to08
Function code
Sub code
(H)
Process number
(H)
Step number
(H)
Number of bytes to read out
(Symbols other than
those shown on the left:
See page 10-3.)
D1 to DN See the example Read the data
[Ex.] Read the data for process number 03 and step number 002 to 004(8). (The data in the cells are in
hexadecimal notation)
Command
Response
2B 43 4C 41 44 64 00 03 02 03
Step
Number
AM 3
o’clock
Number
of reading
bytes
30
seconds
minute
30
Step
Step
003
002
Read out data
"+" "C" "L" "A" CMD SUB ATTR
2B 00 43 4C 41 44 64 00 03 02 03 08 01 03
ACK CMD SUB
Process
Number
Step
004
10-9
Page 49

[13] Read the optional parameters
Read the parameter data for option module (other than JW-21MN) from the control module.
[Write mode assignment]: None
[Communication format]
Command
"+" "C" "L" "A" CMD SUB ATTR UNO PAADR N
10
Response
"+" ACK "C" "L" "A" CMD SUB ATTR UNO PAADR N D1 DN
Symbol Data Details
CMD 42
SUB 02
(H)
(H)
UNO 00 to 07
PAADR 000 to 077
N01to40
Function code
Sub code
(H)
Set value for the module No. switch
(8)
Read the starting address
(H)
Number of bytes to read out
D1 to DN See the example Read out data (for number of bytes of reading data)
[Ex.] Read the parameters at address 030 to 032(8) for an option module (No.3). (Data in frames are in
hexadecimal, except when followed by an(8), indicating octal data).
Command
Response
2B 43 4C 41 42 02 00 03 030
"+" "C" "L" "A" CMD SUB ATTR UNO PAADR N
2B 00 43 4C 41 42 02 00 03 030
ACK CMD SUB 030 031 032
[14] Set the optional parameters
Write parameter data of option module (other than JW-21MN) to the control module.
[Write mode assignment]
2 (or when the PC is stopped by using a "PC operation stop F8(H)" command).
[Communication format]
Command
"+" "C" "L" "A" CMD SUB ATTR UNO PAADR N D1 DN
(Symbols other
than the left: See
page 10-3.)
(8)
003
(8)
(3)
003
(3)
15 21 03
Read out data
Response
"+" ACK "C" "L" "A" CMD SUB ATTR UNO PAADR N
Symbol Data Details
CMD 42
SUB 12
(H)
(H)
UNO 00 to 07
PAADR 000 to 077
N01to40
D1 to DN See the example
Function code
Sub code
(H)
Set value for the module No. switch
(8)
Write the starting address
(H)
Number of bytes to write
Write data (corresponding to the number of bytes
to write)
(Symbols other
than the left: See
page 10-3.)
[Ex.] Write 14(H), 00(H), and 33(H) to parameter address 040 to 042(8) in option module (module No. 2).
(The data in cells are in hexadecimal, except when followed by an(8),indicating octal data.)
Command
Response
2B 43 4C 41 42 12 00 02 040
"+" "C" "L" "A" CMD SUB ATTR UNOPAADR N 040 041 042
2B 00 43 4C 41 42 12 00 02 040(8) 003(8)
ACK CMD SUB
(8)
003
(8)
14 00 33
Read out data
10-10
Page 50

[15] Read the special I/O parameters
Read out parameter data of special I/O modules (other than JW-21MN) from the control module.
[Write mode assignment]: None
[Communication format]
Command
"+" "C" "L" "A" CMD SUB ATTR UNO PAADR N
Response
"+" ACK "C" "L" "A" CMD SUB ATTR UNO PAADR N D1 DN
Symbol Data Details
CMD 42
SUB 03
00 to 07
UNO
00 to 37
(H)
(H)
(H)
(H)
Function code
Sub code
When connected to a JW20/JW20H, set the value for
the module No. switch
When connected to a JW30H, the upper digits are rack
No. and the lower digits are the value for module No.
switch.
PAADR 000 to 177
N01to80
(H)
(8)
Read out start address
Number of bytes to read out
D1 to DN See the example Read out data (for number of bytes of reading data)
[Ex.] To read parameter address data 030 to 032(8) of the special I/O module (Module No. 3). (Except
one with (8), the data in cells are in hexadecimal notation)
Command
Response
2B 43 4C 41 42 03 00 03 030
"+" "C" "L" "A" CMD SUB ATTR UNO PAADR N
2B 00 43 4C 41 42 03 00 03 030
ACK CMD SUB 030 031 032
[16] Set the special I/O parameters
Write parameter data of the special I/O module (other than JW-21MN) to the control module.
[Write mode assignment]
2 (and when the PC stops operation by "PC operation stop F8(H)" command).
[Communication format]
Command
"+" "C" "L" "A" CMD SUB ATTR UNO PAADR N D1 DN
(Symbols other
than the left:
See page 10-3.)
(8)
003
(8)
(3)
003
(3)
15 21 03
10
Read out data
Response
"+" ACK "C" "L" "A" CMD SUB ATTR UNO PAADR N
Symbol Data Details
CMD 42
SUB 02
(H)
(H)
00 to 07
UNO
00 to 37
PAADR 000 to 177
N01to80
(H)
(H)
(H)
Function code
Sub code
When connecting to JW20/JW20H, set value of module
No. switch
When connecting to JW30H, upper digits are rack No.
and lower digits are set value for module No. switch.
(8)
Write start address
Number of bytes to write
(Symbols other
than the left: See
page 10-3.)
D1 to DN See the example Write data (for number of bytes of writing data)
[Ex.] Write 14(H), 00(H), and 33(H) to parameter address 040 to 042(8) of the special I/O module (module
No. 2).(Except ones with (8) marks, the data in cells are in hexadecimal notation)
Command
Response
2B 43 4C 41 42 13 00 02 040
"+" "C" "L" "A" CMD SUB ATTR UNOPAADR N 040 041 042
2B 00 43 4C 41 42 13 00 02 040(8) 003(8)
ACK CMD SUB
(8)
003
(8)
14 00 33
Write data
10-11
Page 51

[17] Set the secret function: JW30H only
Enables the secret function, or deletes previously registered passwords.
[Write mode assignment]
- When command S = 01(H), none.
- When command S = 0F(H), 2 (and when the PC is stopped by using the "PC operation stop F8(H)
command.)
[Communication format]
Command
"+" "C" "L" "A" CMD SUB ATTR S
10
Response
"+" ACK "C" "L" "A" CMD SUB ATTR
Symbol Data Details
(H)
CMD 46
SUB FB
MODE
01
0F
Function code
(H)
Sub code
(H)
Enable the secret function
(H)
Disable the secret function
(Symbols other than the
left: See page 10-3.)
[Ex.] Enables the secret function. (The data in the cells are in hexadecimal notation).
Command
Response
2B 43 4C 41 46 FB 00 01
"+" "C" "L" "A" CMD SUB ATTR Enables
2B 00 43 4C 41 46 FB 00
ACK CMD SUB
[18] Release the secret function, register password: JW30H only
Release the secret function, or register a password.
[Write mode assignment]
- When command S = 00(H), none.
- When command S = 01(H) or 02(H), 2 (and the PC stops operation by "PC operation stop F8(H) command).
[Communication format]
Command
"+" "C" "L "A" CMD SUB ATTR S PW
Response
"+" ACK "C" "L" "A" CMD SUB ATTR
Symbol Data Details
(H)
CMD 46
SUB FC
00
S
01
02
Function code
(H)
Sub code
(H)
Release Release the secret function.
(H)
Temporary password Enter a temporary password.
(H)
Real password
Change the temporary password to a permanent
one (the secret function is enabled).
"0" to "9"
PW
"A" to "Z"
Password (alphabetical and numeric 4 letters)
"a" to "z"
[Ex.] To register password "15AE." (The data in cells are in hexadecimal notation.)
Command
Response
2B 43 4C 41 46 FC 00 02 31 35 41 45
"+" "C" "L" "A" CMD SUB ATTR Password "15AE"
2B 00 43 4C 41 46 FC 00
ACK CMD SUB
Real
register
10-12
Page 52

[19] Check the secret function: JW30H only
Enables/disables the secret function.
[Write mode assignment]: None
[Communication format]
Command
"+" "C" "L" "A" CMD SUB ATTR
Response
"+" ACK "C" "L" "A" CMD SUB ATTR S
Symbol Data Details
CMD 46
SUB FD
S
00
01
(H)
Function code
(H)
Sub code
(H)
Disable the secret function
(H)
Enable the secret function
(Symbols other than the
left: See page 10-3.)
[Ex.] To determine whether the secret function is enabled (the data in cell are in hexadecimal).
Command
Response
2B 43 4C 41 46 FD 00
"+" "C" "L" "A" CMD SUB ATTR
2B 00 43 4C 41 46 FB 00 01
ACK CMD SUB Enable
10
10-13
Page 53

[20] Response on error
When a station that has received data encounters an error while processing data after receiving an
optional command from the host computer, it will send a response as follows.
10
Response
"+" ACK "C" "L" "A" CMD ERR
ACK data ERR data Details
01
06
07
0F
10
11
FF
(H)
(H)
(H)
(H)
(H)
(H)
(H)
None Command data format is not correct.
None PC is not stopped operation.
None Write data is not properly done.
None Memory access time out.
None Write mode is not compatible.
None Assigned address is not program area.
02
(H)
Assigned address is not set value of TMR, CNT, or MD.
(H)
04
05
13
30
31
32
33
34
52
53
Tried to set/reset MD.
(H)
Set value of number of bytes exceeds the set range.
(H)
Tried to set/reset TMR, CNT while the PC is stopped operation.
(H)
A password is not registered.
(H)
The secret function is enabled.
(H)
The password is not correct.
(H)
Password error.
A JW-21CU/JW-31CUH is used as the PC, and an attempt was
(H)
made to read, set, or correct the time.
(H)
Start/end block error
(H)
System memory is not correct.
- Symbols other than above
"+," "C," "L" and "A" : Same as the description on page 10-3.
CMD: Function code for each optional command
See pages 10-4 to 10-13.
10-14
Page 54

Chapter 11: Setting of Switches and Parameter
11-1 Operation procedure
Start
Set switches of the JW-21MN
Install the JW-21MN
Turn "ON" the power of the slave stations
Set parameter of slave stations
Turn "ON" the power of the master station
Set parameter of master station
---------- See pages 11-2 to 11-4.
---------- See page 5-1.
---------- See page 11-22.
11
---------- See page 11-5.
End
Remarks
-Make sure to turn "OFF" the power of the PC prior to setting the module No. switch and station
number switch after installing the JW-21MN.
- Prior to setting the parameters, set the mode of the JW-21MN to "program mode."
-Make sure to write the set parameters into the EEPROM on the JW-21MN after setting.
11-1
Page 55

11-2 Switch setting of master station and slave station
Prior to using the JW-21MN, set the following switches.
[1] Mode switch (MODE)
Set whether the JW-21MN is used as a master station or a slave station as well as
the data link type (standard function or save memory function).
Station
Data link
Setting value of
the mode switch
11
Master station
Standard function
Standard function
2
2
Slave station
4
5
3
Save memory function
3
6
2
7
1
8
0
9
F
A
E
B
D
C
-Do not set the mode switch to "0," "1," or "4" to "F.
- The computer link function is effective for both "2"
and "3" settings.
4
5
3
6
2
7
8
1
0
9
F
E
D
MODE
A
B
C
(Rear side)
(Factory setting: 2)
[2] Module No. switch (UNIT NO.)
Select error history storage registration area and data link (save memory function) area for a slave
station by setting the mode switches.
(1) Setting the mode switch to "2"
Setting value of the
module No. switch
0
1
2
3
4
5
6
7 to 9
Error history storage register
JW20/JW20H JW30H
E1400 to E1577
E1200 to E1377
E1000 to E1177
E0600 to E0777
E0400 to E0577
E0200 to E0377
E0000 to E0177
E7400 to E7577
E7200 to E7377
E7000 to E7177
E6600 to E6777
E6400 to E6577
E6200 to E6377
E6000 to E6177
Prohibited setting
UNIT
NO.
8
7
9
6
0
5
1
4
2
3
(Factory setting: 0)
(2) Setting the mode switch to "3"
Setting value of the
module No. switch
0
1
2
3
4
5 to 9
Data link (Save memory function)
Relay link area
コ1000 to コ1077
コ1100 to コ1177
コ1200 to コ1277
コ1300 to コ1377
コ1400 to コ1477
Register link area
09000 to 09777
19000 to 19777
29000 to 29777
39000 to 39777
49000 to 49777
Prohibited setting
Error history storage register
JW20/JW20H
E1400 to E1577
E1200 to E1377
E1000 to E1177
E0600 to E0777
E0400 to E0577
E7400 to E7577
E7200 to E7377
E7000 to E7177
E6600 to E6777
E6400 to E6577
- The setting value of the module No. switch should not be the same as any other option
module (including JW-21MN) mounted on the same basic rack panel.
- The top address of each relay link area and register link area corresponds to f1 to fn and
g1 to gn on page 11-8 and 11-9.
11-2
(Front side)
JW30H
Page 56

(3) Station number switch (STA NO.)
Make sure to set the master station number to "00." For slave stations, set from "01" to "77" in
octagonal sequence.
- Maximum amount of slave stations to be connected are
63. As the station number should be assigned by
octagonal figures, setting of the following values causes
errors and the JW-21MN cannot communicate.
08, 09, 18, 19, 28, 29, 38, 39, 48, 49, 58, 59, 68, 69, and
78 to 99.
- Be careful that there is no doubly allocated number and no
number has been skipped.
STA NO.STA NO.
8
7
9
6
0
5
1
4
2
3
(Factory setting: 00)
8
7
9
6
0
5
1
4
2
3
×1×10
(Front side)
(4) Termination resistance switch (LT)
When the JW-21MN is at the termination station of the communication line, make sure to set the
termination resistance switch to "ON."
TurnONtheterminationresistanceswitches
Setting
ON
OFF
forthesetwostations.
Condition of the JW-21MN
Insert a termination resistance
Do not insert a termination resistance
ON
OFF
LT
4
5
3
6
2
7
1
8
0
9
F
A
E
B
D
C
-When using a termination (ME-75 made by Toko
Denshi) (device to function as terminator) at the end
(Factory setting: OFF)
of a signal cable, turn "OFF" the termination resistance switch of the termination station.
Termination
Termination
(ME-75)
Termination
1 km max.
(Rear side)
Reference Need for the termination resistance
When a termination resistance is not provided at a communication circuit end, the end of the circuit
generates reflection waves. These reflection waves collide with sending signals and abnormal
communication may occur. The termination resistance prevents the occurrence of these reflection
waves. On the other hand, when an intermediate station has its termination resistance switch turned
"ON," this station causes reflection and attenuates signals and causes abnormal communication.
11
11-3
Page 57

(5) Shield ground switch (LG)
For communication lines, use a coaxial cable.
As coaxial cable is an unbalanced circuit, ground its shield by
turning "ON" the shield ground switch.
Turn "ON" shield ground
switch
Coaxial cable
Turn "ON" shield ground
switch
4
5
3
6
2
7
1
8
0
9
F
A
E
B
D
C
11
Setting
Condition of the JW-21MN
Conductive between the shield and FG
ON
OFF
of the JW20/JW20H/JW30H
Not conductive between the shield and
FG of the JW20/JW20H/JW30H
ON
OFF
LG
(Rear side)
(Factory setting: ON)
Remarks
-Make sure to provide a class-3 grounding for the GND terminal of the power supply module.
Without grounding the power supply module, the JW-21MN cannot become conductive with the
ground after turning "ON" the shield ground switch. (See page 7-2.)
- Prior to any electric welding around the JW-21MN, take out the coaxial cable from the JW-21MN
While the coaxial cable is connected to the JW-21MN, any electric welding nearby the JW-21MN
will cause the welding current to the JW-21MN and may damage part of its circuit pattern.
JW-21MN
Coaxial cable
JW-21MN
Turn "ON" shield
ground switch
FG
Wrap around current
Note:
Electric welder
11-4
Turn "ON" shield
ground switch
Rack etc.
Note: In case enough
conductivity is not
established.
Page 58

11-3 Setting contents of master station parameters
[1] Setting contents
When the JW-21MN is used as a master station, set the following items for parameters.
When the JW-21MN is used as a slave station, setting contents of the parameter address 004004 to
004377(8) and 004404 to 004777(8) may vary with the data link setting condition as a slave station
(standard function/save memory function).
For details of the parameter memory, see pages 16-8 to 16-12.
*Corresponding symbols on pages 11-7 to 11-9
(8).
Parameter
address
004000
to 004001
004002
004003
004004
to 004007
004010
to 004377
004400
to 004403
Setting item
Top address of relay link area on
the master station
Function
Number of connecting stations
Relay link area top address or number
of offset bytes on slave station 01
−−−−−−−−−−−−−−−−−−−−−−−−−−−−−−−−−−−
Relay link area top address or
number of offset bytes on slave
station 02 to 77
(8).
Top address of register link area
on the master station
Register link area top address or
number of offset bytes on slave
station 01
−−−−−−−−−−−−−−−−−−−−−−−−−−−−−−−−−−−
Register link area top address or
(8).
number of offset bytes on slave
station 02 to 77
(8).
Number of sending bytes of master
station relay link area.
Number of sending bytes of slave
station 01
−−−−−−−−−−−−−−−−−−−−−−−−−−−−−−−−−−−
(8) relay link area.
Number of sending bytes of slave
station 02 to 77(8) relay link area.
Number of sending bytes of master
register link area
Number of sending bytes of slave
station 01
−−−−−−−−−−−−−−−−−−−−−−−−−−−−−−−−−−−
(8) register link area.
Number of sending bytes of slave
station 02 to 77(8) register link area.
Slave station connection status
(error code output)
004404
to 004407
004410
to 004777
005000
to 005001
005002
to 005003
005004
to 005177
005200
to 005201
005202
to 005203
005204
to 005377
007750
to 007757
*
Yes/no station number information
output.
V2
007763
(8)
Initial
value
00
00
00
00
00
00
00
00
00
00
00
00
00
00
00
00
(H)
Details (setting range)
Set by file address(8)
(000000 to 007777(8))
Set to relay/register link (01
(H) only).
Set the amount of stations including a master station
by decimals (002 to 064
- When a slave station is
a data link (standard
function), set the top
address by file
address
(8)
(D)).
- When a slave station is
a data link (save
memory function), set
the number of offset
bytes by decimals:
00000 to 00256(D)
Set by file address
- When a slave station is
a data link (standard
function), set the top
address by file
address
(8)
(8)
- When a slave station is
a data link (save
memory function), set
the number of offset
bytes by decimals:
00000 to 02048(D)
Set the number of bytes by decimals: 00000 to
00256
(D)
Set the number of bytes by decimals.
- When a slave station is data link (standard
function): 00000 to 00256
(D).
- When a slave station is data link (save memory
function): 00000 to 00032(D).
Set the number of bytes by decimals: 00000 to
01024
(D)
Set the number of bytes by decimals.
- When a slave station is data link (standard function): 00000 to 01024
(D)
- When a slave station is data link (save memory
function): 00000 to 00256
(D)
Turn ON respective bit.
(See page 16-12.)
When set to 01(H), stores its station number to the
data memory (effective when 1 byte next to 24 bytes
of flag area is 007767
(8) = 80(H).)
*
a 0
–
–
a 1
−−−−
a 2
to a 77
b 0
b 1
−−−−
b 2
to b 77
c 0
c 1
−−−−
c 2
to c 77
d 0
d 1
−−−−
d 2
to d 77
–
–
11
* "Connection condition of slave stations" and "Yes/no station number information out" are unique
functions of the JW-21MN.
11-5
Page 59

*Corresponding symbols on pages 11-7 to 11-9
Set item
Flag area top
address
(communication
e
and PC operation
status monitor flag)
Parameter
address
007764 E0 File address lower digits
007765 01 File address upper digits
007766 00 File number
007767 80 Flag output (Yes: 80
(8)
Initial
value
(H)
Details (set range) *
Set range: See page 11-11 to
11-12.
(H)
- Initial value: 01E0
000740
(H)
, No: 00
(H)
(8)
)
(コ 0740)
to
- Start/stop
operation of the
JW-21MN
r
- Write to the JW-
007777 01
Select "00, 01, 08, 80, 81" with hexadecimal notation.
(See page 16-12.)
21MN EEPROM.
- to are equivalent to number of page 11-13.
-Parameter addresses other than above mentioned are reserved areas and prohibited to be changed.
-When the JW-21MN is a slave station, set the top address and the number of sending bytes so
that the data can be within the setting range of each area (see pages 11-7 to 11-12). When any
slave stations are except JW-21MN, see the instruction manual of each device.
e
---
0
11
11-6
Page 60

[2] Communication area map
(1) In case that setting data link (the standard function) when the master station and all slave
stations are JW-21MN's.
○ : Send
● : Receive
Master station 00
(Data memory)
a
0
c
0
c
1
Relay link area
(Within a total of 256 bytes)
c
n
0
b
0
d
d
1
(8)
Slave station 01
(Data memory)
1
a
0
c
c
1
c
n
1
b
0
d
d
1
n=02to77
(8)
(8)
a
c
c
c
b
d
d
Slave station n
(Data memory)
n
0
1
n
n
0
1
d
Register link area
(Within a total of 2048 bytes)
Flag
area
- Set the relay link area, register link area, flag area within the setting range nominated in page 11-
- Set a0 to en for parameters of master station and slave station. (See page 11-5, 6 and 22)
n
0
e
bytes bytes bytes
24 24 24
11, 12 and 23. However, be careful not to double any address allocation of these.
Parameter for setting in master station
Top address of relay link area a0, a1 to an
Top address of register link area b0, b1 to bn
Number of sending bytes of relay link area
c0, c1 to cn
d
e
n
1
Parameter for setting in slave station
Top address of flag area (slave station) e1 to en
d
e
n
n
11
Number of sending bytes of register link area
d0, d1 to dn
T
op address of flag area (master station) e0.
- Total number of sending bytes per station both relay link and register link is max. 1024 bytes.
c0+d0, c1+d1, cn+dn = 0 to 1024 bytes.
11-7
Page 61

(2) In case that setting the data link (save memory function) when the master station and all
slave stations are JW-21MN's.
Memory addresses inside control module of slave station continue in order of receiving and
sending.
Master station 00
(Data memory)
a
0
a
1
h
1
a
n
c
0
c
n
c
1
c
(Within a total of 256 bytes)
Relay link area
d
(Within a total of 2048 bytes)
Register link area
n
b
0
b
1
i
1
b
n
0
d
n
d
1
d
n
(8)
f
g
1
*
1
*
f
h
+
c
g
i
+
d
1
1
h
1
1
1
i
1
Slave station 01
(Data memory)
(Within JW-21MN)
1
1
n=02to77
(8)
*
(Within control
f
1
module)
*
g
1
(8)
f
g
n
n
Slave station n
(Data memory)
(Within
64 bytes
in total)
※
f
n
h
n
+
c
n
c
n
- Omitted a memory map
inside control module.
(Within a
total of
512 bytes)
*
g
n
n
i
+
d
n
d
n
○ : Send
● : Receive
11
Flag
area
0
bytes bytes bytes
24 24 24
e
1
e
n
e
- Set the relay link area, the register link area, and the flag area within the settings range of page
11-11, 12 and 23. Be careful not to double any address allocation of these.
- Set a0 to en, h1 to in above for parameters of master station and slave station (see page 11-5, 6
and 22) and set f1/fn/g1/gn marked "*" by module No. switch of the JW-21MN (see page 11-2).
Parameter for setting in master station
Top address of relay link area a0, a1 to an
Parameter for setting in slave station
Top address of flag area (slave station) e1 to
en
Top address of register link area b0, b1 to bn
Number of receiving bytes of relay link area
h1 to hn
Number of sending bytes of relay link area
c0, c1 to cn
Number of receiving bytes of register link
area i1 to in
Number of sending bytes of register link
area d0, d1 to dn
Top address of flag area (master station) e0.
* Number of receiving bytes of slave station (h1 to hn, i1 to in)
Select self-setting or "same as number of sending bytes (c1 to cn, d1 to dn)" according to
parameter (007720 to 007723) of slave station.
Note: When installing JW-21MN without 30Hn mark or 30H mark into JW20/JW20H, number
of receiving bytes of each slave station is the same as number of sending bytes.
*
V2
11-8
Page 62

- Set the receiving area for save memory function within the range of the link area.
0 £ a1 £ Total number of bytes of relay link area -h1
0 £ an £ Total number of bytes of relay link area -hn
0 £ b1 £ Total number of bytes of register link area -i1
0 £ bn £ Total number of bytes of register link area -in
-Number of offset bytes can be set exceeding the number of sending bytes of the master station.
a1, an ‡ c0 and b1, bn ‡ d0
- Setting example of top address f1/fn/g1/gn
When the setting value of the module No. switch is "2," f1/fn is コ1200, g1/gn is 29000.
(3) When the master station and slave stations are all JW-21MN's and both data link (the stan-
dard function) and data link (the save memory function) are set among slave stations.
Set signs below by the parameters of the master station (page 11-5, 6) and the module No. switch
of the JW-21MN (page 11-2).
- An example of a relay link area map for the setting of the data link (standard function) for slave
station 01 and the data link (save memory function) to slave station 02.
b
Slave station 01
a
Master station 00
a
0
c
c
c
0
1
2
2
(8)
(the standard function)
a
c
c
c
Total number of bytes of relay link area (
c
2 + h2 ≦ 64 bytes 0 ≦ a2 ≦ c0 +
- An example of register link area map for the setting of the data link (the save memory function) to
slave station 01 and 03 and data link (the standard function) to slave station 02.
Slave station 01
Master station 00
b
0
b
1
3
d
1
(8)
(the save memory function)
d
0
g
i
Data link
(within JW-21MN)
1
1
0
1
2
Data link
1
c
(8)
(8)
a
2
f2h
c
0 + c1 + c2) ≦ 256 bytes
c
1
Slave station 02
Data link
(the standard function)
b
2
d
0
Slave station 02
Data link
(the save memory function)
(within JW-21MN)
2
f
2
h
2
2
+
c
2
(8)
(the save memory function)
g
(8)
f
2
Slave station 03
Data link
(within JW-21MN)
3
(within
control module)
11
(8)
d
3
d
1
d
2
d
3
Total number of bytes of register link area (
0 ≦
b
1
≦
i
1
+
d
1
≦ 512
g
1
+
i
1
d
1
d
0
+
d
2
+
d
3
0 ≦
i
3
+
d
3
≦ 512
b
3
≦
11-9
i
g
3
1+3
i
d
3
d
1
d
2
d
3
d
0
+
d
1
+
d
2
+
d
3
) ≦ 2048 bytes
d
0
+
d
1
+
d
2
Page 63

[Example for setting]
The master station and slave station 01 and 02 are JW-21MN.
It shows example for setting that slave station 01 is data link (standard function) and slave station 02 is
data link (save memory function with 30H mark).
Relay
link area
Register
link area
Flag
area
8 bytes
4 bytes
8 bytes
16 bytes
8 bytes
8 bytes
24 bytes
Station No.
information
コ0210
コ
0220
コ0224
コ
0233
コ
0400
コ
0420
0430
コ
コ
0437
コ
0740
コ0767
コ
0770
Master
station
Flag
24 bytes
Station No.
information
(Standard)
Slave station 01
コ0200
コ0210
コ0214
コ0223
コ0400
コ0420
コ0430
コ0437
コ0740
コ0767
コ0770
(Save memory)
Slave station 02
Off set
(4 bytes)
Off set
(8 bytes)
Flag
24 bytes
Station No.
information
19000
19027
19030
○ : Send
● : Receive
1000
コ
コ
1004
4 bytes
8 bytes
1013
コ
9000
8 bytes
9010
8 bytes
9017
11
Top address of relay link area
Number of off set bytes of relay link area
Number of sending bytes of relay link
Number of receiving bytes of relay link
Top address of register link area
Number of off set bytes of register link area
Number of sending bytes of register link
Number of receiving bytes of register link
Top address of flag area
Station number information output
Maser station
コ0210
–
8 bytes
–
コ0400
–
16 bytes
–
0740
コ
Yes
Slave station 1
(standard)
コ0200
–
4 bytes
–
コ0400
–
8 bytes
–
*コ0740
*Yes
Slave station 2
(save memory)
**コ1000
4 bytes
8 bytes
*4 bytes
**09000
8 bytes
8 bytes
*8 bytes
*19000
No mark -- Setting by parameter of master station
* ------------Setting by parameter of slave station
** ----------- Setting by module No. switch of slave station
*Yes
11-10
Page 64

[3] Setting range of relay link area, register link area, and flag area
For setting the top address of the master stations relay link, register link, and flag area, use the file
address(8) allocated throughout the memory area and set the number of sending bytes of the relay link
and register link area within the setting range shown below. Flag areas are allocated by 24 bytes from
each top address.
When a slave station is a JW-21MN and it is set to data link (the standard function), set the top address
and the number of sending bytes of the slave station's relay link and register link area within the setting
range shown below.
When a slave station is a JW-21MN and it is set to data link (the save memory function), the relay link
and register link area of the slave station are determined by the setting value of the JW-21MN module
No. switch (page 11-2) as shown below.
(1) When master station PC is JW20/JW20H
- When master and slave stations are
JW-21MN and set to data link (the
standard function) :
File
address(8)
000000
000377
000400
000677
000700
000777
001000
001577
001600
001777
002000
003777
004000
004777
005000
005777
006000
006777
007000
007777
010000
010777
011000
011777
I / O relay
Auxiliary relay
Latched relay
General
purpose
relay
Time limited contact
ponit of TMR/CNT
Current value of
TMR/CNT/MD
Register
Register
Register
Register
Register
Register
Byte
address
コ0000
コ0377
コ0400
コ0677
コ0700
コ0777
コ1000
コ1577
b0000
b1777
09000
09777
19000
19777
29000
29777
39000
39777
49000
49777
59000
59777
- When slave stations are JW-21MN
and set to data link (the save memory
function) :
File
address(8)
000000
001000
001477
001500
003777
Flag area setting range
Relay link area setting range
Register link area setting range
004000
004777
005000
005777
006000
006777
007000
007777
010000
010777
011000
Module No. 0
Module No. 1
Module No. 2
Module No. 3
Module No. 4
Module No. 0
Module No. 1
Module No. 2
Module No. 3
Module No. 4
Byte
address
コ0000
コ1000
コ1100
コ1200
コ1300
コ1400
コ1500
09000
09777
19000
19777
29000
29777
39000
39777
49000
49777
59000
Relay link area
Flag area setting range
Register link area
11
015000
015777
Register
99000
99777
11-11
015777
99777
Page 65

(2) When master station PC is JW30H
11
- When master and slave stations are
JW-21MN and set to data link (the
standard function) :
File address
000000
001577
001600
001777
002000
003777
004000
007777
010000
015777
016000
025777
026000
027777
030000
035600
035777
(8)
Relay
Time limited contact
point of TMR/CNT
0000 to 0777
Current value of
TMR/CNT/MD
0000 to 0777
Register
Register
Register
Current value of
TMR/CNT
1000 to 1777
Relay
Time limited contact
point of TMR/CNT
1000 to 1777
Byte address
コ0000
コ1577
b0000
b1777
09000
39777
49000
99777
E0000
E7777
b2000
b3777
コ2000
コ7577035577
- When slave stations are JW-21MN and
set to data link (the save memory
function) :
File address
000000
001000
001477
001500
003777
004000
004777
005000
005777
006000
Flag area setting range
Relay link area setting range
Register link area setting range
006777
007000
007777
010000
010777
011000
015777
035777
(8)
Module No. 0
Module No. 1
Module No. 2
Module No. 3
Module No. 4
Module No. 0
Module No. 1
Module No. 2
Module No. 3
Module No. 4
Byte address
コ0000
コ1000
コ1100
コ1200
コ1300
コ1400
コ1500
09000
09777
19000
19777
29000
29777
39000
39777
49000
49777
59000
99777
Relay link area
Flag area setting range
Register link area setting range
000000
037777
000000
177777
000000
177777
000000
177777
000000
177777
000000
177777
File 1
File 2
File 3
File 10
File 14
File 2C
(H)
(H)
(H)
*1
*2
*3
*4
Flag area setting range
Register link area setting range
000000
037777
000000
177777
000000
177777
000000
177777
000000
177777
000000
177777
File 1
File 2
File 3
File 10
File 14
File 2C
(H)
(H)
(H)
*1
*2
*3
*4
*1: When JW-32CUH/H1 is used (JW-32CUH1: 000000 to 177777 or 000000 to 077777).
*2: When JW-33CUH/H1 is used.
*3: When JW-33CUH2 is used.
*4: When JW-33CUH3 is used.
11-12
Flag area setting range
Page 66

[4] Setting procedure
Set parameters of the master station following the procedure below.
[ ] : See page in chapter 11
Start slave station PC operation
Turn ON the power of master station PC
Connect support tools
Stop PC operation
Stop operation of data link (007777(8) =00(H))
①
②
③
④
⑤
⑥
Set top address of relay link area on slave station 01 to 77(8) (at standard function)
Set top address of register link area on slave station 01 to 77(8) (at standard function)
Set top address of the relay link area on the master station
Set data link function (004002(8) =01(H))
Set number of connecting stations
/number of offset bytes (at save memory function)
Set top address of register link area on master stations
/number of off set bytes (save memory function)
[ 14 ]
[ 14 ]
[ 14 ]
[ 14 ]
[ 14 ]
[ 15 ]
[ 15 ]
[ 15 ]
[ 15 ]
[ 16 ]
[ 17 ]
⑦
⑧
⑨
⑩
⑪
V2
⑫
⑬
⑭
Whether the station number information should be output or not
① to ⑭ are equivalent to number of page 11-5, and 11-6.
Set number of sending bytes of the master station relay link
Set number of sending bytes of the slave station 01 to 77(8) relay link
Set number of sending bytes of the master station register link
Set number of sending bytes of the slave station 01 to 77(8) register link
Set connection status of slave stations
Set top address of flag area
Writing to EEPROM, start operation (007777(8) =81(H))
PC operation
End
[ 17 ]
11
[ 18 ]
[ 18 ]
[ 18 ]
[ 19 ]
[ 19 ]
[ 20 ]
[ 21 ]
[ 21 ]
11-13
Page 67

Indications in [ ] of each item mean as follows:
(Example) Stop operation of data link [HEX (hexadecimal), byte]
This means to set "stop operation" by hexadecimal and byte unit.
"Run" the slave station PC
Turn "ON" the power of the master station PC and connect support tools
11
Connect a support tool with the JW-21MN.
(JW-14JG)
<Usable support tools>
JW-14PG/13PG/12PG
JW-50SP
JW-50PG, Z-100LP2S
- For operation of each support tool, see the instruction
manual attached. The following describes an example
of JW-14PG's key operation.
Note: Setting parameters is unavailable by JW-2PG.
Stop PC operation
Turn to program mode (stop PC operation). Setting of parameters is only available when the PC is
in program mode.
Stop PC operation
Select parameter setting mode.
JW-21MN
Select initial mode
(Set parameter)
Stop operation of data link [HEX (hexadecimal), byte]
Write "00(H)" to parameter address 007777(8) and stop operation
of the JW-21MN. Setting of the parameter is only available
when the operation of the JW-21MN is stopped.
Screen display of JW-14PG
07775 HEX 00
Display the contents of parameter
address 007777 by hexadecimals.
Reference
Function of JW-14PG
Write
()
00
.
(H)
07776 HEX 1F
I PARAM.
>07777 HEX 00
• key: Changeover unit of figures
→HEX
- key: Byte display Changeover word display
(hexadecimal)
←→
→OCT
(octal)
→ DCM
(decimal)
→Bit pattern
007777(8)
0 0(H)
To the next page
11-14
Page 68

From the previous page
Set top address of the relay link area on the master station [OCT (octal), word]
Set file address(8) to parameter address 004000 to 004001(8).
- In case of setting コ0210 (file address 000210(8))
(Example for page 11-10)
Display the contents of address
004000
(8)
(Word display)
After converting to octal,
write the data 000210.
Data link function setting [HEX (hexadecimal), byte]
Set "01(H) (=001(8))" in parameter address 004002(8) and change to
"relay/register link" function.
Set number of connecting stations [DCM (decimal), byte]
Set the number of connecting stations (02 to 64(D)) including the master
station in the parameter address 004003(8) by octal.
- In case of setting in 3 sets (003(D)) (Example for page 11-10)
004000(8)
004001(8)
0 0 0 2 1 0 (8)
Screen display of JW-14PG
03774 0 000000
03776 0 000000
I PARAM.
>04000 0 000210
004002(8)
Screen display of JW-14PG
04000 HEX 880
04001 HEX 00F
I PARAM.
>04002 HEX 01
004003(8)
Screen display of JW-14PG
04001 DCM 000
04002 DCM 001
I PARAM.
>04003 DCM 003
0 1 (H)
0 0 3 (D)
11
Set top address of relay link area on slave station (01 to 77) (at standard function)/number of
offset bytes (at save memory function)
Set in parameter addresses 004004 to 004377(8). These top addresses should not overlap the
register link area, flag area, or any area used by other option module.
Slave
station
01
Slave
station
77(8)
004004
004005(8)
004006(8)
004007(8)
〜
004374(8)
004375(8)
004376(8)
004377(8)
(8)
Lower
Upper
00(H)
·
Lower
Upper
00(H)
·
In case of standard function, set top address by file address(8).
In case of save memory function, set number of offset bytes.
00(H): The top address is the same address of the master station
regardless of the value set at of 004004 to 004005
80(H): The top address is different from the address of the master
station (Offset is valid).
For the save memory function, set in 80(H).
00(H)
80(H)
- In case of setting コ0200 (file address 000200(8)) in parameter addresses 004004 to 004007(8) (slave
station 01) and set 4 (number of off set bytes) in 004010(8) to 004013(8) (slave station 02). (Example
for page 11-10.)
To the next page
(8).
11-15
Page 69

From the previous page
(Word display)
Slave
station
01
Convert to hexa-
decimal figures
(Word display)
Slave
station
02
(Byte display)
Convert to
octal figures
Write 000200(8) in parameter addresses 004004 to 004005(8).
Write 000(8) (=00(H)) in parameter address 004006(8).
Write 80(H) (the top address is not same as the
master station) in parameter address 004007(8).
Write 00004(D) (offset 4) in parameter addresses
004010 to 004011(8).
Write 00(H) in parameter address 004012(8).
Write 80(H) (offset valid) in parameter address 004013(8).
11
Screen display of JW-14PG
04011 HEX 00
04012 HEX 00
I PARAM.
>04013 HEX 80
Slave
station
01
Slave
station
02
004004(8)
004005(8)
004006(8)
004007(8)
004010(8)
004011(8)
004012(8)
004013(8)
000200(8)
00(H)
80(H)
000004(D)
00(H)
80(H)
Set top address of register link area on the master station
Set on the parameter address (004400 to 004403(8))
in the file address(8). These top addresses should
not overlap the relay link area, flag area, or any area
used by other option modules.
004400(8)
004401(8)
004402(8)
004403(8)
Lower
Upper
File number
Unused (00(H))
File address(8)
- In case of setting コ0400 (file address 000400(8)) in parameter addresses 004400 to 004403(8) and
set 0 (file number) in 004402(8). (Example for page 11-10).
Display the contents of parameter addresses 004400 to 004401(8)
Screen display of JW-14PG
04400 OCT 000
04401 OCT 001
I PARAM.
>04402 OCT 000
To the next page
Write 000400(8)
Write 000(8) (=00(H)) in parameter address 004402(8).
004400(8)
004401(8)
004402(8)
004403(8)
000400(8)
00
(H)
Unused (00(H))
11-16
Page 70

From the previous page
Set top address of register link area on slave station 01 to 77(8) (at standard function)/number
of offset bytes (at save memory function)
Set in parameter addresses 004404 to 004777(8). These top addresses should not overlap the
resister link area, flag area, or any area used by other option module.
Slave
station
01
Slave
station
77(8)
004404
004405(8)
004406(8)
004407(8)
〜
004774(8)
004775(8)
004776(8)
004777(8)
(8)
Lower
Upper
File number
·
〜
Lower
Upper
File number
·
In case of standard function, set top address by file address(8).
In case of save memory function, set number of offset bytes.
00(H): The top address is the same address of the master station
regardless of the values set at of 004404 to 004405
(8).
80(H): The top address is different from the address of the master
station (Offset is valid).
For the save memory function, set in 80(H).
00(H)
80(H)
- In case of setting 0 (the top address is コ0440, the same as the address of the master station) in
parameter addresses 004404 to 004407(8) (slave station 01) and the offset byte number 8 and
"offset valid" on the parameter address 004410 to 004413(8) (slave station 02). (Example for 11-10)
Slave
station
01
(Word display)
(Word display)
Write 0 in parameter 004004 to 004007(8) (same as
master station).
Write 00010(D) (offset 8) in parameter
Slave
station
02
(Word display)
(Byte display)
addresses 004410 to 004411(8).
Write 000(H) (file 0) in parameter address 004412(8).
Write 80(H) (offset valid) in parameter address 004413(8).
11
Screen display of JW-14PG
04011 HEX 00
04012 HEX 00
I PARAM.
>04013 HEX 80
Slave
station
01
Slave
station
02
004404(8)
004405(8)
004406(8)
004407(8)
004410(8)
004411(8)
004412(8)
004413(8)
0000(H)
00(H)
00(H)
00008(D)
00(H)
80(H)
Set the number of sending bytes of the master station relay link [DCM (decimal), word]
Set in parameter addresses 005000 to 005001(8).
005000(8)
005001(8)
Lower
Upper
These top addresses should not overlap the resister link area, or the flag area, or exceed the setting
range (0 to 256 bytes for each station, 256 bytes for all stations in total).
- In case of setting 8 bytes (Example for page 11-10)
Display the contents of parameter addresses 005000 to 005001(8)
Write 00008(D) after converting to decimal.
Screen display of JW-14PG
04774 D 00000
04776 D 00000
I PARAM.
>05000 D 00008
005000(8)
005001(8)
00008
(D)
To the next page
11-17
Page 71

From the previous page
Set the number of sending bytes of the slave station (01 to 77) relay link [DCM (decimal), word]
Set the number of sending bytes in decimal on the parameter addresses 005002 to 005177(8). (set in
each station, 2 bytes for each station).
These top addresses should not overlap the resister link area, or the flag area, or exceed the setting
range (0 to 256 bytes for each station, 256 bytes for all stations in total).
Slave
station 01
Slave
station 77(8)
(8)
005002
005003(8)
to
005176(8)
005177(8)
(8)
Lower
Upper
to
Lower
Upper
Slave
station 01
005002(8)
005003(8)
- In case of setting 4 bytes for parameter addresses 005002
to 005003(8) (slave station 01 ), and set 8 bytes for
parameter addresses 005004 to 005005(8) (slave station
Slave
station 02
005004(8)
005005(8)
02). (Example for page 11-10)
Slave station 01
Slave station 02
Write 00004(D) in parameter
addresses 005002 to 005003(8).
Write 00008(D) in parameter
addresses 005004 to 005005(8).
Screen display of JW-14PG
05000 D 00008
05002 D 00004
I PARAM.
>05004 D 00008
Set the number of sending bytes of the master station register link [DCM (decimal), word]
Set the number of sending bytes in decimal on the parameter addresses 005200 to 005201(8).
These top addresses should not overlap the relay link area or the flag area, or exceed the setting
value (0 to 2048 bytes for each station, 2048 bytes for all stations in total).
005200(8)
005201(8)
Lower
Upper
- In case of setting 16 bytes for parameter addresses 005200 to 005201(8). (Example for page 11-10)
11
Write 00016(D)
Display the contents of parameter addresses 005200 to 005201(8)
Screen display of JW-14PG
05174 D 00000
05176 D 00000
I PARAM.
>05200 D 00016
005200(8)
005201(8)
00004(D)
00008(D)
00016(D)
Set the number of sending bytes of the slave station (01 to 77) register link [DCM (decimal), word]
Set the number of sending bytes in decimal on the parameter addresses 005202 to 005377(8). (set in
each station, 2 bytes for each station).
These top addresses should not overlap the relay link area, or the flag area, or exceed the setting
range (0 to 2048 bytes for each station, 2048 bytes for all stations in total).
Slave
station 01
Slave
station 77(8)
005202(8)
005203(8)
to
005376
005377(8)
(8)
- In case of setting 8 bytes for parameter addresses 005202
Lower
Upper
to
Lower
Upper
Slave
station 01
005202(8)
005203(8)
00008(D)
to 005203(8) (slave station 01), and set 8 bytes for
parameter addresses 005204 to 005205(8) (slave station
02). (Example for page 11-10)
Slave station 01
Write 00008(D) in parameter
addresses 005202 to 005203(8).
Slave station 02
Write 00008(D) in parameter
addresses 005204 to 005205(8).
Slave
station 02
005204(8)
005205(8)
Screen display of JW-14PG
05200 D 00016
05202 D 00008
I PARAM.
>05204 D 00008
00008(D)
To the next page
11-18
Page 72

From the previous page
Set connection status of slave station [bit pattern, byte]
V2
Set "connected slave station as 01 and 02, output
error code" in paramenter address 007750(8).
007750
7 6 5 4 3 2 1 0
(8)
0 0 0 0 0 1 1 1
Display the contents of parameter address 007750(8)
Turn "ON" bit 0 (output error code)
Turn "ON" bits 1 and 2 (connects slave station 01 and
02)
Screen display of JW-14PG
07746□□□□□□□□
07747□□□□□□□□
I PARAM.
>07750□□□□□■■■
Set whether the station number information should be output or not
Set whether the station number information should be output or not on the parameter address
007763(8).
Whether the station
007763(8)
number information
should be output or not
00(H): Do not output
01(H): Output
The station number information is output on the next
byte of the flag area (24 bytes.)
This setting is valid when the parameter address is
007767(8) = 80(H).
11
To the next page
11-19
Page 73

From the previous page
Set top address of flag area
File number/flag: HEX (hexadecimal), byte
Set the top address of the flag area (24 bytes) in order to monitor the communication condition and PC
operation condition on the parameter address 007764 to 007767(8).
Flag area uses 24 bytes regardless number of connecting stations.
File address: OCT (octal), word
007764(8)
007765(8)
007766(8)
007767(8)
Lower
Upper
File number
00(H): Do not output flag
(H): Output flag
80
- In case of setting コ 0740 (file address 000740(8)), "output flag" in parameter address 007764 to
007767(8). (Example for page 11-10)
(Word display)
Write "000740(8)" in parameter addresses 007764 to 007765(8).
Write 000(8) (=00(H)) in parameter address 007766(8).
(Byte display)
11
Covert to
hexadecimal
figures
Screen display of JW-14PG
07765 HEX 01
07766 HEX 00
I PARAM.
>07767 HEX 80
Write 80(H) in parameter address 007767(8).
007764
007765
007766
007767
(8)
(8)
(8)
(8)
000740
00
(H)
80
(H)
(8)
To the next page
11-20
Page 74

From the previous page
Writing to the EEPROM of the JW-21MN, start operation [HEX (hexadecimal), byte]
Write "81(H)" into parameter address 007777(8) and write the set parameter contents into the EEPROM
of the JW-21MN. Then start the JW-21MN. After starting operation, the setting value changes to "01(H)."
Setting
value
(H)
0 0
0 1
007777(8)
8 0
8 1
0 8
Display the contents of address
007777(8)
Stop operation of the JW-21MN
Start operation of the JW-21MN
Writing to the EEPROM of the JW-21MN, stop operation
Writing to the EEPROM of the JW-21MN, start operation
Initialize setting values of parameter addresses
004000 to 007777
Write 81(H)
Contents
(8)
Screen display of JW-14PG
07775 HEX 01
07776 HEX 00
I PARAM.
>07777 HEX 80
- Writing time to EEPROM is approximately 0.7 sec. When any error is found for parameter settings, the
JW-21MN lights the error code (6F(H)) by the indication lamp. To recover from this condition, see
pages 16-2.
- Written contents into the EEPROM are automatically written to the RAM of the JW-21MN when turning
ON the power of the PC. At reading, the PC checks BCC and compares BCC check code of the
parameter memory address (007776(8)). When an error is found, the JW-21MN lights the error code
(6E(H)) by the indication lamp.
11
PC operation
Turning a master station PC to monitor or change mode (PC operation).
Monitor mode
Change mode
Screen display of JW-14PG
C00000
>
11-21
Page 75

11-4 Setting slave station parameters (common for all slave stations)
When the JW-21MN is used as a slave station, set the following items for parameters.
[1] Setting contents
Corresponding
signs on pages
(H)
)
(H)
11-7 to 11-9
h
i
e
*1
*2
Setting item
Number of receiving bytes of
relay link in save memory
①
function
Number of receiving bytes of
register link in save memory
②
function
Whether the station number
③
information should be output
or not
Top address of flag area
(communication and PC
④
operation condition monitor
flag)
- Start/stop operation of the
JW-21MN
⑤
- Writing to EEPROM of the
JW-21MN
V2
V2
V2
Address
007720
007721
007722
007723
007763
007764
007765
007766
007767
007777
(8
)
Initial
value
00
00
00
E0
01
00
80
01
(H)
Set the number of bytes by decimals. (0 to 256)
- If 0 is set, the number of bytes will be the same
as the number of the sending bytes which is set
in the master station
Set the number of bytes by decimals. (0 to 2048)
- If 0 is set, the number of bytes will be the same
as the number of the sending bytes which is set
in the master station
Store the number of own statin in the data memory
when setting on 01
flag area of 24 bytes, valid when 007767
Lower of file address
Upper of file address
File number
Flag output (Yes: 80
00
(H)
: Stop operation
01
(H)
: Start operation
80
(H)
: Writing to the EEPROM, stop operation
81
(H)
: Writing to the EEPROM, start operation
Contents
(H)
.
(storage area of 1 byte follows
(8)
is 80
(H)
No: 00
Initial value: 01E0
000740
(H)
)
↓
(8)
(コ0740)
1
to
1
to
1
toen
hn
in
11
08
(H)
: Parameter initializing
*1: Set only when the memory capacity save function is used.
*2: "Whether the station number information should be output or not" is a unique function of the
JW-21MN.
- Parameter addresses other than above mentioned are reserved areas and prohibited to be
changed.
-When any slave stations are except JW-21MN, see the instruction manual of each device.
11-22
Page 76

[2] Setting range of flag area
Flag areas are allocated by 24 bytes from each top address. For setting the top address of flag area,
use the file address(8) allocated throughout the memory area and set within the setting range shown
below.
•When PC is JW20/JW20H
File
address
000000
000377
000400
000677
000700
000777
001000
001577
001600
001777
002000
003777
004000
004777
005000
005777
015000
015777
(8)
I/O Relay
Auxiliary relay
Latched relay
General
purpose relay
Time limited
contact point of
TMR/CNT/MD
Current value
of
TMR/CNT/MD
Register
Register
Register
Byte
address
コ0000
コ0377
コ0400
コ0677
コ0700
コ0777
コ1000
コ1577
b0000
b1777
09000
09777
19000
19777
99000
99777
address
000000
001577
001600
001777
002000
003777
004000
Flag area setting range
007777
010000
015777
016000
025777
026000
027777
030000
035577
035600
035777
• When PC is JW30H
File
(8)
Relay
Time limited
contact point of
TMR/CNT
0000 to 0777
Current value of
TMR/CNT/MD
0000 to 0777
Register
Register
Register
Current value of
TMR/CNT/MD
1000 to 1777
Relay
Time limited
contact point of
TMR/CNT
1000 to 1777
address
コ0000
コ1577
b0000
b1777
09000
39777
49000
99777
E0000
E7777
b2000
b3777
コ2000
コ7577
Byte
Flag area setting range
11
000000
037777
000000
177777
000000
177777
000000
177777
000000
177777
000000
177777
File 1
File 2
File 3
File 10(H)
File 14(H)
File 2C(H)
*1
*2
*3
*4
Flag area setting range
*1: When JW-32CUH/H1 is used (JW-32CUH1:
000000 to 177777 or 000000 to 077777).
*2: When JW-33CUH/H1 is used.
*3: When JW-33CUH2 is used.
*4: When JW-33CUH3 is used.
Flag area setting range of data link (standard function) is same as data link (save memory function).
11-23
Page 77

[3] Setting procedure
[ ] : See page in chapter 11
V2
①
V2
②
When not using
save memory function
③
Whether the station number information should be output or not
V2
④
⑤
① to ⑤ are equivalent to number of page 11- 22.
Turn "ON" the power of slave station PC
Connect support tools
Stop PC operation
Stop operation of data link (007777(8) =00(H))
Set number of receiving bytes of relay link in save memory function
Set number of receiving bytes of register link in save memory function
Set top address of flag area
Writing to EEPROM, start operation (007777(8) =81(H))
PC operation
End
[ 25 ]
[ 25 ]
[ 25 ]
[ 25 ]
[ 26 ]
[ 26 ]
[ 26 ]
[ 27 ]
[ 28 ]
[ 28 ]
11
11-24
Page 78

Indications in [ ] of each item mean as follows:
(Example) Stop operation of data link [HEX (hexadecimal), byte]
This means to set "stop operation" by hexadecimal and byte unit.
Turn "ON" the power of slave station PC
Connect support tools
(JW-14JG)
Connect a support tool with the JW-21MN.
<Usable support tools>
JW-14PG/13PG/12PG
JW-50SP
JW-50PG, Z-100LP2S
JW-21MN
- For operation of each support tool, see the instruction
manual attached. The following describes an example
of JW-14PG's key operation.
Note: Setting parameters is unavailable by JW-2PG.
Stop PC operation
Turn to program mode (stop PC operation). Setting of parameters is only available when the PC is
in program mode.
Stop PC operation
Select parameter setting mode.
11
Select initial mode
(Set parameter)
Stop operation of data link [HEX (hexadecimal), byte]
Write "00(H)" to parameter address 007777(8) and stop operation
of the JW-21MN. Setting of the parameter is only available
when the operation of the JW-21MN is stopped.
Screen display of JW-14PG
Display the contents of parameter
address 007777 by hexadecimals.
Reference
Function of JW-14PG
(
Write
00
(H).
)
07775 HEX 00
07776 HEX 1F
I PARAM.
>07777 HEX 00
- key: Changeover unit of figures
HEX (hexadecimal)
→
- key: Byte display Changeover word display
←→
OCT (octal)
→
DCM (decimal)
→
007777(8)
Bit pattern
→
0 0(H)
To the next page
11-25
Page 79

From the previous page
"Only when using save memory function"
V2
Set the number of sending bytes of the relay link in save memory function [DCM (decimal), word]
Set the number of sending bytes in decimal on the parameter address 007720 to 007721(8).
11
007200(8)
007721(8)
Lower
Upper
- In case of setting 4 bytes (Example for page 11-10)
Display the contents of parameter addresses 007720 to
007721(8)
Write 00004(D) after converting to decimal
Screen display of JW-14PG
07714 D 00000
V2
07716 D 00000
I PARAM.
>07720 D 00004
"Only when using save memory function"
Set the number of receiving bytes of register link in save memory function [DCM (decimal), word]
007720(8)
007721(8)
00004(D)
Set the number of sending bytes in decimal on the parameter address 007722 to 007723(8).
(8)
007722
007723(8)
Lower
Upper
- In case of setting 8 bytes for parameter addresses 007722 to 007723(8). (Example for page 11-10)
Display the contents of parameter addresses 007722 to
007723(8)
Write 00008(D)
Screen display of JW-14PG
07716 D 00000
07720 D 00000
I PARAM.
>07722 D 00008
007722(8)
007723(8)
00008(D)
V2
Set whether the station number information should be output or not
Set whether the station number information should be output or not on the parameter address
007763(8).
Whether the station
007763(8)
number information
should be output or not
00(H): Do not output
01(H): Output
The station number information is output on the next
byte of the flag area (24 bytes.)
This setting is valid when the parameter address is
007767(8) = 80(H).
To the next page
11-26
Page 80

From the previous page
Set top address of flag area
File number/flag: HEX (hexadecimal), byte
Set the top address of the flag area (24 bytes) in order to monitor the communication condition and PC
operation condition on the parameter address 007764 to 007767(8).
Flag area uses 24 bytes regardless number of connecting stations.
File address: OCT (octal), word
007764
007765
007766
007767
(8)
(8)
(8)
(8)
Lower
Upper
File number
00
(H)
: Do not output flag
(H)
: Output flag
80
- In case of setting コ 0740 (file address 000740(8)), "output flag" in parameter address 007764 to 007767(8).
(Slave station 01 of page 11-10)
(Word display)
Write "000740(8)" in parameter addresses 007764 to 007765(8).
Write 000(8) (=00(H)) in parameter address 007766(8).
Covert to
hexadecimal
figures
Screen display of JW-14PG
07765 HEX 01
07766 HEX 00
I PARAM.
>07767 HEX 80
Write 80(H) in parameter address 007767(8).
007764
007765
007766
007767
(8)
(8)
(8)
(8)
000740
00
80
(8)
(H)
(H)
11
To next page
11-27
Page 81

From the previous page
Writing to the EEPROM of the JW-21MN, start operation [HEX (hexadecimal), byte]
11
Write "81
(H)" into parameter address 007777(8) and write the set parameter contents into the EEPROM
of the JW-21MN. Then start the JW-21MN. After starting operation, the setting value changes to "01(H)."
Setting
(H)
value
0 0
0 1
007777(8)
8 0
8 1
0 8
Display the contents of address
007777(8)
Stop operation of the JW-21MN
Start operation of the JW-21MN
Writing to the EEPROM of the JW-21MN, stop operation
Writing to the EEPROM of the JW-21MN, start operation
Initialize setting values of parameter addresses
004000 to 007777
Write 81(H)
Contents
(8)
Screen display of JW-14PG
07775 HEX 00
07776 HEX 36
I PARAM.
>07777 HEX 81
- Writing time to EEPROM is approximately 0.7 sec. When any error is found for parameter settings, the
JW-21MN lights the error code (6F(H)) by the indication lamp. To recover from this condition, see
pages 16-2.
- Written contents into the EEPROM are automatically written to the RAM of the JW-21MN when turning
ON the power of the PC. At reading, the PC checks BCC and compares BCC check code of the
parameter memory address (007776(8)). When an error is found, the JW-21MN lights the error code
(6E(H)) by the indication lamp.
PC operation
Turning a slave station PC to monitor or change mode (PC operation).
Monitor mode
Change mode
Screen display of JW-14PG
C00000
>
11-28
Page 82

Chapter 12: Errors and Countermeasures
The operating condition of the JW-21MN can be monitored using its indication lamps, flags, and the
system memory of a PC.
12-1 Indication lamps
LED
name
Lights during data link operation
CM
Lights while sending data
SD
Lights while receiving data
RD
Lights when detecting carrier
CD
Lights when turning “ON” the termination resistance
LT
Lights during testing (TEST)
T
COM.E
Lights at a communication error
(COM. E)
UNT.E
Lights at time up of the watchdog timer
LED "1" to "80" indicate error codes when an error occurs. Error codes, their
causes, and measures are as shown in the table below.
LED name
4
8
10
20
40
80
○
○
○
○
○
○
○
○
○
○
○
○
○
○
○
○
○
○
○
○
○
○
●
●
○
○
○
○
○
○
○
○
○
○
○
○
○
○
●
●
●
●
●
○
○
○
○
○
○
○
○
○
●
○
○
○
○
○
○
●
○
○
○
●
○
●
○
●
●
●
○
●
○
○
●
○
○
○
●
○
○
○
●
○
○
○
●
○
○
●
●
○
○
●
●
○
○
○
●
●
○
○
●
○
●
●
●
○
●
●
●
○
○
○
○
○
to to
●
●
●
●
○
●
●
○
○
●
○
●
○
○
●
●
●
●
○
○
●
●
○
●
2
Details
1
●
○
●
○
●
○
○
●
○
●
○
●
○
●
○
○
○
●
●
●
Measure
- Check disconnection of the communication
cable
- Check the set contents of switches
- Cheek the set contents of parameters
- Check the power voltage of PC
Replace the JW-21MN
Error
code
(DEC)
01
ROM error, upper CPU
02
RAM error, upper CPU
03
2 port RAM error against PC, upper CPU
04
2 port RAM error against communication CPU, upper CPU
11
ROM error, communication CPU
12
RAM error, communication CPU
18
Communication LSI error, communication CPU
1F
No response, communication CPU
20
More than one token detected
21
Doubled address detected
22
Fault of sending section
23
Token does not return within the rated interval
2A
Over flow of receiving buffer.
2B
Flame length error
30
EEPROM error
*60
Switch setting error
*6E
BCC error
6F
Parameter setting error
*
C1
Communication error
- After converting into octal, the lower two digits
represent the slave station number of the current
*
FF
error. (Ex. C1(H) = 301(8) = slave station 01)
Cause
ME-NET
COMMSDRDCDLTTCOM.E
80 40 20 10 8 4 2 1
Measure
Replace the JW-21MN
- Check the communication
cable
-Check for doubled allocation
of station number
- Replace the JW-21MN
Check the parameter setting
Replace the JW-21MN
Check the communication cable
Check the communication cable
Replace the JW-21MN
Check the switch setting
Check the parameter setting
Check the communication cable
and slave module
UNT.E
12
● : ON, ○ : OFF
* Error code 60(H), 6E(H), C1 to FF(H) are special error codes unique to the JW-21MN.
Other codes are error codes specified by the ME-NET.
Prior to displaying the error code C1 to FF(H), the setting of the parameter addresses
007750 to 007757(8) is required. (See page 16-12.)
12-1
Page 83

12-2 Flag
①
通信監視
②
運転状態
③
運転状態
Flag area is 24 bytes from the "flag top address" set in the master station/slave station parameters.
[1] Flag table [ In case of flag top address is コ 0740 (initial value) ]
12
コ0740
コ0741
コ0742
コ0743
コ0744
コ0745
コ0746
コ0747
コ0750
コ0751
コ0752
コ0753
コ0754
コ0755
コ0756
コ0757
コ0760
コ0761
コ0762
コ0763
コ0764
コ0765
コ0766
コ0767
Slave station 01(8)
子局01
7 6543210
07 06 05 04 03 02 01 00
17 16 15 14 13 12 11 10
27 26 25 24 23 22 21 20
37 36 35 34 33 32 31 30
47 46 45 44 43 42 41 40
57 56 55 54 53 52 51 50
67 66 65 64 63 62 61 60
77 76 75 74 73 72 71 70
07 06 05 04 03 02 01 00
17 16 15 14 13 12 11 10
27 26 25 24 23 22 21 20
37 36 35 34 33 32 31 30
47 46 45 44 43 42 41 40
57 56 55 54 53 52 51 50
67 66 65 64 63 62 61 60
77 76 75 74 73 72 71 70
07 06 05 04 03 02 01 00
17 16 15 14 13 12 11 10
27 26 25 24 23 22 21 20
37 36 35 34 33 32 31 30
47 46 45 44 43 42 41 40
57 56 55 54 53 52 51 50
67 66 65 64 63 62 61 60
77 76 75 74 73 72 71 70
(8)
親局
Master station
Communication monitor flag
①
子局70
Slave station 70(8)
親局
Master station
子局01
Slave station 01(8)
Operation condition
②
監視フラグ〔1〕
monitor flag [1]
Slave station 70(8)
子局70
親局
Master station
Slave station 01(8)
子局01
Operation condition
③
監視フラグ〔2〕
monitor flag [2]
フラグ
(8)
(8)
(8)
(8)
Remark
- Even a slave station can monitor 24 bytes of flag.
12-2
Slave station 70(8)
子局70 (8)
Page 84

[2] In the case of a master station
(1) Communication monitor flag
This flag is used to monitor the communication condition with other stations. Non-connected station
keeps this flag as "OFF."
Flag
Own
station
flag
(master
station)
Flag
Other
station’s
flag
(01 to 77)
Condition for flag operation
When the parameter address 007777
and the master station is operating normally.
When the parameter address 007777(8) of the master station is set to "00(H)."
Improper setting of parameter, BCC check error, or other errors.
Condition for flag operation
Normal communication with slave stations.
Stopped communication or unable to
communicate with slave stations.
Communication monitor flag (1) of the master
station is turned "OFF."
(8) of the master station is set to "01(H),"
Flag operation
ON
OFF
Specific
slave
station
All slave stations
Flag operation
ON
OFF
The master station periodically executes communication recovery operation with the communication
error slave station. When the error situation is recovered, the master station returns to normal
communication.
(2) Operation condition monitor flag [1]
This flag is used to monitor the operation condition of slave stations when the communication with
each slave station is normal.
Non-connected station keeps this flag as "OFF."
Flag
Own
station flag
(master
station)
Condition for flag operation
Communication monitor flag (1) of the master station is turned "ON."
Communication monitor flag (1) of the master station is turned "OFF."
Flag operation
*ON
OFF
Flag
Other
station’s
flag
(01 to 77)
Condition for flag operation
Slave station is operating.
Slave station stops operation (not by an error cause).
Communication monitor flag (1) of the master
station is turned "OFF."
Slave station that communication monitor flag (1)
is turned to "OFF."
Flag operation
ON
OFF
Specific
slave
station
All slave stations
Not specified
* Even if a master station PC has stopped operation normally or by an error, the JW-21MN turns
"ON" this flag while communicating.
(3) Operation condition monitor flag [2]
This flag is used to monitor the abnormal stop of each slave station when the communication with
each slave station is normal.
Non-connected station keeps this flag as "OFF."
Flag
Own
station flag
(master
station)
Flag
Other
station’s
flag
(01 to 77)
Condition for flag operation
Communication monitor flag (1) of the master station is turned "ON."
Communication monitor flag (1) of the master station is turned "OFF."
Condition for flag operation
Each slave station is normal.
Any of the slave stations is faulty (caused to be
stopped abnormally).
Communication monitor flag (1) of the master station
is turned "OFF."
Slave station that communication monitor flag (1) is
turned to "OFF."
Flag operation
*ON
OFF
Flag operation
Specific
ON
slave
station
OFF
All slave
stations
Not specified
* Even if a master station PC has stopped operation normally or by an error, the JW-21MN turns
"ON" this flag while communicating.
12
12-3
Page 85

[3] In the case of slave station 01 to 77(8)
(1) Communication monitor flag
This flag is used to monitor the communication condition with other stations. Non-connected station
keeps this flag as "OFF."
Flag
Own
station
flag
Flag
Other
station’s
flag
Condition for flag operation
When the parameter address 007777(8) of each slave station is set to
"01(H)," and at communicating with a master station normally.
When the parameter address 007777
When link start switch "00
Normal communication with each station.
Stopped communication or unable to
communication with each station.
Communication monitor flag (1) of the master
station is turned "OFF."
(H)" of the master station is OFF.
(8) of each slave station is "00(H)."
Flag operationCondition for flag operation
ON
Specific
OFF
station
All stations
Flag operation
ON
OFF
(2) Operation condition monitor flag [1]
This flag is used to monitor the operation condition of each station when the communication with
each station is normal.
Non-connected station keeps this flag as "OFF."
Flag
Own
station
flag
Flag
Other
station’s
flag
Condition for flag operation
Communication monitor flag (1) of the own station is turned "ON."
Communication monitor flag (1) of the own station is turned "OFF."
Condition for flag operation
Each station is operating.
Each station stops operation (not by an error cause).
Communication monitor flag (1) of the own station
is turned "OFF."
Slave station that communication monitor flag (1)
is turned to "OFF."
Flag operation
*ON
OFF
Flag operation
ON
Specific
station
OFF
All slave
stations
Not specified
12
* Even if the own station PC has stopped operation normally or by an error, the JW-21MN turns
"ON" this flag while communicating.
(3) Operation condition monitor flag [2]
This flag is used to monitor the abnormal stop of each station when the
communication with each station is normal.
Non-connected station keeps this flag as "OFF."
Flag
Own
station
flag
Flag
Other
station’s
flag
Communication monitor flag (1) of the own station is turned "ON."
Communication monitor flag (1) of the own station is turned "OFF."
Each station is normal.
Any of the stations is faulty (caused to be stopped
abnormally).
Communication monitor flag (1) of the own station
is turned "OFF."
Slave station that communication monitor flag (1) is
turned to "OFF."
Condition for flag operation
Condition for flag operation
Flag operation
*ON
OFF
Flag operation
ON
Specific
OFF
station
All stations
Not specified
*Even if a own station PC has stopped operation normally or by an error, the JW-21MN turns "ON"
this flag while communicating.
12-4
Page 86

[4] Monitor operation condition by each station PC
07 06 05 04 03 02 01 00
77 76 75 74 73 72 71 70
to to to to to to to to
07 06 05 04 03 02 01 00
77 76 75 74 73 72 71 70
to to to to to to to to
07 06 05 04 03 02 01 00
77 76 75 74 73 72 71 70
to to to to to to to to
Slave station 01
Slave station 01
Slave station 01
Communication monitor
Operation condition (1) Operarion condition (2)
0 7 4 0 1
0 7 5 0 1
0 7 6 0 1
Slave station 01
normal operation
0 7 4 0
0 7 4 7
0 7 5 0
0 7 5 7
0 7 6 0
0 7 6 7
to
to
to
コ
コ
コ
コ
コ
コ
(1) Communication monitor flag
Slave station 70
(8)
(2) Operation condition monitor flag [1]
(3) Operation condition monitor flag [2]
Master station
Flag top address
7 6 5 4 3 2 1 0
By creating a program having the flags shown below in each station's PC, the JW-21MN can monitor
the operation condition of each station’s PC.
[Ex.: In this case the flag top address is 0740]
12
12-5
Page 87

12-3 Storage of error code
When an error occurs in the JW-21MN, it stores the occurred error’s code to system memory #160,
#170 and error history storage register of each station's PC.
Error
code
(HEX)
01 ROM error, upper CPU
02 RAM error, upper CPU
2 port RAM error against PC, upper CPU
03
04 2 port RAM error against
communication CPU, upper CPU
11 ROM error, communication CPU
12 RAM error, communication CPU
18
Communication LSI error, communication CPU
1F No response
20 More than one token detected
21 Doubled address detected
22 Fault of sending section
Token does not return within the rated interval
23
2A Over flow of receiving buffer.
2B Flame length error
30 EEPROM error
60 Switch setting error
6E BCC error
6F Parameter setting error
C1 Communication error
-
After converting into octal, the lower two digits
to
represent the slave station number of the current
error. (Ex. C1(H) = 301(8)= slave station 01)
FF
Cause
Error code stored to system memory
#160
#170
Replace the JW-21MN
53(H)
- Check the communication
cable
- Check for doubled allocation
of station number
1F (H)
20 (H)
- Replace the JW-21MN
Check the parameter setting
21 (H)
22 (H)
23 (H)
Replace the JW-21MN
Check the communication cable
2A (H)
2B (H)
30 (H)
60 (H)
6E (H)
Check the communication cable
Replace the JW-21MN
Check the switch setting
Check the parameter setting
6F (H)
C1 (H)
to
Check the communication cable
and slave module
FF (H)
Measure
12
- In some cases, error code 23(H) or 2A(H) is stored when inputting power. This is not an error.
- Error code 60(H), 6E(H), C1 to FF(H) are special error codes unique to the JW-21MN.
12-6
Page 88

(1) System memory #170 to 177 (option module error code)
The error code stored in the system memory #170 is shifted to #170 to #177 one after the other as
new errors occur. Thus, the system memory can store up to 8 errors. When the PC is operating by
RAM, these error codes do not disappear even after turning OFF the power.
The contents of system memory #170 to #177 are kept storing after the JW-21MN recovers from the
error.
#177 #176 #175 #174 #173 #172 #171 #170
6E
Occurrence of BCC error
Disappear
6E 6F
Occurrence of parameter
setting error
(2) System memory #160 to 167 (self diagnosis error code)
When any of errors "01(H)" to "18(H)" occurs among the error codes listed on the previous page, the
JW-21MN stores error code "53(H)" (optional error) in the system memory #160. It does not store any
error code in system memory #170.
(3) System memory #150 (monitor error switch number)
When you monitor the system memory #050 at the occurrence of error code "53(H)," you can check
the module No. switch setting value of the error causing option module with a bit pattern. (At normal:
OFF, at error: ON)
76543210
#050
Module No. switch
setting value
6543210
[Ex.] In the case below, an option module having the module No. switch setting value as "2" is an
error.
7654321 0
#050
00100000
12
12-7
Page 89

(4) Error history
When the JW-21MN has errors, it stores them in an error history register. The storage area is
specified using the module No. switch setting value.
Module No. switch
setting value
Error history storage register
JW20/JW20H JW30H *1
0 E1400 to E1577 E7400 to E7577
1 E1200 to E1377 E7200 to E7377
2 E1000 to E1177 E7000 to E7177
3 E0600 to E0777 E6600 to E6777
4 E0400 to E0577 E6400 to E6577
5*2
6*2
7to9
E0200 to E0377 E6200 to E6377
E0000 to E0177 E6000 to E6177
Prohibited setting
*1: When the JW30H is used,
system memory should be set
to #210 = 002(8).
*2: Setting the module No. switch
to "5" or "6" is only valid when
the model switch on the JW21MN is set to "2."
The storage area for the error history (128 bytes) is divided into 8 sections (16 bytes each). The
JW-21MN stores up to 8 errors, in the order they occurred. If a ninth error occurs, the oldest error
data will be deleted.
Register
address *3
E1200
E1220
E1240
E1260
E1300
E1320
E1340
E1360
E1377
Error history storage area
1st error
0 0
0 0
0 0
0 0
0 0
0 0
0 0
2nd error
1st
0 0
0 0
0 0
0 0
0 0
0 0
1st error is deleted.
9th error
8th
7th
6th
5th
4th
3th
2nd
*3: The register address on the left is correct when the
JW20H is used and the Module No. switch is set to
"1."
12
Details of the data for each error (16 bytes) are as follows.
Address (*4) Details
n+0 (E1200) Second
When a JW-21CU/31CUH/31CUH1 is
n+1 (E1201) Minute
n+2 (E1202) Hour
n+3 (E1203) Date
n+4 (E1204) Month
n+5 (E1205) Year
Date and time
error occurred
used for the control module of a
JW20/20H/30H, ignore data from bytes 1
to 7.
(Since the JW-21CU/31CUH/31CUH1 do
not have a clock function, they cannot
store this data correctly.)
n+6 (E1206) Day of week
n+7 (E1207) Error code
JW-21MN
error code
- Stores the error code (value of #170).
- See page 12-6.
n+8 (E1210)
n+9 (E1211)
- When the same error occurs, the JW21MN will count up to 377
n+10 (E1212)
Number of errors
that have occurred
000 to 377
400
(8)
377
occurred is the date and time the error
occurred for the first time.)
n+11 (E1213)
to
n+15 (E1217)
*4: When the top address is "E1200."
Remarks
(8)
. From error
(8)
, the number of errors will stay at
(8)
. (The date and time the error
12-8
Page 90

Chapter 13: Replacement of the JW-21MN
When you want to change the JW-21MN due to an operation fault (lighting UNT.E lamp) etc., follow the
procedures below.
Make sure to store the set parameters onto a floppy diskette using a support tools. (See
the next page)
Operation procedure
Start
Turn "OFF" the JW20/JW20H/JW30H's power
Remove the cables from the JW-21MN
Loosen one retention screw and
Remove the JW-21MN from the rack panel
take out from the rack panel.
Set the switches of the new JW-21MN
Install the new JW-21MN
Connect the cables to the new JW-21MN
Turn "ON" the JW20/JW20H/JW30H’s power
Load the parameters.
End
(See chapter 11)
(See page 5-1)
13
Load the parameters stored in the
floppy diskette into the new JW-21MN
and write in the EEPROM, then start
operation. For details, see chapter 14.
13-1
Page 91

Chapter 14: Support Tools
The following support tools are available to record (store), and load the contents of the parameter
memory.
(Make sure to save the set parameters onto a floppy diskette.)
Model name
Ladder software (JW-92SP, JW-50SP) 3.5-inch 2DD/2HD, 5-inch 2DD/2HD
Multipurpose programmer (JW-50PG) 3.5-inch 2DD
Ladder processor II (Z-100LP2S) 3.5-inch 2DD
Record and load by ladder software (JW-92SP, JW-50SP)
<Record>
(1) Stop operation of the JW-21MN
Select "PC TRANS."
Select "Read."
Applicable floppy diskettes
Select "DL. M. stn. PARAM." or "DL. S. stn.
PARAM."
When the connected JW-21MN is master station, select "DL.
M. stn. PARAM." When the connected JW-21MN is slave
station, select "DL. S. stn. PARAM."
After selecting "PC stop," press the "Enter"
key.
(2) Record onto the personal computer
After stopping operation, record the parameters of the JW-21MN onto the memory of the personal computer.
Select "Read out PARAM" and press the "Enter" key.
Start reading to memory of the personal computer.
(3) Start operation of the JW-21MN
After recording the parameters onto the personal computer, start operation of the JW-21MN.
Select "Start operation."
Start operation of the JW-21MN
(4) Record onto a floppy diskette
Write (record) the memory contents of the personal computer onto a floppy diskette.
Select "FD TRANS."
JW-50SP
JW-21MN
Connection cable
JW-22KC/24KC
14
Select "Save."
Select "DL. M. PARAM." or "DL. S. PARAM."
When the memory contents of the personal computer are for a master station, select
"DL. M. PARAM." When the memory contents of the personal computer are for a
slave station, select "DL. S. PARAM."
Input a file name to record.
Input comments.
Press the "Enter" key.
Start recording onto the floppy diskette.
14-1
Page 92

<Load>
(1) Load to the personal computer
Load the contents of the floppy diskette into the memory of the personal computer.
Select "FD TRANS."
Select "Load."
Select a file name.
14
Press the "Enter" key.
Start loading into the personal computer.
(2) Stop operation of the JW-21MN
After stopping operation, load the memory contents of the personal computer into the JW-21MN.
Select "PC TRANS."
Select "Write."
Select "DL M. stn. PARAM." or "DL S. stn.
PARAM."
When the connected JW-21MN is a master station, select "DL M. stn.
PARAM." When the connected JW-21MN is a slave station, select "DL S. stn.
PARAM."
After selecting "PC stop," press the "Operation
stops" key.
(3) Load to the JW-21MN
After stopping operation, load the memory contents of the personal computer into the JW21MN.
After selecting "Parameter writing," press
the "Enter" key.
JW-50SP
JW-21MN
Start loading into the JW-21MN.
(4) Start operation of the JW-21MN
After loading the parameters from the personal computer, start operation of the JW-21MN.
After selecting "Start: write EEPROM" or
"Execution start," press the "Enter" key.
Start operation of the JW-21MN
14-2
Page 93

Chapter 15: Specifications
15-1 General specifications
Item Specification
New satellite JW20/JW20H (JW-21CU/22CU)
Applicable PC
Installing slot
Storage temperature
Ambient temperature
Ambient humidity
Vibration resistance
Shock resistance
Internal power consumption
Weight
Accessory
15-2 Communication specifications
Item Specification
New satellite JW30H (JW-31CUH/32CUH/33CUH,
JW-31CUH1/32CUH1/33CUH1/33CUH2/33CUH3)
Basic rack panel of JW20/JW20H/JW30H
−20 to +70℃
0 to +55℃
35 to 90%RH (without condensation)
JIS-C-0911 equivalent (X, Y, Z, 2 hours each)
JIS-C-0912 equivalent
Approx. 360 mA
Approx. 285 g
One instruction manual
Communication method
Transmission rate
Transmission format
Coding method
Check method
Sync method
Modulation method
Communication
network system
Connectors
Transmission line
Token/passing
1.25M bits/s
JIS X-5014 high level data link control procedure
Compatible to (HDLC) frame configuration
NRZI (Non Return To Zero Inverted)
CRC
Bit synchronous
Continuous frequency phase modulation (FSK)
Bus type
Module side: BNC receptacle (jack)
Line side: BNC plug
Coaxial cable: 5C-2V JIS · C-3501
Characteristic impedance: 75 ohm
Total cable distance: 1km max.
15
15-1
Page 94

15-3 Data link specifications
Both standard function and save memory function are available. Select by the mode switch on the
JW-21MN.
(1) Standard function
Item
Amount of
connectable stations
Link area
Relay
link
Register
link
Flag area
Total number of links
Transmit points per
station
Communication mode
(2) Save memory function
Specifications
64 stations max.
JW20/JW20H JW30H
コ0000 to コ1577
09000 to 39777
コ0000 to コ1577
09000 to 99777
Set to the parameters of the JW-21MN, (Initial value: コ740)
Relay link : 2048 points max.
Register link: 2048 bytes max.
Max. 1024 bytes including relay link and register link
N: M communication
コ0000 to コ1577, コ2000 to コ7577
b0000 to b1777, b2000 to b3777
09000 to 99777, E0000 to E7777
File 1, 2 (When JW-32CUH1/33CUH1/33CUH2/33CUH3 is used)
File 3 (When JW-33CUH1/33CUH2/33CUH3 is used)
File 10 to 14 (When JW-33CUH2/33CUH3 is used)
File 15 to 2C (When JW-33CUH3 is used)
15
Item
Amount of connectable
stations
Link area
Flag area
Total number of links
Sending points per
station
Communication mode
Specifications
64 stations max.
Relay link : コ1000 to コ1477
(Select by the module No. switch)
Register link : 09000 to 49777
(Select by the module No. switch)
Set to the parameters of the JW-21MN
(Initial value: コ740)
Relay link : 2048 points max.
Register link: 2048 bytes max.
Relay link : 256 points max.
Register link: 256 bytes max.
N: M communication
15-2
Page 95

15-4 Computer link specifications
Item
Link station
Communication data
64 stations max.
Maximum 1024 bytes per command
size
Communication
According to the host computer command
control
Data memory read/write
Program memory read/write
Control functions
PC control
Extension function by optional command
[Outside dimensional drawings]
8
7
9
6
0
5
1
4
2
3
8
8
7
7
9
9
6
6
0
0
5
5
1
1
4
4
2
2
3
3
130
Specifications
(Unit: mm)
Basic rack
panel
110
35 120
15
15-3
Page 96

Chapter 16: Appendix
( ) ( ) ( ) ( ) ( )
16-1 Maintenance and check
Check wiring, installation, and switch settings.
System configuration
Check item
Not parallel with or proximate to high voltage lines
or strong power lines.
Branch lines (drop cable) are within 400 mm.
Total length is less than 1 km.
No damage or breaks in cables.
Connectors are securely assembled.
Communication cable
Connectors are securely connected and locked.
Insulation covers are put on connectors.
Securely tighten the module retention screws.
A ground line is connected with the GND terminal.
Power supply
module
Securely tighten the module retention screws.
Memory module is appropriately installed.
Control
module
Securely tighten the module retention screws.
No other cables than the communication cable and
DC input cables are input in the same duct.
I/O module
Basic rack panel is appropriately installed.
Securely tighten the module retention screws.
Mode switches are appropriately set.
Station number switches are appropriately set (00 to 77
Termination resistance switches are appropriately set.
JW-21MN
Shield ground switches are appropriately set.
Parameters are appropriately set.
(8)
).
ON
16
16-1
Page 97

16-2 Recovery method at communication errors
(1) Check flow chart
Occurrence of error
Connection status of
cable/connector are normal.
YES
First communication?
NO
Does the error occur
continuously?
YES
NO
YES
NO
See "Check cable/connector"
on next page.
See "During initial communication" on page 16-5.
See "When the communication
error occurs instantaneously "
on page 16-7.
16
See "When the communication error
occurs continuously" on page 16- 7.
Recovery
NO
YES
Normal operation
16-2
Page 98

(2) Check cable/connector
As errors on the junction from the main cable to the drop cable or the contact failure on the
connecting point of each station or errors of the master module are assumed, check with the
following procedure.
YES
UNT. E lamp turns ON
NO
Exchange master module
Monitor individual communication flag
in support tool.
Error only 1 station
NO
At plural station error
See next page
See page 12-2
Check and exchange the bus
cable and branch cable to
YES
the station with the error or the
station error module where
the error occurred.
16-3
16
Page 99

- If the bus cable between the slave station 05
03
(8)
02
(8)
01
(8)
04
Master
(8)
station
B
A C
State of an individual communication flag
7
6 5
D
D
0
1234
(8)
and 06
05
(8)
(8)
Disconnection
is disconnected in the following system.
07
06
(8)
(8)
D
OFF
Unstable
OFF
Remove the connector on point
A, and turn ON the termination
resistance of the master station.
Connect the A connector, and
then remove the connector on
point B.
Remove the connector on point
C and make sure the B
connector is not connected.
Turn ON the termination
resistance of the slave module
05
(8)
.
As the communication possible stations
(8)
, 02
(8)
, 01
(8)
03
, and 04
(8)
are normal, the
state of communication monitoring flag is
as follows.
D
7
OFF
6 5
ON
D
0
1234
As the one side of the termination
resistance is lost, all of the
communication possible stations 05
(8)
, and 07
06
station 05
D
7
6 5
OFF
Unstable
(8)
are abnormal, and the
(8)
is unstable.
D
0
1234
OFF ON
(8)
,
As the communication possible station
05
(8)
is normal, abnormal points exists
ahead of the point C.
7
D
OFF
OFFON ON
D
06 5
1234
16
Connect the C connector and
make sure the B connector is
not connected, and remove the
connector at the next point to
the point D.
Turn OFF the termination
resistance of the slave station
05
(8)
, and turn ON the
As the one side of the termination
resistance is lost, the station 05
06
stations, but the station 05
and the station 06
the abnormal states occur between the
point C and the point D.
D
termination resistance of the
end station 06
(8)
.
OFF OFF ON
Cause
Disconnection in the bus cable and the
branch cable between the station 05
(8)
, or contact failure of the connectors
06
Error on the slave station 06
(8)
(8)
(8)
become communication possible
(8)
is unstable
(8)
is turned to OFF, so
7
D
06 5 1234
Unstable
Countermeasure
Remove both the bus cable and
and
the branch cable connectors. After
that, shorten one of these
connectors and check conductivity
using a tester.
Exchange the slave module.
16-4
(8)
and
Page 100

(3) During initial communication (startup of the system)
Lighting error code 6F(H)
- When the master station indicates error code 6F(H) and the COMM lamp is OFF.
The cause may be a parameter setting error of the master station. Check the master station
parameters below.
Parameter address(8)
004000 to 004001
004002
004400 to 004403
005000 to 050001
005200 to 005201
Setting item
Relay link top address
of master station
Amount of connectable
stations
Register link top address
of master station
Relay link transmit
bytes of master station
Register link transmit
bytes of master station
Reference page of the
setting contents
11-5 to 9
007764 to 007767
Flag top address
- When the master station indicates error code 6F(H) and the COMM lamp lights.
The cause may be a setting error of any of the slave stations which are set in the parameter.
Check the following master station parameters.
Parameter address(8)
004004 to 004377
004404 to 004777
005002 to 005177
005202 to 005377
Setting item
Relay link top address of
each slave station.
Number of offset bytes.
Register link top address
of each slave station.
Number of offset bytes.
Relay link transmit bytes
of each slave station
Register link transmit
bytes of each slave station
Reference page of the
setting contents
11-5 to 9
When slave station is JW-21MN, see "Chapter 11: Setting of Switches and Parameter" for
setting range.
- When the master station is normal and the error code 6F(H) of a slave station lights.
The cause may be a faulty setting of the slave station parameter. Check the following slave
station parameters.
Reference page of the
11- 22
007764 to 007767
Setting itemParameter address(8)
Flag top address
16
When slave station is JW-21MN, see "Chapter 11: Setting of Switches and Parameter" for
setting range.
16-5
 Loading...