

Page 1
1-BIT PORTABLE MINIDISC RECORDER
MODEL
IM-DR580H
OPERATION MANUAL
IM-DR580H(E) TINSE0568AWZZ
1
If you require any advice or assistance regarding
your Sharp product, please visit our web-site
www.sharp.co.uk/customersupport.
Customers without Internet access may telephone
08705 274277 during office hours (or (01) 676 0648
if telephoning from Ireland).
IM-DR580H(E) TINSE0568AWZZ 03/10/15 IM-DR580H(E)_FRONT.eps
Thank you for purchasing this SHARP product.
For the best performance, read this manual carefully.
It will guide you in operating your SHARP product.
0101
TINSE0568AWZZ
03K R HK 1
E
Page 2

IM-DR580H
Important Introduction
Special Notes
NOTES FOR USERS IN THE U.K. AND
IRELAND
SERVICE INFORMATION
In the unlikely event of your equipment requiring repair, please use the supplied postage paid label to
send your unit to the Sharp repair centre or contact
the dealer or supplier from whom it was purchased.
Where this is not possible, please visit our web-site
www.sharp.co.uk/customersupport.
Customers without internet access may telephone
08705 274277 during office hours (or (01) 676 0648
if telephoning from Ireland).
Please note; all calls will be charged at local rate.
Certain replacement parts and accessories may be
-Special Notes-
obtained from our main parts distributor.
WILLOW VALE ELECTRONICS LTD.
In the unlikely event of this equipment requiring repair during the guarantee period, you will need to
provide proof of the date of purchase to the repairing
company. Please keep your invoice or receipt, which
is supplied at the time of purchase.
0121 766 5414
! Warnings
" The supplied AC adaptor contains no user serviceable
parts. Never remove covers unless qualified to do so.
It contains dangerous voltages, always remove the
mains plug from the main outlet socket before any service operation or when not in use for a long period.
" The AC adaptor supplied with the IM-DR580H must
not be used with other equipment.
" To prevent fire or shock hazard, do not expose this
appliance to dripping or splashing liquids. No objects
filled with liquids, such as vases, shall be placed on
the apparatus.
" Never use an AC adaptor other than the one specified.
Otherwise, problems or serious hazards may be created.
! Caution
" When recording important selections, make a prelimi-
nary test to ensure that the desired material is properly
recorded.
" SHARP is not liable for damage or loss of your record-
ing arising from malfunction of this unit.
0303
2
03/10/15 IM-DR580H(E)1.fmIM-DR580H(E) TINSE0568AWZZ
Page 3
IM-DR580H
" At full volume, prolonged listening to a personal stereo
may damage the user's hearing. This model complies
with the law if used with the correct earphones (model
number RPHOH0021AWZZ, RPHOH0022AWZZ). If
the earphones are damaged in any way, please order
using the model number given above.
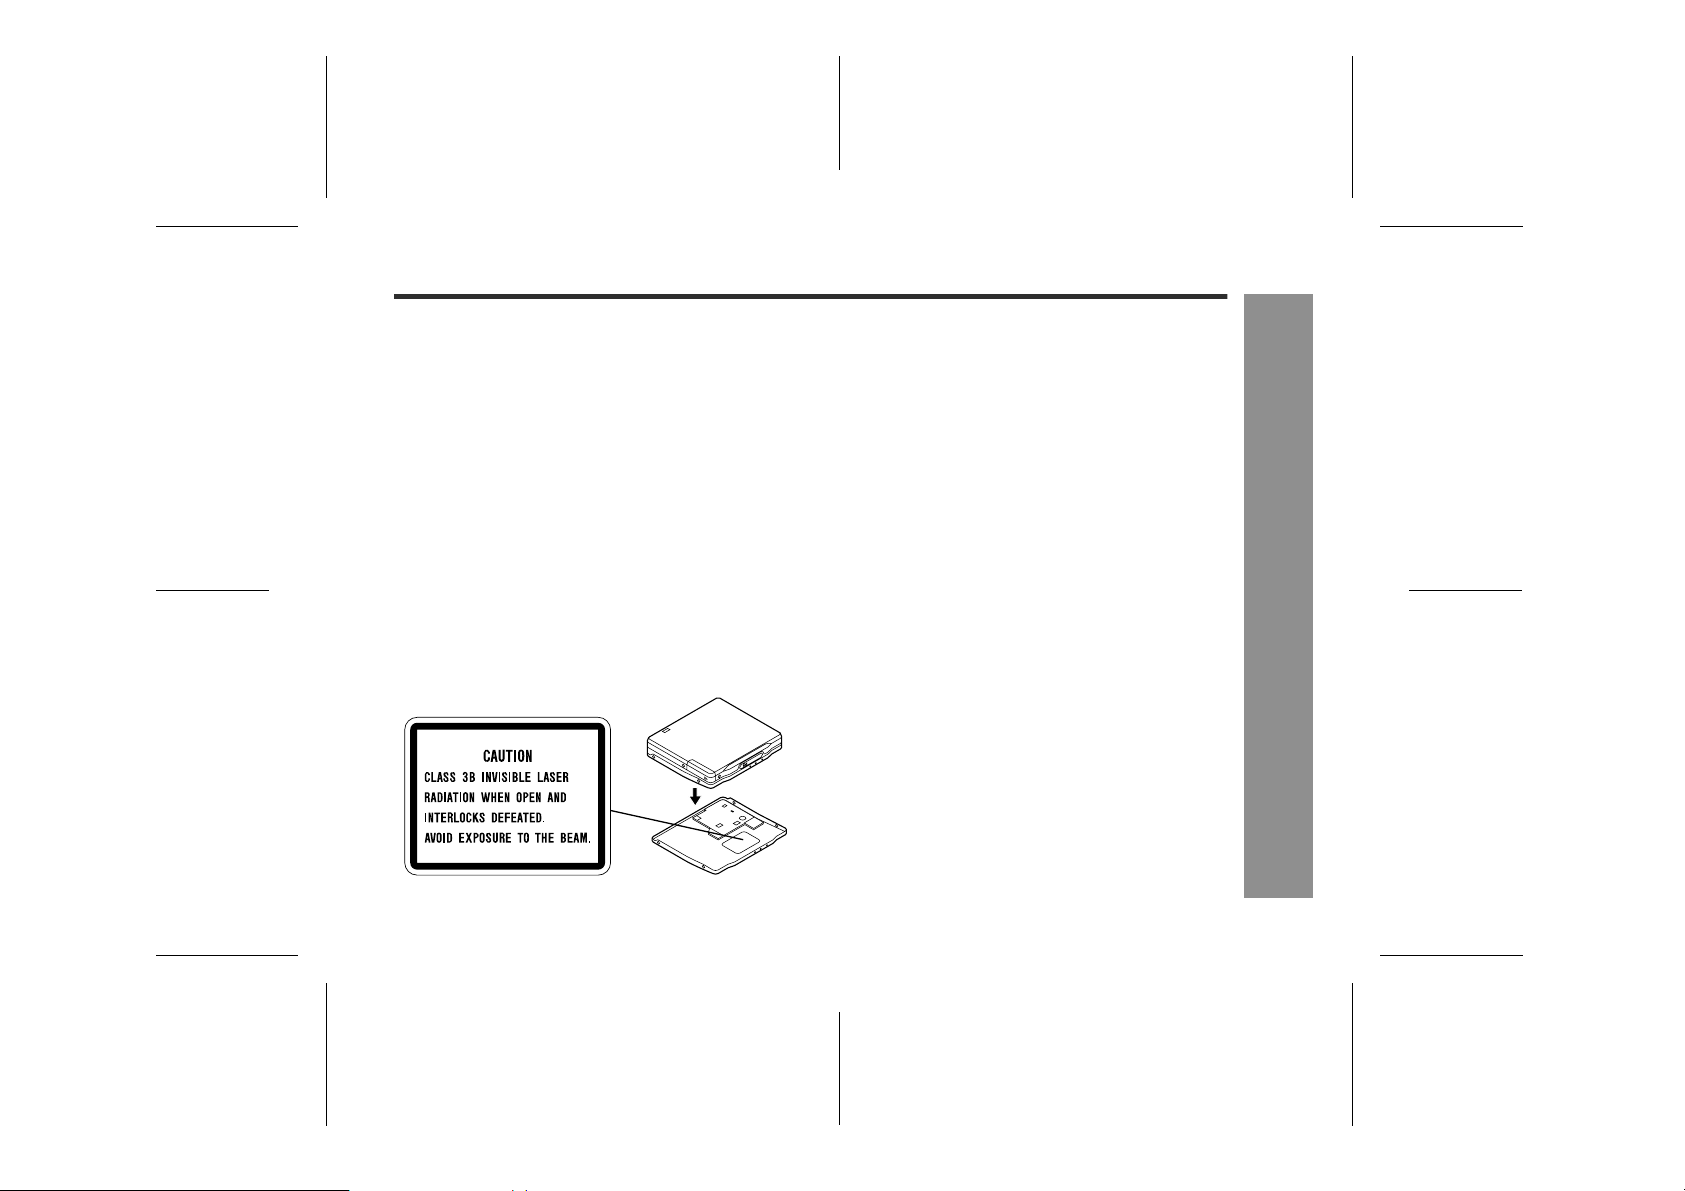
" This product is classified as a CLASS 1 LASER
PRODUCT.
" Use the Portable MiniDisc Recorder only in accor-
dance with the instructions given in this manual and
do not attempt to interfere with the interlock switch or
make any other adjustment as this may result in exposure to hazardous radiation.
Laser Diode Properties
" Material: GaAIAs
" Wavelength: 785 nm
" Pulse time:
Read mode: 0.8 mW Continuous
Write mode: max 12 mW 0.5S
min cycle 1.5S
Repetition
! Notes
" Recording and playback of any material may require
consent, which SHARP is unable to give. Please refer
particularly to the provisions of the Copyright Act
1956, the Dramatic and Musical Performers Protection
Act 1958, the Performers Protection Acts 1963 and
1972 and to any subsequent statutory enactments
and orders.
" This equipment complies with the requirements of
Directives 89/336/EEC and 73/23/EEC as amended
by 93/68/EEC.
" US and foreign patents licensed from Dolby Laborato-
ries.
" The letters in brackets contained in the model number
indicate the colour of the product only. Operation and
specifications are unaffected.
-Special Notes-
Important Introduction
3
03/10/15 IM-DR580H(E)1.fmIM-DR580H(E) TINSE0568AWZZ
Page 4

IM-DR580H
Features
! A Net MD portable recorder
Audio data saved on the hard disk of a PC can be transferred to a Net MD-compatible recorder using the provided software "BeatJam".
! A Portable MD player with "Mobile 1-bit dig-
ital amplifier"
The 1-bit digital signal is sent to a constant voltage circuit
directly from a high-order modulation circuit. The
amplifier transmits and amplifies the signal, and allows
extremely natural and clear sound with little deterioration.
-Features-
Important Introduction
! "4-pole plug earphone" optimizes "Mobile
1-bit digital amplifier"
Sharp has adopted "4-pole plug" earphone that completely separate right and left sound. Enjoy the high quality sound of the "Mobile 1-bit digital amplifier".
4-pole plug for mobile
1-bit digital amplifier
Conventional 3-pole plug
L+ R+ L- R-
L R GND
! Multi-link station
Connect the multi-link station to a PC, speakers with
built-in amplifiers or other external equipment, and place
the main unit on the multi-link station. Now you can enjoy
playing, recording and editing music as well as Net MD
features.
4
03/10/15 IM-DR580H(E)1.fmIM-DR580H(E) TINSE0568AWZZ
Page 5

IM-DR580H(E) TINSE0568AWZZ
2
Contents
! Important Introduction
Accessories. . . . . . . . . . . . . . . . . . . . . . . . . . . . . . . . . .6
Precautions . . . . . . . . . . . . . . . . . . . . . . . . . . . . . . . . . .7
Names of Controls and Indicators . . . . . . . . . . . 8 - 10
! Preparation
Connecting to Other Equipment . . . . . . . . . . . . . . . .11
Using with the Multi-link Station . . . . . . . . . . . . 12 - 13
Using with the Rechargeable Battery . . . . . . . . 14 - 16
Using with the Alkaline Battery . . . . . . . . . . . . . 16 - 17
Notes on Inserting/Removing a MiniDisc . . . . . . . . .17
Hold Function . . . . . . . . . . . . . . . . . . . . . . . . . . . . . . .18
! Recording
Connecting to a Stereo System, PC, etc. . . . . . 19 - 21
Recording from a Stereo System, etc. . . . . . . . 22 - 25
Recording from a Microphone. . . . . . . . . . . . . . 26 - 31
Notes for Recording . . . . . . . . . . . . . . . . . . . . . . 31 - 32
Advanced Recording . . . . . . . . . . . . . . . . . . . . . 32 - 37
! Playback
Connecting Earphones or Speakers . . . . . . . . . . . . .38
Connecting to PC or Stereo System . . . . . . . . . . . . .39
Basic Playback . . . . . . . . . . . . . . . . . . . . . . . . . . 40 - 43
Advanced Playback . . . . . . . . . . . . . . . . . . . . . . 44 - 51
! Group Recording / Group Playback
Group Recording and Group Playback . . . . . . . 52 - 53
Recording by Group . . . . . . . . . . . . . . . . . . . . . . 54 - 55
Listening to Group-recorded MD. . . . . . . . . . . . 56 - 57
! Editing a Recorded MiniDisc
Titling a MiniDisc . . . . . . . . . . . . . . . . . . . . . . . . 58 - 62
Editing Tracks . . . . . . . . . . . . . . . . . . . . . . . . . . . 63 - 65
Editing Groups . . . . . . . . . . . . . . . . . . . . . . . . . . 66 - 68
Page
! Useful Features
Page
Setting the Alarm . . . . . . . . . . . . . . . . . . . . . . . . . . . . 69
Changing Default Settings . . . . . . . . . . . . . . . . 70 - 72
Selecting Menu. . . . . . . . . . . . . . . . . . . . . . . . . . . . . . 73
! Net MD
About Net MD . . . . . . . . . . . . . . . . . . . . . . . . . . 74 - 75
System Requirements. . . . . . . . . . . . . . . . . . . . . . . . 76
Software Installation . . . . . . . . . . . . . . . . . . . . . . . . . 77
Connecting to a PC . . . . . . . . . . . . . . . . . . . . . . 78 - 79
Transferring Data . . . . . . . . . . . . . . . . . . . . . . . . . . . 80
! References
MiniDisc System Limitations . . . . . . . . . . . . . . . . . . 81
Troubleshooting . . . . . . . . . . . . . . . . . . . . . . . . . 82 - 83
Maintenance . . . . . . . . . . . . . . . . . . . . . . . . . . . . . . . . 83
Error Messages . . . . . . . . . . . . . . . . . . . . . . . . . 84 - 85
Specifications. . . . . . . . . . . . . . . . . . . . . . . . . . . 86 - 87
TERMS OF GUARANTEE. . . . . . . . . . . . . . .Back cover
The operation manual of this product consists of 2
volumes.
Unit operation manual:
Guides you through preparation and operation of this
system. Be sure to read this before operating the unit.
BeatJam:
Guides you through operation of the bundled software
"BeatJam".
IM-DR580H
-Contents-
Important Introduction
5
03/10/15 IM-DR580H(E)1.fmIM-DR580H(E) TINSE0568AWZZ
Page 6

IM-DR580H
Accessories
AC Adaptor
(RADPA8066AWZZ) x 1
Carrying bag x 1 Rechargeable nickel-metal
Remote control x 1 Multi-link station x 1 Battery case x 1
hydride battery
(AD-NT55BT) x 1
Battery carrying case x 1 Connection cable (for
-Accessories-
4-pole
plug
Important Introduction
Connection cable (for
digital recording) x 1
Notes:
" You can hear the sound only from one earphone if you use the supplied earphones with other equipment.
" Parts and equipment mentioned in this operation manual other than those detailed above are not included.
" The AC adaptor may be different from the one in the drawing.
Warn ing:
The AC adaptor supplied with the IM-DR580H must not be used with other equipment.
CD-ROM x 1 USB connection
cable x 1
Earphones (inner ear
type) x 1
6
analogue recording) x 1
4-pole
plug
Earphones
(ear-fit type) x 1
03/10/15 IM-DR580H(E)1.fmIM-DR580H(E) TINSE0568AWZZ
Page 7

Precautions
IM-DR580H
! Important
" Do not wear your earphones when you are crossing
streets or near traffic.
" Do not use your earphones whilst driving a
motor vehicle, it may create a traffic hazard and may be illegal. Remember to obey
all of the safety rules in your area.
" Do not play the unit at a high volume. Hearing experts
advise against extended listening at high volume levels.
" If you experience ringing in your ears, reduce the volume
or discontinue use.
" No naked flame sources, such as lighted candles, should
be placed on the apparatus.
" Attention should be drawn to the environmental aspects of
battery disposal.
" The apparatus is designed for use in moderate climate.
" This portable MD should only be used within the range of
0°C - 40°C.
To avoid accidental electric shock or other possible
problems, observe the precautions listed below.
" Do not disassemble or modify the unit.
" Do not drop or subject the unit to shock.
" Do not use the unit near open flames.
" Do not spill liquid on the unit.
" Do not use an external power supply, other than the 3 V
DC supplied with this unit, as it may damage the unit.
" SHARP is not responsible for damage due to improper
use. Refer all servicing to a SHARP authorised service
centre.
! Storing the unit
Avoid using or leaving the unit in the following
places.
" Places exposed to direct sunlight for many hours
(especially in cars with the doors and windows closed)
or near heaters. (The cabinet may deform, change
colour or the unit may malfunction.)
" Places exposed to excessive dust.
" Places exposed to water.
" Places where temperatures are excessively high or
low.
" Places (bathrooms) where the humidity is extremely
high.
" Places with strong magnetic fields such as near TVs
or loudspeakers.
" Places exposed to vibration.
" Places where sand can easily enter the inside of the
unit (beaches etc.).
" If the unit is used near radio tuners or TVs, noise and/
or picture interference may result. If you experience
these problems, move the unit away from such
devices.
It is not recommended to put the
portable MD into a rear pocket, as
this may damage the product when
sitting.
Using this unit near mobile phones
may cause noise pickup. If it occurs, move it away from them.
1
-Precautions-
Important Introduction
7
03/10/15 IM-DR580H(E)1.fmIM-DR580H(E) TINSE0568AWZZ
Page 8

IM-DR580H
Important Introduction
Names of Controls and Indicators
1
2
3
4
5
9
6
7
12 3 54
6
-Names of Controls and Indicators-
7
8
9
14 15 16 17
8
10
11
12
13
! Main unit
1. Stop/Power Off/Hold Button. . . . . . . . . . . . . 18, 40
2. Record Indicator . . . . . . . . . . . . . . . . . . . . . . . . . 22
3. Play/Fast Forward/Fast Reverse/
Volume Button . . . . . . . . . . . . . . . . . . . . . . . . 40, 44
4. Battery Connection Terminals . . . . . . . . . . . . . . 16
5. Multi-link Station Connection Terminal . . . . . . 13
6. Microphone Input Socket . . . . . . . . . . . . . . . . . . 26
7. Remote Control/
Earphone Output Socket . . . . . . . . . . . . . . . 27, 38
8. Open Lever . . . . . . . . . . . . . . . . . . . . . . . . . . . . . 12
9. Rechargeable Battery Cover . . . . . . . . . . . . . . . 12
! Multi-link station display
1. Record Indicator . . . . . . . . . . . . . . . . . . . . . . . . . 22
2. TOC Indicator . . . . . . . . . . . . . . . . . . . . . . . . . . . 37
3. Level Meter . . . . . . . . . . . . . . . . . . . . . . . . . . . . . 29
4. Repeat Indicator . . . . . . . . . . . . . . . . . . . . . . . . . 46
5. Random Indicator . . . . . . . . . . . . . . . . . . . . . . . . 46
6. Synchro Recording Indicator . . . . . . . . . . . . . . 25
7. Disc Information Indicator . . . . . . . . . . . . . . . . . 43
8. Group Information Indicator. . . . . . . . . . . . . . . . 60
9. Track Information Indicator . . . . . . . . . . . . . . . . 50
10. Battery Indicator . . . . . . . . . . . . . . . . . . . . . . . . . 14
11. Track Protection Indicator . . . . . . . . . . . . . . . . . 63
12. Disc Mode Indicator . . . . . . . . . . . . . . . . . . . . . . 23
13. Character/Time Information Indicator . . . . . . . 50
14. Long-Play/Recording Mode Indicator . . . . . . . . 33
15. Monaural Mode Indicator . . . . . . . . . . . . . . . . . . 33
16. Group Indicator . . . . . . . . . . . . . . . . . . . . . . . . . . 56
17. My Entry Indicator . . . . . . . . . . . . . . . . . . . . . . . 48
Reference page
Reference page
8
03/10/15 IM-DR580H(E)1.fmIM-DR580H(E) TINSE0568AWZZ
Page 9

! Multi-link station
10
1
2
3
9
8
4
5
7
6
1. Playback/Recording Mode Switching/
Charge Button . . . . . . . . . . . . . . . . . . . . . 14, 32, 46
2. Display/Bass Button . . . . . . . . . . . . . . . . . . . . . . 43
3. Record Button . . . . . . . . . . . . . . . . . . . . . . . . . . . 22
4. Erase Button . . . . . . . . . . . . . . . . . . . . . . . . . . . . 63
5. Power On or Off/Stop Button . . . . . . . . . . . . . . . 23
6. Fast Forward/Fast Reverse/
Recording Level/Volume Button . . . . . . . . . . 42, 44
7. Play/Pause Button . . . . . . . . . . . . . . . . . . . . . . . . 42
8. Enter/USB Switching Button . . . . . . . . . . . . 28, 80
9. Menu Button . . . . . . . . . . . . . . . . . . . . . . . . . . . . . 28
10. Connection Terminal to Main Unit . . . . . . . . . . . 13
11. Speaker Output Selector Switch . . . . . . . . . 20, 38
12. 3 V DC Input Socket . . . . . . . . . . . . . . . . . . . . . . 12
13. USB Socket . . . . . . . . . . . . . . . . . . . . . . . . . . . . . . 78
14. Optical/Line Input Socket . . . . . . . . . . . . . . . . . . 19
15. Audio Output Socket . . . . . . . . . . . . . . . . . . . . . . 39
16. Speaker Output Socket . . . . . . . . . . . . . . . . . . . . 38
Reference page
IM-DR580H
1
11
12
13
14
15
16
Important Introduction
-Names of Controls and Indicators-
9
03/10/15 IM-DR580H(E)1.fmIM-DR580H(E) TINSE0568AWZZ
Page 10

IM-DR580H
Important Introduction
Names of Controls and Indicators (continued)
! Remote control unit
1
234 5
6
8
7910
121913 14 15 16 1817
-Names of Controls and Indicators-
20 21 22
11
23
24
25
1. Earphones Socket . . . . . . . . . . . . . . . . . . . . . . . 38
2. Record Button . . . . . . . . . . . . . . . . . . . . . . . . . . . 28
3. Display/Bass Button . . . . . . . . . . . . . . . . . . . 32, 43
4. Playback or Recording Mode
Switching Button . . . . . . . . . . . . . . . . . . . . . 32, 46
5. Menu Button. . . . . . . . . . . . . . . . . . . . . . . . . . . . . 28
6. Volume Buttons . . . . . . . . . . . . . . . . . . . . . . . . . . 40
7. Stop/Power Off Button . . . . . . . . . . . . . . . . . . . . 29
8. Fast Reverse/Recording Level/
Menu Select Button. . . . . . . . . . . . . . . . . . . . . . . 44
9. Play/Pause/Power On Button . . . . . . . . . . . . . . . 40
10. Fast Forward/Recording Level/
Menu Select Button. . . . . . . . . . . . . . . . . . . . . . . 44
11. Hold Switch . . . . . . . . . . . . . . . . . . . . . . . . . . . . . 18
12. Disc Mode Indicator . . . . . . . . . . . . . . . . . . . . . . 41
13. Total Track Number Indicator . . . . . . . . . . . . . . 50
14. Track Number Indicator . . . . . . . . . . . . . . . . . . . 41
15. Character/Time Information Indicator . . . . . . . 43
16. My Entry Indicator . . . . . . . . . . . . . . . . . . . . . . . 48
17. Random Indicator . . . . . . . . . . . . . . . . . . . . . . . . 46
18. Repeat Indicator . . . . . . . . . . . . . . . . . . . . . . . . . 46
19. TOC Indicator . . . . . . . . . . . . . . . . . . . . . . . . . . . 37
20. Record Indicator . . . . . . . . . . . . . . . . . . . . . . . . . 28
21. Group Indicator . . . . . . . . . . . . . . . . . . . . . . . . . . 56
22. Battery Indicator . . . . . . . . . . . . . . . . . . . . . . . . . 16
23. Synchro Recording Indicator . . . . . . . . . . . . . . 31
24. Auto Track Mark Record Indicator . . . . . . . . . . 35
25. Alarm Indicator . . . . . . . . . . . . . . . . . . . . . . . . . . 69
Reference page
10
03/10/15 IM-DR580H(E)1.fmIM-DR580H(E) TINSE0568AWZZ
Page 11

Connecting to Other Equipment
Enjoy the multi-link station features with other equipment.
See the corresponding pages for connections and operations.
Example: connecting to a stereo system and microphone
Listening to music through a
stereo system, etc. (page 19)
Recording from a stereo
system, etc. (page 39)
Audio Signal
Audio Signal
Audio Signal
Example: connecting to a PC
Listening through speakers with
built-in amplifiers (page 38)
Audio Signal
Audio Signal
Listening through or
recording onto a PC (page 39)
Audio Signal
Recording from PC
(page 20)
Net MD audio data
To use Net MD features
See pages 74 - 80 for setup
and connections.
See the operation manual of
"BeatJam" for details of the
software.
IM-DR580H
2
Preparation
-Connecting to Other Equipment-
Multi-link station
Note:
SP OUT and AUDIO OUT sockets on the multi-link station
accept 3-pole earphones, not the supplied 4-pole earphones.
Recording from a
microphone (page 26)
Multi-link station
11
03/10/15 IM-DR580H(E)1.fmIM-DR580H(E) TINSE0568AWZZ
Page 12

IM-DR580H
Using with the Multi-link Station
Preparation
-Using with the Multi-link Station-
You can charge the battery, record, play or edit music
1
2
1
Do not force
the battery
cover open
too far.
Insert from
the side.
3
2
AC 110 - 240V,
AC 110 - 240V,
50/60 Hz
Fully insert.
To the
DC IN 3V
socket
50/60 Hz
To the wall socket
To the wall socket
and use Net MD features with the multi-link station.
Insert the rechargeable battery.
1
A rechargeable battery other than the AD-N55BT
cannot be charged.
Plug the AC adaptor into the wall socket, and
2
then insert the plug on the other end into the DC
IN 3V socket.
Insert a MiniDisc.
3
1 Slide the OPEN lever to release the compartment
door.
2 Insert the disc fully as indicated by the arrow, with
the label up.
3 Close the compartment door.
Playback starts automatically with a playback only
MiniDisc or a MiniDisc which is protected against accidental erasure (Auto play function, see page 70).
3
3
12
1
2
03/10/15 IM-DR580H(E)1.fmIM-DR580H(E) TINSE0568AWZZ
Page 13

IM-DR580H(E) TINSE0568AWZZ
3
Place the main unit on the multi-link station.
4
Now the multi-link station is ready. Charging See page 14.
Press down the unit with its
front side facing toward you.
Attach to the main unit
connection terminal.
Operate with the multi-link
station when the main unit
is placed on it. The remote
control and main unit
buttons cannot be used.
4
" Press down the main unit to set it securely.
Caution:
When the unit is not in use for extended periods, remove
the AC adaptor from the wall socket.
Charge the battery.
Recording See pages 19, 26.
Record from a stereo system or microphone.
Playback See page 38.
Listen to MDs through speakers with built-in amplifiers.
Editing See page 58.
Edit tracks on MDs.
Net MD See page 74.
Connect to a PC to use Net MD features.
IM-DR580H
2
Preparation
-Using with the Multi-link Station-
13
03/10/15 IM-DR580H(E)1.fmIM-DR580H(E) TINSE0568AWZZ
Page 14

IM-DR580H
Using with the Rechargeable Battery
When the rechargeable battery is used for the first time or
when you want to use it after a long period of disuse, be sure
to charge it fully.
12
Place the main unit on the multi-link station.
1
Preparation
-Using with the Rechargeable Battery-
! The battery indicator will scroll,
and the battery will begin
charging.
! If placing the main unit with the power on or after op-
erations with the multi-link station, turn it off and hold
down the CHARGE button for 3 seconds or more.
After charging, remove the main unit from the multi-
2
link station.
! Hold the multi-link station and pull the main unit
straight out.
Scrolling
Battery indicator:
The battery indicator shows the progress of charging.
! When the indicator is off,
Charging starts
Appear
Scrolling
(repeated)
Charging complete
(in approx. 3.5 hours)
Goes out
charging is complete.
! Charging does not start if the
main unit is not set on the
multi-link station properly or
there is any dirt or foreign substance on the terminal.
! It may take approx. 30 sec-
onds for the indicator to scroll
depending on the remaining
amount of battery.
! The battery is charged up to
90% if it is completely discharged.
! The unit can be left in the
charging state after it is completed.
! Charging may take less time
depending on the remaining
amount of battery.
Top-up charging:
"Memory effect" is a loss of battery capacity in nickel metal
hydride batteries caused by a voltage drop. This product
allows top-up charging with no
battery is not fully discharged.
"
memory effect" even if the
14
03/10/15 IM-DR580H(E)2.fmIM-DR580H(E) TINSE0568AWZZ
Page 15

IM-DR580H
Notes:
! This product should only be used within the range of
0°C - 40°C. The battery should be charged within the
range of 5°C - 35°C (charging is impossible below 0°C
or over 40°C).
! After the rechargeable battery is charged or used, the
main unit or multi-link station will get slightly warm.
This is normal.
! When the battery is charged for the first time or is
charged after not being used for a long period, the
operating time may be shorter than normal. The battery life will recover with normal use i.e. charging and
discharging.
! Charging stops when you press the REC, or but-
ton on the multi-link station.
! When the portable MD is turned on or operating,
the battery will not be charged.
! For information about battery life, see the battery item
in the "Specifications" on page 87.
! A rechargeable nickel-metal hydride battery is the only
kind that can be used. Even if the battery is not used,
you should charge it at least once every three months
because of the special quality of this battery.
Battery replacement:
! The rechargeable battery can be charged approxi-
mately 300 times.
! When the operating time is reduced to about half the
normal amount of time, even after a full charge is performed, replace the battery with a new one (ADN55BT).
Caution:
! Use the specified battery AD-N55BT only. Do not
charge a battery (nickel-cadmium, alkaline, etc.) other
than that specified.
! Do not remove the outer cover of
the rechargeable battery. It may
cause heat generation, fire, or explosion.
! Do not dip the battery in water, do
not dispose of it in a fire, and do
not take it apart.
! If the rechargeable battery terminal is dirty, charging
may not start. In such a case, wipe off the dirt with a
dry cloth.
! Do not disassemble the battery.
! Do not short-circuit the terminals as they will become
very hot and will damage the battery.
! Do not drop or subject the battery to shock.
! Do not insert objects (metal etc.) into the battery com-
partment of this product or into the rechargeable battery.
! Carry the battery in the supplied
case. Apply the case on the
end.
! If the rechargeable battery is used in a cold environ-
ment, the operating time will be reduced.
! Do not carry the battery in your pocket or a bag
together with metal objects (keys, coins, jewelry, etc.).
The battery may short out and generate significant
amounts of heat.
2
Preparation
-Using with the Rechargeable Battery-
15
03/10/15 IM-DR580H(E)2.fmIM-DR580H(E) TINSE0568AWZZ
Page 16

IM-DR580H
Using with the Rechargeable
Battery (continued)
Using with the Alkaline
Battery
" Checking the remaining amount of battery
level
The remaining amount of battery level is shown by the
battery indicator ( ) during operation.
<On the remote control>
! When the battery is completely discharged, the battery
indicator will flash. Recharge the battery or replace the
alkaline battery with a new one.
! When the battery has run out completely, "LoBATT"
Preparation
will appear. Then, the power will be disconnected
automatically.
Notes:
! If you use the battery which you stopped charging
halfway, " " may appear. It does not mean that the
battery is completely charged.
! The battery indicator will not correctly display the
remaining capacity for approximately 20 seconds after
the power has been turned on.
! When the AC adaptor is used, the battery indicator will
not be shown.
! The number of bars shown in the battery indicator may
increase or decrease, depending on the operation
-Using with the Rechargeable Battery/Using with the Alkaline Battery-
being performed. This is normal.
16
Use one commercially available alkaline battery (LR6,
"AA" size).
The rechargeable battery can be used at the same time.
2
Open
1
Press
RELEASE LOCK
Open the case cover.
1
Insert an alkaline battery into the battery case.
2
Set the battery properly according to and inside
the case.
Attach the battery case to the portable MD.
3
Back of the
portable MD
03/10/15 IM-DR580H(E)2.fmIM-DR580H(E) TINSE0568AWZZ
Page 17

Notes on Inserting/Remov-
IM-DR580H
Caution:
Do not use a rechargeable battery (nickel-cadmium
battery etc.) in the battery case.
Notes:
! Use the rechargeable battery at the same time to
ensure stable operations even if the battery case
falls apart due to shock or vibration.
! Do not replace the battery or the rechargeable battery
during operation.
! If the unit is not used for a long period of time, remove
the battery. (Even if the power is turned off, the battery
will be drained slowly but continuously.)
ing a MiniDisc
! To avoid breakage, do not force the compartment
open, and do not insert a MiniDisc forcibly or under
the holder.
! If a MiniDisc does not go in smoothly or the door does
not close properly, take out the disc and try again.
! Do not open the compartment when the power is
on. Be sure to turn it off before removing a MiniDisc.
The compartment door is locked while recording or editing is in progress. Do not slide the OPEN lever to
avoid breakage.
! Do not open the compartment when the main unit is on
the multi-link station.
2
Preparation
-Using with the Alkaline Battery/Notes on Inserting/Removing a MiniDisc-
17
03/10/15 IM-DR580H(E)2.fmIM-DR580H(E) TINSE0568AWZZ
Page 18

IM-DR580H
Hold Function
-Hold Function-
Preparation
The present operation condition can be kept even if other buttons are accidentally pressed in a place such as a
crowded train. (The main unit and remote control function separately.)
Record Indicator
Hold down the (HOLD) button for 2 seconds or
more.
The mode switches each time the button is pressed.
Hold on: The record indicator flashes three times.
Hold off: The record indicator flashes once.
If the battery is inserted, you can set this function
even when the power is turned off.
If a button is pressed with the hold function active,
the record indicator flashes twice.
To cancel the hold mode
Move the HOLD switch away from the safety position
(the opposite direction of the arrow).
If the hold function is active whilst the power is turned
off, the power cannot be turned on by mistake and the
battery will not be drained.
18
03/10/15 IM-DR580H(E)2.fmIM-DR580H(E) TINSE0568AWZZ
Page 19
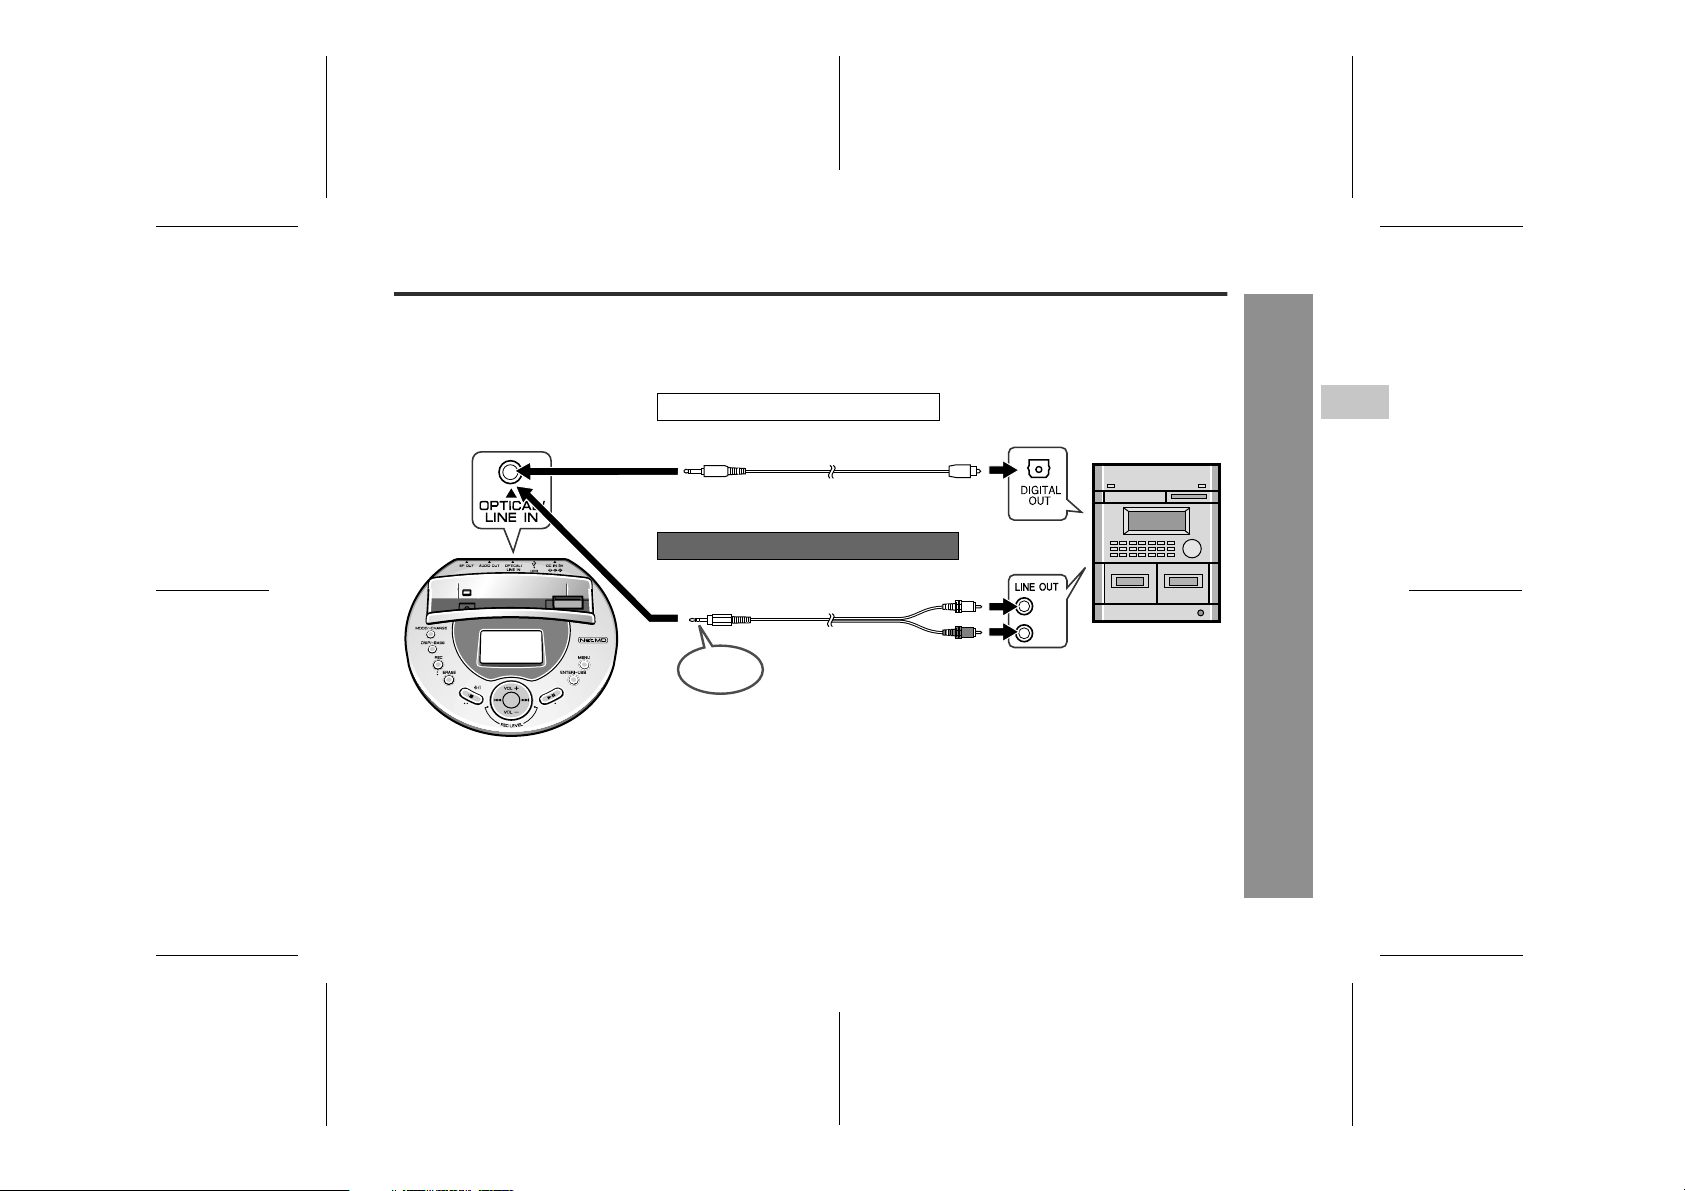
Connecting to a Stereo System, PC, etc.
Connect other equipment to the multi-link station for recording. The connection differs according to the equipment. Recording requires a digital or analogue connection cable.
" Recording from a stereo system
To the
OPTICAL/LINE IN
socket
Connecting to an optical output socket
Supplied connection cable
(for digital recording)
Connecting to an analogue output socket
Supplied connection cable
(for analogue recording)
3-pole
plug
To DIGITAL OUT
(square) socket
(L)
(R)
To the LINE OUT
sockets
IM-DR580H
3
Recording
Notes:
! When recording from a stereo system, do not connect
anything to the MIC IN socket on the main unit.
! This product has a built-in sampling rate converter that
automatically converts the sampling frequency of various digital equipment including the digital radios and
DAT deck (32 kHz and 48 kHz respectively) to 44.1
kHz for recording.
! For digital connections, use equipment with an appro-
priate digital audio interface.
! Plug in cables securely.
03/10/15 IM-DR580H(E)2.fmIM-DR580H(E) TINSE0568AWZZ
-Connecting to a Stereo System, PC, etc.-
19
Page 20

IM-DR580H
Recording
20
Connecting to a Stereo System, PC, etc. (continued)
" Recording from PC
Speakers with
built-in amplifiers
To the
OPTICAL/LINE IN
socket
-Connecting to a Stereo System, PC, etc.-
Note:
When PC and the multi-link station are connected through input and output sockets, howling or sound deterioration may occur.
To avoid this, set the "LINE MONI" to "OFF" for analogue connections (see page 70).
For digital connections, disconnect PC from the AUDIO OUT socket on the multi-link station and set "OPT MONI" to "ON" (see
page 70).
Connecting to an optical output socket
Supplied connection cable
(for digital recording)
Connecting to an analogue output socket
3.5 mm mini plug cable without resistance
(commercially available)
3-pole
plug
When connected to speakers with built-in amplifiers
Connected to an analogue output socket
To LINE IN
Connected to an optical output socket
To MD
Set the speaker output selector switch to "LINE IN" to listen to the
sound from PC through speakers.
(The playback sound level does not affect the recording level.)
Set the speaker output selector switch to "MD" to monitor recording
through speakers.
No sound can be heard when the switch is set to "LINE IN".
3-pole
plug
To DIGITAL OUT
(square) socket
To the LINE OUT
socket
03/10/15 IM-DR580H(E)2.fmIM-DR580H(E) TINSE0568AWZZ
Page 21

IM-DR580H(E) TINSE0568AWZZ
4
" Recording from a portable CD player, etc.
Speakers with built-in amplifiers
Connecting to an optical output socket
Optical digital cable (option:AD-M2DC)
To the
OPTICAL/LINE IN
socket
Note:
Set "LINE MONI" (for analogue connections) or "OPT MONI" (for digital connections) to "ON" (see page 70). You can
listen to the sound being recorded through earphones or speakers.
Connecting to an analogue output socket
3.5 mm mini plug cable without resistance
(commercially available)
3-pole
plug
When connected to speakers with built-in amplifiers
To MD
Set the speaker output selector switch to "MD" to monitor recording
through speakers.
(For analogue connections, when the switch is set to "LINE IN", the
playback sound level does not affect the recording level. No sound
can be heard when digitally connected.)
3-pole
plug
To OPTICAL OUT
(round) socket
To PHONES
socket
IM-DR580H
3
Recording
-Connecting to a Stereo System, PC, etc.-
21
03/10/15 IM-DR580H(E)2.fmIM-DR580H(E) TINSE0568AWZZ
Page 22
IM-DR580H
Recording from a Stereo System, etc.
Before Recording:
! When recording important selections, make a preliminary
test to ensure that the desired material is properly
recorded.
! SHARP is not liable for damage or loss of your recording
arising from malfunction of this unit.
Record indicator
Recording
-Recording from a Stereo System, etc.-
Stereo system,etc.
" Manual recording
Connect external equipment to the OPTICAL/LINE
1
IN socket on the multi-link station (pages 19 - 21).
Insert a recordable MiniDisc (page 12).
2
Place the main unit on the multi-link station.
3
Press the REC button.
4
Recording is paused.
! Even when the power is off, you can start recording
by pressing the REC button.
! The record indicator flashes.
Press the MODE/-CHARGE button repeatedly to se-
5
lect the recording mode (page 33).
Display
None
LP2
LP4
MONO
Start playback on the external equipment and adjust
6
the recording level by pressing the or button
(page 23).
Stereo recording
2 times long recording
4 times long recording
Monaural recording
Recording mode
22
03/10/15 IM-DR580H(E)2.fmIM-DR580H(E) TINSE0568AWZZ
Page 23
Press the PAUSE button on the stereo system to
7
enter the playback pause mode.
Here you can search for the track to record.
Press the button.
8
! The record indicator lights up.
Begin playback on the external equipment, the
9
output will be recorded.
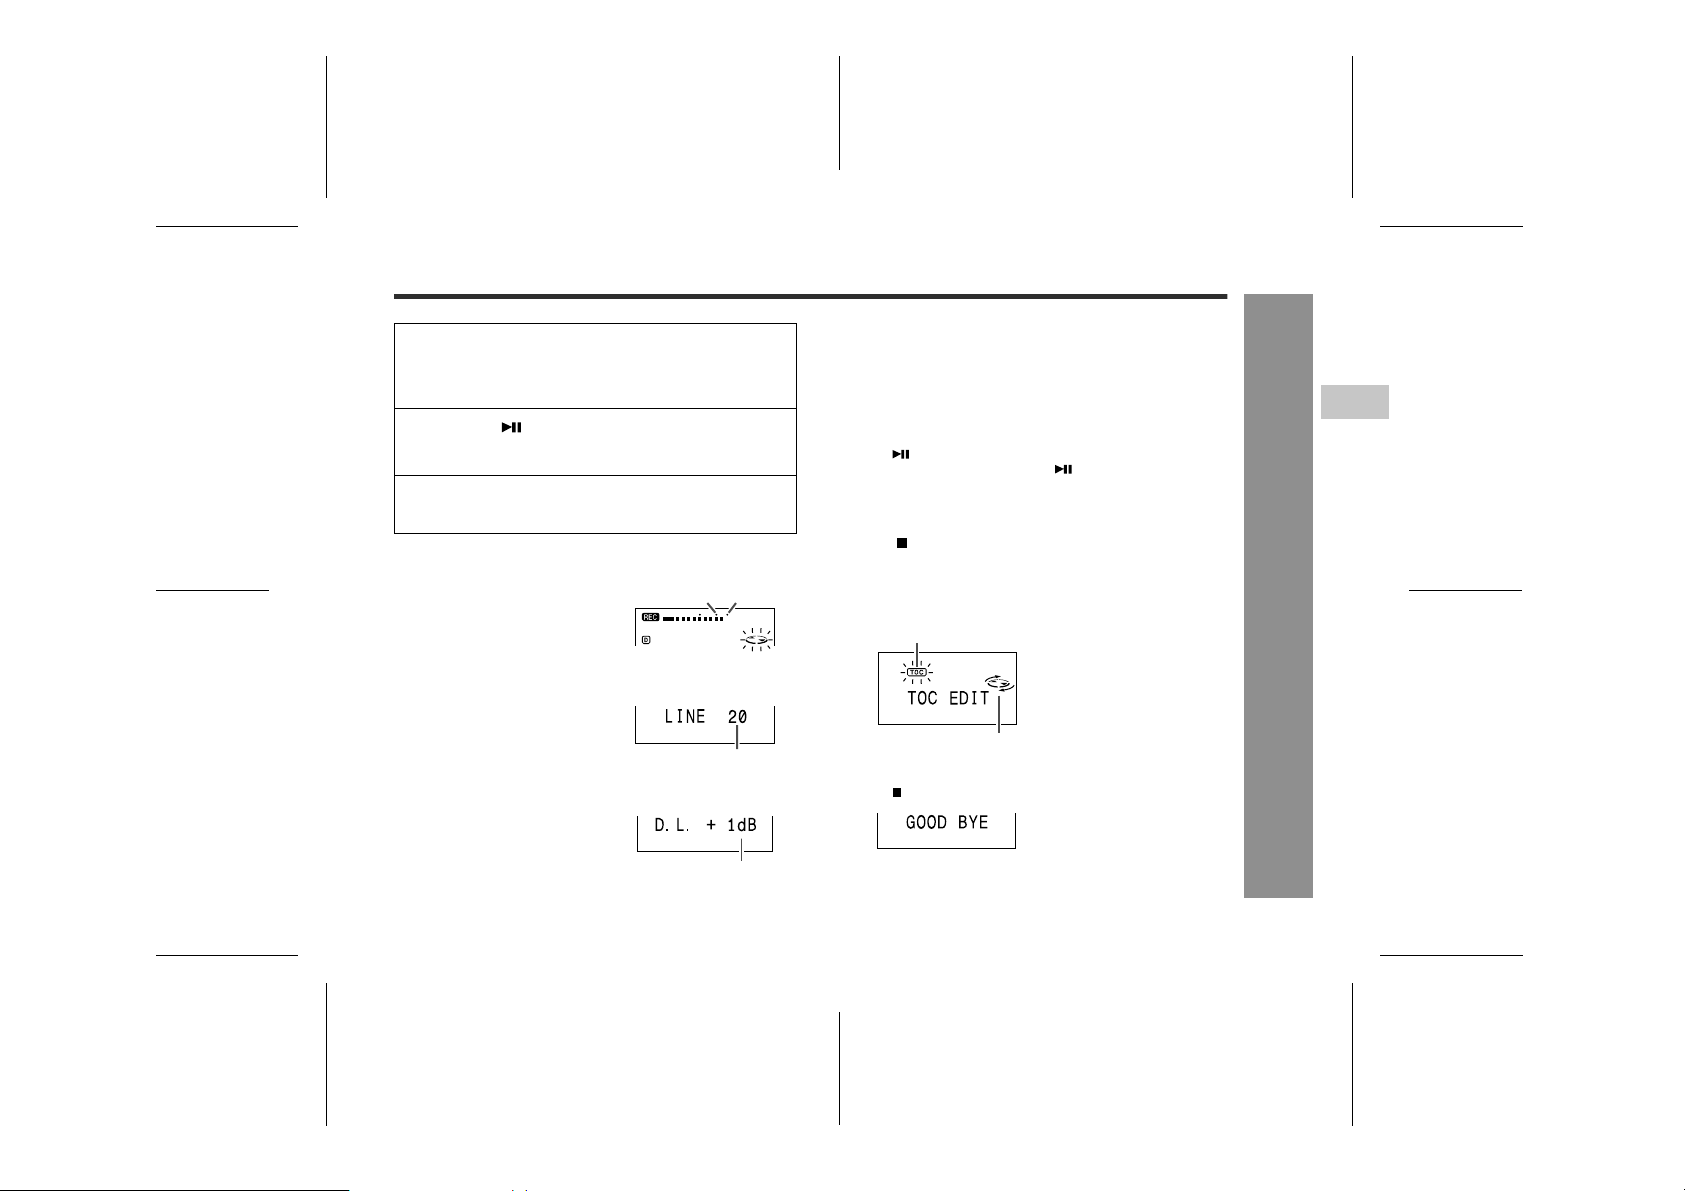
" Recording level adjustment
Adjust the recording level so
that the maximum sound volume from the source makes the
reading swing somewhere between -4 dB and 0 dB.
Analogue recording (connecting with analogue cable)
The recording level can be adjusted between LINE 00 and
30.
Digital recording (connecting with digital cable)
You can adjust the level in 1 dB
increments between +10 dB
and -10 dB.
-4 dB 0 dB
00 - 30
+10 dB to -10 dB
! Do not increase the recording level excessively. The
sound may be distorted.
! Once you adjust the digital recording level, the setting is
retained even after the recording stops. (For cancellation
instructions, see page 70.)
! The sound from the earphones does not change even if
the digital recording level is adjusted.
To interrupt recording
Press the button.
! To resume recording, press the button again.
! The track number will be increased by one each time the
recording is interrupted.
To stop recording
Press the button.
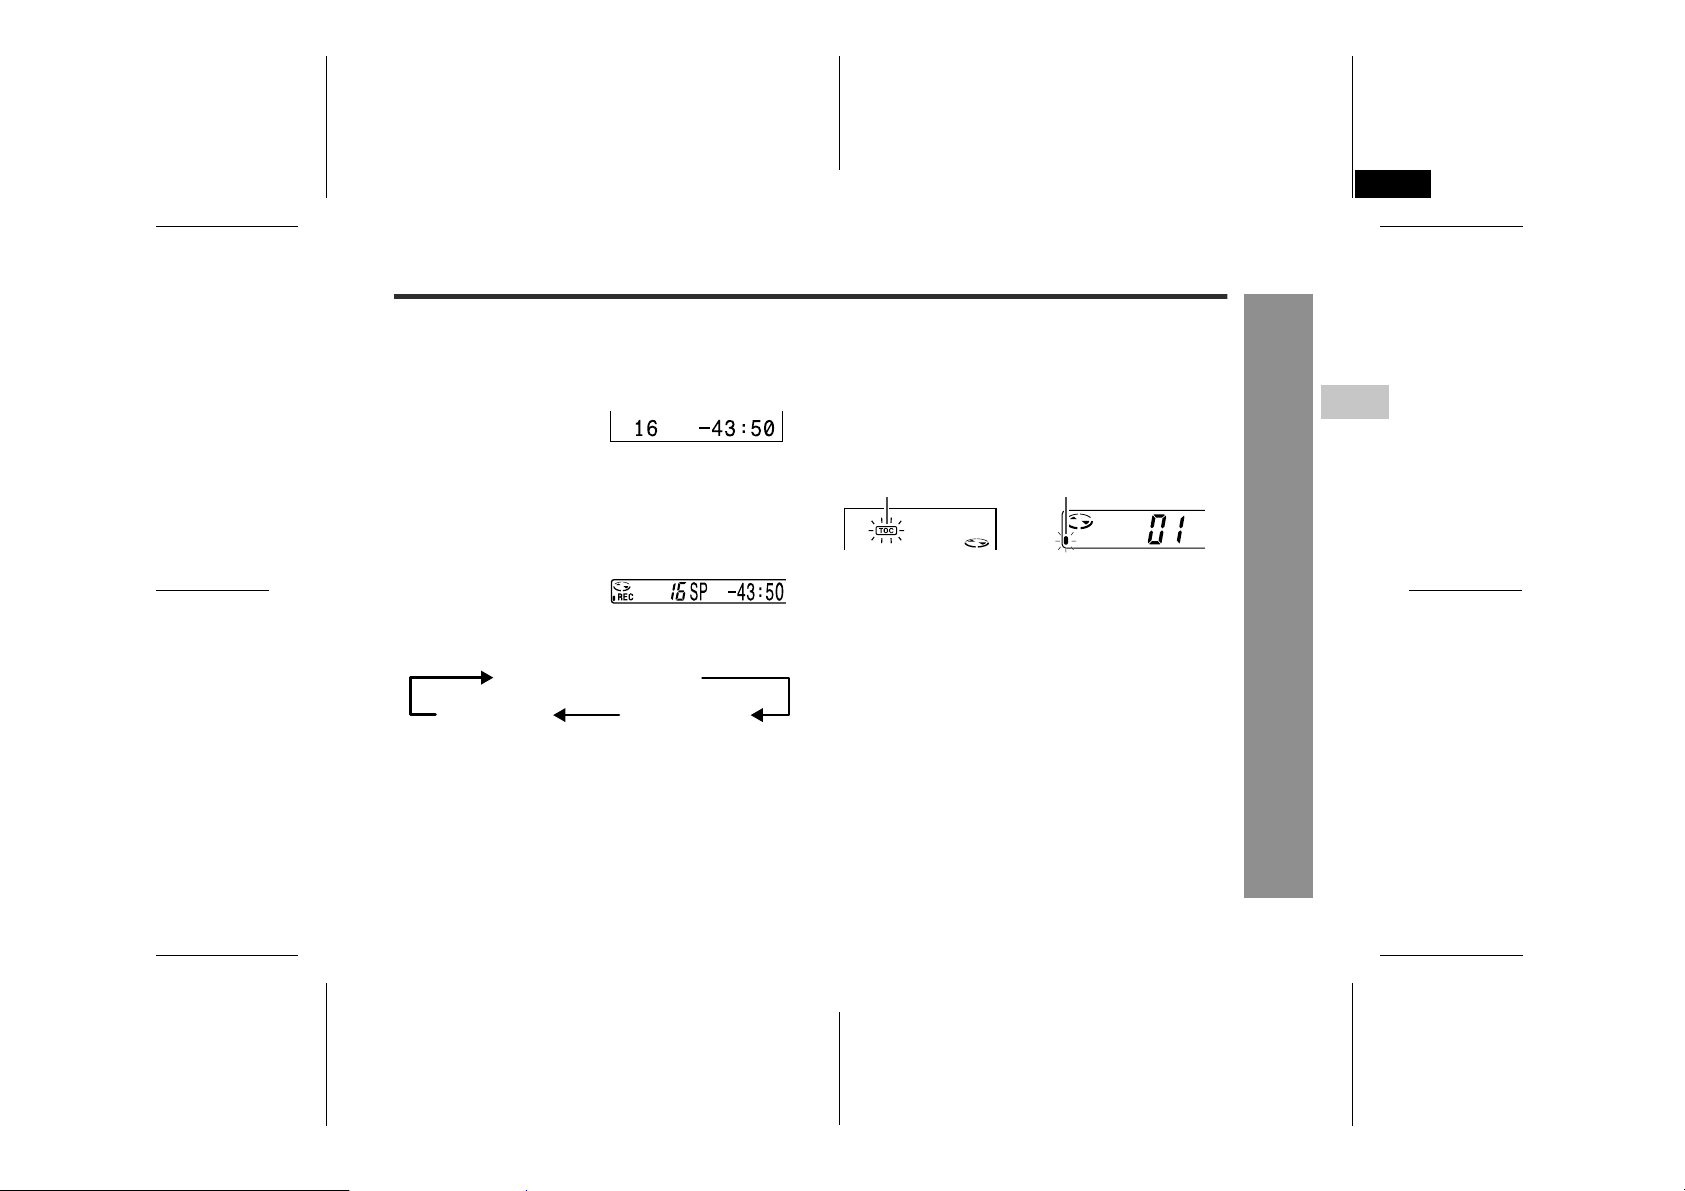
! When you record or edit, "TOC" appears. This indicates
the TOC information is changed, but not recorded yet.
When recording is stopped, TOC is written on the MD.
Flashing (recording information)
Rotating
To turn off the power
Press the button whilst in the stop mode.
! The power automatically turns off approx. 2 minutes after
recording.
! The power does not turn off whilst recording is paused.
IM-DR580H
3
Recording
-Recording from a Stereo System, etc.-
23
03/10/15 IM-DR580H(E)2.fmIM-DR580H(E) TINSE0568AWZZ
Page 24
IM-DR580H
Recording from a Stereo System, etc. (continued)
Notes:
! When recording, it is recommended to use the AC
adaptor and also install the battery. Should the power
failure occur, the power source will be automatically
switched to the battery.
! Changing the volume level whilst recording does not
affect the recording.
! You cannot adjust the bass level whilst recording.
! When recording through the earphone socket, the
recording level depends on the sound volume on
the connected equipment.
! If powered by batteries, some portable CD/MD players
may not send signals from the optical socket. Use the
AC power for digital recording. Also, deactivate sound
skip prevention if installed.
Recording
-Recording from a Stereo System, etc.-
" Playback sound-actuated recording
Recording automatically starts or pauses by detecting
sound from the stereo system (synchronised recording).
Connect external equipment to the OPTICAL/
1
LINE IN socket on the multi-link station (pages
19 - 21).
Insert a recordable MiniDisc (page 12).
2
Place the main unit on the multi-link station.
3
Press the REC button.
4
Recording is paused.
Press the MODE/-CHARGE button repeatedly to
5
select the recording mode (page 33).
Start playback on the external equipment and
6
adjust the recording level by pressing the or
button (page 23).
After the adjustment, leave the connected equipment in the stop mode.
Lit
Flashing
(recording is paused)
24
03/10/15 IM-DR580H(E)3.fmIM-DR580H(E) TINSE0568AWZZ
Page 25
Press the MENU button.
7
The unit enters the menu select
mode.
Select "SYNC REC" by press-
8
ing the or button and
press the ENTER/-USB button.
Recording pause and track numbering
! When the stereo system is stopped, the unit will enter the
synchro recording pause mode. When playback is
resumed, the recording will be resumed.
! If a silence lasts for 3 seconds or more, recording will be
paused (pause function does not work for approximately
10 seconds after the recording starts). When the unit
receives sound again, recording automatically starts.
! A new track number is created when the recording
resumes.
IM-DR580H
3
Select "ON" by pressing the
9
or button and press the
ENTER/-USB button.
! "SYNC" will flash.
ON: Synchro recording is active.
OFF: Synchro recording is deactivated.
Begin playback on the exter-
10
nal equipment.
Recording will begin automatically.
To stop recording
Press the button.
Synchro recording is deactivated.
To use the last setting for synchro recording
Press the REC button to pause recording and press the REC
button for 2 seconds or more.
Synchro recording starts.
Flashing
Lit Rotating
First
track
Silence of 3 seconds
When track number setting is active
Tracks are numbered after a silence of more than 3 seconds
and at set intervals (see page 34).
(Example: the interval is 5 minutes)
First
track
5 min 5 min
Numbered after 5 minutes Numbered after 5 minutes
Note:
Recording may not pause or resume at an appropriate timing
depending on the playback signal. In this case, perform
recording manually (see pages 22 - 23).
Second
track
or more
Second
track
Silence of 3 seconds or more
(Track numbering in synchro recording)
Silence of 3 seconds
Third
track
Third
track
or more
03/10/15 IM-DR580H(E)3.fmIM-DR580H(E) TINSE0568AWZZ
Recording
-Recording from a Stereo System, etc.-
25
Page 26

IM-DR580H
Recording from a Microphone
Connect a microphone to the main unit for recording.
26
To the MIC IN socket
Notes:
! When recording from a microphone with the main unit
on the multi-link station, do not connect anything to the
OPTICAL/LINE IN socket. Noise may be picked up.
! When the recording level is high, MD mechanical
Recording
operation sound may be recorded. To avoid this, keep
the sound collector of the microphone away from the
main unit. MD mechanical operation sound may be
recorded more easily if the microphone is a direct connection type.
-Recording from a Microphone-
! Keep the plug clean. Dirt may cause noise pickup.
! Insert the plug firmly. If you don't, the recording will not
be made properly.
! Use a microphone with a 3.5 mm diameter stereo mini
plug.
Stereo microphone
(commercially available)
! To use a microphone, be sure it is a plug-in-power
type microphone.
- When a plug-in-power type microphone is plugged in,
the portable MD will provide power for the microphone's
operation.
- If a different type of microphone is plugged in, it may not
operate properly or it may cause the unit to malfunction.
03/10/15 IM-DR580H(E)3.fmIM-DR580H(E) TINSE0568AWZZ
Page 27

IM-DR580H
Use the multi-link station or the remote control for microphone recording.
" Indoor recording
If the AC adaptor can be used, keep the main unit on the
multi-link station for recording.
Connect a microphone
before placing on the
multi-link station.
Note:
Recording cannot be remotely controlled when the
main unit is placed on the multi-link station (no display is shown in the indicator).
" Outdoor recording
It is not recommended to use the AC adaptor with the
multi-link station outdoors. When outside or where it is
inconvenient to use the multi-link station with the AC
adaptor, use the remote control for recording.
Make sure the direction of the
plug and plug it in completely.
3
Recording
-Recording from a Microphone-
27
03/10/15 IM-DR580H(E)3.fmIM-DR580H(E) TINSE0568AWZZ
Page 28

IM-DR580H
Recording
Recording from a Microphone (continued)
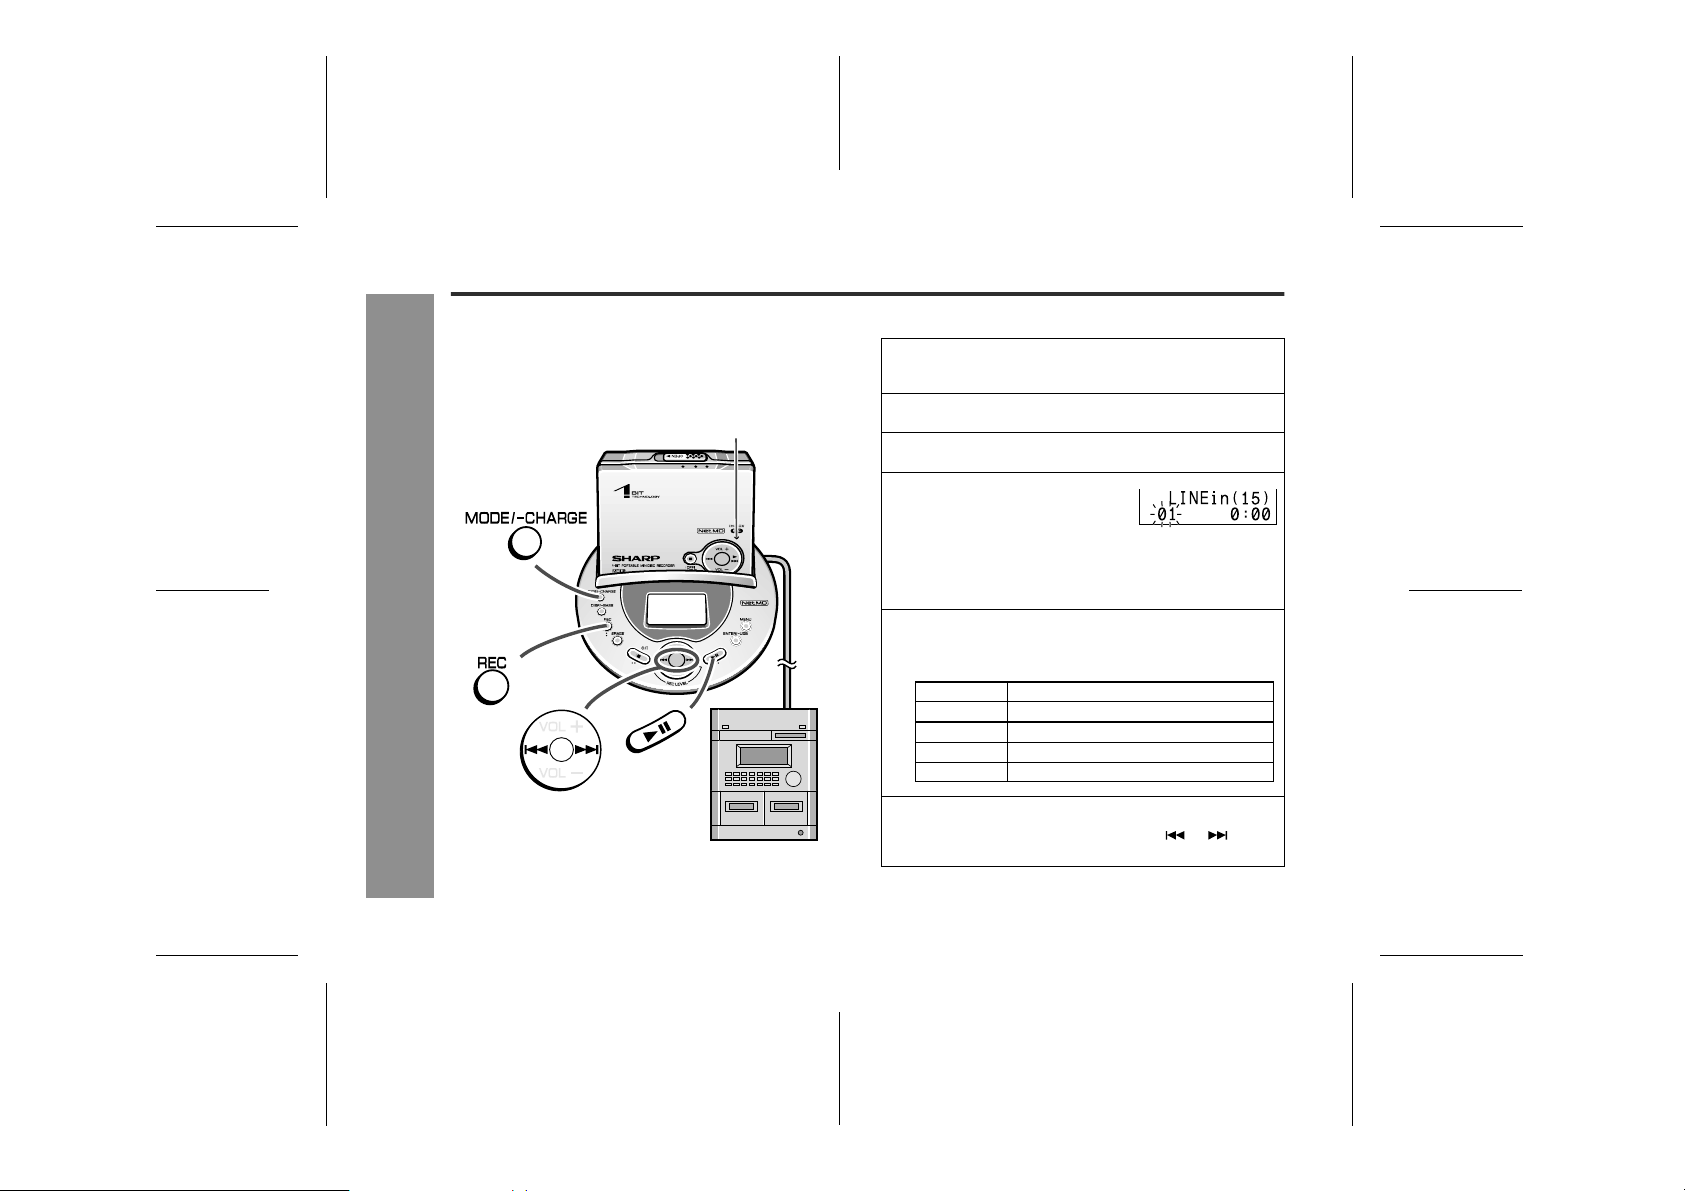
" Manual recording
Record indicator
[Operate with the multi-link station or the remote
control]
( ) indicates remote control operations.
1
2
3
4
5
-Recording from a Microphone-
6
Record
indicator
7
Connect a plug-in microphone to the MIC IN
socket on the main unit (page 26).
Insert a recordable MiniDisc (page 12).
To operate with the multi-link station, place the
main unit on the multi-link station. (To use the re-
mote control, connect it to the main unit.)
Press the REC button.
! The record indicator flashes.
! The REC button functions even if the main unit is
turned off.
Press the MODE/-CHARGE (MODE) button repeatedly to select the recording mode (page 33).
Press the MENU button.
The menu selection mode is activated.
Select "MIC LEVEL" ("MICLevel") by pressing
the or button, and then press the ENTER/
-USB ( ) button.
28
03/10/15 IM-DR580H(E)3.fmIM-DR580H(E) TINSE0568AWZZ
Page 29

IM-DR580H(E) TINSE0568AWZZ
5
Select "ALC-H", "ALC-L" or "MANUAL" by
8
pressing the or button, and the press the
ENTER/-USB ( ) button.
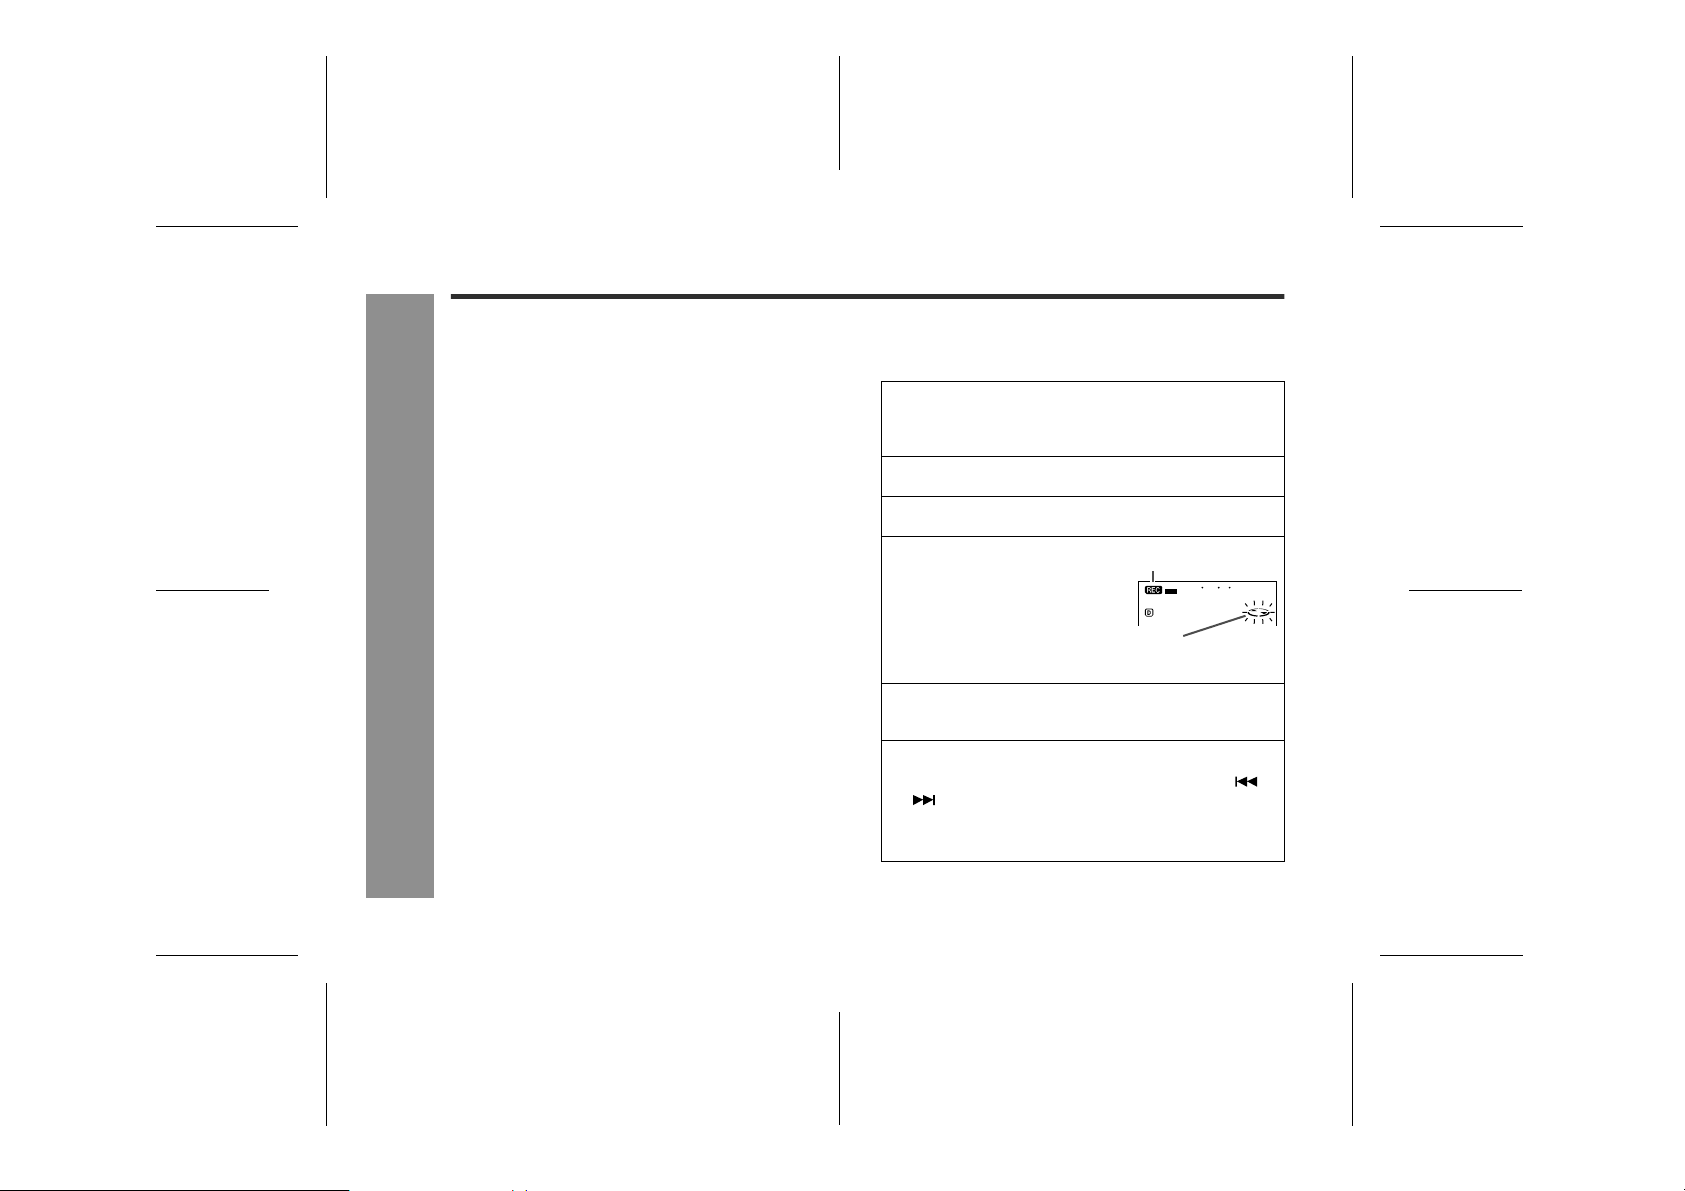
Press the button to start recording.
9
The record indicator lights up.
To interrupt recording
Press the button whilst recording.
To resume recording, press the button.
The track number will be increased by one each time you
interrupt recording.
To stop recording
Press the button.
TOC information is recorded.
" Adjusting the microphone recording level
Auto adjustment:
! In step 8 above, select "ALC-H" or "ALC-L". The
recording level is adjusted according to the sound
from the microphone. Normally set to "ALC-H".
! If the sound from the microphone is too loud and the
recording level exceeds 0 dB frequently, select "ALCL" to lower the level.
! Select "ALC-H" or "ALC-L" so that the maximum
recording level is between -4 dB and 0 dB.
Manual adjustment:
In step 8, select "MANUAL" to adjust the recording level
manually. This is useful at meetings or in conversations.
Select "MANUAL" and press the or button.
! Adjust the maximum level be-
tween -4 dB and 0 dB.
! Adjustable between "MIC L 00
(M-L00)" and "MIC H 30 (MH30)".
Notes:
! Sound is interrupted when switching between "MIC L
20 (M-L20)" and "MIC H 21 (M-H21)". This is not a
malfunction.
! Do not increase the recording level excessively.
! The adjusted level is retained after recording is
stopped.
-4dB 0dB
IM-DR580H
3
Recording
-Recording from a Microphone-
29
03/10/15 IM-DR580H(E)3.fmIM-DR580H(E) TINSE0568AWZZ
Page 30

IM-DR580H
Recording from a Microphone (continued)
30
" Sound-actuated recording (Mic Synchro-
nised recording)
[Operate with the multi-link station or the remote control]
( ) indicates remote control operations.
Connect a plug-in microphone to the MIC IN socket
1
on the main unit (page 26).
Insert a recordable MiniDisc (page 12).
2
To operate with the multi-link station, place the
3
main unit on the multi-link station. (To use the remote control, connect it to the main unit.)
Press the REC button.
4
! The record indicator flashes.
Recording
-Recording from a Microphone-
! The REC button functions even if the main unit is
turned off.
Press the MODE/-CHARGE (MODE) button repeat-
5
edly to select the recording mode (page 33).
Press the MENU button.
6
The menu selection mode is activated.
Select "MIC LEVEL" ("MICLevel") by pressing the
7
or button, and then press the ENTER
() button.
/-USB
Select "ALC-H", "ALC-L" or "MANUAL" by pressing
8
the or button, and the press the ENTER
( ) button (page 29).
Press the MENU button.
9
The unit enters the menu select
mode.
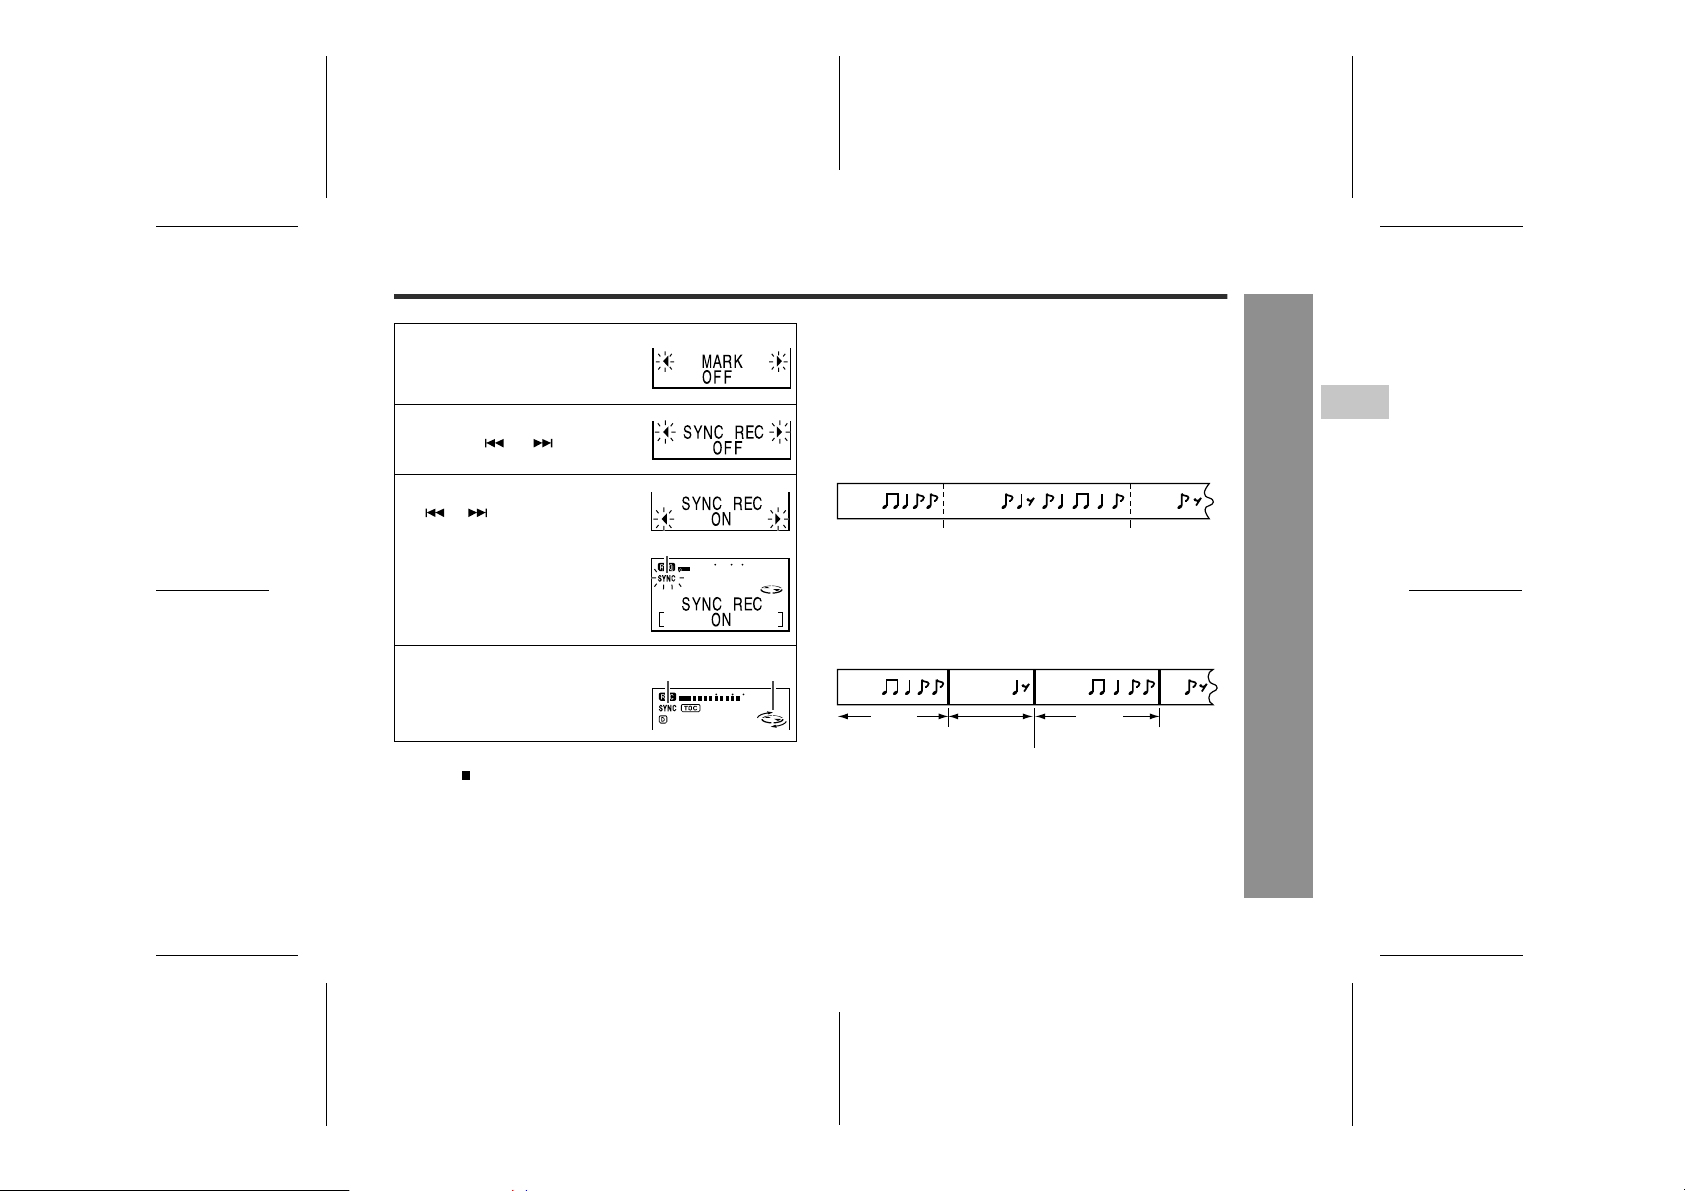
Select "SYNC REC" by press-
10
ing the or button and
press the ENTER/-USB ( )
button.
Select the recording start lev-
11
el by pressing the or
button and press the ENTER/USB ( ) button.
! "SYNC" will flash.
MIC SYNC H (High):
Recording starts when the unit detects -24 dB or more
(the unit can start recording from quiet sounds).
MIC SYNC L (Low):
Recording starts when the unit detects -12 dB or more.
OFF:
Synchro recording is deactivated. ("OFF" cannot be selected with the remote control.)
When a sound, such as person speaking, is picked
12
up by the microphone, recording will begin automatically.
! "SYNC" lights up.
/-USB
03/10/15 IM-DR580H(E)3.fmIM-DR580H(E) TINSE0568AWZZ
Page 31

Notes for Recording
IM-DR580H
To stop recording
Press the button.
Synchro recording is deactivated.
To use the last setting for synchro recording
Press the REC button to pause recording and press the
REC button for 2 seconds or more.
Synchro recording starts.
Synchro recording indicator on the remote control:
You can check the recording status.
Synchro recording indicator
Lit: Recording in progress
Flashing: Paused
Notes:
! Recording may not pause or resume at an appropriate
timing depending on the playback signal from the
microphone. In this case, perform recording manually
(see pages 28 - 29).
! If the unit starts recording from low unwanted noises
too often, set the microphone input to "MIC SYNC L".
Recording pause and track numbering
The unit automatically pauses when the microphone
does not pick up any sound for 3 seconds or more.
(Pause function does not work for approximately 10 seconds after a recording starts.) When the microphone
picks up sound again, recording starts automatically.
" To prevent recorded MiniDiscs from being
erased accidentally
Slide the accidental erase prevention tab, located on the
side of the MiniDisc, in the direction indicated by the
arrow.
The MiniDisc will then be protected against accidental
erasure.
To add a recording to such a MiniDisc, slide the accidental erase prevention tab back to its original position.
" Helpful tip when attaching a label
When attaching a label to a MiniDisc cartridge, be sure to
note the following. If the label is not attached properly,
the MiniDisc may jam inside the unit and you may not be
able to remove it.
! If the label peels off or partially lifts
away, replace it with a new one.
! Do not put a new label on top of an ex-
isting one.
! Attach the label only in the specified
location.
3
Recording
-Recording from a Microphone/Notes for recording-
31
03/10/15 IM-DR580H(E)3.fmIM-DR580H(E) TINSE0568AWZZ
Page 32

IM-DR580H
Notes for Recording (continued)
Advanced Recording
! About sampling rate converter
This portable MD incorporates a sampling rate converter
so that it can record from digital radios or DAT tape
recorders.
! Note for digital recording
You cannot copy a MiniDisc that you recorded from digital inputs to another MiniDisc or DAT. It is prevented by
the SCMS (Serial Copy Management System). Recording from analogue inputs is not affected.
Digital signals Digitally recorded
MiniDisc
Recording
-Notes for Recording/Advanced Recording-
! Switching recording mode
2 times and 4 times long recording
Double or quadruple time of stereo recording is possible.
Monaural recording
In monaural, you can record twice as long as stereo
recording.
Cannot record
32
03/10/15 IM-DR580H(E)4.fmIM-DR580H(E) TINSE0568AWZZ
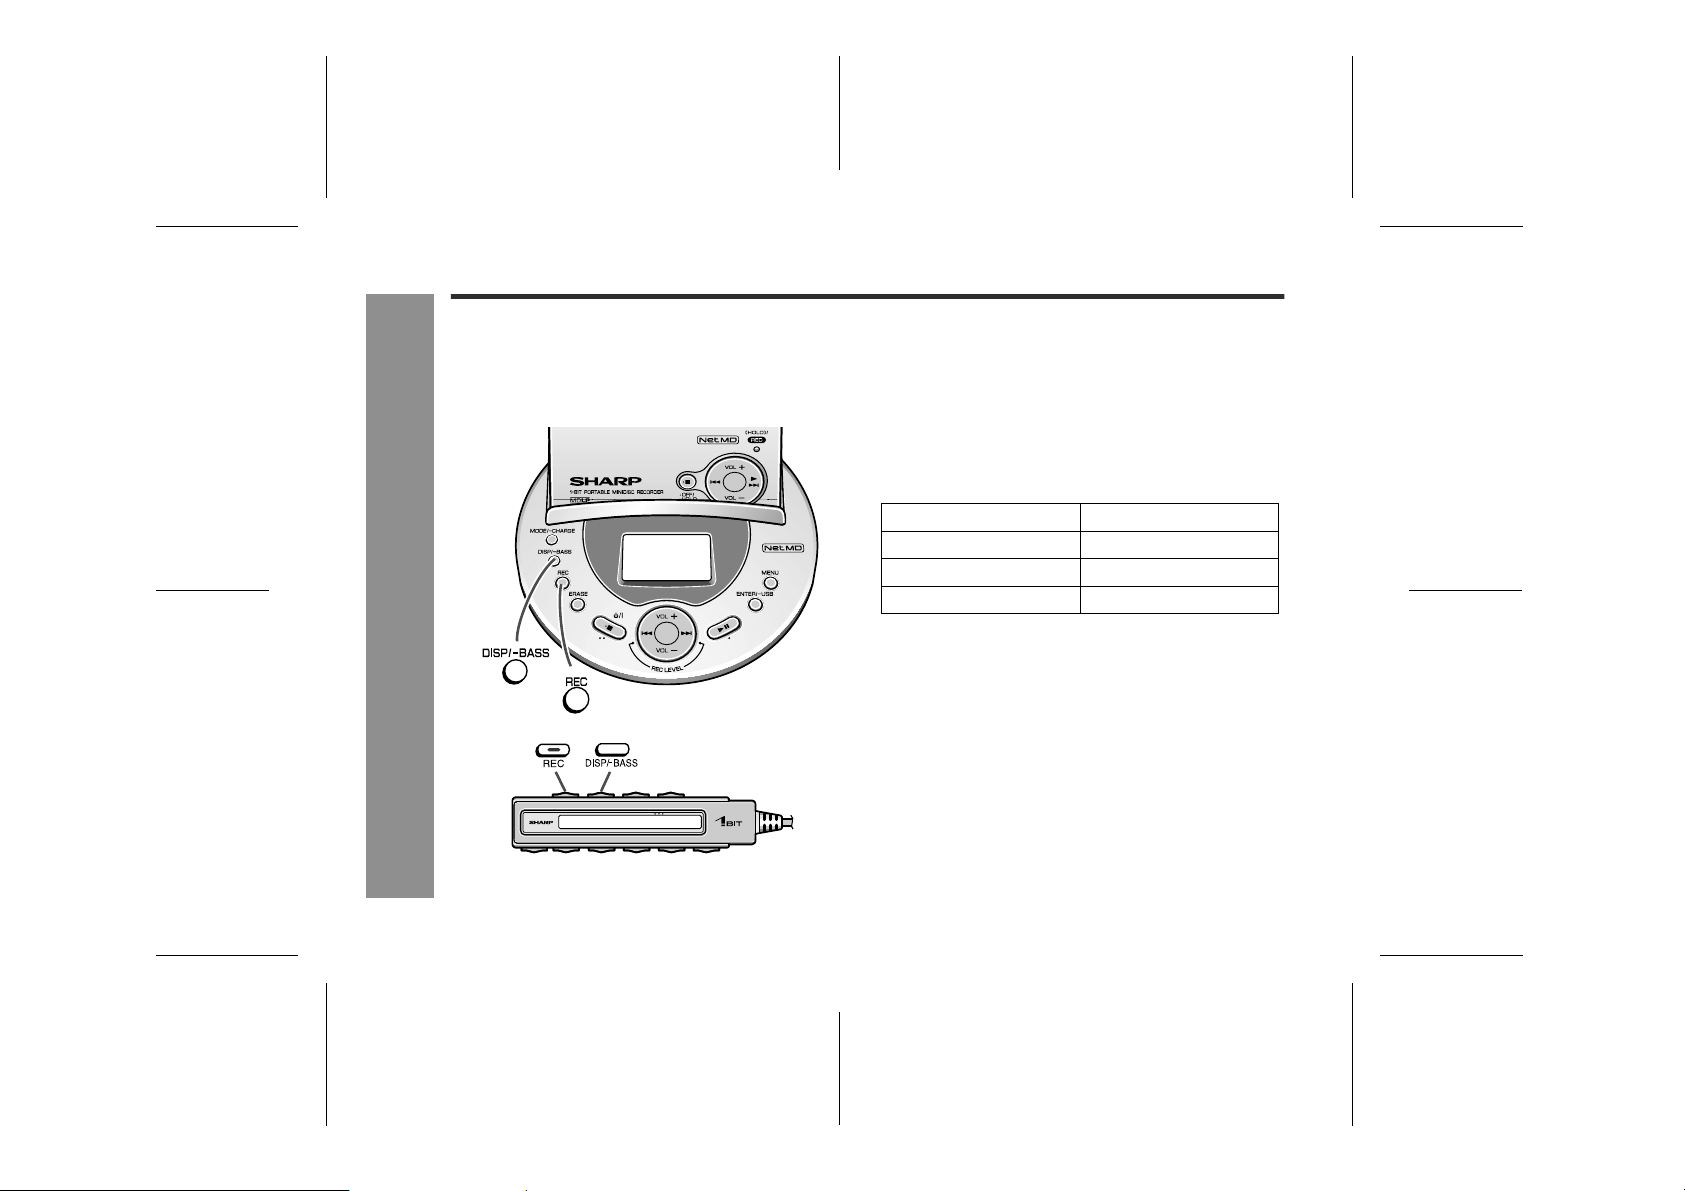
Page 33

IM-DR580H
Press the REC button.
1
Press the MODE/-CHARGE
2
(MODE) button repeatedly to select the desired recording
mode.
Each press of the button changes
the mode.
For an 80 minute MiniDisc.
Indication Recording mode Recording time
None Stereo MAX. 80 min.
LP2 2 times long (MDLP
LP4 4 times long (MDLP
SP/MONO Monaural MAX. 160 min.
Display on the remote control
Indication Recording mode
stereo)
stereo)
Stereo
2 times long (MDLP stereo)
4 times long (MDLP stereo)
Monaural
Recording mode
MAX. 160 min.
MAX. 320 min.
Notes:
FlashLight up
" Tracks recorded in 2 times long recording and 4
times long recording modes cannot be played with
the unit that does not support these modes. On
such a unit, no sound is heard. (The operation
may vary depending on the unit.)
" Tracks can be recorded in stereo recording mode, 2
times long recording mode, and 4 times long recording
mode on one MiniDisc.
" In monaural recording, the sound on the right and left
channels is mixed even if the input source is in stereo.
Although you can hear the stereo sound from the earphones, the recorded sound is monaural.
" The recording mode remains unchanged until a new
mode is selected.
3
Caution for 4 times long recording (LP4)
Special compression methods are used to achieve 4
times long recording. This may cause some noise to be
recorded occasionally. When the highest quality is
required, stereo or LP2 recording is recommended.
Recording
! About ATRAC
The ATRAC (Adaptive TRansform Acoustic Coding) system compresses the sound data into 1/5 by cutting out
the inaudible sound. Since the sound is selected based
on psychoacoustics masking, the sound quality is not
impaired. This unit is equipped with the ATRAC3 compressing system that can reduce the sound data to 1/10
or 1/20 of its original size. By employing this system, 2
times and 4 times long recordings are enabled in stereo
mode.
-Advanced Recording-
33
03/10/15 IM-DR580H(E)4.fmIM-DR580H(E) TINSE0568AWZZ
Page 34

IM-DR580H
Advanced Recording (continued)
! Creating track numbers automatically
1. In analogue recording, tracks will be numbered as
follows:
Recording from a stereo system:
By default, track numbers are created automatically after
1 second or more of silence ("MARK LEVEL-AUTO" is
selected).
Playback
side
Recording
side
Recording from a microphone:
By default, tracks are recorded as a sequence without
numbers ("MARK OFF" is selected).
Sequential recording
Recording
-Advanced Recording-
To change the numbering setting:
<When recording from a stereo system>
Press the REC button.
1
Press the MENU button.
2
The unit enters the menu select
mode.
Select "MARK" by pressing
3
the or button and press
the ENTER/-USB ( ) button.
Select the desired interval by
4
pressing the or button
and press the ENTER/-USB
() button.
LEVEL-AUTO Track numbers will be created auto-
TIME 10min A new track number is created ev-
TIME 5min A new track number is created ev-
TIME 3min A new track number is created ev-
OFF No track numbers are created auto-
matically by detecting 1 second or
more of silence.
ery 10 minutes.
ery 5 minutes.
ery 3 minutes.
matically.
FlashLight up
34
03/10/15 IM-DR580H(E)4.fmIM-DR580H(E) TINSE0568AWZZ
Page 35

IM-DR580H
<When recording from a microphone>
Press the REC button.
1
Press the MENU button.
2
The unit enters the menu select
mode.
Select "MARK" by pressing
3
the or button and press
the ENTER/-USB ( ) button.
Select the desired interval by
4
pressing the or button
and press the ENTER/-USB
( ) button.
OFF No track numbers are created auto-
TIME 10min A new track number is created ev-
TIME 5min A new track number is created ev-
TIME 3min A new track number is created ev-
Notes:
" The interval between marks may vary slightly com-
pared with the actual recording time.
" Whilst recording, a change in the numbering setting is
applied immediately.
matically.
ery 10 minutes.
ery 5 minutes.
ery 3 minutes.
Auto mark indicator on the remote control:
You can check the setting for auto track numbering.
Auto mark indicator
2. In digital recording, tracks will be numbered as follows:
When recording from a CD or a MiniDisc using the digital
connection, track numbers will be created at the same
points as on the CD or MiniDisc (synchro marker function).
Playback
side
Recording
side
Notes:
" Track numbers may not be created in proper places,
depending on the source to be recorded from, such as
signals with noise.
" When recording, if a programmed playback is per-
formed by the source or playback is performed by
selecting tracks manually, the MiniDisc track numbers
may not be the same as on the source.
" In digital recording, track numbers may not be created
depending on the connected stereo system.
First track Second track Third track
Track A Track B Track C
First track Second track Third track
Track A Track B Track C
ON: Set
OFF: Disabled
3
Recording
-Advanced Recording-
35
03/10/15 IM-DR580H(E)4.fmIM-DR580H(E) TINSE0568AWZZ
Page 36
IM-DR580H
Advanced Recording (continued)
! Creating track numbers manually
You can number tracks at the desired positions whilst
recording from a stereo system or microphone. This is
useful when the silence between tracks is too short for
auto track numbering.
Recording
-Advanced Recording-
Whilst recording, press the REC button at the point
where you want to create track numbers.
" The track number will be increased by one.
Numbering restriction
If you attempt to number tracks continuously within a certain time, "SORRY" (the multi-link station) or "Sorry" (the
remote control) will appear and the operation will be
interrupted. Wait a while and try again.
In that case, wait until the next operation can be
resumed.
In stereo recording Within 40 seconds
In 2 times long recording Within 80 seconds
In 4 times long recording Within 160 seconds
In monaural recording Within 80 seconds
36
03/10/15 IM-DR580H(E)4.fmIM-DR580H(E) TINSE0568AWZZ
Page 37
IM-DR580H(E) TINSE0568AWZZ
6
! Checking the remaining recording time
[Operate with the multi-link station]
Whilst recording or recording is paused, press the DISP/BASS button.
" Press the button again to return to the previous dis-
play.
[Operate with the remote control]
Whilst recording or recording is paused, press the DISP/BASS button.
" Each time the button is pressed, the display will
change as follows.
Remaining recording time
Elapsed time Recording level
Notes:
" Remaining recording time varies depending on the set
recording mode.
" Remaining recording time can be checked even in the
stop mode (page 50).
! About TOC
TOC, an abbreviation of Table of Contents, contains a
listing of where tracks start on the disc as well as the
numbers and other information. This system allows a
quick search for the beginning of tracks and blank
spaces for recording. Whilst recording or editing, the
TOC indicator remains lit.
<Multi-link station>
TOC indicator
To avoid data loss whilst recording or editing (TOC indicator lights or flashes), do not:
" Subject the main unit to shock or vibration.
" Unplug the AC adaptor.
" Remove the battery.
Information is recorded in the TOC when recording is
complete or the main unit is turned off.
Notes:
If a power failure occurs during recording (with the
TOC not overwritten), the recorded data will be lost.
To avoid this, use the rechargeable battery at the
same time that replaces the AC adaptor automatically.
" Whilst the TOC indicator lights or flashes, a MiniDisc
cannot be removed. Turn off the main unit and try
again.
" You can record all the information in the TOC at once
after editing several times.
<Remote control>
TOC indicator
IM-DR580H
3
Recording
-Advanced Recording-
37
03/10/15 IM-DR580H(E)4.fmIM-DR580H(E) TINSE0568AWZZ
Page 38
IM-DR580H
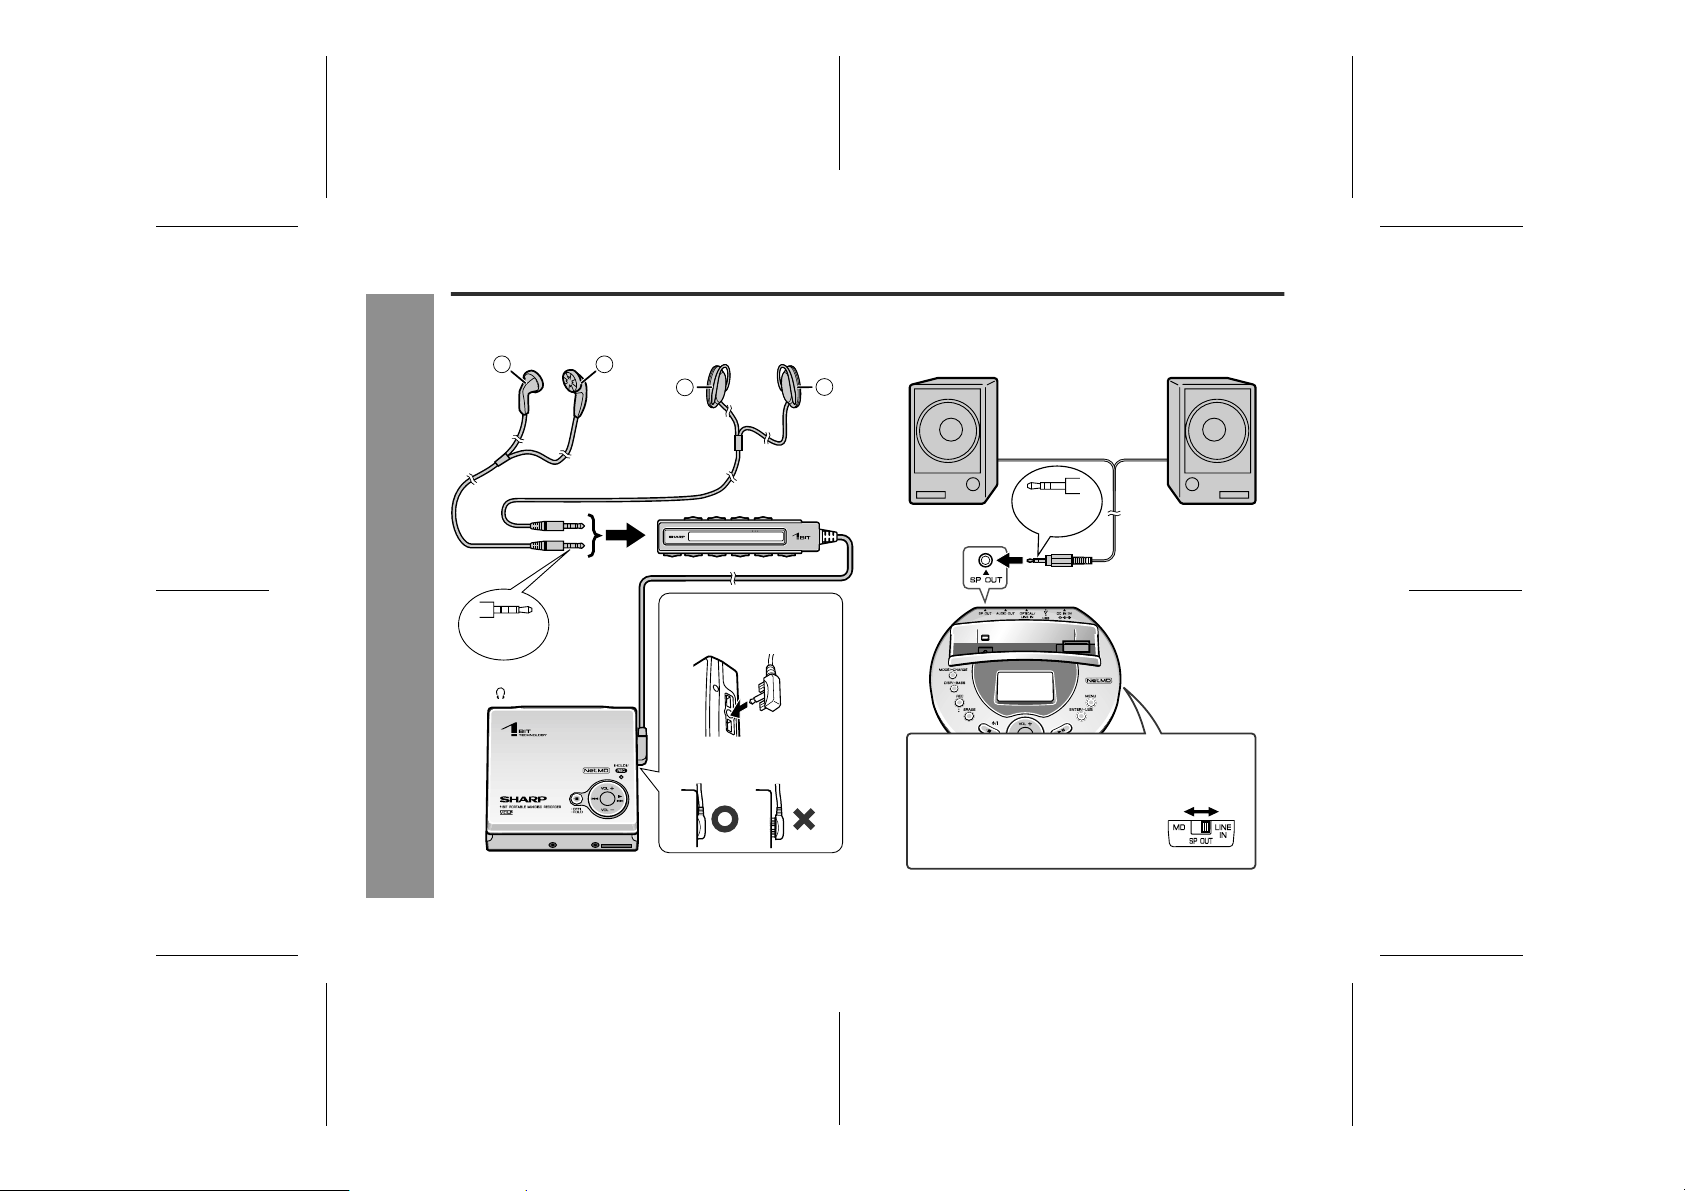
Connecting Earphones or Speakers
! Listening through earphones ! Listening through speakers with built-in
L R
Left
channel
Right
channel
L
Left
channel
R
Right
channel
amplifiers
3-pole
plug
38
Playback
To the
earphone
socket
4-pole
plug
To the
/REMOTE socket
-Connecting Earphones or Speakers-
Make sure the direction
of the plug.
Plug in the remote
control unit completely.
Speaker output selector switch
Use to switch the sound from speakers connected to
the multi-link station.
To listen to MD.......................MD
To listen to the sound from
OPTICAL/LINE IN socket.......LINE IN
To the SP OUT socket
03/10/15 IM-DR580H(E)4.fmIM-DR580H(E) TINSE0568AWZZ
Page 39

Connecting to PC or Stereo System
! Playback/recording on PC ! Playback/recording on stereo system
To the LINE IN sockets
L
R
To the AUDIO OUT
socket
3-pole
plug
To the
LINE IN socket
3.5 mm mini
plug cable without
resistance
(commercially
available)
To the
AUDIO OUT socket
3-pole
plug
PC with an audio socket
PC with a microphone
input socket
To the
MIC socket
White: to the left
Red: to the right
Supplied connection cable
(for analogue recording)
Notes on recording on PC or stereo system
" When recording with a stereo system, eliminate the
confirmation sound (page 70). Otherwise, it will also
be recorded.
" Recording will be made in the analogue mode.
" Character information will not be recorded.
" Playback sound level may decrease depending on the
equipment.
" Recording software should be installed in the PC.
" See the operation manual supplied with the software
for playback, recording or adjusting the level.
" If the monaural microphone input on the PC is used,
recorded sound will be monaural.
IM-DR580H
4
Playback
-Connecting to PC or Stereo System-
39
03/10/15 IM-DR580H(E)4.fmIM-DR580H(E) TINSE0568AWZZ
Page 40

IM-DR580H
Basic Playback
! Listening through earphones
R
Right
channel
L
Left
channel
R
Right
L
Left
channel
channel
40
Playback
Wearing the Earphones (ear-fit type):
Hold the earphone and unfold the ear clip.
1
-Basic Playback-
Hook the ear clip on your ear.
2
Fold the ear clip and adjust the earphone to fit your ear.
3
03/10/15 IM-DR580H(E)4.fmIM-DR580H(E) TINSE0568AWZZ
Page 41

Plug the remote control and earphones into the
1
unit (page 38).
Insert a MiniDisc (page 12).
2
Cancel the hold function if it is active (page 18).
3
Start playback by pressing
4
the button on the remote
control.
! After the last track is played, the main unit stops
automatically.
! This can be operated by pressing the button on
the main unit.
Press the VOL + or VOL -
5
button to adjust the volume.
! You can also use the VOL+ or VOL- button on the
main unit.
Track number
Rotating
Track
name (*)
0 - 30
To interrupt playback
During playback, press the button on the remote control.
! Press the button again to resume playback.
! About 5 minutes after playback is paused, the unit will
enter the stop mode and, 30 seconds later, turn off.
To stop playback
During playback, press the button on the main unit or
remote control.
If the unit is not operated for at least 2 minutes whilst in
the stop mode, the power will shut off automatically.
To turn off the power
Whilst in the stop mode, press the button on the main
unit or remote control.
! If you press the button on the main unit more than 2
seconds, the hold function is activated.
Notes:
! Playback starts automatically with a playback only
MiniDisc or a MiniDisc which is protected against accidental erasure (Auto play function).
! Whilst the main unit is placed on the multi-link sta-
tion, operations are impossible with the main unit
or remote control.
! The sound escaping from your earphones may annoy
people around you. In particularly crowded places
(such as on trains or buses), reduce the volume.
(*) If track names are not recorded on the MiniDisc, "NO
NAME" will be displayed.
IM-DR580H
4
Playback
-Basic Playback-
41
03/10/15 IM-DR580H(E)5.fmIM-DR580H(E) TINSE0568AWZZ
Page 42

IM-DR580H
Basic Playback (continued)
" Listening through built-in amplifier speak-
ers or a stereo system
Example: Built-in amplifier
speakers
(The volume can
also be adjusted
on the speakers.)
Playback
-Basic Playback-
Connect the multi-link station with other equip-
1
ment (pages 38 - 39).
Insert a MiniDisc (page 12).
2
Place the main unit on the multi-link station.
3
Start playback by pressing the button on the
4
multi-link station.
Track
name (*)
Track number
! When the last track has finished playing the unit
will automatically stop.
Press the VOL + or VOL - button on the multi-link
5
station to adjust the volume.
Notes:
! If a power failure occurs and the rechargeable battery
is not installed, unplug the AC adaptor. Otherwise
playback may start automatically when the power is
restored.
! The main unit plays tracks according to the mode they
are recorded (see page 33).
(*) If track names are not recorded on the MiniDisc, "NO
NAME" will be displayed.
Playing time
0 - 30
Rotating
42
03/10/15 IM-DR580H(E)5.fmIM-DR580H(E) TINSE0568AWZZ
Page 43

IM-DR580H
Display in the stop mode:
<On the remote control>
Total tracks
Lit
The display switches after approx. 3 seconds.
Disc information (*1) Disc name (*2)
<On the multi-link station>
Disc
information (*1)
Disc name (*2)
Total tracks Total playing time
(*1) Disc information indicator appears with total tracks,
disc name and total playing time. Disc name display
is " " (single-byte) or " " (double-byte) on the remote
control.
(*2) "NO NAME" appears if there is no disc name. For
group-recorded MDs, the group name is displayed
(see page 57).
Total playing time
Lit
" Resume function
When you stop and then restart playback without removing the disc, playback will resume from the point at which
the disc was stopped.
Once you remove the MiniDisc, playback starts from the
first track.
" To adjust the bass
[Operate with the remote control or the multi-link station]
Hold down the DISP/-BASS button for 2 seconds
1
or more.
Within 3 seconds, press the DISP/-BASS button
2
repeatedly to select the bass strength.
BASS 1: Emphasised slightly.
BASS 2: Emphasised more.
BASS 3: Emphasised fully.
BASS OFF:Cancelled.
Note:
If you set the volume to 23 or more, the bass boost will
be adjusted automatically.
4
Playback
-Basic Playback-
43
03/10/15 IM-DR580H(E)5.fmIM-DR580H(E) TINSE0568AWZZ
Page 44

IM-DR580H
Advanced Playback
" Track search
Playback
-Advanced Playback-
You can place the main unit on the multi-link
station to operate with the multi-link station.
[Operate with the remote control, main unit or multilink station]
To locate the beginning of a track:
During playback or whilst in the stop mode, press the
or button.
! To skip a number of tracks at one time, press the
or button repeatedly until the desired track number
is shown.
To fast forward or fast reverse audibly:
During playback, hold down the or button.
! Normal playback will resume when the or but-
ton is released.
! When the end of the last track is reached during fast
forward, the unit will enter the pause mode. When the
beginning of the first track is reached during fast
reverse, the unit will enter the playback mode.
To start playback with a desired track:
Whilst in the stop mode, press the or but-
1
ton.
Press the button.
2
! The selected track will be played back.
! When operating the main unit, press the button.
If you press the button on the main unit in step
1, the selected track starts playback automatically.
44
03/10/15 IM-DR580H(E)5.fmIM-DR580H(E) TINSE0568AWZZ
 Loading...