

Charging with the Specified AC Adapter
(Sold Separately)
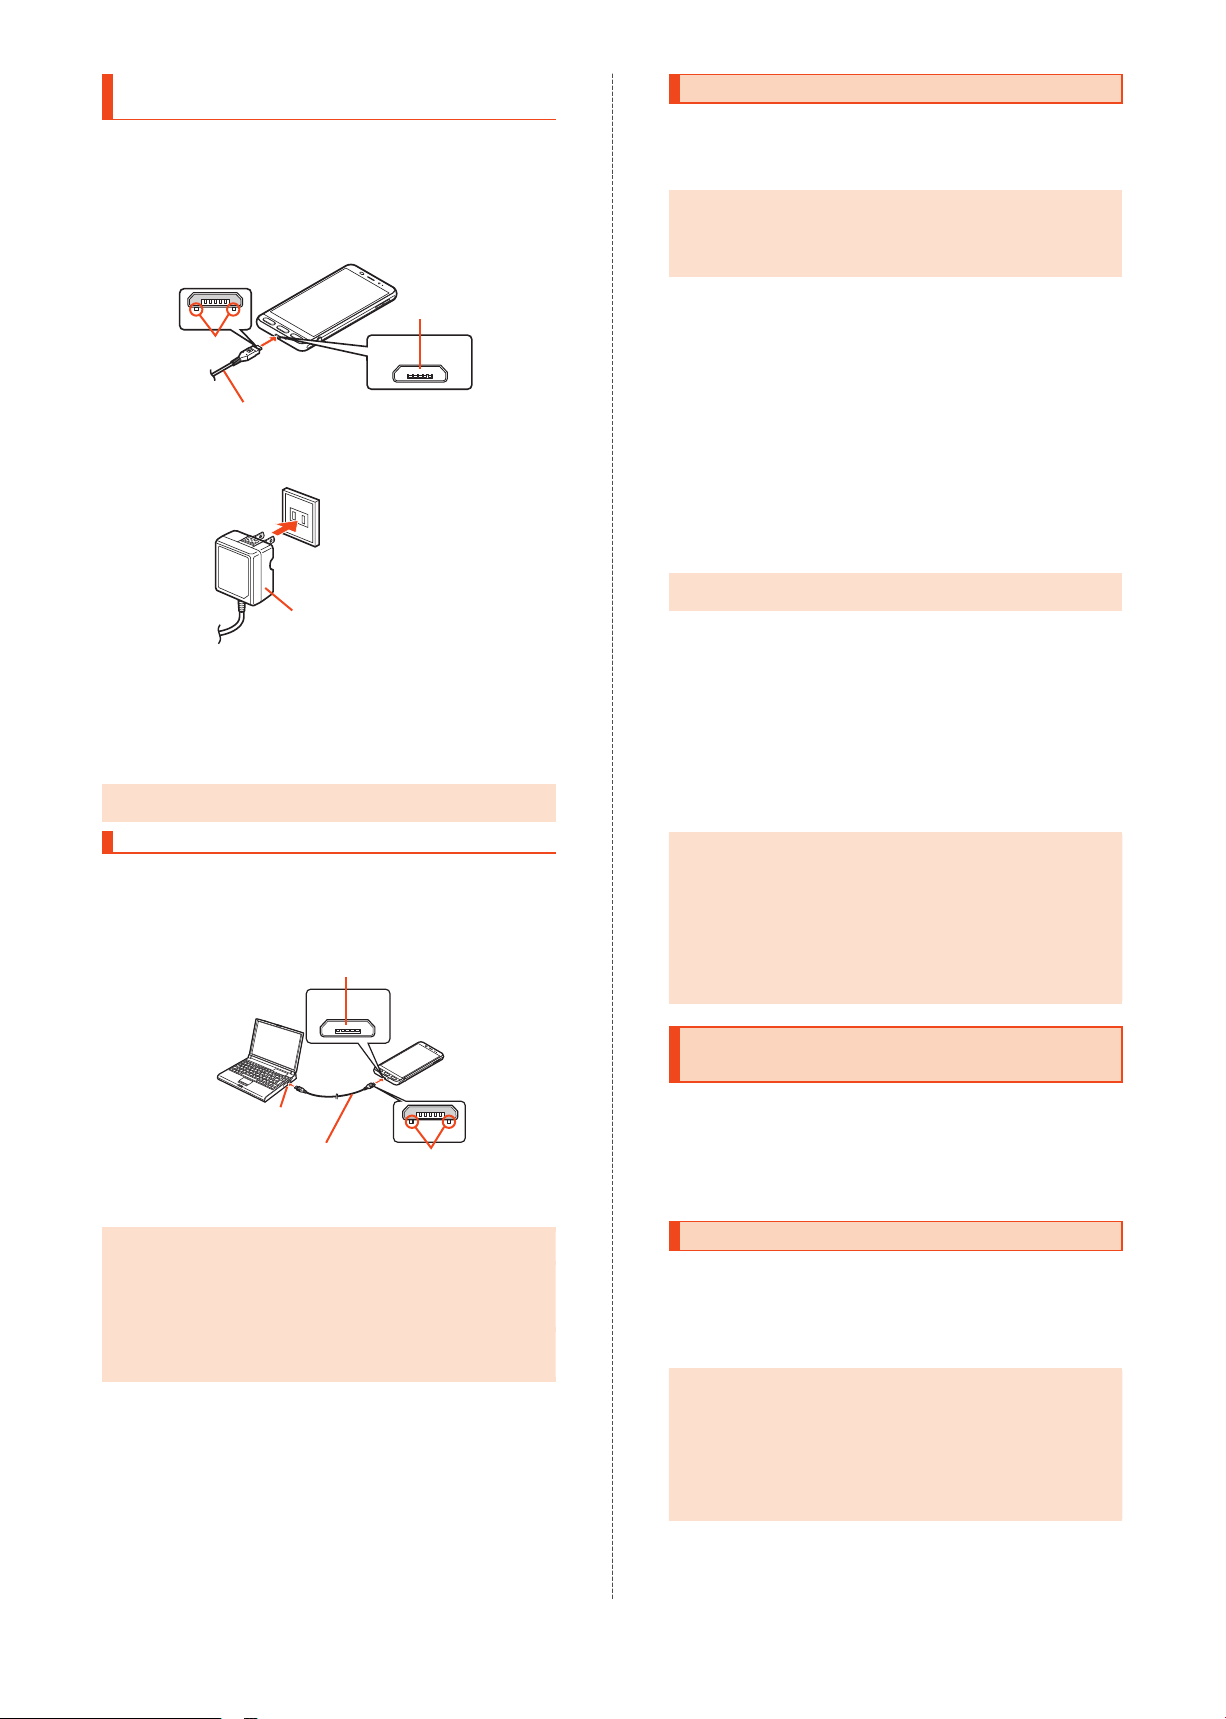
Charge by connecting the common AC adapter 05 (sold separately).
For details on the specified AC adapter (sold separately), refer to
"Introduction of Peripheral Devices" (
Check the orientation of the microUSB plug of the
1
▶
P. 19).
common AC adapter 05 (sold separately), and then
insert it into the external connection jack of the
product in the
Plug the power plug of the common AC adapter 05
2
direction of the arrow
External
connection
jack
Tabs
Common AC adapter 05
(sold separately)
(sold separately) into a 100 V AC outlet
Common AC adapter 05
(sold separately)
When charging is complete, pull the microUSB
3
plug of the common AC adapter 05 (sold
separately) straight out from the external
connection jack of the product
Unplug the power plug of the common AC adapter
4
05 (sold separately) from the outlet
◎Although charging is possible even while the product is turned on,
charging takes longer.
Charging with a PC
Charge by connecting the product to a PC's USB port that is capable
of charging.
Make sure that the PC is running, and then
1
connect microUSB cable 01 (sold separately) to a
USB port of the PC
External connection jack
Turning the Power On/Off
■Turning the Power On
While the product is turned off, f(p) (press and
1
hold for at least 2 seconds)
◎After turning the power on, do not touch the display while "BASIO"
is displayed (setting up the touch panel). Failure to do so might
cause the touch panel to malfunction.
If the screen for touch panel calibration appears after turning the
power on, follow on-screen instructions.
■Turning the Power Off
) (press and hold for at least 2 seconds)
f(p
1
[Power off]
2
■Restarting the Product
The product turns off and then turns back on.
) (press and hold for at least 2 seconds)
f(p
1
[Reboot]
2
■Forcing the Power Off
If the screen is frozen or the product cannot be turned off, force the
power off.
) (press and hold for at least 8 seconds)
f(p
1
Release the button after the product vibrates; the product turns off.
◎If the power is forced off, unsaved data will be lost. Do not force
the power off unless the product is inoperable.
■Starting the Product in Safe Mode
The product turns off and then turns back on in a state similar to its
state at the time of purchase.
If operation of the product is unstable, an application installed after
purchasing the product may be the cause. If the symptoms improve in
safe mo
de, uninstalling the application may remedy the symptoms.
) (press and hold for at least 2 seconds)
f(p
1
Touch and hold [Power off] → [OK]
2
While in safe mode, "Safe mode" is displayed at the bottom of the
screen.
To exit safe mode, restart the product.
◎To start the product in safe mode when it is turned off, turn it on
with
press and hold
logo.
◎
It is recommended that you back up data on the product before
starting it in safe mode.
◎
Widgets you created may be deleted by starting the product in
safe mode.
◎
Safe mode is not a normal state for the product to be started in.
Exit safe mode for normal use.
) (press and hold for at least 2 seconds), and then
f(p
(-) until the lock screen appears after the BASIO
d
PC's USB port
microUSB cable 01
(sold separately)
Connect microUSB cable 01 (sold separately) to
2
Tabs
the product
◎Charging by USB may take longer than by the specified AC
adapter (sold separately).
◎
Insert the microUSB plug straight into the external connection jack
of the product in the correct orientation (with the tabs facing
down). Failure to do so might damage the external connection
jack of the product.
◎
If you charge the internal battery after it has run out, the charging
lamp may not illuminate. In
AC adapter (sold separately).
such cases, charge with the specified
Switching the Display Language to
English
Show function names and other user interface items in English.
Home screen → [設定] under "
1
てを見る] → [言語と入力
[言語]
2
[English]
3
]
ショートカット" → [すべ
Turning the Display On/Off
The display turns off when f(p) is pressed or after a period of
inactivity.
■Turning the Display On
While the display is turned off, f(p)
1
Alternatively, press h.
◎When the display turns on, the screen that was open before the
display turned off may appear depending on the application in
use.
◎
When "Turn screen on by holding" in "On/off with motion" is set,
the display turns on when the product is picked up from a flat
surface (the motion sensor is activated).
◎
When putting the product in a pocket or bag, turn off the display.
Leaving the display turned on
product to malfunction.
in a pocket or bag may cause the
13
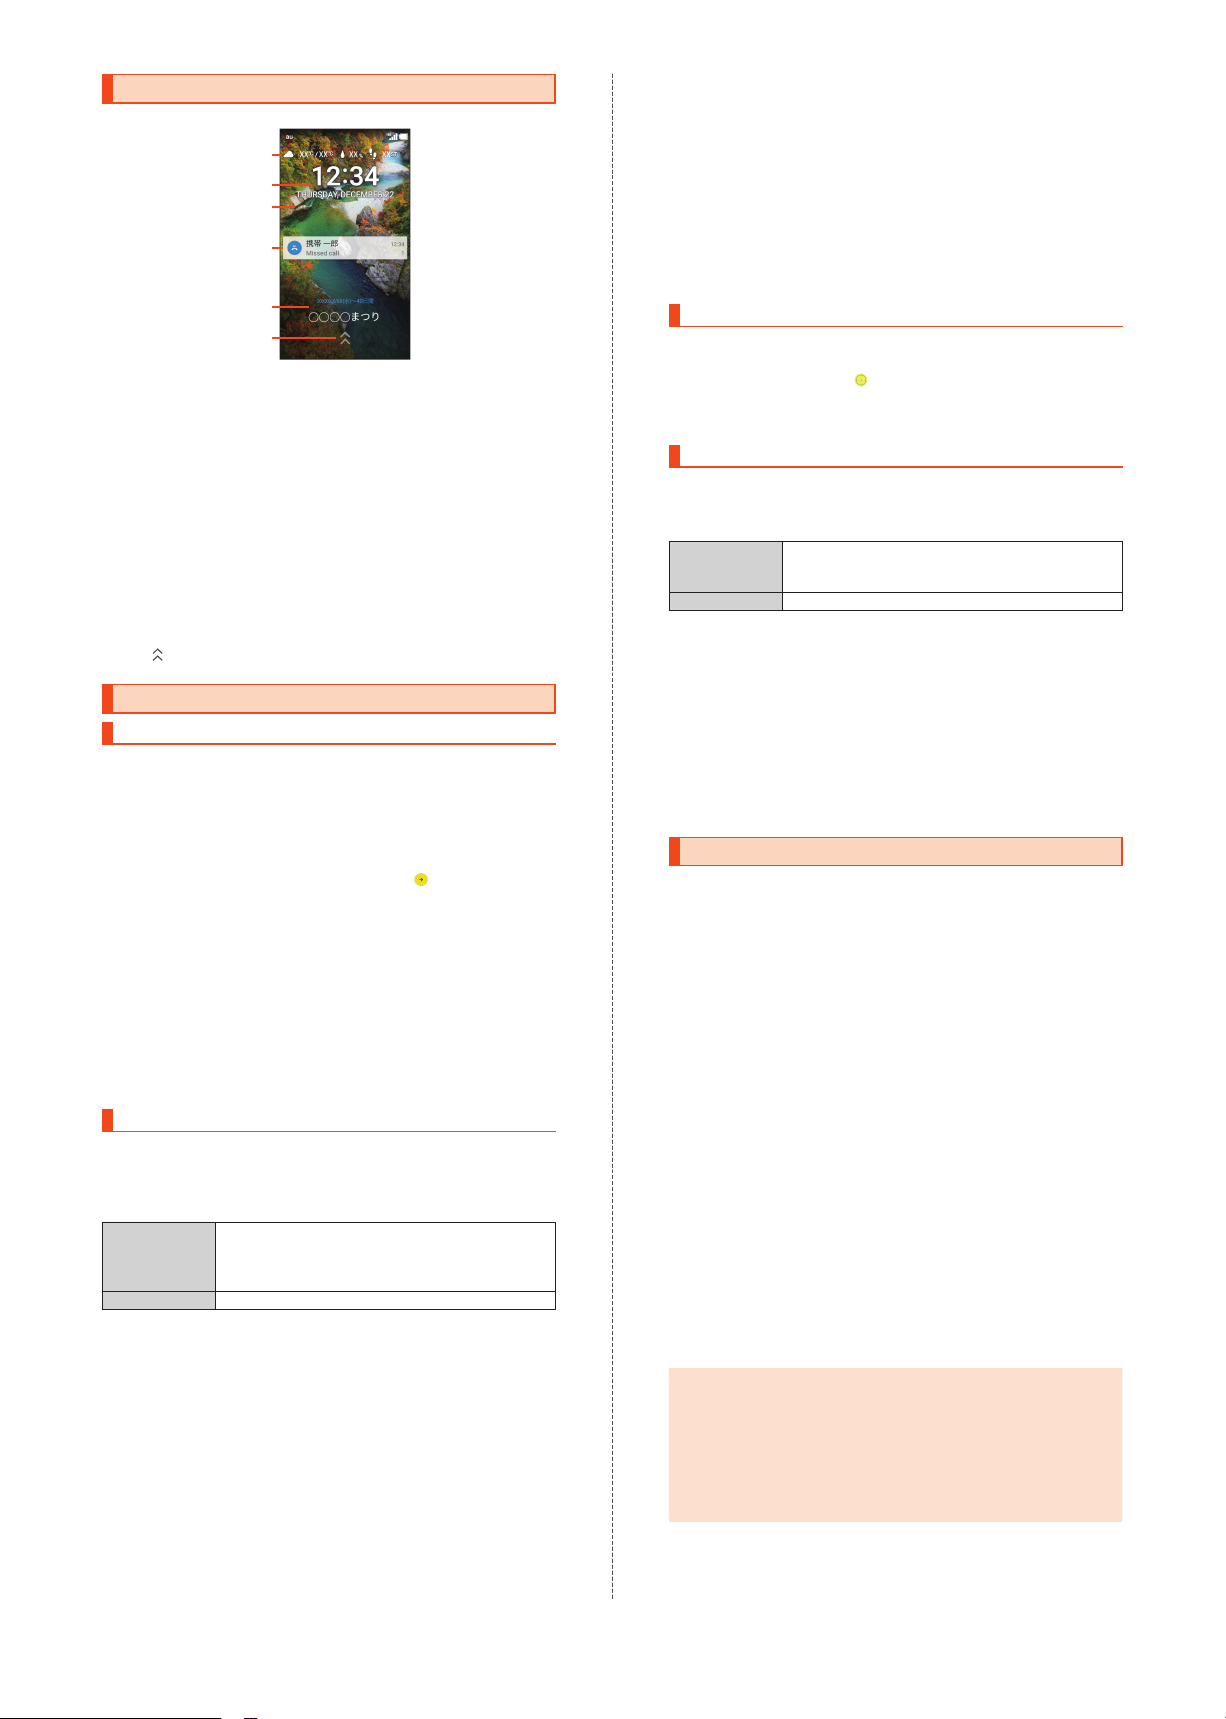
Lock Screen
When the display turns on, the lock screen appears.
①
②
③
④
⑤
⑥
《Lock Screen》
①
Weather and step count
②
Date and time
③
Wallpaper
④
Notifications area
Notifications for missed calls, new E-mail, new SMS, etc. pop up
here. Double-tap a notification for the corresponding screen.
Drag the notifications area down for a list of notifications. Tap a
notification for the corresponding screen.
⑤
Info area
When "
⑥
Slide
エモパー
emopa appears he
•
Flick to the left/right to switch the information.
•
Double-tap information for the related information or details (may
not be available depending on the information).
Screen lock
(emopa)" is set to ON, a variety of information from
re.
up to unlock the screen.
Making Initial Settings
▶
®
設
nd then then
P. 14).
Setting Up Language and Wi-Fi
The Google initial settings screen appears automatically when you turn
the product on for the first time. Follow the on-screen instructions to
set each function.
•
In the following steps, you will skip Wi-Fi® connection settings and
"Got another device?" settings. The "Got another device?" settings
let you copy your Google Accounts, applications and data from a Tap
&
Go compatible Android device to the product.
Select the language ([English]) → [ ]
1
To change the language after initial setup: Home screen → [設定]
under "
ショートカット" →
→
[Language].
[SKIP] → [SKIP ANYWAY] → [No thanks]
2
To set up Wi-Fi® connection after initial setup: Home screen → [
定
] under "
To use Tap & Go: [SKIP]
Accounts, apps, and data from your other device], a
follow the on-screen instructions.
[NEXT]
3
Next, set up a Google Account.
Refer to "Setting Up a Google Account" (
ショートカット" →
[All settings menu] → [Language & input]
[All settings menu] → [Wi-Fi].
→
[SKIP ANYWAY] → [Copy your Google
Setting Up a Google Account
Set up a Google Account to use applications provided by Google Inc.
such as Play Store and Hangouts
required to use some other applications. (The product can be used
without setting up a Google Account.)
The main setting items are as follows.
Username Register a set of characters to use as your user
Password Set up a password for your Google Account.
•The Google Account setup screen also appears when you first
activate an application that requires a Google Account.
•
Steps may differ depending on some conditions. In such cases,
fo
llow the on-screen instructions.
[Or create a new account]
1
If you already have a Google Account, enter the e-mail address.
Enter your "First name" and "Last name" → [NEXT]
2
→
Enter your username → [NEXT] → Enter the
password
ID and e-mail address for your Google Account.
You cannot use a username that is already used
by another user.
→
[NEXT] → Enter the password again →
[NEXT]
Check the phone number for recovery → [NEXT] →
3
Check the phone number
contents
Read the description of Google services → [NEXT]
4
→
[I AGREE] → [NEXT]
TM
. A Google Account may also be
→
[VERIFY] → Read the
[No thanks] → [CONTINUE]
5
To set up payment information for use with Google Play, follow the
on-screen instructions.
[Now now] → [NEXT]
6
To use an e-mail address other than the one for the Google
Account or E-mail (@ezweb.ne.jp), follow on-screen instructions.
Uncheck the checkbox → [SKIP]
7
To set up screen lock, check the checkbox and then follow
on-screen instruc
[SKIP ANYWAY]
8
Next, calibrate the touch panel.
Refer to "Calibrating Touch Panel" (
tions.
▶
P. 14).
Calibrating Touch Panel
Calibrate the touch panel for improved accuracy. Hold the product
normally during calibration.
Tap the six circles ( )
1
Calibration is complete when all the six circles have turned white.
Next, perform au Easy Setting.
Refer to "au Easy Setting" (
▶
P. 14).
au Easy Setting
Set up an au ID to use various services provided by au, such as au
マートパス
Service; a payment option for purchasing applications from Google
Play).
•
1
2
3
4
(au Smart Pass) and au
au ID Register your au phone number or a set of
au ID password Register a password to use your au ID.
To set the au ID after initial setup: Home screen → [設定] under "
トカット
" → [au Settings Menu] → [au Easy Setting].
characters as your au ID. You cannot create an au
ID that is already used by another user.
かんたん決済
(au Simple Payment
[Next] → [Register "au ID"] → [Next] → [au ID
保存
]
Enter the security code → [OK]
The default security code is the four-digit number you wrote in the
application form.
Enter the password → [設定] → [終了]
au ID registration is complete.
Follow the on-screen instructions
ショー
の設定・
Setting Permissions for Applications
When you first activate an application/function that accesses the
product's functions and information, First things first confirmation
screen appears.
Example: When activating
First things first screen → [Next]
1
[Deny]/[Allow]
2
Normally, tap "Allow" to allow use of the function.
Repeat step 2 for other functions, if any.
■Other Methods for Setting Permissions for
Applications
Permissions for applications can also be set as follows.
■Setting Functions to Use by Application
Home screen → [設定] under "
1
settings menu]
Select the application → [Permissions]
2
Select the function
3
■Setting Applications to Allow Use by Function
Home screen → [設定] under "
1
settings menu]
→
[App permissions]
Select the function
2
Select the application
3
◎If you do not allow an application/function to use the related
functions, the application/function may not be activated or use of
functions may be restricted.
◎
A screen that explains the permissions may appear for some
applications/functions. In addition, the confirmation screen may
appear multiple times or the content may be different. Read the
content carefully, and then follow onscreen instru
◎
In this manual, the description of the content of confirmation
screen may be omitted.
写真
(Album)
→
[Apps]
→
[Apps] → [Menu] → [Advanced]
ショートカット" →
ショートカット" →
ctions.
[All
[All
ス
14
Transferring Data
Restoring Data via the au Settings Menu
Restore data from your previous au phone to this product using a
microSD memory card or au Smart Pass server.
•
To restore data using au Smart Pass server, you need to set up an au
ID beforehand.
•
To restore data using a microSD memory card, save the data to the
microSD memory card on your previous au phone beforehand.
Home screen → [設定] under "
1
Settings Menu]
[Data Transfer]
2
If a terms of use screen or privacy policy screen appears, follow
the on-screen instructions.
■When Restoring Data from the Server
[au
スマートパスのサーバから戻す
3
You need to set up an au ID beforehand.
Select the item(s) to restore, and then [戻す] → [完了]
4
If a confirmation screen for Wi-Fi® connection appears, follow the
on-screen instructions.
■When Restoring Data from a microSD Memory Card
[SD
カードから復元する
3
Select the type of your previous au phone
4
Select the item(s) to restore, and then [戻す] → [完了]
5
If a confirmation screen for data restoration appears, follow the
on-screen instructions.
]
Saving Data via the au Settings Menu
Back up important data regularly to a microSD memory card or au
Smart Pass server.
•
If the product needs to be submitted to an au shop, etc. for repair,
the memory will be cleared during the repair process. Back up data
beforehand.
•
To back up data using au Smart Pass server, you need to set up an
au ID beforehand.
Home screen → [設定] under "
1
Settin
gs Menu]
[Data Transfer]
2
If a terms of use screen or privacy policy screen appears, follow
the on-screen instructions.
■When Backing Up Data to the Server
[au
スマートパスのサーバに預ける
3
You need to set up an au ID beforehand.
Select the item(s) to back up, and then [
4
If a confirmation screen for data backup or Wi-Fi® connection
appears, follow the on-screen instructions.
■When Saving Data to a microSD Memory Card
[SD
カードに保存する
3
Select the item(s) to save, and then [
4
]
ショートカット" →
]
ショートカット" →
]
預ける] → [完了
保存する] → [完了
[au
[au
Basic Operations
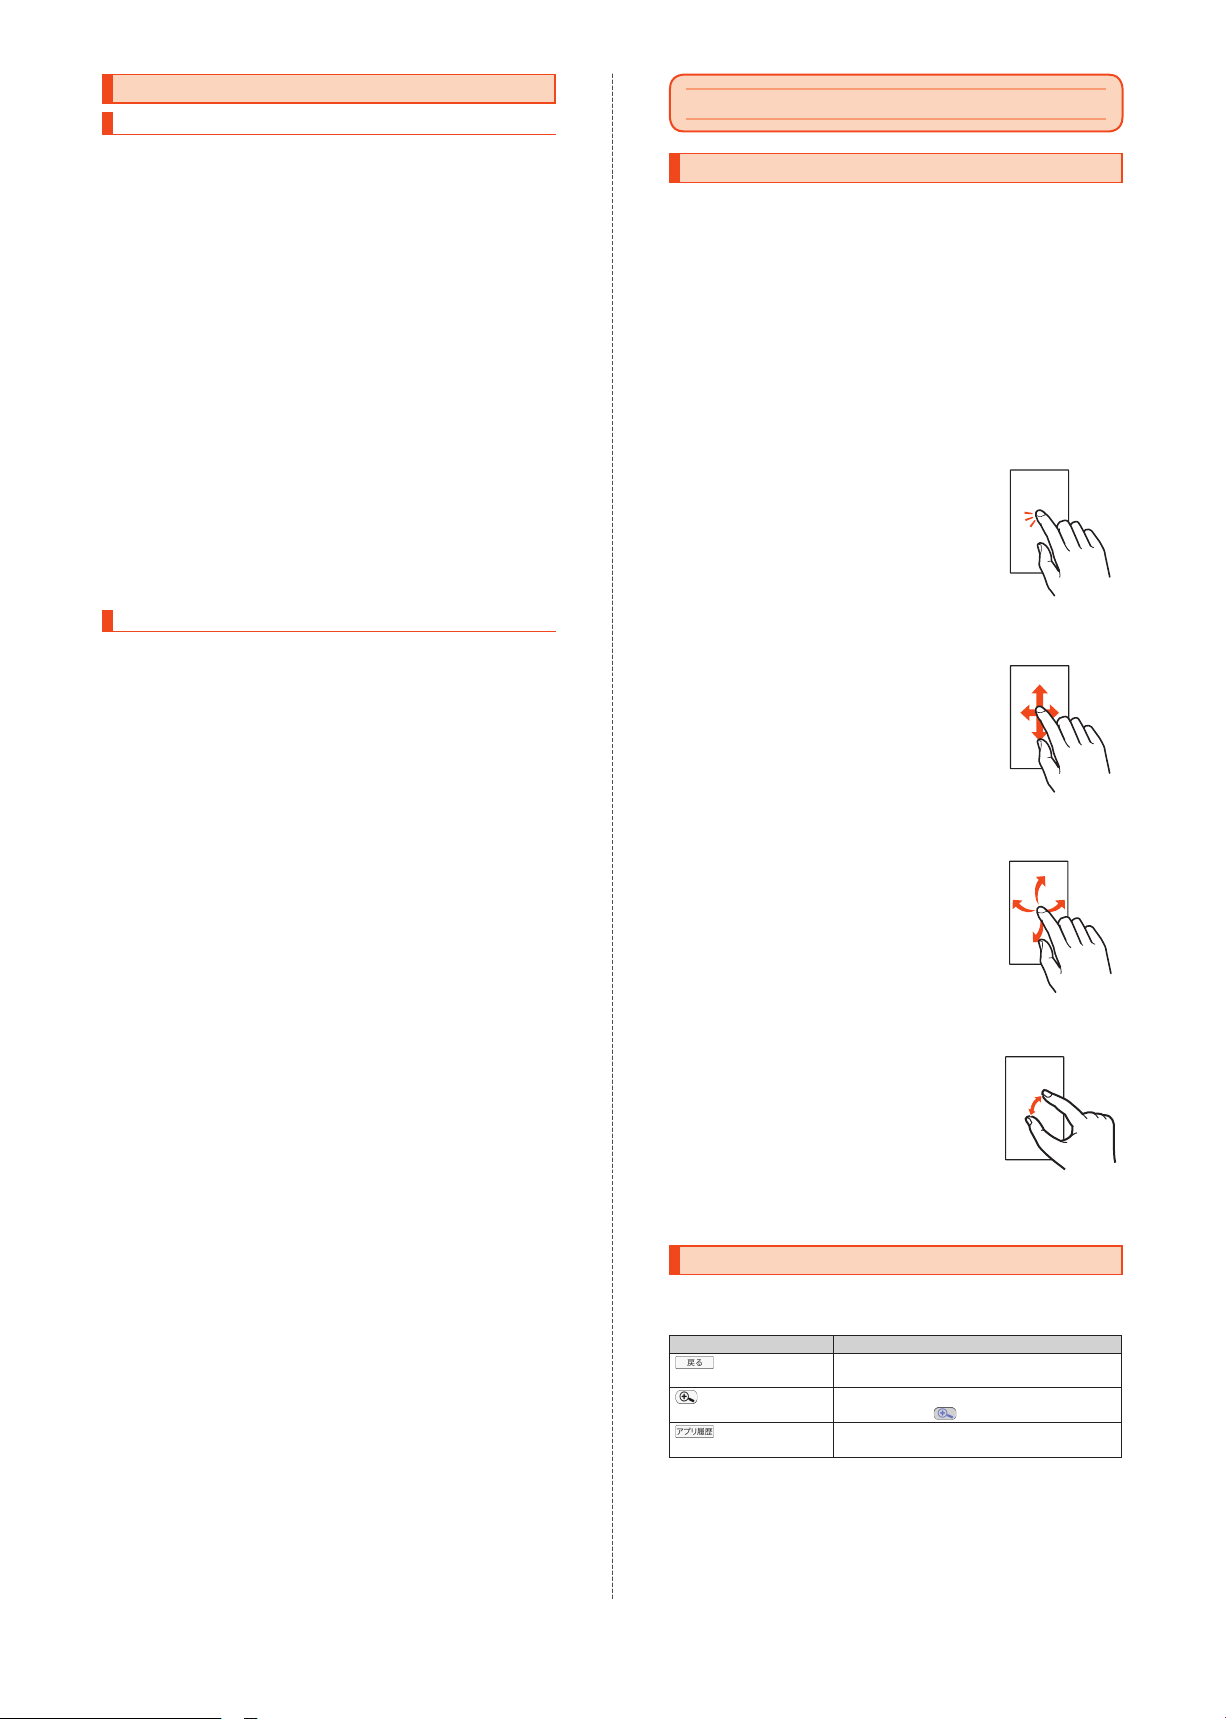
Using Touch Panel
The product's display is a touch panel; operate with your fingers on
the display.
•
The touch panel is designed to be lightly touched by fingers. Do not
apply strong pressure with your fingers or sharp-pointed objects
(such as ballpoint pens and pins) on the touch panel.
•
The touch panel may not respond or may malfunction in the following
cases.
・
Operation with gloved hands
・
Operation with fingernails
・
Operation when a foreign object is on the touch panel
・
Operation with a protective film or sticker on the touch panel
・
Operation with a water drop left or condensation formed on the
display
・
Operation with wet or sweaty fingers
・
Operation under water
■Tap/Double-tap
Tap: Touch the screen lightly and briefly.
Double-tap: Tap the same position twice quickly
on the screen.
•
Select an item or icon displayed on the screen.
Double-tap on a still picture, etc. to enlarge/
reduce it.
■Slide/Swipe/Drag
Slide: Place your finger on the screen and move
your finger in the desired direction.
Swipe: Quickly slide a finger for a short distance.
Drag: Touch an item on the screen and slide your
finger across the screen.
•
Slide/swipe: Scroll the screen or toggle pages.
Operate the volume bars and brightness bar for
adjustment.
•
Drag: Move an item or icon to the desired
position.
■Flick
Quickly brush the screen up/down or left/right.
•
Toggle pages, enter characters using flick input,
etc.
]
]
■Pinch
Touch the screen with two fingers and move
them toward each other (pinch out) or away from
each other (pinch in).
•
Enlarge/reduce a still picture, etc.
15
Using Touch Keys
The following icons appear at the bottom of the screen; use them as
touch keys.
•
Other icons (touch keys) may appear on some screens.
Icon Description
Back key
Magnifier key
Recent apps key
Return to the previous screen.
Enlarge part of the screen.
To cancel, tap again.
Opens the recent apps screen.
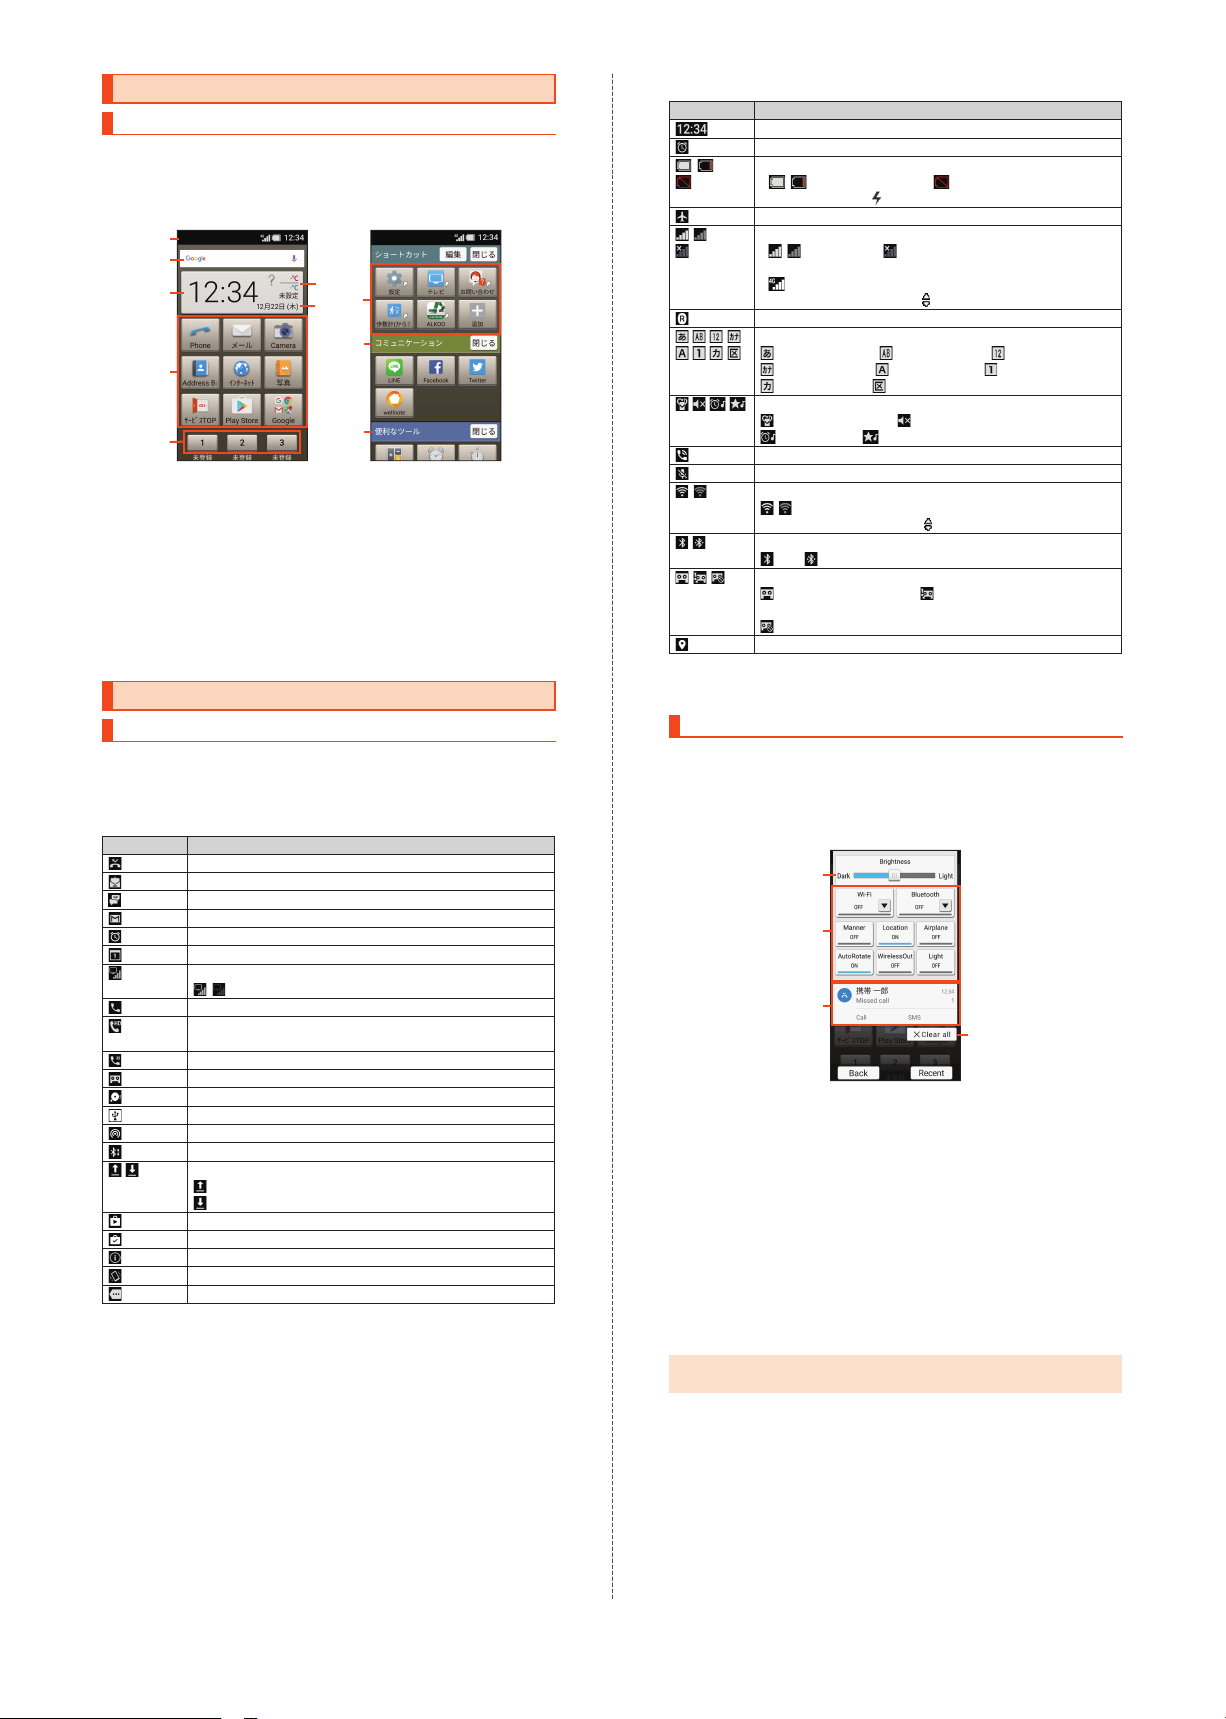
Using the Home Screen
Home Screen Layout
Most operations start from the home screen. Access main applications
from the top area, use Quick Buttons to call or send mail to registered
contacts, and save shortcuts to frequently used applications in
トカット
. In the category area, applications are grouped by type.
•
Slide/flick the home screen for hidden portions.
①
②
③
⑥
⑧
⑦
⑨
④
⑤
《Home Screen (Top Area)》
①
Status bar
②
Quick search box
③
Time
④
Top area
⑤
Quick Buttons
⑥
Weather
⑦
Date
⑧
Shortcuts
⑨
Category
⑨
《Home Screen (Slid)》
ショー
Using the Status Bar
Icons
Notification indicators (missed calls, new mail, running operations, etc.)
appear on the left side of the status bar, while status indicators appear
on the right side to show the status of the product.
■Main Notification indicators
Indicator Description
Missed call
New E-mail
New SMS
New Gmail
Alarm information
Calendar event
TV signal strength
- : Signal level
Call (dialing, in progress, arriving)
High-quality call in progress (with a model supporting
au's VoLTE)
Call on hold
Answering memo information
Low free space in the internal memory
USB tethering in use
Wi-Fi® tethering in use
Bluetooth® file reception request
Data (upload/download, transmission/reception, etc.)
: Data upload/transmission
: Data download/reception
Update available
Installation of application complete
Software update available
Bright Keep set to ON (Notify)
Indicators collected
■Main Status Indicators
Indicator Description
- Battery level
- Signal strength (receiving electric field)
-
* "LTE" and "WiMAX 2+" networks are available. "4G" appears for both
networks. The product connects to the network deemed less congested by
the Company based on the network traffic.
Time
Alarm set
- : Charge remaining : No charge
•
While charging, appears in the battery indicator.
Airplane mode set
- : Signal level : Out of service area
•
A symbol indicating the network type appears in the
: LTE/WiMAX 2+ available
During communication, appears in the indicator.
Roaming
Input mode
: Hiragana/Kanji : Half Alphabet : Half Numeric
: Half Katakana : Full Alphabet : Full Numeric
: Full Katakana : Character Code
Manner mode set
: Standard manner : Total silence
: Alarms only : Priority only
Handsfree call in progress
Microphone set to "Mute" during a call
Wi-Fi® signal strength
- : Signal level
•
During communication,
Bluetooth® in use
: On : Connected
Answering memo set
: No answering memo : One to nine answering
memos recorded
: Ten answering memos recorded
Determining location (High accuracy)
*
appears in the indicator.
Using the Notification/Status Panel
In the notification/status panel, check the status of the product and
notifications or activate applications corresponding to the notifications.
In addition, set manner mode, manage use of location information, etc.
Slide the status bar down
1
■Notification/Status Panel Layout
①
②
③
④
《Notification/Status Panel》
①
Brightness bar
Use the slider to adjust brightness.
②
Function buttons
Change the settings of frequently used functions. Operations are
different depending on the function.
③
Notifications
Check the status of the product and notifications. Tap a notification
to activate the corresponding application.
•
Flick a notification to the left or right to delete it. Some notifications
may not be deleted.
•
Slide the notification area up for hidden notifications.
④
Clear all
Tap to delete all notifications. Some notifications may not be
deleted.
◎In the notification/status panel, slide the screen up to show only
notifications.
16
Setting the Manner Mode
Avoid disturbing others around you in public.
Available options are as follows.
Standard
manner
Total silence Ringtones and operation sounds are muted; the
Alarms only Ringtones and operation sounds are muted
Priority only Ringtones and notification sounds play according
OFF Cancel the manner mode.
◎If the Answering memo setting is set to "Mannermode," answering
memo is enabled while the manner mode is set and follows the
answering memo settings.
◎
When the manner mode is set, the selected manner mode option
name appears in the corresponding function button. Tap the
button to cancel the manner mode.
Open the notification/status panel → Tap the
1
Ringtones and operation sounds are muted; the
product vibrates for incoming calls/mail, etc. Alarm
sounds according to the Alarm application settings.
Media sounds still play.
product does not vibrate for incoming calls/mail,
etc. Alarm sounds and media sounds are also
muted.
; the
product does not vibrate for incoming calls/mail,
etc. Alarm sounds and media sounds still play.
to the "Priority only allows" settings in "Do not
disturb" under "Sound & notification." Other
responses are the same as when the manner
mode is canceled.
Manner function button
The manner mode setting screen appears.
Select the manner mode option to use
2
Setting Airplane Mode
When Airplane mode is set, wireless functions such as Phone features,
packet transmission, wireless LAN (Wi-Fi
disabled.
Home screen → [設定] under "
1
settings menu]
◎When using the product in Airplane mode on an airplane or in a
hospital, etc., follow the instructions of the airline/facility.
◎
Alternatively, to set Airplane mode, open the notification/status
panel
→
Tap the Airplane function button.
◎
When Airplane mode is set, calls cannot be made except to 110
(Police), 119 (Fire and Ambulance), 118 (Regional Coast Guard
Headquarters) or 157 (Customer Servi
Airplane mode will be disabled after the call.
◎
When Airplane mode is set, calling and sending/receiving mail are
not available. In addition, setting Airplane mode disables wireless
LAN (Wi-Fi
Bluetooth
Airplane mode.
®
®
while Airplane mode is set, enable it after setting
→
[More] → [Airplane mode]
) and Bluetooth®. To use wireless LAN (Wi-Fi®) or
®
) and Bluetooth® are
ショートカット" →
ce Center). Note that
[All
Registering Frequently Used
Contacts to Quick Buttons
Registering Contacts to Quick Buttons
Register frequently used contacts to Quick Buttons ( at the
bottom of the home screen) to make calls or create E-mail/SMS easily.
•
Save the contact with a phone number and e-mail address to
Address Book beforehand.
•
The name of the registered contact appears under the Quick Button.
Home screen → / / → [Yes] → Select the
1
contact to register
Select an icon for the contact
2
The contact is registered to the Quick Button.
To select a preset icon: [Select from presets]
[Yes].
→
[Next]
→
Select an icon →
Character Entry
Switching Software Keyboards
The software keyboard appears when an entry field is selected on a
character entry screen to save a contact, create a mail, etc.
Available software keyboards are as follows.
12-key
keyboard
QWERTY
keyboard
Character entry screen → [ ] → [Input UI] →
1
[QWERTY keyboard]/[12 keyboard]
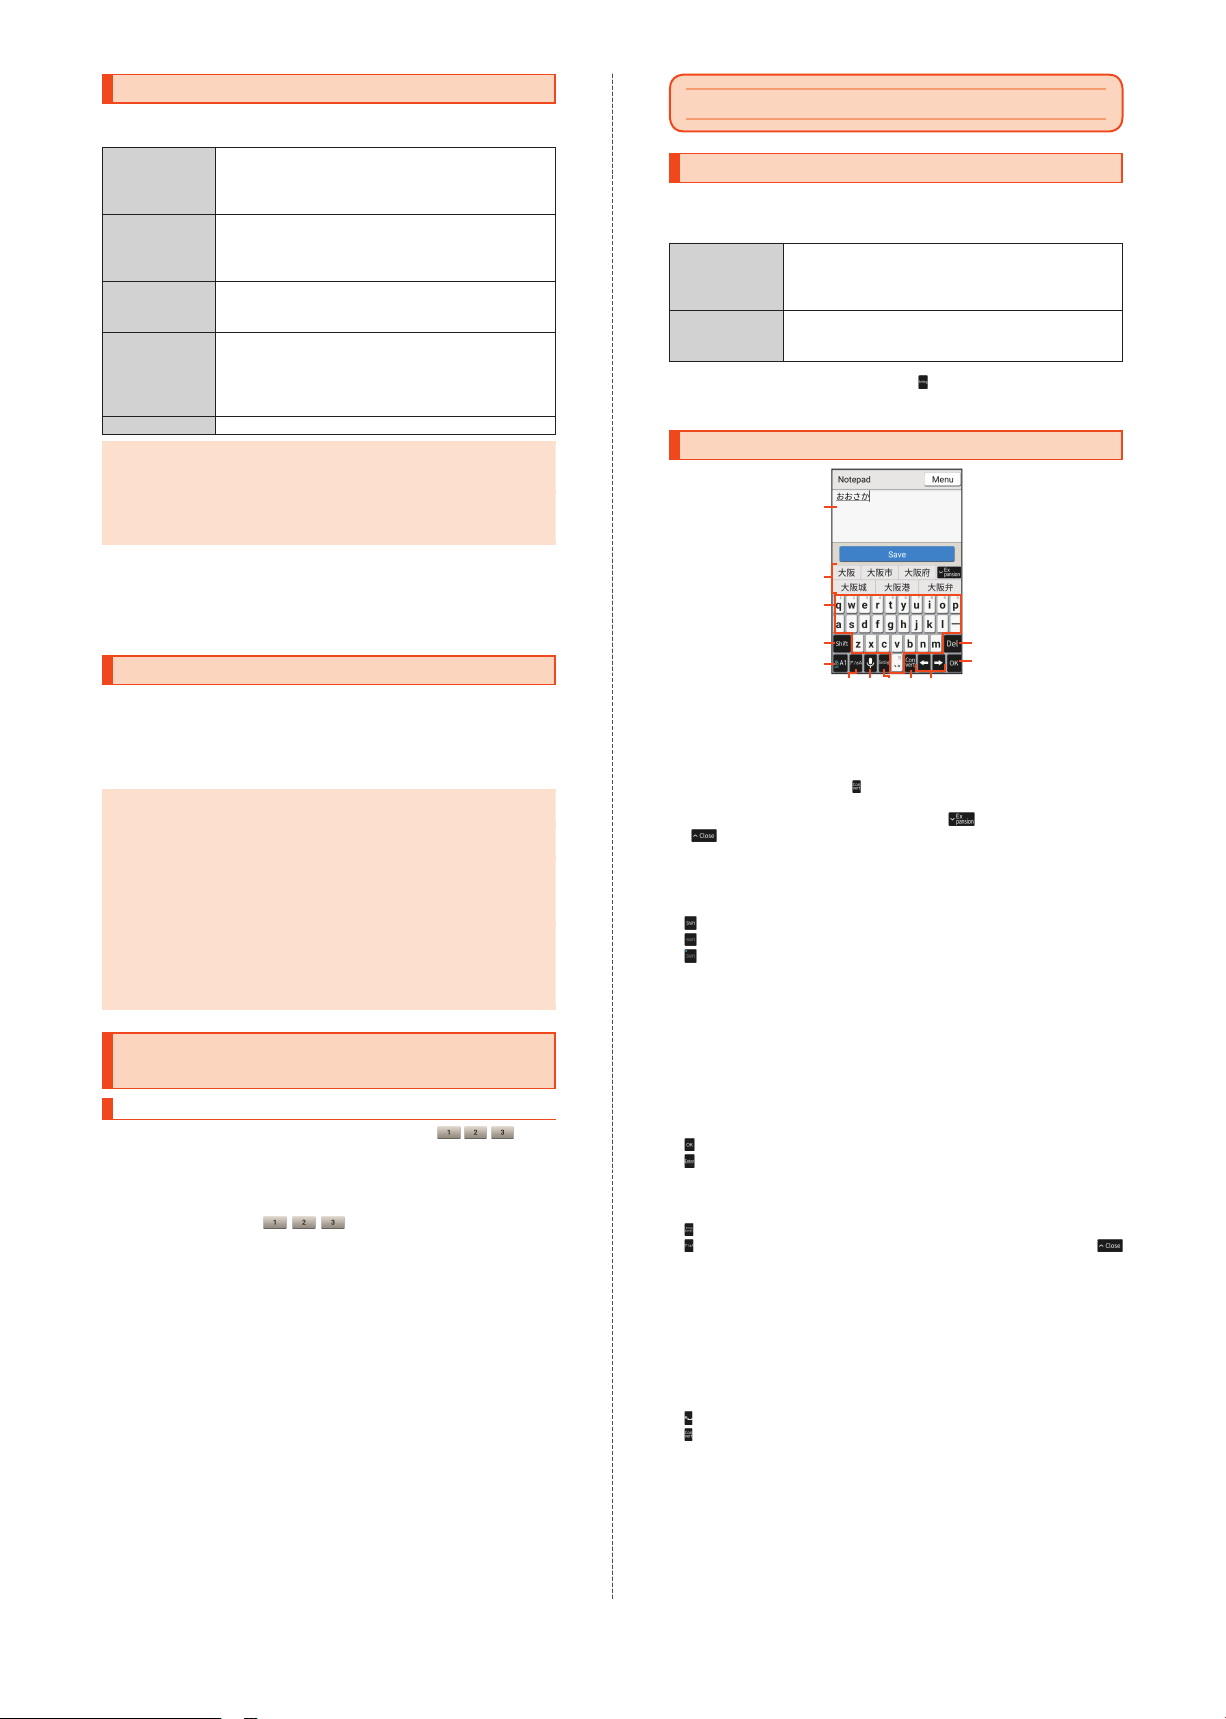
Character Entry Screen Layout
①
Character Entry Field
②
Word suggestions
Predictive word suggestions appear when a character is entered.
Enter a character and tap
(available in the Hiragana/Kanji input mode).
•
To expand the word suggestion list, tap . To collapse it, tap
.
③
Character key
Enter the assigned character.
④
Shift key
Toggle case. The key appearance changes as follows.
: Lowercase
: Uppercase
: Caps lock
In number entry, switch available symbol keys.
⑤
Input mode key
Toggle the input mode. The current input mode is indicated in blue
by one of the following characters.
あ
: Hiragana/Kanji
A
: Half Alphabet
1
: Half Numeric
⑥
Delete key
Delete characters.
⑦
OK key or Enter key
: Confirm the entry.
: Insert a line break at the cursor position.
•
The appearance and function of the key change depending on the
application or entry field.
⑧
Pictogram/symbol/emoticon key or Katakana/letter key
: Open the pictogram/symbol/emoticon list.
: Show word suggestions consisting of katakana or letters; tap
to close the word suggestion list. (Available in the Hiragana/Kanji
input mode.)
⑨
Voice input key or Undo key
Change the input method to "Voice input." Cancel the last operation;
for example, tap the key after confirming the entry to restore the
entered characters to the unconfirmed state.
⑩
Setting key
Open the S-Shoin menu.
⑪
Space key or Conversion key
: Enter spaces.
: Show word suggestions.
⑫
Cursor keys
Move the cursor to the left or right.
Segment a word/phrase for conversion before confirming the entry
(available in the Hiragana/Kanji input mode). Move the cursor to the
right at the text end to enter spaces.
Keys are arranged in the same order as
conventional cell phones. Tap a character key to
toggle character options for that key, and then
enter the character.
Keys are arranged in the same order as
conventional computer keyboards. Tap a character
key to enter the assigned character.
①
②
③
④
⑤
⑥
⑦
⑩ ⑪ ⑫⑨⑧
《Character Entry Screen (QWERTY)》
for non-predictive word suggestions
17

Character Entry Basics
Entering Characters
Example: When entering "Tokyo"
Character entry screen → Enter "tokyo"
1
Tap "Tokyo" in word suggestions
2
Entering Pictograms, Symbols, or
Emoticons
Character entry screen → [ ]
1
Select pictograms, symbols, or emoticons
2
Entering Characters Using Voice Input
Character entry screen → [ ]
1
Speak to the mouthpiece (microphone)
2
:Speech recognition is enabled. Characters are entered when the
recognition is complete. Tap to pause the recognition.
:Speech recognition is paused. Tap to resume.
×
:Tap to switch back to the software keyboard.
:Make voice input settings.
:Delete entered characters.
Using Call Functions
Making Calls
Making a Call by Entering a Phone
Number
c
1
Enter a phone number
2
Include the area code for landline phone numbers even if they are
in the same area code.
[Call] → Call connects
3
To adjust the call volume of the other party's voice, press u(+) or
(-) during a call.
d
[End call]
4
Making a Call Using Call History
→ [Incoming]/[Outgoing]
c
1
Select the record
2
[Call]
3
Making a Call Using Address Book
Save the contact to Address Book beforehand (▶P. 18).
→ [Addr.]
c
1
Select the contact you want to call → [ ] → Call
2
connects
[End call]
3
Making a Call Using a Quick Button
Register the contact to a Quick Button beforehand (▶P. 17).
Home screen → - (where the contact is
1
registered)
[Call] → Call connects
2
[End call]
3
Receiving Calls
Answering a Call
When a call arrives, c flashes.
When a call arrives,
1
Talk → [End call]
2
c
Answering a Call Using Answering Memo
When a call arrives, [Menu] → [Absence Memo]
1
Playing Back Answering Memos
Home screen → [設定] under "
1
settings menu]
[Answering Memo List]
Select the answering memo to play back
2
Stop Stop the playback.
Speaker on/
Speaker off
→
[Call] → [Call/Ans Memo] →
Switch between the speaker and earpiece for
the sound.
ショートカット" →
Checking Your Own Phone Number
Home screen → [設定] under "
1
[Profile]
ショートカット" →
Saving Contacts to Address Book
Home screen → [Address Book]
1
[Menu] → [Add new entry]
2
Enter information in the fields as needed
3
[Save] → [No]
4
◎Contacts saved in Address Book may be altered or lost due to
accidents or malfunctions. It is recommended that you keep a
copy of important phone numbers, etc. Note that the Company is
not liable for any damages or lost profits resulting from alteration
or loss of contacts due to accidents or malfunctions.
[All
18

Using E-mail
Appendix
Making Initial Settings for E-mail
→
[E-mail]
m
1
When activating E-mail for the first time, the E-mail address initial
setting screen appears.
[
接続する
2
[
閉じる
3
Read the contents → [Close]
4
[
同意する] → [完了
5
]
]
]
Changing E-mail Address
→
[E-mail] → [MENU] → [Change Address/
m
1
Setting Filter]
Enter the security code → [送信]
2
[
承諾する
3
Enter characters in the editable portion of E-mail
4
address (before @)
◎In the editable portion of E-mail address, enter up to 30 single-
byte alphanumeric characters including ".", "-" and "_". Note that
"." cannot be entered consecutively or used as the first or last
character of the portion. "0" also cannot be used as the first
character.
]
→ [接続する] →
→ [送信] →
[E
メールアドレスの変更へ
[OK] → [
閉じる
Sending E-mails
→
[E-mail]
m
1
[Create new]
2
Create mail screen appears.
[ ] → [Address book] → Select the recipient
3
Alternatively, tap "Enter address" to enter an address directly.
Enter the subject
4
Enter the body text
5
[Done] → [Send] → [Send]
6
Introduction of Peripheral Devices
■Desktop holder (SHV36PUA)
■
SHARP TV antenna cable 02 (02SHHSA) (sold
separately)
■
au Carrying Case G Black (0106FCA) (sold separately)
■Common AC Adapter 03 (0301PQA)
]
]
(sold separately)
Common AC Adapter 05 (0501PWA)
(sold separately)
Common AC Adapter 03 Navy (0301PBA)
(sold separately)
Common AC Adapter 03 Green (0301PGA)
(sold separately)
Common AC Adapter 03 Pink (0301PPA)
(sold separately)
Common AC Adapter 03 Blue (0301PLA)
(sold separately)
AC Adapter JUPITRIS (White) (L02P001W)
(sold separately)
AC Adapter J
(sold separately)
AC Adapter JUPITRIS (Blue) (L02P001L)
(sold separately)
AC Adapter JUPITRIS (Pink) (L02P001P)
(sold separately)
AC Adapter JUPITRIS (Champagne) (L02P001N)
(sold separately)
UPITRIS (Red) (L02P001R)
Receiving E-mails
When an e-mail arrives, the mail ringtone sounds and m flashes.
•
When an e-mail arrives while the display is turned on (except in the
lock screen), a new e-mail notification appears and then
in the status bar.
→
[E-mail]
m
1
Select [Inbox] or a created folder
2
Select the e-mail
3
appears
Using Camera
Shooting Still Pictures
Slide the camera slide cover down → [OK]
1
Aim the out camera at the subject
2
[ ]/s (shutter key)
3
Recording Videos
Slide the camera slide cover down → [OK]
1
Aim the out camera at the subject
2
[ ] → Recording starts
3
[ ] → Recording stops
4
•Style varies by model.
■Portable charger 02 (0301PFA) (sold separately)
■
microUSB cable 01 (0301HVA) (sold separately)
microUSB cable 01 Navy (0301HBA) (sold separately)
microUSB cable 01 Green (0301HGA) (sold separately)
microUSB cable 01 Pink (0301HPA) (sold separately)
microUSB cable 01 Blue (0301HLA) (sold separately)
◎It may not be possible to charge the product adequately with
Portable charger 02 (sold separately).
◎
For the latest information about available peripheral devices, refer
to the au website (http://www.au.kddi.com/english/) or contact
Customer Service Center.
◎
The product does not support ASYNC/Fax transmission.
◎
The above-mentioned peripheral devices can be purchased from
au Online Shop. They may
depending on the stock status.
http://auonlineshop.kddi.com/
Common AC Adapter 05
not be available for purchase
19

Troubleshooting
Before you assume that the product is malfunctioning, check the
following:
Problem Suggestion/possible cause
Battery runs out
fast
Cannot make
calls
Cannot receive
calls
Cannot hear the
other party
microSD memory
card is not
recognized /
Cannot find
target data
Cannot operate
the keys or touch
panel
not charge
Can
the battery
Cannot turn on
the product
Cannot operate /
Screen is frozen /
Cannot turn off
the product
Cannot operate
the touch panel
as intended
Response to
touch input or
key operation is
slow
An au IC card
(SIM)-related
error message or
a message
indicating that the
card is not
inserted appears
The product
turns off
automatically
The product
turns off after the
power-on logo
appears
(out of service
area) is displayed
The display
illuminates and
flashes but
c
the ringtone does
not sound
Low-battery
related message
is displayed
Call does no
connect and a
beep is heard
from the earpiece
•Avoid using the product in places where (out
of service area) appears (
•
The internal battery has reached the end of its
life.
▶
P. 16).
Check the battery status (▶P. 12).
•
The battery is not adequately charged (▶P. 16).
•
Turn off functions you do not need (▶P. 16).
•
An au Nano IC Card 04 is not inserted (▶P. 11).
•
The phone number is incorrect or the area code
is missing (
•
Airplane mode is set (▶P. 17).
•
The product is turned off (▶P. 13).
•
Tap "Call" after entering the phone number (
▶
P. 18).
P. 18).
•
Reception is poor (▶P. 16).
•
You are outside the service area (▶P. 16).
•
Airplane mode is set (▶P. 17).
•
The product is turned off (▶P. 13).
•
An au Nano IC Card 04 is not inserted (▶P. 11).
•
The call volume is too low(▶P. 18).
•
The earpiece is blocked with your ear. Place the
earpiece over your earhole.
•
The microSD memory card is not inserted
correctly (
•
The data is saved in the internal memory. Data
▶
P. 11).
can be saved in the internal memory besides
microSD memory cards.
•
Turn off the product and then turn it back on.
•
The product is turned off (▶P. 13).
•The power plug of the specified charger (sold
separately) is not securely plugged into the
outlet (
▶
•
•
P. 12).
The internal battery is not adequately charged
(
▶
P. 16).
Make sure that you press and hold f(p) (
P. 13).
•
To force power off, press and hold f(p) for
at least 8 seconds, and th
en release the button
after the product vibrates. Turn the product
back on after a while (
•
Do not operate with gloved hands.
•
Do not operate with fingernails or with a foreign
▶
P. 13).
object between the display and your finger.
•
Restart the product (▶P. 13).
•
A large amount of data is stored in the product
o
r large data is being exchanged between the
internal memory and microSD memory card.
•
An au Nano IC Card 04 is not inserted (▶P. 11).
•
The battery has run out (▶P. 12).
•
The battery has run out (▶P. 12).
•Reception is poor (▶P. 16).
•
You are outside the service area (▶P. 16).
•
Your hand is on the internal antenna area (
P. 10).
•
An au Nano IC Card 04 is not inserted (▶P. 11).
•
Manner mode is set (▶P. 17).
•
The battery is almost empty (▶P. 16).
•
t
Reception is poor (▶P. 16).
•
You are outside the service area (▶P. 16).
•
The network or number is busy. Try again later.
Updating Software
The product supports software updates.
The software update function is also used for operating system
updates. An operating system update is a software update which
includes an upgrade of the product's operating system.
Home screen → [設定] under "
1
settings menu]
→
[About phone] → [Software
ショートカット" →
[All
Update]
When you tap "OK," the product starts to check for a software
update in
the background. If there is an update, you can download
and install it as needed.
•
If "Software update" is displayed in the notification/status panel,
tap the notification and then follow on-screen instructions.
[YES] → [OK]
2
To install it later, [LATER] → [OK]. A confirmation screen for
▶
installation will appear after approximately 24 hours.
■Notes on Software Update
•You will be charged for data communication when connecting to the
Internet from the product using packet communication. Large-volume
data communication occurs in particular for operating system
updates. Use of Wi-Fi
•
Whenever a software update is available, the information will be
announced on the au website, etc. for you. For details, contact an au
shop or Customer Service Center (call toll-free 157). In ad
users of the SHV36 may receive a notice from au when software
update is necessary to improve the functionality of the SHV36.
•
It is recommended that you back up data before updating the
software.
•
When the software update is performed, the product restarts before
and after the update.
•
If the software update has failed or stopped, perform it again.
•
A software update failure may disable the product. If this happens,
take the product to an au shop or PiPit (not accepted by some
shops).
•
Charge the battery adequately before performing the update. If the
battery level is low or if the battery runs low during the update, the
software update will fail.
•
▶
Check the signal reception. The software update may fail in poor
reception areas.
•
The software update will not change data stored on the product
(contacts, mails, still pictures, music files, etc.) or the settings.
However, data may be affected by the update depending on the
condition of the product (malfunctioning, damaged, water seepage,
etc.).
•
After the software is updated, download of another software update
may start automatically (consecutive updates).
•
During international roaming, the software update function is available
only when the product is connected to Wi-Fi
®
Wi-Fi
before performing the software update.
•
Once the operating system is updated, it cannot be reverted to its
previous version.
What not to do during the software update:
•
Do not change locations.
Restrictions during the software update:
•
You cannot operate the product. Not even calls to 110 (Police), 119
(Fire and Ambulance
157 (Customer Service Center) can be made. Alarm and other
functions are also disabled.
®
is recommended.
dition,
®
. Be sure to connect to
), 118 (Regional Coast Guard Headquarters) or
After-Sales Service
■When Requesting a Repair
For repair, contact Keitai Guarantee Service Center.
During the
warranty
period
Outside the
▶
warranty
period
◎Contents in the internal memory may be lost due to repairs; keep
a copy of the contents. Note that the Company is not liable for any
damages or lost profits resulting from altered or lost contents.
◎
Recycled parts that meet the Company's quality standards may
be used for repair.
◎
Your au cell phone collected by the replacement mobile phone
delivery service will be repaired and recycled as anothe
replacement cell phone. Likewise, parts replaced by the au
after-sales service will be collected and recycled by the Company.
Therefore, they cannot be returned to you.
◎
Instances where the product has been changed, modified, or
analyzed (including software modification or analysis (including
rooting, etc.), reverse-engineered, reverse-compiled, or reverseassembled) or has been repaired at a lo
authorized repair location designated by the Company may not be
covered by the warranty or may prevent the product from being
accepted for repairs.
Repairs will be performed under the Company's terms
and conditions of the free-of-charge repair service
described on the warranty.
If the product is repairable, repairs will be performed
for a fee at your request.
r
cation other than an
20

■Performance Parts for Repair
The Company retains performance parts for repair for the SHV36 main
unit and its peripheral devices for 4 years after discontinuation of
production. Performance parts for repair refer to parts required for
maintaining the functionality of a product.
■Warranty
At the store of purchase, check the name of the retailer, date of
purchase and other details written in the wa
rranty. Read the contents
thoroughly and keep it in a safe place.
■Keitai Guarantee Service Plus LTE
An after-sales service membership program on a monthly basis called
"Keitai Guarantee Service Plus LTE" (monthly fee: 380 yen, tax
excluded) is available for continued safe use of your au cell phone.
This service expands coverage for many troubles including
malfunction, theft and loss.
For details on
this service, refer to the au website or contact Keitai
Guarantee Service Center.
◎Membership application is available only at the time of purchasing
an au cell phone.
◎
Once you cancel your membership, you cannot reapply for the
membership until you purchase another au cell phone.
◎
In the case of cell phone upgrade or purchase of additional cell
phones, this service only covers the most recently purchased au
cell phone.
◎
In the case of transfer of ownership of an au cell phone, the Keitai
Guarantee Service Plus LTE membership is also transferred to the
successor of the au cell phone.
◎
If you purchase a new au cell phone (for upgrade, additional
purchase, etc.), your membership of the Keitai Guarantee Service
Plus or the Keitai Guarantee Service Plus LTE for your previous au
cell phone will be canceled automatically.
◎
Service features are subject to change without prior notice.
■au Nano IC Card 04
The au Nano IC Card 04 is lent to you by au. Note that in case of loss
or damage, the card needs to be replaced at your own expense.
When malfunction is suspected, or in case of theft or loss, contact an
au shop or PiPit.
■After-Sales Service
If you have any questions regarding the after-sales service, contact the
following service centers.
Customer Service Center (for li
theft)
From a landline phone,
From an au cell phone, 113 without an area code (toll free)
Business hours: 24 hours a day (7 days a week)
Keitai Guarantee Service Center (in case of loss, theft or damage)
From a landline phone/au cell phone,
0120-925-919 (toll free)
Business hours: 9:00 a.m. to 8:00 p.m. (7 days a week)
Online Replacement Desk (24 hours a day)
(Accessible from PCs and smartphones only)
(https://cs.kddi.com/support/n_login.html)
•Online applications are available for an incident of damage, water
seepage, theft, or loss. In the case of spontaneous failure (for
example, the product does not turn on or the screen is frozen and
the cause is not damage or water seepage), application is accepted
only by telephone since consultation is required.
•
An e-mail address is required for online applications.
ne suspension in case of loss or
0077-7-113 (toll free)
■au After-Sales Service Information
*1
)
*1
)
*1
)
Keitai Guarantee
Service Plus LTE
non-member
N/A
N/A
Actual cost
Actual cost
Ac
tual cost
N/A (upgrade
supported)
8,000 yen
(6,000 yen for
longtime au
users
7,000 yen
(5,000 yen for
longtime au
users
7,500 yen
(5,500 yen for
longtime au
users
dle
*
as your cell
*1
)
*1
)
*1
)
Service
Service Plus LTE
member
Replacement mobile phone
Keitai Guarantee
delivery service (spontaneous
Free N/A
failure; 1st year)
See "Fees for the
Replacement mobile phone
delivery service (spontaneous
failure; 2nd year and later)
Replacement
Mobile Phone
Delivery Service
(for Members)"
below
Replacement mobile phone
delivery service (partial
damage, wate
r seepage,
irreparable damage, theft or
loss)
Depot repair (spontaneous
failure; 1st year)
Depot repair (spontaneous
failure; 2nd year and later)
Depot repair (partial damage)
Depot repair (water seepage
or irreparable damage)
See "Fees for the
Replacement
Mobile Phone
Delivery Service
(for Members)"
below
Free Free
Free (three-year
warranty)
Charge
Up to 5,000 yen
Charge
10,000 yen
Depot repair (theft or loss) N/A
All fees exclude tax.
■Fees for the Replacement Mobile Phone Delivery
Service (for Members)
Applicable condition First time Second time
General
"Online application discount"
and "No substitute phone
discount"
"No substitute phone
discount"
All fees exclude tax.
*1 Applies to customers who have been au users for at least 25 months and
*2 Online application discount: If you apply for the replacement mobile phone
*3 No substitute phone discount: If you
*3
applied
*3
applied
to all the lines in that customer's Family Discount plan. The discount also
applies to users of a data communication device or a tablet who are
subscribed to a bundle discount plan (WIN Single Set Discount or
Smartphone Set Discount) and have been using a line in the bun
discount plan for at least 3 years.
delivery service from the au website, 500 yen will be deducted from the
service fee.
"No substitute phone discount" automatically applies at the same time
since a substitute cell phone cannot be lent when "Online application
discount" applies.
phone when using the replacement mobile phone delivery service, 500
yen will be deducted from the service fee.
For details, refer to the au website.
Replacement Mobile Phone Delivery Service
◎
If you have trouble with your au cell phone, you can have a
replacement cell phone (same model and color
phone) delivered to the specified address by calling us. Please
return your current (faulty) au cell phone within 14 days after the
replacement cell phone is delivered to you.
* If a replacement cell phone of the same model and color is not
available, a replacement cell phone of the model and color specified by
the Company will be provided.
◎You can use this service up to twice a year starting from the date
of first use. If you have not used this service over the past year at
the time of your application for this service, the application will be
regarded as the first time. If you have, the application will be
regarded as the second
time.
For details, refer to the au website.
◎
In the event of theft or loss of the product, an au IC card has to be
reissued when using this service. In such cases, an additional fee
of 1,900 yen is required for the reissue of the au IC card.
Depot Repair
◎
This service does not cover repair of damage or malfunction
intentionally caused by the customer or resulting from modification
(disassembly, par
◎
No discount applies to replacement of the outer casing due to
ts replacement, painting, etc.) by the customer.
stains, scratches, abrasion of coating, etc. on the outer casing.
5,000 yen
(3,000 yen for
longtime au
users
4,000 yen
*2
(2,000 yen for
longtime au
users
4,500 yen
(2,500 yen for
longtime au
users
do not request a substitute cell
21

SIM-Unlocking the Product
The product can be SIM-unlocked. SIM-unlocking the product allows
other-carrier SIM cards to be used with it.
•
A request for SIM-unlocking can be made on the au website or at an
au shop.
•
Some services, functions, etc. may have restrictions when an
other-carrier SIM card is used. The Company does not guarantee
operation whatsoever.
•
Setting after SIM-unlocking the product can be made as follows:
Home screen
[About phone]
For details, refer to the au website.
→ [設定
] under "
→
[Status] → [SIM status] → [SIM lock status]
ショートカット" →
[All settings menu] →
http://www.au.kddi.com/english/support/contract/simcard/unlock/
Main Specifications
■Main Unit (SHV36)
Display Approx. 5.0 inches, approx. 16.77 million
Weight Approx. 150
Dimensions (W x H
x D)
Memory (built-in) RAM: Approx. 2 GB
Continuous talk
time (in Japan)
Continuous talk
time (overseas
(GSM))
Continuous
standby time (in
Japan)
Continuous
standby time
(overseas (GSM))
Continuous
tethering time
Maximum Wi-Fi
tethered
connections
Charging time Common AC adapter 05 (sold separately):
Continuous 1Seg
watching time
Camera device Out camera
Effective pixels Out camera
Bluetooth
®
function
Network
environment
Interface microUSB jack, 3.5 mm 4 pole earphone/
*1 Varies depending on the usage.
*2 Affected by obstacles between communication devices; varies depending
on the signal conditions.
*3 Specifications defined in Bluetooth
*4 Address Book data (contacts) may not be displayed correctly on recipient
*5 A profile that supports Bluetooth
*6 Supports some car navigation systems. Refer to the au website for use.
Bluetooth
devices.
®
◎The continuous talk time and continuous standby time may be
less than half depending on the charge on the battery, usage
environment such as temperature or signal reception, function
settings, etc.
colors, IGZO, 1,280
×
720 (HD)
g
(including the internal battery)
Approx. 71 mm x 143 mm x 9.3-12.0 mm
Internal storage: Approx. 16 GB
Approx. 1,170 min.
Approx. 900 min.
Approx. 820
hours
Approx. 940 hours
Approx. 680 min.
®
10 devices
Approx. 130 min.
Approx. 11 hours and 40 min.
*1
CMOS image sensor
In camera
CMOS image sensor
Approx. 13.10 million pixels
In
camera
Approx. 5.00 million pixels
Communication method: Bluetooth® Standard
Ver.4.2
Output: Bluetooth
Communication distance
obstacles in the range
Compatible Bluetooth
®
Standard Power Class 1
*2
: Within 10 m with no
®
profiles*3: GATT, HSP,
HFP, A2DP, AVRCP, OPP, SPP, PBAP
PAN, PAN NAP, PANU, aptX, SCMS-T, HOGP
*6
DUN
Frequency band: 2.4 GHz band
IEEE80
2.11b/g/n (2.4 GHz) conformant
microphone jack (supported earphones: 3 pole
headphone (Lch/Rch/GND) and 4 pole
earphone with microphone (Lch/Rch/GND/
MIC))
®
devices according to their intended use.
standards that specify behaviors of
®
standard Ver.4.0.
*4
, HID,
*5
■Desktop Holder (SHV36PUA)
Input 5.0 V DC/1.8 A
Output 5.0 V DC/1.8 A
Dimensions (W x H x D)Approx. 106 mm x 53.2 mm x 52.7 mm
Weight Approx. 64
g
Ambient temperature 5°C to 35°C
Ambient humidity 35% to 85%
Specific Absorption Rate (SAR) of
Cell Phones
This model 【SHV36】 cell phone complies with Japanese technical
regulations for exposure to radio waves and international guidelines on
radio wave protection.
This cell phone has been designed in observance of the Japanese
technical regulations regarding exposure to radio waves (*1) and limits
to exposure to radio waves recommended by equivalent internati
guidelines.
These international guidelines were set out by the International
Commission on Non-Ionizing Radiation Protection (ICNIRP), which is in
collaboration with the World Health Organization (WHO), and the
permissible limits include a substantial safety margin designed to
assure the safety of all persons, regardless of age and health condition.
The Japanese technical regulations and inter
national guidelines define
the limits using a unit of measurement known as the Specific
Absorption Rate (SAR), which represents the average amount of radio
frequency energy absorbed by the human body. The SAR limit for cell
phones is 2.0 W/k
tested for use near the head is 0.705 W/k
body, is 0.543 W/k
g
. The highest SAR value for this cell phone when
g
(*2). There may be slight differences in SAR levels
g
, and when worn on the
among individual products, but they all satisfy the limit.
The actual SAR of this cell phone while talking on the phone can be
well below that indicated above. This is due to the cell phone being
designed to only output the minimum power required to communicate
with a base station. Therefore in general, the closer you are to a base
station, the lower the power output of
the cell phone.
This cell phone can be used in positions other than against your head.
Use a carrying case or similar accessory that holds the phone at least
1.5 cm separated from the body and ensure no metal parts are
located between you and the cell phone. Under these conditions, this
cell phone satisfies Japanese technical regulations and international
guidelines for radio wave protection.
The Wo
rld Health Organization has stated that "a large number of
studies have been performed over the last two decades to assess
whether mobile phones pose a potential health risk. To date, no
adverse health effects have been established as being caused by
mobile phone use."
If you would like to know more detailed information, please refer to the
WHO website.
(http://www.who.int/docstore/peh-emf/publicati
fact_english.htm)
*1 Technical regulations are defined by the Ministerial Ordinance Related to
the Radio Law (Article 14-2 of Radio Equipment Regulations).
*2 The value includes other radio systems that can be simultaneously used.
Please refer to the websites listed below if you would like to know
ons/facts_press/
more detailed information regarding SAR.
○
Ministry of Internal Affairs and Communications website:
(http://www.tele.soumu.go.jp/e/sys/ele/index.htm
○
Association of Radio Industries and Businesses website:
)
(http://www.arib-emf.org/01denpa/denpa02-02.html
○
,
SHARP website:
(http://k-tai.sharp.co.jp/support/sar/
○
au website:
(http://www.au.kddi.com/english/
)
)
onal
)
22

CE Declaration of Conformity
Hereby, Sharp Telecommunications of Europe Ltd, declares that this SHV36
is in compliance with the essential requirements and other relevant
provisions of Directive 1999/5/EC.
A copy of the original declaration of conformity can be found at the following
Internet address:
(http://www.sharp.co.jp/k-tai/)
■Mobile Light
Do not point the illuminated light directly at someone's eyes.
Be especially careful
distance.
Do not use Mobile light near people's faces. Eyesight may be
temporarily affected leading to accidents.
■AC Adapter
Any AC adapter used with this handset must be suitably approved
with a 5Vdc SELV output which meets limited power source
requirements as specified in EN/IEC 60950-1 clause 2.5.
■Battery - CAUTION
Use specified Charger only.
Non-specified equipment use may cause malfunctions, electric shock
or fire due to battery leakage, overheating or bursting.
The battery is embedded inside the product. Avoid removing the
embedded battery since this may cause overheating or bursting.
Do not dispose of the product with ordinary refuse. Take the product
to an au Shop, or follow the local disposal regulations.
Charge battery in ambient temperatures between 5°C and 35°C;
outside this range, battery may leak/overheat and performance may
deteriorate.
■Volume Level Caution
To prevent possible hearing damage, do not listen at high
volume levels for long periods.
■Headphone Signal Level
The maximum output voltage for the music player function, measured
in accordance with EN 50332-2, is 116.0 mV.
■Stand-by Mark
: This symbol means the stand-by on/off.
p
■European RF Exposure Information
Your mobile device is a radio transmitter and receiver. It is designed
not to exceed th
international guidelines. These guidelines were developed by the
independent scientific organization ICNIRP and include safety margins
designed to assure the protection of all persons, regardless of age and
health.
The guidelines use a unit of measurement known as the Specific
Absorption Rate, or SAR. The SAR limit for mobile devices is 2 W/k
and
the highest SAR value for this device when tested at the ear is
0.775 W/k
For body-worn operation, this mobile device has been tested and
meets the RF exposure guidelines when used with an accessory
containing no metal and positioning the handset a minimum of 5 mm
from the body. Use of other accessories may not ensure compliance
with RF exposure guidelin
As SAR is measured utilizing the devices highest transmitting power
the actual SAR of this device while operating is typically below that
indicated above. This is due to automatic changes to the power level
of the device to ensure it only uses the minimum level required to
reach the network.
The World Health Organization has stated that present scientific
information does not indicate the need f
the use of mobile devices. They note that if you want to reduce your
exposure then you can do so by limiting the length of calls or using a
hands-free device to keep the mobile phone away from the head.
* The tests are carried out in accordance with international guidelines for
g
testing.
not to shoot small children from a very close
e limits for exposure to radio waves recommended by
*
and when worn on the body is 1.824 W/kg*.
es.
or any special precautions for
g
FCC Notice
- This device complies with part 15 of the FCC Rules. Operation is
subject to the following two conditions:
(1) This device may not cause harmful interference, and (2) this
device must accept any interference received, including interference
that may cause undesired operation.
- Changes or modifications not expressly approved by the
manufacturer responsible for compliance could void the u
authority to operate the equipment.
- The device is electronically labeled and the FCC ID can be displayed
from the home screen as follows: [
settings menu]
→
[About phone].
設定
] under "
ser's
ショートカット" →
[All
■Information to User
This equipment has been tested and found to comply with the limits of
a Class B digital device, pursuant to Part 15 of the FCC Rules. These
limits are designed to provide reas
interference in a residential installation. This equipment generates, uses
and can radiate radio frequency energy and, if not installed and used
in accordance with the instructions, may cause harmful interference to
radio communications.
However, there is no guarantee that interference will not occur in a
particular installation; if this equipment does cause harmfu
to radio or television reception, which can be determined by turning
the equipment off and on, the user is encouraged to try to correct the
interference by one or more of the following measures:
1. Reorient/relocate the receiving antenna.
2. Increase the separation between the equipment and receiver.
3. Connect the equipment into an outlet on a circuit different from that
to which the
4. Consult the dealer or an experienced radio/TV technician for help
and for additional suggestions.
Warning
The user is cautioned that changes or modifications not expressly
approved by the manufacturer could void the user's authority to
operate the equipment.
receiver is connected.
onable protection against harmful
l interference
■FCC RF Exposure Information
Your handset is a radio transmitter and receiver. It is designed and
manufactured not to e
frequency (RF) energy set by the Federal Communications Commission
of the U.S. Government.
The guidelines are based on standards that were developed by
independent scientific organizations through periodic and thorough
evaluation of scientific studies. The standards include a substantial
safety margin designed to assure the safety of all persons, rega
of age and health.
The exposure standard for wireless handsets employs a unit of
measurement known as the Specific Absorption Rate, or SAR. The
SAR limit set by the FCC is 1.6 W/k
Highest SAR value:
Model SHV36
FCC ID APYHRO00238
At the Ear 0.62 W/kg
On the Body 0.61 W/kg
This device was tested for typical body-worn operations with the back
of the handset kept 1.0 cm from the body. To maintain compliance
with FCC RF exposure requirements, use accessories that maintain a
1.0 cm separation distance between the user's body and the back of
the handset. The use of belt clips, holsters and similar accessor
should not contain metallic components in its assembly.
The use of accessories that do not satisfy these requirements may not
comply with FCC RF exposure requirements, and should be avoided.
The FCC has granted an Equipment Authorization for this model
handset with all reported SAR levels evaluated as in compliance with
the FCC RF emission guidelines. SAR information on this model
handset is on
fcc.gov/oet/ea/fccid/) under the Display Grant section after searching
on the corresponding FCC ID (see table above).
Additional information on Specific Absorption Rates (SAR) can be
found on the FCC website at (http://www.fcc.gov/encyclopedia/
radio-frequency-safety).
xceed the emission limits for exposure to radio
rdless
g
.
ies
file with the FCC and can be found at (http://transition.
Export Administration Regulations
The product and its accessories may be subject to the Japan Export
Administration Regulations ("Foreign Exchange and Foreign Trade
Law" and its related laws). In addition, U.S. Re-export Regulations
(Export Administration Regulations) may apply to the product and its
accessories. To export and re-export the product and its accessories,
take the required measures on
expenses. For details on the procedures, contact the Ministry of
Economy, Trade and Industry or the U.S. Department of Commerce.
your responsibility and at your
23

Intellectual Property Rights
■Trademarks
Company names and product names referred to in this manual are
trademarks or registered trademarks of respective companies.
•
The microSD logo, microSDHC logo and microSDXC logo are
trademarks of SD-3C, LLC.
•The Bluetooth® word mark and logo are registered trademarks
owned by the Bluetooth SIG, Inc., and SHARP CORPORATION is
licensed to use these trademarks.
•
Wi-Fi®, Wi-Fi CERTIFIED logo, Wi-Fi Protected Setup logo and Wi-Fi
®
Direct
are registered trademarks of Wi-Fi Alliance®.
•Wi-Fi CERTIFIED™ and Wi-Fi Protected Setup™ are trademarks of
Wi-Fi Alliance
•
The official name for Microsoft® Windows® is Microsoft® Windows®
Operating System.
•
Microsoft®, Windows®, Windows Vista®, Microsoft® Excel®, Microsoft®
PowerPoint
registered trademarks of Microsoft Corporation in the U.S.A. and
other countries.
•
Microsoft® Word and Microsoft® Office are product names of
Microsoft Corporation in the U.S.A.
•
QR code is a registered trademark of DENSO WAVE
INCORPORATED.
•
Twitter and Twitter logo are trademarks or registered trademarks of
Twitter, Inc.
•
Facebook and Facebook logo are trademarks or registered
trademarks of Facebook, Inc.
•
Google™, Google logo, Android™, Android logo, Google Play™,
Google Play logo, Google+™, Gm
Calendar™, Google Calendar logo, Google Maps™, Google Maps
logo, Google Chrome™, Google Chrome logo, Google Voice
Search™, Google Voice Search logo, YouTube™, YouTube logo,
Google Drive™, Google Drive logo, Google™ Search, Google Search
logo, Google Now™, Google Photos™ and Hangouts™ are
trademarks of Google Inc.
•
"ALKOO" is a registered trademark of NAVITIME JAPAN Co., Ltd.
•
Rovi, G-GUIDE, G-GUIDE MOBILE and G-Guide related logos are
trademarks or registered trademarks of Rovi Corporation and/or its
subsidiaries in Japan.
•
LINE is a trademark or registered trademark of LINE Corporation.
•
Oracle and Java are registered trademarks of Oracle and/or its
affiliates. Other names may be trademarks of their respective owners.
•"
でかレシーバー
ク
/Slow Talk", "Bright Keep", "NightCatch/
シャッター
パーメモ
S-Shoin", "
オート
are registered trademarks or trademarks of Sharp Corporation.
®
.
®
, Windows Media® and Exchange® are trademarks or
ail™, Gmail logo, Google
", "
", "
おすすめオート
", "
エモパーヘルスケア
長エネスイッチ
", "
からだメイト
おはようメール
", "LC
", "
トリプルくっきりトーク
", "
おすすめプラス
", "
エモパーク
", "
リラックスビュー
フォント
/LCFONT" and the LC logo symbol
ナイトキャッチ
", "
エモパー
/emopark", "
/Relax View", "
", "
スロートー
", "
ワンタッチ
/emopa", "
エスショイン
リラックス
エモ
/
■Open Source Software
•The product includes software based on GNU General Public License
(GPL), GNU Lesser General Public License (LGPL) and other licenses.
For details on licenses of related software, on the home screen, [設定]
under "
ショートカット" →
[Legal information]
•
Source codes of software based on GPL, LGPL and Mozilla Public
[All settings menu] → [About phone] →
→
[Open source licenses].
License (MPL) can be referred to on the following site for free. For
details, refer to the following site.
http://k-tai.sharp.co.jp/support/developers/oss/
■OpenSSL License
【
OpenSSL License
】
Copyright © 1998-2009 The OpenSSL Project. All rights reserved.
This product includes software developed by the OpenSSL Project for
use in the OpenSSL Toolkit. (http://www.openssl.org/)
THIS SOFTWARE IS PROVIDED BY THE OpenSSL PROJECT ''AS
IS'' AND ANY EXPRESSED OR IMPLIED WARRANTIES, INCLUDING,
BUT NOT LIMITED TO, THE IMPLIED WARRANTIES OF
MERCHANTABILITY AND FITNESS FOR A PARTICULAR PURPOSE
ARE DISCLAIMED. IN NO EVENT SHALL THE OpenSSL PROJECT
OR ITS CONT
RIBUTORS BE LIABLE FOR ANY DIRECT, INDIRECT,
INCIDENTAL, SPECIAL, EXEMPLARY, OR CONSEQUENTIAL
DAMAGES (INCLUDING, BUT NOT LIMITED TO, PROCUREMENT OF
SUBSTITUTE GOODS OR SERVICES; LOSS OF USE, DATA, OR
PROFITS; OR BUSINESS INTERRUPTION) HOWEVER CAUSED AND
ON ANY THEORY OF LIABILITY, WHETHER IN CONTRACT, STRICT
LIABILITY, OR TORT (INCLUDING NEGLIGENCE OR OTHERWISE)
ARISING IN ANY WAY OUT OF THE USE
OF THIS SOFTWARE, EVEN
IF ADVISED OF THE POSSIBILITY OF SUCH DAMAGE.
【
Original SSLeay License
】
Copyright © 1995-1998 Eric Young (eay@cryptsoft.com) All rights
reserved.
This product includes cryptographic software written by Eric Young
(eay@cryptsoft.com)
THIS SOFTWARE IS PROVIDED BY ERIC YOUNG ''AS IS'' AND ANY
EXPRESS OR IMPLIED WARRANTIES, INCLUDING, BUT NOT
LIMITED TO, THE IMPLIED WARRANTIES OF ME
RCHANTABILITY
AND FITNESS FOR A PARTICULAR PURPOSE ARE DISCLAIMED. IN
NO EVENT SHALL THE AUTHOR OR CONTRIBUTORS BE LIABLE
FOR ANY DIRECT, INDIRECT, INCIDENTAL, SPECIAL, EXEMPLARY,
OR CONSEQUENTIAL DAMAGES (INCLUDING, BUT NOT LIMITED
TO, PROCUREMENT OF SUBSTITUTE GOODS OR SERVICES; LOSS
OF USE, DATA, OR PROFITS; OR BUSINESS INTERRUPTION)
HOWEVER CAUSED AND ON ANY THEORY OF LIABILITY,
WHETHER IN CON
TRACT, STRICT LIABILITY, OR TORT (INCLUDING
NEGLIGENCE OR OTHERWISE) ARISING IN ANY WAY OUT OF THE
USE OF THIS SOFTWARE, EVEN IF ADVISED OF THE POSSIBILITY
OF SUCH DAMAGE.
■Windows Notations
In this manual, operating systems (Japanese editions) are abbreviated
as follows.
•
Windows 10 is an abbreviation for Microsoft® Windows® 10 (Home,
Pro, Enterprise, and Education).
•
Windows 8.1 is an abbreviation for Microsoft® Windows® 8.1,
®
Microsoft
Enterprise.
•
Windows 7 is an abbreviation for Microsoft® Windows® 7 (Starter,
Home Basic, Home Premium, Professional, Enterprise, and Ultimate).
•
Windows Vista is an abbreviation for Microsoft® Windows Vista®
(Home Basic, Home Premium, Business, Enterprise, and Ultimate).
Windows® 8.1 Pro, and Microsoft® Windows® 8.1
•iWnn of OMRON SOFTWARE Co., Ltd. is used for conversion
methods for Japanese language, and for phrase prediction methods
for English.
iWnn © OMRON SOFTWARE Co., Ltd. 2008-2016 All Rights
Reserved.
iWnn IME © OMRON SOFTWARE Co., Ltd. 2009-2016 All Rights
Reserved.
•
Qualcomm aptX is a product of Qualcomm Technologies
International, Ltd.
Qualcomm is a trademark of Qualcomm Incorporated, registered in
the United States and other countries, used with permission. aptX is
a trademark of Qualcomm Technologies International, Ltd., registered
in the United States and other countries, used with permission.
•
The product includes pictograms that SHARP CORPORATION is
licensed by NTT DOCOMO, INC.
•
© 2014 Comic Communication Co., Ltd. All rights reserved.
•
VoiceText of HOYA Service Corporation is used for speech synthesis.
VoiceText is a registered trademark of Voiceware co.,ltd.
•
MPEG Layer-3 audio coding technology licensed from Fraunhofer IIS
and Thomson.
24

■More
The software installed on this product or part of it may not be altered,
translated/adapted, reverse-engineered, decompiled or reverseassembled and any such actions are prohibited.
Under the MPEG-4 Visual Patent Portfolio License, customers have
licensed permission for the following use of this product to engage in
non-profit personal use. Other uses are not permitted.
•
Recording MPEG-4 Visual standard video (henceforth referred to as
MPEG-4 Video)
•
Playing back MPEG-4 Video that a customer engaged in personal
and non-profit activities has recorded
•
Playing back MPEG-4 Video obtained from a provider licensed by
MPEG-LA
When using for promotion, in-house use, profit use, and other intended
uses, contact MPEG LA. LLC.
•
This product is licensed under the AVC patent portfolio license for the
personal and noncommercial use of a consumer to (i) encode video
in compliance with the AVC standard (henceforth referred to as AVC
video) and/or (ii) decode AVC video that was encoded by a consumer
engaged in a personal and noncommercial activity and/or was
obtained from a video provider licensed to provide AVC video. No
license is granted or shall be implied for any other use. Additional
in
formation may be obtained from MPEG LA, L.L.C.
Visit http://www.mpegla.com
•
This product is licensed under the VC-1 Patent Portfolio License for
the personal and noncommercial use of a consumer to (i) encode
video in compliance with the VC-1 standard (henceforth referred to
as VC-1 video) and/or (ii) decode VC-1 video that was encoded by a
consumer engaged in a personal and noncommercial activity
was obtained from a video provider licensed to provide VC-1 video.
No license is granted or shall be implied for any other use. Additional
information may be obtained from MPEG LA, L.L.C.
Visit http://www.mpegla.com
This product is licensed under the MPEG-4 Visual Patent Portfolio
License for the personal and non-commercial use of a consumer to (i)
encode video in compliance with the MPEG-4
Video Standard
("MPEG-4 Video") and/or (ii) decode MPEG-4 Video that was encoded
by a consumer engaged in a personal and non-commercial activity
and/or was obtained from a licensed video provider. No license is
granted or implied for any other use. Additional information may be
obtained from MPEG LA. See (http://www.mpegla.com).
This product is licensed under the MPEG-4 Systems Patent Portfolio
Lic
ense for encoding in compliance with the MPEG-4 Systems
Standard, except that an additional license and payment of royalties
are necessary for encoding in connection with (i) data stored or
replicated in physical media which is paid for on a title by title basis
and/or (ii) data which is paid for on a title by title basis and is
transmitted to an end user for permanent storage and/or use. Such
add
itional license may be obtained from MPEG LA, LLC. See (http://
www.mpegla.com )for additional details.
and/or
25

――
MEMO
――
26

au のお客さまサポート
料金・操作・設定などのご確認や各種お手続きができます。
スマートフォンをご利用ならアプリが便利です。
auお客さまサポート
WEB 版
アプリ版
お客さまセンター
総合案内(受付9:00〜20:00)
盗難・紛失(24 時間受付)
Pressingzerowillconnectyoutoanoperator,aftercalling157onyouraucellphone.
※ご契約内容の変更や照会の場合には、ご利用の「au 携帯電話番号」と「暗証番号」が必要です。
※音声応答メニューのご利用料金照会、回線停止、再開手続きは 24 時間ご利用いただけます(メンテナンス時を除く)。
(年中無休 /通話料無料)
au 携帯電話
安心ケータイサポートセンター( 年中無休/ 通話料無料 )
盗難・紛失・故障(受付9:00〜20:00)
※上記の電話番号がつながらない場合があります。
パソコン・スマートフォン 3Gケータイ
https://cs.kddi.com
auMarket もしくは AppStore から
「au お客さまサポート」で検索
局番なし
局番なし
( スマホ / ケータイ )
157
113
au 携帯電話
au 携帯電話以外 / 一般電話
0077-7-111
0077-7-113
( スマートフォン / ケータイ )/
EZボタン>トップメニューまたは
auポータルトップ>auお客さまサポート
0120-925-919
ー
左記番号がつながらない場合
0120-977-033
[ 沖縄の方は ]
0120-977-699
一般電話
濡れた状態での充電は、
異常な発熱・焼損などの原因となり
大変危険です。
携帯電話・PHS事業者は、環境を保護し、貴重な資源を再利用
するためにお客様が不要となってお持ちになる電話機・電池・
充電器を、ブランド・メーカーを問わず マークのあるお店
で回収し、リサイクルを行っています。
2016年7月第1版 発売元:KDDI株式会社・沖縄セルラー電話株式会社 製造元:シャープ株式会社
この取扱説明書は、再生紙を使用しています。
取扱 説明書リサイクルにご協 力をお願 いします。
全国のauショップで、不要な取扱説明書や個装箱等を
回 収 す る リサイク ル 活 動 に 取り 組 んで い ま す 。
 Loading...