

Page 1
SHARP.
Page 2

Congratulations on your purchase of the FO-225, and thank you for having chosen Sharp!
The FO-225 facsimile transceiver is G3 compatible, the most commonly used type of facsimile
machine today. In addition to the basic operationsof sending and receiving documents, it provides
a variety of special features designed to increase the range and power of your communication.
These make it an ideal tool for the office, no matter how big or small the scale of operation.
i
Page 3
..
This manual is intended to help you with the installation and operation of the FO-225. The
information is presented as follows:
The parts of the machine:
The names, briefdescriptions, andillustrationsofthevariousparts ofthe machine are contained
in Chapter 1, “The parts of the machine”.
Unpacking and Setup:
Instructionsforgetting your fax machine installedarecontained in Chapter 2, “installation”. This
also contains guidelines on selecting a suitable location, electrical conditions, telephone
conditions, etc.
Basicoperations:
Basic operations such as sending and receiving documents, copying, and using the machine
as a telephone are explained in Chapter 3, “Basic operations”. This chapter is particularly
important for beginners.
Connecting an answering machine or extension phone to your fax machine:
This is described in Chapter 4, “Using your fax with other devices”.
Polling:
The procedures for polling (using the receiving fax machine to activate transmissions) are
described in Chapter 5, “Polling”.
Optional settings and entry of telephone numbers, etc.:
Optional settings made with the User Switches and entry of telephone numbers for automatic
dialing, etc. are described in Chapter 6, “Optional settings and data entry”.
Reports and lists regarding the activity and settings of your machine:
The proceduresfor printing these out can befound in Chapter 7, “Printing out reports and lists”.
Maintenance and troubleshooting:
Basic maintenance procedures and troubleshooting are described in Chapters 8 and 9,
respectively.
The following conventions are used in this manual:
● Keys, switches, and labels on the machine are indicated in BOLD print.
c Messages appearing in the display are indicated in CAPITAL LE~ERS.
If you have any questions or problems which cannot be solved by reading this manual, please
contact your Sharp dealer.
ii
Page 4
..
GENERALCAUTIONS
● Do not open the muchine during operation (transmitting, receiving, or copying).
● Do not spill any liquids on the muchine. ~ese can damage the intemai circuitry.
Your fax machine and the telephone system
The Austel Registration Number and Ringer Equivalence Number (REN) for this equipment are
shown on the label on the back of the machine. The telephone company may require these
numbers.
The sum of all Ringer Equivalence Numbersonyourtelephone line should be three or less inorder
to assure proper service from the telephone company.
If any of your equipment is not operating properly, you should immediately remove it from your
telephone line, as it may cause harm to the telephone network. If the telephone company notes a
problem, they may temporarily disconnect service.
,,.
Ill
Page 5
INTRODUCTION
i
ABOUT THIS MANUAL
BEFORE USING YOUR FAX MACHINE
TABLE OF CONTENTS
1. THE PARTS OF THE MACHINE
MAIN PARTS . . . . . . . . . . . .
Front . . . . . . . . . . . . .
Rear . . . . . . ;. . . . . . .
Recording papercompartment
OPERATION PANEL . . . . . . . .
2.INSTALLATION
. .
.
SITE SELECTION
.
ii
...
111
iv
1-1
. .
.
.
.
.
.
.
.
.
.
.
.
.
.
.
.
.
.
.
.
.
.
.
.
.
.
.
.
.
.
.
.
.
.
.
.
.
.
.
.
.
.
.
.
.
.
.
.
.
.
.
.
.
.
.
.
.
.
.
.
.
.
.
.,
.
,
.
.
.
.
. .
.
.
.
.
.
. .
. .
.
.
.
●
.
.
.
.
.
.
.
,
.
.
.
.
.
1-1
.
.
.
1-1
.
.
1-2
.
.
1-3
1-4
2-1
.
2-1
UNPACKING . . .
SE~lNGUP . ...
.
.
Assembly and Connections
Loading the recording paper
ENTERING YOUR NAME AND FAX
3. BASIC OPERATIONS
PREPARING TO TRANSMIT A DOCUMENT
About theoriginai . . . , .
Readable length and width
Using the document carrier
Loading the document . .
. .
. .
.
.
.
.
.
.
.
.
.
.
.
.
.
,
.
.
.
.
.
.
.
,
.
.
.
,
.
.
.
.
.
.
.
.
.
.
.
.
.
.
.
.
.
.
.
.
.
2-2
.
.
.
.
.
.
.
.
.
.
.
.
.
.
...
.
.
2-3
.
.
2-3
.
.
.
2-4
.
.
2-6
.
3-1
. .
.
.
. .
.
.
. .
. .
. .
,.
.
.
. .
.
. .
.
. .
.
.,
.
. .
.
. .
.
. .
.
. .
. .
.
.
J
.
.
.
.
.
. .
. .
.
.
.
.
.
. .
. .
. .
. .
. .
. .
.
.
.
.
.
.
. .
.
3-1
.
.
.
.
.
.
.
.
.
.
. .
.
. .
.
. .
. .
...
3-1
3-2
.
3-2
3-3
Page 6
Resolution and contrast . . ‘. .
DIALING AND TRANSMISSION . .
Normal dialing . . . . . . . . .
.
...
.
.
...
TABLE OF CONTENTS
.
.
.
.
.
.
.
.
.
.
.
.
.
.
.
.
.
.
.
.
.
.
.
.
.
.
.
,.
.
3-4
3-6
.
3-6
Direct Keypad Dialing . . . . .
Using the Autodialer (automatic dialing)
Redialing when the line is busy . . . , .
RECEIVING A DOCUMENT . . . . . . . . . .
Modes of reception . . . . . . . . . . .
Manual reception . . . . . . . . . . . .
Automatic reception . . . . . . . . . . .
Automatic Fax/Phone Changeover . . .
Paper cutting . . . . . . . . . . . . . .
COPYING . . . . . . . . . . . . . . . . . . .
VOICE COMMUNICATIONS . . . . . . . . .
4. USING YOUR FAX WITH OTHER DEVICES
.
.
.
.
.
.
.
.
.
.
.
.
.
.
.
.
.
.
.
.
.
.
.
.
.
.
.
,
.
.
.
.
.
.
.
.
.
.
3-7
3-7
3-8
.3-10
.3-10
.3-11
.
.
.
.3-11
.
.
.
.
.
.
.3-12
.3“13
. 3-14
.
.3-15
4-1
ANSWERING MACHINE . , . . .
Connection and preparations
Using the answering machine
settings . . ,
TELEPHONE ,
POLLING
5.
EXTENSION
Polling others . . . . . . . . . . . . . . . . . . . , . . . . . . . . . . . . . 5-1
Gaining permission to polling a secured fax machine . . . . . . . . . . . . 5-1
Turnaround Polling . . . . . . . . . . . . . . . . . . . . . . . . . . . . . . 5-3
...
. . . . .
. . . . .
hook-up
.
.
.
.
.
.
.
.
.
.
.
.
.
.
.
.
...
.
.
.
.
.
.
.
.
.
.
.
.
.
.
.
.
...
. .
4-1
.
4-1
. .
. .
4-2
. .
4-5
. .
4-9
5-1
v
Page 7
TABLE OF CONTENTS
Being polled (Polling Standby) . . . . , . . . . . . . . . . . . . . . . . . . 5-3
Polling Security . . . . . . . . . . . . . . . . . . . . . . . . . . . . . . . . 5-3
6. OPTIONAL SE~lNGS AND DATA ENTRY
.
.
LETTERS AND CHARACTERS FOR NAMES . . . . . . .
Entry . . . . . . . . . . . . . . . . . . . . . . . . .
Deletions and changes . . . . . . . . . . . . . . . ,
FAX AND VOICE NUMBERS FOR AUTOMATIC DIALING .
USER SWITCHES . . . . . . . . . . . . . . . . . . . . . .
7. PRINTING OUT REPORTS AND LISTS
TELEPHONE LIST . . . . . . . . . . . . . . . . . . . . . . . r . . . . . . . . . . 7-1
PASSCODELIST , , , , , , , . , , , , . , . . , . . . . . . , . . . . . . . . . . 7-2
USER SWITCH LIST . . . . . . . . . ,. . . . . . . . . . . . . . . . . . . . . . 7-4
TRANSACTION REPORT . . . . . , . . . . . . . . . . . . . . . . . . . . . . . . 7-5
8. USER MAINTENANCE 8-1
.
.
.
...
.
.
.
.
.
.
. . .
.
.
.
.
6-1
6-1
.
.
6-1
.
.
6-2
6-3
.
6-5
7-1
RECORDING PAPER . . . .
CLEANING THE
CLEANING THE
CLEANING THE
vi
. . .
Recommended paper . .
Handling and storing recording paper
Replacing
the recording paper . . . ,
RECORDING HEAD .,.
HOUSING . . . . . . . . .
READING GLASS AND ROLLERS
. .
. .
. .
.
.
.
.
.
.
.
.
.
.
.
.
.
.
.
.
.
.
.
.
...
.
.
.
.
.
.
.
.
.
.
.
.
.
.
.
.
.
.
.
.
.
.
.
,.
.
.
.
.
.
.
.
.
.
.
.
.
8-1
.
.
.
8-1
.
8-1
.
8-2
.
.
8-3
.
.
8-4
.
8-5
,.
Page 8
.
TABLEOFCONTENTS
ABOUT THE LiTHIUMBA~ERY ~ . . . . . . . . . . . . . . . . . . . . . . . . . 8-6
TROUBLESHOOTING
9.
GENERAL CORRECTIVE MEASURES
DISPLAY MESSAGES . . . . . . . .
ALARMS . . . . . . . . . . . . . . . .
CLEARING A JAMMED DOCUMENT .
CLEARING
COMMUNICATION ERROR
10. SPECIFICATIONS
QUICK REFERENCE GUIDE
INDEX
RECORDING PAPER
. . .
. . .
. . .
. . .
CODES . . . .
.
.
.....
9-1
. . . .
.
.
.
.
.
.
.
.
.
.
.
.
.,. .
.
.
. . . .
,.. .
.
.
,.. .
,.. ,
.
. . . . . . .
. . . . . . .
. . . . . . .
. . . . . . .
. . . . . . .
. . . . . . .
Quick-i
Index-i
9-1
9-4
9-5
9-6
9-7
9-8
1o-1
vii
Page 9

TABLE OF CONTENTS
Notes
Vlll
.
.. .
Page 10
Front
1
12
4
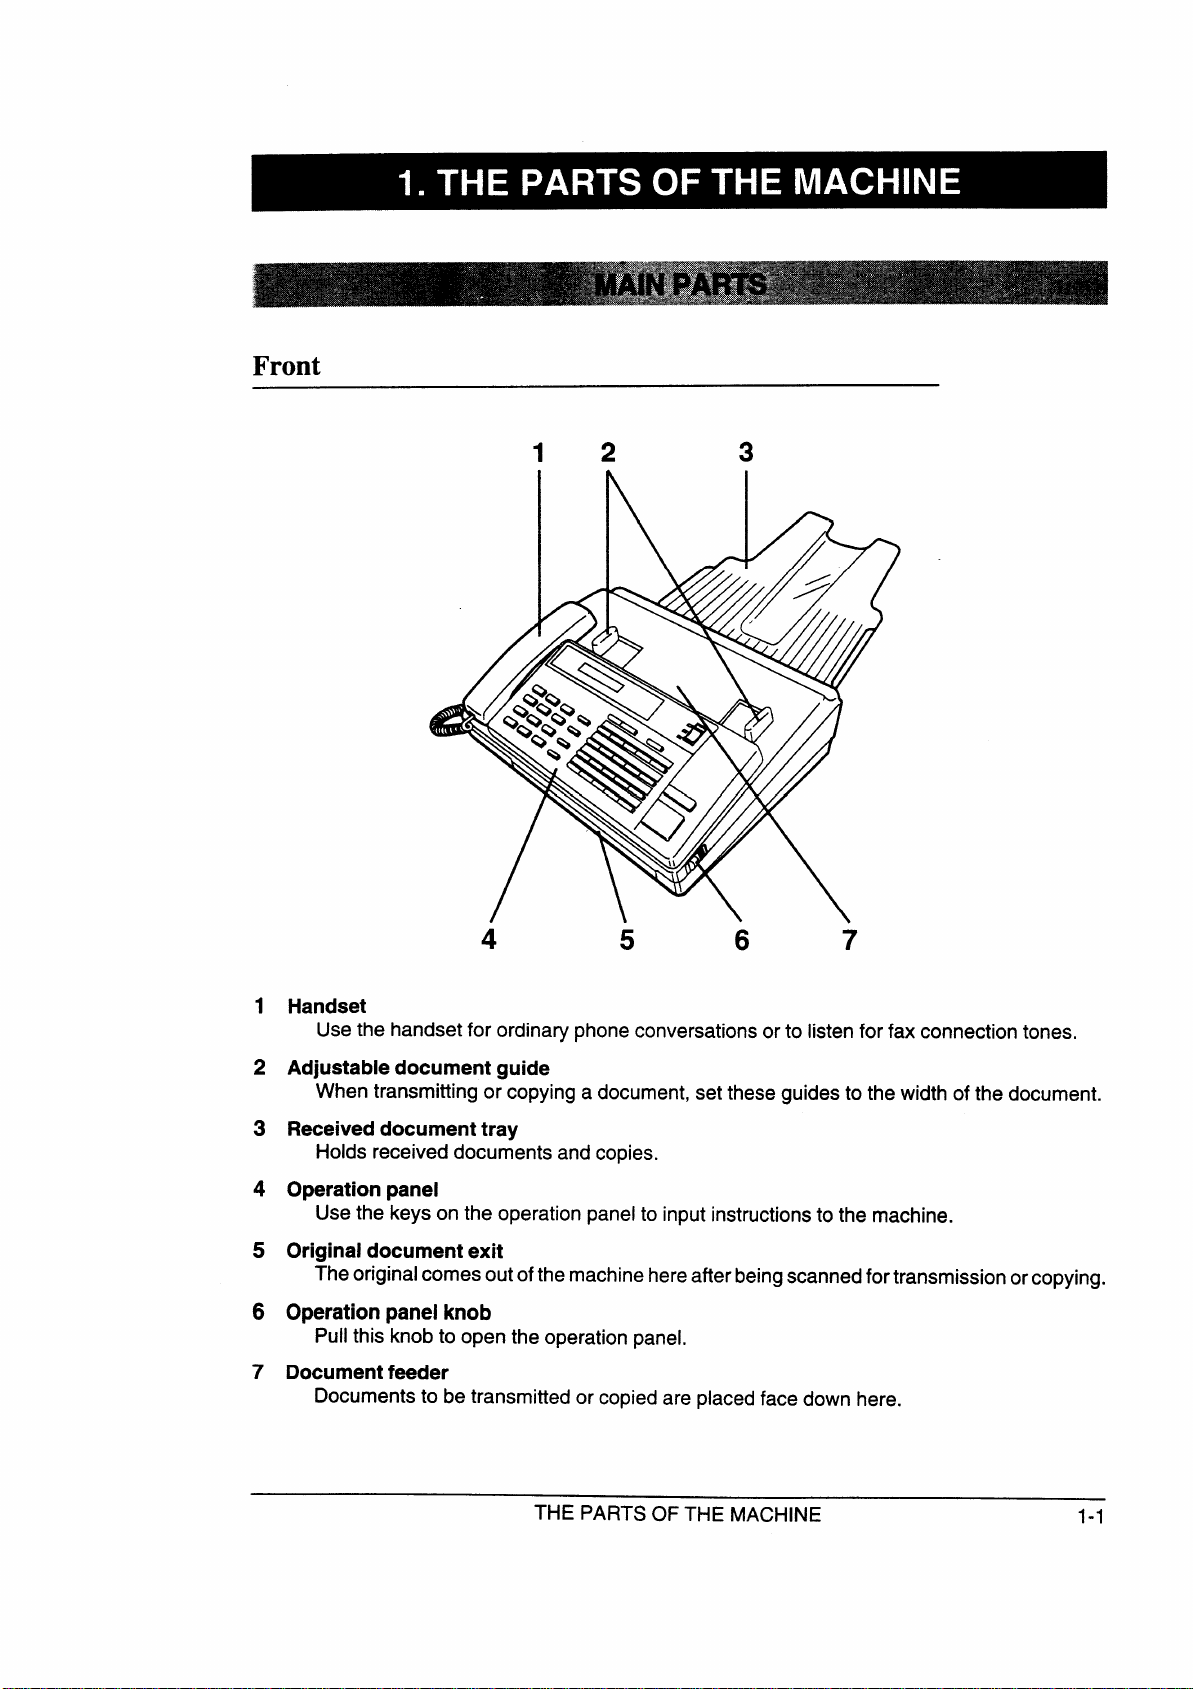
Handset
Use the handset for ordinary phone conversations or to listen for fax connection tones.
5
3
6
7
2
Adjustable document guide
When transmitting or copying a document, set these guides to the width of the document.
Received document tray
3
Holds received documents and copies.
Operation panel
4
Use the keys on the operation panel to input instructions to the machine.
Original document exit
5
The original comes out of the machine hereafter beingscannedfortransmission or copying.
6
Operationpanelknob
Pull this knob to open the operation panel.
7
Document feeder
Documents to be transmitted or copied are placed face down here.
THE PARTS OF THE MACHINE
1-1
Page 11
Rear
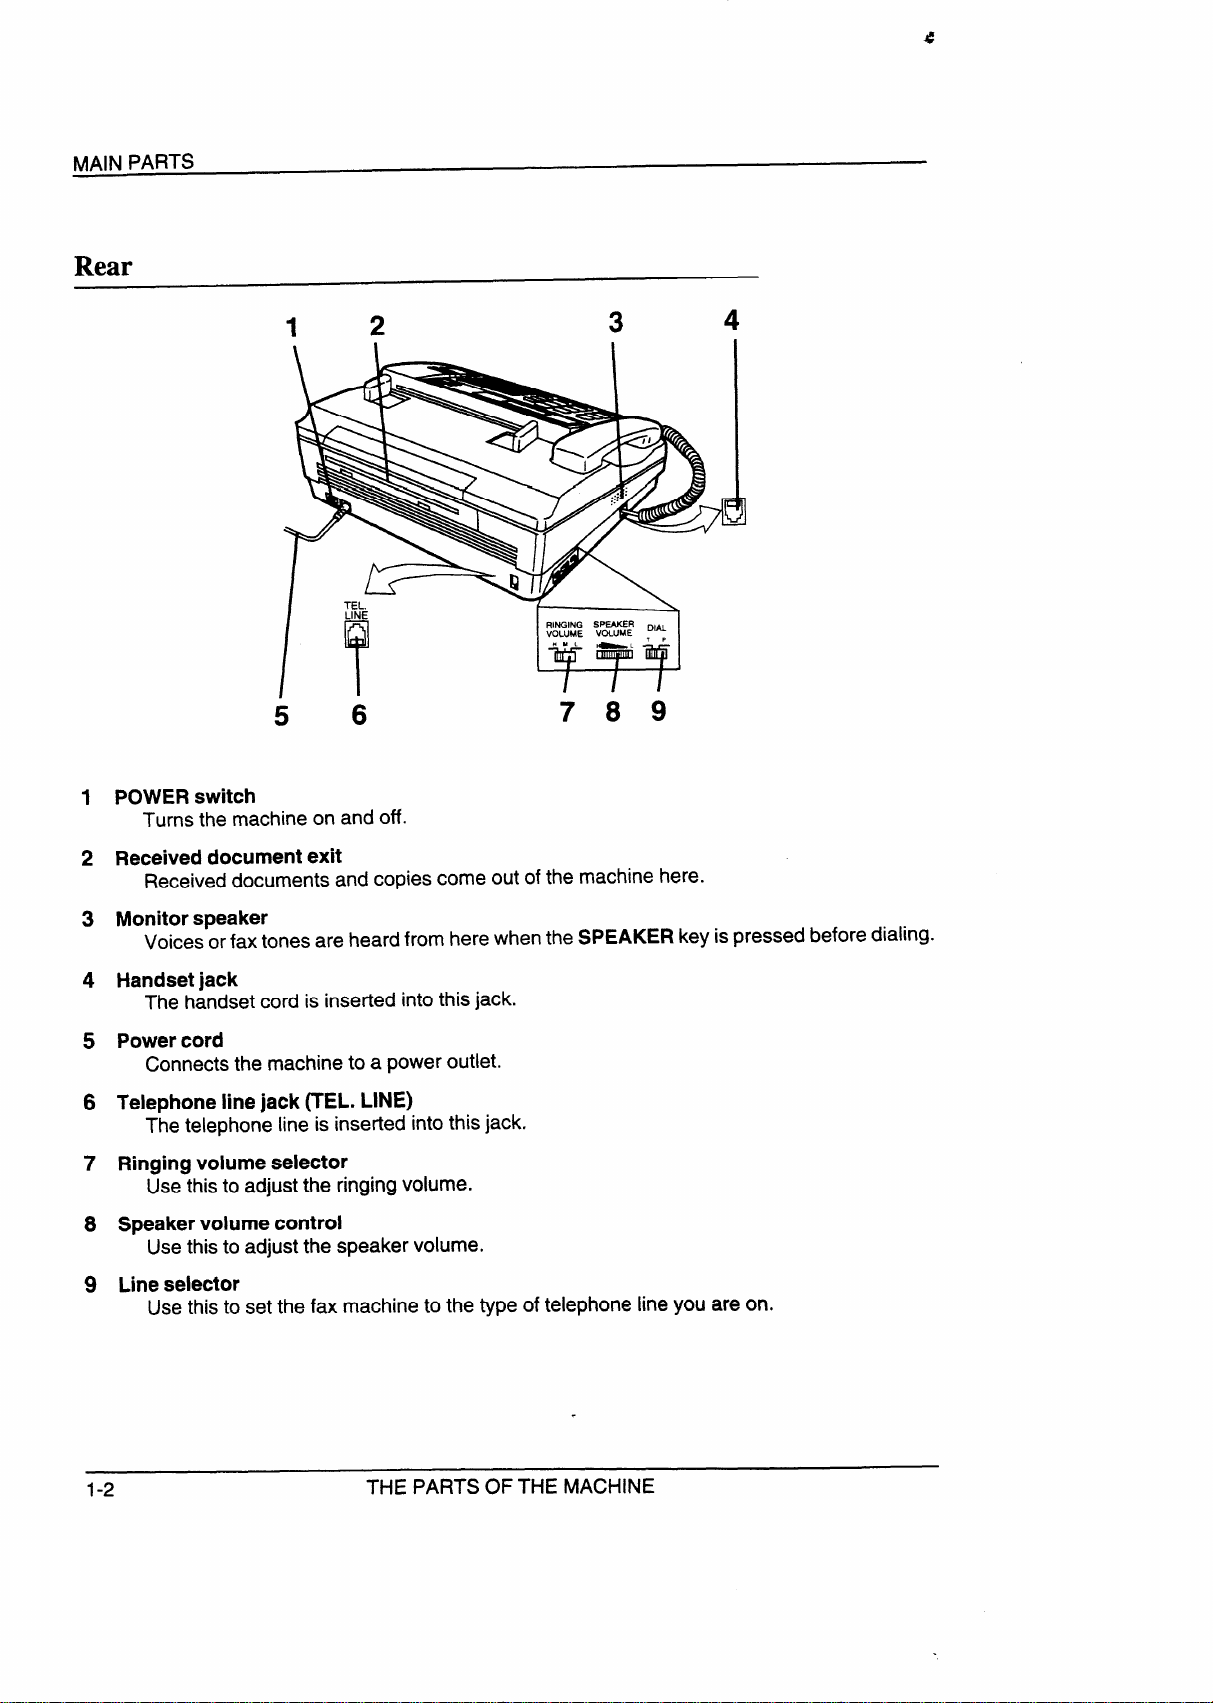
POWER switch
1
Turns the machine on and off.
Received document exit
2
Receiveddocuments and copies come out of the machine here.
5
12
3
RINGING 5P*R ~lfl
vOLUME VOLUME
wUL
~L ‘ p
4
B
6
789
Monitor speaker
3
Voices or fax tones are heard from here when the SPEAKER key is pressed before dialing.
Handsetjack
4
The handset cord is inserted into this jack.
Power cord
5
Connects the machine to a power outlet.
Telephone line jack (TEL. LINE)
6
The telephone line is inserted into this jack.
7
Ringing volume selector
Use this to adjust the ringing volume.
Speaker volume control
8
Usethis to adjust the speaker volume.
9
Line selector
Usethis to set the fax machine to the type of telephone line you are on.
1-2
THE PARTS OF THE MACHINE
Page 12
Recording paper compartment
MAIN PARTS
.
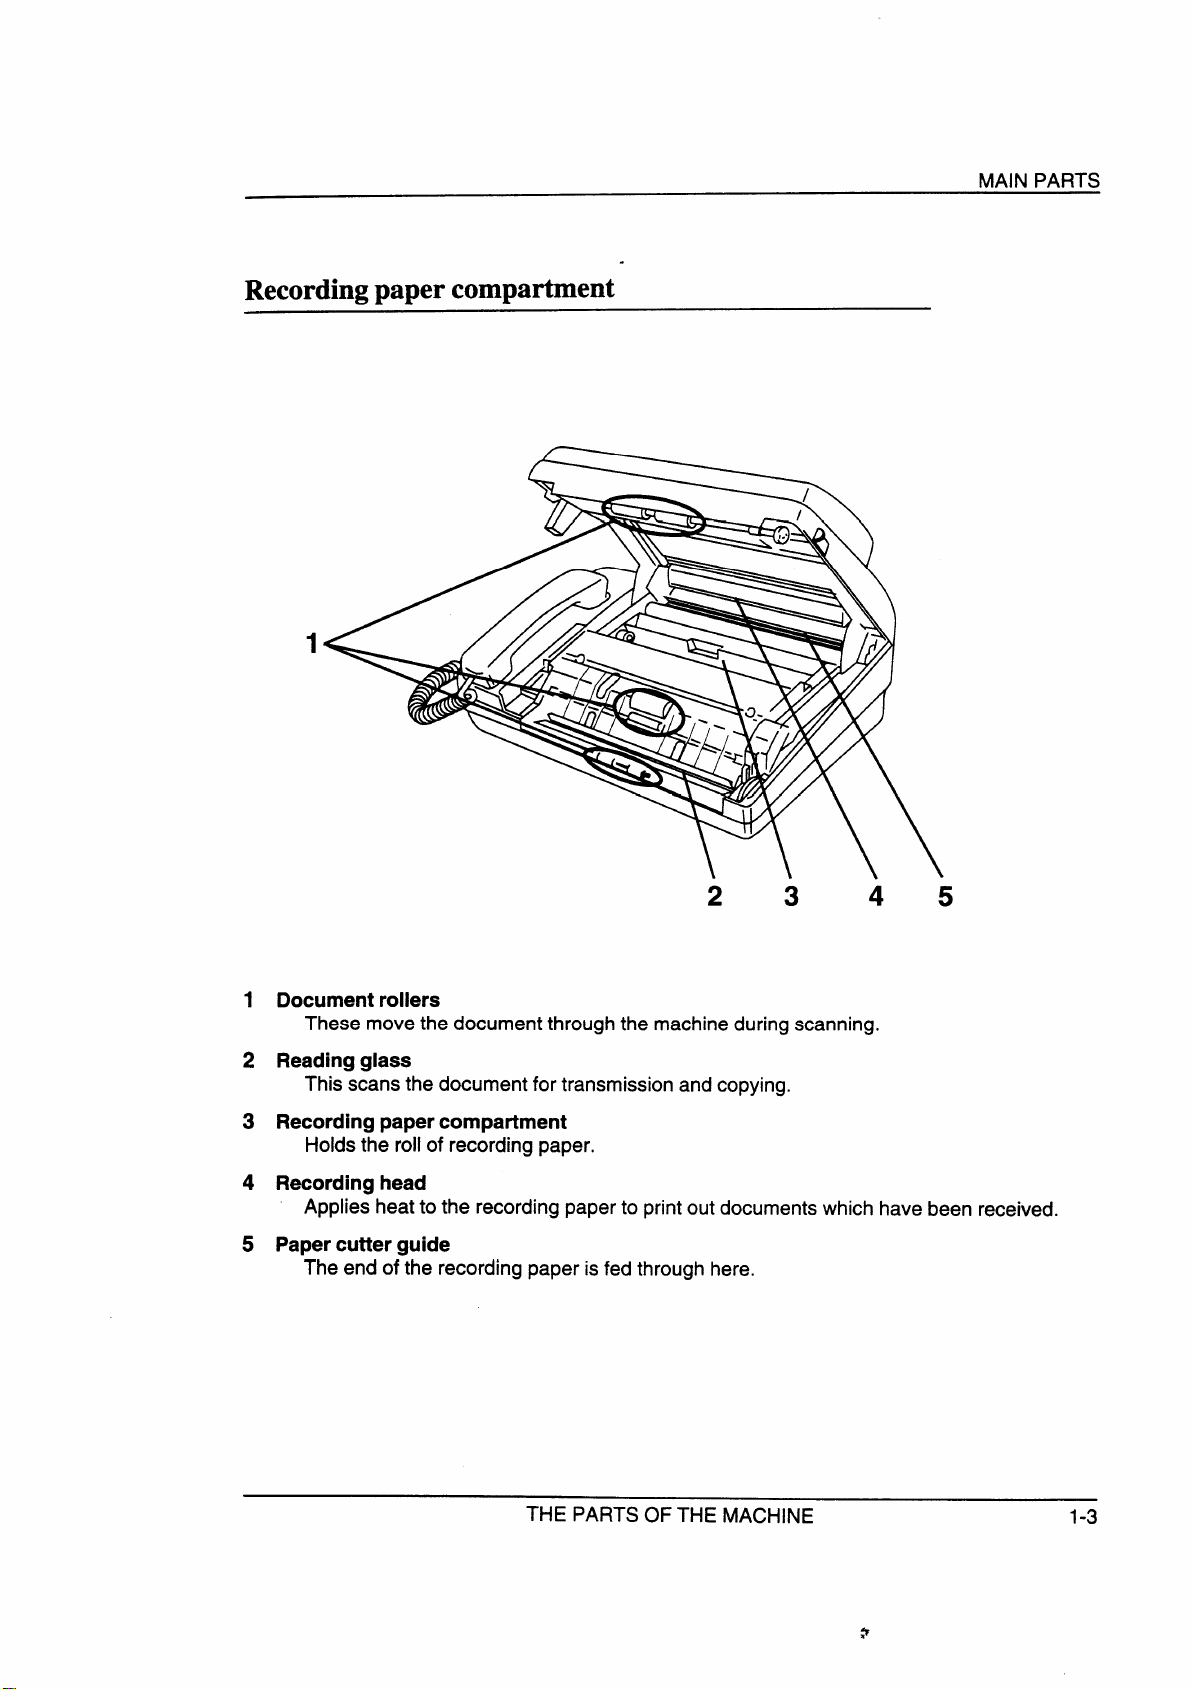
1 Document rollers
These move the document through the machine during scanning.
2 Reading glass
This scans the document for transmission and copying.
3 Recording paper compartment
Holds the roll of recording paper.
4 Recording head
Applies heat to the recording paper to print out documents which have been received.
5 Papercutterguide
The end of the recording paper is fed through here.
2
3
45
THE PARTS OF THE MACHINE
1-3
Page 13
1
2 345
67
f
1’
--------------------
I
imm m!
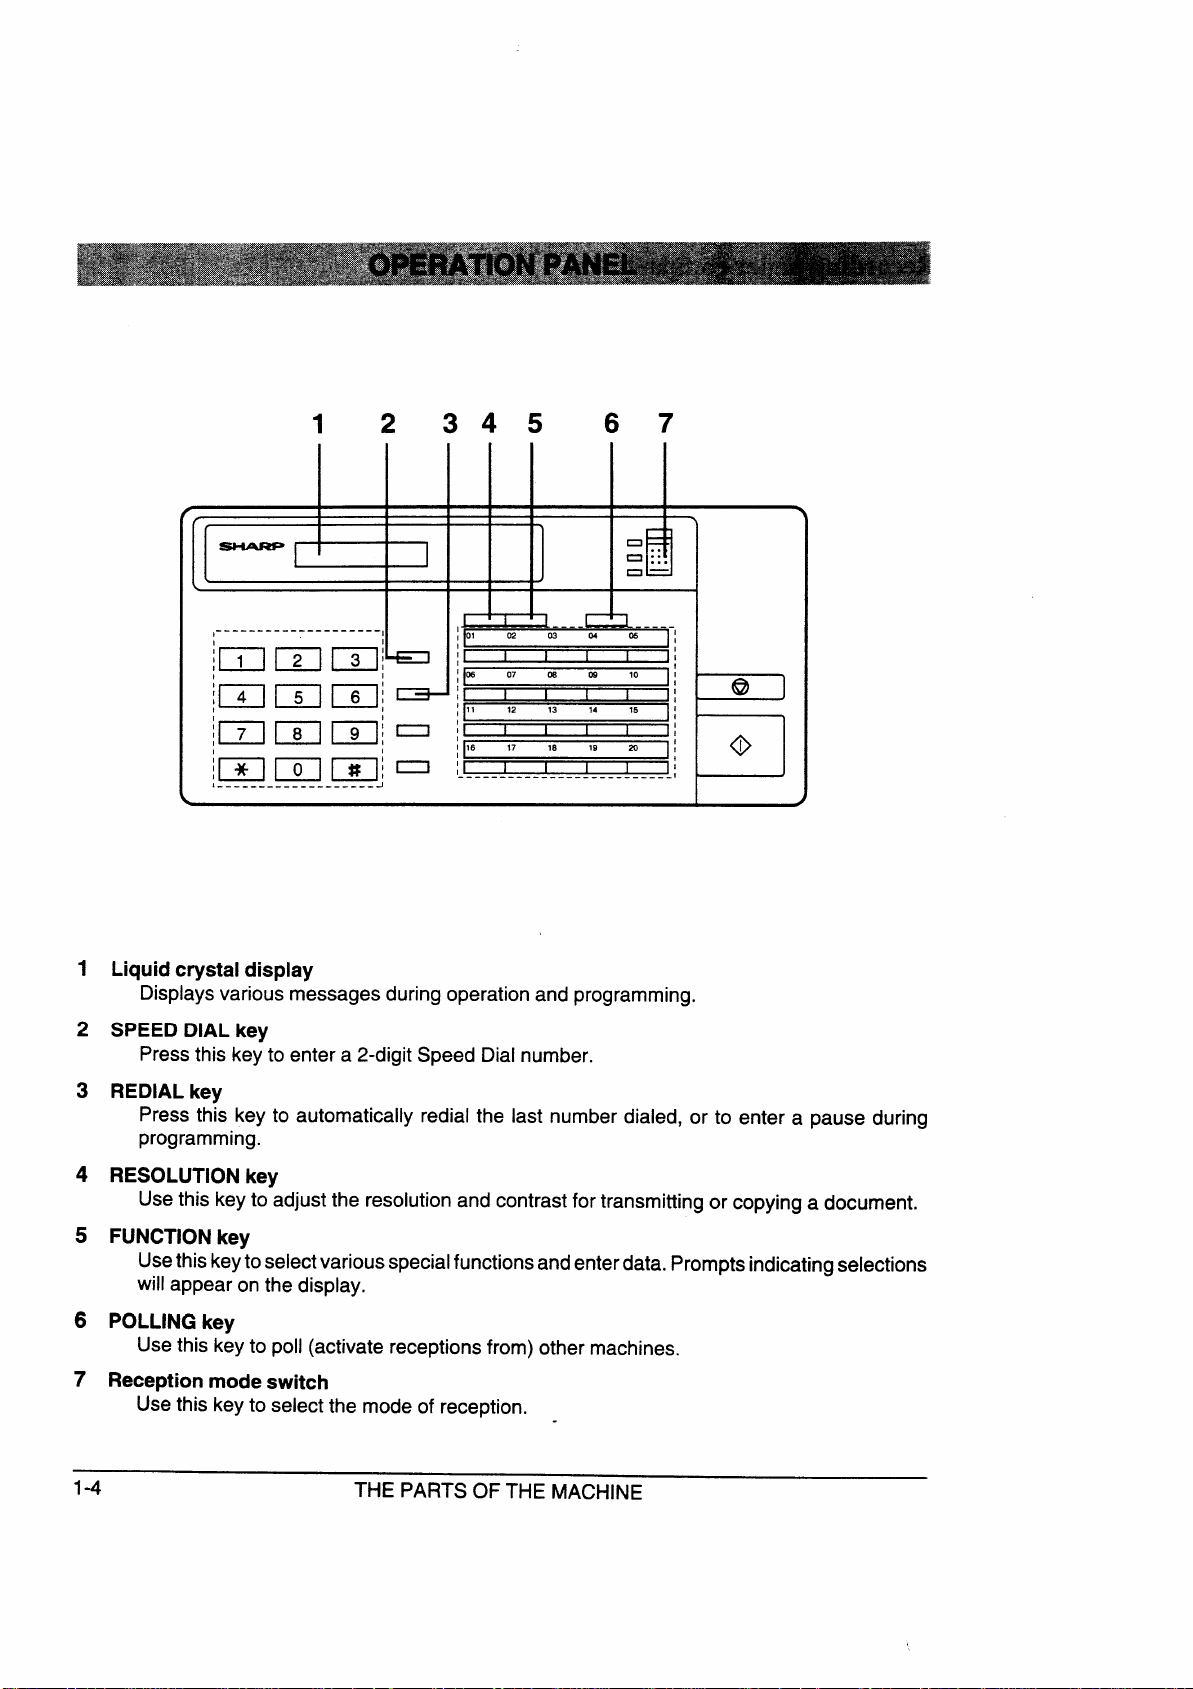
1 Liquid crystal display
Displaysvarious messages during operation and programming.
2 SPEED DIALkey
Pressthis key to enter a 2-digit Speed Dial number.
I
I
I
‘L
3 REDIAL key
Press this key to automatically redial the last number dialed, or to enter a pause during
programming.
4 RESOLUTION key
Usethis key to adjust the resolution and contrast for transmitting or copying a document,
S FUNCTION key
Usethis keytoselectvariousspecialfunctionsandenterdata. Prompts indicating selections
will appear on the display.
6 POLLINGkey
Usethis key to poll (activate receptions from) other machines.
7 Reception mode switch
Usethis key to select the mode of reception.
1-4
THE PARTS OF THE MACHINE
Page 14
o
n :::
n—
OPERATION PANEL
...
u
,--------------------,
l _________ ,____ -----J
8
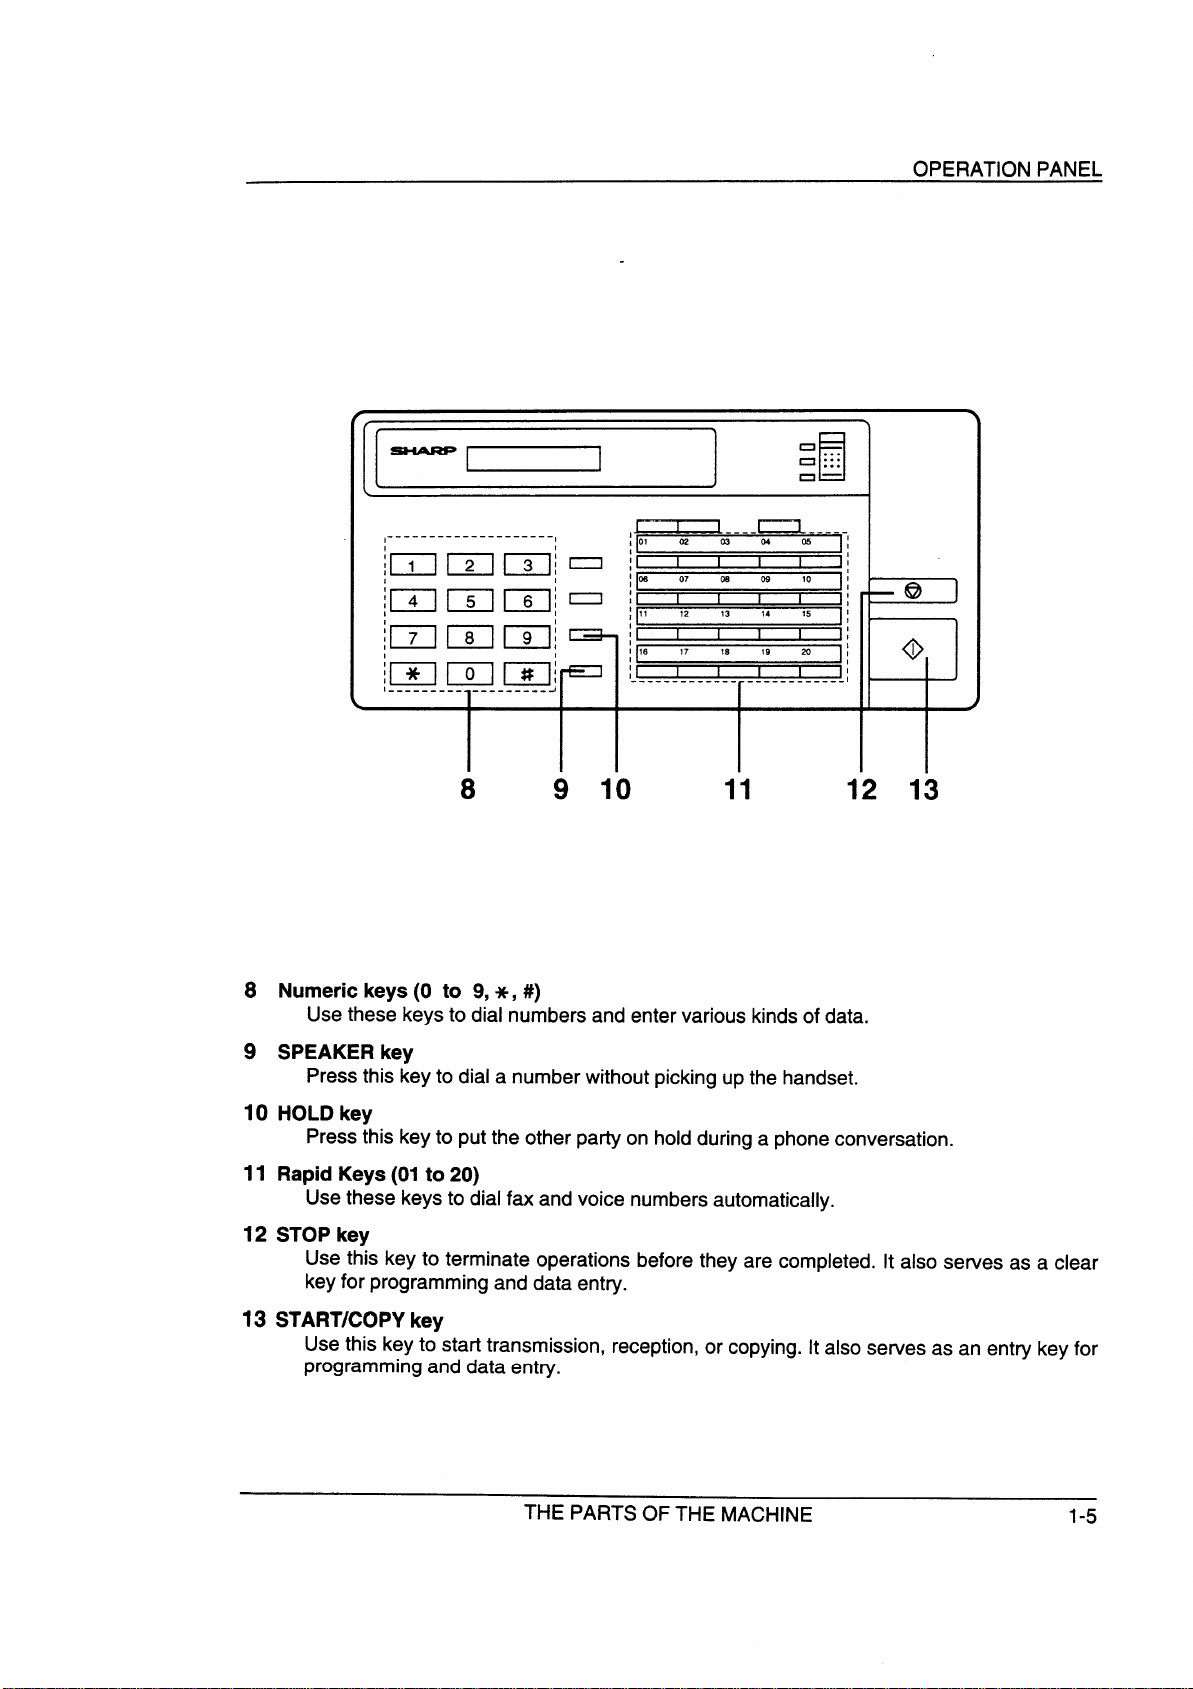
8 Numerickeys(O to 9,*, #)
Use these keys to dial numbers and enter various kinds of data,
9 SPEAKERkey
Press this keyto dial a number without picking up the handset.
~__--n-----,
~[
,06 07 0s 09
I
~~
.------------ ------------
I
9
10
r
11 12 13
10 I
1
10 HOLDkey
Press this key to put the other party on hold during a phone conversation.
11 Rapid Keys (01 to 20)
Usethese keys to dial fax and voice numbers automatically.
12 STOPkey
Use this key to terminate operations before they are completed. It also serves as a clear
keyfor programming and data entry.
13 STARTJCOPYkey
Use this key to start transmission, reception, or copying. It also serves as an entry key for
programming and data entry.
THE PARTS OF THE MACHINE
1-5
Page 15
OPERATION PANEL
Notes
1-6
.
THEPARTSOFTHEMACHINE
Page 16
Take the following points into consideration when selecting a site for your FO-225:
ENVIRONMENT
●
The machine must be installed on a level surface.
●
Keep the machine away from air conditioners, heaters, direct sunlight, and dust.
●
Provideeasyaccesstothefront, back,andsidesofthe machine. Inparticular, keep
,
the area in front of the machine clear,orthe original document mayjam as it comes
out after scanning.
●
The temperature should be between 5“ and 35°C.
●
The humidity should be between 30°A and 85Y0(without condensation).
ELECTRICITY
●
A 240 V, 50 Hz, grounded (3-prong) AC outlet is required.
JJ Note:
● If your area experiences a high incidence of ligh~ing or power surges, we recommend that you
install a surge protector for the power and telephone lines. Surgeprotectors can be purchased at
most telephone specialty stores.
TELEPHONE JACK
Astandard telephone wall jack must be located near the machine.
INSTALLATION
2-1
Page 17
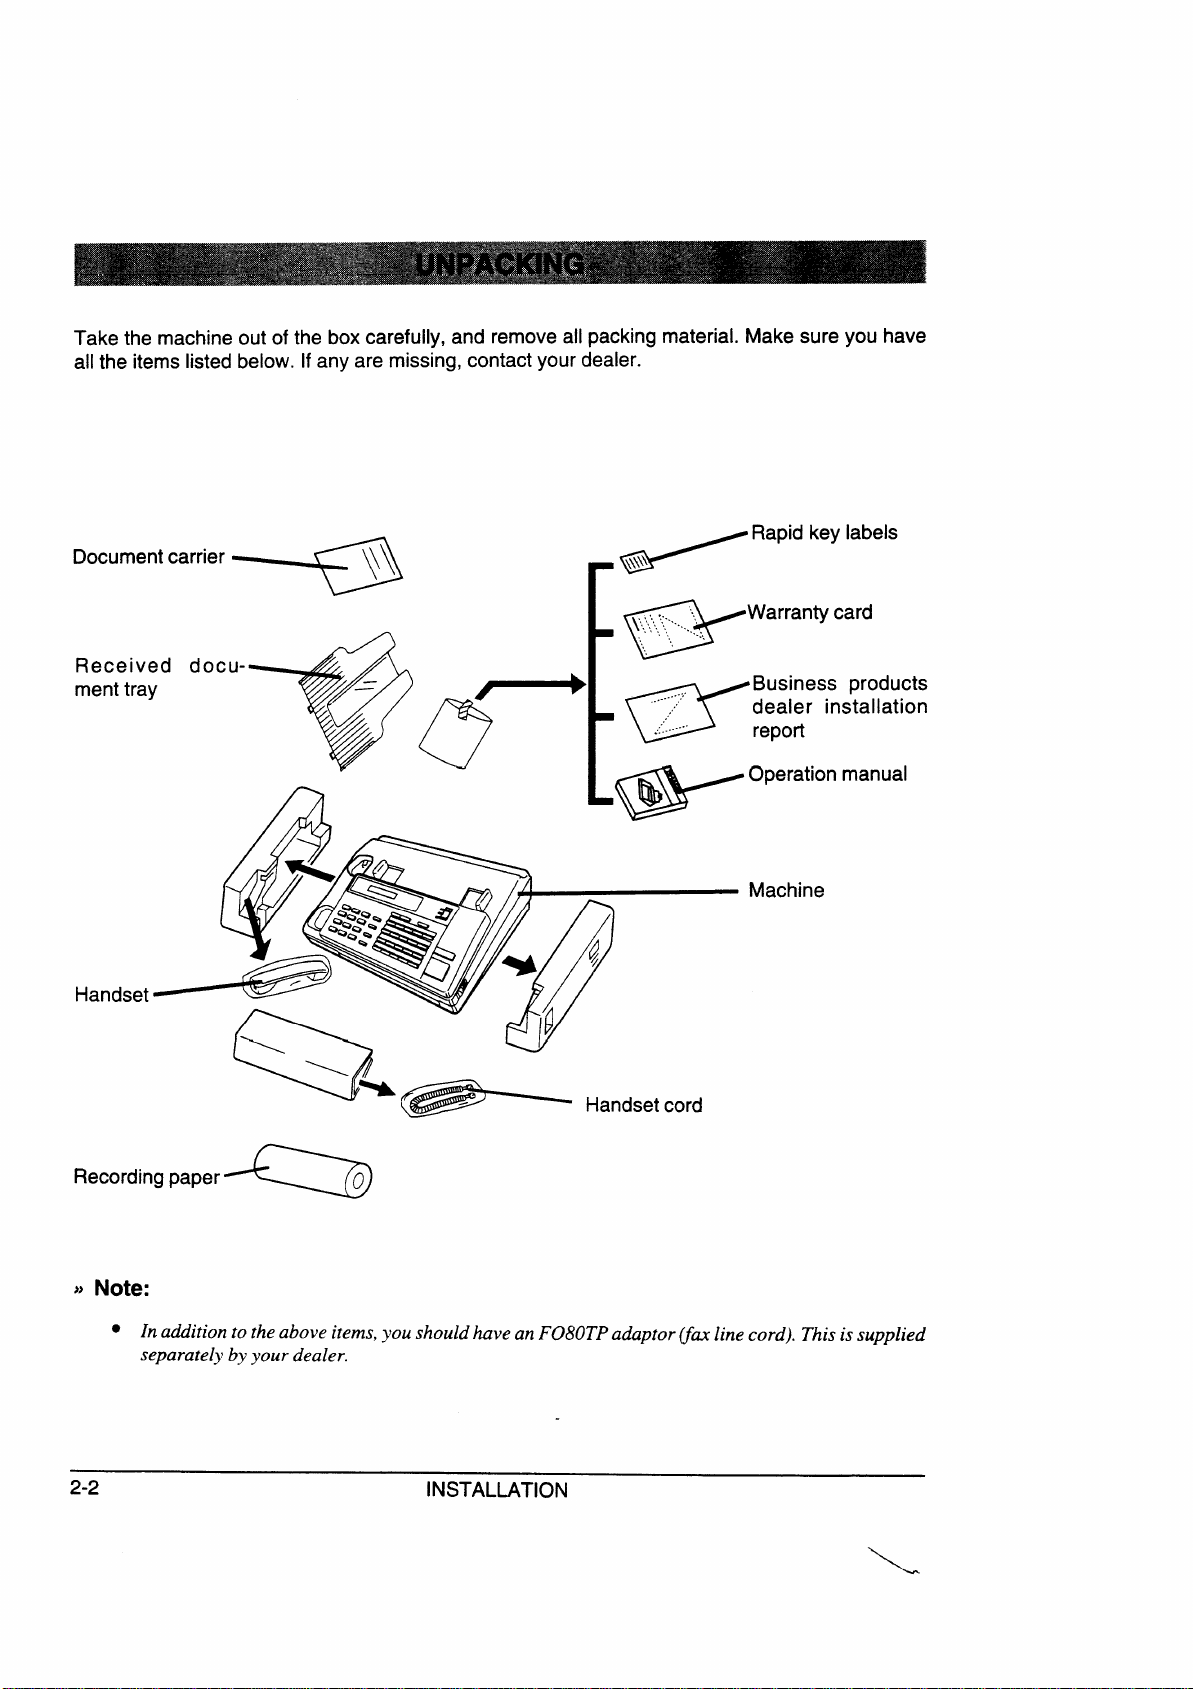
Take the machine out of the box carefully, and remove all packing material. Make sure you have
all the items listed below. If any are missing, contact your dealer.
Document carrier
- ‘Rapidkey’abe’s
Warranty card
Received docu-
ment tray
Recordingpaper
,,~ & ~ ,
P-
W.*
Q
w
Business products
dealer installation
~
o
/
mrePo.
[
w
Handsetcord
Operation manual
Machine
Note:
~~
● In addition to the above items, you shouldhave an F080TPadaptor~m line cord). This is supplied
separately by your dealer.
2-2
INSTALLATION
\.
Page 18
.
Assemblv and Comections
———
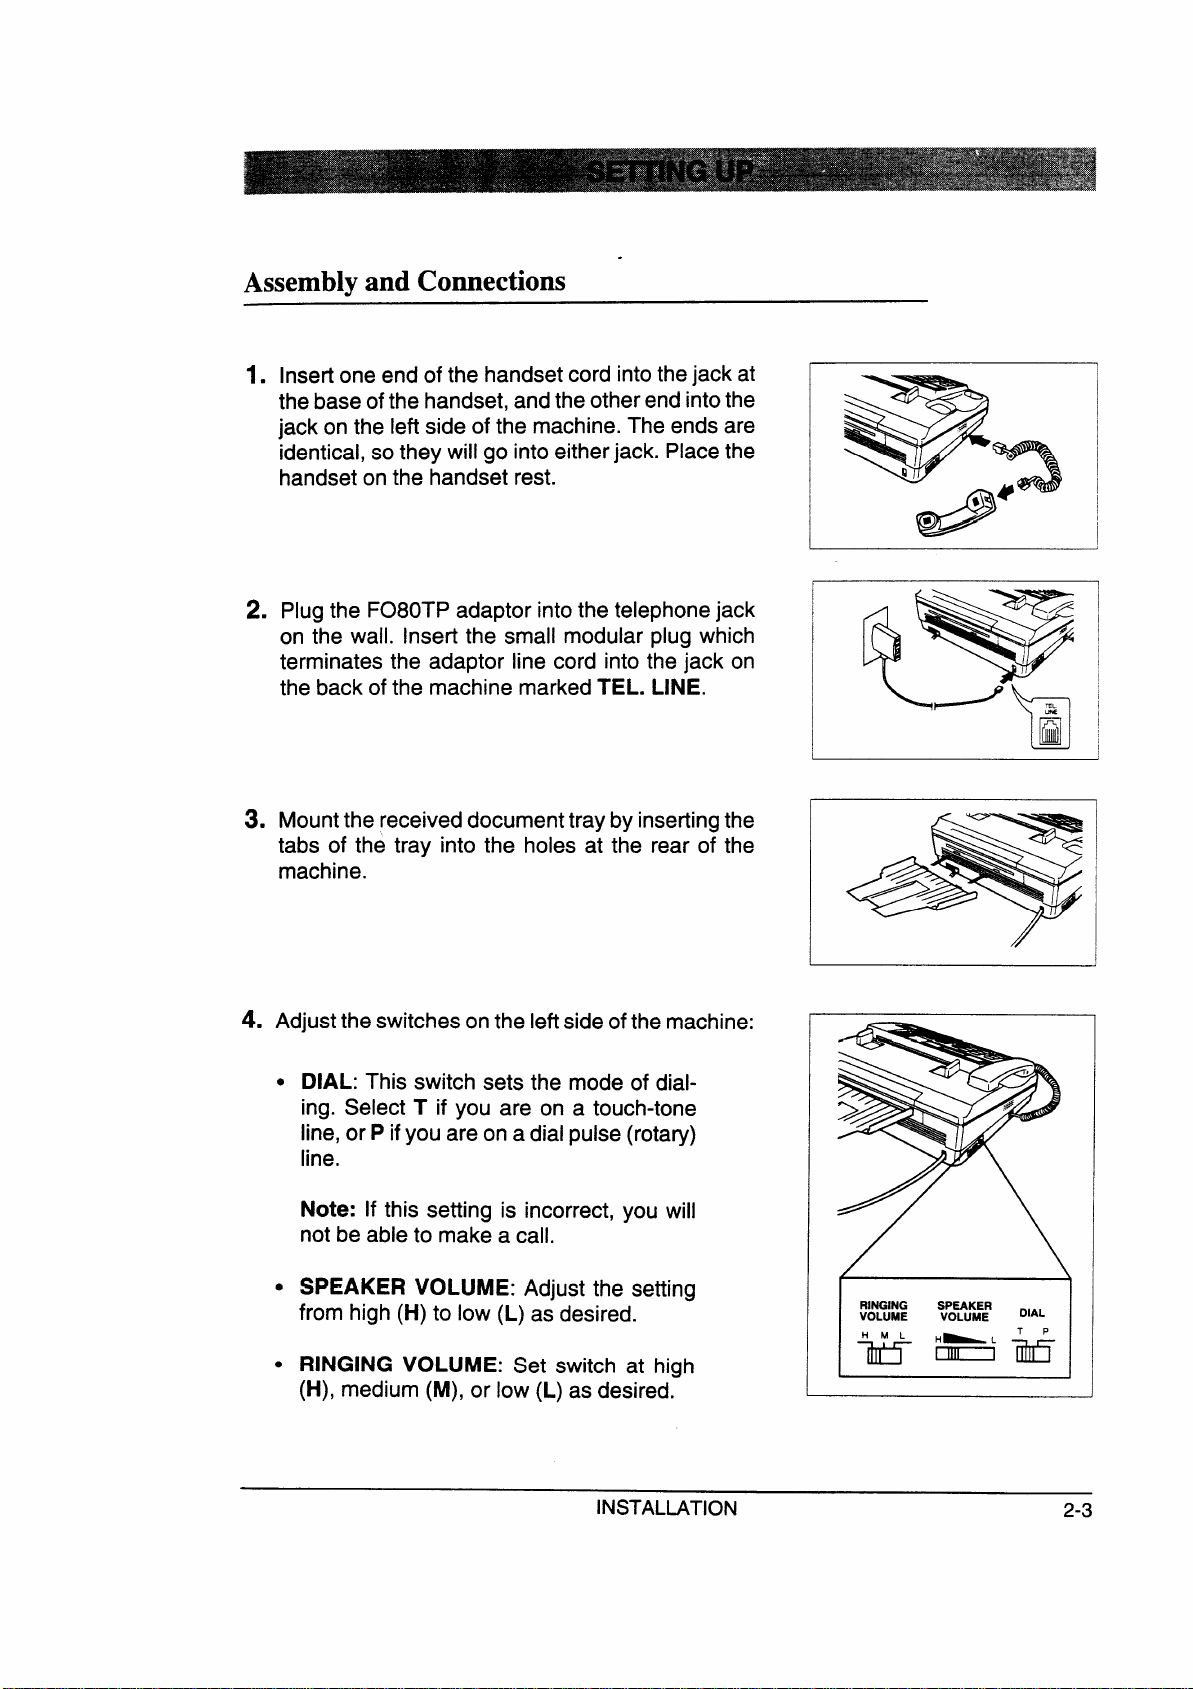
Insert one end of the handset cord into the jack at
1.
thebase ofthe handset, and the other end intothe
jack on the left side of the machine. The ends are
identical, so they will go into either jack. Place the
handset on the handset rest.
Plug the F080TP adaptor intothe telephone jack
2.
on the wall. insert the small modular plug which
terminates the adaptor line cord into the jack on
the back of the machine marked TEL. LINE.
*
Mountthe received document tray by inserting the
tabs of the tray into the holes at the rear of the
machine.
Adjust the switches on the leftside of the machine:
4.
●
DIAL: This switch sets the mode of dialing. Select T if you are on a touch-tone
line, or P if you are on a dial pulse (rotary)
line.
Note: If this setting is incorrect, you will
not be able to make a call.
●
SPEAKER VOLUME: Adjust the setting
from high (H) to low (L)
as desired.
!
RINGINGSPEAKER
VOLUME
I
VOLUME
w
DIAL
●
RINGING VOLUME: Set switch at high
(H),
medium (M), or low (L) as desired:
INSTALLATION 2-3
Page 19
.
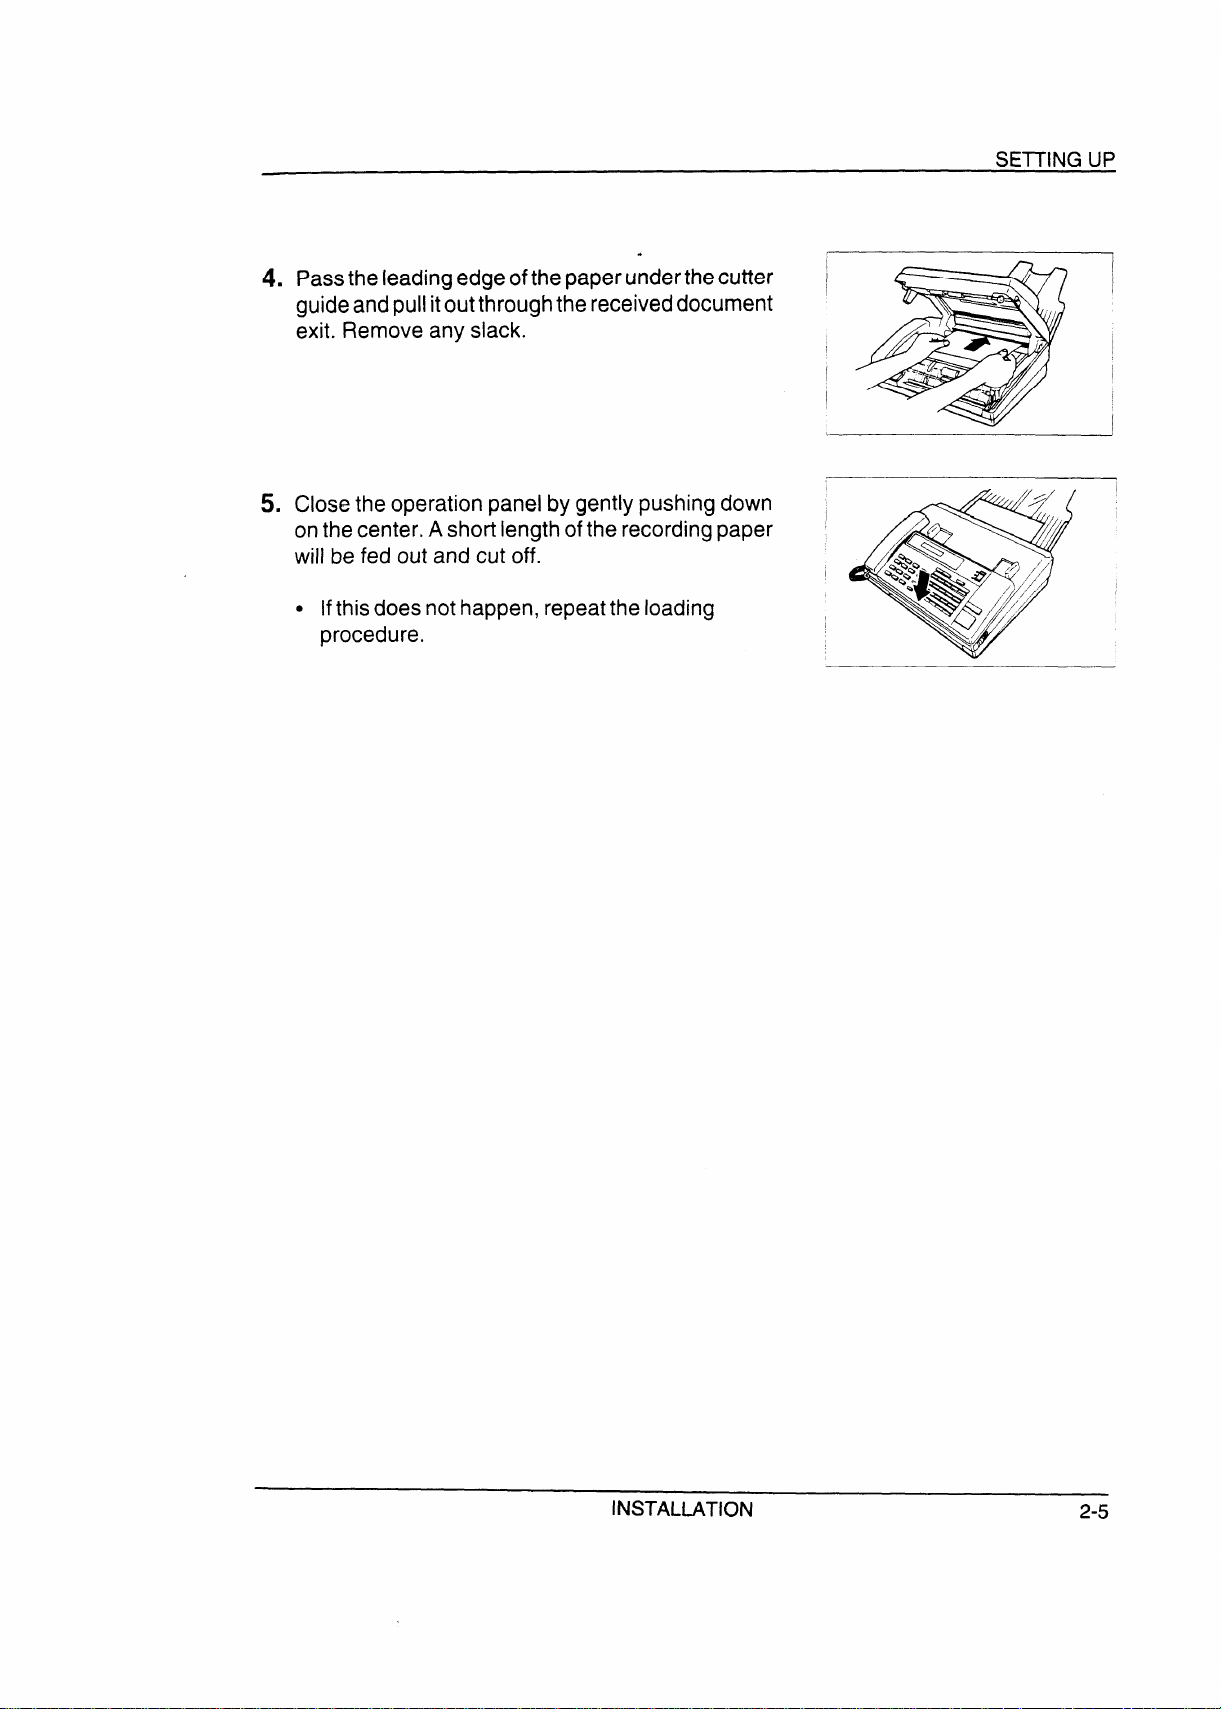
4. Passtheleadingedge ofthepaperunderthe cutter
guideandpullitoutthroughthereceiveddocument
exit. Remove any slack.
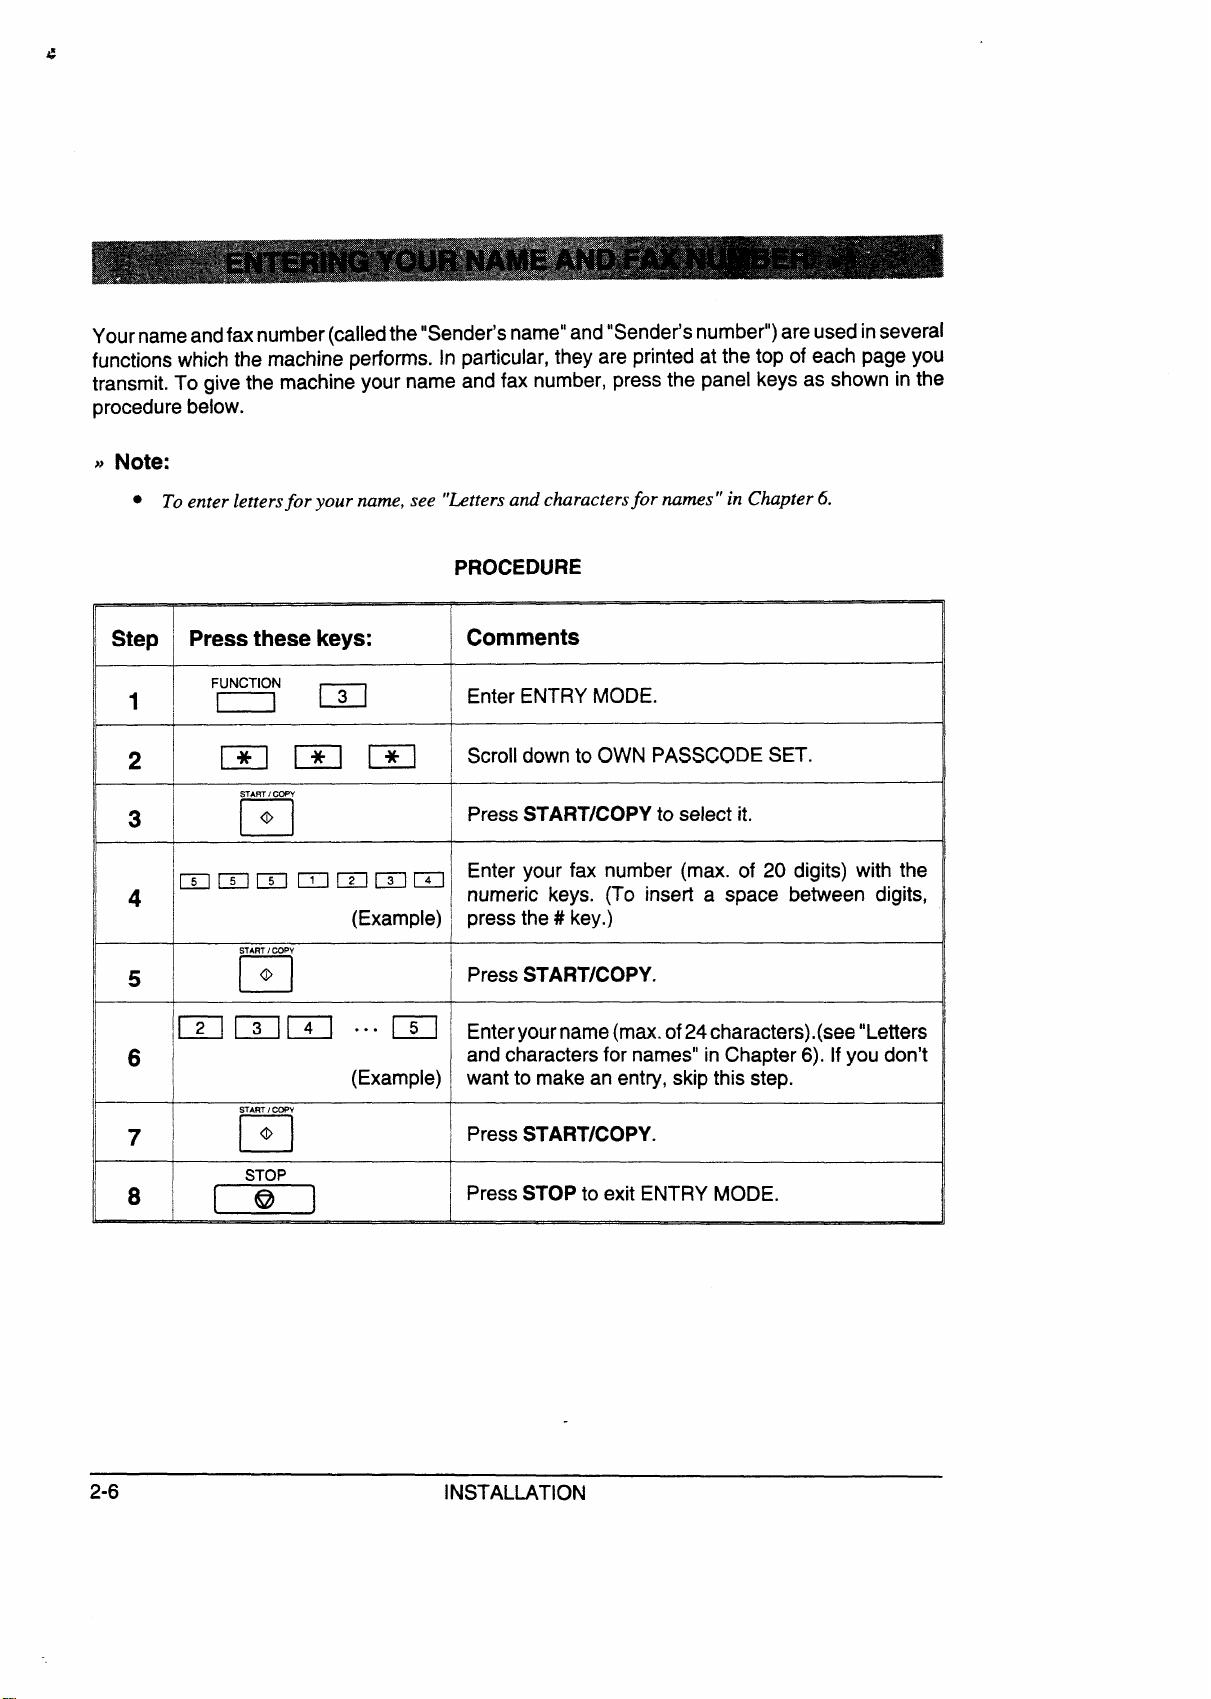
5. Close the operation panel by gently pushing down ,
on the center. A short length of the recording paper
will be fed out and cut off.
. Ifthisdoes not happen, repeatthe loading
procedure.
SETTINGUP
I
I
INSTALLATION
2-5
Page 20
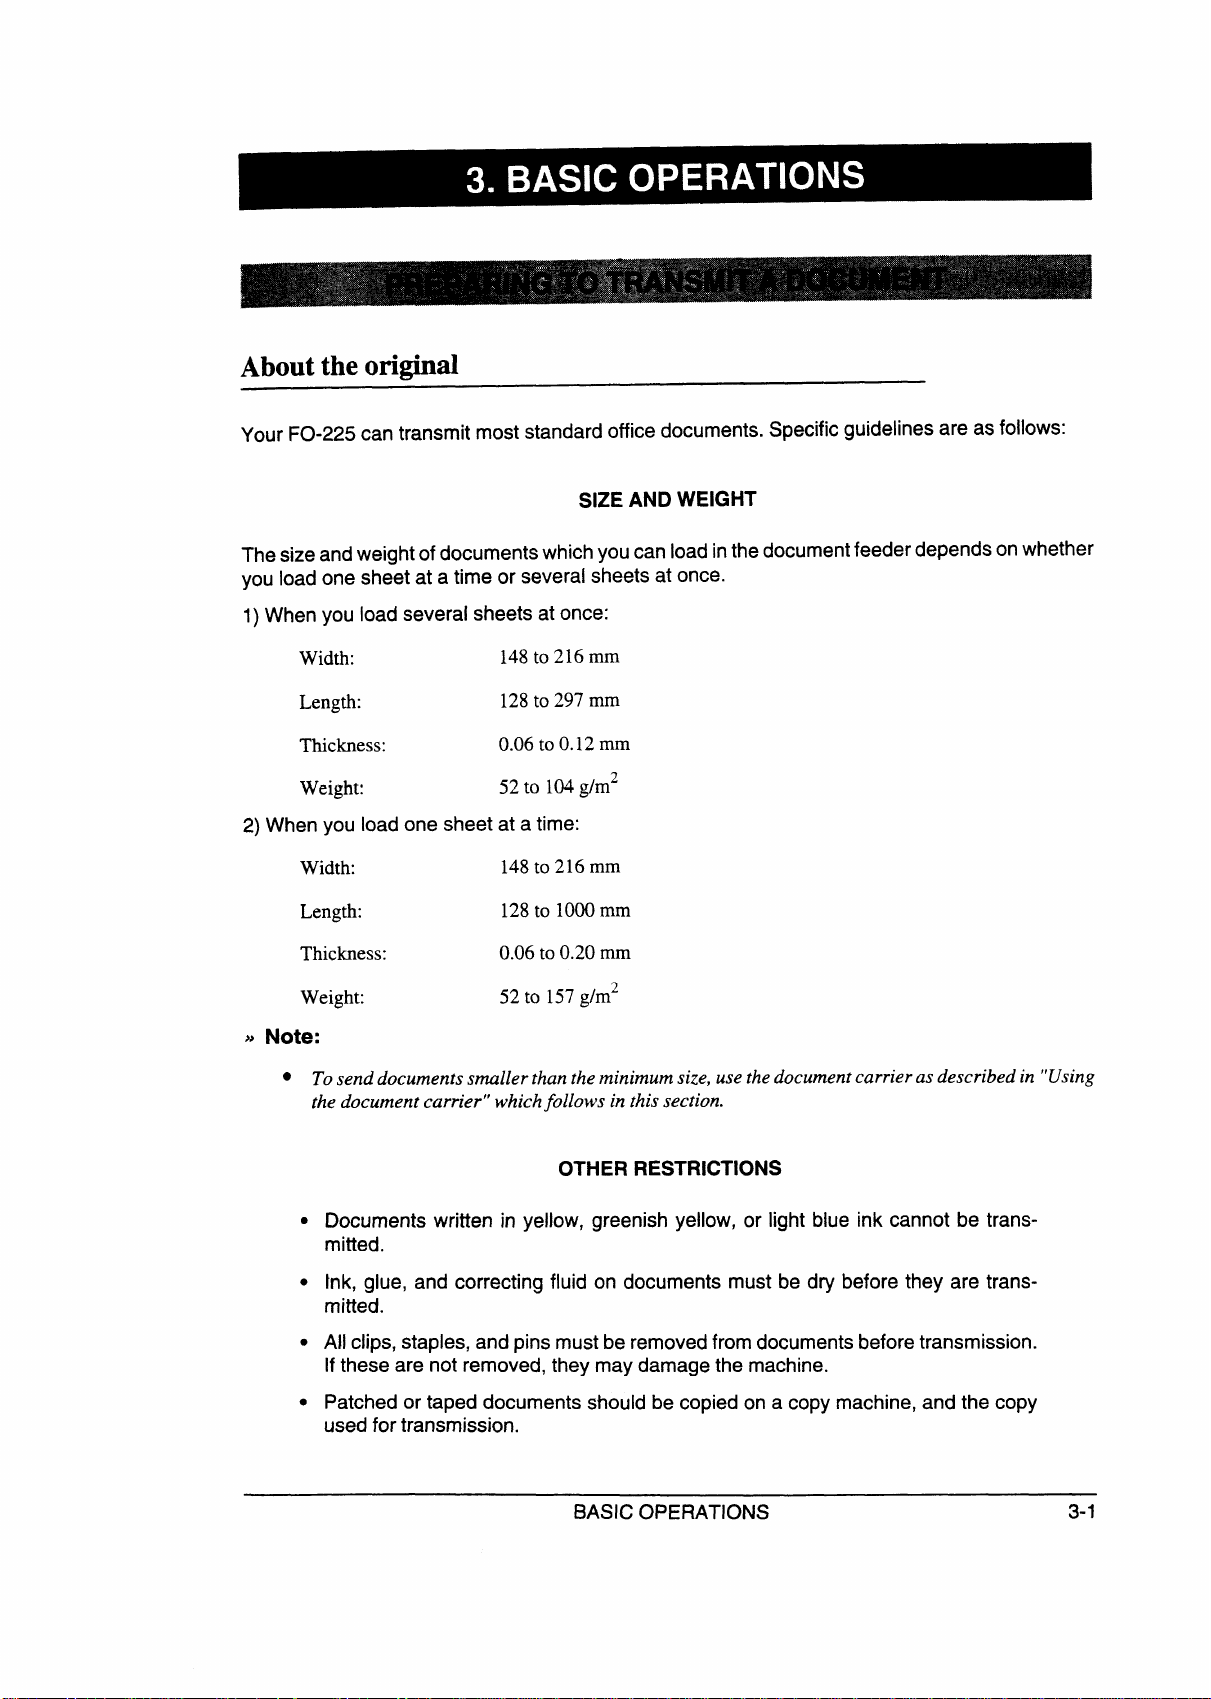
Your nameandfax number(calledthe “Sender’s name” and “Sender’s number”) are usedinseveral
functions which the machine performs. In particular, they are printed at the top of each page you
transmit. To give the machine your name and fax number, press the panel keys as shown in the
procedure below.
● To enter lettersfor your name, see “Lettersand charactersfor names” in Chapter 6.
PROCEDURE
Step
1
2
3
4
5
6
7
8
Press these keys:
FUNCTION
m
mm=
START/COPY
o
D
mmmmmmm
(Example) I press the#key.)
START/COPY
0
0
m mm ““”m
(Example) want to make an entry, skip this step.
START/ -Y
@
D
STOP
m
Comments
Enter ENTRY MODE.
Scroll down to OWN PASSCODE SET.
Press START/COPY to select it.
Enter your fax number (max. of 20 digits) with the
numeric keys. (To insefl a space between digits,
~pressSTART,COPY
Enteryourname(max. of24characters).(see ’’Letters
and characters for names” in Chapter 6). If you don’t
Press STARTICOPY.
j
Press STOP to exit ENTRY MODE.
.
2-6
INSTALLATION
Page 21
About the original
Your FO-225 can transmit most standard office documents. Specific guidelines areas follows:
ANDWEIGHT
SIZE
The size and weight of documents which you can load in the documentfeeder depends on whether
you load one sheet at a time or several sheets at once.
1)When you load several sheets at once:
Width:
Length:
Thickness:
Weight:
148to 216 mm
128to 297 mm
0.06 to 0.12 mm
52 to 104g/m2
2) When you load one sheet at a time:
Width:
Length:
Thickness:
Weight:
● Tosenddocuments srnallerthan the minimum size, use thedocument carrieras described in “Using
148to 216 mm
128to 1000mm
0.06 to 0.20 mm
52 to 157g/m2
the document carrier” whichfollows in this section.
OTHER RESTRICTIONS
●
Documents written in yellow, greenish yellow, or light blue ink cannot be transmitted.
●
Ink, glue, and correcting fluid on documents must be dry before they are trans-
mitted.
●
All clips, staples, and pins must be removed from documents before transmission.
If these are not removed, they may damage the machine.
●
Patched or taped documents should be copied on a copy machine, and the copy
used for transmission.
BASIC OPERATIONS 3-1
Page 22
PREPARING TO TRANSMIT A DOCUMENT
Readable length and width
The area of the document which isread(scanned)bythe machine is slightly smallerthan the actual
document size. Any characters or graphics outside this area will not be transmitted.
Readable width:
210 mm
Readable length: The length of the sheet minus 4 mm frem both the top and bottom edges.
Using the document carrier
The document carrier must be used for the following types of documents:
● Documents which are torn.
● Documents smaller than the minimum size (seethe preceding page).
s Carbon-backeddocuments (insert asheetofwhitepaper between the carbon back
of the document and the document carrier).
. Documents which are easily smudged.
Usethe document carrier according to the instructions on the back.
)> Note:
● If the document carrier is dirty, clean it with a soft cloth moistened with water. Make sure it has
dried complete>’before using itfor transmission.
3-2
BASIC OPERATIONS
Page 23
‘\
PREPARING TO TRANSMIT A DOCUMENT
.
Loading the document
Upto 10 sheets can be placed in the feeder at one time (see “About the original” at the beginning
ofthis section for allowed sizes). These will be automatically fed into the machine starting from the
sheet on the bottom.
. Ifyou needto send or copymorethan IOsheets, placetheadditional sheets gently
and carefully in the feeder as the last sheet is being scanned. Do not try to force
them in, as this may cause double-feeding or jamming.
“ If your document consists of several thick
time, insert each sheet into the maghine as the previous sheet is being scanned.
Insert gently to prevent double-feeding.
PROCEDURE
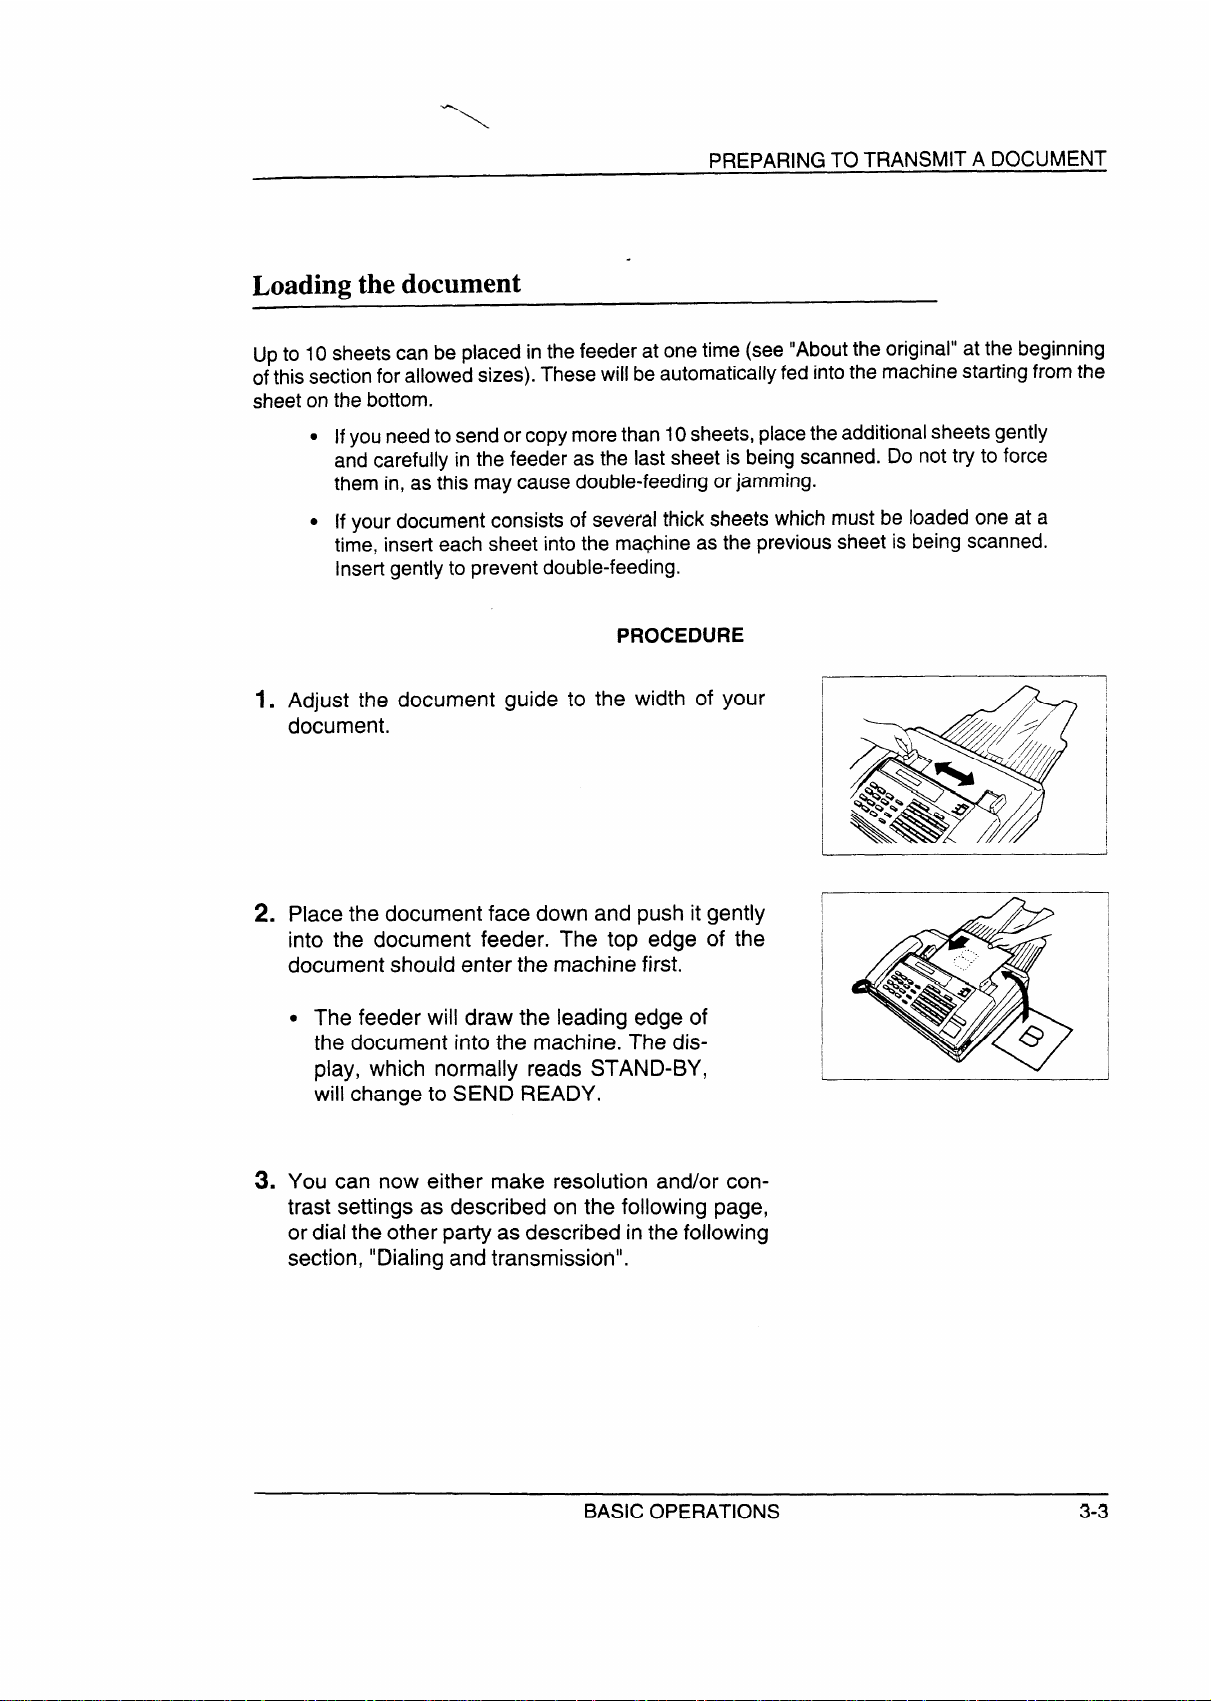
Adjust the document guide to the width of your
1.
document.
Place the document face down and push it gently
2.
into the document feeder. The top edge of the
document should enter the machine first.
c The feeder will draw the leading edge of
the document into the machine. The display, which normally reads STAND-BY,
will change to SEND READY.
sheetswhich must be loaded one at a
L
I
-
I
You can now either make resolution and/or con-
3.
trast settings as described on the following page,
or dial the other party as described in the following
section, “Dialing and transmission”.
BASIC OPERATIONS
3-3
Page 24
PREPARING TO TRANSMIT A DOCUMENT
Resolution and contrast
If you want, you can adjust the resolution and contrast before sending a document.
RESOLUTION
The FO-225 has 3 resolution settings:
STANDARD:
FINE:
HALF TONE: Use HALF TONE for photographs and illustrations. The original will be
Ifyou do not make a setting, the machine will automatically sendthe document in STANDARD (the
default setting can bechanged to FINE byadjusting UserSwitch 1- see “User switches” inChapter
6).
~~Note:
● Inorder to transmit with FINE resolution, the receivingfamachine must also have tht resolution.
Ifit doesn’t, your machine will automatically step down to STANDARD.
The contrast is normally set to AUTO, which means that the machine automatically controls the
contrast, but for very light documents you can change the setting to DARK.
Use STANDARD for ordinarydocuments. This setting gives you the fastest
and most economical transmission.
Use FINE for improved reproduction, especially with documents containing
small letters or fine drawings.
reproduced in 16shades of gray.
CONTRAST
3-4
BASIC OPERATIONS
Page 25
>) Note:
●
PREPARING TO TRANSMIT A DOCUMENT
MAKINGTHESEITINGS
~e document mustfirst be loaded in thefeeder (if this is not done, the RESOLUTIONkey used
to wke the settings will not be activated).
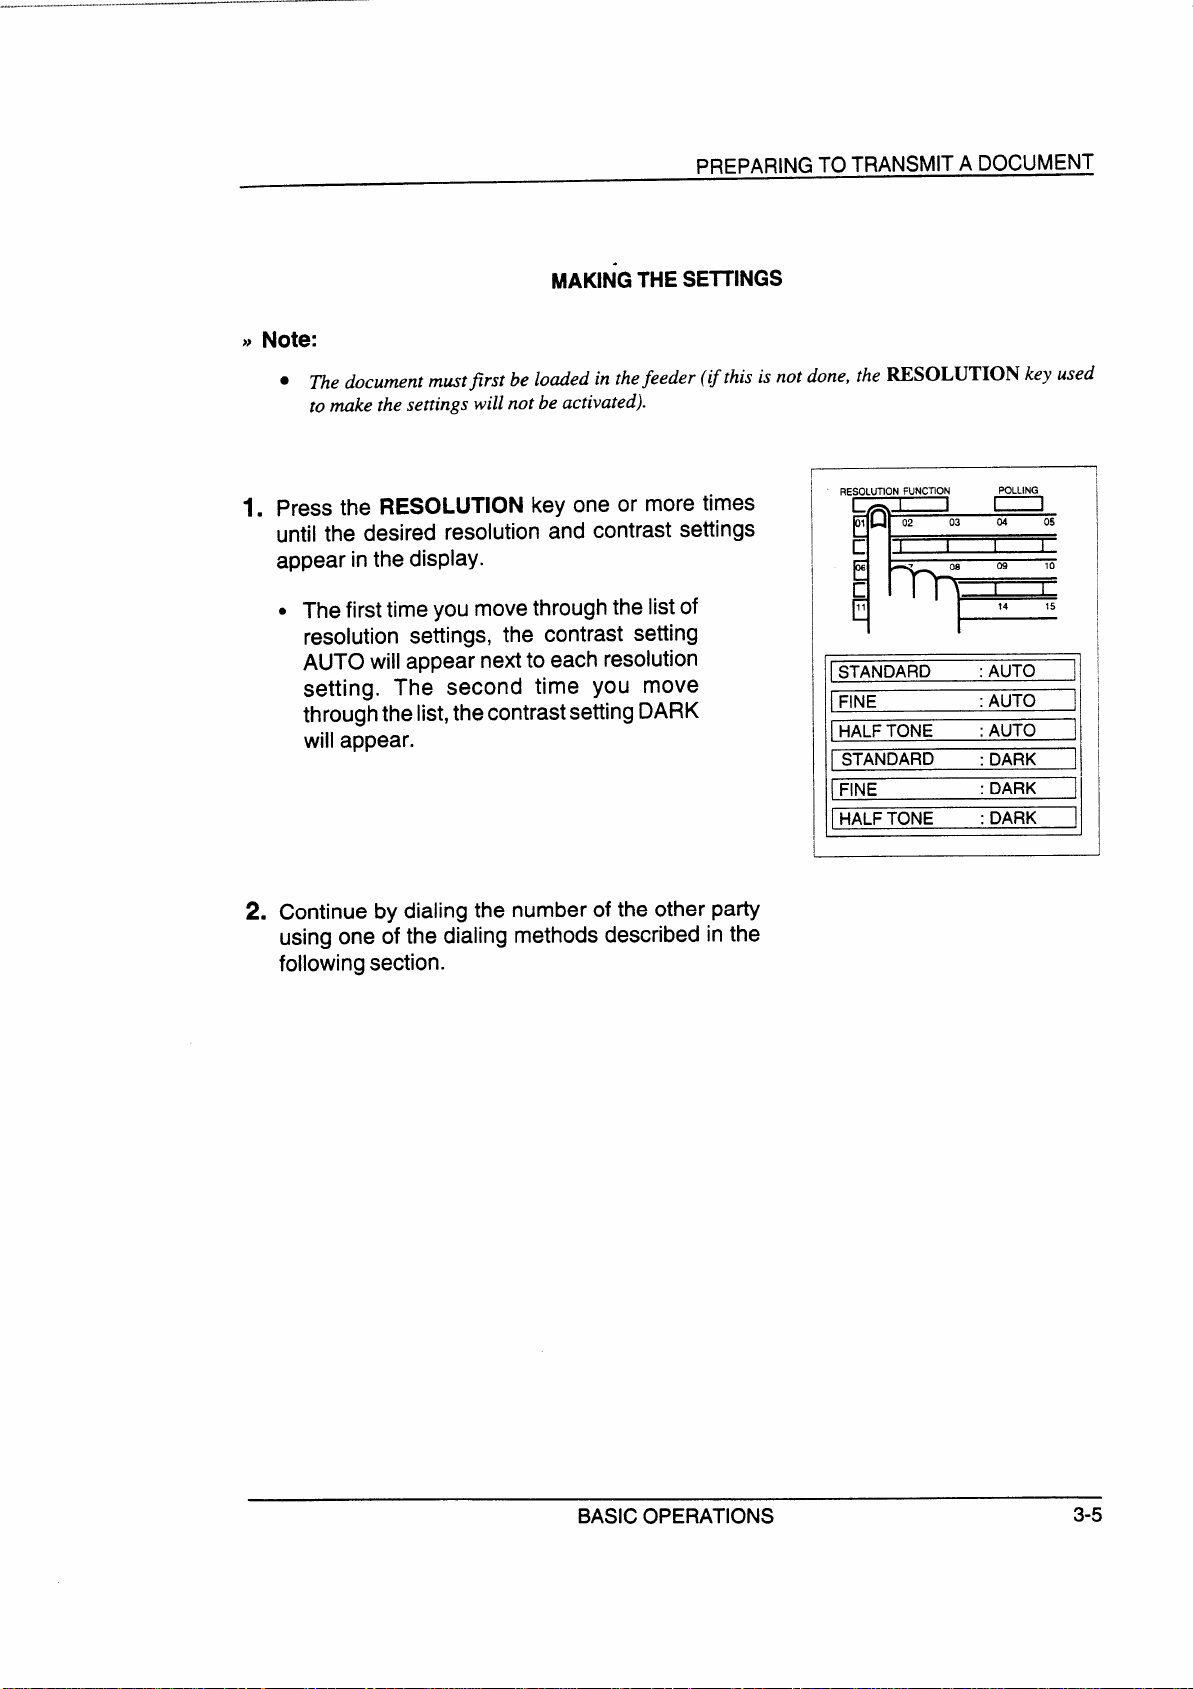
1. Press the RESOLUTION key one or more times
until the desired
appear in the display.
● The first time you move through the list of
resolution and contrast settings
resolution settings, the contrast setting
AUTO will appear next to each resolution
setting. The second time you move
through the list,the contrastsetting DARK
will appear.
2. Continue by dialing the number of the other party
using one of the dialing methods described
following section.
in the
RESOLLMON FUNCTION
~
c
STANDARD
~
POLLING
14
:AUTO
~FINE :AUTO
IHALFTONE
STANDARD
FINE
:AUTO
: DARK
;DARK
IHALFTONE : DARK
15
1
1
1
BASIC OPERATIONS
3-5
Page 26
.,,.-.”-—.—-..--.-.-.,-”,,----——————.—— —--
Once you have loaded the document and made resolution and/or contrast settings as described
inthe previous section, you are readyto dial the number of the receivingfax machine and transmit
the document. There are several ways of dialing, and you may select the one which best suits your
needs.
Normal Dialing
The most basic way of dialing is by Normal Dialing, which is just like dialing with a telephone.
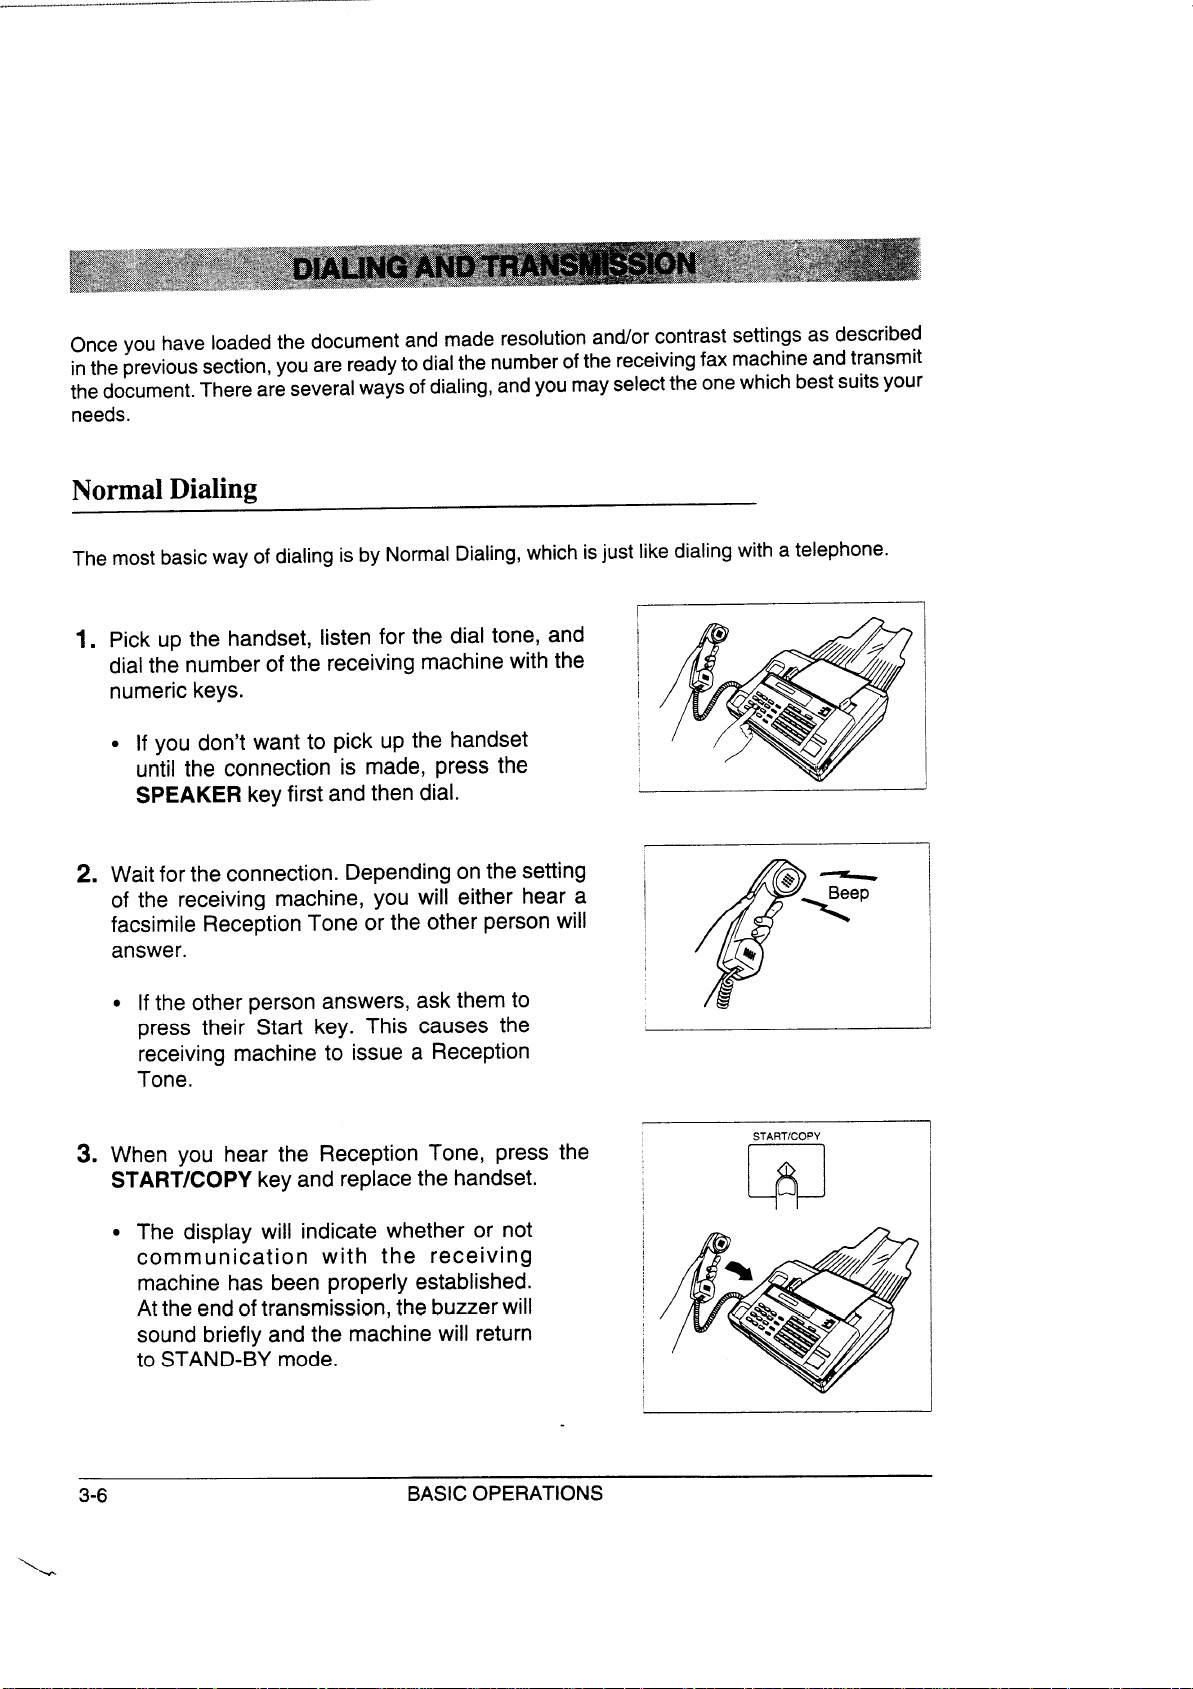
1.
Pick up the handset, listen for the dial tone, and
dial the number of
the receiving machine with the
numeric keys.
● If you don’t want to pick up the handset
until the connection is made, press the
SPEAKER key
Wait for the connection. Depending on the setting
2.
of the receiving machine, you will either hear a
facsimile Reception
first and then dial.
Tone or the other person will
answer.
c Ifthe other person answers, ask them to
press their Start key. This causes the
receiving machine to issue a Reception
Tone.
When you hear the Reception
3.
Tone, press the
START/COPY key and replace the handset.
c The display
communication with the receiving
machine
will indicate whether or not
has been properly established.
Atthe end of transmission, the buzzer will
sound briefly and the machine will return
to STAND-BY mode.
I
I
I
I
I
STARTICOPY
1
J
I
I
w
3-6
\-
BASIC OPERATIONS
Page 27

DIALING AND TRANSMISSION
Direct Keypad Dialing
If the receiving machine is set to automatic reception (see the following section, “Receiving a
document”), you can dialthe number without first picking upthe handsetorpressingthe SPEAKER
key. Simply press the appropriate numeric keys.
●
After dialing, check the display. If the number of the receiving machine shown is
correct, press the START/COPY key. If it is not correct, press the STOP key to
backspace one digit at a time, then enter the correct number(s).
Using
The Autodialer allows you to dial by simply entering a two-digit code number. Each code number
corresponds to a full fax or voice number (to dial a voice number, see “Voice Communications” in
this chapter), and upto 50such numberscan be stored intheAutodialer’s memory. Code numbers
which may be used are any number from 01 to 50.
)) Important:
There are two ways of dialing with the Autodialer:
RapidKeyDialingisdoneusingthe Rapid Keysonthe right sideofthe panel. Each keyisnumbered
from 01 to 20, and these numbers correspond to code numbers 01 to 20. (Note that only these 20
numbers can be dialed with Rapid Key Dialing; the other code numbers must be dialed by Speed
Dialing as described on the following page.)
the Autodialer (automatic dialing)
● To use the Autodialer, the receiving machine must be set to automtic reception.
RAPID KEY DIALING (one-touch)
To dial, simply press the Rapid Key corresponding to the desired code number. Do
1.
not lift the handset or press the SPEAKER key.
The name of the receiving party will appear in the display, or the fax number if no
2.
name was recorded for that number. If the name or number is incorrect, press the
STOP key.
The document will be automatically transmitted once the connection is made. There
3.
is no need to press the START/COPY key.
BASIC OPERATIONS
3-7
Page 28
DIALING AND TRANSMISSION
G
SPEED DIALING
Speed Dialing is done using the
panel. Any of code numbers 01 through 50 maybe dialed. (Note that numbers 01 through 20 may
be dialed both by Speed Dialing and by Rapid Key Dialing.)
To dial, press the SPEEDDIALkeyand then enter the two digits of the code number
1.
using the numeric keys. To enter numbers 1 through 9, first enter O and then the
number. Do not pick up the handset or press the
Check the display. If the name or number shown is correct, press the START/COPY
2.
key and the document will be transmitted. If it is incorrect, press the STOP key.
SPEEDDIAL key and the numeric keys on the left side of the
SPEAKER key.
ABOUTNUMBERENTRY
See
“Fax and voice numbers for automatic dialing” in Chapter 6 for the procedure for
numbers into the Autodialer of the FO-225. For each code number, you may enter a fax
number and a name (this appears in the display when the number is called).
entering
or voice
Redialing when the line is busy
REDIAL KEY
Ifthe line is busy, you can press the
of the methods of dialing described above.
REDIALkey to redial the number. This can be used
with any
The REDIAL key works the same way as Normal Dialing using the
1. Press th~ REDIAL key.
2. Wait for the connection. Depending on the setting of the receiving machine, you will
either hear a facsimile Reception Tone or the other person will answer.
“ Ifthe other person answers, pickup the handset and ask them to press their Start
key.This causes the other machine to issue a Reception Tone.
3. When you hear the Reception Tone, press the START/COPY key. Replace the
handset if you used it.
Note:
~~
● If you do any programming operations afier attempting to dial, you w~illnot be able to use the
REDIAL key (programming erases the numberfiom memog’).
3-8
BASIC OPERATIONS
SPEAKERkey:
Page 29

AUTOMATICREDIALING
DIALING AND TRANSMISSION
If you use Direct Keypad Dialing or automaticdialing and the line is
automatically redial the number. This will be done 2 times at intervals of 5 minutes.
busy, the FO-225 will
BASIC OPERATIONS
3-9
Page 30

“..—,””””.-.... ----
—“—”--., ”. ”-- —.—”...”.—”..— .————
,.. .—.—
Modes of reception
The FO-225 has two basic modes of reception: manual and automatic. With manual reception, you
must first pick up the handset and then press the START/COPY key. With automatic reception,
you don’t need to do anything; the machine automatically receives the incoming document.
●
Manual reception is generally usedwhen you will be receiving both voice calls and
facsimile transmissions on the same line.
●
Automatic reception is generally used for a dedicated fax line (only fax transmissions will be coming in).
SE~lNG THE MODE
Set the mode of reception with the Reception mode switch in the upper right-hand corner of the
operation panel.
● For manual
MANUAL.
. For automatic reception, set the switch to
AUTO.
reception, set the switch to
m
MANUAL= ● ● ● .
I
I
ANSWERING
AUTOO=t
MACHINEm
MANUALm : : :
AUTO-
● 00
~1
(The ANSWERING MACHINE setting is used when you connect an answering machine to the fax
machine. This is described in Chapter 4.)
3-1o
BASIC OPERATIONS
Page 31

-\
RECEIVING A DOCUMENT
.
Manual reception
The procedure for receiving documents manually is as follows:
When the telephone rings, pick up the handset on the fax machine.
1.
You will either hear a fax tone or the other party will speak to you.
2.
● If you hear a fax tone, press the START/COPY key.
“ If the other party first speaks with you and then wants to send a document, press
the START/COPY key after speaking.
Hang up when FAX CONNECTING appears in the display. When reception is
3.
completed, the buzzer will sound.
VARIATIONS
As a back-up feature of manual reception mode, you can set the FO-225 to automatically receive
fax transmissions after 4 rings. This is useful if you are occasionally unable to respond to an
incoming call personally. The setting is made with User Switch 3. See “User Switches” in Chapter
6.
Automatic reception
Inautomatic reception mode,the FO-225automatically answersallcallsandreceivesthe incoming
documents.
VARIATIONS
● You can change the number of rings after which the machine answers incoming
calls with User Switch 2 (see “User Switches” in Chapter 6). 1 or 4 rings may be
selected.
● You can speak with the other party by picking up the handset before the machine
answers. To receive a document afterwards, press the START/COPY key and
hang up.
BASIC OPERATIONS
3-11
Page 32

RECEIVING A DOCUMENT
Automatic Fax/Phone Changeover
This is a special function which allows you to use one line for both fax and voice communications
without having to personally answer every call. When it is enabled, the FO-225 detects whether an
incoming call is a voice call or a fax transmission. If it is a voice call, the machine will signal you to
answer. If it is a fax transmission, the machine will automatically start reception.
ENABLING AUTOMATIC FAX/PHONE CHANGEOVER
Automatic Fax/Phone Changeover is enabled by setting User Switch 4 to “YES”. The procedure
for doing this is described in “User Switches” in Chapter 6.
● Automatic FdPhone Changeover is normully used in automutic reception mode. However, it can
also be used in manual reception mode lj’User Switch 3 is set to YES.
● Do not enable Automatic FdPhone Changeover when using an extension telephone or an
answering machine with thefm machine (voice calls cannot be signaled through these devices).
HOW THE FUNCTION OPERATES
1. When a call comes in, the machine answers after 1 ring. (The number of rings can be
changed by adjusting User Switch 2. See “User Switches” in Chapter 6.)
2. Ifthe machine detects a fax tone, it begins reception automatically.
Ifthe machine doesn’t detect a fax tone, its pseudo ringer will ring for approximately
15seconds, signaling you to pick up the handset. (Note that only the pseudo ringer,
which makes a sound slightly different from that of normal ringing, will ring; an
extension telephone connected to the machine will not ring.)
3. In the latter case, if you do not pick up the handset within 15 seconds, the FO-225
issues a fax tone to the other machine. This enables the other party to send a fax
manuallyifthey desire when you are out.The document will be receivedautomatically.
3-12
BASIC OPERATIONS
Page 33

RECEIVING A DOCUMENT
.
~ Comments:
● If the otherpa~ calls with the intention of sending a document manually, the FO-225 will treat the
call as a voice call. Bis is because normal dialing is usedfor mnual transmission, and nofax tone
is issued. The FO-225 will only be able to recognize afw transmission if the other party uses
automatic dialing.
● me duration ofpseudo ringing can be djustedwith UserSwitch 7(see “UserSwitches” in Chapter
6). Possible settings are 15,30,60, or 120 seconds (thefactory setting is 15seconds).
Paper cutting
The FO-225 automatically cuts the recording paper to the same length as the originals, page-bypage, as documents are received.
BASIC OPERATIONS
3-13
Page 34

-.....“.”. .-.” “-- “-- “ “ L “
“- —. .- --
The FO-225 can also be used to make copies. In particular, this function can be used to make
samplecopies of documents to betransmitted to see ifthe resolutionorcontrast needsadjustment.
1.
. . .-
● The default resolutionfor copying is FINE.
Load the document as you would for a regular ~
transmission.
I
I
I
I
POLLING
If desired, adjust the resolution and contrast with
2.
RESOLUTIONFUNCTION
the RESOLUTION key.
c
Press the START/COPY key.
3.
START/COPY
INCOMING CALLS DURING COPYING
The FO-225 goes into manual reception mode during copying, so if a call comes in at this time,
—
pick up the handset to answer.
c To receive a document, press the START/COPY key after copying is finished. If
you want to begin reception immediately, presstheSTOP keyto stop copying, and
then press the START/COPY key.
14
15
3-14
BASIC OPERATIONS
Page 35

The FO-225 can be used like a regular telephone to make and receive voice calls.
●
When thepower is ofi you cannot dial to make telephone calls. However, you can receive incoming
calls.
MAKING TELEPHONE CALLS
1. Pickup the handset or press the SPEAKER key.
2. Dialthe number using one of the following methods:
●
Normal Dialing: Enter the full telephone numberwith the numeric keys.
●
Rapid Key Dialing: Press the appropriate Rapid Key.
●
Speed Dialing: PresstheSPEED DIAL key,andthen enterthe2-digitcode number
with the numeric keys.
3. SpeakWiththeotherpartywhentheyanswer.IfyoupressedtheSPEAKERkey, pick
up the handset.
REDIAL
The last number called can be redialed by pressing the REDIAL key. (It is not necessary to pick
up the handset or press the SPEAKER key.)
When the other party answers, pick upthe handset.
HOLD
You can put the other party on hold during a conversation by pressing the HOLD key. When this
is done, they cannot hear you. You can put the handset back in the cradle without breaking the
connection.
When you are ready to speak with them again, pickup the handset. If you did not put the handset
back in the cradle, press the HOLD key one more time.
BASIC OPERATIONS 3-15
Page 36

VOICE COMMUNICATIONS
Notes
3-16
.
BASIC OPERATIONS
Page 37

You can connect an answering machine to your FO-225to receive both voice messages and fax
transmissions on the same line while you are out.
Connection and preparatio~
CONNECTING THE ANSWERING MACHINE
Plugtheend oftheanswering machine line intothe
jack on the back side of the F080TP adaptor.
c Important: To operate properly, the
answering machine line must be plugged
into the jack on the back of the F080TP
adaptor. Do not connect it to anY other
jacks.
CHANGING THE OUTGOING MESSAGE
The outgoing message (OGM) of your answering machine should be changed to inform callers who
wanttosendafaxmanually to press their Stafl key. Forexample,your message might go asfollows:
“Hello. You’ve reached the ABC company. No one is available to take your call right
now. Please leave a message after the beep or press your facsimile Start key to send
a fax. Thank you for calling.”
In addition, try to keep the length of the message under 10seconds. If it is too long, you may have
difficulty receiving faxes sent by automatic dialing.
>>Hint:
● Youmayfindthatinsertinga shortpausebeforetheoutgoingmessagewillhelpimprovethereception
offu transmissions sent by automtic dialing (when autowtic dialing is used, af~ tone is sent
immediately by the transmitting mchine, and inserting a pause before the message ensures clear
detection of such tones).
USING YOUR FAX WITH OTHER DEVICES 4-1
Page 38

ANSWERING MACHINE
OTHER CONSIDERATIONS
●
Your answering machine must be set to answer on 2 to 4 rings (preferably 2). If
not, you may not be able to receive faxes sent by automatic dialing.
●
If your answering machine has a remote retrieval function, make sure the code
used to activate remote retrieval is different from the code used to activate fax
receptionwith an extension telephone (see “Extension telephone” which follows in
this chapter). If they are the same, entering the code from an outside telephone to
retrieve messageswill cause the fax machine to be activated.
WHEN THE ANSWERING MACHINE IS NOT IN USE
The answering machine can be left connected to the fax machine when you aren’t using it. If it has
a handset, it will function as an extension telephone, as described in “Extension telephone” which
follows in this chapter.
~~Important:
● When using an answering wchine as an extension telephone, make sure that it is turned OR and
the Reception mode switch on thefa machine is set to AUTO or MANUAL.
● Do not use Automatic FtiPhone Changeover with an answering machine. Voice calls cannot be
signalled through its handset.
Using the answering machine hook-up
ACTIVATING THE HOOK-UP
1. Set the Reception mode switch in the upper right- I ~N~wER,NG
hand corner of the operation panel to ANSWER-
ING MACHINE.
z. Setyouranswering machinetoautoanswer. Make
sure it is set to answer on 2 to
4 rings.
MACHINE= : : :
flt ‘
MANUALm
AUTOU
● ● ●
=
$
4-2
USING YOUR FAX WITH OTHER DEVICES
Page 39

ANSWERING MACHINE
HOW THE HOOK-UP OPERATES
While you are out, all of your incoming calls wiil be,answered by your answering machine, since it
has been set to answer on 2 to 4 rings. While the outgoing message is being played, your fax
machinewill listen quietly on the line. Callers who want to leave a voice message can do so without
knowing a fax machine is there.
Ifyourfax machine detects a fax transmission (seebelow),itwill disconnectthe answering machine
and begin reception.
Comments:
~,
● If the connection is notgoodorthere is noise inthe line, the answering machine andorfar machine
ma}’not respond properly.
● The call counter onyour answering machine may indicate thata voice message was received, when
onlyfm messages were received.
How fax transmissions are detected:
The fax machine detects fax transmissions in two ways, depending on whether the fax is being
sent automatically or manually:
Automatic transmission:
Ifthe fax is sent using a form of automatic transmission, such as Rapid Key or Speed
Dialing, the transmitting machine will send an intermittent “calling tone” for a period
of about 30 to 40 seconds after dialing. When your machine detects this tone, it will
disconnect the answering machine, send a “reception tone” in response, and begin
receivingthe transmission.
Ifthetransmitting machine does not receiveareceptiontone from your machine within
30 to 40 seconds after dialing, it will usually hang up and automatically redial several
minutes later.
Since your fax machine may not be able to detect the transmitting machine’s calling
tone until after the outgoing message ends, it is important that the answering machine
answers the call within 2 to 4 rings and the outgoing message does not last too long.
Otherwise, your machine may not be able to establish communication with the
transmitting machine before the latter hangs up.
USING YOUR FAX WITH OTHER DEVICES
4-3
Page 40

.,.,... “-
.“.. - ..—
. .
ANSWERING MACHINE
Manualtransmission:
If the fax is being sent using a form of manual transmission, such as Normal Dialing,
the transmitting machine does not send a calling tone; rather, the operator normally
waitsfora receptiontone and then presses their Start key. Inthecase of an answering
machine hook-up, they will hear your outgoing message instead of a reception tone,
and then press their Start key.
However, this alone does not signal a fax transmission to your machine. Instead, it
uses a function called “Quiet Detect Time” to detect the transmission. This function
causes your machine to disconnect the answering machine and begin reception if it
detects a certain period of silence.
Yourfax machine issetto automatically begin reception if it detects a period of silence
of 6 seconds. Since this isafax transmission and noonewill speak after the outgoing
message, your machine will disconnect the answering machine 6 seconds after the
message ends and begin reception.
~,Comments:
● Theperiod of silence afier which thefu mchine disconnects the answering mchine and begins
reception can be adjusted. See “QuietDetect Time”in thefollowing section, “Optionalsettings”.
● Additional methods of ~king the fa machine disconnect the answering machine and begin
reception are described in “AnsweringMachine Failure Mode”and “O#-HookHold Time”in the
following section,
“Optionalsettings”.
These arefinctions which can be used if needed to improve
the response of thefu machine to incoming calls.
GETTING MORE OUT OF YOUR HOOK-UP
Your callers can even leave a voice message and send a fax message on the same call. Modify
your outgoing message to explain that they can first leave a voice message, and then press their
Start key to send a fax. Keep in mind that this will only work if the caller is listening to the outgoing
message through the handset of their fax machine; it will not work with automatic transmissions.
4-4
.
USING YOUR FAX WITH OTHER DEVICES
Page 41

ANSWERING MACHINE
“\
i,
Optional settings
If necessary, you can use one or more of the following settings to improve the response of the fax
machine to incoming calls.
QUIETDETECT TIME
This function switches a call to the fax machine if a certain period of silence is detected after the
answering machine answers. To receive faxes sent manually by normai dialing, the function must
be enabled. Time selections for the period of silence are 1 to 10 seconds. A setting close to 6
seconds will generally give the best performance, but you can try other settings if desired.
. The factory setting is 6 seconds.
Caution!
}}
● Although itispossibie to disable thefunction by entering “00’’forthe time selection, fhismayprevent
youfiom receivingfrees sent mnually by Normal Dialing.
~>lrnpoftant:
●
The QuietDetect Time setting should be longer thananyperiod ofsilence included in your recorded
message, or the call will be switched to thefm machine before the caller has a chance to speak.
●
If >Touranswering machine has a VOX mode and you have enabled it (this causes the answering
mchine to break the connection if a certain period of silence is detected), make sure that the time
settingfor that mode is longer than the Quiet Detect Time setting.
●
If a ca[lerpauses for a period of time longer than the Quiet Detect Time setting while leaving a
message, thefax machine will cut in. Make sure the Quiet Detect Time setting is longer than any
possible pauses.
Make the setting by pressing the panel keys as follows:
I
Step
3
Press these keys:
FUNCTION
1
‘mm
m
(Example)
~Comments
,
i EnterA.M.MODE.
I Scroll to QUIET DETECT TM,
I
~ Set the time by entering a two-digit number equal to
the numberofseconds(“01 “to “lO’’seconds), orenter :
“00” to disable the function.
/’
1
STOP
4
m
USING YOUR FAX WITH OTHER DEVICES
Press STOP to return to STAND-BY.
4-5
Page 42

ANSWERING MACHINE
QUIET DETECT START TIMING
This setting can be used to delay the start of Quiet Detect Time if the latter is enabled.
We recommend that you only use this function if there is a long pause between the time the
answering machine answers a call and the beginning of the outgoing message (a pause is
sometimes added before the message to allow clear detection of possible fax tones). In this case,
delaying the stad of Quiet Detect Time prevents the fax from cutting in before voice callers can
leave a message.
You can set Quiet DetectTimeto start at any time from 1to 15secondsafter the answering machine
answers, or enter “00” for no delay.
. The factory setting is “00” (off).
Hint:
● As a general guide, the start timing setting should be slightl>’longer than the pause before the
outgoing message.
Make the setting by pressing the panel keys as follows:
I
I
I
i Step I Press these keys:
I
1 ~ ‘0” m
1
i
‘
3 ~
m m
I
(Example) ~ enter “00” for no delay.
~ 4 ! [+]
Comments
I
I
~ Enter A.M. MODE.
~ Scroll to QUIET START TIME.
I Set the start timing by entering a two-digit number
equal to the number of seconds (“01” to”15“ sees), or
!
Press STOP to returnto STAND-BY.
)
l!
I
I
II
;
i
I
I
1
4-6
USING YOUR FAX WITH OTHER DEVICES
\.
Page 43

ANSWERING MACHINE
ANSWERING tiACHINE FAILURE MODE
When this function is enabled, the fax machine will answer the call after 6 rings if the answering
machine for some reason fails to answer before that time. This ensures that you will receive fax
messages even if the answering machine’s tape fills up or the answering machine is notturned on.
s The factory setting is “NO” (off).
Important:
~}
● When thisfinction is enabied, mke sure that the answering machine is set to answer ~n4 rings or
less. If it isn‘t, the fa machine will always answer first, preventing callers from leaving voice
messages.
Make the setting by pressing the panel keys as follows:
Step ~
Press these keys:
I
FUNCTION
1 ~ B ~
i m m
2
I
I
~ ~
Yes (answer after 6
rings)
~ ~
3
No (do not answer
if the answering
machine fails to
answer)
STOP
4 ~ m
~ Comments
I
I
~ Enter A.M. MODE.
!
I
~
Scroll to SELECT AUTO RCV.
Press one of the numeric keys at left to make the
setting.
~
Press STOP to return to STAND-BY.
USING YOUR FAX WITH OTHER DEVICES
4-7
Page 44

ANSWERING MACHINE
OFF-HOOK HOLD TIME
This setting is used to switch calls unconditionally to the fax machine at a set time after the
answering machine answers.
For normal operation, we recommend that you do not enable this function; however, if you are
havingtrouble receivingfaxes in answering machine mode you can try various time settings to see
if it helps. You can select any time from 1to 255 seconds. Entering “000” disables the function.
Q The factory setting is “000” (off).
Important:
~,
● When selecting a time, you will generally want to make it long enough for your recorded message
to beplayed and for callers to leave messages.
● Ifyou are going toplay backyourmessages from a remote location (remote retrieval), you will want
to select a time longer than the playback time.
Make the setting by pressing the panel keys as follows:
~iStep ~ Press these keys: Comments
I ,
I
I
;
3
FUNCTION
, n m
I
! m m m(Examp,e) i
Enter A.M.MODE.
~ Scroll to OFF HOOK HOLD.
1
Set the hold time by entering 3 digits (from “000” to
“255” seconds) with the numeric keys.
I
~ Press STOP to return to STAND-BY.
I
4-8
USING YOUR FAX WITH OTHER DEVICES
Page 45

.
You can connect an extension telephone to the FO-225. Ifthe telephone isatouch-tone telephone,
you can use it to activate fax reception by pressing “5” and “#’.
Important:
~~
● When using an extension telephone, do not enable Automatic FtiPhone Changeover (voice calls
cannot be signalled through the extension telephone).
● Although rotary dial telephones can be connected to thef~ ~chine tO receive VOiCe calls~ theY
cannot be used to activate fa receptions.
CONNECTING THE EXTENSION
TELEPHONE
I
Plug the end of the extension telephone line into
the jack on the back
● Important: To operate properly, the ex-
tension telephone
into the jack on the back of the F080TP
adaptor. Do not connect it to any other
jacks.
ACTIVATING FAX RECEPTION WITH A TOUCH-TONE TELEPHONE
1. The telephone rings. Answer it. You will either hear a fax tone or the other party will
speak. If you hear a fax tone, go to Step 3.
side of the F080TP adaptor.
line must be plugged
2. If the other party wants to send a fax after speaking, havethem press their Start key.
3. Press “5” and “*” on your telephone.
4. Reception begins. Hang up.
● The code used to activatefa reception (“5”and “+”)can be changed by resetting User Switch 5.
See “UserSwitches” in Chapter 6.
USING YOUR FAX WITH OTHER DEVICES
4-9
Page 46

EXTENSION TELEPHONE
Notes
4-1o
USING YOUR FAX WITH OTHER DEVICES
Page 47

Polling is used to make another machine send a document to your machine. In other words, the
receiving machine, not the transmitting machine, activates the transmission. With the FO-225, you
can both poll and be polled by others.
Polling others
The procedure for polling others is as follows:
1. Dial the machine you want to poll using one of the following methods:
● Pick up the handset (or press the SPEAKER key) and dial the full number.Wait
for the fax answerback tone.
s Press the SPEED DIAL key and enter a 2-digit Speed Dial number.
c Directly enter the full number using the numeric keys (Direct Keypad Dialing).
2. Press the POLLING key.
3. WhenPOLLING appears in the display, hang up the handset if used. Reception will
begin.
Gaining permission to poll a secured fax machine
Ifthe machine you want to poll is secured against unauthorized polling, you will need to confer with
the operator ofthat machine about gaining permission to poll it. Ingeneral, a secured machine can
only be polled if one of the following conditions is met:
●
Your fax number has been entered in the secured machine as having permission
to poll it.
Important: Your fax number must also be entered in your machine, as described
in “Entering your name and fax number” in Chapter 2.
●
You have given your machine a System number (see “Giving your machine a
System number” onthe following page),andthis System number has been entered
in the secured machine as having permission to poll it.
Important:
>>
● A System number can onl? be used if the secured wchine is also a Sharp machine.
POLLING
5-1
Page 48

-\
POLLING
.
Turnaround Polling
After polling a machine, you can send a document to it on the same connection. Simply place the
document to be sent in the feeder and carry out the
pollingprocedure. When polling is finished,
the document will be automatically transmitted.
Note:
})
● The other wchine must also have Turnaround Polling capability.
Being polled (Polling Standby)
To let another machine poll your machine, simply set the Reception mode switch to AUTO, and
loadthedocument(s)to be sent in the usualfashion.
Transmission will take place when the other machine calls your machine and activates polling.
Automatic reception is possible while your machine is on polling standby.
Polling Security
Polling Security is used to prevent unauthorized polling of your machine. When this function is
activated, polling will only take place when one of the following conditions is met:
●
The fax number of the polling machine has been entered into your machine as
having permission to poll you. (The polling machine must also have its fax number
programmed in itself, as described in “Entering your name and fax number” in
Chapter 2.)
●
The polling machine has an ID number (see “Entering ID numbers for polling
permission” which follows inthis section), and this number has been entered into
your machine as having permission to poll you.
Important:
>>
● ID numbers can only be used ~~theotherfa mchine is also a Shap machine.
POLLING
5-3
Page 49

POLLING
TURNING POLLING SECURITY ON AND OFF
Turn Polling Security on or off by pressing the panel keys as follows:
Step Press these keys:
FUNCTION
1
03
n
2 mmm
3
4
5
D of-m
sThT/coPY
Q
c1
STOP
m
Comments
~ Enter ENTRY MODE.
Scroll down to SECURITY SELECT.
i
Press “1” to turn polling security on, or “2” to turn it
off.
I
Press START/COPY.
Press STOP to exit ENTRY MODE.
ENTERING FAX NUMBERS FOR POLLING PERMISSION
You can enter upto 10fax numbers as having permission to poll you. Dothis bypressing the panel
keys as follows:
Step Press these keys: Comments
I
FUNCTION
1
m
Enter ENTRY MODE.
,
I
2 mm
3
4
5
6’ @
7
5-4
1
n
mm
m mm D Bmm
START/~PY
D
‘ &
(Example)
(Example) I
~
Scroll down to PASSCODE # MODE.
I
~ Press “l” to select SET.
I
~ Enter a z-digit number
(frOm 01 to 1O)S
This number marks the fax number you will enter in
, the next step.
Enter the fax number (max. 20 digits).
$
~
Press STARTICOPY.
I
I
~
Return to Step 4 to enter another number, or press
~ STOP to exit ENTRY MODE.
.
POLLING
Page 50

.
CLEARING FAXNUMBERS
POLLING
Step Press these keys:
FUNCTION
1
2
3
4
5
6
mm
2
D
mm
STA~/~
@
D
m
STOP
m
(Example) I to be cleared.
Comments
~ Enter ENTRY MODE.
Scroll down to PASSCODE # MODE.
Press “2” to select CLEAR.
,
1
I
Enterthe 2-digit number which marks the fax number
I
~ press
START/COPY.
Return to Step 4 to clear another number, or press
STOP to exit ENTRY MODE.
POLLING
5-5
Page 51

POLLING
ENTERING ID NUMBERS FOR POLLING PERMISSION
If you need to give pollingpermissionto more than 10 machines, use 4-digit ID numbers. An
unlimited number of machines may be given the same ID number, and if that number is entered in
your machine usingthe procedure shown below, those machines may poll your machine. You can
enter up to 5 different ID numbers.
~~Note:
● The machine which polls you calls the ID number a “Systemnumber”, as described previously in
“Pollinga securedfax machine”.
Step Press these keys: Comments
FUNCTION
1
2
3
4
mm
n
n
mmmm
1
1
5
START/COPY
6
7
D
m
@
STOP
B
(Example) ID number you will enter in the next step.
(Example)
Enter ENTRY MODE.
~
Scroll up to ID # MODE.
Press”1” to select SET.
1
Enter a number from 1to 5. This number marks the
Enter the ID number (4 digits) with the numeric keys.
Press STARTICOPY.
I
~
Return to Step 4 to enter another number, or press
I STOP to exit ENTRY MODE.
5-6
POLLING
Page 52

CLEARINGIDNUMBERS
Step Press these keys:
FUNCTION
1
2
3
4
5
6
mm
2
n
4
n
sTARlfmPY
o
n
m
STOP
m
(Example) want to clear.
Comments
Enter ENTRY MODE.
Scroll up to ID# MODE.
Press “2” to select CLEAR.
Enter the number which marks the ID number you
Press START/COPY.
i Return to Step 4 to clear another number, or press
1 STOP to exit ENTRY MODE.
POLLING
5-7
Page 53

POLLING
Notes
5-8
.
POLLING
Page 54

Entry
To enter names when doing various types of data entry, use the numeric keys. The characters
which may be entered with each key are as follows:
Space ~
I
I
-----------------------------
~ Alphabet (A-Z) ~
,_----- ____
I
L __,__---,
1
I
SPEEDDIAL
~ Delete
J
~ Symbols !
PROCEDURE
1. Pressthe appropriate numeric keyoneor more times untilthe desired number or letter
appears in the display. The number will appear first, and then the letters in the order
they are marked.
2. When the desired letter appears, press the SPEAKER keyto enterit(thismovesthe
cursorone space to the right).Ifthe subsequentletteryouwantto enter is marked
overa differentkey, pressingthat keywillalsoenterthe letter(it is notnecessaryto
pressthe SPEAKER key).
TO CHANGE CASE
The letters initially appear as upper case letters. To enter a lower case letter, press the REDIAL
key. To change back to upper case, press the REDIAL keyagain.
OPTIONAL SEITINGS AND DATA ENTRY
6-1
Page 55

LEITERS AND CHARACTERS FOR NAMES
SPECIAL SYMBOLS
1. Special symbols can be selected by pressingthe “#”and “*” keys.The “#” key moves
you forward through the list, and the “+” key moves you backward.
2. To enter the symbol, press the SPEAKER key.
The list of characters is as follows:
I
/
! “ # $ y’ & ‘ ( ) * + , - : ; < = > ? @ [ % ] A – ‘ { I } + -
1
Pressthe “1” key twice to enter a space between two words.
.
#+
SPACE
+*
Deletions and changes
MOVING THE CURSOR
To make deletions and/or changes, you may have to move the cursor. Press the SPEAKER key
to moveittotheright,andpress the HOLD keyto moveittothe left.
DELETIONS
Deletions are made by pressing the SPEED DIAL key. This occurs in two ways:
● Whenthe cursor is to the right of the last character entered, it will move one space
backward, deleting the last character as it goes.
II
II
● When the cursor is over a character, the character will be deleted.
CHANGES
To change one characterto another, movethe cursoroverthe character, and presstheappropriate
key for the new character. The new character will replace the old character.
.
6-2
OPTIONAL SEITINGS AND DATA ENTRY
Page 56

“-\
You can store up to 50 fax and/or voice numbers in the Autodialer of the FO-225. These numbers
can be dialed by entering 2-digit code numbers (see “Using the Autodialer” in Chapter 3).
For each code number, you can enter a fax or voice number, and a name.
STORING NUMBERS
), Comments:
● You may need to add a pause between certain digits to allow timefor connection. For e.rample, if
you are on a PBX telephone system that requires an access number to be dialed (such as “9”)to
access an outside line, you will need to enter apause between the access number and the number
of the receivingf~ muchine.
● Pauses are entered bypressing the MDWLkey. Eachpause gives a time delay ofabout 2 seconds.
If necessary, several pauses can be entered in a row.
● To correct an entry, see “Deletionsand changes” in “Lettersand characters for names” in this
chapter.
I
Step ~Press these keys:
FUNCTION
1
s
I
n
1
n
mm
(Example) ~ numeric keys. This will be the code number.
2
3
4
mmmmmmm
5
6
IB mm
71
START(COPY
o
D
(Example)
. . . ~1 ~ Enter the name of the location or paw (max. of 20
(Example) ~ If you don’t want to enter a name, skip this step.
1 Comments
I
1
I Enter ENTRY MODE.
!
Move to FA~EL.# MODE.
I
Press “l”toselect SET.
I Enter a 2-digit number (from 01 to 50) using the
I
Enterthefaxorvoice number (max.of32digits) using
I the numeric keys.
I
I
Press START/COPY.
$
I
characters). (See the first section of this chapter).
OPTIONAL SE~lNGS AND DATA ENTRY
6-3
Page 57

FAX AND VOICE NUMBERS FOR AUTOMATIC DIALING
STA~/COPY
8
D
v
Press START/COPY.
STOP
9
Foreasy identification, affix the Rapid Key labels above the appropriate Rapid Keys, and fill in the
names of the parties programmed for each key.
m
Step Press these keys:
FUNCTION
1
2
3
4
5,
I
6 \ [T]
#
n
2
n
mm
START/COPY
D
@
STOP
m
(Example) the numeric keys.
You can now makeentriesfora new number (goback
to Step 4), or press STOP to exit ENTRY MODE.
CLEARING NUMBERS
Comments
Enter ENTRY MODE.
Move to FAWEL,# MODE.
Press “2” to select CLEAR.
Enterthe code number which you want to clear using
Press START/COPY toclearthe number.
Return to Step 4 to clear another number, or press
~
I STOP to exit ENTRY MODE.
CHANGING NUMBERS
To change RapidKeyorSpeed Dial number entries previouslymade, repeatthe storing procedure.
Select the Rapid Key or Speed Dial number for which you want to make changes in Step 4, and
thenchangethenumberand/ornamewhentheyappearinthe display (Steps 5 and 7, respectively).
Numbers and characters are changed as described in “Deletions and changes” in “Letters and
characters for names” in this chapter.
6-4
OPTIONAL SE~lNGS AND DATA ENTRY
Page 58

Userswitches are not physical switches, but are rather software switches located in the micro-circuitry of the FO-225. These switches control various aspects of the functioning of the machine.
Each switch is set at the factory; however, you may want to change one or more of these settings
tobettersuityourneeds.The switchesaredescribedinthe list below,alongwiththeir corresponding
settings.
ACCESSING THE SWITCHES
Press the FUNCTION key and “4” to enter USER SWITCH MODE (this will appear in
1.
the display).
2*
Scroll through the list of switches by pressing “#” to move forward, or ‘~’ to move
backward. The switches will appear in the order shown below.
When the desired switch appears in the display, make the setting.
3*
4.
After the setting is made, the display will show the next item in the list. You can either
make a setting for that item, or press STOP to exit USER SWITCH MODE.
SWITCH SETTINGS
Switch 1: FINE RESOLUTION PRIORITY
This switch is used to change the default resolutionfor document transmission from STANDARD
to FINE. Press “l”(YES) to change it to FINE, or “2” (NO) to change it backto STANDARD.
● Factory setting: “2”
Switch 2: NUMBER OF RINGS TO ANSWER
This sets the number of rings the fax machine waits before answering an incoming call in automatic
reception mode. Press”1” to select 4 rings, or “2” to select 1 ring.
“ Factory setting: “2”
Switch 3:4 RINGS MANUAL ANSWER
Press “l”(YES) to have the machine answer a call after 4 rings when it is in manual reception
mode. Press “2” (NO) to disable the function.
“ Factory setting: “2”
OPTIONAL SE~lNGS AND DATA ENTRY
6-5
Page 59

USER SWITCHES
Switch 4: AUTO FAWPHONE CHANGEOVER
Press “l” (YES) to have the machine detect whether incoming calls are voice calls or fax
transmissions in automatic reception mode. Press “2” (NO) to disable the function.
“ Factorysetting: “2”
Switch 5: TELEPHONE/FAX REMOTE NUMBER
This sets the l-digit code number for transferring an incoming fax from an extension telephone to
the FO-225. Enter any number from “O”to “9”.
c Factorysetting: “5”
Switch 6: TRANSACTION PRINT CONDITION LIST
This sets the condition for printing out Transaction Reports. Enter a number from “l” to “4” as
follows:
“l” (ALWAYS PRINTS): Prints out a report after each transmission, reception, or error,
“2”(ERROR PRINT):
- ..- —
“3”(SEND ONLY):
“4”(NEVER PRINTS):
● Factory setting: “2”
Prints out a report only when an error occurs.
Prints out a report only after each transmission.
Does not print out any reports.
Switch 7: PSEUDO RINGING DURATION
This sets the duration of pseudo ringing when Automatic Fax/Phone Changeover is enabled, Enter
a number from “1” to “4” as follows:
“l” (15 SEC.):
“2”(30 SEC.):
“3”(60 SEC.):
“4”(120 SEC.):
● Factory setting: “l”
15seconds
30 seconds
60 seconds
120seconds
6-6
OPTIONAL SEITINGS AND DATA ENTRY
\
-w.
Page 60

To see what fax and voice numbers have been entered for automatic dialing, you can printout the
Telephone List.
PRINTING OUT
Printoutthelistbypressingthe panelkeys as follows:
I
Step
1
Press these keys: ~Comments
I
FUNCTION
02
D
Enter LISTING MODE.
il
II
II
~ Scroll down to TEL. # LIST.
START/WPV
3
@
n
Print it out.
SAMPLE LIST
TELEPHONE L I ST
FOR : John Doe Corp .
SPEED 8
01 JQNE SMI TH 123-456-7390
02 RBC
03 N. Y . SALES CIFFICE 147-25$-3695
04 JRCK WILLIAMS 963-852-7417
N9ME
TCIOL ~CI, ~87-654-S2 12
1!
Ii
201 555 1234
TEL EPH0 NE 8
PRINTING OUT REPORTS AND LISTS
7-1
Page 61

This list shows the following items:
POLLING MODE
SYSTEM #
ID #
PASSCODE #
SENDER’S NAME
SENDER’S TELEPHONE
NUMBER
HEADER PRINT
QUIET DETECT TIME
OFFHOOKHOLD
SELECT AUTO RECEIVE
QUIET DETECT START
TIMING
Whethersecurity is ON or OFF.
The System number given your machine for polling others.
ID numbers which may poll you.
Numbersoffaxmachineswhichmay pollyou.
Your name as entered in the machine.
Yourfax numberas enteredinthemachine.
Sampleofwhatisprintedatthetopofeachtransmittedpage.
QuietDetectTime settingforansweringmachinehook-up.
Off
Hook Hold Time setting for answering machine hook-up.
Answering Machine Failure Mode setting for answering
machinehook-up.
Quiet Detect Start Timing setting for answering machine hookup.
PRINTING OUT
Print out the list by pressing the panel keys as follows:
[’
1;
1’
1
I
;1
I
Step ~ Press these keys:
‘ FUNCTION
~ n ~ ~ ‘nterL1sTINGMODE1
I
I
Comments
~
I
I Scroll down to PASSCODE LIST.
i
I
!
7-2
3
START/COPY
@
c1
Print it out.
PRINTING OUT REPORTS AND LISTS
.
Page 62

<AMPLELIST
PASSCODE LIST
POLLING MCIDE
S’I’STEM 8
SENIIER’S NAME
John Doe Carp.
sEt~lJRIT’f CIFF
SENIIER”S TELEPHONE 8
2Q1 555 1234
HEQDER PRINT
John DcIe Corp.
ANSNERING M9CHINE MODE
QUIET DETECT TIME
OFF HOOK
HOLII
SELECT @UTOREEEIVE
G!UIET DETECT START TIMING
PRINTING OUTREPORTSAND LISTS
201 555 1234 P*O1
06S
000s
NO
00s
7-3
Page 63

This list shows the current setting of all User Switches.
PRINTING OUT
Print out the list by pressing the panel keys as follows:
~
1!
~~
Step
3
Press these keys:
START/ COPY
~]
USER SH
FOR:
SM NO.
Joh n Ooe ~or P.
ITEM SETTING
1
2 NUMBER OF R INGS
3
4
5
6
7
F I NE PR I OR I TY
4 RINGS MRNU9L 6NSUER
TELz FBX
TEL~FQx REMOTE No,
TRANSACTION PRINT SELECT
PSEUDO RINGING DUR9TION
Comments
Enter LISTING MODE.
Scroll down to USER SWITCH LIST.
Print it out.
SAMPLE LIST
I TCH L I ST
201 555 1234
9UT0 CHANGE
NO
1R I NG
NO
NO
(5 )*
ERROR PRINT
15s
7-4
PRINTING OUTREPORTSAND LISTS
Page 64

This report showsthetypeoftransaction whichtook place,the nameornumberof the other machine
involved, the number of pages, and the result.
The Transaction Repoti is normally printed out only when a problem occurs. However, you can
changethe setting to have itprinted out after everytransmission, everytransmission and reception,
or not at all. The setting is made with User Switch 6 (See “User Switches” in Chapter 6). It cannot
be printed out manually.
EXPLANATION OF HEADINGS
SENDEWRECEIVER
PAGES
NOTE Conditionsofcommunication.
J}Notes which
OK Transmission was normal.
P.FAIL Power failure occurred.
JAM A problemwiththe recordingpaperordocumentoccurred.
NO PAPER
COM.E-Oto COM.E-7
CANCEL
may appear are as follows:
The fax numberoftheothermachineinvolved inthetransaction.
Ifthis machine does not havean IDfunction, the communication
mode will appear (for example, “G3”).
Numberofpagestransmitted.
No recordingpaper.
A line error prevented transmission (see “Communication error
codes” in Chapter 9).
Transmission was canceled because the STOP key was
pressed, no document was in the feeder, or the other machine
requestedtransmission usingafunctionwhich the FO-225 does
not have.
PRINTING OUT REPORTS AND LISTS
7-5
Page 65

TRANSACTION REPORT
SAMPLE REPORT
*********************************************************************
*
*
TRANSACTION REPORT
*
*
FOR: John Doe Corp.
201 555 1234
*
*
RECEIVE
*
*
SENDER
P9GES NOTE
*
*
914-555-9876
1
*
*********************************************************************
OK
*
*
*
*
*
*
*
*
*
*
*
7-6
.
PRINTING OUTREPORTSAND LISTS
Page 66

\\
Your FO-225 prints by means of thermal printing. The head applies heat to special paper which is
chemically treated to turn color when heated to a certain level, and this creates the printed text or
image.
Recommended paper
To assure a long life for your machine and obtain the best reproduction quality, we recommend
that you use the following Sharp recording paper:
FO-20PR
Recording Paper
216 mm x 30 m roll
This paper is available from your authorized Sharp facsimile dealer.
● Usinganon-Sha~ brand ofpapermay result inpoorcopy quali~andexcess ive build-up of residue
on the head.
Sharp paper has a black stripe on the last 1.5m of the roll which activates the paper-out sensor in
the machine.When it detects this stripe, the machine finishes printing the current page, and then
stops.This ensures that the printer head does not come in direct contact with the paper feed roller
when the end of the roll is reached.
● Usingpaper without the proper end mark may cause the paperfeed roller to rub directly on the
printer head, eventually damaging both the roller and the head.
Handling and storing recording paper
The paper may become discolored if:
s It is stored in a place with high humidity or high temperature.
● It is exposed to direct sunlight.
“ it comes in contact with glue, thinner, or a freshly copied blueprint.
c It is scratched, causing heat due to friction.
s A rubber eraser or adhesive tape is used on it.
Do not unpack the paper until you are ready to use it.
USER MAINTENANCE
8-1
Page 67

RECORDING PAPER
Replacing the recording paper
When the paper runs out, NO PAPER will appear in the display. Reception and copying will no
longer be possible.
To replace the paper, first take out the old roll:
1. Pulltheoperation panel knobforward andopenthe
operation panel.
z. Remove the remainder of the old roll of paper.
The buzzer will sound briefly. ~
.
I
nsert the new roll as you did when first installing
3.
your fax machine (see “Setting up” in Chapter 2). ‘
.
8-2
USER MAINTENANCE
Page 68

A clean recording head helps your fax machine deliver optimum printing performance. Clean the
head frequently as follows:
,
1. Turn off the power of the fax machine. Pull the ~
operation panel knob forward and open the opera-
z. Wipe the recording head and edge of the head
cover with a soft cloth dampened with ethyl alcohol.
1
1
I
,
s. Close the operation panel by gently
on the center. Turn the power back
pushing down
on.
~,Caution!
● Do not use benzene or thinner. Avoid touching the head with hard objects.
● The head my be hot tfyourfu mchine hasjust received a large number of documents.If this is
the case, allow the head to cooiprior to cleaning.
USER MAINTENANCE
8-3
Page 69

Wipe the external surface of the machine, docu-
ment feeder, document tray, etc. with a dry cloth.
I
)) Caution!
● Do not use benzene or thinner. These solvents may damage or discolor the wchine.
I
8-4
.
USER MAINTENANCE
Page 70

.
A dirtyreadingglassor rollerswillaffectthe qualityof
transmitted
asfollows.
1. Turn off the power of the fax machine. Pull the
operation panel knob fotward andopen the operation panel.
z. Wipe the reading glass, white backplate, and
rollers with a cotton pad or soft cloth.
s. Close the operation panel by gently pushing down
on the center. Turn the
power back on.
images. Clean”these frequently
1
r
1
I
USER MAINTENANCE 8-5
Page 71

,,,,,,,,,..4.?.44....?..,...!,...”.1.!..1..””.” ,.,,,.....ull!..-........--.l.-...----" "-,...,,,-"-... ...—
G
The FO-225 uses a lithium battery to keep programmed data in memory when the power is turned
off.
Battery power isconsumed primarilywhenthe power isturned off. With the power kept continuously
off, the life of the battery is about 5 years.
Ifthe battery dies, have your dealer or retailer replace it. Replacement cannot be done bythe user.
8-6
.
USER MAINTENANCE
Page 72

Problem
Check and remedy
I
Nothingappearson the display. ~ . Make sure the power cord is properly connected.
I
“ Make sure the power switch has been switched to the
,
correct position.
t
,
c Connect another electrical appliance to the outlet to
I
!
see if it is live.
The machine does not respond to
any key operation.
I
I
Automatic document feeding I .
does network (fortransmission or
copying).
1
Dialing cannot be done.
~ .
I
!
I
~ . Make sure that the setting of the line selector is cor-
1
!
\
Nothingis printed on the receiv- ~ .
ing end.
The power ison, but no transmis- ~
sion takes place.
. If a beep sound (input or error signal) is not made
when the keys are pressed, turn off the power and
then turn it back on several seconds later.
Check the size of the document (see “About the
original” in Chapter 3).
● Make sure the power is on.
Make sure that the line is properly connected to the
jack.
rect (touch-tone or dial pulse).
Make sure that the document for transmission is
placed face down in the feeder.
● Make sure that the recording paper is properly loaded
in the receiving machine.
● Make sure that the receiving machine has recording
paper.
(continued)
TROUBLESHOOTING
9-1
Page 73

GENERAL CORRECTIVE MEASURES
Checkand remedy
(continued)
Problem
s Ifthereceiving machine is inmanual mode with neat-
tendant, reception will not be possible.
● If the receiving machine is not a Sharp model, make
sure it is G3 compatible.
I . Check the displayfor error meSSageS.
I
A distorted image is received at ~ . Noise in the telephone line may cause distortion. Try
the other end.
sending the document again.
c Make a copy of the document on your machine. If the
copy is also distorted, your machine may have a problem.
Nothing is printed when you try to
receive a document.
● Make sure that the recording paper is properly loaded
in your unit.
.
I*
Make sure the power is on.
s Make sure that the document for transmission is
loaded face down in the feeder of the other machine.
The recording paper does not i
come out.
The received image has lowcon- ~.
trast.
Received images are distorted.
9-2
●
Make sure the paper is not jammed (see “Clearing
jammed recording paper” in this chapter).
Make sure that the specified recording paper is used
(see “Recommended paper” in Chapter 8).
!
I
● Ask the other party to send higher contrast docu-
\
ments. If the contrast is still too low, your machine
I may have a problem. Make a copy to check it.
I
● Noise in the telephone line may cause distortion.
,
Have the other party try sending the document again.
(continued)
TROUBLESHOOTING
Page 74

Problem
GENERAL CORRECTIVE MEASURES
.
Check and remedy
(continued)
Copies are distorted.
No reception occurs when polling lo
is attempted.
. The recording head maybe dirty (see “Cleaning the
recording head” in Chapter 8).
,
● Make a copy of another document on your machine. If
the copy is also distorted, your machine may have a
problem.
● Make sure that the specified recording paper is used
(see “Recommended paper” in Chapter 8).
“ Make sure that the recording paper is properly loaded
in your machine.
s The recording head maybe dirty (see “Cleaning the
recording head” in Chapter 8).
● Make a copy of another document on your machine. If
the copy is also distoded, your machine may have a
problem.
Make sure you have not run out of recording paper.
Reception/copying is interrupted. ~
● Make sure the transmitting machine is in automatic
reception mode.
I Q If the transmitting machine has polling security, make
I
sure that your fax number or System number has
!
been entered both in your machine and in the transmit-
~ ting machine.
t
t
i
~ . Check the message on the display. See the next sec-
tion, “Display messages”.
● If reception or copying has been done continuously for
a long time, the recording head maybe overheated.
I
Turn off the power and let it cool down.
TROUBLESHOOTING
9-3
Page 75

The following is a list of messageswhich may appear onthe display, their meanings, andcorrective
measures (if required).
** STAND-BY **
TOTAL PAGE(S) 01
NO PAPER
COVER OPEN
DOCUMENT JAM
LINE ERROR
FUNCTION MODE
STORED ~ Programming has been completed.
ON HOOK DIAL
SEND READY
I Ready for transmission or reception.
~ Number of pages transmitted or received.
f
~ YOUhave run out of recording paper.
I
I
I The operation panel is open. Close it.
I
I
The document is jammed. See the following section,
~ “Clearing a jammed document”.
I
,
~Transmission or reception was not successful. Try again.
I
(
~The machine is in function mode.
[
!
~The handset is on hook.
A document has been loaded and the machine is waiting
for transmission instructions.
9-4
TROUBLESHOOTING
Page 76

Continuous tone
I 3seconds
I
Indicatesthe end of transmission, reception,
or copying.
Intermittent tone
~ 5 seconds
~ (1 second on,
I 1 second off)
35 seconds
(0.7 seconds on,
~ 0.3 seconds off)
Indicates incomplete transmission, recep-
tion, or copying.
Indicates that the handset is off hook.
TROUBLESHOOTING
9-5
Page 77

Ifthe document doesn’tfeed properlyduringtransmission orcopying,orDOCUMENTJAM appears
inthe display, first try pressingthe
to remove it manually as follows:
START/COPYkey. If the document is not fed out, you will have
1, Pull the operation panel knob on the right side of ~
the machine forward, and
lel. The buzzer will sound briefly.
z. Gently pull outthe jammed document.
open the operation ,
s. Close the operation panel by pushing down on the
ter.
.
9-6
TROUBLESHOOTING
Page 78

Pull the operation panel knob on the right side of
1.
the machine forward, and open the operation
panel. The buzzer will sound briefly.
Remove the paper roll.
2.
,,
. If the paper will not come out easily due
to the cutter being stuck in the cutting
position, pullon the rightside of the paper
so that it slides to the right and out.
Cut off the wrinkled part of the paper.
3.
. If any pieces of paper are stuck in the
cutter, remove them with caution.
Close the operation panel once (with no paper in
4.
the machine) and then open it again.This ensures
that the cutter returns to its initial position.
I
~“”7
1
.
5. Reload the paper and close the operation panel.
I
I
● Jammed recording paper is ofien caused by improper loading. Be sure to carefully follow the
instructionsforpaper loading given in “Settingup”in Chapter 2.
TROUBLESHOOTING 9-7
Page 79

The following codes mayappear inthe NOTE column of transaction reports. Checkthe appropriate
list based on whether you were transmitting or receiving.
TRANSMISSION
Code
COM. E-O
Error Condition
Able to recognize the handshake signal, but ithas errors.
Cannot recognize the handshake signal from the receiver side.
1
Line disconnected during transmission.
2
Line disconnected after modem speed fall-back.
3
Line disconnected during multi-page transmission.
4
Cannot recognize the handshake signal for next page at receiver side.
6
No response from receiver side or “disconnect signal” is receivedat transmitter
7
side.
9-8
TROUBLESHOOTING
Page 80

COMMUNICATIONERRORCODES
Code
COM. E-O Able to feco9nize handshake si9nai1but the handshake si9nal has errors”
Line disconnected during reception.
1
Cannot recognize the handshake signal from the transmitter side.
2
Cannot recognize the last handshake signal from the transmitter side.
3
Cannot recognize the handshake signal for next page from the transmitter side
4
in the case of mode change.
Cannot recognize the handshake signal for next page from transmitter side.
5
I No responsefromtransmitter orlldisconnectsignal”
7
ErrorCondition
iSreceivedatreceiverside.
TROUBLESt-tOOTING
9-9
Page 81

COMMUNICATION ERROR CODES
Notes
9-1o
TROUBLESHOOTING
Page 82

-\
Applicabletelephoneline:
Compatibility:
Configuration:
Compression
Scanning method:
Resolution:
scheme:
Recordingsystem:
Display:
Auto
cutter:
Reception modes:
Modem speed:
Transmission time*:
Effective recording width:
Input document size:
Public switched telephone network
CCl~ G3 mode
Half-duplex, desktop transceiver
Modified Huffman and Sharp special mode
Flat-bed, solid-state CCD
Horizontal:
8 lines/mm
Vertical:
Standard
Fine/Halftone
Thermal recording
7 x 5 dots, 1 line by 16-digit display
Standard (to length of original)
Auto/Manual/Answering machine
9600 bps with automatic fallback to 7200,4800, or 2400 bps
Approx. 15 seconds (Sharp special mode)
210 mm max.
Automatic feeding:
Width
Length— 128to 297 mm
Manual feeding:
Width
Length—
— 3.85 lines/mm
— 7.7 Iines/mm
— 148to 216 mm
— 148to 216 mm
128 to 1000 mm
Effective scanning width:
Automatic document
feeder:
Halftone (gray scale):
Contrast control:
Polling:
Copy function:
* Based on CCITT Test Chart #1 at standard resolution in Sharp special mode, excluding time for
protocol signals (i.e., CCl~ phase C time only).
210 mm max.
Standard (1Osheets max.)
Standard (16 levels)
Automatic/Dark selectable
Standard
Standard
SPECIFICATIONS 1o-1
Page 83

SPECIFICATIONS
Telephone function:
Power requirements:
Operating temperature:
Powerconsumption:
Dimensions:
Weight: Approx. 5.2 kg
As a part of our policy of continuous improvement, SHARP reserves the right to make
design and specification changes for product improvement without prior notice. The
performancespecificationsfigures indicated are nominal values of production units. There
may be some deviation from these values in individual units.
Standard (cannot be used if power fails)
230-240 V AC, 50 Hz
5 to 35°c
Stand-by: 15 W
Maximum: 120 W
Width: 365 mm
Depth: 283 mm
Height: 111 mm
10-2
.
SPECIFICATIONS
Page 84

This guide should only be used after you have read the
the manual.
Note:
M
● Steps which are optional are enclosed in a dotted frame: ;
SENDING DOCUMENTS
detailed
~...------~
i
,
L---------;
instructions for each procedure in
t
1
8
Normal Dialing
DirectKeypad
Dialing
Load
document
Dial(press
numerickeys) +
Load
,
document
I
I
I
Rapid Key Dialing ~~~;~men~
Speed Dialing
Redialing
Load : RESOLUTION ;
document
EnterSpeedDialnumber
(press2 numerickeys)
Load
document
Waitfor
receptiontone
+\[—l
+;~j:+
+:~{
+:rl:+
+:\—J:+
~----------
:
RESOLUTION :
L ----------i
Waitfor
receptiontone
:+
Lifthandset
press~!EAKER
+@
~.--------~
RESOLUTION :
:
L.--------J
Dial(press
numerickeys)
~----- .-.-=
;
RESOLUTION :
:+
PressRapid
Key
L--------- J
---------
r
-1
SPEEDDIAL
L--------- J
STARTI COPY
+
@
u
~---------=
:
RESOLUTION : REDIAL
L---------d
START/COPV
+
@
D
0+
0+
START/COPY
D
+
+ Hangup
START!NY
+
o
D
QUICK REFERENCE GUIDE
Quick-i
Page 85

QUICK REFERENCE GUIDE
MAKING VOICE CALLS
NormalDialing
Rapid Key Dialing
Speed Dialing
Redialing
Quiet Detect Time
QuietDetectStart
Timing
Lifthandset
;JEAKER
press
Lifthandset
I press~!EAKER
Lifthandset
press~LEAKER
EnterSpeedDialnumber
(press2 numerickeys) + ~>~~~~d
REDIAL
1
Dial(press
+ numerickeys)
PressRapid
+ Key
SPEEDDIAL
+
+ Lifi handset
n+
+ youpressed
Lifthandsetif
Lifthandsetif
+ you pressed
SPEAKER
Lifthandsetif
SPEAKER
ANSWERING MACHINE SE~lNGS
FUNCTION
[1 m + m + ~;5ri-~4g:pumkr + [+]
FUNCTION
~] m + m + ~:~r;-~;$~)”umber+
[+1
Answering
Machine Failure
Mode
Off-Hook Hold
Time
Quick-ii
‘F:m + ~~] +
Enter”1” (yes)
or
“2” (no)
!
“m
I
~ ‘p~~ + ~,~] +
)
Enter3-digit number
,
(“000”to ‘255”)
+=
QUICK REFERENCE GUIDE
STOP
STOP
\.
Page 86

Polling
(activating recep-
tion)
i
,
Enterfull number
(pressnumerickeys)
or
SPEEDDIAL
~
“POLLING
EnterSpeedDialnumber
(press2 numerickeys)
QUICK REFERENCE GUIDE
+
POLLING
1
TurningPolling
Security on and off ~
Enteringper-
mitted fax
numbers
Clearingpermitted I
faxnumbers
EnteringID
numbers for po1l- I
ing permission
Clearing
IDnumbers
i=! ~ + ~F]FI +
Enter”1” (yes)
or
“2” (no)
START/COPY
+
o
n
“m
STOP
. .
l=? ~ + ~ El + El + ?~~ef~-d~~’~;umber
Enterfaxnumber
~
(pressnumerickeys) +
START/ COPY
o
c1
+-
STOP
‘pyre + ~m[ + ~ +
Enter2-digitnumber ~
I
(“01“to“lo”)
I
I
I
1
STAFIT/COPY
@
D
+m
i I=i’ m + 1- ml + m
Enter4-digitIDnumber
~ (press
numerickeys)
+
~ ‘y! ~ + ml ~{ + ~ +
Enter1-digitnumber
(“1’to “5”)
+
START/COPY
o
D
START/ COPY
@
c1
+m
STOP
Enterl-digit number
+ (“1” to “5”)
STOP
+-
STOP
Giving your
machine a System
number
Clearingyour
machine’s System
number
i=? ~ + ~ ~ ~ ~
Enter4-digitSystemnumber
(pressnumerickeys)
FUNCTION
+
~r[~+~l+~+
START/WPY
o
D
+-
QUICK REFERENCE GUIDE
STOP
START/COPY
o
u
STOP
+-
Quick-iii
Page 87

QUICK REFERENCE GUIDE
I
Entering
I FUNCTION
~ ~1 m + mm m +
FAX AND VOICE NUMBERS FORAUTOMATICDIALING
YOUR NAME AND FAX NUMBER
START/ COPY
o
D
Enteryour name
(pressnumerickeys) +
Enteryourfaxnumber
+ (pressnumerickeys) +
STARTI COPY
@
D
+m
START1COFf
@
D
STOP
+
Entering
Clearing
Fine resolution
priority
(Setting the default
resolution to FINE)
Number ofrings
to answer
(Number of rings
the machine waits
before answering in
automatic reception
mode)
‘F~ ~ ~ ~ ~ ~ ~
Enterfax or voicenumber ~
~
(pressnumerickeys)
Entername(press
numerickeys)
+
START/CW
@
c1
‘p~l~l+m+ ~+
Enter2-digit number ~
(“01”to “50”)
STARTIW
o
D
USER SWITCHES
FUNCTION
~1 ~ ~ ~ ~ Enter~;(YeSJ
START/W
D
+-
“2” (no)
I
‘-~ ~ + ~l~j +
Enter”1” (4rings)
or
“2” (1ring)
+-
o
“m
STOP
E.:::::-~~i:yumber
+
STOP
STOP
STOP
‘m
Quick-iv
QUICK REFERENCE GUIDE
Page 88

4rings manual 1
answer
(Setting the ~
machine to answer ~
after4 rings in
manual reception ~
mode)
,
‘Fym + ~mFl +
I
I
Enter”1M(yes) STOP
or
“2”
(no)
QUICK REFERENCE GUIDE
+-
Auto Fax/Phone
Changeover
(Detection of fax I
and voice calls in ~
automatic reception ~
mode)
Tel/Fax remote # ‘
(Number fortrans- ~
ferring faxes from
extension
telephone)
Transaction list ~
(Print out setting for ~
Transaction Report) ~
Pseudo ringing
duration
(Durationofpseudo I
ringing for Auto
Fax/Phone Change- ~
over)
FUNCTION
n m + IT F] m ~1 +
Enter”1” (yes)
or
“2” (no)
+-
~
1-~~ + ~~~1 ~
Enternumber
from “O”to “9”
+-
I
‘Fym+ ~~~1 +
Enternumberfrom”1” to “4”:
‘1“ = aftertrans.,rec.,or error
“2”=iferroroccurs
“3” =aftertrans.
“4” =noprintout
~UNCTIO~ ~ ~ ~ ~
Enternumberfrom”1” to “4”:
“1“ = 15sec.
I
“2” =30 sec.
“3”=60
sec.
“4” = 120sec.
+-
I
STOP
STOP
STOP
QUICK REFERENCE GUIDE
Quick-v
Page 89

QUICK REFERENCE GUIDE
ENTERING LEITERS AND CHARACTERS
PRINTING OUT LISTS
,
~ Space ~
1
I
I r
----------------------------J
I.
I I
Alphabet (A-Z) I
1
! I
I
---------- L
I
--------
I
HOLD
SPEAKER
1
I
‘,+1
r
J
1 + 1
Quick-vi
QUICK REFERENCE GUIDE
Page 90

A
.
H
Adjustabledocument guide . . . . . . .1-1
Alarms . . . . . . . . . . . . . . . . .9-5
Answering machine
Answering Machine Failure Mode 4-7
Connection . . . . . . . . . . . .4-1
Off-hook Hold Time . . . . . . . .4-8
Quiet Detect Start Timing . . . . .4-6
Quiet Detect Time . . . . . . . .4-5
Settings . . . . . . . . . . . . . .4-1
Assembly . . . . . . . . . . . . . . . .2-3
Automatic dialing . . . . . . . . . . . .3-7
Automatic Fax/Phone Changeover . .3-12
c
Connections . . . . . . . . . . . . . .2-3
Contrast . . . . . . . . . . . . . . . . .3-4
Copying . . . . . . . . . . . . . . . .3-14
D
Dialing
Direct Keypad . . . . . . . . . . .3-7
Normal . . . . . . . . . . . . . .3-6
Rapid key . . . . . . . . . . . . .3-7
Speed . . . . . . . . . . . . . . .3-8
Direct Keypad Dialing . . . . . . . . . .3-7
Display messages . . . . . . . . . . .9-4
Document carrier . . . . . . , . . . . .3-2
Document feeder . . . . . . . . . . . .1-1
Document restrictions . . . . . . . . . .3-1
Document rollers . . . . . . . . . . . .1-3
Document sizes . . . . . . . . . . . . .3-1
Document, readable length and width .3-2
E
Electricity . . . . . . . . . . . . . . . .2-1
Error codes . . . . . . . . . . . . . . .9-8
Extension telephone . . . . . . . . . .4-9
Extension telephone jack . .......1-2
F
Function key . . . . . . . . . . . . . .1-4
Handset . . . . . . . . . . . .
Handsetjack . . . . . . . . . .
Hold key . . . . . . . . . . . .
Housing, cleaning . . . . . . .
I
Installation . . . . . . . . . . .
L
Line selector . . . . . . . . . .
Liquid crystal display . . . . . .
Loading the document . . . . .
N
Normal dialing . . . . . . . . .
Numeric keys . . . . . . . . .
0
Operation panel knob . . . . .
P
Paper cutter guide . . . . . . .
Paper cutting . . . . . . . . . .
Passcode List . . . . . . . . .
Polling
Being polled . . . . . . .
Permission, fax numbers
Permission, ID numbers .
Polling a secured machine
Polling others . . . . . .
Security . . . . . . . . .
System number . . . . .
Turnaround . . . . . . .
Polling key . . . . . . . . . . .
Power switch . . . . . . . . . .
R
Rapid Key Dialing . . . . . . .
Rapid Keys . . . . . . . . . . .
Reading glass . . . . . . . . .
. . . . 1-1
. . . .
. . . . 1-5
.., . 8-4
. . . . 2-1
. . . . 1-2
. . . . 1-4
. . . .
.., .
. . . .
. . . . 1-1
.,. . 1-3
. . .
. . . . 7-2
. . . .
. . . . 5-4
. . . . 5-6
.,. . 5-1
. . . .
. . . .
...0 5-2
. . . . 5-3
. . . .
... ,
. . . . 3-7
. . . . 1-5
. . . .
1-2
3-3
3-6
1-5
3-13
5-3
5-1
5-3
1-4
1-2
1-3
Index-i
Page 91

Reading glass, cleaning . . . . . . . .8-5
Received document tray . .......1-1
Reception . . . . . . . . . . . . . “ -3-10
Automatic . . . . . . . . . . . .3-11
Manual . . . . . . . . . . . . .3-1 I
Reception mode switch . . . . . . . . .1-4
Recording head . . . . . . . . . . . . -1-3
Recording head, cleaning . . . . . . . .8-3
Recording paper
Loading . . . . . . . . . . . . . .2-4
Replacing . . . . . . . . . . . . .8-2
Redial key . . . . . . . . . . . . . . . .1-4
Redialing . . . . . . . . . . . . . . . .3-8
Resolution . . . . . . . . . . . . . . .3-4
Resolution key . . . . . . . . . . . . .1-4
Ringing volume selector . .......1-2
Roller, cleaning . . . . . . . . . . . . .8-5
s
Speaker key . . . . . . . . . . . . . .1-5
Speaker volume control . . . . . . . . .1-2
Speed Dial key . . . . . . . . . . . . .1-4
Speed Dialing . . . . . . . . . . . . . .3-8
Start/copy key . . . . . . . . . . . . . .1-5
Stop key . . . . . . . . . . . . . . . .1-5
T
Telephone Iinejack . . . . . . . . . . .1-2
Telephone List . . . . . . . . . . . . .7-1
Transaction Report . . . . . . . . . . .7-5
Troubleshooting
Jammed document . . . . . . . .9-6
Jammed recording paper . . . . .9-7
u
User Switch List . . . . . . . . . . . . .7-4
User Switches . . . . . . . . . . . . .6-5
Index-ii
Page 92

NOTICE FOR UNITS INSTALLED IN NEW ZEALAND
WARNING:
WARNING:
Should any physical damage occur to the equipment which may result in internal
parts becoming exposed, the equipment should immediately be disconnected
and the user should arrange for its repair before it is reconnected, or its disposal
if necessary.
(NEW ZEALAND PTC 101)
Should it be necessary to move the equipment, it is necessary to disconnect the
teiecom networkconnectionbeforedisconnectingthepowerleadorany separate
earth lead. Similarly when reconnecting the equipment itis necessaryto connect
the power lead or earth lead before connecting to the telecom network.
(NEW ZEALAND PTC 101)
This equipment may not necessarily provide for the effective hand-over of a call
to or from a telephone connected to the same line.
(NEW ZEALAND PTC211)
The operation of this equipment on the same lines as telephones or other
equipment with audible warning devices of automatic ring detectors will give rise
to bell tinkle or noise and may cause false flipping of the ring detector. Should
such a problem occur, the user is not to contact Telecom faults service.
(NEW ZEALAND PTC211)
*
Page 93

,,
SHARP.
SHARP CORPORATION OF AUSTRALIA PTY.LTD.
A.C.N. 003039405
1 Huntingwood Drive, Huntingwood, Blacktown, N.S.W.,2148
SHARP CORPORATION
.
PRINTED INTHAILAND
(TINSE3232XHZZ)
 Loading...