

c\.-
’
c
‘:

This equipment generates and uses radio frequency energy and if not installed
and used properly, that is, in strict accordance with the manufacturer’s instructions, may cause interference to radio and television reception. It has been type
tested and found to comply with the limits for a Class B computing device in ac-
cordance with the specifications in Subpart J of Part 15 of FCC Rules, which are
designed to provide reasonable protection against such interference in a residential installation. However, there is no guarantee that interference will not occur in
a particular installation. If this equipment does cause interference to radio or
television reception which can be determined by turning the equipment off and
on, the user is encouraged to try to correct the interference by one or more of the
following measures:
Reorient the receiving antenna.
Relocate the computer with respect to the receiver.
Move the computer away from the receiver.
Plug the computer into a different outlet so that computer and receiver are on
different branch circuits.
If necessary, the user should consult the dealer or an experienced radio/television
technician for additional suggestions. The user may find the following booklet
prepared by the Federal Communications Commission helpful:
“How to Identify and Resolve Radio-TV Interference Problems”.
.
This booklet is available from the U.S. Government Printing Office, Washington,
D.C., 20402, Stock No. 004-000-00345-4.
FOR YOUR RECORDS
Please record below the model number and serial number, for easy reference,
in case of loss or theft. These numbers are located on the rear side of the unit.
Space is provided for further pertinent data.
Model Number
Serial Number
Data of Purchase
Place of Purchase
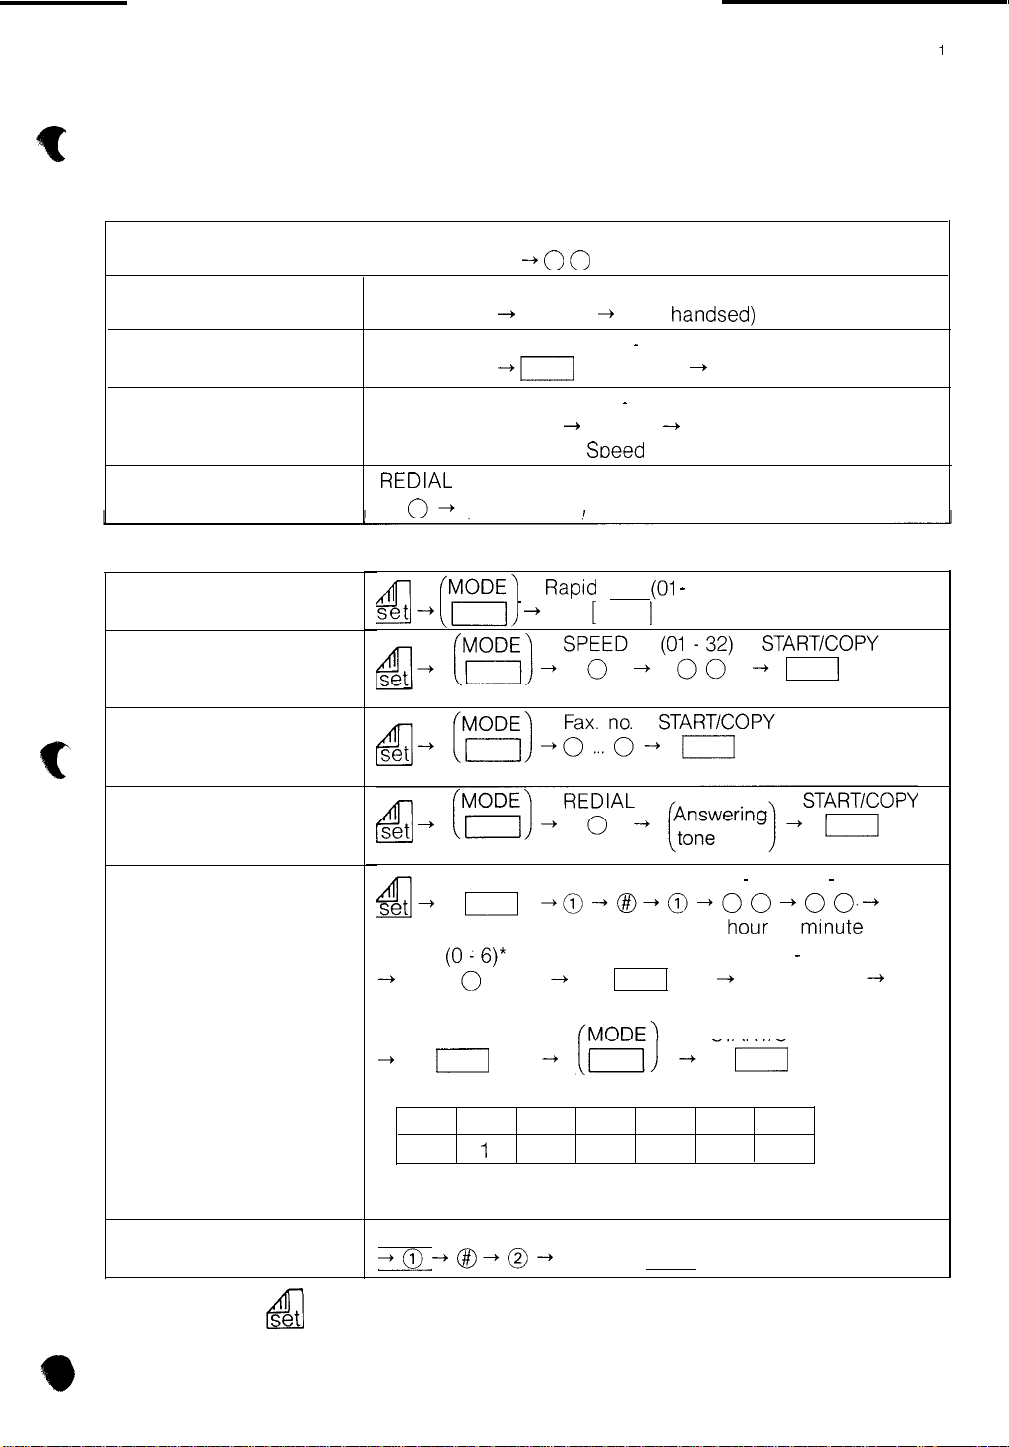
Quick Reference Guide
l
Dialing a telephone number
Normal dialing
Lift handset -+ 0
On-hook dialing
Rapid dialing
Speed dialing
Redialing
l
Transmission
Rapid dialing
SPEAKER
SPEAKER
SPEAKER
REDIAL
4 --) (h;OD;) ~ RapiT
Tel. no.
Tel. no.
+
0
0
0 0
Rapid key (01 - 12)
-+I
SPEED (01 - 32)
0 -0
(Lift handset)
0
+
+
(Lift
0 0
Soeed
key
handsed)
+
(Lift handset)
-+
(Lift handset)
no.
1(01 -
12)
-1
1
T
Speed dialing
Keypad dialing
Last number redial
Timer transmission
Reservation clearing
(timer transmission)
Speed no.
FUNC
START/COPY
-+
+I
l Day of the week codes
*The entry of this code can be skipped, then machine will
FUNC
I
+0-~-o-
(O?)’
day of the week
START/COPY
Sun. Mon. Tue. Wed. Thu. Fri. Sat.
0 1 2 3 4 5 6
transmit within the next 24 hours.
+
START/COPY
n
(00 - 23) (00 - 59)
(01 - 32)
+
00
Speed no.
START/COPY
--+
set
= Set document(s) face down into the feeder.
&!!_I
2
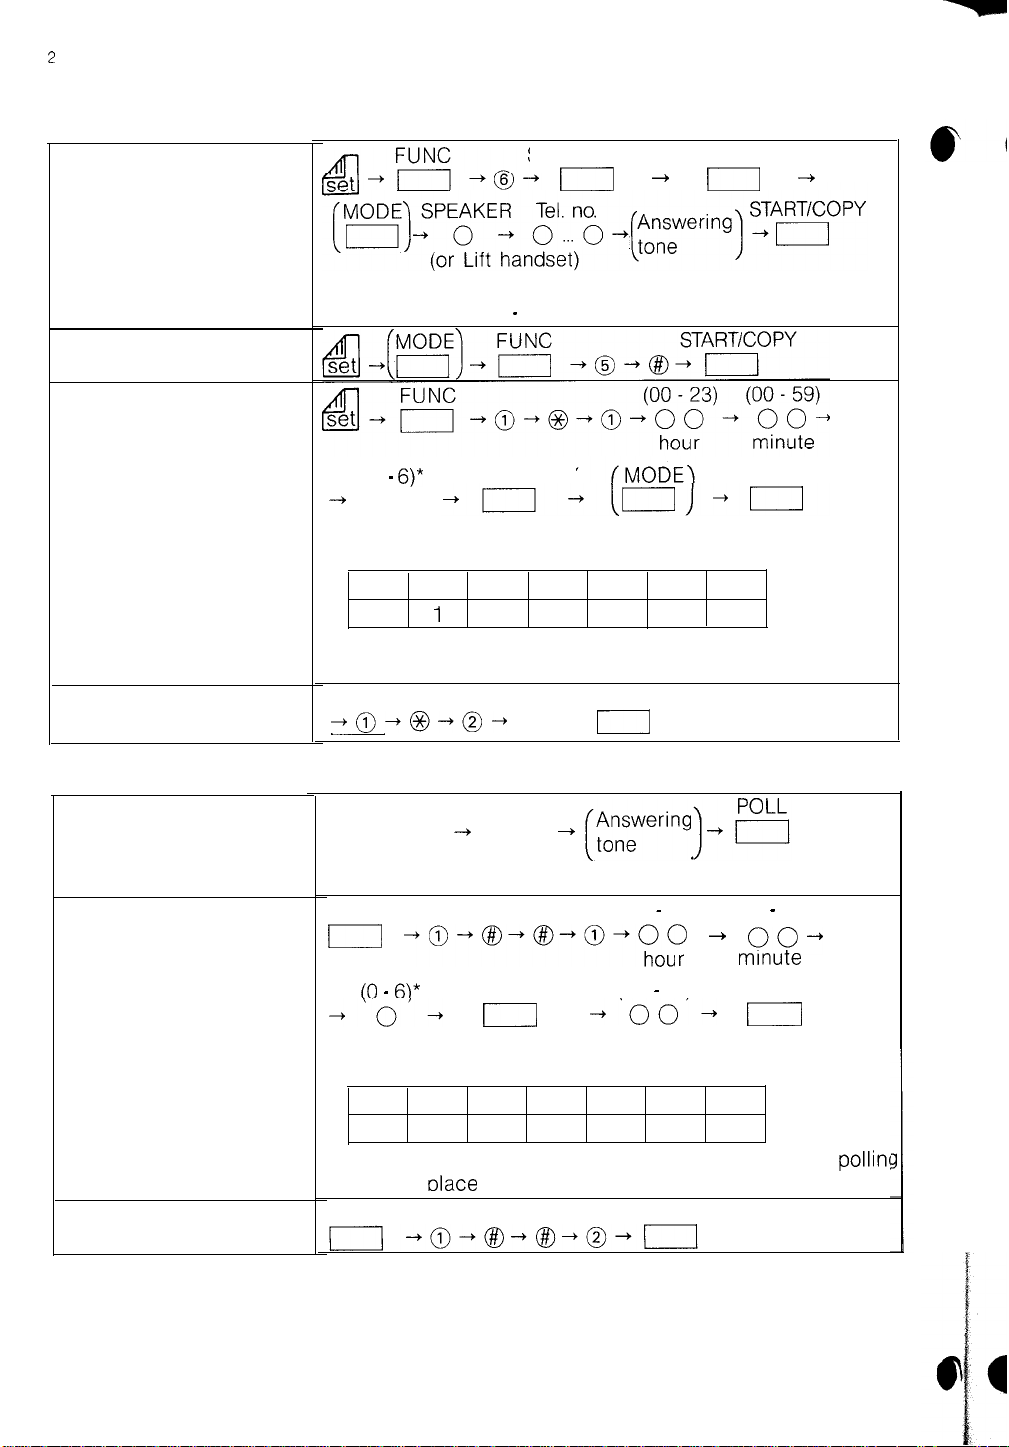
l
Transmission
Confidential
transmission
Relay broadcasting
Timer relay
broadcasting
START/COPY START/COPY*
I
+
* For remote machine with two or more confidential boxes,
enter box No. (00 - 99) in advance.
I
-+
Reservation clearing
(relay transmission)
l
Polling
Polling reception
Timer polling
Reservation clearing
5
+
START/COPY
6
(00 - 59)
qo-
mrnute
n
pollin!
(0 -
6)*
-+
0
day of the week
l Dav of the week codes
Sun. Mon. Tue. Wed. Thu. Fri. Sat.
0
*The entry of this code can be skipped, then machine will
transmit within the next 24 hours.
FUNC
[
+~-&+@-
SPEAKER
0
(or Lift handset)
FUNC
I
10 - 6)*
+‘o’+
Day of the week
l Day of the week codes
Sun. Mon. Tue. Wed. Thu. Fri. Sat.
0 1 2 3 4 5 6
*The entry of this code can be skipped. In this case,
will take olace within the next 24 hours.
FUNC
START/COPY
1
2
Dialing
-+
0 0
-o+B-s-o-~o~
START/COPY
I1
3
START/COPY
+
4
II
(00 - 23)
(01 - 32) START/COPY
-‘oo’-
Speed no.
START/COPY
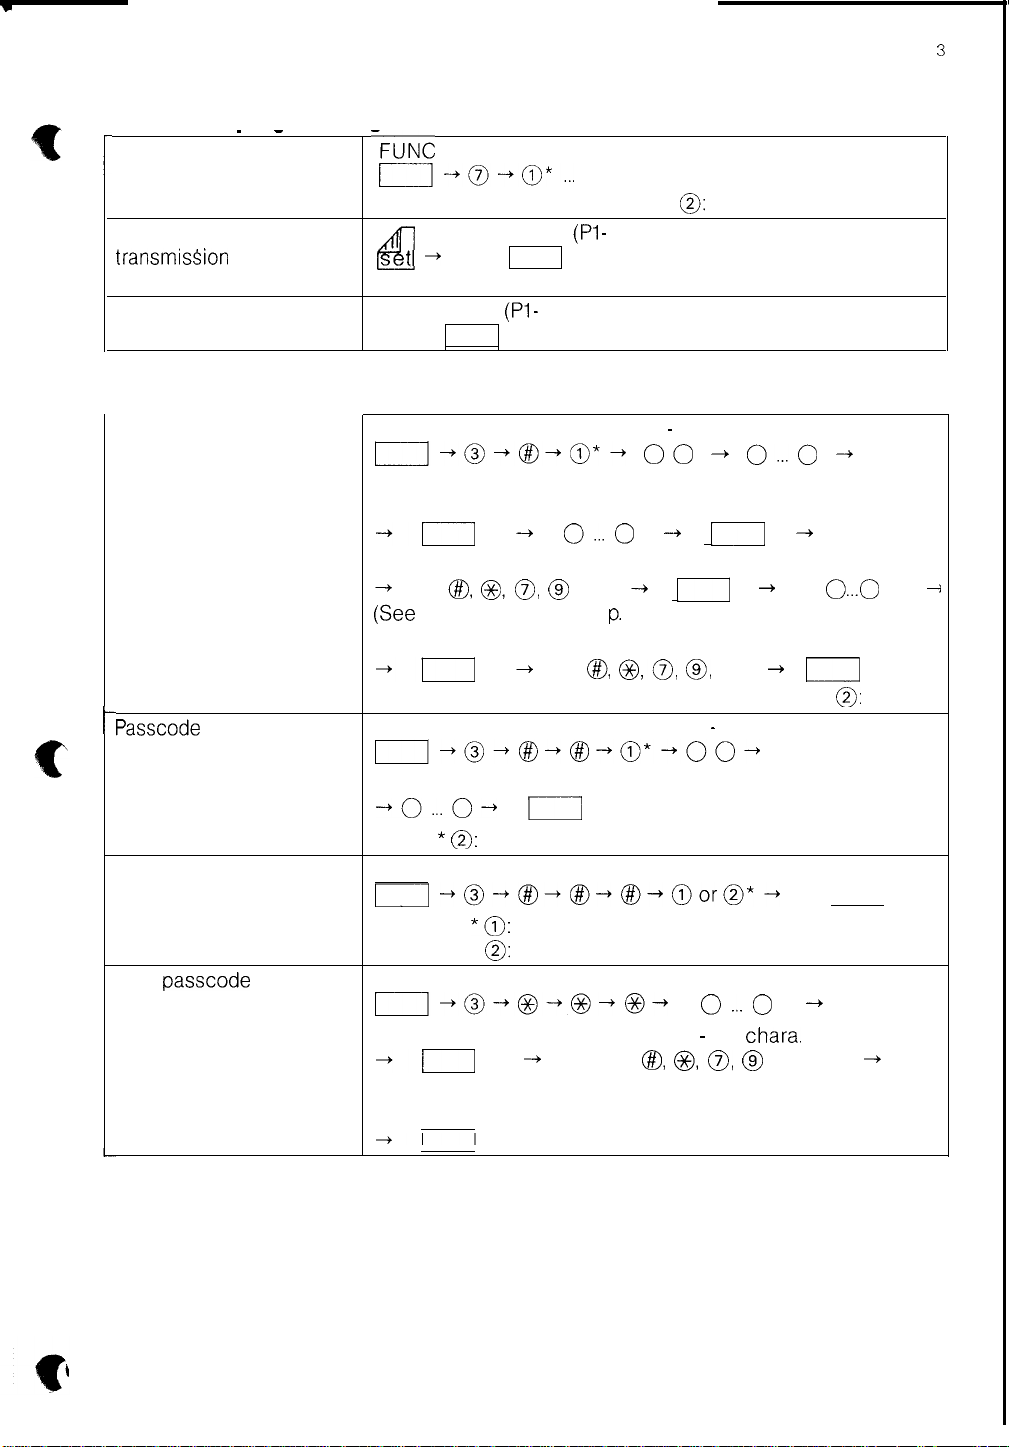
l
Operation programming function
Programming
_ -
-FUNC
r----j+~+~o*...
1
Transmission Confidential Program key
transmisSion
broadcasting
Polling reception Program key
l
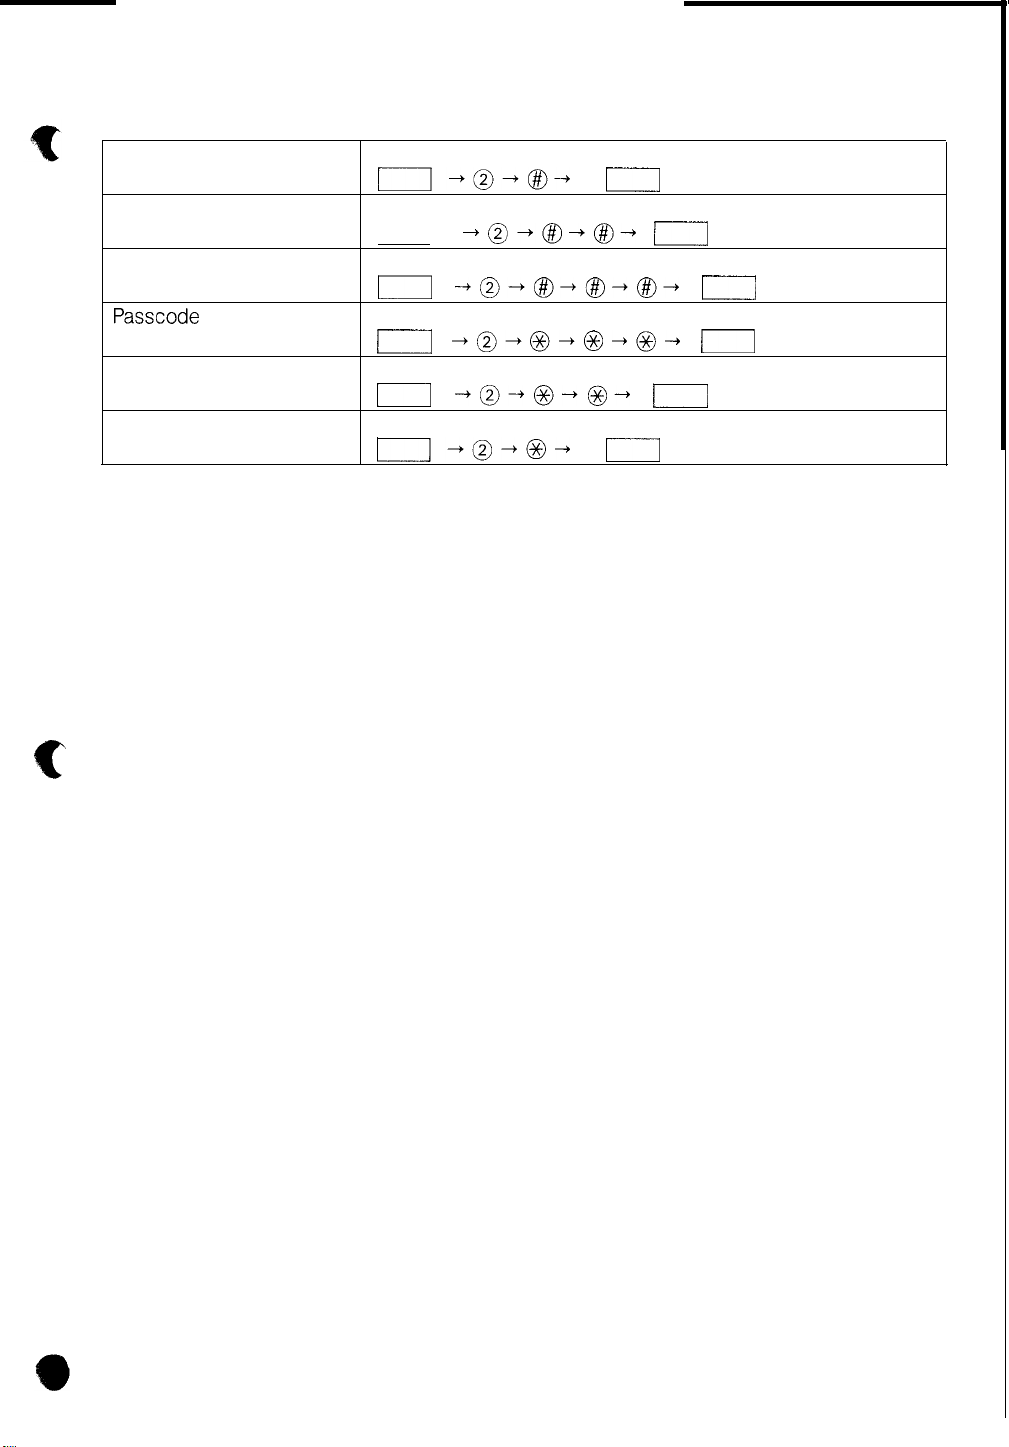
Initial programming
Rapid dialinq Speed
dialing Transmission to a
secondary facsimile
I----
t
Passcode
(polling permission
number)
Polling security
Own passcode
(sender’s number)
Sender’s name
Relay
t+
&I
(Pl -
FUNC
I]+@-@-@*-
START/COPY voice tel. no. START/COPY
-+I
-+ o...o
Name of the other party START/COPY Secondary fax no.
@I, o>o> @
Gee Character Table’on p. 4)
START/COPY Name of secondary fax START/COPY
+I
+
FUNC
~I-@-@-@-@*-()O-
Tel. No. START/COPY
-o...o*
0:
Clear
I]
FUNC
~+@-+@+@-+@-+@or@*-+
II
*@:
security on
0:
security off
FUNC
n+@-@-@-@-
START/COPY
-0
+
START/COPY
* 0: Clear
(Pl -
P3)
P3)
+
Fax tel. no.
o...o
(01 - 32)
00
Speed no.
-+
--+ II
n
+
@I, o,o> 0,
(01 - 10)
20 digits max.
o...o
Character entry - (24
chara.
@> @!@I @
(See Character Table on p. 4)
+
+
o...o
+ I
* 0: Clear
START/COPY
-+
max.)
-+
3
*
l
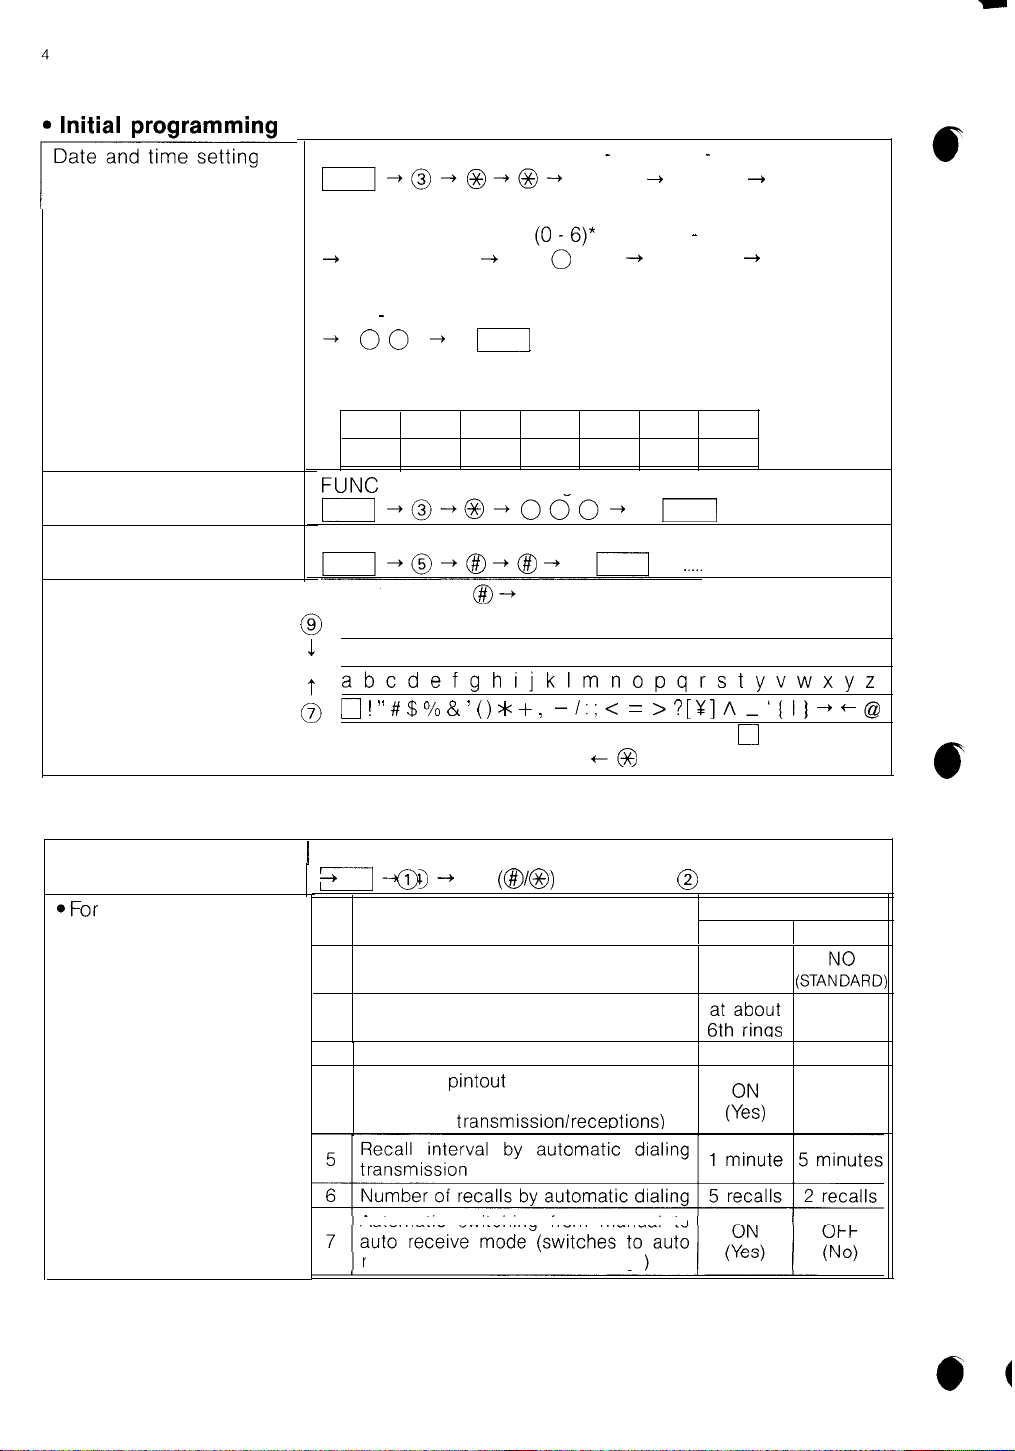
Initial programming
Date and time setting
/-----
Terminal number
Relay station and receive
station
FUNC
n-o-o-o-
(lower 2 digits)
+
-oo-
l Day of the week codes
00
year
(00 - 59)
minute
Sun. Mon. Tue. Wed. Thu. Fri.
0 1 2 3 4 5 6
+
day of the week
START/COPY
I
II-o-o-ooo-
FUNC
(01 - 12)
00 + 00
month
(O?*
3 digits
-+
START/COPY
START/COPY
(01 - 31)
day
(00 - 23)
00
hour
Sat.
n
+
+
[Character Table]
l
User switch programming
User switch programming 1 FUNC
OFor
each item, either (1)
or (2) can be chosen.
@ 0123456789
1
ABCDEFGHIJKLMNOPQRSTUVWXYZ
-1 -+ @ ---,
+
No.
1
2 Number of rings to start auto receive
3
4
abcdefghijklmnopqrstyvwxyz
0 ! ” # $ % & ( () *
item selection
0
or
FINE PRIORITY (Transmission mode
before operation of the MODE key)
Size of send/receive report listing
Automatic pintout of send/receive report
listing (on exceeding memory capacity
for storind
transmissionlreceotions)
-I:;<
+
,
(@I/@)
Item
=
+@
>?[U]A_‘(I)++@
choice
@
YES
(FINE)
r$haii$
11” size VARIABLE
0
Space
Setting
1
2
(ST/&D)
at 1st ring
OFF
(No)
Automatic switching from manual to
receive mode after about 6 rings)
l
Printout
Activity report
Reservation list
Telephone number list
Passcode
list
User switch list
Program list
FUNC
Il+o-@I-
FUNC
r-l
-o-@I-@-
FUNC
I
--+@-@,-@-@I-
FUNC
r-----l +@-@-@-@-
FUNC
n
-+@-@-@-
FUNC
II-o-o-
START/COPY
r----l
START/COPY
r-1
START/COPY
n
START/COPY
r-----l
START/COPY
l----J
START/COPY
(1
6
TABLE OF CONTENTS
QUICK REFERENCE GUIDE
I.
II.
III.
IV.
V.
INTRODUCTION
PRECAUTIONS
A. INSTALLATION 11
B. OPERATION 11
GENERAL PRODUCT OVERVIEW
A. COMPATIBILITY 12
B. MAJOR COMPONENTS 13
1. External View 13
2. Recording Paper Compartment 16
C. OPERATION PANEL 17
D. SPECIFICATIONS 19
INSTALLATION AND CONNECTION
PROGRAMMING
USER (FACTORY-SET) SWITCHES 23
A.
1. Overview 23
2. Programming Procedure 25
FUNCTION PROGRAMMING OVERVIEW 26
B.
1. Function Classification 26
2. Selection of Programming Mode 27
RAPID KEY/SPEED-DIAL/SECONDARY
C.
FACSIMILE NUMBERS 28
1. Entering Rapid Key/Speed-Dial/Secondary N
2. Clearing a Rapid Key/Speed-dial Number 30
POLLING PERMISSION NUMBERS 31
D.
1. Entering Polling Permission Numbers 31
2. Clearing Polling Permission Numbers 32
E.
POLLING SECURITY SELECTION 33
1. Setting 8. Cancelling Polling Security 33
F.
TRANSMIT TERMINAL IDENTIFICATION
REMOTE TERMINAL IDENTIFICATION 34
1. Transmitted Copy Sample with TTI 34
2. Entering the TTI & RTI 35
urn
bers 29
&
10
11
12
21
23

--
TABLE OF CONTENTS
G. DATE & TIME SETTINGS 36
1. Entering the Date
&
Time 37
H. TERMINAL NUMBER 38
1. Entering the Teminal Number 38
I.
CHARACTER ENTRY 39
1. General Character Entry Procedure 39
2. Abailable Characters 39
i
(‘
VI.
VII.
VIII.
IX.
X.
PREPARING FOR TRANSMISSION
A. TRANSMITTABLE DOCUMENTS 40
1. Document Sizes 40
2. Paper Thickness & Weight 40
3. Document Types 41
4. Cautions on Transmitting Documents 41
B. AUTOMATIC DOCUMENT FEEDER CAPACITY 41
C. READABLE WIDTH & LENGTH 42
D. USE OF DOCUMENT CARRIER 43
SELECTION OF MODE KEY SETTING
IMMEDIATE TRANSMISSION
A. USING THE KEYPAD 48
B. USING A RAPID KEY 50
C. USING A SPEED-DIAL CODE 52
COPY FUNCTION
RECEPTION
A. AUTOMATIC RECEPTION 56
B. MANUAL RECEPTION 57
C. CUTTING THE RECORDING PAPER 59
40
44
46
54
56
VOICE COMMUNICATIONS
XI.
60
A.B.USE AS A TELEPHONE 60
1.
Normal Dialing Using Handset 61
2. On-Hook Dialing Using the Monitor Speaker 62
3.
Redialing 63
4.
Holding 64
TALK FUNCTION (Talk and Fax) 65
1.
Voice Communication Before Transmission 65
2.
Voice Communication After an Operation 68
3. Voice Communication When Operation Has Stopped 70

8
TABLE OF CONTENTS
XII. ADVANCED FEATURES
A. POLLING 71
1.
Conditions 71
2.
Polling Security 71
3.
Polling Transmission (standby) 72
4.
Polling Reception 73
5.
Turnaround Polling 74
B. CONFIDENTIAL TRANSMISSION 75
C. RELAY REQUEST 78
1.
Entering the Relay Task Group 79
2.
Clearing the Relay Task Group 81
3.
Using Relay Request 81
D. TIMER TRANSMISSION/POLLING 83
1.
Setting a Timer Transmission 84
2.
Clearing a Timer Transmission 85
3.
Setting a Timer Confidential Transmission 86
4.
Clearing a Timer Confidential Transmission 86
5.
Setting a Timer Relay Request 87
6.
Clearing a Timer Relay Request 88
7.
Setting a Timer Polling Reception 89
8.
Clearing a Timer Polling Reception 90
E. PROGRAM AUTODIALING 91
1.
Entering a Transmission Program 92
2.
Entering a Polling Reception Program 94
3.
Clearing a Program Key 95
4.
Using a Pre-programmed Program Key 95
5.
Cancelling a Selected Program 95
71
r
XIII. REPORTS AND LISTS
A. GENERAL PRINT-OUT PROCEDURE 97
B. ACTIVITY (SEND/RECEIVE) REPORT 98
1.
Print-out Procedure 98
2.
Report Sample 98
3.
Column Descriptions 99
4.
Explanation of Notes 99
96
TABLE OF CONTENTS
C.
RESERVATION (TIMER) LIST
1.
Print-out Procedure 101
2. List Sample 101
D.
TELEPHONE LIST 102
1. Print-out Procedure 102
2. List Sample 102
E.
PASSCODE
1. Print-out Procedure 103
2. List Sample 103
F.
USER SWITCH LIST 104
1. Print-out Procedure 104
2. List Sample 104
G.
PROGRAM LIST 104
1. Print-out Procedure 104
2. List Sample 104
H.
TRANSACTION REPORT 105
1. Report Sample 105
LIST 103
9
101
XIV. USER MAINTENANCE
106
A. RECOMMENDED THERMAL RECORDING PAPER 106
B. CAUTIONS ON STORING THERMAL PAPER 106
C. REPLACING THE RECORDING PAPER 107
*
D. CLEANING THE RECORDING HEAD 109
E. CLEANING THE DOCUMENT SENSOR, WHITE
PLATE & DOCUMENT FEED ROLLERS 110
F. CLEANING THE HOUSING 111
G. FILLING-IN THE LABEL FOR RAPID KEYS 111
XV. TROUBLESHOOTING
112
A. GENERAL CORRECTIVE MEASURES 113
B. LCD MESSAGES 117
C. AUDIBLE ALARMS 121
D. CLEARING AN ORIGINAL DOCUMENT JAM 122
E. CLEARING A RECORDING PAPER JAM 123
F. COMMUNICATION ERROR CODE REFERENCE
TABLE 125
INDEX
127
WARRANTY NOTICE

10
F
I. INTRODUCTION
The Sharp FO-220 Facsimile Transceiver is a compact, desktop digital unit. The
purpose of this manual is to assist users with the machine’s operating procedures. All of the FO-220 features can be easily learned by following the
by-step procedures given in the following pages. The manual is divided into
indexed sections for quick and easy access to information.
If a situation should arise which cannot be resolved through the troubleshooting procedures contained here, please contact the Sharp dealer where you purchased your machine for assistance.
IMPORTANT NOTE:
Please be certain to read following section on “precautions” before installing
or using machine. After installation, read “PROGRAMMING” section. Certain
fonctions
are also User Switches, set at the factory, that can be changed to better suit
your situation.
of the FO-220 must be programmed before they can be used. There
step-
P
If required by the telephone company, inform them of the following:
FCC Registration NO.
Ringer Equivalence No. (REN): 2.80
Both of these items are listed on the equipment label. The sum of all of the
REN’s
on your telephone lines should be less than five in order to assure proper
service from the telephone company. In some cases, a sum of five may not
be usable on a specific line.
If any of your telephone equipment is not operating properly, you have to immediately remove it from your telephone line, as it may cause harm to the telephone network. If the telephone company notes a problem, they may temporarily
discontinue service.
If practical, they will notify you in advance of this disconnection. If advance
notice is not feasible, you will be notified as soon as possible. When you are
notified, you will be given the opportunity to correct the problem and informed
of your right to file a complaint with the FCC.
:
AFL
734-17986-FA-E
F
II. PRECAUTIONS
A. INSTALLATION
Install the machine on a level surface.
1.
2.
Keep the machine away from air conditioners, heaters, direct sunlight,
humidity, and dust.
Provide easy access to the front, back, and sides of the machine.
3.
4.
Avoid locations where the transceiver may be splashed by water or chemicals.
A modular telephone jack must be located near the machine.
5.
A 120 VAC, 60 Hz isolated and grounded (three-prong) outlet is required.
6.
7.
In area’s that experience high incidences of lightning or power surges, a
surge protector is recommended for the power and phone lines.
11
c
B. OPERATION
Do not open the machine during operation (transmitting, receiving, or
1.
copying).
Verify that the LCD (display) message is “STAND-BY”. This means the
2.
machine is ready for facsimile operation.
Use only the proper recording paper. Store the paper in a well ventilated,
3.
shaded, cool place. Sharp
4.
Operate the machine according to the operating procedures described in
this manual.
Remove any paper clips or staples from the documents to be transmitted
5.
to prevent damage to the transceiver.
Make sure that the documents are completely dry.
6.
7.
Thick paper, newsprint, cloth, and other types of similar material should never
be used. Such originals should be photocopied and the copies should be
used for transmitting.
When documents are copied or received continuously for a long period of
8.
time, the recording head overheat protection function becomes active and
as a result, facsimile operation halts. (When the documents are received
in G3 mode, your facsimile unit automatically requests voice communication to the transmitting machine.) Wait for a while and the facsimile will automatically reset.
FO-20PR6
paper is recommended.
F
12
III.
GENERAL PRODUCT OVERVIEW
A. COMPATIBILITY
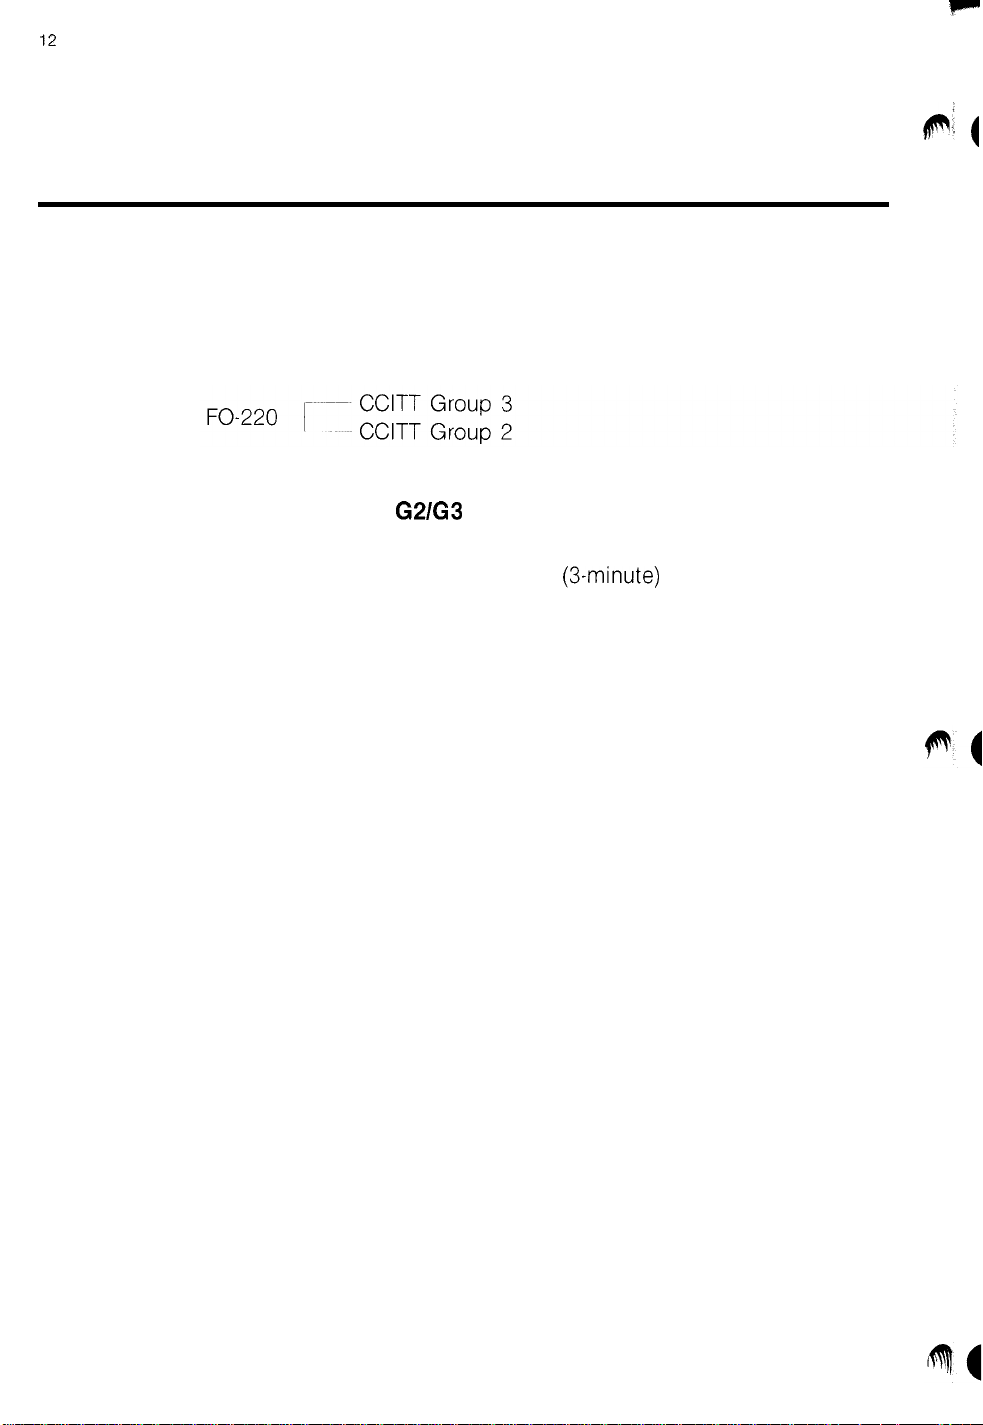
The FO-220 facsimile machine is compatible with the following international
facsimile communication standards.
COMMUNICATION WITH CCITT
The FO-220 facsimile machine has the capability of automatically communicat-
ing with a CCITT Group 3 (Sub-minute)/Group 2
ing communication with a CCITT Group 2 facsimile unit, the TALK and POLLING
functions as well as the FINE and HALF-TONE modes of the FO-220 are
disabled.
G21G3
FACSIMILE UNITS
(3-minute)
facsimile unit. Dur-
p! (
III GENERAL PRODUCT OVERVIEW
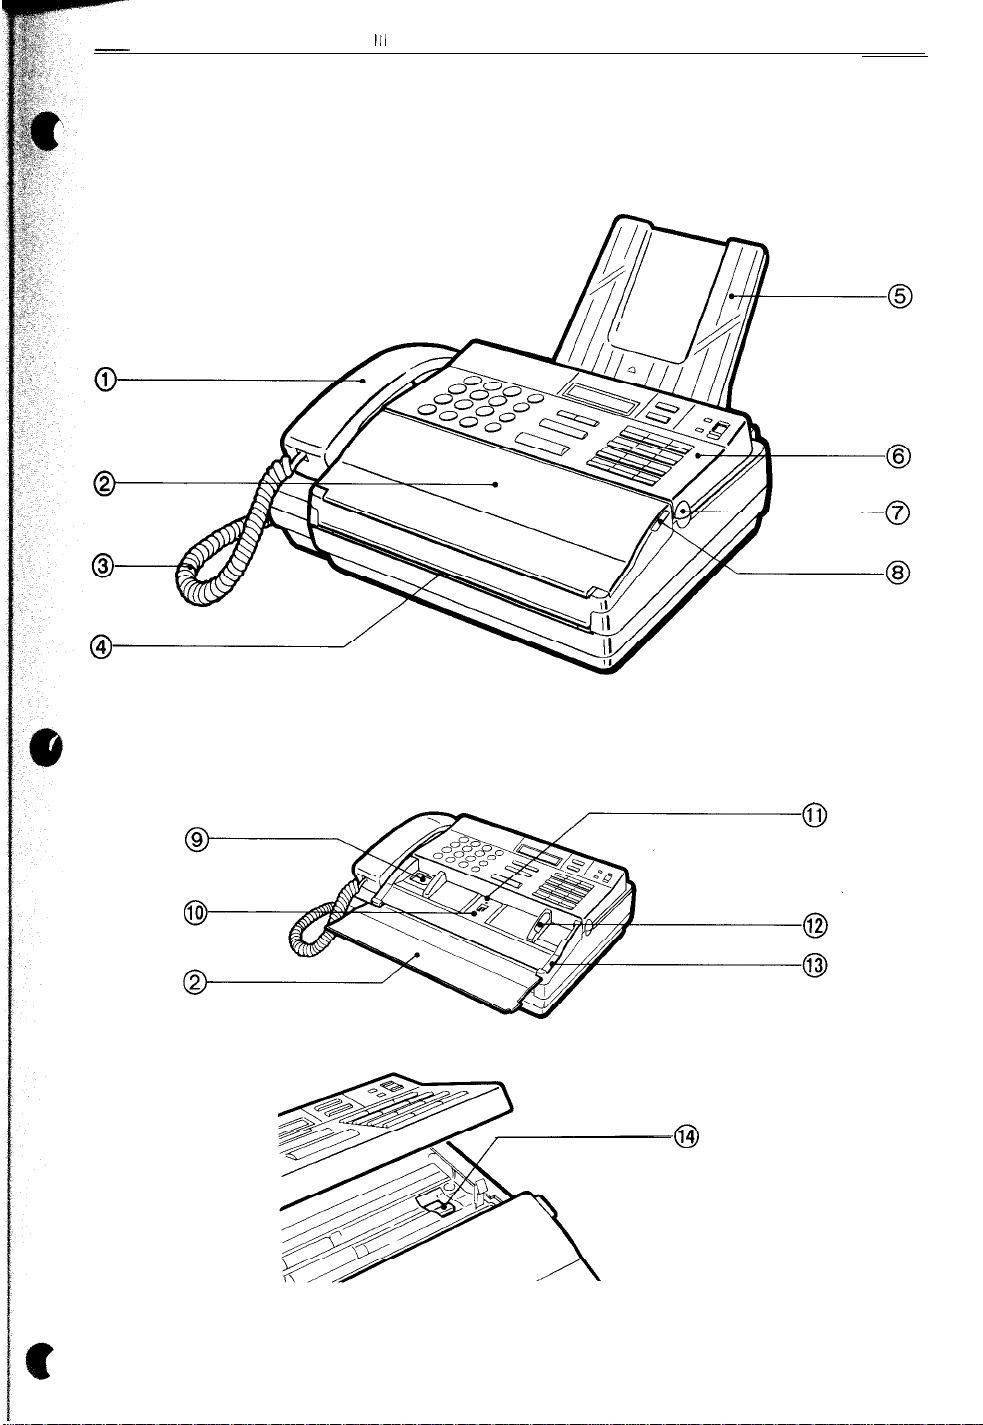
B. MAJOR COMPONENTS
1. External View
13
[When the document hopper is opened]
[When the control panel is opened]
14
Handset
III,
GENERAL PRODUCT OVERVIEW
Document hopper
Handset cord
Received document exit
Document stacker
Control panel
Control compartment
open knob
Document hopper open
knob
Recording paper window
Document feeder
Document insertion slot
Open toward you to set document(s).
Connects the handset to the handset jack.
Recorded document(s) exits the machine here.
Documents transmitted and/or copied are
stacked here.
Used for transmission, copying, voice communication, and various programming jobs.
To remove a jammed document or replace the
paper roll, open the control panel by pulling
this knob up.
To open the document hopper and replace the
paper roll, pull this knob.
Used to check the amount of remaining
recording paper.
Place document(s) to be transmitted or copied
here.
Document should be inserted into this
opening.
Adjustable document
guide
Paper compartment
cover
Paper compartment
cover knob
Set to the width of the document.
Open to replace the recording paper, or clear
paper jams.
Pull this knob to open the paper compartment
cover.
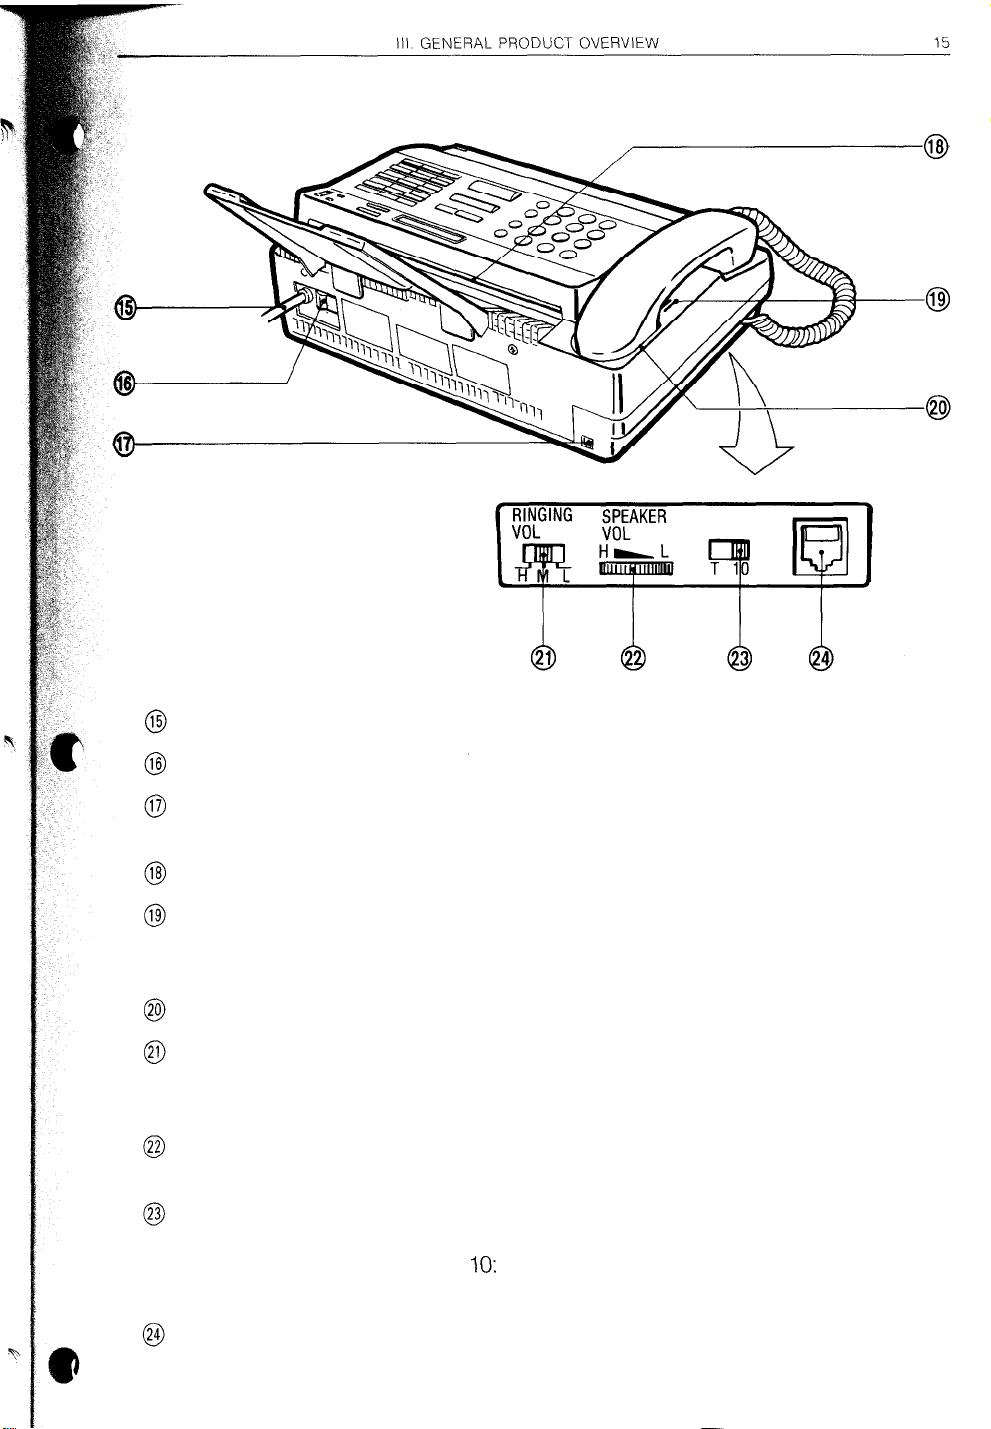
Power cord/plug
Insert the cord plug into an outlet.
Power switch
Line jack
Original document exit
Monitor speaker
Handset rest
Ring volume selector
Speaker volume control
Line selector
Handset jack
Turns the FO-220 on and off.
Connect the telephone line modular plug to
this jack.
Original
document(s) exits the machine here.
When dialing has been done using the SPEAK-
ER key with the handset on-hook, a response
or voice is heard from here.
The handset is placed here.
The desired telephone ring volume can be
selected from among three levels: high, mid-
dle and low.
When the SPEAKER key is pressed, the speak-
er volume is adjusted with this control.
Select 10 or T according to the type of the
telephone line.
10:
Dial pulse telephone mode 10 pps
T: Pushbutton telephone mode
The handset cord is connected to this jack.
III.
16
GENERAL PRODUCT OVERVIEW
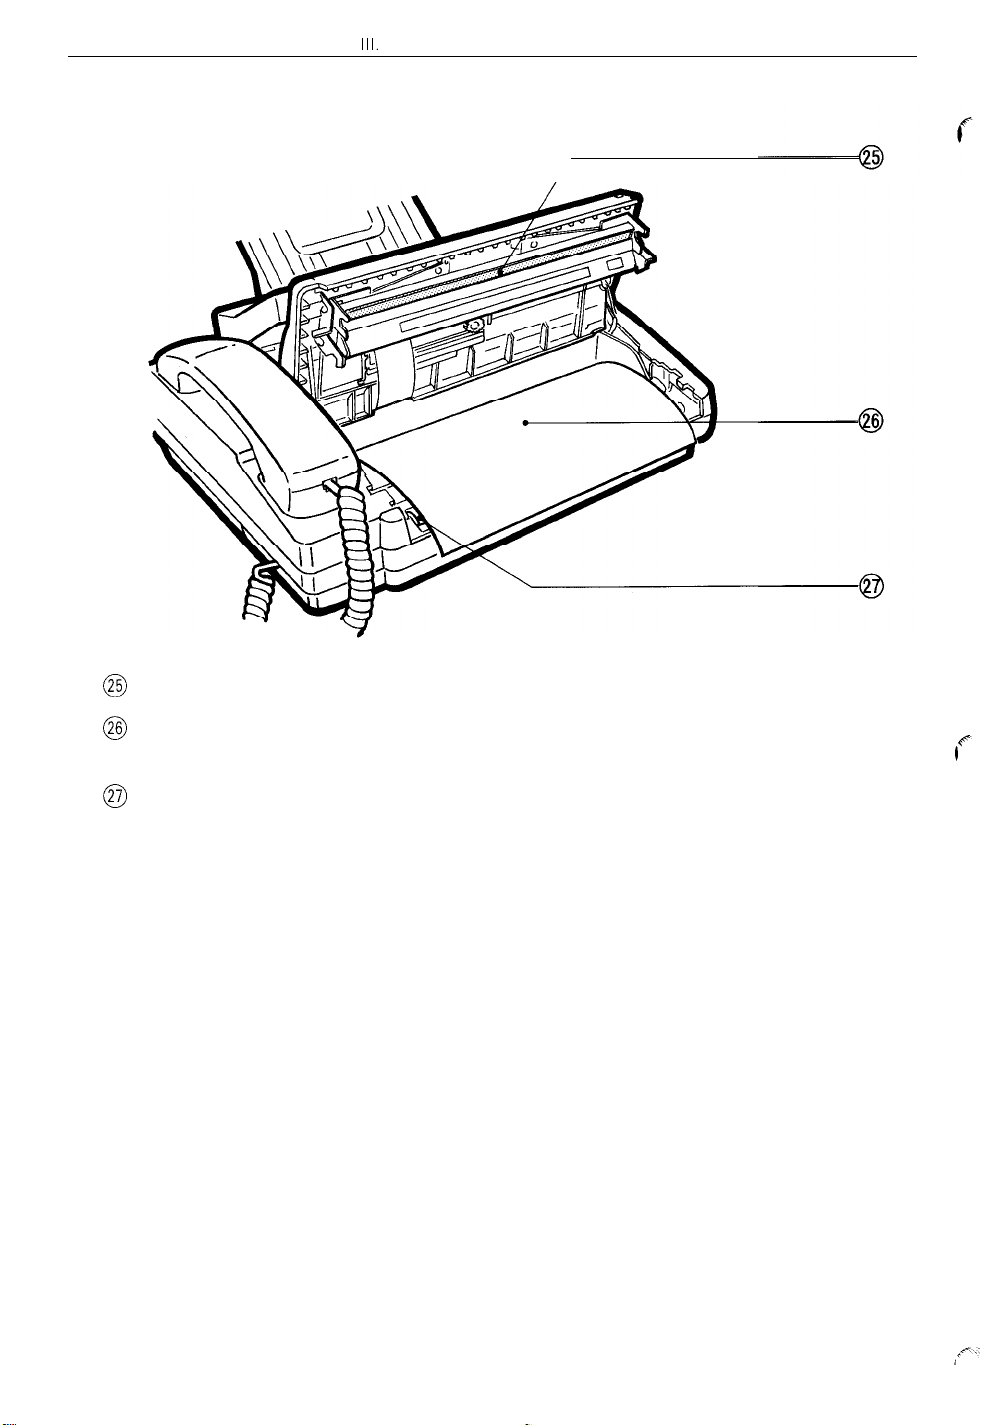
2. Recording Paper Compartment
@ Thermal head
@ Recording paper
@I
Paper feed roller
Records received information on the paper.
Received or copied images and text are printed on this paper.
Feeds out the recording paper.
III GENERAL PRODUCT OVERVIEW
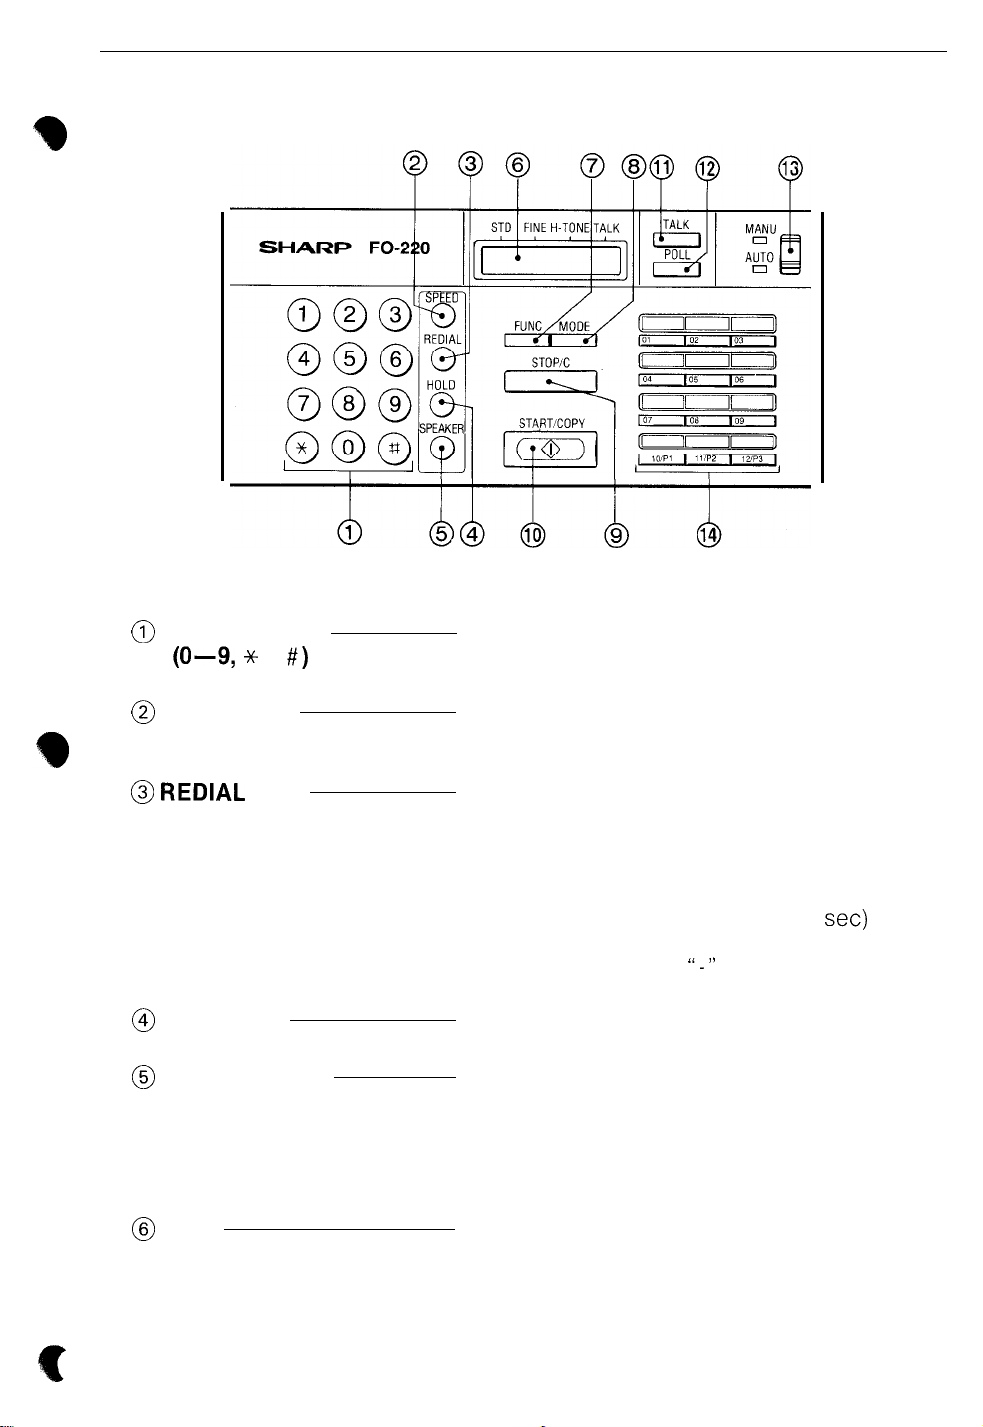
C. OPERATION PANEL
17
@
Numeric keys
(O-3
@ SPEED key
@
REDIAL
@I
HOLD key
@ SPEAKER key
@I
LCD
* ,
key
#)
These keys are used to program machine
operations (enter times, names, numbers, etc)
or to dial a facsimile telephone number.
For speed dialing, first press this key and then
enter the speed number (two digits) with the
numeric keys.
When this key is pressed in the standby state,
the last number dialed (by normal dialing,
speed dialing, rapid dialing or redialing) can
be automatically redialed.
When programming rapid or speed dial numbers, if you wish to put a pause (2
tween numbers, press this key. Each pause
entry is represented by “-I’ on the display. One
or more pauses can be entered.
Places the line on hold during voice communication.
Pressing this key allows you to dial with the
handset on-hook. After pressing the key, rapid
dialing and speed dialing for voice communication are also possible.
The handset is picked-up after you hear a
response.
Displays, during transmission, the name of the
other party with whom you are communicating, their telephone number and the current
operating state, and, during programming
operation, various messages including information on the next operating step.
set)
be-
18
((1
GENERAL PRODUCT OVERVIEW
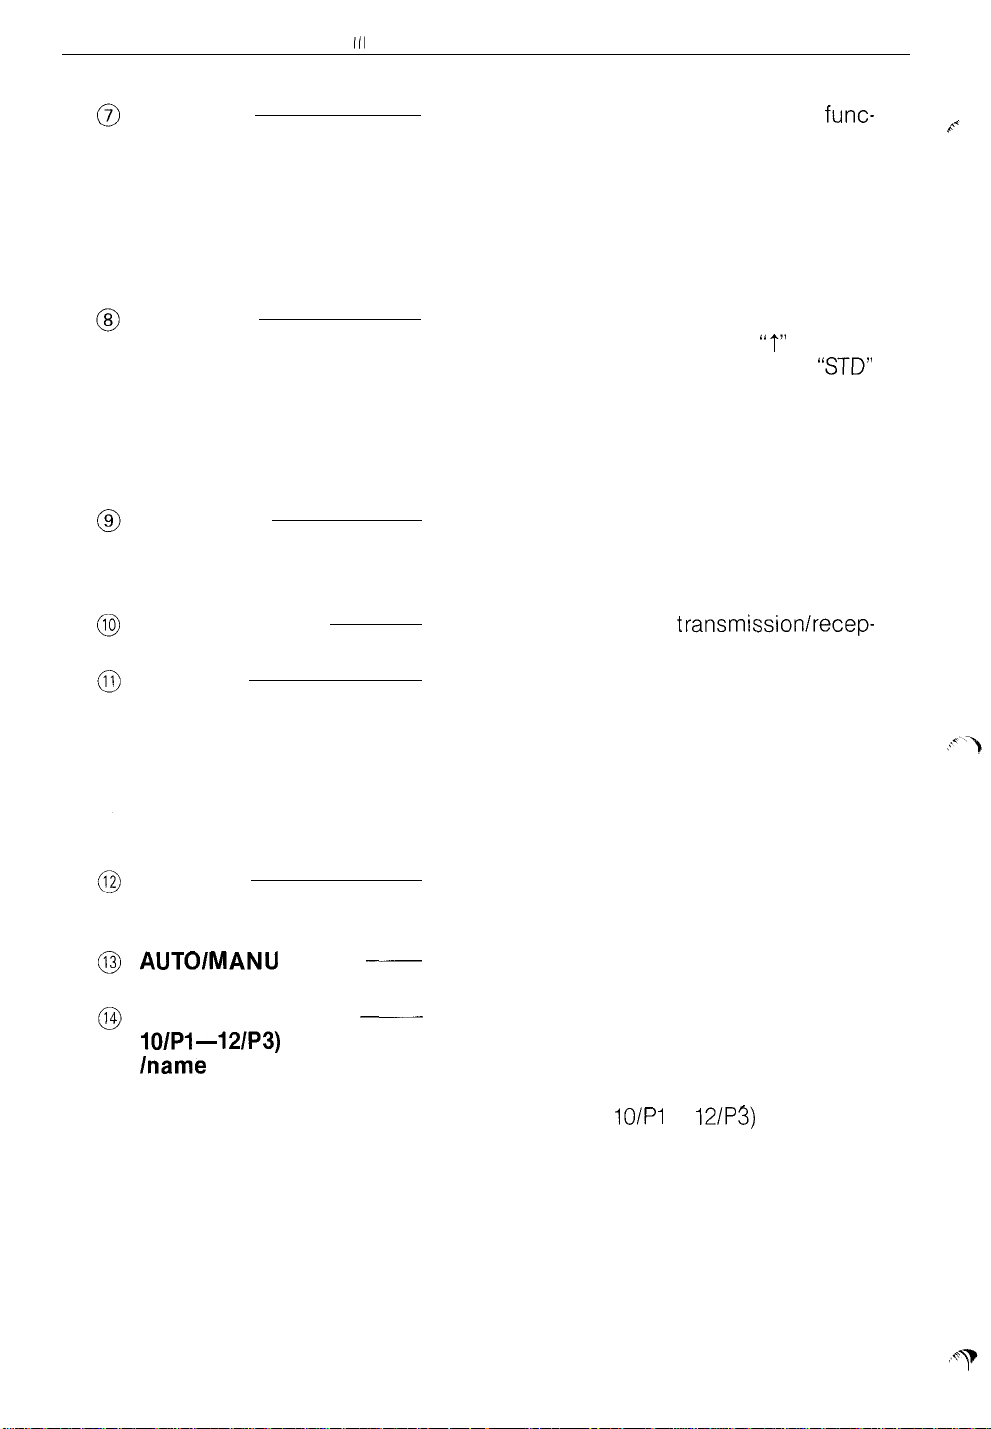
FUNC key
MODE key
STOP/C key
START/COPY key
TALK key
POLL key
AUTOlMANU
switch
Rapid keys (01-09,
lo/P1 -121P3)
/name labels
__
___
This key is first pressed to select various
func-
tions such as timer transmission, timer poll-
ing, relay broadcasting, confidential transmission, programming function, printing function,
various initial setting functions and user switch
programming.
When the key is pressed, prompts for available modes (functions) appear on the display
After the document is set in the document
feeder, when this key is pressed,
on the display; by pressing it repeatedly,
“t”
appears
“STD”
(standard), “FINE” and “H-TONE” (half-tone)
can be selected. “CONTRAST: AUTO” or
“CONTRAST: DARK” appears in the lower section of the display. Select the desired mode
depending on the document.
This key is used to terminate a transmission,
reception, copy operation, other operations
and alarms. Also serves as a clear key in
programming.
This key is used to start transmissionlrecep-
tion or copying. Also serves as the entry key.
Press this key when you wish to talk with the
person on the other end of the line, either be-
fore or after a transmission/reception. When
it is pressed before transmission/reception,
“TALK REQUEST” appears on the display; during transmission/reception, the arrow mark on
the display points to “TALK” to indicate that
“talk” has been reserved.
Press this key after dialing if you wish to
receive documents from the unattended remote machine which are in its feeder.
This switch is used to select either automatic
or manual receive mode.
Press one of these keys to dial the telephone
number. Programmed into that rapid key and
automatically transmit any documents that are
in the feeder.
Rapid keys (from
lo/P1
to
121P3)
works as a
program key too.
Write on the labels the names of the parties
whose telephone numbers are programmed
with these keys for rapid dialing.
Il.
SPECIFICATIONS
Ill GENERAL PRODUCT OVERVIEW
19
Model:
Applicable telephone line:
Configuration:
Compression scheme:
Scanning method:
Resolution:
Recording system:
LCD:
Receive mode:
Modem speed:
Approximate transmission
time*:
Recording paper size:
Effective recording width:
Input document size:
Automatic document
feeder:
Effective scan width:
CCITT G3/G2
Polling:
Confidential communication:
compatibility
FO-220
Public switched telephone network
Half-duplex, desk top, transmitter/receiver
Modified Huffman and SHARP mode
Flat-bed solid-state CCD
Horizontal . . 203 lines/inch (8 lines/mm)
Vertical
Thermal recording
7 x 5 dots, 2-line by 16-digit display
Auto/Manual switching
9600 bps with automatic fallback to 7200,
4800, or 2400 bps
Approx. 18 seconds (Sharp special mode)
8.5” (216 mm) wide, 98.4” (30 mm) long
paper roll
G3 mode 8.3” (210 mm) max.
G2 mode 8.1 ” (205 mm) max.
Normal size
Width: 5.83” to 8.5” (148 mm to 216 mm)
Length: 5.04” to 11 ” (128 mm to 279 mm)
Special size (Attended)
Width: 5.83” to 8.5” (148 mm to 216 mm)
Length: 11” to 39.4” (279 mm to 1000’mm)
Yes (10 documents max.)
G3 mode . . 8.3” (210 mm) max.
G2 mode
Standard
Standard
Yes (transmission only)
.._.
Standard: 98 lines/inch
(3.85 lines/mm)
Fine/Half-tone: 196 lines/inch
(7.7 lines/mm)
(to 27.6” (700 mm) G2 mode)
,.,
8.1 ” (205 mm) max.

20
III.
GENERAL PRODUCT OVERVIEW
Copy function:
Voice communication:
Program function:
Automatic dialing:
Standard
Yes
3 program keys
Rapid 12 stations
Speed 32 stations(including 12 rapid stations)
Keypad, Recall, Secondary facsimile unit call
Timer communication:
2 communications max.
(one transmission, one polling)
Half-tone (gray scale):
Contrast:
Power requirements:
Operating temperature:
Power consumption:
Dimensions:
Yes (16 steps)
Automatic/Dark selectable
120 VAC, 60 Hz
5 to 35°C (41 to 95°F)
121140 W (standbylmax.)
12.6” (W) x 9.45” (D) x 4.61 ” (H)
(320 mm (W) x 240 mm (D) x 117 mm (H))
Weight:
Approx. 10.4 Ibs (4.7 kg)
*Based on CCITT test chart #l at standard resolution in Sharp special mode
excluding time for protocol signals i.e. CCITT phase C time only.
Accessories:
Document
stacker
Handset/cord
Carrier sheet ................................................
Line cable
Operation
....................................................
manual
........................................
................................................
.........................................
1
1
1
1
1
).
The information contained in
this manual is subject to change without notice.
Iv,
INSTALLATION AND
21
CONNECTION c
e
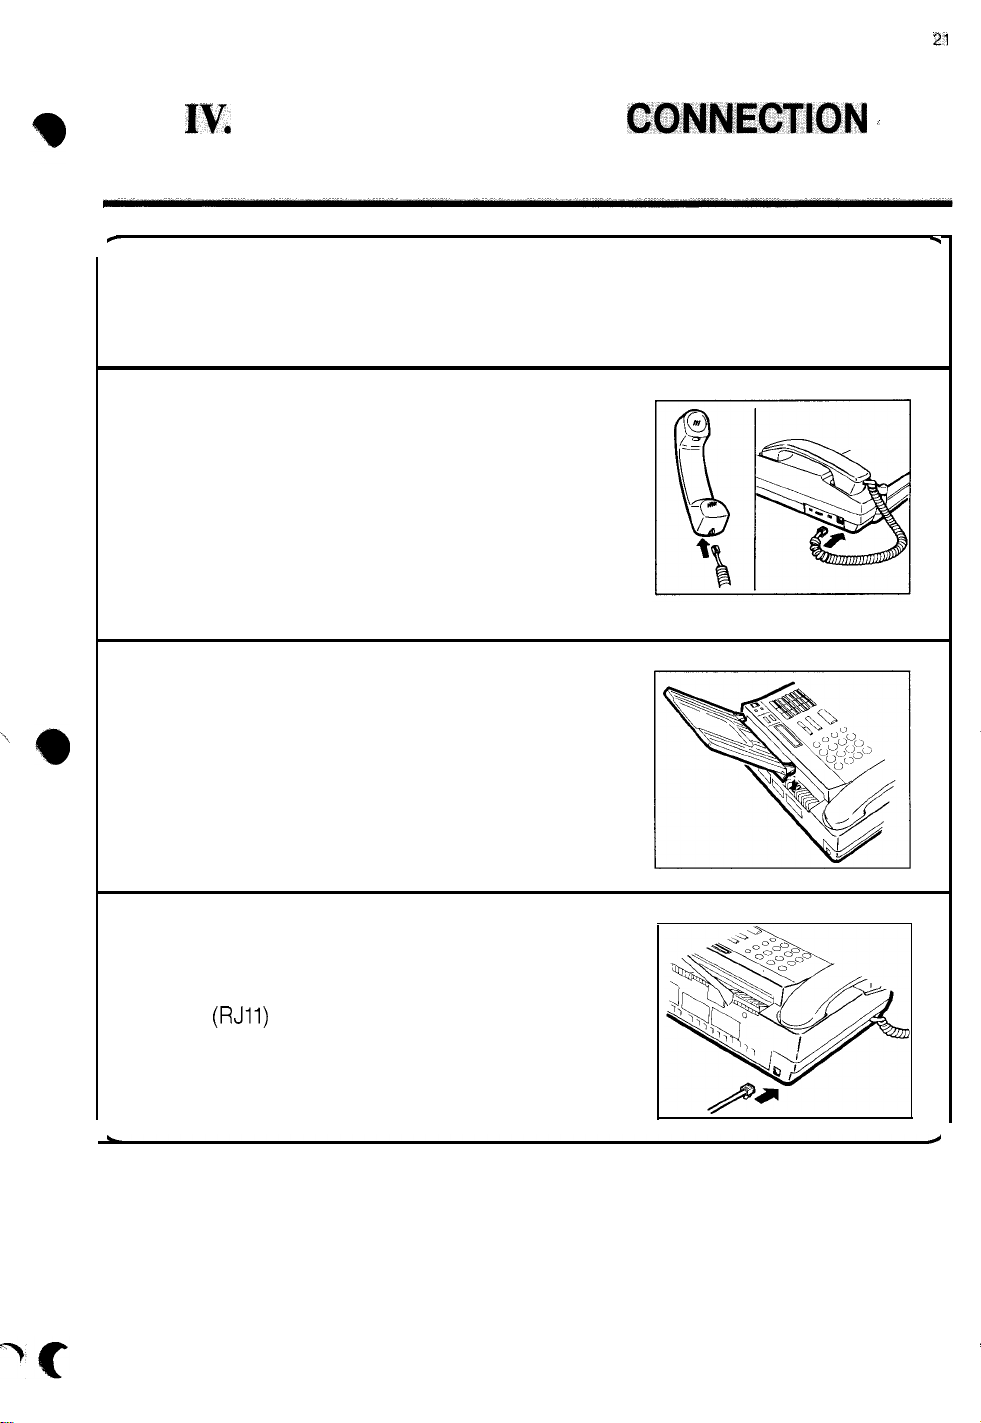
1. Take the machine out of the box and remove all packing material.
2. Place the handset into the cradle and insert one end of the handset cord plug into
the jack on the left side of the machine and
the other end into the jack at the base of
the handset.
3.
Mount the document-exit stacker by inserting the tabs of the stacker into the holes
at the rear of the machine.
.
4.
Insert one end of the telephone cord into
the jack on the back of the machine. Insert
the other end of the cord into the telephone
jack
(RJll)
on the wall.
22
IV. INSTALLATION AND CONNECTION
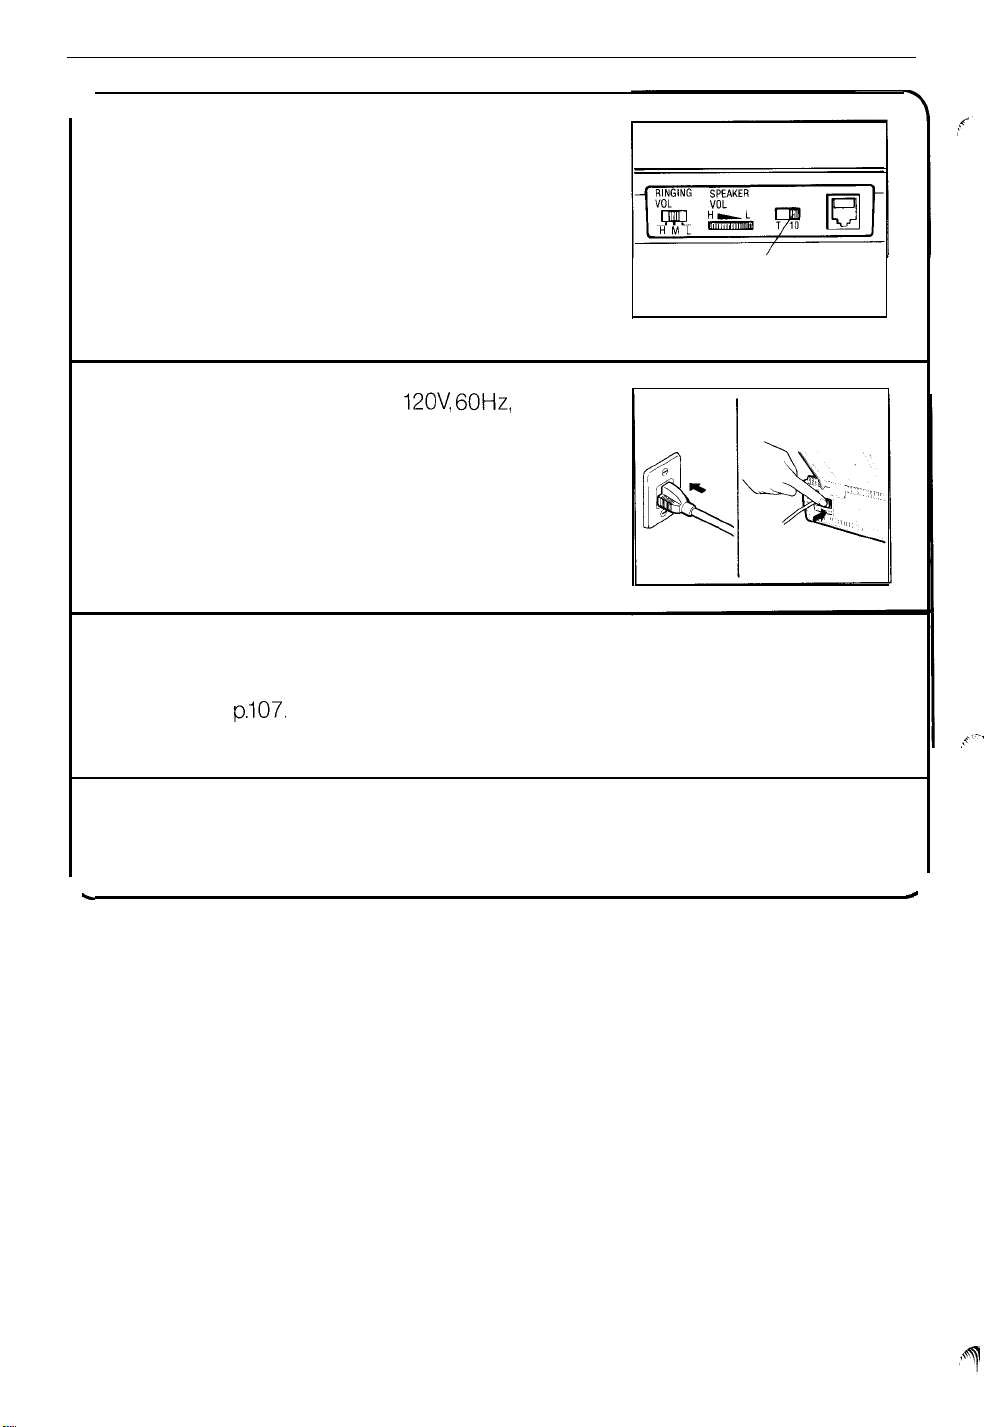
5. Selecting the line selector on left side of
the machine.
Select 10 or T according to the type of telephone line used.
10: Dial pulse telephone mode 10 pps
T: Pushbutton telephone mode
l If the setting is incorrect, you cannot
make a call.
6.
Plug the power cord into a
12OV, 60Hz,
outlet.
Turn on the power switch.
Line selector
wall
7. Place the recording paper roll (Sharp
FO-20PR6) into the paper compartment.
Refer to
p.107.
8. Proceed to PROGRAMMING section on
p.23.
c
#
V.
PROGRAMMING
A. USER (FACTORY-SET) SWITCHES
1.
Overview
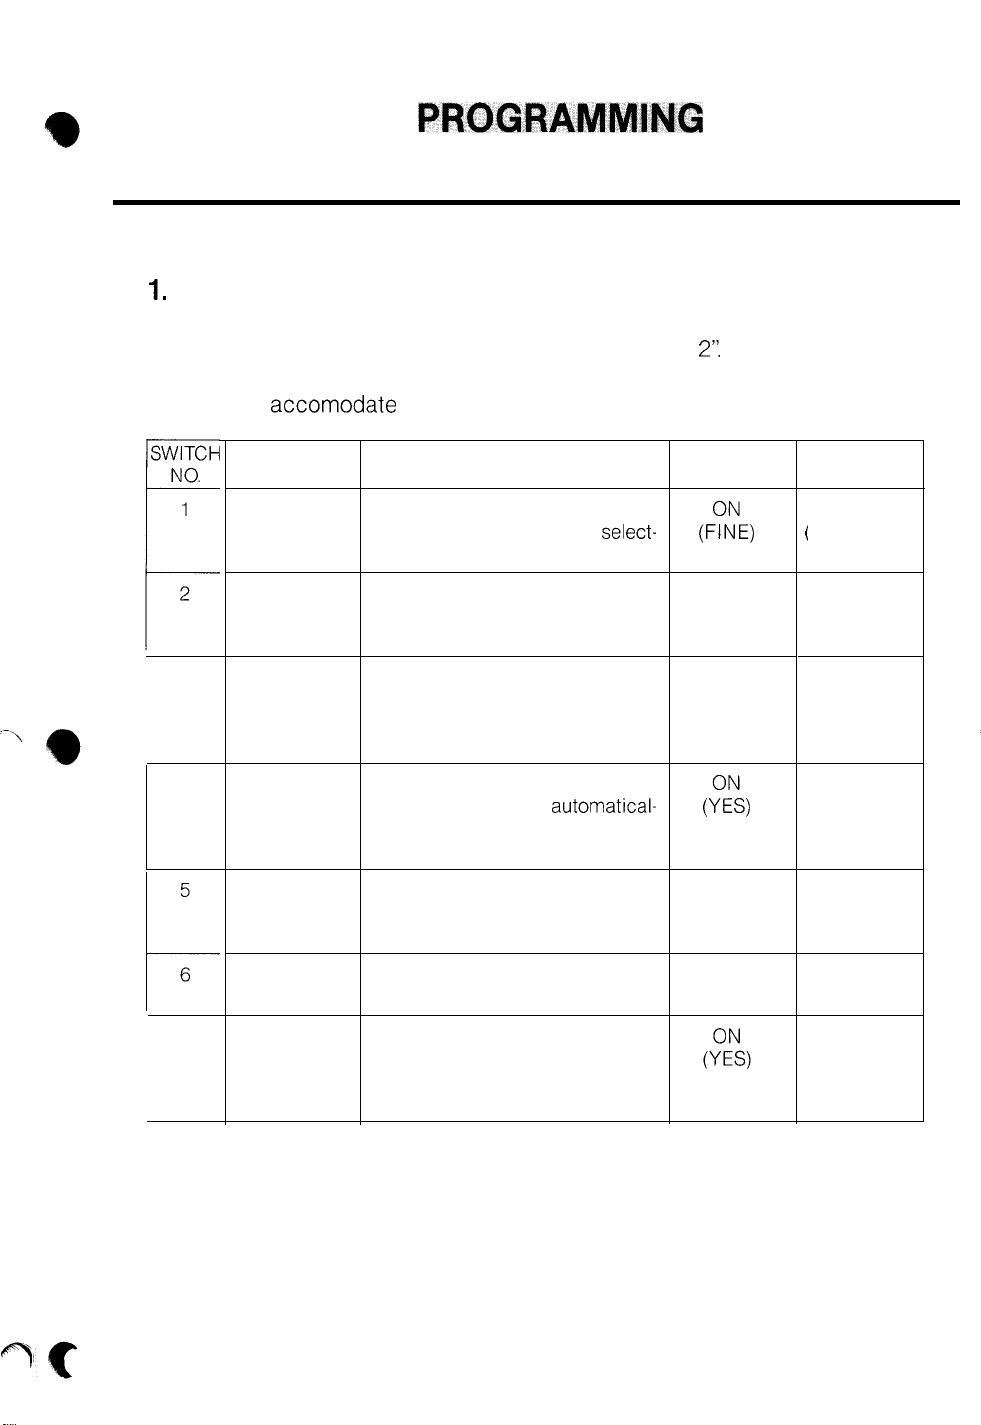
The FO-220 has 7 User Switches. Each switch can be set to one of two possi-
ble selections, and is preset at the factory at “SETTING
of each switch to determine if any of them need to be changed to “SETTING
1” to better accomodate your particular situation.
2’:
Review the purpose
23
ITEM
FINE
RESOLUTION
PRIORITY
NUMBER OF
RINGS TO
ANSWER
LENGTH OF
ACTIVITY
REPORT
4
AUTO
PRINTOUT
5
RECALL
WAIT
INTERVAL
6
NUMBER OF
t
RECALLS
6 RINGS
SWITCH
Resolution used when transmitting
or copying if a setting is not
ed manually with the MODE key.
In ‘AUTO” receive mode, the
machine starts reception after the
selected number of rings.
When Send/Receive (Activity)
Reports are printed, length is
either 11” or dependent upon
amount of stored data.
Send/Receive (Activity) Reports
are printed-out either automatical-
ly (YES) when memory is full or
only on demand (NO).
When dialed number is busy, unit
automatically redials after 1 or 5
minutes.
Number of automatic redials when 5 recalls
telephone number is busy.
In the “MANUAL’ receive mode
with “ON” selected, machine
switches automatically to fax
reception after 6 rings.
DESCRIPTION SETTING
select-
(F?E,
6 RINGS
11”
1 minute
1
SETTING 2
STANDARD)
1 RING
VARIABLE
5 minutes
2 recalls
OFF
OFF
(NO)
OFF
(NO)

24
V. PROGRAMMING
Switch 1 - FINE RESOLUTION PRIORITY Select the “FINE’ setting if a higher
resolution (better copy quality) is desired when transmitting or copying a
document. This setting can be overridden when desired by selecting a particular resolution setting with the MODE key. (Note: Using the “FINE” setting may increase the time and cost of a phone connection over the
“STANDARD” setting.)
Switch 2 - NUMBER OF RINGS TO ANSER: This function only operates when
the machine is set to “AUTO” reception, and determines the number of rings
before the machine answers the call and starts fax reception. Use the “1
RING” setting when the machine has a dedicated line for fax, and all calls
should be answered immediately by the machine. Select the “6 RINGS’ for
the a’bility to answer a call personally when desired before the 6th ring. If
you answer a call and hear a fax tone (someone is trying to send you a
fax), press the START key and hang-up for reception to begin.
Switch 3 - LENGTH OF ACTIVITY REPORT: Select the “11” setting if you
wish to have the Send/Receive (Activity) Reports printed
11”
in length. Use
the “VARIABLE” setting to have one continuous print-out of each report,
where length is dependent upon amount of data stored since last print-out.
(Note: “VARIABLE” setting will conserve paper when stored data does not
fill-up complete 11” length report.)
Switch 4 - AUTO PRINT-OUT Select “YES” to have the machine automatically
print-out the Send/Receive Activity Reports after every 30 transactions since
the last print-out. The report can still be printed on demand when desired.
Use “NO” to print-out the report only when necessary. (Note: If the report
is not printed by the 30th transaction, the older data will be erased. All data
is erased after it is printed out.)
Switch 5
RECALL WAIT INTERVAL: Select “1 minute” when automatic
-
redials of a busy telephone number should be made quickly. Use “5 minutes”
setting for a longer wait period.
Switch 6
NUMBER OF RECALLS: Select “5 recalls” for maximum redial
-
attempts with a busy telephone number. If connection is not made after
5 or 2 redials, Transaction Report will automatically print-out and you will
find original documents still sitting in the automatic document feeder.
V PROGRAMMING
25
Switch 7
-
6 RINGS
SWITCH:
This function only operates when the machine
is set to “MANUAL’ reception. Select “ON” if all calls are normally answered
within 6 rings and fax reception is desired when an operator is absent. Use
“OFF” if all voice and fax calls should be answered by an operator or not
at all.
2.
Programming Procedure
Programming all or a particular User Switch can be done with the following
procedure:
I
/
Repeat for
next decision
The display cursor
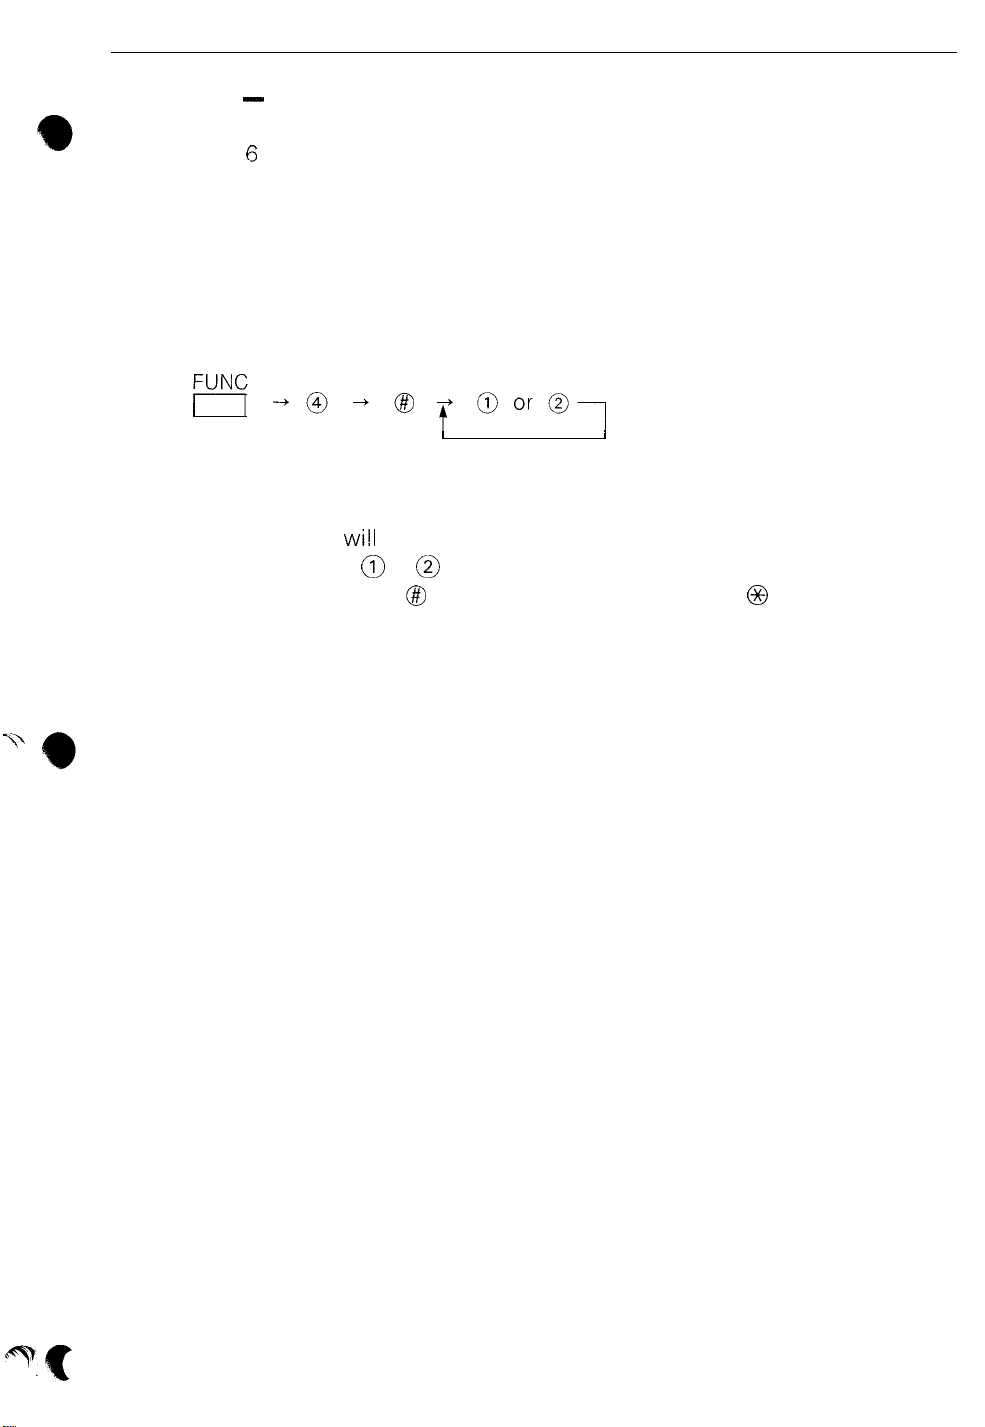
wi!l
flash on the current setting of the switch. To change
the setting, press the 0 or @ key. To skip switch setting and move to the next
switch decision, press the @I key. To go in reverse, press the 0 key. After mak-
ing decisions for all 7 switches, or if you wish to exit the procedure after set-
ting a particular switch, press the STOP/C key.
26
V. PROGRAMMING
B. FUNCTION PROGRAMMING OVERVIEW
All functions listed in this chapter require initial programming before any one
can be used The programming procedure for a particular function should also
be referenced when it current programming must be changed (as with “Transmit Terminal ID” or “Date & Time”) or information must be added or deleted
(as with ‘Rapid/Speed-Dial Numbers” or “Polling Permission Numbers”). Each
function has been classified as BASIC or ADVANCED. It is recommended that
all BASIC functions can be programmed immediately upon installation. AD-
VANCED functions can be programmed later as the need for any one arises.
1. Function Classification
NOTE:
Refer to each function’s programming chapter for a complete explanation of
the function’s purpose.
a) BASIC FUNCTIONS:
l Transmit terminal ID/Remote Therminal ID
l Date
&
Time
b) ADVANCED FUNCTIONS:
RapiedlSpeed-Dial/Secondary Numbers
Polling Permission Numbers
Polling Security Selection
Terminal ID Number
c) Other ADVANCED FUNCTIONS covered in other sections:
l Relay Tasks (refer to p.79)
l Program Keys (refer to p.91)
These functions do not follow the standard programming procedure.
V PROGRAMMING 27
2. Selection of Programming Mode
The following general procedure can be used to access the programming mode
of any function listed in the previous chapter (except the last two nonstandard
functions). Refer to each function’s programming chapter in this section for
a complete explanation of its programming procedure.
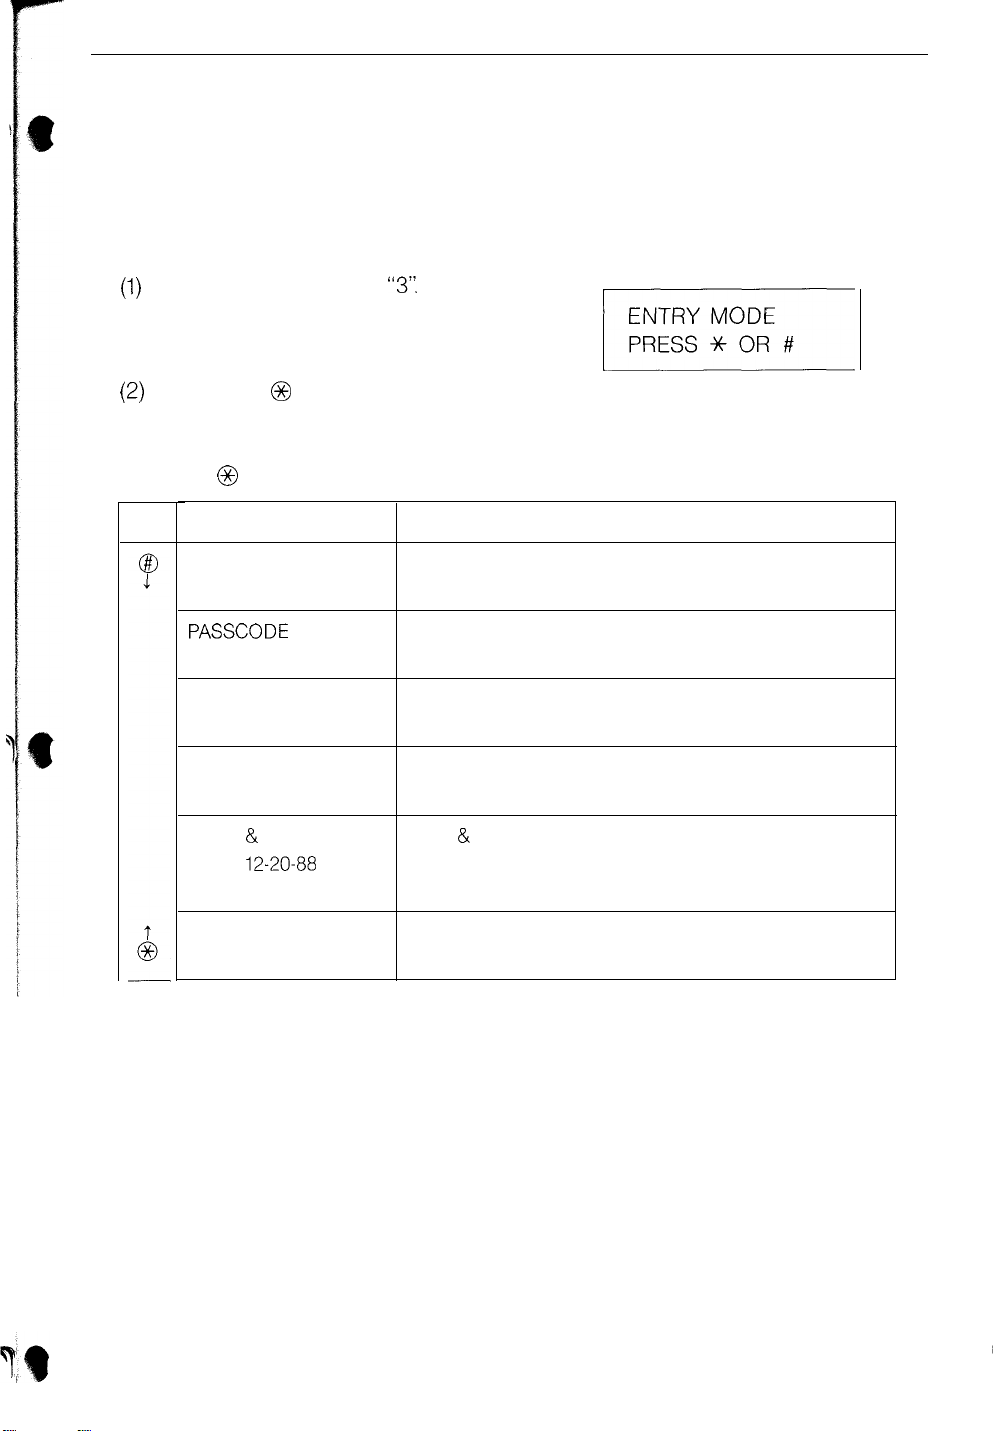
Press FUNC and enter
(1)
“3”.
The message
shown on the right is displayed.
Press @or @ to select a particular func-
(2)
tion for programming. To scroll down,
press @one or more times. To scroll up,
press @ one or more times.
KEY
SECURITY SELECT
OWN PASSCODE?
SET FAX #
DISPLAY
FAX/TEL. # MODE
l-SET, 2-CLEAR
PASSCODE
l-SET, 2-CLEAR
l-ON, 2-OFF
DATE & TIME SET
DATE
# MODE
12-20-88
(example)
Rapid/Speed-Dial/Secondary Numbers
Polling Permission Numbers
Polling Security Selection
Transmit Terminal ID/Remote Terminal ID
Date & Time Settings
FUNCTION
TERMINAL # MODE
SET 3 DIGITS
Terminal ID Number

28
V. PROGRAMMING
C. RAPID KEY/SPEED-DIAL/SECONDARY
The built-in autodialer of the FO-220 can hold up to 32 telephone numbers for
fax use and another 32 telephone numbers for voice (regular phone) calls. Each
fax and phone number is assigned a 2-digit speed-dial code, 01 to 32. Num-
bers with a code of 01 to 12 are also automatically assigned to one of the twelve
corresponding rapid keys. A fax number with a speed-dial code of 01 to 12 (us-
ing a rapid key) can also have a secondary “back-up” telephone number as-
signed to the same code-which is automatically called if the primary number
is busy.
AUTODIAL
NUMBERS
NOTES:
If waiting time is required for a second dial tone when dialing (for example,
if your machine is connected to an extension), add a Pause when entering
the telephone number by using the REDIAL key.
Example: Enter
tered by pressing the REDIAL key. The display indicates
One pause gives a time delay of approximately 2 seconds. It is possible
to enter two or more pauses.
Enter a
“1”
before the area code in dialing locations where required.
Pause” and “telelphone number”. The pause is en-
“9’:
“
‘c’
for a pause.
;-
\‘
If rapid key 10, 11 or 12 is used as a Program-Dial Key, a Rapid-Dial telephone
number cannot be assigned to the same key.
To check any entered or cleared autodialing data, print-out and refer to the
Telephone List (see
reference.
When a Rapid-Dial number (speed-code 01-12) is entered or changed, write-in
the location name on the keypad label provided (see
If incorrect data is entered during the procedure, press the STOP/C key to
erase the previously-entered data, then enter the correct data.
p.102).
Post the new Telphone List near the machine for
p.111).

V PROGRAMMING
--
1. Entering Rapid Key/Speed-dial/Secondary Numbers:
29
Step
1
2
0
3 @, 0 (An example)
4
0, 0, 0, 0, 0, 0, 0
START/COPY
5
6
0, 0,
START/COPY
7
Operation
FUNC
iI>@?@
(An example)
0,
(An example)
0,
@> 0,
@
Description
Standby mode.
Select the Rapid Key/Speed-Dial number
programming mode.
Select the entry mode.
Enter a
the numeric keys.
Enter the remote machine’s fax number by
ing the numeric keys (max. 30 digits).
If you do not wish to enter a fax number for
this code, skip step and go to next one.
Press START/COPY key.
Enter a telephone number for voice calls by
ing the numeric keys (max. 30 digits).
If you do not wish to enter a voice (regular
phone) number for this code, skip step and go
to next one.
Press the START/COPY key.
2-digit
speed-dial code
(01-32)
by using
us-
us-
(Refer to “Character
a
try,”
p.39)
9
0, 0, 0, 0, 0, 0,
(An example)
10
(Refer to “Character
try,” p.39)
11
(step 3) or
ST0 P/C
I/
En-
@
En-
Enter the name of the remote fax and/or phone
location, using a maximum of 20 characters.
If you do not wish to enter a name, press the
START/COPY key.
If using code 13 to 32, return to step 3 to enter
next code or press the STOP/C key to exit
procedure.
Enter a secondary fax number by using the
merit
keys (max. 30 digits).
If you do not wish to enter a secondary number, press the START/COPY key. Return to step
3 to enter the next code or press SOP/C to exit
procedure.
Enter the name of the secondary fax machine
location, using a maximum of 20 characters.
If you do not wish to enter a name, press the
START/COPY key.
Return to step 3 to enter next code or press
the STOP/C key to ext procedure.
nu-

30
V PROGRAMMING
3. Clearing a Rapid-Key/Speed-Dial Number
NOTE:
It is not possible to clear a Rapid Key/Speed-Dial number which is used in
another function-such as Timer Transmit, Timer Polling, Relay Task or a
Program-Dial Key. To clear this number, first clear all other function programs
that use the number.
<. 3
2
Step
1
2
0
3 @, @ (An example)
4
(step 3) or
Operation
FUNC
r---J 0, @
STOP/C
II
Description
Standby mode.
Select the Rapid-Key/Speed-Dial number
programming mode.
Select the clear mode.
Enter the
cleared by using the numeric keys.
(Both fax and phone numbers assigned to code
are cleared.)
Return to step 3 to clear the next code or press
the STOP/C key to exit the procedure.
2-digit
speed-dial code (01-32) to be

V PROGRAMMING
D. POLLING PERMISSION NUMBERS
If the Polling Security function of the next chapter is used, only remote machines
whose fax numbers have been entered as Polling Permission Numbers in your
unit will be allowed to poll your unit. (When a remote unit polls your unit, the
remote unit “picks-up” any documents from the feeder of your unit it initiates a transmission from your unit to the remote unit.) Up to 10 different fax
numbers can be entered as Polling Permission Numbers.
NOTES:
l To check programmed Polling Permission Numbers, print-out and refer to the
“Passcode List” (see
l The Polling Permission Number should be the same number programmed
into the remote unit as its Remote Terminal ID (RTI) number.
l If incorrect data is entered during the procedure, press the STOP/C key to
erase the previously-entered data, then enter the correct data.
1. Entering Polling Permission Numbers
p.103).
31
Step
1
2
0
3 @, @ (An example)
0,
4
START/COPY
5
6
(step 3) or
Operation
FUNC
n
> 0,
o,o,
(An example)
@I, @
OX@>
STOP/C
[
0,
Description
Standby mode.
Select the Polling Permission Number programming mode.
Select the entry mode.
Enter a
(01-10) by using the numeric keys.
0
Enter the RTI (fax number) of the remote unit
(max. 20 digits).
Press the START/COPY key.
Return to step 3 to enter next Polling Permission Number or press the STOP/C key to exit
procedure.
2-digit
Polling Permission code number

32
V. PROGRAMMING
2. Clearing Polling Permission Numbers
Step Operation
FUNC
1
2
3
4
5
~~>O,@>@L
0
@ , @ (An example)
START/COPY
ST0
P/C
(step 3) or
I)
Description
Standby mode.
Select the Polling Permission Number program-
ming mode.
Select the clear mode.
Enter the
ber (01-10) to be cleared by using the numeric
keys.
Press the START/COPY key.
Return to step 3 to clear another polling permission number, or press the STOP/C key to exit
procedure.
2-digit
polling permission code num-

V.
PROGRAMMING
E. POLLING SECURITY SELECTION
If polling security is set, only remote machines whose TTI fax numbers have
been entered into your unit as Polling Permission Numbers will be able to poll
your unit. If polling security is cancelled (referred to as “free polling”), any remote unit can poll your unit. (When a remote unit polls your unit, the remote
unit initiates transmission of any documents in the feeder of your unit back
to the remote unit.)
NOTE:
To check the status of polling security, print-out and refer to the “Passcode List”
(see
p.103).
1.
Setting & Cancelling Polling Security
33
Step
1
2
3
4
FUNC
1-1
Select the Polling Security Selection mode.
@or@
START/COPY
ST0
I
(go to next chapter)
Operation
, 0, @,
P/C
Or
@I, @
Description
Standby mode.
Enter
“1”
to set polling security.
Enter “2” to cancel polling security.
Press the START/COPY key.
Press the STOP/C key to exit the procedure. Or
go to the next chapter to program the TTI
RTI.
&

34
V. PROGRAMMING
F. TRANSMIT TERMINAL IDENTIFICATION & REMOTE TERMINAL
IDENTIFICATION
When documents are transmitted, the TTI (also called “SENDER’S NAME”) is
printed automatically at the top of each page at the receiving unit, along with
the date, time and page number.
Your fax number acts as the RTI, and is used as a Polling Permission
code which is checked by a remote unit with polling security. The RTI also appears in the display of the remote unit during a transaction with your unit.
NOTES:
To change the TTI or RTI, redo the entry operation.
To check the TTI or the RTI, print-out and refer to the Passcode List (see
If incorrect data is entered during the procedure, press the STOP/C key to
erase the previous data, then enter the correct data.
During a transaction, the RTI of the other unit appears in your unit’s display.
Check this read-out to verify correct hook-up.
Pass-
p.103).
. .
Transmitted Copy Example
Date of transmission
I
NO”-
5-08
1912
I
SCIT 12:34
Chairman Tokuji
with TTI:
1 I
SHARP
TEST SHEET
Hayakrwa sets
up business as a
Sender’s name
I I
CORP.
metal
Page No.
I I
P.01
6
worker In Tokyo.

V. PROGRAMMING
35
2. Entering TTI and
Step
1.
0, 0, 0, 0, 0, @>@I
2.
START/COPY
3.
4. (Refer to
“Character Entry”)
Or I
5.
(Go to “Date & Time”)
Operation Description
FUNC
II
, @ , 8 , 0,
Select the function’s programming mode.
(An example)
START/COPY
ST0
P/C
nor
RTI:
Standby mode.
@
Enter your fax number to be used as your
and Polling Permission
digits).
If you do not wish to program or change the
RTI,
skip step and go to next.
Press the START/COPY key.
Enter your name using the 8, @, 0, @ and
START/COPY keys (max 24 characters).
See “Character Entry” p.39.
If you do not wish to program or change the
TTI, press the START/COPY key.
Press the STOP/C key to exit programming
mode, or go to next chapter to program date
and time settings.
Passcode
RTI
(max. 20

36
G. DATE & TIME SETTINGS
V. PROGRAMMING
The FO-220 has a Timer
functio
which makes it possible to transmit and/or poll
documents at a specific time. In order to accomplish this, the Date )) Time settings must be programmed. The Date & Time settings also appear in various
reports and is added to the top of all transmitted copies along with your TTI
and page number.
NOTES:
l To correct/change the currect Date &Time settings, redo the entry operation.
l To check the currect Date
mode.
Example of LCD:
To check the year setting of the date, print-out and refer to the
List (see
p.103).
Remember to change the settings when time shifts occur (e.g., daylight saving time).
If incorrect data is entered during the operation, press the STOP/C key to erase
the previous entry and enter the correct data.
&
Time settings, refer to the LCD in the standby
J 1
Day of
Week
1
Month Day
1
NOV - 15 MON
x--E%
STAND - BY
Time
11:30
***
Passcode

1. Entering the Date & Time
V
PROGRAMMING
37
Step
FUNC
1.
2.
3.
4.
5.
6.
7.
r---J~O~O>O
0 , @
(An example)
@ , @
(An example)
@ ,
@ (An example)
@I
0, @
@,
(An example)
(Example for 1 pm)
@ (An example)
START/COPY
8.
I
ST0
P/C
9.
I
(Go to “Terminal No.“)
Operation
Or
Description
Standby mode.
Select the Date & Time entry mode.
Enter the month with
Enter the day with
Enter the year with
2-digits
2-digits
2-digits.
(01 12).
(01 31).
Enter the day-of-week code (0 - 6).
Refer to table below.
Enter the hour with
Enter the minute with
2-digits
2-digits
(00 - 23).
(00 - 59).
Press the START/COPY key
Press the STOP/C key to exit programming
mode, or go to next chapter to program the Terminal Number,

38
H. TERMINAL NUMBER
V. PROGRAMMING
The Terminal Number is the
number appears on the
3-digit
Passcode
ID number assigned to the fax unit. This
List and Send/Receive Activity Reports. It
is useful for distinguishing listings when two or more fax units are installed at
the same location. The Terminal Number has no relation to the
TTI/RTI
func-
tion or to automatic dialing.
NOTES:
l To correct or change the Terminal Number, redo the entry operation.
l To check the Terminal Number, print-out and refer to the
Passcode
List (see
p.103).
l
If incorrect data is entered during the operation, press the STOP/C key to erase
the previous entry and enter the correct data.
1. Entering the Terminal Number
Step
1.
2.
FUNC
r--J > @IO
0, 0, @
Operation
(An example)
Standby mode.
Select the Terminal Number entry
Enter a
3-digit
Description
mode.
ID by using the numeric keys.
START/COPY
3.
STOP/C
4.
I
(go to “Rapid/Speed-
Dial programming)
Press the START/COPY key.
Or
Press the STOP/C key to exit programming
mode or go to “Rapid-Key/Speed-Dial Number”
programming, p.28.

V. PROGRAMMING
I.
CHARACTER ENTRY
1. General Character Entry Procedure
NOTE:
If an incorrect entry is made during the procedure, press the STOP/C key to
erase the entry and enter the correct data.
Available characters are divided into 4 blocks (or levels) as shown below.
(1)
Press the @ or @ key until the first character of the desired block is displayed.
After displaying the first character of the block, select the character to be
(2)
entered by using the @or @ key.
Press the START/COPY key to enter the selected character.
(3)
Repeat steps 1, 2 and 3 above to enter remaining characters.
(4)
Press the START/COPY key again when all characters have been entered.
(5)
39
2.
Available Characters
Note:
@
moves the cursor to the right on the character table.
0
moves the cursor to the left on the character table.
@
moves the cursor up on the character table.
@
moves the cursor down on the character table.
[Character Table]
#+
0
y
0123456789
ABCDEFGHI
abcdefghijklmnopqrstuvwxyz
n #$ % 84’ ( )*+ ) - /: ;<=>?[V]
JKLMNOPQRSTUVWXYZ
A
_’
+O
(I} +
0
. . . Space
t@.

A. TRANSMITTABLE DOCUMENTS
1. Document Sizes
5.83” - 8.5” (148 216 mm)
5.04” 11” (128 - 279 mm)
11” - 39.4” (279 - 1000 mm); G3 mode
11” - 27.6” (279 - 700 mm): G2 mode
___----
___- - -
.*’
,I
____--
(Max.)
Letter size
/-
7
-------;;:;jq
___---
r
,/
,/
_A
5.04”
(128 mm)
width
lenath
,/’
,A
,_.’
,A
_,*’
Normal size
Special size length
l With special sizes, only one sheet can be fed into the machine at a time.
,A-
/
_A
(Min.)
m---_---____
5.83”
(148
mm)
8.5” (216 mm)
[Normal size]
8.5” (216 mm)
[Special size]
2. Paper Thickness: Weight
Normal
Special
size
Thickness
Weight
Thickness
size
Weight
2.4x10 -3
0.07x10 -3-
4.7x10 -3
0.15x10 -3-
-
4.7x10 -3
0.15x10⁻³ Ibslinch’ (52 - 104
-
7.9x10 -3
0.20x10⁻³
inch (0.06 - 0.12 mm)
inch(0.12
lbs/inch2
-
0.20 mm)
(104 - 157
g/m’)
g/m2)

VI. PREPARING FOR TRANSMISSION
3. Document Types
Normal paper
Documents handwritten by pencil (No. 2 lead or softer), fountain pen, ball
point pen, or felt-tipped pen can be transmitted.
Documents of normal contrast duplicated by a copying machine can also
be transmitted.
Diazo copy (blueprint)
Diazo copy documents of a normal contrast may be transmitted.
Carbon copy
A carbon copy may be transmitted if its contrast is normal.
4. Cautions on Transmitting Documents
l
Documents written in yellow, greenish yellow, or light blue ink cannot be trans-
mitted.
l
Ink, glue, and correcting fluid on documents must be dry before the docu-
ments are transmitted.
l
All clips, staples and pins must be removed from documents before trans-
mission.
41
B.
AUTOMATIC DOCUMENT FEEDER CAPACITY
Number of pages that can be placed into the feeder at any time is as follows:
Normal size: max. 10 sheets
Special size: single sheet only (manual feed)
NOTES:
l
When you need to send or copy more pages than the feeder limit, place ad-
ditional pages in feeder when last page in feeder is being scanned.
l
Place additional pages carefully and gently in feeder.
If force is used, double-feeding or a document jam may result.

42
VI. PREPARING FOR TRANSMISSION
C. READABLE WIDTH AND LENGTH
The readable width and length of a document slightly smaller than the actual
document size.
Note that characters or graphics outside the effective document scanning range
will not be read.
l
Readable width
G3 mode
,.........
8.3” (210 mm) max.
G2 mode . . . . . . . 8.1” (205 mm) max.
k
Readable width
l
Readable length
This is the length of the document sent minus
4
0.16”
(4 mm) from the top and
bottom edges.
lr
Readable length

VI. PREPARING FOR TRANSMISSION
D. USE OF DOCUMENT CARRIER
A document carrier must be used for the following documents.
l Those with tears.
l Those smaller than size 5.83”(W) x
l Carbon-backed documents
NOTE:
To transmit a carbon-backed document, insert a white sheet of paper between
the carbon back of the document and the document carrier.
l
Those containing an easily separable writing material (e.g. tracing paper written
on with a soft, heavy lead pencil).
Direction of insertion
5.04”(L)
(148 mm(W) x 128 mm(L)).
Place the document carrier in the document
feeder with the clear film side down
43
NOTES:
l When using the document carrier, carefully read the instructions written on
the back.
l If the document carrier is dirty, clean it with a soft, moist cloth, and then dry
it before using for transmission.
l Do not place more than one document in the carrier at a time.

Before a document is transmitted or copied, one of four special settings can
be
selected by using the MODE key:
STD (standard resolution) - use this setting for ordinary documents and
(1)
to achieve best transmission speed possible.
FINE (resolution) - use this setting for documents small characters or fine
(2)
drawings.
H-TONE (half-tone) - use this setting when your original document(s) con-
(3)
tains photographs,
illustrations or gradations. Copy will be reproduced in
16 shades of grey.
-
CONTRAST DARK
(4)
NOTE: The FO-220
use this setting for very light originals.
has an Automatic Contrast Control. Therefore, the unit
should normally be kept at the “CONTRASTAUTO” setting, unless document
is very light.
GENERAL NOTES:
l
To check the reproduction quality of a document with or without a special
MODE key setting, make a copy of the document on the unit and make any
adjustments if necessary after reviewing copy.
l
If you change a MODE setting during a multi-page transmission/copying operation, the mode change becomes effective with the following page.
l
If you do not select a special MODE key setting, the unit will automatically
use the default mode (STD or FINE) as programmed in User Switch#l and
CONTRAST AUTO.

XII. SELECTION OF MODE KEY SETTING
Procedure for Selecting a MODE Key Setting
(1) Place documents face-down into the
feeder.
(2) Press the MODE key repeatedly until
desired setting is reached. The
tor appears in the upper section of the display and shifts to the right each time the
MODE key is pressed.
Indicator moves from “STD” to “FINE” to
“H-TONE”,
When MODE key is pressed a fourth time,
“CONTRASTAUTO” in display changes to
‘CONTRAST DARK’:
“t”
indica-
FUNC MODE
STD FINE H-TONE
1
CONTRAST: AUTO
45
1
STD FINE H-TONE

Documents can be transmitted to a remote unit using any one of the three
folow-
ing dialing methods:
A. Using the Keypad
6.
Using a Rapid Key
C. Using s Speed-Dial
Code
IMPORTANT NOTES:
l
Keypad dialing can be used to transmit to a remote unit that is in the AUTOMATIC or MANUAL reception mode. Rapid Keys and Speed-Dial Codes, though,
should only be used to transmit to a remote unit that is in the AUTOMATIC
reception mode. (A remote unit in the MANUAL reception mode usually requires that you do not press your START/COPY key until after you speak with
the remote operator and wait for a fax tone.)
l
The autodialer of the FO-220 can hold up to 32 remote fax numbers and 32
voice numbers. The fax and voice numbers with speed codes of 01 to 12 can
be dialed either by using the speed-dial code or by pressing the corresponding rapid key.
l
If a number is busy using a speed-dial code or rapid key, the FO-220 automatically enters the RECALL mode and redials the remote unit either two
or five times at 1 or 5 minute intervals - depending upon the programming
of User Switch No. 5 and 6.
l
If a rapid key or speed-dial code of 01 to 12 is used which has a programmed
secondary fax number, this “back-up” number is dialed immediately if the
primary number is busy.
If the secondary number is also busy, the primary number is then redialed
2 or 5 tomes at 1 or 5 minute intervals.
l To check the programmed autodialing numbers for fax and voice calls
-
including secondary fax numbers for speed-dial codes 01 to 12-Print-out
and refer to the Telephone List, see
P.102.

VIII IMMEDIATE TRANSMISSION
l
To program the autodialer, refer to “Rapid Key/Speed-Dial/ Secondary Autodial
Numbers,”
l Press the
l If an intermittent alarm sound is heard during or after a transmission, check
p.28.
REDIAL
key to immediately redial a busy number.
the following points:
47
Display
v
LIFT HANDSET
THEN PRESS TALK
/
Meaning
Complete transmission was not made successfully Check Transaction Report for actual
cause and take appropriate action if necessary before resending documents.
Talk is requested by your unit or the remote
unit.
l
1
Pick-up the handset, press the TALK key and
wait for remote operator.
The handset is off the hook.
l
Hang-up the handset and press STOP/C key.

48 VIII. IMMEDIATE TRANSMISSION
A. USING THE KEYPAD
Refer to “IMPORTANT NOTES” at beginning of this section,
F
1.
Make sure that the display reads “STANDBY”. If it does not, check to see if the POWER switch has been turned on or if the
power cord is properly connected.
2.
Open the document hopper for access to
the document feeder.
Adjust the document guide to the width of
your documents.
K‘
3. Place the document(s) face down in the
document feeder. Up to 10 sheets can be
stacked at one time.
The first page will be fed automatically into
the machine about 0.8” (2 cm). The display
reads “SEND READY”,
4. Select a MODE key setting if necessary
(Refer to Selection of “MODE Key Setting”,
p.44).
.
FUNC MODE
'W
STOP/
I
/
Continue

VIII
IMMEDIATE TRANSMISSION 49
5.
Pick up the handset and dial the receiving
machine by using the numeric key.
Dialing can be done without picking up the
handset (On-hook dialing). Press the
SPEAKER key, listen for the dial tone and
then dial.
6. Wait for the connection and facsimile
an-
swerback tone. If the remote unit is in
manual reception mode, the remote operator must first press their START/COPY key
after speaking with you. This then causes
the remote unit to issue an answerback
tone.
7. Press the START/COPY key, then hang-up
the handset if used. Check the display to
see that communication with the receiving
machine has been established. The RTI of
the remote unit, if programmed, appears in
your display when transmission begins.
START/COPY
LGl
8.
At the end of transmission, the buzzer will
sound for 3 seconds and then the machine
returns to the STAND-BY mode. Pick-up
your original documents in stacker at rear
of machine.

50
XIII. IMMEDIATE TRANSMISSION
B. USING A RAPID KEY
Refer to “IMPORTANT NOTES” at beginning of this section.
The rapid keys, located at the right side of the operation panel, can be used
to dial telephone numbers with speed-dial codes of 01 to 12.
e
1.
Make sure that the handset is securely in
place, the display reads “STAND-BY”; and
the document hopper is opened. If so, in-
sert up to 10 pages face-down into the
feeder.
2.
Select the MODE key setting if necessary
(Refer to “Selection of Mode Key Setting,”
p.44.)
3. Without picking-up the handset or pressing the SPEAKER key, press the Rapid Key
for the desired destination which has a
Speed-Dial Code of 01 to 12.
FUNC
I
r
MODE
'W
STOP/
#
Continue

VIII
IMMEDIATE TRANSMISSION
4.
The destination name will appear in the display (if the name is not programmed, the
telephone number will appear). Automatic
dialing will start.
l If the incorrect Rapid Key has been
pressed, press the STOP/C key to cancel
the call.
5. If the primary number is busy, the secondary number will be called if programmed.
If secondary number is also busy or not
programmed, redialing of primary number
will take place.
6. Transmission takes place once connection
is made.
When transmission is completed, an alarm
sounds and the machine returns to the
STAN D-BY mode.
51
.

XIII
52
IMMEDIATE TRANSMISSION
C. USING A SPEED-DIAL CODE
Refer to “IMPORTANT NOTES’ at the beginning of this section.
Speed-Dial Codes can be used to dial remote fax machines whose telephone
numbers have been entered into the autodialer with codes 01 to 32. Telephone
numbers with Speed-Dial Codes of 01 to 12 can be dialed more quickly by using their corresponding Rapid Key (see previous chapter).
1.
Make sure that the handset is securely in
place, the display reads “STAND-BY”, and
the document hopper is opened. If so,
sert up to 10 pages face-down into the
feeder.
in-
“:“““‘“‘“““I‘
2.
Select the MODE key setting if necessary.
(Refer to “Selection of Mode Key Setting,”
p.44.)
3. Without picking-up the handset or pressing the SPEAKER Key, press the SPEED
key and then enter the 2-digit speed-dail
code (01-32) using the numeric keys.
FUNC MODE
'W
STOP/
r
I
Continue

XIII. IMMEDIATE TRANSMISSION
4. Check the display. If the remote location
name or telephone number shown is correct, press the START/COPY key.
l
If incorrect, press STOP/C key, then press
SPEED key again and enter correct code.
5.
If dialed number is busy, automatic
ing takes place. If speed-code of “01” to
redial-
“12”
used, the secondary number, if programmed, is dialed first before redialing of
primary number begins.
DEC-20 WED
5551234
53
12:34
6. Transmission takes place once connection
is made.
When transmission is completed, an alarm
sounds and the machine returns to the
STAN D-BY mode.

The FO-220 can make a sample copy of documents you may wish to transmit.
This feature allows you to confirm how the copy would look at a receiving
machine and to determine if the MODE key setting needs an adjustment.
With this function, the FO-220 can also act as a convenience copier when
necessary.
NOTES:
If the STOP/C key is pressed during copying, copying will stop and the document will be discharged.
During copy operation, the machine is in the MANUAL receive mode.
If a call comes in from a remote machine during this time, first make voice
communication by picking up the handset.
You can begin facsimile reception once the copying operation is complete
by pressing the START/COPY key and hanging-up.
Also you can use the STOP/C key to stop copying immediately.
If you do not use the MODE key, FINE/AUTO-CONTRAST mode in used.
1. Open the document hopper, adjust the
document guide and place the document(s)
face-down in the document feeder.
2. Select the resolution/contrast setting with
the MODE key. (Refer to “Selection of
MODE Key Setting”, p.44.)
FUNC MODE
I
'W
STOP/
I
Continue

IX. COPY FUNCTION
3.
Press the START/COPY key. “COPY MODE”
will appear on the display and copying will
begin.
On completion of copying the tone sounds
4.
for 3 seconds and the machine then
returns to the STAND-BY mode.
Cut the recording paper.
I
r
55
S
I AK
I
I/wry
4

563
i.
_.
The FO-220 has two basic modes of reception-AUTOMATIC and MANUAL.
The desired mode is selected by setting the
top right-hand corner of operation panel) to the correct position.
The “AUTO” setting is used when automatic reception by the FO-220 is desired.
The machine will answer the call after 1 or 6 rings, depending upon the program-
ming of User Switch No. 2. The “MANU” setting is used when a telephone line
is shared by fax and voice calls, and an operator usually answers all calls first.
Automatic reception in the MANUAL mode, though, is possible if User Switch
No. 7 has been set to the ON position. With this enhancement, the call is auto-
matically answered by the fax machine after 6 rings.
A.
AUTOMATIC RECEPTION
x,
REC
MANUlAUTO
switch (located at
,
In this mode, the machine automatically answers all calls and begins recep-
tion unattended.
Note: If the handset is picked-up before actual reception begins, you can speak
with remote operator. To begin reception afterwards press the START/COPY
key and hang-up.
1.
Set the AUTO/MANU switch to the AUTO
position.
2. The auto receive mode is now selected.
When a call comes in, the telephone will
ring either 1 or 6 times (depending upon
setting of User Switch
answers the call and “FAX CONNECTING”
will appear in the display. Reception begins
afterwards.
No.2).
The machine
1
FAXCONNECTING
Continue
j

X. RECEPTION
6.
MANUAL RECEPTION
In this mode, the FO-220 can be used to receive both fax and ordinary voice calls.
NOTES:
When in the MANUAL, receive mode, do not place documents in the document feeder.
You can also receive documents through Polling Reception. See p.73.
If User Switch No. 7 is set to “ON” position, call will automatically be an-
swered by fax machine if handset is not picked-up by the 6th ring.
If the alarm sounds on and off during or after reception, check the display
for one of these situations:
57
Display
DEC-20 WED 14:20
LINE ERROR
Complete reception has not taken place.
l Request retransmission.
TALK mode has been requested by your unit
LIFT HANDSET
THEN PRESS TALK
or the remote unit.
l
Pick-up the handset, press the TALK key and
speak with the remote operator.
The handset is off the hook.
l
OFF HOOK
Hang-up the handset or press STOP/C key.
1. Set the AUTOlMANU switch to the MANU
Action Needed

58 RECEPTION
2. Pick-up the handset when the telephone
rings.
You can now speak with the person on the
other end of the line as in a normal telephone call.
NOTE:
If the call is from a fax machine using au-
tomatic dialing, a fax tone will be heard. Go
immediately then to the next step.
3. If after voice communication, document
reception is required (or a fax tone is
heard), check that no documents are in the
feeder and then press the START/COPY key.
START/COPY
K%Zl
4. Hang-up when the “FAX CONNECTING”
message appears in the display.
5. When reception is completed, the buzzer
will sound, and the machine returns to the
STAN D-BY mode.
6. Cut the recording paper by pulling the
document up against the tear par.
c
I
\
/

P
X. RECEPTION
C. CUTTING THE RECORDING PAPER
After receiving or copying, cut the recording paper as follows:
l Grasp the paper by the edge and pull upward.
l When there are several pages of documents, the recording paper is output
in one piece. Cut along the dotted line
59

XI, VOICE
COMMUNICATIONS
I
The FO-220 can be used as a regular telephone to make strictly voice calls,
or to speak with the remote operator before or after a fax operation - on the
same connection. Convenient Hold and Redial Keys are available, as well as
autodialing of 32 voice telephone numbers.
A.
USE AS A TELEPHONE
The FO-220 can be used as a telephone for just voice communication by dial-
ing after pciking-up the handset or by using the monitor speaker and dialing.
NOTES:
The FO-220 can still be used for voice communications with the machine
turned off, BUT the Rapid Keys, Speed-dial Codes, Redial Key and On-Hook
Dialing cannot be used.
Telephone numbers for voice calls that are entered into the autodialer with
speed-codes of 01 to 12 can be dialed quickly by using the corresponding
Rapid Key.
To check the programmed autodialing numbers for voice as well as fax calls,
print-out and refer to the Telephone List, see
To program the autodialer, refer to “Rapid Key/Speed-Dial/Secondary Autodial
Numbers’: ~28.
p.102.
.,
-

XI. VOICE COMMUNICATION
1. Normal Dialing Using Handset
1.
Pick up the handset and make sure that the
dial tone is heard
2. Dial the telephone number by:
l
Entering a full telephone number at the
keypad.
l
Pressing a Rapid key.
l
Pressing the SPEED key and entering a
2-digit Speed-Dial Code.
l Pressing the
busy.
REDIAL
key if number is
61
3.
Speak with the person on the other end of
the line when they answer the call.
4. When conversation is completed, hang-up
the handset.

62
-
Xl. VOICE COMMUNICATION
2. On-Hook Dialing Using the Monitor Speaker
Using this procedure, you do not have to pick-up the handset until your call
is answered.
1.
Press the SPEAKER key to hear a dial tone
through the monitor speaker.
2. Dial the telephone number by:
l
Entering a full telephone number at the
keypad.
l
Pressing a Rapid Key.
l
Pressing the SPEED key and entering a
2-digit Speed-Dial Code.
l Pressing the
busy.
REDIAL
key if number is
3. Pick-up the handset when you hear the
party at the other end of the line answer
your call.
The SPEAKER mode is automatically
released for you to speak with the other
person.
4. When conversation is completed, hang-up
the handset.
I

Xl. VOICE COMMUNICATION
3. Redialing
1.
The last number dialed can be redialed by
pressing the
(It is not necessary to lift up the handset
or press the SPEAKER key.)
2.
When the party on the other end of the line
answers your call, pick-up the handset and
start conversation.
REDIAL
key.
63

64
XI. VOICE COMMUNICATION
4. Holding
It is possible, during a telephone conversation, to put the other party on hold.
1.
When the HOLD key is pressed, the other
party cannot hear your conversation and
“HOLD” appears in the display. Also, during “HOLD” the handset can be placed
back into the cradle without cutting off the
line.
:
-
HOLD
n
#
F
2. Pick-up the handset to release the HOLD
and return to the conversation mode.
(If the handset is left off the hook during
HOLD, press the HOLD key again to
release the HOLD mode.)
DEC-20 WED
HOLD
12:34

XI. VOICE COMMUNICATION
B. TALK FUNCTION (Talk and Fax)
The TALK function is used to speak with the operator of a remote unit. It allows
you, therefore, to carry on a conversation and send or receive a fax on the
same phone connection. The TALK function can be initiated before transmitting a document, or during a transmission or reception. When transmission or
reception stops abruptly, the machine may also enter the TALK mode automat-
ically.
NOTE:
The TALK function can only be used when communicating with another Group
3 machine in the G3 mode which also has the TALK function (see “Compatibility,”
p.12).
1. Voice Communication Before Transmission
The TALK function is used before transmission when sending to a remote unit
in the AUTOMATIC receive mode. In this case, a remote operator would normally not answer the call.
NOTES:
Only full telephone numbers can be used for dialing when requesting a con-
versation before transmission.
If a Rapid Key or Speed-Dial Code is used, then a conversation is requested
after transmission.
65
If a person on the other end of the line does not answer the call within a
short period of time, the TALK mode is automatically cancelled, and the
machine returns to the STAND-BY mode.

66
1. Open the document hopper, adjust the
document guide and place the documents
face-down in the feeder.
2.
Pick-up the handset, and dial the full telephone number of the remote unit (or use
the monitor speaker).
Xl. VOICE COMMUNICATION
NOTE:
You cannot use Rapid keys or Speed-Dial
Codes.
3.
Wait for the remote facsimile answerback
tone.
4,
Press the TALK key.
“TALKREQUEST” appears in the display.
T
TALK REQUEST
I Now at the remote unit
1. A tone sounds on the unit.
2. They pick-up their handset and press
their TALK key.
1
Continue

XI
VOICE COMMUNICATION
5. A tone sounds on your machine and the
message, “LIFT
TALK” appears
6.
Pick-up the handset (if not done so already)
and press the TALK key.
The message “TALK MODE” appears in the
display.
After a few seconds, voice communication
with the other party is possible.
7. Upon completion of the conversation, ask
the remote operator to press their START
key.
HANDSET-THEN PRESS
in the display.
r
/
TALK
1
8. Select a MODE key setting if necessary.
9. Wait for the facsimile answerback tone,
then press the START/COPY KEY.
10. When the message “FAX CONNECTING”
appears in the display, hang-up the
handset.
Transmission begins. Upon completion, the
machine returns to the STAND-BY mode.
FUNC MODE
x
START/COPY
--!icEz
1
FAXCONNECTING
j

68
XI. VOICE COMMUNICATION
2. Voice Communication After An Operation
When the TALK function is used during a transmission or reception, a voice
request is made when the operation is completed.
NOTES:
l
If a person on the remote side does not answer the call within a short period
of time, the TALK mode is cancelled and the line is disconnected.
l
When receiving, check the Remote Terminal Identification of the other machine
which appears in the display to verify their identification.
l
When transmitting, the TALK function can be used after using a Rapid Key
or Speed-Dial Code (as well as a full telephone number) for dialing.
1. Transmission or reception is in progress.
2. Press the TALK key.
An arrow in the display
points to “TALK’!
3.
When transmission or reception is completed, the machine enters the TALK mode and
the message, “TALK REQUEST” appears in
the display.
Continue

VOICE
COMMUNICATION
69
v
4.
When a tone sounds on your machine, pickup the handset and press the TALK key.
Voice communication is possible after a
few seconds.
5. Upon completion of the conversation,
hang-up the handset.
&
.
/

70
XI. VOICE COMMUNICATION
3. Voice Communication when Operation has Stopped
In any of the following cases, the transmission/reception operation stops and
the unit automatically enters talk mode.
l When transmission/reception is stopped by pressing the STOP/C key.
l When the documents are transmitted that are longer than machine specifi-
cations
l When the recording paper runs out (during reception).
l When the recording head overheats (during reception).
1.
Operation has stopped.
The talk request alarm sounds and “LIFT
HANDSET THEN PRESS TALK” is dis-
played on the LCD.
l If the remote party does not respond, the
machine will return to the standby mode.
2. Pick-up the handset and press the TALK
key.
Voice communication with the person at
the remote unit is initiated after a few
seconds.
Pinpoint the problem (refer to “Trouble-
shooting”,
p.112).
3. When voice communication is finished,
replace the handset.
To resume transmission or reception once
the problem is corrected, the receiving
operator should press their START key first.
The transmitting operator should press
their START key after hearing a fax tone on
the line.
Both operators should hang-up once the
L
transaction begins.
TALK
J

P
71
:
i
i
A. POLLING
I
t
1,
Conditions
With the Polling Function, one fax unit is able to activate a transmission to it
from another unit. This function includes the following operations:
l Polling Transmission (standby)
unit when called-for by a remote unit. Transmission occurs at your unit without
operator assistance. However, your unit must be in the AUTO receive mode.
l Polling Reception
transmitted to your unit at your request. Polling Reception can also be set
for a later time unattended using Timer Polling (see p.89).
l Turnaround Polling
and receive documents from another unit on one phone connection.
NOTE:
Polling is only possible with another unit with a Polling function.
XII.
ADVANCED FEATURES
-
documents are transmitted from your
-
documents that are in the feeder of a remote unit are
-
this operation, in effect, allows your unit to send to
2. Polling Security
To prevent unauthorized polling of your unit (“pick-up” of documents in the feed-
er), the FO-220 is provided with Polling Security. With this feature, transmission
from your unit will only take place when the following two conditions are met:
(1) The remote unit has its Remote Terminal Identification
with its fax number; and (2) The RTI of the remote unit is also programmed
into your unit as a Polling Permission Number. When a remote unit trys to poll
your unit, the RTI of the remote unit is automatically checked against your unit’s
,
programmed list of Polling Permission Numbers. Transmission takes place only
if there is a match-up.
NOTES:
l The Polling Security is activated by programming the Polling Security Selec-
tion function (see p.33).
If security is not chosen, any remote unit with a polling function can poll your
unit (referred to as “free polling”).
l
Up to 10 Polling Permission Numbers can be entered into the FO-220 (see p.31).
(RI)
programmed

72
XII. ADVANCED FEATURES
3. Polling Transmission (stand by)
This operation is used to send documents to a remote unit at the remote oper-
ator’s request. Transmission, therefore, can take place at your unit at any time
without operator assistance.
NOTES:
To restrict polling transmission to only authorized units, program the Polling
Security Selection function (see p.33) and enter the Polling Permission Numbers of authorized units (see p.31).
Phone line costs are charged to the receiving unit.
Automatic reception is still possible while your machine is in a polling stand-
by mode.
Set the AUTOlMANU switch to AUTO position
2. Fold-out the document hopper, adjust the
document guide and place the documents
face-down in the feeder.
The machine is now ready to automatically
transmit the documents when requested by a
remote unit.

XII ADVANCED FEATURES
4. Polling Reception
.t
This operation is used to receive documents tha
unit at your request.
NOTES:
Coordinate a polling operation with the remote operator to assure that documents are placed in feeder of remote unit.
if the remote unit is in a secured polling standby mode, your
programmed with your fax number, and your
into the remote unit as a Polling Permission Number.
If a polling request is refused because of no Polling Permission Number match,
“POLLING REFUSED” is shown in the display and the machine returns to
the STAND-BY mode.
Phone line costs are charged to your unit.
When using a Rapid Key or Speed-Dial for dialing, do not pick-up the handset or press the SPEAKER Key, or the voice number will be dialed instead
of the fax number.
l Polling Reception can also take place at a later time using the timer. See
“Setting a timer Polling Reception”, p.89.
are in the feeder of a remote
RTI
must
RTI
must also be programmed
73
1. Dial the remote unit by:
l Picking-up the handset (or using the
speaker) and dialing the full telephone
number.
l Pressing a Rapid Key.
l Pressing the SPEED key and entering a
2-digit Speed-Dial Code.
2.
If entering a full telephone number, wait for
the facsimile answerback tone.
If using autodialing, go to next step
Continue

74
XII ADVANCED FEATURES
3. Press the POLL key.
4. When “POLLING MODE” appears in the
display, hang-up the handset if used.
5. Reception takes place.
Upon completion, a tone sounds for 3
seconds and the machine returns to the
standby mode.
-
3,
3Eki
/
1
POLL
t
cl
c
6. Cut the recording paper by pulling the
document up against the tear bar.
5. Turnaround Polling
This operation is used to send documents to a remote unit after receiving docu-
ments from the same unit through polling. Transmission and reception, there-
fore, can take place with one phone call.
NOTES:
l The remote unit must also have “Turnaround Polling” capability.
l Refer to other notes under “Polling Reception’!
PROCEDURE:
Place documents to be sent in feeder and follow same procedure for “Polling
Reception”.
Transmission will take place automatically after reception.

XII. ADVANCED FEATURES
B. CONFIDENTIAL TRANSMISSION
This function can be used when you wish that documents, being sent to a remote machine, will be seen only by a specific person or department. When
documents are sent using Confidential Transmission, they are automatically
directed and stored in the image memory of the receiving machine. The documents can only be printed out then when the correct passcode is entered.
75
Sender
Receiver
rdoc-u-me% :
document
Confidential transmission
istored in
Jz?Y
:
I
i
I+
passcode
input
document
print out
NOTES:
Confidential Transmission can only take place when the receiving machine
is a Sharp-brand unit having Confidential Reception capability. (As of Sept.
1988, these models were: FO-300, 420, 550, 700, 800, 3200 and 5000).
When using Confidential Transmission to a Sharp unit with multiple “mailboxes:’
you must indicate a specific mailbox number. Contact party who should receive
documents for their assigned mailbox number. (As of Sept. 1988, those models
with multiple mailboxes were: FO-700, 800, 3200 and 5000).
If any of the following actions are performed during a confidential transmission, or after preparation for a confidential transmission, the transmission
will be cancelled.
Procedure must be repeated.
(1) The documents are removed from the feeder.
(2) Document reception takes place in response to a polling request.
(3) Copying is done.
After preparing for confidential transmission, the telephone can still be used
without cancelling the operation.
During confidential transmission, if the confidential memory of the receiving
machine becomes full, a transmission error will result and the transmission
will stop. In this case,
“LINE ERROR” will appear in the display.

76
l If the remote machine has no confidential reception capability, if its memory
XII ADVANCED FEATURES
is full, or if it is not a Sharp-brand machine, “NO CONF FUNCTION” will appear in the display, and the machine will return to the STAND-BY mode.
l Confidential transmission cannot take place without recording paper in
machine.
l Confidential transmission can also take place at a later time unattended us-
ing the timer. (See “Timer Confidential Transmission’: p.86.)
1.
Place the documents to be sent face down
in the document feeder.
2. Press the FUNC key then the @ and
START/COPY keys, As the machine enters
confidential mode, “SET BOX # OR PRESS
START KEY” will be displayed.
START/COPY
T
3. l If the remote machine has only one confidential memory (FO-300, 420
and
550)
press the START/COPY key.
l If the remote machine has multiple confidential “mailboxes”
(FC-700,
800,
3200 and 5000):
START/COPY
oo-
I
Enter the remote machine’s
2-digit confidential “box
number” (00-99).
Continue

XII. ADVANCED FEATURES
4.
Perform the usual transmission procedure
(refer to “Immediate Transmission” section,
p.46).
After confirming that the transmission is
possible (“CONF. TX READY” will be displayed), make the transmission.
1) Select the resolution/contrast mode
with the MODE key.
2) Dial the receiving machine
(rapid or speed dialing can be used: see
p.50,
52).
3) Press
5.
If the confidential transmission is complet-
STRATICOPY
key.
ed successfully, the buzzer will sound for
3 seconds and the machine will return to
the STAND-BY mode.
77

78
C.
RELAY REQUEST
The Relay Request function is used to transmit the same documents to more
than one location through a relay broadcast machine.
It is only possible when the intermediate relay machine is a Sharp-brand model
having the Relay Broadcast function. (As of Sept. 1988, these models were the
FO-800 and 3200.) By using a relay machine that is in closer proximity to the
end-receiving units than your FO-220, phone line costs can be substantially
reduced overall.
/
FO-220
XII ADVANCED FEATURES
/
Receive Station
k 1
Receive Station
1
/
The documents sent from the FO-220 with the Relay Request function are stored
in the memory of the relay machine, where they are then transmitted to one
end-receiving unit after another.

XII ADVANCED FEATURES
79
5
1. Entering the Relay Task Group
The relay task group must be programmed before the Relay Request function
can be used.
NOTES:
l The relay machine must be selected by using a speed-dial code. The
phone number of the relay machine, therefore, must be entered into the
todialer (see p. 28).
After entering a relay task group, print-out and refer to the Telephone List
(see
The autodialing codes used in the relay task group (rapid-key numbers,
dial codes and group numbers) must represent codes that are pre-programmed
in the autodialer of the RELAY MACHINE and not in your FO-220.
If an error is made during the procedure, press the
previously entered data, and then enter the correct data.
Limitations on number of receiving stations
Rapid number: Requires 2 digits for registration of 1 station
Speed number: Requires 1 digit for registration of 1 station
Group number: Requires 2 digits for registration of 1 group
Tel. number: Can register a maximum 30-digit number on one station, every
2-digit out of which takes 1 digit for registration. (For example, 0451234567
is a IO-digit number and therefore takes 5 digits.)
-
p.102).
STOP/C
tele-
au-
speed-
key to erase the
A maximum of 300 digits in total are available for registration of receive stations among the above numbers. Note, however, that how many receive stations can be registered varies depending on the specification (function) of
the facsimile machine used as the relay station.
EXAMPLE:
When the FO-3200 is used as the relay station, the number of receive stations which can be registered is as follows:
Speed number: 1 digit for 1 station (100 stations max. or 100 digits)
Group number: 2 digits for 1 group (5 groups max. or 10 digits)
Tel. number: A maximum 20-digit number can be registered on 1 station, every 2 digits out of which takes 1 digit for registration (Max. 20-digit x 20 stations or 200 digits). Registration is acceptable up to the combined total of
300 digits.

80
XII. ADVANCED FEATURES
COMBINATION EXAMPLE 1
Group # Registration: 5 groups (100 stations) x 2 digits + 10 digits
Tel. # Registration: Average 12 digits x 20 stations + 120 digits
Total 120 stations + 130 digits (Left 170 digits area)
COMBINATION EXAMPLE 2
Speed # Registration: 20 stations x 1 digit + 20 digits
Tel. # Registration: Average 18 digits x 20 stations -+ 180 digits
Total 40 stations + 200 digits (Left 100 digits area)
l If any of the autodialing numbers or groups of the end-receiving stations (re-
quired by the requesting station) are not programmed in the relay station,
the relay station will not accept the relay broadcasting request.
Step
1
2
Operation
FUNC
n!@>@>@>
START/COPY
STAND-BY mode.
Select the relay program mode.
Press the START/COPY key.
Description
F
3
1
(An example)
START/COPY
4
5 @I>.>@%@...
(An example)
START/COPY
6
7
O>O>O>@...
(An example)
START/COPY
8
9 @>@,@I,@...
(An example)
Enter the
relay machine.
Press the START/COPY key.
Enter the
receiving machines which are programmed in
the relay machine.
(Note: Do not enter rapid numbers if relay
machine is a FO-3200.)
If you are not entering rapid numbers, skip step
and go to next.
Press the START/COPY key.
Enter the
receiving machines which are programmed in
the relay machine.
If you are not entering speed-dial codes, skip
step and go to next.
Press the START/COPY key.
Enter the
receiving machines which are programmed in
the relay machine.
If you are not entering group numbers, skip step
and go to next.
2digit
speed-dial code (01 - 32) of the
2-digit
rapid numbers of the
2-digit
speed-dial codes of the
2-digit
group numbers of the
end-
end-
end-
Continue
f”
a

XII. ADVANCED FEATURES
81
4
Step
10
START/COPY
11
START/COPY
12
Operation Description
Enter a full telephone number (up to 30 digits)
of a receiving unit.
IMPORTANT NOTE: INCLUDE AREA CODE IF
NUMBER IS OUTSIDE CALLING AREA OF RELAY UNIT ALSO INCLUDE ACCESS CODE (e.g.
“1”) BEFORE AREA CODE WHERE NECESSARY.
If a full telephone number is not used, go to
next step.
Press the START/COPY key.
Return to step 10 to enter another full
telephone number, or go to next step.
Press the START/COPY key again.
Machine returns to STAND-BY mode.
2. Clearing the Relay Group Task
I
Step
Operation
I
STAND-BY mode.
Description
Select the relay program clear mode.
START/COPY
Press the START/COPY key.
Machine returns to STAND-BY mode.
3. Using Relay Request
Use this procedure to send documents to one or more remote machines through
an intermediate relay machine.
NOTES:
l
To use the Relay Request function, it is necessary to first program the Relay
Task Group.
l
The number of pages that can be sent in a Relay Request is dependent upon
the available memory space in the relay machine.
(Max. of 40 average pages with the FO-3200 and 70 average pages with the
FO-800-140 pages with an FO-800 that has the optional double memory capacity.)
l
To use Relay Request with a particular relay machine, your Remote Terminal
Identification (RTI) must be entered into the Relay
machine. Advise remote operator of relay machine.
l
If relay request is unsuccessful, check Transaction and/or Activity Report for
note on cause.
l
a
Relay Request can also be set for a later time (see “Timer Relay Request’:
p. 87).
Passcode
List of the relay

87 XII. ADVANCED FEATURES
1. Place the documents face-down in the
feeder.
2. Select the resolution/contrast settings if
necessary with the MODE key.
FUNC MODE
n
STOP/
Fir
3. Press FUNC, @ and @ keys.
The display will show the message on right.
4. Press the START/COPY key.
Transmission will start.
FUNC MODE
F
&J!j
START/COPY
I
I)H
n
.
5.
When relay request is completed, the alarm
will sound for 3 seconds and the machine
then returns to the STAND-BY mode.

XII. ADVANCED FEATURES
m,
D. TIMER TRANSMISSION/POLLING
With this function, transmission or polling is performed automatically at a speci-
fied time without operator assistance. The remote unit must be dialed using
a speed-dial code. The types of operations that can be set for a later time include: (1) normal transmission; (2) confidential transmisson; (3) relay request;
and (4) polling. The FO-220 has two timers--- one of which can be set for nor-
mal transmission, confidential transmission or relay request; and the other timer
for polling. A timer transmission or polling operation can be used to take advantage of lower phone rate periods. A preset timer operation can also be
cleared if necessary before the operation takes place.
NOTES:
When timer function has been set, transmission/reception to/from another
remote unit is still possible. However, be sure to terminate any other transmission/reception before the set time, or the timer operation will not take place.
With a timer transmission, also be sure to set the documents in the feeder
before the preset time arrives.
For a timer transmission, the AUTO contrast setting is used (a manual setting cannot be selected).
For confirmation and reference of a preset timer operation, print-out the Reser-
vation List (see
A timer operation is automatically cleared upon completion.
When the same timer operation is used frequently, it is recommended to pro-
gram that operation into one of the three available Program Keys for convenience (see “Program Autodialing,” p.91).
A timer can be set within a 24 hour range, and if the day of the week is speci-
fied, presetting can be done up to a week in advance.
Refer to table below to select day-of-week code:
p.101).
83
DAY
CODE
SUN
0
MON TUE
1
2 3 4 5
WED
THU
FRI
SAT
6

84
XII. ADVANCED FEATURES
1. Setting a Timer Transmission
Step
1
2
3
4
5
6 (I!)
7
9
10
Operation
FUNC
I]
>
0
@I
0
0,
@ (An example)
@
,
@
(An example)
(An example)
START/COPY
@
, @ (An example)
START/COPY
Description
STAN D-BY mode.
Select the RESERVATION MODE.
Select the TIMER SEND MODE.
Select the SET (enter) MODE.
Enter the
numeric keys.
Enter the
numeric keys.
Enter the day-of-the-week code by using a
numeric key (see table), or skip step if operation
to take place within 24 hours.
Press the START/COPY key.
Enter a
remote unit using the
Press the START/COPY key.
2-digit
hour (00 - 23) by using the
2-digit
minute (00 - 59) by using the
2-digit
speed-dial code (01 - 32) for
nemeric
keys.
MODE
”
I
START/COPY
12
STOP/C
‘3
I
Select resolution setting if necessary using the
MODE key (FINE, H-TONE, STD). Or go to next
step.
Press the START/COPY key.
Press the STOP/C key when data is STORED to
return machine to STAND-BY mode.
IMPORTANT NOTE: PLACE DOCUMENTS IN
FEEDER BEFORE THE PRESET TIME ARRIVES.

XII ADVANCED FEATURES
2. Clearing a Timer Transmission
a5
r
L
Step
1
2
3
4
5
6
Operation
Remove documents from
feeder if in machine.
FUNC
II@
@I
0
START/COPY
STOP/C
I
Description
STAND-BY or SEND READY mode.
Machine enters STAND-BY mode.
Select the RESERVATION MODE.
Select the TIMER SEND MODE.
Select the CLEAR function,
Press the START/COPY key to clear timer,
Press the STOP/C key when timer is CLEARED.
Machine returns to the STAND-BY mode.

86 XII. ADVANCED FEATURES
3. Setting a Timer Confidential Transmission
First perform the procedure for “Setting a Timer Transmission”, The additional
steps should be performed when you are ready to set the confidential docu-
ments in the feeder--- just before the preset time arrives.
NOTE:
Refer to notes under “Confidential Transmission”, p. 75.
Step
1
2
3
4
5
6
Operation Description
(“Setting a Timer
Transmission”)
Place confidential
documents in feeder
before preset time.
FUNC
I.-----l?@
START/COPY
@
, @ (An example)
START/COPY
Perform steps in “Setting a Timer Transmission’:
p. 84.
Machine returns to STAND-BY mode.
First page is fed slightly into machine and
machine enters the SEND READY mode.
Press FUNC and @ keys to select the CONF
TX MODE.
Press the START/COPY key to select the CONF
TX function.
If remote unit has multiple confidential
“mailboxes’: enter the
(00 - 99) for the desired recipient.
If remote unit has one common mailbox, go to
next step.
Press the START/COPY key.
CONF TX READY appears in display.
Confidential transmission takes place at the
preset time.
2-digit
mailbox number
Afterwards, the machine returns to the STAND-
BY mode.
4. Clearing a Timer Confidential Transmission
Follow same procedure for “Clearing a Timer Transmission”, p. 85.

XII. ADVANCED FEATURES a7
?I
5. Setting a Timer Relay Request
NOTE:
Refer to notes under “Using a Relay Request”, p. 79.
Step
1
2
0
3
0
4
@ , @ (An example) Enter the
5
@ , @ (An example) Enter the
6
@
START/COPY
7
FUNC
[I>@
Operation
(An example)
Description
STAN D-BY mode.
Select the RESERVATION MODE.
Select the RELAY TX MODE.
Select the RELAY TX SET (enter) MODE.
2-digit
hour (00 - 23) using the
numeric keys.
2digit
minute (00 - 59) using the
numeric keys.
Enter the day-of-the-week code (0 - 6) using a
numeric key (see table). Or akip step if
operation to take place within 24 hours.
Press the START/COPY key.
MODE
81
START/COPY
9
STOP/C
lo
r
Select the resolution setting if necessary using
the MODE key. Or go to next step.
Press the START/COPY key again.
Press the STOP/C key when data is STORED to
return machine to STAND-BY mode.
Place documents into feeder before preset time
arrives.

88
XII. ADVANCED FEATURES
6. Clearing a Timer Relay Request
Step
1
2
3
4
5
6
Operation
Remove documents from
feeder if in machine.
FUNC
II@
0
0
START/COPY
STOP/C
I
Description
STAND-BY or SEND READY mode.
Machine enters STAND-BY mode.
Select the RESERVATION MODE.
Select the RELAY TX MODE.
Select the CLEAR function.
Press the START/COPY key to clear timer.
Press the STOP/C key when timer is CLEARED.
Machine returns to STAND-BY mode.

XII ADVANCED FEATURES
89
7. Setting a Timer Polling Reception
4
NOTE:
Refer to notes under “Polling Reception’: p. 73.
Step
1
2
3
4
5
6 @
7
8
9
Operation
FUNC
r---l,@
@,@I
0
@ ,
@ (An example)
@ ,
@ (An example)
(An example)
START/COPY
@ ,
@ (An example)
START/COPY
Description
STAND-BY mode.
Select the RESERVATION MODE.
Select the TIMER POLL MODE.
Select the TIMER POLL SET function.
Enter the
numeric keys.
Enter the
numeric keys.
Enter the day-of-the-week code (0 - 6) using a
numeric key (see table). Or skip step if
operation to take place within 24 hours.
Press the START/COPY key.
Enter the
remote unit.
Press the START/COPY key again.
2-digit
hour (00 - 23) using the
2-digit
minute (00 - 59) using the
2-digit
speed-dial code (00 - 32) of
‘0 I
STOP/C
Press the STOP/C key when data is STORED to
return machine to STAND-BY mode.

90
XII. ADVANCED FEATURES
8. Clearing a Timer Polling Reception
Step
1
2 @,@I
3
0
START/COPY
4
STOP/C
5
FUNC
[-]A3
I
Operation
Description
STAN D-BY mode.
Select the RESERVATION MODE.
Select the TIMER POLL MODE.
Select the TIMER POLL CLEAR function.
Press the START/COPY key to clear timer.
Press the STOP/C key when data is CLEARED
to
retuf6
machine to the STAND-BY mode.

XII. ADVANCED FEATURES
E.
PROGRAM AUTODIALING
The Program function is used to program and execute transmission/polling operations with Rapid keys. After a remote unit, start time, operation type and mode
is entered into a Program key, the programmed operation can be executed simply
by pressing the assigned Program key Rapid keys 10, 11 and 12 can be used
as program keys
Pl,
P2 and P3. Up to 3 operations, therefore, can be entered.
The following types of operations can be entered into a Program key:
Normal Transmission (see notes on p.48)
(1)
Confidential Transmission (see notes on p.75)
(2)
Relay Request (see notes on p.78)
(3)
Polling Reception (see notes on p.71)
(4)
NOTES:
l
Rapid-dial number keys 10, 11 and 12 can also be used as Program keys
P2 and P3, but they cannot be used for both purposes. If Rapid key 10,
example, is already used for a number, it cannot be used as Program key
l
An operation can be programmed for immediate or later execution when a
PA,
for
Pl.
Program key is pressed.
l
Write-in the program name on the keypad label after programming.
l
To clear an entry error during programming, press the STOP/C key and then
enter the correct data.
l
Print-out the Program List for reference after programming a Program key
(see
p.104).
l
Use table below to select the day-of-the-week code:
91
DAY
CODE
SUN MON TUE
0
1
2
WED
3
THU
4
FRI
5
SAT
6
This entry can be skipped. In this case, the operation will take place within the
next 24 hours.

92
XII. ADVANCED FEATURES
1. Entering a Transmission Program (for Normal Transmission,
Confidential Transmission and Relay Request)
Step
1
2
m
3
4
5
6 @
7
Operation
FUNC
~]!OZI
(An example)
(See “Character Entry:’
P.
39)
@
,
@
(An example)
@
, @ (An example)
(An example)
START/COPY
Description
STAND-BY mode.
Select the PROGRAM ENTER MODE.
Select Program key
Enter the Program name using the @, 0, @
@ and START/COPY keys to enter up to 20
characters max.
(Refer to “Character Entry;’ p. 39)
If name is not desired, press the START/COPY
key.
Go to next step to use timer. If operation is take
place immediately when Program key is used,
go to step 7.
Enter the
Enter the
E,nter
step if operation to take place within 24 hours.
Press the START/COPY key.
2-digit
2-digit
the day-of-the-week code (0 - 6). Or skip
Pl,
P2 or P3.
hour (00 - 23).
minute (00 - 59).
,
Normal Transmission
8 @I
START/COPY
9
Go to section of procedure for desired
operation.
Select the SEND MODE.
Press the START/COPY key.
Go to step 10.
Continue

XII. ADVANCED FEATURES
93
Step
Operation
Confidential Transmission
START/COPY
9
START/COPY
(94
[I
OR
START/COPY
(9B)
@ > 0 sI]
(An example)
Relay Request
8 @
START/COPY
9
Description
Select the confidential transmission mode
(CONF TX MODE).
Press the START/COPY key.
Press the START/COPY key if remote unit has
only one common mailbox.
OR
Enter a
2digit
mailbox number (00 - 99) if
remote unit has multiple mailboxes. Then press
START/COPY key.
Go to step 10.
Select the relay request mode.
Press the START/COPY key.
10 (Dialing)
START/COPY
11
MODE
l2 I
START/COPY
13
STOP/C
l4
I
Go to
st_ep
10.
Enter number of remote unit by using a rapid
key, speed-dial code or full telephone number:
l Press a rapid key (01
l Press the SPEED key an enter a speed-dial
-
12);
code (01 - 32); or
l Enter a full telephone number.
Press the START/COPY key.
Select a resolution setting if necessary by using
the MODE key, or skip step.
Press the START/COPY key.
Press the STOP/C key to return machine to
STAN D-BY mode.

94
XII. ADVANCED FEATURES
2. Entering a Polling Reception Program
Step
1
2
m
(See “Character Entry;’
3
P.
39)
4
@
5
@
6
@
START/COPY
7
Operation
FUNC
~[!OJZ
(An example)
, @ (An example)
,
@I
(An example)
(An example)
Description
STAND-BY mode.
Select the program entry mode.
Select Program key
Enter the Program name using the @, 0, @
@ and START/COPY keys to enter up to 20
characters.
(Refer to “Character Entry;’ p. 39)
If a name is not desired, press the START/COPY
key.
Go to next step to use timer. If polling is to take
place immediately when Program key is used,
go to step 7.
Enter a
Enter a
Enter a day-of-the-week code (0 - 6) or skip step
if operation to take place within 24 hours.
Press the START/COPY key.
2-digit
2-digit
minute (00 - 59).
Pl,
P2, or P3.
hour (00 23).
,
8
@,@
START/COPY
9
10 (Dialing)
11
12 I
-+I
START/COPY
STOP/C
Select the polling operation.
Press the START/COPY key.
Enter number of remote unit by using a rapid
key, speed-dial code or full telephone number:
l Press a rapid key (01
l Press the SPEED key and enter a speed-dial
code (01 - 32); or
l Enter a full telephone number.
Press the START/COPY key.
Press the STOP/C key to return machine to
STAND-BY mode.
-
12);

XII. ADVANCED FEATURES
95
3. Clearing a Program Key
‘3
NOTE:
The operation in a pre-programmed Program key cannot be changed. Program
Key must first be cleared and then the new operation
STAN D-BY mode.
FUNC
nJL0
m
(An example)
START/COPY
Select the program clear mode.
Press the Program key
Press the START/COPY key to clear key.
entered.
(Pl -
3) to be cleared.
STOP/C
Press the STOP/C key when data is cleared to
return machine to the STAND-BY mode.
4. Using a Pre-programmed Program Key
When you press a pre-programmed Program key, the FO-220 will automatically
perform the programmed operation. If a start time has been included in the
operation, a timed reservation will be set.
Procedure:
(1) Place document(s) in the feeder.
(This step is not needed when polling is to be done.)
(2) Press a Program key.
The unit will automatically begin the programmed operation.
l
If a start time has been specified in the program, the message, “PRG: (program name) ENTERED,” will appear in the display, and the machine returns
to the STAND-BY mode.
5. Cancelling a Selected Program
Procedure:
When you need to cancel a program, selected with a Program key, that is to
take place at a later time (uses the timer), press the same Program key again.

96
XIII.
A variety of reports are available with the FO-220. All reports, except for the
Transaction Report, can be printed on demand. The Activity Report will also
print-out automatically after 30 transactions, if User Switch No. 4 is set to the
“ON” (YES) position.
Available reports include:
1.
Activity Report
2.
Reservation List
Telephone List
3.
4.
Passcode
List
REPORTS AND LISTS
Transmission/reception record
Lising of operations scheduled for later exe-
cution, using the transmission or polling timer.
Rapid key numbers, speed-dial code numbers,
secondary fax numbers and relay task group
entered into autodialer.
Polling security selection, terminal number,
polling permission numbers (passcodes),
transmit terminal ID (sender’s name), and re-
mote ferminal ID (sender’s passcode).
5. User Switch List
6. Program List
7. Transaction Report
Settings of user switches.
Operations in programmed Program keys.
Confirmation of a completed timer operation
and notice of communication error. (With deal-
er service adjustment, can also be printed-out
after every transmission/polling as a confirmation OR disabled altogether.)

XIII
REPORTS AND LISTS
y
A. GENERAL PRINT-OUT PROCEDURE
97
Use the following procedure to print-out any available report. For a
comlete
explanation of each report, its print-out procedure and a sample, refer to the
report’s chapter in this section.
Step
1
2
3
Operation
FUNC
II@
@or@
START/COPY
STAN D-BY mode.
Select the LISTING MODE.
Press the @ or @ key one or more times until
the name of the desired list appears in the
display.
To scroll down, use @, and to scroll up, use
Press the START/COPY key.
Printing begins.
Upon completion, the machine returns to the
STAN D-BY mode.
Description
0.

98
XIII. REPORTS AND LISTS
B. ACTIVITY (SEND/RECEIVE) REPORT
The FO-220 stores information on each successful and unsuccessful transaction. This report is printed-out in two parts-one called the “SEND REPORT”
with results on all transmissions, and the “RECEIVE REPORT” with results on
all receptions. If User Switch No. 4 (AUTO PRINTOUT) is set to the ON (YES)
position, this report is printed-out automatically after every 30 transactions.
Otherwise, it is printed only on demand.
NOTES:
If the report is not printed-out manually after 30 transactions, when AUTO
PRINT-OUT is not chosen, older data is erased.
The report can still be printed-out manually when AUTO PRINTOUT is chosen.
All data is erased when the report is printed-out, either manually or automatically.
1. Print-out Procedure:
FUNC
START/COPY
2. Report Sample:
*****************************************~~*~*~~*~*****~~~****:**~*
*
*
*
TERMINAL lt 123 NOV- 7-88 MON
* *
* NO. DATE
*
* 1 NOV- 7
* 2
* 3
*
* TOTAL 4 ’3
*
*
*
*********************************************~****~~**************
STFlRT
02:30
08:56
10:23
031234567 2’35” 5 T OK *
0751234567 4 8
0451234567 1 ’
GRAND TOTAL TIME:
SEND
RECEIVER TX TIME
REPORT
03”
12M
PfiGES
”
1”
34s PAGES:21
NOTE
1
2 P OK *
3 *
*****************************************~**~**~****~*~**~********
*
*
*
TERMINAL
*
*
NO.
*
* 1 NOV- 7
* 2
* 3
* 4
*
5
*
*
*
*
*
*********************************************************~*4~~~~**
DFITE
0
123
START
02:30
08:56
10:23
!0:44
12:07
GRAND TOTAL
031234567
0751234567 4 8
0451234567
0957248080 1’46” 3 TALK
0587620025 4 5
RECEIVE REPORT
SENDER RX TINE
2’35”
1
’ 03” 2 P OK *
TOTAL
TIME:
7’02” 12
21M 31s
NO’+-
7-33
PAGES NOTE
5 T OK
”
”
1
1
PAGES:19
P.O1 *
12:34
0 K
P.02 *
MOtI 12~34
OK *
OK *
*
*
*
*
:*
*
*
*
*
:
:*
*
:c
*
:*
:+
*
*
*
:*
 Loading...